Embed Size (px)
Citation preview

8/13/2019 Uputstvo Za Mini Liniju
http://slidepdf.com/reader/full/uputstvo-za-mini-liniju 1/39
03/8/20 XL-MP45H(H)_FRONT.fm TINSZ0227SJZZ
MIKRO KOMPONENTEN SYSTEMMICRO-CHAÎNESISTEMA MICROMIKRO KOMPONENT SYSTEMMICRO SISTEMIMICRO SYSTEEMSISTEMA DE MICRO COMPONENTEMICRO COMPONENT SYSTEM
MODELLMODÈLEMODELOMODELL
MODELLOMODELMODELOMODEL
XL-MP45HBEDIENUNGSANLEITUNGMODE D’EMPLOIMANUAL DE MANEJOBRUKSANVISNING
MANUALE DI ISTRUZIONIGEBRUIKSAANWIJZINGMANUAL DE OPERAÇÃOOPERATION MANUAL
Mikro Komponenten System XL-MP45H besteht aus XL-MP45H (Hauptgerät)und CP-XL45H (Lautsprechersystem).
Micro-chaîne XL-MP45H composée de XL-MP45H (appareil principal) et CP-XL45H (enceinte acoustique).
Sistema micro XL-MP45H que consta de XL-MP45H (aparato principal) y CP-XL45H (sistema de altavoces).
XL-MP45H mikro komponent system bestående av XL-MP45H (huvudenhet)och CP-XL45H (högtalarsystem).
Micro sistemi XL-MP45H composto da XL-MP45H (apparecchio principale) eCP-XL45H (sistema di diffusori).
XL-MP45H micro systeem bestaande uit XL-MP45H (hoofdtoestel) en CP-XL45H (luidsprekersysteem).
XL-MP45H Sistema de Micro Componente composto de XL-MP45H (unidadeprincipal) e CP-XL45H (sistema de alto-falante).
XL-MP45H Micro Component System consisting of XL-MP45H (main unit) andCP-XL45H (speaker system).
Siehe Seiten i bis vi und D-1 bis D-30.
Se reporter aux pages i à vi et F-1 à F-30.Consulte las páginas i a vi y S-1 a S-30.
DEUTSCH
Favor consultar as páginas i a vi e P-1 a P-30.PORTUGUÊS
FRANÇAISESPAÑOL
Hänvisa till sidorna i till vi och V-1 till V-30.
Leggere le pagine i a vi e I-1 a I-30.
Raadpleeg de bladzijden i t/m vi en N-1 t/m N-30.
SVENSKA
ITALIANO
NEDERLANDS
Please refer to pages i to vi and E-1 to E-30.ENGLISH

8/13/2019 Uputstvo Za Mini Liniju
http://slidepdf.com/reader/full/uputstvo-za-mini-liniju 2/39

8/13/2019 Uputstvo Za Mini Liniju
http://slidepdf.com/reader/full/uputstvo-za-mini-liniju 3/39

8/13/2019 Uputstvo Za Mini Liniju
http://slidepdf.com/reader/full/uputstvo-za-mini-liniju 4/39
03/8/20 XL-MP45H(H)_common.fm
iii
TINSZ0227SJZZ
XL-MP45H
0307
Når ON/STAND-BY-knappen er sat i STAND-BY positionen,er der stadig netspaending til stede i apparatet.Når ON/STAND-BY-knappen er sat i STAND-BY position,kan apparatet startes v.hj.a. t imer-funksionen ellerfjernbetjeningen.
Advarsel:Apparatet indeholder ingen dele, der kan repareres afbrugeren selv. Fjern aldrig kabinettet med mindre De erkval i f iceret hert i l . Apparatet indeholder far l igstrømspaending. Traek altid stikket ud af stikkontakten før
der foretages reparationer, eller hvis apparatet ikke er ibrug i laengere tid.
DENNA APPARAT ÄR ANSLUTEN TILL 230 VVÄXELSTRÖM NÄR STICKPROPPEN ÄR INSKJUTEN IVÄGGUTTAGET. FÖR ATT FULLSTÄNDIGT KOPPLA IFRÅN
APPARATEN, V.G. DRAG UT STICKPROPPEN.
Audio-visuelles Material kann Urheberrechte umfassen, dieohne Genehmigung des Eigentümers dieser Urheberrechtenicht aufgenommen werden dürfen. Siehe die entsprechendennationalen Gesetze.
Le matériel audio-visuel peut comporter des oeuvres faisantl’objet de droits d’auteur qui ne peuvent être enregistrées sansl’autorisation du possesseur du droit d’auteur, veuillez vousréférer aux réglementations nationales en vigueur.
El material audiovisual puede consistir en trabajos que tengan
derechos de autor y que no deben grabarse sin la autorizacióndel poseedor de dichos derechos de autor. Sírvase consultarlas leyes aplicables en su pa ís.
Audiovisuellt material kan innehålla upphovsrättsarbete sominte skall mångfaldigas utan tillstånd av copyrightinnehavaren.Se den tillämpliga lagen i ditt land.
Il materiale audio-visivo che fosse soggetto a copyright nonpuò essere registrato senza l’autorizzazione del possessoredel copyright. Si prega di attenersi alle leggi in vigore sulterritorio nazionale.
Audio-visueel materiaal kan worden beschermd doorauteursrechten, in welk geval het niet mag worden opgenomenzonder de toestemming van de auteursrechthouder. Zie voornadere informatie de betreffende wetten in het land vangebruik.
O material audiovisual pode consistir de trabalhos de direitosautorias que não devem ser gravados sem autorização doproprietário dos direitos. Favor consultar as leis vigentes emseu país.
Audio-visual material may consist of copyrighted works whichmust not be recorded without the authority of the owner of the
copyright. Please refer to relevant law in your country.

8/13/2019 Uputstvo Za Mini Liniju
http://slidepdf.com/reader/full/uputstvo-za-mini-liniju 5/39

8/13/2019 Uputstvo Za Mini Liniju
http://slidepdf.com/reader/full/uputstvo-za-mini-liniju 6/39

8/13/2019 Uputstvo Za Mini Liniju
http://slidepdf.com/reader/full/uputstvo-za-mini-liniju 7/39
03/8/20 XL-MP45H(H)_common.fm
vi
TINSZ0227SJZZ
XL-MP45H
0203
VAROITUS! LAITTEEN KÄYTTÄMINEN MUULLA KUIN TÄSSÄKÄYTTÖOHJEESSA MAINITULLA TAVALLA SAATTAAALTISTAA KÄYTTÄJÄN TURVALLISUUSLUOKAN 1YLITTÄVÄLLE NÄKYMÄTTÖMÄLLE LASERSÄTEILYLLE.
VARNING - OM APPARATEN ANVÄNDS PÅ ANNAT SÄTT ÄNI DENNA BRUKSANVISNING SPECIFICERAS. KANANVÄNDAREN UTSÄTTAS FÖR OSYNLIG LASER-STRÅLNING, SOM ÖVERSKRIDER GRÄNSEN FÖRLASERKLASS 1.
ADVERSEL-SYNLIG OG USYNLIG LASERSTRÅLING VED ÅBNING.
SE IKKE IND I STRÅLEN-HELLER IKKE MED OPTISKE INSTRUMENTER.
VARO! AVATTAESSA OLET ALTTIINA NÄKYVÄLLE JA NÄKYMÄTTÖMÄLLE
LASERSÄTEILYLLE ÄLÄ TUIJOTA SÄTEESEEN ÄLÄKÄ KATSO SITÄOPTISEN LAITTEEN LÄPI.
VARNING-SYNLIG OCH OSYNLIG LASERSTRÅLNING NÄR DENNA
DEL ÄR ÖPPNAD. STIRRA EJ IN I STRÅLEN OCH BETRAKTA EJ
STRÅLEN GENOM OPTISKT INSTRUMENT.
Eigenschaften der LaserdiodeMaterial: GaAIAsWellenlänge: 780 nmEmissionsdauer: kontinuierlichLaser-Ausgang: max. 0,6 mW
Caractéristiques de la diode laserMatière: GaAIAsLongueur d’onde: 780 nmDurée d’émission: ininterrompuePuissance de sortie laser maximale: 0,6 mW
Características del diodo láserMaterial: GaAIAsLongitud de onda: 780 nmDuración de emisión : continuaSalida de láser: máx. 0,6 mW
Laserdiodens egenskaperMaterial: GaAIAsVåglängd: 780 nmUtstrålningsvaraktighet: kontinuerligLasereffekt: max. 0,6 mW
Proprietà del diodo laser
Materiale: GaAIAsLunghezza d’onda: 780 nmDurata di emissione: continuaUscita massima del laser: 0,6 mW
Laser diode specificatiesMateriaal: GaAIAsGolflengte: 780 nmStralingsduur: doorlopendLaseruitgang: max. 0,6 mW
Propriedades do diodo laserMaterial: GaAlAs
Comprimento de onda: 780 nmDuração da emissão: contínuaSaída de laser: máx. 0,6 mW
Laser Diode PropertiesMaterial: GaAIAsWavelength: 780 nmEmission Duration: continuousLaser Output: max. 0.6 mW 0203

8/13/2019 Uputstvo Za Mini Liniju
http://slidepdf.com/reader/full/uputstvo-za-mini-liniju 8/39
E-1
03/8/20 XL-MP45H(H)E1.fm
ENGLISH
XL-MP45H
TINSZ0227SJZZ
ENGLISH
G e n e r a l I n f o r m a t i o n
IntroductionThank you for purchasing this SHARP product. To obtain the bestperformance from this product, please read this manual carefully. Itwill guide you in operating your SHARP product.
AccessoriesPlease confirm that the following accessories are included.
Note:Only the above accessories are included.
ContentsPage
! General InformationPrecautions . . . . . . . . . . . . . . . . . . . . . . . . . . . . . . . . . . . . . . . . . . 2Controls and indicators . . . . . . . . . . . . . . . . . . . . . . . . . . . . . . 3, 4
! Preparation for Use
System connections . . . . . . . . . . . . . . . . . . . . . . . . . . . . . . . . 5, 6Remote control . . . . . . . . . . . . . . . . . . . . . . . . . . . . . . . . . . . . . . . 7
! Basic OperationSound control . . . . . . . . . . . . . . . . . . . . . . . . . . . . . . . . . . . . . . . . 8Setting the clock . . . . . . . . . . . . . . . . . . . . . . . . . . . . . . . . . . . . . 9
! CD or MP3 disc PlaybackListening to a CD or MP3 disc . . . . . . . . . . . . . . . . . . . . . . 10, 11Advanced CD or MP3 disc playback . . . . . . . . . . . . . . . . 12 - 14
! Radio
Listening to the radio . . . . . . . . . . . . . . . . . . . . . . . . . . . . . . . . . 15Listening to the memorised station . . . . . . . . . . . . . . . . . . . . . 16
! Tape PlaybackListening to a cassette tape . . . . . . . . . . . . . . . . . . . . . . . . . . . 17
! Tape RecordingRecording on a cassette tape . . . . . . . . . . . . . . . . . . . . . . . 18, 19
! Advanced FeaturesUsing the Radio Data System (RDS) . . . . . . . . . . . . . . . . 20 - 24Timer and sleep operation . . . . . . . . . . . . . . . . . . . . . . . . 25 - 27Enhancing your system . . . . . . . . . . . . . . . . . . . . . . . . . . . . . . . 27
! ReferencesTroubleshooting chart . . . . . . . . . . . . . . . . . . . . . . . . . . . . . 28, 29Maintenance . . . . . . . . . . . . . . . . . . . . . . . . . . . . . . . . . . . . . . . . 29Specifications . . . . . . . . . . . . . . . . . . . . . . . . . . . . . . . . . . . . . . . 30
AC power lead 1 Remote control 1
"AA" size battery (UM/SUM-3,R6, HP-7 or similar) 2
AM loop aerial 1
FM aerial 1

8/13/2019 Uputstvo Za Mini Liniju
http://slidepdf.com/reader/full/uputstvo-za-mini-liniju 9/39

8/13/2019 Uputstvo Za Mini Liniju
http://slidepdf.com/reader/full/uputstvo-za-mini-liniju 10/39
03/8/20 XL-MP45H(H)E1.fm
E-3
ENGLISH
XL-MP45H
TINSZ0227SJZZ
G e n e r a l I n f o r m a t i o n
Controls and indicatorsReference page
1. Disc Compartment . . . . . . . . . . . . . . . . . . . . . . . . . . . . . . . 102. Disc Eject Button . . . . . . . . . . . . . . . . . . . . . . . . . . . . . . . . . 103. Volume Control . . . . . . . . . . . . . . . . . . . . . . . . . . . . . . . . . . . . 84. Cassette Compartment . . . . . . . . . . . . . . . . . . . . . . . . . . . . 175. Headphone Socket . . . . . . . . . . . . . . . . . . . . . . . . . . . . . . . . 116. On/Stand-by Button . . . . . . . . . . . . . . . . . . . . . . . . . . . . . . . . 67. Function Selector Button . . . . . . . . . . . . . . . . . 10, 15, 17, 278. Disc or Tape Stop, Tuning Down Button . . . . . . . . 11, 15, 179. Disc Play or Pause, Tape Play,
Tuning Up Button . . . . . . . . . . . . . . . . . . . . . . . . 10, 11, 15, 1710. Bass/Treble Selector Button . . . . . . . . . . . . . . . . . . . . . . . . . 811. Memory/Set Button . . . . . . . . . . . . . . . . . . . . . . . . . . . . 14, 1612. Tape Record Pause Button . . . . . . . . . . . . . . . . . . . . . . 18, 1913. Disc Track Down or Fast Reverse, Tape Rewind,
Tuner Preset Down Button . . . . . . . . . . . . . . . . . . . 12, 16, 1714. Disc Track Up or Fast Forward, Tape Fast Forward,
Tuner Preset Up Button . . . . . . . . . . . . . . . . . . . . . . 12, 16, 17 15. Timer Play Indicator
16. Tape Record Indicator17. Sleep Indicator18. Disc Random Indicator19. Memory Indicator20.RDS Indicator21. Traffic Programme Indicator22. Traffic Announcement Indicator23. FM Stereo Mode Indicator24. FM Stereo Receiving Indicator25. MP3 Disc Indicator26. Disc Play Indicator27. Disc Repeat Indicator 28. AC Power Input Socket . . . . . . . . . . . . . . . . . . . . . . . . . . . 5, 629. FM 75 Ohms Aerial Socket . . . . . . . . . . . . . . . . . . . . . . . . 5, 630. AM Loop Aerial Socket . . . . . . . . . . . . . . . . . . . . . . . . . . . 5, 631. Video/Auxiliary (Audio Signal) Input Sockets . . . . . . . . . . 2732. Speaker Terminals . . . . . . . . . . . . . . . . . . . . . . . . . . . . . . . 5, 6
15
12
3
4
5
17 18 19 23
2726
24
16 20 21 22
25
28
31
32
3029
6
10
7 8 9
11 12 13 14

8/13/2019 Uputstvo Za Mini Liniju
http://slidepdf.com/reader/full/uputstvo-za-mini-liniju 11/39

8/13/2019 Uputstvo Za Mini Liniju
http://slidepdf.com/reader/full/uputstvo-za-mini-liniju 12/39
03/8/20 XL-MP45H(H)E1.fm
E-5
ENGLISH
XL-MP45H
TINSZ0227SJZZ
P r e p a r a t i o n f o r U s e
System connections
(See page 27.)
AM loop aerial
Wall socket(AC 230 V, 50 Hz)
FM aerial
Right speaker
VCR, DVD, etc.
RCA lead(not supplied)
Left speaker
Right speaker Left speaker
Plain
White line

8/13/2019 Uputstvo Za Mini Liniju
http://slidepdf.com/reader/full/uputstvo-za-mini-liniju 13/39
03/8/20 XL-MP45H(H)E1.fm
E-6
ENGLISH
8
XL-MP45H
TINSZ0227SJZZ
P r e p a r a t i o n f o r U s e
! Aerial connection
Note:Placing the aerial on the unit or near the AC power lead may causenoise pickup. Place the aerial away from the unit for better recep-tion.
Installing the AM loop aerial:
External FM aerial:Use an external FM aerial if you require better reception. Consultyour dealer.
! Speaker connectionConnect the wire with the white line to the minus (-) terminal and theplain wire to the plus (+) terminal.
Caution:
Placing the speaker system:There is no distinction between the right and the left speakers.
Note:The speaker grilles are not removable.
! Connecting the AC power leadAfter checking all the connections have been made correctly, con-nect the AC power lead to the AC power input socket, then plug theAC power lead of this unit into the wall socket.
Notes:" Unplug the AC power lead from the wall socket if the unit will not
be in use for a prolonged period of time." Never use a power lead other than the one supplied. Otherwise,
a malfunction or an accident may occur.
!
To turn the power onPress the ON/STAND-BY button to turn the power on.
Supplied FM aerial:Connect the FM aerial wire to the FM 75OHMS socket and position the FM aerial wirein the direction where the strongest signalcan be received. Supplied AM loop aerial:Connect the AM loop aerial to the AM LOOPsocket. Position the AM loop aerial for opti-mum reception. Place the AM loop aerial on ashelf, etc., or attach it to a stand or a wall withscrews (not supplied).
< Assembling > < Attaching to the wall >
Wall Screws (not supplied)
External FM aerial
" Use speakers with an impedance of 4 ohmsor more, as lower impedance speakers candamage the unit.
" Do not mistake the right and the left chan-nels. The right speaker is the one on the rightside when you face the unit.
" Do not let the bare speaker wires toucheach other.
Incorrect
After use:
Press the ON/STAND-BY button to enter the power stand-bymode.

8/13/2019 Uputstvo Za Mini Liniju
http://slidepdf.com/reader/full/uputstvo-za-mini-liniju 14/39

8/13/2019 Uputstvo Za Mini Liniju
http://slidepdf.com/reader/full/uputstvo-za-mini-liniju 15/39
03/8/20 XL-MP45H(H)E1.fm
E-8
ENGLISH
8
XL-MP45H
TINSZ0227SJZZ
B a s i c O p e r a t i o n
Sound control! Adjusting the volumeMain unit operation:When the VOLUME control is turned clockwise, the volume willincrease. When it is turned anti-clockwise, the volume will decrease.
Remote control operation:Press the VOLUME (+ or -) button to increase or decrease the vol-ume.
! Adjusting the bassMain unit operation:1 Press the BASS/TREBLE button to select "BASS".2 Within 6 seconds, turn the VOLUME control to adjust the bass.
Remote control operation:Press the BASS (+ or -) button to adjust the bass.
! Adjusting the trebleMain unit operation:1 Press the BASS/TREBLE button to select "TRE".2 Within 6 seconds, turn the VOLUME control to adjust the treble.
Remote control operation:
Press the TREBLE (+ or -) button to adjust the treble.
21 29 30 MAXIMUM0 .....
... ...0 55
... ...0 55
8/13/2019 Uputstvo Za Mini Liniju
http://slidepdf.com/reader/full/uputstvo-za-mini-liniju 16/39
03/8/20 XL-MP45H(H)E1.fm
E-9
ENGLISH
XL-MP45H
TINSZ0227SJZZ
B a s i c O p e r a t i o n
Setting the clock
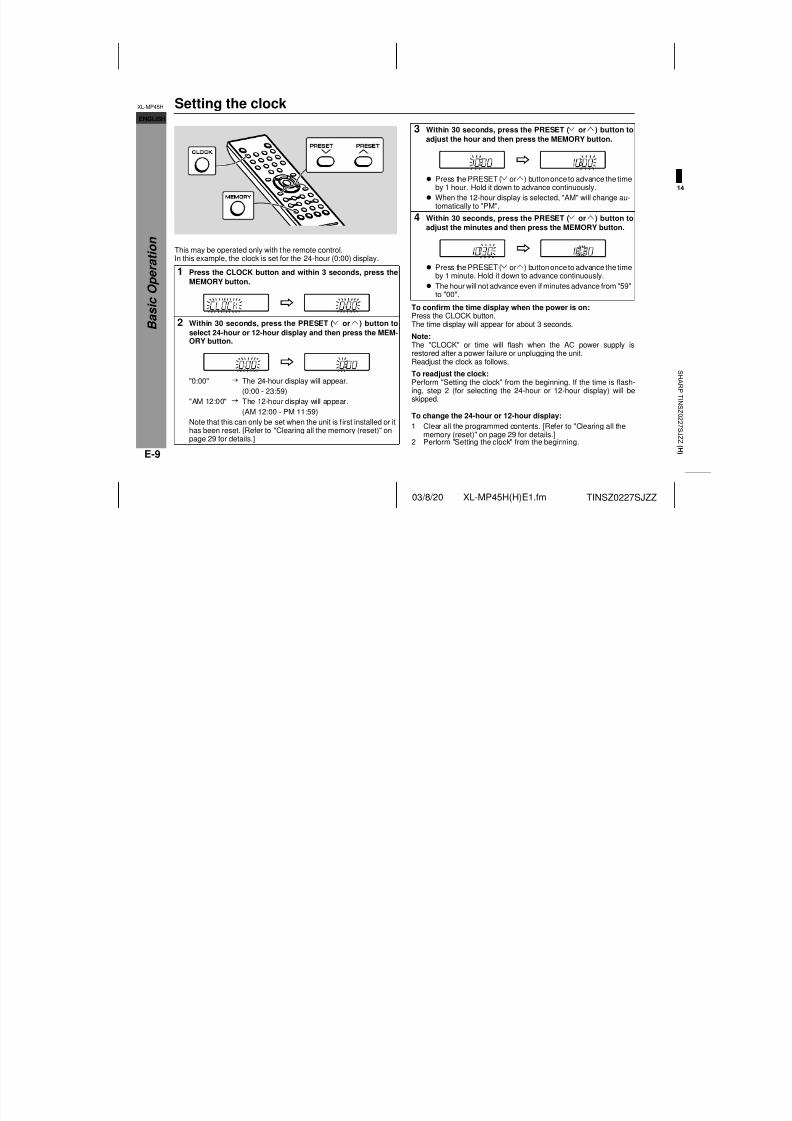
This may be operated only with the remote control.In this example, the clock is set for the 24-hour (0:00) display.
To confirm the time display when the power is on:Press the CLOCK button.The time display will appear for about 3 seconds.
Note:The "CLOCK" or time will flash when the AC power supply isrestored after a power failure or unplugging the unit.Readjust the clock as follows.
To readjust the clock:Perform "Setting the clock" from the beginning. If the time is flash-
ing, step 2 (for selecting the 24-hour or 12-hour display) will beskipped.
To change the 24-hour or 12-hour display:
1 Press the CLOCK button and within 3 seconds, press the
MEMORY button.
2 Within 30 seconds, press the PRESET ( or ) button to
select 24-hour or 12-hour display and then press the MEM-ORY button.
"0:00" The 24-hour display will appear.
(0:00 - 23:59)"AM 12:00" The 12-hour display will appear.
(AM 12:00 - PM 11:59)
Note that this can only be set when the unit is f irst installed or ithas been reset. [Refer to "Clearing all the memory (reset)" onpage 29 for details.]
3 Within 30 seconds, press the PRESET ( or ) button to
adjust the hour and then press the MEMORY button.
" Press the PRESET ( or ) button once to advance the timeby 1 hour. Hold it down to advance continuously.
" When the 12-hour display is selected, "AM" will change au-tomatically to "PM".
4 Within 30 seconds, press the PRESET ( or ) button to
adjust the minutes and then press the MEMORY button.
" Press the PRESET ( or ) button once to advance the timeby 1 minute. Hold it down to advance continuously.
" The hour will not advance even if minutes advance from "59"
to "00".
1 Clear all the programmed contents. [Refer to "Clearing all thememory (reset)" on page 29 for details.]
2 Perform "Setting the clock" from the beginning.
14
S HA RP
T I N S Z 0 2 2 7 S J Z Z ( H )

8/13/2019 Uputstvo Za Mini Liniju
http://slidepdf.com/reader/full/uputstvo-za-mini-liniju 17/39
03/8/20 XL-MP45H(H)E1.fm
E-10
ENGLISH
8
XL-MP45H
TINSZ0227SJZZ
C D o r M P 3
d i s c P l a y b a c k
Listening to a CD or MP3 discThis system can also play audio CD-R and CD-RW discs, but can-not record.Some audio CD-R and CD-RW discs may not be playable due to thestate of disc or the device that was used for recording.
MP3 is a form of compression. It is an acronym which standsfor MPEG Audio Layer 3.MP3 is a type of audio code which is processed by significantcompression from the original audio source with very little lossin sound quality.
Notes:" Due to the structure of its disc information, it takes longer to read
an MP3 disc than a normal CD (approximately 20 to 90 seconds)." "MP3" indicator will light up if an MP3 disc is initialised." This system supports MPEG 1 Layer 3, MPEG 2 Layer 3, and
VBR files." During VBR file playback, time counter in the display may differ
from its actual playback time.
1 Press the ON/STAND-BY button to turn the power on.
2 Press the FUNCTION button until "CD" appears on the dis-
play.
When operating with the remote control, press the CD button.
3 Press the CD EJECT button to open the disc compart-
ment.
4 Place a disc on the spindle,label side up.
5 Close the disc compartment by firmly pushing the corner
marked "PUSH CLOSE".
6 Press the ( ) button to start playback from track 1.
When the last track on the disc has finished playing, the unit willstop automatically.
15
S HA RP
T I N S Z 0 2 2 7 S J Z Z ( H )

8/13/2019 Uputstvo Za Mini Liniju
http://slidepdf.com/reader/full/uputstvo-za-mini-liniju 18/39
03/8/20 XL-MP45H(H)E2.fm
E-11
ENGLISH
XL-MP45H
TINSZ0227SJZZ
C D o r M P 3
d i s c P l a y b a c k
Listening to a CD or MP3 disc (continued)To interrupt playback:Main unit operation:Press the button.To resume playback from the same point, press the buttonagain.Remote control operation:Press the button.To resume playback from the same point, press the button.
To stop playback:Press the button.
To remove the disc:Whilst in the stop mode, press the CD EJECT button.
Caution:! If a disc is damaged, dirty, or loaded upside down, "NO DISC" or
"READ ERR" will appear on the display.! Keep foreign objects out of the disc compartment.! Subjecting the unit to shock or vibration may cause mistracking.
! When the unit is not being used, be sure to close the disc com-partment. If it is left open, the lens may be covered with dust andthe unit may not operate properly.
! If TV or radio interference occurs during CD operation, move theunit away from the TV or radio.
" Headphones
" To change the display (MP3 discs only)Whilst in the stop mode or playback mode, press the MP3 DISPLAYbutton.Each time the button is pressed, the display will change as follows.
[When in the stop mode]
[When in the playback mode]
! Before plugging in or unplugging the head-phones, reduce the volume.
! Be sure your headphones have a 3.5 mm (1/ 8") diameter plug and are between 16 ohms
and 50 ohms impedance. The recommendedimpedance is 32 ohms.! Plugging in the headphones disconnects the
speakers automatically. Adjust the volumeusing the VOLUME control.
Total number of tracks Folder name
Track name
Folder name
Track name
Track number Elapsed playbacktime

8/13/2019 Uputstvo Za Mini Liniju
http://slidepdf.com/reader/full/uputstvo-za-mini-liniju 19/39
03/8/20 XL-MP45H(H)E2.fm
E-12
ENGLISH
8
XL-MP45H
TINSZ0227SJZZ
C D o r M P 3
d i s c P l a y b a c k
Advanced CD or MP3 disc playback" To select the desired folder or track by name
(MP3 discs only)" To locate the beginning of a track
Note:
You can skip to any track by pressing the or button repeat-edly until the desired track number appears.
" To locate the desired portionThe sound will be heard during operation with a CD, but not with anMP3 disc. Check the displayed playback time for an MP3 disc.
Notes:! Normal playback will resume when the ( ) or ( ) but-
ton is released.! When the end of the last track is reached during fast forward,
"END" will appear on the display and CD operation will bepaused. When the beginning of the first track is reached duringfast reverse, the disc will start playback automatically.
1 Whilst in the stop mode, press the MP3 DISPLAY button onthe remote control to display the folder name.
2 Select the desired folder by pressing the or button.
3 Press the MP3 DISPLAY button todisplay the track name.
4 Select the desired track by pressing the or button.
5 Press the ( ) button to beginplayback.
To move to the beginning of the next track:
Press the button for less than 0.5 seconds during playback.
To restart the track being played:
Press the button for less than 0.5 seconds during playback.
For fast forward:
Press and hold down the button on the main unit or the but-ton on the remote control during playback.
For fast reverse:
Press and hold down the button on the main unit or the but-ton on the remote control during playback.

8/13/2019 Uputstvo Za Mini Liniju
http://slidepdf.com/reader/full/uputstvo-za-mini-liniju 20/39
03/8/20 XL-MP45H(H)E2.fm
E-13
ENGLISH
XL-MP45H
TINSZ0227SJZZ
C D o r M P 3
d i s c P l a y b a c k
Advanced CD or MP3 disc playback (continued)" Direct search of the trackBy using the direct search buttons, the desired tracks can be played.
To stop playback:Press the button.
Notes:! The selected track can be started simply by pressing the direct
search buttons during playback. [It is not necessary to press the ( ) button.]! A track number higher than the number of tracks on the disc can-
not be selected.! During random play, direct search is not possible.! For MP3 discs, you can select the track number but cannot select
the folder by pressing the direct search button(s).
" Repeat playAll tracks or a programmed sequence can be continuously repeated.
To cancel repeat play:Press the REPEAT button again. " " will go out.
Caution:After performing repeat play, be sure to press the button. Other-wise, the disc will play continuously. " Random playThe tracks can be played in random order automatically.
To cancel random play:Press the RANDOM button again. "RANDOM" will go out.
Notes:! The random play will stop automatically when all tracks are
played once. (The same track will not be played back twice.)! In random play, the unit will select and play tracks automatically.
(You cannot select the order of the tracks.)! If you press the button during random play, you can move to
the track selected next by the random operation. On the otherhand, the button does not allow you to move to the previoustrack. The beginning of the track being played will be located.
1 Whilst in the stop mode, usethe direct search buttons onthe remote control to select thedesired track.
Selected track number
! The direct search buttons allow you to select up to number 9.
! When selecting number 10 or more, use the "+10" button.
A. For example, to choose 131 Press the "+10" button once.
2 Press the "3" button.
B. For example, to choose 30
1 Press the "+10" button three times.2 Press the "0" button.
2 Press the ( ) button to start playback.
Playback of the selected track is started. When the last track onthe disc has finished playing, the unit will stop automatically.
To repeat all tracks:1 Press the REPEAT button.
2 Press the ( ) button.
To repeat a desired track:1 Perform steps 1 - 3 in the "Pro-
grammed play" section on page 14and then press the REPEAT button.
2 Press the ( ) button.
Press the RANDOM button to be-gin random play.
15
S HA RP
T I N S Z 0 2 2 7 S J Z Z ( H )

8/13/2019 Uputstvo Za Mini Liniju
http://slidepdf.com/reader/full/uputstvo-za-mini-liniju 21/39
03/8/20 XL-MP45H(H)E2.fm
E-14
ENGLISH
8
XL-MP45H
TINSZ0227SJZZ
C D o r M P 3
d i s c P l a y b a c k
" Programmed playYou can choose up to 32 selections for playback in the order youlike.
To clear the programmed selections:
Whilst the "MEMORY" indicator is lit, set the CD to the stop modeand then press the CLEAR button.Each time the button is pressed, one track will be cleared, beginningwith the last track programmed. When all the tracks are cleared,"MEMORY" will disappear.
Adding tracks to the programme:If a programme has been previously stored, the "MEMORY" indica-tor will be displayed. Then follow steps 1 - 2 to add tracks. The newtracks will be stored after the last track of the original programme.
Notes:! Opening the disc compartment automatically cancels the pro-
grammed sequence.! Even if you press the ON/STAND-BY button to enter the stand-by
mode or the function is changed from CD to some other function,the programmed selections will not be cleared.
! During the programme operation, random play is not possible.! For MP3 discs, you can select the track number but cannot select
the folder by pressing the direct search button(s).
1 Whilst in the stop mode, use the direct search buttons toselect the desired track.
Selected track number
You can also select a track by pressing the or button.
2 Press the MEMORY (MEMORY/SET) button to save thetrack number.
Playback order
When the track is memorised, "MEMORY" will appear.
3 Repeat steps 1 - 2 for other tracks. Up to 32 tracks can beprogrammed.
If you make a mistake, the programmed tracks can be clearedby pressing the CLEAR button.
4 Press the ( ) button to start playback.
16
S HA RP
T I N S Z 0 2 2 7 S J Z Z ( H )

8/13/2019 Uputstvo Za Mini Liniju
http://slidepdf.com/reader/full/uputstvo-za-mini-liniju 22/39
03/8/20 XL-MP45H(H)E2.fm
E-15
ENGLISH
XL-MP45H
TINSZ0227SJZZ
R
a d i o
Listening to the radio
To receive an FM stereo transmission:Press the FUNCTION [TUNER (BAND)] button to display the "ST"indicator.! " " will appear when an FM broadcast is in stereo.! If the FM reception is weak, press the FUNCTION [TUNER
(BAND)] button to extinguish the "ST" indicator. The receptionchanges to monaural, and the sound becomes clearer.
1 Press the ON/STAND-BY button to turn the power on.
2 Press the FUNCTION button until "FM" or "AM" appears onthe display.
When operating with the remote control, press the TUNER(BAND) button to select "FM" or "AM".
3 Press the TUNING ( or ) button to tune in to the desiredstation.
Manual tuning:
Press the TUNING button as many times as required to tune into the desired station.
Auto tuning:
When the TUNING button is pressed for more than 0.5 sec-
onds, scanning will start automatically and the tuner will stop atthe first receivable broadcast station.
Notes:
! When radio interference occurs, auto scan tuning may stopautomatically at that point.
! Auto scan tuning will skip weak signal stations.
! To stop the auto tuning, press the TUNING button again.
! When an RDS (Radio Data System) station is tuned in, thefrequency will be displayed first, and then the RDS indicatorwill light. Finally, the station name will appear.
! Full auto tuning can be achieved for RDS stations "ASPM",see page 23.
FM stereo mode indicator FM stereo receiving indicator

8/13/2019 Uputstvo Za Mini Liniju
http://slidepdf.com/reader/full/uputstvo-za-mini-liniju 23/39
03/8/20 XL-MP45H(H)E2.fm
E-16
ENGLISH
8
XL-MP45H
TINSZ0227SJZZ
R
a d i o
Listening to the memorised station! Memorising a stationYou can store 40 AM and FM stations in memory and recall them atthe push of a button. (Preset tuning)
Note:The backup function protects the memorised stations for a fewhours should there be a power failure or the AC power lead discon-nection.
! To recall a memorised station
! To scan the preset stationsThe stations saved in memory can be scanned automatically. (Pre-set memory scan)
! To clear a memorised station
! To erase entire preset memory
1 Perform steps 1 - 3 in "Listening to the radio" on page 15.
2 Press the MEMORY/SET (MEMORY)
button to enter the preset tuning sav-ing mode.
3 Within 30 seconds, press the PRE-SET ( or ) button to select the pre-set channel number.
Store the stations in memory, in order, starting with presetchannel 1.
4 Within 30 seconds, press the MEMO-
RY/SET (MEMORY) button to storethat station in memory.
If the "MEMORY" and preset number indicators go out beforethe station is memorised, repeat the operation from step 2.
5 Repeat steps 1 - 4 to set other stations, or to change a pre-
set station.
When a new station is stored in memory, the station previouslymemorised will be erased.
Press the PRESET ( or ) button for less than 0.5 seconds toselect the desired station.
Preset channel Frequency and frequency band
1 Press the PRESET ( or ) button for more than 0.5 sec-
onds.
The preset number will flash and the programmed stations willbe tuned in sequentially, for 5 seconds each.
2 Press the PRESET ( or ) button again when the desired
station is located.
1 Recall the memorised station.2 Whilst it is displayed, press the MEMO-
RY/SET (MEMORY) button.3 Within 30 seconds, press the CLEAR
button on the remote control.
1 Press the ON/STAND-BY button toenter the power stand-by mode.
2 Whilst pressing down the MEMORY/ SET button and the FUNCTION but-ton, press the ON/STAND-BY buttonuntil "TUNER CL" appears.

8/13/2019 Uputstvo Za Mini Liniju
http://slidepdf.com/reader/full/uputstvo-za-mini-liniju 24/39
03/8/20 XL-MP45H(H)E2.fm
E-17
ENGLISH
XL-MP45H
TINSZ0227SJZZ
T a p e
P l a y b a c k
Listening to a cassette tapeBefore playback:
To stop playback:Press the button.
Fast forward/rewind:To advance the tape, press the button on the main unit or thebutton on the remote control. To rewind it, press the button onthe main unit or the button on the remote control.
Caution:" To remove the cassette, press the button, and then open the
compartment." Before changing from one tape operation to another, press the
button." If a power failure occurs during tape operation, the tape head will
remain engaged with the tape and the cassette compartment will
not open. In this case, wait until the power is restored." Even if the ( ) button is pressed during tape playback, the unit
will not enter the pause mode.
" For playback, use normal or low-noise tapes forthe best sound. (Metal or CrO tapes are not rec-ommended.)
" Do not use C-120 tapes or poor-quality tapes, as theymay cause malfunctions.
" Before loading a tape into the cassette compartment,tighten the slack with a pen or a pencil.
1 Press the ON/STAND-BY button to turn the power on.
2 Press the FUNCTION button until "TAPE" appears on the
display.
When operating with the remote control, press the TAPE button.
3 Open the cassette compart-
ment by pushing the areamarked "PUSH EJECT ".
4 Load a cassette into the cas-
sette compartment with theside to be played facing to-ward you.
5 Close the cassette compartment by pushing the area
marked "PUSH EJECT ".
6 Press the button to start playback.
When playback is performed using the remote control, pressthe button.

8/13/2019 Uputstvo Za Mini Liniju
http://slidepdf.com/reader/full/uputstvo-za-mini-liniju 25/39
03/8/20 XL-MP45H(H)E2.fm
E-18
ENGLISH
8
XL-MP45H
TINSZ0227SJZZ
T a p e R e c o r d i n g
Recording on a cassette tapeBefore recording:" When recording important selections, make a preliminary test to
ensure that the desired material is properly recorded." SHARP is not liable for damage or loss of your recording arising
from malfunction of this unit." The volume and sound controls can be adjusted with no effect on
the recorded signal (Variable Sound Monitor)." For recording, use only normal tapes. Do not use metal or
CrO tapes.
" Do not use C-120 tapes or poor-quality tapes, as they may causemalfunctions.
! Recording from a CD or MP3 disc
To perform programmed recording:
To stop recording:
Press the button.The disc and tape will stop.
To interrupt recording:Press the button." Recording is paused, but disc playback will continue.To resume recording, press the ( ) button.
1 Press the ON/STAND-BY button to turn the power on.
2 Press the FUNCTION button until "CD" appears on the dis-
play.
When operating with the remote control, press the CD button.
3 Load the desired disc.
4 Load a cassette into the cassette compartment with theside to be recorded on facing you.
Wind past the leader of the tape, on which recording cannot beperformed.
5 Press the button.
Recording will be paused.
6 Press the ( ) button to start re-
cording.
" Playback of the disc will start in a few seconds after the tapestarts.
" When the playback of the disc is finished or the end of thetape is reached, the disc and the cassette will stop automat-ically.
1 Programme tracks (see page 14).2 Press the button.3 Press the ( ) button.

8/13/2019 Uputstvo Za Mini Liniju
http://slidepdf.com/reader/full/uputstvo-za-mini-liniju 26/39

8/13/2019 Uputstvo Za Mini Liniju
http://slidepdf.com/reader/full/uputstvo-za-mini-liniju 27/39
03/8/20 XL-MP45H(H)E2.fm
E-20
ENGLISH
8
XL-MP45H
TINSZ0227SJZZ
A d v a n c
e d F e a t u r e s
Using the Radio Data System (RDS)RDS is a broadcasting service which a growing number of FMstations provide. These FM stations send additional signalsalong with their regular programme signals. They send theirstation names, and information about the type of programmesuch as sports or music, etc.When tuned to an RDS station, "RDS" and the station name will bedisplayed."TP" (Traffic Programme) will appear on the display when thereceived broadcast carries traffic information, and "TA" (Traffic
Announcement) will appear whilst a traffic information is on air.
You can control the RDS by using the remote control only.
! Information provided by RDSEach time the DISPLAY button is pressed, the display willswitch as follows:
When you are tuning in to a station other than an RDS station or toan RDS station which sends weak signal, the display will change inthe following order:
Station name (PS) Programme type (PTY)
Frequency
NO PS NO PTY
FM 98.80 MHz

8/13/2019 Uputstvo Za Mini Liniju
http://slidepdf.com/reader/full/uputstvo-za-mini-liniju 28/39
03/8/20 XL-MP45H(H)E3.fm
E-21
ENGLISH
XL-MP45H
TINSZ0227SJZZ
A d v a n c
e d F e a t u r e s
Using the Radio Data System (RDS) (continued)
! Notes for RDS operationIf any of the following events occur, it does not mean that theunit is faulty:" "PS", "NO PS" and a station name appear alternately, and the
unit does not operate properly." If a particular station is not broadcasting properly or a station is
conducting tests, the RDS reception function may not work prop-erly.
" When you receive an RDS station whose signal is too weak,
information like the station name may not be displayed." "NO PS" or "NO PTY" will flash for about 5 seconds, and then the
frequency will be displayed.
Descriptions of the PTY (Programme Type) codes, TP (TrafficProgramme) and TA (Traffic Announcement).You can search for and receive the following PTY, TP and TA sig-nals.
NEWS Short accounts of facts, events and publicly ex-pressed views, reportage and actuality.
AFFAIRS Topical programme expanding or enlarging uponthe news, generally in different presentation style or
concept, including debate, or analysis.INFO Programmes whose purpose is to impart advice in
the widest sense.
SPORT Programme concerned with any aspect of sport.
EDUCATE Programme intended primarily to educate, of whichthe formal element is fundamental.
DRAMA All radio plays and serials.
CULTURE Programmes concerned with any aspect of nationalor regional culture, including language, theatre, etc.
SCIENCE Programmes about the natural sciences and tech-
nology.
VARIED Used for mainly speech-based programmes usuallyof light-entertainment nature, not covered by othercategories. Examples include: quizzes, panelgames, personality interviews.
POP M Commercial music, which would generally be con-sidered to be of current popular appeal, often fea-turing in current or recent record sales charts.
ROCK M Contemporary modern music, usually written andperformed by young musicians.
EASY M Current contemporary music considered to be"easy-listening", as opposed to Pop, Rock or Clas-sical, or one of the specialised music styles, Jazz,Folk or Country. Music in this category is often butnot always, vocal, and usually of short duration.

8/13/2019 Uputstvo Za Mini Liniju
http://slidepdf.com/reader/full/uputstvo-za-mini-liniju 29/39

8/13/2019 Uputstvo Za Mini Liniju
http://slidepdf.com/reader/full/uputstvo-za-mini-liniju 30/39

8/13/2019 Uputstvo Za Mini Liniju
http://slidepdf.com/reader/full/uputstvo-za-mini-liniju 31/39
03/8/20 XL-MP45H(H)E3.fm
E-24
ENGLISH
8
XL-MP45H
TINSZ0227SJZZ
A d v a n c
e d F e a t u r e s
! To recall stations in memoryTo specify programmed types and select stations (PTYsearch):You can search a station by specifying the programme type (news,sports, traffic programme, etc. ... see pages 21 - 22) from the sta-tions in memory.
Notes:" If the display has stopped flashing, start again from step 2. If the
unit finds a desired programme type, the corresponding channelnumber will flash for about 4 seconds, and then the station namewill flash for 7 seconds, which will remain lit.
" If you want to listen to the same programme type of another sta-tion, press the PTY.TI button whilst the channel number or sta-tion name is flashing. The unit will look for the next station.
" If no station can be found, "NOTFOUND" will appear for 4 sec-
onds.
If you select the traffic programme:If you select the traffic programme (TP) in step 3, "TP" will appear.(This does not mean that you can listen to the traffic information atthat time.)When the traffic information is broadcast, "TA" will appear.
To specify station names and select stations manually:You can select a station by specifying the name (BBC R1, BBC R2,etc.) from the stations stored in memory.Before starting this operation, you must store one or more stationnames in memory.
1 Press the TUNER (BAND) button to select "FM".
2 Press the PTY.TI button.
"PTY TI" will flash for about 6 seconds.
3 Within 6 seconds, press the PRESET ( or ) button to se-
lect the programme type.
Each time the button is pressed, the programme type will ap-pear. If the button is held down for more than 0.5 seconds, theprogramme type will appear continuously.
4 Whilst the selected programme type is flashing (within 4
seconds), press the PTY.TI button again.
After the selected programme type has been lit for 2 seconds,"SEARCH" will appear, and the search operation will start.
1 Press the TUNER (BAND) button to select the FM band.2 Press the PRESET ( or ) button to select a desired station.3 The station name will be displayed for 3 seconds. Then the dis-
play will change.

8/13/2019 Uputstvo Za Mini Liniju
http://slidepdf.com/reader/full/uputstvo-za-mini-liniju 32/39

8/13/2019 Uputstvo Za Mini Liniju
http://slidepdf.com/reader/full/uputstvo-za-mini-liniju 33/39
03/8/20 XL-MP45H(H)E3.fm
E-26
ENGLISH
8
XL-MP45H
TINSZ0227SJZZ
A d v a n c
e d F e a t u r e s
To reset or change the timer setting:Perform "Timer playback" from the beginning.
Note:When performing timer playback using another unit connected tothe VIDEO/AUX IN sockets, select "VIDEO/AUX" in step 2. At thistime, only this unit will be turned on or enter the power stand-bymode automatically. It will enter the power stand-by mode 1 hourafter the timer playback starts. However, the other unit will not be
turned on or off.
! Sleep operation
To cancel the sleep operation:Press the ON/STAND-BY button whilst the sleep timer is set.
To confirm the remaining sleep time:Press the SLEEP button once whilst the sleep timer is set.The remaining sleep time is displayed for about 3 seconds.
6 Within 30 seconds, press the PRESET ( or ) button to
specify the minutes to start, then press the MEMORY but-ton.
" The timer playback starting time, function, and volume will bedisplayed, and then the unit will enter the stand-by mode au-tomatically.
" " " will appear and the current time will be displayed.
To cancel the timer playback:
Press the ON/STAND-BY button to turn the power on.
7 When the preset time is reached, playback will start.
The volume will increase gradually until it reaches the volumeyou were listening at before your system enters the timer stand-by mode.
8 The unit will enter the stand-by mode one hour after thetimer playback starts.
1 Play back the desired sound source.
2 Press the SLEEP button and within 3 seconds, press the
MEMORY button.
To change the sleep time:
Whilst the sleep time is displayed, press the PRESET ( or )button.
(Maximum: 3 hours - Minimum: 5 minutes)
3 Within 30 seconds, press the MEMORY button.
4 Your system will enter the power stand-by mode automat-
ically after the preset time has elapsed.
The volume will turn down 30 seconds before the sleep opera-tion finishes.
3:00 2:00 1:30 1:00
0:10 0:15 0:300:05(cancel)

8/13/2019 Uputstvo Za Mini Liniju
http://slidepdf.com/reader/full/uputstvo-za-mini-liniju 34/39
03/8/20 XL-MP45H(H)E3.fm
E-27
ENGLISH
XL-MP45H
TINSZ0227SJZZ
A d v a n c
e d F e a t u r e s
Timer and sleep operation (continued)
! To use timer and sleep operation togetherExample: To fall asleep and wake up to the same radio stationYou can play back the same source only (the function cannot beswitched).
Caution:When using the cassette deck, be sure the tape length is longenough to perform both functions. If you want to sleep and wake uplistening to a tape, and the length of the tape is shorter than thesleep timer setting, timer playback will not be possible.
Enhancing your systemThe connection lead is not included. Purchase a commercially avail-able lead as shown below.
! Listening to the playback sounds from VCR,DVD, etc.
Note:To prevent noise interference, place the unit away from the televi-sion.
! To record on a tape
1 Set the sleep time (steps 1 - 3, page 26).
2 Whilst the sleep timer is set, set the desired playback time
(steps 4 - 6, pages 25 - 26).
Sleep timer setting Timer playback setting
Sleep operation willautomatically stop.
Timer playbackstart time
5 minutes - 3 hours
1 Use a connection lead to connect the VCR, DVD, etc. to the VID-EO/AUX IN sockets.When using video equipment, connect the audio output to thisunit and the video output to a television.
2 Press the ON/STAND-BY button to turn the power on.3 Press the FUNCTION button until "AUX" appears on the display.
When operating with the remote control, press the VIDEO/AUXbutton.
4 Play the connected equipment.
1 Load a cassette into the cassette compartment with the side tobe recorded on facing you.
2 Press the VIDEO/AUX button.3 Press the button.4 Press the ( ) button.5 Play the VCR, DVD, etc.
VCR, DVD, etc.White
Red
To the line output sockets
White
Red
RCA lead(not supplied)

8/13/2019 Uputstvo Za Mini Liniju
http://slidepdf.com/reader/full/uputstvo-za-mini-liniju 35/39
03/8/20 XL-MP45H(H)E3.fm
E-28
ENGLISH
8
XL-MP45H
TINSZ0227SJZZ
R e f e r e n c e s
Troubleshooting chartMany potential problems can be resolved by the owner without call-ing a service technician.If something is wrong with this product, check the following beforecalling your authorised SHARP dealer or service centre.
! General
! CD player
! Tuner
! Cassette deck
! Remote control
Symptom Possible cause
" The clock is not set to the
correct time.
" Did a power failure occur? Reset
the clock. (Refer to page 9.)" When a button is pressed,
the unit does not respond." Set the unit to the power stand-
by mode and then turn it back on.
" If the unit still malfunctions, resetit. (Refer to page 29.)
" No sound is heard. " Is the volume level set to "0"?
" Are the headphones connected?
" Are the speaker wires discon-nected?
Symptom Possible cause
" Playback does not start. " Is the disc loaded upside down?
" Playback stops in the mid-dle or is not performedproperly.
" Does the disc satisfy the stan-dards?
" Is the disc distorted orscratched?
" Playback sounds areskipped, or stopped in the
middle of a track.
" Is the unit located near excessivevibrations?
" Is the disc very dirty?
" Has condensation formed insidethe unit?
Symptom Possible cause
" The radio makes unusualnoises continuously.
" Is the unit placed near the TV orcomputer?
" Is the FM aerial or AM loop aerialplaced properly? Move the aerialaway from the AC power lead ifit's located nearby.
Symptom Possible cause
" Cannot record. " Is the erase-prevention tab re-moved?
" Cannot record tracks withproper sound quality.
" Is it a normal tape? (You cannotrecord on a metal or CrO tape.)
" Cannot erase completely.
" Sound skipping. " Is there slack in the tape?
" Is the tape stretched?
" Cannot hear treble. " Are the capstans, pinch rollers,
or heads dirty?" Sound fluctuation.
" Cannot remove the tape. " If a power failure occurs duringplayback, the heads remain en-gaged with the tape. Do not openthe compartment with great force.
Symptom Possible cause
" The remote control doesnot operate.
" Is the AC power lead of the unitplugged in?
"Is the battery polarity correct?
" Are the batteries dead?
" Is the distance or angle incor-rect?
" Does the remote control sensorreceive strong light?

8/13/2019 Uputstvo Za Mini Liniju
http://slidepdf.com/reader/full/uputstvo-za-mini-liniju 36/39

8/13/2019 Uputstvo Za Mini Liniju
http://slidepdf.com/reader/full/uputstvo-za-mini-liniju 37/39
03/8/20 XL-MP45H(H)E3.fm
E-30
ENGLISH
8
XL-MP45H
TINSZ0227SJZZ
R e f e r e n c e s
SpecificationsAs part of our policy of continuous improvement, SHARP reservesthe right to make design and specification changes for productimprovement without prior notice. The performance specification fig-ures indicated are nominal values of production units. There may besome deviations from these values in individual units.
! General
! Amplifier
! Tuner
! CD player
! Cassette deck
! Speaker
Power source AC 230 V, 50 Hz
Powerconsumption Power on: 26 WPower stand-by: 0.9 W
Dimensions Width: 160 mm (6-5/16")Height: 240 mm (9-1/2")Depth: 247 mm (9-3/4")
Weight 2.5 kg (5.5 lbs.)
Output power PMPO: 30 W (total)
MPO: 15 W (7.5 W + 7.5 W) (DIN 45 324)RMS: 10 W (5 W + 5 W) (DIN 45 324)
Output terminals Speakers: 4 ohms
Headphones: 16 - 50 ohms (recommended:32 ohms)
Input terminals Video/Auxiliary (audio signal): 500 mV/47 kohms
Frequency range FM: 87.5 - 108 MHzAM: 522 - 1,620 kHz
Type Compact disc player
Signal readout Non-contact, 3-beam semiconductor laserpickup
D/A converter 1-bit D/A converter
Frequencyresponse
20 - 20,000 Hz
Dynamic range 90 dB (1 kHz)
Frequencyresponse
50 - 14,000 Hz (normal tape)
Signal/noise ratio 50 dB (recording/playback)
Wow and flutter 0.3 % (DIN 45 511)
Type 10 cm (4") full-range speaker
Maximum inputpower
10 W
Rated input power 5 W
Impedance 4 ohms
Dimensions Width: 145 mm (5-3/4")Height: 240 mm (9-1/2")Depth: 175 mm (6-15/16")
Weight 1.4 kg (3.1 lbs.)/each

8/13/2019 Uputstvo Za Mini Liniju
http://slidepdf.com/reader/full/uputstvo-za-mini-liniju 38/39
03/8/20 XL-MP45H(H)_BACK.fm TINSZ0227SJZZ
SHARP CORPORATION 9906
TINSZ0227SJZZ
03J N HK 1

8/13/2019 Uputstvo Za Mini Liniju
http://slidepdf.com/reader/full/uputstvo-za-mini-liniju 39/39
XL-MP45H MICRO COMPONENT SYSTEM
U P
D O W N