Embed Size (px)
Citation preview

15-601011 Issue 04e – (07 June 2012)
Uni�ed Communications ModuleInstallation and Maintenance
IP O�ce

Unified Communications Module Installation and Maintenance Page 215-601011 Issue 04e (07 June 2012)IP Office
© 2012 AVAYA All Rights Reserved.
NoticesWhile reasonable efforts have been made to ensure that the information inthis document is complete and accurate at the time of printing, Avayaassumes no liability for any errors. Avaya reserves the right to make changesand corrections to the information in this document without the obligation tonotify any person or organization of such changes.
Documentation disclaimerAvaya shall not be responsible for any modifications, additions, or deletionsto the original published version of this documentation unless suchmodifications, additions, or deletions were performed by Avaya.
End User agree to indemnify and hold harmless Avaya, Avaya's agents,servants and employees against all claims, lawsuits, demands and judgmentsarising out of, or in connection with, subsequent modifications, additions ordeletions to this documentation, to the extent made by End User.
Link disclaimerAvaya is not responsible for the contents or reliability of any linked Web sitesreferenced within this site or documentation(s) provided by Avaya. Avaya isnot responsible for the accuracy of any information, statement or contentprovided on these sites and does not necessarily endorse the products,services, or information described or offered within them. Avaya does notguarantee that these links will work all the time and has no control over theavailability of the linked pages.
WarrantyAvaya provides a limited warranty on this product. Refer to your salesagreement to establish the terms of the limited warranty. In addition, Avaya’sstandard warranty language, as well as information regarding support for thisproduct, while under warranty, is available to Avaya customers and otherparties through the Avaya Support Web site: http://www.avaya.com/support.Please note that if you acquired the product from an authorized Avaya reselleroutside of the United States and Canada, the warranty is provided to you bysaid Avaya reseller and not by Avaya.
LicensesTHE SOFTWARE LICENSE TERMS AVAILABLE ON THE AVAYA WEBSITE,HTTP://SUPPORT.AVAYA.COM/LICENSEINFO/ ARE APPLICABLE TO ANYONEWHO DOWNLOADS, USES AND/OR INSTALLS AVAYA SOFTWARE,PURCHASED FROM AVAYA INC., ANY AVAYA AFFILIATE, OR AN AUTHORIZEDAVAYA RESELLER (AS APPLICABLE) UNDER A COMMERCIAL AGREEMENTWITH AVAYA OR AN AUTHORIZED AVAYA RESELLER. UNLESS OTHERWISEAGREED TO BY AVAYA IN WRITING, AVAYA DOES NOT EXTEND THISLICENSE IF THE SOFTWARE WAS OBTAINED FROM ANYONE OTHER THANAVAYA, AN AVAYA AFFILIATE OR AN AVAYA AUTHORIZED RESELLER, ANDAVAYA RESERVES THE RIGHT TO TAKE LEGAL ACTION AGAINST YOU ANDANYONE ELSE USING OR SELLING THE SOFTWARE WITHOUT A LICENSE. BYINSTALLING, DOWNLOADING OR USING THE SOFTWARE, OR AUTHORIZINGOTHERS TO DO SO, YOU, ON BEHALF OF YOURSELF AND THE ENTITY FORWHOM YOU ARE INSTALLING, DOWNLOADING OR USING THE SOFTWARE(HEREINAFTER REFERRED TO INTERCHANGEABLY AS “YOU” AND “ENDUSER”), AGREE TO THESE TERMS AND CONDITIONS AND CREATE ABINDING CONTRACT BETWEEN YOU AND AVAYA INC. OR THE APPLICABLEAVAYA AFFILIATE (“AVAYA”).
Avaya grants End User a license within the scope of the license typesdescribed below. The applicable number of licenses and units of capacity forwhich the license is granted will be one (1), unless a different number oflicenses or units of capacity is specified in the Documentation or othermaterials available to End User. "Designated Processor" means a singlestand-alone computing device. "Server" means a Designated Processor thathosts a software application to be accessed by multiple users. "Software"means the computer programs in object code, originally licensed by Avayaand ultimately utilized by End User, whether as stand-alone products orpre-installed on Hardware. "Hardware" means the standard hardwareoriginally sold by Avaya and ultimately utilized by End User.
License typesDesignated System(s) License (DS). End User may install and use each copyof the Software on only one Designated Processor, unless a different numberof Designated Processors is indicated in the Documentation or other materialsavailable to End User. Avaya may require the Designated Processor(s) to beidentified by type, serial number, feature key, location or other specificdesignation, or to be provided by End User to Avaya through electronic meansestablished by Avaya specifically for this purpose.
CopyrightExcept where expressly stated otherwise, no use should be made of materialson this site, the Documentation(s) and Product(s) provided by Avaya. Allcontent on this site, the documentation(s) and the product(s) provided byAvaya including the selection, arrangement and design of the content isowned either by Avaya or its licensors and is protected by copyright and otherintellectual property laws including the sui generis rights relating to theprotection of databases. You may not modify, copy, reproduce, republish,upload, post, transmit or distribute in any way any content, in whole or inpart, including any code and software. Unauthorized reproduction,transmission, dissemination, storage, and or use without the express writtenconsent of Avaya can be a criminal, as well as a civil, offense under theapplicable law.
Third Party Components Certain software programs or portions thereof included in the Product maycontain software distributed under third party agreements ("Third PartyComponents"), which may contain terms that expand or limit rights to usecertain portions of the Product ("Third Party Terms"). Information regardingdistributed Linux OS source code (for those Products that have distributed theLinux OS source code), and identifying the copyright holders of the ThirdParty Components and the Third Party Terms that apply to them is availableon the Avaya Support Web site: http://support.avaya.com/Copyright.
Preventing toll fraud"Toll fraud" is the unauthorized use of your telecommunications system by anunauthorized party (for example, a person who is not a corporate employee,agent, subcontractor, or is not working on your company's behalf). Be awarethat there can be a risk of toll fraud associated with your system and that, iftoll fraud occurs, it can result in substantial additional charges for yourtelecommunications services.
Avaya fraud interventionIf you suspect that you are being victimized by toll fraud and you needtechnical assistance or support, call Technical Service Center Toll FraudIntervention Hotline at +1-800-643-2353 for the United States and Canada.For additional support telephone numbers, see the Avaya Support Web site:http://support.avaya.comSuspected security vulnerabilities with Avaya products should be reported toAvaya by sending mail to: [email protected].
TrademarksAvaya and Aura are trademarks of Avaya, Inc.The trademarks, logos and service marks (“Marks”) displayed in this site, thedocumentation(s) and product(s) provided by Avaya are the registered orunregistered Marks of Avaya, its affiliates, or other third parties. Users arenot permitted to use such Marks without prior written consent from Avaya orsuch third party which may own the Mark. Nothing contained in this site, thedocumentation(s) and product(s) should be construed as granting, byimplication, estoppel, or otherwise, any license or right in and to the Markswithout the express written permission of Avaya or the applicable third party.Avaya is a registered trademark of Avaya Inc. All non-Avaya trademarks arethe property of their respective owners.
Downloading documentsFor the most current versions of documentation, see the Avaya Support Website: http://www.avaya.com/support
Contact Avaya SupportAvaya provides a telephone number for you to use to report problems or toask questions about your product. The support telephone number is1-800-242-2121 in the United States. For additional support telephonenumbers, see the Avaya Web site: http://www.avaya.com/support

Unified Communications Module Installation and Maintenance Page 315-601011 Issue 04e (07 June 2012)IP Office
Contents
ContentsUnified Communications Module1.
..................................................................... 81.1 Unified Communications Module
..................................................................... 101.2 Using Linux
..................................................................... 101.3 Additional Documentation
..................................................................... 111.4 Network Configuration Limitations
..................................................................... 111.5 Small Community Networks
..................................................................... 121.6 Licenses
..................................................................... 121.7 Voicemail Pro Features
Module Installation2...................................................................... 152.1 IP Address Notes
..................................................................... 162.2 IP Office Configuration
..................................................................... 172.3 System Shutdown
..................................................................... 182.4 Inserting the Module
..................................................................... 192.5 Initializing the Module Services
..................................................................... 232.6 System and Module Start Up
..................................................................... 242.7 Logging on to the Web Menus
..................................................................... 252.8 Changing the Web Password
..................................................................... 262.9 Upgrading Software
Voicemail Pro Configuration3...................................................................... 313.1 Adding Voicemail Licenses
..................................................................... 323.2 IP Office Configuration
..................................................................... 333.3 Installing the Voicemail Pro Client
..................................................................... 343.4 Logging in to the Voicemail Server
..................................................................... 353.5 Changing the Voicemail Server Password
..................................................................... 363.6 Transferring Voicemail Server Settings
..................................................................... 383.7 Backup/Restore Limitations
one-X Portal for IP Office Configuration4...................................................................... 414.1 Adding Licenses
..................................................................... 424.2 Enabling one-X Portal for IP Office Users
..................................................................... 434.3 Initial one-X Portal for IP Office Login
..................................................................... 444.4 Initial AFA Login
Server Maintenance5...................................................................... 475.1 Logging In
..................................................................... 485.2 Changing the Web Password
..................................................................... 495.3 Changing the Root Password
..................................................................... 505.4 Setting the Password Rules
..................................................................... 515.5 Starting/Stopping Application Services
............................................................................ 515.5.1 Starting a Service
............................................................................ 515.5.2 Stopping a Service
............................................................................ 515.5.3 Setting a Service to Auto Start
..................................................................... 525.6 Server Shutdown
..................................................................... 525.7 Rebooting the Server
..................................................................... 535.8 Changing the IP Address Settings
..................................................................... 545.9 Date and Time Settings
..................................................................... 555.10 Changing the Web Control Port
..................................................................... 565.11 Setting the Menu Inactivity Timeout
..................................................................... 575.12 Upgrading Applications
............................................................................ 575.12.1 Loading Application Files onto the Server
............................................................................ 585.12.2 Upgrading Application Files
..................................................................... 595.13 Uninstalling an Application
..................................................................... 605.14 File Repositories
............................................................................ 605.14.1 Source Files
............................................................................ 605.14.2 Setting the Repository Locations
............................................................................ 615.14.3 Uploading Local Files
............................................................................ 625.14.4 Creating Remote Software Repositories
Server Menus6...................................................................... 656.1 Home
..................................................................... 676.2 Logs
............................................................................ 676.2.1 View
............................................................................ 686.2.2 Download
..................................................................... 696.3 Updates
............................................................................ 706.3.1 Services
............................................................................ 716.3.2 System
..................................................................... 726.4 Settings
............................................................................ 736.4.1 General
............................................................................ 766.4.2 System
..................................................................... 816.5 Downloads
Module Maintenance7...................................................................... 857.1 Module LEDs
..................................................................... 857.2 Module Buttons
..................................................................... 867.3 Module Removal
..................................................................... 877.4 Attaching a Monitor and Keyboard
..................................................................... 887.5 Transferring Voicemail Server Settings
..................................................................... 907.6 Module Battery
..................................................................... 917.7 Upgrading Software
..................................................................... 937.8 Module Software Reinstallation
Additional Processes8...................................................................... 998.1 Changing the Root Password
..................................................................... 1008.2 SSH File Transfers
..................................................................... 1018.3 Command Line
............................................................................ 1028.3.1 General Commands
............................................................................ 1048.3.2 Administrator Commands
............................................................................ 1058.3.3 Configuration Commands
...............................................................................107Index


Unified Communications Module Installation and Maintenance Page 515-601011 Issue 04e (07 June 2012)IP Office
Unified CommunicationsModule
Chapter 1.


Unified Communications Module Installation and Maintenance Page 715-601011 Issue 04e (07 June 2012)IP Office
Unified Communications Module:
1. Unified Communications ModuleThe Unified Communications Module is an IP500 base card supported by IP500 V2 systems running IP Office Release 8.0or higher software. The module is supported by systems running in IP Office Essential Edition, IP Office Preferred Editionor IP Office Advanced Edition mode and acts as an automatic PREFERRED EDITION license for such systems.
The module is a PC server, enabling various Linux based IP Office applications to run as embedded applications within theIP500 V2 control unit rather than requiring a separate PC. The Unified Communications Module hosts the followingapplications:
Linux The base operating system installed is CentOS, a Linux operating system. However, no specific knowledge of Linux isrequired for installation or maintenance of the Unified Communications Module.
· one-X Portal for IP Office This is a web browser based application that user's can use to control making and answering calls on their phone. Italso provides a range of gadgets for the user to access features such as their directory, call log and voicemailmessages. The one-X Portal for IP Office application is configured and managed remotely using web browseraccess. Each user who wants to use one-X Portal for IP Office needs to be licensed . The Unified CommunicationsModule acts as an automatic Preferred Edition license that is normally required by the application.
· Voicemail Pro This is a voicemail server. It provides mailbox services to all users and hunt groups on the IP Office system forwhich it is configured. In addition it can be customized to provide a range of call routing and voicemail services. TheVoicemail Pro service is configured and managed remotely using the Windows Voicemail Pro client. A copy of theVoicemail Pro client can be downloaded and installed from the server. The number of simultaneous connectionsto voicemail is licensed .The Unified Communications Module acts as an automatic Preferred Edition license forVoicemail Pro application.
· Web Control Menus The server's own settings are configured and managed remotely using web browser access to a set of menus.
Unified Communications Module CapacityThe capacity of the Unified Communications Module is:
· IP Office Users: Up to 200 users when running Voicemail Pro and one-X Portal for IP Office. More than 200users when running just Voicemail Pro.
· Simultaneous one-X Portal for IP Office Users: 50.
· Maximum voicemail ports: Up to 20 ports when running Voicemail Pro and one-X Portal for IP Office. Up to40 ports when running just Voicemail Pro.
· Small Community Network: Maximum 6 systems.
Linux is a registered trademark owned by Linus Torvalds.
12
81
12

Unified Communications Module Installation and Maintenance Page 815-601011 Issue 04e (07 June 2012)IP Office
1.1 Unified Communications ModuleThis module is supported for IP Office Release 8.0 Q1 2012 Service Pack and higher. The module is an embedded serverthat allows Linux based IP Office applications to be run within the IP Office control unit rather than requiring a separatePC.
· Supports Voicemail Pro and or one-X Portal for IP Office applications. The moduleis only supported by systems running IP Office Essential Edition, IP OfficePreferred Edition or IP Office Advanced Edition modes.
· IP Office Users: Up to 200 users when running Voicemail Proand one-X Portal for IP Office. More than 200 users whenrunning just Voicemail Pro.
· Simultaneous one-X Portal for IP Office Users: 50.
· Maximum voicemail ports: Up to 20 ports when runningVoicemail Pro and one-X Portal for IP Office. Up to 40 portswhen running just Voicemail Pro.
· Small Community Network: Maximum 6 systems.
· Licenses The presence of this module acts as an automatic Preferred Editionlicense for the IP Office system, enabling 4 ports of voicemail. Additionalvoicemail ports can be licensed up to a maximum of 20. A separate Essential Edition license is still required as a pre-requisite.
· IP500 Control Unit:
· IP500 V2 Control Unit: IP Office Release 8.0 Q1 2012 Service Packor higher.
· Maximum per Control Unit: 1 per control unit.
· IP500 Trunk Card Support:
· ! WARNING: Do Not Remove the Port Cover Except for Maintenance
The card is supplied with a removable plastic cover that locates over the external ports (LAN, USB and HDMI) onthe faceplate of the card. This cover should always be in place during normal operation of the card. The covershould only be temporarily removed during maintenance actions that require access to the ports and should bereplaced when the maintenance is completed.
· ! WARNING: Card Remains Hot After System Shutdown
When removing an Unified Communications Module from a system, care should be taken not to touch the heat sinkon the module. The heat sink remains hot for a long period after system shutdown.
PortsThe card is supplied with a removable plastic cover thatlocates over the external ports (LAN, USB and HDMI) on thefaceplate of the card. This cover should always be in placeduring normal operation of the card. The cover should onlybe temporarily removed during maintenance actions thatrequire access to the ports and should be replaced when themaintenance is completed. Whilst removed, the followingports are accessible:
· LAN This port is not used.
· USB These USB2 ports can be used for the temporaryconnection of devices during module maintenance .USB2 memory devices should be USB 2.0 compatible.
· HDMI This port can be used for temporary connection of a videomonitor during module maintenance.
84
87

Unified Communications Module Installation and Maintenance Page 915-601011 Issue 04e (07 June 2012)IP Office
Unified Communications Module: Unified Communications Module
LEDsThe Unified Communications Module provides the following LEDs:
· Upper LEDs
· Orange: Module BIOS starting.
· Lower LED
· Solid Red: Unpacking and initializing.
· Flashing Red: Module initialization.
· Flashing Green: Module operating system starting or shutting down.
· Solid Green with Amber blink: OK. IP Office heartbeat okay.
· Off with Amber blink: Module shutdown. IP Office heartbeat okay.
· If the module is already running when the system restarts, its lower LED remains green when the LEDs on theother base cards are solid red. If the module is not running when the system restarts, its lower LED remains offwhen the LEDs on the other base cards are solid red. The lower LED on the module then flashes red when theLEDs on the other base cards flash red during system initialization; before reverting to either green or off whenthe system reboot is complete.
ButtonsThe Unified Communications Module provides the following buttons:
· Upper Button/Button 1 This button can be used for the following functions:
· Shutdown If the module is running, pressing this button for more than 2 seconds will start a module shutdown. Acompleted shutdown is indicated by the lower LED changing to off with regular amber blinks only.
· Startup If the module has been shutdown, pressing this button will cause it to startup.
· Alternate Boot When the module is about to boot, shown by both upper LEDs being orange, pressing and holding the switchuntil those LEDs change to off instructs the module to attempt to boot from any device attached to its USBports. See Module Software Reinstallation .
· Switch 2: Not used.
93

Unified Communications Module Installation and Maintenance Page 1015-601011 Issue 04e (07 June 2012)IP Office
1.2 Using LinuxDespite using a Linux based operating system, knowledge or experience of Linux by the installer and maintainer is notrequired. The Unified Communications Module is designed to be configured and maintained remotely using its web browserinterface. Other services running on the server are administered using separate client applications.
No access to the Linux command line is expected. Using the Linux command line to perform any other actions may causeunexpected operation of the Unified Communications Module and is not supported except when specifically instructed byAvaya.
1.3 Additional DocumentationIn addition to reading this manual, you should also have, have read and be familiar with the following manuals beforeattempting to install a Unified Communications Module system.
Application Installation and Configuration· one-X Portal for IP Office Administration Manual
This manual covers the installation and administration menus used for the one-X Portal for IP Office application.This manual is essential if the one-X Portal for IP Office needs to be configured to support multiple IP Office serversin a Small Community Network.
· Voicemail Pro Linux Installation Manual This manual covers scenarios where multiple servers are installed within a Small Community Network.
· Voicemail Pro Administration Manual By default the voicemail server will provide mailbox services to all users and hunt groups without any configurationbeing needed. This manual covers the administration of the voicemail server using the Voicemail Pro client in orderto enable additional features.
Technical BulletinsAll releases of IP Office software are accompanied by a technical bulletin. The bulletin will include details of changes thatmay have occurred too late to be included in this documentation. The bulletins will also detail what has changed in thesoftware release compared to previous releases and any specific actions required or restrictions that apply if upgradingfrom a previous release.
Other Documentation and Documentation SourcesAll the documentation for IP Office systems is available from the following web sites:
· Avaya Support Web Site - http://support.avaya.com
· Avaya IP Office Knowledge Base - http://marketingtools.avaya.com/knowledgebase

Unified Communications Module Installation and Maintenance Page 1115-601011 Issue 04e (07 June 2012)IP Office
Unified Communications Module: Additional Documentation
1.4 Network Configuration LimitationsThe IP Office control unit has two physical LAN interfaces: LAN1 and LAN2. The ports labeled LAN and WAN respectively.
Traffic between the IP Office control unit and the Unified Communications Module is on LAN1 of the IP Office system.Scenarios where users of the Unified Communications Module applications, especially one-X Portal for IP Office, areaccessing the IP Office and thus the Unified Communications Module via the IP Office system's LAN2 (WAN) port should beavoided for more than 30 users.
They should also be avoided where NAT is being applied to traffic between LAN1 and LAN2. These restrictions should beobserved even when the IP Office system is in a Small Community Network where the H323 SCN trunks may be routed viathe other LAN.
1.5 Small Community NetworksUp to 32 IP Office systems can be connected together using H323 SCN trunks to form a Small Community Network,supporting up to 1000 users. The servers in the system automatically share information about users and other features inorder to act as a single system.
· The Unified Communications Module is only supported as an application server for a Small Community Network ofup to 6 systems. It is also limited to supporting only 200 users if it is running the one-X Portal for IP Officeapplication.
When installing a Unified Communications Module within a Small Community Network, it is important to be aware of thefollowing factors affecting the different server applications:
· one-X Portal for IP Office Only a single instance of the one-X Portal for IP Office application is supported within a Small Community Network.
· When run on a Unified Communications Module, one-X Portal for IP Office is only supported for up to 200 usersand 50 simultaneous sessions. To support more users and sessions (500), the one-X Portal for IP Officeapplication needs to be installed on a separate server from the Unified Communications Module.
· Following installation of the Unified Communications Module with one-X Portal for IP Office application on it,addition configuration steps are required to configure the one-X Portal for IP Office application with details ofthe other IP Office systems. This addition configuration is covered in the one-X Portal for IP Office InstallationManual.
· Voicemail Pro In an Small Community Network, one Voicemail Pro server is used to store all mailboxes and their relatedmessages, greeting and announcements. This is referred to the centralized voicemail server. However, additionalVoicemail Pro servers can be installed to perform some other specific roles as listed below. Full details of the setupfor these roles is covered in the Voicemail Pro manuals.
· Centralized Voicemail Server In the network, one Voicemail Pro server is used as the centralized voicemail server for all IP Office systems inthe network. This server is used to store all mailboxes and their related messages, greeting andannouncements. This is mandatory regardless of the presence of any additional options below. The IP Officeassociated with the centralized server holds the licenses for voicemail server support. The other servers in thenetwork do not require any voicemail licenses in order to use this server as their voicemail server.
· Fallback IP Office Without needing to install another Voicemail Pro server, the IP Office hosting the centralized voicemailserver can be configured such that, if for any reason it is stopped or disabled, the centralized voicemailserver switches to being controlled by another IP Office in the network.
· Distributed Voicemail Servers Additional Voicemail Pro servers can be installed and associated with other IP Office systems to provide callservices for that system. For example to record messages, play announcements, etc. However, any messagesit records are then automatically transferred to and stored on the centralized server. The IP Office associatedwith the distributed server requires the appropriate licenses for voicemail server support.
· Backup Voicemail Server An additional sever, with the Voicemail Pro application can be specified as the backup server for the centralizedserver. If for any reason the voicemail application on the centralized server is stopped or disabled, thecentralized IP Office will switch to using the backup voicemail server for its voicemail functions. During normaloperation the centralized and backup voicemail servers automatically exchange information about mailboxesand voicemail service configuration. The backup voicemail server uses the licenses provided by the centralizedIP Office. A distributed server cannot also be used as a backup server and vice versa.

Unified Communications Module Installation and Maintenance Page 1215-601011 Issue 04e (07 June 2012)IP Office
1.6 LicensesThe use of various features are licensed, for example, which users are able to use the one-X Portal for IP Officeapplication. These licenses are entered into the IP Office configuration.
For the Unified Communications Module it is important to understand the role of the following system licenses:
· Essential Edition This license is a pre-requisite for the Preferred Edition license below.
· Preferred Edition (Voicemail Pro) This license is required for use of the Voicemail Pro application. It also enables 4 voicemail ports. It is also requiredas a pre-requisite for the user profile licenses required for one-X Portal for IP Office users. The UnifiedCommunications Module acts as an automatic Preferred Edition license for the system.
· Preferred Edition Additional Voicemail Ports These licenses can be used to add additional voicemail ports in addition to the 4 enabled by the PreferredEdition (Voicemail Pro) license above. Multiple licenses can be added, up to a total of 20 ports when runningVoicemail Pro and one-X Portal for IP Office, or up to 40 ports when running just Voicemail Pro.
· VMPro TTS (Linux Voicemail Pro) This license enables the use of text-to-speech facilities using the optional Linux TTS software. One license persimultaneous instance of TTS usage. This license is also used for user email reading.
· User Profile Licenses In order to log into and use the one-X Portal for IP Office application, a user must be configured and licensed to oneof the following user profile roles in the IP Office configuration: Office Worker, Teleworker or Power User. Eachrole requires an available Office Worker, Teleworker or Power User license in the IP Office configuration.
1.7 Voicemail Pro FeaturesVoicemail Pro runs on both Windows and Linux servers. For Voicemail Pro server running on Linux such as with the UnifiedCommunications Module, the following Voicemail Pro features are not supported:
· VB Scripting
· 3rd Party DatabaseIntegration
· VPNM
· UMS Web Voicemail (However, access via IMAP and one-X Portal for IP Office are available asalternatives.)
· ContactStore
When logged into the voicemail server using the Voicemail Pro client, those features not supported are grayed out orhidden. If those features are present in an imported call flow, they will not function and calls attempting to use thosefeatures will be disconnected.
The Voicemail Pro client's backup and restore functions cannot currently be used to move voicemail data between a Linuxbased server and a Windows based server or vice versa. The client functions for importing and exporting module and thecall flow database can be used.
For Small Community Network scenarios where multiple voicemail servers are present, for example distributed and backupserver, a mix of Linux based and Windows based servers are allowed.

Unified Communications Module Installation and Maintenance Page 1315-601011 Issue 04e (07 June 2012)IP Office
Module Installation
Chapter 2.

Unified Communications Module Installation and Maintenance Page 1415-601011 Issue 04e (07 June 2012)IP Office
2. Module Installation
Pre-Requisites· This manual assumes that the installer is already experienced with the installation of an IP500 V2 system, including
the installation of IP500 base cards. It also assumes that the installer is familiar with the configuration of a IP Officesystem using IP Office Manager and System Status Application.
· This manual assumes that the IP Office system has already been installed and licensed for IP Office EssentialEdition mode running IP Office Release 8.0 Q1 2012 Service Pack or higher.
· The Unified Communications Module defaults to using the IP Office system as its source for time and dateinformation. Therefore the IP Office system must be configured to either use a specific external time server toobtain its time or to have its time set manually.
Additional DocumentationDepending on the application to be supported by the Unified Communications Module, Voicemail Pro and or one-X Portalfor IP Office, the following manuals are also required plus any information requirements specified in those manuals.
· one-X Portal for IP Office Administration Manual This manual covers the installation and administration menus used for the one-X Portal for IP Office application.This manual is essential if the one-X Portal for IP Office needs to be configured to support multiple IP Office serversin a Small Community Network.
· Voicemail Pro Linux Installation Manual This manual covers scenarios where multiple servers are installed within a Small Community Network.
· Voicemail Pro Administration Manual By default the voicemail server will provide mailbox services to all users and hunt groups without any configurationbeing needed. This manual covers the administration of the voicemail server using the Voicemail Pro client in orderto enable additional features.
Information Required· IP Office Service User Names and Passwords
Service user names and passwords for IP Office Manager and System Status Application access to the IP Officesystem.
· IP Address Details The IP address of the IP Office system's LAN1 interface is used for the initial configuration of the module. Duringthat configuration separate IP address settings for the module are set.
· Licenses Check that you have the necessary licenses for the expected operation. The licenses must match the Dongle SerialNumber shown in the IP Office system's configuration.
Tools Required· Windows PC
This PC or an existing PC is needed to run IP Office Manager and System Status Application. The PC needs to havea LAN connection to the IP Office control unit.
· 5mm Flat-blade Screwdriver This is required to remove a slot cover from the front of the IP Office control unit and to secure the newly installedUnified Communications Module.
· Anti-Static Wrist Strap and Ground Point These should be used when inserting and removing cards from the IP Office control unit.
Transferring Settings from Other ServersIf the module is replacing an existing Voicemail Pro and or one-X Portal for IP Office server, the settings from thoseservers can be transferred to the module. The methods for this are outlined in the sections Transferring Voicemail ServerSettings and Transferring one-X Portal for IP Office Settings. 88
Unified Communications Module Installation and Maintenance Page 1515-601011 Issue 04e (07 June 2012)IP Office
Module Installation:
2.1 IP Address NotesDuring installation the Unified Communications Module is assigned an IP address. The Unified Communications Module canalso use DHCP to obtain an address. It can also be given a DNS name.
The IP500 V2 system has two physical LAN interfaces: LAN1 and LAN2. The ports labeled LAN and WAN respectively. TheUnified Communications Module is physically connected to the LAN1 network of the system and needs to have an addresson that subnet.
These notes detail how the IP addresses are used.
· User and Administration IP Addresses User and administrator access to the Unified Communications Module and the applications hosted by the moduleuse the following addresses.
· Unified Communications Module A newly installed Unified Communications Module uses the IP Office system's LAN1 IP address for browseraccess to the module's initial configuration menu. During that initial configuration, an IP address for futureaccess to the Unified Communications Module is set.
· one-X Portal for IP Office The one-X Portal for IP Office service running on the Unified Communications Module is accessed using themodule's IP address or DNS name suffixed with :8080 as the port number.
· Voicemail Pro The voicemail server service running on the Unified Communications Module is accessed by the Voicemail Proclient using the module's IP address.
· Internal Addresses The following addresses are used only for internal connections between the IP Office system and the applicationsrunning on its Unified Communications Module. These addresses are fixed and normally automatically set. Howeveryou need to be aware of them as they appear in the IP Office system and one-X Portal for IP Office configurationsettings.
· one-X Portal for IP Office Connection: 169.254.0.1 This address is used for the CSTA and DSML provider connections from the one-X Portal for IP Officeapplication to the IP Office. It is also used as the SNTP time source address for the Unified CommunicationsModule.
· Voicemail Pro Connection: 169.254.0.2 This address is used for as the internal address for connections to the voicemail server. It is set as the IPaddress of the voicemail server in the IP Office system's configuration. It is also used as the voicemail provideraddress by the one-X Portal for IP Office application.
LAN2 and NAT LimitationTraffic between the IP Office control unit and the Unified Communications Module is on LAN1 of the IP Office system.Scenarios where users of the Unified Communications Module applications, especially one-X Portal for IP Office, areaccessing the IP Office and thus the Unified Communications Module via the IP Office system's LAN2 (WAN) port should beavoided for more than 30 users.
They should also be avoided where NAT is being applied to traffic between LAN1 and LAN2. These restrictions should beobserved even when the IP Office system is in a Small Community Network where the H323 SCN trunks may be routed viathe other LAN.

Unified Communications Module Installation and Maintenance Page 1615-601011 Issue 04e (07 June 2012)IP Office
2.2 IP Office ConfigurationThe following are pre-requisites for the system supporting a Unified Communications Module.
· The IP Office system must be running IP Office Release 8.0 Q1 2012 Service Pack or higher software.
· The IP Office system must be configured and licensed for Essential Edition mode operation.
· The system must be configured to use either an external time server or to have its time and date set manually.
Changing the System Time Settings
1.Start IP Office Manager and receive the configuration from the IP Office system.
2.Select System and select the System tab.
3.For a system with an Unified Communications Module, the default Time Setting Config Source setting of VoicemailPro/Manager should not be used. The value should be changed as follows:
· To Use an External Time Server Change the setting to SNTP. The additional fields for setting the address of the time server or servers to useare displayed.
· To Set the Time Manually Change the setting to None. The system's time and date are now set through the menu of an Avaya phoneuser who has System Phone Rights.
4.Click on the save icon to send the configuration back to the IP Office.
Checking/Entering LicensesThe IP Office system requires an Essential Edition license.
1.Start IP Office Manager and receive the configuration from the IP Office system.
2.Select License.
3.To add a license, click and select License. Enter the new license and click OK. We recommend licenses areadded by cutting and pasting them from the supplied file. That avoids potential issues with mistyping.
4.The Status of the new license should show Unknown and the name the license should match the type of licenseentered. If the name shows as Invalid, the most likely cause is incorrect entry of the license key characters.
5.Click on the save icon to send the configuration back to the IP Office.
6.Use Manager to receive the configuration again and check that the status of the license. It should now be Valid.

Unified Communications Module Installation and Maintenance Page 1715-601011 Issue 04e (07 June 2012)IP Office
Module Installation: IP Office Configuration
2.3 System ShutdownBefore adding or removing any hardware from the IP Office system, it must be shutdown using one of the shutdownmethods below. Failing to shutdown the system correctly may cause lose of configuration data.
· ! WARNINGS
· A shutdown must always be used to switch off the system. Simply removing the power cord or switching offthe power input may cause the loss of configuration data.
· This is not a polite shutdown, any user calls and services in operation will be stopped. Once shutdown, thesystem cannot be used to make or receive any calls until restarted.
· The shutdown process takes up to a minute to complete. When shutting down a system with a UnifiedCommunications Module installed, the shutdown can take up to 3 minutes while the card safely closes all openfiles and closes down its operating system. During this period the module's LED 1 remains green.
· When shutdown, the LEDs shown on the system are as follows. Do not remove power from the system orremove any of the memory cards until the system is in this state:
· LED1 on each IP500 base card installed will also flash red rapidly plus LED 9 if a trunk daughter cardis fitted to the base card.
· The CPU LED on the rear of the system will flash red rapidly.
· The System SD and Optional SD memory card LEDs on the rear of the system are extinguished.
· To restart a system when shutdown indefinitely, or to restart a system before the timed restart, switch powerto the system off and on again.
System Shutdown Using the AUX ButtonWhen the AUX button on the rear of the system is pressed for more than 5 seconds, the IP500 V2 control unit willshutdown with the restart timer set to 10 minutes. Wait until the state of the LEDs on the system match those listed abovebefore switching off power to the system.
System Shutdown Using IP Office Manager1.Using IP Office Manager, select File | Advanced | System Shutdown.
2.Using the Select IP Office menu, the System Shutdown Mode menu is displayed.
3.Select Indefinite and click OK.
4.Wait until the state of the LEDs on the system match those listed above before switching off power to the system.
System Shutdown Using the System Status Application1.Start System Status Application and access the system's status output.
2.In the navigation panel select System.
3.At the bottom of the screen select Shutdown System.
4.Select Indefinite and click OK.
5.Wait until the state of the LEDs on the system match those listed above before switching off power to the system.Switch off power to the system.

Unified Communications Module Installation and Maintenance Page 1815-601011 Issue 04e (07 June 2012)IP Office
2.4 Inserting the ModuleOnce the system has been shutdown , the module can be inserted.
· ! WARNINGS
· Correct anti-static protection steps should be taken while handling circuit boards.
· Cards must never be added to or removed from the control unit while it has power connected.
· Tools Required
· o 5mm Flat-blade screwdriver.
· o Anti-static wrist strap and ground point.
Installing the card:
1.If not already done, ensure that the plastic cover that fits over the external ports on the card's faceplate is in place.The plastic cover is supplied with the card.
2.Check that there is no power to the control unit. If the system is on, shutdown the system using one of the correct shutdown methods .
· Do not simply switch off power to a system. Whenever possible a system should be switched off using a correctshutdown method first.
3.Using a flat-bladed screwdriver, remove the cover from the slot on the front of the control unit that will be used forthe module. This cover is no longer required but should be retained until installation has been completed.
4.Allowing the module to rest against the bottom of the slot, begin sliding it into the control unit. When half inserted,check that the module rails have engaged with the slot edges by trying to gently rotate it. If the module rotatesremove it and begin inserting it again.
5.While inserting the module, also check to ensure that cables on the module do not interfere with the insertionoperation.
6.The module should slide in freely until almost fully inserted. At that point, apply pressure at the base of the front ofthe module to complete insertion.
7.Using a flat-bladed screwdriver, secure the module.
8.Once the module is installed, reapply power to the system. The system will go through its normal start up process.The LEDs on the Unified Communications Module will also indicate the card's status, see Module LEDs . Themodule is started once the lower LED changes to green with regular amber flashes.
9.The card now needs to be initialized .
17
17
85
19

Unified Communications Module Installation and Maintenance Page 1915-601011 Issue 04e (07 June 2012)IP Office
Module Installation: Inserting the Module
2.5 Initializing the Module ServicesFollowing installation and start up of the newly installed module, the services provided by the module need to be startedand initialized. This is done via web browser access to the module.
1.From a client PC, start the browser and enter http:// followed by the LAN1 IP address of the IP Office system and:7070. For example http://192.168.42.1:7070.
· The IP Office system's LAN1 address is used just for this initial configuration. During this process, you will setIP address details for the Unified Communications Module that are then used for future access to the card. Notethat only the LAN1 IP address should be used for this process, not the LAN2 IP address.
2.The Unified Communications Module login page is displayed. The default name and password are Administratorand Administrator.
3.Click Login. The menu for initial setup is displayed.
4.Click Next. If you accept the license, select I Agree and click Next.

Unified Communications Module Installation and Maintenance Page 2015-601011 Issue 04e (07 June 2012)IP Office
5.Enter the IP address and DNS settings that the module should use. These will be used for future access to themodule and its applications.
6.Select the services that you want the Unified Communications Module to provide for the Unified CommunicationsModule system.
7.Click Next. Enter and confirm a new password. This is the root user password for access to the operating system. Itis not normally used during Unified Communications Module configuration and maintenance. However, ensure thatyou note the password set.

Unified Communications Module Installation and Maintenance Page 2115-601011 Issue 04e (07 June 2012)IP Office
Module Installation: Initializing the Module Services
8.Click Next. Enter basic details for the module.
· The default setting for the NTP Server is 169.254.0.1. This is an internal address for the IP Office system. Ifthis address is used, the IP Office system must be configured to gets its time from an external source or tohave its time set manually.
9.Click Next. A summary of the settings is displayed.
10.Click Apply. Alternatively use the the Previous and Next options to readjust the settings.

Unified Communications Module Installation and Maintenance Page 2215-601011 Issue 04e (07 June 2012)IP Office
11.Once configuration is complete, the module will restart with the new settings.
12.The module will attempt to redirect your browser to the module's new IP address. If this does not succeed you willhave to enter the new address manually. However, whichever way you will need to login again. You should now seethe server configuration menus .
13.Though the module and the selected services have been started, additional configuration to support those servicesmay be required. See Voicemail Pro Configuration and one-X Portal for IP Office Configuration .
70
30 40

Unified Communications Module Installation and Maintenance Page 2315-601011 Issue 04e (07 June 2012)IP Office
Module Installation: Initializing the Module Services
2.6 System and Module Start UpThe status of the Unified Communications Module can be checked using System Status Application.
1.Using System Status Application, access the system.
2.Select System. The System Hardware Summary includes the UC Module.
3.Under System in the navigation tree, click on UC Module. Details of the module are displayed. The buttons at thebottom of the display can be used to shutdown and startup the module.

Unified Communications Module Installation and Maintenance Page 2415-601011 Issue 04e (07 June 2012)IP Office
2.7 Logging on to the Web Menus1.From a client PC, start the browser and enter http:// followed by the address of the Unified Communications
Module and :7070. The port number and protocol (http or https) used can be changed through the Settings |General menu after logging in.
2.The Unified Communications Module login page is displayed.
3.Select the Language required.
4.Enter the name and password for Unified Communications Module administration. The default name and passwordare Administrator and Administrator. The password can be changed by selecting the Change Passwordoption.
5.If the login is successful, the Home page for the server is displayed.
73
48
65
Unified Communications Module Installation and Maintenance Page 2515-601011 Issue 04e (07 June 2012)IP Office
Module Installation: Logging on to the Web Menus
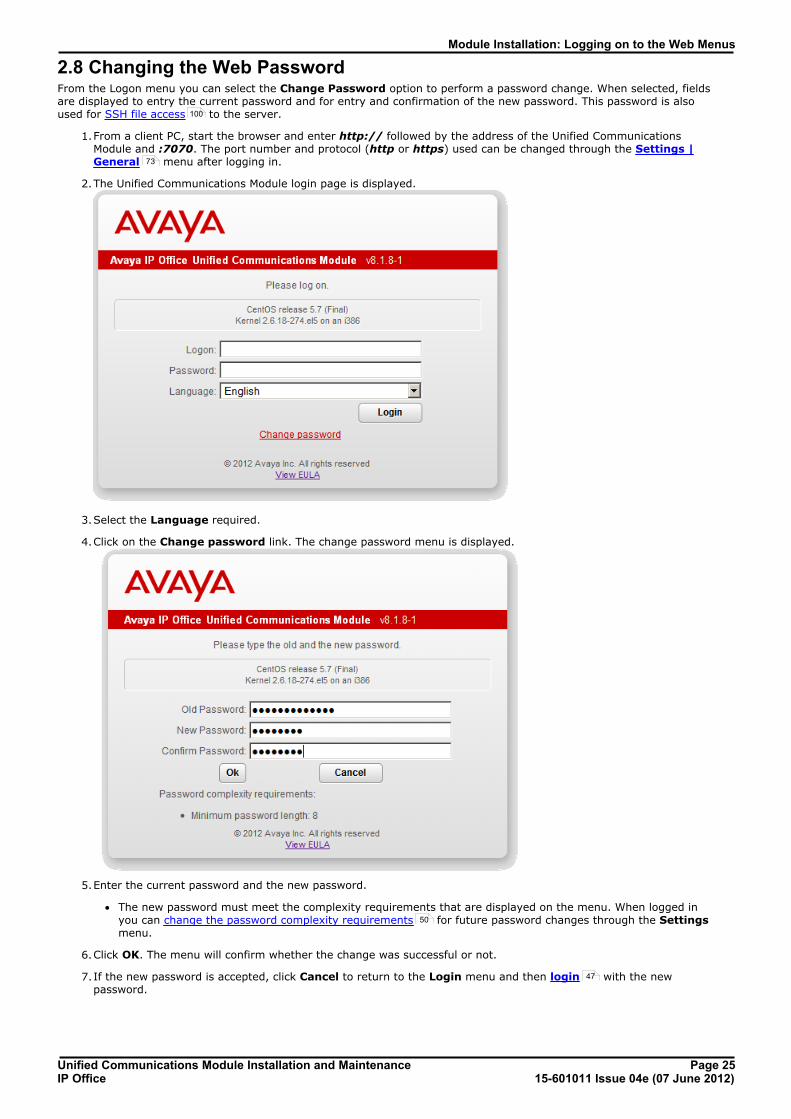
2.8 Changing the Web PasswordFrom the Logon menu you can select the Change Password option to perform a password change. When selected, fieldsare displayed to entry the current password and for entry and confirmation of the new password. This password is alsoused for SSH file access to the server.
1.From a client PC, start the browser and enter http:// followed by the address of the Unified CommunicationsModule and :7070. The port number and protocol (http or https) used can be changed through the Settings |General menu after logging in.
2.The Unified Communications Module login page is displayed.
3.Select the Language required.
4.Click on the Change password link. The change password menu is displayed.
5.Enter the current password and the new password.
· The new password must meet the complexity requirements that are displayed on the menu. When logged inyou can change the password complexity requirements for future password changes through the Settingsmenu.
6.Click OK. The menu will confirm whether the change was successful or not.
7.If the new password is accepted, click Cancel to return to the Login menu and then login with the newpassword.
100
73
50
47

Unified Communications Module Installation and Maintenance Page 2615-601011 Issue 04e (07 June 2012)IP Office
2.9 Upgrading SoftwareThe Unified Communications Module is supplied with a full set of software pre-installed. However, this may not match thesoftware level of the IP Office system or the latest set of application software available for the module. Therefore it may benecessary to upgrade the card after installation.
Most upgrades for the Unified Communications Module will be made available as a set of .rpm files for the componentsbeing upgraded. These will be made available via the Avaya support website http://support.avaya.com. Using these is therecommended method for upgrading rather than a module software .iso reinstallation , as it is both quicker and doesnot remove the current user data. It is also done remotely from the same PC as logging in with web control rather thanrequiring physical access to the system.
Separate .rpm files may be made available for one-X Portal for IP Office, the voicemail server, voicemail language promptsand voicemail TTS languages. Refer to the IP Office Technical Bulletins for each release to confirm the new .rpms availableand whether any other pre-requisite .rpm files are also needed. For the Unified Communications Module, an unzipapplication may also need to be installed or upgraded. A separate unzip .rpm is made available when that is the case.
Note also that .rpm files are also used by other Linux based IP Office solutions. In all cases you must confirm that the .rpm downloaded is compatible for use with the Unified Communications Module.
The upload process for each .rpm takes a couple of minutes. The installation process for each .rpm also takes a couple ofminutes.
· ! WARNINGS
· Loss of Services During this process, the services provided by the Unified Communications Module are not available to users.Therefore users should be warned in advance or this process should be performed outside normal businesshours.
· Read the Technical Bulletins Ensure that you have read and understood all Avaya Technical Bulletins relevant to the software release. Thesewill include notes and information that was not available at the time this document was created.
93

Unified Communications Module Installation and Maintenance Page 2715-601011 Issue 04e (07 June 2012)IP Office
Module Installation: Upgrading Software
Upgrading Software1.Login to the server's web configuration pages.
2.Select the Settings menu and then the General sub-menu.
3.Check that the Local checkbox for Applications is selected.
4.Click on the Browse button and browse to the location of the file that you want to load and select the file. Thefile name should now be listed in the File field.
5.Click Add. The server will now start uploading the file.
6.Repeat the process for any other files.
7.Select Updates. There should be a warning icon next to Updates indicating that there are out of date applicationson the server.
8.Scroll down the Services list. The applications for which you have just uploaded .rpm files should display a Statusof out of date or not installed.
9. If an unzip .rpm has been uploaded, that application should be installed before upgrading any of the otherapplications.
a. Locate unzip in the Application list. If the Status is not installed, click on Install.
b.The installation process takes less than a minute and is completed when the Status of the application changesto up to date.
10.For any applications where the Status is out of date:
a. Location the application and click Update.
b.For some applications the server will warn if the application is currently in use. Select Yes to stop theapplication and disconnect any calls or services it was currently providing.
c. Wait for the upgrade to complete when the Status of the application changes to up to date.
11.Once all the new .rpm files have been installed, select Home. Check that the required Services are running.Restart the services if necessary.
47
60


Unified Communications Module Installation and Maintenance Page 2915-601011 Issue 04e (07 June 2012)IP Office
Voicemail Pro Configuration
Chapter 3.

Unified Communications Module Installation and Maintenance Page 3015-601011 Issue 04e (07 June 2012)IP Office
3. Voicemail Pro ConfigurationBy default the Voicemail Pro application will provide basic mailbox services for all users and hunt groups created in the IPOffice configuration. For installations with just a single IP Office and Voicemail Pro server this will normally occur withoutany further configuration.
Details of IP Office and Voicemail Pro configuration are covered by the Voicemail Pro Linux Installation manual andVoicemail Pro Administration manuals. This section of this manual covers only the minimum steps recommended to ensurethat the voicemail server is operating correctly and is secure. Those are:
Voicemail Pro Initial Configurationa. IP Office Configuration
i. Adding voicemail licenses .
ii. Check the Voicemail Type Setting .
b.Voicemail Pro Configuration
i. Install the Voicemail Pro client .
ii. Log in to the Voicemail Pro server .
iii.Change the default administrator password .
Transferring Settings from a Previous ServerIf the IP Office system was already configured to operate with an external Voicemail Pro server that is now being replaced,the settings, prompts and messages on the old server can be transferred to the new server. After completing the stepsabove, see Transferring Voicemail Server Settings .
NotesFor use of UMS options, the Voicemail Pro service needs to communicate with a MAPI proxy application installed on aWindows PC. The installation package for the MAPI proxy can be downloaded from the server's Windows Clientmenu. For full details refer to the Voicemail Pro Linux Installation manual.
31
32
33
34
34
36
81

Unified Communications Module Installation and Maintenance Page 3115-601011 Issue 04e (07 June 2012)IP Office
Voicemail Pro Configuration:
3.1 Adding Voicemail LicensesThe Unified Communications Module automatically enables 4 port for Voicemail Pro operation. Additional ports can belicensed for up to 20 users when running Voicemail Pro and one-X Portal for IP Office, or up to 40 when running justVoicemail Pro.
For Voicemail Pro operation on Unified Communications Module, the following licenses are used:
· Essential Edition This license is a pre-requisite for the Preferred Edition license below.
· Preferred Edition (Voicemail Pro) This license is required for use of the Voicemail Pro application. It also enables 4 voicemail ports. It is also requiredas a pre-requisite for the user profile licenses required for one-X Portal for IP Office users. The UnifiedCommunications Module acts as an automatic Preferred Edition license for the system.
· Preferred Edition Additional Voicemail Ports These licenses can be used to add additional voicemail ports in addition to the 4 enabled by the PreferredEdition (Voicemail Pro) license above. Multiple licenses can be added, up to a total of 20 ports when runningVoicemail Pro and one-X Portal for IP Office, or up to 40 ports when running just Voicemail Pro.
· VMPro TTS (Linux Voicemail Pro) This license enables the use of text-to-speech facilities using the optional Linux TTS software. One license persimultaneous instance of TTS usage. This license is also used for user email reading.
Entering Licenses1.Start IP Office Manager and receive the configuration from the IP Office system.
2.Select License.
3.To add a license, click and select License. Enter the new license and click OK. We recommend licenses areadded by cutting and pasting them from the supplied file. That avoids potential issues with mistyping.
4.The Status of the new license should show Unknown and the name the license should match the type of licenseentered. If the name shows as Invalid, the most likely cause is incorrect entry of the license key characters.
5.Click on the save icon to send the configuration back to the IP Office.
6.Use Manager to receive the configuration again and check that the status of the license. It should now be Valid.

Unified Communications Module Installation and Maintenance Page 3215-601011 Issue 04e (07 June 2012)IP Office
3.2 IP Office ConfigurationWhen a new Unified Communications Module running Voicemail Pro is added to a new system, the system configuration isautomatically adjusted to use that voicemail server. However, this should be confirmed by checking the Voicemail Typeand Voicemail IP Address settings in the IP Office configuration. If the switch has previously been configured for a specificvoicemail server address, those settings are not automatically changed and will need to be manually updated.
If a different role is intended for the voicemail server (see Small Community Networks ), refer to the Voicemail ProInstallation Manual. This section only covers voicemail server support for the IP Office in which it is installed.
1.Start IP Office Manager and receive the configuration from the IP Office system.
2.Select System.
3.Select the Voicemail tab.
· The Voicemail Type should be set to Voicemail Lite/Pro.
· The Voicemail IP Address of 169.254.0.2 is an internal IP address used for connection between the IP Office andthe Unified Communications Module.
· In the Voicemail Channel Reservation section, the number of channels will be 4 plus any additional channelslicensed. The Unified Communications Module can be licensed for up to 20 ports.
4.If any changes have been made, save the changes back to the IP Office system.
11
15

Unified Communications Module Installation and Maintenance Page 3315-601011 Issue 04e (07 June 2012)IP Office
Voicemail Pro Configuration: IP Office Configuration
3.3 Installing the Voicemail Pro ClientThe client for the Voicemail Pro server must be installed on a Windows PC. It can then be used to remotely administer thevoicemail server. The software package for installing the client can be downloaded from the Unified CommunicationsModule using the following process.
1.From a client PC, start the browser and enter http:// followed by the address of the server and :7070.
2.The server's web login page is displayed. Enter the name and password configured for server administration.
3.After logging in, select the Downloads heading.
4.Click on the link for the Voicemail Pro client file in order to download the software package for installing the client.
5.Once the package has been downloaded, run it to install the Voicemail Pro client.

Unified Communications Module Installation and Maintenance Page 3415-601011 Issue 04e (07 June 2012)IP Office
3.4 Logging in to the Voicemail ServerTo connect to a remote voicemail server you will need to login using the name and password of an administrator accountalready configured on that server. The default account is Administrator and Administrator.
To Login with the Voicemail Pro Client1.From the Start menu, select Programs | IP Office | Voicemail Pro Client.
2.The Voicemail Pro Client window opens. If the client has been started before, it will attempt to start in the samemode as it previously used. If it cannot do that or it is the first time the client has been started, the select modemenu is displayed.
3.Select Online. The menu for entering the name, password and details of the server is displayed.
4.Enter the User Name and User Password for an administrator account on the voicemail server. The defaultaccount is Administrator and Administrator.
5. In the Unit Name\IP Address field enter the DNS name or IP address of the voicemail server. Alternatively clickon Browse to search the local network for a server and select a server from the results.
6.Click Login. Note that if 3 unsuccessful logins are attempted using a particular administrator account name, thatadministrator account is locked for an hour.
7.The following menu may appear. Select Download.
8.You should now change the password . 35

Unified Communications Module Installation and Maintenance Page 3515-601011 Issue 04e (07 June 2012)IP Office
Voicemail Pro Configuration: Logging in to the Voicemail Server
3.5 Changing the Voicemail Server PasswordWhile logged in to the server using the Voicemail Pro client, you can change the password of the Voicemail Proadministrator account being used. The default password of the default account must be changed.
You can also create additional administrator accounts, refer to the Voicemail Pro Administrator manual.
To Change the Voicemail Pro Administrator Password1.From the File menu, select Change Password.
2. In the New Password box, type the new password.
3.In the Confirm Password box, retype the new password.
4.Click OK.

Unified Communications Module Installation and Maintenance Page 3615-601011 Issue 04e (07 June 2012)IP Office
3.6 Transferring Voicemail Server SettingsIf the Unified Communications Module is replacing an existing voicemail server, a backup of all the settings, prompts andmessages from that server can be transferred to the new server. If the existing server is a Linux based server, SSH filetransfer is used to retrieve the backup files from the server. Otherwise, if Windows based, a direct folder copy on theserver can be used.
For the Unified Communications Module, once a backup of the old server has been obtained, it can be loaded onto theUnified Communications Module from a USB2 memory device. Otherwise, if the backup is too large for the USB2 memorydevice, SSH file transfer can be used.
Backing Up the Old Voicemail ServerA full immediate backup of all the voicemail server settings, prompts and messages can be obtained using the VoicemailPro client.
1.Connect to the old voicemail using the Voicemail Pro client.
· Hint: The option File | Voicemail Shutdown | Suspend Calls can be used to display the number ofcurrently active voicemail sessions. If necessary you can used the menu to stop any new sessions or to forcethe end of all sessions before taking the backup.
2.Select Preferences | General. Select the Housekeeping tab.
3.Select Backup Now.
4.Select all the backup options for a complete backup and click OK. This will create a backup folder, the name ofwhich includes the date and time of the backup and Immediate. For example VMPro_Backup_26012011124108_Immediate.
5.The time to complete the backup will vary greatly depending on the number of mailboxes and messages beingsupported by the server.
Shutting Down the Old Voicemail ServerOnce the server has been backed up, it should be shutdown. This will release all the licenses it has currently obtained fromthe IP Office system.
1.Once the backup above has been completed, select File | Voicemail Shutdown | Shutdown.
2.Select Shut Down Immediately. This will start a forced shutdown of the server, ending any currently activevoicemail sessions.
Transferring the Backup to a USB2 Memory DeviceThe location of the backup files on the old server depends on whether it was a Windows based or Linux based server:
· Windows Server The backup location can be selected before starting the backup. The default location for backup files is C:\Program Files\Avaya\IP Office\Voicemail Pro\Backup\Scheduled.
1.Using My Computer, locate the manual backup taken above. The date and time is part of the folder name forthe backup.
2.Right-click on the folder and select Properties. Check that the Size on disk is within the capacity of the USB2memory device.
· If not, copy the backup folder and all its contents onto a PC from which you can eventually load it onto thenew server using an SSH file transfer.
· If with the USB2 memory device capacity, Copy the backup folder and all its content onto a USB2 memorydevice. Do not put the folder into another folder or change the folder name.

Unified Communications Module Installation and Maintenance Page 3715-601011 Issue 04e (07 June 2012)IP Office
Voicemail Pro Configuration: Transferring Voicemail Server Settings
· Linux Server The default location for backup files on a Linux server is /opt/vmpro/Backup/Scheduled/OtherBackups.
1.Using an SSH file transfer tool , connect to the old server and browse to is /opt/vmpro/Backup/Scheduled/OtherBackups.
2.Locate the manual backup taken above. The date and time is part of the folder name for the backup.
3.Copy the folder and all its contents onto the PC running SSH.
4.Right-click on the folder and select Properties. Check that the Size on disk is within the capacity of the USB2memory device.
· If not, copy the backup folder and all its contents onto a PC from which you can eventually load it onto thenew server using an SSH file transfer.
· If with the USB2 memory device capacity, Copy the backup folder and all its content onto a USB2 memorydevice. Do not put the folder into another folder or change the folder name.
Loading the Backup onto the New Server from a USB2 Memory DeviceIf you were able to load the voicemail backup onto a USB2 memory device, you can load it onto the UnifiedCommunications Module server directly from the USB2 memory device.
1.Insert the USB2 memory device into one of the Unified Communications Module's USB sockets.
2.Using a web browser, login to the server's web control menus.
3.Select Settings. On the General tab, select the Restore button for the Voicemail service. The list of availablebackups will include the one on the USB2 memory device.
6.Select the backup on the USB2 memory device and click OK.
7.Do not remove the USB2 memory device until all USB2 memory device activity has ceased.
8.Once the restore has been completed, on the Home menu, Stop and then Start the voicemail service.
Loading the Backup onto the New Server Using SSHIf the backup has been copied onto a PC as it is too large to be loaded from a USB2 memory device, use the followingmethod to transfer and then restore the backup.
1.Connect to the Unified Communications Module using an SSH File transfer tool .
2.Copy the backup folder into the folder /opt/vmpro/Backup/Scheduled/OtherBackups.
3.Using a web browser, login to the server.
4.Select Settings. On the General tab, select the Restore button for the Voicemail service. From the list of availablebackups, select the one just copied onto the server.
5.Click OK.
6.Once the restore has been completed, on the Home menu, Stop and then Start the voicemail service.
100
100
47

Unified Communications Module Installation and Maintenance Page 3815-601011 Issue 04e (07 June 2012)IP Office
3.7 Backup/Restore LimitationsIf extra folders have been manually created on the voicemail server, on Linux based voicemail servers these folders arenot included in the restore process. Instead the extra folders need to be copied manually. For example, if a foldercontaining custom prompts for use in call flows has been created separate from the default language folders used forprompts, that folder will not be backed up or restored.
To resolve this, the extra folders must be backed up and restored manually. In the following example, a folder Custom ismanual copied from an existing server to create a backup. It is then manually restored.
Manually Backing Up a Custom Folder1.Using an SSH file transfer tool , copy the folder Custom from /opt/vmpro to your PC to create a backup of the
folder.
Manually Restoring a Custom Folder1.To restore the folder, again using an SSH file transfer tool, copy the folder to the /home/webcontrol folder on
the server.
2.Using the SSH command line, you now need to copy the Custom folder from /home/webcontrol to the/opt/vmpro folder. This is done by logging in as the root user.
a. Login to the system's command line interface using the existing root user password. This can be done eitherdirectly on the server or remotely using an SSH client shell application.
· If logging in at the on the server:
a.At the Command: prompt, enter login.
b.At the login: prompt enter webcontrol.
c. At the Password: prompt, enter the password (the default is web).
· If logging in remotely:
a.Start your SSH shell application and connect to the Unified Communications Module PC. The exactmethod will depend on the application being used.
· The Host Name is the IP address of the Unified Communications Module.
· The User Name is webcontrol.
· The Protocol is SFTP/SSH.
· The Port is 22. If this is the first time the application has connected to the server, accept thetrusted key.
b. If this is the first time the application has connected to the Unified Communications Module, accept thetrusted key.
c. When prompted, enter the webcontrol user password , the default is web.
b.Enter admin. At the password prompt enter the admin password, the default is Administrator. The promptshould change to Admin>.
c. Enter root. At the password prompt, enter the current root user password.
d.The prompt should have changed to something similar to root@C110~, indicating that you are now logged inas the root user.
e. Change directory by entering cd /home/webcontrol.
f. Move the Custom sub-folder to /opt/vmpro by entering mv Custom /opt/vmpro.
3.Using the SSH file transfer tool again, verify that the Custom has been copied to /opt/vmpro as required.
100
48

Unified Communications Module Installation and Maintenance Page 3915-601011 Issue 04e (07 June 2012)IP Office
one-X Portal for IP OfficeConfiguration
Chapter 4.

Unified Communications Module Installation and Maintenance Page 4015-601011 Issue 04e (07 June 2012)IP Office
4. one-X Portal for IP Office ConfigurationAt this stage, the one-X Portal for IP Office server software has been installed on the server and its service started.However, both the IP Office and the one-X Portal for IP Office services still require some basic configuration. The followingsections are a summary applicable to most installations. For full details of one-X Portal for IP Office installation refer to theone-X Portal for IP Office Installation Manual.
one-X Portal for IP Office Initial Configurationa.Add licenses
Those IP Office users who want to use the one-X Portal for IP Office application need to have their Profile setto Office Worker, Teleworker or Power User and the Enable one-X Portal Services option selected. Todo this requires the addition of licenses for those roles.
b.Enable one-X Portal for IP Office users When licenses are available, the number of licenses allows the configuration of the equivalent number of usersfor those roles and then for one-X Portal for IP Office usage.
c. Initial one-X Portal for IP Office login Having licensed and configured some users for one-X Portal for IP Office, you need to login as the one-X Portalfor IP Office administrator in order to perform initial one-X Portal for IP Office configuration.
d.Initial AFA login The one-X Portal for IP Office AFA interface is used for remote backup and restoration of the application. Atminimum you should login in order to change the default password for the interface.
41
42
43
44

Unified Communications Module Installation and Maintenance Page 4115-601011 Issue 04e (07 June 2012)IP Office
one-X Portal for IP Office Configuration:
4.1 Adding LicensesIn order to log into and use the one-X Portal for IP Office application, a user must have their Profile setting in the IPOffice configuration set to one of the following user profile roles: Office Worker, Teleworker or Power User. To do thatfirst requires a matching Office Worker, Teleworker or Power User license to be available.
Entering Licenses1.Start IP Office Manager and receive the configuration from the IP Office system.
2.Select License.
3.To add a license, click and select License. Enter the new license and click OK. We recommend licenses areadded by cutting and pasting them from the supplied file. That avoids potential issues with mistyping.
4.The Status of the new license should show Unknown and the name the license should match the type of licenseentered. If the name shows as Invalid, the most likely cause is incorrect entry of the license key characters.
5.Click on the save icon to send the configuration back to the IP Office.
6.Use Manager to receive the configuration again and check that the status of the license. It should now be Valid.

Unified Communications Module Installation and Maintenance Page 4215-601011 Issue 04e (07 June 2012)IP Office
4.2 Enabling one-X Portal for IP Office UsersThose users who want to use the one-X Portal for IP Office application need to have their Profile set to Office Worker,Teleworker or Power User and the Enable one-X Portal Services option selected. This requires available licensesfor those roles.
1.Start IP Office Manager and click on the icon.
2.Select the IP Office and click OK.
3.Enter the user name and password for access to the IP Office configuration settings.
4.Click on User.
5.Select the user who you want to enable for one-X Portal for IP Office operation. Select the User tab.
6.Change the user's Profile to Office Worker, Teleworker or Power User.
7.Check that the Enable one-X Portal Services check box is selected.
8.Note the user Name and Password. These are used by the user to login to one-X Portal for IP Office.
10.Repeat the process for any other users who will be using one-X Portal for IP Office services.
11.Click on to save the updated configuration back to the IP Office system.
41

Unified Communications Module Installation and Maintenance Page 4315-601011 Issue 04e (07 June 2012)IP Office
one-X Portal for IP Office Configuration: Enabling one-X Portal for IP Office Users
4.3 Initial one-X Portal for IP Office LoginThe method of initial one-X Portal for IP Office configuration may vary:
· If both one-X Portal for IP Office and Voicemail Pro applications were selected as part of a module initialization, nofurther configuration is required. The applications and the IP Office are defaulted to interoperate. When you log intothe one-X Portal for IP Office administration using the process below, you will be taken directly to the final step,changing the one-X Portal for IP Office administrator password.
· If the one-X Portal for IP Office is to also support additional IP Office servers in a Small Community Network ,after initial configuration as above, the process for adding additional IP Office systems must be used to add theother system. Refer to the one-X Portal for IP Office Installation Manual.
one-X Portal for IP Office Login1.Open a web browser and enter the IP address of the Unified Communications Module followed by :8080/
onexportal-admin.html. This is the login path for the administrator access to the one-X Portal for IP Officeapplication.
2.The login menu is displayed. If the message System is currently unavailable - please wait is displayed, theone-X Portal for IP Office application is still starting. When the message disappears, you can login.
3.Enter the default administrator name (Administrator) and password (Administrator) and click Login.
4.As the final step, the one-X Portal for IP Office server will prompt you to change the password used foradministrator access.
5.Enter a new password and click Change Password.
6.You now have access to the one-X Portal for IP Office administration menus. For full details refer to the one-X Portalfor IP Office Administration manual.
7.Click on Log Out.
8.Click on User Login shown top-right.
9.The login window will display System in currently unavailable. When this message is no longer displayed,attempt to login as a user.
11

Unified Communications Module Installation and Maintenance Page 4415-601011 Issue 04e (07 June 2012)IP Office
4.4 Initial AFA LoginThe AFA menus provided by one-X Portal for IP Office are used to perform backup and restoration operations for theapplication. The default password used for the menus should be changed.
AFA Login1.Open a web browser and enter the IP address of the Unified Communications Module followed by :8080/
onexportal-afa.html. This is the login path for the administrator access to the one-X Portal for IP Office AFAmenus.
2.At the login menu, enter the name Superuser and the associated password. The default password isMyFirstLogin1_0. After logging with the default password you will be prompted the following information including anew password:
· Display Name Enter a name for display in the one-X Portal for IP Office menus.
· Password/Confirm Password Enter a password that will be used for future access.
· Backup Folder This is the path to be used for backup and restore operations on the one-X Portal for IP Office server. Note thateven if backing up and restoring to and from an FTP or local PC folder, this server folder is still used fortemporary file storage.

Unified Communications Module Installation and Maintenance Page 4515-601011 Issue 04e (07 June 2012)IP Office
Server Maintenance
Chapter 5.

Unified Communications Module Installation and Maintenance Page 4615-601011 Issue 04e (07 June 2012)IP Office
5. Server MaintenanceThe main configuration and control of the Unified Communications Module is done via web browser access. After logging inusing the administrator name and password, you are able to view the status of the services provided by the server and toperform actions such as stopping or starting those services.
· Logging In
· Changing the Web Password
· Starting/Stopping Application Services
· Server Shutdown
· Rebooting the Server
· Changing the IP Address Settings
· Date and Time Settings
· Upgrading an Application
· Uninstalling an Application
· Setting Update Repositories
47
48
51
52
52
53
54
57
59
60

Unified Communications Module Installation and Maintenance Page 4715-601011 Issue 04e (07 June 2012)IP Office
Server Maintenance:
5.1 Logging In1.From a client PC, start the browser and enter http:// followed by the address of the Unified Communications
Module and :7070. The port number and protocol (http or https) used can be changed through the Settings |General menu after logging in.
2.The Unified Communications Module login page is displayed.
3.Select the Language required.
4.Enter the name and password for Unified Communications Module administration. The default name and passwordare Administrator and Administrator. The password can be changed by selecting the Change Passwordoption.
5.If the login is successful, the Home page for the server is displayed.
73
48
65

Unified Communications Module Installation and Maintenance Page 4815-601011 Issue 04e (07 June 2012)IP Office
5.2 Changing the Web PasswordFrom the Logon menu you can select the Change Password option to perform a password change. When selected, fieldsare displayed to entry the current password and for entry and confirmation of the new password. This password is alsoused for SSH file access to the server.
1.From a client PC, start the browser and enter http:// followed by the address of the Unified CommunicationsModule and :7070. The port number and protocol (http or https) used can be changed through the Settings |General menu after logging in.
2.The Unified Communications Module login page is displayed.
3.Select the Language required.
4.Click on the Change password link. The change password menu is displayed.
5.Enter the current password and the new password.
· The new password must meet the complexity requirements that are displayed on the menu. When logged inyou can change the password complexity requirements for future password changes through the Settingsmenu.
6.Click OK. The menu will confirm whether the change was successful or not.
7.If the new password is accepted, click Cancel to return to the Login menu and then login with the newpassword.
100
73
50
47

Unified Communications Module Installation and Maintenance Page 4915-601011 Issue 04e (07 June 2012)IP Office
Server Maintenance: Changing the Web Password
5.3 Changing the Root PasswordThe root password for the server is set during the server installation. This is a password used for Linux command lineaccess and so is not normally used during normal operation. However, for security you can change the root passwordthrough the web control menus.
1.Login to the server's web configuration pages.
2.Select Settings and click on the System tab.
3.The new root password is set through the Change Root Password menu.
· New Password Enter the new password for the server's root account.
· Confirm New Password Confirm the new password.
4.Note the rules displayed for the password entry, enter the new password. The password complexity requirementsare set in the Password Rules Settings menu. The rules set there are applied to changing both the rootpassword and changing the web control administrator password .
5.Click Save. The menu will confirm if the new password was accepted.
47
50
49 48

Unified Communications Module Installation and Maintenance Page 5015-601011 Issue 04e (07 June 2012)IP Office
5.4 Setting the Password RulesYou can configure the rules applied to new passwords. These rules are applied when changing the web administratorpassword . They are also applied when changing the root password . The current rules are shown on the changepassword menus when someone attempts to change either password.
1.Login to the server's web configuration pages.
2.Select Settings and click on the System tab.
3.The current password rules are shown in the Password Rules Settings menu.
· Minimum password length This field set the minimum length of new passwords. Note that the combined requirements of the fields belowfor particular character types may create a requirement that exceed this value. Note also that the maximumpassword length is 31 characters.
· Minimum number of uppercase characters This field sets the number of uppercase alphabetic characters that new passwords must contain.
· Minimum number of lowercase characters This field sets the number of lowercase alphabetic characters that new passwords must contain.
· Minimum number of numeric characters This field sets the number of numeric characters that new passwords must contain.
· Minimum number of special characters This field sets the number of non-alphanumeric characters that new passwords must contain.
· Allow character sequences If this option is selected, character sequences such as 1234 or 1111 or abcd, are allowed in new passwordswithout any restriction. When not selected, the maximum length of any sequence is set by the field below.
· Maximum allowed sequence length This field is used to set the maximum allowed length of any character sequence when Allow charactersequences is not selected.
4.Adjust the rules are required and then click Save.
48 49
47

Unified Communications Module Installation and Maintenance Page 5115-601011 Issue 04e (07 June 2012)IP Office
Server Maintenance: Setting the Password Rules
5.5 Starting/Stopping Application ServicesThe application services installed on the Unified Communications Module can be started and stopped individually. This maybe necessary for maintenance or if a particular service is not currently required, for example if one-X Portal for IP Officehas been installed but is not wanted or currently licensed.
The services can be set to automatically start after a server reboot. By default all the application services areautomatically started.
5.5.1 Starting a Service1.Login to the server's web configuration pages.
2.Select Home. The services and their current status (running or stopped) are listed.
3.To start a particular service click on the Start button next to the service. To start all the services that are notcurrently running, click on the Start All button.
5.5.2 Stopping a Service1.Login to the server's web configuration pages.
2.Select Home. The services and their current status (running or stopped) are listed.
3.To start a particular service click on the Stop button next to the service. To stop all the services that are currentlyrunning, click on the Stop All button.
4.The service's status changes to stopping while it is being stopped. If it remains in this state too long, the servicecan be forced to stop by clicking on Force Stop.
5.5.3 Setting a Service to Auto StartBy default all the application services are automatically started.
1.Login to the server's web configuration pages.
2.Select Home. The services and their current status (running or stopped) are listed.
3.Use the Auto Start check box to indicate whether a service should automatically start when the UnifiedCommunications Module is started.
47
47
47

Unified Communications Module Installation and Maintenance Page 5215-601011 Issue 04e (07 June 2012)IP Office
5.6 Server ShutdownThis process should be used when it is necessary to switch off the Unified Communications Module for any period. Oncethe process has been completed, power to the server can be switched off. To restart the server, switch the server powerback on.
For the Unified Communications Module, the card can be shutdown or started up using the upper switch on its front panel.See Unified Communications Module .
1.Login to the server's web configuration pages.
2.After logging select the Home page. This page includes a server Shutdown button.
3.Click on Shutdown. You will be prompted to confirm the action.
4.Click Yes to confirm that you want to proceed with the shutdown.
5.The login page will be displayed again. Do not login again as the Unified Communications Module will still be in theprocess of stopping services.
6.After a few minutes, typically no more than 2 minutes though this will vary depending on the hardware specificationof the server, the server will shutdown.
7.Switch off power to the server.
5.7 Rebooting the ServerRebooting the server will stop all currently running services and then stop and restart the server. Only those applicationservices which are set to Auto Start will be automatically restarted after the reboot.
1.Login to the server's web configuration pages.
2.After logging select the Home page. This page includes a server Reboot button.
3.Click on Reboot. You will be prompted to confirm the action.
4.Click Yes to confirm that you want to proceed with the reboot.
5.The login page will be displayed again. Do not login again immediately as the Unified Communications Module willstill be in the process of stopping services prior to a reboot of the server.
6.After a few minutes, typically no more than 5 minutes though this will vary depending on the hardware specificationof the server, you should be able to login again.
7.Once logged in you can manually restart any services required if not set to Auto Start.
8
47
65
51
47
65

Unified Communications Module Installation and Maintenance Page 5315-601011 Issue 04e (07 June 2012)IP Office
Server Maintenance: Rebooting the Server
5.8 Changing the IP Address SettingsThe IP address and other network settings used by the server can be changed through the server's web configurationpages.
· Warning Changing IP address and other network settings will require you to login again. If the server is using DHCP or isswitched to DHCP, the address obtained for the server is displayed on the server's command line display.
· The port and protocol used to access the web control menus can also be changed .
1.Login to the server's web configuration pages.
2.Select Settings.
3.Select System.
4.The IP address settings are shown in the Network section.
· Network Interface This field is fixed to eth0.1.
· Host Name Sets the host name that the Unified Communications Module should use. This setting requires the local networkto support a DNS server. Do not use localhost.
· Use DHCP If selected, the IP address, subnet mask and default gateway information is obtained by the server makingDHCP requests. The related fields are greyed out and cannot be set manually, instead they show the valuesobtained in response to the DHCP request.
· IP Address Displays the IP address set for the server. If DHCP is not being used, the field can be edited to change thesetting. The Unified Communications Module is physically connected to the LAN1 network of the system andneeds to have an address on that subnet. See IP Address Notes .
· Subnet Mask Displays the subnet mask applied to the IP address. If DHCP is not being used, the field can be edited tochange the setting.
· Default Gateway Displays the default gateway settings for routing. If DHCP is not being used, the field can be edited to changethe setting.
· System DNS Enter the address of the primary DNS server. This option is greyed out if the address of the DNS server is setto be obtained from the DHCP server (see below).
· Automatically obtain DNS from provider This setting is only used if Use DHCP is also selected. If selected, the server will attempt to obtain DNS serverdetails from the DHCP server.
5.Click Save. The server PC is restarted.
55
47
15

Unified Communications Module Installation and Maintenance Page 5415-601011 Issue 04e (07 June 2012)IP Office
5.9 Date and Time SettingsThe date and time settings used by the server PC can be changed through the server's web configuration pages. Thecurrent time being used by the server is shown on the Home menu.
By default the Unified Communications Module is set to use NTP with the NTP server address set to 169.254.0.1 which isthe IP Office system. This requires the IP Officesystem to be configured to get its time from a specific external SNTPserver or to have its time set manually.
1.Login to the server's web configuration pages.
2.Select Settings.
3.Select System.
4.The date and time settings are shown in the Date Time section.
· Date Shows the current date being used by the server. If Enable Network Time Protocol is selected, this is thedate obtained from the NTP server and cannot be manually changed.
· Time Shows the current UTC time being used by the server. If Enable Network Time Protocol is selected, this isthe time obtained from the NTP server and cannot be manually changed. The current time being used by theserver is shown on the Home menu.
· Timezone In some instances the time displayed or used by a function needs to be the local time rather than UTC time.The Timezone field is used to determine the appropriate offset that should be applied to the UTC time above.Note that changing the timezone can cause a Session expired message to appear in the browser.
· Enable Network Time Protocol If this option is selected, the Unified Communications Module will attempt to obtain the current UTC time fromthe NTP servers listed in the NTP Servers list below. It will then use that time and make regular NTP requeststo update the date and time. The following options are only used if Enable Network Time Protocol isselected.
· NTP Servers This field is used to enter the IP address of an NTP server or servers which should be used when EnableNetwork Time Protocol is selected. Enter each address as a separate line. The network administrator orISP may have an NTP server for this purpose. A list of publicly accessible NTP servers is available at http://support.ntp.org/bin/view/Servers/WebHome, however it is your responsibility to make sure you are awareof the usage policy for any servers you choose. Choosing several unrelated NTP servers is recommended incase one of the servers you are using becomes unreachable or its clock is unreliable. The operating systemuses the responses it receives from the servers to determine which are reliable.
· The IP Office system can also use NTP to obtain its system time. Using the same servers for theUnified Communications Module and IP Office system is recommended.
· The default time setting for the Unified Communications Module is to use NTP with the server addressset to 169.254.0.1 which is the IP Office system. When this is set, the IP Office system must beconfigured to get its time from an external SNTP server or to have its time set manually.
· Synchronize system clock before starting service When using NTP, the time obtained by the operating system is used to gradually change the server'shardware clock time. If this option is selected, an immediate update of the server's clock to match the NTPobtained time is forced.
· Use local time source When using NTP, the time obtained by the operating system is used to gradually change the server'shardware clock time. If this option is selected, the server's hardware clock time is used as the current timerather than the NTP time.
5.Click Save.
65
47
65

Unified Communications Module Installation and Maintenance Page 5515-601011 Issue 04e (07 June 2012)IP Office
Server Maintenance: Date and Time Settings
5.10 Changing the Web Control PortBy default, access to the web control menus uses http and port 7070. These can be changed if required.
· Warning Changing IP address and other network settings will require you to login again. If the server is using DHCP or isswitched to DHCP, the address obtained for the server is displayed on the server's command line display.
1.Login to the server's web configuration pages.
2.Select Settings.
3.Select General.
4.The Application Port and Protocol settings are shown in the Web Control section.
· Application Port Change the port used for logging in. The default is 7070. If you change this value you must ensure that you donot set it to a value already used by another service or application.
· Protocol Select the protocol used for connection. The default is http. The options are http or https.
5.Click Save. The server will advise you that it is restarting the web service and that you will need to login again.
47

Unified Communications Module Installation and Maintenance Page 5615-601011 Issue 04e (07 June 2012)IP Office
5.11 Setting the Menu Inactivity TimeoutYou can adjust the inactivity time applied to the web control menus.
· ! Note
Note that changing this setting will require you to login again.
1.Login to the server's web configuration pages.
2.Select Settings.
3.Select General.
4.The Inactivity timeout is shown in the Web Control section.
· Inactivity Timeout Select the period of inactivity after which the web session is automatically logged out. Changing this value willrequire you to login again. The options are 5 minutes, 10 minutes, 30 minutes and 1 hour.
5.Click Save. The server will advise you that it is restarting the web service and that you will need to login again.
47

Unified Communications Module Installation and Maintenance Page 5715-601011 Issue 04e (07 June 2012)IP Office
Server Maintenance: Setting the Menu Inactivity Timeout
5.12 Upgrading ApplicationsThe application services hosted by the Unified Communications Module can be upgraded without having to reinstall orupgrade the whole server. This is done using files either uploaded to the server (local) or downloaded by the server froman HTTP folder (remote repository), see File Repositories .
Once an .rpm file or files are available, the Unified Communications Module web configuration pages will list the availableversions and allow switching between versions or simple upgrading to the latest version.
· Warning Before upgrading or changing the version of any installed application or operating system components, you mustensure that you have read the appropriate Avaya Technical Bulletins for the software release. The TechnicalBulletins detail supported versions of software and known issues or additional actions required for upgrading.
The options in this section cover the upgrading of individual components of the operating system and applicationssupported by the Unified Communications Module. If a full reinstallation is necessary, following a backup of user data, theserver can be reinstalled from a USB2 memory device .
5.12.1 Loading Application Files onto the ServerThis method uploads the .rpm file for an application onto the Unified Communications Module. The files can then be usedto update the applications. The alternative is to use files loaded into a remote software repository .
1.Login to the server's web configuration pages.
2.Select the Settings menu and then the General sub-menu.
3.Check that the Local checkbox for Applications is selected.
4.Click on the Browse button and browse to the location of the file that you want to load and select the file. Thefile name should now be listed in the File field.
5.Click Add. The server will now start uploading the file.
6.Repeat the process for any other files.
· Voicemail Pro Each version of the Voicemail Pro server application is split into separate .rpm files for the server and each ofthe prompt languages it supports. Unless advised otherwise, you should copy or upload the full set of files tothe file repository.
60
88
62
47
60

Unified Communications Module Installation and Maintenance Page 5815-601011 Issue 04e (07 June 2012)IP Office
5.12.2 Upgrading Application FilesWhere multiple versions of a software component are available to the server, the web menus can be used to update orchange the current version installed.
1.Login to the server's web configuration pages.
2.Select the Updates page.
3.The Services section displays the current version and latest available version of each application service.
· Some applications may not support upgrading or downgrading whilst the application is currently installed. Forthose applications, the Change Version and Update buttons remain greyed out even if there are updatesavailable in the application file repository. These applications must first be uninstalled using the Uninstallbutton before the Change Version and Update buttons become useable.
4.Select one of the following actions:
· To update an application to the latest version available, click on Update.
· To update all applications to the latest version available, click on Update All.
· To change the current version of an application, click on Change Version. Select the version required andclick Apply.
47

Unified Communications Module Installation and Maintenance Page 5915-601011 Issue 04e (07 June 2012)IP Office
Server Maintenance: Upgrading Applications
5.13 Uninstalling an ApplicationThe Updates menu can also be used to uninstall an application service. When uninstalled the application is removed fromthe list of available service unless files for reinstallation are present in the configured file repository.
1.Login to the server's web configuration pages.
2.Select the Updates page.
3.The Services section displays the current version and latest available version of each application service.
4.To uninstall a service, click on Uninstall.
· If there are installation files for the application available in the application file repository , the button willchange to become an Install button.
· If there are no installation files for the application available in the file repository, the application is no longerlisted.
47
60

Unified Communications Module Installation and Maintenance Page 6015-601011 Issue 04e (07 June 2012)IP Office
5.14 File RepositoriesThe Updates and Web Client menus use files stored in the configured file repositories. Each repository can beeither a set of files uploaded to the sever or the URL of a remote folder on an HTTP server.
You can add files to these repositories without affecting the existing operation of the server. However when the applicationor operating system repositories contain later versions of the files than those currently installed, a icon is displayed onthe Updates menu.
5.14.1 Source FilesUpdate files may be made available individually in response to particular issues or to support new IP Office releases. Thefiles are also included on the Unified Communications Module DVD. Files can be extracted from a DVD .iso image using anapplication such as WinZip.
· Warning Before upgrading or changing the version of any installed application or operating system components, you mustensure that you have read the appropriate Avaya Technical Bulletins for the software release. The TechnicalBulletins detail supported versions of software and known issues or additional actions required for upgrading.
File Type DVD/.iso Folder
Application Files Voicemail Pro .rpm \AVAYA\VMPro
one-X Portal for IP Office .rpm \AVAYA\ONEX
Windows Client Files .exe \AVAYA\THICK_CL
Operation System Files .rpm \CENTOS
· Voicemail Pro Each version of the Voicemail Pro server application is split into separate .rpm files for the server and each ofthe prompt languages it supports. Unless advised otherwise, you should copy or upload the full set of files tothe file repository.
5.14.2 Setting the Repository LocationsThe Unified Communications Module can use either remote or local software repositories to store software update files.Separate repositories are configured for operating system updates, IP Office application installation files and Windowsclient files.
The files uploaded or present in the file repositories are used by the Updates and Downloads menus.
· Repository If the Local option is not selected, this field is used to set the URL of a remote HTTP file repository . Note thateach repository must be different, the same URL must not be used for multiple repositories.
· Local This checkbox is used to set whether the file repository used is local (files stored on the Unified CommunicationsModule or remote (a folder on a HTTP web server specified in the Repository field).
· File / Browse / Add If the Local option is selected, this field and adjacent buttons can be used to browse to a specific update file. Whenthe file is located and selected, click Add to upload the file to the file store on the Unified Communications Module.
69 81
69 81
62

Unified Communications Module Installation and Maintenance Page 6115-601011 Issue 04e (07 June 2012)IP Office
Server Maintenance: File Repositories
5.14.3 Uploading Local FilesThe processes below can be used to upload files to the server if it is being used as a repository for that type of file.
5.14.3.1 Uploading Application Files
This method uploads the .rpm file for an application onto the Unified Communications Module. The files can then be usedto update the applications. The alternative is to use files loaded into a remote software repository .
1.Login to the server's web configuration pages.
2.Select the Settings menu and then the General sub-menu.
3.Check that the Local checkbox for Applications is selected.
4.Click on the Browse button and browse to the location of the file that you want to load and select the file. Thefile name should now be listed in the File field.
5.Click Add. The server will now start uploading the file.
6.Repeat the process for any other files.
· Voicemail Pro Each version of the Voicemail Pro server application is split into separate .rpm files for the server and each ofthe prompt languages it supports. Unless advised otherwise, you should copy or upload the full set of files tothe file repository.
5.14.3.2 Uploading Operating System Files
This method uploads the .rpm file for an application onto the Unified Communications Module. The files can then be usedto update the IP Office applications. The alternative is to use files loaded into a remote software repository .
1.Login to the server's web configuration pages.
2.Select the Settings menu and then the General sub-menu.
3.Check that the Local checkbox for Operating System is selected.
4.Click on the Browse button and browse to the location of the file that you want to load and select the file. Thefile name should now be listed in the File field.
5.Click Add. The server will now start uploading the file.
6.Repeat the process for any other files.
5.14.3.3 Uploading Windows Client Files
This method uploads the .rpm file for an application onto the Unified Communications Module. The files can then be usedto update the IP Office applications. The alternative is to use files loaded into a remote software repository .
1.Login to the server's web configuration pages.
2.Select the Settings menu and then the General sub-menu.
3.Check that the Local checkbox for Downloads is selected.
4.Click on the Browse button and browse to the location of the file that you want to load and select the file. Thefile name should now be listed in the File field.
5.Click Add. The server will now start uploading the file.
6.Repeat the process for any other files.
62
47
60
62
47
60
62
47
60

Unified Communications Module Installation and Maintenance Page 6215-601011 Issue 04e (07 June 2012)IP Office
5.14.4 Creating Remote Software RepositoriesAlternatively to using local files uploaded to the server for updates, the server can be configured to display theversions of files available for use in remote file folders hosted on an HTTP server.
Creating an Application Update Repository1.Create a folder on the web server for the remote file repository. For example a folder called Applications.
2.If the folder is a sub-folder of the existing web site it will be browseable as part of that website's URL, ie. if thefolder is a sub-folder of wwwroot. If the folder is on a separate path, then it must be mapped to the web serverURL path, the process for this will depend on the HTTP server being used.
3.The folder directory must be browseable. For example, in IIS right -click on the folder, select Properties andensure that Directory Browse option is selected.
4.Copy the .rpm files from their source into the folder.
5.From another PC, test that you can browse to the URL of the folder and that the list of files in the folder isdisplayed.
6.Login to the Unified Communications Module web configuration pages.
7.Select Settings and then General.
8.Uncheck the Local checkbox for Applications. Enter the URL of the HTTP server folder into the preceding field.
9.Click Save.
10.Select Updates.
11.If the server is able to access the HTTP folder, the details of the versions available will now reflect those availablein that folder. The message repository error indicates that the Unified Communications Module was not able toconnect to the folder or not able to list the files in the folder.
Creating an Windows Client RepositoryThe process is the similar to that shown above for application .rpm files. However a separate folder on the HTTP servermust be used and the files placed in it are the .exe files used for installing the Windows applications.
Creating an Operating System RepositoryThe repository for operating system updates is different from those used for application updates and downloads. It mustbe a YUM repository, details of how to setup and configure a YUM repository will depend on the version of Linux beingused on the HTTP server. Each time an .rpm file is added, deleted or changed, the directory must be updated using the createrepo <folder_path> command.
In order to host the repository on a Windows web server, the folder must be setup and maintained on a Linux serverwhere the createrepo command can be used and the folder then copied to the Windows server.
57
60

Unified Communications Module Installation and Maintenance Page 6315-601011 Issue 04e (07 June 2012)IP Office
Server Menus
Chapter 6.

Unified Communications Module Installation and Maintenance Page 6415-601011 Issue 04e (07 June 2012)IP Office
6. Server MenusThe Unified Communications Module web configuration pages are as follows:
· Home This menu gives an overview of the current status of the applications hosted on the server.
· Logs This menu has sub-menus for viewing and managing log records and log files.
· View View the current log files for the server and the application services hosted by the server.
· Download Create and download archive files of existing log records.
· Updates Display the versions of applications and components installed and the alternate versions available.
· Settings This menu has sub-menus for various areas of server configuration and operation.
· General General server settings such as the locations of software update repositories.
· System View and manage the server setting for date, time and IP address details.
· Downloads This page can be used to download the installation packages for Windows applications such as the Voicemail Proclient application.
65
67
67
68
69
72
73
76
81

Unified Communications Module Installation and Maintenance Page 6515-601011 Issue 04e (07 June 2012)IP Office
Server Menus:
6.1 HomeThis menu is accessed by selecting Home. The menu provides an overview of the server status including the status of theapplication services running on the server.
· Services This table lists the services being supported by the server. In addition to showing the status of the service, it alsocontains buttons to start/stop each service and to select whether the service should be automatically startedwhenever the server is started. Clicking on the link for Mem/CPU usage will display a summary graph of CPU andmemory usage by the application.
· Notifications This table gives a summary of the most recent log messages generated by the services running on the UnifiedCommunications Module. More detailed information is available through the Logs page.
· System This table gives a general overview of the sever status. This section also provides controls to shutdown or rebootthe server. Note that it may take up to 10 minutes for CPU usage data to appear after a server reboot.
· OS/Kernel: The overall version of the CentOS operating system installed on the server and the version of theoperating system kernel.
· Up Time: This field shows the system running time since the last server start.
· Server Time: This field shows the current time on the server.
· Average CPU Load: This field shows the average CPU load (percentage use) for the preceding minute, 5 minute and 15 minuteperiods.
· Last Successful Logon: This field shows the date and time of the last successful logon, including the current logon.
· Unsuccessful Logon Attempts: This field shows a count of unsuccessful logon attempts.
67

Unified Communications Module Installation and Maintenance Page 6615-601011 Issue 04e (07 June 2012)IP Office
· Shutdown Selecting this button will start a process that will stop all the application services and then shutdown UnifiedCommunications Module. This process should be used when it is necessary to switch off the UnifiedCommunications Module for any period. Once the process has been completed, power to the server can beswitched off. To restart the server, switch the server power back on.
· Reboot Selecting this button will start a process that will stop all the application services and then stop and restart theUnified Communications Module and services. Note that this stops all services. To stop and restart individualapplication services, use the buttons shown for each service in the Services panel above.

Unified Communications Module Installation and Maintenance Page 6715-601011 Issue 04e (07 June 2012)IP Office
Server Menus: Home
6.2 LogsThis menu is accessed by selecting Logs. The menu is divided into two sub-menus:
· View View the current log files for the server and the application services hosted by the server.
· Download Create and download archive files of existing log records.
6.2.1 ViewThis menu is accessed by selecting Logs and then clicking on the View tab. This menu can be used to view applicationlogs and audit log records.
· Application Log This table lists the log records for a selected server application supported by the Unified Communications Module.The Application drop-down is used to select which records are shown. Clicking on a column header sorts therecords using that column. The records shown are all those generated since the last time the log files were archivedusing the Create Archive command on the Logs | Download page. For Voicemail Pro the level of loginformation output is set through the Debug section of the Settings | General menu. For one-X Portal for IPOffice the level of log information output is set through the applications own administration menus, not through theUnified Communications Module menus.
· Audit Log This table lists the actions performed by users logged in through the Unified Communications Module's web browserinterface. Clicking on a column header sorts the records using that column.
67
68
68
73

Unified Communications Module Installation and Maintenance Page 6815-601011 Issue 04e (07 June 2012)IP Office
6.2.2 DownloadThis menu is accessed by selecting Logs and then clicking on the Download tab. This menu is used to create, manageand download archives of previous log files.
The log files are compressed into an archive file which can then be downloaded by clicking on the link. The archive files arein .tar.gz format. The log files within this type of archive file can be extracted by a range of utility applications includingWinZip.
To Create Archive Files1.Click on the Create Archive button. Any log records recorded since the last creation of an archive are placed into
archive files for each service.
2.The new archive files are listed in the web page.
To Download Archive Files1.Any archive file can be downloaded by clicking on the file name of the archive file.
2.The process for the download and the location to which the file is downloaded will depend on the browser beingused.
To Delete Archive Files1.To delete an archive, select the Delete checkbox next to the archive file in the list. To select all the archive files
click on Select All.
2.To delete the selected files, click on Delete Selected.

Unified Communications Module Installation and Maintenance Page 6915-601011 Issue 04e (07 June 2012)IP Office
Server Menus: Logs
6.3 UpdatesThis menu is accessed by selecting Updates. The menu displays the different versions of server operating system filesand application files available in the file repositories. The file repository locations are configured through the Settings |General page.
· Warning Before upgrading or changing the version of any installed application or operating system components, you mustensure that you have read the appropriate Avaya Technical Bulletins for the software release. The TechnicalBulletins detail supported versions of software and known issues or additional actions required for upgrading.
The menu is divided into 2 sections:
· Services This section displays the current version of application files and whether update files are available.
· System This section displays the current version of the operating system and whether update files are available.
73
70
71

Unified Communications Module Installation and Maintenance Page 7015-601011 Issue 04e (07 June 2012)IP Office
6.3.1 ServicesThis menu is accessed by selecting Updates. The Services section shows details of the current version of each applicationinstalled and the latest version available.
· The Change Version, Update and Update All buttons in the panel are not useable unless appropriate updatefiles are available in the applications software repository . This also affects the availability of the Installbutton option.
· Change Version Clicking on this button shows the update files available for the related application in the server's file repository .The current version is selected. Selecting another version and then clicking Apply will upgrade or downgrade to theselected version.
· Update Clicking on this button will start an update of the related application to the latest available version in theapplication file repository .
· Uninstall Clicking on this button will uninstall the selected application.
· If there are installation files for the application available in the application file repository , the button willchange to become an Install button.
· If there are no installation files for the application available in the file repository, the application is no longerlisted.
· Install This button is displayed if an application is uninstalled and update files for the application are available in the filerepository.
· Check Now Clicking this button makes the Unified Communications Module recheck the version of update files available in thefile repository. Normally it does this automatically when the Updates page is loaded.
· Update All If this button is clicked, those applications that support upgrading without being uninstalled (see above) areupdated to the latest versions available in the application file repository.
60
60
60
60

Unified Communications Module Installation and Maintenance Page 7115-601011 Issue 04e (07 June 2012)IP Office
Server Menus: Updates
6.3.2 SystemThis menu is accessed by selecting Updates. The System section shows details of the operating system and whetherthere are updates available.
· Check Now Clicking this button makes the Unified Communications Module recheck the version of update files available in thefile repository. Normally it does this automatically when the Updates page is loaded.
· Review updates Clicking this button will display a list of the available update files. This list allows selection of which updates youwant to install.
· Update All Clicking this button will install all the available updates without going through the process of selecting with updatesto install.

Unified Communications Module Installation and Maintenance Page 7215-601011 Issue 04e (07 June 2012)IP Office
6.4 SettingsThis menu is accessed by selecting Setting. The menu has two tabs for various areas of server configuration andoperation.
· General General server settings such as the locations of software update repositories.
· System View and manage the server setting for date, time and IP address details.
73
76

Unified Communications Module Installation and Maintenance Page 7315-601011 Issue 04e (07 June 2012)IP Office
Server Menus: Settings
6.4.1 GeneralThis menu is accessed by selecting Settings and then clicking on the General tab. This menu is used for a wide variety ofserver settings.

Unified Communications Module Installation and Maintenance Page 7415-601011 Issue 04e (07 June 2012)IP Office
Software RepositoriesThe Unified Communications Module can use either remote or local software repositories to store software update files.Separate repositories are configured for operating system updates, IP Office application installation files and Windowsclient files.
The files uploaded or present in the file repositories are used by the Updates and Downloads menus.
· Repository If the Local option is not selected, this field is used to set the URL of a remote HTTP file repository . Note thateach repository must be different, the same URL must not be used for multiple repositories.
· Local This checkbox is used to set whether the file repository used is local (files stored on the Unified CommunicationsModule or remote (a folder on a HTTP web server specified in the Repository field).
· File / Browse / Add If the Local option is selected, this field and adjacent buttons can be used to browse to a specific update file. Whenthe file is located and selected, click Add to upload the file to the file store on the Unified Communications Module.
Watchdog· Log files age (days)
Sets the number of days that log file records are retained. This does not affect log file archives . Not applied toone-X Portal for IP Office which performs its own log file size limitation.
Web ControlNote that changing any of these settings will require you to login again.
· Application Port Change the port used for logging in. The default is 7070. If you change this value you must ensure that you donot set it to a value already used by another service or application.
· Protocol Select the protocol used for connection. The default is http. The options are http or https.
· Inactivity Timeout Select the period of inactivity after which the web session is automatically logged out. Changing this value willrequire you to login again. The options are 5 minutes, 10 minutes, 30 minutes and 1 hour.
Voicemail SettingsThis section can be used to set the debug logging level used by certain applications. For the one-X Portal for IP Office thelogging level is set through the applications own web administration menus. Log files are retrievable through the Logs |Download menu.
· Debug Level This control is used to set the level of information that the voicemail service includes in its log files. The options are None, Critical, Error, Warning, Information and Verbose. The default level is Critical.
Backup and Restore
These controls allow you to backup and restore the application settings being used selected IP Office applications.
· Voicemail Pro Server For the Voicemail Pro server, these controls can only be used to restore an existing backup. Using the Voicemail Proclient, the voicemail server can be configured to perform regular (daily, weekly and or monthly) automatic backupsof selected options including messages and prompts. The Voicemail Pro client can also be used to perform animmediate backup. When the Restore button is selected, the backups available in the backup folder (/opt/vmpro/Backup/Scheduled) are listed. The backup name includes the date and time and whether the backup was a manualor scheduled backup. When the required backup is selected, clicking OK will start the restoration process. Fordetails refer to the Voicemail Pro client help.
· one-X Portal for IP Office one-X Portal for IP Office has its own method of backup and restore that can be access through the one-X Portal forIP Offices web client administration.
69 81
62
68
68

Unified Communications Module Installation and Maintenance Page 7515-601011 Issue 04e (07 June 2012)IP Office
Server Menus: Settings

Unified Communications Module Installation and Maintenance Page 7615-601011 Issue 04e (07 June 2012)IP Office
6.4.2 SystemThis menu is accessed by selecting Settings and then clicking on the System tab. This menu is used to adjust serversettings such as its IP address settings and time settings.

Unified Communications Module Installation and Maintenance Page 7715-601011 Issue 04e (07 June 2012)IP Office
Server Menus: Settings
Network· Network Interface
This field is fixed to eth0.1.
· Host Name Sets the host name that the Unified Communications Module should use. This setting requires the local networkto support a DNS server. Do not use localhost.
· Use DHCP If selected, the IP address, subnet mask and default gateway information is obtained by the server makingDHCP requests. The related fields are greyed out and cannot be set manually, instead they show the valuesobtained in response to the DHCP request.
· IP Address Displays the IP address set for the server. If DHCP is not being used, the field can be edited to change thesetting. The Unified Communications Module is physically connected to the LAN1 network of the system andneeds to have an address on that subnet. See IP Address Notes .
· Subnet Mask Displays the subnet mask applied to the IP address. If DHCP is not being used, the field can be edited tochange the setting.
· Default Gateway Displays the default gateway settings for routing. If DHCP is not being used, the field can be edited to changethe setting.
· System DNS Enter the address of the primary DNS server. This option is greyed out if the address of the DNS server is setto be obtained from the DHCP server (see below).
· Automatically obtain DNS from provider This setting is only used if Use DHCP is also selected. If selected, the server will attempt to obtain DNS serverdetails from the DHCP server.
·
15

Unified Communications Module Installation and Maintenance Page 7815-601011 Issue 04e (07 June 2012)IP Office
Date TimeThese settings are used to set or obtain a UTC date and time value for use by the Unified Communications Module andservices.
· Date Shows the current date being used by the server. If Enable Network Time Protocol is selected, this is thedate obtained from the NTP server and cannot be manually changed.
· Time Shows the current UTC time being used by the server. If Enable Network Time Protocol is selected, this isthe time obtained from the NTP server and cannot be manually changed. The current time being used by theserver is shown on the Home menu.
· Timezone In some instances the time displayed or used by a function needs to be the local time rather than UTC time.The Timezone field is used to determine the appropriate offset that should be applied to the UTC time above.Note that changing the timezone can cause a Session expired message to appear in the browser.
· Enable Network Time Protocol If this option is selected, the Unified Communications Module will attempt to obtain the current UTC time fromthe NTP servers listed in the NTP Servers list below. It will then use that time and make regular NTP requeststo update the date and time. The following options are only used if Enable Network Time Protocol isselected.
· NTP Servers This field is used to enter the IP address of an NTP server or servers which should be used when EnableNetwork Time Protocol is selected. Enter each address as a separate line. The network administrator orISP may have an NTP server for this purpose. A list of publicly accessible NTP servers is available at http://support.ntp.org/bin/view/Servers/WebHome, however it is your responsibility to make sure you are awareof the usage policy for any servers you choose. Choosing several unrelated NTP servers is recommended incase one of the servers you are using becomes unreachable or its clock is unreliable. The operating systemuses the responses it receives from the servers to determine which are reliable.
· The IP Office system can also use NTP to obtain its system time. Using the same servers for theUnified Communications Module and IP Office system is recommended.
· The default time setting for the Unified Communications Module is to use NTP with the server addressset to 169.254.0.1 which is the IP Office system. When this is set, the IP Office system must beconfigured to get its time from an external SNTP server or to have its time set manually.
· Synchronize system clock before starting service When using NTP, the time obtained by the operating system is used to gradually change the server'shardware clock time. If this option is selected, an immediate update of the server's clock to match the NTPobtained time is forced.
· Use local time source When using NTP, the time obtained by the operating system is used to gradually change the server'shardware clock time. If this option is selected, the server's hardware clock time is used as the current timerather than the NTP time.
65

Unified Communications Module Installation and Maintenance Page 7915-601011 Issue 04e (07 June 2012)IP Office
Server Menus: Settings
Password Rules Settings· Minimum password length
This field set the minimum length of new passwords. Note that the combined requirements of the fields belowfor particular character types may create a requirement that exceed this value. Note also that the maximumpassword length is 31 characters.
· Minimum number of uppercase characters This field sets the number of uppercase alphabetic characters that new passwords must contain.
· Minimum number of lowercase characters This field sets the number of lowercase alphabetic characters that new passwords must contain.
· Minimum number of numeric characters This field sets the number of numeric characters that new passwords must contain.
· Minimum number of special characters This field sets the number of non-alphanumeric characters that new passwords must contain.
· Allow character sequences If this option is selected, character sequences such as 1234 or 1111 or abcd, are allowed in new passwordswithout any restriction. When not selected, the maximum length of any sequence is set by the field below.
· Maximum allowed sequence length This field is used to set the maximum allowed length of any character sequence when Allow charactersequences is not selected.
Change Root Password· New Password
Enter the new password for the server's root account.
· Confirm New Password Confirm the new password.

Unified Communications Module Installation and Maintenance Page 8015-601011 Issue 04e (07 June 2012)IP Office

Unified Communications Module Installation and Maintenance Page 8115-601011 Issue 04e (07 June 2012)IP Office
Server Menus: Settings
6.5 DownloadsThis menu is accessed by selecting Downloads. The menu is used to download files for use on the local PC. For example,the Voicemail Pro client used to administer the Voicemail Pro server application.
The file repository location is configured through the Settings | General page.
The files included in the installation may vary. Typical files are listed below. Note that some packages require the additionof licenses to the system and configuration changes. Refer to the specific installation manuals for those applications:
· VmPro...ClientOnly.exe This is the installation package for the Voicemail Pro client application used to administer the Voicemail Pro serverapplication.
· VmPro...Mapi.exe This is the installation package for the MAPI proxy. This can be installed on a Windows PC in the same network asthe Windows Exchange server. It allows the Linux based Voicemail Pro server to access UMS services. Refer to theVoicemail Pro installation manual.
73

Unified Communications Module Installation and Maintenance Page 8215-601011 Issue 04e (07 June 2012)IP Office

Unified Communications Module Installation and Maintenance Page 8315-601011 Issue 04e (07 June 2012)IP Office
Module Maintenance
Chapter 7.

Unified Communications Module Installation and Maintenance Page 8415-601011 Issue 04e (07 June 2012)IP Office
7. Module MaintenanceThe following sections cover various Unified Communications Module maintenance processes:
· Module LEDs
· Module Buttons
· Module Removal
· Attaching a Monitor and Keyboard
· Loading Windows Voicemail Server Settings
· Module Battery
· Module Software Reinstall
85
85
86
87
88
90
93

Unified Communications Module Installation and Maintenance Page 8515-601011 Issue 04e (07 June 2012)IP Office
Module Maintenance:
7.1 Module LEDsThe Unified Communications Module provides the following LEDs:
· Upper LEDs
· Orange: Module BIOS starting.
· Lower LED
· Solid Red: Unpacking and initializing.
· Flashing Red: Module initialization.
· Flashing Green: Module operating system starting or shutting down.
· Solid Green with Amber blink: OK. IP Office heartbeat okay.
· Off with Amber blink: Module shutdown. IP Office heartbeat okay.
· If the module is already running when the system restarts, its lower LED remains green when the LEDs on theother base cards are solid red. If the module is not running when the system restarts, its lower LED remains offwhen the LEDs on the other base cards are solid red. The lower LED on the module then flashes red when theLEDs on the other base cards flash red during system initialization; before reverting to either green or off whenthe system reboot is complete.
7.2 Module ButtonsThe Unified Communications Module provides the following buttons:
· Upper Button/Button 1 This button can be used for the following functions:
· Shutdown If the module is running, pressing this button for more than 2 seconds will start a module shutdown. Acompleted shutdown is indicated by the lower LED changing to off with regular amber blinks only.
· Startup If the module has been shutdown, pressing this button will cause it to startup.
· Alternate Boot When the module is about to boot, shown by both upper LEDs being orange, pressing and holding the switchuntil those LEDs change to off instructs the module to attempt to boot from any device attached to its USBports. See Module Software Reinstallation .
· Switch 2: Not used.
93

Unified Communications Module Installation and Maintenance Page 8615-601011 Issue 04e (07 June 2012)IP Office
7.3 Module RemovalBefore adding or removing any hardware from the IP Office system, it must be shutdown using one of the shutdownmethods below. Failing to shutdown the system correctly may cause lose of configuration data.
· ! WARNINGS
· A shutdown must always be used to switch off the system. Simply removing the power cord or switching offthe power input may cause the loss of configuration data.
· This is not a polite shutdown, any user calls and services in operation will be stopped. Once shutdown, thesystem cannot be used to make or receive any calls until restarted.
· The shutdown process takes up to a minute to complete. When shutting down a system with a UnifiedCommunications Module installed, the shutdown can take up to 3 minutes while the card safely closes all openfiles and closes down its operating system. During this period the module's LED 1 remains green.
· When shutdown, the LEDs shown on the system are as follows. Do not remove power from the system orremove any of the memory cards until the system is in this state:
· LED1 on each IP500 base card installed will also flash red rapidly plus LED 9 if a trunk daughter cardis fitted to the base card.
· The CPU LED on the rear of the system will flash red rapidly.
· The System SD and Optional SD memory card LEDs on the rear of the system are extinguished.
· To restart a system when shutdown indefinitely, or to restart a system before the timed restart, switch powerto the system off and on again.
System Shutdown Using the AUX ButtonWhen the AUX button on the rear of the system is pressed for more than 5 seconds, the IP500 V2 control unit willshutdown with the restart timer set to 10 minutes. Wait until the state of the LEDs on the system match those listed abovebefore switching off power to the system.
System Shutdown Using IP Office Manager1.Using IP Office Manager, select File | Advanced | System Shutdown.
2.Using the Select IP Office menu, the System Shutdown Mode menu is displayed.
3.Select Indefinite and click OK.
4.Wait until the state of the LEDs on the system match those listed above before switching off power to the system.
System Shutdown Using the System Status Application1.Start System Status Application and access the system's status output.
2.In the navigation panel select System.
3.At the bottom of the screen select Shutdown System.
4.Select Indefinite and click OK.
5.Wait until the state of the LEDs on the system match those listed above before switching off power to the system.Switch off power to the system.

Unified Communications Module Installation and Maintenance Page 8715-601011 Issue 04e (07 June 2012)IP Office
Module Maintenance: Module Removal
7.4 Attaching a Monitor and KeyboardThe Unified Communications Module and its applications are designed for remote maintenance only, via web browser andor client applications running on a PC networked to the IP Office system. However, during some processes may requiredirect attachment of a monitor and keyboard. When that is necessary, the USB and HDMI ports can be used.
· ! WARNING: Do Not Remove the Port Cover Except for Maintenance
The card is supplied with a removable plastic cover that locates over the external ports (LAN, USB and HDMI) onthe faceplate of the card. This cover should always be in place during normal operation of the card. The covershould only be temporarily removed during maintenance actions that require access to the ports and should bereplaced when the maintenance is completed.
Attaching a KeyboardFor maintenance and diagnostics purposes, a keyboard can be attached to either of the USB ports on the front of themodule.
Attaching a MonitorFor maintenance and diagnostics purposes, a HDMI monitor can be attached to the HDMI port on the front of the module.Alternatively, a HDMI to DVI cable can be used.

Unified Communications Module Installation and Maintenance Page 8815-601011 Issue 04e (07 June 2012)IP Office
7.5 Transferring Voicemail Server SettingsIf the Unified Communications Module is replacing an existing voicemail server, a backup of all the settings, prompts andmessages from that server can be transferred to the new server. If the existing server is a Linux based server, SSH filetransfer is used to retrieve the backup files from the server. Otherwise, if Windows based, a direct folder copy on theserver can be used.
For the Unified Communications Module, once a backup of the old server has been obtained, it can be loaded onto theUnified Communications Module from a USB2 memory device. Otherwise, if the backup is too large for the USB2 memorydevice, SSH file transfer can be used.
Backing Up the Old Voicemail ServerA full immediate backup of all the voicemail server settings, prompts and messages can be obtained using the VoicemailPro client.
1.Connect to the old voicemail using the Voicemail Pro client.
· Hint: The option File | Voicemail Shutdown | Suspend Calls can be used to display the number ofcurrently active voicemail sessions. If necessary you can used the menu to stop any new sessions or to forcethe end of all sessions before taking the backup.
2.Select Preferences | General. Select the Housekeeping tab.
3.Select Backup Now.
4.Select all the backup options for a complete backup and click OK. This will create a backup folder, the name ofwhich includes the date and time of the backup and Immediate. For example VMPro_Backup_26012011124108_Immediate.
5.The time to complete the backup will vary greatly depending on the number of mailboxes and messages beingsupported by the server.
Shutting Down the Old Voicemail ServerOnce the server has been backed up, it should be shutdown. This will release all the licenses it has currently obtained fromthe IP Office system.
1.Once the backup above has been completed, select File | Voicemail Shutdown | Shutdown.
2.Select Shut Down Immediately. This will start a forced shutdown of the server, ending any currently activevoicemail sessions.
Transferring the Backup to a USB2 Memory DeviceThe location of the backup files on the old server depends on whether it was a Windows based or Linux based server:
· Windows Server The backup location can be selected before starting the backup. The default location for backup files is C:\Program Files\Avaya\IP Office\Voicemail Pro\Backup\Scheduled.
1.Using My Computer, locate the manual backup taken above. The date and time is part of the folder name forthe backup.
2.Right-click on the folder and select Properties. Check that the Size on disk is within the capacity of the USB2memory device.
· If not, copy the backup folder and all its contents onto a PC from which you can eventually load it onto thenew server using an SSH file transfer.
· If with the USB2 memory device capacity, Copy the backup folder and all its content onto a USB2 memorydevice. Do not put the folder into another folder or change the folder name.

Unified Communications Module Installation and Maintenance Page 8915-601011 Issue 04e (07 June 2012)IP Office
Module Maintenance: Transferring Voicemail Server Settings
· Linux Server The default location for backup files on a Linux server is /opt/vmpro/Backup/Scheduled/OtherBackups.
1.Using an SSH file transfer tool , connect to the old server and browse to is /opt/vmpro/Backup/Scheduled/OtherBackups.
2.Locate the manual backup taken above. The date and time is part of the folder name for the backup.
3.Copy the folder and all its contents onto the PC running SSH.
4.Right-click on the folder and select Properties. Check that the Size on disk is within the capacity of the USB2memory device.
· If not, copy the backup folder and all its contents onto a PC from which you can eventually load it onto thenew server using an SSH file transfer.
· If with the USB2 memory device capacity, Copy the backup folder and all its content onto a USB2 memorydevice. Do not put the folder into another folder or change the folder name.
Loading the Backup onto the New Server from a USB2 Memory DeviceIf you were able to load the voicemail backup onto a USB2 memory device, you can load it onto the UnifiedCommunications Module server directly from the USB2 memory device.
1.Insert the USB2 memory device into one of the Unified Communications Module's USB sockets.
2.Using a web browser, login to the server's web control menus.
3.Select Settings. On the General tab, select the Restore button for the Voicemail service. The list of availablebackups will include the one on the USB2 memory device.
6.Select the backup on the USB2 memory device and click OK.
7.Do not remove the USB2 memory device until all USB2 memory device activity has ceased.
8.Once the restore has been completed, on the Home menu, Stop and then Start the voicemail service.
Loading the Backup onto the New Server Using SSHIf the backup has been copied onto a PC as it is too large to be loaded from a USB2 memory device, use the followingmethod to transfer and then restore the backup.
1.Connect to the Unified Communications Module using an SSH File transfer tool .
2.Copy the backup folder into the folder /opt/vmpro/Backup/Scheduled/OtherBackups.
3.Using a web browser, login to the server.
4.Select Settings. On the General tab, select the Restore button for the Voicemail service. From the list of availablebackups, select the one just copied onto the server.
5.Click OK.
6.Once the restore has been completed, on the Home menu, Stop and then Start the voicemail service.
100
100
47

Unified Communications Module Installation and Maintenance Page 9015-601011 Issue 04e (07 June 2012)IP Office
7.6 Module BatteryThe Unified Communications Module includes a Lithium coin cell battery. If the module is no longer required, care must betaken to ensure that the battery is removed and disposed of correctly. The battery can be removed from its holder bybending the tab out the way and then pulling the battery upwards.
· ! WARNING: Card Remains Hot After System Shutdown
When removing an Unified Communications Module from a system, care should be taken not to touch the heat sinkon the module. The heat sink remains hot for a long period after system shutdown.
· ! WARNING:
There is a risk of explosion if the battery is replaced by an incorrect type. Dispose of used batteries according to thelocal instructions for recycling and disposal of batteries.

Unified Communications Module Installation and Maintenance Page 9115-601011 Issue 04e (07 June 2012)IP Office
Module Maintenance: Module Battery
7.7 Upgrading SoftwareMost upgrades for the Unified Communications Module will be made available as a set of .rpm files for the componentsbeing upgraded. These will be made available via the Avaya support website http://support.avaya.com. Using these is therecommended method for upgrading rather than a module software .iso reinstallation , as it is both quicker and doesnot remove the current user data. It is also done remotely from the same PC as logging in with web control rather thanrequiring physical access to the system.
Separate .rpm files may be made available for one-X Portal for IP Office, the voicemail server, voicemail language promptsand voicemail TTS languages. Refer to the IP Office Technical Bulletins for each release to confirm the new .rpms availableand whether any other pre-requisite .rpm files are also needed. For the Unified Communications Module, an unzipapplication may also need to be installed or upgraded. A separate unzip .rpm is made available when that is the case.
Note also that .rpm files are also used by other Linux based IP Office solutions. In all cases you must confirm that the .rpm downloaded is compatible for use with the Unified Communications Module.
The upload process for each .rpm takes a couple of minutes. The installation process for each .rpm also takes a couple ofminutes.
· ! WARNINGS
· Loss of Services During this process, the services provided by the Unified Communications Module are not available to users.Therefore users should be warned in advance or this process should be performed outside normal businesshours.
· Read the Technical Bulletins Ensure that you have read and understood all Avaya Technical Bulletins relevant to the software release. Thesewill include notes and information that was not available at the time this document was created.
93

Unified Communications Module Installation and Maintenance Page 9215-601011 Issue 04e (07 June 2012)IP Office
Upgrading Software1.Login to the server's web configuration pages.
2.Select the Settings menu and then the General sub-menu.
3.Check that the Local checkbox for Applications is selected.
4.Click on the Browse button and browse to the location of the file that you want to load and select the file. Thefile name should now be listed in the File field.
5.Click Add. The server will now start uploading the file.
6.Repeat the process for any other files.
7.Select Updates. There should be a warning icon next to Updates indicating that there are out of date applicationson the server.
8.Scroll down the Services list. The applications for which you have just uploaded .rpm files should display a Statusof out of date or not installed.
9. If an unzip .rpm has been uploaded, that application should be installed before upgrading any of the otherapplications.
a. Locate unzip in the Application list. If the Status is not installed, click on Install.
b.The installation process takes less than a minute and is completed when the Status of the application changesto up to date.
10.For any applications where the Status is out of date:
a. Location the application and click Update.
b.For some applications the server will warn if the application is currently in use. Select Yes to stop theapplication and disconnect any calls or services it was currently providing.
c. Wait for the upgrade to complete when the Status of the application changes to up to date.
11.Once all the new .rpm files have been installed, select Home. Check that the required Services are running.Restart the services if necessary.
47
60

Unified Communications Module Installation and Maintenance Page 9315-601011 Issue 04e (07 June 2012)IP Office
Module Maintenance: Upgrading Software
7.8 Module Software ReinstallationA full reinstall of the module software can be done using a .iso image file copied onto on a specially prepared USB2memory device. The Unified Communications Module can be made to boot from the USB2 memory device at which point itwill load and run the .iso file.
When necessary, Avaya will make such images available along with appropriate installation notes for setting up the USB2memory device. This method of upgrading should only be used when absolutely necessary. Upgrading by uploading andinstalling new .rpm files should always be used where possible.
This process takes at least 45 minutes.
· ! Warnings
· Backup Application Data Before attempting the following process, all user data for the services provided by the module should bebacked-up to a safe location other than the Unified Communications Module.
· Voicemail Pro The Voicemail Pro client can be used to perform a manual backup of the voicemail data including, ifselected, user messages and prompts. The default location for the backup is on the UnifiedCommunications Module. Therefore, following the backup, SSH file transfer should be used to copy thebackup files to another PC.
· one-X Portal for IP Office The AFA menus supported by one-X Portal for IP Office can be used to perform a backup to another PC orto an FTP server.
· Unified Communications Module Following the reinstall the IP address settings of the module must be set again. Login to the modules webcontrol menus and not the settings on the various menus.
· Loss of Services During this process, the services provided by the Unified Communications Module are not available to users.Therefore users should be warned in advance or this process should be performed outside normal businesshours.
· Read the Technical Bulletins Ensure that you have read and understood all Avaya Technical Bulletins relevant to the software release. Thesewill include notes and information that was not available at the time this document was created.
· Monitoring the Process A suitable monitor for use with an HDMI to HDMI cable or HDMI to DVI cable is recommended. This will allowyou to monitor the process and to confirm when the process has been completed.
91
100

Unified Communications Module Installation and Maintenance Page 9415-601011 Issue 04e (07 June 2012)IP Office
Preparing a USB2 Memory Device using WindowsThe USB Initiator application can be used to install the necessary files and folders onto a USB2 memory device. The new .iso file for the Unified Communications Module can then be placed onto the USB2 memory device.
1.Install the USB Initiator application:
a. From the Avaya support web site (http://support.avaya.com) download the USB Initiator application. Thedownload will be located in the set of IP Office application downloads.
b.Unzip the download to a temporary directory.
c. Double-click on setup.exe file to install the application.
2.Prepare the USB2 memory device:
a. Insert the USB2 memory device into a USB port on the PC.
b.Select Start | All Programs | IP Office | UC Module USB Initiator.
c. Select the USB2 memory device from the list of detected devices.
d.Click Initiate.
3.Load the image file:
a. From the Avaya support web site (http://support.avaya.com) download the new .iso image file for the UnifiedCommunications Module.
b.View the files on the USB2 memory device using file manager or similar. Open the C110iso folder.
c. Copy the .iso file into the C110iso folder. Note that there should only be one .iso file in the folder.
4.The USB2 memory device can now be used as the source from which the Unified Communications Module boots.

Unified Communications Module Installation and Maintenance Page 9515-601011 Issue 04e (07 June 2012)IP Office
Module Maintenance: Module Software Reinstallation
Preparing a USB2 Memory Device using LinuxThe USB Initiator application includes the files necessary to also manually prepare a USB2 memory device on a Linux PC.Within the zip file for the application download, copy the contents of the /Manual folder. This contains the files ks.cfg andsyslinux.cfg.
The following assumes that the USB2 memory device mounts as /dev/sdb with the partition /dev/sdb1. Those values mayvary depending on the PC configuration.
1.Make sure that the pen is not mounted by entering #umount /dev/sdb1
2.Enter the following to make the partition bootable:
#fdisk /dev/sdba # toggle bootable flag1 # partition numberw # write to disk
3.Enter the following to install syslinux:
#syslinux -s /dev/sdb1#dd if=/usr/share/syslinux/mbr.bin of=/dev/sdb
4.Mount the USB2 memory device by entering the following:
#mkdir /tmp/cdimage#mkdir /tmp/stick#mount -ro loop apc-8.iso /tmp/cdimage#mount /dev/sdb1 /tmp/stick
5.Copy the new .iso image and other related files to the USB2 memory device by entering the following:
#cd /tmp/stick#mkdir ApcIso#cd -#cp apc-8.iso /tmp/stick/ApcIso#cd -#cp -rv /tmp/cdimage/isolinux syslinux#cp -rv /tmp/cdimage/images ApcIso/#rm -f syslinux/isolinux.bin#rm -f syslinux/isolinux.cfg#cp [provided syslinux.cfg] syslinux/#cp [provided ks.cfg] .#cd#umount /tmp/cdimage#umount /tmp/stick
6.Wait until all file operations have completed. This may take several minutes.
Backing Up the Existing Application DataIf the module is already being used for customer operations, you need to backup the Voicemail Pro and one-X Portal for IPOffice settings. Do this using the processes outlined in Transferring Voicemail Server Settings and Transferring one-XPortal for IP Office Settings.
88

Unified Communications Module Installation and Maintenance Page 9615-601011 Issue 04e (07 June 2012)IP Office
Booting and Loading a New Image from a USB2 memory device1.Using either of the processes above prepare a USB2 memory device with the required .iso file.
2.Remove the plastic cover from the front of the faceplate of the card. The cover must be retained and must bereattached after this process is completed.
3.Connecting a suitable monitor for use with an HDMI to HDMI cable or HDMI to DVI cable is recommended. This willallow you to monitor the process and to confirm when the process has been completed.
4.Check that you have obtained backups of all application data (one-X Portal for IP Office, Voicemail Pro) from themodule if it is already from an operating customer system.
5.Insert the USB2 memory device with the new images file into one of the USB ports located on the front of themodule.
6.Shut down the module by pressing the upper button on the module until the lower LED starts to flash green. Theshutdown is complete once all module LEDs are off except for regular (every 5 seconds) amber flashes of the lowerLED.
7.Restart the module by pressing the upper reset button again and keeping it pressed until the top two LEDs changefrom orange to off.
8.The module will reboot using the image files on the USB2 memory device.
9.After a short period the top two LEDs will change to alternately flashing green as the upgrade process takes place.The lower LED will be steady green. This process takes approximately 45 minutes.
10.When the two top LED stop alternately flashing green, wait a few additional minutes for any USB2 memory deviceactivity to cease. If you have a monitor connected to the module, completion of the upgrade is shown by the Login> prompt appearing on the monitor.
11.Remove the USB2 memory device and monitor connection. Refit the plastic cover that was removed at the start ofthe process.
12.You now need to repeat the processes for module initialization as if this was a new module.
Restoring the Application DataAny previously backed up settings and date for the Voicemail Pro and one-X Portal for IP Office applications can now berestored. Do this using the processes outlined in Transferring Voicemail Server Settings and Transferring one-X Portalfor IP Office Settings.
19
88

Unified Communications Module Installation and Maintenance Page 9715-601011 Issue 04e (07 June 2012)IP Office
Additional Processes
Chapter 8.

Unified Communications Module Installation and Maintenance Page 9815-601011 Issue 04e (07 June 2012)IP Office
8. Additional ProcessesThis section details processes that are not normally required but may be useful. These should only be attempted if you areconfident with Linux commands and managing a Linux based system.
· Changing the Root Password
· SSH File Transfers
· Command Line Controls
99
100
101

Unified Communications Module Installation and Maintenance Page 9915-601011 Issue 04e (07 June 2012)IP Office
Additional Processes:
8.1 Changing the Root PasswordThe root password for the server is set during the server installation. This is a password used for Linux command lineaccess and so is not normally used during normal operation. However, for security you can change the root passwordthrough the web control menus.
1.Login to the server's web configuration pages.
2.Select Settings and click on the System tab.
3.The new root password is set through the Change Root Password menu.
· New Password Enter the new password for the server's root account.
· Confirm New Password Confirm the new password.
4.Note the rules displayed for the password entry, enter the new password. The password complexity requirementsare set in the Password Rules Settings menu. The rules set there are applied to changing both the rootpassword and changing the web control administrator password .
5.Click Save. The menu will confirm if the new password was accepted.
47
50
49 48

Unified Communications Module Installation and Maintenance Page 10015-601011 Issue 04e (07 June 2012)IP Office
8.2 SSH File TransfersThe directory structure of files on the server can be accessed using any file transfer tool that supports SFTP/SSH. Forexample WS_FTP or SSH Secure Shell.
1.Start your SFTP or SSH file application and connect to the Unified Communications Module PC. The exact methodwill depend on the application being used.
a. Enter the details for the Unified Communications Module:
· The Host Name is the IP address of the Unified Communications Module.
· The User Name is webcontrol.
· The Protocol is SFTP/SSH.
· The Port is 22. If this is the first time the application has connected to the server, accept thetrusted key.
b. If this is the first time the application has connected to the Unified Communications Module, accept thetrusted key.
c. When prompted, enter the webcontrol user password , the default is web.
2.The default folder displayed after logging in is /home/webcontrol.
48

Unified Communications Module Installation and Maintenance Page 10115-601011 Issue 04e (07 June 2012)IP Office
Additional Processes: SSH File Transfers
8.3 Command LineThere are a range of Unified Communications Module commands that can be performed from the server's command linewhen logged in as the webcontrol user. The commands are grouped into three tiered sets, each set protected by aseparate password.
· General Commands These commands are used mainly to display information about the server and the services it is running. Access tothese commands is controlled by the webcontrol user password.
· Administrator Commands These commands allow you to stop, start, restart and update the services. Access to these commands iscontrolled by the webcontrol user password and an additional administrator password.
· Configuration Commands These commands allow you to change server settings. Access to these commands is controlled by thewebcontrol user password, the administrator password and an additional configurator password.
1.Log in to the server's webcontrol user account:
· If logging in at the on the server:
a.At the Command: prompt, enter login.
b.At the login: prompt enter webcontrol.
c. At the Password: prompt, enter the password (the default is web).
· If logging in remotely:
a.Start your SSH shell application and connect to the Unified Communications Module PC. The exactmethod will depend on the application being used.
· The Host Name is the IP address of the Unified Communications Module.
· The User Name is webcontrol.
· The Protocol is SFTP/SSH.
· The Port is 22. If this is the first time the application has connected to the server, accept thetrusted key.
b. If this is the first time the application has connected to the Unified Communications Module, accept thetrusted key.
c. When prompted, enter the webcontrol user password , the default is web.
2.You should now be at the > prompt. From this prompt you can perform various general commands .
102
104
105
48
102

Unified Communications Module Installation and Maintenance Page 10215-601011 Issue 04e (07 June 2012)IP Office
8.3.1 General CommandsIn the commands below, <application> is replaced with name of the required application: voicemail, onexportal,watchdog or all.
At the > prompt, the following commands can be used:
· admin Change to the Admin > prompt. The administrator password is required.
· exit Exit the > prompt. At this level this is the same as logging out.
· help Display general help on entering commands.
· history Display the history of commands used in the current session.
· list Display a list of commands.
· logout End the session and logout.
· password Change the webcontrol password.
· show <application> Show information about the application including its current status, version, boot on start setting and any watchdogalarms for the application.
> show voicemailVoicemail Pro is running.Boot at startup: on.Version: 6.0.6.19Watchdog alarms:[15:24:19 - 21 Apr 2010] Voicemail Pro crashed, restarting.
· show backup <application> Show information about the backups available for the entered application.
> show backup voicemail<Backups>/opt/vmpro/Backup/Scheduled/Immediate/VMPro_Backup_07122011075040|Immediate|Immediate|2011-12-07 07:50:40|5205|1861885|2
</Backups>
· show config Show a summary of the applications being supported by the Unified Communications Module.
> show configServices Repository: http://www.avaya.com/support/ipoffice/OS Repository: http://www.avaya.com/support/centos/Applications Version Boot at startupVoicemail Pro: 6.0.20.1, on.one-X Portal: 6.0.20.1, off.Watchdog: 6.0.6.19, on.CLI 6.0.6.1 -Operating System: CentOS 5.4Kernel version: 2.6.18-92.1.18.el5Last updated: 2010-04-27 – 15:30
· show logging <application> Show logging information for the application. This includes both audit trail commands, watchdog alarms and theapplications own log output.
> show logging voicemail# Last command:[15:24:19 - 21 Apr 2010] Voicemail Pro starting…[15:25:00 - 21 Apr 2010] Voicemail Pro started.# Watchdog alarms:[15:24:19 - 21 Apr 2010] Voicemail Pro crashed, restarting.# Voicemail Pro log file:...
· show status <application> Show the status (running, starting or stopped) of the application.
> show status voicemailVoicemail Pro is running.
104

Unified Communications Module Installation and Maintenance Page 10315-601011 Issue 04e (07 June 2012)IP Office
Additional Processes: Command Line
· show time Show the current date and time on the server.
> show timeCurrent date and time: 15:30:00 - 21 Apr 2010
· show updates <application> Show the current version of the application and the versions available in the updates repository. > show updates voicemailCurrent Voicemail Pro Version: 6.0.6.19Available Versions:- Voicemail Pro 6.0.7.1- Voicemail Pro 6.0.8.3- Voicemail Pro 6.0.9.5
· top Return to the > prompt. 102

Unified Communications Module Installation and Maintenance Page 10415-601011 Issue 04e (07 June 2012)IP Office
8.3.2 Administrator CommandsThe Admin> prompt is accessed by entering admin at the > general command prompt and then entering theadministrator password (the default password is Administrator).
In the commands below, <application> is replaced with name of the required application: voicemail, onexportal,watchdog or all.
At the Admin> prompt, the following commands can be used:
· auditlog Display a log of application commands executed.
· configure Change to the Configure> prompt. The configurator password is required.
· exit Exit the Admin> prompt and return to the > prompt .
· forcestop <application> Stop the specified application. This is a forced shutdown of the application. For a polite shutdown use the stopcommand.
· help Display general help on entering commands.
· history Display the history of commands used in the current session.
· list Display a list of commands.
· logout End the session and logout.
· password Change the administrator password required to access the Admin> prompt.
· restart <application> Restarts specified application.
· root Access the root user account. The root user password is required.
· start <application> Start the specified application.
· stop <application> Stop the specified application. This is a controlled shutdown of the application. The command prompt is redisplayedonce the application is stopped. To force a shutdown of an application user forcestop.
· update <application> <version> Begin an update of the specified application to a specified version. The versions available for upgrade can be shownusing the show updates <application> command. In addition to the standard applications, cli can also bespecified.
· top Return to the > prompt.
102
105
102
102

Unified Communications Module Installation and Maintenance Page 10515-601011 Issue 04e (07 June 2012)IP Office
Additional Processes: Command Line
8.3.3 Configuration CommandsThe Configure> prompt is accessed by entering configure at the Admin> prompt and then entering the configuratorpassword (the default password is Configurator).
In the commands below, <application> is replaced with name of the required application: voicemail, onexportal,watchdog or all.
At the Configure> prompt, the following commands can be used:
· autostart <application> <on/off> Change the autostart settings of an application.
· backup <application> Backup the application. This command is currently only supported for the onexportal application.
· exit Exit the Configure> prompt and return to the Admin> command prompt.
· help Display general help on entering commands.
· history Display the history of commands used in the current session.
· list Display a list of commands.
· logout End the session and logout.
· password Change the configuration password required to access the Configure> prompt.
· install <application> Install an application from the repository.
· repository <type> <link> Set the location for the updates repository.
· The <type> value indicates the repository:
· os Operating system repository.
· services Applications repository.
· The <link> value indicates the repository location.
· restore <application> Restore an application. This command is currently only supported for the onexportal application.
· search Search for an application and display basic information if found on the server.
· show Display a list of installed applications.
· startup <application> <on/off> Set the start on boot up setting for an application.
· uninstall <application>Uninstall an application.
· top Return to the > prompt.
104
104
102

Unified Communications Module Installation and Maintenance Page 10615-601011 Issue 04e (07 June 2012)IP Office

Unified Communications Module Installation and Maintenance Page 10715-601011 Issue 04e (07 June 2012)IP Office
Index
IndexAAddress
DNS 53, 76IP 53, 76
Administrator
Login 40Application
Install 57
Uninstall 59
Upgrade 57Application Logs 67Archive 68
Audit Log 67
Auditlog 104Autostart 105
BBackup 73, 105
CCentOS 10
Change Password Root Password 99Web Browser Password 48
Clients 81
clish 101Configuration
one-X Portal for IP Office 40
Voicemail Pro 30
CPU Usage 65
Create Archive 68
DDate 54, 76
Default Gateway 53, 76Password 24, 47
DHCP 53, 76
Disk Usage 65
DNS 53, 76
Download
Logs 68Windows Clients 81
FForcestop 104
GGateway 53, 76
General 73
HHome 65Host Name 53, 76
IInitial configuration 40
Install Application 57Service 57
IP Address 53, 76
IP Office Check 40Select 40
LLinux 10
Local 73
Log Files Age 73Logging In 47Login 34
Administrator 40
Logs 67Application 67Archive 68
Audit 67
Download 68Log Files Age 73
MMask 53, 76
Memory
Usage 65Menu
Download 68
General 73
Home 65Logs 67Logs Download 68
Logs View 67
Services 70Settings 72System 71, 76
Updates 69
Updates Services 70Updates System 71View 67
Windows Clients 81
NNetwork Time Protocol 54, 76no Remote 34Notifications 65
NTP 54, 76
Oone-X Portal for IP Office
Configuration 40
PPasswd 99
Password 104, 105
Change 40Root Password 99Web Browser Password 48
Port
Web Control 73
RRAM
Usage 65
Reboot 52, 65
Remote Software Repositories 62Repositories 62Repository 73, 105
Restart 104
Restore 73, 105Root 104
SServer
NTP 54, 76
Reboot 52, 65Shutdown 52, 65
Server Name 34
Service
Install 57

Unified Communications Module Installation and Maintenance Page 10815-601011 Issue 04e (07 June 2012)IP Office
Service
Uninstall 59Upgrade 57
Services 70
Start 65
Starting 51Status 65Stop 65
Stopping 51
Settings 72SFTP 100Show 102
Shutdown 52, 65
SNMP 73SNMP Support 73Software 34
Repositories 62
Software Repositories 73SSH access 100Start 104
Start Services 65
Startup 105Status 65Stop 104
Stop Services 65
Subnet Mask 53, 76System 71, 76
TTime
Timezone 54, 76
UUninstall
Application 59Service 59
Unit Name/IP Address 34
Update 104Services 70System 71
Updates
Services 69System 69
Upgrading Applications 57
Usage
CPU 65Disk 65Memory 65
VView Logs 67
Voicemail Pro Configuration 30Limitations 12
Voicemail Pro Client
run 34Voicemail Pro Client window 34Voicemail Pro Login window 34
Voicemail Pro Server
connect 34
WWAN 34Watchdog 73
Web Control Port 73
Windows Clients 81Workstation 34

Unified Communications Module Installation and Maintenance Page 10915-601011 Issue 04e (07 June 2012)IP Office

Unified Communications Module Installation and Maintenance Page 11015-601011 Issue 04e (07 June 2012)IP Office
Performance figures and data quoted in this document are typical, and must bespecifically confirmed in writing by Avaya before they become applicable to anyparticular order or contract. The company reserves the right to make alterationsor amendments to the detailed specifications at its discretion. The publication of
information in this document does not imply freedom from patent or otherprotective rights of Avaya or others.
All trademarks identified by the ® or ™ are registered trademarks or trademarks,respectively, of Avaya Inc. All other trademarks are the property of their
respective owners.
This document contains proprietary information of Avaya and is not to bedisclosed or used except in accordance with applicable agreements.
© 2012 Avaya Inc. All rights reserved.