Embed Size (px)
Citation preview

USUI Virginia Plant
Revision 00 – October 2013
1
USUI
Log in to WebEDI via Log in to WebEDI via Log in to WebEDI via Log in to WebEDI via PLEX PLEX PLEX PLEX Supplier PortalSupplier PortalSupplier PortalSupplier Portal
This is a manual aimed at suppliers of Usui International that are using the web based
application PLEX WebEDI. The purpose of the manual is to describe how to log in and use
the WebEDI via the Usui International PLEX Supplier Portal.
IndexIndexIndexIndex
Log in to WebEDI via Usui PLEX Supplier Portal…………………………………………………………………2
Open WebEDI …………………………………………………………………………………………………………………3
Online Releases ……………………………………………………………………………………………………………..4
Acknowledge Releases …….. …………………………………………………………………………………………..5
Printing Labels …………………………………………………………………………………………………………… 6-7
Creating the Shipper and BOL ………………………………………………………………………………….. 8-10
User Support….……………………………………………………………………………………………………………..11
GeneralGeneralGeneralGeneral
This manual describes how to log in to WebEDI via the Usui International PLEX Supplier
Portal.
User SupportUser SupportUser SupportUser Support
For user support concerning the Usui International PLEX Supplier Portal please contact your
customer service representative via email or by calling 757-558-7300.

2
USUI
Supplier Portal Log In ProcedureSupplier Portal Log In ProcedureSupplier Portal Log In ProcedureSupplier Portal Log In Procedure
To reach the log in window for the PLEX supplier portal, open your internet browser and type
http://www.plexushttp://www.plexushttp://www.plexushttp://www.plexus----online.comonline.comonline.comonline.com in the address field and either press enter or click on the
corresponding button in the browser (illustrated in picture 1)
Picture 1 – Address in Browser
Once the log in window has been opened the interface in picture 2 will be displayed.
To Log InTo Log InTo Log InTo Log In
Fill in your User ID and password in the corresponding fields and click on the button marked “Login” (See picture 2)
http://http://http://http://www.www.www.www.plexusplexusplexusplexus----online.com/online.com/online.com/online.com/
Picture 2 – Log In Window

3
USUI
To To To To Open WebEDIOpen WebEDIOpen WebEDIOpen WebEDI
Once you are logged in to the supplier portal, click on the “Online Releases” menu node to gain access to supplier releases.
Once you have accessed the Online Releases, from the next screen (picture 4) you will be able to access all releases. It is the supplier’s responsibility to review and acknowledge all releases. The supplier must review the supplier portal daily after 10:00am to review and acknowledge all releases.
Picture 3 – Online Releases Menu

4
USUI
Online ReleasesOnline ReleasesOnline ReleasesOnline Releases Online releases can be accessed by filling in the fields as illustrated in picture 4.
The supplier also has the option to look at releases by date, part number, release number, as well as the PO No. All can be filtered by filling in the appropriate fields in the above screen.
Choose type of Choose type of Choose type of Choose type of
release to reviewrelease to reviewrelease to reviewrelease to review
Picture 4 – Supplier Online Release Screen

5
USUI
Acknowledging ReleasesAcknowledging ReleasesAcknowledging ReleasesAcknowledging Releases, Additions, , Additions, , Additions, , Additions, ChangesChangesChangesChanges and Notesand Notesand Notesand Notes
Start by filling in your Supplier Code and choosing “NO” for “Release Acknowledged”. (Picture 4) The screen will then show all releases that have not been acknowledged. Once the releases appear on the screen click the box under the acknowledge column to acknowledge the release. You may also click the green check mark within the column heading to acknowledge all at once. A note column is also provided for the supplier. Notes may be entered by clicking on the miniature asterisk (*) in the supplier note column. (Illustrated in picture 5)
Picture 5 – Supplier Online Release Screen
Once the releases are acknowledged the system will generate an automated notification letting the UIC Material Planner and Manager know that the release has been acknowledged by the supplier. NOTE:NOTE:NOTE:NOTE: New releases will be submitted no later than close of business every New releases will be submitted no later than close of business every New releases will be submitted no later than close of business every New releases will be submitted no later than close of business every Wednesday. If Usui shoWednesday. If Usui shoWednesday. If Usui shoWednesday. If Usui should need to add additional releases after this time the supplier will uld need to add additional releases after this time the supplier will uld need to add additional releases after this time the supplier will uld need to add additional releases after this time the supplier will be notified by email. All suppliers are responsible for acknowledging all releases by close of be notified by email. All suppliers are responsible for acknowledging all releases by close of be notified by email. All suppliers are responsible for acknowledging all releases by close of be notified by email. All suppliers are responsible for acknowledging all releases by close of business the following Friday.business the following Friday.business the following Friday.business the following Friday.
Mini. Asterisk
Generate
Shipping Label
Acknowledgment box

6
USUI
Printing Labels for ShipmentPrinting Labels for ShipmentPrinting Labels for ShipmentPrinting Labels for Shipment Labels must be printed via the supplier once the product is ready to ship. (Picture 5) Labels cannot
be printed unless the release is in firm status, (Picture 6)
Picture 6 – Supplier Online Release Screen
When product is ready for shipment you must click on the link “Label and Ship”. This will bring you to
the “Add Inventory” screen. Supplier must fill in the following information:
PO No:PO No:PO No:PO No:
Tracking no.Tracking no.Tracking no.Tracking no.
Quantity per ContainerQuantity per ContainerQuantity per ContainerQuantity per Container
No. of ContainersNo. of ContainersNo. of ContainersNo. of Containers.
Firm Order
Label Access
7
USUI
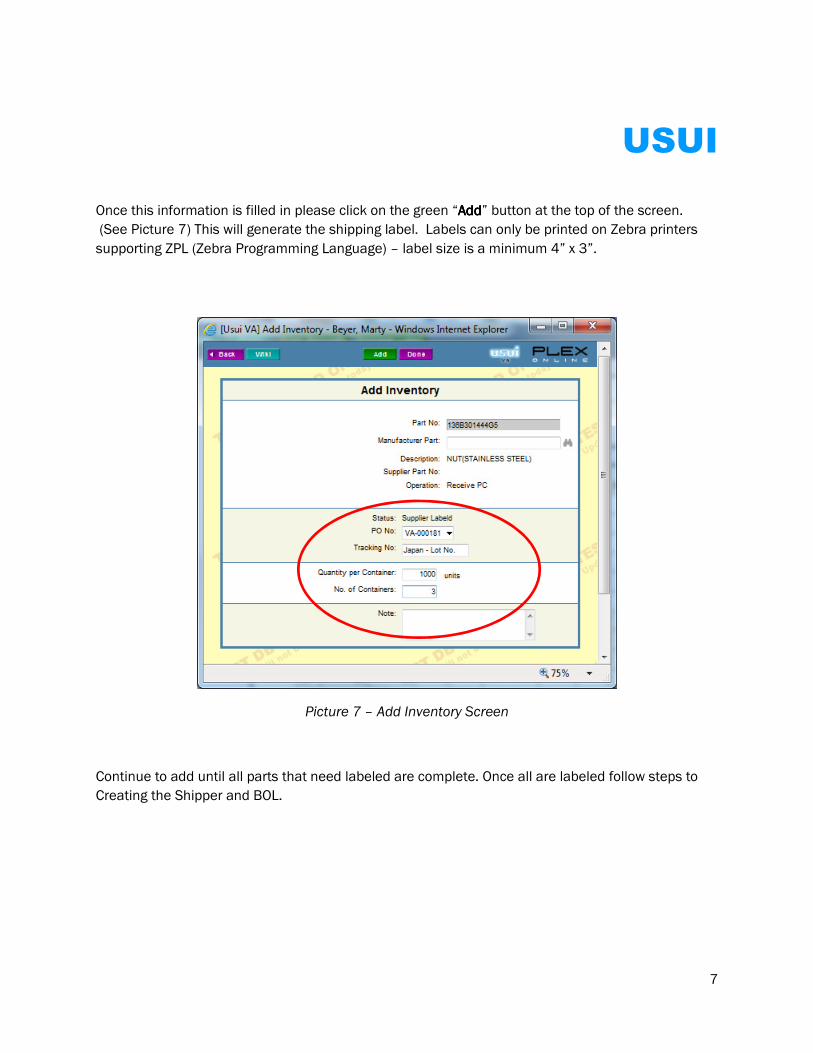
Once this information is filled in please click on the green “AddAddAddAdd” button at the top of the screen.
(See Picture 7) This will generate the shipping label. Labels can only be printed on Zebra printers
supporting ZPL (Zebra Programming Language) – label size is a minimum 4” x 3”.
Picture 7 – Add Inventory Screen
Continue to add until all parts that need labeled are complete. Once all are labeled follow steps to
Creating the Shipper and BOL.

8
USUI
Creating the Shipper and BOLCreating the Shipper and BOLCreating the Shipper and BOLCreating the Shipper and BOL
After you create your last label for the shipment then click the DONEDONEDONEDONE button located at the top of the screen. This will bring you to the BOL screen. As the supplier, you may opt to fill in the Supplier Serial numberSupplier Serial numberSupplier Serial numberSupplier Serial number (optional)(optional)(optional)(optional), next check the items that are to be included in the shipment and then click on the SHIPSHIPSHIPSHIP button located at the top of the screen. (See Picture 8)
Picture 8 – BOL Screen
Click on SHIP when all items
have been selected.
Check items to be
shipped.
9
USUI
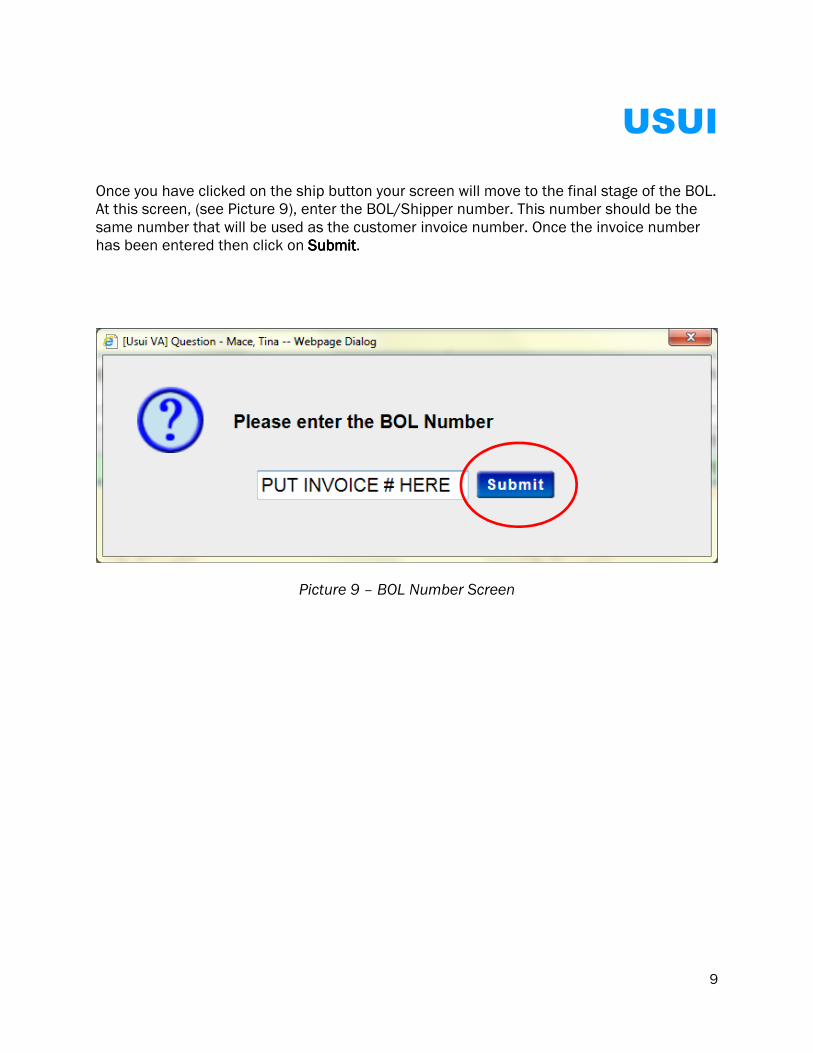
Once you have clicked on the ship button your screen will move to the final stage of the BOL. At this screen, (see Picture 9), enter the BOL/Shipper number. This number should be the same number that will be used as the customer invoice number. Once the invoice number has been entered then click on SubmitSubmitSubmitSubmit.
Picture 9 – BOL Number Screen

10
USUI
The Supplier Shipper will now generate. See picture 10.
Picture 10 – Supplier Shipper
The supplier shipper should be printed and attached to the shipment. This document will be used at the time of receipt at Usui. Once the supplier shipper is printed an ASN is automatically generated and entered into Usui’s ERP system.

11
USUI
User User User User SupportSupportSupportSupport
For user support concerning the Usui International PLEX Supplier Portal please contact your
customer representative via email or by calling 757-558-7300.