Embed Size (px)
Citation preview

Triniti Post Cloning Manual
November 2019

© 2011 Triniti Corporation. All rights reserved. This document is for informational purposes only. Triniti Corporation makes no warranties expressed or implied in this document. Triniti, Triniti Corporation and the Triniti Logomark are either registered trademarks or trademarks of Triniti Corporation in the United States and/or other countries. All other marks noted are owned by their respective companies.
Contact Information
Triniti Corporate Offices
Triniti Corporation
2001 Gateway Place, 425E
San Jose, CA 95110
USA
T: (408) 659-7764
Triniti Advanced Software Labs Pvt. Ltd.
1st Floor
Ashoka My Home Chambers
1-8-301, S.P. Road
Hyderabad 500 003
INDIA
T: (91) 40 27893939
T: (91) 40 66723800
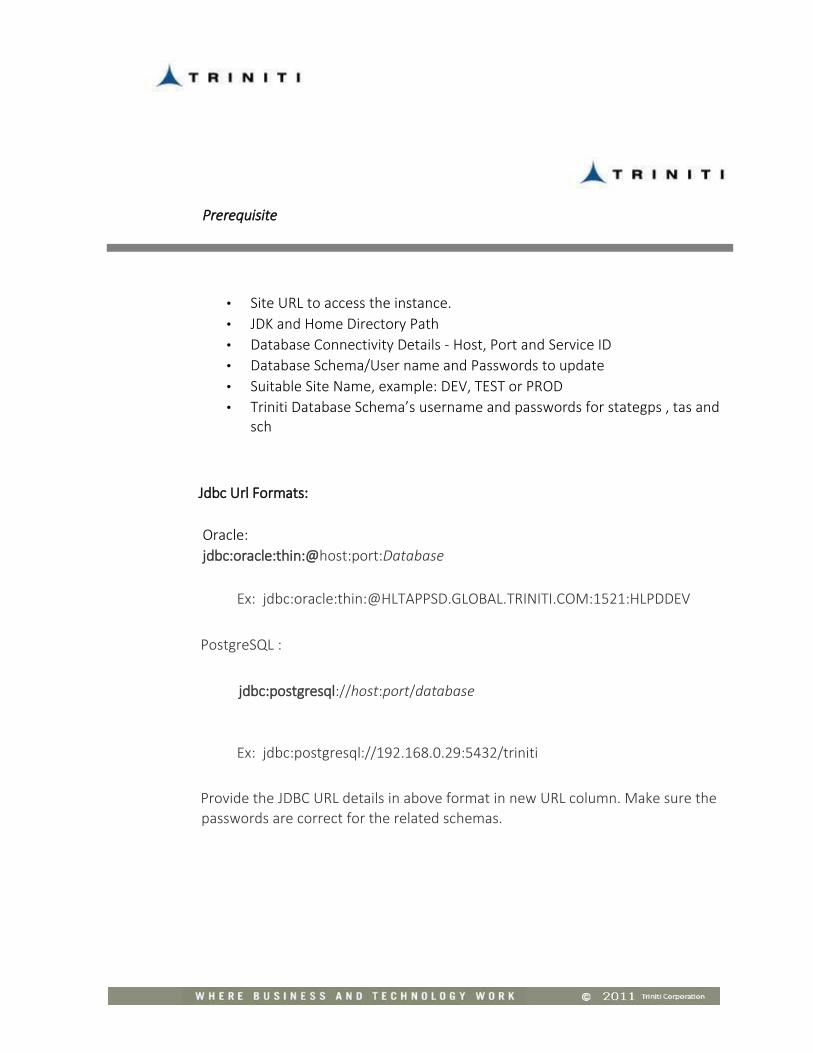
Prerequisite
• Site URL to access the instance.
• JDK and Home Directory Path
• Database Connectivity Details - Host, Port and Service ID
• Database Schema/User name and Passwords to update
• Suitable Site Name, example: DEV, TEST or PROD
• Triniti Database Schema’s username and passwords for stategps , tas and sch
Jdbc Url Formats:
Oracle:
jdbc:oracle:thin:@host:port:Database
Ex: jdbc:oracle:thin:@HLTAPPSD.GLOBAL.TRINITI.COM:1521:HLPDDEV
PostgreSQL :
jdbc:postgresql://host:port/database
Ex: jdbc:postgresql://192.168.0.29:5432/triniti
Provide the JDBC URL details in above format in new URL column. Make sure the
passwords are correct for the related schemas.

Steps to perform post cloner process :
Download Triniti-post-cloner Software from resources.triniti.com.
Copy the downloaded Triniti-post-cloner zip in Deployment folder[ TrinitiApps28 ].
Unzip the Triniti-post-cloner.
Open unzipped Triniti-post-cloner folder.

For Windows :
Run TrinitiPostCloner.bat file. It will open user interface [Triniti Post Cloner UI frame] for cloning
For Linux :
Log on to the server using user credentials.
Note: If installation is to be done remotely using a Windows terminal, make sure that the
PC X connectivity tool (such as VNC Viewer) is activated.
If you use VNC Viewer for remote installation, ensure that VNC Server is running on the
machine that you’re connecting to.
Enter vncserver at the command prompt (in putty) to create a new session ID. Note down
the session ID created by VNC Server.

Then, enter VNC Server password and click OK.
Click OK.

Open terminal, then the following Screen appears

Go to TrinitiPostCloner folder in deployment path and run TrinitiPostCloner.sh file using sh command.
Ex: sh TrinitiPostCloner.sh
After running the sh file it will open user interface [TrinitiPostCloner UI frame] for cloning.
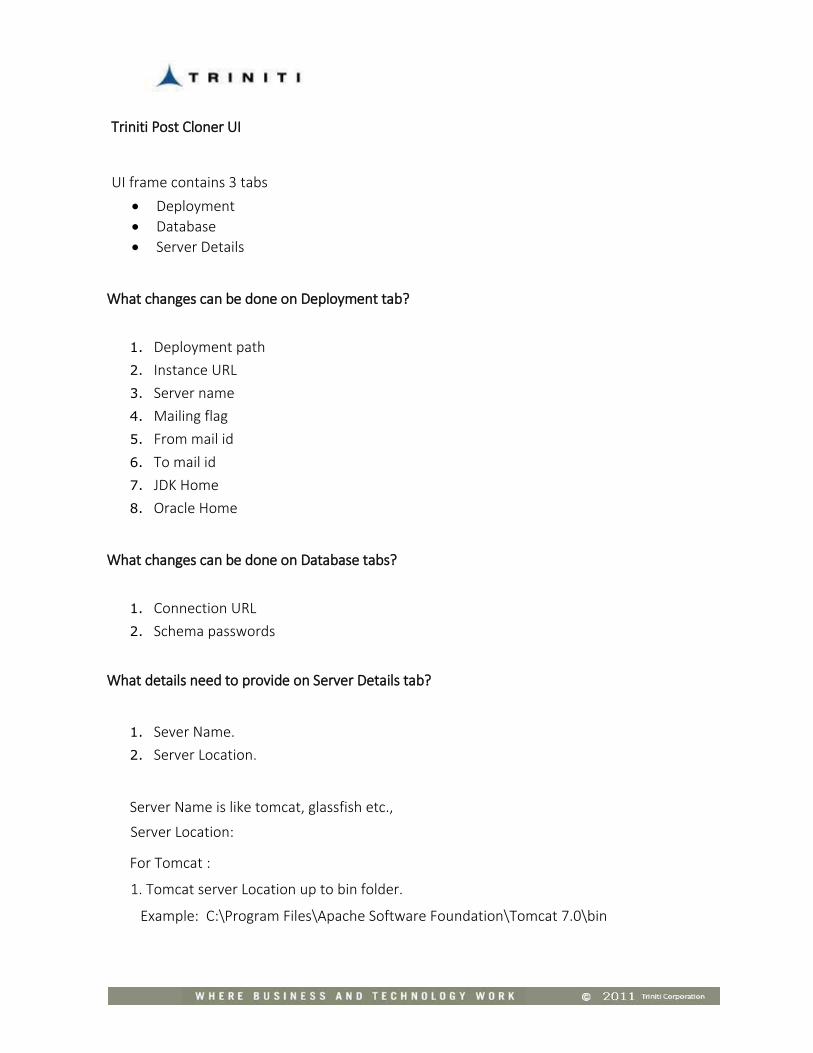
Triniti Post Cloner UI
UI frame contains 3 tabs
Deployment
Database
Server Details
What changes can be done on Deployment tab?
1. Deployment path
2. Instance URL
3. Server name
4. Mailing flag
5. From mail id
6. To mail id
7. JDK Home
8. Oracle Home
What changes can be done on Database tabs?
1. Connection URL
2. Schema passwords
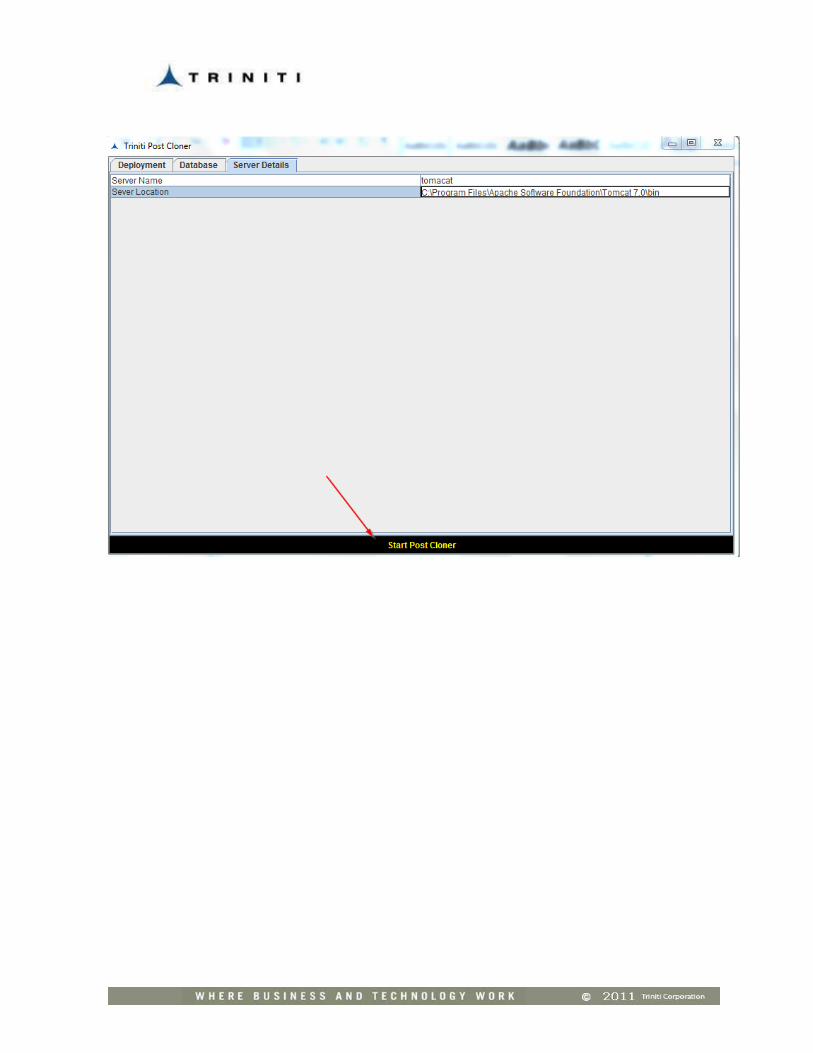
What details need to provide on Server Details tab?
1. Sever Name.
2. Server Location.
Server Name is like tomcat, glassfish etc.,
Server Location:
For Tomcat :
1. Tomcat server Location up to bin folder.
Example: C:\Program Files\Apache Software Foundation\Tomcat 7.0\bin

For Glassfish :
1. Glassfish server location upto specific domain.
Example: D:\glassfishh\glassfish3\glassfish\domains\domain1
Note: Here domain1 is a specific domain in domains folder. As there may be different domain like
domain1, domain2 may have in few cases.
After triggering bat file (or) sh file you will notify with a prompt message, which request to wait till the properties loaded.
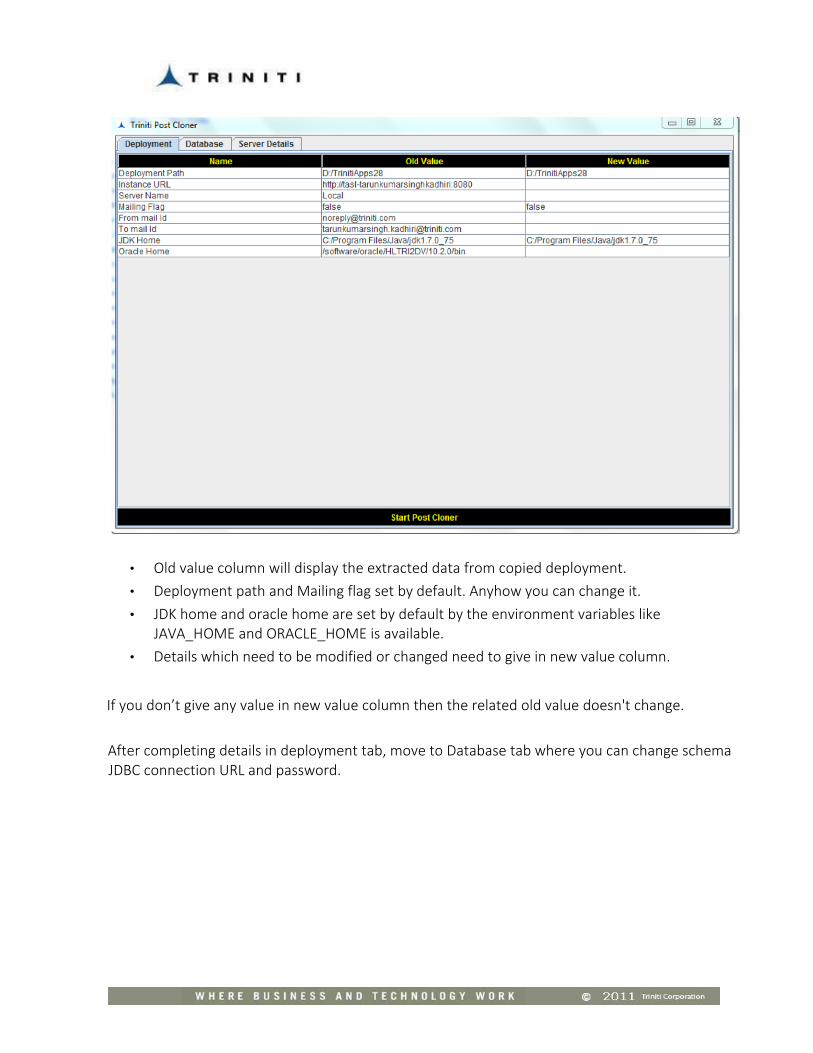
• Old value column will display the extracted data from copied deployment.
• Deployment path and Mailing flag set by default. Anyhow you can change it.
• JDK home and oracle home are set by default by the environment variables like JAVA_HOME and ORACLE_HOME is available.
• Details which need to be modified or changed need to give in new value column.
If you don’t give any value in new value column then the related old value doesn't change.
After completing details in deployment tab, move to Database tab where you can change schema JDBC connection URL and password.
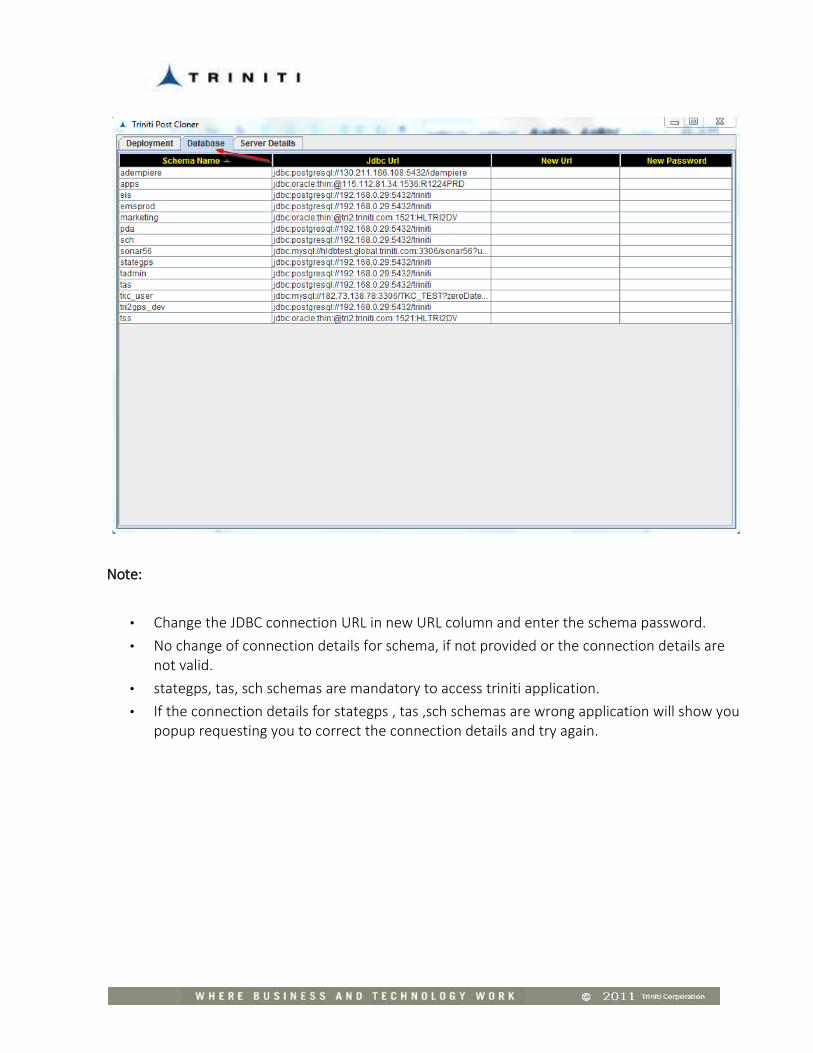
Note:
• Change the JDBC connection URL in new URL column and enter the schema password.
• No change of connection details for schema, if not provided or the connection details are not valid.
• stategps, tas, sch schemas are mandatory to access triniti application.
• If the connection details for stategps , tas ,sch schemas are wrong application will show you popup requesting you to correct the connection details and try again.

• After completing database details navigate to server details tab where you need to provide server name and server locations up to specific folder which is mention above in this document.

• First it validate connection details after pressing the button and shows the confirmation dialog with the failed connection details to proceed further or not.
How post cloner process work?
• First it validate connection details.
• It will show a confirmation dialog with list of failed connection details.
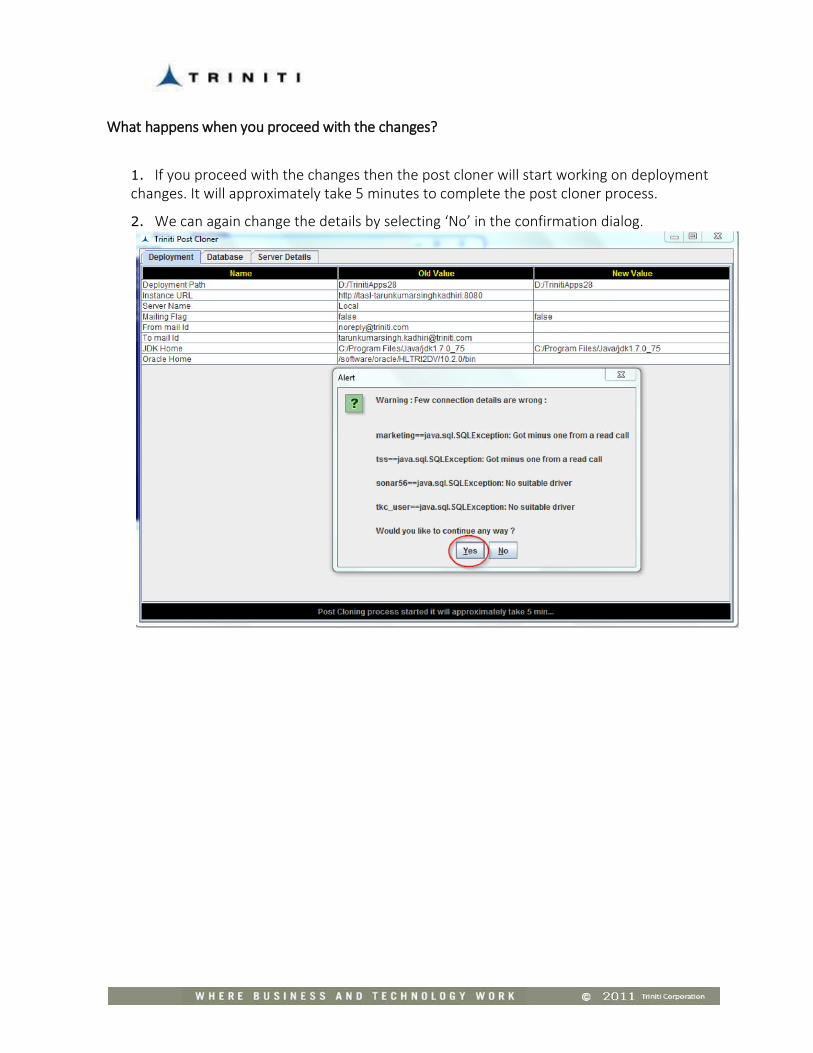
What happens when you proceed with the changes?
1. If you proceed with the changes then the post cloner will start working on deployment changes. It will approximately take 5 minutes to complete the post cloner process.
2. We can again change the details by selecting ‘No’ in the confirmation dialog.
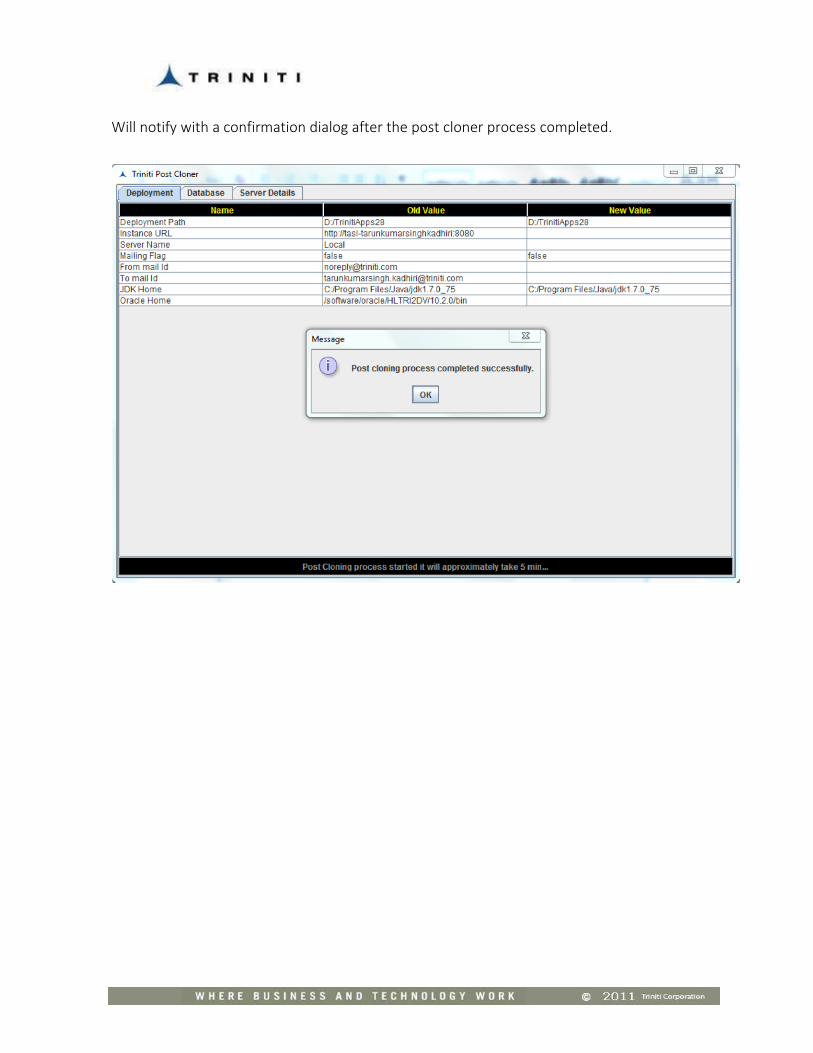
Will notify with a confirmation dialog after the post cloner process completed.

Automate Post Cloning Process:
1. Perform all above steps for once, it will generate a configuration file to rerun next time onwards.
2. Move up Triniti-Post-Cloner directory and make it parallel to deployment directory 3. Run your shell script which copies Triniti Apps Deployment from PROD to Test 4. Copy Triniti-Post-Cloner inside Cloned Triniti Apps Deployment directory 5. Invoke TrinitiPostClonerCommandPrompt.sh from TrinitiApps28/Triniti-Post-Cloner
directory
Steps 2 to 5 should be included in your shell script and as part of automation of Database Clone, Triniti Application Clone and then Post Cloning Process.