Embed Size (px)
DESCRIPTION
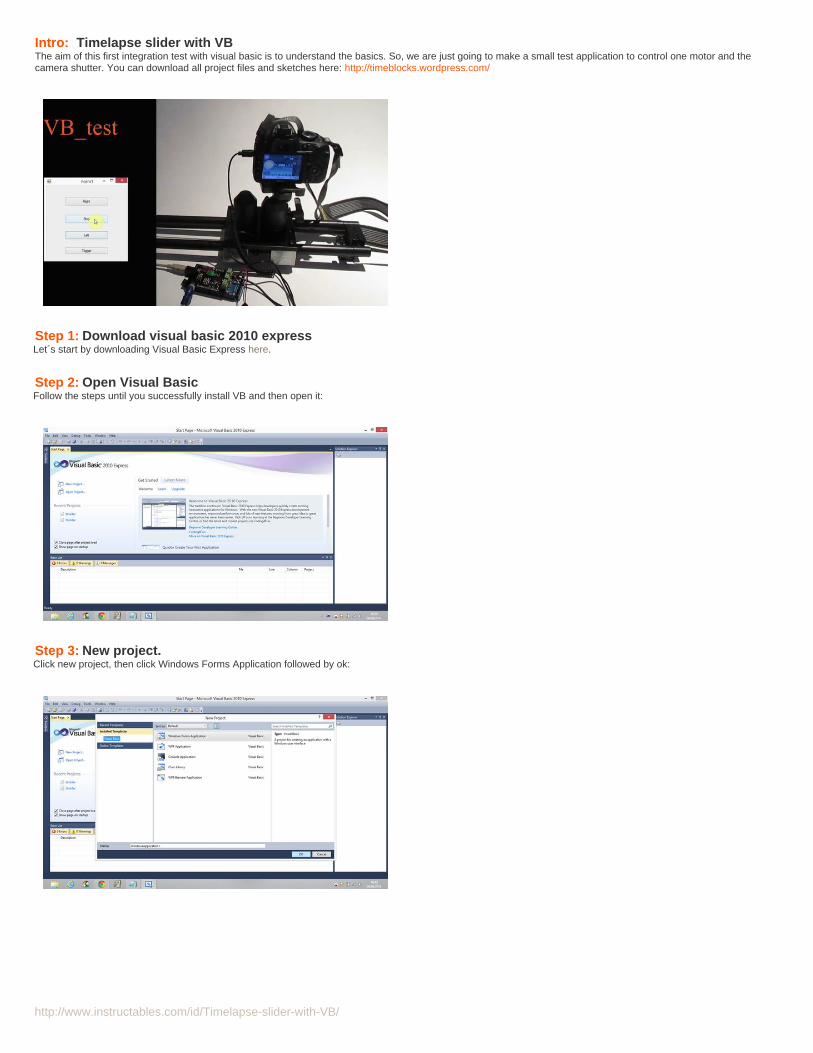
The aim of this first integration test with visual basic is to understand the basics. So, we are just going to make a small test application to control one motor and the camera shutter. You can download all project files and sketches here: http://timeblocks.wordpress.com/
Citation preview
http://www.instructables.com/id/Timelapse-slider-with-VB/
Food Living Outside Play Technology Workshop
Timelapse slider with VBby Timeblocks on August 6, 2014
Table of Contents
Timelapse slider with VB . . . . . . . . . . . . . . . . . . . . . . . . . . . . . . . . . . . . . . . . . . . . . . . . . . . . . . . . . . . . . . . . . . . . . . . . . . . . . . . . . . . . . . . . . . . . . . . . . . . . . . . . 1
Intro: Timelapse slider with VB . . . . . . . . . . . . . . . . . . . . . . . . . . . . . . . . . . . . . . . . . . . . . . . . . . . . . . . . . . . . . . . . . . . . . . . . . . . . . . . . . . . . . . . . . . . . . . . . 2
Step 1: Download visual basic 2010 express . . . . . . . . . . . . . . . . . . . . . . . . . . . . . . . . . . . . . . . . . . . . . . . . . . . . . . . . . . . . . . . . . . . . . . . . . . . . . . . . . . . . . . 2
Step 2: Open Visual Basic . . . . . . . . . . . . . . . . . . . . . . . . . . . . . . . . . . . . . . . . . . . . . . . . . . . . . . . . . . . . . . . . . . . . . . . . . . . . . . . . . . . . . . . . . . . . . . . . . . . . 2
Step 3: New project. . . . . . . . . . . . . . . . . . . . . . . . . . . . . . . . . . . . . . . . . . . . . . . . . . . . . . . . . . . . . . . . . . . . . . . . . . . . . . . . . . . . . . . . . . . . . . . . . . . . . . . . . 2
Step 4: Buttons . . . . . . . . . . . . . . . . . . . . . . . . . . . . . . . . . . . . . . . . . . . . . . . . . . . . . . . . . . . . . . . . . . . . . . . . . . . . . . . . . . . . . . . . . . . . . . . . . . . . . . . . . . . . 3
Step 5: Serial port . . . . . . . . . . . . . . . . . . . . . . . . . . . . . . . . . . . . . . . . . . . . . . . . . . . . . . . . . . . . . . . . . . . . . . . . . . . . . . . . . . . . . . . . . . . . . . . . . . . . . . . . . . 3
Step 6: VB code . . . . . . . . . . . . . . . . . . . . . . . . . . . . . . . . . . . . . . . . . . . . . . . . . . . . . . . . . . . . . . . . . . . . . . . . . . . . . . . . . . . . . . . . . . . . . . . . . . . . . . . . . . . 3
File Downloads . . . . . . . . . . . . . . . . . . . . . . . . . . . . . . . . . . . . . . . . . . . . . . . . . . . . . . . . . . . . . . . . . . . . . . . . . . . . . . . . . . . . . . . . . . . . . . . . . . . . . . . . . . . 4
Step 7: Arduino sketch . . . . . . . . . . . . . . . . . . . . . . . . . . . . . . . . . . . . . . . . . . . . . . . . . . . . . . . . . . . . . . . . . . . . . . . . . . . . . . . . . . . . . . . . . . . . . . . . . . . . . . 4
File Downloads . . . . . . . . . . . . . . . . . . . . . . . . . . . . . . . . . . . . . . . . . . . . . . . . . . . . . . . . . . . . . . . . . . . . . . . . . . . . . . . . . . . . . . . . . . . . . . . . . . . . . . . . . . . 5
Step 8: Testing . . . . . . . . . . . . . . . . . . . . . . . . . . . . . . . . . . . . . . . . . . . . . . . . . . . . . . . . . . . . . . . . . . . . . . . . . . . . . . . . . . . . . . . . . . . . . . . . . . . . . . . . . . . . 5
Related Instructables . . . . . . . . . . . . . . . . . . . . . . . . . . . . . . . . . . . . . . . . . . . . . . . . . . . . . . . . . . . . . . . . . . . . . . . . . . . . . . . . . . . . . . . . . . . . . . . . . . . . . . . . 6
Advertisements . . . . . . . . . . . . . . . . . . . . . . . . . . . . . . . . . . . . . . . . . . . . . . . . . . . . . . . . . . . . . . . . . . . . . . . . . . . . . . . . . . . . . . . . . . . . . . . . . . . . . . . . . . . . . . . 6
Comments . . . . . . . . . . . . . . . . . . . . . . . . . . . . . . . . . . . . . . . . . . . . . . . . . . . . . . . . . . . . . . . . . . . . . . . . . . . . . . . . . . . . . . . . . . . . . . . . . . . . . . . . . . . . . . . . 6
http://www.instructables.com/id/Timelapse-slider-with-VB/
Intro: Timelapse slider with VBThe aim of this first integration test with visual basic is to understand the basics. So, we are just going to make a small test application to control one motor and thecamera shutter. You can download all project files and sketches here: http://timeblocks.wordpress.com/
Step 1: Download visual basic 2010 expressLet´s start by downloading Visual Basic Express here.
Step 2: Open Visual BasicFollow the steps until you successfully install VB and then open it:
Step 3: New project.Click new project, then click Windows Forms Application followed by ok:
http://www.instructables.com/id/Timelapse-slider-with-VB/
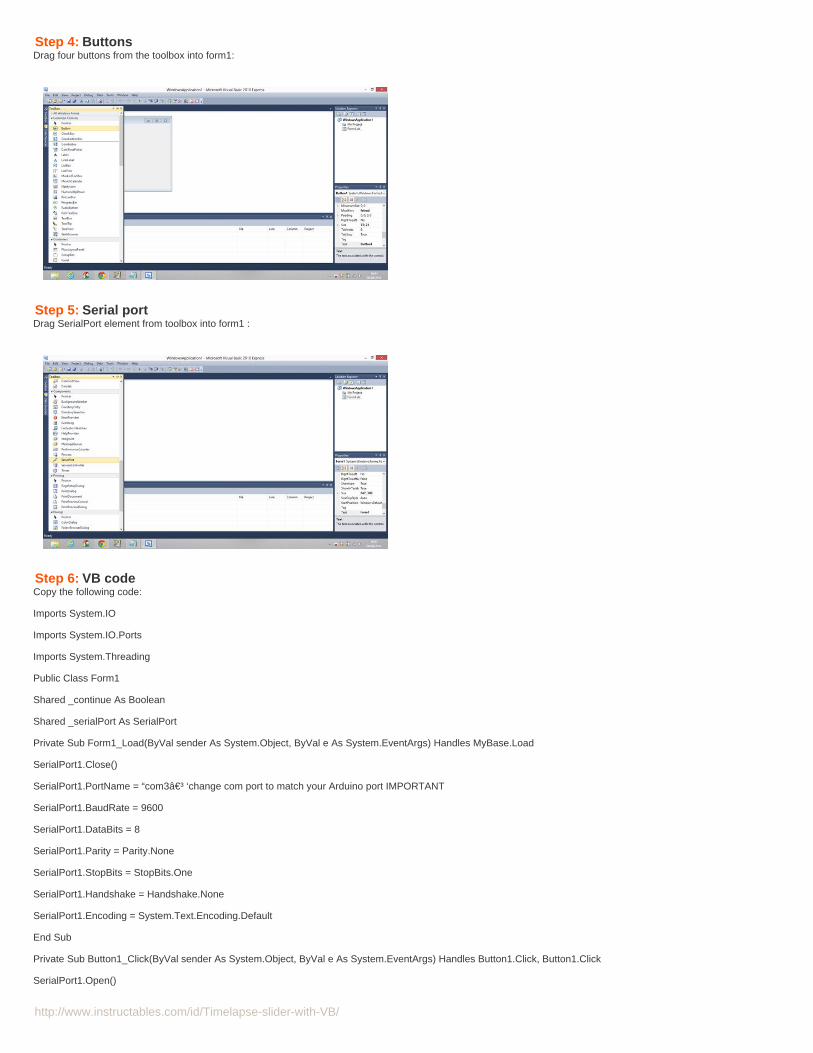
Step 4: ButtonsDrag four buttons from the toolbox into form1:
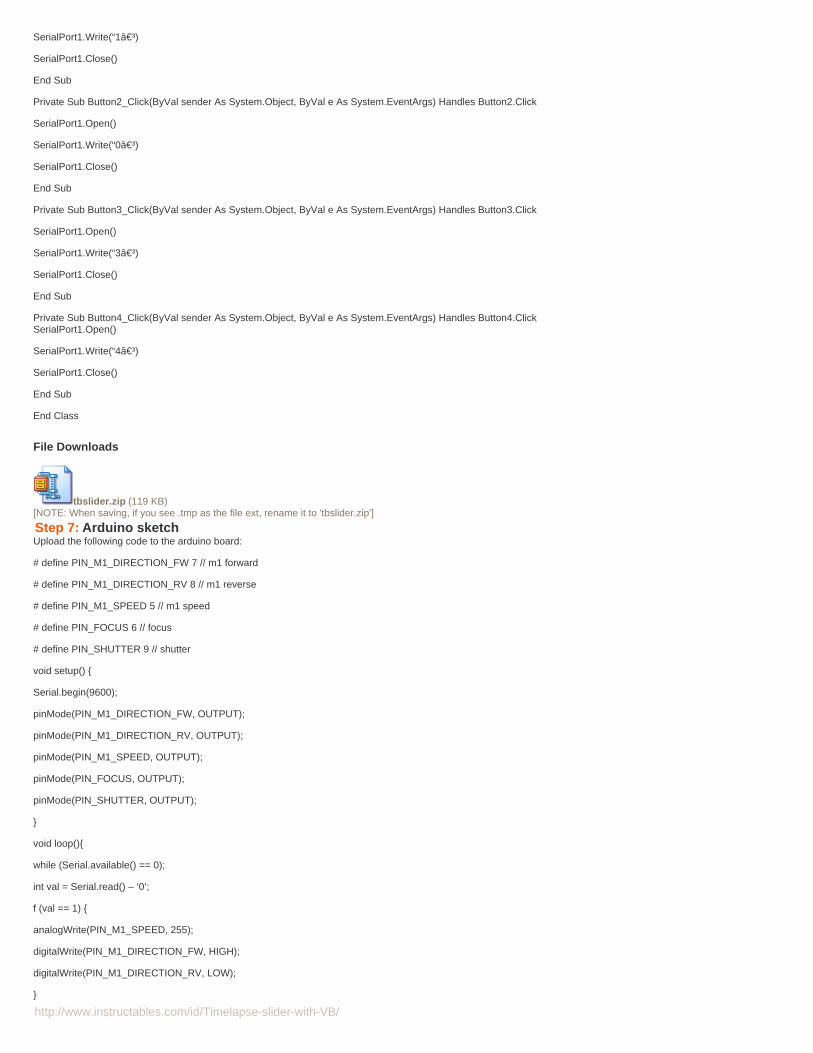
Step 5: Serial portDrag SerialPort element from toolbox into form1 :
Step 6: VB codeCopy the following code:
Imports System.IO
Imports System.IO.Ports
Imports System.Threading
Public Class Form1
Shared _continue As Boolean
Shared _serialPort As SerialPort
Private Sub Form1_Load(ByVal sender As System.Object, ByVal e As System.EventArgs) Handles MyBase.Load
SerialPort1.Close()
SerialPort1.PortName = “com3″ ‘change com port to match your Arduino port IMPORTANT
SerialPort1.BaudRate = 9600
SerialPort1.DataBits = 8
SerialPort1.Parity = Parity.None
SerialPort1.StopBits = StopBits.One
SerialPort1.Handshake = Handshake.None
SerialPort1.Encoding = System.Text.Encoding.Default
End Sub
Private Sub Button1_Click(ByVal sender As System.Object, ByVal e As System.EventArgs) Handles Button1.Click, Button1.Click
SerialPort1.Open()
http://www.instructables.com/id/Timelapse-slider-with-VB/
SerialPort1.Write(“1″)
SerialPort1.Close()
End Sub
Private Sub Button2_Click(ByVal sender As System.Object, ByVal e As System.EventArgs) Handles Button2.Click
SerialPort1.Open()
SerialPort1.Write(“0″)
SerialPort1.Close()
End Sub
Private Sub Button3_Click(ByVal sender As System.Object, ByVal e As System.EventArgs) Handles Button3.Click
SerialPort1.Open()
SerialPort1.Write(“3″)
SerialPort1.Close()
End Sub
Private Sub Button4_Click(ByVal sender As System.Object, ByVal e As System.EventArgs) Handles Button4.ClickSerialPort1.Open()
SerialPort1.Write(“4″)
SerialPort1.Close()
End Sub
End Class
File Downloads
tbslider.zip (119 KB)[NOTE: When saving, if you see .tmp as the file ext, rename it to 'tbslider.zip']
Step 7: Arduino sketchUpload the following code to the arduino board:
# define PIN_M1_DIRECTION_FW 7 // m1 forward
# define PIN_M1_DIRECTION_RV 8 // m1 reverse
# define PIN_M1_SPEED 5 // m1 speed
# define PIN_FOCUS 6 // focus
# define PIN_SHUTTER 9 // shutter
void setup() {
Serial.begin(9600);
pinMode(PIN_M1_DIRECTION_FW, OUTPUT);
pinMode(PIN_M1_DIRECTION_RV, OUTPUT);
pinMode(PIN_M1_SPEED, OUTPUT);
pinMode(PIN_FOCUS, OUTPUT);
pinMode(PIN_SHUTTER, OUTPUT);
}
void loop(){
while (Serial.available() == 0);
int val = Serial.read() – ‘0’;
f (val == 1) {
analogWrite(PIN_M1_SPEED, 255);
digitalWrite(PIN_M1_DIRECTION_FW, HIGH);
digitalWrite(PIN_M1_DIRECTION_RV, LOW);
}
http://www.instructables.com/id/Timelapse-slider-with-VB/
else if (val == 0){
analogWrite(PIN_M1_SPEED, 0);
digitalWrite(PIN_M1_DIRECTION_FW, LOW);
digitalWrite(PIN_M1_DIRECTION_RV, LOW);
}
else if (val == 3) {
analogWrite(PIN_M1_SPEED, 255);
digitalWrite(PIN_M1_DIRECTION_FW, LOW);
digitalWrite(PIN_M1_DIRECTION_RV, HIGH);
}
else if (val == 4) {digitalWrite(PIN_FOCUS, HIGH);
delay(100);
digitalWrite(PIN_SHUTTER, HIGH);
delay(100);
digitalWrite(PIN_FOCUS, LOW);
digitalWrite(PIN_SHUTTER, LOW);
delay(100);
}
else{
}
Serial.println(val);
Serial.flush();
}
File Downloads
vb_1.zip (530 bytes)[NOTE: When saving, if you see .tmp as the file ext, rename it to 'vb_1.zip']
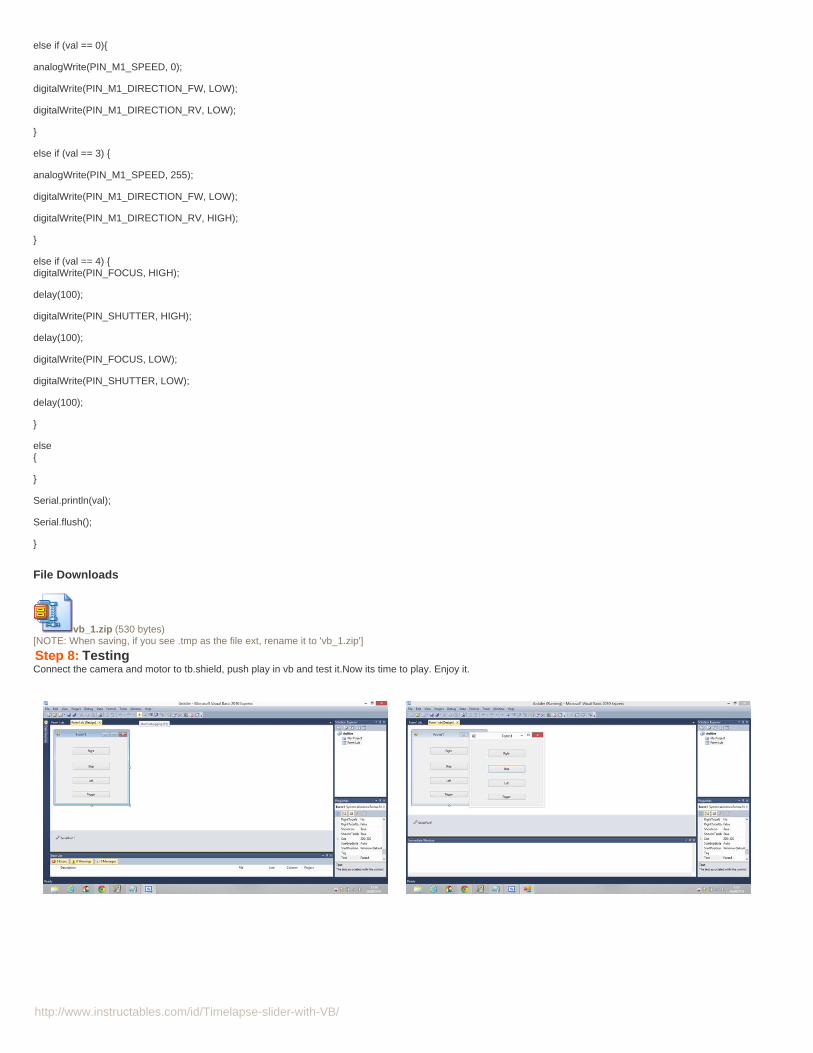
Step 8: TestingConnect the camera and motor to tb.shield, push play in vb and test it.Now its time to play. Enjoy it.
http://www.instructables.com/id/Timelapse-slider-with-VB/
Related Instructables
Arduinotb.shield (3 axistimelapsemotion control)by Timeblocks
Arduino+StepperMotor CameraSlider bymartinbolton
High Quality DIYCamera Slider(video) bytimcarlielle DIY motorized
movingtimelapsecamera dollywith Arduino bymastelios
THE WAGON byinevitable-crafts-lab
TimelapsePanningcontroller forGoPro Camerasby twinegarner
Advertisements
Comments