Embed Size (px)
Citation preview

TAC
Xen
ta©
Engineering TAC Xenta 527


TAC
Xen
ta©
Engineering TAC Xenta 527

Copyright © 2004 TAC AB. All rights reserved.
This document, as well as the product it refers to, is only intended for licensed users. TAC AB owns the copyright of this document and reservesthe right to make changes, additions or deletions. TAC AB assumes no responsibility for possible mistakes or errors that might appear in thisdocument.
Do not use the product for other purposes than those indicated in this document.
Only licensed users of the product and the document are permitted to use the document or any information therein. Distribution, disclosure,copying, storing or use of the product, the information or the illustrations in the document on the part of non-licensed users, in electronic ormechanical form, as a recording or by other means, including photo copying or information storage and retrieval systems, without the expresswritten permission of TAC AB, will be regarded as a violation of copyright laws and is strictly prohibited.
Trademarks and registered trademarks are the property of their respective owners. Microsoft® and Windows® are registered trademarks ofThe Microsoft Corporation.
Trademarks and registered trademarks are the property of their respective owners.
TAC Vista®, TAC Menta®, TAC Xenta® and TAC I-talk® are registered trademarks of TAC AB.

TAC Xenta, Engineering TAC Xenta 527 Contents
Contents
INTRODUCTION
1 About this Manual 91.1 Structure ..................................................................................................................... 91.2 Typographic Conventions .......................................................................................... 101.3 Prerequisites ............................................................................................................... 101.4 How to Use this Book ................................................................................................ 11
GETTING STARTED
2 Configuration Instructions 152.1 Preparing to Configure the Xenta 527 ....................................................................... 152.2 Setting the IP Address for the TAC Xenta 527.......................................................... 152.3 Connecting the Xenta 527 to Your Network.............................................................. 172.4 Using a Proxy Server ................................................................................................. 182.5 Working With Firewalls............................................................................................. 19
3 Logging Into the TAC Xenta 527 213.1 Connecting Through a Web Browser......................................................................... 213.2 Using a Self-Signed Certificate.................................................................................. 21
4 Setting Up I/NET Communications 254.1 Defining I/NET Host IP Addresses............................................................................ 254.2 Defining Host Masks.................................................................................................. 27
5 Securing the Web Server 295.1 Setting up Password-protected User Accounts .......................................................... 295.2 Assigning User Access Rights ................................................................................... 315.3 Logging Failed Login Attempts ................................................................................. 325.4 Extending Time Between Failed Login Attempts...................................................... 335.5 Configuring Secure Socket Layer Connections ......................................................... 335.6 Preventing Remote Configuration Clients from Altering Parameters ....................... 36
6 Creating Web Pages with XBuilder 396.1 Using XBuilder .......................................................................................................... 396.2 Creating a Project That Will Include I/NET Items .................................................... 406.3 Converting and Importing I/NET SAV Files ............................................................. 426.4 Updating Your Project with New I/NET SAV Files.................................................. 446.5 Displaying Dynamic I/NET Alarms and Events from Web Pages ............................ 456.6 Using I/NET Point Signals......................................................................................... 476.6.1 Mapping I/NET Point Signals to Web Pages ............................................................. 476.6.2 Mapping I/NET Point Signals to Graphic Pages........................................................ 49
TAC AB, April 2004 5 (94)0-004-7682-0 (EN)

Contents TAC Xenta, Engineering TAC Xenta 527
6.7 Using I/NET Page Links ............................................................................................ 546.7.1 Linking an I/NET Trend Log to a Graphic Page........................................................ 546.7.2 Linking an I/NET Time Schedule to a Graphic Page................................................. 586.8 Using the Find Function ............................................................................................. 62
REFERENCE
7 I/NET Objects in XBuilder 677.1 Network Objects ......................................................................................................... 687.2 Point Signals ............................................................................................................... 687.3 Page Links .................................................................................................................. 69
8 DCU-to-XML Conversion Utility 738.1 Launching the Utility from an Explorer Window ...................................................... 738.2 Running the Utility from the Command Line ............................................................ 74
9 History Logs 779.1 Occurrences of I/NET System and Web Server Alarms and Events.......................... 779.2 Records of Individuals Who Modified an Alarm Status ............................................ 77
10 Storing Data on the Xenta 527 7910.1 Data Limits ................................................................................................................. 7910.2 Web Server Data......................................................................................................... 7910.3 Protecting Stored Data................................................................................................ 7910.3.1 Maintaining Data During Power Interruptions........................................................... 7910.3.2 Backing Up and Restoring Data ................................................................................. 79
APPENDIX
A Frequently Asked Questions (FAQs) 85
B Troubleshooting 87
Index 91
6 (94) TAC AB, April 20040-004-7682-0 (EN)

INTRODUCTION
1 About this Manual


TAC Xenta, Engineering TAC Xenta 527 1 About this Manual
1 About this ManualThis manual describes the configuration and operation of the TAC Xenta 527. For information on supporting products, please refer to the manual for the product in question.
The TAC Xenta 527 provides the same capabilities as the Xenta 511, as well as additional features that support the use of I/NET systems. The focus of this manual is to explain the features that are unique to the Xenta 527. For an explanation of the features that are common to both the Xenta 511 and Xenta 527, refer to the Xenta 511 documentation.
1.1 StructureThe manual is divided into the following parts:
• IntroductionThe Introduction section contains information on how this manual is structured and how it should be used to find information in the most efficient way.
• Getting StartedThe Getting Started section contains a step-by-step description of how to engineer or carry out different tasks. It also gives you guided instructions on how to complete a sample project. If you want more information, see the corresponding chapter in the Ref-erence section of the manual.
• ReferenceThe Reference section contains more comprehensive information about various parts of the Getting Started section. It also provides you with information on alternative solutions not covered by the Getting Started section.
Note
We are continuously improving and correcting our documentation. This manual may have been updated.
Please check our Docnet site at www.tac.com for the latest version.
TAC AB, April 2004 9 (94)0-004-7682-0 (EN)
1 About this Manual TAC Xenta, Engineering TAC Xenta 527
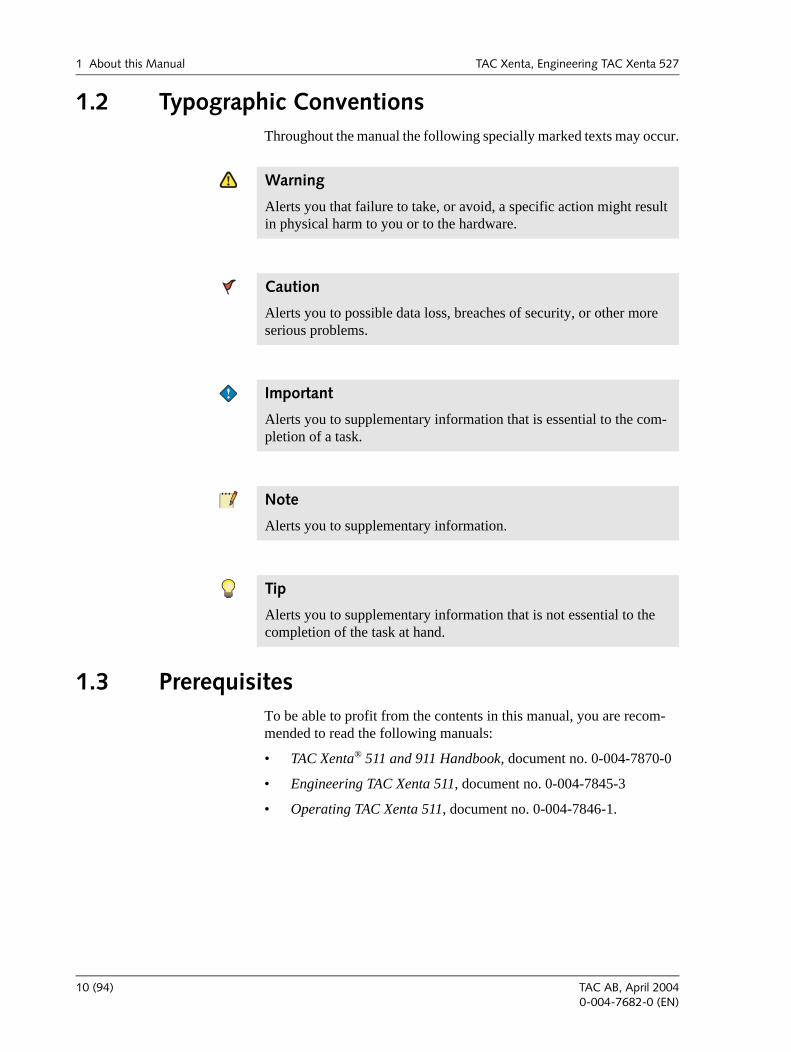
1.2 Typographic ConventionsThroughout the manual the following specially marked texts may occur.
1.3 PrerequisitesTo be able to profit from the contents in this manual, you are recom-mended to read the following manuals:
• TAC Xenta® 511 and 911 Handbook, document no. 0-004-7870-0
• Engineering TAC Xenta 511, document no. 0-004-7845-3
• Operating TAC Xenta 511, document no. 0-004-7846-1.
! Warning
Alerts you that failure to take, or avoid, a specific action might result in physical harm to you or to the hardware.
Caution
Alerts you to possible data loss, breaches of security, or other more serious problems.
Important
Alerts you to supplementary information that is essential to the com-pletion of a task.
Note
Alerts you to supplementary information.
Tip
Alerts you to supplementary information that is not essential to the completion of the task at hand.
10 (94) TAC AB, April 20040-004-7682-0 (EN)

TAC Xenta, Engineering TAC Xenta 527 1 About this Manual
1.4 How to Use this BookThis document follows a standard style indicating keystrokes, cursor movement, navigation, and data entry. TAC software is intended to be used primarily with a mouse. However, you may use keyboard equiva-lents as indicated below.
Filenames
Filenames appear in this manual as they appear on the screen of your computer. To further identify them as files, they appear as uppercase, italicized letters with any file extensions included. For instance, the con-figuration file used by your computer upon start up is shown as CON-FIG.SYS.
Menu Commands
Menu selections are shown in bold font with initial capitalization as in Edit. A menu item with the arrow symbol (>) indicates another menu level.
Keystrokes
Keystrokes are shown in bold surrounded by square brackets. For exam-ple, the Y key is shown as [Y], and the Enter key is shown as [Enter].
Certain standard keys are used within the application to perform certain system functions within editors, message boxes, etc. These are the [Enter], [Esc], [Tab], and Up and Down Arrow keys.
• [Enter] Key — Use this key to accept or activate a function, typi-cally a highlighted button.
• [Esc] Key — Use this key to cancel an action or editor. You may use the [Esc] key to back up from successive levels of windows until you return to the main application window.
• [Tab] Key — Use this key to cycle through the available active buttons or entry fields in an editor or screen.
• Up/Down Arrows — Use these keys to move the highlighted selection from one item to another in the various list, drop-down, and combo boxes found in the editors.
TAC AB, April 2004 11 (94)0-004-7682-0 (EN)

1 About this Manual TAC Xenta, Engineering TAC Xenta 527
12 (94) TAC AB, April 20040-004-7682-0 (EN)

GETTING STARTED
2 Configuration Instructions
3 Logging Into the TAC Xenta 527
4 Setting Up I/NET Communications
5 Securing the Web Server
6 Creating Web Pages with XBuilder


TAC Xenta, Engineering TAC Xenta 527 2 Configuration Instructions
2 Configuration Instructions
2.1 Preparing to Configure the Xenta 527Before you begin configuring the TAC Xenta 527, take time to gather crucial network information. First determine whether fixed IP address or DHCP (Dynamic Host Configuration Protocol) will be used. If DHCP is used, the TAC Xenta 527 IP address will be assigned by the DHCP server.
Gather the following additional information:
• IP address (If fixed; e.g. 172.20.4.21):
• Subnet mask (If fixed; e.g. 255.255.0.0):
• Default Gateway (e.g. 172.20.2.100):
• DNS (e.g. 192.165.248.22):
• Web site name:
• Domain name:
• Host name:
2.2 Setting the IP Address for the TAC Xenta 527In order to set the IP Address for the TAC Xenta 527, you will need to connect a serial cable between the Xenta 527 and your PC workstation. You can then use a terminal emulator such as Hyperterminal within Windows to communicate with the Xenta 527.
Fig. 2.1: Using a Terminal Emulator to Communicate with the TAC Xenta 527
A RS232 B 10Base-T
9600 bps8 data bitsno parity1 stop bitno flow control
TAC Xenta Programming Serial Kit, part no. 0-073-0920
TAC AB, April 2004 15 (94)0-004-7682-0 (EN)

2 Configuration Instructions TAC Xenta, Engineering TAC Xenta 527
1 Connect a serial cable between the PC and the Xenta 527 RS232 B port.
2 Within Windows, start a terminal emulator such as Hyperterminal.
3 Log into the TAC Xenta 527 by entering a valid user name and password.
4 Type setip to start the configuration script.
5 Answer the DHCP enable question as follows:
• No - Choose this answer if you will assign a static IP address.
• Yes - Choose this answer if you will allow the system to assign the IP address.
6 Depending on the DHCP setting you chose, continue as follows:
• If DHCP Enable = No, enter the following:
– IP address
– Subnet mask
• If DHCP Enable = Yes, enter the following:
– Default Gateway
– DNS
– Web site name
– Domain name
– Host name
7 Change root password (immediately or later, using passwd).
8 “Do you want to restart the IP interface?”
• Answer Yes to make the changes effective immediately
• Answer No to make the changes effective after the next 527 restart.
9 Exit by typing lo (log out) and pressing [Enter].
Fig. 2.2: Assigning the IP address using Hyperterminal
username:rootpassword:rootdsh/>setipDHCP enable
(yes/no) no..
dsh/>restart
16 (94) TAC AB, April 20040-004-7682-0 (EN)

TAC Xenta, Engineering TAC Xenta 527 2 Configuration Instructions
2.3 Connecting the Xenta 527 to Your NetworkThe TAC Xenta 527 integrates with I/NET and Vista networks by com-municating with these systems across the Ethernet. The following figure shows an example network configuration.
In order for the Xenta 527 to successfully establish communications with your building control systems, certain network criteria must be met. More specifically, the ports required for proper communication with these systems must be open and available to the Xenta 527. The TAC Xenta 527 uses the following communication ports:
• Port 80 (http access)
• Port 443 (https access)
• Port 20/21 (FTP access)
• Port 25 (SMTP access)
• Port 80 (Status Viewer, Alarm Viewer and Graphics Viewer)
• Port 1068 (LTA for Vista)
• Port 161 (snmp access)
• UDP Port 50069 (I/NET system access)
Connect the Xenta 527 to your network at the desired location. If nec-essary, configure the network’s proxies/firewalls to allow for proper communication. Refer to “Using a Proxy Server” and “Working With
Fig. 2.3: Network Location Options for the Xenta 527
Firewall 2
I/NET Network
Xenta 527
Firewall 1
Internet
DMZ Intranet
Vista Network
Router
Node
Node
Node
Option A
Xenta 527
Option B
NPR
Node
Node
NodeInstall the Xenta 527
at either location
Note
You have the option of changing the HTTP, HTTPS, and Dynamic variables communication Port settings. Refer to page 89 in Chapter B, “Troubleshooting”, for more information.
TAC AB, April 2004 17 (94)0-004-7682-0 (EN)

2 Configuration Instructions TAC Xenta, Engineering TAC Xenta 527
Firewalls” later in this chapter for general information about these devices.
The figure above shows an example network and the location options for the Xenta 527. Each location is described below.
Explanation of Option A:
The first location (see Fig. 2.3, option A) shows the Xenta 527 installed in the DMZ between two firewalls (be aware that this may be logically two firewalls but physically only one piece of hardware). This location requires the following configuration:
• Firewall 1: For security reasons, you may only want to open ports 80 and 443 from the internet. This is all that is necessary for inter-net access to the Xenta 527’s web interface.
• Firewall 2: Open ports 20, 21, 25, 80, 161, and 443 from the intra-net side. Also open port 1068 and UDP port 50069 from the DMZ side to allow the Xenta 527 to communicate with I/NET and Vista networks.
Explanation of Option B:
The second location (see Fig. 2.3, option B) shows the Xenta 527 installed on the network with no firewall between it and the building control systems. This location requires that both firewalls allow traffic through ports 80 and 443. The other ports are not required to be open on either firewall since the Xenta 527 is installed at a network location that allows it to communicate directly with I/NET and Vista networks.
2.4 Using a Proxy ServerA proxy server is a server that sits between a client application, such as a web browser, and a target server. The proxy server intercepts all requests to the target server. Proxy servers have two main purposes, as described below.
Improve Performance:
Proxy servers can be configured to improve client request response time by saving the results of all requests for a certain amount of time. If a cli-ent requests information that has been saved, the proxy server can respond to the client request quickly with the stored information.
Filter Requests:
A proxy server can modify a client request before sending it on to the server. When the server responds, the response also passes through the proxy before it is forwarded on to the client. The proxy can modify the headers in this response.
By intercepting and translating network transactions, a proxy server can:
18 (94) TAC AB, April 20040-004-7682-0 (EN)

TAC Xenta, Engineering TAC Xenta 527 2 Configuration Instructions
• Protect the client by monitoring potentially dangerous transac-tions.
• Enable the client to communicate using protocols that might not be implemented by the client software.
• Act as a gateway between a private network and a public network.
2.5 Working With FirewallsA firewall is a system designed to prevent unauthorized access to or from a private network. Firewalls can be implemented in both hardware and software, or a combination of both. Firewalls are frequently used to prevent unauthorized Internet users from accessing private networks connected to the Internet, especially intranets. All messages entering or leaving the intranet pass through the firewall, which examines each message and blocks those that do not meet the specified security crite-ria.
There are several types of firewall techniques:
• Packet filter: Looks at each packet entering or leaving the net-work and accepts or rejects it based on user-defined rules. Packet filtering is fairly effective and transparent to users, but it is diffi-cult to configure. In addition, it is susceptible to IP spoofing.
• Application gateway: Applies security mechanisms to specific applications, such as FTP and Telnet servers. This is very effec-tive, but can impose a performance degradation.
• Circuit-level gateway: Applies security mechanisms when a TCP or UDP connection is established. Once the connection has been made, packets can flow between the hosts without further check-ing.
• Proxy server: Intercepts all messages entering and leaving the network. The proxy server effectively hides the true network addresses.
In practice, many firewalls use two or more of these techniques in con-cert.
TAC AB, April 2004 19 (94)0-004-7682-0 (EN)

2 Configuration Instructions TAC Xenta, Engineering TAC Xenta 527
20 (94) TAC AB, April 20040-004-7682-0 (EN)

TAC Xenta, Engineering TAC Xenta 527 3 Logging Into the TAC Xenta 527
3 Logging Into the TAC Xenta 527
3.1 Connecting Through a Web Browser1 Start Internet Explorer.
2 Type the Xenta 527’s IP address in the address field in the browser and click the Go arrow.
3.2 Using a Self-Signed CertificateIf you are using a self-signed certificate (i.e. a self-signed certificate has been created in the XBuilder project and sent to the target), you will see the Security Alert dialog when you connect to the Xenta 527. This dia-log will appear each time you connect to the Xenta 527, unless you install the certificate on your system.
1 Proceed by performing one of the following actions:
• If you trust the content and would like to proceed without installing the self-signed certificate, click Yes and proceed with Step 3, below.
Fig. 3.1: Typing the Xenta 527’s IP Address
Fig. 3.2: Security Alert
TAC AB, April 2004 21 (94)0-004-7682-0 (EN)

3 Logging Into the TAC Xenta 527 TAC Xenta, Engineering TAC Xenta 527
• If you do not trust the content and would like to abort the con-nection, click No. In this case, do not perform any of the fol-lowing steps.
• You can view, and optionally install, the self-signed certificate by clicking View Certificate. If you wish to install the certifi-cate, proceed with Step 2, below.
2 If you are viewing the certificate and wish to install it, perform the following steps:
a Click Install Certificate. The Install Certificate Wizard opens.
b Click Next in each dialog presented by the wizard. We recom-mend that you use the default settings. When the final dialog appears, click Finish to end the wizard.
c Close and restart the web browser.
d In the web browser’s address field, type the Xenta 527’s IP address.
Since the certificate is installed, no security alert dialog will appear when you connect to the Xenta 527. Proceed to Step 3.
Fig. 3.3: Viewing the Self-signed Certificate
Fig. 3.4: Typing the Xenta 527’s IP Address
22 (94) TAC AB, April 20040-004-7682-0 (EN)

TAC Xenta, Engineering TAC Xenta 527 3 Logging Into the TAC Xenta 527
3 Log in as the System Administrator by performing the following steps:
a The root account is the system administrator. Therefore, enter a Username of root.
b Enter the password for the root account. The default password for this account is root.
c Click Login.
Being logged in as the System Administrator, you are now able to set up I/NET communications and create user accounts.
Fig. 3.5: Logging In
TAC AB, April 2004 23 (94)0-004-7682-0 (EN)

3 Logging Into the TAC Xenta 527 TAC Xenta, Engineering TAC Xenta 527
24 (94) TAC AB, April 20040-004-7682-0 (EN)

TAC Xenta, Engineering TAC Xenta 527 4 Setting Up I/NET Communications
4 Setting Up I/NET Communications
4.1 Defining I/NET Host IP AddressesIn order for the TAC Xenta 527 to communicate with I/NET devices from across an Ethernet, it must first obtain the IP addresses of remote I/NET hosts from at least one I/NET reference host. A Reference Host is any I/NET workstation or NetPlus Router that serves as a source of IP addresses. Any host workstation or NetPlus Router attached to an Ethernet LAN can be used as a Reference Host.
I/NET host IP addresses may be entered from a web page or from the console, or downloaded as part of an XBuilder project. You can also assign an I/NET host number to the Xenta 527 while you are defining IP addresses.
From a Web Browser:
1 Expand the INet section of the navigation tree as shown in the fol-lowing figure and select Configuration Profile to define Host IP addresses.
2 Define an IP Address for each reference host. If you define less then eight reference hosts, set the unused fields to "0.0.0.0".
Fig. 4.1: Defining Reference Host IP Addresses from a Web Browser
TAC AB, April 2004 25 (94)0-004-7682-0 (EN)

4 Setting Up I/NET Communications TAC Xenta, Engineering TAC Xenta 527
3 Assign an I/NET host number to the Xenta 527. This can be any number from 1 to 63. Make sure that the number you define is unique among all hosts on the I/NET network.
From a Console Window:
In order to enter host IP addresses from a console window, you will need to connect a serial cable between the Xenta 527 and your PC work-station. You can then use a terminal emulator such as Windows Hyper-terminal to communicate with the Xenta 527. If necessary, refer to Fig. 2.1 (page 15) to view a typical serial cable connection.
1 After logging into the Xenta 527, begin entering host IP addresses by typing inethost at the command line (see the figure below).
The inethost command is only available from the console. The addresses you define enable the Xenta 527 to communicate with one or more reference hosts. Up to eight reference host IP addresses can be defined. Set any unused reference hosts to "0.0.0.0".
2 Assign an I/NET host number to the Xenta 527. This can be any number from 1 to 63. Make sure that the number you define is unique among all hosts on the I/NET network
From an XBuilder Project:
In Project mode, the I/NET network is imported into XBuilder. When you transfer the compiled project to the Xenta 527, any Host IP addresses that you have defined from a web browser or from a console window will be overwritten.
1 In XBuilder, open or create a project that uses the X527 project template. For instructions on how to create a project, refer to “Cre-ating a Project That Will Include I/NET Items” on page 40.
Fig. 4.2: Entering Host IP Addresses from a Console Window
26 (94) TAC AB, April 20040-004-7682-0 (EN)

TAC Xenta, Engineering TAC Xenta 527 4 Setting Up I/NET Communications
2 In the Network pane of XBuilder, expand the IP Backbone item and highlight the INET object.
3 In the parameters for the INET object, define IP addresses for up to eight reference hosts. Set any unused reference hosts to "0.0.0.0".
4 Define an I/NET host number for the Xenta 527. This can be any number from 1 to 63. Make sure that the number you define is unique among all hosts on the I/NET network.
5 Compile the project and download it to the TAC Xenta 527.
4.2 Defining Host MasksMasks are part of a filtering system I/NET uses to route messages, alarms, and data to host workstations. The TAC Xenta 527 also makes use of masks in order to receive alarm and event information from the I/NET system.
The masks you define in the Xenta 527 are sent to remote hosts in the I/NET system, allowing them to determine whether to send messages to the Xenta 527. These remote hosts (workstations and NetPlus Routers) compare this mask information to the mask information that accompa-nies each message received from an I/NET controller. If this compari-son results in a match, the message is routed from the remote host to your Xenta 527.
Fig. 4.3: The INET Object in XBuilder
Fig. 4.4: Setting IP Addresses from XBuilder
TAC AB, April 2004 27 (94)0-004-7682-0 (EN)

4 Setting Up I/NET Communications TAC Xenta, Engineering TAC Xenta 527
1 Expand the INet section of the navigation tree as shown in the fol-lowing figure and select Host Masks Summary to define Host IP addresses.
2 In the Host Mask Summary, click on a host IP address to set its routing masks. The Host Routing Mask Editor opens.
3 Activate (!) or deactivate (#) masking positions as necessary. You can define up to 32 different masks for alarms, and another 32 different masks for events. The masks you define in this editor are sent to the selected host, allowing it to determine whether to send messages to the Xenta 527.
If necessary, you can use the Set All and Clear All buttons to speed up the selection process.
4 With all masks properly defined, click Save to accept your set-tings.
5 Repeat these steps as necessary to define masks for other I/NET hosts.
Fig. 4.5: Defining Host Routing Masks
Fig. 4.6: Launching the Host Routing Mask Editor
28 (94) TAC AB, April 20040-004-7682-0 (EN)

TAC Xenta, Engineering TAC Xenta 527 5 Securing the Web Server
5 Securing the Web Server
5.1 Setting up Password-protected User AccountsThe TAC Xenta 527 is a multi-user system that allows each user to have access to specific parts of the system. The authorization level of the dif-ferent users can only be set by the system administrator, the “root” user. For security reasons, you should change the password for the root user while you are commissioning the Xenta 527.
Read and read/write authorization is assigned at the directory level. The rights are set recursively, which means that subdirectories get the same access level as the folder in which they are located.
The Xenta 527 uses the Xenta 511’s method for assigning read or read/write rights to objects. However, the Xenta 527 also allows you to assign user access rights to I/NET links and stations.
In User Administration you can create a new user by performing the fol-lowing steps:
1 Select Create New User. The Create User screen displays (see the figure on the next page).
2 In the User Details section, enter the user’s name and a brief description of this user account. The four first characters of the name are used as a signature in connection with I/NET events and alarms.
3 In the Password Options section, define a password for the new user.
Fig. 5.1: User Administration
TAC AB, April 2004 29 (94)0-004-7682-0 (EN)

5 Securing the Web Server TAC Xenta, Engineering TAC Xenta 527
4 Use the User Settings section to customize the new account. The following options are available:
• Profile – Assign one of the following profiles to this user:
– Web User - The web user has minimal access to the sys-tem. This user cannot browse the I/NET system, control I/NET points, access I/NET trend logs, or access I/NET time schedules.
– Operator - The operator has access to all viewers and whatever is needed to supervise the operation of the building. By default, the operator has read/write permis-sion in the relevant parts of the system, and is able to han-dle all alarms.
A third setting, called Administrator, also exists, but this set-ting is restricted to the root user account. Refer to the Xenta 511 documentation for more information about these options.
• HTTPS Idle TimeOut – This setting determines what duration of user inactivity will cause automatic user logout. You can choose a setting from 15 minutes to 24 hours.
• FTP – Choose whether or not this user will have the ability to transfer files to and from the Xenta 527 using FTP. Be aware that FTP is not a secure method of communication. Pass-words, etc. can easily be intercepted.
Fig. 5.2: Creating a New User
30 (94) TAC AB, April 20040-004-7682-0 (EN)

TAC Xenta, Engineering TAC Xenta 527 5 Securing the Web Server
5 Use the Frame Settings section to link customized web pages to this user account. Using this feature, you can design and specify individual web pages for different users. Refer to the Xenta 511 documentation for further information about this feature.
6 Click the Create User button to create the new user account.
5.2 Assigning User Access RightsAn I/NET user can receive access rights to I/NET using the I/NET Access Rights Explorer. Expand the navigation tree as shown in the fol-lowing figure and select Access Rights. Initially, the Link layer of your I/NET system is displayed. You can assign user access rights at this level, and penetrate down to the next layer by selecting the appro-priate link.
After you penetrate a link, the stations available for that link are dis-played. You can continue assigning user access rights as necessary to each station.
Ultimately, a user’s access rights will be determined by the combination of their link access rights, station access rights, and user authority.
Fig. 5.3: Assigning User Access Rights to I/NET Links
TAC AB, April 2004 31 (94)0-004-7682-0 (EN)

5 Securing the Web Server TAC Xenta, Engineering TAC Xenta 527
The available selections are:
The four first characters of the User name are used as a signature in con-nection with events and alarms.
I/NET User access rights are stored in a system file. This file can only be edited in the system using the web browser, although the file may be stored in the corresponding XBuilder project.
5.3 Logging Failed Login AttemptsThe system creates a log file of any failed log in attempts. The log file keeps the latest 50 entries. Each entry is 176 bytes. You can view the log file by selecting Utilities > Error > Login Error Log in the System view.
Fig. 5.4: Assigning User Access Rights to I/NET Controllers
Link 00 Station 00Station 01Station 02..Station 63
Link 01 Station 00Station 01Station 02..Station 63
..Link 99 Station 00
Station 01Station 02..Station 63
32 (94) TAC AB, April 20040-004-7682-0 (EN)

TAC Xenta, Engineering TAC Xenta 527 5 Securing the Web Server
The errors shown are registered in the system login error log.The format is as follows:
host - user date “url + error text” http status 0
Example:
172.20.10.105 - 203-008-01 01/Jun/2001:08:22:26 +0000 "GET /www/index/index.html HTTP/1.1
Error: Bad Portal timestamp TS=20010404120000" 403 0
Here is a brief description of the error components:
5.4 Extending Time Between Failed Login AttemptsAs a deterrent to unauthorized users, the system takes an increasing amount of time between log in attempts upon each failure. A login delay is introduced separately, based on the user’s User ID and IP address, as follows:
• After 3 consecutive login failures, the login is disabled for 1 minute.
• After the next login failure, the login is disabled for 2 minutes.
• After the next login failure, the login is disabled for 3 minutes.
• After the next login failure, the login is disabled for 4 minutes.
• After the next and following login failures, the login is disabled for 5 minutes.
A successful login or a system restart (RELOAD, WARMSTART, COLDSTART) will reset the login attempt delay.
5.5 Configuring Secure Socket Layer ConnectionsSSL is short for Secure Sockets Layer, a protocol developed by Netscape for transmitting private documents via the Internet.
SSL works by using a public key to encrypt data that is transferred via the SSL connection. Both Netscape Navigator and Internet Explorer support SSL, and many web sites use the protocol to obtain confidential user information, such as credit card numbers.
Heading Descriptionhost The fully qualified domain name or IP address of
the connecting machine.user The user ID used in the request.date Date and time when error occurred.“url + error text” The http method and URL. An error explanation is
added. http status The http error code.
TAC AB, April 2004 33 (94)0-004-7682-0 (EN)

5 Securing the Web Server TAC Xenta, Engineering TAC Xenta 527
SSL uses certificate-based authentication.
The TAC Xenta 527 is, by default, configured with a self-signed certif-icate from the factory. Some web browsers require parameters in the certificate to be set according to the web site name, i.e. the IP address or a DNS name. The SSL certificate generator creates a new certificate with the correct parameter settings.
Certificates are used for the authentication and secure exchange of information on non-secured networks, such as the Internet. Most com-monly, server certificates are used to enable clients to verify the authen-ticity of web sites.
Two Different Certificates, Self-Signed and CA
In XBuilder you can choose between two types of certificates, self-signed certificates and CA certificates.
Self-Signed Certificates
Self-Signed Certificates are created locally and thus not installed in your browser. When a Self-Signed Certificate is used, the certificate must also be installed on the client i.e. the computer used to browse the Xenta 527.
The Xenta 527 device must be restarted to enable the new certificate. The new certificate is accepted by browsers and may be installed.
The Getting Started section of this manual explains how to create and use a self-signed certificate.
CA Certificates
CA Certificates are issued by trusted certificate authorities (CAs) like Verisign. These certificates are already installed with the Internet browser. Thus, when using a CA Certificate, there is no need to do any-thing to the client i.e. the computer used for browsing the Xenta 527.
Using a CA Certificate
1 Within an opened project in XBuilder, select Tools > Generate Certificate from the menu.
The Generate Certificate dialog opens.
2 Use the radio button and select CA-signed. Click Next.
34 (94) TAC AB, April 20040-004-7682-0 (EN)

TAC Xenta, Engineering TAC Xenta 527 5 Securing the Web Server
3 Use the CA-signed Certificate dialog to browse to the certificate and the private key.
4 Click Next and then Finish to send the certificate to target.
TAC AB, April 2004 35 (94)0-004-7682-0 (EN)

5 Securing the Web Server TAC Xenta, Engineering TAC Xenta 527
5 The Xenta 527 has to be restarted for the certificate to take effect.
Note that the CA Certificates are already installed with the browser. Thus, nothing has to be done to the client computer, (i.e. the computer containing the browser that is used to connect to the TAC Xenta 527.)
5.6 Preventing Remote Configuration Clients from Altering Parameters
Local commands to prevent or allow remote configuration can be issued to the Xenta 527 from a console window. This will require that you con-nect a serial cable between the Xenta 527 and your PC workstation. You can then use a terminal emulator such as Windows Hyperterminal to communicate with the Xenta 527. If necessary, refer to Fig. 2.1 (page 15) to view a typical serial cable connection.
By default, remote configuration is enabled. Regardless of the which state is selected (i.e., enabled or disabled), the default state of “enabled” is reinforced following a system restart RELOAD (typically at installa-tion). Other restart types will keep the selected state.
You can disable remote configuration by issuing the following com-mand on the local console:
> disrcfg<CR>
This command will disable remote configuration of the following parameters:
• DHCP enable/disable
• IP-address
• Subnet mask
• Default gateway
• DNS
• Website name
• Domain name
• Host name
• HTTP port
• HTTPS port
• Dynamic variables communication Port issued from the web interface.
36 (94) TAC AB, April 20040-004-7682-0 (EN)

TAC Xenta, Engineering TAC Xenta 527 5 Securing the Web Server
You can enable remote configuration by issuing the following com-mand on the local console:
>enrcfg<CR>
This command will enable remote configuration of the parameters listed above.
TAC AB, April 2004 37 (94)0-004-7682-0 (EN)

5 Securing the Web Server TAC Xenta, Engineering TAC Xenta 527
38 (94) TAC AB, April 20040-004-7682-0 (EN)

TAC Xenta, Engineering TAC Xenta 527 6 Creating Web Pages with XBuilder
6 Creating Web Pages with XBuilder
6.1 Using XBuilderWhen you create an XBuilder project that uses the Xenta 527 template, an "INET" object becomes available (see the figure below). This object provides functions that allow you to add I/NET-related items to your project.
The DCU-to-XML Conversion Tool
The "INET" object in XBuilder relies on an DCU-to-XML conversion tool that is included in the XBuilder installation. This tool converts I/NET SAV files into an XML file that can then be imported into your XBuilder project. When you import the XML file, XBuilder creates a representation of the I/NET network. Any portions of the I/NET net-work that are defined in the I/NET SAV files will be included in the associated XBuilder representation.
The I/NET Network in XBuilder
The following figure shows a portion of an I/NET network that has been converted from a SAV file and imported into XBuilder. The figure is annotated to describe how each object in the network view represents a portion of the I/NET network.
Fig. 6.1: The INET Object in XBuilder
Fig. 6.2: I/NET Point Structure in XBuilder
Link NumberStation Number
Point NumberBit OffsetPoint Type
Point Signals
Page Link
TAC AB, April 2004 39 (94)0-004-7682-0 (EN)

6 Creating Web Pages with XBuilder TAC Xenta, Engineering TAC Xenta 527
Sequence of Tasks
The overall sequence that allows you to include I/NET-related items in your project is as follows:
1 Create an XBuilder project that uses the Xenta 527 template.
2 Convert one or more I/NET SAV files to an XML file.
3 Import the XML file in order to create an XBuilder representation of the I/NET network within your project.
4 Add resulting I/NET items to the web pages you create within your project.
6.2 Creating a Project That Will Include I/NET ItemsUse the following steps to create an XBuilder project that will contain I/NET-related items.
1 Within XBuilder, start a new project by selecting File > New Project... from the main menu.
2 In the Create New Project dialog, perform the following tasks:
a Define a name for the new project.
b Choose the appropriate storage location for the project files.
c Select the X527 Project template.
d Select OK to save these settings.
Fig. 6.3: Entering Basic Project Information
40 (94) TAC AB, April 20040-004-7682-0 (EN)

TAC Xenta, Engineering TAC Xenta 527 6 Creating Web Pages with XBuilder
3 In the Project Settings dialog, enter a description of the project and set the other parameters as necessary. Select OK to continue.
4 In the Network pane of XBuilder, expand the IP Backbone item and verify that an INET object is available.
5 Highlight the INET object and define IP addresses for up to eight reference hosts. Leave unused addresses set to 0.0.0.0.
6 Set the HostNum parameter to a value from 1 to 63. This parame-ter defines the host address that I/NET will use in order to commu-nicate with the Xenta 527. Make sure that the address you define is
Fig. 6.4: Entering Project Settings
Fig. 6.5: The INET Object in XBuilder
Fig. 6.6: Setting IP Addresses from XBuilder
TAC AB, April 2004 41 (94)0-004-7682-0 (EN)

6 Creating Web Pages with XBuilder TAC Xenta, Engineering TAC Xenta 527
unique (i.e., it is not already being used by any other host device on the I/NET network).
6.3 Converting and Importing I/NET SAV FilesUse the following steps to create a representation of the I/NET network within your XBuilder project:
1 Right-click on the INET object and select Create Network from SAV files from the resulting pop-up menu.
2 In the DCU to XML Conversion dialog, setup the conversion pro-cess by completing the following tasks:
a Use the Add Files button to locate and select the I/NET SAV files that you wish to convert. The files you select will appear in the dialog’s Source SAV list.
b Define a complete path and filename for the XML file that the conversion process will create. The ... button opens a Save As
Fig. 6.7: Converting I/NET SAV Files
Note
The utility that converts I/NET SAV files to XML can also be used from outside of XBuilder. Refer to “DCU-to-XML Conversion Util-ity” on page 61 for more information.
Fig. 6.8: DCU to XML Conversion Dialog
42 (94) TAC AB, April 20040-004-7682-0 (EN)

TAC Xenta, Engineering TAC Xenta 527 6 Creating Web Pages with XBuilder
dialog that you can use in order to browse through your file system.
c Select OK to convert the selected SAV files into a single XML file.
3 Import the newly-created XML file by right-clicking the INET object and selecting Insert TAC INET Network... from the result-ing pop-up menu.
4 Select the appropriate XML file and click Open to import the file.
5 Expand the INET object and verify that your project now contains imported I/NET network objects.
Fig. 6.9: Importing the XML File
Fig. 6.10: Selecting the XML File
Fig. 6.11: Viewing the Imported I/NET Network
TAC AB, April 2004 43 (94)0-004-7682-0 (EN)

6 Creating Web Pages with XBuilder TAC Xenta, Engineering TAC Xenta 527
6.4 Updating Your Project with New I/NET SAV FilesModifications within your I/NET system such as adding or deleting points and point extensions will cause SAV files to change. If changes occur in any of the I/NET SAV files that you have already converted and imported into your project, you must update your project so that it accurately represents the modified I/NET network. This will require that you convert updated I/NET SAV files to a new version of the XML file that you imported earlier.
Use the following steps to update the network in your project:
1 Right-click on the INET object and select Create Network from SAV files from the resulting pop-up menu.
2 In the DCU to XML Conversion dialog, setup the conversion pro-cess by completing the following tasks:
a Use the Add Files button to locate and select the updated I/NET SAV files that you wish to convert. The files you select will appear in the dialog’s Source SAV list.
b Define a complete path and filename for the XML file that the conversion process will create. Be sure to specify the same path and filename for the resulting XML file that you defined earlier, when you built the network in your current project.
Fig. 6.12: Converting I/NET SAV Files
Fig. 6.13: DCU to XML Conversion Dialog
44 (94) TAC AB, April 20040-004-7682-0 (EN)

TAC Xenta, Engineering TAC Xenta 527 6 Creating Web Pages with XBuilder
c Select OK to convert the selected SAV files into a single XML file.
3 Update the network in the project by right-clicking the INET object and selecting Update Network from the resulting pop-up menu.
XBuilder automatically selects the same XML file that was last imported, and then re-imports it.
4 Expand the INET object and verify that your project now contains updated I/NET network objects.
6.5 Displaying Dynamic I/NET Alarms and Events from Web Pages
In the following example, we will configure the project to provide Java-enabled I/NET alarms and events pages.
1 Add an alarm page to the project by right-clicking the site in the system view and selecting Add Page > Alarm Page from the resulting pop-up menu.
Fig. 6.14: Updating the Network
Note
Alarm and Event pages use Java to display dynamic information. If a user attempts to view these pages from a web browser that is not Java-enabled, no data will display.
Fig. 6.15: Adding an Alarm Page
TAC AB, April 2004 45 (94)0-004-7682-0 (EN)
6 Creating Web Pages with XBuilder TAC Xenta, Engineering TAC Xenta 527
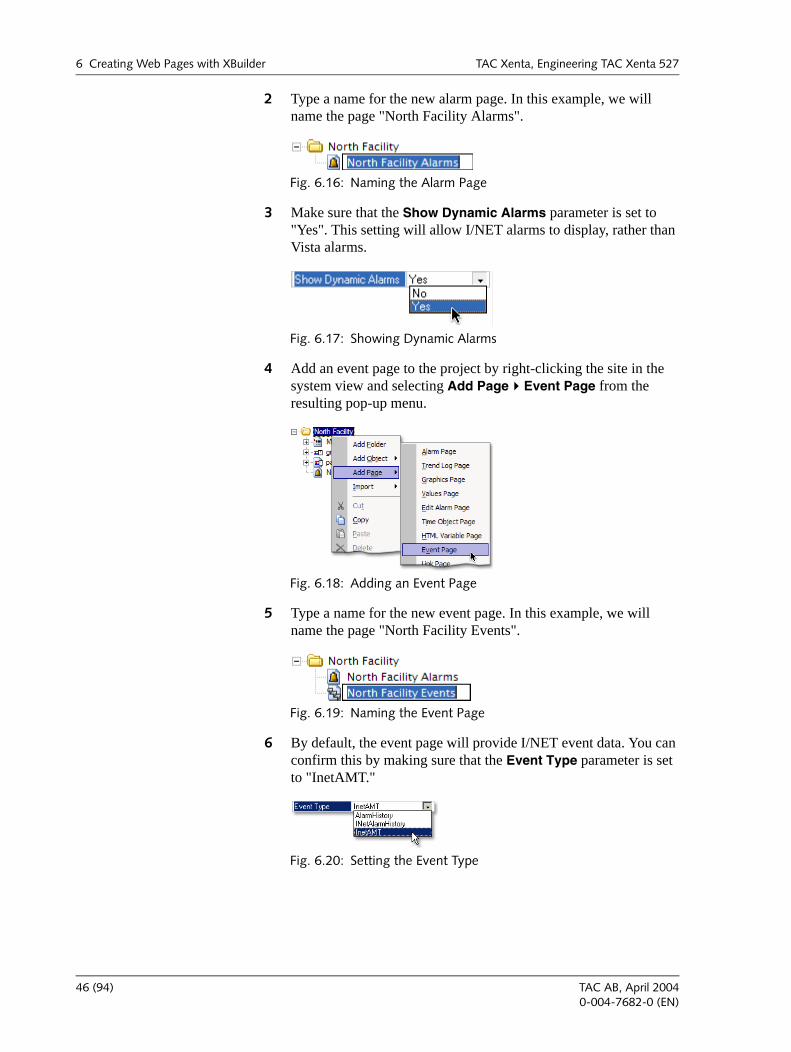
2 Type a name for the new alarm page. In this example, we will name the page "North Facility Alarms".
3 Make sure that the Show Dynamic Alarms parameter is set to "Yes". This setting will allow I/NET alarms to display, rather than Vista alarms.
4 Add an event page to the project by right-clicking the site in the system view and selecting Add Page > Event Page from the resulting pop-up menu.
5 Type a name for the new event page. In this example, we will name the page "North Facility Events".
6 By default, the event page will provide I/NET event data. You can confirm this by making sure that the Event Type parameter is set to "InetAMT."
Fig. 6.16: Naming the Alarm Page
Fig. 6.17: Showing Dynamic Alarms
Fig. 6.18: Adding an Event Page
Fig. 6.19: Naming the Event Page
Fig. 6.20: Setting the Event Type
46 (94) TAC AB, April 20040-004-7682-0 (EN)

TAC Xenta, Engineering TAC Xenta 527 6 Creating Web Pages with XBuilder
7 Highlight the "TAC_Xenta_527" object in the network pane and make sure that the IP address, Username and Password param-eters are defined.
8 Compile the project and send it to the Xenta 527. Using a Web browser, verify that the alarm and event pages display properly.
6.6 Using I/NET Point SignalsWithin XBuilder, each I/NET point has associated signals. A point sig-nal represents one particular aspect of the point. For example, the "value" point signal represents the point’s current value. For a descrip-tion of each I/NET point signal, refer to “Point Signals” on page 68.
You can use I/NET point signals within web pages and graphic pages in your project. The procedures for doing so are described below.
6.6.1 Mapping I/NET Point Signals to Web Pages
Mapping an I/NET point to a web page can be as easy as dragging a sig-nal from XBuilder’s network view and dropping it onto the appropriate web page in the system view. The way the point information on a page is displayed to the user, and the way it can be used, depends on the type of web page on which it resides.
Fig. 6.21: Checking the IP Address, Username, and Password
Fig. 6.22: Viewing the Event Page from a Web Browser
TAC AB, April 2004 47 (94)0-004-7682-0 (EN)

6 Creating Web Pages with XBuilder TAC Xenta, Engineering TAC Xenta 527
In the following example, we will map I/NET point information to a values page.
1 Add a values page to the project by right-clicking the site in the system view and selecting Add page > Values page from the resulting pop-up menu.
2 Type a name for the new values page. In this example, we will name the page "Main Lobby".
3 Add signals to the values page by dragging signals from the net-work view and dropping them on the values page. In this example, we will add the value, state, test, alarm, old, and alarm_ack signals for I/NET point 51040408 DA to the values page.
Fig. 6.23: Adding a Values Page
Fig. 6.24: Adding Signals to a Values Page
48 (94) TAC AB, April 20040-004-7682-0 (EN)

TAC Xenta, Engineering TAC Xenta 527 6 Creating Web Pages with XBuilder
4 For each signal, enter a description. This text is what will appear on the resulting web page, and should therefore, be useful to the end-user.
5 Compile the project and send it to the Xenta 527. Using a Web browser, verify that the web page displays properly.
6.6.2 Mapping I/NET Point Signals to Graphic Pages
In the following example, we will map I/NET point information to a graphic page.
1 Add a graphic object to the project by right-clicking the site in the system view and selecting Add Object > Graphic from the result-ing pop-up menu.
Fig. 6.25: Entering a Description of the Signal
Note
When viewing a point’s value, be aware that the Xenta 527 uses an Ansi-C 32-bit standard for floating points. Point values that exceed this limit of floating points are subject to inconsistent displays.
Fig. 6.26: Viewing the Values Page from a Web Browser
Fig. 6.27: Adding a Graphic Object
TAC AB, April 2004 49 (94)0-004-7682-0 (EN)

6 Creating Web Pages with XBuilder TAC Xenta, Engineering TAC Xenta 527
2 In the New Graphic dialog, specify a name and location for the new graphic.
3 Type a name for the new graphic object. In this example, we will name the object "graphic - Main Lobby".
4 Open the new graphic in the Vista Graphic Editor by right-clicking the object and selecting Edit Graphic... from the resulting pop-up menu.
5 Add a new item to the page by clicking a tool in the Drawing Tools toolbar and then clicking on a blank area in the graphic
Fig. 6.28: Saving the New Graphic Object
Fig. 6.29: Naming the New Graphic Object
Fig. 6.30: Editing the Graphic
50 (94) TAC AB, April 20040-004-7682-0 (EN)

TAC Xenta, Engineering TAC Xenta 527 6 Creating Web Pages with XBuilder
page. In this example, we will add a Digital Presentation object to the page and assign it an I/NET point value.
6 Right-click anywhere on the graphic page to change your cursor back into an arrow.
7 Now double-click the new item on the graphic page to view its attributes.
Fig. 6.31: Adding an Object to the Graphic Page
Fig. 6.32: Viewing the Item’s Attributes
TAC AB, April 2004 51 (94)0-004-7682-0 (EN)

6 Creating Web Pages with XBuilder TAC Xenta, Engineering TAC Xenta 527
8 Link an I/NET point value to the graphic object by dragging a "value" signal from XBuilder and dropping it onto the Object field in the attributes dialog.
9 The Object field now contains the path of the signal that you just dropped. Set the other parameters in the attributes dialog as desired and click OK to save your settings.
10 Save the graphic and return to XBuilder. Verify that the graphic object in the system view now has a child item representing the signal that you just linked to the graphic.
11 Add a graphic page to the project by right-clicking the site in the system view and selecting Add Page > Graphic Page from the resulting pop-up menu.
Fig. 6.33: Dragging and Dropping a Signal
Fig. 6.34: Verifying the Linked Signal
Fig. 6.35: Adding a Graphic Page
52 (94) TAC AB, April 20040-004-7682-0 (EN)

TAC Xenta, Engineering TAC Xenta 527 6 Creating Web Pages with XBuilder
12 Type a name for the new graphic page. In this example, we will name the page "page - Main Lobby".
13 Link the graphic object to the graphic page by dragging and drop-ping the object onto the page.
14 Verify that the graphic page in the system view now has a child item representing the graphic that you just linked to the page.
15 Compile the project and send it to the Xenta 527. Using a Web browser, verify that the graphic page displays properly.
Fig. 6.36: Naming the New Graphic Page
Fig. 6.37: Linking a Graphic Object to a Graphic Page
Fig. 6.38: Verifying the Linked Graphic
Fig. 6.39: Viewing the Graphic Page from a Web Browser
TAC AB, April 2004 53 (94)0-004-7682-0 (EN)

6 Creating Web Pages with XBuilder TAC Xenta, Engineering TAC Xenta 527
6.7 Using I/NET Page LinksIn addition to the point signals that are associated with an I/NET net-work in XBuilder, page links are also available. The following I/NET page links can be used within your project and are further described in “Page Links” on page 69:
Point Control – Links to the Point Control page. This page link is included with all I/NET points.
Trend – Links to the Trend Setup page. This page link is included with I/NET points that have a trend (TR) extension.
Trendlog – Links to the Trend Chart page. This page link is included with I/NET points that have a trend (TR) extension.
Time Schedule – Links to the Time Schedule page. This page link is included with I/NET points that have a time schedule (TS) extension.
An I/NET page link can be connected to a standard link page in XBuilder. The link page can optionally be connected to a graphic page, allowing a user to click on a defined area in the graphic to jump directly to the appropriate I/NET page. The procedures for creating these con-nections are the same for each type of I/NET page link. For your conve-nience, procedures for linking the Trendlog and Time Schedule pages to a graphic page are described below.
6.7.1 Linking an I/NET Trend Log to a Graphic Page
As a system administrator or user with "operator" privileges, you can access an I/NET trend log by connecting to the Xenta 527 from a web browser, selecting Utilities > INet > Browse I/NET from the navigation tree, and browsing the I/NET system. Using this method, you can locate an I/NET point that has a TR (trend) extension, configure the trend log as necessary, and then view the trend log.
A quicker way to access a trend log would be to jump to it from a link, without having to browse through the I/NET system. In the following
54 (94) TAC AB, April 20040-004-7682-0 (EN)

TAC Xenta, Engineering TAC Xenta 527 6 Creating Web Pages with XBuilder
example, we will create a link page that links directly to an I/NET trend log, and then associate the link page with a link area on a graphic page.
1 Add a Link Page to the project by right-clicking the site in the sys-tem view and selecting Add Page > Link Page from the resulting pop-up menu.
2 Type a name for the new link page. In this example, we will name the page "link - Trend Log".
3 Expand the link page object to expose its link.
4 Associate the link with an I/NET trend log by dragging and drop-ping a Trendlog object onto the link object.
Fig. 6.40: Adding a Link Page
Fig. 6.41: Naming the New Link Page
Fig. 6.42: Expanding the Link Page Object
Fig. 6.43: Creating a Link to an I/NET Trend Log
TAC AB, April 2004 55 (94)0-004-7682-0 (EN)

6 Creating Web Pages with XBuilder TAC Xenta, Engineering TAC Xenta 527
5 Now that you have created a link page that jumps to an I/NET trend log, you can associate the link page with a link area on a graphic page.
Perform one of the following tasks:
• Open an existing graphic object by right-clicking the object and selecting Edit Graphic... from the resulting pop-up menu.
• Add a new graphic object to the project by performing the first 4 steps in “Mapping I/NET Point Signals to Web Pages” on page 47.
6 Add a new link area to the page by clicking the Link Area tool in the Drawing Tools toolbar and then drawing a link area in the graphic page. In this example, we will create a link area around an I/NET point value.
7 Right-click anywhere on the graphic page to change your cursor back into an arrow.
8 Right-click the link area and select Attributes from the resulting pop-up menu. The Link Area attributes dialog opens.
Fig. 6.44: Creating a Link Area on the Graphic Page
Fig. 6.45: Viewing the Link Area Attributes
56 (94) TAC AB, April 20040-004-7682-0 (EN)

TAC Xenta, Engineering TAC Xenta 527 6 Creating Web Pages with XBuilder
9 Associate the link page in XBuilder with the link area on the graphic page by dragging and dropping the link page object onto the Linked Graphic Object field in the attributes dialog.
10 The Linked Graphic Object field now contains the path of the link page that you just dropped. Click OK to save this setting.
11 Save the graphic and return to XBuilder.
12 Compile the project and send it to the Xenta 527. Using a Web browser, verify that the graphic page now links to an I/NET trend log.
Fig. 6.46: Dragging and Dropping the Link
Fig. 6.47: Verifying the Link from a Web Browser
TAC AB, April 2004 57 (94)0-004-7682-0 (EN)

6 Creating Web Pages with XBuilder TAC Xenta, Engineering TAC Xenta 527
6.7.2 Linking an I/NET Time Schedule to a Graphic Page
The TAC Xenta 527 provides a special editor that allows the system administrator, or a user with "operator" privileges, to modify I/NET Seven time schedules. The user can access this editor by browsing through the I/NET system until they locate an I/NET point that has a TS (time schedule) extension. However, you can also create a link on a graphic page that, when clicked, can send the user directly to a time schedule, without requiring the user to browse through the I/NET sys-tem.
In the following example, we will create a link page that connects to an I/NET time schedule, and then associate the link page with a link area on a graphic page.
1 Add a Link Page to the project by right-clicking the site in the sys-tem view and selecting Add Page > Link Page from the resulting pop-up menu.
2 Type a name for the new link page. In this example, we will name the page "link - Time Schedule".
3 Expand the link page object to expose its link.
Fig. 6.48: Adding a Link Page
Fig. 6.49: Naming the New Link Page
Fig. 6.50: Expanding the Link Page Object
58 (94) TAC AB, April 20040-004-7682-0 (EN)

TAC Xenta, Engineering TAC Xenta 527 6 Creating Web Pages with XBuilder
4 Associate the link with an I/NET time schedule by dragging and dropping a Time Schedule object onto the link object.
5 Now that you have created a link page that jumps to an I/NET time schedule, you can associate the link page with a link area on a graphic page.
Perform one of the following tasks:
• Open an existing graphic object by right-clicking the object and selecting Edit Graphic... from the resulting pop-up menu.
• Add a new graphic object to the project by performing the first 4 steps in “Mapping I/NET Point Signals to Web Pages” on page 47.
6 Add a new link area to the page by clicking the Link Area tool in the Drawing Tools toolbar and then drawing a link area in the
Fig. 6.51: Creating a Link to an I/NET Time Schedule
TAC AB, April 2004 59 (94)0-004-7682-0 (EN)

6 Creating Web Pages with XBuilder TAC Xenta, Engineering TAC Xenta 527
graphic page. In this example, we will create a link area around a graphic that has been imported into the graphic page.
7 Right-click anywhere on the graphic page to change your cursor back into an arrow.
8 Right-click the link area and select Attributes from the resulting pop-up menu. The Link Area attributes dialog opens.
Fig. 6.52: Creating a Link Area on the Graphic Page
Fig. 6.53: Viewing the Link Area Attributes
60 (94) TAC AB, April 20040-004-7682-0 (EN)

TAC Xenta, Engineering TAC Xenta 527 6 Creating Web Pages with XBuilder
9 Associate the link page in XBuilder with the link area on the graphic page by dragging and dropping the link page object onto the Linked Graphic Object field in the attributes dialog.
10 The Linked Graphic Object field now contains the path of the link page that you just dropped. Click OK to save this setting.
11 Save the graphic and return to XBuilder.
12 Compile the project and send it to the Xenta 527. Using a Web browser, verify that the graphic page now links to an I/NET time schedule.
Fig. 6.54: Dragging and Dropping the Link
Fig. 6.55: Verifying the Link from a Web Browser
TAC AB, April 2004 61 (94)0-004-7682-0 (EN)

6 Creating Web Pages with XBuilder TAC Xenta, Engineering TAC Xenta 527
6.8 Using the Find FunctionWhen working on large projects the Find function may be used to iden-tify variables and objects in the projects.
1 Activate the find function using any of the following methods:
• Press Ctrl + F.
• Choose Edit > Find from the main menu.
• Right-click an item in the System pane or Network pane and select Find from the resulting pop-up menu.
2 Use the Find dialog to search through the project. If necessary, narrow the search by specifying which objects, pages, and signals to include in the search. By default, all items are included.
You can also use the Look in field to narrow the search to a specific branch of the system or network. This field will automatically con-
Fig. 6.56: Selecting Find from the Main Menu
Fig. 6.57: Selecting Find from a Pop-up Menu
62 (94) TAC AB, April 20040-004-7682-0 (EN)

TAC Xenta, Engineering TAC Xenta 527 6 Creating Web Pages with XBuilder
tain an appropriate path if you activate the Find function by right-clicking on an item in the System pane or Network pane.
3 Click Find to begin the search. The results are displayed in the Output pane. A number of options are available when you select an item in the results, as described below.
• Jump to the source of any item in the results by double-click-ing on the item. You can also right-click on the item and select Go to the source from the pop-up menu.
• Clear all items by right-clicking on any item in the results and selecting Clear from the pop-up menu.
• Delete the source of an item by right-clicking the item in the results and selecting Delete from the pop-up menu. The Delete option is not available for signal objects in the Net-work pane.
• Rename any item associated with a System pane object by right-clicking the item in the results and selecting Rename from the pop-up menu.
Fig. 6.58: The Find Dialog
Fig. 6.59: Viewing the Results of the Find Function
TAC AB, April 2004 63 (94)0-004-7682-0 (EN)

6 Creating Web Pages with XBuilder TAC Xenta, Engineering TAC Xenta 527
64 (94) TAC AB, April 20040-004-7682-0 (EN)

REFERENCE
7 I/NET Objects in XBuilder
8 DCU-to-XML Conversion Utility
9 History Logs
10 Storing Data on the Xenta 527

TAC Xenta, Engineering TAC Xenta 527 7 I/NET Objects in XBuilder
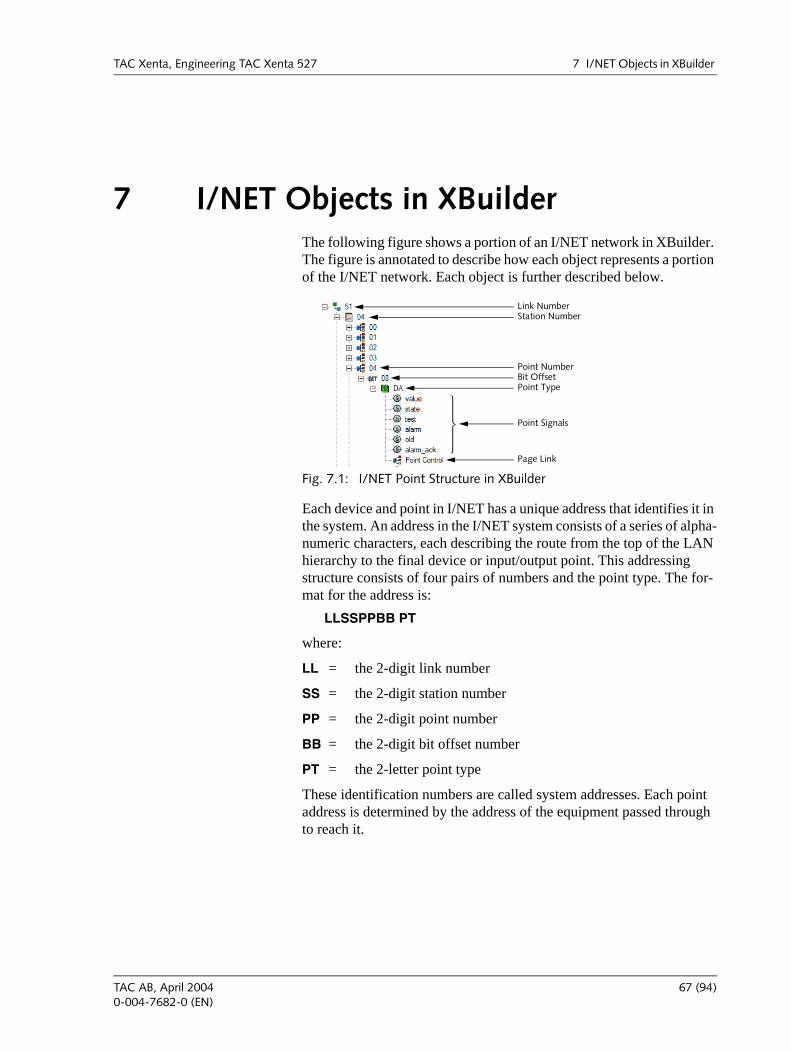
7 I/NET Objects in XBuilderThe following figure shows a portion of an I/NET network in XBuilder. The figure is annotated to describe how each object represents a portion of the I/NET network. Each object is further described below.
Each device and point in I/NET has a unique address that identifies it in the system. An address in the I/NET system consists of a series of alpha-numeric characters, each describing the route from the top of the LAN hierarchy to the final device or input/output point. This addressing structure consists of four pairs of numbers and the point type. The for-mat for the address is:
LLSSPPBB PT
where:
LL = the 2-digit link number
SS = the 2-digit station number
PP = the 2-digit point number
BB = the 2-digit bit offset number
PT = the 2-letter point type
These identification numbers are called system addresses. Each point address is determined by the address of the equipment passed through to reach it.
Fig. 7.1: I/NET Point Structure in XBuilder
Link NumberStation Number
Point NumberBit OffsetPoint Type
Point Signals
Page Link
TAC AB, April 2004 67 (94)0-004-7682-0 (EN)

7 I/NET Objects in XBuilder TAC Xenta, Engineering TAC Xenta 527
7.1 Network ObjectsThe following objects in XBuilder represent levels of the I/NET net-work:
• Link — This object represents the software link address (00–99) that leads to a specific I/NET controller LAN. By expanding this object, you can access stations connected to the controller LAN.
• Station — This object represents the address (00–63) of a particu-lar controller on the controller LAN. By expanding this object, you can access the points defined for the controller.
• Point — This object represents the address (00–31) of a particular memory location within the selected station.
• Bit Offset — This object represents the bit offset (00–09) of the the selected memory location.
• Point Type — This object represents the two-letter point type des-ignation for the selected point.
7.2 Point SignalsThe following I/NET point signals are available in XBuilder. As described below, not all signals are available for all point types.
• value (all point types) — This signal represents the value of the selected point. For all point types except DC and DO, an operator with proper authority can log into the Xenta 527 and use this sig-nal to view or change the point’s value. For DC and DO points, an operator would have to change the value of the "control" signal (described below) in order to change the point’s value.
• state (DA, DC, DI, DM, and DO points only) — This read-only signal shows the textual state of the point. This text is based on the state descriptions assigned to the point in I/NET. Refer to the I/NET Seven documentation for a description of state descriptions.
• control (DC and DO points only) — Use this signal to manually control the point. This signal’s default value is 0. A change in this signal’s value causes the value to be sent to the point. Therefore, even if you wish to send the default value of 0 to the point, you must temporarily change the signal’s value to 1 and then back to 0. Refer to the I/NET Seven documentation for a description of con-trol descriptions.
• test (all point types) — This signal represents the value of the point’s test mode setting. A value of 1 indicates that the point is operating in test mode. An operator with proper authority can log into the Xenta 527 and use this signal to view or change the point’s test mode condition.
68 (94) TAC AB, April 20040-004-7682-0 (EN)

TAC Xenta, Engineering TAC Xenta 527 7 I/NET Objects in XBuilder
• manual (output points only) — This signal represents the value of the point’s manual mode setting. A value of 1 indicates that the point is operating in manual mode. An operator with proper authority can log into the Xenta 527 and use this signal to view or change the point’s manual mode condition.
• alarm (all point types) — This read-only signal represents the value of the point’s "alarm" state. A value of 1 indicates that the point is currently in alarm.
• old (all point types) — This read-only signal represents the value of the point’s "old" state. A value of 1 indicates that the point value is invalid or is no longer communicating.
• unack (all point types) — This read-only signal represents the value of the point’s "unacknowledged" alarm state. A value of 1 indicates that the point’s alarm is unacknowledged. If an autho-rized user acknowledges the alarm, this value will change to 0.
• alarm_ack (all point types) — This signal allows an authorized operator to acknowledge an alarm associated with the point. The user can acknowledge an alarm by setting this signal’s value to 1. Once the Xenta 527 verifies that I/NET has acknowledged the alarm, this signal’s value will return to 0.
7.3 Page LinksAlong with the signals described above, page links are also available for I/NET points. You can add these links to Link Pages within an XBuilder project. As described below, not all page links are available for all points.
• Point Control — The Point Control link is included with all I/NET point types. This link allows the system administrator, or a user with "operator" privileges, to access the Point Control screen.
Fig. 7.2: Point Control from a Web Browser
TAC AB, April 2004 69 (94)0-004-7682-0 (EN)

7 I/NET Objects in XBuilder TAC Xenta, Engineering TAC Xenta 527
• Trend — The Trend link is included with I/NET points that have a Trend Sampling (TR) extension. This link allows the system administrator, or a user with "operator" privileges, to access the Trend Setup screen.
• Trendlog — The Trendlog link is included with I/NET points that have a Trend Sampling (TR) extension. This link allows the sys-tem administrator, or a user with "operator" privileges, to access the Trend chart.
• Time Schedule — The Time Schedule link is included with I/NET points that have a Trend Schedule (TS) extension. This link
Fig. 7.3: Trend Setup from a Web Browser
Fig. 7.4: Trend Chart Displayed in a Web Browser
70 (94) TAC AB, April 20040-004-7682-0 (EN)

TAC Xenta, Engineering TAC Xenta 527 7 I/NET Objects in XBuilder
allows the system administrator, or a user with "operator" privi-leges, to access the Time Schedule screen.
Fig. 7.5: Time Schedule Editor Displayed in a Web Browser
TAC AB, April 2004 71 (94)0-004-7682-0 (EN)

7 I/NET Objects in XBuilder TAC Xenta, Engineering TAC Xenta 527
72 (94) TAC AB, April 20040-004-7682-0 (EN)

TAC Xenta, Engineering TAC Xenta 527 8 DCU-to-XML Conversion Utility
8 DCU-to-XML Conversion UtilityIn order to create and use I/NET system objects within XBuilder, you must first convert I/NET SAV files into an XML file that you can then import into your project. This conversion process relies on an I/NET-to-XBuilder utility that is included in the XBuilder installation.
As described in “Converting and Importing I/NET SAV Files” on page 42, you can launch this utility from within XBuilder by right-clicking on the INET object in your project and selecting Create Network from SAV files from the resulting pop-up menu. However, you can also launch and use this utility from outside of XBuilder, as described below.
8.1 Launching the Utility from an Explorer WindowThe DCU-to-XML conversion utility is located in the XBuilder instal-lation directory. You can launch the utility as a stand-alone application by locating and executing the file named DCUXML.EXE. This causes the DCU to XML Conversion dialog box to appear.
You can use the conversion utility just as if you had launched it from XBuilder. Refer to “Converting and Importing I/NET SAV Files” on page 42 for instructions.
Fig. 8.1: DCU to XML Conversion Dialog
TAC AB, April 2004 73 (94)0-004-7682-0 (EN)

8 DCU-to-XML Conversion Utility TAC Xenta, Engineering TAC Xenta 527
8.2 Running the Utility from the Command LineThe DCU-to-XML conversion utility can be run as a command-line application, as follows:
1 Click the Start button in Windows and select Run... from the resulting menu. The Run dialog opens.
2 Type CMD.EXE in the text field and select OK. A command win-dow opens.
3 At the command prompt, use the change directory command (CD) to go to the XBuilder installation directory. In the example below, XBuilder is installed at its default location on C drive.
4 Run the utility using the following syntax:
dcuxml.exe output_file input_file(s)
Fig. 8.2: The Run Dialog
Fig. 8.3: Command Window
Fig. 8.4: Changing to the XBuilder Installation Directory
74 (94) TAC AB, April 20040-004-7682-0 (EN)

TAC Xenta, Engineering TAC Xenta 527 8 DCU-to-XML Conversion Utility
Example:
The following command will initiate the conversion of two I/NET SAV files (DCU5101.SAV and DCU5104.SAV) into an XML output file named LINK51.XML. The input files reside in the root directory of C drive (as will the resulting XML output file).
dcuxml.exe c:\link51.xml c:\dcu5101.sav c:\dcu5104.sav
Using the command in the example above will cause the utility to open and look like this:
5 If necessary, make adjustments to the configuration. When the configuration is correct, click OK to run the conversion.
6 When the conversion is complete, the utility automatically closes.
Fig. 8.5: DCU-to-XML Conversion Utility
TAC AB, April 2004 75 (94)0-004-7682-0 (EN)

8 DCU-to-XML Conversion Utility TAC Xenta, Engineering TAC Xenta 527
76 (94) TAC AB, April 20040-004-7682-0 (EN)

TAC Xenta, Engineering TAC Xenta 527 9 History Logs
9 History Logs
9.1 Occurrences of I/NET System and Web Server Alarms and Events
The TAC Xenta 527 can store a total of 1,000 events and alarms (added together). They are stored in a non-volatile managed memory buffer. This allows the Xenta 527 to maintain its stored events and alarms even during power interruptions.
9.2 Records of Individuals Who Modified an Alarm Status
All changes made to the status of I/NET alarms made by the logged-in user are stored as events in the Xenta 527 memory buffer. These changes are also stored in the I/NET system, and identify the user. The information used to identify the user will differ, depending on how the user made the changes.
I/NET records identify the user as follows:
• When changes are made from the Xenta 527 alarm view, I/NET records will contain the user’s initials (i.e., the first 4 char-acters of the user name) and the user’s complete user name.
• When changes are made from a Point Control dialog, I/NET records will contain only the user’s initials (i.e., the first 4 charac-ters of the user name).
TAC AB, April 2004 77 (94)0-004-7682-0 (EN)

9 History Logs TAC Xenta, Engineering TAC Xenta 527
78 (94) TAC AB, April 20040-004-7682-0 (EN)

TAC Xenta, Engineering TAC Xenta 527 10 Storing Data on the Xenta 527
10 Storing Data on the Xenta 527
10.1 Data LimitsThe TAC Xenta 527 has the following data storage limits:
• Max project size = 10 MB
• Max number of Xenta 511 type Alarms = 300
• Max number of Xenta 511 type Trendlogs = 150
• Max number of Xenta 511 type Time Schedules = 50
10.2 Web Server DataThe following Web server data is stored in the TAC Xenta 527:
• User information
• User information for up to 64 users
• Client information including passwords and connection infor-mation
• Log files containing historical data
• Graphics
10.3 Protecting Stored Data
10.3.1 Maintaining Data During Power Interruptions
The TAC Xenta 527 configuration (including user information and project files) and dynamic data (including alarms, events, and trend logs) is stored in non-volatile memory. This allows the Xenta 527 to maintain its stored information even during power interruptions.
10.3.2 Backing Up and Restoring Data
XBuilder provides the tools necessary to allow you to backup and restore Xenta 527 data files. The following data can be backed up and restored:
• Event Data
• Trend Logs
TAC AB, April 2004 79 (94)0-004-7682-0 (EN)

10 Storing Data on the Xenta 527 TAC Xenta, Engineering TAC Xenta 527
• Alarm History
• Project Data
Backing Up and Restoring Event, Trendlog, and Alarm History Data
When you backup data from the Xenta 527, the data gets stored with the currently open XBuilder project. If desired, you can then backup the project to further protect the stored data.
The following steps describe how to backup and restore event, trendlog, and alarm history data. Project backup and restore procedures are described separately.
1 Open the project that will be used as the storage location for the data that you are backing up.
2 Select Tools > Backup Operations from the XBuilder menu. A sub-menu opens, allowing you to choose the desired operation.
3 Choose the desired operation to backup or restore the associated data.
Backing Up Project Data
Use the following procedures to backup project data:
1 Open the project that you want to back up and view the project set-tings by selecting Project > Settings... from the XBuilder menu.
Fig. 10.1: Initiating the Event Data Backup Process
Fig. 10.2: Opening the Project Settings
80 (94) TAC AB, April 20040-004-7682-0 (EN)

TAC Xenta, Engineering TAC Xenta 527 10 Storing Data on the Xenta 527
2 In the resulting dialog box, make sure that the Send Project backup file to Target option is activated (!).
3 Compile the project and send it to the Xenta 527. A backup file will be included in the sent data.
Restoring Project Data
Use the following procedures to restore project data:
1 Restore a project by selecting Project > Get from Target... from the XBuilder menu.
2 In the resulting dialog box, specify an appropriate setting for each parameter. If you have a project already open, the fields in this dia-
Fig. 10.3: Project Settings
Fig. 10.4: Restoring a Project
TAC AB, April 2004 81 (94)0-004-7682-0 (EN)

10 Storing Data on the Xenta 527 TAC Xenta, Engineering TAC Xenta 527
log will initially contain settings based on the open project. If no project is currently open, the fields will be blank.
3 Select OK to get the project from the Xenta 527.
4 If differences are found between the currently open project and the project being retrieved from the Xenta 527, they will be displayed in a dialog box. In this case, you can choose which configuration to use. Select either Project or Target.
Fig. 10.5: Uploading a Project from the Xenta 527
82 (94) TAC AB, April 20040-004-7682-0 (EN)

APPENDIX
A Frequently Asked Questions (FAQs)
B Troubleshooting


TAC Xenta, Engineering TAC Xenta 527 A Frequently Asked Questions (FAQs)
A Frequently Asked Questions (FAQs)What if I need to remove the Xenta 527 from the network?
Before you remove the TAC Xenta 527 from the network, you should first remove all host masks that you have defined. This will ensure that other I/NET hosts stop their transmission of alarms and events to the Xenta 527.
Remove host masks as follows:
1 Expand the INet section of the navigation tree as shown in the fol-lowing figure and select Host Masks Summary.
2 In the Host Mask Summary, click on a host IP address to set its routing masks. The Host Routing Mask Editor opens.
Fig. A.1: Opening the Host Mask Summary
Fig. A.2: Launching the Host Routing Mask Editor
TAC AB, April 2004 85 (94)0-004-7682-0 (EN)

A Frequently Asked Questions (FAQs) TAC Xenta, Engineering TAC Xenta 527
3 Click the Clear All button to remove all mask settings for this IP address.
4 Click Save to accept your settings.
5 Repeat these steps as necessary to remove the masks for all other IP addresses.
What if I need to perform a full installation of system software for a Xenta 527 that is already operational?
When you load system software onto the Xenta 527, you have a choice of whether to perform a software update or a full installation. If you intend to perform a full installation, you should first remove all host masks that you have defined in the Xenta 527. This will ensure that other I/NET hosts stop their transmission of alarms and events to the Xenta 527.
The steps for the overall process are as follows:
1 Remove all host masks from the Xenta 527. The instructions for removing host masks are described on the previous page.
2 Perform the system software installation as follows:
a Connect the PC to the same network as the Xenta 527.
b Start the installation program TACXenta527-nnnn.exe (obtained via TARAI or from a CD).
c Type user name ‘root’, your password, and the TAC Xenta 527’s IP address.
d Follow the instructions on the screen.
3 When the software installation is complete, re-define host masks on the Xenta 527 as necessary. Refer to “Defining Host Masks”, on page 27 for instructions.
86 (94) TAC AB, April 20040-004-7682-0 (EN)

TAC Xenta, Engineering TAC Xenta 527 B Troubleshooting
B TroubleshootingThis section addresses common issues that may arise while you are con-figuring or using the TAC Xenta 527.
My Alarms and/or Events pages are completely blank
Dynamic alarm and event pages use Java to display periodically updated information. If you attempt to view these pages from a web browser that is not Java-enabled, no data will display.
If Java is properly installed, but alarm and event pages appear blank when you view them from a web browser, you may need to clear the Java cache. The following steps describe how to clear the Java cache:
1 Open the Windows Control Panel by clicking the Start button and selecting Control Panel from the resulting menu.
2 Double-click the Java Plug-in icon to open the Java Plug-in Con-trol Panel. Select the Cache panel.
3 Clear the Java cache by clicking the Clear button.
4 At the confirmation screen, select Yes to clear the cache.
With the Java cache clear, re-connect to the Xenta 527 and verify that alarms and events pages display properly.
TAC AB, April 2004 87 (94)0-004-7682-0 (EN)

B Troubleshooting TAC Xenta, Engineering TAC Xenta 527
Changes to my XBuilder project do not always appear when viewed from a web browser
As you design your building control application, you will most likely compile and send your XBuilder project to the Xenta 527 at various stages of development. This allows you to verify the results of project changes as you make them.
If you find that a changed web page is not displaying correctly when you view the project from a web browser, the browser may be displaying a cached version of the page. In this case, you will have to clear the web browser’s temporary files in order to view the updated web page.
The following steps describe how to clear Internet Explorer’s temporary files:
1 Select Tools > Internet Options from the web browser’s menu. The Internet Options dialog opens.
2 In the "Temporary Internet files" section of the dialog, click the Delete Files... button. This causes a confirmation dialog to open.
3 Select OK to delete all temporary internet files.
88 (94) TAC AB, April 20040-004-7682-0 (EN)

TAC Xenta, Engineering TAC Xenta 527 B Troubleshooting
A network proxy/firewall is preventing the Xenta 527 from establishing proper communications.
Your network configuration plays a key role in how the Xenta 527 com-municates with the internet, I/NET, and Vista. If you are unable to establish proper network communications, ensure that the necessary ports are open and available to the Xenta 527. The TAC Xenta 527 uses the following communication ports:
• Port 80 (http access)
• Port 443 (https access)
• Port 20/21 (FTP access)
• Port 25 (SMTP access)
• Port 80 (Status Viewer, Alarm Viewer and Graphics Viewer)
• Port 1068 (LTA for Vista)
• Port 161 (snmp access)
• UDP Port 50069 (I/NET system access)
Perhaps you are unable to make the necessary configuration changes to your proxies/firewalls because of restrictions imposed by your com-pany’s network security policies. In this case, you have the option of choosing alternate communication ports.
The following steps describe how to use alternate communication ports:
1 Expand the navigation tree as shown in the following figure and select HTTP Server.
TAC AB, April 2004 89 (94)0-004-7682-0 (EN)

B Troubleshooting TAC Xenta, Engineering TAC Xenta 527
2 Set the communication port assignments to the appropriate values. Use the following fields:
• HTTP Port
• HTTPS Port
• Dynamic variables communication Port
3 Accept your settings by selecting Save & Restart.
4 Configure your network to allow communication on the ports you assigned to the Xenta 527.
5 Verify that the Xenta 527 can now successfully communicate across the Internet and with your building control systems.
90 (94) TAC AB, April 20040-004-7682-0 (EN)
TAC Xenta, Engineering TAC Xenta 527 Index
IndexAAbout this Manual 9Access Rights 31address, I/NET 67alarm
modification records 77point signal 69
alarm_ack, point signal 69Alarms, I/NET 45, 77Appendix 83authorization level 29
BBit Offset object 68
Ccertificate
CA 34self signed 21SSL 34
ConfigurationClients 36Instructions 15Profile 25
control, point signal 68Conversion Utility 73
Ddata
limits 79storage 79
DCU-to-XML Conversion 39, 73DHCP 15DISRCFG command 36DNS 15Docnet 9dynamic web pages 45
EENRCFG command 37Error log
login 32Event Type parameter 46
Events, I/NET 45, 77extending login time 33
Ffailed logins 32FAQs 85Filenames 11Find Function, using 62Firewalls 19Frame Settings 31Frequently Asked Questions 85
GGateway 15, 19Getting Started 13Graphic Pages 49
HHistory Logs 77host masks 27, 85HostNum parameter 41HTTPS Idle TimeOut 30Hyperterminal 15
II/NET
Network 39Objects 67Point Mapping 47, 49Point Structure 67SAV Files 42, 44Time Schedule 58Trend Log 54
IP address 15, 21–22, 25
JJava 87
KKeystrokes 11
LLink object 68logging in 21
TAC AB, April 2004 91 (94)0-004-7682-0 (EN)

Index TAC Xenta, Engineering TAC Xenta 527
Mmanual, point signal 69Menu Commands 11
NNetwork Objects 68
Oold, point signal 69
PPacket filter 19Page Links 69Password 47Point Control 69Point object 68point signals 68
alarm 69alarm_ack 69control 68manual 69old 69test 68unack 69value 68
Point Type object 68Points, Mapping 47, 49ports 17, 89Power Interruptions 79Prerequisites 10project
backing up 80creating 40restoring 81template 40updating 44
Protecting Stored Data 79Proxy Server 18
RReference 65reference host 25Remote Configuration 36
SSAV files 42Secure Socket Layer 33Security 29SSL Certificate 33state, point 68Station object 68storing data 79
Subnet mask 15system administrator 29
Ttemporary files 88Terminal Emulator 15test, point signal 68Time Schedule 70Time Schedule, I/NET 58Trend 70Trend Log, I/NET 54Trendlog 70Troubleshooting 87Typographic Conventions 10
Uunack, point signal 69User
Accounts 29Settings 30
Username parameter 47
Vvalue, point signal 68
Wweb pages, creating 39Web Server
Data 79Security 29
XXBuilder 67XBuilder, using 39XML
Conversion Utility 73file 39
92 (94) TAC AB, April 20040-004-7682-0 (EN)


TAC helps people feel and function better, as a direct result of greater indoor climate. This ismade possible by TAC’s concept of Open Systems for Building IT®, which utilizes informationtechnology to provide clients with advantages such as indoor climate optimization, energysavings, flexibility, security, reduced expenses and user-friendly operation.
Last Manual Page