Embed Size (px)
DESCRIPTION
understanding windows
Citation preview

Study Unit
UnderstandingWindowsBy
Troy McMillan

About the Author
Troy McMillan is a product developer and technical editor for Kaplan IT
and a full time professional trainer for Cisco, Microsoft, Comptia, and
Wireless classes. He is the author of Change Your Career: Computer
Network Security as Your New Profession. Mr. McMillan has also
served as a contributing subject matter expert and a prep question
writer. He currently creates certification practice tests and study
guides for the Transcender and Self-Test brands. Mr. McMillan lives
in Atlanta, Georgia.
Copyright © 2011 by Penn Foster, Inc.
All rights reserved. No part of the material protected by this copyright may bereproduced or utilized in any form or by any means, electronic or mechanical,including photocopying, recording, or by any information storage and retrieval system, without permission in writing from the copyright owner.
Requests for permission to make copies of any part of the work should be mailed to Copyright Permissions, Penn Foster, 925 Oak Street, Scranton,Pennsylvania 18515.
Printed in the United States of America
All terms mentioned in this text that are known to be trademarks or service marks have been appropriately capitalized. Use of a term in this text should not beregarded as affecting the validity of any trademark or service mark.

The Windows XP, Vista, and Windows 7 operating systems
are newer versions of the Windows NT 4.0 operating system.
The core programming of each operating system (OS) has
roots in the IBM/Microsoft OS/2 product. All three operating
systems use the New Technology File System (NTFS) as their
default file system. Their core programming is a true 32- or
64-bit OS that has security and reliability features superior
to those of the Windows 95, 98, and Me operating systems.
Windows XP comes in two versions. Windows XP Home
Edition is for people who are currently running Windows 95,
98, or Me, and it comes with some popular features for run-
ning games, playing music, and communicating over the
Internet. Windows XP Professional is marketed as an upgrade
for Windows 2000 Professional.
The Vista OS is a dramatic upgrade to Windows XP, while
Windows 7 is a more modest upgrade to Vista, with most of
the difference having to do with performance.
iii
Previe
wPrevie
w
When you complete this study unit, you’ll beable to
• Identify the differences among the Windows XP, Vista,and Windows 7 operating systems
• Describe the steps required to install Windows XP, Vista,and Windows 7
• Explain the startup process, and troubleshoot problemswith the process
• Discuss the processes required to install hardware andsoftware using Windows XP, Vista, and Windows 7
• Identify and use the tools available for troubleshootingand support

BRIEF INTRODUCTIONS TO WINDOWS XP, VISTA, AND WINDOWS 7 1
The OSs 1Common Features 2Windows XP Home Features 6Windows XP Professional Features 13Windows XP 64-Bit Edition Features 17Vista Editions 19Vista Home Basic Requirements and Features 20Vista Home Premium Requirements and Features 23Vista Business Features 24Vista Enterprise and Vista Ultimate Features 24Windows 7 Editions 25Windows 7 Hardware Requirements 25Windows 7 Starter Features 26Windows 7 Home Premium Features 27Windows 7 Professional Features 28Windows 7 Ultimate Features 28The History of Windows 29
INSTALLING THE OPERATING SYSTEM 36Preparing for the Installation of Windows XP, Vista,
and Windows 7 36Installing Windows XP 40Upgrading to Windows XP 45Installing Windows XP as a Second OS 50Installing Vista 55Upgrading to Vista 60Installing Vista as a Second OS 62Installing Windows 7 63Upgrading to Windows 7 67Installing Windows 7 as a Second OS 68Installing Other Components 69Adjusting the Power Options 77
CUSTOMIZING THE LOOK AND FEEL OF THE PC 86The Desktop 86Scanners and Cameras 101Other Input Devices 107Sounds and Multimedia 110Additional Windows Modifications 113Special-Needs Configurations 123
v
Contents
Contents

Contentsvi
OPTIMIZING THE OPERATING SYSTEM 138General Optimization 138Disabling Features 145
OPERATING-SYSTEM PROCESSES 167Startup 167The Registry 182
SOFTWARE IN THE WINDOWS ENVIRONMENT 189Installing and Removing Software 189Troubleshooting Software Problems 192Backup and Monitoring Methods 201Special Software Installations 202
HARDWARE IN THE WINDOWS ENVIRONMENT 208Plug and Play 208General Hardware Installation and Removal 212Special-Consideration Hardware Installations 216
TROUBLESHOOTING AND SUPPORT 219Windows XP Support Tools 219Windows XP Tools Used to Manage Server Services 231Vista Troubleshooting 234Server 2008 Support Tools for Vista 235Windows 7 Troubleshooting 237Windows 7 Support Tools 239Common Support Tools 241Performance Monitor 247System File Checker 262
ANSWERS 265

1
BRIEF INTRODUCTIONS TO WINDOWS XP, VISTA, AND WINDOWS 7This study unit focuses on the Windows XP, Vista, and
Windows 7 operating systems, all of which were developed
using Intel technologies. All three operating systems will be
covered in this unit, with special focus on Windows XP
Professional and Windows 7.
The OSs
Windows XP
Windows XP (Figure 1) is a Windows desktop oper-
ating system for the PC. Windows XP is built on
the Windows 2000 kernel (the basic, central com-
ponent), but it brings a more personalized look to
the desktop. The Windows XP OS also makes it
easier for users to scan or import images, acquire
music files on the Web, and transfer them to
portable devices. The operating system also allows
multiple logons, desktops, and personal sets of
files. The Start menu has been designed to make
the most-used programs easy to find. Windows XP
comes in Home, Professional, and 64-Bit editions.
Understanding Windows
FIGURE 1—Windows XP

Understanding Windows2
Vista
Vista (Figure 2) is a dramatic upgrade to Windows
XP. It includes many additional features, such
as the Windows Aero desktop, a new version of
Windows Explorer, and Windows Flip and Flip 3D,
which allows a preview of each open window while
scrolling through the windows with the Alt-tab key
combination. The Search feature is improved and
displays results as you type. It also includes the
Windows Sidebar, where small applications called
gadgets can be attached to the desktop. Many
other features formerly included in Windows XP
have been upgraded and in some cases renamed.
Because Vista was never fully embraced by busi-
nesses due to its hardware requirements and
sluggish performance, the time between the release
of Vista and Windows 7 was much shorter than
normal.
Windows 7
Windows 7 (Figure 3) offers a much smaller num-
ber of new features but is superior in performance
to Vista and requires fewer hardware resources.
New features include a method of sharing for the
home called Home Group, better thumbnail pre-
view in the taskbar, speedier access to favorites
files with the use of Jump Lists, and a featured
called Snap that’s a quick way to manage and
resize windows on the desktop. When combined
with Windows Server 2008, many additional fea-
tures become available, although these are beyond
the scope of this study unit.
Common FeaturesWindows XP, Vista, and Windows 7 are all based on the same
Windows kernel. This kernel is an offspring of the Windows
NT 32-bit kernel. The base operating system features are
similar in all three products, and the systems share many
common features.
FIGURE 2—Vista
FIGURE 3—Windows 7

Understanding Windows 3
Reliability and Stability Features
• Full 32-bit operating system (or 64-bit) minimizes applica-
tion failures and unplanned reboots.
• Microsoft installer works with the Windows Installer
Service to help users install, configure, track, upgrade,
and remove software programs correctly, and minimizes
the risk of user error and productivity loss.
• Windows logo program provides assurance that applications
have met Microsoft standards developed in cooperation
with customers and third-party developers.
• Reduced reboot scenarios eliminate most scenarios that
forced users to reboot in Windows NT 4.0, Windows 95,
and Windows 98.
Mobile-User Features
• Hibernate enables the operating system, after a set period
of time or on demand, to save memory to disk and shut
the power down, so that when power is restored, all the
applications are reopened exactly as they were left.
• Offline viewing makes entire Web pages with graphics
available for viewing offline, when you don’t have a net-
work or Internet connection.
• Synchronization manager lets you compare and update
offline files and folders with those on the network.
• Hot docking lets you dock or undock a notebook com-
puter without hanging the hardware configuration or
rebooting.
• Easier remote configuration wizards guide you through
steps for setting up remote access to a network or virtual
private network (VPN).

Understanding Windows4
Upgrade and Peripheral Features
• Digital devices supports removable storage devices such
as DVD and Device Bay, and supports new display
devices such as Accelerated Graphics Port (AGP), multi-
ple video cards and monitors, OpenGL 1.2, DirectX API,
and Video Port Extensions.
• Universal serial bus (USB) lets you connect and disconnect
peripherals such as joysticks, scanners, and camcorders
without configuring or rebooting the desktop or laptop.
• IrDA support provides secure, wireless communications
between two Windows 2000- or XP-based computers
using infrared protocol.
• IEEE 1394, commonly called FireWire or iLink, provides
a higher-bandwidth connection for devices that require
faster data transfer.
• Plug and play (PnP) lets you automatically install new
hardware with only minimal configuration, and is now
supported by more than 12,000 devices.
Use and Maintenance Features
• Scalable memory and processor support can handle up
to 4 gigabytes (GB) of RAM and up to two symmetric
(simultaneously running) multiprocessors.
• Troubleshooting helps you configure, optimize, and
troubleshoot numerous Windows OS functions.
Security and Internet Features
• IP security (IPSec) support helps to protect data transmit-
ted across a network, is an important part of providing
security for VPNs, and allows organizations to transmit
encrypted data over the Internet.

Understanding Windows 5
• Kerberos support provides industry-standard authentication
with fast, single logon to Windows 2000- and XP-based
network resources. Because Kerberos is an Internet
standard, it’s effective for networks consisting of different
operating systems such as UNIX.
• Smart-card support integrates smart-card capabilities
into the operating system. Smart cards enhance soft-
ware-only solutions, such as client authentication,
interactive logon, code signing, and e-mail security.
• Microsoft Management Console (MMC) provides a central-
ized and consistent environment for management tools.
• Windows Management Instrumentation (WMI) provides a
standardized architecture for monitoring and managing
system resources, and allows system administrators to
monitor and control the system via scripting and third-
party applications.
• Safe-mode startup options allows users to boot the PC at
the most basic level, using default settings and minimum
device drivers.
• Group policy settings simplify the administration of users
and objects by letting administrators organize them into
logical units, such as departments or locations, and then
assign the same settings, including security, appearance,
and management options, to all employees in that group.
There are hundreds of new policies available for Vista
and Windows 7 Professional, in addition to those pro-
vided for Windows XP.
• Internet connection sharing connects a home network or
small office network to the Internet, using a dial-up or
broadband connection. From a single computer, you can
provide network address translation, addressing, and
name resolution services for all computers on a small
network.

Understanding Windows6
Windows XP Home FeaturesTable 1 lists the system requirements for Windows XP Home.
Table 2 on the following page lists the additional items
needed to access some of the Windows XP Home features.
Table 1
WINDOWS XP HOME REQUIREMENTS
Requirements Minimum Recommended
Processor
233 megahertz (MHz) IntelPentium/Celeron family, or AMDK6/Athlon/Duron family, or compatible processor
300 MHz or higher processor clockspeed recommended
Memory 64 MB of RAM; may limit perform-ance and some features 128 MB of RAM or higher
Hard Disk 2 GB with 1.5 GB of free space 2 GB with 1.5 GB of free space
CPU Support Support for single- or dual-processorsystem
Support for single- or dual-proces-sor system
Drive CD-ROM or DVD drive CD-ROM or DVD drive
Display Super VGA (800 × 600) or higher-resolution video adapter and monitor
Super VGA (800 × 600) or higher-resolution video adapter and monitor
Keyboard/Mouse Required Required

Understanding Windows 7
Table 2
WINDOWS XP HOME FEATURE REQUIREMENTS
Feature Requirements
Internet access
Internet account, and payment of a separate fee to an Internet serviceprovider (ISP); local and/or long-distance telephone toll charges may apply
14.4 kilobits per second (Kbps) or higher-speed modem
Networking Network adapter; access to third-party networks may require additionalcharges
Instant messaging, bothparties need
Internet access with a Microsoft .NET Passport account and/or MicrosoftExchange2000 Server instant-messaging account and network access
Voice messagingand conferencing,both parties need
Internet access with a Microsoft .NET Passport account and/or MicrosoftExchange2000 Server instant-messaging account and network access
33.6 Kbps or higher-speed modem, or a network connection
Microphone and sound card with speakers or headset
Videoconferencing,both parties need
Internet access with a Microsoft .NET Passport account and/or MicrosoftExchange2000 Server instant-messaging account and network access
33.6 Kbps or higher-speed modem, or a network connection
Microphone and sound card with speakers or headset
Video-conferencing camera
Windows XP
Application sharing, both parties need
Internet access with a Microsoft .NET Passport account and/or MicrosoftExchange2000 Server instant-messaging account and network access
33.6 Kbps or higher-speed modem, or a network connection
Windows XP
Remote assistance Both parties must be running Windows XP and be connected by a network
Remote desktop A network must connect a Windows 95 or later-based computer, and thetwo machines
Sound Sound card and speakers or headphones
DVD video playbackDVD drive and DVD decoder card or DVD decoder software
8 MB of video RAM
Windows MovieMaker
Video capture feature requires appropriate digital or analog video capturedevice
400 MHz or higher processor for digital video camera capture

Understanding Windows8
Windows XP Home combines new features with features of
Windows 98 and Windows Millennium Edition (plug and play,
simplified user interface, and support services). Beyond the
common features of Windows XP, Vista, and Windows 7, here
are the major features included with Windows XP Home.
Reliability and Stability Features
• The Windows NT engine is the code base for Windows XP,
and features a 32-bit computing architecture and a pro-
tected memory model.
• Enhanced device driver verifier provides for greater stress
tests on device drivers.
• Improved code protection is brought about through the
use of critical kernel data structures that are read-only
so that drivers and applications can’t corrupt them, and
read-only and page protected device-driver code that
keeps rogue applications from adversely affect core
operating-system areas.
• Side-by-side DLL support provides a mechanism for
multiple versions of individual Windows components to
be installed and run side-by-side and thereby helps to
address a DLL problem by allowing an application writ-
ten and tested with one version of a system component
to continue to use that version, even if an application
that uses a newer version of the same component is
installed.
• Enhanced software restriction policies provide administra-
tors a policy-driven mechanism to identify software running
in their environment and control its ability to execute,
can be used in virus and Trojan horse prevention and
software lockdown, and can contribute to improved system
integrity and manageability.
• Preemptive multitasking architecture allows multiple
applications to run simultaneously, ensures high system
response and stability, and allows you to run demanding
applications with quick system-response time.

Understanding Windows 9
Mobile and Remote-User Features
• Credential Manager provides a secured store for pass-
word information, which allows users to input user
names and passwords once and then have the system
automatically supply that information for subsequent
visits. It also enables easy access to network resources
for users who aren’t connected to a domain or who need
to access resources in multiple domains without trust
relationships.
• ClearType is a new text-display technology that triples
the horizontal resolution available for rendering text
through software and is designed for text on liquid
crystal display (LCD) screens.
• Dualview enables a single desktop to be displayed on two
monitors driven off a single display adapter, such as a
laptop computer using an internal LCD display and an
external monitor.
• Improved power management provides accurate data on
the amount of battery time left, is able to wake up as the
battery nears a drained state, and allows power manage-
ment to now be set for each computer, or each user on a
computer.
• Advanced Configuration and Power Interface (ACPI) pro-
vides features for mobile PCs, including plug and play,
hot docking, and full power-management support.
• Wireless networking support provides secured access and
performance improvements for wireless networks, and
provides automatic IEEE 802.1x wireless network config-
uration, which makes it much easier for users who need
to move between wireless networks.
A Dynamic-Link Library (DLL) is a collection of small programs that
can be called when needed by a larger program. DLL files that
support specific device operation are known as device drivers.
A device driver is a program that controls a particular type of
device that’s attached to the PC. There are device drivers for
printers, monitors, mice, and so on.

Understanding Windows10
• Network location awareness allows the operating system
and applications to determine when a machine has
changed network locations and subsequently enables
connection to a closer server.
• Remote Assistance enables a user to share control of his
or her PC with someone on a network or the Internet and
allows an administrator to view the user’s screen, control
the pointer, and use the keyboard to help solve technical
problems.
Use and Maintenance Features
• Clean design is an option in which common tasks have
been simplified and new visual cues have been added to
help users navigate their PCs more easily.
• Adaptive user environment enables the OS to adapt to
individual users by showing the most frequently used
applications first on the Start menu, consolidating under
a single taskbar button multiple open files for a single
application, and hiding items that aren’t being used from
the notification area.
• Windows Media Player combines, into a single applica-
tion, common digital-media activities such as virtual
meetings, streaming audio and video, Internet radio, CD
listening and creation, and DVD viewing.
• Context-sensitive task menus show an additional menu
that lists appropriate tasks for a file selected in Windows
Explorer.
• Integrated CD burning is integrated into Windows
Explorer and enables archiving data using CD-R and
CD-RW.
• Publishing information to the Web enables files and fold-
ers to be published to any Web service that uses the
WebDAV protocol.

Understanding Windows 11
• Help and Support Center has Search, Index, and Favorites
features; content from the World Wide Web to provide more
options on getting help; and contains tools such as My
Computer Information and System Restore.
• System Restore enables a user to restore a computer to a
previous state without losing data.
• Device driver rollback maintains copies of certain previ-
ously installed drivers so that they can be reinstalled if
problems occur when a new device driver is installed but
causes problems.
Internet Features
• Windows Messenger provides real-time communication
using text, voice, or video, and provides support for
transferring files, sharing applications, and displaying
whiteboard drawings.
• Windows Firewall protects a computer from common
Internet attacks.
• Network setup wizard helps a PC owner to set up and
manage a network by walking the owner through key
steps such as sharing files and printers, sharing the
Internet connection, and configuring the Internet con-
nection firewall.
• Internet Explorer Administration Kit controls features
such as the Media bar, Auto Image Resize, and the
Personal bar.
• Network bridge simplifies the setup and configuration of
small networks that use mixed network connections
(such as Cat-5, Ethernet, and wireless) without the need
for bridges and routers.
• Peer-to-peer networking support enables Windows XP to
communicate with earlier versions of Windows on a peer-
to peer level, allowing the sharing of all resources, such
as folders, printers, and peripherals.

Understanding Windows12
Advanced Management, Deployment, and Support Tools
• Application compatibility provides fixes and patches to
hundreds of applications so that they run on Windows
XP, is available from the Windows Update service, and
enables an application to run in compatibility mode.
• Automatic updates automatically download (with the
user’s permission) updates, such as application compati-
bility updates and new device drivers, available from the
Windows Update Web site.
• Support for hardware standards includes support for
UDF 2.05 (an ISO13346 standard for reading DVDs), for-
matting of DVD-RAM drives with the FAT32 file system,
Microsoft DirectX API, Infrared Data Association (IrDA)
standards, universal serial bus (USB), and the high-
speed IEEE 1394 bus (FireWire or iLink).
• Setup with dynamic update ensures that the operating
system files are up-to-date. Before any files are installed,
Windows XP checks the Web for critical system updates
and downloads them for installation. This process ensures
that you install the most recent updates to the operating
system.
• Unattended installation provides administrators flexibility
in scripting unattended setup routines.

Understanding Windows 13
Windows XP Professional FeaturesTable 3 lists the system requirements for Windows XP.
Windows XP Professional includes a few features that aren’t
included with Windows Home Edition, Vista, or Windows 7.
Reliability and Stability, and Mobile and Remote-User Features
• Encrypting File System (EFS) with multiuser support can
provide multiple users access to an encrypted document.
EFS provides protection from hackers and data theft.
• Remote desktop allows users to create a virtual session
onto their desktop computers using the Microsoft Remote
Desktop Protocol (RDP). This feature allows users to
access all their data and applications stored on their
desktop computers from another computer that’s run-
ning Windows 95 or later and is connected over a
network.
Table 3
WINDOWS XP PROFESSIONAL REQUIREMENTS
Requirements Minimum Recommended
Processor
233 megahertz (MHz) IntelPentium/Celeron family, or AMDK6/Athlon/Duron family, or compatibleprocessor
300 MHz or higher processor clockspeed recommended
Memory 64 MB of RAM; may limit performanceand some features 128 MB of RAM or higher
Hard Disk 2 GB with 1.5 GB of free space. 2 GB with 1.5 GB of free space
CPU Support Support for single or dual-processor system
Support for single- or dual-processor system
Drive CD-ROM or DVD drive CD-ROM or DVD drive
Display Super VGA (800 × 600) or higherresolution video adapter and monitor
Super VGA (800 × 600) or higher-resolution video adapter andmonitor
Keyboard/Mouse Required Required

Understanding Windows14
• Synchronization Manager lets users compare and update
their offline files and folders with those on the network.
After working with files and folders offline, the changes
are automatically replicated back to the network, thereby
ensuring that the latest version is always available.
• Offline files and folders let you disconnect from the net-
work and work as if you were still connected. This
feature lets you create a copy of documents stored on the
network.
Use and Maintenance Features, and AdvancedManagement, Deployment, and Support Tools
• Recovery console provides a command-line console for
administrators to start and stop services, format drives,
read and write data on a local drive, and perform many
other administrative tasks. In the event of errors that
prevent Windows XP Professional from starting, adminis-
trators can boot the system to a command console and
potentially repair the operating system.
• User state migration tool helps administrators to transfer
a user’s data, application, and operating-system settings
from an old computer to a new Windows XP Professional
desktop PC.
• System Preparation Tool (SysPrep) helps administrators
clone computer configurations, systems, and applications.
A single image, which includes the operating system and
business applications, can be copied to multiple different
machine configurations. SysPrep allows administrators
to reduce the number of operating-system images they
maintain, and it reduces the time it takes to install a
typical desktop system.

Understanding Windows 15
• Setup Manager is a graphical wizard that guides admin-
istrators in designing installation scripts.
• Remote OS installation enables Windows XP Professional
to be installed across a network (including SysPrep
images). This feature saves time by allowing administra-
tors to standardize desktop environments for business
requirements.
• Multilingual support allows users to create, read, and edit
documents in many languages using the English version
of Windows XP Professional. The Multilingual User
Interface Pack lets you change the user interface lan-
guage for each user.
• Resultant Set of Policy (RSoP) allows an administrator to
see the effect of group policy on an individual installa-
tion. with RSoP, administrators can plan, monitor, and
troubleshoot group policy.
Table 4 lists the additional requirements to access some
Windows XP Professional features.

Understanding Windows16
Table 4
WINDOWS XP PROFESSIONAL FEATURE REQUIREMENTS
Feature Requirements
Internet access
Internet account, and payment of a separate fee to an Internet serviceprovider (ISP); local and/or long-distance telephone toll charges mayapply.
14.4 kilobits per second (Kbps) or higher-speed modem
Networking Network adapter; access to third-party networks may require additionalcharges.
Instant messaging, bothparties need
Internet access with a Microsoft .NET Passport account and/or MicrosoftExchange 2000 Server instant-messaging account and network access
Voice messagingand conferencing,both parties need
Internet access with a Microsoft .NET Passport account and/or MicrosoftExchange 2000 Server instant-messaging account and network access
33.6 Kbps or higher-speed modem, or a network connection
Microphone and sound card with speakers or headset
Videoconferencing,both parties need
Internet access with a Microsoft .NET Passport account and/or MicrosoftExchange 2000 Server instant-messaging account and network access
33.6 Kbps or higher-speed modem, or a network connection
Microphone and sound card with speakers or headset
Videoconferencing camera
Windows XP
Application sharing, both parties need
Internet access with a Microsoft .NET Passport account and/or MicrosoftExchange 2000 Server instant-messaging account and network access
33.6 Kbps or higher-speed modem, or a network connection
Windows XP
Remote assistance Both parties must be running Windows XP and be connected by a network.
Remote desktop A network must connect a Windows 95 or later-based computer, and thetwo machines.
Sound Sound card and speakers or headphones
DVD video playbackDVD drive and DVD decoder card or DVD decoder software
8 MB of video RAM
Windows MovieMaker
Video capture feature requires appropriate digital or analog video capturedevice.
400 MHz or higher processor for digital video camera capture

Understanding Windows 17
Windows XP 64-Bit Edition FeaturesThe 64-bit Microsoft Windows XP operating system provides
availability, scalability, and large-memory support based on
the Intel Itanium, AMD Opteron, and AMD Athlon 64 proces-
sors, which feature multiprocessing features, floating-point
arithmetic extensions, and multimedia-specific instruction
sets. The Windows XP 64-Bit Edition is designed to address
the business needs of technical workstation users who require
floating-point performance in areas such as mechanical
design and analysis, digital content creation, and scientific
computing.
Windows XP 64-Bit also provides a scalable platform for
applications based on the Win64 API. Compared to 32-bit
systems, the Win64 API architecture provides more efficient
processing of large amounts of data.
Windows XP 64-Bit supports up to 16 GB of RAM and 16 ter-
abytes of virtual memory. Windows XP 64-Bit is designed to
support up to two symmetric Intel Itanium processors.
Table 5 offers a comparison of Windows XP 64-bit and 32-bit
architectures.
Table 5
64-BIT AND 32-BIT ARCHITECTURE COMPARISON
Address space 64-bit Windows 32-bit Windows
Virtual memory 16 terabytes 4 GB
Paging file 512 terabytes 16 terabytes
Paged pool 128 GB 470 MB
Non-paged pool 128 GB 256 MB
System cache 1 terabyte 1 GB

Understanding Windows18
Windows XP 64-Bit Edition provides a platform to integrate
both 64-bit technical applications and 32-bit business appli-
cations using the Windows on Windows 64 (WOW64) x86
emulation layer. By isolating 32-bit applications from 64-bit
applications, the WOW64 subsystem prevents file and reg-
istry collisions. Console and graphical user interface (GUI)
applications are supported, as well as service applications.
The system provides features to share data across the 32/64
boundaries for processes such as cut-and-paste and COM.
Just as with 16-bit and 32-bit dynamic-link libraries (DLLs),
32-bit processes can’t load 64-bit DLLs, and 64-bit processes
can’t load 32-bit DLLs.
While 64-bit hardware is compatible with many 32-bit applica-
tions, 32-bit applications perform better on 32-bit hardware.
WOW64 is intended to run 32-bit applications on 64-bit hard-
ware with the purpose of sharing data with 64-bit applications.
Windows XP 64-Bit Edition can be managed using the same
tools as 32-bit Windows systems. Users and system adminis-
trators find the 64-bit user interface similar to the 32-bit
Windows XP interface. Setup, configuration, and administration
are essentially the same.
Differences between 32-Bit and 64-Bit Windows
The major difference between 32-bit and 64-bit Windows is in
memory support. Currently, 32-bit Windows is capable of
supporting up to 4 GB of system memory, with up to 2 GB of
dedicated memory per process. Windows XP 64-Bit Edition
currently supports up to 16 GB of RAM, with the potential to
support up to 16 terabytes of virtual memory as hardware
capabilities and memory sizes grow.
System Requirements
Windows XP 64-Bit Edition requires a 64-bit motherboard
and chip set, available through Intel AMD and several OEMs.
Table 6 on the following page lists the system requirements
for Windows 64-bit edition.

Understanding Windows 19
Vista EditionsVista comes in a number of editions with various combina-
tions of feature sets. One interesting aspect of this variety is
that the installation CD includes all the editions. A user can
install any of the editions, but the edition paid for is the only
edition that will activate properly and continue to run. The
Vista editions are as follows:
• Vista Home Basic has the smallest set of features and
supports basic computing needs, such as browsing the
Internet, sending and receiving e-mail, and viewing
photos. It requires the least resources of the editions.
• Vista Home Premium has all the features of Basic and
also includes mobility features, improved performance,
Windows Media Center, and Windows Aero.
• Vista Business includes a few of the features that sepa-
rate Home from Basic, but it includes many utilities and
tools that make it easier to deploy, manage, and protect
Vista computers in a business environment.
• Vista Enterprise, available only through the partner
program and not through retail, is basically the same as
Vista Business, but also includes BitLocker.
• Vista Ultimate contains all the features found in all editions.
As one might expect, it requires the most resources.
Table 6
WINDOWS XP 64-BIT EDITION REQUIREMENTS
Requirements Minimum Recommended
Processor
900 MHz Intel ItaniumAMD OpteronAMD 64-bit AthlonAMD 64-bit Athlon Mobile
1 GHz Intel ItaniumAMD 64-bit Athlon FX
Memory 1 GB RAM 1 GB RAM
Video Super VGA 3-D graphics

Understanding Windows20
Vista Home Basic Requirements and FeaturesTable 7 lists the system requirements for Vista Home Basic
Edition. Vista Home Basic combines new features with the
features of Windows XP.
Security Features
• User Account Control, probably the most criticized new
feature, requires approval from the user for major
changes to help prevent malware from executing. This
feature can be turned off, but the process isn’t straight-
forward for the average user.
• Windows Defender helps to keep spyware off the
computer.
• Internet Explorer Protected Mode helps to prevent Internet
malware from executing without your knowledge by low-
ering the access level of Internet Explorer.
• Phishing Filter helps to protect the user from fake, but
legitimate-looking, Web sites used in phishing scams.
• Junk Mail Filter, which comes with Windows Mail (which
replaces Outlook Express), helps to reduce the amount
of junk mail.
Table 7
MINIMUM REQUIREMENTS FOR VISTA HOME BASIC
Processor 800 megahertz (MHz) 32-bit (x86)800 MHz 64-bit (x64) processor
Memory
512 megabytes (MB)Note: On system configurations that use system memory as graphicsmemory, at least 448 MB of system memory must be available to theoperating system after some memory is allocated for graphics.
Video DirectX 9-class graphics card32 MB of graphics memory
Hard Disk 20 GB hard disk that has 15 GB of free hard disk space

Understanding Windows 21
• Windows Service Hardening lowers the access level of
most services to only that which they require to help
reduce damage when a computer is compromised.
• Secure Startup enables the encryption of the system
drive, which prevents the computer from starting without
a key.
• Network Access Protection can be used to check the
health of a computer and, if it’s having problems, pre-
vent it from operating on a network until it has been
fixed.
Ease-of-Use Features
• Instant Search is a new search box located in the upper-
right corner of folder windows that makes it easier to
search. This feature also begins to present matches as
you type.
• Internet Explorer 7, available as an upgrade in Windows XP,
is native to Vista and provides an enhanced Internet
experience.
• Network and Sharing Center simplifies the process of
connecting to a network.
Performance and Reliability Features
• I/O cancellation is a technology improved in Vista that
can detect when a program is stuck waiting for an I/O
request to be fulfilled (an I/O request is made by the
application of the processor). This feature helps to pre-
vent programs from crashing and locking up the OS.
• Reliability Monitor tracks the overall stability of the system
over time and allows users to view the effects on the
stability and reliability of the system due to events such
as software installs and device driver installs. This feature
allows you to determine visually which events may have
compromised the reliability of the system.

Understanding Windows22
• Service Recovery employs a recovery policy for each
Windows service and identifies any additional services
that need to be restarted when that single service needs
to be restarted. It also ensures that they’re started in the
proper order according to the service dependences.
• Startup Repair Tool starts immediately whenever a
startup problem occurs, analyzes the logs, performs
tests, and, if possible, solves the problem with little user
intervention.
• New Diagnostic Tools are included, such as Disk
Diagnostics, Windows Memory Diagnostics, Memory
Leak Diagnostics, and Windows Resource Exhaustion
detection.
• Faster startup is a result of optimized startup code.
• Superfetch monitors your activities, makes educated
guesses about what data you’ll need next, and preloads
it to increase performance.
• Restart Manager, in many cases, eliminates the need to
restart the computer after applying an update by restart-
ing only those processes that are required to be
restarted.
Mobile-User Features
• Sleep mode is a combination of hibernate and standby
modes. Like hibernate, it allows saving the desktop to
the hard drive, but, like standby, it can be resumed in
seconds.
• Power management provides more granular control of the
use of the battery to help extend battery life.

Understanding Windows 23
Vista Home Premium Requirementsand FeaturesTable 8 lists the system requirements for Vista Home
Premium Edition, which are the same for Vista Business,
Vista Enterprise, and Vista Ultimate. Vista Home Premium
combines additional features with features of Vista Home
basic.
Mobility Features
• Windows Mobility Center places the most commonly used
mobile PC settings in one place.
• Tablet PC support is provided with integrated pen support,
touch screen support, and handwriting-recognition
technology.
Productivity Features
• Meeting Space makes it easy to share documents and
collaborate.
• Scheduled Backup allows for automatic backups of data
at preset intervals.
Table 8
MINIMUM REQUIREMENTS FOR VISTA HOME PREMIUM, BUSINESS, AND ULTIMATE
Processor 1 gigahertz (GHz) 32-bit (x86)1 GHz 64-bit (x64)
Memory 1 GB of system memory
VideoDirectX 9-class graphics card that supports the WDDM driver, Pixel Shader 2.0 in hardware, 32 bits per pixel, and 128 MB of graphics memory(minimum)
Hard Disk40 GB hard disk that has 15 GB of free hard disk space (the 15 GB of free space provides room for temporary file storage during the install orupgrade.)

Understanding Windows24
Ease-of-Use Features
• Windows Media Center can be used to make any room in
the home a media room through the use Media Center
Extenders.
• DVD Maker makes it possible to burn DVDs.
• Premium games include Chess Titans, Mahjong Titans,
and Inkball.
• Windows Movie Maker can be used to make high-
definition movies.
Vista Business FeaturesVista Business, while not including some of the features of
Vista Home premium (Media Center, DVD maker, Movie
Maker, and Premium Games) includes many features not
found in either Home Basic or Premium, including the
following:
• Complete PC Backup and Restore can be used to back up
the entire PC to protect against hardware failures.
• Windows Fax and Scan combines all fax and scan func-
tions in one place, making it easier to manage the two
processes.
• Remote Desktop Connection can be used to remotely
access business resources.
Vista Enterprise and Vista Ultimate FeaturesVista Enterprise includes all features available in the Vista
Business edition, and also includes BitLocker drive encryp-
tion, which allows for protecting data and the operating
system drive against mobile computer theft.
Vista Ultimate includes all features available in all other
versions of Vista.

Understanding Windows 25
Windows 7 EditionsWindows 7 offers a much smaller number of new features,
but offers superior performance compared to Vista while
requiring fewer hardware resources. The editions of
Windows 7 are as follows:
• Windows 7 Starter comes preinstalled only on netbook
PCs. It requires fewer resources than the other versions
and includes a subset of their features.
• Windows 7 Home Premium includes features that would
normally be required in the home while not including
those that may be relevant only in a business setting.
• Windows 7 Professional includes features that would
normally be required in a business setting but leaves out
those that may be relevant only in a home.
• Windows 7 Ultimate includes all the features included in
the other editions.
Windows 7 Hardware RequirementsThe hardware requirements for Windows 7 editions use a
slightly different paradigm from that used in Vista. There’s a
set of requirements for what’s called the “basic experience”
and another for what’s called the “premium experience.” There
are also additional requirements to enable certain features.
Table 9 lists the system requirements for Windows 7 basic
experience.
Table 9
MINIMUM REQUIREMENTS FOR WINDOWS 7 BASIC EXPERIENCE
Processor 800 megahertz (MHz) 32-bit (x86)800 MHz 64-bit (x64) processor
Memory 512 MB
Video DirectX 9-class graphics card32 MB of graphics memory
Hard Disk 16 GB hard-disk space (32-bit) or 20 GB (64-bit)

Understanding Windows26
Table 10 lists the system requirements for Windows 7 pre-
mium experience.
Table 11 lists the system requirements for certain additional
features.
Windows 7 Starter FeaturesWindows 7 Starter combines new features with features of
Vista.
Ease-of-Use and Entertainment Features
• View available networks provides a way to find all wire-
less networks in range to make it easier to locate and
connect to unfamiliar networks, such as hotspots.
Table 10
MINIMUM REQUIREMENTS FOR WINDOWS 7 PREMIUM EXPERIENCE
Processor 1 GHz or faster 32-bit (x86) or 64-bit (x64) processor
Memory 1 GB RAM (32-bit) or 2 GB RAM (64-bit)
Video DirectX 9-class graphics card32 MB of graphics memory
Hard Disk 40 GB of hard-drive capacity with 16 GB available hard-disk space (32-bit)or 20 GB (64-bit)
Table 11
REQUIREMENTS FOR SELECTED WINDOWS 7 ADDITIONAL FEATURES
Viewing TV shows with Media Center TV tuner and additional hardware
Windows Touch and Tablet PCs Specific hardware required
High-end video and gaming Additional system memory and advanced graphics hardware
BitLocker Trusted Platform Module (TPM) 1.2
Windows XP ModeAdditional 1 GB of RAM, an additional 15 GB of availablehard-disk space, and a processor capable of hardware virtualization with Intel VT or AMD-V turned on

Understanding Windows 27
• Bluetooth support enables users to make a Bluetooth
connection to any Bluetooth-enabled device such as
mobile phones, wireless headsets, wireless mice, and
keyboard devices.
• Internet Explorer 8, an available add-on to Vista is native
to Windows 7.
• Play To makes it possible to steam music, videos and
photos from one PC to other devices throughout the
home.
Productivity Features
• Windows Connect Now (WCN) makes the creation of a
wireless network at home easier.
• Peak, Shape, and Snap, all part of an improved Windows
Aero desktop, make navigating and managing multiple
windows easier.
• Device Stage suggests common tasks specific to a device
type that can be performed as soon as you plug in the
device.
• Windows Libraries make organizing files easier, regard-
less of their physical location on the computer.
Windows 7 Home Premium FeaturesWindows 7 Home Premium combines additional features
with the features of Windows 7 Starter. However, neither
Windows 7 Starter nor Windows 7 Home premium supports
BitLocker drive encryption.
Productivity Features
• HomeGroup makes it easier to share files and photos on
a home network and easier to print to a single printer
from any computer in the network.
• 64-bit Support allows a 64-bit version of Windows 7
Home Premium to take advantage of a 64-bit processor.

Understanding Windows28
Ease-of-Use Features
• Remote Media Streaming makes it possible to remotely
access and stream video and music files from the Media
Library on the home computer.
• Windows Touch allows the OS to function correctly when
installed on a PC with touch screen capability.
Windows 7 Professional FeaturesWindows 7 Professional combines additional features with
the features included in Windows 7 Home Premium.
Security Features
• BitLocker drive encryption allows for the protection of
data (even the volume where the OS is located) in the
case of laptop thefts.
• Advanced backup and restore is a more full-featured
backup tool that can be controlled by group policy in a
domain.
Business Enterprise Features
• Group Policy can be used to control various aspects of
the desktop to maintain a common corporate experience,
distribute software and updates, and enforce security
and Internet Explorer settings.
• Encrypting File System (EFS) can be used to protect sen-
sitive data even in the event of computer theft.
Windows 7 Ultimate FeaturesWindows 7 Ultimate combines additional features with the
features included in Windows 7 Professional.
• AppLocker is a program that can be used to allow or pre-
vent the operation of various software types to protect
against malware and pirated software.

Understanding Windows 29
• BrancheCache, when used in combination with Server
2008, can be used to cache copies of documents in a
branch office to save time and bandwidth when users
access those files from the main office.
• Direct boot from a virtual hard drive (VHD) allows booting
an instance of Windows 7 Ultimate from a hard drive
that’s actually a file located on an existing or external
hard drive or from a network location.
• DirectAccess, when used in combination with Server
2008, can be used to allow a connection to a corporate
network by clicking a document or link located in that
network, without making a VPN connection.
The History of Windows
Windows 1.0 (1985)
Most PC users trace the Microsoft Windows operating system
to the release of Windows 3.0, the first version of Windows
many people ever tried. In truth, though, Microsoft initially
released a first version, Windows 1.0, in
1985 (Figure 4). That first version of
Windows provided a new software
environment for developing and running
applications that use bitmap displays and
mouse pointing devices. With Windows 1.0,
users moved a mouse to point and click
through tasks, such as starting applica-
tions. Before Windows 1.0, PC owners
relied on typing commands at the C prompt
(C:\). In addition, Windows users could
switch among several concurrently running
applications. The product included a set of
desktop applications, including the MSDOS
file management program, a calendar,
card file, notepad, calculator, clock, and
telecommunications programs, which
helped users manage day-to-day activities. FIGURE 4—Windows 1.0

Understanding Windows30
Windows 2.0 (1987)
Windows 2.0 took advantage of the improved processing
speed of the Intel 286 processor, as well as the expanded
memory and interapplication communication capabilities
made possible through Dynamic Data Exchange (DDE). The
follow-up release, Windows 2.03, took advantage of the pro-
tected mode and extended memory capabilities of the Intel
386 processor. The Intel 80386 chip was used on Compaq
portables and wasn’t supported by IBM on its PCs. With
improved graphics support, Windows 2.x provided for over-
lapping windows, controlled screen layout, and the use of
keyboard combinations to move through operations.
Windows 3.0 (1990)
The third major release of the Windows operating system
offered better performance, 16-color graphics, and full sup-
port of the Intel 386 processor. A wave of 386 clones helped
drive the popularity of Windows 3.0. New features included
the File Manager and support for more icons (Figure 5). The
popularity of Windows 3.0 also grew with the release of the
Windows Software Development Kit (SDK), which helped soft-
ware developers focus on writing applications instead of
writing device drivers.
FIGURE 5—Windows 3.0Program Manager

Understanding Windows 31
Windows for Workgroups 3.11 (1993)
A superset of Windows 3.1, Windows for Workgroups 3.11,
added workgroup and domain networking support. Windows
for Workgroups was used in local area networks (LANs) and
on stand-alone PCs. It added centralized configuration and
security. Windows for Workgroups 3.11 also improved sup-
port for Novell NetWare networks and for remote access.
Windows NT 3.1 (1993)
Microsoft Windows NT 3.1 was the completion of a project
begun in the late 1980s. The project’s goal was to build an
advanced new operating system. Working with IBM and using
OS/2 as the core, Windows NT was a fully functional OS
aimed at the business world. With a new 32-bit operating
system, Windows NT 3.1 supported high-end client/server
business applications.
Windows NT 3.1 was released in both a workstation and
server version (called Windows NT Advanced Server). The
desktop version was well received by developers because of
its security, stability, and Microsoft Win32 application pro-
gram interface (API), all of which made it easier to support
new, larger programs.
New features of the Windows NT 3.1 OS included preemptive
multitasking, integrated networking, domain server security,
OS/2 and POSIX support, provisions for four separate proces-
sor platforms (later dropped to two), and the New Technology
File System (NTFS).
Windows NT Workstation 3.5 (1993)
The Windows NT Workstation 3.5 release provided higher
degrees of protection for business applications and data.
Windows NT Workstation 3.5 supported the OpenGL graphics
standard. With OpenGL, Windows NT Workstation 3.5 powered
applications for software development, engineering, financial
analysis, and scientific and business tasks. One other feature
of note was the capability to use long file names (up to 255
characters).

Understanding Windows32
Windows 95 (1995)
Windows 95 was the successor to the general-purpose
desktop operating systems, Windows 3.1 and MS-DOS.
Windows 95 integrated a 32-bit Transmission Control
Protocol/Internet Protocol (TCP/IP) stack for built-in Internet
support, dial-up networking, and new plug-and-play capabili-
ties that made it easy for users to install hardware and
software. Windows 95, like Windows NT, was a 32-bit
operating system. Windows 95 also offered new multimedia
capabilities, features for mobile computing, and integrated
networking.
Windows NT Workstation 4.0 (1996)
Windows NT Workstation 4.0 was a significant upgrade to the
business OS. It incorporated simplified network management,
higher network throughput, and tools for developing and
managing LANs. Windows NT Workstation 4.0 provided net-
working support for secure access to the Internet. Windows
NT Workstation 4.0 also added the Windows 95 graphic user
interface (GUI) for its desktop manager.
Windows 98 (1998)
Windows 98 was the first version of Windows designed specif-
ically for home users. With Windows 98, users could find
information more easily on their PCs as well as the Internet.
Other improvements included support for reading DVD discs
and universal serial bus (USB) devices.
Windows 98 Second Edition (1999)
Windows 98 Second Edition (SE) offered home users enhanced
hardware compatibility and Internet-related features. It
offered home networking capabilities through Internet con-
nection sharing. Windows 98 SE also added the Internet
Explorer 5.0 browser and Microsoft Windows NetMeeting 3.0
conferencing software to simplify communication using the
Internet or a LAN. Included with Windows 98 SE was
Microsoft DirectX 6.1, which provided improved support for
multimedia applications.

Understanding Windows 33
Windows Millennium Edition (2000)Windows Me offered home users music, video, and home
networking features while improving the operating system’s
stability. Features included the System Restore troubleshoot-
ing tool that let users roll back their software configuration to
a date or time before a problem occurred.
The music and video features included Windows Movie Maker
(with tools to digitally edit, save, and share home videos) and
Microsoft Windows Media Player 7 (used to find, organize,
and play digital media). Windows Me was the last Microsoft
operating system to be based on the Windows 95 base code.
Microsoft announced that future operating system products
would be based on the Windows NT kernel.
Windows 2000 Professional (2000)Windows 2000 Professional was designed to replace
Windows 9x/Me, and Windows NT Workstation 4.0 on all
business desktops and laptops. Built on the Windows NT
Workstation 4.0 kernel, Windows 2000 added features that
improved reliability, ease of use, Internet connectivity, and
support for mobile computing. Windows 2000 came in a
workstation version (now called Professional) and server
editions.
By adding the Windows 9.x plug-and-play support for net-
working and wireless products, USB devices, IEEE 1394
devices, and infrared devices, Windows 2000 Professional was
designed as a full-featured business OS requiring less infor-
mation technology (IT) support.
Windows XP (2001)Microsoft merged its home and business operating-system
lines around the Windows NT Workstation 4.0 kernel with the
release of Windows XP. Versions included Windows XP Home
Edition, Windows XP Professional, and Windows XP 64-Bit
Edition.
With Windows XP Home Edition, users could work with
and enjoy music, movies, instant messaging, and photos.
Windows XP Home Edition offered a design that made fre-
quently used features more accessible. Designed for home

Understanding Windows34
users, the product offered enhancements to the Network
Setup Wizard, Windows Media Player, Windows Movie Maker,
and digital-photo features.
Business users could use Windows XP Professional’s tools to
support a remote desktop feature, an encrypting file system,
system restore, and networking features. Key enhancements
for mobile users included wireless 802.1x networking sup-
port, Windows Messenger, and Remote Assistance.
Windows XP 64-Bit Edition satisfied the needs of power
users with workstations that used the Intel Itanium 64-bit
processor and AMD 64-bit Athlon processor. The first 64-bit
consumer operating system from Microsoft, Windows XP
64-Bit Edition was designed for specialized, technical work-
station users who required extra memory and floating-point
performance in areas such as movie effects, animation,
engineering, and data-intensive scientific applications.
Vista (2007)
Continuing to build on the NT kernel, Vista was released in
five versions and was aimed at both the home and business
market. Along with Windows XP and Windows 7, its use is
one of the main focuses of this study unit.
Windows 7 (2009)
Offering a much smaller number of new features but a per-
formance superior to that of Vista while also requiring fewer
hardware resources, Windows 7 has been more favorably
received in both homes and businesses.

Understanding Windows 35
Self-Check 1
At the end of each section of Understanding Windows, you’ll be asked to pause and check
your understanding of what you’ve just read by completing a “Self-Check” exercise.
Answering these questions will help you review what you’ve studied so far. Please
complete Self-Check 1 now.
Match the items on the left with their descriptions on the right.
______ 1. Vista Home Edition
______ 2. Windows 7 Ultimate
______ 3. Windows XP Professional
______ 4. Windows XP Home Edition
______ 5. Windows XP Vista Enterprise
______ 6. Windows XP 64-Bit Edition
Check your answers with those on page 265.
a. The most fully featured OS in the list
b. The only Vista edition that supports Bitlocker
c. Replacement for Windows 9x/Me
d. The first to support device driver rollback
e. Supports for the Itanium processor
f. Requires 20 GB disk space with 15 GB offree space

Understanding Windows36
INSTALLING THE OPERATINGSYSTEMA PC without an operating system is like a car without gas. A
brand-new PC may have features that are supposed to make
it fast and reliable, but until the OS is installed, one doesn’t
really know how well it will function. This section covers
installing Windows XP, Vista, and Windows 7.
Preparing for the Installation ofWindows XP, Vista, and Windows 7The Windows XP, Vista, and Windows 7 operating systems
allow no direct interaction between an application and the
hardware. This characteristic requires device drivers to be
specifically written for the operating system for the installed
hardware. For example, many Windows NT and some
Windows 2000 device drivers won’t work on Windows XP.
Contact the manufacturer’s Web site for the drivers required
by the Windows operating system you’re installing. Even with
updated drivers, the hardware and software you’ve been
using may not work on the operating system. This has
historically proven true of sound and graphics applications.
Another factor to be aware of is that operating systems have
progressively larger base-system requirements.
Let’s now look at some additional issues of which a user
should be aware before installing.
Hardware Compatibility
To address the problem with hardware compatibility, Microsoft
has developed an update catalog for Windows operating sys-
tems. There’s a list of the operating system’s supported
hardware items on the installation CD, but you need to pur-
chase Windows before you can view it. The Microsoft Catalog
Update site at http://catalog.update.microsoft.com/ lists
hardware that’s compatible with Windows products. If there’s
Understanding Windows 37
a hardware item that isn’t listed on the Windows Catalog but
is supported by the operating system, try the device driver; it
may work.
Software Compatibility
For software products that run without difficulty on each
Windows operating system, refer also to the catalog site.
Designed for Microsoft Windows
This label on software and hardware products (including
whole systems) guarantees the product has been tested for
that specific OS. Using the labeling to identify products for a
specific OS doesn’t mean that the product works on all
Windows operating systems. In fact, quite a number of prod-
ucts designed for Windows 9x, Me, or 2000 can’t work on
later Windows versions.
Clean Install or Upgrade
All versions of Windows give you the option of performing
either a clean install or an upgrade from a previous version of
Windows. You can do a clean install (including creating a
dual-boot system) as long as you have a copy of the full ver-
sion of the current operating system. Performing a clean
install, in practice, erases the entire contents of the hard
drive. Everything on the PC will be starting over from scratch.
A clean install is usually preferable only when the upgrade
process fails. Formatting a hard drive and starting over isn’t
complicated, but it does require patience and time.
An upgrade is easier. All the current settings such as language
choices, network settings, and other system variables will be
kept. The drawback is that the registry will also be migrated
to the new OS. If a PC has problems that can be traced to
the registry, an upgrade transfers these problems to the new
installation.

Understanding Windows38
Dual-Boot Option
The dual boot, or multiboot, option requires a clean install the
new Windows OS on its own partition. (Windows can’t share
a partition with any other operating system.) One should be
aware that the NTFS encryption incompatibility often renders
a Windows NT, Windows XP, Vista, or Windows 7 multiboot
PC unable to perform the critical process of sharing data.
In addition, the dynamic disk format introduced in Windows
2000 (and continued in Windows XP, Vista, and Windows 7)
doesn’t work with earlier operating systems or Windows XP
Home Edition. If you have one hard disk and you’ve con-
verted it to dynamic disk, you can install only one operating
system and you can’t use the multiboot option. To determine
if you have a dynamic hard disk, log on to Windows XP,
Vista, or Windows 7 with administrative privileges, and then
• Right-click My Computer.
• Double-click Computer Management, and then click
Disk Management. In the right pane, the disk is labeled
as a basic or dynamic type.
The need for a multiboot PC has been reduced with the intro-
duction of Windows XP, Vista, and Windows 7. Better options
for system recovery have reduced the multiboot needs for
many people. Windows XP, Vista, and Windows 7 also include
a compatibility mode to run most of your older legacy programs.
However, multibooting continues to be a useful feature if you’re
using Windows XP, Vista, or Windows 7 but occasionally need
to use older operating system environments.
You must choose the drive you want the new OS to reside
on and ensure that it’s formatted using the right file system.
To have a system that boots in DOS or Windows 95 and
Windows XP, Vista, or Windows 7, you need to format the hard
drive using FAT16 for DOS or Windows 95 applications to be
able to read the data. If creating a dual-boot system with
Windows 98, 98SE, or Me as one of the operating systems, you
need to use FAT16 or extended FAT32 on the hard drive for
Windows 98, 98SE, or Me to be able to read the data.
You also need to create the two partitions for the two operat-
ing systems. If the hard drive isn’t partitioned before the OS

Understanding Windows 39
installation, the installation program prompts you for drive
and partition information during the installation process.
You can also use the FDISK command to partition the drive
before the OS installation process. To use the FDISK com-
mand on an MS-DOS PC, type FDISK at the command
prompt (clean install and dual boot only).
On a Windows 3.x PC (clean install and dual boot only),
1. Click File and then Exit.
2. At the command prompt, type FDISK and then press
Enter.
On a PC using Windows 9x, Me, NT, or 2000,
1. Click Start and then Run.
2. In the Open box, type FDISK/MBR, and then click OK.
See Table 12 for FDISK syntax and switches.
Table 12
FDISK SYNTAX AND SWITCHES
Syntax
FDISK [/STATUS][/X][/MBR][/CMBR<DISK>][x/PRI:num][x/EXT:num][x/LOG:num][/PARTN][/Q][/ACTOK][/FPRMT]
Switch Description
/STATUS Displays partition information.
/X Ignores extended disk-access support (won’t use LBA support).
/MBR Rewrite the master boot record.
/CMBR <DISK> Recreate master boot record on specified disk. Performs the same functions asFDISK /MBR except can be used on other disk drives.
x/PRI:num Create a num MB partition on hard drive x.
x/EXT:num Create a num meg extended partition on hard drive x.
x/LOG:num Create num logical drives on hard drive x.
/PARTN Saves the partition to a file called PARTSAV.FIL
/Q Prevents fdisk from booting the system automatically after exiting fdisk.
/ACTOK Makes FDISK not check the disk integrity, allowing the drives to be createdfaster.
/FPRMT Won’t get the prompt for FAT32 support and allows FDISK to be forced intousing FAT32 on drives smaller then 540MB. This command can be used onlywith FDISK that supports FAT32.

Understanding Windows40
Recording Important Information
You should write down all of your ISP account information
as well as your e-mail information. Part of the installation
process is setting up an Internet account, so this information
comes in handy. The Internet account can be set up or
changed at any time using the operating system’s wizards,
but many people find it easier to do the whole installation at
once.
Other important information to record if you’re installing this
PC on a network:
• The computer name or workgroup name for a peer-to-
peer network
• The username, user password, and host name for a
domain network
• Knowledge of how IP addresses are assigned if connect-
ing to a TCP/IP network. If the IP address is assigned
using Dynamic Host Configuration Protocol (DHCP), the
PC gets an address from the server. If the network uses
static IP addresses, you’ll need to get this address from
the network administrator.
Installing Windows XP1. If the computer currently has an OS, back up any exist-
ing data.
• Use a CD-RW or other removable media to back up
critical system files, the registry, and important data
files.
• A second option, if you don’t have large-capacity
removable-media drives, is online storage. Some
online storage companies provide free space on their
servers. Placing critical files on both removable and
online storage is the safest option.

Understanding Windows 41
2. Change the BIOS boot order to boot from CD-ROM.
• During the boot process, press the key that allows
configuration of the BIOS. Depending on the PC, this
can be the Del, F1, F2, or F10 key. Just watch the
POST screen or read the documentation that came
with the PC to discover the correct key.
• Set the boot order to CD or DVD, hard drive, and
then floppy drive (if the computer has a floppy
drive). This order can be modified later to put the
hard drive first, to save some boot time.
• Save the changes, and then exit.
3. Place the Windows XP Installation CD into the CD or
DVD drive, and restart the PC.
4. Press the spacebar as soon as the prompt asks you to
do so. This forces the PC to boot directly into CD-ROM
emulation.
5. The installation program begins to copy the preliminary
setup files to the computer.
6. Now, the installation process needs direction and input.
You’re asked if you want to perform a new installation,
repair an existing installation, or quit.
7. Select the type of installation you’ll be performing by
pressing the correct key.
8. The Windows XP licensing agreement screen appears
(Figure 6). Press F8 to accept the terms of the licensing
agreement and proceed with the installation. (If there are
terms within the agreement you don’t agree with, your
only choice is to terminate the installation. In most
cases, though, not accepting the licensing agreement
isn’t a valid reason for returning the OS and getting your
money back on an opened software product.)

Understanding Windows42
9. The next phase of the installation is to create and/or
delete partitions. Remember, Windows XP Home Edition
doesn’t support the dynamic-disk format. You have the
opportunity to create and/or delete partitions or just
allocate the available disk space to one partition. However,
try to keep the partitions a reasonable size.
10. Figure out which partition Windows XP will be installed
on. If dual-booting to FAT32, install XP on the secondary
partition. (Place the newer OS last.)
11. If required, format the partition. Format the partition to
either FAT32 if you plan to use the multiboot option with
a Windows 9x/Me OS, or NTFS, which is recommended
for the single OS install.
12. It’s recommended that you proceed with a full format on
the partition and don’t choose the quick format.
13. The installation program starts copying files after the
partition is formatted. Each filename that’s being copied
over to the hard drive appears alphabetically in the
lower-left corner. You can also watch the installation
completion percentage increase.
FIGURE 6—A Windows XP Licensing Agreement

Understanding Windows 43
14. Choose the region and language.
15. Type in your name and organization.
16. Enter the product license key. This information is found
in the documentation that came with the Windows XP
product. It’s is most often printed on the CD case or the
CD’s documents.
17. Name the computer, enter an administrator password,
and write the administrator password down.
18. Enter the correct time and date.
19. Choose the network settings. Leave this choice on auto-
matic if you use a DHCP server to assign IP addresses. If
you have a static IP address for broadband access, enter
the settings that your ISP has provided to you.
20. If prompted (and if it’s necessary), enter a workgroup or
domain name.
21. Register the copy of Windows XP if you’ve installed all
the hardware on the machine. Otherwise, wait until
you’ve finished installing any additional hardware, so
you don’t have to activate your copy of Windows XP
again.
23. Add users that will sign on to the computer.
24. Log in as the administrator, and update any drivers that
have an update available for download. The updated
drivers can be found on the Windows Update Web site or
the manufacturers’ Web site. A list of all the hardware
devices incorporated on the PC comes in handy for this
process.
25. Often, Windows XP finds device drivers for all the hard-
ware on the PC. If this isn’t the case, check for device
drivers that were shipped with the hardware. If no device
drivers are found on CDs or floppy disks, you need to go
to the manufacturer’s Web site from another PC and
download the Windows XP–compatible driver (if there’s
You have only 30 days to activate your copy of Windows XP after you
install it. If you don’t register the copy in this period, you’ll need to
reinstall the OS from the original disc.
Understanding Windows44
one available). You may also search online for other sites
that may still support the device drivers. The only other
option is to disable the device or application and remove
it after the OS installation finishes.
26. It takes about 30 minutes to perform this installation if
all the devices have drivers and you aren’t forced to
restart the installation process more than the required
three times.
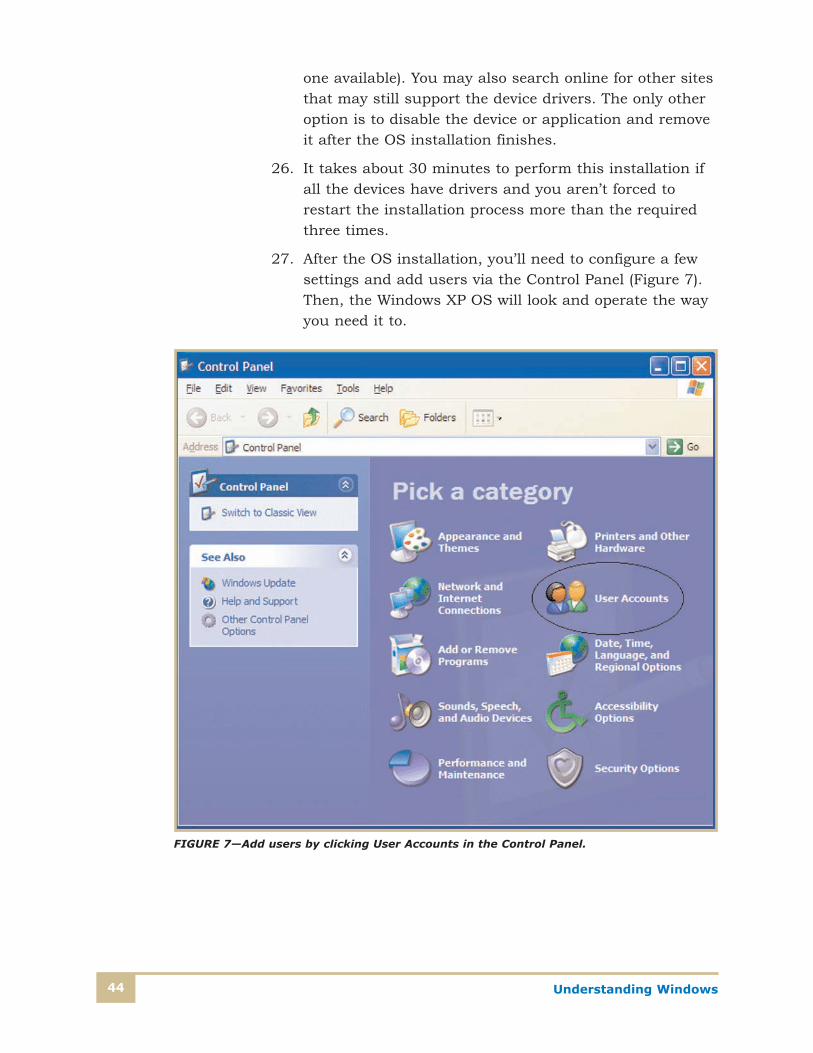
27. After the OS installation, you’ll need to configure a few
settings and add users via the Control Panel (Figure 7).
Then, the Windows XP OS will look and operate the way
you need it to.
FIGURE 7—Add users by clicking User Accounts in the Control Panel.

Understanding Windows 45
Upgrading to Windows XPIf you’re performing an upgrade, you need to take these extra
preparatory steps:
1. Run the antivirus software, and scan the hard drive and
memory.
2. Close all open applications, and turn off the antivirus
software.
3. Back up all critical files, including critical system files,
the registry, and any critical data files.
After you’ve fully backed up all the important files and set-
tings, insert the upgrade CD into the CD or DVD drive. Once
the CD is recognized, it automatically launches the installa-
tion menu. Minimize the menu, and open the CD using My
Computer or Windows Explorer (depending on your current
OS). Open the Read1st.txt file, located in the Docs folder,
and examine its contents. The Read1st.txt file contains
last-minute information that didn’t make it into other docu-
mentation and a step-by-step process for finding other useful
Windows XP information.
Now you’re ready for the upgrade. When upgrading the OS,
the existing language and network settings are used. Follow
these directions to upgrade the current OS to Windows XP.
1. If not already set, change the BIOS boot order to boot
from CD-ROM.
• During the boot process, press the key that allows
configuration of the BIOS. Depending on the PC, this
can be the Del, F1, F2, or F10 key. Just watch the
POST screen or read the documentation that came
with the PC to discover the correct key.
• Set the boot order to CD-ROM, hard drive, and then
floppy drive (if the computer has a floppy drive). This
order can be modified later to put the hard drive
first to save some boot time.
• Save the changes, and then reboot the computer.
2. With the PC running its current OS, insert the Windows
XP CD into the CD or DVD drive.

Understanding Windows46
3. Restart the PC. During the restart, you’re prompted to
press any key to boot directly into CD-ROM emulation.
4. Press the spacebar to display the installation menu. This
Windows upgrade uses the GUI.
5. The installation menu offers four options (Figure 8).
6. There’s no Upgrade-to-Windows-XP option, so click
Install Windows XP.
7. The Collecting Information process launches and identi-
fies if you’re eligible for a product upgrade. A popup
window welcoming you to the Windows setup should be
the next thing on the display.
FIGURE 8—The Windows XP Installation Menu

Understanding Windows 47
8. Ensure that the Installation Type pull-down menu
reads Upgrade (Recommended) as shown in Figure 9.
Click the Next button.
9. Click the I accept this agreement radio button to accept
the licensing agreement. (To install Windows, you must
accept the agreement.) Click the Next button.
10. Enter the 25-character product key (Figure 10). This key
is found on a label on the Windows XP’s disc sleeve. Click
the Next button.
11. You’re prompted to display an upgrade report after the
installation. Choose one of the three options. Click the
Next button to proceed to Dynamic Update.
12. The dynamic update goes online and downloads updated
installation files that have been released after your copy
of Windows XP was made. Choose the dynamic update
option that best suits your needs (Figure 11).
13. Click the Next button to proceed to “Preparing Installation.”
FIGURE 9—The installation type should read “Upgrade (Recommended).”

Understanding Windows48
FIGURE 10—Enter the product key here.
FIGURE 11—Choose a Dynamic Update option.

Understanding Windows 49
14. An estimate of how much time is needed to complete the
installation process is presented on the display.
15. Next displayed are all the new Windows XP features.
There’s no interaction required or any way to bypass this
section of the installation. While you’re looking at the
features, the installation program is compiling a list of
files it will copy to the PC.
16. The installation program now copies the selected files to
the PC. When this process is completed, the PC automat-
ically restarts itself.
17. You’re prompted to choose an installation of Windows
you would like to start. Don’t choose anything; the
Windows XP installation program automatically proceeds
with the correct version. However, ensure that the file
structure (FAT32 or NTFS) is chosen correctly.
18. You should now see the Windows XP logo while the com-
puter is booting up. The installation finishes copying all
setup files and then restarts itself.
19. After restarting, you’ll notice a slight difference in the
display properties. The setup continues copying installa-
tion files and other components over to the hard drive.
The screen may flicker a few times during the copying
process. This is normal and indicates the installation is
progressing.
20. Choose the region and language if it has changed since
the last Windows OS was installed. Click the Next
button.
21. Type in your name and organization, and then click the
Next button. This makes the installation program begin
to copy all the network components.
22. If you’ve reached this point, you’ve completed a success-
ful upgrade of the PC to Windows XP.
Professional Tip
Choose to download files from the Internet only if you have a broad-
band connection. Otherwise, skip this section and choose to update
after your install. Downloading the dynamic update files using a dial-
up connection adds hours to the installation time.

Understanding Windows50
23. You should now see the Tour Windows screen. Click the
Next button at the bottom to proceed to the activation
process.
24. Windows Product Activation (WPA) is the last step along
the Windows XP upgrade path. Hold off on the activation
until you’ve finished installing any hardware. This prac-
tice prevents having to activate Windows XP again after
making changes to the hardware configuration.
25. Click the Finish button to proceed to setting up your
user accounts.
26. The final step is to name the user accounts. Do this
now, and then click the Next button. The new desktop
is displayed.
Installing Windows XP as a Second OSBefore installing Windows XP and an earlier version on the
same machine, you must prepare the hard disk with different
partitions. To create and name multiple partitions, choose
Advanced Options during setup. You can also create parti-
tions using Fdisk.
You can divide a single hard disk into multiple partitions,
and each partition can function as a separate logical drive.
For example, logical drives C and D can both exist on the
same hard drive but function separately. You should install
each operating system on a different partition and then
install applications on the same partition as the operating
system with which you run them. If an application is used
with two different operating systems, install copies on both
partitions. A basic disk can contain up to four partitions.
Each partition can be formatted for use by a file system
(FAT16, FAT32, or NTFS). If you’ve already installed Windows
and you have only one partition, you must reformat and
partition the hard drive before you can use multiboot.

Understanding Windows 51
Windows XP and Windows 2000
You can set up a computer so that it has multiple installa-
tions of Windows XP and Windows 2000 Professional.
However, you must use a different computer name for each
installation if the computer is part of a Windows 2000, 2003,
2008, or Windows NT Server domain, because a unique secu-
rity identifier (SID) is used for each installation of the OS on
these domains.
Generally, you should always install the most recent OS last.
To create a multiboot computer containing Windows 2000
and Windows XP,
• Install each operating system on a separate disk
partition.
• Install Windows XP after you’ve installed Windows 2000.
• Perform a new installation of Windows XP, as opposed to
an upgrade.
• By default, the Windows XP installation is placed on a
partition on which no other operating system is located.
You can specify which empty partition during setup.
• Don’t install Windows XP on a compressed drive unless
the drive was compressed with the NTFS compression
feature.
• Reinstall any applications after the Windows XP installa-
tion and setup is complete.
• Install applications used by each OS on that system’s
partition. If you want the applications to run on both
operating systems, you need to install copies of the
applications in each of the operating system’s partitions.
Windows NT 4.0 and Windows XP
Setting up a computer to run Windows XP as well as
Windows NT Workstation 4.0 requires addressing compatibil-
ity issues among different file systems (FAT16, FAT32, and
NTFS).

Understanding Windows52
Normally, NTFS is the recommended file system because it
supports important security and encryption features. However
using NTFS as the only file system on a computer that contains
both Windows XP and Windows NT isn’t recommended.
Windows NT 4.0 can’t access files that have been stored
using NTFS features that didn’t exist when Windows NT 4.0
was released. For example, a file that uses the new NTFS
encryption feature won’t be readable when the computer is
started with Windows NT 4.0 Workstation, which was
released before the encryption feature existed. By installing
Windows NT on a FAT partition, you can ensure the OS can
read all the partition’s files. In addition, if Windows NT isn’t
installed on the system partition (usually the first partition
on the hard disk), this partition also needs to be formatted
with FAT. To create a multiboot computer containing
Windows NT 4.0 and Windows XP,
• Ensure that Windows NT 4.0 has been updated with at
least Service Pack 4 (SP4) before installing Windows XP.
• Install each operating system on a separate disk
partition.
• If the PC is on a Windows NT Server or Windows 2000,
2003, or 2008 Server domain, each installation of the
operating systems on that PC must have a different
computer name.
• Perform a new installation of Windows XP as opposed to
an upgrade.
• As with the Windows 2000 / Windows XP multiboot
installation, the Windows XP installation is placed on a
partition on which no other operating system is located.
You can specify a partition during setup.
• Don’t install Windows XP on a compressed drive unless
the drive was compressed with the NTFS compression
feature.
• Reinstall any applications after the Windows XP installa-
tion and setup is complete.
Understanding Windows 53
• Install applications used by each OS on that system’s
partition. If you want the applications to run on both
operating systems, you need to install copies of the
applications in each of the operating system’s partitions.
Windows 9x/Me and Windows XP
This multiboot installation also requires you to address file-
system compatibility issues. Windows 9x/Me can’t reside on
or share data with an NTFS partition. If the multiboot instal-
lation is done to enable sharing of data between applications
running on different operating systems, both the Windows
9x/Me and Windows XP partitions need to be formatted
using the FAT file system.
Remember to install the latest operating system last; other-
wise important system files may be overwritten. To create a
multiboot computer containing Windows 9x/Me and Windows
XP,
• Windows 9x/Me must be installed on a partition format-
ted with FAT16 or FAT32.
• If Windows 9x/Me isn’t installed on the system partition
(usually the first partition on the disk), the system parti-
tion must also be formatted with FAT16 or FAT32.
• If you have partitions compressed using DriveSpace or
DoubleSpace, this data won’t be available to the
Windows XP OS. In most cases, it’s recommended that
you uncompress these partitions.
• Windows XP must be installed last.
MS-DOS and Windows XP
There are even options for creating a multiboot system with
MS-DOS and Windows XP. All the file system compatibility
issues must be addressed. MS-DOS supports only FAT16, so
if you want to share data between the operating systems,
you’ll have limited hard-drive resources on the OS partitions.
• MS-DOS must be installed on a basic disk on a partition
formatted with FAT.

Understanding Windows54
• If MS-DOS isn’t installed on the system partition (usually
the first partition on the disk), the system partition must
also be formatted with FAT.
• Windows XP must be installed last. Otherwise, important
files needed for starting Windows XP will be overwritten.
Windows XP’s Forgotten Password Wizard
Installing a new copy of Windows XP always requires you to
insert an administrator’s password. This password is used to
access features needed to add new users and configure some
system properties. One amusing rule that some IT people
keep in mind is this: The more important the password, the
more likely it’s forgotten.
However, Microsoft created a utility on the Windows XP OS to
make a password recovery disk, and, thanks to the Forgotten
Password Wizard, you need not fear losing the password. Use
the following procedure to launch the Forgotten Password
Wizard and create a password recovery disk.
1. Click Start, point to Settings, click Control Panel, and
then choose User Accounts.
2. Click your user account name.
3. Under Related Tasks, click Prevent forgotten password
to launch the Forgotten Password Wizard.
4. Insert a 31/2-inch floppy disk into the drive and allow
the system to write the required files.
5. Label the password recovery dDisk and stash it away for
an emergency.
If you happen to forget the password, click the green arrow
as you would to finish logging on to the PC. A dialog box
opens, directing you to use the password recovery disk. If you
forget the password and misplace the disk, you need to rein-
stall the Windows XP OS to access the administrative
functions.

Understanding Windows 55
Installing VistaInstalling Vista isn’t much different from installing Windows
XP. Be sure that you first address the preparation issues for
the installation of XP, Vista, and Windows. You also should
back up existing data and configure the boot order of the
computer so that you can boot to the installation DVD. Then,
use the following procedure to perform the installation:
1. Insert the Vista Installation DVD into the drive, and
restart the PC.
2. Press the spacebar as soon as the prompt asks you to
do so. This forces the PC to boot directly into CD-ROM
emulation.
3. The installation program begins to copy the preliminary
setup files to the computer.
4. Now, the installation process needs direction and input.
You’re asked if you to indicate the language, time, cur-
rency format, and keyboard input method. Ensure these
are set to the desired settings, and click Next.
5. On the Install Windows page are selections to Repair a
computer, obtain important preinstallation information,
and install. Click Install now.
6. The next page is where you enter the product key. There
is also a check box, selected by default, to automatically
activate when online. You can uncheck this if you would
like to control when the activation attempt occurs. You
can either enter the product key now or later. If you
proceed without entering the key, you’ll get the box
shown in Figure 12.
7. On the next page, you’re asked a question that you
weren’t asked when installing XP, and that’s “Which
edition do you want to install?” All editions are on the
DVD, and you must select the one you purchased. (When
the time comes to activate, the activation process will fail
if you chose an edition you didn’t pay for.) If you entered
a key earlier, the decision is made for you based on the
key. Select an edition, check the box to indicate you’ve
selected the edition you paid for (if you didn’t enter a
key), and click Next.

Understanding Windows56
8. Read the terms of the license agreement, accept them,
and click Next.
9. On the Which type of Installation do you want page,
select Custom (Advanced) as opposed to Upgrade
(which is disabled).
10. The next page allows you to create and delete partitions.
If you’re on a computer with no OS, you’ll see all
unallocated space (Figure 13).
11. To create a partition, select Drive Options. When the
options for Format, Delete, and Extend appear, select
New.
12. Remember to create a partition large enough for Vista.
To support Vista Ultimate, select 60 GB (Figure 14).
Select Apply, and Windows creates the partition.
FIGURE 12—Choose No if you decide to enter the product code at a later time.

Understanding Windows 57
13. Select the partition you just created, and click Next.
Windows takes a few minutes to copy files to the new
partition (Figure 15). When it’s done with that, it also
performs additional tasks.
FIGURE 13—UnallocatedSpace
FIGURE 14—Choose 60,000 MB.

Understanding Windows58
14. The computer restarts. Don’t choose to boot to the DVD.
Allow the computer to boot to the setup files that have
been installed. The screen asks you to wait while Windows
prepares to start for the first time.
15. The computer returns to the screen in Figure 15 and
continues the installation.
16. The computer reboots again. Again, don’t select to boot
to the DVD. Allow the computer to boot to the setup files
that have been installed.
17. Next, the instructions on the screen ask you to choose a
name and picture. You can name the user account
(which will have administrative permissions) and select a
picture. Enter a username and password, and click
Next.
18. On the Help protect Windows automatically page, select
Use the recommended settings. This choice lets the
computer check for and receive automatic updates.
19. Ensure that the date and time zone are correct on the
next page, and click Next.
FIGURE 15—Vista isinstalling.
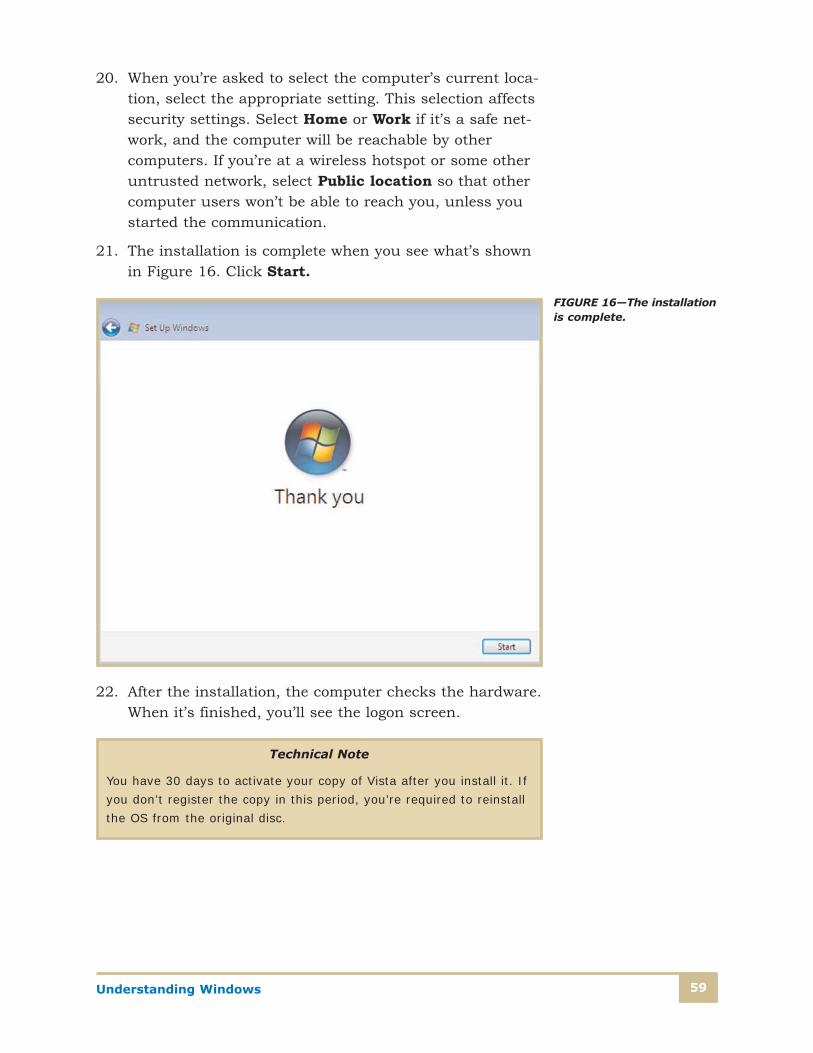
Understanding Windows 59
20. When you’re asked to select the computer’s current loca-
tion, select the appropriate setting. This selection affects
security settings. Select Home or Work if it’s a safe net-
work, and the computer will be reachable by other
computers. If you’re at a wireless hotspot or some other
untrusted network, select Public location so that other
computer users won’t be able to reach you, unless you
started the communication.
21. The installation is complete when you see what’s shown
in Figure 16. Click Start.
22. After the installation, the computer checks the hardware.
When it’s finished, you’ll see the logon screen.
Technical Note
You have 30 days to activate your copy of Vista after you install it. If
you don’t register the copy in this period, you’re required to reinstall
the OS from the original disc.
FIGURE 16—The installationis complete.

Understanding Windows60
23. Activate the copy of Vista if you’ve installed all the hard-
ware on the machine. Otherwise, wait until you’ve
finished installing any additional hardware so you don’t
have to activate the copy of Vista again.
24. Add users that will sign on to this computer.
25. Log in as the administrator, and update any drivers for
which an update is available for download. The updated
drivers can be found on the Windows Update Web site or
the manufacturers’ Web site. A list of all the hardware
devices incorporated on the PC comes in handy for this
process.
26. Often, Windows finds device drivers for all the hardware
on the PC. If this isn’t the case, check for device drivers
that were shipped with the hardware. If no device drivers
are found on CDs or floppy disks, you need to go to the
manufacturer’s Web site from another PC and download
the Vista-compatible driver (if there’s one available). You
may also search online for other sites that may still
support the device drivers. The only other option is to
disable the device or application and remove it after the
OS installation finishes.
Upgrading to VistaWithout performing a clean install, you can upgrade only
Windows XP to Vista. Before the upgrade, take these
preparatory steps:
1. Run your antivirus software, and scan the hard drive
and memory.
2. Close all open applications, and turn off the antivirus
software.
3. Back up all critical files, including critical system files,
the registry, and any critical data files.
After you’ve fully backed up all your important files and set-
tings, insert the upgrade disc into the drive. Once the DVD is
recognized, it automatically launches the installation menu.
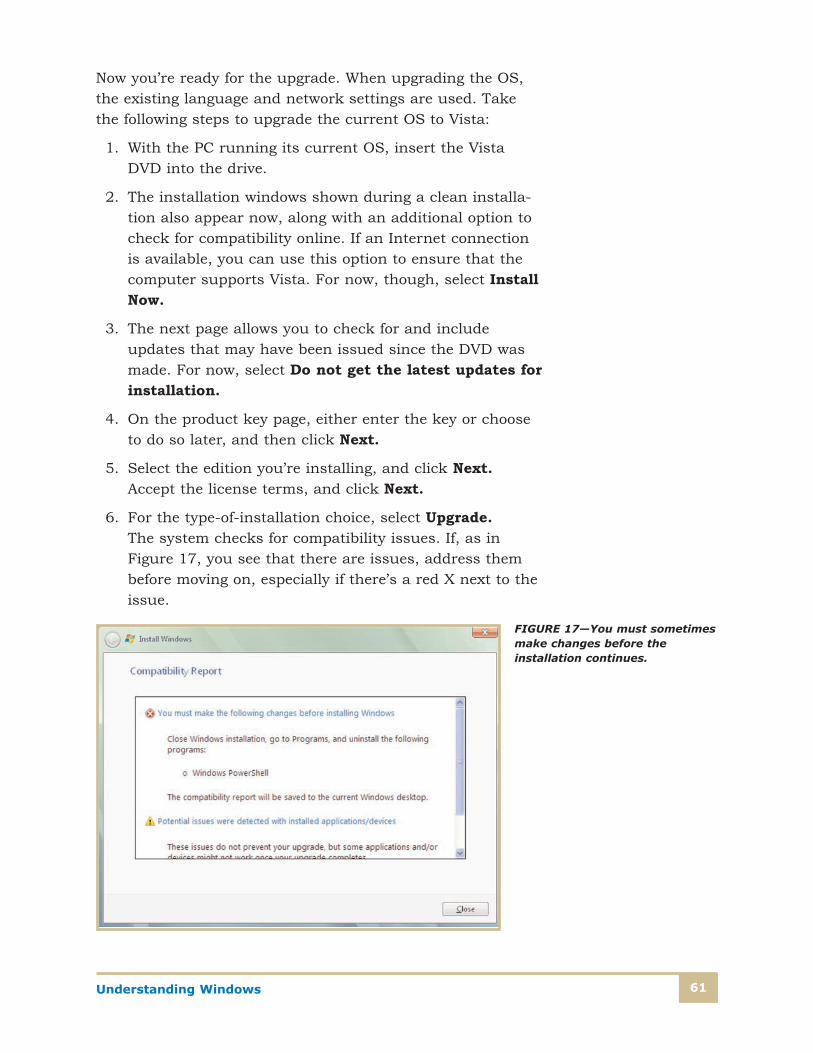
Understanding Windows 61
Now you’re ready for the upgrade. When upgrading the OS,
the existing language and network settings are used. Take
the following steps to upgrade the current OS to Vista:
1. With the PC running its current OS, insert the Vista
DVD into the drive.
2. The installation windows shown during a clean installa-
tion also appear now, along with an additional option to
check for compatibility online. If an Internet connection
is available, you can use this option to ensure that the
computer supports Vista. For now, though, select Install
Now.
3. The next page allows you to check for and include
updates that may have been issued since the DVD was
made. For now, select Do not get the latest updates for
installation.
4. On the product key page, either enter the key or choose
to do so later, and then click Next.
5. Select the edition you’re installing, and click Next.
Accept the license terms, and click Next.
6. For the type-of-installation choice, select Upgrade.
The system checks for compatibility issues. If, as in
Figure 17, you see that there are issues, address them
before moving on, especially if there’s a red X next to the
issue.
FIGURE 17—You must sometimesmake changes before the installation continues.

Understanding Windows62
7. Now the process proceeds much as it did during the
clean install (Figure 15). There are several reboots.
Likewise, these are also followed by update pages and
time-zone settings.
8. When the logon screen appears, the upgrade is complete.
Installing Vista as a Second OSBefore installing Vista and an earlier version on the same
machine, you must prepare the hard disk with different par-
titions. To create multiple partitions, choose Drive options
(Advanced) during setup to create and name multiple parti-
tions. You can also create partitions using Fdisk. Follow the
file system and hard-drive guidelines that were covered in the
Windows XP section.
Vista and Windows 2000 or Windows XP
You can set up a computer so that it has multiple installa-
tions of Vista and Windows 2000 Professional or XP.
However, you must use a different computer name for each
installation if the computer is part of a Windows 2000, 2003,
2008, or Windows NT Server domain, because a unique
security identifier (SID) is used for each installation of the OS
on these domains.
Generally, you should always install the most-recent OS
last. To create a multiboot computer containing Vista and
Windows 2000 or XP, take these steps:
1. Install each operating system on a separate disk
partition.
2. Install Vista after you’ve installed the earlier OS.
3. Perform a new installation of Vista, not an upgrade.
4. By default, the Vista installation is placed on a partition
on which no other operating system is located. During
setup, you can specify which empty partition to use.
5. Don’t install Vista on a compressed drive, unless the
drive was compressed with NTFS compression.

Understanding Windows 63
6. Reinstall any applications after the Vista installation and
setup is complete.
7. Install applications used by each OS on that system’s
partition. If you want the applications to run on both
operating systems, you need to install copies of the
applications in each of the operating system’s partitions.
Vista and Pre-Windows 2000
Simply put, a dual-boot configuration can be done only with
Windows 2000 or Windows XP. Earlier operating systems
aren’t supported with Vista in a dual boot without the use of
third-party utilities that are unsupported by Microsoft.
Installing Windows 7Installing Windows 7 is much like installing Vista. Be sure
that you first address the preparation issues for the installa-
tion of Windows XP, Vista, and Windows 7. You also should
back up existing data and configure the boot order of the
computer so that you can boot to the installation DVD. Then,
use the following procedures to perform the installation:
1. Place the Windows 7 Installation DVD into the drive, and
restart the PC.
2. Press the spacebar as soon as the prompt asks you to
do so. This forces the PC to boot directly into CD-ROM
emulation.
3. The installation program begins to copy the preliminary
setup files to the computer. This copying is followed by a
screen that indicates that Windows is starting.
4. Now, the installation process needs direction and input.
You’re asked if you to indicate the language, time, cur-
rency format, and keyboard-input method. Set these to
the settings you desire, and click Next.
5. There are now selections to repair the computer, obtain
important preinstallation information, and install. Click
Install now. The screen then indicates that setup is
starting.

Understanding Windows64
6. Read the terms of the license agreement, accept them,
and click Next.
7. When the computer asks which type of Installation you
want, select Custom (Advanced). Don’t choose to
upgrade; this option is disabled if no previous OS exists
or if the older OS can’t be upgraded.
8. The next page allows you to create and delete partitions.
If you’re on a computer with an existing OS or with exist-
ing partitions, you see them listed (Figure 18).
9. To create or delete a partition, select Drive Options in
the lower-right corner. When the options for Format,
Delete, and Extend appear, select New to create a new
partition and Delete to remove a partition to make
space. You must have a 7982 MB partition (Figure 18).
10. Select the partition you just created, and click Next.
Windows takes a few minutes to copy files to the new
partition (Figure 19). When it’s done, it also performs
the other tasks listed below and checks each off as com-
pleted. Then the computer reboots, the screen indicates
that the computer is updating registry settings, and then
it indicates that setup is starting services.
FIGURE 18—The ExistingPartitions

Understanding Windows 65
11. The computer briefly returns to the screen shown in
Figure 19 and reboots. Then, screens appear that
indicate that Windows is starting, then that setup is
preparing the computer for first use, and that setup is
checking video performance.
12. Next, you can name the user account and the PC
(Figure 20). Enter that information, and click Next.
FIGURE 19—Windows 7 isinstalling.
FIGURE 20—Choose a username.

Understanding Windows66
13. You’re next asked to enter the password. Do so, and
click Next.
14. Either enter the product key, or choose to do so later.
15. When you’re asked to help protect Windows automati-
cally, select Use the recommended settings. This
option sets the computer to check for and receive auto-
matic updates.
16. Ensure that the date and time zone are correct on the
next page, and click Next.
17. When you’re asked to select the computer’s current
location, select an appropriate option. This selection
affects security settings. Select Home or Work if it’s a
safe network, and the computer will be reachable by
other computers. If you’re at wireless hotspot or some
other untrusted network, select Public location and
other computer users won’t be able to reach you unless
you started the communication.
18. You may get the opportunity to create a homegroup,
which can be used to link devices and share items on a
home network. If you can, choose the items you would
like to share with the homegroup and make note of the
password that’s generated, which you’ll need if you
decide later to add other devices to the homegroup.
Click Next.
19. The installation is complete when you see the desktop.
20. If you’ve installed all the hardware on the machine, acti-
vate the copy of Windows 7. Otherwise, wait until you’ve
finished installing any additional hardware so that you
don’t have to activate the copy of Windows 7 again.
21. Add users that will sign on to this computer.
Technical Note
You have 30 days to activate your copy of Windows 7 after you
install it. If you don’t register the copy in this period, you’ll be
required to reinstall the OS from the original disc.
Understanding Windows 67
22. Log in as the administrator, and update any drivers for
which an update is available for download. The updated
drivers can be on the Windows Update Web site or the
manufacturers’ Web site. A list of all the hardware
devices on the PC comes in handy for this process.
23. Often, Windows 7 finds device drivers for all the hard-
ware on the PC. If this isn’t the case, check for device
drivers that were shipped with the hardware. If no device
drivers are found on CDs or floppy disks, you need to go
to the manufacturer’s Web site from another PC and
download the Windows 7-compatible driver (if there’s
one available). You may also search online for other sites
that may still support the device drivers. The only other
option is to disable the device or application and remove
it after the OS installation finishes.
Upgrading to Windows 7Without performing a clean install, you can upgrade only
Vista to Windows 7. Before the upgrade, take these prepara-
tory steps:
1. Run the antivirus software, and scan the hard drive and
memory.
2. Close all open applications, and turn off the antivirus
software.
3. Back up all critical files, including critical system files,
the registry, and any critical data files.
After you’ve fully backed up all your important files and set-
tings, insert the upgrade disc into the drive. Once the DVD is
recognized, it automatically launches the installation menu.
Now you’re ready for the upgrade. When upgrading the OS,
the existing language and network settings are used. Take
these steps to upgrade the current OS to Windows 7:
1. With the PC running its current OS, insert the
Windows 7 DVD into the drive.

Understanding Windows68
2. The installation windows shown during the clean instal-
lation appear, with an additional selection to check for
compatibility online. If an Internet connection is avail-
able, you can use this to ensure that the computer
supports Windows 7. For now, select Install Now. The
screen indicates that setup is now copying files, and
then that setup is starting.
3. The next screen allows you to check for and include
updates that may have been issued since the DVD was
made. For now, select Do not get the latest updates for
installation.
4. Accept the license terms.
5. On the type of installation, select Upgrade. The system
checks for compatibility issues. Note that you can
upgrade only from Vista.
6. Now the process continues much as it does for a clean
install, with several reboots. These are also followed by
requests for update and time-zone information.
7. When the logon screen appears, the upgrade is complete.
Installing Windows 7 as a Second OSBefore installing Windows 7 and an earlier version on the
same machine, you must prepare the hard disk with different
partitions. To create multiple partitions, choose Drive
options (Advanced) during setup to create and name multi-
ple partitions. You can also create partitions using Fdisk.
Use the file system and hard-drive guidelines discussed in
the Windows XP section.
Windows 7 and Windows 2000 or Windows XP
You can set up a computer so that it has multiple installations
of Windows 7 and Windows 2000 Professional or Windows XP.
However, you must use a different computer name for each
installation if the computer is part of a Windows 2000, 2003,
2008, or Windows NT Server domain, because a unique secu-
rity identifier (SID) is used for each installation of the OS on
these domains.

Understanding Windows 69
Generally, you should always install the most recent OS last.
To create a multiboot computer containing Windows 2000,
XP, or Vista and Windows 7,
1. Install each operating system on a separate disk
partition.
2. Install Windows 7 after you’ve installed the older OS.
3. Perform a new installation of Windows 7, not an
upgrade.
4. By default, the Windows 7 installation is placed on a
partition on which no other operating system is located.
During setup, you can specify which empty partition to
use.
5. Don’t install Windows 7 on a compressed drive, unless
the drive was compressed with NTFS compression.
6. Reinstall any applications after the Windows 7 installa-
tion and setup is complete.
7. Install applications used by each OS on that system’s
partition. If you want the applications to run on both
operating systems, you need to install copies of the
applications in each of the operating system’s partitions.
Windows 7 and Pre–Windows 2000
As with Vista, a dual-boot configuration can be done only
with Windows 2000, XP, or Vista. Earlier operating systems
aren’t supported with Windows 7 in a dual boot, without the
use of third-party utilities that are unsupported by Microsoft.
Installing Other ComponentsVista, XP, and Windows 7 also support other components
within the OS. Microsoft supports these products using the
Windows Update Web site. Windows components can be acti-
vated during the original installation setup or any time you
need to add or remove a component. To install selected
Windows components during the installation process, choose
the Custom setup model and select the components you
need. You can add or remove a Windows component after the
original installation.

Understanding Windows70
To add or remove a Windows component in Windows XP,
1. Have the original Windows installation disc available.
2. Click Start, point to Settings, and then click Control
Panel.
3. Double-click Add/Remove Programs.
4. Select Add/Remove Windows Components on the left
side of the screen, which invokes the screen shown in
Figure 21.
5. Select the Windows components you wish to install. The
dialog box displays the amount of hard disk space used
by your choice and the amount of free space.
6. If you have enough free space, insert the Windows instal-
lation disc into the drive, and click Have Disk.
FIGURE 21—Windows Components

Understanding Windows 71
To add or remove a Windows component in Vista and
Windows 7,
1. Have the original Windows installation CD available.
2. Click Start, point to Settings, and then click Control
Panel.
3. Select Programs. On the next screen under Programs
and Features, select Turn Windows features on or off.
Click Continue on the UAC pop up box.
4. Select the features that you would like to add or remove
by checking or unchecking the boxes (Figure 22).
Windows Update
The Windows Update Web site, http://windowsupdate.com,
has supported the Windows operating systems since
Windows 98. If you have Windows XP and an open Internet
connection, click Start, All Programs, and then click
Windows Update. If you have Vista or Windows 7, click
Start, Help and Support, and then Windows Update to
access the site.
FIGURE 22—Adding or RemovingWindows Features

Understanding Windows72
Windows Update is an Internet-based service that allows you
to download and install patches, updates, and other files for
the OS, including bug or security fixes, enhancements to the
OS, and device drivers for the hardware. There are two main
parts of the Windows Update Web site: Product Updates and
Support Information.
Product updates. The product-update area of the Windows
Update Web site checks to see if there are any product fixes
or updates available for the OS. (To query the PC and find
out what OS you have, you must not be running the firewall
in stealth mode.) The Windows Update Web site queries the
PC to see if the latest version of Windows Update is installed
and to give you an option to install the latest version of the
Update software. If security levels are installed on the PC that
don’t allow changes to the registry, log off and sign on as a
user who has administrator privileges.
After the Windows Update software is checked (and updated
if necessary). The copy of Windows installed on the PC
checks the Microsoft database for updates that haven’t been
installed. If there are updates available, you’ll be offered a
chance to download and install the updates. It’s a good idea
to install all critical updates, because they usually deal with
security issues.
The other updates and device-driver files are optional and are
more user-specific. These files take up valuable space on the
PC’s hard drive, so be selective. There are some products
available at the site that may not apply to you and the way
you use the PC at all. For example, if you’ve no need to
translate a specific language, don’t download and install the
language-support options. Many of the updates available are
listed as recommended. You need to evaluate these updates.
Take into account the new feature(s) being added as well as
the loss of any feature(s) you’ve already installed.
Some, but not most, recommended updates can be removed
from the system using the Update Wizard Uninstall or at the
Windows Update site. The uninstall option won’t apply to most
critical updates. If an update doesn’t support uninstall, a
disclaimer is included during the update process. To remove
an update already installed on the PC, use Update Wizard
Uninstall or select the Display Installed Updates tab on the

Understanding Windows 73
Windows Update window. If the Windows Update site supports
an uninstall option for a specific update, the option to remove
the update is available. The Windows Update site is shown in
Figure 23.
Help and Support information. The Help and Support
area of the Windows Update Web site is aimed at new users
of the site. Included in this area is a list of frequently asked
questions (FAQs) about Windows Update as well as a place to
ask specific questions if the answer provided in the FAQ area
isn’t adequate.
DirectX
Besides the Windows OSs, Microsoft supports their DirectX
software product. The OS uses DirectX to support graphics
and sounds. With the explosion of products released into the
multimedia and game markets, Microsoft has found that
DirectX requires frequent updates. When purchasing graph-
ics or sound intensive software, it’s a good idea to check the
level of DirectX required to support the software. The level of
DirectX the software requires is often supplied on the CD or
disks that contain the application, but sometimes you need
to download and install an updated level of DirectX to
have the new software function. Many multimedia devices
FIGURE 23—The Microsoft Windows Update Web Page

Understanding Windows74
connected to a PC access DirectX and its components. DirectX
is available at no cost to the user. Access to some of the
multimedia devices is accomplished by clicking Start, All
Programs, Accessories, and Entertainment. To display the
level of DirectX on the PC,
1. Click Start and point to All Programs, Accessories, and
System Tools.
2. Click System Information.
3. Click Tools, and then click DirectX Diagnostic Tool
(Figure 24).
4. Click the System tab. The version of DirectX installed on
the system is listed here. You may also access this by
clicking Start and then Run. Type DXDIAG in the Open
box, and then click OK.
PowerToys
Windows PowerToys are additional programs that developers
work on after a product has been released to manufacturing.
They can often add fun and functionality to the Windows
experience. PowerToys were available for Windows 98 and
then disappeared until those for Windows XP were developed.
The PowerToys covered in this study unit are for Windows XP
only.
FIGURE 24—The DirectXDiagnostic Tool
Understanding Windows 75
Microsoft indicates that it has “taken great care to ensure
that PowerToys operate as they should, but they are not part
of Windows and are not supported by Microsoft.” Microsoft
Technical Support won’t answer questions about the PowerToys
command structure or functions. Be aware you must unin-
stall old copies of Windows PowerToys before installing the
new ones, and PowerToys works only with U.S. English
regional settings. The Microsoft PowerToys for Windows XP
are available without charge at http://www.microsoft.com/
windowsxp/downloads/powertoys/xppowertoys.mspx.
The PowerToys released for Windows XP include
• Color Control Panel Applet
• SyncToy
• RAW Image Thumbnailer and Viewer
• ClearType Tuner
• HTML Slide Show Wizard
• Open Command Window Here
• Alt-Tab Replacement
• Tweak UI
• Power Calculator
• Image Resizer
• CD Slide Show Generator
• Virtual Desktop Manager
• Taskbar Magnifier
• Webcam Timershot
The PowerToys area of the Microsoft Web site provides a
description of each program.

Understanding Windows76
Power Options
Using Power Options can reduce the power consumption of
attached devices or the entire system. To use these options,
choose a power scheme, which is a collection of settings that
manage the power usage by the PC. Windows includes preset
desktop and laptop power schemes, and, alternatively, you
can create your own schemes. Adjusting the settings of an
existing power scheme is the easiest way to create a power
scheme.
To use Power Options, the hardware attached to the PC must
support power-saving features like standby mode and hiber-
nate. To support the hibernate mode, all devices that are part
of the system must support hibernation. For information on
power-saving modes, see the documentation that came with
the computer. Depending on the hardware, you can
• Turn off the monitor and hard disks automatically
• Put the computer on standby when it’s idle. Standby (also
known as sleep in Vista and Windows 7) mode switches
the PC to a low-power state. Some devices, such as the
monitor and hard disks, turn off. When you want to use
the computer again, moving the mouse or pressing a key
makes the PC come out of standby, and the desktop is
restored as you left it. Standby is particularly useful for
conserving battery power in laptop and portable comput-
ers. However, because standby doesn’t save the desktop
state to disk, a power failure while on standby can cause
you to lose unsaved information.
• Put the computer in hibernation, which saves everything
in memory on disk, turns off the monitor and hard disk,
and then turns off the computer. In this case, you need
to restart the computer. The desktop is restored exactly
as you left it and the data is saved. It takes longer to
bring a PC out of hibernation than out of standby.
Typical power-option schemes conserve power by turning off
the monitor and hard disk after a short period. When you’re
away from the PC for a while, the power scheme is set to put
the PC into standby. Hibernation is commonly set to activate
after the PC has been idle for an extended time or overnight.

Understanding Windows 77
Advanced Configuration and Power Interface (ACPI)
Using the Power Options in the Control Panel changes power
settings that take advantage of advanced configuration and
power interface (ACPI), which is the industry specification
that defines a hardware interface for the system board. This
specification integrates power-management features through-
out a computer system (hardware, OS, and applications).
This integration allows the OS to determine which applications
are active and to handle the power management resources of
desktop, portable, and server computers. ACPI is also the
industry specification that defines the functions for OnNow,
which allows computers to start at the touch of a key on a
keyboard.
During Windows setup, ACPI is installed only if all
components present during setup support ACPI power
management. If you’re unsure whether the PC is ACPI-
compliant, check the documentation supplied with the PC.
Adjusting the Power OptionsTo adjust the power options for a computer running Windows
XP,
1. Click Start, point to Settings, click Control Panel,
Performance and Maintenance (Windows XP Category
View), and then double-click Power Options.
2. Click the Hibernate tab, and then select the Enable
hibernate support check box (Figure 25). If the
Hibernate tab isn’t available, the computer doesn’t
support this feature.
3. Click OK to close the Power Options Control Panel.
4. Click Start, and then Shut Down. In the What do you
want the computer to do drop-down list, click
Hibernate.

Understanding Windows78
To automatically put the computer into hibernation, you
must be logged on as an administrator or a member of the
administrators group. If the computer is connected to a net-
work, network policy settings may also prevent you from
completing this procedure:
1. Click Start, point to Settings, click Control Panel,
Performance and Maintenance (Windows XP Category
View), and then double-click Power Options.
2. Click the Hibernate tab, select the Enable hibernate
support check box, and then click Apply. If the
Hibernate tab isn’t available, the computer doesn’t
support this feature.
FIGURE 25—The HibernateTab of the Power OptionsProperties Control Panel

Understanding Windows 79
3. Click the APM tab, choose Enable Advanced Power
Management support, and then click Apply. The APM
tab is unavailable on ACPI-compliant computers. ACPI
automatically enables Advanced Power Management,
which disables the APM tab.
4. Click the Power Schemes tab, and then select a time in
System hibernates. The PC hibernates after it has been
idle for the specified amount of time.
To manually put a PC on standby, click Start, and then click
Shut Down. In the What do you want the computer to do
drop-down list, click Standby. You can also put the computer
on standby by following this procedure:
1. Click Start, point to Settings, click Control Panel,
Performance and Maintenance (Windows XP Category
View), and then double-click Power Options.
2. Click the Advanced tab. Under When I press the power
button on my computer, click Standby. If you’re using
a portable computer, click Standby under When I close
the lid of my portable computer.
3. Click OK or Apply, and then turn off the power or close
the lid of the portable computer.
Save your work before putting the computer on standby
(sleep mode) because information in computer memory isn’t
saved on the hard disk. If there’s an interruption in power,
the information in memory is lost. To automatically put the
computer on standby,
1. Click Start, point to Settings, click Control Panel,
Performance and Maintenance (Windows XP Category
View), and then double-click Power Options.
2. On the Power Schemes tab, click the down arrow next
to System standby (Figure 26). On the drop-down list,
select the amount of time you want to pass before the
PC goes into standby mode.

Understanding Windows80
3. Adjust the time settings for the Turn off monitor and
Turn off hard disks options by using the drop-down
lists next to these items. The most common option is to
have the monitor and disk(s) turn off before the system
goes into the standby mode.
4. Name the new power scheme by clicking Save As and
typing the new name in the box provided.
5. Click OK or Apply to save the changes to the power
options. The system goes into standby mode after the
set amount of time.
To set the alarms feature,
1. Click Start, point to Settings (Windows 2000 only),
click Control Panel, Performance and Maintenance
(Windows XP Category View), and then double-click
Power Options.
2. Click the Alarms tab. You can set a low-battery alarm,
a critical-battery alarm, or both.
FIGURE 26—The PowerSchemes Tab of the PowerOptions Properties ControlPanel

Understanding Windows 81
To manually put a computer running Windows 7 into hiber-
nation, you must be logged on as an administrator or a
member of either the administrators or power users group. If
the computer is connected to a network, network policy set-
tings might also prevent you from completing this procedure.
1. Click the Start button, click the small arrow next to the
Shutdown button, and then click Hibernate.
Windows 7 automatically puts a computer into hibernation.
Again, to cancel this setting, you must be logged on as an
administrator or a member of the administrators group, and
the network policy settings must allow it.
1. Open Power Options by clicking the Start button,
Control Panel, Hardware and Sound, and then Power
Options.
2. Click Change plan settings under the selected plan.
There are three plans, but only one can be in effect at a
time.
3. Click Change advanced power settings.
4. Expand Sleep, expand Sleep after, and then do one of
the following:
• If you’re using a mobile PC, click battery or Plugged
in (or both), click the arrow, and then click Never.
• If you’re using a desktop computer, click Setting,
click the arrow next to Put the computer to sleep
after, and then click Never.
5. Expand Hibernate after, and then do one of the following:
• If you’re using a mobile PC, click battery or Plugged
in (or both), click the arrow, and then click Never.
• If you’re using a desktop computer, click Setting,
click the arrow, and then click Never.

Understanding Windows82
By default, Vista and Windows 7 users are notified when a
computer’s battery runs low. No action is required to set the
alarms feature. To cancel this setting in Windows 7,
1. Open Power Options by clicking the Start button,
Control Panel, Hardware and Sound, and then Power
Options.
2. On the Select a power plan page, click Change plan
settings under the selected plan. There are three plans,
but only one can be in effect at a time.
3. On the Change settings for the plan page, click
Change advanced power settings.
4. On the Advanced settings tab, expand Sleep, expand
Allow wake timers, and then click the arrow next to
Setting and set it to Disable.
Laptops and Other Portable Computers
Using Power Options in the Control Panel, you can reduce
battery-power consumption of a portable computer and still
keep the computer available for immediate use. You can view
multiple batteries separately or as a whole, and set alarms to
warn you of low-battery conditions. You should strongly con-
sider making use of the standby and hibernate features for
portable computers.
Commercial air travel. Operating a PC during commercial
air travel is restricted by most airlines, who request that you
turn off portable computers during, at minimum, certain
portions of the flight, such as takeoff and landing. To comply
with this request, you must turn off the computer completely.
The computer might appear to be turned off while in standby
or hibernate mode; however, the operating system might
automatically reactivate itself to run certain tasks or to issue
an alarm. To prevent this from occurring during air travel, be
certain to shut down the computer completely. In addition, if
the computer is equipped with a cellular wireless modem,
you must also ensure that this modem is completely turned
off as required by Federal Communication Commission (FCC)
regulations. Failure to comply with these requirements
could possibly lead to civil or criminal penalties.

Understanding Windows 83
Windows XP. Laptop and portable power options expanded
with the release of Windows XP. Microsoft expanded its
OnNow power management and ACPI support. The expansion
has added these new benefits and usage scenarios for end
users:
• The expansion has given PC users a faster resume time.
This speed is accomplished by support for BIOS improve-
ments. Windows XP supports the Simple Boot Flag
specification. This specification provides a boot flag regis-
ter that can communicate boot options to the system
firmware. This allows a PC to automatically optimize its
behavior and boot performance based on the installed
operating system and previous boots.
• The fast resume time is also supported by boot loader
improvements. The Windows XP boot loader caches file
and directory metadata in large chunks according to
what’s most recently used, reducing the time spent seek-
ing data on hard disks.
• Windows XP boot improvements also include optimiza-
tions of overlapping device initialization with the required
disk I/Os, and removing or delaying the loading of
processes and services that are unnecessary at boot
time.
• Windows XP options for laptops and portables offer
native processor performance control for the Intel
SpeedStep, AMD PowerNow, and Transmeta Longrun
mobile processors.
• Windows XP options for laptops and portables offer
improved power management of USB devices.
• Windows XP offers hibernation improvements. Before
Windows XP writes to the hibernation file, all memory
pages on the zero, free, and standby lists are freed, so
these aren’t written to disk. Memory pages are also com-
pressed before being written.
Windows has additional optimizations for mobile PCs. Windows
XP also includes optimizations for C-state performance, which
is the ability to run the processor in lower power states when

Understanding Windows84
the PC is idle. To do this, Windows developers made it possible
for system manufacturers to program the C-state behavior for
the specific processor used in a new mobile unit.
Windows XP has additional features that support micro-
processors that employ different performance states. These
new processors use high-voltage/high-frequency states when
processor utilization is high and low-voltage/low-frequency
states to conserve battery life. To achieve this, Windows XP
has implemented native processor performance control and
processor performance control policies.
Vista. With the release of Vista, more power-option improve-
ments were made. The improvements include the following:
• All power-off options are set to send the computer into
sleep mode, not shutdown.
• Sleep is the only option (there’s no hibernate) but it does
everything you need it to do.
• Both sleep and resume produce immediate results, no
waiting.
Windows 7. With the release of Windows 7, more power-
option improvements were made, including these:
• More granular control of various power settings
• Significant increase in the battery life
• More efficiency in the entire power-management system
Manufacturer’s Power Utilities
If the laptop manufacturer includes a power management
utility, it may disable the Windows Power Options Control
Panel, because the computer manufacturer, who should
know the laptop’s hardware and its capabilities, can provide
additional power-management tuning abilities. For example,
some laptops offer the option to dim the display in low-
battery situations. So, if the laptop comes with a power
management utility, you’ll commonly find that it offers added
capabilities. Just ensure that the utility is compatible with
your version of Windows. You may need to download a newer
version of the manufacturer’s power utilities from the manu-
facturer’s Web site.

Understanding Windows 85
Self-Check 2
1. True or False? If the hibernate tab is available on the Power Options screen, all the PC’s components support the hibernation feature.
2. The primary OS interface for graphics and sound is _______.
3. The process of putting the Windows XP operating system on a PC’s newly formatted disk iscalled a _______.
4. The HCL is used to check _______.
5. True or False? Windows 2000 comes with four startup disks.
6. Which control panel applet is used to navigate to power options in Vista?
__________________________________________________________
7. What power option was eliminated in Windows 7?
__________________________________________________________
8. What is the only operating system that can be upgraded to Windows 7?
__________________________________________________________
9. True or False? You must enter the product key at the time of installation in Vista andWindows 7.
10. Which power option in Windows XP saves the desktop to the hard drive and shuts the computer down?
__________________________________________________________
Check your answers with those on page 265.

Understanding Windows86
CUSTOMIZING THE LOOK AND FEEL OF THE PCBefore working on a PC within a business environment, be
sure to check with the company policy on the screen images
and hardware customizations that are allowed. Keeping this
in mind, you should know how to set up the way a PC looks
and works.
The DesktopAfter Windows boots, you’re presented with the desktop on
the display. One of the best ways to make a PC more func-
tional is to manage this environment so it works the way you
need it to. A user should have easy access to the programs
and folders that are used the most. Also, the desktop, Start
menu, programs, and folders should be logically organized.
The Windows XP Taskbar
The taskbar is the entry point to all the items that aren’t dis-
played on the desktop. The taskbar includes the Start menu,
Quick Launch items, and notification items. These items can
be controlled using the Taskbar and Start Menu Properties
control panel (Figure 27). This box is accessible by right-
clicking the taskbar and clicking Properties.
The Taskbar tab allows you to customize the taskbar’s
appearance and the actions of the items in the notification
area. Click the appearance options, and then Apply to see
how these features affect the look of the PC’s desktop.
In the notifications area, you can choose which notifications
you want presented. By clicking Customize, you can dictate
the actions of each notification present on the PC (Figure 28).
You have the choice of having the notification always present,
never present, or present only when being used.

Understanding Windows 87
FIGURE 27—The Taskbarand Start Menu PropertiesControl Panel
FIGURE 28—You can changehow notifications are displayed.

Understanding Windows88
The Start Menu tab allows you to add or remove items from
the Start menu without removing them from the PC. This
feature is handy for concealing tools and applications you
seldom use or programs that you’ve installed but don’t want
everyone to have instant access to from the Start menu.
On Windows XP, this tab also allows you to switch between
the classic Start menu (which looks like a Windows 2000
Start menu) and the Windows XP Start menu (Figure 29). The
option to customize either menu type is offered. When cus-
tomizing the XP-style Start menu, there are options to select
the browser and e-mail client for each user on the PC.
If you’re using the Windows XP classic mode, other options
on this screen allow you to select which items are displayed
on the base Start menu, such as Logoff or Favorites.
FIGURE 29—The StartMenu Tab

Understanding Windows 89
Adding items to the quick launch area can also modify the
taskbar. To do this, select the icon for a program, a shortcut
from the desktop, or any folder and drag it to the quick
launch area. If the item was a shortcut, this process copies
the shortcut to the quick launch area. If the item was an
application, this process creates a shortcut on the quick
launch area.
By right-clicking the taskbar, you can also change the
way that open windows are displayed. Options for win-
dow display include Cascade Windows, Tile Windows
Horizontally, and Tile Windows Vertically (Figure 30).
Some other changes that can be made to the taskbar
are as follows:
• Changing the taskbar’s size and location in Windows
XP. The default placement for the taskbar is the
bottom of the screen, displaying one line of informa-
tion. To change the taskbar’s size, unlock the
taskbar and then right-click and drag the double
arrow that’s displayed when you put the cursor on
the edge of the taskbar. To change its location, unlock
the taskbar and then right-click it and drag it to one of
the four edges of the desktop.
• Adding the taskbar magnifier in Windows XP. This action
allows the area around the cursor to be magnified on a
section of the taskbar.
• Adding the Desktop Manager is also available on systems
with Windows XP installed. This option allows you to set
up and use up to four separate desktops on the active
display (Figure 31).
FIGURE 30—Some OtherTaskbar Options
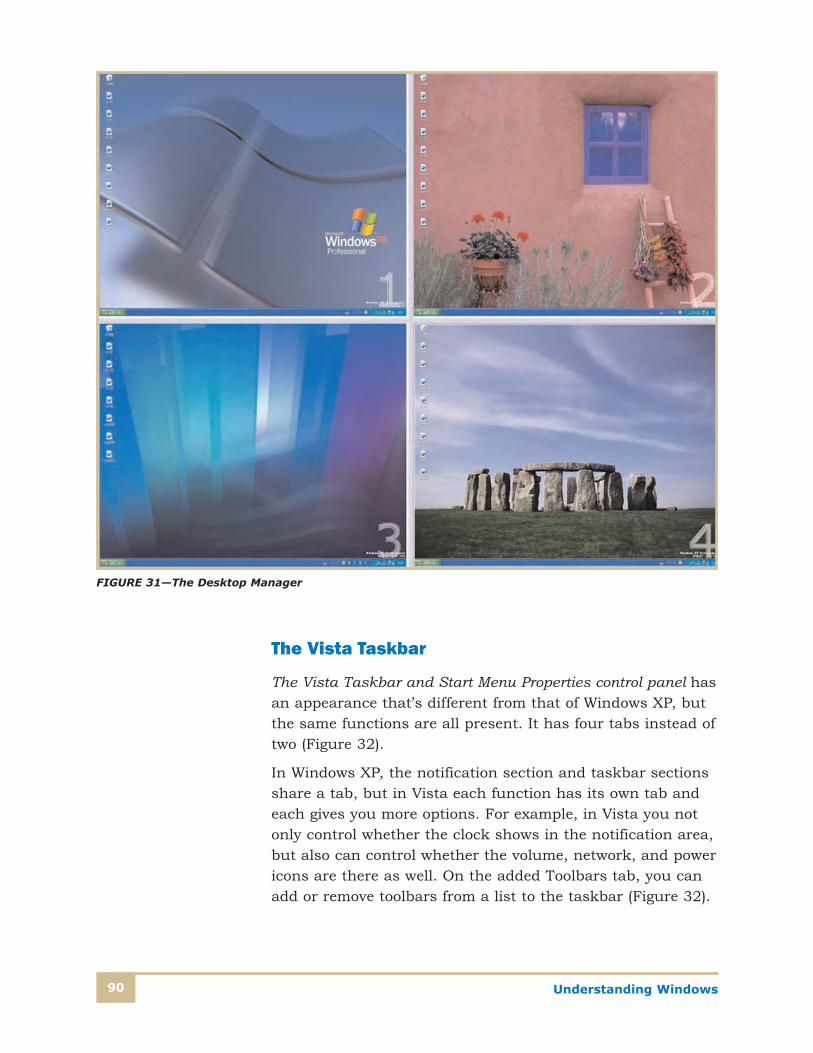
Understanding Windows90
The Vista Taskbar
The Vista Taskbar and Start Menu Properties control panel has
an appearance that’s different from that of Windows XP, but
the same functions are all present. It has four tabs instead of
two (Figure 32).
In Windows XP, the notification section and taskbar sections
share a tab, but in Vista each function has its own tab and
each gives you more options. For example, in Vista you not
only control whether the clock shows in the notification area,
but also can control whether the volume, network, and power
icons are there as well. On the added Toolbars tab, you can
add or remove toolbars from a list to the taskbar (Figure 32).
FIGURE 31—The Desktop Manager

Understanding Windows 91
The Windows 7 Taskbar
The Windows 7 taskbar properties box combines the notifica-
tion and taskbar functions on the same format, but again the
same functions are present with a few new functions. It
keeps the Toolbars tab added in Vista (Figure 33).
The new functions include the ability to manage the taskbar
location on the Taskbar tab and to control the action taken
when you click the Power button (shutdown or sleep). These
options are on the Start Menu tab.
FIGURE 32—The VistaTaskbar and Start MenuProperties Control Panel

Understanding Windows92
The Windows XP Start Menu
The Start menu allows access to the programs loaded on the
PC and to Windows tools and features. Two methods can
modify this menu and its submenus. The first is to open the
Taskbar Properties control panel (Figure 29).
1. Right-click the taskbar, and click Properties.
2. Click the Start Menu tab.
This control panel allows you to alter the main Start menu
items, as well as the items listed in the Programs list.
The second method is to open the C:\WINDOWS\START MENU
folder and modify the main menu items listed. To change the
program lists, open C:\WINDOWS\START MENU\PROGRAMS,
or if you’re working on a multiuser PC, C:\Documents and
Settings\username\Start Menu\Programs, and move the
program shortcuts into folders that group similar applica-
tions. An example of this type of grouping that comes with
Windows XP is the Accessories subfolder already created in
FIGURE 33—The Windows 7 Taskbar andStart Menu PropertiesControl Panel

Understanding Windows 93
the C:\WINDOWS\START MENU\PROGRAMS, or if you’re
working on a multiuser PC, the C:\Documents and Settings\
username\Start Menu\Programs folder.
Individual program items can be moved to the Start menu’s
Programs list by right-clicking and dragging the listing into a
place in the programs list.
The Vista and Windows 7 Start Menu
The process of opening the Taskbar Properties control panel
is the same in Vista and Windows 7, but the second method
to alter the main Start menu items and items listed in the
Programs list is slightly different. The logic is the same, but
the folder names are different. In Vista and Windows 7, the
folder is located in c:\Users\username\AppData\Roaming\
Microsoft\Windows\Start Menu for individual users, or
c:\ProgramData\Microsoft\Windows\Start Menu for all
users collectively.
Icons
Shortcuts to an application, folder, or file that belongs to an
application are indicated by icons. Desktop icons, which have
a little arrow in the lower-left corner, are shortcuts. These
shortcuts point to a file and location on the PC. Right-click-
ing a file and selecting Create Shortcut can create these
shortcuts. The shortcuts can then be cut and pasted onto
the desktop for easy access later. Deleting a shortcut’s icon
doesn’t remove the program or folder from the PC, it just
eliminates a way to access it quickly.
Shortcuts
Shortcuts themselves can be modified to make them more
functional and to enhance the look of the desktop. To
change a shortcut, right-click the shortcut’s icon and select
Properties.

Understanding Windows94
Windows XP Shortcut Properties
The General tab lists the information on the shortcut. The
top area lists the name given to the shortcut. To edit this
information, click the name and change the information. The
name of the shortcut doesn’t have to correspond to the file
name being pointed to. For example, you can change the
name of a shortcut from My Music to Tunes without changing
the function of the shortcut.
The Shortcut tab allows you to modify its target, which is the
place to which the shortcut points (Figure 34). Changing this
information makes the PC look in a different location for the
file. However, changing this setting is often more troublesome
than creating a new shortcut that points to the correct location
(if you know it) or using the Find Target function.
FIGURE 34—A ShortcutProperties Control Panel

Understanding Windows 95
The shortcut properties panel also allows you to open the file
in a specific location, open the file using a selected keystroke
or combination of keystrokes, and have the file displayed in a
particular manner when it opens.
The shortcut properties Shortcut tab also allows you to
change the icon for many shortcuts. Changing icons can
help to personalize the desktop. If you’re connected to the
Internet, many Web sites are dedicated to distributing inter-
esting icons, and some of these icons are free for home users.
Just click the Change Icon box and select an icon from an
icon file residing anywhere on the PC.
The Security tab allows administrators to set the permission
level for the item pointed to by the shortcut. An additional
tab available for Windows XP PCs is the Compatibility tab.
The options on this tab allow you to set the compatibility
modes for the program. This is helpful for legacy applications
installed on a Windows XP computer. You can set the PC to
emulate Windows 9x or Windows 2000 PCs to run the appli-
cation. Display settings can also be set for the application,
which is handy for some old applications. The final choice on
this tab enables or disables advanced text services for the
application. These same features are also modifiable using
the Program Compatibility Wizard.
Vista and Windows 7 Shortcut Properties
The Vista and Windows 7 Shortcut Properties dialog box has
more functionality and tabs. The two additional tabs are
Details, where more detailed information about the shortcut
is provided, and Previous Versions (Figure 35), which is
present if Windows Shadow Copy is enabled on the drive
where the target file is located. When present, it allows a
user to revert to a previous version of a file.

Understanding Windows96
Display
The easiest way to personalize the look of a PC is to change
the background picture the display uses as wallpaper. This
task can be done by simply choosing a different background
picture from the small assortment of pictures included with
Windows. Another easy way is to use a photo you’ve taken
with a digital camera, copy it to the PC, and use it for your
wallpaper. Alternatively, you could scan a photo and use it
for your wallpaper. Other options include using an Internet
search engine to find appropriate background scenes, copy-
ing these scenes onto the PC (usually into the My Pictures
directory), and then using them for the wallpaper.
FIGURE 35—A PreviousVersions Tab

Understanding Windows 97
Windows XP Display Settings
There are two different dynamics for the components that
modify the desktop graphic images: themes and visual styles.
These features are controlled by either adjusting the Display
Properties control panel (Figure 36) or by using the Desktop
Themes from within the Display Properties Control Panel. To
open the Display Properties screen in Windows XP, right-click
the desktop (not an application or folder) and then click
Properties.
FIGURE 36—Windows XPDisplay Properties
Themes were introduced in Microsoft Plus! for Windows 95.
Each theme is a collection of settings that includes wallpaper,
cursors, fonts, sounds, and icons. The following are some
characteristics of themes:
• Theme settings are specified in .theme files.
• The format of a .theme file is similar to that of a win.ini
file.

Understanding Windows98
• An independent software vendor (ISV) creates and
distributes a .theme file with a product.
• Theme files are also displayed on the Theme tab of the
Display option in Control Panel.
• A user can select a theme by choosing one of the
installed .theme files.
Windows XP has many options controlling display properties.
The first tab, Themes, allows you to select an overall theme
for the PC’s display and sounds (Figure 36). These theme files
need to be installed into C:\Program Files\Plus\Themes
using the Plus! For Windows XP application or an application
that allows the installation of themes (available from some
software manufacturers). Because the desktop artwork and
screen savers are possible carriers of virus contamination, no
sources except Microsoft are allowed direct installation of
desktop themes. Individual desktop components for Windows
XP can still be downloaded from many Web sites.
Visual styles were introduced with Windows XP. Visual styles
are specifications for the appearance of controls. For example,
a visual style can define the appearance of controls, enable
an ISV to configure the visual interface to coordinate with
this application interface, and provide a mechanism for all
Windows-based applications to apply visual styles. Sometimes,
these styles are called skins or are part of a theme. The follow-
ing are some characteristics of visual styles:
• Visual styles change the look and feel of controls in
Windows.
• You can’t author a specification file that changes the
appearance of controls.
• To use a particular appearance in the application, you
must use the UxTheme application-programming inter-
face (API).
• Users can choose how they want the desktop controls to
appear by making selections on the Appearance tab of
the display option in Control Panel.

Understanding Windows 99
Windows XP offers other options on its Display Properties
screen. On the Background tab, you can select the picture you
want for your wallpaper. You can look at the pictures avail-
able in the default C:\WINDOWS and C:\MY DOCUMENTS\
MY PICTURES directories, or look for other images on the PC
by clicking the Browse button. There are three options for
displaying the object:
1. Center. This option centers the picture in the middle of
the display with a border of the color that’s selected as
the desktop color on the Appearance tab.
2. Tile. This option repeats the art, theme, or photo on the
screen, beginning with the first full-sized picture. This
option is commonly used for small photos that make a
pleasant pattern when repeated. Windows supplies a few
of these pictures.
3. Stretch. This option stretches the selected picture to fit
the entire screen. This stretching doesn’t preserve the
aspect ratio, so it shouldn’t be used for portraits.
The Screen Saver tab allows you to select the screen saver you
want to use when the PC is idle for a set period. This tab also
allows you access to the properties screen of the screen saver,
where you can set the way the screen saver itself performs
(speed and colors). The setting for how long the PC is idle
before starting the screen saver is also set on this screen,
as well as an alternate location for setting up the power
management schemes.
The Appearance tab sets the appearance of all the items on the
PC’s display, other than the wallpaper. These items include
the colors and sizes of all the windows, as well as the fonts
used on the different parts of the display. There’s an option
for setting the Windows environment to a classic style that
looks like Windows 2000. You can choose from many preset
schemes. Some of the available schemes are high-contrast,
The original purpose of screen savers was to prevent an image from
burning into the monitor display. Although today’s screens aren’t sus-
ceptible to this problem, screen savers remain a popular way to
personalize the display and to conceal the computer screen when the
computer is unattended.

Understanding Windows100
for visually impaired users. Under the Windows XP style, you
have three color schemes to choose from. You can also define
individual elements in the Windows environment to create a
unique visual style.
The last display property is the Settings tab, which offers you
choices of screen resolution and color-depth support. The
higher the resolution and color depth, the more video mem-
ory that’s required. For example, changing the setting from
800 × 600 video resolution with a 16-bit color depth to
1024 × 768 video resolution and a 24-bit True Color depth
changes the required video RAM from 1 MB to 4 MB. If you
notice a performance change when you change these set-
tings, then you may need to install more video RAM or settle
for the lower settings.
Vista Display Settings
Vista’s display properties are arranged differently but with
much the same features and functions as those of Windows
XP. To access the display settings in Vista, right-click the
desktop and select Personalize. The box in Figure 37 appears.
You can use the Windows Color and Appearance, Desktop
background, Screen Saver, Theme, and Display sections in
the same fashion that you would the tabs in Windows XP.
Windows 7 Display Settings
Windows 7 display properties are arranged differently but
with much the same features and functions as Windows XP
and Vista. To access the display settings in Windows 7,
right-click the desktop and select Personalize. The box in
Figure 38 appears. Again, you can use the Windows Color
and Appearance, Desktop background, Screen Saver, Theme,
and Display sections in the same fashion that you would in
Vista and Windows XP.

Understanding Windows 101
One additional set of themes is called Aero themes. Aero is a
new display technology that makes dialog boxes translucent
so you can see through them to the underlying desktop. The
computer must have enough resources to satisfy all graphic
requirements for Aero to function.
Scanners and CamerasPersonalizing the display’s background picture can be dependent
on the acquisition of unique photographic source materials.
This is a good place to discuss how Windows handles image-
creation devices, like scanners and cameras.
FIGURE 37—Personalizing the Computer’s Display in Vista
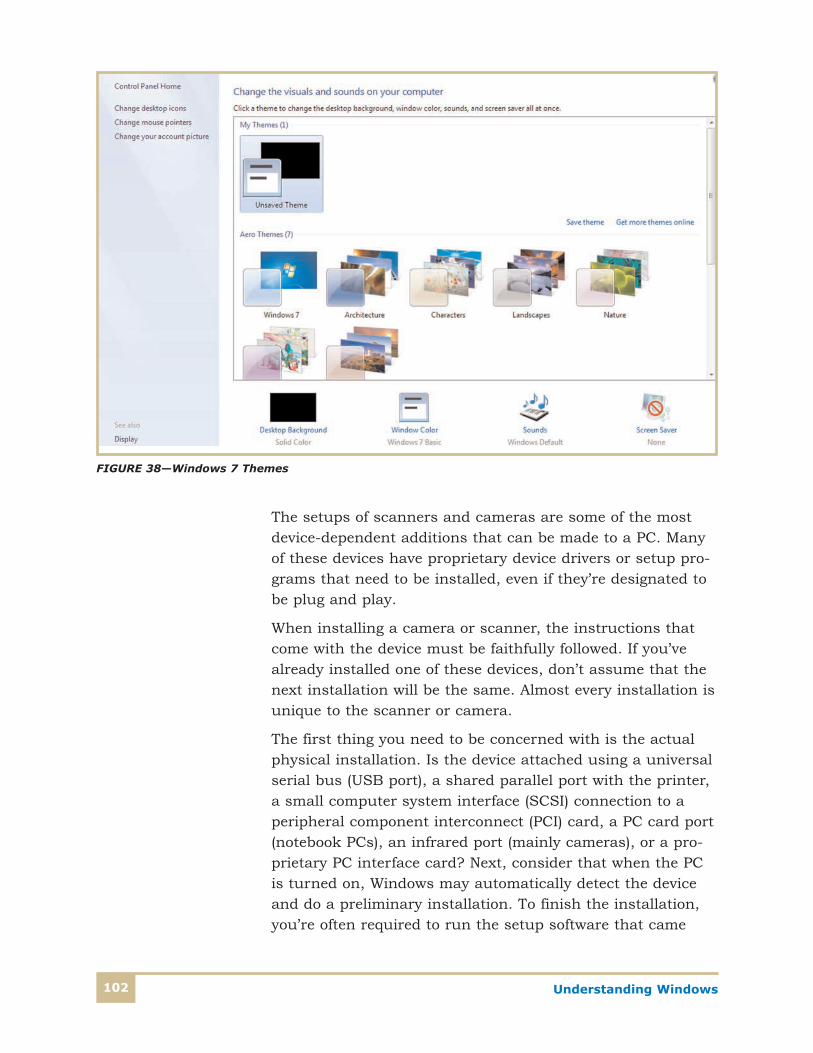
Understanding Windows102
The setups of scanners and cameras are some of the most
device-dependent additions that can be made to a PC. Many
of these devices have proprietary device drivers or setup pro-
grams that need to be installed, even if they’re designated to
be plug and play.
When installing a camera or scanner, the instructions that
come with the device must be faithfully followed. If you’ve
already installed one of these devices, don’t assume that the
next installation will be the same. Almost every installation is
unique to the scanner or camera.
The first thing you need to be concerned with is the actual
physical installation. Is the device attached using a universal
serial bus (USB port), a shared parallel port with the printer,
a small computer system interface (SCSI) connection to a
peripheral component interconnect (PCI) card, a PC card port
(notebook PCs), an infrared port (mainly cameras), or a pro-
prietary PC interface card? Next, consider that when the PC
is turned on, Windows may automatically detect the device
and do a preliminary installation. To finish the installation,
you’re often required to run the setup software that came
FIGURE 38—Windows 7 Themes
Understanding Windows 103
with the scanner or camera. This setup software installs pro-
grams that can be used to run the device and display the
pictures it has created. Finally, you need to set up Windows
to accept the pictures in a way that’s logical to you.
Now let’s discuss the specifics of installing cameras and
scanners to the PC.
Cameras in Windows XP
Windows XP offers full support for digital cameras. This type
of digital imaging device plugs into the PC and transfers
images. The first time you connect a device, you may need
to turn off the PC, attach the device, and turn the PC back
on, even with hot-swappable devices. Ensure you follow the
instructions included with the imaging device before you
attach or detach it from the PC. Some devices, especially
cameras, require you to flip a switch on the camera before
it’s connected to, or disconnected from, a PC.
After you’ve run through the device’s setup program(s),
Windows lists the device on the Scanners and Cameras
Control Panel. To access this panel,
1. Click Start, and then click Control Panel.
2. Double-click Scanners and Cameras.
This action opens a window that displays all the installed
devices, their connections, and properties. A troubleshooting
option is also available to check on how the device is func-
tioning. In the case of cameras, Windows also gives you an
option of placing an icon for the camera in the desktop and
taskbar.
Additionally, you can transfer the pictures from the con-
nected external device to the PC using the Picture Acquisition
Wizard:
1. Right-click the camera icon on the desktop or on the
Scanners and Camera window, and select Use Wizard.
2. Click Next.
3. Thumbnails of the pictures stored in the device appear.
Click the pictures you want, or click Select All, and then
click Next.
Understanding Windows104
4. Enter a name prefix for the selected pictures in the
Name box. The pictures are numbered sequentially with
the prefix you enter (such as Pic001.jpg, Pic002.jpg,
and Pic003.jpg).
5. Enter a destination for the pictures in the Destination
drop-down list, or right-click Browse for a new location.
The default is C:\MY DOCUMENTS\MY PICTURES.
6. If you want to delete the images from the camera after
you’ve transferred the ones you want, check the Delete
copied pictures from the camera box and then click
Finish. This feature isn’t available with all cameras.
Cameras in Vista
The same functions are available in Vista, but the control
paths are slightly different. Use this procedure to access the
Scanners and Cameras control panel:
1. Click Start, and then click Control Panel.
2. Double-click Hardware and Sound.
3. Double-click Scanners and Cameras.
Cameras in Windows 7
The same functions are also available in Windows 7, but,
again, the control paths are slightly different. If the camera is
detected when you connect it, it appears in Control Panel in
Devices. Use this procedure to access the camera when it has
been detected:
1. Click Start, and then click Control Panel.
2. Double-click Hardware and Sound.
3. Double-click Devices and Printers.
4. The camera is listed in the Devices section.
When you connect a camera to Windows 7, it detects the
camera and asks you if you want to import pictures from it.
You can apply tags to each picture. The pictures are located
in the Pictures Library. A new feature in Windows 7, libraries
allow you to group items regardless of their physical location.
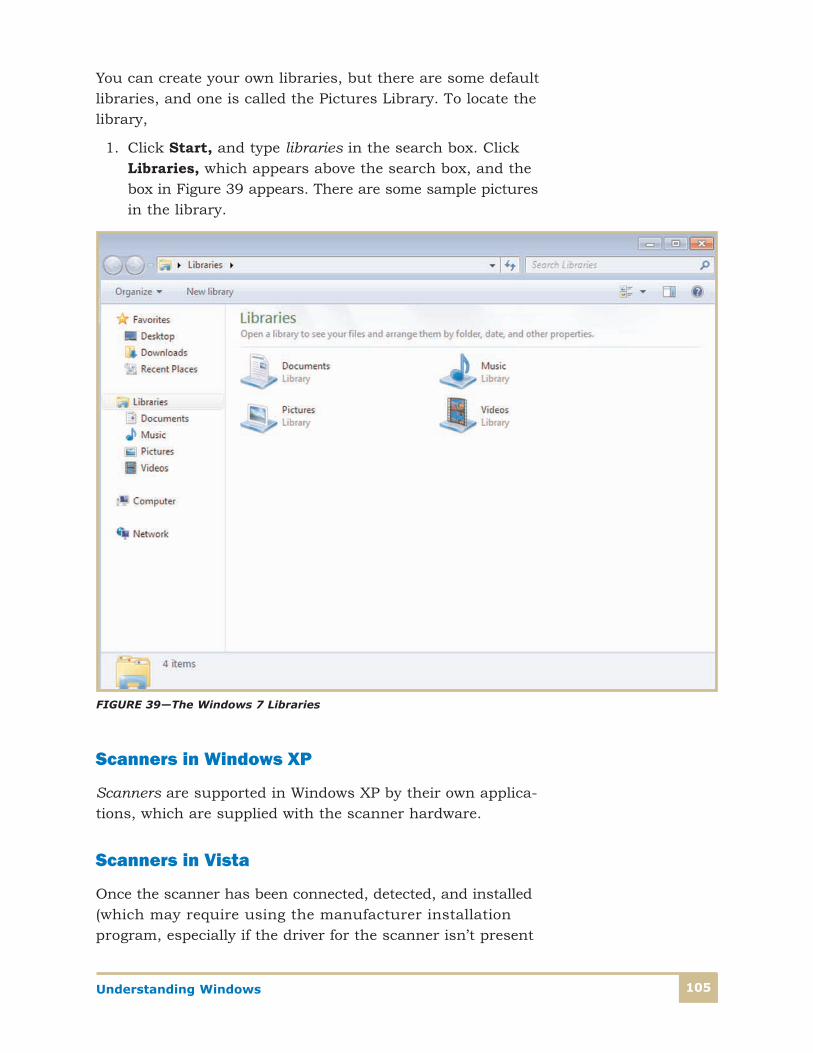
Understanding Windows 105
You can create your own libraries, but there are some default
libraries, and one is called the Pictures Library. To locate the
library,
1. Click Start, and type libraries in the search box. Click
Libraries, which appears above the search box, and the
box in Figure 39 appears. There are some sample pictures
in the library.
Scanners in Windows XP
Scanners are supported in Windows XP by their own applica-
tions, which are supplied with the scanner hardware.
Scanners in Vista
Once the scanner has been connected, detected, and installed
(which may require using the manufacturer installation
program, especially if the driver for the scanner isn’t present
FIGURE 39—The Windows 7 Libraries

Understanding Windows106
in the built-in driver cache), scanned images can be imported
either by using the software that came with the scanner or by
following this procedure:
1. Click File and then Import from Camera or Scanner.
2. In the Import Pictures and Videos window, select the
scanner and click Import.
3. A series of dialog boxes allows you to
• View the default settings for importing and change
them
• Select paper size of the item scanned
• Select a color format
• Select the file type you would like the item to be
saved as
• Select resolution and control brightness and contrast
• Preview the item
4. When the settings are complete, click Scan. The items
are placed in the Windows Photo Gallery. To locate this,
click Start and type Windows Photo Gallery in the search
box.
Scanners in Windows 7
In Windows 7, you can either use the software that came
with the scanner to manage it, or you can use the Windows
Fax and Scan Wizard. To locate this wizard, use the search
box. If you use the Fax and Scan Wizard, the scanned files
are saved in the Scanned documents folder in your profile.
If you use the software that came with the scanner or third-
party software, you probably can choose another location.

Understanding Windows 107
Other Input Devices
Keyboards in Windows XP and Vista
Changing the way a PC feels commonly requires changing the
keyboard settings. These settings can be modified using the
Keyboard Properties Control Panel. To open this Control
Panel,
1. Click Start, and then click Control Panel.
2. Double-click Keyboard to display Keyboard Properties.
The Keyboard Properties control panel has two tabs on the
Windows XP system. The Speed tab allows you to set the
length of the delay that occurs before a key repeats. You can
also define how fast the character is repeated and set the
cursor blink rate. The Hardware tab is a list of all hardware
devices installed that serve a keyboard function. This list
includes standard keyboards, USB keyboards, and other
devices connected to the PC that function as a character-
input device.
Keyboards in Windows 7
The exact same Keyboard control panel is used in
Windows 7, but its navigation path is different.
1. Click Start, and then click Control Panel.
2. In the search bar in the upper-left corner, type
keyboards.
3. The Keyboard Properties control panel appears
(Figure 40). You can change the settings as you wish.
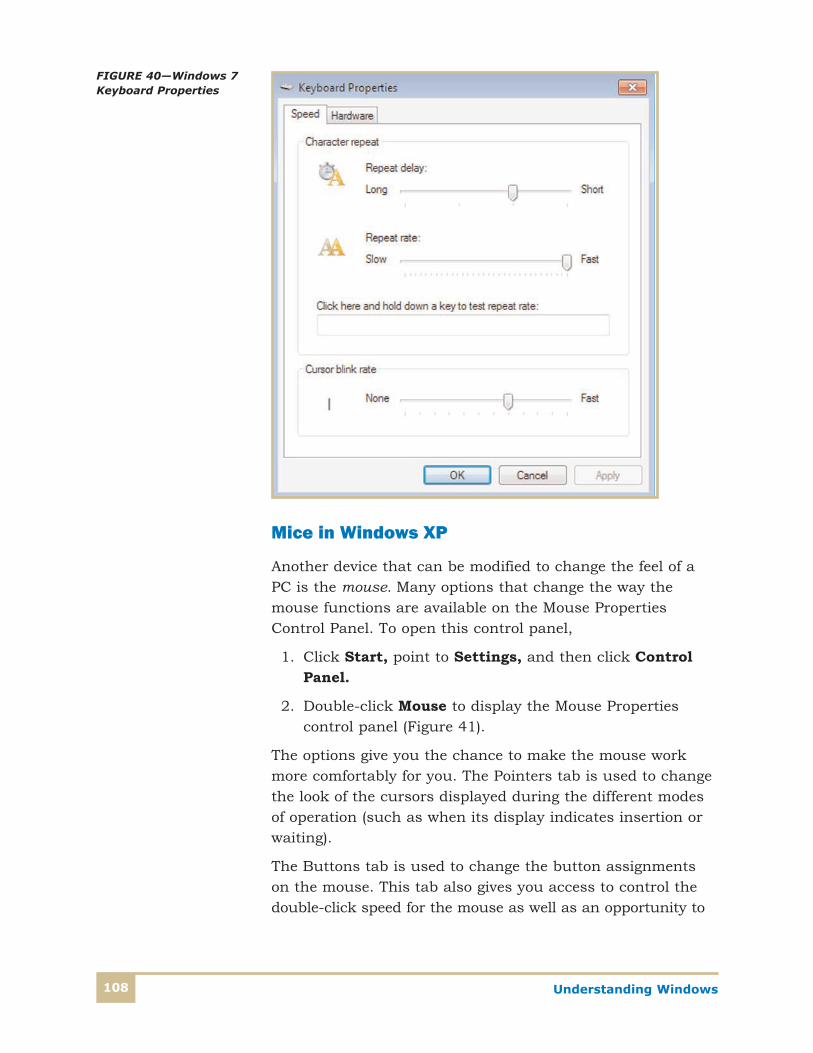
Understanding Windows108
Mice in Windows XP
Another device that can be modified to change the feel of a
PC is the mouse. Many options that change the way the
mouse functions are available on the Mouse Properties
Control Panel. To open this control panel,
1. Click Start, point to Settings, and then click Control
Panel.
2. Double-click Mouse to display the Mouse Properties
control panel (Figure 41).
The options give you the chance to make the mouse work
more comfortably for you. The Pointers tab is used to change
the look of the cursors displayed during the different modes
of operation (such as when its display indicates insertion or
waiting).
The Buttons tab is used to change the button assignments
on the mouse. This tab also gives you access to control the
double-click speed for the mouse as well as an opportunity to
FIGURE 40—Windows 7Keyboard Properties

Understanding Windows 109
test the speed to see if it’s appropriate for you. Also included
is a feature for mobility-impaired individuals and others that
don’t or can’t hold down the mouse button to drag items on
the screen.
The Pointer Options tab allows you to change how fast the
mouse moves the screen cursor when you move the mouse. It
also lets you decide whether you want the mouse to move
faster the more you move it (a feature known as acceleration).
Other options have to do with the Snap To function, which
moves the cursor to the highlighted button on a screen, and
how fast the select button repeats.
Mice in Vista and Windows 7
The only difference in the mouse control panel in Vista and
Windows 7 is its location. In Vista, click Start, Control
Panel, and then Hardware and Sound. Next, click Mouse,
and the panel appears.
FIGURE 41—MouseProperties
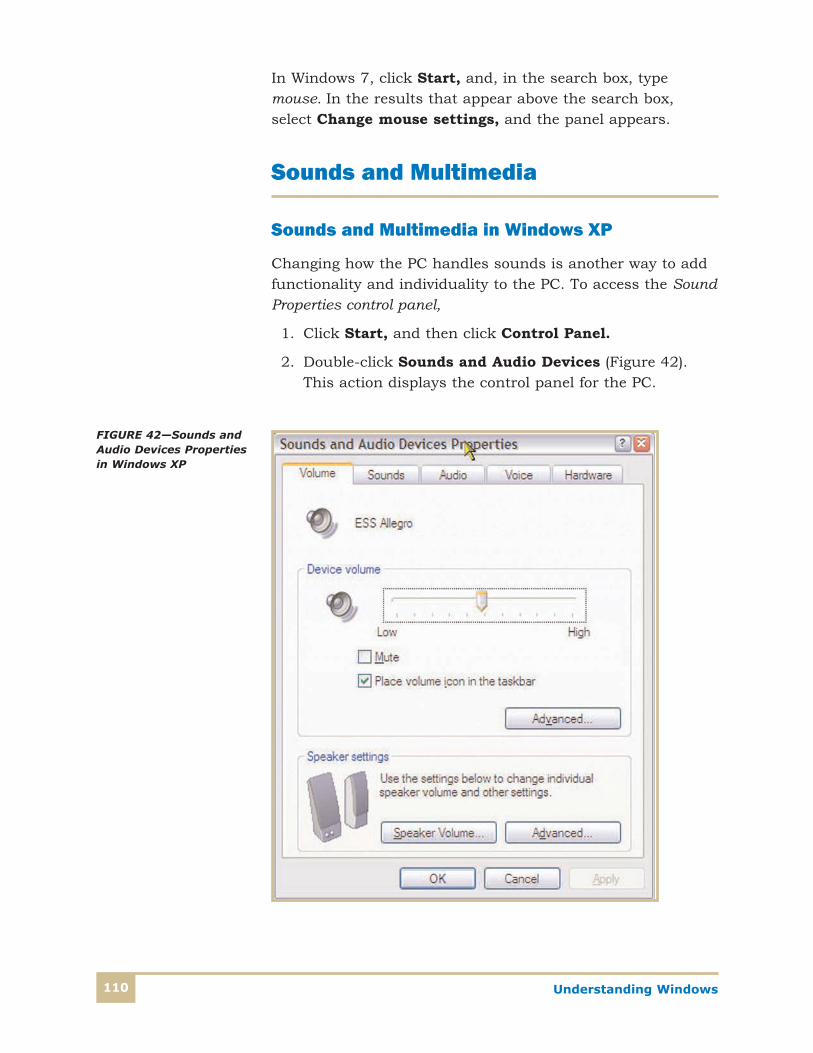
Understanding Windows110
In Windows 7, click Start, and, in the search box, type
mouse. In the results that appear above the search box,
select Change mouse settings, and the panel appears.
Sounds and Multimedia
Sounds and Multimedia in Windows XP
Changing how the PC handles sounds is another way to add
functionality and individuality to the PC. To access the Sound
Properties control panel,
1. Click Start, and then click Control Panel.
2. Double-click Sounds and Audio Devices (Figure 42).
This action displays the control panel for the PC.
FIGURE 42—Sounds andAudio Devices Propertiesin Windows XP

Understanding Windows 111
The first tab, Volume, adjusts the most basic of sound func-
tions, the quantity of sound that’s output to the speakers. By
selecting the Advanced tab in the Device volume section, a
full volume control is displayed and you can adjust individual
volume settings for different devices. In the Speaker settings
section, you’re able to adjust the volume of the external
speakers and change the speaker type.
The Sounds tab lists the sounds the PC makes during certain
predefined events. These sound events play.wav files stored
in the default directory C:\WINDOWS\MEDIA. You can select
any of the listed sound schemes, or make your own using
.wav files you’ve created and saved on the PC.
The Audio tab allows you to select the devices you choose to
handle the sounds used on the PC.
Using the Voice tab, you can control the volume and advanced
options for the microphone and speakers for voice functions.
The voice functions are often used for type-as-you-speak
applications, as well as instant-messaging voice communica-
tions. To set levels that avoid feedback, adjustments can be
made for voice recording and playback.
The Hardware tab provides a list of the devices that support
sound on the PC. Clicking the Troubleshoot button sends
you to the Help and Support program’s sound troubleshoot-
ing section.
Sounds and Multimedia in Vista and Windows 7
The Sound control panel is organized differently in Vista and
Windows 7. In Figure 43, you can see that there are only three
tabs. The properties of each output device are controlled on
the Playback tab. By selecting the device and then clicking
Properties, each can be given different settings. On the
Recording tab, you can control the properties of any recording
devices that may be connected to the computer (Figure 44).
The Sounds tab operates the same as that of Windows XP.

Understanding Windows112
FIGURE 43—The SoundControl Panel in Vista andWindows 7
FIGURE 44—The RecordingTab

Understanding Windows 113
Additional Windows ModificationsWindows offers additional modifications to make the PC look
and feel the way you would like it to.
Folders in Windows XP
Windows allows you to customize how you view folders.
Windows XP features five views: thumbnails, tiles, icons, list,
and details. If you wish, you can set one view across every
folder on the PC. If you prefer to view all the folders in the
same style, follow these directions:
1. Open Windows Explorer by pressing Windows key + E
on the keyboard. If you don’t have a Windows key, click
Start, point to All Programs, Accessories, and then
click Windows Explorer.
2. Click View, and select the option you wish, from among
the Thumbnails, Tiles, Icons, List, and Details choices.
3. Click Tools, and select Folder Options.
4. Click the View tab.
5. Click the Apply to All Folders button to make every
folder look like the one you’re currently in.
Folders in Vista
The procedure is slightly different in Vista, but the logic is
the same.
1. Open Windows Explorer by clicking Start, pointing to All
Programs and then Accessories, and then clicking
Windows Explorer.
2. Click View, and select the option that suits you.
3. In the Organize menu, select Folder and Search
options.
4. In the Folder Options dialog box, select the View tab.
On this tab under Folder views, click Apply to Folders.

Understanding Windows114
Folders in Windows 7
There’s only one small difference in the procedure for
Windows 7.
1. Open Windows Explorer by clicking Start, pointing to
All Programs and then Accessories, and then clicking
Windows Explorer.
2. In the upper-right corner of the resulting Libraries dia-
log box, select the drop-down arrow next to the Change
your view icon. (If you’re not sure, just scroll over the
top of the icons and it tells the name of the icon.) Select
the option that suits you.
3. In the Organize menu, select Folder and Search
options.
4. In the Folder Options dialog box, select the View tab.
On this tab under Folder views, click Apply to Folders.
The Album Thumbnail Generator
A Windows XP feature aimed at the home user is the album
thumbnail generator. Let’s say you just finished ripping MP3
files from a new album you’ve bought, and you want the art
from the album to be displayed on the folder where all the
music is stored. All you need to do is download the album
cover from somewhere on the Internet (as long as it’s not a
copyright-protected picture) and then do the following:
1. On the Web site with the picture, right-click the image
and choose Save Picture As to bring up the Save Picture
dialog box (Figure 45).
2. Name the image, and then place it inside the folder
containing the music from the new album.
3. Click Save to write the image to the hard drive.
4. Using Windows Explorer, navigate to where the music
folder is stored. Change the folder view to Thumbnails
by clicking View and then clicking Thumbnails.
5. Windows XP automatically places the artwork on the
thumbnail. If there’s more than one piece of artwork in
the file, the system attempts to display all the artwork
as a thumbnail.

Understanding Windows 115
Thumbnails in Vista and Windows 7
In Vista and Windows 7, folders have thumbnails of the
documents and pictures automatically displayed (Figure 46).
This behavior can be disabled by selecting Always show icons,
never thumbnails in Folder options.
My Pictures Slideshow in Windows XP
You can display the pictures stored in the My Pictures folder
in random order as a screen saver. To make this personal
screen saver,
1. Right-click the desktop, and click Properties.
2. Click the Screen Saver tab.
3. In the Screen Saver roll-down menu, click My Pictures
Slideshow.
4. Adjust the time of inactivity before the screen saver is
initiated.
FIGURE 45—DisplayingAlbum Cover Art asThumbnails

Understanding Windows116
5. Click Settings to adjust transition effects between pic-
tures, how frequently they change, and what size the
pictures should be. Click OK.
6. Click Preview to see what the screen saver looks like,
and then click Apply.
My Pictures Slideshow in Vista and Windows 7
The path to this same procedure is slightly different in Vista
and Windows 7.
1. Right-click the desktop, and click Personalize.
2. On the ensuing page, select Screen Saver.
3. In the Screen saver dialog box, click the drop-down box
next to Screen Saver and select Photos.
4. Click settings (Figure 47), and adjust as you would in
Windows XP.
FIGURE 46—If you don’t want thumbnails displayed, select the Advanced settings box as shown.

Understanding Windows 117
The Interface in Windows XP
If you like the old, familiar version of the Windows interface,
you can change the interface that Windows XP uses.
1. Right-click the desktop and select Properties.
2. Click the Appearance tab.
3. Select Windows Classic, and click Apply.
4. Click OK to close the Desktop Display Properties dialog
box
The Interface in Vista
To change the interface in Vista,
1. Right-click the desktop, and select Personalize.
2. Click Windows Color and Appearance.
3. In the Color scheme box, select Windows Classic and
click OK.
FIGURE 47—Setting up the Screen Saver in Vista and Windows 7

Understanding Windows118
The Interface in Windows 7
To change the interface in Windows 7,
1. Right-click the desktop, and select Personalize.
2. Under the section Change the visuals and sounds on
the computer, scroll down to Basic and High Contrast
Themes.
3. Double-click Windows Classic.
Start Menu Programs
If you have some favorite programs you want in the Start
menu, you can use some Windows XP, Vista, and Windows 7
features to pin programs to the Start menu so you’ll never
again have to search for them in the All Programs list. To
accomplish this,
1. Click Start and point to All Programs.
2. Locate and right-click the program icon you want to pin
to the Start menu.
3. In the roll-down menu, choose Pin to Start menu.
You should be able to pin as many icons to the Start menu
as the screen resolution allows. If you want to unpin an icon
from the Start menu,
1. Click the Start menu and point to the program icon you
want to unpin.
2. Right-click the program’s icon, and choose Unpin from
Start menu from the roll-down menu.
Microsoft Narrator in Windows XP
For people who are blind, have impaired vision, or simply
enjoy being read to, Microsoft Narrator offers a viable alterna-
tive to reading the computer screen. Narrator reads the
contents of the Start menu, all program file menus, and
Web links. It also speaks aloud every keystroke. To use the

Understanding Windows 119
program, you need to turn the Narrator on and then config-
ure how Microsoft SAM (text-to-speech engine) reads to you.
To turn on Microsoft Narrator,
1. Press Windows key + U to launch the Utility Manager. If
you don’t have a Windows key, click Start, point to All
Programs, Accessories, Accessibility, and then click
Utility Manager.
2. On the Utility Manager, click Narrator isn’t running,
and then click Start.
3. You should now see a dialog box that lists directions on
how to use Microsoft Narrator. (If you get a message
explaining that Narrator was unable to find a text-to-
speech engine, you need to install the accessibility
components using the Add/Remove Programs feature.)
4. The actual Narrator should be minimized in the toolbar.
Click it to see the list of available configuration options
(Figure 48).
FIGURE 48—Narrator’sConfiguration Options
5. After you’ve finished customizing Narrator, minimize it.
6. To turn Narrator off, close the Narrator dialog box.
Microsoft Narrator in Vista and Windows 7
1. Click Start and Control Panel, and then select Ease of
Access.
2. Click Ease of Access Center at the top of the window.

Understanding Windows120
3. Under the Make the computer easier to use area, click
Start Narrator.
4. A box similar to that shown in Figure 48 appears and
offers the same choices.
Balloon Hints
Balloon tips can tell you where you are or what a button’s
function is. While these tips can be convenient for home
users, they’re unnecessary for most business users. Some of
these tips no longer appear after a while if you don’t follow
their directions. Others, like the balloon reminding you to
download and install the latest Windows Update, won’t
disappear until you follow their instructions.
If you wish, you can stop the help balloons from appearing.
However, remember that you’ll need to manually check
Windows Update, because the reminder won’t pop up. The
balloon that warns you that the hard drive is running low on
space also no longer functions if you turn the balloon hints
off. (You’ll still get a little picture of a hard drive in the
taskbar.)
There are two ways to remove the balloons. The easiest choice
(for Windows XP only) is to go to http://www.microsoft.com/
windowsxp/pro/downloads/powertoys.asp and download
Microsoft’s PowerToys. This is a set of unsupported applica-
tions offered free from Microsoft. Once installed, the PowerToys
are displayed as an item on the program menu. Use of the
PowerToys and specifically Tweak UI is covered elsewhere in
this study unit. Once you have it installed, go to taskbar and
uncheck Enable Balloon Tips.
There’s a second, more risky way to remove the balloon tips
through altering the registry. The first step in modifying the
registry is to back it up. Set a restore point:
1. Click Start, point to All Programs, Accessories, and
System Tools, and then click System Restore.
2. On the System Restore screen, click the Create restore
point radio button and then click Next.
3. Name your restore point, and then click OK.

Understanding Windows 121
To open the registry editing tool and edit the registry,
1. Click Start and then Run.
2. In the Open box, type REGEDIT, and then click OK.
3. Go to this key:
KEY_CURRENT_USER\Software\Microsoft\Windows\
CurrentVersion\Explorer\Advanced
4. Create a new DWORD value, name it EnableBalloon
Tips, and set it equal to 0. You can create a DWORD by
right-clicking the mouse in the right panel of the Editor
and selecting DWORD value. Then, type in the name and
hit Enter. Right-click the name and select Modify. Enter
the _ if necessary, and select OK.
5. If EnableBalloonTips is already there and equal to 1, set
it equal to 0.
6. Exit the registry editor, log off, and log back on.
Microsoft Error Reporting
When a system error occurs while you’re using Windows XP,
a dialog box appears and asks whether you want to report
the error to Microsoft. Clicking one of the two options closes
the message box. You don’t have to report any errors if you
don’t want to, and you can turn this feature off. To disable
error reporting, first log on as a member of the administrative
group. Then, if you’re running Windows XP,
1. Click Start, point to Settings, and then click Control
Panel, or right-click My Computer and choose
Properties.
2. Click the Advanced tab on the system Properties dialog
box, and click the Error Reporting button.
3. Select Disable error reporting, but keep the But notify
me when critical errors occur radio button unchecked.
4. Click OK.
If you’re running Vista,
1. Click Start, and in the search box type problem.
2. In the area above the search box, click Problem Reports
and Solutions.

Understanding Windows122
3. In the left menu, select Change Settings. Then, on the
next page, select Advanced Settings.
4. Under the For my Programs, problem reporting section,
select Off.
If you’re running Windows 7,
1. Click Start, and, in the search box, type problem.
2. In the area above the search box, click Choose when to
check for solutions to problem reports.
3. Select the Never Check for solutions radio button.
System Time
Previous versions of Windows occasionally lost track of the
system’s time. Now, Windows is capable of synchronizing the
PC’s internal clock once a week with an Internet timeserver.
Just follow these steps:
In Windows XP,
1. Double-click the time on the taskbar.
2. On the Date and Time tab, ensure that you display the
correct date before continuing. If the date is incorrect,
adjust the date and then click Apply.
3. Click the Internet Time tab.
4. Select the timeserver you want to use.
5. Click next to the text that reads Automatically synchro-
nize with an Internet timeserver.
6. Click Update Now to begin synchronizing.
In Vista and Windows 7,
1. Double-click the time on the taskbar.
2. Click Change Date and Time settings.
3. On the Date and Time tab, ensure that you display the
correct date before continuing. If the date is incorrect,
adjust the date and then click Apply.
4. Click the Internet Time tab.
5. Select the Change settings button.
Understanding Windows 123
6. Select the timeserver you want to use from the drop-down
box next to Time Server.
7. Click Update Now to begin synchronizing.
Special-Needs ConfigurationsConfiguring some of the special-needs items can assist many
computer users. These tools can help with problem areas for
individuals and assist with common issues that can affect
personal enjoyment and job performance. These tools fall into
two groups:
• Accessibility Tools. These items, set up by the
Accessibility Wizard, allow you to configure Windows for
special vision, hearing, and mobility needs. Accessibility
Tools aren’t installed by default when you install
Windows.
• Accessibility Options. These options configure the
OS for specific changes in the devices connected to it.
Accessibility Options are installed by default when you
install Windows.
It’s possible that one or both of these components aren’t
installed on the PC. To install these features, they must be
installed as a Windows component.
Accessibility Tools in Windows XP
Windows XP is packaged with a group of components called
Accessibility Tools, which are intended for individuals with
special needs. The Accessibility Wizard configures these com-
ponents. This wizard sets up all the accessibility options, so
you don’t have to configure the options one at a time. To
start the Accessibility Wizard,
1. Click Start, and point to All Programs, Accessories,
and Accessibility.
2. Click the Accessibility Wizard (Figure 49).

Understanding Windows124
This action brings you to a screen in which you can set the
screen’s text size. This setting is offered before any of the
other options, in case you’re setting up the PC for individuals
that have visual impairment. Options are offered to change
the Windows components’ text size, to change all text size by
changing the monitor setting, or to use a screen magnifier
(Figure 50).
FIGURE 49—TheAccessibility Wizard
FIGURE 50—TheAccessibilityWizard DisplaySettings
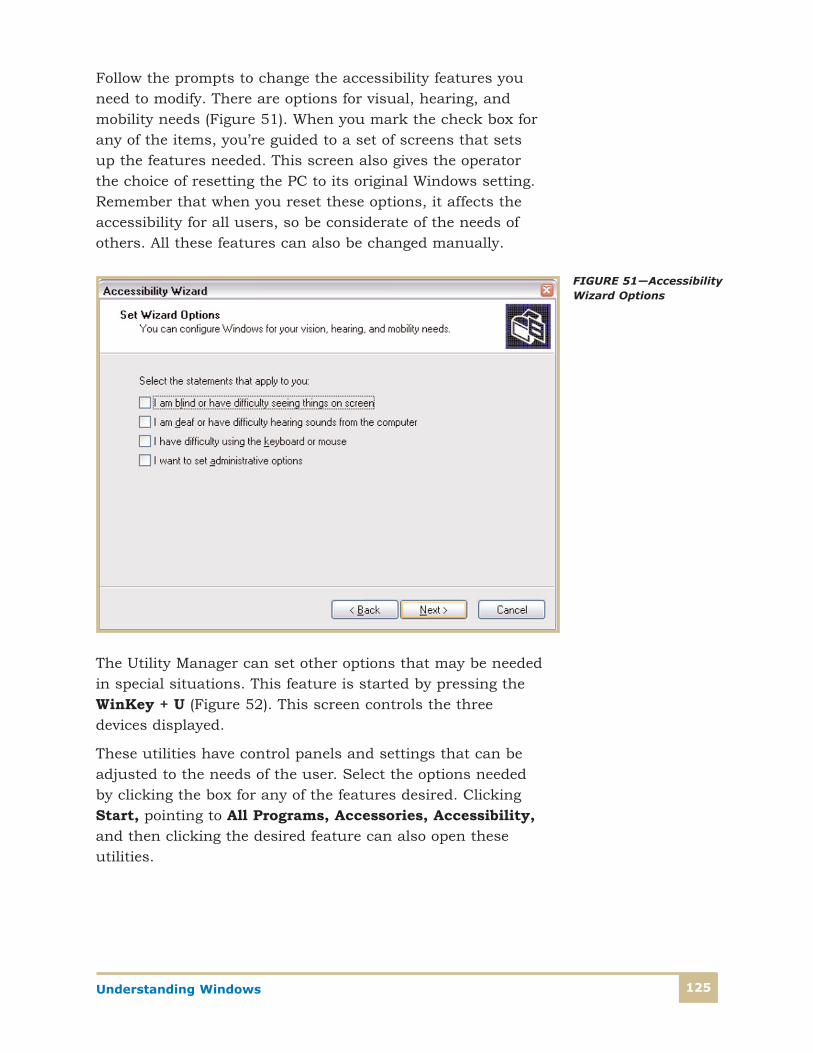
Understanding Windows 125
Follow the prompts to change the accessibility features you
need to modify. There are options for visual, hearing, and
mobility needs (Figure 51). When you mark the check box for
any of the items, you’re guided to a set of screens that sets
up the features needed. This screen also gives the operator
the choice of resetting the PC to its original Windows setting.
Remember that when you reset these options, it affects the
accessibility for all users, so be considerate of the needs of
others. All these features can also be changed manually.
The Utility Manager can set other options that may be needed
in special situations. This feature is started by pressing the
WinKey + U (Figure 52). This screen controls the three
devices displayed.
These utilities have control panels and settings that can be
adjusted to the needs of the user. Select the options needed
by clicking the box for any of the features desired. Clicking
Start, pointing to All Programs, Accessories, Accessibility,
and then clicking the desired feature can also open these
utilities.
FIGURE 51—AccessibilityWizard Options

Understanding Windows126
Accessibility Tools in Vista and Windows 7
The same tools included in the Accessibility Wizard and
Utility manager in Windows XP reside in the Control Panel in
the Ease-of-Use area in Vista and Windows 7. Neither tool is
found in Vista or Windows 7. To locate the same items,
1. Click Start, Programs, and then Accessories.
2. Click the Ease of Access folder, and then select Ease of
Access Center. This action directs you to the location in
the Control Panel shown in Figure 53.
Here you’ll find access to all the functions discussed in the
section on Windows XP.
Accessibility Options in Windows XP
Accessibility Options are controlled using the Accessibility
Properties control panels. These panels allow you to set each
of the features that the Accessibility Wizard configures. To
open the Accessibility Property control panels,
1. Click Start, point to Settings, and then click Control
Panel.
2. Double-click Accessibility Options to open the Accessibility
Properties control panels. (These components may need
to be installed first.)
FIGURE 52—UtilityManager

Understanding Windows 127
Most of these features have two items that can be set. First,
you can check a box that turns the feature on or off. Second,
there’s a Settings button that opens a dialog box to let you
configure the feature. We’ll discuss each of the Accessibility
Options features that can be modified: the keyboard, sound,
display, mouse, and general features.
Keyboard. You can control how the keyboard behaves by
altering any of these keyboard options:
• StickyKeys, which treats the Ctrl, Shift, and Alt keys as
toggle keys (Each time you press them, they toggle on
and off, so that, if you want to use key combinations,
like Alt + F to open the File menu, you don’t have to hit
the two keys simultaneously.)
FIGURE 53—Vista and 7 Ease of Access Center

Understanding Windows128
• FilterKeys, which allows the Windows keyboard interface
to ignore brief or repeated keystrokes that may occur
with certain types of mobility impairments
• ToggleKeys, which plays a sound when the Caps Lock,
Num Lock, or Scroll Lock keys are pressed, so you’ll
know when you’ve pressed them
Sound. The features under the Sound tab address how
additional visual information is presented for hearing-
impaired users.
• SoundSentry, which allows Windows to generate visual
warnings onscreen whenever the PC normally makes a
sound, and which includes extending the visual warning
feature to any programs that support its use
• ShowSounds, which turns on an option that works like
closed captioning on TV, so that the OS, and programs
that support this feature, type out the speech or sounds
being generated
Display. Under the Display tab is the Use High Contrast
check box (Figure 54). This feature sets the display to use
fonts and colors that are designed for easier reading, which
is especially convenient for visually impaired users. Other
options adjust the blink rate and width of the screen’s
cursor.
Mouse. The only feature you can access under the Mouse
tab is the Use MouseKeys option. This feature allows you to
use the arrow keys on the numeric keypad instead of using a
mouse. This option is convenient for individuals who have
mobility impairments that make using a mouse difficult. If
you use this feature, you should also use the FilterKey option.
General. The General tab presents more options you may
wish to customize:
• Automatic Reset, which resets the PC and turns off all
accessibility features after a set time, but doesn’t turn
off the check box on the Accessibility Options screen; it
merely suspends the feature until it’s turned back on
(You may, of course, reselect any accessibility option at
any time by reselecting it on the Accessibility Options
screen.)
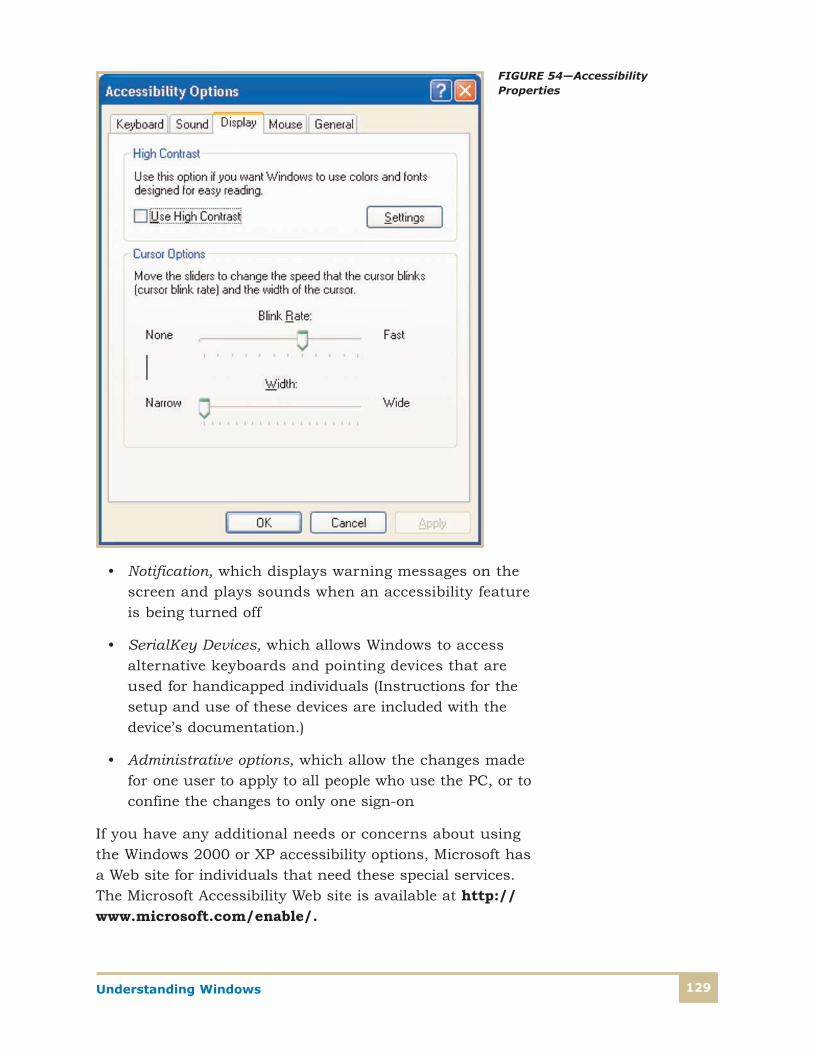
Understanding Windows 129
• Notification, which displays warning messages on the
screen and plays sounds when an accessibility feature
is being turned off
• SerialKey Devices, which allows Windows to access
alternative keyboards and pointing devices that are
used for handicapped individuals (Instructions for the
setup and use of these devices are included with the
device’s documentation.)
• Administrative options, which allow the changes made
for one user to apply to all people who use the PC, or to
confine the changes to only one sign-on
If you have any additional needs or concerns about using
the Windows 2000 or XP accessibility options, Microsoft has
a Web site for individuals that need these special services.
The Microsoft Accessibility Web site is available at http://
www.microsoft.com/enable/.
FIGURE 54—AccessibilityProperties

Understanding Windows130
Accessibility Options in Vista and Windows 7
All the options discussed above are located in the Ease of Use
section of the Control Panel in Vista and Windows 7. To
locate these functions,
1. Click Start, Programs, and Accessories.
2. Click the Ease of Use folder, and then select Ease of Use
Center. This action directs you to the location in the
Control Panel shown in Figure 53. In the Explore all
settings portion are sections dedicated to making the
use of various devices easier. Simply select the device
(the mouse, for example) and the same accessibility
options as those in Windows XP are present.
Internet Accessibility Options in Windows XP
Accessibility options Windows XP extend to the Internet
pages displayed on the PC.
Ignoring colors, font styles, or font sizes specified on
Web pages. Your color and style selections can override
those on a Web page if you set Internet Explorer to ignore
colors, font styles, and font sizes specified on Web pages. To
accomplish this,
1. Click Start, point to Settings, and then click Control
Panel.
2. On the Control Panel, click Internet Options. Be sure
you’re using the Classic View (in which all Control Panel
icons are showing). If not, under Control Panel in the
left pane, select Switch to Classic View.
3. On the Internet Properties dialog box, click the General
tab and then the Accessibility button (Figure 55).
4. On the Accessibility dialog box (Figure 56), under
Formatting,
• Select the Ignore colors specified on Web pages
check box.
• Select the Ignore font styles specified on Web
pages check box.

Understanding Windows 131
• Select the Ignore font sizes specified on Web
pages check box.
5. Select OK, and then close the Internet Properties dialog
box by clicking OK again.
FIGURE 55—TheGeneral Tab on theInternet PropertiesDialog Box
FIGURE 56—TheInternet OptionsAccessibility DialogBox

Understanding Windows132
Formatting Web pages using a custom style sheet. You
can also display Web pages using their own custom style
sheets to specify the default font style, size, colors, and back-
ground for text and headings. Use this procedure to select
your own custom style sheet:
1. On the Accessibility dialog box shown on Figure 56,
under User style sheet:
• Select the Format documents using my style
sheet check box.
• Select the Browse button.
• Navigate to and open a saved style sheet.
2. Select OK, and then close the Internet Properties dialog
box by clicking OK again.
Selecting Web page colors. To increase contrast between
screen elements, you can select text and background colors
of Web pages displayed on the screen. After you’ve selected
the Ignore colors specified in Web pages option, you can
use this procedure to select colors for text and background
colors that make pages easier to view. The settings you
choose override the Web page author’s choice of colors.
Follow this procedure to select Web page colors:
1. On the Internet Properties dialog box, click the General
tab and then the Colors button.
2. In the Colors dialog box, clear the Use Windows colors
check box to activate the Text and Background buttons
if these are the colors you want to change (Figure 57).
FIGURE 57—The InternetOptions Colors Dialog Box

Understanding Windows 133
3. Select one of the four color buttons. The Color dialog box
displays a color palette (Figure 58).
4. In the Color dialog box, select the color you want and
then select OK.
5. Select OK again, and then close the Internet Properties
dialog box by clicking OK.
Selecting hover-link colors. You can choose a color to dis-
play links you pass over or point to with the mouse pointer.
This hover color can help some people with vision or cognitive
impairments identify Web links. Use this procedure to select
hover-link colors of Web pages.
1. On the Colors dialog box, click the Use hover color
check box to activate the hover radio button. Clear the
Use Windows colors check box to activate the Text and
Background buttons if you want to change these colors.
2. Select the Hover button. The Color dialog box appears
and displays a palette of colors (Figure 58).
3. In the Color dialog box, select the color you want and
then select OK.
4. Select OK again, and then close the Internet Properties
dialog box by clicking OK.
FIGURE 58—The Color Palette

Understanding Windows134
Selecting a font style. To help make Web pages more legi-
ble on screen, you can select a font style to be used in Web
pages that don’t have a specified text font.
1. On the Internet Properties dialog box, click the General
tab and then the Fonts button (Figure 59).
2. In the Fonts dialog box, select the Web page font and
the Plain text font that you want, and then select OK.
3. Select OK again to close the Internet Properties dialog
box.
Setting ALT text. The ALT text is read by the text-to-speech
engine to describe images. To ensure that ALT text isn’t cut
off if the amount of ALT text is larger than the image area,
people who rely on ALT text should select the Always expand
ALT text for images option. Turned on, this option expands
the image size to fit all the alternate text. Use this procedure
to select this option:
1. In the Internet Options dialog box, click the Advanced
tab (Figure 60).
2. Under Accessibility, turn on the Always expand ALT
text for images setting by selecting its check box.
3. Under Multimedia, turn off the Show pictures option.
4. Select OK, and then close the Internet Properties dialog
box by clicking OK again.
FIGURE 59—The InternetOptions Fonts Dialog Box

Understanding Windows 135
Other accessibility options are available using this screen.
The ones that have the greatest effects on making Web pages
more accessible are
• Move system caret with focus/selection changes
• Use smooth scrolling
• Play animations in Web pages
• Play sounds in Web pages
• Play videos in Web pages
FIGURE 60—The InternetOptions Advanced Tab

Understanding Windows136
Internet Accessibility Options in Vista and Windows 7
The path to the Internet Properties dialog box is slightly dif-
ferent in Vista, but all functions are the same. To locate the
Internet Properties dialog box in Vista and Windows 7,
1. Click Start, and then click Control Panel.
2. Select the Network and Internet applet. When it opens,
select Internet Properties.
3. You’re now at the same box shown in Figure 55, and all
functions are the same.

Understanding Windows 137
Self-Check 3
1. True or False? One way to delete a folder is to delete the shortcut pointing to it.
2. Three special-needs conditions for which Windows provides accessibility options are _______.
3. Visual styles are Windows XP specifications for the _______.
4. The Windows XP feature that allows you to have up to four separate desktops on the activescreen is _______.
5. The selection of an operating system emulator, when using Windows XP, is made on the_______.
6. What are the two additional tabs that appear in the Vista and Windows 7 Shortcut Propertiesdialog box that aren’t present in the Windows XP Shortcut Properties dialog box?
__________________________________________________________
7. Where are accessibility controls located in Vista and Windows 7?
__________________________________________________________
8. What two accessibility tools found in Windows XP are not present in Vista and Windows 7?
__________________________________________________________
9. In which section of Control Panel is a scanner configured in Vista and Windows 7?
__________________________________________________________
10. How can you access Display properties from the desktop in Vista and Windows 7?
__________________________________________________________
Check your answers with those on page 265.

Understanding Windows138
OPTIMIZING THE OPERATING SYSTEMNo matter how fast a system runs, there’s a natural tendency
to try to make it run faster, and this is the goal of optimizing
the OS. There are many commercial products available for
optimizing an OS. Probably your best sources for the latest
information on such products are experienced PC users, who
can tell you about the products that they like to use.
However, certain basic optimizing schemes work with all
operating systems. Many of these procedures are focused on
having the OS more quickly access data on the hard drive.
The basic idea is to have the minimum amount of data resid-
ing on the hard drive and to make the files as contiguous as
possible. Other procedures involve adding key hardware com-
ponents. The trick is to figure out what’s slowing the system
down and then to focus on optimizing the items causing the
bottleneck.
General OptimizationOperating systems access data faster on efficiently organized
hard drives. One of the easiest ways to have the files on a PC
efficiently organized is to install the OS on an empty, format-
ted partition of a hard drive. If you’re doing an update, it’s an
excellent idea to clean up and defragment the hard drive
before installing the OS. The first part of the process is to
remove all extraneous files from the partition onto which
you’ll install the OS. These unnecessary files reside in many
places. You can safely remove the following files from these
locations:
• Downloaded program files in C:\WINDOWS\Downloaded
Program Files
• Temporary Internet Files in C:\Documents and
Settings\“username”\Local Settings\Temporary
Internet Files
• Offline Web pages in C:\WINDOWS\Offline Web Pages

Understanding Windows 139
• Discarded files in the Recycle Bin
• Setup log files
• Temporary files found in Temp folders created by
applications
• WebClient/Publisher temporary files
• Offline files in the Offline Files folder
On some versions of Windows, the Disk Cleanup tool auto-
mates this process. To access this tool in current versions
of Windows,
1. Click Start, point to Programs, Accessories, System
Tools, and then Disk Cleanup (Figure 61).
FIGURE 61—The Disk Cleanup Tool

Understanding Windows140
2. The Disk Cleanup tool looks in all the above listed places
and reports on how much disk space will be freed up.
3. Click all the check boxes, and then click OK. The files
are removed from the hard disk.
Other files stored by a browser can be permanently removed
from the system by using the browser’s tools. For all versions
of Microsoft’s Internet Explorer, use the following procedure:
1. Click the icon you use to open the Internet Explorer.
2. In the menu bar, click Tools and then Internet Options.
3. Select the General tab. In the browsing history section,
click Delete.
4. Click Delete Cookies. In the dialog box, click OK.
5. Click Delete Files. Check Delete All Offline Content,
and then click OK.
6. Click Delete History. In the dialog box, click OK.
7. Close Internet Explorer. Don’t access any Web sites
before closing the browser, or you’ll create new cookies,
files, and history items.
Defragmenting in Windows XP
Now that the file system is emptied of as much junk as possi-
ble, you should defragment the hard drive or partition. The
process can be quite lengthy on large partitions. However,
this process can enhance the speed of a hard drive or parti-
tion at any time. NTFS drives probably need defragmenting at
least once a month. FAT file system drives require defrag-
mentation more often because of the way files are written to
the drive. Defragment FAT file system drives every two weeks
if possible. If you defragment the hard drives often enough,
you won’t notice a change in performance immediately after
defragmentation. If the computer is noticeably more respon-
sive right after defragmentation, you’ve let the fragmentation
process go too long and you should shorten the schedule. To
defragment a hard drive or partition in Windows XP,
1. Disable the screen saver and any power options that
will affect the system before the defragmentation is
completed.

Understanding Windows 141
2. Right-click the desktop, and click Properties.
3. Click the Screen Saver tab.
4. Select (None) for the screen saver.
5. Click Power in the monitor power section.
6. Set all the settings to Never, and then click OK.
7. Click OK again to save the settings.
8. Click Start, point to All Programs, Accessories, and
System Tools, and then click Disk Defragmenter
(Figure 62).
9. Select the drive or partition, and click Defragment.
FIGURE 62—The Disk Defragmenter

Understanding Windows142
Defragmenting in Vista and Windows 7
1. Disable the screen saver and any power options that
will affect the system before the defragmentation is
completed.
2. Right-click the desktop, and click Personalize.
3. Click Screen Saver.
4. Select (None) for the screen saver.
5. Click Power Settings in the power management section.
6. Select Change plan settings on the power plan currently
in use. Set all the settings to Never, and then click OK.
7. Click Save Changes again to save the settings.
8. Click Start, point to Programs, Accessories, and
System Tools, and then click Disk Defragmenter
(Figure 62). The path to this tool is the same in all ver-
sions, but the box looks different when it opens in Vista
(Figure 63) and Windows 7 (Figure 64).
9. Select the drive or partition, and click Defragment now
in Vista and Defragment disk in Windows 7.
FIGURE 63—Disk Defragmenter in Vista

Understanding Windows 143
CPUs with More L2 Cache
Another way to enhance the speed of a PC, even one that’s
being used as a server, is to use CPUs with more L2 cache.
This addition often makes a noticeable change in processing
speed even on servers.
FIGURE 64—Disk Defragmenter in Windows 7
Cache memory is RAM that a PC’s microprocessor can access more
quickly than regular system RAM. L2 cache memory is on a separate
chip, possibly on an expansion card.

Understanding Windows144
System RAM
Adding system RAM also creates a modest increase in the
processing speed of most PCs. The relatively low cost of a
RAM increase makes this one of the most popular optimizing
strategies. Changing the speed of the CPU can also signifi-
cantly increase the processing speed, but this change is more
costly than adding RAM.
Desktop Cleanup
A tidy desktop is an efficient desktop. As is the case with all
versions of Windows, excessive desktop icons and desktop
wallpaper take up system memory, and they’re constantly
refreshed by the graphics subsystems. Animated desktops
are particularly hard on a system’s core resources. If you’re
working on a system that has 64MB of RAM on a 200MHz
Pentium processor, every clock cycle is critical.
Windows Optimization
Of everything you can do to optimize Windows XP, Vista, and
Windows 7, one of the simplest is just to use it. As you use
applications, Windows observes your behavior and updates a
dynamic file called Layout.ini. Every three days, during idle
time, it rearranges the locations of programs on the system
hard drive to optimize their launch and execution.
Prefetching in Windows XP
Windows XP also speeds up the boot process and optimizes the
launch of programs by using prefetching. Windows observes
the code and programs used immediately upon bootup and
creates a list of data to prefetch early in the boot process.
Similarly, as individual programs are launched, Windows
keeps track of which files and components are accessed. The
next time the application is accessed, Windows prefetches
the necessary items to speed up the application’s launch.
The prefetch optimizing code exists both within the Windows
XP kernel and the task scheduler service. The kernel keeps
track of pages that are referenced by a given procedure
immediately after the procedure is created. The recorded

Understanding Windows 145
pages are then transformed into prefetch instructions for that
procedure. The next time the procedure is created, the kernel
executes the prefetch instructions, thereby speeding up the
creation of the procedure.
Disk optimization and application/boot prefetching work
in tandem. That is, when Windows XP optimizes the file
system for faster program access, the data it recorded for
the application and boot-up prefetch processes is factored in
to determine optimal file placement on the disks.
Superfetching in Vista and Windows 7
In Vista and Windows 7, prefetching is taken to a new level
called superfetching, in which the system also holds the infor-
mation in memory, where it can be retrieved even faster. It
also creates profiles of each application you use and the files
that are used by these applications. It ensures that these
files are in memory when you use the application.
Disabling FeaturesAnother important and sometimes overlooked task that can
help optimize the performance of a Windows XP, Vista, and
Windows 7 system is disabling some of the features that are
automatically set up when the OS is installed. If you’re sure
that a feature won’t be needed or is causing problems, you
can disable it and thereby free up whatever resources it
would have been taking up.
Fast User Switching
Available on Windows XP Home Edition, Windows XP
Professional when it’s not part of a domain, and all versions
of Vista and Windows 7 (that aren’t in a domain), fast user
switching lets users of the same computer switch between
accounts without logging off. It’s a useful feature when
members of the same household share the same computer;
however, keeping multiple user accounts active is a burden
to a PC’s memory usage.

Understanding Windows146
When more than one user is logged on, each user’s settings
remain active and the programs activated through his or her
account remain open—even if someone switches to another
user account. If one person leaves a memory-intensive appli-
cation running, it negatively affects the other people using
the PC.
For best performance, ensure that only one user is logged in
at a time, and if that becomes a nuisance, disable the feature
altogether.
1. In Windows XP, click Start and Control Panel, and
double-click User Accounts (Figure 65).
2. Click Change the way users log on or off and uncheck
Use Fast User Switching.
FIGURE 65—User Accounts

Understanding Windows 147
In Vista and Windows 7, disabling this feature involves using
a tool called the Group Policy editor.
1. Click Start, type gpedit.msc, and press Enter.
2. In the Local Computer Policy, navigate to the following
location: Administrative Templates\System\Logon.
3. Set the Hide Entry Points for Fast User Switching to
Enabled.
4. Quit the Group policy editor.
Automatic Updating
You should always keep Windows up-to-date with the latest
security fixes, DirectX versions, compatibility patches, and
other updates. By default, Windows XP, Vista, and Windows
7 do this for you. However, this feature requires a small pro-
gram to run in the background and occasionally check (or
ask you to check) for Windows revisions. If you would rather
handle the task of updating Windows yourself, you can turn
off the notification program. To disable the automatic
updates and update notifications in Windows XP,
1. Click Start and Control Panel, and double-click
System.
2. Click the Automatic Update tab (Figure 66). If the tab
isn’t present, the PC you’re working on must be part of a
domain.
3. Click the Turn off automatic updating radio button.
Click Apply and then OK.
To disable the automatic updates and update notifications in
Vista and Windows 7,
1. Click Start and Control Panel, and double-click System
and Maintenance (System and Security in Windows 7).
2. Under Windows Update, click Turn Automatic
Updating On or Off.
3. In the Important Updates drop-down box, select Never
Check for Updates (not recommended) and then click
OK.
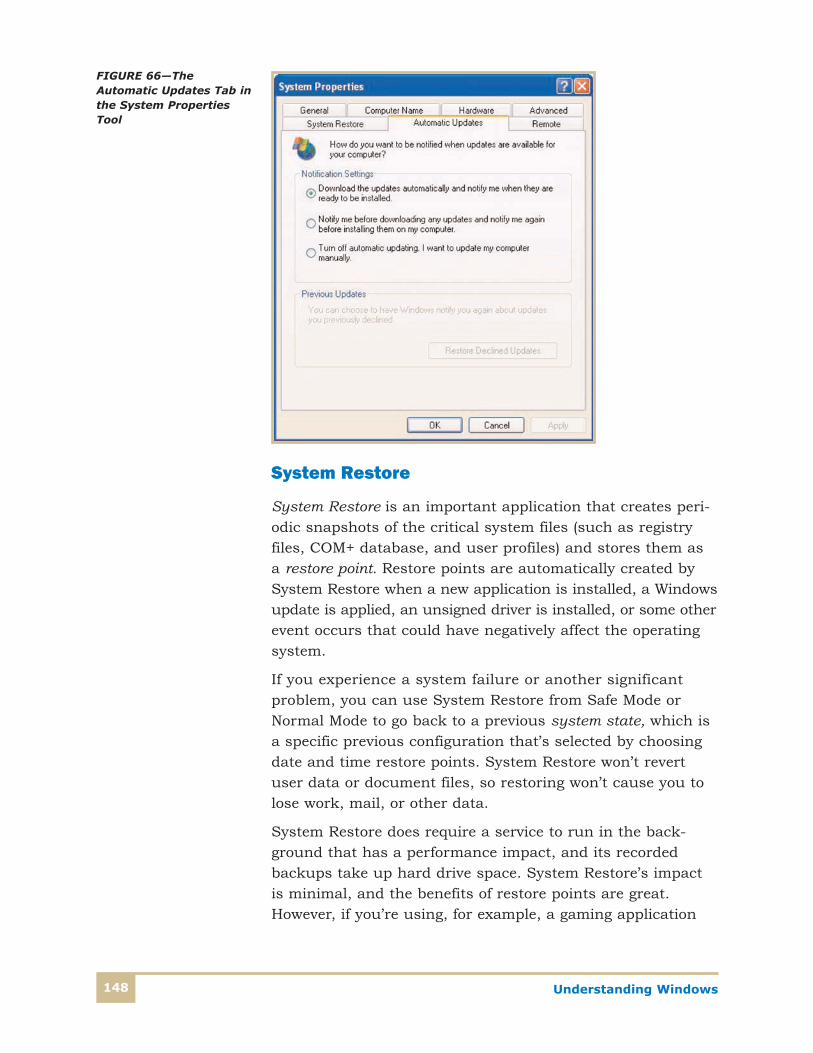
Understanding Windows148
System Restore
System Restore is an important application that creates peri-
odic snapshots of the critical system files (such as registry
files, COM+ database, and user profiles) and stores them as
a restore point. Restore points are automatically created by
System Restore when a new application is installed, a Windows
update is applied, an unsigned driver is installed, or some other
event occurs that could have negatively affect the operating
system.
If you experience a system failure or another significant
problem, you can use System Restore from Safe Mode or
Normal Mode to go back to a previous system state, which is
a specific previous configuration that’s selected by choosing
date and time restore points. System Restore won’t revert
user data or document files, so restoring won’t cause you to
lose work, mail, or other data.
System Restore does require a service to run in the back-
ground that has a performance impact, and its recorded
backups take up hard drive space. System Restore’s impact
is minimal, and the benefits of restore points are great.
However, if you’re using, for example, a gaming application
FIGURE 66—TheAutomatic Updates Tab inthe System PropertiesTool

Understanding Windows 149
that uses all the system’s resources or you’re running a
benchmark test of the system, you may want to modify the
settings or disable System Restore.
In Windows XP, you can adjust the percentage of space that
System Restore is allowed to work with on each disk on the
system through the System Restore tab in the System
Properties tool (Figure 67).
The System Restore tab also provides a check box that allows
you to shut down System Restore entirely for all drives. To
get to the System Restore tab on the System Properties
screen in Windows XP,
1. Click Start, click Control Panel, and double-click
System.
2. Click the System Restore tab. If the tab isn’t present,
the PC you’re working on must have this feature disabled
for some users. Log on as an administrator.
3. Click the Turn off System Restore on all drives radio
button, or adjust the percentage of hard drive space allo-
cated for System Restore files. Click Apply and then OK.
FIGURE 67—The SystemRestore Tab in the SystemProperties Tool

Understanding Windows150
In Vista,
1. Click Start and Control Panel, and double-click System
and Maintenance and then System.
2. In the menu on the left side of the page, select System
Protection.
3. This action takes you to the System Protection tab on
System Properties. For any drives listed in the Create
restore point automatically box, deselect the check
box. To completely disable system restore, uncheck all
drives listed.
In Windows 7,
1. Click Start, click Control Panel, and double-click
System and Security and then System.
2. In the menu on the left side of the page, select System
Protection.
3. This action takes you to the System Protection tab on
System Properties. Click the Configure button and then
select the Turn off system protection radio button
(Figure 68).
FIGURE 68—SystemProtection in Windows 7
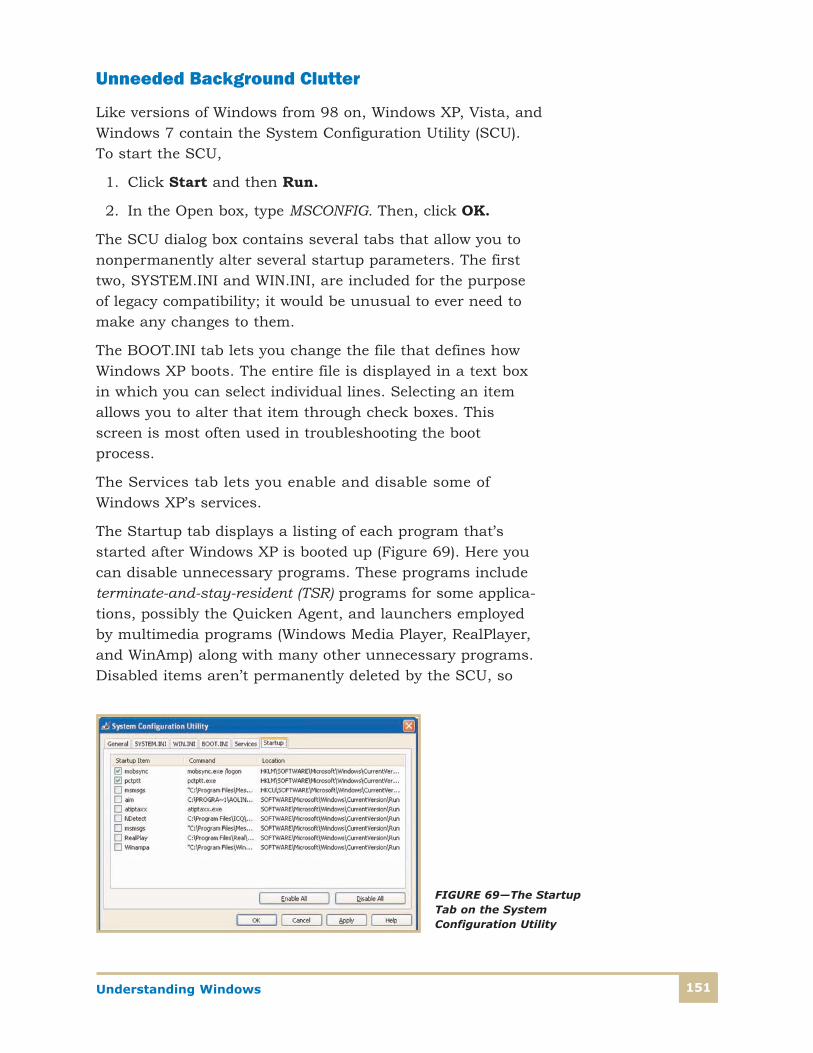
Understanding Windows 151
Unneeded Background Clutter
Like versions of Windows from 98 on, Windows XP, Vista, and
Windows 7 contain the System Configuration Utility (SCU).
To start the SCU,
1. Click Start and then Run.
2. In the Open box, type MSCONFIG. Then, click OK.
The SCU dialog box contains several tabs that allow you to
nonpermanently alter several startup parameters. The first
two, SYSTEM.INI and WIN.INI, are included for the purpose
of legacy compatibility; it would be unusual to ever need to
make any changes to them.
The BOOT.INI tab lets you change the file that defines how
Windows XP boots. The entire file is displayed in a text box
in which you can select individual lines. Selecting an item
allows you to alter that item through check boxes. This
screen is most often used in troubleshooting the boot
process.
The Services tab lets you enable and disable some of
Windows XP’s services.
The Startup tab displays a listing of each program that’s
started after Windows XP is booted up (Figure 69). Here you
can disable unnecessary programs. These programs include
terminate-and-stay-resident (TSR) programs for some applica-
tions, possibly the Quicken Agent, and launchers employed
by multimedia programs (Windows Media Player, RealPlayer,
and WinAmp) along with many other unnecessary programs.
Disabled items aren’t permanently deleted by the SCU, so
FIGURE 69—The StartupTab on the SystemConfiguration Utility

Understanding Windows152
you can uncheck particular components, reboot, and then test
the PC for functionality. If you determine that you removed
something important to the PC’s hardware or applications,
you can start the SCU again, recheck the box next to the
important startup item, and reboot.
You can often improve system performance by eliminating
everything that isn’t necessary using the SCU. Other items
that start automatically after the boot process are located at
C:\Documents and Settings\<username>\StartMenu\
Programs\Startup Items. Delete an item’s icon, and it won’t
be launched during startup anymore.
The registry also launches items during the boot process.
Some items can be purged through the REGEDIT program.
The REGEDIT program should be used only after you’ve
backed up the registry (in case you accidentally alter
something critical). To back up the registry, log on with
administrative privileges and use the following procedure:
1. Click Start, point to All Programs, Accessories, and
System Tools, and click System Restore (Figure 70).
2. On the System Restore window, click the Create a
restore point radio button. In Vista and Windows 7,
leave the radio button selected with today’s date and
time, and click Next and then Finish.
3. In Windows XP, fill in the data at the prompts.
It’s now time to open the REGEDIT program (Figure 71).
To open REGEDIT,
1. Click Start and then Run.
2. In the Open box, type REGEDIT. Then, click OK.
The startup items you may want to remove are often found
in the HKEY_LOCAL_MACHINE\SOFTWARE\Microsoft\
Windows\CurrentVersion\Run key. Delete these items’
values to prevent them from being launched on subsequent
boots.

Understanding Windows 153
FIGURE 70—Back up the registry by creating a restore point.
FIGURE 71—Editing theRegistry

Understanding Windows154
Managing Services
Services are important components of the operating system
that provide functions for hardware and applications. There
are noncritical services that may be disabled or modified to
improve system performance.
However, you shouldn’t attempt to disable core kernel
processes or services that manage process scheduling, inter-
rupt handing, file management, virtual memory management,
and many other essential services. If you’re unsure about a
particular service, don’t alter it.
In Windows XP, you can launch the Services control applet.
1. Click Start, and then click Control Panel.
2. Double-click Administrative Tools, and then double-
click Services.
Or,
1. Click Start and then click Run.
2. In the Open box, type SERVICES.MSC. Then, click OK.
This action opens a window that lists every service available
for modification (at your level of privileges) in the Windows XP
configuration. To view a description of a service, select the
extended tab and then click the service (Figure 72).
A description is displayed for the service in question. Also
listed are the service’s status (whether it’s been started or
not), its startup type (automatic, manual, or disabled), and
the user account with which the service logs on to the com-
puter if you’re logged on as an administrator. The startup
type has three options:
• Automatic. These services start when Windows starts.
• Manual. These services are called upon by a user or
invoked by another program or service.
• Disabled. These services won’t start at all.

Understanding Windows 155
Right-clicking the service and selecting Properties can
modify the properties of any listed service. For optimal per-
formance, you can stop, and/or set on manual, a number of
services. Don’t disable a service unless you’re sure that no
other services or hardware needs it.
For example, the Portable Media Serial Number service has
no identifiable advantage, so set it on manual (or disable it
if you don’t have a portable music player). Many users can
set the Help and Support service on manual. If you don’t
use themes, turn off the service. Experiment with stopping
other services cautiously. You may never need services like
Telnet or Error Reporting. If you’re unsure about a particular
service, leave it alone. You can find out more about each
service, including any dependent services or services upon
which it depends, through its property sheet.
FIGURE 72—Services

Understanding Windows156
In Vista and Windows 7, the only difference in the operation
of services is the path to the Services Control Panel. To begin
managing the services, you would click Start and then type
services. In the area above the search box, select Services.
Hidden Windows Components
Microsoft makes difficult the removal of some components,
like Windows Messenger. In Windows XP, it’s installed by
default, and it doesn’t appear in the Add or Remove Programs
list in Control Panel. You can make it possible to delete the
hidden components by editing the SYSOC.INF file. This file,
which is by default found in the C:\WINDOWS\INF folder,
can be opened with the Windows Notepad accessory.
Under the [Components] heading, you’ll see parameters for
various Windows applets. Some programs contain the word
hide. These programs include Windows Messenger (msmsgs),
Terminal Server, Pinball, and others. The programs are
installed on the PC, but their entries aren’t displayed on the
Add or Remove Program list. Remove hide from the line
msmsgs=msgrocm.dll,OcEntry,msmsgs.inf,hide,7 so that it
reads as follows.
msmsgs=msgrocm.dll,OcEntry,msmsgs.inf,7
Save the file, and open Add or Remove Programs. Click the
Windows Component button, and the hidden program
should now be on the list. If you wish, edit out hide every-
where it appears in the SYSOC.INF file to reveal other
removable Windows XP components.
In Vista and Windows 7, it’s a bit easier to uninstall these
hidden features.
1. Click Start, then Control Panel.
2. Select Programs and then Programs and Features.
3. On the left side, select Turn Windows Features on
or off.
4. Select the Continue button (if UAC is in effect).
5. Check or uncheck a feature.

Understanding Windows 157
Offering DMA to All ATAPI Drives
By default, slave drives on advanced technology attachment
packet interface (ATAPI) channels are set to programmed
input/output (PIO) mode, even when the attached device is
capable of much more efficient UltraATA or direct memory
access (DMA) mode data transfers. This setting can hurt the
performance of ROM burners, DVD movie playback, and
other drive functions. In addition, DMA mode data transfers
require much less CPU overhead than PIO mode transfers.
In Windows XP, you can correct the default settings using the
Device Manager.
1. Click Start, and then click Control Panel.
2. Double-click System Properties and select the
Hardware tab.
3. Click Device Manager.
4. Expand IDE/ATAPI controllers by clicking the +
preceding the item.
5. Select the primary channel, and click Properties.
6. Choose the Advanced Settings tab.
Direct memory access (DMA)—A bus architecture capability that allows data to be sent directly
from a device (such as a hard drive) to the computer’s memory.
Advanced technology attachment packet interface (ATAPI)—An interface between a PC and CD,
DVD, and tape backup drives. ATAPI provides the additional commands needed for controlling a
CD player or tape backup.
Programmed input/output (PIO)—A way of moving data between devices in a PC in which all
data must pass through the processor. The following are PIO data transfer rates.
• Mode 0: 3.3 MBps
• Mode 1: 5.2 MBps
• Mode 2: 8.3 MBps
• Mode 3: 11.1 MBps
• Mode 4: 16.6 MBps

Understanding Windows158
7. For each device listed, change the transfer mode to DMA
if available. Devices that aren’t capable of DMA mode
stay in PIO mode.
8. Repeat the process for the secondary channel (Figure 73).
The only difference in Vista and Windows 7 is the path to
Device Manager. In Vista,
1. Click Start and Control Panel, and double-click System
and Maintenance and then System.
2. On the left side of the page, select Device Manager.
From this point, the operation is the same as that for
Windows XP.
FIGURE 73—Changing theIDE Channel Properties

Understanding Windows 159
In Windows 7,
1. Click Start and Control Panel, and double-click System
and Security and then System.
2. On the left side of the page, select Hardware and Sound.
3. Under Devices and Printers, click Device Manager.
From this point, the operation is the same as that for
Windows XP.
Windows Special Effects
Windows has more graphic features than previous Microsoft
operating systems. Menu transitions are animated, dialogs
and mouse cursors have shadows, screen fonts are adjusted
for maximum readability, and there are many other memory-
eating features.
Windows, during installation, runs a few tests to autoconfigure
its GUI settings for a mix of functionality and appearance.
These settings can be overridden if the feature is having a
negative impact on the system functions, or if you would
prefer to not have a feature.
Some of the settings are accessed through the Effects set-
tings on the Appearance tab of the Display Properties. In
Windows XP, the Effects setting in the Display Properties dia-
log box can be accessed using the following procedure:
1. Right-click the desktop, and click Properties.
2. Click the Appearance tab, and then click Effects.
3. Here, you can alter the types of the menu transitions,
shadows, and font properties (Figure 74).
In Vista,
1. Right-click the desktop, and click Personalize.
2. Select Windows Color and Appearance.
3. Click the Effects button.

Understanding Windows160
Windows 7 controls effects in one place, except for clear type,
which is managed in the same place as it is in Windows XP
and Vista. In Windows 7,
1. Click Start. When the menu appears, right-click
Computer and select Properties.
2. On the left side of the page, select Advanced System
settings.
3. On the Advanced tab under the Performance section,
click the Settings button.
4. The box that appears allows you to manually enable and
disable effects, or you can choose to let Windows decide
by making a general selection indicating the relative
amount of resources you would like to devote to appear-
ance as compared to performance (Figure 75).
FIGURE 74—The EffectsDialog Box

Understanding Windows 161
Other memory-eating Windows options are configurable using
the System Properties tool, in all versions. Open it using the
following procedure:
1. Click Start and Control Panel, and then double-click
System. Alternatively, you can right-click My Computer
and click Properties. In Vista and Windows 7, you see
the box in Figure 72; in Windows XP, Figure 73.
2. Click the Advanced tab, and then click Settings in the
Performance part of the dialog box.
3. On the Visual Effects tab of the Performance Options
dialog box, you can configure the PC to choose between
visuals and performance (Figure 76).
FIGURE 75—PerformanceOptions in Windows 7

Understanding Windows162
FIGURE 76—The VisualEffects Tab on thePerformance OptionsDialog Box
You can also customize the mix from the list of visual effects.
1. Click the Advanced tab of the Performance Options dia-
log box (Figure 77).
2. Ensure that processor scheduling and memory usage are
configured for programs. The background services and
caching are used on PCs that are servers.
3. Specify the size and location of the system’s paging file.
Windows XP does an efficient job of managing its own
paging file, and there appears to be no advantage in
manually overriding Windows XP’s paging file handling.

Understanding Windows 163
Tweak UI
Other utilities created by Microsoft and others can enhance the
speed of a PC. One of these is the Tweak UI PowerToy, which
gives you access to system settings that aren’t available using
the Windows XP default user interface. This tool is in essence
a collection of dialog boxes that allows you to fix some features
without needing to directly access the registry. The settings
include ones that affect the mouse, Explorer, and the taskbar.
Version 2.10 of Tweak UI requires Windows XP Service Pack
1, and this is the version that works with Windows XP. You
can download this version here:
http://www.microsoft.com/windowsxp/downloads/
powertoys/xppowertoys.mspx
FIGURE 77—The PerformanceOptions’ Advanced Tab

Understanding Windows164
Some unusual situations can result from using this tool, so
make changes incrementally and set restore points often. If
you don’t understand the functions of Tweak UI, or if you
change multiple settings all at once, you’re likely to end up
with a PC that needs to have its OS reinstalled.
Listed are some of the common changes made on the
Windows XP operating system using Tweak UI:
• Don’t beep on errors.
• Disable combo box animation.
• Disable cursor shadow.
• Disable list box animation.
• Disable menu animation.
• Disable menu fading.
• Disable menu selection fading.
• Disable mouse hot tracking effects.
• Disable window animation.
• Don’t show Help on Start menu.
• Don’t show Recent Documents on Start menu.
• Don’t allow Web content to be added to the desktop.
• Clear document history on exit.
• Disable smooth scrolling
• Don’t maintain document history.
• Don’t maintain network history.
• Don’t manipulate connected files as a unit.
• Don’t prefix “Shortcut to” on new shortcuts.
• Don’t show links on Favorites.
• Don’t show My Documents on Start menu.
• Don’t show My Pictures on Start menu.
• Use Classic Search in Explorer.

Understanding Windows 165
• Use Classic Search in Internet Explorer.
• Do use Tab to navigate Autocomplete.
• Hide places bar in common dialogs.
• Disable balloon tips in Taskbar and Start menu.
Exercise 1
To aid in your understanding of the material, perform the
following exercises.
1. Set the computer to adjust the CPU to give priority to
Programs and not Background services in Windows XP.
2. Create a shortcut on the desktop for the Calculator in
Windows XP.
3. Turn off System Restore in Vista.
4. Defragment the hard drive in Windows 7.
Check your methods with those on page 266.

Understanding Windows166
Self-Check 4
1. Name three things you can do to increase the performance of a PC with Windows XP installed.
__________________________________________________________
2. True or False? Changing services settings can disable a PC.
3. What is the name of the feature that allows more than one user to be logged on to a PC atthe same time?
__________________________________________________________
4. One tool that removes unnecessary files from a PC is _______.
5. True or False? Windows XP optimizes file placement and the boot process automatically.
6. The capability that allows data to be sent directly from a device (such as a hard drive) to thecomputer’s memory is called _______.
7. In Vista, what are the three startup types for a service?
__________________________________________________________
8. In Windows 7, how can you invoke the System Configuration Utility (SCU)?
__________________________________________________________
9. True or False? Windows Updates can be disabled in Vista.
10. The version of prefetch in Vista is called _______.
Check your answers with those on page 267.

Understanding Windows 167
OPERATING-SYSTEM PROCESSESMost problems with a PC’s operating system can be grouped
into two categories:
• Boot problems, which occur during the loading of the OS
• System problems, which occur after the OS is loaded and
running
We’ll now focus on boot problems. Boot problems often
happen after the PC has some changes in the hardware or
software components. One of the best strategies for keeping a
system running is to have a way to reset the PC to a working
state.
Windows XP, Vista, and Windows 7 include a solution:
System Restore. In a data set called a restore point, System
Restore backs up the registry and system files required for
the system to function. The restore point function doesn’t
back up the system files required to boot the OS. To set a
new restore point,
1. Click Start, point to Programs or All Programs,
Accessories, and then System Tools.
2. Click System Restore.
3. On the System Restore screen, click the Create restore
point radio button and then click Next.
4. Name your restore point and then click OK or Create.
StartupThe boot process for Windows XP remains unchanged from
Windows NT. Understanding the boot process and customiz-
ing it when required are among the first steps in supporting
the Windows XP, Vista, and Windows 7 operating system
installations.

Understanding Windows168
The Windows XP Boot Process
The boot process for Windows XP is a sequential process
outlined in Table 13. The names of the files involved in the
process are in Table 14. With a dual-boot system that’s not
booted to Windows, control is passed to Bootsect.dos, which
loads the rest of the selected operating system.
Table 13
THE BOOT SEQUENCE
Step Performed By Description
1 Startup BIOS Power-on self test (POST) is executed.
2 Startup BIOS Master Boot Record (MBR) is loaded, and the master boot programis run.
3 MBR program Boot sector from the active partition is loaded, and the program inthis boot sector is run.
4 Boot sector program The Windows NT Loader (ntldr) file is loaded and run.
5 Windows NT loader Processor is changed from real mode to flat memory mode. Thisallows 32-bit code execution.
6 Windows NT loader Minifile system drivers are started.
7 Windows NT loader The Boot.ini file is read, and the boot loader menu is built.
8 Windows NT loader Ntdetect.com is run to detect hardware installed.
9 Windows NT loader The information in the registry about device drivers is read. Thedevice drivers, Hal.dll, and Ntoskrnl.exe are loaded.
10 Windows NT loader Ntldr passes control over to Ntoskrml.exe, and load is complete.

Understanding Windows 169
The Vista and Windows 7 Boot Process
Beginning with the Vista operating system, the way that
Windows computers (Vista, Windows 7, Server 2003, Server
2008) boot and the source of the boot information changed.
The process is described in Table 15.
The boot configuration information formerly contained in the
boot.ini file is now located in the boot configuration database
(BCD). Moreover, the Bootmgr now handles the job that for-
merly was performed by the NT loader (NTLDR). Edits to the
boot information are no longer made by editing the boot.ini
file but rather by editing the BCD with a command-line tool
Table 14
FILES REQUIRED FOR WINDOWS 2000 AND XP TO BOOT
File Location
Ntldr Root directory of the system partition (usually C:\)
Boot.ini Root directory of the system partition (usually C:\)
Bootsect.dos Root directory of the system partition (usually C:\)
Ntdetect.com Root directory of the system partition (usually C:\)
Ntbootdd.sys Root directory of the system partition (usually C:\) Only used in systemswith Small Computer System Interface (SCSI) boot drives.
Ntoskrnl.exe \winnt_root\system32 directory on the boot partition
Hal.dll \winnt_root\system32 directory on the boot partition
System \winnt_root\system32 directory on the boot partition
Device drivers \winnt_root\system32 directory on the boot partition
Table 15
THE BOOT SEQUENCE
Step Performed By Description
1 Startup BIOS POST is executed.
2 Startup BIOS MBR is loaded.
3 MBR Partition boot record is loaded.
4 PBR The boot sector is located, and bootmgr is loaded.
5 Bootmgr Bootmgr locates winload.
6 Winload The kernel is initialized.

Understanding Windows170
called bcedit.exe. Msconfig can also be used to edit this infor-
mation. Finally, as you see, the process is more streamlined
as well.
Troubleshooting the Boot Process
The Windows operating systems covered in this study unit
are some of the most stable available for Intel and AMD-
based processors. However, this doesn’t mean that there will
never be problems booting the PC. Problems that halt the
boot process commonly involve problems with device drivers
or the registry. When the PC won’t boot in a normal way, the
Windows operating system allows access to many critical files
for troubleshooting.
The Advanced Options Menu
Windows XP, Vista, and Windows 7 allow you to interrupt the
boot process. This practice is often used as a troubleshooting
tool when the PC is unable to successfully boot the PC. To
interrupt the boot process, press the F8 key during the Starting
Windows display. This action accesses the Safe Boot options
and opens the Advanced Options menu. This feature is avail-
able on PCs for which pressing the F8 key during boot hasn’t
been disabled. Disabling this feature is a common security
feature on networked computers.
With the minor differences noted in the list, Windows XP,
Vista, and Windows 7 offer the Safe Boot options that load
the PC with a minimal set of drivers for troubleshooting the
boot process. You can use these boot options to modify the
registry or install/remove device drivers. You can use these
boot options to modify the registry or to install and remove
device drivers. To use the Safe Boot option,
1. Restart the computer, and when the boot menu appears,
press F8. On a computer that’s configured for booting to
multiple operating systems, you can press the F8 key
when you see the boot menu.
2. When the Windows Advanced Options menu appears,
select an option. Then, press Enter.

Understanding Windows 171
3. When the boot menu appears again, with the words Safe
Mode displayed at the bottom, select the installation you
want to start, and then press Enter.
The Windows Advanced Options menu offers several choices
for booting the PC, and each choice has its own combination
of drivers installed. The following list explains the options
and specifies which operating systems support each option.
• Repair the computer (Vista and Windows 7), which pro-
vides a list of recovery tools that can be used to diagnose
and repair boot problems
• Safe Mode (Windows XP, Vista, and Windows 7), which
uses a minimal set of device drivers and services (mouse,
except serial mice; monitor; keyboard; mass storage;
base video; default system services; and no network
connections) to start Windows (This option is often used
when a newly installed hardware item is causing boot
problems.)
• Safe Mode with Networking (Windows XP, Vista, and
Windows 7), which uses a minimal set of device drivers
and services to start Windows, plus the drivers that you
need to load networking (This option is used for newly
installed hardware problems when you need access to a
network.)
• Safe Mode with Command Prompt (Windows XP, Vista,
and Windows 7), which is the same as Safe mode, except
that cmd.exe starts instead of Windows Explorer (There’s
no GUI loaded with this mode.)
• Enable low-resolution video (640 × 480) (Vista and
Windows 7), which uses the current video driver but a
low resolution and refresh rate
• Safe Mode with Command Prompt, Enable VGA Mode
(Windows XP), which starts Windows in 640 × 480 mode,
using the current video driver, not Vga.sys (This mode is
useful if the display is configured for a setting that the
monitor can’t display.)

Understanding Windows172
• Last Known Good Configuration (Windows XP, Vista, and
Windows 7), which is presented when Windows experi-
ences problems during the boot process (This configuration
is stored in the registry under HKEY_LOCAL_MACHINE\
HARDWARE . If you’ve accidentally removed a critical
device (for example, the display), Windows automatically
uses the Last Known Good Configuration to start the OS.)
• Directory Service Restore Mode (Windows XP, Vista, and
Windows 7), which is valid only for Windows-based
domain controllers, and which performs repair services
to the Active Directory domain database
• Debug Mode (Debugging Mode in Vista and Windows 7),
which enables debug mode in Windows (Debugging infor-
mation can be sent across a serial cable to another
computer running a debugger. This mode is configured
to use COM2. Further details on using this feature is
found in the Windows 2000 Professional Resource Kit
available from Microsoft.)
• Disable automatic restart on system failure (Vista and
Windows 7), which stops the normal behavior of Windows,
which is to restart when an error causes a failure, and
which can be used if the startup is stuck in a loop of
restarts
• Disable Driver Signature Enforcement (Vista and
Windows 7), which stops the normal behavior of
Windows and allows only signed drivers to load
• Directory Service Restore Mode: Debugging Mode
(Windows XP), which turns on debug mode in Windows
(Debugging information can be sent across a serial
cable to another computer that’s running a debugger.
This mode is configured to use COM2.)
Professional Tip
If you’re experiencing troubles booting the PC, don’t log on. An
authenticated log-on overwrites the Last Known Good Configuration
stored in the registry with the one that’s currently causing troubles.

Understanding Windows 173
• Enable Boot Logging (Windows XP, Vista, and Windows 7),
which enables logging when the computer is started with
any of the Safe Boot options except Last Known Good
Configuration (The boot logging text is recorded in the
Ntbtlog.txt file in the %SystemRoot% folder.)
• Start Windows Normally (Windows XP and Windows 7),
which starts Windows in its normal mode
• Reboot (Windows XP), which reboots the computer
• Return to OS Choices Menu (Windows XP), which, on a
computer that’s configured for booting to more than one
operating system, returns to the boot menu
The Recovery Console
If using Advanced Options doesn’t solve the boot problems,
the next level of troubleshooting is to use the Recovery
Console. The Windows Recovery Console is designed to help
you recover when your Windows-based computer doesn’t
start properly or at all. This method is recommended only if
you can use the command prompt to identify and locate
problem drivers and files. To use the Recovery Console, you
must have administrator privileges.
Installing the Recovery Console (Windows XP only). To
use the Recovery Console, you must first install it to make it
available in case you’re unable to restart Windows. To install
the Recovery Console, you must have administrative rights
on the computer. It’s wise to install the Recovery Console on
important workstations and servers. After installation, you
can select the Recovery Console option from the list of avail-
able operating systems at startup.
Although you can run the Recovery Console by booting
directly from the Windows installation CD, it’s more conven-
ient to set it up as a startup option on the boot menu. To
install the Recovery Console,
1. Insert the Windows installation CD.
2. Click Start, and then click Run.
3. In the Open box, type d:\i386\winnt32.exe /cmdcons,
where d is the drive letter for the CD or DVD drive.

Understanding Windows174
4. Click Yes to start the installation procedure.
5. Restart the computer. The next time you start the com-
puter, you’ll see a Microsoft Windows Recovery Console
entry on the boot menu.
Using the Recovery Console (Windows XP only). Now that
the Recovery Console is installed on the PC and is displayed
as one of the boot options, you can use this utility to enable
and disable services, format drives, read and write data on a
local drive, and perform other administrative tasks. The
Recovery Console is particularly useful if you need to repair
the computer by copying a file from a floppy disk or CD to
the hard disk, or if you need to reconfigure a service that’s
preventing the computer from starting properly. To run the
Recovery Console,
1. From the boot menu, select Microsoft Windows Recovery
Console.
2. When you’re prompted to do so, type the administrator
password. If the administrator password is blank, press
Enter.
3. At the command prompt, type the appropriate commands
to diagnose and repair the Windows installation.
4. For a list of commands available in Recovery Console,
type recovery console commands or help at the command
prompt, and then press Enter. For information about a
specific command, type help and the command name,
and then press Enter.
5. To exit the Recovery Console and restart the computer,
type exit at the command prompt and then press Enter.

Understanding Windows 175
If you’re unable to even get to the boot-option screen, you
can run the Recovery Console from the Windows XP Startup
disks or the Windows XP installation CD. To start a PC from
the Windows CD, you need to configure the BIOS to boot
from the CD or DVD drive. To run the Recovery Console from
the Windows XP startup disks or the Windows XP CD,
1. Insert the Windows XP startup disk into the floppy disk
drive, or insert the Windows CD into the CD or DVD
drive. Then, restart the computer.
2. At the prompt, click to select any options that are
required to start the computer from the floppy drive or
the CD or DVD drive.
3. When the Welcome to Setup screen appears, press R to
start the Recovery Console.
4. If you have a dual-boot or multiple-boot computer,
choose the system that you need to access from the
Recovery Console.
5. From this point, the procedure is the same as using the
Recovery Console from the boot menu.
Using the Recovery Console command prompt. When
using the Recovery Console, you’re working at a special
command prompt rather than the usual Windows command
prompt. The Recovery Console has its own password-
controlled command interpreter. To enter this command
interpreter, type the local administrator password (not a
domain administrator password).
When the Recovery Console starts, you have the opportunity
to press F6 to install a SCSI or RAID driver, in case you need
the driver to access the hard disk. After a few seconds, the
Recovery Console menu is displayed with a numbered list of
the Windows installations on the computer. Press a number,
and press ENTER, even if only one entry appears. When you
see the prompt for %SystemRoot% (usually C:\Windows),
you can begin using commands for the Recovery Console.
Table 16 describes the available commands.

Understanding Windows176
Table 16
COMMANDS FOR THE RECOVERY CONSOLE
Command Description
Attrib Changes attributes on one file or subdirectory.
BatchExecutes commands that you specify in the text file, Inputfile. Outputfile holdsthe output of the commands. If you omit the Outputfile parameter, output is displayed on the screen.
Bootcfg Used to manipulate the Boot.ini for boot configuration and recovery.
CD (Chdir)CD changes the current directory only within the system directories of the cur-rent Windows installation, removable media, the root directory of any hard diskpartition, or the local installation sources.
Chkdsk
Checks the drives within the current Windows installations for problems. Chkdskon the Recovery Console requires Autochk. Chkdsk automatically looks forAutochk.exe in the startup (or boot) folder. If Chkdsk can’t find the file in thestartup folder, it looks for the Windows Setup CD-ROM. If Chkdsk can’t find theinstallation CD-ROM, it prompts the user for the location of Autochk.exe. Chkdskon the Recovery Console supports the following switches.
/p Runs Chkdsk even if the drive isn’t flagged as dirty.
/r Locates bad sectors and recovers readable information. This switchimplies /p
Cls Clears the screen.
CopyCopies one file to a target location. By default, the target cannot be removablemedia and you cannot use wildcards. Copying a compressed file from theWindows Setup CD-ROM automatically decompresses the file.
Del (Delete)Deletes one file. Operates within the system directories of the current Windowsinstallation, removable media, the root directory of any hard disk partition, orthe local installation sources. By default, you can’t use wildcards.
Dir Displays a list of all files, including hidden and system files.
Disable
Disables a Windows system service or driver. The variable service_or_driver isthe name of the service or driver that you want to disable. When you use thiscommand to disable a service, it displays the service’s original startup typebefore changing the type to SERVICE_DISABLED. You should note the originalstartup type so that you can use the Enable command to restart the service.
Diskpart
Diskpart manages partitions on hard-disk volumes and supports the followingswitches and syntax.
/addCreates a new partition. The variable device is the device name for anew partition (such as \device\anewdisk). The variable size is the size,in megabytes, of a new partition.
/delete
Deletes an existing partition. The variable drive is the drive letter for apartition that you’re deleting (for example, D); partition is the partition-based name for a partition that you’re deleting, (for example: \device\olddisk\partition1) and can be used in place of the drive variable.

Understanding Windows 177
Table 16—Continued
Command Description
Enable
Enables a Windows system service or driver. The variable service_or_driver isthe name of the service or driver that you want to enable, and start_type is thestartup type for an enabled service. The startup type uses one of the followingformats: SERVICE_BOOT_STARTSERVICE_SYSTEM_STARTSERVICE_AUTO_STARTSERVICE_DEMAND_START
Exit Quits the Recovery Console and then restarts the computer.
Expand
Expands a compressed file. The variable source is the file that you want toexpand; you can’t use wildcard characters by default. The variable destination isthe directory for the new file; by default, the destination can’t be removablemedia and can’t be read-only. You can use the attrib command to remove theread-only attribute from the destination directory. Expand supports the followingswitches.
/f:filespec Required if the source contains more than one file; this option permits wildcards.
/y Disables the overwrite confirmation prompt.
/y Specifies that the files shouldn’t be expanded and displays a directory of the files in the source.
Fixboot Fixboot writes a new boot sector on the partition the current installation uses forthe system partition.
Fixmbr
Fixmbr repairs the boot partition’s master boot code. The variable device is anoptional name that specifies the device that needs a new MBR. Omit the namevariable when the target is the boot device.
/q Performs a quick format.
/fs Specifies the file system.
Help Help lists all the commands that the Recovery Console supports.
Listsvc Displays all available services and drivers on the PC.
LogonLogon is used to move to another installation or subdirectory. The command dis-plays all detected installations of Windows and requests the local administratorpassword in order to switch to another installation.
Map
Map displays currently active device mappings. Map supports the followingswitch in the Recovery Console environment.
/arc Used to specify the use of Advanced RISC Computing (ARC) paths(the format for Boot.ini) instead of Windows device paths.
MD (Mkdir)MD makes a new directory within the system directories of the current Windowsinstallation, removable media, the root directory of any hard disk partition, orthe local installation sources.
More/Type Displays the specified text file on screen.

Understanding Windows178
Several environmental rules are in effect while you’re working
in the Recovery Console. Type set to see the current environ-
ment. By default, these are the rules:
• AllowAllPaths = FALSE, which prevents access to directo-
ries and subdirectories outside the system installation
that you selected when you entered the Recovery Console
• AllowRemovableMedia = FALSE, which prevents access to
removable media as a target for copied files
• AllowWildCards = FALSE, which prevents wildcard sup-
port for commands such as Copy and Delete (Wildcards
use ? and * to represent a letter or word. The command
Copy *.* would copy all file types.)
• NoCopyPrompt = FALSE, which means that you’re
prompted by the Recovery Console for confirmation
when overwriting an existing file
Table 16—Continued
Command Description
Net Use
Net Use connects to a remote share for the Windows XP Recovery Console. Thesyntax for this command is:NET USE [devicename | *] [\\computername\sharename[\volume] [password |*]]
[/USER:[domainname\]username][/USER:[dotted domain name\]username][/USER:[username@dotted domain name][/SMARTCARD][/SAVECRED][[/DELETE] | [/PERSISTENT:{YES | NO}]]
NET USE {devicename | *} [password | *] /HOMENET USE [/PERSISTENT:{YES | NO}]
Rd (Rmdir)RD removes a directory within the system directories of the current Windowsinstallation, removable media, the root directory of any hard disk partition, orthe local installation sources.
Ren (Rename)
Ren renames a file or directory within the system directories of the currentWindows installation, removable media, the root directory of any hard disk partition, or the local installation sources.You can’t specify a new drive or path as the target.
Set Displays and sets the Recovery Console environment variables.
Systemroot Systemroot sets the current directory to %SystemRoot%.

Understanding Windows 179
Deleting the Recovery Console. Use the following proce-
dure to delete the Recovery Console from the PC:
1. Restart the computer.
2. Click Start, click My Computer, and then double-click
the hard disk on which you installed the Recovery
Console.
3. On the Tools menu, click Folder Options, and then click
the View tab.
4. Click Show hidden files and folders, click the Hide
protected operating system files check box to clear the
checkmark, and then click OK.
5. At the %SystemRoot% root folder (normally C:WINNT),
delete the Cmdcons folder and the Cmldr file.
6. Still at the %SystemRoot% root folder, right-click the
Boot.ini file, and then click Properties.
7. Click the Read-only check box to remove the check-
mark, and then click OK.
8. Open the Boot.ini file in Microsoft Windows Notepad,
and remove the entry for the Recovery Console. The
entry looks similar to this:
C:\cmdcons\bootsect.dat= “Microsoft Windows Recovery
Console” /cmdcons
9. Save the Boot.ini file, and Close it.
Vista and Windows 7 System Recovery Options
The Recovery Console was discontinued as a main advanced
boot option when Vista was released, but was included in a
set of tools that are a part of a new option called System
Recovery Options. These options may or may not be prein-
stalled. If they aren’t, you can access them by booting from
Caution!
Modifying the Boot.ini file incorrectly may prevent the computer from
restarting. Be sure to delete only the entry for the Recovery Console.
It’s also recommended that you change the Boot.ini file attribute
back to read-only after you complete this procedure.

Understanding Windows180
the CD. The tools available when you select System Recovery
Options, either from the Advanced boot menu or from the
installation media (Figure 78) are
• Startup Repair, which scans the computer for the prob-
lem and, if it’s a damaged or missing system file, repairs
the file or files
• System Restore, which allows you to return the computer
system state to an earlier point in time when the system
was bootable (It does require that a restore point exists.)
• Windows Complete PC Restore (called System Image
Recovery in Windows 7) , which allows you to restore
the entire computer from a backup (The backup can be
made with the Windows Complete PC Backup and
Restore Tool and must already exist on backup media
to use this option.)
• Windows Memory Diagnostics Tool, which scans the
memory to find errors
• Command prompt, which replaces the Windows XP
Recovery Console
FIGURE 78—Vista andWindows 7 RecoveryOptions

Understanding Windows 181
Windows XP Setup Disks
Vista and Windows 7 don’t support booting to floppy disks.
However, for Windows XP, there are six setup boot floppy
disks. These disks contain the files and drivers that are
required to access the CD or DVD drive and begin the setup
process. These disks aren’t part of the Windows XP package
and need to be downloaded from Microsoft. For information
about what setup boot disk versions are available for down-
load, visit the following sites:
Windows XP Home Edition http://www.microsoft.com/down-
loads/details.aspx?displaylang=en&FamilyID=E8FE6868-6E4F-
471C-B455-BD5AFEE126D8
Windows XP Home Edition SP1 http://www.microsoft.com/
downloads/details.aspx?displaylang=en&FamilyID=FBE5E4FC-
695F-43E5-AF05-719F45C382A4
Windows XP Professional http://www.microsoft.com/down-
loads/details.aspx?displaylang=en&FamilyID=55820EDB-5039-
4955-BCB7-4FED408EA73F
Windows XP Professional SP1 http://www.microsoft.com/
downloads/details.aspx?displaylang=en&FamilyID=83F53BE9-
28FA-40E8-8EC2-631504EF5E26
The download contains only one large program file. Running
the downloaded file extracts the files. The following is the
process required to create the setup disks from the down-
loaded file.
1. Run the download file from the location it was written to
by double-clicking the file’s icon. You receive the follow-
ing prompt:
This program creates the setup boot disks for Microsoft
Windows XP. To create these disks, you need to provide
six blank, formatted, high-density disks.

Understanding Windows182
2. Type the drive letter for the floppy disk drive, which is
typically drive A. After you type the floppy disk drive
letter, you see the following prompt:
Insert one of these disks into drive A:. This disk becomes
the Windows XP Setup Boot Disk.
3. Press any key when you’re ready.
4. The downloaded file starts extracting and copying the
files. Continue inserting the blank disks as you’re
prompted to do so until all six disks are created. If the
process is interrupted, you must run the downloaded
program file again from the beginning.
5. Label each disk with the number that’s specified during
the extraction. You must use the disks in the correct
order during the setup process.
To test your copy of the setup disks, insert the first disk in
the floppy disk drive, and then restart the computer. Note
that the computer must be configured to boot from the floppy
disk drive. In some cases, you may need to modify the com-
puter’s BIOS settings to do this.
The setup process starts. Insert the other floppy disks as
you’re prompted to do so. Note that you need to use the origi-
nal Windows XP CD to finish setup.
The RegistryIn the Windows for Workstations and Windows 3.x operating
systems, there were many files scattered all over the hard drive
used by Windows and applications to initialize (set parameters)
for the OS and applications. These files, commonly identified
by the .ini file type, were necessary for the OS to function.
However, there was no communication between the .ini files.
The possibility of conflicts for resources or resetting parame-
ters increased as new software and hardware was added to
the computer. To solve this problem, the Windows NT, XP,
Vista, and Windows 7 operating systems use a centralized
database, called the registry, which eliminates the need for
many of these.ini files.

Understanding Windows 183
The Logical Organization of the Registry
The registry is organized as a hierarchical database with an
inverted treelike design. Many types of data are stored in the
registry, including user settings, system configurations,
applications software settings, device drivers, and hardware
profiles. Logically, the registry follows the treelike structure
that has five branches, called keys or subtrees (Figure 79).
FIGURE 79—You can think of the Windows registry as an inverted treelike structure.

Understanding Windows184
Each key or subtree contains several subkeys. The subkeys
contain values, which in turn contain names and data. The
values are the lowest level of the registry. Table 17 lists the
keys (subtrees) and their functions within the Windows NT,
XP, Vista, and Windows 7 operating systems.
The Physical Organization of the Registry
The physical makeup of the registry on a Windows
PC is quite different from the logical setup. The
registry is a single database that’s contained in five
files in the \%SystemRoot%\system32\config folder
(Figure 80).
These files, called hives, don’t have a one-to-one
correlation with the five keys, or subtrees, of the
logical organization. The keys are stored as hives
or parts of the hives (Figure 81).
To further clarify the way the hives store the key’s
information, look at Table 18.
Table 17
KEYS AND FUNCTIONS OF THE WINDOWS NT OPERATING SYSTEM
Keys Functions
HKEY_LOCAL_MACHINE Contains all configuration data about the computer. This includesinformation about device drivers and devices included at startup.
HKEY_CURRENT_CONFIG Contains information about the current hardware configuration.This data is extracted from the Software and System hives.
HKEY_CLASSES_ROOT Contains information on software and software configuration. Thisdata is extracted from the Software hive.
HKEY_USERS Contains information about the currently logged-on user.
HKEY_CURRENT_USERS Contains information used to create the log-on screen and the IDof the current logged-on user.
FIGURE 80—The files that makeup the registry are stored in the\%SystemRoot%\system32\con-fig folder.

Understanding Windows 185
Registry Backup
Because it’s a vital part of the OS, the registry needs to be
copied before and after it’s edited. A copy should also be made
before you add hardware or software to the PC, and after
you’re sure the installation has been successful (from the
OS’s point of view). The registry is backed up while creating
a Restore Point.
FIGURE 81—TheRelationship of Keys(Subtrees) and Hives inthe Registry
Table 18
KEYS/ HIVES OF THE REGISTRY
Root key name Abbreviation
HKEY_LOCAL_MACHINE HKLM
HKEY_CURRENT_USER HKCU
HKEY_CLASSES_ROOT HKCR
HKEY_CURRENT_CONFIGURATION HKCC

Understanding Windows186
Registry Modifications
This section of the study unit is designed to instruct you on
editing the registry, for rare occasions when a manual change
is required. We don’t recommend manually altering this data-
base unless you have no other choice. If you do need to
modify the database, some specific steps are required. Before
you start, remember to back up the registry.
Windows has a registry editor named regedt32.exe. This file
is stored in the \%SystemRoot%\system32 folder. This editor
looks and acts similar to the Windows Explorer (Figure 82).
The next step is to run regedt32.exe. There are two ways to
start this program.
1. Use Explorer to open the \WINNT\System32 folder.
2. Double-click regedt32.exe.
or,
1. Click Start, and then Run.
2. In the Open box, type regedit.exe., Then, click OK. This
action opens the Registry Editor (Figure 79). Clicking a
plus (+) opens the key; conversely, clicking a minus (–)
closes a key. We aren’t going to change the registry at
this time (we’ll simply view it), so we’ll set the Registry
Editor to read-only mode.
3. Click the Options menu and select Read-only Mode.
FIGURE 82—regedt32.exe

Understanding Windows 187
4. To view a screen that looks like the example in
Figure 79,
• Reduce all the subtree windows to icons except
HKEY_LOCAL_MACHINE.
• Maximize the HKEY_LOCAL_MACHINE window.
Notice that HKEY_LOCAL_MACHINE has five sub-
keys. The Hardware subkey is newly created each
time the Windows environment starts, so it isn’t
contained in a hive.
• Notice the values on the right side of the Registry
Editor screen. Each value contains a name, data
type, and the value itself.
5. To edit the registry, double-click the value to open an
edit box. Make your changes in this box, and click OK.
6. Exit the registry by choosing Exit on the Registry menu.

Understanding Windows188
Self-Check 5
1. How many keys are contained in the registry?
__________________________________________________________
2. The registry is contained in how many hives?
__________________________________________________________
3. By default, the hive file(s) are stored in the _______ folder.
4. The HKEY_USERS key is contained in the _______ hive.
5. True or False? The regedt32.exe program is used to modify the registry.
6. What is the name of the file that contains boot information in Windows XP?
__________________________________________________________
7. Which operating systems use System Recovery Options?
__________________________________________________________
8. True or False? You can download startup disks from Microsoft for Vista.
9. What is the Windows Complete PC Restore recovery option called in Windows 7?
__________________________________________________________
Check your answers with those on page 268.

Understanding Windows 189
SOFTWARE IN THE WINDOWSENVIRONMENTSoftware is installed and uninstalled using the Control
Panel’s Add or Remove Programs tool. To get to this tool,
click Start and Control Panel, and then double-click Add
or Remove Programs.
Installing and Removing Software
Software Installation in Windows XP
Installation of software is usually quite straightforward and is
often supported by the software’s setup or install file. Insert
the floppy disk or CD into the appropriate drive, open the
drive, and click the Setup, Startup, or Install executable file.
Some software products are so self-installing that all you
need to do is insert the floppy disk or CD to start the instal-
lation automatically.
If the software doesn’t have such a utility included, you need
to use the Add or Remove Programs wizard. Doing the follow-
ing steps accesses this wizard.
1. Click Start and Control Panel.
2. Double-click Add or Remove Programs and then click
Add New Programs to open the dialog box that assists
you in the installation of the software (Figure 83).
3. Click CD or Floppy to start the installation process.
You’re prompted to insert the CD or floppy disk contain-
ing the program. If the program resides in a directory on
the PC, click Browse and navigate to the program’s file
or directory.
4. The InstallShield Wizard opens and guides you through
the installation process.
5. After installation, delete all the files and folders in the
C:\WINDOWS\TEMP folder. This practice conserves
hard drive space and eliminates a possible cause of
errors the first time you run the program.

Understanding Windows190
Software Removal in Windows XP
The remove (uninstall) process is even easier than the install
process. If the program has its own uninstall program, just
run it from the Start menu. This removes most traces of the
program from the PC. If the program doesn’t have its own
uninstall program, you need to use the Add or Remove
Programs wizard. To use the wizard,
1. Click Start, and then click Control Panel.
2. Double-click Add or Remove Programs to open the
dialog box that assists you in the removal of the program
(Figure 84).
3. Scroll down the list of installed programs, highlight the
program you wish to remove, and click Change/Remove.
FIGURE 83—Add or Remove Programs Wizard

Understanding Windows 191
4. A software uninstall wizard goes through a series of
screens that require a few decisions on your part and
then uninstalls the program. At times, the uninstall
process leaves a file folder or item on the Start menu (or
in the C:\Program Files directory) that you need to delete
manually. The same may be true of shortcuts you have
in the Startup folder or on the desktop.
Software Installation and Removal in Vista and Windows 7
In Vista and Windows 7, the Add or Remove Programs utility
has been replaced with Programs and Features in the Control
Panel, and it can be used only to remove software, not to install
it. The good news is that almost all software now comes with
its own install program, so all you do is insert the CD or DVD
and the program walks you through the installation. To locate
and use these tools and uninstall software,
1. Click Start and Control Panel, and select Programs.
2. On the Programs page, select Programs and Features.
The box in Figure 85 appears. Highlight the program
you wish to remove, and use either the context menu
that appears or the Uninstall menu item on the toolbar
to remove the software.
FIGURE 84—Uninstalling a Program

Understanding Windows192
Troubleshooting Software ProblemsEven with the most painstakingly developed programs for
Windows, problems can arise. The easiest solution to a
program that isn’t working is to uninstall and reinstall the
program. This process often eliminates the problem, so try it
first. Other program problems, however, may not have as
straightforward a solution.
Software Conflicts
If Windows has been running correctly and the existing
programs have been working well, but you start to experience
problems (specifically, general protection fault errors) with
any program, existing or new, after installing something
new, you can usually find the problem in the C:\I386 or
C:\WINDOWS\SYSTEM32 folder (Figure 86).
FIGURE 85—Uninstalling in Vista and Windows 7

Understanding Windows 193
These folders contain files that are used by the OS
and other programs. Most of the files are dynamic-
link library (DLL) files that have the .dll extension.
These library files perform common tasks for many
programs, so new code doesn’t have to be written
each time you use a drop-down menu from the tool-
bar. Windows comes with many of these DLL files
as part of the OS, but programs also add many of
these files when they’re installed. It’s possible that
the existing DLL file that was working fine with all
the programs and the OS was overwritten by a more
recent version of the DLL supplied on the program
floppy disk or CD. This overwrite is done automati-
cally, without any screen prompts to allow you to
choose if you want the file overwritten. The interest-
ing part of this problem is that the standard
solution won’t work. Reinstalling the program won’t
overwrite a DLL with the same or newer date.
The uninstall process won’t work either, because
DLL files that reside in the WINDOWS\SYSTEM32
or C:\I386 folder aren’t (and shouldn’t be) removed
during the uninstall process. Also, looking for this
troublesome DLL can be difficult because file dates
aren’t updated as they’re written, and the typical
WINDOWS\ SYSTEM32 or C:\I386 folder has over a
hundred DLL files.
However, if this problem has already occurred, you can
restore the system to the level you backed up before you
installed the program. To restore the system to a prior state,
1. Click Start, point to All Programs, Accessories, System
Tools, and click System Restore.
2. Click the Restore my computer to an earlier time
radio button (Figure 87). Although the box looks slightly
different in Vista and Windows 7, the function is exactly
the same.
3. Select a restore point, and click OK.
FIGURE 86—Some of the DLL Files inthe C:\WINDOWS\SYSTEM32 Folder

Understanding Windows194
Dr. Watson in Windows XP
If you don’t have a backup level before the problem installa-
tion, you need to use some of the tools that are part of the
OS. One method is to start Dr. Watson and then start the
program that’s not working correctly and reproduce the
error. Dr. Watson records a detailed report of the system
errors that occur and what program caused the error in a
log file. This log file is written to C:\WINDOWS\DRWATSON\
WATSONxx.WLG, where xx is the incremental number of the
log file by time and date. View the latest (highest number) log
file using the Diagnostic tab. To access Dr. Watson,
1. Click Start, point to All Programs, Accessories, System
Tools, and click System Information.
FIGURE 87—Windows XP System Restore

Understanding Windows 195
2. Click Tools, and then select Dr Watson from the roll-down
menu (Figure 88).
FIGURE 88—The Dr.Watson Utility
or,
1. Click Start and then Run.
2. In the Open box, type DRWATSON. Then, click OK.
Use the recorded information to simplify the search for the
modules or files that cause the error. You can try going to
http://www.support.microsoft.com/ to see if this error has
happened often enough have a solution listed at this site.
Problem Reports and Solutions in Vista
In Vista, the Dr. Watson utility has been replaced with a set of
tools called Problem Reports and Solutions. Application errors
are only one of the types of errors that this tool can report to
Microsoft so that a solution can be found.

Understanding Windows196
Windows Error Reporting collects information about the com-
puter configuration, what the software was doing when the
problem occurred, and other information directly related to
the problem. You can set the tool either to report the problem
automatically or to prompt you before doing so. You can also
exempt certain programs from this reporting.
After the problem is reported, if and when a solution is found
you’re notified with an icon in the notification area. If you
choose not to view the solution at that time, you can return
to the tool at any time and view all the reported solutions. To
access the tool to make changes to the settings and to view
solution,
1. Click Start and Control Panel, and then select System
and Maintenance.
2. Select Problem Reports and Solutions. The box shown
in Figure 89 appears.
FIGURE 89—The Problem Reports and Solutions Dialog Box

Understanding Windows 197
If the computer was installed recently, there may be no prob-
lems or solutions listed. If the problems have been reported
and solutions have been sent back from Microsoft, they
would be listed.
3. To change the operation of the tool, click Change Settings
on the left side of the page. The box in Figure 90 appears.
At this page, you can specify whether you want to be
alerted before a problem is reported.
FIGURE 90—Changing the Settings for Problem Reports and Solutions

Understanding Windows198
4. To exempt a program or to make per-user settings,
click the Advanced Settings link, which yields the box
in Figure 91. On this page, you can
• Disable reporting for all users
• Disable reporting for yourself only
• Control settings that can be changed by nonadmin-
istrative users
• Exempt programs from reporting
FIGURE 91—The Advanced Settings for Reporting a Problem

Understanding Windows 199
Problem Reports in Windows 7
Although the Problem Reports and Solutions tool per se
doesn’t exist in Windows 7, problem reporting does occur and
is managed in a new tool called the Action Center, which also
manages a number of other computer functions such as
backups, virus protection and Windows Updates. To locate
this tool and its controls (which are pretty much the same as
those in Vista),
1. Click Start, Control Panel, and System and Security.
2. Click Action Center, and the box in Figure 92 opens.
FIGURE 92—The Windows 7 Action Center

Understanding Windows200
3. To view reported solutions, select View archived
messages in the menu on the left. A list of messages
about problems appears. In Figure 93 the computer has
no reported solutions.
4. To make changes to the settings, select Change Action
Center Settings, and you’re directed to the Turn
messages off page. At the bottom of this page, select
Problem Reporting Settings. The same options to con-
trol the behavior of reporting are found here (Figure 94).
FIGURE 93—Reviewing Messages

Understanding Windows 201
Backup and Monitoring Methods
System Directory Backup
For all Windows versions, if you plan to do extensive additions
to the programs on the PC, and if you have enough free space
on the hard drive, back up the entire C:\WINDOWS\
SYSTEM32 and C:\I386 folders. These folders supply you
with a copy of all the DLL files that may have been changed
by the hardware installation. To fix a problem, you can com-
pare the files in the old folders with the ones in the current
one and swap one DLL file at a time to discover which one is
causing the problem.
FIGURE 94—Problem Reporting Settings
Understanding Windows202
The OS during Software Installation
One solution to a software-conflict problem is to install
a program that tracks the changes to the C:\WINDOWS\
SYSTEM32 and C:\I386 folders during installation. Norton
Utilities and McAfee System Mechanic are good examples of
this type of program.
Special Software Installations
DOS Programs in Windows
Most people who use the Windows operating systems use a
variety of application software products, some of which
they’ve used in a DOS environment before their upgrade to
Windows XP, Vista, or Windows 7. While most applications
install easily using Windows, some application installations
require extra steps to install them correctly.
DOS programs install and uninstall the same way as 32-bit
programs, but they’re managed differently by the OS. That is,
DOS programs have their settings listed in the [PIF95] section
of the Apps.inf file. If you want to change the settings for a
DOS program, you can
1. Right-click the filename in Explorer and select
Properties. If you don’t know where the file resides, use
the Windows search function.
• Click Start and then Search.
• Enter the filename in the appropriate box, and click
Search.
• You can right-click the filename here and select
Properties.
2. Click the Program tab, and then click the Advanced
button.
3. Select the MS-DOS mode check box (Figure 95).

Understanding Windows 203
4. Select either Use current MS-DOS
configuration (which runs the
DOSTART.BAT file when the program
is opened) or Specify a new MS-DOS
configuration. If Specify a new MS-
DOS configuration is chosen, you can
enter information that will be run for
this program’s DOS mode only. A typi-
cal entry would be to load SmartDrive
when the program is run, to speed up
disk access.
Changing the DOS settings as we’ve out-
lined creates an individual program
information file (PIF) for the DOS program
that will be run before the program. If there
isn’t a PIF or an entry in the [PIF95] section
of the Apps.inf file, a new entry will be
made using default values.
16-Bit Windows Programs in Windows XP
16-bit Windows programs install and uninstall the same way
as 32-bit programs. In the Windows XP environments, 16-bit
Windows-based programs run as separate threads in a
multithreaded process called Windows Virtual DOS Machine
(NTVDM). The NTVDM process simulates a 16-bit Windows
environment.
If you find that the 16-bit programs aren’t performing well
under the Windows XP environment, you can access and
configure some of the program’s properties.
1. In Windows Explorer, right-click the name of the pro-
gram and select Properties.
2. If the program’s display performance is slow, click the
Screen tab and then click Full-Screen.
3. If the program pauses periodically, click the Misc tab
and set the Idle Sensitivity slider to Low.
FIGURE 95—Advanced Program Settings forDOS Programs

Understanding Windows204
Many different 16-bit applications designed to run under
Windows 3.1 have been tested with Windows XP. When you’re
troubleshooting a 16-bit Windows-based application that’s
not working properly under Windows XP, the following items
should be taken into consideration:
• If possible, verify that the application works correctly
under Windows 3.0 and 3.1.
• If the application requires a VxD (virtual device driver), it
won’t work properly under Windows XP.
• Some applications (such as Microsoft Word version 2.0
for Windows) won’t function properly under Windows
unless a default printer has been selected. Check the
Print Manager to see that a default printer has been
selected.
• Ensure that any dynamic link libraries (DLLs) used by
the application are both current and locatable by the
application (either on the system path or defined within
the application).
• Ensure that the default items in the CONFIG.NT and
AUTOEXEC.NT files are present and in the proper order.
1. CONFIG.NT contains the following commands by
default:
• dos=high, umb
• device=%SystemRoot%\system32\himem.sys
• files=20
2. AUTOEXEC.NT contains the following commands by
default:
• @echo off
• lh %SystemRoot%\system32\mscdexnt.exe
• lh %SystemRoot%\system32\redir
• lh %SystemRoot%\system32\dosx
• SET BLASTER=A220 I5 D1 P330 T3

Understanding Windows 205
• Any environment variables required by the Windows-
based application should be in the AUTOEXEC.BAT
file.
• If any changes are made to variables related to the
Windows 3.0 or 3.1 subsystem (wowexec.exe), you
may have to restart the computer for these changes
to be put into operation.
• Determine whether Windows has been installed as a
stand-alone operating system or as an upgrade from
Windows 3.0 or 3.1. If it’s an upgrade, information
from the WIN.INI and SYSTEM.INI files may haven’t
been correctly copied into the Windows registry’s
database. To correct this problem, you may have to
reinstall the application that’s not working.
• Try running the application in a separate memory
space by editing the icon or shortcut’s properties
and checking the appropriate check box.
16-Bit Windows Programs in Vista and Windows 7
Vista and Windows 7 don’t support running16-bit applications.
They support only 32- and 64-bit applications.
64-Bit Applications
As we wave goodbye to 16-bit applications, we say hello to
64-bit applications. Most likely, support for 32-bit applications
will cease, and all applications will be 64-bit. A key concept
to understand is that there are 32- and 64-bit operating
systems, and there are 32- and 64-bit applications. Their
relationship is as follows:
• A 32-bit application can be run on a 32- or 64-bit
operating system.
• A 64-bit application can be run only on a 64-bit
operating system.

Understanding Windows206
• A 32-bit operating system can run on a computer that
has either a 32- or 64-bit CPU.
• A 64-bit operating system can be run only on a computer
with a 64-bit CPU.
Windows XP, Vista, and Windows 7 all come in 32-bit and
64-bit versions. Note that if you run a 32-bit operating sys-
tem on a computer with a 64-bit CPU, you’re losing the
advantage of having a 64-bit CPU.

Understanding Windows 207
Self-Check 6
Match the items on the left with their descriptions on the right. Indicate your answers in
the place provided.
______ 1. Dr. Watson
______ 2. DLLs
______ 3. Registry
______ 4. 16-bit Windows Program
______ 5. MS-DOS program
______ 6. 64-bit CPU
______ 7. 32-bit CPU
______ 8. 32-bit application
______ 9. Action Center
______ 10. Problem Reporting and Solutions
Check your answers with those on page 268.
a. Perform common tasks for many programs
b. A centralized database of initialization files
c. Settings listed in [PIF95] section oftheApps.inf file
d. A utility that records system errors in Windows XP
e. Runs in its own NTVDM
f. Can be run on either a 32 or 64-bit OS
g. Required for a 64-bit OS
h. Can host only a 32-bit application
i. The replacement for Dr. Watson in Vista
j. Where solutions are reported in Windows 7

Understanding Windows208
HARDWARE IN THE WINDOWSENVIRONMENTHardware installation, like software installation, is quite
easy using Windows tools, as long as all the hardware
devices on the PC were designed to be plug and play (PnP)
compliant. If even one of the devices on the PC isn’t designed
around the Windows PnP specification, you can experience
some problems with hardware installations. These problems
can be bothersome, but they’re easy to circumvent if you
know what hardware devices you need to configure sepa-
rately. By the time Vista and Windows 7 were released,
almost all devices on the market supported plug and play,
and therefore a manual installation is no longer required.
In these operating systems, all that’s need for a successful
installation is the correct device driver.
In Windows XP, hardware is installed using the Control
Panel’s Add Hardware tool. To get to this tool, click Start,
point to Settings, click Control Panel, and then double-
click the Add Hardware tool.
Plug and PlayIn Windows XP, Vista, and Windows 7, plug and play (PnP)
is used to automatically detect new hardware and determine
essential information about the device.
PnP Operation
Information is gathered about what device drivers are required
as well as what resources (memory and IRQ) the hardware
needs to link to. This information is then used by the OS to
configure the hardware device. To use this function, the
hardware needs to have some built-in features that allow
the OS to determine this information.

Understanding Windows 209
The PnP BIOSThe PnP BIOS stores all the PnP information that has been
gathered, and each time the PC is booted, it presents this
information to the OS for further processing. There’s also
extended system configuration data (ESCD) BIOS, which does
all the things a PnP BIOS does, plus creates a list of all the
manual configuration changes that you’ve made during the
installation of non-PnP-compliant devices. This information
is also stored on the BIOS, so even if the hard drive fails, all
the hardware configuration data is stored on the BIOS.
PnP Hardware Installation
The process used to install PnP-compliant hardware devices
is straightforward and simple. After the device is physically
installed, turn on the PC, which then launches the Add New
Hardware Wizard (Figure 96).
FIGURE 96—The Add New Hardware Wizard

Understanding Windows210
The wizard configures the new hardware and prompts you for
the required software (device driver) to complete the process.
If the device is PnP compliant, but not recognized by the OS
during the boot process, you need to
1. Click Start, and then click Control Panel.
2. Double-click Add Hardware to open the Add New
Hardware Wizard (Figure 96).
3. On the opening screen, select Yes (Recommended).
4. If the hardware is recognized as PnP compliant, the wiz-
ard configures the new hardware and prompts you for
the required software (device driver) to complete the
process.
5. If the device is recognized but not PnP compliant, the
Add New Hardware Wizard opens a screen on which you
can manually configure the device. Suggestions are
offered for resources required by the device (Figure 97).
Use the settings offered unless the hardware manufac-
turer has its own recommended settings.
FIGURE 97—Suggested Resource Settings

Understanding Windows 211
A final obstacle that can happen when you start the system
with a new hardware device connected is that the Add New
Hardware Wizard may not detect the hardware device at all
(Figure 98).
When you click the Next on this screen, you’re offered a list
of devices (Figure 99). Select the best match for your new
device.
FIGURE 98—The Add NewHardware Wizard doesn’tdetect the hardwaredevice.
FIGURE 99—Device Types

Understanding Windows212
A list of supported manufacturers and models is displayed.
If the device is manufactured by one of the companies on the
list, select it. Then, select the model from the list on the left.
If you have a floppy disk or CD from the manufacturer, click
Have Disk (Figure 100).
General Hardware Installation and Removal
Hardware Installation in Vista and Windows 7
Almost all devices supported with Vista and Windows 7 are
plug and play. One problem you may encounter when
installing a device in Vista, however, is that the device driver
may not be present in the driver cache, provided with each
installation DVD. Once you’ve plugged the device in, Vista
completely sets up the device if the driver is present. If it’s
not,
1. Click Start, right-click Computer, and select Manage.
2. When Computer Management opens, select Device
Manager from the left-side menu.
FIGURE 100—A List ofManufacturers and Models
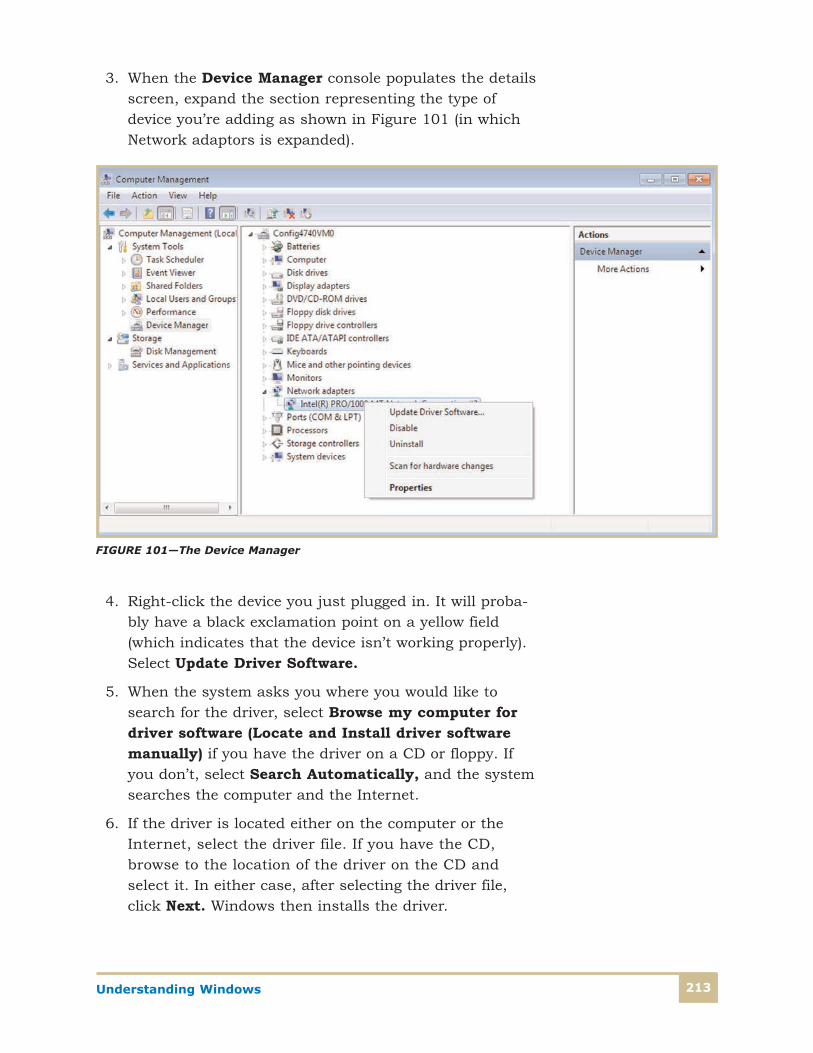
Understanding Windows 213
3. When the Device Manager console populates the details
screen, expand the section representing the type of
device you’re adding as shown in Figure 101 (in which
Network adaptors is expanded).
4. Right-click the device you just plugged in. It will proba-
bly have a black exclamation point on a yellow field
(which indicates that the device isn’t working properly).
Select Update Driver Software.
5. When the system asks you where you would like to
search for the driver, select Browse my computer for
driver software (Locate and Install driver software
manually) if you have the driver on a CD or floppy. If
you don’t, select Search Automatically, and the system
searches the computer and the Internet.
6. If the driver is located either on the computer or the
Internet, select the driver file. If you have the CD,
browse to the location of the driver on the CD and
select it. In either case, after selecting the driver file,
click Next. Windows then installs the driver.
FIGURE 101—The Device Manager

Understanding Windows214
Hardware Removal in Windows XP
Unlike programs, it’s possible to remove hardware devices
without following any special process. The device driver
remains on the PC in case you reinstall the device in the
future. However, sometimes this causes errors or messages
as the OS looks for the missing device. Thus, a better approach
is to use the Add/Remove Hardware function in the Control
Panel. This practice allows you to temporarily unplug or eject
a device (while keeping the driver). You may also permanently
remove the device. A permanent uninstall removes the device
and its driver.
Hardware Removal in Vista and Windows 7
In Vista and Windows 7, simply unplug the device. If you
also want to remove the driver for the device, go into Device
Manager and, on the View menu, select Show Hidden
Devices (in Device Manager hidden devices are those that
aren’t physically present but their drivers are being retained
in case the hidden device is plugged back in). Then, right-
click the device and select Uninstall. Upon the next reboot,
the driver for the device will be removed and the device will
no longer show up in Device Manager, even if you select
Show Hidden Devices, which means that you have to install
the driver again if you decide to plug the device in again.
Hardware Problem Troubleshooting
Newly installed hardware devices rarely cause a PC to not
boot properly. The only exception to this may be a hard drive
on which you set the jumpers to master during installation.
In this case, the PC tries to boot from a blank hard drive and
won’t succeed. To resolve this problem, reset the jumpers on
the system’s hard drives so that the drive with Windows
installed is the master and the new blank drive’s jumper is
set to the slave position.
The OS usually identifies any other problems with hardware
during the BIOS bootstrap phase, in which the PnP or ESCD
BIOS information is processed by the OS. When a conflict
occurs with a hardware device, the OS informs you of a
resource conflict or, in a worst-case scenario, the device
doesn’t work as expected.

Understanding Windows 215
The Device Manager can be a powerful troubleshooting tool
in locating and resolving resource conflicts. To open the
Device Manager,
1. Click Start, and point to Control Panel.
2. Double-click System, and then click the Device
Manager tab. A list of devices is displayed. Six different
symbols may be in front of a listing for a hardware
device.
• A plus sign (+) indicates the device has a list of types,
models, and/or manufacturers for it. Click the plus
sign to open the list.
• A minus sign (–) indicates the list of devices is
already expanded. Click the minus sign to collapse
the list.
• An open diamond ( ) indicates the device is a SCSI
device.
• A red X through the device’s name indicates a dis-
abled device. This may be a device that has been
removed from the PC.
• A yellow circle with an exclamation point (!) indicates
a problem with the device (Figure 102).
• A blue I on a white background indicates the device
has been manually configured. This doesn’t indicate
a problem.
To expand the explanation of a problem, click the device to
select it and then click Properties. This action opens the
Device Properties dialog box, which may have some useful
information about solving the problem. Information on the
property dialog box includes the device’s I/O addresses,
DMA channels, and IRQs. Also included is a list of other
devices that are trying to use these resources. Resolution of
the problem requires you to assign unique resources to the
device that’s having a problem.
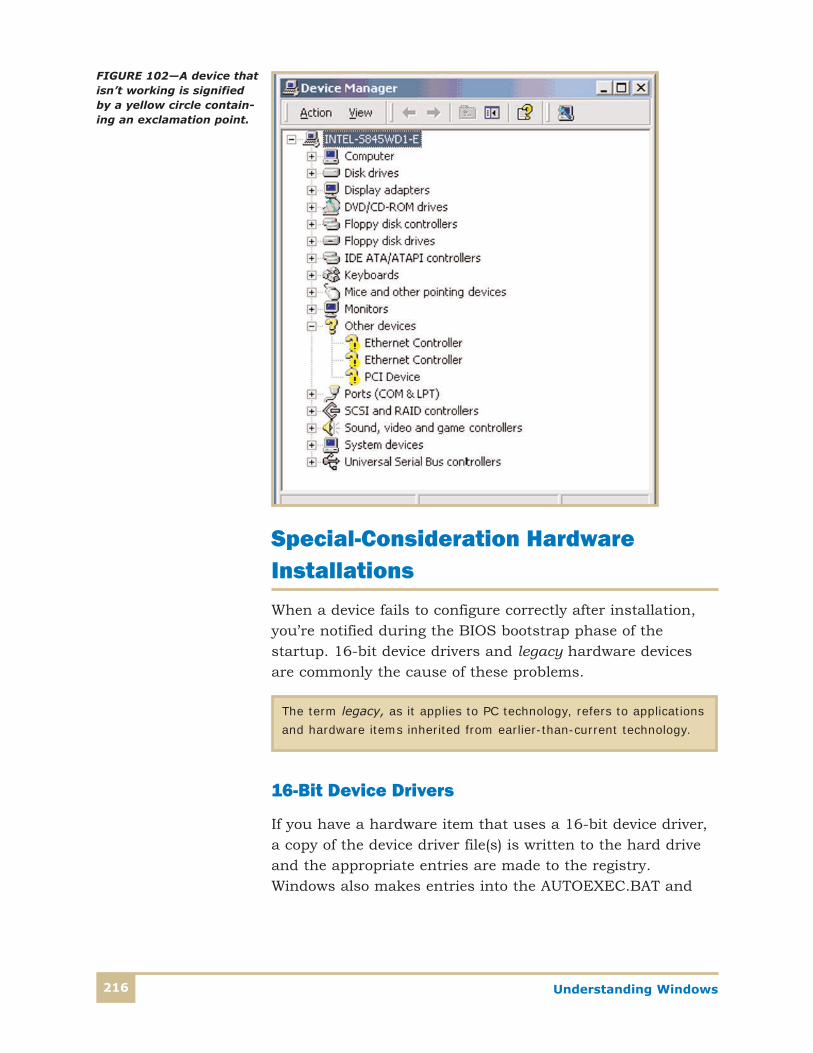
Understanding Windows216
FIGURE 102—A device thatisn’t working is signifiedby a yellow circle contain-ing an exclamation point.
Special-Consideration HardwareInstallationsWhen a device fails to configure correctly after installation,
you’re notified during the BIOS bootstrap phase of the
startup. 16-bit device drivers and legacy hardware devices
are commonly the cause of these problems.
16-Bit Device Drivers
If you have a hardware item that uses a 16-bit device driver,
a copy of the device driver file(s) is written to the hard drive
and the appropriate entries are made to the registry.
Windows also makes entries into the AUTOEXEC.BAT and
The term legacy, as it applies to PC technology, refers to applications
and hardware items inherited from earlier-than-current technology.

Understanding Windows 217
CONFIG.SYS files to have the device driver boot as part of the
OS. If Windows has difficulty finding or installing these 16-bit
drivers, you can
• Contact the hardware device’s manufacturer and see if
there’s an updated or 32-bit driver for the device.
• Use a substitute driver recommended by the manufacturer.
• Install the device driver at the DOS prompt. This method
is often supported by an install or setup program supplied
with the device by the manufacturer.
Any of the choices listed above usually installs the device
drivers and writes the appropriate lines in the AUTOEXEC.BAT
and CONFIG.SYS files. If this isn’t the case, you can manually
add the lines to these files or purchase a new device, which
is what you probably should do. The time spent modifying
the AUTOEXEC.BAT and CONFIG.SYS files, as well as making
the registry entries, can make this effort a costly one.
Legacy Devices
If you’re installing a hardware device that worked well under
Windows 3.x and not under Windows XP, Vista, or Windows 7
(assuming that the device is supported in these operating
systems, which is unlikely) you have a resource conflict.
Check the device against the hardware compatibility list for
the OS you’re using. You need to set the jumpers on the
device to force it to use a different set of resources. Refer to
the documentation that came with the device for jumper and
dipswitch settings. (The use of dipswitches to assign resource
requests was eliminated by PnP technology.)
A dipswitch is a series of tiny switches built into a circuit board.
Dipswitches enable you to configure a circuit board for a particular
type of PC or application. Dipswitches are always toggle switches,
with two possible positions—on or off. The DIP part of the name indi-
cates the shape of the switches. Dipswitches have the same
rectangular shape as dual in-line package (DIP) chips.

Understanding Windows218
Self-Check 7
1. The feature used by Windows to detect new hardware is _______.
2. True or False? The PnP BIOS information is stored on the hard drive.
3. A small file that allows a hardware item to work on a PC is called the _______.
4. During the BIOS bootstrap phase of the startup, you’re notified about _______.
5. True or False? A yellow circle with an exclamation point (!) indicates a manually configureddevice that doesn’t have a problem.
6. The _______ tool, used to install devices in Windows XP, isn’t present in Vista or Windows 7.
7. What are devices that are installed, yet not physically present, called?
__________________________________________________________
8. True or False? A red X next to a device in Device Manager means that the device is disabled.
9. _______ are usually a problem experienced when using legacy devices.
10. What types of devices receive entries into the AUTOEXEC.BAT and CONFIG.SYS files?
__________________________________________________________
Check your answers with those on page 268.

Understanding Windows 219
TROUBLESHOOTING AND SUPPORTSupporting a PC with a Windows XP, Vista, or Windows 7
operating system requires knowledge of the troubleshooting
and support tools the operating system offers.
Windows XP Support ToolsProvided here is an overview of some of the tools available to
troubleshoot Windows XP. Some are included in the Windows
XP support tools. These support tools can be installed from
the Windows XP disc. These tools are aimed at advanced users
and system administrators. Some of the utilities available can
cause damage to the PC if used incorrectly. Ensure that you
have a particular goal in mind. These tools aren’t the type you
should try out just to see what happens.
Windows XP Support ToolsFirst, uninstall any previous version of the Support Tools. To
install the new tools,
1. Insert the Windows XP disc. If the Windows XP installation
screen appears, click Exit.
2. Double-click My Computer, right-click the CD or DVD
drive, and choose Explore (Figure 103).
3. Locate the Support\Tools folder, and double-click
setup.exe.
4. The Windows Support Wizard launches. Click Next.
5. The End User License Agreement appears. Click I agree.
6. Enter your name and organization, if applicable.
7. Choose either a typical or a complete installation, and
click Next.
8. Confirm the location, and click Install.
9. When the installation has finished, the support tools
have been installed in the Program Files\Support Tools
directory, with shortcuts on the All Programs menu to
the command prompt, the Support Tools Help file, and
the Release Notes (Figure 104).

Understanding Windows220
FIGURE 103—Accessingthe Windows XP SupportTools through MyComputer
FIGURE 104—The Support Tools Help File

Understanding Windows 221
Memory Profiling Tool
The Memory Profiling tool (memsnap.exe) takes a snapshot
of the memory resources being consumed by all running
processes and writes this information to a log file.
Poolmon Tool
The Poolmon tool (poolmon.exe) monitors memory tags,
including total paged and non-paged pool bytes. Poolmon is
often used to help detect memory leaks. Before running
Poolmon, you must enable pool tagging on the computer.
The easiest way to do this is to use gflags.exe to edit the
registry entry for you.
Registry Console Tool
The Registry Console tool (reg.exe) enables you to add,
change, delete, search, save, restore, and perform other
operations on registry entries from the command prompt
or a batch file. It can be used on both local and remote
computers.
Table 19 lists the root key abbreviations used for the Registry
Console tool. Reg.exe recognizes the data types listed in
Table 20.
Technical Note
Unlike most command-line tools, help for Poolmon is available after
running poolmon.exe by typing h or ?.
Caution
Don’t use a registry editor to edit the registry directly unless you
have no alternative. The registry editors bypass the standard safe-
guards provided by administrative tools. Editing the registry directly
can have serious, unexpected consequences that can prevent the
system from starting and require that you reinstall Windows XP.

Understanding Windows222
Table 19
ROOT KEY ABBREVIATIONS
Root key name Abbreviation
HKEY_LOCAL_MACHINE HKLM
HKEY_CURRENT_USER HKCU
HKEY_CLASSES_ROOT HKCR
HKEY_CURRENT_CONFIGURATION HKCC
Table 20
REG.EXE RECOGNIZED DATA TYPES
Value Meaning
REG_BINARY Binary data in any form.
REG_DWORD A 32-bit number.
REG_DWORD_LITTLE_ENDIAN
A 32-bit number in little-endian format. This is equivalent to REG_DWORD. (Endian refers to the way byte values are represented. Little-endian format shows the least significantvalues on the left; big-endian format shows the most signifi-cant values on the left.)
REG_DWORD_BIG_ENDIAN A 32-bit number in big-endian format.
REG_EXPAND_SZ A null-terminated string that contains unexpanded referencesto environment variables (for example, "%PATH%").
REG_MULTI_SZ An array of null-terminated strings, terminated by two nullcharacters.
REG_NONE No defined value type.
REG_SZ A null-terminated string. It will be a Unicode or ANSI string.
Technical Note
Only HKLM and HKCU are available on remote computers.

Understanding Windows 223
Task Killing UtilityThe Task Killing Utility enables you to stop tasks and
processes. Processes can be stopped using the process ID
number (PID), or by any part of the process name. To find the
PID, use TList, another Windows XP Tool. The kill command
can tell a process to stop itself or force the process to end.
Task List ViewerThe Task List Viewer displays a list of tasks, or processes,
currently running on the local computer. For each process,
it shows the process ID number, process name, and, if the
process has a window, the title of that window. Once you’ve
used TList to find the processes running on the computer,
you can end one or more of those processes by using the
Task Killing Utility.
Windows XP Error and Event Messages HelpThe Error and Event Messages Help file lists most of the error
and system-information messages generated by Windows XP,
and it provides explanations of each message and suggestions
on how to correct the problem. Some messages generated by
applications or device drivers have been included as well.
Windows XP Error and Event Messages Help isn’t intended
as an exclusive reference. If, for example, you encounter a
network error message, you can find information about it by
typing net helpmsg and the message identification number at
the command prompt.
Windows Installer ZapperThe Installer Zapper command-line tool removes files and
registry entries that sometimes are left behind after removing
software. It’s recommended to be used only as a last resort
because it can remove items required by the Windows Installer
service and cause the service to not work properly.
Dependency WalkerThe Dependency Walker tool builds a hierarchical tree diagram
of all dependent modules including .exe, .dll, .ocx, and .sys.
It scans both 32- and 64-bit Windows modules.

Understanding Windows224
Connectivity Tester
The Network Connectivity Tester (netdiag.exe) tests the
functionality of the network client by performing a series of
tests. Table 21 lists the tests executable with the Network
Connectivity Tester. This command (netdiag) works only if
the Support Tools are installed. If items listed aren’t used to
refine the operation of the tool, all tests are run.
Table 21
TESTS USED WITH THE .NETDIAG TOOL
Test Description
Autonet Automatic Private IP Addressing (APIPA) address test
Bindings Bindings test
Browser Redir and Browser test
DcList Domain controller list test
DefGw Default gateway test
DNS DNS test
DsGetDc Domain controller discovery test
IpConfig IP address configuration test
IpLoopBk IP address loopback ping test
IPX Internet Package Exchange (IPX) test
Kerberos Kerberos test
Ldap LDAP test
Member Domain membership test. Can’t be skipped.
Modem Modem diagnostics test
NbtNm NetBT name test
Ndis Netcard queries test. Can’t be skipped.
NetBTTransports NetBT transports test. Can’t be skipped.
Netstat Netstat information test
Netware Netware test
Route Routing table test
Trust Trust relationship test
WAN WAN configuration test
WINS WINS service test
Winsock Winsock test

Understanding Windows 225
Point-to-Point Tunneling Protocol Ping Utilities
There’s a pair of tools that work in unison to verify that the
required protocol and port for Point-to-Point Tunneling Protocol
(PPTP) is being routed from a PPTP client to a PPTP server.
System Information
System Information retrieves and reports the system configu-
ration information for the hardware, system components, and
software environment. The display is at the command line. To
locate this tool,
1. Click Start, All Programs, and Accessories, and then
select System Tools.
2. Select System Information. The box opens after a brief
pause to gather information.
DiskProbe
The DiskProbe tool allows a local Administrator to directly
edit, save, and copy, on the physical hard drive, data that
isn’t accessible in any other way. You can use DiskProbe to
replace the Master Boot Record, repair damaged partition
table information, and repair or replace damaged partition
boot sectors or other file system data. DiskProbe doesn’t
support FAT32 or dynamic disks.
Distributed File System Utility
The Distributed File System Utility helps administrators to
diagnose the Distributed File System (DFS) from the command
prompt. It can be used to perform maintenance of a DFS
root and to clean up metadata left behind by orphaning or
abandoning domain-based DFS roots.
File and Directory Comparison
File and Directory Comparison (windiff.exe) compares and
shows the differences between two ASCII text files or folders
of ASCII text files. This is particularly useful for program
source code.
Understanding Windows226
FileVer Command Line Utility
The version data on applications and other executable files is
displayed by the FileVer Command Line Utility (filever.exe).
Remote Storage Diagnostic Utility
The Remote Storage Diagnostic Utility examines and diagnoses
Remote Storage (HSM) databases. It can be used to retrieve
diagnostic information about removable media.
Remote Storage File Information Utility
The Remote Storage File Information Utility examines remote
storage reparse points, displaying remote storage information
for files in the current directory and its subdirectories
Security Administration Tools
The Security Administration Tools (sidewalk.exe) are a set of
programs to help system administrators manage access-
control policies on Windows 2000 and Windows NT systems.
Process Resource Monitor
The Process Resource Monitor (pmon.exe) tracks per-process
usage of CPU and memory.
Process Viewer
The Process Viewer (pviewer.exe) is a tool that displays infor-
mation about a running process and allows you to stop (kill)
processes and change process priority.
A reparse point is a file system object in NTFS version 5.0 that has a
definable attribute containing user-controlled data. It’s used to
extend functionality in the input/output (I/O) subsystem by altering
the way NTFS resolves path names.

Understanding Windows 227
Open Handles
Open Handles (oh.exe), true to its name, simply shows the
handles of all open windows (such as files and directories).
The tool can also show information relating to a specific
process, object type, or object name. This feature is useful
for finding the process that has a file open when a sharing
violation occurs.
Process and Thread Status Tool
The Process and Thread Status Tool (pstat.exe) lists all
running processes and threads and displays their status.
(Threads allow a program to split into multiple, simultane-
ously running tasks.)
Setx.exe Tool
The command-line Setx tool (setx.exe) offers administrators
a batch method for setting environment variables in the user
or system environment and requires no programming or
scripting. In addition to taking an environment variable and
its associated value from the command line, it can also get
the values of registry keys and write them to text files.
Service Pack Check
Service Pack Check (spcheck.exe) is used to determine which
service pack is installed on a Windows XP system. SPCheck
looks at which executable files, dynamic-link libraries, and
drivers are installed on the target system. This check helps to
identify when service packs or hot fixes should be reinstalled,
and it can ensure that all installed services are at the
appropriate service-pack level.
Xcacls.exe Tool
The Xcacls tool (xcacls.exe) sets all file-system security options
that are accessible in Windows Explorer. XcAcls does this by
displaying and modifying the access control lists (ACLs) of
files.

Understanding Windows228
Compatibility Administration Tool
To browse and edit the Windows XP compatibility data-
base, you can use the Compatibility Administration Tool
(compatadmin.exe).
Page Heap
The Page Heap command-line tool (pageheap.exe) sets page
heap flags that help to find heap-related bugs and corrup-
tion. It can also help detect leaks in applications that are
running on the Windows XP Professional system. Leaks occur
when applications or processes fail to release allocated RAM.
Quick Fix Application
The Quick Fix Application (qfixapp.exe) provides an interface
for determining which combination of fixes resolves an appli-
cation compatibility problem for an executable (.exe) file.
Directory Disk Usage
Directory Disk Usage (diruse.exe) displays directory size
information, including compression information on NTFS-
formatted drives.
Disk Manager Diagnostics
The Disk Manager Diagnostics tool (dmdiag.exe) displays
system state and configuration information describing disk
storage. The tool displays the following information for the
computer on which it’s running:
• Computer name and operating system version
• Physical disk-to-disk type
• Mount points
• LDM file versions
In C and Pascal, a heap is an area of pre-reserved memory. A leak
is a gradual loss of usable memory when a program fails to return
memory obtained for temporary use.

Understanding Windows 229
• Drive letter usage, GetLogicalDrives(), GetDriveType()
• Device
• Symbolic links
• ldmsize
• Kernel list
• Disk partition information
Encrypting File System Information
The Encrypting File System Information tool (efsinfo.exe)
displays information about files and folders encrypted with
Encrypting File System (EFS) on NTFS partitions.
Fault Tolerant Disk
The Fault Tolerant Disk (ftonline.exe) allows an administrator
to mount and recover files from a fault tolerant disk created
in a previous version of Windows. This tool is useful if you
failed to upgrade the disks to dynamic disks, or failed to back
up your data before installing Windows XP Professional.
DHCP Server Locator Utility
The DHCP Server Locator Utility command-line tool (dhcploc.exe)
displays the DHCP servers active on the subnet. If it detects
any unauthorized DHCP servers, it beeps and sends out alert
messages. It also displays packets that it detects from DHCP
servers. You can use this tool to determine which DHCP servers
are available to a DHCP client and to detect unauthorized
DHCP servers on a subnet.
Get Security ID
The Get Security ID (getsid.exe) compares the user security IDs
(SIDs) of two accounts. You can use it to compare account
SIDs between a primary domain controller and a backup
domain controller when you suspect user database corruption.

Understanding Windows230
Network Monitor Capture Utility
The Network Monitor Capture Utility tool (netcap.exe) allows a
system administrator to monitor packets on a LAN and write
the information to a log file.
Extensible Performance Counter List
The Extensible Performance Counter List tool (exctrlst.exe)
lists all services and applications that provide registry-based
performance counters on local and remote Windows XP
Professional systems. It displays the names and locations of
the dynamic link libraries (DLLs) that support performance
counters, indicates disabled counters, and lets you enable
and disable the performance counters for a service.
Performance Data Block Dump Utility
The Performance Data Block Dump Utility (showperf.exe) dumps
the content of the Performance Data Block so you can view
and debug the raw data structure. Showperf generates a
display by loading and running each performance DLL,
extracting data from the performance registry, and displaying
the contents of the data buffer for each performance counter.
Page Fault Monitor
The Page Fault Monitor tool (pfmon.exe) traces the source
and number of page faults in a process and displays the
data in the command window, writes it to a log file, or both.
A sustained high rate of hard page faults might indicate a
shortage of memory and can cause a disk bottleneck. You
can resolve soft page faults with Virtual Memory Manager.
Security IDs (SIDs) are a data structure of variable length that
identifies user, group, and computer accounts.
Understanding Windows 231
Windows XP Tools Used to ManageServer ServicesThe following Tools, when installed on a Windows XP com-
puter, can be used to manage services residing on a server
remotely from the Windows XP computer.
DNS Server Troubleshooting
DNS Server Troubleshooting allows the administrator to view
the properties of DNS servers, zones, and resource records
from a Windows XP computer. In addition, the DNS Server
Troubleshooting tool can be used to manually modify these
properties, create and delete zones and resource records, and
force replication events between DNS server physical memory
and DNS databases and datafiles. For command-line Help,
type Dnscmd /?. For Help on a specific command, type
Dnscmd command /?.
ClonePrincipal
ClonePrincipal creates clones of Windows NT 4.0 users and
groups. It allows you to migrate the clones to Windows Active
Directory. More information on directory services, including
Active Directory, is here: http://technet.microsoft.com/
en-us/library/cc770946(WS.10).aspx.
ACL Diagnostics
ACL Diagnostics (acldiag.exe) helps diagnose and troubleshoot
problems with permissions on Active Directory objects. It
reads security attributes from ACLs and writes information
in either readable or tab-delimited format. ACL Diagnostics
also provides some cleanup functions.
Active Directory Diagnostic
The Active Directory Diagnostic tool (ntdsutil.exe) compares
and detects differences between naming contexts on domain
controllers. Options can be used to minimize or focus the
search or comparisons.

Understanding Windows232
Domain Controller Diagnostic
The Domain Controller Diagnostic tool (dcdiag.exe) analyzes
and troubleshoots domain controller conflicts over a network.
It consists of a group of tests that verify different functional
areas of the system.
Active Directory Object Manager
The Active Directory Object Manager tool (movetree.exe)
allows administrators to move Active Directory objects, such
as organizational units and users, between domains in a
single forest. When performing operations with this tool,
movetree returns ErrorLevel 0 for success and ErrorLevels 1
to 5 for various types of failure. Table 22 lists the error level
values that can be used as a decisive factor for branching
when the tool is used in a batch file.
Active Directory Replication Monitor
The Active Directory Replication Monitor (replmon.exe) dis-
plays, in a graphical format, replication topology, status, and
performance of Active Directory domain controllers.
Table 22
MOVETREE ERROR LEVELS
Error Level Description
0 Success
1 Error - command line syntax
2 Error - directory conflict (duplicate names, insuffi-cient privilege, name conflict, immovable object)
3 Error - network error (DC unavailable)
4 Error - system resource (Low VM, disk space)
5 Error - internal processing error
Understanding Windows 233
Active Directory Administration and Search Tool
The Active Directory Administration and Search tool (ldp.exe)
allows users to perform LDAP operations, such as connect,
bind, search, modify, add, and delete, against any LDAP-com-
patible directory.
ADSI Edit Snap-In
ADSI Edit is a Microsoft Management Console (MMC) snap-in
that acts as a low-level editor for Active Directory. Using Active
Directory Service Interfaces (ADSI) provides a means to add,
delete, and move objects within the directory services. The
attributes of each object can be viewed, changed, and deleted.
DsAcls
The DsAcls tool facilitates management of access control
lists for directory services. DsAcls enables you to query and
manipulate security attributes on Active Directory objects.
Kerberos Keytab Setup
Kerberos Keytab Setup (ktpass) is used to generate Kerberos
keytab files and set password and account name mappings
for UNIX services that use the Windows 2000 Kerberos Key
Distribution Center (KDC).
Kerberos Setup
Kerberos Setup (ksetup) configures Windows XP clients to use
an MIT Kerberos server.
NlTest
The command-line NlTest tool helps perform these network
administrative tasks:
• Getting a list of primary domain controllers (PDCs)
• Forcing a shutdown
• Querying and checking on the status of a trust

Understanding Windows234
• Testing trust relationships and the state of domain
controller (DC) replication in a Windows domain
• Forcing a user-account database into sync on Windows
NT 4.0 or earlier domain controllers (Windows 2000,
2003, and 2008 domain controllers use a completely
different mechanism for maintaining user accounts.)
Security Descriptor Check Utility
The Security Descriptor Check utility (sdcheck.exe) is another
command-line tool that displays the security descriptor for
any object stored in Active Directory. The security descriptor
contains the ACLs, defining the permissions that users have
on objects stored in Active Directory.
Windows Domain Manager
The Windows 2000 Domain Manager (netdom) enables admin-
istrators to manage Windows 2000, 2003, and 2008 domains
and trust relationships.
Winsock Remote Console
The Winsock Remote Console (wsremote.exe) can start a
console application on the server and connect to it from the
client using sockets or named pipes.
Vista TroubleshootingMicrosoft has indicated that support tools are no longer being
developed for client operating systems after Windows XP.
They’ve attempted to put all necessary tools for troubleshoot-
ing the local operating system in the system itself. They’ve
also made diagnostic tools more robust and user friendly.
Vista comes with a set of tools called the Windows Diagnostic
Infrastructure (WDI). Some of the tools are as follows.
A trust relationship is a link between domains that enables
passthrough authentication, in which a trusting domain honors
the logon authentications of a trusted domain.

Understanding Windows 235
Disk Diagnostics
Disk Diagnostics use Self-Monitoring, Analysis, and Reporting
Technology (SMART), previously available with third-party
tools only. It warns you if the disk is at risk of failure, and it
guides you through a backup session.
Windows Resource Exhaustion Detection and Resolution
The Windows Resource Exhaustion Detection and Resolution
tool (RADAR) monitors virtual memory and issues a warning
when resources fun low. Moreover, it identifies the process
causing the problem.
Memory Diagnostics
The Memory Diagnostics tool helps to determine if physical
memory is the cause of a crash.
Memory Leak Diagnostics
Memory Leak Diagnostics can identify a program leaking
memory and take steps to fix the problem.
Server 2008 Support Tools for VistaVista doesn’t officially support either the Windows XP or the
Windows Server 2003 support tools. However, the Windows
Server 2003 support tools installs and runs on Vista. To
install the Windows Server 2003 Support Tools,
1. Insert the Windows CD into the CD or DVD drive.
2. Click No if you’re prompted to reinstall Windows.
3. When the Welcome screen appears, click Perform
additional tasks, and then click Browse this CD.
4. Go to the \Support\Tools folder.
5. Double-click suptools.msi.
6. Follow the instructions that appear on the screen.

Understanding Windows236
The Windows Server 2003 support tools include the following
items:
Acldiag.exe
Adsiedit.msc
Dcdiag.exe
Dsacls.exe
Ktpass.exe
Ldp.exe
Netdiag.exe
Netdom.exe
Repadmin.exe
Replmon.exe
Additional tools in the Windows Server 2003 Support Tools
are as follows.
Background Intelligent Transfer ServiceAdministrator
The Background Intelligent Transfer Service Administrator tool
(bitsadmin.exe) can be used to create upload and download
jobs and monitor progress. BITS stands for Background
Intelligent Transfer Service, which is an upload or download
method that operates in the background without affecting the
user. It also maintains awareness of the process and, if inter-
rupted, starts exactly where it was on a bit basis when
reconnected.
Distributed File System Utility
The Distributed File System utility (dfsutil.exe) also allows you
to query and troubleshoot the Distributed File System (DFS).
DFS allows you to host folders or volumes on separate physi-
cal servers while presenting to the user a tree structure that
doesn’t require the user to know the physical location of the
volumes other than the DFS root.

Understanding Windows 237
Dnslint.exe
Dnslint is a command-line utility that help to diagnose DNS
or name-resolution problems.
Iadstools.dll
Iadstools is a .dll file that you can use to write Visual Basic
scripts that enumerate or extract information about Active
Directory.
File Replication Service
The File Replication Service (FRS) utility (ntfrsutl.exe) is
involved in both DFS operations and Active Directory replica-
tion. This tool can be used to troubleshoot FRS problems.
Portqry.exe
The Portqry tool can be used to report the status of ports on a
computer. It can identify which ports are open or available by
reporting the ports’ status, which can be listening, not listen-
ing, or filtered. In general, for security reasons, ports that
aren’t required shouldn’t be listening or open.
Setspn.exe
The Setspn tool enables you to read, modify, and delete
service principal names (SPN) for an Active Directory
account. This is required when these names are stale or no
longer valid, such as in the case of renaming a computer.
Windows 7 TroubleshootingWindows 7 has a number of new built-in tools available to aid
in troubleshooting. These tools build on the infrastructure of
Vista.

Understanding Windows238
Problem Steps Recorder
When attempting to help a user, an IT technician may find it
difficult to get useful information from the user. The user
may give an incomplete description, and the user can’t
always remember what he or she was doing or the order in
which it was done. The Problem Steps Recorder (PSR) allows
the user to turn the recorder on, generate the problem, and
record all of the clicks with screen shots. It also creates a
report of all processes and programs involved. This html
document can be sent to the technician and can make
troubleshooting much easier.
Troubleshooting PowerShell Scripts
These scripts can be executed remotely, locally, or through
group policy. Unified Tracing helps to identify and resolve
network connectivity issues in a single tool. Control Panel
contains an item called Troubleshooting, which can run at
any time and may even unearth problems that haven’t caused
an issue yet. Figure 105 is an example of an identified problem,
in this case a loss of the connection to the Internet.
Netsh
Netsh, a command-line tool, can be used to configure network
connections and to troubleshoot network-connectivity issues.

Understanding Windows 239
Windows 7 Support Tools You can install and use Windows Server 2008 Remote Server
Administration Tools, which perform some of the same func-
tions as the Windows XP tools that are used to manage
server services. The tools provided include the following.
Active Directory Certificate Services
The Active Directory Certificate Services tool is used to
connect to and manage a Server 2008 certificate server.
(Certificates are used to both encrypt data and authenticate
users and computers.)
FIGURE 105—Troubleshooting Computer Problems

Understanding Windows240
Active Directory Domain Services
The Active Directory Domain Services tool is used to connect
to and access the same AD tools available on a domain
controller.
DHCP Server
The DHCP Server tools are used to connect to and manage a
DHCP server. (DHCP servers assign network configuration
information to computers.)
DNS Server
The DNS Server tools are used to connect to and mange a
DNS server. (DNS servers perform resolution of computer
names to IP addresses.)
File Services
The File Services tools are used to manage the DFS and
consist of a graphical tool as well as a set of command-line
tools. DFS allows you to host folders or volumes on separate
physical servers while presenting to the user a tree structure
that doesn’t require the user to know the physical location of
the volumes, other than the DFS root.
Network Policy and Access Services
The Network Policy and Access Services tools are used to con-
nect to and manage a network policy server. These servers
manage remote access connections and can ascertain the
health of computers before allowing them to connect to the
network, and can even remedy a problem, such as a missing
security update.
Terminal Services
The Terminal Services tools are used to manage remote desk-
tops and terminal services.

Understanding Windows 241
Universal Description, Discovery, and Integration Services
These tools are used to manage the Universal Description,
Discovery, and Integration (UDDI) service. This service helps
companies organize and catalog Web services and other pro-
gramming resources.
Common Support ToolsBeyond the OS-specific support Tools, the Windows XP,
Vista, and Windows 7 operating systems come with other
troubleshooting tools.
Command Prompt
A useful tool when Windows crashes or won’t boot correctly is
the command prompt. When the Windows’ GUI isn’t function-
ing, you need to work from the DOS command prompt. There
are four ways to get to this prompt. The reason for using one
method over another is determined by when the PC stops
processing information correctly. To access the command
prompt, try one of the following:
• Boot from a boot disk set.
• During Startup, press F8 to access the Startup menu.
On this menu, select either the Command Prompt or
Safe Mode Command Prompt mode.
• If Windows is running, click Start and then Run. Type
COMMAND in the Open box, and click OK.
• Again, when Windows is running, click Start, Programs,
Accessories, and then click Command Prompt.
Be aware that all the network drives you’re used to seeing
as part of the LAN to which the PC is connected may not be
available through the command prompt. Also, note that some
of the drive letters are different than when you use the
Windows GUI.

Understanding Windows242
For further information on DOS commands and their struc-
ture, refer to the MS DOS 6 Users Guide, available from
Microsoft Press, or any of the numerous books published on
this topic. One Web site that supplies information on DOS
commands is http://www.computerhope.com/msdos.htm.
DirectX Diagnostic Tool
Another diagnostic tool available to help troubleshoot problems
is the DirectX Diagnostic Tool (Figure 106). This utility helps
isolate problems with multimedia applications. By using this
tool, you can test all the devices and device functions supported
by DirectX, as well as find out information on the level of the
DirectX files and modules installed on the System.
FIGURE 106—DirectX Diagnostic Tool

Understanding Windows 243
This utility has no options to fix problems it encounters, but
it does have the option of disabling certain features supported
by the DirectX programming. The DirectX Diagnostic Tool
also has a feature that allows you to save and then print a
copy of all the features and cards supported. This is good
reference material when you’re troubleshooting the actual
system hardware or applications.
File Signature Verification
The File Signature Verification tool can be used to identify
unsigned drivers on a PC. This information can be helpful
when you’re troubleshooting system instability. Instability
can present itself as the following:
• The computer stops responding while running an
application.
• You start receiving STOP error messages.
• You’re unable to put the computer into Standby or
Hibernate mode.
• You notice other unusual errors.
Microsoft has been promoting driver signing as a means to
advance the quality of drivers. Microsoft began digitally sign-
ing drivers for the Microsoft Windows 98 operating system.
The signed drivers needed to pass the Windows Hardware
Quality Labs (WHQL) tests. Although an unsigned system
driver may work, it can cause problems in Windows. To find
unsigned system drivers in the Drivers folder (most system
drivers are loaded from this folder) on the PC,
1. Click Start and point to All Programs, Accessories,
System Tools, and then click System Information.
2. Click Tools and then File Signature Verification
(Figure 107).
3. Click the Advanced button.
4. On the Search tab, ensure that the Notify me if any
systems files aren’t signed radio button is selected and
click OK.

Understanding Windows244
5. Click Start.
6. A list of unsigned drivers is displayed.
Doing the following also starts the File Signature Verification
tool on Windows XP and is the only way to invoke the tool in
Vista and Windows 7.
1. Click Start, and then Run.
2. In the Open box, type sigverif.exe, and then click OK.
You can use the list of unsigned drivers as a starting point
for troubleshooting issues in Windows. For example, WHQL-
signed drivers must support power management. Some
unsigned drivers don’t contain power management support,
so you may experience power management problems if you
install such a driver on Windows.
After you find the unsigned drivers, you can disable the
drivers one by one, using any of the following methods:
• Uninstall the software that installed the unsigned driver,
using the Add/Remove Programs tool.
• Disable the device in Device Manager. To do this, you
may have to click View, click Show hidden devices, and
then disable the device under Non-plug and play
Drivers.
• Rename the driver in WINDOWS\SYSTEM32\DRIVERS.
• If disabling a driver resolves the problem, contact the
manufacturer of the product using an unsigned system
driver for an updated version that’s designed to run with
Windows.
FIGURE 107—FileSignature Verification Tool
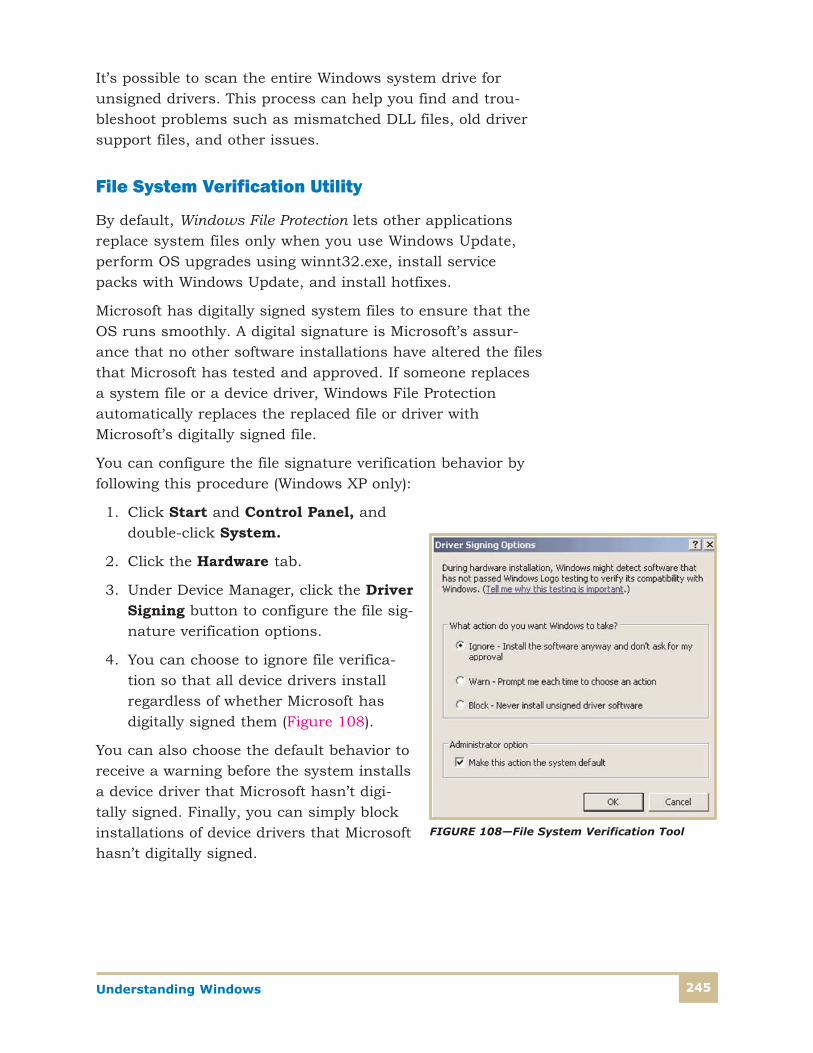
Understanding Windows 245
It’s possible to scan the entire Windows system drive for
unsigned drivers. This process can help you find and trou-
bleshoot problems such as mismatched DLL files, old driver
support files, and other issues.
File System Verification Utility
By default, Windows File Protection lets other applications
replace system files only when you use Windows Update,
perform OS upgrades using winnt32.exe, install service
packs with Windows Update, and install hotfixes.
Microsoft has digitally signed system files to ensure that the
OS runs smoothly. A digital signature is Microsoft’s assur-
ance that no other software installations have altered the files
that Microsoft has tested and approved. If someone replaces
a system file or a device driver, Windows File Protection
automatically replaces the replaced file or driver with
Microsoft’s digitally signed file.
You can configure the file signature verification behavior by
following this procedure (Windows XP only):
1. Click Start and Control Panel, and
double-click System.
2. Click the Hardware tab.
3. Under Device Manager, click the Driver
Signing button to configure the file sig-
nature verification options.
4. You can choose to ignore file verifica-
tion so that all device drivers install
regardless of whether Microsoft has
digitally signed them (Figure 108).
You can also choose the default behavior to
receive a warning before the system installs
a device driver that Microsoft hasn’t digi-
tally signed. Finally, you can simply block
installations of device drivers that Microsoft
hasn’t digitally signed.
FIGURE 108—File System Verification Tool

Understanding Windows246
Network Diagnostics
Another feature on the tool list is the Network Diagnostics
utility (Figure 109).
This tool tests the network you’ve set up on the PC. It checks
all the network connections and reports on their status. To
access this tool,
1. Click Start, and select Help and Support.
2. In the search box at the top of the Help and Support
screen, type Network Diagnostics.
This is a diagnostic utility, so it has no options to fix any of
the problems it encounters. Often, though, knowing what
connection is causing a communications fault is a good first
step in solving the problem. This utility allows you to print a
copy of all the setup services and connections for reference
when you’re actively troubleshooting the PC.
FIGURE 109—Network Diagnostics

Understanding Windows 247
Performance MonitorPerformance Monitor can measure application and operating
system performance. Click Start, point to All Programs,
Administrative Tools, and click Performance Monitor to
open this utility in Windows XP. In Vista and Windows 7,
click Start and then type perform in the search box. Then,
select the utility name when it appears above the search
box. When the Reliability and Performance Tool opens,
select Performance Monitor from the tree on the left. The
Performance Monitor lets you track the use of system
resources over time. This utility allows you to set alerts on
the use of specific resources. You can also monitor systems
remotely, which is helpful in identifying network problems.
When you first open the Performance Monitor, you see a
blank chart. You must select which objects, instances, and
counters to monitor. To add items, click the + icon on the
toolbar, which opens the Add to Chart dialog box (Figure 110).
FIGURE 110—The Performance Monitor’s Add to Chart Dialog Box

Understanding Windows248
By default, Performance Monitor opens the Add to Chart dialog
box with the Processor as the object and the %Processor Time
counter highlighted. This counter is one of the most commonly
used counters, and is a good choice for a default.
Table 23 provides a starting point for choosing counters. Select
the counters you want to monitor, and click Add. For a brief
explanation of a counter, click Explain. When you finish
adding counters, close the Add to Chart dialog box and
observe the graphical display.
Creating Charts
Performance Monitor has approximately 350 different counters,
and it can graph performance for several counters at the
same time (Figure 111).
An object is any system component that has a set of measurable
properties. An object can be a physical, logical, or software
component.
An instance is the number of occurrences of a particular object on
the system. Windows allows a listing of total instance, which gives
you the combined values for all instances.
A counter is a measurable attribute of the object. In Figure 110,
the processor object has several counters, including the percent-
age of processor time in use and percentage of time the CPU
spends in privileged and user modes.
Table 23
IMPORTANT COUNTERS TO TRACK WITH THE PERFORMANCE MONITOR
Object Counter Description
Processor %Processor Time Time executing non-idle thread
Process %Processor Time Time allocated to a specific process
Memory Pages/sec High value indicates excessive paging
Cache Data Map Hits% Low value suggests memory shortage
LogicalDisk Avg. Disk Queue Length Activity on logical disk

Understanding Windows 249
On the Add to Chart dialog box, you can change the thickness
line type and color of any counter displayed on the screen.
A thicker line is desirable if you’re using these graphs on a
projection system. If necessary, you can also vary the scale
for each item.
A legend of the monitored counters appears at the bottom of
the screen. Click a counter to have the values appear in the
boxes just above the legend. Listed are the last, average,
maximum, and minimum values, and the timescale in seconds
for the chart display.
FIGURE 111—Performance Monitor can produce a graphical representation of several counters at once.
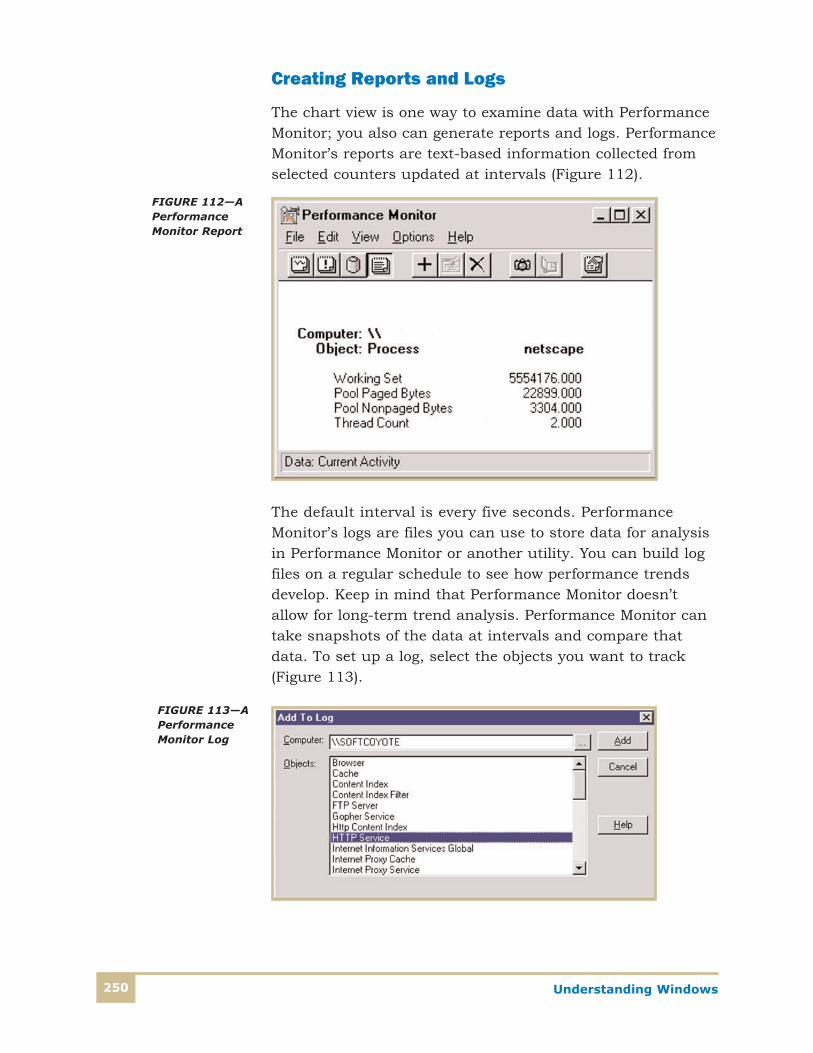
Understanding Windows250
Creating Reports and Logs
The chart view is one way to examine data with Performance
Monitor; you also can generate reports and logs. Performance
Monitor’s reports are text-based information collected from
selected counters updated at intervals (Figure 112).
The default interval is every five seconds. Performance
Monitor’s logs are files you can use to store data for analysis
in Performance Monitor or another utility. You can build log
files on a regular schedule to see how performance trends
develop. Keep in mind that Performance Monitor doesn’t
allow for long-term trend analysis. Performance Monitor can
take snapshots of the data at intervals and compare that
data. To set up a log, select the objects you want to track
(Figure 113).
FIGURE 112—APerformanceMonitor Report
FIGURE 113—APerformanceMonitor Log
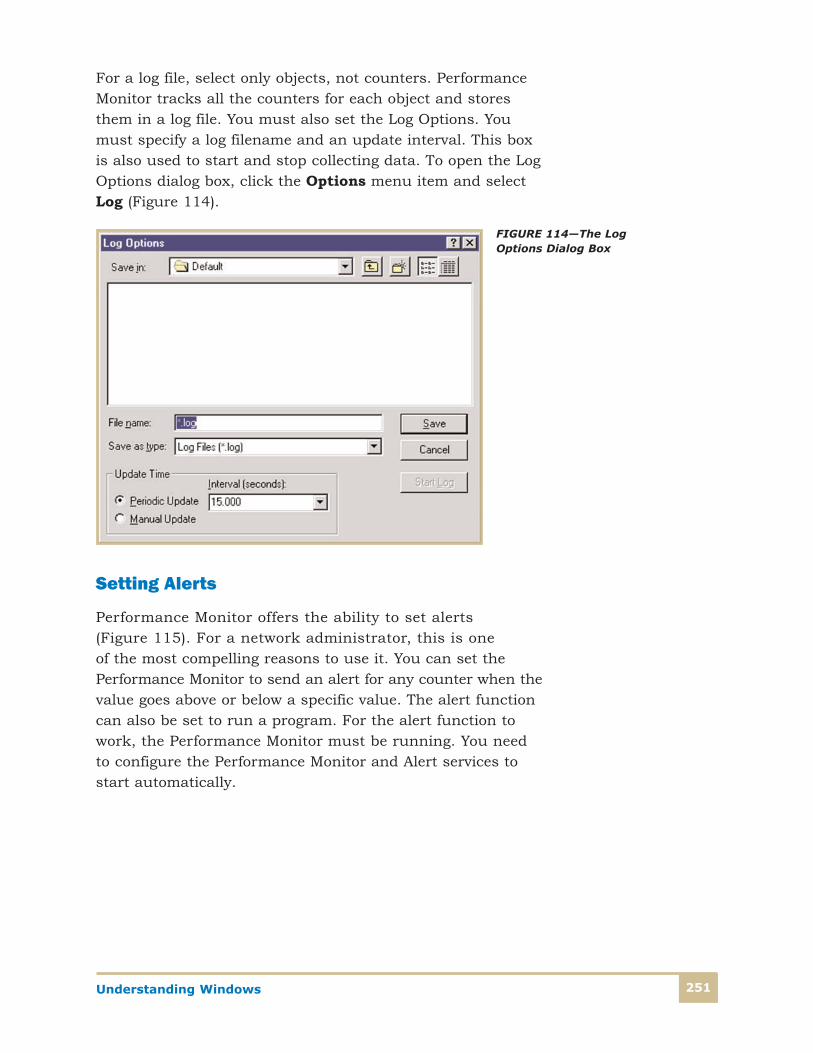
Understanding Windows 251
For a log file, select only objects, not counters. Performance
Monitor tracks all the counters for each object and stores
them in a log file. You must also set the Log Options. You
must specify a log filename and an update interval. This box
is also used to start and stop collecting data. To open the Log
Options dialog box, click the Options menu item and select
Log (Figure 114).
Setting Alerts
Performance Monitor offers the ability to set alerts
(Figure 115). For a network administrator, this is one
of the most compelling reasons to use it. You can set the
Performance Monitor to send an alert for any counter when the
value goes above or below a specific value. The alert function
can also be set to run a program. For the alert function to
work, the Performance Monitor must be running. You need
to configure the Performance Monitor and Alert services to
start automatically.
FIGURE 114—The LogOptions Dialog Box

Understanding Windows252
Saving the Settings
On the File menu, you have the option to save the settings.
This option changes depending on whether you’re looking at
the chart, log, alert, or report. You can save any view and the
workspace, which is the combination of the various views.
Clicking File on the menu and then selecting Save Workspace
saves all the settings in a file with a .pmw extension. By
selecting File on the menu bar and selecting Open, you can
restore the workspace the next time you use Performance
Monitor.
Monitoring Remote Computers
If you have the necessary authorization, you can monitor
another PC. You can do this by opening the Add to Chart
screen shown on Figure 110, and clicking the ellipsis (. . .)
button. This action opens a selection dialog box that shows
the domains, workgroups, and computers in the network.
Select the PC you want to monitor, define the counters for
that PC, and close the selection window. At the bottom of the
chart screen, the computer name appears with the parameter
you’re monitoring. Note that the Routing and Remote Access
service must be running on the PC you want to monitor
remotely.
Performance Monitor offers many more options. For example,
you can customize the appearance of your charts, add verti-
cal and horizontal grids, vary the update interval, and display
data as histograms instead of lines on the chart. The challenge
is to become familiar with the various counters and to know
what to monitor in the network.
FIGURE 115—ThePerformance Monitor’sAlert Dialog Box

Understanding Windows 253
The Performance Monitor can tell you which of the processes
are causing bottlenecks. Use Table 24 as a reference for the
minimum performance counters to use in finding the cause
of bottlenecks in any type of server. The format used to list
these counters is <object>\<performance counter>.
Table 24
SERVER PERFORMANCE COUNTERS
Potential
BottleneckPerformance Counter Definition
Memory
Memory\ Available Bytes
The amount of physical memory in bytes available toprocesses running on the computer. This counter displaysthe last observed value only; it’s not an average.
Memory\ Pages/sec
The number of pages read from or written to disk toresolve hard page faults. (Hard page faults occurwhen a process requires code or data that is not inits working set or elsewhere in physical memory, andmust be retrieved from disk). This counter serves asa primary indicator of the kinds of faults that causesystem-wide delays.
Cache\ Data Maps/secThe frequency that a file system such as NTFS mapsa page of a file into the file system cache to read thepage.
Network(Capture foreach networkadapterinstance.)
Network Interface\Bytes Total/sec
The rate at which bytes are sent and received on theinterface, including framing characters.
Network Interface\Bytes Sent/sec
The rate at which bytes are sent on the interface,including framing characters.
Network Interface\Bytes Received/sec
The rate at which bytes are received on the interface,including framing characters.
Network Segment\ %Network Utilization
Percentage of network bandwidth in use on a networksegment.
Disk
Physical Disk\% Disk Time
The percentage of elapsed time that the selected diskdrive is busy servicing read or write requests.
Physical Disk\% Idle Time
Reports the percentage of time during the sampleinterval that the disk was idle.
Physical Disk\Disk Reads/sec The rate of read operations on the disk.
Physical Disk\Disk Writes/sec The rate of write operations on the disk.
Physical Disk\Avg. Disk Queue Length
The average number of both read and write requeststhat were queued for the selected disk during thesample interval.

Understanding Windows254
Table 24—Continued
Potential
BottleneckPerformance Counter Definition
CPU
Processor\Interrupts/sec
The average number of hardware interrupts the proces-sor is receiving and servicing in each second. It doesn’tinclude deferred procedure calls (DPCs), which arecounted separately. This value is an indirect indicator ofthe activity of devices that generate interrupts, such asthe system clock, the mouse, disk drivers, data commu-nication lines, network interface cards, and other peripheraldevices. These devices normally interrupt the processorwhen they’ve completed a task or require attention. Mostsystem clocks interrupt the processor every 10 milliseconds,creating a background of interrupt activity. This counterdisplays the difference between the values observed inthe last two samples, divided by the duration of thesample interval.
Processor\ % ProcessorTime (Use the _Totalinstance to track performance of allprocessors in a multi-processor system.)
The percentage of time that the processor is executing anonidle thread. This counter was designed as a primaryindicator of processor activity. It’s calculated by measur-ing the time that the processor spends executing thethread of the idle process in each sample interval, andsubtracting that value from 100 percent. (Each processorhas an idle thread, which consumes cycles when noother threads are ready to run.) It can be viewed as thepercentage of the sample interval spent doing usefulwork.
System\ % PrivilegedTime (Use the _Totalinstance to track performance of allprocessors in a multi-processor system.)
The percentage of non-idle processor time spent in privi-leged mode. (Privileged mode is a processing modedesigned for operating system components and hard-ware-manipulating drivers. It allows direct access tohardware and all memory. The alternative, user mode, isa restricted processing mode designed for applications,environment subsystems, and integral subsystems. Theoperating system switches application threads to privi-leged mode to access operating system services.) %Privileged Time includes time servicing interrupts andDPCs. A high rate of privileged time might be attributa-ble to a large number of interrupts generated by a failingdevice. This counter displays the average busy time as apercentage of the sample time.
System\ % User Time(Use the _Total instanceto track performance ofall processors in a multiprocessor system.)
The percentage of non-idle processor time spent in usermode. (User mode is a restricted processing modedesigned for applications, environment subsystems, andintegral subsystems. The alternative, privileged mode, isdesigned for operating system components and allowsdirect access to hardware and all memory. The operatingsystem switches application threads to privileged modeto access operating system services.) This counter displaysthe average busy time as a percentage of the sampletime.

Understanding Windows 255
For file servers, we recommend that you log the performance
counters shown in Table 25 in addition to the general per-
formance counters.
Table 24—Continued
Potential
BottleneckPerformance Counter Definition
CPU(Continued)
System\ ProcessorQueue Length
The number of threads in the processor queue. There’sa single queue for processor time even on computerswith multiple processors. Unlike the disk counters, thiscounter counts ready threads only, not threads that arerunning. A sustained processor queue of greater thantwo threads generally indicates processor congestion.This counter displays the last observed value only; it’snot an average.
System\ SystemCalls/sec
The combined rate of calls to Windows 2000 systemservice routines by all processes running on the computer.These routines perform all of the basic scheduling andsynchronization of activities on the computer, and pro-vide access to nongraphic devices, memory management,and name space management. This counter displays thedifference between the values observed in the last twosamples, divided by the duration of the sample interval.
System Context Switches/sec
The combined rate at which all processors on the com-puter are switched from one thread to another. Contextswitches occur when a running thread voluntarily relin-quishes the processor, is preempted by a higher-priorityready thread, or switches between user-mode and privi-leged (kernel) mode to use an Executive or subsystemservice. It is the sum of Thread: Context Switches/secfor all threads running on all processors in the computerand is measured in numbers of switches. There are con-text switch counters on the System and Thread objects.This counter displays the difference between the valuesobserved in the last two samples, divided by the durationof the sample interval.

Understanding Windows256
Table 25
FILE SERVER PERFORMANCE COUNTERS
Performance
Object
Performance
Counter Definition
Server
Bytes Transmitted/sec
The number of bytes the server has sent on the network.Indicates how busy the server is.
Bytes Received/sec
The number of bytes the server has received from the network. Indicates how busy the server is.
System File ControlOperations/sec
The combined rate of file system operations that are neither read operations nor write operations, such as filesystem control requests and requests for information aboutdevice characteristics or status. This is the inverse ofSystem: File Data Operations/sec and is measured in number of operations per second. This counter displays the difference between the values observed in the last twosamples, divided by the duration of the sample interval.
Server WorkQueues Queue Length
The current length of the server work queue for the CPU. A sustained queue length greater than four might indicateprocessor congestion. This is an instantaneous count, notan average over time.
Memory
Cache Bytes
The number of bytes currently being used by the file sys-tem cache. The file system cache is an area of physicalmemory that stores recently used pages of data for appli-cations. Windows 2000 continually adjusts the size of thecache, making it as large as it can while still preserving theminimum required number of available bytes for processes.This counter displays the last observed value only; it’s notan average.
Page Faults/sec
The overall rate-faulted pages are handled by the proces-sor. It’s measured in numbers of pages faulted per second.A page fault occurs when a process requires code or datathat’s not in its working set (its space in physical memory).This counter includes both hard faults (those that requiredisk access) and soft faults (where the faulted page isfound elsewhere in physical memory). Most processors canhandle large numbers of soft faults without consequence.However, hard faults can cause significant delays. Thiscounter displays the difference between the valuesobserved in the last two samples, divided by the durationof the sample interval.
Transition Faults/sec
Transition Faults/sec is the number of page faults resolvedby recovering pages that were on the modified page list, onthe standby list, or being written to disk at the time of thepage fault. The pages were recovered without additionaldisk activity. Transition faults are counted in numbers offaults, without regard for the number of pages faulted ineach operation. This counter displays the differencebetween the values observed in the last two samples,divided by the duration of the sample interval.
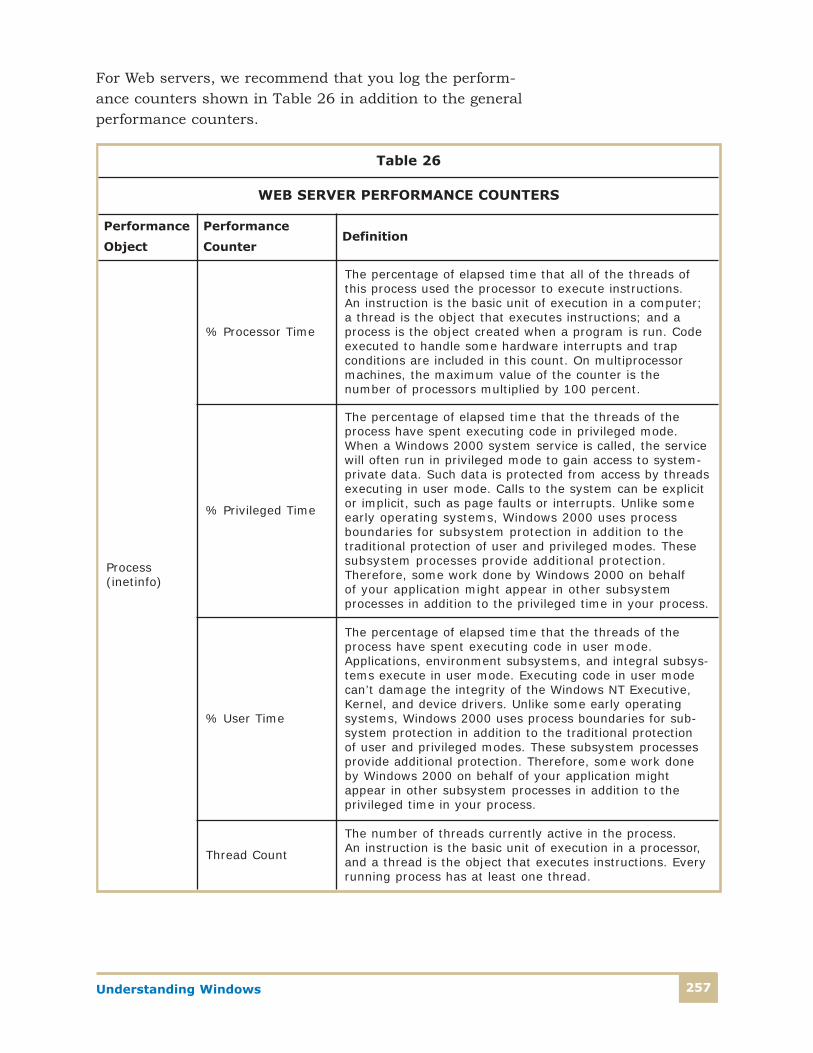
Understanding Windows 257
For Web servers, we recommend that you log the perform-
ance counters shown in Table 26 in addition to the general
performance counters.
Table 26
WEB SERVER PERFORMANCE COUNTERS
Performance
Object
Performance
Counter Definition
Process(inetinfo)
% Processor Time
The percentage of elapsed time that all of the threads ofthis process used the processor to execute instructions. An instruction is the basic unit of execution in a computer;a thread is the object that executes instructions; and aprocess is the object created when a program is run. Codeexecuted to handle some hardware interrupts and trap conditions are included in this count. On multiprocessormachines, the maximum value of the counter is the number of processors multiplied by 100 percent.
% Privileged Time
The percentage of elapsed time that the threads of theprocess have spent executing code in privileged mode.When a Windows 2000 system service is called, the servicewill often run in privileged mode to gain access to system-private data. Such data is protected from access by threadsexecuting in user mode. Calls to the system can be explicitor implicit, such as page faults or interrupts. Unlike someearly operating systems, Windows 2000 uses processboundaries for subsystem protection in addition to the traditional protection of user and privileged modes. Thesesubsystem processes provide additional protection.Therefore, some work done by Windows 2000 on behalf of your application might appear in other subsystemprocesses in addition to the privileged time in your process.
% User Time
The percentage of elapsed time that the threads of theprocess have spent executing code in user mode.Applications, environment subsystems, and integral subsys-tems execute in user mode. Executing code in user modecan’t damage the integrity of the Windows NT Executive,Kernel, and device drivers. Unlike some early operatingsystems, Windows 2000 uses process boundaries for sub-system protection in addition to the traditional protection of user and privileged modes. These subsystem processesprovide additional protection. Therefore, some work doneby Windows 2000 on behalf of your application mightappear in other subsystem processes in addition to theprivileged time in your process.
Thread Count
The number of threads currently active in the process. An instruction is the basic unit of execution in a processor,and a thread is the object that executes instructions. Everyrunning process has at least one thread.

Understanding Windows258
Table 26—Continued
Performance
Object
Performance
Counter Definition
Process(inetinfo)(Continued)
Page File Bytes
The current number of bytes the process has used in thepaging file(s). Paging files are used to store pages of mem-ory used by the process that aren’t contained in other files.Paging files are shared by all processes, and lack of spacein paging files can prevent other processes from allocatingmemory.
WebService
Bytes Total/sec The sum of Bytes Sent/sec and Bytes Received/sec. This isthe total rate of bytes transferred by the Web service.
Get Requests/sec
The rate at which HTTP requests using the GET method are made. Get requests are generally used for basic fileretrievals or image maps, though they can be used withforms.
CGI Requests/sec(only if you useCGI programs)
The rate of CGI requests that are simultaneously beingprocessed by the Web service.
ISAPI ExtensionRequests/sec (onlyif you use ISAPIextensions)
The rate of ISAPI Extension requests that are simultane-ously being processed by the Web service.
Active ServerPages (onlyif you useASP programs)
Requests/sec The number of requests executed per second.
InternetInformationServicesGlobal
Current FilesCached
Current number of files whose content is in the cache forWorld Wide Web (WWW) and File Transfer Protocol (FTP)services.
File Cache Hits % The ratio of file cache hits to total cache requests. A filecache hit is a successful lookup in the system’s file cache.
Using the information on the log files, use the CPU perform-
ance thresholds in Table 27 to identify a CPU cause of a
bottleneck.

Understanding Windows 259
Table 27
CPU-RELATED BOTTLENECKS
ResourceObject\
Counter
Suggested
ThresholdComments
Processor Processor\ % Processor Time 95%
Upgrade to a processor with a largerL2 cache, a faster processor, or installan additional processor.
Processor Processor\Interrupts/sec
Depends onprocessor.
A dramatic increase in this countervalue without a correspondingincrease in system activity indicates a hardware problem. Identify the net-work adapter causing the interrupts.Use the affinity tool to balance inter-rupts in a multiprocessor system.
Processor Processor\ % Interrupt Time
Depends onprocessor.
An indirect indicator of the activity ofdisk drivers, network adapters, andother devices that generate interrupts.
Server Server Work Queues\Queue Length 4
Tracks the current length of the serverwork queue for the computer. If thevalue reaches this threshold, theremay be a processor bottleneck. This is an instantaneous counter; observeits value over several intervals.
MultipleProcessors
System\ProcessorQueue Length 2
This is an instantaneous counter;observe its value over several inter-vals. A queue of two or more itemsindicates a bottleneck. If more than afew program processes are contendingfor most of the processor’s time,installing a faster processor or onewith a larger L2 cache will improvethroughput. An additional processorcan help if you’re running multi-threaded processes, but be aware thatscaling to additional processors mayhave limited benefits.
Using the information on the log files, use the memory perform-
ance thresholds in Table 28 to identify a memory-related
bottleneck.

Understanding Windows260
Using the information on the log files, use the performance
thresholds in Table 29 to identify a disk-related bottleneck.
Using the information on the log files, use the performance
thresholds in Table 30 to identify a network-related
bottleneck.
Table 28
MEMORY-RELATED BOTTLENECKS
ResourceObject\
Counter
Suggested
ThresholdComments
Memory Memory\ AvailableBytes
Less than 4 MB
Research memory usage and addmemory if needed.
Memory Memory\ Pages/sec 20 Research paging activity.
Server Server\ Pool PagedPeak
Amount ofphysical RAM
This value is an indicator of the maxi-mum paging file size and the amountof physical memory.
Table 29
DISK-RELATED BOTTLENECKS
ResourceObject\
Counter
Suggested
ThresholdComments
Disk Physical Disk\% Disk Time 90% Add more disk drives and partition the
files among all of the drives.
DiskPhysical Disk\DiskReads/sec, PhysicalDisk\Disk Writes/sec
Depends onmanufacturer’sspecifications
Check the specified transfer rate foryour disks to verify that this ratedoesn’t exceed the specifications. Ingeneral, Ultra Wide SCSI disks canhandle 50 I/O operations per second.
Disk Physical Disk\CurrentDisk Queue Length
Number of spindles plus 2
This is an instantaneous counter;observe its value over several inter-vals. For an average over time, usePhysical Disk\ Avg. Disk QueueLength.

Understanding Windows 261
Table 30
NETWORK-RELATED BOTTLENECKS
ResourceObject\
Counter
Suggested
ThresholdComments
Network Network Segment\ % Net Utilization
Depends ontype of network
For full-duplex, switched Ethernet net-works, for example, 80 percent canindicate a bottleneck.
Processor Processor\Interrupts/sec
Depends onprocessor
A dramatic increase in this countervalue without a correspondingincrease in system activity indicates ahardware problem. Identify the net-work adapter causing the interrupts.Use the affinity tool to balance inter-rupts in a multiprocessor system.
ServerServer\ Work Item
Shortages3
If the value reaches this threshold,consider tuning InitWorkItems orMaxWorkItems in the Registry (underHKEY_LOCAL_MACHINE\SYSTEM\CurrentControlSet\Services\LanmanServer).
Server Server\ BytesTotal/sec
If the sum of Bytes Total/sec isroughly equal to the maximum trans-fer rates of your network, you mayneed to segment the network.
NetworkSegment
Network Segment\Broadcast framesreceived/second
Depends onnetwork
Can be used to establish a baseline ifmonitored over time. Large variationsfrom the baseline can be investigatedto determine the cause of the problem.Because each computer processesevery broadcast, high broadcast levelsmean lower performance.
NetworkSegment
Network Segment\ % Network utilization
Depends onnetwork
Indicates how close the network is tofull capacity. The threshold dependson your network infrastructure andtopology. If the value of the counter isabove 30 to 40 percent, collisions cancause problems.
NetworkSegment
Network Segment\Total framesreceived/second
Depends onnetwork
Indicates when bridges and routersmight be flooded.

Understanding Windows262
System File CheckerThe System File Checker (SFC) checks for damaged or
replaced system files, and then allows you to replace any
files that don’t match the original Windows files. The System
File Checker can be used to restore Windows OS files if
they’re corrupted. It also offers a convenient way to extract
compressed files (such as drivers) from installation disks. To
keep the files in good shape, run the System File Checker
after installing any new software. You must be logged on as
a member of the Administrators group to run the SFC. To
start the System File Checker,
1. Click Start and then Run.
2. In the Open box, type CMD and then click OK.
3. In the command prompt, type this: sfc/scannow
The SFC command, when used on the Windows command
prompt, can use the switches listed in Table 31.
Table 31
SFC SYNTAX AND SWITCHES
Syntax
SFC [/scannow] [/scanonce] [/scanboot] [/revert] [/purgecache] [/cachesize=x]
Switch Description
/scannow Scans all protected system files immediately.
/scanonce Scans all protected system files once.
/scanboot Scans all protected system files every time the computer is restarted.
/revert Returns the scan to its default operation.
/purgecache Purges the Windows File Protection file cache and scans all protectedsystem files immediately.
/cachesize=x Sets the size, in MB, of the Windows File Protection file cache.
/? Displays help at the command prompt.
Understanding Windows 263
Exercise 2
To aid in your understanding of the material, perform the
following exercises.
1. Set up the performance monitor in Windows XP to track
the Processor/% of Processor time counter.
2. Use system information to determine the amount of RAM
in the computer.
3. Install the Recovery Console on the PC, and check the
primary Windows drive.
4. Execute the System File Checker to determine if any of
the system files need to be replaced.
Check your methods with those on page 269.

Understanding Windows264
Self-Check 8
Match the items on the left with their descriptions on the right. Indicate your answers in
the place provided.
______ 1. File System Verification Utility
______ 2. Performance Monitor
______ 3. DiskProbe
______ 4. System Information
______ 5. System File Checker
Check your answers with those on page 270.
a. Checks for damaged or replaces OS files
b. Retrieves and displays the current configuration
c. Tracks application and OS resourceusage
d. Checks the OS for digital signatures
e. Doesn’t support FAT32

Self-Check 1
1. f
2. a
3. d
4. c
5. b
6. e
Self-Check 2
1. True
2. DirectX
3. clean install
4. hardware compatibility
5. False
6. Hardware and Sound
7. Hibernate
8. Vista
9. False
10. Hibernate
Self-Check 3
1. False
2. visual impairment, hearing impairment, and mobility
impairment
3. appearance of controls
4. Desktop Manager
5. Shortcut Properties Compatibility tab
6. Details and Previous versions
7. The Ease of use section of the Control Panel
265
Answers
Answers

8. Accessibility Wizard and Utility Manager
9. Hardware and Sound
10. Right-click and select Personalize.
Exercise 1
1. To set the computer to adjust the CPU to give priority to
Programs and not Background services,
• Click Start, click Control Panel, and double-click
System; or, right-click My Computer and click
Properties.
• Click the Advanced tab, and then click Settings in
the Performance part of the dialog box.
• Click the Advanced tab of the Performance Options
dialog box.
• In the Processor Scheduling section, select the
Programs radio button under Adjust for best
performance for.
2.
• The calculator is found by clicking Start, pointing to
All Programs, and Accessories.
• Right-click the Calculator icon, and select Copy.
• Right-click the desktop, and select Paste.
3.
• Click Start, click Control Panel, and double-click
System and Maintenance and then System.
• In the menu on the left side, select System
Protection.
• This action takes you to the System Protection tab on
System Properties. For any drives listed in the Create
restore point automatically box, deselect the check
box. To completely disable system restore, uncheck all
drives listed.
Self-Check and Exercise Answers266
4.
• Click Start, point to Programs, Accessories, and
System Tools, and then click Disk Defragmenter.
• Select the drive or partition, and click Defragment
disk.
Self-Check 4
1. Any three of the following:
• Add RAM.
• Add a CPU with more L2 cache.
• Defragment the disk.
• Clean up the desktop.
• Delete unnecessary files.
2. True
3. Fast User Switching
4. Disk Cleanup
5. True
6. direct memory access (DMA)
7. Automatic, manual, and disabled
8. Type Run in the search box, select it, and then type
msconfig in the run box.
9. True
10. Superfetch
Self-Check and Exercise Answers 267
Self-Check 5
1. Five
2. Five
3. \%SystemRoot%\system32\config
4. default
5. True
6. boot.ini
7. Vista and Windows 7
8. False
9. System Image Recovery
Self-Check 6
1. d
2. a
3. b
4. e
5. c
6. g
7. h
8. f
9. j
10. i
Self-Check 7
1. plug and play (PnP)
2. False
3. device driver
4. resource conflicts
5. False
Self-Check and Exercise Answers268

6. Add Hardware
7. Hidden
8. True
9. Resource conflicts
10. 16-bit devices
Exercise 2
1. This is the default listing on the Add to Chart dialog box.
Simply open Performance Monitor using these steps:
• Click Start, point to All Programs, Administrative
Tools.
• Click Performance Monitor to open this utility in
Windows XP.
2. Your process will vary somewhat according to the OS
version installed. Here are the major steps:
• Click Start, Programs, Accessories and the select
System Tools.
• Select System Information. The box opens after a
brief pause to gather information.
• In the detail pane, locate the Physical memory
section, and the amount of memory is listed.
3. To install the Recovery Console,
• Insert the Windows installation CD into the CD or
DVD drive.
• Click Start, and then click Run.
• In the Open box, type d:\i386\winnt32.exe/cmdcons,
where d is the drive letter for the CD or DVD drive.
• Click Yes to start the installation procedure.
• Restart the computer. The next time you start the
computer, you see a Microsoft Windows Recovery
Console entry on the boot menu.
Self-Check and Exercise Answers 269

• On the boot menu, select Microsoft Windows Recovery
Console.
• When you’re prompted to do so, type the administrator
password. If the administrator password is blank,
press Enter.
• At the command prompt, type chkdsk d:, where d: is
the Windows drive.
4.
• Click Start and then Run.
• In the Open box, type CMD, and then click OK.
• In the command prompt type sfc/scannow.
• Wait until the scan completes, and view the results.
Self-Check 8
1. d
2. c
3. e
4. b
5. a
Self-Check and Exercise Answers270


![Unit I: [Understanding Corporate Environment] Unit II](https://img.dokumen.tips/doc/110x75/629bc04220e18e3e813c59da/unit-i-understanding-corporate-environment-unit-ii-.jpg)


