Embed Size (px)
Citation preview

V.2 Jan 08
ultraframe
STEP BY STEP
TO BUILDING YOUR CONSERVATORY
Ulltraframe (UK) Ltd, Salthill Road, Clitheroe, Lancashire, BB7 1PE
ultraframewww.ultraframe.com
GUIDE

The Proposed Site
The ground is cleared as part of the preparationprocess.
Space may be required for a skip during the groundwork stage.
33
11
22
The Proposed Site
This step-by-step guide gives you an insight into the work that will take place at your home during the installation of your dream conservatory.
Contents3. The Proposed Site
4. Planning & Preparation
5. The Foundations
6. The Cavity Wall
7. The Insulated Floor Slab
8. Base Completion/Flashing
9. Installing the Side Frames
10. Door & Roof Insulation
11. Roof/Side Glazing
12. The Last Few Jobs
As you can see a conservatory is a substantially built structure that has detailed foundations like any other building project. If you have questions about any stage of your conservatory project, please talk to your preferred installation company.
ultraframe
Hello & Welcome...
2 3

Planning & Preparation The Foundations
Construction work begins with the digging of the strip footings.
14
25
The outline of the dwarf walls are calculated & marked out as
per plans.
Concrete is poured into the ‘trench’ to form the foundations.
Footings are dug to a minimum depth of 450mm - this will vary depending on the ground conditions.
16 17
Any drainage pipes will be identifi ed, protected and ‘bridged’ by concrete lintels.
The concrete is fl oated to form a level surface area to build upon.
18 19
4 5

The Cavity Wall
The outer leaf of the cavity wall is built to just below outside ground level.
The Insulated Floor Slab
Any existing air bricks can be transferredthrough the base work.
The inner leaf of the cavity wall is built to inner fl oor level.
10
11 12
Floor insulation and a damp proof membrane arelaid over the sand.
Hardcore is laid and compacted to a minimum 100mmdeep. A blinding screen of sand is laid over the hardcore.
The concrete is fl oated to a smooth surface level.Concrete 100mm thick is laid to bring the slab up to the fi nished fl oor level.
13 14
15 16
6 7
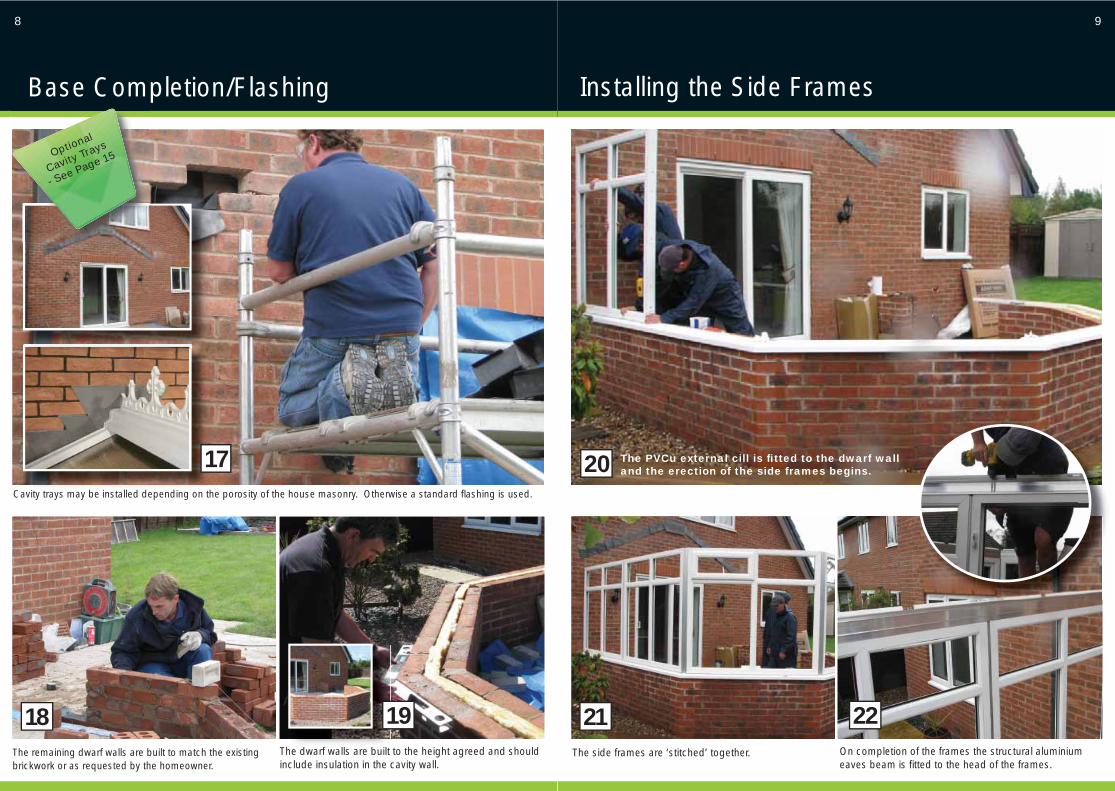
Installing the Side FramesBase Completion/Flashing
Cavity trays may be installed depending on the porosity of the house masonry. Otherwise a standard fl ashing is used.
The dwarf walls are built to the height agreed and should include insulation in the cavity wall.
The remaining dwarf walls are built to match the existingbrickwork or as requested by the homeowner.
18 19On completion of the frames the structural aluminium eaves beam is fi tted to the head of the frames.
The side frames are ‘stitched’ together.
21 22
The PVCu external cill is fi tted to the dwarf wall and the erection of the side frames begins.2017
Optional
Cavity Trays
- See Page 15
8 9

Door & Roof Installation
The outline of the dwarf walls are calculated & marked out
The doorframe is fi tted to theside frames and dwarf walls.
The ridge and starter bars are fi xed into place.
23
25
The drainage system will be fi tted, including the guttering attached to the eaves beam and any down pipes.
Completing the Roof/Side Glazing
The chosen glazing panels or sealed units are installed.All the glazing bars are fi xed from the eaves beam to the ridge.
The glazing is installed into the side frames.If specifi ed in the plans, a vent will be installed into the conservatory roof.
26 27
28 2924
10 11
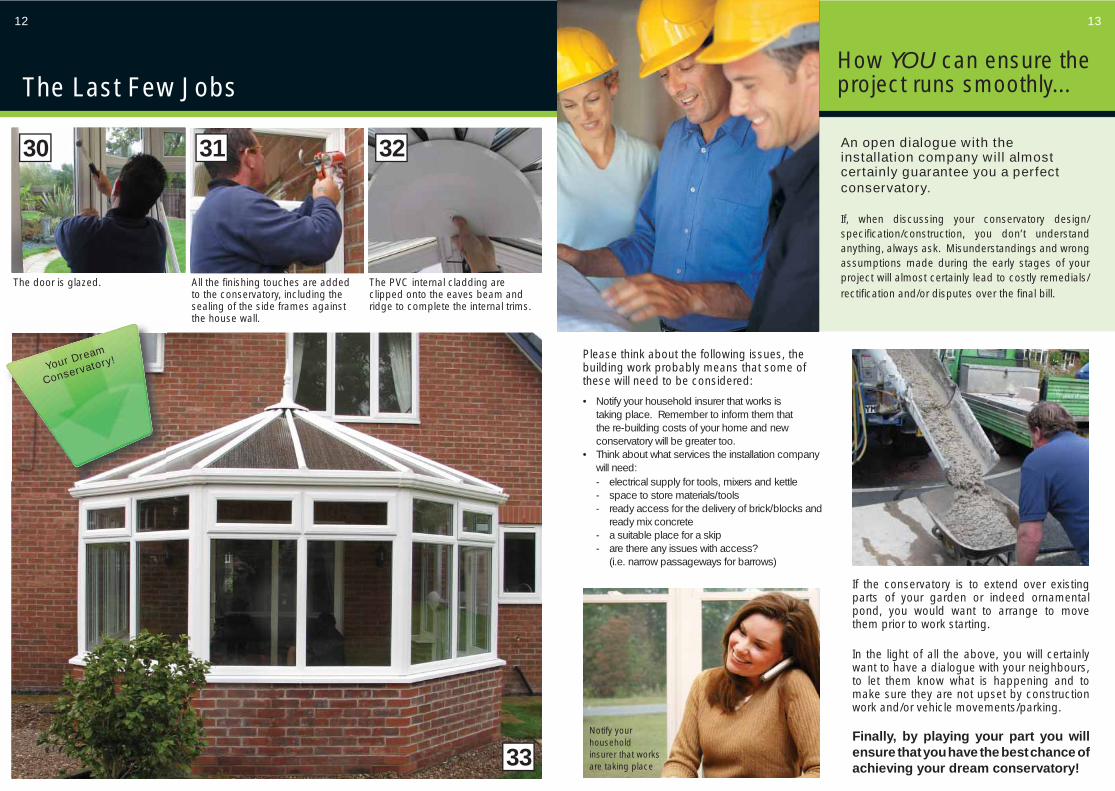
Your Dream
Conservatory!
33
Please think about the following issues, the building work probably means that some of these will need to be considered:
• Notify your household insurer that works is taking place. Remember to inform them that the re-building costs of your home and new conservatory will be greater too.• Think about what services the installation company will need:
The door is glazed.
The Last Few Jobs
30 31 32
All the fi nishing touches are added to the conservatory, including the sealing of the side frames against the house wall.
The PVC internal cladding areclipped onto the eaves beam and ridge to complete the internal trims.
An open dialogue with the installation company will almost certainly guarantee you a perfect conservatory.
If, when discussing your conservatory design/specifi cation/construction, you don’t understand anything, always ask. Misunderstandings and wrong assumptions made during the early stages of your project will almost certainly lead to costly remedials/rectifi cation and/or disputes over the fi nal bill.
How YOU can ensure the project runs smoothly...
If the conservatory is to extend over existing parts of your garden or indeed ornamental pond, you would want to arrange to move them prior to work starting.
- electrical supply for tools, mixers and kettle- space to store materials/tools- ready access for the delivery of brick/blocks and ready mix concrete- a suitable place for a skip- are there any issues with access? (i.e. narrow passageways for barrows)
In the light of all the above, you will certainly want to have a dialogue with your neighbours, to let them know what is happening and to make sure they are not upset by construction work and/or vehicle movements/parking.
Finally, by playing your part you will ensure that you have the best chance of achieving your dream conservatory!
Notify your householdinsurer that worksare taking place
12 13
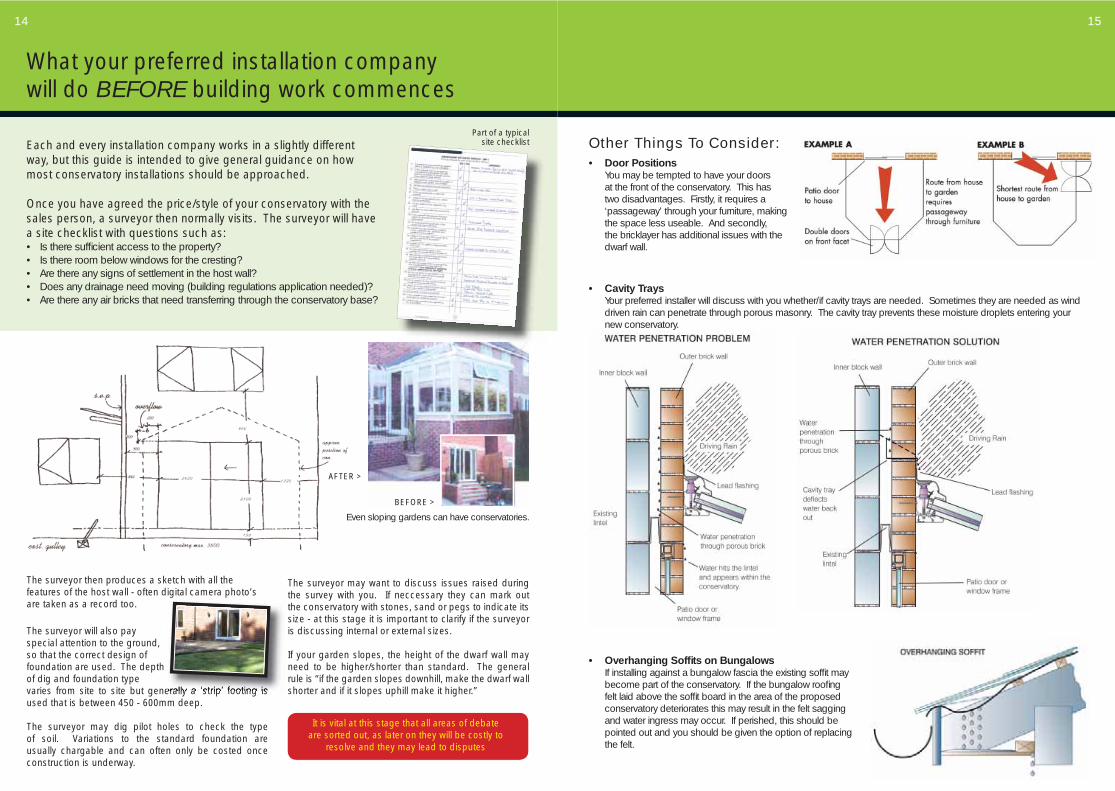
What your preferred installation company will do BEFORE building work commences
Each and every installation company works in a slightly different way, but this guide is intended to give general guidance on how most conservatory installations should be approached.
Once you have agreed the price/style of your conservatory with the sales person, a surveyor then normally visits. The surveyor will have a site checklist with questions such as:• Is there suffi cient access to the property?• Is there room below windows for the cresting?• Are there any signs of settlement in the host wall?• Does any drainage need moving (building regulations application needed)? • Are there any air bricks that need transferring through the conservatory base?
Part of a typicalsite checklist
The surveyor will also pay special attention to the ground, so that the correct design of foundation are used. The depthof dig and foundation type varies from site to site but generally a ‘strip’ footing is used that is between 450 - 600mm deep.
The surveyor may dig pilot holes to check the type of soil. Variations to the standard foundation are usually chargable and can often only be costed once construction is underway.
Even sloping gardens can have conservatories.
It is vital at this stage that all areas of debate are sorted out, as later on they will be costly to
resolve and they may lead to disputes
Other Things To Consider:• Door Positions You may be tempted to have your doors
at the front of the conservatory. This has two disadvantages. Firstly, it requires a ‘passageway’ through your furniture, making the space less useable. And secondly, the bricklayer has additional issues with the dwarf wall.
• Overhanging Soffi ts on Bungalows If installing against a bungalow fascia the existing soffi t may
become part of the conservatory. If the bungalow roofi ng felt laid above the soffi t board in the area of the proposed conservatory deteriorates this may result in the felt sagging and water ingress may occur. If perished, this should be pointed out and you should be given the option of replacing the felt.
The surveyor then produces a sketch with all the features of the host wall - often digital camera photo’s are taken as a record too.
BEFORE >
AFTER >
• Cavity Trays Your preferred installer will discuss with you whether/if cavity trays are needed. Sometimes they are needed as wind
driven rain can penetrate through porous masonry. The cavity tray prevents these moisture droplets entering your new conservatory.
14 15
The surveyor may want to discuss issues raised during the survey with you. If neccessary they can mark out the conservatory with stones, sand or pegs to indicate its size - at this stage it is important to clarify if the surveyor is discussing internal or external sizes.
If your garden slopes, the height of the dwarf wall may need to be higher/shorter than standard. The general rule is “if the garden slopes downhill, make the dwarf wall shorter and if it slopes uphill make it higher.”