Embed Size (px)
Citation preview

Product Documentation
Pivotal™ HDVersion 2.1
Stack and Tools ReferenceRev: A03
© 2014 Pivotal Software, Inc.
Copyright Stack and Tools Reference
2
Notice
Copyright
Copyright © 2014 Pivotal Software, Inc. All rights reserved.
Pivotal Software, Inc. believes the information in this publication is accurate as of its publication date. Theinformation is subject to change without notice. THE INFORMATION IN THIS PUBLICATION IS PROVIDED"AS IS." PIVOTAL SOFTWARE, INC. ("Pivotal") MAKES NO REPRESENTATIONS OR WARRANTIES OF ANYKIND WITH RESPECT TO THE INFORMATION IN THIS PUBLICATION, AND SPECIFICALLY DISCLAIMSIMPLIED WARRANTIES OF MERCHANTABILITY OR FITNESS FOR A PARTICULAR PURPOSE.
Use, copying, and distribution of any Pivotal software described in this publication requires an applicablesoftware license.
All trademarks used herein are the property of Pivotal or their respective owners.
Use of Open SourceThis product may be distributed with open source code, licensed to you in accordance with the applicable opensource license. If you would like a copy of any such source code, Pivotal will provide a copy of the source codethat is required to be made available in accordance with the applicable open source license. Pivotal may chargereasonable shipping and handling charges for such distribution.
About Pivotal Software, Inc.Greenplum transitioned to a new corporate identity (Pivotal, Inc.) in 2013. As a result of this transition, therewill be some legacy instances of our former corporate identity (Greenplum) appearing in our products anddocumentation. If you have any questions or concerns, please do not hesitate to contact us through our web site:http://support.pivotal.io.
Published September 2014
Updated November 2014

Copyright Stack and Tools Reference
3
Contents Stack and Tools Reference
4
Contents
Chapter 1: Overview of Apache Stack and Pivotal Components............8Deployment/Installation Options..........................................................................................................8Pivotal Command Center Deployment................................................................................................8Manual Installation...............................................................................................................................8Core Apache Stack Components........................................................................................................9Pivotal Other Components................................................................................................................ 10Location of Installation Instructions...................................................................................................11Hadoop Versions............................................................................................................................... 11How to Use this Document............................................................................................................... 11
Chapter 2: Manually Installing and Using Pivotal HD 2.1 Stack............12Distribution Contents......................................................................................................................... 12Apache Configuration Reference...................................................................................................... 12Accessing PHD 2.1........................................................................................................................... 13
Prerequisities.......................................................................................................................... 13Installation Notes.................................................................................................................... 14
Hadoop HDFS................................................................................................................................... 14About Hadoop HDFS..............................................................................................................14Installing Hadoop HDFS.........................................................................................................14Using Hadoop HDFS..............................................................................................................18
Hadoop YARN................................................................................................................................... 20About Hadoop YARN............................................................................................................. 20Installing Hadoop YARN.........................................................................................................20Using Hadoop YARN..............................................................................................................24
Hadoop Pseudo-distributed Configuration.........................................................................................25About Pseudo Distribution......................................................................................................25Installing a Hadoop Pseudo-distributed Configuration........................................................... 26
Zookeeper..........................................................................................................................................26About Zookeeper.................................................................................................................... 26Installing Zookeeper............................................................................................................... 26Zookeeper RPM Packages.....................................................................................................27Zookeeper Server Setup........................................................................................................ 27Zookeeper Client Setup..........................................................................................................28Zookeeper Configuration........................................................................................................ 28Using Zookeeper.................................................................................................................... 28Starting the Zookeeper Daemon............................................................................................ 28Accessing the Zookeeper Service..........................................................................................28Stopping the Zookeeper Daemon.......................................................................................... 29
HBase................................................................................................................................................ 29About HBase...........................................................................................................................29Installing HBase......................................................................................................................29Using HBase...........................................................................................................................32
Hive....................................................................................................................................................33About Hive.............................................................................................................................. 34Installing Hive......................................................................................................................... 34Hive Components................................................................................................................... 34Prerequisites........................................................................................................................... 34Hive RPM Packages.............................................................................................................. 34

Contents Stack and Tools Reference
5
Installing DB for Hive Metastore............................................................................................ 35Hive MetaStore Server Setup................................................................................................ 36Hive Server Setup.................................................................................................................. 37Hive Server2 Setup................................................................................................................ 37Hive Configuration.................................................................................................................. 38Hive Post-installation Configuration........................................................................................38Hive Client Setup....................................................................................................................39Using Hive.............................................................................................................................. 39
HCatalog............................................................................................................................................ 40About HCatalog...................................................................................................................... 40Installing HCatalog..................................................................................................................40Using HCatalog.......................................................................................................................43
Pig......................................................................................................................................................44About Pig................................................................................................................................ 44Installing Pig........................................................................................................................... 44Using Pig................................................................................................................................ 45
Mahout............................................................................................................................................... 46About Mahout......................................................................................................................... 46Installing Mahout.....................................................................................................................46Using Mahout..........................................................................................................................47
Flume................................................................................................................................................. 47About Flume........................................................................................................................... 47Installing Flume.......................................................................................................................47Using Flume............................................................................................................................48
Sqoop.................................................................................................................................................49About Sqoop........................................................................................................................... 50Installing Sqoop...................................................................................................................... 50Using Sqoop........................................................................................................................... 51
Oozie..................................................................................................................................................52About Oozie............................................................................................................................ 52Installing Oozie....................................................................................................................... 52Using Oozie............................................................................................................................ 55
GraphLab........................................................................................................................................... 59About GraphLab..................................................................................................................... 60Installing GraphLab.................................................................................................................60
Hamster............................................................................................................................................. 64About Hamster........................................................................................................................64Installing Hamster................................................................................................................... 65
Chapter 3: Manually Upgrading Pivotal HD Stack to 2.1.0.................... 70General Upgrade Tasks for Each Component..................................................................................70Components to Upgrade (Supported by icm_client).........................................................................70
Upgrade Bigtop Utilities..........................................................................................................70Upgrade Zookeeper................................................................................................................71Upgrade Hadoop.................................................................................................................... 71Upgrade HBase...................................................................................................................... 71Upgrade Hive..........................................................................................................................71Upgrade Pig............................................................................................................................71Upgrade Mahout..................................................................................................................... 72
Components to Upgrade (Not Supported by icm_client).................................................................. 72Upgrade Flume....................................................................................................................... 72Upgrade Sqoop.......................................................................................................................73Upgrade Oozie........................................................................................................................73Upgrade HCatalog.................................................................................................................. 74
Contents Stack and Tools Reference
6
Chapter 4: Pivotal Hadoop Enhancements.............................................76HDFS Off-Cluster Client Rack Awareness........................................................................................77
Overview of Rack Awareness................................................................................................ 77Problem: Ignored Off-cluster Clients...................................................................................... 77Solution: Design......................................................................................................................78Enabling Off-Client Rack Awareness..................................................................................... 79
Vaidya................................................................................................................................................ 79Overview................................................................................................................................. 79Installing Vaidya Files.............................................................................................................80Enabling Vaidya......................................................................................................................80Disabling Vaidya..................................................................................................................... 80Using Vaidya to Analyze Jobs............................................................................................... 80Vaidya Configuration Rules.................................................................................................... 81Deploying Files....................................................................................................................... 83
HVE Topology Awareness................................................................................................................ 84Topology Awareness Configuration and Verification..............................................................84
HVE Elasticity.................................................................................................................................... 86Overview................................................................................................................................. 86Function List........................................................................................................................... 86Configuration...........................................................................................................................87Command-Line Interface for YARN Cluster........................................................................... 87
Chapter 5: Security................................................................................... 90Security Overview..............................................................................................................................90Kerberos Setup..................................................................................................................................90
Installing the KDC...................................................................................................................91Integrating Cluster Security with an Organizational KDC.......................................................93
LDAP Setup.......................................................................................................................................95Overview................................................................................................................................. 95Configuring Local LDP............................................................................................................96
Configuring Kerberos for HDFS and YARN (MapReduce)............................................................... 96Creating the Principals and Keytabs......................................................................................97Installing Java Support Items............................................................................................... 100Modifying the Container and Script......................................................................................101Editing the Site XML............................................................................................................ 102Completing the HDFS/YARN Secure Configuration.............................................................106Turning Secure Mode Off.....................................................................................................107Building and Installing JSVC................................................................................................ 108
Configuring Kerberos for HDFS High Availability........................................................................... 109Configuring Secure Zookeeper....................................................................................................... 109
Zookeeper Servers............................................................................................................... 109Zookeeper Clients.................................................................................................................111
Configuring Secure HBase..............................................................................................................112HBase Master and Regionservers....................................................................................... 112HBase Clients....................................................................................................................... 114Configuring HBase with Secure Zookeeper......................................................................... 115Access Control and PXF External Tables............................................................................115
Configuring Secure Hive................................................................................................................. 117Changing to Hive Server 2...................................................................................................119Hive Warehouse Permissions Issues...................................................................................119Connecting and Using Secure Hive with Beeline.................................................................119
Configuring HCatalog (WebHCat) on Secure Hive.........................................................................120Prerequisites......................................................................................................................... 120

Contents Stack and Tools Reference
7
Create Keytab File for the WebHCat Server........................................................................120Distribute the Keytab File to the WebHCat Server.............................................................. 121Configure WebHCat and Proxy Users................................................................................. 121Verify WebHCat is Working..................................................................................................122
Configuring HAWQ on Secure HDFS............................................................................................. 122Requirements........................................................................................................................122Preparation............................................................................................................................123Configuration.........................................................................................................................123Troubleshooting.................................................................................................................... 124
Enabling Auditing.............................................................................................................................124Secure Web Access........................................................................................................................125
Overview............................................................................................................................... 126Prerequisites......................................................................................................................... 127Configuring Secure WebHDFS.............................................................................................127Using WebHDFS in Secure Mode....................................................................................... 127
Secure Web Access via HttpFS......................................................................................................129Prerequisites......................................................................................................................... 129Add Principal for HttpFS.......................................................................................................129Create and Distribute Keytab............................................................................................... 129Configuration.........................................................................................................................130Restart HttpFS...................................................................................................................... 131Verify HttpFS is Working...................................................................................................... 131
Configuring Secure Flume...............................................................................................................132Prerequisites......................................................................................................................... 132Create the Flume Principal...................................................................................................132Create the Flume Keytab Files............................................................................................ 132Distribute the Flume Keytab Files and Change Ownership and Permissions...................... 132Single User for All HDFS Sinks........................................................................................... 133Different Users Across Multiple HDFS Sinks....................................................................... 133
Configuring Secure Oozie............................................................................................................... 135Prerequisites......................................................................................................................... 135Create the Oozie Principal................................................................................................... 135Create the HTTP Principal for the Oozie Server................................................................. 135Create the Oozie Keytab Files.............................................................................................136Copy the Oozie Keytab Files and Change Ownership and Permissions............................. 136Edit the Oozie Configuration File......................................................................................... 136Using Oozie with a Secure Hive Metastore Server..............................................................136Verify Secure Oozie............................................................................................................. 137
Configuring Secure Sqoop.............................................................................................................. 137Configuring Secure Pig................................................................................................................... 137Configuring Secure Mahout.............................................................................................................137Security - Troubleshooting.............................................................................................................. 137

Overview of Apache Stack and Pivotal Components Stack and Tools Reference
8
Chapter
1Overview of Apache Stack and Pivotal Components
Pivotal HD Enterprise is an enterprise-capable, commercially supported distribution of Apache Hadoop packagestargeted to traditional Hadoop deployments.
• Deployment/Installation Options on page 8
• Pivotal Command Center Deployment on page 8• Manual Installation on page 8
• Core Apache Stack Components on page 9• Pivotal Other Components on page 10• Location of Installation Instructions on page 11• Hadoop Versions on page 11• How to Use this Document on page 11
Deployment/Installation OptionsPivotal HD Enterprise supports two options for deployment/installation:
• Deployment through Pivotal Command Center• Manual installation of RPMs
Pivotal Command Center DeploymentPivotal Command Center (PCC) is a Web-based interface that supports performing the following actionsfor Pivotal HD Enterprise:
• Monitoring and management of a Pivotal HD (PHD) environment.• Deployment and configuration of PHD clusters.
PCC also provides a CLI (Command-Line Interface) which can be used to deploy and configure PHDclusters. You can deploy most of the components through the PCC GUI or CLI. However, note that somecomponents (specifically Flume, Sqoop, Oozie, Hamster and GraphLab) can only be installed manually.
• For more information about using the GUI, see Pivotal Command Center User Guide.• For more information about using the CLI, see Pivotal HD Enterprise Installation and Administrator
Guide.
Manual InstallationAll the Hadoop and Pivotal components can be installed manually without using the PCC GUI or CLI. Formanual installs, Pivotal HD Enterprise provides RPM files.

Overview of Apache Stack and Pivotal Components Stack and Tools Reference
9
This document provides detailed manual instructions for installing all the Apache components, as well assome of the additional components.
The following sections provide more details about each component, including the various supporteddeployment options for each component.
Core Apache Stack ComponentsComponent Description CLI/GUI Install Manual Install (RPM)
Hadoop HDFS: A Hadoopdistributed file system(HDFS).
YARN: Next-generationHadoop data-processingframework.
Pig Procedural languagethat abstracts lower levelMapReduce.
Hive Data warehouseinfrastructure built on topof Hadoop.
HBase Database for randomreal time read/writeaccess.
Hcatalog HCatalog is a table andstorage managementlayer for Hadoop thatenables users withdifferent data processingtools — e.g. Pig,MapReduce — to moreeasily read and writedata on the grid.
Mahout Scalable machinelearning and data mininglibrary.
Zookeeper Hadoop centralizedservice for maintainingconfigurationinformation, naming,providing distributedsynchronization, andproviding group services.
Flume A tool used for collectingand aggregating datafrom multiple sources toa centralized data store.
Sqoop A tool for transferringbulk data between
Overview of Apache Stack and Pivotal Components Stack and Tools Reference
10
Component Description CLI/GUI Install Manual Install (RPM)
Apache Hadoop andstructured datastores.
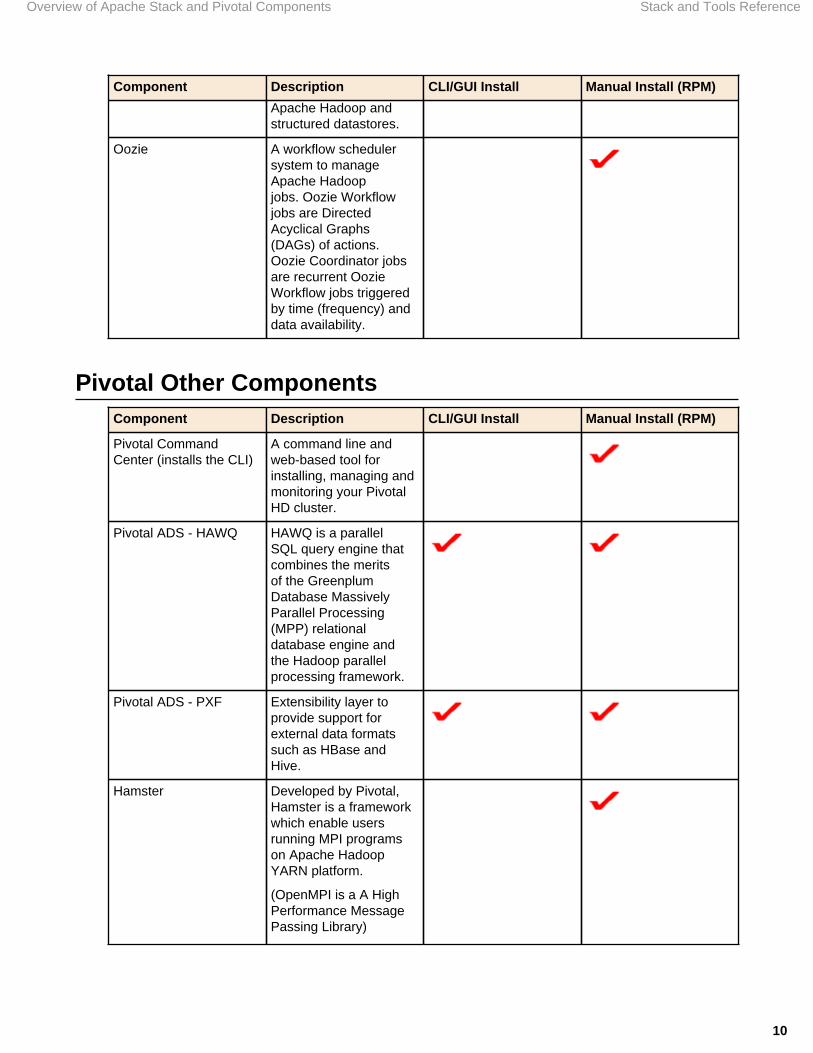
Oozie A workflow schedulersystem to manageApache Hadoopjobs. Oozie Workflowjobs are DirectedAcyclical Graphs(DAGs) of actions.Oozie Coordinator jobsare recurrent OozieWorkflow jobs triggeredby time (frequency) anddata availability.
Pivotal Other ComponentsComponent Description CLI/GUI Install Manual Install (RPM)
Pivotal CommandCenter (installs the CLI)
A command line andweb-based tool forinstalling, managing andmonitoring your PivotalHD cluster.
Pivotal ADS - HAWQ HAWQ is a parallelSQL query engine thatcombines the meritsof the GreenplumDatabase MassivelyParallel Processing(MPP) relationaldatabase engine andthe Hadoop parallelprocessing framework.
Pivotal ADS - PXF Extensibility layer toprovide support forexternal data formatssuch as HBase andHive.
Hamster Developed by Pivotal,Hamster is a frameworkwhich enable usersrunning MPI programson Apache HadoopYARN platform.
(OpenMPI is a A HighPerformance MessagePassing Library)

Overview of Apache Stack and Pivotal Components Stack and Tools Reference
11
Component Description CLI/GUI Install Manual Install (RPM)
GraphLab GraphLab is apowerful new systemfor designing andimplementing parallelalgorithms in machinelearning. It is agraph-based, highperformance, distributedcomputation frameworkwritten in C++ thatmakes use of MPIand has its ownprogramming model.
Location of Installation InstructionsYou can find installation instructions for the above components in these documents:
Component GUI Install CLI Install Manual Install
Pivotal CommandCenter
NOT SUPPORTED Pivotal HD EnterpriseInstallation andAdministrator Guide
NOT SUPPORTED
Pivotal Hadoop Stack Pivotal CommandCenter User Guide
Pivotal HD EnterpriseInstallation andAdministrator Guide
This guide.
Pivotal ADS (HAWQ andPXF)
Pivotal CommandCenter User Guide
Pivotal HD EnterpriseInstallation andAdministrator Guide
Pivotal ExtensionFramework Installationand User Guide
Hadoop VersionsPHD 2.1 is based upon Hadoop 2.2.0.
How to Use this DocumentManual Installation Instructions:
• Manually installing a YARN-based cluster using the RPM distribution. See Manually Installing and UsingPivotal HD 2.1 Stack on page 12.
Upgrade Instructions:
• Manually upgrading a YARN-based cluster using the RPM distribution. See Manually Upgrading PivotalHD Stack to 2.1.0 on page 70.
Security:
• Manually securing your cluster via Kerberos. See Security on page 90.

Manually Installing and Using Pivotal HD 2.1 Stack Stack and Tools Reference
12
Chapter
2Manually Installing and Using Pivotal HD 2.1 Stack
This section describes how to manually install and use all the components included with Pivotal HD 2.1.
Distribution ContentsPivotal HD is a full Apache Hadoop distribution with Pivotal add-ons and a native integration with PivotalHAWQ.
The RPM distribution of PHD contains the following:
• Hadoop 2.2.0• Pig 0.12.0• Zookeeper 3.4.5• HBase 0.96.0• Hive 0.12.0• Hcatalog 0.12.0• Mahout 0.7• Flume 1.4.0• Sqoop 1.4.2• Oozie 4.0.0• Hamster 1.1• GraphLab 2.2
Apache Configuration ReferenceThe following table provides links to configuration resources for Apache Hadoop and its components:
Component Configuration Reference
Hadoop (HDFS, Yarn) http://hadoop.apache.org/docs/r2.2.0/
Zookeeper http://zookeeper.apache.org/doc/r3.4.5/zookeeperStarted.html
Hbase http://hbase.apache.org/book.html
Hive/Hcatalog https://cwiki.apache.org/confluence/display/Hive/Home
https://cwiki.apache.org/confluence/display/Hive/HBaseIntegration
Pig http://pig.apache.org/docs/r0.12.0/start.html
Manually Installing and Using Pivotal HD 2.1 Stack Stack and Tools Reference
13
Component Configuration Reference
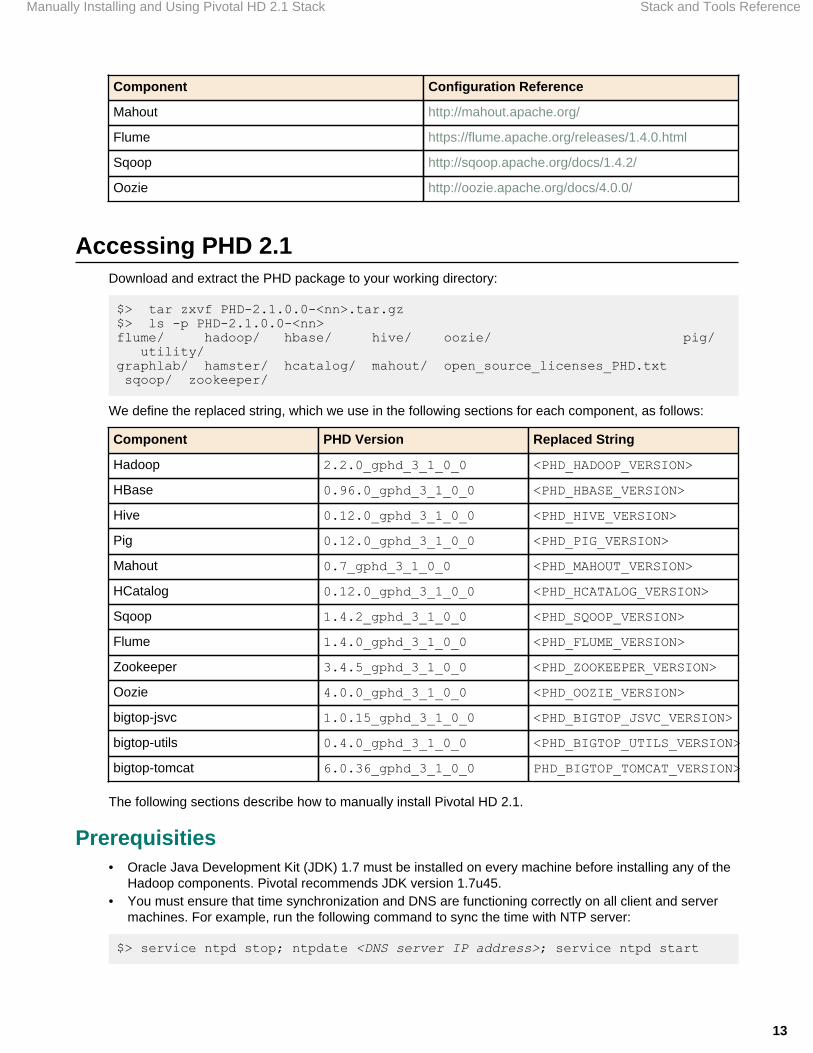
Mahout http://mahout.apache.org/
Flume https://flume.apache.org/releases/1.4.0.html
Sqoop http://sqoop.apache.org/docs/1.4.2/
Oozie http://oozie.apache.org/docs/4.0.0/
Accessing PHD 2.1Download and extract the PHD package to your working directory:
$> tar zxvf PHD-2.1.0.0-<nn>.tar.gz$> ls -p PHD-2.1.0.0-<nn>flume/ hadoop/ hbase/ hive/ oozie/ pig/ utility/graphlab/ hamster/ hcatalog/ mahout/ open_source_licenses_PHD.txt sqoop/ zookeeper/
We define the replaced string, which we use in the following sections for each component, as follows:
Component PHD Version Replaced String
Hadoop 2.2.0_gphd_3_1_0_0 <PHD_HADOOP_VERSION>
HBase 0.96.0_gphd_3_1_0_0 <PHD_HBASE_VERSION>
Hive 0.12.0_gphd_3_1_0_0 <PHD_HIVE_VERSION>
Pig 0.12.0_gphd_3_1_0_0 <PHD_PIG_VERSION>
Mahout 0.7_gphd_3_1_0_0 <PHD_MAHOUT_VERSION>
HCatalog 0.12.0_gphd_3_1_0_0 <PHD_HCATALOG_VERSION>
Sqoop 1.4.2_gphd_3_1_0_0 <PHD_SQOOP_VERSION>
Flume 1.4.0_gphd_3_1_0_0 <PHD_FLUME_VERSION>
Zookeeper 3.4.5_gphd_3_1_0_0 <PHD_ZOOKEEPER_VERSION>
Oozie 4.0.0_gphd_3_1_0_0 <PHD_OOZIE_VERSION>
bigtop-jsvc 1.0.15_gphd_3_1_0_0 <PHD_BIGTOP_JSVC_VERSION>
bigtop-utils 0.4.0_gphd_3_1_0_0 <PHD_BIGTOP_UTILS_VERSION>
bigtop-tomcat 6.0.36_gphd_3_1_0_0 PHD_BIGTOP_TOMCAT_VERSION>
The following sections describe how to manually install Pivotal HD 2.1.
Prerequisities• Oracle Java Development Kit (JDK) 1.7 must be installed on every machine before installing any of the
Hadoop components. Pivotal recommends JDK version 1.7u45.• You must ensure that time synchronization and DNS are functioning correctly on all client and server
machines. For example, run the following command to sync the time with NTP server:
$> service ntpd stop; ntpdate <DNS server IP address>; service ntpd start

Manually Installing and Using Pivotal HD 2.1 Stack Stack and Tools Reference
14
Installation NotesIn this section, we install packages by running the following command:
rpm -ivh <package_name>-<version>-<nn>.rpm
Where:
<version> is the PHD version.
<nn> is the build number.
Hadoop HDFS• About Hadoop HDFS on page 14• Installing Hadoop HDFS on page 14
• Hadoop HDFS RPM Packages on page 14• Prerequisites: Core Package Setup on page 17• HDFS Namenode Setup on page 17• HDFS Datanode Setup on page 18• HDFS Secondary Namenode Setup on page 18• HDFS NFS Gateway Setup on page 18• HDFS Configuration on page 18
• Using Hadoop HDFS on page 18
• Starting HDFS on page 18• Starting NFS gateway on page 19• Using HDFS on page 19• Stopping HDFS on page 20
About Hadoop HDFSThe Hadoop Distributed File System (HDFS) is the primary distributed storage used by Hadoopapplications. It is a distributed file system designed to provide reliable, scalable, self-healing, highbandwidth, clustered storage.
Installing Hadoop HDFSThis section provides instructions for installing each of the following core Hadoop RPMs:
• HDFS Namenode Setup• HDFS Datanode Setup• HDFS Secondary Namenode Setup• HDFS NFS Gateway Setup
Hadoop HDFS RPM PackagesPivotal provides the following RPMs as part of this release. The core packages provide all executables,libraries, configurations, and documentation for Hadoop and are required on every node in the Hadoopcluster as well as on the client workstation that will access the Hadoop service. The daemon packagesprovide a convenient way to manage Hadoop HDFS daemons as Linux services, which rely on the corepackage.
Manually Installing and Using Pivotal HD 2.1 Stack Stack and Tools Reference
15
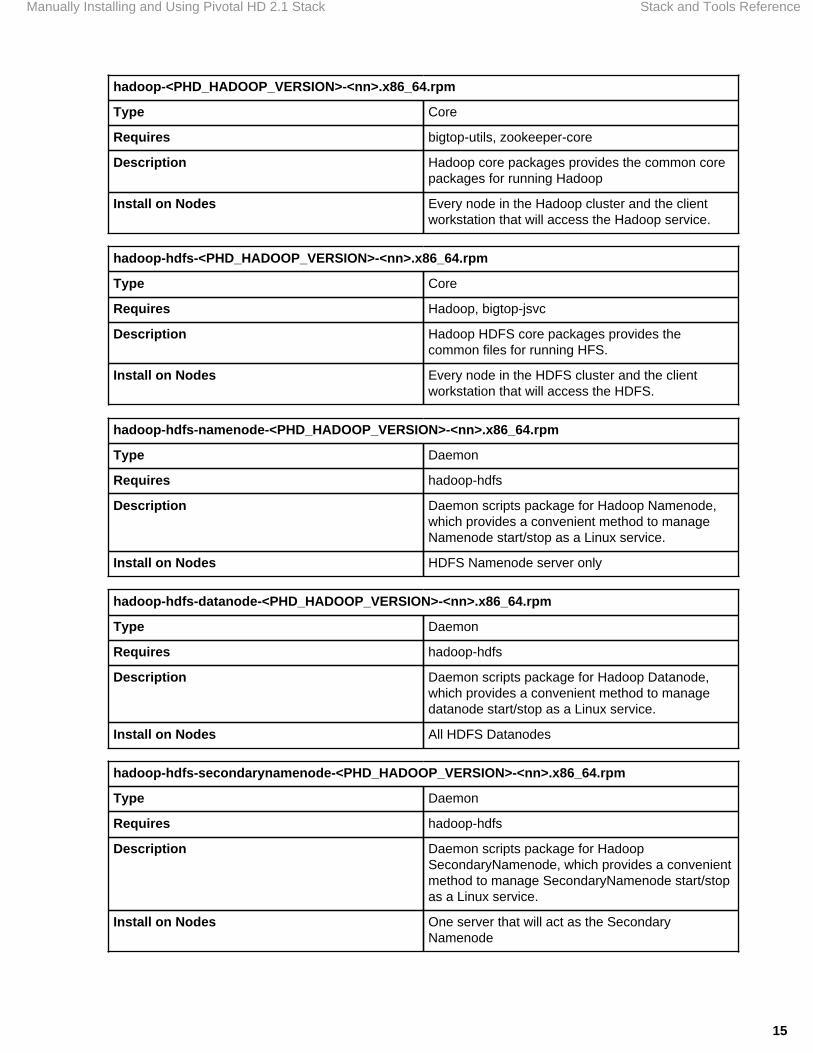
hadoop-<PHD_HADOOP_VERSION>-<nn>.x86_64.rpm
Type Core
Requires bigtop-utils, zookeeper-core
Description Hadoop core packages provides the common corepackages for running Hadoop
Install on Nodes Every node in the Hadoop cluster and the clientworkstation that will access the Hadoop service.
hadoop-hdfs-<PHD_HADOOP_VERSION>-<nn>.x86_64.rpm
Type Core
Requires Hadoop, bigtop-jsvc
Description Hadoop HDFS core packages provides thecommon files for running HFS.
Install on Nodes Every node in the HDFS cluster and the clientworkstation that will access the HDFS.
hadoop-hdfs-namenode-<PHD_HADOOP_VERSION>-<nn>.x86_64.rpm
Type Daemon
Requires hadoop-hdfs
Description Daemon scripts package for Hadoop Namenode,which provides a convenient method to manageNamenode start/stop as a Linux service.
Install on Nodes HDFS Namenode server only
hadoop-hdfs-datanode-<PHD_HADOOP_VERSION>-<nn>.x86_64.rpm
Type Daemon
Requires hadoop-hdfs
Description Daemon scripts package for Hadoop Datanode,which provides a convenient method to managedatanode start/stop as a Linux service.
Install on Nodes All HDFS Datanodes
hadoop-hdfs-secondarynamenode-<PHD_HADOOP_VERSION>-<nn>.x86_64.rpm
Type Daemon
Requires hadoop-hdfs
Description Daemon scripts package for HadoopSecondaryNamenode, which provides a convenientmethod to manage SecondaryNamenode start/stopas a Linux service.
Install on Nodes One server that will act as the SecondaryNamenode

Manually Installing and Using Pivotal HD 2.1 Stack Stack and Tools Reference
16
hadoop-hdfs-journalnode-<PHD_HADOOP_VERSION>-<nn>.x86_64.rpm
Type Daemon
Requires hadoop-hdfs
Description Daemon scripts package for Hadoop JournalNode,which provides a convenient method to managejournalnode start/stop as a Linux service.
Install on Nodes All HDFS JournalNodes
hadoop-hdfs-nfs3-<PHD_HADOOP_VERSION>-<nn>.x86_64.rpm
Type Daemon
Requires hadoop-hdfs
Description Daemon scripts package for Hadoop NFS gateway,which provides a convenient method to manageNFS gateway start/stop as a Linux service.
Install on Nodes Node serving as the NFS server
hadoop-hdfs-portmap-<PHD_HADOOP_VERSION>-<nn>.x86_64.rpm
Type Daemon
Requires hadoop-hdfs
Description Daemon scripts package for Hadoop portmap,which provides a convenient method to manageportmap start/stop as a Linux service.
Install on Nodes Node serving as the NFS server
hadoop-hdfs-zkfc-<PHD_HADOOP_VERSION>-<nn>.x86_64.rpm
Type Daemon
Requires hadoop-hdfs
Description Daemon scripts package for Hadoop zkfc, whichprovides a convenient method to manage zkfc start/stop as a Linux service.
Install on Nodes All HDFS zkfc nodes
hadoop-hdfs-fuse-<PHD_HADOOP_VERSION>-<nn>.x86_64.rpm
Type Core
Requires hadoop-libhdfs, hadoop-client
Description Binaries that can be used to mount hdfs as a localdirectory.
Install on Nodes Servers that mount the HDFS
hadoop-libhdfs-<PHD_HADOOP_VERSION>-<nn>.x86_64.rpm
Type Core

Manually Installing and Using Pivotal HD 2.1 Stack Stack and Tools Reference
17
Requires hadoop-hdfs
Description Native implementation of the HDFS.
Install on Nodes Servers that run native HDFS
hadoop-httpfs-<PHD_HADOOP_VERSION>-<nn>.x86_64.rpm
Type Core
Requires bigtop-tomcat, Hadoop, hadoop-hdfs
Description HttpFS is a server that provides a REST HTTPgateway supporting all HDFS File Systemoperations (read and write).
Install on Nodes Servers that will be serving the REST HDFSservice
hadoop-doc-<PHD_HADOOP_VERSION>-<nn>.x86_64.rpm
Type Doc
Requires N/A
Description Hadoop documentation package.
hadoop-client-<PHD_HADOOP_VERSION>-<nn>.x86_64.rpm
Type Library
Requires Hadoop, hadoop-yarn, hadoop-mapreduce,hadoop-hdfs
Description A set of symbolic links which gathers the librariesfor programming Hadoop and submit Hadoop jobs.
Install on Nodes Clients nodes that will be used to submit Hadoopjobs
Prerequisites: Core Package SetupPerform the following steps on all the nodes in the Hadoop cluster and its client nodes:
$ sudo rpm -ivh working_dir/utility/rpm/bigtop-utils-<PHD_BIGTOP_UTILS_VERSION>-<nn>.noarch.rpm$ sudo rpm -ivh working_dir/zookeeper/rpm/zookeeper-<PHD_ZOOKEEPER_VERSION>-<nn>.noarch.rpm$ sudo rpm -ivh working_dir/hadoop/rpm/hadoop-<PHD_HADOOP_VERSION>-<nn>.x86_64.rpm
Where working_dir is the directory where you want the rpms expanded.
HDFS Namenode SetupInstall the Hadoop Namenode package on the workstation that will serve as HDFS Namenode:
$ sudo rpm -ivh working_dir/utility/rpm/bigtop-jsvc-<PHD_BIGTOP_JSVC_VERSION>-<nn>.x86_64.rpm$ sudo rpm -ivh working_dir/hadoop/rpm/hadoop-hdfs-<PHD_HADOOP_VERSION>-<nn>.x86_64.rpm
Manually Installing and Using Pivotal HD 2.1 Stack Stack and Tools Reference
18
$ sudo rpm -ivh working_dir/hadooop/rpm/hadoop-hdfs-namenode-<PHD_HADOOP_VERSION>-<nn>.x86_64.rpm
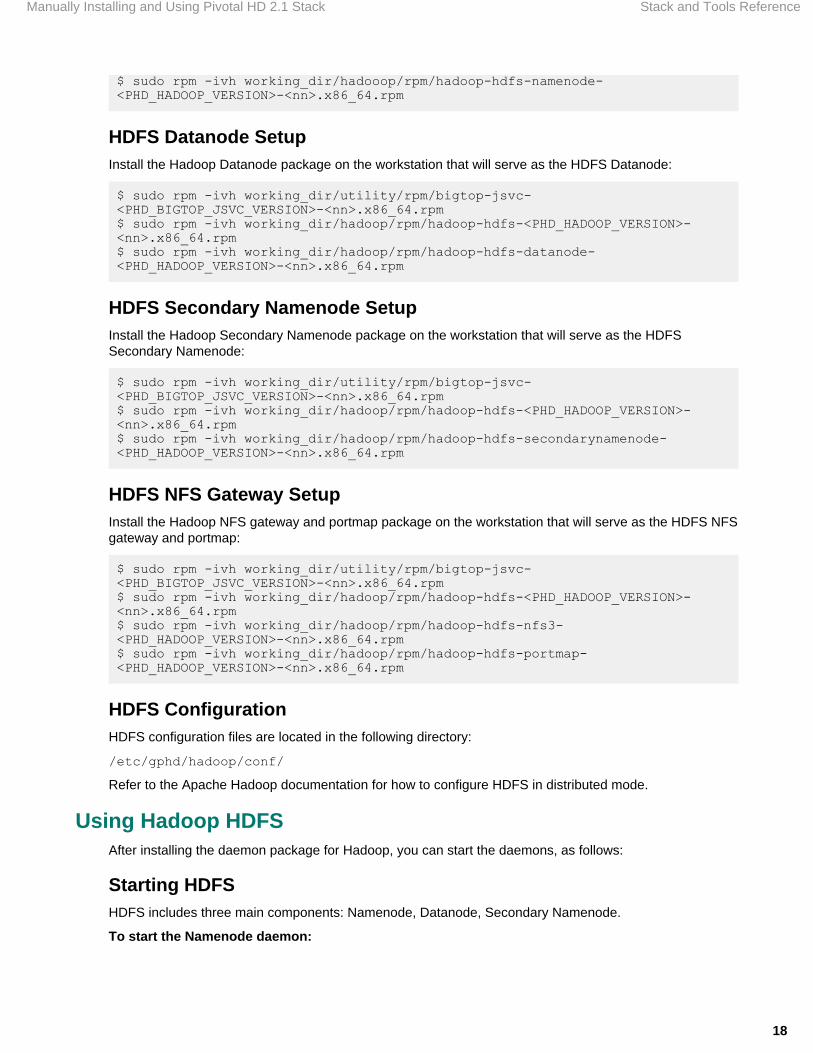
HDFS Datanode SetupInstall the Hadoop Datanode package on the workstation that will serve as the HDFS Datanode:
$ sudo rpm -ivh working_dir/utility/rpm/bigtop-jsvc-<PHD_BIGTOP_JSVC_VERSION>-<nn>.x86_64.rpm$ sudo rpm -ivh working_dir/hadoop/rpm/hadoop-hdfs-<PHD_HADOOP_VERSION>-<nn>.x86_64.rpm$ sudo rpm -ivh working_dir/hadoop/rpm/hadoop-hdfs-datanode-<PHD_HADOOP_VERSION>-<nn>.x86_64.rpm
HDFS Secondary Namenode SetupInstall the Hadoop Secondary Namenode package on the workstation that will serve as the HDFSSecondary Namenode:
$ sudo rpm -ivh working_dir/utility/rpm/bigtop-jsvc-<PHD_BIGTOP_JSVC_VERSION>-<nn>.x86_64.rpm$ sudo rpm -ivh working_dir/hadoop/rpm/hadoop-hdfs-<PHD_HADOOP_VERSION>-<nn>.x86_64.rpm$ sudo rpm -ivh working_dir/hadoop/rpm/hadoop-hdfs-secondarynamenode-<PHD_HADOOP_VERSION>-<nn>.x86_64.rpm
HDFS NFS Gateway SetupInstall the Hadoop NFS gateway and portmap package on the workstation that will serve as the HDFS NFSgateway and portmap:
$ sudo rpm -ivh working_dir/utility/rpm/bigtop-jsvc-<PHD_BIGTOP_JSVC_VERSION>-<nn>.x86_64.rpm$ sudo rpm -ivh working_dir/hadoop/rpm/hadoop-hdfs-<PHD_HADOOP_VERSION>-<nn>.x86_64.rpm$ sudo rpm -ivh working_dir/hadoop/rpm/hadoop-hdfs-nfs3-<PHD_HADOOP_VERSION>-<nn>.x86_64.rpm$ sudo rpm -ivh working_dir/hadoop/rpm/hadoop-hdfs-portmap-<PHD_HADOOP_VERSION>-<nn>.x86_64.rpm
HDFS ConfigurationHDFS configuration files are located in the following directory:
/etc/gphd/hadoop/conf/
Refer to the Apache Hadoop documentation for how to configure HDFS in distributed mode.
Using Hadoop HDFSAfter installing the daemon package for Hadoop, you can start the daemons, as follows:
Starting HDFSHDFS includes three main components: Namenode, Datanode, Secondary Namenode.
To start the Namenode daemon:
Manually Installing and Using Pivotal HD 2.1 Stack Stack and Tools Reference
19
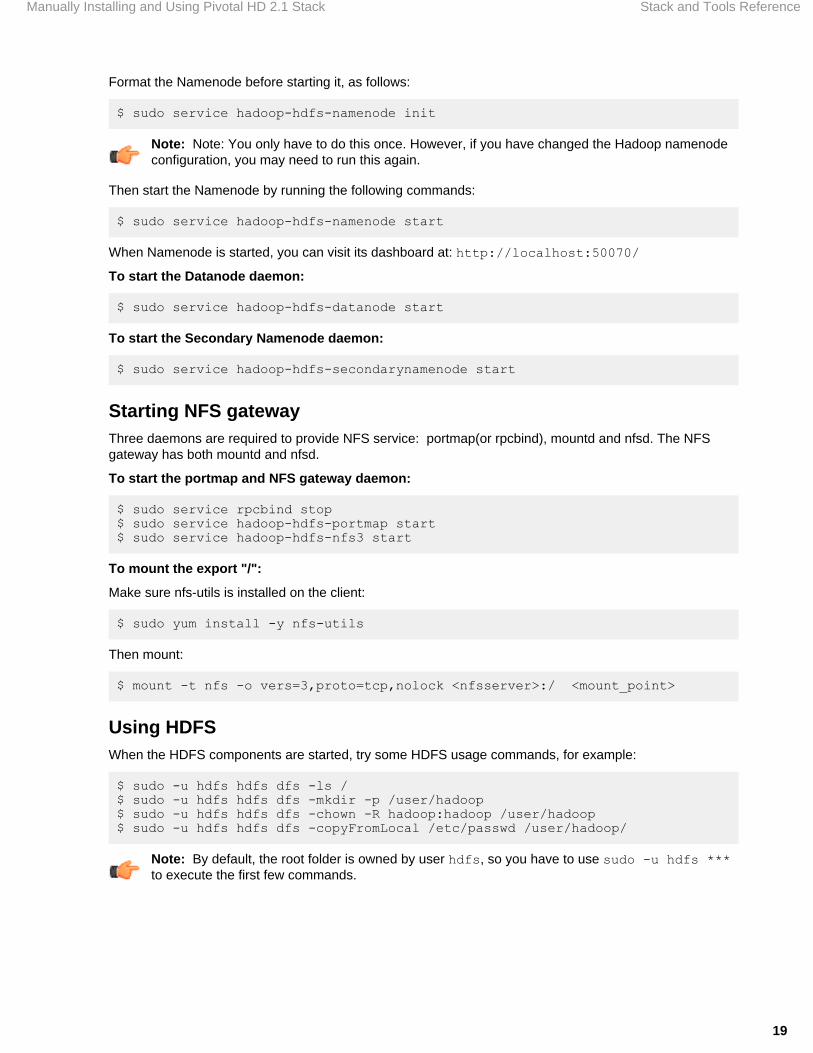
Format the Namenode before starting it, as follows:
$ sudo service hadoop-hdfs-namenode init
Note: Note: You only have to do this once. However, if you have changed the Hadoop namenodeconfiguration, you may need to run this again.
Then start the Namenode by running the following commands:
$ sudo service hadoop-hdfs-namenode start
When Namenode is started, you can visit its dashboard at: http://localhost:50070/
To start the Datanode daemon:
$ sudo service hadoop-hdfs-datanode start
To start the Secondary Namenode daemon:
$ sudo service hadoop-hdfs-secondarynamenode start
Starting NFS gatewayThree daemons are required to provide NFS service: portmap(or rpcbind), mountd and nfsd. The NFSgateway has both mountd and nfsd.
To start the portmap and NFS gateway daemon:
$ sudo service rpcbind stop$ sudo service hadoop-hdfs-portmap start$ sudo service hadoop-hdfs-nfs3 start
To mount the export "/":
Make sure nfs-utils is installed on the client:
$ sudo yum install -y nfs-utils
Then mount:
$ mount -t nfs -o vers=3,proto=tcp,nolock <nfsserver>:/ <mount_point>
Using HDFSWhen the HDFS components are started, try some HDFS usage commands, for example:
$ sudo -u hdfs hdfs dfs -ls /$ sudo -u hdfs hdfs dfs -mkdir -p /user/hadoop$ sudo -u hdfs hdfs dfs -chown -R hadoop:hadoop /user/hadoop$ sudo -u hdfs hdfs dfs -copyFromLocal /etc/passwd /user/hadoop/
Note: By default, the root folder is owned by user hdfs, so you have to use sudo -u hdfs ***to execute the first few commands.
Manually Installing and Using Pivotal HD 2.1 Stack Stack and Tools Reference
20
Stopping HDFSStop the Namenode Daemon:
$ sudo service hadoop-hdfs-namenode stop
Stop the Datanode Daemon:
$ sudo service hadoop-hdfs-datanode stop
Stop the Secondary Namenode Daemon:
$ sudo service hadoop-hdfs-secondarynamenode stop
Stop the NFS gateway Daemon:
$ sudo service hadoop-hdfs-portmap stop$ sudo service hadoop-hdfs-nfs3 stop
Hadoop YARN• About Hadoop YARN on page 20• Installing Hadoop YARN on page 20
• Hadoop YARN RPM Packages on page 21• Prerequisites: Core Package Setup on page 23• YARN ResourceManager Setup on page 23• YARN NodeManager Setup on page 23• Mapreduce HistoryServer Setup on page 23• YARN ProxyServer Setup on page 23• YARN Configuration on page 24
• Using Hadoop YARN on page 24
• Starting YARN on page 24• Starting ResourceManager on page 24• Starting NodeManager on page 24• Start MapReduce HistoryServer on page 24• Using YARN on page 25• Stopping YARN on page 25
About Hadoop YARNHadoop MapReduce is a software framework for easily writing applications which process vast amounts ofdata (multi-terabyte data-sets) in-parallel on large clusters (thousands of nodes) of commodity hardware ina reliable, fault-tolerant manner.
Apache overhauled MapReduce and released MapReduce 2.0 (MRv2) or YARN. YARN now splits themajor functionalities of the JobTracker, resource management and job scheduling/monitoring, into separatedaemons.
Installing Hadoop YARNThis section provides instructions for installing each of the following core Hadoop YARN RPMs:

Manually Installing and Using Pivotal HD 2.1 Stack Stack and Tools Reference
21
• YARN ResourceManager Setup• YARN NodeManager Setup• Mapreduce HistoryServer Setup• YARN ProxyServer Setup
Hadoop YARN RPM PackagesPivotal provides the following RPMs as part of this release. The core packages provide all executables,libraries, configurations, and documentation for Hadoop and is required on every node in the Hadoopcluster, as well as on the client workstation that will access the Hadoop service. The daemon packagesprovide a convenient way to manage Hadoop YARN daemons as Linux services, which rely on the corepackage.
hadoop-<PHD_HADOOP_VERSION>-<nn>.x86_64.rpm
Type Core
Requires bigtop-utils, zookeeper-core
Description Hadoop core packages provides the common corepackages for running Hadoop.
Install on Nodes Every node in the Hadoop cluster and the clientworkstation that will access the Hadoop service
hadoop-yarn-<PHD_HADOOP_VERSION>-<nn>.x86_64.rpm
Type Core
Requires hadoop
Description Hadoop YARN core packages provides commonfiles for running YARN.
Install on Nodes All YARN nodes
hadoop-yarn-resourcemanager-<PHD_HADOOP_VERSION>-<nn>.x86_64.rpm
Type Daemon
Requires hadoop-yarn
Description Daemon scripts package for Hadoop YARNResourceManager, which provides a convenientmethod to manage ResourceManager start/stop asa Linux service.
Install on Nodes ResourceManager node
hadoop-yarn-nodemanager-<PHD_HADOOP_VERSION>-<nn>.x86_64.rpm
Type Daemon
Requires hadoop-yarn
Description Daemon scripts package for Hadoop YARNNodeManager, which provides a convenientmethod to manage NodeManager start/stop as aLinux service.
Install on Nodes All NodeManager nodes

Manually Installing and Using Pivotal HD 2.1 Stack Stack and Tools Reference
22
hadoop-yarn-proxyserver-<PHD_HADOOP_VERSION>-<nn>.x86_64.rpm
Type Daemon
Requires hadoop-yarn
Description Daemon scripts package for Hadoop YARNProxyServer, which provides a convenient methodto manage ProxyServer start/stop as a Linuxservice.
Install on Nodes Node that will act as a proxy server from the user toapplicationmaster
hadoop-mapreduce-<PHD_HADOOP_VERSION>-<nn>.x86_64.rpm
Type Core
Requires hadoop-yarn
Description Hadoop Mapreduce core libraries.
Install on Nodes All ResourceManager and NodeManager nodes
hadoop-mapreduce-historyserver-<PHD_HADOOP_VERSION>-<nn>.x86_64.rpm
Type Daemon
Requires hadoop, hadoop-mapreduce
Description Daemon scripts package for Hadoop MapReduceHistoryServer, which provides a convenient methodto manage MapReduce HistoryServer start/stop asa Linux service.
Install on Nodes Host that will act as the MapReduce HistoryServer
hadoop-doc-<PHD_HADOOP_VERSION>-<nn>.x86_64.rpm
Type Doc
Requires N/A
Description Hadoop documentation package.
hadoop-client-<PHD_HADOOP_VERSION>-<nn>.x86_64.rpm
Type Library
Requires hadoop, hadoop-hdfs, hadoop-yarn, hadoop-mapreduce
Description A set of symbolic links which gathers the librariesfor programming Hadoop and submit Hadoop jobs.
Install on Nodes Clients nodes that will be used to submit Hadoopjobs

Manually Installing and Using Pivotal HD 2.1 Stack Stack and Tools Reference
23
Prerequisites: Core Package SetupPerform the following steps on all the nodes in the Hadoop cluster and its client nodes:
$ sudo rpm -ivh working_dir/utility/rpm/bigtop-utils-<PHD_BIGTOP_UTILS_VERSION>-<nn>.noarch.rpm$ sudo rpm -ivh working_dir/zookeeper/rpm/zookeeper-<PHD_ZOOKEEPER_VERSION>-<nn>.noarch.rpm$ sudo rpm -ivh working_dir/hadoop/rpm/hadoop-<PHD_HADOOP_VERSION>-<nn>.x86_64.rpm
Where working_dir is the directory where you want the rpms expanded.
YARN ResourceManager SetupInstall the YARN ResourceManager package on the workstation that will serve as YARNResourceManager:
$ sudo rpm -ivh working_dir/hadoop/rpm/hadoop-yarn-<PHD_HADOOP_VERSION>-<nn>.x86_64.rpm$ sudo rpm -ivh working_dir/hadoop/rpm/hadoop-yarn-resourcemanager-<PHD_HADOOP_VERSION>-<nn>.x86_64.rpm
YARN NodeManager SetupInstall the YARN NodeManager package on the workstation that will serve as YARN nodes:
$ sudo rpm -ivh working_dir/hadoop/rpm/hadoop-yarn-<PHD_HADOOP_VERSION>-<nn>.x86_64.rpm$ sudo rpm -ivh working_dir/hadoop/rpm/hadoop-yarn-nodemanager-<PHD_HADOOP_VERSION>-<nn>.x86_64.rpm
Mapreduce HistoryServer SetupInstall the YARN Mapreduce History Manager package and its dependency packages on the workstationthat will serve as the MapReduce History Server:
$ sudo rpm -ivh working_dir/hadoop/rpm/hadoop-yarn-<PHD_HADOOP_VERSION>-<nn>.x86_64.rpm$ sudo rpm -ivh working_dir/hadoop/rpm/hadoop-mapreduce-<PHD_HADOOP_VERSION>-<nn>.x86_64.rpm$ sudo rpm -ivh working_dir/hadoop/rpm/hadoop-mapreduce-historyserver-<PHD_HADOOP_VERSION>-<nn>.x86_64.rpm
YARN ProxyServer SetupInstall the YARN Proxy Server package and its dependency packages on the workstation that will serve asthe YARN Proxy Server.
$ sudo rpm -ivh working_dir/hadoop/rpm/hadoop-yarn-<PHD_HADOOP_VERSION>-<nn>.x86_64.rpm$ sudo rpm -ivh working_dir/hadoop/rpm/hadoop-yarn-proxyserver-<PHD_HADOOP_VERSION>-<nn>.x86_64.rpm

Manually Installing and Using Pivotal HD 2.1 Stack Stack and Tools Reference
24
YARN ConfigurationYarn configuration files are located in the following directory:
/etc/gphd/hadoop/conf/
Refer to the Apache Hadoop documentation for how to configure YARN in distributed mode.
Using Hadoop YARN
Starting YARNYARN includes three services:
• ResourceManager (RM)• NodeManager (NM)• MapReduce HistoryManager (MRHM)
RM and NM are required, MRHM is optional.
Before you start these services, create some working directories on HDFS, as follows:
Create working directories on HDFS:
The examples we show here are only examples; the exact steps depend upon your own environment anddirectory setup.
$ sudo -u hdfs hdfs dfs -mkdir /tmp$ sudo -u hdfs hdfs dfs -chmod 777 /tmp$ sudo -u hdfs hdfs dfs -mkdir -p /var/log/gphd/hadoop-yarn$ sudo -u hdfs hdfs dfs -chown yarn:hadoop /var/log/gphd/hadoop-yarn$ sudo -u hdfs hdfs dfs -mkdir -p /user/history$ sudo -u hdfs hdfs dfs -chown mapred:hadoop /user/history$ sudo -u hdfs hdfs dfs -chmod -R 777 /user/history$ sudo -u hdfs hdfs dfs -mkdir -p /user/hadoop$ sudo -u hdfs hdfs dfs -chown hadoop:hadoop /user/hadoop
Starting ResourceManagerThe RM daemon only needs to be started on the master node.
$ sudo service hadoop-yarn-resourcemanager start
Once RM is started, you can visit its dashboard at: http://localhost:8088/
Starting NodeManagerThe NodeManager daemon needs to be started on all hosts that will be used as working nodes.
To start NodeManager, run:
$ sudo service hadoop-yarn-nodemanager start
Start MapReduce HistoryServerMapReduce HistoryServer only needs to be run on the server that is meant to be the history server. It isan optional service and should only be enabled if you want to keep track of the MapReduce jobs that havebeen run.

Manually Installing and Using Pivotal HD 2.1 Stack Stack and Tools Reference
25
To start the MapReduce History Server, run:
$ sudo service hadoop-mapreduce-historyserver start
When the MR HistoryServer is started, you can visit its dashboard at: http://localhost:19888/
Using YARNAfter RM and NM are started, you can now submit YARN applications.
For simplicity, we assume you are running Hadoop in pseudo-distributed mode using the default pseudoconfiguration.
Note: Before you start using YARN, make sure the HDFS daemons are running.
Here is an example MapReduce job:
$ hadoop jar /usr/lib/gphd/hadoop-mapreduce/hadoop-mapreduce-examples-*.jar pi 2 200
This runs the PI generation example. You can track the progress of this job at the RM dashboard: http://localhost:8088/
You can also run other MapReduce examples, for example the following command will print a list ofavailable examples:
$ hadoop jar /usr/lib/gphd/hadoop-mapreduce/hadoop-mapreduce-examples-*.jar
Stopping YARNStop the YARN daemons manually by running the following commands.
To stop the MapReduce HistoryServer Daemon:
$ sudo service hadoop-mapreduce-historyserver stop
To stop the NodeManager Daemon:
$ sudo service hadoop-yarn-nodemanager stop
To stop the ResourceManager Daemon:
$ sudo service hadoop-yarn-resourcemanager stop
Hadoop Pseudo-distributed Configuration• About Pseudo Distribution on page 25• Installing a Hadoop Pseudo-distributed Configuration on page 26
• Hadoop Pseudo-distributed Configuration Setup on page 26
About Pseudo DistributionHadoop can be run on a single-node in a pseudo-distributed mode where each Hadoop daemon runs in aseparate Java process.

Manually Installing and Using Pivotal HD 2.1 Stack Stack and Tools Reference
26
Installing a Hadoop Pseudo-distributed ConfigurationThis section provides instructions for installing Hadoop Pseudo-distributed Configuration.
hadoop-conf-pseudo-<PHD_HADOOP_VERSION>-<nn>.x86_64.rpm
Type Configuration
Requires hadoop-hdfs-datanode, hadoop-hdfs-secondarynamenode, hadoop-yarn-resourcemanager, hadoop-hdfs-namenode,hadoop-yarn-nodemanager, hadoop-mapreduce-historyserver, hadoop-yarn-proxyserver
Description A set of configuration files for running Hadoop inpseudo-distributed mode on one single server.
Install on Nodes Pseudo-distributed host
Hadoop Pseudo-distributed Configuration SetupHadoop pseudo-distributed configuration files are created in the following directory:
/etc/gphd/hadoop/conf/
$ sudo rpm -ivh working_dir/hadoop/rpm/hadoop-conf-pseudo-<PHD_HADOOP_VERSION>-<nn>.x86_64.rpm
Zookeeper• About Zookeeper on page 26• Installing Zookeeper on page 26
• Zookeeper RPM Packages on page 27• Zookeeper Server Setup on page 27• Zookeeper Client Setup on page 28• Zookeeper Configuration on page 28
• Using Zookeeper on page 28
• Starting the Zookeeper Daemon on page 28• Accessing the Zookeeper Service on page 28• Stopping the Zookeeper Daemon on page 29
About ZookeeperZooKeeper is a high-performance coordination service for distributed applications.
For more info, refer to the Apache Zookeeper page: http://zookeeper.apache.org/
Installing ZookeeperThis section describes how to install Zookeeper.

Manually Installing and Using Pivotal HD 2.1 Stack Stack and Tools Reference
27
Zookeeper RPM PackagesPivotal HD provides the following RPMs as part of this release. The core package provides all executable,libraries, configurations, and documentation for Zookeeper and is required on every node in the Zookeepercluster as well as the client workstation that will access the Zookeeper service. The daemon packagesprovide a convenient way to manage Zookeeper daemons as Linux services, which rely on the corepackage.
Note: Zookeeper doesn't require Hadoop Core Packages.
zookeeper-<PHD_ZOOKEEPER_VERSION>-<nn>.noarch.rpm
Type Core
Requires N/A
Description Zookeeper core package, which provides theexecutable, libraries, configuration files anddocumentation.
Install on Nodes Every node in the ZooKeeper cluster, and the clientworkstations which will access the ZooKeeperservice.
zookeeper-server-<PHD_ZOOKEEPER_VERSION>-<nn>.noarch.rpm
Type Deamon
Requires ZooKeeper Core Package
Description Daemon scripts package for Zookeeper server,which provides a convenient method to manageZookeeper server start/stop as a Linux service.
Install on Nodes N/A
zookeeper-doc-<PHD_ZOOKEEPER_VERSION>-<nn>.noarch.rpm
Type Documentation
Requires N/A
Description Zookeeper documentation package.
Zookeeper Server SetupInstall the Zookeeper core package and the Zookeeper server daemon package on the workstation that willserve as the Zookeeper server, as follows:
$ sudo rpm -ivh working_dir/zookeeper/rpm/zookeeper-<PHD_ZOOKEEPER_VERSION>-<nn>.noarch.rpm
Manually Installing and Using Pivotal HD 2.1 Stack Stack and Tools Reference
28
$ sudo rpm -ivh working_dir/zookeeper/rpm/zookeeper-server-<PHD_ZOOKEEPER_VERSION>-<nn>.noarch.rpm
Where working_dir is the directory where you want the rpms expanded.
Zookeeper Client SetupInstall the Zookeeper core package on the client workstation to access the Zookeeper service, as follows:
$ sudo rpm -ivh working_dir/zookeeper/rpm/zookeeper-<PHD_ZOOKEEPER_VERSION>-<nn>.noarch.rpm
Zookeeper ConfigurationZookeeper configuration files are located in the following directory
/etc/gphd/zookeeper/conf
This is the default configuration for quick reference and modification.
You can make modifications to these configuration templates or create your own configuration set.
Using Zookeeper
Starting the Zookeeper DaemonAfter installing the daemon package for Zookeeper, the Zookeeper server daemon by default startsautomatically at system startup.
Start the daemons manually by running the following commands:
Either:
$ sudo service zookeeper-server start
Or:
$ sudo /etc/init.d/zookeeper-server start
Accessing the Zookeeper ServiceTo access the Zookeeper service on a client machine, use the command zookeeper-client directly in theZK shell:
$ zookeeper-client In the ZK shell: > ls > create /zk_test my_data > get /zk_test > quit
You can get a list of available commands by inputting "?" in the Zookeeper shell.

Manually Installing and Using Pivotal HD 2.1 Stack Stack and Tools Reference
29
Stopping the Zookeeper DaemonStop the Zookeeper server daemon manually by running the following commands:
sudo service zookeeper-server stop
HBase• About HBase on page 29• Installing HBase on page 29
• Prerequisites on page 29• HBase RPM Packages on page 29• HBase Master Setup on page 31• HBase RegionServer Setup on page 31• HBase Client Setup on page 31• HBase Thrift Server Setup on page 31• REST Server Setup on page 31• HBase Configuration on page 31• HBase Post-Installation Configuration on page 32
• Using HBase on page 32
• Starting the HBase Daemon on page 32• Starting the HRegionServer Daemon on page 32• Starting the Hbase Thrift Server Daemon on page 32• Starting the Hbase Rest Server Daemon on page 32• Accessing the HBase Service on page 32• Stopping the HBase Daemon on page 33• Stopping the HRegionServer Daemon on page 33• Stopping the Hbase Thrift Server Daemon on page 33• Stopping the Hbase Rest Server Daemon on page 33
About HBaseHBase is a scalable, distributed database that supports structured data storage for large tables.
For more info, refer to the Apache HBase page: http://hbase.apache.org/
Installing HBaseThis section specifies how to install HBase.
PrerequisitesAs HBase is built on top of Hadoop and Zookeeper, the Hadoop and Zookeeper core packages must beinstalled for HBase to operate correctly.
HBase RPM PackagesPivotal HD provides the following RPMs as part of this release. The core package provides all executables,libraries, configurations and documentation for HBase and is required on every node in the HBase cluster
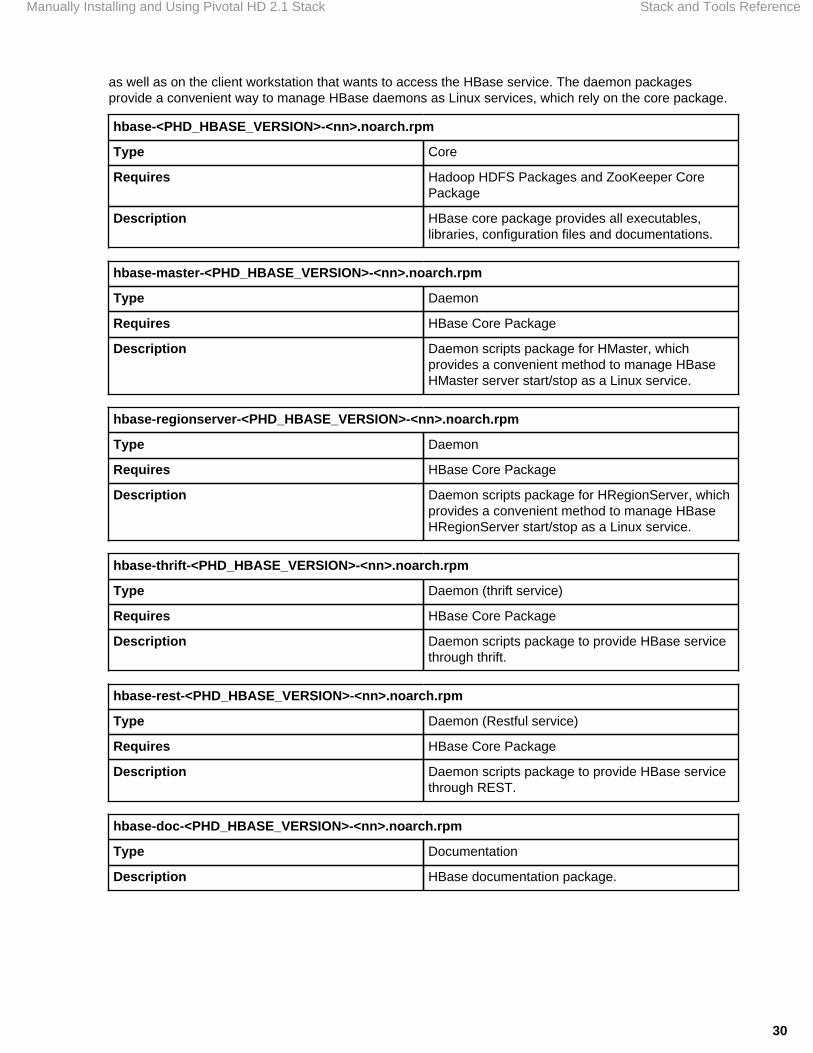
Manually Installing and Using Pivotal HD 2.1 Stack Stack and Tools Reference
30
as well as on the client workstation that wants to access the HBase service. The daemon packagesprovide a convenient way to manage HBase daemons as Linux services, which rely on the core package.
hbase-<PHD_HBASE_VERSION>-<nn>.noarch.rpm
Type Core
Requires Hadoop HDFS Packages and ZooKeeper CorePackage
Description HBase core package provides all executables,libraries, configuration files and documentations.
hbase-master-<PHD_HBASE_VERSION>-<nn>.noarch.rpm
Type Daemon
Requires HBase Core Package
Description Daemon scripts package for HMaster, whichprovides a convenient method to manage HBaseHMaster server start/stop as a Linux service.
hbase-regionserver-<PHD_HBASE_VERSION>-<nn>.noarch.rpm
Type Daemon
Requires HBase Core Package
Description Daemon scripts package for HRegionServer, whichprovides a convenient method to manage HBaseHRegionServer start/stop as a Linux service.
hbase-thrift-<PHD_HBASE_VERSION>-<nn>.noarch.rpm
Type Daemon (thrift service)
Requires HBase Core Package
Description Daemon scripts package to provide HBase servicethrough thrift.
hbase-rest-<PHD_HBASE_VERSION>-<nn>.noarch.rpm
Type Daemon (Restful service)
Requires HBase Core Package
Description Daemon scripts package to provide HBase servicethrough REST.
hbase-doc-<PHD_HBASE_VERSION>-<nn>.noarch.rpm
Type Documentation
Description HBase documentation package.

Manually Installing and Using Pivotal HD 2.1 Stack Stack and Tools Reference
31
HBase Master SetupInstall the HBase core package and the HBase master daemon package on the workstation that will serveas the HMaster:
$ sudo rpm -ivh working_dir/hbase/rpm/hbase-<PHD_HBASE_VERSION>-<nn>.noarch.rpm $ sudo rpm -ivh working_dir/hbase/rpm/hbase-master-<PHD_HBASE_VERSION>-<nn>.noarch.rpm
HBase RegionServer SetupInstall the HBase core package and the HBase regionserver daemon package on the workstation that willserve as the HRegionServer:
$ sudo rpm -ivh working_dir/hbase/rpm/hbase-<PHD_HBASE_VERSION>-<nn>.noarch.rpm$ sudo rpm -ivh working_dir/hbase/rpm/hbase-regionserver-<PHD_HBASE_VERSION>-<nn>.noarch.rpm
HBase Client SetupInstall the HBase core package on the client workstation that will access the HBase service:
$ sudo rpm -ivh working_dir/hbase/rpm/hbase-<PHD_HBASE_VERSION>-<nn>.noarch.rpm
HBase Thrift Server Setup[OPTIONAL]
Install the HBase core package and the HBase thrift daemon package to provide HBase service:
$ sudo rpm -ivh working_dir/hbase/rpm/hbase-<PHD_HBASE_VERSION>-<nn>.noarch.rpm$ sudo rpm -ivh working_dir/hbase/rpm/hbase-thrift-<PHD_HBASE_VERSION>-<nn>.noarch.rpm
REST Server Setup[OPTIONAL]
Install the HBase core package and the HBase rest daemon package to provide HBase service through theRestful interface:
$ sudo rpm -ivh working_dir/hbase/rpm/hbase-<PHD_HBASE_VERSION>-<nn>.noarch.rpm$ sudo rpm -ivh working_dir/hbase/rpm/hbase-rest-<PHD_HBASE_VERSION>-<nn>.noarch.rpm
HBase ConfigurationHBase configuration files are located in the following directory:
/etc/gphd/hbase/conf/
This is the default configuration for quick reference and modification.
Manually Installing and Using Pivotal HD 2.1 Stack Stack and Tools Reference
32
You can make modifications to these configuration templates or create your own configuration set.
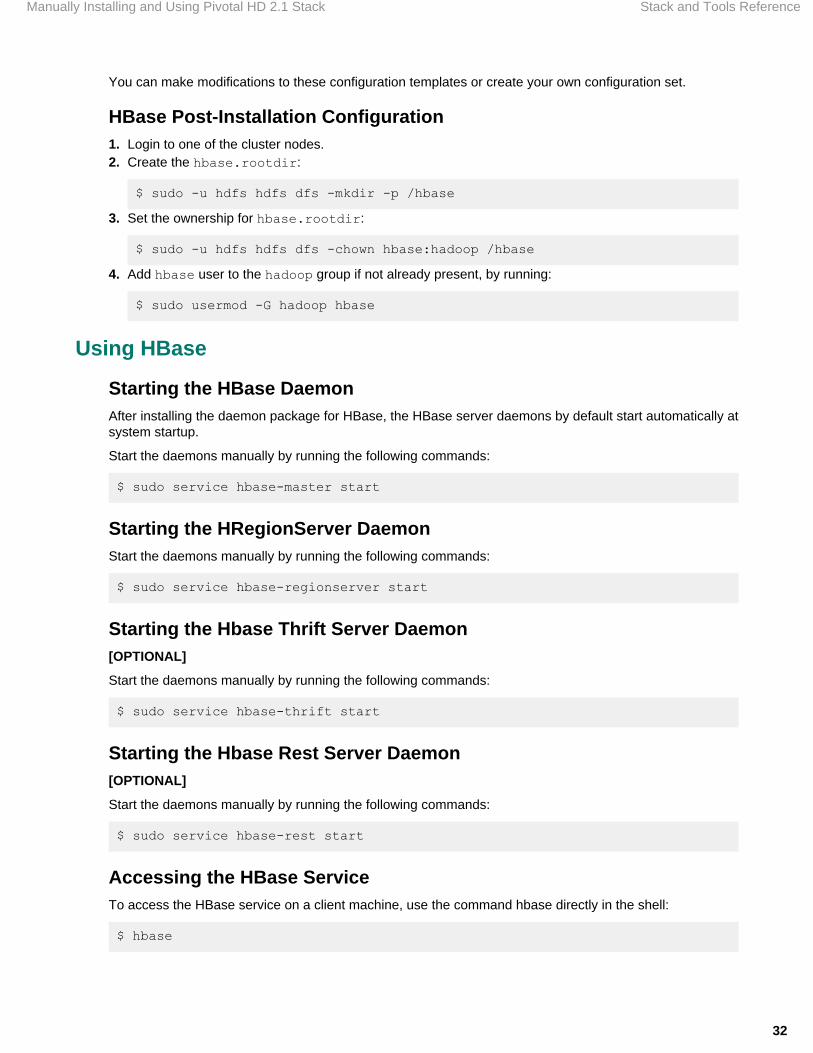
HBase Post-Installation Configuration1. Login to one of the cluster nodes.2. Create the hbase.rootdir:
$ sudo -u hdfs hdfs dfs -mkdir -p /hbase
3. Set the ownership for hbase.rootdir:
$ sudo -u hdfs hdfs dfs -chown hbase:hadoop /hbase
4. Add hbase user to the hadoop group if not already present, by running:
$ sudo usermod -G hadoop hbase
Using HBase
Starting the HBase DaemonAfter installing the daemon package for HBase, the HBase server daemons by default start automatically atsystem startup.
Start the daemons manually by running the following commands:
$ sudo service hbase-master start
Starting the HRegionServer DaemonStart the daemons manually by running the following commands:
$ sudo service hbase-regionserver start
Starting the Hbase Thrift Server Daemon[OPTIONAL]
Start the daemons manually by running the following commands:
$ sudo service hbase-thrift start
Starting the Hbase Rest Server Daemon[OPTIONAL]
Start the daemons manually by running the following commands:
$ sudo service hbase-rest start
Accessing the HBase ServiceTo access the HBase service on a client machine, use the command hbase directly in the shell:
$ hbase

Manually Installing and Using Pivotal HD 2.1 Stack Stack and Tools Reference
33
Or you can use this command to enter the hbase console:
$ hbase shell
In the HBase shell, run some test commands, for example:
hbase(main):003:0> create 'test', 'cf'hbase(main):003:0> list 'test'hbase(main):004:0> put 'test', 'row1', 'cf:a', 'value1'hbase(main):005:0> put 'test', 'row2', 'cf:b', 'value2'hbase(main):006:0> put 'test', 'row3', 'cf:c', 'value3'hbase(main):007:0> scan 'test'hbase(main):008:0> get 'test', 'row1'hbase(main):012:0> disable 'test'hbase(main):013:0> drop 'test'hbase(main):014:0> quit
Type help to get help for the HBase shell.
Stopping the HBase DaemonStop the daemons manually by running the following commands:
$ sudo service hbase-master stop
Stopping the HRegionServer DaemonStop the daemons manually by running the following commands:
$ sudo service hbase-regionserver stop
Stopping the Hbase Thrift Server Daemon[OPTIONAL]
Stop the daemons manually by running the following commands:
$ sudo service hbase-thrift stop
Stopping the Hbase Rest Server Daemon[OPTIONAL]
Stop the daemons manually by running the following commands:
$ sudo service hbase-rest stop
Hive• About Hive on page 34• Installing Hive on page 34
• Hive Components on page 34• Prerequisites on page 34• Hive RPM Packages on page 34• Installing DB for Hive Metastore on page 35

Manually Installing and Using Pivotal HD 2.1 Stack Stack and Tools Reference
34
• Hive MetaStore Server Setup on page 36• Hive Server Setup on page 37• Hive Server2 Setup on page 37• Hive Configuration on page 38• Hive Post-installation Configuration on page 38• Hive Client Setup on page 39
• Using Hive on page 39
• Start/Stop Hive Metastore Server on page 39• Start/Stop Hive Server on page 39• Start/Stop Hive Server2 on page 39• Start HiveServer Client on page 39• Start HiveServer2 Client on page 40
About HiveHive is a data warehouse infrastructure that provides data summarization and ad hoc querying.
For more info, refer to the Apache Hive page: http://hive.apache.org/
Installing HiveThis section specifies how to install Hive.
Hive ComponentsA Hive installation consists of the following components:
• hive-core• hive-metastore• hive-server• hive-server2
PrerequisitesAs Hive is built on top of Hadoop, HBase and Zookeeper, the Hadoop, HBase and Zookeeper corepackages must be installed for Hive to operate correctly. The following prerequisites must be also metbefore installing Hive:
• DB Server (we recommend using PostgresSQL)
Hive RPM PackagesHive consists of hive core, hive metastore daemon, hive server and hive server2 packages:
hive-<PHD_HIVE_VERSION>-<nn>.noarch.rpm
Type Core
Requires Hadoop, HBase Core Packages
Description Hive core package provides the executables,libraries, configuration files and documentations.
Install on Nodes Hive client, server workstation
hive-server-<PHD_HIVE_VERSION>-<nn>.noarch.rpm

Manually Installing and Using Pivotal HD 2.1 Stack Stack and Tools Reference
35
Type Daemon (hive server)
Requires Hive Core Package
Description Daemon scripts package to provide Hive servicethrough thrift.
Install on Nodes Hive server node
hive-metastore-<PHD_HIVE_VERSION>-<nn>.noarch.rpm
Type Deamon (Metastore server)
Requires Hive Core Package
Description Daemon scripts package to provide Hive metadatainformation through metastore server.
Install on Nodes Hive Metastore server node
hive-server2-<PHD_HIVE_VERSION>-<nn>.noarch.rpm
Type Daemon (hive server2)
Requires Hive Core Package
Description Daemon scripts package to provide Hive Server2.
Install on Nodes Hive server2 node
Installing DB for Hive Metastore
Set up DB (Recommend using PostgreSQL) on the hive metastoreNode1. Install postgresql-server on hive metastore node as root:
$ sudo yum install postgresql-server
2. Initialize the database:
$ sudo service postgresql initdb
3. Open the /var/lib/pgsql/data/postgresql.conf file and set the following values:
listen_addresses = '*'standard_conforming_strings = off
4. Open the /var/lib/pgsql/data/pg_hba.conf file and comment out all the lines starting withhost and local by adding # to start of the line.Then add the following lines:
local all all trusthost all all 0.0.0.0 0.0.0.0 trust
5. Create the /etc/sysconfig/pgsql/postgresql file and add the following parameter/value pair:
PGPORT=10432
6. Disable SELinux (Security-Enhanced Linux):

Manually Installing and Using Pivotal HD 2.1 Stack Stack and Tools Reference
36
Check the state of SELinux:
$ getenforceEnforcing
If the result is Enforcing, you need to disable it temporarily or permanently.
Either: Disable SELinux temporarily
$ sudo setenforce 0$ getenforcePermissive
Or: Disable SELinux permanently
(You will need to reboot your system to disable SELinux permanently, or disable it temporarily asdescribed above for the same result.)
$ sudo sed -i '/^[ ]*SELINUX[ ]*=.*$/d' /etc/selinux/config$ echo "SELINUX=disabled" | sudo tee -a /etc/selinux/configSELINUX=disabled$ # reboot your system
7. Start the database:
$ sudo service postgresql start
8. Create the user, database:
$ sudo -u postgres createuser -p 10432 -D -S -R -P hive$ sudo -u postgres createdb -p 10432 -O hive metastore
9. Install the Hive Metastore RPM package following the step Install the Hive Metastore.10.Run the postgres sql script to create hive schema in postgres db:
$ sudo -u postgres psql -p 10432 -d metastore -U hive -f /usr/lib/gphd/hive/scripts/metastore/upgrade/postgres/hive-schema-<HIVE_VERSION>.postgres.sql
Hive MetaStore Server SetupInstall the Hive core package and Hive Metastore daemon package to provide Hive metadata informationthrough the centralized Metastore service.
1. Install the Hive metastore:
$ sudo yum install postgresql-jdbc$ sudo rpm -ivh working_dir/hive/rpm/hive-<PHD_HIVE_VERSION>-<nn>.noarch.rpm$ sudo rpm -ivh working_dir/hive/rpm/hive-metastore-<PHD_HIVE_VERSION>-<nn>.noarch.rpm
2. Open the /etc/gphd/hive/conf/hive-site.xml and change it as follows:
<configuration> <property> <name>javax.jdo.option.ConnectionPassword</name> <value>hive</value> </property> <property> <name>hive.metastore.uris</name>

Manually Installing and Using Pivotal HD 2.1 Stack Stack and Tools Reference
37
<value>thrift://<CHANGE_TO_HIVE_METASTORE_ADDRESS>:9083</value> </property> <property> <name>javax.jdo.option.ConnectionURL</name> <value>jdbc:postgresql://<CHANGE_TO_HIVE_METASTORE_ADDRESS>:10432/metastore</value> </property> <property> <name>hive.hwi.war.file</name> <value>/usr/lib/gphd/hive/lib/hive-hwi.war</value> </property> <property> <name>javax.jdo.option.ConnectionDriverName</name> <value>org.postgresql.Driver</value> </property> <property> <name>datanucleus.autoCreateSchema</name> <value>false</value> </property> <property> <name>javax.jdo.option.ConnectionUserName</name> <value>hive</value> </property> <property> <name>hive.metastore.execute.setugi</name> <value>true</value> </property> </configuration>
Note: Replace <CHANGE_TO_HIVE_METASTORE_ADDRESS> in above file.
3. Link the postgresql jar file:
$ sudo ln -s /usr/share/java/postgresql-jdbc.jar /usr/lib/gphd/hive/lib/postgresql-jdbc.jar
4. Start the hive-metastore:
$ sudo service hive-metastore start
Hive Server Setup[OPTIONAL]
Install the Hive core package and Hive server package to provide Hive service:
$ sudo rpm -ivh working_dir/hive/rpm/hive-<PHD_HIVE_VERSION>-<nn>.noarch.rpm$ sudo rpm -ivh working_dir/hive/rpm/hive-server-<PHD_HIVE_VERSION>-<nn>.noarch.rpm
Set up PostgreSQL jdbc driverCopy the postgresql-jdbc.jar from the HIVE_METASTORE node to /usr/lib/gphd/hive/libon the HIVE_SERVER node
Hive Server2 Setup[OPTIONAL]
Manually Installing and Using Pivotal HD 2.1 Stack Stack and Tools Reference
38
Install the Hive core package and Hive server2 package to provide access to the Hive service:
$ sudo rpm -ivh working_dir/hive/rpm/hive-<PHD_HIVE_VERSION>-<nn>.noarch.rpm$ sudo rpm -ivh working_dir/hive/rpm/hive-server2-<PHD_HIVE_VERSION>-<nn>.noarch.rpm
Open the /etc/gphd/hive/conf/hive-site.xml and add the following properties:
<property> <name>hive.server2.thrift.port</name> <value><CHANGE_TO_HIVE_SERVER2_PORT></value> <description>Port number of HiveServer2 Thrift interface. Can be overridden by setting $HIVE_SERVER2_THRIFT_PORT</description></property><property> <name>hive.server2.thrift.bind.host</name> <value><CHANGE_TO_HIVE_SERVER2_HOSTNAME></value> <description>Bind host on which to run the HiveServer2 Thrift interface. Can be overridden by setting $HIVE_SERVER2_THRIFT_BIND_HOST</description></property>
Note: Replace <CHANGE_TO_HIVE_SERVER2_PORT> and <CHANGE_TO_HIVE_SERVER2_HOSTNAME>in above file.
Set up PostgreSQL jdbc driverCopy the postgresql-jdbc.jar from the HIVE_METASTORE node to /usr/lib/gphd/hive/lib onthe HIVE_SERVER2 node.
Hive ConfigurationThe Hive configuration files are located in the following directory:
/etc/gphd/hive/conf/
You can make modifications to this configuration template or create your own.
Hive Post-installation Configuration1. Login to one of the cluster nodes as root.2. Create the hive.warehouse.dir:
$ sudo -u hdfs hadoop fs -mkdir -p /user/hive/warehouse
3. Set permissions for the hive.warehouse.dir :
$ sudo -u hdfs hadoop fs -chmod 775 /user/hive/warehouse
4. Set the ownership for the hive.warehouse.dir:
$ sudo -u hdfs hadoop fs -chown hive:hadoop /user/hive/warehouse
5. Add the hive user to the hadoop group, if not already present, by running:
$ sudo usermod -G hadoop hive
Manually Installing and Using Pivotal HD 2.1 Stack Stack and Tools Reference
39
Hive Client SetupHive is a Hadoop client-side library. Install the Hive core package on the client workstation:
$ sudo rpm -ivh working_dir/hive/rpm/hive-<PHD_HIVE_VERSION>-<nn>.noarch.rpm
Set up PostgreSQL jdbc driverCopy the postgresql-jdbc.jar from the HIVE_METASTORE node to /usr/lib/gphd/hive/lib onthe HIVE_CLIENT node.
Using Hive
Start/Stop Hive Metastore ServerStart/stop the Hive Metastore server daemon by running:
$ sudo service hive-metastore start$ sudo service hive-metastore stop
Or:
$ sudo /etc/init.d/hive-metastore start$ sudo /etc/init.d/hive-metastore stop
Start/Stop Hive Server[OPTIONAL]
Start/stop the Hive server daemon by running:
$ sudo service hive-server start$ sudo service hive-server stop
Start/Stop Hive Server2[Optional]
Start/stop Hive server2 daemon by running:
$ sudo service hive-server2 start$ sudo service hive-server2 stop
Start HiveServer ClientTo run Hive on a client machine, use the hive command directly in the shell:
$ hive
For example:
$ hive -e "CREATE TABLE test(id string, name string);"$ hive -e "show tables"OK

Manually Installing and Using Pivotal HD 2.1 Stack Stack and Tools Reference
40
test
Start HiveServer2 ClientHiveServer2 supports a new command shell Beeline that works with HiveServer2:
$ beeline
For example:
$ beelinebeeline> !connect jdbc:hive2://<hostname>:<port> <username> <password> org.apache.hive.jdbc.HiveDriver0: jdbc:hive2://localhost> create table test1(id string, name string);0: jdbc:hive2://localhost> show tables;+-----------+| tab_name |+-----------+| test || test1 |+-----------+
HCatalog• About HCatalog on page 40• Installing HCatalog on page 40
• Prerequisites on page 41• HCatalog RPM Packages on page 41• HCatalog Client Setup on page 42• HCatalog Server Setup on page 42• Webhcat Setup on page 42• Webhcat Server Setup on page 42• HCatalog Configuration on page 42
• Using HCatalog on page 43
• Start/Stop Hcatalog Server on page 43• Start/Stop Webhcat Server on page 43• Using HCatalog Command-line API on page 43• Using HCatalog with REST on page 43• Using HCatalog with Pig on page 43
About HCatalogHCatalog is a metadata and table management system layer for Hadoop.
As HCatalog is now released with Hive, refer to the Apache Hive page for more information: http://hive.apache.org/
Installing HCatalogThis section specifies how to install HCatalog.

Manually Installing and Using Pivotal HD 2.1 Stack Stack and Tools Reference
41
PrerequisitesHCatalog is built on top of Hadoop, HBase , Hive and Zookeeper, so the Hadoop, HBase, Hive andZookeeper core packages must be installed for HCatalog to operate correctly.
HCatalog RPM PackagesHCatalog consists of four packages:
1. Core package.
hcatalog-<PHD_HCATALOG_VERSION>-<nn>.noarch.rpm
Type Core
Requires Hadoop, HBase and Hive Core Packages.
Description Hcatalog core package provides the executables,libraries, configuration files and documentation.
Install on Nodes Hcatalog Client workstation
2. Thrift server daemon package that provides catalog service.
hcatalog-server-<PHD_HCATALOG_VERSION>-<nn>.noarch.rpm
Type Daemon (hcatalog server)
Requires Hcatalog Core Package
Description Daemon scripts package to provide Hive servicethrough thrift.
Install on Nodes Hcatalog server node
3. Library package
webhcat-<PHD_HCATALOG_VERSION>-<nn>.noarch.rpm
Type Libraries
Requires Hcatalog Core Package
Description Daemon scripts package to provide Hive metadatainformation through metastore server.
Install on Nodes Webhcat server node
4.Web server daemon package that provides catalog service through http.
webhcat-server-<PHD_HCATALOG_VERSION>-<nn>.noarch.rpm
Type Daemon(webhcata server)
Requires Hcatalog and Webhcat Core Package
Description Daemon scripts package to provide WebhcatServer.
Install on Nodes Webhcat server node

Manually Installing and Using Pivotal HD 2.1 Stack Stack and Tools Reference
42
HCatalog Client SetupHcatalog is a Hadoop client-side library. Install the Hcatalog core package on the client workstation.
$ sudo rpm -ivh working_dir/hcatalog/rpm/hcatalog-<PHD_HCATALOG_VERSION>-<nn>.noarch.rpm
HCatalog Server Setup[OPTIONAL]
Install the Hcatalog core package and Hcatalog thrift daemon package to provide access to the Hcatalogservice:
$ sudo rpm -ivh working_dir/hcatalog/rpm/hcatalog-<PHD_HCATALOG_VERSION>-<nn>.noarch.rpm$ sudo rpm -ivh working_dir/hcatalog/rpm/hcatalog-server-<PHD_HCATALOG_VERSION>-<nn>.noarch.rpm
Webhcat Setup[OPTIONAL]
Install the Hcatalog core package and Webhcat package to provide Webhcat libraries:
$ sudo rpm -ivh working_dir/hcatalog/rpm/hcatalog-<PHD_HCATALOG_VERSION>-<nn>.noarch.rpm$ sudo rpm -ivh working_dir/hcatalog/rpm/webhcat-<PHD_HCATALOG_VERSION>-<nn>.noarch.rpm
Webhcat Server Setup[OPTIONAL]
Install the Hcatalog core package, Webhcat core package and Webhcat daemon package to provideWebhcat service:
$ sudo rpm -ivh working_dir/hcatalog/rpm/hcatalog-<PHD_HCATALOG_VERSION>-<nn>.noarch.rpm$ sudo rpm -ivh working_dir/hcatalog/rpm/webhcat-<PHD_HCATALOG_VERSION>-<nn>.noarch.rpm$ sudo rpm -ivh working_dir/hcatalog/rpm/webhcat-server-<PHD_HCATALOG_VERSION>-<nn>.noarch.rpm
HCatalog ConfigurationThe Hcatalog configuration files are located in the following directories:
/etc/gphd/hive/conf/
/etc/gphd/hcatalog/conf/
You can make modifications to these configuration templates or create your own.
Manually Installing and Using Pivotal HD 2.1 Stack Stack and Tools Reference
43
Using HCatalog
Start/Stop Hcatalog ServerStart/stop Hcatalog server daemon by running the following commands:
$ sudo service hcatalog-server start$ sudo service hcatalog-server stop
Note: hcatalog-server and hive-metastore server can not run on the same node at the same time.These 2 services should be put on different nodes.
Start/Stop Webhcat ServerStart/stop Webhcat server daemon by running the following commands:
$ sudo service webhcat-server start$ sudo service webhcat-server stop
Using HCatalog Command-line APIWe can use following HCatalog command-line to create a table and access table data:
# Create a table$ hcat -e "CREATE TABLE test(key string, value string) ROW FORMAT DELIMITED FIELDS TERMINATED BY ','"OK # Get the scheme for a table$ hcat -e "DESC test"OKkey string nonevalue string none
Note: Make sure the user is permitted to read the file (e.g., 'test_data') and write the table (e.g.,'test'), and the YARN service is up.
Using HCatalog with REST
# Get table by using webhcat, you need to change hostname and username to appropriate value$ curl -s 'http://<hostname>:50111/templeton/v1/ddl/database/default/table/test?user.name=username'{"columns":[{"name":"key","type":"string"},{"name":"value","type":"string"}],"database":"default","table":"test"}
Using HCatalog with Pig
$ pig -useHCatalog#use HCatLoader to have table schema retrieved automatically$grunt> A = LOAD 'test' USING org.apache.hcatalog.pig.HCatLoader(); $grunt> DESCRIBE A;#outputA: {key: chararray,value: chararray}

Manually Installing and Using Pivotal HD 2.1 Stack Stack and Tools Reference
44
Pig• About Pig on page 44• Installing Pig on page 44
• Prerequisites on page 44• Pig RPM Packages on page 44• Pig Client Setup on page 44• Pig Configuration on page 45
• Using Pig on page 45
• Using Pig with Hbase on page 45• Using Pig with Piggybank/Hive on page 45
About PigPig is a high-level data-flow language and execution framework for parallel computation.
For more info, refer to the Apache Pig page: http://pig.apache.org/
Installing PigThis section specifies how to install Pig.
PrerequisitesAs Pig is built on top of Hadoop, the Hadoop package must be installed to run Pig correctly.
Pig RPM PackagesPig has only one core package.
pig-<PHD_PIG_VERSION>-<nn>.noarch.rpm
Type Core
Requires Hadoop Core Packages
Description Pig core package provides executable, libraries,configuration files and documentation.
Install on Nodes Pig client workstation
pig-doc-<PHD_PIG_VERSION>-<nn>.noarch.rpm
Type Documentation
Requires N/A
Description Pig documentation package.
Pig Client SetupPig is a Hadoop client-side library. To install the Pig package on the client workstation, run:
$ sudo rpm -ivh working_dir/pig/rpm/pig-<PHD_PIG_VERSION>-<nn>.noarch.rpm
Manually Installing and Using Pivotal HD 2.1 Stack Stack and Tools Reference
45
Pig ConfigurationPig configuration files are located in the following directory:
/etc/gphd/pig/conf/
This directory contains the default configuration templates for quick reference and modification.
You can modify these configuration templates or create your own configuration set.
Using PigTo run Pig scripts on a client machine, use the command pig directly in the shell:
$ pig
For more information about the pig command usage, run:
$ pig -help
Using Pig with HbaseUse the following script to register the Hbase library in your Pig script:
register /usr/lib/gphd/hbase/lib/htrace-core-*.jarregister /usr/lib/gphd/hbase/lib/hbase-*.jarregister /usr/lib/gphd/zookeeper/zookeeper.jar;
Using Pig with Piggybank/HivePiggybank is a Java library which includes numerous useful Pig UDFs. Piggybank provides UDFs fordifferent Pig storage functions, math functions, string functions and datetime functions, etc.
After you have installed the Pig RPM package, the Piggybank library is also installed on the host.
The Piggybank jar is in the following location:
/usr/lib/gphd/pig/piggybank.jar
The library jars that Piggybank depends on are in the following location:
/usr/lib/gphd/pig/lib/
Use the following script to register the Piggybank library in your Pig script:
register /usr/lib/gphd/pig/lib/avro-*.jarregister /usr/lib/gphd/pig/lib/commons-*.jarregister /usr/lib/gphd/pig/lib/groovy-all-*.jarregister /usr/lib/gphd/pig/lib/guava-*.jarregister /usr/lib/gphd/pig/lib/jackson-*.jarregister /usr/lib/gphd/pig/lib/joda-time-*.jarregister /usr/lib/gphd/pig/lib/json-simple-*.jarregister /usr/lib/gphd/pig/lib/parquet-pig-bundle-*.jarregister /usr/lib/gphd/pig/lib/protobuf-java-*.jarregister /usr/lib/gphd/pig/lib/snappy-java-*.jarregister /usr/lib/gphd/pig/lib/automaton-*.jarregister /usr/lib/gphd/pig/piggybank.jar
Here are some notes for using Hive storage (such as HiveColumnarStorage) in Piggybank.
• PHD Hive must be installed. Please refer to the Hive on page 33 for Hive installation.

Manually Installing and Using Pivotal HD 2.1 Stack Stack and Tools Reference
46
• You can register Piggybank dependency jars as needed in your Pig script with the above code.• Additionally, use the following Pig code to register Hive jars in your script:
register /usr/lib/gphd/hive/hive-exec-*.jarregister /usr/lib/gphd/hive/hive-common-*.jar
Mahout• About Mahout on page 46• Installing Mahout on page 46
• Prerequisites on page 46• Mahout RPM Packages on page 46• Mahout Client Setup on page 46• Mahout Configuration on page 46
• Using Mahout on page 47
About MahoutMahout is a scalable machine learning and data mining library.
For more information, refer to the Apache Mahout page: http://mahout.apache.org/
Installing MahoutThis section specifies how to install Mahout.
PrerequisitesMahout is built on top of Hadoop, so the Hadoop package must be installed to get Mahout running.
Mahout RPM PackagesMahout has only one core package.
mahout-<PHD_MAHOUT_VERSION>-<nn>.noarch.rpm
Type Core
Requires Hadoop Core Packages
Description Mahout core package provides executable,libraries, configuration files and documentation.
Install on Nodes Mahout client workstation
Mahout Client SetupMahout is a Hadoop client-side library. Install the Mahout package on the client workstation:
$ sudo rpm -ivh working_dir/mahout/rpm/mahout-<PHD_MAHOUT_VERSION>-<nn>.noarch.rpm
Mahout ConfigurationMahout configuration files are located in the following directory:

Manually Installing and Using Pivotal HD 2.1 Stack Stack and Tools Reference
47
/etc/gphd/mahout/conf/
This contains the default configuration templates for quick reference and modification.
You can modify these configuration templates or create your own configuration set.
Using MahoutTo run Mahout scripts on a client machine, use the command mahout directly in the shell:
$ mahout <PROGRAM>
Check the full list of mahout programs by running:
$ mahout
Flume• About Flume on page 47• Installing Flume on page 47
• Prerequisites on page 47• Flume RPM Packages on page 47• Flume Setup on page 48• Flume Agent Setup on page 48• Flume Configuration on page 48
• Using Flume on page 48
• Flume Configuration Example on page 48• Starting/Stopping Flume on page 49• Verifying the Installation on page 49
About FlumeFlume is a distributed, reliable, and available service for efficiently collecting, aggregating, and movinglarge amounts of log data. It has a simple and flexible architecture based on streaming data flows. It isrobust and fault tolerant with tunable reliability mechanisms and many failover and recovery mechanisms.It uses a simple extensible data model that allows for online analytic application.
For more information, see the Apache Flume page: http://flume.apache.org/
Installing FlumeThis section specifies how to install Flume.
PrerequisitesAs Flume is built on top of Hadoop, the Hadoop package must be installed to get Flume running correctly.(Hadoop core and hadoop hdfs should be installed)
Flume RPM PackagesFlume consists of one core package and a flume agent package.
flume-<PHD_FLUME_VERSION>-<nn>.noarch.rpm

Manually Installing and Using Pivotal HD 2.1 Stack Stack and Tools Reference
48
Type Flume
Requires Hadoop Core Packages
Description Flume core package provides executable, libraries,configuration files and documentation.
Install on Nodes Flume workstation
flume-agent-<PHD_FLUME_VERSION>-<nn>.noarch.rpm
Type Flume Agent
Requires Flume Package
Description Daemon scripts package to provide Flume servicefor generating, processing, and delivering data.
Install on Nodes Flume agent node
Flume SetupFlume is a Hadoop client-side library. Install the Flume package on the client workstation:
$ sudo rpm -ivh working_dir/flume/rpm/flume-<PHD_FLUME_VERSION>-<nn>.noarch.rpm
Flume Agent Setup[OPTIONAL]
Install the Flume package and Flume agent daemon package to provide Flume service for generating,processing, and delivering data:
$ sudo rpm -ivh working_dir/flume/rpm/flume-<PHD_FLUME_VERSION>-<nn>.noarch.rpm $ sudo rpm -ivh working_dir/flume/rpm/flume-agent-<PHD_FLUME_VERSION>-<nn>.noarch.rpm
Flume ConfigurationFlume configuration files are located in the following directory:
/etc/gphd/flume/conf/
This contains the default configuration templates for quick reference and modification.
You can modify these configuration templates or create your own configuration set.
Using Flume
Flume Configuration Example
$ cat /etc/gphd/flume/conf/flume.conf agent.sources = r1agent.sinks = k1agent.channels = c1
# Describe/configure the sourceagent.sources.r1.type = netcat
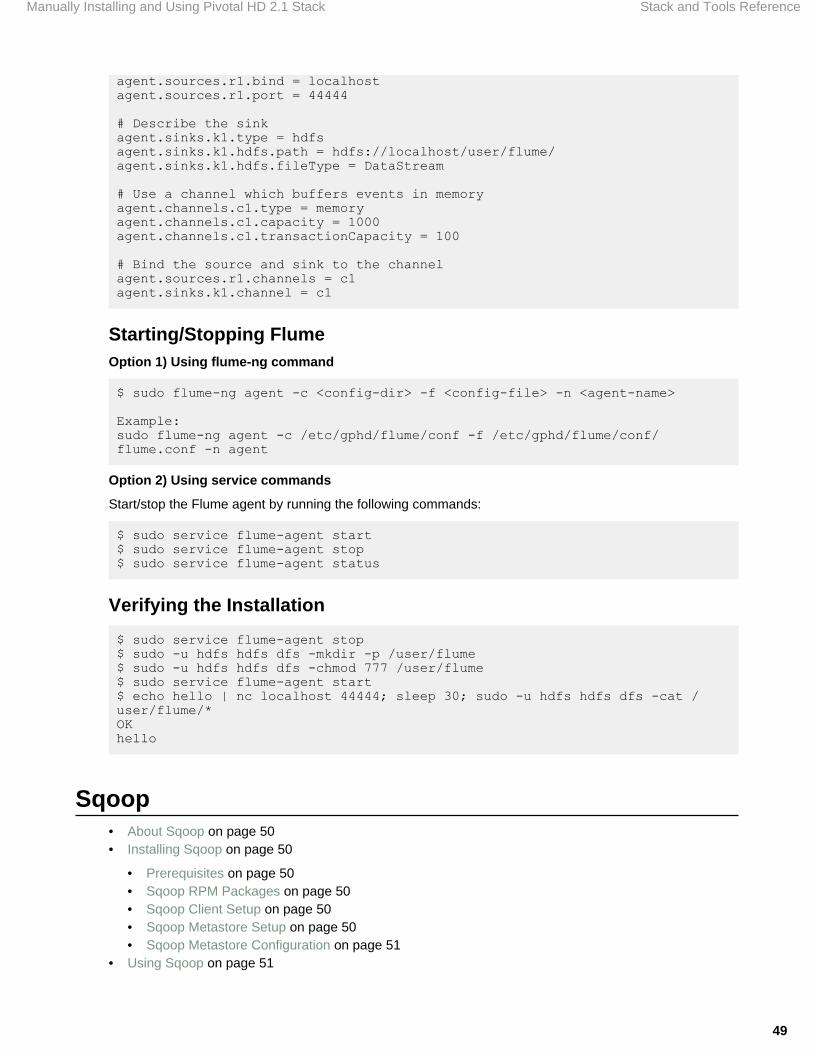
Manually Installing and Using Pivotal HD 2.1 Stack Stack and Tools Reference
49
agent.sources.r1.bind = localhostagent.sources.r1.port = 44444
# Describe the sinkagent.sinks.k1.type = hdfsagent.sinks.k1.hdfs.path = hdfs://localhost/user/flume/agent.sinks.k1.hdfs.fileType = DataStream
# Use a channel which buffers events in memoryagent.channels.c1.type = memoryagent.channels.c1.capacity = 1000agent.channels.c1.transactionCapacity = 100
# Bind the source and sink to the channelagent.sources.r1.channels = c1agent.sinks.k1.channel = c1
Starting/Stopping FlumeOption 1) Using flume-ng command
$ sudo flume-ng agent -c <config-dir> -f <config-file> -n <agent-name>
Example:sudo flume-ng agent -c /etc/gphd/flume/conf -f /etc/gphd/flume/conf/flume.conf -n agent
Option 2) Using service commands
Start/stop the Flume agent by running the following commands:
$ sudo service flume-agent start$ sudo service flume-agent stop$ sudo service flume-agent status
Verifying the Installation
$ sudo service flume-agent stop$ sudo -u hdfs hdfs dfs -mkdir -p /user/flume$ sudo -u hdfs hdfs dfs -chmod 777 /user/flume$ sudo service flume-agent start$ echo hello | nc localhost 44444; sleep 30; sudo -u hdfs hdfs dfs -cat /user/flume/*OKhello
Sqoop• About Sqoop on page 50• Installing Sqoop on page 50
• Prerequisites on page 50• Sqoop RPM Packages on page 50• Sqoop Client Setup on page 50• Sqoop Metastore Setup on page 50• Sqoop Metastore Configuration on page 51
• Using Sqoop on page 51

Manually Installing and Using Pivotal HD 2.1 Stack Stack and Tools Reference
50
• Starting/Stopping Sqoop Metastore Server on page 51• Starting Sqoop Client on page 51• Sqoop ClientExample on page 51
About SqoopSqoop is a tool designed for efficiently transferring bulk data between http://hadoop.apache.org/ andstructured datastores such as relational databases.
For more details, refer to the Apache Sqoop page: http://sqoop.apache.org/
Installing SqoopThis section specifies how to install Sqoop.
PrerequisitesAs Sqoop is built on top of Hadoop and HBase, the Hadoop and HBase package must be installed to getSqoop running correctly.
Sqoop RPM PackagesSqoop consists of one core package and a sqoop-metastore sever daemon package.
sqoop-<PHD_SQOOP_VERSION>-<nn>.noarch.rpm
Type Core
Requires Hadoop, HBase Core Packages
Description Sqoop core package provides executable, libraries,configuration files and documentations.
Install on Nodes Sqoop client workstation
sqoop-metastore-<PHD_SQOOP_VERSION>-<nn>.noarch.rpm
Type Daemon (Sqoop Metastore server)
Requires Sqoop core Package
Description Daemon scripts package to provide sharedmetadata repository for Sqoop.
Install on Nodes Sqoop metastore server node
Sqoop Client SetupSqoop is a Hadoop client-side library. Install the Sqoop package on the client workstation:
$ sudo rpm -ivh working_dir/sqoop/rpm/sqoop-<PHD_SQOOP_VERSION>-<nn>.noarch.rpm
Sqoop Metastore Setup[OPTIONAL]
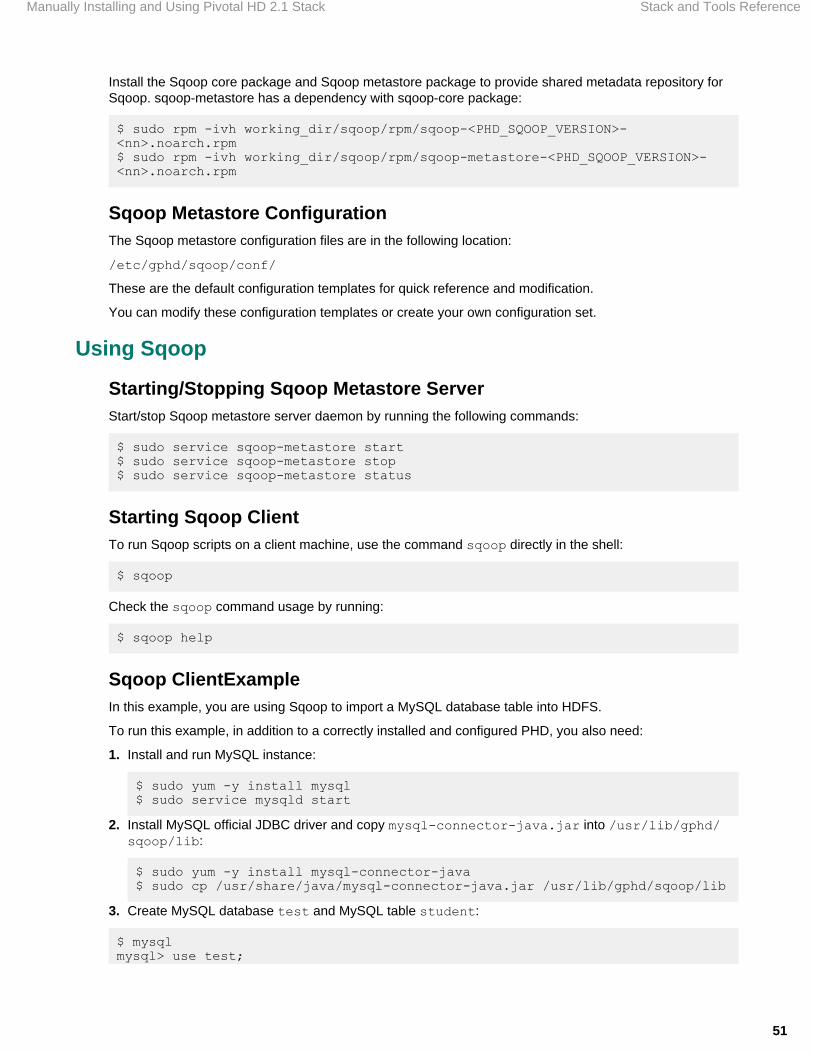
Manually Installing and Using Pivotal HD 2.1 Stack Stack and Tools Reference
51
Install the Sqoop core package and Sqoop metastore package to provide shared metadata repository forSqoop. sqoop-metastore has a dependency with sqoop-core package:
$ sudo rpm -ivh working_dir/sqoop/rpm/sqoop-<PHD_SQOOP_VERSION>-<nn>.noarch.rpm$ sudo rpm -ivh working_dir/sqoop/rpm/sqoop-metastore-<PHD_SQOOP_VERSION>-<nn>.noarch.rpm
Sqoop Metastore ConfigurationThe Sqoop metastore configuration files are in the following location:
/etc/gphd/sqoop/conf/
These are the default configuration templates for quick reference and modification.
You can modify these configuration templates or create your own configuration set.
Using Sqoop
Starting/Stopping Sqoop Metastore ServerStart/stop Sqoop metastore server daemon by running the following commands:
$ sudo service sqoop-metastore start$ sudo service sqoop-metastore stop$ sudo service sqoop-metastore status
Starting Sqoop ClientTo run Sqoop scripts on a client machine, use the command sqoop directly in the shell:
$ sqoop
Check the sqoop command usage by running:
$ sqoop help
Sqoop ClientExampleIn this example, you are using Sqoop to import a MySQL database table into HDFS.
To run this example, in addition to a correctly installed and configured PHD, you also need:
1. Install and run MySQL instance:
$ sudo yum -y install mysql$ sudo service mysqld start
2. Install MySQL official JDBC driver and copy mysql-connector-java.jar into /usr/lib/gphd/sqoop/lib:
$ sudo yum -y install mysql-connector-java$ sudo cp /usr/share/java/mysql-connector-java.jar /usr/lib/gphd/sqoop/lib
3. Create MySQL database test and MySQL table student:
$ mysqlmysql> use test;
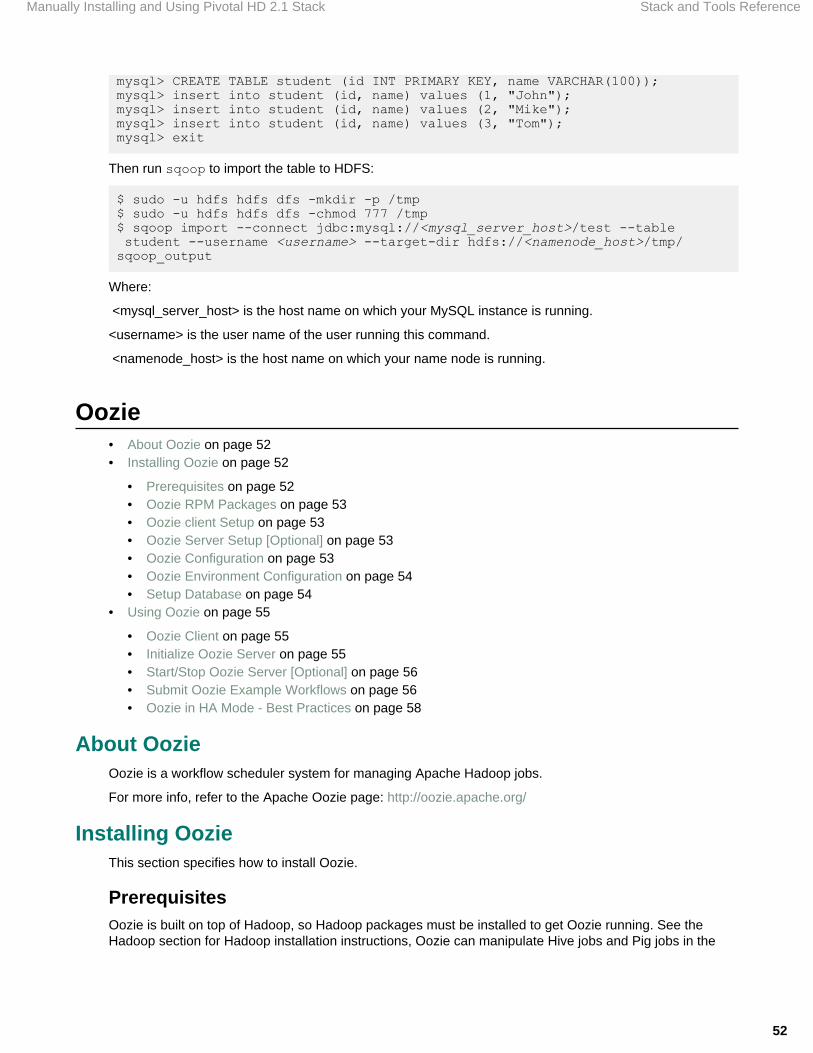
Manually Installing and Using Pivotal HD 2.1 Stack Stack and Tools Reference
52
mysql> CREATE TABLE student (id INT PRIMARY KEY, name VARCHAR(100));mysql> insert into student (id, name) values (1, "John");mysql> insert into student (id, name) values (2, "Mike");mysql> insert into student (id, name) values (3, "Tom");mysql> exit
Then run sqoop to import the table to HDFS:
$ sudo -u hdfs hdfs dfs -mkdir -p /tmp$ sudo -u hdfs hdfs dfs -chmod 777 /tmp$ sqoop import --connect jdbc:mysql://<mysql_server_host>/test --table student --username <username> --target-dir hdfs://<namenode_host>/tmp/sqoop_output
Where:
<mysql_server_host> is the host name on which your MySQL instance is running.
<username> is the user name of the user running this command.
<namenode_host> is the host name on which your name node is running.
Oozie• About Oozie on page 52• Installing Oozie on page 52
• Prerequisites on page 52• Oozie RPM Packages on page 53• Oozie client Setup on page 53• Oozie Server Setup [Optional] on page 53• Oozie Configuration on page 53• Oozie Environment Configuration on page 54• Setup Database on page 54
• Using Oozie on page 55
• Oozie Client on page 55• Initialize Oozie Server on page 55• Start/Stop Oozie Server [Optional] on page 56• Submit Oozie Example Workflows on page 56• Oozie in HA Mode - Best Practices on page 58
About OozieOozie is a workflow scheduler system for managing Apache Hadoop jobs.
For more info, refer to the Apache Oozie page: http://oozie.apache.org/
Installing OozieThis section specifies how to install Oozie.
PrerequisitesOozie is built on top of Hadoop, so Hadoop packages must be installed to get Oozie running. See theHadoop section for Hadoop installation instructions, Oozie can manipulate Hive jobs and Pig jobs in the

Manually Installing and Using Pivotal HD 2.1 Stack Stack and Tools Reference
53
workflow. So if you want to use Hive jobs or Pig jobs in your workflow, Hive and Pig packages must beinstalled. See the Hive section and Pig section for their installation instructions.
Oozie RPM PackagesOozie contains an oozie-client rpm package and an oozie package. The Oozie package depends on theoozie-client package.
oozie-client-<PHD_OOZIE_VERSION>-<nn>.noarch.rpm
Type Client and Core
Requires bigtop-util, hadoop-client
Description Oozie client package provides the oozie library andclient binary to connect to Oozie service.
Install on Nodes Oozie service node and Oozie client node
oozie-<PHD_OOZIE_VERSION>-<nn>.noarch.rpm
Type Daemon(Oozie server)
Requires bigtop-tomcat, hadoop-client, oozie-client
Description Daemon package to provide Oozie service.
Install on Nodes Oozie service node
Oozie client SetupInstall the oozie-client package on the client host that submits workflows to Oozie service.
$ sudo rpm -ivh working_dir/utility/rpm/bigtop-utils-<PHD_BIGTOP_UTILS_VERSION>-<nn>.noarch.rpm$ sudo rpm -ivh working_dir/oozie/rpm/oozie-client-<PHD_OOZIE_VERSION>-<nn>.noarch.rpm
Note: User "oozie" and group "oozie" are created with correct configuration (uid oozie, gid oozie). Itis a non-login user.
Oozie Server Setup [Optional]Install the oozie-client package and oozie package to provide Oozie service:
$ sudo rpm -ivh working_dir/utility/rpm/bigtop-utils-<PHD_BIGTOP_UTILS_VERSION>-<nn>.noarch.rpm$ sudo rpm -ivh working_dir/utility/rpm/bigtop-tomcat-<PHD_BIGTOP_TOMCAT_VERSION>-<nn>.noarch.rpm$ sudo rpm -ivh working_dir/oozie/rpm/oozie-client-<PHD_OOZIE_VERSION>-<nn>.noarch.rpm$ sudo rpm -ivh working_dir/oozie/rpm/oozie-<PHD_OOZIE_VERSION>-<nn>.noarch.rpm
Oozie ConfigurationOozie configuration files are located in the following directory:
/etc/gphd/oozie/conf/
This contains the default configuration templates for quick reference and modification.
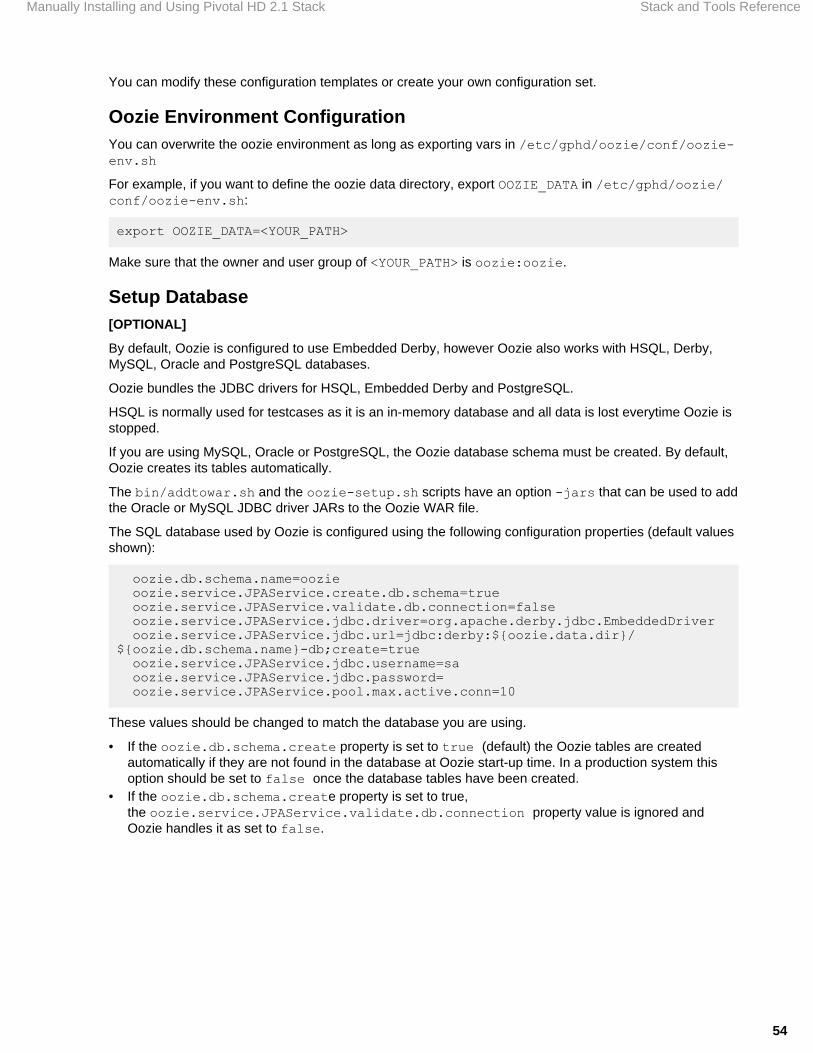
Manually Installing and Using Pivotal HD 2.1 Stack Stack and Tools Reference
54
You can modify these configuration templates or create your own configuration set.
Oozie Environment ConfigurationYou can overwrite the oozie environment as long as exporting vars in /etc/gphd/oozie/conf/oozie-env.sh
For example, if you want to define the oozie data directory, export OOZIE_DATA in /etc/gphd/oozie/conf/oozie-env.sh:
export OOZIE_DATA=<YOUR_PATH>
Make sure that the owner and user group of <YOUR_PATH> is oozie:oozie.
Setup Database[OPTIONAL]
By default, Oozie is configured to use Embedded Derby, however Oozie also works with HSQL, Derby,MySQL, Oracle and PostgreSQL databases.
Oozie bundles the JDBC drivers for HSQL, Embedded Derby and PostgreSQL.
HSQL is normally used for testcases as it is an in-memory database and all data is lost everytime Oozie isstopped.
If you are using MySQL, Oracle or PostgreSQL, the Oozie database schema must be created. By default,Oozie creates its tables automatically.
The bin/addtowar.sh and the oozie-setup.sh scripts have an option -jars that can be used to addthe Oracle or MySQL JDBC driver JARs to the Oozie WAR file.
The SQL database used by Oozie is configured using the following configuration properties (default valuesshown):
oozie.db.schema.name=oozie oozie.service.JPAService.create.db.schema=true oozie.service.JPAService.validate.db.connection=false oozie.service.JPAService.jdbc.driver=org.apache.derby.jdbc.EmbeddedDriver oozie.service.JPAService.jdbc.url=jdbc:derby:${oozie.data.dir}/${oozie.db.schema.name}-db;create=true oozie.service.JPAService.jdbc.username=sa oozie.service.JPAService.jdbc.password= oozie.service.JPAService.pool.max.active.conn=10
These values should be changed to match the database you are using.
• If the oozie.db.schema.create property is set to true (default) the Oozie tables are createdautomatically if they are not found in the database at Oozie start-up time. In a production system thisoption should be set to false once the database tables have been created.
• If the oozie.db.schema.create property is set to true,the oozie.service.JPAService.validate.db.connection property value is ignored andOozie handles it as set to false.

Manually Installing and Using Pivotal HD 2.1 Stack Stack and Tools Reference
55
Using Oozie
Oozie ClientTo run Oozie scripts on a client machine, use the command oozie with the sub-command directly in shell.Each sub-command may have different arguments.
$ oozie [sub-command]
Check the oozie command usage by running:
$ oozie help
Initialize Oozie Server[OPTIONAL]
Before starting Oozie service, follow the steps below to initialize Oozie server.
1. Add the following configuration to the Hadoop configuration core-site.xml. Then restart HDFS andYarn
<property> <name>hadoop.proxyuser.oozie.hosts</name> <value>*</value></property><property> <name>hadoop.proxyuser.oozie.groups</name> <value>*</value></property>
2. mkdir for user oozie on HDFS:
$ sudo -u hdfs hdfs dfs -mkdir -p /user/oozie$ sudo -u hdfs hdfs dfs -chown oozie /user/oozie
3. Create the oozie database:
$ sudo service oozie init
4. Download extjs-2.2 from here http://extjs.com/deploy/ext-2.2.zip. Put the zip file in a new directorynamed /tmp/oozie-libext.
$ wget http://extjs.com/deploy/ext-2.2.zip$ mkdir -p /tmp/oozie-libext$ mv ext-2.2.zip /tmp/oozie-libext$ sudo chown -R oozie:oozie /tmp/oozie-libext
5. Setup the oozie tomcat war file:
$ sudo -u oozie oozie-setup prepare-war -d /tmp/oozie-libext/
6. Setup sharelib for oozie service. Replace namenode-host with your name node hostname, andreplace namenode-port with your name node port:
$ sudo -u oozie oozie-setup sharelib \create -fs hdfs://<namenode-host>:<namdenode-port> \-locallib /usr/lib/gphd/oozie/oozie-sharelib.tar.gz

Manually Installing and Using Pivotal HD 2.1 Stack Stack and Tools Reference
56
Start/Stop Oozie Server [Optional]Start/stop Oozie server by running the following commands:
$ sudo service oozie start$ sudo service oozie stop$ sudo service oozie status
Submit Oozie Example Workflows1. Expand the examples:
$ mkdir /tmp/oozie-example$ cd /tmp/oozie-example$ tar xzf /usr/lib/gphd/oozie/oozie-examples.tar.gz
2. Change the job properties in the examples.Change the following files:
/tmp/oozie-example/examples/apps/map-reduce/job.properties/tmp/oozie-example/examples/apps/hive/job.properties/tmp/oozie-example/examples/apps/pig/job.properties
In each file, set the following properties:
nameNode=hdfs://<namenode-host>:<namenode-port>jobTracker=<resource-manager-host>:<resource-manager-port>
Use the exact hostname and service port in your cluster. 3. Edit the Oozie workflow.xml as follows:The Oozie workflow.xml is in the following directory:
/tmp/oozie-example/examples/apps/hive
Add the NameNode variable as a prefix to all paths, for example:
<param>INPUT=${nameNode}/user/${wf:user()}/${examplesRoot}/input-data/table</param><param>OUTPUT=${nameNode}/user/${wf:user()}/${examplesRoot}/output-data/hive</param>
Also make sure to reference the hive-oozie-site.xml using the job-xml tag in theworkflow. The <job-xml> element needs to be put inside the <hive> element betweenthe <prepare> and <configuration> elements in the examples/apps/hive/workflow.xl file,as shown below:
<workflow-app xmlns="uri:oozie:workflow:0.2" name="hive-wf"> <start to="hive-node"/> <action name="hive-node"> <hive xmlns="uri:oozie:hive-action:0.2"> <job-tracker>${jobTracker}</job-tracker> <name-node>${nameNode}</name-node> <prepare> <delete path="${nameNode}/user/${wf:user()}/${examplesRoot}/output-data/hive"/> <mkdir path="${nameNode}/user/${wf:user()}/${examplesRoot}/output-data"/> </prepare> <job-xml>${nameNode}/user/oozie/hive-oozie-site.xml</job-xml> <configuration> <property> <name>mapred.job.queue.name</name>

Manually Installing and Using Pivotal HD 2.1 Stack Stack and Tools Reference
57
<value>${queueName}</value> </property> </configuration> <script>script.q</script> <param>INPUT=${nameNode}/user/${wf:user()}/${examplesRoot}/input-data/table</param> <param>OUTPUT=${nameNode}/user/${wf:user()}/${examplesRoot}/output-data/hive</param> </hive> <ok to="end"/> <error to="fail"/> </action> <kill name="fail"> <message>Hive failed, error message[${wf:errorMessage(wf:lastErrorNode())}]</message> </kill> <end name="end"/></workflow-app>
4. Put example code onto HDFS:
$ hdfs dfs -put examples /user/<username>
Where <username> is the name of user who issues this command.5. Submit a map reduce example workflow
a. Submit workflow:
$ oozie job -oozie http://localhost:11000/oozie -config examples/apps/map-reduce/job.properties -runjob: <oozie-job-id>
b. Check workflow status. Where <oozie-job-id> is the same id in the output of the last command.
$ oozie job -oozie http://localhost:11000/oozie -info <oozie-job-id>
6. Oozie Setup for Hive:
• Remote Metastore Mode (recommended):
Put the Hive jars into the Tomcat class loader path. Make the following change in the /var/lib/gphd/oozie/tomcat-deployment/conf/catalina.properties file:
common.loader=${catalina.home}/lib,${catalina.home}/lib/*.jar,/var/lib/gphd/oozie/*.jar,/usr/lib/gphd/oozie/libtools/*.jar,/usr/lib/gphd/oozie/oozie-core/*.jar,/usr/lib/gphd/hadoop/client/*.jar,/usr/lib/gphd/hive/lib/*.jar
Note: common loader classpath
Make sure ${catalina.home}/lib,${catalina.home}/lib/*.jar are at the beginning of theclasspath. Keep the jars in the classpath as the following order.
• Tomcat Jars (the jars under ${catalina.home}/lib)• Oozie Jars (the jars under ${oozie.home}, ${oozie.home}/libtools, ${oozie.home}/oozie-
core )• Hadoop Jars (the jars under ${hadoop.home}/client/ )• Hive Jars (the jars under ${hive.home}/lib )
• Local Metastore Mode:
Upload the JDBC driver to Oozie sharelib. To enable the local metastore mode, comment outthe hive.metastore.uris property and verify that Hive still works properly at the command-line.In local metastore mode, Oozie hive actions do not connect to the Hive Metastore, but instead

Manually Installing and Using Pivotal HD 2.1 Stack Stack and Tools Reference
58
talk to the database directly. In this setup, the appropriate JDBC driver (for example, for Postgres)needs to be made available to hive jobs running within Oozie:
sudo -u oozie hdfs dfs -put /usr/lib/gphd/hive/lib/postgresql-jdbc.jar /user/oozie/share/lib/hive
7. Submit the Hive example workflow:
a. Upload the Hive configuration file onto HDFS:
$ sudo -u oozie hdfs dfs -put /etc/gphd/hive/conf/hive-site.xml /user/oozie/hive-oozie-site.xml
Note: When uploading a Hive configuration file to HDFS, do not use hive-site.xml asthe file name. This is because Hive action in Oozie overwrites the hive-site.xml file.
In the Oozie workflow file, use <job-xml>${nameNode}/user/oozie/hive-oozie-site.xml</job-xml> to refer to the Hive configuration file.
b. Submit the workflow:
$ oozie job -oozie http://localhost:11000/oozie -config examples/apps/hive/job.properties -runjob: <oozie-job-id>
c. Check the workflow status.
Where <oozie-job-id> is the same id in the output of last command.
$ oozie job -oozie http://localhost:11000/oozie -info <oozie-job-id>
8. Submit a Pig example workflow:
a. Submit the workflow:
$ oozie job -oozie http://localhost:11000/oozie -config examples/apps/pig/job.properties -runjob: <oozie-job-id>
b. Check the workflow status.
Where <oozie-job-id> is the same id in the output of the last command.
$ oozie job -oozie http://localhost:11000/oozie -info <oozie-job-id>
Oozie in HA Mode - Best Practices• Ensure that HA is configured correctly and identically on all nodes, including client nodes. Specifically,
ensure that the following variables are set appropriately in hdfs-site.xml:
dfs.nameservicesdfs.ha.namenodes.nameservice ID dfs.namenode.rpc-address.nameservice ID.name node IDdfs.namenode.http-address.nameservice ID.name node IDdfs.namenode.shared.edits.dir dfs.client.failover.proxy.provider.nameservice IDdfs.ha.fencing.methods
And in core-site.xml:
fs.defaultFS

Manually Installing and Using Pivotal HD 2.1 Stack Stack and Tools Reference
59
• Use the namenode HA service in mapreduce.job.hdfs-servers in yarn-site.xml:
<property> <name>mapreduce.job.hdfs-servers</name> <value>hdfs://test</value></property>
• While using Namenode HA, create all tables using the HA service as the HDFS location:
CREATE EXTERNAL TABLE test (a INT) STORED AS TEXTFILE LOCATION 'hdfs://test/user/myuser/examples/input-data/table/';
• Verify that all tables in Hive are created using the HA service as the HDFS location (note the location inthe example below refers to hdfs://test/, which is the HA service.)
hive> describe extended mytable;OKa int None DetailedTable Information Table(tableName:mytable, dbName:default, owner:gpadmin@PIVOTAL, createTime:1391839636, lastAccessTime:0, retention:0, sd:StorageDescriptor(cols:[FieldSchema(name:a, type:int, comment:null)], location:hdfs://test/user/gpadmin/examples/input-data/mytable,inputFormat:org.apache.hadoop.mapred.TextInputFormat, outputFormat:org.apache.hadoop.hive.ql.io.HiveIgnoreKeyTextOutputFormat,compressed:false,numBuckets:-1, serdeInfo:SerDeInfo(name:null, serializationLib:org.apache.hadoop.hive.serde2.lazy.LazySimpleSerDe, parameters:{serialization.format=1}),bucketCols:[], sortCols:[], parameters:{}, skewedInfo:SkewedInfo(skewedColNames:[], skewedColValues:[], skewedColValueLocationMaps:{}), storedAsSubDirectories:false),partitionKeys:[], parameters:{EXTERNAL=TRUE, transient_lastDdlTime=1391839636}, viewOriginalText:null, viewExpandedText:null, tableType:EXTERNAL_TABLE)
GraphLab• About GraphLab on page 60• Installing GraphLab on page 60
• Prerequisites on page 60• GraphLab RPM Packages on page 60• Reconfigure YARN Virtual Memory on page 61• Running an Example on page 61• Using GraphLab on page 62• Recommended YARN Configurations for GraphLab on Hamster on page 62
• Resource allocation / monitoring on page 62• Fetch the log for the Hamster Job on page 62
• Troubleshooting on page 63
Manually Installing and Using Pivotal HD 2.1 Stack Stack and Tools Reference
60
About GraphLabGraphLab is a powerful new system for designing and implementing parallel algorithms in machinelearning. It is a graph-based, high performance, distributed computation framework written in C++. Itmakes use of MPI and has its own programming model.
You can find more information about GraphLab here: http://graphlab.org/.
Because GraphLab itself cannot run on YARN, we have integrated GraphLab into Hadoop using Hamster.
Following is an architecture diagram for GraphLab on Hadoop:
Installing GraphLab
Prerequisites• hadoop-libhdfs*.rpm and JRE package If GraphLab algorithm's input/output are from/to
HDFS, then hadoop-libhdfs*.rpm and JRE package are required. When installing PHD, makesure that hadoop-libhdfs*.rpm is installed and $JAVA_HOME/jre/lib/amd64/server/libjvm.so is found.
• Hamster-1.1
GraphLab RPM PackagesGraphLab consists of the following graphlab rpm package:
graphlab-<PHD_GraphLab_VERSION>-1.x86_64.rpm
Type GraphLab
Requires Hamster, hadoop-libhdfs*.rpm, jre package
Description GraphLab installation package

Manually Installing and Using Pivotal HD 2.1 Stack Stack and Tools Reference
61
Install on Nodes Every node in the YARN cluster and the clientworkstation that will access the YARN service.
GraphLab Setup
$ sudo rpm -ivh working_dir/graphlab/rpm/graphlab-<PHD_GraphLab_VERSION>-1.x86_64.rpm
Reconfigure YARN Virtual MemoryWhile the GraphLab process is running, it will consume a large amount of virtual memory. Once theamount of virtual memory it consumes exceeds the YARN virtual memory configuration, NodeManagerwill kill the container in which the GraphLab process is located. Therefore, we recommend thatyou set yarn.nodemanager.vmem-pmem-ration to a higher value (e.g. 100) or disableyarn.nodemanager.vmem-check-enabled in $HADOOP_CONF_DIR/yarn-site.xml. For example:
<property> <name>yarn.nodemanager.vmem-pmem-ratio</name> <value>100</value> </property>
or:
<property> <name>yarn.nodemanager.vmem-check-enabled</name> <value>false</value> </property>
After setting either of these properties, restart all NodeManagers to enable the configuration.
Running an ExampleFollowing is an example to test that GraphLab is working:
Create a connected_component.ini file that contains the following:
1 2 4.0 2 3 1.0 3 4 5.0 4 5 2.0 5 3 3.0
Run the following commands to place this file in HDFS, and create a folder in HDFS for write output:
sudo -u hdfs hadoop fs -mkdir /graphlabsudo -u hdfs hadoop fs -copyFromLocal /path/to/connected_component.ini /graphlab/connected_component.inisudo -u hdfs hadoop fs -mkdir -p /graphlab/connected_component/outputsudo -u hdfs hadoop fs -chmod 777 /graphlab/connected_component/output
Run the following command to execute a GraphLab job:
mpirun -np 2 /${graphlab_installation_dir}/graph_analytics/connected_component --saveprefix=hdfs://${hdfs_hostname}:${hdfs_port}/graphlab/connected_component/output/ --graph=hdfs://${hdfs_hostname}:${hdfs_port}/graphlab/connected_component.ini --format=tsv
After the job has finished, you can check the output in HDFS.
hadoop fs -ls /graphlab/connected_component/output Found 8 items-rw-r--r-- 3 yarn supergroup 4 2014-07-08 01:56 /graphlab/connected_component/output/_1_of_8-rw-r--r-- 3 yarn supergroup 4 2014-07-08 01:56 /graphlab/connected_component/output/_2_of_8-rw-r--r-- 3 yarn supergroup 0 2014-07-08 01:56 /graphlab/connected_component/output/_3_of_8

Manually Installing and Using Pivotal HD 2.1 Stack Stack and Tools Reference
62
-rw-r--r-- 3 yarn supergroup 0 2014-07-08 01:56 /graphlab/connected_component/output/_4_of_8-rw-r--r-- 3 yarn supergroup 4 2014-07-08 01:56 /graphlab/connected_component/output/_5_of_8-rw-r--r-- 3 yarn supergroup 0 2014-07-08 01:56 /graphlab/connected_component/output/_6_of_8-rw-r--r-- 3 yarn supergroup 0 2014-07-08 01:56 /graphlab/connected_component/output/_7_of_8-rw-r--r-- 3 yarn supergroup 4 2014-07-08 01:56 /graphlab/connected_component/output/_8_of_8
Using GraphLabYou can find Usage information for GraphLab's toolkits here: http://docs.graphlab.org/toolkits.html.
Recommended YARN Configurations for GraphLab on Hamster
Resource allocation / monitoring
In YARN, both virtual and physical memory usage for processes running on node managers are checked,if your program used more memory than requested, it will be killed by node manager. You can changeyour memory/cpu limit for your processes by specifying -mem (--mem-per-proc) and -cpu (--cpu-per-proc).For example, if you want your program using 2G memory and 2 cores, you can use following command toexecute your job.
hamster -mem 2048 -cpu 2 -np N <your-program and parameters>
By default, -mem is 1024 (in MB) and -cpu is 1. But this is not enough, YARN itself has some propertiesthat will take effect on resource allocation and monitoring, all in yarn-site.xml in $HADOOP_CONF_DIR.
• yarn.scheduler.maximum-allocation-mb and yarn.scheduler.maximum-allocation-vcores The twooptions will limit YARN's maximum resource allocation for each launched process. By default, they're8192 (8GB memory) and 32 (cores), if your process need more than this limit, you need increase theirsvalues. GraphLab will consume lots of memory, we suggest at least, specify maximum allocationmemory in YARN to 16GB. Otherwise, you may find your program frequently killed by node managers,which can be found in logs of node managers.
• yarn.nodemanager.vmem-check-enabled and yarn.nodemanager.vmem-pmem-ratio First optionindicated if we need check virtual memory. For example, some program will use a lot of virtual memorybut barely use physic memory (GraphLab is an example). If you think it's unnecessary to check virtualmemory, you can set it to false to disable this checking (default is true). The second option is theratio for physical memory to virtual memory, default is 2.1. For example, if you specified 2G memory(which can be specified by hamster -mem 2048 ...) for your processes, the limit of its physical memoryis 2G, and the limit of its virtual memory is 2.1 * 2G = 4.2G. This process will be killed either it used2G physical memory or 4.2G virtual memory. We suggest set a higher value of this to reduce yourprocesses killed by node manager when it used too much virtual memory.
Fetch the log for the Hamster Job
A traditional OpenMPI program has a feature that allows you to get logs when jobs are running. In Hamster1.0 we don't support this because we launch MPI processes in a different way, however you can still get alllog files after the job is finished.
We recommend that you set yarn.log-aggregation-enable to true in the yarn-site.xml (bydefault this is disabled). If this is left disabled, fetching logs for Hamster jobs is more complicated, as youhave to use the YARN web server to get your logs like other applications (for example, map-reduce).
When the yarn.log-aggregation-enable set to true, you need to be aware that the parent directoryof yarn.nodemanager.remote-app-log-dir in HDFS should have write permission for the yarnuser.By default, the yarn.nodemanager.remote-app-log-dir is set to /tmp/logs.
Manually Installing and Using Pivotal HD 2.1 Stack Stack and Tools Reference
63
Once you have set the above properties, run the following command to get the log after your job hasfinished:
yarn logs -applicationId <application ID> -appOwner <Application Owner>
Note that -appOwner should be set to the user name used to submit Hamster job; when you used adifferent user name execute the yarn logs command.
TroubleshootingQ: I'm unable to see Hadoop logs.
A: You need to add the following property in yarn-site.xml:
<property> <description></description> <name>yarn.nodemanager.delete.debug-delay-sec</name> <value>1800</value> </property>
Then restart resource manager and nodemanager.
Q: When I run hamster -np 3 /absolute/path/to/hello_c, the following error is thrown:
Caused by: org.apache.hadoop.ipc.RemoteException(org.apache.hadoop.security.AccessControlException): Permission denied: user=root, access=WRITE, inode="/user":hdfs:supergroup:drwxr-xr-xat org.apache.hadoop.hdfs.server.namenode.FSPermissionChecker.check(FSPermissionChecker.java:234)at org.apache.hadoop.hdfs.server.namenode.FSPermissionChecker.check(FSPermissionChecker.java:214)at org.apache.hadoop.hdfs.server.namenode.FSPermissionChecker.checkPermission(FSPermissionChecker.java:158)at org.apache.hadoop.hdfs.server.namenode.FSNamesystem.checkPermission(FSNamesystem.java:5380)at org.apache.hadoop.hdfs.server.namenode.FSNamesystem.checkPermission(FSNamesystem.java:5362)at org.apache.hadoop.hdfs.server.namenode.FSNamesystem.checkAncestorAccess(FSNamesystem.java:5336)at org.apache.hadoop.hdfs.server.namenode.FSNamesystem.mkdirsInternal(FSNamesystem.java:3583)at org.apache.hadoop.hdfs.server.namenode.FSNamesystem.mkdirsInt(FSNamesystem.java:3553)at org.apache.hadoop.hdfs.server.namenode.FSNamesystem.mkdirs(FSNamesystem.java:3525)at org.apache.hadoop.hdfs.server.namenode.NameNodeRpcServer.mkdirs(NameNodeRpcServer.java:745)
A: Run the following command:
sudo -u hdfs hadoop fs -chmod 777 /userhadoop fs -mkdir /user/root
Q: I see the following in the YARN logs:
14/02/17 09:52:30 ERROR event.HamsterEventHandler: exception when launch HNP processjava.io.IOException: Cannot run program "mpirun": error=13, Permission deniedat java.lang.ProcessBuilder.start(ProcessBuilder.java:1029)at java.lang.Runtime.exec(Runtime.java:615)at java.lang.Runtime.exec(Runtime.java:526)

Manually Installing and Using Pivotal HD 2.1 Stack Stack and Tools Reference
64
at com.pivotal.hamster.appmaster.hnp.DefaultHnpLauncher$1.run(DefaultHnpLauncher.java:84)at java.lang.Thread.run(Thread.java:722)Caused by: java.io.IOException: error=13, Permission deniedat java.lang.UNIXProcess.forkAndExec(Native Method)at java.lang.UNIXProcess.<init>(UNIXProcess.java:135)at java.lang.ProcessImpl.start(ProcessImpl.java:130)at java.lang.ProcessBuilder.start(ProcessBuilder.java:1021)... 4 more
A: Check if the node that is running the hamster application has openmpi installed.
Q: I see the following information in logs:
LogType: stderrLogLength: 48Log Contents:/bin/bash: /bin/java: No such file or directoryLogType: stdoutLogLength: 0Log Contents:
A: Make sure $JAVA_HOME is set:
Run this command:
echo $JAVA_HOME
You should see something like this:
/usr/java/latest
Q: I see the following information in logs:
ERROR: fiber_control.cpp(launch:229): Check failed: b<nworkers [1 < 1]
A: Find another machine which has more than 1 core, this is a limitation of GraphLab.
Hamster• About Hamster on page 64• Installing Hamster on page 65
• Prerequisites on page 65• Hamster RPM Packages on page 65• Hamster-core Setup on page 65• OpenMPI Setup on page 66• Hamster-rte Setup on page 66• Reconfig & Restart NodeManager on page 66• Set PATH in your env on page 66• Hamster Usage on page 66• Hamster Service on page 68• Run job with mpirun/mpiexec (submitting job with mpirun/mpiexec directly) on page 68• Run job with hamster qsub (submitting job described as a script file with qsub) on page 68• Run job with hamster (compatible with Hamster-1.0 command line options): on page 68
About HamsterHamster is a framework that enables users running MPI programs on Apache Hadoop YARN platform.

Manually Installing and Using Pivotal HD 2.1 Stack Stack and Tools Reference
65
This section specifies how to install, configure, and use Hamster.
Installing Hamster
PrerequisitesHamster is dependent upon PHD-2.0/2.1 (Apache Hadoop 2.0.5 / 2.2.0).
Hamster RPM PackagesHamster contains three packages: hamster-core, hamster-rte, and openmpi.
hamster-core-<PHD_HAMSTER-CORE_VERSION>-1.x86_64.rpm
Type Client and application master library
Requires
Description Hamster-core installation package.
Install on Nodes Every node in the YARN cluster and the clientworkstation that will access the YARN service
hamster-rte-<PHD_HAMSTER-RTE_VERSION>-1.x86_64.rpm
Type Plugins for OpenMPI
Requires
Description Hamster runtime environment installation package.
Install on Nodes Every node in the YARN cluster and the clientworkstation that will access the YARN service
openmpi-<PHD_OPENMPI_VERSION>-1.x86_64.rpm
Type OpenMPI
Requires
Description OpenMPI installation package.
Install on Nodes Every node in the YARN cluster and the clientworkstation that will access the YARN service
Hamster-core SetupInstall the hamster-core package on the nodes in the YARN cluster and the client workstation that willaccess the YARN service:
$ sudo rpm -ivh working_dir/hamster/rpm/hamster-core-<PHD_HAMSTER-CORE_VERSION>-1.x86_64.rpm

Manually Installing and Using Pivotal HD 2.1 Stack Stack and Tools Reference
66
OpenMPI SetupInstall the OpenMPI package on the nodes in the YARN cluster and the client workstation that will accessthe YARN service:
$ sudo rpm -ivh working_dir/hamster/rpm/openmpi-<PHD_OPENMPI_VERSION>-1.x86_64.rpm
Hamster-rte SetupInstall the hamster-rte package on the nodes in the YARN cluster and the client workstation that will accessthe YARN service:
$ sudo rpm -ivh working_dir/hamster/rpm/hamster-rte-<PHD_HAMSTER-RTE_VERSION>-1.x86_64.rpm
Reconfig & Restart NodeManagerIn Hamster-1.1, we have implemented an auxiliary in each NodeManager to launch orted (ORTEDaemon). Therefore,you need to deploy and configure the auxiliary service in the yarn-site.xml filoefor each NodeManager.
1. Copy hamster-core-<VERSION>.jar (by default, /usr/local/hamster/lib/hamster/hamster-core-1.1.0-SNAPSHOT.jar ) to /usr/lib/gphd/hadoop-yarn/
2. Specify the auxiliary service in yarn-site.xml, as follows:
<property> <name>yarn.nodemanager.aux-services</name> <value>mapreduce_shuffle,hamster_aux</value> <description>shuffle service that needs to be set for Map Reduce to run </description></property><property> <name>yarn.nodemanager.aux-services.hamster_aux.class</name> <value>com.pivotal.hamster.aux.HamsterAuxService</value></property>
3. Restart NodeManager.
Set PATH in your envAfter installing Hamster, set the PATH in your env.
1. Put 'export PATH=/usr/local/hamster/bin:$PATH' in your ~/.bashrc (only for you) or in /etc/bashrc (for all users in this node.)
2. source ~/.bashrc (or source /etc/bashrc)3. Check the hamster by running:
$ which hamster
/usr/local/hamster/bin/hamster
Hamster UsageHamster command usage can be shown by running:
$hamster --help

Manually Installing and Using Pivotal HD 2.1 Stack Stack and Tools Reference
67
cmd option description example
start start theserver(AppService/JobService)
hamster start
stop stop theservice(AppService/JobService)
hamster stop
service
mgmt
status check the status ofserver(AppService/JobService)
hamster status
submit the job
-preload-files, --preload-files
Preload the commaseparated list offiles to HDFS forjob execution
-unmanaged, --unmanaged
Only register thejob to JobService,Hamster server willnot launch the jobfor the user.
User needs to starttheir applicationsby their own.
-p, --policy Policy forscheduling. Validvalue: { simple,compute-locality/cl }
-cpu, --cpu-per-proc
Specify how manyv-cores allocated toeach container
-mem, --mem-per-proc
Specify how manymemory (in MB)allocated to eachcontainer
qsub
-parent-jobid, --parent-jobid
the new job will beassociated withparent job as itschild jobs, if parentjob id is provided
hamster qsub /path/to/scripts \
-preload-files /path/to/file1,/path/to/file2
qstat -jobid, --jobid query the job state. hamster qstat --jobid 888
job
mgmt
qdel -jobid, --jobid cancel jobs hamster qdel --jobid 888
other -h, --help print all options anddescriptions
hamster --help

Manually Installing and Using Pivotal HD 2.1 Stack Stack and Tools Reference
68
cmd option description example
-V, --version Print version andexit
hamster -V
-v, --verbose Be verbose
Hamster ServiceBefore running any jobs, start the Hamster Service (JobService/AppMasterService).
To start the Hamster Service:
$ hamster start
To check the current status of the Hamster Service:
$ hamster status
To stop the Hamster Service:
$ hamster stop
Run job with mpirun/mpiexec (submitting job with mpirun/mpiexecdirectly)Make sure Hamster Service's status is running.
$ mpirun -np 3 /path/to/mpi/executable
Run job with hamster qsub (submitting job described as a script filewith qsub)Suppose there are two mpirun job as batch job or pipeline in your scripts named myjob.sh as following:
vi myjob.shmpirun -np 2 /path/to/mpi/executable1mpirun -np 4 /path/to/mpi/executable2
Submit the job script:
$ hamster qsub /path/to/myjob.sh
Run job with hamster (compatible with Hamster-1.0 command lineoptions):
$ hamster -np 2 /path/to/mpi/executable
Currently, MPI processes in Hamster will redirect their output to files in the Hadoop log folder, you canaccess them in yarn.nodemanager.log-dirs in yarn-site.xml under $HADOOP_CONF_DIR.

Manually Installing and Using Pivotal HD 2.1 Stack Stack and Tools Reference
69
Manually Upgrading Pivotal HD Stack to 2.1.0 Stack and Tools Reference
70
Chapter
3Manually Upgrading Pivotal HD Stack to 2.1.0
Pivotal HD Stack supports the following upgrade:
• Upgrade from PHD 1.1.1 to PHD 2.1• Upgrade from PHD 2.0.1 to PHD 2.1
This section describes how to manually upgrade your Pivotal HD stack components.
• General Upgrade Tasks for Each Component on page 70• Components to Upgrade (Supported by icm_client) on page 70• Components to Upgrade (Not Supported by icm_client) on page 72
PHD supports only stack-level upgrade; it doesn't support component-level upgrade. All PHD componentsshould come from the same release package and all PHD components need to upgrade to same releaseversion.
General Upgrade Tasks for Each ComponentFor each component upgrade, the following steps need to be followed:
• Back up Configuration• Stop Service• RPM upgrade• Restore Configuration• Start Service
Components to Upgrade (Supported by icm_client)• Bigtop utilities• Zookeeper• Hadoop (HDFS and Yarn)• HBase• Hive• Pig• Mahout
Attention: Upgrade for these components is supported through the CLI. Manual RPM upgrade isrisky and upgrade through the CLI is strongly recommended.
Upgrade Bigtop Utilities RPM Upgrade Bigtop Utilities

Manually Upgrading Pivotal HD Stack to 2.1.0 Stack and Tools Reference
71
Upgrade Zookeeper1. Back up existing configuration files.2. Stop the zookeeper-server service.3. RPM Upgrade Zookeeper.4. Restore backup configuration files and make sure configuration is compatible with the new installed
version.5. Restart the zookeeper-server service on Zookeeper server.
Upgrade HadoopRefer to http://wiki.apache.org/hadoop/Hadoop_Upgrade for Hadoop data upgrade/migration. The followingsteps only cover Hadoop configuration and packages upgrade.
1. Backup existing configuration files.2. Stop Hadoop services.3. RPM upgrade Hadoop.4. Restore backup configuration files and make sure configuration is compatible with new installed
version.5. Restart Hadoop services.
Upgrade HBase Refer to http://hbase.apache.org/book/upgrading.html for hbase data upgrade/migration. The followingsteps only cover hbase configuration and packages upgrade.
1. Back up existing configuration files.2. Stop HBase master/region/thrift/restful service.3. RPM upgrade Hbase.4. Restore backup configuration files and make sure configuration is compatible with the new installed
version.5. Restart HBase master/region/thrift/restful service.
Upgrade HiveRefer to https://cwiki.apache.org/confluence/display/Hive/Hive+Schema+Tool for Hive data upgrade/migration. The following steps only cover Hive configuration and packages upgrade.
1. Back up existing configuration files.2. Stop Hive Server, Hive Server2, metastore services.3. RPM upgrade Hive4. Restore backup configuration files and make sure configuration is compatible with the new installed
version.5. If you use postgresql as the metastore DB, please copy postgresql-jdbc.jar to /usr/lib/gphd/hive/lib on
hive-server node.6. Restart Hive Server, Hive Server2, metastore services.
Upgrade Pig1. Backup existing configuration files.2. RPM upgrade Pig.3. Restore backup configuration files and make sure configuration is compatible with new installed
version.4. Restore any customized UDF jars to lib directory.
Manually Upgrading Pivotal HD Stack to 2.1.0 Stack and Tools Reference
72
Upgrade Mahout1. Backup existing configuration files.2. RPM upgrade Mahout3. Restore backup configuration files and make sure configuration is compatible with new installed
version.
Components to Upgrade (Not Supported by icm_client)• Sqoop• Flume• Oozie• Hcatlog
Upgrade of these components using RPM requires root privileges on the nodes to be upgraded. Unlessspecified, all the following operations should be run by user root.
Note: These instructions assume that the following components were already upgraded to PHDstack 2.1.0 and work correctly (see previous section):
• Zookeeper• Hadoop• Hbase• Hive• Pig• Mahout
Upgrade Flume1. Backup existing configuration files:
$ cp -r /etc/gphd/flume/conf <dir_to_save_Flume_configuration>$ cp -r /etc/default/flume* <dir_to_save_Flume_environment>
2. Stop Flume Agent Service:
Before you begin the upgrade, stop the flume-agent service:
$ sudo service flume-agent stop
3. Upgrade Flume:
$ sudo rpm -U flume-<PHD_FLUME_VERSIOIN>.noarch.rpm$ sudo rpm -qa | grep flumeflume-<PHD_FLUME_VERSION>.noarch
4. Upgrade the Flume Agent:
$ sudo rpm -U flume-<PHD_FLUME_VERSION>.noarch.rpm flume-agent-<PHD_FLUME_VERSION>.noarch.rpm$ sudo rpm -qa | grep flumeflume-<PHD_FLUME_VERSION>.noarchflume-agent-<PHD_FLUME_VERSION>.noarch
5. Restore the old configurations:
After upgrading all Flume packages, you need to restore your configuration files in /etc/gphd/flume/conf, especially flume.conf. Check your previous backup configuration files, and manually

Manually Upgrading Pivotal HD Stack to 2.1.0 Stack and Tools Reference
73
add any change you made back to your upgraded configuration files.You also need to restore flumeenvironment files in /etc/default, if they were changed.
6. Restart Flume Agent Service:
$ sudo service flume-agent start
Upgrade Sqoop1. Backup existing configuration files:
You are also required to back up the external jar files used to connect with the database for Sqoop:
$ cp -r /etc/gphd/sqoop/conf <dir_to_save_Sqoop_configuration>$ cp -r /usr/lib/gphd/sqoop/lib <dir_to_save_external_jar_files>$ cp -r /etc/default/sqoop* <dire_to_save_Sqoop_environment>
2. Stop Sqoop Metastore Service:
Before you run the upgrade, first stop the sqoop-metastore service:
$ sudo service sqoop-metastore stop
3. Upgrade Sqoop Client:
$ rpm -U sqoop-<PHD_SQOOP_VERSION>.noarch.rpm$ rpm -qa | grep sqoopsqoop-<PHD_SQOOP_VERSION>.noarch
4. Upgrade Sqoop Metastore:
$ rpm -U sqoop-<PHD_SQOOP_VERSION>.noarch.rpm sqoop-metastore-<PHD_SQOOP_VERSION>.noarch.rpm$ rpm -qa | grep sqoopsqoop-<PHD_SQOOP_VERSION>.noarchsqoop-metastore-<PHD_SQOOP_VERSION>.noarch
5. Restore old configurations:
After upgrading all Sqoop packages, you need to restore your configuration files in /etc/gphd/sqoop/conf, especially sqoop-site.xml.
Check your previous backup configuration files, and manually add back any change you made to yourupgraded configuration files.
You also need to restore your external jar files to /usr/lib/gphd/sqoop/lib and restore Sqoopenvironment files in /etc/default, if they were changed.
6. Restart Sqoop Metastore service:
$ sudo service sqoop-metastore start
Upgrade Oozie1. Back up existing configuration files:
$ cp -r /etc/gphd/oozie/conf <dir_to_save_Oozie_configuration>
2. Stop Oozie service:
Before you run the upgrade, first stop the Oozie service:
$ sudo service oozie stop

Manually Upgrading Pivotal HD Stack to 2.1.0 Stack and Tools Reference
74
3. Upgrade Oozie RPMs:
$ sudo rpm -U oozie-client-<PHD_OOZIE_VERSION>.noarch.rpm oozie-<PHD_OOZIE_VERSION>.noarch.rpm$ sudo rpm -qa | grep oozieoozie-client-<PHD_OOZIE_VERSION>.noarchoozie-<PHD_OOZIE_VERSION>.noarch
4. Clean up Tomcat container files
$ sudo rm -rf /usr/lib/gphd/oozie-<PHD_OOZIE_OLD_VERSION>
Note: PHD_OOZIE_OLD_VERSION is the old Oozie version in the previous PHD release.
5. Copy Oozie Data:
$ sudo -u oozie cp -r /var/lib/gphd/oozie-<PHD_OOZIE_OLD_VERSION>/* /var/lib/gphd/oozie/
Note: PHD_OOZIE_OLD_VERSION is the old Oozie version in the previous PHD release. Thedefault OOZIE_DATA is /var/lib/gphd/oozie/. If OOZIE_DATA is set to another path, youmust put it into the path you set.
6. Restore old configurations:
After upgrading all Oozie packages, you need to restore your configuration files in /etc/gphd/oozie/conf. Check your previous backup configuration files, and manually add any change you madeback to your upgraded configuration files. You also need to restore Oozie environment files in /etc/default, if they were changed.
7. Upgrade Oozie database:
$ sudo -u oozie oozie-setup db upgrade -run$ sudo -u oozie oozie-setup db postupgrade -run
8. Init new version of Oozie Service:
$ sudo -u oozie oozie-setup prepare-war -d <ext-js-2.2-path>$ sudo -u oozie hdfs dfs -rm -r shareDeleted share$ sudo -u oozie oozie-setup sharelib create -fs hdfs://<NameNodeHost>:<HDFSPort>
Note: Make sure that there is a file named ext-2.2.zip in <ext-js-2.2-path>.
9. Restart Oozie service:
$ sudo service oozie start
Upgrade HCatalog1. Backup existing configuration files:
$ cp -r /etc/gphd/hcatalog/conf <dir_to_save_HCatlog_configuration>$ cp -r /etc/default/hcatalog* <dir_to_save_HCatlog_environment>$ cp -r /etc/default/webhcat* <dir_to_save_Webhcat_environment>
2. Stop webhcat-server Service:
$ sudo service webhcat-server stop

Manually Upgrading Pivotal HD Stack to 2.1.0 Stack and Tools Reference
75
3. Stop hcatalog-server Service:
$ sudo service hcatalog-server stop
4. Upgrade webhcat-server:
$ rpm -U webhcat-server-<PHD_HCATALOG_VERSION>.noarch.rpm$ rpm -qa | grep webhcat-serverwebhcat-server-<PHD_HCATALOG_VERSION>.noarch.rpm
5. Upgrade webhcat:
$ rpm -U webhcat-<PHD_HCATALOG_VERSION>.noarch.rpm$ rpm -qa | grep webhcatwebhcat-<PHD_HCATALOG_VERSION>.noarch.rpm
6. Upgrade hcatalog-server:
$ rpm -U hcatalog-server-<PHD_HCATALOG_VERSION>.noarch.rpm$ rpm -qa | grep hcatalog-serverhcatalog-server-<PHD_HCATALOG_VERSION>.noarch.rpm
7. Upgrade hcatalog:
$ rpm -U hcatalog-<PHD_HCATALOG_VERSION>.noarch.rpm$ rpm -qa | grep hcataloghcatalog-<PHD_HCATALOG_VERSION>.noarch.rpm
8. Restore old configurations:
After upgrading all packages, you need to restore your configuration files in /etc/gphd/hcatalog/conf.
Check your previous backup configuration files, and manually add any change you made back to yourupgraded configuration files. You also need to restore hcatalog and webhcat environment files in /etc/default if they were changed.
9. Restart webhcat-server service:
$ sudo service webhcat-server start
10.Restart hcatalog-server service:
$ sudo service hcatalog-server start

Pivotal Hadoop Enhancements Stack and Tools Reference
76
Chapter
4Pivotal Hadoop Enhancements
Pivotal HD is a full Apache Hadoop distribution with Pivotal add-ons and a native integration with the PivotalGreenplum database.
• HDFS Off-Cluster Client Rack Awareness on page 77
• Overview of Rack Awareness on page 77• Problem: Ignored Off-cluster Clients on page 77• Solution: Design on page 78• Enabling Off-Client Rack Awareness on page 79
• Vaidya on page 79
• Overview on page 79• Installing Vaidya Files on page 80• Enabling Vaidya on page 80• Disabling Vaidya on page 80• Using Vaidya to Analyze Jobs on page 80• Vaidya Configuration Rules on page 81
• Disabling a Rule on page 81• Changing the Importance of a Rule on page 81• Changing Success Threshold on page 82• Changing Input Parameters on page 82• Other Elements on page 82• Adding a New Rule on page 82• Creating a Java Binary for a New Rule on page 82• Creating XML Configuration for a New Rule on page 83• Deploying Files on page 83
• HVE Topology Awareness on page 84
• Topology Awareness Configuration and Verification on page 84• HVE Elasticity on page 86
• Overview on page 86• Function List on page 86• Configuration on page 87• Command-Line Interface for YARN Cluster on page 87
• List all CLIs on page 87• List Nodes on page 87• Get Node Status on page 88• Set Node Resource Capacity on page 88
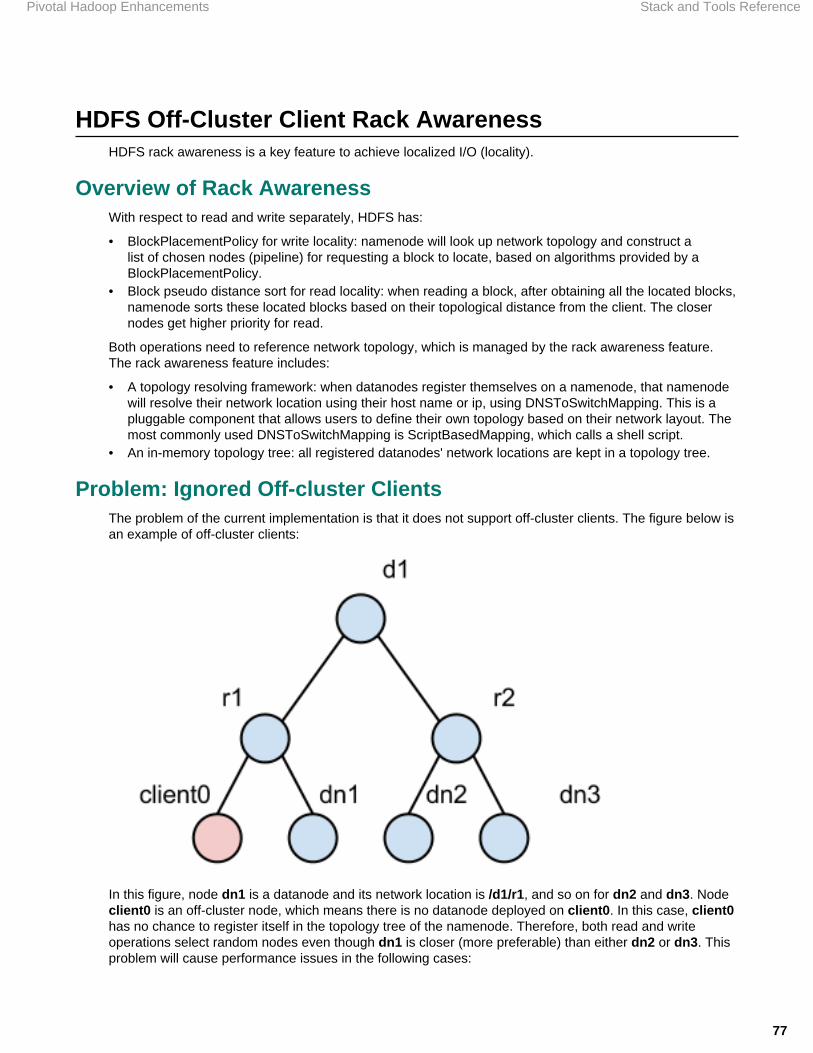
Pivotal Hadoop Enhancements Stack and Tools Reference
77
HDFS Off-Cluster Client Rack AwarenessHDFS rack awareness is a key feature to achieve localized I/O (locality).
Overview of Rack AwarenessWith respect to read and write separately, HDFS has:
• BlockPlacementPolicy for write locality: namenode will look up network topology and construct alist of chosen nodes (pipeline) for requesting a block to locate, based on algorithms provided by aBlockPlacementPolicy.
• Block pseudo distance sort for read locality: when reading a block, after obtaining all the located blocks,namenode sorts these located blocks based on their topological distance from the client. The closernodes get higher priority for read.
Both operations need to reference network topology, which is managed by the rack awareness feature.The rack awareness feature includes:
• A topology resolving framework: when datanodes register themselves on a namenode, that namenodewill resolve their network location using their host name or ip, using DNSToSwitchMapping. This is apluggable component that allows users to define their own topology based on their network layout. Themost commonly used DNSToSwitchMapping is ScriptBasedMapping, which calls a shell script.
• An in-memory topology tree: all registered datanodes' network locations are kept in a topology tree.
Problem: Ignored Off-cluster ClientsThe problem of the current implementation is that it does not support off-cluster clients. The figure below isan example of off-cluster clients:
In this figure, node dn1 is a datanode and its network location is /d1/r1, and so on for dn2 and dn3. Nodeclient0 is an off-cluster node, which means there is no datanode deployed on client0. In this case, client0has no chance to register itself in the topology tree of the namenode. Therefore, both read and writeoperations select random nodes even though dn1 is closer (more preferable) than either dn2 or dn3. Thisproblem will cause performance issues in the following cases:

Pivotal Hadoop Enhancements Stack and Tools Reference
78
• When a mapreduce cluster is not exactly co-located: some mapreduce clusters share the samehdfs cluster with other mapreduce clusters, or in some cases a mapreduce cluster will cover severalhdfs clusters. In those cases, a large portion of I/O will be off-cluster client operations, which cannotbenefit from localized I/O.
• When a physical cluster is not dedicated to Hadoop: a physical cluster might not be dedicated toHadoop and other supporting systems, such as data loading tools, might share the same cluster. In thatcase, the data loading tool can not benefit from localized I/O, even if the tool and hdfs shares the samerack/data center. The problem could be even more common in virtualized environments.
Solution: DesignTo tackle this problem, we changed the logic in the block placement policy and the block pseudo distancesort. We also resolved the network location of the client.
Resolving client location
Resolving the client location: we reused the framework that resolves datanodes. However, since we did notadd client network locations into the topology tree (as explained below), we have to cache client locationsto avoid unnecessary resolve operations.
As a result, we introduced two LRU caches:
• A black list for those clients that have no valid location or whose locations do not share the same rackwith any datanode.
• A white list, opposite to the black list, for those clients that are not datanodes but share the same rackwith at least one datanode.
Referring to the diagram of ignored off-cluster clients, the table below lists some examples of locationcache.
Location Cache Examples
HostName Location Cache
client1 d1/r1 white list
client2 d2/r1 black list
client3 null black list
The size of the LRU cache is configurable, so you can limit the memory usage of namenode.
Block placement policy
The tables below demonstrate how the BlockPlacementPolicy has been changed to support non-datanodeclients.
Former block placement algorithm
Replica Rule
1 Client Local
2 Random node whose rack is different from replica 1
3 Random node who share the same rack withreplica 2

Pivotal Hadoop Enhancements Stack and Tools Reference
79
>=4 Random node
Changed block placement algorithm
Replica Rule
1 Client Local if client is datanode, or a random nodethat shares the same rack with client, if client is nota datanode
2 Random node whose rack is different from replica 1
3 Random node who shares the same rack withreplica 2
>=4 Random node
Enabling Off-Client Rack AwarenessThe client rack aware feature is disabled by default. To enable, add the following to the hdfs-site.xmlfile:
<properties> <property> <name>dfs.rackawareness.with.client</name> <value>true</value> </property> </properties> <properties> <property> <name>dfs.rackawareness.with.client.blacklist.size</name> <description>Black list size of client cache, 5000 by default.</description> <value>5000</value> </property> </properties> <properties> <property> <name>dfs.rackawareness.with.client.cache.size</name> <description>White list size of client cache, best set it equals the size of cluster. 2000 by default.</description> <value>2000</value> </property> </properties>
Note: You need to restart DFS after changing the configuration.
Vaidya
OverviewVaidya is a diagnostic tool installed with PHD for Map/Reduce jobs. After a job is executed successfully,it uses a job history log and the job configuration information to identify any performance or scalability

Pivotal Hadoop Enhancements Stack and Tools Reference
80
problems with the job. Upon execution, it provides a job analysis report indicating specific problems withthe job, along with the remedy to correct them. The report element includes, "rule title", "rule description", "rule importance", "rule severity", "reference details" and "remedy/prescription" to rectify the problem. The"rule severity", is a product of rule impact and the rule importance.
Note: The Vaidya tool does not analyze failed jobs, either for performance or scalability problems, nor forthe reason for failures.
The Vaidya tool includes diagnostic rules (also referred to as "tests") where each rule analyzes a specificproblem with the M/R job. A diagnostic rule is written as a Java class and captures the logic of how todetect a specific problem condition with the M/R job. Each diagnostic rule uses the job history log and jobconfiguration information provided to it using a standard structured interface. The standard interface allowsadministrators and developers to independently add more diagnostic rules in the Vaidya tool.
Installing Vaidya FilesBy default, Vaidya files are installed at:
• The Vaidya JAR library is installed into /usr/lib/gphd/hadoop-mapreduce/.• The Vaidya default configuration file is installed into /etc/gphd/hadoop/conf/.
Enabling VaidyaOn the history server node, go to the PHD configuration folder (by default, /etc/gphd/hadoop/conf),and add the following lines into the mapred-site.xml file.
Restart the job history server service to ensure the change takes effect.
mapred-site.xml Structure
<property> <name>mapreduce.vaidya.enabled</name> <value>true</value> </property> <property> <name>mapreduce.vaidya.jarfiles</name> <value>/usr/lib/gphd/hadoop-mapreduce/hadoop-vaidya.jar</value> </property> <property> <name>mapreduce.vaidya.testconf.file</name> <value>/etc/gphd/hadoop/conf/postex_diagnosis_tests.xml</value> </property>
Disabling VaidyaTo disable Vaidya:
Set the mapreduce.vaidya.enabled property value to false, or remove these lines from mapred-site.xml:
• The value of property mapreduce.vaidya.enabled should be changed to point to the correctjar file you installed. By default, this is /usr/lib/gphd/hadoop-mapreduce/hadoop-vaidya-<HADOOP_PHD_VERSION>.jar.
• Restart the job history server service to ensure the change takes effect.
Using Vaidya to Analyze Jobs1. Ensure your job history server service is running.2. Successfully run a MapReduce job for Vaidya to analyze.3. Open the following URL in a web browser:

Pivotal Hadoop Enhancements Stack and Tools Reference
81
http://<historyserver_host>:<historyserver_port>/jobhistory
Where:
• <historyserver_host> refers to the host name or IP address of the machine where you run jobhistory server service.
• <historyserver_port> refers to the HTTP port job history server web where the UI listens. Bydefault, this value is 19888. Your browser should show you the job history server UI page.
4. You will see a list of jobs that have run, including the most recent job. Click the job id of any job in thislist, and you should see the detailed information for the job.
5. On the left side of the navigation area, there should be a link called Vaidya report under the navigationitem Job. Click the Vaidya report link and Vaidya will analyze the job for you and show a report.
Vaidya Configuration RulesAfter you installed Vaidya with PHD, rules configuration is installed as apostex_diagnosis_tests.xml file in /etc/gphd/hadoop/conf.
You can find all rules to be run on a selected job in this file, where each rule is defined as an XMLPostExPerformanceDiagnosisTests/DiagnosticTest element.
For example, a rule in postex_diagnosis_tests.xml:
<DiagnosticTest> <Title><![CDATA[Balanced Reduce Partitioning]]></Title> <ClassName> <![CDATA[org.apache.hadoop.vaidya.postexdiagnosis.tests.BalancedReducePartitioning]]></ClassName> <Description><![CDATA[This rule tests as to how well the input to reduce tasks is balanced]]></Description> <Importance><![CDATA[High]]></Importance> <SuccessThreshold><![CDATA[0.40]]></SuccessThreshold> <Prescription><![CDATA[advice]]></Prescription> <InputElement> <PercentReduceRecords><![CDATA[85]]></PercentReduceRecords> </InputElement> </DiagnosticTest>
The Title and Description elements provide a brief summary about what this rule is doing.
By editing postex_diagnosis_tests.xml, you can configure the rules.
Note:
• Remember to back up the original configuration file before editing the configuration file. Aninvalid XML config file may cause Vaidya to behave incorrectly.
• Before you start editing rules, you should have background knowledge about XML syntax andhow XML represents data (for example, what the CDATA element represents).
Disabling a RuleComment out or remove the entire <DiagnosticTest> element.
Changing the Importance of a RuleImportance indicates how relatively important a rule is, relative to other rules in the same set. You canchange the importance value by editing the <Importance> element in the XML file. A level serves as afactor, which is multiplied to impact the value returned by each rule.
Pivotal Hadoop Enhancements Stack and Tools Reference
82
There are three values valid for this attribute: Low (value of 0.33), Medium (value of 0.66), and High (valueof 0.99).
In the displayed Vaidya report, there is a value named Severity for each rule. A severity level is the resultof multiplying the impact value (returned by rule) and the importance factor (defined in the XML file).
For example, a rule returns an impact of 0.5, its importance is marked as Medium, then its severity is 0.5 *0.66 = 0.33.
Changing Success ThresholdEach rule calculates a value between 0 and 1 (inclusively) to indicate how healthy a job is according to thespecified rule; this value is called impact. The smaller the impact is (that is, closer to 0), the healthier thejob is.
To give a more straightforward result, you can set a threshold for each rule. Therefore, a rule whose impactvalue is larger than the threshold will be marked as "failed"; otherwise, it is marked as "passed".
Note that the threshold is compared with the impact value, rather than severity (which means making a ruleless important will not make a failed rule succeed).
You can change the threshold value by editing the <SuccessThreshold> element in the XML file.
Changing Input ParametersSome rules might need additional input parameters to complete their logic. You can specify additionalparameters by editing/adding elements under the <InputElement> element of each rule.
Other ElementsFor a full explanation and instructions about the meaning of each XML element, as well as how to changethem, see Apache's documentation (https://hadoop.apache.org/docs/stable1/vaidya.html) for moreinformation.
Adding a New RuleA Vaidya rule consists of the following two parts:
• A java class that consists of the logic of the rule• A paragraph of XML in the configuration file
Creating a Java Binary for a New RuleImportant: This section assumes a working knowledge of how to write, compile, and package Javacode.
1. From where you installed PHD, download the correct hadoop-vaidya-<HADOOP_PHD_VERSION>.jar file (which you specified in mapred-site.xml) to your developmentmachine, if you plan on writing Java code on another machine than the one where you installed PHD.(This is a typical use case.)
2. Create a java file with an IDE or editor, which defines a class that extends theorg.apache.hadoop.vaidya.DiagnosticTest class:
myrule.java
package com.greenplum.vaidya.rules; import org.apache.hadoop.vaidya.DiagnosticTest; import org.apache.hadoop.vaidya.statistics.job.JobStatistics; public class MyRule extends DiagnosticTest { @Override public String getReferenceDetails() {
Pivotal Hadoop Enhancements Stack and Tools Reference
83
return ""; } @Override public String getPrescription() { return ""; } @Override public double evaluate(JobStatistics jobStatistics) { return 0.5; } }
3. Edit the three methods getReferenceDetails, getPrescription and evaluate to construct thelogic.evaluate method should return a double value between 0.0 and 1.0 and represents the impact asthe analysis result.
• getPrescription method should return some text providing user suggestions/remedies abouthow to optimize your Map/Reduce configuration accordingly.
• getReferenceDetails method should return some text indicating the meaningful counters andtheir values which can help you to diagnose your MapReduce configuration accordingly.
4. Compile the java class and package compiled class to a jar file, for example myrule.jar. Note thatyou need to put the Vaidya jar file you just downloaded into your classpath to make your code compile.
Creating XML Configuration for a New RuleAdd a DiagnosticTest element into the postex_diagnosis_tests.xml file (the file you set in themapred-site.xml file), according to the sample given in the configuration part. Ensure the value of the<ClassName> element is set to be the full class name of the java rule class you just created.
Deploying Files1. Upload the packaged jar file (myrule.jar for example) to the node where you installed PHD job
tracker, and store it in a folder where hadoop service has the permission to read and load it. Werecommend you place it under /usr/lib/gphd/hadoop-mapreduce/lib/.
2. Edit mapred-site.xml, append the jar file you just uploaded to the mapred.vaidya.jar file ormapreduce.vaidya.jar files property value. For example:
mapred-site.xml <property> <name>mapreduce.vaidya.jarfiles</name> <value>/usr/lib/gphd/hadoop-mapreduce/hadoop-vaidya.jar:/usr/lib/gphd/hadoop-mapreduce/lib/myrule.jar</value> </property>
Important:
• Do not remove the default Vaidya jar file from this property, Vaidya needs this property to loadbasic Vaidya classes to make it run.
• Multiple jar files are separated by different separator characters on different platforms.On the Linux/Unix platform, the ":" character should be used. You can look atthe theFile.pathSeparator attribute of your java platform to verify it.
• To make your settings take effect, restart the job history server service.

Pivotal Hadoop Enhancements Stack and Tools Reference
84
HVE Topology AwarenessHadoop Virtualization Extensions (HVE) allow Hadoop clusters implemented on virtualized infrastructurefull awareness of the topology on which they are running, thus enhancing the reliability and performance ofthese clusters.
HVE should be enabled in the following situations:
• When there is more than one Hadoop VM per physical host in virtualized environments.• When Datanodes and NodeManagers/TaskTrackers exist in separate virtual machines in virtualized
environments, in order to achieve graceful scaling of the compute component of the Hadoop cluster.• When there is a topology layer between host and rack (e.g. chassis), which can affect the failure/locality
group between hosts, in non-virtualized environments.
Topology Awareness Configuration and VerificationSample Setup:
This setup has 2 logical racks, 2 physical hosts (installed by ESXi and managed by vCenter) per rack, and2 DN/NM (VM in ESXi) nodes per host. There is also one NameNode/ResourceManager and a client nodethat can be used to start jobs.
In this setup, each DN/NM node has 4 vCPUs, 16G memory, and 200G (Non-SSD) disks.
The NameNode and ResourceManager are installed on another dedicated VM with 4vCPU, 4G Memoryand 100G disks.
Node Distribution on Hosts:
Rack 1 Host 1 NameNode andResourceManager
DN1
Host 2 DN2 DN3
Rack 2 Host 3 DN4 DN5
Host 4 DN6 DN7
Enable topology awareness (Hadoop V2):
1. Add the following line to core-site.xml:
<property> <name>topology.script.file.name</name> <value>/hadoop/hadoop-smoke/etc/hadoop/topology.sh</value<!-- point to topology.sh location.--></property><property> <name>net.topology.impl</name> <value>org.apache.hadoop.net.NetworkTopologyWithNodeGroup</value> <description> The default implementation of NetworkTopology which is classic three layer one. </description></property><property> <name>net.topology.nodegroup.aware</name> <value>true</value> <description> By default, network topology is not aware of nodegroup layer. </description>

Pivotal Hadoop Enhancements Stack and Tools Reference
85
</property><property> <name>dfs.block.replicator.classname</name> <value>org.apache.hadoop.hdfs.server.blockmanagement.BlockPlacementPolicyWithNodeGroup</value> <description> The default implementation of ReplicationTargetChooser. </description></property>
2. Add the following line to yarn-site.xml:
<property> <description>The class to use as scheduled requests.</description> <name>yarn.resourcemanager.scheduled.requests.class</name> <value>org.apache.hadoop.mapreduce.v2.app.rm.ScheduledRequestsWithNodeGroup</value></property><property> <description> The boolean value to identify if the cluster is deployed on an environment which needs an additional layer (node group) between node and rack for network topology. </description> <name>net.topology.with.nodegroup</name> <value>true</value></property><property> <description>The class to use as AbstractSchedulerElementsFactory in RM scheduler. </description> <name>yarn.resourcemanager.scheduler.elements.factory.impl</name><value>org.apache.hadoop.yarn.server.resourcemanager.scheduler. SchedulerElementsFactoryWithNodeGroup</value></property>
Topology.data sample:
[root@namenode enable]# cat topology.data10.111.57.223(VM IP) /Rack1/NodeGroup110.111.57.224 /Rack1/NodeGroup110.111.57.225 /Rack1/NodeGroup210.111.57.226 /Rack2/NodeGroup110.111.57.227 /Rack2/NodeGroup110.111.57.228 /Rack2/NodeGroup210.111.57.229 /Rack2/NodeGroup2
Topology.sh sample:
[root@namenode enable]# cat topology.sh#! /bin/bashHADOOP_CONF=/hadoop/hadoop-smoke/etc/hadoop # this is the location of topology.datawhile [ $# -gt 0 ] ; do nodeArg=$1 exec< ${HADOOP_CONF}/topology.data result="" while read line ; do ar=( $line ) if [ "${ar[0]}" = "$nodeArg" ] ; then result="${ar[1]}" fi

Pivotal Hadoop Enhancements Stack and Tools Reference
86
done shift if [ -z "$result" ] ; then echo -n "/default/rack " else echo -n "$result " fidone
3. Verify HVE is enabled:
Run the TestDFSIO script. The output is as follows:
1)HVE enabled:Job CountersLaunched map tasks=100Launched reduce tasks=1Data-local map tasks=26NODEGROUP_LOCAL_MAPS=49Rack-local map tasks=252)HVE disabled: Job CountersLaunched map tasks=100Launched reduce tasks=1Data-local map tasks=20Rack-local map tasks=80
HVE ElasticityHVE Elastic Resource Extension enables the adaption of MapReduce tasks to changing resources onnodes/clusters where Hadoop clusters are deployed to virtualized environments, by sharing resources withVMs from other clusters or applications.
OverviewCurrently, the Hadoop resource model is static at the node level, assuming the node resources are notchanged while the cluster is running. This design and implementation are based on an assumption thatall cluster resources are dedicated for Hadoop MapReduce jobs, so they are fully available at all times.This assumption does not hold when users want to deploy multiple applications on the same cluster, e.g.deploying HBase and MapReduce on the same HDFS cluster. In particular, in an era of cloud computing, itis common for Hadoop clusters to be deployed on virtualized environments by sharing resource with VMsfrom other clusters or applications.
The HVE elastic resource feature addresses scenarios in which nodes' resources are possibly changed, sothat scheduling of MapReduce tasks on these nodes can adapted to changing resources.
With this feature, APIs (CLI and JMX interface) and script tools are provided to get/set resources (memory,v-cores) on Hadoop cluster nodes for MR jobs.
Function ListBelow are functionalities included in this elastic feature:
Function Description
Configuration Enable/disable elastic resource feature on Hadoopcluster by specifying a configuration property whenstarting MR cluster.
Pivotal Hadoop Enhancements Stack and Tools Reference
87
Function Description
List nodes' status List the status of all the nodes or nodes specified byuser.
The node status including its memory resource, v-core resource, hostname, health status, etc.
Set resource capacity in Node Manager node Set resource capacity (memory, v-cores) of NodeManager to a node specified by user via CLI orJMX interface.
ConfigurationTo enable elastic resources, make the following changes to the Hadoop configuration.
In yarn-site.xml, add the following property to enable the elastic resource feature:
<property> <name>yarn.dynamic.resource.enable</name> <value>true</value></property>
Command-Line Interface for YARN Cluster
List all CLIs
yarn rmadmin [-refreshQueues] [-refreshNodes] [-refreshUserToGroupsMappings] [-refreshSuperUserGroupsConfiguration] [-refreshAdminAcls] [-refreshServiceAcl] [-getGroups [username]] [-updateNodeResource [NodeID][MemSize][Cores]] [-help [cmd]] yarn node -all Works with -list to list all nodes. -list List all running nodes. Supports optional use of -states to filter nodes based on node state, all -all to list all nodes. -states <States> Works with -list to filter nodes based on input comma-separated list of node states. -status <NodeId> Prints the status report of the node.
List Nodes
yarn node -list -all
Example
List all nodes:
yarn node -list -all
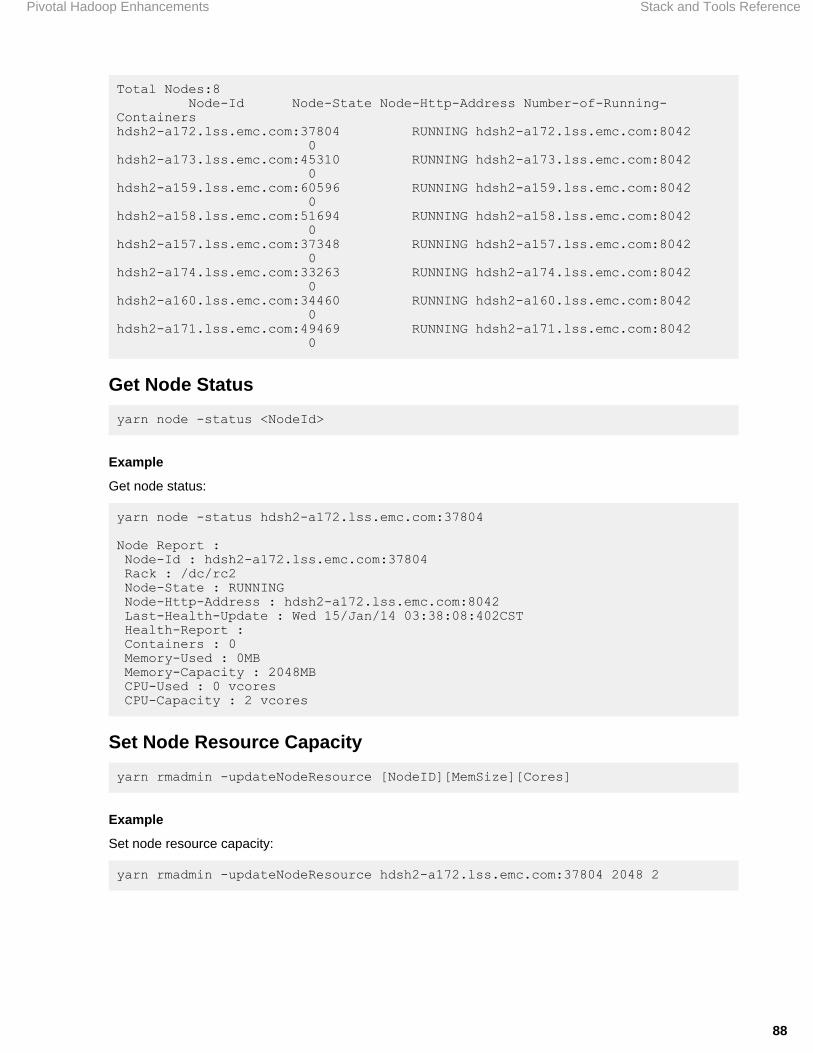
Pivotal Hadoop Enhancements Stack and Tools Reference
88
Total Nodes:8 Node-Id Node-State Node-Http-Address Number-of-Running-Containershdsh2-a172.lss.emc.com:37804 RUNNING hdsh2-a172.lss.emc.com:8042 0hdsh2-a173.lss.emc.com:45310 RUNNING hdsh2-a173.lss.emc.com:8042 0hdsh2-a159.lss.emc.com:60596 RUNNING hdsh2-a159.lss.emc.com:8042 0hdsh2-a158.lss.emc.com:51694 RUNNING hdsh2-a158.lss.emc.com:8042 0hdsh2-a157.lss.emc.com:37348 RUNNING hdsh2-a157.lss.emc.com:8042 0hdsh2-a174.lss.emc.com:33263 RUNNING hdsh2-a174.lss.emc.com:8042 0hdsh2-a160.lss.emc.com:34460 RUNNING hdsh2-a160.lss.emc.com:8042 0hdsh2-a171.lss.emc.com:49469 RUNNING hdsh2-a171.lss.emc.com:8042 0
Get Node Status
yarn node -status <NodeId>
Example
Get node status:
yarn node -status hdsh2-a172.lss.emc.com:37804
Node Report : Node-Id : hdsh2-a172.lss.emc.com:37804 Rack : /dc/rc2 Node-State : RUNNING Node-Http-Address : hdsh2-a172.lss.emc.com:8042 Last-Health-Update : Wed 15/Jan/14 03:38:08:402CST Health-Report : Containers : 0 Memory-Used : 0MB Memory-Capacity : 2048MB CPU-Used : 0 vcores CPU-Capacity : 2 vcores
Set Node Resource Capacity
yarn rmadmin -updateNodeResource [NodeID][MemSize][Cores]
Example
Set node resource capacity:
yarn rmadmin -updateNodeResource hdsh2-a172.lss.emc.com:37804 2048 2

Pivotal Hadoop Enhancements Stack and Tools Reference
89

Security Stack and Tools Reference
90
Chapter
5Security
This section describes how to secure a PHD cluster, including configuring Kerberos and LDAP authentication,and enabling auditing.
Security OverviewStarting with PHD 2.1, security setup for components installed via the Pivotal Command Center (PCC/ICM)is done as part of the installation process. For details, see the PHD Installation and Administrator Guide.
This section exists to provide a reference for (1) components that are not yet fully ICM managed; (2)default secure configuration for components; (3) troubleshooting assistance.
Securing a PHD cluster in the context of this document means configuring the following:
• Setting up and enabling the use of Kerberos for authentication. Kerberos is a network authenticationprotocol that provides strong authentication for client/server applications using secret-key cryptography.
• Setting up YARN containers to run as the invoking user within a Linux container.• Setting datanode processes to run on system ports.• [Optional] Setting up hosts to communicate with LDAP.• [Optional] Setting up one way trust and hosts for Active Directory integration.
Standard configuration uses defaults for several values (such as allowed groups/hosts for a service); youmay want to further restrict these parameters. These will be noted below.
Notes
• You must install and configure Kerberos to enable security in Pivotal HD 1.1.x. and higher. In PHD 2.1and higher, this can be done as part of the install process.
• [Optional] Local OpenLDAP server installation is provided from PHD 2.1 onwards.• For HAWQ to work with secure HDFS, the Pivotal ADS version must be 1.1.3 or greater.• For more information about HAWQ secure configuration, see the Kerberos Authentication section of the
HAWQ Administrator Guide.• Note that Kerberos operation in Hadoop is very sensitive to proper networking configuration:
• Host IP's for service nodes must reverse map to the FQDN's used to create the node principal forthe service/FQDN.
• hostname -f on a node must return the FQDN used to create the principal for the service/FQDN.• The cluster needs to have been created with FQDN's, not short names.
• Make sure your networking is properly configured before attempting to secure a cluster.
Kerberos SetupThis section describes how to set up Kerberos authentication.

Security Stack and Tools Reference
91
• Installing the KDC on page 91
• Install the MIT Kerberos 5 KDC on page 91• Install Kerberos Workstation and Libraries on Cluster Hosts on page 93• Distribute the Kerberos Client Configuration File to all Cluster Hosts on page 93
• Integrating Cluster Security with an Organizational KDC on page 93
• Configure MIT krb5 Kerberos Trust on page 94• Configure One-way Trust with Active Directory on page 94
Installing the KDCIf you have PHD 2.1 or later, the KDC was installed as part of the installation and you can skip this section.If you skipped this step during PHD installation, or want to set up your own MIT krb5 KDC, follow theinstructions in this section.
Note: CentOS and RedHat use AES-256 as the default encryption strength. If you want to useAES-256, you will need to install the JCE security policy file (described below) on all cluster hosts. Ifnot, disable this encryption type in the KDC configuration. To disable AES-256 on an MIT kerberos5 KDC, remove aes256-cts:normal from thesupported_enctypesparameter inkdc.conf.
Install the MIT Kerberos 5 KDCThis section outlines a simple krb5 KDC setup, mainly for test and development purposes.
These instructions were largely derived from Kerberos: The Definitive Guide by James Garman, O'Reilly,pages 53-62.
1. Install the Kerberos packages (krb5-libs, krb5-workstation, and krb5-server) on the KDChost.
2. Define your REALM in /etc/krb5.conf.
• For testing purposes, you can just use the EXAMPLE.COM REALM.• Set the kdc and admin_server variables to the resolvable hostname of the KDC host.• Set the default_domain to your REALM.
In the following example, REALM was changed to BIGDATA.COM and the KDC hostis centos62-1.localdomain:
[logging] default = FILE:/var/log/krb5libs.log kdc = FILE:/var/log/krb5kdc.log admin_server = FILE:/var/log/kadmind.log
[libdefaults] default_realm = BIGDATA.COM dns_lookup_realm = false dns_lookup_kdc = false ticket_lifetime = 24h renew_lifetime = 7d forwardable = true
[realms] BIGDATA.COM = { kdc = centos62-1.localdomain:88 admin_server = centos62-1.localdomain:749 default_domain = BIGDATA.COM }
[domain_realm] .bigdata.com = BIGDATA.COM

Security Stack and Tools Reference
92
bigdata.com = BIGDATA.COM
3. Set up /var/kerberos/krb5kdc/kdc.conf:
• If you want to use AES-256, uncomment the master_key_type line.• If you do not want to use AES-256, remove it from the supported_enctypes line.• Add a key_stash_file entry: /var/kerberos/krb5kdc/.k5.REALM.• Set the maximum ticket lifetime and renew lifetime to your desired values (24 hours and 7 days are
typical).• Add the kadmind_port entry: kadmind_port = 749.
Important: The stash file lets the KDC server start up for root without a password being entered. Theresult (using AES-256) for the above REALM is:
[kdcdefaults] kdc_ports = 88 kdc_tcp_ports = 88
[realms] BIGDATA.COM = { master_key_type = aes256-cts acl_file = /var/kerberos/krb5kdc/kadm5.acl dict_file = /usr/share/dict/words admin_keytab = /var/kerberos/krb5kdc/kadm5.keytab key_stash_file = /var/kerberos/krb5kdc/.k5.BIGDATA.COM max_life = 24h 0m 0s max_renewable_life = 7d 0h 0m 0s kadmind_port = 749 supported_enctypes = aes256-cts:normal aes128-cts:normal des3-hmac-sha1:normal arcfour-hmac:normal des-hmac-sha1:normal des-cbc-md5:normal des-cbc-crc:normal }
4. Create the KDC master password by running:
kdb5_util create -s
Do NOT forget your password, as this is the root KDC password.This typically runs quickly, but can take5-10 minutes if the code has trouble getting the random bytes it needs.
5. Add an administrator account as username/admin@REALM. Run the kadmin.local application fromthe command line:
.kadmin.local: addprinc username/admin@REALM
Type quit to exit kadmin.local.
Important: The KDC does not need to be running to add a principal.
6. Start the KDC by running:
/etc/init.d/krb5kdc start
You should get an [OK] indication if it started without error.7. Edit /var/kerberos/krb5kdc/kadm5.acl and change the admin permissions username from * to
your admin. You can add other admins with specific permissions if you want (man kadmind). This is asample ACL file:
joeit/[email protected] *

Security Stack and Tools Reference
93
8. Use kadmin.local on the KDC to enable the administrator(s) remote access:
kadmin.local: ktadd -k /var/kerberos/krb5kdc/kadm5.keytab kadmin/admin kadmin/changepw
Important: kadmin.local is a KDC host-only version of kadmin that can do things remotekadmin cannot (such as use the -norandkey option in ktadd).
9. Start kadmind:
/etc/init.d/kadmin start
The KDC should now be done and ready to use, but you need to set up your clients first.10.Install krb5-libs and krb5-workstation on all cluster hosts, including any client/gateway hosts.11.Push your KDC /etc/krb5.conf to all workstation hosts.12.Do a simple test, as follows:
a. Log in as the admin you created:
kinit username/admin.
b. Run kadmin and make sure you can log in.
If you get the message kinit: Cannot contact any KDC for realm 'REALM' whilegetting initial credentials, then the KDC is not running or the KDC host information in /etc/kdc.conf is incorrect.
You should now have a KDC that is functional for PHD secure cluster operations.
Install Kerberos Workstation and Libraries on Cluster HostsIf you are using MIT krb5, run:
# yum install krb5-libs krb5-workstation
Distribute the Kerberos Client Configuration File to all Cluster HostsIf you are using Kerberos 5 MIT, the file is /etc/krb5.conf. This file must exist on all cluster hosts. ForPHD, you can use massh to push the files, and then to copy them to the proper place.
Integrating Cluster Security with an Organizational KDCIf your organization runs Active Directory or other Kerberos KDC, it is not recommended this be used forcluster security. Instead, install an MIT Kerberos KDC and realm for the cluster(s) and create all the serviceprincipals in this realm as per the instructions below. This KDC will be minimally used for service principals,whilst Active Directory (or your organizations's MIT KDC) will be used for cluster users. Next, configureone-way cross-realm trust from this realm to the Active Directory or corporate KDC realm.
Important: Though it is possible to use your corporate KDC infrastructure for Hadoop serviceprincipals, the local KDC with trust configuration is strongly recommended, as a large PHD clusterrequires the IT manager to create large numbers of service principals for your organizations'Active Directory or organizational MIT KDC. For example, a 100 node PHD cluster requires 200+service principals. In addition, when a large cluster starts up, it may impact the performance of yourorganizations' IT systems, as all the service principals make requests of the AD or MIT KerberosKDC at once.
Some useful references:
http://technet.microsoft.com/en-us/library/bb742433.aspx

Security Stack and Tools Reference
94
http://www.kerberos.org/software/mixenvkerberos.pdf
https://access.redhat.com/documentation/en-US/Red_Hat_Enterprise_Linux/5/html/Deployment_Guide/sec-kerberos-crossrealm.html
Configure MIT krb5 Kerberos TrustOne-way trust is established in Kerberos by creating trust principals in both KDCs that allow one KDC torequest authentication from another KDC. You may want to configure MIT KDC to MIT KDC trust to allowone cluster access to another cluster or if you are using MIT Kerberos for your corporate KDC.
Caution: Some Java versions are not compatible with some later Kerberos versions. For example,Java 6 is not compatible with newer MIT krb5 releases. If you are using an older version of PHDwith Java 6, this may cause problems if you have a newer version KDC.
The trust principals should be created at the same time and if one needs to change both should berecreated. In the MIT krb5 KDC, principals are of the form:
krbtgt/REALM_OF_TRUSTING_KDC@REALM_OF_TRUSTED_KDC
To create a trust principal:
1. Run:
addprinc -e <supported_encryption_types> krbtgt/REALM_OF_TRUSTING_KDC@REALM_OF_TRUSTED_KDC
This principal must be created with the same encryption types, same password, and same keyversion on both the trusting and trusted KDC.
2. Next, you need to add an entry in all host /etc/krb5.conf files on the cluster to point to the trustedKDC for the trusted realm:
[realms] REALM_OF_TRUSTED_KDC = { kdc = trusted_kdc.mydomain:88 admin_server = trusted_kdc.mydomain:749 default_domain = mydomain } ...
This allows the cluster nodes to look up the KDC they should contact for logins from this realm.
To create two-way trust, you simply need to repeat the process with the trusted and trusting KDCsreversed.
Configure One-way Trust with Active DirectoryTo set up an MIT cluster to use AD for user logins, you will need to run some commands on all domaincontrollers advertising the domains that will have access to the Hadoop cluster. This will also have to bepart of the process when new domain controllers are added.
To configure one-way trust with AD:
1. Add the cluster KDC to the domain controllers:
ksetup /addkdc <cluster_realm> <cluster_kdc_fqdn>
2. Set up one-way trust between the MIT Kerberos Realm and the Active Directory domain:
netdom trust <cluster_realm> /Domain:<active_directory_realm> /add /realm /passwordt:<trust_password>

Security Stack and Tools Reference
95
Note: The passwordt option is correctly spelled; the "t" at the end is required.
3. Set the encryption types (AES256-CTS-HMAC-SHA1-96, AES128-CTS-HMAC-SHA1-96, RC4-HMAC-MD5):
ksetup /SetEncTypeAttr <cluster_realm> <enc_type_list_space_separated>
Note: The format used in this command for types is different from the format used in MITkrb5, but the essentials are the same. For example, AES256-CTS-HMAC-SHA1-96 for AD isaes256-cts:normal in MIT krb5.
4. Now Active Directory knows about the KDC and has the trust key, so next you need to tell your clusterKDC about AD. On the MIT Kerberos KDC:
addprinc -e <supported_encryption_types> krbtgt/[email protected]
Where the encryption types are the same and the same trust password as was given in the netdomcommand is used and the AD realm is AD.CORP.BIGDATA.COM.
5. Next edit the krb5.conf file on all cluster hosts to add the realm. On all cluster nodes:
[realms] AD.CORP.BIGDATA.COM = { kdc = ad_server.mydomain:88 admin_server = ad_server.mydomain:749 default_domain = mydomain } ...
6. Finally, edit core-site.xml on the cluster hosts (use the icm_client reconfigure option ifpossible) to allow for mapping of the AD realm to local names in the cluster:
<property> <name>hadoop.security.auth_to_local</name> <value> RULE:[1:$1@$0](^.*@AD\.CORP\.BIGDATA\.COM$)s/^(.*)@AD\.CORP\.BIGDATA\.COM$/$1/g RULE:[2:$1@$0](^.*@AD\.CORP\.BIGDATA\.COM$)s/^(.*)@AD\.CORP\.BIGDATA\.COM$/$1/g DEFAULT </value></property>
LDAP Setup
OverviewThis section describes how to set up sssd to allow integrated LDAP/KDC login to cluster hosts. Thesssd module is a wrapper for the Linux PAM authentication module that handles login process for variousauthentication methods. After setting up sssd, user logins will be served via LDAP; passwords will beauthenticated via Kerberos. After logging in to a host (e.g. via ssh), users will automatically have aKerberos ticket.
Note: This topic applies only to PHD 2.1 or greater. It assumes you have run icm_clientsecurity -i and selected to install the OpenLDAP server when prompted, or that you haveinstalled an LDAP server on your own.

Security Stack and Tools Reference
96
Configuring Local LDPRun the following commands on the PCC node to configure local LDAP.
Start the LDAP ServerOn the PCC node, start the local LDAP server process:
chkconfig slapd onservice slapd start
Configure the Cluster NodesOn the PCC node, run the icmdriver tool with the sssdconfig option to configure sssd on all thecluster nodes hosts.
Provide your domain (-b) and realm (-r) as shown in the example below along with a file indicating thecluster nodes to configure.
Host SSSD Configuration Example
/usr/lib/gphd/tools/security/bin/icmdriver sssdconfig -b "ou=phdusers,dc=phddev,dc=local" -r PHDDEV.LOCAL -f HostFile.txt
Verify LDAP configurationAfter the above command is compete, you can test the setup as follows.
1. Add an LDAP user on the PCC node and the corresponding principal into Kerberos. 2. ssh as that user into a cluster host. 3. After logging in, you should already have a Kerberos ticket (verify using klist).4. Validate the login by running a simple Hadoop command; for example:
hdfs dfs -ls /
Configuring Kerberos for HDFS and YARN (MapReduce)At a minimum, Kerberos provides protection against user and service spoofing attacks, and allows forenforcement of user HDFS access permissions. The installation is not difficult, but requires very specificinstructions with many steps, and suffers from the same difficulties as any system requiring distributedconfiguration. Pivotal is working to automate the process to make it simple for users to enable/disablesecure PHD clusters. Until then, these instructions are intended to provide a step-by-step process forgetting a cluster up and running in secure mode.
• Creating the Principals and Keytabs on page 97
• Create the Principals on page 97• Create the Keytab Files on page 98• Distribute the Keytab Files on page 99
• Installing Java Support Items on page 100
• Install JCE on all Cluster Hosts on page 100• Check JSVC on all Datanodes on page 100
• Modifying the Container and Script on page 101

Security Stack and Tools Reference
97
• Configure the Linux Container on page 101• Edit the Environment on the Datanodes on page 101
• Editing the Site XML on page 102
• Use _HOST in Site XML on page 102• Edit the Site XML on page 102
• Completing the HDFS/YARN Secure Configuration on page 106• Turning Secure Mode Off on page 107• Building and Installing JSVC on page 108
Note that after the initial HDFS/YARN configuration, other services that need to be set up to run on secureHDFS (for example, HBase), or that you want to also secure (for example, Zookeeper), need to configured.
Important: Save your command history; it will help in checking for errors when troubleshooting.
Creating the Principals and KeytabsThese instructions are for MIT Kerberos 5; command syntax for other Kerberos versions may be different.
Principals (Kerberos users) are of the form: name/role@REALM. For our purposes, the name will be aPHD service name (for example, hdfs), and the role will be a DNS-resolvable fully-qualified hostname(host_fqdn); one you could use to connect to the host in question.
Important:
• Replace REALM with the KDC realm you are using for your PHD cluster, where it appears.• The host names used must be resolvable to an address on all the cluster hosts and must be of
the form host.domain, as some Hadoop components require at least one period ('.') part in thehost names used for principals.
• The names of the principals seem to matter, as some processes may throw exceptions if youchange them. Hence, it is safest to use the specified Hadoop principal names.
• Hadoop supports an _HOST tag in the site XML that is interpreted as the host_fqdn, but thismust be used properly. See Using _HOST in Site XML.
For the HDFS services, you will need to create an hdfs/host_fqdn principal for each host running anHDFS service (name node, secondary name node, data node).
For YARN services, you will need to create a yarn/host_fqdn principal for each host running a YARNservice (resource manager, node manager, proxy server).
For MapReduce services, you need to create a principal, mapred/host_fqdn for the Job History Server.
Create the PrincipalsTo create the required secure HD principals (running kadmin.local):
• Cluster Hosts
For each cluster host (except client-only hosts), run:
addprinc -randkey HTTP/<host_fqdn>@<REALM>
• HDFS (name node, secondary name node, data nodes)
For each HDFS service host, run:
addprinc -randkey hdfs/<host_fqdn>@<REALM>
• YARN (resource manager, node managers, proxy server)

Security Stack and Tools Reference
98
For each YARN service host, run:
addprinc -randkey yarn/<host_fqdn>@<REALM>
• MapReduce (job history server)
For each JHS service host, run:
addprinc -randkey mapred/<host_fqdn>@<REALM>
Note: If you have 1000 cluster hosts running HDFS and YARN, you will need 2000 HDFS andYARN principals, and need to distribute their keytab files. It is recommended that you use a cluster-local KDC for this purpose and configure cross-realm trust to your organizational Active Directory orother Kerberos KDC. For more information, see Kerberos Setup on page 90.
Create the Keytab FilesImportant: You must use kadmin.local (or the equivalent in your KDC) for this step on theKDC, as kadmin does not support -norandkey.
Also, you can put the keytab files anywhere during this step. In this document, we created adirectory /etc/security/phd/keytab/ and are using this directory on cluster hosts, and so, forconsistency, are placing them in a similarly-named directory on the KDC. If the node you are usingalready has files in /etc/security/phd/keytab/, it may be advisable to create a separate,empty directory for this step.
Each service's keytab file for a given host will have the service principal for that host and the HTTPprincipal for that host in the file.
• HDFS key tabs
For each host having an HDFS process (name node, secondary name node, data nodes), run:
kadmin.local: ktadd -norandkey -k /etc/security/phd/keytab/hdfs-hostid.service.keytab hdfs/<host_fqdn>@<REALM> HTTP/<host_fqdn@<REALM>
Where hostid is the short name for the host, for example, vm1, vm2, etc. This is to differentiate thefiles by host. You can use the hostname if desired.
For example, for a three node cluster (one name node, two data nodes):
kadmin.local: ktadd -norandkey -k /etc/security/phd/keytab/hdfs-vm2.service.keytab hdfs/[email protected] HTTP/[email protected]: ktadd -norandkey -k /etc/security/phd/keytab/hdfs-vm3.service.keytab hdfs/[email protected] HTTP/[email protected]: ktadd -norandkey -k /etc/security/phd/keytab/hdfs-vm4.service.keytab hdfs/[email protected] HTTP/[email protected]
• YARN keytabs
For each host having a YARN process (resource manager, node manager or proxy server), run:
kadmin.local: ktadd -norandkey -k /etc/security/phd/keytab/yarn-hostid.service.keytab yarn/<host_fqdn>@<REALM> HTTP/<host_fqdn>@<REALM>
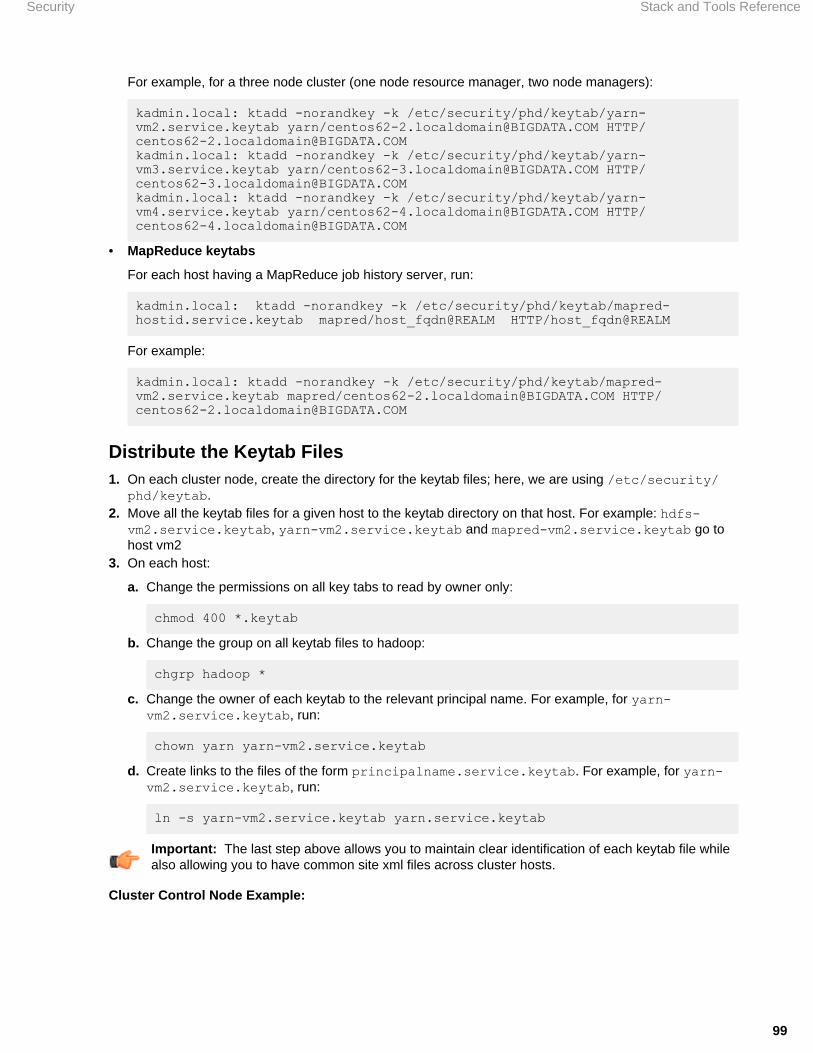
Security Stack and Tools Reference
99
For example, for a three node cluster (one node resource manager, two node managers):
kadmin.local: ktadd -norandkey -k /etc/security/phd/keytab/yarn-vm2.service.keytab yarn/[email protected] HTTP/[email protected]: ktadd -norandkey -k /etc/security/phd/keytab/yarn-vm3.service.keytab yarn/[email protected] HTTP/[email protected]: ktadd -norandkey -k /etc/security/phd/keytab/yarn-vm4.service.keytab yarn/[email protected] HTTP/[email protected]
• MapReduce keytabs
For each host having a MapReduce job history server, run:
kadmin.local: ktadd -norandkey -k /etc/security/phd/keytab/mapred-hostid.service.keytab mapred/host_fqdn@REALM HTTP/host_fqdn@REALM
For example:
kadmin.local: ktadd -norandkey -k /etc/security/phd/keytab/mapred-vm2.service.keytab mapred/[email protected] HTTP/[email protected]
Distribute the Keytab Files1. On each cluster node, create the directory for the keytab files; here, we are using /etc/security/
phd/keytab.2. Move all the keytab files for a given host to the keytab directory on that host. For example: hdfs-
vm2.service.keytab, yarn-vm2.service.keytab and mapred-vm2.service.keytab go tohost vm2
3. On each host:
a. Change the permissions on all key tabs to read by owner only:
chmod 400 *.keytab
b. Change the group on all keytab files to hadoop:
chgrp hadoop *
c. Change the owner of each keytab to the relevant principal name. For example, for yarn-vm2.service.keytab, run:
chown yarn yarn-vm2.service.keytab
d. Create links to the files of the form principalname.service.keytab. For example, for yarn-vm2.service.keytab, run:
ln -s yarn-vm2.service.keytab yarn.service.keytab
Important: The last step above allows you to maintain clear identification of each keytab file whilealso allowing you to have common site xml files across cluster hosts.
Cluster Control Node Example:
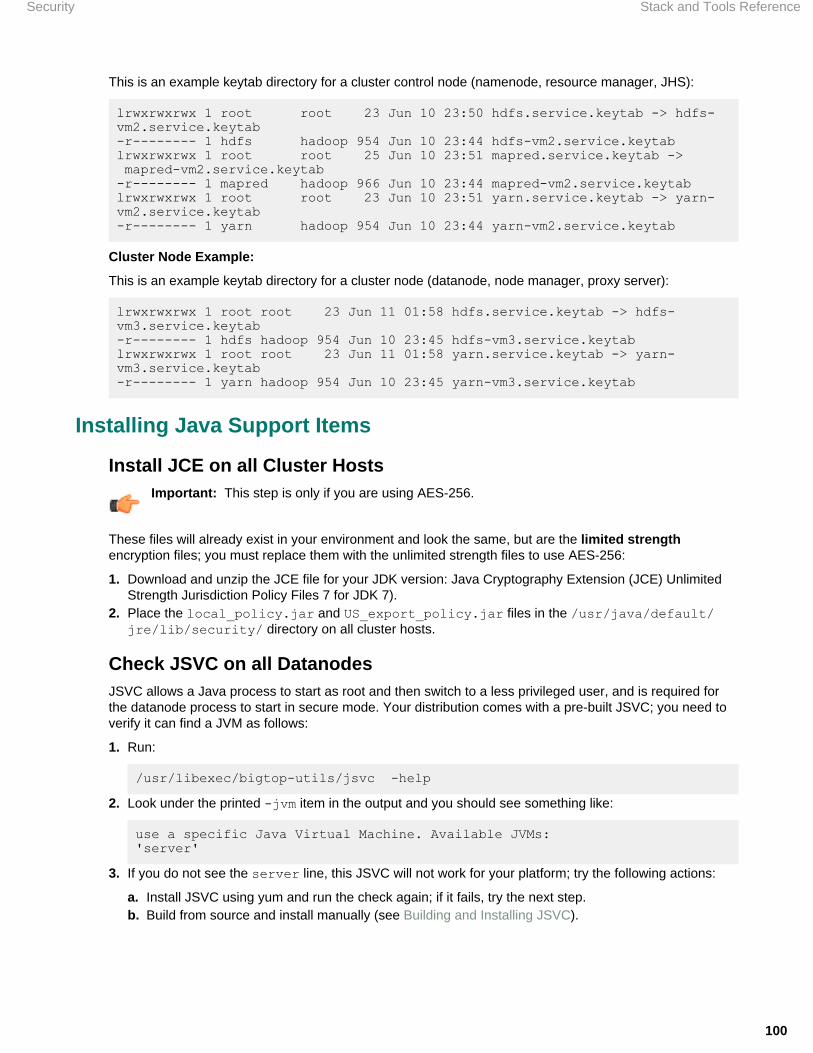
Security Stack and Tools Reference
100
This is an example keytab directory for a cluster control node (namenode, resource manager, JHS):
lrwxrwxrwx 1 root root 23 Jun 10 23:50 hdfs.service.keytab -> hdfs-vm2.service.keytab-r-------- 1 hdfs hadoop 954 Jun 10 23:44 hdfs-vm2.service.keytablrwxrwxrwx 1 root root 25 Jun 10 23:51 mapred.service.keytab -> mapred-vm2.service.keytab-r-------- 1 mapred hadoop 966 Jun 10 23:44 mapred-vm2.service.keytablrwxrwxrwx 1 root root 23 Jun 10 23:51 yarn.service.keytab -> yarn-vm2.service.keytab-r-------- 1 yarn hadoop 954 Jun 10 23:44 yarn-vm2.service.keytab
Cluster Node Example:
This is an example keytab directory for a cluster node (datanode, node manager, proxy server):
lrwxrwxrwx 1 root root 23 Jun 11 01:58 hdfs.service.keytab -> hdfs-vm3.service.keytab-r-------- 1 hdfs hadoop 954 Jun 10 23:45 hdfs-vm3.service.keytablrwxrwxrwx 1 root root 23 Jun 11 01:58 yarn.service.keytab -> yarn-vm3.service.keytab-r-------- 1 yarn hadoop 954 Jun 10 23:45 yarn-vm3.service.keytab
Installing Java Support Items
Install JCE on all Cluster HostsImportant: This step is only if you are using AES-256.
These files will already exist in your environment and look the same, but are the limited strengthencryption files; you must replace them with the unlimited strength files to use AES-256:
1. Download and unzip the JCE file for your JDK version: Java Cryptography Extension (JCE) UnlimitedStrength Jurisdiction Policy Files 7 for JDK 7).
2. Place the local_policy.jar and US_export_policy.jar files in the /usr/java/default/jre/lib/security/ directory on all cluster hosts.
Check JSVC on all DatanodesJSVC allows a Java process to start as root and then switch to a less privileged user, and is required forthe datanode process to start in secure mode. Your distribution comes with a pre-built JSVC; you need toverify it can find a JVM as follows:
1. Run:
/usr/libexec/bigtop-utils/jsvc -help
2. Look under the printed -jvm item in the output and you should see something like:
use a specific Java Virtual Machine. Available JVMs:'server'
3. If you do not see the server line, this JSVC will not work for your platform; try the following actions:
a. Install JSVC using yum and run the check again; if it fails, try the next step.b. Build from source and install manually (see Building and Installing JSVC).

Security Stack and Tools Reference
101
If you have datanode start-up problems and no other errors are obvious, it might be a JSVC problemand you may need to perform step 2, above, another time. JSVC is very picky about platform and JDKmatching, so use the Building and Installing JSVC instructions for your system OS and JDK.
Modifying the Container and Script
Configure the Linux Container1. Edit the /usr/lib/gphd/hadoop-yarn/etc/hadoop/container-executor.cfg file as follows:
# NOTE: these next two should be set to the same values they have in yarn-site.xmlyarn.nodemanager.local-dirs=/data/1/yarn/nm-local-diryarn.nodemanager.log-dirs=/data/1/yarn/userlogs# configured value of yarn.nodemanager.linux-container-executor.groupyarn.nodemanager.linux-container-executor.group=yarn# comma separated list of users who can not run applicationsbanned.users=hdfs,yarn,mapred,bin# Prevent other super-usersmin.user.id=500
Note: The min.user.id varies by Linux distribution; for CentOS it is 500, RedHat is 1000.
2. Check the permissions on /usr/lib/gphd/hadoop-yarn/bin/container-executor. Theyshould look like:
---Sr-s--- 1 root yarn 364 Jun 11 00:08 container-executor
If they do not, then set the owner, group and permissions as:
chown root:yarn container-executorchmod 050 container-executorchmod u+s container-executorchmod g+s container-executor
3. Check the permissions on /usr/lib/gphd/hadoop-yarn/etc/hadoop/container-executor.cfg. They should look like:
-rw-r--r-- 1 root root 363 Jul 4 00:29 /usr/lib/gphd/hadoop-yarn/etc/hadoop/container-executor.cfg
If they do not, then set them as follows:
chown root:root container-executor.cfgchmod 644 container-executor.cfg
Edit the Environment on the DatanodesImportant:
• At this point you should STOP the cluster, if it is running.• You only need to perform the steps below on the data nodes.
1. Uncomment the lines at the bottom of /etc/default/hadoop-hdfs-datanode:
# secure operation stuffexport HADOOP_SECURE_DN_USER=hdfsexport HADOOP_SECURE_DN_LOG_DIR=${HADOOP_LOG_DIR}/hdfsexport HADOOP_PID_DIR=/var/run/gphd/hadoop-hdfs/

Security Stack and Tools Reference
102
export HADOOP_SECURE_DN_PID_DIR=${HADOOP_PID_DIR}
2. Set the JSVC variable:
export JSVC_HOME=/usr/libexec/bigtop-utils
If you are using the included jsvc, the JSVC_HOME variable in /etc/default/hadoop shouldalready be properly set.
If, however, you built or hand-installed JSVC, your JSVC_HOME will be /usr/bin , so you must set itappropriately. Modify /etc/default/hadoop and set the proper JSVC_HOME:
export JSVC_HOME=/usr/bin
Important: Make sure JSVC_HOME points to the correct jsvc binary.
Attention: As long as HADOOP_SECURE_DN_USER is set, the datanode will try to start in securemode.
Editing the Site XML
Use _HOST in Site XMLYou can maintain consistent site XML by using the _HOST keyword for the host_fqdn part in the site XMLif:
• Your cluster nodes were identified with fully-qualified domain names when configuring the cluster.• hostname -f on all nodes yields the proper fully-qualified hostname (same as the one used when
creating the principals).
You cannot use constructs like _HOST.domain; these will be interpreted literally.
You can only use _HOST in the site XML; files such as jaas.conf, needed for Zookeeper and HBase,must use actual FQDN's for hosts.
Edit the Site XMLFinally, you are ready to edit the site XML to turn on secure mode. Before starting this task, it is goodto understand who needs to talk to whom. By "talk", we mean using authenticated Kerberos to initiateestablishment of a communication channel. Doing this requires you to know your own principal, to identifyyourself, and know the principal of the service you want to talk to. To be able to use its principal, a serviceneeds to be able to log in to Kerberos without a password, using a keytab file:
• Each service needs to know its own principal name.• Each running service on a node needs a service/host specific keytab file to start up.• Each data node needs to talk to the name node.• Each node manager needs to talk to the resource manager and the job history server.• Each client/gateway node needs to talk to the name node, resource manager and job history server.
Important:
• Redundant keytab files on some hosts do no harm and it makes management easier tohave constant files. Remember, though, that the host_fqdn must be correct for each entry.Remembering this helps when setting up and troubleshooting the site xml files.
• Before making changes, back up the current site xml files so that you can return to non-secureoperation, if needed.
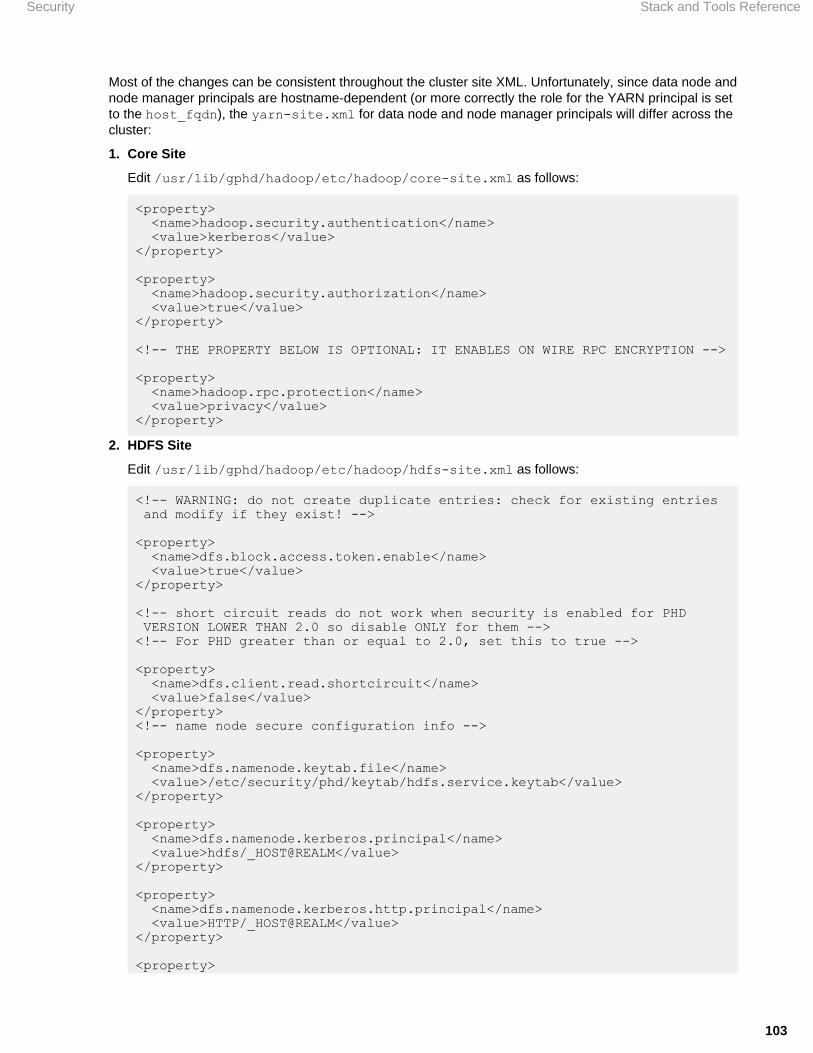
Security Stack and Tools Reference
103
Most of the changes can be consistent throughout the cluster site XML. Unfortunately, since data node andnode manager principals are hostname-dependent (or more correctly the role for the YARN principal is setto the host_fqdn), the yarn-site.xml for data node and node manager principals will differ across thecluster:
1. Core Site
Edit /usr/lib/gphd/hadoop/etc/hadoop/core-site.xml as follows:
<property> <name>hadoop.security.authentication</name> <value>kerberos</value></property>
<property> <name>hadoop.security.authorization</name> <value>true</value></property>
<!-- THE PROPERTY BELOW IS OPTIONAL: IT ENABLES ON WIRE RPC ENCRYPTION -->
<property> <name>hadoop.rpc.protection</name> <value>privacy</value></property>
2. HDFS Site
Edit /usr/lib/gphd/hadoop/etc/hadoop/hdfs-site.xml as follows:
<!-- WARNING: do not create duplicate entries: check for existing entries and modify if they exist! -->
<property> <name>dfs.block.access.token.enable</name> <value>true</value></property> <!-- short circuit reads do not work when security is enabled for PHD VERSION LOWER THAN 2.0 so disable ONLY for them --><!-- For PHD greater than or equal to 2.0, set this to true --> <property> <name>dfs.client.read.shortcircuit</name> <value>false</value></property><!-- name node secure configuration info -->
<property> <name>dfs.namenode.keytab.file</name> <value>/etc/security/phd/keytab/hdfs.service.keytab</value></property>
<property> <name>dfs.namenode.kerberos.principal</name> <value>hdfs/_HOST@REALM</value></property>
<property> <name>dfs.namenode.kerberos.http.principal</name> <value>HTTP/_HOST@REALM</value></property>
<property>
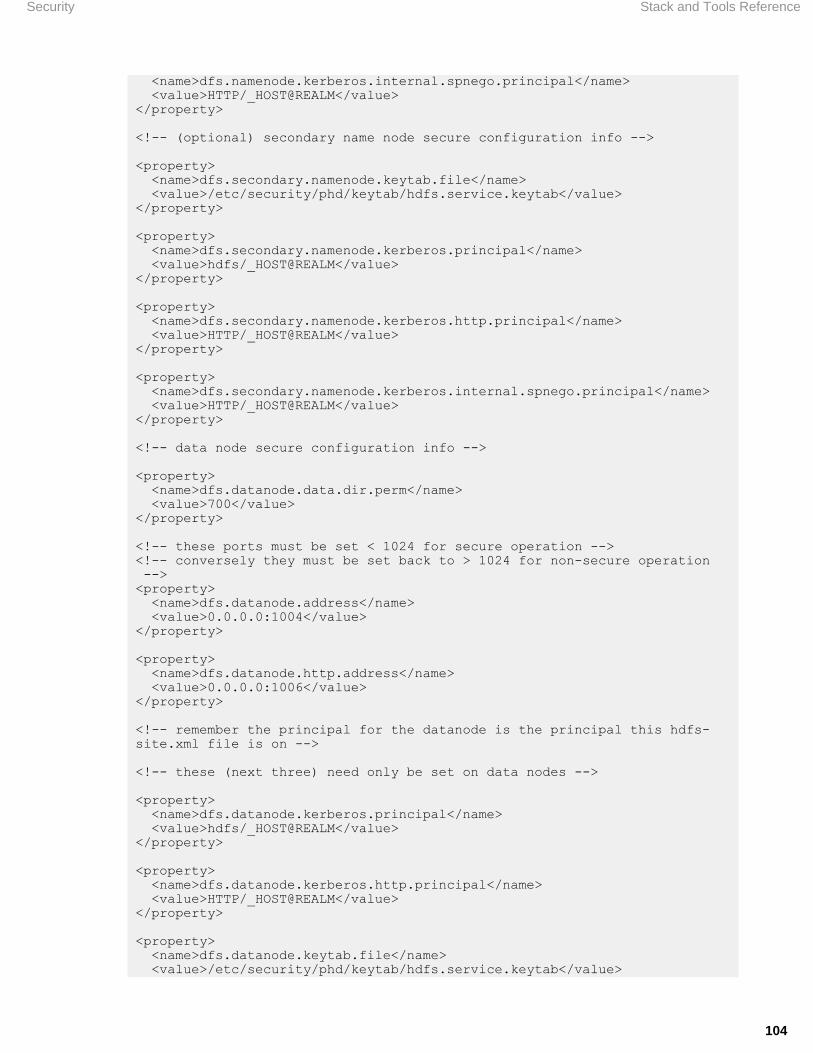
Security Stack and Tools Reference
104
<name>dfs.namenode.kerberos.internal.spnego.principal</name> <value>HTTP/_HOST@REALM</value></property>
<!-- (optional) secondary name node secure configuration info -->
<property> <name>dfs.secondary.namenode.keytab.file</name> <value>/etc/security/phd/keytab/hdfs.service.keytab</value></property>
<property> <name>dfs.secondary.namenode.kerberos.principal</name> <value>hdfs/_HOST@REALM</value></property>
<property> <name>dfs.secondary.namenode.kerberos.http.principal</name> <value>HTTP/_HOST@REALM</value></property>
<property> <name>dfs.secondary.namenode.kerberos.internal.spnego.principal</name> <value>HTTP/_HOST@REALM</value></property>
<!-- data node secure configuration info -->
<property> <name>dfs.datanode.data.dir.perm</name> <value>700</value></property>
<!-- these ports must be set < 1024 for secure operation --><!-- conversely they must be set back to > 1024 for non-secure operation --><property> <name>dfs.datanode.address</name> <value>0.0.0.0:1004</value></property>
<property> <name>dfs.datanode.http.address</name> <value>0.0.0.0:1006</value></property>
<!-- remember the principal for the datanode is the principal this hdfs-site.xml file is on -->
<!-- these (next three) need only be set on data nodes -->
<property> <name>dfs.datanode.kerberos.principal</name> <value>hdfs/_HOST@REALM</value></property>
<property> <name>dfs.datanode.kerberos.http.principal</name> <value>HTTP/_HOST@REALM</value></property>
<property> <name>dfs.datanode.keytab.file</name> <value>/etc/security/phd/keytab/hdfs.service.keytab</value>

Security Stack and Tools Reference
105
</property>
<!-- OPTIONAL - set these to enable secure WebHDSF --> <!-- on all HDFS cluster nodes (namenode, secondary namenode, datanode's) --> <property> <name>dfs.webhdfs.enabled</name> <value>true</value></property> <property> <name>dfs.web.authentication.kerberos.principal</name> <value>HTTP/_HOST@REALM</value></property> <!-- since we included the HTTP principal all keytabs we can use it here --> <property> <name>dfs.web.authentication.kerberos.keytab</name> <value>/etc/security/phd/keytab/hdfs.service.keytab</value></property> <!-- THE PROPERTIES BELOW ARE OPTIONAL AND REQUIRE RPC PRIVACY (core-site): THEY ENABLE ON WIRE HDFS BLOCK ENCRYPTION --> <property> <name>dfs.encrypt.data.transfer</name> <value>true</value></property> <property> <name>dfs.encrypt.data.transfer.algorithm</name> <value>rc4</value> <description>may be "rc4" or "3des" - 3des has a significant performance impact</description></property>
3. YARN Site
Edit /usr/lib/gphd/hadoop/etc/hadoop/yarn-site.xml as follows:
<!-- resource manager secure configuration info -->
<property> <name>yarn.resourcemanager.principal</name> <value>yarn/_HOST@REALM</value></property>
<property> <name>yarn.resourcemanager.keytab</name> <value>/etc/security/phd/keytab/yarn.service.keytab</value></property>
<!-- remember the principal for the node manager is the principal for the host this yarn-site.xml file is on -->
<!-- these (next four) need only be set on node manager nodes -->
<property> <name>yarn.nodemanager.principal</name> <value>yarn/_HOST@REALM</value>

Security Stack and Tools Reference
106
</property>
<property> <name>yarn.nodemanager.keytab</name> <value>/etc/security/phd/keytab/yarn.service.keytab</value></property>
<property> <name>yarn.nodemanager.container-executor.class</name> <value>org.apache.hadoop.yarn.server.nodemanager.LinuxContainerExecutor</value></property>
<property> <name>yarn.nodemanager.linux-container-executor.group</name> <value>yarn</value></property>
<!-- OPTIONAL - set these to enable secure proxy server node -->
<property> <name>yarn.web-proxy.keytab</name> <value>/etc/security/phd/keytab/yarn.service.keytab</value></property>
<property> <name>yarn.web-proxy.principal</name> <value>yarn/_HOST@REALM</value></property>
4. MapReduce Site
Edit /usr/lib/gphd/hadoop/etc/hadoop/mapred-site.xml as follows:
<!-- job history server secure configuration info -->
<property> <name>mapreduce.jobhistory.keytab</name> <value>/etc/security/phd/keytab/mapred.service.keytab</value></property>
<property> <name>mapreduce.jobhistory.principal</name> <value>mapred/_HOST@REALM</value></property>
Completing the HDFS/YARN Secure Configuration1. Start the cluster:
$ icm_client start
2. Check that all the processes listed below start up:
• Control processes: namenode, resourcemanager, historyserver should all be running.• Cluster worker processes: datanode and namenode should be running.
Note: Until you do HBase security configuration, HBase will not start up on a secure cluster.
If the process do not start up, see the Security - Troubleshooting on page 137 section.
Security Stack and Tools Reference
107
3. Create a principal for a standard user (the user must exist as a Linux user on all cluster hosts):
kadmin: addprinc testuser
Set the password when prompted.4. Log in as that user on a client box (or any cluster box, if you do not have specific client purposed
systems).5. Get your Kerberos TGT by running kinit for the user and entering the user's password:
kinit testuser
6. Test simple HDFS file list and directory create:
hadoop fs -lshadoop fs -mkdir testdir
If these do not work, see the Security - Troubleshooting on page 137 section.7. [Optional] Set the sticky bit on the /tmp directory (prevents non-super-users from moving or deleting
other users' files in /tmp):
a. Log in as gpadmin on any HDFS service node (namenode, datanode).b. Execute the following:
sudo -u hdfs kinit -k -t /etc/security/phd/keytab/hdfs.service.keytab hdfs/this-host_fqdn@REALM
c. Execute the following:
sudo -u hdfs hadoop fs -chmod 1777 /tmp
d. Run a simple MapReduce job such as the Pi example:
hadoop jar /usr/lib/gphd/hadoop-mapreduce/hadoop-mapreduce-examples-2.0.2-alpha-gphd-2.0.1.0.jar pi 10 100
If everything works, then you are ready to configure other services. If not, see the Security -Troubleshooting on page 137 section.
Turning Secure Mode OffTo turn off secure mode:
1. Stop the cluster:
icm_client stop
2. Comment out HADOOP_SECURE_DN_USER in hadoop-env.sh and /etc/init.d/hadoop-hdfs-datanode on all data nodes.
3. Either:
a. If you made backups as suggested above, restore the original site xml files, or:b. If you do not have backups, then edit the site xml as follows:
i. Set the Linux container executable toorg.apache.hadoop.yarn.server.nodemanager.DefaultContainerExecutor on alldata nodes.
ii. Set dfs.block.access.token.enable to false on all data nodes.iii. Return the datanode ports modified above so they are > 1024 again.
Security Stack and Tools Reference
108
iv. Set hadoop.security.authentication to simple andhadoop.security.authorization to false in core-site.xml on all cluster nodes.
v. Undo the changes to the Zookeeper site xml and configuration files.vi. If applicable, revert the changes to the hdfs-client.xml and gpinisystem_config for
HAWQ.vii.If applicable, undo the changes to the Hive and HBase site xml, configuration, and environments.
4. Start the cluster.
Building and Installing JSVCIn order for the data nodes to start as root to get secure ports, then switch back to the HDFS user, JSVCmust be installed (http://commons.apache.org/proper/commons-daemon/download_daemon.cgi). If thepackaged JSVC binary is not working, we recommend building JSVC from source for your platform.
You only need to perform the make on one node, then the binary can be distributed to the other nodes(assuming all systems are using the same basic image):
1. Install gcc and make (you can remove them after this process if desired):
yum install gcc make
2. Download the Apache commons daemon. For example, commons-daemon-1.0.15-src.zip wastested.
The daemon is available here: http://commons.apache.org/proper/commons-daemon/download_daemon.cgi
3. scp the file to one of your data node cluster systems.4. Uncompress it.5. Change to the install directory:
cd commons-daemon-1.0.15-src/src/native/unix
6. If you are on a 64-bit machine and using a 64 bit JVM, run these exports before configure/make:
export CFLAGS=-m64export LDFLAGS=-m64
7. Configure and make it:
./configure --with-java=/usr/java/defaultmake
8. Manually install it to the following location:
mv ./jsvc /usr/bin/jsvc
9. Check that the correct JSVC was found by running:
which jsvc
The correct output is:
/usr/bin/jsvc
10.Run:
jsvc -help
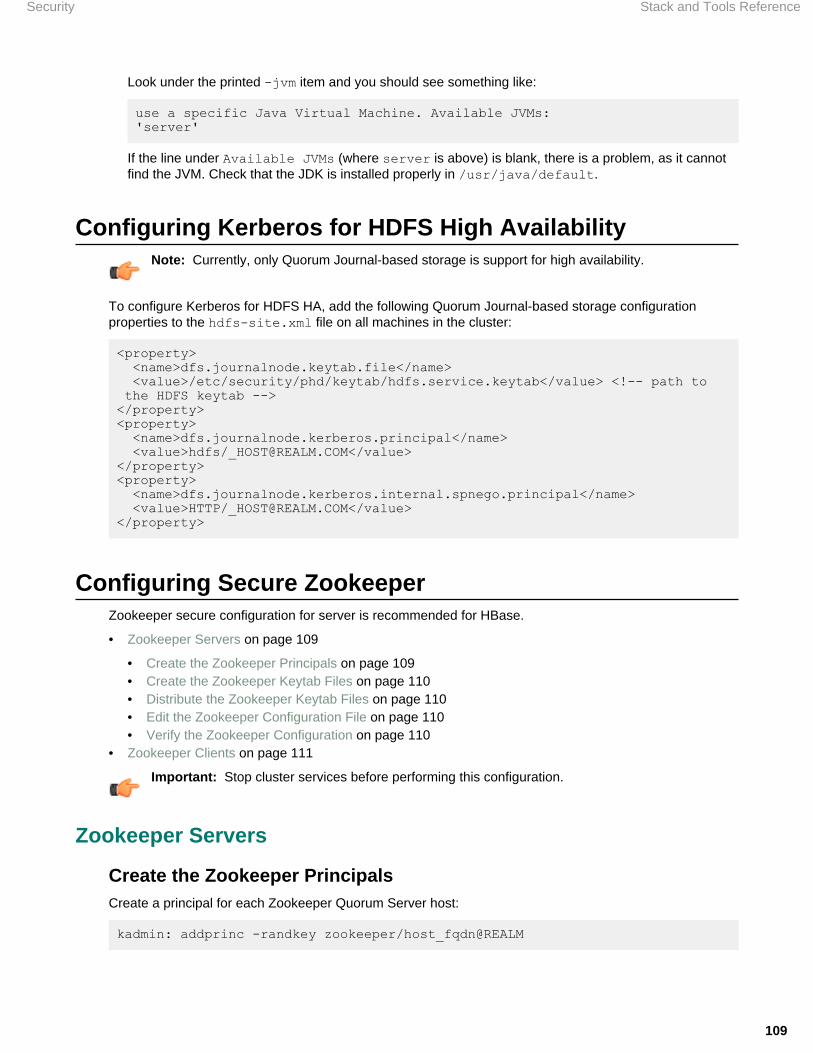
Security Stack and Tools Reference
109
Look under the printed -jvm item and you should see something like:
use a specific Java Virtual Machine. Available JVMs:'server'
If the line under Available JVMs (where server is above) is blank, there is a problem, as it cannotfind the JVM. Check that the JDK is installed properly in /usr/java/default.
Configuring Kerberos for HDFS High AvailabilityNote: Currently, only Quorum Journal-based storage is support for high availability.
To configure Kerberos for HDFS HA, add the following Quorum Journal-based storage configurationproperties to the hdfs-site.xml file on all machines in the cluster:
<property> <name>dfs.journalnode.keytab.file</name> <value>/etc/security/phd/keytab/hdfs.service.keytab</value> <!-- path to the HDFS keytab --></property><property> <name>dfs.journalnode.kerberos.principal</name> <value>hdfs/[email protected]</value></property><property> <name>dfs.journalnode.kerberos.internal.spnego.principal</name> <value>HTTP/[email protected]</value></property>
Configuring Secure ZookeeperZookeeper secure configuration for server is recommended for HBase.
• Zookeeper Servers on page 109
• Create the Zookeeper Principals on page 109• Create the Zookeeper Keytab Files on page 110• Distribute the Zookeeper Keytab Files on page 110• Edit the Zookeeper Configuration File on page 110• Verify the Zookeeper Configuration on page 110
• Zookeeper Clients on page 111
Important: Stop cluster services before performing this configuration.
Zookeeper Servers
Create the Zookeeper PrincipalsCreate a principal for each Zookeeper Quorum Server host:
kadmin: addprinc -randkey zookeeper/host_fqdn@REALM

Security Stack and Tools Reference
110
Create the Zookeeper Keytab FilesFor each Zookeeper server host, run:
ktadd -norandkey -k /etc/security/phd/keytab/zookeeper-hostid.service.keytab zookeeper/host_fqdn@REALM
Distribute the Zookeeper Keytab FilesFor each Zookeeper server host:
1. Move the appropriate keytab file for each host to that hosts' /etc/security/phd/keytab directory2. Run the following:
chgrp hadoop zookeeper-hostid.service.keytab
chown zookeeper zookeeper-hostid.service.keytab
chmod 400 zookeeper-hostid.service.keytab
ln -s zookeeper-hostid.service.keytab zookeeper.service.keytab
Edit the Zookeeper Configuration File1. Add the following lines to /etc/gphd/zookeeper/conf/zoo.cfg:
authProvider.1=org.apache.zookeeper.server.auth.SASLAuthenticationProviderjaasLoginRenew=3600000
2. Create a file in /etc/gphd/zookeeper/conf/jaas.conf and add the following entry to the file:
Server { com.sun.security.auth.module.Krb5LoginModule required useKeyTab=true keyTab="/etc/security/phd/keytab/zookeeper-hostid.service.keytab" storeKey=true useTicketCache=false principal="zookeeper/host_fqdn@REALM";};
3. Add the following line to /etc/gphd/zookeeper/conf/java.env (create the file if it does not exist):
export JVMFLAGS="-Djava.security.auth.login.config=/etc/gphd/zookeeper/conf/jaas.conf"
If JVMFLAGS already exists in the file, then modify the property by adding new values within quotesseparated by spaces. For example, modify export JVMFLAGS="-Xmx2048m" to:
export JVMFLAGS="-Xmx2048m -Djava.security.auth.login.config=/etc/gphd/zookeeper/conf/jaas.conf"
Verify the Zookeeper Configuration1. Start up the cluster and connect using a client.
Note: You do not need to set up clients to use Kerberos, but if you want to use this functionality,see Zookeeper Clients.
Security Stack and Tools Reference
111
2. Connect as:
zookeeper-client -server hostname:port
Note: The port is defined in /etc/gphd/zookeeper/conf/zoo.cfg and is typically 2181.
3. Create a protected znode:
create /testznode testznodedata sasl:zkcli@REALM:cdwra
4. Verify the znode:
getAcl /testznode:
You should see something like this:
'sasl,'zkcli@{{BIGDATA.COM%7D%7D: cdrwa
Zookeeper Clients[Optional]
1. Add a principal for the client on the client host:
kadmin.local: addprinc -randkey zclient/host_fqdn@REALM
2. Add the keytab:
kadmin.local: ktadd -norandkey -k /etc/security/phd/keytab/zclient-hostid.client.keytab zclient/host_fqdn@REALM
3. Move the file to the /etc/security/phd/keytab directory on the host and change the owner andgroup appropriately, so that only users of the client can access the file:
chmod 400 /etc/security/phd/keytab/zclient-hostid.client.keytab
4. Create a link:
ln -s zclient-hostid.client.keytab zclient.client.keytab
5. Add the following entry to /etc/gphd/zookeeper/conf/jaas.conf (create the file if it doesn'texist):
Client { com.sun.security.auth.module.Krb5LoginModule required useKeyTab=true keyTab="/etc/security/phd/keytab/zclient.client.keytab" storeKey=true useTicketCache=false principal="zclient/host_fqdn@REALM";};
If you get a failure message indicating a name lookup failure, that indicates you should add a nameservice setting.
Security Stack and Tools Reference
112
Add or edit the following line to /etc/gphd/zookeeper/conf/java.env (create the file if it doesn'texist):
export JVMFLAGS="-Djava.security.auth.login.config=/etc/gphd/zookeeper/conf/jaas.conf -Dsun.net.spi.nameservice.provider.1=dns,sun"
Important: You cannot do this on a server node, as the -Dsun.net.spi.nameservice.provider.1=dns,sun line could cause the server to fail tostart.
You should now be able to establish a secure session with zookeeper-client. Test this by startingzookeeper-client and insuring no errors occur while connecting.
You may have issues with addressing or be forced to use the actual server IP address with the -serveroption for zookeeper-client to handle incompatibilities between the settings needed to make the Kerberoslookups work (-Dsun.net.spi.nameservice.provider.1=dns,sun) and what makes the Java hostresolution work.
This problem also may be encountered in trying to set up HBase to communicate with a secure Zookeeper,where it is more difficult to resolve.
Configuring Secure HBaseIf you are running secure HBase, you should also also run a secure Zookeeper (see Configuring SecureZookeeper on page 109). You can, however, set up the HBase master and region servers to useKerberos and test that they start without a secure Zookeeper.
This section covers the basics of how to get HBase up and running in secure mode; for further informationsee the HBase documentation (http://hbase.apache.org/book/security.html).
• HBase Master and Regionservers on page 112
• Create the HBase Principals on page 112• Create the HBase Keytab files on page 113• Distribute the HBase Keytab Files on page 113• Edit the HBase Site XML on page 113• Test HBase Startup on page 114
• HBase Clients on page 114
• Enable Encrypted Communication on page 114• REST Gateway on page 114• Thrift Client Configuration on page 115
• Configuring HBase with Secure Zookeeper on page 115• Access Control and PXF External Tables on page 115
• Scope of Permissions on page 116• PXF Access on page 117
HBase Master and Regionservers
Create the HBase PrincipalsFor the HBase master and each region server host, run:
kadmin.local: addprinc -randkey hbase/host_fqdn@REALM
Where host_fqdn refers to the service principal (master, region server) host.

Security Stack and Tools Reference
113
Create the HBase Keytab filesFor the HBase master and each region server host, run:
kadmin.local: ktadd -norandkey -k /etc/security/phd/keytab/hbase-hostid.service.keytab hbase/host_fqdn@REALM
Distribute the HBase Keytab FilesFor each host:
1. Move the appropriate keytab file for each host to that hosts' /etc/security/phd/keytab directory.2. Run:
chown hbase:hadoop hbase-hostid.service.keytab
chmod 400 hbase-hostid.service.keytab
ln -s hbase-hostid.service.keytab hbase.service.keytab
Edit the HBase Site XMLFor each master and region server host, add the following properties to /etc/gphd/hbase/conf/hbase-site.xml:
<property> <name>hbase.security.authentication</name> <value>kerberos</value></property>
<property> <name>hbase.security.authorization</name> <value>true</value></property>
<property> <name>hbase.coprocessor.region.classes</name> <value>org.apache.hadoop.hbase.security.token.TokenProvider</value></property>
<!-- HBase secure region server configuration --><property> <name>hbase.regionserver.kerberos.principal</name> <value>hbase/_HOST@REALM</value></property>
<property> <name>hbase.regionserver.keytab.file</name> <value>/etc/security/phd/keytab/hbase.service.keytab</value></property>
<!-- HBase secure master configuration --><property> <name>hbase.master.kerberos.principal</name> <value>hbase/_HOST@REALM</value></property>
<property> <name>hbase.master.keytab.file</name> <value>/etc/security/phd/keytab/hbase.service.keytab</value>

Security Stack and Tools Reference
114
</property>
Test HBase StartupYou can now test HBase startup. Start the cluster services and check that the HBase Master and Regionservers start properly. If they do not, look at the .log file in the /var/log/gphd/hbase/ directory forhints as to why. Also make sure HDFS came up properly.
As you fix issues, you can run /etc/init.d/hbase-master start or /etc/init.d/hbase-regionserver start to check that the issue is resolved.
HBase ClientsAdd the following property to the hbase-site.xml file on every client host:
<property> <name>hbase.security.authentication</name> <value>kerberos</value></property>
Enable Encrypted Communication[Optional]
If you are running secure HBase, you can enable encryption from clients to the server. To do so, add thefollowing property to hbase-site.xml on all clients:
<property> <name>hbase.rpc.protection</name> <value>privacy</value></property>
This can also be set on a per-connection basis. Set it in the configuration supplied to HTable:
Configuration conf = HBaseConfiguration.create();conf.set("hbase.rpc.protection", "privacy");HTable table = new HTable(conf, tablename);
The Apache HBase documentation indicates you should expect a ~10% performance penalty whenencryption is enabled.
REST GatewayYou can set up the REST Gateway to use Kerberos to authenticate itself as a principal to HBase. Notethat all client access will use the REST Gateway's credentials set below, and these will have this user'sprivileges.
For every REST Gateway, add the following to the hbase-site.xml file:
<property> <name>hbase.rest.keytab.file</name> <value>path-to-rest-users-keytab</value></property>
<property> <name>hbase.rest.kerberos.principal</name> <value>rest-users-principal-name</value></property>

Security Stack and Tools Reference
115
You must also give the REST principal access privileges. Do this by adding the rest-principal-name to theacl table in HBase. Adding the permissions below are sufficient, according to the HBase documentation:
grant 'rest-principal-name', 'RWCA'
Thrift Client ConfigurationSee the HBase documentation (http://hbase.apache.org/book/security.html) for instructions on configuringThrift clients.
Configuring HBase with Secure ZookeeperFor secure HBase, you should also run a secure Zookeeper (see Configuring Secure Zookeeper on page109). If you do so, you will need to execute the steps in this section.
Note: These steps must be done on the HBase master and all region servers.
1. Create a file called /etc/gphd/hbase/conf/jaas.conf and add the following entry:
Client { com.sun.security.auth.module.Krb5LoginModule required useKeyTab=true useTicketCache=false keyTab="/etc/security/phd/keytab/hbase.service.keytab" principal="hbase/host_fqdn@REALM";};
Important: Make sure to replace host_fqdn@REALM with the host_fqdn of the server andthe correct REALM.
2. Add the following at the bottom of /etc/gphd/hbase/conf/hbase-env.sh:
export HBASE_OPTS="$HBASE_OPTS -Djava.security.auth.login.config=/etc/gphd/hbase/conf/jaas.conf"export HBASE_MANAGES_ZK=false
3. Edit the site XML and add the following properties:
<property> <name>hbase.zookeeper.quorum</name> <value>comma-separated-list-of-zookeeper-hosts</value></property>
<property> <name>hbase.cluster.distributed</name> <value>true</value></property>
4. Edit /etc/gphd/zookeeper/conf/zoo.cfg and add: the following lines
kerberos.removeHostFromPrincipal=truekerberos.removeRealmFromPrincipal=true
Access Control and PXF External TablesThe version of HBase distributed with PHD supports access control. Basic mappings of permissions(RWCA) to operations allowed are as follows:

Security Stack and Tools Reference
116
Permission Operations
Read
Get
Exists
Scan
Write
Put
Delete
Lock/UnlockRow
IncrementColumnValue
CheckAndDelete/Put
Flush
Compact
Create
Admin
Alter
Drop
Admin
Enable/Disable
>Snapshot/Restore/Clone
Split
Major Compact
Grant
Revoke
Shutdown
Scope of PermissionsTable permissions:
• Read: User can read from any column family in a table• Write: User can write to any column family in a table• Create: User can alter table attributes; add, alter, or drop column families; and drop the table.• Admin: User can alter table attributes; add, alter, or drop column families; and enable, disable, or drop
the table. User can also trigger region (re)assignments or relocation.
Column Family:
• Read: User can read from the column family• Write: User can write to the column family
For PHD, the Hbase superuser is the "hbase" user/principal. There is an implicit global scope forpermissions granted by the superuser.

Security Stack and Tools Reference
117
Tables have an OWNER attribute that defaults to the table creator, but may be changed with an ALTERoperation.
See the HBase documentation (http://hbase.apache.org/book/security.html) for further details onconfiguring and using access controls.
Set the properties shown below to enable access control:
<property> <name>hbase.security.authorization</name> <value>true</value></property> <property> <name>hbase.coprocessor.master.classes</name> <value>org.apache.hadoop.hbase.security.access.AccessController</value></property> <property> <name>hbase.coprocessor.region.classes</name> <value>org.apache.hadoop.hbase.security.access.AccessController, org.apache.hadoop.hbase.security.token.TokenProvider</value></property>
When access control is enabled, you will need to explicitly grant users permissions to the database asshown below (example assumes it is being run on an HBase service host). You may also choose to createa specific hbase principal (hbase@REALM) for HBase administration rather than using the service keytabas shown below; this would allow administration from any client host:
# sudo -u hbase kinit -kt /etc/security/phd/keytab/hbase.service.keytab hbase/<host_fqdn># sudo -u hbase hbase shellhbase> grant 'myuser', 'RWCA'# kdestroy
PXF AccessIf you are using PXF external HBase tables, you will need to grant user hdfs permissions as follows:
# sudo -u hbase kinit -kt /etc/security/phd/keytab/hbase.service.keytab hbase/<host_fqdn># sudo -u hbase hbase shellhbase> grant 'hdfs', 'RWCA'# kdestroy
Configuring Secure HiveThe Hive MetaStore supports Kerberos authentication for Thrift clients. You can configure astandalone Hive MetaStoreServer instance to force clients to authenticate with Kerberos by settingthe hive.metastore.sasl.enabled property in the hive-site.xml configuration file to true, asshown in the example below.
Note: Hive Server 1 (hiveserver) does not support Kerberos, so you will need to switch to usingHive Server 2 in a secured cluster. For more information, see Changing to Hive Server 2 on page119 later in this section.
1. Add the Kerberos principals and their locations to hive-site.xml. For example:
<property>

Security Stack and Tools Reference
118
<name>hive.server2.authentication</name> <value>KERBEROS</value></property> <property> <name>hive.server2.authentication.kerberos.principal</name> <value>hive/_HOST@REALM</value></property> <property> <name>hive.server2.authentication.kerberos.keytab</name> <value>/etc/security/phd/keytab/hive.keytab</value></property> <property> <name>hive.server2.enable.impersonation</name> <value>true</value></property> <property> <name>hive.server2.enable.doAs</name> <value>true</value></property> <property> <name>hive.metastore.sasl.enabled</name> <value>true</value> <description>If true, the metastore thrift interface will be secured with SASL. Clients must authenticate with Kerberos.</description></property> <property> <name>hive.security.authorization.enabled</name> <value>true</value> <description>enable or disable the hive client authorization</description></property>
<property> <name>hive.security.authorization.createtable.owner.grants</name> <value>ALL</value> <description>the privileges automatically granted to the owner whenever a table gets created. An example like "select,drop" will grant select and drop privilege to the owner of the table. You may change this value if you desire lower privileges on create.</description></property>
<property> <name>hive.metastore.kerberos.keytab.file</name> <value>/etc/security/phd/keytab/hive.keytab</value> <description>The path to the Kerberos Keytab file containing the metastore thrift server's service principal.</description></property>
<property> <name>hive.metastore.kerberos.principal</name> <value>hive-metastore/_HOST@REALM</value> <description>The service principal for the metastore thrift server. The special string _HOST will be replaced automatically with the correct host name.</description>
Security Stack and Tools Reference
119
</property>
2. Add the following parameters to core-site.xml (Hadoop configuration) to enable users to run Hivequeries:
<property> <name>hadoop.proxyuser.hive.hosts</name> <value>*</value></property><property> <name>hadoop.proxyuser.hive.groups</name> <value>*</value></property> <!-- you may of course add more restrictive values here -->
Changing to Hive Server 2You will need to change to Hive Server 2 in order to use Hive in non-local mode with Kerberos. On theHive server, edit the /etc/gphd/init.d/hive-server file and change the following line:
server_name="server"
to:
server_name="server2"
Then restart the Hive Server:
/etc/init.d/hive-server restart
Hive Warehouse Permissions IssuesAs of this version, there is a known issue with Hive permissions such that the default 775 warehousepermissions on /hive/gphd/warehouse will prevent write access by non-superuser users. The simplestway to resolve this is, as the hdfs user, change the permissions to 777. If this is not acceptable, then Hiveexternal tables could provide a solution.
Note: You must have created an hdfs principal to do HDFS administration work, such aschanging permissions on other users' or root-level directories.
Connecting and Using Secure Hive with BeelineIn order to use secure Hive, you should create a Kerberos principal for the hive user; this is your Hiveadministrator principal.
Whenever you want to grant privileges to an ordinary user, you need to be logged in as the hivesuperuser.
To log in as a particular user using beeline:
1. Make sure there are no tickets for any other user in your cache (run kdestroy and the knit user toensure this).
2. kinit as the Hive user you want to log in as.3. Connect to beeline using the form:
!connect jdbc:hive2://<hive_server2_fqdn>:10000/<database>;principal=hive/<hive_server2_fqdn>@REALM
Security Stack and Tools Reference
120
Where:
<hive_server2_fqdn> is the FQDN of the host for the Hive Server role.
<database> is the database to connect to (for example, default).
REALM is your Kerberos realm.
Note:
• Unless you already have performed kinit as the user you want to connect as, and haveensured that only that user has a ticket in the cache (using klist), you will need to enteryour Kerberos principal name and password twice: once before starting beeline, by doingkinit, and again when queried by Hive during connect.
• Remember that in order for an ordinary user to do anything, you must first follow the abovesequence for user hive (Hive administrator) and use GRANT to grant the user privileges.
• As of the version tested, SHOW GRANT does not show any actual information in beeline, soyou can only tell if a GRANT worked by testing as that user (or looking for errors in the hivelog).
• Using GRANT as another user will not have any effect on databases that are not owned bythat user. For example, if your grant creates permissions in database default as usertester, that user will not actually have permissions on database default (and you maynot receive an error).
Configuring HCatalog (WebHCat) on Secure HiveHCatalog is a tool that operates on the Hive metastore. If you want to use the HCatalog RESTFul APIs(WebHCat), security configuration is required to enable the security functionality of the WebHCat server.
• Prerequisites on page 120• Create Keytab File for the WebHCat Server on page 120• Distribute the Keytab File to the WebHCat Server on page 121• Configure WebHCat and Proxy Users on page 121• Verify WebHCat is Working on page 122
Prerequisites• Hive is installed and configured properly on your cluster.• Hive metastore is configured to work in remote mode.• Security is properly enabled for Hive, as described in the Configuring Secure Hive on page 117
section.• HCatalog and WebHCat are installed and configured properly on your cluster.
Create Keytab File for the WebHCat ServerCreate a keytab file that contains the HTTP principal:
> kadmin.localkadmin.local: ktadd -norandkey -k /etc/security/phd/keytab/webhcat-hostid.service.keytab HTTP/host_fqdn@REALM

Security Stack and Tools Reference
121
Distribute the Keytab File to the WebHCat ServerCopy the generated /etc/security/phd/keytab/webhcat-hostid.service.keytab file to themachine where the WebHCat server is running. Put it under /etc/security/phd/keytab/. Then,create a symbolic link and adjust the file owner and permissions.
For example:
> chown hive:hadoop /etc/security/phd/keytab/webhcat-hostid.service.keytab> chmod 400 /etc/security/phd/keytab/webhcat-hostid.service.keytab> ln -s /etc/security/phd/keytab/webhcat-hostid.service.keytab /etc/security/phd/keytab/webhcat.service.keytab
Configure WebHCat and Proxy UsersOn the WebHCat server machine, edit the /etc/gphd/webhcat/conf/webhcat-site.xml file andadd the following properties:
webhcat-site.xml
<property> <name>templeton.kerberos.secret</name> <value>SuPerS3c3tV@lue!</value></property>
<property> <name>templeton.kerberos.keytab</name> <value>/etc/security/phd/keytab/webhcat.service.keytab</value></property>
<property> <name>templeton.kerberos.principal</name> <value>HTTP/_HOST@<REALM></value></property>
In the above code snippet, you need to replace <FQDN> with the correct FQDN of your WebHCat servermachine. Replace <REALM> with the Kerberos realm name you are using for your cluster. You may set thetempleton.kerberos.secret property value to any random secret value.
Note: In most cases, when the WebHCat server starts, it reads the Hive metastore informationfrom the corresponding Hive configuration files (/etc/gphd/hive/conf/hive-site.xml).If your WebHCat server is not running on the same machine as the Hive server, you may needmanually copy /etc/gphd/hive/conf/hive-site.xml from the Hive server machine to theWebHCat server machine before restarting the WebHCat server.
After editing the webhcat-site.xml file, you need to restart the WebHCat server to make the changestake effect:
> service webhcat-server restart
Because WebHCat will access the HDFS NameNode, you need configure Hadoop to allow impersonationas the HTTP user. Edit /etc/gphd/hadoop/conf/core-site.xml on all your HDFS node machinesand add the following properties if they don't already exist:
core-site.xml
<property> <name>hadoop.proxyuser.HTTP.hosts</name> <value>*</value></property>

Security Stack and Tools Reference
122
<property> <name>hadoop.proxyuser.HTTP.groups</name> <value>*</value></property>
After you edit core-site.xml, restart all HDFS services to enable your changes.
Verify WebHCat is WorkingEnsure you have an installed version of curl that supports GSS-negotiation by calling curl -V:
> curl 7.19.7 (x86_64-redhat-linux-gnu) libcurl/7.19.7 NSS/3.13.6.0 zlib/1.2.3 libidn/1.18 libssh2/1.4.2Protocols: tftp ftp telnet dict ldap ldaps http file https ftps scp sftpFeatures: GSS-Negotiate IDN IPv6 Largefile NTLM SSL libz
Then do:
> kinit <username><output omitted, you will need enter password to login>> curl -i -u : --negotiate 'http://<FQDN>:<PORT>/templeton/v1/ddl/database'HTTP/1.1 401WWW-Authenticate: NegotiateSet-Cookie: hadoop.auth=;Path=/;Expires=Thu, 01-Jan-1970 00:00:00 GMTCache-Control: must-revalidate,no-cache,no-storeContent-Type: text/html;charset=ISO-8859-1Content-Length: 1274Server: Jetty(7.6.0.v20120127)
HTTP/1.1 200 OKSet-Cookie: hadoop.auth="u=root&[email protected]&t=kerberos&e=1393939264464&s=mJG9x4mE4S9BMDCbSeRcVKyRY5g=";Version=1;Path=/;DiscardExpires: Thu, 01 Jan 1970 00:00:00 GMTContent-Type: application/jsonTransfer-Encoding: chunkedServer: Jetty(7.6.0.v20120127)
{"databases":["default"]}
In the above code snippet, replace <FQDN> with the real FQDN of your WebHCat server machine, andreplace <PORT> with your WebHCat server port (50111 by default).
If you see output similar to the above (a 401 response followed by a 200 response), your securedWebHCat installation is functioning properly.
Configuring HAWQ on Secure HDFS
Requirements• A secure HDFS installation• HDFS on wire encryption (dfs.encrypt.data.transfer) MUST be set to false.• A new un-initialized HAWQ instance or a stopped already initialized HAWQ instance that was
previously running on non-secured HDFS

Security Stack and Tools Reference
123
Preparation1. If HAWQ is already initialized and running, stop HAWQ by running service hawq stop or
<HAWQ_installation_directory>/bin/gpstop.2. Secure the HDFS cluster using the instructions provided in this guide or using available security tools.3. Ensure HDFS is running properly in secured mode.4. Ensure that the dfs.encrypt.data.transfer property is set to false in hdfs-site.xml for your
cluster.
Configuration1. Generate a postgres principal and keytab file as shown below:
Note: The form of principal for the HAWQ master is postgres@REALM, where postgres isthe default service name of HAWQ and REALM is the default realm in the cluster's Kerberosconfiguration. In the examples below, we use EXAMPLE.COM for the REALM; this should bereplaced by your cluster's actual REALM.
kadmin: addprinc -randkey [email protected]: ktadd -k /etc/security/phd/keytab/hawq.service.keytab [email protected]
2. Move this keytab file to the appropriate keytab directory on the HAWQ master node (for example, /etc/security/phd/keytab/).
3. Set the ownership of the keytab file to gpadmin:gpadmin and the permissions to 400.4. Refer to your gpinitsystem_config file (typically in /etc/gphd/hawq/conf) to determine
your configured HAWQ HDFS data directory (typically /hawq_data). This will be the last part of theDFS_URL value in the file. For example, if DFS_URL is set to centos61-2:8020/hawq_data, thenyour HAWQ HDFS data directory is /hawq_data.
5. Create (if required) the HAWQ HDFS data directory in HDFS, and assign ownership aspostgres:gpadmin and permissions 755.
• If HAWQ has already been initialized and the directory exists, just modify the owner and permissionsas shown.
• You need to have HDFS super-user permissions to create or modify a directory in HDFS root. Ifnecessary, create an hdfs principal to accomplish this task.
6. If not present, create the /user/gpadmin directory in HDFS with ownership gpadmin:gpadmin andpermissions 777.
7. Modify the hdfs-client.xml file (typically in /usr/lib/gphd/hawq/etc), on the master node andall segment server nodes, by adding the following properties:
<property> <name>hadoop.security.authentication</name> <value>kerberos</value></property>
<property> <name>dfs.namenode.kerberos.principal</name> <value>HDFS_NAMENODE_PRINCIPAL</value></property>
Note:
• hdfs-client.xml is in the <HAWQ_installation_directory>/etc, typically /usr/lib/gphd/hawq/etc.
• These property blocks should be in the file, but commented out; if so, uncomment and editthe values.
Security Stack and Tools Reference
124
• HDFS_NAMENODE_PRINCIPAL should be value from your cluster's hdfs-site.xml file.• Make sure the namenode principal value is correct.
8. Edit your gpinitsystem_config file (typically in /etc/gphd/hawq/conf) and add (or uncommentif they are present and commented out):
KERBEROS_KEYFILE=/path/to/keytab/fileENABLE_SECURE_FILESYSTEM=on
Note:
• Make sure there is no space between the key=value pairs; for example,ENABLE_SECURE_FILESYSTEM = on will cause errors because there are spaces.
• Make sure the value of KERBEROS_KEYFILE is the full path where you placed thehawq.service.keytab file on the master.
9. If HAWQ has already been initialized prior to being secured, run the following commands on the HAWQmaster as the gpadmin user:
service hawq startsource /usr/local/hawq/greenplum_path.shgpconfig --masteronly -c krb_server_keyfile -v "'/path/to/keytab/file'"service hawq stop
Important: The single quotes ' after/before the double quotes " in the keytab string above arerequired!
10.After you have completed all these steps, you can start or initialize HAWQ:
a. If HAWQ was already initialized on non-secured HDFS before this process, start it by runningservice hawq start or <HAWQ_installation_directory>/bin/gpstart.
b. If HAWQ has not been initialized, initialize it now.11.Verify HAWQ is operating properly; if not, see the next section.
TroubleshootingIf initialization or start-up fails, you can look into the gpinitsystem log output and the namenode logs tosee if you can pinpoint the cause. Some possible causes include:
• Incorrect values in your hdfs-client.xml file.• hdfs-client.xml was not updated on the master and all segment servers.• Unable to log in with Kerberos:
This may indicate a possible bad keytab or principal for postgres. You can validate on the master byentering the following:
kinit -k <keytab dir path>/hawq.service.keytab [email protected]
• Wrong HAWQ HDFS data directory or directory permissions:
Check the gpinitsystem_config file and the DFS_URL value and the directory permissions.• Unable to create the HAWQ HDFS data directory errors:
Ensure that you have created the proper directory as specified in gpinitsystem_config and that theownership and permissions are correct.
Enabling AuditingYou can enable auditing before deployment or re-configuration of a cluster.

Security Stack and Tools Reference
125
To enable auditing:
1. Locate your templates directory (by default ClusterConfigDir). This directory is created during initialinstallation, see the PHD Installation and Administrator Guide for details.
2. For HDFS and MapReduce, locate the hdfs subdirectory and edit the log4j.properties file asfollows:
• For HDFS, change the following line from:
hdfs.audit.logger=INFO,NullAppender
to:
hdfs.audit.logger=INFO,RFAAUDIT
• For MapReduce, change the following line from:
mapred.audit.logger=INFO,NullAppender
to:
mapred.audit.logger=INFO,RFAAUDIT
• For other components, locate the component sub-directory in the template and its correspondinglog4j.properties file and make similar edits.
To specify the auditing output location:
• By default, log files and other auditing information are output to /var/log/gphd/.• To set up logging to go to syslog, define the following:
# Configure syslog appenderlog4j.appender.SYSLOG=org.apache.log4j.net.SyslogAppenderlog4j.appender.SYSLOG.syslogHost=loghostlog4j.appender.SYSLOG.layout=org.apache.log4j.PatternLayoutlog4j.appender.SYSLOG.layout.ConversionPattern=%d{ISO8601} %p %c: %m%nlog4j.appender.SYSLOG.Facility=LOCAL1
You can now log audit information to syslog. For example:
hdfs.audit.logger=INFO,SYSLOG
You can also log to file and syslog. For example:
hdfs.audit.logger=INFO,RFAAUDIT,SYSLOG
Note: These changes only go into effect after deployment or re-configuration.
Secure Web AccessThis section describes how to configure WebHDFS on a secure PHD cluster.
• Overview on page 126• Prerequisites on page 127• Configuring Secure WebHDFS on page 127
• Create a Principal on page 127• Add to Groups on page 127

Security Stack and Tools Reference
126
• Using WebHDFS in Secure Mode on page 127
• Authenticate Yourself on page 127• Verify your Authentication on page 128• Verify Curl Supports Kerberos Negotiate on page 128• Run Secure WebHDFS on page 128
OverviewWebHDFS is a REST API that allows a user to perform various HDFS operations.
More details about these APIs are available from the Apache Hadoop documentation: http://hadoop.apache.org/docs/r1.0.4/webhdfs.html
On an insecure cluster, you can run any webhdfs command as any user, including root. For example:
$ curl -i "http://<HOST>:<PORT>/webhdfs/v1/?user.name=root&op=LISTSTATUS"
Where <HOST>:<PORT> is the HTTP address of the namenode (the value of dfs.http.address inhdfs-site.xml); by default, the port number is 50070.
The client receives a JSON response that looks like this:
HTTP/1.1 200 OKContent-Type: application/jsonContent-Length: 427
{ "FileStatuses": { "FileStatus": [ { "accessTime" : 1320171722771, "blockSize" : 33554432, "group" : "supergroup", "length" : 24930, "modificationTime": 1320171722771, "owner" : "webuser", "pathSuffix" : "a.patch", "permission" : "644", "replication" : 1, "type" : "FILE" }, { "accessTime" : 0, "blockSize" : 0, "group" : "supergroup", "length" : 0, "modificationTime": 1320895981256, "owner" : "szetszwo", "pathSuffix" : "bar", "permission" : "711", "replication" : 0, "type" : "DIRECTORY" }, ... ] }}

Security Stack and Tools Reference
127
PrerequisitesBefore accessing WebHDFS in secure mode, you need to secure the underlying Hadoop cluster, startingwith Configuring Kerberos for HDFS and YARN (MapReduce) on page 96.
Note that as part of the procedure to secure your cluster, you will edit the site.xml file. Thedfs.webhdfs.enabled and dfs.web.authentication.kerberos.principal properties in thisfile must be set correctly to enable secure WebHDFS.
After security is enabled, all WebHDFS operations will fail with a 401 error until you use WebHDFS insecure mode.
Configuring Secure WebHDFSOnce the cluster is secured, perform the following steps.
Create a PrincipalTo access WebHDFS in secure mode, a new Kerberos user (or principal) must be created in Kerberos.To do this, use the kadmin.local command on the host where Kerberos is installed, and then run theaddprinc <username> command. For example:
# kadmin.localAuthenticating as principal root/[email protected] with password.kadmin.local: addprinc testuserWARNING: no policy specified for [email protected]; defaulting to no policyEnter password for principal "[email protected]": Re-enter password for principal "[email protected]": Principal "[email protected]" created.
Add to Groups[Optional]
Group information is accessed on the Namenode. If you need the principal you just created (testuserin the example above) to reside in specific groups (for example, if you need permission to run aGETCONTENTSUMMARY command), you need to create an OS user on the Namenode that belongs to thegroups you need: for example, hadoop.
To add a regular user on the NameNode, run the adduser command, as follows:
adduser -N -g hadoop testuser
Using WebHDFS in Secure ModeTo verify WebHDFS works in secure mode, perform the following tasks.
Authenticate YourselfYou must authenticate yourself as a valid Kerberos user. Do this by running kinit command with youruser name. In this example, the user is testuser:
$ kinit testuserPassword for [email protected]:

Security Stack and Tools Reference
128
Verify your Authentication[Optional]
If kinit is successful, you will be able to validate that you have a valid Kerberos ticket by using the klistcommand, as follows:
$ klistTicket cache: FILE:/tmp/krb5cc_0Default principal: [email protected]
Valid starting Expires Service principal09/19/13 01:36:40 09/20/13 01:36:40 krbtgt/[email protected] renew until 09/26/13 01:36:40
Verify Curl Supports Kerberos NegotiateYour version of curl must support Keberos's GSS-Negotiate feature; you can verify this by running thefollowing:
$ curl -Vcurl 7.24.0 (x86_64-apple-darwin12.0) libcurl/7.24.0 OpenSSL/0.9.8x zlib/1.2.5Protocols: dict file ftp ftps gopher http https imap imaps ldap ldaps pop3 pop3s rtsp smtp smtps telnet tftp Features: AsynchDNS GSS-Negotiate IPv6 Largefile NTLM NTLM_WB SSL libz
Run Secure WebHDFSYou can now run a secure WebHDFS command.
For example, the --negotiate parameter in curl, which turns on Kerberos negotiate:
curl -i --negotiate -u testuser "http://<HOST>:50070/webhdfs/v1/?op=GETCONTENTSUMMARY"
You should see a response like this:
Enter host password for user 'testuser':HTTP/1.1 401 Date: Thu, 19 Sep 2013 01:45:55 GMTPragma: no-cacheDate: Thu, 19 Sep 2013 01:45:55 GMTPragma: no-cacheWWW-Authenticate: NegotiateSet-Cookie: hadoop.auth=;Path=/;Expires=Thu, 01-Jan-1970 00:00:00 GMTContent-Type: text/html;charset=ISO-8859-1Cache-Control: must-revalidate,no-cache,no-storeContent-Length: 1358Server: Jetty(7.6.10.v20130312)
HTTP/1.1 200 OKDate: Thu, 19 Sep 2013 01:45:55 GMTPragma: no-cacheCache-Control: no-cacheDate: Thu, 19 Sep 2013 01:45:55 GMTPragma: no-cacheSet-Cookie: hadoop.auth="u=testuser&[email protected]&t=kerberos&e=1379591155709&s=zlzr9/EuqluQ9C2F6Yg8Fex9YzI=";Path=/

Security Stack and Tools Reference
129
Expires: Thu, 01 Jan 1970 00:00:00 GMTContent-Type: application/jsonTransfer-Encoding: chunkedServer: Jetty(7.6.10.v20130312)
{"ContentSummary":{"directoryCount":29,"fileCount":9,"length":3156,"quota":2147483647,"spaceConsumed":9468,"spaceQuota":-1}}
This response verifies that you are accessing WebHDFS in secure mode. Note the initial 401 responseabove, followed by the 200 response. This is a result of the curl Kerberos negotiation.
Secure Web Access via HttpFSHttpFS is another set of RESTful APIs that enable you to operate HDFS via the HTTP protocol. It has APIsthat are compatible with WebHDFS. You also need to make some configuration changes to make it workwith security.
• Prerequisites on page 129• Add Principal for HttpFS on page 129• Create and Distribute Keytab on page 129
• Set the Keytab File Ownership and Permissions on page 130• Configuration on page 130• Restart HttpFS on page 131• Verify HttpFS is Working on page 131
Prerequisites• Hadoop and HDFS are installed and security enabled.• HttpFS is installed correctly.
Add Principal for HttpFSHttpFS needs two principals, one for secured HTTP access and another for secured Hadoop access. Insecured Hadoop, there is already an HTTP/<host FQDN>@<realm> principal for all HTTP access, soonly one new principal needs to be added. Run the following commands on KDC host (or use kadmin fromanother host):
> kadmin.localkadmin.local : addprinc -randkey httpfs/host_fqdn@REALM
Create and Distribute KeytabPut the new httpfs/host_fqdn@REALM principal and the existing HTTP/host_fqdn@REALM principalkeys into one keytab file:
kadmin.local : ktadd -norandkey -k /etc/security/phd/keytab/httpfs-hostid.service.keytab httpfs/host_fqdn@REALM HTTP/host_fqdn@REALM
The above command should create the file /etc/security/phd/keytab/httpfs-hostid.service.keytab. Distribute this keytab file to the node where you installed HttpFS as /etc/security/phd/keytab/httpfs.<host_fqdn>.service.keytab.

Security Stack and Tools Reference
130
Set the Keytab File Ownership and PermissionsOwner and permissions need to be properly set up for the distributed keytab file to make it readable byHttpFS service. It is also recommended to create a symbol link as follows:
> chown httpfs:hadoop /etc/security/phd/keytab/httpfs.<host_fqdn>.service.keytab> chmod 400 /etc/security/phd/keytab/httpfs.<host_fqdn>.service.keytab> ln -s /etc/security/phd/keytab/httpfs.<host_fqdn>.service.keytab /etc/security/phd/keytab/httpfs.service.keytab
ConfigurationEdit the /etc/gphd/hadoop-httpfs/conf/httpfs-site.xml file by adding the following propertiesto the file:
httpfs-site.xml
<property> <name>httpfs.authentication.type</name> <value>kerberos</value></property><property> <name>httpfs.hadoop.authentication.type</name> <value>kerberos</value></property><property> <name>httpfs.authentication.kerberos.principal</name> <value>HTTP/<host_fqdn>@<REALM></value></property><property> <name>httpfs.authentication.kerberos.keytab</name> <value>/etc/security/phd/keytab/httpfs.service.keytab</value></property><property> <name>httpfs.hadoop.authentication.kerberos.principal</name> <value>httpfs/<host_fqdn>@<REALM></value></property><property> <name>httpfs.hadoop.authentication.kerberos.keytab</name> <value>/etc/security/phd/keytab/httpfs.service.keytab</value></property><property> <name>httpfs.authentication.kerberos.name.rules</name> <value>DEFAULT</value> <!-- same as the value of hadoop.security.auth_to_local in your core-site.xml --></property>
Note:
• You should replace <host_fqdn>@<REALM> with your actual FQDN and REALM in the aboveexample.
• The value of the httpfs.authentication.kerberos.name.rules property should be thesame as the value of the hadoop.security.auth_to_local property in your /etc/gphd/hadoop/conf/core-site.xml file.
Security Stack and Tools Reference
131
Restart HttpFSNext, restart HttpFS service to apply the configuration changes:
> service hadoop-httpfs restart
Verify HttpFS is WorkingYou need curl with GSS negotiation enabled to verify that secured HttpFS is working. Check your curlfeatures with:
> curl -Vcurl 7.19.7 (x86_64-unknown-linux-gnu) libcurl/7.19.7 NSS/3.12.7.0 zlib/1.2.3 libidn/1.18 libssh2/1.2.2Protocols: tftp ftp telnet dict ldap ldaps http file https ftps scp sftpFeatures: GSS-Negotiate IDN IPv6 Largefile NTLM SSL libz
Now, you need to log in as a user who has a corresponding principal in the KDC. In this example, we usethe hadoop user:
> su - hadoophadoop> kinit<output omitted, you need password to login>hadoop> curl -i --negotiate -u : "http://<host_fqdn>:<PORT>/webhdfs/v1/user?op=LISTSTATUS"HTTP/1.1 401 UnauthorizedServer: Apache-Coyote/1.1WWW-Authenticate: NegotiateSet-Cookie: hadoop.auth=""; Expires=Thu, 01-Jan-1970 00:00:10 GMT; Path=/Content-Type: text/html;charset=utf-8Content-Length: 951Date: Wed, 26 Feb 2014 09:37:51 GMT
HTTP/1.1 200 OKServer: Apache-Coyote/1.1Set-Cookie: hadoop.auth="u=hadoop&[email protected]&t=kerberos-dt&e=1393443472388&s=18UnRj4g0DqUTHyPqC7kC3amsr0="; Version=1; Path=/Content-Type: application/jsonTransfer-Encoding: chunkedDate: Wed, 26 Feb 2014 09:37:51 GMT
{"FileStatuses":{"FileStatus":[{"pathSuffix":"hadoop","type":"DIRECTORY","length":0,"owner":"hadoop","group":"hadoop","permission":"755","accessTime":0,"modificationTime":1393384282224,"blockSize":0,"replication":0},{"pathSuffix":"history","type":"DIRECTORY","length":0,"owner":"mapred","group":"hadoop","permission":"1777","accessTime":0,"modificationTime":1393384456756,"blockSize":0,"replication":0},{"pathSuffix":"hive","type":"DIRECTORY","length":0,"owner":"hive","group":"hadoop","permission":"755","accessTime":0,"modificationTime":1393384258263,"blockSize":0,"replication":0},{"pathSuffix":"oozie","type":"DIRECTORY","length":0,"owner":"oozie","group":"hadoop","permission":"755","accessTime":0,"modificationTime":1393384338240,"blockSize":0,"replication":0}]}}
Note: In the above example:
• Ensure you replace <host_fqdn> with an actual FQDN in your environment (it must be aFQDN; any short name or alias such as localhost will not work)
• Replace <PORT> with the actual port (14000 by default).

Security Stack and Tools Reference
132
If you see output similar to the above (a 401 response followed by a 200 response), your secured HttpFSis working.
Configuring Secure FlumeThis section describes the Flume security configurations.
• Prerequisites on page 132• Create the Flume Principal on page 132• Create the Flume Keytab Files on page 132• Distribute the Flume Keytab Files and Change Ownership and Permissions on page 132• Single User for All HDFS Sinks on page 133• Different Users Across Multiple HDFS Sinks on page 133
• Configure Impersonation in core-site.xml on page 133• Flume Configuration for Multiple Sinks on page 134
Prerequisites• Flume must be installed on the cluster.• Security has been enabled for HDFS on the cluster.
Create the Flume PrincipalOn the KDC admin server, create a principal for the flume server:
kadmin.local: addprinc -randkey flume/host_fqdn@REALM
Create the Flume Keytab FilesOn the KDC admin server, create the Flume keytab files:
kadmin.local: ktadd -norandkey -k /etc/security/phd/keytab/flume-hostid.service.keytab flume/host_fqdn@REALM
Distribute the Flume Keytab Files and Change Ownership andPermissions
Move the keytab file created in the previous step to the /etc/security/phd/keytab directory onthe host running the Flume server, then run the following commands on the Flume server:
cd /etc/security/phd/keytabchgrp flume flume-hostid.service.keytab chown flume flume-hostid.service.keytab chmod 400 flume-hostid.service.keytab ln -s flume-hostid.service.keytab flume.service.keytab

Security Stack and Tools Reference
133
Single User for All HDFS SinksFor a single user for all HDFS sinks, add the following properties in /etc/gphd/flume/conf/flume.conf in the Flume server:
agentName.sinks.sinkName.hdfs.kerberosPrincipal = flume-hostid/[email protected] = /etc/security/phd/keytab/flume.service.keytab
Flume configuration example:
agent.sources = r1agent.sinks = k1agent.channels = c1
# Describe/configure the sourceagent.sources.r1.type = netcatagent.sources.r1.bind = localhostagent.sources.r1.port = 44444
# Describe the sinkagent.sinks.k1.type = hdfsagent.sinks.k1.hdfs.path = hdfs://centos64-1.localdomain/user/flumeagent.sinks.k1.hdfs.fileType = DataStreamagent.sinks.k1.hdfs.kerberosPrincipal = flume/[email protected] = /etc/security/phd/keytab/flume.service.keytab
# Use a channel which buffers events in memoryagent.channels.c1.type = memoryagent.channels.c1.capacity = 1000agent.channels.c1.transactionCapacity = 100
# Bind the source and sink to the channelagent.sources.r1.channels = c1agent.sinks.k1.channel = c1
Different Users Across Multiple HDFS SinksFor different users across multiple HDFS sinks, the same keytab path must be used across all HDFS sinksin the same agent because Flume does not support using multiple Kerberos principals or keytabs in thesame agent.
If multiple users on HDFS are used, impersonation in core-site.xml in Hadoop must be configured.
Configure Impersonation in core-site.xmlTo configure impersonation in core-site.xml, add the following properties to the file:
property> <name>hadoop.proxyuser.flume.groups</name> <value>group1,group2</value> <description>Allow the flume user to impersonate any members of group1 and group2</description></property><property> <name>hadoop.proxyuser.flume.hosts</name> <value>host1,host2</value>

Security Stack and Tools Reference
134
<description>Allow the flume user to connect only from host1 and host2 to impersonate a user</description></property>
Flume Configuration for Multiple SinksTo configure Flume for multiple sinks:
agent.sinks.sink-1.type = HDFSagent.sinks.sink-1.hdfs.kerberosPrincipal = flume-hostid/[email protected] = /etc/security/phd/keytab/flume.service.keytabagent.sinks.sink-1.hdfs.proxyUser = log1
agent.sinks.sink-2.type = HDFSagent.sinks.sink-2.hdfs.kerberosPrincipal = flume-hostid/[email protected] = /etc/security/phd/keytab/flume.service.keytabagent.sinks.sink-2.hdfs.proxyUser = log2
Flume configuration example:
agent.sources = r1agent.sinks = k1agent.channels = c1
# Describe/configure the sourceagent.sources.r1.type = netcatagent.sources.r1.bind = localhostagent.sources.r1.port = 44444
# Describe the sinkagent.sinks.k1.type = hdfsagent.sinks.k1.hdfs.path = hdfs://centos64-1.localdomain/user/flume1agent.sinks.k1.hdfs.fileType = DataStreamagent.sinks.k1.hdfs.kerberosPrincipal = flume/[email protected] = /etc/security/phd/keytab/flume.service.keytabagent.sinks.k1.hdfs.proxyUser = log1
# Use a channel which buffers events in memoryagent.channels.c1.type = memoryagent.channels.c1.capacity = 1000agent.channels.c1.transactionCapacity = 100
# Bind the source and sink to the channelagent.sources.r1.channels = c1agent.sinks.k1.channel = c1
agent.sources = r2agent.sinks = k2agent.channels = c2
# Describe/configure the sourceagent.sources.r2.type = netcatagent.sources.r2.bind = localhostagent.sources.r2.port = 55555
# Describe the sinkagent.sinks.k2.type = hdfsagent.sinks.k2.hdfs.path = hdfs://centos64-1.localdomain/user/flume2agent.sinks.k2.hdfs.fileType = DataStream

Security Stack and Tools Reference
135
agent.sinks.k2.hdfs.kerberosPrincipal = flume/[email protected] = /etc/security/phd/keytab/flume.service.keytabagent.sinks.k2.hdfs.proxyUser = log2
# Use a channel which buffers events in memoryagent.channels.c2.type = memoryagent.channels.c2.capacity = 1000agent.channels.c2.transactionCapacity = 100
# Bind the source and sink to the channelagent.sources.r2.channels = c2agent.sinks.k2.channel = c2
Configuring Secure OozieThis section describes Oozie security configuration.
• Prerequisites on page 135• Create the Oozie Principal on page 135• Create the HTTP Principal for the Oozie Server on page 135• Create the Oozie Keytab Files on page 136
• Copy the Oozie Keytab Files and Change Ownership and Permissions on page 136• Edit the Oozie Configuration File on page 136• Using Oozie with a Secure Hive Metastore Server on page 136• Verify Secure Oozie on page 137
Prerequisites• The Oozie server must be installed on the cluster.• Security must be enabled for HDFS and YARN on the cluster.
Create the Oozie PrincipalOn the KDC admin server, create a principal for the Oozie server:
kadmin.local: addprinc -randkey oozie/<host_fqdn>@REALM
Where <host_fqdn> is the host where the Oozie server is running.
Create the HTTP Principal for the Oozie ServerOn the KDC admin server, create the HTTP principal for the host running the Oozie server:
Note: This principal may have been created when enabling security for other services. Skip thisstep if that is the case.
kadmin.local: addprinc -randkey HTTP/<host_fqdn>@REALM

Security Stack and Tools Reference
136
Create the Oozie Keytab FilesOn the KDC admin server, create the Oozie keytab files:
kadmin.local: ktadd -norandkey -k /etc/security/phd/keytab/oozie-<host_fqdn>.service.keytab oozie/<host_fqdn>@REALM HTTP/<host_fqdn>@REALM
Copy the Oozie Keytab Files and Change Ownership andPermissions
Move the keytab file created in the previous step to the /etc/security/phd/keytab directory onthe host running the Oozie server:
scp /ect/security/phd/keytab/oozie-<host_fqdn>.service.keytab <oozie.host.name>:/etc/security/phd/keytab/
Then run the following commands on the Oozie server:
cd /etc/security/phd/keytabchgrp hadoop oozie-<host_fqdn>.service.keytab chown oozie oozie-<host_fqdn>.service.keytab chmod 400 oozie-<host_fqdn>.service.keytab ln -s oozie-<host_fqdn>.service.keytab oozie.service.keytab
Edit the Oozie Configuration FileOn the Oozie server, locate the Oozie configuration file (/etc/gphd/oozie/conf/oozie-site.xml),and change the following properties to configure Oozie to run in secure mode:
Property Value
oozie.service.HadoopAccessorService.kerberos.enabledtrue
local.realm <YOUR-REALM>
oozie.service.HadoopAccessorService.keytab.file/etc/security/phd/keytab/oozie.service.keytab
oozie.service.HadoopAccessorService.kerberos.principaloozie/_HOST@<YOUR-REALM>
oozie.authentication.type simple
oozie.authentication.kerberos.principal HTTP/_HOST@<YOUR-REALM>
oozie.authentication.kerberos.name.rulesUse the value configured forhadoop.security.auth_to_local in core-site.xml. The default value is DEFAULT if not setin the core-site.xml.
Using Oozie with a Secure Hive Metastore ServerFor Hive actions to connect to a secure Hive metastore, you need to add credential configuration to the /etc/gphd/oozie/conf/oozie-site.xml file, as follows:
<property> <name>oozie.credentials.credentialclasses</name> <value>

Security Stack and Tools Reference
137
hcat=org.apache.oozie.action.hadoop.HCatCredentials,hive=org.apache.oozie.action.hadoop.HbaseCredentials </value></property>
Verify Secure OozieLog in as the authorized user, kinit, cd into the home directory of the authorized user, then run theOozie Hive action:
oozie job -oozie http://<oozier_hostname>:11000/oozie -config examples/apps/hive/job.properties -run
Check Oozie job status using the job_ID returned after running the above command:
oozie job -oozie http://<oozie.host.name>:11000/oozie -info <JOBID>
Configuring Secure SqoopUsers invoking Sqoop must have a valid Kerberos ticket. Otherwise no Sqoop-specific configuration isrequired on secured clusers.
Note that Sqoop with Hbase or Hive proper authorization must exist for the user to create and write to therelevant tables in these services.
Note: Sqoop 2 and Whirr do not support Kerberos at this time.
Configuring Secure PigUsers invoking Pig must have a valid Kerberos ticket. Otherwise no Pig-specific configuration is requiredon secured clusers.
Configuring Secure MahoutKerberos configuration is required for users submitting Mahout jobs.
Security - Troubleshooting
Log Files
A good first step is to look for exceptions that may give you a clue as to the problem in the log files (wherehostname is the host where the log file is located):
• namenode: /var/log/gphd/hadoop-hdfs/hadoop-hdfs-namenode-hostname.log• resourcemanager: /var/log/gphd/hadoop-yarn/yarn-yarn-resourcemanager-
hostname.log• historyserver: /var/log/gphd/hadoop-mapreduce/mapred-mapred-historyserver-
hostname.log• datanode: /var/log/gphd/hadoop-hdfs/hadoop-hdfs-datanode-hostname.log• nodemanager: /var/log/gphd//hadoop-yarn/yarn-yarn-nodemanager-hostname.log
Security Stack and Tools Reference
138
You can enable debug level logging for the Java Kerberos classes by editing /etc/default/hadoopand setting the following value:
HADOOP_OPTS="$HADOOP_OPTS -Dsun.security.krb5.debug=true"
Networking Configuration
Kerberos operation in Hadoop is very sensitive to proper networking configuration:
• Host IP's for service nodes must reverse map to the FQDN's used to create the node principal for theservice/FQDN.
• hostname -f on a node must return the FQDN used to create the principal for the service/FQDN.
Make sure your networking is properly configured before attempting to secure a cluster!
Data Node Does Not Start
• If you are getting a message about a data node requiring privileged resources to start, check that yourports are < 1024 in yarn-site.xml.
• Make sure you only changed the ports indicated in the instructions to be < 1024.• Make sure core-site.xml is configured to use Kerberos.• Check that the keytab and principal entries in site XML, and the keytab directory owner/group is correct.
To inspect keytab files run:
klist -e -k -t pathtokeytab
• Check that you modified hadoop-env.sh and /etc/init.d/hadoop-hdfs-datanode properly:
• If they are correct, run:
/etc/init.d/hadoop-hdfs-datanode start
• If there are no printed errors in the output or it complains that no VM can be found, it is a JSVCproblem. See Building and Installing JSVC.
Cannot Find Principal
• Check keytab and principal entries in the site xml, and the keytab directory permissions.• Cannot get password for username:
1. Check keytab and principal entries in the site xml, and the keytab directory permissions perms.2. If these all look OK, then run:
kinit -k -t ./etc/security/phd/keytab/servicename.service.keytab
You should get no errors (just a prompt back).3. If there is an error, check that the principal and keytab are correct.4. Check to make sure you used -norandkey when creating keytab files.
Node Manager Will Not Start
• Login failure due to policy error exceptions in logs (typically seen as a remote exception to nodemanager for resource manager):
Check /usr/lib/gphd/hadoop/etc/hadoop/hadoop-policy.xml and replace any occurrencesof ${HADOOP_HDFS_USER} with hdfs and ${HADOOP_YARN_USER} with yarn.

Security Stack and Tools Reference
139