Embed Size (px)
Citation preview

User’s ManualFCC ID: UJW-4000IC: 6695A-4000Model: Yapalong4000
YAPALONG - 4000 AM & EU
YOU ARE RECEIVING THE FOLLOWING:
Up/DownButton
Dual AudioJack
Aux ButtonPower Button
Power Jack
Main Unit
ChargerAdaptor with cable(s)
or or
Ear Hanger
Boom MIC
Speaker
DualAudio Plug
Belt Clip
Headset
Nautic Devices Inc.7895 Tranmere Dr., Unit 13Mississauga, Ontario L5S 1V9Email : [email protected], Phone : 1-(905)-405-0300
08
SPECIFICATIONS
Radio frequency
Group size
Wireless network
Digital modulation
No. of channels
Range
Size
Weight
Power rating
Power source
Power efficiency
Operating temp range
Noise cancelling
Safety
IP rating
Unlicensed ISM band900 MHz (Yapalong4000 AM) 800 MHz (Yapalong4000 EU)
8 talkers for Yapalong4000 AM 4 talkers for Yapalong4000 EU Unlimited listeners
Auto channel selection no-master TDMA/peer-to-peer
FSK
8
up to 900 meters line-of-sight
164mm x 64mm x 22mm
125 grams
27 dBm/ 500 mW
Lithium polymer, 3.7 V, 1700 mAh
Over 8 hours after being fully charged
-20 °C ~ 50 °C
5-level sensitivity adjustment
Lead free, RoHS compliance
IP54, splash proof

INDUSTRY CANADA COMPLIANCE STATEMENTUnder Industry Canada regulations, this radio transmitter may only operate using an antenna of a type and maximum (or lesser) gain approved for the transmitter by Industry Canada. To reduce potential radio interference to other users, the antenna type and its gain should be so chosen that the equivalent isotropically radiated power(e.i.r.p.)is not more than that necessary for successful communication.
Conformément à la réglementation d’Industrie Canada, le présent émetteur radio peut fonctionner avec une antenne d’un type et d’un gain maximal (ou inférieur) approuvé pour l’émetteur par Industrie Canada. Dans le but de réduire les risques de brouillage radioélectrique à l’intention des autres utilisateurs, il faut choisir le type d’antenne et son gain de sorte que la puissance isotrope rayonnée équivalente (p.i.r.e.) ne dépasse pas l’intensité nécessaire à l’établissement d’une communication satisfaisante.
This device complies with Industry Canada licence-exempt RSS standard(s). Operation is subject to the following two conditions: (1)this device may not cause interference, and (2) this device must accept any interference, including interference that may cause undesired operation of the device.
Le présent appareil est conforme aux CNR d’Industrie Canada applicables aux appareils radio exempts de licence. L’exploitation est autorisée aux deux conditions suivantes : (1) l’appareil ne doit pas produire de brouillage, et (2) l’utilisateur de l’appareil doit accepter tout brouillage radioélectrique subi, même si le brouillage est susceptible d’en compromettre le fonctionnement.
FCC INFORMATION TO USERSThis equipment has been tested and found to comply with the limits for Class B digital devices, pursuant to Part 15 of the FCC Rules. These limits are designed to provide reasonable protection against harmful interference in a residential installation. This equipment generates, uses, and can radiate radio frequency energy and, if not installed and used in accordance with the instruction manual, may cause harmful interference to radio communications.
However, there is no guarantee that interference will not occur in a particular installation. If this equipment does cause harmful interference to radio or television reception, which can determined by turning the equipment off and on, the user is encouraged to try to correct the interference by one or more of the following measures:-Reorient or relocate the receiving antenna;-Increase the separation between the equipment and receiver;-Connect the equipment into an outlet on a circuit different from that to which the receiver isconnected.
Consult the dealer or an experienced radio/TV technician for help.
WARNING: Changes or modifications not expressly approved by Nautic Devices Inc. could void the user’s authority to operate the equipment.
FOR CLASS B – UNINTENTIONAL RADIATORSThis device complies with Part 15 of the FCC Rules. Operation is subject to the following two conditions: (1) this device may not cause harmful interference and (2) this device must accept any interference received, including interference that may cause undesired operations.
07
SAFETY WARNING!Don’t hold Yapalong too close to your head when in use.
GET STARTED1. Be ware that the antenna coveris purposely pre-bent for impactprevention
7. To adjust the sound volume,press UP or DOWN button, repeatedlyif necessary, until desired volume isreached. To adjust the microphonesensitivity, while holding down AUXbutton, press UP or DOWN button,repeatedly if necessary until desiredsensitivity is reached. Now Yapalongslet every member in the group talkfreely and listen at the same time.
8. To turn Yapalong unit off, holdPOWER button 2 seconds until REDLED flashes 3 times. Then the unitpowers down.
2. The rechargeable Lithium polymer battery is pre-installed to comply with the shipping regulations. For future battery replacement, make sure the battery connector is plugged into the socket with the color of the cables matching the polarity “Red Black” shown on the case. For your safety, use only battery provided by Nautic Devices Inc.
3. Turn Yapalong unit on by holdingdown POWER button for 2 secondsuntil RED LED turns on.
4. If the AMBER LED blinks every 2or 5 seconds or there is no LED lightat all, battery needs to be charged.Plug the adaptor to the wall outlet.Plug the barrel connector of thecable into the power charging jack.
Turn off the unit during battery charging will speed up the charge time. AMBER LED turns on during charging and GREEN LED turns on when battery is fully charged.
5. If RED LED remains on with highintensity, it means it cannot detect other group unit due to various reasons: no group unit powered on; group unit out of range; unit in different group (refer to “Binding Procedure” to do grouping).
6. If RED LED remains on with normal intensity, it means it has detected group unit(s). Plug in the headset as show in the figure. The unit is now ready to be used with other powered-on group units.
02
BINDING PROCEDURENote:1. Binding needs to be done under minimum radio interference environment,which means no cellphone, no computer, no Bluetooth, and no electricalcontrol panel nearby.
2. After binding procedure, there is no need to do binding again next time forthe same group.
03
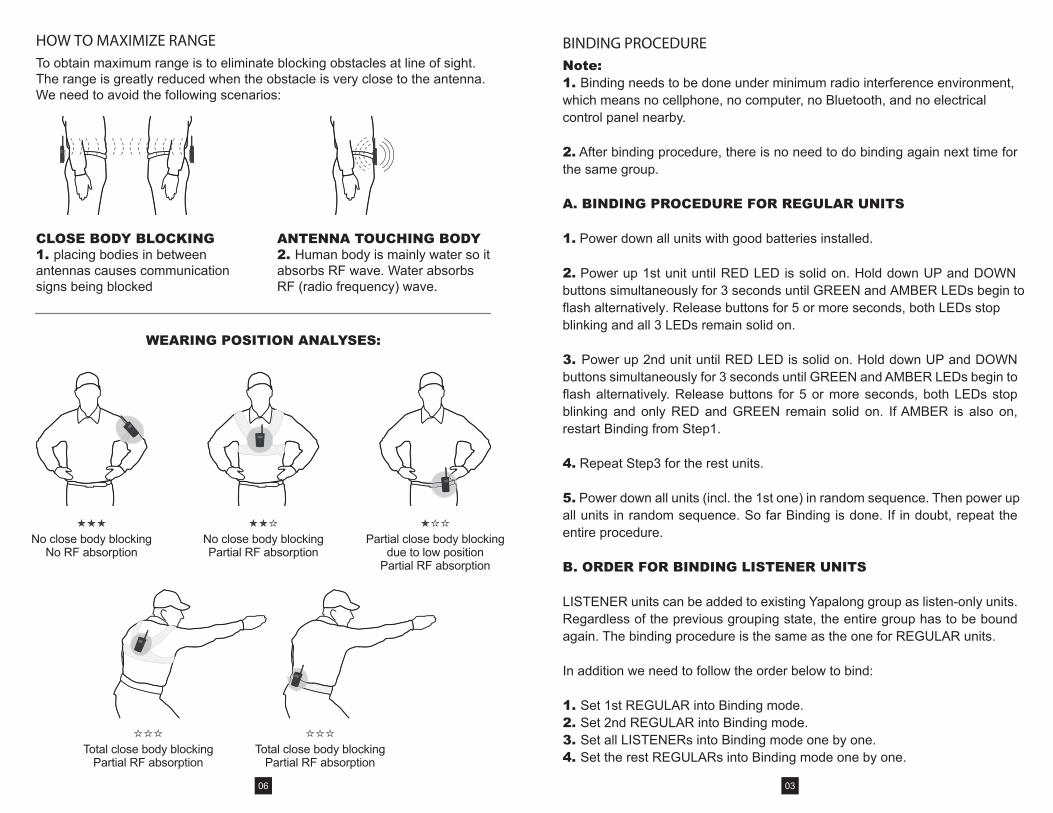
CLOSE BODY BLOCKING1. placing bodies in betweenantennas causes communicationsigns being blocked
ANTENNA TOUCHING BODY2. Human body is mainly water so itabsorbs RF wave. Water absorbsRF (radio frequency) wave.
06
No close body blockingNo RF absorption
No close body blockingPartial RF absorption
Partial close body blockingdue to low position
Partial RF absorption
HOW TO MAXIMIZE RANGETo obtain maximum range is to eliminate blocking obstacles at line of sight. The range is greatly reduced when the obstacle is very close to the antenna. We need to avoid the following scenarios:
Total close body blockingPartial RF absorption
Total close body blockingPartial RF absorption
WEARING POSITION ANALYSES:
A. BINDING PROCEDURE FOR REGULAR UNITS
1. Power down all units with good batteries installed.
2. Power up 1st unit until RED LED is solid on. Hold down UP and DOWNbuttons simultaneously for 3 seconds until GREEN and AMBER LEDs begin toflash alternatively. Release buttons for 5 or more seconds, both LEDs stopblinking and all 3 LEDs remain solid on.
3. Power up 2nd unit until RED LED is solid on. Hold down UP and DOWNbuttons simultaneously for 3 seconds until GREEN and AMBER LEDs begin toflash alternatively. Release buttons for 5 or more seconds, both LEDs stopblinking and only RED and GREEN remain solid on. If AMBER is also on,restart Binding from Step1.
4. Repeat Step3 for the rest units.
5. Power down all units (incl. the 1st one) in random sequence. Then power upall units in random sequence. So far Binding is done. If in doubt, repeat theentire procedure.
B. ORDER FOR BINDING LISTENER UNITS
LISTENER units can be added to existing Yapalong group as listen-only units. Regardless of the previous grouping state, the entire group has to be bound again. The binding procedure is the same as the one for REGULAR units.
In addition we need to follow the order below to bind:
1. Set 1st REGULAR into Binding mode.2. Set 2nd REGULAR into Binding mode.3. Set all LISTENERs into Binding mode one by one.4. Set the rest REGULARs into Binding mode one by one.

INSTRUCTION FOR USE
Hold down POWER button approx. 2 seconds until RED LED turns on. Then release button.
RED LED will remain on at a lower intensity if your unit hears other unit(s) in the same group; otherwise the RED LED will be extra bright.
04
TURN ON
Hold down POWER button approx. 2 seconds until RED LED flashes 3 times. Then release button.
All LEDs are off in power down mode except battery charging indicator.
TURN OFF
Press UP button to move up one level at a time until desired level.
GREEN LED flashes once unless maximum level is reached. There are 6 volume levels.
VOLUMEUP
Press DOWN button to move down one level at a time until desired level.
GREEN LED flashes once unless minimum level is reached.
VOLUMEDOWN
Press AUX button until GREEN LED flashes 3 times.
Continuous slow blinking of RED LED indicates microphone being muted. When microphone is muted, other Yapalong units cannot hear you but you can hear the others.
MIC MUTE
Press AUX button until GREEN LED flashes 3 times.
RED LED slow blinking stops. Back to normal operation.
MICREACTIVATE
Hold down AUX button then press UP button to move up one level at a time until desired level.
GREEN LED flashes twice unless maximum level is reached. Increase microphone sensitivity if you want to speak softly in a quiet environment. There are 5 sensitivity levels.
INCREASEMICSENSITIVITY
Hold down AUX button then press DOWN button to move down one level at a time until desired level.
GREEN LED flashes twice unless minimum level is reached. Decrease microphone sensitivity when background noise is loud. Speak closer to the microphone to compensate.
DECREASEMICSENSITIVITY
Press power button momentarily forces the unit to re-establish sync with the rest of the group.
FORCESYNC
Up/DownButton
Aux Button
MICsensitivity
MIC SENSITIVITY ADJUSTMENT
FORCE SYNC TO RESUME
05
Solid red light(extra bright)
Solid green light
Solid amber light
Slow blinking amber light
Out of range indicator. Your unit cannot receive RF signal from any unit in the group. Power on other units, or move closer to each other.
Battery is fully charged.
Battery is being charged.
1st battery low level warning–Amber light blinks every 5 seconds.
2nd battery low level warning–Amber light blinks every 2 seconds.
Then the unit turns off automatically.
After the radio is taken out of range and brought back into range, its communication to the group will resume automatically. If the communication is not resumed immediately, as indicated by extra bright red LED light, you may press POWER button 1-3 seconds on this radio to force the sync. Restart the radio is also a good way to resume the communication.
MIC sensitivity sets the minimum level of sound loudness that the microphone can pick up. The higher MIC sensitivity is, the slighter sound is picked up by the microphone. Yapalong4000 MIC sensitivity is divided into 5 levels. And the default level is 4.
It is good practice to lower MIC sensitivity in a noisy environment so that other users will not hear so much background noise.
Press Up/Down and AUX buttons simultaneously to adjust MIC sensitivity. Be sure not to press AUX button alone, which will mute the radio.
LIGHT INDICATIONS