Embed Size (px)
Citation preview

PO Box 5518Pagosa Springs, CO 81147
Growing Spaces
Solar Cooling Fan Installation Manual

1
Assemble wood fan frame. Match the letters and use (2) 1 3/4" screws on the top
and (2) 3" screws on the bottom of the frame.
From the inside of the dome, locate the fan frame in the proper panel, make sure it is
level, and trace inside dimension with a felt tip marker.
Disassemble wood fan frame. Insert fan with green dot facing lettered side and feed wire
through hole in side. Assemble wood fan frame with (4) 1 3/4" screws on top, (4) 3" screws on the bottom, and (3) 1 3/4" screws into the sides
to secure the fan into the frame as shown.
Solar Cooling Fan Installation ManualGrowing Spaces
From the outside of the dome, use a circular saw or jigsaw to cut out where you
marked.
pg 01
1 2
3 4

From inside the dome, secure fan frame to struts with (4) 3" screws.
Have someone hold the frame on the inside of the dome with the lettered side against the glazing. Make sure it butts up against both
struts. From the outside of the dome, line up the frame with the cutout and screw through the glazing into the fan frame at each corner
using (8) 1 5/8" glazing screws.
Predrill and then attach hood supports as shown with (4) 3" screws.
Solar Cooling Fan Installation ManualGrowing Spaces
Attach hood supports, flush with the top of the cutout, with (6) 3" screws.
pg 02
5 6
7 8
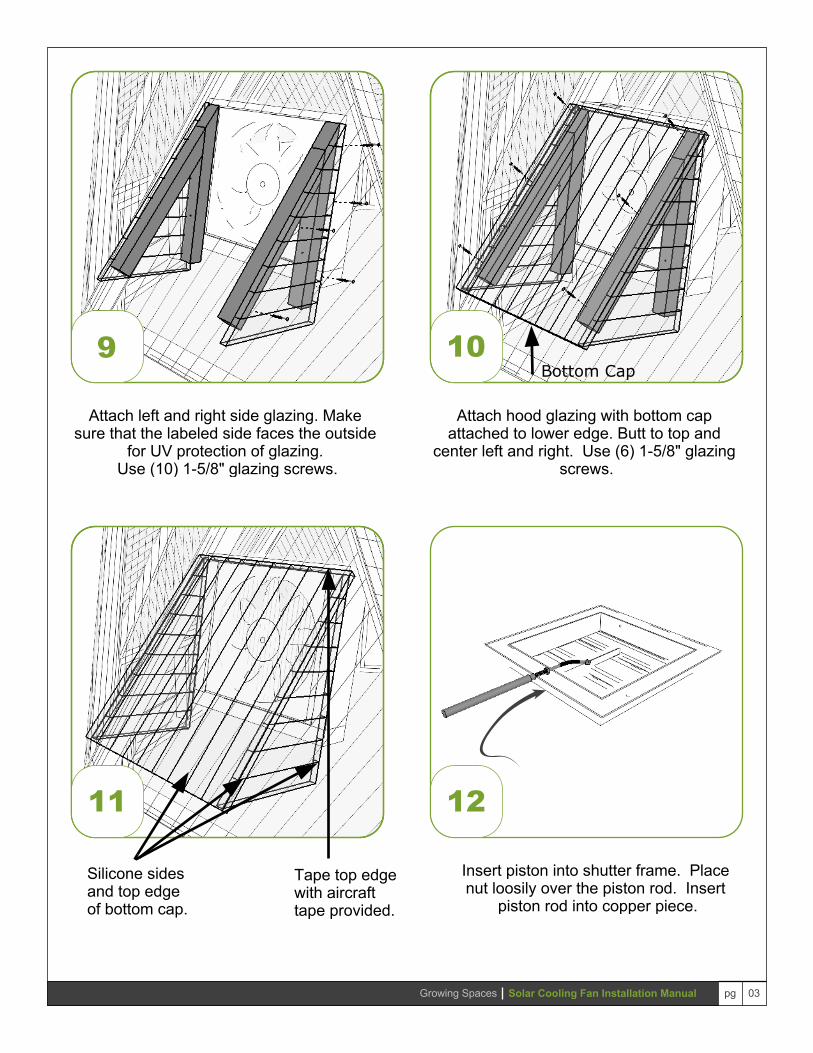
Attach left and right side glazing. Make sure that the labeled side faces the outside
for UV protection of glazing. Use (10) 1-5/8" glazing screws.
Attach hood glazing with bottom cap attached to lower edge. Butt to top and
center left and right. Use (6) 1-5/8" glazing screws.
Insert piston into shutter frame. Place nut loosily over the piston rod. Insert
piston rod into copper piece.
Solar Cooling Fan Installation ManualGrowing Spaces pg 03
9 10
11
Silicone sidesand top edgeof bottom cap.
Tape top edgewith aircrafttape provided.
12
Bottom Cap

Insert cotter pin through copper piece and hole in piston rod. Once inserted, bend
cotter pin so it won't slip out.Tighten nut onto piston threads until snug
to frame.
Attach shutter to fan frame using (8) 3/4" drillits.
Solar Cooling Fan Installation ManualGrowing Spaces pg 04
141313