Embed Size (px)
Citation preview

Issued September 24, 1210.
U. S. DEPARTMENT OF AGRICULTURE.
FARMERS’ BULLETIN 408.
SCHOOL EXERCISES IN PLANT
PRODUCTION.
BY
DICK J. CROSBY,
Specialist in Agricultural Education,
Office of Experiment Stations.
WASHINGTON:
GOVERNMENT PRINTING OFFICE
1910.

LETTER OF TRANSMITTAL.
U. S. Department of Agriculture,
Office of Experiment Stations,
Washington, D. C., April 30, 1910. Sir: Three years ago the Department issued as Bulletin No. 186,
Office of Experiment Stations, a publication entitled “ Exercises in Elementary Agriculture—Plant Production.” The demand for this bulletin has been large and continuous, and notwithstanding the fact that four editions aggregating 22,000 copies have been issued the supply is now exhausted. The bulletin was prepared primarily for the use of public-school teachers, and since popular interest in the teaching of agriculture in the schools is growing rapidly, it now seems wise to reissue the exercises in the Farmers’ Bulletin series. With this aim in view I have had Parts 1 and 2 of Bulletin 186, deal¬ ing with the plant and its environment, revised for publication as a Farmers’ Bulletin on “School Exercises in Plant Production.” Part 3, of Bulletin 186, “Lessons on Corn,” will be revised and combined with Circular 96 of this Office, “How to Test Seed Corn in Schools,” for publication as a Farmers’ Bulletin on “School Lessons on Corn.”
Respectfully, A. C. True,
Director Hon. James Wilson,
Secretary of Agriculture. 408
2

CONTENTS.
Pasre Purpose of the bulletin. 7
Scope of the bulletin. S
Materials for laboratory exercises. 8
General plan of laboratory exercises. 10
Exercises in plant production. 12
Part 1.—The plant. 12
Exercise 1.—To show that plants absorb moisture from the soil. 12
Exercise 2.—How roots absorb moisture. 13
Exercise 3.—To show that plants get food from the soil. 15
Exercise 4.—To show that plants give off moisture. 16
Exercise 5.—To show the rise of water in plants. 16
Exercise 6.—Circulation of water in plants. 16
Exercise 7.—To show that part of the moisture absorbed by the roots
of plants is retained in the plant. 17
Exercise 8.—To show that plants get food from the air. 17
Exercise 9.—How plants grow.... 18 Propagation. 19
Exercise 10.—Spores. 19
Exercise 11.—Seeds—germination test. 20
Exercise 12.—To make a balance. 21
Exercise 13.—Seeds—purity test. 23
Exercise 14.—Development of young plants from seeds. 25
Exercise 15.—To show that young plants get food from seeds. 26
Exercise 16.—Pollination. 26
Exercise 17.—Layering. 27
Facilities for rooting cuttings.'. 29
Exercise 18.—To make soft cuttings. 30
Exercise 19.—To make hard cuttings. 30
Exercise 20.—To make grafting wax. 31
Exercise 21.—Cleft grafting.- - - 32
Exercise 22.—Whip grafting. 33
Exercise 23.—Budding. 34
Part 2.—The environment of the plant. 36 Exercise 24.—Conditions essential to plant growth—light. 36
Exercise 25.—Conditions essential to plant growth—heat. 36
Exercise 26.—Conditions essential to plant growth—moisture. 37
Exercise 27.—Conditions essential to plant growth—air. 37
Exercise 28.—Soil collection.
Exercise 29:—Classification of soils.-.
Exercise 30.—Light and heavy soils. Exercise 31.—Porosity—the capacity of soils to take in rainfall.
Exercise 32.—Air in soils. ^
408 3

4 CONTENTS.
Exercises in plant production—Continued. Part 2.—The environment of the plant—Continued. Page.
Exercise 33.—Capillarity—the power of soils to take up moisture from
below. 40 Exercise 34.—Puddling. 41
Exercise 35.—The effect of lime on clay soils. 41
Exercise 36.—Action of frost on soils. 42
Exercise 37.—Temperature of soils as affected by color. 42
Exercise 38.—Temperature as affected by moisture. 43
Exercise 39.—Temperature of soils as affected by inclination of the
surface or exposure to the sun. 43
Exercise 40.—Free moisture in soils... 43
Exercise 41.—Capillary moisture in soils. 44
Exercise 42.—Hygroscopic moisture in soils. 44
Exercise 43.—The influence of tillage and mulches on the retention of
moisture in soils. 45 Exercise 44.—To show the effect of plowing down manures and clods . 45
Exercise 45.—Influence of drainage upon plant growth. 45
Exercise 46.—Effect of manures on plant growth. 46
Helps for teachers. 47
408

ILLUSTRATIONS.
Page. Fig. 1. An alcohol lamp made from a tin box. 9
2. Wash bottle. 10
3. A homemade garden line. 10
4. A stamen. 11
5. A pistil. 11
6. Vertical section of a tomato blossom. 11
7. To show that plants absorb moisture from the soil. 13
8. To show osmosis. 14
9. Osmosis shown with bladder membrane. 14
10. To show that plants give off a part of the moisture absorbed from the
soil. 16
11. To show where roots increase in length. 18
12. Seed-testing device. 20
13. A simple balance. 21
14. A serviceable tripod magnifying glass and a convenient mount for pre¬
serving seeds for study. 24
15. Device showing proper depth to plant seeds. 25
16. To show the best depths at which to plant corn. 26
17. Plant food in seeds. 26
18. Tomato blossom ready to pollinate. 27
19. Tip layering. 28
20. Vine layering. 28
21. Mound layering. 29
22. Frame for rooting cuttings. 29
23. Leaf cutting—part of leaf. 30
24. Leaf cutting—whole leaf. 30
25. Stem cutting or “slip” of Coleus. 31
26. Cutting set in trench. 31
27. Cuttings: a, Simple cutting; 5, heel cutting; c, mallet cutting; d,
single-eye cutting. 31
28. Grafting tool. 32
29. Cleft grafting: a, Scion; b, scions inserted in cleft. 32
30. Cross section of stock and scion. 33 31. Whip grafting: a, The stock; b, the scion; c, stock and scion united... 33
32. A bud stick. 34
33. Cutting the bud. 34
34. Budding: Preparing the stock. 35. Budding: a, Inserting the bud; b, tying; c, cutting off the top.
36. Method of demonstrating the effect of too much water in soil. 37. Arrangement for showing the effect of the exclusion of air on plant
growth. 38. Apparatus to test the capacity of soils to take in rainfall. 39. Apparatus to test the power of soils to take up moisture from below...
408 5

Digitized by the Internet Archive in 2018 with funding from
University of North Carolina at Chapel Hill
https://archive.org/details/schoolexercisesi4014cros

SCHOOL EXERCISES IN PLANT PRODUCTION.
PURPOSE OF THE BULLETIN.
This bulletin supersedes a similar bulletin of the Office of Experi¬ ment Stations.® It is intended as a laboratory guide or manual for the use of teachers and not as a text-book to be studied by the pupils. It is expected that the pupils will use a text-book on agri¬ culture and that teachers will provide themselves with text-books and other helps as suggested in the section on “ Helps for Teachers.” They should also prepare themselves in advance on each lesson by working out the necessary exercises and familiarizing themselves with all details of the work. In this wav they will learn what diffi- culties are likely to arise and what details of the less complicated exercises can safely be intrusted to the older pupils in the class in agriculture, thus saving time for themselves and increasing the value of the exercises to the pupils.
While success in this work will depend largely upon the personal influence and work of the teacher, there is nevertheless a duty incum¬ bent upon school officers to improve the physical and material equipment of the schools. The very lowest requirements that could be considered adequate for carrying through these exercises are warm, light, well-ventilated schoolrooms—warm enough to protect tender growing plants from cold at all times.
While many of the exercises could be performed in any sort of room, or even out of doors, the series can not be followed out in the order given unless provision is made for growing plants in the school¬ room. And it is a matter of some importance that the exercises be taken up in the order given, so that each step may lead naturally and logically to the next. In the earlier nature-study work of the grades, formality, order, and the other accompaniments of science are kept in the background, so as to reduce to the lowest terms the embarrassment of getting acquainted with the “common natural objects and processes which appeal to human interest directly.” But now that the pupils are to take up the more formal study of elementary agriculture, they should proceed in a more orderly way
a XJ. S. Department of Agriculture, Office of Experiment Stations Bui. 186, Exci-
cises in Elementary Agriculture.—Plant Production. This bulletin is no longer
available for distribution from this Department, but can be procured for 10 cents
from the Superintendent of Documents, Washington, D. C.
408 7

8 SCHOOL EXERCISES IN PLANT PRODUCTION.
and be led to feel that in nature things do not “just happen/’ but
follow inexorable laws of cause and effect. It is for the purpose of
illustrating the application of some of these laws that these exercises
have been brought together.
SCOPE OF THE BULLETIN.
The course in agriculture for the rural common schools, as outlined
by the committee on instruction in agriculture in its ninth report to
the Association of American Agricultural Colleges and Experiment
Stations,® was designed to extend over two years, the seventh and
eighth years in schools having eight grades. The first year was to
be given up to a study of plant production, and the second year to
animal production and some matters concerning dairying, farm
mechanics, and farm accounts. The experiments thus far tried in
teaching agriculture in the elementary schools have been directed
mainly along the line of plant production; hence there is much more
material in teachable form on this phase of agriculture than on any
other phase. On this account, and for the further reason that a bul¬
letin dealing with the whole subject of elementary agriculture would
be so large as to preclude its wide distribution, it has been decided to
limit this bulletin to exercises illustrating some of the more important
principles of plant production, leaving to subsequent bulletins the
application of these principles to particular crops.
MATERIALS FOR LABORATORY EXERCISES.
The rural elementary school is fortunately located in the midst of a
bountiful supply of illustrative material for the outdoor study of agri¬
cultural subjects. There are birds, trees, flowers, growing crops, and
other nature-study material all around it; land for school and home
gardens is readily available, and well-managed farms with field crops,
live stock, farm machinery, and good buildings are usually near at
hand. Such material as this should be utilized to the fullest extent.
Every farm and home in the district should contribute to the agri¬
cultural work of the school, and the farmers themselves should be
asked to talk to the pupils and give them the benefit of their experi¬
ences. In this way “training in the elements of failure and success”
can be effectively given and the patrons of the school can be made to
realize that the elements which contribute to intellectual training and
culture are not all confined within the covers of text-books.
But while it will be best to take the pupils out of doors for much of
their practice work, some of the principles of agriculture do not lend
a United States Department of Agriculture, Office of Experiment Stations Circ. 60,
The Teaching of Agriculture in the Rural Common Schools, and Bui. 164, Proceedings
of the Nineteenth Annual Convention of the Association of American Agricultural
Colleges and Experiment Stations, 1905
408

SCHOOL EXERCISES IN PLANT PRODUCTION. 9
themselves readily to illustration in this manner. There is need of some laboratory work which can best be performed indoors with spe¬ cially prepared apparatus. The material for this apparatus is inex¬ pensive, and much of it could be provided by the pupils. Two dozen empty tomato cans, three or four lard pails, a few baking-powder cans and covers, a lot of empty bottles and corks of different sizes, a few small wooden boxes, some empty packing boxes, a collection of typical soils (clay, sand, loam, and muck or peat), and a few seeds of garden and farm crops, will enable the teacher and pupils without expense to perform a variety of experiments illustrating important principles upon which the science and practice of agriculture are based.
If to this material the school board or the pupils will add by pur¬ chase an 8-ounce glass graduate (10 cents), a simple magnifying glass (50 cents), a set of metric weights ($1), 4 dairy thermometers (SI), 6 student-lamp chimneys (90 cents), 12 5-inch test tubes (25 cents),
Fig. 1.—An alcohol lamp made from a tin box.
a yard of thin muslin or cheese cloth (5 cents), a pint glass funnel (10 cents), a putty knife (15 to 25 cents), a grafting tool (50 to 75 cents), an alcohol lamp (25 cents), a kitchen scale with dial which will weigh from 1 ounce to 24 pounds (90 cents), 12 ordinary glass tumblers (30 to 50 cents), a yard of bicycle tire tape or surgeon’s adhesive plaster, a }^ard of quarter-inch glass tubing, 3 large iron spoons, and a few ordinary plates, pie tins, etc., the school will be provided with an excellent equipment for the laboratory exercises included in this bulletin, and all at a cost of $6 or $7.
It will not be necessary to purchase all of the articles to which prices are attached in this list. In place of the putty knife, which would be used mainly as a spatula for mixing soils, a common, thin case knife or kitchen knife may be used. A heavy pocketknife maj0 be used in place of the grafting tool.
The boys can easily make a fairly good alcohol lamp, as shown in figure 1, by punching a hole in the top of a tin box and inserting a
piece of soft twine for a wick.
52472°—Bull. 408—10-2

10 SCHOOL EXERCISES IN PLANT PRODUCTION.
The wash bottle shown in figure 2 is a very convenient piece of apparatus, and is easily made from an empty bottle, a rubber cork with two holes through it, and two pieces of glass tubing. Hold the tubing in the alcohol flame, turning it slowly to heat all sides alike,
until a short section of it becomes red- hot, when it can be bent as shown in the illustration. An ordinary cork will do nearly as well as a rubber cork, and holes can be burned through it with a red-hot wire. The glass tubing should fit tightly in the cork. To operate the bottle, fill it two-thirds full of water and blow on it at A. Water will be forced out at B in a small stream, which can be directed against the inner surfaces of tumblers, test tubes, tin cans, etc., to wash down soil or sediment not easily reached in any other way.
The pupils should be encouraged to make and set up as much as possible of the apparatus. They should be taught how to melt off the tops of tomato cans neatly, how to make flats ° and other boxes out of packing boxes, how to make soil sieves by the use of wire
screens on bottomless boxes, to make garden lines (fig. 3), stakes, and numerous other things that will be needed from time to time in these exercises. If one or two glass-covered frames like the one shown in figure 22 can be made soon after the opening of the fall term, the plants needed for indoor experiments can be grown much more easily and they can be protected better from cold. By mount¬ ing such frames on legs instead of brackets they can be moved from one window to an¬ other or at night can be moved away from the window to a warmer place. This work may be done at school if tools are available, otherwise at the homes of the pupils.
Fig. 2.—Wash bottle.
Fig. 3.—A homemade garden line. GENERAL PLAN OF LABORATORY EXER¬
CISES.
« No claim is made for the originality of these exercises. The attempt has been rather to arrange the work in a progressive and connected way, so that when completed it will give the pupils a
a A flat is a box about 2 feet wide, 3 feet long, and 3 inches deep, and is used for starting cuttiDgs, seeds, etc.
408
SCHOOL EXERCISES IN PLANT PRODUCTION. 11
Anther--
a
Strgma-C
Style,-
FiJament-
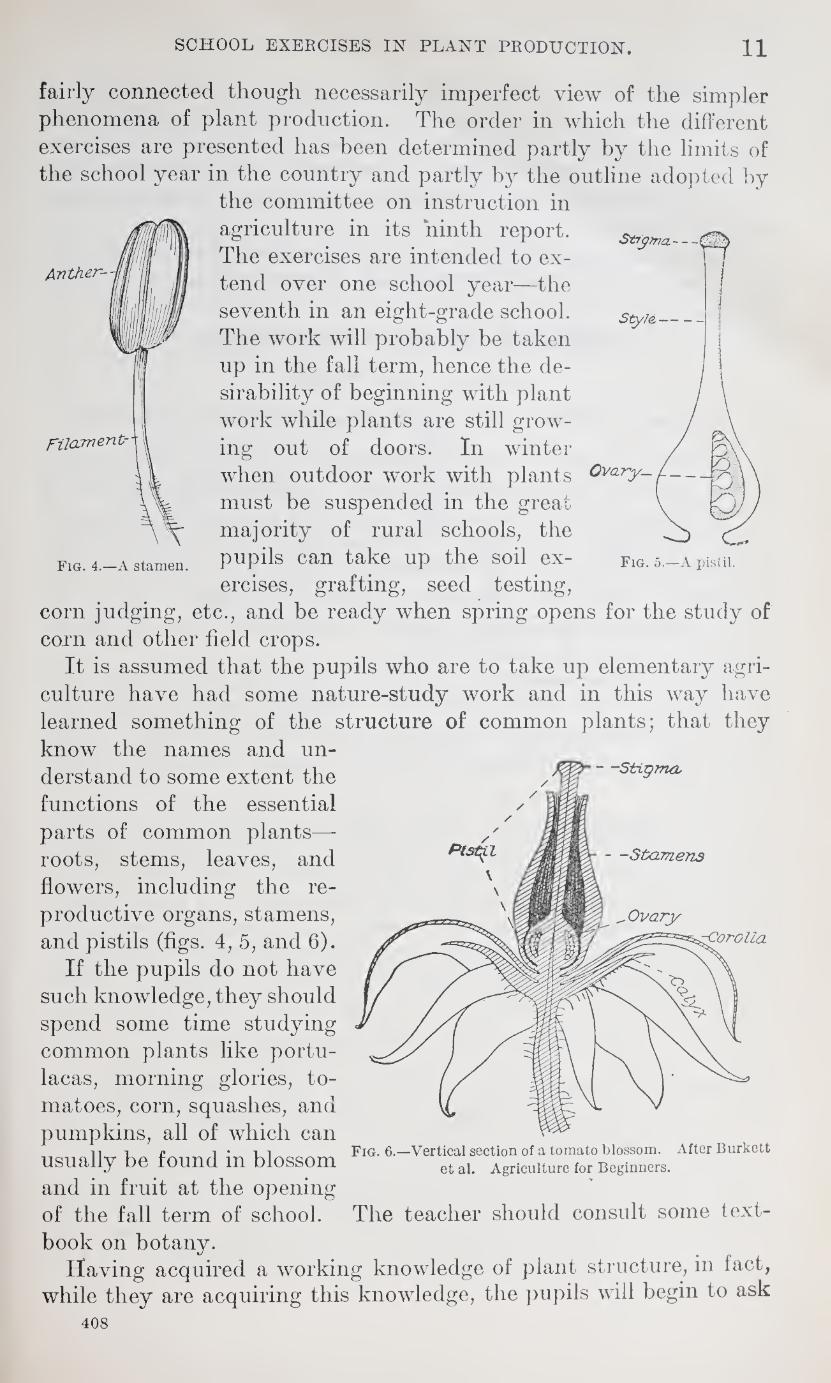
Fig. 4.—A stamen. Fig. 5.—A pistil.
fairly connected though necessarily imperfect view of the simpler phenomena of plant production. The order in which the different exercises are presented has been determined partly by the limits of the school year in the country and partly by the outline adopted by
the committee on instruction in agriculture in its ninth report. The exercises are intended to ex¬ tend over one school year—the seventh in an eight-grade school. The work will probably be taken up in the fall term, hence the de¬ sirability of beginning with plant work while plants are still grow¬ ing out of doors. In winter when outdoor work with plants Ovary- f.—
must be suspended in the great majority of rural schools, the pupils can take up the soil ex¬ ercises, grafting, seed testing,
corn judging, etc., and be ready when spring opens for the study of corn and other field crops.
It is assumed that the pupils who are to take up elementary agri¬ culture have had some nature-study work and in this way have learned something of the structure of common plants; that they know the names and un¬ derstand to some extent the functions of the essential parts of common plants— roots, stems, leaves, and flowers, including the re¬ productive organs, stamens, and pistils (figs. 4, 5, and 6).
If the pupils do not have such knowledge, they should spend some time studying common plants like portu- lacas, morning glories, to¬ matoes, corn, squashes, and pumpkins, all of which can usually be found in blossom and in fruit at the opening of the fall term of school, book on botany.
Having acquired a working knowledge of plant structure, in fact, while they are acquiring this knowledge, the pupils will begin to ask
408
—Stigma,
—Stamens
rCorolia
Fig. 6.—Vertical section of a tomato blossom. After Burkett et al. Agriculture for Beginners.
The teacher should consult some text-

12 SCHOOL EXERCISES IN PLANT PRODUCTION.
what plants do—how they feed, grow, reproduce, etc., and this is where the exercises in this bulletin begin. The study of plants does not proceed very far before their dependence upon proper conditions of light, heat, moisture, air, soil, and other physical agencies becomes apparent; hence the reason for part 2 of this study—“The Environ¬
ment of Plants.” Soils and climate therefore are not studied because of their
fundamental importance, but because of their influence upon plant
production.
EXERCISES IN PLANT PRODUCTION.®
PART 1.—THE PLANT.
Exercise 1.—To Show That Plants Absorb Moisture from the Soil.
Take two 1-quart tin cans as near alike as you can get them and punch holes in the bottoms for drainage. Secure enough garden soil to fill both cans, mix it thoroughly, and sift it to remove pebbles and clods. Fill both cans level full of loose soil, which should then be packed by jarring each can three times on the table or floor. It is important to have the soil packed alike in both cans. Weigh the filled cans, and if one is heavier than the other, take out enough soil to bring them to the same weight.
Plant 5 or 6 kernels of corn in one can, water both cans alike, and set them aside for the corn to grow. Whenever water is applied to the can containing corn, an equal amount should be applied to the other can in order to keep both soils in about the same physical condition.
When the corn is 3 or 4 inches high, wet both soils thoroughly, allow the cans to stand until water ceases to drip from the bottom, weigh them, and record their weights separately. Set both cans in a warm light place where the corn will continue to grow rapidly. Weigh the cans twice on the following day—morning and after¬ noon—and record the weights. Keep this up for three or four days, or until the corn begins to suffer from lack of moisture. Water again and continue as before. You will probably find that the can containing the growing plants loses moisture much more rapidly than the other. Why? Compute the difference. As the corn increases in size does it use more or less water? How is the corn affected when the soil becomes too dry ? What does it mean when corn in the field “rolls” or “curls?”
a Notwithstanding the apparent simplicity of the exercises, there are many chances
for failure unless the utmost care is taken to follow directions and to eliminate as far *
as possible all factors except those needed in the demonstration. The teacher ought
to work out each exercise before attempting to present it to the pupils.
408
SCHOOL EXERCISES IN PLANT PRODUCTION. 13
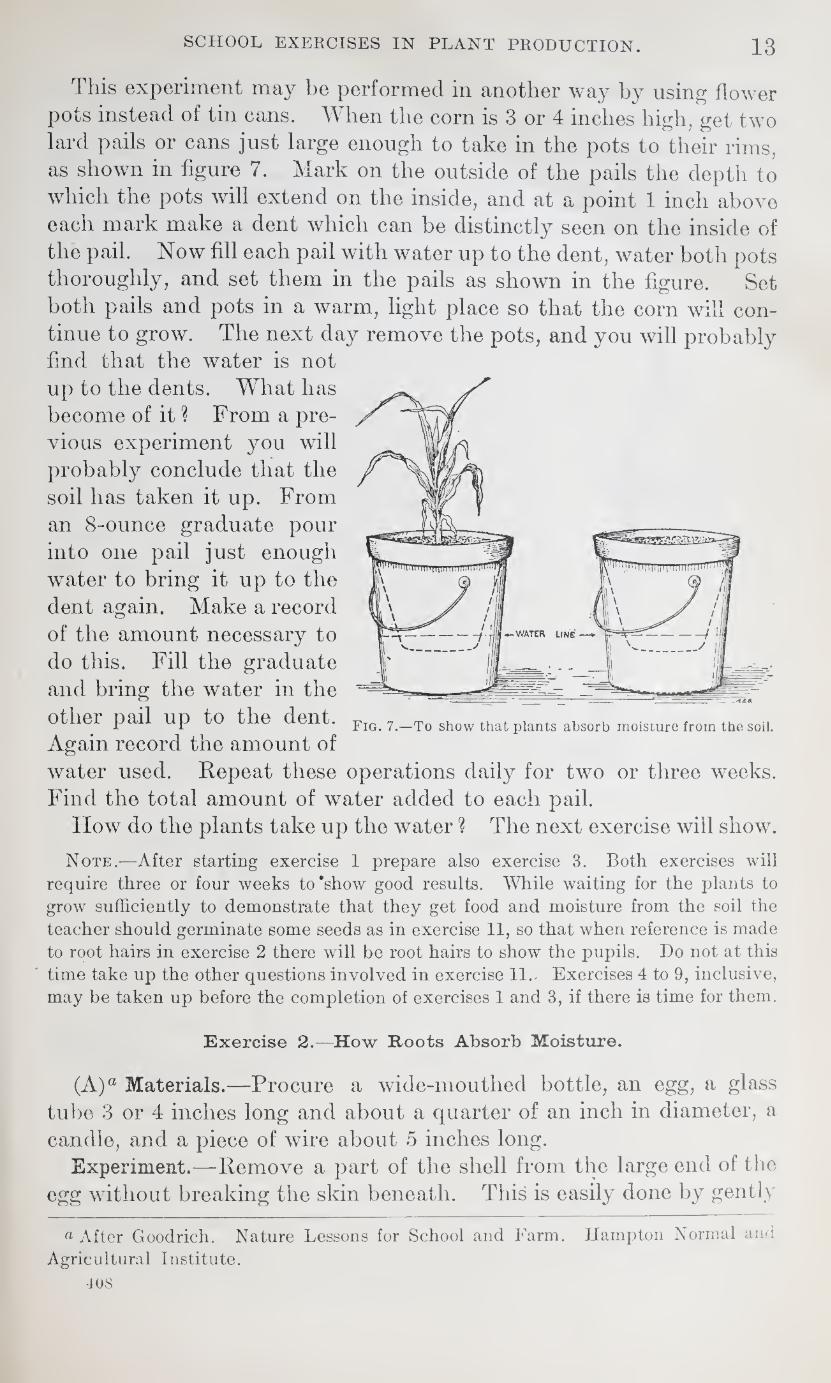
This experiment may be performed in another way by using flower pots instead of tin cans. When the corn is 3 or 4 inches high, get two lard pails or cans just large enough to take in the pots to their rims, as shown in figure 7. Mark on the outside of the pails the depth to which the pots will extend on the inside, and at a point 1 inch above each mark make a dent which can be distinctly seen on the inside of the pail. Now fill each pail with water up to the dent, water both pots thoroughly, and set them in the pails as shown in the figure. Set both pails and pots in a warm, light place so that the corn will con¬ tinue to grow. The next day remove the pots, and you will probably find that the water is not up to the dents. What has become of it ? From a pre¬ vious experiment you will probably conclude that the soil has taken it up. From an 8-ounce graduate pour into one pail just enough water to bring it up to the dent again. Make a record of the amount necessary to do this. Fill the graduate and bring the water in the other pail up to the dent. Again record the amount of
water used. Repeat these operations daily for two or three weeks. Find the total amount of water added to each pail.
How do the plants take up the water ? The next exercise will show.
Fig. 7.—To show that plants absorb moisture from the soil.
Note.—After starting exercise 1 prepare also exercise 3. Both exercises will
require three or four weeks to*show good results. While waiting for the plants to
grow sufficiently to demonstrate that they get food and moisture from the soil the
teacher should germinate some seeds as in exercise 11, so that when reference is made
to root hairs in exercise 2 there will be root hairs to show the pupils. Do not at this
time take up the other questions involved in exercise 11. Exercises 4 to 9, inclusive,
may be taken up before the completion of exercises 1 and 3, if there is time for them.
Exercise 2.—How Roots Absorb Moisture.
(A)a Materials.—Procure a wide-moutlied bottle, an egg, a glass tube 3 or 4 inches long and about a quarter of an inch in diameter, a candle, and a piece of wire about 5 inches long.
Experiment.—Remove a part of the shell from the large end of the egg without breaking the skin beneath. This is easily done by gently
a After Goodrich. Nature Lessons for School and Farm. Hampton Normal and
Agricultural Institute.
408

14 SCHOOL EXERCISES IN PLANT PRODUCTION.
an
pi 1 L
tapping the shell until it is full of small cracks and then picking off the small pieces. In this way take the shell from a space about one- half inch in diameter. Remove the shell from the small end over a space as large as the diameter of the glass tube. Next cut from the lower end of the candle a piece about one-half inch long; bore a hole in this just the size of the glass tube. Now soften one end of this
piece of candle and then stick it onto the small end of the egg so that the hole in the candle comes over the hole in the shell. Heat the wire and with it solder the piece of candle more firmly to the egg, making a water-tight joint. Place the glass tube in the hole in the piece of candle and with the hot wire solder it firmly. Now run the wire down the tube and break the skin of the egg just under the end of the tube. Then fill the bottle with water until it overflows and set the egg on the bottle, as in figure 8. In an hour or so the white of the egg will be seen rising in the glass tube, be¬ cause the water is making its way by osmosis into the egg through the
skin, which has no opening so far as can be found with the most powerful micro¬ scope. In this way water laden with plant food enters the slender root hairs of plants.
This process of osmosis may also be shown as follows: Remove the shell from the large end of an egg without breaking the skin, break a hole in the small end of the egg and empty the shell, rinse it out with water, fill the bottle with colored water, fill the egg partly full of clear water, and set it on the bottle of colored water. Colored water will gradually pass up into the egg and color the water that is there. Or the colored water may be put into the eggshell at the start and the clear water in the bottle. In that case coloring matter will pass from the shell to the bottle.
Fig. 8.—To show osmosis.
Fig. 9.—Osmosis shown with bladder membrane.
408

SCHOOL EXERCISES IN PLANT PRODUCTION. 15
(B)a The method by which plants absorb moisture through their roots can be shown in another way by the use of the apparatus in figure 9. Tie a piece of moistened bladder over the large end of the thistle tube A, as shown at B, previously filling the tube partly full of molasses. Insert the tube in the cork of a wide-mouthed bottle and immerse it in clear water, as shown in the accompanying illus¬ tration. In the course of a few hours water will pass through the bladder and force the molasses out of the top of the tube.
Of what importance is it to know that the roots of plants take up moisture from the soil? Does this have anything to do with the feeding of plants ?
Exercise 3.—To Show that Plants Get Food from the Soil.
Secure about 2 quarts of clean sand and heat it in a shovel or iron pan until all vegetable matter is burned out. Fill two large tin tomato cans, or other similar vessels, having holes in the bottom for drainage, with this soil and plant in each 5 large, plump beans as near alike as possible, which have been soaked overnight. Water both cans with rain water and set them in a warm place for the beans to grow.
After this treat both cans alike, except that one is to be watered with rain water and the other with soil solution.6 After the beans are up pull out all but 3 of the strongest plants in each can. Con¬ tinue watering one can with rain water and the other with soil solu¬ tion for four or five weeks. By that time the beans in the latter should be much larger and stronger than the others. To what is this difference due ? Surely not to differences in temperature or light or soil or the rain water. It must be mainly due, then, to something dissolved from the rich soil and carried in solution to the roots of the beans, which in turn pumped it up to the stem and leaves of the beans.
Plant food in the soil is dissolved by water and by weak acids given off by the root hairs much in the same way that sugar and salt are dissolved. In this condition plant food can be taken in by the roots as easily as pure water, and water may be rich in plant food and yet remain as clear as pure water. We think of the “clear-as- crystal” well water that we drink as being pure water, but we know that often it contains so much lime that every few weeks we have to chip off the scale of lime on the inside of the teakettle.
a After Burkett, Stevens, and Hill. Agriculture for Beginners. b To make the soil solution, fill a lard pail two-thirds full of rich garden soil or, better,
rich soil from beneath a manure heap, and add enough rain water to make a thin slop.
Stir this thoroughly and set it aside until water is needed for the beans, then strain off
some of the water, using a piece of thin muslin or cheese cloth for a strainer. A new
solution should be made up about once a week.
408

16 SCHOOL EXERCISES IN PLANT PRODUCTION.
Well water may also contain other substances in solution. Sup¬ pose you try an experiment to show this by fastening sprouted kernels of wheat on thin slices of floating cork in such manner that the roots will hang over the edges of the cork down into the water. Put some of the seedlings thus arranged into a tumbler of clean rain water and others into a tumbler of clean well water and watch their development.
Exercise 4.—To Show that Plants Give off Moisture.
Take a plant that is well started in a tomato can or flower pot, a piece of cardboard, and a glass tumbler or jar large enough to cover the plant. Cut a slit in the cardboard and draw it around the plant
as shown in figure 10. Seal the slit with pitch, wax, or tallow so that no moist¬ ure can come up through it from be¬ low; cover the plant with the glass and set it in a warm, sunny place. Moist¬ ure will condense on the inner surface of the glass.® Where does it come from ? Is all the moisture absorbed by the roots given off in this way ? How can you find out ? Why do plants need water ?
Exercise 5.—To Show the Rise of Water
in Plants.
That the water absorbed by the roots of plants is forced upward through the plants can be demonstrated by sever-
fig. io.—to show that plants give off ing the stem of a geranium 3 or 4 part of the moisture absorbed from the incheg from the surface 0f the Soil, Set¬
ting on top of the cut end of the stem a section of glass tubing several inches long, and fastening the two together by wrapping the joint with a strip of adhesive tape or sur¬ geon’s plaster. Keep the root of the plant normal by supplying it with water. Note what happens inside the glass tube, making obser¬ vations every few hours.
Exercise 6.—Circulation of Water in Plants.
To show that water and whatever substances it holds in solution circulate to all parts of the plant, fill a tumbler about one-third full of lukewarm water colored with a few drops of red ink or some
a If moisture does not condense readily inside the glass, cool the glass by exposing
it to a current of cold air or by wrapping it for a minute or two in a cloth wrung out
of cold water. The outside of the glass should then be dried so that the moisture on
the outside will not obscure that within.
408

SCHOOL EXERCISES IN PLANT PRODUCTION. 17
other brilliant coloring matter, and place in the colored water the freshly cut stems of white carnations, white roses, lilies of the valley, or other white flowers, or the twigs of trees with young leaves on, or almost any soft green plant. Be sure that they are fresh. In a short time the colored water will rise through the stems or twigs and may be seen distributed in vein-like patterns through the petals of the flowers or through the leaves. Hold the leaves up to the light and the coloring matter can be seen more clearly. In this manner the stem of the plant carries food m solution which has been absorbed by the roots.
Exercise 7. To Show that Part of the Moisture Absorbed by the Roots of
Plants is Retained in the Plant.
Pull up any good-sized green plant like a bunch of clover or a pig weed, weigh it carefully, and record the weight. Now put it in a pie tin, tomato can, or other metal receptacle, and set in the bright sunlight until it is thoroughly dry and brittle. Weigh again and by comparison with the first weight determine what percentage of the plant was water.a Using this result as a basis for calculation, how many pounds of green clover will it take to make a ton of clover hay?
Put the dried plant in an oven or on top of a stove over a slow fire which will not char the plant and see if any more moisture can be driven off.* * 6 What are the percentages of dry material and water as finally determined ? We have found that part of the water taken up by the roots is given off by the leaves and part of it is retained— enough to make up a large percentage of the weight of herbaceous plants. It has been found that corn roots take up over 300 pounds of water for every pound of dry matter produced, while oats and clover take up over 500 pounds of water for every pound of dry matter. The plant food is therefore taken in very dilute form.
Exercise 8.—To Show that Plants Get Food, from the Air.
Take two or three small pieces of green wood a half inch or less in diameter (short sections of a small twig will answer), put them into a test tube or a covered pressed-tin box with small holes in the top to allow the escape of smoke and gas, and hold over a hot fire until all gas and smoke have been driven off. Do not allow them to blaze. What remains ? What color is it ? Apply a match to one of the pieces. Does it burn with a flame? Will it burn at
a If the school scales do not weigh small amounts accurately,it wTould be well to use
more green material. & A safer plan than that above would be to heat the dried plant for several days in a
double boiler, such as is used in the kitchen for cooking oatmeal. Such a boiler can
be rigged up in the schoolroom by hanging a small pail containing the dried plant
inside a larger pail partly filled with water.
52472°—Bull. 408—10-3
18 SCHOOL EXERCISES IN PLANT PRODUCTION.
all? It answers to the description of charcoal, which is almost pure carbon. Boil the carbon in water and in weak acid (vinegar) to see if it can be dissolved in either of these liquids. Do you think that the roots of plants could take up much of this material ?
Put a tablespoonful of sifted soil (from a pot in which a plant has been growing) in an iron spoon and heat it red hot. Was there much material to burn in the soil, much carbon ? Not enough will be found to supply plants with all they need of this material, which constitutes nearly one-half of their solid material. It must come mainly from some other source.
Now put the charred sticks into an iron spoon and heat them until only ash remains. What has become of the carbon? It has com¬ bined with an invisible gas, oxygen, to form another invisible gas, carbon dioxid, or carbonic-acid gas, which mixes with the air and from which the plant may take it in through the leaves. The leaves
discard most of the oxygen, but the carbon is sent to all parts of the plant and built into the new structure representing the season’s growth.
Exercise 9.—How Plants Grow.®
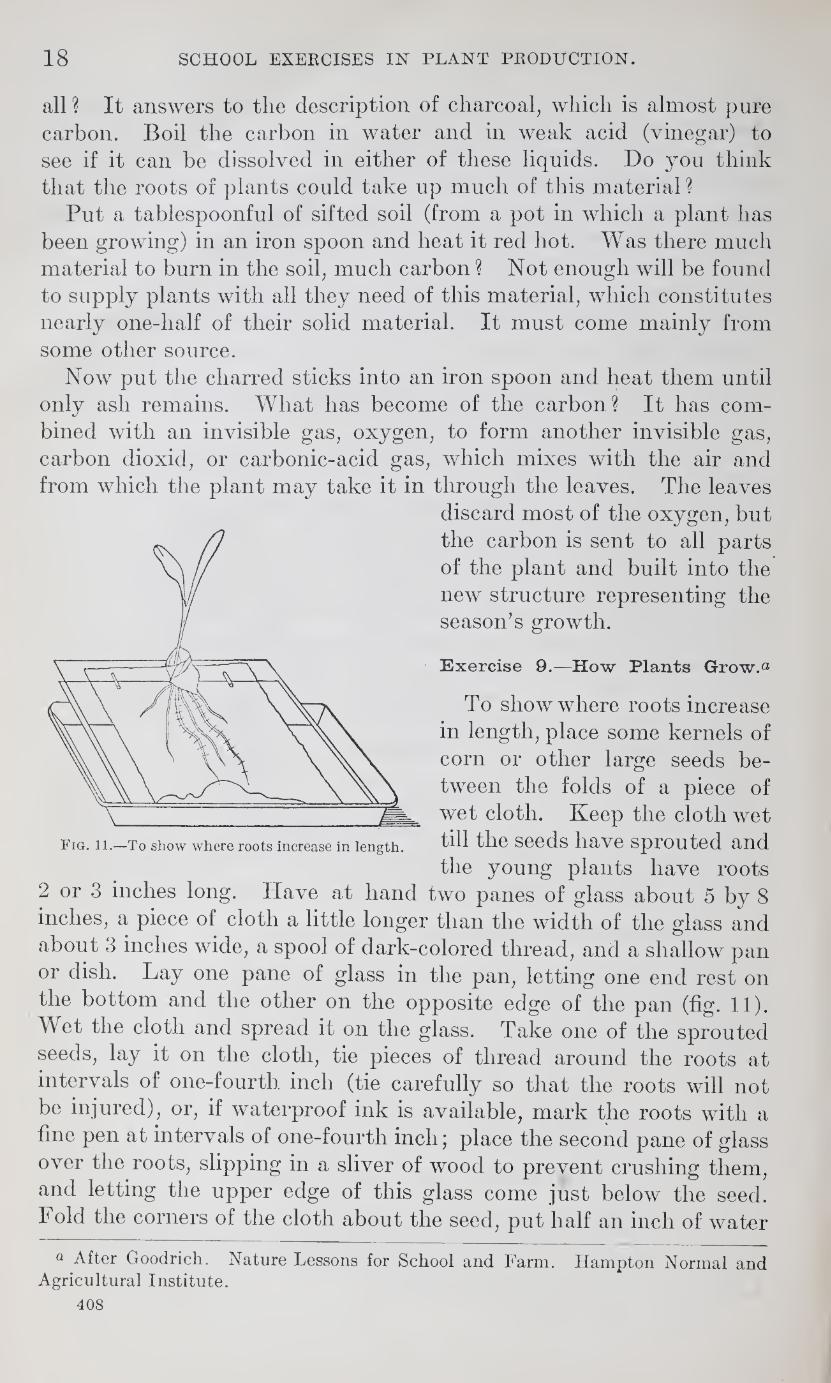
To show where roots increase in length, place some kernels of corn or other large seeds be¬ tween the folds of a piece of wet cloth. Keep the cloth wet till the seeds have sprouted and the young plants have roots
2 or 3 inches long. Have at hand two panes of glass about 5 by 8 inches, a piece of cloth a little longer than the width of the glass and about 3 inches wide, a spool of dark-colored thread, and a shallow pan or dish. Lay one pane of glass in the pan, letting one end rest on the bottom and the other on the opposite edge of the pan (fig. 11). Wet the cloth and spread it on the glass. Take one of the sprouted seeds, lay it on the cloth, tie pieces of thread around the roots at intervals of one-fourth inch (tie carefully so that the roots will not be injured), or, if waterproof ink is available, mark the roots with a fine pen at intervals of one-fourtli inch; place the second pane of glass over the roots, slipping in a sliver of wood to prevent crushing them, and letting the upper edge of this glass come just below the seed. I old the corners of the cloth about the seed, put half an inch of water
Q After Goodrich. Nature Lessons for School and Farm. Hampton Normal and Agricultural Institute.
408
Fig. 11.—To show where roots increase in length.

SCHOOL EXERCISES IN PLANT PRODUCTION. 19
into the pan, and leave for development. A day or two will show conclusively where the lengthening takes place. Has this fact any bearing on the relation of soil texture to root development? The soft, tender root tips will force their way through a mellow soil with greater ease and rapidity than through a hard soil, and the more rapid the root growth the more rapid the development of the plant. Here is the lesson of deep plowing and thorough breaking and pulver¬ izing of the soil before the crop is planted.
The growth of the stem of plants can be shown in a similar way by tying pieces of thread around the stem and branches of any plant at intervals of one-fourth inch, or marking them with ink. Measure carefully from time to time the distance between the threads and the distance from the top thread to the tip of the plant to determine whether the stem elongates or the plant makes its growth mainly at the tip.
Propagation.
Plants propagate by means of spores (as smut, puffballs, molds, ferns, and toadstools), seeds (corn, bean, and lettuce), root sprouts (locust, poplar, and plum), and by division. Some of the plants which propagate by division divide naturally and some artificially. Natural separation of parts occurs in plants which reproduce by means of rhizomes or root stocks (June grass, quick grass, and iris), bulbs (onion and lily), corms (crocus and gladiolus), tubers (potato, dahlia, and Jerusalem artichoke), detached tips of branches (water milfoil and some varieties of willow), stolons (strawberry), and layers (black raspberry and Forsythia). Artificially the principal ways of propagating plants are by means of layers, cuttings, buds, and grafts. Many of the plants mentioned, and others also, propa¬ gate in two or three different ways.
Have pupils try experiments in tip layering with black raspberries (fig. 19), in vine layering with grapevines (fig. 20), and in mound layering with currant or gooseberry bushes (fig. 21).
Exercises in grafting and budding can be conducted indoors to secure facility in performing these operations by bringing in large branches of green trees for stocks and securing the necessary scions and bud sticks in the usual way. The stocks may be prepared for budding by boiling to loosen the bark, and trimmed bud sticks may be preserved for winter use in dilute alcohol. The pupils should be given practice in as many methods of propagating plants as possible.
Exercise 10.—Spores.
The development of molds from spores can be followed easily by cutting a potato in two, rubbing lightly the freshly cut surface of one half with a piece of moldy bread and putting it on a plate under an
408
20 SCHOOL EXERCISES IN PLANT PRODUCTION.
inverted tumbler. Keep this covered potato in a warm but rather dark place for several days, examining it every few hours to note
progress in the growth of the mold. In two or three days there ought to be a heavy growth of mold.
By examining this closely the pupils will be able to see little globular spore cases growing at the tops of slender branches which spring up from a network of whitish, threadlike material. Observe these spore cases closely to see if any change occurs in them as they mature. Much more pleasure can be had from the study of molds if a micro¬ scope is available, but all that has been mentioned in this exercise can be seen with the naked eye.
The little rusty spots seen near the margins of some fern leaves are spore cases. When you step on a puffball it sends up a cloud of
spores. Exercise 11.—Seeds—Germination Test.
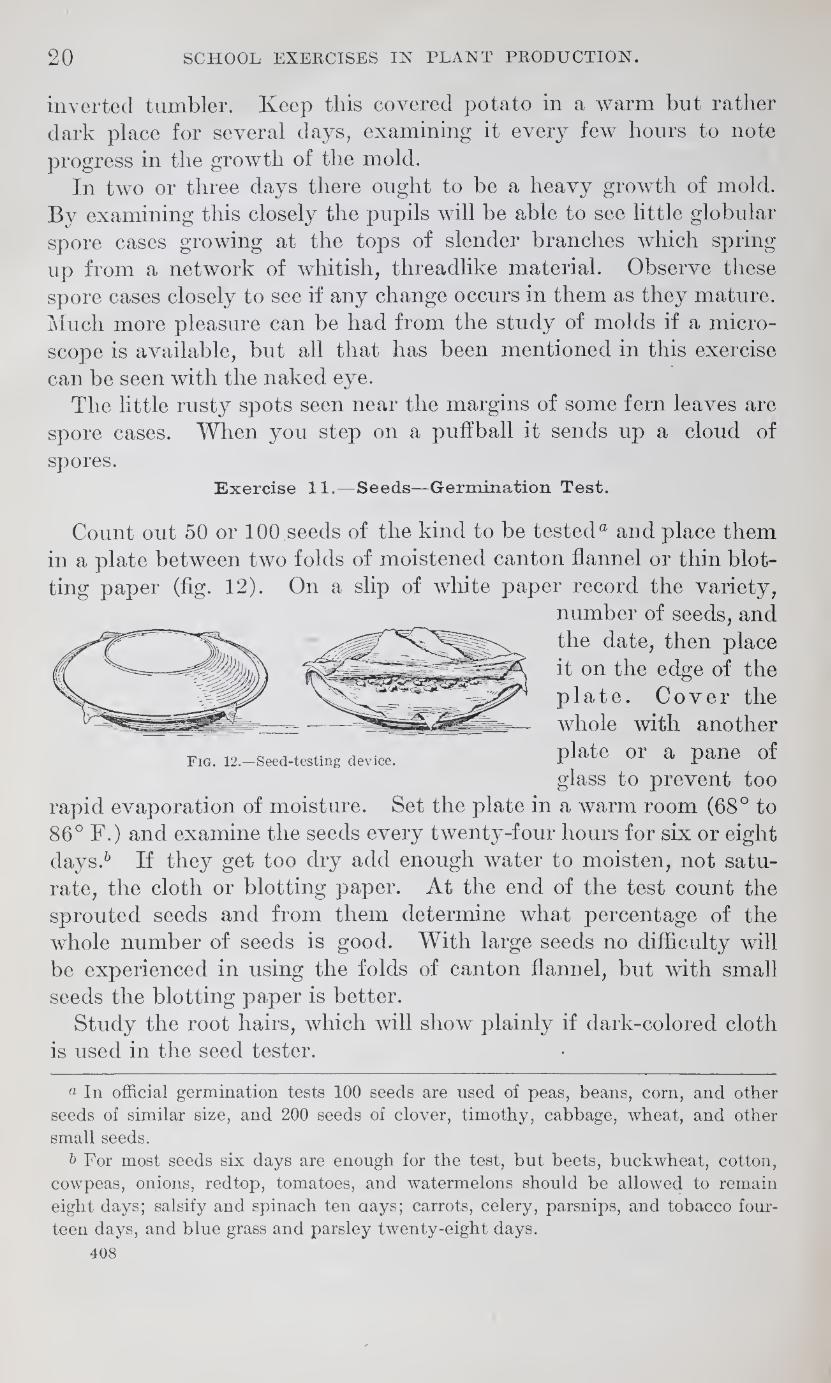
Fig. 12.—Seed-testing device.
Count out 50 or 100 seeds of the kind to be tested0 and place them in a plate between two folds of moistened canton flannel or thin blot¬ ting paper (fig. 12). On a slip of white paper record the variety,
number of seeds, and the date, then place it on the edge of the plate. Cover the whole with another plate or a pane of glass to prevent too
rapid evaporation of moisture. Set the plate in a warm room (68° to 86° F.) and examine the seeds every twenty-four hours for six or eight days.5 If they get too dry add enough water to moisten, not satu¬ rate, the cloth or blotting paper. At the end of the test count the sprouted seeds and from them determine what percentage of the whole number of seeds is good. With large seeds no difficulty will be experienced in using the folds of canton flannel, but with small seeds the blotting paper is better.
Study the root hairs, which will show plainly if dark-colored cloth is used in the seed tester.
a In official germination tests 100 seeds are used of peas, beans, corn, and other
seeds of similar size, and 200 seeds of clover, timothy, cabbage, wheat, and other
small seeds.
& For most seeds six days are enough for the test, but beets, buckwheat, cotton,
cowpeas, onions, redtop, tomatoes, and watermelons should be allowed to remain
eight days; salsify and spinach ten ciays; carrots, celery, parsnips, and tobacco four¬
teen days, and blue grass and parsley twenty-eight days.
408

21 SCHOOL EXERCISES IN PLANT PRODUCTION.
Exercise 12.—To Make a Balance.
A balance suitable for weighing small articles can be made easily and cheaply. Such a balance can be made sensitive to the weight of one-fourth of a postage stamp, and capable of sustaining a weight of several ounces. It is made chiefly of wood. All the parts are common articles and only ordinary tools are required. Only certain features require careful attention; in other respects rough work is permissible.
The essential parts of a balance (see fig. 13) are the base (a), the pillar (b), the beam (c), and the trays or pans, as they are usually called (<d, d). The beam is balanced by means of the balancing nuts (e, e). The pointer (/) indicates on the scale (g) the effect of weights on the trays. A screw eye (h) encircling the pointer serves to hold the beam at rest or permits it to swing as desired, according as the screw eye is turned. Four screws (i) at the corners of the base serve to level the balance.
In making the balance thoroughly dry, soft, pine wood is prefer¬ able. Screws are preferable to nails. The base is 12 or 14 inches
408

22 SCHOOL EXERCISES IN PLANT PRODUCTION.
long by 7 inches wide and 1 inch thick. The pillar is 1 inch square and about 9 inches high. It can be set in an inch hole in the center of the base. Care should be taken to have it stand perpendicular to the base. The upper end of the pillar is beveled on the right and left sides, as shown at Ic. A slot is sawed in the end to receive a knife edge, as shown at l. The beam is made from a stick 1 inch square and about 10 inches long. Its lower face is left straight; the other faces are beveled from the center to the ends, which are left three-eighths or one-half inch square. A notch 1 inch wide and one-half inch deep is accurately cut in the center of the flat or bottom face. This receives the central bearing (m) of the beam. An inch from each end of the beam a notch one-fourth inch deep is cut to receive the tray bearings. Each end is rounded to receive the balancing nuts. The nuts should cut well-defined threads in the wood and move easily and smoothly. Applying a little soap to the threads helps this. A strong pointer (/) is firmly fastened to the beam by two or more screws. Its lower end is provided with a needle, colored black so as to be readily seen. The screw eye (Ji) is placed near the end of the pointer and in the center of the pillar. It should turn easily and smoothly. When the balance is otherwise completed, turn the screw eye so as to hold the pointer firmly, then paste to the pillar back of the pointer a strip of white paper (g) bearing scale marks one-sixteenth inch apart, with the 0 mark of the scale directly back of the needle.
The three bearings of the beam are the most exacting features of the construction. Each consists of a knife edge acting within a groove formed of bent tin. The knife edge (Z) for the central bearing may be made of a pocket or case knife blade or of a piece of hard brass filed to a straight, sharp edge. The knife edges for the end bearings are made by filing the lower side of the tray wires where they cross the beam, producing a straight, sharp edge (n) about three-fourths inch long. The tins forming the grooves of the bear¬ ings are made of thin tin, such as is used in oyster and vegetable cans. Bright pieces are selected. The central bearing requires a strip 1 inch wide and 2 inches long (m). It is bent across at the middle, the bend being lightly hammered flat on a flatiron. The ends are then separated. The halves of the strip curve somewhat, leaving a narrow angle at the bend. This tin is firmly held in the central notch of the beam by four small screws. The tin strips for the end bearings are about one-half inch wide. They are bent in the same way as the other. One end of the strip is longer than the other, and is punched to receive a single screw holding it to the beam, as shown at o. The bending of the tin strips roughens the surface of the groove. It must be polished by rubbing the back
408
SCHOOL EXERCISES IN PLANT PRODUCTION. 23
of the point of a knife blade back and forth in the groove for some time. To insure success the grooves must be very narrow to prevent side slipping, yet not so narrow as to bind on the knife edge. The highly polished groove and sharp knife edges produce the least friction and increase the sensitiveness of the balance.
The tray wires are made of common No. 12 wire. The trays are 3 by 3 inches and one-fourth inch thick. Two holes near opposite edges receive the wires, which are bent in opposite directions beneath the trays, thereby holding them firm and level. If the trays tend to swing from front to back of the balance, the tins of the bearings may be slightly twisted by inserting a knife blade under them.
The balance can now be tested for use. When in working con¬ dition the pointer will slowly swing back and forth many times and finally come to rest at 0 of the scale. It probably will not do this at the first trial. Set the balancing nuts at about equal distances from the ends of the beam, then stand tacks along the lighter beam arm until the two arms nearly balance. The tacks are then driven in permanently. If tacks are too light, use brads or screws. The final balancing can then be done by properly moving one or both of the nuts. The proper adjustment of the balancing nuts should be tested each time the balance is used.
Weights and objects to be weighed can be held on the trays by cardboard dishes (j). A pair of forceps can be made from a strip of spring brass or even of hickory wood, the points being properly
sharpened. A set of metric weights ranging from 20 grams to 1 centigram and
suitable for use with this balance can be had for SI or less.
Exercise 13.—Seeds—Purity Test.
It is as important to plant pure seeds as it is to plant seeds that will grow. Many of the smaller seeds, such as clovers and grasses, frequently contain seeds of troublesome weeds and inert material
like chaff, sticks, broken seeds, etc. To make a purity test, secure one or more samples of red clover,
alsike clover, or alfalfa seed, preferably of different trade grades, and examine them for impurities. Mix the seed thoroughly and weigh out 5 grams of the mixture. Spread this sample thinly on a piece of white paper. By means of a magnifying glass (fig. 14) sepa¬ rate the seed with a knife blade into three parts—one containing only pure seed of the kind being tested, another consisting of seeds other than pure seed, as adulterants or weed seeds, and the third consisting of inert materials, as sticks, gravel, broken seeds, etc. By weighing these parts separately and comparing their weights with that of the original sample the percentage each of pure seeds, of weed seeds, and
408

24 SCHOOL EXERCISES IN PLANT PRODUCTION.
of inert materials is readily determined. Slight loss in weight dur¬ ing careful testing is usually due to the loss of fine inert matter.
It is sometimes important to know the character of the foreign seeds. If an adulterant like yellow trefoil is present, it should be recognized. It may be of interest to determine its amount separately. Certain weed seeds are especially undesirable, as dodder, Canada thistle, chicory, wild carrot, etc. If present, these should be counted and their number per pound estimated according to the weight of the sample tested. Farmers’ Bulletins 260 and 382 will be helpful in determining adulterants and weed seeds.
The pure seed may contain many shriveled seeds. It would be of interest to know how the weight of 100 of these seeds compares with that of an ecpial number of plump seeds. A question may arise as
Fig. 14.—A serviceable tripod magnifying glass and a convenient mount for preserving seeds for study.
to the value of such shriveled seed. Again, the relative weights of the smallest and largest seeds in the sample may be determined. See how equal numbers of large and small seeds compare in weight.
It may be well to consider the relative chances of large and small seeds in producing a crop under adverse seeding and weather con¬ ditions. If the pure seed consists in part of bright seed and in part of dull, reddish-brown seeds, it is evidently a mixture of new and old seed. Make a number of germinating tests to determine these matters.
In making a germinating test of such seed the seeds to be tested are counted indiscriminately from the pure seed lot.
It is of especial interest in such tests to consider the different trade grades offered by large dealers. After making complete tests of different grades compare their quality with their price, bearing in
408

25 SCHOOL EXERCISES IN PLANT PRODUCTION.
mind that more than 95 per cent of the sample should be pure seed and more than 95 per cent of the pure seed should terminate promptly.
Exercise 14.—Development of Young Plants from Seeds.
The development of young plants from seeds may be observed very nicely by planting seeds against the sides in tall bottles or in a box with glass sides, as shown in figures 15 and 16. Suppose, for example, that you put an inch of soil in the bottom of the box shown in figure 15 and then put a kernel of corn on top of the soil close to the glass at one end of the box and a bean at the other end of the •
box. Then put in another inch of soil, another kernel of corn, an¬ other bean, and perhaps also a clover seed near the glass in the middle of the box. Continue in this way until the box is filled. Water the soil thoroughly, cover the glass sides of the box with black cloth or paper to exclude the light, and set it aside to allow the seeds to germinate.
You will doubtless find that some very large seeds will germinate and send leaves to the surface from a depth of 5 or 6 inches in a light sandy soil, but that this depth is not so favorable for their develop¬ ment as a depth of 2 or 3 inches. Try to find the best depth for planting a few large seeds and a few small seeds like radishes, clover,
408

26 SCHOOL EXERCISES IN PLANT PRODUCTION.
lettuce, etc. Planting seeds against the side of the glass in this
way will enable you and the pupils to examine them from time to
time and see what becomes of those which do not reach the surface.
Exercise 15.—To Show that Young Plants Get
Food from Seeds.
Much of the food of very young plants comes
from the seeds to which they are attached.
To prove this, plant two beans in a tin can con¬
taining sandy soil; water and keep in a warm,
light place. Soon after the beans push above
ground take a sharp-pointed knife and carefully
cut off the two half beans (cotyledons) without
injuring the rest of the plant. (See A, fig. 17.)
Allow the plants to grow for a week or two and
note the more rapid development of the plant
to which the cotyle¬
dons are attached.
Have the children
try similar experi¬
ments at home with
squash seeds or Lima
beans.
Exercise 16.—Pollina¬
tion. Fig. 16.—To show the best
depths at which to plant (^) Why do some
flowers produce fruit
or seed while others do not? Why do
some ears of corn have vacant places on
the cob—places where there are no
kernels? This can be answered by an
experiment in the school or at home.
Find a hill of corn on which an ear is just
starting, and before any silk pushes out
of the husk tie a paper or muslin bag
over the ear in such a way as to exclude
all pollen and insects. Leave this on for
several weeks; then examine the ear to
see if anv kernels of corn have de-
veloped. The application of pollen to
the pistil of a flower is called pollination.
The necessity of pollination for the production of fruit can be
shown by another, somewhat more difficult, experiment. Carefully
open the flower bud of an apple, a tomato, or other flower having 408
Fig. 17.—Plant food in seeds. After Graham, Ohio Agr. Col. Ext. Bui., Vol. I, No. 8, p. 10. Beans planted in rich black earth on the same day. Both plants came up on the same day. The half beans were removed from one. The other grew faster be¬ cause the half beans furnished food.

SCHOOL EXERCISES IN PLANT PRODUCTION. 27
both stamens and pistil, when it appears to be just ready to blossom,
and remove all of the stamens, using care not to injure the pistil or
stigma (fig. 18). Without removing the flowers from the parent plant
inclose all of them in small white muslin bags in such way that no
insects can get in. At the same time prepare other flowers of the
same kind in the same way, except that pollen from another flower
of the same kind is in each case dusted on the pistil of the flower
inclosed. After a week or ten days remove the bags and see what has
happened to the flowers. You will probably find that all of the flow¬
ers not dusted with pollen have withered and dropped off without
producing any fruit, while the others have begun to develop small
fruits.
From this it will be seen that it is necessary, in order for a flower
to produce fruit, that its pistil receive pollen either from the same
flower or from some other closely related flower. This pollen is
carried by the wind and by bees, flies, and other insects, but some-
Fig. 18.—Tomato blossom ready to pollinate. At the left a partly opened bud, in the middle an opened blossom, at the right an opened blossom with anthers removed.
times none of these agencies succeed in bringing the right kind of
pollen to the flower, and it withers and drops off.
In the case of corn each silk protruding from the husks is a pistil,
and if any one of these silks fails to receive pollen the kernel of corn
down at the lower end of the silk will not be developed.
(B) Have the children plant a few hills each of field corn and pop
corn side by side in the school garden or at home. In the autumn
when the corn is husked notice the mixture of two kinds of kernels
on the same cob. How did the corn mix ? It is by putting the pollen
of one kind of plant on the pistil of another closely related and
excluding all other pollen that plant breeders sometimes originate
new varieties.
Exercise 17.—Layering.
Layering may be considered the connecting link between natural
and artificial propagation. Many plants, such as black raspberries,
grapes, Forsytliias, and others, increase naturally in this way, but
408

28 SCHOOL EXERCISES IN PLANT PRODUCTION.
man has lent his aid in so many ways to this process of propagation
that it may he considered to a certain extent artificial.
A layer is a branch so placed in contact with the earth as to induce it
to throw out roots and shoots, thus producing one or more independ¬
ent plants, the branch
meanwhile remaining at¬
tached to the parent
plant. Layering fre¬
quently proves a satis¬
factory method of multi-
plying woody plants
which do not readily
take root from cuttings.
Tip layering.—The tip
of a branch or cane is
fig. 19.—Tip layering. bent down to the ground
and slightly covered
with soil, when it will throw out roots and develop a new plant (fig.
19). Many plants can be propagated in this way. The black rasp¬
berry is a familiar example.
Vine layering.—A vine is stretched along the ground and buried
throughout its entire length in a shallow
trench, or it may be covered in certain
places, leaving the remaining portions
exposed. Roots will be put forth at
intervals and branches thrown up.
Later the vine may be cut between
these, leaving a number of independent
plants (fig. 20). The grape can be
easily propagated in this way.
Mound layering.—Plants which stool,
Fig. 20.—Vine layering.
sending up a large number of stems or shoots from a single root, are
often layered by mounding up the earth so as to cover the bases of
these stems and cause them to throw out roots (fig. 21). Each may
then be removed from the original root and treated as an independent
408

SCHOOL EXERCISES IN PLANT PRODUCTION. 29
plant. A plant is often cut back to the ground to make it send up
a large number of shoots to be layered in this way.
Facilities for Rooting
Cuttings.
In order successfully to
root cuttings of coleus,
geraniums, fuchsias, roses,
and begonias in the school¬
room it will be an advant¬
age to have a broad window
box constructed some¬
what as follows: Make a
frame about 15 or 20
inches wide, 8 inches high
at one side and 12 inches
high at the other, and as
long as the width of the Fig. 21.—Mound layering.
window in which it is to be used. Place a tight bottom in the frame,
thus making a box similar to that shown in figure 22. Provide
three or four holes one-half inch in to
diameter in the bottom of
the box to allow the escape
of any excess moisture. Place
about 1 inch of broken pots,
coarse gravel, or clinkers in
the bottom of the box, and
on top of these place a layer
of clean sand free from
clay or decaying organic
matter, about 2\ to 3 inches
thick. Over the top place
panes of glass, so as to
make a close but well-lighted
chamber within the frame.
Place the cuttings in this
frame. By using care in
watering and providing ven¬
tilation by the partial re¬
moval of the glass as neces¬
sity requires under such
treatment, lair results should
follow. Some experience will
be necessary to successfully root plants even with this device, but
much better results may be expected than without it.
40S
Fig. 22.—Frame for rooting cuttings.

30 SCHOOL EXERCISES IN PLANT PRODUCTION.
Exercise 18.—To Make Soft Cuttings.
Soft cuttings may be made from either the leaf or stem. Some
plants, such as the Rex begonia and wax plants, may be propagated
by inserting the edge of a leaf or even a piece
of a leaf (fig. 23) in sand and supplying it with
plenty of moisture and warmth; or a leaf may
be laid flat, right side up, on the surface of the
sand and fastened down by splinters through
the veins at intervals (fig. 24). Plants will
spring up at the broken edges of the leaf or at
cut places in the veins.
Stem cuttings are readily made from the coleus,
geranium, verbena, tomato, and numerous other
herbaceous plants. Take thrifty shoots from
any of these plants and divide them into cut¬
tings having at least two nodes and several
leaves; reduce the leaf surface to about one-half
to check evaporation; insert the cutting in moist
sand about one-half of its length and press the
sand firmly around it. (See fig. 25.)
Exercise 19.—To Make Hard Cuttings.
Hard cuttings may be made from dormant
mature wood of last season's growth of privet, grape, barberry,
willow, and many other plants. Make the cuttings 4 to 6 inches
long so as to include at least two nodes. They may then be rooted
Fig. 24.—Leaf cutting—whole leaf.
in the same way that soft cuttings are rooted, or, if prepared in
autumn or winter for planting out of doors next spring, they may
be tied in bundles of about 50, using care to keep all tips in one
direction and butts in the other. These bundles should be buried
Fig. 23.—Leaf cutting—part of leaf.
408

SCHOOL EXERCISES IN PLANT PRODUCTION. 31
out of doors or put in moist sand or sawdust in the cellar, placing
tips down. In the spring prepare a trench in sand or sandy loam,
as shown in figure 26, set in the cuttings about 6 inches apart, and
pack earth tightly around them.
Keep the surface of the soil
free from weeds and mellow
throughout the summer, water
in dry times, and it is likely
Fig. 25.—Stem cutting or “slip” of coleus. Fig. 26.—Cutting set in trench.
that a large percentage of the cuttings will root and grow. There are
various modifications of the simple cutting, as shown in figure 27.
Fig. 27.—Cuttings: a, Simple cutting; b, heel cutting; c, mallet cutting; d, single-eye cutting.
Exercise 20.—To Make Grafting’ Wax.
A good grafting wax may be made of the following ingredients:
Kesin, 4 parts; beeswax, 2 parts; tallow or linseed oil, 1 part by
408

32 SCHOOL EXERCISES IN PLANT PRODUCTION.
weight. If a harder wax is needed, 5 parts of resin and 2\ of bees¬
wax may be used with 1 part of tallow.
The resin and beeswax should be broken up tine and melted
together with the tallow. When thoroughly melted the liquid
should be poured into a vessel of cold water. As soon as it becomes
hard enough to handle it should be taken out and pulled and worked
until it becomes tough and has the color of very light-colored manila
paper. If the wax is applied by hand, the hands should be well
greased, tallow being the best material for this purpose. The wax
may be applied hot with a brush, but care is necessary in order to
avoid injury.
The wax should be spread carefully over all cut or exposed surfaces
and pressed closely, so that upon
cooling it will form a sleek coat¬
ing impenetrable to air or moisture.
Waxed string may be prepared
by putting a ball of No. 18 knit¬
ting cotton into a kettle of melted
grafting wax. In five minutes it
a
Fig. 29.—Cleft grafting: a, Scion; b, scions inserted
Fig. 28.—Grafting tool. in cleft.
will be thoroughly saturated, after which it will remain in condition
for use indefinitely.
Exercise 21.—Cleft Grafting.
To make a cleft graft select a branch 1 or 1£ inches in diameter
and sever it with a saw. Care should be taken that the bark be not
loosened from any portion of .the stub. Split the exposed end with a
broad thin chisel or grafting tool (fig. 28). Then with a wedge or
the wedge-shaped prong at the end of the grafting tool spread the
cleft so that the scion (fig. 29, a) may be inserted (fig. 29, b). 408

SCHOOL EXERCISES IN PLANT PRODUCTION. 33
The scion should consist of a portion of the previous season’s
growth of the tree to be propagated and should be long enough to
have two or three buds. The lower end of the scion, which is to be
inserted into the cleft, should be cut into the shape of a wedge,
having the outer edge thicker than the other (fig. 30). In general
it is a good plan to cut the scion so that the lowest bud will come
just at the top of this wedge (fig. 29, a) in order that
it will be near the top of the stock. The advantage
of cutting the wedge thicker on one side is illus¬
trated in figure 30, which shows how the pressure of
the stock is brought upon the outer growing parts
of both scion and stock, whereas were the scion .... .. . i •, • . . . Fig. —Cross section of thicker on the inner side the conditions would be re- stock and scion,
versed, and the death of the scion would follow.
The importance of having an intimate connection between the
growing tissues of both scion and stock can not be too strongly
emphasized, for upon this alone the success of grafting depends.
To make this contact of the growing portions doubly certain, the
scion is often set at a slight angle with the stock into which it is
inserted, in order to cause the growing portions of the two to cross.
After the scions have been set,
the operation of cleft grafting is
completed by covering all cut sur¬
faces with a layer of grafting wax.
Cleft grafting is particularly
adapted to top-working old trees,
that is, changing them from un¬
desirable to desirable varieties.
Branches too large to be worked by
other methods can be cleft grafted.
Sometimes several varieties are
grafted on a single tree. The best
time for cleft grafting is in the spring
just after growth has begun. Wood
for scions is usually cut in the fall,
tied in bundles, and buried in sand to
protect them from extremes of heat
and cold until they are to be used.
Exercise 22.—Whip Grafting-.
To make a whip graft, cut the stock off diagonally—one long
smooth cut with a sharp knife, leaving about three-fourths of an
inch of cut surface, as shown in figure 31, a. Place the knife about
one-third of the distance from the end of the cut surface, at right
V >'
Fig. 31.—Whip grafting: a, The stock; b, the scion; c, stock and scion united.
408

34 SCHOOL EXERCISES IN PLANT PRODUCTION.
angles to the cut, and split the stock in the direction of its long axis.
Cut the lower end of the scion in like manner (fig. 31, a and &), and
when the two parts are forced together, as shown in figure
31, c, the cut surfaces will fit neatly, and one will nearly
cover the other if the scion and stock are of the same size.
A difference in diameter of the two parts to be united may
be disregarded unless it be too great. After the scion and
stock have been joined they should be wrapped with 5 or
6 turns of waxed cotton to hold the parts firmly.
This is the process used almost exclusively in the pro¬
duction of young nursery stock by means of root grafting.
The roots are dug and the scions are cut in the autumn
and stored. The work of grafting may be done during the
winter months. When the operation has been completed
the grafts are packed away in moss, sawdust, or sand, in a
cool cellar, to remain until spring. It is important that the
place of storage be cool, else the grafts may start into
growth and be ruined, or heating and rotting may occur.
If the temperature is kept low—not above 40° F.—there
will be no growth except callousing and the knitting
together of stock and scion. In spring the grafted plant
is so set as to bring the union of stock and scion below the
surface of the ground.
Top-grafting may also be done in this way, but whenever the
union is above ground it must be protected, as in cleft grafting, by
either a coating of grafting wax or
a bandage of waxed muslin.
Fig. 32.—A bud stick.
Fig. 33.—Cutting the bud. Fig. 34.—Budding: Preparing the stock.
Exercise 23.—Budding.
Budding is one of the most rapidly performed and economical forms
of artificial propagation. The work of budding is done during the 408
SCHOOL EXERCISES IN PLANT PRODUCTION. 35
season of active growth—July, August, or early September. The
bud should be taken from strong, healthy twigs of the present season’s
growth. The bud sticks (fig. 32) are prepared so that the petiole or
stem of each leaf is left attached to serve as a handle to aid in inserting
the bud beneath the bark of the stock. The bud should be cut as in
figure 33, paring off a small portion of the woody tissue with the bud.
The stock for budding should be at least as thick as an ordinary
lead pencil. With the apple and pear a second season’s growth will
be necessary to develop this size, while with the peach a single season
will suffice. To bud a plant make a T-shaped cut through the bark
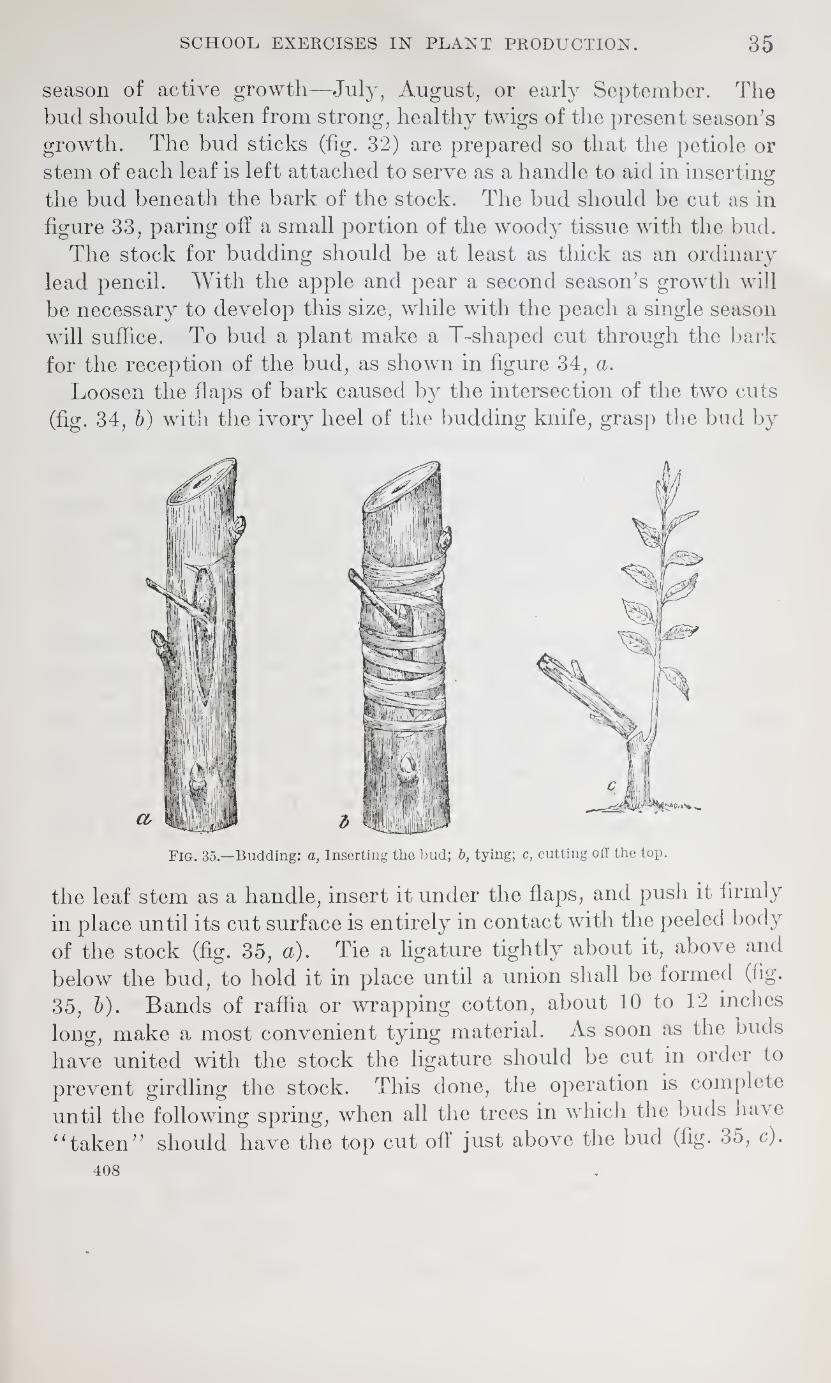
for the reception of the bud, as shown in figure 34, a. Loosen the flaps of bark caused by the intersection of the two cuts
(fig. 34, b) with the ivory heel of the budding knife, grasp the bud by
Fig. 35.—Budding: a, Inserting the bud; b, tying; c, cutting off the top.
the leaf stem as a handle, insert it under the flaps, and push it firmly
in place until its cut surface is entirely in contact with the peeled body
of the stock (fig. 35, a). Tie a ligature tightly about it, above and
below the bud, to hold it in place until a union shall be formed (fig.
35, b). Bands of raffia or wrapping cotton, about 10 to 12 inches
long, make a most convenient tying material. As soon as the buds
have united with the stock the ligature should be cut in order to
prevent girdling the stock. This done, the operation is complete
until the following spring, when all the trees in which the buds have
1 ‘taken” should have the top cut off just above the bud (fig. 35, c),
408

36 SCHOOL EXERCISES IN PLANT PRODUCTION.
PART 2.—THE ENVIRONMENT OF THE PLANT.
Exercise 24.—Conditions Essential to Plant Growth.—Light.
To show that light is an important factor in plant growth call the attention of the pupils to the way in which plants growing in a poorly lighted room stretch toward the nearest window. Recall how potatoes sprouting in the cellar send their sprouts sometimes for a yard or more in the direction of the light. Notice the struggle of forest trees to send their branches up to the light. There will be exceptions, of course—some trees and shrubs which seem to do well under the cover of other trees, but in the main those trees which are siiut off from the direct rays of the sun do not thrive. It will be an instructive object lesson to visit a forest and notice how on the edge of the woods the large limbs on all of the trees are on the side next to the open field. Why do trees growing in the thick forest become so much taller and more spindling than trees of the same variety growing in the open field ? Does this habit of trees have any im¬ portant economic bearing ? Are trees with long, straight, clean trunks more or less valuable for timber than trees with low, bushy tops ?
The influence of light on plant growth may be shown experi¬
mentally as follows: Plant two pots with corn. Place one in a
window where it may make a normal growth. Give the other the
same temperature and the same attention as regards watering, but
place it under a paper cone or box through which light can not pene¬
trate. Contrast the appearance of the two sets of plants grown under
these conditions. After the plants under the. cone or box have
attained a height of 2 or 3 inches, remove the covering and note
what takes place when the pot is placed in full sunshine.
Exercise 25.—Conditions Essential to Plant Growth.—Heat.
Numerous opportunities will occur to show the importance of heat
as a factor in plant growth. Seeds may be planted in two pots or
tin cans which are treated exactly alike in every way except that
one pot is kept where the temperature ranges from 60 to 80° F., while
the other is kept in a temperature 20 to 40° cooler. The latter may
germinate, but there will be a marked difference in the time of germi¬
nation and in the vigor of the plants.
In the spring or fall when the weather is cool, but not frosty, radish
seeds may be started indoors in two boxes about a foot square and 8
or 10 inches deep, with 3 inches of good soil in the bottom. As soon
as the young plants are well started remove all but 5 or 6 of the
strongest plants in each box, then set the boxes side by side out of
doors. Cover one box with a pane of glass, leaving a small crack for 408

SCHOOL EXEKCISES IN PLANT PKODUCTION. 37
ventilation, but aside from this treat them exactly alike. Water
when necessary. Put a thermometer in each box in such a position
that temperatures can be read without disturbing the boxes. Take
and record temperatures several times daily for a week and observe
differences in the development of the plants. Draw conclusions con¬
cerning the relation of heat to the growth of plants.
Exercise 26.—Conditions Essential to Plant Growth—Moisture.
Take two pots or tin cans in which plants are growing. Put them
under like conditions except that water is withheld from one for sev¬
eral days. Have pupils draw conclusions as to
the importance of moisture to plant growth.
Exercise 27.—Conditions Essential to Plant
Growth—Air.
Air is necessary in the soil in order to make it
a congenial place for the growth of plants.
(A) The necessity for air can be demonstrated fig. 36.—Method of demon-
very nicely by taking some ordinary garden strating the effec<; of t0°
soil which is rather retentive in nature—that is,
contains a considerable percentage of clay—and placing an equal
quantity in each of two tumblers, as shown in figure 36. In one plant
seeds of beans or peas in the usual fashion, and in the other plant the
same kind of seeds in the same way, but
keep the soil constantly saturated with
water, so that there is a thin stratum of
moisture over the surface of the soil. The
seeds in the first tumbler will undoubtedly
germinate in a short time, while the seeds
in the other tumbler will require a longer
time to germinate, and if the temperature
of the room in which the two glasses are
kept is low the seeds will rot. The tum-
fig. 37.—Arrangement for showing bier which contains an excessn e amount the effect of the exclusion of air on 0f moisture prevents the access of air that plant growth. necessary to the germination of the seed,
while the one which is kept only moderately moist allows a sufficient
amount of air to come in contact with the seeds to insure germi¬
nation. (B) The necessity of air for the development of roots can be dem¬
onstrated by using two bottles similar to those shown in figure 37.
After filling them two-thirds full of water which has been boiled to
drive out the air, place a cutting of coleus, geranium, or willow in tin'
receptacles, as indicated, but over the surface of the water in one
408

38 SCHOOL EXERCISES IN PLANT PRODUCTION.
bottle pour a thin layer of oil—castor oil or sweet oil—and observe
the behavior of the cuttings.
Exercise 28.—Soil Collection.
Have each pupil in the class bring samples of all the leading types
of soils to be found on his home farm or, if not living on a farm, in the
near vicinity of his home. Quart samples will be large enough.
Empty each sample out on a separate sheet of heavy tough paper.
Compare the different samples. Bring those which seem to be very
much alike together, so as to reduce the number of samples. Provide
enough boxes to hold the different kinds of soil, and in these store the
soils for future use. In nearly every locality the pupils will be able
to secure samples of sand, clay, loam, and peat or muck, and an effort
should be made to have these four types represented in the school
collection.
Exercise 29.—Classification of Soils.
The teacher will select a sample of dry soil from each of his most typical soils (sand, clay, loam, and peat) and put them side by side
in pans or on plates where the pupils can examine them. All lumps
should be broken up with a potato masher or rolling-pin or other piece
of wood. The pupils should now examine the different soils and take
notes concerning them.
Examine the samples as to color and fineness, rub the particles
between the thumb and forefinger. Which are the coarsest ?
Wet a handful of each soil and mix it in the hand. Which crum¬
bles or falls apart most easily after wetting ? Which is most sticky ?
Take four tumblers nearly full of water. Into one put 10 grams
of sand, into another the same weight of clay, into another loam,
and into another peat. Stir all thoroughly and set them aside to set¬
tle. Which settles most quickly? Which most slowly? Stir them
again and set them aside. After one minute pour off the liquid.
Allow the settled portions to dry thoroughly and then examine them.
It will be found that in each case the sediment consists largely of
rather coarse particles of sand. Weigh each dried sample and find
what percentage of the original 10 grams of each soil consists of
sand. Which soil contains the largest percentage of sand ?
Put 10 grams of peat in a large iron spoon or in a test tube and
heat it red-hot. What happens ? Test the other soils in the same
way. The part that burns is humus or decayed vegetable matter.
Which soil contains the largest percentage of humus ?
From the data at hand have the pupils write a description of
each class of soil. 408
SCHOOL EXERCISES IN PLANT PRODUCTION, 39
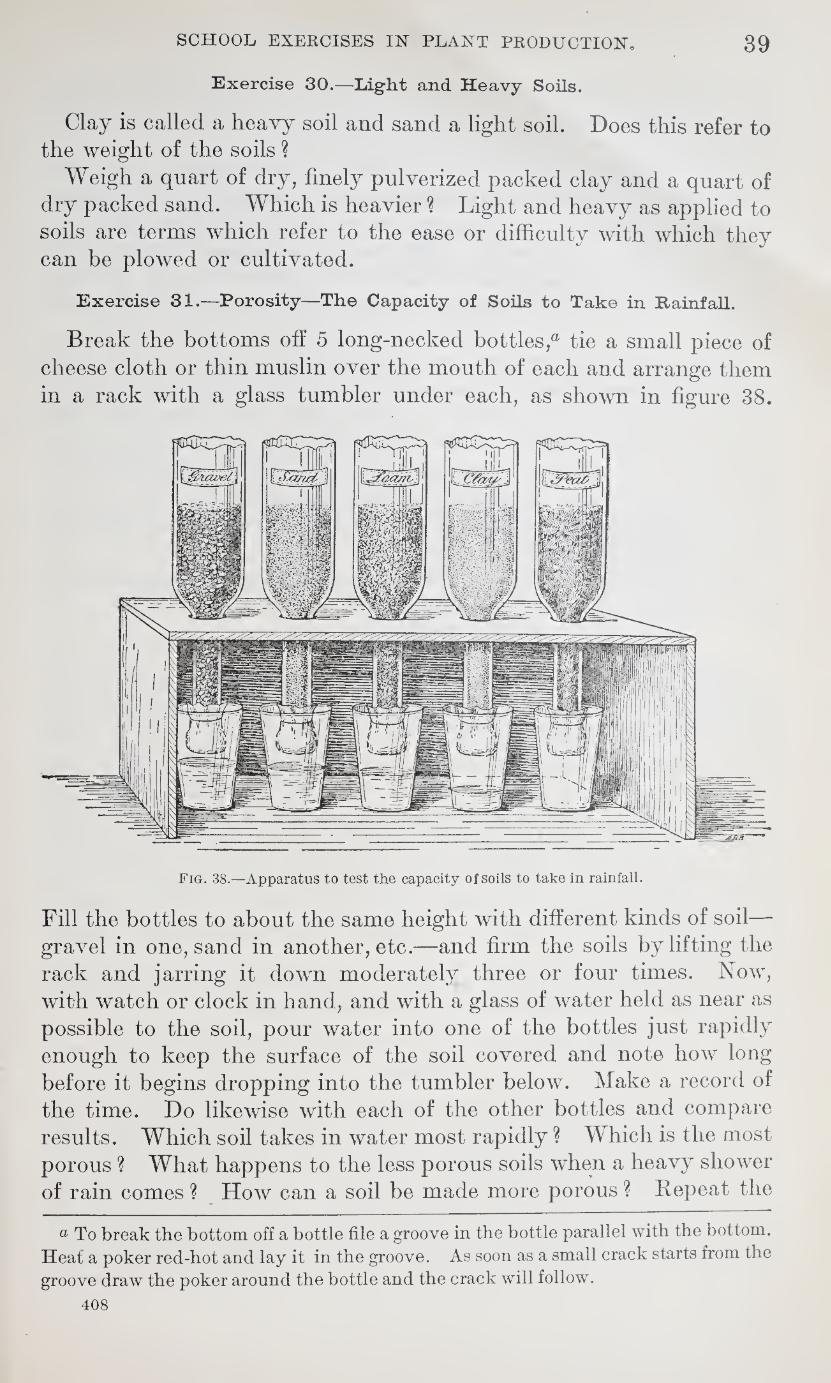
Exercise 30.—Light and Heavy Soils.
Clay is called a heavy soil and sand a light soil. Does this refer to the weight of the soils ?
Weigh a quart of dry, finely pulverized packed clay and a quart of
dry packed sand. Which is heavier ? Light and heavy as applied to
soils are terms which refer to the ease or difficulty with which they
can be plowed or cultivated.
Exercise 31.—Porosity—The Capacity of Soils to Take in Rainfall.
Break the bottoms off 5 long-necked bottles,® tie a small piece of
cheese cloth or thin muslin over the mouth of each and arrange them
in a rack with a glass tumbler under each, as shown in figure 38.
Fig. 38.—Apparatus to test the capacity of soils to take in rainfall.
Fill the bottles to about the same height with different kinds of soil—
gravel in one, sand in another, etc.—and firm the soils by lifting the
rack and jarring it down moderately three or four times. Now,
with watch or clock in hand, and with a glass of water held as near as
possible to the soil, pour water into one of the bottles just rapidly
enough to keep the surface of the soil covered and note how long
before it begins dropping into the tumbler below. Make a record of
the time. Do likewise with each of the other bottles and compare
results. Which soil takes in water most rapidly ? Which is the most
porous % What happens to the less porous soils when a heavy shower
of rain comes ? How can a soil be made more porous ? Repeat the
a To break the bottom off a bottle file a groove in the bottle parallel with the bottom.
Heat a poker red-hot and lay it in the groove. As soon as a small crack starts from the
groove draw the poker around the bottle and the crack will follow.
408

40 SCHOOL EXERCISES IN PLANT PRODUCTION.
experiment with one of the soils, packing the soil tightly in one bottle
and leaving it loose in the other. What is the effect of packing?
Does this have any bearing on farm practice ?
Which soil has the greatest capacity to hold water? This can
be determined from the above experiment by emptying and replacing
each tumbler as soon as all free water has disappeared from the upper
surface of the soil above it. After water has ceased dripping from
all the bottles measure and compare the water in each tumbler.
Which soil continued dripping longest? Which would drain most
readily ?
Which soil would store up the greatest amount of moisture ? This
can be determined from the same experiment by weighing each bottle
before and after filling it with dry soil, and again after water has
entirely ceased dripping from it. The difference between the weight
of the dry soil and that of the wet soil is the weight of water stored.
During the time that the bottles are dripping, which may take several
days, they should be covered to prevent evaporation of water from
the surface of the soils.
Make other practical applications of the principles brought out in
this exercise.
Exercise 32.—Air in Soils.
In Exercise 27 it was shown that air is necessary in soils for the
proper development of plants. To determine the percentage of air
space in different soils, put a pint of loose soil into each of three
cans—sand in one, clay in another, and loam in another. Now pour
water very slowly from a graduate into each can until water just
shows at the top of the soil. Pour the water in at one place, leaving
the rest of the surface dry so that the air can escape from the soil.
When the soil is full of water the space formerly occupied with air
is filled with water. How much water did it take to fill this space ?
Your graduate will tell you. Compute the percentage of air space
in each soil.
Plan an experiment to determine the percentage of air space more
accurately by weighing the soil and the water used.
E xercise 33.—Capillarity—The Power of Soils to Take up Moisture from
Below.
Arrange 4 or 5 student-lamp chimneys, as shown in figure 39, and
tie cheese cloth or thin muslin over their lower ends. Fill each with
a different kind of dry soil, as in Exercise 31. Pour water into the
pan beneath until it stands about half an inch above the lower end
of the chimneys, then observe the rise of water in the different soils.
Make notes on the height to which the water rises and on the time
it takes. In which soil does the water rise most rapidly; in which 408

SCHOOL EXERCISES IN PLANT PRODUCTION. 41
to the greatest height ? Which soil draws up the greatest amount of
water? How can this be determined? Which soil would dry out
soonest ? W hich would be able to bring moisture from the greatest
depth? This power of soils to raise water from below is called
capillarity. It is an important function, for by it plants are able to
get moisture and plant food from the subsoil in times of drought.
If chimneys are not to be had, this experiment can be performed
with the apparatus shown in figure 38 by substituting the pan for
the tumblers, or the experiments performed with the bottles can be
performed with the chimneys and tumblers.
If more accurate tests of capillarity are desired, it will be necessary
to procure a series of glass tubes at least 3 feet high, for in some soils
water will rise to that height, or even higher.
Exercise 34.—Puddling.
Some soils if cultivated
immediately after a heavy
rain will puddle, i. e., pack
so closely that when they
dry out they bake into a
hard, almost impenetrable,
condition.
Fill four tomato cans half
full—one with sand, an¬
other with clay, another wifdi loom nnrl onnttpr FlQ* 39l—Apparatus to test the power of soils to take up vim loam, ana anotner moisture from below.
with peat. Add water, and
stir until the soils are about the consistency of paste. Set them aside
ten or fifteen minutes. Pour off the free water and stir again. Set
them in the sunlight and allow them to dry thoroughly, or, better,
set them over a slow fire for several hours. Which soils baked ?
Which could be most easily stirred or cultivated after drying ? In
farm practice which could be worked soonest after a rain without
danger of puddling ? Which could be worked earliest in the spring ?
Exercise 35.—The Effect of Lime on Clay Soils.a
(A) Take a vessel holding a pint or more and fill it with clear well
water. Put into it a couple of spoonfuls of fine clay soil and stir up
thoroughly for three or four minutes. Let it settle for five minutes.
Then take two clear glass bottles, holding about a half pint each,
and fill them with water from the vessel, being careful not to stir up
the sediment again. Into one of the bottles put a piece of lime about
a After Fisher. Practical Studies in Agriculture for Public Schools. Purdue
University.
40S

42 SCHOOL EXERCISES IN PLANT PRODUCTION.
as large as a bean and shake the contents well. Put nothing in the
other bottle. Set the two bottles aside and notice any difference or
changes that take place in an hour or two and over night.
(B) Take two deep dishes or other vessels and fill them with fine
clay soil. Into one put a couple of teaspoonfuls of lime, according to
the size of the dish. Put no lime in the other dish. Stir up both lots
of soil with water until they are thoroughly sloppy. Set them where
they will dry out. When they are completely dry remove the cakes
of soil from the dishes and pulverize. What differences do you
notice? Can you explain these differences? Do the results in the
bottles help you to understand the action of the lime in the soil?
Could you expect a similar result from putting lime on stiff clay soil ?
Do you think it would be a good idea to try it ?
Exercise 36.—Action of Frost on Soils.
Puddle a pint of stiff clay, mold it into a ball, and bake it on the
stove. In freezing weather moisten this ball and put it out of doors
over night. If it does not break up the first night, moisten it again
and subject it to the action of frost. What happens? From this
result what would you say of the practice of fall plowing heavy
clay land? Is there any advantage in fall plowing aside from the
action of frost on the soil ?
Exercise 37.—Temperature of Soils as Affected by Color.
Sink a box about 2 feet long by 1 foot wide and 8 or 10 inches deep
into the soil so that the top is even with the surface of the ground.
Fill the box with the lightest-colored sand you can find. Cover half
of it with a thin layer of lampblack—just enough to blacken the
whole surface. Insert the bulb of one thermometer about one-half
inch under the surface of the uncolored sand and another one-half
inch under the surface of the colored sand, and on a sunny day take
readings of the thermometers, every hour from daylight until two or
three hours after sunset.
Perform a similar experiment with peat or the darkest-colored soil
you can find, except that half of this soil is colored white with lime
dust. Take readings as before. Compare results. What conclusions
may be drawn as to the influence of color on the temperature of soils?
Are the differences recorded in sunlight as marked as when the sun is
not shining? Other conditions being equal, which soil would soonest
be warm enough for planting in the spring ?
The influence of color upon temperature may be illustrated in a
simple way b}r scattering lampblack or dark-colored earth on snow
when the sun is shining. 408

SCHOOL EXERCISES IN PLANT PRODUCTION. 43
Exercise 38.—Temperature as Affected by Moisture.
Take two tomato cans and in the bottom of one punch a number of
holes for drainage. Fill both with the same kind of soil. Wet the
soils thoroughly. Insert the bulb of a thermometer an inch under
the surface of each and set them in direct sunlight. Take readings
from each thermometer every two hours for two or three days, and
record the temperatures. Compare the readings and see what results
follow as the moisture disappears from the can provided with drainage.
What is the conclusion as to the temperature of drained and un¬
drained soils? Which would be the earlier soil in spring? Which
the later as the fall rains start in? Would there be a tendency to
shorten or to lengthen the growing season by draining wet soils?
Exercise 39.—Temperature of Soils as Affected by Inclination of the Surface > or Exposure to the Sun.
Fill three boxes, about a foot square and 6 or 8 inches deep, with
the same kind of soil and set them in the sunlight side by side with
the same exposure, except that one is level, one tilted about 30° to the
south, and the other tilted about 30° to the north. Insert the bulb of
a thermometer about one-half inch under the surface of the soil in
each box, take readings every hour during a sunny day, and compare
results. In which box were the highest temperatures recorded ? Ask
pupils to explain this. What practical bearing has this upon the
selection of farms? With other conditions alike, which would be
ready to work earlier in the spring, a north slope or a south slope ?
Exercise 40.—Free Moisture in Soils.
Take four slender baking-powder cans of the same size, with tops
and bottoms removed, and tie over one end of each a piece of cheese
cloth or thin muslin.
Fill one can to within an inch of the top with coarse dry sand,
another with dry loam, the third with dry pulverized clay, and the
fourth with dry muck or leaf mold mixed with sand. Weigh the
soils before putting them into the cans, in order to have a record of
the weights for use in the next experiment. If any of the soils con¬
tain pebbles or clods, these should be removed by sifting. Set the
cans where they can drain readily into separate vessels; then have
four pupils pour water slowly into each can until it begins to drip
from the bottom, using care not to have any water stand on the sur¬
face of the soils when the dripping begins. Allow'the cans to stand
until all drip has ceased. Measure or weigh the drainage from each
can. This is free water—the water which would be removed from
soils by thorough underdrainage. 408

44 SCHOOL EXERCISES IN PLANT PRODUCTION.
From which soil was the greatest amount of drainage collected ?
Does the amount of drainage water appear to have any relation to the
fineness of the soil ? Which soil drained the most rapidly ? Do soils
underlain with sand (having a sandy subsoil) need underdraining as
a rule ? Exercise 41.—Capillary Moisture in Soils.
As soon as all drip from the soils used in Exercise 40 has ceased
weigh each can, and by comparing this weight with the dry weight
of the same soil determine how much moisture has been held by each
soil. The difference in each case represents approximately the capil¬
lary moisture in the soil—that is, the moisture which is held in sus¬
pension between the soil particles.
Which soil retained the greatest amount of capillary moisture?
This was what per cent of the dry weight ? Does the amount bear
any relation to the fineness of the soils? To the amount of organic
matter? Find the volume of your cans and estimate how many
pounds of water per cubic foot each soil is capable of holding. What
does it represent in inches of rainfall ?
Capillary moisture and film moisture (see Exercise 42) are sup¬
posed to dissolve from the surface of soil particles plant food which
is taken up by the roots of plants. Does a fine or a coarse soil present
a greater amount of surface to the action of water? Does the fine¬
ness of a soil then bear any relation to its fertility ? What ?
The teacher can illustrate the increase of surface due to fineness of
division by taking an inch cube of wood and dipping it in ink. Show
the pupils that it now presents a surface of 6 square inches; split it
in two and show them the 2 square inches of uncolored surface which
have been added by division. Have seedlings of radishes growing
in a box of sandy soil. Pull some of these up and show how the root
hairs cling to the particles of soil.
Exercise 42.—Hygroscopic Moisture in Soils.
The presence of hygroscopic or film moisture in soils may be dem¬ onstrated by spreading out and air-drying thoroughly one of the soil
samples used in the preceding exercises; then putting a small portion
of it into a test tube and heating it to a high temperature. If an}/
moisture condenses on the inside of the tube it is hygroscopic or
film moisture from the soil. Or weigh out 10 grams of air-dry soil,
put it in an iron spoon, heat it red hot, and again weigh it. From
the weights before and after heating determine the film moisture. 408
SCHOOL EXERCISES IN PLANT PRODUCTION. 45
Exercise 43.—The Influence of Tillage and Mulches on the Retention of
Moisture in Soils.
Fill four lamp chimneys, prepared as in figure 39, or better, four
12-inch lengths of 4-inch down-spouting or conductor pipe prepared
in a similar manner, with fine garden loam to within 2 inches of the
top. Immerse these tubes for a few seconds in water. Cover the
surface of the soil in one tube with 1J inches of the same kind of soil,
and pack it down. Cover another with 1 \ inches of the same kind of
soil, and keep it loose by stirring from time to time. Cover another
with 1J inches of road dust, and another with 1J inches of chaff or
finely cut straw. Suspend the tubes where drainage will be free and
where all will be subjected to the same conditions as to sunlight and
currents of air. Weigh them morning and evening for three or four
days.
Which tube lost moisture most rapidly? Which most slowly?
What is the conclusion as to the influence of cultivation or mulches
upon the retention of moisture in the soil? Is the destruction of
weeds the only object sought in cultivating crops?
Exercise 44.—To Show the Effect of Plowing Down Manures and Clods.a
Fill three chimneys or tin cylinders, prepared as in Exercise 43,
three-fourths full of fine dry soil. On top of this soil in one chimney
pack 1 inch of finely cut, dry straw, on another 1 inch of well-rotted
straw or manure, and on the other 1 inch of hard clay broken into
pieces about the size of large peas. Fill the chimneys with more fine
dry soil and set them in a pan containing a half inch or so of water.
Keep water in the pan all of the time. Note the rise of water in the
chimneys. Does it pass through the dry straw or clods as quickly as
it does through the rotted material? The straw and rotted manure
represent material plowed under and lying in the bottom of the
furrow, and the clods represent a hard baked surface plowed under.
The soil on top represents the furrow slice. Apply this experiment
to farm practice. In which condition do you think a crop would
suffer least from dry weather? When should strawy manure be
plowed under, spring or autumn? When hard baked clay? Why?
(See Exercise 36.)
Exercise 45.—Influence of Drainage upon Plant Growth.
We have learned from Exercise 38 how the amount of moisture in
the soil, or, in other words, how drainage affects the temperature.
The influence of drainage upon plant growth can be shown by planting
corn, beans, or almost any seed in the same kind of soil in two tomato
a Adapted from Fisher. Practical studies in Agriculture for Public Schools.
Purdue University. 408

46 SCHOOL EXERCISES IN PLANT PRODUCTION.
cans, one with holes punched in the bottom and the other without.
Apply the same amount of water to each can from day to day, and
observe the condition of the plants for two or three weeks.
As soon as any marked difference in favor of the drained soil is
manifested in the condition of the growing plants, seal the holes in
the bottom of the drained can with paraffin or wax, and punch holes
in the bottom of the other can. Continue to apply water as before
and note any changes that occur.
Exercise 46.—Effect of Manures on Plant Growth.
In this exercise wheat is to be grown for three weeks on soils treated
in different ways. The first thing to do is to put about 150 or 200
plump kernels of wheat in the seed tester (fig. 12) so that it will be
sprouted by the time the soil is ready for planting.
Now secure enough sandy or sandy loam soil to fill 8 common tum¬
blers or drinking glasses. Pulverize the soil, mix it thoroughly and
divide it into 4 equal parts, putting each fourth into a granite or
earthenware pan, and numbering the pans 1, 2, 3, and 4.
The soil in pan No. 1 should be used as a check, that is, it should
not be treated with any fertilizer or manure. It will thus serve as a
means of comparison to show the effect of applying manures to the
other soils.
The soil in pan No. 2 should be treated with nitrogen as follows:
Secure from a druggist or a fertilizer dealer a small quantity of
nitrate of soda and dissolve one level teaspoonful of this material in
2 quarts of clean rain water. Take 1 ounce of this solution (meas¬
ured in a graduate or an ounce bottle) and sprinkle it carefully over
the whole surface of the soil in pan No. 2. Sprinkle enough more
clean rain water over the soil to wash the nitrate of soda into the soil.
To the soil in pan No. 3 add as much dry finely pulverized barnyard
manure as can be put (without packing) in a 10-gauge shotgun shell.
With a case knife or clean glass rod mix the manure thoroughly with
the soil. Sprinkle the soil with clean rain water as in pan No. 2.
Green manure is to be added to the soil in pan No. 4. To prepare
this dig up a number of plants of clover, alfalfa, or cowpeas, and
carefully wash all dirt from the roots. Select two or three plants
having nodules (small irregular knots formed by nitrogen-gathering
bacteria) on the roots and run them (root and top) through a meat
chopper or sausage grinder, or chop them with a chopping knife until
they become a shredded pulpy mass. Do not lose the green watery
juice that is squeezed from the plants in grinding or chopping, but
mix it in with the pulp. To the soil in pan No. 4 add a 10-gauge
shotgun shell twice full of this pulp, mix thoroughly, and wash down
as directed for pan No. 3. 408

SCHOOL EXERCISES IN PLANT PRODUCTION. 47
Place the four pans in the sunshine and leave them for about twenty-four hours.
On the following day bring the soil in the different pans to the proper condition of moisture—just wet enough to hold together after squeezing in the hand, but not so wet that water can easily be squeezed from it. Fill two tumblers to within one-lialf inch of the top from each pan. The tumblers filled from pan No. 1 should be labeled “No. 1, check,” those from pan No. 2, “No. 2, nitrogen,” those from pan No. 3, “No. 3, barnyard manure,” and those from pan No. 4, “No. 4, green manure.”
From the seed tester select five strong, well-sprouted grains of wheat for each tumbler. Make a straight groove one-quarter inch deep in the soil of each tumbler and place in it at regular intervals the five selected grains of wheat, using care to set the kernels with the sprouts right side up and all facing oneway, so that the plants will all come up regularly at about the same time. Cover the grains and set the tumblers in a light, warm place.
Allow the plants to grow three weeks. Water them each day, but do not use enough water to soak the soil. The tumblers have no drainage and if water stands in the bottom of the tumblers it will shut out the oxygen needed by the roots of the plants.
At the end of the three weeks compare the plants in the four sets of tumblers as to color, vigor, height of plant, and root development.
Judging by the condition of the plants, was the soil improved by the application of a manure ? Which treatment gave the best result ? Which soil seems to be in the best physical condition—i. e., loose and friable ? Which contains the most humus ? How was this humus provided ? If you had a farm of this kind of soil which manure would you use?
HELPS FOR TEACHERS. •
Teachers will find additional suggestions for school exercises and problems in agriculture in nearly every elementary text-book on the subject. In addition to these, the following books and pamphlets are devoted entirely to such exercises and problems:
Rural School Agriculture, by W. M. Hays and others, St. Paul, Minn.
Rural School Agriculture, by C. W. Davis, New York, 1907. One Hundred Experiments in Elementary Agriculture for California
Schools, by R. O. Johnson, San Francisco, 1908. One Hundred Lessons in Agriculture, by A. W: Nolan, Morgan¬
town, W. Va., 1909. Farm Arithmetic, by Miss Jessie Field, Shenandoah, Iowa, 1909.
408
48 SCHOOL EXERCISES IN PLANT PRODUCTION.
Outlines of Agriculture for Rural Schools, by C. M. Evans, Chicago,
1910. Teachers will do well to purchase through their local dealers copies
of as many as possible of these books to be used for reference purposes.
Almost any local stationer or book dealer will be able to procure them.
In addition to these there are many free publications that will be
helpful to both teachers and pupils.
The free publications of the United States Department of Agricul¬
ture can be selected from lists which can be procured from Members
of Congress or from the Secretary of Agriculture. One of these lists
has been prepared especially for teachers and is entitled “ Free Publi¬
cations of the Department of Agriculture Classified for the Use of
Teachers.” (O. E. S. Cir. 94.)
The publications of the several state institutions are in most cases
free to teachers residing in the State, but are not available for others.
Every state experiment station issues free agricultural bulletins,
and in addition to these the following state institutions have issued
pamphlets containing lessons or exercises for public schools:
Alabama—Tuskegee Institute; Connecticut—State Board of Edu¬
cation, Hartford; Geogria—Education Department (Ann. Rpt. 1904),
Atlanta; Indiana—Purdue University bulletins, Lafayette; Kansas—
State Agricultural College (Industrialist), Manhattan; Massachu¬
setts—Agricultural College, Department of Agricultural Education,
Amherst; Michigan—Agricultural College, East Lansing, and State
Department of Public Instruction, Lansing; Minnesota—College of
Agriculture, University Farm, St. Paul; Missouri—University of Mis¬
souri bulletins, and State Board of Agriculture bulletins, Columbia;
Nebraska—College of Agriculture, and State Department of Educa¬
tion, Lincoln; New Hampshire—College of Agriculture and Mechanic
Arts, Durham; New York—State College of Agriculture (Rural School
Leaflets), Ithaca, and State Education Department, Albany; Ohio—
College of Agriculture (Extension Bulletins), Columbus; Oklahoma—
Agricultural and Mechanical College, Stillwater; Rhode Island—
State College (Nature Guard), Kingston; South Dakota—State Col¬
lege of Agriculture and Mechanic Arts, Brookings.
[A list giving the titles of all Farmers’ Bulletins available for distribution will be
sent free upon application to a Member of Congress or the Secretary of Agriculture.]
408
o