Embed Size (px)
Citation preview

RL Incident Reporting
Last updated: 3/21/2017
RL Incident Reporting Page 1
Need Help?
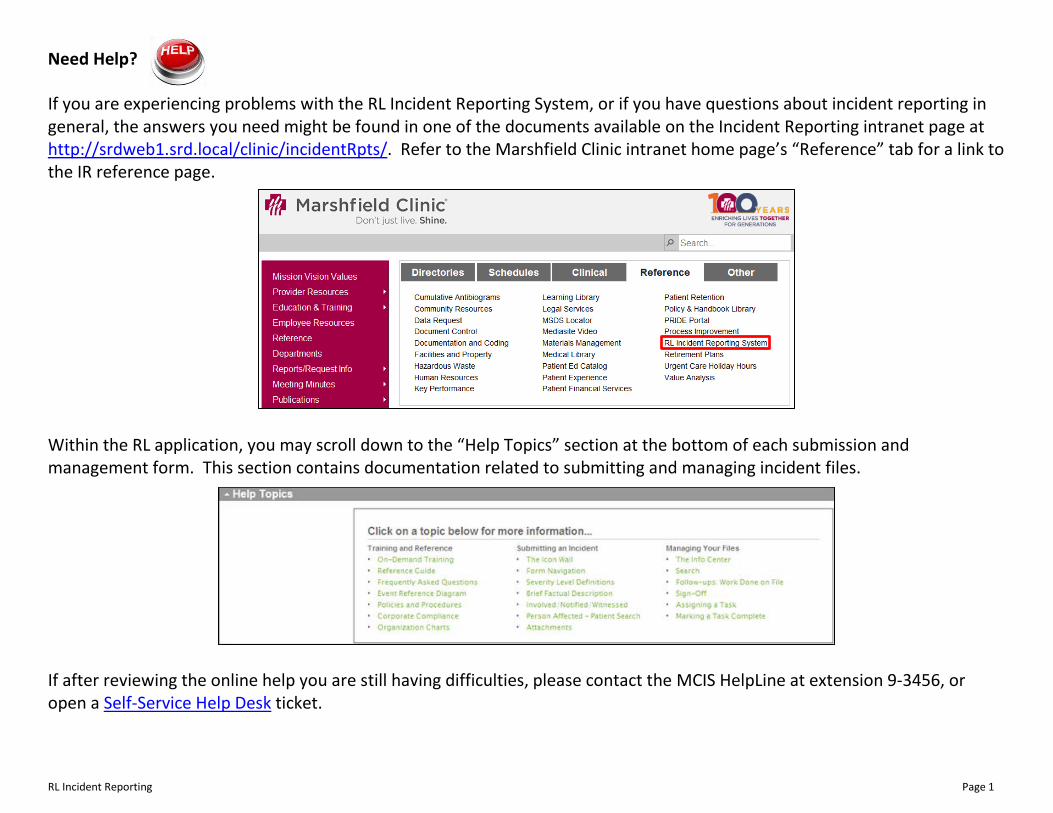
If you are experiencing problems with the RL Incident Reporting System, or if you have questions about incident reporting in general, the answers you need might be found in one of the documents available on the Incident Reporting intranet page at http://srdweb1.srd.local/clinic/incidentRpts/. Refer to the Marshfield Clinic intranet home page’s “Reference” tab for a link to the IR reference page.
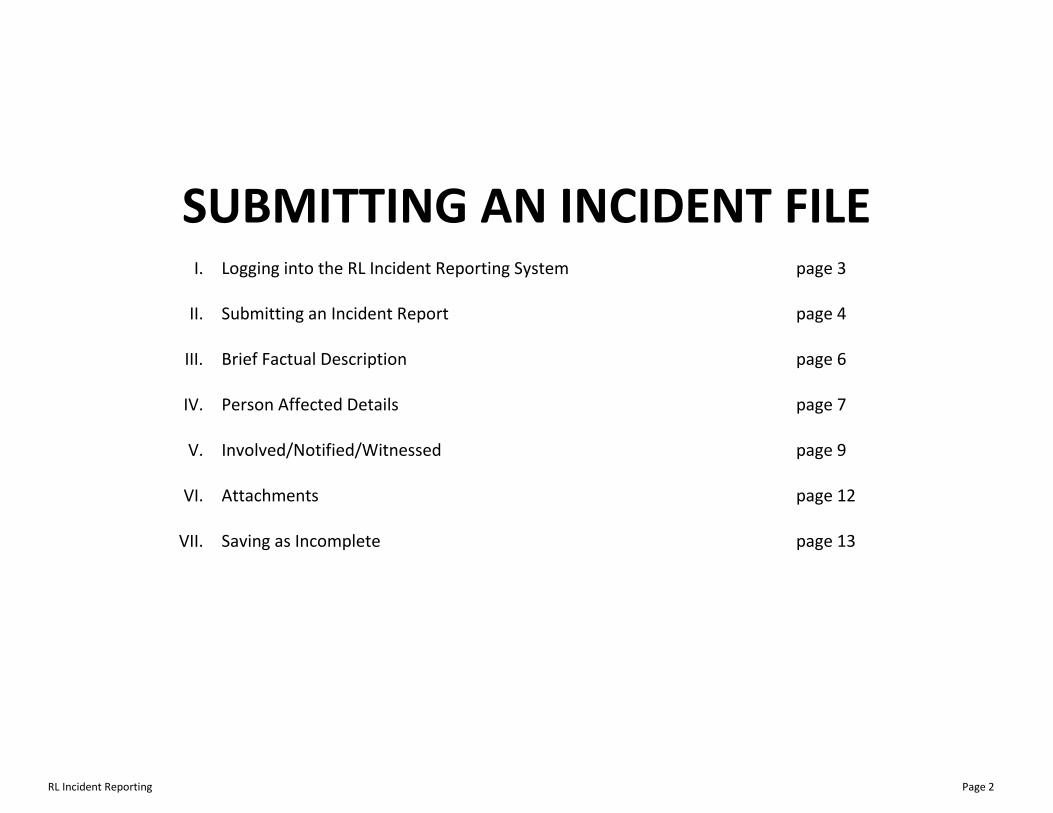
Within the RL application, you may scroll down to the “Help Topics” section at the bottom of each submission and management form. This section contains documentation related to submitting and managing incident files.
If after reviewing the online help you are still having difficulties, please contact the MCIS HelpLine at extension 9-3456, or open a Self-Service Help Desk ticket.
RL Incident Reporting Page 2
SUBMITTING AN INCIDENT FILE
I. Logging into the RL Incident Reporting System
II. Submitting an Incident Report
III. Brief Factual Description
IV. Person Affected Details
V. Involved/Notified/Witnessed
VI. Attachments
VII. Saving as Incomplete
page 3 page 4 page 6 page 7 page 9 page 12 page 13
RL Incident Reporting Page 3
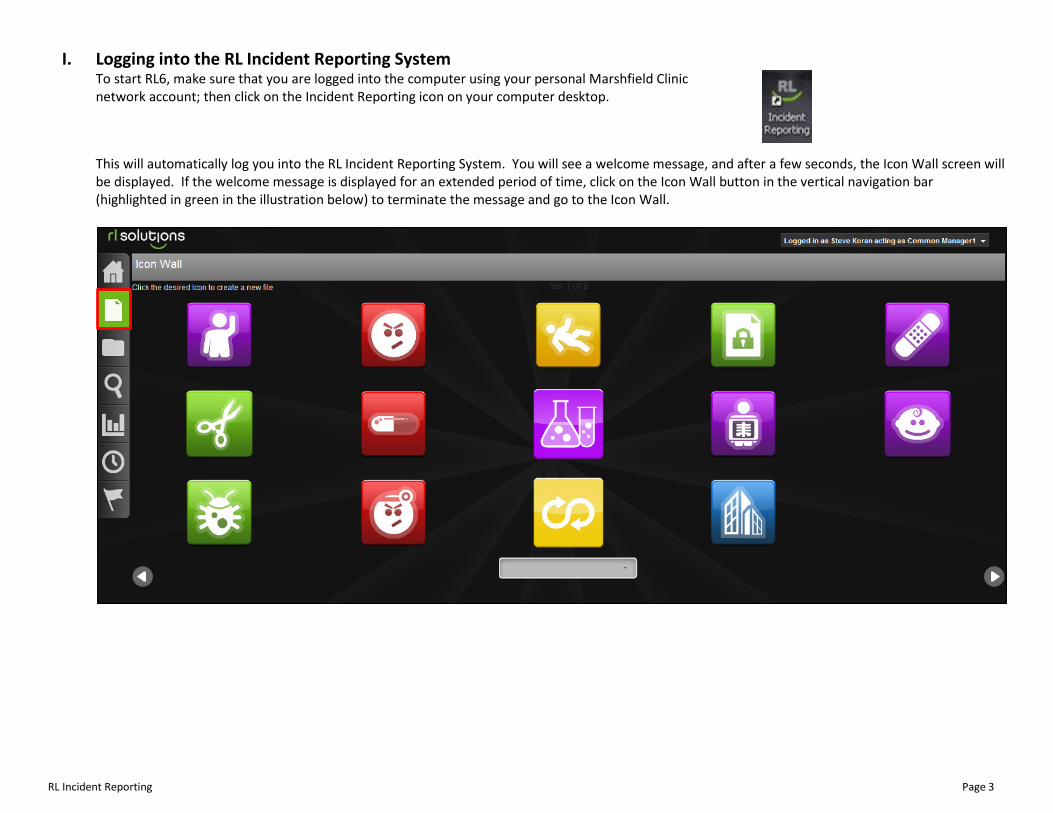
I. Logging into the RL Incident Reporting System To start RL6, make sure that you are logged into the computer using your personal Marshfield Clinic network account; then click on the Incident Reporting icon on your computer desktop.
This will automatically log you into the RL Incident Reporting System. You will see a welcome message, and after a few seconds, the Icon Wall screen will be displayed. If the welcome message is displayed for an extended period of time, click on the Icon Wall button in the vertical navigation bar (highlighted in green in the illustration below) to terminate the message and go to the Icon Wall.
RL Incident Reporting Page 4
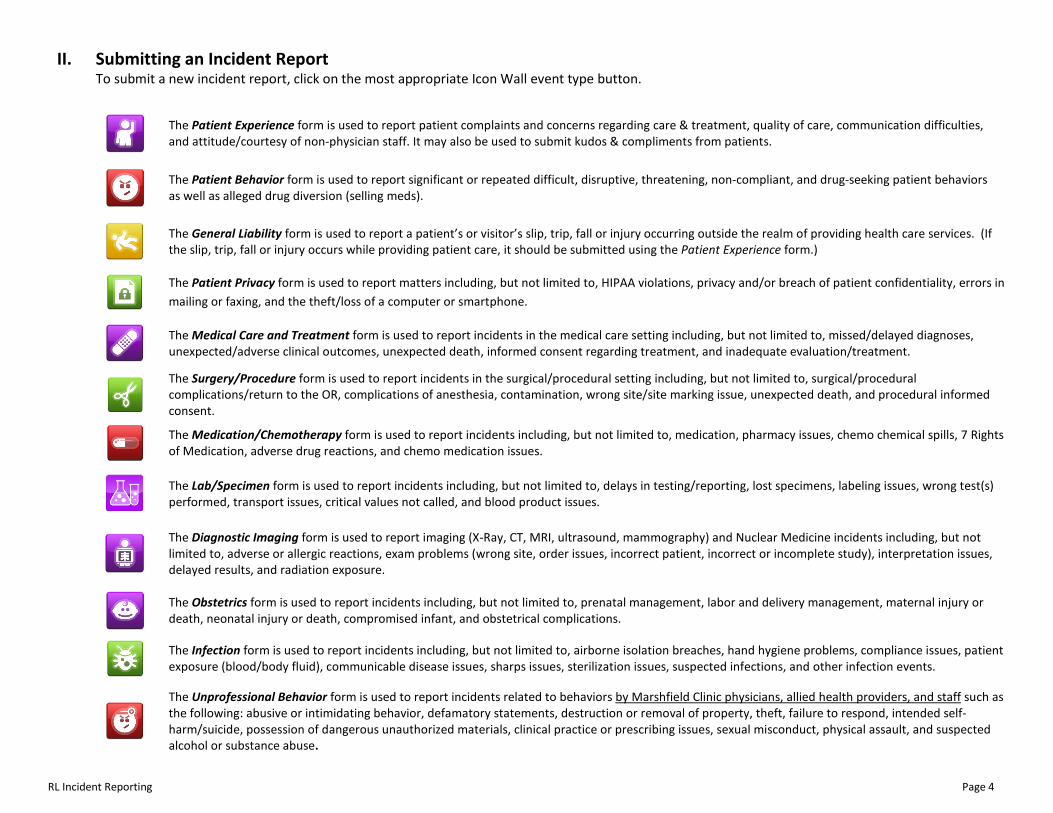
II. Submitting an Incident Report To submit a new incident report, click on the most appropriate Icon Wall event type button.
The Patient Experience form is used to report patient complaints and concerns regarding care & treatment, quality of care, communication difficulties, and attitude/courtesy of non-physician staff. It may also be used to submit kudos & compliments from patients.
The Patient Behavior form is used to report significant or repeated difficult, disruptive, threatening, non-compliant, and drug-seeking patient behaviors as well as alleged drug diversion (selling meds).
The General Liability form is used to report a patient’s or visitor’s slip, trip, fall or injury occurring outside the realm of providing health care services. (If the slip, trip, fall or injury occurs while providing patient care, it should be submitted using the Patient Experience form.)
The Patient Privacy form is used to report matters including, but not limited to, HIPAA violations, privacy and/or breach of patient confidentiality, errors in mailing or faxing, and the theft/loss of a computer or smartphone.
The Medical Care and Treatment form is used to report incidents in the medical care setting including, but not limited to, missed/delayed diagnoses, unexpected/adverse clinical outcomes, unexpected death, informed consent regarding treatment, and inadequate evaluation/treatment.
The Surgery/Procedure form is used to report incidents in the surgical/procedural setting including, but not limited to, surgical/procedural complications/return to the OR, complications of anesthesia, contamination, wrong site/site marking issue, unexpected death, and procedural informed consent.
The Medication/Chemotherapy form is used to report incidents including, but not limited to, medication, pharmacy issues, chemo chemical spills, 7 Rights of Medication, adverse drug reactions, and chemo medication issues.
The Lab/Specimen form is used to report incidents including, but not limited to, delays in testing/reporting, lost specimens, labeling issues, wrong test(s) performed, transport issues, critical values not called, and blood product issues.
The Diagnostic Imaging form is used to report imaging (X-Ray, CT, MRI, ultrasound, mammography) and Nuclear Medicine incidents including, but not limited to, adverse or allergic reactions, exam problems (wrong site, order issues, incorrect patient, incorrect or incomplete study), interpretation issues, delayed results, and radiation exposure.
The Obstetrics form is used to report incidents including, but not limited to, prenatal management, labor and delivery management, maternal injury or death, neonatal injury or death, compromised infant, and obstetrical complications.
The Infection form is used to report incidents including, but not limited to, airborne isolation breaches, hand hygiene problems, compliance issues, patient exposure (blood/body fluid), communicable disease issues, sharps issues, sterilization issues, suspected infections, and other infection events.
The Unprofessional Behavior form is used to report incidents related to behaviors by Marshfield Clinic physicians, allied health providers, and staff such as the following: abusive or intimidating behavior, defamatory statements, destruction or removal of property, theft, failure to respond, intended self-harm/suicide, possession of dangerous unauthorized materials, clinical practice or prescribing issues, sexual misconduct, physical assault, and suspected alcohol or substance abuse.

RL Incident Reporting Page 5
The Medical Device Reporting and Recall form is used to report incidents involving equipment, failed medical devices, and recalls.
The Safety/Security/Facility form is used to report incidents related to environment, cleanliness, safety, auto accidents on premises, parking, abduction, bomb threats, weapons on premises, theft, and property damage/vandalism.
The selected event type’s submission form will open. (The top half of the Medication/Chemotherapy form is shown below.) Fill out fields accurately and completely. Fields with a green asterisk* are required.
When you have filled in the fields accurately and completely, click on the button (located at the bottom-right of the submission form) to submit the incident report file.
RL Incident Reporting Page 6
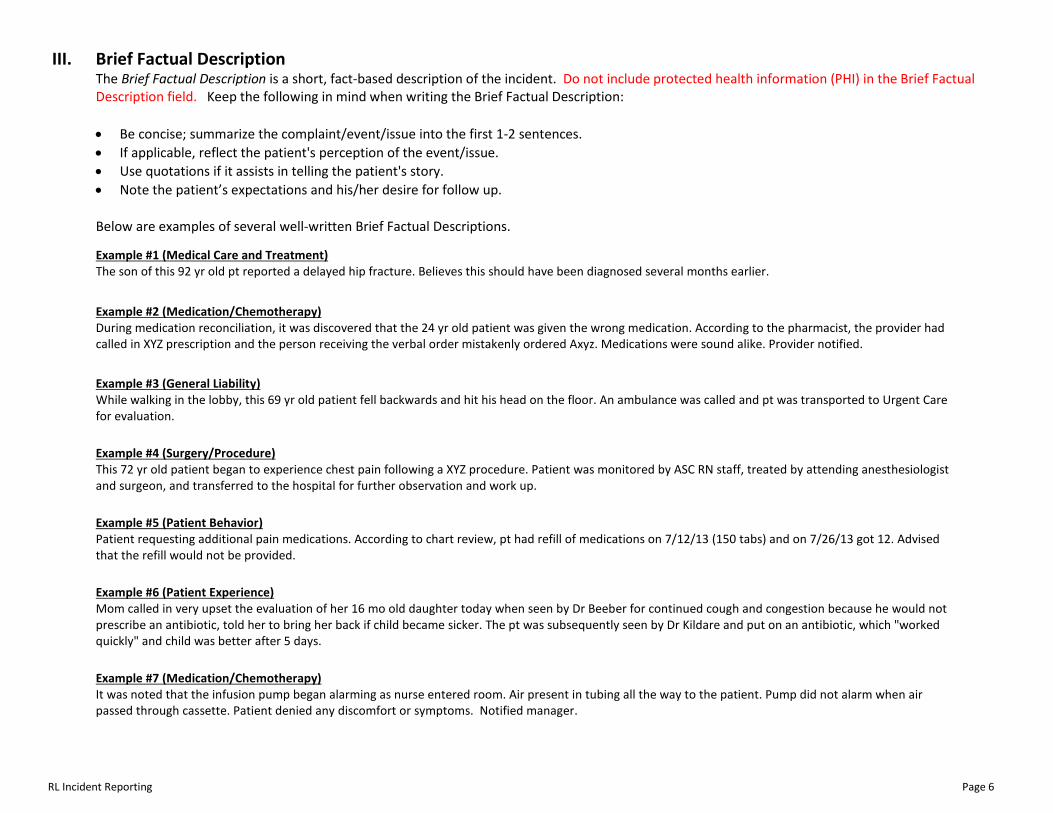
III. Brief Factual Description The Brief Factual Description is a short, fact-based description of the incident. Do not include protected health information (PHI) in the Brief Factual Description field. Keep the following in mind when writing the Brief Factual Description:
• Be concise; summarize the complaint/event/issue into the first 1-2 sentences. • If applicable, reflect the patient's perception of the event/issue. • Use quotations if it assists in telling the patient's story. • Note the patient’s expectations and his/her desire for follow up.
Below are examples of several well-written Brief Factual Descriptions.
Example #1 (Medical Care and Treatment) The son of this 92 yr old pt reported a delayed hip fracture. Believes this should have been diagnosed several months earlier.
Example #2 (Medication/Chemotherapy) During medication reconciliation, it was discovered that the 24 yr old patient was given the wrong medication. According to the pharmacist, the provider had called in XYZ prescription and the person receiving the verbal order mistakenly ordered Axyz. Medications were sound alike. Provider notified.
Example #3 (General Liability) While walking in the lobby, this 69 yr old patient fell backwards and hit his head on the floor. An ambulance was called and pt was transported to Urgent Care for evaluation.
Example #4 (Surgery/Procedure) This 72 yr old patient began to experience chest pain following a XYZ procedure. Patient was monitored by ASC RN staff, treated by attending anesthesiologist and surgeon, and transferred to the hospital for further observation and work up.
Example #5 (Patient Behavior) Patient requesting additional pain medications. According to chart review, pt had refill of medications on 7/12/13 (150 tabs) and on 7/26/13 got 12. Advised that the refill would not be provided.
Example #6 (Patient Experience) Mom called in very upset the evaluation of her 16 mo old daughter today when seen by Dr Beeber for continued cough and congestion because he would not prescribe an antibiotic, told her to bring her back if child became sicker. The pt was subsequently seen by Dr Kildare and put on an antibiotic, which "worked quickly" and child was better after 5 days.
Example #7 (Medication/Chemotherapy) It was noted that the infusion pump began alarming as nurse entered room. Air present in tubing all the way to the patient. Pump did not alarm when air passed through cassette. Patient denied any discomfort or symptoms. Notified manager.
RL Incident Reporting Page 7
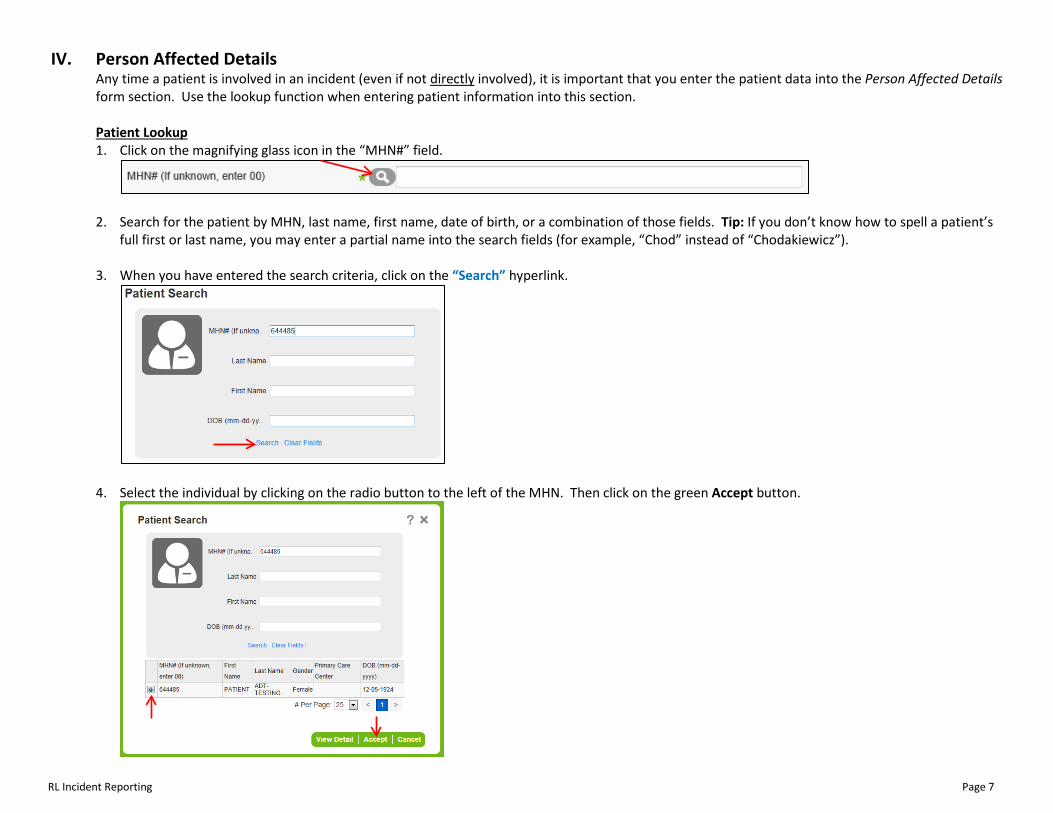
IV. Person Affected Details Any time a patient is involved in an incident (even if not directly involved), it is important that you enter the patient data into the Person Affected Details form section. Use the lookup function when entering patient information into this section.
Patient Lookup 1. Click on the magnifying glass icon in the “MHN#” field.
2. Search for the patient by MHN, last name, first name, date of birth, or a combination of those fields. Tip: If you don’t know how to spell a patient’s
full first or last name, you may enter a partial name into the search fields (for example, “Chod” instead of “Chodakiewicz”). 3. When you have entered the search criteria, click on the “Search” hyperlink.
4. Select the individual by clicking on the radio button to the left of the MHN. Then click on the green Accept button.

RL Incident Reporting Page 8
5. The patient’s demographic data will be loaded into the Person Affected Details section of the form.
RL Incident Reporting Page 9
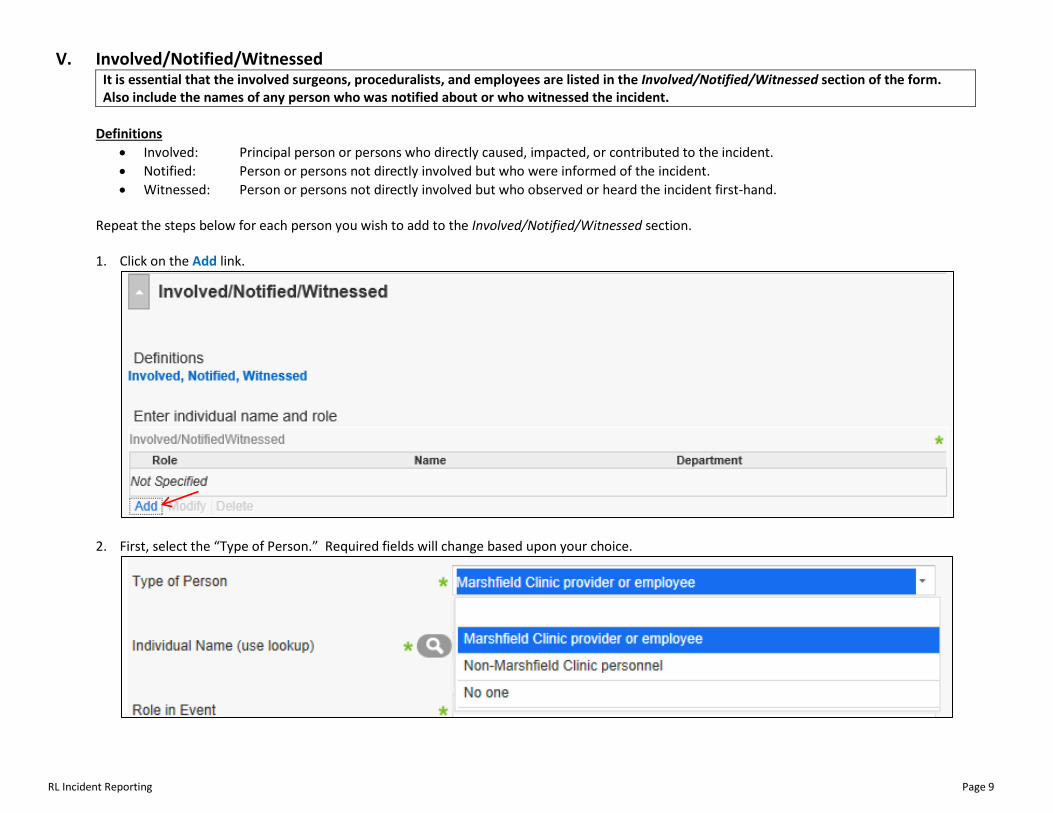
V. Involved/Notified/Witnessed It is essential that the involved surgeons, proceduralists, and employees are listed in the Involved/Notified/Witnessed section of the form. Also include the names of any person who was notified about or who witnessed the incident.
Definitions
• Involved: Principal person or persons who directly caused, impacted, or contributed to the incident. • Notified: Person or persons not directly involved but who were informed of the incident. • Witnessed: Person or persons not directly involved but who observed or heard the incident first-hand.
Repeat the steps below for each person you wish to add to the Involved/Notified/Witnessed section.
1. Click on the Add link.
2. First, select the “Type of Person.” Required fields will change based upon your choice.
RL Incident Reporting Page 10
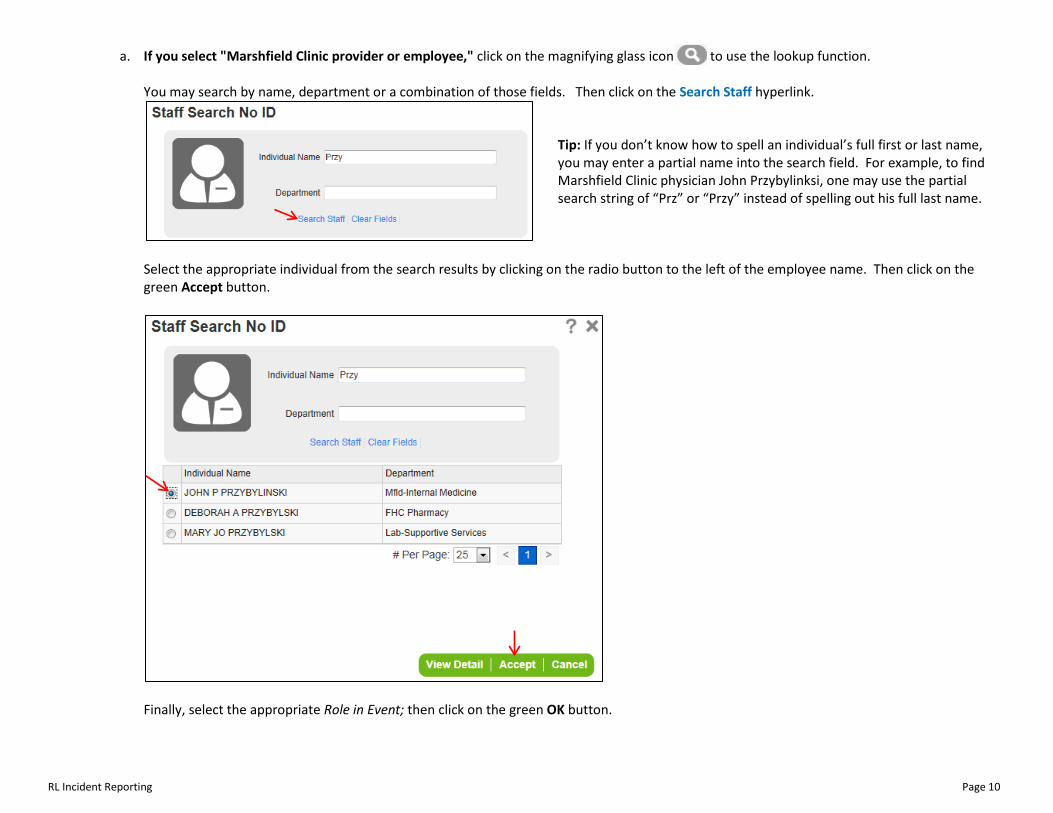
a. If you select "Marshfield Clinic provider or employee," click on the magnifying glass icon to use the lookup function.
You may search by name, department or a combination of those fields. Then click on the Search Staff hyperlink.
Tip: If you don’t know how to spell an individual’s full first or last name, you may enter a partial name into the search field. For example, to find Marshfield Clinic physician John Przybylinksi, one may use the partial search string of “Prz” or “Przy” instead of spelling out his full last name.
Select the appropriate individual from the search results by clicking on the radio button to the left of the employee name. Then click on the green Accept button.
Finally, select the appropriate Role in Event; then click on the green OK button.
RL Incident Reporting Page 11
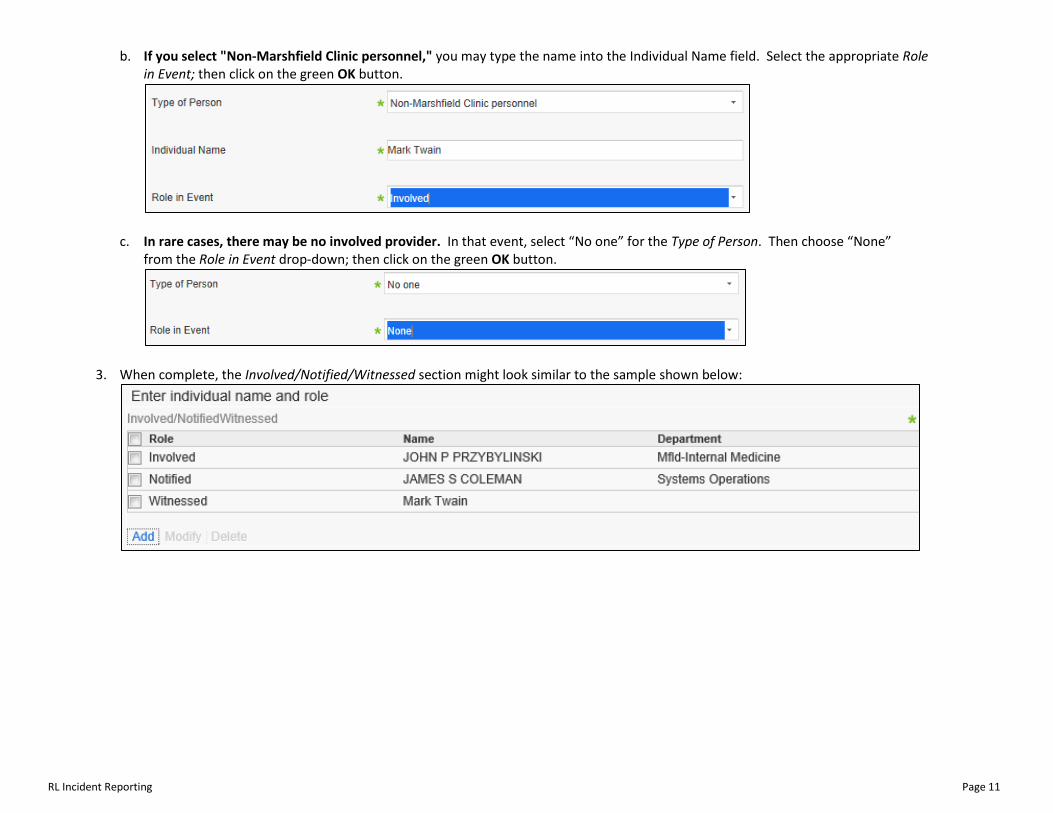
b. If you select "Non-Marshfield Clinic personnel," you may type the name into the Individual Name field. Select the appropriate Role in Event; then click on the green OK button.
c. In rare cases, there may be no involved provider. In that event, select “No one” for the Type of Person. Then choose “None”
from the Role in Event drop-down; then click on the green OK button.
3. When complete, the Involved/Notified/Witnessed section might look similar to the sample shown below:

RL Incident Reporting Page 12
VI. Attachments As necessary, you may upload a PDF file, Microsoft Word file, or other related document to the incident report file. 1. Find the Attachments section near the bottom of the main form.
2. Click on the Add link.
The Add Attachment page will open. Click on the Browse button to specify the location of the file you wish to attach. The “Category” field is not required; however, you may add a brief description of the attachment. When finished, click on the green OK button.
3. The document will be uploaded to the incident reporting system and attached to the incident file.
RL Incident Reporting Page 13
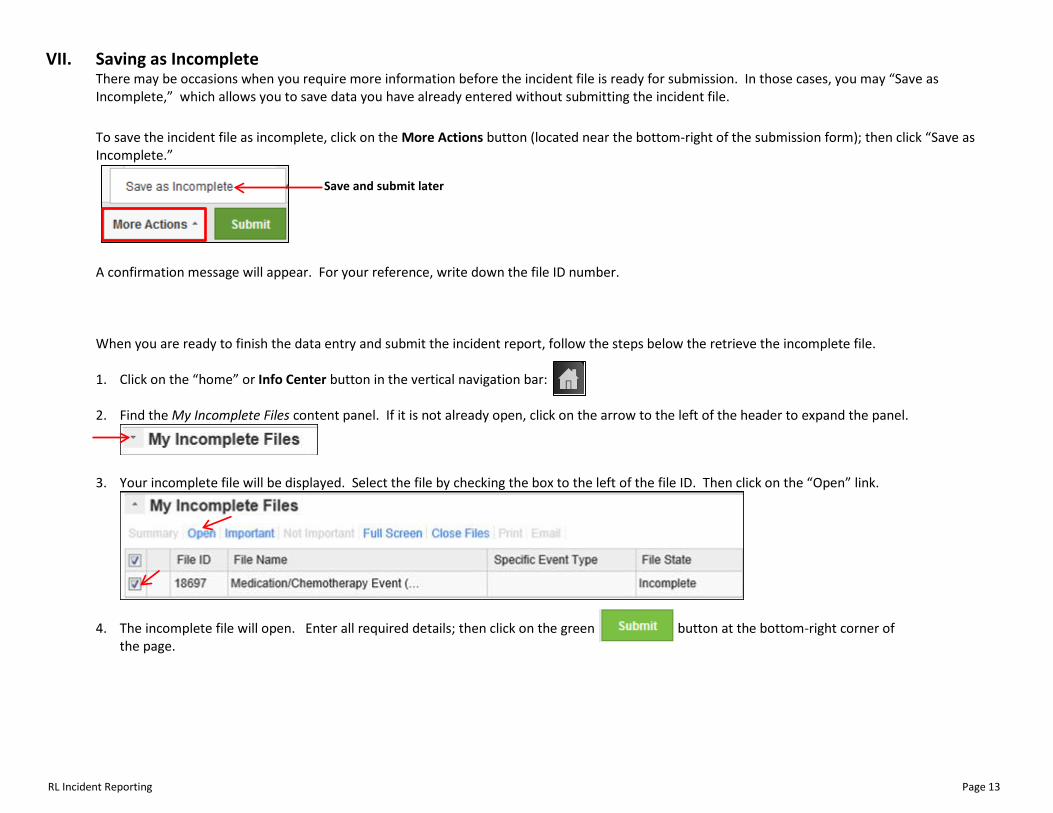
VII. Saving as Incomplete There may be occasions when you require more information before the incident file is ready for submission. In those cases, you may “Save as Incomplete,” which allows you to save data you have already entered without submitting the incident file. To save the incident file as incomplete, click on the More Actions button (located near the bottom-right of the submission form); then click “Save as Incomplete.”
A confirmation message will appear. For your reference, write down the file ID number. When you are ready to finish the data entry and submit the incident report, follow the steps below the retrieve the incomplete file. 1. Click on the “home” or Info Center button in the vertical navigation bar: 2. Find the My Incomplete Files content panel. If it is not already open, click on the arrow to the left of the header to expand the panel.
3. Your incomplete file will be displayed. Select the file by checking the box to the left of the file ID. Then click on the “Open” link.
4. The incomplete file will open. Enter all required details; then click on the green button at the bottom-right corner of
the page.
Save and submit later
RL Incident Reporting Page 14
MANAGING AN INCIDENT FILE
When an incident report is submitted in RL6, the appropriate managers and/or administrators are notified via e-mail. RL file managers are responsible for completing the following steps:
• Investigating the incident, • Documenting investigation details and any follow-up actions, • When the matter is resolved and documentation complete, signing-off on the incident file.
For additional information, see the RL Incident Reporting File Manager Checklist on page 31.
I. E-mail Notifications
II. Opening an Incident File via Search
III. The Info Center
IV. View File Summary
V. Open a File
VI. Saving Changes
VII. Review and Document: Follow-ups • Follow-up attachments
VIII. Assigning a Task
IX. Marking a Task Complete
X. Sign-Off
XI. Closing a File
XII. File Manager Checklist
page 15 page 16 page 17 page 18 page 19 page 20 page 21 page 23 page 24 page 26 page 29 page 30 page 31
RL Incident Reporting Page 15
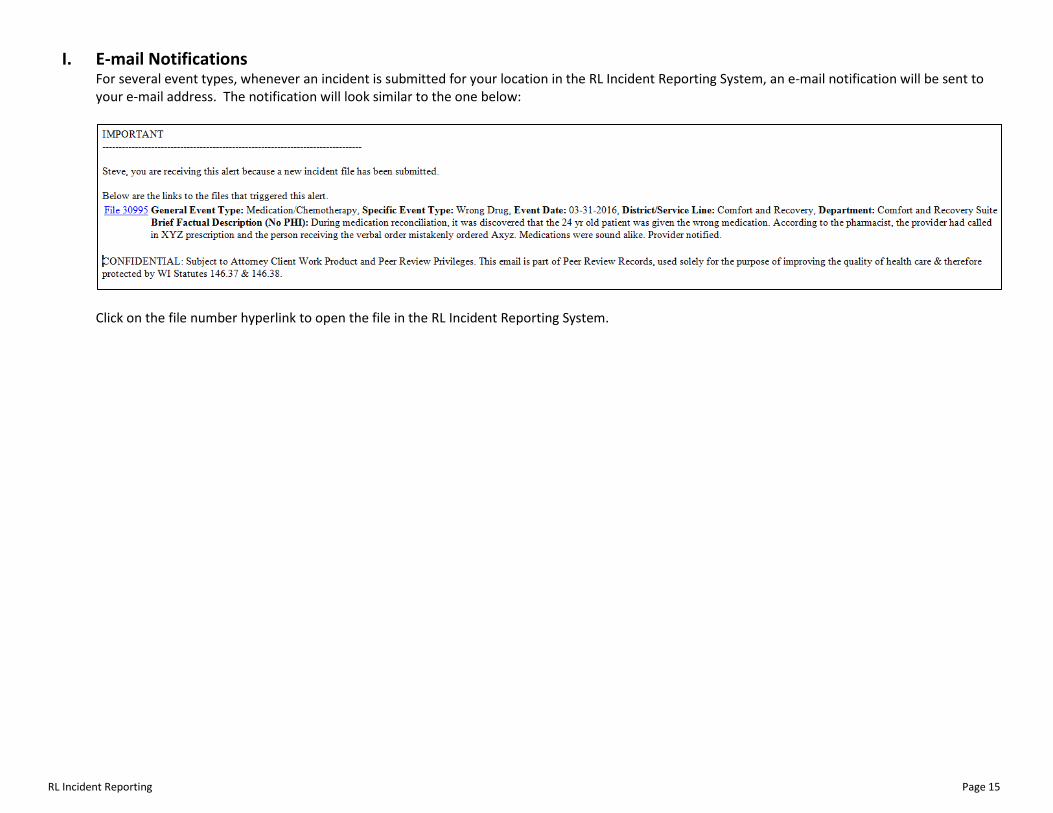
I. E-mail Notifications For several event types, whenever an incident is submitted for your location in the RL Incident Reporting System, an e-mail notification will be sent to your e-mail address. The notification will look similar to the one below:
Click on the file number hyperlink to open the file in the RL Incident Reporting System.
RL Incident Reporting Page 16
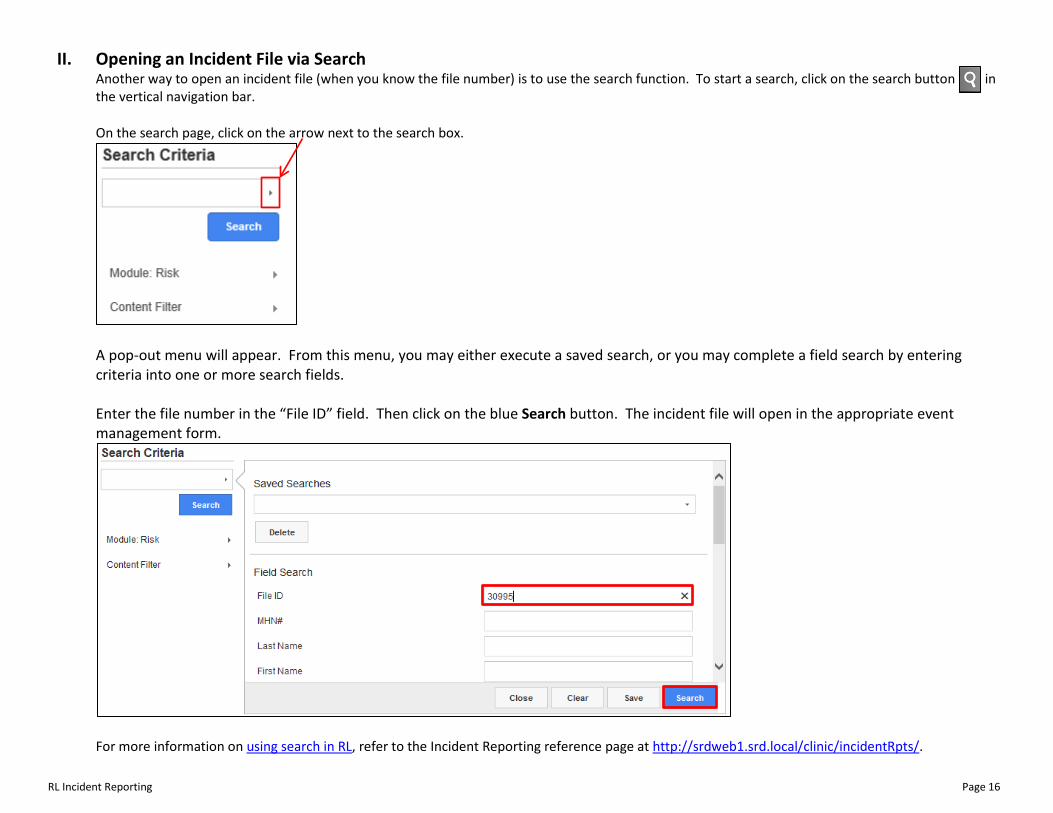
II. Opening an Incident File via Search Another way to open an incident file (when you know the file number) is to use the search function. To start a search, click on the search button in the vertical navigation bar. On the search page, click on the arrow next to the search box.
A pop-out menu will appear. From this menu, you may either execute a saved search, or you may complete a field search by entering criteria into one or more search fields. Enter the file number in the “File ID” field. Then click on the blue Search button. The incident file will open in the appropriate event management form.
For more information on using search in RL, refer to the Incident Reporting reference page at http://srdweb1.srd.local/clinic/incidentRpts/.
RL Incident Reporting Page 17
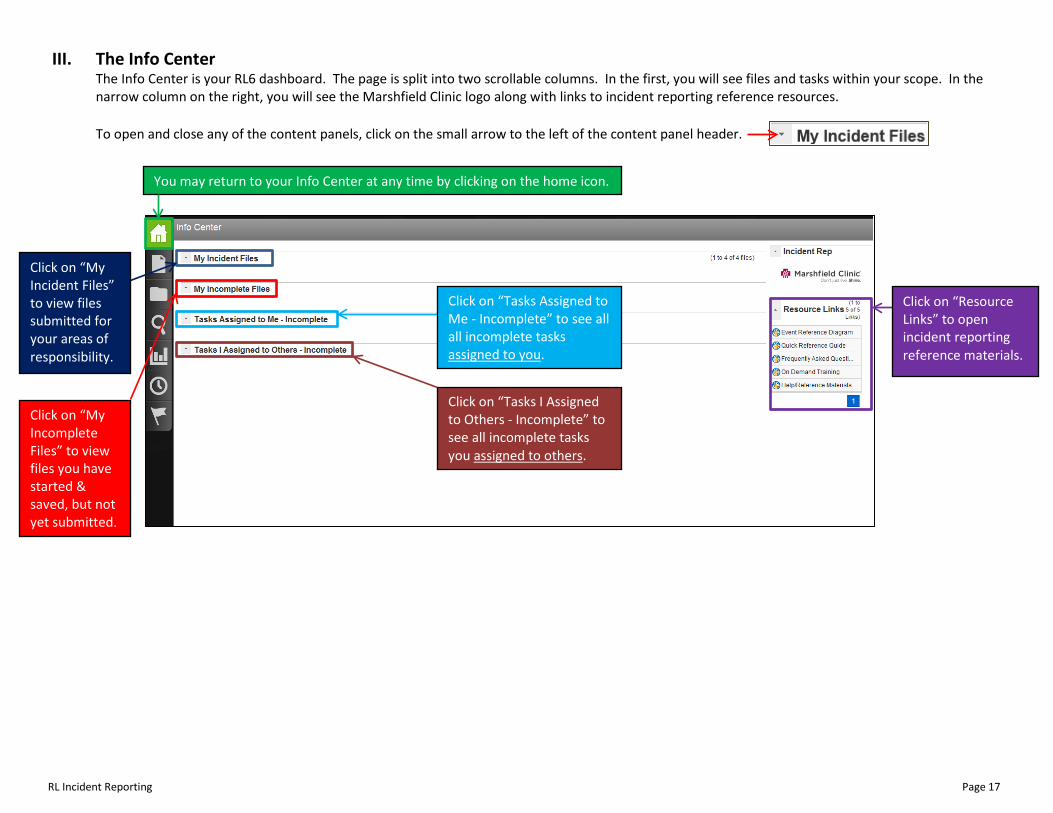
III. The Info Center The Info Center is your RL6 dashboard. The page is split into two scrollable columns. In the first, you will see files and tasks within your scope. In the narrow column on the right, you will see the Marshfield Clinic logo along with links to incident reporting reference resources.
To open and close any of the content panels, click on the small arrow to the left of the content panel header.
You may return to your Info Center at any time by clicking on the home icon.
Click on “My Incident Files” to view files submitted for your areas of responsibility.
Click on “My Incomplete Files” to view files you have started & saved, but not yet submitted.
Click on “Resource Links” to open incident reporting reference materials.
Click on “Tasks I Assigned to Others - Incomplete” to see all incomplete tasks you assigned to others.
Click on “Tasks Assigned to Me - Incomplete” to see all all incomplete tasks assigned to you.
RL Incident Reporting Page 18
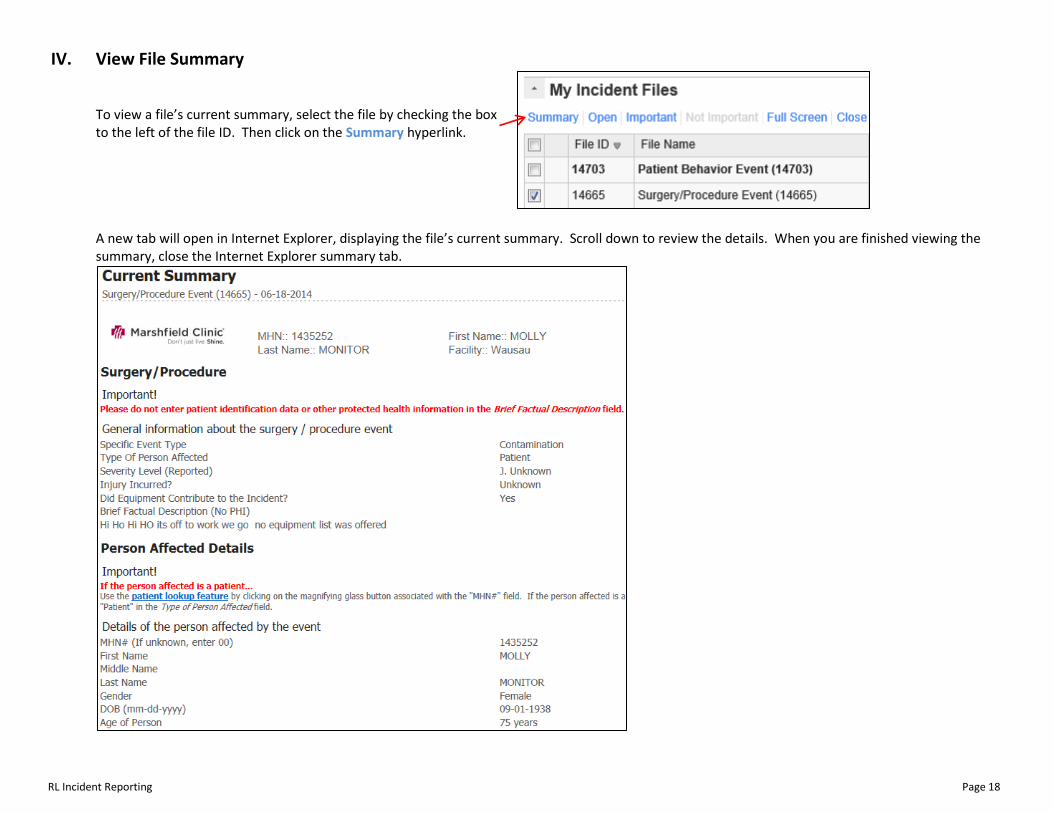
IV. View File Summary To view a file’s current summary, select the file by checking the box to the left of the file ID. Then click on the Summary hyperlink.
A new tab will open in Internet Explorer, displaying the file’s current summary. Scroll down to review the details. When you are finished viewing the summary, close the Internet Explorer summary tab.
RL Incident Reporting Page 19
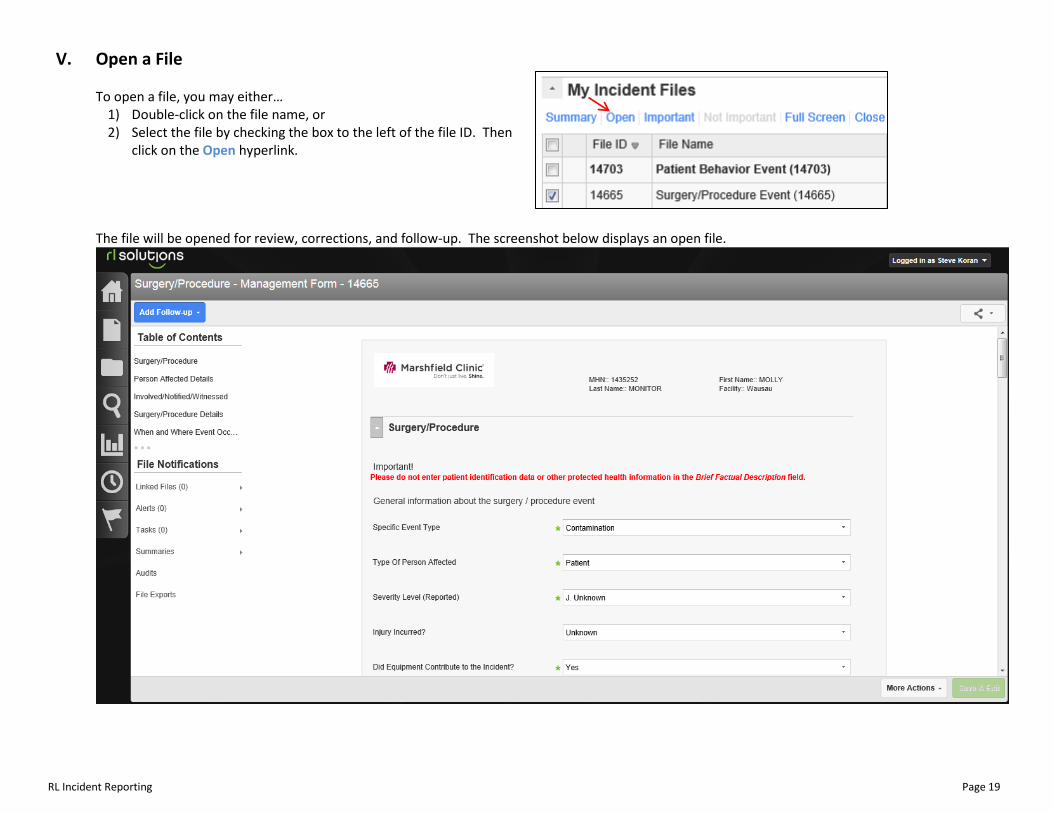
V. Open a File To open a file, you may either…
1) Double-click on the file name, or 2) Select the file by checking the box to the left of the file ID. Then
click on the Open hyperlink.
The file will be opened for review, corrections, and follow-up. The screenshot below displays an open file.
RL Incident Reporting Page 20
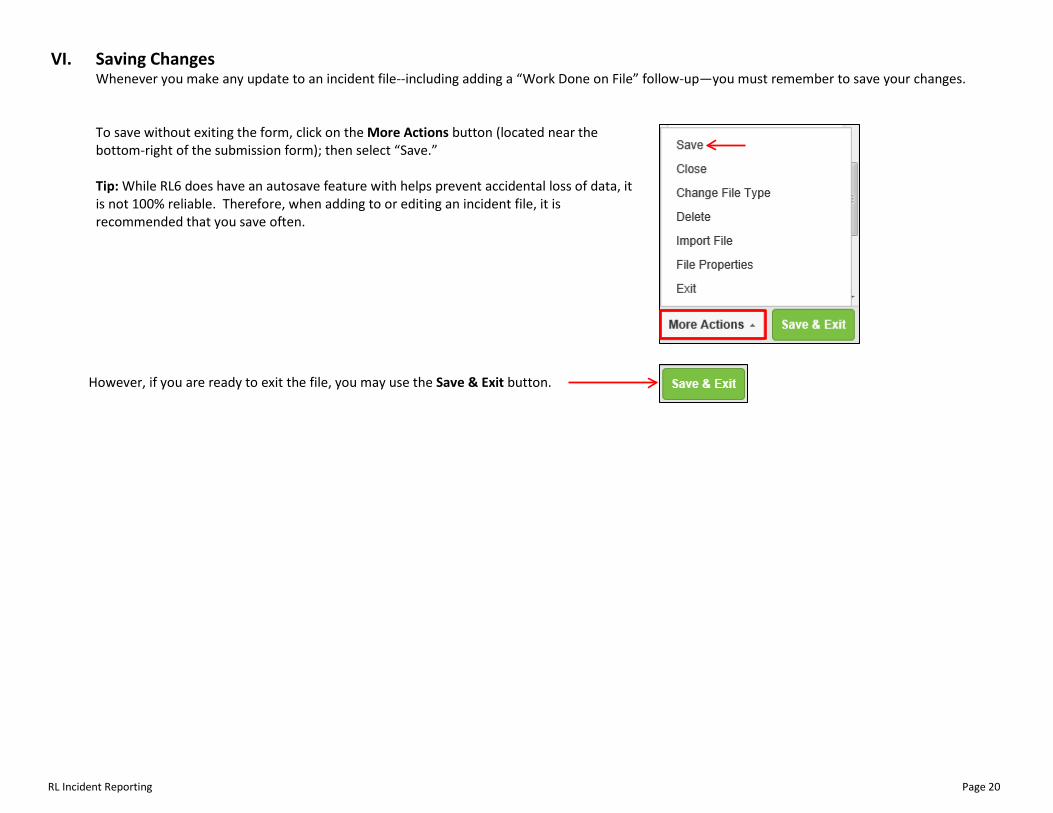
VI. Saving Changes Whenever you make any update to an incident file--including adding a “Work Done on File” follow-up—you must remember to save your changes.
To save without exiting the form, click on the More Actions button (located near the bottom-right of the submission form); then select “Save.” Tip: While RL6 does have an autosave feature with helps prevent accidental loss of data, it is not 100% reliable. Therefore, when adding to or editing an incident file, it is recommended that you save often.
However, if you are ready to exit the file, you may use the Save & Exit button.
RL Incident Reporting Page 21
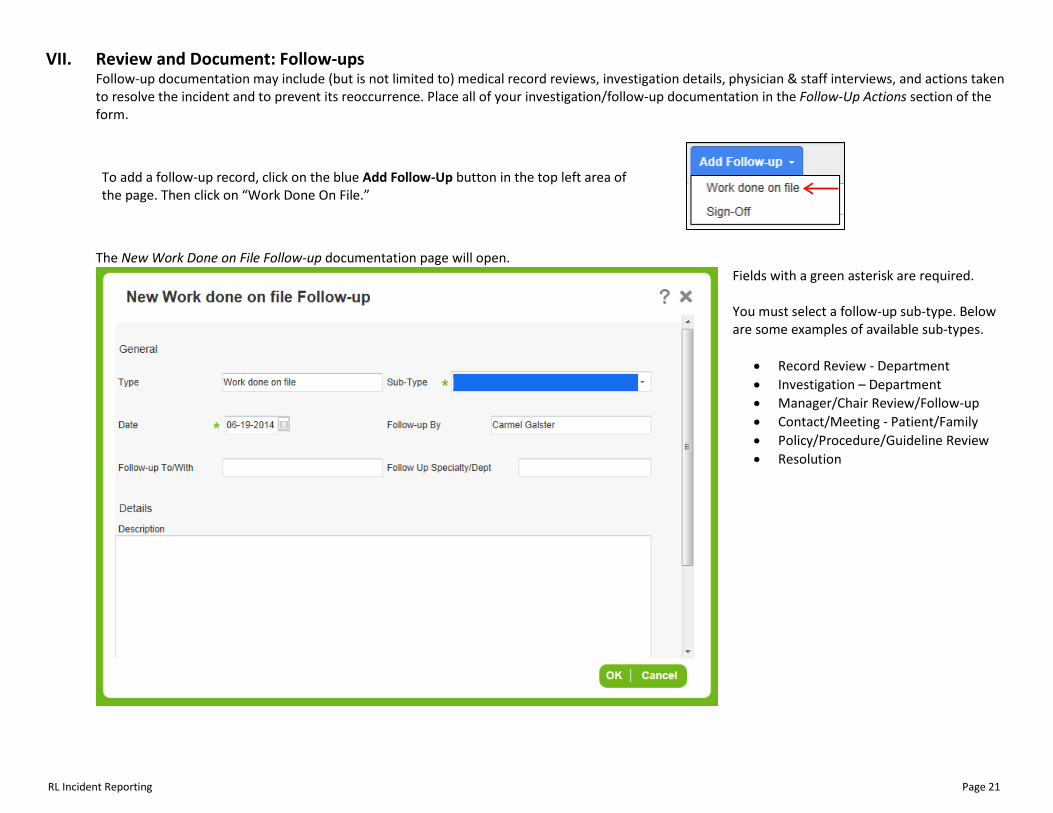
VII. Review and Document: Follow-ups Follow-up documentation may include (but is not limited to) medical record reviews, investigation details, physician & staff interviews, and actions taken to resolve the incident and to prevent its reoccurrence. Place all of your investigation/follow-up documentation in the Follow-Up Actions section of the form.
To add a follow-up record, click on the blue Add Follow-Up button in the top left area of the page. Then click on “Work Done On File.”
The New Work Done on File Follow-up documentation page will open.
Fields with a green asterisk are required. You must select a follow-up sub-type. Below are some examples of available sub-types.
• Record Review - Department • Investigation – Department • Manager/Chair Review/Follow-up • Contact/Meeting - Patient/Family • Policy/Procedure/Guideline Review • Resolution
RL Incident Reporting Page 22
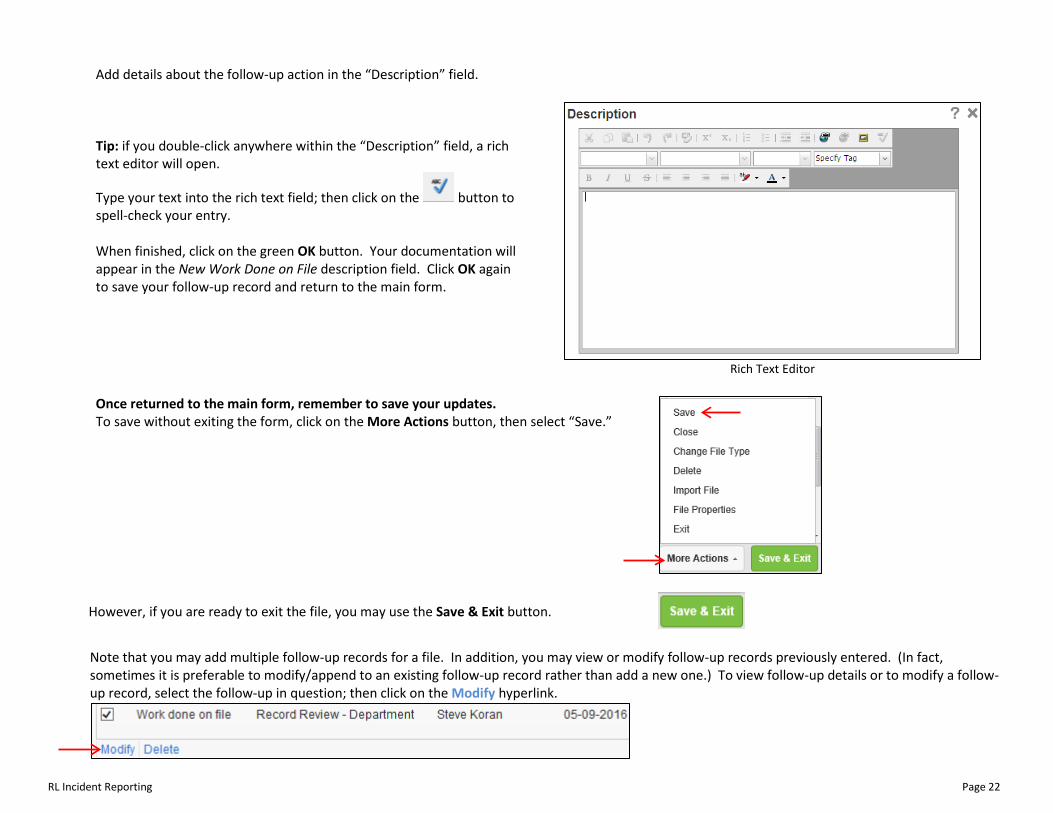
Add details about the follow-up action in the “Description” field. Tip: if you double-click anywhere within the “Description” field, a rich text editor will open.
Type your text into the rich text field; then click on the button to spell-check your entry.
When finished, click on the green OK button. Your documentation will appear in the New Work Done on File description field. Click OK again to save your follow-up record and return to the main form.
Rich Text Editor
Note that you may add multiple follow-up records for a file. In addition, you may view or modify follow-up records previously entered. (In fact, sometimes it is preferable to modify/append to an existing follow-up record rather than add a new one.) To view follow-up details or to modify a follow-up record, select the follow-up in question; then click on the Modify hyperlink.
Once returned to the main form, remember to save your updates. To save without exiting the form, click on the More Actions button, then select “Save.”
However, if you are ready to exit the file, you may use the Save & Exit button.
RL Incident Reporting Page 23
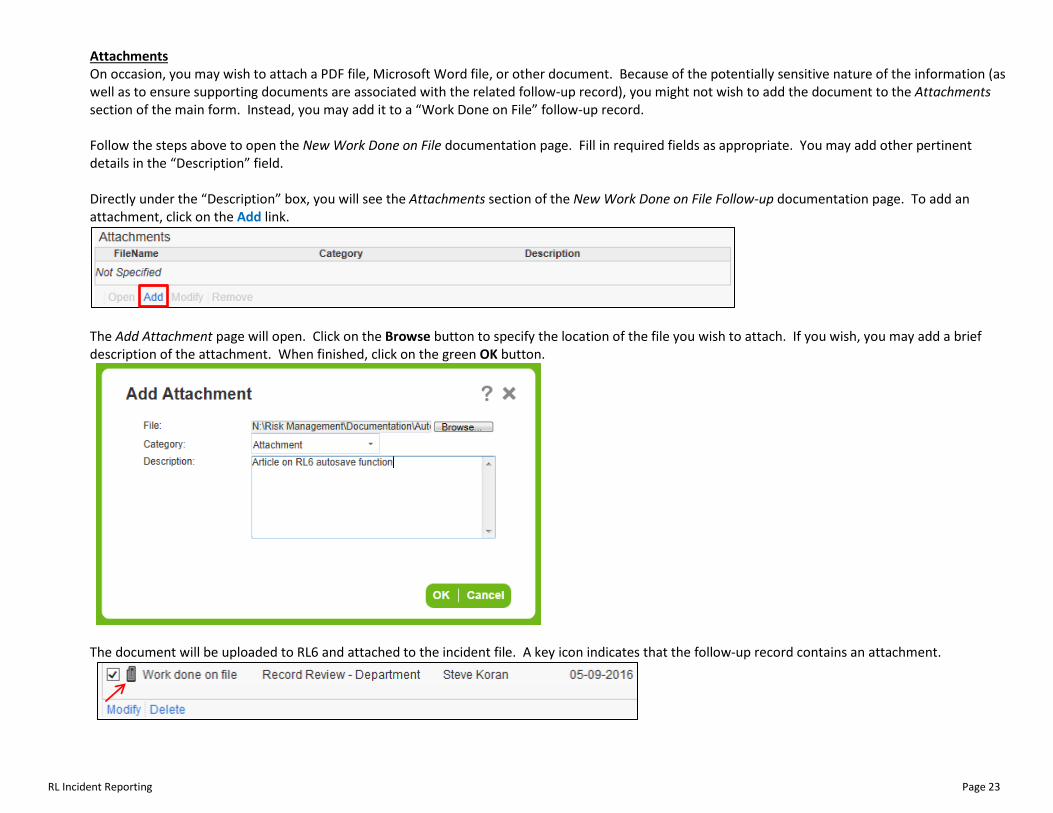
Attachments On occasion, you may wish to attach a PDF file, Microsoft Word file, or other document. Because of the potentially sensitive nature of the information (as well as to ensure supporting documents are associated with the related follow-up record), you might not wish to add the document to the Attachments section of the main form. Instead, you may add it to a “Work Done on File” follow-up record. Follow the steps above to open the New Work Done on File documentation page. Fill in required fields as appropriate. You may add other pertinent details in the “Description” field. Directly under the “Description” box, you will see the Attachments section of the New Work Done on File Follow-up documentation page. To add an attachment, click on the Add link.
The Add Attachment page will open. Click on the Browse button to specify the location of the file you wish to attach. If you wish, you may add a brief description of the attachment. When finished, click on the green OK button.
The document will be uploaded to RL6 and attached to the incident file. A key icon indicates that the follow-up record contains an attachment.
RL Incident Reporting Page 24
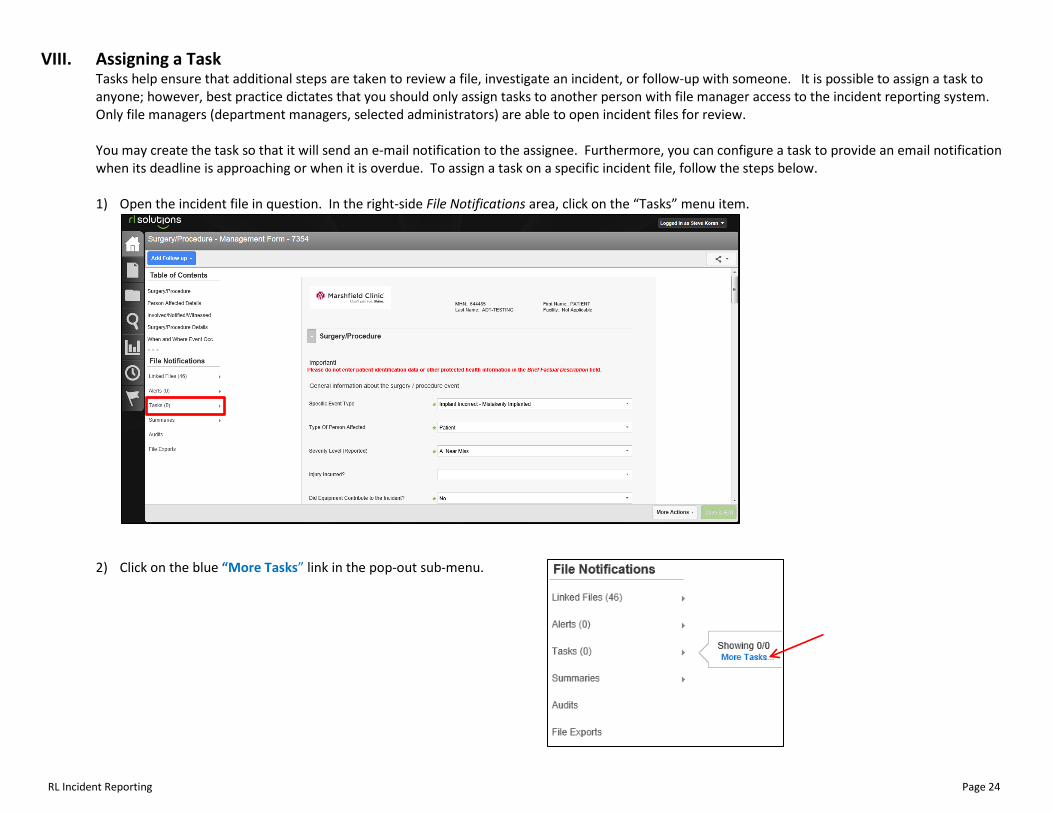
VIII. Assigning a Task Tasks help ensure that additional steps are taken to review a file, investigate an incident, or follow-up with someone. It is possible to assign a task to anyone; however, best practice dictates that you should only assign tasks to another person with file manager access to the incident reporting system. Only file managers (department managers, selected administrators) are able to open incident files for review. You may create the task so that it will send an e-mail notification to the assignee. Furthermore, you can configure a task to provide an email notification when its deadline is approaching or when it is overdue. To assign a task on a specific incident file, follow the steps below. 1) Open the incident file in question. In the right-side File Notifications area, click on the “Tasks” menu item.
2) Click on the blue “More Tasks” link in the pop-out sub-menu.
RL Incident Reporting Page 25
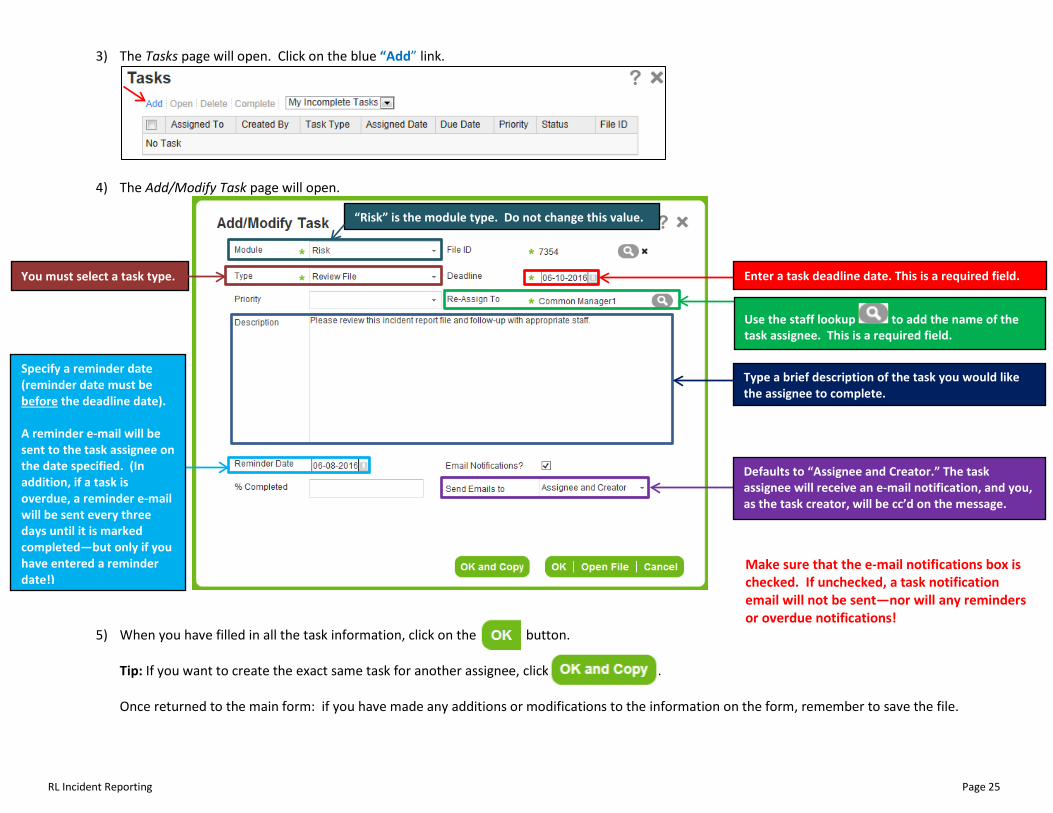
3) The Tasks page will open. Click on the blue “Add” link.
4) The Add/Modify Task page will open.
5) When you have filled in all the task information, click on the button. Tip: If you want to create the exact same task for another assignee, click . Once returned to the main form: if you have made any additions or modifications to the information on the form, remember to save the file.
Use the staff lookup to add the name of the task assignee. This is a required field.
Enter a task deadline date. This is a required field.
Specify a reminder date (reminder date must be before the deadline date). A reminder e-mail will be sent to the task assignee on the date specified. (In addition, if a task is overdue, a reminder e-mail will be sent every three days until it is marked completed—but only if you have entered a reminder date!)
Type a brief description of the task you would like the assignee to complete.
Defaults to “Assignee and Creator.” The task assignee will receive an e-mail notification, and you, as the task creator, will be cc’d on the message.
Make sure that the e-mail notifications box is checked. If unchecked, a task notification email will not be sent—nor will any reminders or overdue notifications!
“Risk” is the module type. Do not change this value.
You must select a task type.
RL Incident Reporting Page 26
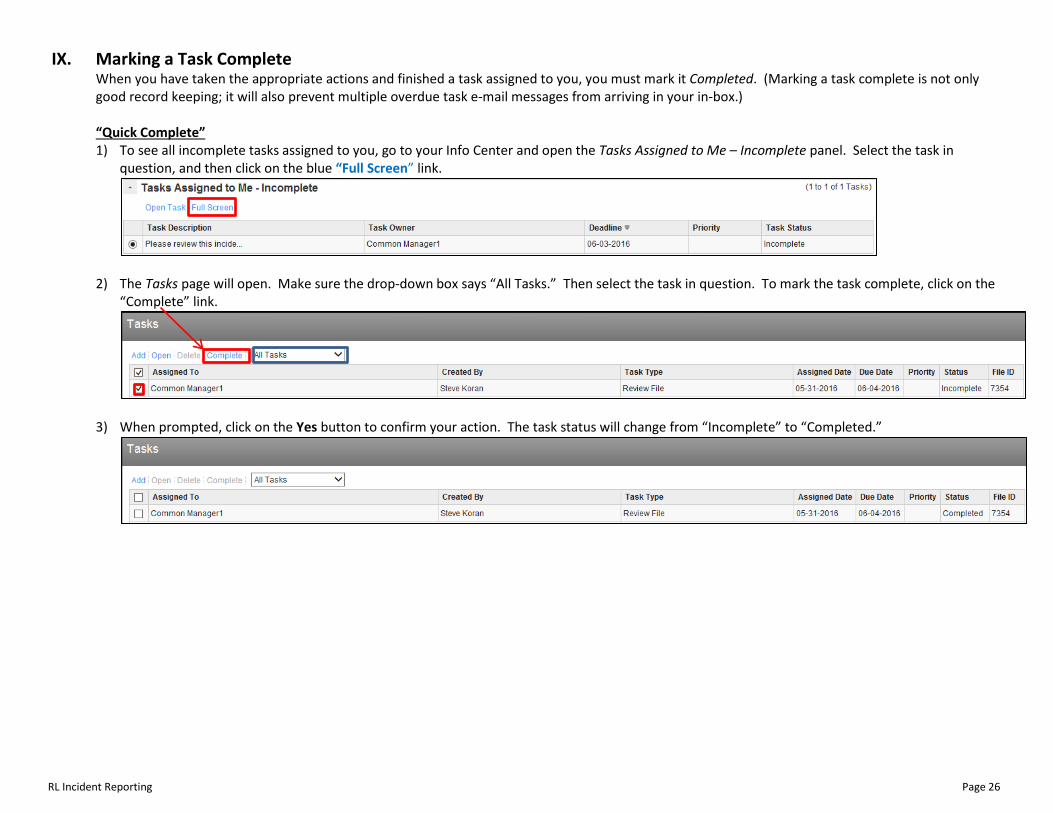
IX. Marking a Task Complete When you have taken the appropriate actions and finished a task assigned to you, you must mark it Completed. (Marking a task complete is not only good record keeping; it will also prevent multiple overdue task e-mail messages from arriving in your in-box.) “Quick Complete” 1) To see all incomplete tasks assigned to you, go to your Info Center and open the Tasks Assigned to Me – Incomplete panel. Select the task in
question, and then click on the blue “Full Screen” link.
2) The Tasks page will open. Make sure the drop-down box says “All Tasks.” Then select the task in question. To mark the task complete, click on the
“Complete” link.
3) When prompted, click on the Yes button to confirm your action. The task status will change from “Incomplete” to “Completed.”
RL Incident Reporting Page 27
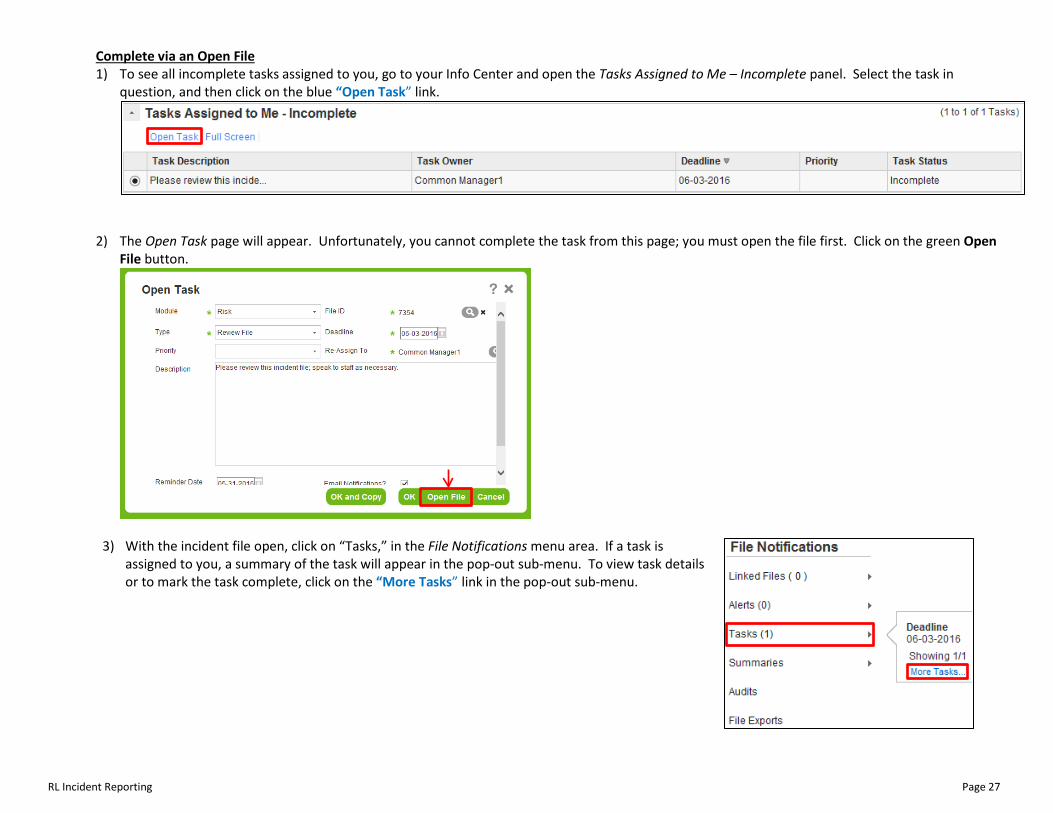
Complete via an Open File 1) To see all incomplete tasks assigned to you, go to your Info Center and open the Tasks Assigned to Me – Incomplete panel. Select the task in
question, and then click on the blue “Open Task” link.
2) The Open Task page will appear. Unfortunately, you cannot complete the task from this page; you must open the file first. Click on the green Open File button.
3) With the incident file open, click on “Tasks,” in the File Notifications menu area. If a task is assigned to you, a summary of the task will appear in the pop-out sub-menu. To view task details or to mark the task complete, click on the “More Tasks” link in the pop-out sub-menu.
RL Incident Reporting Page 28
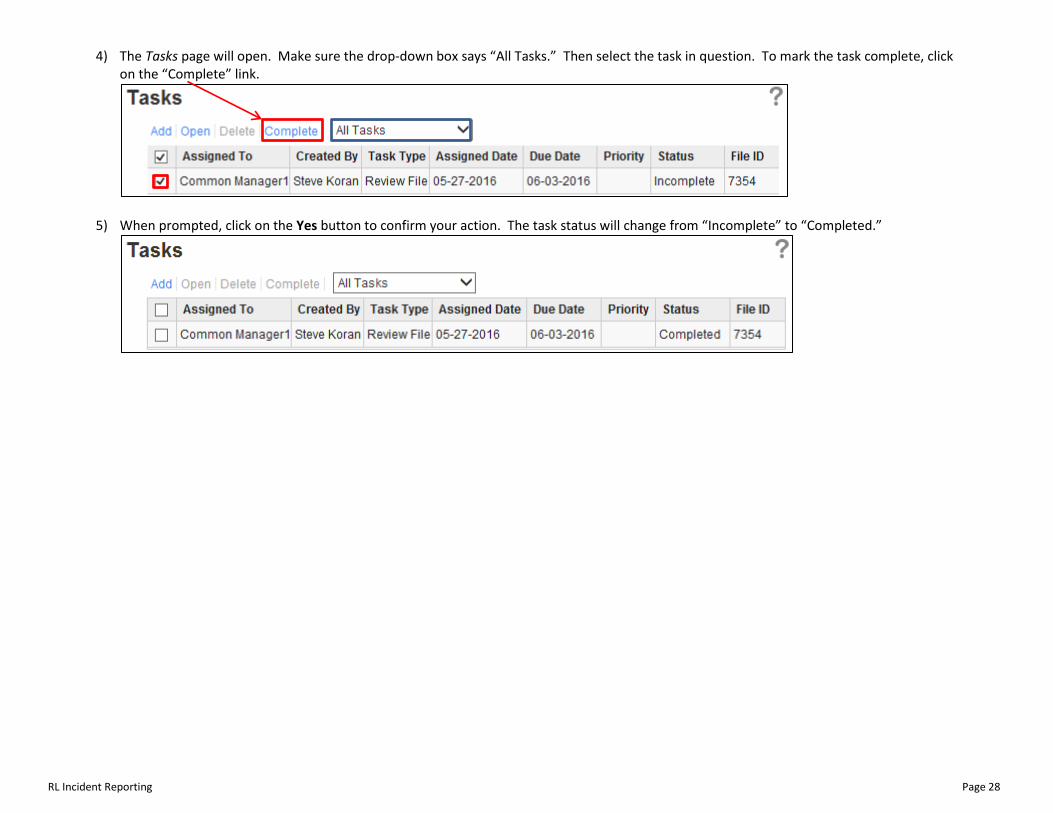
4) The Tasks page will open. Make sure the drop-down box says “All Tasks.” Then select the task in question. To mark the task complete, click on the “Complete” link.
5) When prompted, click on the Yes button to confirm your action. The task status will change from “Incomplete” to “Completed.”
RL Incident Reporting Page 29
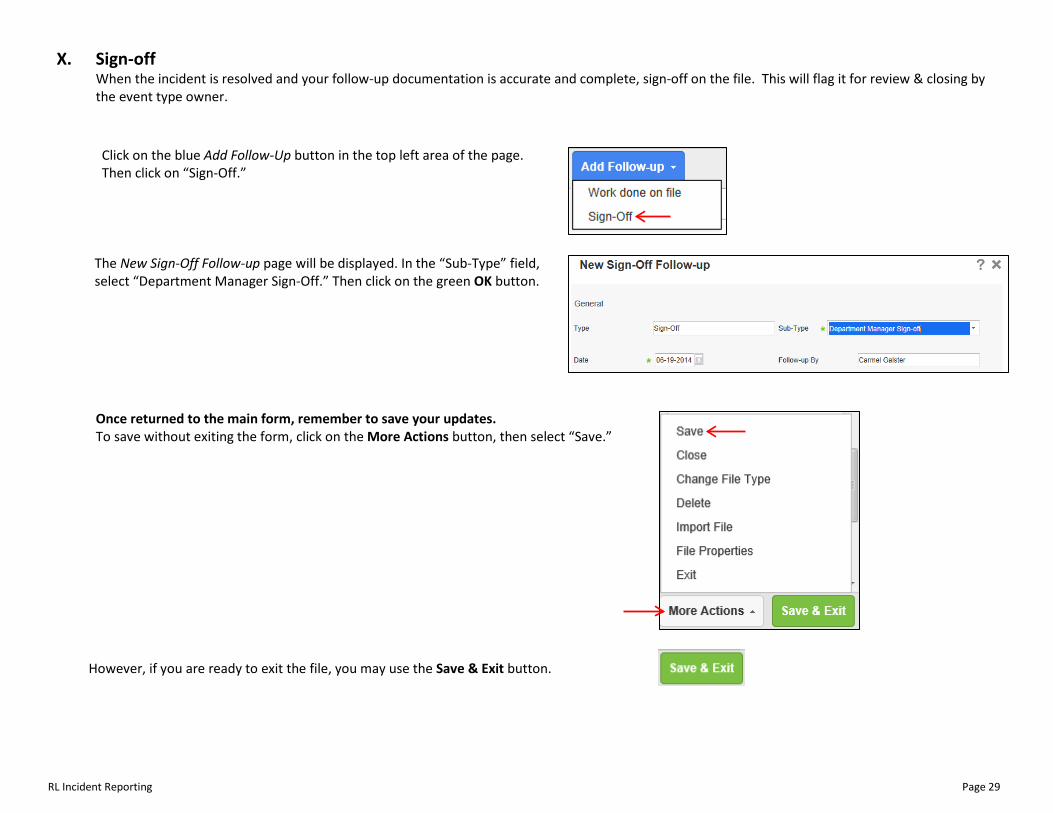
X. Sign-off When the incident is resolved and your follow-up documentation is accurate and complete, sign-off on the file. This will flag it for review & closing by the event type owner. Click on the blue Add Follow-Up button in the top left area of the page. Then click on “Sign-Off.”
The New Sign-Off Follow-up page will be displayed. In the “Sub-Type” field, select “Department Manager Sign-Off.” Then click on the green OK button.
Once returned to the main form, remember to save your updates. To save without exiting the form, click on the More Actions button, then select “Save.”
However, if you are ready to exit the file, you may use the Save & Exit button.
RL Incident Reporting Page 30
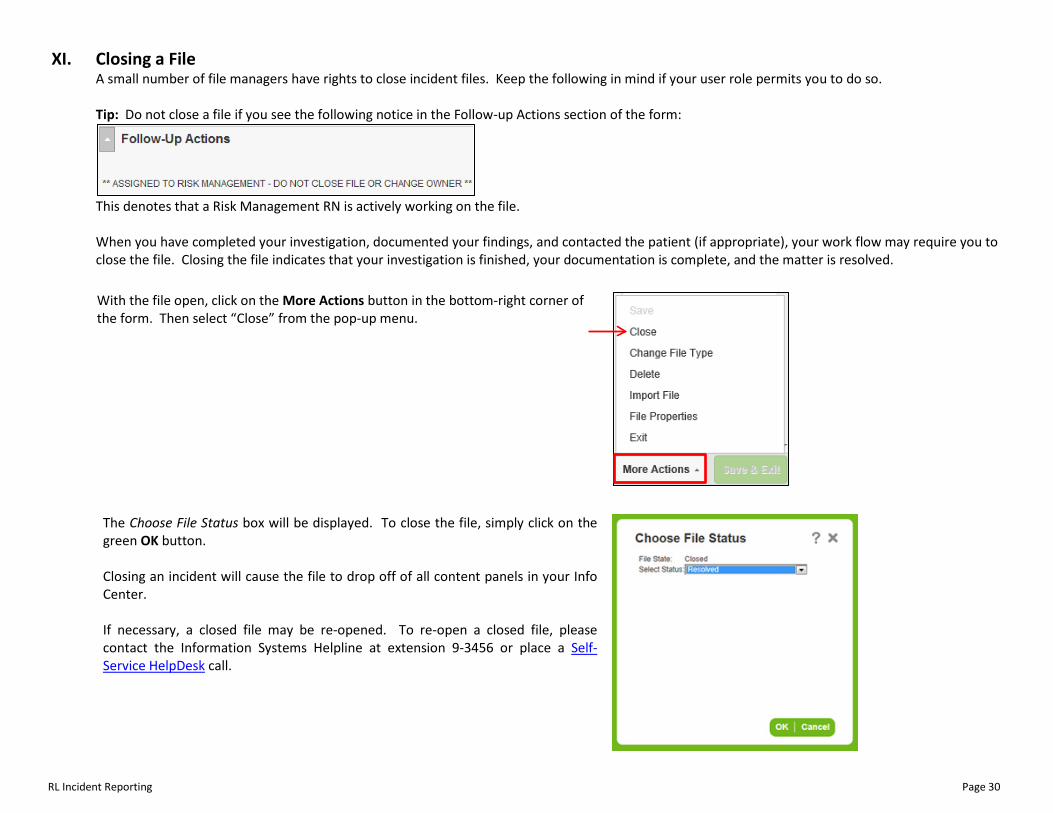
XI. Closing a File A small number of file managers have rights to close incident files. Keep the following in mind if your user role permits you to do so. Tip: Do not close a file if you see the following notice in the Follow-up Actions section of the form:
This denotes that a Risk Management RN is actively working on the file. When you have completed your investigation, documented your findings, and contacted the patient (if appropriate), your work flow may require you to close the file. Closing the file indicates that your investigation is finished, your documentation is complete, and the matter is resolved.
With the file open, click on the More Actions button in the bottom-right corner of the form. Then select “Close” from the pop-up menu.
The Choose File Status box will be displayed. To close the file, simply click on the green OK button. Closing an incident will cause the file to drop off of all content panels in your Info Center. If necessary, a closed file may be re-opened. To re-open a closed file, please contact the Information Systems Helpline at extension 9-3456 or place a Self-Service HelpDesk call.
RL Incident Reporting File Manager Checklist
Incident Investigation 1. Review the brief factual description. If necessary, edit text to accurately describe the issue/event and to clarify patient
expectations.
2. Ensure that all concerned individuals are accurately listed in the Involved/Notified/Witnessed section of the incident form.
3. Ensure that the incident form correctly reflects the location where the incident occurred, as RL determines the responsible file manager based on the “where occurred” location.
4. Review the medical record related to the incident. • Make sure documentation in the medical record is accurate. • In RL, document significant facts from the medical record in a follow-up note.
5. Interview staff and providers who were involved, who witnessed, or who were notified about the issue or event.
6. Review Marshfield Clinic and departmental policies and procedures. Has there been a policy violation? • Consider action related to the policy/procedure violation. As appropriate, discuss with the the dept. chair, district
administrator, and/or Human Resources. 7. Consider customer service recovery actions.
• Compensate patient for inconvenience? • Contact Business Office Helpline (9-0700) with questions related to charges. • Assist patient with future appointments and, if requested, transfer of care.
8. Consider whether a special condition alert message is necessary. 9. In RL, task the incident to another manager, if necessary. 10. As needed or requested, communicate with patient following incident review and investigation.
• Resolve the incident with the patient during the initial contact, if you are able to do so.
Follow-up Documentation & Sign-Off
1. Complete required Work Done on File follow-up documentation. Follow-up documentation may include (but is not limited to) medical record reviews, investigation details, physician & staff interviews, and actions taken to resolve the incident and to prevent its reoccurrence. Consider the following when completing follow-up documentation:
• Based on your investigation, what caused/contributed to the incident? • What actions have been taken to correct the situation? • What steps have been taken to ensure that the incident will not reoccur?
When adding a follow-up record, select the appropriate follow-up sub-type. Most follow-ups may be completed using one of
these sub-types:
Record Review – Department: Summarize medical record documentation concerning the issue or event.
Investigation – Department: Summarize what was discovered through the review process. Contact/Meeting - Patient/Family: Add date & summarize all contacts, phone calls, or letters sent (attach to file) to the patient
or a family member concerning the incident.
Manager/Chair Review/Follow-up: Summarize conversation with Manager/Chair. Resolution: Add details on incident resolution: discount, change in policy or procedure, service recovery
action, etc.
Multiple Patients: Use when the incident affects more than one patient; for example, a mailing error, prescription mix-ups, a mother and infant, or two siblings. Enter the other name(s) and MHN(s) in the follow-up description field.
2. Spell-check your follow-up documentation.
3. To prevent loss of data, save the file at regular intervals.
4. When the incident is resolved and your documentation complete, sign-off on the file. (Or close the file, if your RL security role allows.)
5. If you add to or modify the incident file, do not exit the file without saving.
RL Incident Reporting Page 31