Embed Size (px)
Citation preview

RESIDENTIAL HYBRID ELECTRIC HEAT PUMP WATER HEATER
Service Handbook
PRINTED IN THE U.S.A. 0511 321547-000
SERVICE SHOULD ONLY BE PERFORMED BY A QUALIFIED SERVICE TECHNICIAN
®
FOR MODELS:PHPT-60 (60 GAL.)PHPT-80 (80 GAL.)
INSTALLATION CONSIDERATIONS - PREVENTIVE MAINTENANCE -
OPERATION & SERVICE - TROUBLESHOOTING

2
Introduction ............................................................................................................................................................ 3Certifi cation and Approvals .................................................................................................................................... 3Tools Required....................................................................................................................................................... 3Terms, Defi nitions, and Formulas .......................................................................................................................... 4Safety Precautions ................................................................................................................................................ 5Installation Check List............................................................................................................................................ 6Potential Issues ..................................................................................................................................................... 7Dry Fire Protection / Powered Anode Operation ................................................................................................... 8Water Piping System ............................................................................................................................................ 9T&P Valve / Thermal Expansion .......................................................................................................................... 10General Service / Preventive Maintenance ..........................................................................................................11Operational Overview .......................................................................................................................................... 12Operating Your Heat Pump.................................................................................................................................. 13Control Board Overview ...................................................................................................................................... 14Control Board Section “A”.................................................................................................................................... 15Control Board Section “B”.................................................................................................................................... 16Control Board Section “C” ................................................................................................................................... 17Control Board Section “D” ................................................................................................................................... 18Wiring Diagrams ............................................................................................................................................. 19-20Accessing Maintenance Display .......................................................................................................................... 21Element Test (Continuity Check) ......................................................................................................................... 22Element Test (Ohm’s Check) ............................................................................................................................... 23Heating Element Replacement ............................................................................................................................ 24Energy Cutout (ECO) Troubleshooting ................................................................................................................ 25Run Capacitor...................................................................................................................................................... 26Powered Anode Replacement / Removing the Shroud ....................................................................................... 27Component Check Flowcharts ....................................................................................................................... 28-31Temperature Sensors .......................................................................................................................................... 32Resistance vs. Temperature Charts .................................................................................................................... 33R-134a Temperature Chart .................................................................................................................................. 34Cleaning the Evaporator ...................................................................................................................................... 35Common Service Problems ............................................................................................................................ 36-38Fault Code Troubleshooting Guide ................................................................................................................. 39-44Draining and Filling the Water Heater ................................................................................................................. 45Condensate Pump ............................................................................................................................................... 46Parts List.............................................................................................................................................................. 47
Table of Contents

3
Introduction:Your safety, and the safety of others, is extremely important in the servicing of this water heater. Many safety-related messages and instructions have been provided in this handbook and on your water heater to warn you and others of potential hazards. Read, understand and obey all safety messages and instructions that appear throughout this handbook and in the Installation Instructions and Use & Care Guide that shipped with the water heater. It is very important that the meaning of each safety message is understood by you and others who service this water heater.
The information contained in this handbook is designed to answer commonly faced situations encountered in the operation of the residential electric heat pump product line and is not meant to be all-inclusive. If you are experiencing a problem not covered in this handbook, please contact the Technical Information Center listed on the back cover of this handbook for further assistance. Additional information is also available on the web site listed on the back cover of this handbook.
This handbook is intended for use by qualifi ed service technicians and reference should be made to the Installation Instructions and Use & Care Guide accompanying the product. This handbook contains supplemental information to the Installation Instructions and Use & Care Guide.
When servicing residential electric heat pump water heaters, it is essential that you return the unit to a safe condition before you leave the site. All original components must be re-installed and all safety measures must be implemented. In addition, the recommended water temperature setting is 120°F.
Certifications and Approvals:Code Compliance - All models meet or exceed federal minimum energy standards effective January 20, 2004, according to latest editions of the National Appliance Energy Conservation Act (NAECA). They also comply with the latest editions of the B.O.C.A. National Codes, C.E.C., U.B.C., S.B.C.C., C.A.B.O. and the H.U.D. standards. All models U.L. listed according to safety specifications outlined in Underwriters Laboratories, Inc. Standards for Safety (UL 174 and UL 1995)
Tools for servicing residential electric heat pump water heater models:• Container (to measure flow rate)• Continuity checker or electrical multimeter (with alligator leads)• Funnel (for chlorination or scale-removal treatments)• Hose (to drain tank)• Needle nose pliers• Pipe wrench• Screw drivers (flat tip and Phillips)• Nut Drivers - 5/16” & 9/32”• Socket wrench:
1-1/16 inch socket– 6 point deep well (for anode removal) 1-1/2 inch socket (for element removal) Appropriate extensions
• Thermometer• Water pressure gauge• Flashlight• Drill• Amp meter-clamp type
Supplies for servicing residential electric heat pump water heater models:• Chlorine Bleach (for chlorination procedure, as well as algae/scale removal
from condensate drain pan)• Cotton swabs (to check for minor leaks)• Teflon® tape or approved thread sealant• All Purpose ABS/PVC Cement• Un-Lime or Mag Erad (for removal of scale)
Service Handbook
Figure 1
Digital multimeter shown.

4
Terms, Defi nitions and Formulas
First Hour Rating (FHR) is a volume of hot water delivered by a water heater during a 1-hour, Department Of Energy mandate test procedure. The FHR is given in gallons or liters.
Energy Factor (EF) is an indicator of the combined thermal effi ciency and standby effi ciency of a water heater. The higher the Energy Factor, the more effi cient the water heater will be.
Recovery rate is the amount of water, expressed in gallons per hour (GPH),heated to a given temperature rise. Residential water heaters are typically rated at approximately 90°F temperature rise. IE: A standard electric water heater with one 4.5 kW (kilowatt) electric heating element can produce 20 GPH at an approximate 90°F rise.
Temperature rise is the increase in the temperature from its coldest “inlet” water temperature to the desired hot “outlet” setting.
Standby effi ciency relates to the ability of the product to retain the stored heat (Btu) while the heating source is not on. Insulation and other services are used to increase this effi ciency.
Water (for all practical purposes) cannot be compressed.
Water expands when it is heated. The volume and pressure of water increases when it is heated in a closed system. IE: Water heated from 90°F to 140°F in a 40 gallon water heater will expand by approximately one-half gallon.
Minerals and gases will separate from water as temperature increases.
Amperage (Amps) (1 phase) = Watts divided by Volts (Ohm’s Law)
KW Required = (GPH X 8.25 X Temp. Rise X 1.0) divided by (3413)
Ohms = Volts divided by Amperes (Ohm’s Law)
One killowatt is equal to 1000 watts
One kilowatt is equal to 3,413 BTU
Recovery Rate =(KW X 3413) divided by (Temp. Rise X 8.25)
Rise (°F) = (KW X 3413) divided by (GPH X 8.25)
Supply electrical fusing and wiring or breakers should be sized at least 125% of expected heater amperage, per NEC and local codes.
Water weighs 8.25 pounds per gallon at 120°F
% of Hot water = (Mixed temp. - Cold) divided by (Hot temp. - Cold). This formula gives the number of gallons drawn from the water heater for each gallon delivered at a shower head or faucet. If the shower head fl ow rate (gallons per minute) is known, the draw effi ciency and gallon capacity of the water heater may be used to calculate the length of the showering period in minutes.
Watt Density = the density of the wattage output of the element compared to the surface area of the element (i.e. “High Watt Density Element” will have the most wattage per square inch of element surface.

5
Safety Precautions
Explosion Hazard
WARNINGExcessive Weight Hazard
Use two or more people to move and install water heater.Failure to do so can result in back or other injury.
6
Water Heater Location• Centrally located with the water piping system.• The fl ooring beneath the water heater must be able
to support the weight of the water heater when fi lled with water (see Table 1).
TABLE 1: Weight of water heater, full of waterCapacity Weight (lbs)60 Gallon 76080 Gallon 967
• Located indoors (such as a basement or garage) and in a vertical position. Protected from freezing temperatures.
• Provisions made to protect the area from water damage. Metal drain pan installed and piped to an adequate drain.
• Sufficient room to service the water heater.• Sufficient air for the heat pump to function. The
approximate minimum air requirement is 750 cubic feet of space. For example: this would be a room approximately 10’X9 1/2’ in size with an 8’ ceiling. NOTE: For optimal effi ciency, the following minimum clearances should be maintained: 3 ft. on the air inlet side, 6 ft. on the air outlet side and 2 ft. front and back.
• Unrestricted airfl ow, the unit cannot be placed into any type of closet or small enclosure.
• The site location must be free from any corrosive elements in the atmosphere such as sulfur, fl uorine, and chlorine. These elements are found in aerosol sprays, detergents, bleaches, cleaning solvents, air fresheners, paint and varnish removers, and many other commercial and household products. In addition, excessive dust and lint may affect the operation of the unit and require more frequent cleaning, see “Cleaning/Replacing the Air Filter” section (p.11).
• Ambient air temperature must be between 45°F and 109°F (inclusive) in order for the heat pump to work properly. If the ambient air temperature falls outside these upper and lower limits the electrical elements will activate to meet hot water demand.
Water System Piping• Temperature and pressure relief valve properly
installed with a discharge pipe run to an adequate drain and protected from freezing.
• All piping properly installed and free of leaks.• Heater completely filled with water, see “Water
Piping System” section (p.9).• Closed system pressure buildup precautions
installed, see “Closed System/Thermal Expansion” section (p.10).
• Mixing valve (when applicable) installed per manufacturer’s instructions see “Water Piping System” (p.9).
Condensate Drain Line Installation• Must be located with access to an adequate drain
or condensate pump.• Condensate drain lines installed and piped to an
adequate drain or condensate pump.
Electrical Connections• The water heater requires nominal 240 VAC for
proper operation.• Wiring size and connections comply with all
applicable codes or in the absence of local or state codes follow NFPA-70, the National Electrical Code-current edition.
• Water heater and electrical supply are properly grounded.
• Wiring enclosed in approved conduit (if required by local codes).
• Dedicated circuit with proper overload fuse or circuit breaker protection installed.
Post Installation Review• To maintain optimal operation check, remove and
clean the air filter see “Cleaning/Replacing the Air Filter” section (p.11).
• Understand the importance of routine inspection/maintenance of the condensate drain pan and lines, see “Inspection/Cleaning of the Condensate Drain Pan & Condensate Drain Lines” (p.46). This is to help prevent any possible drain line blockage resulting in the condensate drain pan overflowing. IMPORTANT: Water coming from the plastic shroud is an indicator that both condensation drain lines may be blocked. Immediate action is required.
• Understand how to use the User Interface Module to set the various modes and functions, see “Adjusting the User Interface Module/Operating Modes” (p.12-13).
• Understand the various Operating Modes and which mode may be best based on season, ambient temperature, and usage see “Operating Mode Description” (p.12-13). NOTE: It may be necessary to temporaily change modes if, for example, filling a spa or hot tub.
• The Installation Instructions and Use & Care Guide should be kept with the water heater for reference.
Installation Checklist

7
Potential Installation Issues
Symptom Cause SolutionTemperature set to 60 ºF and not adjustable
Vacation mode is on Turn off Vacation mode by pressing the Vacation button
Electric mode selected but the heat pump is running
Upon initial start up, the heat pump will run until the tank temperature reaches the set point; this is done so that the heat pump operation can be verified. The water heater will operate according to the selected mode after this first run.
No action is necessary.If after heat pump operation has been verified and element heating is desired, lower the set point temperature to 95ºF. The heat pump will shut off when the tank temperature is ≥ 95º F. Set the temperature to the desired set point. The elements will now be used for heating in Hybrid and Electric modes.
Power is applied to the unit, but there is no display on the User Interface Module (UIM)
The unit is in Standby; the power button on the UIM is RED
Press the power button; it should turn green and the display should light up. If the power button does not turn green, remove the protective film over the face of the UIM and re-try the power button.If the unit does not power up, cycle power to the unit and re-try using a thumb.
“Low Water Level Alarm” message displayed on the UIM
The tank is not completely filled with water
Purge air from the tank using the procedure outlined in the “Dry Fire Element Protection” section (p.8).If the tank is properly filled, the unit should operate normally.
“Heat Pump Fault” message displayed on the UIM
There are 12 potential causes for this fault
Refer to the Trouble Shooting section for corrective actions (p.39-44)
Efficiency mode selected but elements come on instead of heat pump
Ambient air or water temperature outside the heat pump safe operating envelope
Heat pump safety lock out occurs if :• ambient air temperature is
below 45º F or above 109º F;• tank temperature is below 59º F

8
Dry Fire is a term used to describe a heating element that is on and not fully submerged in water. This will result in permanent damage to the element. The dry fi re element protection algorithm is installed on this heat pump water heater and prevents damage to the heating elements in the event that power is applied to the water heater without suffi cient water in the tank to cover the elements. This routine takes approximately four (4) minutes. If it is determined that the element is not fully submersed in water, an error will be displayed on the user interface: LOW WATER LEVEL ALARM. The water heater will not operate while this fault is active and it must be
cleared before the water heater will operate. In order to clear the error, shut off power to the water heater, and purge all air from the water heater tank. This is done by opening all hot water taps in the building. Run the water until there is no air coming out with the water. Shut off all hot water taps. Apply power to the water heater. After four (4) minutes, dry fi re detection should be complete, the error should be cleared and the water heater should operate normally. If the LOW WATER LEVEL ALARM repeats, purge air from tank again by following the method outlined above.
Dry Fire Element Protection
Checking the Powered Anode for Proper Operation:When dissimilar metals are in contact with water, a galvanic cell will likely result and corrosion of the metal components will occur. If left unchecked, corrosion will weaken the wall of a water heater tank which will eventually leak. Passive anodes are typically used to counteract this corrosion and extend tank life. Passive anodes erode over time and become less effective until they stop working all together, another type of protective device is a powered anode.
A powered anode is an active device that counteracts galvanic corrosion in the water heater tank. Unlike a standard depleting anode, a powered anode does not lose effectiveness over time. The powered anode circuit is made up of an electronic control, a titanium anode rod, and the water heater tank. The electronic control monitors conditions in the tank and produces a voltage that will prevent galvanic corrosion from occurring. The titanium anode rod consists of two functional parts: A steel body which threads into the tank providing mechanical and electrical connection to the tank and a titanium rod that is electrically insulated
from the body. The voltage produced by the powered anode circuit is delivered to the titanium anode rod by a red wire connected to the tab that connects to the anode rod. Current fl ows from the titanium anode rod, through the water and to the grounded tank wall. The powered anode circuitry will maintain the minimum voltage required to protect the tank steel.
Fault detection is built into the powered anode software. If a fault is detected, an error message will be displayed on the User Interface Module (UIM): “Powered Anode Fault”. By checking the fault code history, see “Accessing the Maintenance Display” (p.21), a specifi c fault code can be read to aid in isolating the cause. Refer to the “Fault Code Troubleshooting Guide” (p39-44) for the list of powered anode fault messages, what the messages indicate, possible causes, and corrective actions.IMPORTANT: The anode protecting the tank requires power to the unit to operate. Do not shut off power to the unit for an extended period of time. If power must be turned off, drain the tank completely to minimize corrosion.
Powered Anode Operation

9
Water Piping System
Cold Water Inlet Valve
Cold Water Inlet
Pressure Reducing Valve (PRV)should be installed where the watersupply enters the residence.
In a closed system, use athermal expansion tank.See “Closed System/Thermal Expansion”section.
Cold Water Outlet
Shut-off Valve(Cold)
Tempered Water to Fixtures
Untempered Water Outlet
Vacuum Relief Valve
Mixing Valve - Follow the Mixing Valve’s Manufacturer’s Installation Instructions. (Set to 120° F)
6” Maximum Air Gap
Metal Drain Pan 2 1/2” Depth Maximum and2 Inches wider thanthe water heater.
Discharge Pipe(Do Not Cap or Plug)
Temperature and Pressure Relief Valve
Union
Shut-off Valve (Hot)
Drain Line 3/4” ID Minimum Drain
Condensate Drain Lines*
Massachusetts: Install a vacuum relief in cold water line per section 19 MGL 142.
* If an adequate drain is not available for the condensate drain lines then a condensate pump should be used. DO NOT discharge the condensate drain lines into the metal drain pan.
Union
Hot(Outlet)
Cold(Inlet)
Figure 2
Piping, fi ttings, and valves should be installed according to the installation drawing (Figure 2). If the indoor installation area is subject to freezing temperatures, the water piping must be properly insulated. Water supply pressure should be 50-60 PSIG (.35 MPa) and not exceed the maximum 80 PSIG (.55 MPa). If the supply line pressure exceeds 80 PSIG (.55 MPa), a pressure reducing valve (PRV) with a bypass should be installed in the cold water supply line. This should be placed on the supply to the entire house in order to maintain equal hot and cold water pressures.IMPORTANT: • Heat must not be applied to the water fittings on
the heater as they may contain nonmetallic parts. If solder connections are used, solder the pipe to the adapter before attaching the adapter to the hot and cold water fittings.
• Always use a good grade of joint compound and be certain that all fittings are tight. IMPORTANT: DO NOT over apply joint compound.
Piping Installation1. Install the water piping and fittings as shown (Figure 2).
Connect the cold water supply (3/4” NPT) to the fitting marked “Cold”. Connect the hot water supply (3/4” NPT) to the fitting marked “Hot”.
2. The installation of unions in both the hot and cold water supply lines are recommended for ease of removing the water heater for service or replacement.
3. Some local codes may require, and the manufacturer of this water heater recommends, installing a mixing valve or an anti-scald device in the domestic hot water line as shown (Figure 2), or at the point of use. These valves reduce the point-of-use temperature of the hot water by mixing cold and hot water and are readily available. Contact a licensed plumber or the local plumbing authority for more information.
4. Some local codes may require, and the manufacturer of this water heater recommends, installing a pressure reducing valve (PRV) in the cold water inlet line where it enters the residence as shown (Figure 2).
5. If installing the water heater in a closed water system, install an expansion tank in the cold water line as specified under “Closed System/Thermal Expansion” (p.10).
6. Install a shut off valve in the cold water inlet line. It should be located close to the water heater and be easily accessible. Know the location of this valve and how to shut off the water to the heater.
7. Install a discharge line from the temperature and pressure relief valve in the opening marked “T & P RELIEF VALVE”. See Figure 3 and the “Temperature and Pressure Relief Valve” (p.10)
8. After piping has been properly connected to the water heater, open the nearest hot water faucet. Then open the cold water shut off valve and allow the tank to completely fill with water. To purge the lines of any excess air and sediment, keep the hot water faucet open for three (3) minutes after a constant flow of water is obtained. Close the faucet and check all connections for leaks.

10
tubing so that any discharge from the valve exits only within 6 in. (152mm) above drain, or at any distance below, the structural fl oor, and does not contact any live electrical part. The discharge opening must not be blocked or reduced in size under any circumstance. IMPORTANT: Only a new temperature and pressure relief valve should be used with your water heater. Do not use an old or existing valve as it may be damaged or not adequate for the working pressure of the new water heater. Do not place any valve between the relief valve and the tank.The Temperature & Pressure Relief Valve: • Shall not be in contact with any electrical part.• Shall be connected to an adequate discharge line.• Shall not be rated higher than the working pres-
sure shown on the data plate of the water heater.The Discharge Line:• Shall not be smaller than the pipe size of the relief
valve or have any reducing coupling installed in the discharge line.
• Shall not be capped, blocked, plugged or contain any valve between the relief valve and the end of the discharge line.
• Shall terminate a maximum of 6 in. (152mm) above a floor drain or external to the building. In cold climates, it is recommended that the discharge pipe be terminated at an adequate drain inside the build-ing.
• Shall be of material listed for hot water distribution.• Shall be installed to allow complete drainage of
both the valve and discharge line.
Explosion Hazard
6” (152mm)Maximum Air Gap
Drain Pan 2 1/2” (63.5mm) Depth Maximum and2” (51mm) wider thanthe water heater.
Discharge Pipe(Do Not Plug or Cap)
Temperature and Pressure Relief Valve
Drain Line 3/4” (19mm) ID Minimum Drain
Figure 3Temperature and Pressure Relief Valve Installation
For protection against excessive pressures and temperatures, a temperature and pressure relief valve must be installed in the opening marked “T & P RELIEF VALVE” (Figure 3).To reduce the risk of excessive pressures and temperatures in this water heater, install temperature and pressure relief protective equipment required by local codes, but no less than a combination temperature and pressure relief valve certifi ed by a nationally recognized testing laboratory that maintains periodic inspection of the production of listed equipment or materials, as meeting the requirements for Relief Valves and Automatic Shutoff Devices for Hot Water Supply Systems, ANSI Z21.22 - latest edition. This valve must be marked with the maximum set pressure not to exceed the marked maximum working pressure of the water heater. Install the valve into an opening provided and marked for this purpose in the water heater, and orient it or provide
Temperature and Pressure Relief Valve
Closed System/Thermal ExpansionAs water is heated, it expands (thermal expansion). In a closed system, the volume of water will grow. As the volume of water grows, there will be a corresponding increase in water pressure due to thermal expansion. Thermal expansion can cause premature tank failure (leakage). This type of failure is not covered under the limited warranty. Thermal expansion can also cause intermittent temperature-pressure relief valve operation: water discharge from the valve due to excessive pressure build up. The temperature pressure relief is not intended for the constant relief of thermal expansion. This condition is not covered under the limited warranty.
A properly-sized thermal expansion tank should be installed on all closed systems to control the harmful effects of thermal expansion. Contact a plumbing service agency or your retail supplier reguarding the installation of a thermal expansion tank.

11
General Service information• Volts times Amps = Watts
• Watts divided by Volts = Amps
• Replacement Elements:
Use replacement elements that are rated at the same wattage, voltage and shape indicated on the heater model and rating plate. Installing an element with a higher voltage rating or wattage output may create a safety hazard. (It could overload the heater wiring, the supply wiring, or the fusing.) Installing an element with a lower wattage or voltage rating will reduce performance.
Also, select replacement elements with the most surface area (low watt density) available for your water heater. By spreading the heat of the element over a greater area, the lime (calcium) buildup rate should be reduced.
Elements constructed of Incoloy are much more durable than zinc-coated copper elements.
• Element Cycling:
Most two-element water heaters are non-simultaneous. In other words, only one element operates at a time.
If the upper element fails, the customer will lose hot water. (Power switches to the lower element only after the water at the top of the tank is heated.) If the lower element or thermostat fails, the customer should still have hot water in the top 1/3 of the tank.
Also, with two-element water heaters, the lower element and thermostat will cycle more frequently than the upper element and thermostat. For this reason, the lower element will normally accumulate lime faster and fail more often than the upper element. This increased cycling also causes lower thermostats to fail more often than upper thermostats.
Routine Preventive MaintenanceAt least monthly, a visual inspection should be made of the following:• Air Filter (Remove and inspect, clean if needed, and reinstall).• Condensate drain pan and condensate lines.• The lower metal drain pan for standing water which may indicate a clogged condensate drain pan, condensate
lines, or plumbing leak.• Leaking or damaged water piping.• Presence of corrosive materials in the installation area.• Presence of combustible materials near the water heater.• After servicing this water heater, check to make sure it is working properly, see “Operational Overview/Initial Start
Up” (p.12)IMPORTANT: If you lack the necessary skills required to properly perform this visual inspection, you should not proceed, but get help from a qualified person.
Cleaning/Replacing the Air FilterAir Filter Cleaning/ReplacementIMPORTANT: Before attempting to clean or replace the air fi lter, press the power button to place the water heater in Standby Mode and turn-off power to the water heater at the circuit breaker/fuse box.1. Locate the screw securing the filter panel to the heat pump shroud and remove it.2. Remove (slide) the filter from the unit.3. If you are replacing the filter, skip to step 4. To clean the filter, use a vacuum with a hose attachment to
remove any dust or debris.4. Place the new or cleaned filter into the filter panel and secure the filter to the shroud with the screw loosened
earlier. Use the slots for guides when inserting the filter into the water heater and replace the screws. 5. Restore power to the water heater and press the power button to turn the water heater on.
NOTE: The water heater will conduct a system diagnostic prior to operation.

12
Operational OverviewHeat Pump Water Heater Operation: Heat pump water heaters remove heat from surrounding air and use that heat to heat water. By doing so, heat pump water heaters can operate much more effi ciently and at signifi cantly lower costs compared to standard electric water heaters.
This heat pump water heater has four (4) operating modes for maximum fl exibility in meeting hot water needs under a variety of conditions. Available modes are: Effi ciency, Hybrid, Electric and Vacation.
Operating Mode Descriptions:Effi ciency Mode provides the highest effi ciency and lowest cost operation by using only the heat pump to heat water. Recovery time and effi ciency will vary with ambient temperature and relative humidity. Effi ciency will be greatest when both are high and recovery time will be shortest. At lower temperatures and relative humidity levels, effi ciency will be lower and recovery will take longer. Heat pump operation is allowed from 45°F to 109°F ambient temperature. At ambient temperatures lower that 45°F and greater than 109°F the heat pump will not operate. Similarly, if the water temperature in the tank is less than 59°F, the heat pump will not operate. The unit will operate in electric mode until ambient and water temperatures return to the safe operating range of the heat pump.
Hybrid mode provides the best combination of energy effi ciency and hot water delivery. The heat pump will be used to heat water after moderate hot water use. When a large quantity of hot water is used, the upper electric heating element will heat water in order to speed up recovery. Once the upper portion of the tank reaches set point, the element will shut off and the heat pump will heat water until the average tank temperature reaches set point. Hybrid mode provides the highest fi rst hour hot water delivery with excellent economy.
Electric mode allows operation like a standard electric water heater, using the upper and lower heating elements to heat water. The heat pump is not used in this mode. The key advantage of using this mode is that it eliminates the cool air exhausted from the heat pump. During cold weather months, this may be desirable. Hot water delivery and operating costs are comparable to a standard electric water heater with similar tank capacity.
Vacation mode should be used when hot water will not be needed for a period of time greater than three (3) days. In vacation mode electric elements are used to heat water and set point is a non-adjustable 60°F. Minimal electricity will be used and maintaining 60°F minimizes the risk of the water heater freezing in cold weather.
User Interface Module Overview:The User Interface Module (UIM) is used to control the heat pump water heater. It displays useful information about the operating status of the water heater, the selected mode of operation and the set point temperature. Fault information will be displayed should a malfunction occur with one of the components or sub-systems. The UIM also is used to set the water heater to the desired set point temperature, mode of operation, temperature units (°F or °C) and to check the operating condition of the heat pump through the maintenance display, see “Accessing the Maintenance Display”(p. 21).
Initial Start Up:When powered up for the fi rst time (or when power is re-applied after a power outage or service work is performed), the control will run the dry fi re check to establish that the tank is completely fi lled with water, see “Dry Fire Element Protection” (p.8). The UIM will display “Dry Fire” during this operation, which will take about four (4) minutes. After eight (8) minutes have elapsed, the fan should come on; after an aditional thirty (30) seconds, the heat pump compressor should turn on. Note that during the initial start up, the heat pump will come on regardless of operation mode selected. This is intended to allow for evaluation of the heat pump to ensure that it is operating properly. The heat pump will heat water until the set point temperature is reached in the tank; it will then shut off. After this initial start up is complete, the water heater will operate per operational mode setting, ambient air and tank water tamperatures, and set point temperature.

13
Operating Your Heat Pump Water Heater
°F/°C
LOCKHEAT PUMP ELEMENT EFFICIENCY
F
VACATIONELECTRICHYBRIDEFFICIENCY
Power Button: On - Green Standby - Red
Temperature Down (Decrease)Button
Temperature Up (Increase)Button
Operational Mode Buttons
Water TemperatureSet Point
Water HeaterMode/StatusIndicator
Water HeaterEfficiency StatusIcon
LCD Display Panel Lock Button
Fahrenheit/Celsius Temperature DisplayButton
LCD Control Panel Lock Icon
Heat PumpFunctioningIcon
ElementFunctioningIcon
Figure 4 User Interface Module (UIM)
Turning the Unit On:The power button is located at the bottom of the UIM, below the display. There are two (2) conditions for the power button indicated by color: RED-the unit is in STANDBY and power is applied to the unit; GREEN-the unit is ON. Press the power button to turn the unit on if needed.NOTE: All buttons on the User Interface are touch sensitive and require only a light touch.
Adjusting Set Point Temperature:The water temperature can be adjusted from 95°F to 150°F. Use the Up and Down Buttons on the UIM to set the desired temperature.IMPORTANT: Before attempting to adjust the thermostat, read the information on water temperature adjustment above. If the instructions are not clear, contact a qualifi ed person.
IMPORTANT: Filling a spa or hot tub from this water heater may result in extended recovery/re-heat time. Switching (temporarily) to Hybrid Mode or Electric Mode will decrease the recovery/re-heat time. Be sure to switch back to the desired operational mode when fi nished. The factory temperature set point is 120°F. Notify homeowner if the set point is increased above 120° at any time for any reason. Return the set point to a safe level upon completion of service work.
Selecting Operating Mode:The operating mode can be changed by touching the desired mode icon on the User Interface Module (Figure 4).
NOTE: While vacation mode is on, the other modes cannot be selected and set point temperature can not be changed. Turn off vacation mode by pressing the vacation mode button. Desired mode and set point can now be selected.
EFFICIENCY
Effi ciency Mode - Is the most energy effi cient mode. This mode uses the heat pump to heat water in the tank. The elements are not used unless the ambient operating temperature is below 45°F or above 109°F.
HYBRID
Hybrid Mode - Combines high energy effi ciency with reduced recovery time. This mode uses the heat pump as the primary heating source. The heating element will heat water if demand exceeds a predetermined level so that the set point temperature can be recovered more quickly.
Electric Mode - The water heater functions as a conventional electric unit, relying totally on the elements to heat the water in the tank. This mode may be useful in winter to eliminate the output of cold air from the unit.
VACATION
Vacation Mode - The set point changes to 60°F which is the temperature that will be maintained. This mode is recommended for periods of three (3) days or more in which the water heater will be idle. Vacation Mode minimizes energy consumption and minimizes the risk of freezing during cold weather.NOTE: To activate Vacation Mode touch the Vacation Mode button. To deactivate Vacation Mode, touch the Vacation Mode button again.
Other Controls Lock - Holding this button for more than 3
seconds switches the lock mode on or off. When the User Interface Module is locked a symbol and “Lock” text will be visible on the display and there will be no access to mode change or set point change.
°F/°C °F/°C - The button switches the display to show the set temperature in Fahrenheit or Celsius.
ELECTRIC

14
AB
C
D
Figure 5
Control Board Overview
Heat Pump Water Heater Control Board Overview: The Control Board on the Heat Pump Water Heater monitors the complete heating system and reports any errors through the User Interface Module (UIM). Based on the inputs from the sensors and/or the manual inputs from the UIM, the Control Board determines which heating mode the unit should be in to reach the user set-point.
Above, the Control Board is broken down into four (4) sections. The specifi cs of each section are explained in greater detail in the following pages.

15
FUS202FUS201
CN207
CN201
Figure 6
CN202 CN206
Section “A”
CN 201 Line Power:• Pin 1 - Control board power wire L1 (240VAC)• Pin 2 - Control board power wire L2 (240VAC)• Pin 3 - Not used• Pin 4 - Control board power wire ground
CN 202 ECO Bottom:• Pin 1 - Connect to lower heating element• Pin 2 - Connect to L1 behind ECO switch
CN 206 Compressor: • Pin 1 - Compressor power L1• Pin 2 - Unused• Pin 3 - Unused
• Pin 4 - Compressor power L2
CN 207 Fan Low/high:• Pin 1 - Fan power L1• Pin 2 - Unused• Pin 3 - Fan power
FUS 201:• Fuse 201 (3 Amp, 250V, slow blow) fuses the L1 power leg coming to the Control Board
FUS 202:• Fuse 202 (3 Amp, 250V, slow blow) fuses the L2 power leg coming to the Control Board
Section “A” of Control Board

16
RY 203 Upper Element Relay:• Terminal 1 - COM Connects to L1 behind the ECO Switch.• Terminal 2 - NO Connects to the upper heating element.
CN 203 Powered Anode:• Pin 1 - Powered anode signal
• Pin 2 - Ground
Figure 7
Terminal 1
Terminal 2
Pin 2
Pin 1
Section “B”
Section “B” of Control Board

17
Section “C” of Control Board
CN 204 Upper and Lower tank water temperature sensors:• Pin 1 - Upper water temperature sensor on tank.• Pin 2 - Upper water temperature sensor on tank.• Pin 3 - Lower water temperature sensor on tank.• Pin 4 - Lower water temperature sensor on tank.
CN 212 Temperature Sensors:• Pin 1 - Ambient temperature sensor.• Pin 2 - Ambient temperature sensor.• Pin 3 - Discharge temperature sensor.• Pin 4 - Discharge temperature sensor.• Pin 5 - Coil temperature sensor.
• Pin 6 - Coil temperature sensor.
Figure 8
CN 204
CN 212
CN 211/215
CN 208
Dip Switch
Section “C”

18
CN 211/215 UIM Communication Cable:• Pin 1 - +5 V• Pin 2 - +12 V• Pin 3 - Signal A+• Pin 4 - Signal B+• Pin 5 - Ground
Note: Both CN211 and CN215 are identical and either can be used for the UIM communication.
CN 208 Overload Detection:• Pin 1 - High pressure switch.• Pin 2 - High pressure switch.• Pin 3 - Low pressure switch.• Pin 4 - Low pressure switch.• Pin 5 - Not used• Pin 6 - Not used• Pin 7 - Not used• Pin 8 - Not used• Pin 9 - Condensate pump signal overfl ow (optional)• Pin 10 - Condensate pump signal overfl ow (optional)
Note: Pin 9 and 10 are connected by a jumper wire. This wire should be cut and wired in series to the overfl ow switch of the fi eld supplied condensation pump (optional).
SW 201 Dip Switch:• SW 1 - Not used• SW 2 - Not used• SW 3 - Not used• SW 4 - Not used
Led 201 Power Indicator:• LED 201 when illuminated, indicate that 5 and 12 Volts DC are present for the UIM
Section DLED 202/203 Powered Anode Indicators:• LED 202-
One (1) fl ash/second (approx.), indicates there is power to the anode circuit.
• LED 203- Two (2) fl ashes/second (approx.), indicates proper operation. Four (4) fl ashes/second (approx.), indicates a fault.
Figure 9
LED203 / 202
Section D
Section “C” of Control Board (con’t)

19
Wiring Diagram for Models With Relay
L1
L2
Red
Black
Approved Connectors
Junction Box
OverloadProtectio
To 240v1 Phase
Power supply
ElectricalService ground
CircuiBreaker
GroundWire
Green
n t
C
RSG
COMPRESSOR
1
10
1 5
1 5
1
6
1
4 1 2
1
4
1
2
1
3
14
N.O.COM.
CN201
CN207
CN202
CN206
RY 203CN208
CN215
CN211 CN212CN204 CN203
HEAT PUMP WATER HEATER CONTROLLER
COIL TEMP. SENSORDISCHARGE TEMP. SENSORAMBIENT TEMP. SENSOR
LOW
PRESSURE
SWITCH
HIG
H PRESSU
RE SW
ITCH
TANK UPPER TEMP. SENSORTANK LOWER TEMP. SENSORA-A
C-CD-D ANODE - POWERED
LOWER ELEMENT 2K W
1 3
4
HIGH LIMIT SWITCH
JUNCTION BOX
TANK
L1 L2
ANODE-POWERED
GROUNDING STRIP
G
TANK JACKET
2 41 0 RELAY
6 8
CAPACITOR
BLOWER
D-D
C-C
L1L2
G
TANK UPPER TEMP. SENSOR
TANK LOWER TEMP. SENSOR
B-B
A-A
B-B
OVERFLOWSWITCH
HEAT PUMP WATER HEATER WIRING DIAGRAM
b
a
AC 240V 60Hz 1PH.
LOWER ELEMENT
BLOWER
POWERLINE
UPPER ELEMENT
OVERLOAD DETECTION
ANODE-POWEREDHP TEMP.
TANK TEMP.
COMPRESSOR
DISPLAY
USER IN
TERFACE
UPPER ELEMENT 4.5 KW
NOTES1. THE FUNCTION OF CN211 AND CN215 IS THE SAME, EITHER CN211 OR CN215 SHOULD BE CONNECTED TO COMPUTER BY SPECIAL CONNECTOR.
2. IF ANY OF THE ORIGINAL WIRE AS SUPPLIED MUST BE REPLACED, USE THE SAME SIZE ONLY TYPE 105°CTHERMOPLASTIC OR EQUIVALENT..
3. TANK LOWER ELEMENT MUST NOT EXCEED 2KW.
GREEN
RED
RED
REDGREEN
GREEN
GREEN
GREEN
GREEN GREEN AND YELLOW COMBINATION
GREEN
GR
EE
N
RE
DB
LAC
K
REDBLACK
WHITEBLACK
BLACK
BLACK
BLACKBLACK
WHITE
WHITE
RED
RED
REDBLACK
BLACKBLACK
RED
RED
BLA
CK
RE
D
BLACK
RED
BLACKWHITE
WHITE
BLACK
RED
FIELD INSTALLEDFACTORY INSTALLED
GR
GREEN
RED
BLU
E
BLA
CK
WHITE
WHITE
BLUE
BROWN
RED
BLACK
BLACK
BLACK
BLA
CK
OPTIONAL OVERFLOW SWITCH, NORMALLY CLOSED
RESERVED UIM CONNECTIONa
b
2
WHITE
WHITE
WHITE
Figure 10
Figure 10a
Capacitor
Compressor Control Relay
Compressor control relays were used in early production models so the compressor’s operating voltage did not have to travel through the tank’s high limit switch (Figure 10a).

20
Wiring Diagram for Non-Relay Models
L1
L2
Red
Black
Approved Connectors
Junction Box
OverloadProtectio
To 240v1 Phase
Power supply
ElectricalService ground
CircuiBreaker
GroundWire
Green
n t
FIigure 11

21
Accessing the Maintenance DisplayThe User Interface Module on the front of the heat pump water heater has a multi-function display that gives information about the status and condition of the operation of the water heater. In power saving mode, the display will be off; momentarily touching any of the buttons above or below the display area will ‘wake’ the display and cause it to light up. The User Display is the default screen viewable during normal operation. A second display mode is available, Maintenance Display, which provides more detail about how the water heater is operating and stores and displays more specific fault messages.
Accessing the Maintenance Display1. Touch and hold the Up and Down arrows at the
same time for three (3) seconds. The display will change to the Maintenance Display mode.
2. A total of ten (10) screens are available in this mode (see Table 2). By using the up arrow to scroll, each screen is available for viewing. The fi rst six (6) screens display system temperatures and the fi nal four (4) show the fault code history. The down arrow can be used to access previous screens.
Table 2: Maintenance DisplayScreen Message Meaning
1 ---- Ambient Temperature Air temperature entering evaporator2 ---- Average Tank Temperature Weighted average of UT and LT3 ---- Upper Tank Temperature Thermisitor, outer tank wall4 ---- Lower Tank Temperature Thermisitor, outer tank wall5 ---- Discharge Temperature Measured at compressor6 ---- Coil Temperature Measured at evaproator7 E01 Fault Code Newest (active) fault code8 E02 Fault Code Historical Fault9 E03 Fault Code Historical Fault
10 E04 Fault Code Historical fault
Interpreting the fault code historyFault code E01 is the newest code detected. If there is a fault shown on the User Display, E01 is the active fault. Faults E02 through E04 are faults that have been detected in the past and may or may not be relevant. If one of these faults is the same as E01, it is an indication that the fault is repeating. If there are multiple operational issues, codes E01-E04 will be helpful in troubleshooting efforts. The fault history can not be cleared or reset. There will always be codes stored whether there is an actual fault or not.

22
E l ement Test (Continuity Tester)
I. Preparing for the Test
1. Press the power button on the User Interface Module (UIM).
2. Turn off power to the water heater at the breaker or disconnect switch serving the water heater.
3. Verify there is no power at the incoming power connections to the water heater with an AC Volt meter.
4. Remove the cover panel(s), then move the insulation away from the element. Do not damage the insulation.
5. Remove the thermostat cover(s).
6. Disconnect the wires from the element terminals.
IIA. Testing for a Burned Out Element
1. Complete Preparing for the Test before you proceed.
2. Place one test probe on each of the element terminals.
3. If there is no continuity, replace the element (p. 24). If there is continuity, proceed to Testing for a Grounded Element.
IIB. Testing for a Grounded Element
1. Complete Preparing for the Test before you proceed.
2. Check for continuity as follows:
A. Place a test probe on one of the element terminals and the other test probe on the element fl ange or tank shell. Ensure a good ground connection.
B. Repeat the test for the other element terminal.
C. If either test shows continuity, the element is
defective and should be replaced (p. 24).
D. Proceed to Completing the Test.
III. Completing the Test
1. Replace the element(s) if necessary (p. 24).
2. Reconnect the terminal wires.
3. Reinstall the thermostat cover(s), put the insulation back in place, then reinstall the cover panel(s).
4. Make sure that the tank is full of water before reconnecting power.
A. Open a hot water faucet.
B. Once water fl ows smoothly from the hot water side of the faucet, all air has been purged from the tank and it is safe to energize the elements.
C. Reconnect power to the water heater.
Figure 12

23
E l ement Test (OhmMeter)
IIA. Testing for a Burned Out Element
1. Complete Preparing for the Test before you proceed.
2. Measure the element’s resistance by placing a probe on each terminal. (See graphic at right.)
3. Compare your result with the following:A. If the resistance is between 10 and 25 Ohms,
the element is good. Proceed to Completing the Test.
B. If the meter shows no continuity, the element should be replaced (p. 24). Proceed to Completing the Test.
C. If the meter measures more than 25 Ohms, proceed to Testing for a Grounded Element.
IIB. Testing for a Grounded Element
1. Complete Preparing for the Test before you proceed.
2. Check for resistance as follows:
A. Place a probe on one of the element terminals and the other probe on the element fl ange or tank shell. Ensure a good ground connection.
B. Repeat the test for the other element terminal.
C. If both tests show infi nite resistance, the element is not grounded. If either test shows less than infi nite resistance, the element is defective and should be replaced (p. 24).
D. Proceed to Completing the Test.
III. Completing the Test
1. Replace the element(s) if necessary (p. 24).
2. Reconnect the terminal wires.
3. Reinstall the thermostat cover(s), put the insulation back in place, then reinstall the cover panel(s).
4. Make sure that the tank is full of water before reconnecting power.
A. Open a hot water faucet.
B. Once water fl ows smoothly from the hot water side of the faucet, all air has been purged from the tank and it is safe to energize the elements.
C. Reconnect power to the water heater.
I. Preparing for the Test
1. Press the power button on the User Interface Module.
1. Turn off power to the water heater at the breaker or disconnect switch serving the water heater.
2. Verify there is no power at the incoming power connections to the water heater with an AC volt meter.
3. Remove the cover panel(s), then move the insulation away from the element. Do not damage the insulation.
4. Remove the thermostat cover(s).
5. Disconnect the wires from the element terminals.
Figure 13

24
Heating Element Replacement
Replacement heating elements must be of the same style and Voltage/wattage rating as the ones originally in the water heater. This information can be found on the fl ange or terminal block of the element or on the water heater data plate.
IMPORTANT: Before replacing any element, confi rm that you have the correct replacement element (wattage). This water heater has a folded 4500 watt upper element and a folded 2000 watt lower element. DO NOT replace the element(s) with a wattage, style or shape different than the elements specifi ed for the upper and/or lower element. 1. Turn off power to the water heater at the breaker
disconnect switch serving the water heater.2. Verify there is no power at the incoming power
connection to the water heater with an AC volt meter.
3. Open a nearby hot water faucet and allow to run until the water is no longer hot.
4. Drain the water heater by connecting a hose to the drain valve and terminating it to an adequate drain or to the exterior of the building. When unit is drained, close the drain valve and remove hose.
5. Remove the access cover, then remove the foam insulation block.
6. Remove the protective plastic cover from the attachment point.
7. Disconnect the electrical wires from the heating element by loosening the screws (Figure 14). Remove the screw-in element by turning the element counterclockwise with a 1-1/2 inch socket wrench. Remove the existing gasket.
8. Clean the area where the gasket fits to the tank. If you are replacing the bottom element, remove any accumulated sediment on the bottom of the tank.
9. Make sure the replacement element has the correct voltage and wattage rating and shape by matching it to the rating plate on the water heater. Position the new gasket(s) on the element and insert it into the water heater tank (Figure 15). Tighten the element by turning it clockwise until secure.
10. Close the drain valve and open the nearest hot water faucet. Then open the cold water shut off valve and allow the tank to fill completely with water. To purge the lines of any excess air and sediment, keep the hot water faucet open for three (3) minutes after a constant flow of water is obtained.
11. Check for leaks around the element.12. Reconnect the electrical wires to the element and
securely tighten the screws (See Figure 14).13. Replace the protective plastic cover removed
earlier. Make sure the cover is securely engaged on the attachment points.
14. Replace the foam block and access cover.15. Although this water heater is equipped with “Dry
Fire” protection circuitry, be sure tank is completely filled with water before applying electrical power to the water heater.
Screws
Wires
Element
Figure 14
Spud
Gasket
Screw-inElement
Figure 15

25
Energy Cutout (ECO) Switch TroubleshootingECO Function and Troubleshooting:An energy cutout (ECO) switch is installed on this water heater to shut down the water heating means in the event of a malfunction. If the upper tank temperature reaches 190°F. the ECO contacts will open breaking the L1 and L2 legs that feed the upper heating elements. The ECO also interrupts power to the compressor control relay, which in turn shuts off power to the compressor. Some models will not have a compressor relay in which case the compressor will be controlled directly by the ECO. Refer to the wiring diagram located on the control box cover to see if a given unit is equipped with a compressor control relay.
If the ECO has tripped, it must be manually reset as follows below.
Resetting a tripped ECO:1. Shut off power to the unit at the breaker/fuse
panel prior to servicing the unit.
2. Gain access to the ECO located in the upper element compartment, above the element.
3. Check the temperature of the tank. In order to manually reset the ECO, the tank temperature must fi rst drop below 120°F.
4. Press the red button located on the front of the ECO.
5. Apply power to the unit. Once the ECO has been reset, the fault on the user interface module should clear and the water heater should return to normal operation.
If resetting the ECO does not clear the error, the ECO will need to be checked. Follow the procedure below.
NOTE: Tank temperature must be less than 120°F in order to re-set ECO.
TABLE 3Relay Number Load Check PinsRY 203 Upper Element COM to NO (Top of Relay)RY 205 Lower Element CN206 pin 1 to 4RY 207 Compressor CN202 pin 1 to 2
Checking the ECO:1. Shut off power to the unit at the breaker/fuse
panel prior to servicing the unit.
2. Gain access to the ECO located in the upper element compartmant, above the element.
3. Remove the black wire from terminal number one (1) and the white wire from terminal number three (3) on the ECO.
4. Using an Ohm meter or continuity tester, check pin 1 to pin 2; there should be continuity (very low resistance). If resistance is high or continuity checks bad, replace the ECO. Check pin 3 to 4, again there should be continuity. If not replace the ECO.
Investigate cause of ECO tripping:It is very important to investigate why the ECO tripped as the control board may be faulty. Check the relays on the control board to determine if the contacts might be stuck closed; check the three relays listed in Table 3 by checking pin to pin resistances as noted. Resistance should be greater than 1 mega-Ohm (no continuity) between the pins as listed in the table. If the resistance between any of the pin combinations listed is less than 1 mega-Ohm, replace the control board.

26
THERMAL PROTECTOR
AUX. MAIN
COMPR.MOTOR
RUN CAPACITOR
C
S R
Figure 17
If the compressor is not operating or is not operating correctly, the run capacitor may be the cause and should be checked.
A bad capacitor will typically be either shorted or open. Visually inspect the body of the capacitor; look for any sign of the housing bulging, splitting or leaking fl uid. Replace the capacitor if there is any sign of physical damage. Use a capacitance meter to measure the capacitance of the capacitor. If it measures 25uF ±5%, it is good. If the value is outside this tolerance, the capacitor is bad and should be replaced. If a capacitance meter is not available, use an Ohm meter to check the condition of the capacitor. Place one meter lead on each of the capacitor terminals. If the resistance value is increasing or decreasing, this indicates it is charging or discharging and that the capacitor is probably good. If the resistance is infi nite, it shows the capacitor is open or the resistance is steady, that the capacitor is partly shorted. In either case, the run capacitor should be replaced with a unit with the same specifi cations and dimensions.
Checking the Run Capacitor
Figure 16
Capacitor Terminals

27
Powered Anode Troubleshooting and ReplacementChecking the Powered Anode for Proper Operation:When dissimilar metals are in contact with water, a galvanic cell will likely result and corrosion of the metal components will occur. If left unchecked, corrosion will weaken the wall of a water heater tank which will eventually leak. Passive anodes are typically used to counteract this corrosion and extend tank life. Passive anodes erode over time and become less effective until they stop working all together, another type of protective device is a powered anode.
A powered anode is an active device that counteracts galvanic corrosion in the water heater tank. Unlike a standard depleting anode, a powered anode does not lose effectiveness over time. The powered anode circuit is made up of an electronic control, a titanium anode rod, and the water heater tank. The electronic control monitors conditions in the tank and produces a voltage that will prevent galvanic corrosion from occuring. The titanium anode rod consists of two functional parts: A steel body which threads into the tank providing mechanical and electrical connection to the tank and a titanium rod that is electrically insulated from the body. The voltage produced by the powered anode circuit is delivered to the titanium anode rod by a red wire connected to the tab that connects to the anode rod. Current fl ows from the titanium anode rod, through the water and to the grounded tank wall. The powered anode circuitry will maintain the minimum voltage required to protect the tank steel.
Fault detection is built into the powered anode software. If a fault is detected, an error message will be displayed on the User Interface Module (UIM): “Powered Anode Fault”. By checking the fault code history see “Interpreting the Fault Code History” (p.21), a specifi c fault code can be read to aid in isolating the cause. Refer to the Fault Code Troubleshooting guide for the list of powered anode fault messages, what the messages indicate, possible causes, and corrective actions.IMPORTANT: The anode protecting the tank requires power to the unit to operate. Do not shut off power to the unit for an extended period of time. If power must be turned off, drain the tank completely to minimize corrosion.
Removing the Powered Anode:1. Press the power button on the UIM to place the water
heater in Standby Mode.Note: Power to the board is still present at this time.
2. Terminate all power to the unit at the breaker/fuse panel.
3. Open a nearby hot water faucet and allow to run until the water is no longer hot.
4. De-pressurize the water heater by closing the cold water supply valve to the water heater and opening a nearby hot water faucet.
5. The powered anode is located on the left side of the heat pump compartment and is between the compressor and the evaporator.
6. Remove the top housing see “Removing the Top Housing” below to gain access to the powered anode.
7. Un-plug the red wire from the powered anode.8. Use a 1-1/16 inch deep well socket with extension
and long breaker bar to loosen and remove the powered anode.
Replacing the Powered Anode:1. Apply a small amount of thread sealant to the threads
of the replacement anode. Do not get thread sealant on anode.
2. Thread the anode into the spud and torque to 50 lb-ft.3. Connect the red wire to the tab on the powered
anode.4. Re-fi ll the tank with water.5. Apply power to the water heater and press the power
button if needed to turn it on.6. Wait eight (8) minutes for the dry fi re detection to run
and for water heating to begin.7. Monitor the UIM to see if the powered anode fault
repeats. It may take up to 70 minutes for a powered anode fault to appear.
Removing the Top Housing (Shroud):1. Press the power button on the User Interface Module
(UIM) to place the water heater in standby mode.Note: Power to the board is still present at this time.
2. Terminate all power to the unit at the breaker/fuse panel.
3. Using a #2 Phillips head screwdriver, remove the eight (8) screws attaching the left louvered panel to the top of the unit and set aside.
4. Using a #2 Phillips screwdriver, remove the two (2) screws from the control board cover located inside the top of the unit on the right side, then remove the cover by lifting up and out.
5. Locate the ribbon cable and disconnect from either CN211 or CN215. Thread the connector through the plastic grommet on the bottom left side of the control box.
6. Remove the seven (7) screws attaching the shroud to the top of the unit and carefully lift the top up and away from the unit.

28
Compressor Check Flow Chart
Compressor Fault
Check maintenance display
Put unit in stand by
Wait eight (8) minutes for compressor time
out
Turn power off at breaker / fuse panel
Verify connections and insure they are
seated fully
Check Compressor
shell temperature
Allow compressor to cool; thermal switch
to reset
Restore power at breaker / fuse panel-press power button
and verify that unit is in effi ciency mode
Raise set point 10°
Wait ten (10) seconds for compressor to
turn on
Perform voltage and current checks
Fan on
Hot
Cool
No
Fan on
No
YesYes
Table 4Check Voltage *
(VAC)
± 5%
Resistance
(Ω)
± 5%
C-R 240 3.5C-S 298 6.1R-S 380 9.5
C-GROUND 128 >1MR-GROUND 112 >1MS-GROUND 321 >1M
*Values with 240 VAC input
Check CN207 on control board pin
1 to 3 for 240 VAC
Voltage present
No
Yes
Replace control board *
Replace fan assembly
*If replacing the control board does not resolve the issue, contact technical support.

29
Powered Anode Check Flow ChartPowered anode
Fault
Check connection at
anode
Check voltage ≈ 2.5 Vdc
Check connection at
ground
Check connection on
control board @ CN203
Disconnect CN203
and measure resistance between
pin1 and tab at end of wire ≈100Ω
Bad
Good
Bad
Good
Bad
Good
Reconnect terminal to powered anode
Reconnect terminal to
control board @ CN203
Reconnect ground to terminal in
bottom of control board box
Disconnect wire from powered
anode
Fault cleared?
YesDone
No
Bad
Good
Check resistance
from anode center tab to tank ≥1MΩ
Bad
Remove anode and
check resistance from threaded portion
of anode to the tab ≥1MΩ
Bad Replace anode
Good
Check that upper element is
folded
No Replace element
with folded type
Yes
Clean threads on powered anode and tank threads, apply
tefl on® tape to anode, re-install and re-connect
Restore power
Fault cleared?
Yes
No Call tech services
Good Replace control board *
Bad
Replace anode wire
Place unit in standby mode and turn power off at breaker/
fuse panel
Fault cleared?
Fault cleared?
Yes
Yes
No
No
Call tech services *If replacing the control board does not resolve the issue, contact technical support.
30
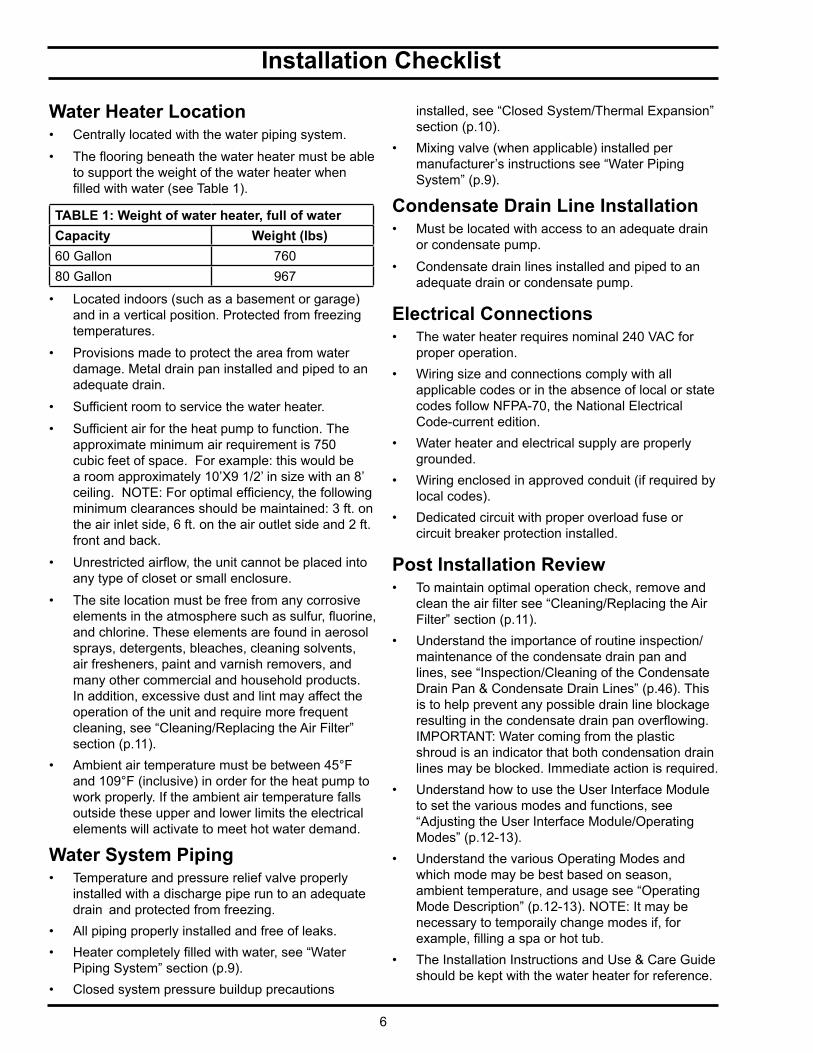
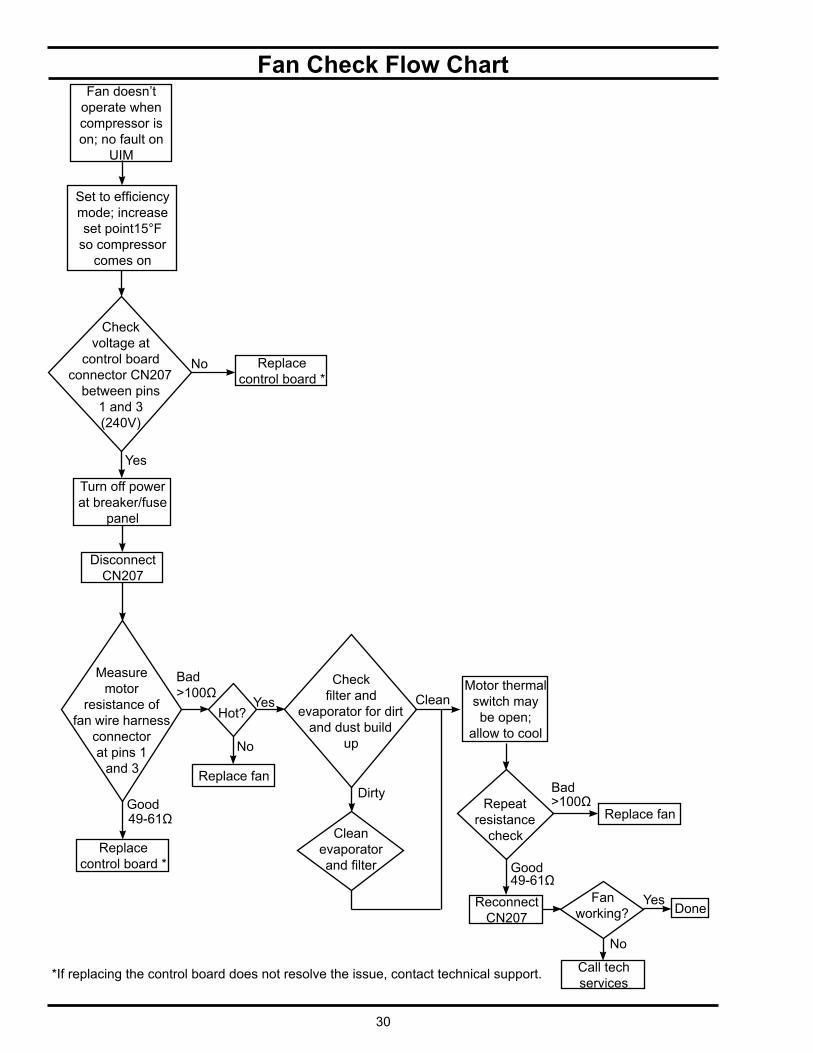
Fan Check Flow ChartFan doesn’t
operate when compressor is on; no fault on
UIM
Check voltage at
control board connector CN207
between pins 1 and 3 (240V)
No Replace control board *
Disconnect CN207
Measure motor
resistance of fan wire harness
connector at pins 1
and 3
Replace control board *
Yes
Hot?Yes
No
Replace fan
Check fi lter and
evaporator for dirt and dust build
up
Bad ˃100Ω
Good
Motor thermal switch may be open;
allow to cool
Repeat resistance
checkReplace fan
˃100Ω
49-61ΩReconnect
CN207Fan
working? Done
Call tech services
Clean
Dirty
Clean evaporator and fi lter
Yes
No
49-61Ω
Bad
Good
Set to effi ciency mode; increase set point15°F
so compressor comes on
Turn off power at breaker/fuse
panel
*If replacing the control board does not resolve the issue, contact technical support.

31
Fan Check Flow ChartFan connect fault on UIM
Check connection at
CN207
Good
Reconnect on CN207
Replace fan motor assembly
Bad Fault cleared?
DoneYes
No
Check resistance
on fan cable connector pin
1 to 3
Good 49-61Ω
Bad ˃100Ω
Is case
of motor hot?
No
Yes
Thermal switch may be open; allow to cool
Check resistance
of cold motor
Bad ˃100Ω
Good 49-61Ω
Reconnect cable to CN207
Replace control board
Check air fi lter; clean if
needed
Apply power to the unit
Fault cleared?
Yes
No
Done
Call tech services

32
Temperature SensorsOverview: The temperature sensors used in this water heater are negative temperature co-effi cient (NTC) thermisitors. With this type sensor, as temperature increases, the resistance across the thermisitor decreases or as temperature decreases, resistance will increase. The control board monitors the resistance of each sensor and converts each to a corresponding temperature. There are fi ve (5) such sensors installed on the heat pump water heater to monitor ambient, evaporator (coil), upper tank, lower tank and compressor discharge temperatures. Each is critical to the operation of the unit. If there is a connection issue with any sensor, there should be a connection fault displayed on the User Interface Module (UIM) Maintenance Display see “Accessing the Maintenance Display” (p.21).
The water heater can continue to heat water with a faulty temperature sensor, but operation will be affected as follows:
• The unit can function with a faulty lower tank temperature sensor. Upper tank temperature will be used in place of average tank temperature.
• A fault with the ambient, compressor discharge or coil (evaporator outlet) temperature sensor will cause a HEAT PUMP fault, locking out the heat pump. The unit will operate as if in ELECTRIC mode until the problem is resolved and the fault is cleared.
• An upper tank temperature sensor fault will lock out all water heating means, both heat pump and elements, until the problem is resolved and the fault is cleared.NOTE: After the problem is resolved, a fault must be cleared by turning off power to the unit at the breaker or fuse panel for ten (10) seconds and then turning it back on.
Temperature Sensor Resistance Measurement:If a temperature sensor connect fault is indicated by the Maintenance Display or if a temperature sensor issue is suspected, use the following procedure to check the sensor(s):
1. Check the resistance of a suspect temperature sensor by disconnecting the appropriate connector from the control board and placing the meter leads on the corresponding connector pins (see Table 4). Note that there are contacts located on the side of each connector that should be used.
2. Note the ambient temperature.
3. Compare the resistance reading on the appropriate Resistance vs. Temperature graph for the sensor being checked. If the reading is within ±2% of the value obtained from the graph, the sensor is good. If the value is outside this tolerance, the sensor should be replaced.
A more thorough check of a sensor can be done by checking at high and low temperature extremes. Check at low temperature by placing the sensor in ice. The reading should be 32°F. High temperature can be checked also, but do not exceed 130°F for the ambient sensor. All other sensors can be checked up to the boiling point (212°F). Submerge only the end of the sensor in boiling water; do not submerge the wire.
TABLE 5Sensor Connector /
PinsChart
Ambient CN212
Pins 1 to 2
Chart #1
Coil-Evaporator
CN212
Pins 5 to 6
Chart #1
Tank-Upper CN204
Pins 1 to 2
Chart #2
Tank-Lower CN204
Pins 3 to 4
Chart #2
Discharge-Compressor
CN212
Pins 3 to 4
Chart #2

33
Resistance vs. temperature for ambient and coil thermistors
0
5
10
15
20
25
30
35
0 20 40 60 80 100 120 140 160 180 200 220
Temperature (F)
Res
ista
nce
(k O
hms)
Chart #1
Resistance vs. Temperature for Tank and Discharge thermistors
0
10
20
30
40
50
60
70
80
90
100
110
120
130
140
150
160
170
0 20 40 60 80 100 120 140 160 180 200 220
Temperature (F)
Res
ista
nce
(k O
hms)
Chart #2
Resistance vs. Temperature Charts

34
Chart #3PSIG 5 4 3 2 1 0 1 2 3 4 5 6 7
°F -22 -21 -19 -18 -16 -15 -12 -10 -8 -5 -3 -1 1
PSIG 8 9 10 11 12 13 14 15 16 17 18 19 20°F 3 5 7 8 10 12 13 15 16 18 19 21 22
PSIG 21 22 23 24 25 26 27 28 29 30 31 32 33°F 24 25 26 27 29 30 31 32 33 35 36 37 38
PSIG 34 35 36 37 38 39 40 42 44 46 48 50 52°F 39 40 41 42 43 44 45 47 49 51 52 54 56
PSIG 54 56 58 60 62 64 66 68 70 72 74 76 78°F 57 59 60 62 64 65 66 68 69 71 72 73 75
PSIG 80 85 90 95 100 105 110 115 120 125 130 135 140°F 76 79 82 85 88 90 93 96 98 100 103 105 107
PSIG 145 150 155 160 165 170 175 180 185 190 195 200 205°F 109 112 114 116 118 120 122 123 125 127 129 131 132
PSIG 210 220 230 240 250 260 275 290 305 320 335 350 365°F 134 137 140 143 146 149 153 157 161 165 169 172 176
Pressure-Temperature Chart for Refrigerant R-134a
35
Cleaning the Evaporator
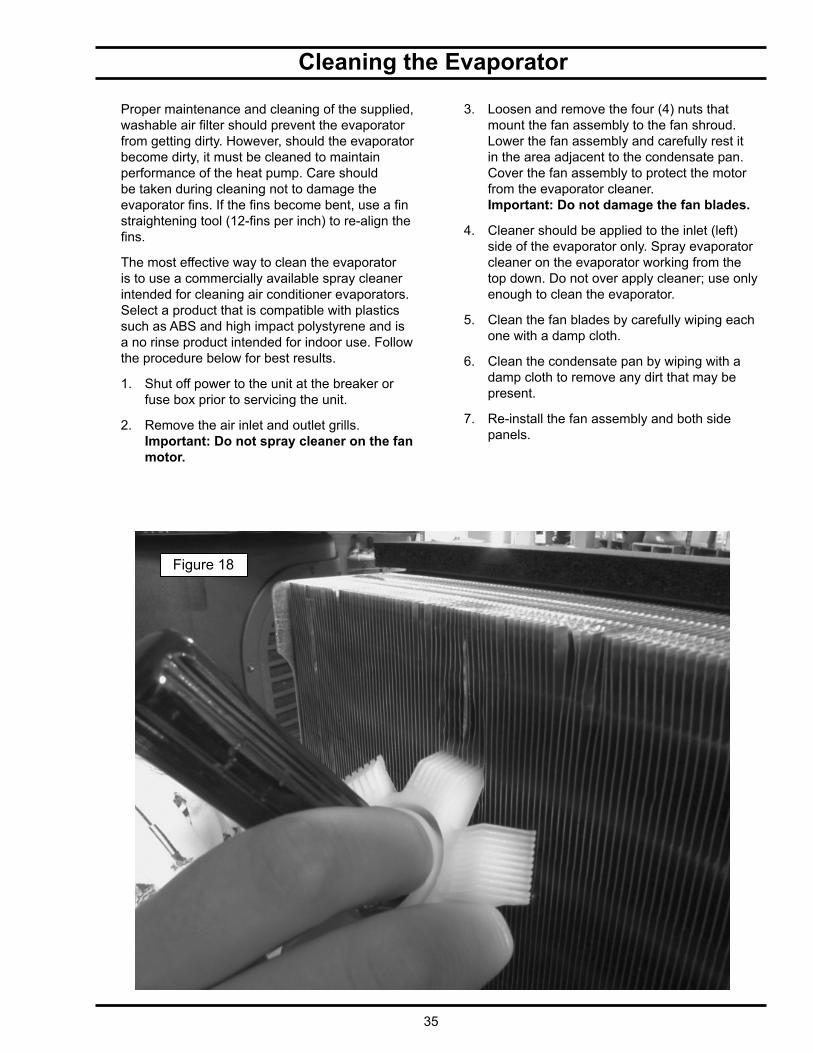
Proper maintenance and cleaning of the supplied, washable air fi lter should prevent the evaporator from getting dirty. However, should the evaporator become dirty, it must be cleaned to maintain performance of the heat pump. Care should be taken during cleaning not to damage the evaporator fi ns. If the fi ns become bent, use a fi n straightening tool (12-fi ns per inch) to re-align the fi ns.
The most effective way to clean the evaporator is to use a commercially available spray cleaner intended for cleaning air conditioner evaporators. Select a product that is compatible with plastics such as ABS and high impact polystyrene and is a no rinse product intended for indoor use. Follow the procedure below for best results.
1. Shut off power to the unit at the breaker or fuse box prior to servicing the unit.
2. Remove the air inlet and outlet grills.Important: Do not spray cleaner on the fan motor.
Figure 18
3. Loosen and remove the four (4) nuts that mount the fan assembly to the fan shroud. Lower the fan assembly and carefully rest it in the area adjacent to the condensate pan. Cover the fan assembly to protect the motor from the evaporator cleaner.Important: Do not damage the fan blades.
4. Cleaner should be applied to the inlet (left) side of the evaporator only. Spray evaporator cleaner on the evaporator working from the top down. Do not over apply cleaner; use only enough to clean the evaporator.
5. Clean the fan blades by carefully wiping each one with a damp cloth.
6. Clean the condensate pan by wiping with a damp cloth to remove any dirt that may be present.
7. Re-install the fan assembly and both side panels.

36
Troubleshooting Common Service ProblemsAs a first step in diagnosis and troubleshooting, the unit should be disconnected from power at the breaker/fuse panel for ten seconds, then reconnect power to the unit and determine if the noted error code still appears. The process of waiting for the error code to reappear may take about 8 minutes for the initial power initialization of the unit.
PROBLEM POSSIBLE CAUSE TEST/CORRECTIVE ACTION
NO HOT WATER: No power to the water heater. Check for blown fuse or tripped breaker. Restore power to the unit then press power button.
On/Off switch is off. Press On/Off switch, should be illuminated green when energized.
Unit in Vacation mode. Press Vacation button to turn off.High temperature limit switch open Reset the high temperature limit
switch; see “ECO Switch Trouble-shooting” (p.25)
Non-functioning upper temperature sensor
Perform temperature sensor resistance test procedure (p.32), replace sensor if defective.
Inlet or outlet water valves at the water heater closed
Insure valves are fully open
INSUFFICIENT HOT WATER / SLOW HOT WATER RECOVERY:
Temperature set point too low Increase set point temperature; see “Adjusting Set Point Temperature” section (p.13)
Inlet or outlet valves at the water heater are partially closed
Insure valves are fully open
Air fi lter dirty Clean or replace air fi lterHot water usage pattern exceeds the capability of the water heater in current mode
Change to diffrent mode or modify usage patterns
Water connections to unit reversed Ensure the cold connection is at the bottom and the hot connection is at the top
Heat lost through long run of exposed pipe
Insulate exposed piping.
Hot water leak at faucet or piping Repair hot water leaksNon-functioning heating element Test elements and replace as
required; see details in the “Element Test” section (p.22-23)
Sediment or scale build up in tank Drain and fl ush tank. Water conditioning may be necessary to minimize build up.
Water heater may be under-sized Upgrade to larger capacity water heater

37
Troubleshooting Common Service ProblemsPROBLEM POSSIBLE CAUSE TEST/CORRECTIVE
ACTIONHIGHER THAN EXPECTED OPERATING COSTS:
Electric mode selected Change to effi ciency or hybrid for reducing energy costs
Ambient air temperature preventing compressor operation
Ambient air temperature must be ≥ 45°F and ≤109°F to enable compressor operation.
Air fi lter dirty Clean or replace air filterTemperature set point too high Decrease set point temperature;
see “Adjusting Set Point Temperature” section (p.13)
Water connections to unit reversed Ensure the cold connection is at the bottom and that the hot connection is at the top
Heat lost through long run of exposed pipe or a recirculation system
Insulate exposed piping. It may be necessary to discontinue use of re-circulation system.
Hot water leak at faucet or piping Repair hot water leaksSediment or scale build up in tank Drain and flush tank. Water
conditioning may be required to minimize build up
DRIP FROM TEMPERATURE & PRESSURE RELIEF VALVE:
(Warning: Do not plug or cap T&P discharge pipe.)
Excessive water pressure Check water supply inlet pressure. If more than 80 PSIG, install a pressure reducing valve
Add or service a thermal expansion tank
See “Closed System/Thermal Expansion” section (p.10)
Malfunctioning Temperature & Pressure Relief Valve
Replace the Temperature & Pressure relief valve.
OTHER: The heat pump does not run in effi ciency mode
If ambient temperature is greater than 109°F or less than 45°F the heat pump will not operate.
LEAKS AROUND THE ELEMENTS:
The gasket and or threads are leaking
Re-seal or replace gasket. See “Heating Element Replacement” (p.24), for draining and fi lling procedures.
See also “Leaks around Tank Fittings”

38
Troubleshooting Common Service ProblemsPROBLEM POSSIBLE CAUSE TEST/CORRECTIVE
ACTIONLEAKS AROUND TANK FITTINGS
(e.g., drain valve, relief valve, etc.):
The threads are leaking and need to be resealed
Insert a cotton swab between the jacket opening and the fi tting. If the cotton absorbs water, follow these steps:
Disconnect power, then drain the tank (p.45). Remove the fi tting and put thread sealant or Tefl on tape on the threads, then reinstall the fi tting. Refi ll tank (p.45). Restore power.
See also “Leaks Around the Elements”
The spud had developed a leak at the weld.
Call technical support before replacing the water heater
DRIPPING DRAIN VALVE: Valve may be slightly open Check to see if the drain valve is closed tightly. If the leakage cannot be stopped by tightening the valve, replace it.
WATER, DISCOLORED: Milky water: There may be build up gases in the heated water (oxygen, chlorine, carbon dioxide, hydrogen sulfi de, etc.)
Although milky water may not be completely eliminated, it can be reduced by installing aerated faucets
NOISES
(Crackling, gurgling, popping, rumbling):
Scale / lime / mineral build up in the water heater.
Treat the water heater with a deliming solution (e.g. Mag-Erad or Un-Lime). The directions for the product should be followed explicitly.
NOISES
(Pounding noises or vibrations in pipes
Water hammer. To prevent damage to the water heater and plumbing system, install a water hammer arrestor.

39
Upper Element Connect Fault (Upper heating element circuit is open):Loose connection or damaged wire- • Turn off power at the circuit breaker / fuse box and check for a loose connection at the element. For
access directions see “Heating Element Replacement” (p.24). Upper element faulty-• Check resistance of the element itself to see if it’s around 12.4 Ω. If it is broken, replace non-
functioning element. See “Heating Element Replacement” (p.24).Control board faulty-• If the error persist, the problem may be caused by the control. Replace the control board.• If replacing the control board doesn’t resolve the issue, contact technical support.
Lower Element Connect Fault (lower heating element circuit is open):Loose connection or damaged wire-• Turn off power at the circuit breaker / fuse box and check for a loose connection at the element. For
access directions see “Heating Element Replacement” (p.24).Lower element faulty-• Check resistance of the element itself to see if it is around 28 Ω. If it is broken , replace non-
functioning element. See “Heating Element Replacement” (p.24).Important: Using an element greater than 2000 watts in place of the lower element will damage the water heater and void the warranty.
Control board faulty-• If the error still persists, this problem may be caused by the control board. Replace the control board.
Heat Pump Connect Fault (Heat pump compressor circuit is open):Loose connection or damaged wire-• Turn off power at the circuit breaker / fuse box.• Check wire harness connections at compressor, control board, run capacitor and compressor relay.• Inspect wires for damage.Compressor thermal protector open-• Compressor will restart after coolling off.Faulty run capacitor-• Check the capacitor, see “Checking the Run Capacitor” (p.26), replace if defective.Control board faulty-• Replace control board.• If replacing the control board doesn’t resolve the issue, contact technical support.Compressor faulty-• Check the compressor, refer to the “Checking the compressor” fl owchart p.28, replace if defective.
Fan Connect Fault (Heat pump fan circuit is open):Loose connection or damaged wire-• Turn off power at the circuit breaker / fuse box• Check that connector CN207 on control board is seated.• Check wires for damageThe internal protector of fan motor may be open or the fan motor is broken-• Check the fan motor, refer to “Checking the fan motor” fl owcharts (p.30-31). Replace if defective.Control board faulty-• Replace control board.• If replacing the control board doesn’t resolve the issue, contact technical support.
Fault Code Troubleshooting Guide

40
Ambient Temperature Sensor Short or Open or Ad Error (Ambient temperature sensor circuit is not functioning):
Loose connection or damaged wire-• Turn off power at the circuit breaker / fuse box.• Check that connector CN212 on control board is seated.• Check wires for damage.Ambient temperature sensor is shorted or open-• Unplug ribbon cable from CN212; check resistance between pins 1 and 2 of the ribbon cable
connector. Refer to chart #1 (p.33) for expected resistance value. If the measured resistance is >40kΩ or = 0Ω, the thermisitor is faulty.
• Replace thermisitor assembly.Control board faulty-• Replace control board.• If replacing the control board doesn’t resolve the issue, contact technical support.
Upper Temperature Sensor Short or Open or Ad Error (Upper temperature sensor circuit is not functioning):
Loose connection or damaged wire-• Turn off power at the circuit breaker / fuse box.• Check that connector CN204 on control board is seated.• Check wires for damage.Upper temperature sensor is shorted or open-• Unplug ribbon cable from CN204; check resistance between pins 1 and 2 of the ribbon cable
connector. Refer to chart #2 (p.33) for expected resistance value. If the measured resistance is >200kΩ or = 0Ω, the thermisitor is faulty.
• Replace thermisitor assembly.Control board faulty-• Replace control board.• If replacing the control board doesn’t resolve the issue, contact technical support.
Lower Temperature Sensor Short or Open or Ad Error (Lower temperature sensor circuit is not functioning):
Loose connection or damaged wire-• Turn off power at the circuit breaker / fuse box• Check that connector CN204 on control board is seated.• Check wires for damage.Lower temperature sensor is short or open-• Unplug ribbon cable fron CN204; check resistance between pins 3 and 4 of the ribbon cable
connector. Refer to chart #2 (p.33) for expected resistance value. If the measured resistance is >200kΩ or =0Ω, the thermisitor is faulty.
• Replace thermisitor assembly.Control board faulty-• Replace control board. • If replacing the control board doesn’t resolve the issue, contact technical support.
Discharge Temperature Sensor Short or Open or Ad Error (Discharge temperature sensor circuit is not functioning):
Loose connection or damaged wire-• Turn off power at the circuit breaker / fuse box• Check that connector CN212 on control board is seated.• Check wires for damage.Discharge temperature sensor is short or open-• Unplug ribbon cable from CN212; check resistance between pins 3 and 4 of the ribbon cable
Fault Code Troubleshooting Guide

41
Fault Code Troubleshooting Guideconnector. Refer to chart #2 (p.33) for expected resistance value. If the measured resistance is >200Ω or =0Ω, the thermisitor is faulty.
• Replace thermisitor assembly.Control board faulty-• Replace control board. • If replacing the control board doesn’t resolve the issue, contact technical support.
Coil Temperature Sensor Short or Open or Ad Error (Coil temperature sensor circuit is not functioning):
Loose connection or damaged wire-• Turn off power at the circuit breaker / fuse box.• Check that connector CN212 on control board is seated.• Check wires for damage.Discharge temperature sensor is shorted or open-• Unplug ribbon cable from CN212; check resistance between pins 5 and 6 of the ribbon cable
connector, refer to chart #1 (p.33) for expected resistance value. If the measured resistance is >40Ω or = 0Ω, the thermisitor is faulty.
• Replace thermisitor assembly.Control board faulty-• Replace control board.
• If replacing the control board doesn’t resolve the issue, contact technical support.
Low Water Level Alarm (The tank is not full of water):Tank is not completely fi lled with water-• Ensure that the tank is completely fi lled and cycle power off and back on to restart dry fi re protection.Fault is still present-• Call tech services.
Heat Pump Low Pressure Fault (Lower pressure switch is open):Low suction pressure-• Use a service gage set to check system pressures (high and low sides).• The low side pressure switch opens if suction pressure drops below 7.3 psi. and will reset (close)
when pressure exceeds 21.8 psi; if suction pressure is less 21.8 psi, the low pressure switch is open, preventing the compressor from running.
• Can be caused by poor air fl ow across the evaporator; make sure the evaporator and air fi lter are free of dust and dirt build up, see “Cleaning the Air Filter” (p.11) and “Cleaning the Evaporator” (p.35).
• Can be caused by low refrigerant charge or a blockage in the refrigerant system.Low side pressure checks good-• Disconnect the wires from the low pressure switch and check.
Heat Pump High Pressure Fault (High pressure switch is open):High discharge pressure-• Use a service gage set to check system pressures (high and low sides).• The high pressure switch opens at 338 psi and resets when pressure drops below 275 psi.; if it is 275
psi or higher then the pressure switch is open, preventing the compressor from running.• Can be caused by poor air fl ow across the evaporator; make sure the evaporator and air fi lter are free
of dust and dirt build up, see “Cleaning the Air Filter” (p.11) and “Cleaning the Evaporator” (p.35).• Can be caused by blockage in the refrigerant system or low water level in tank.High side pressure is less than 275 psi.-• Disconnect the wires from the high pressure switch and check resistance across the terminals; 0
42
ohms indicates good; high resistance indicates the switch is defective and should be replaced.
Heat Pump High Temperature Fault (Compressor discharge temperature is too high):The refrigerant system may be blocked-• Check the heat pump piping and evaporator; if the tubing or evaporator is covered with frost in
one spot, this indicates there is a restriction in the system at that point. Call technical services for assistance.
Check the condition of the compressor-• See the “Compressor Check Flowchart” (p.28).Water temperature is too high-• The control board is not controling the tank temperature properly• Check the upper and lower tank thermisitors; make sure they are in contact with the tank wall.• Check the tank temperature sensors, see “Temperature Sensors” (p.32).
Main Control Board Crystal Fault (Main board failure):Faulty control board-• Replace the control board.• If replacing the control board doesn’t resolve the issue, contact technical support.
Main Control Board RAM Fault (Main board failure):Faulty control board-• Replace the control board.• If replacing the control board doesn’t resolve the issue, contact technical support.
Main Control Board ROM Fault (Main board failure):Faulty control board-• Replace the control board.• If replacing the control board doesn’t resolve the issue, contact technical support.
Main Control Board EEPROM Fault (Main board failure):Faulty control board-• Replace the control board.• If replacing the control board doesn’t resolve the issue, contact technical support.
Main Control Board State Fault (Main board failure):Faulty control board-• Replace the control board.• If replacing the control board doesn’t resolve the issue, contact technical support.
Low Supply Voltage Fault (Low input voltage):Power supply voltage is too low-• Verify the unit is connected to 240 VAC. Heat pump operating voltage range is 204-264 VAC. The
compressor will not operate below 204 VAC, but the heating elements will.• If connected to 208 VAC, a buck-boost tramsformer is required to boost to 240 VAC.
High Supply Voltage Fault (High input voltage):Power supply voltage is too high-• Verify the unit is connected to 240 VAC, unit is intended for 240 VAC connection only. If connected
to higher voltage, a buck boost transformer may be required to reduce voltage. Heat pump operating voltage range is 204-264 VAC. The compressor will not operate above 264 VAC, but the heating elements will.
• If connected to 208 VAC, a buck-boost transformer is required to boost to 240 VAC.
Fault Code Troubleshooting Guide

43
Low Supply Voltage Fault (Very low input voltage):Power supply voltage is extremely low-• Verify the unit is connected to 240 VAC, unit is intended for 240 VAC connection only. The unit will not
operate below 184 VAC.
High Temperature Lock Out (ECO tripped due to excessivly high tank temperature):Eco has detected a tank temperature of 190 ± 5°F and tripped-• Check the ECO-if tripped, press red button to reset. See “ECO Switch Troubleshooting” (p.25).• Check for faulty control board not shutting off heating means (element or heat pump)Loose connection or damaged wire-• Turn off power at the circuit breaker/fuse box and check for a loose connection or damaged wire
between the ECO and control board.Faulty temperature sensor-• Check the upper temperature sensor; refer to “Temperature Sensors” (p.32) for details.• A faulty lower temperature sensor will not cause this error.Faulty ECO-• Check the ECO with an Ohm meter: Pin 1 to 2 and pin 3 to 4 should measure short, if they do not,
press the red reset button and check again. If the pins are shorted, the ECO is good, if not the ECO is faulty and should be replaced.
Condensate Drain Alarm (The installed condensate pump is not working):Condensate pump not operating-• Check to see if condensate pump is plugged in and has power. Also check circuit breaker/fuse box
and GFCI (if used).• Check operation of condensate pump; replace if defective.Condensate pump drain line is blocked-• Check condensate pump outlet tube for blockage.Loose connection or damaged wire in the condensate pump failure detect circuit-• Check control wire for connections to condensate pump. If error persists see “Condensate Pump
Troubleshooting” (p.46).
Power Anode Over Current (Powered anode circuit not working):Faulty control board-• Replace control board.• If replacing the control board doesn’t resolve the issue, contact technical support.
Power Anode Max Current at Min PWM (Powered anode circuit not working):Faulty control board-• Replace control board.• If replacing the control board doesn’t resolve the issue, contact technical support.
Power Anode Offset Current (Powered anode circuit not working):Faulty control board-• Replace control board.• If replacing the control board doesn’t resolve the issue, contact technical support.
Fault Code Troubleshooting Guide
44
Power Anode Drive Voltage LT Tank Voltage (Powered anode circuit not working):Anode shorted to tank or upper element-• Check for short circuit-
1. Disconnect the red wire from the tab on the anode; use an Ohm meter to check between the wire tab on the anode and the tank. A low reading (should be ≥ 1 mega-ohm) indicates a short.
2. If short, take out the upper element and re-check; if no longer short, make sure the upper element is a folded type, maximum 10 inches long. Replace if wrong element.
3. If the short persists, the anode may be bent and touching the tank. Remove the anode, see “Powered Anode Troubleshooting” (p.27), and carefully straighten if bent.
4. Check the anode for a short by placing one Ohm meter probe on the steel nut, the other on the tab connector. If resistance is low reading (should be ≥ 1 mega-ohm), replace the anode.
Power Anode ADC Error (Powered anode circuit not working):Faulty control board-• Replace the control board.• If replacing the control board doesn’t resolve the issue, contact technical support.
Power Anode No Tank Voltage (Powered anode circuit not working):Anode shorted to ground-• Anode may be shorted to tank or element. Check for short see “Powered Anode Flowchart” (p.29).Low water level-• Check water level, fi ll the tank if necessary.
Power Anode No Current Sense (Powered anode circuit not working):Faulty control board-• Replace the control board.• If replacing the control board doesn’t resolve the issue, contact technical support.
Power Anode Wrong Voltage Feedback (Powered anode circuit not working):Anode internally shorted, shorted to tank or upper element-• Refer to “Powered Anode Flowchart” (p.29)Control board faulty• If anode is not shorted in any way, replace control board.
No Display on User Interface Module (UIM):Confi rm that there is no power to the unit-Determine if UIM or control board is faulty-• If the water heater heats water (compressor runs or elements turn on), troubleshoot the UIM• If the water heater does not heat water, check LED201 on the control board. If lit, assume control
board is good. Troubleshoot the UIM and ribbon cable.• If not lit troubleshoot control board.Troubleshoot UIM-• Turn off power at the circuit breaker/fuse box• Check for a loose connection of the ribbon cable at CN211 or CN215 on the control board.• Check the cable connection on the UIM PCBTroubleshoot control board-• Check the fuses on the control board.
1. If good replace the control board. If replacing control board doesn’t resolve issue, call technical support.
2. If bad replace fuses and look for shorts to ground.
Fault Code Troubleshooting Guide

45
Draining and Filling the Water Heater
D raining and F illing the Water Heater
The water heater should be drained if being shut down during freezing temperatures. Also, periodic draining and cleaning of sediment from the tank may be necessary.
1. Place the water heater in Standby Mode by pressing the power button on the user interface module.
2. Turn off the power to the water heater at the breaker or disconnect switch serving the water heater.
3. Open a nearby hot water faucet until the water is no longer hot.
4. Close the cold water inlet valve.5. Connect a hose to the drain valve and terminate it
to an adequate drain or external to the building.6. Open the water heater drain valve and allow all of
the water to drain from the tank. Flush the tank with water as needed to remove sediment.
7. Close the drain valve, refi ll the tank (open the cold water inlet valve), and restart the heater. IMPORTANT: Do not turn on power to the water heater unless it is completely fi lled with water. To ensure that the tank is full, open a hot water faucet and allow the water to run until the air is purged and the water fl ows uninterrupted from the faucet.
8. Press the power button to turn the water heater on. NOTE: the water heater will conduct a system diagnostic prior to operation that takes approximately 8 minutes.
If the water heater is going to be shut down for an extended period, the drain valve should be left open.
NOTE: If the water heater is going to be shut down and drained for an extended period, the drain valve should be left open with the hose connected, allowing water to terminate to an adequate drain or external to the structure.
Never use this water heater unless it is completely full of water. To prevent damage to the tank and heating element, the tank must be fi lled with water. Water must fl ow from the hot water faucet before turning on power.

46
Condensate Pump TroubleshootingA condensate pump may be necessary if the drain point is above the level of the condensate drain on the heat pump water heater. A condensate pump failure detect is provided with the heat pump water heater control. Follow the instructions in the installation and operation manual for connection of the condensate pump failure switch to the heat pump control.
Should the condensate pump fail to operate and clear the condensate from the pump reservoir, the fl oat switch provided with the pump will open. The heat pump control will detect condensate pump failure and shut off the heat pump in order to stop condensate from being produced. “HEAT PUMP FAULT” will be displayed on the user interface and the heat pump will not operate until the fault is cleared. By checking the MAINTENANCE DISPLAY, the fault can be narrowed down. For a condensate pump failure, the MAINTENANCE DISPLAY will indicate CONDENSATE DRAIN ALARM.
In order to determine the cause of the condensate drain alarm, fi rst ensure that the condensate pump has power. Check that the condensate pump is plugged into an outlet and that the socket that the condensate pump is plugged into is powered. If the pump has power, check the outlet tubing for clogs or kinks that could prevent fl ow of condensate. Also check the pump inlet in the sump for debris that might block fl ow. Follow the condensate pump manufacturer’s instructions for seperating the pump section from the tank.
If condensate pump appears to be functioning properly but is unable to clear the condensate from the tank, make sure the height of the discharge point does not exceed the pump manufacturer’s specifi cation. Consult the manufacturer’s literature for this information.
Condensate Drain Maintenance
Condensate may be produced when the heat pump runs, depending on the amount of humidity in the air. If the relative humidity is high, the amount of condensate can exceed 20 oz per hour. The condensate is collected in a plastic pan under the evaporator. Two drain ports are provided for connection of primary and secondary drain lines. 1/2 inch PVC is recommended for connection to the drain ports. The condensate pan, drain ports and lines should be inspected and cleaned periodically. Shut off power to the appliance before performing any maintenance or repair. Access to the drain pan can be gained by removing right side of louver panel. The black plastic pan is inside located below the evaporator and the two drain ports are located toward the back of the unit. Wipe the inside of the condensate pan with a clean rag to remove any debris or algea that may be present. Use an old toothbrush or a bottle brush to clean the inside of the two drain ports. Flush the ports with a small amount of clean water. Clean the condensate pump, if one is installed, in accordance with the manufacturer’s instructions.
Disposal of Condensate
Condensate should be disposed of in accordance with any applicable local codes that may exist. Guidelines for HVAC systems are applicable to the heat pump water heater.
Inspection/Cleaning of the Condensate Drain Pan & Condensate Drain LinesIMPORTANT: Before attempting to clean or replace the condensate drain pan or lines press the power button to place the water heater in Standby Mode and shut-off power to the water heater at the circuit breaker/fuse box.1. Remove the access panel (fan side) by loosening the screws securing it to the unit. 2. Check the condensate drain pan and drain lines for any dirt or debris that might interfere with proper drainage.
Wipe out any dirt or debris with a damp cloth.3. Once the condensate drain pan and lines have been inspected/cleaned, secure the access panel to the water
heater.4. Restore power to the water heater and press the power button to turn the water heater on.
NOTE: The water heater will conduct an eight (8) minute system diagnostic prior to operation.

47
Service Parts List for 60 and 80 Gallon Heat Pump Water Heaters
Item Part Number1. Ambient / Discharge / Coil Temperature Sensor Assembly ................................................. 9007473015
2. Upper / Lower Temperature Sensor Assembly .................................................................... 9007474015
3. Run Capacitor ...................................................................................................................... 9007475005
4. Compressor Control Relay .................................................................................................. 9007476005
5. Electronic Control Board ...................................................................................................... 9007477005
6. User Interface Module ......................................................................................................... 9007478005
7. Fan Assembly (complete) .................................................................................................... 9007486005
8. Upper Heating Element (4.5 kW) ......................................................................................... 9007479015
9. Lower Heating Element (2.0 kW) ..........................................................................................9003946115
10. Energy Cut-Off Switch (ECO) .............................................................................................. 9007480015
11. J-tube, Hot Water Outlet, Stainless Steel ............................................................................ 9007481015
12. Anode, Powered, 3mm for 80-gallon models ...................................................................... 9007564005
13. Anode, Powered, 2mm for 60-gallon models ...................................................................... 9007324005
14. Air Filter ............................................................................................................................... 9007482005
15. Compressor Wiring Harness ................................................................................................ 409171-000
16. Fuses (2), Input power to control board, 3 Amp, 250V, slow blow, 20mm X 5mm .............. 9007485015
17. T&P Valve ............................................................................................................................ 9000728015
18. Drain Valve, Brass, 2-inch ................................................................................................... 9001870015
19. Nipple, Dielectric, PEX Lined, 3-inch ....................................................................................9005883115
20. Element Access Cover (upper) ............................................................................................. 409230-000
21. Element Access Cover (lower) ............................................................................................. 409231-000
22. Personnel Protector (ECO) ................................................................................................... 408454-000
23. Personnel Protector (element terminals) ............................................................................. 409195-000
24. Air Inlet Side Panel (louvered) .............................................................................................. 409184-000
25. Air Outlet Side Panel (louvered) ........................................................................................... 409185-000
26. Top Shroud ........................................................................................................................... 409183-000
27. Element Door (EPS) ............................................................................................................. 409196-000
28. Filter Dryer ............................................................................................................ Call (1-800-433-2545)
29. Thermal Expansion Valve ..................................................................................... Call (1-800-433-2545)
30. Pressure Switch (high) ......................................................................................... Call (1-800-433-2545)
31. Pressure Switch (low) ........................................................................................... Call (1-800-433-2545)
32. Evaporator ............................................................................................................ Call (1-800-433-2545)
33. Compressor, 850 Watt, Rotary ............................................................................. Call (1-800-433-2545)

48
500 Tennessee Waltz Parkway, Ashland City, TN 37015Technical Support: 800-527-1953 • Parts: 800-433-2545 • Fax: 800-644-9306
www.hotwater.com Copyright © 2011, Inc. All Rights Reserved
®