Embed Size (px)
Citation preview
IBM Tivoli Assist On-site Remote Support UtilityVersion 3.3
User's Guide
���

IBM Tivoli Assist On-site Remote Support UtilityVersion 3.3
User's Guide
���

NoteBefore using this information and the product it supports, read the information in “Notices” on page 41.
This edition applies to version 3, release 3 of IBM Tivoli Assist On-site and to all subsequent releases andmodifications until otherwise indicated in new editions.
© Copyright IBM Corporation 2008, 2011.US Government Users Restricted Rights – Use, duplication or disclosure restricted by GSA ADP Schedule Contractwith IBM Corp.
Contents
Figures . . . . . . . . . . . . . . . v
Chapter 1. IBM Tivoli Assist On-site. . . 1New in this release . . . . . . . . . . . . 1Assist On-site components . . . . . . . . . . 2Assist On-site process . . . . . . . . . . . 2Support sessions . . . . . . . . . . . . . 3
Unattended support sessions . . . . . . . . 3Assist On-site tunneling and port forwarding . . 3Session modes . . . . . . . . . . . . . 4
Host sessions . . . . . . . . . . . . . . 7Rational Host Access Transformation Services . . 7Host session architecture . . . . . . . . . 8
Collaboration in sessions . . . . . . . . . . 9Assist On-site launch-in-context . . . . . . . 10IBM Client Diagnostic Data Repository . . . . . 10Assist On-site security . . . . . . . . . . . 11
Authentication . . . . . . . . . . . . 12Encryption and decryption . . . . . . . . 13Logging and auditing . . . . . . . . . . 13
Chapter 2. Installing the RemoteSupport Utility . . . . . . . . . . . 15Remote Support Utility Prerequisites . . . . . . 15Running the Assist On-site connectivity test . . . 16Installing the Utility for external IBM customers . . 18Installing the Utility for internal IBM customers . . 20Manually configuring the connection for the proxyserver . . . . . . . . . . . . . . . . 21
Chapter 3. Using the Remote SupportUtility . . . . . . . . . . . . . . . 23Consenting to support sessions . . . . . . . . 23Stopping support sessions . . . . . . . . . 25Switching between session modes . . . . . . . 25Remote Support Utility actions . . . . . . . . 25
Obtaining Remote Support Utility versioninformation . . . . . . . . . . . . . 25Finding out who is connected to your machine 26Getting your system's information . . . . . . 26Opening the file transfer directory . . . . . . 26Chatting with the support engineer . . . . . 27Configuring port forwarding in the Utility . . . 28Starting host sessions . . . . . . . . . . 30Stopping host sessions. . . . . . . . . . 32
Chapter 4. Relay Server . . . . . . . 35
Chapter 5. Assist On-site SupportService . . . . . . . . . . . . . . 37Downloading and installing the Support Service . . 37Configuring the Assist On-site Support Service . . 37Configuring port forwarding . . . . . . . . 39
Notices . . . . . . . . . . . . . . 41
© Copyright IBM Corp. 2008, 2011 iii

iv Remote Support Utility: User's Guide
Figures
1. Guidance-mode action symbols . . . . . . 52. Guidance-mode mouse button symbols . . . 63. Example of the Paint drawing tool . . . . . 64. Example of the Highlighting tool. . . . . . 65. Host session architecture . . . . . . . . 96. Connectivity test results . . . . . . . . 177. Online request form. . . . . . . . . . 198. Session code window . . . . . . . . . 209. Remote Support Utility interface . . . . . 23
10. The Assist On-site window . . . . . . . 2411. Information window with the support
engineer's details. . . . . . . . . . . 26
12. Utility Chat window . . . . . . . . . 2713. Configure Port Forwarding window . . . . 2914. Configure Port Forwarding window with
examples . . . . . . . . . . . . . 3015. Start Host Session window . . . . . . . 3116. The emulator session running in the Web
browser window . . . . . . . . . . . 3217. Support Service Config window . . . . . 3818. Configure Port Forwarding window . . . . 3919. Configure Port Forwarding window with
examples . . . . . . . . . . . . . 40
© Copyright IBM Corp. 2008, 2011 v

vi Remote Support Utility: User's Guide

Chapter 1. IBM Tivoli Assist On-site
IBM® Tivoli® Assist On-site is a lightweight remote support program intendedprimarily for help desks and support engineers to diagnose and fix problemswithout the need of any external dependencies. Assist On-site is based on the IBMTivoli Remote Control technology.
Assist On-site has been developed specifically to meet functionality, security, andprivacy requirements of IBM and IBM customers. Support engineers and theircustomers can run it on various platforms. It currently has a native version for the32 bit Windows environment and generic Linux compatible operating systems.Assist On-site uses IBM AES MARS encryption, NTLM authentication, and IBMintranet authentication for IBM support engineers. Assist On-site can also supportlightweight Rational® Host Access Transformation Services emulator sessions forcomputers running z/OS® and Power i.
Assist On-site provides a launch-in-context feature such that support engineers canstart Assist On-site from within the session of the third-party support tool. Forrestricted use only, Assist On-site supports IBM diagnostic tools to function overthe Assist On-site connection for the purpose of debugging hardware devices andIBM software.
New in this releaseVersion 3.3 provides new features and enhancements to Assist On-site Version 3.2.They support tunneling, launch-in-context, and IBM Client Data DiagnosticRepository.
Version 3.3 contains the following new features and enhancements:v Assist On-site launch-in-context
Assist On-site provides a launch-in-context feature such that support engineerscan start Assist On-site from within the session of the third-party support tool.
v Assist On-site tunneling and port forwarding
For restricted use only, Assist On-site supports IBM diagnostic tools to functionover the Assist On-site connection for the purpose of debugging hardwaredevices and IBM software. During a Assist On-site tunneling session, the set offorwarded ports is saved to a CSV file on the support engineer's machine.Connections to multiple devices from the same port on the support engineer'smachine and collaborative sessions are also supported. The Assist On-siteadministrator can turn on this feature for teams that have specific permission touse it for remote diagnostics.
v Support for the exchange of diagnostic data
Assist On-site provides support for the IBM Client Diagnostic Data Repository(CDDR) strategy in the exchange of data through the propagation of team URLsand file transfer functions.
© Copyright IBM Corp. 2008, 2011 1
Assist On-site componentsAssist On-site has several primary components: Remote Support Console, RemoteSupport Utility, Relay Server, Administration Portal, and Assist On-site SupportService.v Remote Support Console
It is a Java application that is installed on the machine of the support engineerand is used to communicate with the Remote Support Utility. The RemoteSupport Console has many functions to assist the support engineer in resolvingcustomer issues within a support session.
v Remote Support UtilityIt is a lightweight Java application that communicates with the Remote SupportConsole. The Remote Support Utility has many functions that provides thecustomer with various privacy functions while the support engineer can takecontrol of the customer's machine when allowed. After support session stops, theRemote Support Utility deletes itself from the customer's machine.
v Relay ServerIt is an application server that handles the data transmissions for supportsessions between the Remote Support Console and the Remote Support Utility.There is a network of servers across several geographic regions, with supportengineers and customers connecting to those servers within their geographicregions where possible.
v Administration PortalIt is a single, secure point of access to information, applications, teams, andusers that can be administered and managed to support Assist On-site.
v Assist On-site Support ServiceIt is an applicative service that has features similar to the Remote Support Utilityand runs on target machines. It registers itself with the Relay Server and sendsHTTPS heartbeats as status updates.Assist On-site Support Service configurationuses customer policies that determine when and how the support engineer canrun unattended support sessions.
Assist On-site processThe components of Assist On-site (AOS) interact together to start and maintain asupport session between the support engineer and the customer.
The Assist On-site process can be summarized as follows:1. The customer contacts the support team and opens a PMR with an issue or
question.2. In the Remote Support Console, the support engineer starts a support session
to determine the problem.3. The Relay Server generates a connection code that is displayed in the Remote
Support Console. The connection between the Relay Server and the RemoteSupport Console is established. The one-time-use connection code is sevendigits, with a default timeout of 15 minutes.
4. The support engineer refers the customer to an Assist On-site URL and thecustomer can enter details such as name, PMR number, and customer number.
5. The support engineer can extend the connection code timeout for anadditional 10 minutes to accommodate slow network connectivity
2 Remote Support Utility: User's Guide
6. The Remote Support Utility plug-in downloads automatically through thecustomer's Web browser and is less than 780 KB. The customer enters theconnection code.
7. The Remote Support Utility starts and the initialize support session andsession mode window opens.
8. The customer must select the session mode and thereby accept the requestfrom the support engineer to start the support session. The connectionbetween the Relay Server and the Remote Support Utility is established.
9. After the customer accepts, the support engineer is connected to thecustomer's machine through the Relay Server
10. The support engineer attempts to resolve the problem during the supportsession and uses the functions of the Remote Support Console.
11. During the session, the customer can retake control of the mouse andkeyboard at any time.
12. Either the support engineer or customer can stop the session.13. After the session ends, the Remote Support Utility is deleted from the
customer's machine.
Support sessionsSupport engineers can troubleshoot issues with the machine of a customer duringa support session. A support session is a lightweight remote-control and interactiveexchange between the support engineer's controller machine running the RemoteSupport Console and the customer's target machine running the Remote SupportUtility.
The support engineer establishes an authenticated connection to the Relay Serverand creates the support session, requesting a unique connection code from theRelay Server. The support engineer gives this connection code to the customer,who downloads the Remote Support Utility and joins the support session using theconnection code.
Support sessions can run in various modes that determine the level of access thesupport engineer has to the target machine. With the customer's permission, thesupport engineer can view the target desktop and shares control of the targetmouse and keyboard. The customer has overriding control of the mouse andkeyboard and can stop the support session at any time.
Unattended support sessionsThe support engineer can run lights-out or unattended support sessions, includingport forwarding sessions, during which the customer is not in attendance. Thesupport engineer establishes an authenticated connection between the RemoteSupport Console and the Relay Server. The Remote Support Console displays a listof target machines on which the Assist On-site Support Service runs. Assist On-siteSupport Service configuration uses customer policies that determine when andhow the support engineer can run unattended support sessions and portforwarding sessions.
Assist On-site tunneling and port forwardingA customer might have issues on a storage device or another IT device that doesnot have a GUI and want a support engineer to troubleshoot the issues by usingdebug tools such as Telnet or SSH during a port forwarding session. A portforwarding session is a tunneled session that routes debugging or diagnostic traffic
Chapter 1. IBM Tivoli Assist On-site 3
between the configured local port on the support engineer's machine and the porton the remote host machine. It runs over an existing Assist On-site connection,ensuring secure end-to-end connections.
For restricted use only, Assist On-site supports IBM diagnostic tools to functionover the Assist On-site connection for the purpose of debugging hardware devicesand IBM software. The Assist On-site administrator can turn on this feature forteams that have specific permission to use it for remote diagnostics.
After the customer explicitly configures permission for port forwarding in theRemote Support Utility, the support engineer can begin the attended, portforwarding session to the authorized ports. During anAssist On-site tunnelingsession, the set of forwarded ports is saved to a CSV file on the support engineer'smachine.
The support engineer and the customer can use the Assist On-site chat function tocommunicate during this session or change to another session mode. The customeror support engineer can stop the port forwarding session at any time.
The support engineer can set which local ports on the support engineer's machineto forward to which remote host machines and ports. Connections to multipledevices from the same port on the support engineer's machine and collaborativesessions are also supported.
Alternatively, the customer can use Assist On-site Support Service to configureremote host machines for unattended, port forwarding sessions. The supportengineer can start and run multiple unattended, port forwarding sessions in theRemote Support Console.
Session modesAssist On-site can establish remote connections for support sessions in differentmodes. The customer chooses the session mode after joining the support session orthe support engineer can request that the customer changes the mode during thesupport session. The type of session or the permissions associated with the supportengineer also determine the session modes that are available during sessions.
When Assist On-site administrators create a team or a user, they can select thedefault permissions for that team or user including the set of session modes thatare available. For example, a team might have default permissions to run sessionsin View Only and Chat Only session modes. Customers can further restrict thesession mode when they consent to sessions.
Chat Only modeThis session mode allows the support engineer to chat with the customer in theChat window, but does not allow the support engineer to view the target systemor have any control of the target mouse or keyboard.
Note: The Chat window allows the support engineer to chat to the customerwithin another session mode and provides an additional form of contact.
The support engineer can also request or the customer can change to the ChatOnly mode during a support session.
View Only modeThis session mode the support engineer to view the target system, but does notallow the support engineer to have any control of the target mouse or keyboard.
4 Remote Support Utility: User's Guide
In the View Only mode, the support engineer can select and mark areas of thetarget desktop using the Remote Support Console tools.
The support engineer can also request or the customer can change to the ViewOnly mode during a support session.
Guidance modeThis session mode allows the support engineer to view the target system anddirect the customer to perform tasks on the target system, but does not allow thesupport engineer to have any control of the target mouse or keyboard. The supportengineer can use the Guidance mode symbols, Remote Support Console tools, andthe chat function to direct the customer through any task to perform on the target.
The Guidance mode is often used in training situations and in workplaces of veryhigh sensitivity.
Note: Your administrator might have disabled the Guidance mode and thereforeit is disabled in the Session mode window.
The support engineer can request or the customer can change to the Guidancemode during a support session.
Legend for the Guidance mode symbols
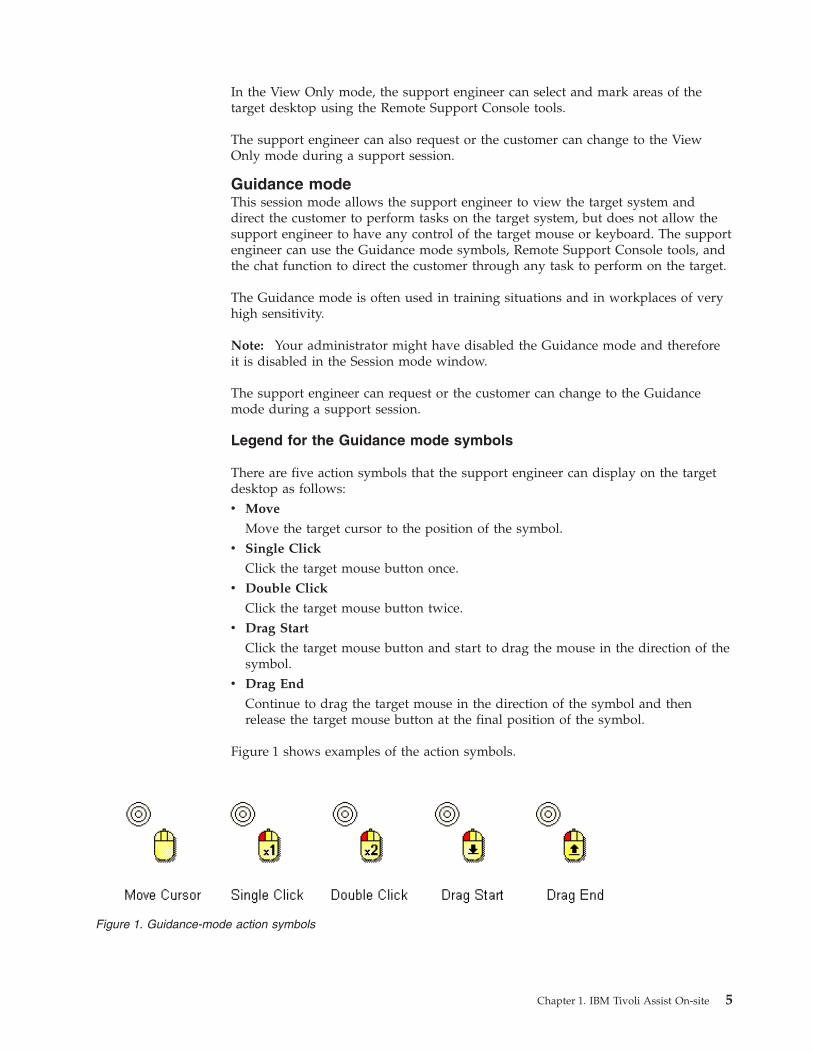
There are five action symbols that the support engineer can display on the targetdesktop as follows:v Move
Move the target cursor to the position of the symbol.v Single Click
Click the target mouse button once.v Double Click
Click the target mouse button twice.v Drag Start
Click the target mouse button and start to drag the mouse in the direction of thesymbol.
v Drag End
Continue to drag the target mouse in the direction of the symbol and thenrelease the target mouse button at the final position of the symbol.
Figure 1 shows examples of the action symbols.
Figure 1. Guidance-mode action symbols
Chapter 1. IBM Tivoli Assist On-site 5
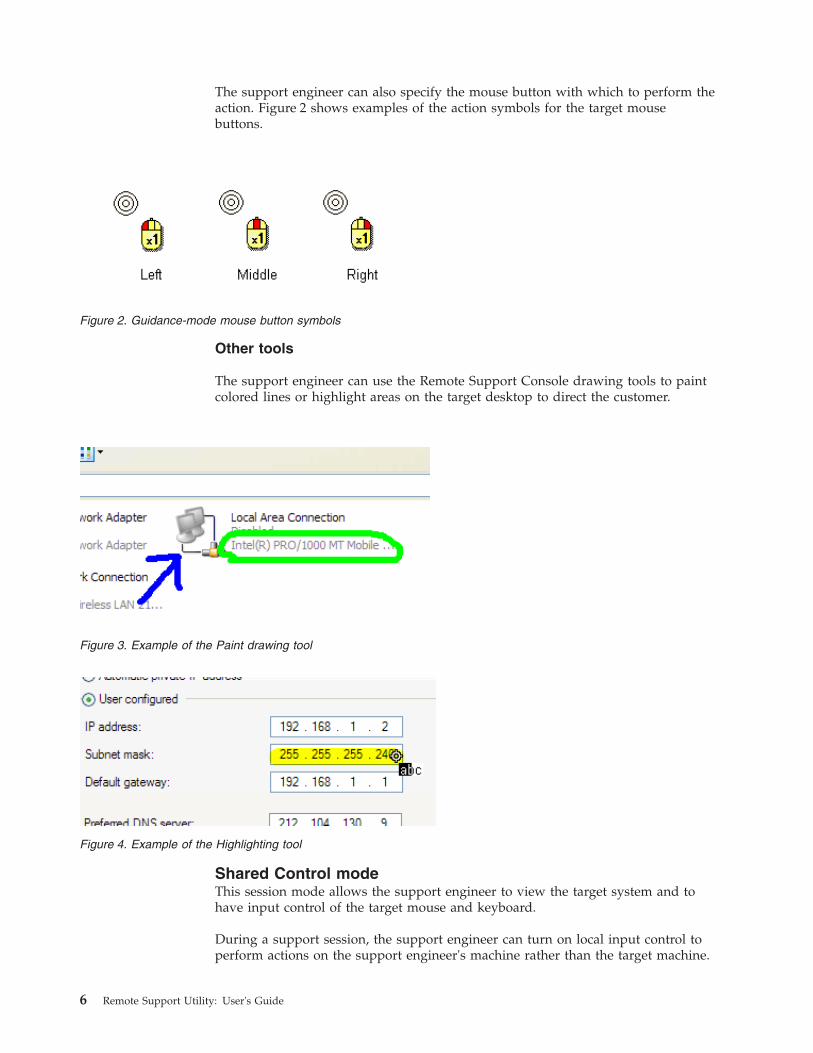
The support engineer can also specify the mouse button with which to perform theaction. Figure 2 shows examples of the action symbols for the target mousebuttons.
Other tools
The support engineer can use the Remote Support Console drawing tools to paintcolored lines or highlight areas on the target desktop to direct the customer.
Shared Control modeThis session mode allows the support engineer to view the target system and tohave input control of the target mouse and keyboard.
During a support session, the support engineer can turn on local input control toperform actions on the support engineer's machine rather than the target machine.
Figure 2. Guidance-mode mouse button symbols
Figure 3. Example of the Paint drawing tool
Figure 4. Example of the Highlighting tool
6 Remote Support Utility: User's Guide
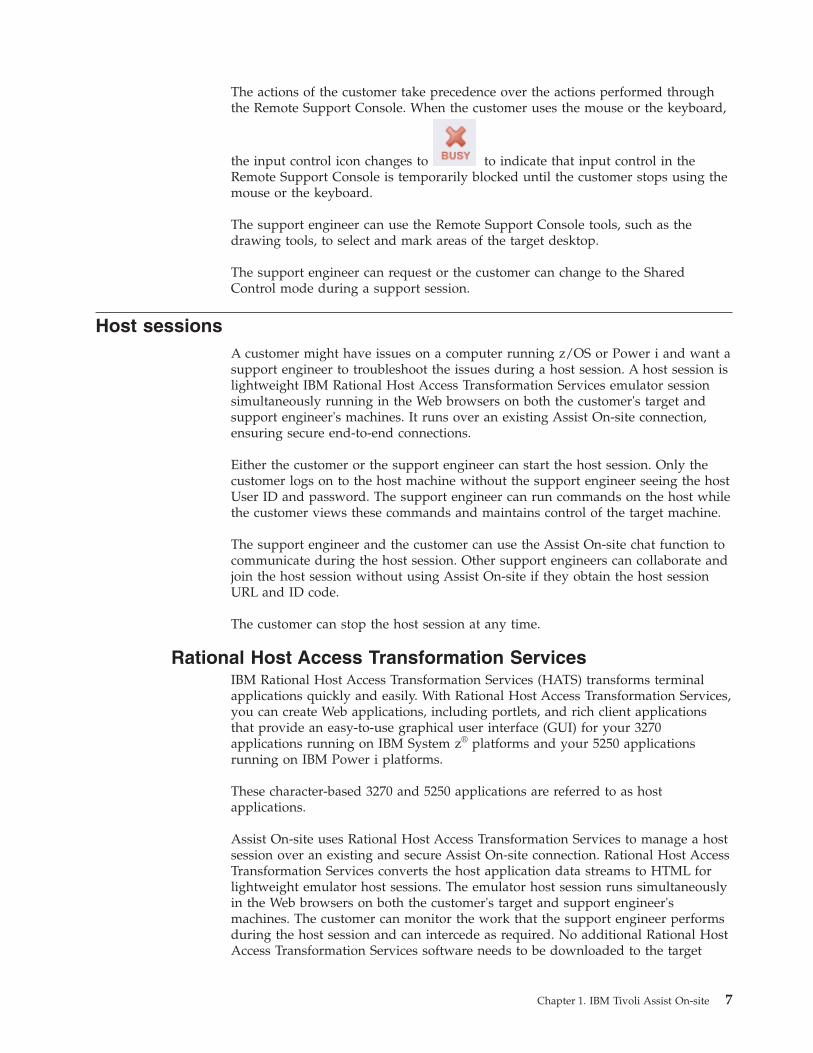
The actions of the customer take precedence over the actions performed throughthe Remote Support Console. When the customer uses the mouse or the keyboard,
the input control icon changes to to indicate that input control in theRemote Support Console is temporarily blocked until the customer stops using themouse or the keyboard.
The support engineer can use the Remote Support Console tools, such as thedrawing tools, to select and mark areas of the target desktop.
The support engineer can request or the customer can change to the SharedControl mode during a support session.
Host sessionsA customer might have issues on a computer running z/OS or Power i and want asupport engineer to troubleshoot the issues during a host session. A host session islightweight IBM Rational Host Access Transformation Services emulator sessionsimultaneously running in the Web browsers on both the customer's target andsupport engineer's machines. It runs over an existing Assist On-site connection,ensuring secure end-to-end connections.
Either the customer or the support engineer can start the host session. Only thecustomer logs on to the host machine without the support engineer seeing the hostUser ID and password. The support engineer can run commands on the host whilethe customer views these commands and maintains control of the target machine.
The support engineer and the customer can use the Assist On-site chat function tocommunicate during the host session. Other support engineers can collaborate andjoin the host session without using Assist On-site if they obtain the host sessionURL and ID code.
The customer can stop the host session at any time.
Rational Host Access Transformation ServicesIBM Rational Host Access Transformation Services (HATS) transforms terminalapplications quickly and easily. With Rational Host Access Transformation Services,you can create Web applications, including portlets, and rich client applicationsthat provide an easy-to-use graphical user interface (GUI) for your 3270applications running on IBM System z® platforms and your 5250 applicationsrunning on IBM Power i platforms.
These character-based 3270 and 5250 applications are referred to as hostapplications.
Assist On-site uses Rational Host Access Transformation Services to manage a hostsession over an existing and secure Assist On-site connection. Rational Host AccessTransformation Services converts the host application data streams to HTML forlightweight emulator host sessions. The emulator host session runs simultaneouslyin the Web browsers on both the customer's target and support engineer'smachines. The customer can monitor the work that the support engineer performsduring the host session and can intercede as required. No additional Rational HostAccess Transformation Services software needs to be downloaded to the target
Chapter 1. IBM Tivoli Assist On-site 7
machine and host machine or the support engineer's machine. The customer doesnot have to open any ports in the firewalls on the customer's network.
Host session architectureThe components of Assist On-site (AOS) interact together and with the RationalHost Access Transformation Services (HATS) server to start and maintain a hostsession.
The process to start and maintain the host session is shown in Figure 5 on page 9and can be summarized as follows:1. The customer uses the Remote Support Utility Start a Host Session function
to initiate a session with the host computer.2. Remote Support Utility prepares a packet-forwarding thread and port to
establish a host connection.3. Assist On-site sends the packet over the existing Assist On-site connection to
request a new host connection.4. The Relay Server opens a new port and a bidirectional packet-forwarding
thread within the Assist On-site network to be ready to accept a Rational HostAccess Transformation Servicesconnection for the new host session.
5. The Relay Server opens a HTTP or HTTPS URL connection to the RationalHost Access Transformation Services server. It passes the newly-opened localport, server, and connection type for the new connection, for example:https://localhost:9443/hatsproj1/index.jsp?host=aosrelay1&sessionType=1&port=9101;
6. The Rational Host Access Transformation Services server begins a TN3270 or aTN5250 host session to the requested port.
7. The packet-forwarding thread within the Relay Server forwards the TN3270data packet to the Remote Support Utility.
8. The Remote Support Utility routes the TN3270 or TN5250 packet to the hostcomputer, and the packet-forwarding thread routes all packets from the hostcomputer across the Assist On-site connection.
9. The Relay Server receives the new session ID from the Rational Host AccessTransformation Services server for the Web browser clients. It sends a newpacket to both endpoints informing them of this secure session ID to which toconnect to the Rational Host Access Transformation Services emulator session.
10. Assist On-site launches the same emulator session in Web browser clients atboth endpoints.
11. The emulator session remains active and synchronized, with either thecustomer or support engineer running commands. This session functionsindependently of the Assist On-site connection. The customer can select theChat Only mode and monitor the support engineer without relinquishingcontrol of the customer's target machine.
12. When either the customer or support engineer ends the Assist On-site session,the host session also ends.
8 Remote Support Utility: User's Guide

Collaboration in sessionsAssist On-site has the Collaboration function to let multiple participants (supportengineers and the customer) to connect, view the target desktop, and chat duringthe same support session. The original or primary support engineer starts thecollaboration for the existing support session and provides a collaboration code tothe other participating support engineers. The customer must accept eachparticipating support engineer's request to join the support session.
The secondary support engineer can join an existing support session using thecollaboration code or the secure URL if the Remote Support Console is notinstalled. The primary support engineer provides the secondary support engineerwith the secure URL that launches the Remote Support Console from a RelayServer using a Java Web Start Launcher.
Figure 5. Host session architecture
Chapter 1. IBM Tivoli Assist On-site 9
The primary support engineer can assign and return control of the support session,disconnect other participating support engineers, and leave the support sessionwhile the other participants continue. All participants can send messages in ashared chat session.
Collaboration can also occur during a host session, although the other participatingsupport engineers do not need to use Assist On-site. The primary support engineercan send the host session URL and ID to the other participants, and they canparticipate using their Web browsers.
Assist On-site launch-in-contextSupport engineers might start troubleshooting customers' issues by first usingother support tools such as Technical Support Chat. Rather than starting AssistOn-site independent of other support tools, Assist On-site provides alaunch-in-context feature such that support engineers can start Assist On-site fromwithin the session of the third-party support tool.
The Assist On-site launch-in-context feature has the following functions:v Command-line interface to start Assist On-site from the third-party support tool.
It opens the Remote Support Console on the support engineer's machine, createsa support session, and obtains the connection code. Assist On-site also creates aconnection file that contains the instructions for the customer to download theRemote Support Utility from the specified Assist On-site URL.
Note: The third-party support tool provides the launch mechanism, for example,a menu item in the support tool that executes the command-line interface andruns Assist On-site.
v Command-line launch-in-context parameters to specify details of the customer,support engineer, and PMR, flags to write values to standard output, and pathsto use the Assist On-site connection and template URL files.
v Template URL file to contain the launch-in-context parameters and theinstructions for the customer to download the Remote Support Utility asspecified by Assist On-site URL launch-in-context parameter.When Assist On-site is started in context, Assist On-site generates the connectionfile with contents of the template URL file and replaces the launch-in-contextparameters by their runtime values.
To use this feature, you must perform the following tasks:1. Build the launch mechanism in the third-party tool.2. Add the Assist On-site command with the launch-in-context parameters to the
launch mechanism.3. Create the template URL file with the launch-in-context parameters and the
instructions for the customer to download the Remote Support Utility asspecified by Assist On-site URL launch-in-context parameter.
4. Display the contents of the connection file to the customer.
IBM Client Diagnostic Data RepositoryOften IBM support engineers need to analyze customer data to diagnosecustomers' issues or they need to provide customers with utilities to debug theissues.Assist On-site provides support for the IBM Client Diagnostic DataRepository (CDDR) strategy in the exchange of data through the propagation ofteam URLs and file transfer functions. Administrators can add team URLs to the
10 Remote Support Utility: User's Guide
relevant URLS associated with CDDR and propagate those URLs to subteams.During Assist On-site sessions, support engineers can open these URLs on thecustomers' machines and transfer diagnostic data.
The CDDR strategy uses the Enhanced Customer Data Repository (ECuRep) as theconsolidated back end data repository for exchanging information with IBMSoftware Technical Support. The strategy also means that customers can exchangedata by using the fastest method based on geographic location, for example, byconnecting to the Testcase FTP server or by connecting to ECuRep directly. Formore information, see the following address:
http://www-01.ibm.com/software/support/exchangeinfo.html
Assist On-site securitySecurity and privacy are fundamental concerns when granting remote access tocorporate IT assets. Assist On-site uses the latest security technology to ensure thatthe data exchanged between support engineers and customers is completely secure.Identities are verified and protected with industry-standard authenticationtechnology. Assist On-site support sessions are kept secure and private usingrandomly generated session keys and advanced encryption.
Assist On-site allows support engineers to remotely access customers' machines toidentify and resolve technical issues in real time. Assist On-site has a powerfulsuite of tools for problem determination and remediation that support engineerscan use to quickly complete root cause analysis and take appropriate correctiveaction.
No permanent installation of software on the customer's machine is required. TheRemote Support Utility plug-in downloads automatically through the customer'sWeb browser and is less than 780 KB. The plug-in is kept secure and virus free onthe Relay Server and must be downloaded each time a support session isestablished.
Only customers can initiate support sessions unless they are unattended supportsessions. During the initiation of an attended support session, the customer canrefuse receipt of the Remote Support Utility plug-in, thus refusing the download.When the customer accepts the connection to the support session, the customer canchoose a session mode. During the support session, the customer can retake controlof the mouse and keyboard at any time.
After a support session starts, the support engineer is connected to the customer'smachine through the Relay Server. Large, randomly generated session keys areissued to both participants; thus, only the designated parties are connected. Duringthe support session, all transferred data is encrypted, including screen views, filetransfer data, and identities. Encryption and decryption are from end to end;therefore, data cannot be intercepted during transit and can only be viewedthrough the Remote Support Console.
The support engineer can also troubleshoot problems on the customer's machinerunning z/OS or Power i by using a host session over an existing Assist On-siteconnection to ensure secure end-to-end connections. No Rational Host AccessTransformation Services emulators must be installed on the customer's targetmachine, the host machine, or the support engineer's machine. Either the customeror support engineer can start a host session, but only the customer can log on to
Chapter 1. IBM Tivoli Assist On-site 11
the host machine. The support engineer can run commands on the host machineand the customer can monitor this work and maintain control of the customer'starget machine.
Either the customer or support engineer can stop the support session or hostsession. After the support or host session stops, the support engineer can no longerconnect to the customer's computer or the host machine. Any future supportsessions require new session keys and only the customer can initiate them.
The support engineer can troubleshoot problems on a customer's IT device byusing debug tools such as Telnet or SSH during a port forwarding session. A portforwarding session is a tunneled session that routes debugging or diagnostic trafficbetween the configured local port on the support engineer's machine and the porton the remote host machine. It runs over an existing Assist On-site connection,ensuring secure end-to-end connections. No emulator or diagnostic software needsto be installed on the remote host machine. The Assist On-site administrator canturn on this feature for teams that have specific permission to use it for remotediagnostics. The customer configures the remote host machines and ports for portforwarding sessions whether attended by using the Remote Support Utility orunattended by using the Assist On-site Support Service.
AuthenticationSupport sessions are protected by strong password authentication. Supportengineers are authenticated using a challenge and response password exchange, orIBM support engineers can be authenticated using their IBM intranet IDs andpasswords through IBM Intranet Password eXternal. Customers can select basic orNTLMv2 authentication for Assist On-site connections through their proxy servers.Administrators can view audit reports detailing logon failures associated withincorrect IDs or passwords through the Administration Portal.
NTLMv2NTLMv2 is a Microsoft challenge-response authentication protocol, that is usedwith the SMB protocol. It sends two 16-byte responses to an 8-byte serverchallenge. The protocol hashes the client and server challenges by usingHMAC-MD5 that hashes the proxy password and other data including the proxyuser name and domain name.
Assist On-site detects the customer's proxy server through the customer's Webbrowser settings or registry keys. Proxy settings are evaluated through a JavaScriptparser if available. The Remote Support Utility opens a window to allow thecustomer to select basic or NTLM proxy authentication. If the customer selectsNTLM, the customer enters the domain, user ID and password to authenticateusing the NTLMv2 protocol.
IBM intranet ID and password authenticationIBM Intranet Password eXternal is an authentication tool that uses leading edgeopen standards to allow IBM employees on the intranet to securely use the existingintranet password system to log on to third-party vendor Web sites. The openstandards include the RSA Public Key Cryptography Standard (PKCS) 7, XML, andSOAP-based Web services.
IBM Intranet Password eXternal utilizes web service technology to adopt theintranet password system regardless of their operating system or server platformand to remotely validate digitally-signed authentication tokens.
12 Remote Support Utility: User's Guide
Assist On-site adopts IBM Intranet Password eXternal to allow support engineersto log on to the Remote Support Console and Administration Portal using theirIBM intranet ID and passwords, withoutAssist On-site compromising thepasswords. Using IBM BlueGroups, IBM Intranet Password eXternal can managesupport engineers' membership of support teams and thereby access to AssistOn-site. Assist On-site migrates the details from the BlueGroups to theAdministration Portal database.
Encryption and decryptionAssist On-site implements outbound connections that are protected bystate-of-the-art 128-bit MARS encryption over an HTTPS browser session. Thisform of advanced encryption prevent intruder access to the information exchangedduring all support sessions. Chat, screen viewing, screen sharing, and file transferdata is encrypted end to end. Packets are never decrypted in transit by the RelayServer.
Logging and auditingAssist On-site writes to log files on the Relay Server and can also write to log fileson the customer's target machine if the customer selects the option when initiatingthe support session.
Relay Server logs the following support session data: the customer name andnumber; the support engineer name and number; the customer's and supportengineer's IP and MAC addresses; and the connection and disconnection timestamps. Administrators can view reports of these log files through theAdministration Portal.
The customer can choose to audit the support session locally and must explicitlyactivate it upon accepting the support session. Assist On-site events are written tothe target system's application log. Written events include:v Connection and disconnectionv Initial session mode and subsequent changes to other session modesv Details about port forwarding session including the user name of the support
engineer and a date and time stamp about when the connection was started andstopped
v Names of the files that have been received and transferredv Any requests for system information from the Remote Support Console
Chapter 1. IBM Tivoli Assist On-site 13

14 Remote Support Utility: User's Guide
Chapter 2. Installing the Remote Support Utility
You can download and automatically install the Remote Support Utility throughthe Assist On-site Web site or from a URL that you obtained from your supportengineer if an internal IBM customer. It is a small Utility (ibmaos.exe).
The Utility includes the following files:v ibmaos.bat
This batch file calls the main Utility. It deletes the main Utility from yourmachine and itself after the Utility deletes the auxiliary files.
v forthook.dll
This library places hooks on the mouse and keyboard. These hooks ensure thatthe Remote Support Utility is aware of the mouse position coordinates andshape, has the ability to inject or reject events in the operating system's eventqueue, and detect when you press Pause to stop the support session. The mainUtility deletes this file.
v tgrab.sys
This Windows system file stores system settings and variables to support fullscreen, text mode windows. The main Utility deletes this file.
v egathdrv.sys
This driver is copied to the system32 directory if the customer is anadministrator and the support engineer requests system information. It is loadedto gather system information such as the serial number of the target machine. Itis automatically unloaded and deleted from the machine after this operationfinishes.
Remote Support Utility PrerequisitesAssist On-site requires that you can connect to the Americas Relay Server andanother server located in your geographical region. Your firewall and proxy servermust allow traffic to and from the Relay Server.
Assist On-site provides a connectivity test executable that checks whether you canconnect to the Relay Server in each geographical region. For more informationabout running the test, see “Running the Assist On-site connectivity test” on page16.
Your firewall might deny the Assist On-site connection. If your firewall logs showthat it has blocked Assist On-site traffic, configure your firewall according to theassociated firewall documentation to allow traffic to and from the Relay Server inthe Americas on the relevant ports and any other Relay Server in your region. Formore information about the IP addresses and port numbers for each Relay Server,see Chapter 4, “Relay Server,” on page 35.
The summary of requirements for the Remote Support Utility is as follows:v 28.8Kbps or greater Internet connection (56K recommended)v One of the following supported platforms:
– Pentium-class computer running Windows starting with Windows 2000Service Pack 4 and above, including all variants of Windows XP, WindowsVista, and Windows 7
© Copyright IBM Corp. 2008, 2011 15

– Red Hat Enterprise and Desktop Linux 4 for Intel 32-bit and 64-bit– Red Hat Enterprise Linux 4.0 for z/Series 31-bit– Red Hat Enterprise Linux 4.0 for z/Series 64-bit– Red Hat Enterprise and Desktop Linux 5 and above for Intel 32-bit and 64-bit– Red Hat Enterprise Linux 5.0 and above for z/Series 31-bit– Red Hat Enterprise Linux 5.0 and above for z/Series 64-bit– SUSE Linux Enterprise Server 9 for Intel– SUSE Linux Enterprise Server 9 for zSeries® 31-bit– SUSE Linux Enterprise Server 9 for zSeries 64-bit– SUSE Linux Enterprise Server 10 for Intel– SUSE Linux Enterprise Server 10 for zSeries 64-bit– SUSE Linux Enterprise Server 11 for Intel– SUSE Linux Enterprise Server 11 for zSeries 64-bit
v Internet Explorer 4.0 or later, Netscape Navigator 4.0 or later, or Mozilla Firefox1.0 or later
v Access to ports 80, 443, and 8200v Recommended: Ability to make direct outgoing TCP connections, or availability
of a SOCKS server or an HTTP proxy
Running the Assist On-site connectivity testYou can run the Assist On-site connectivity test to check whether you cansuccessfully connect to the Relay Server in each geographical region. Theconnectivity test uses an executable that you download to your local machine andrun.
Procedure1. Open the following URL:
http://www-01.ibm.com/support/assistonsite/2. Click Assist On-site Connectivity Test.3. When prompted, click Open to temporarily save the executable to your local
machine.4. When prompted, click Run.5. If prompted by your firewall, allow the executable to connect to the Internet.
Results
The connectivity test runs and displays the results in your Web browser. You mustbe able to connect to at least oneRelay Server in the Americas and to realizeimproved throughput, you should be able to connect to a Relay Server in yourgeographical region.
Important: If you cannot connect to any Relay Server in the Americas, you mightnot be able to use Assist On-site. Check that your firewall is configured to allowtraffic to and from Relay Server in the Americas.
16 Remote Support Utility: User's Guide
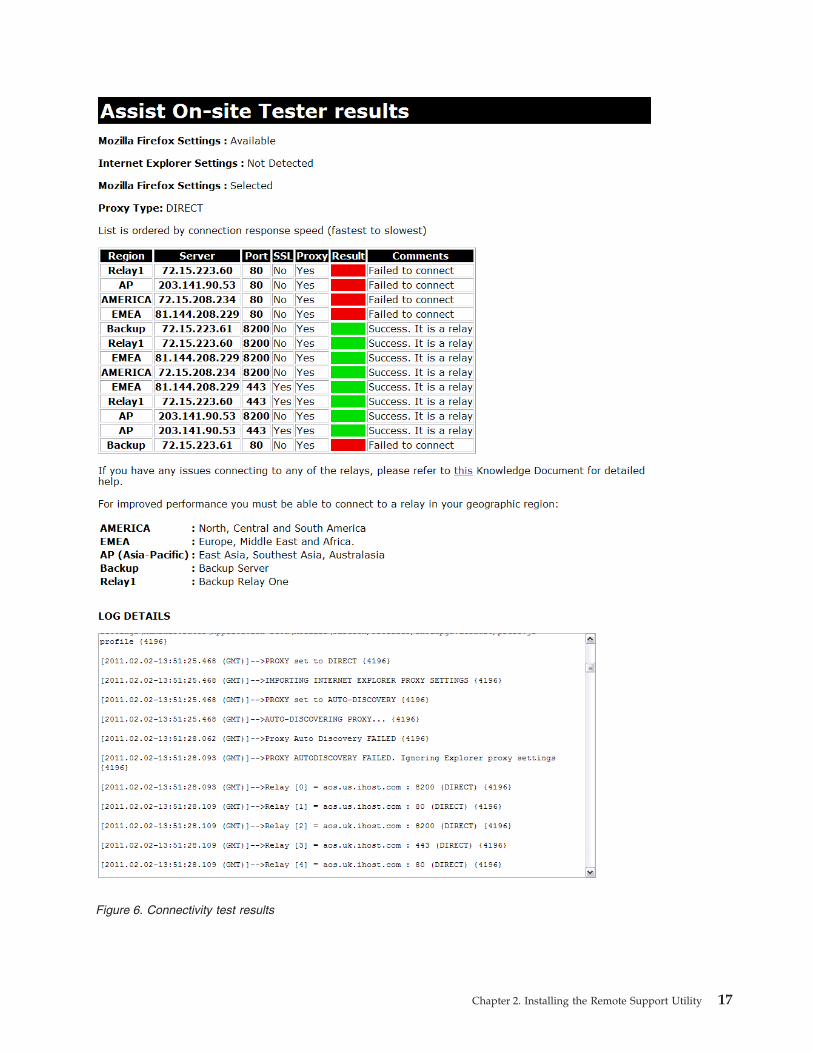
Figure 6. Connectivity test results
Chapter 2. Installing the Remote Support Utility 17
Example
In Figure 6 on page 17, the customer can connect to the Relay Server on port 8200in the Americas, Relay Server on ports 8200 and 443 in EMEA, and the RelayServer on ports 8200 and 443 in AP. Thus the customer can download the RemoteSupport Utility and choose to connect to any Relay Server , though the customershould choose to connect to the server that is located in the same geographicregion.
What to do next
If the connectivity test is successful, you can download and install the RemoteSupport Utility.
Installing the Utility for external IBM customersYou must complete the online request form on the Assist On-site Support Web siteand agree to the terms and conditions for using Remote Support Utility before youcan download and install the Utility, ibmaos.exe.
Before you begin
Ensure that you have successfully connected to the Relay Server. The supportengineer must also give you a connection code, otherwise you cannot install theUtility after you download it.
Note: If your support engineer started Assist On-site during a session of athird-party support tool such as Technical Support Chat, the URL that is providedmight be different to the URL provided in the following procedure. If it is, acceptthe license agreement and proceed to step 9 on page 19.
About this task
You are prompted to install the Utility that is less than 780 KB.
Procedure1. Open the following URL:
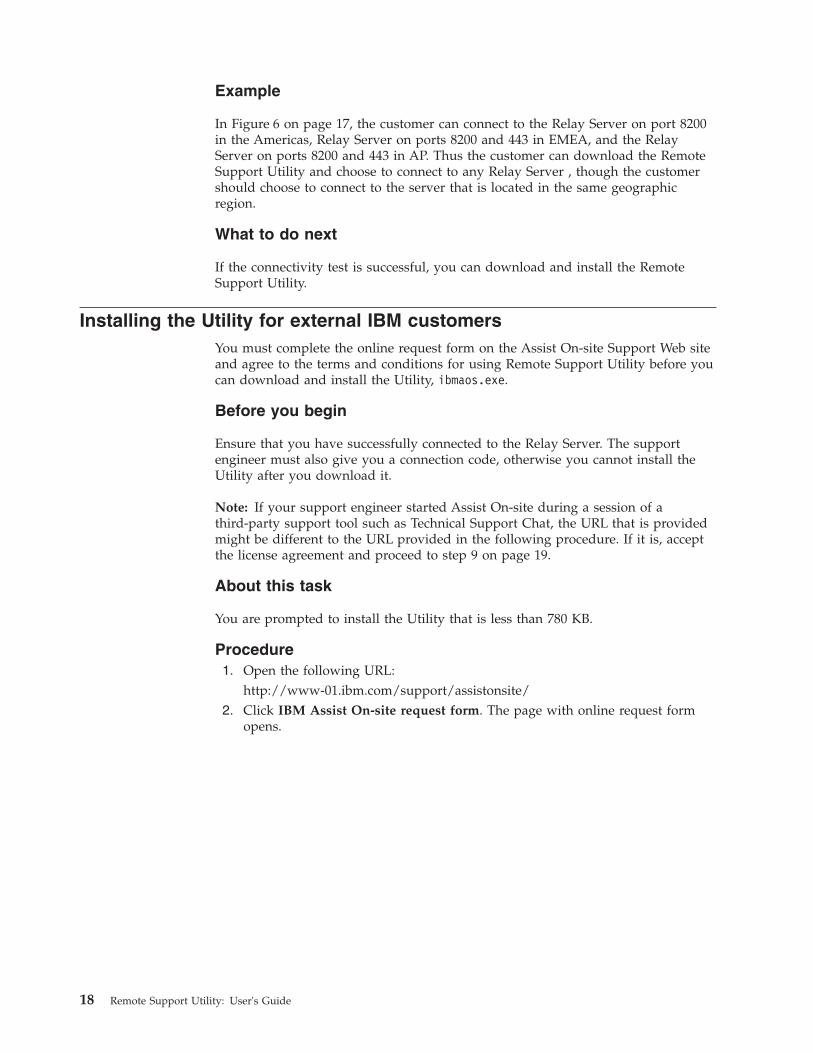
http://www-01.ibm.com/support/assistonsite/2. Click IBM Assist On-site request form. The page with online request form
opens.
18 Remote Support Utility: User's Guide
3. In the Name field, type your name.4. In the IBM Customer Number field, type your customer number. If you do
not know it, type all zeros.5. PMR number, branch code, country code fields, type the PMR number and
associated codes for your issue.6. In the Connection code field, type the connection code that you obtained from
the support engineer if required.7. From the Geography list, select your geographical region.
Important: Ensure that you select a geographical region that contains a RelayServer to which you successfully connected when you ran the connectivitytest.
8. Click I Agree.9. When prompted, click Open or Run to download the Utility.
Figure 7. Online request form
Chapter 2. Installing the Remote Support Utility 19
Note: You might need to temporarily allow popup windows in your Webbrowser depending upon your Web browser security settings.
10. The Utility detects any proxy server settings and if necessary, it opens a proxyauthentication window to enter the proxy user name and password. Entersome or all of the following details, and click OK:
Options Description
User name (basic proxy authentication) Enter the proxy user name and password foryour proxy server.
Domain\User (NTLM proxy authentication) Enter the domain controller and user namefor your proxy server.
Password Enter the password for the proxy user.
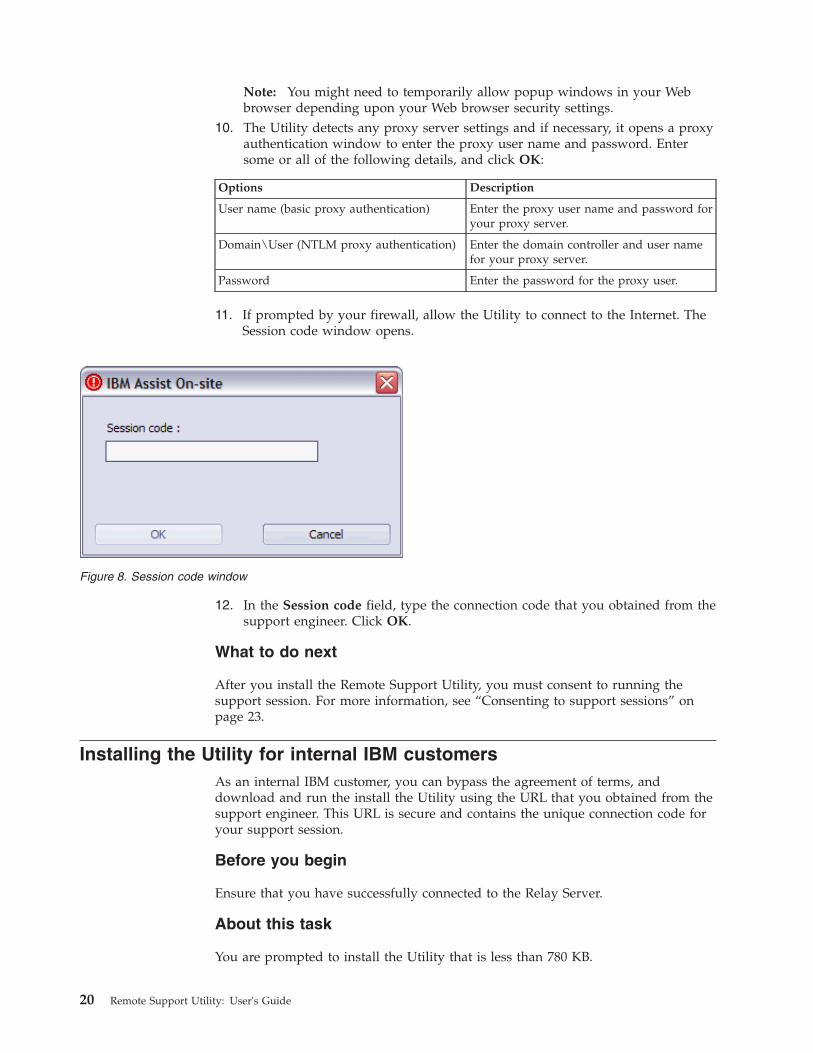
11. If prompted by your firewall, allow the Utility to connect to the Internet. TheSession code window opens.
12. In the Session code field, type the connection code that you obtained from thesupport engineer. Click OK.
What to do next
After you install the Remote Support Utility, you must consent to running thesupport session. For more information, see “Consenting to support sessions” onpage 23.
Installing the Utility for internal IBM customersAs an internal IBM customer, you can bypass the agreement of terms, anddownload and run the install the Utility using the URL that you obtained from thesupport engineer. This URL is secure and contains the unique connection code foryour support session.
Before you begin
Ensure that you have successfully connected to the Relay Server.
About this task
You are prompted to install the Utility that is less than 780 KB.
Figure 8. Session code window
20 Remote Support Utility: User's Guide
Procedure1. Open the URL that you obtained from the support engineer.2. You are prompted to download and run the Utility. Click Run or Open.
Note: You might need to temporarily allow popup windows in your Webbrowser depending upon your Web browser security settings. Otherwise, youneed to click the download link on the page.
3. The Utility detects any proxy server settings and if necessary, it opens a proxyauthentication window to enter the proxy user name and password. Enter someor all of the following details, and click OK:
Option Description
User name (basic proxy authentication) Enter the proxy user name and password foryour proxy server.
Domain\User (NTLM proxy authentication) Enter the domain controller and user namefor your proxy server.
Password Enter the password for the proxy user.
4. If prompted by your firewall, allow the Utility to connect to the Internet.
What to do next
After you install the Remote Support Utility, you must consent to running thesupport session. For more information, see “Consenting to support sessions” onpage 23.
Manually configuring the connection for the proxy serverAssist On-site detects the customer's proxy server through the customer's Webbrowser settings including the Proxy Autoconfiguration file (PAC), or registry keys.It evaluates the proxy settings through a JavaScript parser if available; otherwise,Assist On-site supports manual proxy configuration using a configuration file,proxy_ibm.txt.
Before you begin
Ensure that you obtained the proxy server settings from your administrator beforeyou create the configuration file.
Procedure1. Create a text file using a text editor.2. In the text file, enter your proxy server details using the following syntax:
Proxy=myproxy.mycompany.com:myproxy_port
myproxy.mycompany.com is the fully qualified host name or IP address for yourproxy server and myproxy_port is the port number on the proxy server foroutbound connections.
3. Save the text file with the name proxy_ibm.txt in your home directory or at theroot level of yourC:\ drive.
Chapter 2. Installing the Remote Support Utility 21

What to do next
If you cannot establish a connection to a Relay Server, ensure that you configureyour proxy server to allow encrypted non-SSL outbound traffic to the AmericasRelay Server and to a relevant Relay Server in your geographic region. For moreinformation about the IP addresses and port numbers, see Chapter 4, “RelayServer,” on page 35.
If you still cannot establish a connection, Assist On-site creates a diagnostic reportin the connrpt.html file that you can submit to Assist On-site Support.
22 Remote Support Utility: User's Guide

Chapter 3. Using the Remote Support Utility
A customer can accept connections from a support engineer's machine, obtainsupport, and interact with the support engineer using various functions of theRemote Support Utility.
When a session is active, Remote Support Utility opens a small window for theduration of the support session. You can minimize it to the taskbar.
Remote Support Utility functions
Table 1 describes the main functions of the Remote Support Utility that you canaccess from the toolbar.
Table 1. Remote Support Utility functions
Function Description
Disconnect from a session Disconnect from a session. For moreinformation, see “Stopping support sessions”on page 25.
Session mode drop-down list Contains the session mode options to switchto during a session. For more information,see “Switching between session modes” onpage 25.
Actions menu Contains menu items to perform commonactions on your host machine. For moreinformation, see “Remote Support Utilityactions” on page 25.
Consenting to support sessionsWhen an support engineer starts a support session and attempts to connect to yourtarget machine, the Remote Support Utility displays a message on your machine.You must accept the connection and choose the session mode before it times out.At no point is the session activated until you accept the connection. If the requesttimes out after the default or extended timeout period, the Remote Support Utilityautomatically refuses the connection.
About this task
Note: You can stop the support session at any time. For more information, see“Stopping support sessions” on page 25.
Figure 9. Remote Support Utility interface
© Copyright IBM Corp. 2008, 2011 23
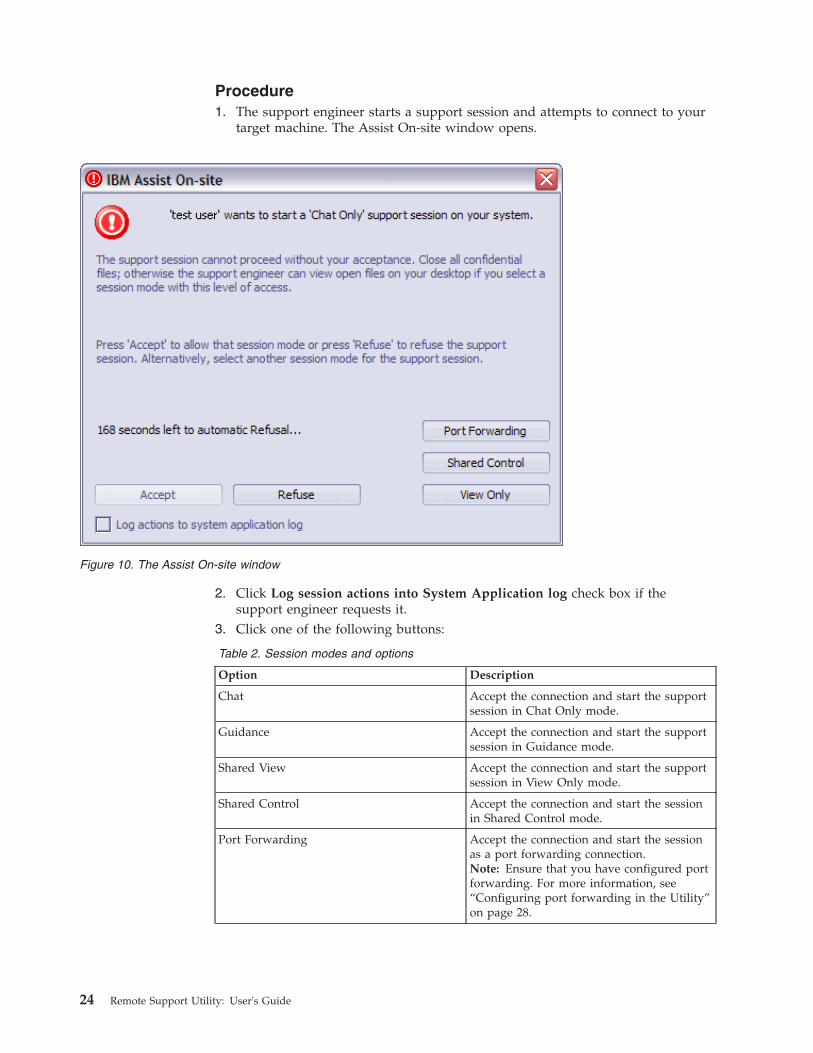
Procedure1. The support engineer starts a support session and attempts to connect to your
target machine. The Assist On-site window opens.
2. Click Log session actions into System Application log check box if thesupport engineer requests it.
3. Click one of the following buttons:
Table 2. Session modes and options
Option Description
Chat Accept the connection and start the supportsession in Chat Only mode.
Guidance Accept the connection and start the supportsession in Guidance mode.
Shared View Accept the connection and start the supportsession in View Only mode.
Shared Control Accept the connection and start the sessionin Shared Control mode.
Port Forwarding Accept the connection and start the sessionas a port forwarding connection.Note: Ensure that you have configured portforwarding. For more information, see“Configuring port forwarding in the Utility”on page 28.
Figure 10. The Assist On-site window
24 Remote Support Utility: User's Guide
Table 2. Session modes and options (continued)
Option Description
Refuse Refuse the connection and deny access toyour target machine. The Remote SupportConsole displays a refused access messageto the support engineer.
Important: The choice of session modes is dependent on the defaultpermissions of the team to which the support engineer belongs, the permissionsof the support engineer, and the type of session.
Stopping support sessionsYou can stop a support session by different methods. There is no confirmation andthe support session stops immediately. After the support session stops, a deletionutility within the Remote Support Utility deletes the main utility and flags itself forremoval the next time you reboot your machine.
Procedure
Choose one of the following options:v Press PAUSE/BREAK.
v Click .v Click End Session in the Session in Progress window.
Switching between session modesYou might want to change or the support engineer might request that you changesession mode during a support session. You can select the new session mode fromthe Session Mode drop-down list. The current session mode is selected by default.
Procedure
From the Session Mode list, select the new session mode. A message is displayedon the Remote Support Console informing the support engineer that you changedthe session mode.
Remote Support Utility actionsThe Remote Support Utility provides a set of functions for a support session. Thesefunctions include displaying information about your system and who is connectedto it, starting a chat or host session, opening your file transfer directory, andexiting the session.
You can access these functions from .
Obtaining Remote Support Utility version informationYou can obtain information about the current version of the Remote SupportUtility using the About function.
Chapter 3. Using the Remote Support Utility 25
Procedure
Click and select About. An information window opens that contains theversion information.
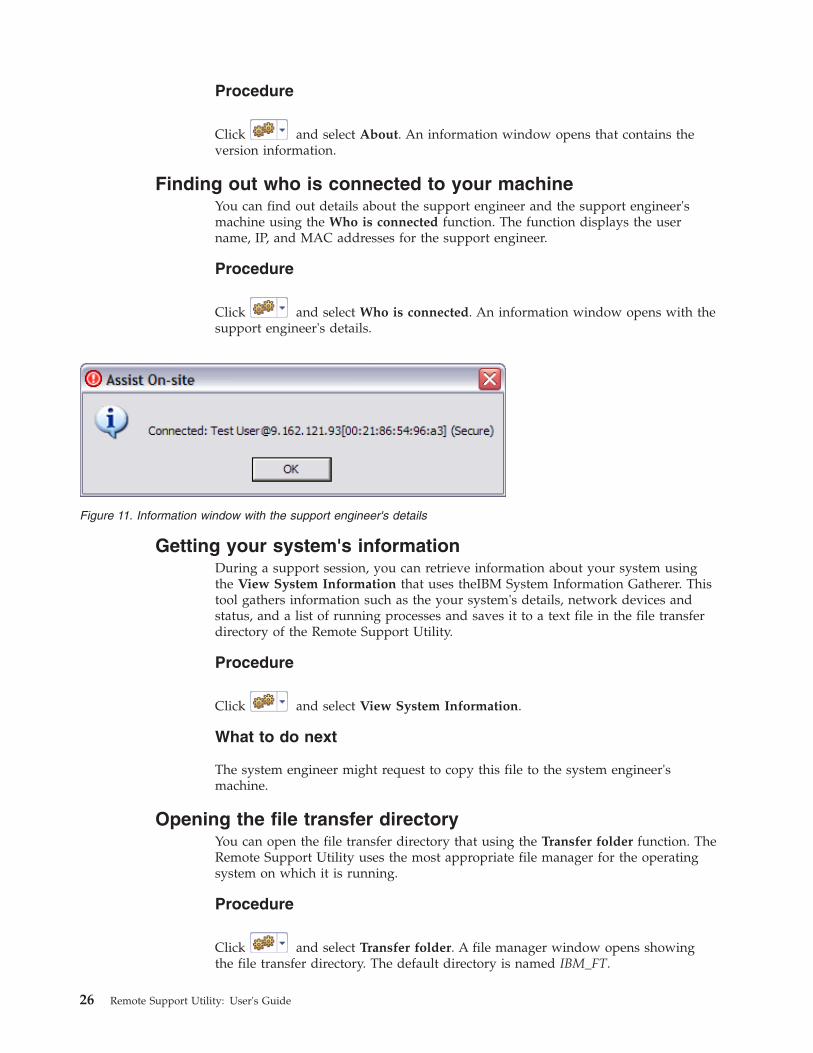
Finding out who is connected to your machineYou can find out details about the support engineer and the support engineer'smachine using the Who is connected function. The function displays the username, IP, and MAC addresses for the support engineer.
Procedure
Click and select Who is connected. An information window opens with thesupport engineer's details.
Getting your system's informationDuring a support session, you can retrieve information about your system usingthe View System Information that uses theIBM System Information Gatherer. Thistool gathers information such as the your system's details, network devices andstatus, and a list of running processes and saves it to a text file in the file transferdirectory of the Remote Support Utility.
Procedure
Click and select View System Information.
What to do next
The system engineer might request to copy this file to the system engineer'smachine.
Opening the file transfer directoryYou can open the file transfer directory that using the Transfer folder function. TheRemote Support Utility uses the most appropriate file manager for the operatingsystem on which it is running.
Procedure
Click and select Transfer folder. A file manager window opens showingthe file transfer directory. The default directory is named IBM_FT.
Figure 11. Information window with the support engineer's details
26 Remote Support Utility: User's Guide
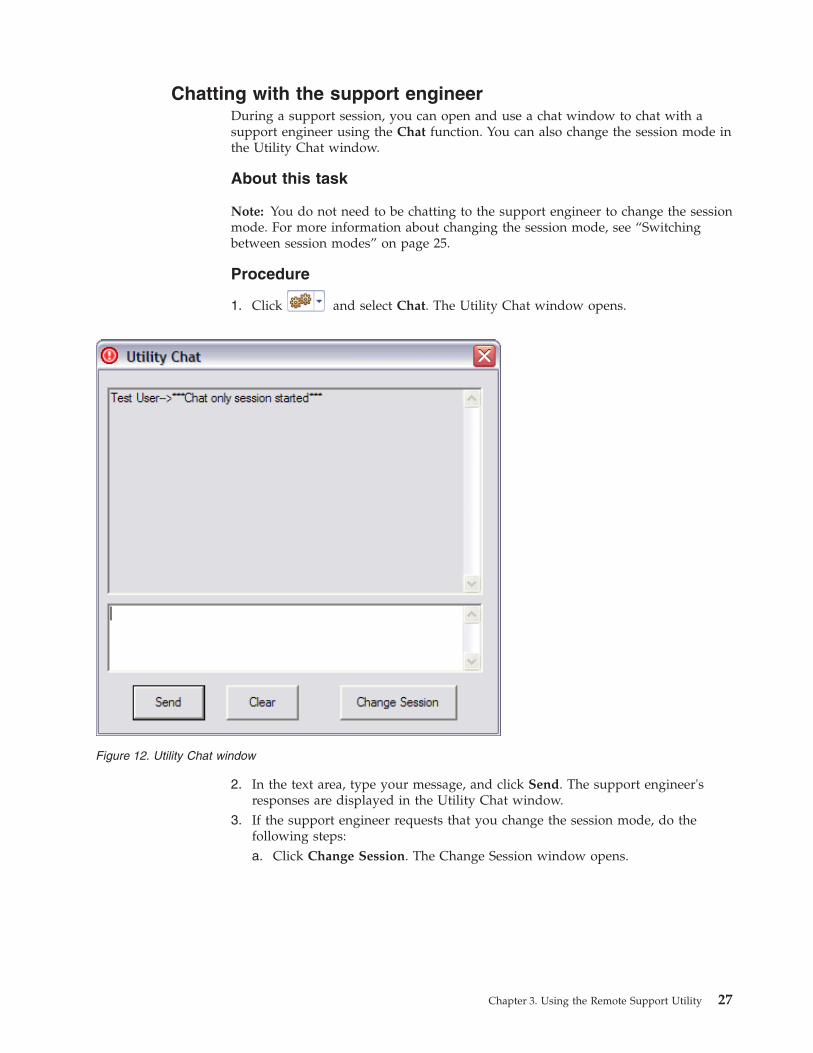
Chatting with the support engineerDuring a support session, you can open and use a chat window to chat with asupport engineer using the Chat function. You can also change the session mode inthe Utility Chat window.
About this task
Note: You do not need to be chatting to the support engineer to change the sessionmode. For more information about changing the session mode, see “Switchingbetween session modes” on page 25.
Procedure
1. Click and select Chat. The Utility Chat window opens.
2. In the text area, type your message, and click Send. The support engineer'sresponses are displayed in the Utility Chat window.
3. If the support engineer requests that you change the session mode, do thefollowing steps:a. Click Change Session. The Change Session window opens.
Figure 12. Utility Chat window
Chapter 3. Using the Remote Support Utility 27

Important: The choice of session modes is dependent on the defaultpermissions of the team to which the support engineer belongs, thepermissions of the support engineer, and the type of session.
b. Select the radio button associated with the session mode to which you wantto change.
c. Click Change. A message is displayed in the Remote Support Consoleinforming the support engineer of the session mode change.
Configuring port forwarding in the UtilityYou can configure port forwarding and reverse port forwarding by using theConfigure Port Forwarding action in the Remote Support Utility. You can also setthe time out value in hours for the port forwarding session. If you set the value to0, no timeout applies and the port forwarding session continues until you or thesupport engineer stops it.
Procedure1. Click Configure Port Forwarding. The Configure Port Forwarding window
opens.
28 Remote Support Utility: User's Guide
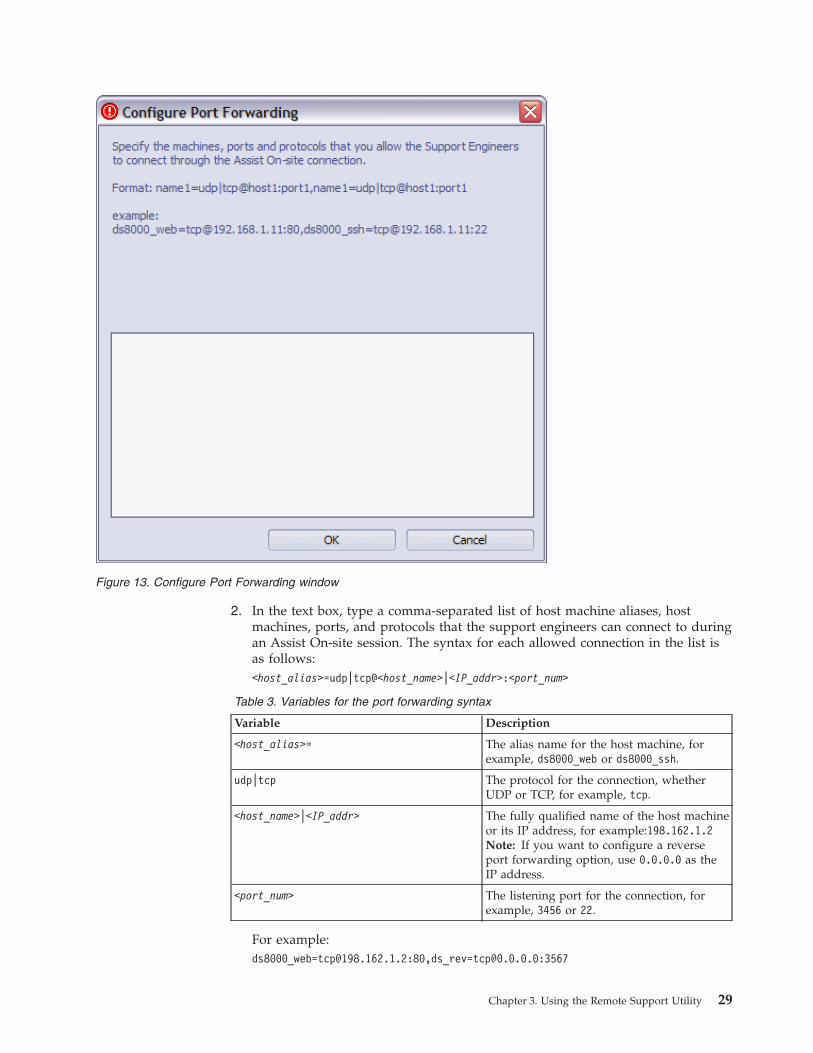
2. In the text box, type a comma-separated list of host machine aliases, hostmachines, ports, and protocols that the support engineers can connect to duringan Assist On-site session. The syntax for each allowed connection in the list isas follows:<host_alias>=udp|tcp@<host_name>|<IP_addr>:<port_num>
Table 3. Variables for the port forwarding syntax
Variable Description
<host_alias>= The alias name for the host machine, forexample, ds8000_web or ds8000_ssh.
udp|tcp The protocol for the connection, whetherUDP or TCP, for example, tcp.
<host_name>|<IP_addr> The fully qualified name of the host machineor its IP address, for example:198.162.1.2Note: If you want to configure a reverseport forwarding option, use 0.0.0.0 as theIP address.
<port_num> The listening port for the connection, forexample, 3456 or 22.
For example:[email protected]:80,[email protected]:3567
Figure 13. Configure Port Forwarding window
Chapter 3. Using the Remote Support Utility 29
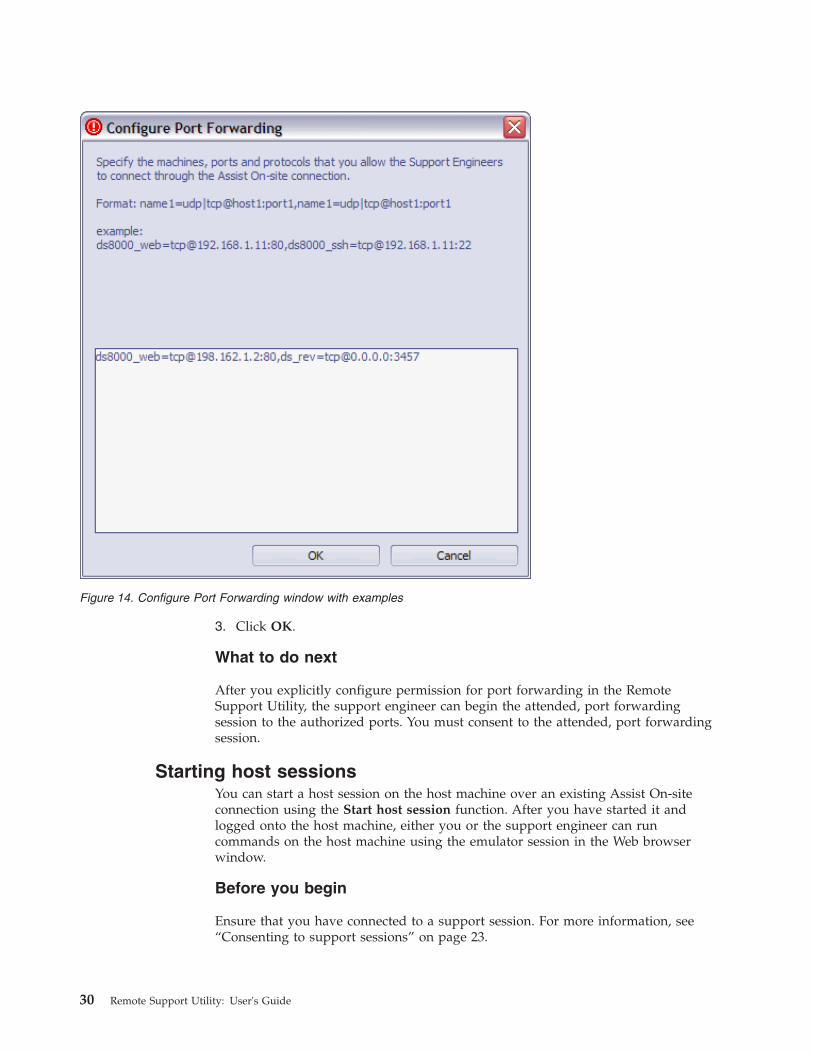
3. Click OK.
What to do next
After you explicitly configure permission for port forwarding in the RemoteSupport Utility, the support engineer can begin the attended, port forwardingsession to the authorized ports. You must consent to the attended, port forwardingsession.
Starting host sessionsYou can start a host session on the host machine over an existing Assist On-siteconnection using the Start host session function. After you have started it andlogged onto the host machine, either you or the support engineer can runcommands on the host machine using the emulator session in the Web browserwindow.
Before you begin
Ensure that you have connected to a support session. For more information, see“Consenting to support sessions” on page 23.
Figure 14. Configure Port Forwarding window with examples
30 Remote Support Utility: User's Guide
Procedure
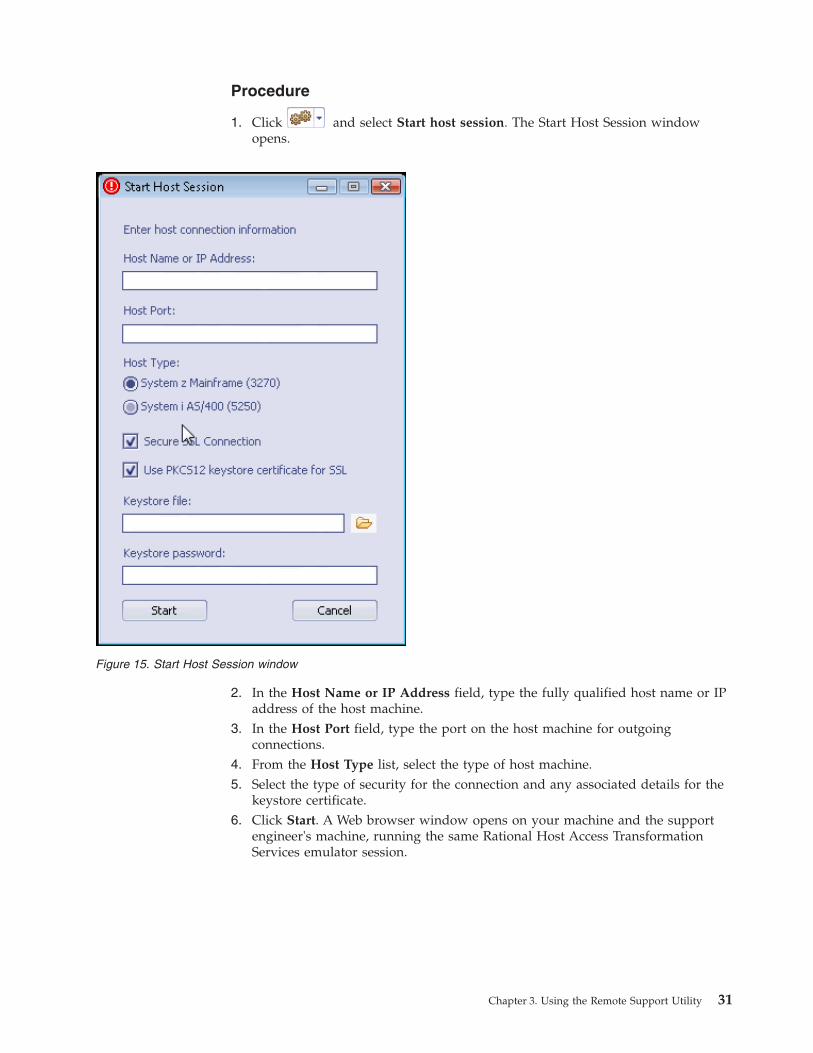
1. Click and select Start host session. The Start Host Session windowopens.
2. In the Host Name or IP Address field, type the fully qualified host name or IPaddress of the host machine.
3. In the Host Port field, type the port on the host machine for outgoingconnections.
4. From the Host Type list, select the type of host machine.5. Select the type of security for the connection and any associated details for the
keystore certificate.6. Click Start. A Web browser window opens on your machine and the support
engineer's machine, running the same Rational Host Access TransformationServices emulator session.
Figure 15. Start Host Session window
Chapter 3. Using the Remote Support Utility 31
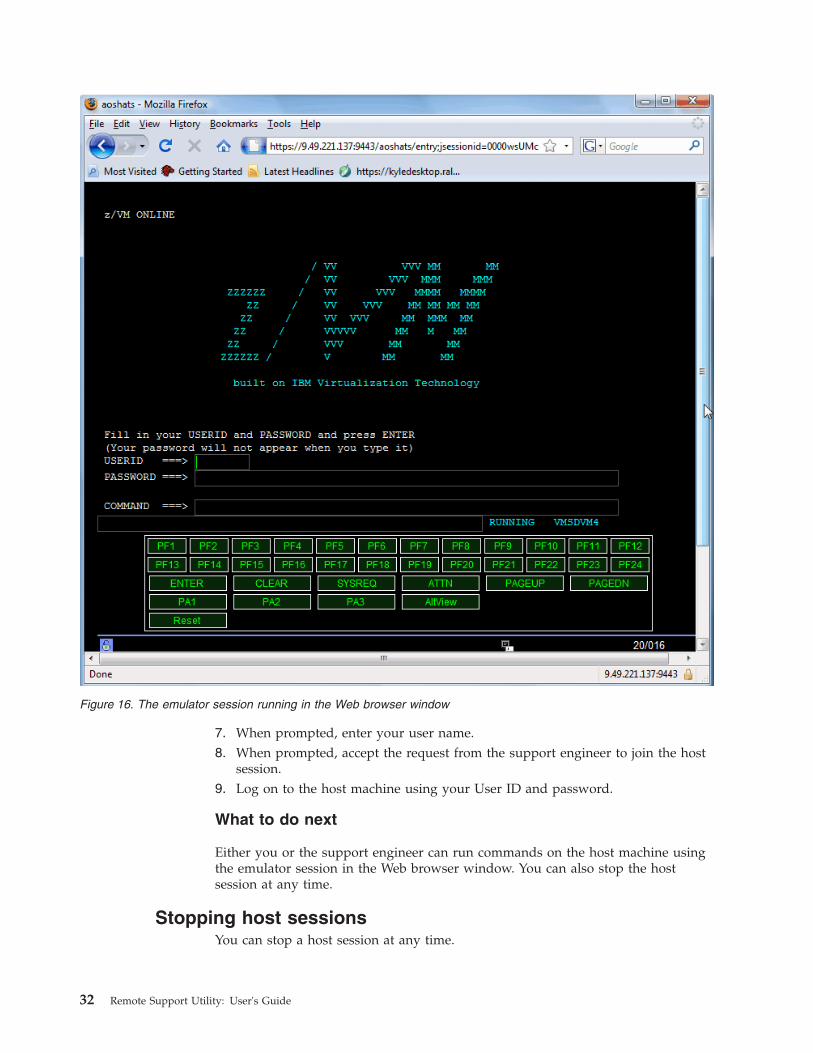
7. When prompted, enter your user name.8. When prompted, accept the request from the support engineer to join the host
session.9. Log on to the host machine using your User ID and password.
What to do next
Either you or the support engineer can run commands on the host machine usingthe emulator session in the Web browser window. You can also stop the hostsession at any time.
Stopping host sessionsYou can stop a host session at any time.
Figure 16. The emulator session running in the Web browser window
32 Remote Support Utility: User's Guide
Procedure1. In the Web browser emulator session window, log off the host system.2. Choose one of the following options:
v To stop the host session only, close the Web browser emulator session
window or click and select Exit.
v To stop the host and support sessions simultaneously, click .
Chapter 3. Using the Remote Support Utility 33

34 Remote Support Utility: User's Guide
Chapter 4. Relay Server
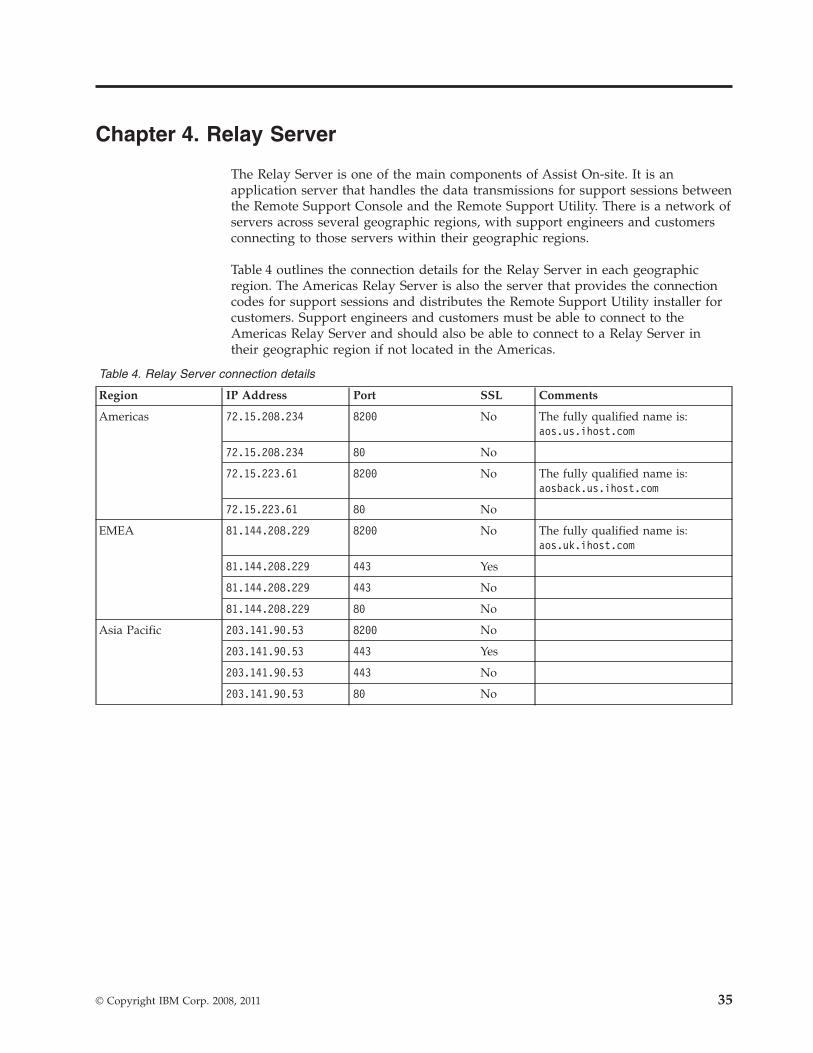
The Relay Server is one of the main components of Assist On-site. It is anapplication server that handles the data transmissions for support sessions betweenthe Remote Support Console and the Remote Support Utility. There is a network ofservers across several geographic regions, with support engineers and customersconnecting to those servers within their geographic regions.
Table 4 outlines the connection details for the Relay Server in each geographicregion. The Americas Relay Server is also the server that provides the connectioncodes for support sessions and distributes the Remote Support Utility installer forcustomers. Support engineers and customers must be able to connect to theAmericas Relay Server and should also be able to connect to a Relay Server intheir geographic region if not located in the Americas.
Table 4. Relay Server connection details
Region IP Address Port SSL Comments
Americas 72.15.208.234 8200 No The fully qualified name is:aos.us.ihost.com
72.15.208.234 80 No
72.15.223.61 8200 No The fully qualified name is:aosback.us.ihost.com
72.15.223.61 80 No
EMEA 81.144.208.229 8200 No The fully qualified name is:aos.uk.ihost.com
81.144.208.229 443 Yes
81.144.208.229 443 No
81.144.208.229 80 No
Asia Pacific 203.141.90.53 8200 No
203.141.90.53 443 Yes
203.141.90.53 443 No
203.141.90.53 80 No
© Copyright IBM Corp. 2008, 2011 35

36 Remote Support Utility: User's Guide
Chapter 5. Assist On-site Support Service
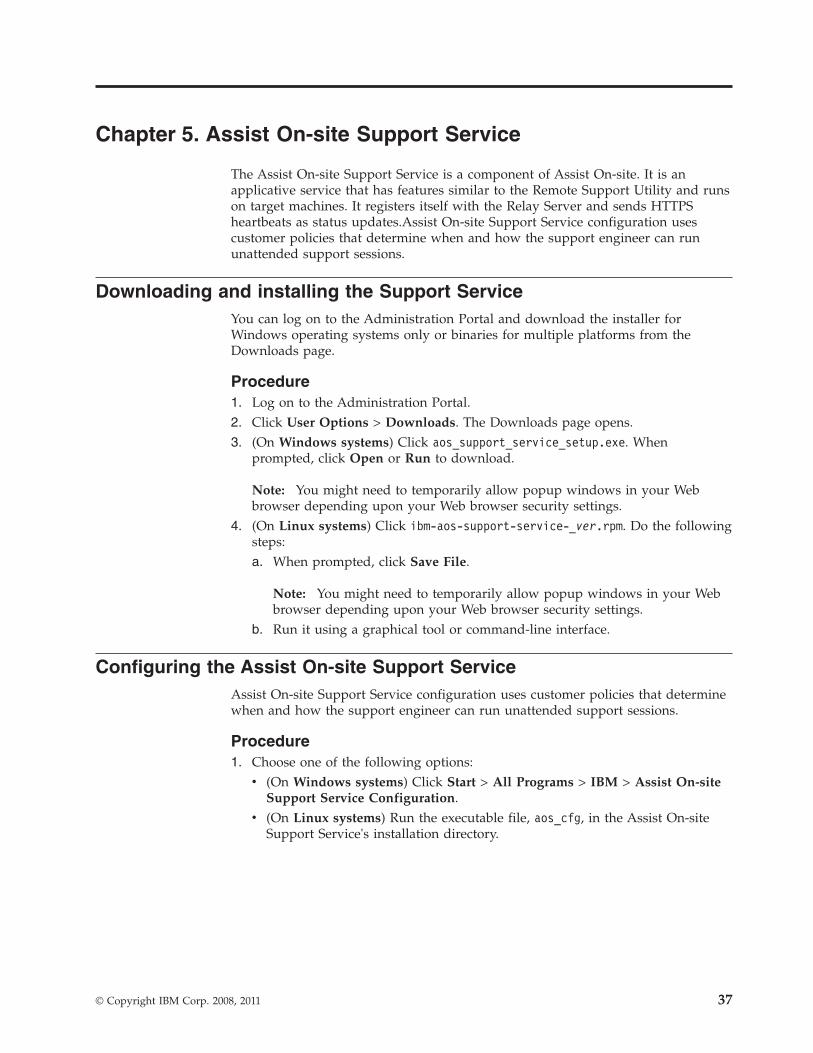
The Assist On-site Support Service is a component of Assist On-site. It is anapplicative service that has features similar to the Remote Support Utility and runson target machines. It registers itself with the Relay Server and sends HTTPSheartbeats as status updates.Assist On-site Support Service configuration usescustomer policies that determine when and how the support engineer can rununattended support sessions.
Downloading and installing the Support ServiceYou can log on to the Administration Portal and download the installer forWindows operating systems only or binaries for multiple platforms from theDownloads page.
Procedure1. Log on to the Administration Portal.2. Click User Options > Downloads. The Downloads page opens.3. (On Windows systems) Click aos_support_service_setup.exe. When
prompted, click Open or Run to download.
Note: You might need to temporarily allow popup windows in your Webbrowser depending upon your Web browser security settings.
4. (On Linux systems) Click ibm-aos-support-service-_ver.rpm. Do the followingsteps:a. When prompted, click Save File.
Note: You might need to temporarily allow popup windows in your Webbrowser depending upon your Web browser security settings.
b. Run it using a graphical tool or command-line interface.
Configuring the Assist On-site Support ServiceAssist On-site Support Service configuration uses customer policies that determinewhen and how the support engineer can run unattended support sessions.
Procedure1. Choose one of the following options:
v (On Windows systems) Click Start > All Programs > IBM > Assist On-siteSupport Service Configuration.
v (On Linux systems) Run the executable file, aos_cfg, in the Assist On-siteSupport Service's installation directory.
© Copyright IBM Corp. 2008, 2011 37
2. Enter your customer number and name.3. In the Server URL field, type the URL for the listening Relay Server, for
example:https://aos.us.ihost.com/AssistOnSite/callHome
4. In the Access Control List (ACL) box, type a comma-separated list of AssistOn-site user IDs (e-mail addresses) an Assist On-site team names.
5. Clear the check boxes to disable session modes, collaboration, or sessionrecording.
Important: If you do not clear Enable Attended Mode, ACL members cannotrun unattended support sessions.
6. If you want to turn on tunneling, select Enable Port Forwarding. You canconfigure port forwarding. For more information, see “Configuring portforwarding” on page 39.
7. Click OK.8. Use your operating system's tools to start the service.
Figure 17. Support Service Config window
38 Remote Support Utility: User's Guide
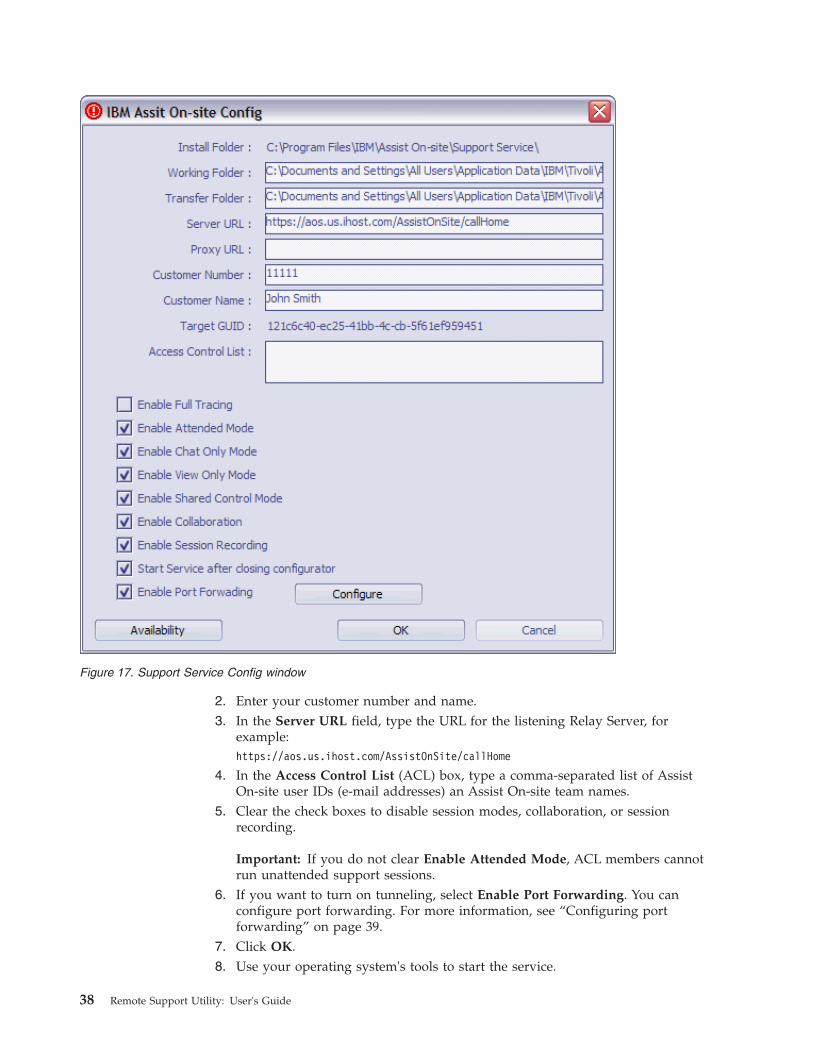
Configuring port forwardingYou can configure port forwarding and reverse port forwarding on the ConfigurePort Forwarding window. After you explicitly configure permission for portforwarding, the support engineer can begin the unattended port forwardingsession to the authorized ports.
Procedure1. Optional: In the Support Service Config window, select Enable Port
Forwarding if required.2. Click Configure. The Configure Port Forwarding window opens.
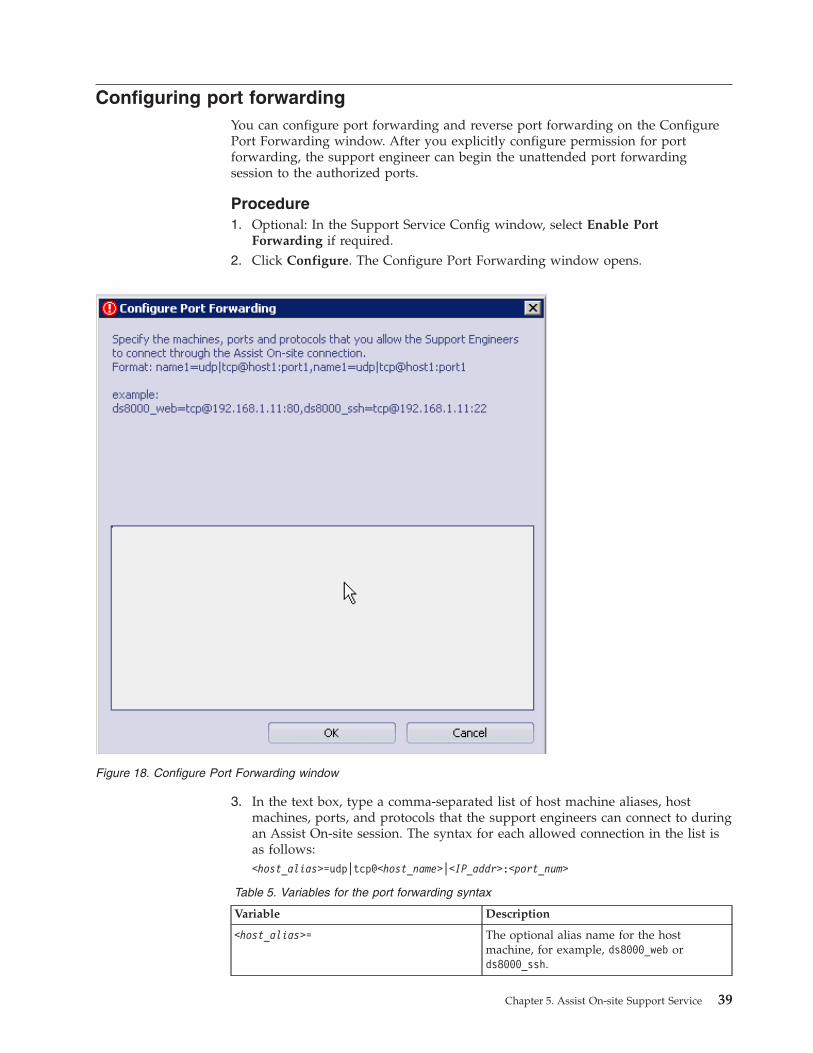
3. In the text box, type a comma-separated list of host machine aliases, hostmachines, ports, and protocols that the support engineers can connect to duringan Assist On-site session. The syntax for each allowed connection in the list isas follows:<host_alias>=udp|tcp@<host_name>|<IP_addr>:<port_num>
Table 5. Variables for the port forwarding syntax
Variable Description
<host_alias>= The optional alias name for the hostmachine, for example, ds8000_web ords8000_ssh.
Figure 18. Configure Port Forwarding window
Chapter 5. Assist On-site Support Service 39
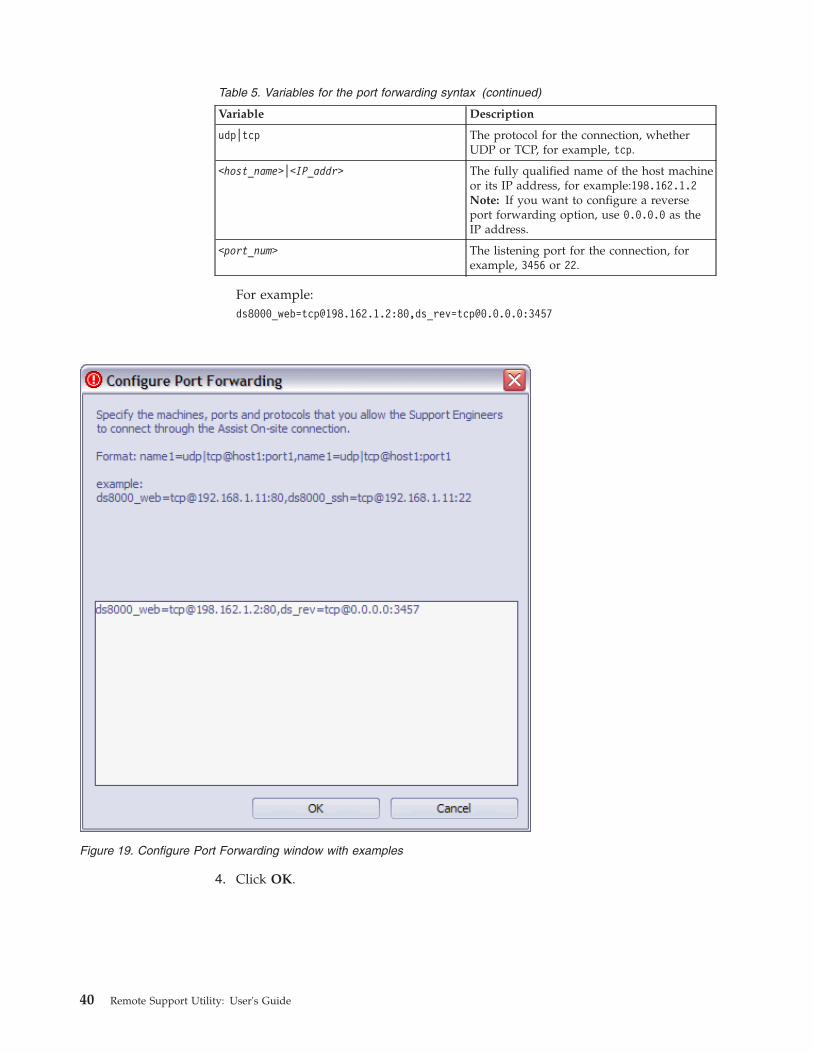
Table 5. Variables for the port forwarding syntax (continued)
Variable Description
udp|tcp The protocol for the connection, whetherUDP or TCP, for example, tcp.
<host_name>|<IP_addr> The fully qualified name of the host machineor its IP address, for example:198.162.1.2Note: If you want to configure a reverseport forwarding option, use 0.0.0.0 as theIP address.
<port_num> The listening port for the connection, forexample, 3456 or 22.
For example:[email protected]:80,[email protected]:3457
4. Click OK.
Figure 19. Configure Port Forwarding window with examples
40 Remote Support Utility: User's Guide
Notices
This information was developed for products and services offered in the U.S.A.IBM may not offer the products, services, or features discussed in this document inother countries. Consult your local IBM representative for information on theproducts and services currently available in your area. Any reference to an IBMproduct, program, or service is not intended to state or imply that only that IBMproduct, program, or service may be used. Any functionally equivalent product,program, or service that does not infringe any IBM intellectual property right maybe used instead. However, it is the user's responsibility to evaluate and verify theoperation of any non-IBM product, program, or service.
IBM may have patents or pending patent applications covering subject matterdescribed in this document. The furnishing of this document does not give youany license to these patents. You can send license inquiries, in writing, to:
IBM Director of LicensingIBM CorporationNorth Castle DriveArmonk, NY 10504-1785 U.S.A.
For license inquiries regarding double-byte (DBCS) information, contact the IBMIntellectual Property Department in your country or send inquiries, in writing, to:
Intellectual Property LicensingLegal and Intellectual Property LawIBM Japan, Ltd.3-2-12, Roppongi, Minato-ku, Tokyo 106-8711 Japan
The following paragraph does not apply to the United Kingdom or any othercountry where such provisions are inconsistent with local law:
INTERNATIONAL BUSINESS MACHINES CORPORATION PROVIDES THISPUBLICATION "AS IS" WITHOUT WARRANTY OF ANY KIND, EITHEREXPRESS OR IMPLIED, INCLUDING, BUT NOT LIMITED TO, THE IMPLIEDWARRANTIES OF NON-INFRINGEMENT, MERCHANTABILITY OR FITNESSFOR A PARTICULAR PURPOSE.
Some states do not allow disclaimer of express or implied warranties in certaintransactions, therefore, this statement might not apply to you.
This information could include technical inaccuracies or typographical errors.Changes are periodically made to the information herein; these changes will beincorporated in new editions of the publication. IBM may make improvementsand/or changes in the product(s) and/or the program(s) described in thispublication at any time without notice.
Any references in this information to non-IBM Web sites are provided forconvenience only and do not in any manner serve as an endorsement of those Websites. The materials at those Web sites are not part of the materials for this IBMproduct and use of those Web sites is at your own risk.
© Copyright IBM Corp. 2008, 2011 41
IBM may use or distribute any of the information you supply in any way itbelieves appropriate without incurring any obligation to you.
Licensees of this program who wish to have information about it for the purposeof enabling: (i) the exchange of information between independently createdprograms and other programs (including this one) and (ii) the mutual use of theinformation which has been exchanged, should contact:
IBM Corporation2Z4A/10111400 Burnet RoadAustin, TX 78758 U.S.A.
Such information may be available, subject to appropriate terms and conditions,including in some cases payment of a fee.
The licensed program described in this document and all licensed materialavailable for it are provided by IBM under terms of the IBM Customer Agreement,IBM International Program License Agreement or any equivalent agreementbetween us.
Information concerning non-IBM products was obtained from the suppliers ofthose products, their published announcements or other publicly available sources.IBM has not tested those products and cannot confirm the accuracy ofperformance, compatibility or any other claims related to non-IBM products.Questions on the capabilities of non-IBM products should be addressed to thesuppliers of those products.
All statements regarding IBM's future direction or intent are subject to change orwithdrawal without notice, and represent goals and objectives only.
This information contains examples of data and reports used in daily businessoperations. To illustrate them as completely as possible, the examples include thenames of individuals, companies, brands, and products. All of these names arefictitious and any similarity to the names and addresses used by an actual businessenterprise is entirely coincidental.
COPYRIGHT LICENSE:
This information contains sample application programs in source language, whichillustrate programming techniques on various operating platforms. You may copy,modify, and distribute these sample programs in any form without payment toIBM, for the purposes of developing, using, marketing or distributing applicationprograms conforming to the application programming interface for the operatingplatform for which the sample programs are written. These examples have notbeen thoroughly tested under all conditions. IBM, therefore, cannot guarantee orimply reliability, serviceability, or function of these programs. You may copy,modify, and distribute these sample programs in any form without payment toIBM for the purposes of developing, using, marketing, or distributing applicationprograms conforming to IBM‘s application programming interfaces.
If you are viewing this information in softcopy form, the photographs and colorillustrations might not be displayed.
42 Remote Support Utility: User's Guide
Trademarks
IBM, the IBM logo, and ibm.com® are trademarks or registered trademarks ofInternational Business Machines Corp., registered in many jurisdictions worldwide.Other product and service names might be trademarks of IBM or other companies.A current list of IBM trademarks is available on the Web at “Copyright andtrademark information” at http://www.ibm.com/legal/copytrade.shtml.
Adobe, Acrobat, PostScript and all Adobe-based trademarks are either registeredtrademarks or trademarks of Adobe Systems Incorporated in the United States,other countries, or both.
Cell Broadband Engine and Cell/B.E. are trademarks of Sony ComputerEntertainment, Inc., in the United States, other countries, or both and is used underlicense therefrom.
Intel, Intel logo, Intel Inside, Intel Inside logo, Intel Centrino, Intel Centrino logo,Celeron, Intel Xeon, Intel SpeedStep, Itanium, and Pentium are trademarks orregistered trademarks of Intel Corporation or its subsidiaries in the United Statesand other countries.
IT Infrastructure Library is a registered trademark of the Central Computer andTelecommunications Agency which is now part of the Office of GovernmentCommerce.
ITIL is a registered trademark, and a registered community trademark of the Officeof Government Commerce, and is registered in the U.S. Patent and TrademarkOffice.
Java and all Java-based trademarks and logosare trademarks or registered trademarks ofSun Microsystems, Inc. in the United States,other countries, or both.
Linux is a trademark of Linus Torvalds in the United States, other countries, orboth.
Microsoft, Windows, Windows NT, and the Windows logo are trademarks ofMicrosoft Corporation in the United States, other countries, or both.
UNIX is a registered trademark of The Open Group in the United States and othercountries.
Other company, product, and service names may be trademarks or service marksof others.
Notices 43

44 Remote Support Utility: User's Guide


����
Product Number:
Printed in USA