Embed Size (px)
Citation preview

Prospects Guide

04/23/2012 ResearchPoint 2.91 Prospects US
©2011 Blackbaud, Inc. This publication, or any part thereof, may not be reproduced or transmitted in any form or by anymeans, electronic, or mechanical, including photocopying, recording, storage in an information retrieval system, or other-wise, without the prior written permission of Blackbaud, Inc.
The information in this manual has been carefully checked and is believed to be accurate. Blackbaud, Inc., assumes noresponsibility for any inaccuracies, errors, or omissions in this manual. In no event will Blackbaud, Inc., be liable for direct,indirect, special, incidental, or consequential damages resulting from any defect or omission in this manual, even if advisedof the possibility of damages.
In the interest of continuing product development, Blackbaud, Inc., reserves the right to make improvements in this manualand the products it describes at any time, without notice or obligation.
All Blackbaud product names appearing herein are trademarks or registered trademarks of Blackbaud, Inc.
All other products and company names mentioned herein are trademarks of their respective holder.
Prospects-2011

ContentsRESEARCHPOINT QUICK REFERENCE 1Add a New User to ResearchPoint 1
2Assign Existing User to System Role 2
Add/Edit Prospect Biographical Information 2Designate a Constituent in your Database a Prospect Manager 2Assign a Prospect Manager to a Prospect 3Get WealthPoint Updates on a Prospect 3Get WealthPoint Updates on a Group 4Edit Confidence Rating 4Run a Prospect Research Report 5Configure Raiser’s Edge Integration 6Import Queries from The Raiser’s Edge as a Research Group 7
PROSPECT CONFIGURATION 9Raiser’s Edge Integration 9
Requirements to Integrate 9Configuration Steps 10Configure Raiser’s Edge Integration 10Configure Fields 10
Integrated Fields 12Edit Credentials 13Search the Raiser’s Edge 14
Wealth And Ratings Data 15Access Wealth And Ratings Data Page 15View Refreshed WealthPoint Data 15
View Refreshed Constituent Record 16View List of WealthPoint Searches 16
Retrieve WealthPoint Search Results 16Track Subscription Status 16Edit the WealthPoint URL 17Register with WealthPoint 17Enable Data Refresh 17Disable Data Refresh 17Manage WealthPoint Searches 17
Create WealthPoint Search Process 17Add WealthPoint Search Process Screen 18Edit WealthPoint Search Process 18Delete WealthPoint Search Process 19

Tabs of a Process Status Page 19Recent Status Tab 19History Tab 19
Delete a Status Record from the History Tab of a Process Status Page 20Job Schedules Tab (Not Available on all Process Pages) 20
Schedule a Process Job 20Edit a Job Schedule 21Create Job Screen 22Delete a Job Schedule 23
Start process 23Exception Report 24Generate Windows Scripting File 24
Wealth Capacity Formula Management 24Access Wealth Capacity Formula Management 25Create a Wealth Capacity Formula 25
Add Wealth Capacity Formula Screen 28Name/Description Tab 28Assets Tab 28Calculations Tab 28
Manage Wealth Capacity Formulas 29Apply a Wealth Capacity Formula 29Apply Wealth Capacity Formula Screen 29Set Wealth Capacity Formula Default 29Edit Wealth Capacity Formula 30Delete Wealth Capacity Formula 31
Edit Prospect Quick Search URL 31Edit Number of Prospect Quick Searches Saved 31Reason Codes 31
Add Reason Codes 32Edit a Reason Code 32Delete a Reason Code 32Mark a Reason Code as Inactive or Active 33
Prospect Research Report Templates 33
WEALTH AND RATINGS MANAGEMENT 35WealthPoint Searches 36Obtain Prospect Wealth Information 36
Wealth and Ratings Management 38Disable/Enable Wealth Updates 38Link Raiser’s Edge Constituent 39Unlink Raiser’s Edge Constituent 39View Raiser’s Edge Constituent 39
Sync with The Raiser’s Edge 39Link Tank 40Manage Constituent Modeling and Ratings Data 40
Create Customized Ratings 40Add Rating Information to Constituent 41Edit Rating Information on a Constituent 41Modeling and Propensity Updates through Batch Entry 42Delete Rating Information from a Constituent 43
Manage Wealth Summary Information 43Confidence Rating 44
Edit Confidence Rating 45Biographical Information 46
Add Biographical Information 46Edit Biographical Information 47Add Biographical Information Screen 47
Name and Address Tab 48Bio 1 Tab 48Bio 2 Tab 48Career Tab 49
Confirm Biographical Information 49Reject Biographical Information 49Delete Biographical Information 49
Real Estate Information 50Add Real Estate Information 50Edit Real Estate Information 50Add Real Estate Information Screen 51
Property Tab 51Assessment Tab 51Assessment Detail tab 52Deed tab 52Mortgage Tab 53
Confirm Real Estate Information 53Reject Real Estate Information 54Delete Real Estate Information 54
Business Ownership Information 55Add Business Ownership Information 55
Add Business Ownership Information Screen 55Company Tab 56Biographies Tab 56Valuation Tab (Individual constituents, not organizations) 57Ownership Tab 57
Edit Business Ownership Information 57Confirm Business Ownership Information 58

Reject Business Ownership Information 58Delete Business Ownership Information 58
Securities 59Add Securities Information 59Add Securities Screen 60
Fields Tab (Individual constituents only, not organizations) 60Transactions Tab (Individual constituents only, not organizations) 61Add Securities Screen (Organization constituents only, not individuals) 61
Edit Securities Information 61Confirm Securities Information 62Go to Transaction 62Reject Securities Information 62Delete Securities Information 63
Income/Compensation 63Add Income and Compensation Information 63Add Income/Compensation Information Screen 64Edit Income and Compensation Information 64Confirm Income and Compensation Information 65Reject Income/Compensation Information 65Delete Income and Compensation Information 65
Affluence Indicators 66Add Affluence Indicators 66Add Affluence Indicator Information Screen 66
Personal Tab 66Contact Tab 67
Edit Affluence Indicator Information 67Confirm Affluence Indicator Information 67Reject Affluence Indicator Information 68Delete Affluence Indicator Information 68
Nonprofit Affiliations Information 69Add Nonprofit Affiliation Information 69Add Nonprofit Affiliation Information Screen 69Edit Nonprofit Affiliation Information 70Confirm Nonprofit Affiliation Information 71Reject Nonprofit Affiliation Information 71Delete Nonprofit Affiliation Information 71
Private Foundations 72Add Private Foundation Information 72Add Private Foundation Information Screen 73Edit Private Foundation Information 73Confirm Private Foundation Information 74Reject Private Foundation Information 74Delete Private Foundation Information 74

Philanthropic Gift Information 75Add Philanthropic Gift Information 75Add Philanthropic Gift Information Screen 75Edit Philanthropic Gift Information 76Confirm Philanthropic Gift Information 76Reject Philanthropic Gift Information 77Delete Philanthropic Gift Information 77
Political Donations 78Add Political Donation Information 78Add Political Donation Screen 78Edit Political Donation Information 79Confirm Political Donation Information 79Reject Political Donation Information 79Delete Political Donation Information 80
Other Assets 80Add Other Assets 80Edit Other Asset Information 80Add Other Assets Screen 80Confirm Other Asset Information 81Reject Other Asset Information 81Delete Other Asset Information 81
Group Member Ratings 82Access Group Member Record 82
Manage Wealth Capacity 82Transaction Page 85
Add Transaction to Existing Securities Record 85Edit Security Transaction 85Delete Security Transaction 86
Edit Research Details 86Data Refresh Notifications 87
WealthPoint Data Refresh Notifications Page 87Reports 87
Prospect Research Report 88Giving Summary 88
Add Giving Summary Information 88Giving History Updates through Batch Entry 89Edit Giving Summary Information 90Delete Giving Summary Information 90
PROSPECT ANALYSIS 91Access Prospect Analysis 91Add Prospect Analysis Dashboard 91

Add a Prospect Segmentation Screen 93Edit Prospect Analysis Dashboards 94Edit Prospect Segmentation Permissions 94Delete Prospect Analysis Dashboards 95Update Prospect Analysis Dashboards 95View Prospect Analysis Dashboards 95Prospect Segmentation Page 96
Print Prospect Analysis Dashboards 96Export Prospect Analysis Dashboards 96View Segment Page 96
Access Segmentation Page 97Open Constituent Records from Segment Page 98Save Segment Prospects to Research Group 98Save Segment Prospects to Selection 99Delete Prospect Segmentation 100
RESEARCH GROUPS 101Access Research Groups 101Add a Research Group 101Edit a Research Group 103Delete a Research Group 103Filter Research Groups 103Open a Research Group 104Manage Research Group Records 104
Import Group WealthPoint Updates 104Track Group Members 105
Add Members to an Existing Group 105Delete Members from an Existing Group 106Edit Research Details 106View Members Constituent Records 106
Manage Member Integration with The Raiser’s Edge 107Link Group Members with The Raiser’s Edge 107Unlink Group Members from The Raiser’s Edge 109Sync Group Members with The Raiser’s Edge 110View Group Members 112Sync Entire Group with The Raiser’s Edge 112
Assign a Prospect Manager to a Group 113Edit Group Permissions 114Map Group Address 114Research Group Report 114
Add or Update Group Members 114Update Group Selection 115

Create New Update Process 115Add Populate Research Group Process Screen 116Edit an Update Process 116Delete an Update Process 117Run an Update Process 117Tabs of a Process Status Page 117
Recent Status Tab 118History Tab 118Delete a Status Record from the History Tab of a Process Status Page 118Job Schedules Tab (Not Available on all Process Pages) 118Schedule a Process Job 119Edit a Job Schedule 120Create Job Screen 120Delete a Job Schedule 122Generate Windows Scripting File 122
Import Research Group from The Raiser’s Edge 122Import Queries from The Raiser’s Edge as a Research Group 124
PROSPECT RESEARCH REQUESTMANAGEMENT 125Prospect Research Request Workflow 125Add New Prospect Research Requests 126
Add a Prospect Research Request Screen 127Manage Prospect Research Requests 127
Edit a Specific Constituent Request 128Edit an Existing Research Request 128Add Prospects to Research Request 128Cancel a Specific Prospect Request 128Cancel an Existing Research Request 129Delete an Existing Research Request 129View Research Requests 129
Documentation 129Attachments 129
Add Attachments 129Add an Attachment Screen 130Edit Attachments 130Delete Attachments 130
Media Links 130Add Media Links 131Add a Media Link Screen 131Edit Media Links 131Delete Media Links 131
Notes 132

Add Notes 132Add a Note Screen 132Edit Notes 132Delete Notes 132
Open Media Link or Attachment Files 132Research Request Record 133Manage Submitted Research Requests 133
Open Requests 133Research Request Record 134
Open Individual Request 137Completed Requests 143Establish User Permissions for Prospect Research Request Management 144
Track Constituent Research Requests 145
PROSPECT QUICK SEARCH 147Field Matching Logic 147Match Codes 149Execute a Prospect Quick Search 149Real Estate Tab 151Business Ownership Tab 152Prospect Quick Search Details Page - Real Estate 153
Add Information to Constituent from Prospect Quick Search Details page 154Add Constituent from Prospect Quick Search Details Page 155
Prospect Quick Search Details Page - Business Ownership 157Business Ownership Summary Section 157Biography Information Tab 158Ownership Information Tab 159
Matching Executives Tab 160
WEALTHPOINT BATCH SCREENING PROCESS 163Manage a WealthPoint Batch Screening Process 163Tabs of a Process Status Page 165
Recent Status Tab 165History Tab 165
Delete a Status Record from the History Tab of a Process Status Page 166
INDEX 167

ResearchPoint QuickReferenceAdd a New User to ResearchPoint 1
Add/Edit Prospect Biographical Information 2
Designate a Constituent in your Database a Prospect Manager 2
Assign a Prospect Manager to a Prospect 3
Get WealthPoint Updates on a Prospect 3
Get WealthPoint Updates on a Group 4
Edit Confidence Rating 4
Run a Prospect Research Report 5
Configure Raiser’s Edge Integration 6
Import Queries from The Raiser’s Edge as a Research Group 7
This document provides quick, task-based answers to common questions about ResearchPoint: how to resetuser passwords, how to add a new user, how to edit biographical information, and much more. This documentdoes not provide detailed conceptual information. It is designed to help users quickly find answers to veryspecific questions.For a deeper understanding of the application, see the Prospect &Wealth Management Guide.
Add a New User to ResearchPoint} Add a new application user to ResearchPoint
1. From Administration, click Security. The Security page appears.
2. Under Configuration, click Organizational Units. The organizational units page appears.
3. Click Add. The Add organizational users screen appears.
4. Enter the user name and password for each user you want to add.
chapter 1

Note: ResearchPoint passwords must be at least eight characters long and include a combination ofthe following: upper case letter, lower case letter, number, symbol such as @ or !.
5. Click Save to save your settings and return to the Organizational Unit page. Permissions and systemaccess for the user is established when you add the user to a system role.
Assign Existing User to System Role} Assign an existing user to a system role
1. From Administration, click Security. The Security page appears.
2. Click System roles. The System Roles page appears.
3. Select the role to which you want to assign the user.
4. Click Go to role. The selected system role page appears.
5. Select the Users tab.
6. Click Add. The search screen appears.
7. Enter the login name of the user you want to add to the role and click Search.
8. Select the user from the results grid and click Select.
Add/Edit Prospect Biographical Information} Add/Edit biographical information for a selected prospect
1. From the Prospects page, click Constituent search and locate the record you want to edit. When youopen the selected record, the prospect’s Wealth and Ratings page appears.
2. Under View as, click Constituent. The constituent view of the prospect appears.
• To change phone, email, and address information, select the Contact tab.
• To change name, marital status, gender, birth date, age, website, demographic information,alternate lookup IDs, or interests, select the Personal tab.
• To change relationship information, select the Relationships tab.
• To change constituency information, select the Constituencies tab.
• To change a note, media link, or file attachment, select the Documentation tab.
• To change name formats or aliases, select the Names tab.
For more information, see the Prospect &Wealth Management Guide.
Designate a Constituent in your Database aProspect ManagerThe prospect manager in ResearchPoint functions much like a solicitor. Themanagers can be assigned to specificprospect records in your system. Before you can assign someone as a prospect manager, you first must assign
2 CHAPTER 1
the individual the “Prospect Manager” constituency.
Assign a Prospect Manager to a ProspectConfirm the individual you want to assign as a “Prospect Manager” exists in your database. For instructions oncreating a prospect manager, see Designate a Constituent in your Database a Prospect Manager on page 2.
} Assign a prospect manager to a prospect in your database
1. Open the Constituent record of the individual you want to assign a prospect manager. The individual’sWealth and Ratings page appears.
2. Under Tasks, click Edit research details. The Edit research details screen appears.
3. In the Prospect manager field, click the search icon at the end of the field and search for the prospectmanager you want to assign this prospect.
4. From the Fundraiser Search screen, click Select. You return to the Edit research details screen.
5. From the Edit research details screen, you can also change the prospect’s research status to Confirmed.
6. Click Save to save the assignment and return to the prospect’s Wealth and Ratings page. The selectedfundraiser displays under Research details on the summary section of the page.
Get WealthPoint Updates on a ProspectWhen importingWealthPoint information, the system does not override any manually entered data you storedon a given prospect. For example, if you entered real estate information for Mark Adamson and real estateinformation is included in theWealthPoint update, whatever information you entered about Mr. Adamsonremains intact after the update.
} Get WealthPoint updates for a selected prospect
1. Open the individual record you want to update. The individual’s Wealth and Ratings page appears.
2. Under Tasks, click Get WealthPoint updates. A confirmation screen appears.
Note: IfGet WealthPoint updates does not display under Tasks, you may need to register withWealthPoint. To registerWealthPoint, navigate to the Prospects functional area and clickWealth andratings data under Tasks. From the prospects Wealth and Ratings Data page, click Register withWealthPoint.
3. Click Yes. The program processes your request. (A bar appears at the top of the page, informing you thatthe system is processing your request.)
Warning: If you Disable wealth updates on the selected individual’s record, that individual’s wealthinformation cannot be updated.
4. After the update process is complete, a confirmation message appears. Click themessage bubble toreturn to the page from which you executed the update.
5. To help you track newly imported information, the individual’s Go to wealth details drop down menuindicates which data categories include new data.
RESEARCHPOINT QUICK REFERENCE 3

Get WealthPoint Updates on a GroupWhen importingWealthPoint information, the system does not override any manually entered data you storedon a given prospect. For example, if you entered real estate information for Mark Adamson and real estateinformation is included in theWealthPoint update, whatever information you entered about Mr. Adamsonremains intact after the update.
} Get WealthPoint updates for all members of a selected group
1. From the Research Groups tab on the Research Groups page, select the existing research group you wantto update.
Note: You access the research group functionality from the Prospects page by clickingManage researchgroups. The Research Groups page appears displaying two tabs: Research Groups and PopulateResearch Groups.
2. Click Go to research group. The selected research group appears displaying theWealth Summary tab.
3. Under Tasks, click Get WealthPoint updates for group. A confirmation screen appears.
Warning: Only members with theWealthPoint update option enabled are processed. If you markedtheDisable wealth updates on any member records, thosemembers are not included in the update.
4. Click Yes to get the updates. The program processes the update request. (A bar at the top of the pagetracks the process.)
When the update is complete, information about themost recent wealth update displays on theWealthsummary tab.
Note: The standard research group record page is comprised of two tabs: Wealth Summary andMembers. If Raiser’s Edge users integrate the application with The Raiser’s Edge (versions 7.84 andhigher), a third tab displays: The Raiser’s Edge Integration tab. Through this tab, you can manage theresearch group members “link” and “sync” status with the Raiser’s Edge.
For more information, see the Research Groups chapter in the Prospect &Wealth Management Guide.
Edit Confidence RatingAlthough the application includes a default confidence rating map, your organization may find the need tocustomize the ratings map to better meet your internal structures. When you edit a ratings map, you change thematch criteria used to determine the confidence ratings on wealth records.
} Edit confidence rating map
1. Open a constituent record. TheWealth and Ratings page appears.
2. In theWealth summary grid, click Go to wealth details. From the drop down menu, select a wealthdetails page to open.
When editing confidence rating information, it does not matter which page you open. You can edit allconfidence ratings from any open details page. For example, if you want to edit the Real Estate ratingsinformation but you are currently on the Securities page, you do not have to switch to the Real Estatepage. You can enter your edits from your existing page.
4 CHAPTER 1

3. From theWealth details page, under Tasks, click Edit confidence settings. The Edit confidence settingsscreen appears.
4. In the Select a source box, select the wealth information source for which you want to edit theconfidence ratings.
5. In the Set confidence ratings box, the rating information for the selected source appears. Expand theplus signs next to the ratings number to view the criteria used to qualify for the rating.
6. Select the criteria entry and using the arrow buttons move the criteria to the new rating number. Forexample, in the default settings for Larkspur Data, “P06 - Name, Phone number, First/MiddleCombination” is included in the “5 - Trusted” rating category. To move this down to the “4 - Very HighConfidence” category, select the P06 criteria and click the down arrow key. The criteria is now associatedwith the “4 - Very High Confidence” rating category for the selected data source.
7. To establish a default rating for all manually entered wealth records, in the Set manually entered recordsto field, select the rating you want used. Once the rating is established, the application automaticallyapplies this rating to all manually entered wealth records.
8. Click Save to save your changes and return to the data source page.
Run a Prospect Research ReportThe Prospect Research Report provides details about a selected prospect’s wealth information.
} Run a prospect research report on an individual
1. From a prospect’s Wealth and Ratings page, under Reports, click Prospect research report. The ProspectResearch Report page appears.
2. You can base your report on selected confidence ratings or all confidence ratings, by choosing yourpreference in the Confidence field.
3. In the Include field, select the report sections you want to include. To use only selected sections in yourreport, in the Include field, select “Selected sections”. The Selected sections button activates. Click thebutton to access the Prospect research report section selection screen. Place a check mark next to allsections you want to include and click OK.
4. From the Prospect Research Report page:
• Click the Refresh icon to update the report display
• Click the Print icon to print the report
• Click the Print layout icon to preview the report before printing
• Click the Page layout icon to open the Page setup screen. From here you can select paper size,source, orientation, and margins. You can also select a printer.
• Click the Export icon and select an export option. You can export and save your report to MicrosoftExcel or Adobe PDF.
} Run a prospect research report on a group
1. From Prospects, clickManage Research Groups. The Research Groups page appears.
2. Select the group for which you want to run the report.
3. Click Go to research group. The selected research group page appears.
RESEARCHPOINT QUICK REFERENCE 5

4. Under Reports, click Research Group report. The Research Group Report page appears.
Note: Report capacity is 500 records.
5. When the report appears, you can use the blue arrows to scroll through the pages and view thesummary details for each prospect.
6. To viewmore information for an individual prospect, click View Details on the individual’s report page.
7. Click Back to return to the group report.
8. From the Research Group Report page:
• Click the Refresh icon to update the report display
• Click the Print icon to print the report
• Click the Print layout icon to preview the report before printing
• Click the Page layout icon to open the Page setup screen. From here you can select paper size,source, orientation, and margins. You can also select a printer.
• Click the Export icon and select an export option. You can export and save your report to MicrosoftExcel or Adobe PDF.
Configure Raiser’s Edge IntegrationBefore you can use the link and synchronizing features in ResearchPoint, you must configure the application torecognize and open The Raiser’s Edge. You also must define the data you want to synchronize between the twoapplications.
} Configure ResearchPoint to integrate with The Raiser’s Edge
1. From the Prospects page in ResearchPoint, under Configuration, click The Raiser’s Edge integration.The The Raiser’s Edge Integration page appears.
Warning: You can configure only one Raiser’s Edge database with ResearchPoint. Once configured, theselected database is locked in and cannot be switched out.
2. Under Tasks, click Configure integration. The The Raiser’s Edge integration configuration screen appears.
3. From the drop-down menu, select the Raiser’s Edge database you want to integrate withResearchPoint. You can integrate the application to only one Raiser’s Edge database.
4. Click Save. You return to the The Raiser’s Edge Integration page.
5. Once you select a database, the Edit Credentials link on the page activates. Click this link and enter yourRaiser’s Edge login credentials.
} Configure fields to integrate
The Configure fields functionality allows you to select the specific fields and data groups you want synchronizedbetween the two programs. Only the fields and data groups selected are synchronized; all others are ignored inthe process.
1. From the Prospects page in ResearchPoint, under Configuration, click The Raiser’s Edge integration.The The Raiser’s Edge Integration page appears.
2. Under Task, click Configure fields. The Raiser’s Edge integration configuration screen appears.
6 CHAPTER 1

3. To select the data fields you want written from ResearchPoint to The Raiser’s Edge during thesynchronization process, on the To The Raiser’s Edge tab mark Add data to The Raiser’s Edge. Thescreen activates, and you can move fields listed in the Available data fields box into the Selected datafields box. All fields included in the Selected data fields box are included in the process.
Warning: If you do not have the RE:Searchmodule in your Raiser’s Edge install, you cannot move datafrom ResearchPoint into The Raiser’s Edge. If this is the case, we recommend accepting the defaultsettings on the To The Raiser’s Edge tab. RE:Search is an optional module in The Raiser’s Edge. If aconstituent record in The Raiser’s Edge displays a Prospects tab, you have RE:Search.
In the Available data fields list, the system does not send any data to The Raiser’s Edge that has notbeen confirmed. Depending on your organization, you may not want to send wealth data at the initialconfiguration. If you have a researcher you may want to manually confirm data before sending it over toThe Raiser’s Edge. If this is the case, it may be best to select the “Modeling, likelihood and propensityratings” and move it into the Selected data fields list.
If you do want all confirmed values in The Raiser’s Edge, either system-confirmed or manually-confirmed, select all options in the Available data fields list and move them into the Select data fieldslist.
Be aware, only confirmed wealth and ratings records are brought to The Raiser’s Edge.
Note: The “fields” in ResearchPoint sent to The Raiser’s Edge are individual pieces of data (Estimatedwealth, Target Gift Range, etc.); however, the “fields” pulled from The Raiser’s Edge into ResearchPointare actually groups of data fields. For example, biographical information includes a number of fields:First name, Last name, date of birth. Therefore the data titles are represented differently on the To TheRaiser’s Edge tab and the From The Raiser’s Edge tab, one identifying “fields” and the other “groups”.
4. To select the data groups you want written from The Raiser’s Edge to ResearchPoint during thesynchronization process, on the From The Raiser’s Edge tab mark Add data from The Raiser’s Edge. Thescreen activates, and you can move groups listed in the Available data groups box into the Selecteddata groups box. All groups included in the Selected data groups box are included in the process.
You can move data from The Raiser’s Edge to ResearchPointwith or without the optional RE:Searchmodule.
5. Click Save.
Note: For information about fields used in the integration, visit Blackbaud’s Knowledgebase itemBB709167.
Import Queries from The Raiser’s Edge as aResearch GroupYou must configure ResearchPoint to integrate with The Raiser’s Edge before you can perform this task.
} Import a Query from The Raiser's Edge as a Research Group
1. From the Prospects page, clickManage research groups. The Research Groups page appears.
2. Under Tasks, click Import research group from The Raiser's Edge.
3. Search for the query to import into ResearchPoint.
4. On the Import group screen chose to create a newResearch Group or add to an existing group.
RESEARCHPOINT QUICK REFERENCE 7

• Constituents in ResearchPoint are added to the group.
• Constituents not in ResearchPoint appear in a window. There is a choice to add or link theconstituent to ResearchPoint or to ignore the record.
8 CHAPTER 1

Prospect ConfigurationRaiser’s Edge Integration 9
Wealth And Ratings Data 15
Wealth Capacity Formula Management 24
Edit Prospect Quick Search URL 31
Edit Number of Prospect Quick Searches Saved 31
Reason Codes 31
Prospect Research Report Templates 33
Before you can manage prospect information, we recommend you set up configuration options. FromProspects, you can access these options under Configuration.You use configuration options to set up Prospects for your users. These options can affect multiple areas in theprogram. For example, you can define plan outlines and opportunity amount ranges you want available for yourProspects users.
Raiser’s Edge IntegrationUsers of the standalone version of ResearchPoint (not integrated with Blackbaud’s Constituent RecordManagement system) and The Raiser’s Edge version 7.84 or higher can integrate the two applications andsimplify constituent management duties between the two application databases. The integration feature linksrecords included in both databases and synchronizes the information included on both records. You can alsoopen Raiser’s Edge records from ResearchPoint and ResearchPoint records from The Raiser’s Edge.Once your system is configured to integrate with The Raiser’s Edge, integration functionality is also availablefrom the constituent’s Wealth and Ratings page. From this page, you can link and unlink records andsynchronize information.
Requirements to Integrate• The Raiser’s Edge version 7.84 or higher• RE:Searchmodule included with your The Raiser’s Edge install. This is an optional module in The Raiser’sEdge. If a constituent record in The Raiser’s Edge displays a Prospects tab, you have RE:Search.If you do not have this module, you can still integrate with The Raiser’s Edge, but your capabilities are limited:
• You can import data from The Raiser’s Edge into ResearchPoint
• You can open a The Raiser’s Edge constituent record from ResearchPoint
chapter 2

• You cannot send data from ResearchPoint to The Raiser’s Edge
Configuration Steps1. Configure Raiser’s Edge Integration on page 10
2. Configure Fields on page 10
3. Edit Credentials on page 13
Configure Raiser’s Edge IntegrationBefore you can use the link and synchronizing features in ResearchPoint, you must configure the application torecognize and open The Raiser’s Edge. You also must define the data you want to synchronize between the twoapplications.
} Configure ResearchPoint to integrate with The Raiser’s Edge
1. From the Prospects page in ResearchPoint, under Configuration, click The Raiser’s Edge integration.The Raiser’s Edge Integration page appears.
Warning: You can configure only one Raiser’s Edge database with ResearchPoint. Once configured, theselected database is locked in and cannot be switched out.
2. Under Tasks, click Configure integration. The Raiser’s Edge integration configuration screen appears.
3. From the drop-down menu, select the Raiser’s Edge database you want to integrate withResearchPoint. You can integrate the application to only one Raiser’s Edge database.
4. Click Save. You return to the The Raiser’s Edge Integration page.
5. Once you select a database, the Edit Credentials link on the page activates. Click this link and enter yourRaiser’s Edge login credentials.
Configure FieldsThe Configure fields functionality allows you to select the specific fields and data groups you want synchronizedbetween the two programs. Only the fields and data groups selected are synchronized; all others are ignored inthe process.You can revisit Configure fields at any time to change your settings.
Note: You cannot configure fields until you complete the procedure in Configure Raiser’s Edge Integration onpage 10.
} Configure field to integrate
1. From the Prospects page in ResearchPoint, under Configuration, click The Raiser’s Edge integration.The The Raiser’s Edge Integration page appears.
2. In the Tasks pane, click Configure fields. The Raiser’s Edge integration configuration screen appears.
10 CHAPTER 2

3. To select the data fields you want written from ResearchPoint to The Raise’s Edge during thesynchronization process, on the To The Raiser’s Edge tab mark Add data to The Raiser’s Edge. Thescreen activates, and you can move fields listed in the Available data fields box into the Selected datafields box. All fields included in the Selected data fields box are included in the process.
Warning: If you do not have the RE:Searchmodule in your Raiser’s Edge install, you cannot move datafrom ResearchPoint into The Raiser’s Edge. If this is the case, we recommend accepting the defaultsettings on the To The Raiser’s Edge tab. RE:Search is an optional module in The Raiser’s Edge. If aconstituent record in The Raiser’s Edge displays a Prospects tab, you have RE:Search.
In the Available data fields list, the system does not send any data to The Raiser’s Edge that has notbeen confirmed. Depending on your organization, you may not want to send wealth data at the initialconfiguration. If you have a researcher you may want to manually confirm data before sending it over toThe Raiser’s Edge. If this is the case, it may be best to select just the “Modeling, likelihood andpropensity ratings” and move it into the Selected data fields list.
If you do want all confirmed values in The Raiser’s Edge, either system-confirmed or manually-confirmed, select all options in the Available data fields list and move them into the Selected datafields list.
Be aware, only confirmed wealth and ratings records are brought to The Raiser’s Edge.
For more information about the available fields, see Integrated Fields on page 12.
Note: The “fields” in ResearchPoint sent to The Raiser’s Edge are individual pieces of data (Estimatedwealth, Target Gift Range, etc.); however, the “fields” pulled from The Raiser’s Edge into ResearchPointare actually groups of data fields. For example, biographical information includes a number of fields:first name, Last name, date of birth. Therefore the data titles are represented differently on the To TheRaiser’s Edge tab and the From The Raiser’s Edge tab, one identifying “fields” and the other “groups”.
4. To select the data groups you want written from The Raiser’s Edge to ResearchPoint during thesynchronization process, on the From The Raiser’s Edge tab mark Add data from The Raiser’s Edge. Thescreen activates, and you can move groups listed in the Available data groups box into the Selecteddata groups box. All groups included in the Selected data groups box are included in the process.
PROSPECT CONFIGURATION 11

You can move data from The Raiser’s Edge to ResearchPointwith or without the optional RE:Searchmodule.
5. Click Save. You return to the Configure Integration with The Raiser’s Edge page. You are now ready to linkand synchronize data. Next each user who will be working in both systems should enter his logincredentials. If this information is not entered, the user will be promoted to enter the credentials everytime ResearchPoint accesses The Raiser’s Edge. For more information, see Edit Credentials on page 13.
Integrated FieldsThe following fields are integrated from ResearchPoint to The Raiser’s Edge.
Note: The “fields” in ResearchPoint sent to The Raiser’s Edge are individual pieces of data (Estimated wealth,Target Gift Range, etc.); however, the “fields” pulled from The Raiser’s Edge into ResearchPoint are actuallygroups of data fields. For example, biographical information includes a number of fields: first name, Last name,date of birth. Therefore the data titles are represented differently on the To The Raiser’s Edge tab and the FromThe Raiser’s Edge tab, one identifying “fields” and the other “groups”.
• Contributions
• Contributions (refers to Political donations and philanthropic gifts)
• Summary Information
• Estimated Wealth
• Major Giving Capacity
• Modeling, Likelihood, and Propensity Ratings
• Major Giving Likelihood
• Annual Giving Likelihood
• Planned Giving Likelihood
• Target Gift Range
• Overall rating
• Asset Information
• Total Other Assets
• Total Real Estate Assets
• Total Securities
The following fields are integrated from The Raiser’s Edge to ResearchPoint.• Biographical Information
• First, Middle, Last name, Nickname
• Date of Birth
• Gender
• Title1, Title2
• Suffix1, Suffix2
• RE7 constituent ID
12 CHAPTER 2

Warning: When synchronizing records, if the Lookup ID on the ResearchPoint record differs from theconstituent ID on the RE7 record to which you are linking, the RE7 constituent ID overrides the original LookupID and becomes the imported record’s Lookup ID. The original Lookup ID is, however, saved and stored as analternate Lookup ID with the type “'Original RP Lookup ID.”
Warning: If an existing ResearchPoint record - a record other than the one included in the integration process -shares the Lookup ID equivalent to the constituent ID of the RE7 record included in the integration process, thesynchronization process is unable to complete. Amessage notifies you of the conflict.
• Giving Summary
• First Gift Amount/Date/Type/Fund
• Largest Gift Amount/Date/Type/Fund
• Latest Gift Amount/Date/Type/Fund
• Total number of gifts
• Total amount given
• Phone number
Note: If the Raiser’s Edge constituent record has only one phone number entered, that number imports as the“Primary” number. If the Raiser’s Edge constituent record has multiple phone numbers entered, all numbersaremoved into ResearchPoint based on the following criteria: the “Home” phone number is designated“Primary;” if no “Home” number is located, the integration still pulls all numbers into ResearchPoint and thefirst number on the list is designated “Primary.”
Warning: When integrating phone numbers, ResearchPoint pulls in only Phone types that have a Phonenumber type of "Telephone number." For example, "Fax number" and "Email address" are not pulled intoResearchPoint during the integration process
• Preferred Address Information
• Address lines, City, State, ZIP, Country, Country abbreviation, and Address Type
• Primary Business Information
• Primary Business Address: Address lines, City, State, ZIP, Country, Country abbreviation, and Address Type
• Primary Business Name
Edit CredentialsYou must configure the Raiser’s Edge integration before you can access the Edit Credentials functionality. Forinformation about configuring your system, see Configure Raiser’s Edge Integration on page 10.On the screen accessed from this link, you enter your Raiser’s Edge login credentials.
} Enter Raiser’s Edge credentials
1. From the Prospects page in ResearchPoint, under Configuration, click The Raiser’s Edge integration.The The Raiser’s Edge Integration page appears
2. Click Edit credentials. The Edit The Raiser’s Edge integration credentials screen appears.
PROSPECT CONFIGURATION 13

3. Enter your Raiser’s Edge login information.
• The first Login as option uses yourWindows authentication. If you opt to use yourWindowsauthentication for the integration and your Raiser’s Edge database is not set to also use yourWindows authentication, you will be asked to enter your Raiser’s Edge login when you use theSearch The Raiser’s Edge functionality.
• If you select a different user, enter theUser name and Password you use to log into The Raiser’sEdge.
Note: The Password is required only if you want to test the login. You do not have to save it from thisscreen. If you do not enter and save the Password, when you attempt to search or link records, theRaiser’s Edge login screen appears, allowing you to enter your password at that time.
• Click Test login to confirm the credentials are valid.
4. Click Save. You return to the Configure Integration with The Raiser’s Edge page.
Search the Raiser’s EdgeOnce your application is configured to integrate with The Raiser’s Edge, you can search your Raiser’s Edgedatabase from ResearchPoint.
Note: For information about configuring your application to integrate with The Raiser’s Edge, see ConfigureRaiser’s Edge Integration on page 10.
} Search a Raiser’s Edge database from ResearchPoint
1. From the Prospects page in ResearchPoint, click Search The Raiser’s Edge link. The Raiser’s Edge Openscreen appears.
Note: If the integration is configured to use theWindows authentication and The Raiser’s Edgedatabase does not useWindows authentication, the Raiser’s Edge login screen appears, and you mustenter your Raiser’s EdgeUser name and Password.
2. Enter your search criteria in the fields at the bottom of the screen.
3. Click Find Now.
14 CHAPTER 2

4. Locate the constituent you want to open.
5. Click Open.
Note: If the constituent record does not exist in The Raiser’s Edge, click Add Now to add theconstituent. The New Individual screen appears. When you save the new record, the ResearchPointIndividual Search screen appears.
6. The ResearchPoint Individual Search screen appears. The selected constituent name defaults into thename fields. Click Search to locate the constituent in the ResearchPoint database.
• If a match is located in the ResearchPoint database, the record displays in the Results grid. You canselect the constituent, linking the constituent in the two databases.
• If a match is not located in ResearchPoint, click Cancel. A screen appears asking if you want to addthe constituent. Click Yes to add the constituent to the ResearchPoint database and create a linkwith the Raiser’s Edge constituent. When the process completes, the new constituent’s Wealth andRatings page opens.
Note: For information about the Open screen and entering a new constituent in The Raiser’s Edge, seethe Constituent Data Entry Guide included with your Raiser’s Edge documentation. For informationabout working on theWealth and Ratings page, see Wealth and Ratings Management on page 38.
Wealth And Ratings DataFrom theWealth And Ratings Data page, you can define aWealthPoint search process that includes a selectionof records. For example, you have ten prospects you want updated with the latestWealthPoint data. InManageResearch Groups you create a group that includes these ten BB_Variables. FromWealth And Ratings Data youcan then create a search process using this group that instructs the program to extract information about theprospects included in the group from yourWealthPoint system and update your prospects’WealthPointinformation.Once you create a search process, you can also create a job schedule, instructing the process to run at a fixedinterval. TheWealth And Ratings Data page houses a list of all executed searches. It displays date, status, user,and prospect information.TheWealthPoint Refresh Notification tab tracks wealth screening refreshes.
AccessWealth And Ratings Data PageYou access theWealth And Ratings Data page by clicking theWealth and ratings data link housed in theConfiguration on the Prospects page.
ViewRefreshedWealthPoint DataIf you choose to allow automaticWealthPoint Data Refreshes - by clicking the Enable Data Refresh optiondisplayed on the explorer bar of theWealth And Ratings Data page - any data refreshes added to the system aredisplayed on theWealth And Ratings Data page.
Note: For information about enabling data refreshes, see Enable Data Refresh on page 17.
PROSPECT CONFIGURATION 15

For example, if the D&B data is refreshed, all constituents whose records were updated with the newD&B datadisplay on the page, along with the date of the update, the source updated, wealth detail information, fieldsupdated, and the old and new values.The following data sources are included in the Data Refresh process:• D&B• GuideStar - Nonprofit Associations• GuideStar - Private Foundations• Thomson• Who’s WhoYou can filter the notifications included on the page based on theName, Date submitted, or User name. Simplyenter the information in the appropriate field included at the top of the grid and click Apply. To return to thedefault setting of all notifications, click Reset.
View Refreshed Constituent RecordFrom theWealth And Ratings Data page on theWealthPoint Data Refresh tab, you can access the constituentrecord of any constituent included in a Data Refresh process.To access the record, select the record in theWealthPoint Data Refresh history grid and click Go to constituent.The constituent record displays. Click Back to return to theWealth And Ratings Data page.
View List of WealthPoint SearchesTheWealthPoint Search History tab on theWealth And Ratings Data page houses a list of all searches. The topsection of the tab - theWealthPoint unresolved searchers grid - displays any incomplete or failed searches.TheWealthPoint resolved searches grid displays all searches, single and groups, that have completed or failed.From this grid, you can filter and reorder items listed and open selected constituents.To access theWealth And Ratings Data page, from the Prospects page, under Configuration clickWealth AndRatings Data in the explorer bar. TheWealth And Ratings Data page appears.
Retrieve WealthPoint Search ResultsFrom theWealthPoint Search History tab on theWealth And Ratings Data page, you can track the searchprocess, watching for the “Results ready” status to appear in theWealthPoint unresolved searches grid,confirming that your results are ready. You can then access the search results by selecting the item in the gridand clicking Retrieve results. After you retrieve the results, the search item is moved to the bottom half of thepage into theWealthPoint resolved searches grid. For more information about theWealth And Ratings Datapage, see View List ofWealthPoint Searches on page 16.
Track Subscription StatusUnder Tasks on theWealth And Ratings Data page, click Subscription status to access a screen displayinginformation about your current subscription. You must be logged intoWealthPoint before you can access thesubscription information.The screen displays the Subscription type, number of Group searches remaining, and your Subscriptionrenewal date.
16 CHAPTER 2

Edit theWealthPoint URLIf you need to change the network location where you connect toWealthPoint, you can do so from theWealthand Ratings Data page. Under Tasks, click Edit WealthPoint URL. On the Edit WealthPoint URL screen, enter thelocation of the wwsoap file used to connect toWealthPoint and click Save. You return to theWealth and RatingsData page.
Register withWealthPointThe first time you use a database withWealthPoint, you must register the database. This is a one-timeprocedure. Once the database is registered the registration link disappears. To register, click the Register withWealthPoint link under Tasks on theWealth And Ratings Data page.
Enable Data RefreshIf you click Enable Data Refresh under Tasks on theWealth And Ratings Data page, every timeWealthPointupdates D&B, Guidestar NP or PF, Thomson, or Who’s Who data your existing records are automaticallyupdated. To help you keep track of refreshed records, the constituent name and other relevant informationdisplays on theWealth And Ratings Data page. For more information, see View Refreshed WealthPoint Data onpage 15.
Disable Data RefreshIf you click Disable Data Refresh under Tasks on theWealth And Ratings Data page, the Enable Data Refreshtask is turned off and no longer are your records automatically updated every timeWealthPoint updates D&B,Guidestar NP or PF, Thomson, or Who’s Who data.
ManageWealthPoint SearchesTheWealthPoint searches tab inWealth And Ratings Data houses all yourWealthPoint search processing tools.From here, you can create a search process, edit or delete existing search processes, generate aWindowsscripting file, schedule processing jobs, run a job process, and view job processing records.
Create WealthPoint Search ProcessA search process defines what and how information is extracted fromWealthPoint. Before you create a process,you must create a research group and include all prospects for which you wantWealthPoint informationupdated. Using the group of prospects saves you a great deal of time over updating prospects one at a time. Thegroup can include as many prospects as necessary. If you are updating a large number of prospects, you maywant to schedule the job for a timewhen no one is working in your system.
} Create a WealthPoint search process
1. From theWealth And Ratings Data page, select theWealthPoint searches tab.
Note: For information about accessing theWealth and Ratings Data page, see Access Wealth AndRatings Data Page on page 15.
2. Click Add. The Add WealthPoint search process screen appears.
PROSPECT CONFIGURATION 17

3. Enter the necessary information. For an explanation of the fields and options included on this screen, seeAdd WealthPoint Search Process Screen on page 18.
4. Click Save. The process is saved and stored on theWealthPoint searches tab.
5. To update the records, from theWealthPoint searches tab, select the import process you want to runand click Start Process. TheWealthPoint search process screen appears. From this screen, you can viewthe updating process and confirm when the process is complete and if it was successful. This screen alsostores details about yourWealthPoint search processes. For more information, see ViewWealthPointSearch Process Information on page 1.
Add WealthPoint Search Process ScreenFrom this screen, you select the prospect records for which you want to updateWealthPoint data, and definethe search process.
Screen Item Description
Name Name the search process you are creating. The name displays in theWealthPoint search process grid on theWealthPoint searches tab.
DescriptionDescribe the search process you are creating. This helps users identify theprocess from theWealthPoint search process grid on theWealthPointsearches tab.
Research group Select the research group you want to include in the update process.
Edit WealthPoint Search ProcessA search process defines what and how information is extracted fromWealthPoint. From theWealthPointsearches tab inWealth And Ratings Data, you can edit existing search processes. If you want to change theprospect group used in the process, you may want to first edit the group inManage Research Groups.You can also edit a process from theWealthPoint search process screen by clicking the Edit process optionincluded in Tasks on the Explorer bar. The process screen appears after you run a process or when you select aprocess on theWealthPoint Searches tab of theWealth And Ratings Data page then click Go to WealthPointsearch process.
} Edit an existing WealthPoint search process
1. From theWealth And Ratings Data page, select theWealthPoint searches tab.
Note: For information about accessing theWealth and Ratings Data page, see Access Wealth AndRatings Data Page on page 15.
2. Click Edit. Edit WealthPoint search process screen appears.
3. Enter the necessary information.
The fields and options included on the Edit WealthPoint search process screen are the same as thoseincluded on the Add WealthPoint search process screen. For an explanation of the fields and optionsincluded on these screens, see Add WealthPoint Search Process Screen on page 18.
4. Click Save. The process is saved and stored on theWealthPoint searches tab.
5. To update the records, from theWealthPoint searches tab, select the import process you want to runand click Start Process. TheWealthPoint search process screen appears. From this screen, you can viewthe updating process and confirm when the process is complete and if it was successful. This screen also
18 CHAPTER 2

stores details about yourWealthPoint search processes. For more information, see ViewWealthPointSearch Process Information on page 1.
Delete WealthPoint Search ProcessA search process defines what and how information is extracted fromWealthPoint. From theWealthPointsearches tab inWealth And Ratings Data, you can delete existing search processes, removing them permanentlyfrom your system.You can also delete a process from theWealthPoint search process screen by clicking theDelete process optionincluded in Tasks on the Explorer bar. The process screen appears after you run a process or when you select aprocess on theWealthPoint Searches tab of theWealth And Ratings Data page then click Go to WealthPointsearch process.
} Delete an existing WealthPoint search process
1. From theWealth And Ratings Data page, select theWealthPoint searches tab.
Note: For information about accessing theWealth and Ratings Data page, see Access Wealth AndRatings Data Page on page 15.
2. In theWealthPoint search processes grid, select the process you want to delete.
3. Click Delete. A confirmation screen appears.
4. Click Yes. The process is deleted and removed from theWealthPoint searches tab.
Tabs of a Process Status PageEach business process in the database has a status page. The process status page contains information specificto the process. You enter this information when you add the process to the database. Each process status pagealso includes information about themost recent instance of the process and historical data about the process.On some process status pages, you can manage the job schedules of the process. To help manage thisinformation, each process status page contains multiple tabs.
Recent Status TabOn the Recent status tab, you view the details of themost recent instance of the process. These details includethe status of the process; the start time, end time, and duration of the process; the person who last started theprocess; the name of the server most recently used to run the process; the total number of records processed;and howmany of those records processed successfully and howmany were exceptions.
History TabEach time you run a business process, the program generates a status record of the instance. On the History tab,you view historical status record information about each instance of the process. The information in the gridinclude the status and date of the instance.On the History tab, you can limit the status records that appear in the grid. You can filter by the process status. Ifyou filter the records that appear in the grid, it can reduce the amount of time it takes to find a process instance.For example, if you search for a instance that did not finish its operation, you can select to view only statusrecords with a Status of Did not finish. To filter the records that appear in the grid, click the funnel in the actionbar. The Status field and Apply button appear so you can select the status of the instances to appear in the grid.To update the information that appears, click Refresh List on the action bar.
PROSPECT CONFIGURATION 19

Depending on your security rights and system role, you can delete a status record from the grid on the Historytab.
Delete a Status Record from the History Tab of a Process Status PageOn the History tab of a process status page, you can delete a specific status record of the process. When youdelete a status record, you delete the process and all of its history. Before you delete a process, we stronglyrecommend you back up your data. Unless you previously save the transmission file or prenotificationauthorization file, once you delete the process, you can no longer use its output file that contains the dataextracted from your database.
} Delete a status record from the History tab
1. On the process status page, select the History tab.
Note: You can filter the status records that appear in the grid by the process status. If you filter therecords in the grid, it can reduce the amount of time it takes to find an process instance. For example, ifyou search for a instance that completed its operation, you can select to view only status records with aStatus of Completed. To filter the records that appear in the grid, click the funnel in the action bar. TheStatus field and Apply button appear so you can select the status of the instances to appear in the grid.
2. In the grid, select the status record to delete.
3. On the action bar, select Delete. Amessage appears to confirm the deletion of the status record.
4. Click Yes. You return to the History tab. The selected status record no longer appears.
Job Schedules Tab (Not Available on all Process Pages)On the Job schedules tab, you view the job schedules of the process in the database. The details in this gridinclude the name of the job, whether a job schedule is enabled, the frequency of the job schedule, the start dateand time and end date and time of the scheduled jobs, and the dates the job schedule is added and last changedin the database. You enter this information when you set the job schedule of the process.Depending on your security rights and system role, you can add, edit, and delete job schedules that appear onthe Job schedules tab. To update the information that appears, click Refresh List on the action bar.
Schedule a Process JobYou can create a job schedule to automatically run a business process. When you create a schedule for a process,the program exports and runs the process at the scheduled instance or interval. For example, you can scheduleto run a process at a time convenient for your organization, such as overnight. You can create a job schedulefrom the Job schedules tab of the process status page. On the action bar, click Add. The Create job screenappears.
Note: To create a job schedule from any tab of the process status page, click Create job schedule under Tasks.
} Create a job schedule
1. Select the process to schedule.
2. From the Job schedules tab click Add or from Tasks click Create job schedule. The Create job screenappears.
20 CHAPTER 2

3. In the Job name field, enter a descriptive name for the scheduled process.
4. To suspend the scheduled process, unmark Enabled. To make the process active, mark Enabled. Bydefault, this checkbox is marked.
5. In the Schedule Type field, select the desired frequency on which to run the process.
6. Make any necessary changes to the job’s frequency and duration.
7. To save the changes, click Save.
Edit a Job ScheduleOnce you create an job schedule for a process, you can update it as necessary, such as to adjust its frequency.You cannot edit the package selected to create the job schedule.
} Edit a job schedule
1. On the Job schedules tab, select the job to edit.
PROSPECT CONFIGURATION 21

2. On the action bar, click Edit. The Edit schedule screen appears.
3. Edit the information on the screen. For example, you could change the Schedule Type and specify adifferent frequency on which the process should run. The items on this screen are the same as those onthe Create job screen. For more information about these items, see Schedule a Process Job on page 119and the Create Job Screen on page 120.
4. Click Save to save the changes. You return to the Job schedules tab.
Create Job ScreenThe table below explains the items on the Create job screen. For information about how to access this screen,see Schedule a Process Job on page 119.
Screen Item Description
Job name Enter the name of the job schedule.
Schedule type
Selections for job frequency include:-One time: The scheduled process runs once, on the date and timespecified in the One-time occurrence field.-Daily: The scheduled process runs on a daily basis. In the Frequencysection, specify the number of days to lapse between each run of the job.In the Daily frequency section, specify a time for the process to run orspecify that the process run repeatedly during a specific period of time. Inthe Duration section, specify the date that your process begins. If youwant the process to run over a specific period of time, specify an optionalEnd date or keep the default ofNo end date.-Weekly: The scheduled process runs on a weekly basis. In the Frequencysection specify the number of weeks to lapse before the process runs, inaddition to the day of the week for it to run. In the Daily frequency section,set a specific time for the process to run, or specify that the process runrepeatedly during a specific period of time. In the Duration section, specifythe date that your process begins. If you want the process to run over aspecific period of time, specify an optional End date or keep the default ofNo end date.-Monthly: The scheduled process runs on a monthly basis. In theFrequency section, specify the number ofmonths to lapse before theprocess runs, in addition to the day of themonth for it to run. In theDailyfrequency section, specify a specific time for the process to run or specifythat the process run repeatedly during a specific period of time. In theDuration section, specify the date that your process begins. If you wantthe process to run over a specific period of time, specify an optional Enddate or keep the default ofNo end date.-Start when SQL Server Agent service starts: The scheduled job processruns when the SQL Server Agent service starts. This is useful if you use theSQL Server Agent service for other tasks.-Start when the computer becomes idle: The job runs when enoughresources are available on the server. This is determined by the idlecondition defined in the SQL Server Agent properties on the server.
Enabled To suspend the scheduled process, unmark this checkbox. To make theprocess active, mark Enabled. By default, this checkbox is marked.
22 CHAPTER 2

Screen Item Description
DateAppears when you select One time in the Schedule type field. Use thedate format mm/dd/yyyy, or click the drop down arrow to select from acalendar.
Time Appears when you select One time in the Schedule type field. Enter thedate of the one-time occurrence.
Occurs every [ ] month(s) Enabled when you select Daily, Weekly, or Monthly in the Schedule typefield.
Days of the weekAppears when you select Weekly in the Schedule type field. Mark thecheckbox beside the day of the week to run the job. You can select one ormultiple days.
Day [ ] of the month Appears when you select Monthly in the Schedule type field.
The [ ] [ ] of the month
Appears when you select Monthly in the Schedule type field. In the firstfield select First, Second, Third, Fourth, or Last. In the second field select aday of the week or Day, Weekday, or Weekend day. For example, to run aprocess the last Friday of every month, select Last in the first field andFriday in the second field.
Occurs once at [ ] Enabled when you select Daily, Weekly, or Monthly in the Schedule typefield.
Occurs every [ ] [ ]
Enabled when you select Daily, Weekly, or Monthly in the Schedule typefield. To move the number by one, click the up and down arrow in the firstfield. In the second field, select Minutes or Hour. For example, to run thisprocess in themorning and afternoon every day at work, enter 4 in thefirst field and select Hours in the second field.
Starting at and Ending atEnabled when you select Occurs every [ ] [ ]. Using the example in theprevious row, enter 8:00:00AM in the Start at field and 5:00:00PM in theEnding at field.
Start date Enter the date for the job schedule to begin to process. Use the dateformat mm/dd/yyyy, or click the arrow to select from a calendar.
End dateEnter the date for the job schedule to end. For example, enter an end-of-year date. Use the date format mm/dd/yyyy, or click the arrow to selectfrom a calendar. This option is disabled when No end date is selected.
No end date If your job schedule does not have an end date, mark this option.
Delete a Job ScheduleOn the Job schedules tab of a status page, you can delete a job schedule of the process. When you delete a jobschedule, you delete the scheduled job and any changes made to it outside the program.
} Delete a job schedule
1. On the Job schedules tab, select the job to delete.
2. On the action bar, click Delete. A confirmation screen appears.
3. Click Yes to delete the job. You return to the Job schedules tab.
Start processThis task allows you to start the selected business process from the process page.
PROSPECT CONFIGURATION 23

Exception ReportWhen you run a process, the process status page appears and displays the number of records that did and didnot process. Records that fail to process are called exceptions. When there are exceptions, you can view theException Report for the generated process. This report lists the expectations generated and explains why eachdid not process properly. You can view themost recent Exception Report from the Recent status tab of theprocess page. If you want to view an older report, you can do so from the History tab of the process page.To print a report, click the Print button on the toolbar of the report. You can also set up the page format for theprint job to determine how the printed report looks. You can also use the report information in another softwareapplication or save the report in another file format, such as to share the data with someonewho cannot accessthe program. When you click the Export button on the toolbar, you can export the information into a sharedapplication, such as Microsoft Excel, or save the report into an easily shared format, such as Adobe Acrobat(*.pdf) or a Web archive (*.mhtml).
Generate Windows Scripting FileAWindows Scripting File (*.wsf) is an executable script file format for Windows that can incorporate VBScript(*.vbs) routines and include XML elements.
} Generate a Windows Scripting File
1. Go to the process that requires a Windows Scripting File.
2. Under Tasks, click Generate WSF. The Generate business process WSF file screen appears.
3. In the Save As field, enter the path and file name for theWSF file. To browse for a location to save thefile, click the ellipsis. The Save As screen appears.
4. Click OK. The program saves theWSF file.
Wealth Capacity Formula ManagementAwealth capacity formula is used to determine a constituent’s estimated wealth range, major giving capacityrange, and major giving capacity value. The system provides a default formula for calculating these ranges, butyou may also choose to create additional formulas.From theWealth Capacity Formula Management page, you can add a newwealth capacity formula, edit anexisting formula and choose which formula to use as the system default. You can also assign a formula to arecord, group of records, or a research group.
24 CHAPTER 2

AccessWealth Capacity FormulaManagementYou access theManageWealth Capacity Formula Management page by clicking theWealth capacity formulamanagement link housed under Configuration on the Prospects page.
Create aWealth Capacity FormulaIn addition to the default formula provided with the system, you can create new formulas for calculating aprospect’s estimated wealth, major giving capacity, and major giving capacity value. You create a newwealthcapacity formula from theWealth Capacity Formula Management page.
} Create a wealth capacity formula
1. From theWealth Capacity Formula Management page, select Add. The Add wealth capacity formulascreen appears.
PROSPECT CONFIGURATION 25
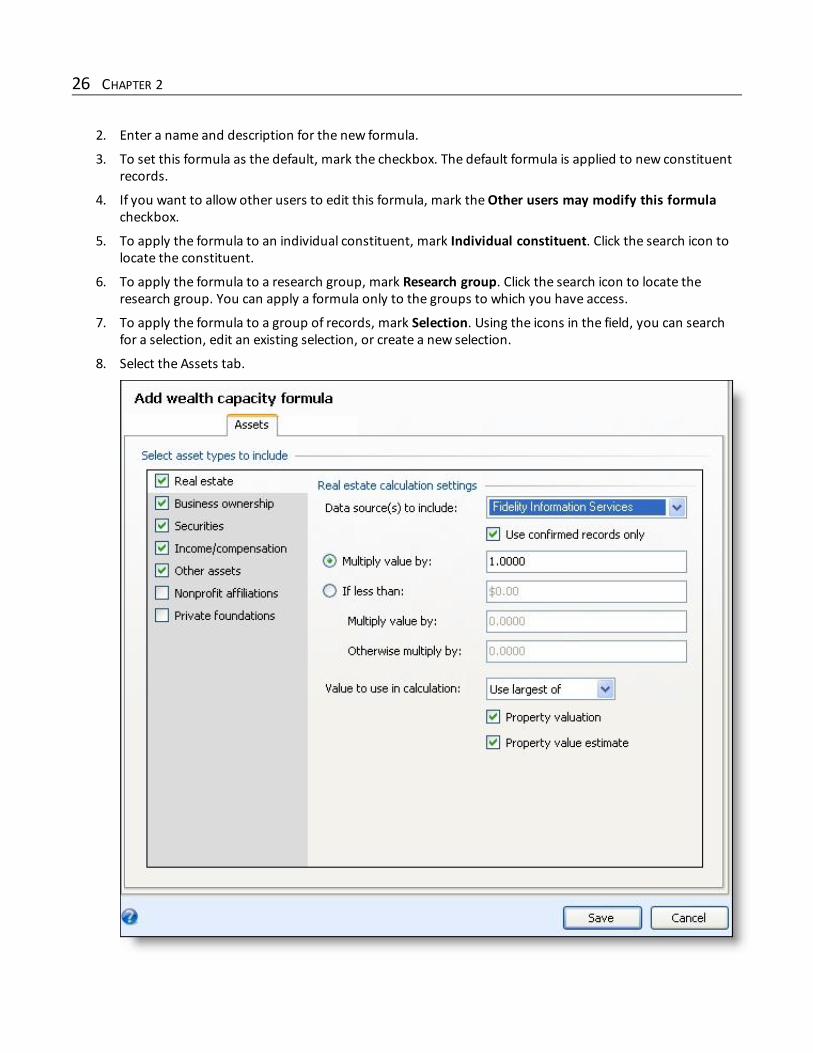
2. Enter a name and description for the new formula.
3. To set this formula as the default, mark the checkbox. The default formula is applied to new constituentrecords.
4. If you want to allow other users to edit this formula, mark theOther users may modify this formulacheckbox.
5. To apply the formula to an individual constituent, mark Individual constituent. Click the search icon tolocate the constituent.
6. To apply the formula to a research group, mark Research group. Click the search icon to locate theresearch group. You can apply a formula only to the groups to which you have access.
7. To apply the formula to a group of records, mark Selection. Using the icons in the field, you can searchfor a selection, edit an existing selection, or create a new selection.
8. Select the Assets tab.
26 CHAPTER 2

9. In the Select asset types to include frame, select the assets you want to include in the formula. Thecalculation settings on the right side of the screen change depending on the asset you highlight.
10. Enter the necessary information. For an explanation of the fields and options included on this screen, seeAdd Wealth Capacity Formula Screen on page 28.
Note: Values of “0” are not included in calculations when you select “Use smallest of” or “Use averageof” as your asset calculation method.
11. Select the Calculations tab.
12. Enter the necessary information. For an explanation of the fields and options included on this screen, seeAdd Wealth Capacity Formula Screen on page 28.
Note: Values of “0” are not included in calculations when you select “Smallest asset value” or “Averageasset value” as your asset calculation method.
13. Click Save. The formula is saved and stored on theWealth Capacity Formula Management page.
PROSPECT CONFIGURATION 27

Add Wealth Capacity Formula ScreenThe Add wealth capacity formula screen consists of the Name/Description, Assets, and Calculations tabs. Usingthese tabs you create a newwealth capacity formula.
Name/Description Tab
Screen Item Description
Name Enter a name for the new formula. The name you enter displays on theWealthCapacity Formula Management page.
Description Enter a description for the new formula. The description you enter displays ontheWealth Capacity Formula Management page.
Set this as the defaultformula
Mark this checkbox to set this formula as the default. The default formula isapplied to new constituent records.
Other users maymodify this formula Mark this checkbox if you want to allow other users to edit this formula.
Apply formula toMark this checkbox if you want to apply the formula to a record, group ofrecords, or research group. For more information about applying formulas, seeApply a Wealth Capacity Formula on page 29.
Assets Tab
Screen Item Description
Select asset types toinclude
Select the assets you want to include in the formula. The calculation settings onthe right side of the screen change depending on the asset you highlight.
Data source(s) toinclude Select the data source(s) you want to include in the formula.
Use confirmedrecords only
Mark this checkbox to use only confirmed records. When marked, the systemverifies each asset record type is confirmed before including them in theformula.
Multiplier value For each asset type, you select a multiplier value to apply to the asset.
Values to use incalculation
The values you can include in the calculation change depending upon the assettype you select. For example, if you select Securities, you can select Directholdings value, Indirect holdings value, or Total value; if you select Affluenceindicators, your only option is Retirement plan assets.
Calculations Tab
Screen Item Description
Asset calculationmethod
Select a calculation method. Your choices include “Total Asset Value”, “AverageAsset Value”, “Largest Asset Value”, and “Smallest Asset Value.” The wealthcapacity estimation is determined from your selection.
Major givingmultiplier
This percentage is applied to a constituent’s estimated wealth value todeterminemajor giving capacity. You can enter a fixed percentage to use for allprospects, or base the percentage on age. You edit the percentages in each ofthe fields.
28 CHAPTER 2
ManageWealth Capacity FormulasTheWealth Capacity Formula Management page lists the formulas currently defined in the system. From thispage, you can add a new formula, edit and delete existing formulas, and select which formula to use as thedefault. You can also assign formulas to prospects, research groups and selections.
Apply a Wealth Capacity FormulaYou have several options when you choose to apply a formula to a record or group of records. For example, youcan apply a formula to a single constituent or a group of constituents. When applying a formula to a group ofrecords, you can edit or create a new selection from ad-hoc query to select the records. You can also apply aformula to any research group to which you have access.
} Apply a wealth capacity formula
1. From theWealth Capacity Formula Management page, select the formula you want to apply and clickApply formula. The Apply wealth capacity formula screen appears.
2. To apply the formula to an individual constituent, mark Individual constituent. Click the search icon tolocate the constituent.
3. To apply the formula to a research group, mark Research group. Click the search icon to locate theresearch group. You can apply a formula only to the groups to which you have access.
4. To apply the formula to a group of records, mark Selection. Using the icons in the field, you can searchfor selection, edit an existing selection, or create a new selection.
5. Click Save. The formula is saved and stored on theWealth Capacity Formula Management page.
Apply Wealth Capacity Formula ScreenFrom this screen you apply a wealth capacity formula.
Screen Item Description
Individual constituent Mark Individual constituent to apply the formula to an individual constituent.Use the search icon to locate the constituent.
Research groupMark Research group to apply the formula to a research group. Use the searchicon to locate the research group. You can apply a formula only to the groupsto which you have access.
SelectionMark Selection to apply the formula to a group of records. You can use theicons in the field to search for an existing selection, edit an existing selection, orcreate a new selection.
Set Wealth Capacity Formula DefaultYou can select any formula defined in the system to use as the default for new constituent records. While youcan change the default at any time, only one formula can be used as the default.
} Set wealth capacity formula default
1. From theWealth Capacity Formula Management page, select the formula you want to set as the defaultand click Set default. A confirmation message appears.
2. Click Yes.
PROSPECT CONFIGURATION 29

Note: You can also choose to make a formula the default when adding new formulas or editing existingformulas.
Edit Wealth Capacity FormulaYou can edit wealth capacity formulas from theWealth Capacity Management page. You can edit only the wealthcapacity formulas to which you have access.
} Edit a wealth capacity formula
1. From theWealth Capacity Formula Management page, select the formula you want to edit and click Edit.The Edit wealth capacity formula screen appears.
2. Enter the necessary information.
30 CHAPTER 2

The fields and options included on the Edit wealth capacity formula screen are the same as thoseincluded on the Add wealth capacity formula screen. For an explanation of the fields and optionsincluded on these screens, see Add Wealth Capacity Formula Screen on page 28.
3. Click Save. The formula is saved and stored on theWealth Capacity Formula Management page.
Delete Wealth Capacity FormulaYou can delete wealth capacity formulas from theWealth Capacity Management page. However, you can deleteonly those formulas to which you have access, and the default formula cannot be deleted. Formulas currentlyassigned to prospect records cannot be deleted.
} Delete a wealth capacity formula
1. From theWealth Capacity Formula Management page, select the formula you want to delete and clickDelete. A confirmation message appears.
2. Click Yes to delete the formula.
Edit Prospect Quick Search URLIf you need to change the database used to search for prospect wealth information, you can do so from theProspect Quick Search page.
Edit Number of Prospect Quick SearchesSavedWhen you perform a prospect quick search, to help with speed, we save the search parameters and thesummary data returned. By default the application saves the last 100 searches, stored on the Prospect QuickSearch History page. If you want to change the default number, you can from the Prospect Quick Search page.
} Change the number of prospect quick searches saved
1. From the Prospects page, click Prospect Quick Search. The Prospect Quick Search page appears.
2. Under Configuration, click Edit configuration. The Edit Prospect Quick Search configuration screenappears.
3. In the Saved searches per user field, enter the number of searches you want saved to the ProspectQuick Search History page.
4. Click Save to save your changes.
Reason CodesWith reason codes, your organization can standardize the reasons users change information and restrict the useof records, such as when they mark a constituent as inactive. When users make the change, they can select thiscode to consistently explain the reason for the change.
PROSPECT CONFIGURATION 31

AddReason CodesWith reason codes, your organization can standardize the reasons users make changes to information andrecords. Before users can select a reason code, you must add it to your database. Reason codes can be up to 10characters in length.
} Add a reason code
1. From Prospects, click Reason codes under Configuration. The Reason Codes page appears.
2. Click Add. The Add a reason code screen appears.
3. In the Reason code field, enter an alphanumeric code to identify the reason for the change. For example,for a change to correct a data entry error, enter ERR.
4. In theDescription field, enter a description or explanation of when to select the reason code.
5. Click Save. You return to the Reason Codes page.
Edit a Reason CodeAfter you add a reason code, you can edit its name or description as necessary, such as to correct a typographicalerror.
} Edit a reason code
1. From Prospects, click Reason codes under Configuration. The Reason Codes page appears.
2. Select the reason code to edit.
3. Click Edit. The Edit a reason code screen appears.
4. Edit the name or description of the code as necessary.
5. Click Save. You return to the Reason Codes page.
Delete a Reason CodeIf your organization no longer uses a reason code, you can delete it from your database.If a reason code is currently in use, you cannot delete it from your database. To prevent the future use of thereason code, you can mark it as inactive. For information about how to mark a reason code as inactive, see Marka Reason Code as Inactive or Active on page 33.
Tip: To avoid the loss of data, we recommend you mark a reason code as inactive rather than delete it. Inactivereason codes remain in the database as archived information, but users cannot assign it to a change.
} Delete a reason code
1. From Prospects, click Reason codes under Configuration. The Reason Codes page appears.
2. Select the reason code to delete.
3. Click Delete. Amessage appears to ask whether to delete the reason code.
4. Click Yes. You return to the Reason Codes page.
32 CHAPTER 2
Mark a Reason Code as Inactive or ActiveIf you no longer use a reason code, you can mark it as inactive. The code remains in the database as archivedinformation, but users cannot assign it to a future change. To view an inactive reason code on theManageReason Codes page, you must first click Filter, select Include inactive, and click Apply on the action bar of thegrid.
Tip: If you cannot delete a reason code such as when assigned to a change, but do not plan to use it in thefuture, you can mark it as inactive.
After you mark a reason code as inactive, you can mark it as active again to resume its use.
} Mark a reason code as inactive
1. From Prospects, click Reason codes under Configuration. The Reason Codes page appears.
2. Select the reason code to mark as inactive.
3. ClickMark inactive. Amessage appears to ask whether to mark the code as inactive.
4. Click Yes. You return to the Reason Codes page.
} Mark a reason code as active
1. From Prospects, click Reason codes under Configuration. The Reason Codes page appears.
2. Select the reason code to mark as active. To display inactive reason codes in the grid, on the action bar,click Filter, mark Include inactive, and click Apply.
3. ClickMark active. Amessage appears to ask whether to mark the code as active.
4. Click Yes. You return to the Reason Codes page.
Prospect Research Report TemplatesThe Prospect Research Report Templates page is accessed from Prospects.From this page, you can view all existing report templates, add new templates, edit existing templates, copy froman existing template to add a new template, and delete templates. Additionally, you can set which template youwant to use as your default.
} Add a prospect research report template
1. From the Prospects page, under Configuration, click Prospect Research Report Templates. The ProspectResearch Report Templates page appears.
2. Click Add.The Add prospect research report template screen appears.
3. Enter a name and description for your template.
4. From the Available sections pane select, and using the arrow keys, move the selections you want toinclude in your report to the Selected sections pane.
5. Click Save to save the template and return to Prospect Research Report Templates page.Your newtemplate displays in the Report templates grid. In addition, you can now select this template whencreating a Prospect Research Report.
PROSPECT CONFIGURATION 33

} Edit a prospect research report template
1. From the Prospects page, under Configuration, click Prospect Research Report Templates. The ProspectResearch Report Templates page appears.
2. Select the template you want to change.
3. Click Edit.The Edit prospect research report template screen appears.
4. Make any necessary changes.
5. Click Save to save the template and return to Prospect Research Report Templates page.
} Copy a prospect research report template
1. From the Prospects page, under Configuration, click Prospect Research Report Templates. The ProspectResearch Report Templates page appears.
2. In the Report templates grid, select the template you want to copy.
3. Click Copy.The Copy prospect research report template screen appears.
4. Change the template name and description.
5. Make any other necessary changes.
6. Click Save to save the template and return to Prospect Research Report Templates page. Your newtemplate displays in the Report templates grid. In addition, you can now select this template whencreating a Prospect Research Report.
} Delete a prospect research report template
1. From the Prospects page, under Configuration, click Prospect Research Report Templates. The ProspectResearch Report Templates page appears.
2. In the Report templates grid, select the template you want to delete.
Warning: You cannot delete system templates.
3. Click Delete. A confirmation screen appears.
4. Click Yes to delete the selected template.
5. You return to Prospect Research Report Templates page. The deleted template no longer displays in theReport templates grid. In addition, you can no longer select this template when creating a ProspectResearch Report.
} Set a prospect research report default template
1. From the Prospects page, under Configuration, click Prospect Research Report Templates. The ProspectResearch Report Templates page appears.
2. In the Report templates grid, select the template you want to use as your default.
3. Click Set my default template. Your selected template now displays a green checkmark in theMydefault template column of the Report templates grid.
34 CHAPTER 2

Wealth and RatingsManagementWealthPoint Searches 36
Obtain Prospect Wealth Information 36
Disable/Enable Wealth Updates 38
Link Raiser’s Edge Constituent 39
Unlink Raiser’s Edge Constituent 39
View Raiser’s Edge Constituent 39
Sync with The Raiser’s Edge 39
Link Tank 40
Manage Constituent Modeling and Ratings Data 40
Manage Wealth Summary Information 43
Group Member Ratings 82
Manage Wealth Capacity 82
Transaction Page 85
Edit Research Details 86
Data Refresh Notifications 87
Reports 87
Giving Summary 88
Wealth information is data used to track your constituent’s estimated wealth. Knowing the types and amount ofwealth your constituents possess, allows you to better determine cultivation strategies and determine theconstituent’s giving potential.
chapter 3

From a prospect’s Wealth and Ratings page, you can enter a variety of wealth-related information, such as realestate, stock, pension, salary. If you subscribe toWealthPoint, the wealth screening solution from TargetAnalytics, you can also import allWealthPoint data obtained by Target Analytics. This service helps you identifyyour best major and planned gift constituents, attract and retain wealthy donors, maximize gifts, determine thewealth potential of your entire database, set reasonable campaign goals, and free up staff resources for person-to-person fundraising.
WealthPoint SearchesWhenWealthPoint searches its various data sources for wealth information about your selected constituents,the constituent fields listed below are used. Accurate and complete information in these fields results in morecomprehensive and reliable search results.• Constituent’s full name: Any combination. Consider entering middle name information if possible when youcreate a constituent record. The suffix field may also prove useful in constituent match process.
• Primary business: Even if you do not know the address, the company namemay prove helpful• Spouse: Any combination• Phone numbers• Address: Used in many matching formulas and required for real estate• Nickname• Birth date and spouse birth date
Obtain Prospect Wealth InformationYou can manually enter any wealth information you obtain about a prospect. Manually entering data simplyinvolves locating theWealth and Ratings page for an existing or a new prospect. This page appears automaticallywhen you open a prospect record or save a new prospect record.
Warning: TheWealthPoint search option is available for only individual constituents, not organizations.
TheWealth summary grid on this page displays links to all wealth information available. To manually enter datain any wealth category, click the link. For example, if you have real estate information you want to record, clickthe Real estate link in the Assets column.
36 CHAPTER 3

If you subscribe toWealthPoint, Blackbaud’s wealth screening solution, you can importWealthPoint data.When importingWealthPoint information, the system does not override any manually entered data you storedon a given prospect. For example, if you entered real estate information from Mark Adamson and real estateinformation is included in theWealthPoint import, whatever information you entered about Mr. Adamsonremains intact after the import. This is also true of any information you manually edited or deleted.If data is found in aWealthPoint update, the information displays in theWealth summary grid of theWealthand Ratings page. The Assets rows display the total amount of wealth located for each asset. This amountdisplays in the Total identified column. If “$0” is recorded in this column, it means the service located data butan associated dollar amount did not exist.In addition, a New icon displays next to theGo to wealth details button anytime data is screened and newinformation is located. If you click the drop-down menu in Go to wealth details, the New icon also displaysbeside each source for which new data was located. The number in parenthesis designates howmany hits werefound. Click the source to access a page that displays details about the selected data source.
WEALTH AND RATINGS MANAGEMENT 37

Warning: The number of prospects included in any group you intend to updatemust be less than or equal tothe number of searches remaining in your organization’sWealthPoint subscription.
Wealth and Ratings Management
Wealth information is data used to track your constituent’s estimated wealth. Knowing the types and amount ofwealth your constituents possess, allows you to better determine cultivation strategies and determine theconstituent’s giving potential.From a prospect’s Wealth and Ratings page, you can enter a variety of wealth-related information, such as realestate, stock, pension, salary. If you subscribe toWealthPoint, the wealth screening solution from TargetAnalytics, you can also import allWealthPoint data obtained by Target Analytics. This service helps you identifyyour best major and planned gift constituents, attract and retain wealthy donors, maximize gifts, determine thewealth potential of your entire database, set reasonable campaign goals, and free up staff resources for person-to-person fundraising.
Disable/Enable Wealth UpdatesIf your database includes constituents whose wealth information you do not want updated during theWealthPoint update process, you can disable updates for the selected constituent. Once disabled, the record isnot updated even if it is included in a selection of constituents on which aWealthPoint update is executed.
} Disable Wealth Updates for a selected constituent
1. Select the individual constituent you want to disable.
2. From the constituent’s page, in the Tasks pane, click Disable wealth updates. Updates for thisconstituent are disabled, and the link changes to read Enable wealth updates.
Note: Click the Enable wealth updates link to allow the constituent to once again receive wealthupdates.
38 CHAPTER 3
Link Raiser’s Edge ConstituentIf you integrate ResearchPointwith The Raiser’s Edge (7.84 or higher), you can link constituent records stored inthe two program databases. Once linked, you can synchronize information stored on the two records, allowingyou to maintain up-to-date information on any constituents stored in both application databases.
} Link a ResearchPoint constituent with a Raiser’s Edge constituent
Before you can link records, you must set up the Raiser’s Edge integration functionality.
1. From the Tasks pane on the constituent’s Wealth and Ratings page, click Link with The Raiser’s Edge.The Raiser’s Edge constitute search screen appears. A number of the fields on this screen populateautomatically, displaying information about the selected constituent.
2. If the program locates a potential match, thematch appears in the grid. Select the record and click Open.The two records are linked, and you return to theWealth and Ratings page. When the record is linked, inthe View as pane of theWealth and Ratings page, the The Raiser’s Edge constituent link appears.
If no potential match is located, modify the search criteria and click Find Now. All Raiser’s Edgeconstituents satisfying the search criteria appear. Select the record and click Open. The two records arelinked, and you return to theWealth and Ratings page. When the record is linked, in the View as pane oftheWealth and Ratings page, the The Raiser’s Edge constituent link appears.
If no match exists, click Add New from the Open screen. The New Individual screen appears. You can addthe new constituent. The record links to the ResearchPoint constituent when you save the new record.When the record is linked, in the View as pane of theWealth and Ratings page, the The Raiser’s Edgeconstituent link appears.
Unlink Raiser’s Edge ConstituentIf you integrate ResearchPointwith The Raiser’s Edge (7.84 or higher), you can link constituent records stored inthe two program databases. Once linked, you can synchronize information stored on the two records, allowingyou to maintain up-to-date information on any constituents stored in both application databases. Once you linka constituent, theUnlink with The Raiser’s Edge link appears in the Tasks pane of theWealth and Ratings page,allowing you to unlink linked constituent records if necessary.
View Raiser’s Edge ConstituentOnce you link a ResearchPoint constituent to a Raiser’s Edge constituent you can access the constituent’sRaiser’s Edge record from theWealth and Ratings page of the linked ResearchPoint constituent. In the View aspane, click The Raiser’s Edge constituent. The constituent’s Raiser’s Edge record opens. For information aboutlinking records, see Link Raiser’s Edge Constituent on page 39.
Sync with The Raiser’s EdgeThe Raiser’s Edge integration feature allows you to link records included in both databases. Once the records arelinked, the synchronization option included on theWealth and Ratings page - Sync with The Raiser’s Edge -activates, allowing you to synchronize the information included on both records.The synchronization process is defined in Configure integration.
WEALTH AND RATINGS MANAGEMENT 39

Note: For information about linking records, see Link Raiser’s Edge Constituent on page 39.
Link TankThe Link Tank window, nested in the right side of theWealth and Ratings page, provides links to popular onlinedata resources. These resources are popular tools for prospect researchers. Housing the links within theapplication gives researchers quick access to sites likeMarketWatch, Guidestar, and InvestorWords. The linksopen the web page in a separate window, allowing you to easily toggle between the application and the website.
Manage Constituent Modeling and RatingsDataYou can track a constituent’s propensity to give using either theWealthPoint system imported with yourWealthPoint data or your own internal ratings information. This information is stored on the specific constituentrecord.
Create Customized RatingsTo create your own ratings system, you must first add “Modeling and Propensity” attribute categories. This isdone through the Attribute Categories feature available in Administration. Once the categories are in place, youcan enter the attribute category, say “Major Gift”, on the constituent record and then assign a rating value,letting your users knowwhat the chances are for your organization to win a Major Gift from the constituent. Ifyou imported theWealthPoint system into the application, you can also edit the default entries, to better meetyour specific needs.
} Create Modeling and Propensity attribute categories
1. Click Administration.
2. Under Data on the Administration page, click Attribute categories. The Attribute Categories pageappears.
3. Click Add. The Add attribute category screen appears.
4. Enter a Name for your new attribute category.
5. In the Record type field, select “Modeling and Propensity.”
6. Select a Data type. For example, if you use numbers to rate data, select “Number.”
Note: For detailed instructions about working in Attribute Categories, see the Attribute Categorieschapter in the Administration Guide.
7. Click Save to save the new attribute category and return to the Attribute Categories page. The newcategory displays underModeling and Propensity. It also appears as an option on the Add modelingand propensity attribute screen in theModeling and Propensity Custom Ratings feature. For moreinformation, see Add Rating Information to Constituent on page 41.
40 CHAPTER 3
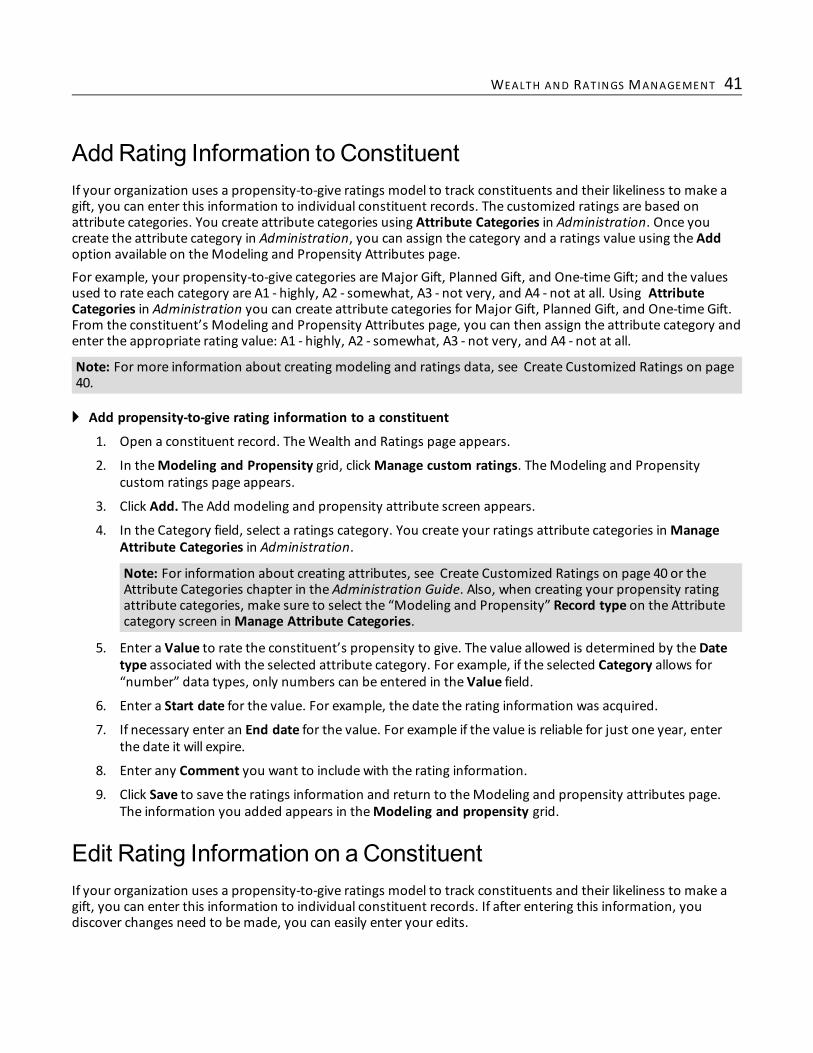
AddRating Information to ConstituentIf your organization uses a propensity-to-give ratings model to track constituents and their likeliness to make agift, you can enter this information to individual constituent records. The customized ratings are based onattribute categories. You create attribute categories using Attribute Categories in Administration. Once youcreate the attribute category in Administration, you can assign the category and a ratings value using the Addoption available on theModeling and Propensity Attributes page.For example, your propensity-to-give categories areMajor Gift, Planned Gift, and One-time Gift; and the valuesused to rate each category are A1 - highly, A2 - somewhat, A3 - not very, and A4 - not at all. Using AttributeCategories in Administration you can create attribute categories for Major Gift, Planned Gift, and One-time Gift.From the constituent’s Modeling and Propensity Attributes page, you can then assign the attribute category andenter the appropriate rating value: A1 - highly, A2 - somewhat, A3 - not very, and A4 - not at all.
Note: For more information about creating modeling and ratings data, see Create Customized Ratings on page40.
} Add propensity-to-give rating information to a constituent
1. Open a constituent record. TheWealth and Ratings page appears.
2. In theModeling and Propensity grid, clickManage custom ratings. TheModeling and Propensitycustom ratings page appears.
3. Click Add. The Add modeling and propensity attribute screen appears.
4. In the Category field, select a ratings category. You create your ratings attribute categories inManageAttribute Categories in Administration.
Note: For information about creating attributes, see Create Customized Ratings on page 40 or theAttribute Categories chapter in the Administration Guide. Also, when creating your propensity ratingattribute categories, make sure to select the “Modeling and Propensity” Record type on the Attributecategory screen inManage Attribute Categories.
5. Enter a Value to rate the constituent’s propensity to give. The value allowed is determined by theDatetype associated with the selected attribute category. For example, if the selected Category allows for“number” data types, only numbers can be entered in the Value field.
6. Enter a Start date for the value. For example, the date the rating information was acquired.
7. If necessary enter an End date for the value. For example if the value is reliable for just one year, enterthe date it will expire.
8. Enter any Comment you want to include with the rating information.
9. Click Save to save the ratings information and return to theModeling and propensity attributes page.The information you added appears in theModeling and propensity grid.
Edit Rating Information on a ConstituentIf your organization uses a propensity-to-give ratings model to track constituents and their likeliness to make agift, you can enter this information to individual constituent records. If after entering this information, youdiscover changes need to bemade, you can easily enter your edits.
WEALTH AND RATINGS MANAGEMENT 41

} Edit propensity-to-give rating information on a constituent
For information about using the import/batch functions to run bulk updates, see Modeling and PropensityUpdates through Batch Entry on page 42.
1. Open a constituent record. TheWealth and Ratings page appears.
2. In theModeling and Propensity grid, clickManage custom ratings. TheModeling and Propensitycustom ratings page appears.
3. Select the entry you want to change.
4. Click Edit. The Edit modeling and propensity attribute screen appears.
5. In the Category field, select a ratings category. You create your ratings attribute categories inManageAttribute Categories in Administration.
Note: For information about creating attributes, see Create Customized Ratings on page 40 or theAttribute Categories chapter in the Administration Guide. Also, when creating your propensity ratingattribute categories, make sure to select the “Modeling and Propensity” Record type on the Attributecategory screen inManage Attribute Categories.
6. Enter a Value to rate the constituent’s propensity to give.
7. Enter any Comment you want to include with the rating information.
8. Click Save to save the ratings information and return to theModeling and propensity attributes page.The information you edited appears in theModeling and propensity grid.
Modeling and Propensity Updates through Batch EntryBatch Entry allows you to update and add information to your database quickly, without opening each affectedrecord. There are two ways to use Batch Entry to enter data:• The Import and Batch Entry functions help you to quickly add information contained in an outside application,such as Microsoft Excel, to your database (the outside file must be saved as a comma-separated value (*.csv)file). With Import you can create an import process that generates a batch file containing all informationincluded in the outside file. From Batch Entry you can then validate and commit the batch file and add orupdate information in your database.For example, you have several revised modeling scores for a group of constituents that you need to importinto the system. After you have your data in a CSV file format, you can import the information into thedatabase. The import is based on a batch template created in Batch Entry. In the batch template, you selectthe batch type and workflow you want used when data is imported.
• If you do not have an import file, but you want to enter updated information quickly, without opening everyrecord, you can use the batch process. With a batch, the program lists the selected fields (fields included in thebatch template) as fields in a spreadsheet so you can efficiently enter information in the database. Like theimport process, the batch requires a batch template, which specifies the fields to add or update.
Note: For information about working in Batch Entry, see the Batch Entry chapter in Data Management; forinformation about working in Import, see the Import chapter in Data Management.
The following Batch type is available when you create a modeling and propensity batch template:• Modeling and Propensity Update Batch: Updates constituent modeling and propensity data based oninformation included in the import file or batch. When using import, the process compares a record IDincluded in the import file to system lookup IDs and alternate lookup IDs. During the import process, if theapplication finds a match in the database, the information in thematched record is updated.
42 CHAPTER 3

Delete Rating Information from aConstituentIf your organization uses a propensity-to-give ratings model to track constituents and their likeliness to make agift, you can enter this information to individual constituent records. If after entering this information, youdiscover the information to be no longer valid, you can easily remove it from the constituent.
} Delete propensity-to-give rating information from a constituent
1. Open a constituent record. TheWealth and Ratings page appears.
2. In theModeling and Propensity grid, clickManage custom ratings. TheModeling and Propensitycustom ratings page appears.
3. Select the entry you want to delete.
4. Click Delete. A confirmation screen appears.
5. Click Yes to delete the entry and return to theModeling and propensity attributes page. The informationyou deleted no longer appears in the Modeling and propensity grid.
ManageWealth Summary InformationTheWealth summary grid is housed on the constituent’s Wealth and Ratings page. The page appears when youopen a constituent. If you are working in the Constituent or Prospects view, you can access the constituent’sWealth and Ratings page by clickingWealth and ratings in theMore information pane.The grid is composed of wealth information gathered on the selected constituent. The information can beimported from yourWealthPoint service or entered manually from the program.
WEALTH AND RATINGS MANAGEMENT 43

Links included in the grid take you to specific areas in the program which provide additional information for theselected asset or indicator. For example, if in the Assets column you click the Real estate link, the constituent’sReal estate page appears. From this page, you can view, edit, delete, confirm, or add real estate information forthis constituent.You can also track the confidence level associated with each data type. For more information, see ConfidenceRating on page 44.
Confidence RatingEach wealth record, whether imported fromWealthPoint or manually entered, displays a Confidence rating. Itappears in the grid of the select data source page. For example, if you are on the Real Estate page, theConfidence rating column appears on the left side of the Real Estate page.
Warning: TheWealthPoint search option is available for only individual constituents, not organizations.
44 CHAPTER 3

Note: Check icon = the information contained in the record has been confirmed as correct. Star =WealthPointused a piece of information in the recursivematching process to help identify a better match. For example, itlocates a good Securities record match. It then uses the name of the company included in that record to make abetter business ownership record match.
The rating indicates the relative strength of thematch. For example, if confidence in the wealth informationprovided is very high, the rating number is “4”; if confidence in the wealth information provided is low, the ratingnumber is “1”. The following table explains each default confidence rating.
Note: You can edit the default ratings included in the application. For information about editing the ratings, seeEdit Confidence Rating on page 45.
Rating Description
5
Confirmed record - any record confirmed in the application receives a 5 rating.You designate a record “Confirmed” by selecting the record and clicking theConfirm button. When you confirm a wealth information record, theConfidence number changes to “5” and a green check mark appears to the leftof the selected entry.
4 Very high confidence3 High confidence2 Moderate confidence1 Low confidence
0
Rejected record - any record rejected in the application receives a 0 rating. Youdesignate a record “Rejected” by selecting the record and clicking the Rejectbutton. When you reject a wealth information record, the Confidence numberchanges to “0” and a red icon appears to the left of the selected entry.
Edit Confidence RatingAlthough the application includes a default confidence rating map, your organization may find the need tocustomize the ratings map to better meet your internal structures. When you edit a ratings map, you change thecriteria used to determine the ratings number.
} Edit confidence rating map
1. Open a constituent record. TheWealth and Ratings page appears.
2. In theWealth summary grid, click Go to wealth details. From the drop down menu, select the wealthdetails page you want to open.
WEALTH AND RATINGS MANAGEMENT 45

When editing confidence rating information, it does not matter which record you open. You can edit allconfidence ratings from any open record. For example, if you want to edit the Real Estate ratingsinformation but you are currently on the Securities page, you do not have to switch to the Real Estatepage. You can enter your edits from your existing page.
3. From theWealth details page, click Edit confidence settings in the Tasks pane on the left side of thescreen. The Edit confidence settings screen appears.
4. In the Select a source box, select the wealth information source for which you want to edit theconfidence ratings.
5. In the Set confidence ratings box, the rating information for the selected source appears. Expand theplus signs next to the ratings number to view the criteria used to qualify for the rating.
6. Select the criteria entry and using the arrow buttons move the criteria to the new rating number. Forexample, in the default settings, “P06 - Name, Phone number, First/Middle Combination” is included inthe “4” rating category. To move this up to the “5” category, select the P06 criteria and click the up arrowkey. The criteria is now associated with the “5” rating category for the selected data source.
7. To establish a default rating for all manually entered wealth records, in the Set manually entered recordsto field, select the rating you want used. Once the rating is established, the application automaticallyapplies this rating to all manually entered wealth records.
8. Click Save to save your changes and return to the data source page.
Biographical InformationWarning: Biographical information displays for only individual constituents, not organizations.
The Biographical page on the constituent’s Wealth details page displays information such as name, address,gender, and birth information. From this page, you can add, edit, delete, reject, and confirm the constituent’sbiographical information. The page also stores information from Marquis Who’s Who imported fromWealthPoint.TheWho’s Who data source includes detailed biographical information on over 1,000,000 individuals. To obtainthis information, Marquis matches the WealthPoint file against 20 volumes, including all regional publications:Who’s Who in Finance & Industry, Who’s Who of Emerging Leaders in America, and Who’s Who in America.At the top of the page, you can filter information to display by selecting a specific Source, Confidence rating, orMatch code.For information about transferring data fromWealthPoint, see Obtain Prospect Wealth Information on page 36.
Add Biographical InformationYou can add biographical information to a constituent’s wealth information record by clicking the Add button onthe top of the Biographical page.
} Add a constituent’s biographical information
1. From the constituent’s Wealth and Ratings page, click Biographical in theWealth summary grid. Theconstituent’s Biographical page appears.
Note: For information about accessing the constituent’s wealth information, see ManageWealthSummary Information on page 43.
46 CHAPTER 3

2. To create a new record, click Add. The Add biographical information screen appears, displaying the Name& address tab.
The Name& address tab includes name, home address, business address, birth information, andgender. For more information, see Name and Address Tab on page 48.
3. Select the Bio 1 tab. On the Bio 1 tab, you enter education, personal, and family information about thisconstituent. For more information, see Bio 1 Tab on page 48.
4. Select the Bio 2 tab. On the Bio 2 tab, you enter civic, political, religious, and military service information.For more information, see Bio 2 Tab on page 48.
5. Select the Career tab. On the Career tab enter career, occupation, position, and certification information.For more information, see Career Tab on page 49.
6. To save your changes and return to the Biographical page, click Save.
Edit Biographical InformationYou can edit biographical information in a constituent’s wealth information record, even data imported fromWealthPoint, by clicking the Edit button on the top of the Biographical page.
} Edit a constituent’s Wealth biographical information
1. From the constituent’s Wealth and Ratings page, click Biographical in theWealth summary grid. Theconstituent’s Biographical page appears.
Note: For information about accessing the constituent’s wealth information, see ManageWealthSummary Information on page 43.
2. In the grid, select the biographical record you want to edit, and click Edit. The Edit biographicalinformation screen appears, displaying the Name& address tab.
The Name& address tab includes name, home address, business address, birth information, andgender. You can edit any information contained on this screen. For more information, see Name andAddress Tab on page 48.
3. Select the Bio 1 tab. On the Bio 1 tab, you enter education, personal, family, award, and membershipinformation about this constituent. For more information, see Bio 1 Tab on page 48.
4. Select the Bio 2 tab. On the Bio 2 tab, you enter civic and military service information. For moreinformation, see Bio 2 Tab on page 48.
5. Select the Career tab. On the Career tab you enter career, occupation, position, and certificationinformation. For more information, see Career Tab on page 49.
6. To save your changes and return to the Biographical page, click Save.
Add Biographical Information ScreenWhen working in a constituent’s Wealth and Ratings record, you access the constituent’s biographicalinformation from the Biographical page. This tab also houses Marquis Who’s Who data imported fromWealthPoint. For information about importing data fromWealthPoint, see Obtain Prospect WealthInformation on page 36.
WEALTH AND RATINGS MANAGEMENT 47
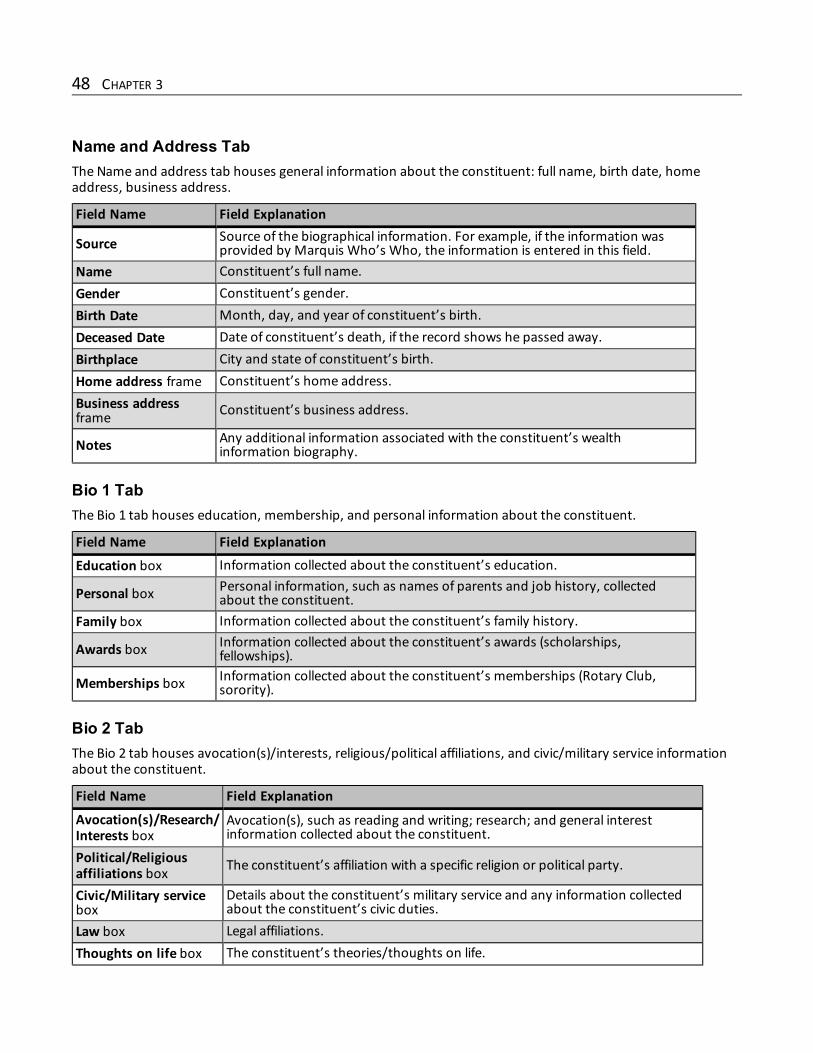
Name and Address TabThe Name and address tab houses general information about the constituent: full name, birth date, homeaddress, business address.
Field Name Field Explanation
Source Source of the biographical information. For example, if the information wasprovided by Marquis Who’s Who, the information is entered in this field.
Name Constituent’s full name.Gender Constituent’s gender.Birth Date Month, day, and year of constituent’s birth.Deceased Date Date of constituent’s death, if the record shows he passed away.Birthplace City and state of constituent’s birth.Home address frame Constituent’s home address.Business addressframe Constituent’s business address.
Notes Any additional information associated with the constituent’s wealthinformation biography.
Bio 1 TabThe Bio 1 tab houses education, membership, and personal information about the constituent.
Field Name Field Explanation
Education box Information collected about the constituent’s education.
Personal box Personal information, such as names of parents and job history, collectedabout the constituent.
Family box Information collected about the constituent’s family history.
Awards box Information collected about the constituent’s awards (scholarships,fellowships).
Memberships box Information collected about the constituent’s memberships (Rotary Club,sorority).
Bio 2 TabThe Bio 2 tab houses avocation(s)/interests, religious/political affiliations, and civic/military service informationabout the constituent.
Field Name Field Explanation
Avocation(s)/Research/Interests box
Avocation(s), such as reading and writing; research; and general interestinformation collected about the constituent.
Political/Religiousaffiliations box The constituent’s affiliation with a specific religion or political party.
Civic/Military servicebox
Details about the constituent’s military service and any information collectedabout the constituent’s civic duties.
Law box Legal affiliations.Thoughts on life box The constituent’s theories/thoughts on life.
48 CHAPTER 3

Career TabThe Career tab houses information about the constituent’s career/profession.
Field Name Field Explanation
Career box Information collected about the constituent’s professional career.
Occupation box Information collected about the constituent’s occupation, such as the name ofthe occupation and duties.
Positions held box Information collected about professional positions held by the constituent.Certifications box Information collected about any certifications held by the constituent.
Confirm Biographical InformationIf your organization confirms a constituents’s biographical information, you can designate this on thebiographical record.
Reject Biographical InformationIf while attempting to confirm a constituent’s biographical information, you discover it to be incorrect orunreliable, you can reject the information. The “Reject” designation helps you keep track of information you donot want to delete from your system, but you do not feel is entirely accurate.
} Reject constituent biographical information
1. From the constituent’s Wealth and Ratings page, click Biographical in theWealth summary grid. Theconstituent’s Biographical page appears.
Note: For information about accessing the constituent’s wealth information, see ManageWealthSummary Information on page 43.
2. In the grid, select the entry you want to reject.
3. On the action bar, click Reject. The “Reject” icon appears next to the selected information.
Click Clear status to remove the icon from the Status column.
Delete Biographical InformationYou can permanently remove a constituent’s biographical information record from their Wealth Details screen.
Note: Deleting a record does not prevent the record from being included in futureWealthPoint updates. Thenext time you run aWealthPoint update on the constituent, the deleted record reappears in the results. Topermanently remove the record from a constituent’sWealthPoint data, you can reject the record. Forinformation on how to reject a record, see Reject Biographical Information on page 49.
} Delete a constituent’s biographical information
Before deleting an entry, permanently removing it from your system, you may want to consider designating itwith the “Reject” tag. Using the Reject option, you can remove information from consideration, withoutpermanently removing it from your system. For more information, see Reject Biographical Information on page49.
1. From the constituent’s Wealth and Ratings page, click Biographical in theWealth summary grid. Theconstituent’s Biographical page appears.
WEALTH AND RATINGS MANAGEMENT 49

Note: For information about accessing the constituent’s wealth information, see ManageWealthSummary Information on page 43.
2. In the grid, select the record you want to remove.
3. On the action bar, click Delete. A confirmation screen appears.
4. Click Yes to remove the record.
Real Estate InformationThe Real estate page accessed from the constituent Wealth and Ratings page tracks the constituent’s real estateholdings. From this page, you can add, edit, delete, reject, and confirm information. The page also storesinformation from the Fidelity Data Services real estate data source imported fromWealthPoint.
Warning: TheWealthPoint search option is available for only individual constituents, not organizations.
At the top of the page, you can filter information to display by selecting a specific Source, Confidence rating, orMatch code (match code is available for individual constituents only, not organizations).The Details view displays detailed information about the selected real estate record. The information is arrangedin a series of tabs. The tab structure reflects the same structured used to enter the information with a fewadditions:• Property tab: The property address is linked to Zillow.com, which displays a satellite view of the property alongwith details about the property and other real estate in that area.
• Assessment tab: A Lookup assessment information link is included. This link opens the Tax AssessorDatabase. From this site, you can locate county auditor contact and Website information.
• For information about all fields included on the tabs, see Add Real Estate Information Screen on page 51.For information about transferring data fromWealthPoint, see Obtain Prospect Wealth Information on page 36.
Add Real Estate InformationYou can add real estate information to a constituent by clicking the Add button on the top of the Real estatepage.
} Add a constituent’s real estate information
1. From the constituent’s Wealth and Ratings page, click Real Estate in theWealth summary grid. Theconstituent’s Real estate page appears.
Note: For information about accessing the constituent’s wealth information, see ManageWealthSummary Information on page 43.
2. Click Add. The Add real estate information screen appears.
3. Enter the new information. For more information about this screen, see Add Real Estate InformationScreen on page 51.
4. To save your entry and return to the Real estate page, click Save.
Edit Real Estate InformationYou can edit real estate information on a constituent, even information imported fromWealthPoint, by clickingthe Edit button on the top of the Real estate page.
50 CHAPTER 3

} Edit a constituent’s real estate information
1. From the constituent’s Wealth and Ratings page, click Real Estate in theWealth summary grid. Theconstituent’s Real estate page appears.
Note: For information about accessing the constituent’s wealth information, see ManageWealthSummary Information on page 43.
2. Click Edit. The Edit real estate information screen appears.
3. Enter the new information. The fields and options included on this screen are the same as those includedon the Add real estate information screen. For more information about these fields and options, see AddReal Estate Information Screen on page 51.
4. To save your entry and return to the Real estate page, click Save.
Add Real Estate Information ScreenYou access constituent real estate information from the Real estate page on theWealth details screen in theconstituent record. The information is arranged in the following tabs:• Property Tab on page 51• Assessment Tab on page 51• Assessment Detail tab on page 52• Deed tab on page 52• Mortgage Tab on page 53
Property TabThe Property tab houses general information about the real estate, the location of the real estate, and theassessed and market values of the real estate.
Field Name Field Explanation
Address, City, State,ZIP, County Site address of the property.
APN (Assessor’sparcel number) Serial number assigned to the property.
Owner Name of the constituent.Care of name Name of the individual responsible for the property.Mailing address Address of the name entered in the Care of name field..
Reported valuesThe reported Sales amount displays in the Value column and the date thisamount was recorded in the Reported date column. The Property valuation isthe largest of the following: property value estimate, assessed amount, marketvalue, sales amount, loan amount, or second loan amount.
Source Source of the real estate information.Notes Any additional information about the property.
Assessment Tab
WEALTH AND RATINGS MANAGEMENT 51

Field Name Field Explanation
Assessee #1 name Assessed owner as of the Lien date. This is the name exactly as shown in thecurrent Assessor’s Tax Roll..
Assessee #2 nameThis name varies from county to county. It contains any additional assessedowner namewhen provided separately by the county. DBA names arepreceded with indicator of “dba.”
Care of name If a C/O name is included in the assessment record, it is recorded here.Assessee address Any address information associated with the assessee is recorded here.Recording date Date of themost recent sale as listed on the county tax/assessment roll.Document type County description of the document type for most recent sale.Tape cut date Date sale was recorded.
Sales price Price paid by the current owner of the property as listed on the countytax/assessment roll.
Sales price indicator Identifies the sales price indicator: full amount, assessor qualified, partialamount, etc.
Assessed value year Year property was assessed.Assessedimprovement value
Value attached to any structures or improvements made to the property in thelast assessed year.
Assessed land value Value attached to land alone in the last assessed year.Total assessed value Total assessed value of property (includes improvements and land).Market value year Year property market value was assigned.Market improvementvalue
Market value attached to any structures or improvements made to theproperty.
Market land value Market value attached to land alone.Total market value Total market value of property (includes improvements and land).
Assessment Detail tabThis tab houses property specifications - number of rooms, size, year built, heating and cooling information.
Deed tabThis tab houses ownership and property description information.
Field Name Field Explanation
Buyer #1 name/Buy#2 name Identifies buyers listed on the deed.
Buyer vesting Indicates how the buyers took title to the subject property: communityproperty, estate, family trust, etc.
Care of name If a C/O name is included in the deed, it is recorded here.Buyer address Address recorded for the buyer.Seller #1 name/Seller#2 name Identifies sellers included on the deed.
Seller address Address recorded for the seller.
52 CHAPTER 3

Field Name Field Explanation
Recording date Date the parties record the deed. Post dates the recording date.
Document type Indicates the deed document type: affidavit, conservator’s deed, contract ofsale, etc.
Date of contract The date the document was executed by the parties. This pre-dates therecording date.
Sale price Amount paid for property by current owner.Loan amount Total amount borrowed to purchase the property.Loan type Indicates the type of loan: cash, FHA, land contract, etc.Type of financing Indicates financing: adjustable rate, fixed rate, other.Due date Date the first trust deed will be paid in full.
Lender nameName of the beneficiary to the first trust deed (mortgage). When more that onelender is reported, only the first lender included on the document is entered. Ifa Trust, along with Trustees appear as Lender, then the Trust Name is entered.
Title company Name of title company which issues the certificate of title insurance.This information is taken from the Deed and/or Trust Deed.
Legal propertydescription
Legal description of the property, which includes property use, lot code andnumber, block, unit number, city/township, subdivision, and a briefdescription.
Mortgage TabThis tab tracks mortgage information associated with the property. It records data for up to two mortgages.
Field Name Field Explanation
Recording date Date the parties record themortgage.Borrower #1name/Borrower #2name
Borrowers associated with themortgage.
Borrower vesting Tracks vesting of borrowers. For example, John Smith and Jane Smith, Husbandand Wife, as Joints Tenants with rights of survivorship.
Borrower address Address information associated with the borrowers.Loan amount Total amount borrowed to purchase the property.Loan type Indicates the type of loan: cash, FHA, land contract, etc.Type of financing Indicates financing: adjustable rate, fixed rate, other.
Date of contract The date the document was executed by the parties. This pre-dates therecording date.
Due date Date the first trust deed will be paid in full.
Lender nameName of the beneficiary to the first trust deed (mortgage). When more that onelender is reported, only the first lender included on the document is entered. Ifa Trust, along with Trustees appear as Lender, then the Trust Name is entered.
Confirm Real Estate InformationIf your organization internally confirms a constituents’s real estate information, you can track this on the Realestate page.
WEALTH AND RATINGS MANAGEMENT 53

} Confirm a constituent’s real estate information
1. From the constituent’s Wealth and Ratings page, click Real Estate in theWealth summary grid. Theconstituent’s Real estate page appears.
Note: For information about accessing the constituent’s wealth information, see ManageWealthSummary Information on page 43.
2. In the grid, select the entry you want to confirm.
3. On the action bar, click Confirm. A check mark appears in the Status column of the grid.
Click Clear status to remove the check mark from the Status column and return the status to“Unconfirmed”.
Reject Real Estate InformationIf while attempting to confirm a constituent’s real estate information, you discover it to be incorrect orunreliable, you can reject the information. The “Reject” designation helps you keep track of information you donot want to delete from your system, but you do not feel is entirely accurate.
} Reject constituent real estate information
1. From the constituent’s Wealth and Ratings page, click Real Estate in theWealth summary grid. Theconstituent’s Real estate page appears.
Note: For information about accessing the constituent’s wealth information, see ManageWealthSummary Information on page 43.
2. In the grid, select the entry you want to reject.
3. On the action bar, click Reject. The “Reject” icon appears next to the selected information.
Click Clear status to remove the icon from the Status column.
Delete Real Estate InformationYou can permanently remove selected real estate information from your constituent.
Note: Deleting a record does not prevent the record from being included in futureWealthPoint updates. Thenext time you run aWealthPoint update on the constituent, the deleted record reappears in the results. Topermanently remove the record from a constituent’sWealthPoint data, you can reject the record. Forinformation on how to reject a record, see Reject Real Estate Information on page 54.
} Delete a constituent’s real estate information
Before deleting an entry, permanently removing it from your system, you may want to consider designating itwith the “Reject” tag. Using the Reject option, you can remove information from consideration, withoutpermanently removing it from your system. For more information, see Reject Real Estate Information on page54.
1. From the constituent’s Wealth and Ratings page, click Real Estate in theWealth summary grid. Theconstituent’s Real estate page appears.
Note: For information about accessing the constituent’s wealth information, see ManageWealthSummary Information on page 43.
2. In the grid, select the entry you want to remove.
54 CHAPTER 3

3. On the action bar, click Delete. A confirmation screen appears.
4. Click Yes to remove the entry.
Business Ownership InformationThe constituent’s Business ownership page tracks the constituent’s professional life. From this page, you canadd, edit, delete, confirm, and reject information. The page also stores information from D&B imported fromWealthPoint.
Warning: WealthPoint search is available for only individual constituents, not organizations.
WealthPoint leverages three files from D&B to provide you with data about the constituent’s employer,position, career history, and compensation.• Private Company Stock Ownership: This provides stock ownership information about private companies. Withthis information, you can see howmuch of a business your potential donor owns.
• Management Biographies: This source provides career history, compensation data, and stock information onmore than 1,000,000 executives.
• Executives at Home: Private company owners and professionals make up over 75% of all millionaires. TheExecutives at Home file provides access to the names and addresses of 8,000,000 executives.
At the top of the page, you can filter information to display by selecting a specific Source, Confidence rating, orMatch code (match code is available for individual constituents only, not organizations).For information about importing data fromWealthPoint, see Obtain Prospect Wealth Information on page 36.
Add Business Ownership InformationYou can add business ownership information, such as company name, address, and stock information to aconstituent’s wealth information record by clicking the Add button on the top of the constituent’s BusinessOwnership page.
} Add a constituent’s business ownership information
1. From the constituent’s Wealth and Ratings page, click Business ownership in theWealth summary grid.The constituent’s Business ownership page appears.
Note: For information about accessing the constituent’s wealth information, see ManageWealthSummary Information on page 43.
2. Click Add. The Add business ownership information screen appears displaying the Company tab.
3. Enter the new information. For more information about this screen, see Add Business OwnershipInformation Screen on page 55.
4. To save your entry and return to the Business Ownership page, click Save.
Add Business Ownership Information ScreenYou access constituent business ownership information from the Business ownership link on theWealth andRatings screen in the constituent record.• Company Tab on page 56• Biographies Tab on page 56• Valuation Tab (Individual constituents, not organizations) on page 57
WEALTH AND RATINGS MANAGEMENT 55

• Ownership Tab on page 57
Company Tab
Field Name Field Explanation
Source Source of the business ownership information.Company Name of the company associated with the constituent.
Trade name Also known as the business name, the trade name is the name under which abusiness trades for commercial purposes.
Description Company’s primary line of business.Company address,city, State, ZIP Company’s address information.
Year started Year the company started.
# of employees Number of individuals employed by the company.Held Identifies the company as privately or publicly held.Phone Company’s telephone number.Mailing address, city,State, ZIP The address used for business mail.
Name Name of owner (individual constituents only).Job title Title in company (individual constituents only).% ownership What percentage of the company this constituent owns.Ownership value Monetary value associated with this constituent’s ownership.Home address, city,State, ZIP Owner’s home address (individual constituents only).
Year of birth Owner’s birth date (individual constituents only).Gender Owner’s gender (individual constituents only).
Biographies TabThis tab houses biographical information about key officers in the company.
56 CHAPTER 3

Valuation Tab (Individual constituents, not organizations)
Field Name Field Explanation
DUNS The D&B DUNS number is a unique nine-digit identification sequence thatprovides unique identifiers of single business entities.
SIC code used
The SIC code used in the Valuation. The application searches all six codes andthe first code located with a corresponding Ratio is used in determining the Val-uation entry. For example, if SIC code 1 has a 0.00 Ratio and SIC code 2 a 0.789Ratio, SIC code 2 is used.
Sales Annual sales as reported by the company.
Ratio usedThe ratio used in the Valuation. The application searches all Ratio columns andthe first column located with an entry is used in determining the Valuationentry.
Valuation
A calculation that takes the Sales information from the D&B record multipliedby the IBAMarket data ratio for privately held companies. The application looksat each Ratio column available for the business record, and selects the first col-umn with a valid entry. This entry is used to determine the valuation.
SIC Code/Ratio
Standard Industrial Classification (SIC) codes are four digit numerical codesassigned by the U.S. government to business establishments to identify theprimary business of the establishment. The first two digits of the code identifythemajor industry group, the third digit identifies the industry group and thefourth digit identifies the industry.
Note: SIC Code, calculated average Price/Revenue Ratio and calculated average Discretionary Earnings toRevenue Ratio, both based on IBAMarket data ©. This material is used by permission of the Institute ofBusiness Appraisers.
Ownership TabThis tab lists any other owners of the business along with theirName, % ownership and Ownership value. Italso displays any notes about the ownership.
Edit Business Ownership InformationYou can edit professional information stored on the constituent, such as employer, career history, andcompensation, even information imported fromWealthPoint, by clicking the Edit button on the top of theBusiness Ownership page.
} Edit a constituent’s professional information
1. From the constituent’s Wealth and Ratings page, click Business ownership in theWealth summary grid.The constituent’s Business ownership page appears.
Note: For information about accessing the constituent’s wealth information, see ManageWealthSummary Information on page 43.
2. In the grid, select the entry you want to edit.
3. Click Edit. The Edit business ownership information screen appears.
WEALTH AND RATINGS MANAGEMENT 57

4. Enter the new information. The fields and options included on this screen are the same as those includedon the Add business ownership information screen. For more information about these fields andoptions, see Add Business Ownership Information Screen on page 55.
5. To save your entry and return to the Business Ownership page, click Save.
Confirm Business Ownership InformationIf your organization internally confirms a constituents’s business ownership information, you can track this onthe Business Ownership page.
} Confirm a constituent’s business ownership information
1. From the constituent’s Wealth and Ratings page, click Business ownership in theWealth summary grid.The constituent’s Business ownership page appears.
Note: For information about accessing the constituent’s wealth information, see ManageWealthSummary Information on page 43.
2. In the grid, select the entry you want to confirm.
3. On the action bar, click Confirm. A check mark appears in the Status column of the grid.
Click Clear status to remove the check mark from the Status column and return the status to“Unconfirmed”.
Reject Business Ownership InformationIf while attempting to confirm a constituent’s business ownership information, you discover it to be unreliableand you want the information designated as such on the constituent, you can reject the business ownershipinformation.
} Reject constituent business ownership information
1. From the constituent’s Wealth and Ratings page, click Business ownership in theWealth summary grid.The constituent’s Business ownership page appears.
Note: For information about accessing the constituent’s wealth information, see ManageWealthSummary Information on page 43.
2. In the grid, select the entry you want to reject.
3. On the action bar, click Reject. The “Reject” icon appears next to the selected information.
Click Clear status to remove the icon from the Status column.
Delete Business Ownership InformationYou can permanently remove selected business ownership information from your constituent.
Note: Deleting a record does not prevent the record from being included in futureWealthPoint updates. Thenext time you run aWealthPoint update on the constituent, the deleted record reappears in the results. Topermanently remove the record from a constituent’sWealthPoint data, you can reject the record. Forinformation on how to reject a record, see Reject Business Ownership Information on page 58.
58 CHAPTER 3
} Delete a constituent’s business ownership information
Before deleting an entry, permanently removing it from your system, you may want to consider designating itwith the “Reject” tag. Using the Reject option, you can remove information from consideration, withoutpermanently removing it from your system. For more information, see Reject Business Ownership Informationon page 58.
1. From the constituent’s Wealth and Ratings page, click Business ownership in theWealth summary grid.The constituent’s Business ownership page appears.
Note: For information about accessing the constituent’s wealth information, see ManageWealthSummary Information on page 43.
2. In the grid, select the entry you want to remove.
3. On the action bar, click Delete. A confirmation screen appears.
4. Click Yes to remove the entry.
SecuritiesThe Securities page on the constituent tracks the constituent’s stock holdings. From this page, you can add, edit,delete, confirm, and reject information. The page also stores information from Thomson Financial imported fromWealthPoint.
Warning: TheWealthPoint search option is available for only individual constituents, not organizations.
The SEC Stock Information by Thomson Financial file includes stockholding information on public companyofficers, directors, and major shareholders. You are provided with the latest holdings, stock type, and type ofownership.In addition, Target Analytics obtains stock prices from BATS Exchange, a securities trading company thatprovides up-to-date trade information at the close of each trading day. This updated data is reflected in theapplication whenever a newwealth search returns security information or a security transaction updatesthrough a Data Refresh. The new price is included in theDirect holdings value and Indirect holdings valuecolumns displayed on the Securities page. It is also included in the price information displayed in theDetails paneof the Securities page.
Warning: Be aware, when creating a query that requires any of theHoldings fields included on the Add/Editsecurities screen for an organization constituent, the organization Holding fields in Querymap to the individualconstituent Holdings fields. For example, if you want to include Last retrieved price from your organizationconstituents, in Query you select Direct holding last retrieved price. The related fields are as follows: Lastretrieved price -> Direct holdings last retrieved price; Last retrieved price date -> Direct holdings last transactiondate; Quantity held -> Direct holdings quantity held; Total value ->Direct holdings value.
At the top of the page, you can filter information to display by selecting a specific Source, Confidence rating, orMatch code (match code is available for individual constituents only, not organizations).For information about importing data fromWealthPoint, see Obtain Prospect Wealth Information on page 36.
Add Securities InformationYou can add stockholding information to a constituent by clicking the Add button on the top of the Securitiespage.
WEALTH AND RATINGS MANAGEMENT 59

} Add a constituent’s stockholding information
1. From the constituent’s Wealth and Ratings page, click Securities in theWealth summary grid. Theconstituent’s Securities page appears.
Note: For information about accessing the constituent’s wealth information, see ManageWealthSummary Information on page 43.
2. Click Add. The Add Securities screen appears.
3. Enter the new information. For more information about this screen, see Add Securities Screen on page60.
4. To save your entry and return to the Securities page, click Save.
Add Securities ScreenYou access constituent stockholding information from the Securities page on the constituent. This information ishoused in the following sections.• Fields Tab (Individual constituents only, not organizations) on page 60• Transactions Tab (Individual constituents only, not organizations) on page 61• Add Securities Screen (Organization constituents only, not individuals) on page 61
Fields Tab (Individual constituents only, not organizations)
Field Name Field Explanation
Name Name listed as the owner of the stock.Filer ID Enter the filer ID number.Relationship Constituent’s relationship to the company.
SymbolTicker symbol is an abbreviation used to identify a security. The ticker symbolsfor stocks trading on the NYSE or AMEX have one to three letters. NASDAQstock ticker symbols can consist of four or five letters. If this field is blank, thecompany may no longer be publicly held.
Issuer name Name of the company in which the constituent owns stock.
CusipCUSIP stands for Committee on Uniform Securities Identification Procedures. ACUSIP number identifies most securities, including stocks of all registered U.S.and Canadian companies, and U.S. government and municipal bonds.
DirectThis row displays information about stock directly held by the constituent. Date- Date of last action; Quantity - number of shares directly held by theconstituent; Price - approximate current share price of the stock; Value -product of the share pricemultiplied by the number of shares.
Indirect
This row displays information about stock indirectly held by the constituent.For example, the stock may be in the constituent’s wife’s name. Date - Date oflast action; Quantity - number of shares indirectly held by the constituent; Price- approximate current share price of the stock; Value - product of the sharepricemultiplied by the number of shares.
Source Source of the stock information.Notes Enter any additional information about the security.
60 CHAPTER 3

Transactions Tab (Individual constituents only, not organizations)
Field Name Field Explanation
Quantity Number of shares held.Transaction date Date the security transaction took place.Share price Share price as located by Thomson.Ownership type Type of ownership.Transactiondescription Brief description of the transaction.
Transaction value The proceeds or costs resulting from the transaction.
Add Securities Screen (Organization constituents only, not individuals)
Field Name Field Explanation
Source Source of the stock information.
SymbolTicker symbol is an abbreviation used to identify a security. The ticker symbolsfor stocks trading on the NYSE or AMEX have one to three letters. NASDAQstock ticker symbols can consist of four or five letters. If this field is blank, thecompany may no longer be publicly held.
Issuer name Name of the company in which the constituent owns stock.
Holdings information Details about the stock holdings, such as the quantity of shares held, totalvalue, last retrieved price information, and more.
Notes Enter any additional information about the security.
Edit Securities InformationYou can edit prospect, security, holdings, and properties information, including information imported fromWealthPoint, by clicking the Edit button on the top of the Securities page. You cannot, however, edit transactioninformation from this button.You change transaction information from the transactions page, accessed by clicking theGo to transactionsbutton on the Securities page. For more information, see Transaction Page on page 85.
} Edit a constituent’s stockholding information
1. From the constituent’s Wealth and Ratings page, click Securities in theWealth summary grid. Theconstituent’s Securities page appears.
Note: For information about accessing the constituent’s wealth information, see ManageWealthSummary Information on page 43.
2. In the grid, select the entry you want to edit.
3. Click Edit. The Edit securities screen appears.
4. Enter the new information. The fields and options included on this screen are the same as those includedon the Add securities screen. For more information about these fields and options, see Add SecuritiesScreen on page 60.
WEALTH AND RATINGS MANAGEMENT 61

5. To save your entry and return to the Securities page, click Save.
Confirm Securities InformationIf your organization internally confirms a constituents’s stockholding information, you can track this on theSecurities page.
} Confirm a constituent’s stockholding information
1. From the constituent’s Wealth and Ratings page, click Securities in theWealth summary grid. Theconstituent’s Securities page appears.
Note: For information about accessing the constituent’s wealth information, see ManageWealthSummary Information on page 43.
2. In the grid, select the entry you want to confirm.
3. On the action bar, click Confirm. A check mark appears in the Status column of the grid.
Click Clear status to remove the check mark from the Status column and return the status to“Unconfirmed”.
Go to TransactionFrom the Securities page, you can easily access specific transaction information. Once on the transaction page,you can also add, edit, and delete transactions.
} Access constituent stockholding transaction information
1. From the constituent’s Wealth and Ratings page, click Securities in theWealth summary grid. Theconstituent’s Securities page appears.
Note: For information about accessing the constituent’s wealth information, see ManageWealthSummary Information on page 43.
2. In the grid, select the entry for which you want to view transaction information.
3. On the action bar, click Go to transaction. The transaction page appears. For more information, seeTransaction Page on page 85.
Reject Securities InformationIf while attempting to confirm a constituent’s stockholding information, you discover it to be unreliable and youwant the information designated as such on the constituent, you can reject the securities information withoutremoving it from your system.
} Reject constituent stockholding information
1. From the constituent’s Wealth and Ratings page, click Securities in theWealth summary grid. Theconstituent’s Securities page appears.
Note: For information about accessing the constituent’s wealth information, see ManageWealthSummary Information on page 43.
2. In the grid, select the entry you want to reject.
3. On the action bar, click Reject. The “Reject” icon appears next to the selected information.
Click Clear status to remove the icon from the Status column.
62 CHAPTER 3

Delete Securities InformationYou can permanently remove selected stockholding information from your constituent.
Note: Deleting a record does not prevent the record from being included in futureWealthPoint updates. Thenext time you run aWealthPoint update on the constituent, the deleted record reappears in the results. Topermanently remove the record from a constituent’sWealthPoint data, you can reject the record. Forinformation on how to reject a record, see Reject Securities Information on page 62.
} Delete a constituent’s stockholding information
Before deleting an entry, permanently removing it from your system, you may want to consider designating itwith the “Reject” tag. Using the Reject option, you can remove information from consideration, withoutpermanently removing it from your system. For more information, see Reject Securities Information on page 62.
1. From the constituent’s Wealth and Ratings page, click Securities in theWealth summary grid. Theconstituent’s Securities page appears.
Note: For information about accessing the constituent’s wealth information, see ManageWealthSummary Information on page 43.
2. In the grid, select the entry you want to remove.
3. On the action bar, click Delete. A confirmation screen appears.
4. Click Yes to remove the entry.
Income/CompensationThe Income/Compensation page on a constituent tracks the constituent’s salary, bonuses, stock options, etc.From this page, you can add, edit, delete, confirm, and reject the constituent’s income and compensationinformation. The page also stores information from MarketGuide by Reuters imported fromWealthPoint.
Warning: Income/Compensation information displays for only individual constituents, not organizations.
MarketGuide by Reuters provides comprehensive biographical and financial information on officers and directorsof over 20,000 companies worldwide. Insider data includes officer and board of director names, biographies,compensation, and stock options for over 9,000 U.S. public companies.At the top of the page, you can filter information to display by selecting a specific Source, Confidence rating, orMatch code.For information about importing data from WealthPoint, see Obtain Prospect Wealth Information on page 36.
Add Income and Compensation InformationYou can add income and compensation information to a constituent by clicking the Add button on the top of theIncome/Compensation page.
} Add a constituent’s income and compensation information
1. From the constituent’s Wealth and Ratings page, click Income/compensation in theWealth summarygrid. The constituent’s Income/compensation page appears.
Note: For information about accessing the constituent’s wealth information, see ManageWealthSummary Information on page 43.
2. Click Add. The Add income/compensation information screen appears.
WEALTH AND RATINGS MANAGEMENT 63

3. Enter the income/compensation information. For more information about this screen, see AddIncome/Compensation Information Screen on page 64.
4. To save your entry and return to the Income/Compensation page, click Save.
Add Income/Compensation Information ScreenYou access constituent income/compensation information from the Income/Compensation page on theconstituent.
Field Name Field Explanation
Source Source of the income/compensation information.Company Name of the company with which the constituent is associated.
SymbolTicker symbol is an abbreviation used to identify a security. The ticker symbolsfor stocks trading on the NYSE or AMEX have one to three letters. NASDAQstock ticker symbols can consist of four or five letters. If this field is blank, thecompany may no longer be publicly held.
Name Constituent’s name as listed on the proxy statement.Job title Constituent’s title in the corporation.
Officer/Director If the constituent holds an officer’s title (CEO) or a director’s title (ActiveDirector of the board).
Officer Start If the constituent is an officer, this field displays his start date.Director Start If the constituent is a director, this field displays his start date.Age Constituent’s age.
Compensation frame
Displays information about any compensation the constituent received as aresult of his position in the company: Year - Year compensation received; Salary- Amount of compensation classified as salary; Bonus - Amount ofcompensation classified as bonus; Other Short Term - Amount of any shortterm compensation (company car); Other Long Term - Amount of any longterm compensation.
Options frameDisplays information about any options exercised by the constituent: Exercised- Value of any options exercised in the reporting year; Unexercised - Value ofoptions available but not yet exercised by the constituent in the reporting year;Unexerciseable - Value of options granted but not vested as of reporting year.
Biography Information about the constituent provided by the reporting company.Notes Enter any notes associated with the data source information.
Edit Income and Compensation InformationYou can edit income and compensation information on a constituent, even data imported fromWealthPoint, byclicking the Edit button on the top of the Income/Compensation page.
} Edit a constituent’s income and compensation information
1. From the constituent’s Wealth and Ratings page, click Income/compensation in theWealth summarygrid. The constituent’s Income/compensation page appears.
Note: For information about accessing the constituent’s wealth information, see ManageWealthSummary Information on page 43.
2. In the grid, select the entry you want to edit.
64 CHAPTER 3

3. Click Edit. The Edit income/compensation information screen appears.
4. Enter the income/compensation information. The fields and options included on this screen are thesame as those included on the Add income/compensation information screen. For more informationabout these, see Add Income/Compensation Information Screen on page 64.
5. To save your entry and return to the Income/Compensation page, click Save.
Confirm Income and Compensation InformationIf your organization internally confirms a constituents’s income and compensation information, you can trackthis on the Income/Compensation page.
} Confirm a constituent’s income and compensation information
1. From the constituent’s Wealth and Ratings page, click Income/compensation in theWealth summarygrid. The constituent’s Income/compensation page appears.
Note: For information about accessing the constituent’s wealth information, see ManageWealthSummary Information on page 43.
2. In the grid, select the entry you want to confirm.
3. On the action bar, click Confirm. A check mark appears in the Status column of the grid.
Click Clear status to remove the check mark from the Status column and return the status to“Unconfirmed”.
Reject Income/Compensation InformationIf while attempting to confirm a constituent’s income and compensation information, you discover it to beunreliable and you want the information designated as such on the constituent, you can reject the informationwithout removing it from your system.
} Reject constituent income and compensation information
1. From the constituent’s Wealth and Ratings page, click Income/compensation in theWealth summarygrid. The constituent’s Income/compensation page appears.
Note: For information about accessing the constituent’s wealth information, see ManageWealthSummary Information on page 43.
2. In the grid, select the entry you want to reject.
3. On the action bar, click Reject. The “Reject” icon appears next to the selected information.
Click Clear status to remove the icon from the Status column.
Delete Income and Compensation InformationBefore deleting an entry, permanently removing it from your system, you may want to consider designating itwith the “Reject” tag. Using the Reject option, you can remove information from consideration, withoutpermanently removing it from your system. For more information, see Reject Income/CompensationInformation on page 65.
Note: Deleting a record does not prevent the record from being included in futureWealthPoint updates. Thenext time you run aWealthPoint update on the constituent, the deleted record reappears in the results. To
WEALTH AND RATINGS MANAGEMENT 65

permanently remove the record from a constituent’sWealthPoint data, you can reject the record. Forinformation on how to reject a record, see Reject Income/Compensation Information on page 65.
} Delete a constituent’s income and compensation information
1. From the constituent’s Wealth and Ratings page, click Income/compensation in theWealth summarygrid. The constituent’s Income/compensation page appears.
Note: For information about accessing the constituent’s wealth information, see ManageWealthSummary Information on page 43.
2. In the grid, select the entry you want to remove.
3. On the action bar, click Delete. A confirmation screen appears.
4. Click Delete to remove the entry.
Affluence IndicatorsThe Affluence indicators page on the constituent tracks the constituent’s general wealth indicators. For example,the presence of luxury items like luxury automobiles, yachts, and private planes, or a high-balance personalretirement (Keogh) plan indicate wealth. From this page, you can add, edit, delete, confirm, and reject theconstituent’s wealth indicator information. The page also stores information from Larkspur imported fromWealthPoint.
Warning: Affluence Indicator information displays for only individual constituents, not organizations.
Larkspur compiles wealth indicators from over 70 different data sources, and isolates 3.4million high net-worthindividuals nationwide.At the top of the page, you can filter information to display by selecting a specific Source, Confidence rating, orMatch code.For information about importing data fromWealthPoint, see Obtain Prospect Wealth Information on page 36.
Add Affluence IndicatorsYou can add wealth indicator information to a constituent by clicking the Add button on the top of the Affluenceindicators page.
Add Affluence Indicator Information ScreenYou access constituent affluence indicator information from the Affluence indicators page on the constituent.• Personal Tab on page 66• Contact Tab on page 67
Personal Tab
Field Name Field Explanation
Source Source of the information.
66 CHAPTER 3

Field Name Field Explanation
Name/Gender/Age/MaritalStatus/Children Basic personal information about the constituent.
Job title Constituent’s professional title - CEO of XYZ Corporation.
Millionaire code Information contained in this field varies. It may include a wealth designation,such as “millionaire”; it often includes a salary range.
Income Constituent’s annual income.Donor type Type of causes to which the constituent likes to give - political, religious.Contributor type Types of cause to which the constituent likes to give - liberal, conservative.Politicalaffiliation/Religiousaffiliation/Ethnicity
Basic personal information about the constituent’s political and religiousaffiliations and ethnicity association.
Wealth indicators
This field displays information on the investment habits of your constituent.The investment information offered is almost entirely self-reported, taken froma variety of sources, including surveys and mail-in response cards. Otherinformation is inferred from subscriptions to different publications,memberships in certain organizations, or requests for information on specifictopics.
Notes Enter any notes associated with the data source information.
Contact TabThis tab tracks the constituent’s general contact information - address, phone, company.
Edit Affluence Indicator InformationYou can edit wealth indicator information on a constituent, even data imported fromWealthPoint, by clickingthe Edit button on the top of the Affluence indicators page.
} Edit a constituent’s wealth indicator information
1. From the constituent’s Wealth and Ratings page, click Affluence indicator in theWealth summary grid.The constituent’s Affluence indicator page appears.
Note: For information about accessing the constituent’s wealth information, see ManageWealthSummary Information on page 43.
2. In the grid, select the entry you want to edit.
3. Click Edit. The Edit affluence indicator information screen appears.
4. Enter the new information. The fields and options included on this screen are the same as those on theAdd affluence indicator information screen. For more information about these fields and options, seeAdd Affluence Indicator Information Screen on page 66.
5. To save your entry and return to the Affluence indicators page, click Save.
Confirm Affluence Indicator InformationIf your organization internally confirms a constituents’s wealth indicator information, you can track this on theAffluence indicators page.
WEALTH AND RATINGS MANAGEMENT 67

} Confirm a constituent’s wealth indicator information
1. From the constituent’s Wealth and Ratings page, click Affluence indicator in theWealth summary grid.The constituent’s Affluence indicator page appears.
Note: For information about accessing the constituent’s wealth information, see ManageWealthSummary Information on page 43.
2. In the grid, select the entry you want to confirm.
3. On the action bar, click Confirm. A check mark appears in the Status column of the grid.
Click Clear status to remove the check mark from the Status column and return the status to“Unconfirmed”.
Reject Affluence Indicator InformationIf while attempting to confirm a constituent’s affluence indicator information, you discover it to be unreliable andyou want the information designated as such on the constituent, you can reject the information withoutremoving it from your system.
} Reject constituent affluence indicator information
1. From the constituent’s Wealth and Ratings page, click Affluence indicator in theWealth summary grid.The constituent’s Affluence indicator page appears.
Note: For information about accessing the constituent’s wealth information, see ManageWealthSummary Information on page 43.
2. In the grid, select the entry you want to reject.
3. On the action bar, click Reject. The “Reject” icon appears next to the selected information.
Click Clear status to remove the icon from the Status column.
Delete Affluence Indicator InformationYou can permanently remove selected affluence indicator information from your constituent.
Note: Deleting a record does not prevent the record from being included in futureWealthPoint updates. Thenext time you run aWealthPoint update on the constituent, the deleted record reappears in the results. Topermanently remove the record from a constituent’sWealthPoint data, you can reject the record. Forinformation on how to reject a record, see Reject Affluence Indicator Information on page 68.
} Delete a constituent’s affluence indicator information
Before deleting an entry, permanently removing it from your system, you may want to consider designating itwith the “Reject” tag. Using the Reject option, you can remove information from consideration, withoutpermanently removing it from your system. For more information, see Reject Affluence Indicator Information onpage 68.
1. From the constituent’s Wealth and Ratings page, click Affluence indicator in theWealth summary grid.The constituent’s Affluence indicator page appears.
Note: For information about accessing the constituent’s wealth information, see ManageWealthSummary Information on page 43.
2. In the grid, select the entry you want to remove.
68 CHAPTER 3

3. On the action bar, click Delete. A confirmation screen appears.
4. Click Yes to remove the entry.
Nonprofit Affiliations InformationThe Nonprofit affiliations page on the constituent tracks the constituent’s relationship with nonprofitorganizations. From this page, you can add, edit, delete, confirm, and reject information. The page also storesinformation from GuideStar.com imported fromWealthPoint.
Warning: TheWealthPoint search option is available for only individual constituents, not organizations.
GuideStar scans the names of 220,000 nonprofit board members and executives from 275,000 organizations andextracts information such as nonprofit organization name, affiliation, and address of the donor.• The top of the page displays the number of Identified organizations, the number of Confirmed organizationsand the compensation values associated with each.
• At the top of theNonprofit affiliations section, you can filter information to display by selecting a specificSource, Confidence rating, orMatch code (match code is available for individual constituents only, notorganizations).
• The grid in theNonprofit affiliations section displays details about the nonprofit’s associated with theprospect, such as confidence ratings, organization name, match code information, and more.
• To view additional details, select a nonprofit in theNonprofit affiliations grid and click Show details. A detailswindow opens at the bottom of the page.
For information about importing data fromWealthPoint, see Obtain Prospect Wealth Information on page 36.
Add Nonprofit Affiliation InformationYou can add nonprofit affiliation information to a constituent by clicking the Add button on the top of theNonprofit Affiliation page.
} Add a constituent’s nonprofit affiliation information
1. From the constituent’s Wealth and Ratings page, click Nonprofit affiliation in theWealth summarygrid. The constituent’s Nonprofit affiliation page appears.
Note: For information about accessing the constituent’s wealth information, see ManageWealthSummary Information on page 43.
2. Click Add. The Add nonprofit affiliation information screen appears.
3. Enter the new information. For more information about this screen, see Add Nonprofit AffiliationInformation Screen on page 69.
4. To save your entry and return to the Nonprofit Affiliation page, click Save.
Add Nonprofit Affiliation Information ScreenYou access constituent nonprofit affiliation information screen from the Nonprofit affiliations page on theconstituent.
WEALTH AND RATINGS MANAGEMENT 69

Field Name Field Explanation
Source Source of the nonprofit affiliation information.
Organization Name of the nonprofit organization with which the constituent has anofficer/director relationship.
Description A description of the nonprofit.
Address, City, State,ZIP Nonprofit organization’s address information.
EIN The constituent’s employer identification number.Revenue Revenue generated by nonprofit.Total assets Fair market value of all nonprofit’s assets.Phone Nonprofit organization’s phone number.Website Nonprofit’s Website address.
Org. form year The year entered on the nonprofit affiliation forms (used to retain 501(c)(3)status).
Ruling year The year that the IRS granted an organization 501(c)(3) status.Name Constituent’s name.Location city,Location state, andLocation ZIP
The affiliated constituent’s location information.
Job title Constituent’s title with the nonprofit organization.Salary Salary amount the nonprofit pays the constituent.Form year The year the constituent’s affiliation with the nonprofit started.Notes Enter any notes associated with the data source information.
Edit Nonprofit Affiliation InformationYou can edit nonprofit affiliation information on a constituent, including information imported fromWealthPoint, by clicking the Edit button on the top of the Nonprofit Affiliation page.
} Edit a constituent’s nonprofit affiliation information
1. From the constituent’s Wealth and Ratings page, click Nonprofit affiliation in theWealth summarygrid. The constituent’s Nonprofit affiliation page appears.
Note: For information about accessing the constituent’s wealth information, see ManageWealthSummary Information on page 43.
2. In the grid, select the entry you want to edit.
3. Click Edit. The Edit nonprofit affiliation information screen appears.
4. Enter the new information. The fields and options included on this screen are the same as those on theAdd nonprofit affiliation information screen. For more information about these fields and options, seeAdd Nonprofit Affiliation Information Screen on page 69.
5. To save your entry and return to the Nonprofit Affiliation page, click Save.
70 CHAPTER 3

Confirm Nonprofit Affiliation InformationIf your organization internally confirms a constituents’s nonprofit affiliation information, you can track this onthe Nonprofit Affiliation page.
} Confirm a constituent’s nonprofit affiliation information
1. From the constituent’s Wealth and Ratings page, click Nonprofit affiliation in theWealth summarygrid. The constituent’s Nonprofit affiliation page appears.
Note: For information about accessing the constituent’s wealth information, see ManageWealthSummary Information on page 43.
2. In the grid, select the entry you want to confirm.
3. On the action bar, click Confirm. A check mark appears in the Status column of the grid.
Click Clear status to remove the check mark from the Status column and return the status to“Unconfirmed”.
Reject Nonprofit Affiliation InformationIf while attempting to confirm a constituent’s nonprofit affiliation information, you discover it to be unreliableand you want the information designated as such on the constituent, you can reject the information withoutremoving it from your system.
} Reject constituent nonprofit affiliation information
1. From the constituent’s Wealth and Ratings page, click Nonprofit affiliation in theWealth summarygrid. The constituent’s Nonprofit affiliation page appears.
Note: For information about accessing the constituent’s wealth information, see ManageWealthSummary Information on page 43.
2. In the grid, select the entry you want to reject.
3. On the action bar, click Reject. The “Reject” icon appears next to the selected information.
Click Clear status to remove the icon from the Status column.
Delete Nonprofit Affiliation InformationYou can permanently remove selected nonprofit affiliation information from yourWealth and Ratings screen.
Note: Deleting a record does not prevent the record from being included in futureWealthPoint updates. Thenext time you run aWealthPoint update on the constituent, the deleted record reappears in the results. Topermanently remove the record from a constituent’sWealthPoint data, you can reject the record. Forinformation on how to reject a record, see Reject Nonprofit Affiliation Information on page 71.
} Delete a constituent’s nonprofit affiliation information
Before deleting an entry, permanently removing it from your system, you may want to consider designating itwith the “Reject” tag. Using the Reject option, you can remove information from consideration, withoutpermanently removing it from your system. For more information, see Reject Nonprofit Affiliation Informationon page 71.
WEALTH AND RATINGS MANAGEMENT 71

1. From the constituent’s Wealth and Ratings page, click Nonprofit affiliation in theWealth summarygrid. The constituent’s Nonprofit affiliation page appears.
Note: For information about accessing the constituent’s wealth information, see ManageWealthSummary Information on page 43.
2. In the grid, select the entry you want to remove.
3. On the action bar, click Delete. A confirmation screen appears.
4. Click Yes to remove the entry.
Private FoundationsGuideStar.com information includes the foundation name and address and total assets (fair market value) alongwith the constituent's title and compensation.
Warning: TheWealthPoint search option is available for only individual constituents, not organizations.
The Private foundations page on the constituent tracks the constituent’s association with any nonprofitfoundations. From this page, you can add, edit, delete, confirm, and reject the constituent’s private foundationinformation. The page also stores information from GuideStar.com imported fromWealthPoint.• The top of the page displays the number of Identified organizations, the number of Confirmed organizationsand the compensation values associated with each.
• At the top of the Private foundations section, you can filter information to display by selecting a specificSource, Confidence rating, orMatch code (match code is available for individual constituents only, notorganizations).
• The grid in the Private foundations section displays details about the foundations associated with theprospect, such as confidence ratings, organization name, fair market asset value, match code information, andmore.
• To view additional details, select a foundation in the Private foundations grid and click Show details. A detailswindow opens at the bottom of the page. A link to the foundation’s Website is included in this view.
For information about importing data fromWealthPoint, see Obtain Prospect Wealth Information on page 36.
Add Private Foundation InformationYou can add private foundation information to a constituent by clicking the Add button on the top of the PrivateFoundations page.
} Add constituent private foundations information
1. From the constituent’s Wealth and Ratings page, click Private foundations in theWealth summary grid.The constituent’s Private foundations page appears.
Note: For information about accessing the constituent’s wealth information, see ManageWealthSummary Information on page 43.
2. Click Add. The Add private foundation information screen appears.
3. Enter the private foundation information. For more information about this screen, see Add PrivateFoundation Information Screen on page 73.
4. To save your entry and return to the Private Foundations page, click Save.
72 CHAPTER 3

Add Private Foundation Information ScreenYou access constituent private foundation information from the Private foundations page on the constituent.
Field Name Field Explanation
Source Source of the foundation affiliation information.
Organization Name of the foundation with which the constituent has a relationship.Description A description of the private foundation.
Address, City, State,ZIP Foundation’s address information.
EIN The constituent’s employer identification number.Total assets Fair market value of all foundation’s assets.Fair market valueassets Amount the foundation could obtain by selling its assets.
Phone Foundation’s phone number.Website Foundation’s Website address.Org. form year The year entered on the foundation forms (used to retain 501(c)(3) status).Ruling year The year that the IRS granted an organization 501(c)(3) status.Name Constituent’s name.Location city,Location state, andLocation ZIP
The affiliated constituent’s location information.
Job title Constituent’s title with the foundation.Compensation Salary amount the foundation pays the constituent.Form year The year the constituent’s affiliation with the foundation started.Notes Enter any notes associated with the data source information.
Edit Private Foundation InformationYou can edit private foundation information, even data imported fromWealthPoint, by clicking the Edit buttonon the top of the Private Foundations page.
} Edit constituent private foundations information
1. From the constituent’s Wealth and Ratings page, click Private foundations in theWealth summary grid.The constituent’s Private foundations page appears.
Note: For information about accessing the constituent’s wealth information, see ManageWealthSummary Information on page 43.
2. In the grid, select the entry you want to edit.
3. Click Edit. The Edit private foundations screen appears.
4. Enter the private foundation information. The fields and options included on this screen are the same asthose on the Add private foundation screen. For more information about these fields and options, seeAdd Private Foundation Information Screen on page 73.
5. To save your entry and return to the Private Foundations page, click Save.
WEALTH AND RATINGS MANAGEMENT 73

Confirm Private Foundation InformationIf your organization internally confirms a constituents’s private foundation information, you can track this on thePrivate Foundations page.
} Confirm a constituent’s private foundation information
1. From the constituent’s Wealth and Ratings page, click Private foundations in theWealth summary grid.The constituent’s Private foundations page appears.
Note: For information about accessing the constituent’s wealth information, see ManageWealthSummary Information on page 43.
2. In the grid, select the entry you want to confirm.
3. On the action bar, click Confirm. A check mark appears in the Status column of the grid.
Click Clear status to remove the check mark from the Status column and return the status to“Unconfirmed”.
Reject Private Foundation InformationIf while attempting to confirm a constituent’s private foundation information, you discover it to be unreliableand you want the information designated as such on the constituent, you can reject the information withoutremoving it from your system.
} Reject constituent private foundation information
1. From the constituent’s Wealth and Ratings page, click Private foundations in theWealth summary grid.The constituent’s Private foundations page appears.
Note: For information about accessing the constituent’s wealth information, see ManageWealthSummary Information on page 43.
2. In the grid, select the entry you want to reject.
3. On the action bar, click Reject. The “Reject” icon appears next to the selected information.
Click Clear status to remove the icon from the Status column and return the status to “Unconfirmed”.
Delete Private Foundation InformationYou can permanently remove selected private foundation information from your constituent.
Note: Deleting a record does not prevent the record from being included in futureWealthPoint updates. Thenext time you run aWealthPoint update on the constituent, the deleted record reappears in the results. Topermanently remove the record from a constituent’sWealthPoint data, you can reject the record. Forinformation on how to reject a record, see Reject Private Foundation Information on page 74.
} Delete a constituent’s private foundation information
Before deleting an entry, permanently removing it from your system, you may want to consider designating itwith the “Reject” tag. Using the Reject option, you can remove information from consideration, withoutpermanently removing it from your system. For more information, see Reject Private Foundation Informationon page 74.
74 CHAPTER 3

1. From the constituent’s Wealth and Ratings page, click Private foundations in theWealth summary grid.The constituent’s Private foundations page appears.
Note: For information about accessing the constituent’s wealth information, see ManageWealthSummary Information on page 43.
2. In the grid, select the record you want to remove.
3. On the action bar, click Delete. A confirmation screen appears.
4. Click Yes to remove the record.
Philanthropic Gift InformationThe Philanthropic gifts page on the constituent tracks the constituent’s donations to other nonprofitorganizations. From this page, you can add, edit, delete, confirm, and reject information. The page also storesinformation from DonorBank and NOZA, Inc. imported fromWealthPoint.
Warning: TheWealthPoint search option is available for only individual constituents, not organizations.
DonorBank and NOZA, Inc. gather information on charitable donations from thousands of nonprofitorganizations covering all 50 states. Donor name, type of gift, contribution date, and gift size are included inthese detailed reports.At the top of the page, you can filter information to display by selecting a specific Source, Confidence rating, orMatch code (match code is available for individual constituents only, not organizations).For information about importing data fromWealthPoint, see Obtain Prospect Wealth Information on page 36.
Note: An “*” in theName field indicates the individual is deceased.
Add Philanthropic Gift InformationYou can add charitable donation information to a constituent by clicking the Add button on the top of thePhilanthropic gifts page.
} Add a constituent’s charitable donation information
1. From the constituent’s Wealth and Ratings page, click Philanthropic gifts in theWealth summary grid.The constituent’s Philanthropic gifts page appears.
Note: For information about accessing the constituent’s wealth information, see ManageWealthSummary Information on page 43.
2. Click Add. The Add Philanthropic gift information screen appears.
3. Enter the new information. For more information about this screen, see Add Philanthropic GiftInformation Screen on page 75.
4. To save your entry and return to the Philanthropic gifts page, click Save.
Add Philanthropic Gift Information ScreenYou access constituent philanthropic gift information from the Philanthropic gifts page on the constituent.
WEALTH AND RATINGS MANAGEMENT 75
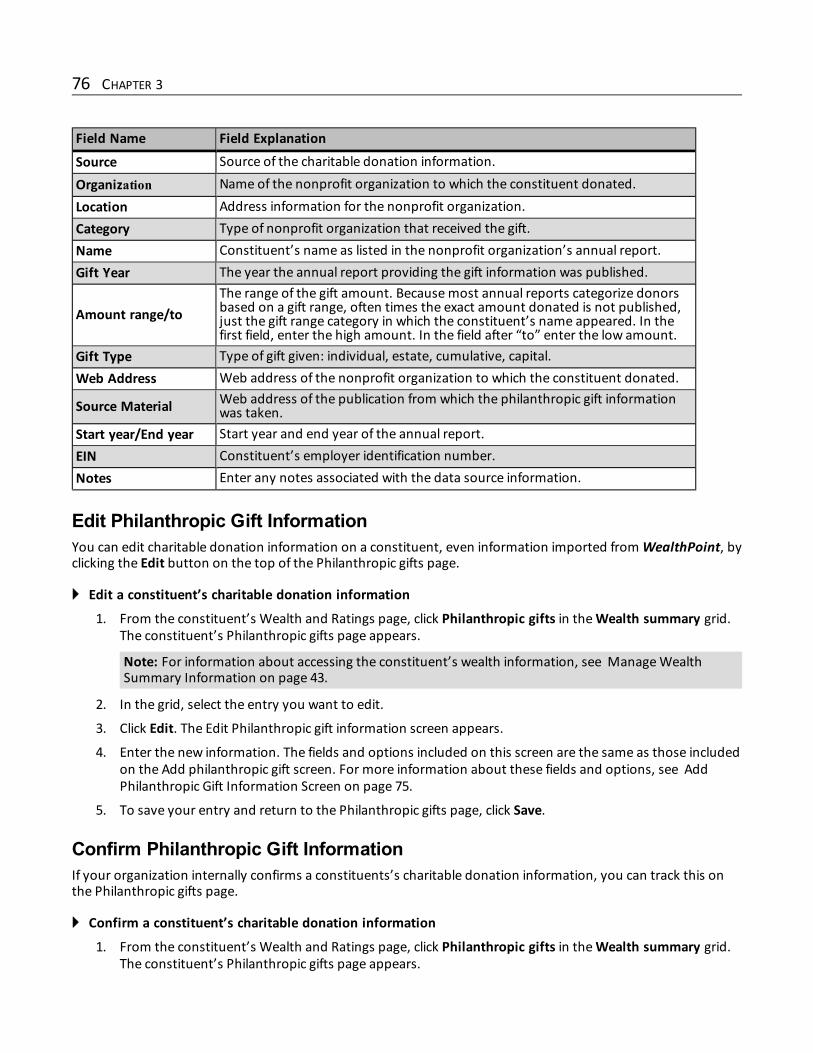
Field Name Field Explanation
Source Source of the charitable donation information.
Organization Name of the nonprofit organization to which the constituent donated.Location Address information for the nonprofit organization.Category Type of nonprofit organization that received the gift.Name Constituent’s name as listed in the nonprofit organization’s annual report.Gift Year The year the annual report providing the gift information was published.
Amount range/toThe range of the gift amount. Becausemost annual reports categorize donorsbased on a gift range, often times the exact amount donated is not published,just the gift range category in which the constituent’s name appeared. In thefirst field, enter the high amount. In the field after “to” enter the low amount.
Gift Type Type of gift given: individual, estate, cumulative, capital.Web Address Web address of the nonprofit organization to which the constituent donated.
Source Material Web address of the publication from which the philanthropic gift informationwas taken.
Start year/End year Start year and end year of the annual report.EIN Constituent’s employer identification number.Notes Enter any notes associated with the data source information.
Edit Philanthropic Gift InformationYou can edit charitable donation information on a constituent, even information imported fromWealthPoint, byclicking the Edit button on the top of the Philanthropic gifts page.
} Edit a constituent’s charitable donation information
1. From the constituent’s Wealth and Ratings page, click Philanthropic gifts in theWealth summary grid.The constituent’s Philanthropic gifts page appears.
Note: For information about accessing the constituent’s wealth information, see ManageWealthSummary Information on page 43.
2. In the grid, select the entry you want to edit.
3. Click Edit. The Edit Philanthropic gift information screen appears.
4. Enter the new information. The fields and options included on this screen are the same as those includedon the Add philanthropic gift screen. For more information about these fields and options, see AddPhilanthropic Gift Information Screen on page 75.
5. To save your entry and return to the Philanthropic gifts page, click Save.
Confirm Philanthropic Gift InformationIf your organization internally confirms a constituents’s charitable donation information, you can track this onthe Philanthropic gifts page.
} Confirm a constituent’s charitable donation information
1. From the constituent’s Wealth and Ratings page, click Philanthropic gifts in theWealth summary grid.The constituent’s Philanthropic gifts page appears.
76 CHAPTER 3

Note: For information about accessing the constituent’s wealth information, see ManageWealthSummary Information on page 43.
2. In the grid, select the entry you want to confirm.
3. On the action bar, click Confirm. A check mark appears in the Status column of the grid.
Click Clear status to remove the check mark from the Status column and return the status to“Unconfirmed”.
Reject Philanthropic Gift InformationIf while attempting to confirm a constituent’s philanthropic gift information, you discover it to be unreliable andyou want the information designated as such on the constituent, you can reject the information withoutremoving it from your system.
} Reject constituent philanthropic gift information
1. From the constituent’s Wealth and Ratings page, click Philanthropic gifts in theWealth summary grid.The constituent’s Philanthropic gifts page appears.
Note: For information about accessing the constituent’s wealth information, see ManageWealthSummary Information on page 43.
2. In the grid, select the entry you want to reject.
3. On the action bar, click Reject. The “Reject” icon appears next to the selected information.
Click Clear status to remove the icon from the Status column and return the status to “Unconfirmed”.
Delete Philanthropic Gift InformationYou can permanently remove selected charitable donation information from yourWealth and Ratings screen.
Note: Deleting a record does not prevent the record from being included in futureWealthPoint updates. Thenext time you run aWealthPoint update on the constituent, the deleted record reappears in the results. Topermanently remove the record from a constituent’sWealthPoint data, you can reject the record. Forinformation on how to reject a record, see Reject Philanthropic Gift Information on page 77.
} Delete a constituent’s philanthropic gift information
Before deleting an entry, permanently removing it from your system, you may want to consider designating itwith the “Reject” tag. Using the Reject option, you can remove information from consideration, withoutpermanently removing it from your system. For more information, see Reject Philanthropic Gift Information onpage 77.
1. From the constituent’s Wealth and Ratings page, click Philanthropic gifts in theWealth summary grid.The constituent’s Philanthropic gifts page appears.
Note: For information about accessing the constituent’s wealth information, see ManageWealthSummary Information on page 43.
2. In the grid, select the entry you want to remove.
3. On the action bar, click Delete. A confirmation screen appears.
4. Click Yes to remove the entry.
WEALTH AND RATINGS MANAGEMENT 77

Political DonationsThe Political donations page on the constituent tracks the constituent’s campaign donations. From this page,you can add, edit, delete, confirm, and reject the constituent’s political donation information. The page alsostores information from Federal Elections Commission imported fromWealthPoint.
Warning: TheWealthPoint search option is available for only individual constituents, not organizations.
The Federal Elections Commission database contains detailed information about 2,000,000 federal electioncontributions. This information includes the amount of the contribution and the recipient of the contribution.At the top of the page, you can filter information to display by selecting a specific Source, Confidence rating, orMatch code (match code is available for individual constituents only, not organizations).For information about importing data fromWealthPoint, see Obtain Prospect Wealth Information on page 36.
Add Political Donation InformationYou can add political donation information to a constituent by clicking the Add button on the top of the PoliticalDonations page.
} Adding constituent political donation information
1. From the constituent’s Wealth and Ratings page, click Political donations in theWealth summary grid.The constituent’s Political donations page appears.
Note: For information about accessing the constituent’s wealth information, see ManageWealthSummary Information on page 43.
2. Click Add. The Add political donation screen appears.
3. Enter the political donation information. For more information about this screen, see Add PoliticalDonation Screen on page 78.
4. To save the entry and return to the Political donations page, click Save.
Add Political Donation ScreenYou can access constituent political donation information from the constituent record.
Field Name Field Explanation
Source Source of the political donation information.Recipient Name of the individual or organization receiving the donation.Date Date of contribution.Amount Amount of contribution.Name Donor’s name.Occupation Donor’s occupation. This information is self-reported by the donor.
City, State, ZIP Donor’s address information.Notes Enter any notes associated with the data source information.
78 CHAPTER 3

Edit Political Donation InformationYou can edit political donation information in a constituent, even data imported fromWealthPoint, by clickingthe Edit button on the top of the Political Donations page.
} Edit constituent political donation information
1. From the constituent’s Wealth and Ratings page, click Political donations in theWealth summary grid.The constituent’s Political donations page appears.
Note: For information about accessing the constituent’s wealth information, see ManageWealthSummary Information on page 43.
2. In the grid, select the entry you want to edit.
3. Click Edit. The Edit political donation screen appears.
4. Enter the political donation information. The fields and options included on this screen are the same ason the Add political donations screen. For more information about these fields and options, see AddPolitical Donation Screen on page 78.
5. To save the entry and return to the Political Donation tab, click Save.
Confirm Political Donation InformationIf your organization internally confirms a constituents’s political donation information, you can track this on theconstituent.
} Confirm a constituent’s political donation information
1. From the constituent’s Wealth and Ratings page, click Political donations in theWealth summary grid.The constituent’s Political donations page appears.
Note: For information about accessing the constituent’s wealth information, see ManageWealthSummary Information on page 43.
2. In the grid, select the entry you want to confirm.
3. On the action bar, click Confirm. A check mark appears in the Status column of the grid.
Click Clear status to remove the check mark from the Status column and return the status to“Unconfirmed”.
Reject Political Donation InformationIf while attempting to confirm a constituent’s political donation information, you discover it to be unreliable andyou want the information designated as such on the constituent, you can reject the information withoutremoving it from your system.
} Reject constituent political donation information
1. From the constituent’s Wealth and Ratings page, click Political donations in theWealth summary grid.The constituent’s Political donations page appears.
Note: For information about accessing the constituent’s wealth information, see ManageWealthSummary Information on page 43.
2. In the grid, select the entry you want to reject.
WEALTH AND RATINGS MANAGEMENT 79

3. On the action bar, click Reject. The “Reject” icon appears next to the selected information.
Click Clear status to remove the icon from the Status column and return the status to “Unconfirmed”.
Delete Political Donation InformationYou can permanently remove a constituent’s political donation information record from yourWealth andRatings screen.
Note: Deleting a record does not prevent the record from being included in futureWealthPoint updates. Thenext time you run aWealthPoint update on the constituent, the deleted record reappears in the results. Topermanently remove the record from a constituent’sWealthPoint data, you can reject the record. Forinformation on how to reject a record, see Reject Political Donation Information on page 79.
} Delete a constituent’s political donation information
Before deleting an entry, permanently removing it from your system, you may want to consider designating itwith the “Reject” tag. Using the Reject option, you can remove information from consideration, withoutpermanently removing it from your system. For more information, see Reject Political Donation Information onpage 79.
1. From the constituent’s Wealth and Ratings page, click Political donations in theWealth summary grid.The constituent’s Political donations page appears.
Note: For information about accessing the constituent’s wealth information, see ManageWealthSummary Information on page 43.
2. In the grid, select the record you want to remove.
3. On the action bar, click Delete. A confirmation screen appears.
4. Click Yes to remove the record.
Other AssetsThe Other assets page on the constituent tracks additional constituent assets not covered in the standard datasource options. From this page, you can add, edit, delete, confirm, and reject information.At the top of the page, you can filter information to display by selecting a specific Source or Confidence rating.
Add Other AssetsYou can add information about other assets held by the constituent but not covered in the standard data sourceoptions by clicking the Add button on the top of the Other assets page.
Edit Other Asset InformationYou can edit other asset information on a constituent, including information imported fromWealthPoint, byclicking the Edit button on the top of the Other assets page.
Add Other Assets ScreenYou access a constituent’s other asset information from the Other assets page on the the constituent.
80 CHAPTER 3

Field Name Field Explanation
Source How you learned about this asset.Description Description of the other asset.Value Value of the other asset.Notes Enter any additional information about the asset.
Confirm Other Asset InformationIf your organization internally confirms a constituents’s other asset information, you can track this on the OtherAsset tab.
} Confirm a constituent’s other asset information
1. From the constituent’s Wealth and Ratings page, click Other assets in theWealth summary grid. Theconstituent’s Other assets page appears.
Note: For information about accessing the constituent’s wealth information, see ManageWealthSummary Information on page 43.
2. In the grid, select the entry you want to confirm.
3. On the action bar, click Confirm. A check mark appears in the Status column of the grid.
Click Unconfirm to remove the check mark from the Status column and return the status to“Unconfirmed”.
Reject Other Asset InformationIf while attempting to confirm a constituent’s other asset information, you discover it to be unreliable and youwant the information designated as such on the constituent, you can reject the information without removing itfrom your system.
} Reject constituent other asset information
1. From the constituent’s Wealth and Ratings page, click Other assets in theWealth summary grid. Theconstituent’s Other assets page appears.
Note: For information about accessing the constituent’s wealth information, see ManageWealthSummary Information on page 43.
2. In the grid, select the entry you want to reject.
3. On the action bar, click Reject. The “Reject” icon appears next to the selected information.
Click Clear status to remove the icon from the Status column and return the status to “Unconfirmed”.
Delete Other Asset InformationYou can permanently remove selected other asset information from yourWealth and Ratings screen.
Note: Deleting a record does not prevent the record from being included in futureWealthPoint updates. Thenext time you run aWealthPoint update on the constituent, the deleted record reappears in the results. Topermanently remove the record from a constituent’sWealthPoint data, you can reject the record. Forinformation on how to reject a record, see Reject Other Asset Information on page 81.
WEALTH AND RATINGS MANAGEMENT 81

} Delete a constituent’s other asset information
Before deleting an entry, permanently removing it from your system, you may want to consider designating itwith the “Reject” tag. Using the Reject option, you can remove information from consideration, withoutpermanently removing it from your system. For more information, see Reject Other Asset Information on page81.
1. From the constituent’s Wealth and Ratings page, click Other assets in theWealth summary grid. Theconstituent’s Other assets page appears.
Note: For information about accessing the constituent’s wealth information, see ManageWealthSummary Information on page 43.
2. In the grid, select the entry you want to remove.
3. On the action bar, click Delete. A confirmation screen appears.
4. Click Yes to remove the entry.
Group Member RatingsTheGroup member wealth capacity grid included on the group Wealth and Ratings page, displays aggregatedwealth information for the individual constituents included in the group or household. If the samewealth detailrecord exists for two or more constituents in the group, it is counted only once. For example if a husband andwife in a household each include their home under real estate, the value of the home is included in the groupwealth summary only one time.The group’sModeling and propensity information displays in the bottom half of the tab.
Access GroupMember RecordFrom the Group Member Ratings tab on theWealth and Ratings page, you can easily access a group member’sconstituent record. Form theGroup member wealth capacity grid, select the constituent you want to view andclick Go to constituent.
ManageWealth CapacityYou can enter wealth capacity information on your constituent records, tracking estimated wealth and majorgiving capacity. You can also enter a wealth capacity rating and themajor giving capacity value.
82 CHAPTER 3

The Wealth capacity grid displays general information about the prospect’s wealth capacity including theformula used to determine the capacity. You create formulas in theWealth capacity formula managementfunction, accessed from the Administration pane on the Prospects page.
} Enter constituent wealth capacity information
1. Open a constituent record. TheWealth and Ratings page appears.
2. In theWealth Capacity grid near the bottom of the page, click Edit. The Edit wealth capacity screenappears.
WEALTH AND RATINGS MANAGEMENT 83

3. TheWealth capacity formula field displays the formula used to determine the current wealth capacity.
Note: You create formulas in theWealth capacity formula management function, accessed from theAdministration pane on the Prospects page.
4. Enter the constituent’s Estimated wealth dollar amount.
5. Select the constituent’s Estimated wealth dollar range.
6. Select the constituent’s Major giving capacity range.
7. Enter a specificMajor giving capacity value based on your research for this constituent.
8. Enter an Overall rating for the constituent’s wealth capacity. This is an internal rating determined byyour organization.
9. In the (Group) Wealth capacity formula field of the Compare to frame, select another formula tocompare against the existing formula.
10. If you prefer the new formula ratings, click Apply comparison formula and the new formula is assignedto the constituent to determine wealth capacity.
11. Click Save to save the ratings information and return to the constituent’s Wealth and Ratings page. Theinformation you entered appears in the bottom grid.
84 CHAPTER 3

} Confirm and lock constituent wealth capacity information
1. Open a constituent record. TheWealth and Ratings page appears.
2. In the (Group) Wealth Capacity grid near the bottom of the page, click Confirm and lock. Theapplication designates the entry “Confirmed and locked”, disabling the Edit button.
3. To designate the entry “Unconfirmed”, click theUnconfirmed button. The application designates theentry “Unconfirmed”, activating the Edit button.
Transaction PageA prospect’s transactions page lists all security transactions entered in the system, including the quantity ofshares owned, transaction date, share price, transaction value and more. From the Show field on the page, youcan filter the transactions displayed. After selecting a Show option, click Apply to update the view.From this page you can do the following:• Add Transaction to Existing Securities Record on page 85• Edit Security Transaction on page 85• Delete Security Transaction on page 86
Add Transaction to Existing Securities RecordYou can include transaction information when you create a securities record; however, if after creating therecord, you need to add additional transaction information, you can do so from the transactions page.
} Add new transaction to an existing securities record
1. From the constituent’s Wealth and Ratings page, click Securities in theWealth summary grid. Theconstituent’s Securities page appears.
Note: For information about accessing the constituent’s wealth information, see ManageWealthSummary Information on page 43.
2. In the grid, select the entry to which you want to add transaction information.
3. On the action bar, click Go to transaction. The transaction page appears.
4. Click Add. The Add security transactions screen appears. For information about completing the fieldsincluded on this screen, see Transactions Tab (Individual constituents only, not organizations) on page61.
5. Click Save to save the entry and return to the transactions page.
Edit Security TransactionYou can include transaction information when you create a securities record; however, if after creating therecord, you need to make changes to the information, you can do so from the transactions page.
WEALTH AND RATINGS MANAGEMENT 85

} Edit existing security transactions
1. From the constituent’s Wealth and Ratings page, click Securities in theWealth summary grid. Theconstituent’s Securities page appears.
Note: For information about accessing the constituent’s wealth information, see ManageWealthSummary Information on page 43.
2. In the grid, select the entry in which you want to change transaction information.
3. On the action bar, click Go to transaction. The transaction page appears.
4. Select the transaction you want to edit.
5. Click Edit. The Edit security transactions screen appears. For information about completing the fieldsincluded on this screen, see Transactions Tab (Individual constituents only, not organizations) on page61.
6. Click Save to save the entry and return to the transactions page.
Delete Security TransactionYou can include transaction information when you create a securities record; however, if after creating therecord, you need to remove the information from the record, you can do so from the transactions page.
} Delete existing security transactions
1. From the constituent’s Wealth and Ratings page, click Securities in theWealth summary grid. Theconstituent’s Securities page appears.
Note: For information about accessing the constituent’s wealth information, see ManageWealthSummary Information on page 43.
2. In the grid, select the entry from which you want to delete transaction information.
3. On the action bar, click Go to transaction. The transaction page appears.
4. Select the transaction you want to delete.
5. Click Delete. A confirmation message appears.
6. Click Yes to delete the entry and return to the transactions page.
Edit Research DetailsIf you discover you must change the prospect manager assigned to a prospect or change the prospect’s status,you can using the Edit research details link. The Edit research details screen appears, and you can make thesenecessary changes.
86 CHAPTER 3

Data Refresh NotificationsIf you choose to allow automaticWealthPoint Data Refreshes - by clicking the Enable Data Refresh optiondisplayed on the explorer bar of theManageWealth and Ratings Data page - any data refreshes added to theselected record are displayed on theWealthPoint Data Refresh Notification screen.You access theWealthPoint Data Refresh Notification screen, by clicking Data Refresh notifications on theexplorer bar of the constituent Wealth and Ratings page.
Note: For information about enabling data refreshes, see Disable/EnableWealth Updates on page 38.
WealthPoint Data Refresh Notifications PageAccessed by clicking Data Refresh notifications on the explorer bar of the constituent Wealth and Ratings page,theWealthPoint Data Refresh Notifications page displays any data refreshes added to the selected record. Forexample, if the D&B data is refreshed, the refresh information for this constituent displays here.The following data sources are included in the Data Refresh process:• D&B• GuideStar - Nonprofit Affiliations• GuideStar - Private Foundations• Thomson• Who’s WhoYou can filter the notifications included on the tab based on the Constituent, data Source or a selected Daterange. Simply enter the information in the appropriate field included at the top of theWealthPoint Data Refreshhistory grid and click Apply. To return to the default setting of all notifications, click Reset.
ReportsThe Reports pane on the left side of theWealth and Ratings page links you to all reports available in the program.
Warning: The Prospect Research Report is available for only individual constituents, not organizations.
WEALTH AND RATINGS MANAGEMENT 87

Prospect Research ReportThe Prospect Research Report provides details about a selected prospect’s wealth information. To access thereport, click the Prospect research report link under Reports on the prospect’s Wealth and Ratings page. Oncethe Prospect Research Report page appears, use the grid at the top of the page to select what information youwant to include in the report.You can base your report on a selected Confidence rating and select the report sections you want to include. Touse only selected sections in your report, in the Include field at the top of the report page, select “Selectedsections”. The Selected sections button activates. Click the button to access the Prospect research report sectionselection screen. Place a check mark next to all sections you want to include and click OK. When you return to thereport page, click Refresh to update the report display.The report includes a Prospect summary section which provides an overview of the prospect, as well as a wealthsummary section, a separate section for each wealth source, and a Relationships and Extended relationshipssection.
Giving SummaryTheGiving summary link appears in theMore information pane of theWealth and Ratings page. This link takesyou to the constituent’s Giving Summary page. From this page, you can view total giving, largest gift, first gift,and latest gift information; and add, edit, and delete giving information. The page also tracks the constituent’stotal number of gifts.
Warning: TheGiving summary option is available for only individual constituents, not organizations.
If the constituent is linked to a Raiser’s Edge record, the data is synchronized with and populated from theRaiser’s Edge record.• Add Giving Summary Information on page 88• Edit Giving Summary Information on page 90• Delete Giving Summary Information on page 90
AddGiving Summary InformationIf you have a large amount of giving summary information to update, you can run bulk updates using the importand batch functions. For more information, see Giving History Updates through Batch Entry on page 89.
} Add prospect giving summary information
1. From the constituent’s Wealth and Ratings page, in the More information pane, click Giving Summary.The Giving Summary page appears.
2. Click Add. The Add giving summary information screen appears.
88 CHAPTER 3

3. Add the necessary information. You do not have to complete all fields for each giving designation.
4. Click Save.
Giving History Updates through Batch EntryBatch Entry allows you to update and add information to your database quickly, without opening each affectedrecord. There are two ways to use Batch Entry to enter data:• The Import and Batch Entry functions help you to quickly add information contained in an outside application,such as Microsoft Excel, to your database (the outside file must be saved as a comma-separated value (*.csv)file). With Import you can create an import process that generates a batch file containing all informationincluded in the outside file. From Batch Entry you can then validate and commit the batch file and add orupdate information in your database.For example, you want to update and add giving history information on several constituent records. After youhave your new data saved in a CSV file format, you can import the information into the database. The import is
WEALTH AND RATINGS MANAGEMENT 89

based on a batch template created in Batch Entry. In the batch template, you select the batch type andworkflow you want used when data is imported.
• If you do not have an import file, but you want to enter updated information quickly, without opening everyrecord, you can use the batch process. With a batch, the program lists the selected fields (fields included in thebatch template) as fields in a spreadsheet so you can efficiently enter information in the database. Like theimport process, the batch requires a batch template, which specifies the fields to add or update.
Note: For information about working in Batch Entry, see the Batch Entry chapter in Data Management; forinformation about working in Import, see the Import chapter in Data Management.
The following Batch type is available when you create a giving summary batch template:• Giving Summary Update Batch: Updates constituent giving history data based on information included in theimport file or batch. If using an import, the import process can compare a record ID included in the import fileto system lookup IDs and alternate lookup IDs. During the import process, if the application finds a match inthe database, the information in thematched record is updated.
Edit Giving Summary Information
} Edit prospect giving summary information
1. From the constituent’s Wealth and Ratings page, in the More information pane, click Giving Summary.The Giving Summary page appears.
2. Click Edit. The Edit giving summary information screen appears.
3. Make the necessary changes. You do not have to complete all fields for each giving designation.
4. Click Save.
Delete Giving Summary Information
} Delete prospect giving summary information
1. From the constituent’s Wealth and Ratings page, in the More information pane, click Giving Summary.The Giving Summary page appears.
2. Click Delete. A confirmation screen appears.
3. Click Yes.
90 CHAPTER 3

Prospect AnalysisAccess Prospect Analysis 91
Add Prospect Analysis Dashboard 91
Add a Prospect Segmentation Screen 93
Edit Prospect Analysis Dashboards 94
Edit Prospect Segmentation Permissions 94
Delete Prospect Analysis Dashboards 95
Update Prospect Analysis Dashboards 95
View Prospect Analysis Dashboards 95
Prospect Segmentation Page 96
Prospect Analysis tools can help Prospect Researchers and Development Officers determine who and howmuchto ask for a gift. The prospect segmentation report is used to segment constituents in your database, identifyingprospects that satisfy specified modeling scores or ratings and aiding in the development of a cultivation strategyfor each segment created.The prospect segmentation report’s cross tab functionality shows all giving potential options held by yourconstituents. It places constituents in the report cell which carries the highest matched rating range. In addition,a constituent can exist in multiple cells, if you design the report using two secondary variables. When this occurs,the constituent appears in the best of these possible cells. The cell with the best rating displays in the lower, rightcorner of the report.
Access Prospect AnalysisYou access the Prospect Analysis functionality from the Prospects page by clicking Prospect analysis. TheProspect analysis page appears displaying any existing prospect analysis definitions. From this page you create,edit, delete, update, and generally manage your prospect analysis definitions and dashboards.
Add Prospect Analysis DashboardOnce created, the prospect analysis dashboard definitions are stored in the Prospect analysis dashboards gridon the Prospect analysis page. The dashboard views can be updated at any time.
chapter 4

} Add a new prospect analysis dashboard
1. From the Prospect analysis page, click Add. The Add prospect segmentation screen appears.
Note: For information about accessing the Prospect analysis page, see Access Prospect Analysis onpage 91.
2. Define your prospect analysis dashboard. For information on the fields and options included on thisscreen, see Add a Prospect Segmentation Screen on page 93.
Warning: The segmentation report is designed to display values from low to high, so make sure youenter your column and row information to correspond with this rule. For example, if you select Annualgiving likelihood for rows, in the Ranges grid, make sure your first entry is the lowest AGL rating youwant included in the report. The next grid entry should be the second lowest and so on.
3. Click Save to save the dashboard and return to the Prospect analysis page. The new dashboard displaysin the Prospect analysis dashboard grid.
92 CHAPTER 4

Add a Prospect Segmentation ScreenWarning: Custom ratings added by your organization are not available as variables in your prospect analysisdashboard.
Screen Item Description
Name You must name the prospect analysis dashboard. The name appears inthe Prospect analysis dashboard grid on the Prospect analysis page.
DescriptionYou can enter a description of the dashboard to help you identify it later.The description appears in the Prospect analysis dashboard grid on theProspect analysis page.
Others can modify Select if you want to allow other users to make changes to this definition.
Prospect source
Select the constituents you want to include in your dashboard.All modeled constituents: Any constituent in your database withmodeling or rating information that satisfies the variables selected.Use research group: Any constituent included in the selected researchgroup with modeling or rating information that satisfies the variablesselected.Use selection: Any constituent included in the chosen query selectionwith modeling or rating information that satisfies the variables selected.
Rows tab
Define the rows to be included in the Prospect Analysis cross tabs report:• Select score/rating: Select the score or rating variable on which you
want to base the rows displayed in your report. Custom ratings addedby your organization are not available as variables. Also, you cannotselect the same score or rating used on the Columns tab.
• Ranges: You must define at least one row using the columns providedin the Ranges frame. Each rowmust include a Label,Minimum value,andMaximum value. For example, if you select “Annual GivingLikelihood” in the Select score/rating field, for ranges to display in yourreport rows, you can enter “AGL 0-300” as a row Label, “0” as aMinimum value, and “300” as aMaximum value. To the right side ofthe Ranges grid, use the up and down arrows to arrange entries in thegrid. You must select the entire row you want to move to activate thearrows
Columns tab
Define the columns to be included in the Prospect Analysis cross tabsreport:• Select score/rating: Select the score or rating variable on which you
want to base the columns displayed in your report. You can select twoscores or ratings to include in the column head, but at least one isrequired. Custom ratings added by your organization are not availableas variables. Also, you cannot select the same score or rating used onthe Rows tab.
• Ranges: You must define at least one dashboard column using thecolumns provided in the Ranges frame. Each column must include aLabel,Minimum value, andMaximum value. The same is true if you
PROSPECT ANALYSIS 93
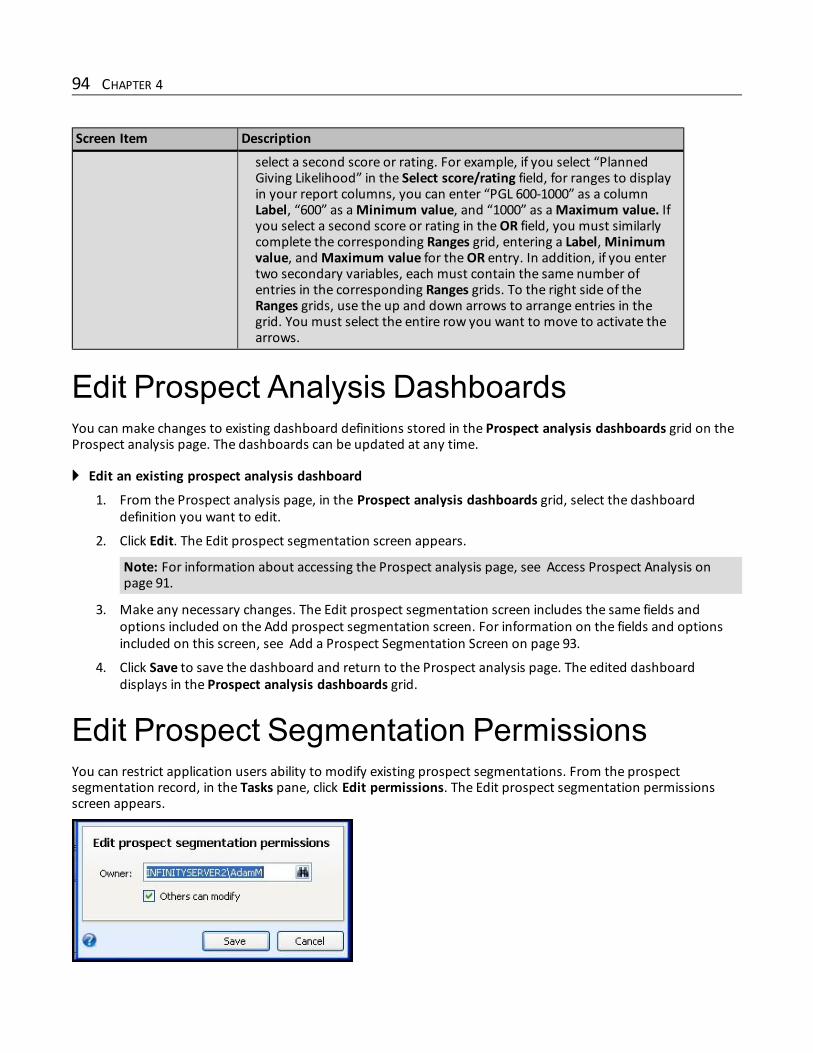
Screen Item Description
select a second score or rating. For example, if you select “PlannedGiving Likelihood” in the Select score/rating field, for ranges to displayin your report columns, you can enter “PGL 600-1000” as a columnLabel, “600” as aMinimum value, and “1000” as aMaximum value. Ifyou select a second score or rating in theOR field, you must similarlycomplete the corresponding Ranges grid, entering a Label,Minimumvalue, andMaximum value for theOR entry. In addition, if you entertwo secondary variables, each must contain the same number ofentries in the corresponding Ranges grids. To the right side of theRanges grids, use the up and down arrows to arrange entries in thegrid. You must select the entire row you want to move to activate thearrows.
Edit Prospect Analysis DashboardsYou can make changes to existing dashboard definitions stored in the Prospect analysis dashboards grid on theProspect analysis page. The dashboards can be updated at any time.
} Edit an existing prospect analysis dashboard
1. From the Prospect analysis page, in the Prospect analysis dashboards grid, select the dashboarddefinition you want to edit.
2. Click Edit. The Edit prospect segmentation screen appears.
Note: For information about accessing the Prospect analysis page, see Access Prospect Analysis onpage 91.
3. Make any necessary changes. The Edit prospect segmentation screen includes the same fields andoptions included on the Add prospect segmentation screen. For information on the fields and optionsincluded on this screen, see Add a Prospect Segmentation Screen on page 93.
4. Click Save to save the dashboard and return to the Prospect analysis page. The edited dashboarddisplays in the Prospect analysis dashboards grid.
Edit Prospect Segmentation PermissionsYou can restrict application users ability to modify existing prospect segmentations. From the prospectsegmentation record, in the Tasks pane, click Edit permissions. The Edit prospect segmentation permissionsscreen appears.
94 CHAPTER 4

In theOwner field, click the binoculars to access the Application users search screen. From this screen, you canassign an owner. Mark theOthers can modify checkbox if you want to allow anyone other than the assignedowner to make changes. Click Save to save the permissions.
Delete Prospect Analysis DashboardsYou can permanently remove existing dashboard definitions stored in the Prospect analysis dashboards grid onthe Prospect analysis page.
} Delete an existing prospect analysis dashboard
1. From the Prospect analysis page, in the Prospect analysis dashboards grid, select the dashboarddefinition you want to delete.
Note: For information about accessing the Prospect analysis page, see Access Prospect Analysis onpage 91.
2. Click Delete. A confirmation screen appears.
3. Click OK to remove the dashboard and return to the Prospect analysis page. The deleted dashboard nolonger displays in the Prospect analysis dashboards grid.
Update Prospect Analysis DashboardsOnce a dashboard definition is in place and saved in the Prospect analysis dashboards grid on the Prospectanalysis page, you can update the dashboard at any time. The Status column in the Prospect analysisdashboards grid tells you when an update is required for a specific dashboard definition.
} Update a prospect analysis dashboard
1. From the Prospect analysis page, in the Prospect analysis dashboards grid, select the dashboard youwant to update.
2. Click Update dashboard. A confirmation screen appears.
Note: For information about accessing the Prospect analysis page, see Access Prospect Analysis onpage 91.
3. Click Yes. The dashboard is updated to include themost up-to-date information.
View Prospect Analysis DashboardsYou must define and update your dashboard before you can view the results. For information about creating adashboard definition, see Add Prospect Analysis Dashboard on page 91; for information about updating adashboard, see Update Prospect Analysis Dashboards on page 95.
} View a prospect analysis dashboard
1. From the Prospect analysis page, in the Prospect analysis dashboards grid, select the dashboard youwant to view.
PROSPECT ANALYSIS 95

2. In the Status column, confirm the dashboard is “Ready” for viewing. If the column displays “Updaterequired” run the update by clicking Update dashboard.
Note: For information about accessing the Prospect analysis page, see Access Prospect Analysis onpage 91.
3. Once the dashboard is ready, click Go to dashboard. The selected dashboard opens.
If a constituent satisfies multiple range entries, rather than including the constituent in all range-satisfying boxes the report places the constituent in the higher rated box.
Prospect Segmentation PageThe Prospect segmentation page displays the results of your dashboard definitions in a cross tab format.
Print Prospect Analysis Dashboards
} Print a selected prospect analysis dashboard
1. From the dashboard, open the right-click menu or select the print icon on the dashboard toolbar.
Note: For information about accessing a dashboard, see View Prospect Analysis Dashboards on page95.
2. To preview the print version of the dashboard, select Print Layout.
3. To edit the print parameters including printer, orientation, paper size and source, and margins, selectPage Setup.
4. To print the dashboard, select Print.
Export Prospect Analysis DashboardsYou can export data contained in your dashboard to PDF or Microsoft Excel.
} Export a selected prospect analysis dashboard to another format
1. From the dashboard, open the right-click menu or click the export icon on the dashboard toolbar.
Note: For information about accessing a dashboard, see View Prospect Analysis Dashboards on page95.
2. To export to PDF, select Export, Acrobat (PDF) file. The Save As screen appears, allowing you to selectwhere you want the new file saved.
3. To export to Excel, select Export, Excel. The Save As screen appears, allowing you to select where youwant the new file saved.
View Segment PageA segment page displays the selected segment’s properties; date, source, owner, and description information;and a list of the prospects included in the selected segment. From this page, you can open an includedprospect’s constituent record, save the segment as a research group, and save the segment as a query selection.
96 CHAPTER 4

Access Segmentation PageFrom a prospect segmentation dashboard, you can access a segment page for a selected segment in thedashboard.
Note: For information about accessing a segmentation dashboard, see View Prospect Analysis Dashboards onpage 95.
For example, a segmentation dashboard includes a row for annual giving likelihood scores of 0-300 and anintersecting column for planned giving likelihood scores of 600-1000.
Click on the number included in this segment block to access the segment page displaying prospects satisfyingthe variable scores.
PROSPECT ANALYSIS 97
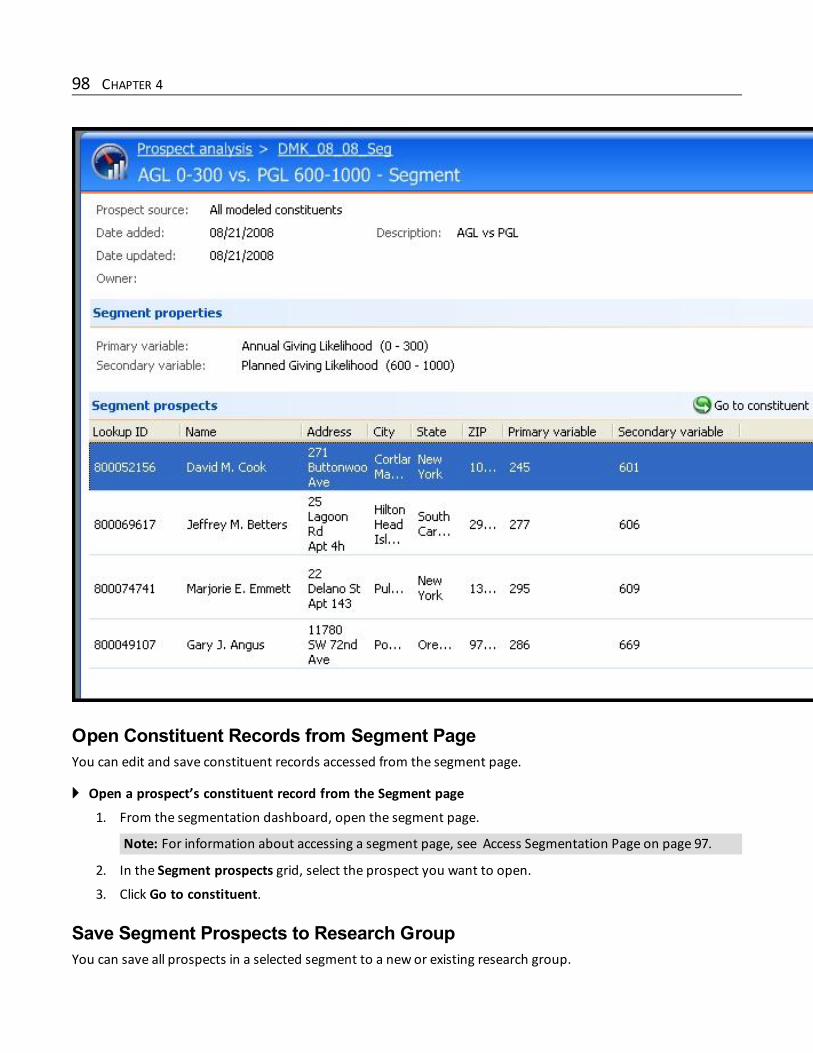
Open Constituent Records from Segment PageYou can edit and save constituent records accessed from the segment page.
} Open a prospect’s constituent record from the Segment page
1. From the segmentation dashboard, open the segment page.
Note: For information about accessing a segment page, see Access Segmentation Page on page 97.
2. In the Segment prospects grid, select the prospect you want to open.
3. Click Go to constituent.
Save Segment Prospects to Research GroupYou can save all prospects in a selected segment to a new or existing research group.
98 CHAPTER 4

Note: For information about Research Groups, see the Research Groups on page 101.
} Save segment prospects to a new or existing research group
1. From the segmentation dashboard, open the segment page.
Note: For information about accessing a segment page, see Access Segmentation Page on page 97.
2. Click Save constituents and select Research group. The Save constituents to research group screenappears.
3. To save the prospects to a new research group, select Create a new research group and enter a nameand description.
To add the prospects to an existing research group, select Add to existing research group and click thebinoculars in theName field to search for the research group you want to use.
4. Click Save.
Save Segment Prospects to SelectionYou can save all prospects in a selected segment to a new or existing research group.
Note: For information about selections, see the Query chapter in theQuery and Export Guide.
} Save segment prospects to a new or existing research group
1. From the segmentation dashboard, open the segment page.
Note: For information about accessing a segment page, see Access Segmentation Page on page 97.
2. Click Save constituents and select Selection. The Save constituents to selection screen appears.
PROSPECT ANALYSIS 99

3. Enter a enter a name and description.
4. You can also choose to make the new selection available for use in Query Designer and to overwrite anyexisting selection that shares this selection name.
5. Click Save. The next time you visit Query, the new selection displays in the Constituent frame of theSelections tab.
Delete Prospect SegmentationWhile working on a Prospect Segmentation page, you can delete the opened segmentation dashboard byclicking Delete prospect segmentation in the Tasks pane.
100 CHAPTER 4

Research GroupsAccess Research Groups 101
Add a Research Group 101
Edit a Research Group 103
Delete a Research Group 103
Filter Research Groups 103
Open a Research Group 104
Manage Research Group Records 104
Add or Update Group Members 114
Import Research Group from The Raiser’s Edge 122
Import Queries from The Raiser’s Edge as a Research Group 124
Research groups help you more effectively research potential BB_Variables. Research groups are static groups ofconstituents. You can manually add or deletemembers from the group, or you can update groups using aselection created in Query. Researchers use these groups to locate prospects and determine the quantity,quality, and type of prospects available in their database.
Access Research GroupsYou access the research group functionality from the Prospects page by clickingManage research groups. TheResearch Groups page appears displaying two tabs: Research Groups and Populate Research Groups. From thispage you create, edit, delete, and manage your research groups.
Warning: Only individual records can be added to research groups. You cannot include organizations.
Add a Research GroupWhen you add a research group, you must enter a name for the group. You can create your group from aselection created in Query, or you can create a group with no members and manually add members later.
chapter 5

} Add a new prospect research group
1. From the Research Groups tab on the Research Groups page, click Add. The Add research group screenappears.
Note: For information about accessing the Research Groups page, see Access Research Groups on page101.
2. In theName field, you must enter a name for your new group. The name appears in the Research groupsgrid of the Research Groups page.
3. In theDescription field, enter a description to help you identify the group.
4. In the Create from selection field, do one of the following:
• Click the binoculars to access the Selection Search screen and locate an existing selection of recordsyou want to include in the group. For information about selections, see the Query chapter in theQuery and Export Guide.
• Click theNew button at the end of the field to create a new selection of records. The Select a SourceView screen appears. For information about creating selections, see the Query chapter in theQueryand Export Guide.
Note: When creating selections it is important to understand the idea of “source views.” All selectionqueries are based on an initial source view, which instructs the program to select that particular type ofrecord for inclusion in the query. Source views determine the field categories available to include in aselection query.The record type on which a selection is based determines where the selection isavailable in the application and how it can be used.
• If you do not want to include a selection of records and plan to manually add records later, leave thefield blank. You manually add members from theMembers tab of the selected research group’srecord or you can add records from the Populate Research Groups tab. For more information, seeAdd Members to an Existing Group on page 105 or Add or Update Group Members on page 114.
5. If you do not select Others can modify, you limit another user’s ability to edit the name and description;however others can still run the populate research group process.
6. Click Save to save the new group and return to the Research Groups page.
102 CHAPTER 5

Edit a Research GroupYou can easily edit an existing research group, changing the name or description.
} Edit a prospect research group
1. From the Research Groups tab on the Research Groups page, select the group you want to edit.
Note: You can also access the Edit research group screen from a selected research group record. Fromthe Tasks pane on the record page, click Edit research group.
2. Click Edit. The Edit research group screen appears.
Note: For information about accessing the Research Groups page, see Access Research Groups on page101.
3. In theName field, enter a new group name. This field is required. The name appears in the Researchgroups grid of the Research Groups page.
4. In theDescription field, enter a new group description to help you identify the group.
5. Click Save to save the group and return to the Research Groups page.
Delete a Research GroupYou can easily delete an existing research group, permanently removing it from your system.
Warning: If you attempt to delete a research group on whichWealthpoint updates have been performed, youcannot delete the group without first deleting theWealthPoint search history related to the research group.
} Delete a prospect research group
1. From the Research Groups tab on the Research Groups page, select the group you want to delete.
2. Click Delete. A confirmation screen appears.
Note: For information about accessing the Research Groups page, see Access Research Groups on page101.
3. Click Yes to delete the group and return to the Research Groups page.
Filter Research GroupsOn the Research Groups page, you can apply filters to determine what to view on the page. As the group listgrows, it may be difficult to find a particular group. To narrow the list, click Filter on the action bar. TheName,Added by, and Date added fields appear. Enter the information on which you want to base your filtering process.Once you enter criteria, click Apply on the action bar. The appropriate group(s) appear in the grid. To start thefilter process over, click Reset. The data is removed from the fields so you can enter data again. To return to thedefault grid without the filter fields, click Filter on the action bar.
RESEARCH GROUPS 103

Open a Research Group} Open an existing research group
1. From the Research Groups tab on the Research Groups page, select the existing research group you wantto open.
Note: For information about accessing the Research Groups page, see Access Research Groups on page101.
2. Click Go to research group. The selected research group appears.
Manage Research Group RecordsFrom the research group record, you can importWealthpoint updates for the entire group; viewwealthsummary information; track themembers included in the group; and sync, link and unlink members withconstituent records in The Raiser’s Edge.
Import GroupWealthPoint UpdatesIf your organization usesWealthPoint service, you can importWealthPoint updates for all members in thegroup.When importingWealthPoint information, the system does not override any manually entered data you storedon a given prospect. For example, if you entered real estate information for Mark Adamson and real estateinformation is included in theWealthPoint import, whatever information you entered about Mr. Adamsonremains intact after the import.
Note: You can also importWealthPoint updates for an individual constituent from the constituent’s Wealthand Ratings page. For more information, see Obtain Prospect Wealth Information on page 36.
} Import WealthPoint updates for all members of a group
1. From the Research Groups tab on the Research Groups page, select the existing research group you wantto open.
Note: For information about accessing the Research Groups page, see Access Research Groups on page101.
2. Click Go to research group. The selected research group appears displaying theWealth Summary tab.
3. In the Tasks pane, click Get WealthPoint updates for group. A confirmation screen appears.
Warning: Only members with theWealthPoint update option enabled are processed. If you markedtheDisable wealth updates on any member records, thosemembers are not included in the update.For more information, see “Wealth and Ratings Management” on page 1.
4. Click Yes to get the updates. The program processes the update request. A bar at the top of the pagetracks the process.
When the update is complete, information about themost recent wealth update displays on theWealthsummary tab.
104 CHAPTER 5
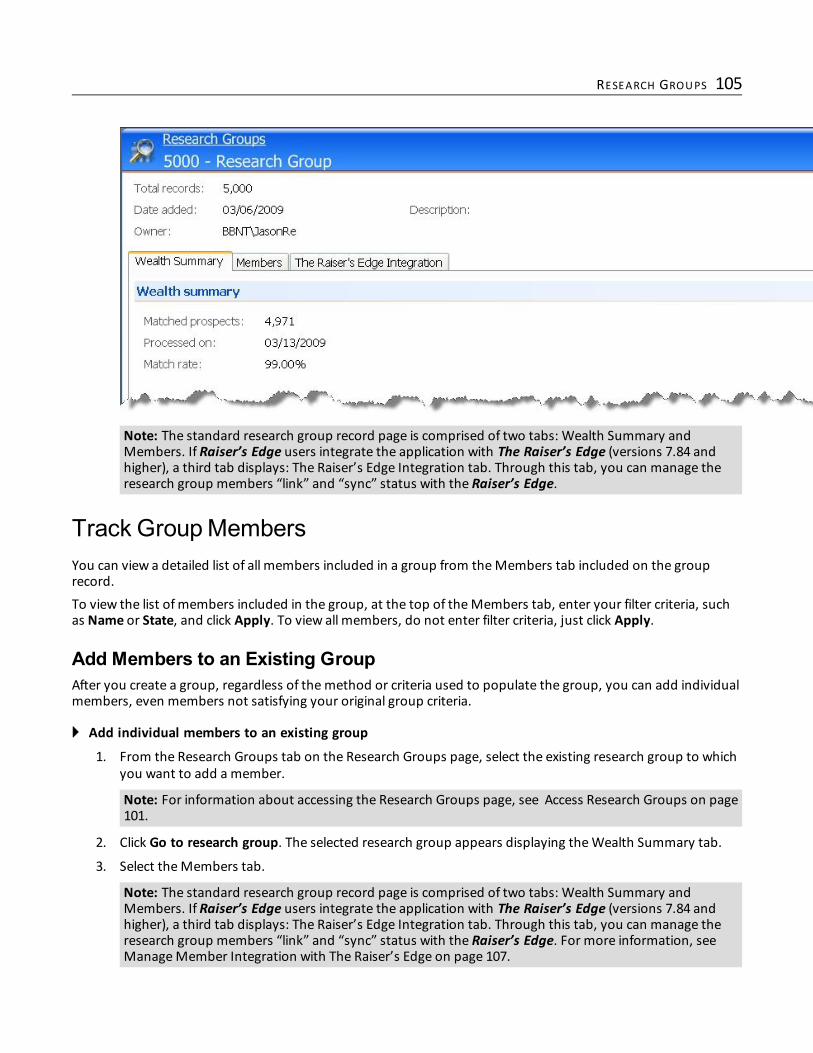
Note: The standard research group record page is comprised of two tabs: Wealth Summary andMembers. If Raiser’s Edge users integrate the application with The Raiser’s Edge (versions 7.84 andhigher), a third tab displays: The Raiser’s Edge Integration tab. Through this tab, you can manage theresearch group members “link” and “sync” status with the Raiser’s Edge.
Track GroupMembersYou can view a detailed list of all members included in a group from theMembers tab included on the grouprecord.To view the list ofmembers included in the group, at the top of theMembers tab, enter your filter criteria, suchas Name or State, and click Apply. To view all members, do not enter filter criteria, just click Apply.
Add Members to an Existing GroupAfter you create a group, regardless of themethod or criteria used to populate the group, you can add individualmembers, even members not satisfying your original group criteria.
} Add individual members to an existing group
1. From the Research Groups tab on the Research Groups page, select the existing research group to whichyou want to add a member.
Note: For information about accessing the Research Groups page, see Access Research Groups on page101.
2. Click Go to research group. The selected research group appears displaying theWealth Summary tab.
3. Select theMembers tab.
Note: The standard research group record page is comprised of two tabs: Wealth Summary andMembers. If Raiser’s Edge users integrate the application with The Raiser’s Edge (versions 7.84 andhigher), a third tab displays: The Raiser’s Edge Integration tab. Through this tab, you can manage theresearch group members “link” and “sync” status with the Raiser’s Edge. For more information, seeManageMember Integration with The Raiser’s Edge on page 107.
RESEARCH GROUPS 105

4. Click Add. The Add research group member screen appears.
5. Click the binoculars to access the Individual Search screen and locate the newmember. You can also addconstitutes to your database from the search screen by clicking the Add button.
6. Once the newmember has been selected or added, from the Add research group member screen, clickSave. The newmember is added to the group.
Delete Members from an Existing GroupAfter you create a group, regardless of themethod or criteria used to populate the group, you can removeindividual members.
} Delete individual members from an existing group
1. From the Research Groups tab on the Research Groups page, select the existing research group to whichyou want to add a member.
Note: For information about accessing the Research Groups page, see Access Research Groups on page101.
2. Click Go to research group. The selected research group appears displaying theWealth Summary tab.
3. Select theMembers tab.
Note: The standard research group record page is comprised of two tabs: Wealth Summary andMembers. If Raiser’s Edge users integrate the application with The Raiser’s Edge (versions 7.84 andhigher), a third tab displays: The Raiser’s Edge Integration tab. Through this tab, you can manage theresearch group members “link” and “sync” status with the Raiser’s Edge. For more information, seeManageMember Integration with The Raiser’s Edge on page 107.
4. In theMembers grid, select the constituent you want to remove from the group.
5. Click Delete. A confirmation screen appears.
6. Click Yes to remove themember from the group.
Edit Research DetailsIf you discover you must change the prospect manager assigned to a prospect or change the prospect’s status,you can using the Edit research details link. The Edit research details screen appears, and you can make thesenecessary changes.
View Members Constituent RecordsIf while working in a research group, you need to access a member’s constituent record, you can easily do so.Once in the constituent record, you can make and save any necessary changes and return to the research group.
106 CHAPTER 5

ManageMember Integration with The Raiser’s EdgeIf your organization uses Blackbaud’s The Raiser’s Edge 7.84 or higher and the programs are integrated, a thirdtab displays on the research group record page. Using The Raiser’s Edge Integration tab, you can sync recordswith The Raiser’s Edge, and link and unlink records with The Raiser’s Edge.
Note: For more information about integrating your program with The Raiser’s Edge, see Raiser’s EdgeIntegration on page 9.
Link Group Members with The Raiser’s EdgeIf you integrate ResearchPointwith The Raiser’s Edge (7.84 or higher), you can link constituent records stored inthe two program databases. Once linked, you can sync up information stored on the two records, allowing youto maintain up-to-date information on any constituents stored in both application databases.
} Link a group member with a Raiser’s Edge constituent
Before you can link records, you must set up the Raiser’s Edge integration functionality. For information aboutconfiguring your system to integrate with The Raiser’s Edge, see Raiser’s Edge Integration on page 9.
1. From the Research Groups tab on the Research Groups page, select the research group containing themember you want to link to a Raiser’s Edge constituent.
Note: For information about accessing the Research Groups page, see Access Research Groups on page101.
2. Click Go to research group. The selected research group appears displaying theWealth Summary tab.
3. Select the The Raiser’s Edge Integration tab.
RESEARCH GROUPS 107

4. Any constituents included in the group not linked to a constituent record in The Raiser’s Edge display intheUnlinked constituents grid. To view the list of unlinked constituents, enter filter information -Name,City, orState - and click the Apply. All constituents satisfying your filter criteria display in the grid.
5. In this grid, select the constituent you want to link.
Note: Only 500 constituents can display in each grid. If you are working with more than 500constituents, use the filtering options included at the top of the tab to filter for just the constituentsyou need to see.
6. Click Link with The Raiser’s Edge. The Raiser’s Edge constitute search screen appears. A number of thefields on this screen populate automatically, displaying information about the selected constituent.
Note: You can also opt to add a new constituent from the search screen by clicking the Add button.
7. Click Search. All Raiser’s Edge constituents satisfying the search criteria appear.
8. Select the constituent you want to link to the ResearchPoint constituent.
108 CHAPTER 5

9. Click Open. The two records are linked, and you return to the Raiser’s Edge Integration tab. The newlylinked record moves into the Linked constituents grid.
Unlink Group Members from The Raiser’s EdgeIf you integrate ResearchPointwith The Raiser’s Edge (7.84 or higher), you can link constituent records stored inthe two program databases. If after linking constituents you discover an error or want to break the link for anyreason, you can easily do so.
} Unlink a group member from a Raiser’s Edge constituent
Before you can link or unlink records, you must set up the Raiser’s Edge integration functionality. Forinformation about configuring your system to integrate with The Raiser’s Edge, see Raiser’s Edge Integration onpage 9.
1. From the Research Groups tab on the Research Groups page, select the research group containing themember you want to unlink from a Raiser’s Edge constituent.
Note: For information about accessing the Research Groups page, see Access Research Groups on page101.
2. Click Go to research group. The selected research group appears displaying theWealth Summary tab.
3. Select the The Raiser’s Edge Integration tab.
RESEARCH GROUPS 109
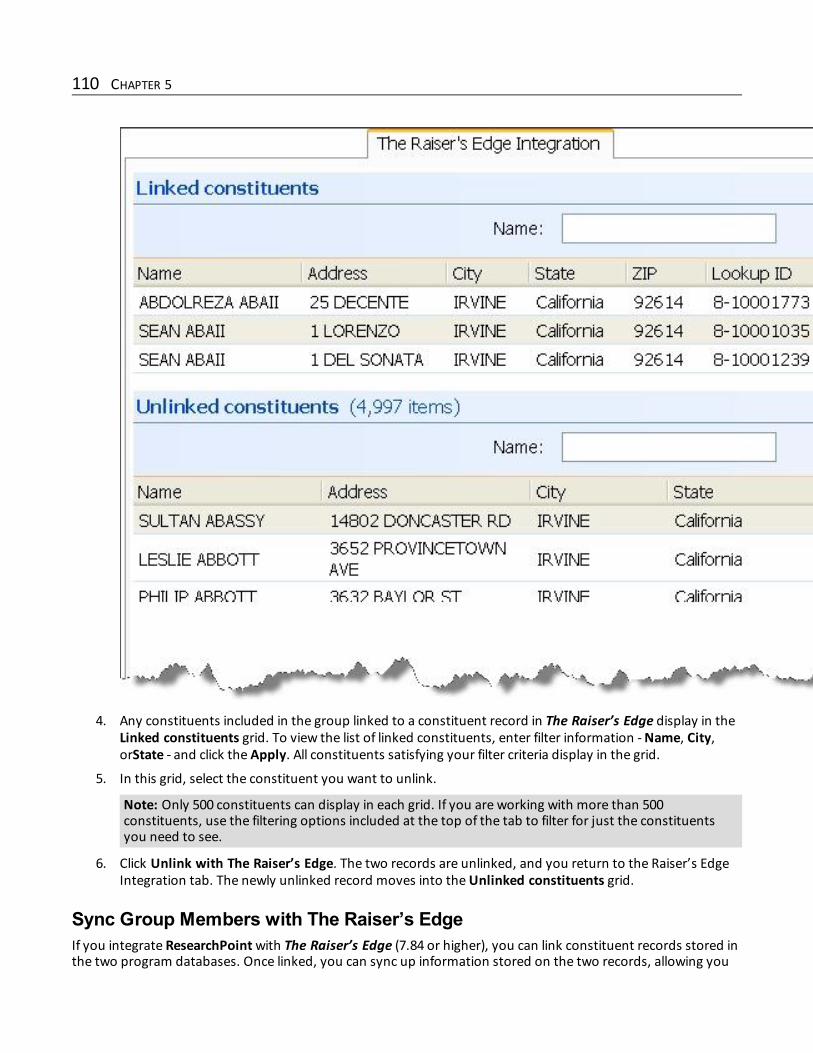
4. Any constituents included in the group linked to a constituent record in The Raiser’s Edge display in theLinked constituents grid. To view the list of linked constituents, enter filter information -Name, City,orState - and click the Apply. All constituents satisfying your filter criteria display in the grid.
5. In this grid, select the constituent you want to unlink.
Note: Only 500 constituents can display in each grid. If you are working with more than 500constituents, use the filtering options included at the top of the tab to filter for just the constituentsyou need to see.
6. Click Unlink with The Raiser’s Edge. The two records are unlinked, and you return to the Raiser’s EdgeIntegration tab. The newly unlinked record moves into theUnlinked constituents grid.
Sync Group Members with The Raiser’s EdgeIf you integrate ResearchPointwith The Raiser’s Edge (7.84 or higher), you can link constituent records stored inthe two program databases. Once linked, you can sync up information stored on the two records, allowing you
110 CHAPTER 5

to maintain up-to-date information on any constituents stored in both application databases.
} Sync a group member with a Raiser’s Edge constituent
Before you can link and sync records, you must set up the Raiser’s Edge integration functionality. Forinformation about configuring your system to integrate with The Raiser’s Edge, see Raiser’s Edge Integration onpage 9.
1. From the Research Groups tab on the Research Groups page, select the research group containing themember you want to sync with a Raiser’s Edge constituent.
Note: For information about accessing the Research Groups page, see Access Research Groups on page101.
2. Click Go to research group. The selected research group appears displaying theWealth Summary tab.
3. Select the The Raiser’s Edge Integration tab.
RESEARCH GROUPS 111

4. To view the list of linked constituents, in the Linked constituents grid enter filter information -Name,City, orState - and click the Apply. All constituents satisfying your filter criteria display in the grid.
5. In the Linked constituents grid, select the record you want to sync with the linked Raiser’s Edgeconstituent. If the record you want to sync is not linked to a Raiser’s Edge constituent, see Link GroupMembers with The Raiser’s Edge on page 107.
Note: Only 500 constituents can display in each grid. If you are working with more than 500constituents, use the filtering options included at the top of the tab to filter for just the constituentsyou need to see.
6. Click Sync with The Raiser’s Edge. The program syncs the selected record with the linked Raiser’s Edgerecord based on the integration configuration settings established in The Raiser’s Edge Integration.
Note: For information about configuring the integration process, see Raiser’s Edge Integration on page9.
View Group MembersWhile working on the The Raiser’s Edge Integration tab linking, unlinking, and syncing records in the twoapplications, you can easily access ResearchPoint constituent records. You can view information, and make andsave changes. You can also easily return to the The Raiser’s Edge Integration tab.
} View group members constituent records
1. From the The Raiser’s Edge Integration tab, in either the Linked constituents or Unlinked constituentsgrid, select the constituent you want to view.
2. Click Go to constituent. Themember’s ResearchPoint constituent record appears.
3. Click Back to return to the The Raiser’s Edge Integration tab.
Sync Entire Group with The Raiser’s EdgeIf you integrate ResearchPointwith The Raiser’s Edge (7.84 or higher), you can link constituent records stored inthe two program databases. Once linked, you can sync up information stored on the two records, allowing youto maintain up-to-date information on any constituents stored in both application databases. Using the Syncgroup with The Raiser’s Edge function, you can save time, and sync all linked group members at once.
Note: For information about syncing one record at a time, see Sync Group Members with The Raiser’s Edge onpage 110; for information about linking records, see Link Group Members with The Raiser’s Edge on page 107.
} Sync entire group with Raiser’s Edge constituents
Before you can link and sync records, you must set up the Raiser’s Edge integration functionality. Forinformation about configuring your system to integrate with The Raiser’s Edge, see Raiser’s Edge Integration onpage 9.
1. From the Research Groups tab on the Research Groups page, select the research group containing themembers you want to sync with Raiser’s Edge constituents.
Note: For information about accessing the Research Groups page, see Access Research Groups on page101.
2. Click Go to research group. The selected research group appears displaying theWealth Summary tab.
3. Select the The Raiser’s Edge Integration tab.
112 CHAPTER 5
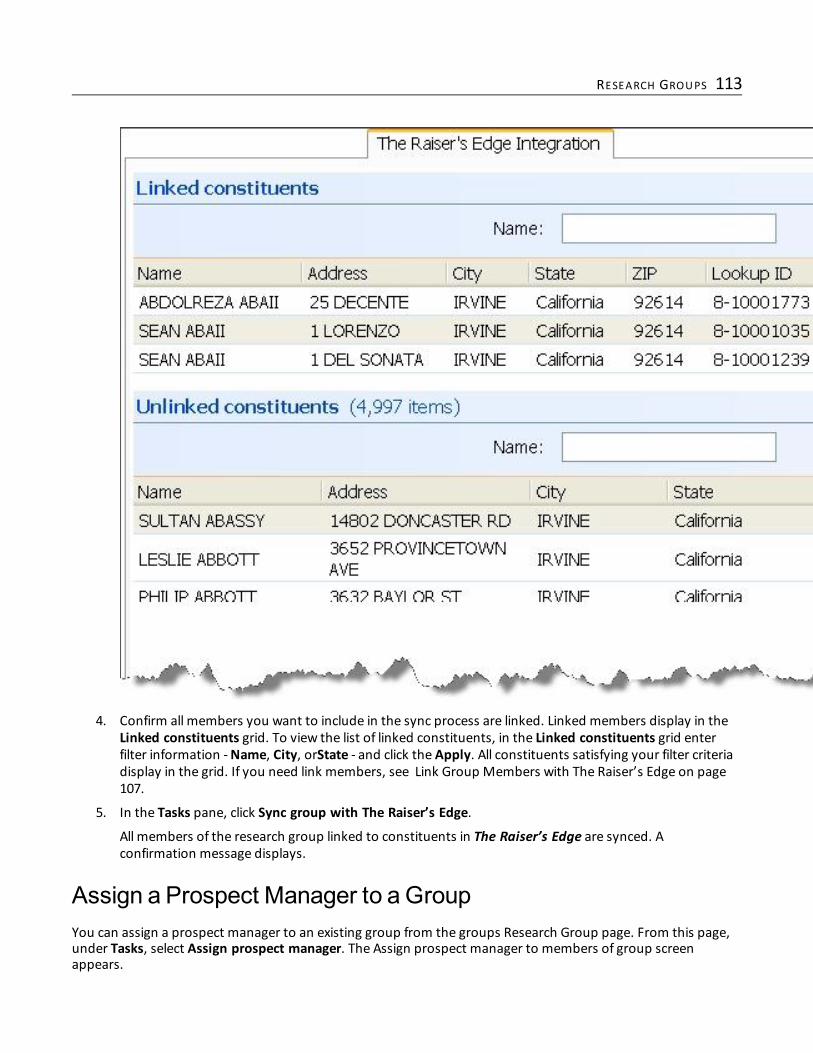
4. Confirm all members you want to include in the sync process are linked. Linked members display in theLinked constituents grid. To view the list of linked constituents, in the Linked constituents grid enterfilter information -Name, City, orState - and click the Apply. All constituents satisfying your filter criteriadisplay in the grid. If you need link members, see Link Group Members with The Raiser’s Edge on page107.
5. In the Tasks pane, click Sync group with The Raiser’s Edge.
All members of the research group linked to constituents in The Raiser’s Edge are synced. Aconfirmation message displays.
Assign a Prospect Manager to a GroupYou can assign a prospect manager to an existing group from the groups Research Group page. From this page,under Tasks, select Assign prospect manager. The Assign prospect manager to members of group screenappears.
RESEARCH GROUPS 113

In the Prospect manager field, select themanager you want to assign all members of this group. Click the searchicon in the field to access a search screen to help you locate themanager. Mark Overwrite existing prospectmanager if you want this selection to override any manager currently assigned group members. Click Save toassign the selected manager.
Edit Group PermissionsYou can restrict application users ability to modify existing research groups. From the research group record, inthe Tasks pane, click Edit group permissions. The Edit research group permissions screen appears.In theOwner field, click the binoculars to access the Application users search screen. From this screen, you canassign an owner to the group. Mark theOthers can modify checkbox if you want to allow anyone other than theassigned owner to make changes to the group. Click Save to save the permissions.
MapGroup AddressFrom the Research Group page, you can map to the group’s address by clickingMap group in the Tasks pane onthe left side of the page. TheMapping page appears, and you can create and save your group map.To use this functionality, your organization must haveMicrosoft’s virtual Earth installed and you must haverights to themapping software.
Research Group ReportThe Research group report allows prospect researchers to prepare and print reports that include all members ofa selected research group.To generate the report, open the research group for which you want to generate the research group report.Under Reports, click Research group report.
Note: Report capacity is 500 records.
The report includes a detailed profile of each group member. In addition to the group member’s name andcontact information, the report includes:• Prospect Summary: Primary business, birth, gender, and spouse information• Notes: Any notations, media links, or attachments included on the Documentation tab of the prospect’sconstituent record
The details view of the report, accessed by clicking the View details link included on the report screen, includesadditional information pulled from the prospect’s constituent record, such as constituencies and relationshipdata.
Add or Update Group MembersWhen you create a research group you have the option of assigning the group a static selection of records orcreating an empty group to be populated at a later date. Even if you associate your group with a selection ofrecords when you create it, there is a good chance that at some point you will want to add newmembers orupdate the static selection, making sure any new constituents satisfying your selection criteria are included asmembers in the group. The program allows you to both add members manually and update the list ofmembersincluded in your selection.
114 CHAPTER 5
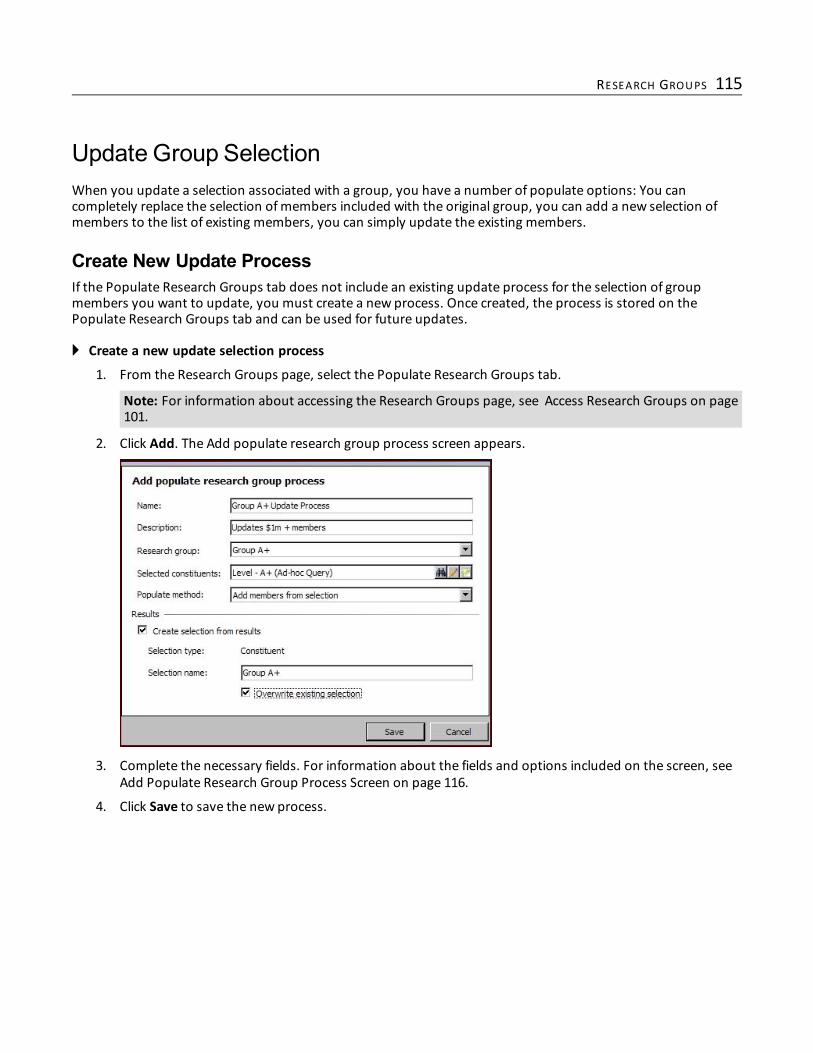
Update Group SelectionWhen you update a selection associated with a group, you have a number of populate options: You cancompletely replace the selection ofmembers included with the original group, you can add a new selection ofmembers to the list of existing members, you can simply update the existing members.
Create New Update ProcessIf the Populate Research Groups tab does not include an existing update process for the selection of groupmembers you want to update, you must create a new process. Once created, the process is stored on thePopulate Research Groups tab and can be used for future updates.
} Create a new update selection process
1. From the Research Groups page, select the Populate Research Groups tab.
Note: For information about accessing the Research Groups page, see Access Research Groups on page101.
2. Click Add. The Add populate research group process screen appears.
3. Complete the necessary fields. For information about the fields and options included on the screen, seeAdd Populate Research Group Process Screen on page 116.
4. Click Save to save the new process.
RESEARCH GROUPS 115
Add Populate Research Group Process ScreenScreen Item Description
Name Name the process - required.Description You can enter a description of the process to help you identify it later.
Research groupYou create research groups on the Research Groups tab. This fieldincludes a list of all existing groups. Select the group for which you want tocreate a populate process. For information about creating a new groups,see Add a Research Group on page 101.
Selectconstituents/Populatemethod
In the Select constituents field, select the selection of constituents youwant to use to populate the group. You then must select a Populatemethod. You have a number of options here:• You can replace the selection ofmembers included with the original
group by selecting a different selection in the Select constituents fieldthan the one used when you created the group. Then in the Populatemethod field, select “Updatemember list as selection”.
• You can add a new selection ofmembers to the list of existing membersby selecting a different selection in the Select constituents field thanthe one used when you created the group. Then in the Populatemethod field, select “Add members from selection”.
• You can update the existing members by selecting the same selectionused when you created the group. Then in the Populate method field,you can select either “Add members from selection” or “Updatemember list as selection”.
Keep in mind, only members included in the selection are affected by thisupdate. Any other changes made to this group before you run the updateare not affected.• The “Add members from selection” option adds any additional
members without overriding any members you manually added to thegroup.
• The “Updatemember list as selection” option replaces the entire groupwith the updated selection, and overrides any manually addedmembers not included in the selection.
Results frame
Mark Create selection from results if you want to create a selectionrecord containing all members added to the group. If you mark thischeckbox, you must enter a name for the new selection. If you want tooverwrite any existing selection record with the same name, markOverwrite existing selection. The results selection is available in Query.
Edit an Update ProcessYou can easily edit existing update processes from the Populate Research Groups tab.
} Edit an existing update selection process
1. From the Research Groups page, select the Populate Research Groups tab.
Note: For information about accessing the Research Groups page, see Access Research Groups on page101.
116 CHAPTER 5

2. Select the process you want to change.
3. Click Edit. The Edit populate research group process screen appears.
4. Change the necessary fields. For information about the fields and options included on the screen, seeAdd Populate Research Group Process Screen on page 116.
5. Click Save to save the edited process.
Delete an Update ProcessYou can easily delete existing update processes from the Populate Research Groups tab.
} Delete an existing update selection process
1. From the Research Groups page, select the Populate Research Groups tab.
Note: For information about accessing the Research Groups page, see Access Research Groups on page101.
2. Select the process you want to remove.
3. Click Delete. A confirmation screen appears.
4. Click Yes to remove the process.
Run an Update ProcessOnce you have an update process in place, you must run the process to populate the group.
Note: For information about creating a process, see Create NewUpdate Process on page 115; for informationabout editing an existing process, see Edit an Update Process on page 116.
} Run an existing update selection process
1. From the Research Groups page, select the Populate Research Groups tab.
Note: For information about accessing the Research Groups page, see Access Research Groups on page101.
2. Select the process you want to run.
3. Click Start process. The Edit populate research group process screen appears.
4. Make any necessary changes. For information about the fields and options included on the screen, seeAdd Populate Research Group Process Screen on page 116.
5. Click Start to start the process. The process is executed and the processing page appears.
For information about the processing page, see ViewUpdate Process Information on page 1.
Tabs of a Process Status PageEach business process in the database has a status page. The process status page contains information specificto the process. You enter this information when you add the process to the database. Each process status pagealso includes information about themost recent instance of the process and historical data about the process.On some process status pages, you can manage the job schedules of the process. To help manage thisinformation, each process status page contains multiple tabs.
RESEARCH GROUPS 117

Recent Status TabOn the Recent status tab, you view the details of themost recent instance of the process. These details includethe status of the process; the start time, end time, and duration of the process; the person who last started theprocess; the name of the server most recently used to run the process; the total number of records processed;and howmany of those records processed successfully and howmany were exceptions.
History TabEach time you run a business process, the program generates a status record of the instance. On the History tab,you view historical status record information about each instance of the process. The information in the gridinclude the status and date of the instance.On the History tab, you can limit the status records that appear in the grid. You can filter by the process status. Ifyou filter the records that appear in the grid, it can reduce the amount of time it takes to find a process instance.For example, if you search for a instance that did not finish its operation, you can select to view only statusrecords with a Status of Did not finish. To filter the records that appear in the grid, click the funnel in the actionbar. The Status field and Apply button appear so you can select the status of the instances to appear in the grid.To update the information that appears, click Refresh List on the action bar.Depending on your security rights and system role, you can delete a status record from the grid on the Historytab.
Delete a Status Record from the History Tab of a Process Status PageOn the History tab of a process status page, you can delete a specific status record of the process. When youdelete a status record, you delete the process and all of its history. Before you delete a process, we stronglyrecommend you back up your data. Unless you previously save the transmission file or prenotificationauthorization file, once you delete the process, you can no longer use its output file that contains the dataextracted from your database.
} Delete a status record from the History tab
1. On the process status page, select the History tab.
Note: You can filter the status records that appear in the grid by the process status. If you filter therecords in the grid, it can reduce the amount of time it takes to find an process instance. For example, ifyou search for a instance that completed its operation, you can select to view only status records with aStatus of Completed. To filter the records that appear in the grid, click the funnel in the action bar. TheStatus field and Apply button appear so you can select the status of the instances to appear in the grid.
2. In the grid, select the status record to delete.
3. On the action bar, select Delete. Amessage appears to confirm the deletion of the status record.
4. Click Yes. You return to the History tab. The selected status record no longer appears.
Job Schedules Tab (Not Available on all Process Pages)On the Job schedules tab, you view the job schedules of the process in the database. The details in this gridinclude the name of the job, whether a job schedule is enabled, the frequency of the job schedule, the start dateand time and end date and time of the scheduled jobs, and the dates the job schedule is added and last changedin the database. You enter this information when you set the job schedule of the process.Depending on your security rights and system role, you can add, edit, and delete job schedules that appear onthe Job schedules tab. To update the information that appears, click Refresh List on the action bar.
118 CHAPTER 5
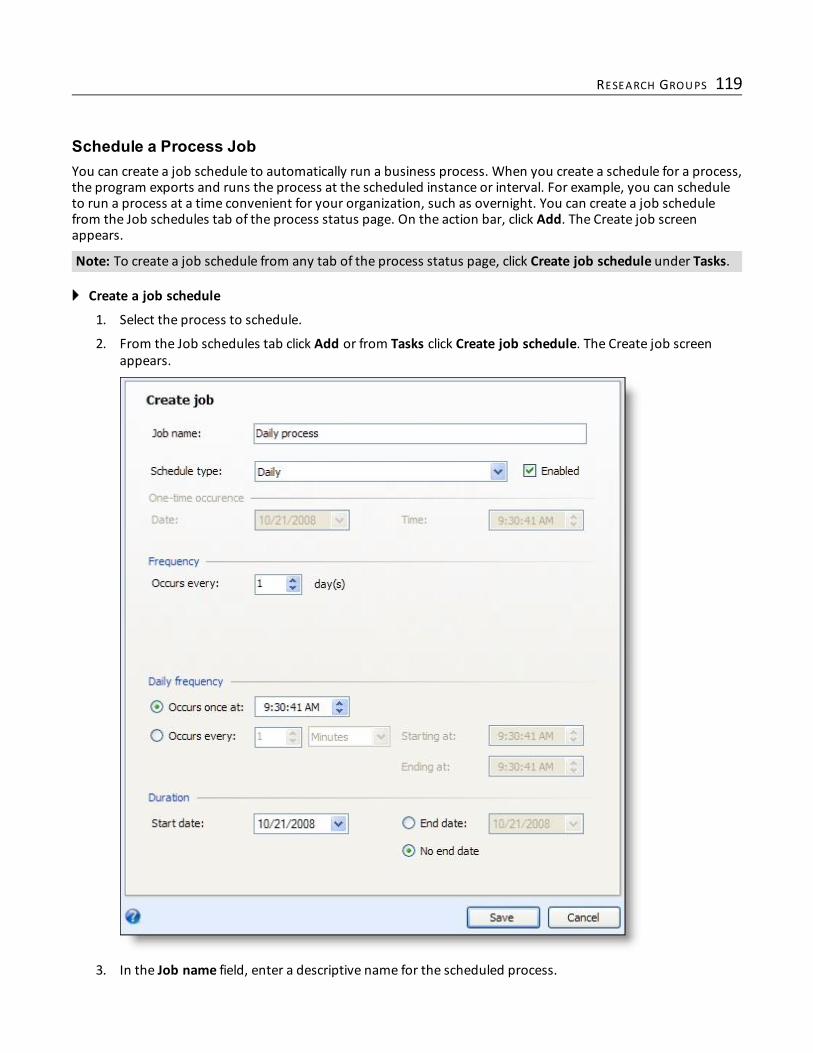
Schedule a Process JobYou can create a job schedule to automatically run a business process. When you create a schedule for a process,the program exports and runs the process at the scheduled instance or interval. For example, you can scheduleto run a process at a time convenient for your organization, such as overnight. You can create a job schedulefrom the Job schedules tab of the process status page. On the action bar, click Add. The Create job screenappears.
Note: To create a job schedule from any tab of the process status page, click Create job schedule under Tasks.
} Create a job schedule
1. Select the process to schedule.
2. From the Job schedules tab click Add or from Tasks click Create job schedule. The Create job screenappears.
3. In the Job name field, enter a descriptive name for the scheduled process.
RESEARCH GROUPS 119

4. To suspend the scheduled process, unmark Enabled. To make the process active, mark Enabled. Bydefault, this checkbox is marked.
5. In the Schedule Type field, select the desired frequency on which to run the process.
6. Make any necessary changes to the job’s frequency and duration.
7. To save the changes, click Save.
Edit a Job ScheduleOnce you create an job schedule for a process, you can update it as necessary, such as to adjust its frequency.You cannot edit the package selected to create the job schedule.
} Edit a job schedule
1. On the Job schedules tab, select the job to edit.
2. On the action bar, click Edit. The Edit schedule screen appears.
3. Edit the information on the screen. For example, you could change the Schedule Type and specify adifferent frequency on which the process should run. The items on this screen are the same as those onthe Create job screen. For more information about these items, see Schedule a Process Job on page 119and the Create Job Screen on page 120.
4. Click Save to save the changes. You return to the Job schedules tab.
Create Job ScreenThe table below explains the items on the Create job screen. For information about how to access this screen,see Schedule a Process Job on page 119.
Screen Item Description
Job name Enter the name of the job schedule.
Schedule type
Selections for job frequency include:-One time: The scheduled process runs once, on the date and timespecified in the One-time occurrence field.-Daily: The scheduled process runs on a daily basis. In the Frequencysection, specify the number of days to lapse between each run of the job.In the Daily frequency section, specify a time for the process to run orspecify that the process run repeatedly during a specific period of time. Inthe Duration section, specify the date that your process begins. If youwant the process to run over a specific period of time, specify an optionalEnd date or keep the default ofNo end date.-Weekly: The scheduled process runs on a weekly basis. In the Frequencysection specify the number of weeks to lapse before the process runs, inaddition to the day of the week for it to run. In the Daily frequency section,set a specific time for the process to run, or specify that the process runrepeatedly during a specific period of time. In the Duration section, specifythe date that your process begins. If you want the process to run over aspecific period of time, specify an optional End date or keep the default ofNo end date.-Monthly: The scheduled process runs on a monthly basis. In theFrequency section, specify the number ofmonths to lapse before theprocess runs, in addition to the day of themonth for it to run. In theDaily
120 CHAPTER 5

Screen Item Description
frequency section, specify a specific time for the process to run or specifythat the process run repeatedly during a specific period of time. In theDuration section, specify the date that your process begins. If you wantthe process to run over a specific period of time, specify an optional Enddate or keep the default ofNo end date.-Start when SQL Server Agent service starts: The scheduled job processruns when the SQL Server Agent service starts. This is useful if you use theSQL Server Agent service for other tasks.-Start when the computer becomes idle: The job runs when enoughresources are available on the server. This is determined by the idlecondition defined in the SQL Server Agent properties on the server.
Enabled To suspend the scheduled process, unmark this checkbox. To make theprocess active, mark Enabled. By default, this checkbox is marked.
DateAppears when you select One time in the Schedule type field. Use thedate format mm/dd/yyyy, or click the drop down arrow to select from acalendar.
Time Appears when you select One time in the Schedule type field. Enter thedate of the one-time occurrence.
Occurs every [ ] month(s) Enabled when you select Daily, Weekly, or Monthly in the Schedule typefield.
Days of the weekAppears when you select Weekly in the Schedule type field. Mark thecheckbox beside the day of the week to run the job. You can select one ormultiple days.
Day [ ] of the month Appears when you select Monthly in the Schedule type field.
The [ ] [ ] of the month
Appears when you select Monthly in the Schedule type field. In the firstfield select First, Second, Third, Fourth, or Last. In the second field select aday of the week or Day, Weekday, or Weekend day. For example, to run aprocess the last Friday of every month, select Last in the first field andFriday in the second field.
Occurs once at [ ] Enabled when you select Daily, Weekly, or Monthly in the Schedule typefield.
Occurs every [ ] [ ]
Enabled when you select Daily, Weekly, or Monthly in the Schedule typefield. To move the number by one, click the up and down arrow in the firstfield. In the second field, select Minutes or Hour. For example, to run thisprocess in themorning and afternoon every day at work, enter 4 in thefirst field and select Hours in the second field.
Starting at and Ending atEnabled when you select Occurs every [ ] [ ]. Using the example in theprevious row, enter 8:00:00AM in the Start at field and 5:00:00PM in theEnding at field.
Start date Enter the date for the job schedule to begin to process. Use the dateformat mm/dd/yyyy, or click the arrow to select from a calendar.
End dateEnter the date for the job schedule to end. For example, enter an end-of-year date. Use the date format mm/dd/yyyy, or click the arrow to selectfrom a calendar. This option is disabled when No end date is selected.
No end date If your job schedule does not have an end date, mark this option.
RESEARCH GROUPS 121

Delete a Job ScheduleOn the Job schedules tab of a status page, you can delete a job schedule of the process. When you delete a jobschedule, you delete the scheduled job and any changes made to it outside the program.
} Delete a job schedule
1. On the Job schedules tab, select the job to delete.
2. On the action bar, click Delete. A confirmation screen appears.
3. Click Yes to delete the job. You return to the Job schedules tab.
Generate Windows Scripting FileAWindows Scripting File (*.wsf) is an executable script file format for Windows that can incorporate VBScript(*.vbs) routines and include XML elements.
} Generate a Windows Scripting File
1. Go to the process that requires a Windows Scripting File.
2. Under Tasks, click Generate WSF. The Generate business process WSF file screen appears.
3. In the Save As field, enter the path and file name for theWSF file. To browse for a location to save thefile, click the ellipsis. The Save As screen appears.
4. Click OK. The program saves theWSF file.
Import Research Group from The Raiser’sEdgeThe Import research group from The Raiser’s Edge task allows you to import Raiser’s Edge query results anduse the results to create a new research group in ResearchPoint. You can also add the query results to an existingresearch group.When creating the Raiser’s Edge query, make sure to include the system record ID as an output field. AnyRaiser’s Edge records that do not include a system ID do not import.
} Import a Raiser’s Edge query as a ResearchPoint research group
1. From the Tasks pane on the Research Groups page, click Import research group from The Raiser’s Edge.The Open Query screen appears.
122 CHAPTER 5

Note: For information about accessing the Research Groups page, see Access Research Groups on page101.
2. Locate the Raiser’s Edge query you want to import.
Note: You can also opt to create a new query from the Open Query search screen. For informationabout creating queries, see the Query chapter in theQuery and Export Guide.
3. Click Open. The Import group to screen appears.
4. Select how you want ResearchPoint to process the query records.
• To create a new research group using the query records, select New research group. You then mustenter a name and description for the new group.
• To add the query records to an existing research group, select Existing research group. In theNamefield, select the name of the existing research group to which you want the records added.
5. Click OK.
6. The application searches the query for any Raiser’s Edge records already linked to ResearchPointrecords. Linked constituents are automatically added to the group. Any unlinked constituent aredisplayed in a screen.
RESEARCH GROUPS 123
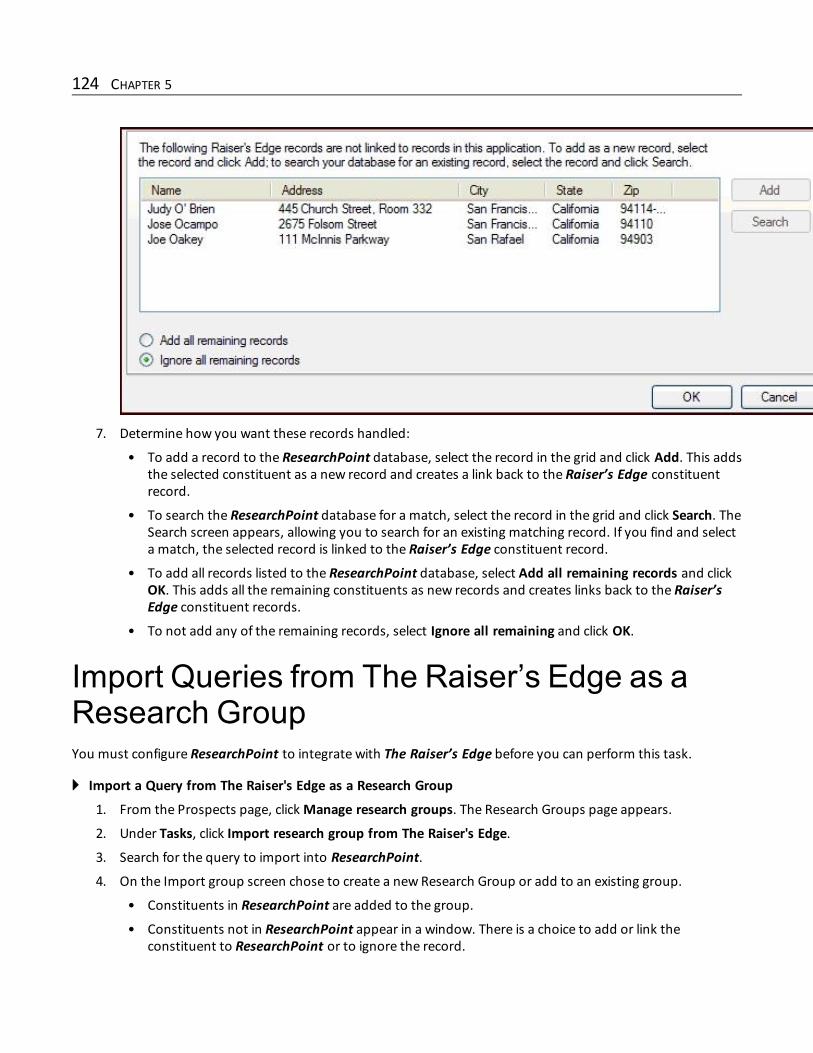
7. Determine how you want these records handled:
• To add a record to the ResearchPoint database, select the record in the grid and click Add. This addsthe selected constituent as a new record and creates a link back to the Raiser’s Edge constituentrecord.
• To search the ResearchPoint database for a match, select the record in the grid and click Search. TheSearch screen appears, allowing you to search for an existing matching record. If you find and selecta match, the selected record is linked to the Raiser’s Edge constituent record.
• To add all records listed to the ResearchPoint database, select Add all remaining records and clickOK. This adds all the remaining constituents as new records and creates links back to the Raiser’sEdge constituent records.
• To not add any of the remaining records, select Ignore all remaining and click OK.
Import Queries from The Raiser’s Edge as aResearch GroupYou must configure ResearchPoint to integrate with The Raiser’s Edge before you can perform this task.
} Import a Query from The Raiser's Edge as a Research Group
1. From the Prospects page, clickManage research groups. The Research Groups page appears.
2. Under Tasks, click Import research group from The Raiser's Edge.
3. Search for the query to import into ResearchPoint.
4. On the Import group screen chose to create a newResearch Group or add to an existing group.
• Constituents in ResearchPoint are added to the group.
• Constituents not in ResearchPoint appear in a window. There is a choice to add or link theconstituent to ResearchPoint or to ignore the record.
124 CHAPTER 5

Prospect ResearchRequest ManagementProspect Research Request Workflow 125
Add New Prospect Research Requests 126
Manage Prospect Research Requests 127
Documentation 129
Research Request Record 133
Manage Submitted Research Requests 133
Track Constituent Research Requests 145
The application tools and workflow detailed in this document help you manage prospect research requestssubmitted by fundraisers in your organization. The prospect research request tools allow you to submit aprospect research request; designate the search for a specific record type (constituent, organization, researchgroup); enter request information such as priority, type of research, reason for request, and much more; andtrack the results.
Note: Enterprise Constituent Record Management users can also include event registrants in a researchrequest.
When you create a request, several request records are created: one for the overall request and additionalrequest records for each individual included in the request. For example, if you create a “Constituent” requestand add three individuals to the Prospects to research grid on the add screen, a record is created for the generalconstituent request and three additional records are created for each individual you listed in the grid. Researchofficers can then address each individual record when they complete work on the constituent research request.
Prospect Research Request Workflow• Gift officer determines he needs additional research data for a specific prospect• Gift officer uses the Add a Prospect Research Request tool included in Prospects and submits his request forinformation about the prospect
• After submitting, the gift officer tracks the request activity from the Research Requests tab on his fundraiserrecord. From here, he can also access the research request record, edit or cancel the existing record, and add anew request. For more information, see Prospect Research Requests Tab on page 1.
chapter 6

• Director of prospect research tracks, prioritizes, assigns, and generally manages prospect research requestsfrom Research Request Management page. For more information, see Manage Submitted Research Requestson page 133.
• Once the research is complete and ready for the gift officer, the director of prospect research designates it“Complete” from the Research Request Management page. This designation is reflected on the ResearchRequests tab of the fundraiser who submitted and requested the data.
Add New Prospect Research RequestsWhen you add a prospect research request, your request is submitted to a research officer for approval andcompletion.
} Add a new prospect research request from the Fundraiser page
1. From the Fundraiser page, select the Research requests tab.
2. Click Add. The Add a prospect research request screen appears. The fields included on this screen mayvary slightly based on the Record type you select.
3. Select the Record type for which you are requesting information: Constituent, Event, or Research Group.
4. Depending on the Record type selected, you next must select the constituent, event, or research groupfor which you want information. For example, if you select the “Event” Record type, the Event to includein request field appears. Search for and select the event. After you select the event, the Constituents toresearch grid populates to include all even registrants.
Warning: The constituent, event, or research group for which you are requesting information mustexist in your database before you can create a prospect research request.
5. Enter any additional information required for the request, such as a priority, due date, and reason. Formore information about the fields and options included on this screen, see Add a Prospect ResearchRequest Screen on page 127.
6. Click Save to save the request and return to the Research Requests tab.
126 CHAPTER 6

Add a Prospect Research Request ScreenScreen Item Description
StatusIf you are creating a new request, “New” defaults in this field and cannotbe changed. Once the request is saved, the status is changed to“Pending.” This field displays the current status of your request andcannot be edited from the Research Request tool.
Record type The available record types on which to base your request are. Forexample, a constituent or a research group.
Research group toinclude in request
If in the Record type field you select Research Group a new field appears.Select the group you want to research. All prospects included in the groupdisplay in the Prospect names grid. The number of constituents includedin the grid is capped at 500.
Prospects to research
If in the Record type field you selected “Individual” or “Organization,” inthis field enter or search for the existing individual or organizationconstituent you want to include in your research request. Click the searchicon in the field to access the search screen if you want to search for theconstituent. You can enter multiple constituents in this grid.If in the Record type field you selected “Research group,” the constituentsincluded in the research group populate the grid. To remove aconstituent, select the constituent name and click DELETE on yourkeyboard.
Priority Select a priority for the request. Priorities are created in Code tables inAdministration.
Due date Select a date by which you need the requested information. The defaultdate is two weeks from the current date.
Research TypeSelect the type of information you need on the constituents. For example,“Full Profile” or “Financial Profile.” Types are created in Code tables inAdministration.
Request Reason Select a reason for the request. Reasons are created in Code tables inAdministration.
Requested by/Submittedby
Enter or select the names of the individuals requesting the information.Click the search icon in the respective field to access the Constituentsearch screen.Both fields default to the constituent name linked to the application userentering the request, but the entries can be changed.
Notes Enter any additional information you want to include with the request.Copy research requestinformation to linkedindividual requests
Select this option if you want linked individual requests to be updated tomatch themain request.
Manage Prospect Research RequestsProspect research requests inform individuals in your organization responsible for prospect research that youneed more information on a specific constituent or members of a research group. The request form allows you toenter details including priority, reason, and notes to justify your request. Once the request is created and saved,the individuals responsible for prioritizing the requests can access and act upon the request. The individual
PROSPECT RESEARCH REQUEST MANAGEMENT 127

responsible for submitting or requesting the research can track its progress from the Research Requests tab onthe fundraiser record.
Edit a Specific Constituent RequestAfter you create and submit a request, you can edit the request parameters for selected constituents included inthe request. For example, if you submit a request for a research group but you want a different Research typeassociated with one of the group members, you can make this change from the research request record. You canchange Priority, Due date, Research type, Request reason, and Notes.
Edit an Existing Research RequestAfter you create and submit a research request, you can easily make any necessary changes to the request fromthe Research Request page. This page appears after you save a request.
Add Prospects to Research RequestConstituent record requests allow you to add constituents after the request is submitted.You cannot add new constituents to event or group requests if they are not part of the selected research group.You can, however, add back deleted constituents. For example, if when creating your request you delete twogroup members and later decide you want to add one or both back to your request, you can do so with the Addprospects to request option. Or, if additional constituents have been recently added to the research group,thesemay also be added to the request with Add prospects to request.
} Add prospects to an existing research request
1. From the Research Request page, under Tasks, click Add prospects to request. The Add prospects to aresearch request screen appears.
You cannot change the Status from this screen.
2. In the Prospects to add grid, add the newBB_Variables. Click the search icon at the end of the field toaccess the Constituent Search screen.
3. You can also enter a Priority, Due date, Research type, Request reason, and Notes for the additional BB_Variables. For more information about these options, see Add a Prospect Research Request Screen onpage 127.
4. Click Save to save the additions and return to the Research Request screen. Your newly added prospectsdisplay in the Prospects grid.
Cancel a Specific Prospect RequestAfter you create and submit a request, you can cancel a selected prospect included in the request. This keeps theexisting request in place but removes the selected prospect.
Warning: Once you cancel a request, the cancel action cannot be undone.
To cancel a specific prospect from an existing prospect research request, from the Research Request page, selectthe Prospects tab. In the Prospects grid, select the prospect you want to cancel and click Cancel. A confirmationscreen appears. Select a Reason for cancelling the request and enter any necessary Notes. Reasons are created in
128 CHAPTER 6

Code tables in Administration. Click Save to complete the process. The canceled constituent is removed from theProspects grid.
Cancel an Existing Research RequestAfter you create and submit a request, you can cancel the entire request. This keeps the request in your system,but changes the status to “Canceled.”
Warning: Once you cancel a request, the cancel action cannot be undone.
To cancel an existing prospect research request, from the Research Request page, under Tasks, select Cancelrequest. A confirmation screen appears. Select a Reason for cancelling the request and enter any necessaryNotes. Reasons are created in Code tables in Administration. Click Save to complete the process. All prospectsare removed from the Prospects grid and the request’s status is changed to “Canceled.”
Delete an Existing Research RequestAfter you create and submit a request, you can delete the request. This removes the request from the system.
Warning: Once you delete a request, the delete action cannot be undone.
To delete an existing prospect research request, from the Research Request page, under Tasks, select Deleterequest. A confirmation screen appears. Click Yes. The request is removed from the system and you return to theProspects page.
ViewResearch RequestsAfter you submit a research request, the Research Request record appears. From this page you track activity onyour request. After leaving this page, you can return to it through your fundraiser record.From the Prospects page, clickMy fundraiser page. Select the Research Requests tab. All requests yousubmitted or requested display in the Research requests grid. Select the request you want to open and click Goto request.
DocumentationOn the Documentation tab, you can add notes to track helpful or interesting information about your records.You can save links to websites or related materials stored outside of the program. You can also attach itemsdirectly to records. When you attach a file, the program stores a copy in the database.
AttachmentsYou can attach items to records. When you attach a file, the program stores a copy in the database.
Add AttachmentsYou can use attachments to track additional details about records. When you attach a file, the program stores acopy in the database.
PROSPECT RESEARCH REQUEST MANAGEMENT 129

} Add an attachment
1. From a record, select the Documentation tab and click Add, Attachment. The Add an attachment screenappears.
2. Select an attachment type. Enter the date, title, and author. To search for the attachment, click Choosefile.
3. Click Save. You return to the Documentation tab.
Add an Attachment ScreenScreen Item Description
TypeSelect the type of attachment. The system administrator configuresattachment types. If you have security rights, click Type to add an attachmenttype.
Date Enter the date of the attachment.Title Enter the title, or purpose, of the attachment.Author To search for the author, click the binoculars. A search screen appears.
File To locate the attachment, click Choose file. To view an attachment, click Openfile. To remove an attachment, click Clear file.
Edit AttachmentsOn the Documentation tab, you can edit an attachment. You can remove a file and choose a different file. Youcan also view an attachment.
} Edit an attachment
1. On the Documentation tab of a record, select an attachment and click Edit. The Edit attachment screenappears.
2. Make changes as necessary to the attachment type, date, title, or author. To view an attachment, clickOpen file. To remove an attachment, click Clear file. To select a different file, click Choose file.
3. Click Save. You return to the Documentation tab.
Delete AttachmentsAfter you add an attachment to the Documentation tab, you can delete it as necessary.
} Delete an attachment
1. On the Documentation tab of a record, select an attachment and click Delete. A confirmation messageappears.
2. Click Yes. You return to the Documentation tab, and the attachment no longer appears.
Media LinksOn the Documentation tab, you can save links to websites or related materials stored outside of the program.
130 CHAPTER 6

Add Media LinksWhen you add a media link, you enter the website address or the location of the linked file.
} Add a media link
1. From a record, select the Documentation tab and click Add,Media link. The Add a media link screenappears.
2. Select a media link type. Enter the date, title, and author. Enter the URL for a website or click the editmedia URL icon to search for a linked file.
3. Click Save. You return to the Documentation tab.
Add a Media Link ScreenScreen Item Description
Type Select the type ofmedia link. The system administrator configures media linktypes. If you have security rights, click Type to add a media link type.
Date Enter the date of themedia link.Title Enter the title, or purpose, of the link.Author To search for an author, click the binoculars. A search screen appears.
Media URLEnter the URL for a website or the location of a linked file. To search for a file,click the edit media URL icon. Note: Users must have access to the locationwhere the linked file is stored, otherwise they will not be able to view the linkedfile.
Edit Media LinksYou can edit the URL for a website or the location of the linked file.
} Edit a media link
1. On the Documentation tab of a record, select a media link and click Edit. The Edit media link screenappears.
2. Make changes as necessary to themedia link type, date, title, or author. You can edit the URL for awebsite or the location of a linked file. To search for a linked file, click the edit media URL icon.
3. Click Save. You return to the Documentation tab.
Delete Media LinksAfter you add media links to the Documentation tab, you can delete them as necessary.
} Delete a media link
1. On the Documentation tab of a record, select a media link and click Delete. A confirmation messageappears.
2. Click Yes. You return to the Documentation tab, and themedia link no longer appears.
PROSPECT RESEARCH REQUEST MANAGEMENT 131

NotesOn the Documentation tab, you can add notes to track helpful or interesting information about your records.
Add NotesOn the Documentation tab, you can track notes about your records.
} Add a note
1. From a record, select the Documentation tab and click Add, Note. The Add a note screen appears.
2. Select a note type. Enter the date, title, author, and the content of the note.
3. Click Save. You return to the Documentation tab.
Add a Note ScreenScreen Item Description
Type Select the type of note. The system administrator configures note types. If youhave security rights, click Type to add a note type.
Date Enter the date of the note.Title Enter the title, or purpose, of the note.Author To search for an author, click themagnifying glass. A search screen appears.Notes Enter the content of the note.
Edit NotesOn the Documentation tab, you can edit notes as necessary.
} Edit a note
1. On the Documentation tab of a record, select a note and click Edit. The Edit note screen appears.
2. Make changes as necessary to the note type, date, title, author, or note content.
3. Click Save. You return to the Documentation tab.
Delete NotesAfter you add notes to the Documentation tab, you can delete notes when necessary.
} Delete a note
1. On the Documentation tab of a record, select a note and click Delete. A confirmation message appears.
2. Click Yes. You return to the Documentation tab, and the note no longer appears.
OpenMedia Link or Attachment FilesAfter you add a media link or attachment on the Documentation tab, you can open the link or attachment. Selectthe attachment or media link and click Open file.
132 CHAPTER 6

Research Request RecordAfter you create and submit a prospect research request, the system generates a Research Request record. Therecord is composed of two tabs: the Prospects tab and the Documentation tab. It also includes a researchrequest summary section.
Note: There are two main pieces to a research request - themain request and the individuals included in therequest. For example, if you create a request for a group and the group has 10members, when you submit therequest 10 different requests are created off themain request - one request for each individual. Should youaccess the prospect request record for just one of these individuals rather than themain request, the recorddoes not include the Prospects tab. The summary section and Documentation options are available for theindividual.
The summary section provides an overview of the request, displaying the status, priority, request date, numberof constituents, and much more.The Prospects tab displays all constituents included in the request. From here, you can also perform thefollowing tasks:The Documentation tab houses all notes and attachments associated with the request. For more informationabout this tab, see Add Notes, Media Links, and Attachments to Research Requests on page 1.
Manage Submitted Research RequestsAfter a gift officer submits a research request, the prospect research department accesses and manges therequests from the Research Request Management page. This page is accessed by clickingMy prospect researchpage from Prospects or by clickingMy prospect research page from the Research Request page.Depending on your role and security settings you may see only research requests assigned to you or you maysee all assignments.From this page, you manage both pieces of the research request - themain request and the individuals includedin themain request. You also can track completed requests from this page.• For information on managing themain requests, which includes all individuals included in the request, seeOpen Requests on page 133.
• For information on managing the individual requests included within a main request, see Open IndividualRequest on page 137.
• For information on tracking completed requests, see Completed Requests on page 143.
OpenRequestsAll requests are listed on the Request Queue tab of the Research Request Management page. Unlike theIndividual Request tab also included on this page, the Request Queue tab allows you to deal with the requestgroup - all individuals in the group are treated as one - instead of individually with each constituent included inthe request group. If you prefer dealing with the request on the individual level, see Open Individual Request onpage 137.
PROSPECT RESEARCH REQUEST MANAGEMENT 133

} View open research requests
1. From the Prospects page, clickMy prospect research page. The Research Request Management pageappears.
2. Select the Request Queue tab. All open requests display in theOpen research requests grid.
3. You can filter information displayed on this tab based on Researcher, Request date, Due date, andStatus. Click Apply to filter the display.
Research Request RecordAfter you create and submit a prospect research request, the system generates a Research Request record. Therecord is composed of two tabs: the Prospects tab and the Documentation tab. It also includes a researchrequest summary section.
Note: There are two main pieces to a research request - themain request and the individuals included in therequest. For example, if you create a request for a group and the group has 10members, when you submit therequest 10 different requests are created off themain request - one request for each individual. Should youaccess the prospect request record for just one of these individuals rather than themain request, the recorddoes not include the Prospects tab. The summary section and Documentation options are available for theindividual.
The summary section provides an overview of the request, displaying the status, priority, request date, numberof constituents, and much more.The Prospects tab displays all constituents included in the request. From here, you can also perform thefollowing tasks:The Documentation tab houses all notes and attachments associated with the request. For more informationabout this tab, see Add Notes, Media Links, and Attachments to Research Requests on page 1.
} Change the researcher currently assigned to an open research request
1. From the Prospects page, clickMy prospect research page. The Research Request Management pageappears.
2. Select the Request Queue tab. All open requests display in theOpen research requests grid.
3. Select the request you want to change.
4. Click Change status and select Assigned. The Assign request to a researcher screen appears displayingthe researcher currently assigned.
5. In the Researcher field, select the new fundraiser you want to assign as a researcher for this request. Clickthe search icon in the field to access the Fundraiser Search screen.
6. If you want all individuals included in the request assigned to this researcher, select Assign individualrequests to the same researcher. If you would rather assign each individual separately, do not select thisoption. You can assign each individual request from the Individual Requests tab on the Research RequestManagement page.
7. Click Save to return to the Individual Requests tab.
} Unassign a researcher from an open research request
1. From the Prospects page, clickMy prospect research page. The Research Request Management pageappears.
2. Select the Request Queue tab. All open requests display in theOpen research requests grid.
134 CHAPTER 6

3. Select the request you want to unassign.
4. Click Change status and select Pending. The researcher is removed from the request and the statuschanged to “Pending.”
} Designate an open research request as “In progress”
1. From the Prospects page, clickMy prospect research page. The Research Request Management pageappears.
2. Select the Request Queue tab. All open requests display in theOpen research requests grid.
3. Select the request you want to designate as “In progress.”
4. Click Change status and select In progress. The status changes to “In progress.” The Complete requestoption is also activated. In addition, the Research Request tab on the requesting/submitting fundraiserrecord now displays the request as “In progress.”
} Designate an open research requests as “Complete”
1. From the Prospects page, clickMy prospect research page. The Research Request Management pageappears.
2. Select the Request Queue tab. All open requests display in theOpen research requests grid.
3. Select the request you want to designate as “Complete.”
4. Click Complete request. A confirmation screen appears.
5. Click Yes. The status changes to “Complete,” and the request is moved from the Request Queue tab tothe Completed Requests tab. In addition, the Research Request tab on the requesting/submittingfundraiser record now displays the request as “Complete.”
} Reject an open research requests
1. From the Prospects page, clickMy prospect research page. The Research Request Management pageappears.
2. Select the Request Queue tab. All open requests display in theOpen research requests grid.
3. Select the request you want to reject.
4. Click Reject request. The Reject a prospect research request screen appears.
5. In the Reason field, select a reason for rejecting the request. Reasons are created in Code tables inAdministration.
6. In the Comments box, enter any additional information you want to include with the rejected request.
7. Click Save. The status changes to “Rejected.” In addition, the Research Request tab on therequesting/submitting fundraiser record now displays the request as rejected.
} View research requests record
1. From the Prospects page, clickMy prospect research page. The Research Request Management pageappears.
2. Select the Request Queue tab. All open requests display in theOpen research requests grid.
3. Select the request for which you want to view the research request record.
PROSPECT RESEARCH REQUEST MANAGEMENT 135

4. Click Go to request. The Research Request page appears. For information about working on this page,see Manage Prospect Research Requests on page 127.
5. To return to the Research Request Management page, click Back.
} Add a new research request from the Research Request Management page
1. From the Prospects page, clickMy prospect research page. The Research Request Management pageappears.
2. Select the Request Queue tab.
3. Click Add. The Add a prospect research request screen appears. The fields included on this screen mayvary slightly based on the Record type you select.
4. Select the Record type for which you are requesting information.
5. Depending on the Record type select, you next must select the constituent or research group for whichyou want information. For example, if you select the “Research group” Record type, the Research groupto include in request field appears. Search for and select the group. After you select the group, theProspects to research grid populates to include all group members.
Warning: The constituent (individual or organization) or research group for which you are requestinginformation must exist in your database before you can create a prospect research request.
6. Enter any additional information you want to provide with the request, such as a priority, due date, orreason. For more information about the fields and options included on this screen, see Add a ProspectResearch Request Screen on page 127.
7. Click Save. The new research request now displays in theOpen research requests grid.
} Edit an existing prospect research request
1. From the Prospects page, clickMy prospect research page. The Research Request Management pageappears.
2. Select the Request Queue tab.
3. In the Open research requests grid, select the request you want to edit.
136 CHAPTER 6

4. Click Edit. The Edit a prospect research request screen appears.
5. The constituent’s Status and Record type cannot be changed. You can change the following options:Priority, Due date, Research type, Request reason, Requested by, Submitted by, and Notes. Forinformation about these options, see Add a Prospect Research Request Screen on page 127.
6. Select Copy research request information to linked individuals requests if you want the information inthe edit form copied to any of the individual requests created off themain request. The informationcopies if those individual requests are linked and not completed or canceled.
7. Click Save to save the changes.
Open Individual RequestAll individual constituents associated with research requests are listed on the Individual Requests tab of theResearch Request Management page. Unlike the Request Queue tab, the Individual Requests tab allows you todeal separately with each individual included in a request instead of the request as a whole. If you prefer dealingwith the request as a whole, see Open Requests on page 133.
} View open individual research request
1. From the Prospects page, clickMy prospect research page. The Research Request Management pageappears.
2. Select the Individual Requests tab. All open requests display in theOpen research requests grid.
PROSPECT RESEARCH REQUEST MANAGEMENT 137

3. You can filter information displayed on this tab based on Researcher, Request date, Due date, andStatus. Click Apply to filter the display.
} Assign researcher to open individual research request
1. From the Prospects page, clickMy prospect research page. The Research Request Management pageappears.
2. Select the Individual Requests tab. All open requests display in theOpen research requests grid.
3. Select the request you want to assign.
4. Click Change status and select Assigned. The Assign request to a researcher screen appears.
5. In the Researcher field, select the fundraiser you want to assign as a researcher for this individual. If youare associated as a fundraiser with an application user in the system, your name defaults in theResearcher field, but the entry can be edited. Click the search icon in the field to access the FundraiserSearch screen.
138 CHAPTER 6

6. Click Save to return to the Individual Requests tab. The individual’s status is changed to “Assigned.”
} Change the researcher currently assigned to an open individual research request
1. From the Prospects page, clickMy prospect research page. The Research Request Management pageappears.
2. Select the Individual Requests tab. All open requests display in theOpen research requests grid.
3. Select the request you want to change.
4. Click Change status and select Assigned. The Assign request to a researcher screen appears displayingthe researcher currently assigned.
5. In the Researcher field, select the new fundraiser you want to assign as a researcher for this individual.Click the search icon in the field to access the Fundraiser Search screen.
6. Click Save to return to the Individual Requests tab.
} Unassign a researcher from an open individual research request
1. From the Prospects page, clickMy prospect research page. The Research Request Management pageappears.
2. Select the Individual Request tab. All open individual requests display in theOpen research requestsgrid.
3. Select the request you want to unassign.
4. Click Change status and select Pending. The researcher is removed from the request and the statuschanged to “Pending.”
} Designate an open individual research request as “In progress”
1. From the Prospects page, clickMy prospect research page. The Research Request Management pageappears.
2. Select the Individual Request tab. All open individual requests display in theOpen research requestsgrid.
3. Select the request you want to designate as “In progress.”
4. Click Change status and select In progress. The status changes to “In progress.” The Complete requestoption is also activated. In addition, the Research Request tab on the requesting/submitting fundraiserrecord now displays the individual request as “In progress.”
} Designate an open individual research request as “Complete”
1. From the Prospects page, clickMy prospect research page. The Research Request Management pageappears.
2. Select the Individual Request tab. All open individual requests display in theOpen research requestsgrid.
3. Select the request you want to designate as “Complete.”
4. Click Complete request. The Complete prospect research request screen appears.
PROSPECT RESEARCH REQUEST MANAGEMENT 139
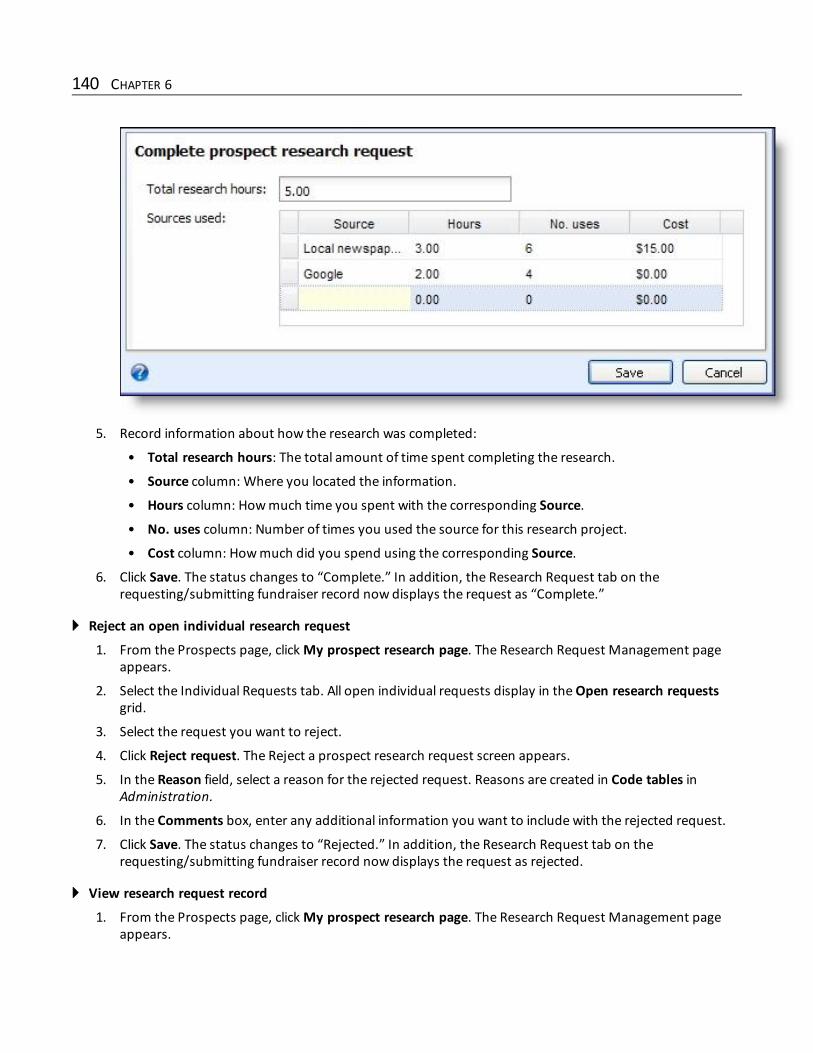
5. Record information about how the research was completed:
• Total research hours: The total amount of time spent completing the research.
• Source column: Where you located the information.
• Hours column: Howmuch time you spent with the corresponding Source.
• No. uses column: Number of times you used the source for this research project.
• Cost column: Howmuch did you spend using the corresponding Source.
6. Click Save. The status changes to “Complete.” In addition, the Research Request tab on therequesting/submitting fundraiser record now displays the request as “Complete.”
} Reject an open individual research request
1. From the Prospects page, clickMy prospect research page. The Research Request Management pageappears.
2. Select the Individual Requests tab. All open individual requests display in theOpen research requestsgrid.
3. Select the request you want to reject.
4. Click Reject request. The Reject a prospect research request screen appears.
5. In the Reason field, select a reason for the rejected request. Reasons are created in Code tables inAdministration.
6. In the Comments box, enter any additional information you want to include with the rejected request.
7. Click Save. The status changes to “Rejected.” In addition, the Research Request tab on therequesting/submitting fundraiser record now displays the request as rejected.
} View research request record
1. From the Prospects page, clickMy prospect research page. The Research Request Management pageappears.
140 CHAPTER 6

2. Select the Individual Requests tab. All open individual requests display in theOpen research requestsgrid.
3. Select the request for which you want to view the research request record.
4. Click Go to request. The Research Request page appears. For information about working on this page,see Manage Prospect Research Requests on page 127.
5. To return to the Research Request Management page, click Back.
} Add a new individual research request from the Research Request Management page
1. From the Prospects page, clickMy prospect research page. The Research Request Management pageappears.
2. Select the Individual Requests tab.
3. Click Add. The Add a prospect research request screen appears. The fields included on this screen mayvary slightly based on the Record type you select.
PROSPECT RESEARCH REQUEST MANAGEMENT 141

4. Select the Record type for which you are requesting information. For example, Individual, Organization,or Research Group.
5. Depending on the Record type select, you next must select the constituent or research group for whichyou want information. For example, if you select the “Research group” Record type, the Research groupto include in request field appears. Search for and select the group. After you select the group, theConstituents to research grid populates to include all group members.
Warning: The constituent or research group for which you are requesting information must exist inyour database before you can create a prospect research request.
6. Enter any additional information you want to provide with the request, such as a priority, due date, orreason. For more information about the fields and options included on this screen, see Add a ProspectResearch Request Screen on page 127.
7. Click Save. The constituents included in the request now display in theOpen research requests grid.
} Edit a specific constituent from an existing prospect research request from the Research RequestManagement page
1. From the Prospects page, clickMy prospect research page. The Research Request Management pageappears.
2. Select the Individual Requests tab.
3. Click Edit. The edit screen appears.
4. The constituent’s Status cannot be changed. You can change the following options: Priority, Due date,Research type, Request reason, and Notes. For information about these options, see Add a ProspectResearch Request Screen on page 127
5. Click Save to save the changes.
142 CHAPTER 6

Completed RequestsThe Completed Requests tab in Research Request Management tracks all completed requests. This tab displaysonly completed main requests; it does not display completed individual requests. Once all individuals included ina main request are complete, the request housing these individuals displays on the Completed Requests tab.
} Edit an existing prospect research request from the Competed Requests tab of the Research RequestManagement page
1. From the Prospects page, clickMy prospect research page. The Research Request Management pageappears.
2. Select the Completed Requests tab.
3. In the Completed research requests grid, select the request you want to edit.
4. Click Edit. The Edit a prospect research request screen appears.
PROSPECT RESEARCH REQUEST MANAGEMENT 143

5. The constituent’s Status and Record type cannot be changed. You can change the following options:Priority, Due date, Research type, Request reason, Requested by, Submitted by, and Notes. Forinformation about these options, see Add a Prospect Research Request Screen on page 127.
6. Select Copy research request information to linked individuals requests if you want the information inthe edit form copied to any of the individual requests created off themain request. The informationcopies if those individual requests are linked and not completed or canceled.
7. Click Save to save the changes.
} View research request record from the Completed Requests tab of the Research Request Managementpage
1. From the Prospects page, clickMy prospect research page. The Research Request Management pageappears.
2. Select the Completed Requests tab. All completed requests display in the Completed research requestsgrid.
3. Select the request for which you want to view the research request record.
4. Click Go to request. The Research Request page appears. For information about working on this page,see Manage Prospect Research Requests on page 127.
5. To return to the Research Request Management page, click Back.
Establish User Permissions for Prospect Research RequestManagementYou can manage the application users that have access to information stored on the Prospect Research RequestManagement page. Application users are the individual users of your system. Access to the research data isbased on the permissions established in Prospect Research Request Management Configuration.
} Add user permissions for Prospect Research Request Management
1. From the Prospects page, clickMy prospect research page. The Research Request Management pageappears.
2. Under Configuration, click Research request.
3. The Prospect Research Request Management Configuration page appears. All existing application userswith permission to the Research Request Management page display in the Application UserPermissions grid.
4. Click Add. The Add an application user permission screen appears.
5. In the Application user field, enter the domain and user name for the user you want to add. Click thesearch icon in this field to access a search screen to help you locate the application user.
6. Select Can view requests assigned to others if you want to allow this user to view all requests inResearch Request Management. If you do not select this option, the user can see only requests assignedto him.
7. Click Save to save your settings and return to the Prospect Research Request ManagementConfiguration page.
144 CHAPTER 6

} Edit user permissions for Prospect Research Request Management
1. From the Prospects page, clickMy prospect research page. The Research Request Management pageappears.
2. Under Configuration, click Research request.
3. The Prospect Research Request Management Configuration page appears. All existing application userswith permission to the Research Request Management page display in the Application UserPermissions grid.
4. Select the user you want to edit.
5. Click Edit. The Edit an application user permission screen appears.
6. Select Can view requests assigned to others if you want to allow this user to view all requests inResearch Request Management. If you do not select this option, the user can see only requests assignedto him.
7. Click Save to save your settings and return to the Prospect Research Request ManagementConfiguration page.
} Delete user permissions for Prospect Research Request Management
1. From the Prospects page, clickMy prospect research page. The Research Request Management pageappears.
2. Under Configuration, click Research request.
3. The Prospect Research Request Management Configuration page appears. All existing application userswith permission to the Research Request Management page display in the Application UserPermissions grid.
4. Select the user you want to delete.
5. Click Delete. A confirmation screen appears.
6. Click Yes to delete the selection and return to the Prospect Research Request ManagementConfiguration page.
Track Constituent Research RequestsYou can track research request statuses from all application pages related to the constituent that is affected bythe request. For example, from the constituent’s Wealth and Ratings page, a message box appears near the topof the page announcing a request is open.
PROSPECT RESEARCH REQUEST MANAGEMENT 145

Click on themessage box to open the notifications screen.
146 CHAPTER 6

Prospect Quick SearchField Matching Logic 147
Match Codes 149
Execute a Prospect Quick Search 149
Real Estate Tab 151
Business Ownership Tab 152
Prospect Quick Search Details Page - Real Estate 153
Prospect Quick Search Details Page - Business Ownership 157
Matching Executives Tab 160
Prospect Quick Search allows researchers to identify important data on prospects even when only incompleteinformation is available. For example, a prospect may own vacation property that for a number of reasons is notshowing up during the standardWealthPoint search. With Prospect Quick Search, the researcher can search forthe home by entering only a Last name and the state in which he suspects the vacation home exists.
Note: Prospect Quick Search is available only to clients withWealthPoint subscriptions.
The quick search tool takes the submitted information and matches it against the Fidelity Data Services realestate data source or the D&B business ownership data source. The results display on the Prospect Quick Searchpage.
Field Matching LogicProspect Quick Search returns records arranged based on confidence levels going from highest confidence tolowest, and it continues to return records until matches no longer exist or it reaches the 100 record return limit.The search first queries all records that match all fields sent in the search. Then, based on a field ranking system,the search attempts to partially match records by dropping a field from the search that it considers least helpfulin getting the best record back. The priority of the fields considered is as follows.
} For real estate searches
1. Address
2. ZIP
3. City
4. State
5. Last Name
chapter 7

6. First Name/Nickname
7. Company Name
• If information is entered in this field, and a Last Name and/or First Name/Nickname is also enteredthe application uses the company name in only the Business Ownership search.
• If information is entered in this field, and no Last Name or First Name/Nickname is entered, theCompany Name is also used to search against the Last name field in the Real Estate portion of thesearch.
8. Unit (used in real estate searches only)
} For business ownership searches
1. Last Name
2. First Name/Nickname
3. Company Name
• If information is entered in this field, and a Last Name and/or First Name/Nickname is also enteredthe application uses the company name in only the Business Ownership search.
• If information is entered in this field, and no Last Name or First Name/Nickname is entered, theCompany Name is also used to search against the Last name field in the Real Estate portion of thesearch.
4. State
5. City
6. ZIP
7. Address
8. Phone number (used in business ownership searches only)
• Three characters or less: the number is assumed to be an area code, and the system attempts tomatch against area code. For one or two characters, a * wildcard is assumed.
• Four to seven characters: the number is assumed to be themain phone number (not the areacode). For between four and six characters, a * wildcard is assumed.
• Greater than seven characters: first three numbers are assumed to be the area code, with theremaining numbers used to match against themain phone number. For example if you enter ninenumbers, the first three are broken out as the area code and the next six are used to create the restof the phone number with a wildcard in the seventh slot (123456789 = (123) 456-789*).
• If numbers are entered within parenthesis ( ): the system assumes these numbers are the areacode. So with a (123)456 entry, even though it contains six numbers, the system identifies 123 as thearea code and 456 as the first three digits of themain phone number.
• Area code and next three numbers or area code and last four numbers: Wild card characters canbe used in place of the unknown numbers. For example, if you know the area code and the nextthree numbers, but you do not know the remaining four numbers, you can enter “843765****” inyour search. If you know the area code and the last four numbers, but you do not know the threemiddle numbers, you can enter “843***1000” in your search.
148 CHAPTER 7

Match CodesWhen you add a real estate or business asset record through Prospect Quick Search, the new addition isidentified on theWealth Details page in theMatch code column. The Confidence rating defaults to level 5, but itcan be changed through Edit confidence settings. For more information about changing a confidence setting,see “Edit Confidence Rating” on page 11.
Execute a Prospect Quick SearchNone of the fields included on the Prospect Quick Search page are required, however, the fewer number of fieldscompleted, the longer the results list may be. The results display the first 100 records matched.
Tip: In order to return search results as quickly as possible, we limit the number of records displayed to the first100 - the order is based on the confidence rating, going from the highest to the lowest. If your search turns upmore than 100 returns, change your search criteria to better filter the results. For example, if you entered justthe Last name and state information for your first search, consider adding a first name or a city and rerunningthe search.
} Search for prospect wealth information using the quick search option
1. From the Prospects page, click Prospect Quick Search. The Prospect Quick Search page appears.
2. The quick search allows you to enter any combination of fields. For information about how thematchinglogic works, see Field Matching Logic on page 147.
None of the fields is required; however, themore information provided the better the results.
3. In the Real estate address to search section, you can select to search All addresses satisfying yourcriteria or Selected addresses. If you select Selected addresses, select the addresses you want includedin the search.
4. In theData source(s) to search section, you can select to search All data sources or Selected datasources. If you select Selected data sources, select the data sources you want included in the search. For
PROSPECT QUICK SEARCH 149

example, if you want just real estate information returned, select the Real estate option under Selecteddata sources.
Tip: By default, Prospect Quick Searchmatches search fields exactly. For example, if you enter “Jo” inthe First name field, the search looks for first names spelled “Jo.” It does not consider Joe, or Joseph, orJohn as would the search functionality in other areas of the application. You can, however, use the *wildcard character when you are unsure of exact spelling. For example, you can enter “Jo*” or “Joh*” inthe First name field and expect the search to include Joe/Joseph or John. In the address fields, use the* to designate a “like” statement. For example, 211* returns 211 San Remo Circle, 2110 San Remo Circle,211Main Street, 2110 First Street, and so on. 21*1* returns 211 Park Ave., 21541 Second Street, 2101Water Street, and so on. Be aware, searching with wildcards may result in longer processing time.
5. Click Search.
The result records are displayed in order of the confidence rating, with the higher rated recordsdisplaying first. In addition, results are arranged based on the data source from which the information
150 CHAPTER 7

was gathered. For example, Fidelity results display on the Real estate tab and D&B results display on theBusiness ownership tab.
For more information, see:
• Real Estate Tab on page 151
• Business Ownership Tab on page 152
Real Estate TabAfter you execute a prospect quick search, the search results are arranged in tabs, displaying data related to aspecific data source. This section details the Real estate tab.
• To view additional information, select the record in the grid for which you want to view details and click Viewdetails. The Prospect Quick Search Details page appears. For more information about this page, see ProspectQuick Search Details Page - Real Estate on page 153.
• If you want to add the selected results to an existing constituent record in your database, click Add toconstituent.
• An Add screen for the selected option appears. From here, click the Search icon to search for and select theconstituent to which you want to add this information.
• Click Continue.
• If you select Real estate record, the system runs a duplicate check before adding the information to therecord. If no duplicates are located, the information is added, and you return to the Prospect QuickSearch page. If a duplicate is located, the Duplicate Search screen appears. From here, click Select toupdate the existing record with the new information; click Ignore to add the new information even as apotential duplicate; click Cancel to not add the information.
• If you select Property address orMailing address the Add an address screen appears. The selectedaddress information defaults. Complete the following steps:
PROSPECT QUICK SEARCH 151

1. Select the type of information you want to add: Real estate record, Property address, orMailingaddress.
2. Select the Last name, First name, and if necessaryMiddle name you want to use in the constituent rec-ord.
3. You can also select Spouse and Relationship information you want used in the record.
4. Click Continue. The new record is created with the selected address and name options and the Add anindividual screen appears. From this screen you can complete the new constituent record, adding house-hold and business information if necessary. For information about the items included on this screen, seethe Contact Information section of the Constituent Records chapter in the Prospects &Wealth Man-agement Guide.
5. Click Save to add the record to your database.
• If you want to add the selected result as a constituent record in your database, click Add constituent. Thenselect if you want the result added From owner/property address or the From owner/mailing address. TheSelect constituent names to add screen appears. For information about this screen, see Add a newconstituent to your database from the Prospect Quick Search Details page on page 155. Start at step 2.
Business Ownership TabAfter you execute a prospect quick search, the search results are arranged in tabs, displaying data related to aspecific data source. This section details the Business ownership tab.
• To view additional information, select the record in the grid for which you want to view details and click Viewdetails. The Prospect Quick Search Details page appears. For more information about this page, see ProspectQuick Search Details Page - Business Ownership on page 157.
• If you want to add the selected results to an existing constituent record in your database, click Add toconstituent and select either Business ownership record or Company address.
• An Add screen appears. From here, click the Search icon to search for and select the constituent to whichyou want to add this information.
152 CHAPTER 7

• Click Save.
• If you selected Business ownership record, the system adds the business ownership record to theselected constituent. To view the added record, open the selected constituent, and from theWealth andRatings page, in theWealth summary section, click Business ownership. The constituent’s business own-ership page appears with the new record.
• If you selected Company address the Add an address screen appears. The selected address informationdefaults. For information about the items included on this screen, see the Contact Information section ofthe Constituent Records chapter in the Prospects &Wealth Management Guide. When you are doneentering information to this screen, click Save to add the record to your database.
Prospect Quick Search Details Page - RealEstateThe Prospect Quick Search Details page generated for Fidelity Data Services searches displays all real estateinformation located for the selected prospect. It allows you to review the information before you decide to takeadditional action.
PROSPECT QUICK SEARCH 153

Add Information to Constituent from Prospect Quick SearchDetails pageFrom the Prospect Quick Search Details page, after you review the returned data, you can choose to add theinformation to an existing constituent in your database.
} Add information to an existing constituent from the Prospect Quick Search Details page
1. From the Prospect Quick Search Details page, click Add to constituent and then select the informationyou want added to the constituent record: Real estate record, Property address,Mailing address,Assessee address, or Buyer address. Regardless of your selection, the Select constituent screen appears.
2. Click the search icon to access the Individual Search screen. From here you can locate and select therecord in your database to which you want to add the information.
3. From the Select Constituent screen, click Save.
154 CHAPTER 7

• If you select Real estate record, the system runs a duplicate check before adding the information tothe record. If no duplicates are located, the information is added and you return to the ProspectQuick Search page.
If a duplicate is located, the Duplicate Search screen appears. From here, click Select to update theexisting record with the new information; click Ignore to add the new information even as apotential duplicate; click Cancel to not add the information.
• If you select Property address,Mailing address, Assessee address, or Buyer address the Add anaddress screen appears. The selected address information defaults to the proper fields. Forinformation about the items included on this screen, see the Contact Information section of theConstituent Records chapter in the Prospects &Wealth Management Guide.
AddConstituent from Prospect Quick Search Details PageFrom the Prospect Quick Search Details page, after you review the returned data, you can add a new constituentto your database. You can also choose how you want the information added: owner information with theproperty address, owner information with themailing address, assessee information with the assessee address,or buyer information with the buyer address.
} Add a new constituent to your database from the Prospect Quick Search Details page
1. From the Prospect Quick Search Details page, click Add constituent and then select the propertysummary data on which you want to base the new constituent record: owner information with theproperty address, owner information with themailing address, assessee information with the assesseeaddress, or buyer information with the buyer address. Regardless of your selection, the Selectconstituent names to add screen appears.
PROSPECT QUICK SEARCH 155

2. Select the Last name, First name, and if necessaryMiddle name you want to use in the constituentrecord. Your options default to the names included in the property summary. For example, if you selectthe assessee information with the assessee address and in the property summary two assessees arelisted, both assessees’ names appear as name options for the new constituent record. Select the nameyou want to use.
3. You can also select Spouse and Relationship information you want used in the record.
4. Click Continue. The Add an individual screen appears.
5. Add any additional information you want to include on this constituent record. For information aboutthe items included on this screen, see the Contact Information section of the Constituent Recordschapter in the Prospects &Wealth Management Guide.
Note: The real estate asset is automatically added to the prospect record. If a spouse is included in thequick search results, the asset is not included on the spouse record. After the asset is added, the wealthcapacity formulas are updated.
156 CHAPTER 7

6. Click Save. The new constituent’s Wealth and Ratings page appears. If you want to create additionalconstituent records based on other information included in the property summary, click Back to returnto the Prospect Quick Search Details page.
Prospect Quick Search Details Page - BusinessOwnershipThe Prospect Quick Search Details page generated for D&B searches displays all business ownership informationlocated for the selected prospect. It allows you to review the information before you decide to take additionalaction. The data is arranged in a summary section and on three tabs:
Business Ownership Summary SectionThe Business ownership summary section displays at the top of the page and includes general informationabout the business, such as:• Company name• Trade name• Short description• Phone number• Company address• Mailing address• DUNS number• SIC code• Year the business started• Number of employees• How the company is held• Sales revenue• Ratio• Valuation
PROSPECT QUICK SEARCH 157

Biography Information TabThis tab lists the names associated with the company for whom we located biographical information. To viewdetails, select a name in the Biography information grid. The Details window appears at the bottom of the tab.
Once you review the information on this tab, you have the following options:• Create a new constituent record with the selected information by clicking Add constituent. The Select optionsto add constituent screen appears.
1. TheName defaults to the name associated with the selected record, and it cannot be edited.
2. In the Address to use field, select the address type on the individual constituent record to which youwant to assign the address associated with the selected business ownership record.
158 CHAPTER 7
3. In theOrganization section, select how you want to handle the business organization informationincluded in the selected business ownership record. You can Add a new organization record to yourdatabase or Search existing organizations to which to add the business ownership data.
4. In the Relationship section, identify what the individual’s relationship is to the organization included inthe business ownership record. For example, “Owner.”
5. Click Continue. The Add an individual screen appears.
6. Add any additional information you want to include on this constituent record. For information aboutthe items included on this screen, see the Contact Information section of the Constituent Recordschapter in the Prospects &Wealth Management Guide.
7. Click Save. The new constituent’s Wealth and Ratings page appears. If you want to create additionalconstituent records based on other information included in the business ownership summary, click Backto return to the Prospect Quick Search Details page.
• Add selected information to an existing constituent in your database by clicking Add to constituent andselecting Company address orMailing address. The Select constituent screen appears.
• Locate and select the constituent to which you want to add the selected information. The Add an addressscreen appears.
• Add any additional information you want to include on this constituent record. For information about theitems included on this screen, see the Contact Information section of the Constituent Records chapter in theProspects &Wealth Management Guide.
• Click Save. The new constituent’s Wealth and Ratings page appears. If you want to create additional con-stituent records based on other information included in the business ownership summary, click Back toreturn to the Prospect Quick Search Details page.
Ownership Information TabThis tab displays each owner name associated with the company along with their ownership percentage anddefault ownership value.Once you review the information on this tab, you have the following options:• Create a new constituent record with the selected information by clicking Add constituent. The Select optionsto add constituent screen appears.
1. Select the Last name, First name, and if necessaryMiddle name you want to use in the constituentrecord. Your options default to the names included in the business ownership summary.
2. In the Address to use field, select the address type on the individual constituent record to which youwant to assign the address associated with the selected business ownership record.
3. In theOrganization section, select how you want to handle the business organization informationincluded in the selected business ownership record. You can Add a new organization record to yourdatabase or Search existing organizations to which to add the business ownership data.
4. In the Relationship section, identify what the individual’s relationship is to the organization included inthe business ownership record. For example, “Owner.”
5. Click Continue. The Add an individual screen appears.
PROSPECT QUICK SEARCH 159

6. Add any additional information you want to include on this constituent record. For information aboutthe items included on this screen, see the Contact Information section of the Constituent Recordschapter in the Prospects &Wealth Management Guide.
7. Click Save. The new constituent’s Wealth and Ratings page appears. If you want to create additionalconstituent records based on other information included in the business ownership summary, click Backto return to the Prospect Quick Search Details page.
• Add selected information to an existing constituent in your database by clicking Add to constituent andselecting Company address orMailing address. The Select constituent screen appears.
• Locate and select the constituent to which you want to add the selected information. The Add an addressscreen appears.
• Add any additional information you want to include on this constituent record. For information about theitems included on this screen, see the Contact Information section of the Constituent Records chapter in theProspects &Wealth Management Guide.
• Click Save. The new constituent’s Wealth and Ratings page appears. If you want to create additional con-stituent records based on other information included in the business ownership summary, click Back toreturn to the Prospect Quick Search Details page.
Matching Executives TabThis tab displays the executive names matched on the selected search. In most cases, only one name displays.
Once you review the information on this tab, you have the following options:• Create a new constituent record with the selected information by clicking Add constituent. The Select optionsto add constituent screen appears.
• TheName defaults to the name associated with the selected record, and it cannot be edited.
• In the Address to use field, select the address type on the individual constituent record to which you wantto assign the address associated with the selected business ownership record.
• In theOrganization section, select how you want to handle the business organization information includedin the selected business ownership record. You can Add a new organization record to your database orSearch existing organizations to which to add the business ownership data.
• In the Relationship section, identify what the individual’s relationship is to the organization included in thebusiness ownership record. For example, “Owner.”
• Click Continue. The Add an individual screen appears.
160 CHAPTER 7

• Add any additional information you want to include on this constituent record. For information about theitems included on this screen, see the Contact Information section of the Constituent Records chapter in theProspects &Wealth Management Guide.
• Click Save. The new constituent’s Wealth and Ratings page appears. If you want to create additional con-stituent records based on other information included in the business ownership summary, click Back toreturn to the Prospect Quick Search Details page.
• Add selected information to an existing constituent in your database by clicking Add to constituent andselecting Business ownership record, Company address,Mailing address, or Home address. The Selectconstituent screen appears.
• Locate and select the constituent to which you want to add the selected information. The Add an addressscreen appears.
• Add any additional information you want to include on this constituent record. For information about theitems included on this screen, see the Contact Information section of the Constituent Records chapter in theProspects &Wealth Management Guide.
• Click Save. The new constituent’s Wealth and Ratings page appears. If you want to create additional con-stituent records based on other information included in the business ownership summary, click Back toreturn to the Prospect Quick Search Details page.
PROSPECT QUICK SEARCH 161

162 CHAPTER 7

WealthPoint BatchScreening ProcessManage a WealthPoint Batch Screening Process 163
Tabs of a Process Status Page 165
TheManage WealthPoint Batch Screening Process allows you to create a business process to screen multipleresearch groups throughWealthPoint. You can link multiple groups to one process, and the processautomatically submits the groups toWealthPoint and retrieves the results.The process submits up to five groups at a time. It checks the status of all groups sent toWealthPoint, and whenresults are retrieved for one group, it sends another, so that five groups are running at all times. This cyclecontinues until all groups are screened.
Manage aWealthPoint Batch ScreeningProcess} Create a WealthPoint Batch screening process
1. In Query, create a selection that contains all records you want to include in the screening process. Youcan also create the selection at the same time you create the screening process. The selection recordtypemust be “Research Group.”
2. From the Prospects page, clickManage modeling and propensity. TheManageModeling andPropensity page appears.
3. Under Tasks, clickManage WealthPoint batch screenings. TheWealthPoint Batch Screenings pageappears.
4. Click Add. The Add WealthPoint batch screening process screen appears.
5. In theName field, you must enter a name for your new process. The name appears in theWealthPointbatch screening processes grid of theWealthPoint Batch Screenings page.
chapter 8

6. In theDescription field, enter a description to help you identify the process.
7. In the Selection field, do one of the following:
• Click the search icon to access the Selection Search screen and locate an existing selection of recordsyou want to include in the process. For information about selections, see the Query chapter in theQuery and Export Guide.
• Click the new icon at the end of the field to create a new selection of records. The Select a SourceView screen appears. The Research group source view defaults and cannot be edited. Forinformation about creating selections, see the Query chapter in theQuery and Export Guide.
8. Once back to the Add WealthPoint batch screening process screen, click Save to save the process andreturn to theWealthPoint Batch Screening page.
} Run a WealthPoint batch screening process
1. From theWealthPoint Batch Screenings page, in theWealthPoint batch screening processes grid, selectthe process you want to run. If you have not yet created the process, see Create aWealthPoint Batchscreening process on page 163.
Warning: If you have not yet registered withWealthPoint, the Start process button is not activated.
2. Click Start process. A screen appears asking you to enter yourWealthPoint login credentials.
3. Enter the credentials and click Start.
Note: For large jobs, the process depends on the number ofWealthPoint queues available. If multipledatabases are using a business process to send groups toWealthPoint, then five jobs from each of thedatabases are sent, and the jobs queued until they can be processed.
4. The process starts.
Warning: A business process can run for up to 10 days. If you havemore groups than can be processedin 10 days, you should create a second process.
When completed, theWealthPoint Batch Screening process page appears, displaying processinginformation such as recent status data, history information, and job schedules. For more informationabout this page, see Tabs of a Process Page on page 1.
} Edit an existing WealthPoint batch screening process
1. From the Prospects page, clickManage modeling and propensity. TheManageModeling andPropensity page appears.
2. Under Tasks, clickManage WealthPoint batch screenings. TheWealthPoint Batch Screenings pageappears.
3. In theWealthPoint batch screening processes grid, select the process you want to edit.
4. Click Edit. The Edit WealthPoint batch screening process screen appears.
5. In theName field, you can change the name of your process. The name appears in theWealthPointbatch screening processes grid of theWealthPoint Batch Screenings page.
6. In theDescription field, you can change the description used to help you identify the process.
7. In the Selection field, do one of the following:
164 CHAPTER 8

• Click the search icon to access the Selection Search screen and locate an existing selection of recordsyou want to include in the process. For information about selections, see the Query chapter in theQuery and Export Guide.
• Click the new icon at the end of the field to create a new selection of records. The Select a SourceView screen appears. The Research group source view defaults and cannot be edited. Forinformation about creating selections, see the Query chapter in theQuery and Export Guide.
8. Once back to the Add WealthPoint batch screening process screen, click Save to save the changes andreturn to theWealthPoint Batch Screening page.
} Delete an existing WealthPoint batch screening process
1. From the Prospects page, clickManage modeling and propensity. TheManageModeling andPropensity page appears.
2. Under Tasks, clickManage WealthPoint batch screenings. TheWealthPoint Batch Screenings pageappears.
3. In theWealthPoint batch screening processes grid, select the process you want to delete.
4. Click Delete. A confirmation screen appears.
5. Click Yes to delete the process and return to theWealthPoint Batch Screening page.
Tabs of a Process Status PageEach business process in the database has a status page. The process status page contains information specificto the process. You enter this information when you add the process to the database. Each process status pagealso includes information about themost recent instance of the process and historical data about the process.On some process status pages, you can manage the job schedules of the process. To help manage thisinformation, each process status page contains multiple tabs.
Recent Status TabOn the Recent status tab, you view the details of themost recent instance of the process. These details includethe status of the process; the start time, end time, and duration of the process; the person who last started theprocess; the name of the server most recently used to run the process; the total number of records processed;and howmany of those records processed successfully and howmany were exceptions.
History TabEach time you run a business process, the program generates a status record of the instance. On the History tab,you view historical status record information about each instance of the process. The information in the gridinclude the status and date of the instance.On the History tab, you can limit the status records that appear in the grid. You can filter by the process status. Ifyou filter the records that appear in the grid, it can reduce the amount of time it takes to find a process instance.For example, if you search for a instance that did not finish its operation, you can select to view only statusrecords with a Status of Did not finish. To filter the records that appear in the grid, click the funnel in the actionbar. The Status field and Apply button appear so you can select the status of the instances to appear in the grid.To update the information that appears, click Refresh List on the action bar.
WEALTHPOINT BATCH SCREENING PROCESS 165

Depending on your security rights and system role, you can delete a status record from the grid on the Historytab.
Delete a Status Record from the History Tab of a Process Status PageOn the History tab of a process status page, you can delete a specific status record of the process. When youdelete a status record, you delete the process and all of its history. Before you delete a process, we stronglyrecommend you back up your data. Unless you previously save the transmission file or prenotificationauthorization file, once you delete the process, you can no longer use its output file that contains the dataextracted from your database.
} Delete a status record from the History tab
1. On the process status page, select the History tab.
Note: You can filter the status records that appear in the grid by the process status. If you filter therecords in the grid, it can reduce the amount of time it takes to find an process instance. For example, ifyou search for a instance that completed its operation, you can select to view only status records with aStatus of Completed. To filter the records that appear in the grid, click the funnel in the action bar. TheStatus field and Apply button appear so you can select the status of the instances to appear in the grid.
2. In the grid, select the status record to delete.
3. On the action bar, select Delete. Amessage appears to confirm the deletion of the status record.
4. Click Yes. You return to the History tab. The selected status record no longer appears.
166 CHAPTER 8

Index
Aasset wealth information 80attachments
about 129add 129add screen 130delete 130edit 130open 132
Bbiographical wealth information 46business ownership wealth information 55
Ccompensation wealth information 63confidence rating 44configure fields for integration with The Raiser’sEdge
10
configure integration for The Raiser’s Edge 10configureWealthPoint
search processes, manage 17search prospects, view 16
constituent fields used in data source search 36credentials, edit for The Raiser’s Edge integration 13customizemodeling and rating information 40
Ddelete job schedule 23, 122delete status record from history tab 20, 118, 166director, non-profit, wealth information 69disable wealth updates 38
Eedit a job schedule 21, 120exception report 24
Ggiving summary 88group member wealth rating 82
Hhistory tab 19, 118, 165
Iincomewealth information 63
Jjob schedules tab 20, 118
Lluxury item wealth information 66
Mmajor giving setup
explained 9media link
add 131add screen 131delete 131edit 130-131open 132

Nnote
about 132add 132add screen 132edit 132
notesdelete 132
Oother asset wealth information 80
Ppension wealth information 66philanthropic gift wealth information 75political donation wealth information 78private foundation wealth information 72process status page 19, 117, 165prospect research request
add new research request 126add prospects to existing research request 128assign researcher 133cancel request 128-129change status 133delete request 129edit
constituent request 128research request 128
explain 125open individual request 137open request 133reject 133view request 129workflow 125
prospectsedit
manager 86, 106status 86, 106
RRaiser’s Edge
configure fields for integration 10
configure integration 10configure steps 10credentials, edit for integration 13link with ResearchPoint 39search 14sync with ResearchPoint 39unlink with ResearchPoint 39
rating data 15rating information
add 41confidence 44delete 43
real estate wealth information 50recent status tab 19, 118, 165refreshed WealthPoint
search searches 15research group 101
add 101add members 105assign prospect manager 113delete 103deletemembers 106edit 103edit permissions 114filter 103import WealthPoint updates 104link members with The Raiser’s Edge 107map address 114open 104sync entire group with The Raiser’s Edge 112sync members with The Raiser’s Edge 110unlink members with The Raiser’s Edge 109update selection 115view constituent 106
Research group report 114research request
add new research request 126add prospects to existing research request 128assign researcher 133cancel request 128-129change status 133delete request 129edit
constituent request 128research request 128
open individual request 137open request 133reject 133
168 INDEX

view request 129
Sschedule a job process 20, 119search process
WealthPointcreate 17delete 19edit 18
search The Raiser’s Edge 14security wealth information 59stocks, see security 80
Wwealth capacity 82wealth data 15wealth information
biographical 46business ownership 55compensation 63director, non-profit 69explained 35, 38income 63luxury items 66officer, non-profit 69other assets 80pension 66philanthropic gift 75political donation 78private foundations 72real estate 50security 59
WealthPointsearch process
create 17delete 19edit 18
search searches, refreshed 15windows scripting file
generate 24, 122
INDEX 169

170 INDEX