Embed Size (px)
Citation preview

PREPARING AND
MANAGING EXHIBITS
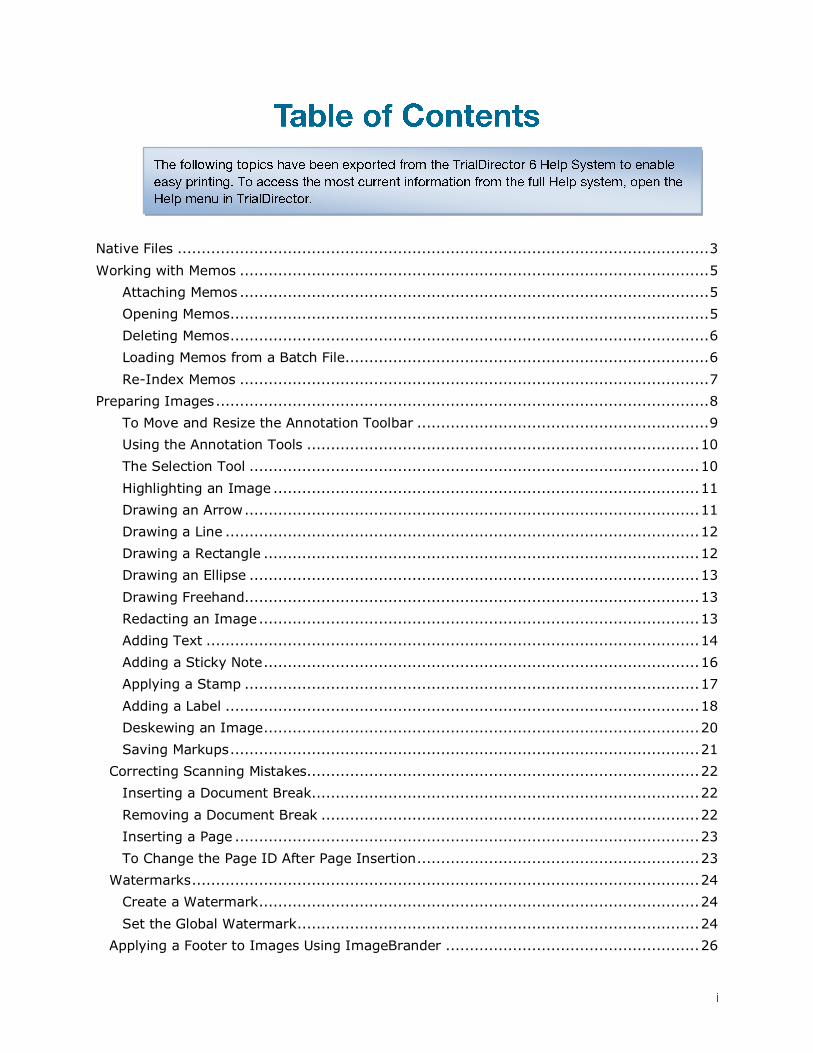
Native Files ............................................................................................................... 3
Working with Memos .................................................................................................. 5
Attaching Memos .................................................................................................. 5
Opening Memos .................................................................................................... 5
Deleting Memos .................................................................................................... 6
Loading Memos from a Batch File............................................................................ 6
Re-Index Memos .................................................................................................. 7
Preparing Images ....................................................................................................... 8
To Move and Resize the Annotation Toolbar ............................................................. 9
Using the Annotation Tools .................................................................................. 10
The Selection Tool .............................................................................................. 10
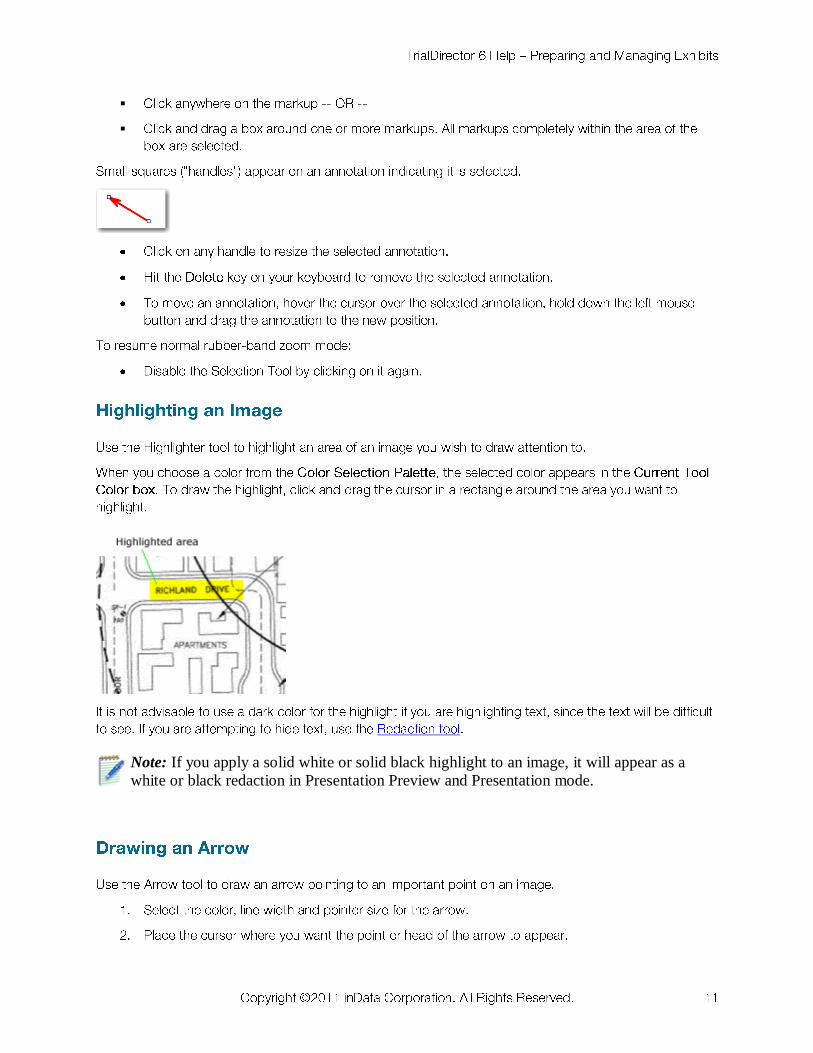
Highlighting an Image ......................................................................................... 11
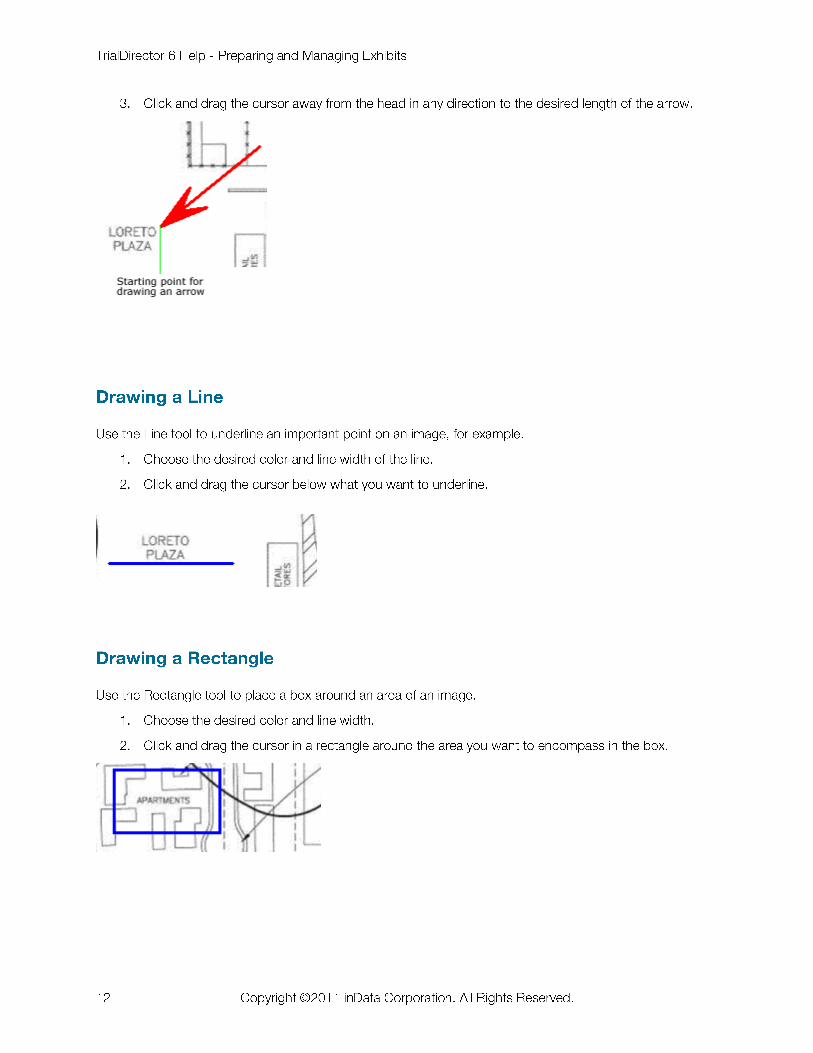
Drawing an Arrow ............................................................................................... 11
Drawing a Line ................................................................................................... 12
Drawing a Rectangle ........................................................................................... 12
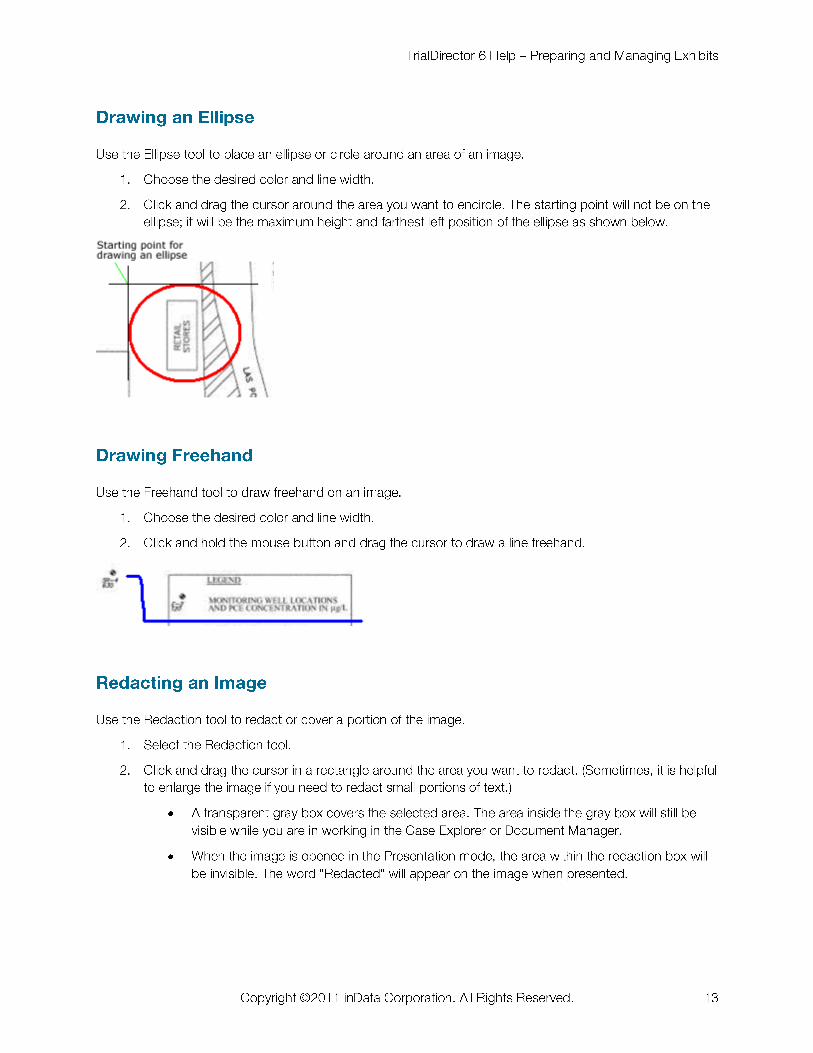
Drawing an Ellipse .............................................................................................. 13
Drawing Freehand............................................................................................... 13
Redacting an Image ............................................................................................ 13
Adding Text ....................................................................................................... 14
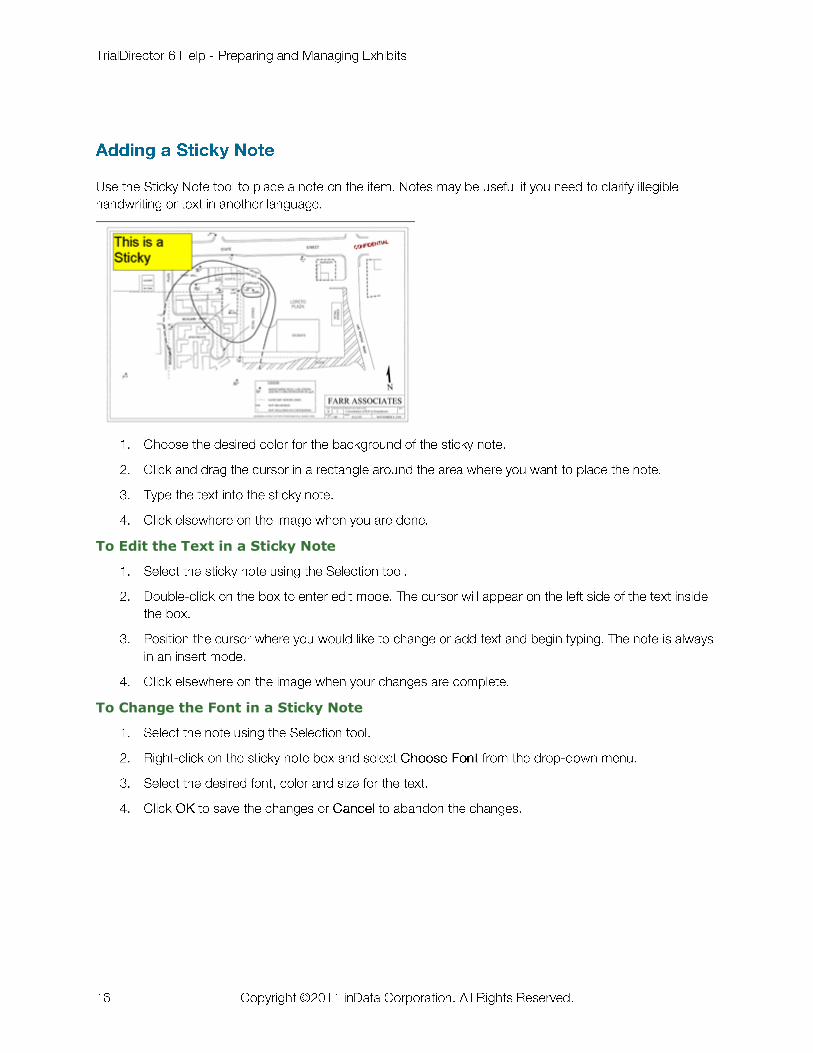
Adding a Sticky Note ........................................................................................... 16
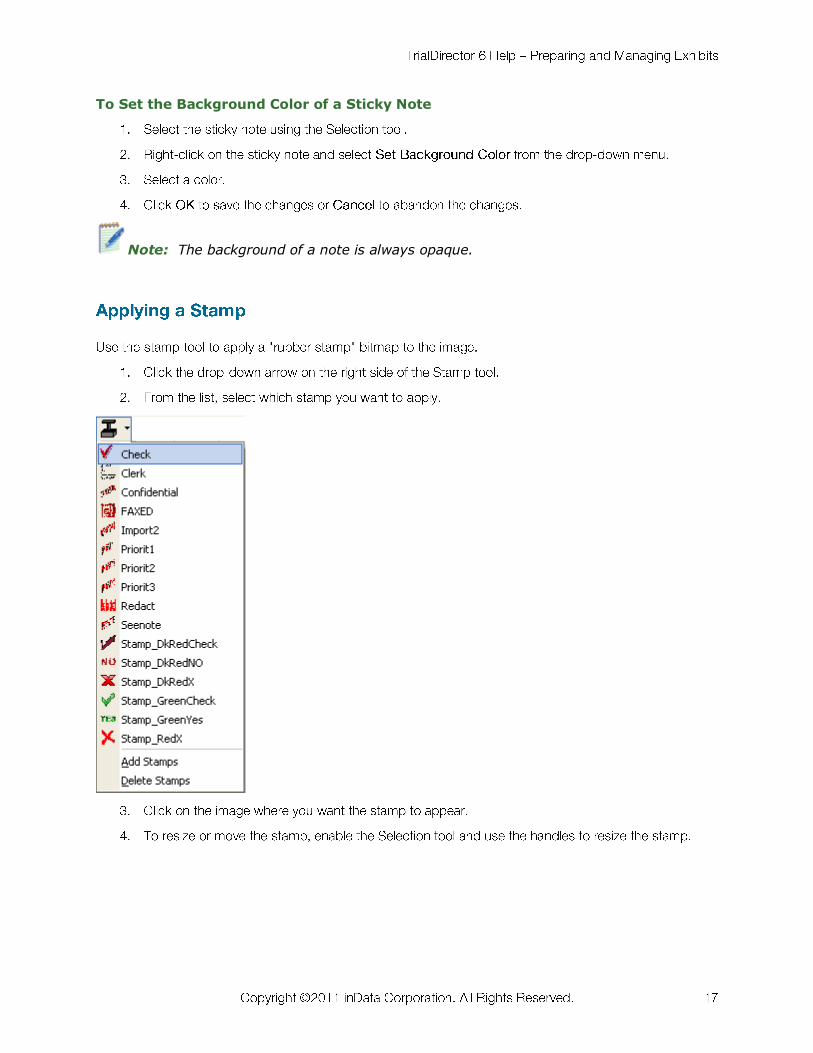
Applying a Stamp ............................................................................................... 17
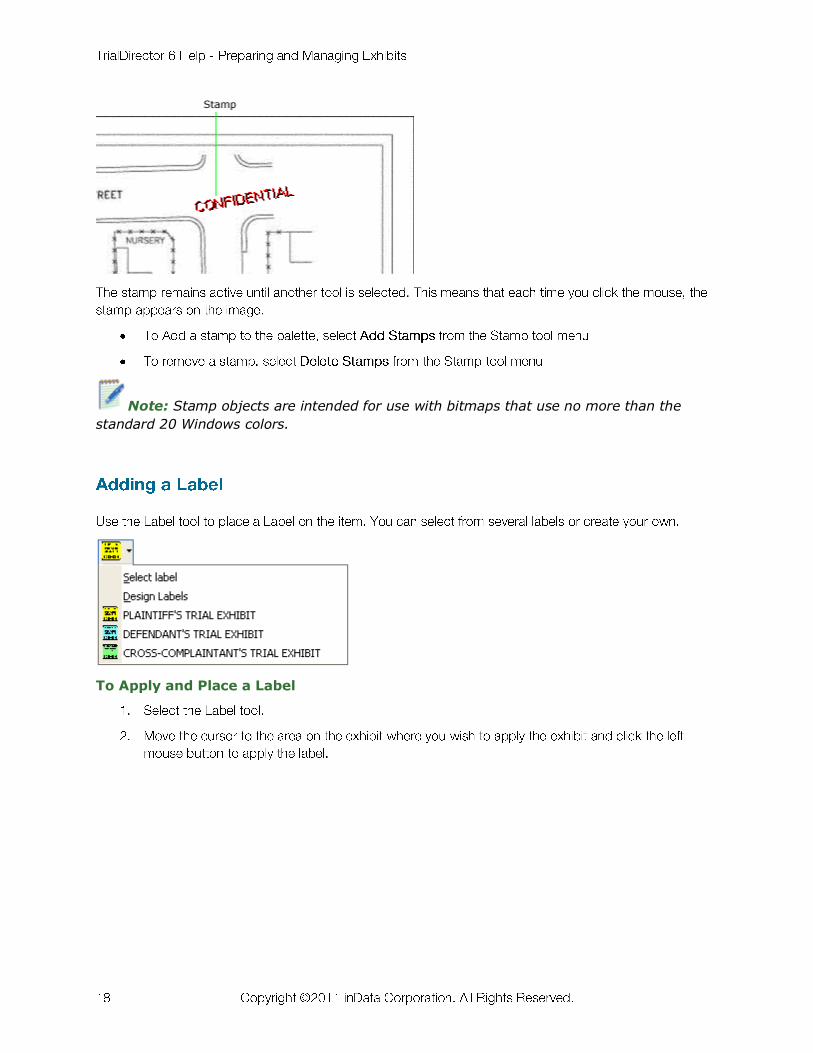
Adding a Label ................................................................................................... 18
Deskewing an Image ........................................................................................... 20
Saving Markups .................................................................................................. 21
Correcting Scanning Mistakes.................................................................................. 22
Inserting a Document Break................................................................................. 22
Removing a Document Break ............................................................................... 22
Inserting a Page ................................................................................................. 23
To Change the Page ID After Page Insertion ........................................................... 23
Watermarks .......................................................................................................... 24
Create a Watermark ............................................................................................ 24
Set the Global Watermark .................................................................................... 24
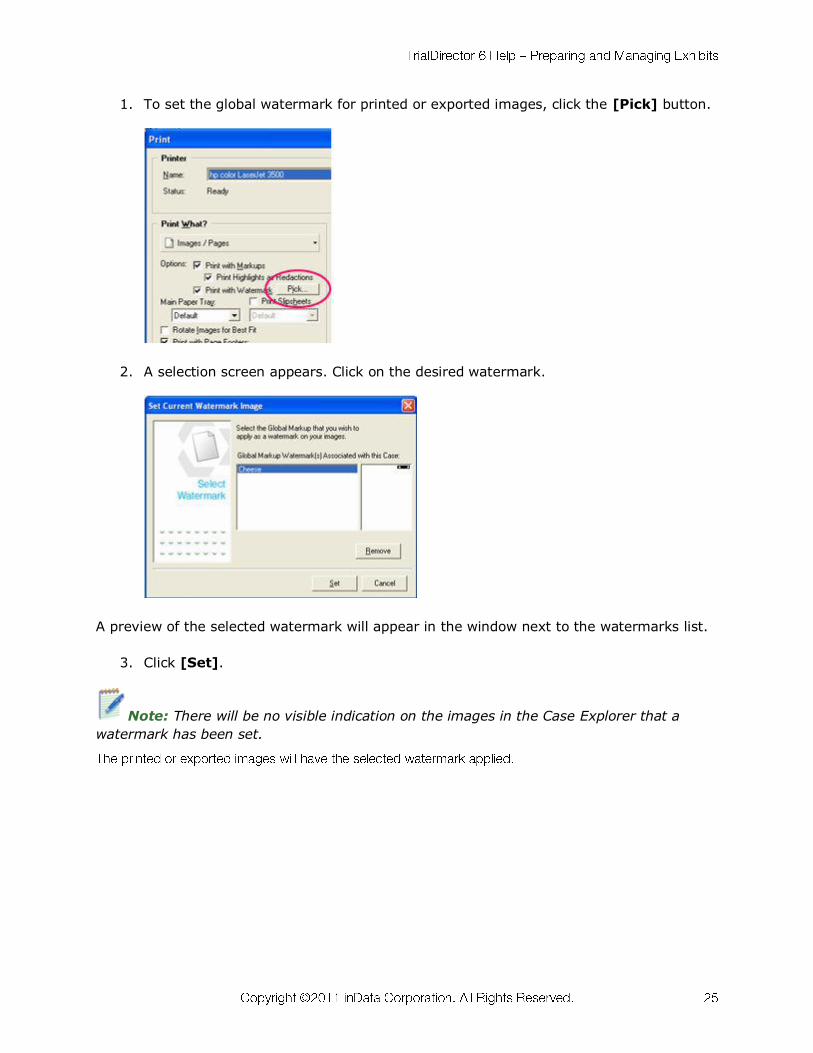
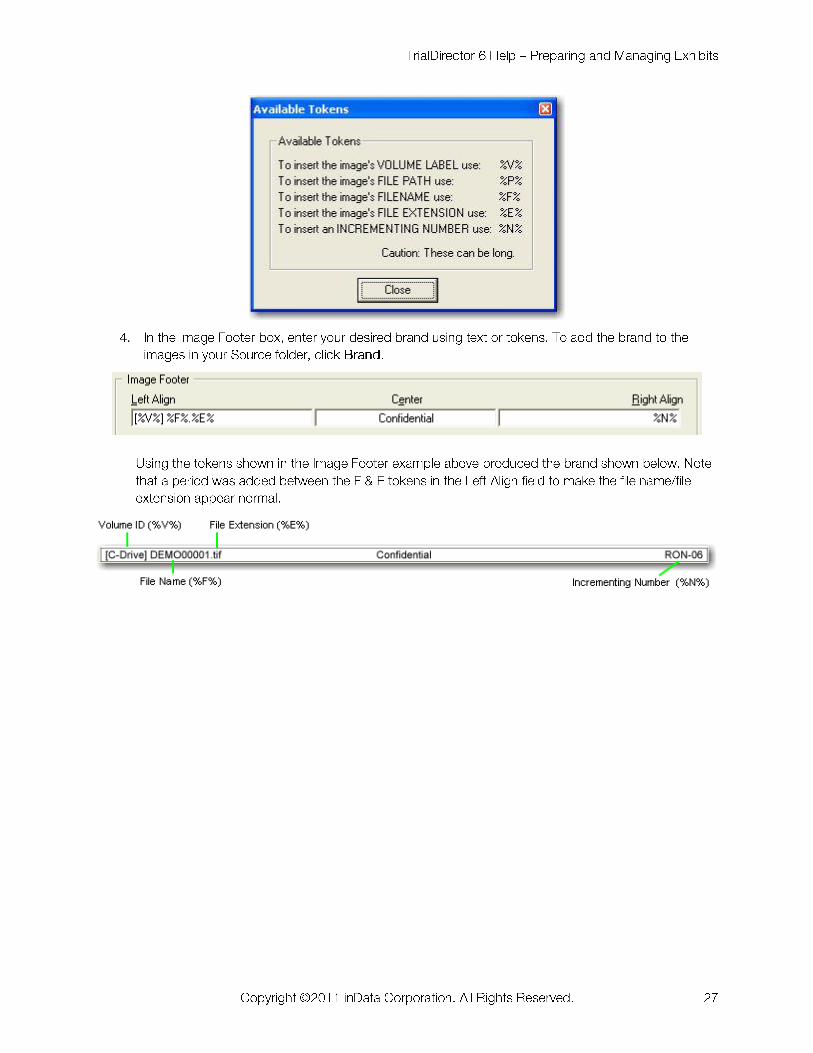
Applying a Footer to Images Using ImageBrander ..................................................... 26
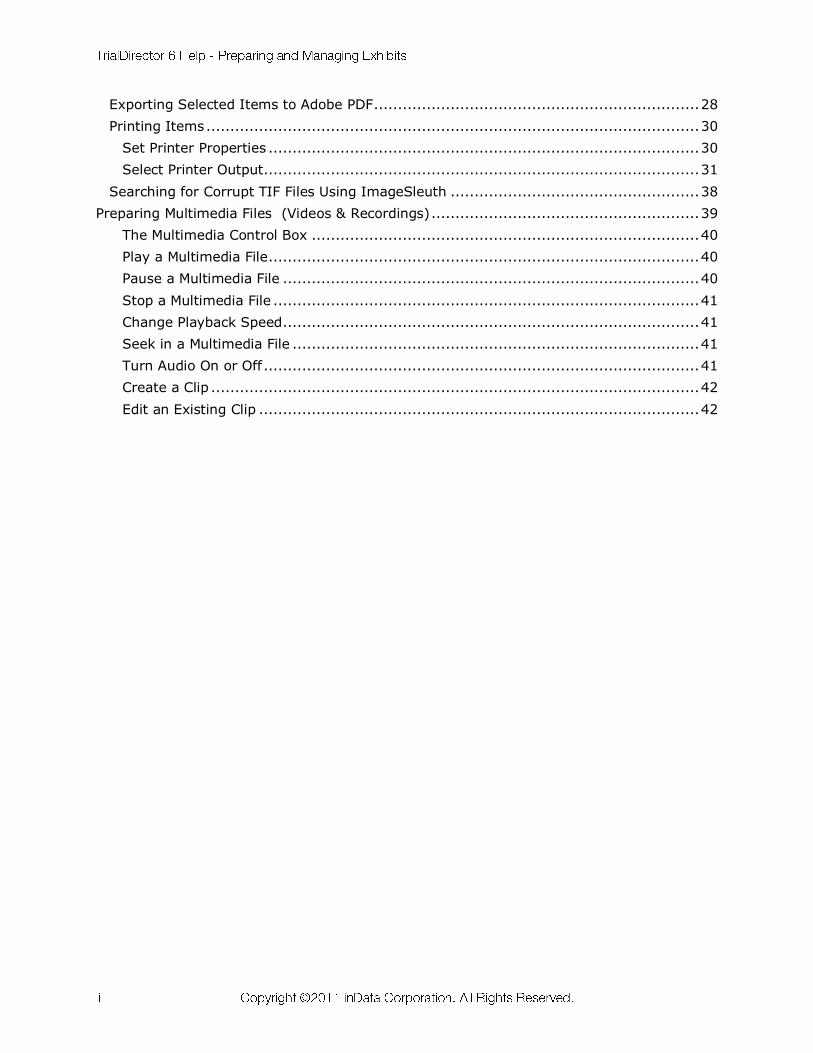
Exporting Selected Items to Adobe PDF .................................................................... 28
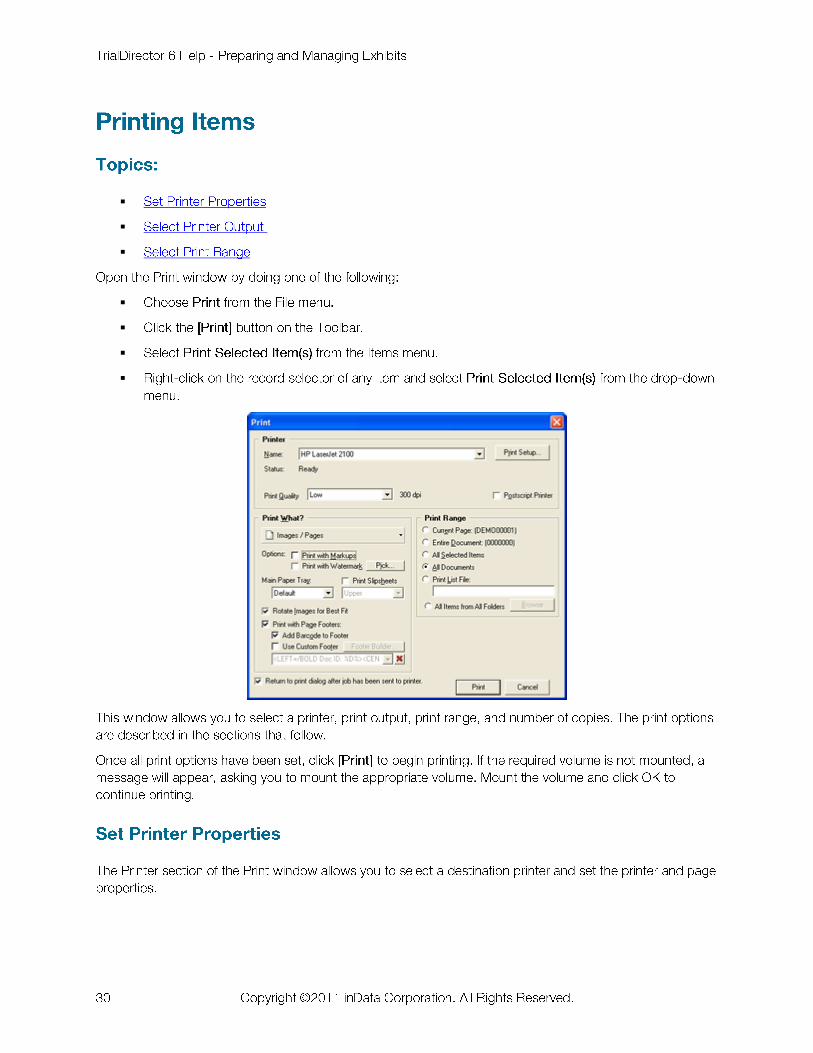
Printing Items ....................................................................................................... 30
Set Printer Properties .......................................................................................... 30
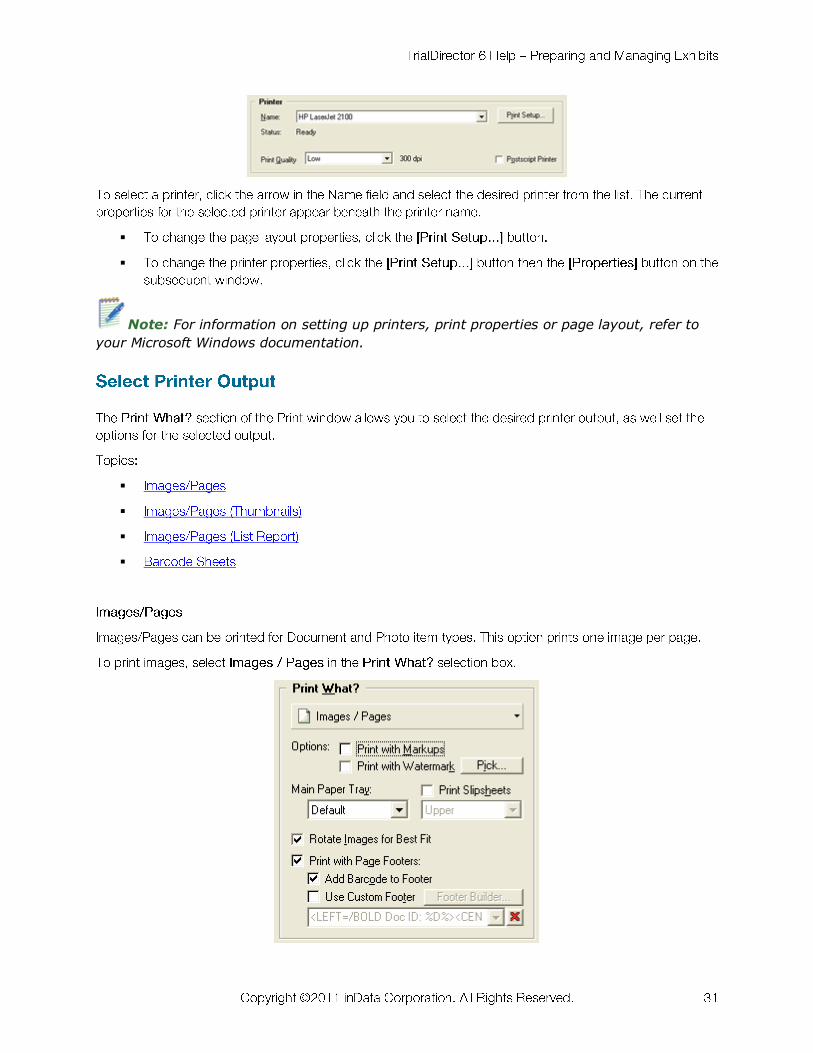
Select Printer Output ........................................................................................... 31
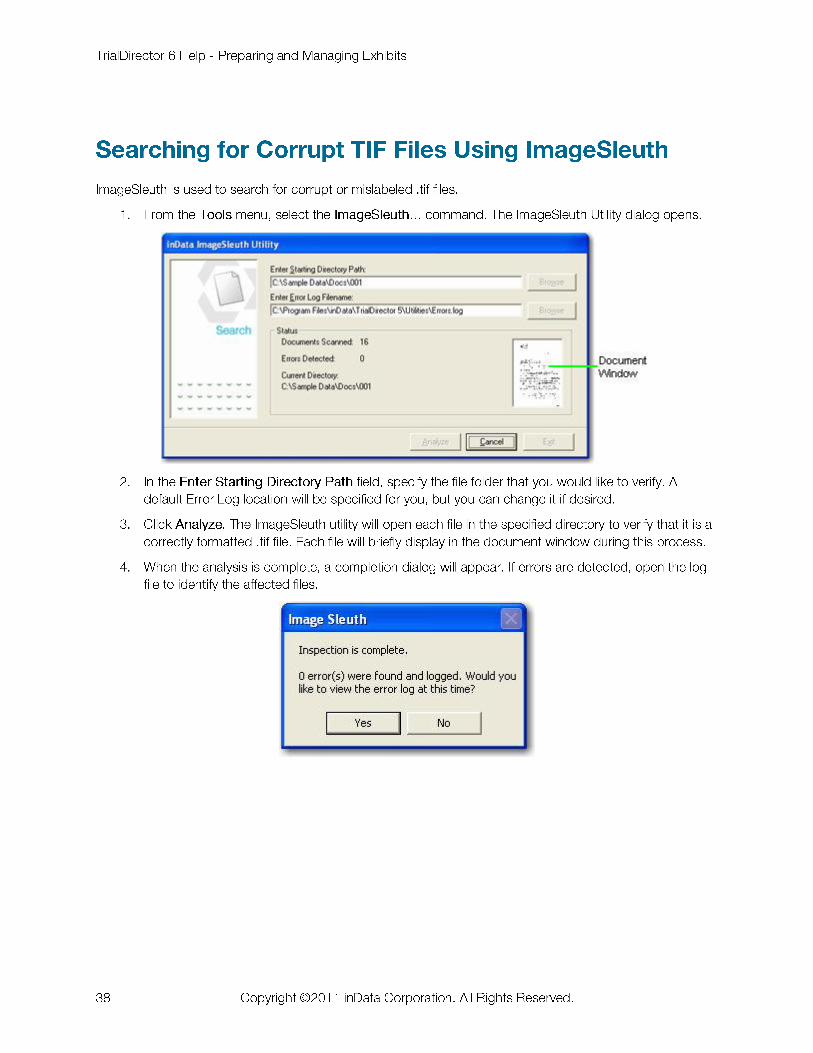
Searching for Corrupt TIF Files Using ImageSleuth .................................................... 38
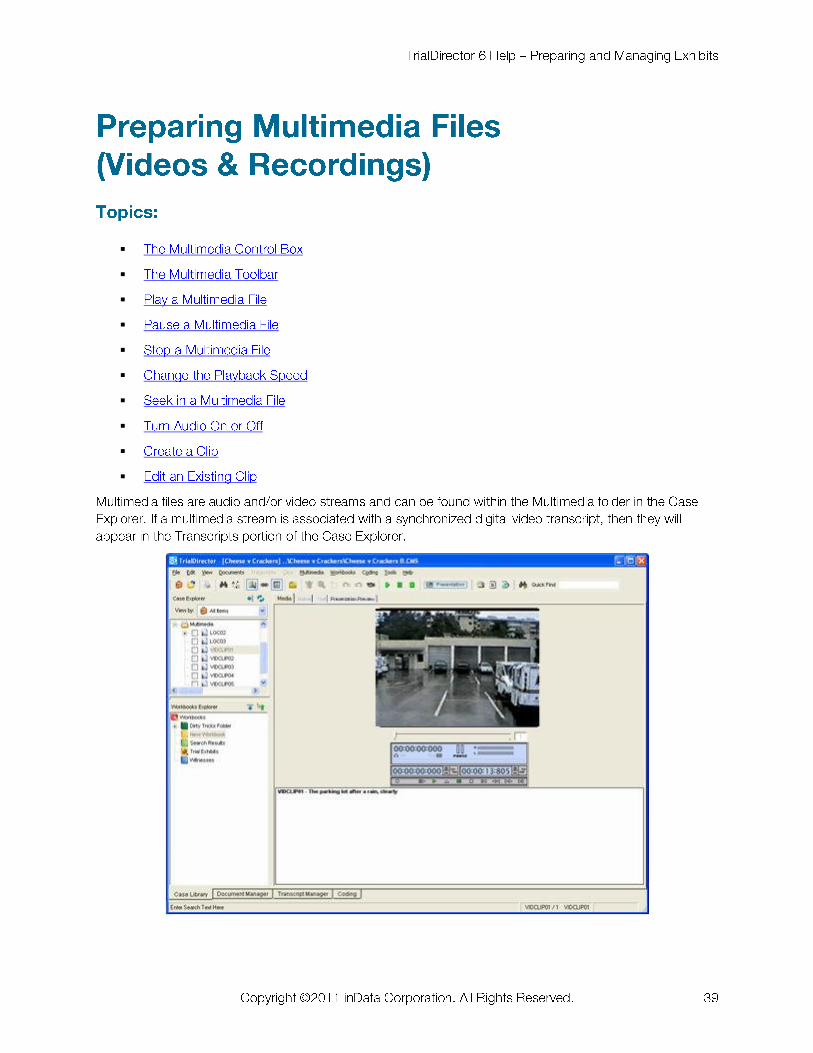
Preparing Multimedia Files (Videos & Recordings) ........................................................ 39
The Multimedia Control Box ................................................................................. 40
Play a Multimedia File .......................................................................................... 40
Pause a Multimedia File ....................................................................................... 40
Stop a Multimedia File ......................................................................................... 41
Change Playback Speed ....................................................................................... 41
Seek in a Multimedia File ..................................................................................... 41
Turn Audio On or Off ........................................................................................... 41
Create a Clip ...................................................................................................... 42
Edit an Existing Clip ............................................................................................ 42
To assign an Exhibit or Trial Exhibit Number to an item:
To assign Exhibit or Trial Exhibit Numbers to multiple items:
To remove Exhibit or Trial Exhibit Numbers:
Attaching Memos
Opening Memos
Deleting Memos
Loading Memos from a Batch File
Re-Indexing Memos
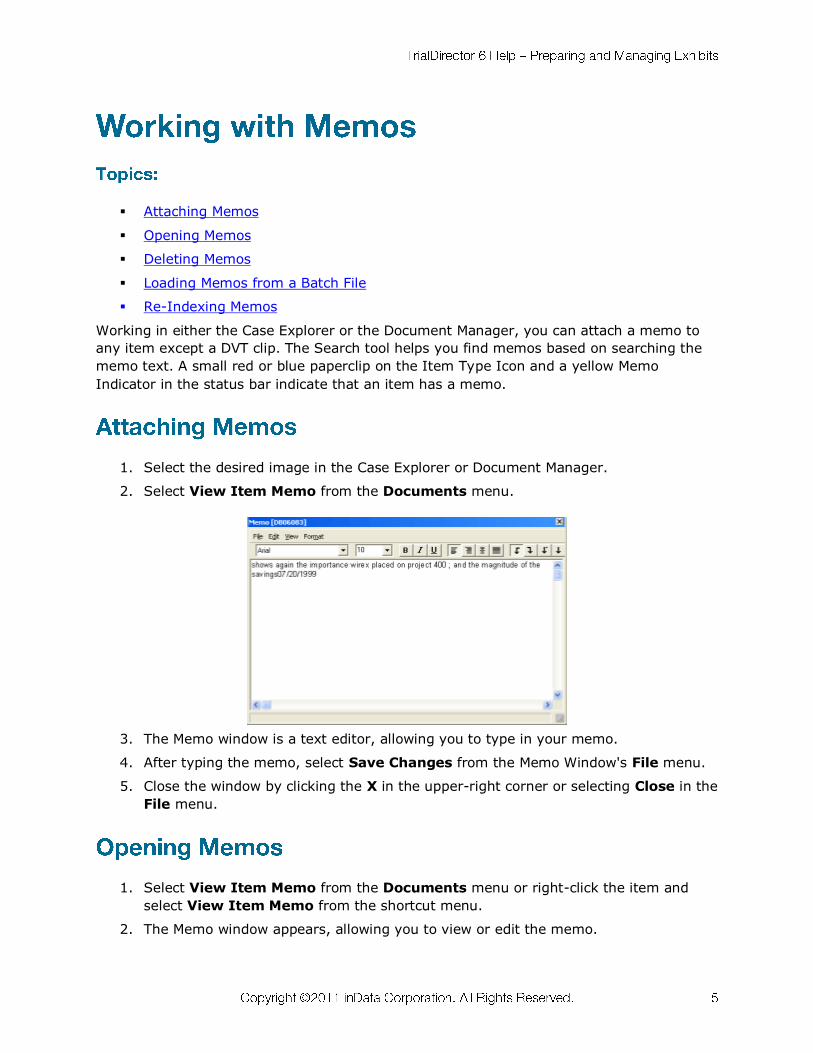
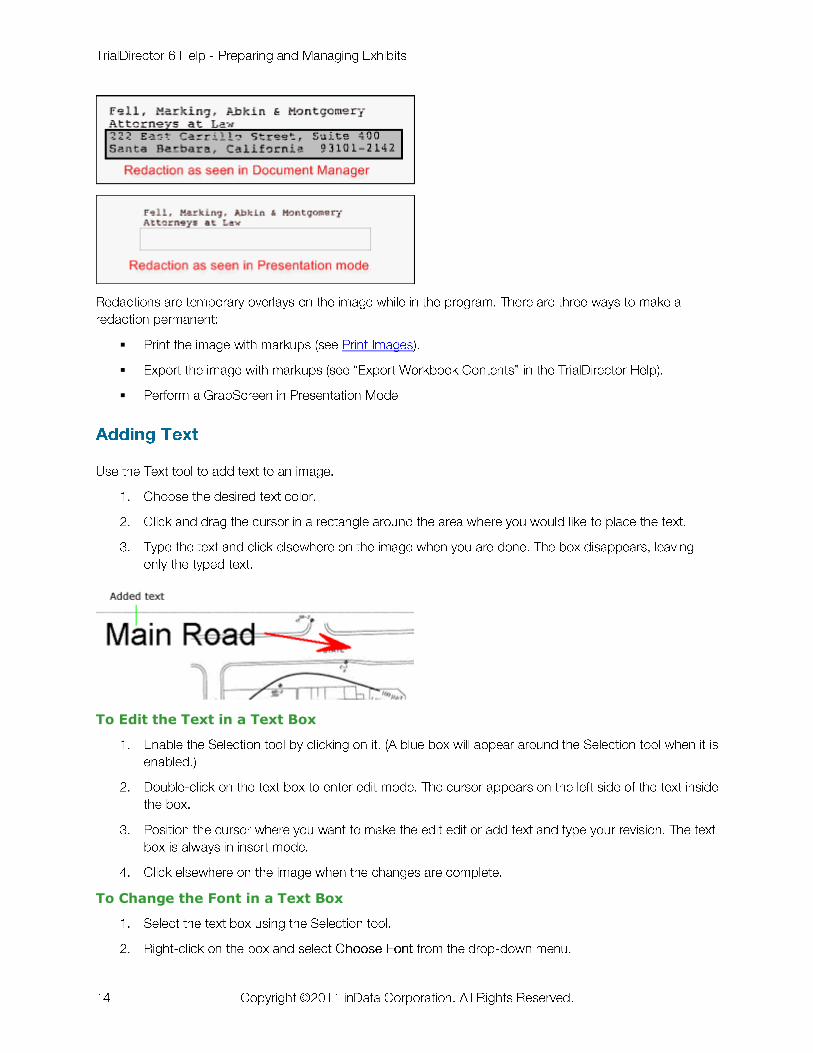
Working in either the Case Explorer or the Document Manager, you can attach a memo to
any item except a DVT clip. The Search tool helps you find memos based on searching the
memo text. A small red or blue paperclip on the Item Type Icon and a yellow Memo
Indicator in the status bar indicate that an item has a memo.
1. Select the desired image in the Case Explorer or Document Manager.
2. Select View Item Memo from the Documents menu.
3. The Memo window is a text editor, allowing you to type in your memo.
4. After typing the memo, select Save Changes from the Memo Window's File menu.
5. Close the window by clicking the X in the upper-right corner or selecting Close in the
File menu.
1. Select View Item Memo from the Documents menu or right-click the item and
select View Item Memo from the shortcut menu.
2. The Memo window appears, allowing you to view or edit the memo.
3. If the memo is edited, it must be saved again by selecting Save Changes from the
Memo Window's File menu.
1. Select the desired item in the Case Explorer or Document Manager and open the
memo.
2. When the Memo window appears, choose Remove Memo from the Memo Window's
File menu.
3. Close the Memo Window.
If you have a memo field in a third party database, you can transfer the memo information
into TrialDirector memos by loading memos from a batch file.
1. Open the Memo Window by selecting View Item Memo from the Documents
menu.
2. Choose Load Memo Text From Batch File from the File menu.
3. Browse to the location of the memo batch file, select the file and click Open to begin
loading the memos from the batch file.
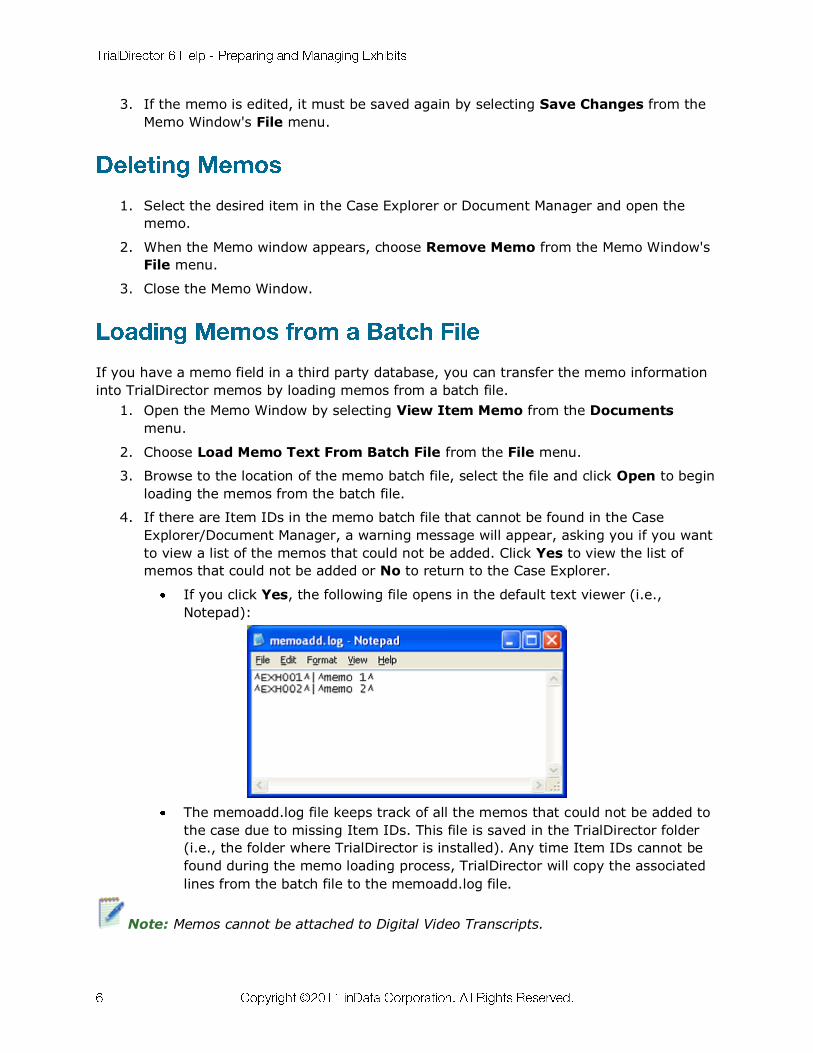
4. If there are Item IDs in the memo batch file that cannot be found in the Case
Explorer/Document Manager, a warning message will appear, asking you if you want
to view a list of the memos that could not be added. Click Yes to view the list of
memos that could not be added or No to return to the Case Explorer.
If you click Yes, the following file opens in the default text viewer (i.e.,
Notepad):
The memoadd.log file keeps track of all the memos that could not be added to
the case due to missing Item IDs. This file is saved in the TrialDirector folder
(i.e., the folder where TrialDirector is installed). Any time Item IDs cannot be
found during the memo loading process, TrialDirector will copy the associated
lines from the batch file to the memoadd.log file.
Note: Memos cannot be attached to Digital Video Transcripts.
If TrialDirector was closed without shutting down properly, you may need to re-index the
memos to refresh the database so that you can view the memos properly.
1. Open the Memo window by selecting View Item Memo from the Documents
menu.
2. When the Memo window appears, choose Re Index All Memos from the File menu.
3. When TrialDirector finishes refreshing the database, close the Memo window by
clicking the X in the upper-right corner or choosing Close from the File menu.
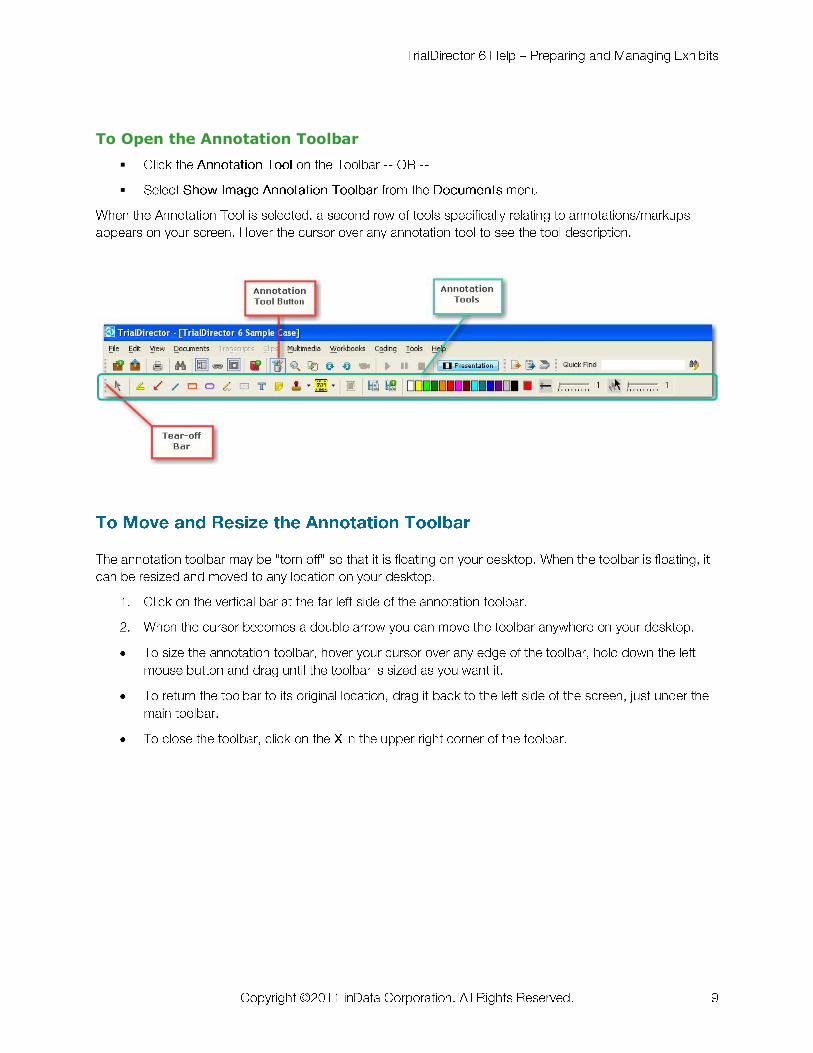
To Open the Annotation Toolbar
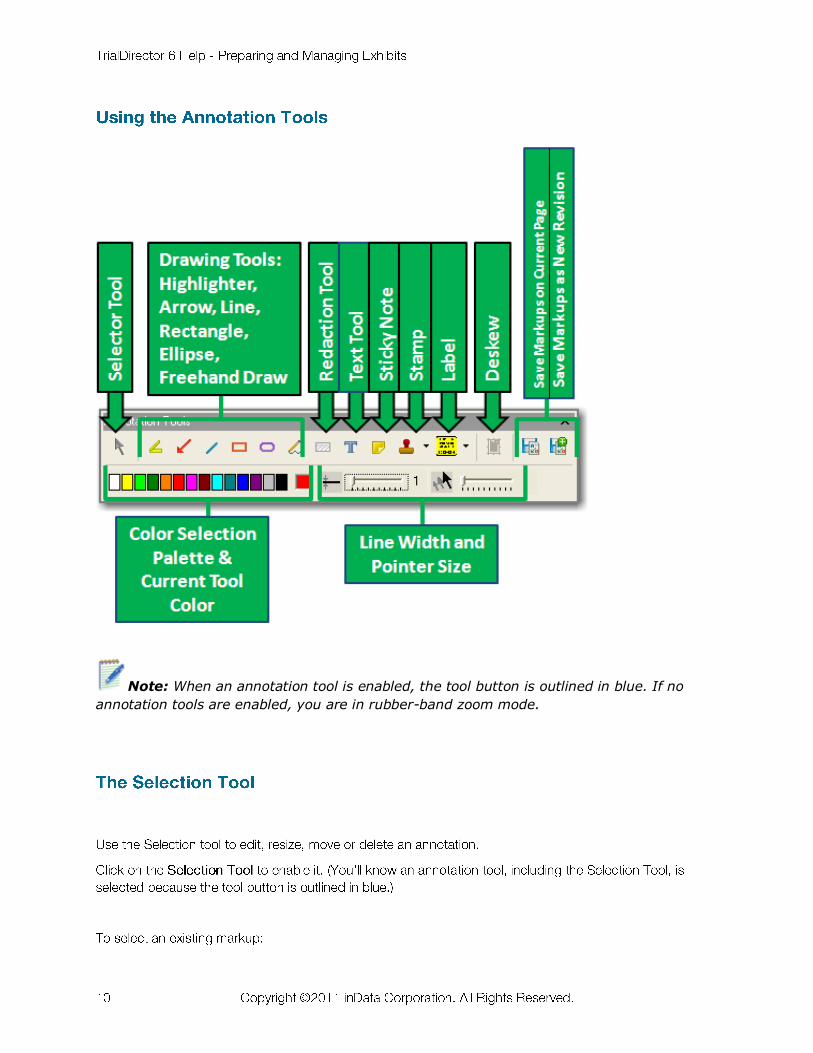
Note: When an annotation tool is enabled, the tool button is outlined in blue. If no
annotation tools are enabled, you are in rubber-band zoom mode.
Note: If you apply a solid white or solid black highlight to an image, it will appear as a
white or black redaction in Presentation Preview and Presentation mode.
To Edit the Text in a Text Box
To Change the Font in a Text Box
To Adjust the Angle of Text in a Text Box
To Set the Background Color of a Text Box
To Set the Background Mode of a Text Box
To Edit the Text in a Sticky Note
To Change the Font in a Sticky Note
To Set the Background Color of a Sticky Note
Note: The background of a note is always opaque.
Note: Stamp objects are intended for use with bitmaps that use no more than the
standard 20 Windows colors.
To Apply and Place a Label
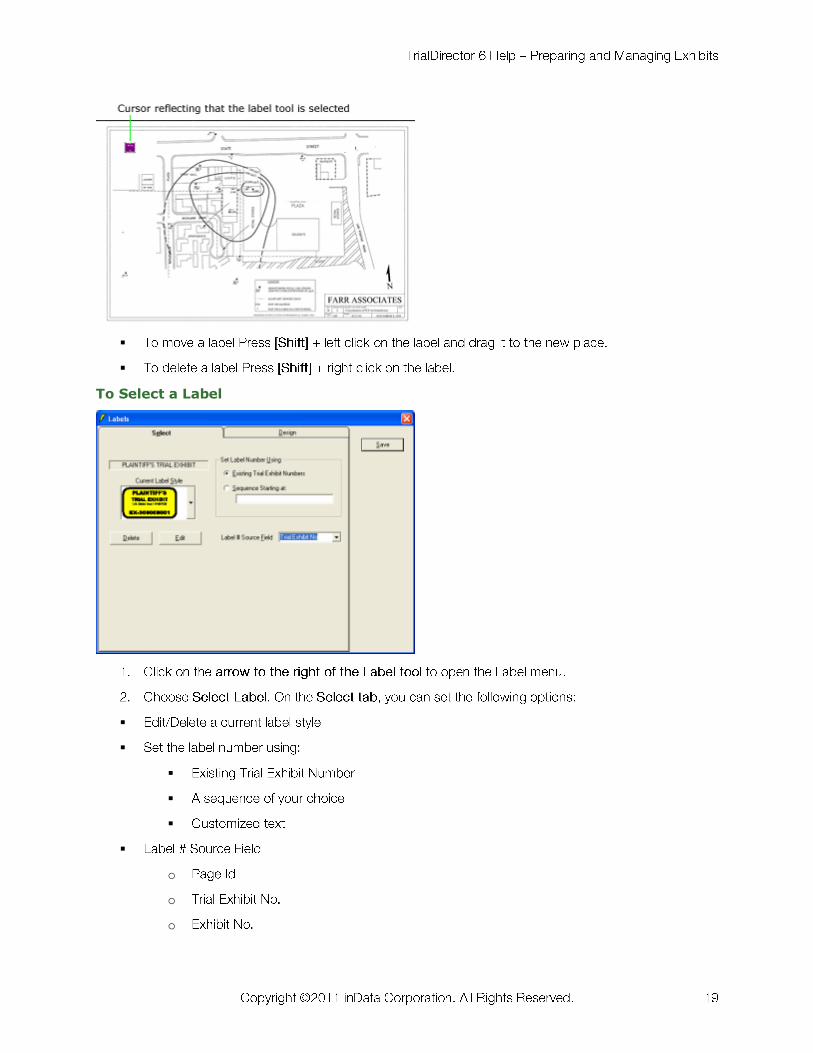
To Select a Label
o
o
o
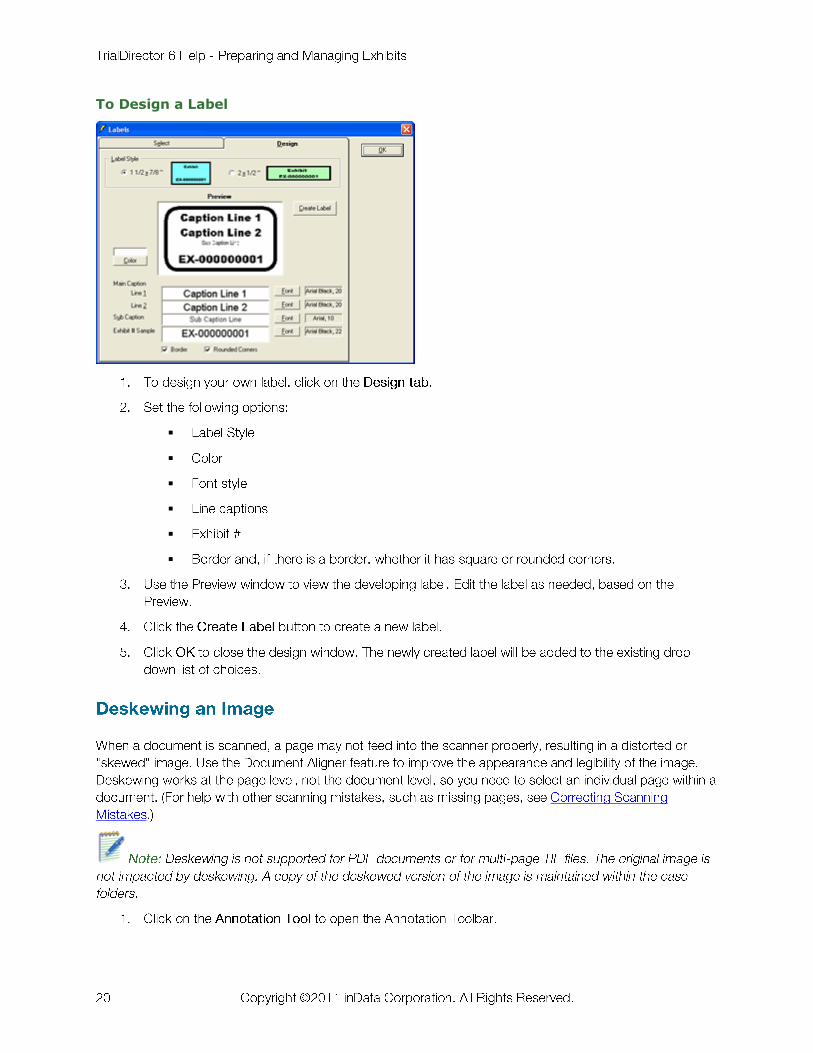
To Design a Label
You may also want to insert a color picture that was scanned separately from the black-and-
white images of a document. This can easily be done with TrialDirector's Insert Page
feature.
Note: You cannot correct scanning errors in PDFs or multi-page TIF files. You can use TrialDirector to split
multi-page TIF files into single-page TIF files through an export process.
To separate one document into several documents, insert a document break:
1. In Case Explorer or Document Manager, select the page where you need the new
document to begin.
2. Right-click and select Insert Document Break from the shortcut menu. The selected page is now the first page of the next document.
To combine multiple documents into a single document, remove a document break:
1. In Case Explorer or Document Manager, select Page 1 of the document you wish to
combine with the previous document.
2. Right-click and choose Remove Document Break from the shortcut menu. Both documents are now combined.
Create a Watermark Set Global Watermark
1. Open the Annotation Toolbar and annotate an image with the annotation that you
want to use as a watermark.
2. When you have created the desired annotation, click the [Save current image's
markups as a global markup] button from the toolbar.
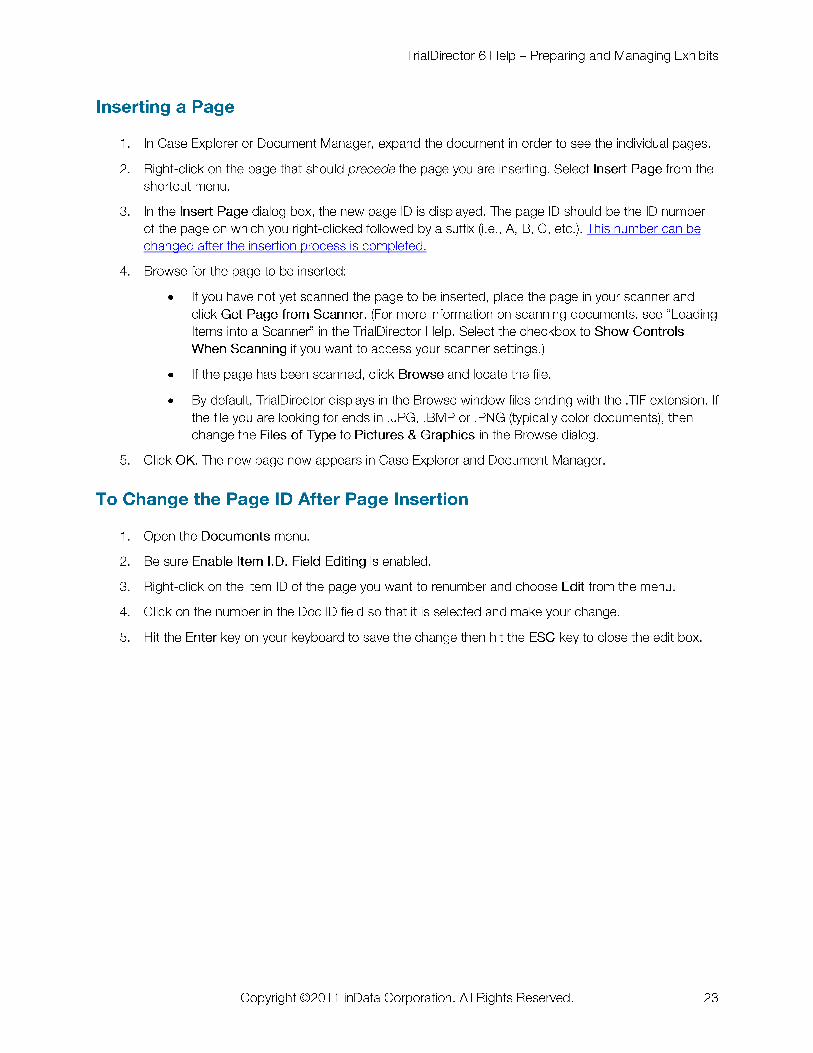
3. Enter the Name for the Watermark in the resulting dialog box
5. Click [OK]. The watermark will be added to the list of available watermarks. Click [Cancel] to exit without saving.
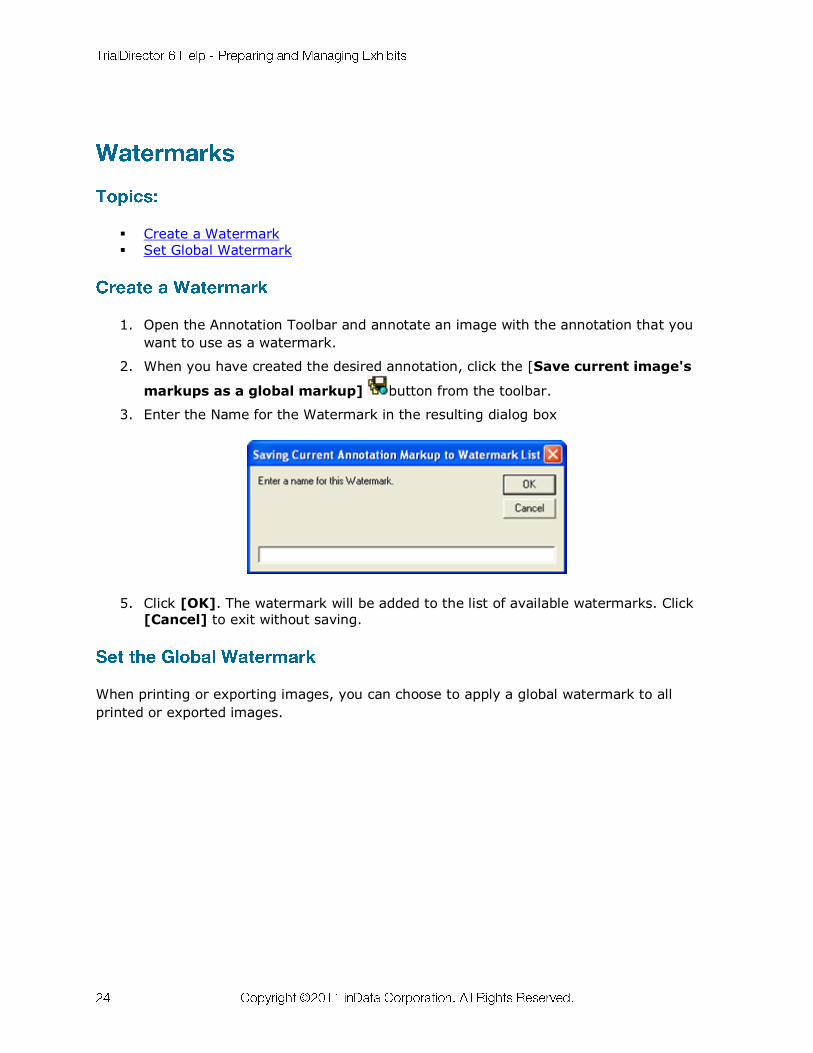
When printing or exporting images, you can choose to apply a global watermark to all
printed or exported images.
1. To set the global watermark for printed or exported images, click the [Pick] button.
2. A selection screen appears. Click on the desired watermark.
A preview of the selected watermark will appear in the window next to the watermarks list.
3. Click [Set].
Note: There will be no visible indication on the images in the Case Explorer that a
watermark has been set.

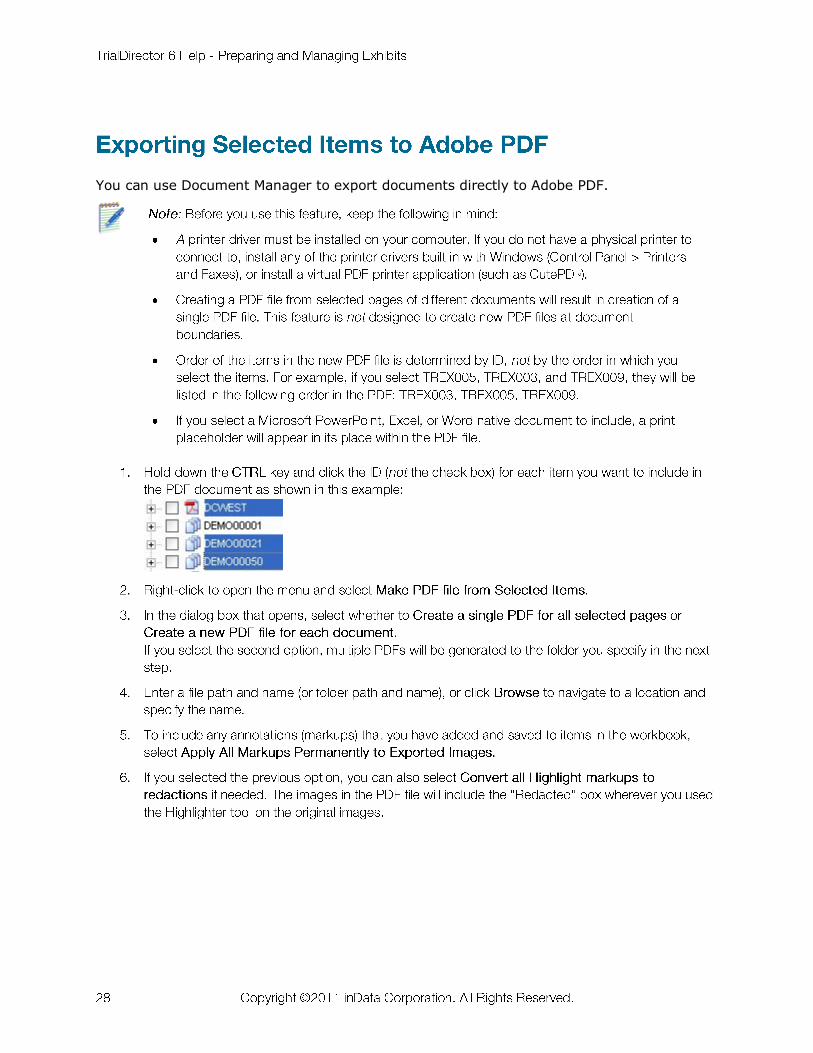
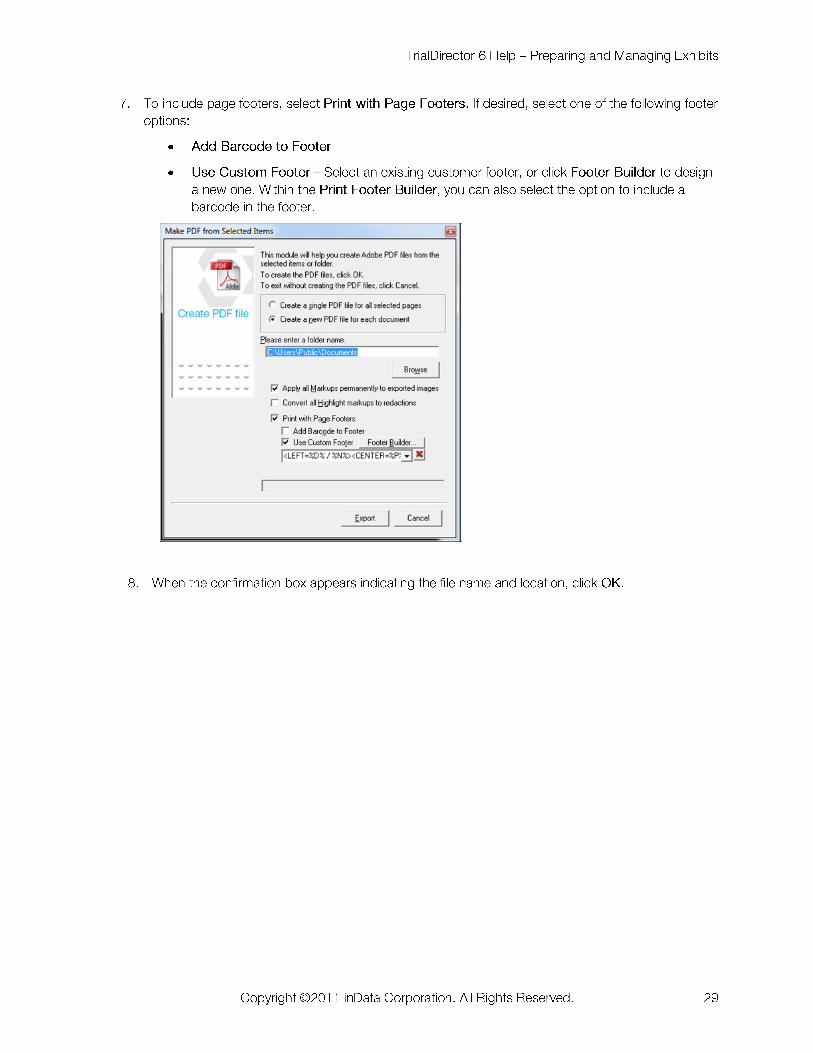
You can use Document Manager to export documents directly to Adobe PDF.
Note: For information on setting up printers, print properties or page layout, refer to
your Microsoft Windows documentation.
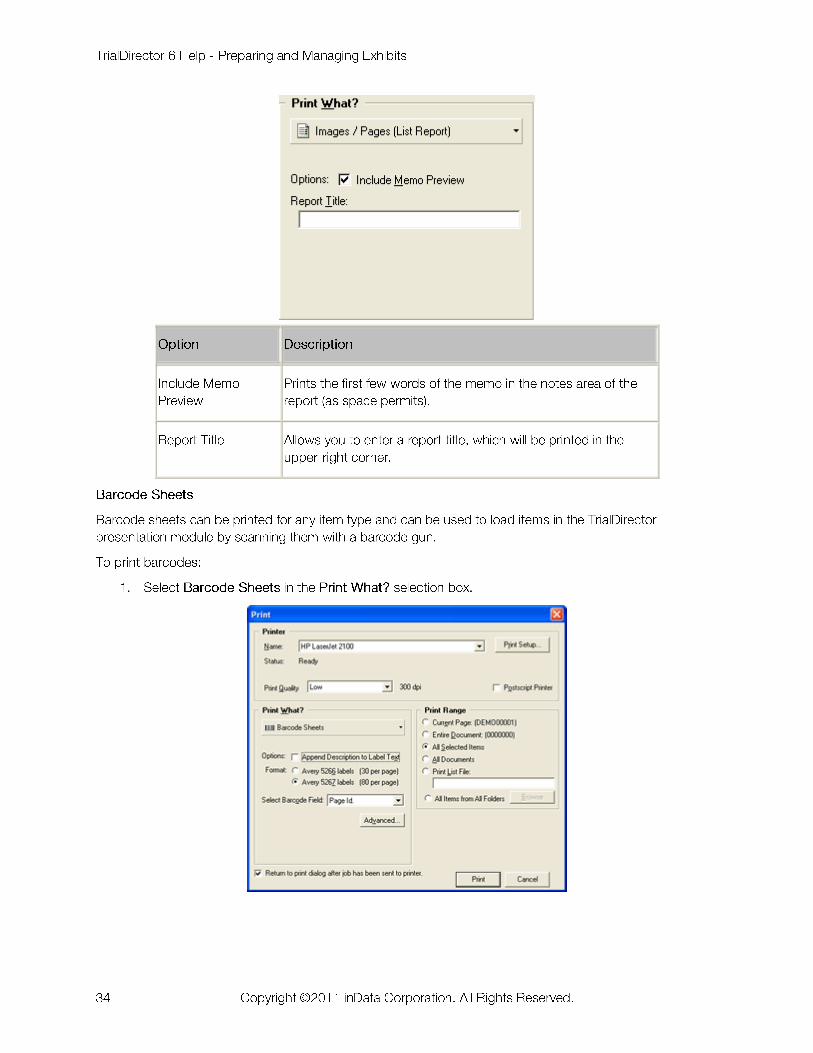
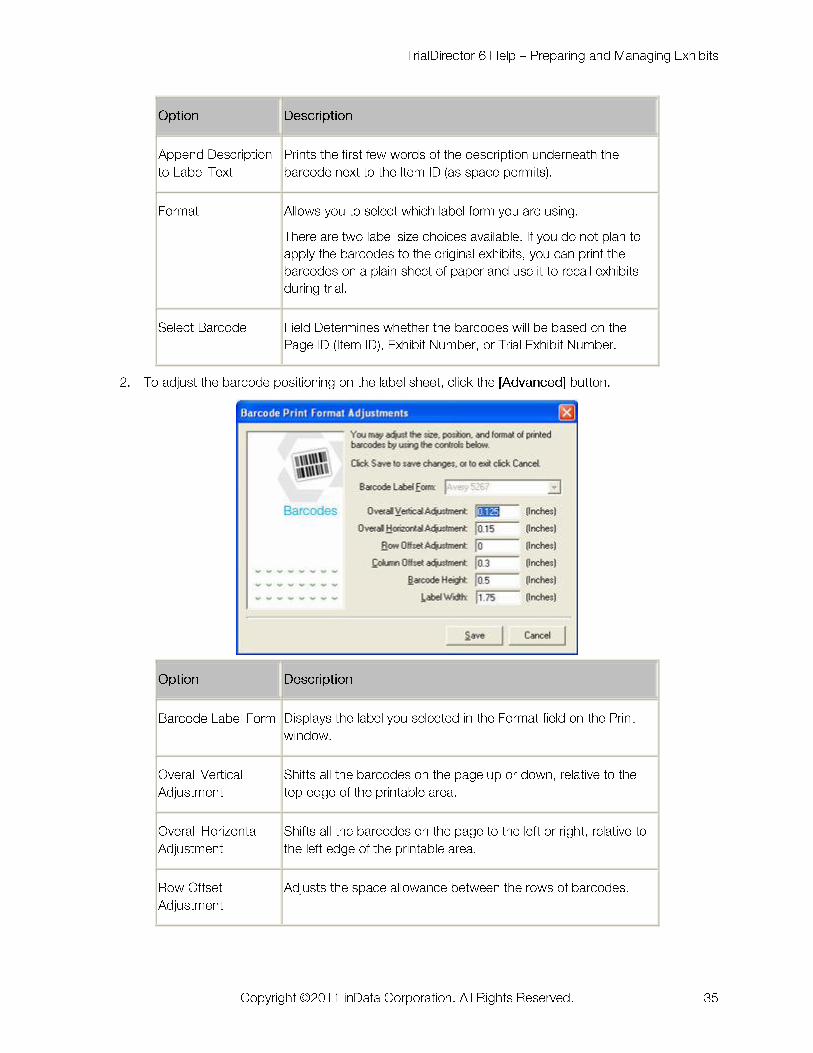
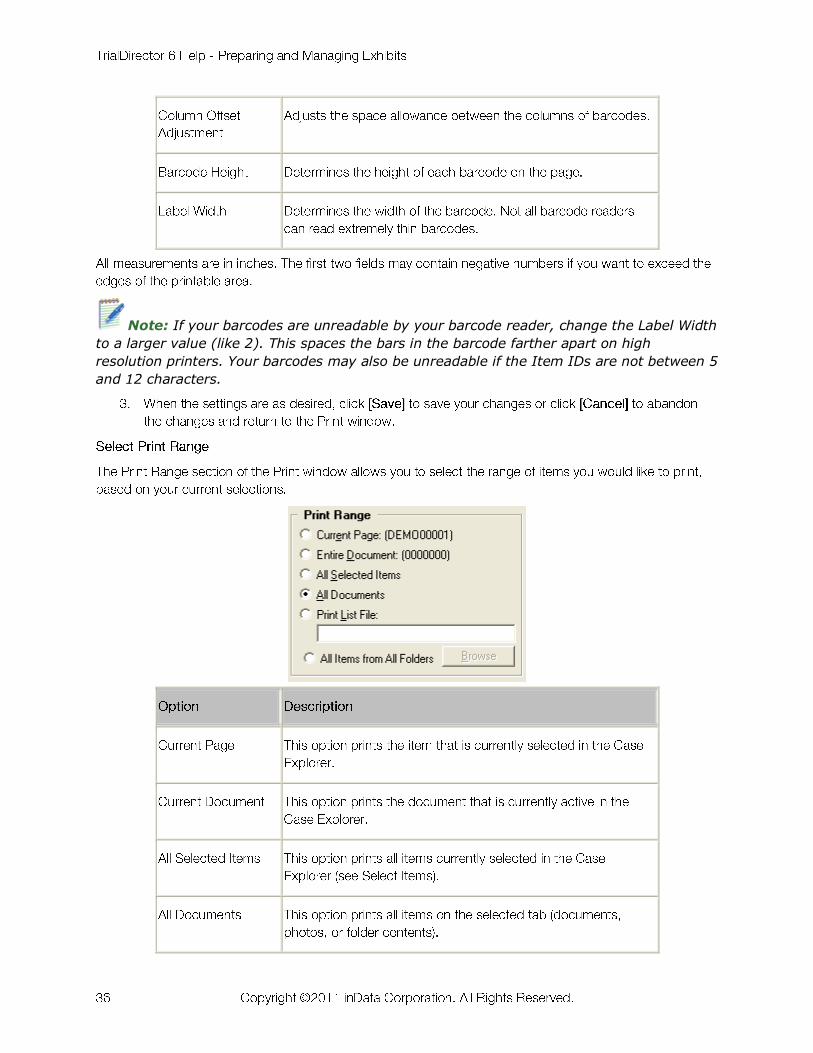
Note: If your barcodes are unreadable by your barcode reader, change the Label Width
to a larger value (like 2). This spaces the bars in the barcode farther apart on high
resolution printers. Your barcodes may also be unreadable if the Item IDs are not between 5
and 12 characters.

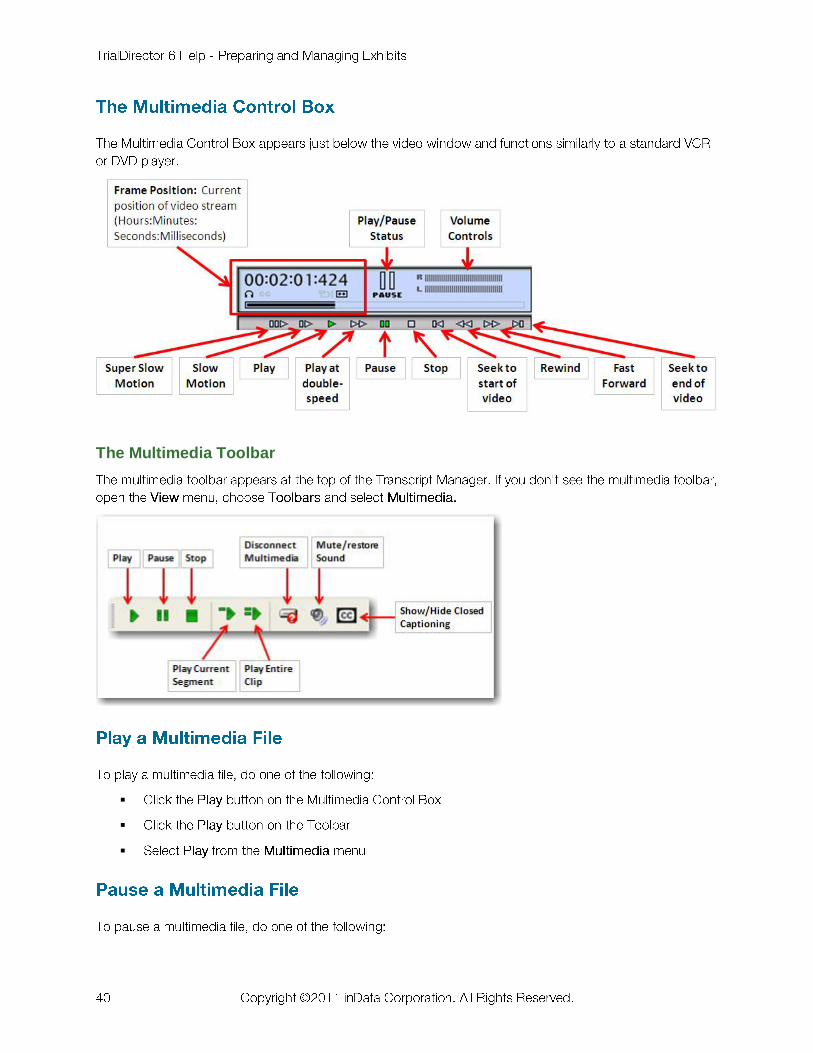
The Multimedia Toolbar