Embed Size (px)
Citation preview

Pipit 500
In-home Display
Quick Start Guide
BGX501-792-R03
Before you get started
Overview
Pipit 500 is an in-home display unit that collects energy usage information from your Smart Meter1 and displays it on a LCD screen. In addition, the unit allows you to set up customised alerts relating to your energy usage.
The Pipit 500 connects (pairs) wirelessly to your Smart Meter using a Home Area Network which is built into both the Smart Meter and the Pipit 500. Importantly, only the data from your Smart Meter will be visible on your Pipit 500.

Page 2
Touch screen: Pipit’s LCD screen is touch-sensitive and backlit. The buttons and functions on the screen will change depending on the operation being carried out.
Energy usage information: Presents near real-time information on the energy you are currently using and also allows you to check your past energy usage patterns.
Customised alerts: Allows you to set-up threshold alerts to inform you when your consumption is higher than you want it to be. 1 Smart Meter refers to an electronic electricity meter with wireless communications to talk to an in-home display device using ZigBee® SEP 1.x.
What is inside the box?
Inside your Pipit 500 pack you will find:
• Pipit 500 (in-home display unit) • Mains power adaptor • Quick Start Guide (this
document) • Wall mount bracket • 2 x wall mount screws • 2 x AAA alkaline batteries
Care instructions
• Do not use the unit for any purpose other than for which it is intended.
• To avoid damage, do not use sharp objects on the display. • Do not immerse the unit in water or any other liquid. Keep it
away from heat-generating sources or areas with high moisture. • Excessive impact or shock may damage the unit. If the display is
damaged avoid touching the liquid crystals contained in it.

Page 3
Setting up your Pipit 500
Powering the unit
Only use the adapter provided with your display to power it. Place the unit in an easy-to-view location, near a power outlet.
Step 1: Insert the two AAA batteries supplied with the unit, taking care to observe that they are fitted correctly, as indicated by the terminal markings in the battery compartment (refer to page 15).
Step 2: Hold the display with its rear facing towards you; align the small end of the power adapter cable vertically with symbol ‘B’ facing towards you and plug it into the socket at the back of the display as shown in the figure.
Step 3: Push the cable into the groove of the cable grip to secure the connector.
Step 4: Plug the other end into a power outlet and switch the power on. The start-up screen should appear, as shown below.

Page 4
Pairing Pipit 500 with your Smart Meter:
Before you can start using your Pipit it must be connected (paired) wirelessly with your Smart Meter. For the unit to pair automatically, your smart meter should have the pairing window open so as to accept connection requests from Pipit. A pairing wizard is accessible using the ‘pair with smart meter’ tab from our website www.freedomtosave.com.au which can guide you through the pairing process. This is typically a one off task and is a similar process to pairing a mobile phone to a Bluetooth device. Your smart meter remembers which units it is been paired with, even in the event of power failure.
After initial start up, Pipit 500 will display the message ‘Waiting for home area network’ indicating that the unit is searching for your Smart Meter. Joining the network is a self-running process which can take up to 10 minutes and doesn’t require you to press anything on the display. Once successful, the message ‘IHD paired successfully’ will be displayed and the network connection icon will show in the top left-hand corner.
If your display does not link to your network go to the ‘Troubleshooting’ section for further advice.
Note: In order to action the pairing process, it may also be necessary to identify
and enter the following information:
1. The NMI number of your Smart Meter (this can be found on your
electricity bill).
2. The serial number of your Smart Meter (this can be found on your
electricity bill or on the face of your meter).
3. The MAC number of your Pipit 500 (this can be found on the
underside of the unit).
You would need the above information when pairing the unit by using the
pairing wizard from ‘pair with smart meter’ tab available on our website.
Page 5
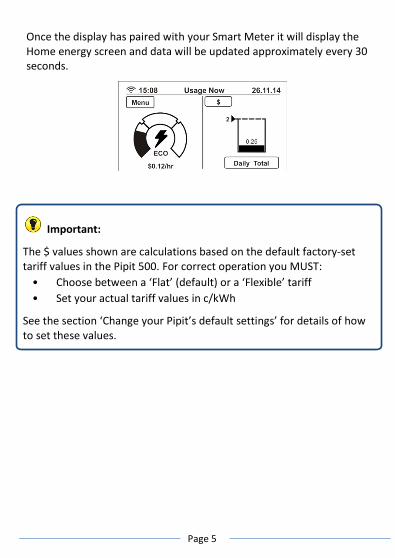
Once the display has paired with your Smart Meter it will display the Home energy screen and data will be updated approximately every 30 seconds.
Important:
The $ values shown are calculations based on the default factory-set tariff values in the Pipit 500. For correct operation you MUST: • Choose between a ‘Flat’ (default) or a ‘Flexible’ tariff • Set your actual tariff values in c/kWh
See the section ‘Change your Pipit’s default settings’ for details of how to set these values.

Page 6
Understanding the main display
Home screen
Electricity net consumption scenario
Network icon - indicates the network connection status
Current time
Current date
Display title
Menu button - press this to access the main menu
Instantaneous power usage indicator dial. When the indicator is in the ECO or MID range, your current usage is within your $ per day target. If the indicator is in the High range, you will exceed your $ per day target if the current level of consumption is maintained. (See ‘Setting tariffs’ for details on entering your daily target).
Electricity icon
Shows the instantaneous power level: ECO, MED or HI
1
2
3
4
5
6
7
8
12
13
3
11
1 10
9
8
5
7
2 4
6
Page 7
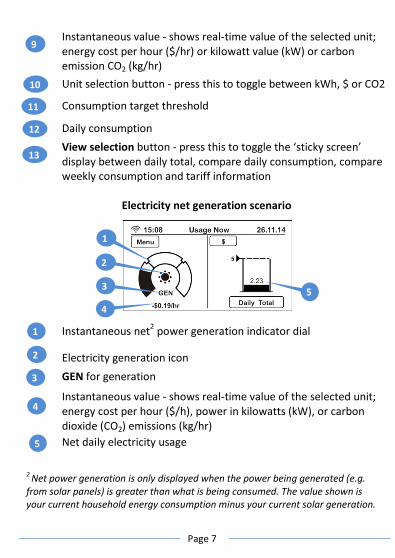
Instantaneous value - shows real-time value of the selected unit; energy cost per hour ($/hr) or kilowatt value (kW) or carbon emission CO2 (kg/hr)
Unit selection button - press this to toggle between kWh, $ or CO2
Consumption target threshold
Daily consumption
View selection button - press this to toggle the ‘sticky screen’ display between daily total, compare daily consumption, compare weekly consumption and tariff information
Electricity net generation scenario
Instantaneous net2 power generation indicator dial
Electricity generation icon GEN for generation
Instantaneous value - shows real-time value of the selected unit; energy cost per hour ($/h), power in kilowatts (kW), or carbon dioxide (CO2) emissions (kg/hr)
Net daily electricity usage
2 Net power generation is only displayed when the power being generated (e.g. from solar panels) is greater than what is being consumed. The value shown is your current household energy consumption minus your current solar generation.
9
10
11
12
13
1
2
3
4
5
5
4
3
2
1

Page 8
Display identifiers
Network connection ok
No network connection
Battery charge low; the batteries should be replaced if this icon is displayed
Message in-box
Electricity consumption symbol
Net electricity generation symbol. This is displayed when your current generation exceeds your current household electricity consumption. The amount shown is the surplus electricity being exported to the electricity network.
ECO Economy
MED Medium
HI High
GEN Net electricity generation

Page 9
Display page navigation
Accessing the main menu
View your real-time energy usage
The label on the Unit selection button shows the type of information being displayed on the Home screen. By default this is the cost you are incurring at the current rate of energy usage; use this button to display your real-time energy usage or the resulting carbon emissions. The instantaneous Power Usage indicator dial (in left-hand section of the screen) shows live energy usage. When the indicator is in the Eco or Mid range, your current usage is within your $ per day target. If the indicator is in the High range, you will exceed your $ per day target if consumption continues at the current level. (See ‘Change your Pipit’s default settings’ for entering your daily target).
View/compare your energy usage by day or week and know your tariff rate
Use the View selection button from the Home screen to view your daily or weekly energy consumption comparison and tariff information.

Page 10
View your historical energy usage
Touch the History icon from the Main Menu screen to view your energy consumption pattern graphically as well as in tabular form or compare your current energy consumption with the previous day, week, month or year.
View historical energy usage graphically
Touch the Graphs icon to see your net hourly consumption pattern over the past 24 hours, and daily consumption along with your daily target threshold. You can set your own daily consumption target threshold to help you control your energy consumption and keep your energy bills low. Use the arrow buttons on either side of the graph to scroll backwards and forwards through the data.
On the same screen you can also see your daily, weekly and monthly consumption patterns by using the View button or you can check your
Unit
Time
View button

Page 11
hourly rate of consumption ($/hour) and carbon emissions by using the Unit selection button.
Compare energy usage by day, week, month or year
Touch the Compare icon to compare your current and previous week, month and year’s consumption by using the View button.
View historical energy usage table
Touch the Table icon to see your hourly consumption pattern in tabular form over the past 24 hours. Use the View button to see your daily, weekly and monthly consumption data. To scroll through days use the left-hand arrow, as shown above.
Page 12
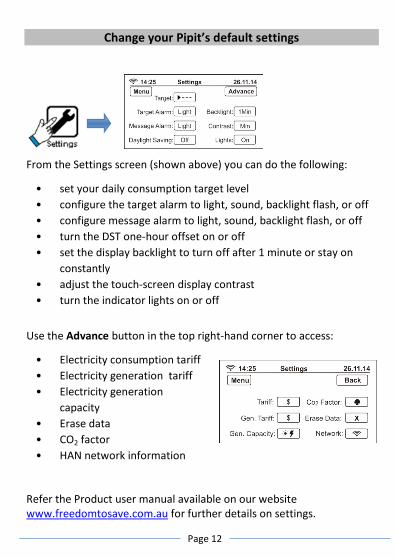
Change your Pipit’s default settings
From the Settings screen (shown above) you can do the following:
• set your daily consumption target level • configure the target alarm to light, sound, backlight flash, or off • configure message alarm to light, sound, backlight flash, or off • turn the DST one-hour offset on or off • set the display backlight to turn off after 1 minute or stay on
constantly • adjust the touch-screen display contrast • turn the indicator lights on or off
Use the Advance button in the top right-hand corner to access:
• Electricity consumption tariff • Electricity generation tariff • Electricity generation
capacity • Erase data • CO2 factor • HAN network information
Refer the Product user manual available on our website www.freedomtosave.com.au for further details on settings.

Page 13
Setting tariffs
Use the Tariff button and select either flat or flexible.
Press the Flat button – enter on the numerical keypad the rate in c/kWh, for example: 25.456 c/kWh (i.e. $ 0.25456 $/kWh).
Press the OK button to finish. You will be prompted for a PIN code (see ‘PIN Code entry’).
Press the Flexible button – a Weekday window will appear with 4 line items. Press the button directly adjacent to line item 1, twice.
Note:
• Setting tariffs will ensure your consumption of electricity approximates
correctly with your actual usage. Supply/service charges are not
included in this tariff.
• Flat tariff is one where the same rate (c/kWh) applies through all billing
periods (default).
• Flexible tariff is one where the rate (c/kWh) varies at different times of
the day, or for different days of the week.
You can find your current tariff type and rate(s) on your electricity bill. If only
one tariff rate value is listed you are most likely on a flat tariff. If separate
peak and off-peak rates are listed you are most likely on a flexible tariff.
Page 14
Line items 1 and 2 will auto-populate with default values (these are the most common peak and off-peak time periods):
1 7am 11pm 30.000 c/kWh
2 11pm 7am 18.000 c/kWh
Line item 1 is the peak rate. Press the 7am button to change the start time, if required. Press the 30.000 button to change the peak rate. Enter the rate (c/kWh) for your peak tariff using the numerical keypad.
Line item 2 is the off-peak rate. Press the 11pm button to change the start time, if required. Press the 18.000 button to change the off-peak rate. Enter the rate (c/kWh) for your off-peak tariff using the numerical keypad.
Press the OK button and you will then see the Weekend tariff screen. Adjust the time and tariff rate as required.
Press the OK button to finish. You will be prompted for a PIN code.
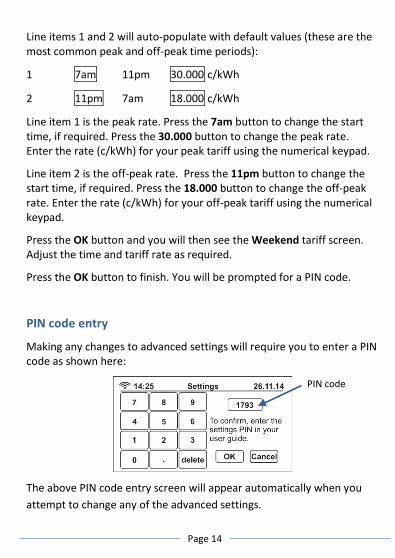
PIN code entry
Making any changes to advanced settings will require you to enter a PIN code as shown here:
The above PIN code entry screen will appear automatically when you attempt to change any of the advanced settings.
PIN code
Page 15
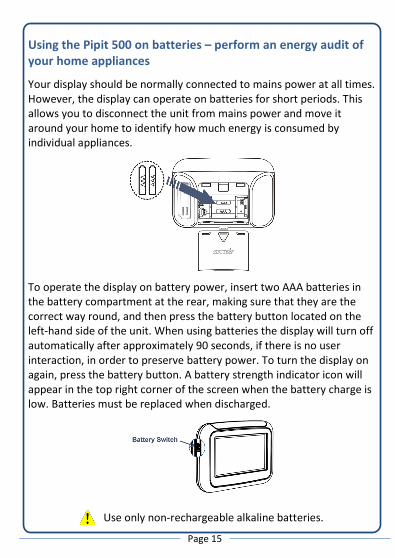
Using the Pipit 500 on batteries – perform an energy audit of your home appliances
Your display should be normally connected to mains power at all times. However, the display can operate on batteries for short periods. This allows you to disconnect the unit from mains power and move it around your home to identify how much energy is consumed by individual appliances.
To operate the display on battery power, insert two AAA batteries in the battery compartment at the rear, making sure that they are the correct way round, and then press the battery button located on the left-hand side of the unit. When using batteries the display will turn off automatically after approximately 90 seconds, if there is no user interaction, in order to preserve battery power. To turn the display on again, press the battery button. A battery strength indicator icon will appear in the top right corner of the screen when the battery charge is low. Batteries must be replaced when discharged.
Use only non-rechargeable alkaline batteries.

Page 16
Troubleshooting
My Pipit is not pairing/re-pairing to my Smart Meter
You may want to check with your electricity distributor3 on whether or not they are currently allowing IHD (In-Home Display) connections to the Smart Meters.
a) If they are then you may have to re-run the pairing process via our pairing wizard which is accessible through the ‘pair with smart meter’ tab on website www.freedomtosave.com.au and ensure that Pipit is powered-on while the pairing window at the Smart Meter is open.
b) If they are not then you will have to wait until they enable the HAN (Home Area Network) functionality in the Smart Meter.
3 An electricity distributor is not the energy retailer that sends you your bill, but rather the company which provides power services to your home, including the meter. For example – Jemena, United Energy, Powercor, CitiPower and SpAusNet are the Electricity Distributors in Victoria whereas AGL, Origin, Energy Australia (erstwhile TruEnergy) etc are Electricity Retailers.
My Pipit is paired with my Smart Meter (the Network icon appears steady) but the Home screen displays ‘__’ instead of a value
‘_ _’ indicates that the Pipit is not receiving data from your Smart Meter. Please contact your electricity distributor for assistance with your Smart Meter.
Note:
You will find additional FAQs on our website www.freedomtosave.com.au
Page 17
Get support
User manual
Pipit user manual is available on our website www.freedomtosave.com.au
Support on the web
Visit www.freedomtosave.com.au to learn more about your Pipit.

Page 18
Notes

Page 19
Limited warranty
This Secure product is warranted to be free from defects in materials or workmanship for one year from the date of purchase. Within this period, Secure will, at its sole discretion, repair or replace the product.
Such repairs or replacement will be made at no charge to the customer for parts or labour, provided that the customer shall be responsible for any transportation cost. This warranty does not apply for (i) cosmetic damage, such as scratches and dents; (ii) consumable parts; (iii) damage caused by accident, abuse, misuse, water, flood, fire, or other acts of nature; (iv) damage caused by service performed by anyone who is not an authorised service provider of Secure; or (v) damage to a product that has been modified or altered. In addition, Secure reserves the right to refuse warranty claims against products or services that are obtained and/or used in contravention of the laws of any country.
This product is intended to be used only as an energy monitor aid and must not be used for any purpose requiring precise measurement of energy consumption. Secure makes no warranty as to the accuracy of this product.
The warranties and remedies contained herein are exclusive and in lieu of all other warranties expressed, implied, or statutory, including any liabilities arising under any warranty of merchantability or fitness for a particular purpose, statutory or otherwise. This warranty gives you specific legal rights, which may vary from state to state.
In no event shall Secure be liable for any incidental, special, indirect or consequential damages.

Secure Australasia Pty Ltd
258 Darebin Rd
Fairfield VIC 3078
www.freedomtosave.com.au
Copyright © 2013, SIHPL. All rights reserved. E&OE.
Pipit 500® is a registered trade name of Secure Meters Ltd.
Other product names are trademarks or registered trademarks of their respective owners.
www.securetogether.com