Embed Size (px)
Citation preview

8/7/2019 PageMaker File Guide 2010
http://slidepdf.com/reader/full/pagemaker-file-guide-2010 1/4
FILE SUBMISSIONGUIDELINESPreparing digital fles or printing is a complex process. It is ar dierent than printing a fle rom your personal computer. Unless fles properly prepared, the results are unpredictable. This comprehensive guide will help you properly submit fles to Adnet Printing. Whe
documents are submitted correctly, it saves you time and money! Please read over the general requirements and then reer to the checlist or the specifc layout program that you are using. I you are using Microsot Publisher, please contact us or guidelines.
ARTWORK/PHOTO REQUIREMENTSArtwork requirements apply to any clip art, photograph, or other graphic element (except or lines or shapes created within your layo
program) which appears in your document. These requirements are the same or all artwork/photos regardless o the layout programyou use.
We are happy to scan items or you. Please see the section titled“Submitting Materials or Designers to Work With” or require-
ments.
Make sure that your image is high resolution.
Grayscale images must be 170 dpi – 300 dpi Color images must be 170 dpi – 300 dpi Bitmap or line art images must be at least 600 dpi
Make sure that all color images are CMYK (not RGB). Youcan check images in Photoshop to confrm the color mode(Image>Mode>).
Make sure that all black and white images are Grayscale (not RGBor Index). You can check images in Photoshop to confrm the col-or mode (Image>Mode>).
Do NOT use graphic elements downloaded from the interne
Unless you are downloading rom a proessional stock picture sit
internet images are saved at 72 dpi. They look fne on your screebut when they are printed they will be severely distorted.
Save graphic elements as TIFF, EPS, or PSD fles. TIFFs should bsaved with no LZW compression. EPS fles should be saved witMac preview, Binary encoding, and no compression. I you are u
ing InDesign, Photoshop fles may be saved as PSD to preservtransparencies.
Please remember that Photoshop, Illustrator and Freehand ar
meant or graphics, not page layout. Place all graphics into a layoprogram like InDesign, PageMaker, or Quark. Be sure to includ
these fles separately on your disk.
SETTING UP YOUR FILEWe use two dierent presses to print documents. All publications require particular measurements, so please ollow the guidelines belo
to ensure that your publication will be printed correctly. I you don’t know which press will be used or do not see the document size yowish to print listed, please contact your sales representative. If you are preparing a brochure, please contact the Creative Design Team
so we can give you the correct sizes for each panel. SHEETFED publications generally require a margin o .375 inches on all sides. Pleasnote that with WEB printing, images generally print darker so it is important to adjust them accordingly. (An image or screen with dogain o 30% becomes an image with dot gain o 60%.)
I your document is a... Press Document Size is (in inches): Margins are (in inches): Bleeds must be (in inches):
34” Full Tab WEB 11.375 x 17 5/8 (.625) on all sides cannot bleed
29” Tab WEB 11.375 x 14.5 5/8 (.625) on all sides cannot bleed26” Tab WEB 11.375 x 13 5/8 (.625) on all sides cannot bleed
24” Tab (olds to legal size) WEB 11.375 x 12 5/8 (.625) on all sides cannot bleed
Hal Tab WEB 8.125 x 10.625 .5 on all sides bleed must extend .5
Hal Tab Glossy Cover SHEETFED 8.125 x 10.625 .375 on all sides bleed must extend .25
Letter Size SHEETFED 8.5 x 11 .375 on all sides bleed must extend .25
Small Magazine Size WEB 7 x 10 .5 on all sides bleed must extend .5
Digest Size WEB 6 x 10 .5 on all sides bleed must extend .5
Large Postcard SHEETFED 8.5 x 5.5 .375 on all sides bleed must extend .25
Small Postcard SHEETFED 6 x 4 .375 on all sides bleed must extend .25
Extra Large Postcard SHEETFED 11 x 6 .375 on all sides bleed must extend .25
SOFTWARE ACCEPTEDMACINTOSH: QuarkXPress up to 7.3.1, PageMaker up to 7.0, InDesign up to CS4, Photoshop up to CS4, Illustrator up to CS4, Acroup to 9, Multi-Ad Creator up to 7.0, Microsot Word up to 8.0 is acceptable or text fles ONLY
WINDOWS: QuarkXPress up to 5.0, PageMaker up to 7.0, InDesign up to 2.0, Microsot Publisher up to 2003, Corel Draw up to 9.
Microsot Ofce 98 is acceptable or text fles ONLY
73 Buffalo St. • Canandaigua, NY 1442
585.394.0770 • FAX 585.394.878
MESSENGER POST MEDIACommercial
8/7/2019 PageMaker File Guide 2010
http://slidepdf.com/reader/full/pagemaker-file-guide-2010 2/4
FONT REQUIREMENTSWhile we have a large number o onts, we don’t necessarily have the exact ones you have used to create your document. Pleascollect all o the onts you have used and place them on the disk.
Do not “stylize” your onts using your layout program. Many, butnot all, onts come with more than one typeace (bold, italic, etc.)
For example i you want a headline to be a bold version o Times,do not make the ont Times and then bold it using a button or
menu in your program. Instead, use the Times Bold typeace. Fontsthat are styled within your program do not print well.
No matter what kind o fle you are submitting, always supply all
versions o the onts used in the document. I you are concernedthat you might miss one, you can copy your entire ont older to
your disk.
We preer that you use Type 1 onts in creating your fle. Thesonts include a screen and printing ont, which means that the
have ewer possible errors when we are printing your documen
Some programs, including Illustrator and InDesign, allow you tturn your text into outlines (Create Outlines). I you know that n
changes will need to be made to your text, please turn your texto outlines. This will eliminate many potential ont problems.
SUBMITTING MATERIALS FOR DESIGNERS TO WORK WITHWe are happy to design your printed materials or you. To save you money, we suggest your prepare your materials as ollows:
I you have access to a computer, type your own text and submit it on a disk.
I you are using Microsot Word or Mac or Windows, save the fle normally with the .doc extension on the end o the fle nam
Do NOT embed graphics into your document. The graphics cannot be extracted and used or printing i they are embedded in youMicrosot Word document. You can include the graphics separately on the disk.
I you are using another word processing program, save the fle as a plain text fle with the .txt extension.
Photographs or artwork:
You can scan these yoursel, using the guidelines under Artwork/Photo Requirements.
You can submit these or scanning by the designers (we recommend this option). Artwork should be the largest possible version and preerably the original art, not a photocopy. DO NOT write or draw on to
o the artwork you are submitting. I you want us to make changes or additions, please indicate that with post-it notes or on separate sheet o paper. We cannot eliminate pen/pencil marks on top o art!
Photographs should be the original negative, slide, or photograph. DO NOT print out digital photos on your inkjet or laser printe
These are o unacceptable quality or scanning and printing. (Digital photos should be put on a disk or E-mailed at the highesresolution possible.) DO NOT write or draw on top o a photo to indicate cropping. I you have particular cropping in mind
please indicate that in writing on a separate sheet o paper, or use a post-it note i you must (be aware that post-its can damagthe photo and make it unusable or scanning!). At the time o your proo, you will have an opportunity to see the way the photo
has been cropped and make changes. We suggest addressing cropping concerns at that time. I you wish to have your artwork/photographs returned, please indicate this to your sales rep.
USING COLORIt is very important to use color correctly when creating your document to avoid numerous problems during printing.
I you are planning to use a "spot color" in your document (black plus one o our standard ink colors), you must designate items
that you wish to appear in color using 100% cyan. During print-ing, we will replace the cyan with the ink color you have chosen.
By using cyan instead o a CMYK color, you are creating just twoseparations instead o our. This is more cost eective or you and
easier to work with in the printing process.
I you are producing a our-color or process document, please dnot use RGB color palettes or mode in your design program. In
stead be sure to choose colors that are mixed using CMYK. In addtion, make sure to designate these colors as process, not spot.
In Quark, InDesign, and PageMaker there is a color placed automatically in the color palette called “Registration.” Even thougthis color appears to be black, you should never use it in plac
o black. Something designated “Registration” will print on evecolor separation.
QUESTIONS?Please eel ree to contact us with any questions as you prepare your materials or digital fles.
Creative Design Team585.394.0770 x514FAX 585.394.8786E-MAIL [email protected]
8/7/2019 PageMaker File Guide 2010
http://slidepdf.com/reader/full/pagemaker-file-guide-2010 3/4
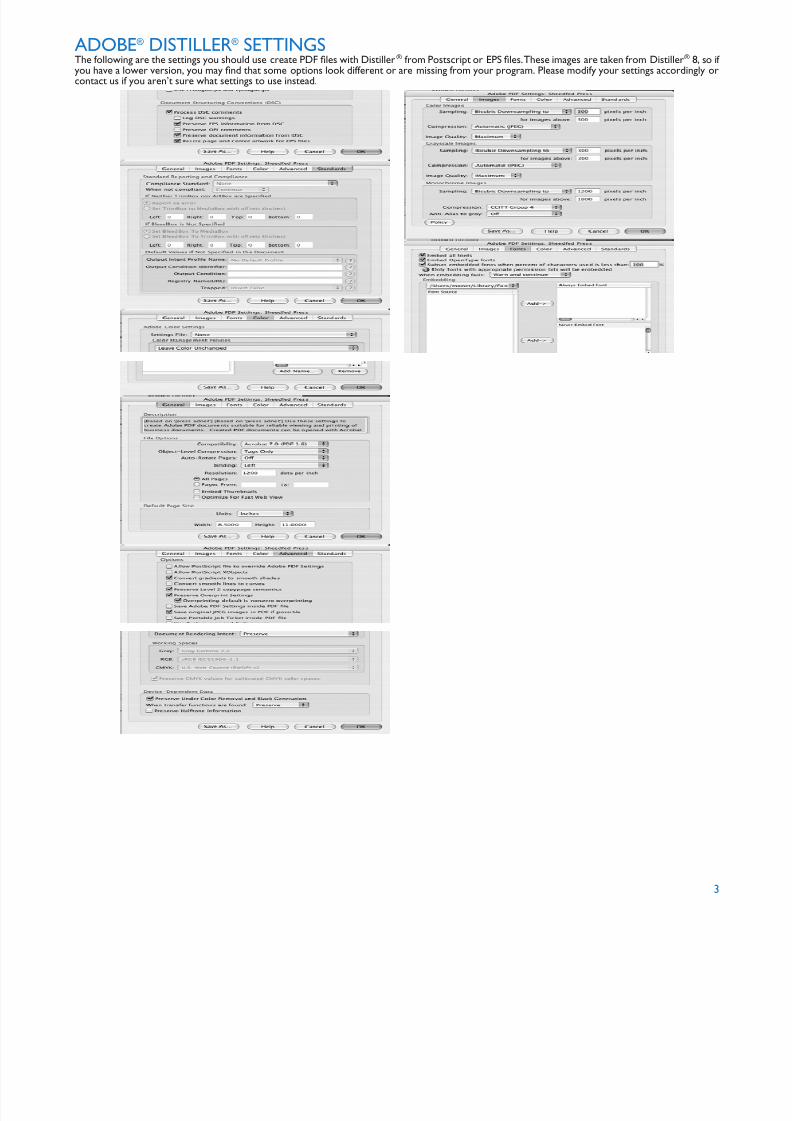
ADOBE® DISTILLER® SETTINGSThe ollowing are the settings you should use create PDF fles with Distiller® rom Postscript or EPS fles. These images are taken rom Distiller® 8, soyou have a lower version, you may fnd that some options look dierent or are missing rom your program. Please modiy your settings accordingly ocontact us i you aren’t sure what settings to use instead.
8/7/2019 PageMaker File Guide 2010
http://slidepdf.com/reader/full/pagemaker-file-guide-2010 4/4
4
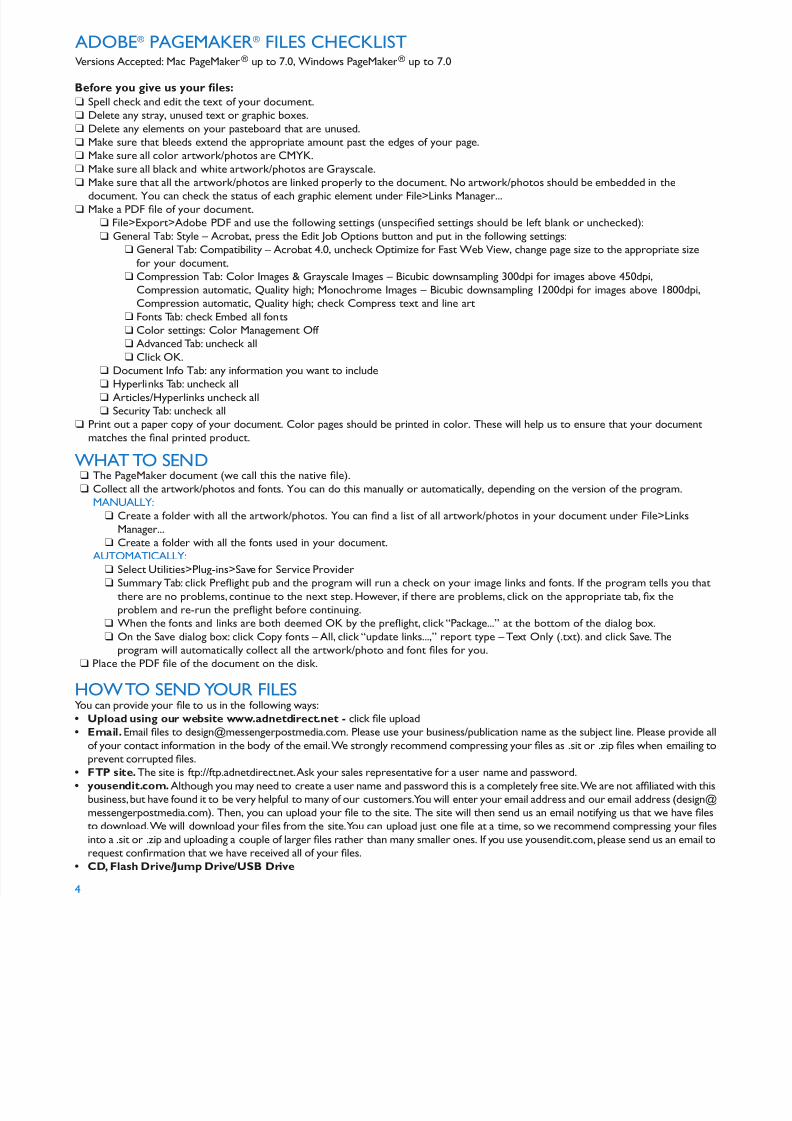
HOW TO SEND YOUR FILESYou can provide your fle to us in the ollowing ways:
• Uploadusingourwebsitewww.adnetdirect.net-click fle upload• Email.Email fles to [email protected]. Please use your business/publication name as the subject line. Please provide a
o your contact inormation in the body o the email. We strongly recommend compressing your fles as .sit or .zip fles when emailing tprevent corrupted fles.
• FTPsite.The site is tp://tp.adnetdirect.net. Ask your sales representative or a user name and password.• yousendit.com.Although you may need to create a user name and password this is a completely ree site. We are not afliated with th
business, but have ound it to be very helpul to many o our customers. You will enter your email address and our email address ([email protected]). Then, you can upload your fle to the site. The site will then send us an email notiying us that we have fleto download. We will download your fles rom the site. You can upload just one fle at a time, so we recommend compressing your fle
into a .sit or .zip and uploading a couple o larger fles rather than many smaller ones. I you use yousendit.com, please send us an email trequest confrmation that we have received all o your fles.
• CD,FlashDrive/JumpDrive/USBDrive
ADOBE® PAGEMAKER® FILES CHECKLISTVersions Accepted: Mac PageMaker® up to 7.0, Windows PageMaker® up to 7.0
Spell check and edit the text of your document. Delete any stray, unused text or graphic boxes. Delete any elements on your pasteboard that are unused. Make sure that bleeds extend the appropriate amount past the edges of your page. Make sure all color artwork/photos are CMYK. Make sure all black and white artwork/photos are Grayscale.
Make sure that all the artwork/photos are linked properly to the document. No artwork/photos should be embedded in thedocument. You can check the status of each graphic element under File>Links Manager...
Make a PDF le of your document.
File>Export>Adobe PDF and use the following settings (unspecied settings should be left blank or unchecked):
General Tab: Style – Acrobat, press the Edit Job Options button and put in the following settings: General Tab: Compatibility – Acrobat 4.0, uncheck Optimize for Fast Web View, change page size to the appropriate size
for your document. Compression Tab: Color Images & Grayscale Images – Bicubic downsampling 300dpi for images above 450dpi,
Compression automatic, Quality high; Monochrome Images – Bicubic downsampling 1200dpi for images above 1800dpi,Compression automatic, Quality high; check Compress text and line art
Fonts Tab: check Embed all fonts Color settings: Color Management Off Advanced Tab: uncheck all
Click OK. Document Info Tab: any information you want to include Hyperlinks Tab: uncheck all
Articles/Hyperlinks uncheck all Security Tab: uncheck all
Print out a paper copy of your document. Color pages should be printed in color. These will help us to ensure that your documentmatches the nal printed product.
The PageMaker document (we call this the native le).
Collect all the artwork/photos and fonts. You can do this manually or automatically, depending on the version of the program. MANUALLY:
Create a folder with all the artwork/photos. You can nd a list of all artwork/photos in your document under File>Links
Manager...
Create a folder with all the fonts used in your document. AUTOMATICALLY:
Select Utilities>Plug-ins>Save for Service Provider
SummaryTab: click Preight pub and the program will run a check on your image links and fonts. If the program tells you that
there are no problems, continue to the next step. However, if there are problems, click on the appropriate tab, x the
problem and re-run the preight before continuing.
When the fonts and links are both deemed OK by the preight, click “Package...” at the bottom of the dialog box.
On the Save dialog box: click Copy fonts – All, click “update links...,” report type – Text Only (.txt). and click Save. The
program will automatically collect all the artwork/photo and font les for you.
Place the PDF le of the document on the disk.
WHAT TO SEND
Beore you give us your fles: