Embed Size (px)
Citation preview
PageMaker
Desktop publishing has gone a long way to blur the lines between the traditional roles in publication design and production. In the past, editors, writers, designers, artists, layout staff, prepress specialists and printers all had specialized jobs. The computer has not eliminated the need to perform each task. But now a single person, with the appropriate equipment, may need to be familiar with all those skills.
PageMaker is a powerful Desk-Top Publishing package (DTP) produced by Adobe. DTP packages are neither graphics packages nor word-processors, although they have some of the characteristics of both. Their main strength lies in their ability to combine text and graphics which have been produced on other packages into a single document, sometimes consisting of many pages.
PageMaker is available for MAC and PC systems. This guide attempts to cover both versions. The screenshot images shown are taken from the PC version. The MAC screens may have a different appearance, but are basically the same.
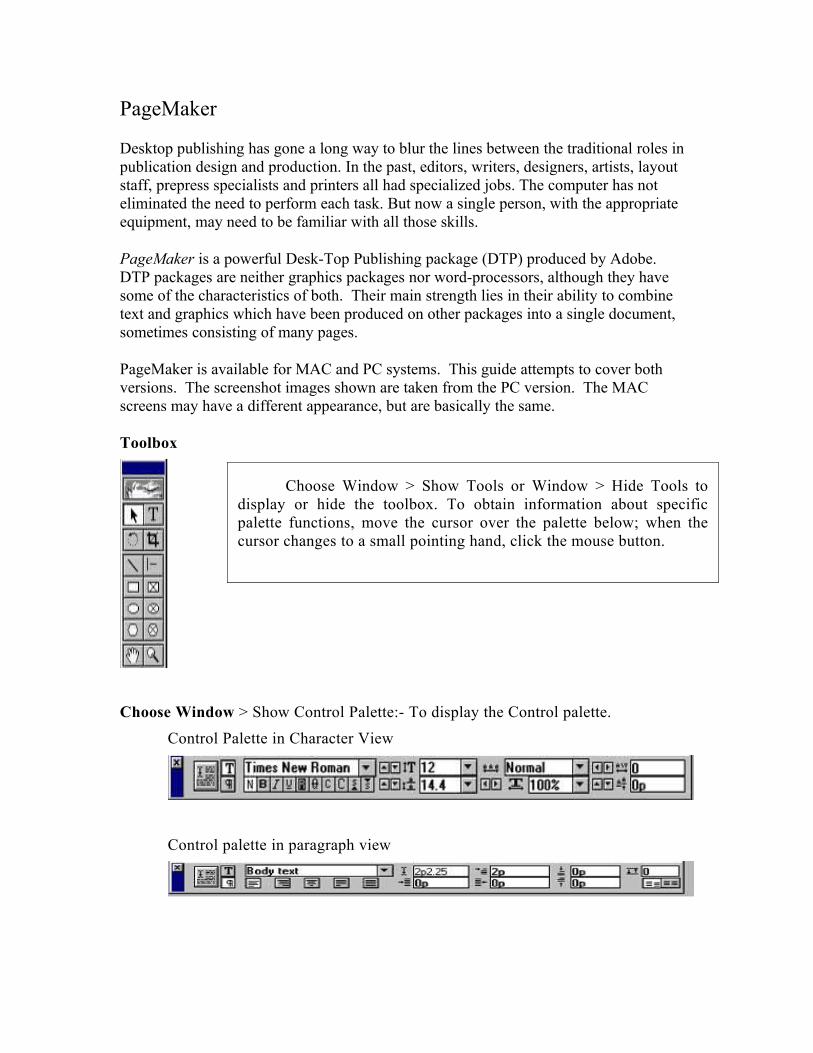
Toolbox
Choose Window > Show Control Palette:- To display the Control palette.
Control Palette in Character View
Control palette in paragraph view
Choose Window > Show Tools or Window > Hide Tools to display or hide the toolbox. To obtain information about specific palette functions, move the cursor over the palette below; when the cursor changes to a small pointing hand, click the mouse button.
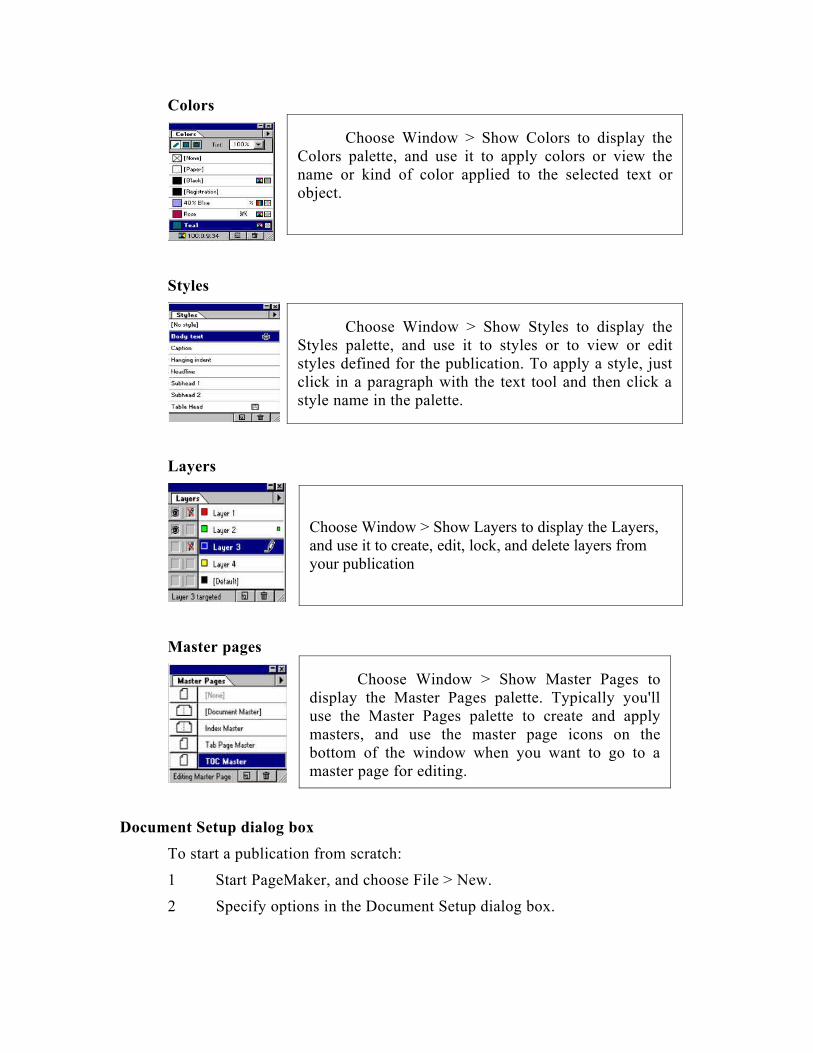
Colors
Styles
Layers
Master pages
Document Setup dialog box
To start a publication from scratch:
1 Start PageMaker, and choose File > New.
2 Specify options in the Document Setup dialog box.
Choose Window > Show Colors to display the Colors palette, and use it to apply colors or view the name or kind of color applied to the selected text or object.
Choose Window > Show Styles to display the Styles palette, and use it to styles or to view or edit styles defined for the publication. To apply a style, just click in a paragraph with the text tool and then click a style name in the palette.
Choose Window > Show Layers to display the Layers, and use it to create, edit, lock, and delete layers from your publication
Choose Window > Show Master Pages to display the Master Pages palette. Typically you'll use the Master Pages palette to create and apply masters, and use the master page icons on the bottom of the window when you want to go to a master page for editing.
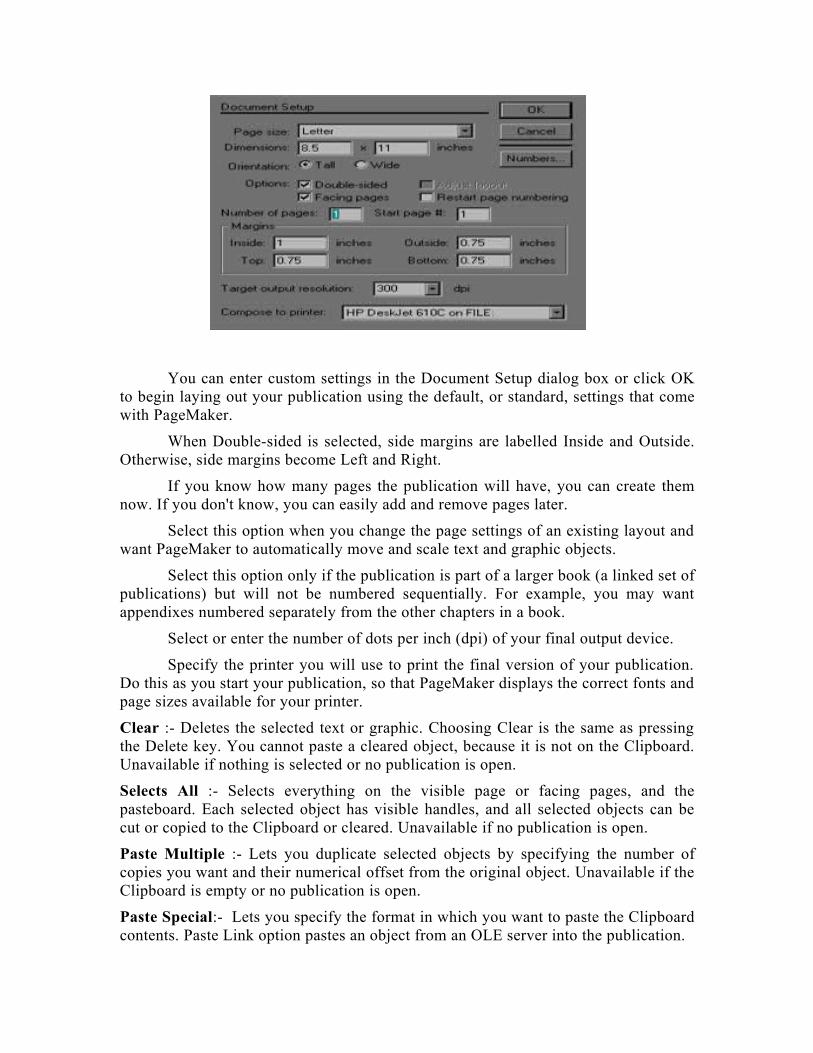
You can enter custom settings in the Document Setup dialog box or click OK to begin laying out your publication using the default, or standard, settings that come with PageMaker.
When Double-sided is selected, side margins are labelled Inside and Outside. Otherwise, side margins become Left and Right.
If you know how many pages the publication will have, you can create them now. If you don't know, you can easily add and remove pages later.
Select this option when you change the page settings of an existing layout and want PageMaker to automatically move and scale text and graphic objects.
Select this option only if the publication is part of a larger book (a linked set of publications) but will not be numbered sequentially. For example, you may want appendixes numbered separately from the other chapters in a book.
Select or enter the number of dots per inch (dpi) of your final output device.
Specify the printer you will use to print the final version of your publication. Do this as you start your publication, so that PageMaker displays the correct fonts and page sizes available for your printer.
Clear :- Deletes the selected text or graphic. Choosing Clear is the same as pressing the Delete key. You cannot paste a cleared object, because it is not on the Clipboard. Unavailable if nothing is selected or no publication is open.
Selects All :- Selects everything on the visible page or facing pages, and the pasteboard. Each selected object has visible handles, and all selected objects can be cut or copied to the Clipboard or cleared. Unavailable if no publication is open.
Paste Multiple :- Lets you duplicate selected objects by specifying the number of copies you want and their numerical offset from the original object. Unavailable if the Clipboard is empty or no publication is open.
Paste Special:- Lets you specify the format in which you want to paste the Clipboard contents. Paste Link option pastes an object from an OLE server into the publication.
PageMaker: Tool Box Working in the PageMaker window
When you create a publication, PageMaker opens a publication window, which contains an empty page centered on the pasteboard. The page and pasteboard, where you lay out text and graphics, are similar to the work space used in traditional paste-up.
Choose Window > Show Tools or Window > Hide Tools to display or hide the toolbox.
Choose Window > Show Control Palette to display the Control palette.
When you initially create a publication by selecting "New" document and formatting it, PageMaker opens a publication window that contains an empty page, which is centered on your "desktop". Today we are going to begin to discuss and understand what our work area includes.
Open up a "New" document within PageMaker 7.0. A Document set up window will appear. At this time, select "OK". When looking at your desktop you should be viewing the actual page or document you will be working on as well as a toolbox and a palette.
The toolbox is positioned on the left of your new document and the palette is positioned on the right of your new document.
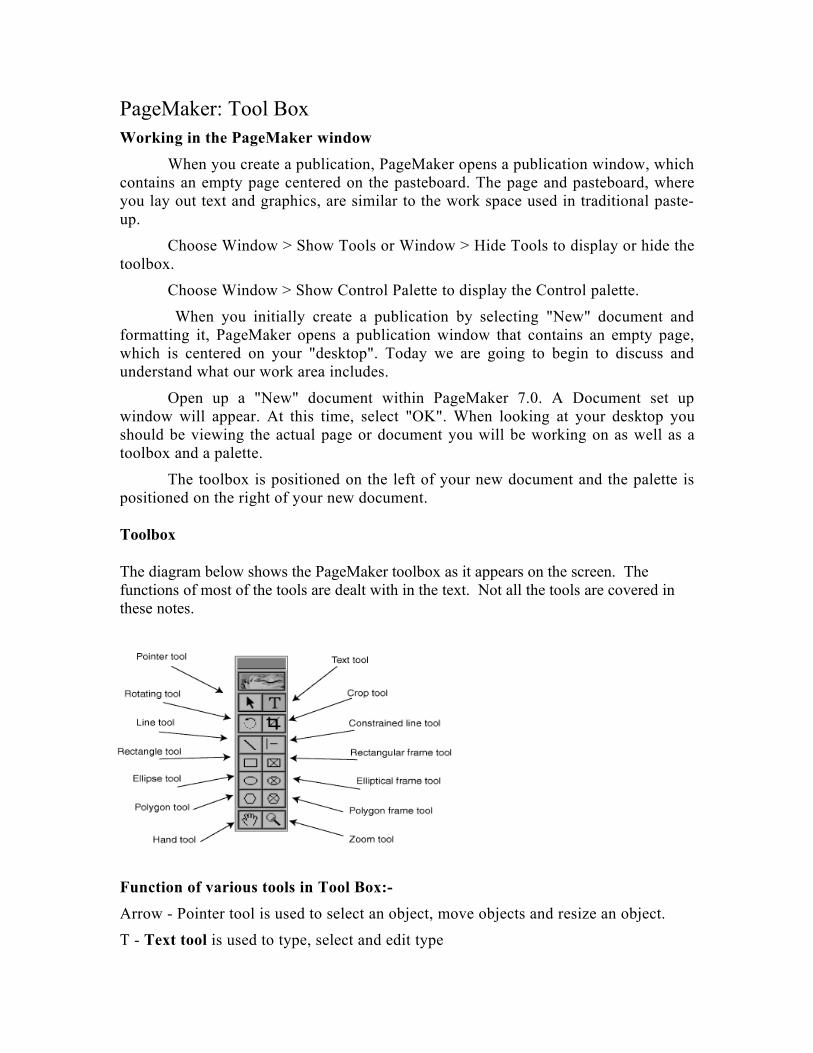
Toolbox
The diagram below shows the PageMaker toolbox as it appears on the screen. The functions of most of the tools are dealt with in the text. Not all the tools are covered in these notes.
Function of various tools in Tool Box:-
Arrow - Pointer tool is used to select an object, move objects and resize an object.
T - Text tool is used to type, select and edit type
Rotating tool is used to select and rotate objects
Cropping tool is used to trim imported objects.
Line tool used to draw straight lines in any direction
Constrained line tool is used to draw vertical or horizontal lines only.
Rectangle tool is to draw squares ad rectangles.
Frame tools (Rectangle, circle & polygon) used to create placeholder shapes.
Ellipse tool is used to draw circles and ellipses
Polygon tool is used to draw polygons
Hand tool is used to scroll the page or to preview and test hyperlinks
Magnifying glass tool is used to zoom or reduce an area of the page.
Working with text.:- To type text:
Select the text tool from the toolbox.
The text tool turns into an I-beam when you move it onto the page.
Click the I-beam where you want to insert text on the page, and then begin typing.
To view the boundaries of the text block you just created, select the pointer tool and click anywhere in the text.
Identifying a text object
An empty windowshade handle at the top of a text object indicates the beginning of a story.
A plus sign in the windowshade handle indicates that text from the same story is contained in another text object.
An empty windowshade handle at the bottom of a text object indicates the end of a story.
A down arrow in the windowshade handle indicates that there is more text to be placed onto the page.
A handle indicates the point where you drag to resize a text object.
Selecting text with the text tool
To edit or format text, you must first select the range of characters you want to affect. To deselect text, click another insertion point, or select any tool in the toolbox.
• Double-click to select a word.
• Triple-click to select an entire paragraph.
• Drag the I-beam to select a range of text.
• Click in a text block and choose Edit > Select All to select all the text in that story.
Importing text
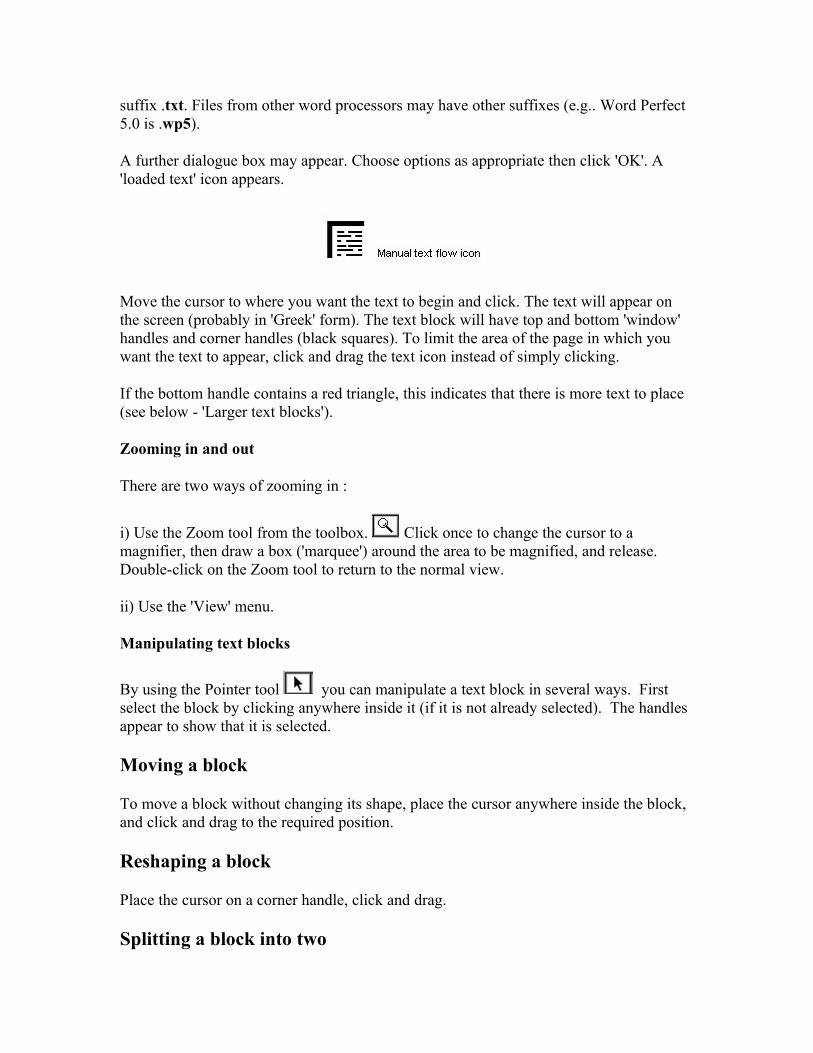
Click on 'File', then 'Place'. In the dialogue box that appears, select the appropriate drive and directory. Choose the file to be imported and click 'OK'. Standard text files have the suffix .txt. Files from other word processors may have other suffixes (e.g.. Word Perfect 5.0 is .wp5).
A further dialogue box may appear. Choose options as appropriate then click 'OK'. A 'loaded text' icon appears.
Move the cursor to where you want the text to begin and click. The text will appear on the screen (probably in 'Greek' form). The text block will have top and bottom 'window' handles and corner handles (black squares). To limit the area of the page in which you want the text to appear, click and drag the text icon instead of simply clicking.
If the bottom handle contains a red triangle, this indicates that there is more text to place (see below - 'Larger text blocks').
If the text to be placed is too big to fit on one page, PageMaker allows you to place it on several pages. This can be done manually or automatically.
Manual text flow
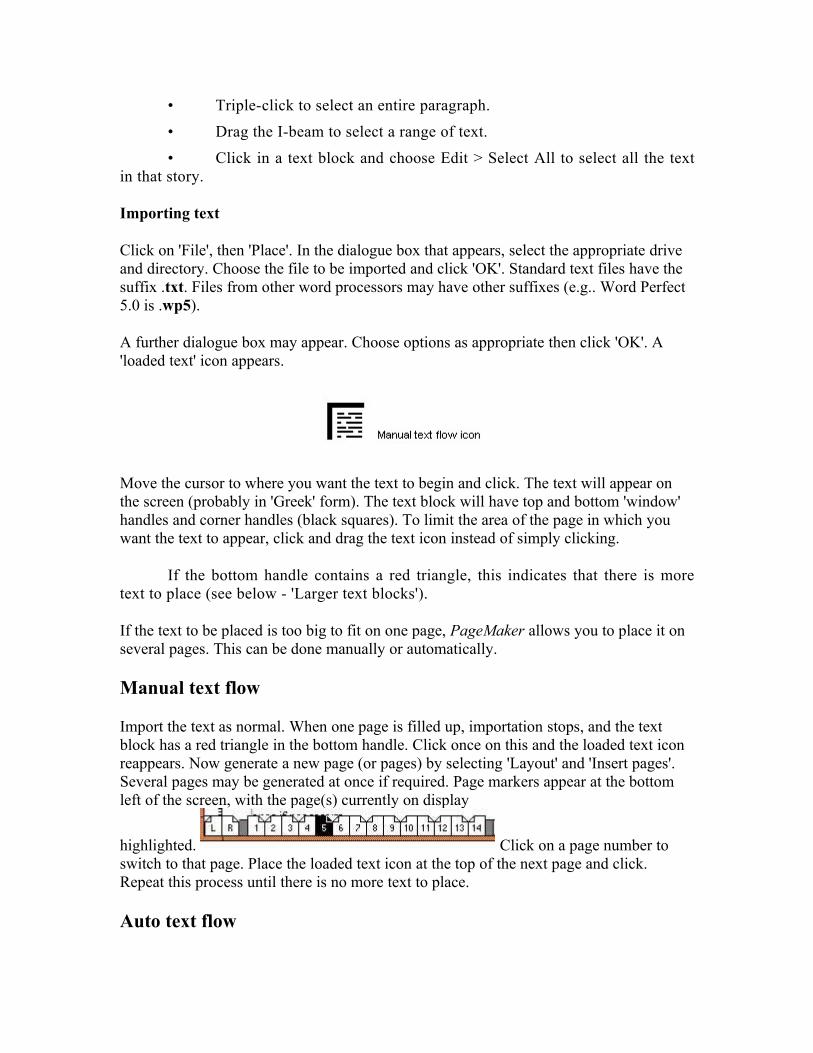
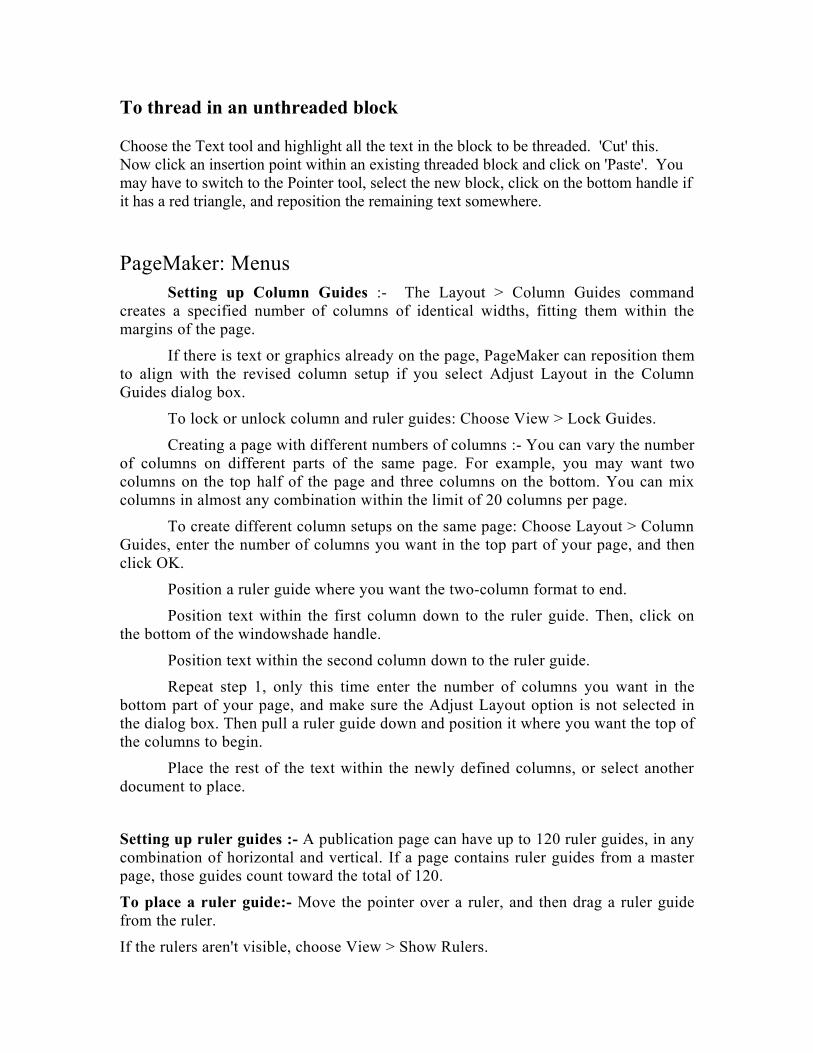
Import the text as normal. When one page is filled up, importation stops, and the text block has a red triangle in the bottom handle. Click once on this and the loaded text icon reappears. Now generate a new page (or pages) by selecting 'Layout' and 'Insert pages'. Several pages may be generated at once if required. Page markers appear at the bottom left of the screen, with the page(s) currently on display
highlighted. Click on a page number to switch to that page. Place the loaded text icon at the top of the next page and click. Repeat this process until there is no more text to place.
Auto text flow
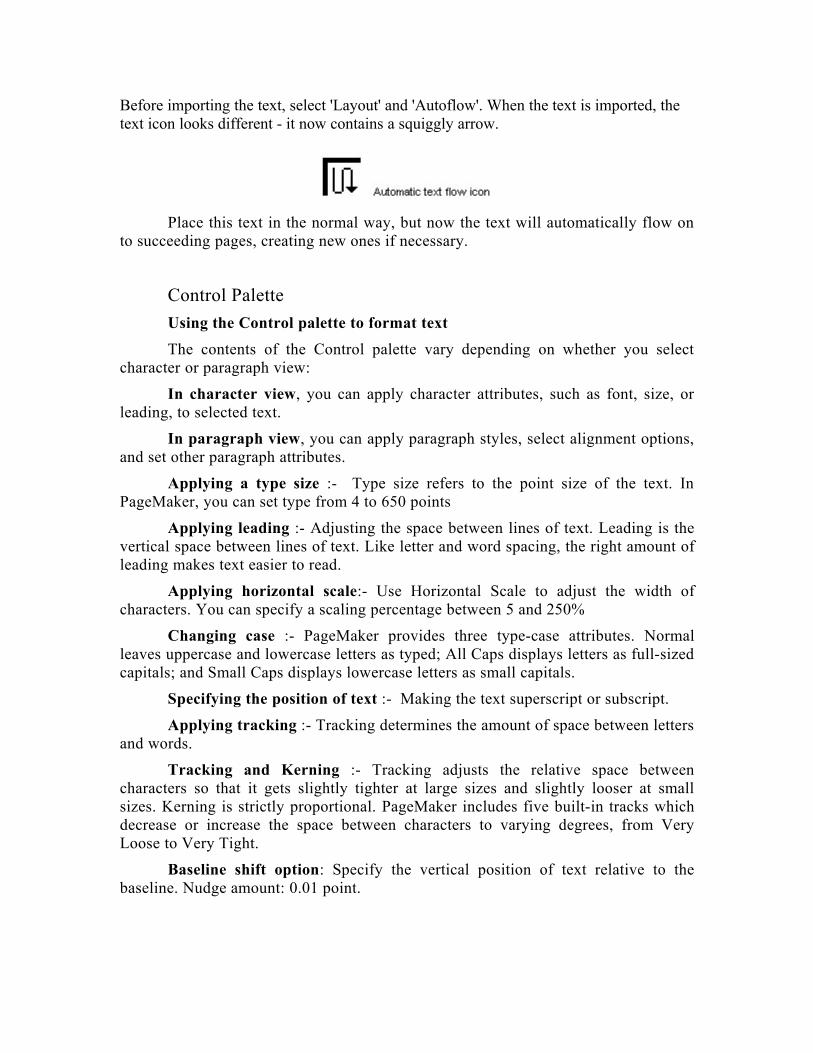
Before importing the text, select 'Layout' and 'Autoflow'. When the text is imported, the text icon looks different - it now contains a squiggly arrow.
Place this text in the normal way, but now the text will automatically flow on to succeeding pages, creating new ones if necessary.
Control Palette
Using the Control palette to format text
The contents of the Control palette vary depending on whether you select character or paragraph view:
In character view, you can apply character attributes, such as font, size, or leading, to selected text.
In paragraph view, you can apply paragraph styles, select alignment options, and set other paragraph attributes.
Applying a type size :- Type size refers to the point size of the text. In PageMaker, you can set type from 4 to 650 points
Applying leading :- Adjusting the space between lines of text. Leading is the vertical space between lines of text. Like letter and word spacing, the right amount of leading makes text easier to read.
Applying horizontal scale:- Use Horizontal Scale to adjust the width of characters. You can specify a scaling percentage between 5 and 250%
Changing case :- PageMaker provides three type-case attributes. Normal leaves uppercase and lowercase letters as typed; All Caps displays letters as full-sized capitals; and Small Caps displays lowercase letters as small capitals.
Specifying the position of text :- Making the text superscript or subscript.
Applying tracking :- Tracking determines the amount of space between letters and words.
Tracking and Kerning :- Tracking adjusts the relative space between characters so that it gets slightly tighter at large sizes and slightly looser at small sizes. Kerning is strictly proportional. PageMaker includes five built-in tracks which decrease or increase the space between characters to varying degrees, from Very Loose to Very Tight.
Baseline shift option: Specify the vertical position of text relative to the baseline. Nudge amount: 0.01 point.
The Type > Expert Kerning command automates kerning to give you tight control over letter spacing for headlines, poster type, and other display type at large sizes.’
Tips for planning a long document :- Save time and effort by planning a multiple-publication document in advance:
Create a master template that includes common elements in your book, such as margins and columns, text styles, colors, headers and footers, and other design elements.
Set up page-number markers in the master template, and add prefixes or change the numbering format for each section template or publication.
Use paragraph styles to make it easy to generate a consistent table of contents.Specify colors only once in the master template. This ensures that the colors are consistent in all publications based on the template.
PageMaker: Document & TextFormatting Paragraphs :- Paragraph attributes specify how your paragraphs appear on the page, including alignment, position of indents and tabs, and the amount of space before and after the paragraph. In PageMaker, a paragraph is any contiguous text followed by a paragraph return. You can apply attributes to selected paragraphs, or you can change the attributes of all paragraphs of a particular paragraph style.
Alignments: left align, right align, center align, justify, and force justify.
Cursor-position indicator: Tracks the position of the cursor on the publication page.
Left-indent option: Specify the amount of indent for the left side of the paragraph.
First indent: Specify the amount of indent for the first sentence in a paragraph.
Right-indent option: Specify the amount of indent for the right side of the paragraph.
Space-before and space-after options: Specify the amount of space to insert above or below the selected paragraphs.
Grid-size option: Specify the point size of the text grid to use when Align to Grid option is on.
Align-to-grid option: Click the right icon to align columns vertically, according to the point size set in the Grid-size option.
Text Formatting
Indents and Tabs :- Indents and tabs are powerful tools for positioning text. Indents move text inward from the right and left edges of a text object, and tabs position text at specific locations in a text object. You can create left- and right-aligned tabs; center
tabs, which center text around the tab; and decimal tabs, which align characters at a decimal point. You can also apply a leader of any style to any tab. A leader is a repeated pattern, such as a series of dots or dashes, between the tab and the preceding text.
To set tabs with the Indents/Tabs ruler:
In layout view, click an insertion point in a paragraph or select a group of paragraphs.
Choose Type > Indents/Tabs.
Creating a hanging indent
To align text in numbered and bulleted paragraphs, the first line must extend farther left than the rest of the paragraph. You can create this effect, called a hanging indent.
Creating and editing paragraph styles :- Lets you create and edit paragraph styles for text typed in or placed into PageMaker. Lets you apply styles already defined in the styles palette on the paragraph level. PageMaker applies the style to all paragraphs in the selected text, even if only part of a paragraph is selected.
PageMaker makes it easy to create and edit styles for your publication.
Choose Window > Show Styles, and either choose New Style from the Styles palette menu or click the new style button at the bottom of the palette.
Choose Type > Define Styles, Applying a style to a paragraph
To apply a style: Using the text tool, click an insertion point in a paragraph or select a range of paragraphs. Then use one of the following methods to apply a style:
On the Styles palette, click the name of the style you want to apply. On the Control palette (in paragraph view), type or select the name of the style you want to apply, and then click Apply.
Editing text : - To work in story editor:
Click in a story with the text tool or the pointer tool.
Choose Edit > Edit Story.
When you are finished working in the story editor, choose Edit > Edit Layout to return to layout view.
Adding and deleting pages :- If you choose File > Document Setup to alter the number of pages, PageMaker adds or deletes pages from the end of the publication.
If you choose Layout > Insert Pages or Layout > Remove Pages, you can add or remove pages anywhere in the publication, and also specify which master to apply to new pages you insert.
Shortcut: To add a page to the end of the publication, press Ctrl + Alt + Shift + G.
Cut:- Moves the selected text or objects from the publication to the Clipboard, removing them from the page. Unavailable if nothing is selected or no publication is open.
Copy :- Copies the selected text or graphics to the Clipboard. The original objects remain on the page or in the story view window. Unavailable if nothing is selected or no publication is open.
Paste :-Places the contents of the Clipboard (the last thing you cut or copied) into your publication. The contents of the Clipboard can be pasted repeatedly. Pasting does not affect the contents of the Clipboard. Unavailable if the Clipboard is empty or no publication is open.
Document and Master Page
To move between publication pages : Click a page icon along the bottom of the layout window. Choose Layout > Go to Page, and type the page number you want.
Imported text or graphics: Choose File > Place, and select the text or graphic file you want to add to the publication.
Starting a publication from a template :- A template is a publication with a pre-built page design that you can use as is or as the starting point to design your own publication.
Building your own template :- you can create a new template much as you create an original publication. The difference between a template and a publication lies in how you save it.
To save a publication as a template: Choose File > Save As.
Type a name for the template.
Select Template for the Save As option, and click OK.
Naming and saving a publication :- To name and save a publication for the first time Choose File > Save or File > Save As.
Select a folder in which to store the saved file.
Type a name for the publication, and then click Save
Closing a publication :- To close the active publication without exiting PageMaker, choose File > Close. To close all open publications without exiting PageMaker, hold down Shift and then choose File > Close All.
Revert :- Removes all changes to the active publication since you last saved it. Press Shift as you choose Revert to cancel changes since the last mini-save. Several operations cause mini-saves, including turning, deleting or inserting pages, printing, and copying or pasting objects to the Clipboard.
Master Pages
In addition to using the default Document Master in your publication, you can create a master page from scratch, or create a master based on an existing master or publication page. If you plan to have several master pages that share one or more design attributes (such as position and formatting of page numbers), you can save time by designing the Document Master page or spread (for example), and then basing additional masters on the Document Master, rather than creating each new master from scratch.
In multi-page publications, your design will be more cohesive if each page is built on a common foundation, or master page. A master page typically contains basic design elements, such as headers, footers, and page numbers, that are common to most or all pages in your publication. Master pages also contain nonprinting layout guides, such as column guides, ruler guides, and margin guides. Each publication can have a virtually unlimited number of master pages.
An icon representing the master pages appears at the lower left corner of a publication window in layout view. The letters L and R (for left and right) mark the master page icon for facing pages; a single-sided publication icon is marked by an R alone.
Creating Master Pages
Choose Window > Show Master Pages.
Choose New Master from the Master Pages palette menu, or click the new master button at the bottom of the palette.
Type a name for the master, and specify whether you want a single page or a two-page spread.
PageMaker: Importing and manipulating text
Importing text
Click on 'File', then 'Place'. In the dialogue box that appears, select the appropriate drive and directory. Choose the file to be imported and click 'OK'. Standard text files have the
suffix .txt. Files from other word processors may have other suffixes (e.g.. Word Perfect 5.0 is .wp5).
A further dialogue box may appear. Choose options as appropriate then click 'OK'. A 'loaded text' icon appears.
Move the cursor to where you want the text to begin and click. The text will appear on the screen (probably in 'Greek' form). The text block will have top and bottom 'window' handles and corner handles (black squares). To limit the area of the page in which you want the text to appear, click and drag the text icon instead of simply clicking.
If the bottom handle contains a red triangle, this indicates that there is more text to place (see below - 'Larger text blocks').
Zooming in and out
There are two ways of zooming in :
i) Use the Zoom tool from the toolbox. Click once to change the cursor to a magnifier, then draw a box ('marquee') around the area to be magnified, and release. Double-click on the Zoom tool to return to the normal view.
ii) Use the 'View' menu.
Manipulating text blocks
By using the Pointer tool you can manipulate a text block in several ways. First select the block by clicking anywhere inside it (if it is not already selected). The handles appear to show that it is selected.
Moving a block
To move a block without changing its shape, place the cursor anywhere inside the block, and click and drag to the required position.
Reshaping a block
Place the cursor on a corner handle, click and drag.
Splitting a block into two
Place the cursor on the bottom handle, click and drag upwards. When you release, the bottom handle will contain a red triangle. Click once on this, and the cursor changes to a loaded text icon. Position this where the second part of the text is to be, and click. (See 'Threaded and Unthreaded Text' below.)
Rejoining split blocks
Starting with the last block, click and drag the bottom handle up to meet the top. Then move to the first block, and click and drag the bottom handle down. If the original has been split into more than two, you will have to start with the last and work backwards through them to the first.
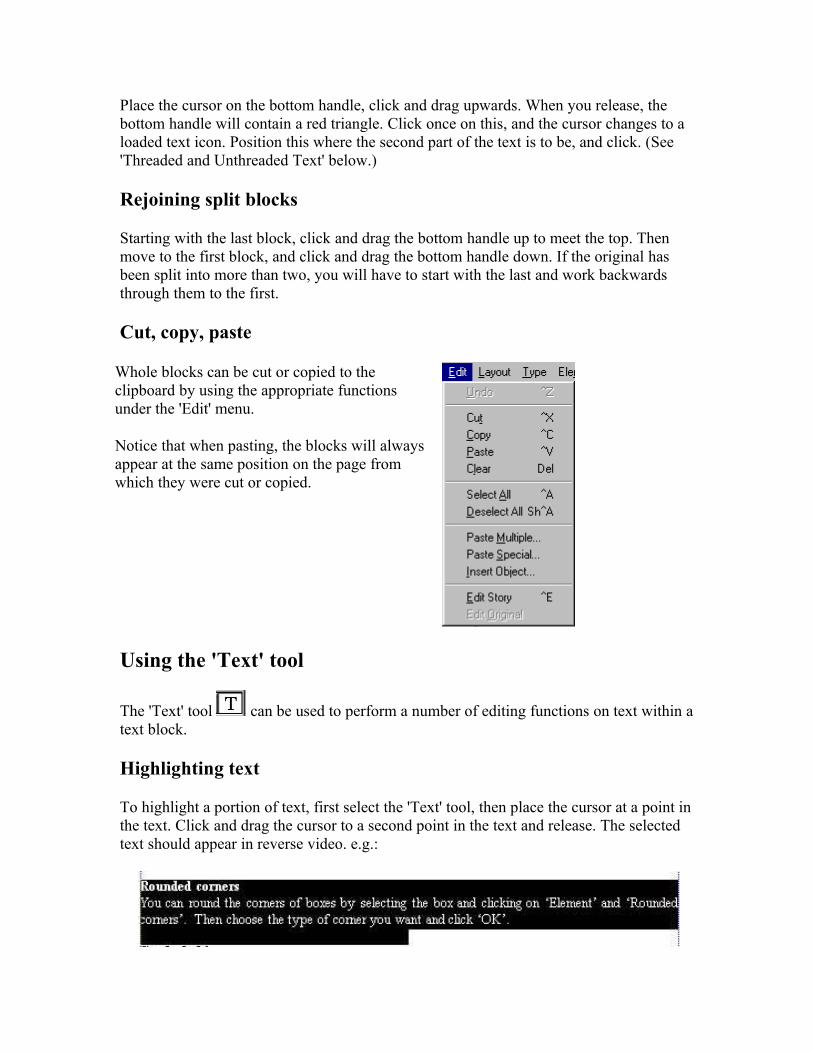
Cut, copy, paste
Whole blocks can be cut or copied to the clipboard by using the appropriate functions under the 'Edit' menu.
Notice that when pasting, the blocks will always appear at the same position on the page from which they were cut or copied.
Using the 'Text' tool
The 'Text' tool can be used to perform a number of editing functions on text within a text block.
Highlighting text
To highlight a portion of text, first select the 'Text' tool, then place the cursor at a point in the text. Click and drag the cursor to a second point in the text and release. The selected text should appear in reverse video. e.g.:

OR
Click an insertion point at the beginning of the text to be highlighted. Move the cursor to the end of the text and hold <Shift> whilst you click another insertion point.
Changing text attributes
Having highlighted a portion of text, you can alter its attributes by using the 'Type' menu.
The most useful choice here is 'Character', which allows you to alter fonts, size, type style (i.e.. bold, underline, etc.) in one go.
Cut, copy, paste
The highlighted text can be cut to the clipboard or copied to the clipboard by using the appropriate function under the 'Edit' menu. In either case, to re-insert the text somewhere else, position the cursor at the required position and click, then choose 'Edit' and click on 'Paste'.
Larger text blocks
If the text to be placed is too big to fit on one page, PageMaker allows you to place it on several pages. This can be done manually or automatically.
Manual text flow
Import the text as normal. When one page is filled up, importation stops, and the text block has a red triangle in the bottom handle. Click once on this and the loaded text icon reappears. Now generate a new page (or pages) by selecting 'Layout' and 'Insert pages'. Several pages may be generated at once if required. Page markers appear at the bottom
left of the screen, with the page(s) currently on display
highlighted. Click on a page number to switch to that page. Place the loaded text icon at the top of the next page and click. Repeat this process until there is no more text to place.
Auto text flow
Before importing the text, select 'Layout' and 'Autoflow'. When the text is imported, the text icon looks different - it now contains a squiggly arrow.
Place this text in the normal way, but now the text will automatically flow on to succeeding pages, creating new ones if necessary.
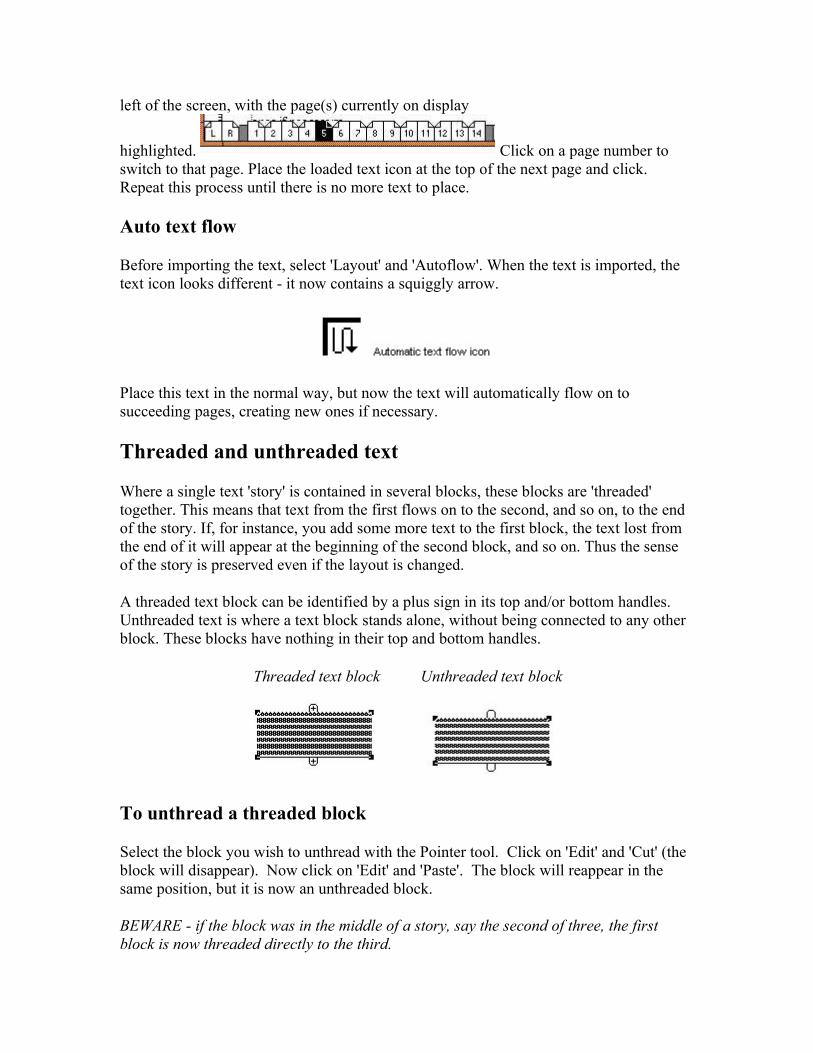
Threaded and unthreaded text
Where a single text 'story' is contained in several blocks, these blocks are 'threaded' together. This means that text from the first flows on to the second, and so on, to the end of the story. If, for instance, you add some more text to the first block, the text lost from the end of it will appear at the beginning of the second block, and so on. Thus the sense of the story is preserved even if the layout is changed.
A threaded text block can be identified by a plus sign in its top and/or bottom handles. Unthreaded text is where a text block stands alone, without being connected to any other block. These blocks have nothing in their top and bottom handles.
Threaded text block Unthreaded text block
To unthread a threaded block
Select the block you wish to unthread with the Pointer tool. Click on 'Edit' and 'Cut' (the block will disappear). Now click on 'Edit' and 'Paste'. The block will reappear in the same position, but it is now an unthreaded block.
BEWARE - if the block was in the middle of a story, say the second of three, the first block is now threaded directly to the third.
To thread in an unthreaded block
Choose the Text tool and highlight all the text in the block to be threaded. 'Cut' this. Now click an insertion point within an existing threaded block and click on 'Paste'. You may have to switch to the Pointer tool, select the new block, click on the bottom handle if it has a red triangle, and reposition the remaining text somewhere.
PageMaker: MenusSetting up Column Guides :- The Layout > Column Guides command
creates a specified number of columns of identical widths, fitting them within the margins of the page.
If there is text or graphics already on the page, PageMaker can reposition them to align with the revised column setup if you select Adjust Layout in the Column Guides dialog box.
To lock or unlock column and ruler guides: Choose View > Lock Guides.
Creating a page with different numbers of columns :- You can vary the number of columns on different parts of the same page. For example, you may want two columns on the top half of the page and three columns on the bottom. You can mix columns in almost any combination within the limit of 20 columns per page.
To create different column setups on the same page: Choose Layout > Column Guides, enter the number of columns you want in the top part of your page, and then click OK.
Position a ruler guide where you want the two-column format to end.
Position text within the first column down to the ruler guide. Then, click on the bottom of the windowshade handle.
Position text within the second column down to the ruler guide.
Repeat step 1, only this time enter the number of columns you want in the bottom part of your page, and make sure the Adjust Layout option is not selected in the dialog box. Then pull a ruler guide down and position it where you want the top of the columns to begin.
Place the rest of the text within the newly defined columns, or select another document to place.
Setting up ruler guides :- A publication page can have up to 120 ruler guides, in any combination of horizontal and vertical. If a page contains ruler guides from a master page, those guides count toward the total of 120.
To place a ruler guide:- Move the pointer over a ruler, and then drag a ruler guide from the ruler.
If the rulers aren't visible, choose View > Show Rulers.
To remove a ruler guide:- Select the guide you want to remove and drag it off the publication page.
To remove all ruler guides at once:- Choose View > Clear Ruler Guides. (This command is unavailable if the Lock Guides command is checked.)
To make objects align to the ruler increments:- Choose View > Snap to Rulers.
Grids & Numbering Pages
Creating and applying layout grids :- Creating a grid with the Grid Manager plug-in is similar in many ways to creating a grid manually in the PageMaker layout window. The main difference is that you use the Grid Manager dialog box to type values specifying the number of guides and width of gutters, and use the preview window within the dialog box to position guides exactly as you want them on the page.
To set up a grid:- Choose Utilities > Plug-ins > Grid Manager.
In the Define Grid area, specify the kind of guide you want from the Guide pop-up menu, as follows:
Columns lets you divide the page or pages vertically using column guides.
Rulers lets you divide the page or pages vertically and horizontally using ruler guides
Baseline lets you insert horizontal ruler guides at intervals matching the leading of your body text
Type the number of rows you or the number of columns you want per page.
In the Gutter text boxes, specify the space between the rows and between the columns.
For Fit, specify whether you want to fit column and ruler guides between margins, or within the dimensions of the entire page. Apply the guides to specific pages.
Numbering pages :- To add page numbers to a publication
Turn to a master page or to a publication page. Use the text tool to click an insertion point on the page where you want the page number to appear, or click in a text frame you've placed on the page for the page number.
Shortcut command is Press Ctrl + Alt + P.
Use the text tool to select and format the text as desired. On the master pages, a page-number marker (LM for a left master page, RM for a right master page or single page master) indicates where page numbers will appear.
Rearranging pages:- You can move pages from one position to another in the active publication simply by arranging thumbnail representations of your pages in the page order you want. PageMaker then reorders and renumbers your pages based on the changes you make.
To move pages:- Choose Layout > Sort Pages.
Select the page or pages you want to move, as follows:
To select either a single-sided page or a pair of facing pages, click the page icon.
To select one page in a pair of facing pages, press Ctrl and click the page.
Drag the selection to the location you want. To insert a selection between a pair of facing pages, press Ctrl and drag the selection over the facing pages.
Balancing columns (text blocks only)
To make two or more columns align: Use the pointer tool to select two or more columns (or text blocks) within the same story.
Choose Utilities > Plug-ins > Balance Columns.
Select an alignment option
Click OK.
Adding jump lines (text blocks only)
To add and format jump lines: Use the pointer tool to select the first or last text block on a page.
Choose Utilities > Plug-ins > Add Cont'd Line.
Specify whether you want to add the jump line to the top or bottom of the text block.
After adding all the required jump lines, edit the paragraph styles Cont. From and Cont. On to format the jump lines.
Counting Stories, Words, and Other items
You can use the Utilities > Plug-ins > Word Counter command to keep track of the number of stories, text objects, characters, words, sentences, and paragraphs in the current publication.
Changing Strokes and Fills
With the object selected, choose Element > Fill and Stroke, and select Overprint for both Fill and Stroke.
Changing the shape of rectangles and polygons
Select a rectangle you want to change or, to set the default, double-click the rectangle tool.
Choose Element > Rounded Corners.
To set the number of sides of the polygon
Select a polygon you want to change
Choose Element > Polygon Settings.
Specify the number of sides you want, from 3 to 100.

Frames :- A frame can hold content--either text or graphics
To turn a basic shape into a frame:
Create or select a PageMaker-drawn shape.
Choose Element > Change to Frame.
Grouping and ungrouping objects :- You can combine several objects into a group so that the objects are treated as a unit. This allows you to move or transform a number of objects together.
To Group Objects: Using the pointer tool, press Shift and select the objects to be grouped. Choose Element > Group.
To Ungroup Objects: Select the group. Choose Element > Ungroup.
Locking Objects :- You can lock individual objects in place in order to help preserve the design of your pages through all stages of production.
To Lock or Unlock an object: :- Select the object. Choose Element > Lock Position or Unlock.
Autoflow :- When checked, text flows into available columns until there's no more text to place. Pages are added to the end of the publication if necessary. Switch between manual and automatic flow by pressing Ctrl while text is flowing.
Align, Import, Crop
Aligning and distributing objects :- You can align objects in relation to one another, and then evenly distribute the spaces between the objects. Align or distribute objects based on a common edge or based on the centers of objects.
To align and distribute objects: Select the objects you want to align and distribute.
Choose Element > Align.
Cropping a Graphic:- When you import a graphic from another program or publication, you can crop parts of the graphic that you do not want to print by adjusting the size of its surrounding bounding box.
To crop a graphic using the cropping tool:
Select the cropping tool, and select the graphic that you want to crop.
Position the cropping tool so that a handle shows through the center of the tool.
Hold down the mouse button to turn the cropping tool into a two-way arrow, and drag until only the part of the graphic you want in your publication remains.
Wrapping Text around Graphics:- One of the best ways to create visual impact in a publication is to wrap text around graphics.
To wrap text around a graphic:
Select a graphic or image.
Choose Element > Text Wrap.
Placing :- Imports text, graphics, and spreadsheet or database files into the active publication. The Place command is PageMaker's primary importing method. When you place text or a graphic, PageMaker establishes a link to the source file on your hard drive.
Export :- Options for creating new files from elements within a publication. Export in various format
Adobe PDF, HTML, Graphic, Text.
PageMaker Printing Basics:- You can print a black-and-white, grayscale, or color publication on a range of output devices.
To print using the default settings of a publication:
Choose File > Print.
Link Manager :- Lets you view link status, update, and manage linked files in the active publication.
Link Option :- Lets you control the way PageMaker handles linked files. You can store a linked file in the publication file, update the linked object when the original is updated, and have PageMaker alert you when a linked file has been updated.
Insert Objects :- Lets you launch an OLE server application in which you create an object which is then pasted as an OLE-embedded object into the current publication.
Snap to Ruler:- Lets you precisely position text or graphics by pulling them to the increments shown on the ruler. Snap to Rulers does not work unless the rulers are turned on.
Zero Lock :- Removes the crosshairs from the upper-left corner of the screen so that you cannot change the zero point of the rulers. Unavailable if the rulers are not displayed.
Snap to Guide :- Lets you precisely position text or graphics by pulling them to the non-printing column and ruler guides. Unavailable if the guides are turned off. Snap to Guides will not work unless the guides are visible.
PageMaker: Combining graphics with text
Combining graphics with text
When text and graphics coexist on a page, there are several ways in which they may be combined.
Overlay
By default, imported graphics will overlay text, often making it difficult to read.
Text wrap
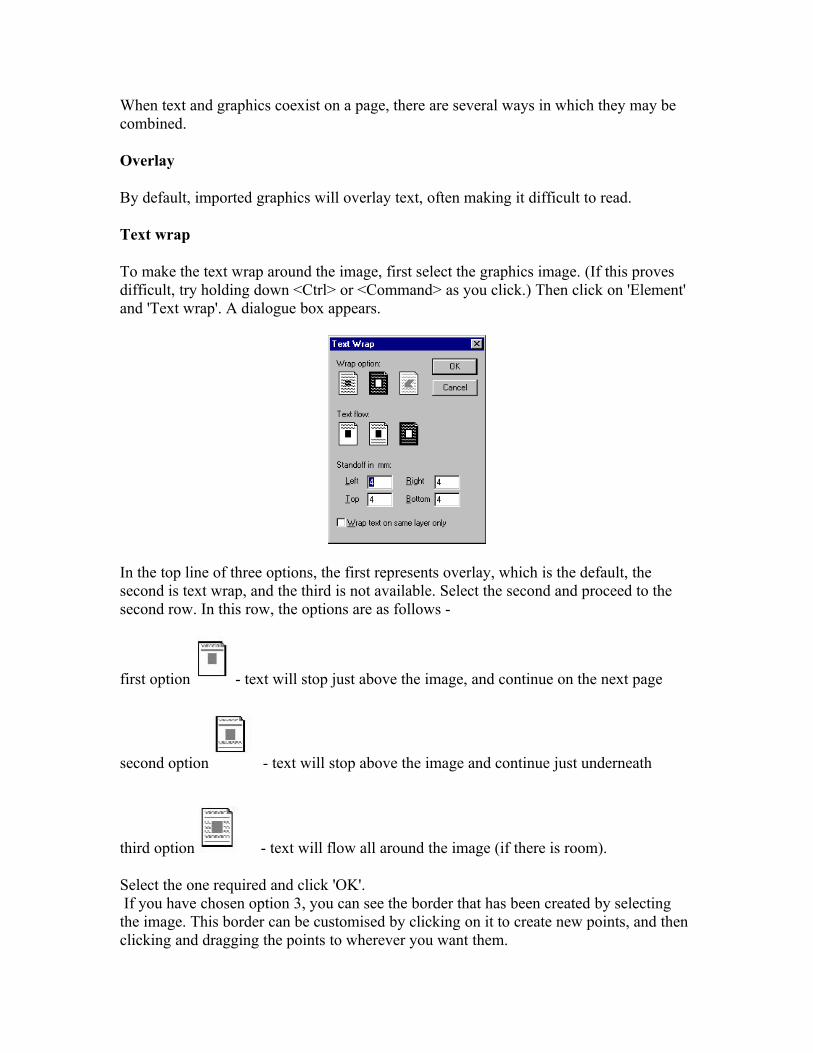
To make the text wrap around the image, first select the graphics image. (If this proves difficult, try holding down <Ctrl> or <Command> as you click.) Then click on 'Element' and 'Text wrap'. A dialogue box appears.
In the top line of three options, the first represents overlay, which is the default, the second is text wrap, and the third is not available. Select the second and proceed to the second row. In this row, the options are as follows -
first option - text will stop just above the image, and continue on the next page
second option - text will stop above the image and continue just underneath
third option - text will flow all around the image (if there is room).
Select the one required and click 'OK'. If you have chosen option 3, you can see the border that has been created by selecting the image. This border can be customised by clicking on it to create new points, and then clicking and dragging the points to wherever you want them.
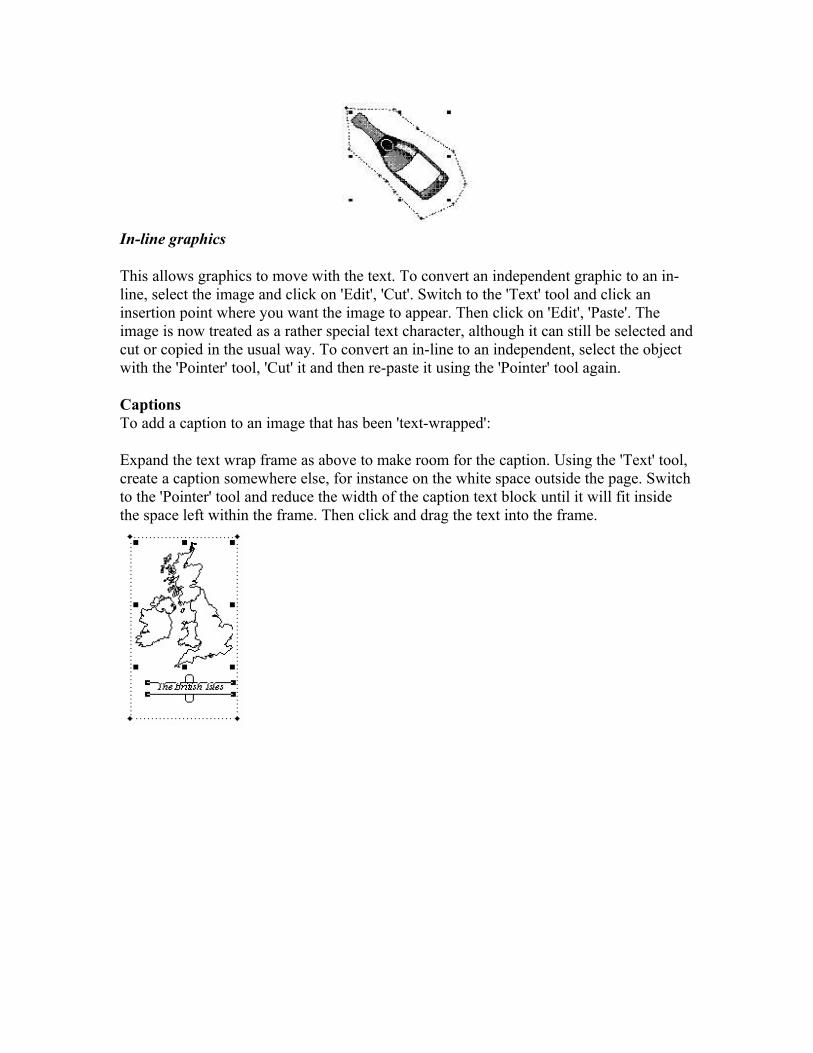
In-line graphics
This allows graphics to move with the text. To convert an independent graphic to an in-line, select the image and click on 'Edit', 'Cut'. Switch to the 'Text' tool and click an insertion point where you want the image to appear. Then click on 'Edit', 'Paste'. The image is now treated as a rather special text character, although it can still be selected and cut or copied in the usual way. To convert an in-line to an independent, select the object with the 'Pointer' tool, 'Cut' it and then re-paste it using the 'Pointer' tool again.
CaptionsTo add a caption to an image that has been 'text-wrapped':
Expand the text wrap frame as above to make room for the caption. Using the 'Text' tool, create a caption somewhere else, for instance on the white space outside the page. Switch to the 'Pointer' tool and reduce the width of the caption text block until it will fit inside the space left within the frame. Then click and drag the text into the frame.