Embed Size (px)
Citation preview
Oracle® Self-Service Human ResourcesDeploy Self-Service Capability GuideRelease 12.2 Part No. E48876-06
August 2017
Oracle Self-Service Human Resources Deploy Self-Service Capability Guide, Release 12.2
Part No. E48876-06
Copyright © 2002, 2017, Oracle and/or its affiliates. All rights reserved.
Primary Author: Gowri Arur
Contributing Author: John Salvini, Pragya Singh Nair, Swathi Mathur
This software and related documentation are provided under a license agreement containing restrictions on use and disclosure and are protected by intellectual property laws. Except as expressly permitted in your license agreement or allowed by law, you may not use, copy, reproduce, translate, broadcast, modify, license, transmit, distribute, exhibit, perform, publish, or display any part, in any form, or by any means. Reverse engineering, disassembly, or decompilation of this software, unless required by law for interoperability, is prohibited.
The information contained herein is subject to change without notice and is not warranted to be error-free. If you find any errors, please report them to us in writing.
If this is software or related documentation that is delivered to the U.S. Government or anyone licensing it on behalf of the U.S. Government, then the following notice is applicable:
U.S. GOVERNMENT END USERS: Oracle programs, including any operating system, integrated software, any programs installed on the hardware, and/or documentation, delivered to U.S. Government end users are "commercial computer software" pursuant to the applicable Federal Acquisition Regulation and agency-specific supplemental regulations. As such, use, duplication, disclosure, modification, and adaptation of the programs, including any operating system, integrated software, any programs installed on the hardware, and/or documentation, shall be subject to license terms and license restrictions applicable to the programs. Noother rights are granted to the U.S. Government.
This software or hardware is developed for general use in a variety of information management applications. It is not developed or intended for use in any inherently dangerous applications, including applications that may create a risk of personal injury. If you use this software or hardware in dangerous applications, then you shall be responsible to take all appropriate fail-safe, backup, redundancy, and other measures to ensure its safe use. Oracle Corporation and its affiliates disclaim any liability for any damages caused by use of this software or hardware in dangerous applications.
Oracle and Java are registered trademarks of Oracle and/or its affiliates. Other names may be trademarks of their respective owners.
Intel and Intel Xeon are trademarks or registered trademarks of Intel Corporation. All SPARC trademarks are used under license and are trademarks or registered trademarks of SPARC International, Inc. AMD, Opteron, the AMD logo, and the AMD Opteron logo are trademarks or registered trademarks of Advanced Micro Devices. UNIX is a registered trademark of The Open Group.
This software or hardware and documentation may provide access to or information about content, products, and services from third parties. Oracle Corporation and its affiliates are not responsible for and expressly disclaim all warranties of any kind with respect to third-party content, products, and services unless otherwise set forth in an applicable agreement between you and Oracle. Oracle Corporation and its affiliates will not be responsible for any loss, costs, or damages incurred due to your access to or use of third-party content, products, or services, except as set forth in an applicable agreement between you and Oracle.
For information about Oracle's commitment to accessibility, visit the Oracle Accessibility Program website at http://www.oracle.com/pls/topic/lookup?ctx=acc&id=docacc.
Oracle customers that have purchased support have access to electronic support through My Oracle Support. For information, visit http://www.oracle.com/pls/topic/lookup?ctx=acc&id=info or visit http://www.oracle.com/pls/topic/lookup?ctx=acc&id=trs if you are hearing impaired.

iii
Contents
Send Us Your Comments
Preface
1 Introduction to Oracle Self-Service Human Resources (SSHR)
Overview................................................................................................................................... 1-1
What is SSHR?...........................................................................................................................1-2
Introduction to Self-Service...................................................................................................... 1-4
SSHR Licenses......................................................................................................................1-4
Key Concepts in Self-Service Human Resources (SSHR)..................................................... 1-5
Self-Service Functionality.................................................................................................... 1-6
Getting Started........................................................................................................................ 1-26
Overview........................................................................................................................... 1-26
Understanding a Typical SSHR Function.......................................................................... 1-26
How an SSHR Function Works................................................................................... 1-27
A Typical SSHR Web Page.......................................................................................... 1-31
Getting Started with SSHR ................................................................................................1-32
2 SSHR Implementation Steps
Implementation Steps for Self-Service HR (SSHR)................................................................. 2-1
Implementation Flowcharts...................................................................................................... 2-1
Implementation Steps for Self-Service HR (SSHR)................................................................. 2-3
3 SSHR and User Access
User Access Overview............................................................................................................... 3-1
Managing User Access in SSHR............................................................................................... 3-1
iv
SSHR and User Access.............................................................................................................. 3-3
User Access and Security in Oracle SSHR............................................................................3-3
Access Roles for Self-Service Actions.................................................................................3-10
Self-Service Menus and User Access..................................................................................3-11
Predefined Self-Service Responsibilities and User Menus................................................. 3-14
Responsibility Ownership..................................................................................................3-17
Sample Code for Subscribing to Business Event - Responsibility Ownership................... 3-19
Creating Data Grants for Responsibility Ownership......................................................... 3-23
Restricting Access to Workflow Transactions....................................................................3-25
Simplified User Interface (UI) Menus for Oracle SSHR .......................................................3-28
Simplified User Interface (UI) Menus for Oracle SSHR .................................................... 3-28
Simplified User Interface (UI) Menus for General Self-Service..........................................3-29
Simplified User Interface (UI) Menus for Americas Localizations.....................................3-50
Simplified User Interface (UI) Menus for EMEA Localizations......................................... 3-55
Simplified User Interface (UI) Menus for APAC Localizations..........................................3-58
SSHR User Accounts............................................................................................................... 3-63
Batch Creation of User Accounts....................................................................................... 3-63
Creating Batch User Accounts with Concurrent Programs................................................3-64
Writing User Hooks for the Batch Creation of User Accounts...........................................3-68
4 Extending SSHR
Configuration Overview........................................................................................................... 4-1
Extending SSHR........................................................................................................................4-2
Guidelines for Configuring SSHR Functions....................................................................... 4-2
Transaction History............................................................................................................. 4-3
Managing Preferred Currencies...........................................................................................4-4
Managing Dates in SSHR.....................................................................................................4-5
Legislation and Customer Overrides .................................................................................. 4-7
Defining Menus for SSHR..................................................................................................4-10
Defining User Access to Self-Service Functions................................................................. 4-11
Defining Functions for SSHR............................................................................................. 4-12
Menu Function Parameters..................................................................................................... 4-16
Supplied Functions............................................................................................................ 4-16
Menu Function Parameter Descriptions............................................................................ 4-34
5 SSHR and Workflow
Workflow Overview..................................................................................................................5-1
Setting Up Workflow for SSHR................................................................................................5-1
SSHR and Workflows............................................................................................................... 5-3
Self-Service Workflows ....................................................................................................... 5-3
v
Workflow Objects and Item Types.......................................................................................5-3
Notifications........................................................................................................................ 5-5
Configuring Workflow Objects............................................................................................5-8
Configuring Workflow Attribute Values........................................................................... 5-10
Configuring Workflow Error Processes............................................................................. 5-11
Defining Your Enterprise's Email Addresses .................................................................... 5-11
Running the Workflow Cleanup Process...........................................................................5-12
6 SSHR Page Layouts
Page Layout Overview.............................................................................................................. 6-1
Setting Up Page Layouts for SSHR...........................................................................................6-1
SSHR Personalizations..............................................................................................................6-4
The Personalization Framework.......................................................................................... 6-4
Function-level Personalizations........................................................................................... 6-8
Configuring Web Pages..................................................................................................... 6-21
Configuring Page Headers.................................................................................................6-26
Configuring Flexfields....................................................................................................... 6-27
Configuring Tabbed Regions............................................................................................. 6-28
Adding Instructions to Web Pages.................................................................................... 6-35
Configuring the Global Button Bar.................................................................................... 6-38
Personalizing Screen Images..............................................................................................6-39
Configuring the Effective Date Prompts............................................................................6-41
7 Approvals
Approvals Overview................................................................................................................. 7-1
Features of Approvals in SSHR................................................................................................ 7-3
Approvals.................................................................................................................................. 7-4
Approvals in SSHR.............................................................................................................. 7-4
Oracle Approvals Management (AME) Configuration........................................................7-5
Further Approvals Options..................................................................................................7-9
Using the Parallel Approval Process in Oracle SSHR........................................................ 7-11
Sample Code for Modifying Approvals Using PL/SQL..................................................... 7-15
Implementing Oracle Approvals Management (AME)......................................................7-17
Configuring Approvals in the Workflow Builder.............................................................. 7-21
8 Configuring Self-Service Modules
Configuring the Common SSHR Modules...............................................................................8-2
Configuring the People in Hierarchy, My List, and Search Pages .......................................8-2
Configuring the Review Page.............................................................................................. 8-7
Configuring the Special Information Types (SITs) Page.................................................... 8-10
vi
Configuring the Extra Information Types (EITs) Page.......................................................8-13
Configuring the Allocated Checklists Page........................................................................8-16
Configuring Views..................................................................................................................8-18
Configuring the My Information and My Employee Information Views.......................... 8-18
Configuring the Employee Information View................................................................... 8-27
Configuring the Assignment Details View........................................................................ 8-28
Configuring the Compensation Activity View.................................................................. 8-30
Configuring the Termination History View.......................................................................8-31
Configuring the Search Functions for HR Views............................................................... 8-33
Configuring the Workforce Sourcing and Deploy Modules................................................. 8-34
Configuring the Location Module..................................................................................... 8-34
Configuring the Work Schedule Module........................................................................... 8-36
Configuring the Change Pay Function...............................................................................8-37
Configuring the Assignment Rate Module........................................................................ 8-39
Configuring the Documents of Record Module.................................................................8-41
Configuring the Termination Module................................................................................8-45
Configuring the Voluntary Termination Module.............................................................. 8-48
Configuring the Voluntary Terminate Placement Module................................................ 8-52
Configuring the Reverse Termination Module.................................................................. 8-55
Configuring the End Placement Module........................................................................... 8-58
Document Categories and Types............................................................................................ 8-60
Overview of Document Categories and Types.................................................................. 8-60
Creating Document Categories, Subcategories, and Types................................................8-60
Running the Register Document Types (EITs) Process...................................................... 8-61
Configuring Professional Details Modules............................................................................8-63
Configuring Education and Qualifications........................................................................ 8-63
Configuring Other Professional Qualifications .................................................................8-66
Configuring Competency Profile.......................................................................................8-68
Configuring Suitability Matching...................................................................................... 8-72
Configuring the Work Preferences Module....................................................................... 8-77
Configuring the Resume Module.......................................................................................8-78
Configuring the Tenure Status Module............................................................................. 8-79
Configuring the Academic Rank Module.......................................................................... 8-80
Configuring Recruitment Modules........................................................................................ 8-82
Configuring Applicant Hire and Rehire, Hire or Placement, Place Contingent WorkerProcesses............................................................................................................................8-82
Configuring Absence Management........................................................................................8-87
Configuring the Absence Management Pages................................................................... 8-87

vii
9 Workforce Sourcing and Deployment
Workforce Sourcing and Deployment Overview.....................................................................9-1
Using SSHR for Workforce Sourcing and Deployment...........................................................9-1
Employee Demographics.......................................................................................................... 9-3
Personal Information Modules............................................................................................ 9-3
Basic Details.................................................................................................................. 9-5
Main Address................................................................................................................ 9-7
Secondary Address......................................................................................................9-10
Phone Numbers...........................................................................................................9-12
Emergency Contacts....................................................................................................9-14
Dependents and Beneficiaries..................................................................................... 9-16
Info Online on the Personal Information Page............................................................ 9-18
Entering Disability and Veteran Status Details to Comply with OFCCP (US)...................9-19
Contact Extra Information (Japan)..................................................................................... 9-20
Documents of Record.........................................................................................................9-23
Professional Details Modules.............................................................................................9-24
Education and Qualifications...................................................................................... 9-24
Other Professional Qualifications................................................................................9-25
Competency Profile..................................................................................................... 9-25
Work Preferences........................................................................................................ 9-27
Resume........................................................................................................................9-27
Tenure Status (US).......................................................................................................9-28
Academic Rank (US)................................................................................................... 9-28
Employment Verification...................................................................................................9-28
Employee Directory.................................................................................................................9-32
The Employee Directory Module.......................................................................................9-32
Anonymous Access to the Employee Directory.................................................................9-39
Enabling Single Sign On to Self Service............................................................................. 9-40
Enabling Customer Overrides for the Employee Directory............................................... 9-41
Populating the Repository................................................................................................. 9-42
Legislation and Customer Overrides for Employee Directory...........................................9-44
Manage Employment Events.................................................................................................. 9-47
Manage Employment Events Modules and Workflow...................................................... 9-47
Assignment........................................................................................................................9-50
Termination....................................................................................................................... 9-56
End Placement................................................................................................................... 9-58
Voluntary Termination...................................................................................................... 9-58
Voluntary Terminate Placement........................................................................................ 9-59
Reverse Termination..........................................................................................................9-59

viii
Work Schedule ..................................................................................................................9-62
Location............................................................................................................................. 9-62
Special Information Types (SITs)....................................................................................... 9-62
Extra Information Types (EITs)..........................................................................................9-63
Other Employment Information........................................................................................ 9-63
Change Pay........................................................................................................................9-65
Assignment Rate................................................................................................................9-65
Change Manager................................................................................................................9-66
Organization Management..................................................................................................... 9-69
Organization Manager.......................................................................................................9-69
Views....................................................................................................................................... 9-72
Information Overview....................................................................................................... 9-72
My Information and My Employee Information............................................................... 9-73
Employee Information View..............................................................................................9-75
Assignment Details View...................................................................................................9-75
Compensation Activity View.............................................................................................9-75
Termination History View................................................................................................. 9-76
Search Functions for HR Views......................................................................................... 9-76
Views - US Federal.................................................................................................................. 9-77
Information Overview (US Federal).................................................................................. 9-77
My Information and My Employee Information (US Federal)...........................................9-79
Employee Information View (US Federal)......................................................................... 9-86
Personnel Actions - US Federal ..............................................................................................9-89
Processing Personnel Actions (US Federal)....................................................................... 9-89
Configuring Personnel Actions (US Federal).....................................................................9-93
Recruitment........................................................................................................................... 9-101
Apply for Job................................................................................................................... 9-101
Hire or Placement, Place Contingent Worker Processes.................................................. 9-103
Applicant Hire and Rehire...............................................................................................9-105
10 Transaction Monitor
Transaction Monitor................................................................................................................10-2
Using Transaction Monitor................................................................................................ 10-2
Configuring Transaction Monitor......................................................................................10-4
11 Common SSHR Modules
Common Modules Overview..................................................................................................11-1
Using Common SSHR Functions............................................................................................11-1
Common SSHR Modules........................................................................................................ 11-4
People in Hierarchy, My List, and Search Pages................................................................11-4

ix
Actions...............................................................................................................................11-5
Return for Correction.........................................................................................................11-9
Release Information......................................................................................................... 11-11
Review and Confirm........................................................................................................11-13
Save For Later.................................................................................................................. 11-14
Document Management...................................................................................................11-16
Set Up Eligibility Processing............................................................................................11-34
Allocated Checklists ........................................................................................................11-40
Delete Transactions Pending Approval........................................................................... 11-41
Self-Service Actions.............................................................................................................. 11-43
Overview of Self-Service Actions.....................................................................................11-43
Configuring Self-Service Actions..................................................................................... 11-46
Managing Conflicting Actions......................................................................................... 11-49
Initiating a Self-Service Action.........................................................................................11-54
Approving a Self-Service Action......................................................................................11-59
New User Registration.......................................................................................................... 11-62
New User Registration.....................................................................................................11-62
New Employee Registration and Non-employee Registration........................................ 11-63
Create User Name............................................................................................................11-65
User Hooks To Generate User Names For New User Registration..................................11-67
Setting Up a Generic User ID For New User Registration............................................... 11-68
Configuring the New Employee and Non-Employee Registration Processes..................11-74
Configuring the Create User Name Process.....................................................................11-79
Generating Self-Service User Names and Passwords...................................................... 11-81
12 Talent Management
Talent Management Overview (SSHR).................................................................................. 12-1
Using SSHR for Talent Management..................................................................................... 12-2
Event and Attendance Administration................................................................................... 12-4
Events and Bookings..........................................................................................................12-4
Employee Reviews.............................................................................................................12-5
Suitability Matching (Self-Service)........................................................................................ 12-7
Suitability Matching...........................................................................................................12-7
Succession Planning..............................................................................................................12-10
Succession Planning.........................................................................................................12-10
Creating and Maintaining Succession Plans.................................................................... 12-11
Setting up Information for Succession Planning..............................................................12-12
13 Organization Chart in Oracle SSHR
Using the Organization Chart.................................................................................................13-2

x
Using the Organization Chart............................................................................................13-2
Using the Organization Chart as Managers in Oracle SSHR..............................................13-3
Using the Organization Chart as Workers in Oracle SSHR................................................13-5
Implementing the Organization Chart...............................................................................13-6
Configuring the Organization Chart Module in Oracle SSHR...........................................13-7
14 Talent Profile in Oracle SSHR
Talent Profile Functionality in Oracle SSHR......................................................................... 14-2
Talent Profile in Oracle SSHR............................................................................................ 14-2
Using Talent Profile as Managers in Oracle SSHR.............................................................14-5
Using Talent Profile as Workers in Oracle SSHR............................................................. 14-14
Generating Printable Talent Profiles in Oracle SSHR.......................................................14-20
Enabling Talent Profile in Oracle SSHR.............................................................................. 14-23
Enabling Talent Profile in Oracle SSHR........................................................................... 14-23
Setup Steps to Implement a Custom Version of the Talent Profile Feature in SSHR....... 14-26
Completing the Configuration Steps for Talent Profile in SSHR..................................... 14-38
Configuring Manager and Personal Actions in Talent Profile......................................... 14-45
Personalizing the Talent Profile Page.............................................................................. 14-59
Displaying Person Extra Information Types (EITs) as Talent Profile Page Regions.........14-64
Displaying Person Special Information Types (SITs) as Talent Profile Page Regions...... 14-68
Displaying Custom Content as Talent Profile Page Regions............................................14-70
15 Absence Management
Absence Management............................................................................................................. 15-2
Absence Management in SSHR..........................................................................................15-2
Accrual Balances Maintained by SSHR : Overview........................................................... 15-2
Viewing Accrual Balances in SSHR................................................................................... 15-4
16 Vehicle and Mileage Processing
Vehicle and Mileage Processing............................................................................................. 16-2
Vehicle Repository............................................................................................................. 16-2
Vehicle Repository Menu and Function Names.................................................................16-3
Configuration Settings for Vehicle Repository and Mileage Claims..................................16-4
17 Payroll Process Management
Payroll Overview.....................................................................................................................17-1
Using SSHR with Payroll Functions.......................................................................................17-1
Payroll - Global ...................................................................................................................... 17-3
Online Payslip...................................................................................................................17-3

xi
Payment Methods.............................................................................................................. 17-3
Online Payslip .................................................................................................................17-12
Voluntary Deductions......................................................................................................17-14
Element Entries Using Self-Service.................................................................................. 17-14
Using Payslip Modeler.....................................................................................................17-18
Using Payroll Dashboard.................................................................................................17-20
Using Readiness Configuration....................................................................................... 17-23
Configuring Payroll Dashboard.......................................................................................17-24
Using SSHR for Payroll Management - US.......................................................................... 17-25
Tax Form (W-4) (US)........................................................................................................17-25
Configuring the Tax Form (W-4) (US)..............................................................................17-28
Tax Information Form W-2 and W-2c (US)...................................................................... 17-34
Online Payslip (US)..........................................................................................................17-38
Paycheck Modeling (US)..................................................................................................17-42
Configuration Information for Paycheck Modeling (US).................................................17-44
Configuration Steps to Display Dates on Online Payslip (US).........................................17-51
Using Oracle SSHR for Payroll Management - Canada....................................................... 17-55
Online Payslip (Canada).................................................................................................. 17-55
Payslip Modeling (Canada)............................................................................................. 17-59
Examples of Payslip Modeling Scenarios (Canada)......................................................... 17-62
Configuration Information for Payslip Modeling (Canada)............................................ 17-64
Changes to Self-Service Menus for Canada..................................................................... 17-70
Employee T4.................................................................................................................... 17-73
Employee T4A................................................................................................................. 17-74
Configuring Employee T4 and T4A Modules.................................................................. 17-75
Employee RL1..................................................................................................................17-80
Employee RL2..................................................................................................................17-80
Configuring Employee RL1 and RL2 Modules................................................................ 17-81
Using Oracle SSHR for Payroll Management - Mexico....................................................... 17-87
Payslip Modeling (Mexico).............................................................................................. 17-87
Configuration Information for Payslip Modeling (Mexico)............................................. 17-89
Payroll Management - EMEA................................................................................................17-96
Online Payslip (South Africa) ......................................................................................... 17-96
Payslip Modeling (UK).................................................................................................... 17-98
Configuration Information for Payslip Modeling (UK)................................................... 17-99
P11D Reports (UK).........................................................................................................17-101
Online Payslip (UK).......................................................................................................17-102
Employee Claims........................................................................................................... 17-104
Payroll Management - APAC..............................................................................................17-106
Online Payslip (Australia, Hong Kong, Korea, Singapore, New Zealand, India, Kuwait)....................................................................................................................................... 17-106

xii
Self Printed Payment Summary Report (AU)................................................................ 17-108
Payslip Modeler (AU).................................................................................................... 17-110
Configuration Information for Payslip Modeling (Australia)........................................17-111
Configuring the Readiness Check for TFN.................................................................... 17-113
Tax Declaration (India).................................................................................................. 17-114
Medical Expenses (India)...............................................................................................17-117
Leave Travel Concession Expenses (India).................................................................... 17-119
Payslip Modeler (India)................................................................................................. 17-122
Configuration Information for Payslip Modeling (India).............................................. 17-123
Income Tax Register Report (India)............................................................................... 17-126
Commutation Allowance (Japan).................................................................................. 17-127
Withholding ITAX (Japan).............................................................................................17-127
Life Insurance Notification (Japan)................................................................................ 17-128
Dependent Exemption Notification (Japan)...................................................................17-129
Personal Number (Japan)...............................................................................................17-130
18 Self-Service Benefits Enrollments -US Federal
Self-Service Benefits Enrollments - US Federal..................................................................... 18-2
US Federal Self-Service Benefits.........................................................................................18-2
Managing the Thrift Savings Plans (TSP) Information Using Self-Service.........................18-3
Configuring Thrift Savings Plan (TSP) Self-Service Pages................................................. 18-6
Setting Up User Access to Self-Service Benefits............................................................... 18-10
Enabling US Federal Benefits Notifications..................................................................... 18-12
HRMS Glossary
Index

xiii
Send Us Your Comments
Oracle Self-Service Human Resources Deploy Self-Service Capability Guide, Release 12.2
Part No. E48876-06
Oracle welcomes customers' comments and suggestions on the quality and usefulness of this document. Your feedback is important, and helps us to best meet your needs as a user of our products. For example:
• Are the implementation steps correct and complete? • Did you understand the context of the procedures? • Did you find any errors in the information? • Does the structure of the information help you with your tasks? • Do you need different information or graphics? If so, where, and in what format? • Are the examples correct? Do you need more examples?
If you find any errors or have any other suggestions for improvement, then please tell us your name, the name of the company who has licensed our products, the title and part number of the documentation andthe chapter, section, and page number (if available).
Note: Before sending us your comments, you might like to check that you have the latest version of the document and if any concerns are already addressed. To do this, access the new Oracle E-Business Suite Release Online Documentation CD available on My Oracle Support and www.oracle.com. It contains the most current Documentation Library plus all documents revised or released recently.
Send your comments to us using the electronic mail address: [email protected]
Please give your name, address, electronic mail address, and telephone number (optional).
If you need assistance with Oracle software, then please contact your support representative or Oracle Support Services.
If you require training or instruction in using Oracle software, then please contact your Oracle local officeand inquire about our Oracle University offerings. A list of Oracle offices is available on our Web site at www.oracle.com.

xv
Preface
Intended AudienceWelcome to Release 12.2 of the Oracle Self-Service Human Resources Deploy Self-Service Capability Guide.
This guide assumes you have a working knowledge of the following:
• The principles and customary practices of your business area
• Oracle Human Resources Management Systems (HRMS)
Oracle HRMS is a major component of the Oracle E-Business Suite of applications. If you are unfamiliar with Oracle HRMS, then Oracle suggests that you attend one or more of the Oracle HRMS training classes available through Oracle University.
• The Oracle Applications graphical user interface
To learn more about the Oracle Applications graphical user interface, read the Oracle E-Business Suite User's Guide.
See Related Information Sources on page xvi for more Oracle E-Business Suite product information.
Documentation AccessibilityFor information about Oracle's commitment to accessibility, visit the Oracle Accessibility Program website at http://www.oracle.com/pls/topic/lookup?ctx=acc&id=docacc.
Access to Oracle SupportOracle customers that have purchased support have access to electronic support through My Oracle Support. For information, visit http://www.oracle.

xvi
com/pls/topic/lookup?ctx=acc&id=info or visit http://www.oracle.com/pls/topic/lookup?ctx=acc&id=trs if you are hearing impaired.
Structure1 Introduction to Oracle Self-Service Human Resources (SSHR)2 SSHR Implementation Steps3 SSHR and User Access4 Extending SSHR5 SSHR and Workflow6 SSHR Page Layouts7 Approvals8 Configuring Self-Service Modules9 Workforce Sourcing and Deployment10 Transaction Monitor11 Common SSHR Modules12 Talent Management13 Organization Chart in Oracle SSHR14 Talent Profile in Oracle SSHR15 Absence Management16 Vehicle and Mileage Processing17 Payroll Process Management18 Self-Service Benefits Enrollments -US Federal HRMS Glossary
Related Information SourcesOracle HRMS shares business and setup information with other Oracle Applications products. Therefore, it is advised that you reference other user guides and implementation guides when you set up and use Oracle HRMS.
Guides Related to All Products
Oracle E-Business Suite User's Guide
This guide explains how to navigate, enter and query data, and run concurrent requestsusing the user interface (UI) of Oracle E-Business Suite. It includes information on setting preferences and customizing the UI. In addition, this guide describes accessibility features and keyboard shortcuts for Oracle E-Business Suite.
Oracle Application Framework Personalization Guide
This guide covers the design-time and run-time aspects of personalizing applications built with Oracle Application Framework.
Oracle E-Business Suite Maintenance Guide
This guide contains information about the strategies, tasks, and troubleshooting activities that can be used to help ensure an Oracle E-Business Suite system keeps running smoothly, together with a comprehensive description of the relevant tools and utilities. It also describes how to patch a system, with recommendations for optimizing

xvii
typical patching operations and reducing downtime.
Oracle E-Business Suite Security Guide
This guide contains information on a comprehensive range of security-related topics, including access control, user management, function security, data security, and auditing. It also describes how Oracle E-Business Suite can be integrated into a single sign-on environment.
Oracle E-Business Suite Setup Guide
This guide contains information on system configuration tasks that are carried out either after installation or whenever there is a significant change to the system. The activities described include defining concurrent programs and managers, enabling Oracle Applications Manager features, and setting up printers and online help.
Oracle E-Business Suite Flexfields Guide
This guide provides flexfields planning, setup, and reference information for the Oracle E-Business Suite implementation team, as well as for users responsible for the ongoing maintenance of Oracle E-Business Suite product data. This guide also provides information on creating custom reports on flexfields data.
Guides Related to This Product
Oracle Human Resources Management Systems Implementation Guide
Learn about the setup procedures you need to carry out to implement Oracle HRMS successfully in your enterprise.
Oracle Human Resources Management Systems Configuring, Reporting, and System Administration Guide
Learn about extending and configuring Oracle HRMS, managing security, auditing, andinformation access.
Oracle Human Resources Management Systems Enterprise and Workforce Management Guide
Learn how to use Oracle HRMS to represent your enterprise. This includes setting up your organization hierarchy, recording details about jobs and positions within your enterprise, defining person types to represent your workforce, and also how to manage your budgets and costs.
Oracle Human Resources Management Systems Workforce Sourcing, Deployment, and Talent Management Guide
Learn how to use Oracle HRMS to represent your workforce. This includes recruiting new workers, developing their careers, managing contingent workers, and reporting on your workforce.
Oracle Human Resources Management Systems Payroll Processing Management Guide
Learn about wage attachments, taxes and social insurance, the payroll run, and other processes.
Oracle Human Resources Management Systems Compensation and Benefits Management

xviii
Guide
Learn how to use Oracle HRMS to manage your total compensation package. For example, read how to administer salaries and benefits, set up automated grade/step progression, and allocate salary budgets. You can also learn about setting up earnings and deductions for payroll processing, managing leave and absences, and reporting on compensation across your enterprise.
Oracle Human Resources Management Systems FastFormula User Guide
Learn about the different uses of Oracle FastFormula, and understand the rules and techniques you should employ when defining and amending formulas for use with Oracle applications.
Oracle Self-Service Human Resources Deploy Self-Service Capability Guide
Set up and use self-service human resources (SSHR) functions for managers, HR Professionals, and employees.
Oracle Human Resources Management Systems Window Navigation and Reports Guide
This guide lists the default navigation paths for all windows and the default reports andprocesses as they are supplied in Oracle HRMS.
Oracle Performance Management Implementation and User Guide
Learn how to set up and use performance management functions. This includes setting objectives, defining performance management plans, managing appraisals, and administering questionnaires.
Oracle Succession Planning Implementation and User Guide
Learn how to set up and use Succession Planning functions. This includes identifying succession-planning requirements, using talent profile, organization chart, suitability analyzer, and performance matrices.
Oracle Human Resources Management Systems Approvals Management Implementation Guide
Use Oracle Approvals Management (AME) to define the approval rules that determine the approval processes for Oracle applications.
Oracle iRecruitment Implementation and User Guide
Set up and use Oracle iRecruitment to manage all of your enterprise's recruitment needs.
Oracle Learning Management Implementation Guide
Learn how to implement and configure Oracle Learning Management (OLM).
Oracle Learning Management User Guide
Use Oracle Learning Management to accomplish your online and offline learning goals.
Oracle Time and Labor Implementation and User Guide
Learn how to capture work patterns, such as shift hours, so that this information can be used by other applications, such as General Ledger.

xix
Oracle Labor Distribution User Guide
Learn how to maintain employee labor distribution schedules, distribute pay amounts, encumber (commit) labor expenses, distribute labor costs, adjust posted labor distribution, route distribution adjustment for approval, and manage error recovery processes. You also learn how to set up effort reporting for Office of Management and Budget (OMB) compliance.
Integration Repository The Oracle Integration Repository is a compilation of information about the service endpoints exposed by the Oracle E-Business Suite of applications. It provides a complete catalog of Oracle E-Business Suite's business service interfaces. The tool lets users easily discover and deploy the appropriate business service interface for integration with any system, application, or business partner.
The Oracle Integration Repository is shipped as part of the Oracle E-Business Suite. As your instance is patched, the repository is automatically updated with content appropriate for the precise revisions of interfaces in your environment.
Do Not Use Database Tools to Modify Oracle E-Business Suite DataOracle STRONGLY RECOMMENDS that you never use SQL*Plus, Oracle Data Browser, database triggers, or any other tool to modify Oracle E-Business Suite data unless otherwise instructed.
Oracle provides powerful tools you can use to create, store, change, retrieve, and maintain information in an Oracle database. But if you use Oracle tools such as SQL*Plus to modify Oracle E-Business Suite data, you risk destroying the integrity of your data and you lose the ability to audit changes to your data.
Because Oracle E-Business Suite tables are interrelated, any change you make using an Oracle E-Business Suite form can update many tables at once. But when you modify Oracle E-Business Suite data using anything other than Oracle E-Business Suite, you may change a row in one table without making corresponding changes in related tables.If your tables get out of synchronization with each other, you risk retrieving erroneous information and you risk unpredictable results throughout Oracle E-Business Suite.
When you use Oracle E-Business Suite to modify your data, Oracle E-Business Suite automatically checks that your changes are valid. Oracle E-Business Suite also keeps track of who changes information. If you enter information into database tables using database tools, you may store invalid information. You also lose the ability to track whohas changed your information because SQL*Plus and other database tools do not keep arecord of changes.


Introduction to Oracle Self-Service Human Resources (SSHR) 1-1
1Introduction to Oracle Self-Service Human
Resources (SSHR)
OverviewOracle Self-Service Human Resources (SSHR) extends the functionality of standard Oracle HRMS by enabling both employees and managers to participate in Human Resources management via a web browser. SSHR offers secure self-service business transactions and easy-to-use functionality driven by Oracle's proven web and workflowtechnologies. These technologies enable the data, views, stored procedures, validation routines, and Application Programmatic Interfaces (APIs) used in the standard Oracle Applications to be shared, thus providing seamless integration between Oracle HRMS and Self-Service HRMS.
Features of SSHRKey features of SSHR include the following:
• Configurability
SSHR uses the Oracle Applications Framework (OA Framework) technology to enable flexible personalizations options. For example, you can personalize your self-service pages to reflect your corporate identify, or to reflect the specific business processes in your organization. You can personalize content, appearance, and self-service transactions to suit your requirements and those of the individual user. You can personalize self-service applications to suit role, experience, work content, language, and information needs.
• Intuitive layout
The pages and windows used in SSHR have an intuitive layout and enable users to carry out business processes and transactions without the need for extensive documentation or instruction. Notes and messages are available on pages if appropriate and meaningful.
1-2 Oracle Self-Service Human Resources Deploy Self-Service Capability Guide
• Dynamic routing of transactions
SSHR utilizes workflow technology to enable you to define dynamic routing and approvals paths for your self-service transactions. You can use Oracle Workflow to configure any process that requires routing, approval, and submission.
• Delivery of workforce intelligence
By providing manager functions in SSHR, you can deliver intelligence and information to managers, HR Professionals, executives. These users can retrieve andquery information simply and quickly.
• Improved accuracy of data
By enabling users to enter and maintain their own information, data input is more accurate and up-to-date. This also reduces repetitive data entry tasks for HR administrators.
• Streamlined business processes
By allowing managers, HR Professionals, contingent workers, and employees to work in a paperless environment, you can streamline business processes, reduce administration costs, and improve service. Users can make their own decisions about benefits options and work preferences, for example, and view information online including payslips and tax forms.
• Integration with Oracle Approvals Management (OAM)
Oracle Approvals Management (OAM) enables you to define routing rules for your transactions. By using OAM with SSHR, you ensure that your self-service transactions are received and approved or rejected by the correct user.
Scope of SSHRSSHR functions are available for all major functional areas in Oracle HRMS: Workforce Sourcing and Deployment, Compensation, Benefits, and Payroll Management, and Enterprise and Workforce Management. Within these functional areas, some functions are available in SSHR only, some are available in the Forms Interface only, and some areavailable in both SSHR and the Forms Interface.
For information on the self-service functions available for each functional area, see: Self-Service Modules, page 1-6.
What is SSHR?The following sections answer common questions on SSHR and give an overview of thefunctionality.

Introduction to Oracle Self-Service Human Resources (SSHR) 1-3
What does self-service mean?Self-service means that the originator of a task is also the person responsible for that task. Using a standard web browser, the user accesses HR data and performs a specific task, for example, registering a change of address. By transferring the responsibility for the task to the originator of the task, data accuracy is increased and administration costsare reduced.
How do self-service applications differ from traditional HR systems?The key elements that distinguish self-service applications from other systems are:
• easy-to-use user interfaces
• easy access to functions via web browsers
• complex processes reduced to simple steps
• reliability and scalability enabling many people to experience good response times, for example during an annual benefit enrollment period
• opportunities to configure and extend the application to meet enterprise needs
• system accessibility for people who are not Human Resource specialists
• ability to configure SSHR web pages to suit user requirements.
How can SSHR meet my enterprise's unique business processes?SSHR is highly configurable: you can configure web pages and predefined business transactions. You can also create your own business processes. Although SSHR uses thedesign standards that are common to all Oracle applications, you can change the appearance of the web pages by adding your own logos and by changing field and radio button names. On some pages, you can choose which sections are displayed. If you want to highlight procedures that are specific to your enterprise, you can customizethe instructions that provide online help for users.

1-4 Oracle Self-Service Human Resources Deploy Self-Service Capability Guide
Introduction to Self-Service
SSHR LicensesTo enable SSHR, you must first purchase the appropriate licence from Oracle. For information on licences, contact your Oracle sales representative.
SSHR delivers particular functionality according to your base product licence. If you have licenced SSHR you have access to all SSHR HRMS functionality with the followingexceptions:
• Oracle Advanced Benefits (OAB). Although the self-service Benefits functions are available with Standard Benefits which is included in the HRMS licence, additional functionality is available if you purchase OAB. For example, life event restrictions in the Advanced Benefits model allow you to use Self-Service Benefits at any time during the year.
Note: For Standard Benefits customers, it is recommended the Benefits Election function be available only during the annual enrollment period. In other words, you should consider taking your enrollment web pages off-line during periods where you do not want benefits participants to make changes to their elections.
• Oracle Training Administration: You must purchase a separate licence to be able to use the self-service training function.
• Payroll: You must purchase a separate licence to be able to use the self-service payroll functions.
• Oracle Compensation Workbench: If you purchased a Self-Service HR license prior to June 18th, 2007 and have an Oracle Human Resources (HR) license, you can use Compensation Workbench. The purchase of a Self-Service HR license on or after June 18th, 2007 does not permit the use of Compensation Workbench. You must purchase a separate Compensation Workbench license in addition to an Oracle Human Resources (HR) license to use the product. A Self-Service HR license is not required to use Compensation Workbench if you purchased a Compensation Workbench license.
Important: If you are licensed to use Compensation Workbench, you must set the HR: Self Service HR Licensed profile option to 'Yes' to avoid this error: 'You do not have permission to use this product', when attempting to use Compensation Workbench.
Introduction to Oracle Self-Service Human Resources (SSHR) 1-5
• Oracle Total Compensation Statement: If you purchased a Self-Service HR license prior to June 18th, 2007 and have an Oracle Human Resources (HR) license, you canuse Total Compensation Statement. The purchase of a Self-Service HR license on or after June 18th, 2007 does not permit the use of Total Compensation Statement. A Compensation Workbench or Advanced Benefits license purchased on or after June 18th, 2007 allows the use of Total Compensation Statement. A Self-Service HR license is not required to use Total Compensation Statement if you purchased a Compensation Workbench or Advanced Benefits license on or after June 18th, 2007.
• Oracle Performance Management: If you purchased a Self-Service HR license prior to June 18th, 2007 and have an Oracle Human Resources (HR) license, you can use Oracle Performance Management. The purchase of a Self-Service HR license on or after June 18th, 2007 does not permit the use of Performance Management. You must purchase a separate Performance Management license in addition to an OracleSelf-Service HR license to use the Appraisals, Questionnaire Administration, and Objectives Management self-service functions.
Key Concepts in Self-Service Human Resources (SSHR)This section defines some important terms used throughout this Implementation Guide.
Application Object Library (AOL) function
An AOL function is an item that can be added to a menu. The item can call a screen or web page or be a hidden function.
See also: Self-Service Function
Business Process
Produces the products and services that are recognized outside the business area. They support the organization's objectives, critical success factors, or business objectives. They can be subdivided into sub-processes, for example, the Change Hours workflow process consists of the Work Schedule and Pay Rate subprocesses.
See: The Personalization Framework, page 6-4
MDS (Meta Data Services) Repository
An active repository that stores information on the appearance and behavior of self-service pages. Customers can configure changes to the definitions held in the MDS Repository using the Personalization Framework.
See: The Personalization Framework, page 6-4
Oracle Applications (OA) Framework
The OA Framework is the technical foundation for the Oracle Self-Service Applications (OSSWA).
Personalization Framework
The Personalization Framework allows you to configure the display of Oracle Self-
1-6 Oracle Self-Service Human Resources Deploy Self-Service Capability Guide
Service Web Applications (OSSWA) without having to make any changes to the underlying code. Your configurations are stored in the MDS Repository and are preserved during upgrades.
Region
A region in the MDS Repository defines a section in a page in Oracle Self-Service Web Applications. The region is defined in terms of elements such as fields and buttons.
Self-Service Function
Self-service functions appear as menu options to the SSHR user. The function determines how the self-service modules are called. For example, the same self-service module is used for Personal Information from both the manager and employee menus but the function determines whether the module is called in Employee or Manager mode.
Self-Service Module
A set of dynamic web pages and related components (for example, workflow process and definitions stored in the MDS Repository, stored procedures). Examples include Personal Information, Competencies, and Assignment.
Transaction
A transaction is a logical unit of work such as a promotion or an assignment change. It may consist of several components, such as changes to salary, locations, and grade, but all the components of a transaction must be handled as a unit to be either approved or rejected.
Workflow Builder
Oracle Workflow is embedded within SSHR and manages the flow of information between the HR professional, the manager, the employee, and the applicant. You use workflow to control who and how these participants take part in HR processes by modifying the underlying process definitions.
See: Self-Service Workflows, page 5-3
Workflow Function
A workflow activity which is defined as a function and which maps to a PL/SQL procedure that is executed by the Workflow Engine when it encounters this activity in the workflow process.
See: Self-Service Workflows, page 5-3
Workflow Process
A workflow process is a series of activities linked by transitions. Each activity can be a function, a notification, or a subprocess.
Self-Service FunctionalityThis section provides a brief description of the delivered SSHR functionality.

Introduction to Oracle Self-Service Human Resources (SSHR) 1-7
Summary of SSHR FunctionalityNote: In the tables below the Manage or Employee/Worker column refers to the type of activities that the responsibility would do, rather than a function that would specifically appear on a Manager or Employee menu.
Common FunctionalityThe following generic modules provide common, low-level functionality that is reused in many of the higher-level functions.
Module Name Manager or Employee/Worker
Workflow chainable/Approvals
Localization
Enter Process Manager No/No Global
Manager Actions Manager No/No Global
Return for Correction Manager Yes/No Global
New User Registration
Both Yes/Yes Global
Review and Confirm N/A Yes/Yes Global
Release Information Both No/Yes Global
Document Management
Manager No/No Global
Personal Actions Employee/Worker No/No Global
Save for Later Both No/No Global
Enter ProcessThe Enter Process module enables the user to:
• Select a person from a searchable list of people
• Select a person from their supervisor hierarchy or from their position hierarchy

1-8 Oracle Self-Service Human Resources Deploy Self-Service Capability Guide
• Add and remove people from their personal list of employees and workers
A Simple Search enables to search for a person by name. With an Advanced Search, a manager can search for a person or persons who meet particular criteria. You can searchon personal, assignment or skills criteria.
Integration with Oracle Approvals ManagementFrom version 4.1 onwards, SSHR uses the Oracle Approvals Management (AME) application to define and manage approval logic. For more information on AME, see: Oracle Approvals Management Implementation Guide
The existing method of defining customizable PL/SQL packages for approvals is still supported in this release as an alternative to AME.
See: Oracle Approvals Management (AME), page 7-5
Manager ActionsThe Manager Actions feature enables the user to first select a person and then the function, or action, to be performed. When the user selects the person, a context-sensitive list of available actions is displayed and the user can choose the required action from the list.
See: Actions Page, page 11-5
Return for CorrectionThe Return for Correction feature enable managers to return a transaction either to the initiator of the transaction or a prior approver of the transaction for correction. The person to whom the transaction is returned for correction will receive a notification.
See: Return for Correction, page 11-9
New User RegistrationNew User Registration enables users to register their own details for SSHR and for benefits providers. You set up a generic name and password and you can either enable users to create their own user name or you can use user hooks to create the user name automatically.
See: New User Registration, page 11-62
Review and ConfirmThe Review and Confirm module shows details of transactions that a user has updated or details about pending transactions that require approval. The user can review the information displayed to ensure that all the details are correct before the changes are finally submitted to the database. If necessary, the user can return to the previous screen to change incorrect information. The user can also perform What If analyses to ascertain the effect any changes will have on an person's benefits.
See: Review and Confirm, page 11-13
Introduction to Oracle Self-Service Human Resources (SSHR) 1-9
Personal ActionsThe Personal Actions module is the employee/worker equivalent of Manager Actions. The user is presented with a context-sensitive list of actions that they can perform on themselves.
See: Actions Page, page 11-5
Document ManagementThe Document Management modules enables you to automatically generate business documents containing data from self-service actions.
See: Document Management, page 11-16
Save for LaterThe Save for Later functionality enables a user to interrupt a transaction before the data is submitted. The transaction is saved in a transaction table from which it can be retrieved and continued at a later time. Users can select those transactions which they have explicitly saved for later, or which were partially saved at the time of a system failure or time-out, from the All Actions Awaiting Your Attention list in the Actions page.
See: Save for Later, page 11-14
All Actions Awaiting Your AttentionUsing the All Actions Awaiting Your Attention function from the Manager, Professional, Employee or Worker responsibilities, SSHR users can access their notifications. This function displays all the notifications and actions irrespective of the responsibilities assigned to a user. Oracle SSHR does not distinguish notifications basedon the user's access to functions.
Important: SSHR notifications can be used to relaunch a transaction using the Update Action or Continue Action functionality. Therefore, you must ensure that SSHR users are assigned the relevant responsibilities based on their roles in the enterprise.
Delete Transactions Pending ApprovalThe Delete Transactions Pending Approval functionality enables users to delete the transactions that they have initiated before approval.
See: Delete Transactions Pending Approval, page 11-41
Allocated ChecklistsThe Allocated Checklists module allows you to view and maintain the allocated checklists for your direct reports. The checklists contain a list of tasks relevant to a particular HR action, usually a life event, for example, New Hire. From the Allocated
1-10 Oracle Self-Service Human Resources Deploy Self-Service Capability Guide
Checklists page, you can perform a task, reassign a task to an alternative performer, andupdate the task and its status.
See: Allocated Checklists, page 11-40
Workforce Sourcing and Deployment
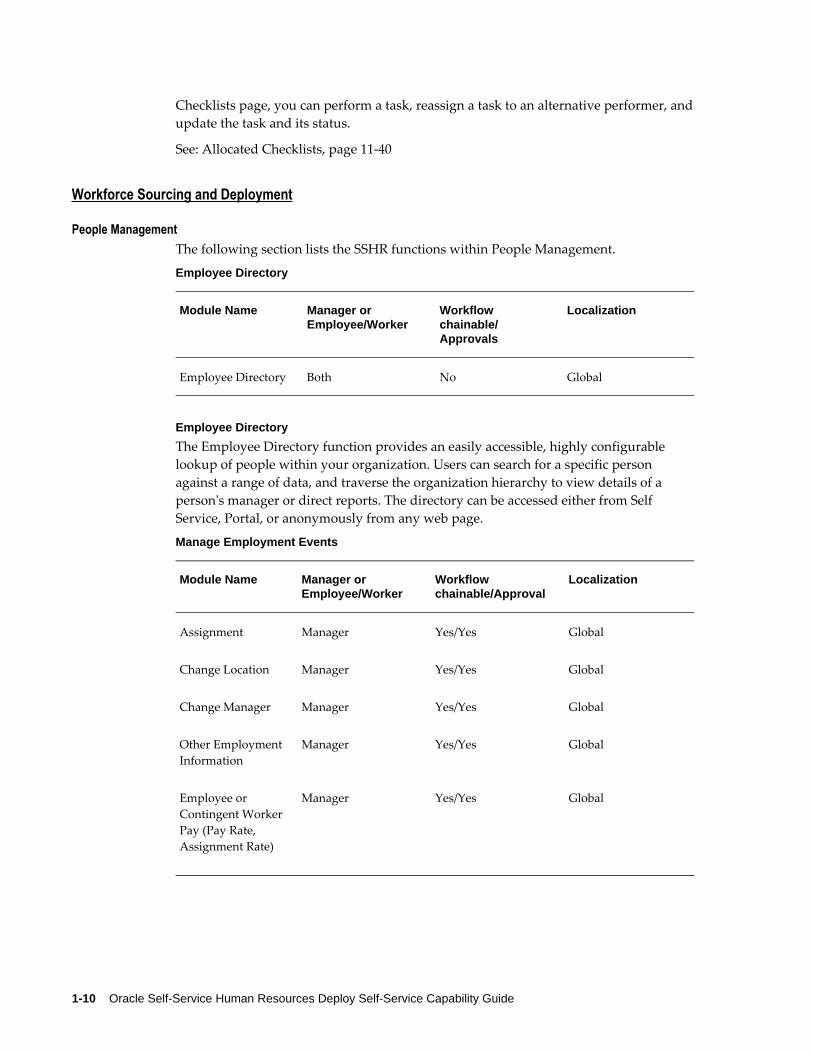
People ManagementThe following section lists the SSHR functions within People Management.
Employee Directory
Module Name Manager or Employee/Worker
Workflow chainable/ Approvals
Localization
Employee Directory Both No Global
Employee Directory
The Employee Directory function provides an easily accessible, highly configurable lookup of people within your organization. Users can search for a specific person against a range of data, and traverse the organization hierarchy to view details of a person's manager or direct reports. The directory can be accessed either from Self Service, Portal, or anonymously from any web page.
Manage Employment Events
Module Name Manager or Employee/Worker
Workflow chainable/Approval
Localization
Assignment Manager Yes/Yes Global
Change Location Manager Yes/Yes Global
Change Manager Manager Yes/Yes Global
Other Employment Information
Manager Yes/Yes Global
Employee or Contingent Worker Pay (Pay Rate, Assignment Rate)
Manager Yes/Yes Global
Introduction to Oracle Self-Service Human Resources (SSHR) 1-11
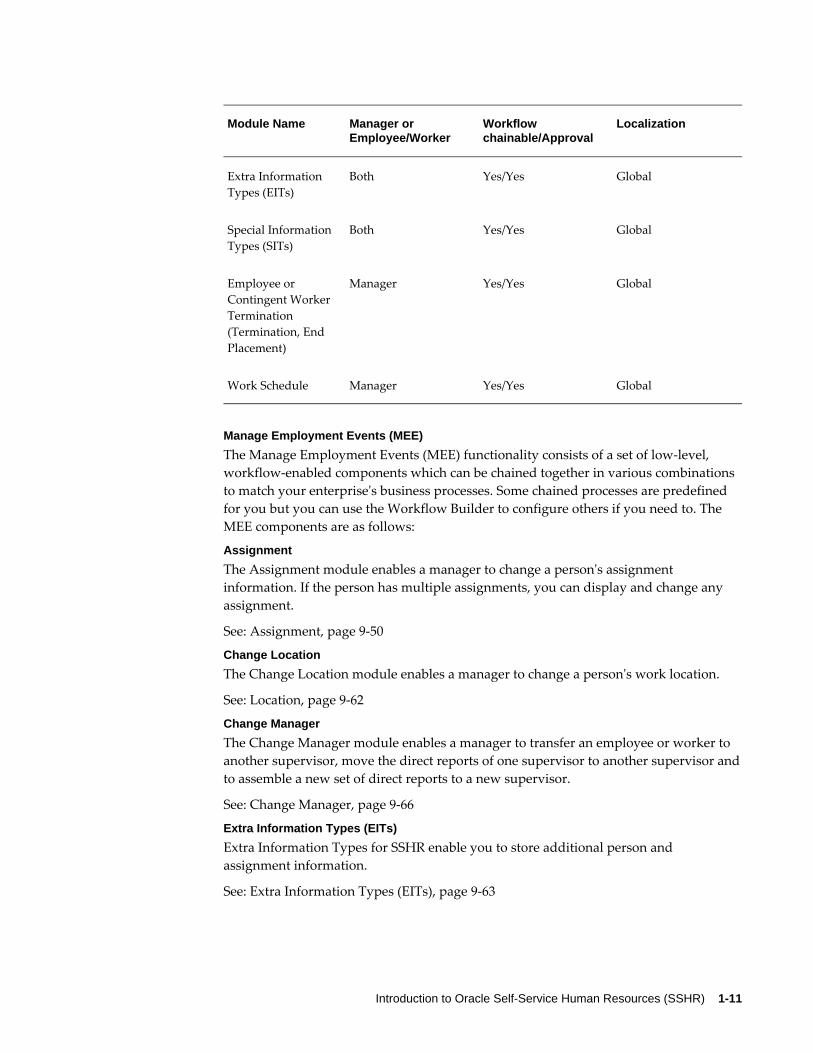
Module Name Manager or Employee/Worker
Workflow chainable/Approval
Localization
Extra Information Types (EITs)
Both Yes/Yes Global
Special Information Types (SITs)
Both Yes/Yes Global
Employee or Contingent Worker Termination (Termination, End Placement)
Manager Yes/Yes Global
Work Schedule Manager Yes/Yes Global
Manage Employment Events (MEE)
The Manage Employment Events (MEE) functionality consists of a set of low-level, workflow-enabled components which can be chained together in various combinations to match your enterprise's business processes. Some chained processes are predefined for you but you can use the Workflow Builder to configure others if you need to. The MEE components are as follows:
Assignment
The Assignment module enables a manager to change a person's assignment information. If the person has multiple assignments, you can display and change any assignment.
See: Assignment, page 9-50
Change Location
The Change Location module enables a manager to change a person's work location.
See: Location, page 9-62
Change Manager
The Change Manager module enables a manager to transfer an employee or worker to another supervisor, move the direct reports of one supervisor to another supervisor andto assemble a new set of direct reports to a new supervisor.
See: Change Manager, page 9-66
Extra Information Types (EITs)
Extra Information Types for SSHR enable you to store additional person and assignment information.
See: Extra Information Types (EITs), page 9-63

1-12 Oracle Self-Service Human Resources Deploy Self-Service Capability Guide
Other Employment Information
The Other Employment Information module enables you to update and retrieve assignment and employment information in assignment descriptive flexfields and localization-enabled flexfields.
See: Other Employment Info, page 9-63
Pay Rate
The Pay Rate module enables a manager to change a person's overall pay rate or updatean individual component of the pay rate.
See: Pay Rate, page 9-65
Assignment Rate
The Assignment Rate module enables a manager to enter and record contingent worker rates, per assignment, based on assignment rate types, such as overtime or weekend rates.
See: Assignment Rates, page 9-65
Special Information Types (SITs)
Special Information Types enable you to store additional information that is not currently captured by the system.
See: Special Information Types (SITs), page 9-62
Voluntary Termination of Employment or End Placement
If employees or contingent workers decide to leave the enterprise, they can initiate the process of ending their employment or placement.
Using the Voluntary Termination function:
• Employees can request for termination of their employment.
• Contingent workers can request for ending their placement.
See: Voluntary Termination, page 9-58
Termination
The Termination module enables a manager to end a person's relationship with their employer. You can also use the Change Manager workflow process to reassign a terminated supervisor's reports.
You can combine the Termination module with the ICD module to create a severance pay process if required.
See: Termination, page 9-56
End Placement
The End Placement module enables a manager to end a contingent worker's work relationship, and specify a reason. You can also use the Change Manager process to reassign the contingent worker's reports.
See: End Placement, page 9-58
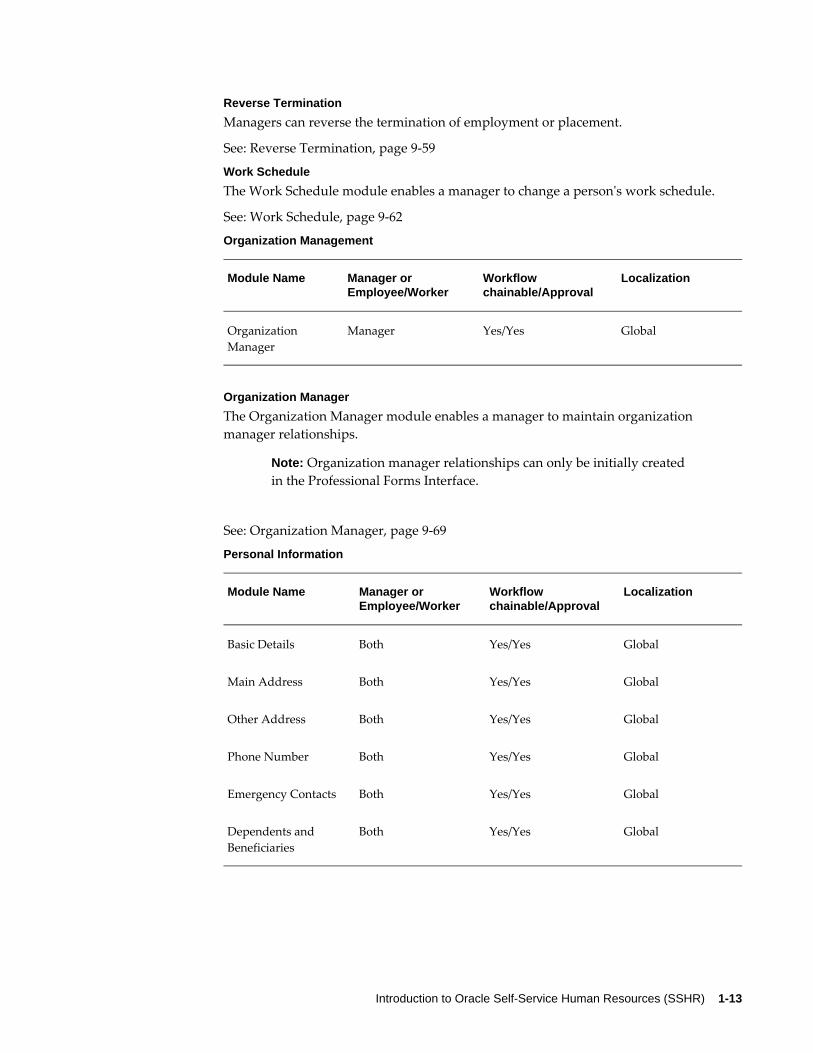
Introduction to Oracle Self-Service Human Resources (SSHR) 1-13
Reverse Termination
Managers can reverse the termination of employment or placement.
See: Reverse Termination, page 9-59
Work Schedule
The Work Schedule module enables a manager to change a person's work schedule.
See: Work Schedule, page 9-62
Organization Management
Module Name Manager or Employee/Worker
Workflow chainable/Approval
Localization
Organization Manager
Manager Yes/Yes Global
Organization Manager
The Organization Manager module enables a manager to maintain organization manager relationships.
Note: Organization manager relationships can only be initially created in the Professional Forms Interface.
See: Organization Manager, page 9-69
Personal Information
Module Name Manager or Employee/Worker
Workflow chainable/Approval
Localization
Basic Details Both Yes/Yes Global
Main Address Both Yes/Yes Global
Other Address Both Yes/Yes Global
Phone Number Both Yes/Yes Global
Emergency Contacts Both Yes/Yes Global
Dependents and Beneficiaries
Both Yes/Yes Global
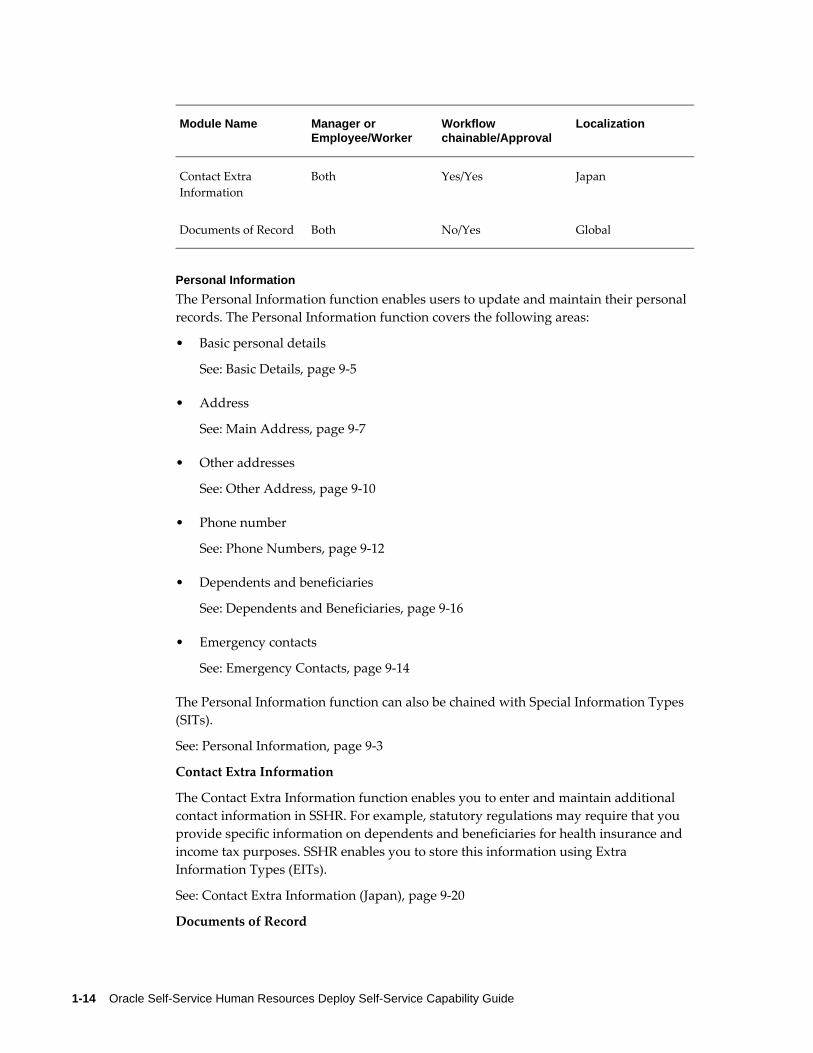
1-14 Oracle Self-Service Human Resources Deploy Self-Service Capability Guide
Module Name Manager or Employee/Worker
Workflow chainable/Approval
Localization
Contact Extra Information
Both Yes/Yes Japan
Documents of Record Both No/Yes Global
Personal Information
The Personal Information function enables users to update and maintain their personal records. The Personal Information function covers the following areas:
• Basic personal details
See: Basic Details, page 9-5
• Address
See: Main Address, page 9-7
• Other addresses
See: Other Address, page 9-10
• Phone number
See: Phone Numbers, page 9-12
• Dependents and beneficiaries
See: Dependents and Beneficiaries, page 9-16
• Emergency contacts
See: Emergency Contacts, page 9-14
The Personal Information function can also be chained with Special Information Types (SITs).
See: Personal Information, page 9-3
Contact Extra Information
The Contact Extra Information function enables you to enter and maintain additional contact information in SSHR. For example, statutory regulations may require that you provide specific information on dependents and beneficiaries for health insurance and income tax purposes. SSHR enables you to store this information using Extra Information Types (EITs).
See: Contact Extra Information (Japan), page 9-20
Documents of Record

Introduction to Oracle Self-Service Human Resources (SSHR) 1-15
The Documents of Record function enables you to store documents such as work permits, visa information, and medical certificates in one place. If required, you can alsoupload electronic versions of document.
See: Documents of Record, page 9-23
Employment Verification
The Employment Verification function enables you to release employment information and, optionally, salary information, to an external organization for a specific purpose, for example, to complete a mortgage or loan agreement.
See: Employment Verification, page 9-28
Professional Details
Module Name Manager or Employee/Worker
Workflow chainable/Approval
Localization
Academic Rank Both No/Yes US
Competency Profiles Both No/Yes Global
Education and Qualifications
Both No/Yes Global
Resume Both No/No Global
Other Professional Qualifications
Both No/Yes Global
Tenure Status Both No/Yes US
Work Preferences Both No/No Global
Professional Details
The Professional Details modules enable users to maintain professional details. They can be used by both employees and their managers, however, certain functions can be restricted for manager access only.
The Professional Details menu contains the following functions:
Education and Qualifications
The Education and Qualifications module enables employees and managers to store details on their academic qualifications. Information entered using this module requiresan establishment attendance record for qualifications.
See: Education and Qualifications, page 9-24
Other Professional Qualifications

1-16 Oracle Self-Service Human Resources Deploy Self-Service Capability Guide
The Other Professional Qualifications module enables employees and managers to storedetails on professional qualifications. Professional qualifications or certification details do not require an attendance record.
See: Other Professional Qualifications, page 9-25
Competency Profiles
The Competency Profile module enables employees and managers to store information on skills and competencies.
See: Competency Profile, page 9-25
Work preferences
The Work Preferences module enables employees and managers to store information such as relocation preferences and travel preferences.
See: Work Preferences, page 9-27
Resume
The Resume module enables employees and managers to store a resume.
See: Resume, page 9-27
Tenure Status (US)
The Tenure Status module enables managers to store information on an person's tenure (completion of professional criteria and extended probationary period).
See: Tenure Status, page 9-28
Academic Rank (US)
The Academic Rank module enables managers to store information on the academic rank for employees within Higher Education.
See: Academic Rank, page 9-28
Views
Module Name Manager or Employee/Worker
Workflow chainable/Approval
Localization
My Information Employee/Worker No/No Global
My Employee Information
Manager No/No Global
HR Views HR Professional No/No Global
My Information/My Employee Information
My Information and My Employee Information offer users access to employment and assignment records containing information about employment, salary, performance,

Introduction to Oracle Self-Service Human Resources (SSHR) 1-17
training, absence, and job applications. Employees can view their personal records and managers can view the records for the people they manage.
See: My Information and My Employee Information, page 9-73
HR Views
The HR Views module offers a summarized view of specific information: Personal Information, Assignment Details, Compensation Activity, and Termination History. This module is used by the HR Professional.
See: HR Views, page 9-72
Recruiting and Hiring
Module Name Manager or Employee/Worker
Workflow chainable/Approval
Localization
Apply for Job Employee/Worker No/No Global
Candidate Offers Manager No/Yes Global
Hire Manager No/Yes Global
French New Hire Manager No/Yes France
French Applicant Hire
Manager No/Yes France
Contingent Worker Placement
Manager No/Yes Global
Apply for a Job
The Apply for Job functionality enables employees and workers to search and apply for jobs online.
For more information, see: Apply for a Job, page 9-101
Candidate Offers
The Candidate Offers functionality is used by managers to seek approval for a job offer, send it to an applicant, and track the applicant's response.
For information on Candidate Offers, see: Oracle HRMS Implementing Oracle Self-Service Human Resources 3.4.
Hire
The Hire process is used by managers to enter details about new employees and hire them into their enterprise.
See: Hire or Placement, Place Contingent Worker Processes, page 9-103
1-18 Oracle Self-Service Human Resources Deploy Self-Service Capability Guide
Contingent Worker Placement
You can use the Contingent Worker Placement process to bring contingent workers intothe organization and give them an assignment.
See: Hire or Placement, Place Contingent Worker Processes, page 9-103
Applicant Hire and Rehire
Use the Applicant Hire and Rehire page to:
• Hire external applicants who have application assignments with a status of Accepted.
• Hire internal applicants (applicants who are employees in your organization) who have application assignments with a status of Accepted.
• Rehire ex-employees in the same business group in which they were previously employed.
See: Applicant Hire and Rehire, page 9-105
Transaction MonitorHR professionals, managers, and workers can use the Transaction Monitor page to trackand view details of the self-service transactions. As the list of all self-service transactionsis available on a single-page, users can efficiently track the status of their transactions.
Users can track transactions using the following status values and view their details.
• Pending Approval
• Complete
• Defer
• Error
See: Using Transaction Monitor, page 10-2
Organization ChartManagers can view their organization hierarchy using the Organization Chart. Details of workers in the manager's hierarchy are displayed in the form of panel cards. The application supports different hierarchy viewer layouts.
Using the Organization Chart, managers can:
• View the Contact, Employment, and Salary information of workers in their hierarchy.
• Identify key high potential workers with succession plans, key high potential workers without succession plans, workers whose salary is above the specified grade range and below the specified grade range.

Introduction to Oracle Self-Service Human Resources (SSHR) 1-19
• Launch self-service actions for workers in their hierarchy. These manager actions are launched in a new page in the Manager Actions tab. This page has a side navigator that helps managers to process and complete multiple self-service transactions for workers in their hierarchy without leaving the page.
• View and perform manager actions for multiple assignments of an employee or worker in their hierarchy, if the subordinate has more than one assignment. Managers can perform these actions for multiple assignments only if the Multiple Assignments feature is enabled and the appropriate security access is setup.
Workers can use the Organization Chart to view their contact and employment information. They can also search for other workers and view their contact and employment information. Workers can launch personal actions using the Actions link inthe personal details panel. When a worker selects an action, the action is launched in a page with a side navigation container in the Personal Actions tab. All the personal actions links appear in the side navigation container on the left side of the page. The worker can complete the transaction launched, and move on to other transactions without leaving the page. Note that workers can launch actions for their primary assignment only.
For more information, see: Using the Organization Chart, page 13-2
Talent ManagementNote: The Training, External Training, and Training Plans functions, which were previously available from the Employee Self-Service menu,are now available from the Learner Self-Service responsibility and the Learner Home and External Learning functions. For all other training functionality, see: Oracle Learning Management, Oracle Learning Management User Guide.
Talent ProfileThe Talent Profile feature of Oracle SSHR helps enterprises to obtain a complete picture of the talent profile of their workforce to manage and execute their talent processes. Talent Profile captures and displays complete worker talent details on a single-interface.
Managers can use Talent Profile to launch personal actions or manager actions. These personal actions or manager actions are launched in a new page in the Personal Actions tab or the Manager Actions tab respectively. The page that is launched when a manager initiates a personal action or manager action has a side navigator that helps managers toprocess and complete multiple self-service transactions for themselves or for workers intheir hierarchy without leaving the page. Managers can view and perform actions for multiple assignments of an employee or worker in their hierarchy, if the subordinate has more than one assignment. Managers can perform these actions for multiple assignments only if the Multiple Assignments feature is enabled and the appropriate security access is setup.
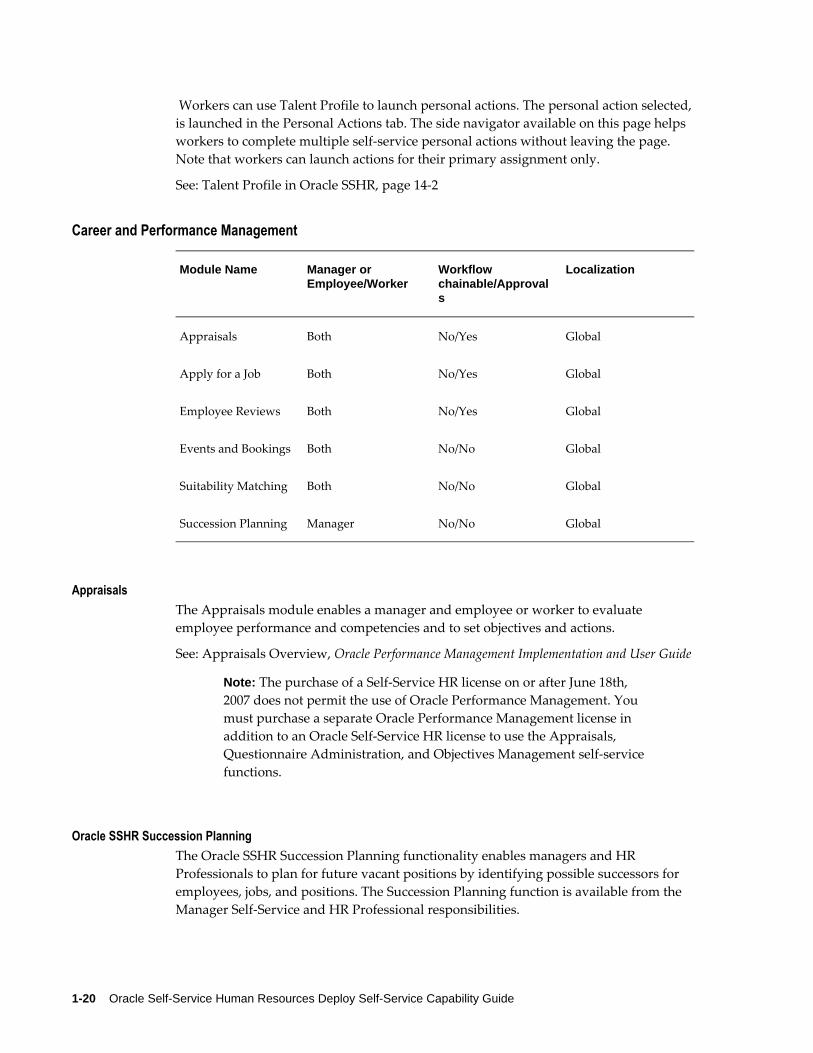
1-20 Oracle Self-Service Human Resources Deploy Self-Service Capability Guide
Workers can use Talent Profile to launch personal actions. The personal action selected,is launched in the Personal Actions tab. The side navigator available on this page helps workers to complete multiple self-service personal actions without leaving the page. Note that workers can launch actions for their primary assignment only.
See: Talent Profile in Oracle SSHR, page 14-2
Career and Performance Management
Module Name Manager or Employee/Worker
Workflow chainable/Approvals
Localization
Appraisals Both No/Yes Global
Apply for a Job Both No/Yes Global
Employee Reviews Both No/Yes Global
Events and Bookings Both No/No Global
Suitability Matching Both No/No Global
Succession Planning Manager No/No Global
Appraisals The Appraisals module enables a manager and employee or worker to evaluate employee performance and competencies and to set objectives and actions.
See: Appraisals Overview, Oracle Performance Management Implementation and User Guide
Note: The purchase of a Self-Service HR license on or after June 18th, 2007 does not permit the use of Oracle Performance Management. You must purchase a separate Oracle Performance Management license in addition to an Oracle Self-Service HR license to use the Appraisals, Questionnaire Administration, and Objectives Management self-servicefunctions.
Oracle SSHR Succession PlanningThe Oracle SSHR Succession Planning functionality enables managers and HR Professionals to plan for future vacant positions by identifying possible successors for employees, jobs, and positions. The Succession Planning function is available from the Manager Self-Service and HR Professional responsibilities.
Introduction to Oracle Self-Service Human Resources (SSHR) 1-21
See: Succession Planning, page 12-10.
Note: To use enhanced Succession Planning features, you must have a separate Oracle Succession Planning license. For more information, refer to the Oracle Succession Planning Implementation and User Guide. Otherwise, you can use the succession planning feature available with Oracle SSHR. For a comparison of the succession planning features available in Oracle SSHR and Oracle Succession Planning, refer to the My Oracle Support note: Talent Profile and Succession Planning in Oracle Self-Service HR and Oracle Succession Planning – A Comparative Note (Doc ID 861499.1).
Events and BookingsThe Events and Bookings module enables self-service users to create their own events such as meetings, presentations, or training days or to book themselves on existing events. The Events and Bookings function is available to both managers and employees,enabling managers to book their subordinates onto events.
See: Events and Bookings, page 12-4
Suitability MatchingThe Suitability Matching functionality enables managers to find suitable people for an existing or planned work opportunity, or find suitable work opportunities for a person. Employees can find opportunities for themselves.
For general information on Suitability Matching, see: Suitability Matching, Oracle HRMS Enterprise and Workforce Management Guide.
Employee ReviewsThe Employee Review functionality enables employees/workers and managers to createor update reviews. Employees and workers can create their own reviews and managers can create reviews for their employees and workers. Both managers and employees can invite reviewers to attend the review.
See: Employee Review, page 12-5
Compensation and Benefits Management
Leave and Absence Management

1-22 Oracle Self-Service Human Resources Deploy Self-Service Capability Guide
Module Name Manager or Employee/Worker
Workflow chainable/Approvals
Localization
Absences Both No/Yes Global
The Absences functionality enables employees or managers to enter absence-related information using a self-service interface. Users can submit and update absence requests. Planned, confirmed, and updated requests are then submitted for approval.
See: Absences, page 15-2
Using self-service, employees can view their accrual balance details based on an effective date, and managers can do the same for employees in their team.
See: Accrual Balances Maintained by SSHR: Overview, page 15-2
See: Leave and Absence Management Overview, Oracle HRMS Compensation and BenefitsManagement Guide
See: How do we track and analyze absences and net accrual entitlement:Leave and Absence Management, Oracle HRMS Compensation and Benefits Management Guide
Benefits
Module Name Manager or Employee/Worker
Workflow chainable/Approvals
Localization
Benefits Enrollment Both No/No Global
Benefits Enrollment Employee/Worker No/No Federal
Benefits Enrollment
Benefit Enrollments enables an person to:
• Review their current benefit enrollments
• Select benefits
• Add, update, or remove dependents
• Add, update, or remove beneficiaries
• Search for and select primary care providers
See: Self-Service Benefits Enrollments, Oracle HRMS Compensation and Benefits

Introduction to Oracle Self-Service Human Resources (SSHR) 1-23
Management Guide
For information on US federal self-service benefits, see: Federal Health Employee Benefits Overview, Oracle HRMS Compensation and Benefits Management Guide (US Federal)
Compensation
Module Name Manager or Employee/Worker
Workflow chainable/Approvals
Localization
Compensation Workbench
Manager No/Yes Global
Individual Compensation Distributions (ICD)
Manager Yes/Yes Global
Compensation Workbench
The Compensation Workbench enables managers to determine and allocate compensation awards such as salary increases, bonuses, and stock options using a self-service interface. Managers can also view details on their direct reports, prepare budgets, and generate reports.
See: Compensation Workbench, Oracle HRMS Compensation and Benefits Management Guide
Using self-service, compensation managers can update grade step and grade point of their employee's salaries. Additionally, managers can view the grade step, grade point, grade step date, and point value details using manager view.
See: Grade Step Progression, Oracle HRMS Compensation and Benefits Management Guide
See:Implementing Grade Related Pay, Oracle HRMS Compensation and Benefits Management Guide
See: Placing an Employee on a Grade Step, Oracle HRMS Compensation and Benefits Management Guide
See: Setting up a Grade Ladder, Oracle HRMS Compensation and Benefits Management Guide
Individual Compensation Distributions (ICD)ICD enables managers to assign one-time or recurring awards, bonuses, and allowancesto qualified employees and individuals.
You can also set up ICD for non-manager employees if your enterprise offers discretionary contribution plans, such as a charitable contribution or savings bond plan.
You define ICD plans using the same application windows that you use to define

1-24 Oracle Self-Service Human Resources Deploy Self-Service Capability Guide
Benefits plans. ICD is available to users of both Standard and Advanced Benefits.
See: Individual Compensation Distributions, Oracle HRMS Compensation and Benefits Management Guide
Payroll
Module Name Manager or Employee/Worker
Workflow chainable/Approval
Localization
Online Payslip Both No/No Australia, US, UK, Canada, Hong Kong,Korea New Zealand,Singapore, South Africa, Netherlands
Personal Payment Methods (Direct Deposit)
Both No/Yes Global
Online Tax Form (W-4)
Both No/No US
Online W-2 Form Employee/Worker No/No US
Commutation Information
Both Japan
Online PayslipThe Online Payslip enables a user to view their payslip using a Web browser when the required payroll processes have been run. Payslips are available for all assignments for which payroll has been completed. Employees can display payslips for the most recent payroll period or for previous payroll periods.
See: Online Payslip, page 17-12
Tax Information Form (W-2)The Tax Information form gives summary tax information for tax years from 2001 onwards. The form is used for information purposes only as it contains no updateable fields and cannot be submitted in place of the paper version of the form.
See: Tax Information Form (W-2) (US), page 17-34
Tax Withholdings Form (W-4)The Online Tax Form enables a user to submit US Tax Withholdings forms (W-4 tax

Introduction to Oracle Self-Service Human Resources (SSHR) 1-25
forms) using a Web browser. The user can use the form to update withholding information. A defined contact person will then receive notification of the changed information.
See: Tax Withholdings Form (W-4) (US), page 17-25
Voluntary DeductionsYou can use the Individual Compensation Distributions (ICD) functionality if your enterprise uses voluntary deduction plans, such as a charitable contribution or savings bond plan.
You define ICD plans using the same application windows that you use to define Benefits plans. ICD is available to users of both Standard and Advanced Benefits.
See: Individual Compensation Distributions, Oracle HRMS Compensation and Benefits Management Guide
Personal Payment MethodsThe Personal Payment Methods functionality enables a user to determine how they are paid. The available payment methods are cash, check, deposit, or a combination.
See: Personal Payment Methods, page 17-3
Commutation AllowanceThe Commutation Allowance functionality enables a user to view and modify their commutation and transportation allowance details.

1-26 Oracle Self-Service Human Resources Deploy Self-Service Capability Guide
Getting Started
OverviewThis section gives you a brief overview of the minimum tasks you need to complete to set up SSHR.
See: Minimum Requirements for an SSHR System, page 1-32
For a list of all implementation steps, see Implementation Steps for SSHR, page 2-3
Notes on Migrating from SSHR Version 3The following notes provide you with information that is useful if you are upgrading your SSHR installation from 3.x to 4.x or 5.x:
• SSHR 4.x/5.x may be installed in the same instance as SSHR 3.x
• SSHR 3.x components are still supported
• You can have both SSHR 4.x/5.x and SSHR 3.x functions on the same menu
• You can set up equivalent 4.x/5.x functions when they become available. In doing this, you would compare the new and old workflow processes and reapply workflow changes as required.
See: Self-Service Workflows, page 5-3
Note: Some 3.x workflow attributes are obsolete in SSHR 4.x/5.x as theyhave been replaced by the Personalization Framework functionality.
• When ready, simply migrate your users to the 4.x/5.x functions. You can switch over to 4.x/5.x functions one at a time, if required.
Understanding a Typical SSHR FunctionThis chapter examines a typical SSHR function, Personal Information, and introduces the underlying concepts.
By following the functional flow of the Personal Information function, you should understand how information is passed from the web browser to Oracle Applications, how Workflow is used by SSHR, how the page layout is controlled by the definitions held in the MDS Repository and the Personalization Framework, and how the approvals process operates. The general principles described here can be applied to anyother SSHR function.

Introduction to Oracle Self-Service Human Resources (SSHR) 1-27
The chapter includes an example of a typical SSHR Web page to illustrate the different elements that you can configure.
The configuration steps for SSHR functions and their web pages are discussed in detail in the subsequent chapters of the Implementation Guide.
How an SSHR Function WorksThe following flowchart and accompanying text describe the functional flows that occurwhen a user changes a main address using the Personal Information function.

1-28 Oracle Self-Service Human Resources Deploy Self-Service Capability Guide
1. The user chooses the Personal Information function from the user menu.
2. The application calls the HR workflow service (OA.jspsOA.jsp?

Introduction to Oracle Self-Service Human Resources (SSHR) 1-29
akRegionCode=HR_CREATE_PROCESS_TOP_SS&akRegionApplicationId=800) with a parameter specifying the Personal Information workflow process for the workflow item type (HR_MAINT_PERSONAL_DETAILS_PRC).
See: Self-Service Workflows, page 5-3
3. The HR workflow service creates an instance of the Personal Information workflow process for the item type.
The FND data security is checked to make sure that this function is permitted for the legislation code of the current user's business group. Personal Information is a global function that is available for all legislation codes.
See: User Access and Security, page 3-3
4. Oracle Workflow runs the Maintain Personal Information activity (HR_PERINFO_OVERVIEW_JSP_FCT) within the Personal Information subprocess (HR_PROCESS_PERINFO_JSP_PRC) within the Personal Information workflow process (HR_PERSONAL_INFO_JSP_PRC).
5. The application calls the generic HR_WORKFLOW_SERVICE.BLOCK function. TheHR Activity Type Value workflow attribute for this process activity is set to HR_OVERVIEW_TOP_SS with the Activity Type as JSP.
6. A page is displayed based on the definition of the OverviewPG document in the MDS Repository. The page is influenced by any context-sensitive flexfields and the cumulative effect of any Personalization Framework configurations that relate to this document.
See: The Personalization Framework, page 6-4
7. If no past address changes are awaiting approval or correction, or if no future-datedaddress changes exist, the Details page is displayed. The user specifies whether theywant to correct an existing address or enter an entirely new one.
The button displayed to the user will be either Update/View Future Changes or View Pending Approval.
8. If the user chooses to enter a new address, the Entry page is displayed. The user enters the information.
If required, the user can save the information and submit the transaction later. In this case, the changes entered so far are saved to the transaction tables without server-side validation.
See: Save for Later, page 11-14
If the user chooses to correct an existing address, the existing Address information is displayed. The user corrects the information.
9. When the user has entered the information (or is ready to complete the transaction),

1-30 Oracle Self-Service Human Resources Deploy Self-Service Capability Guide
they click the Continue link at the bottom of the page. Any field-related errors (bad formatting, missing fields, and so on) are flagged by a JavaScript procedure stored on the client and the user is asked to correct this information.
10. Web page data is sent from the client to the server and server-side validation is performed by HR Application Programming Interfaces (APIs). If all fields are validated, the Review page is displayed.
See: Review and Confirm, page 11-13
11. The Review page displays the information that the user has entered. If the user nowwants to modify the address information, they can choose the Back button to return to the update page to make changes.
12. When the changes are complete, the user returns to the Review page and clicks the Submit Information link to save the changes.
13. The number of approval levels and approvers is determined by the configuration ofDynamic Approvals. If applicable, the user can insert additional approvers and/or notification recipients.
See: Dynamic Approvals, page 7-9
14. If the Main Address part of the Personal Information function is configured for update without requiring approval, the new address data is inserted directly into the HR tables. (This step is the same process as step 18 for changes requiring an approval.)
15. If the Main Address part of the Personal Information function is configured to require approval, the data is inserted into HR transaction tables and the Approvals process begins for that item.
16. The workflow item is routed for approval according to the configuration of the Approvals process.
17. The approver can either approve or reject the transaction or return it to the user for correction.
If the transaction is returned for correction, it is displayed for the user in the All Actions Awaiting Your Attention list in the Actions page. The user can reopen the transaction. The previous values are reloaded from the transaction tables ready for the user to make the required changes and resubmit.
See: Save for Later, page 11-14
When the approver approves or rejects the transaction, the user is notified of the transaction status and the transaction details are deleted from the transaction tables.If the transaction is approved, the data is loaded into the HR tables.

Introduction to Oracle Self-Service Human Resources (SSHR) 1-31
A Typical SSHR Web PageThe following diagram shows a simplified sample web page for the Personal Information function. The different elements that you can configure in the Personalization Framework are listed below.
Sample Web Page
The graphic above shows the following elements which you can configure using the Personalization Framework:
1. Add or remove links to enable personalization configuration
2. Change the sequence of fields
3. Add or remove buttons to control user's ability to update fields
1-32 Oracle Self-Service Human Resources Deploy Self-Service Capability Guide
4. Rename region items
5. Configure table views
See: The Personalization Framework, page 6-4
Getting Started with SSHR The following procedure gives you the basic implementation steps that are required to enable you to run SSHR in a test environment. For information on running SSHR in a production environment, please see the detailed chapters in this Implementation Guide and also the Implementation Steps, page 2-1.
To set up an SSHR system:1. Ensure that Oracle Human Resources R12is installed with the most up-to-date
patch according to the readme file for SSHR at the time of installation.
2. Ensure that at least one business group has been set up in Oracle HRMS with at least two employee records (one record should be defined as the supervisor for the other).
See: Adapting and Creating a New Business Group, Oracle HRMS Enterprise and Workforce Management Guide
3. Ensure that the Apache server and Apache JSERV are installed. Set up the Apache server as specified in the Oracle Self-Service Web Applications Implementation Manual (available on My Oracle Support).
4. Apply the patch for SSHR and make sure that all prerequisites are met, including those for the OA Framework.
5. Complete the install and set-up of the OA Framework.
See: Oracle Application Framework Documentation Resources (available on My Oracle Support - technical note number: 391554.1)
6. If you have licensed SSHR, set the following profile option to "Yes" at the site level.
• HR: Self Service HR Licensed
If you have not licensed SSHR, please contact your Oracle sales representative for information on purchasing a licence.
See: User Profiles, Oracle HRMS Configuring, Reporting, and System Administration Guide
7. Add the Manager Self Service and Employee Self Service responsibilities to your users (use either new or existing users).

Introduction to Oracle Self-Service Human Resources (SSHR) 1-33
See: Self-Service Responsibilities and User Menus, page 3-14
See: Responsibilities, Oracle HRMS Configuring, Reporting, and System Administration Guide
8. Link the users to (new or existing) employee records in HRMS.
See: Defining User Access and Menus, page 4-10
See: Users Window, Oracle E-Business Suite Security Guide
For information on a typical SSHR function, please see: Understanding a Typical SSHR Function, page 1-26


SSHR Implementation Steps 2-1
2SSHR Implementation Steps
Implementation Steps for Self-Service HR (SSHR)SSHR is supplied with predefined data and functionality, although you must configure this data and functionality for your own implementation of SSHR.
Note: If you try to configure functionality before you are familiar with Oracle HRMS and Oracle Workflow, you may make mistakes. Before you complete any step, read the referenced topic information.
Note: It is your responsibility to populate data fields.
Implementation FlowchartsThe flowcharts provide you with a summary of the logical sequence you might follow in any implementation of SSHR. It is not the only sequence you could follow but one werecommend.
The functional areas of the system you configure to your specific business needs. Steps that are required for all implementations are marked as required.
Some functions have been seeded with default data. The steps where you can use data supplied with the system are marked as seeded.
Decision making is an important part of any configuration process. Before you begin to customize SSHR, you must decide how you want to use it alongside your other Oracle HRMS applications.
Adopting a staged, or incremental, approach to configuration lets you focus on those processes you want to use.

2-2 Oracle Self-Service Human Resources Deploy Self-Service Capability Guide
Implementation Flowchart for SSHR, part 1

SSHR Implementation Steps 2-3
Implementation Flowchart for SSHR, part 2
Implementation Steps for Self-Service HR (SSHR)
To Prepare the Environment for SSHR: Required Steps
Step 1: Check HR Installation Required StepInstall the latest Oracle Human Resources patch according to the readme file for SSHR at the time of installation.

2-4 Oracle Self-Service Human Resources Deploy Self-Service Capability Guide
Step 2: Set the HR:Self Service HR Licensed profile option Required StepIf you have licensed SSHR, set the following profile option to "Yes" at the site level.
• HR: Self Service HR Licensed
If you have not licensed SSHR, please contact Oracle for information on purchasing a licence.
Step 3: Check you have the correct Internet browser Required StepCheck that you have the correct Internet browser. You can use Netscape Navigator 4.08 or Microsoft Internet Explorer version 4 or 5 or above.
Step 4: Create an SSHR Background Workflow Cleanup Process Required StepYou should remove transaction information from the temporary tables for processes that support Web transactions. To do this, include the Remove Transaction activity in the workflow process.
See: Running the Workflow Cleanup Process, page 5-12
Step 5: Install the Workflow Builder on Selected Workstations Required StepMembers of your Implementation team who will be making changes to workflow process definitions need to have the Workflow Builder installed on their workstations or available from a file server.
Step 6: Set the Access Levels for the Predefined Workflow Item Type Required StepThe predefined workflow item type is used as the basis for all future upgrades. Provided the access and protection levels are set correctly, you can work with the delivered item type and your configurations will not be overwritten.
See: Overview of Oracle Workflow Access Protection, Oracle Workflow Administrator's Guide
Step 7: Configure the HRMS applications Required StepDefine work structures, key flexfield, descriptive flexfields, lists of values.
See: Extend Oracle HRMS Overview, Oracle HRMS Configuring, Reporting, and System Administration Guide
Step 8: Check you have the tools for SSHR implementation Required StepCheck that you have the required tools for implementing SSHR. You should have now installed the following tools:
• Oracle Workflow
• Oracle Applications

SSHR Implementation Steps 2-5
• SSHR
• OA Framework
See: Getting Started with SSHR, page 1-26
See: User Profiles, Oracle HRMS Configuring, Reporting, and System Administration Guide
User Access Setup (SSHR) Required Steps
Step 9: Identify the Target User Groups Required StepBefore starting your implementation, it is important to identify any groups of users in your enterprise who may have different requirements. Most enterprises will differentiate between managers and other workers. In your enterprise, you may identifyfurther distinct groups such as HR professionals, managers in a particular department, or senior managers.
Step 10: Set Up Access Roles for Self-Service Actions Optional StepIf you want to take advantage of security based on access roles when routing and approving self-service actions, you must first activate the system profile option HR: Allow Approver updates to Self Service actions. Optionally, create and assign roles that grant or deny privileges to update actions. All users can update by default. Define and manage access roles in the Maintain Roles window.
See: Access Roles for Self Service Actions, page 3-10
Step 11: Create the User Menus Required StepUser menus group together a number of functions. SSHR includes predefined menus for employees, managers, and system administrators, but we recommend that you create your own user menus using the seeded menus as a basis. To create user menus, use the Menu window.
See: Defining User Access and Menus, page 4-10
Step 12: Create Self-Service Responsibilities Required StepSSHR is supplied with predefined responsibilities, however, we recommend that you create your own responsibilities based on the seeded responsibilities. Assign a menu to them in the Responsibilities window.
See: Self-Service Responsibilities and User Access, page 3-14
Step 13: Set Up Eligibility Processing for Self-Service Actions Optional StepYou can configure SSHR to automatically determine if a person is eligible for a self-service action. To do this, you set up eligibility profiles, reporting groups (actions), and plans (sub actions), using SSHR Compensation and Benefits functionality as a generic processing engine.

2-6 Oracle Self-Service Human Resources Deploy Self-Service Capability Guide
See: Eligibility Processing Setup Example, page 11-34
Step 14: Configure the Person Search Screens Required StepThree tabs are displayed on the Person Search page. You can choose whether to display all these tabs or whether to hide one or more tabs from the user. You remove a tab from display in the Menu Exclusions Region of the Responsibilities window.
See: Person Tree, page 11-4
Step 15: Set Up the System Profiles Required StepYou set up the security profiles to control access to information.
See: User Access and Security, page 3-3
Step 16: Link the Responsibilities to Your Security Profiles Required StepUse the System Profile Values window to link the responsibilities you have created to your security profile.
Step 17: Set the HR: Cross Business Group Profile Required StepIf you want your managers to be able to access data for employees in other business groups, also set the HR: Cross Business Group responsibility.
See: User Profiles, Configuring, Reporting, and System Administration in Oracle HRMS
Step 18: Set the Allow Granted Access Profile Required StepIf you want managers to be able to access data for workers outside their security profile whose information has been released to them using the Release Employee Information function, also set the Allow Granted Access profile option to Yes for the responsibility.
See: User Profiles, Oracle HRMS Configuring, Reporting, and System Administration Guide
See: Release Employee Information, page 11-11
Step 19: Manually Create User Accounts Required StepCreate at least one user account manually to test the responsibilities and menus. For a small enterprise, you may choose to create all your user accounts manually and skip thenext step.
See: Defining User Access and Menus, page 4-10
Step 20: Configure Batch Creation of User Accounts Required StepTo create and manage the batch creation of user accounts, you must first write API user hooks. User hooks enable you to extend the predefined business rules to reflect your enterprise's business rules. You use the user account hooks for example, to set up your customary user name and password format, responsibilities, and profile options you want to associate with a user.
See: Writing User Hooks to Create Batch User Accounts, page 3-64

SSHR Implementation Steps 2-7
Configuring Workflow Processes and Page Layouts (SSHR) Required Steps
Step 21: Display Your Enterprise Logo Required StepSSHR is delivered with a default Oracle logo in the upper left hand corner of the application. You can replace this logo with your own logo at the Site or Organization level.
Place the logo in the $OA_MEDIA/<Language> directory.
The logos are named FNDLWAPP.gif for SSHR version 3.2 and later, and FNDLOGHR for SSHR 2.0 functions.
See: Replacing the Default Oracle Logo, page 6-39
Step 22: Define your Email Address Required StepSet up the email addresses for your enterprise. Set up the following addresses using the Attributes Value tab in the Workflow Builder:
• HR email address
• Training administrator email address
• Recruitment supervisor email address
See: Defining Your Enterprise's Email Addresses, page 5-11
Step 23: Identify and Prioritize Required Business Flows Required StepSSHR is delivered with a number of business flows incorporating workflow-enabled functions. First identify which business flows you need to implement for your enterprise. Consider the information flows and approval processes within your enterprise.
For each business flow, repeat steps 30 thru 41. Detailed information is available in the relevant chapters as indicated. Details of the configuration options are available for eachSSHR module.
Step 24: Configure the Workflow Process Required StepReview the underlying workflow process in the Workflow Builder. If you wish to make changes, first copy the process so that you can make changes to the copy.
See: Self-Service Workflows, page 5-3
Step 25: Configure the Approvals Process Required StepReview the seeded approvals processes and, if necessary, configure changes in the Workflow Builder.
Self-service actions use Oracle AME as a processing engine for routing and approvals.
See: Oracle Approvals Management (AME), page 7-5

2-8 Oracle Self-Service Human Resources Deploy Self-Service Capability Guide
Step 26: Configure the Workflow Error Processes Required StepEach workflow-enabled function has an error process that runs when a system error occurs. The error process sends a notification and a description of the error to the sysadmin ID. You configure the error processes in the Workflow Builder.
See: Configuring Workflow Error Processes, page 5-11
Step 27: Link the Workflow Item Type to the Function Required StepUse the Form Functions Window and the Parameters field to link the workflow item type to functions. The Parameters field is displayed when you select the Form tab.
Step 28: Restrict a User's Access to Workflow Transactions, if Required Optional StepIf you do not want your workflow administrator to monitor all the workflow transactions in your enterprise, then you can restrict the workflow administrator's access to specific transactions. For example, you can restrict the administrator's access toworkflow transactions to a specific organization hierarchy or a business group.
See: Restricting Access to Workflow Transactions, page 3-25
Note: The workflow security functionality works only when the Enable Security Group profile option is not set or set to No at the Application level for Application Object Library.
Step 29: Add Submenus to Self-Service User Menus Required StepAdd submenus to user menus that allow users to see the Effective Date, Sub Actions, Return for Correction, Refresh Attributes, and Document Management pages.
See: Defining Menus for SSHR, page 4-10
Step 30: Add the Functions to the User Menu Required StepMake sure that your configured functions are available in your user menus.
See: Defining User Access and Menus, page 4-10
Step 31: Set Up User Profile Options Required StepUser profiles control how users access information and how the information is displayed. You define the profiles at either the user or responsibility level in the System Profile Values window.
Step 32: Test the Basic Flow Required StepTest the workflow process to make sure that it is correct.
See: Testing a Workflow Definition (Oracle Workflow Guide)
SSHR Implementation Steps 2-9
Step 33: Configure the Pages for Your Functions and Notifications Required StepUse the Personalization Framework. Set up user effective date options. See the earlier step, Configure Effective Date Options, page 2-9.
See: Configuring Page Layouts, page 6-4
Step 34: Configure Flexfields for the Regions Required StepYou can configure the flexfield structures in the Application Developer responsibility, then enable selected segments in the appropriate pages using the Personalization Framework.
See: Configuring Flexfields, page 6-27
Step 35: Create Messages for the Regions Required StepYou can add predefined messages to your regions or you can create your own messagesif required.
See: Adding Instructions to Web Pages, page 6-35
Step 36: Configure Your National Address Style Required StepTo ensure that the correct address style for your country is used in the application, select one of the predefined address styles. The default address style is determined by the legislation of the business group. To select an address style, use the Descriptive Flexfield Segments window.
See" Descriptive Flexfields and Address Styles, Oracle HRMS Configuring, Reporting, and System Administration Guide
Implementing SSHR Functions Optional StepsIn addition to implementing the basic SSHR tools and processes, the following section discusses optional configuration steps.
Step 37: Define the Name Format in Notifications Optional StepDefine the way a person's name appears in your workflow notifications.
See: User Profiles, Oracle HRMS Configuring, Reporting, and System Administration Guide
Step 38: Configure Effective Date OptionsOptional StepThe Effective Date page of a self-service action presents users with two choices:
• Manually enter an effective date
• Specify that the action takes effect on approval
You can use personalizations to hide either option, effectively making the other option the default choice for all actions. If you hide the manual entry field, the Effective Date page does not appear.

2-10 Oracle Self-Service Human Resources Deploy Self-Service Capability Guide
See: Configuring Web Pages, page 6-21
Step 39: Configure the Review Page Optional StepThe Review page of most self-service actions displays an Attachments region by default. If you want users to see the What If Analysis region, you must enable the display. Hide Attachments or show What If Analysis via Personalizations.
See: Configuring Web Pages, page 6-21
See:Configuring the Review Page, page 8-7
Save Attachments
When managers and workers perform self-service transactions, they can select the Save Attachments check box to save attachments to the self-service transactions and view them in the Oracle HRMS windows.
The Save Attachments check box on the Review page is hidden by default. Enterprises can decide whether to display the check box on the Review page using the Personalization feature. Personalization can be done only at the Function level, depending on the functionality that supports personalization at the Function level.
The following table provides a list of Review pages of self-service HR functions where users can save the attachments to view them in Oracle HRMS windows:
Self-Service HR Function Oracle HRMS Window
Absence Management Absence Details
Education and Qualification People
Other Professional Qualifications People
Special Information People
Extra Information People
Hire People
Applicant Hire and Rehire People
Release Information People
Transfer People
Termination Terminate

SSHR Implementation Steps 2-11
Self-Service HR Function Oracle HRMS Window
Termination with Compensation Terminate
Personal Information People
Contingent Worker Placement People
Contact Extra Information People
Employee Review People
Worker Status Change, Change Hours, Change Job, Change Costcenter, Location and Manager, Change Costcenter, Terms and Manager, Change Worker Status and Terms, Change Job and Terms, Change Manager
Assignment
Change Pay Assignment
Competency Profile People
Step 40: Control the Display of the Effective Date, Review, and Confirmation Pages for Self-Service Transactions Optional Step
Enterprises can determine whether Effective Date, Review, and Confirmation pages must be displayed for self-service transactions. For example, when top management executives perform self-service transactions, the Review page may not be required as they would like to enter the transaction details and submit the transaction without routing for approvals. To meet such business requirements, Oracle SSHR enables system administrators to control the display of Effective Date, Review, and Confirmation pages for self-service transactions.
Note: Oracle SSHR displays the Effective Date page in a new region at the top of the initial page that appears when you launch a function.
Set the following parameters for relevant functions to control the display of Effective Date, Review, and Confirmation pages in the transaction flow:
• &pQkFn: Set this parameter value to Y to turn off the Effective Date.
• &pBpRv: Set this parameter value to Y to turn off the Review page.
Setting either of the above parameters will bypass Confirmation page in the transaction flow. Note that if either the &pQkFn or &pBpRv parameter is set to Y, then the

2-12 Oracle Self-Service Human Resources Deploy Self-Service Capability Guide
Confirmation page is automatically hidden.
Note: These function parameters are not set for any Personal or Manager Action functions by default. You must set these values, if required, for specific functions to control the display of Effective Date, Review and Confirmation pages.
For the Personal Information function, if the &pQkFn parameter is set to Y and managers or workers click Update in the Basic Details, Main Address, Secondary Address or Tertiary Address regions in the Personal Information page, then the options to correct current details or enter new information appear at the top of the related page and not in a separate Basic Details: Choose Option page.
Completing the Required Workflow Changes
If the &pBpRv parameter to hide the Review page is set to Y, then for the last page in the relevant process, the 'Last Page in Flow' attribute must be set to Yes using Oracle Workflow Builder. This indicates that the specific page is the last page in the transactionand the Review page is not available. Another Node attribute "Approval Required Flag"must be set for the same last page node to decide whether "Approvals" are required for that functionality or not. For self-service transaction processes, by default the "LAST_PAGE_IN_FLOW" attribute is set to value "No" and the "HR_APPROVAL_REQ_FLAG" attribute would have value same as it exists on the Review node.
The following functions provide the LAST_PAGE_IN_FLOW attribute:
• Academic Rank
• Change Contact Extra Information
• Change Cost Centre, Location, Manager
• Change Cost Centre, Location, Worker Terms, Manager
• Change Extra Information
• Change Hours
• Change Hours 5.2
• Change Job and Terms
• Change Location
• Change Manager
• Change Pay
• Change Pay 5.2

SSHR Implementation Steps 2-13
• Change Special Information
• Change Worker Status and Terms
• Change Worker Status and Terms 5.2
• Education and Qualification
• Employee Review
• Individual Compensation Distribution
• Organization Manager
• Other Professional Qualifications
• Personal Information (All 5 processes)
• Change Hours
• Termination Release Information
• Reverse Termination
• Tenure Status
• Termination
• Termination with Compensation
• Transfer
• Transfer 5.2
• Vehicle Mileage Expense
• Work Schedule
• Worker Status Change
• Worker Status Change 5.2
• Commutation Information
• Documents of Record
• Private Vehicle Allocation
Example: Adding the Parameters and Making Workflow Changes

2-14 Oracle Self-Service Human Resources Deploy Self-Service Capability Guide
In this example, the following business changes are required for the Change Job function:
• Hide the Effective Date, Review, and Confirmation pages.
• Turn off the approval feature for job changes.
This example uses the following predefined components:
• HR Workflow (hrssa.wft)
• Change Job process (HR_ASSIGNMENT_JSP_PRC)
• Change Job function (HR_CHANGE_JOB_SS)
Complete the following steps to update the Change Job process (HR_ASSIGNMENT_JSP_PRC)
1. Open Oracle Workflow Builder.
2. Open the hrssa.wft file.
3. Open the Processes node.
4. Navigate to the HR_ASSIGNMENT_JSP_PRC process.
5. Open the process in the designer mode. HR_ASSIGNMENT_JSP_FCT is the node which is before the HR_REVIEW_CHANGES_JSP_FCT (Review Page Node).
6. Open the node HR_ASSIGNMENT_JSP_FCT and select the Node Attributes tab. View the following attributes:Last Page In Flow
HR_APPROVAL_REQ_FLAG
7. Select Yes as the node attribute value for the Last Page In Flow to indicate that this the last page in the transaction business flow.
8. Select No as the node attribute for the HR_APPROVAL_REQ_FLAG to indicate that approvals are not required for the Change Job process.
9. Save your work.
Set the function parameters to hide the Effective Date, Review, and Confirmation pages:
1. Log in to the Functional Administrator responsibility.
2. Navigate to the Functions page.

SSHR Implementation Steps 2-15
3. Search for the HR_CHANGE_JOB_SS function.
4. Click Edit to add the function parameters.
5. Add the parameters as follows to the existing parameter list:&pQkFn=Y&pBpRv=Y
6. Click Apply.
7. Bounce the listener to clear cache.
Now, when a user performs the Change Job function, the Effective Date, Review, and Confirmation pages do not appear. Approval is also not required for the change job transaction.
Step 41: Configure Fields in the Pop-up Windows Optional StepIn the Hierarchy page, when managers place the mouse over the Details icon, they can view the photo of the worker, and details such as employment and contact in a pop-up window. Using personalization, you can display the Job, Organization, and Mobile fields that are hidden by default.
Step 42: Use the Quick Change Hours and Termination Processes Optional StepManagers can use two processes to quickly perform change hours and termination transactions. If required, enterprises can implement the following processes:
• HR_QK_TERMINATION_JSP_PRC: Using this process, managers can enter termination details of their workers and submit the transaction for approval, without having to navigate to the 'Change Manager' page to reallocate workers whoreport to the terminated worker, if the terminated worker is a manager.
For information on how to implement this new process, see: Configuring the Termination Module, page 8-45
• HR_QK_CHANGE_HOURS_JSP_PRC: Using this process, managers can quickly change the work schedule and assignment category of a worker and submit the transaction, without requiring to change pay.
For information on how to implement this new process, see: Configuring the Change Pay Function, page 8-37
Step 43: Display the Person Card Pop-up in OAF Pages Optional StepThe Person Card pop-up provides information such as the name, discretionary title, organization, work phone, mobile phone, and location of a person. Using the Oracle Applications Framework (OAF) Personalization function, a system administrator can configure to display the Person Card as a pop-up in the applicable Oracle Applications Framework (OAF) pages. For example, you can personalize the Oracle SSHR Change Manager page to display the Person Card pop-up for the employee Name field.
2-16 Oracle Self-Service Human Resources Deploy Self-Service Capability Guide
To display the Person Card pop-up, complete the following steps:
1. Secure the Person Card data through encryption
2. Configure the setup steps to display the Person Card pop-up
For more information, see: Setting Up the Person Card Pop-up in OAF Pages, Oracle HRMS Implementation Guide
Implementing and Configuring the Organization Chart Optional Steps
Step 44: Implement the Organization Chart Optional StepManagers can view their organization hierarchy using the Organization Chart. Details of workers in the manager's hierarchy are displayed in the form of panel cards. The application supports different hierarchy viewer layouts.
Using the Organization Chart, managers can:
• View the Contact, Employment, and Salary information of workers in their hierarchy.
• Identify key high potential workers with succession plans, key high potential workers without succession plans, workers whose salary is above the specified grade range and below the specified grade range.
• Launch self-service actions for workers in their hierarchy.
Workers can use the Organization Chart to view their contact and employment information. They can also search for other workers and view their contact and employment information.
For more information, see: Using the Organization Chart, page 13-2
The Organization Chart is built on Applications Development Framework (ADF) and the component used is hierarchyViewer, which is one of the ADF Data Visualization components. To implement this feature, see: Implementing the Organization Chart, page 13-6
Configuring Talent Management in Oracle SSHR Optional Steps
Step 45: Enabling Talent Profile Optional StepThe Talent Profile feature of Oracle SSHR helps enterprises to obtain a complete picture of the talent profile of their workforce to manage and execute their talent processes. Talent Profile captures and displays complete worker talent details on a single-interface.
See: Enabling Talent Profile in Oracle SSHR, page 14-23
Step 46: Set up Information for Succession Planning Optional StepThe Succession Planning functionality enables managers to plan for future vacant
SSHR Implementation Steps 2-17
positions by identifying possible successors for employees, jobs, and positions.
See: Setting up Information for Succession Planning, page 12-12
Configuring Document Management Optional Steps
Step 47: Set Up Document Management Optional StepIf you want to make formatted documents available to users that contain merged data from self-service actions, create them from PDF or RFT templates and link them to appropriate menu functions by creating groups in Document Management.
See: Document Management, page 11-16
Configuring the Employee Directory Optional Steps
Step 48: Populate the Employee Directory Required StepYou must load data from your database into the repository. At this time you can override any of the supplied mappings with your own data.
See: Populating the Repository, page 9-42
Step 49: Deploy the Employee Directory Required StepYou can choose to deploy the Employee Directory from any of the following environments:
• Self Service Personal Home Page
Add the Proxy Page function (HR_EMPDIR_PROXY_SS) to a menu or responsibility using the standard AOL setup. Give the function a prompt.
See: Self-Service Menus and User Access, page 3-11
The Personal Home Page uses the standard Self Service Global Menu to provide global buttons. See: Configuring the Global Button Bar, page 6-38 to configure this menu.
• Anonymous login
Anonymous login uses the standard Self Service Global Menu to provide global buttons, but does not render the Return to Portal or the Log Off buttons.
For setup details, and how to add additional global buttons, see: Anonymous Access to the Employee Directory, page 9-39
• Portal
For information on how to deploy the Employee Directory from a portal environment, see the following notes on My Oracle Support:
132035.1

2-18 Oracle Self-Service Human Resources Deploy Self-Service Capability Guide
380484.1
Step 50: Enable Single Sign On To Self Service Optional StepThe Employee Directory is read only. To enable users to edit their personal information,provide them with single sign on access to Self-Service.
See: Enabling Single Sign On to Self Service, page 9-40
Step 51: Set the Server Timezone system profile Required StepSet this profile option to the time zone corresponding to your server time zone. This option affects the date and time displayed on the Personal Details page.
Step 52: Set up International (Hijrah and Thai Buddhist) Calendars, if required Optional StepBy default, the calendar in the Date Picker shows the Gregorian calendar. If required, you can enable the Hijrah or Thai Buddhist calendar by defining the following profile options:
• FND: Forms User Calendar: Choose a preferred calendar.
• FND: Calendar Week Start Day: Choose the first day of the week.
Note: Setting these profile options not only impacts the date picker fields but also the read-only date fields. All the date fields in the application will display the date format based on the profile definitions.
For information on how to set these profile options, refer to the Support for Calendars topic in the Oracle E-Business Suite Setup Guide and the Hijrah and Thai Calendar Support in Oracle E-Business Suite Release 12.1 (Doc ID 807393.1) note on My Oracle Support.
Configuring Links between Oracle SSHR and Information Providers Optional Steps
Step 53: Enable Info Online Content Container to Access Enwisen Optional StepYou can configure access between Oracle SSHR and Enwisen, a third-party information provider to enable end users to access company information or any other related information hosted on the Enwisen web site. The Info Online content container displayshypertext links to information providers.
See: Info Online Links to Enwisen from Oracle Self-Service Human Resources (SSHR) Pages, Oracle HRMS Configuring, Reporting, and System Administration Guide
See: Configuring Links between HRMS Products and Enwisen, Oracle HRMS Configuring, Reporting, and System Administration Guide

SSHR Implementation Steps 2-19
Configuring the iCalendar Export Feature in Oracle SSHR Optional Steps
Step 54: Enable the Export of Absence Details Optional StepManagers and workers can export absence details such as absence dates to the calendar application that they use. To help users download absence schedules to their calendar application, you can enable the Export feature on the Absence Summary page of the Absence Management function. You can enable this feature for Manager Self-Service and Employee Self-Service responsibilities using Personalization.
For information on how to configure the Export feature, refer to this note on My Oracle Support Configuring the iCalendar Export Feature in Oracle HRMS Applications, Note ID: 761563.1
Configuring SSHR for Use Outside Firewall Optional Steps
Step 55: Set up Oracle SSHR for Use Outside the Firewall Optional StepFor information on how to secure Oracle SSHR for use outside the firewall, see:
• DMZ Configuration with Oracle E-Business Suite 12 (Note: 380490.1) on My Oracle Support
• Enabling SSL in Oracle Applications Release 12 (Note: 376700.1) on My Oracle Support

SSHR and User Access 3-1
3SSHR and User Access
User Access OverviewSSHR uses the same security mechanisms as Oracle HRMS applications. By defining user profiles, security profiles, responsibilities, and menu structures, you can control who uses SSHR, which information they can access, and how they access it.
See: Security Overview, Oracle HRMS Configuring, Reporting, and System Administration Guide
This documentation identifies the key concepts relating to SSHR user access and security and to provide information on how to apply these concepts to address the needs of your enterprise.
Managing User Access in SSHRThe following section answers common questions on SSHR and user access and gives an overview of the functionality.
How can the HR Department control the self-service activities available to each user?The security controls - responsibilities, menus, and security profiles - used in standard Oracle applications also apply to self-service users. The seeded SSHR menus (EmployeeSelf Service, Manager Self Service, and Contingent Worker Self Service) are collections of functions intended for distinct audiences. The employee functions are constrained to operate only on the current self-service user's record; the manager functions allow the user to select an person from a list of available employees and workers and carry out the required function. The seeded SSHR responsibilities corresponding to each of these menus are useful for exploring the functionality delivered with the product, although they are not intended for production use. Instead, customers can configure their own variations of these menus and responsibilities, combined with appropriate security profiles, to restrict different groups of users to specific functions and employee groups. The Personalization Framework and Workflow Builder tools offer considerable

3-2 Oracle Self-Service Human Resources Deploy Self-Service Capability Guide
flexibility in controlling the user's access to specific functions and require that users' transactions are approved before they are committed to the database. You can also control the user's access by configuring the base products. For example, Benefits eligibility profiles and enrollment requirements can determine which benefits an employee can select from within the Benefits Enrollment function.
How do I control access to employee information?In addition to controlling which self-service functions a user can access, you can also control which employee records a user can access. Employees can only access their own personal information. Manager and HR professionals can access the personal information for selected employees. This access is controlled by security profiles which restrict different groups of users to accessing specific employee groups. When a manager selects a function from the self-service menu, the list of subordinate employeesand workers is displayed in a hierarchy. If appropriate, you can permit managers to search for employees and workers in other business groups or organizations and if required, you can restrict this access to view-only and prevent managers from performing any transactions on employees outside of their business group.
But what happens if an employee wishes to release their personal information to a third party?
In certain situations, for example, after an applying for a different position, an employeemay wish to release their personal information to a third party, for example, a new manager. In this case, the employee can use the Release Employee Information function to enable the new manager to access the employee's personal information.
How are users created for SSHR?You can follow the standard Oracle procedures to create users and enable self-service by adding the self-service responsibilities to the user. Alternatively, you can use a batch process to create multiple users at one time. The batch processes are particularly useful if you need to create large numbers of accounts after initial installation, or for the new hire process.

SSHR and User Access 3-3
SSHR and User Access
User Access and Security in Oracle SSHRThe following description gives an overview of the standard security mechanisms used in Oracle HRMS and discusses how they relate to Oracle SSHR.
ResponsibilitiesA responsibility combines low-level elements of user access configuration to control which functions the user can access (User Access to Functions) and on whom they can perform these actions (see User Access to People).
You define SSHR responsibilities in the same way as you define responsibilities for Oracle HRMS applications.
Note: When you define your responsibilities, make sure they are available from Oracle Self-Service Web Applications.
See: Responsibilities, Oracle HRMS Configuring, Reporting, and System Administration Guide
As an administrator, you can view a list of all owned responsibilities using the Responsibility Ownership functionality in SSHR. This functionality enables you to display a list of people with access to each of your owned responsibilities and revoke access to the responsibilities if appropriate.
See: Responsibility Ownership, page 3-17
User Access to PeopleThe primary users of SSHR can be divided into two main groups: managers and employees (non-managers).
Employees (non-managers)
Employees and workers can only access their own employee records.
Managers
Managers can process the records for other employees and workers after selecting them from the Enter Process page. In the Enter Process page the manager can switch between View as:
• Hierarchy
This view presents a hierarchical view of the employees and workers reporting to the current user. This view is based on either the supervisor or supervisor

3-4 Oracle Self-Service Human Resources Deploy Self-Service Capability Guide
assignment hierarchy but can be configured to use the position hierarchy by setting the profile option HR: Self-Service Display Position Hierarchy to Yes.
For more information on supervisor hierarchies, see Security Profiles by Supervisor Hierarchy, Oracle HRMS Configuring, Reporting, and System Administration Guide
Note: Although Oracle recommend using either a position or supervisor-based hierarchy, you can set up other security structures in Oracle HRMS if you prefer.
• My List
This view contains a user-defined list of people for quick reference.
Note: If the profile option HR:Expand Role of Contingent Worker is set to Yes, contingent workers will be able to manage other employees.
Person SearchThe Enter Process page enables managers to perform a basic search for any employee within the underlying security profile. Alternatively managers can access the AdvancedSearch page to apply more detailed search criteria.
The manager can process employees and workers in the resulting list directly or add them to My List for future reference.
Note: You can extend the security profile for managers by enabling the Release Employee Information function.
See:Release Employee Information, page 11-11
Some functions enable managers and HR Professionals to search for ex-employees and terminated employees.
See:
• Online Payslip (Generic), page 17-12
• Configuring the Appraisals Function, Oracle Performance Management Implementationand User Guide
• Tax Information Form (W-2) (US), page 17-34
This extended search functionality is controlled by a function parameter.
See: Menu Function Parameter Descriptions, page 4-34

SSHR and User Access 3-5
Configuration OptionsYou can control user access to the People Search functions by excluding certain functions if required, for example, you can hide the Person Search function so that managers can only process the records for the employees and workers displayed in their hierarchy.
See: Defining User Access and Menus, page 4-10
You can also control how managers search for employees and workers by assigning profile options. For example, you can apply the HR: Cross Business Group profile option to enable managers to search across business groups. If you then set the HR: Restrict Transactions Across Legislations in SSHR profile to Yes, the names of the employees and workers in other legislations will be disabled.
Security ProfilesSSHR uses security profiles to control a user's access to person records. For example, a security profile can give a manager access to the records for all the employees and workers in the department.
See: Security Profiles, Oracle HRMS Configuring, Reporting, and System Administration Guide
Employees (non-managers) and contingent workers
You can use the default View All security profile for the corresponding business group for the employee (non-manager) responsibilities because the employee functions restrictthe user to accessing only their own record.
Managers
If you allow your managers to access the Search functions, you must create suitable security profiles. For most SSHR managers, the most appropriate security profile is a profile based on a supervisor hierarchy. This type of security profile dynamically generates a list of available employees and workers based on either the supervisor hierarchy or the supervisor assignment hierarchy (starting with the current user). The advantage of using a profile of this type is that you can set up a single security profile and use it for multiple users. To activate supervisor security, select either the Restrict bySupervisor (person-based) option or the Restrict by Supervisor (assignment-based) option in the Security Profile window. In this case, the manager can see the records for the persons with at least one assignment for which they are the supervisor and the manager can also see the direct reports for this person.
See: Security Profiles by Supervisor Hierarchy, Oracle HRMS Configuring, Reporting, and System Administration Guide
You can choose to build your supervisor hierarchy based on individual assignments. This means that your SSHR manager can only view and update a person's record if the manager is the supervisor for the specific assignment.
3-6 Oracle Self-Service Human Resources Deploy Self-Service Capability Guide
See: Assignment-Level Security, Oracle HRMS Configuring, Reporting, and System Administration in Oracle HRMS
Multiple Assignments
If you wish to enable your managers to view and update multiple assignments for employees and workers, you can use the HR:Enable Multiple Assignments in SSHR system profile to allow this.
Note: If you are using assignment-based security, you must enable this profile option.
If the profile is set to No, managers can only view and update primary assignments. If the profile is set to Yes, managers can view and update only the assignments that are reporting to them through the security hierarchy.
Note: In the Security Profile window, on the User-Based Security tab, select the Primary Assignments Only check box to restrict managers to viewing and updating primary assignment information only.
See: Defining a Security Profile, Oracle HRMS Configuring, Reporting, and System Administration Guide
Alternatively, you can choose to disable the Search functions for an SSHR manager responsibility. In this case, you can assign the View All security profile to the users.
Release InformationYou can supplement the list of people who appear in a security profile by enabling the Release Information function. With this function, users can allow other users (who are outside of the security profile) to access their records. Similarly, managers can use the Release Information to allow a second manager (who is outside of the security profile) to access the records for one of their employees.
To illustrate a typical use of this function, imagine that an employee wants to transfer toanother organization. The new manager may need to review the employee's absence history before the transfer can take place. However, this manager may be outside the employee's current business group and would therefore, be restricted by HRMS security access. The manager cannot access the employee's data from a Person Search because of the defined security profiles. With the Release Information function, the employee granting access can search for the manager's name across all organizations and business groups and grant access to that person. This enables the manager to view the employee's absence history. However, you must ensure that the manager has a responsibility that satisfies the following conditions:
• includes appropriate manager functions, for example, My Employee Information.
• is associated with a security profile which has the "Allow Granted Access" check

SSHR and User Access 3-7
box flagged.
If you want managers in your enterprise to have the same privileges for granted employees as for other employees who work for them, you can simply enable the "Allow Granted Access" option on the security profile they use with their main Manager Self Service responsibility. Alternatively, you may choose to limit managers' capabilities with respect to granted employees. For example, you may restrict managersto selected views and not allow them to use functions such as Termination. To do this, disable the "Allow Granted Access" check box for the main security profile and enable the check box for a separate security profile with a reduced set of functions.
See: Release Information, page 11-11
User Access to FunctionsYou control user access to specific functions using function security. Functions are attached to menus which are then attached to responsibilities.
Navigation pathsThe traditional navigation path for SSHR users is to select a function, for example, Personal Information or Change Manager, directly from a user menu. From SSHR 4.2, SSHR supports this approach but also introduces a new navigation path which uses the Actions pages.
Accessing functions from the Actions pages:Instead of selecting a specific function from the menu, the user selects either the Personal Actions function (for employees and workers) or the Manager Actions function (for managers). SSHR displays a context-sensitive list of available functions.
Personal Actions
The Actions page displays a list of available functions for the employee or worker. To generate this context-sensitive list, SSHR takes the submenu defined in the HR: PersonalActions Menu profile option and excludes any legislation-specific functions that do match the legislation code of the user's business group.
Manager Actions
The manager is first presented with the Enter Process page from which they can select an employee assignment. They will then proceed to the Actions page which displays a list of functions available for the selected employee or worker. SSHR derives the list of functions by taking the submenu defined in the HR: Manager Actions Menu profile option and excluding any legislation-specific functions that do not match the legislation code of the selected person's business group.
Note: If the manager first selected their own record, the submenu is derived using the HR: Personal Actions Menu profile option.

3-8 Oracle Self-Service Human Resources Deploy Self-Service Capability Guide
Accessing functions directly from a menu:Managers
When a user selects a manager function directly from the menu, they are first presented with the Enter Process page. From this page, they can select an employee for processing.The user is then taken, via the Effective Date page, to the corresponding web page for the function.
Note: Data security starts after the user has selected a person. If the function is specific to a legislation other than the legislation to which the selected person belongs, an error message is displayed.
Other Employees
When a user selects an employee function directly from the menu they are taken, via the Effective Date page if appropriate, to the corresponding web page for the function.
Note: Data security is checked after the user has selected a function. If the function is specific to a legislation other than the legislation to which the user belongs, an error message is displayed.
Access to Workflow TransactionsWorkflow administrators can monitor all workflow transactions across the business areas in an enterprise. Now, depending on your business requirements, you can restrict a workflow administrator's access to specific workflow transactions using the HR Self Service Selected Person ID Instance Set. This object instance set uses security profiles to identify the data that workflow administrators can access. For example, you can use thisfeature to restrict an administrator's access to workflow transactions in a specific organization hierarchy or a business group. Similarly, you can restrict a human resources manager to view only HR transactions and a payroll executive to view only payroll transactions.
See: Restricting Access to Workflow Transactions, page 3-25
Legislation-specific FunctionsMost SSHR functions are global and can be used on employees in any legislation. However, some functions are legislation-specific and must be restricted to employees inthe corresponding legislation.
SSHR uses FND Data Security to enforce this restriction. A data security object has beendefined on the combination of person and legislation and data security menus have been created for predefined functions. There is one data security menu for global functions and one for each legislation code. The predefined functions are associated with either the global data security menu or with one or more of the country-specific
SSHR and User Access 3-9
data security menus as appropriate.
Data security grants have been predefined associating each data security menu with theappropriate legislation code (or with all legislation codes in the case of the global menu). The effect of each grant is to enable the functions attached to the corresponding data security menu for people in business groups having the corresponding legislation code.
For example, a function on the global data security menu may be used with any employee but a function that is only on the US data security menu may be used only with employees in a US business group.
In addition to the data security menus that are available for predefined functions, there is a similar set of data security menus to which you can attach your custom functions. The data security grants are already in place.
See: Data Security Menus, page 3-11
Users and ResponsibilitiesYou define SSHR users in the same way as you define users for Oracle HRMS applications.
See: Users Window, Oracle E-Business Suite Security Guide
However, the Person field of the Users window is particularly important for SSHR as it acts as the link between the professional forms interface and SSHR. It ensures that the user name is linked to the correct person records. For example, if you were to create a user and assign an SSHR responsibility to this user, the correct employee records wouldonly be displayed in SSHR if the user's name is entered in the Person field.
See: Responsibilities, Oracle HRMS Configuring, Reporting, and System Administration Guide
New User RegistrationThe New User Registration functions enable new users to register their own details and create their own users for SSHR. You can also add a user hook which generates the username when the user clicks a button on the web page.
You can enable the New User Registration functions for both employees and non-employees. The non-employee registration form is usually used in conjunction with Advanced Benefits.
See: New User Registration, page 11-62
User ProfilesYou apply user profiles to control how the SSHR application runs. You can set profile options at site level, application level, responsibility level, and user level. The individual profile options are specified in the sections on each module.

3-10 Oracle Self-Service Human Resources Deploy Self-Service Capability Guide
See: User Profiles, Oracle HRMS Configuring, Reporting, and System Administration
User Access to Functions
Manager and Employee FunctionsYou can control which functions employees, workers, and managers can access by adding or removing functions from the user menus. For example, you could restrict employee access to the Termination function by only including it in the Manager menu.
See: Defining User Access and Menus, page 4-10
User Access to NotificationsSSHR users access their notifications using one of the following methods:
• Using the Home page Worklist
• Using the Workflow User Web Applications responsibility
• Using the All Actions Awaiting My Attention function from the Manager, Professional, Employee or Worker responsibilities.
• As an E-mail sent to the user's inbox
If in your enterprise, the WF: Enable Worklist Global Header profile option is setup, then a Worklist Header appears on each of the Oracle SSHR OAF application pages to enable users to navigate to notifications from OAF pages. However, users may experience security issues while accessing notifications from the Worklist Header if HRMS security is implemented using the HRMS security framework and the HR:Business Group and HR: Security Profile options are setup. To prevent access issues, you must disable the WF: Enable Worklist Global Header profile option for all Oracle SSHR predefined and custom responsibilities. Users must access notifications using anyof the methods discussed above rather than from the Worklist Header.
Access Roles for Self-Service ActionsAccess roles specify permission to view or update routed transactions, such as self-service actions. You manage access roles for self-service actions in the Maintain Roles window.
SSHR provides two predefined types that you can use to create access roles that govern update permissions in self-service actions:
• SSHR Update Allowed
• SSHR Update Not Allowed

SSHR and User Access 3-11
By default, all users can update an action. If you define a role using the SSHR Update Allowed type and assign it to a user, everyone else can no longer update. If you define and assign a role using the SSHR Update Not Allowed type, everyone else can update.
You do not use both types in the same implementation. Your decision to use one type orthe other depends on whether the majority of users require update privileges. If they do, use the Update Not Allowed type to remove edit privileges from the remaining users. If the majority do not require permission to update, use the Update Allowed typeto grant edit permission to those who do. If your organization has 40,000 people, of whom only 80 require update privileges for self-service actions, it makes more sense to grant privileges to 80 people than to deny them to 39,920.
Note: Position control and budgeting features also use role types to set up roles for routing and approvals. Do not use the predefined role types of Line Manager, HR Manager, or Budget Manager with self-service actions.
See: Defining Workflow Roles for Transactions, Oracle HRMS Enterprise and Workforce Management Guide
Self-Service Menus and User AccessSSHR uses four types of menu: top-level menus, submenus, hidden submenus, and datasecurity menus. The following section looks at each of these menus in detail.
The predefined menus are overwritten whenever an SSHR patch is applied so any changes you have made to the menus are lost. For this reason, you should create at leastone top-level menu for employees and at least one for managers.
Note: You can avoid having to configure several similar menus by adding all employee and manager functions to each of your menus and then defining menu exclusions against the responsibility to exclude specific functions from groups of users.
See: Defining Menus for SSHR, page 4-10
Types of MenusTop-level Menus
The top-level menus define the choices that the user sees on their menu when they log in to SSHR. For example, the top-level menu for the Employee Self-Service responsibility is the Employee Self Service menu.
See: Defining User Access and Menus, page 4-10
Submenus

3-12 Oracle Self-Service Human Resources Deploy Self-Service Capability Guide
Submenus group together functions in a logical group on the top-level menu, for example, the Professional Details functions are grouped together in the Manager Professional Details submenu. The predefined submenus for SSHR include:
• Professional Details (for Employee Self-Service)
• Manager Professional Details (for Manager Self-Service)
Hidden Submenus
By attaching a submenu to the top-level menu without defining a prompt, you can assign functions to the responsibility but hide them from the user. This means that the user cannot select these functions directly. The following hidden submenus are predefined for SSHR:
• Submenus for Actions
• Manager Actions Menu (for Manager Self-Service)
• Personal Actions Menu (for Employee Self-Service)
• Contingent Worker Personal Actions Menu (for Contingent Worker Self-Service)
• Appraisals Menu
• Submenus for Pages (Employee Self-Service)
• Suitability Matching Employee Personal menu
• Suitability Matching Pages menu
• HR Self-Service Pages submenu
• My Information Functions menu
• Submenus for Pages (Manager Self-Service)
• HR Self-Service Pages submenu
• Suitability Matching Manager menu
• Suitablility Matching Pages menu
• Self Service Contingent Worker Functions
• HR Manager Self Service Pages
• My Employee Information Functions menu

SSHR and User Access 3-13
• SSHR hierarchy and search functions
SSHR uses these submenus to determine the availability of functions in other places. For example, the Manager Enter Process submenu controls the tabbed regions appearing on the Manager Enter Process page. The Manager Actions menu controls which functions are available on the Actions page for a manager to perform on other employees. The Personal Actions menu controls which functions are available to a user on the Personal Actions page. This menu also controls which functions are available from the Actions page when the manager selects their own record.
Data Security Menus
SSHR uses the data security menus to determine which functions are global and which are for specific legislations.
The data security menus for SSHR are:
• HR_GLOBAL_SS_FUNCTIONS_SEED
Contains all the functions that are accessible across legislations (global functions)
• HR_cc_SS_FUNCTIONS_SEED (where cc is legislation code)
Contains all the functions that are specific to a legislation
• HR_GLOBAL_SS_FUNCTIONS_CUSTOM
Contains customer functions that are accessible across legislations
• HR_cc_SS_FUNCTIONS_CUSTOM (where cc is the legislation code)
Contains customer functions that are specific to a legislation
Simplified User Interface (UI) MenusOracle SSHR provides simplified user interface (UI) menus that facilitate general and localization self-service users better search and transactional user experience. The general and localization self-service simplified UI menus group together related functions to perform self-service tasks with more ease. For more information, see: Simplified User Interface (UI) Menus for Oracle SSHR, page 3-28.
Menus for Employees (Non-Managers)If you create a new employee menu and want to use the Personal Actions functionality, you need to add the following submenu to your new menu:
• Personal Actions Menu (or your configured copy of this menu)
If you intend that contingent workers use your new employee menu, add the Contingent Worker Personal Actions Menu (or your configured copy) instead of the Personal Actions Menu.

3-14 Oracle Self-Service Human Resources Deploy Self-Service Capability Guide
You must also add the following functions to your new menu:
• Personal Actions (or your configured copy of this menu)
• Suspended Actions
You must also make sure that, for any responsibilities that use your new employee menu, the values for the following profile options match the names of the personal actions submenus you selected above.
• HR:Personal Actions Menu
• HR:Contingent Worker Personal Actions Menu
Menus for ManagersIf you create a new Manager menu and want to use the Manager Actions functions, youneed to add the following submenus to your new menu:
• Personal Actions Menu (or your configured copy of this menu)
• Manager Actions Menu (or your configured copy of this menu)
• SS Hierarchy and Search Functions
If you intend that contingent workers use your new manager menu, add the ContingentWorker Personal Actions Menu (or your configured copy) instead of the Personal Actions Menu.
You must also add the following functions to your new menu:
• Suspended Actions Mgr
You must also make sure that, for any responsibilities that use the new manager menu, the values for the following profile options match the names of the manager actions andpersonal actions submenus you selected above.
• HR:Manager Actions Menu
• HR:Contingent Worker Manager Actions Menu
• HR:Personal Actions Menu
Predefined Self-Service Responsibilities and User MenusSSHR modules are accessible from predefined responsibilities, each with a corresponding top level menu.
In this version of SSHR, the predefined responsibilities are:

SSHR and User Access 3-15
• Employee Self-Service
• Manager Self-Service
• HR User Self Service
• New User Registration
• HR Professional
• Payroll Professional
• Contingent Worker Self-Service
• Responsibility Ownership
The predefined US Federal responsibilities are:
• US Federal Employee Self-Service
• US Federal Manager Self-Service
• US Federal HR Self-Service
The predefined responsibilities for the HR Foundation application are:
• Employee Self Service Foundation
• Manager Self Service Foundation
The additional responsibilities provided by OSSWA (Oracle Self-Service Web Applications are:
• Workflow User Web Applications
• Preferences
Note: These responsibilities are provided as a starting point only. You should create your own responsibilities and menus using the predefined SSHR responsibilities and menus as examples. Otherwise, your changes may be lost during an upgrade.
See: User Access and Security, page 3-3
User Menus SSHR includes several predefined top-level menus:
• Employee Self Service
3-16 Oracle Self-Service Human Resources Deploy Self-Service Capability Guide
• Manager Self Service
• HR Professional
• Payroll Professional
• Contingent Worker Self Service
• Employee Self Service Foundation
Which includes the following functions/submenus:
• Suspended Actions
• Personal Actions
• Employee Enter Process submenu
• Personal Actions Foundation submenu
• Professional Details
• Manager Self Service Foundation
Which contains the following functions/submenus:
• Suspended Actions Manager
• Manager Actions Tree View
• Manager Enter Process submenu
• Manager Actions Foundation
• Personal Actions Foundation
• Manager Professional Details
US Federal SSHR includes predefined top-level menus:
• Benefits
• My Information
• My Employee Information
• Employee Information
The Employee Self Service menu contains the functions that employees can perform on their own records, for example, the Personal Details function. The Manager Self-Service

SSHR and User Access 3-17
menu contains the same functions as the employee menu plus additional functions that the manager can carry out for the employees for whom they are responsible.
The HR Professional menu is available for HR professionals who wish to view summarized information on employees.
You can also use the following menu for administration purposes:
• HR Web Administrator
See: Self-Service Menus, page 3-11
Navigation Options for Functions Both employees and managers can access functions in one of two ways. They can either use the above menus and select the function using the corresponding menu option or they can display the Actions page through the Manager Actions or Personal Actions menus and select the required function from the list of available actions.
Legislation-specific MenusSSHR provides legislation-specific menus to give users access to the functions that are specific to a country.
See: Self-Service Menus, page 3-11
Responsibility OwnershipThe Responsibility Ownership function enables you (as an administrator or implementor) to view a list of owned responsibilities. You can expand the list of responsibilities to display the menus and functions attached to each responsibility. From the list of responsibilities, you can see the number of people with access to each responsibility both within the organization (in other words, within your HR security access environment) and outside of the organization (outside of your HR security accessenvironment). By clicking on the number of people, you can display the user ID and other information for each user with access to the responsibility and if required, you canrevoke access directly in the self-service page. If you choose to revoke access to a responsibility, the affected user receives notification of the change.
Additional Information: When the application generates the notification, it also triggers a business event. You can subscribe to this business event and call Application Programmatic Interfaces (APIs) to end date the responsibility access.
See: Event Subscriptions, Oracle Workflow Developer's Guide
You can use the Responsibility Ownership functionality as an extra security measure to review and restrict the number of people outside of your organization with access to

3-18 Oracle Self-Service Human Resources Deploy Self-Service Capability Guide
particular responsibilities. You can also monitor the number of people with access to each responsibility for auditing purposes.
Menu and Function NamesYou access this module can be accessed from the following menus and functions:
User Menu Name Function Name
Responsibility Ownership Responsibility Ownership
WorkflowThe workflow details for this module are listed below:
Workflow Process Display Name: Not applicable
Configurable Workflow Attributes:Not applicable
Configurable Profile OptionsNot applicable
Additional Configuration Steps1. Before you can use the Responsibility Ownership function, you must create data
security grants to link responsibilities to your users.
See: Creating Data Grants for Responsibility Ownership, page 3-23
See: Grants, Oracle E-Business Suite Security Guide
2. You should create code to subscribe to the following business event:
• oracle.apps.per.selfservice.respowner.revoke_access
This code should trigger the fnd_user_resp_groups_api.update_assignment API to end date the responsibility assignment.
See: Sample Code for Subscribing to Business Event (Responsibility Ownership), page 3-19

SSHR and User Access 3-19
Sample Code for Subscribing to Business Event - Responsibility Ownership
If you are using the Responsibility Ownership function, you should write a PL/SQL code to subscribe to the following business event:
• oracle.apps.per.selfservice.respowner.revoke_access
Important: The code should call the following Application Programmatic Interface (API) which end-dates the responsibility assignment:
• fnd_user_resp_groups_api.update_assignment
Sample code is provided below. You can use this as a basis for your own code.
Creating a Sequence (CUST_RESP_OWNER_ARCHIVE_SEQ)CREATE SEQUENCE CUST_RESP_OWNER_ARCHIVE_SEQ MINVALUE 1 MAXVALUE 999999999999999999999999999 START WITH 1 INCREMENT BY 1 CACHE 20;
Creating a Table (CUST_RESP_OWNER_ARCHIVE)create table CUST_RESP_OWNER_ARCHIVE(REVOKE_ID varchar2(25),USER_ID NUMBER(10),RESPONSIBILITY_ID NUMBER(10),REVOKE_JUSTIFICATION varchar2(250),REVOKE_DATE Date,REVOKED_BY NUMBER(10),STATUS varchar2(250));
Creating a Package HeaderCREATE OR REPLACE PACKAGE cust_resp_owner_bevent AUTHID CURRENT_USER ASFUNCTION revoke_access_wfevent_subscrb( p_subscription_guid in raw,p_event in out NOCOPY wf_event_t)RETURN VARCHAR2;END cust_resp_owner_bevent;/
Creating Package Body

3-20 Oracle Self-Service Human Resources Deploy Self-Service Capability Guide
CREATE OR REPLACE PACKAGE BODY cust_resp_owner_bevent ASPROCEDURE archive_data(p_user_id IN NUMBER,p_user_name IN VARCHAR2,p_resp_id IN NUMBER,p_resp_appl_id IN NUMBER,p_security_group_id IN NUMBER,p_justification IN VARCHAR2,p_status IN VARCHAR2) ISl_login_person_id number;BEGINl_login_person_id := fnd_global.user_id;INSERT INTO CUST_RESP_OWNER_ARCHIVE(REVOKE_ID,USER_ID,RESPONSIBILITY_ID,REVOKE_JUSTIFICATION,REVOKE_DATE,REVOKED_BY,STATUS)VALUES(CUST_RESP_OWNER_ARCHIVE_SEQ.nextval,p_user_id,p_resp_id,p_justification,sysdate,l_login_person_id,p_status);EXCEPTIONWHEN OTHERS THENNULL;END archive_data;PROCEDURE remove_resp(p_user_id IN NUMBER,p_resp_id IN NUMBER,p_resp_appl_id IN NUMBER,p_security_group_id IN NUMBER,p_error OUT VARCHAR2,p_justification IN VARCHAR2) IScursor csr_user_name(v_user_id in number) isselect user_namefrom fnd_userwhere user_id = v_user_id;cursor csr_user_resp_groups isselect descriptionfrom fnd_user_resp_groupswhere user_id = p_user_idand responsibility_id = p_resp_id;l_user_name fnd_user.user_name%type;l_owner_name fnd_user.user_name%type;l_description varchar(2000);l_login_person_id number;BEGINl_login_person_id := fnd_global.user_id;OPEN csr_user_name(p_user_id);FETCH csr_user_name into l_user_name;CLOSE csr_user_name;OPEN csr_user_name(l_login_person_id);FETCH csr_user_name into l_owner_name;CLOSE csr_user_name;OPEN csr_user_resp_groups;FETCH csr_user_resp_groups into l_description;CLOSE csr_user_resp_groups;BEGINFnd_User_Resp_Groups_Api.update_assignment(USER_ID => p_user_id,

SSHR and User Access 3-21
RESPONSIBILITY_ID => p_resp_id,RESPONSIBILITY_APPLICATION_ID => p_resp_appl_id,SECURITY_GROUP_ID => p_security_group_id,START_DATE => SYSDATE - 2,END_DATE => SYSDATE - 1,DESCRIPTION =>substr('RO:'||l_owner_name||':'||l_description,1,240));p_error := 'Status SUCCESSFUL!';EXCEPTIONWHEN OTHERS THENp_error := SQLERRM;END;--Helpdesk.remove_resp-- (p_username => l_user_name,-- resp_code => to_char(p_resp_id),-- p_error => p_error,-- p_description =>--substr('RO:'||l_owner_name||':'||l_description,1,240));archive_data(P_USER_ID => p_user_id,P_USER_NAME => l_user_name,P_RESP_ID => p_resp_id,P_RESP_APPL_ID => p_resp_appl_id,P_SECURITY_GROUP_ID => p_security_group_id,p_justification => p_justification,p_status => p_error);EXCEPTIONWHEN OTHERS THENNULL;END remove_resp;FUNCTION revoke_access_wfevent_subscrb( p_subscription_guid in raw,p_event in out NOCOPY wf_event_t)RETURN VARCHAR2ISI number := 0;usrIdCnt number := 0;l_error varchar2(2000) := null;BEGINusrIdCnt := to_number(p_event.GetValueForParameter('USER_COUNT'));FOR I IN 1 .. usrIdCnt LOOPremove_resp(p_user_id =>to_number(p_event.GetValueForParameter('USER_ID'||to_char(I))),p_resp_id => to_number(p_event.GetValueForParameter('RESP_ID')),p_resp_appl_id =>to_number(p_event.GetValueForParameter('RESP_APPL_ID')),p_security_group_id => to_number(p_event.GetValueForParameter('SECURITY_GROUP_ID')),p_error => l_error,p_justification => p_event.GetValueForParameter('MESSAGE'));END LOOP;COMMIT;RETURN 'SUCCESS';EXCEPTIONWHEN OTHERS THENWF_CORE.CONTEXT('PER_RESPOWNER_UTIL_SS','revoke_access_wfevent_subscrb', p_event.getEventName(),p_subscription_guid);WF_EVENT.setErrorInfo(p_event, l_error);RETURN 'ERROR';END revoke_access_wfevent_subscrb;END cust_resp_owner_bevent;/

3-22 Oracle Self-Service Human Resources Deploy Self-Service Capability Guide
For more information on using PL/SQL, see: Overview of Using PL/SQL in Applications, Oracle E-Business Suite Developer's Guide
Subscribing to the Business EventUse the Workflow Administrator Web Applications responsibility and Events page to enable the business event: oracle.apps.per.selfservice.respowner.revoke_access. The revoke access feature of the Responsibility Ownership functionality works only if you subscribe to the business event
Follow these steps to subscribe to the business event:
Enabling the Business Event
1. Log on to the Workflow Administrator Web Applications responsibility.
2. Click Business Events. The Events page appears.
3. In the Events page, search for the business event: oracle.apps.per.selfservice.respowner.revoke_access.
4. Click Update.
5. In the Update Event page, select the Enabled status and click Apply.
Creating Subscription for the Business Event
1. In the Events page, search for the business event: oracle.apps.per.selfservice.respowner.revoke_access.
2. Click Subscription. The Subscriptions: Event: oracle.apps.per.selfservice.respowner.revoke_access page appears.
3. Click Create Subscription. The Create Event Subscription page appears.
4. Select the instance name.
5. Select the event filter: oracle.apps.per.selfservice.respowner.revoke_access
6. Enter 10 in the Phase field.
7. Select Enabled as the Status.
8. Select Message as the Rule Data.
9. Select custom as the Action Type.
10. Click Next.
11. In the PL/SQL Rule Function, enter the PL/SQL rule function in the following

SSHR and User Access 3-23
format: <package_name>.<function_name>
for example, cust_resp_owner_bevent.revoke_access_wfevent_subscrb
12. Enter the Owner Name: SSHR.
13. Enter the Owner Tag: PER.
14. Click Apply.
Creating Data Grants for Responsibility OwnershipData grants enable you to control access to data in the data security system. When you create a data grant, you grant access to a database object to a user. In the case of the Responsibility Ownership function, you use data grants to grant responsibility ownership to a user. The following graphic illustrates the concept of data grants:
Data Grants for Responsibility Ownership:
The data grant links the user (grantee) to a specific data set instance (row in the data object). In addition, you link a function set to the user which enables the user to access particular functionality (in this case, the Responsibility Ownership functionality).
For information on using data grants for other purposes, see: Overview of Data Security(Oracle E-Business Suite Security Guide).

3-24 Oracle Self-Service Human Resources Deploy Self-Service Capability Guide
To create a data grant for the Responsibility Ownership:1. First identify which users should be granted ownership of responsibilities. These
users would have an administrative role, for example, an HR Manager, Finance Manager, or System Administrator.
2. Use the Functional Administrator responsibility to create grants.
1. Select the Grants tab.
2. From the Grants page, click Create Grant to initiate the creation process and define the data grant.
3. In the Name field, enter a descriptive name for the grant, for example, <responsibility name>-Ownership. You can also enter a description.
4. Specify the effective date for the grant.
Navigate to the Security Context region to define the context for applying the grant.
5. In the Grantee Type field, select Specific User.
6. In the Grantee field, enter the user ID of the person who you are designating as the owner of the responsibility.
Navigate to the Data Security region.
7. In the Object field, enter the following delivered object:
• FND_USER_RESP_GROUPS
Note: Oracle provides this object for use with the Responsibility Ownership functionality.
8. For the purpose of the Responsibility Ownership function, you must create a data set that grants access to a specific instance in the object table. Select this option (Instance) and continue to the next page to enter the instance information.
9. The data set instance comprises three segments of information. Enter the information, leaving the remaining fields blank:
SSHR and User Access 3-25
Primary Key Example
Responsibility ID 50101
Application ID 800
Security Group ID 0
Note: To determine the information for the data set, query the user in the Users window and select Help > Diagnostics > Examine from the Responsibilities block. Query the following fields in the Examine Field and Variable Values window:
• RESPONSIBILITY_ID
• RESPONSIBILITY_APPLICATION_ID
• SECURITY_GROUP_ID
10. In the Set field, enter the delivered set PRIMARY_OWNER.
Note: Oracle provides this function set for use with the Responsibility Ownership functionality.
In this case, a function set is a data security menu containing the Responsibility Ownership function.
11. Click Finish to complete the data grant creation process. The desginated ownerscan now log on to SSHR and use the Responsibility Ownership function to administer and control access to their responsibilities.
See: Responsibility Ownership, page 3-17
You should repeat steps 1 through 11 for each responsibility that you want to review and maintain.
Restricting Access to Workflow TransactionsYou can restrict a workflow administrator's access to specific workflow transactions, depending on your business requirements. To restrict access to workflow transactions, you create a grant for the Workflow Item Attribute Values object using the Functional Developer responsibility.
3-26 Oracle Self-Service Human Resources Deploy Self-Service Capability Guide
Prerequisites
Before you define restrictions to access workflow transactions, ensure that you:
1. Set up users and responsibilities to use Oracle SSHR.
2. Assign the Workflow Administrator responsibility to users to monitor workflow transactions.
3. Set up security profiles to give access to restricted set of information.
4. Set the HR: Security Profile option at the responsibility level for the Workflow Administrator responsibility.
To restrict access to workflow transactions:1. Log on to the Functional Developer responsibility.
2. Search for the predefined Workflow Item Attribute Values (WF_ITEM_ATTRIBUTE_VALUES) object.
3. Click the Update icon to navigate to the Update Object page.
4. Click Create Grant on the Grants tab to initiate the creation process and to define the grant.
5. On the Define Grant page, enter the following details:
• In the Name field, enter a descriptive name for the grant.
• Specify the effective date for the grant. Navigate to the Security Context region to define the context to apply the grant.
• In the Grantee Type field, you can select a single user, a role, or global (all usersand roles).
• In the Responsibility field, specify a Workflow Administrator responsibility to apply the grant to that responsibility.
• In the Object field, select the delivered object Workflow Item Attribute Values
Note: Oracle provides the Workflow Item Attribute Values object to restrict access to workflow transactions.
6. On the Grant: Select Object Data Context page, select the HR Self-Service Selected Person ID Instance Set (HRSS_WF_ATTR_PERSONID_INSTSET) to create a data setthat grants access to a specific instance in the object table.

SSHR and User Access 3-27
7. On the Grant: Define Object Parameters and Select Set page:
1. Review the definition of the grant.
2. In the Set field, enter the delivered Business workflow item attribute permissionset (WF_ADMIN_ITEM_ATTR_PSET) to define the grantee's access.
8. Click Finish to complete the grant creation process. The designated workflow administrators can administer only the workflow transactions that they can access.
You must repeat these steps for each workflow administrator responsibility that you want to review and maintain.
Note: If users in your enterprise perform multiple roles such as a workflow administrator and a HR manager, then ensure that the users have the appropriate workflow responsibility to view their workflow transactions. For example, as a workflow administrator, the user must be able to view HR transactions.

3-28 Oracle Self-Service Human Resources Deploy Self-Service Capability Guide
Simplified User Interface (UI) Menus for Oracle SSHR
Simplified User Interface (UI) Menus for Oracle SSHR Oracle SSHR provides simplified user interface (UI) menus that facilitate general and localization self-service users better search and transactional user experience. The general and localization self-service simplified UI menus group together related functions to perform self-service tasks with more ease. For example, the 'Manager Self Service - Simplified' menu includes the 'Onboard' function that groups together related functions: Hire, Contingent Worker Placement, Applicant Hire and Rehire, and Reverse Termination. When managers click the 'Onboard' prompt in the 'Manager Self Service - Simplified' menu, the Hire: Enter Basic Details page appears, the application presents these grouped functions as easily identifiable function tabs. Managers can perform self-service transactions from the same page rather than navigating back to Home. Similarly,the 'Employee Self Service - Simplified' menu includes the 'Professional Details' function that groups together related functions: Education and Qualifications, Other Professional Qualifications, Competency Profile, and Work Preferences. Each of these functions does not appear as separate prompts in the responsibility. When an employee clicks the Professional Details prompt, the application presents these functions as easily identifiable function tabs on the Education and Qualifications page. Workers can click each of the tabs to navigate to the relevant pages to provide professional details.
Note: The simplified UI is available only when launching functions from the 'SimplifiedUI menus' and not from features such as Talent Profile, Save for Later, Update Action on notifications, Return for Correction etc.
The following is a list of simplified UI menus for general and localization self-service users:
• General Self-Service
• Manager Self Service - Simplified (HR_LINE_MANAGER_SIMPLIFIED)
• Employee Self Service - Simplified (HR_EMPLOYEE_ACCESS_SIMPLIFIED)
• Localizations - Americas
• Simplified US Manager Self-Service Container (US_MGR_SS_SIMPLIFIED_CNTR)
• Simplified US Employee Self-Service Container (US_EMP_SS_SIMPLIFIED_CNTR)
• Simplified CA Employee Self-Service Container (CA_EMP_SS_SIMPLIFIED_CNTR)
SSHR and User Access 3-29
• Localizations - APAC
• Simplified AU Manager Self-Service Container (AU_MGR_SS_SIMPLIFIED_CNTR)
• Simplified AU Employee Self-Service Container (AU_EMP_SS_SIMPLIFIED_CNTR)
• Simplified IN Employee Self-Service Container (IN_EMP_SS_SIMPLIFIED_CNTR)
• Localizations - EMEA
• Simplified UK Employee Self Service Container (UK_EMPLOYEE_SS_SIMPLIFIED_CNTR)
• Simplified IE Employee Self Service Container ( IE_EMPLOYEE_SS_SIMPLIFIED_CNTR)
• Simplified ZA Employee Self Service Container (ZA_EMPLOYEE_SS_SIMPLIFIED_CNTR)
Key Concepts:The following topics provide details about the simplified UI menus:
• Simplified User Interface (UI) Menus for General Self-Service, page 3-29
• Simplified User Interface (UI) Menus for Americas Localizations, page 3-50
• Simplified User Interface (UI) Menus for EMEA Localizations, page 3-55
• Simplified User Interface (UI) Menus for APAC Localizations, page 3-58
Simplified User Interface (UI) Menus for General Self-ServiceFor an overview of the simplified user interface (UI) menus, see: Simplified User Interface (UI) Menus for Oracle SSHR, page 3-28. This topic provides details about the Oracle SSHR delivered simplified UI menus for general self-service users.
For localizations, see:
• Simplified User Interface (UI) Menus for Americas Localizations, page 3-50
• Simplified User Interface (UI) Menus for EMEA Localizations, page 3-55
• Simplified User Interface (UI) Menus for APAC Localizations, page 3-58

3-30 Oracle Self-Service Human Resources Deploy Self-Service Capability Guide
Manager Self Service - SimplifiedName: Manager Self Service - Simplified
Code: HR_LINE_MANAGER_SIMPLIFIED
Prompt Sub Menu Function Description andFunction Code
Tab Name and Code
Manager Actions Manager ActionsTree View (HR_PERSON_TREE_SS)
Click this prompt to select a worker in the manager's hierarchy and perform manager actions.
Manager ActionsMenu (HR_LINE_MANAGER_FUNCTIONS)
Personal ActionsMenu (HR_LINE_MANAGER_PERS_FUNCTIONS)
SSHR hierarchy and search functions ( HR_HIERARCHY_SEARCH_SS)

SSHR and User Access 3-31
Prompt Sub Menu Function Description andFunction Code
Tab Name and Code
My Transaction Monitor
My Transaction Monitor (HR_SS_HOME_NTF_MGR)
Following functions are available from this prompt:
Transaction Monitor (HR_TRANSACTION_MGR_SS)
All Actions Awaiting Your Attention (HR_MY_SUS_ACTIONS_MGR_SS)
Self Service Tab Menu - Transaction Monitor Mgr (HR_SS_TAB_TRANS_MONITOR_MGR)
Self Service Tab Menu - All Action Awaiting Mgr (HR_SS_TAB_MY_SUS_ACTIONS_MGR)
Self Service Transaction Monitor Menu - Manager ( HR_SS_TRANS_MONITOR_MENU_MGR)

3-32 Oracle Self-Service Human Resources Deploy Self-Service Capability Guide
Prompt Sub Menu Function Description andFunction Code
Tab Name and Code
Personnel Action Personnel Action(HR_SS_HOME_PERSONAL_MGR)
Click this prompt to select a worker in the manager's hierarchy and perform the following personnel actions:
Worker Status Change (HR_EMP_STATUS_CHANGE_SS)
Change Hours (HR_CHG_HOURS_SS)
Change Manager(HR_MANAGER_SS)
Change Pay (HR_PAY_RATE_CHANGE_SS)
Change Worker Status and Terms (HR_EMP_TERMS_CHANGE_SS)
Release Information (HR_CAED_SS)
Change Job (HR_CHANGE_JOB_SS)
Transfer (HR_EMP_TRANSFER_SS)
Change Cost
Self Service Tab Menu - Worker Status Change (HR_SS_TAB_WRK_STATUS)
Self Service Tab Menu - Change Hours (HR_SS_TAB_CHG_HOURS)
Self Service Tab Menu - Change Manager (HR_SS_TAB_CHG_MGR)
Self Service Tab Menu - Change Pay (HR_SS_TAB_CHG_PAY)
Self Service Tab Menu - Worker Status Terms (HR_SS_TAB_EMP_TERMS_CHG)
Self Service Tab Menu - Release Information Mgr(HR_SS_TAB_CAED)
Self Service Tab Menu - Change Job (HR_SS_TAB_CHG_JOB)
Self Service Tab Menu - Transfer (HR_SS_TAB_TRANSFER)

SSHR and User Access 3-33
Prompt Sub Menu Function Description andFunction Code
Tab Name and Code
Center, Location and Manager (HR_CHG_COST_LOC_SUP_SS)
Self Service Tab Menu - Change Cost Center (HR_SS_TAB_CHG_COST_LOC_SUP)
Self Service Personal ActionsMenu - Manager (HR_SS_PERSONAL_MENU_MGR)

3-34 Oracle Self-Service Human Resources Deploy Self-Service Capability Guide
Prompt Sub Menu Function Description andFunction Code
Tab Name and Code
Talent Management
Talent Management (HR_SS_TALENT_MGMT_FUNC_MGR)
Click this prompt to select a worker in the manager's hierarchy and perform the following transactions:
Resume (HR_RESUME_SS)
Event And Bookings (PQH_EVENT_BOOKING_OV)
Employee Review (PQH_EMP_REVIEWS)
Suitability Matching (HR_SUITABILITY_MATCH_SS)
Succession Planning (PER_SUCCESSION_PLAN_SEARCH)
Self Service Tab Menu - Resume Mgr (HR_SS_TAB_RESUME_MGR)
Self Service Tab Menu - Event And Bookings Mgr (PQH_TAB_EVENT_BOOKING_MGR)
Self Service Tab Menu - Employee Reviews Mgr (PQH_TAB_EMP_REVIEWS_MGR)
Self Service Tab Menu - Suitability Matching Mgr (HR_SS_TAB_SUIT_MATCH_MGR)
Self Service Tab Menu - Succession Planning Search (PER_TAB_SUCCESSION_PLAN_SEARCH)
Self Service Talent Management Menu - Manager (HR_SS_TALENT_MGMT_MENU_MGR)
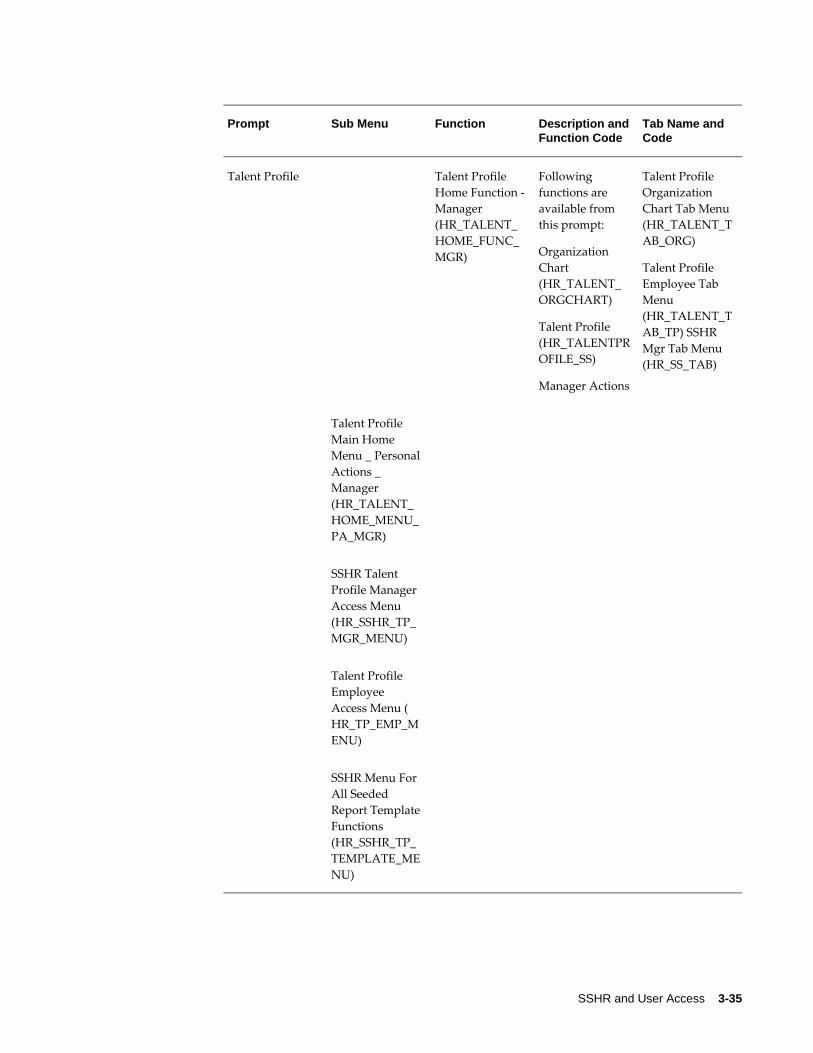
SSHR and User Access 3-35
Prompt Sub Menu Function Description andFunction Code
Tab Name and Code
Talent Profile Talent Profile Home Function -Manager (HR_TALENT_HOME_FUNC_MGR)
Following functions are available from this prompt:
Organization Chart (HR_TALENT_ORGCHART)
Talent Profile (HR_TALENTPROFILE_SS)
Manager Actions
Talent Profile Organization Chart Tab Menu (HR_TALENT_TAB_ORG)
Talent Profile Employee Tab Menu (HR_TALENT_TAB_TP) SSHR Mgr Tab Menu (HR_SS_TAB)
Talent Profile Main Home Menu _ PersonalActions _ Manager (HR_TALENT_HOME_MENU_PA_MGR)
SSHR Talent Profile Manager Access Menu (HR_SSHR_TP_MGR_MENU)
Talent Profile Employee Access Menu ( HR_TP_EMP_MENU)
SSHR Menu For All Seeded Report TemplateFunctions (HR_SSHR_TP_TEMPLATE_MENU)
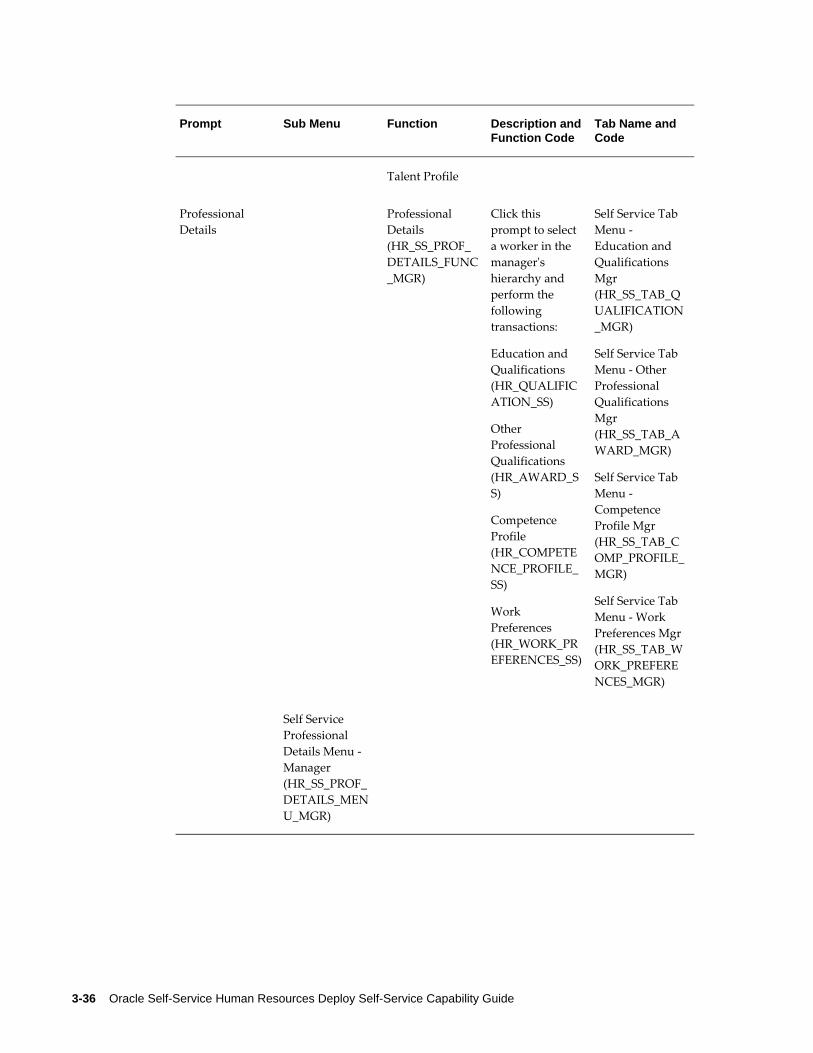
3-36 Oracle Self-Service Human Resources Deploy Self-Service Capability Guide
Prompt Sub Menu Function Description andFunction Code
Tab Name and Code
Talent Profile
Professional Details
Professional Details (HR_SS_PROF_DETAILS_FUNC_MGR)
Click this prompt to select a worker in the manager's hierarchy and perform the following transactions:
Education and Qualifications (HR_QUALIFICATION_SS)
Other Professional Qualifications (HR_AWARD_SS)
Competence Profile (HR_COMPETENCE_PROFILE_SS)
Work Preferences (HR_WORK_PREFERENCES_SS)
Self Service Tab Menu - Education and Qualifications Mgr (HR_SS_TAB_QUALIFICATION_MGR)
Self Service Tab Menu - Other Professional Qualifications Mgr (HR_SS_TAB_AWARD_MGR)
Self Service Tab Menu - Competence Profile Mgr (HR_SS_TAB_COMP_PROFILE_MGR)
Self Service Tab Menu - Work Preferences Mgr (HR_SS_TAB_WORK_PREFERENCES_MGR)
Self Service Professional Details Menu - Manager (HR_SS_PROF_DETAILS_MENU_MGR)
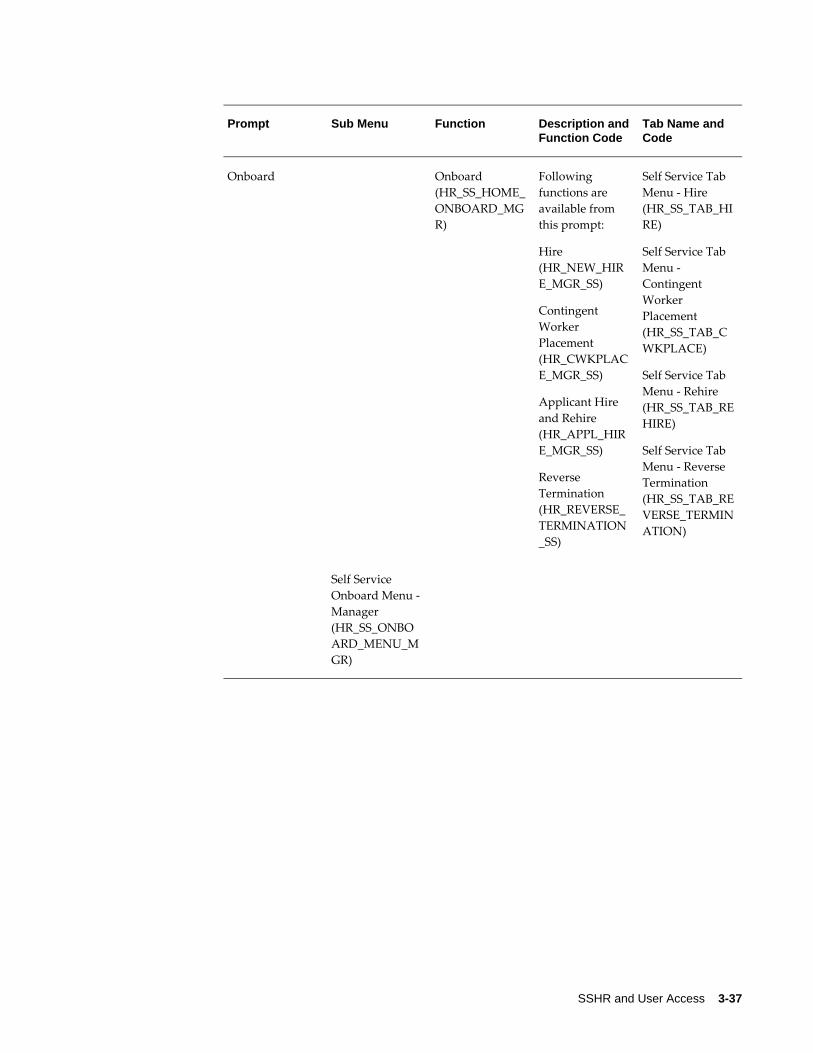
SSHR and User Access 3-37
Prompt Sub Menu Function Description andFunction Code
Tab Name and Code
Onboard Onboard (HR_SS_HOME_ONBOARD_MGR)
Following functions are available from this prompt:
Hire (HR_NEW_HIRE_MGR_SS)
Contingent Worker Placement (HR_CWKPLACE_MGR_SS)
Applicant Hire and Rehire (HR_APPL_HIRE_MGR_SS)
Reverse Termination (HR_REVERSE_TERMINATION_SS)
Self Service Tab Menu - Hire (HR_SS_TAB_HIRE)
Self Service Tab Menu - Contingent Worker Placement (HR_SS_TAB_CWKPLACE)
Self Service Tab Menu - Rehire (HR_SS_TAB_REHIRE)
Self Service Tab Menu - Reverse Termination (HR_SS_TAB_REVERSE_TERMINATION)
Self Service Onboard Menu - Manager (HR_SS_ONBOARD_MENU_MGR)

3-38 Oracle Self-Service Human Resources Deploy Self-Service Capability Guide
Prompt Sub Menu Function Description andFunction Code
Tab Name and Code
OffBoard OffBoard (HR_SS_HOME_OFFBOARD_MGR)
Click this prompt to select a worker in the manager's hierarchy and perform the following transactions:
Termination (HR_TERMINATION_SS)
Termination with Compensation (HR_TERMINATION_COMP_SS)
Allocated Checklists (HR_ALLOCATED_CHECKLIST_SS)
Self Service Tab Menu - Termination (HR_SS_TAB_TERMINATION)
Self Service Tab Menu - Termination with Compensation (HR_SS_TAB_TERM_COMP)
Self Service Tab Menu - Allocated Checklists (HR_SS_TAB_ALLOCATED_CHECKLIST)
Self Service Offboard Menu -Manager (HR_SS_OFFBOARD_MENU_MGR)

SSHR and User Access 3-39
Prompt Sub Menu Function Description andFunction Code
Tab Name and Code
Performance Management
Performance Management (HR_SS_PERF_MANAGEMENT_FUNC_MGR)
Following functions are available from this prompt:
Performance Management (HR_MGR_TALMGMT_SS)
Appraisals (HR_MGR_MN_APPR_SS)
Self Service Tab Menu - Performance Management Mgr (HR_SS_TAB_PERF_MANAGEMENT_MGR)
Self Service Tab Menu - Appraisals Mgr (HR_SS_TAB_APPRAISALS_MGR)
Self Service Performance Management Menu - Manager (HR_SS_PERF_MANAGEMENT_MENU_MGR)
Absences and Scheduling
Absences and Scheduling (HR_SS_HOME_TIME_MGR)
Click this prompt to select a worker in the manager's hierarchy and perform the following transactions:
Absence Management (HR_LOA_SS)
Assign Schedules and Manage Exceptions (HR_ASSIGN_SCHEDULE_SS)
Self Service Tab Menu - Absence Management Mgr (HR_SS_TAB_LOA_MGR)
Self Service Tab Menu - Assign Schedule (HR_SS_TAB_ASSIGN_SCHEDULE)
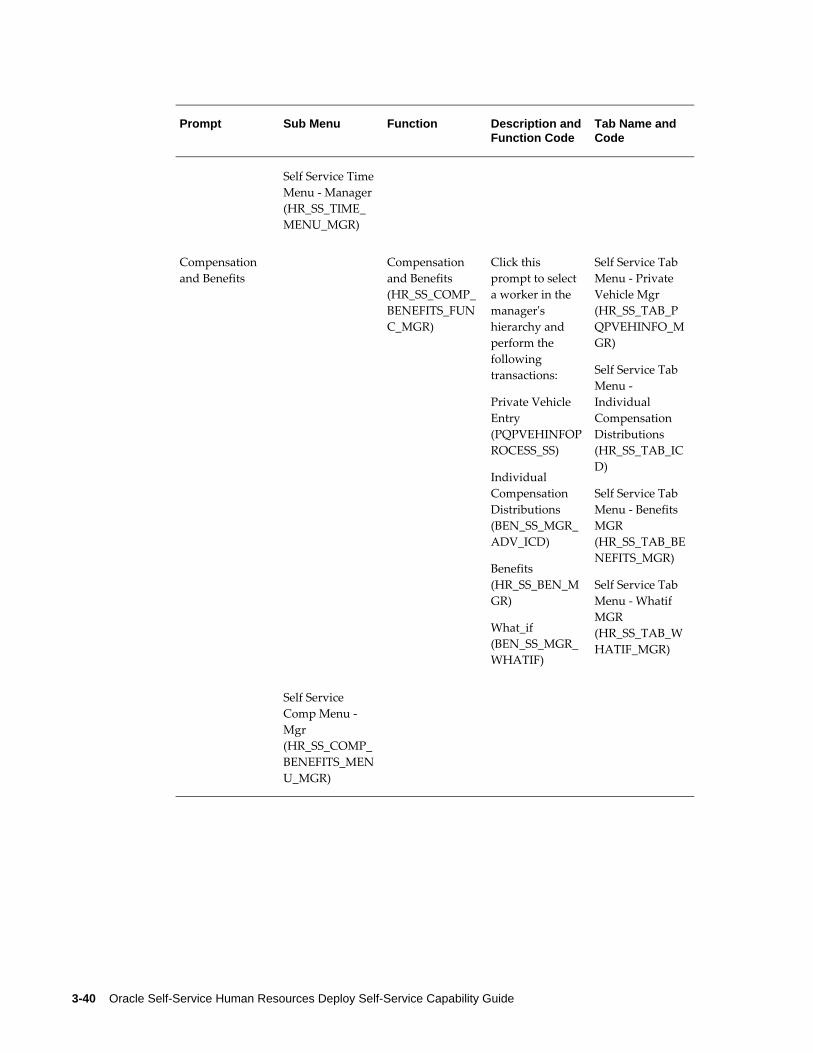
3-40 Oracle Self-Service Human Resources Deploy Self-Service Capability Guide
Prompt Sub Menu Function Description andFunction Code
Tab Name and Code
Self Service TimeMenu - Manager (HR_SS_TIME_MENU_MGR)
Compensation and Benefits
Compensation and Benefits (HR_SS_COMP_BENEFITS_FUNC_MGR)
Click this prompt to select a worker in the manager's hierarchy and perform the following transactions:
Private Vehicle Entry (PQPVEHINFOPROCESS_SS)
Individual Compensation Distributions (BEN_SS_MGR_ADV_ICD)
Benefits (HR_SS_BEN_MGR)
What_if (BEN_SS_MGR_WHATIF)
Self Service Tab Menu - Private Vehicle Mgr (HR_SS_TAB_PQPVEHINFO_MGR)
Self Service Tab Menu - Individual Compensation Distributions (HR_SS_TAB_ICD)
Self Service Tab Menu - Benefits MGR (HR_SS_TAB_BENEFITS_MGR)
Self Service Tab Menu - Whatif MGR (HR_SS_TAB_WHATIF_MGR)
Self Service Comp Menu - Mgr (HR_SS_COMP_BENEFITS_MENU_MGR)
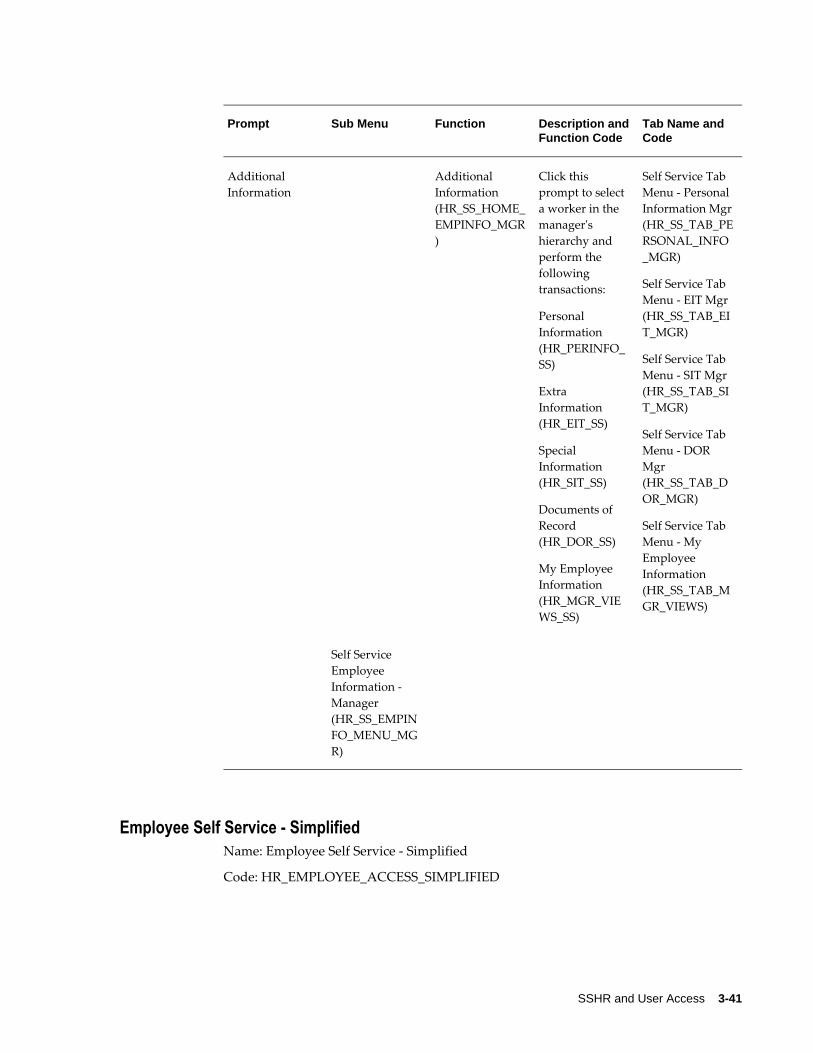
SSHR and User Access 3-41
Prompt Sub Menu Function Description andFunction Code
Tab Name and Code
Additional Information
Additional Information (HR_SS_HOME_EMPINFO_MGR)
Click this prompt to select a worker in the manager's hierarchy and perform the following transactions:
Personal Information (HR_PERINFO_SS)
Extra Information (HR_EIT_SS)
Special Information (HR_SIT_SS)
Documents of Record (HR_DOR_SS)
My Employee Information (HR_MGR_VIEWS_SS)
Self Service Tab Menu - Personal Information Mgr(HR_SS_TAB_PERSONAL_INFO_MGR)
Self Service Tab Menu - EIT Mgr (HR_SS_TAB_EIT_MGR)
Self Service Tab Menu - SIT Mgr (HR_SS_TAB_SIT_MGR)
Self Service Tab Menu - DOR Mgr (HR_SS_TAB_DOR_MGR)
Self Service Tab Menu - My Employee Information (HR_SS_TAB_MGR_VIEWS)
Self Service Employee Information - Manager (HR_SS_EMPINFO_MENU_MGR)
Employee Self Service - SimplifiedName: Employee Self Service - Simplified
Code: HR_EMPLOYEE_ACCESS_SIMPLIFIED

3-42 Oracle Self-Service Human Resources Deploy Self-Service Capability Guide
Prompt Sub Menu Function Description and Function Code
Tab Name and Code
My Transaction Monitor
My Transaction Monitor (HR_SS_TRANS_MONITOR_FUNC_EMP)
Following functions are available from this prompt: :
All Actions Awaiting Your Attention (HR_MY_SUS_ACTIONS_SS) Transaction Monitor(HR_TRANSACTION_EMP_SS)
Self Service Tab Menu _ All Actions Awaiting emp (HR_SS_TAB_ALL_ACTIONS_AWAITING)
Self Service Tab Menu - Transaction Monitor emp (HR_SS_TAB_TRANSACTION_MONITOR)
Professional Details
Professional Details (HR_SS_PROF_DETAILS_FUNC_EMP)
Following functions are available from this prompt:
Education and Qualifications (HR_QUALIFICATION_SS)
Other Professional Qualifications (HR_AWARD_SS)
Competency Profile (HR_COMPETENCE_PROFILE_SS)
Work Preferences (HR_WORK_PREFERENCES_SS)
Self Service Tab Menu - Qualification emp (HR_SS_TAB_QUALIFICATION)
Self Service Tab Menu - Other Professional Qualifications emp (HR_SS_TAB_AWARD)
Self Service Tab Menu - CompetencyProfile emp (HR_SS_TAB_COMPETENCE_PROFILE)
Self Service Tab Menu - Work Preferences emp (HR_SS_TAB_WORK_PREFERENCES)

SSHR and User Access 3-43
Prompt Sub Menu Function Description and Function Code
Tab Name and Code
Talent Talent (HR_SS_TALENT_MGMT_FUNC_EMP)
Following functions are available from this prompt:
Suitability Matching(HR_SUITABILITY_MATCH_SS)
Resume (HR_RESUME_SS)
Event And Bookings (PQH_EVENT_BOOKING_OV)
Employee Review (PQH_EMP_REVIEWS)
Self Service Tab Menu - Suitability Matching emp (HR_SS_TAB_SUITABILITY_MATCH)
Self Service Tab Menu - Resume emp (HR_SS_TAB_RESUME)
Self Service Tab Menu - Event And Bookings Overview emp (PQH_TAB_EVENT_BOOKING_OV)
Self Service Tab Menu - Employee Reviews emp (PQH_TAB_EMP_REVIEWS)
Performance Management
Performance Management (HR_SS_PERF_MANAGEMENT_FUNC_EMP)
Following functions are available from this prompt:
Performance Management (HR_EMP_TALMGMT_SS)
Appraisals (HR_EMP_MY_APPR_SS)
Self Service Tab Menu - PerformanceManagement emp (HR_SS_TAB_PERF_MANAGEMENT)
Self Service Tab Menu - Appraisals emp (HR_SS_TAB_APPRAISALS)
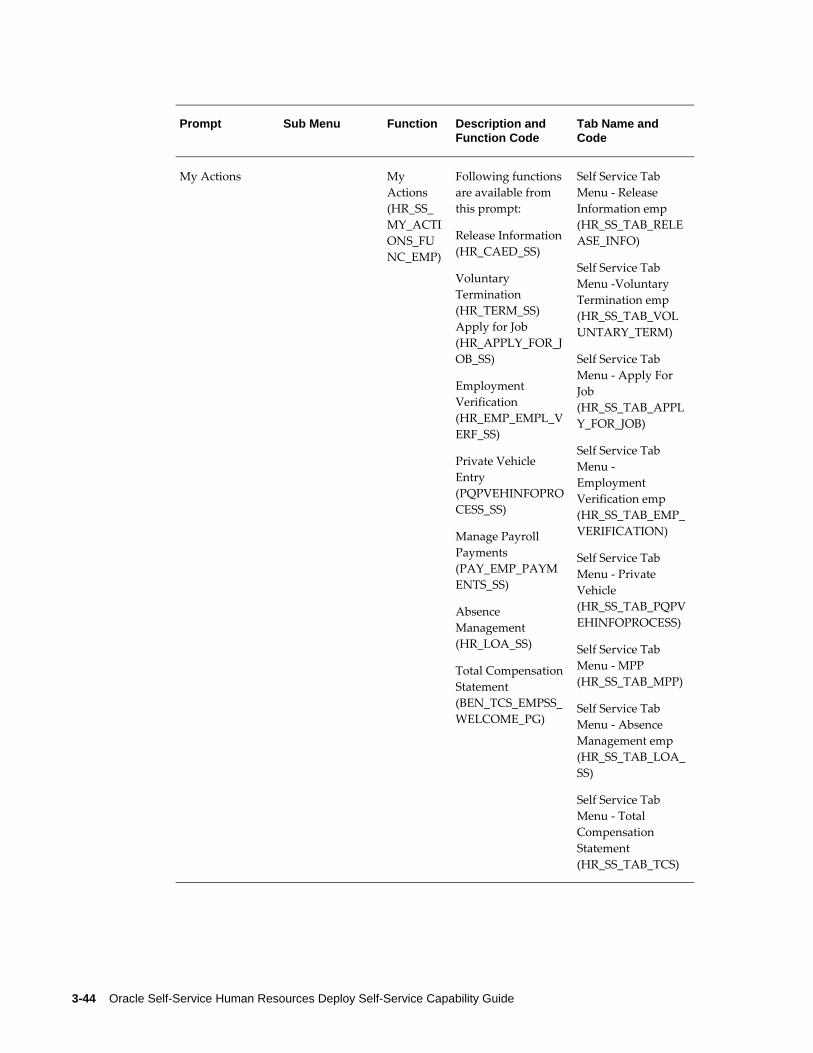
3-44 Oracle Self-Service Human Resources Deploy Self-Service Capability Guide
Prompt Sub Menu Function Description and Function Code
Tab Name and Code
My Actions My Actions (HR_SS_MY_ACTIONS_FUNC_EMP)
Following functions are available from this prompt:
Release Information(HR_CAED_SS)
Voluntary Termination (HR_TERM_SS) Apply for Job (HR_APPLY_FOR_JOB_SS)
Employment Verification (HR_EMP_EMPL_VERF_SS)
Private Vehicle Entry (PQPVEHINFOPROCESS_SS)
Manage Payroll Payments (PAY_EMP_PAYMENTS_SS)
Absence Management (HR_LOA_SS)
Total CompensationStatement (BEN_TCS_EMPSS_WELCOME_PG)
Self Service Tab Menu - Release Information emp (HR_SS_TAB_RELEASE_INFO)
Self Service Tab Menu -Voluntary Termination emp (HR_SS_TAB_VOLUNTARY_TERM)
Self Service Tab Menu - Apply For Job (HR_SS_TAB_APPLY_FOR_JOB)
Self Service Tab Menu - Employment Verification emp (HR_SS_TAB_EMP_VERIFICATION)
Self Service Tab Menu - Private Vehicle (HR_SS_TAB_PQPVEHINFOPROCESS)
Self Service Tab Menu - MPP (HR_SS_TAB_MPP)
Self Service Tab Menu - Absence Management emp (HR_SS_TAB_LOA_SS)
Self Service Tab Menu - Total Compensation Statement (HR_SS_TAB_TCS)

SSHR and User Access 3-45
Prompt Sub Menu Function Description and Function Code
Tab Name and Code
Additional Information
Additional Information (HR_SS_MY_INFO_FUNC_EMP)
Following functions are available from this prompt:
Personal Information (HR_PERINFO_SS)
My Information (HR_EMP_VIEWS_SS)
Extra Information (HR_EIT_SS)
Special Information (HR_SIT_SS)
Documents of Record (HR_DOR_SS)
Employee Directory(HR_EMPDIR_PROXY_SS)
Self Service Tab Menu - Personal Information emp (HR_SS_TAB_PERSONAL_INFO)
Self Service Tab Menu - My Information emp (HR_SS_TAB_MY_INFORMATION)
Self Service Tab Menu - EIT emp (HR_SS_TAB_EIT)
Self Service Tab Menu - SIT emp (R_SS_TAB_SIT)
Self Service Tab Menu - DOR emp (HR_SS_TAB_DOR)
Self Service Tab Menu - Employee Dir emp (HR_SS_TAB_EMP_DIR)
Self Service Transaction Monitor Menu - Employee ( HR_SS_TRANS_MONITOR_MENU_EMP )
Self Service Professional Details Menu - Employee ( HR_SS_PROF_DEATAILS_MENU_EMP )

3-46 Oracle Self-Service Human Resources Deploy Self-Service Capability Guide
Prompt Sub Menu Function Description and Function Code
Tab Name and Code
Self Service Talent Management Menu - Employee (HR_SS_TALENT_MGMT_MENU_EMP)
Self Service Performance Management Menu - Employee ( HR_SS_PERF_MANAGEMENT_MENU_EMP )
Self Service My Actions Menu - Employee (HR_SS_MY_ACTIONS_MENU_EMP)
Self Service My Information Menu - Employee (HR_SS_MY_INFO_MENU_EMP)
My Information Functions Menu (HR_EMP_VIEWS_FUNC_MENU)

SSHR and User Access 3-47
Prompt Sub Menu Function Description and Function Code
Tab Name and Code
Talent Profile Talent Profile Employee Home Function (HR_TALENT_PROFILE_FUNC_EMP)
Following functions are available from this prompt:
Talent Profile (HR_TALENTPROFILE_SS)
Personal Actions My Hierarchy (HR_TALENT_ORGCHART)
Talent Profile Employee Tab Menu (HR_TALENT_TAB_TP )
SSHR Emp Tab Menu ( HR_SS_EMP_TAB)
Talent Profile Organization Chart Tab Menu (HR_TALENT_TAB_ORG )
Talent Profile Home Menu _ Employee ( HR_TALENT_PROFILE_MENU_EMP )
Personal ActionsMenu (HR_LINE_MANAGER_PERS_FUNCTIONS)
SSHR Menu For All Seeded Report TemplateFunctions (HR_SSHR_TP_TEMPLATE_MENU)
Talent Profile Launch Menu ( HR_TP_LAUNCH_MENU )

3-48 Oracle Self-Service Human Resources Deploy Self-Service Capability Guide
Prompt Sub Menu Function Description and Function Code
Tab Name and Code
Talent Profile Employee Access Menu (HR_TP_EMP_MENU)
Personal Actions Personal Actions (HR_PERSONAL_PROCESS_SS)
Following functions are available from this prompt:
Personal Actions
My Benefits Self Service Home Function -My Benefits Group Emp (HR_SS_BEN_WHATIF_FUNC_EMP)
Following functions are available from this prompt:
Benefits
What_If
Self Service Tab Menu - Benefits Emp (HR_SS_TAB_BENEFITS
Self Service Tab Menu - Whatif Emp(HR_SS_TAB_WHATIF)
Self Service My Benefits Group Menu - Employee (HR_SS_BEN_WHATIF_MENU_EMP)
Self Service Benefits Enrollment ( BEN_SS_ENROLLMENT )
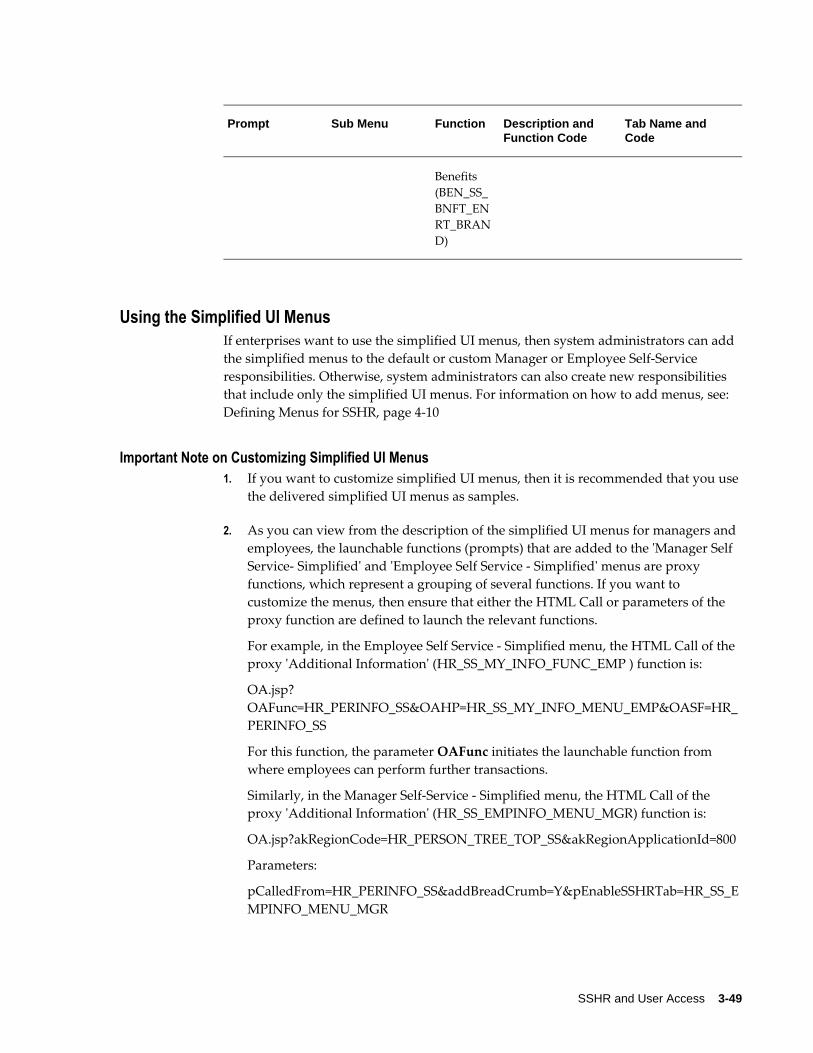
SSHR and User Access 3-49
Prompt Sub Menu Function Description and Function Code
Tab Name and Code
Benefits (BEN_SS_BNFT_ENRT_BRAND)
Using the Simplified UI MenusIf enterprises want to use the simplified UI menus, then system administrators can add the simplified menus to the default or custom Manager or Employee Self-Service responsibilities. Otherwise, system administrators can also create new responsibilities that include only the simplified UI menus. For information on how to add menus, see: Defining Menus for SSHR, page 4-10
Important Note on Customizing Simplified UI Menus1. If you want to customize simplified UI menus, then it is recommended that you use
the delivered simplified UI menus as samples.
2. As you can view from the description of the simplified UI menus for managers and employees, the launchable functions (prompts) that are added to the 'Manager Self Service- Simplified' and 'Employee Self Service - Simplified' menus are proxy functions, which represent a grouping of several functions. If you want to customize the menus, then ensure that either the HTML Call or parameters of the proxy function are defined to launch the relevant functions.
For example, in the Employee Self Service - Simplified menu, the HTML Call of the proxy 'Additional Information' (HR_SS_MY_INFO_FUNC_EMP ) function is:
OA.jsp?OAFunc=HR_PERINFO_SS&OAHP=HR_SS_MY_INFO_MENU_EMP&OASF=HR_PERINFO_SS
For this function, the parameter OAFunc initiates the launchable function from where employees can perform further transactions.
Similarly, in the Manager Self-Service - Simplified menu, the HTML Call of the proxy 'Additional Information' (HR_SS_EMPINFO_MENU_MGR) function is:
OA.jsp?akRegionCode=HR_PERSON_TREE_TOP_SS&akRegionApplicationId=800
Parameters:
pCalledFrom=HR_PERINFO_SS&addBreadCrumb=Y&pEnableSSHRTab=HR_SS_EMPINFO_MENU_MGR

3-50 Oracle Self-Service Human Resources Deploy Self-Service Capability Guide
For this function, the parameter pCalledFrom initiates the launchable function fromwhere managers can perform further transactions.
3. For manager functions, which start from the Hierarchy Page or Search Page, you must use the 'pEnableSSHRTab' parameter in the proxy function to point to the Home Page menu under which your functions have been defined. You must not usethe parameter 'OAHP' for such functions. For employee functions, you must use the'OAHP' parameter in proxy function to point to the Home Page menu under which your functions have been defined especially if your functionality can be accessed in multiple ways such as from the Employee Self Service and Manager Self Service responsibilities, Talent Profile, Notification etc.
Enabling the Payslip Function for Localizations that do not have Simplified UI MenusOracle SSHR delivers simplified UI menus for specific localizations only. If enterprises want to use the simplified UI menus for localizations that do not have their own simplified UI menus, then certain steps must be completed to enable employees to viewtheir Payslip online. The 'Employee Self Service – Simplified' menu delivers the Payslip function without a prompt.
To enable users of specific localizations to view their Payslip through self-service using the 'Employee Self Service – Simplified' menu, system administrators must complete thefollowing steps:
1. Add the 'Employee Self Service - Simplified' menu to the default or custom Employee Self-Service responsibility.
2. Navigate to the Menus window using the System Administrator responsibility.
3. Query the 'Self Service My Actions Menu - Employee' (HR_SS_MY_ACTIONS_MENU_EMP) menu. This menu includes the 'Self-Service Tab Menu - Employee Payslip emp' (HR_SS_TAB_EMP_PAYSLIP) sub menu, by default.
4. Add a prompt called 'Payslip' to the 'Self-Service Tab Menu - Employee Payslip emp' sub menu.
5. Save your work.
Once you add the prompt, users can click My Actions to launch the self-service Payslip function.
Simplified User Interface (UI) Menus for Americas LocalizationsFor an overview of the simplified user interface (UI) menus, see: Simplified User Interface (UI) Menus for Oracle SSHR, page 3-28. This topic provides details about the Oracle SSHR delivered simplified UI menus for Americas (US, Canada, and Mexico)
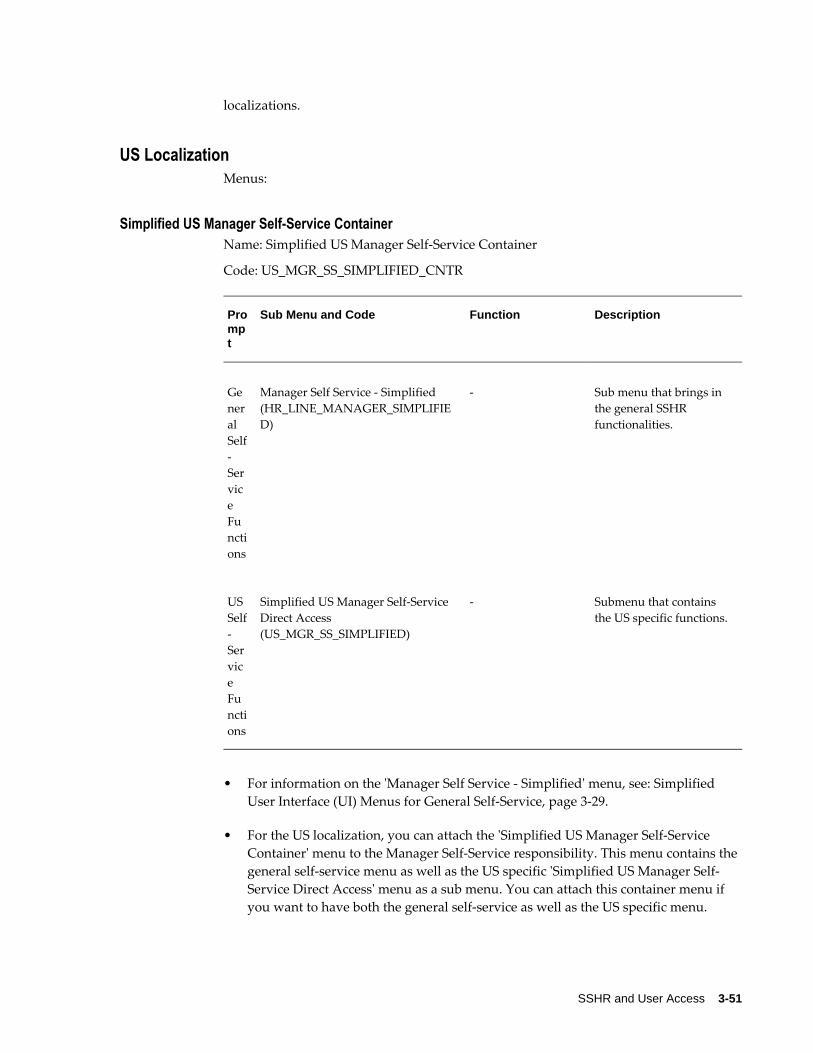
SSHR and User Access 3-51
localizations.
US LocalizationMenus:
Simplified US Manager Self-Service Container Name: Simplified US Manager Self-Service Container
Code: US_MGR_SS_SIMPLIFIED_CNTR
Prompt
Sub Menu and Code Function Description
General Self-Service Functions
Manager Self Service - Simplified (HR_LINE_MANAGER_SIMPLIFIED)
- Sub menu that brings in the general SSHR functionalities.
US Self-Service Functions
Simplified US Manager Self-Service Direct Access (US_MGR_SS_SIMPLIFIED)
- Submenu that contains the US specific functions.
• For information on the 'Manager Self Service - Simplified' menu, see: Simplified User Interface (UI) Menus for General Self-Service, page 3-29.
• For the US localization, you can attach the 'Simplified US Manager Self-Service Container' menu to the Manager Self-Service responsibility. This menu contains the general self-service menu as well as the US specific 'Simplified US Manager Self-Service Direct Access' menu as a sub menu. You can attach this container menu if you want to have both the general self-service as well as the US specific menu.

3-52 Oracle Self-Service Human Resources Deploy Self-Service Capability Guide
• In case, you want only the US specific menu, you can attach the 'Simplified US Manager Self-Service Direct Access' sub menu directly to the Manager Self-Service responsibility.
• Once you attach the 'Simplified US Manager Self-Service Direct Access' sub menu, users can navigate to the My Actions and Reports: People in Hierarchy page by clicking My Actions and Reports. When a manager clicks the Action icon for an employee in the My Actions and Reports: People in Hierarchy page, the following function tabs are available:
• Tenure Status
• Academic Rank
Simplified US Employee Self-Service Container Name: Simplified US Employee Self-Service Container
Code: US_EMP_SS_SIMPLIFIED_CNTR
Prompt
Sub Menu and Code Function Description
General Self-Service Functions
Employee Self Service - Simplified (HR_EMPLOYEE_ACCESS_SIMPLIFIED)
- Sub menu that brings in the general SSHR functionalities.
US Self-Service Functions
Simplified US Employee Self-Service Direct Access (US_EMP_SS_SIMPLIFIED)
- Sub menu that contains the US specific functions.
• For information on the Employee Self Service - Simplified menu, see: Simplified

SSHR and User Access 3-53
User Interface (UI) Menus for General Self-Service, page 3-29.
• For the US localization, you can attach the 'Simplified US Employee Self-Service Container' menu to the Employee Self-Service responsibility. This menu contains the general self-service menu as well as the US specific 'Simplified US Employee Self-Service Direct Access' menu as the sub menu. You can attach this container menu if you want to have both the general self-service as well as the US specific menu.
• In case, you want only the US specific menu, you can attach the 'Simplified US Employee Self-Service Direct Access' sub menu directly to the Employee Self-Service responsibility.
Once you attach the 'Simplified US Employee Self-Service Direct Access' sub menu, users can navigate to the following function tabs by clicking My Actions and Reports:
• Payslip
• Payslip Modeling
• Employee W-2
• Tax Form
• Disclose Veteran Status
• Disclose Disability Status
• Tenure Status
• Academic Rank
Canada LocalizationMenus:
Simplified CA Employee Self-Service Container Name: Simplified CA Employee Self-Service Container
Code: Code CA_EMP_SS_SIMPLIFIED_CNTR

3-54 Oracle Self-Service Human Resources Deploy Self-Service Capability Guide
Prompt
Sub Menu and Code Function Description
General Self-Service Functions
Employee Self Service - Simplified (HR_EMPLOYEE_ACCESS_SIMPLIFIED)
Sub menu that brings in the general SSHR functionalities.
Canadian Self-Service Functions
Simplified CA Employee Self-ServiceDirect Access (CA_EMP_SS_SIMPLIFIED)
Sub menu that contains Canada specific functions.
• For information on the Employee Self Service - Simplified menu, see: Simplified User Interface (UI) Menus for General Self-Service, page 3-29.
• For the Canada localization, you can attach the 'Simplified CA Employee Self-Service Container' menu to the delivered or custom Employee Self-Service responsibility. This menu contains the general self-service menu as well as the Canada specific menu 'Simplified CA Employee Self-Service Direct Access' as a sub menu. You can attach this container menu if you want to have the general as well asthe Canada specific menu.
• In case, you want only the Canada specific menu, you can attach the 'Simplified CA Employee Self-Service Direct Access' menu directly to the Employee Self-Service responsibility.
Once you attach the 'Simplified CA Employee Self-Service Direct Access' sub menu,users can navigate to the following function tabs by clicking My Actions and Reports:
• Payslip

SSHR and User Access 3-55
• Payslip Modeling
• Employee T4
• Employee T4A
• Employee RL1
• Employee RL2
Mexico LocalizationOracle SSHR does not deliver Mexico specific localization simplified UI menus. To enable the Mexico localization users to use the Employee Self Service - Simplified menu,system administrators can complete the steps mentioned in the section: Enabling the Payslip Function for Localizations that do not have Simplified UI Menus, in the Simplified User Interface (UI) Menus for General Self-Service, page 3-29 topic.
Simplified User Interface (UI) Menus for EMEA LocalizationsFor an overview of the simplified user interface (UI) menus, see: Simplified User Interface (UI) Menus for Oracle SSHR, page 3-28
This topic provides details about the Oracle SSHR delivered simplified UI menus for EMEA (Europe, Middle East, and Africa) localizations.
UK LocalizationMenus
Simplified UK Employee Self Service Container Name: Simplified UK Employee Self Service Container
Code: UK_EMPLOYEE_SS_SIMPLIFIED_CNTR
Prompt
Sub Menu and Code Function
General SelfService
Employee Self Service - Simplified (HR_EMPLOYEE_ACCESS_SIMPLIFIED)
-

3-56 Oracle Self-Service Human Resources Deploy Self-Service Capability Guide
Prompt
Sub Menu and Code Function
UK Self-Service
Simplified UK Employee Self Service ( UK_EMPLOYEE_SS_SIMPLIFIED)
-
• For information on the Employee Self Service - Simplified menu, see: Simplified User Interface (UI) Menus for General Self-Service, page 3-29.
• For the UK localization, you can attach the 'Simplified UK Employee Self Service Container' menu to the Employee Self- Service responsibility. This menu contains the general self-service menu as well as the UK specific 'Simplified UK Employee Self Service' menu as the sub menu. You can attach this container menu if you want to have both the general self-service as well as the UK specific menu.
• In case, you want only the UK specific menu, you can attach the 'Simplified UK Employee Self Service' sub menu directly to the Employee Self-Service responsibility.
Once you attach the 'Simplified UK Employee Self Service' sub menu, users can navigate to the following function tabs by clicking My Actions and Reports:
• Payslip
• EP60
• P11D
• Vehicle Mileage Claim
• Payslip Modeler
Ireland LocalizationMenus
Simplified IE Employee Self Service Container Name: Simplified IE Employee Self Service Container
Code: Code IE_EMPLOYEE_SS_SIMPLIFIED_CNTR
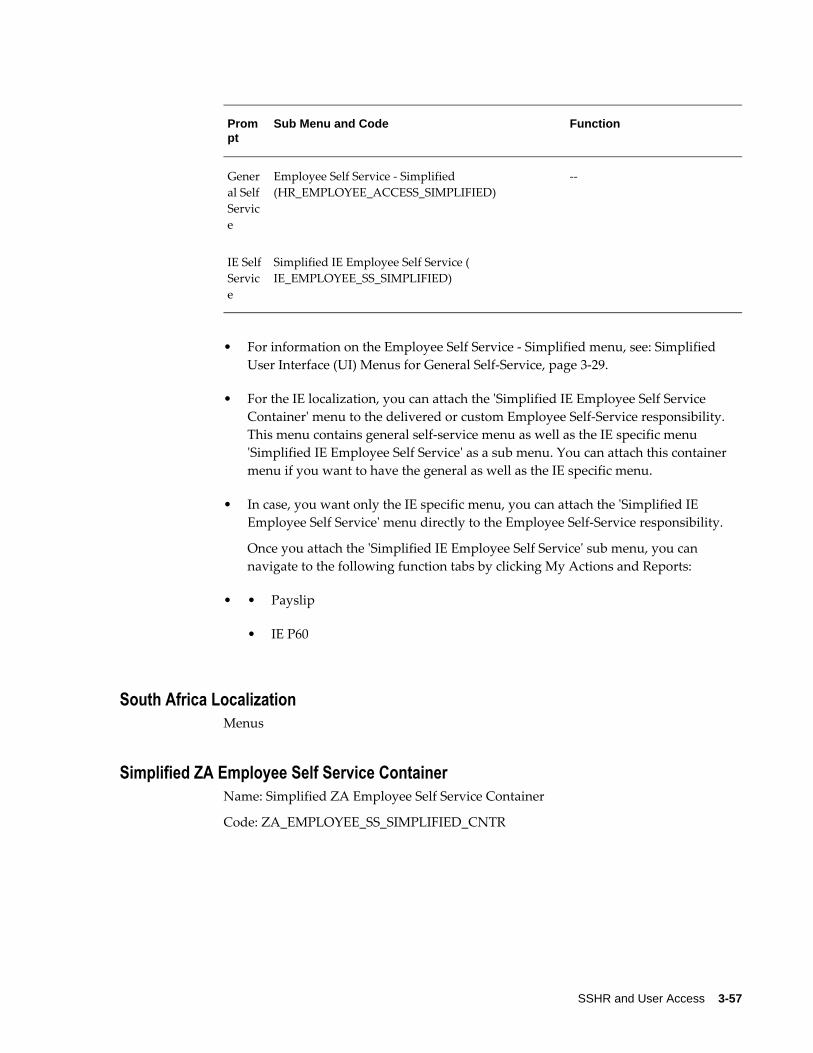
SSHR and User Access 3-57
Prompt
Sub Menu and Code Function
General SelfService
Employee Self Service - Simplified (HR_EMPLOYEE_ACCESS_SIMPLIFIED)
--
IE SelfService
Simplified IE Employee Self Service ( IE_EMPLOYEE_SS_SIMPLIFIED)
• For information on the Employee Self Service - Simplified menu, see: Simplified User Interface (UI) Menus for General Self-Service, page 3-29.
• For the IE localization, you can attach the 'Simplified IE Employee Self Service Container' menu to the delivered or custom Employee Self-Service responsibility. This menu contains general self-service menu as well as the IE specific menu 'Simplified IE Employee Self Service' as a sub menu. You can attach this container menu if you want to have the general as well as the IE specific menu.
• In case, you want only the IE specific menu, you can attach the 'Simplified IE Employee Self Service' menu directly to the Employee Self-Service responsibility.
Once you attach the 'Simplified IE Employee Self Service' sub menu, you can navigate to the following function tabs by clicking My Actions and Reports:
• • Payslip
• IE P60
South Africa LocalizationMenus
Simplified ZA Employee Self Service Container Name: Simplified ZA Employee Self Service Container
Code: ZA_EMPLOYEE_SS_SIMPLIFIED_CNTR

3-58 Oracle Self-Service Human Resources Deploy Self-Service Capability Guide
Prompt
Sub Menu and Code Function
General SelfService
Employee Self Service - Simplified (HR_EMPLOYEE_ACCESS_SIMPLIFIED)
-
ZA Self Service
Simplified ZA Employee Self Service (ZA_EMPLOYEE_SS_SIMPLIFIED)
-
• For information on the Employee Self Service - Simplified menu, see: Simplified User Interface (UI) Menus for General Self-Service, page 3-29.
• For the ZA localization, you can attach the 'Simplified ZA Employee Self Service Container' menu to the delivered or custom Employee Self Service responsibility. This menu contains general self-service menu as well as the ZA specific menu 'Simplified ZA Employee Self Service' as a sub menu. You can attach this container menu if you want to have general self-service as well as the ZA specific menu.
• In case, you want only the ZA specific menu, you can attach the 'Simplified ZA Employee Self Service' sub menu directly to the Employee Self-Service responsibility.
Once you attach the 'Simplified ZA Employee Self Service' sub menu, users can navigate to the following function tabs by clicking My Actions and Reports:
• Payslip
• ZA Tax Certificate
Simplified User Interface (UI) Menus for APAC LocalizationsFor an overview of the simplified user interface (UI) menus, see: Simplified User Interface (UI) Menus for Oracle SSHR, page 3-28
This topic provides details about the Oracle SSHR delivered simplified UI menus for APAC (Asia Pacific) localizations.
Australia LocalizationMenus:

SSHR and User Access 3-59
Simplified AU Manager Self-Service Container Name: Simplified AU Manager Self-Service Container
Code: AU_MGR_SS_SIMPLIFIED_CNTR
Prompt
Sub Menu and Code Function
General Self-Service Functions
Manager Self Service - Simplified (HR_LINE_MANAGER_SIMPLIFIED)
-
AU Self-Service Functions
Simplified AU Manager Self-Service Direct Access (AU_MGR_SS_SIMPLIFIED)
-
• For information on the Manager Self Service - Simplified menu, see: Simplified UserInterface (UI) Menus for General Self-Service, page 3-29.
• For the Australia localization, you can attach the 'Simplified AU Manager Self-Service Container' menu to the Manager Self- Service responsibility. This menu contains the general self-service menu as well as the Australia specific 'Simplified AU Manager Self-Service Direct Access' menu as a sub menu. You can attach this container menu if you want to have both the general self-service as well as the Australia specific menu.
• In case, you want only the Australia specific menu, you can attach the 'Simplified AU Manager Self-Service Direct Access' sub menu directly to the Manager Self Service responsibility.
Once you attach the 'Simplified AU Manager Self-Service Direct Access' sub menu, users can navigate to the My Actions and Reports: People in Hierarchy page by clicking My Actions and Reports. From the My Actions and Reports: People in Hierarchy page, they can select an employee in their hierarchy to view the following function tab:
View Employee Payment Summary

3-60 Oracle Self-Service Human Resources Deploy Self-Service Capability Guide
Simplified AU Employee Self-Service Container Name: Simplified AU Employee Self-Service Container
Code: AU_EMP_SS_SIMPLIFIED_CNTR
Prompt
Sub Menu and Code Function
General Self-Service Functions
Employee Self Service – Simplified (HR_EMPLOYEE_ACCESS_SIMPLIFIED)
-
AU Self-Service Functions
Simplified AU Employee Self-Service Direct Access ( AU_EMP_SS_SIMPLIFIED)
-
• For information on the Employee Self Service - Simplified menu, see: Simplified User Interface (UI) Menus for General Self-Service, page 3-29.
• For the Australia localization, you can attach the 'Simplified AU Employee Self-Service Container' menu to the delivered or custom Employee Self-Service responsibility. This menu contains general self-service menu as well as the Australia specific menu 'Simplified AU Employee Self-Service Direct Access' as a sub menu. You can attach this container menu if you want to have the general self-service as well as the Australia specific menu.
• In case, you want only the Australia specific menu, you can attach the 'Simplified AU Employee Self-Service Direct Access' sub menu directly to the Employee Self-Service responsibility.
Once you attach the 'Simplified AU Employee Self-Service Direct Access' sub menu,users can navigate to the following function tabs by clicking My Actions and Reports:
• Payslip
• Payslip Modeling
• Payment Summary
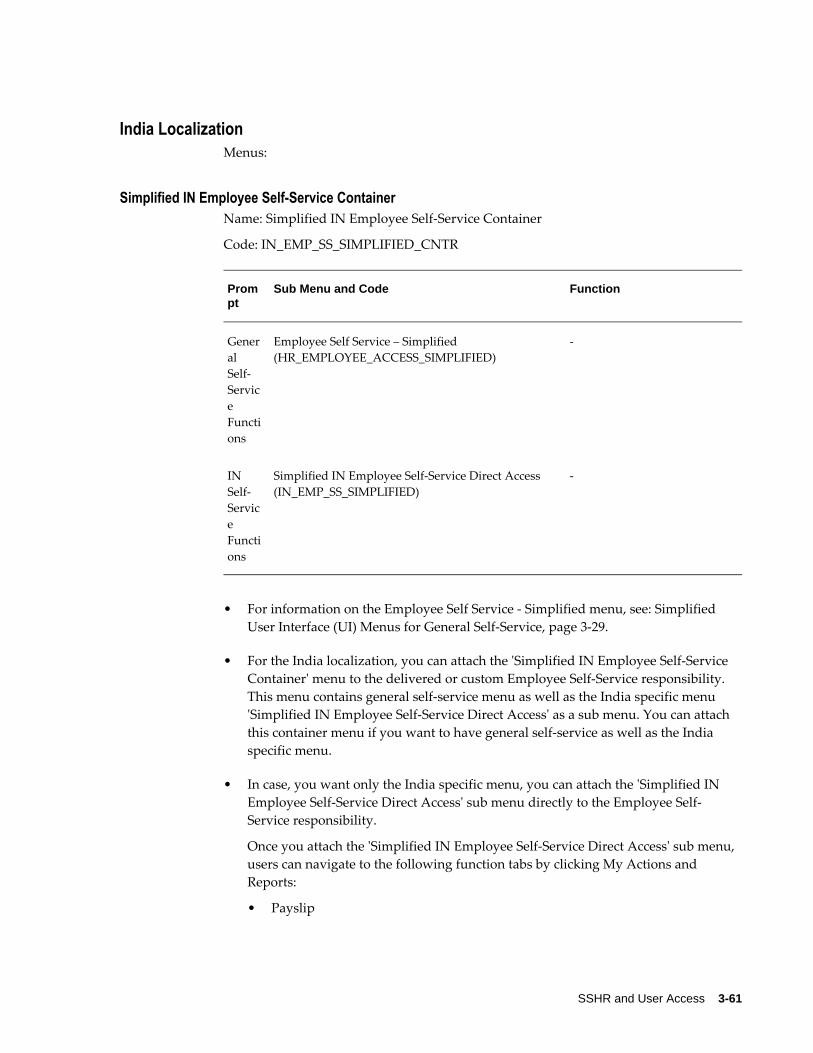
SSHR and User Access 3-61
India LocalizationMenus:
Simplified IN Employee Self-Service ContainerName: Simplified IN Employee Self-Service Container
Code: IN_EMP_SS_SIMPLIFIED_CNTR
Prompt
Sub Menu and Code Function
General Self-Service Functions
Employee Self Service – Simplified (HR_EMPLOYEE_ACCESS_SIMPLIFIED)
-
IN Self-Service Functions
Simplified IN Employee Self-Service Direct Access (IN_EMP_SS_SIMPLIFIED)
-
• For information on the Employee Self Service - Simplified menu, see: Simplified User Interface (UI) Menus for General Self-Service, page 3-29.
• For the India localization, you can attach the 'Simplified IN Employee Self-Service Container' menu to the delivered or custom Employee Self-Service responsibility. This menu contains general self-service menu as well as the India specific menu 'Simplified IN Employee Self-Service Direct Access' as a sub menu. You can attach this container menu if you want to have general self-service as well as the India specific menu.
• In case, you want only the India specific menu, you can attach the 'Simplified IN Employee Self-Service Direct Access' sub menu directly to the Employee Self-Service responsibility.
Once you attach the 'Simplified IN Employee Self-Service Direct Access' sub menu, users can navigate to the following function tabs by clicking My Actions and Reports:
• Payslip

3-62 Oracle Self-Service Human Resources Deploy Self-Service Capability Guide
• Payslip Modeling

SSHR and User Access 3-63
SSHR User Accounts
Batch Creation of User AccountsEvery Oracle HRMS user needs to be registered with a user name, password and responsibility. The creation or deletion of these user accounts can often be time consuming, particularly if you are restricting a user's access with a responsibility associated with a security profile and a menu.
A set of concurrent programs have been created for Oracle HRMS applications to automate the creation and management of large groups of user accounts. These programs are particularly useful if you have to create a large number of user accounts atinitial installation, for managing new hire user accounts, or for managing accounts for terminated employees.
Note: The creation of users with effective dates in the future is not supported.
The concurrent programs are:
• User Account Employee Extract Process
• Data Pump Engine
• Data Pump Batch Exceptions Report
Before you can use the concurrent programs however, you must write custom logic to reflect your enterprise's unique business rules. A user hook in the hr_user_acct_api is provided for you to do this.
You can find sample user hook code in the following package:
• $PER_TOP/patch/115/sql/hrhksmpl.pkb
Features of the Create Batch Users ProcessThe Create Batch Users process only creates new responsibilities or profile option values for the new responsibility you create in the batch. This is for Oracle HRMS Applications only. The batch process does not create security profiles either. However, if you create a security profile, in Oracle HRMS, you can assign the security profile to a new responsibility that is created for a user in the batch process. The batch process does not create security attributes for a responsibility or a user.
A naming convention you might use is email ID with a responsibility name. For example, email ID JSMITH associated with the Manager Self Service responsibility could be JSMITH_MSS. If you have set up security profiles for managers in Oracle

3-64 Oracle Self-Service Human Resources Deploy Self-Service Capability Guide
HRMS you can associate the security profile name to a user, a responsibility and a security profile. For example, the SEC_PF security profile could be JSMITH_MSS_SEC_PF.
You can create a template responsibility for the batch process. If you create a template responsibility, or use the predefined Manager Self Service responsibility, you can code anew responsibility created by the user hook to inherit the template responsibilities attributes. You can then overwrite the template responsibilities attributes, by setting values in the communication area, hr_user_acct_utility, of the API.
Creating Batch User Accounts with Concurrent ProgramsTo create batches of users you must first write user hooks with your own custom logic.
See: Writing User Hooks to Create Batch User Accounts, page 3-68.
When you have created user hooks, you can run a set of concurrent programs to manage the batch creation of users on an ongoing basis.
You run the concurrent programs from the Submit Requests window.
To create batch user accounts with concurrent programs:1. Run the User Account Employee Extract Process
This program extracts employee recordsand creates a batch file ofuser accounts to be created or deactivated.
2. Run Data Pump Engine
This program uses the batch from the employee extract process and calls the HR API to create or deactivate user accounts.
3. Submit Data Pump Batch Exceptions Report
This program reports errors in the Data Pump Engine.
User Account Employee Extract ProcessThis extract process produces output records which are used by the Data Pump Engine. The Data Pump Engine calls the hr_user_acct_api to create or deactivate user accounts.
The batch name is written to the HR_PUMP_BATCH_HEADERS table. The extracted employee records are written to the HR_PUMP_BATCH_LINES table. The batch line table has defined generic attributes but for each API, the Data Pump generates a view on the HR_PUMP_BATCH_LINES table to reflect the parameters of the API.
The specific views tailored for the hr_user_acct_api are:
• hrdpv_create_user_acct
Records for creating new user accounts can be mapped to this database view

SSHR and User Access 3-65
• hrdpv_update_user_acct
Records for terminated employees whose user accounts are to be inactivated can be mapped to this database view
Note: You must use a meaningful batch name. For example, run type and date range or another parameter. The batch name is the only way you can identify which batch to select in the Employee Data Pump process and the Data Pump Batch Exceptions Report processes.
To run the user account employee extract process:1. Access the User Account Employee Extract Process concurrent program.
2. Enter a batch name to identify the batch.
3. Enter the following date input parameters:
• Start Date
defaults to SYSDATE. This parameter sets the start date from which the records are extracted
• End Date
defaults to SYSDATE. This parameter is used in conjunction with the start date parameter to set a date range for the extraction of the records
4. Enter the following organization input parameters:
• Organization
this parameter comprises a list of all the business group organizations that the responsibility is associated with. If you select an organization from the list of values, the program only extracts records from the selected organization.
Note: If you enter values in the Organization parameter, they are superseded by any values you enter in the Organization Hierarchy,Organization Hierarchy Version, and Parent Organization parameters. These parameters always take precedence and replace the values entered in the organization parameter and work togetheras a set.
• Organization Hierarchy
organization hierarchy name for the responsibility's business group. This parameter contains an list of all the organizations hierarchies in the business

3-66 Oracle Self-Service Human Resources Deploy Self-Service Capability Guide
group.
• Organization Hierarchy Version
organization hierarchy version for the responsibility's business group. This parameter contains an list of the organization hierarchy versions selected in the organization hierarchy parameter.
• Parent Organization
parent organization within the hierarchy. Selecting the parent organization will extract records from this organization and any organizations below the parent organization.
5. Enter the Run Type input parameters by selecting a processing option from the list of values. The processing options are:
• Create User Account for New Hires
selects all employees hired between the start date and end date within the organization or organization hierarchy. This run type is used on an ongoing basis.
• Create User Accounts for All Employees
selects all employees as of the end date, within the organization or organizationhierarchy. The start date parameter will be ignored and employees terminated before the end date will not be selected either. This run type is used on the initial implementation and is usually used once.
• Inactivate User Account for Terminated Employees selects all employees terminated between the start date and end date parameter within the organization or organization hierarchy. Once selected, the user account for the terminated employee or worker is end dated. This run type is used on an ongoing basis to end date accounts for terminated employees and workers within the date range.
• Create and Inactivate User Accounts runs two queries. The first query selects allemployees and workers hired between the start date and end date within the organization or organization hierarchy. The second query selects all employees and workers terminated between the start date and end date within the organization or organization hierarchy. This run type is used on an ongoing basis.
Note: Each employee or worker extracted from the database is recorded in the hr_pump_batch_line table. The hrdpv_create_user_acct view has been defined to map create user

SSHR and User Access 3-67
accounts to the hr_pump_batch_line table. The hrdpv_update_user_acct view has been defined to map inactivate user accounts to the hr_pump_batch_line table. You can access these views because the API column name is used to identify the record rather than the generic names used in the hr_pump_batch_lines table.
Data Pump EngineThe Data Pump Engine will call the hr_user_acct_api to perform data validation and loading operations. The employee data is recorded in the hr_pump_batch_lines table.
Note: You must run the User Account Employee Extract Process before you run the Data Pump Engine process. The Data Pump Engine depends on the batch id the User Account Employee Extract process creates.
To run the Data Pump Engine concurrent program: 1. Access the Data Pump Engine concurrent program.
2. Enter the following parameters:
• Batch Name
you must enter the same batch name as you did in the Employee Extract Process. The Batch Name is the only information you have to identify which batch to run
• Validation Mode
you can set two values, YES or NO. A YES value enables you to review errors inthe batch, or related records in a batch, and change them before any are committed to the database.
A NO value will commit the data to the database if there are no errors. If there are errors the data will not be committed to the database and you can fix the errors and rerun the batch.
DataPump will set the Line Status to one of the following values:
• E - Error
• C - Completed
• U - Unprocessed

3-68 Oracle Self-Service Human Resources Deploy Self-Service Capability Guide
• V - Valid
See: Oracle HRMS Data Pump, Oracle HRMS Implementation Guide
Employee Data Pump Exceptions ReportEach person record is recorded in an individual batch line. The data pump exceptions report will show whether the error is from the batch header or batch line. You can identify which person record is in error from the person id in the exception report.
Note: You must run the User Account Employee Extract Process before you run the Data Pump Engine and Data Pump Batch Exception Reportprocesses. The Data Pump Engine and Data Pump Batch Exception Report processes depend on the batch id the User Account Employee Extract process creates.
To run the Data Pump Batch Exceptions report: 1. Access the Data Pump Process Exceptions Report concurrent program.
Note: You can run the Data Pump Engine and Data Pump Batch Exception Report processes in sequence. See: Overview of Concurrent Processing, Oracle E-Business Suite Setup Guide
See: Oracle HRMS Data Pump, Oracle HRMS Implementation Guide
Writing User Hooks for the Batch Creation of User AccountsBefore you write your user hook, you must review your user population and create a standard user name format, responsibility, and security profile for your enterprise. When you have defined a standard and created any security profiles or security groups you need, you can begin to write your user hook.
You can create a template responsibility for the batch process. If you create a template responsibility or use the predefined Manager Self-Service responsibility, you can code a new responsibility created by the user hook to inherit the template responsibilities attributes. You can then overwrite the template responsibility's attributes by setting values in the communication area of the API, hr_user_acct_utility.
You can find sample user hook code in the following package:
• $PER_TOP/patch/115/sql/hrhksmpl.pkb
To set up the prerequisites for writing user hooks:1. Create a security profile in Oracle HRMS and, using your naming standard,

SSHR and User Access 3-69
associate the security profile and responsibility to a new user in your user hook code.
2. Implement security groups to manage security profiles with the Enable Security Groups profile option. By implementing security groups, you can associate more than one security profile to a single responsibility.
Note: Before you write user hooks, run the Security List Maintenance concurrent process. This ensures that the security profiles work.
Note: If you plan to use security groups in a responsibility defined for use in Oracle Self-Service Web Applications, or plan to create a new responsibility for use in Oracle Self-Service Web Applications, set the Enable Security Groups profile option at the application level: Oracle Self Service Web Applications.
3. Set up a guest user account in Oracle Applications by setting the GUEST USER PASSWORD profile option. This must be in the format <username/password>. You can obtain and verify the guest user account with your Database Administrator.
4. Use the Define System Profile Option Value in System Administrator responsibility to set a security profile at Site or Application level. This is necessary because security profile option values can be set at Responsibility or User level with the batch process.
Note: The sample user hook is called hrhksmpl.pkb and each code block is documented. You can also find a copy of the sample in the following directory $PER_TOP/patch/115/sql.
See: API User Hooks, Oracle HRMS Implementation Guide
See: Sample Code, Oracle HRMS Implementation Guide
Tables Updated in the Batch ProcessThe batch process inserts records into the following FND tables:
• FND_USER
• FND_USER_RESP_GROUPS
to enable a new user to use a designated responsibility
• FND_RESPONSIBILITY
if new responsibilities are created in the custom user hook module for the new user

3-70 Oracle Self-Service Human Resources Deploy Self-Service Capability Guide
• FND_RESPONSIBILITY_TL
stores the translated value of responsibility name
• FND_RESP_FUNCTIONS
if the new responsibility has function exclusion rules
• FND_PROFILE_OPTION_VALUES
to set profile option values for any newly created responsibility for the user.
• PER_SEC_PROFILE_ASSIGNMENTS
if security groups are enabled.
The batch process automates the functionality of the Define User Form and inserts records into the following FND tables:
• FND_USER
• FND_RESP_GROUPS
Note: Security attributes for a user cannot be created in the batch process
The batch process automates the functionality of the Define Responsibility Form and inserts records into the following FND tables:
• FND_USER_RESP_GROUPS
• FND_RESPONSIBILITY_TL
Note: Security attributes for a responsibility cannot be created in the batch process
The batch process automates the functionality of the Profile Option Value Form and inserts records into the following FND table:
• FND_PROFILE_OPTION_VALUES
To write batch user hooks with your own custom business logic:1. To create batches of users you need to write PL/SQL programs in the user hooks of
the following API:
• hr_user_acct_api
This API contains two procedures:

SSHR and User Access 3-71
• hr_user_acct_api.create_user_acct
used to create a new user
• hr_user_acct_api.update_user_acct
used to inactivate user accounts, for example on termination of an employee or worker
To set up the Create User API procedure:1. Write a PL/SQL program to communicate to the API the user name, password,
responsibility, and profile to use when it creates a new user account for the employee or worker in the process.
There are two user hook points in the create user procedure:
• hr_user_acct_bk1.create_user_acct_b
before-process hook point
• hr_user_acct_bk1.create_user_acct_a
after-process hook point
Use the before-process hook for the PL/SQL program. The program enters these values into the global variables or record structures in hr_user_acct_utility.
Note: You can supply passwords for the new user account or leave the API to generate a random string. The string will be in an 8 character alphanumeric format.
2. Write a PL/SQL program for the after-process hook if you leave the API to generate a password. The program must save the password of the new user account to a file that can be accessed by a system administrator. This is necessary because the password created by the API is encrypted when it is saved to the FND_USER table in the database. You must capture the password before it is encrypted so that you can notify employees of their initial password.
Note: If you supply a password, you may not need to write a user hook for this after-process hook point.
To set up the Update User API procedure:The update user API procedure is used to inactivate employees. The API end dates the employees record in the FND_USER and FND_USER_RESP_GROUPS tables and is not meant for general purpose update.
3-72 Oracle Self-Service Human Resources Deploy Self-Service Capability Guide
There are two user hook points in the update user procedure:
• hr_user_acct_bk2.update_user_acct_b
before process hook point
• hr_user_acct_bk2.update_user_acct_a
after process hook point
The before process user hook point is used for your extra validation. The API will not pick up any values from your user hook.
The after process user hook point executes any extra logic after the main API validation and processing logic has successfully completed and the update process is finished.
To carry out the remaining steps:1. Compile the custom package you have created after you have written your user
hooks.
2. Register and link your custom package procedures to the appropriate API user hooks when you have compiled the package.
See: API User Hooks, Oracle HRMS Implementation Guide
A sample script to register and link your custom package and procedures is provided below.
Sample code
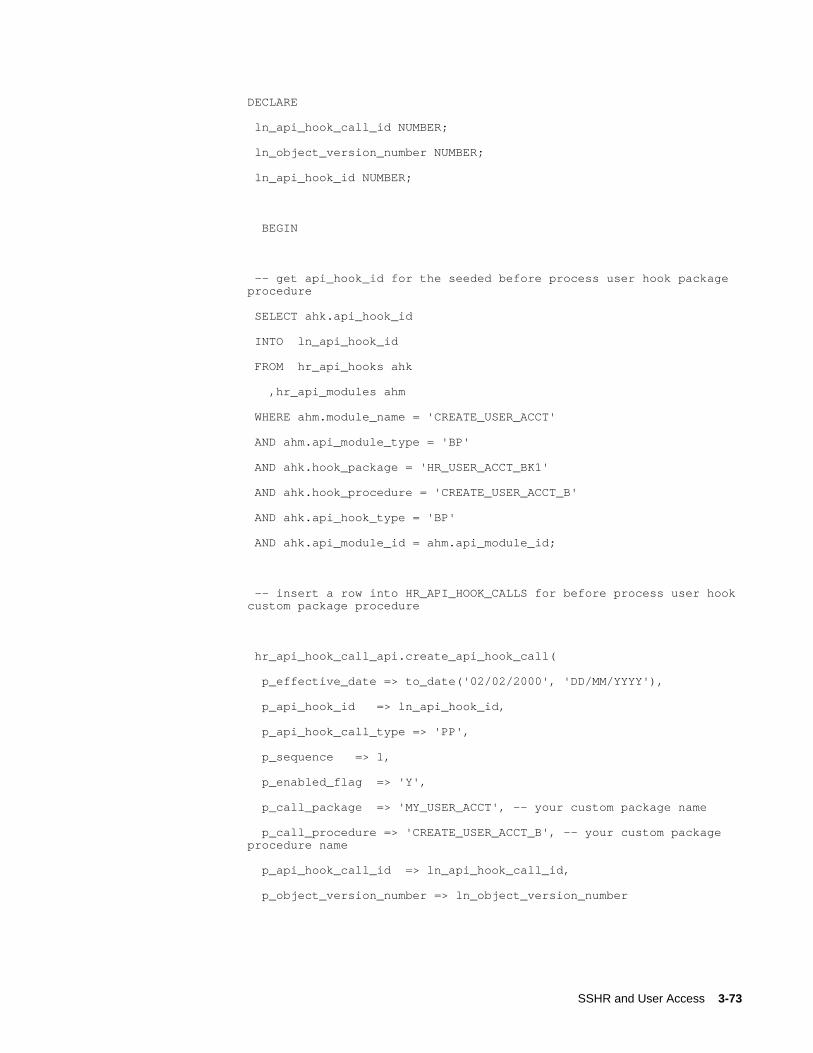
SSHR and User Access 3-73
DECLARE
ln_api_hook_call_id NUMBER;
ln_object_version_number NUMBER;
ln_api_hook_id NUMBER;
BEGIN
-- get api_hook_id for the seeded before process user hook package procedure
SELECT ahk.api_hook_id
INTO ln_api_hook_id
FROM hr_api_hooks ahk
,hr_api_modules ahm
WHERE ahm.module_name = 'CREATE_USER_ACCT'
AND ahm.api_module_type = 'BP'
AND ahk.hook_package = 'HR_USER_ACCT_BK1'
AND ahk.hook_procedure = 'CREATE_USER_ACCT_B'
AND ahk.api_hook_type = 'BP'
AND ahk.api_module_id = ahm.api_module_id;
-- insert a row into HR_API_HOOK_CALLS for before process user hookcustom package procedure
hr_api_hook_call_api.create_api_hook_call(
p_effective_date => to_date('02/02/2000', 'DD/MM/YYYY'),
p_api_hook_id => ln_api_hook_id,
p_api_hook_call_type => 'PP',
p_sequence => 1,
p_enabled_flag => 'Y',
p_call_package => 'MY_USER_ACCT', -- your custom package name
p_call_procedure => 'CREATE_USER_ACCT_B', -- your custom package procedure name
p_api_hook_call_id => ln_api_hook_call_id,
p_object_version_number => ln_object_version_number

3-74 Oracle Self-Service Human Resources Deploy Self-Service Capability Guide
);
-- get api_hook_id for the seeded after process user hook package procedure
SELECT ahk.api_hook_id
INTO ln_api_hook_id
FROM hr_api_hooks ahk
,hr_api_modules ahm
WHERE ahm.module_name = 'CREATE_USER_ACCT'
AND ahm.api_module_type = 'BP'
AND ahk.hook_package = 'HR_USER_ACCT_BK1'
AND ahk.hook_procedure = 'CREATE_USER_ACCT_A'
AND ahk.api_hook_type = 'AP'
AND ahk.api_module_id = ahm.api_module_id;
-- insert a row in HR_API_HOOK_CALLS for after process user hook custom package procedure
hr_api_hook_call_api.create_api_hook_call(
p_effective_date => to_date('02/02/2000', 'DD/MM/YYYY'),
p_api_hook_id => ln_api_hook_id,
p_api_hook_call_type => 'PP',
p_sequence => 1,
p_enabled_flag => 'Y',
p_call_package => 'MY_USER_ACCT',
p_call_procedure => 'CREATE_USER_ACCT_A',
p_api_hook_call_id => ln_api_hook_call_id,
p_object_version_number => ln_object_version_number
);
EXCEPTION
when others then
dbms_output.put_line('Error in seeding user hook procedures: ' ||

SSHR and User Access 3-75
sqlerrm);
END;
/
commit;
exit;
Execute User Hook Pre-Processor
When you have registered and linked your custom package procedure to the API you should execute the user hook pre-processor program. Run the hrahkone.sql found in $PER_TOP/patch/115/sql directory to do this. However, you'll need to know the internal api_module_id for the HR_USER_ACCT_API before running the script. To find the internal api_module_id you should run the script below: SELECT api_module_id
,api_module_type
,module_name
FROM hr_api_modules
WHERE module_package = 'HR_USER_ACCT_API';
You should see results similar to those below: API_MODULE_ID API_MODULE_TYPE MODULE_NAME
--------------------------------------------------------
383 BP CREATE_USER_ACCT
384 BP UPDATE_USER_ACCT
Note: Your api_module_id will be different from the one above.
Use your own API module id when executing hrahkone.sql. If you have a customer package for UPDATE_USER_ACCT hook point, you will need to run hrahkone.sql twice. Once for the api_module_id for CREATE_USER_ACCT hook call and secondfor the UPDATE_USER_ACCT hook call.
3. Enter any new message text for the messages that you issue in your custom packagewhen you have run the pre-processor program. Use an Application Developer responsibility in Oracle Applications to create your message text.
4. Ensure you have set the application level correctly if you use security groups to manage security profiles. For example, in SSHR you must set the application level to Oracle Self Service Web Applications. Set the security profile option to the

3-76 Oracle Self-Service Human Resources Deploy Self-Service Capability Guide
application level if you need to associate the responsibility with another HRMS application.
This updates the following tables: per_sec_ profile_ assignments, and fnd_user_resp_groups
5. Make sure that the Enable Security Groups profile option is Yes.
6. Set the Data Pump error parameters. These parameter control aspects of the Data Pump Engine process.
See: Oracle HRMS Data Pump, Oracle HRMS Implementation Guide.
Note: You must set the MAX_ERRORS_ALLOWED parameter to see all the errors logged during the run. This parameter controls how many errors are issued before the engine stops processing. Thedefault value for the parameter is 20 or the chunk size. If you do not set this parameter value, the engine will stop processing after 20 errors.
7. Test the custom packages by running the following programs:. To test, run the User Account Employee Extract concurrent program to create batches of extracted employees. Run the Data Pump Engine concurrent program to process your batch, and run the Data Pump Batch Exceptions
• User Account Employee Extract concurrent program - to create batches of extracted employees
• Data Pump Engine concurrent program - to process your batch
• Data Pump Batch Exceptions concurrent program - to report any errors.
If necessary, you can rerun the batch after fixing any errors.
Note: You can use the Pipemon utility to help you debug your code.
See: Creating Batches of Users with Concurrent Programs, page 3-64
Extending SSHR 4-1
4Extending SSHR
Configuration OverviewAll Oracle Self-Service Applications, including the SSHR modules, are built on the Oracle Applications (OA) Framework to enable maximum flexibility. Although the SSHR modules are delivered with predefined settings which meet the HRMS requirements of the majority of enterprises with little or no configuration, there are many configuration options available to ensure that all your enterprise requirements are met.
This chapter provides an overview of the different configuration steps for SSHR and introduces a common configuration method that you can apply to any SSHR module in conjunction with the function-specific configuration steps. For detailed information on the configuration steps, see the following topics:
• User Access, page 3-1
• Workflow, page 5-1
• Page Layouts, page 6-1
• Approvals, page 7-1

4-2 Oracle Self-Service Human Resources Deploy Self-Service Capability Guide
Extending SSHR
Guidelines for Configuring SSHR FunctionsThe best approach to take when configuring SSHR is to first configure a sample function, test it until you are satisfied with the results, and then repeat the steps for the other functions.
Start your configuration process by configuring a module for a particular group of users. It is important to consider both the module and the intended audience at the same time because, if required, you can configure multiple variations of the same module to suit different groups of users. For example, you might choose to implement one version of the Personal Information module for all employees, another version for one set of managers, and another version for a second set of managers.
Note: If function-level personalizations have been delivered by Oracle for a function you wish to copy, be aware that you will lose these personalizations if you create a custom version of the function.
See: Function-level Personalizations, page 6-4
See Supplied Functions, page 4-16 and Menu Function Parameters, page 4-34 for information on parameter use in functions.
User AccessYou make your new version of the SSHR module available to your target group of usersby creating an AOL function and attaching it to a menu. The menu is attached to a responsibility which you assign to your users.
You specify whether the AOL function is restricted to the user's own records or whethera manager can use the function to select from a list of employees and workers.
For each responsibility (or combination of responsibility and user), you need to define a security profile to restrict the user to an appropriate business group and, if required, a subset of a business group. A typical subset would be all employees in a specific organization or all employees reporting to the current user.
You also need to consider whether to allow users to access people in other business groups and whether users can access additional people who may grant them access to their records using the Release Employee Information function.
See: User Access and Security, page 3-3

Extending SSHR 4-3
Process FlowsIf the SSHR modules are workflow-enabled (see: Summary of SSHR Modules table, page 1-7), you can choose to modify the predefined process flow if required. For example, you can chain two modules together (where permitted) or introduce additional branching logic.
See: Self-Service Workflows, page 5-3
ApprovalsYou must decide whether changes that users make using your modified function are subject to approval and who the approvers are. You can either use the Workflow Builder, PL/SQL, or Oracle Approvals Management to control transaction approvals.
See: Approvals, page 7-9
Page LayoutsIn most cases, the predefined page layouts contain all the fields that users need to perform a transaction. However, you may decide that some changes are required. For example, you could change the field prompts to match terminology used by your enterprise. You can also add more detailed instructions to the web pages, display selected flexfield segments, and hide fields or sections of web pages.
You modify page layouts using the Personalization Framework.
See: The Personalization Framework, page 6-4
Module-specific Configuration OptionsDetailed information on the configuration options for each module is given in the corresponding sections. Each section contains the following information:
• menu and function names
• workflow process names and attributes
• region, tip, and instruction names
• profile options
Transaction HistoryThe history of all transactions and changes to transactions is stored on the database. If you need to investigate transaction history you can query the tables below using either SQL*Plus, Discoverer workbooks, or Report*Writer reports.

4-4 Oracle Self-Service Human Resources Deploy Self-Service Capability Guide
Additional Information: See also My Oracle Support Knowledge Document 2277369.1, Oracle E-Business Suite Support Implications for Discoverer 11gR1.
Data Mining Action History tables
Table name Description Primary Key
PQH_SS_TRANSACTION_HISTORY
Transaction History
This table holds historical information that identifies each transaction. The data in this table is unlikely to changeover the course of a transaction.
Transaction ID
PQH_SS_APPROVAL_HISTORY
Approval Changes
This table tracks actions takenby approvers. Each action taken by an approver constitutes a separate entry.
Transaction Id and Approval Id
PQH_SS_STEP_HISTORY Step History
The Step History table stores changes to existing transactions.
Transaction Id, Transaction Step Id and Approval Id
PQH_SS_VALUE_HISTORY Transaction Value History
This holds transaction values for every step history created.
Managing Preferred Currencies You can use the General Preferences page in SSHR to specify a preferred currency for certain SSHR transactions. If, as a Manager, your preferred currency differs from the operating currency for a direct report, you can see the transaction amount in both currencies in selected SSHR pages. The currencies are displayed in the format:
• Operating currency (Preferred currency), for example,
• 5,979.02 USD (5,315.69 EUR)

Extending SSHR 4-5
Note: To use this functionality, you must first define daily exchange rates using Oracle General Ledger. If you do not define daily exchange rates, or attempt to use the preferred currency for future-dated transactions, only the operating currency is displayed.
The SSHR pages that support this functionality are:
• SSHR Assignment header
Note: By default, the Salary field in the Assignment Header region is not displayed and must be rendered through personalization.
• Pay Rate Review page
• My Employee Information page (Salary field in Header region, Salary view, Training view)
• Individual Compensation Distributions Review page
Note: On this page, the preferred currency is displayed in a separate Preferred Currency field.
For HR Professionals, the following page supports this functionality:
• HR View (Compensation Activity view)
Managing Dates in SSHR
Effective DatesWhen a user initiates an action the application prompts the user for an effective date. The user can elect for the changes to take place as soon as final approval is made. Or theuser can supply an effective date. The application checks the hire date and tells the user to select a later date. The application also informs the user of any pending changes to that person's record.
The application validates the entry to make sure the data is correct using specific criteria. The following checks are carried out in a chained process:
• hire_date
Checks that the effective date entered is later than the hire date. If it is not, an error will be issued and the user will be unable to continue.
• termination_date
4-6 Oracle Self-Service Human Resources Deploy Self-Service Capability Guide
Checks that the effective date entered is earlier than the termination date. If it is not,an error will be issued and the user will be unable to continue.
• pending_workflow
Checks if there are changes pending in the workflow tables for the selected person.
If there are pending changes, the user will be unable to continue with the action unless the profile option HR:Allow Concurrent Self Service Actions is set to Yes.
• future_assignment
Checks if there are any future assignment changes with respect to the effective date entered.
• insert_mode
Issues a warning (alert) only if the effective date of the assignment is less than a future-dated change.
To configure the outcome of the above checks, see Handling Concurrent Transactions, page 4-6 below.
Handling Concurrent TransactionsThe application supports multiple simultaneous actions on the same employee or worker. To activate this feature you need to set the system profile option HR:Allow Concurrent Self Service Actions to Yes.
Enabling concurrent transactions can give rise to potential data conflicts from either intervening actions or actions dated in the future. Two profile options enable you to control the potentially conflicting data: HR:Refresh Self Service Actions With Data FromIntervening Actions, and HR:Manage Self Service Actions When Future-Dated Changes Exist.
Intervening ActionsIf someone approves an action on an employee or worker while a manager is performing a transaction on the same employee or worker, and the effective date of the approved action is prior to the current action's effective date, then a potential conflict exists. The system profile, HR:Refresh Self Service Actions With Data From Intervening Actions, enables you to deal with this potential conflict.
• If you set the system profile to Yes, the application displays a warning message listing the attributes that have been changed by the prior approved action. A refreshof the current data will occur. The manager will then be able to proceed with the transaction.
• If you set the system profile to No, the application displays a warning with the following message: "The database contains future-dated changes to this person's

Extending SSHR 4-7
record. Your current setup does not allow you to complete this action. Contact your system administrator." The current transaction will fail.
Future-Dated ChangesWhen the application encounters a pending change to the manager's selected person's record, effective subsequent to the current action's effective date, the future-dated change poses a potential conflict with the current action. You can manage these potential conflicts by setting the profile option, HR:Manage Self Service Actions When Future-Dated Changes Exist, to one of the values below:
• Allow Approval (Notify HR Rep)
After completing the chain of approval, a notification of the transaction will be sent to an HR Representative who can review the change, then apply the necessary changes to the database manually.
You must define a role based on the predefined type HR Representative, and assignit to each HR manager you want to receive the notification. The first HR manager toact on the notification and apply manual changes does so on behalf of all HR Representatives.
• Stop with an Error
The manager will be forced to choose an Effective Date subsequent to the future-dated change.
Important: If you enable the system profile HR:Manage Self Service Actions When Future-Dated Changes Exist by setting it to Allow Approval (Notify HR Rep), Oracle highly recommends that you also enable HR:Refresh Self Service Actions with Data from Intervening Actions. Otherwise you should disable HR:Refresh Self Service Actions with Data from Intervening Actions.
Note: A system administrator or other implementer of Self-Service Benefits can access the Change Session Date menu option for testing future dated enrollments. You should remove this menu item in your production environment so that benefits participants do not alter their enrollment date. To remove the Change Session Date item from the menu, query the BEN_SELF_SERVICE_BENEFITS menu option in the Menus window and delete the Change Session Date menu entry.
Legislation and Customer Overrides An override enables a user to customize field values and data in a code package . An override is different from a user hook, which enables users to write code and update

4-8 Oracle Self-Service Human Resources Deploy Self-Service Capability Guide
both fields and HRMS database tables.
Within SSHR, you can use overrides in the following situations:
• To customize the fields used when loading data from Oracle HRMS tables to the Employee Directory repository tables to meet user and legislation requirements. Forexample, to enable single sign on for the Employee Directory you use an override toadd the FND_USER field to the Employee Directory tables..
For more information, see: Enabling Customer Overrides for the Employee Directory, page 9-41.
• To populate the Employee Directory with data.
For more information, see: Legislation and Customer Overrides for the Employee Directory, page 9-44.
• To configure the read-only display of job and position fields in the following pages.
• My Information and My Employee Information
See: My Information and My Employee Information, page 9-73.
• Person Header and Assignment Headers in all Manager Self-Service pages.
• Selected Enter Process pages
• People in Hierarchy page
(supervisor hierarchy and position hierarchy)
• My List page
• Simple Search page
Note: The overrides are not used in the Advanced Search page as the job and position fields are used for searching.
• Person Detail page
See: Examples of Overrides, page 4-9
To enable an override, you must carry out the following steps:
1. Open the required package. This package may be one of the following:
• perwscor.pkb (for My Employee Information)
• peredcor.pkb (for the Employee Directory)

Extending SSHR 4-9
Note: The packages reside in the following directory:
$PER_TOP/patch/115/sql directory
2. Modify the override flag in the package to enable the customer override. The override flag is similar to the following line of code:g_override_flg BOOLEAN:=FALSE
Change the BOOLEAN value to TRUE.
3. Insert your code for the override. For examples of code, see the documentation relevant to your function:
• Customer Overrides for Single Sign On, page 9-41
• Legislation and Customer Overrides for the Employee Directory, page 9-44
• My Information and My Employee Information, page 9-73
4. Compile the override and apply to database.
When the override packages are implemented, they are called by the application.
Examples of OverridesDisplaying Position or Job Names
You can use customer overrides to configure a user-defined format for displaying position or job names. For example, you can choose to replace the defined format for displaying a user's job with a user-defined name format consisting of fewer segments.
For example, instead of displaying a job as:
12345.Global Development.Development Manager.12B
you can display only the third segment (Development Manager).
To make this change, you need to modify the perwscor.pkb code package to include thefollowing code:
Note: The packages are available within $PER_TOP/patch/115/sql directory. The file containing the package header is perwscor.pkh.
FUNCTION getJobName( p_job_id IN number, p_bg_id IN number, p_value IN varchar2//Actual MLS job name)return varchar2
To make a similar change to the position field, you need to modify the package to

4-10 Oracle Self-Service Human Resources Deploy Self-Service Capability Guide
include the following code:FUNCTION getPositionName( p_pos_id IN number, p_bg_id IN number, p_value IN varchar2)return varchar2
You also need to change the job override and/or position override flag to TRUE in the package. In the following example, only the job override flag is set to TRUE.:g_job_override_flg BOOLEAN:=TRUE;g_position_override_flg BOOLEAN:=FALSE
Defining Menus for SSHRThe predefined self-service responsibilities are linked to a menu that contains a number of functions. We recommend that you create a menu based on the predefined menus and, if necessary, add or remove functions so that the menus accurately reflect your organization's structures and business processes. You can base your configuration on the sample menus provided although you should not change the predefined menus directly.
You configure menus in the Menus window.
To set up menus for self-service:1. Review the sample functions in the Employee Self-Service User Menu, Contingent
Worker Self Service Menus, and the Manager Self-Service User Menu. Decide whichfunctions you want to include in your user menus.
Note: For US Federal, review the Federal Employee Self-Service, the Manager Self-Service, and the Federal HR Self-Service menus.
See: Self-Service Responsibilities and User Menus, page 3-14
See: Menu Window, Oracle E-Business Suite Security Guide
2. Create your own menu based on the predefined menus.
3. Make sure that all the functions you require are listed in the Function column of your menu.
4. Make sure the following submenus are attached to your custom menu:
• Employee Enter Process menu - for employee, worker, and manager menus
• Personal Actions menu - for employee, worker, and manager menus
• Manager Actions menu - for manager menus
Extending SSHR 4-11
• HR Self-Service Pages sub menu - for manager menus
• SSHR hierarchy and search functions - if your menu calls the Hierarchy, My List, and Search functions
5. Make sure that the following functions are attached to your custom menu:
• Personal Actions V4.0 (or a configured copy) - for employee and worker menus
• Manager Actions V4.0 (or a configured copy) - for manager menus
• Suspended Actions - for employee, worker, and manager menus
6. Save your work.
Defining User Access to Self-Service FunctionsTo define user access to self-service functions, you need to define a user, assign a responsibility, assign profile values, and assign a menu to the responsibility. The following process takes you through the separate procedures.
We recommend that you create a different responsibility for each target group of users.
To define a responsibility for a self-service application:1. Follow the standard procedure for creating a responsibility.
See: Defining a Responsibility, Oracle E-Business Suite Security Guide
2. Define your responsibilities to be available from Oracle Self-Service Web Applications.
3. Consider whether you should create menu or function exclusions to restrict the employee and contingent worker menus.
To set your system profiles:1. Set the system profiles for security groups.
If Security Groups are not enabled, use the System Profile Values window to link your responsibility to a security profile in the appropriate Business Group.
If Security Groups are enabled, you can set the security profile at the user level using the Assign Security Profiles window.
Note: Self-Service Benefits users: If you do not link your responsibility to your business group using the HR:Security Profile,
4-12 Oracle Self-Service Human Resources Deploy Self-Service Capability Guide
any benefits participants who attempt to enroll will receive an errormessage indicating that they cannot enroll.
2. Set any additional required profiles.
• HR: Security Profile
• HR:Cross Business Group (if you want users to be able to select employees from different business groups in lists of values)
• HR:Restrict Transactions across Business Groups in SSHR (if you want to stop your users from performing transactions on employees from different business groups. This profile option works together with the HR:Cross Business Group profile option).
• HR:Personal Actions Menu (for SSHR)
• HR: Manager Actions Menu (for SSHR)
Note: You need to restart the Apache listener after changing profile options.
To define a user:• Define the people you would like to access Self-Service. There are two ways to do
this. You can follow the typical steps for defining a new user and then assign each individual user to a responsibility that enables access to self-service benefits.
See: Users Window, Oracle E-Business Suite System Administrator's Guide - Security
Alternatively, you can set up concurrent programs to automate this manual process.
See: Creating Batch User Accounts with Concurrent Programs, page 3-64
Defining Functions for SSHRIf required, you can create your own SSHR functions using the predefined functions as a basis.
You can then configure how the function is accessed, for example, whether it is available from the Actions pages or from the People Search page.
For information on modifying the related workflow processes, see Configuring Workflow Objects, page 5-8
You create the function in the Form Functions window using the system administrator responsibility.

Extending SSHR 4-13
To create a function based on a predefined SSHR function:1. Query the function on which you want to base your function, for example, Personal
Information (HR_PERINFO_SS).
2. Insert a new record beneath it in the table.
3. Move from field to field in the new record using the tab key. In each field, press Shift and F5 to duplicate the field value from the record above.
Note: The Function Name and User Function Name fields must be unique so insert your standard prefix in front of the value duplicated from the previous record.
4. In the Parameter field, note that the pItemType parameter value is 'HRSSA' (the internal name for the predefined HR workflow item type). Leave this value unchanged but change the pProcessName parameter from HR_PERSONAL_INFO_JSP_PRC to the name of your configured process.
See: Self-Service Workflows, page 5-3
5. Change the OAFunc parameter to your configured function name, for example HR_PERINFO_SS
6. If you have created a custom manager function or an Enter Process function (Hierarchy, My List or Search page), you can display a navigation link, or breadcrumb on the web page. To do this add the addBreadCrumb parameter with value N.
See: Menu Function Parameter Descriptions, page 4-34
7. If you are using Oracle Approvals Management (AME) for your function, add the following parameters:'
• pAMETranType=SSHRMS
• pAMEAppId=800
See: Configuring SSHR Functions to Use Oracle Approvals Management (AME), page 7-17
8. Enter the parameter values in the HTML call field. You enter the parameters as follows: Note that the HTML call field is made up of several parameters:
• akRegionCode
You can use a different person selection page instead of the Hierarchy Page. Forexample, you may want to launch the Search page as the initial page. This is

4-14 Oracle Self-Service Human Resources Deploy Self-Service Capability Guide
typically used if you are creating functions for an HR Professional user. Enter the parameter values as follows:
• HR_PERSON_TREE_TOP_SS
For the Hierarchy page
• HR_PERSON_SEARCH_TOP_SS
For the Person Search page
• HR_MY_LIST_TOP_SS
For the My List page
• akRegionApplicationId
This value is 800.
To make the function available globally or for specific legislations:1. If this function is for a specific legislation, add it to the appropriate
HR_cc_SS_FUNCTIONS_CUSTOM data security menu. Otherwise, add it to the HR_GLOBAL_SS_FUNCTIONS_CUSTOM data security menu.
Note: You do not need to enter a prompt for the function. Also, make sure that the Granted check box is unchecked.
2. Save your work.
To add the function to an employee or contingent worker menu in the Menus window:1. Use the system administration responsibility to display the Menus window.
2. Add the function to the top-level menus and/or submenus as appropriate. For example, you may want to add the function to your configured copy of the Employee Self-Service menu.
See: Defining Menus for SSHR, page 4-10
To make a function available from the Actions pages:1. If this function is appropriate for employees and workers to perform on themselves,
add it to your configured copy of the Personal Actions menu.
2. If this function is appropriate for managers to perform on other employees, add it to your configured copy of the Manager Actions menu.

Extending SSHR 4-15
Note: You only add the employee version of the function to the Manager Actions menu.
To make a function available from the Manager menus via the People Search page:To make this function available to managers directly from the menu via the People Search page, you need to create a matching function. Model your matching function on the corresponding predefined manager function.
You create your matching function in the Form Functions window.
1. Query the predefined manager function on which you want to base your function, for example, Personal Information Manager (HR_PERINFO_MGR_SS).
2. Insert a new record beneath it.
3. Move from field to field in the new record using the tab key. In each field, press Shift and F5 to duplicate the field value from the record above. Insert your standardprefix where required.
4. In the Parameter field, change the pCalledFrom parameter to match the name of your original custom function (as created in the above procedure)
The HTML call field is OA.jsp?akRegionCode=HR_PERSON_TREE_TOP_SS&akRegionApplicationId=800. This corresponds to the Person Search page. When the user selects a person from this page, SSHR calls the AOL function specified by the pCalledFrom parameter, appending the selected person_id to the pPersonID parameter specified for that function.
5. Save your work.
6. Add the function to the top-level menus and/or submenus as required.
Note: There is no need to add this type of function to the data security menus or to the actions menus.
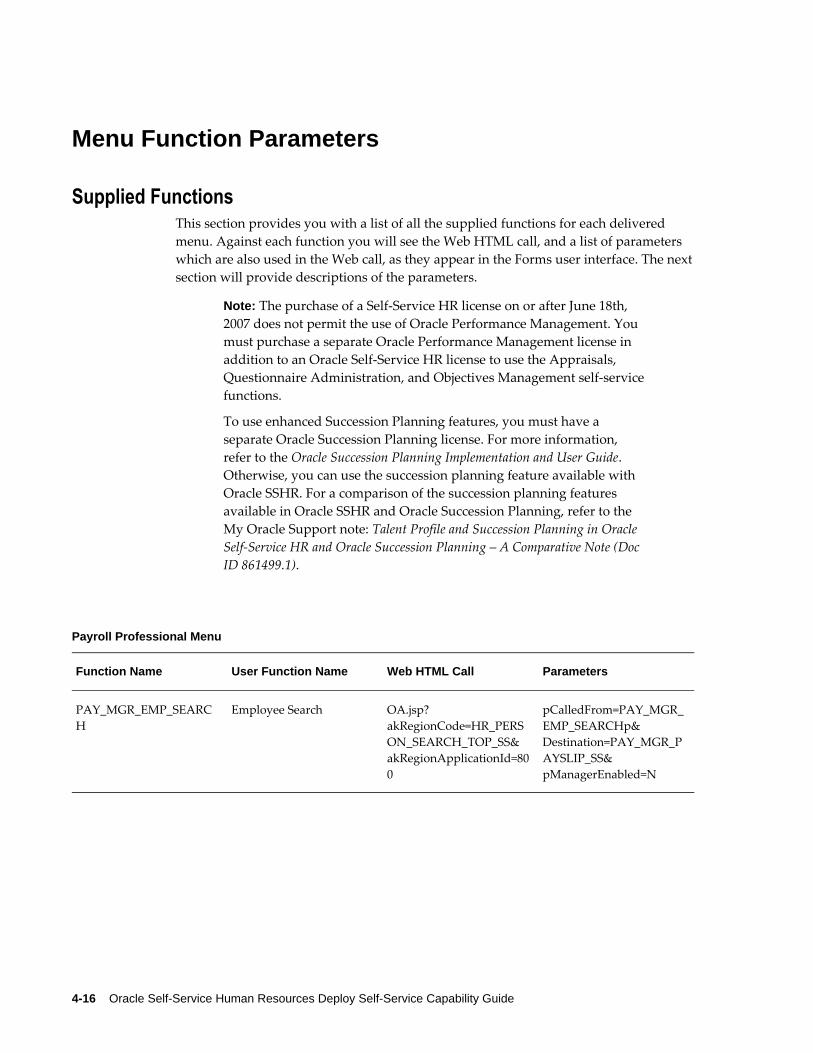
4-16 Oracle Self-Service Human Resources Deploy Self-Service Capability Guide
Menu Function Parameters
Supplied FunctionsThis section provides you with a list of all the supplied functions for each delivered menu. Against each function you will see the Web HTML call, and a list of parameters which are also used in the Web call, as they appear in the Forms user interface. The nextsection will provide descriptions of the parameters.
Note: The purchase of a Self-Service HR license on or after June 18th, 2007 does not permit the use of Oracle Performance Management. You must purchase a separate Oracle Performance Management license in addition to an Oracle Self-Service HR license to use the Appraisals, Questionnaire Administration, and Objectives Management self-servicefunctions.
To use enhanced Succession Planning features, you must have a separate Oracle Succession Planning license. For more information, refer to the Oracle Succession Planning Implementation and User Guide. Otherwise, you can use the succession planning feature available with Oracle SSHR. For a comparison of the succession planning features available in Oracle SSHR and Oracle Succession Planning, refer to the My Oracle Support note: Talent Profile and Succession Planning in Oracle Self-Service HR and Oracle Succession Planning – A Comparative Note (Doc ID 861499.1).
Payroll Professional Menu
Function Name User Function Name Web HTML Call Parameters
PAY_MGR_EMP_SEARCH
Employee Search OA.jsp?akRegionCode=HR_PERSON_SEARCH_TOP_SS& akRegionApplicationId=800
pCalledFrom=PAY_MGR_EMP_SEARCHp& Destination=PAY_MGR_PAYSLIP_SS& pManagerEnabled=N

Extending SSHR 4-17
HR Professional Menu
Function Name User Function Name Web HTML Call Parameters
BEN_CWB_HOME_SWT_MGR_PAGE
Compensation Workbench Home for Administrators
OA.jsp?akRegionCode=BEN_CWB_HOME_PAGE& akRegionApplicationId=805& displayDate=N& displaySwitchManager=Y& OAFunc=BEN_CWB_HOME_PAGE
None
HR_VIEWS_SEARCH_INITIAL
HR Views Person Search Initial Screen
OA.jsp?akRegionCode=HR_SUPER_PERSON_SEARCH_TOP1_SS& akRegionApplicationId=800& pViewMenu=HR_VIEWS& pDestination=& OAFunc=HR_VIEWS_SEARCH_INITIAL
OAFunc=HR_VIEWS_SEARCH_INITIAL
HR_ALLOCATED_CHECKLIST_SS
Allocated Checklist Function
OA.jsp?page=/oracle/apps/per/checklist/allocated/webui/AllocatedChecklistPG
pCalledFrom=HR_ALLOCATED_CHECKLIST_SS &OAFunc=HR_ALLOCATED_CHECKLIST_SS
HR_TRANSACTION_HR_SS
Transaction Monitor OA.jsp?page=/oracle/apps/per/selfservice/transactionmonitor/webui/TransactionMonitorBasePG&OAFunc=HR_TRANSACTION_HR_SS
OAFunc=HR_TRANSACTION_HR_SS&pCalledFrom=HR_TRANSACTION_HR_SS&pRespIdent=H
Manager Self Service Foundation Menu
Function Name User Function Name Web HTML Call Parameters
HR_MY_SUS_ACTIONS_MGR_SS
Suspended Actions Mgr OA.jsp?akRegionCode=HR_PROCESS_MY_SUSPENDS_TOP_SS& akRegionApplicationId=800
pMode=LMDA

4-18 Oracle Self-Service Human Resources Deploy Self-Service Capability Guide
Function Name User Function Name Web HTML Call Parameters
HR_PERSON_TREE_SS Manager Actions Tree View
OA.jsp?akRegionCode=HR_PERSON_TREE_TOP_SS& akRegionApplicationId=800
pDestination=HR_ACTIONS_SS& pCalledFrom=&addBreadcrumb=Y
Employee Self Service Foundation Menu
Function Name User Function Name Web HTML call Parameters
HR_MY_SUS_ACTIONS_SS
Suspended Actions OA.jsp?akRegionCode=HR_PROCESS_MY_SUS_EDA_TOP_SS& akRegionApplicationId=800
pMode=EDA& pFromMenu=Y
HR_PERSONAL_PROCESS_SS
Personal Actions OA.jsp?akRegionCode=HR_PERSONAL_PROCESS_TOP_SS& akRegionApplicationId=800
pAssignmentID=& pPersonID=
Manager Self Service Menu
Function Name User Function Name
Web HTML call Parameters
BEN_CWB_HOME_PAGE
Compensation Workbench Home
OA.jsp?akRegionCode=BEN_CWB_HOME_PAGE& akRegionApplicationId=805& displayDate=N& WFHomeWorklist=Y& OAFunc=BEN_CWB_HOME_PAGE
None

Extending SSHR 4-19
Function Name User Function Name
Web HTML call Parameters
BEN_SS_MGR_ICD_SRCH
Self Service Individual Distribution-Manager
OA.jsp?akRegionCode=HR_PERSON_TREE_TOP_SS& akRegionApplicationId=800
pCalledFrom=BEN_SS_MGR_ICD& OAFunc=BEN_SS_MGR_ICD&pDestination=HR_ACTIONS_SS& pManagerEnabled=N&addBreadCrumb=Y
BEN_SS_MGR_SRCH Self Service Benefits Enrollment-Manager
OA.jsp?akRegionCode=HR_PERSON_TREE_TOP_SS& akRegionApplicationId=800
pCalledFrom=BEN_SS_MGR_ENRT& OAFunc=BEN_SS_MGR_ENRT&addBreadCrumb=Y
CANDIDATE_OFFERS Candidate Offers hr_offer_form_web.SETUP None
HR_APPL_HIRE_MGR_SS
Applicant Hire Mgr
OA.jsp?akRegionCode=HR_SEARCH_HIRE_APPL_TOP_SS&akRegionApplicationId=800&OAFunc=HR_NEW_HIRE_SS
pCalledFrom=HR_APPL_HIRE_SS
HR_CAED_MGR_SS Release Employee Information Mgr
OA.jsp?akRegionCode=HR_PERSON_TREE_TOP_SS& akRegionApplicationId=800
pCalledFrom=HR_CAED_SS&AddBreadCrumb=Y
HR_CCMGR_SS Organization Manager
OA.jsp?akRegionCode=HR_CREATE_PROCESS_TOP_SS& akRegionApplicationId=800& OAFunc=HR_CCMGR_SS
pAMETranType=SSHRMS& pAMEAppId=800& pProcessName=HR_CCMGR_JSP_PRC& pCalledFrom=HR_CCMGR_SS& pItemType=HRSSA& pPersonID=& pFromMenu=Y&pManagerEnabled=N
HR_CHANGE_HOURS_MGR_SS
Change of Hours Mgr
hr_mee_person_search_tree_web.setup
P_CALLED_FROM=HR_CHANGE_HOURS
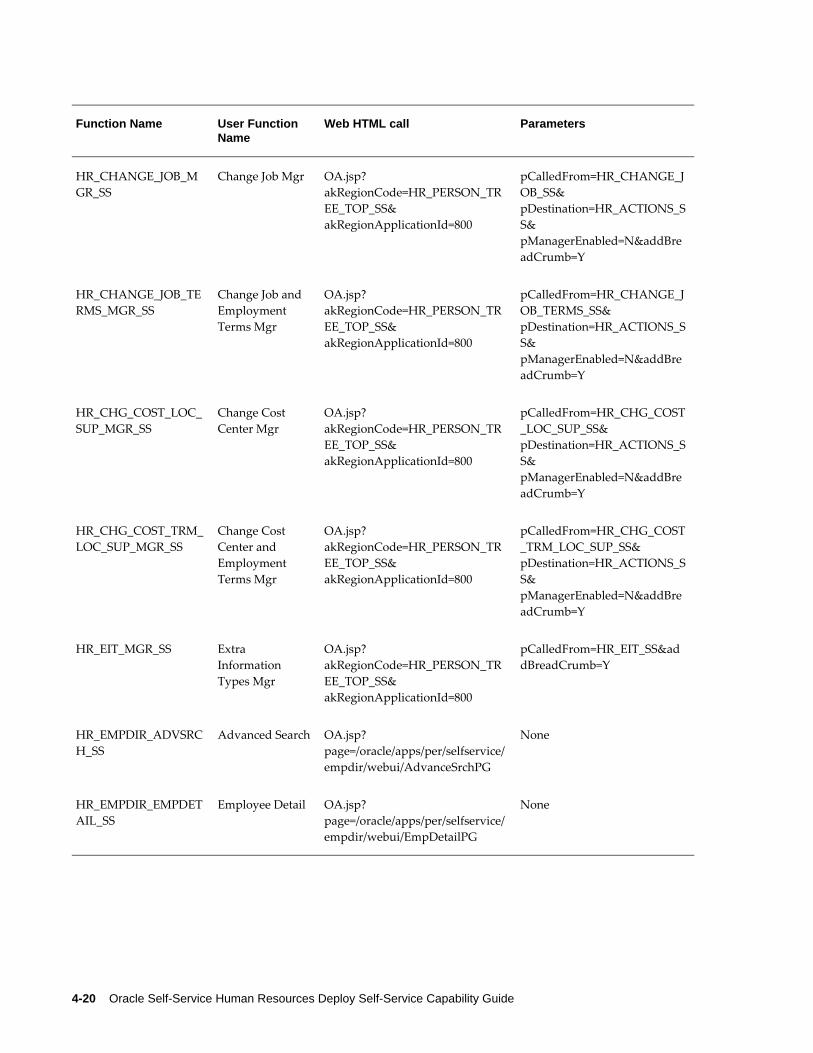
4-20 Oracle Self-Service Human Resources Deploy Self-Service Capability Guide
Function Name User Function Name
Web HTML call Parameters
HR_CHANGE_JOB_MGR_SS
Change Job Mgr OA.jsp?akRegionCode=HR_PERSON_TREE_TOP_SS& akRegionApplicationId=800
pCalledFrom=HR_CHANGE_JOB_SS& pDestination=HR_ACTIONS_SS& pManagerEnabled=N&addBreadCrumb=Y
HR_CHANGE_JOB_TERMS_MGR_SS
Change Job and Employment Terms Mgr
OA.jsp?akRegionCode=HR_PERSON_TREE_TOP_SS& akRegionApplicationId=800
pCalledFrom=HR_CHANGE_JOB_TERMS_SS& pDestination=HR_ACTIONS_SS& pManagerEnabled=N&addBreadCrumb=Y
HR_CHG_COST_LOC_SUP_MGR_SS
Change Cost Center Mgr
OA.jsp?akRegionCode=HR_PERSON_TREE_TOP_SS& akRegionApplicationId=800
pCalledFrom=HR_CHG_COST_LOC_SUP_SS& pDestination=HR_ACTIONS_SS& pManagerEnabled=N&addBreadCrumb=Y
HR_CHG_COST_TRM_LOC_SUP_MGR_SS
Change Cost Center and Employment Terms Mgr
OA.jsp?akRegionCode=HR_PERSON_TREE_TOP_SS& akRegionApplicationId=800
pCalledFrom=HR_CHG_COST_TRM_LOC_SUP_SS& pDestination=HR_ACTIONS_SS& pManagerEnabled=N&addBreadCrumb=Y
HR_EIT_MGR_SS Extra Information Types Mgr
OA.jsp?akRegionCode=HR_PERSON_TREE_TOP_SS& akRegionApplicationId=800
pCalledFrom=HR_EIT_SS&addBreadCrumb=Y
HR_EMPDIR_ADVSRCH_SS
Advanced Search OA.jsp?page=/oracle/apps/per/selfservice/empdir/webui/AdvanceSrchPG
None
HR_EMPDIR_EMPDETAIL_SS
Employee Detail OA.jsp?page=/oracle/apps/per/selfservice/empdir/webui/EmpDetailPG
None
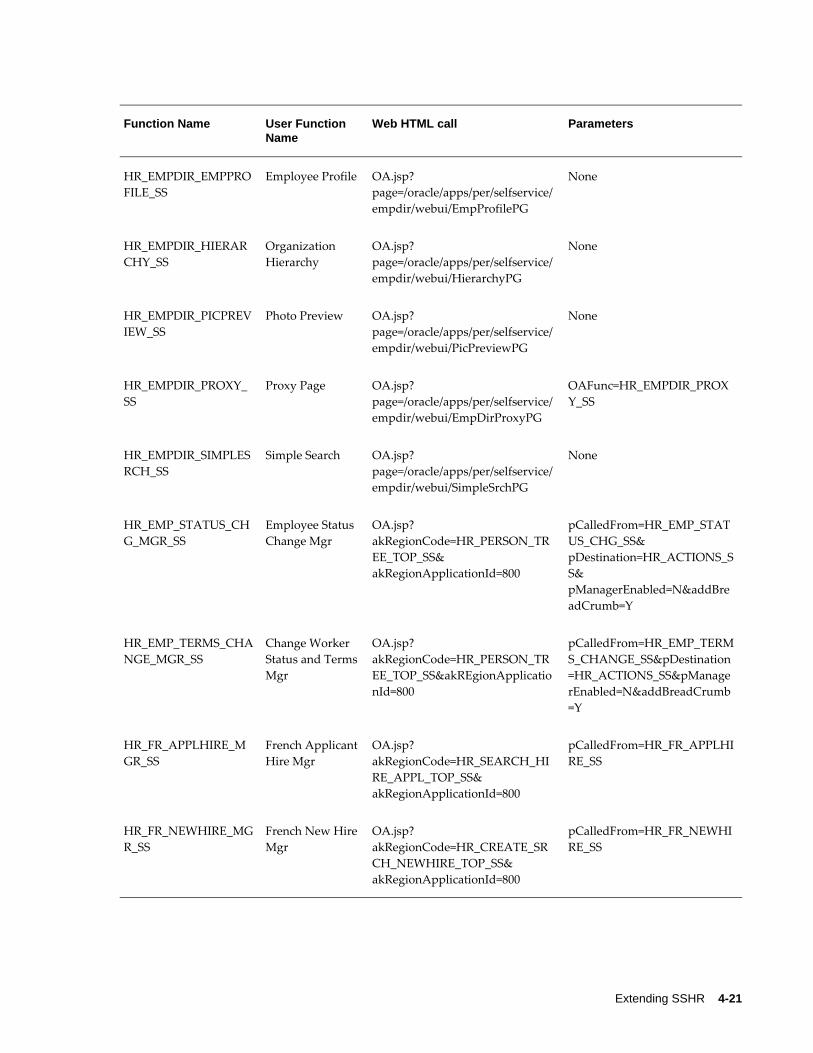
Extending SSHR 4-21
Function Name User Function Name
Web HTML call Parameters
HR_EMPDIR_EMPPROFILE_SS
Employee Profile OA.jsp?page=/oracle/apps/per/selfservice/empdir/webui/EmpProfilePG
None
HR_EMPDIR_HIERARCHY_SS
Organization Hierarchy
OA.jsp?page=/oracle/apps/per/selfservice/empdir/webui/HierarchyPG
None
HR_EMPDIR_PICPREVIEW_SS
Photo Preview OA.jsp?page=/oracle/apps/per/selfservice/empdir/webui/PicPreviewPG
None
HR_EMPDIR_PROXY_SS
Proxy Page OA.jsp?page=/oracle/apps/per/selfservice/empdir/webui/EmpDirProxyPG
OAFunc=HR_EMPDIR_PROXY_SS
HR_EMPDIR_SIMPLESRCH_SS
Simple Search OA.jsp?page=/oracle/apps/per/selfservice/empdir/webui/SimpleSrchPG
None
HR_EMP_STATUS_CHG_MGR_SS
Employee Status Change Mgr
OA.jsp?akRegionCode=HR_PERSON_TREE_TOP_SS& akRegionApplicationId=800
pCalledFrom=HR_EMP_STATUS_CHG_SS& pDestination=HR_ACTIONS_SS& pManagerEnabled=N&addBreadCrumb=Y
HR_EMP_TERMS_CHANGE_MGR_SS
Change Worker Status and TermsMgr
OA.jsp?akRegionCode=HR_PERSON_TREE_TOP_SS&akREgionApplicationId=800
pCalledFrom=HR_EMP_TERMS_CHANGE_SS&pDestination=HR_ACTIONS_SS&pManagerEnabled=N&addBreadCrumb=Y
HR_FR_APPLHIRE_MGR_SS
French ApplicantHire Mgr
OA.jsp?akRegionCode=HR_SEARCH_HIRE_APPL_TOP_SS& akRegionApplicationId=800
pCalledFrom=HR_FR_APPLHIRE_SS
HR_FR_NEWHIRE_MGR_SS
French New HireMgr
OA.jsp?akRegionCode=HR_CREATE_SRCH_NEWHIRE_TOP_SS& akRegionApplicationId=800
pCalledFrom=HR_FR_NEWHIRE_SS
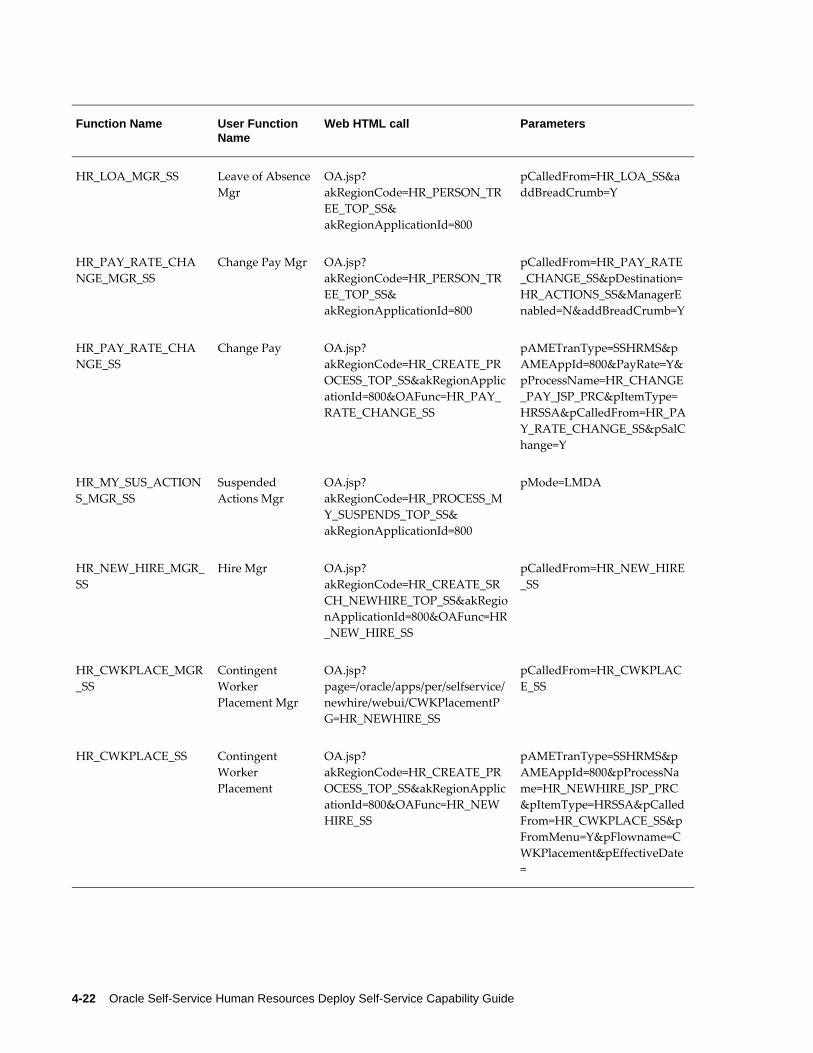
4-22 Oracle Self-Service Human Resources Deploy Self-Service Capability Guide
Function Name User Function Name
Web HTML call Parameters
HR_LOA_MGR_SS Leave of AbsenceMgr
OA.jsp?akRegionCode=HR_PERSON_TREE_TOP_SS& akRegionApplicationId=800
pCalledFrom=HR_LOA_SS&addBreadCrumb=Y
HR_PAY_RATE_CHANGE_MGR_SS
Change Pay Mgr OA.jsp?akRegionCode=HR_PERSON_TREE_TOP_SS& akRegionApplicationId=800
pCalledFrom=HR_PAY_RATE_CHANGE_SS&pDestination=HR_ACTIONS_SS&ManagerEnabled=N&addBreadCrumb=Y
HR_PAY_RATE_CHANGE_SS
Change Pay OA.jsp?akRegionCode=HR_CREATE_PROCESS_TOP_SS&akRegionApplicationId=800&OAFunc=HR_PAY_RATE_CHANGE_SS
pAMETranType=SSHRMS&pAMEAppId=800&PayRate=Y&pProcessName=HR_CHANGE_PAY_JSP_PRC&pItemType=HRSSA&pCalledFrom=HR_PAY_RATE_CHANGE_SS&pSalChange=Y
HR_MY_SUS_ACTIONS_MGR_SS
Suspended Actions Mgr
OA.jsp?akRegionCode=HR_PROCESS_MY_SUSPENDS_TOP_SS& akRegionApplicationId=800
pMode=LMDA
HR_NEW_HIRE_MGR_SS
Hire Mgr OA.jsp?akRegionCode=HR_CREATE_SRCH_NEWHIRE_TOP_SS&akRegionApplicationId=800&OAFunc=HR_NEW_HIRE_SS
pCalledFrom=HR_NEW_HIRE_SS
HR_CWKPLACE_MGR_SS
Contingent Worker Placement Mgr
OA.jsp?page=/oracle/apps/per/selfservice/newhire/webui/CWKPlacementPG=HR_NEWHIRE_SS
pCalledFrom=HR_CWKPLACE_SS
HR_CWKPLACE_SS Contingent Worker Placement
OA.jsp?akRegionCode=HR_CREATE_PROCESS_TOP_SS&akRegionApplicationId=800&OAFunc=HR_NEWHIRE_SS
pAMETranType=SSHRMS&pAMEAppId=800&pProcessName=HR_NEWHIRE_JSP_PRC&pItemType=HRSSA&pCalledFrom=HR_CWKPLACE_SS&pFromMenu=Y&pFlowname=CWKPlacement&pEffectiveDate=

Extending SSHR 4-23
Function Name User Function Name
Web HTML call Parameters
HR_PAY_RATE_MGR_SS
Change Base Salary Mgr
OA.jsp?akRegionCode=HR_PERSON_TREE_TOP_SS& akRegionApplicationId=800
pCalledFrom=HR_PAY_RATE_SS& pDestination=HR_ACTIONS_SS& pManagerEnabled=N&addBreadCrumb=Y
HR_PERINFO_MGR_SS Personal Information Mgr
OA.jsp?akRegionCode=HR_PERSON_TREE_TOP_SS& akRegionApplicationId=800
pCalledFrom=HR_PERINFO_SS&addBreadCrumb=Y
HR_PERSON_TREE_SS Manager Actions Tree View
OA.jsp?akRegionCode=HR_PERSON_TREE_TOP_SS& akRegionApplicationId=800
pDestination=HR_ACTIONS_SS& pCalledFrom=&addBreadcrumb=Y
HR_SIT_MGR_SS Special Information Types Mgr
OA.jsp?akRegionCode=HR_PERSON_TREE_TOP_SS& akRegionApplicationId=800
pCalledFrom=HR_SIT_SS&addBreadCrumb=Y
HR_SUCCESSION_PLANNING
Succession Planning Menu
hr_succ_plan_menu_web.setup None
HR_SUIT_MATCH_MENU
Suitabilty Match Menu
hr_suit_match_menu_web.setup None
HR_TERMINATION_COMP_MGR_SS
Termination withCompensation Mgr
OA.jsp?akRegionCode=HR_PERSON_TREE_TOP_SS& akRegionApplicationId=800& OAFunc=HR_TERMINATION_COMP_SS
pCalledFrom=HR_TERMINATION_COMP_SS& pDestination=HR_ACTIONS_SS& pManagerEnabled=N&addBreadCrumb=Y
HR_TERMINATION_MGR_SS
Termination Mgr OA.jsp?akRegionCode=HR_PERSON_TREE_TOP_SS& akRegionApplicationId=800& OAFunc=HR_TERMINATION_SS
pCalledFrom=HR_TERMINATION_SS& pDestination=HR_ACTIONS_SS& pManagerEnabled=N&addBreadCrumb=Y

4-24 Oracle Self-Service Human Resources Deploy Self-Service Capability Guide
Function Name User Function Name
Web HTML call Parameters
HR_EMP_TRANSFER_MGR_SS
Transfer Mgr OA.jsp?akRegionCode=HR_PERSON_TREE_TOP_SS& akRegionApplicationId=800
pCalledFrom=HR_EMP_TRANSFER_SS&Destination=HR_ACTIONS_SS&pManagerEnabled=N&addBreadCrumb=Y
HR_VIEWS_MGR Manager Views hr_mee_views_web.setup p_called_from=HR_VIEWS_MGR
HXC_TIMECARDS_MGR
TimeCard Manager
OA.jsp?akRegionCode=HR_PERSON_TREE_TOP_SS& akRegionApplicationId=800
pCalledFrom=HXC_TIME_ENTER&addBreadCrumb=Y
OTA_ADD_TRAINING_MGR_SS
External TrainingMgr
OA.jsp?akRegionCode=HR_PERSON_TREE_TOP_SS& akRegionApplicationId=800
pCalledFrom=OTA_ADD_TRAINING_SS&addBreadCrumb=Y
OTA_TRAINING_MGR_SS
Enroll and Cancel Training Mgr
OA.jsp?akRegionCode=HR_PERSON_TREE_TOP_SS& akRegionApplicationId=800
pCalledFrom=OTA_ENROLL_SS&addBreadCrumb=Y
OTA_TRNG_PLAN_MGR_SS
Training Plans Mgr
OA.jsp?akRegionCode=HR_PERSON_TREE_TOP_SS& akRegionApplicationId=800
pCalledFrom=OTA_TRNG_PLAN_VIEWS_SS&addBreadCrumb=Y
PER_APPRAISAL_PERSON_SEARCH
Appraisal Mgr hr_person_search_tree_web.setup p_called_from=PER_APPRAISAL_EMPLOYEE
PQH_ACADEMIC_RANK_MGR
Academic Rank Mgr
OA.jsp?akRegionCode=HR_PERSON_TREE_TOP_SS& akRegionApplicationId=800
pCalledFrom=PQH_ACADEMIC_RANK& pDestination=HR_ACTIONS_SS&addBreadCrumb=Y
PQH_EMP_REVIEWS_MGR
Employee Reviews Mgr
OA.jsp?akRegionCode=HR_PERSON_TREE_TOP_SS& akRegionApplicationId=800
pCalledFrom=PQH_EMP_REVIEWS&addBreadCrumb=Y

Extending SSHR 4-25
Function Name User Function Name
Web HTML call Parameters
PQH_EVENT_BOOKING_MGR
Events and Bookings Mgr
OA.jsp?akRegionCode=HR_PERSON_TREE_TOP_SS& akRegionApplicationId=800
pCalledFrom=PQH_EVENT_BOOKING&addBreadCrumb=Y
PQH_TENURE_STATUS_MGR
Tenure Status Mgr
OA.jsp?akRegionCode=HR_PERSON_TREE_TOP_SS&akRegionApplicationId=800
pCalledFrom=PQH_TENURE_STATUS&addBreadCrumb=Y
HR_ALLOCATED_CHECKLIST_SS
Allocated Checklist Function
OA.jsp?page=/oracle/apps/per/checklist/allocated/webui/AllocatedChecklistPG
pCalledFrom=HR_ALLOCATED_CHECKLIST_SS &OAFunc=HR_ALLOCATED_CHECKLIST_SS
HR_REVERSE_TERMINATION_MGR_SS
Reverse Termination Mgr
OA.jsp?page=/oracle/apps/per/selfservice/reverseterm/webui/SearchPG
pCalledFrom=HR_REVERSE_TERMINATION_SS
HR_DOR_MGR_SS Documents of Record
OA.jsp?akRegionCode=HR_PERSON_TREE_TOP_SS&akRegionApplicationId=800
pCalledFrom=HR_DOR_SS&pManagerEnabled=Y&addBreadCrumb=Y
HR_TALENT_HOME_FUNC_MGR
Talent Profile Home Function - Manager
OA.jsp?OAFunc=HR_TALENT_ORGCHART&OAHP=HR_TALENT_HOME_MENU_MGR&OASF=HR_TALENT_HOME_FUNC_MGR
None
HR_TRANSACTION_MGR_SS
Transaction Monitor
OA.jsp?page=/oracle/apps/per/selfservice/transactionmonitor/webui/TransactionMonitorBasePG&OAFunc=HR_TRANSACTION_MGR_SS
OAFunc=HR_TRANSACTION_MGR_SS&pCalledFrom=HR_TRANSACTION_MGR_SS&pRespIdent=M

4-26 Oracle Self-Service Human Resources Deploy Self-Service Capability Guide
Employee Self Service Menu
Function Name User Function Name Web HTML Call Parameters
HR_APPL_HIRE_SS Applicant Hire OA.jsp?akRegionCode=HR_CREATE_PROCESS_TOP_SS&akRegionApplicationId=800&OAFunc=HR_NEW_HIRE_SS
pAMETranType=SSHRMS&pAMEAppId=800&pProcessName=HR_NEW_HIRE_PLACE_JSP_PRC&pItemType=HRSSA&pCalledFrom=HR_APPL_HIRE_SS&pFromMenu=Y&pFlowName=HrCommonInsertOab&pEffectiveDate=
HR_CHANGE_HOURS_SS
Change of Hours hr_mee_workflow_service.create_process
pAMETranType=SSHRMS&pAMEAppId=800&pPayRate=Y&pProcessName=HR_CHG_HOURS_JSP_PRC&pItemType=HRSSA&pCalledFrom=HR_CHANGE_HOURS_SS&pEffectiveDate=
HR_NEW_HIRE_SS Hire OA.jsp?akRegionCode=HR_CREATE_PROCESS_TOP_SS&akRegionApplicationId=800&OAFunc=HR_NEW_HIRE_SS
pAMETranType=SSHRMS&pAMEAppId=800&pProcessName=HR_NEW_HIRE_PLACE_JSP_PRC&pItemType=HRSSA&pCalledFrom=HR_NEW_HIRE_SS&pFromMenu=Y&pFlowName=HrCommonInsertOab&pEffectiveDate=
HR_EMP_STATUS_CHANGE_SS
Worker Status Change OA.jsp?akRegionCode=HR_CREATE_PROCESS_TOP_SS&akRegionApplicationId=800&OAFunc=HR_EMP_STATUS_CHANGE_SS
pAMETranType=SSHRMS&pAMEAppId=800&pPayRate=Y&pProcessName=HR_EMP_STATUS_CHANGE_JSP_PRC&pItemType=HRSSA&pCalledFrom=HR_EMP_STATUS_CHANGE_SS&pEffectiveDate=
HR_EMP_TERMS_CHANGE_SS
Change Worker Status and Terms
OA.jsp?akRegionCode=HR_CREATE_PROCESS_TOP_SS&akRegionApplicationId=800&OAFunc=HR_EMP_TERMS_CHANGE_SS
pAMETranType=SSHRMS&pAMEAppId=800&pPayRate=Y&pProcessName=HR_EMP_STS_TERMS_CHG_JSP_PRC&pItemType=HRSSA&pCalledFrom=HR_EMP_TERMS_CHANGE_SS&pAMETranType=SSHRMS&pAMEAppId=800&pEffectiveDate=

Extending SSHR 4-27
Function Name User Function Name Web HTML Call Parameters
HR_EMP_TRANSFER_SS
Transfer OA.jsp?akRegionCode=HR_CREATE_PROCESS_TOP_SS&akRegionApplicationId=800&OAFunc=HR_EMP_TRANSFER_SS
pAMETranType=SSHRMS&pAMEAppId=800&pPayRate=Y&pProcessName=HR_EMP_TRANSFER_JSP_PRC&pItemType=HRSSA&pCalledFrom=HR_EMP_TRANSFER_SS&pEffectiveDate=
BEN_SS_BNFT_ENRT Self Service Benefits Enrollment-Employee
OA.jsp?akRegionCode=BEN_EFFECTIVE_DATE_PAGE& akRegionApplicationId=805
displayDate=N& allowEnrt=Y& sessionDate=& sendFYINotification=N& wfProcessName=FYI_NOTIFICATION_PRC
HR_APPLY_FOR_JOB_SS
Apply for Job OA.jsp?page=/oracle/apps/per/irc/candidateSelfService/webui/EmpJobSearchPG&akRegionApplicationId=800&SeededSearchFlag=N
None
HR_CAED_SS Release Employee Information
OA.jsp?akRegionCode=HR_CREATE_PROCESS_TOP_SS& akRegionApplicationId=800& OAFunc=HR_CAED_SS
pAMETranType=SSHRMS& pAMEAppId=800& pProcessName=HR_CAED_JSP_PRC& pItemType=HRSSA& pCalledFrom=HR_CAED_SS& pPersonID=& pFromMenu=Y
HR_EIT_SS Extra Information Types
OA.jsp?akRegionCode=HR_CREATE_PROCESS_TOP_SS& akRegionApplicationId=800& OAFunc=HR_EIT_SS
pAMETranType=SSHRMS& pAMEAppId=800& pProcessName=HR_EIT_JSP_PRC& pItemType=HRSSA& pCalledFrom=HR_EIT_SS& pPersonID=& pFromMenu=Y
HR_LOA_SS Leave of Absence OA.jsp?akRegionCode=HR_CREATE_PROCESS_TOP_SS& akRegionApplicationId=800& OAFunc=HR_LOA_SS
pAMETranType=SSHRMS& pAMEAppId=800& pProcessName=HR_LOA_JSP_PRC& pItemType=HRSSA& pCalledFrom=HR_LOA_SS& pPersonID=& pFromMenu=Y

4-28 Oracle Self-Service Human Resources Deploy Self-Service Capability Guide
Function Name User Function Name Web HTML Call Parameters
HR_MY_SUS_ACTIONS_SS
Suspended Actions OA.jsp?akRegionCode=HR_PROCESS_MY_SUS_EDA_TOP_SS& akRegionApplicationId=800
pMode=EDA&pFromMenu=Y
HR_PERINFO_SS Personal Information OA.jsp?akRegionCode=HR_CREATE_PROCESS_TOP_SS& akRegionApplicationId=800& OAFunc=HR_PERINFO_SS
pAMETranType=SSHRMS& pAMEAppId=800& pProcessName=HR_PERSONAL_INFO_JSP_PRC& pItemType=HRSSA& pCalledFrom=HR_PERINFO_SS& pPersonID=& pFromMenu=Y
HR_PERSONAL_PROCESS_SS
Personal Actions OA.jsp?akRegionCode=HR_PERSONAL_PROCESS_TOP_SS& akRegionApplicationId=800
pAssignmentID=&pPersonID=
HR_SIT_SS Special Information Types
OA.jsp?akRegionCode=HR_CREATE_PROCESS_TOP_SS& akRegionApplicationId=800& OAFunc=HR_SIT_SS
pAMETranType=SSHRMS& pAMEAppId=800& pProcessName=HR_SIT_JSP_PRC& pItemType=HRSSA& pCalledFrom=HR_SIT_SS& pPersonID=& pFromMenu=Y
HR_VIEWS_EMP Employee Views hr_mee_views_web.setup p_called_from=HR_VIEWS_EMP& p_mgr=FALSE
OTA_ADD_TRAINING_SS
Enroll and Cancel Training
OA.jsp?akRegionCode=HR_CREATE_PROCESS_TOP_SS& akRegionApplicationId=800& OAFunc=OTA_ADD_TRAINING_SS
pProcessName=OTA_ADDTRNG_JSP_PRC& pCalledFrom=OTA_ADD_TRAINING_SS& pItemType=HRSSA& pFromMenu=Y

Extending SSHR 4-29
Function Name User Function Name Web HTML Call Parameters
OTA_ENROLL_SS Academic Rank Overview
OA.jsp?akRegionCode=HR_CREATE_PROCESS_TOP_SS& akRegionApplicationId=800& OAFunc=OTA_ENROLL_SS
pAMETranType=SSHRMS& pAMEAppId=800& pProcessName=OTA_ENROLL_IN_TRAINING_JSP_PRC& pCalledFrom=OTA_ENROLL_SS& pItemType=HRSSA& pTrainingViewCode=10& pFromMenu=Y
OTA_EXTERNAL_LINKING_SS
External Training OA.jsp?akRegionCode=HR_CREATE_PROCESS_TOP_SS& akRegionApplicationId=800& OAFunc=OTA_EXTERNAL_LINKING_SS
pAMETranType=SSHRMS& pAMEAppId=800& pProcessName=OTA_EXT_LINK_JSP_PRC& pCalledFrom=OTA_EXTERNAL_LINKING_SS& pItemType=HRSSA& pActivityVerId=& pEventId=& pFromMenu=Y& pOATrngFunc=OTA_ENROLL_SS& pTrngProcessName=OTA_ENROLL_IN_TRAINING_JSP_PRC
OTA_TRNG_PLAN_VIEWS_SS
Training Plan Views OA.jsp?page=/oracle/apps/ota/trainingplan/webui/ViewTrainingPlansPG& retainAM=Y
pAMETranType=SSHRMS& pAMEAppId=800& pCalledFrom=OTA_TRNG_PLAN_VIEWS_SS& pItemType=HR& pFromMenu=Y
PAY_EMP_PAYMENTS_SS
Manage Payroll Payments
OA.jsp?akRegionCode=PAY_MPP_TOP_REGION& akRegionApplicationId=801& OAFunc=PAY_EMP_PAYMENTS_SS
pAMETranType=SSHRMS& pAMEAppId=800& pProcessName=PAY_PAYMENTS_JSP_PRC& pItemType=HRSSA& pCalledFrom=PAY_EMP_PAYMENTS_SS
PAY_PAYSLIP_SS Payslip OA.jsp?akRegionCode=PAY_PAYSLIP_TOP_SS& akRegionApplicationId=801
pCalledFrom=PAY_PAYSLIP_SS& pPersonID=

4-30 Oracle Self-Service Human Resources Deploy Self-Service Capability Guide
Function Name User Function Name Web HTML Call Parameters
PAY_W2_SS Employee W2 OA.jsp?akRegionCode=HR_CREATE_PROCESS_TOP_SS& akRegionApplicationId=800& OAFunc=PAY_W2_SS
pAMETranType=SSHRMS& pAMEAppId=800& pProcessName=PAY_EMPLOYEE_W2_PROCESS& pItemType=HRSSA& pCalledFrom=PAY_W2_SS& pPersonID=& pFromMenu=Y
PAY_W4INFO_SS Employees W4 Information
OA.jsp?akRegionCode=HR_CREATE_PROCESS_TOP_SS& akRegionApplicationId=800& OAFunc=PAY_W4INFO_SS
pAMETranType=SSHRMS& pAMEAppId=800& pProcessName=PAY_CHANGE_W4_INFO_JSP_PRC& pItemType=HRSSA& pCalledFrom=PAY_W4INFO_SS& pPersonID=& pFromMenu=Y
PER_APPRAISAL_EMPLOYEE
Appraisal hr_workflow_service.create_process
P_PROCESS_NAME=HR_APPRAISAL_DETAILS_PRC& P_ITEM_TYPE=HRSSA& P_PERSON_ID=
PQH_ACADEMIC_RANK_OVRVW
Tenure Status Overview
OA.jsp?akRegionCode=PQH_ACADEMIC_RANK_OVRVW_TOP& akRegionApplicationId=8302
pCalledFrom=PQH_ACADEMIC_RANK_OVRVW& pPersonID=
PQH_EMP_REVIEWS Employee Reviews OA.jsp?akRegionCode=HR_CREATE_PROCESS_TOP_SS& akRegionApplicationId=800& OAFunc=PQH_EMP_REVIEWS
pCalledFrom=PQH_EMP_REVIEWS& pProcessName=PQH_EMP_REV_JSP_PRC& pItemType=HRSSA& pPersonID=
PQH_EVENT_BOOKING_OV
Events and Bookings Overview
OA.jsp?akRegionCode=PQH_EVENTS_SEARCH_TOP& akRegionApplicationId=8302
None

Extending SSHR 4-31
Function Name User Function Name Web HTML Call Parameters
PQH_TENURE_STATUS_OVRVW
OA.jsp?akRegionCode=PQH_TENURE_STATUS_OVRVW_TOP& akRegionApplicationId=8302
pCalledFrom=PQH_TENURE_STATUS_OVRVW& pPersonID=
PAY_JP_CMI_SS Japan Commutation Information Self Service
OA.jsp?akRegionCode=HR_CREATE_PROCESS_TOP_SS&akakRegionApplicationId=800&OAFunc=PAY_JP_CMI_SS
pAMETranType=SSHRMS&pAMEAppId=800&pProcessName=PAY_JP_CMI_JSP_PRC&pItemType=HRSSA&pCalledFrom=PAY_JP_CMI_SS&pPersonID=&pFromMenu=Y
PAY_JP_CMI_MGR_SS Japan Commutation Information Manager Self Service
OA.jsp?akRegionCode=HR_PERSON_TREE_TOP_SS&akRegionApplicationId=800
pCalledFrom=PAY_JP_CMI_SS&addBreadCrumb=Y
PAY_JP_CMI_MAIN_SS
Japan Commutation Information Main Page
OA.jsp?page=/oracle/apps/pay/selfservice/jpcommutationinfo/webui/CmiMainPG
None
PAY_JP_CMI_INSERT_SS
Japan Commutation Information Insert Page
OA.jsp?page=/oracle/apps/pay/selfservice/jpcommutationinfo/webui/CmiInsertPG
None
PAY_JP_CMI_UPDATE_SS
Japan Commutation Information Update Page
OA.jsp?page=/oracle/apps/pay/selfservice/jpcommutationinfo/webui/CmiUpdatePG
None
PAY_JP_CMI_DELETE_SS
Japan Commutation Information Delete Page
OA.jsp?page=/oracle/apps/pay/selfservice/jpcommutationinfo/webui/CmiDeletePG
None
PAY_JP_CMI_VIEW_FUTURE_SS
Japan Commutation Information View Future Change Page
OA.jsp?page=/oracle/apps/pay/selfservice/jpcommutationinfo/webui/CmiViewFuturePG

4-32 Oracle Self-Service Human Resources Deploy Self-Service Capability Guide
Function Name User Function Name Web HTML Call Parameters
HR_TERM_EMP_SS Voluntary Termination Emp
OA.jsp?akRegionCode=HR_PERSON_TREE_TOP_SS&akRegionApplicationId=800&OAFunc=HR_TERM_SS
pCalledFrom=HR_TERM_SS&pDestination=HR_ACTIONS_SS&addBreadCrumb=Y&pEmpFuncEfDt=Y
HR_DOR_SS Documents of Record OA.jsp?page=/oracle/apps/per/dor/webui/DocsOfRecordForPersonPG&akRegionApplicationId=800
pItemType=HRCORE&pNtfyReviewerPrc=HR_NOTIFY_DOR_REVIEWER_PRC&pNtfyRevieweePrc=HR_NOTIFY_DOR_REVIEWEE_PRC&pCalledFrom=HR_DOR_SS&OAFunc=HR_DOR_SS&addBreadCrumb=Y
HR_TALENT_HOME_FUNC_EMP
Talent Profile Home Function - Employee
OA.jsp?OAFunc=HR_TALENT_ORGCHART&OAHP=HR_TALENT_HOME_MENU_EMP&OASF=HR_TALENT_HOME_FUNC_EMP
None
HR_TRANSACTION_EMP_SS
Transaction Monitor OA.jsp?page=/oracle/apps/per/selfservice/transactionmonitor/webui/TransactionMonitorBasePG&OAFunc=HR_TRANSACTION_EMP_SS
OAFunc=HR_TRANSACTION_EMP_SS&pCalledFrom=HR_TRANSACTION_EMP_SS&pRespIdent=E
Contingent Worker Self Service Menu
Function Name User Function Name
Web HTML Call Parameters
HR_EIT_SS Extra Information Types
OA.jsp?akRegionCode=HR_CREATE_PROCESS_TOP_SS& akRegionApplicationId=800& OAFunc=HR_EIT_SS
pAMETranType=SSHRMS& pAMEAppId=800& pProcessName=HR_EIT_JSP_PRC& pItemType=HRSSA& pCalledFrom=HR_EIT_SS& pPersonID=& pFromMenu=Y
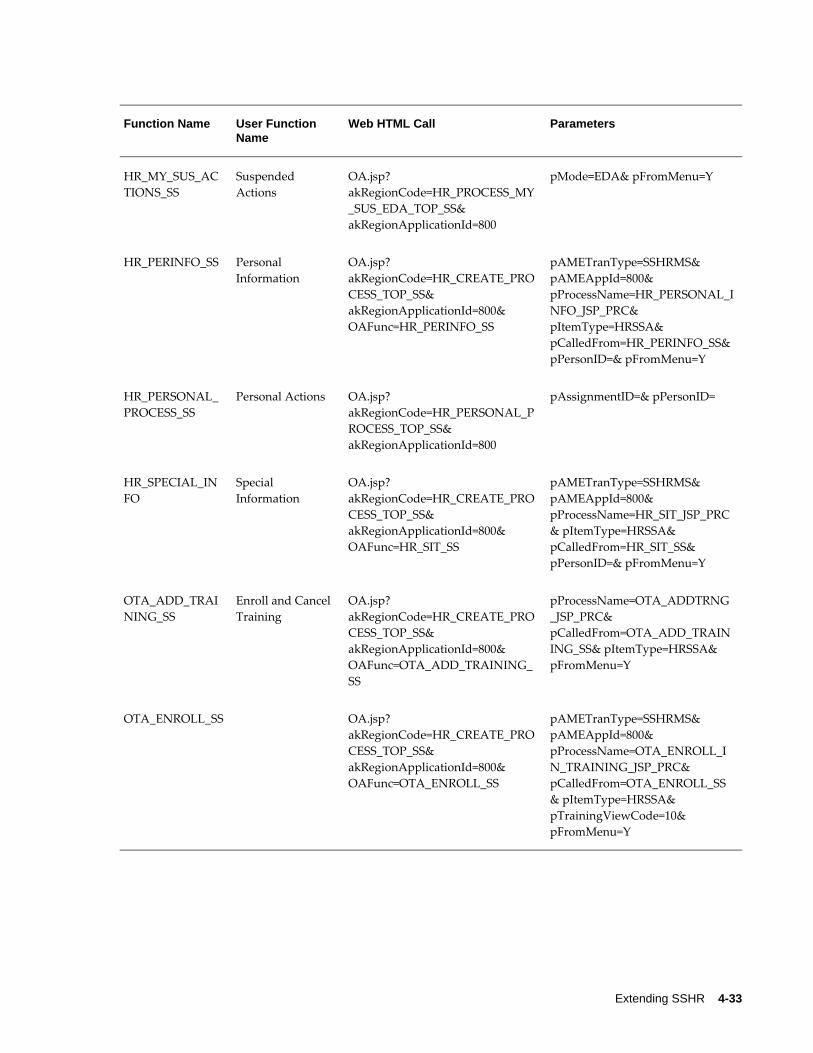
Extending SSHR 4-33
Function Name User Function Name
Web HTML Call Parameters
HR_MY_SUS_ACTIONS_SS
Suspended Actions
OA.jsp?akRegionCode=HR_PROCESS_MY_SUS_EDA_TOP_SS& akRegionApplicationId=800
pMode=EDA& pFromMenu=Y
HR_PERINFO_SS Personal Information
OA.jsp?akRegionCode=HR_CREATE_PROCESS_TOP_SS& akRegionApplicationId=800& OAFunc=HR_PERINFO_SS
pAMETranType=SSHRMS& pAMEAppId=800& pProcessName=HR_PERSONAL_INFO_JSP_PRC& pItemType=HRSSA& pCalledFrom=HR_PERINFO_SS& pPersonID=& pFromMenu=Y
HR_PERSONAL_PROCESS_SS
Personal Actions OA.jsp?akRegionCode=HR_PERSONAL_PROCESS_TOP_SS& akRegionApplicationId=800
pAssignmentID=& pPersonID=
HR_SPECIAL_INFO
Special Information
OA.jsp?akRegionCode=HR_CREATE_PROCESS_TOP_SS& akRegionApplicationId=800& OAFunc=HR_SIT_SS
pAMETranType=SSHRMS& pAMEAppId=800& pProcessName=HR_SIT_JSP_PRC& pItemType=HRSSA& pCalledFrom=HR_SIT_SS& pPersonID=& pFromMenu=Y
OTA_ADD_TRAINING_SS
Enroll and Cancel Training
OA.jsp?akRegionCode=HR_CREATE_PROCESS_TOP_SS& akRegionApplicationId=800& OAFunc=OTA_ADD_TRAINING_SS
pProcessName=OTA_ADDTRNG_JSP_PRC& pCalledFrom=OTA_ADD_TRAINING_SS& pItemType=HRSSA& pFromMenu=Y
OTA_ENROLL_SS OA.jsp?akRegionCode=HR_CREATE_PROCESS_TOP_SS& akRegionApplicationId=800& OAFunc=OTA_ENROLL_SS
pAMETranType=SSHRMS& pAMEAppId=800& pProcessName=OTA_ENROLL_IN_TRAINING_JSP_PRC& pCalledFrom=OTA_ENROLL_SS& pItemType=HRSSA& pTrainingViewCode=10& pFromMenu=Y
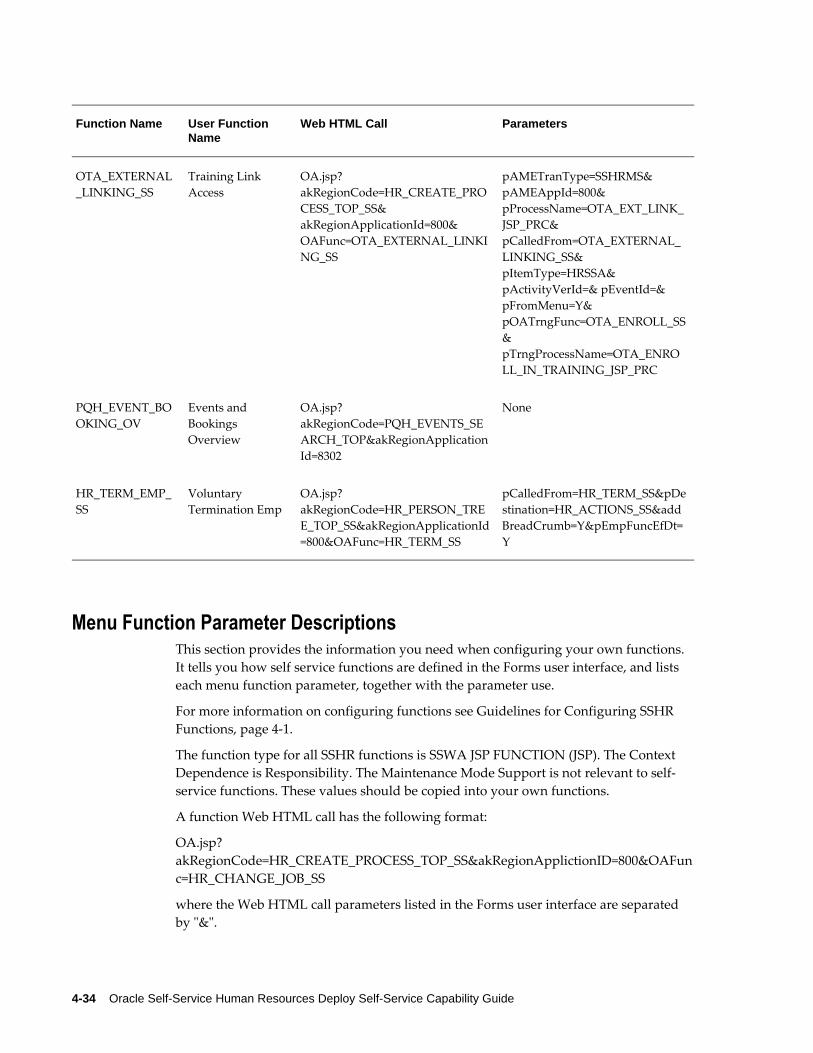
4-34 Oracle Self-Service Human Resources Deploy Self-Service Capability Guide
Function Name User Function Name
Web HTML Call Parameters
OTA_EXTERNAL_LINKING_SS
Training Link Access
OA.jsp?akRegionCode=HR_CREATE_PROCESS_TOP_SS& akRegionApplicationId=800& OAFunc=OTA_EXTERNAL_LINKING_SS
pAMETranType=SSHRMS& pAMEAppId=800& pProcessName=OTA_EXT_LINK_JSP_PRC& pCalledFrom=OTA_EXTERNAL_LINKING_SS& pItemType=HRSSA& pActivityVerId=& pEventId=& pFromMenu=Y& pOATrngFunc=OTA_ENROLL_SS& pTrngProcessName=OTA_ENROLL_IN_TRAINING_JSP_PRC
PQH_EVENT_BOOKING_OV
Events and Bookings Overview
OA.jsp?akRegionCode=PQH_EVENTS_SEARCH_TOP&akRegionApplicationId=8302
None
HR_TERM_EMP_SS
Voluntary Termination Emp
OA.jsp?akRegionCode=HR_PERSON_TREE_TOP_SS&akRegionApplicationId=800&OAFunc=HR_TERM_SS
pCalledFrom=HR_TERM_SS&pDestination=HR_ACTIONS_SS&addBreadCrumb=Y&pEmpFuncEfDt=Y
Menu Function Parameter DescriptionsThis section provides the information you need when configuring your own functions. It tells you how self service functions are defined in the Forms user interface, and lists each menu function parameter, together with the parameter use.
For more information on configuring functions see Guidelines for Configuring SSHR Functions, page 4-1.
The function type for all SSHR functions is SSWA JSP FUNCTION (JSP). The Context Dependence is Responsibility. The Maintenance Mode Support is not relevant to self-service functions. These values should be copied into your own functions.
A function Web HTML call has the following format:
OA.jsp?akRegionCode=HR_CREATE_PROCESS_TOP_SS&akRegionApplictionID=800&OAFunc=HR_CHANGE_JOB_SS
where the Web HTML call parameters listed in the Forms user interface are separated by "&".

Extending SSHR 4-35
All functions that end in "_SS" (but not those ending in "_MGR_SS") use the following parameters, which are described in greater detail below:
• pAMETranType=SSHRMS
• pAMEAppId=800
• pProcessName=WORKFLOW_PROCESS_NAME
• pItemType=HRSSA
• pCalledFrom=EDA_FUNCTION_NAME
• pEffectiveDate=
The following table describes all available menu function parameters:
Note: References to "_SS" functions exclude "_MGR_SS" functions.
Parameter Description
OAFunc=<function>_SS Add this parameter to all the self service _SS functions, providing your own function name.This parameter enables you to do personalization for a specified <function>_SS level.
pAMEAppId=800 Add this parameter to all the _SS functions that contain pAMETranType=SSHRMS to specify the application Id for the transaction type.
pAMETranType=SSHRMS Add this parameter to all functions that use AME to process approvals. The parameter provides the transaction type name of SSHRMS. If you define your own transaction type provide that transaction type name here.
pCalledFrom=EDA_FUNCTION_NAME Add this parameter to all the _SS functions that are launched through workflow. It indicates which function calls the current function. Replace EDA_FUNCTION_NAME with the corresponding _SS function name.

4-36 Oracle Self-Service Human Resources Deploy Self-Service Capability Guide
Parameter Description
pDestination=HR_ACTIONS_SS Add this parameter to the _MGR_SS functionsif the workflow process attached to this function can navigate through the Actions page.
pEffectiveDate= Add this parameter to the _SS function if this function needs the effective date field to be displayed in the actions screen. No value should be set.
pFlowName=<processname> Use this parameter for functions that require special processing. The process names are "COBRA Registration", "Benefits Registration" & "New Hire".
pGroupName=<documentgroupshortname> Use this parameter to provide the Document Group short name for a PDF merge
pItemType=HRSSA Add this parameter to all the _SS and _MGR_SS functions to provide the Item Type.
pManagerEnabled=N Add this parameter to _MGR _SS functions if managers are not allowed to select themselvesin the hierarchy tree; the Action icon for the logged-in manager will be disabled.
pMode=<value> Add this parameter to your manager or personal action functions with the value of LMDA for manager action functions and EDAfor personal action functions.
pPayRate=Y Use this parameter to validate pay rate relatedtransactions. If this parameter is set to Yes, then only SSHR performs pay rate validations.
pProcessName=WORKFLOW_PROCESS_NAME
Add this parameter to all the _SS functions that are launched through workflow. Replace WORKFLOW_PROCESS_NAME with the corresponding workflow process name, for example HR_PERSONAL_INFO_JSP_PRC .

Extending SSHR 4-37
Parameter Description
pSalChange=Y This parameter indicates that the process is purely a Salary Change process and does not include Assignment Pages. An appropriate message will be presented on the Effective Date page. If this parameter is absent it defaults to 'N', which indicates that the process includes Assignment related pages.
addBreadCrumb=Y Add this parameter to MGR_SS functions or Enter Process functions if you want to display a navigation link, or breadcrumb, on the page.
pEnableTerms=Y This parameter enables users to include ex-employees (terminated employees) in a personsearch. This parameter is enabled for selected Manager and Professional functions with a default setting of Y.
pRehireReco=Y When managers search for ex-employees to rehire them using the Applicant Hire and Rehire function, by default the search result displays ex-employees whose rehire is recommended and whose rehire is not recommended. Add this parameter to the Applicant Hire Mgr (HR_APPL_HIRE_MGR_SS) function to display only ex-employees whose rehire is recommended.
See: Applicant Hire and Rehire, page 9-105

4-38 Oracle Self-Service Human Resources Deploy Self-Service Capability Guide
Parameter Description
pNtfFyiDetails=Y Add this parameter to _SS functions to enable notification recipients to view transaction changes on the FYI Notification page after transactions are either approved or rejected. If this parameter is set to Y, then the FYI Notification page displays a Details region with the Proposed column and a Supporting Documents region. If any attachments are added to a transaction's Review page, then these attachments appear as a link on the FYI Notification page. For example, after a manager approves a leave of absence transaction, the recipient who receives the FYI notification can view the absence details that have been approved. The recipient need not navigate to the relevant self-service pages in the application to understand the changes thathave been approved.
The FYI notifications retrieve information from the transaction table and not from the base table. Therefor if transaction data is dependent on base table and base table data isdeleted, then relevant data is not displayed in FYI notifications.
Note: If you set this parameter, it is recommended that you schedule the Complete Defunct Workflow process to run with "AC" (Approval Complete ) statusto delete completed transactions. For example, you can delete completed transactions that are about 15 or 20 days earlier than the current date.
&pQkFn=Y Add this parameter to the self-service functions to hide the Effective Date page in the self-service transactions flow.
For information on how to use this parameter,see: Control the Display of the Effective Date, Review, and Confirmation Pages for Self-Service Transactions, page 2-11

Extending SSHR 4-39
Parameter Description
&pBpRv=Y Add this parameter to the self-service functions to hide the Review page in the self-service transactions flow.
If this parameter to hide the Review page is set to Y, then for the last page in the relevant process, the 'Last Page in Flow' attribute must be set to Yes using Oracle Workflow Builder. This indicates that the specific page is the last page in the transaction and the Review page isnot available. Another Node attribute "Approval Required Flag" must be set for the same last page node to decide whether "Approvals" are required for that functionalityor not.
Note: Note that if either &pQkFn or &pBpRv parameter is set to Y, then the Confirmation page is automatically hidden.If you plan to hide the Review page and approvals are required for the function, then it is not possible to view the list of reviewers or track the approval process. Also, any additional functionality availableon the Review page such as adding comments, viewing list of approvers, or adding attachments to transactions will notbe available.
For information on how to use this parameter,see: Control the Display of the Effective Date, Review, and Confirmation Pages for Self-Service Transactions, page 2-11


SSHR and Workflow 5-1
5SSHR and Workflow
Workflow OverviewOracle Self-Service Web Applications utilize the capabilities of Oracle Workflow to manage transaction flows. The workflows are embedded within SSHR and control the flow of information between the HR professional, the manager, the employee or worker, and the applicant.
See: Overview of Oracle Workflow for Users, Oracle Workflow Guide
SSHR uses workflow processes to combine related functions into a single transaction (for example, to add Special Information Types to Change Assignment or to Personal Information). and to control the transaction flow between the initiating user and other users such as a manager, an HR professional, or an applicant.
You use the Workflow Builder to look at the delivered processes which have been designed to support typical business processes. If necessary, you can configure differentversions of the workflow processes to suit your business processes. You link a workflow process to one or more functions using the Form Functions window. When you have linked the workflow process to the function, you can include or hide the function in your user menus.
See: Defining Functions for SSHR, page 4-12
Setting Up Workflow for SSHR
How does Oracle Workflow increase the flexibility of SSHR?In addition to configuring self-service functions and menus, you can also configure the underlying workflow processes on which SSHR functions are based. You can configure the workflow attributes and process flows to suit the particular requirements of your enterprise.

5-2 Oracle Self-Service Human Resources Deploy Self-Service Capability Guide
Can I change the delivered workflow processes for SSHR?Although Oracle provides a set of workflow processes for SSHR, we recommend that you leave these processes intact and create your own processes if any process changes are required. The Oracle Workflow Builder enables you to copy the delivered processes and modify them to suit your requirements. The delivered workflow processes are within the HRSSA item type. Although you can make changes within this item type, forexample, you can create new processes within this item type, the access level security provided by the Workflow Builder ensures that delivered processes are not modified.
How can I use the Workflow Builder to create new processes?You can use the Workflow Builder to create new processes by chaining together separate modules. For example, the Manage Employment Events modules can be chained together as required to create a custom workflow process.
Workflow processes often create redundant transaction information. Are there any cleanup procedures?
Yes. Oracle provides a workflow cleanup process which clears any redundant transaction data from temporary tables. Such data is created if the system crashes, or if auser ID is removed or disabled, for example.
Does Workflow generate automatic notifications?Yes. When Oracle Workflow executes specific events, it generates workflow notifications for specified users, or roles. For example, a manager may receive notification of a training enrollment or salary increase, where the manager must approve the event. Alternatively, a user may receive a notification purely for information purposes, for example, as confirmation that a change to personal details has been submitted to the database.

SSHR and Workflow 5-3
SSHR and Workflows
Self-Service Workflows This chapter describes how to use the Workflow Builder to review the delivered processflows and to configure alternative flows if desired.
For more information on the Workflow Builder, see Overview of Oracle Workflow for Users, Oracle Workflow Users Guide
Approvals ProcessesYou also use the Workflow Builder to configure your approvals processes. For more information, see: Approvals, page 7-9
Access Roles and Workflow
You use access roles to determine whether a user has permission to update and approveself-service transactions. If a function is marked for approval in the Workflow Builder, SSHR submits the transaction to the automated approval process (AME or Dynamic Approvals). The approvers then receive a notification in their Worklist with a link to open the action. The permissions and privileges defined by the access roles determine whether they can edit, change the effective date, or attach supporting documents to these transactions.
For more information on Access Roles, see Access Roles for Self-Service Actions, page 3-10
Workflow Objects and Item TypesIn Oracle Workflow, all processes are associated with an item type. An item type can include one or more processes and related objects, such as item attributes, functions, and messages. Oracle SSHR delivers a number of predefined workflow item types containing workflow processes that you can work with.
• HR (HRSSA)
• HR Self-Service Benefits
• HR Offer Letter (HR_OFFER) (for SSHR 3.4 only)
• HR Standard (HRSTAND) (for SSHR 3.4 only)
Previous versions of this implementation guide advised customers to make their configuration change to a copy of the delivered item type. Workflow processes that have been implemented using this approach will still be supported, however, for new

5-4 Oracle Self-Service Human Resources Deploy Self-Service Capability Guide
configurations, you should make your changes to the delivered item type using the approach described below. The new approach utilizes Oracle Workflow's access level features for preserving customizations.
You update the workflow item type in the Workflow Builder.
Note: We recommend that you do not change the item type directly in the database. Instead, download the item type to a .wft file which you then source control. Make the changes to this file and then upload it to the server.
See: Opening and Saving Item Types, Oracle Workflow Guide
Workflow Access Levels:The access protection levels ensure that your customizations are preserved during an upgrade. As long as you set your own access level to 100 or (higher) while working on changes, the access protection ensures that when an upgrade takes place, the "read-only" objects are updated and that customizations made to the "customizable" objects are preserved.
You can change objects if your access level is less than or equal to the object's protection level and greater than or equal to the object's customization level.
Note: If you copy workflow objects and change the access level to 100, the copied objects are displayed without a red tag on the icon. The original objects have a red tag. The absence of the red tag indicates that you can customize the objects.
The following table shows typical settings for workflow objects within the HRSSA item type. The customization level of a customizable object is set to the user's access level at the time when the user customized the object.
Most Objects (Default)
Customizable Objects (as delivered)
Customizable Objects (after changes)
Protection level 20 1000 1000
Lock at this level Yes No No
Customization level
20 20 100
Preserve customizations
No Yes Yes

SSHR and Workflow 5-5
NotificationsOracle Workflow generates a workflow notification for a user when the Workflow Engine executes a specific activity within a workflow process. For example, workflow may generate a notification for a manager if a direct report requests leave or enrolls on atraining course. This notification may be for information purposes only or may require that the recipient perform an activity, for example, approve a transaction.
For more information on workflow notifications, see: Overview of Notification Handling, Oracle Workflow User's Guide.
All the required information appears in the notification message, regardless of how the user receives the information (for example, in an E-mail or using SSHR). The information includes details of the transaction along with personal information and approval information. In addition, changed information is highlighted with a blue dot, enabling you to easily see which information has changed in the self-service transaction.The format and content of the workflow notifications are essentially the same as the Review page.
Note: A self-service user can receive notifications as e-mails by setting the Notification Preferences in the User Preferences web page. To enable E-mail delivery of notifications, the workflow administrator must set up a notification mailer.
For more information, see Reviewing Notifications via Electronic Mail, Oracle Workflow User's Guide
From the notification you can select the Printable Page button to display the information in a format suitable for printing. If enabled, you can use the Generate Document link in the Related Applications region to generate a pdf version of the document.
See: Document Management, page 11-16
Note: The Generate Document link is not available from E-mail notifications.
Accessing Workflow NotificationsSSHR users access their notifications using one of the following methods:
• Using the Workflow User Web Applications responsibility.
• Using the All Actions Awaiting My Attention function from the Manager, Professional, Employee or Worker responsibilities.

5-6 Oracle Self-Service Human Resources Deploy Self-Service Capability Guide
• As an E-mail sent to the user's inbox.
Note: The worklist may also contain additional system-generated notifications.
Personalizing NotificationsYou can use the Personalization Framework to configure the notifications to suit your requirements. All of the standard Personalization Framework functionality is available to you including the ability to rearrange fields, to insert and edit instructions, and to hide and display fields and regions.
For more information, see:
• Configuring Web Pages, page 6-4
• Adding Instructions to Web Pages, page 6-35
If you personalize your notification regions by selecting the Personalize Page link and setting the scope of the personalization to the appropriate page value, the changes are only applicable to the specific Notification page and E-mail page. If you select a shared region as the personalization scope, the personalizations are replicated in the other pages that use this shared region.
Notification MessagesThe following table provides a list of messages used within workflow notifications.
Message Name Workflow Message Name Workflow Display Name
HR_TRANSFER_TO_APPRAISEE_MSG
HR_EMBED_APPR_TRANSFER_MSG
Notify Appraisee on Appraisal Transfer
HR_APPRAISAL_COM_APPRAISEE_MSG
HR_EMBED_APPRAISEE_MSG
Notify Appraisee of AppraisalComplete (New)
HR_APPRAISER_MSG HR_EMBED_APPRAISER_MSG
Notify Appraiser (New)
HR_MAIN_APPRAISER_MSG
HR_EMBED_MAIN_APPRAISER_MSG
Notify Main Appraiser (New)
HR_NEW_MAIN_APPRAISER_MSG
HR_EMBED_NEW_MA_MSG
Notify New Main Appraiser (New)
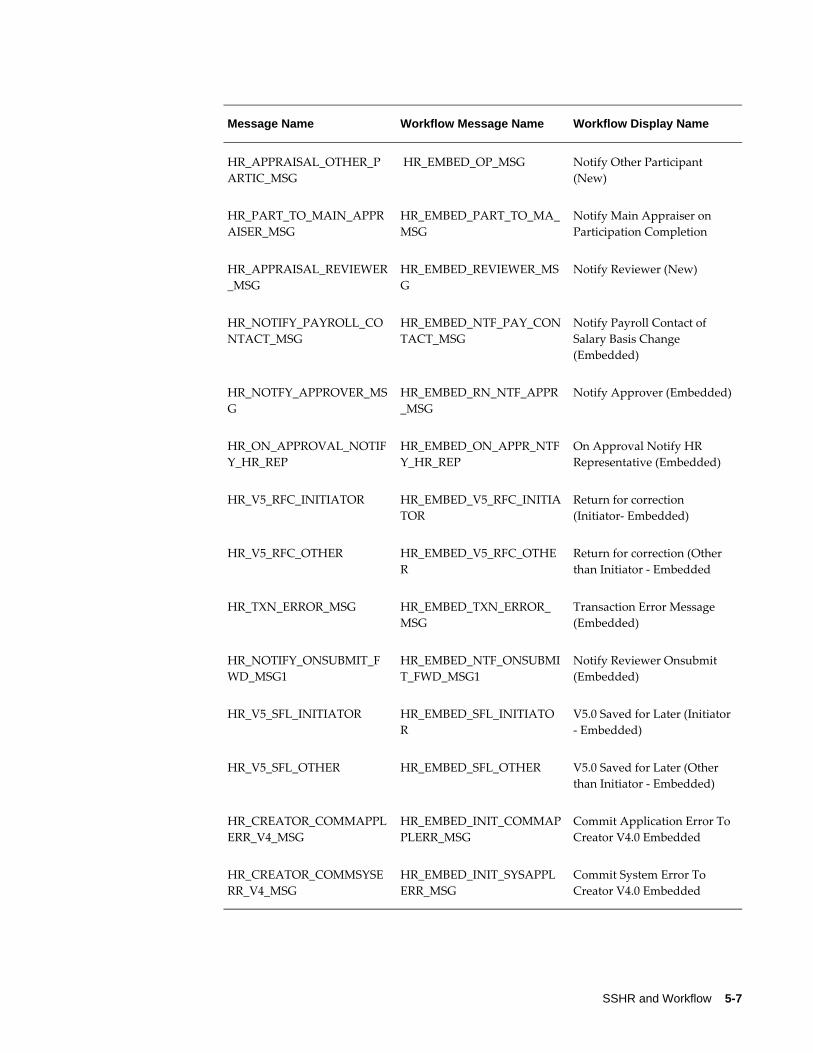
SSHR and Workflow 5-7
Message Name Workflow Message Name Workflow Display Name
HR_APPRAISAL_OTHER_PARTIC_MSG
HR_EMBED_OP_MSG Notify Other Participant (New)
HR_PART_TO_MAIN_APPRAISER_MSG
HR_EMBED_PART_TO_MA_MSG
Notify Main Appraiser on Participation Completion
HR_APPRAISAL_REVIEWER_MSG
HR_EMBED_REVIEWER_MSG
Notify Reviewer (New)
HR_NOTIFY_PAYROLL_CONTACT_MSG
HR_EMBED_NTF_PAY_CONTACT_MSG
Notify Payroll Contact of Salary Basis Change (Embedded)
HR_NOTFY_APPROVER_MSG
HR_EMBED_RN_NTF_APPR_MSG
Notify Approver (Embedded)
HR_ON_APPROVAL_NOTIFY_HR_REP
HR_EMBED_ON_APPR_NTFY_HR_REP
On Approval Notify HR Representative (Embedded)
HR_V5_RFC_INITIATOR HR_EMBED_V5_RFC_INITIATOR
Return for correction (Initiator- Embedded)
HR_V5_RFC_OTHER HR_EMBED_V5_RFC_OTHER
Return for correction (Other than Initiator - Embedded
HR_TXN_ERROR_MSG HR_EMBED_TXN_ERROR_MSG
Transaction Error Message (Embedded)
HR_NOTIFY_ONSUBMIT_FWD_MSG1
HR_EMBED_NTF_ONSUBMIT_FWD_MSG1
Notify Reviewer Onsubmit (Embedded)
HR_V5_SFL_INITIATOR HR_EMBED_SFL_INITIATOR
V5.0 Saved for Later (Initiator - Embedded)
HR_V5_SFL_OTHER HR_EMBED_SFL_OTHER V5.0 Saved for Later (Other than Initiator - Embedded)
HR_CREATOR_COMMAPPLERR_V4_MSG
HR_EMBED_INIT_COMMAPPLERR_MSG
Commit Application Error To Creator V4.0 Embedded
HR_CREATOR_COMMSYSERR_V4_MSG
HR_EMBED_INIT_SYSAPPLERR_MSG
Commit System Error To Creator V4.0 Embedded

5-8 Oracle Self-Service Human Resources Deploy Self-Service Capability Guide
Message Name Workflow Message Name Workflow Display Name
HR_DEPART_COMMAPPLERR_V4_MSG
HR_EMBED_DEPT_COMMAPPLERR_MSG
Commit Application Error To Department V4.0 Embedded
HR_DEPART_COMMSYSERR_V4_MSG
HR_EMBED_DEPT_SYSAPPLERR_MSG
Commit System Error To Department V4.0 Embedded
If required, you could use the Workflow Builder to replace the new message with a custom message.
See: Messages, Oracle Workflow Developer's Guide
Configuring Workflow Objects
Before you make changes to workflow objects:1. Open WorkFlow Builder.
2. On the File Menu select Help/About Workflow Builder.
3. Ensure that you are using a version of Workflow Builder that is compatible with theversion of Oracle Workflow installed on your server.
4. Set the Access Level to 100.
See: Workflow Objects and Item Types, page 5-3
5. Deselect the Allow Modifications of Customized Objects check box.
6. Select and display the Human Resources Self-Service Applications item type. Save itto a local file for backup.
Note: We recommend that you maintain source control for the .wft files so that you can track changes to the original objects, move definitions to other database instances using the Workflow Loader, and revert to previous versions if necessary.
To modify delivered workflow objects:1. Open WorkFlow Builder.

SSHR and Workflow 5-9
2. Select and display the Human Resources Self-Service Applications item type or the HR Self-Service Benefits item type.
3. If required, change any configurable item attributes.
Note: Some item attributes can be customized and other objects, such as processes, notifications, messages, and lookup types, are "read-only". You can change the "customizable" attributes directly in the workflow process. In SSHR item types, the only directly configurable objects are item-level attributes (including enterprise e-mail addresses) and dynamic approval levels.
See: Defining Your Enterprise's Email Addresses, page 5-11
See: Configuring Approvals with the Workflow Builder, page 7-21
4. If required, create copies of the read-only objects.
See: Copying Workflow Processes
5. Save your work.
Copying Workflow Processes
To copy a workflow process: 1. Copy the object and rename it.
For example, you can copy the FYI Notification Process (FYI_NOTIFICATION_PRC) for use with Self-Service Benefits Enrollments. Make sure the new process has the same item type as the original process.
Note: Prefix your copies with a consistent code, for example, a consistent numeral or a four-letter acronym for the company.
2. You may have to copy multiple levels of the process, for example, to make changes to the Basic Details subprocess within the Personal Information process, you would have to copy the overall process (Personal Information) and the subprocesses (Process Basic Details and Process Personal Information).
3. If you have copied (and modified) a subprocess, you will have to insert your copy of the subprocess into your copy of the higher level process in place of the original subprocess.
4. Save your work.
5. Create at least one function to point to the new process.

5-10 Oracle Self-Service Human Resources Deploy Self-Service Capability Guide
See: Defining Functions for SSHR, page 4-12
After applying a patch:During the application of an SSHR patch, the workflow loader utility ensures that your server has the latest versions of any delivered workflow objects. This upload overwritesany "read-only" objects but preserves any customizations that have been made to "customizable" objects.
If a patch includes new features or bug fixes for delivered objects that you have copied, you need to apply the same changes to your copied objects. Refer to the patch readme file for instructions. You may have to compare your copied object with the original read-only object.
Configuring Workflow Attribute ValuesWorkflow attribute values are the values for item types. They are variables that can be set by the application that maintains the item.
You configure workflow attributes in the Workflow Builder.
If you want to modify a predefined process, first make a copy of the process.
See: Self-Service Workflows, page 5-3
To configure workflow attributes:1. Open Workflow Builder.
2. If necessary, create a copy of the workflow process you want to modify.
3. Open the Human Resources Self-Service Applications Item Type or the HR Self-Service Benefits Item Type depending on which Item Type you want to modify.
See: Workflow Objects and Item Types, page 5-3
4. Double-click the process you want to modify. This opens the Process window.
5. Double-click an activity in the Process window to open the Control Properties window.
6. Choose the Node Attributes Tab and select a value name. For information on the attributes that are relevant for each process, see the function-specific documentation.
7. Edit any values defined in a procedure in the Value drop down list.
8. Click OK and save your work.

SSHR and Workflow 5-11
Configuring Workflow Error ProcessesEvery workflow-enabled function has an error process. The process runs when a systemerror occurs. The process sends a notification and a description to the System Administrator's ID.
To configure a workflow error process:1. Edit the workflow error process:
• HR_STANDARD_ERROR_PRC
2. Change the text of the error message by editing the Self-Service HR System Error Message:
• HR_SYSTEM_ERROR_MSG
3. Save your work.
Defining Your Enterprise's Email Addresses E-mail addresses of key people in your enterprise may be displayed in various pages or error messages throughout SSHR.
You set up the e-mail addresses for your enterprise in the Workflow Builder.
To change email addresses:1. Open the Oracle Workflow Builder.
2. Open your configured HR item type (HRSSA).
3. Select Attributes.
4. Select the following attribute and enter the appropriate email address in the DefaultValue field:
• HR Department Email ID
Note: You configure the Training Administrator ID (if using Enroll in a Class or Cancel Enrollment) and the Recruitment Supervisor ID(if using Candidate Offers) in the Professional Forms Interface.
5. Save your work.
5-12 Oracle Self-Service Human Resources Deploy Self-Service Capability Guide
Running the Workflow Cleanup ProcessThe workflow cleanup process enables you to remove workflow processes that are left running if a system crashes or a user ID is disabled or removed. The process cleans up temporary tables by removing redundant transaction information. You can specify which transactions are queried by the process by setting the Transaction Status parameter.
You run the cleanup process by running the concurrent program Complete Defunct HR Workflow Processes from the Submit Request Set window.
Before you run the cleanup process, you must define a request set that runs the Purge Obsolete Workflow Runtime Data (FNDWFPR) concurrent program before the Complete Defunct HR Workflow Resources (HRWFDFCT) concurrent program.
Note: From SSHR 4.1, the Complete Defunct Workflow Processes concurrent process is registered under Oracle Human Resources instead of Oracle Self-Service Web Applications. If you previously scheduled this concurrent process to run when still registered under Oracle Self-Service Web Applications, you must cancel the process and resubmit it using the new Complete Defunct HR Workflow Processes registered under Oracle Human Resources.
See:Overview of Concurrent Processing , Oracle E-Business Suite Setup Guide
See:Concurrent Programs Window, Oracle E-Business Suite Setup Guide
To run the request set:1. In the Request Set field, enter the name of your request set.
2. Place your cursor on the Parameters field in the row for the Purge Obsolete Workflow Runtime Data process to open the Parameters window.
3. Select the item type for which you want to remove obsolete workflow runtime data.If you leave the field blank, the process will purge obsolete data for all item types.
4. If applicable, enter an item key.
5. Enter the number of days for which you want to run the process. For example, if you want to purge obsolete data for the last 7 days, enter 7.
6. Select the persistence type of the data to be purged (Temporary or Permanent).
7. Choose OK to close the Parameters window.

SSHR and Workflow 5-13
8. Place your cursor on the Parameters field in the row for the Complete Defunct HR Workflow Processes process to open the Parameters window.
9. Select the item type to be included in the process.
10. Enter the number of days for which you want to run the process. For example, if you want to run the cleanup process for the last 7 days, enter 7.
11. Select the transaction statuses to be queried in the program. The permitted values for the transaction status parameter are as follows:
Transaction Status Values
Parameter Value Description
ALL All transaction statuses are queried in the program.
C Transaction returned for correction (in modules with SSHR V4.x and earlier)
RO Transactions returned to approver for correction
ROS Transactions returned to approver for correction and saved for later
RI Transactions returned to initiator for correction
RIS Transactions returned to initiator for correction and saved for later
D Deleted transactions
E Transactions with errors
N Transactions initiated but not submitted for approval
S Transactions saved for later
W Transactions in progress

5-14 Oracle Self-Service Human Resources Deploy Self-Service Capability Guide
12. Choose the Submit button.

SSHR Page Layouts 6-1
6SSHR Page Layouts
Page Layout OverviewThe OA (Oracle Applications) Personalization Framework, a component of the OA Framework, enables you to modify the appearance and behavior of self-service pages. You can customize your web pages in line with corporate standards and data requirements, and streamline your self-service process flows to reflect working practices.
Meta Data Services Repository
The MDS (Meta Data Services) Repository stores the base page definitions for self-service pages and you can create personalizations are which are stored separately from the base page definitions. Your personalizations are preserved during upgrades becauseupgrades only affect the base page definitions.
For more detailed information on the OA Framework and the OA Personalization Framework, please see the following documentation:
Overview of Oracle Self-Service Web Applications, Oracle Self-Service Web Applications Implementation Manual
Oracle Application Framework Documentation Resources(My Oracle Support Note # 391554.1)
For more information on using the Personalization Framework with SSHR, see: Configuring Web Pages, page 6-21.
Setting Up Page Layouts for SSHR
How does the Personalization Framework improve the flexibility of self-service functions?
The Personalization Framework enables you to modify the delivered SSHR web pages
6-2 Oracle Self-Service Human Resources Deploy Self-Service Capability Guide
to suit the requirements of your enterprise. For example, you can include a company logo on a page or hide/show particular fields. You can also restrict the information displayed to a user and define how information is entered by adding radio buttons, flexfields, lists of values, and read-only fields. You can also configure the sequence of pages and reorder regions and region items to better suit the requirements of your enterprise.
Can anyone use the Personalization Framework?For security reasons, not everyone has access to the Personalization Framework functionality. You control access to the Personalization Framework using profile options. If the profile options are set for your user or responsibility, you can access the Personalization Framework.
See: The Personalization Framework, page 6-4.
How does the Personalization Framework improve security in my enterprise?The Personalization Framework can control the data that is displayed to a user on a self-service page and can restrict the functions that a user can perform, for example, by defining fields as read-only.
Can I control approvals?Yes. You can use SSHR with Oracle Approvals Management (AME) or use standard and dynamic approvals to determine how managers and HR professionals approve self-service transactions.
Can I use the Personalization Framework to provide instructions to SSHR users?Yes. You can use the Personalization Framework and Oracle HRMS to create long or short messages for your SSHR users. You can also create field text to assist users when entering data in particular fields. You can replace delivered instructions and messages or add text to items or regions that are delivered without text.
Can I use the Personalization Framework to configure notifications?Yes. If your system administrator has enabled the Personalization Framework functionality, you can configure notifications to suit your requirements. You can specifywhether notifications are delivered using e-mail or using Oracle Workflow, or use both delivery methods.
Can I add objects or content to my SSHR pages?Yes. With OA Framework you can add new items and objects. Available items include flexfields, buttons, tips, and messages.
SSHR Page Layouts 6-3
See: Oracle Application Framework Documentation Resources(My Oracle Support Note # 391554.1)
Can I change the flow of self-service pages?Yes. You can take advantage of the extensibility functions offered by the OA Framework and change your process logic to suit your business requirements. You can change the sequence of self-service pages and add additional pages and regions if required.
For more information on using the Personalization Framework with SSHR, see: Configuring Page Layouts, page 6-21

6-4 Oracle Self-Service Human Resources Deploy Self-Service Capability Guide
SSHR Personalizations
The Personalization FrameworkOracle Applications Framework (OAF) technology (which includes the Personalization Framework) enables you to configure web pages for distinct audiences. For example, you can create one set of personalizations for a line manager and one set for an employee. Alternatively, you may personalize a self-service page differently for localizations, organizations, and sites. To enable this flexibility, the OA Framework provides two levels of personalization privileges: administrator level and end-user level. Administrators can choose to create personalizations at a number of different levels, for example, at the responsibility, site, or function level. These levels are arranged in a hierarchy where lower level personalizations take precedence over higher level personalizations.
See: Personalization Framework Hierarchy, page 6-4
Users can create personalizations for specific regions and items, for example, a user can hide or display particular columns in a table. A user can also personalize a portlet to hide or display particular information. User personalizations are only seen by the creating user.
Personalization Framework HierarchyConfigure web pages for different audiences by creating personalizations at different levels. This list shows the available personalization levels (with an example of a typical personalization):
Administrator Level Personalizations
Personalization Level Example
Function Make certain fields read-only for particular functions.
Localization Rename or hide fields for a particular localization.
Site Define a table format for your site.
Organization Add a corporate logo to all web pages used byyour organization.

SSHR Page Layouts 6-5
Personalization Level Example
Responsibility Add display or hide a flexfield for a responsibility.
Admin-seeded end user Create default views for your users.
User Level Personalizations
Personalization Level Example
Portlet Personalize the portlet to display news headlines.
User Create personalized views for tables.
Note: The lower level personalizations, for example, user-level personalizations, take precedence over the higher level personalizations, for example, site-level personalizations.
Not all personalization levels may be available for your self-service application. For example, for iRecruitment, use only site and responsibility levels.
To enable administration-level personalizations, the system administrator sets the personalization profile options for the user in question. The user then logs on to the self-service application and selects a responsibility. If the profile options are set correctly, the user sees the Personalize Region and Personalize Page links on the web page. By clicking on these links, the user can customize the page to the level required.
See: Oracle Application Framework Documentation Resources(My Oracle Support Note # 391554.1)
To enable user-level and portlet personalizations, the system administrator defines region items as user-configurable by using the User Personizable attribute in the Personalization Framework. For user and portlet-level personalizations, this attribute generally applies to tables. If a table can be personalized, you can define views for the table. For example, you can hide or display columns, filter data, select the number of rows to display, and define searches. You can then select the required view from a drop-down list. You can also define a default view.

6-6 Oracle Self-Service Human Resources Deploy Self-Service Capability Guide
Personalization and ExtensibilityEnhanced extensibility functionality enables you to add new functionality and override or extend the delivered business logic. For example, you can add new pages to a functional flow or add new items, such as a field, to a delivered page.
See: Oracle Application Framework Documentation Resources(My Oracle Support Note # 391554.1)
Function-Level PersonalizationsSome delivered SSHR functions include function-level customizations which you cannot update or delete. Currently, the following functions include function-level personalizations:
• Change Cost Center, Location and Manager
• Change Cost Center, Terms and Manager
• Change Job
• Change Job and Terms
• Worker Status Change
• Change Worker Status and Terms
• Hire/Applicant Hire/Contingent Worker Placement
• Termination
• Termination with Compensation
• Transfer
See: Oracle Application Framework Documentation Resources(My Oracle Support Note # 391554.1)
To personalize one of the above functions, you can either make the personalizations at the site or responsibility level (and override the delivered function-level personalizations) or you can create a copy of the function and make your own personalizations accordingly. However, if you prefer to work with your own custom functions rather than the delivered functions, you should be aware that you will lose any delivered function-level personalizations.
See: Defining Functions for SSHR, page 4-12
See: Function-level Personalizations, page 6-8

SSHR Page Layouts 6-7
Configurable Profile OptionsThe following table lists the configurable profile options used with the Personalization Framework.
Profile Configurable Levels Values Default
Personalize Self-Service Defn (FND_CUSTOM_OA_DEFINITION)
Site, Responsibility, User
Yes/No No
FND: Personalization Region Link Enabled (FND_PERSONALIZATION_REGION_LINK_ENABLED)
Site, Application, Responsibility, User
Yes/No No
Disable Self-Service Personal (FND_DISABLE_OA_CUSTOMIZATIONS)
Site, Application, User
Yes/No No
Personalize Self-Service DefnThis profile option enables or disables the global Personalize Page link that appears on each self-service web application page. This profile option must be set to enable personalization at the administrator level. When an administrator displays the Page Hierarchy personalization page from the Personalize Page link, the administrator must navigate to the region or item to be personalized by expanding the hierarchy.
FND: Personalization Region Link EnabledThis profile option enables the Personalize Region link above each region in a SSHR web page. You can set this profile option in addition to the Personalize Self-Service Defn profile option. The advantage of setting this profile option is that the Page Hierarchy personalization page focusses on the specific region and the administrator does not have to expand the branches of the hierarchy.
Disable Self-Service PersonalIf this system profile option is set to Yes, the configurations you make will not be applied, regardless of the level at which you make the configurations. Only the original definition of each self-service page will be displayed.

6-8 Oracle Self-Service Human Resources Deploy Self-Service Capability Guide
Function-level PersonalizationsOracle delivers a number of SSHR processes with function-level personalizations. If youcopy of one of these processes to create your own version, you lose the function-level personalizations.
The following tables show which personalizations are included in the delivered processes, so you can replicate them if you require. The tables show where the behavior of a region item for a particular process is different than in a standard module. For example, for the Change Job process, the Department item, which is normally displayedin the Assignment page, is hidden. Any region item not included in this table behaves in the default way.
See: The Personalization Framework, page 6-4
Function Name Region Name Hidden Region Items
Displayed Region Items
Change Job (HR_CHANGE_JOB_SS)
Assignment HRInstruction
Department
Position
Grade
People Group
Assignment Status
Other Assignment Information
Statutory Information
Payroll
Salary Information
Location

SSHR Page Layouts 6-9
Function Name Region Name Hidden Region Items
Displayed Region Items
Assignment Review Change Reason
Assignment Flex
Assignment Status
Ceiling Point
Ceiling Step
Employee Category
Employment Category
Establishment Name
Frequency
Grade Name
Location
Normal End Time
Normal Start Time
People Group Key Flex
Performance Review Period
Performance Review Frequency
Position Name
Salary Basis
Salary Review Frequency
Salary Review Period
Work Hours
Additional Information
Payroll Name

6-10 Oracle Self-Service Human Resources Deploy Self-Service Capability Guide
Function Name Region Name Hidden Region Items
Displayed Region Items
Change Job and Terms (HR_CHANGE_JOB_TERMS_SS)
Assignment Department
Position
Grade
People Group
Assignment Status
Other Assignment Information
Statutory Information
Payroll
Salary Information
Location
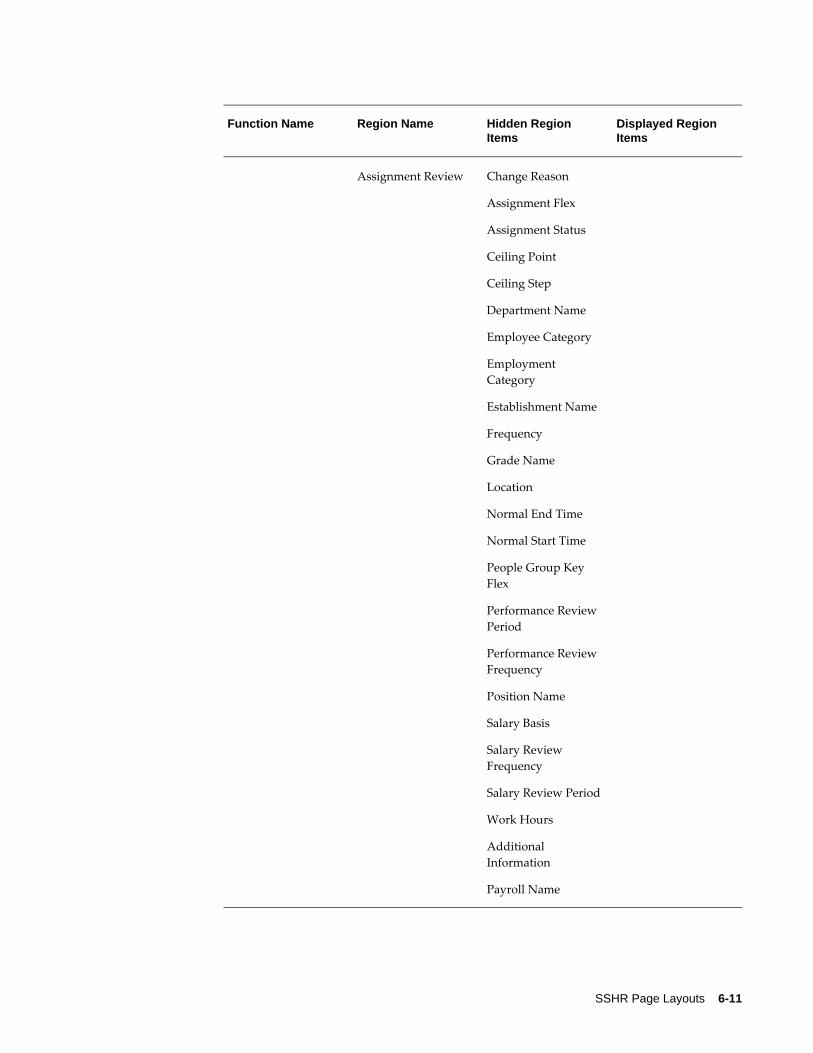
SSHR Page Layouts 6-11
Function Name Region Name Hidden Region Items
Displayed Region Items
Assignment Review Change Reason
Assignment Flex
Assignment Status
Ceiling Point
Ceiling Step
Department Name
Employee Category
Employment Category
Establishment Name
Frequency
Grade Name
Location
Normal End Time
Normal Start Time
People Group Key Flex
Performance Review Period
Performance Review Frequency
Position Name
Salary Basis
Salary Review Frequency
Salary Review Period
Work Hours
Additional Information
Payroll Name

6-12 Oracle Self-Service Human Resources Deploy Self-Service Capability Guide
Function Name Region Name Hidden Region Items
Displayed Region Items
Change Cost Center, Location and Manager (HR_CHG_COST_LOC_SUP_SS)
Assignment HRInstruction
Job
Position
Grade
People Group
Assignment Status
Other Assignment Information
Statutory Information
Payroll
Salary Information
Location

SSHR Page Layouts 6-13
Function Name Region Name Hidden Region Items
Displayed Region Items
Assignment Review Change Reason
Assignment Flex
Assignment Status
Ceiling Point
Ceiling Step
Employee Category
Employment Category
Establishment Name
Frequency
Grade Name
Job Title
Location
Employee is a Manager
Normal End Time
People Group Key Flex
Performance Review Period
Performance Review Frequency
Position Name
Salary Basis
Salary Review Frequency
Salary Review Period
Work Hours
Additional Information

6-14 Oracle Self-Service Human Resources Deploy Self-Service Capability Guide
Function Name Region Name Hidden Region Items
Displayed Region Items
Payroll Name
Change Cost Center, Terms and Manager (HR_CHG_COST_TRM_LOC_SUP_SS)
Assignment Job
Position
Grade
People Group
Assignment Status
Other Assignment Information
Statutory Information
Payroll
Salary Information
Location

SSHR Page Layouts 6-15
Function Name Region Name Hidden Region Items
Displayed Region Items
Assignment Review Change Reason
Assignment Flex
Assignment Status
Ceiling Point
Ceiling Step
Employee Category
Employment Category
Establishment Name
Frequency
Grade Name
Job Title
Location
Employee is a Manager
Normal End Time
Normal Start Time
People Group Key Flex
Performance Review Period
Performance Review Frequency
Position Name
Salary Basis
Salary Review Frequency
Salary Review Period
Work Hours
Additional
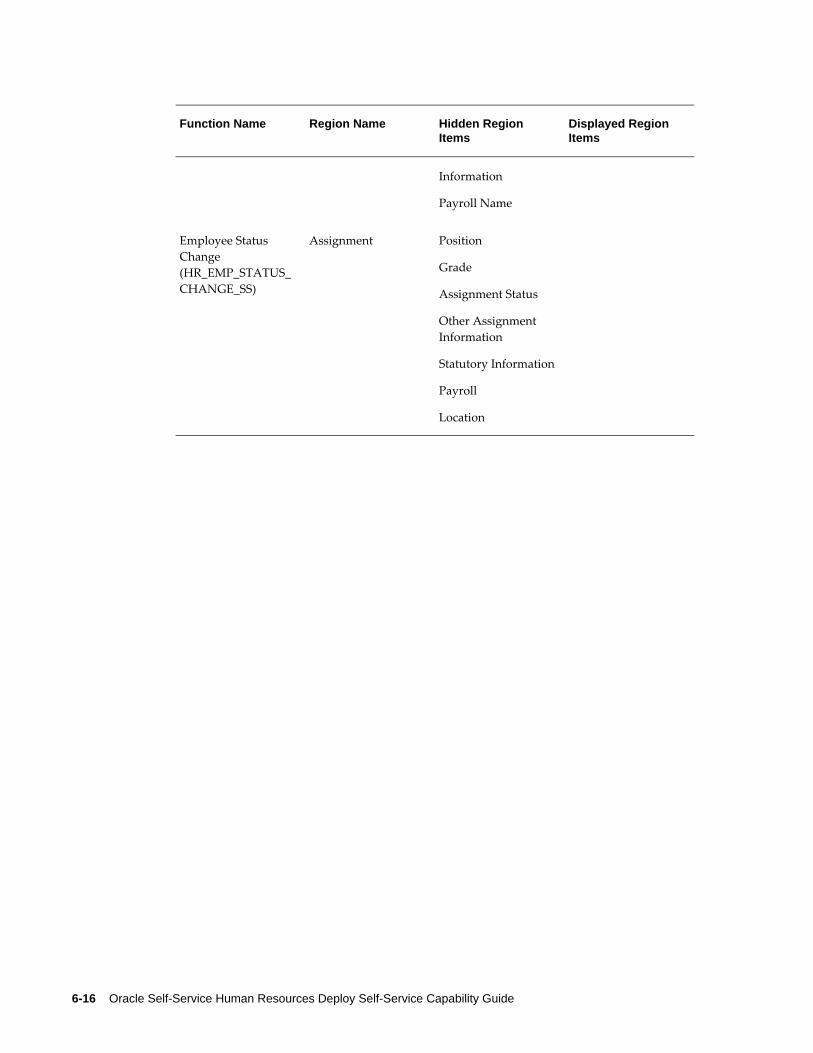
6-16 Oracle Self-Service Human Resources Deploy Self-Service Capability Guide
Function Name Region Name Hidden Region Items
Displayed Region Items
Information
Payroll Name
Employee Status Change (HR_EMP_STATUS_CHANGE_SS)
Assignment Position
Grade
Assignment Status
Other Assignment Information
Statutory Information
Payroll
Location
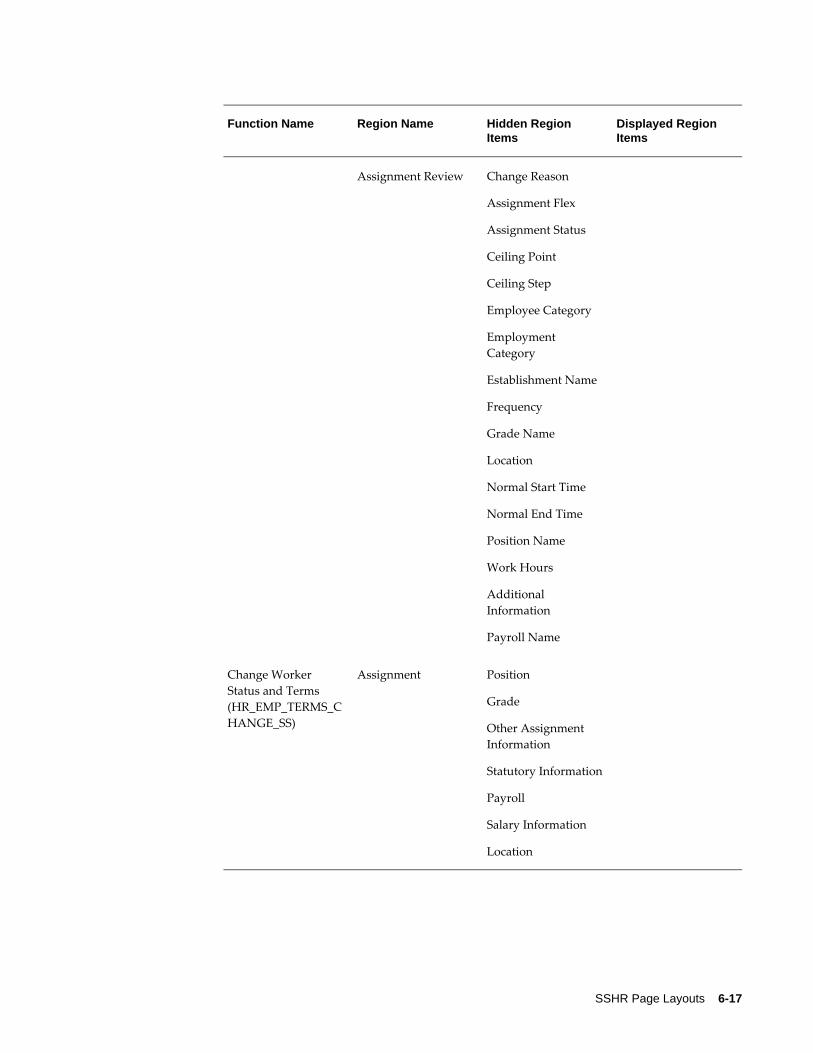
SSHR Page Layouts 6-17
Function Name Region Name Hidden Region Items
Displayed Region Items
Assignment Review Change Reason
Assignment Flex
Assignment Status
Ceiling Point
Ceiling Step
Employee Category
Employment Category
Establishment Name
Frequency
Grade Name
Location
Normal Start Time
Normal End Time
Position Name
Work Hours
Additional Information
Payroll Name
Change Worker Status and Terms (HR_EMP_TERMS_CHANGE_SS)
Assignment Position
Grade
Other Assignment Information
Statutory Information
Payroll
Salary Information
Location
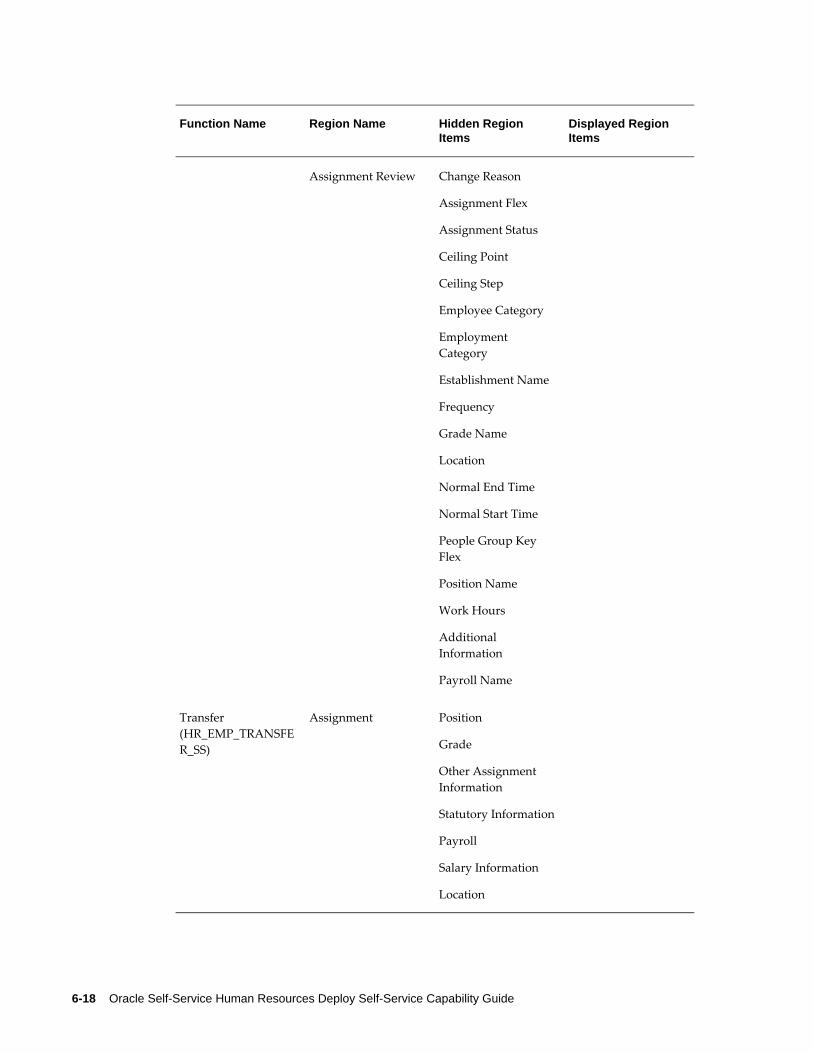
6-18 Oracle Self-Service Human Resources Deploy Self-Service Capability Guide
Function Name Region Name Hidden Region Items
Displayed Region Items
Assignment Review Change Reason
Assignment Flex
Assignment Status
Ceiling Point
Ceiling Step
Employee Category
Employment Category
Establishment Name
Frequency
Grade Name
Location
Normal End Time
Normal Start Time
People Group Key Flex
Position Name
Work Hours
Additional Information
Payroll Name
Transfer (HR_EMP_TRANSFER_SS)
Assignment Position
Grade
Other Assignment Information
Statutory Information
Payroll
Salary Information
Location

SSHR Page Layouts 6-19
Function Name Region Name Hidden Region Items
Displayed Region Items
Assignment Review Change Reason
Assignment Flex
Assignment Status
Ceiling Point
Ceiling Step
Employee Category
Employment Category
Establishment Name
Frequency
Grade Name
Location
Normal End Time
Normal Start Time
Performance Review Period
Performance Review Frequency
Position Name
Salary Basis
Salary Review Frequency
Salary Review Period
Work Hours
Additional Information
Payroll Name
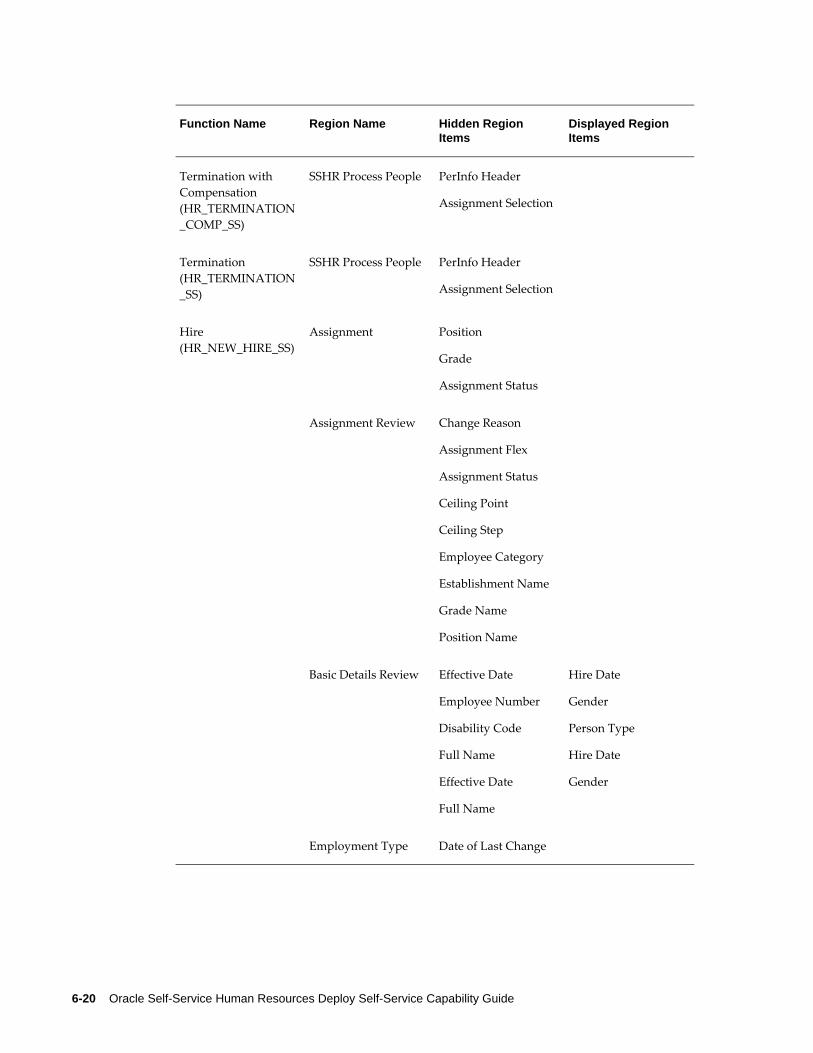
6-20 Oracle Self-Service Human Resources Deploy Self-Service Capability Guide
Function Name Region Name Hidden Region Items
Displayed Region Items
Termination with Compensation (HR_TERMINATION_COMP_SS)
SSHR Process People PerInfo Header
Assignment Selection
Termination (HR_TERMINATION_SS)
SSHR Process People PerInfo Header
Assignment Selection
Hire (HR_NEW_HIRE_SS)
Assignment Position
Grade
Assignment Status
Assignment Review Change Reason
Assignment Flex
Assignment Status
Ceiling Point
Ceiling Step
Employee Category
Establishment Name
Grade Name
Position Name
Basic Details Review Effective Date
Employee Number
Disability Code
Full Name
Effective Date
Full Name
Hire Date
Gender
Person Type
Hire Date
Gender
Employment Type Date of Last Change
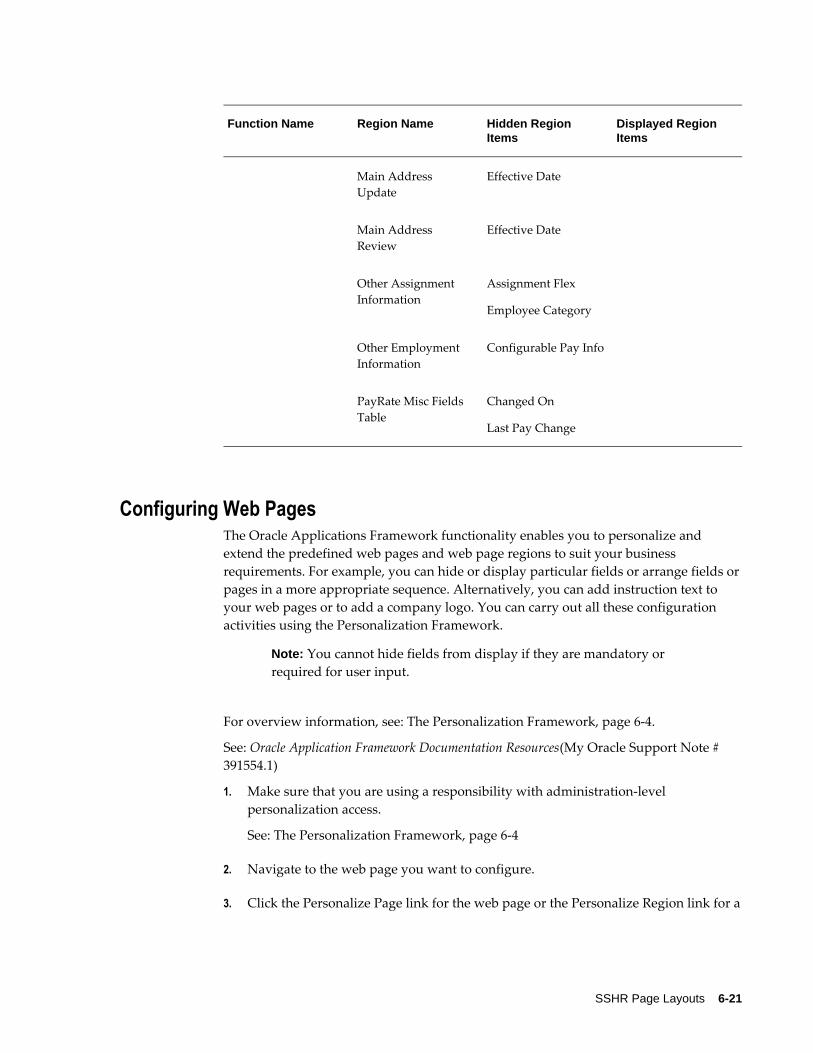
SSHR Page Layouts 6-21
Function Name Region Name Hidden Region Items
Displayed Region Items
Main Address Update
Effective Date
Main Address Review
Effective Date
Other Assignment Information
Assignment Flex
Employee Category
Other Employment Information
Configurable Pay Info
PayRate Misc Fields Table
Changed On
Last Pay Change
Configuring Web PagesThe Oracle Applications Framework functionality enables you to personalize and extend the predefined web pages and web page regions to suit your business requirements. For example, you can hide or display particular fields or arrange fields orpages in a more appropriate sequence. Alternatively, you can add instruction text to your web pages or to add a company logo. You can carry out all these configuration activities using the Personalization Framework.
Note: You cannot hide fields from display if they are mandatory or required for user input.
For overview information, see: The Personalization Framework, page 6-4.
See: Oracle Application Framework Documentation Resources(My Oracle Support Note # 391554.1)
1. Make sure that you are using a responsibility with administration-level personalization access.
See: The Personalization Framework, page 6-4
2. Navigate to the web page you want to configure.
3. Click the Personalize Page link for the web page or the Personalize Region link for a
6-22 Oracle Self-Service Human Resources Deploy Self-Service Capability Guide
specific region.
The Choose Personalization Context page appears, displaying the following personalization levels:
Note: If applicable, you can populate these fields with the values for you (as the person logged on) by clicking on the Set to My ... button.
• Scope
This is the name of the region or page that you are personalizing. You can switch to a different region within the page by selecting a value from the list.
• Function
• Location
• Organization
• Responsibility
• Site
Note: When you define the personalization context, you should take care to consider the personalization hierarchy. For example, if you personalize a function and only enter a value in the Function field, the personalizations are also applicable if the function is used elsewhere, for example, with other responsibilities. If you only select a value in the Responsibility field, the personalizations are only applicable to that responsibility.
See: Personalization Framework Hierarchy, page 6-4
Similarly, you should take care when selecting the Scope. If you select the page as the scope and navigate to the required region on the following page, the personalizations only apply to the region in that particular page. However, if you select a shared region in the Scope field, the personalizations are replicated wherever the region appears throughout the application.
4. Click Apply to continue to the next page.
The Personalize Page or Personalization Region page appears.
Making Your Personalization Changes
5. The page or region contains a hierarchy (Personalization Structure). If you are

SSHR Page Layouts 6-23
personalizing a page, the hierarchy contains all nodes for the page. If you are personalizing a region, the hierarchy contains the region and any subregions. Expand the hierarchy to display the required region.
Tip: If required, you can search for particular styles or items within the page or region by expanding the Search region.
6. The Personalization Structure table contains links to the personalization functions. Although the content of this table may vary according to the type of element you have selected for personalization, common functions include:
• Personalize
Click on this icon to display the Personalization Properties.
See: Personalization Properties, page 6-23
• Reorder
You can change the sequence of regions in a page or items in a region.
See: Reorder Contents Page, page 6-25.
• Add Content
You can add predefined content regions to a selected region.
See: Add Content Page, page 6-25.
• Create Item
You can add items to a selected region.
Note: You can only add an item at the Site, Localization, or Function levels.
See: Create Item Page, page 6-25
• Update Item
You can update the properties for an item created using the Create Item function.
• Delete Item
You can delete an item from a page or region.
Select the required function.
Personalization Properties Page
6-24 Oracle Self-Service Human Resources Deploy Self-Service Capability Guide
7. If you select the Personalize icon, the Personalization Properties page appears. The properties and functions available vary according to the type of page element you have selected for personalization.
See: Oracle Application Framework Documentation Resources(My Oracle Support Note # 391554.1)
The personalization properties are arranged in a table. The columns have the following significance:
• Original Definition
This shows the base definition as stored in the MDS (Meta Data Services) Repository.
• Columns for personalizations
The columns displayed depend on the personalization levels you selected for the personalization context. They are displayed in order of precedence (lowest to highest). You can enter a value for each of the available personalization levels. If a field does not contain a personalization, it has the value Inherit. In this case, the field inherits its value from the corresponding field in the preceding column. For example, if you enter the prompt Employee Name for a page element at the function level, you can ensure that the same prompt is usedfor all subsequent personalization levels by selecting the Inherit value for these levels.
• Result/Source
This column displays the final personalization.
The rows displayed in the Personalization Properties table also vary according to the page element selected for personalization. The rows relate to the attributes that you can personalize for your page element. Common attributes include:
• Prompt
Enter a prompt for the page element.
• Rendered
This attribute determines whether a page element is hidden (False) or displayed(True).
• User Personalization
This attribute determines whether the page element can be personalized by a user (not an administration-level user).
Note: You can clear your personalizations for a particular level by
SSHR Page Layouts 6-25
selecting a level in the Clear Personalization field.
8. To submit your personalizations, click the Apply button.
Reorder Contents Page
9. To reorder the items on a page, click on the Reorder icon.
The Reorder Contents page appears. This page contains a reorder region for each personalization level and also displays the base definition.
10. Select the personalization level at which you want to reorder the items on the page. If you do not reorder the items for a specific level, the level inherits the order from the personalization level above it.
11. Use the arrows at the side of the reorder region to region the page items.
12. To submit your personalizations, click the Apply button.
Add Content Page
13. To add a content region to a page, click on the Add Content icon.
The Add Content page appears.
14. Select a predefined content region to add to the page.
Note: You can only add a content region to a boxed layout region that contains only content regions.
15. To submit your personalizations, click the Apply button.
Create Item Page
16. To create a new item for your page or region, click on the Create Item icon. To update the properties for an item that you have created using the Create Item page, click on the Update Item icon.
The Create Item page appears.
17. Select the item type to be created or updated. For example, you can select flexfield, button, or tip.
18. Enter the ID for the new item. This ID should not exceed 30 characters.
Note: The properties displayed for the new item depend on the type of item you are creating.

6-26 Oracle Self-Service Human Resources Deploy Self-Service Capability Guide
See: Oracle Application Framework Documentation Resources(My Oracle Support Note # 391554.1)
19. To submit your personalizations, click the Apply button.
Configuring Page HeadersSelf-service pages often include a header region which provides summary information for the user. Manager self-service pages, for example, usually include headers to provide information such as the employee (or worker) name, employee number, job, and department for the person on whom they are carrying out a transaction.
In SSHR there are two header regions: Person Header and Assignment Header. Each header region contains several fields although some fields are delivered as hidden. In other words, the Rendered attribute for the field is set to False. To display these fields, use the Personalization Framework.
Name Format Personalizations
The Header regions display names in brief format by default. If you prefer to see the full name of the employee or worker, set the profile option HR:Display Person Name to Full Name.
Configurable Flexfields
The following tables show which flexfields are included in the Person and Assignment Headers:
Note: US Federal HR does not include these flexfields in the Person andAssignment headers.
Person Header
Flexfield Name Flexfield Code
Further Person Information Person Developer DF
Additional Personal Details Flex PER_PEOPLE

SSHR Page Layouts 6-27
Assignment Header
Flexfield Name Flexfield Code
Add'l Salary Admin Details PER_PAY_PROPOSALS
Additional Assignment Details PER_ASSIGNMENTS
Personalizing Page Headers:1. Navigate to the page or header region that you want to personalize and choose the
appropriate link (Personalize Region or Personalize Page).
2. In the Choose Personalization Context page, select one of the following values in the Scope field:
• /oracle/apps/per/selfservice/common/webui/SummaryContainerRN
to personalize the top-level header region containing the Person and Assignment headers
• /oracle/apps/per/selfservice/common/webui/PersonSummaryRN
to personalize the Person header
• /oracle/apps/per/selfservice/common/webui//AsgSummaryRN
to personalize the Assignment header
3. Make your personalizations.
See: Configuring Web Pages, page 6-21
Caution: Be aware that if you personalize the header regions, the changes are reflected throughout the application. In other words, if you personalize the Person header to hide the Contingent Worker Name field, this field will not appear on the Person header regions throughout SSHR.
4. Choose Apply to submit your changes.
Configuring FlexfieldsFlexfields are user-defined data structures which are provided with many of the applications database tables. Key flexfields are used to uniquely identify a record.
6-28 Oracle Self-Service Human Resources Deploy Self-Service Capability Guide
Descriptive flexfields add attributes to an existing object. Each flexfield can consist of multiple flexfield segments, each with its own validation rules.
See: Overview of Flexfield Concepts, Oracle Applied Technology Guide
If the self-service function you are using has flexfields enabled, you can access them using the Personalization Framework. The flexfields are not automatically displayed so you can choose to hide or display the flexfields using the Personalization Framework. However, not all self-service functions use flexfields. For a list of the available flexfields for each self-service function, please see the corresponding functional description in thisImplementation Guide.
Note: It may be the case that flexfields available in the Professional Forms Interface are not available in SSHR.
You can also add flexfields to regions of your web pages using the Personalization Framework.
To modify the flexfields displayed in a region:1. Select the region.
2. Configure the region by choosing the Personalize Region link.
To personalize existing flexfields1. Expand the hierarchy structure and click Personalize to open the
Personalization Properties page.
2. To hide or display a flexfield, change the value in the Render column to True (to display the flexfield) or False (to hide the flexfield).
3. To display all flexfield segments, leave the Flex Segment List field blank. To display only selected segments, enter the segments in the Flex Segment List using the following format:
context1|segment1|segment||context2|segment 1
For example,
Global Data Element|New Employer|Address||US|Zip Code
4. Click Save to submit your changes.
3. Choose Apply to save your personalizations.
Configuring Tabbed RegionsTabbed regions appear on several SSHR web pages; for example, the Benefits Self

SSHR Page Layouts 6-29
Service page includes the Benefits Enrollments and Current Benefits tabs. The self-service Views functions also use tabbed regions and buttons to enable the user to switchbetween the different views.
The structure of the tabbed regions is defined by a series of menus and submenus. The graphic illustrates a typical example of a tabbed region in SSHR. In this example, the user selects the HR Professional responsibility which calls the HR Professional menu. The HR Professional menu contains the HR Views menu which, in turn, calls the HR Views submenu and the Search function. The Search function and HR Views submenu form the tabs displayed on the self-service page. The functions attached to the HR Views submenu become the buttons displayed under the HR Views tab.
Tabbed Regions in SSHR
The following menus contain tabbed regions:
Menu Structure for Tabbed Regions
Top Level Menu Submenu/Function Function Function
HR Professional (HR_PROF_SELF_SERVICE_V4.0)
HR Views (HR_VIEWS_MENU)
Search function
HR Views submenu (HR_VIEWS)
View Employee Information Details

6-30 Oracle Self-Service Human Resources Deploy Self-Service Capability Guide
Top Level Menu Submenu/Function Function Function
View Employee Compensation Activity
View Employee Termination History
View Employee/Personal Information
Search function
Benefits Self-Service (BEN_SELF_SERVICE_BENEFITS
Benefit Enrollments function
Current Benefits function
My Employee Information Functions Menu (HR_MGR_VIEWS_FUNC_MENU)
Simple Search
Advanced Search
My List
My Employee Information
Person Details
My Employee Information Views Sub Tab Menu (HR_MGR_VIEWS_SUB_TABS)
Employment

SSHR Page Layouts 6-31
Top Level Menu Submenu/Function Function Function
Salary
Performance
Training
Absence
Job Applications
Effort Distribution
Contracts
My Information Functions Menu (HR_EMP_VIEWS_FUNC_MENU)
My Information
My Information Views Sub Tab Menu (HR_EMP_VIEWS_SUB_TABS)
Employment
Salary
Performance
Training
Absence
Job Applications
Effort Distribution
Contracts

6-32 Oracle Self-Service Human Resources Deploy Self-Service Capability Guide
Top Level Menu Submenu/Function Function Function
Salary Details
Salary Details
Menu Structure for US Federal HR Tabbed Regions
Top Level Menu Sub menu Sub Tab Function
Federal HR Self Service (GHR_HR_MANAGER_ACCESS)
Employee Information (GHR_HR_VIEWS_FUNC_MENU)
Employee Information (GHR_HR_VIEWS_SUB_TABS)
Employment
Position
Personal
Obligation Dates
Salary
Benefits
Awards and Bonuses
Performance
Personnel Action
Training
Absence
Job Application
Federal Manager Self Service (GHR_LINE_MANAGER_ACCESS)
My Employee Information (GHR_MGR_VIEWS_FUNC_MENU)
My Employee Information (GHR_MGR_VIEWS_SUB_TABS)
Employment

SSHR Page Layouts 6-33
Top Level Menu Sub menu Sub Tab Function
Position
Personal
Salary
Awards and Bonuses
Performance
Personnel Action
Training
Absence
Job Application
Federal Employee Self Service (GHR_EMPLOYEE_DIRECT_ACCESS)
My Information (GHR_EMP_VIEWS_FUNC_MENU)
My Information (GHR_EMP_VIEWS_SUB_TABS)
Employment
Position
Personal
Salary
Benefits
Awards and Bonuses
Performance
Personnel Action
Training
Absence

6-34 Oracle Self-Service Human Resources Deploy Self-Service Capability Guide
Top Level Menu Sub menu Sub Tab Function
Job Application
See also: Setting Up Self-Service Benefits Web Pages, Oracle HRMS Compensation and Benefits Management Guide
You can determine which responsibilities can view information by hiding the tabbed region (function exclusion):
• At the responsibility level for a specific responsibility
• At the menu level for all responsibilities
To configure tabbed regions:To exclude a tabbed region for all responsibilities at the menu level:
Set a function exclusion at the menu level:
1. In the Menus window, query the self-service manager menu, such as HR_VIEWS_SUB_TABS.
2. Locate the row for the prompt and function associated with the tabbed region, such as Training.
3. Click the Grant check box to deselect the tabbed region for all responsibilities that use this menu.
4. Save your work.
To exclude a tabbed region from one responsibility:
Set a function exclusion at the responsibility level:
1. In the Responsibility window, query the self-service manager responsibility.
2. In the Menu Exclusions tabbed region, create an exclusion with the type Function.
3. Select the function you wish to exclude in the Name column. See Menu Structure for Tabbed Regions, page 6-29.
4. Save your work.
To rename the tabbed regions:
1. In the Menu window, query either the menu representing the tabbed region or the menu containing the functions that represent the buttons.

SSHR Page Layouts 6-35
2. Change the name of the tabbed region or button by changing the value in the Prompt field of the Menus window.
Note: If you change the prompt, the change will be visible for all responsibilities or menus calling that menu or submenu. If you want to use different names for the tabbed regions and buttons for different responsibilities, you must create additional versions of themenu or submenu.
See: Defining Menus, Oracle HRMS Configuring, Reporting, and System Administration Guide
3. Save your work.
Adding Instructions to Web PagesYou can change the predefined instructions, messages, and tips attached to your web pages to provide relevant information for your users. You can replace delivered texts orcreate new texts for regions or item delivered without a text attached, using one of threeformats:
• Instructions. These texts appear at the top of a region and generally give advice applicable to the whole region or page.
• Long messages. These texts are attached to a field. When the user clicks the Information icon next to a field, the message opens in a separate window.
• Short tips. These texts are also attached to a field, however, they are displayed underneath the field in blue.
The graphic below illustrates examples of the different types of text:
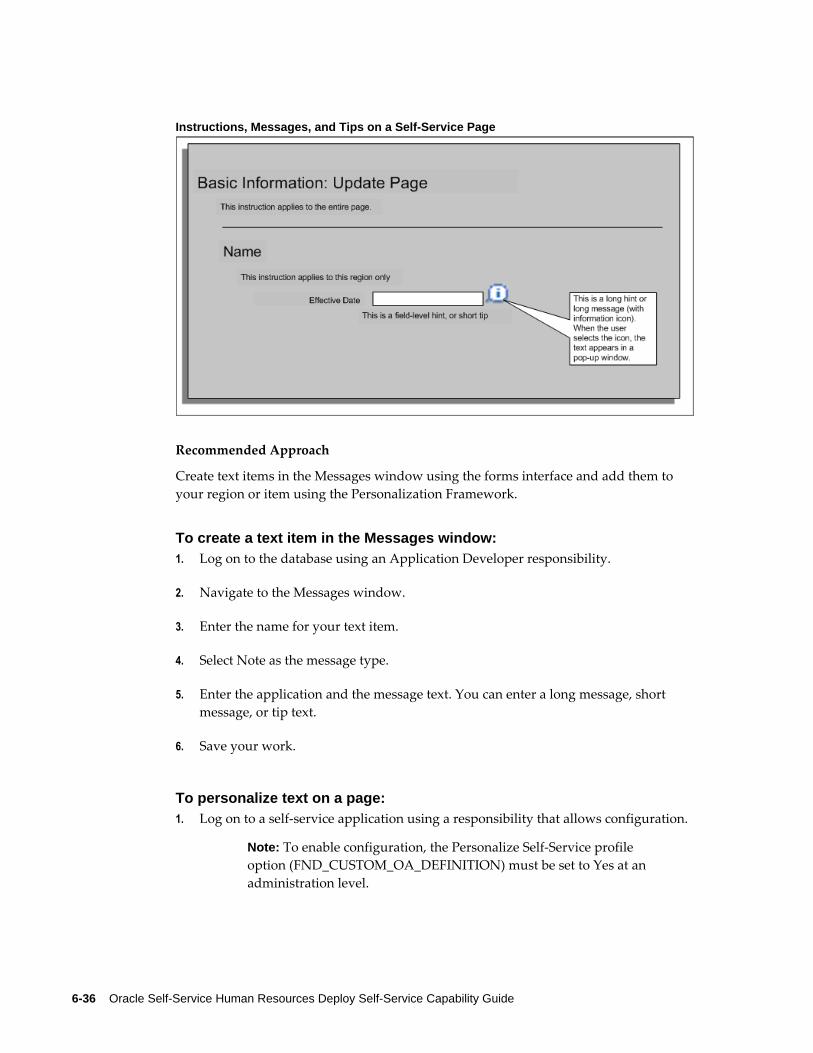
6-36 Oracle Self-Service Human Resources Deploy Self-Service Capability Guide
Instructions, Messages, and Tips on a Self-Service Page
Recommended Approach
Create text items in the Messages window using the forms interface and add them to your region or item using the Personalization Framework.
To create a text item in the Messages window:1. Log on to the database using an Application Developer responsibility.
2. Navigate to the Messages window.
3. Enter the name for your text item.
4. Select Note as the message type.
5. Enter the application and the message text. You can enter a long message, short message, or tip text.
6. Save your work.
To personalize text on a page: 1. Log on to a self-service application using a responsibility that allows configuration.
Note: To enable configuration, the Personalize Self-Service profile option (FND_CUSTOM_OA_DEFINITION) must be set to Yes at anadministration level.

SSHR Page Layouts 6-37
2. Click Personalize Region or Personalize Page.
3. Navigate to the self-service page or region in which you want to replace the text.
Then select one of the following options:
• To replace an existing text item, page 6-37
• To add a text item to a new region or page, page 6-37
To replace an existing text item:1. When the personalization structure is displayed, drill down to the region or page
element containing the text.
2. Locate the text item on the page. The text item will be one of the following items:
• Static Styled Text: <name> - for instruction text
• Message Text Input - for short tips and long messages
• Message Choice - for long messages attached to a list of values
3. Select the Personalize icon for the item.
4. Replace the value in the Message Name field with the text item that you created in the Messages window.
5. Click Apply to save your changes
To add a text item to a new region:If you are adding a text item to a region or page that does not contain a text as standard,you need to carry out the following steps:
1. Create an item with one of the following styles:
• Static Styled Text: <name> - for instruction text
• Message Text Input - for short tips and long messsages
• Message Choice - for long messages attached to a list of values
See: Create Item Page, page 6-25
2. Enter the ID for the item following the standard naming conventions.
See: Oracle Applications Framework Personalization Guide
3. Set the CSS Class to OraInstructionText.

6-38 Oracle Self-Service Human Resources Deploy Self-Service Capability Guide
4. Enter the application short name in the Message Appl Short Name field..
5. Enter the name of the message in the Message Name field.
6. In the Tip Type field, select the appropriate format for your text.
Note: If applicable, you can display a date format example next to adate field. In this case, select dateFormat in the Tip Type field. The OA Framework then automatically displays a date example based on the user's date preference.
7. Click Apply to submit your changes.
Configuring the Global Button BarThe Global Button Bar comprises the following buttons by default:
• Return to Portal
• Log Off
• Select Preferences
• Self-Service Help
Selecting a button enables a user to access the button's function.
You can configure the Global Button bar by removing any, or all, of the buttons from a user's web page. You edit the contents of the Global Button bar in the Menus window. When you remove a button from display a user can no longer access the button's functionality. You can also rearrange the order of the buttons or use a button bar that you create.
To configure a button on the global button bar:1. Query the following Menu in the Menus window:
• ICX_GLOBAL_MENU
2. Consider which of the following functions you want your users to access with the Global Button Bar:
• Return to Portal
• Log Off

SSHR Page Layouts 6-39
• Select Preferences
• Self-Service Help
3. Delete the functions you don't want users to access.
4. Save your work.
See: Users Window, Oracle E-Business Suite Security Guide
To remove the global button bar display:1. Navigate to the web page you want to configure.
2. Choose Personalize.
3. Hide the Global Button bar.
See Oracle Application Framework Documentation Resource, My Oracle Support note 391554.1
Personalizing Screen ImagesOracle delivers self-service functions with a default Oracle image in the upper left corner of the page. This image, together with the header text that identifies the function,is known as branding.
You can replace the default Oracle image, with your own image if required. Change the default image in one of two ways: overwrite the default image with an image of the same name or replace the default image with one of your own.
Alternatively, you can add an image to a region or page if required.
The standard size of the branding image and text is small. However, if required, you canchange the size to regular or medium by changing the FND: Branding Size profile option value. The profile option settings have the following effect:
• Regular
- the global buttons appear with corresponding icons and links.
• Medium
- displays global buttons with links and a lower profile product branding image.
• Small
- results in global buttons with links and low profile product branding text with a
6-40 Oracle Self-Service Human Resources Deploy Self-Service Capability Guide
small, generic graphic
To overwrite the default image with your own image:1. Create an image.
2. Save and name the image:
• FNDSSCORP.gif (Oracle image)
• PERBRAND.gif (Human Resources image)
• IRCBRAND.gif (iRecruitment image)
• LOGO.gif (log-in image)
3. Place the gif in the $OA_MEDIA/<Language> directory.
Note: If you have a multilingual install, you must also copy this fileto the other language locations.
To replace the default image with your own image:1. Create a .gif image.
2. Place the gif in the $OA_MEDIA/<Language> directory.
Note: If you have a multilingual install, you must also copy this fileto the other language locations.
3. Query the web page regions or page for personalization.
4. The Image URL attribute defines which graphic appears on the web pages. Overwrite the attribute name with the name of your image.
5. Save your work.
To add a image to a page or region:1. Query the web page regions or page for personalization.
2. Click Create Item.
3. Create an item with the item style Image.
See: Create Item Page, page 6-25
SSHR Page Layouts 6-41
4. Click Apply to submit your changes.
Configuring the Effective Date PromptsThe effective date prompt appears at the top of most self-service web pages and indicates whether the current transaction is effective as of a specific date or whether the transaction is effective on approval.
The two prompts are as follows:
• Effective Date:
Appears if you specify an effective date on the Effective Date Options page.
• Effective as of Approval Date
Appears if you specify on the Effective Date Options page that changes should take effect as soon as approval takes place.
There are two different procedures for configuring these prompts:
To configure the Effective Date prompt:You configure the Effective Date prompt in the Messages window.
1. In the Messages window, query the following message:
HR_EFFECTIVE_DATE_PROMPT
The message body appears in the lower half of the screen.
2. Change the text of the message as required. For more information on creating messages, see: Messages Window, Oracle E-Business Suite Developer's Guide
Adding Instructions to Web Pages, page 6-35
3. Save your work.
When you next log on to SSHR to carry out a transaction, your new effective date prompt appears.
To configure the Effective as of Approval prompt:1. Click either Personalize Page or Personalize Region.
2. Select the Personalization Context.
For more information, see: Configuring Web Pages, page 6-21.
3. Navigate through the personalization hierarchy to the element Message Styled Text:<prompt text> and click Personalize.

6-42 Oracle Self-Service Human Resources Deploy Self-Service Capability Guide
4. To change the text for the prompt, enter the required text in the appropriate personalization level field in the Prompt row. For example, to change the text for allselected personalization levels, enter a new text in the first personalization level column, and select the Inherit value for any other personalization levels.
5. Apply the changes and return to the application.
Approvals 7-1
7Approvals
Approvals OverviewWhen you define your SSHR functions, you can decide whether they require approval before they are submitted to the HR tables. You can define different approval requirements for different transactions and vary the approval requirements as required.For example, you can configure the workflow processes so that the Address part of Personal Information requires approval but the Phone Numbers part does not. Alternatively, you can vary the Approvals requirements by responsibility so that records changed by employees would need approval but records changed by managers would not.
All approvals mechanisms used in SSHR follow a basic approval loop. The logic checks whether the current approver is the final approver in the hierarchy. If the current approver is not the final approver, the application fetches the next approver who then receives the approval notification. The next approver can either reject the transaction, approve the transaction, reassign the transaction, or send the transaction for correction to anyone in the approvals chain. The approver may also be able to update the transaction, depending on the system configuration.

7-2 Oracle Self-Service Human Resources Deploy Self-Service Capability Guide
The Basic Approvals Loop Using the Approval Chain
Within the approvals process, the application uses rules to generate a list of approvers for the SSHR transaction. The way in which the list is generated depends on the approvals mechanism you are using (see Approvals in SSHR).
The application uses dynamic approvals by default. The dynamic approvals functionality comprises:
• A self-service user interface which enables the initiating manager to add additional approvers an notification recipients, display the approvers list, and limit the number of approval levels.
• An application which generates the default approvers. The standard tool is Oracle Approvals Management (AME). Alternatively, you can use the customizable PL/SQL packages.
The dynamic approval workflow processes send notifications to approvers and notification recipients identified in the approver list.
Parallel Approval Process for Oracle SSHR TransactionsTo simultaneously notify multiple approvers of Oracle SSHR transactions, you can set up the parallel approval process. You use Oracle Approvals Management (AME) components to set up the parallel approval process.
See: Using the Parallel Approval Process in Oracle SSHR, page 7-11
Approvals 7-3
Features of Approvals in SSHR
Does SSHR provide a secure approvals tool?Yes. Oracle SSHR can use dynamic approvals with Oracle Approvals Management (AME) or with a PL/SQL package to provide a secure approvals environment.
Why does SSHR use both customizable PL/SQL packages and AME for approvals?Up until SSHR 4.1, customizable PL/SQL packages were used to define approvals in SSHR. From SSHR 4.1, however, the delivered functions used Oracle Approvals Management (AME) as standard. You can choose to use dynamic approvals instead of AME by configuring your self-service functions accordingly, however, Oracle recommends that you use AME for all your approvals as other approval types may not be supported in future releases.
What is the advantage of using Oracle Approvals Management?Oracle Approvals Management enables you to define business rules to control your approvals processes. You can define conditions, rules, and attributes to define an approvals process to meet the requirements of your enterprise. For example, you could create an approvals process in which approval from a particular user is only required if a salary raise is above a set amount. Alternatively, you could set up an approvals process for a particular business process.
Can the approvals chain be configured to meet my requirements?Yes. You can configure your approvals processes to include specific approvers or managers. You can also specify that particular users should receive notification of the approval. If you are using Dynamic Approvals, you can still configure your processes using the Workflow Builder.
Do I need a separate license to use Oracle Approvals Management?No. Oracle Approvals Management is included if you purchase any application license.

7-4 Oracle Self-Service Human Resources Deploy Self-Service Capability Guide
Approvals
Approvals in SSHRThe Approvals interface for SSHR functions differs according to the type of approvals you have implemented. From release 4.1, SSHR uses Oracle Approvals Management (AME) to define and manage approval logic for all delivered SSHR functions. You can also use AME with all custom functions that use SSHR version 4 and above.
See: Implementing Oracle Approvals Management (AME), page 7-17
Oracle recommends that you use Oracle Approvals Management (AME) for all SSHR functions, however, all of the following alternatives are available:
• Dynamic approvals with Oracle Approvals Management (AME)
This interface allows you to add approvers to the approvals chain and specify their position in the approvals chain. You can choose whether the approver receives a For Your Information (FYI) notification or whether the approver must approve or reject the transaction. In addition, you can choose the type of approver. You can add the following approver types to the approval chain:
• Person
Add a person, for example, John White.
• User
Add a user, for example, JWHITE.
• Position
Add a position, for example, Senior Manager - Accounts.
Note: If you select a position, each person with that position has access to the notification. When the first person holding that position approves or rejects the notification, AME processes the notification by either forwarding the approved notification to the next person in the approval chain, or by returning the rejected notification to the initiator.
When you have selected an approver, you can specify their position in the approvals chain (the insertion point). You can:
• Select an existing approver as the insertion point.
You insert the new approver either before or after an existing approver in the list.

Approvals 7-5
• Append the new approver to the list.
You add the new approver to the end of the approval list or specify whether thenew approver is the First or Last Post Approver.
Note: You can also select an order number as the insertion point, for example, Order: 3. In this case, the new approver is always be third in the approvers list.
For more information on AME, see: Oracle Approvals Management Implementation Guide
• Dynamic approvals without AME
This interface comprises the Approvals and Notification Recipient sections, however, the list-modification functionality is less comprehensive than that provided by AME. The manager initiating the SSHR transaction can add additional approvers to the approval chain and nominate additional notification recipients (reviewers). The application sends notifications to these persons on submission or on approval.
See: Customizing Approvals Using PL/SQL, page 7-15
• Standardapprovals
You can disable the insert approvers and add notification recipients functionality and use standard approvals by configuring the Review activity for the workflow process. Oracle does not recommend this approach.
See: Review and Confirm, page 11-13
In this case, no configuration options are available, and the approvers list is as defined by the PL/SQL code. You cannot add approvers to or remove approvers from the approvers list.
Oracle Approvals Management (AME) ConfigurationOracle Approvals Management (AME) is a web-based application that is integrated with Oracle Workflow and enables you to define business rules to control your approvals processes.
With AME, you use the following components to define your approvals processes. Theyare associated with a transaction type for a particular application.
• Attribute - this is a business variable, for example, a salary amount, user ID, or workflow process name.
See: Standard AME Attributes for SSHR, page 7-6

7-6 Oracle Self-Service Human Resources Deploy Self-Service Capability Guide
• Condition - a condition compares an attribute value with a set of allowed attribute values. For example, a condition could look at a salary amount. If the salary is greater than a specified value, a particular approver list is created.
• Approval type and approval specifications - these components define the type of approver list that is generated. For example, to generate a supervisor-based approver list with 5 levels, you use the 'supervisory level' approval type with the 'requires approval up to the first 5 approvers' approval specification.
• Rules - a rule links the other components together by associating one or more conditions with the approval type and approval rule.
For more information on the components used in AME, see: Oracle Approvals Management Implementation Guide
Default Use of AME Configuration in SSHROracle SSHR delivers an AME configuration that emulates functionality delivered in thePL/SQL package. This configuration delivers a supervisor-based approvals hierarchy using AME rules.
The default AME configuration consists of:
• a single AME transaction type 'SSHRMS' with
• the following conditions:
• WORKFLOW_PROCESS_NAME
• MID_PAY_PERIOD_CHG
• the following rules:
• SSHR rule for at most 10 Approvers in supervisor chain
Requires approvals to the top of the approval hierarchy or to 10 levels above the initiator, whichever comes first
• SSHR Payroll Contact inclusion rule
Requires pre-approval from payroll contact if the transaction results in a mid-period pay change
Standard AME Attributes for SSHROracle SSHR provides the following AME attributes to help you define your approvals processes:
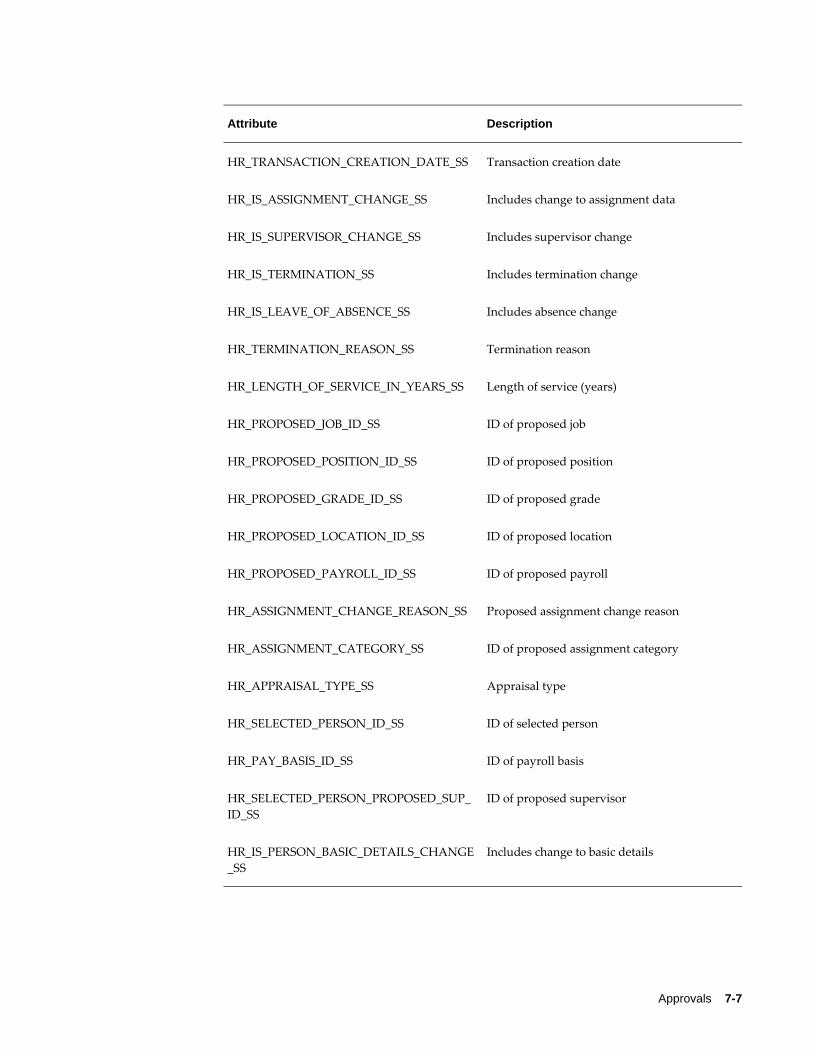
Approvals 7-7
Attribute Description
HR_TRANSACTION_CREATION_DATE_SS Transaction creation date
HR_IS_ASSIGNMENT_CHANGE_SS Includes change to assignment data
HR_IS_SUPERVISOR_CHANGE_SS Includes supervisor change
HR_IS_TERMINATION_SS Includes termination change
HR_IS_LEAVE_OF_ABSENCE_SS Includes absence change
HR_TERMINATION_REASON_SS Termination reason
HR_LENGTH_OF_SERVICE_IN_YEARS_SS Length of service (years)
HR_PROPOSED_JOB_ID_SS ID of proposed job
HR_PROPOSED_POSITION_ID_SS ID of proposed position
HR_PROPOSED_GRADE_ID_SS ID of proposed grade
HR_PROPOSED_LOCATION_ID_SS ID of proposed location
HR_PROPOSED_PAYROLL_ID_SS ID of proposed payroll
HR_ASSIGNMENT_CHANGE_REASON_SS Proposed assignment change reason
HR_ASSIGNMENT_CATEGORY_SS ID of proposed assignment category
HR_APPRAISAL_TYPE_SS Appraisal type
HR_SELECTED_PERSON_ID_SS ID of selected person
HR_PAY_BASIS_ID_SS ID of payroll basis
HR_SELECTED_PERSON_PROPOSED_SUP_ID_SS
ID of proposed supervisor
HR_IS_PERSON_BASIC_DETAILS_CHANGE_SS
Includes change to basic details

7-8 Oracle Self-Service Human Resources Deploy Self-Service Capability Guide
Attribute Description
HR_IS_SELECTED_PERSON_ADDRESS_CHANGE_SS
Includes address change
HR_IS_SELECTED_PERSON_CONTACT_CHANGE_SS
Includes contact change
HR_IS_RELEASE_INFORMATION_SS Includes change to release information
WORKFLOW_PROCESS_NAME Workflow process name
CURRENT_ASSIGNMENT_ID ID of current assignment
CURRENT_EFFECTIVE_DATE Current effective date
HR_PROPOSED_SALARY_BASIS_SS Proposed salary basis
HR_ABSENCE_TYPE_ID_SS ID of absence type
HR_IS_MID_PAY_PERIOD_SS Includes mid-period change to pay
For more information on using attributes, see: Oracle Approvals Management Implementation Guide.
Configuring SSHR Approval Levels in AMETo meet your business needs, you may add additional rules, conditions, or attributes within the delivered SSHRMS transaction type, or you can define a custom transaction type.
For more information on configuring AME rules, conditions, and attributes, see: Oracle Approvals Management Implementation Guide
It is relatively easy to make minor changes to the delivered AME configuration and some examples are provided below.
To define a different approval level for all SSHR workflow processes:
• For example, to specify two approval levels: The approval level is currently defined in the rule 'SSHR Rule for at most 10 approvers in Supervisor chain'. You would edit this default rule and change the approval level for the supervisory level approval type to 'requires approval up to the first two superiors at most'.
To define a different approval level for a specific workflow process:

Approvals 7-9
• First you create a new condition with the attribute WORKFLOW_PROCESS_NAMEand enter the workflow processes which will have the different approval level as the attribute values.
• Then you create a new rule, for example, '2 approvers in supervisor chain'.
• Use the 'supervisory level' approval type with the 'requires approval up to the first two superiors at most' approval
• Finally, attach your new condition to the rule.
To define a new approval level (if the delivered approvals do not meet your requirements):
1. You create a new approval (for example, 'requires approval up to the first 15 superiors at most') in the 'supervisory level' approval type.
To define a particular user as the final approver, or final authority (even if they are not the last person in the approval chain):
• You create a List Modification Condition and specify a user, for example, a manager, as the final approver. You would add this list modification condition to your rules so that the approval chain would stop at this specified approver. Alternatively, you could create a new rule, add the approval type for final approverand add the WORKFLOW_PROCESS_NAME condition so that this final approver rule would apply to selected processes.
For more information on the configuration options offered by AME, see: Oracle Approvals Management Implementation Guide
For information about function parameters associated with AME, see Supplied Functions, page 4-16
For descriptions of function parameters, see Menu Function Parameter Descriptions, page 4-34
Further Approvals Options
Allow updates of pending transactionsAn approver can update an action themselves, or return an action for correction to any recipient on the approval chain. However, the ability to update depends on two configurations:
• The system profile option HR: Allow Approver Updates to Self Service Actions must be set to Yes.
• The recipient must have a workflow role that allows edits.

7-10 Oracle Self-Service Human Resources Deploy Self-Service Capability Guide
To update pending transactions, approvers must have a workflow role with the appropriate role type attached to allow them to edit actions. They can then update actions regardless of their position in the approval chain.
There are two supplied role types that control approvers' ability to update pending transactions: SSHR Update Allowed and SSHR Update Not Allowed. These role types should not be used in conjunction with each other; use whichever is simplest.
• SSHR Update Allowed
If you associate a role with this role type, any approver with that role can update a pending transaction. No one else can perform updates on pending transactions.
• SSHR Update Not Allowed
If you associate a role with this role type, all approvers with that role are prevented from updating pending transactions; all other approvers can update pending transactions.
Use the Maintain Roles window to associate a role with a role type.
Route actions to HR representativeYou can route actions to an HR representative. The application sends the action to all persons having a role associated with the seeded HR Representative role type. Use the Maintain Roles window to associate a role with this role type.
The first HR representative to process the action does so on behalf of all HR. This is especially useful in situations where the application encounters a future-dated change to a person's record. See Future-Dated Actions in Managing Dates in SSHR, page 4-5.
Defer Update After ApprovalBy default, the save of the SSHR transaction to the database is deferred after the final approval. This is to prevent any delay between the final approver clicking the approve button and moving on to the next notification.
The transaction is saved automatically when the Workflow Background Process runs. The system administrator needs to schedule this process to run periodically as needed.
When you run the Workflow Background Process you need to set the following parameters:
• Item Type = HR
• Process Deferred = Yes
• Process Timeout = No
• Process Stuck = No
If you need to modify the default behavior so that transactions are saved immediately

Approvals 7-11
after final approval, set the system profile HR:Defer Update After Approval to No at User/Responsibility/Application/Site level.
See User Profiles, Oracle HRMS Configuring, Reporting, and System Administration Guide
Using the Parallel Approval Process in Oracle SSHROracle SSHR provides the ability to route transactions simultaneously to multiple approvers using the parallel approval process. Use Oracle Approvals Management (AME) to set up approval groups for the parallel approval process in Oracle SSHR.
The AME features that Oracle SSHR supports in the parallel approval process are:
• Approver group voting method must be defined as First Responder Wins. All members in the approver group receive the transaction notification. Oracle SSHR considers a transaction as approved if any approver from the approval group first approves the transaction. No further action is required from other group members.
• Parallelization rule is applied only at member level in an approval chain or approval group.
For more information about the parallel approval process in AME, refer to the Parallel Approval Process topic in the Oracle Approvals Management Implementation Guide.
How the Parallel Approval Process Works in Oracle SSHRWhen a self-service transaction that uses the AME rule with 'First Responder Wins' voting regime is submitted for approval, Oracle SSHR:
• Sends the approval request to all members in the approval group in parallel.
• Enables any member of the approval group to approve, reject, or return the transaction for correction to the transaction initiator.
• Considers a transaction as approved if any one of the approvers approves the transaction as the voting method used is first responder wins.
• Returns the notification to the initiator if any one member of the group returns it forcorrection.
• Saves changes to the database after the transaction is approved by any one member of the approval group.
• Displays an Action History region in the approval notification of the transaction to enable all members in the approval groups to know the latest status of the transaction. The Action History region displays the name of the approver, the date when a member of the approval group acted on the transaction, and comments if any.

7-12 Oracle Self-Service Human Resources Deploy Self-Service Capability Guide
Note: The transaction action history information is available in all notifications regardless of whether parallel approval feature is implemented.
If there is more than one level of approval and multiple approval groups are setup for parallel approval, then a member of the next approval group can return the transaction for correction to a member of the previous approval group who approved the transaction. Oracle SSHR routes requests for information notifications either to the initiator of the transaction or to any member of the approval group depending on who submitted the transaction last. As the parallel approval process is based on the first responder wins method, if a request for additional information is pending at any level in the approval process, then another approver from the approval group can either approve or reject the transaction.
Delegating notifications during the parallel approval process
If an approver delegates a notification to:
• Another approver in the same approval group, then any member of the approver group apart from the person who delegated the notification can approve or reject the transaction.
• A member in another parallel approval group, then any of the approval group members in that group can delegate the notification to members of that group or other group. Member who receives the notification and other group members can act on the notification.
• A member outside of the approval group, then that member or the person who delegated the notification or approver group members can act on the notification.
Note: If approvers use the Transfer Ownership option when reassigning notifications, then the transfer option works in the same way as delegate in case of parallel approvals.
Setting up the Parallel Approval Process for Oracle SSHR TransactionsTo set up the parallel approval process for Oracle SSHR transactions, you must use Oracle Approvals Management (AME). You can use the standard Oracle Self Service Human Resources transaction type for the parallel approval process. Otherwise, if you require additional conditions, rules, or attributes, you can create them using the supplied components as examples. For more information about Oracle Approvals Management, refer to the Oracle Approvals Management Implementation Guide.
When you set up the parallel approval process, you must ensure that approval group voting method is 'First Responder Wins'.

Approvals 7-13
Example: Setup Steps for the Parallel Approval ProcessThe following example assumes that you use the predefined components delivered with Oracle SSHR and Oracle Approvals Management (AME). You can set up the parallel approval process for any of the Oracle SSHR transactions.
This example explains how to set up the parallel process for the Change Job and Terms (HR_CHANGE_JOB_ TERMS_SS) transactions in the Vision Corporation business group. In this requirement, approvals are required from two approval groups: Change Job Approval Group 1 and Change Job Approval Group 2.
Complete the following steps to define the parallel approval process for the Change Job and Terms transactions:
1. Define Approver Groups
1. Navigate to the Approvals Management Business Analyst responsibility.
2. Click the Setup icon for the predefined Oracle Self Service Human Resources transaction type.
3. Click the Approver Groups tab.
4. Click Create.
5. Create two approval groups: Change Job Approval Group 1 and Change Job Approval Group 2.
6. Enter the name and description of the approver groups. Select First Responder Wins as the voting regime. Select Static as the usage type. Select the group members. Select required approvers and HR People as the approver type.
Note: You can select Dynamic as usage and write your own queries to retrieve approvers. For more information, refer to theOracle Approvals Management Implementation Guide
For group 1, enter the order number as 1 and group 2, enter the order number as 2.
7. Click Apply.
8. Click the Conditions tab and click Create.
2. Define Conditions
This example uses the predefined WORKFLOW_PROCESS_NAME attribute and HR_CHANGE_JOB_ TERMS_SS function.

7-14 Oracle Self-Service Human Resources Deploy Self-Service Capability Guide
1. Select Ordinary as the condition type.
2. Select WORKFLOW_PROCESS_NAME as the attribute.
3. Enter HR_CHANGE_JOB_ TERMS_SS in the string value field.
4. Click Apply.
5. Click the Rules tab.
3. Define Rules
1. Click Create to define a new rule using the approver groups created in the previous steps.
2. Enter the rule name and select List Creation as the rule type.
3. Click Next.
4. Select the condition defined in the previous step (HR_CHANGE_JOB_ TERMS_SS) and click Continue.
5. Click Next.
6. Select approval-group chain of authority as the action type. Select Require Approval from Group 1 as the action and click Add Action.
7. Select approval-group chain of authority as the action type. Select Require Approval from Group 2 as the action.
8. Click Next and then Finish.
When you complete this setup, Oracle SSHR displays a list of parallel approvers in the Change Job: Review page and routes the change job transactions based on the conditions and rules set up for the function.
Using the Parallel Approval Process in Other Oracle HRMS Suite of ProductsYou can configure the parallel approval process in other HRMS products that use the supplied Oracle Self Service Human Resources transaction type or a transaction type that is configured using the supplied type. For example, you can set up the parallel approval process for the following features:
• Standard appraisals in Oracle Performance Management
• Learner enrollments in Oracle Learning Management
• Vacancies in Oracle iRecruitment
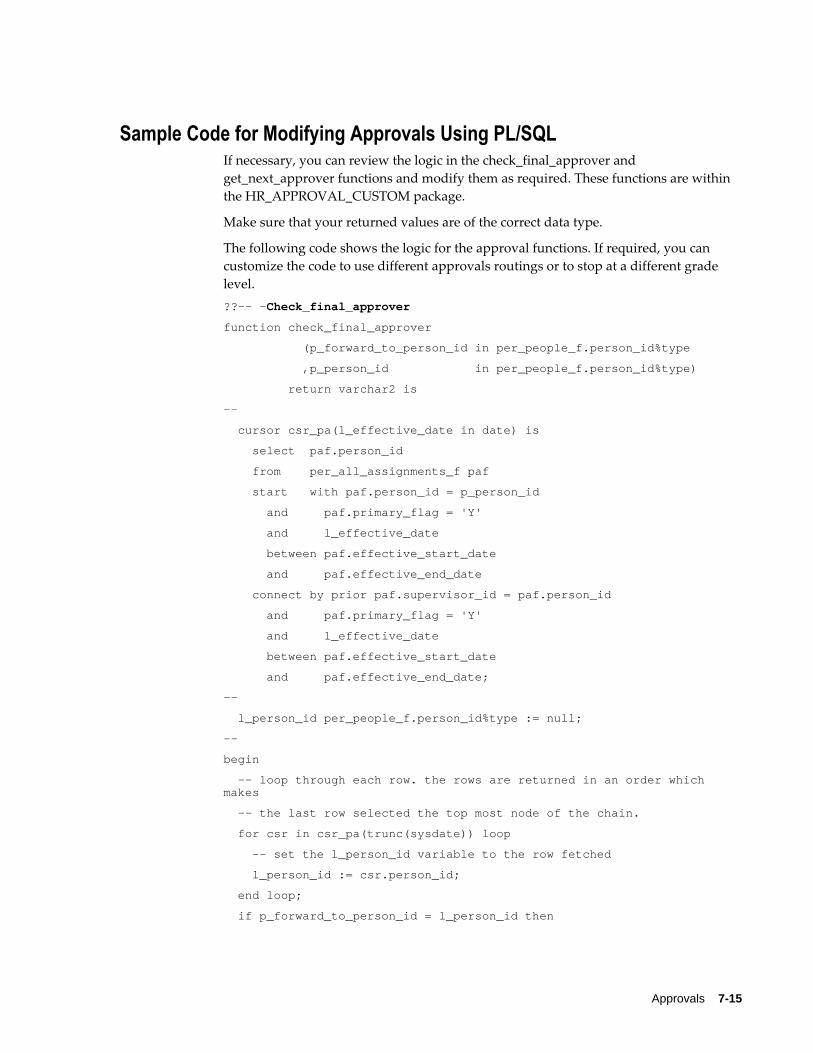
Approvals 7-15
Sample Code for Modifying Approvals Using PL/SQLIf necessary, you can review the logic in the check_final_approver and get_next_approver functions and modify them as required. These functions are within the HR_APPROVAL_CUSTOM package.
Make sure that your returned values are of the correct data type.
The following code shows the logic for the approval functions. If required, you can customize the code to use different approvals routings or to stop at a different grade level. ??-- -Check_final_approver
function check_final_approver
(p_forward_to_person_id in per_people_f.person_id%type
,p_person_id in per_people_f.person_id%type)
return varchar2 is
--
cursor csr_pa(l_effective_date in date) is
select paf.person_id
from per_all_assignments_f paf
start with paf.person_id = p_person_id
and paf.primary_flag = 'Y'
and l_effective_date
between paf.effective_start_date
and paf.effective_end_date
connect by prior paf.supervisor_id = paf.person_id
and paf.primary_flag = 'Y'
and l_effective_date
between paf.effective_start_date
and paf.effective_end_date;
--
l_person_id per_people_f.person_id%type := null;
--
begin
-- loop through each row. the rows are returned in an order which makes
-- the last row selected the top most node of the chain.
for csr in csr_pa(trunc(sysdate)) loop
-- set the l_person_id variable to the row fetched
l_person_id := csr.person_id;
end loop;
if p_forward_to_person_id = l_person_id then
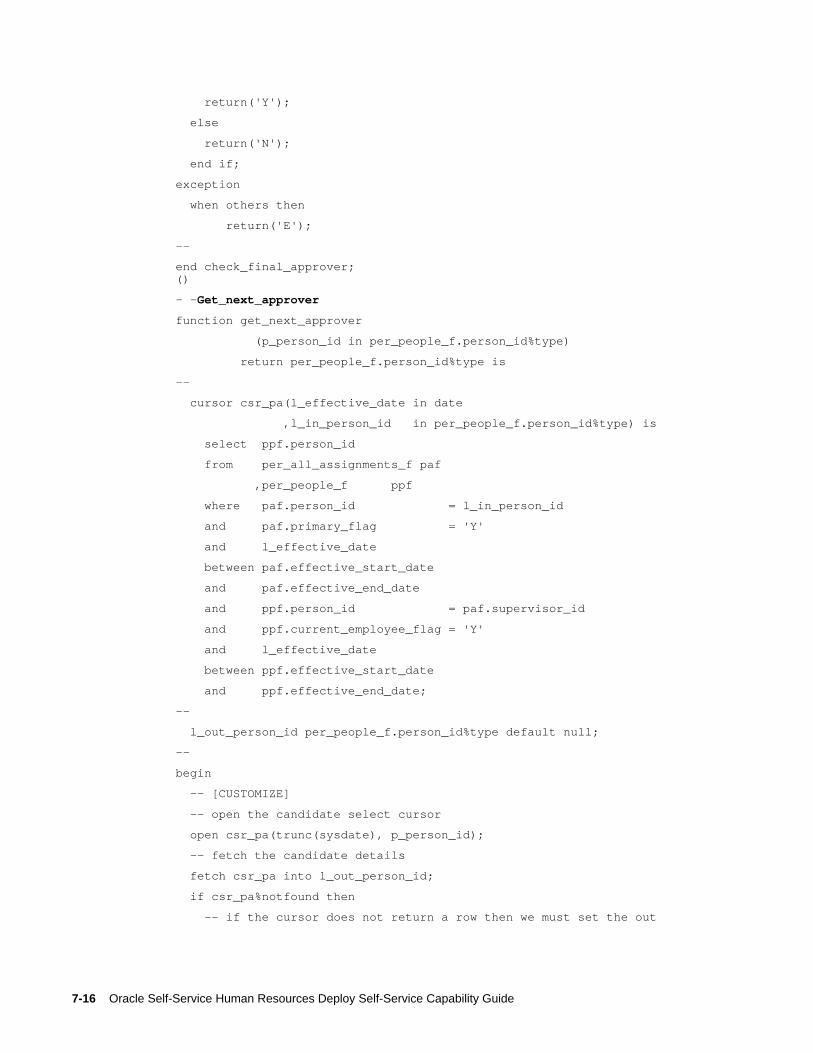
7-16 Oracle Self-Service Human Resources Deploy Self-Service Capability Guide
return('Y');
else
return('N');
end if;
exception
when others then
return('E');
--
end check_final_approver;()
- -Get_next_approver
function get_next_approver
(p_person_id in per_people_f.person_id%type)
return per_people_f.person_id%type is
--
cursor csr_pa(l_effective_date in date
,l_in_person_id in per_people_f.person_id%type) is
select ppf.person_id
from per_all_assignments_f paf
,per_people_f ppf
where paf.person_id = l_in_person_id
and paf.primary_flag = 'Y'
and l_effective_date
between paf.effective_start_date
and paf.effective_end_date
and ppf.person_id = paf.supervisor_id
and ppf.current_employee_flag = 'Y'
and l_effective_date
between ppf.effective_start_date
and ppf.effective_end_date;
--
l_out_person_id per_people_f.person_id%type default null;
--
begin
-- [CUSTOMIZE]
-- open the candidate select cursor
open csr_pa(trunc(sysdate), p_person_id);
-- fetch the candidate details
fetch csr_pa into l_out_person_id;
if csr_pa%notfound then
-- if the cursor does not return a row then we must set the out

Approvals 7-17
-- parameter to null
l_out_person_id := null;
end if;
-- close the cursor
close csr_pa;
return(l_out_person_id);
end get_next_approver;()
For more information on using PL/SQL, see Overview of Using PL/SQL in Applications,Oracle E-Business Suite Developer's Guide
Implementing Oracle Approvals Management (AME)There are several settings that you must configure in AME before you can use the functionality in SSHR.
Also, any custom functions you created prior to release 4.1 will use the customizable PL/SQL package as the default approvals mechanism. However, you can modify any custom SSHR functions to point to AME by adding two new function parameters.
Note: The AME rules and conditions always override any other workflow attribute settings that apply to approvals, for example, the attribute settings for the Review activity. If the Approvals Required workflow attribute is set to Yes for a workflow process but AME does not return any approvers, the process completes without requiring approval. As a general set-up recommendation, you should set up processes that currently do not require approval as follows:
• Set the Approvals Required workflow attribute to Yes
• Configure AME so that no approvers are returned
If you subsequently need to add approvals to your process, you can simply use a different AME condition.
To set up AME for SSHR:1. Use an appropriate AME responsibility to check that the value of the following
variables is Yes:
• AllowFYINotifications
• AllowAllApproverTypes
If the value for this variable is No, you cannot use the Position approver type.

7-18 Oracle Self-Service Human Resources Deploy Self-Service Capability Guide
2. Use the Workflow Builder to set the Timeout value for the Notification activity in your workflow processes.
See: To Define Nodes in a Process, Oracle Workflow Developer's Guide
See: Timeout Transitions, Oracle Workflow Developer's Guide
3. If you have created custom workflow processes, use the Workflow Builder to replace the existing notification processes with the new process Notification Processfor Approvers and Notifiers.
See: Diagramming a Process, Oracle Workflow Developer's Guide
To link a custom function to AME:You define additional function parameters in the Form Functions window. You should also check the workflow attributes for your workflow process using the Workflow Builder.
1. Query your function.
2. Navigate to the Form tabbed region.
3. Add the following parameter information to the Parameters field for your function:
• pAMETranType=SSHRMS
• pAMEAppId=800
4. Save your work.
To add a custom workflow process to the list of values for the condition attribute for the SSHRMS AME transaction type (required if using the delivered SSHR transaction type):1. Log on to Oracle Approvals Management using the appropriate AME
responsibility.
2. Select the SSHRMS transaction type.
3. Select the Conditions tab and click on the WORKFLOW_PROCESS_NAME condition.
4. Choose the Add Text Value button and enter the name of your new workflow process as an attribute value.
5. Save your work.

Approvals 7-19
Technical Information:Workflow Processes
• Notification Process for Approvers and Notifiers, which includes the following subprocesses:
• FYI Notification Process (HR_FYI_NOTIFICATION_PRC)
• Approvers Notification Process (HR_APPROVAL_NTF_PRC)
• RFC Notification Process (HR_RFC_NTF_PRC)
Avoid Errors When Routing Approvals in Oracle SSHR
Currently, workflow transactions that use the Notification Process for Approvers and Notifiers SSHR approval process end in errors for the following reasons and users cannot track such transactions:
• When an approver does not approve a transaction within the time period, the workflow updates the corresponding Oracle Approval Management (AME) transaction type with the No Response status. Then, the workflow tries to route the notification to the approver's supervisor based on the approval chain. If the supervisor is not available, then the workflow displays an error.
• If the AME transaction type is incorrectly setup, then the workflow cannot route transaction for approvals. This happens because the workflow uses the list of recipients defined in the transaction type.
Using AME, you can define the adminApprover configuration variable for a transactiontype. The adminApprover variable identifies the person or user account that AME identifies as the administrator who can correct the hierarchy issue so that transactions get processed without any errors.
Oracle SSHR notifies the administrative approver identified by AME indicating that an exception has occurred for transactions that use the SSHR approval process Notificationprocess for approvers and notifiers.
The administrative approver receives notifications:
• When a user submits the transaction on the Review page, even after receiving the Oracle Approval Management (AME) transaction type incorrect setup error.
• When the approval chain is broken and workflow cannot route the transaction to the next approver. For example, the workflow routes transactions from employee Ato employee B, and then from B to employee C. Once the approval process starts, C resigns from the enterprise. When employee B approves the transaction, the workflow process sends a notification alerting the administrator about the break in the approval chain.
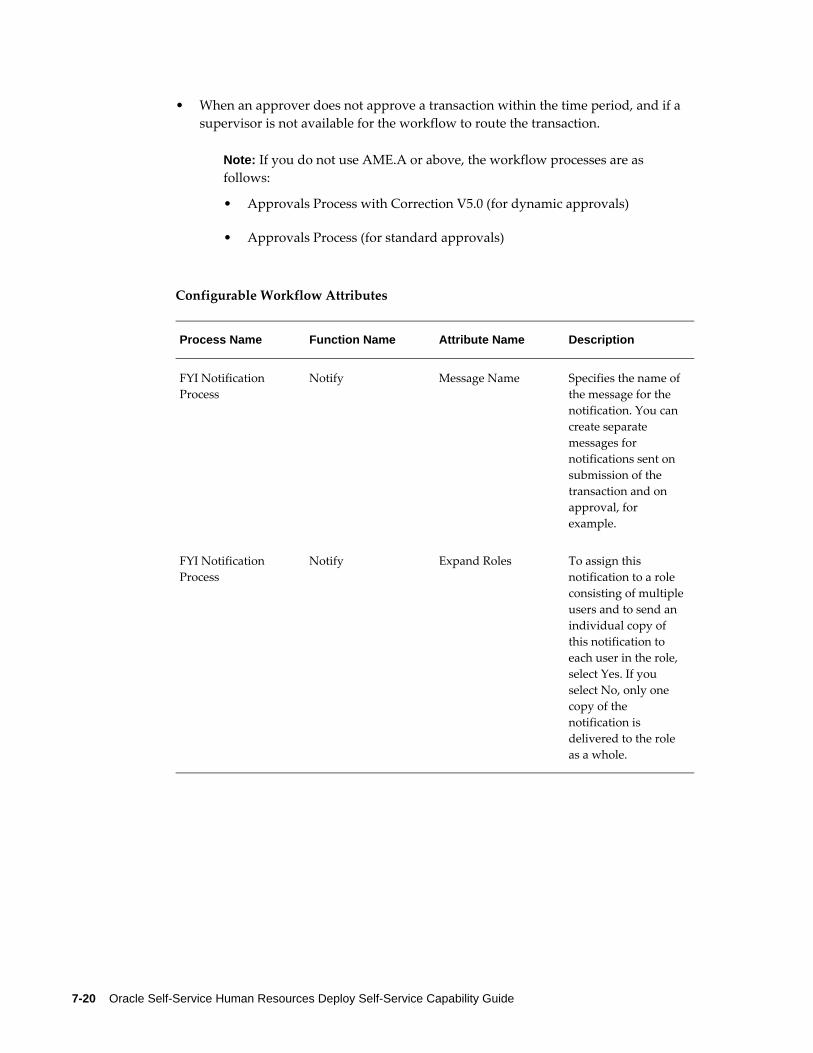
7-20 Oracle Self-Service Human Resources Deploy Self-Service Capability Guide
• When an approver does not approve a transaction within the time period, and if a supervisor is not available for the workflow to route the transaction.
Note: If you do not use AME.A or above, the workflow processes are asfollows:
• Approvals Process with Correction V5.0 (for dynamic approvals)
• Approvals Process (for standard approvals)
Configurable Workflow Attributes
Process Name Function Name Attribute Name Description
FYI Notification Process
Notify Message Name Specifies the name of the message for the notification. You can create separate messages for notifications sent on submission of the transaction and on approval, for example.
FYI Notification Process
Notify Expand Roles To assign this notification to a role consisting of multipleusers and to send an individual copy of this notification to each user in the role, select Yes. If you select No, only one copy of the notification is delivered to the role as a whole.

Approvals 7-21
Process Name Function Name Attribute Name Description
FYI Notification Proces
Notify Performer The role to whom the notification is sent. You can select a constant role name or an item type attribute that dynamically determines the role atruntime.
Configurable Profile Options
For information on profile options to control whether users can update pending transactions, see: Further Approvals Options, page 7-9.
Configuring Approvals in the Workflow BuilderIf you are not using Oracle Approvals Management (AME), you configure the predefined approvals processes in the Workflow Builder. You set up the approvals process using workflow attributes.
Note: Oracle recommends that you use AME for your approvals instead of the customizable PL/SQL packages.
To configure approvals in the Workflow Builder:1. Open the workflow item type.
2. Navigate to the process you want to modify and double click to open the workflow diagram.
3. Open the Review Page activity for your workflow process.
Note: You may have to drill down through several subprocesses until you reach the correct Review Page activity.
4. Make a copy of the process and any affected subprocesses. For example, if you are modifying the approvals for the Process Personal Information process, you would have to copy the Process Personal Information process, and the related subprocesses, for example, the Process Basic Details subprocess.
See: Updating Workflow Objects, page 5-3

7-22 Oracle Self-Service Human Resources Deploy Self-Service Capability Guide
5. Select the Review Page activity for your process/subprocess and set the Approval Required workflow attribute (HR_APPROVAL_REQ_FLAG) to YES. This activates approval for your process/subprocess.
Note: The default value varies for different modules.
See: Review and Confirm, page 11-13
6. Decide how a process should pass through the entire approval chain, in other words, how many levels of approval are required. Set the approval level using the Approval Level attribute (HR_DYNAMIC_APPROVAL_LEVEL). Add an approval level value to the Default Value field. A value of 1 for example will pass the approval one level up the supervisor chain.
Note: The default number of level is 0, meaning that the number of levels is unlimited.
7. Save your work.
Configuring Self-Service Modules 8-1
8Configuring Self-Service Modules

8-2 Oracle Self-Service Human Resources Deploy Self-Service Capability Guide
Configuring the Common SSHR Modules
Configuring the People in Hierarchy, My List, and Search Pages This topic provides information to configure the People in Hierarchy, My List, and Search pages.
The navigation options from the People in Hierarchy page depend on the path that the manager has taken to navigate to the page. There are two possible paths:
• From the generic Manager Actions menu
In this case, the manager first selects a person the from People in Hierarchy page or the People in My List page. This takes the manager to the Actions page. A context-sensitive list the SSHR modules or actions available for the selected person.
Note: The parameter pDestination for the Manager Actions Tree View function (HR_PERSON_TREE_SS) has the value HR_ACTIONS_SS (instead of a specific function value) to ensure that the user navigates through the Actions page.
• From a specific manager self-service menu item
In this case, the manager selects a specific SSHR function and then selects the person for processing in the People in Hierarchy or People in My List page. When the manager selects a person, the selected function appears.
See:Defining Functions for SSHR, page 4-12
People in HierarchyThe People in Hierarchy region displays a hierarchical view of the current manager's subordinates. Users can expand or collapse the lower levels of management as desired.
By default, the hierarchy uses a supervisor hierarchy (based either on the supervisor or the supervisor assignment).
Note: If you want to build a hierarchy based on the supervisor's assignments, you must specify the hierarchy type using the HR: Supervisor Hierarchy Usage profile option and you must enable multiple assignments using the SSHR:Enable Multiple Assignments in SSHR profile option. See Multiple Assignments, page 9-51.
However, if you prefer, you can display a position hierarchy. To do this, set the profile option HR:Display Position Hierarchy. Set this profile option to Yes if you prefer to

Configuring Self-Service Modules 8-3
display the position hierarchy.
Note: Oracle recommends that you set up either position or supervisor security if you are using SSHR because the manager self-service functionality enables you to choose whether to display the person hierarchy by either supervisor or position. However, you can set up other types of security if you prefer.
Personalizing Hierarchy, My List, and Search PagesImportant: Changes in Oracle HRMS Version 11.i.10
Oracle HRMS version 11.i.10 delivers new Hierarchy, Search, and My List pages. This means that the base definitions of these pages in the Meta Data Services Repository have changed. As a result, any personalizations that you may have created on these pages are no longer valid.
In addition, SSHR plans to use the enhanced sorting functionality provided by the OA Framework. However, as this is a future development, sorting support is not currently available for the Hierarchy page.
Simple Search Personalizations
From some self-service pages, you can search for a person by entering the person's name in the Name field. If you prefer to use different search criteria, you can use the Personalization Framework to enable a drop-down list displaying the Full Name, Last Name, and First Name as search criteria. You can select any of these criteria to be the default criterion by setting the Initial Value attribute (the Last Name is the standard default value).
1. Select the Personalize Page link.
2. Navigate to the QuickSearch region
3. Personalize the Search Filter item by changing the value in the Rendered field to True.
Searching by First Name
If you choose to personalize the Search function to search by First Name, you must create a function index for the first name (Oracle provides a function index for the last name). To do this, you must use a SQL client to add an additional index to the followingtable:
• per_people_f

8-4 Oracle Self-Service Human Resources Deploy Self-Service Capability Guide
The syntax for creating an index is as follows (for an example, see the function index PER_PEOPLE_F_N2 UPPER("LAST_NAME" which is provided by Oracle):create index <index_name> on <schema_name>.per_all_people_f(upper(first_name))
See: Configuring Web Pages, page 6-21
Name Format
The Enter Process pages display names in brief format by default. If you prefer to see the full name of the employee or worker, set the profile option HR:Display Person Name to Full Name.
Customer Overrides
Customer overrides enable you to configure data without making any changes to database tables. In the Enter Process pages (My List, Hierarchy, Person Search), you canuse customer overrides to configure a user-defined format for displaying positions and jobs. For example, you can display a name using fewer segments.
For more information on overrides, see: Legislation and Customer Overrides, page 4-7.
Navigation Links (Breadcrumbs)
The delivered Hierarchy, My List, and Search pages display navigation links to help you navigate through the pages. For example:
Manager Actions: People in Hierarchy > Manager Actions: People in My List
If you choose to include this functionality in custom versions of the Enter Person pages, set the following function parameter:
• &addBreadcrumb=Y
Multiple AssignmentsIf a person has more than one assignment for a given manager, the manager needs to select the Action icon for the relevant assignment in order to carry out the action.
To enable multiple assignments, set the profile option HR:Enable Multiple Assignmentsin SSHR to Yes at the required level. This allows managers to update all assignments reporting to them. If you set the profile option to No, managers can only view and edit primary assignments.
Note: If you set this profile option to Yes, Oracle recommends that you create supervisor-based security profiles for SSHR managers. See: Security Profiles in Managing User Access, page 3-3
Transactions Across Business GroupsYou can choose to enable your managers to see the names of persons in other business
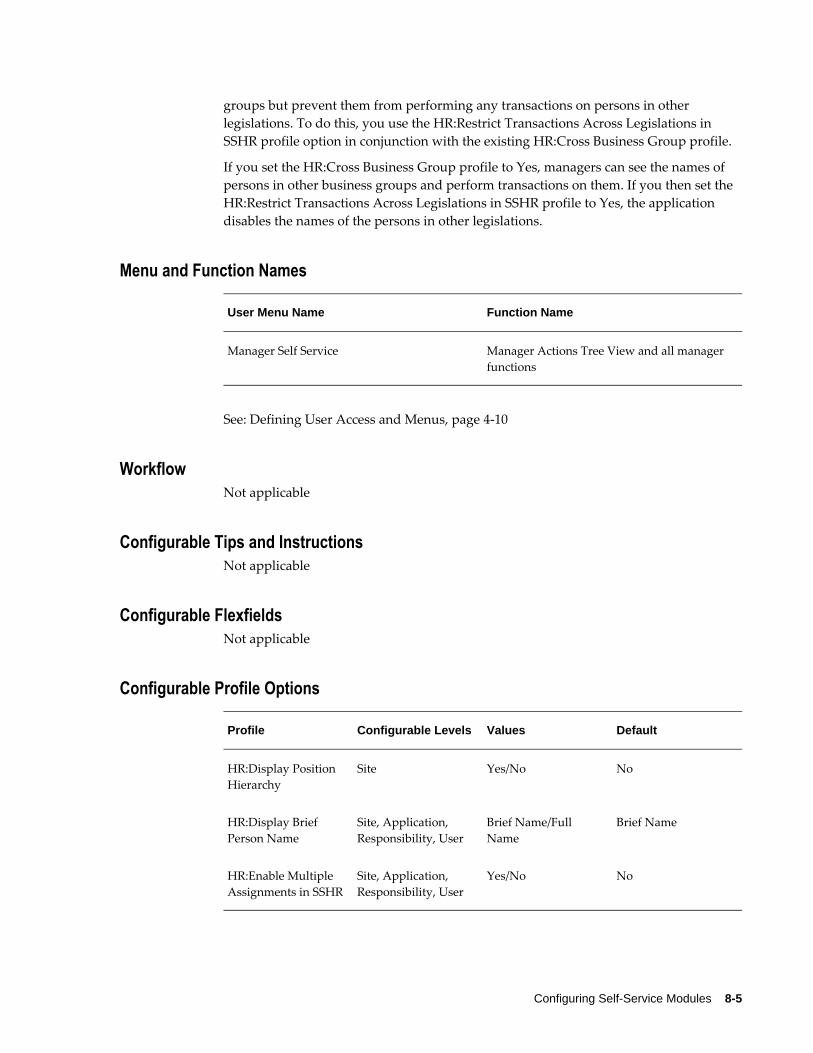
Configuring Self-Service Modules 8-5
groups but prevent them from performing any transactions on persons in other legislations. To do this, you use the HR:Restrict Transactions Across Legislations in SSHR profile option in conjunction with the existing HR:Cross Business Group profile.
If you set the HR:Cross Business Group profile to Yes, managers can see the names of persons in other business groups and perform transactions on them. If you then set the HR:Restrict Transactions Across Legislations in SSHR profile to Yes, the application disables the names of the persons in other legislations.
Menu and Function Names
User Menu Name Function Name
Manager Self Service Manager Actions Tree View and all manager functions
See: Defining User Access and Menus, page 4-10
WorkflowNot applicable
Configurable Tips and InstructionsNot applicable
Configurable FlexfieldsNot applicable
Configurable Profile Options
Profile Configurable Levels Values Default
HR:Display Position Hierarchy
Site Yes/No No
HR:Display Brief Person Name
Site, Application, Responsibility, User
Brief Name/Full Name
Brief Name
HR:Enable Multiple Assignments in SSHR
Site, Application, Responsibility, User
Yes/No No

8-6 Oracle Self-Service Human Resources Deploy Self-Service Capability Guide
Profile Configurable Levels Values Default
HR:Cross Business Group
Site Yes/No No
HR:Restrict Transactions Across Legislations in SSHR
All Yes/No No
HR: Supervisor Hierarchy Usage
Site
HR:Display Position Hierarchy
If you set this profile option to Yes, the application displays the position hierarchy on the Enter Person page instead of the supervisor hierarchy.
HR:Display Brief Person Name
If you set this profile option to Brief Name (default value), the application displays the person names in the brief format instead of the long name format.
HR:Enable Multiple Assignments in SSHR
This profile option controls whether a manager can view and update multiple assignments for a person in SSHR. If you set the profile option to Yes, the application displays all the assignments for a person on the Enter Process page. Otherwise, the application only displays primary assignments.
HR:Cross Business Group
This user profile option allows SSHR users to see certain information for more than one business group. For example, managers can view persons in other business groups.
HR:Restrict Transactions Across Legislations in SSHR
If you set this profile option to Yes, SSHR managers cannot carry out transactions on persons (within their supervisor hierarchy) who are from different legislations.
HR: Supervisor Hierarchy Usage
This profile option determines how supervisor hierarchies are built within Oracle HRMS and SSHR. You can select either a person-based or assignment-based hierarchy.
Additional Configuration Steps
Search Page1. To prevent your users from using the Basic or Advanced Search, hide the
corresponding region in the Personalization Framework or use function exclusions

Configuring Self-Service Modules 8-7
to exclude the Person Search function at the responsibility level.
2. You can configure the search criteria for the Basic and Advanced Searches. You can rearrange the sequence of the criteria by configuring the displayed fields using the Personalization Framework.
See: Configuring Web Pages, page 6-21
Configuring the Review PageYou can use the Personalization Framework to configure the Review and Confirm pages to suit your requirements. All of the standard Personalization Framework functionality is available to you including the ability to rearrange fields, to insert and edit instructions, and to hide and display fields and regions.
For more information, see the following documentation:
• Configuring Web Pages, page 6-4
• Adding Instructions to Web Pages, page 6-35
ApprovalsIf you configure approvals, users can enter approvals comments in this page. If you are using dynamic approvals , the user can view approvers and pre-approval and post-approval notifiers, and add further approvers and notification recipients.
You can set up the approval properties for a process by changing the activity level attributes for the Review workflow functions.
See: Approvals Overview, page 7-1
AttachmentsIf you have enable the Attachments region in the Personalization Framework, users can attach supporting documents to the current transaction. An attachment can be a file, a URL, or text.
What-IfIf you have enabled the What If region in the Personalization Framework, users can assess the impact of the change on the employee's eligibility for benefits before committing the change or sending it for approval.
Note: The What If feature will only function if you have Oracle Advanced Benefits (OAB) installed.

8-8 Oracle Self-Service Human Resources Deploy Self-Service Capability Guide
Menu and Function NamesNot applicable
WorkflowThe workflow details for this module are listed below:
Workflow Process Display Name: Common functionality which is used by all processes.
Configurable Workflow Attributes:
Process Display Name Function Activity Display Name
Function Activity Attribute Display Name
Review Page HR_DYNAMIC_APPROVAL_LEVEL
Review Page HR_APPROVAL_REQUIRED_FLAG
Review Page Confirm Instruction Application Short Name
Review Page Confirm Save Instruction Name
Review Page Confirm Send for Approval Instruction Name
HR_DYNAMIC_APPROVAL_LEVEL:
This attribute is used to specify the number of levels to which this transaction needs to be forwarded for approval in the approval hierarchy. For example, if the value is 1, the transaction is submitted for approval to one level higher than the initiating person. When the transaction has been approved, it is committed to the HRMS application. By default, this attribute reads the approval level from the APPROVAL_LEVEL (Approval Level) item level attribute. If you specify a value for the item level attribute, you can control the approval level for all the processes. If you specify a value for the HR_DYNAMIC_APPROVAL_LEVEL attribute, it overrides the item level attribute for the process for which you have specified the value.
HR_APPROVAL_REQUIRED_FLAG:

Configuring Self-Service Modules 8-9
This attribute is used to specify whether the current transaction requires an approval. The valid values are:
• No: the process does not require approval
• Yes: the process requires approval but the dynamic approval user interface will not be shown in the review page. This means that the initiator cannot add additional approvers or notifiers.
• Yes - Dynamic Approval: the process requires approval and the dynamic approval user interface will be shown in the review page. The initiator can add additional approvers and notifiers.
Confirm Instruction Application Short Name:
In addition to the standard confirmation message shown in the confirmation page, you can also configure messages that are specific to the process. You can specify one for a scenario for which approval is required and one for a scenario for which no approval is required. Processes can be set to either Approval Required or Approval Not Required, but not both, using the HR_APPROVAL_REQUIRED_FLAG. For example, you can define a message for Confirm Save Instruction Name and Confirm Send for Approval Instruction Name. You register this message under your custom application.
Confirm Send for Approval Instruction Name:
The text associated with this message name is displayed in the confirmation page immediately after the standard confirmation message. This text is only displayed when the process does not require approval.
The text associated with this message name is displayed in the confirmation page immediately after the standard confirmation message. This text is only displayed when the process requires approval.
Note: You must copy the delivered processes and make changes to the copy. If you make changes to the delivered processes, they will be overwritten when new patches are applied to your system.
See: Configuring Workflow Attribute Values, page 5-10

8-10 Oracle Self-Service Human Resources Deploy Self-Service Capability Guide
Configurable Tips and Instructions
Review Page
Region Tip Type Message Name
Additional Information Instruction PQH_SS_REVIEW_ATTACH_INT
Additional Information Instruction Text PQH_SS_REVIEW_ADDL_INFO_INT
Configurable FlexfieldsFor a list of flexfields for SSHR review pages, please see the corresponding functional descriptions.
Configurable Profile OptionsNot applicable
Configuring the Special Information Types (SITs) PageThis topic provides information to configure the Special Information Types page.
Menu and Function NamesSpecial Information Types
WorkflowThe workflow details for this module are listed below:
Workflow Process Display Name: Change Special Information Types
Configurable Workflow Attributes:Not applicable
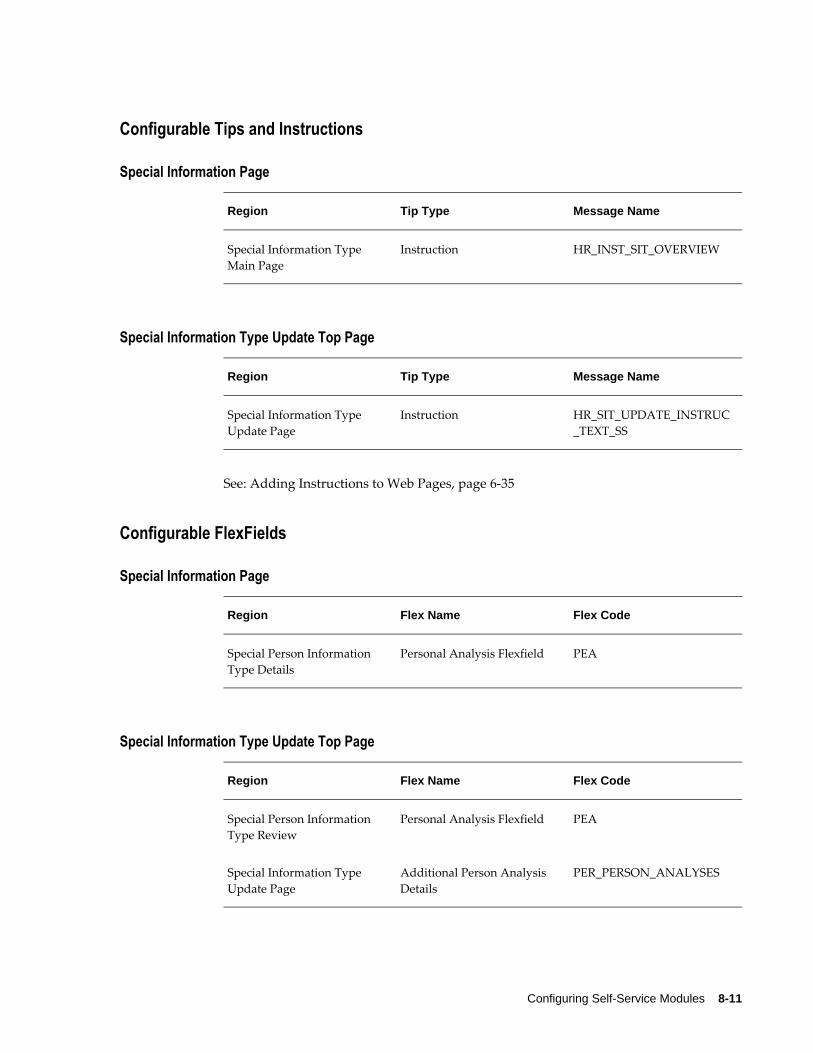
Configuring Self-Service Modules 8-11
Configurable Tips and Instructions
Special Information Page
Region Tip Type Message Name
Special Information Type Main Page
Instruction HR_INST_SIT_OVERVIEW
Special Information Type Update Top Page
Region Tip Type Message Name
Special Information Type Update Page
Instruction HR_SIT_UPDATE_INSTRUC_TEXT_SS
See: Adding Instructions to Web Pages, page 6-35
Configurable FlexFields
Special Information Page
Region Flex Name Flex Code
Special Person Information Type Details
Personal Analysis Flexfield PEA
Special Information Type Update Top Page
Region Flex Name Flex Code
Special Person Information Type Review
Personal Analysis Flexfield PEA
Special Information Type Update Page
Additional Person Analysis Details
PER_PERSON_ANALYSES

8-12 Oracle Self-Service Human Resources Deploy Self-Service Capability Guide
Review Page
Region Flex Name Flex Code
Special Information Type Review
Additional Person Analysis Details
PER_PERSON_ANALYSES
Special Information Type Review
Person Analysis Flexfield PEA
See: Configuring Flexfields , page 6-27
Configurable Profile OptionsNot applicable
Additional Configuration Steps: 1. Decide how you want to use your SIT modules:
• standalone - as an Employee or Manager menu
• chained - as part of a self-service action flow
• chained - as part of a Personal Information flow
See: Manage Employment Events Functions and Workflow, page 9-47
2. Enable your SITs using the Special Information Types form. You must enable them for each business group and select at least the Enabled and Other check boxes.
See: Enabling Special Information Types, Oracle HRMS Enterprise and Workforce Management
3. Check the title of the SIT type. This title appears as the region header above the datain the self-service module.
4. Use the Personalization Framework to restrict the SIT types that are displayed. By default, all SIT types that are enabled using the above procedure are displayed in the self-service SIT module (defined by the selected person's business group), however, you can use the Personalization Framework to display only specific types.
To display only certain special information types, personalize the HR_PERSON_SIT_DETAILS_SS region at the appropriate level (for example, responsibility or function) and in the Flex Settings box for HrSitKeyFlex, list the keyflexfield structure codes of only the types you wish to appear. After each structure

Configuring Self-Service Modules 8-13
code, list the names of the segments you wish to appear for that special information type. Separate multiple segments with single pipe symbols (|) and separate multiple structures with double pipe symbols (||).
Note: If you list a structure code with no segment names, the special information type does not appear on your self-service pages.
If you choose to only display certain SITs, you should also personalize the HR_PERSON_SIT_UPDATE_SS region and the HR_PERSON_SIT_REVIEW_SS region to correspond to the HR_PERSON_SIT_DETAILS_SS region.
See: Configuring Flexfields, page 6-27
Configuring the Extra Information Types (EITs) PageThis topic provides details to help you configure the Extra Information Types page.
Although EITs and SITs are similar in appearance, configuration steps differ due to underlying structural differences. You can currently set up EITs for the following HR entities:
• People
• Assignment
• Location
• Contacts
Menu and Function NamesExtra Information Types
WorkflowThe workflow details for this module are listed below:
Workflow Process Display Name: Change Extra Information Types
Configurable Workflow Attributes:

8-14 Oracle Self-Service Human Resources Deploy Self-Service Capability Guide
Process Display Name Function Activity Display Name
Function Activity Attribute Display Name
Change Extra Information Types
EIT HR EIT TYPE
HR EIT TYPE
This attribute value defines whether the EIT is a Person or Assignment EIT. The possible values are PERSON or ASSIGNMENT, and the default value is PERSON.
See: Configuring Workflow Attribute Values, page 5-10
Configurable Tips and Instructions
Extra Information Type Page
Region Tip Type Message Name
Extra Information Type Main Page
Instruction HR_EIT_INSTRUCTION_TEXT_SS
Extra Information Type Update Page
Region Tip Type Message Name
Extra Information Type Update
Instruction HR_EIT_UPDATE_INSTRUC_TEXT_SS
See: Adding Instructions to Web Pages, page 6-35
Configurable FlexFields
Extra Information Type Page

Configuring Self-Service Modules 8-15
Region Flex Name Flex Code
Extra Information Type Update
Extra Person Information Extra Person Info DDF
Extra Information Type Update Page
Region Flex Name Flex Code
Extra Information Type Update
Extra Person Information Extra Person InfoDDF
Extra Information Update Page
Extra Person Info Details PER_PEOPLE_EXTRA_INFO
Review Page
Region Flex Name Flex Code
Extra Information Update Page
Extra Person Info Details PER_PEOPLE_EXTRA_INFO
See: Configuring Flexfields, page 6-27
Configurable Profile OptionsNot applicable
Additional Configuration Steps1. First, you choose how you want to use your EIT modules:
• standalone - as an Employee or Manager menu
• chained - as part of a Manage Employment Events flow
• chained - as part of a Personal Information flow
2. User responsibilities and business group legislation codes restrict the EITs that appear in a self service module. Before you can add the EIT function to an SSHR
8-16 Oracle Self-Service Human Resources Deploy Self-Service Capability Guide
process, you must restrict the EITs available to your responsibilities. All EITs are available to all business groups and delivered responsibilities, in other words, there are no predefined legislation restrictions. All EITs are already available to the business group for your responsibility.
You enable EITs in the Information Types Security window.
1. Copy the EITs for the delivered Manager Self-Service or Employee Self-Service responsibility to a custom responsibility.
2. Delete the EITs that are not required for your responsibility.
3. Save your work.
Note: The Context Description for the descriptive flexfield context value for the EIT appears as the region header in the self-service module. You configure the Context Description in the Descriptive Flexfield Segments window.
The self-service EIT module displays all EITs you enable using the above steps.
If your responsibility only covers one business group, you can specify the required EITs directly in the Information Types region. If your responsibility covers multiple business groups, you need to include the EITs from the other business groups with your responsibility.
See: Setting Up Extra Information Types for a Responsibility, Oracle HRMS Configuring, Reporting, and System Administration Guide
3. Use the Personalization Framework to restrict which EIT segments appear on your self-service pages.
To display only certain segments, personalize the region at the appropriate level and list the names of the segments you wish to appear for that EIT. Separate multiple segments with single pipe symbols (|) and separate multiple structures with double pipe symbols (||).
Note: If you list a structure code with no segment names, the EIT does not appear on the page..
See: Configuring Flexfields, page 6-27
Configuring the Allocated Checklists PageThis topic provides information to configure the Allocated Checklists page.

Configuring Self-Service Modules 8-17
Menu and Function Names
User Menu Name Function Name
Manager Self-Service Allocated Checklists
HR Professional Allocated Checklists
Super HRMS Manager Setup/Maintain Checklists
WorkflowWorkflow Process Display Name
• HR Checklist Notifier Workflow (HRCKLFYI)
• HR Checklist (HRCKLTSK)
Configurable Flexfields
Page Flex Name Flex Code
Add Task Additional Allocated Task Details
PER_ALLOCATED_TASKS
Update Task Additional Allocated Task Details
PER_ALLOCATED_TASKS
Add Checklist Additional Allocated Checklist Details
PER_ALLOCATED_CHECKLISTS
Update Checklist Additional Allocated Checklist Details
PER_ALLOCATED_CHECKLISTS
Additional Configuration StepsFor a complete overview of the configuration steps for checklists, see: Setting Up Checklists, Oracle HRMS Workforce Sourcing, Deployment, and Talent Management Guide.

8-18 Oracle Self-Service Human Resources Deploy Self-Service Capability Guide
Configuring Views
Configuring the My Information and My Employee Information ViewsThis topic provides information on configuring the My Information and My Employee Information View.
PersonalizationsUsing personalizations, you enable only the functionality, information, and controls you want to make available to users. For example, you can display only the column headings of your choice in Summary and Details views. Consider the following personalizations specific to My Employee Information:
• Enable Manager Actions Icon
• Enable Effective Date
• Enable My List
• Enable Search Filter
• Name Format
Enable Manager Actions IconYou can navigate to Manager Actions and initiate a self-service action for employees listed on My Employee Information, My List, or Advanced Search pages. To do this, enable the Action icon. Your Employee Type (EMP or CWK) determines whether you navigate to the Manager Actions or the Contingent Worker Manager Actions function. You can enable the Action icon on the following pages:
• My Employee Information
• My List
• Simple Search
• Advanced Search
See: The Personalization Framework, page 6-4
See: Configuring Web Pages, page 6-21
See: OA Framework Personalization and Extensibility Guide.
My Employee Information

Configuring Self-Service Modules 8-19
The main page for My Employee Information displays information in six categories, grouped on the following sub tabs:
• Employment
• Salary
• Performance
• Training
• Absence
• Job Applications
• Effort Distribution
• Contracts
Note: The Training, Effort Distribution, and Contracts tabs are hidden by default. To display these tabs, see the section Menu and Function Names, page 8-23, below.
Enable the Action icon for each tab by clicking the Personalize Page link. Apply the default scope of Page: 'Oracle Self Service Human Resources: My Employee Information'.
Using the Employment tab as an example, navigate the following nodes:
• Default Single Column: Manager Views
• Sub Tab Layout: (subTabRN)
• Stack Layout: Employment
• Query: Employment.EmpQueryRN
For each tab, navigate the child nodes beneath Query to enable the Action icon when you view selected people from search results or My List:
• Table: Employment
• Image: Action
For each tab, the sibling nodes beside Query (beneath Stack Layout) enable the Action icon for position hierarchies and supervisor hierarchies. Navigate the following nodes beneath Stack Layout:
• H Grid: [Supervisory Hierarchy|Position Hierarchy]
8-20 Oracle Self-Service Human Resources Deploy Self-Service Capability Guide
• Image: Action
To enable the Action icon at the function, location, site, organization, or responsibility level, click the Personalize icon and set the value of the Rendered field corresponding tothe level.
Repeat the above steps in a similar way for the remaining tabs.
Note: When you personalize at the page level by selecting a scope usingthe Page: prefix, as shown here, your personalizations are unique to that page. Shared regions can appear on multiple pages. When you select a scope using the Shared Region: prefix (such as Quick Search), your changes propagate to all instances of the region on all pages that use it.
My List
To personalize the My List page, click the Manage My List link to display the My List page. Set the scope on the Choose Personalization Context page to Shared Region: My List. Navigate the following nodes:
• Stack Layout: MyList
• Table: People in My List
• Image: Action
For information on how to enable the Manage My List link, see Enable My List, page 8-21, below.
Simple Search
To personalize the Simple Search page, enter text in the Quick Search field and press Goto display the page. Click the Personalize Basic Search link, and accept the default scopeof Region: Basic Search. Navigate the following nodes:
• Default Single Column: Basic Search
• Table: People
• Image: Action
Advanced Search
To personalize the Advance Search page, click the Advanced Search link to display the page. Click the Personalize Advanced search link, and accept the default scope of Region: Advanced Search. Navigate the following nodes:
• Default Single Column: Advanced Search
• Query: Advanced Search

Configuring Self-Service Modules 8-21
• Table: People
• Image: Action
Enable Effective DateEnable the Effective Date field to display snapshot views at a point in time in Hierarchy or My List views.
To do this, click the Personalize Effective Date and View As link, and accept the default scope of Region: Effective Date and View As. To enable the Effective Date field and the Go button, navigate the following nodes:
• Flow Layout: Effective Date and View As
• Row Layout: Effective Date
• Message Text Input: Effective Date
• Submit Button: Go
Enable My ListEnable My List features by adding the My List entry to the context switcher. See Lookups, page 8-23, below.
The Manage My List page enables you to view or delete My List members. Enable the Manage My List link on the My Employee Information or Basic Search page using the Personalize Page link. Navigate the following nodes:
• Page: [My Employee Information|Basic Search]
• Scope: 'Shared Region: Quick Search'
• Row Layout: Quick Search
• Link: Manage My List
The Add To My List button enables you to add selected people to My List. Enable the Add to My List button on the Basic Search and Advanced Search pages using the Personalize Page link. Navigate the following nodes from the Basic Search page:
• Scope: Shared Region: Basic Search
• Default Single Column: Basic Search
• Table: People
• Table Selection

8-22 Oracle Self-Service Human Resources Deploy Self-Service Capability Guide
• Multiple Selection
• Selection Button: Add To My List
Navigate the following nodes from the Advanced Search page:
• Scope: 'Shared Region: Advanced Search'
• Default Single Column: Basic Search
• Query: Advanced Search
• Table: People
• Table Selection
• Multiple Selection
• Selection Button: Add To My List
Enable Search FilterTo filter name searches, enable the search filter list for First Name, Last Name, or Full Name on the My Employee Information page, the Basic Search Page, or the My List page. If you do not enable the list, users see only the Name label and the Search field, and the default filter is Last Name. Navigate the following nodes:
• Page: [My Employee Information|Basic Search|My List]
• Scope: Shared Region: Quick Search
• Row Layout: Quick Search
• Message Choice: (SearchFilter)
Name FormatThe My Information and My Employee Information pages display names in brief format by default. If you prefer to see the full name of the employee or worker, set the profile option HR:Display Person Name to Full Name.
OverridesIn the My Information and My Employee Information pages, the position and job names are displayed using a concatenated flexfield format. If required, you can use customer overrides to configure a user-defined format for displaying position and job names. For example, you can display a name using fewer segments.
For more information on overrides, see: Legislation and Customer Overrides, page 4-7.
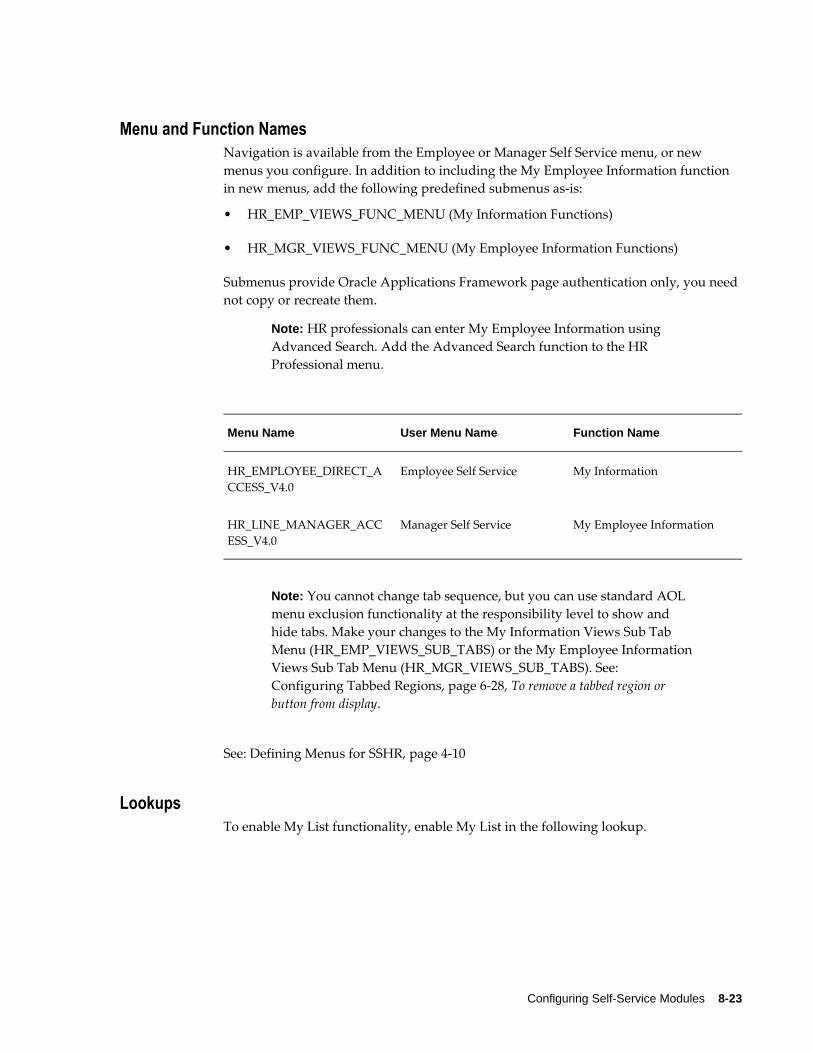
Configuring Self-Service Modules 8-23
Menu and Function NamesNavigation is available from the Employee or Manager Self Service menu, or new menus you configure. In addition to including the My Employee Information function in new menus, add the following predefined submenus as-is:
• HR_EMP_VIEWS_FUNC_MENU (My Information Functions)
• HR_MGR_VIEWS_FUNC_MENU (My Employee Information Functions)
Submenus provide Oracle Applications Framework page authentication only, you need not copy or recreate them.
Note: HR professionals can enter My Employee Information using Advanced Search. Add the Advanced Search function to the HR Professional menu.
Menu Name User Menu Name Function Name
HR_EMPLOYEE_DIRECT_ACCESS_V4.0
Employee Self Service My Information
HR_LINE_MANAGER_ACCESS_V4.0
Manager Self Service My Employee Information
Note: You cannot change tab sequence, but you can use standard AOL menu exclusion functionality at the responsibility level to show and hide tabs. Make your changes to the My Information Views Sub Tab Menu (HR_EMP_VIEWS_SUB_TABS) or the My Employee InformationViews Sub Tab Menu (HR_MGR_VIEWS_SUB_TABS). See: Configuring Tabbed Regions, page 6-28, To remove a tabbed region or button from display.
See: Defining Menus for SSHR, page 4-10
LookupsTo enable My List functionality, enable My List in the following lookup.
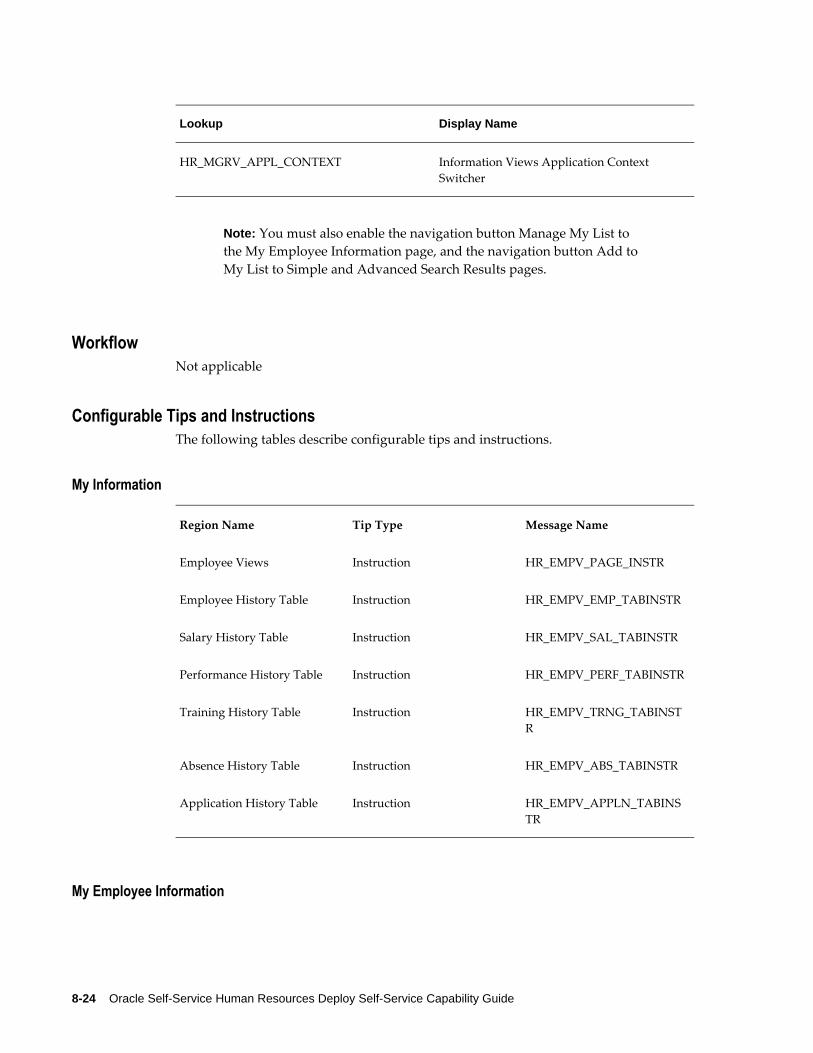
8-24 Oracle Self-Service Human Resources Deploy Self-Service Capability Guide
Lookup Display Name
HR_MGRV_APPL_CONTEXT Information Views Application Context Switcher
Note: You must also enable the navigation button Manage My List to the My Employee Information page, and the navigation button Add to My List to Simple and Advanced Search Results pages.
WorkflowNot applicable
Configurable Tips and InstructionsThe following tables describe configurable tips and instructions.
My Information
Region Name Tip Type Message Name
Employee Views Instruction HR_EMPV_PAGE_INSTR
Employee History Table Instruction HR_EMPV_EMP_TABINSTR
Salary History Table Instruction HR_EMPV_SAL_TABINSTR
Performance History Table Instruction HR_EMPV_PERF_TABINSTR
Training History Table Instruction HR_EMPV_TRNG_TABINSTR
Absence History Table Instruction HR_EMPV_ABS_TABINSTR
Application History Table Instruction HR_EMPV_APPLN_TABINSTR
My Employee Information
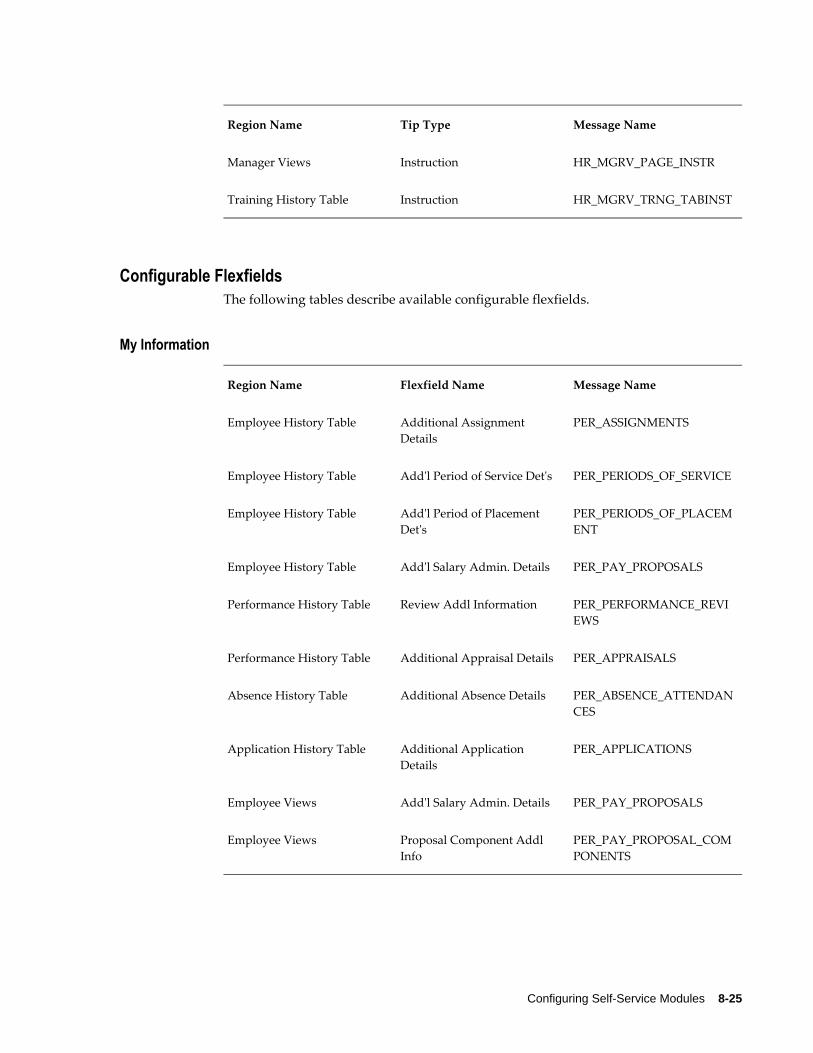
Configuring Self-Service Modules 8-25
Region Name Tip Type Message Name
Manager Views Instruction HR_MGRV_PAGE_INSTR
Training History Table Instruction HR_MGRV_TRNG_TABINST
Configurable FlexfieldsThe following tables describe available configurable flexfields.
My Information
Region Name Flexfield Name Message Name
Employee History Table Additional Assignment Details
PER_ASSIGNMENTS
Employee History Table Add'l Period of Service Det's PER_PERIODS_OF_SERVICE
Employee History Table Add'l Period of Placement Det's
PER_PERIODS_OF_PLACEMENT
Employee History Table Add'l Salary Admin. Details PER_PAY_PROPOSALS
Performance History Table Review Addl Information PER_PERFORMANCE_REVIEWS
Performance History Table Additional Appraisal Details PER_APPRAISALS
Absence History Table Additional Absence Details PER_ABSENCE_ATTENDANCES
Application History Table Additional Application Details
PER_APPLICATIONS
Employee Views Add'l Salary Admin. Details PER_PAY_PROPOSALS
Employee Views Proposal Component Addl Info
PER_PAY_PROPOSAL_COMPONENTS

8-26 Oracle Self-Service Human Resources Deploy Self-Service Capability Guide
My Employee Information
Region Name Flexfield Name Message Name
Employment Details Additional Assignment Details
PER_ASSIGNMENTS
Employment Details Add'l Period of Service Det's PER_PERIODS_OF_SERVICE
Employment Details Add'l Period of Placement Det's
PER_PERIODS_OF_PLACEMENT
Employee History Table Add'l Salary Admin. Details PER_PAY_PROPOSALS
Employee History Table Add'l Period of Service Det's PER_PERFORMANCE_REVIEWS
Employee History Table Add'l Period of Placement Det's
PER_APPRAISALS
Salary Details Add'l Salary Admin. Details PER_PAY_PROPOSALS
Performance History Table Review Addl Information PER_ABSENCE_ATTENDANCES
Performance History Table Additional Appraisal Details PER_APPLICATIONS
Training History Table Additional Delegate Booking Information
OTA_DELEGATE_BOOKINGS
Training History Table Add'l Non OTA Training History Info.
OTA_NOTRING_HISTORIES
Employee History Table Additional Absence Details PER_ABSENCE_ATTENDANCES
Application History Table Additional Application Details
PER_APPLICATIONS
Application History Table Additional Assignment Details
PER_ASSIGNMENTS
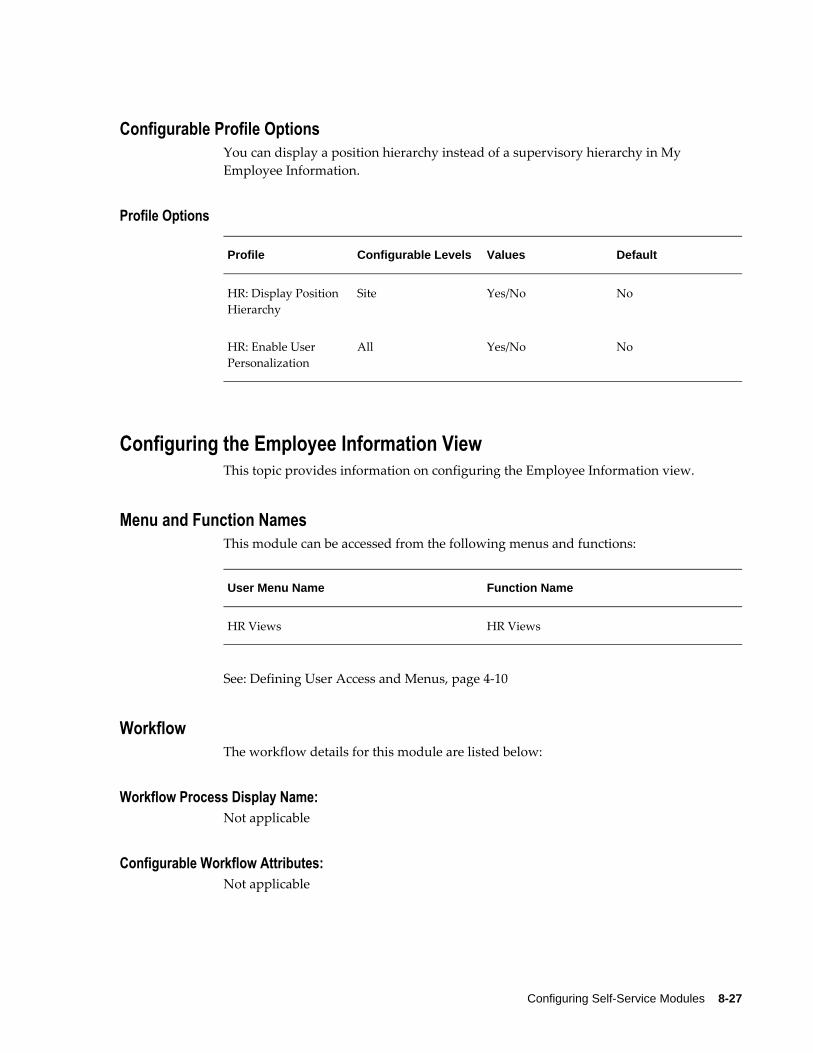
Configuring Self-Service Modules 8-27
Configurable Profile OptionsYou can display a position hierarchy instead of a supervisory hierarchy in My Employee Information.
Profile Options
Profile Configurable Levels Values Default
HR: Display Position Hierarchy
Site Yes/No No
HR: Enable User Personalization
All Yes/No No
Configuring the Employee Information ViewThis topic provides information on configuring the Employee Information view.
Menu and Function NamesThis module can be accessed from the following menus and functions:
User Menu Name Function Name
HR Views HR Views
See: Defining User Access and Menus, page 4-10
WorkflowThe workflow details for this module are listed below:
Workflow Process Display Name: Not applicable
Configurable Workflow Attributes:Not applicable
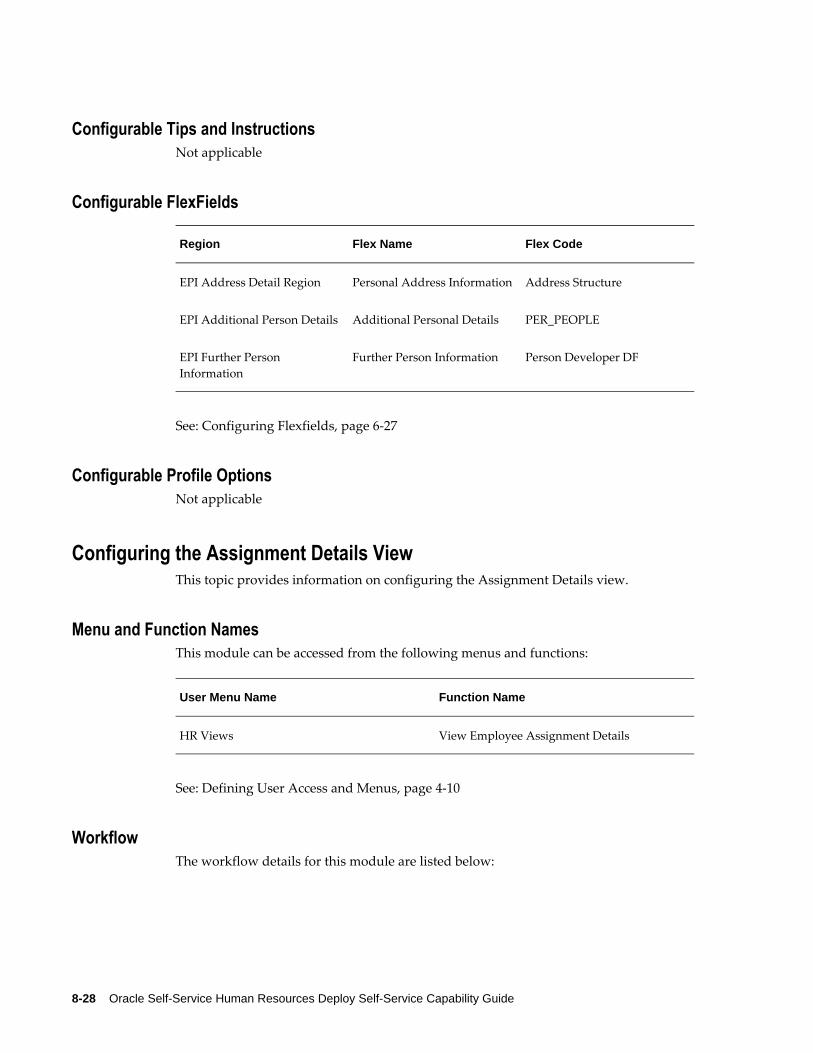
8-28 Oracle Self-Service Human Resources Deploy Self-Service Capability Guide
Configurable Tips and InstructionsNot applicable
Configurable FlexFields
Region Flex Name Flex Code
EPI Address Detail Region Personal Address Information Address Structure
EPI Additional Person Details Additional Personal Details PER_PEOPLE
EPI Further Person Information
Further Person Information Person Developer DF
See: Configuring Flexfields, page 6-27
Configurable Profile OptionsNot applicable
Configuring the Assignment Details ViewThis topic provides information on configuring the Assignment Details view.
Menu and Function NamesThis module can be accessed from the following menus and functions:
User Menu Name Function Name
HR Views View Employee Assignment Details
See: Defining User Access and Menus, page 4-10
WorkflowThe workflow details for this module are listed below:

Configuring Self-Service Modules 8-29
Workflow Process Display Name: Not applicable
Configurable Workflow Attributes:Not applicable
Configurable Tips and InstructionsNot applicable
Configurable FlexFields
Region Flex Name Flex Code
AD Current Assignment Region
Job Flexfield JOB
AD Current Assignment Region
Position Flexfield POS
AD Current Assignment Region
Grade Flexfield GRD
AD Additional Assignment Details Desc Flex Region
Additional Assignment Details
PER_ASSIGNMENTS
AD Assignment History Detail Region
Job Flexfield JOB
AD Assignment History Detail Region
Position Flexfield POS
AD Assignment History Detail Region
Grade Flexfield GRD
AD Assignment Statutory Info
Soft Coded Key Flex SCL
See: Configuring Flexfields, page 6-27

8-30 Oracle Self-Service Human Resources Deploy Self-Service Capability Guide
Configurable Profile OptionsNot applicable
Configuring the Compensation Activity ViewThis topic provides information on configuring the Compensation Activity view.
Personalization
When HR managers or Payroll managers log in to Oracle SSHR using the HR Professional responsibility to view the compensation details for employees in the Compensation Activity tabbed region, they can now view the compensation activity for all element types. Oracle SSHR displays all elements by default. If you want to display only specific elements, then you can use the Personalization feature to set the default priority using the Default Priority column in the Table: Elements Region.
The Compensation Activity view displays all the elements for a worker unless they are linked to benefit plans and, therefore, have rates defined. If this is the case, only the rates are displayed. If you want to restrict the elements displayed in this view, create an element set (of type Customization Set) containing the elements you want to display, and select this element set in the Element Set Name user profile option.
Menu and Function NamesThis module can be accessed from the following menus and functions:
User Menu Name Function Name
HR Views View Employee Compensation Activity
See: Defining User Access and Menus, page 4-10
WorkflowThe workflow details for this module are listed below:
Workflow Process Display Name: Not applicable
Configurable Workflow Attributes:Not applicable
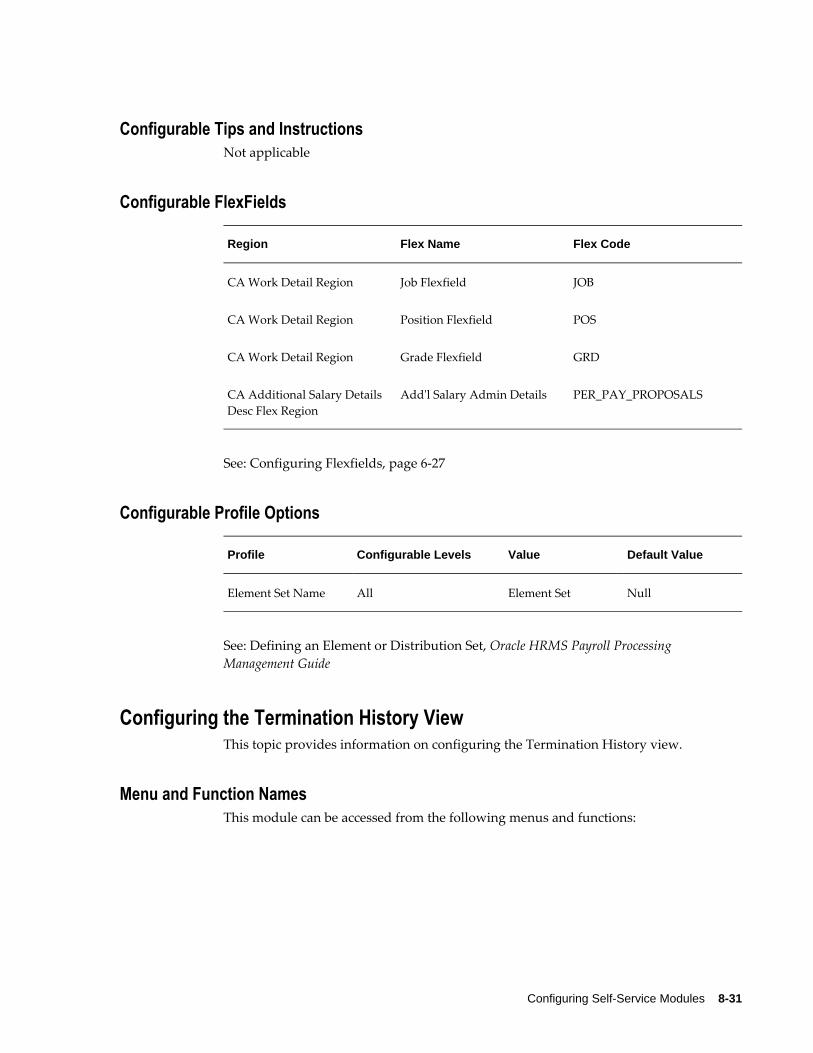
Configuring Self-Service Modules 8-31
Configurable Tips and InstructionsNot applicable
Configurable FlexFields
Region Flex Name Flex Code
CA Work Detail Region Job Flexfield JOB
CA Work Detail Region Position Flexfield POS
CA Work Detail Region Grade Flexfield GRD
CA Additional Salary Details Desc Flex Region
Add'l Salary Admin Details PER_PAY_PROPOSALS
See: Configuring Flexfields, page 6-27
Configurable Profile Options
Profile Configurable Levels Value Default Value
Element Set Name All Element Set Null
See: Defining an Element or Distribution Set, Oracle HRMS Payroll Processing Management Guide
Configuring the Termination History ViewThis topic provides information on configuring the Termination History view.
Menu and Function NamesThis module can be accessed from the following menus and functions:

8-32 Oracle Self-Service Human Resources Deploy Self-Service Capability Guide
User Menu Name Function Name
HR Views View Employee Termination History
See: Defining User Access and Menus, page 4-10
WorkflowThe workflow details for this module are listed below:
Workflow Process Display Name: Not applicable
Configurable Workflow Attributes:Not applicable
Configurable Tips and InstructionsNot applicable
Configurable FlexFields
Region Flex Name Flex Code
TH Work Detail Region Job Flexfield JOB
TH Work Detail Region Position Flexfield POS
TH Work Detail Region Grade Flexfield GRD
TH Additional Periods of Service Desc Flex Region
Add'l Period of Service Det's PER_PERIODS_OF_SERVICE
TH Additional Periods of Service Information Desc FlexRegion
Add'l Periods of Service Information
PER_PDS_DEVELOPER_DF
See: Configuring Flex Segments, page 6-27

Configuring Self-Service Modules 8-33
Configurable Profile OptionsNot applicable
Configuring the Search Functions for HR ViewsThis topic provides information on configuring the search functions for HR views.
Menu and Function NamesThese modules can be accessed from the following menus and functions:
User Menu Name Function Name
HR User Self Service (HR_USER_SELF_SERVICE_V4.0)
HR Views Person Search Initial Screen
HR Views Menu (HR_VIEWS_MENU) HR Views Person Search
See: Defining User Access and Menus, page 4-10
WorkflowThe workflow details for this module are listed below:
Workflow Process Display Name: Not applicable
Configurable Workflow Attributes:Not applicable
Configurable Tips and InstructionsNot applicable
Configurable FlexFieldsNot applicable
Configurable Profile OptionsNot applicable

8-34 Oracle Self-Service Human Resources Deploy Self-Service Capability Guide
Configuring the Workforce Sourcing and Deploy Modules
Configuring the Location ModuleThis topic provides information to configure the Location module.
Menu and Function NamesNot applicable
WorkflowThe workflow details for this module are listed below:
Workflow Process Display Name: Location
Configurable Workflow Attributes:
Process Display Name Function Activity Display Name
Function Activity Attribute Display Name
Location Location Hr Null Allowed
Location Location HR Location Required
Location Location Hr Use Defaults
Location Location Hr Override Defaults
Location Location HR Element Warning
HR Null Allowed:
Allows null location for an employee or worker.
HR Location Required:
Defines whether the location is required for an employee or worker.
HR Use Defaults:

Configuring Self-Service Modules 8-35
The location can be changed to the default locations which are the user's Organization Location or Position Location. This is enforced by displaying the locations in a poplist.
HR Override Defaults:
The location can be changed to any global location or any location in the user's business group. The locations are displayed in a list of values if this attribute is called.
HR Element Warning:
Defines whether or not to display the HR element warning.
See: Configuring Workflow Attribute Values, page 5-10
Configurable Tips and Instructions
Location Page
Region Tip Type Message Name
Change Location Instruction HR_INST_TOP_COMMON_TEXT
Change Location Long Message HR_TIP_LOCATION_CODE
See: Adding Instructions to Web Pages, page 6-35
Configurable FlexFields
Location Page
Region Flex Name Flex Code
Location Location Address Address Location
Location Additional Assignment Details
PER_ASSIGNMENTS
See: Configuring Flexfields, page 6-27
Configurable Profile OptionsNot applicable
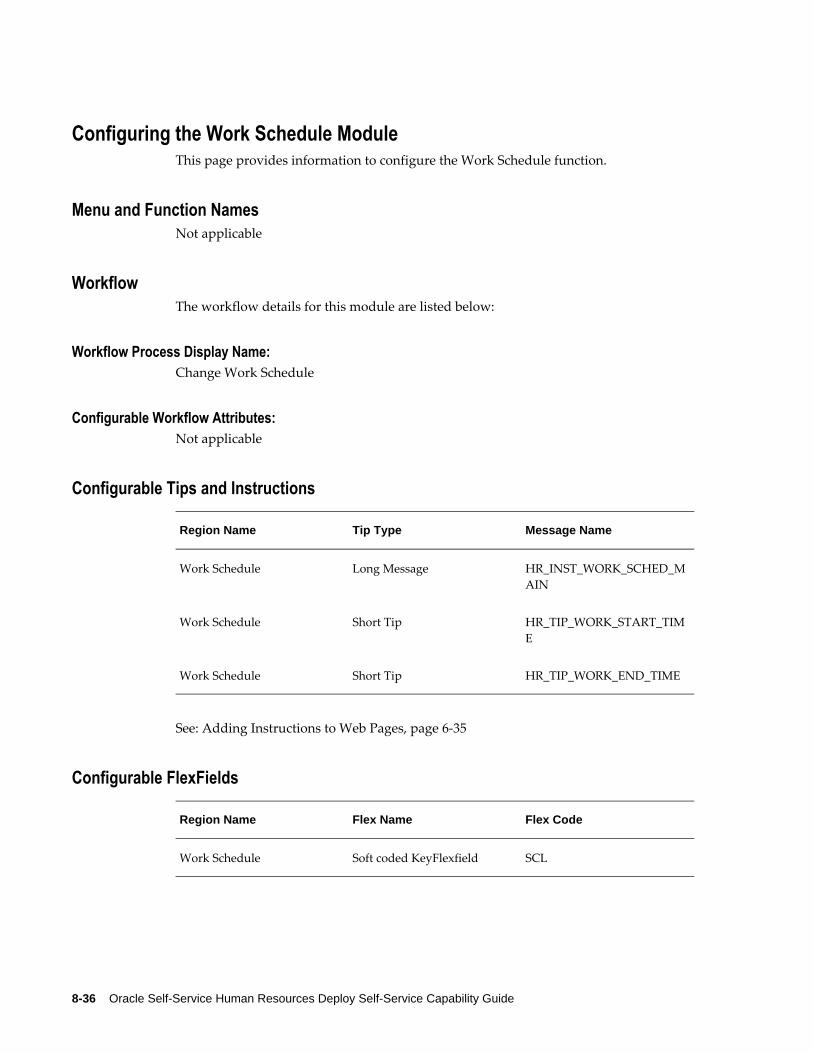
8-36 Oracle Self-Service Human Resources Deploy Self-Service Capability Guide
Configuring the Work Schedule ModuleThis page provides information to configure the Work Schedule function.
Menu and Function NamesNot applicable
WorkflowThe workflow details for this module are listed below:
Workflow Process Display Name: Change Work Schedule
Configurable Workflow Attributes:Not applicable
Configurable Tips and Instructions
Region Name Tip Type Message Name
Work Schedule Long Message HR_INST_WORK_SCHED_MAIN
Work Schedule Short Tip HR_TIP_WORK_START_TIME
Work Schedule Short Tip HR_TIP_WORK_END_TIME
See: Adding Instructions to Web Pages, page 6-35
Configurable FlexFields
Region Name Flex Name Flex Code
Work Schedule Soft coded KeyFlexfield SCL
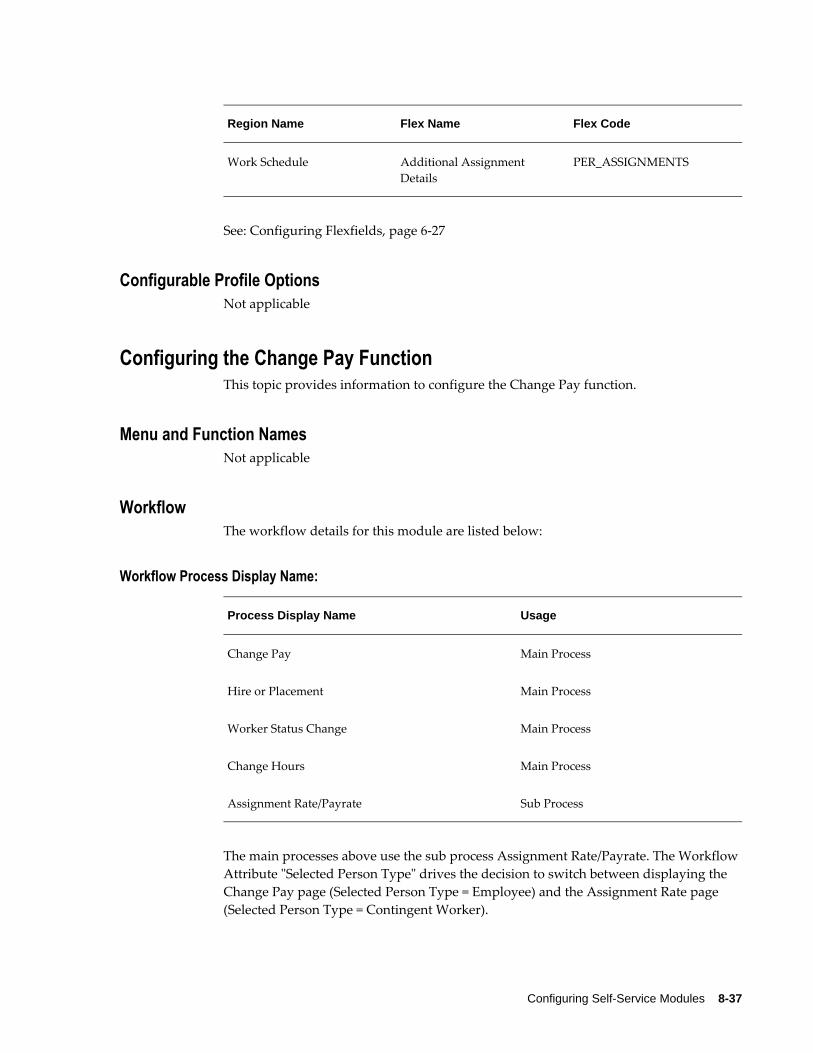
Configuring Self-Service Modules 8-37
Region Name Flex Name Flex Code
Work Schedule Additional Assignment Details
PER_ASSIGNMENTS
See: Configuring Flexfields, page 6-27
Configurable Profile OptionsNot applicable
Configuring the Change Pay FunctionThis topic provides information to configure the Change Pay function.
Menu and Function NamesNot applicable
WorkflowThe workflow details for this module are listed below:
Workflow Process Display Name:
Process Display Name Usage
Change Pay Main Process
Hire or Placement Main Process
Worker Status Change Main Process
Change Hours Main Process
Assignment Rate/Payrate Sub Process
The main processes above use the sub process Assignment Rate/Payrate. The Workflow Attribute "Selected Person Type" drives the decision to switch between displaying the Change Pay page (Selected Person Type = Employee) and the Assignment Rate page (Selected Person Type = Contingent Worker).

8-38 Oracle Self-Service Human Resources Deploy Self-Service Capability Guide
The Applicant hire process uses the same workflow process as Hire or Placement (New Hire).
Quick Change Hours ProcessThe Quick Change Hours process (HR_QK_CHANGE_HOURS_JSP_PRC) is a change hours process in addition to the existing Change Hours process (HR_CHANGE_HOURS_PRC) that includes the Change Pay transaction page. Using this process, managers can quickly change the work schedule and assignment category of a worker and submit the transaction, without requiring to change pay.
If you want to use the Quick Change Hours process, then you must change the name of process in the predefined or custom HR_CHANGE_HOURS function.
For example, by default, the parameters of the predefined HR_CHANGE_HOURS_SS function are:pAMETranType=SSHRMS&pAMEAppId=800&pPayRate=Y&pProcessName=HR_CHG_HOURS_JSP_PRC&pItemType=HRSSA&pCalledFrom=HR_CHANGE_HOURS_SS&pEffectiveDate=
The process that is used in the predefined function is the HR_CHG_HOURS_JSP_PRC, which is a standard Change Hours process.
To use the Quick Change Hours process, change the value of the pProcessName parameter as pProcessName=HR_QK_CHANGE_HOURS_JSP_PRC.
Configurable Workflow Attributes:
Process Display Name Function Activity Display Name
Function Activity Attribute Display Name
Change Pay HR_CHANGE_PAY_JSP_PRC Change Pay, Assignment Rate
See: Configuring Workflow Attributes, page 5-10
Configurable Tips and InstructionsNot Applicable
Configurable FlexFields
Region Flex Name Flex Code
Pay Rate Salary Admin Flex Cell
Add'l Salary Admin Details PER_PAY_PROPOSALS

Configuring Self-Service Modules 8-39
Region Flex Name Flex Code
Pay Rate Multiple Table Proposal Component Addl Info
PER_PAY_PROPOSAL_COMPONENTS
See: Configuring Flexfields, page 6-27
Configurable Profile Options
Profile Configurable Levels Values Default
HR: Base Salary Required
Site Yes/No Null
HR: Base Salary Required
When you set this profile option to Yes, if a person's assignment has a salary basis assigned but no pay proposal, the Description and Salary fields will be mandatory. The user will be forced to enter values for these fields.
See: User Profiles, Oracle HRMS Configuring, Reporting, and System Administration Guide
Configuring the Assignment Rate ModuleThis topic provides information to configure the Assignment Rate module.
Menu and Function NamesNot applicable
WorkflowThe workflow details for this module are listed below:
Workflow Process Display Name:
Process Display Name Usage
Change Pay Main Process
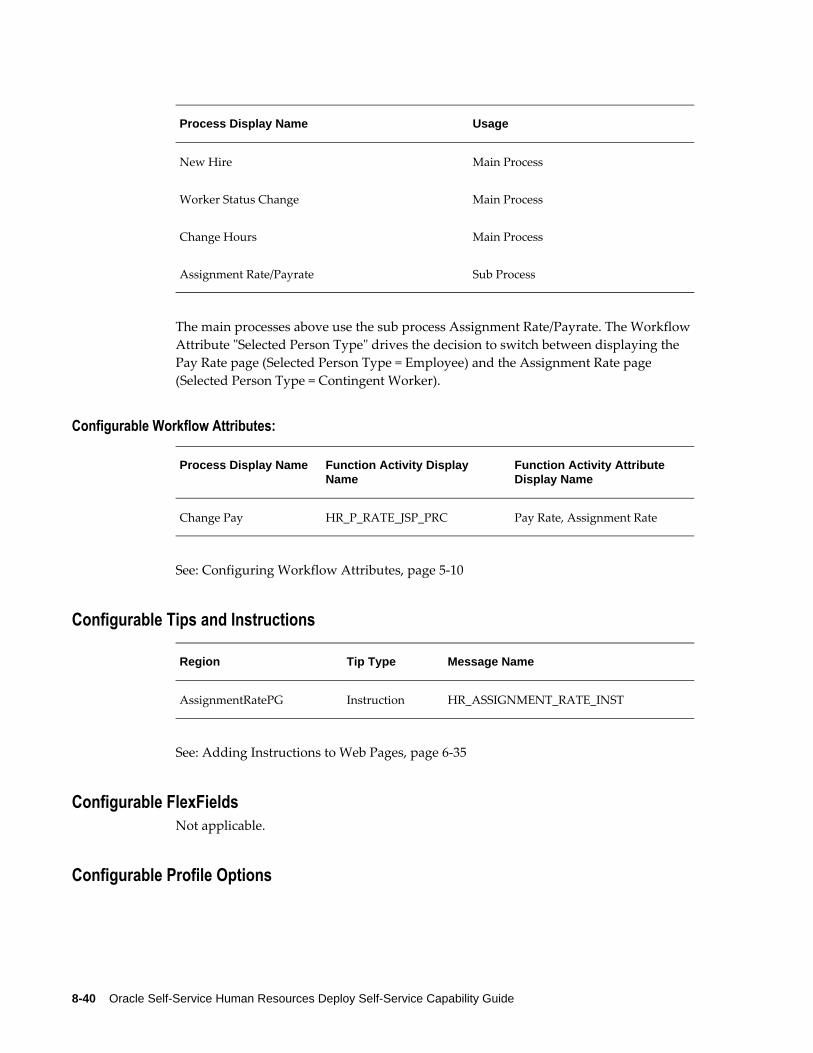
8-40 Oracle Self-Service Human Resources Deploy Self-Service Capability Guide
Process Display Name Usage
New Hire Main Process
Worker Status Change Main Process
Change Hours Main Process
Assignment Rate/Payrate Sub Process
The main processes above use the sub process Assignment Rate/Payrate. The Workflow Attribute "Selected Person Type" drives the decision to switch between displaying the Pay Rate page (Selected Person Type = Employee) and the Assignment Rate page (Selected Person Type = Contingent Worker).
Configurable Workflow Attributes:
Process Display Name Function Activity Display Name
Function Activity Attribute Display Name
Change Pay HR_P_RATE_JSP_PRC Pay Rate, Assignment Rate
See: Configuring Workflow Attributes, page 5-10
Configurable Tips and Instructions
Region Tip Type Message Name
AssignmentRatePG Instruction HR_ASSIGNMENT_RATE_INST
See: Adding Instructions to Web Pages, page 6-35
Configurable FlexFieldsNot applicable.
Configurable Profile Options

Configuring Self-Service Modules 8-41
Profile Configurable Levels Values Default
PO: Services Procurement Enabled
Site Yes/No No
If Oracle Services Procurement is installed and licensed, and the user profile option PO: Services Procurement Enabled is set to Yes, assignment rate information is obtained automatically from Oracle Services Procurement.
Configuring the Documents of Record ModuleThis topic provides information on configuring the Documents of Record page.
Menu and Function NamesYou can access this module from the following menus and functions:
User Menu Name Function Name
Manager Self Service Documents of Record
Employee Self Service Documents of Record
HRMS Navigator (HR Professional menus) People > Search Documents of Record
People > Enter and Maintain > Documents of Record (access from task flow).
FastPath > Documents of Record.
WorkflowThe workflow details for this function are listed below:
Workflow Process Display Name:Notify Document of Record Reviewee Process (HR_NOTIFY_DOR_REVIEWEE_PRC)
Notify Document of Record Reviewer Process (HR_NOTIFY_DOR_REVIEWER_PRC)
Configurable Workflow Attributes:The following attributes are used in the Notify Document of Record Reviewee process and Notify Document of Record Reviewer process:

8-42 Oracle Self-Service Human Resources Deploy Self-Service Capability Guide
Activity Display Name Attribute Display Name Description
Notify Document of Record Reviewee/Notify Document of Record Reviewer
Reviewee Name of person whose document of record is created.
Document of Record Type Type of document being created.
Valid From Validity start date for document.
Valid To Validity end date for document.
Here URL of document of record page.
Reviewer Name of person who reviews document of record.
Review Action Action being carried out, for example, creation or deletion of document.
Effective Date Effective date for transaction.
Configurable Flexfields
Region Flex Prompt (SSHR) Flex Name
Extra Information Document Type Extra Document Information
Additional Document Details AddDocDtlsDff Extra Document Info Details
Configurable Profile OptionsNone
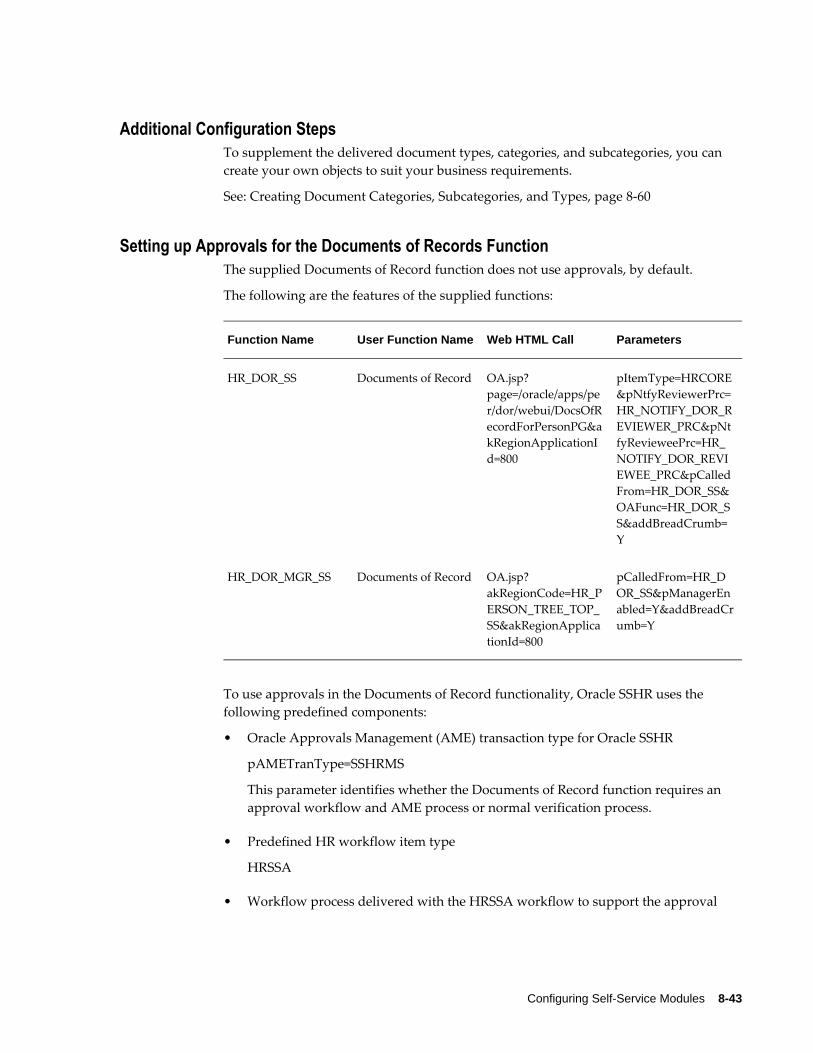
Configuring Self-Service Modules 8-43
Additional Configuration StepsTo supplement the delivered document types, categories, and subcategories, you can create your own objects to suit your business requirements.
See: Creating Document Categories, Subcategories, and Types, page 8-60
Setting up Approvals for the Documents of Records FunctionThe supplied Documents of Record function does not use approvals, by default.
The following are the features of the supplied functions:
Function Name User Function Name Web HTML Call Parameters
HR_DOR_SS Documents of Record OA.jsp?page=/oracle/apps/per/dor/webui/DocsOfRecordForPersonPG&akRegionApplicationId=800
pItemType=HRCORE&pNtfyReviewerPrc=HR_NOTIFY_DOR_REVIEWER_PRC&pNtfyRevieweePrc=HR_NOTIFY_DOR_REVIEWEE_PRC&pCalledFrom=HR_DOR_SS&OAFunc=HR_DOR_SS&addBreadCrumb=Y
HR_DOR_MGR_SS Documents of Record OA.jsp?akRegionCode=HR_PERSON_TREE_TOP_SS&akRegionApplicationId=800
pCalledFrom=HR_DOR_SS&pManagerEnabled=Y&addBreadCrumb=Y
To use approvals in the Documents of Record functionality, Oracle SSHR uses the following predefined components:
• Oracle Approvals Management (AME) transaction type for Oracle SSHR
pAMETranType=SSHRMS
This parameter identifies whether the Documents of Record function requires an approval workflow and AME process or normal verification process.
• Predefined HR workflow item type
HRSSA
• Workflow process delivered with the HRSSA workflow to support the approval
8-44 Oracle Self-Service Human Resources Deploy Self-Service Capability Guide
process for the Documents of Record functionality:
PER_DOR_JSP_PRC
Based on your business requirements, to implement approvals in the Documents of Record functionality, you can follow any of the approaches:
1. You can change the parameters of the delivered HR_DOR_SS form function using the Form Functions window.
Add the parameter values as given in the following example:pItemType=HRSSA&pAMETranType=SSHRMS&pAMEAppId=800&pProcessName=PER_DOR_JSP_PRC&pFromMenu=Y&pApprovalMode=YD&OAFunc=HR_DOR_SS&pCalledFrom=HR_DOR_SS
2. You can create a custom function to use the approvals feature. Complete the following steps:
1. Using the Form Functions window, copy the supplied function: HR_DOR_SS and create a custom function.
2. In the Parameter field of the custom form function, edit the values of the form function to add the following predefined components.
Add the parameter values as given in the following example:pItemType=HRSSA&pAMETranType=SSHRMS&pAMEAppId=800&pProcessName=PER_DOR_JSP_PRC&pFromMenu=Y&pApprovalMode=YD&OAFunc=HR_DOR_SS&pCalledFrom=HR_DOR_SS
3. Create a custom function: HR_DOR_MGR_SS and modify the parameters of this form function to include the custom HR_DOR_SS function.
4. Add the custom form functions to the Manager Self-Service, Employee Self-Service, and Contingent Worker Self-Service menus, as required.
For more information on how to define functions, see: Defining Functions for SSHR, page 4-12
To base approvals on your business requirements, you can:
• Customize the predefined workflow process PER_DOR_JSP_PRC using the Workflow Builder.
See: Workflow Objects and Item Types, page 5-3
• Customize the predefined AME transaction type SSHRMS to define conditions, rules, and attributes using Oracle Approvals Management (AME)
See: Oracle Approvals Management (AME) Configuration, page 7-5
When you implement the approvals process for the Documents of Record functionality, Oracle SSHR displays the following changes:

Configuring Self-Service Modules 8-45
• On the Create Document of Record or the Update Document of Record page, a Nextbutton is displayed. When workers or managers click this button, the Review page appears.
• The Documents of Record Review page is similar to the standard SSHR Review page. This page displays the following regions:
• Proposed region with document details.
• Comments to Approver, where the transaction creator can add comments.
• Supporting Documents region to add attachments.
• Approvers region that shows a list of approvers.
• Add Adhoc Approver to select additional approvers and recipients of the FYI notifications.
User can click Submit to route the transaction for approval.
• The Update Documents of Record Review page shows two columns: Current and Proposed.
• The Documents of Record for Person page displays the transaction status of a document that is submitted for approval. If the transaction is pending approval, then the Update feature is unavailable. This page displays the document of record details in a table. Users can click the View icon to view further details on the View Document of Record page.
• The Notification page that an approver receives to review the document of record does not display the Return for Correction button and the Update link.
The Save For Later and inadvertent Save For Later feature are not available with approvals for Documents of Record.
Configuring the Termination ModuleThis topics provides details about the Termination module.
Menu and Function NamesYou can access this module from the following menus and functions:

8-46 Oracle Self-Service Human Resources Deploy Self-Service Capability Guide
User Menu Name Function Name
Manager Self Service Termination Mgr
Quick Termination ProcessThe Quick Termination process (HR_QK_TERMINATION_JSP_PRC) is in addition to the existing Termination process (HR_TERMINATION_JSP_PRC). Using this process managers can enter termination details of their workers and submit the transaction for approval, without having to navigate to the Change Manager page to reallocate the workers who report to the terminated worker, if the terminated worker is a manager.
Note: If you use the process named HR_QK_TERMINATION_JSP_PRC, then to automatically move the workers reporting to the terminated manager to the terminated manager's manager, the parameter &pQkFn in the HR_TERMINATION_SS function must be set to Y.
Complete the following steps:
1. Log in to the System Administrator responsibility.
2. Navigate to the Function window.
3. Search for the HR_TERMINATION_SS function.
4. Click the Form tab.
5. Change the Parameters value to the following:pAMETranType=SSHRMS&pAMEAppId=800&pProcessName=HR_QK_TERMINATION_JSP_PRC&pItemType=HRSSA&pCalledFrom=HR_TERMINATION_SS&pEffectiveDate=&pQkFn=Y
When enterprises use the Quick Termination process, they can set the HR: No Supervisor Error or Warning profile option. This profile option determines the processing behavior of the application when users initiate termination transactions of employees who are managers but do not have a supervisor. If the profile option value isset to Error, then the application does not allow the user to proceed with the termination transaction of a manager who does not have a supervisor. If the profile option value is set to Warning, then the application allows the user to proceed with the termination transaction of a manager who does not have a supervisor. However, as the terminated manager does not have a supervisor the application does not reassign the terminated manager's subordinate workers. In such cases, the HR administrator must assign a supervisor to the subordinate workers using the Oracle HRMS Assignment window.
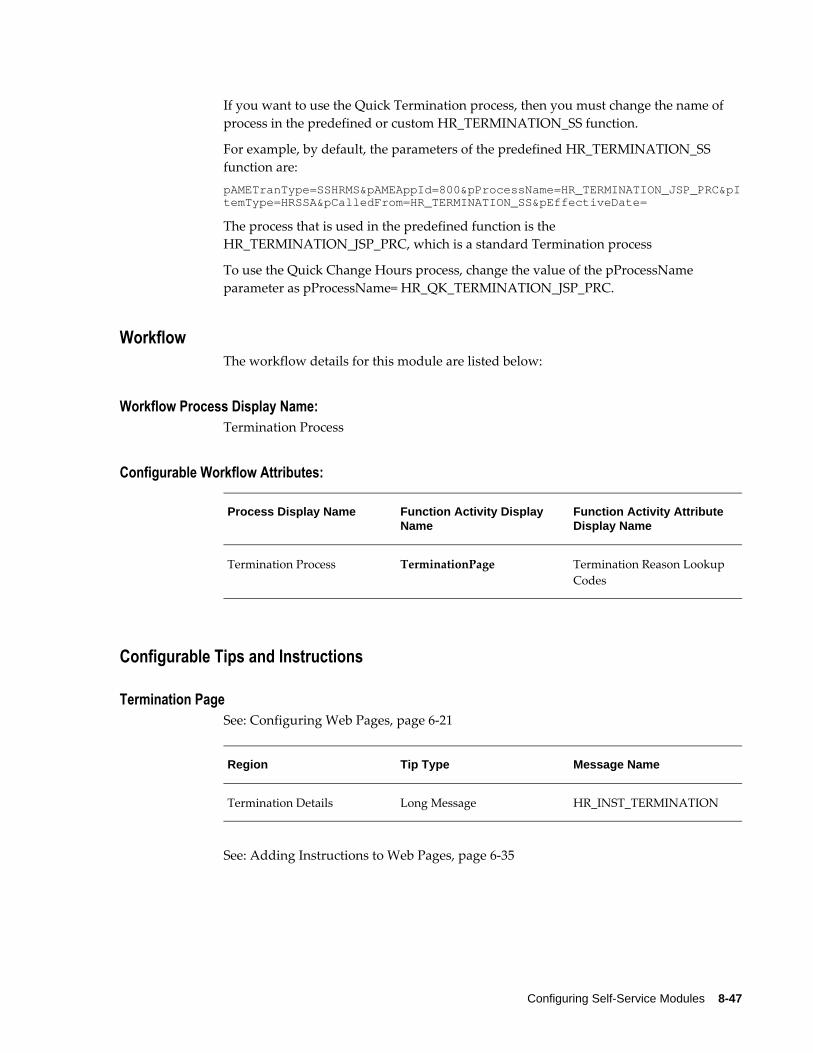
Configuring Self-Service Modules 8-47
If you want to use the Quick Termination process, then you must change the name of process in the predefined or custom HR_TERMINATION_SS function.
For example, by default, the parameters of the predefined HR_TERMINATION_SS function are:pAMETranType=SSHRMS&pAMEAppId=800&pProcessName=HR_TERMINATION_JSP_PRC&pItemType=HRSSA&pCalledFrom=HR_TERMINATION_SS&pEffectiveDate=
The process that is used in the predefined function is the HR_TERMINATION_JSP_PRC, which is a standard Termination process
To use the Quick Change Hours process, change the value of the pProcessName parameter as pProcessName= HR_QK_TERMINATION_JSP_PRC.
WorkflowThe workflow details for this module are listed below:
Workflow Process Display Name: Termination Process
Configurable Workflow Attributes:
Process Display Name Function Activity Display Name
Function Activity Attribute Display Name
Termination Process TerminationPage Termination Reason Lookup Codes
Configurable Tips and Instructions
Termination PageSee: Configuring Web Pages, page 6-21
Region Tip Type Message Name
Termination Details Long Message HR_INST_TERMINATION
See: Adding Instructions to Web Pages, page 6-35

8-48 Oracle Self-Service Human Resources Deploy Self-Service Capability Guide
Configurable Flexfields
Termination Page
Region Flex Name Flex Code
Termination Details Additional Period of Service Details
PER_PERIODS_OF_SERVICE
Termination Details Additional Period of Service Information
PER_PDS_DEVELOPER_DF
See: Configuring Flexfields, page 6-27
Configurable Profile Options
Profile Configurable Levels Values Default
HR: No Supervisor Error or Warning
Site, Application, Responsibility, User
Warning
Error
HR: No Supervisor Error or Warning
Set this profile option if you are using the quick Termination HR_QK_TERMINATION_JSP_PRC function. When enterprises use the Quick Termination process, they can set the HR: No Supervisor Error or Warning profile option. This profile option determines the processing behavior of the application when users initiate termination transactions of employees who are managers but do not have a supervisor. If the profile option value is set to Error, then the application does not allow the user to proceed with the termination transaction of a manager who does not have a supervisor. If the profile option value is set to Warning, then the application allows the user to proceed with the termination transaction of a manager who does not have a supervisor. However, as the terminated manager does not have a supervisor the application does not reassign the terminated manager's subordinate workers. In such cases, the HR administrator must assign a supervisor to the subordinate workers using the Oracle HRMS Assignment window.
Configuring the Voluntary Termination ModuleThis topic provides details about the Voluntary Termination module.
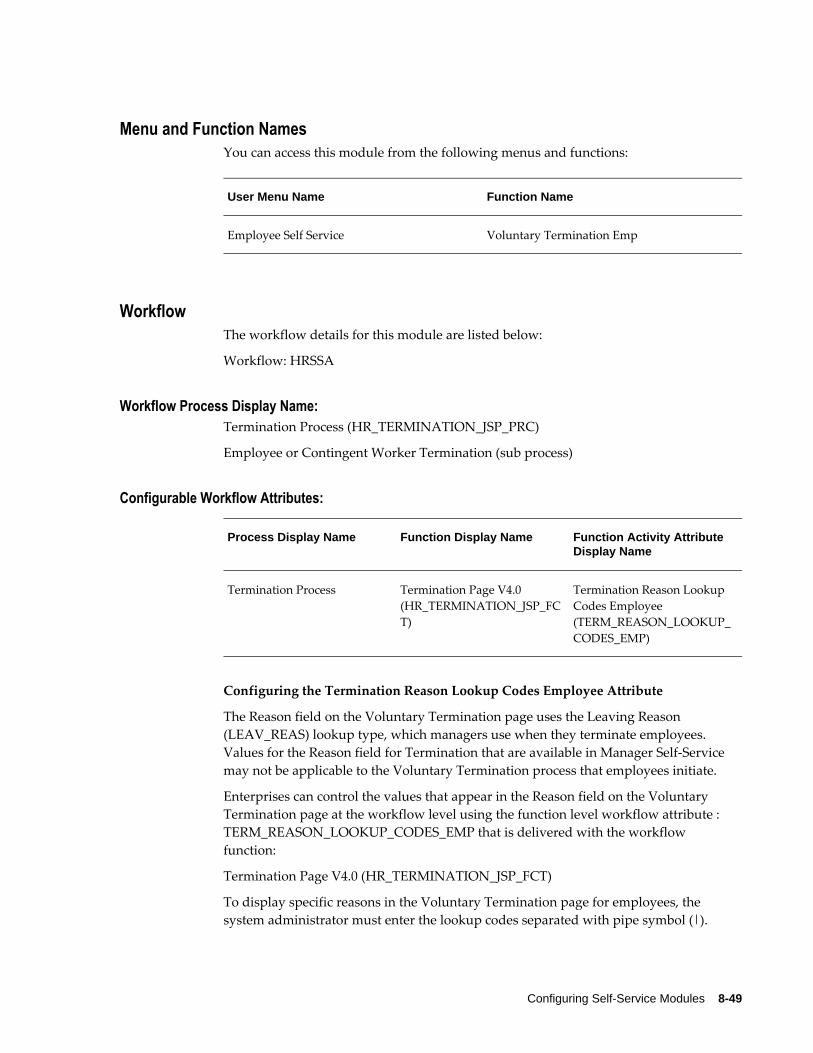
Configuring Self-Service Modules 8-49
Menu and Function NamesYou can access this module from the following menus and functions:
User Menu Name Function Name
Employee Self Service Voluntary Termination Emp
WorkflowThe workflow details for this module are listed below:
Workflow: HRSSA
Workflow Process Display Name: Termination Process (HR_TERMINATION_JSP_PRC)
Employee or Contingent Worker Termination (sub process)
Configurable Workflow Attributes:
Process Display Name Function Display Name Function Activity Attribute Display Name
Termination Process Termination Page V4.0 (HR_TERMINATION_JSP_FCT)
Termination Reason Lookup Codes Employee (TERM_REASON_LOOKUP_CODES_EMP)
Configuring the Termination Reason Lookup Codes Employee Attribute
The Reason field on the Voluntary Termination page uses the Leaving Reason (LEAV_REAS) lookup type, which managers use when they terminate employees. Values for the Reason field for Termination that are available in Manager Self-Service may not be applicable to the Voluntary Termination process that employees initiate.
Enterprises can control the values that appear in the Reason field on the Voluntary Termination page at the workflow level using the function level workflow attribute : TERM_REASON_LOOKUP_CODES_EMP that is delivered with the workflow function:
Termination Page V4.0 (HR_TERMINATION_JSP_FCT)
To display specific reasons in the Voluntary Termination page for employees, the system administrator must enter the lookup codes separated with pipe symbol (|).

8-50 Oracle Self-Service Human Resources Deploy Self-Service Capability Guide
Configuring the Change Manager and Change Organization Manager Pages in the Voluntary TerminationFlow
By default, when an employee who has direct subordinates requests voluntary termination, Oracle SSHR does not display the Change Manager page. The Bypass Change Manager node attribute of the Branch on Presence of Subordinates V4.0 is set toYes.
In the event of the employee being a manager to an organization, the Update Organization Manager page does not appear in the voluntary termination business flow. The Bypass Organization Manager attribute of the Branch on Organization Manager function is set to Yes.
Based on your business requirements, to display the Change Manager and Update Organization Manager pages, you must set the following node attributes:
Function Node Attribute Node Value
Branch on Presence of Subordinates V4.0 ( HR_BRANCH_ON_SUBORDINATES_FCT)
Bypass Change Manager (BYPASS_CHG_MGR)
No
Branch on Organization Manager (HR_BRANCH_ON_COST_CENTER_MGR)
Bypass Organization Manager(BYPASS_ORG_MGR)
No
For information on how to configure workflow attributes, see: Configuring Workflow Attribute Values, page 5-10
Configurable Tips and Instructions
Voluntary Termination PageSee: Configuring Web Pages, page 6-21
Region Tip Type Message Name
Termination Details Instruction HR_50704_TERM_NTF_DATE_TIP
The following warning messages appear when approvers receive voluntary terminationnotifications:
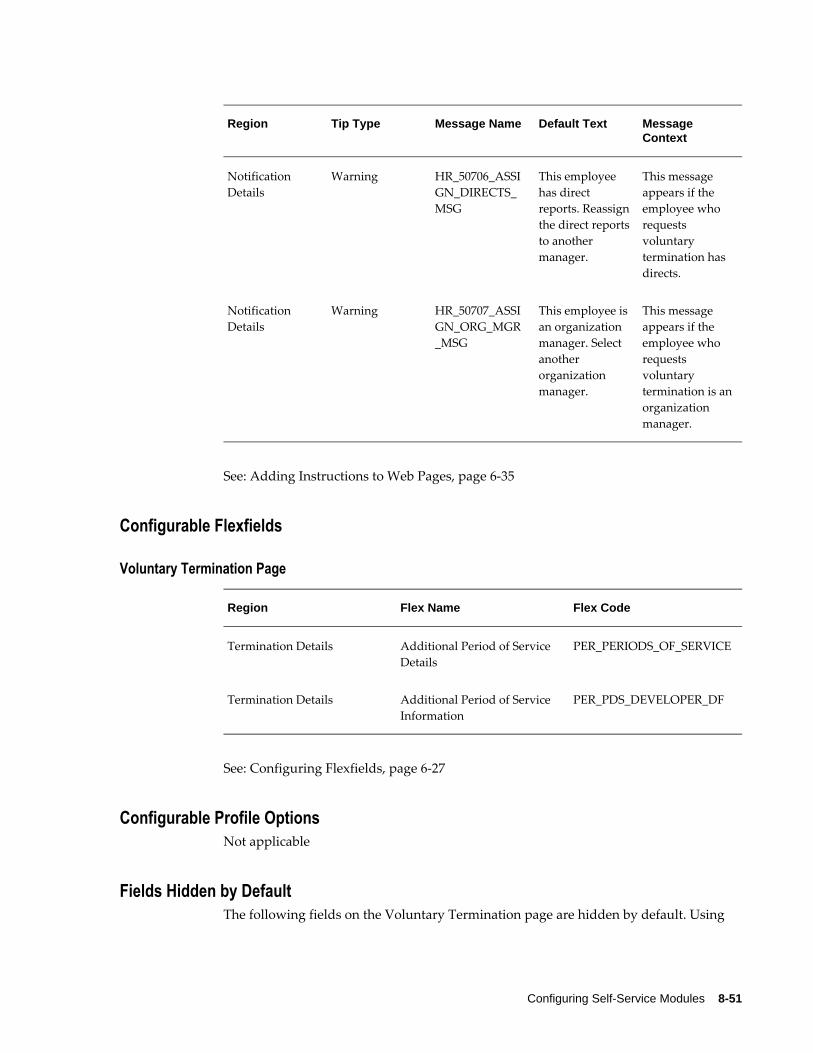
Configuring Self-Service Modules 8-51
Region Tip Type Message Name Default Text Message Context
Notification Details
Warning HR_50706_ASSIGN_DIRECTS_MSG
This employee has direct reports. Reassignthe direct reportsto another manager.
This message appears if the employee who requests voluntary termination has directs.
Notification Details
Warning HR_50707_ASSIGN_ORG_MGR_MSG
This employee isan organization manager. Select another organization manager.
This message appears if the employee who requests voluntary termination is anorganization manager.
See: Adding Instructions to Web Pages, page 6-35
Configurable Flexfields
Voluntary Termination Page
Region Flex Name Flex Code
Termination Details Additional Period of Service Details
PER_PERIODS_OF_SERVICE
Termination Details Additional Period of Service Information
PER_PDS_DEVELOPER_DF
See: Configuring Flexfields, page 6-27
Configurable Profile OptionsNot applicable
Fields Hidden by DefaultThe following fields on the Voluntary Termination page are hidden by default. Using

8-52 Oracle Self-Service Human Resources Deploy Self-Service Capability Guide
personalization, these fields can be displayed:
• Last Standard Process Date
• Projected Date
• Final Process Date
• Person Type
• Assignment Status
• Rehire
• Rehire Reason
• Additional Period of Service Details flexfield
• Additional Period of Service Information flexfield
Configuring the Voluntary Terminate Placement ModuleThis topics provides details about the Voluntary Terminate Placement module.
Menu and Function NamesYou can access this module from the following menus and functions:
User Menu Name Function Name
Contingent Worker Self-Service Voluntary Termination Emp
WorkflowThe workflow details for this module are listed below:
Workflow: HRSSA
Workflow Process Display Name: Termination Process (HR_TERMINATION_JSP_PRC)
Employee or Contingent Worker Termination (HR_EMP_OR_CWK_TERM_JSP_PRC), which is a sub process.
Note: The Termination process uses the sub process Employee or Contingent Worker

Configuring Self-Service Modules 8-53
Termination. The Workflow Attribute "Selected Person Type" drives the decision to switch between displaying the Voluntary Termination page (Selected Person Type = Employee) and the Voluntary Terminate Placement page (Selected Person Type = Contingent Worker).
Configurable Workflow Attributes:
Process Display Name Function Display Name Function Activity Attribute Display Name
Termination Process CWK Termination Page (HR_CWK_TERMINATION_JSP_FCT)
Termination Reason Lookup Codes Employee (TERM_REASON_LOOKUP_CODES_EMP)
Configuring the Termination Reason Lookup Codes Employee Attribute
The Reason field on the Voluntary Terminate Placement page uses the lookup type Leaving Reason (LEAV_REAS), which managers use when they end placement of workers. Values for the Reason field for ending placement that are available in ManagerSelf-Service may not be applicable to the Voluntary Terminate Placement process that contingent workers initiate.
Enterprises can control the values that appear in the Reason field on the Voluntary Terminate Placement page at the workflow level using the function level workflow attribute : TERM_REASON_LOOKUP_CODES_EMP that is delivered with the workflow function:
CWK Termination Page (HR_CWK_TERMINATION_JSP_FCT)
To display specific reasons in the Voluntary Terminate Placement page for contingent workers, the system administrator must enter the lookup codes separated with pipe symbol (|).
Configuring the Change Manager Page in the Voluntary Terminate Placement FlowBy default, when a contingent worker who has direct subordinates requests voluntary termination of placement, Oracle SSHR does not display the Change Manager page. TheBypass Change Manager node attribute of the Branch on Presence of Subordinates V4.0 is set to Yes.
Based on your business requirement, to display the Change Manager, you must set the node attribute value to No:

8-54 Oracle Self-Service Human Resources Deploy Self-Service Capability Guide
Function Node Attribute Node Value
Branch on Presence of Subordinates V4.0 ( HR_BRANCH_ON_SUBORDINATES_FCT)
Bypass Change Manager (BYPASS_CHG_MGR)
No
For information on how to configure workflow attributes, see: Configuring Workflow Attribute Values, page 5-10
Configurable Tips and Instructions
Voluntary Terminate Placement PageSee: Configuring Web Pages, page 6-21
Region Tip Type Message Name
Termination Details Long Message HR_INST_CWK_TERMINATION
The following warning message appears when approvers receive voluntary terminationnotifications:
Region Tip Type Message Name
Notification Details Warning HR_50706_ASSIGN_DIRECTS_MSG
See: Adding Instructions to Web Pages, page 6-35
Configurable Flexfields
Voluntary Termination Page

Configuring Self-Service Modules 8-55
Region Flex Name Flex Code
Termination Details Additional Period of Service Details
PER_PERIODS_OF_SERVICE
Termination Details Additional Period of Service Information
PER_PDS_DEVELOPER_DF
See: Configuring Flexfields, page 6-27
Configurable Profile OptionsNot applicable
Fields Hidden by DefaultThe following fields on the Voluntary Terminate Placement page are hidden by default. Using personalization, these fields can be displayed:
• Person Type
• Additional Period of Service Details flexfield
• Additional Period of Service Information flexfield
Configuring the Reverse Termination ModuleThis topics provides details about the Reverse Termination module.
Menu and Function NamesYou can access this module from the following menus and functions:
User Menu Name Function Name
Manager Self Service Reverse Termination Mgr
WorkflowThe workflow details for this module are listed below:
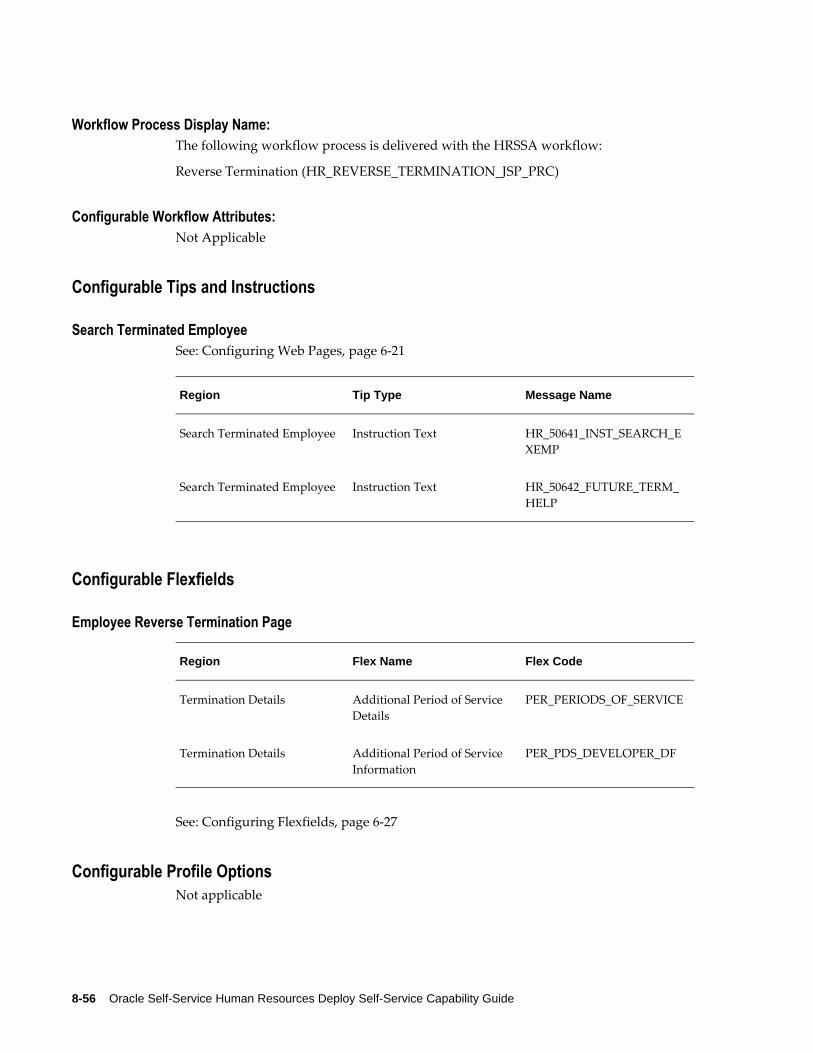
8-56 Oracle Self-Service Human Resources Deploy Self-Service Capability Guide
Workflow Process Display Name: The following workflow process is delivered with the HRSSA workflow:
Reverse Termination (HR_REVERSE_TERMINATION_JSP_PRC)
Configurable Workflow Attributes:Not Applicable
Configurable Tips and Instructions
Search Terminated EmployeeSee: Configuring Web Pages, page 6-21
Region Tip Type Message Name
Search Terminated Employee Instruction Text HR_50641_INST_SEARCH_EXEMP
Search Terminated Employee Instruction Text HR_50642_FUTURE_TERM_HELP
Configurable Flexfields
Employee Reverse Termination Page
Region Flex Name Flex Code
Termination Details Additional Period of Service Details
PER_PERIODS_OF_SERVICE
Termination Details Additional Period of Service Information
PER_PDS_DEVELOPER_DF
See: Configuring Flexfields, page 6-27
Configurable Profile OptionsNot applicable

Configuring Self-Service Modules 8-57
Configurable Tips and InstructionsReview Page
Depending on the reverse termination action that managers process, any one of the following message appears on the Review page:
Message Name: HR_50649_REVERSE_TERM_REVIEW
Message token: &REVIEW_MESSAGE: Application adds the following messages dynamically based on the context.
Region Tip Type Default Message Text
Review Message Reverse termination action clears the termination details and reinstates the assignment to the status prior to the termination. Person Type changes from Ex-Employee toEmployee.
Review Message Reverse termination action clears the termination details and reinstates the assignment to the status prior to the termination. Person Type changes from Ex-Contingent Worker to Contingent Worker.
Review Message Reverse termination action clears the termination details and reinstates the assignment to the status prior to the termination.
Fields Hidden by DefaultIn the search results table of the Search Terminated Employee page, the following fields are hidden by default.
• Rehire Recommendation
• Rehire Reason
• Job

8-58 Oracle Self-Service Human Resources Deploy Self-Service Capability Guide
• Grade
Using Personalization you can display the hidden fields, if required.
Configuring the End Placement ModuleThis topic provides information on configuring the End Placement module.
Menu and Function NamesNot applicable
WorkflowThe workflow details for this module are listed below:
Workflow Process Display Name:
Process Display Name Usage
Termination Process Main Process
Employee or Contingent Worker Termination Sub Process
The Termination process uses the sub process Employee or Contingent Worker Termination. The Workflow Attribute "Selected Person Type" drives the decision to switch between displaying the Termination page (Selected Person Type = Employee) and the End Placement page (Selected Person Type = Contingent Worker).
Configurable Workflow Attributes:Not applicable.
Configurable Tips and Instructions
Termination Page
Region Tip Type Message Name
Termination Details Long Message HR_INST_CWK_TERMINATION
See: Adding Instructions to Web Pages, page 6-35
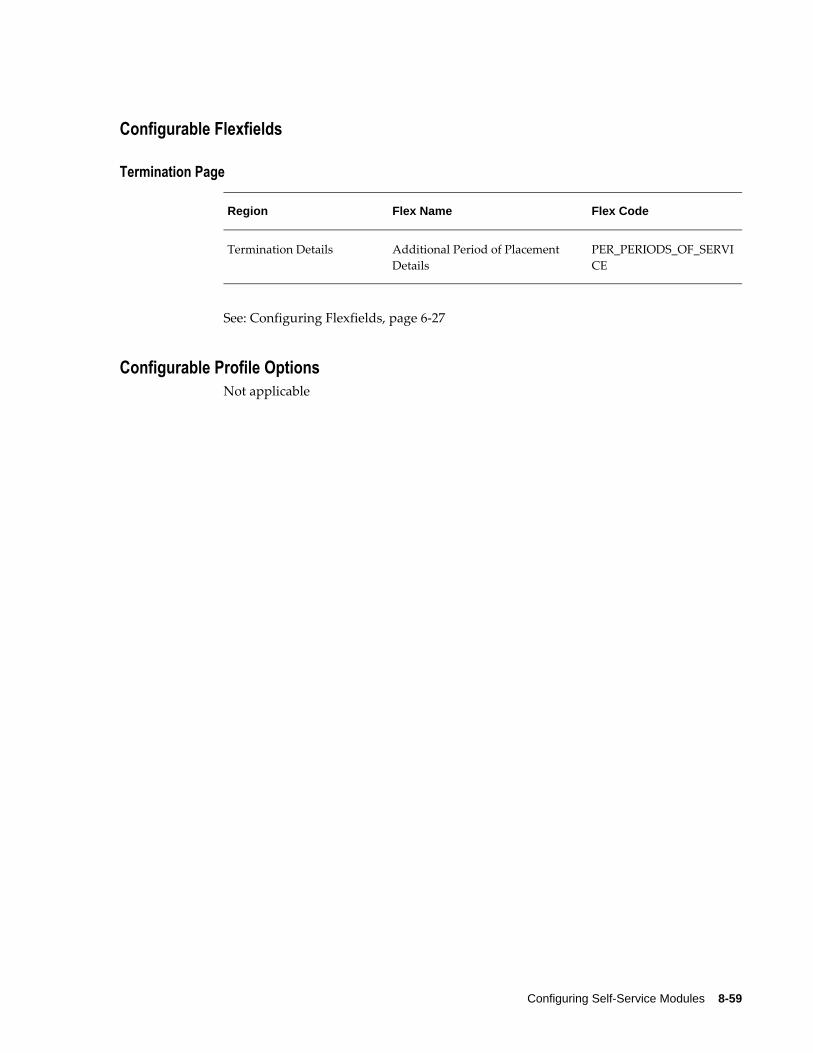
Configuring Self-Service Modules 8-59
Configurable Flexfields
Termination Page
Region Flex Name Flex Code
Termination Details Additional Period of Placement Details
PER_PERIODS_OF_SERVICE
See: Configuring Flexfields, page 6-27
Configurable Profile OptionsNot applicable

8-60 Oracle Self-Service Human Resources Deploy Self-Service Capability Guide
Document Categories and Types
Overview of Document Categories and TypesThe Documents of Record functionality enables you to create and maintain documents, such as medical certificates, visas, and licenses, in Oracle HRMS. These documents belong to document categories (for example, visa information), subcategories (for example, work visa or business visa), and types (for example, US H1, US H2). The following table provides additional examples:
Examples of Document Categories, Subcategories, and Types
Document Category Document Subcategory Document Type
Absence Information Sickness Doctor Certificate
Maternity Hospital Certificate
Personal Information General Birth Certificate
General Driver's License
Educational Information Degree Certificate Bachelor of Science
Degree Certificate Master of Science
Oracle provides some standard document types. However you can also create your own document categories, subcategories, and types to suit the particular requirements of your enterprise.
See: Creating Document Categories, Subcategories, and Types, page 8-60
See also: Documents of Record, page 9-23 for information on using the Documents of Record function in SSHR.
Creating Document Categories, Subcategories, and TypesAlthough Oracle provides several document categories, subcategories, and types for usewith the Documents of Record functionality, you may need to create new objects to match your specific business requirements. Use the following process to create these objects.
Configuring Self-Service Modules 8-61
1. To create a new document category, use the Application Utilities Lookups window and the DOCUMENT_CATEGORY lookup type. Enter the name of the new document category in the lookup code region, for example, Professional Information.
See: Adding Lookup Types and Values, Oracle HRMS Configuring. Reporting, and System Administration Guide
2. To create a new document subcategory, use the User Types and Statuses window:
1. Query the DOCUMENT_CATEGORY lookup in the Name field.
2. Enter the document category, for example, Professional Information, in the System Type column.
3. Enter the required subcategories in the Code column, for example, Diploma, Certificate, Award.
See: Creating User Types and Statuses, Oracle HRMS Configuring, Reporting, and System Administration Guide
3. To create new document types, run the Register Document Types (EITs) process.
See: Running the Register Document Types Process, page 8-61
4. When you have created your document types, you must associate them with a responsibility in the Information Types Security window (in the same way as you associate Extra Information Types with a responsibility).
See: Setting Up Extra Information Types for a Responsibility, Oracle HRMS Configuring, Reporting, and System Administration Guide
For more information on document categories and types, see: Overview of Document Categories and Types, page 8-60
Running the Register Document Types (EITs) ProcessUse this process to create new document types for the Documents of Record functionality.
See: Overview of Document Categories and Types, page 8-60
Run this process from the Submit Requests window.
To run the Register Document Types (EITs) process:1. In the Name field, select Register Document Types (EITs).
The Parameters window appears.

8-62 Oracle Self-Service Human Resources Deploy Self-Service Capability Guide
2. In the Document Type field, enter a unique name for the new document type.
Note: When the process runs, the application creates an internal name for the document type. The internal name is the same as the document type name and does not change, even if you subsequently change the document type name, for example, for translation. The internal name is used as the flexfield context.
3. In the Multiple Rows field, specify whether multiple occurrences of the same document type can exist. For example, for a birth certificate, the value would be No.
4. Select the country to which the document is applicable. You can leave the Country Code field blank to create a globally applicable document, for example, a passport document.
5. Enter the Category Code (mandatory) and Sub Category Code (optional).
See: Overview of Document Categories and Types, page 8-60
6. Specify whether authorization is required for the new document type.
7. Click Submit.

Configuring Self-Service Modules 8-63
Configuring Professional Details Modules
Configuring Education and QualificationsThis topic provides details about the Education and Qualifications module.
Important: Personalizing Table Header Prompts for Education and Qualifications
With the introduction of version 11.i.10 of the Oracle Applications Framework (OAF), Oracle has changed the definition of some elements in the Education and Qualifications Review page. If you have previously personalized this page by changing the table header prompts for the tables within the Education and Qualifications Review page, Oracle recommends that you check the personalizations and make the changes again if necessary.
See: Configuring Web Pages, page 6-21
Menu and Function NamesThis module can be accessed from the following menus and functions:
User Menu Name Function Name
Manager Self Service Education and Qualifications Mgr
Employee Self Service Education and Qualifications
See: Defining Menus for SSHR, page 4-10
WorkflowThe workflow details for this module are listed below:
Workflow Process Display Name: Education and Qualifications
Configurable Workflow Attributes:Not applicable
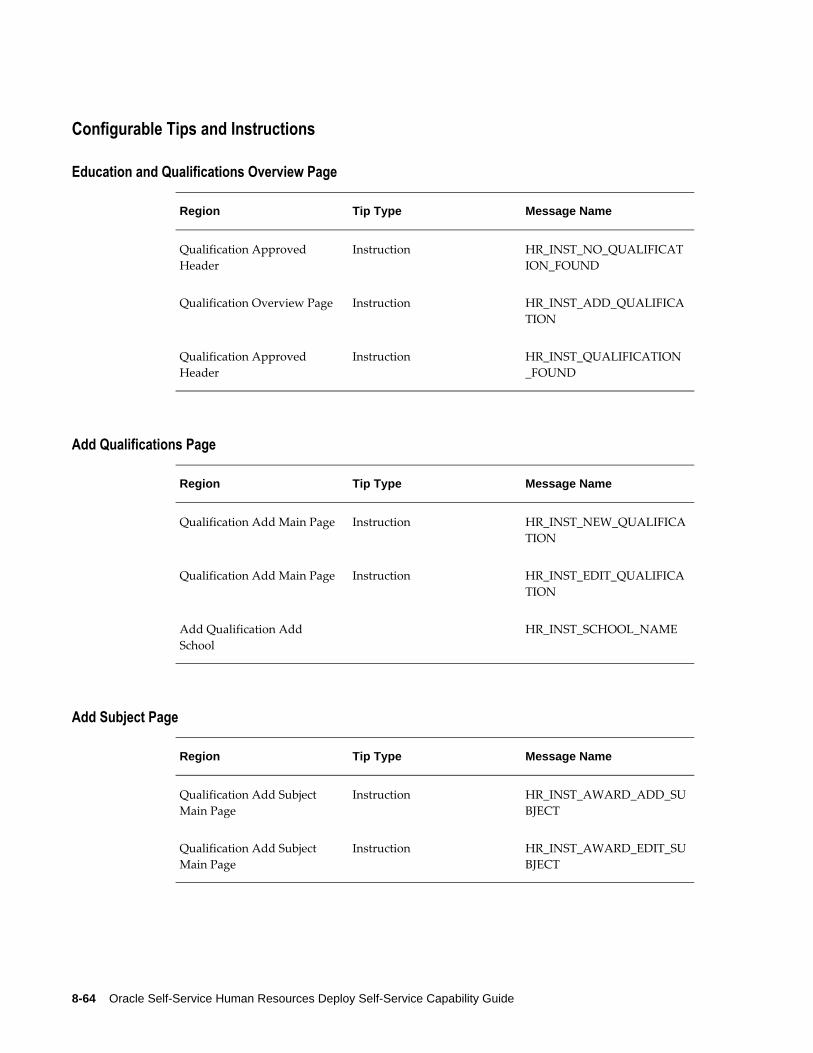
8-64 Oracle Self-Service Human Resources Deploy Self-Service Capability Guide
Configurable Tips and Instructions
Education and Qualifications Overview Page
Region Tip Type Message Name
Qualification Approved Header
Instruction HR_INST_NO_QUALIFICATION_FOUND
Qualification Overview Page Instruction HR_INST_ADD_QUALIFICATION
Qualification Approved Header
Instruction HR_INST_QUALIFICATION_FOUND
Add Qualifications Page
Region Tip Type Message Name
Qualification Add Main Page Instruction HR_INST_NEW_QUALIFICATION
Qualification Add Main Page Instruction HR_INST_EDIT_QUALIFICATION
Add Qualification Add School
HR_INST_SCHOOL_NAME
Add Subject Page
Region Tip Type Message Name
Qualification Add Subject Main Page
Instruction HR_INST_AWARD_ADD_SUBJECT
Qualification Add Subject Main Page
Instruction HR_INST_AWARD_EDIT_SUBJECT
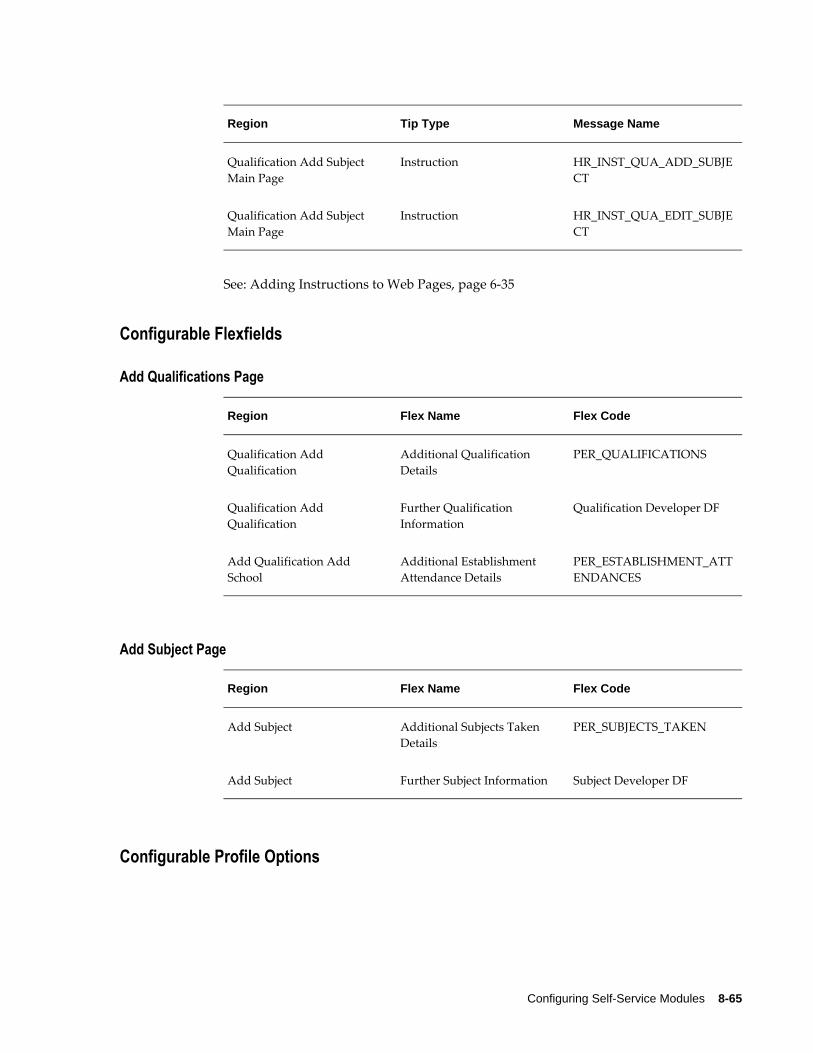
Configuring Self-Service Modules 8-65
Region Tip Type Message Name
Qualification Add Subject Main Page
Instruction HR_INST_QUA_ADD_SUBJECT
Qualification Add Subject Main Page
Instruction HR_INST_QUA_EDIT_SUBJECT
See: Adding Instructions to Web Pages, page 6-35
Configurable Flexfields
Add Qualifications Page
Region Flex Name Flex Code
Qualification Add Qualification
Additional Qualification Details
PER_QUALIFICATIONS
Qualification Add Qualification
Further Qualification Information
Qualification Developer DF
Add Qualification Add School
Additional Establishment Attendance Details
PER_ESTABLISHMENT_ATTENDANCES
Add Subject Page
Region Flex Name Flex Code
Add Subject Additional Subjects Taken Details
PER_SUBJECTS_TAKEN
Add Subject Further Subject Information Subject Developer DF
Configurable Profile Options

8-66 Oracle Self-Service Human Resources Deploy Self-Service Capability Guide
Profile Configurable Levels Values Default
HR: Free Text School Name Allowed in SelfService
All Null, Yes/No Null
The following profile option controls a user's ability to enter school names
HR: Free Text School Name Allowed in Self Service
Users can add a school names either in free text, or they can select the school name froma list of values. You can prevent users from entering the school name in free text and only allow them to select the school name from a list of values, by setting the profile option HR: Free Text School Name Allowed in Self Service. If this is set to Yes or Null (the default), then free form entry of the school name will be possible. If you set this profile option to No, the list of values will be used to validate the entry of the school name.
Configuring Other Professional Qualifications This topic provides details about the Other Professional Qualifications module.
Menu and Function NamesThis module can be accessed from the following menus and functions:
User Menu Name Function Name
Manager Self Service Other Professional Qualifications Mgr
Employee Self Service Other Professional Qualifications
See: Defining Menus for SSHR, page 4-10
WorkflowThe workflow details for this module are listed below:
Workflow Process Display Name: Other Professional Qualifications
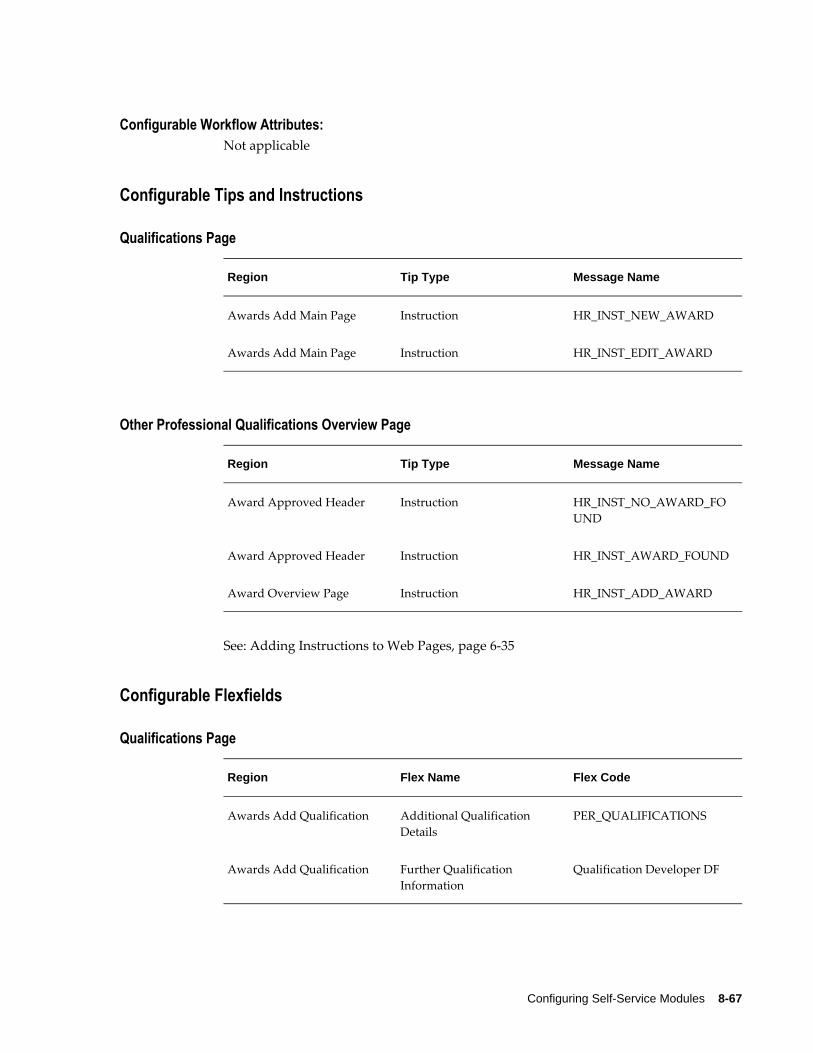
Configuring Self-Service Modules 8-67
Configurable Workflow Attributes:Not applicable
Configurable Tips and Instructions
Qualifications Page
Region Tip Type Message Name
Awards Add Main Page Instruction HR_INST_NEW_AWARD
Awards Add Main Page Instruction HR_INST_EDIT_AWARD
Other Professional Qualifications Overview Page
Region Tip Type Message Name
Award Approved Header Instruction HR_INST_NO_AWARD_FOUND
Award Approved Header Instruction HR_INST_AWARD_FOUND
Award Overview Page Instruction HR_INST_ADD_AWARD
See: Adding Instructions to Web Pages, page 6-35
Configurable Flexfields
Qualifications Page
Region Flex Name Flex Code
Awards Add Qualification Additional Qualification Details
PER_QUALIFICATIONS
Awards Add Qualification Further Qualification Information
Qualification Developer DF

8-68 Oracle Self-Service Human Resources Deploy Self-Service Capability Guide
Add Subject Page
Region Flex Name Flex Code
Add Subject Additional Subjects Taken Details
PER_SUBJECTS_TAKEN
Add Subject Further Subject Information Subject Developer DF
Configurable Profile OptionsNot applicable
Configuring Competency ProfileThis topic provides details about the Competency Profile module.
Competency Profile ModuleThe Competency Profile module comprises the following pages:
Competency Overview /oracle/apps/per/selfservice/competency/profile/webui/OverviewPG
Add Competencies /oracle/apps/per/selfservice/competency/profile/webui/AddCompsPG
Correct Competencies /oracle/apps/per/selfservice/competency/profile/webui/CorrectCompsPG
Enter New Levels /oracle/apps/per/selfservice/competency/profile/webui/NewLevelsPG
Search and Select: Competencies /oracle/apps/per/selfservice/competency/profile/webui/SearchPG
Review /oracle/apps/per/selfservice/competency/profile/webui/ReviewPG
Confirmation /oracle/apps/per/selfservice/competency/profile/webui/ConfirmPG

Configuring Self-Service Modules 8-69
Menu and Function NamesUsers can access this module from the following menus and functions:
User Menu Name Function Name
Manager Self Service > Professional Details Competency Profile (HR_COMPETENCE_PROFILE_SS)
Employee Self Service > Professional Details Competency Profile (HR_COMPETENCE_PROFILE_SS)
See: Defining Menus for SSHR, page 4-10
WorkflowThe workflow details for this module are listed below:
Workflow Process Display Name: Self Service Generic Approval Process
Configurable Workflow Attributes:Not applicable
Configurable Tips and Instructions
Review Competencies Page
Region Tip Type Message Name
Additional Information Instruction PQH_SS_REVIEW_ADDL_INFO_INT
Additional Information Instruction PQH_SS_REVIEW_ATTACH_INT
Confirmation Page

8-70 Oracle Self-Service Human Resources Deploy Self-Service Capability Guide
Region Tip Type Message Name
Instruction HR_CONFIRM_SMT_4_APPR_SS
Instruction HR_CONFIRM_APPLD_CHGS_SS
See: Adding Instructions to a Web Page, page 6-35
Configurable Flexfields
Competency Overview Page
Region Flex Name Flex Code
Person Summary Further Person Information Person Developer DF
Person Summary Additional Personal Details PER_PEOPLE
Proposed Changes Table Add'l Competence Element Det's
PER_COMPETENCE_ELEMENTS
Current Competencies Table Add'l Competence Element Det's
PER_COMPETENCE_ELEMENTS
History Table Add'l Competence Element Det's
PER_COMPETENCE_ELEMENTS
Add Competencies Page
Region Flex Name Flex Code
Person Summary Further Person Information Person Developer DF
Person Summary Additional Personal Details PER_PEOPLE
New Competencies Table Add'l Competence Element Det's
PER_COMPETENCE_ELEMENTS
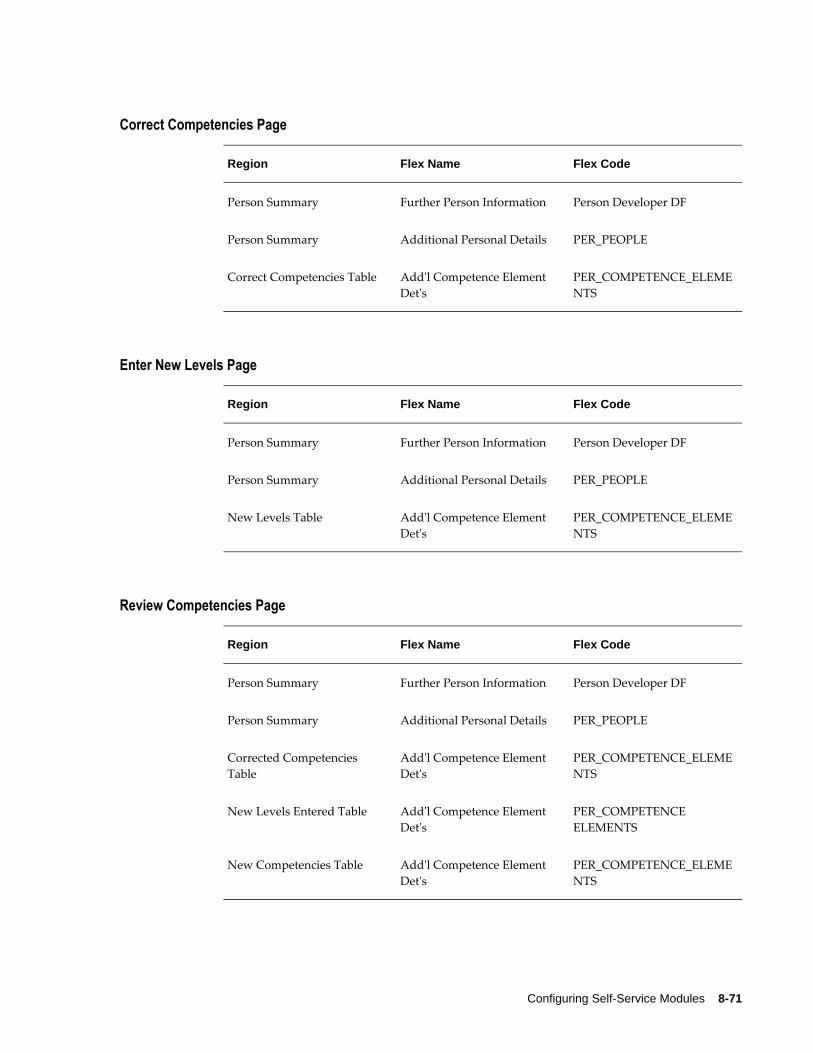
Configuring Self-Service Modules 8-71
Correct Competencies Page
Region Flex Name Flex Code
Person Summary Further Person Information Person Developer DF
Person Summary Additional Personal Details PER_PEOPLE
Correct Competencies Table Add'l Competence Element Det's
PER_COMPETENCE_ELEMENTS
Enter New Levels Page
Region Flex Name Flex Code
Person Summary Further Person Information Person Developer DF
Person Summary Additional Personal Details PER_PEOPLE
New Levels Table Add'l Competence Element Det's
PER_COMPETENCE_ELEMENTS
Review Competencies Page
Region Flex Name Flex Code
Person Summary Further Person Information Person Developer DF
Person Summary Additional Personal Details PER_PEOPLE
Corrected Competencies Table
Add'l Competence Element Det's
PER_COMPETENCE_ELEMENTS
New Levels Entered Table Add'l Competence Element Det's
PER_COMPETENCE ELEMENTS
New Competencies Table Add'l Competence Element Det's
PER_COMPETENCE_ELEMENTS
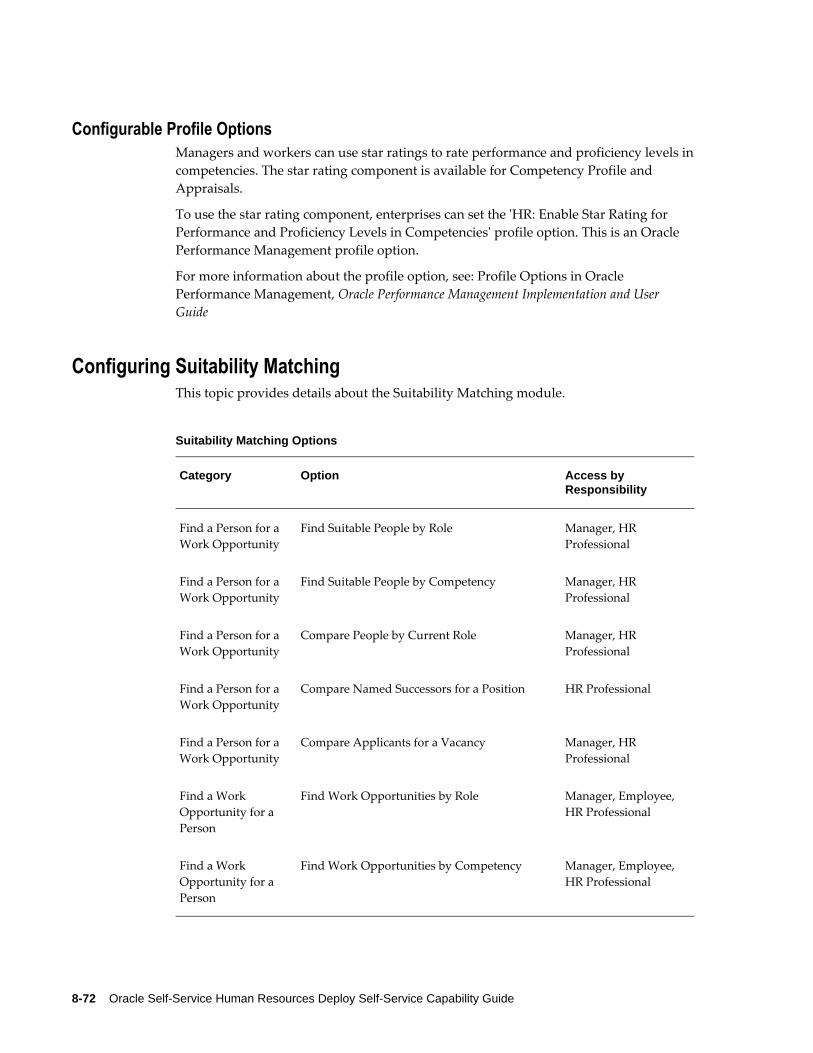
8-72 Oracle Self-Service Human Resources Deploy Self-Service Capability Guide
Configurable Profile OptionsManagers and workers can use star ratings to rate performance and proficiency levels incompetencies. The star rating component is available for Competency Profile and Appraisals.
To use the star rating component, enterprises can set the 'HR: Enable Star Rating for Performance and Proficiency Levels in Competencies' profile option. This is an Oracle Performance Management profile option.
For more information about the profile option, see: Profile Options in Oracle Performance Management, Oracle Performance Management Implementation and User Guide
Configuring Suitability MatchingThis topic provides details about the Suitability Matching module.
Suitability Matching Options
Category Option Access by Responsibility
Find a Person for a Work Opportunity
Find Suitable People by Role Manager, HR Professional
Find a Person for a Work Opportunity
Find Suitable People by Competency Manager, HR Professional
Find a Person for a Work Opportunity
Compare People by Current Role Manager, HR Professional
Find a Person for a Work Opportunity
Compare Named Successors for a Position HR Professional
Find a Person for a Work Opportunity
Compare Applicants for a Vacancy Manager, HR Professional
Find a Work Opportunity for a Person
Find Work Opportunities by Role Manager, Employee, HR Professional
Find a Work Opportunity for a Person
Find Work Opportunities by Competency Manager, Employee, HR Professional

Configuring Self-Service Modules 8-73
Category Option Access by Responsibility
Find a Work Opportunity for a Person
Compare Pending Applications Manager, Employee, HR Professional
Find a Work Opportunity for a Person
Compare Succession Options HR Professional
Find a Work Opportunity for a Person
Compare Current Assignments Manager, Employee, HR Professional
Menu and Function NamesSuitability Matching is accessible through three menus and corresponding functions as described in the following table.
Menu and Function Names
User Menu Name Function Name
Manager Self-Service (LINE_MANAGER_ACCESS_V4.0)
Suitability Matching Mgr (HR_SUITABILITY_MATCH_MGR_SS)
Employee Self-Service (EMPLOYEE_DIRECT_ACCESS_V4.0)
Suitability Matching (HR_SUITABILITY_MATCH_SS)
Contingent Worker Self-Service (HR_CWK_DIRECT_ACCESS)
Suitability Matching (HR_SUITABILITY_MATCH_SS)
HR Professional (HR_PROF_SELF_SERVICE_V4.0)
Suitability Matching Hr (HR_SUITABILITY_MATCH_HR_SS)
WorkflowSuitability Matching uses no configurable workflow processes.

8-74 Oracle Self-Service Human Resources Deploy Self-Service Capability Guide
Tips and InstructionsYou can configure all the following tips and instructions directly from the Suitability Matching pages, using the "Personalize..." links.
The following table describes the tips and instructions.
Tips and Instructions
Region Attribute Name Message Name
AddCompetenciesPG SelectCompInst HR_INST_ADD_COMP_TO_LIST
CompGapsPG SMCompGapsInst HR_INST_COMP_GAPS_SS
ComparePeopleListPG PersonListInst HR_INST_PERSON_LIST
CompareSuccessorsListPG PersonListInst HR_INST_PERSON_LIST
CurrentAssignmentsPG CurrentAssnInst HR_INST_ASSIGNMENT_LIST
GraphByCompetencePG GraphCompInst HR_INST_GRAPH_COMP
GraphByPersonPG GraphPersonInst HR_INST_GRAPH_PERSON
GraphByWorkOppPG GraphWorkOppInst HR_INST_GRAPH_WORKOPP
PersonCompetenciesPG PersonCompInst HR_INST_PERSON_SELECT_COMP
PersonListPG PersonListInst HR_INST_PERSON_LIST
RefineSearchPG RefineSearchInst HR_INST_REFINE_SEARCH
SMManagerOptionsPG ManagerOppInst HR_INST_SUITMATCH_LMDA_OPTIONS
SMManagerOptionsPG WorkOppInst HR_INST_WORK_OPP_OPTIONS

Configuring Self-Service Modules 8-75
Region Attribute Name Message Name
SMManagerOptionsPG PersonOppInst HR_INST_PERSON_OPP_OPTIONS
SMOptionsPG HROptionsInst HR_INST_SUITMATCH_LMDA_OPTIONS
SMOptionsPG WorkOppInst HR_INST_WORK_OPP_OPTIONS
SMOptionsPG PersonOppInst HR_INST_PERSON_OPP_OPTIONS
SMPersonOptionsPG PersonPageOppInst HR_INST_SUITMATCH_EDA_OPTIONS
SMTrainingActivitiesPG SMTrainActInst HR_INST_TRAIN_ACT_SS
SelectCompetenciesPG SelectCompInst HR_INST_SELECT_COMP
SelectMultiRolePG SelectRoleInst HR_INST_MULTI_SELECT_ROLE
SelectRolePG SelectRoleInst HR_INST_SELECT_ROLE
SelectRolePG CompareByRoleInst HR_INST_COMPARE_PEOPLE_ROLE
SelectRolePG SelectPositionInst HR_INST_SELECT_POSITION
SelectRolePG SelectVacancyInst HR_INST_SELECT_VACANCY
SuccessionOptionsPG SuccOptionsInst HR_INST_SUCCESSION_OPTIONS
SuitableWorkOppListPG WorkOppListInst HR_INST_SUITABLE_WORKOPP_LIST
VacancyListPG VacancyListInst HR_INST_VACANCIES_LIST
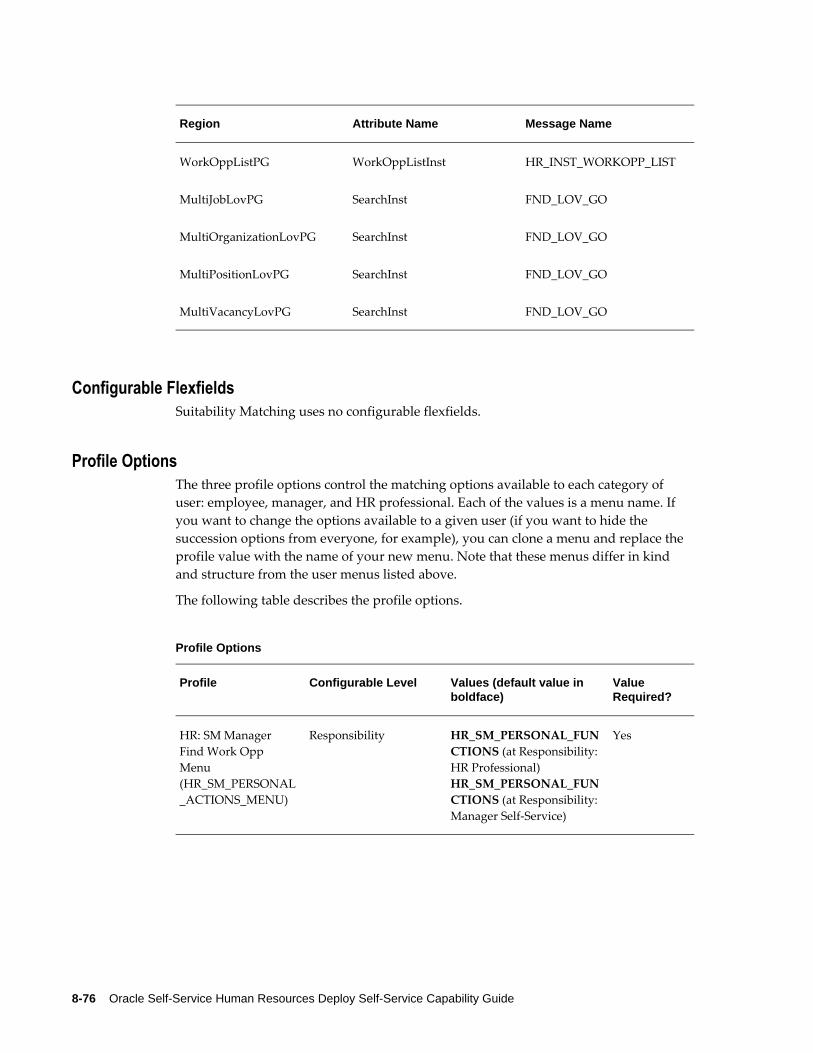
8-76 Oracle Self-Service Human Resources Deploy Self-Service Capability Guide
Region Attribute Name Message Name
WorkOppListPG WorkOppListInst HR_INST_WORKOPP_LIST
MultiJobLovPG SearchInst FND_LOV_GO
MultiOrganizationLovPG SearchInst FND_LOV_GO
MultiPositionLovPG SearchInst FND_LOV_GO
MultiVacancyLovPG SearchInst FND_LOV_GO
Configurable FlexfieldsSuitability Matching uses no configurable flexfields.
Profile OptionsThe three profile options control the matching options available to each category of user: employee, manager, and HR professional. Each of the values is a menu name. If you want to change the options available to a given user (if you want to hide the succession options from everyone, for example), you can clone a menu and replace the profile value with the name of your new menu. Note that these menus differ in kind and structure from the user menus listed above.
The following table describes the profile options.
Profile Options
Profile Configurable Level Values (default value in boldface)
Value Required?
HR: SM Manager Find Work Opp Menu (HR_SM_PERSONAL_ACTIONS_MENU)
Responsibility HR_SM_PERSONAL_FUNCTIONS (at Responsibility:HR Professional)HR_SM_PERSONAL_FUNCTIONS (at Responsibility:Manager Self-Service)
Yes

Configuring Self-Service Modules 8-77
Profile Configurable Level Values (default value in boldface)
Value Required?
HR: SM Manager Find Person Menu (HR_SM_MANAGER_ACTIONS_MENU)
Responsibility HR_SM_MANAGER_FUNCTIONS (at responsibility:HR Professional)HR_SM_MANAGER_FUNCTIONS (at responsibility: Manager Self-Service)
Yes
HR: SM Employee Find Work Opp Menu (HR_SM_EMP_PERSONAL_ACTIONS_MENU)
Responsibility HR_SM_EMP_PERSONAL_FUNCTIONS (at responsibility: Employee Self-Service)
Yes
Configuring the Work Preferences ModuleThis topic provides information on configuring the Work Preferences function.
Menu and Function NamesThis module can be accessed from the following menus and functions:
User Menu Name Function Name
Manager Self Service Work Preferences Mgr
Employee Self Service Work Preferences
See: Defining Menus for SSHR, page 4-10
WorkflowNot applicable
Configurable Tips and Instructions
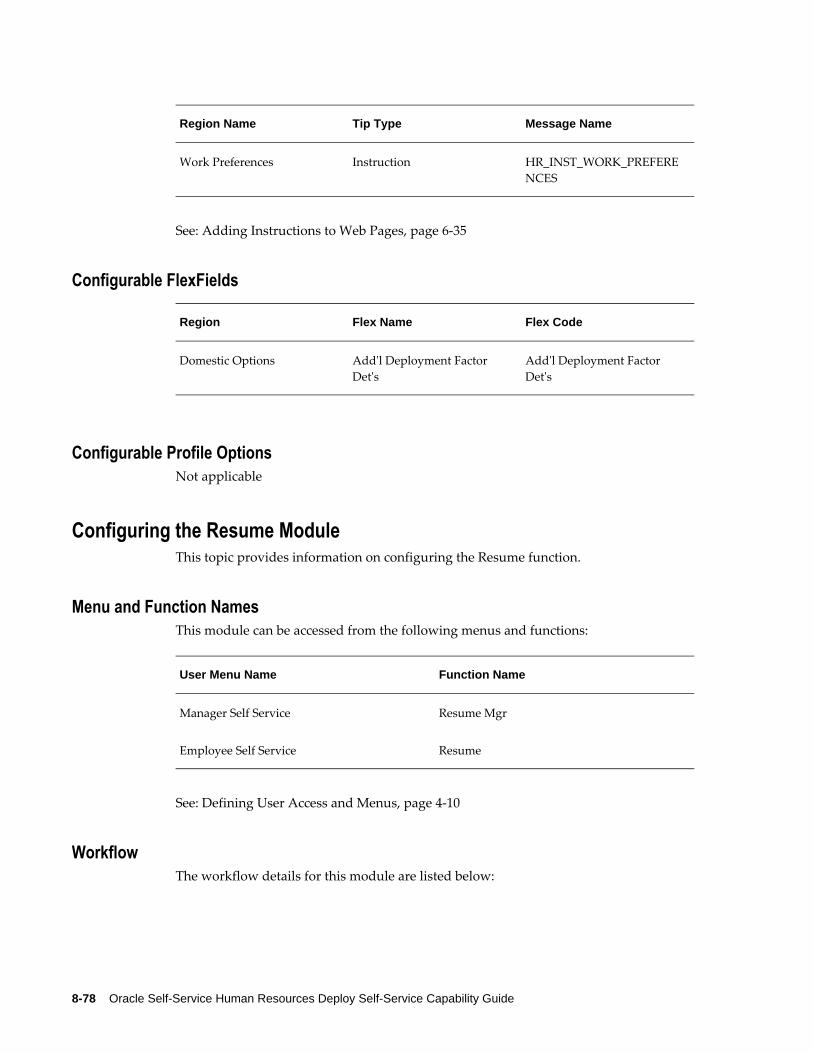
8-78 Oracle Self-Service Human Resources Deploy Self-Service Capability Guide
Region Name Tip Type Message Name
Work Preferences Instruction HR_INST_WORK_PREFERENCES
See: Adding Instructions to Web Pages, page 6-35
Configurable FlexFields
Region Flex Name Flex Code
Domestic Options Add'l Deployment Factor Det's
Add'l Deployment Factor Det's
Configurable Profile OptionsNot applicable
Configuring the Resume ModuleThis topic provides information on configuring the Resume function.
Menu and Function NamesThis module can be accessed from the following menus and functions:
User Menu Name Function Name
Manager Self Service Resume Mgr
Employee Self Service Resume
See: Defining User Access and Menus, page 4-10
WorkflowThe workflow details for this module are listed below:

Configuring Self-Service Modules 8-79
Workflow Process Display Name: Not applicable
Configurable Workflow Attributes:Not applicable
Configurable Tips and Instructions
Region Name Tip Type Message Name
Resume Instruction HR_INST_TEXT_RESUME
See: Adding Instructions to Web Pages, page 6-35
Configurable FlexFieldsNot applicable
Configurable Profile OptionsNot applicable
Configuring the Tenure Status ModuleThis topic provides information on configuring the Tenure Status function.
Menu and Function NamesThis module can be accessed from the following menus and functions:
User Menu Name Function Name
Manager Professional Details Tenure Status
Professional Details Tenure Status Overview
Employee Self Service Tenure Status
Manager Self Service Tenure Status

8-80 Oracle Self-Service Human Resources Deploy Self-Service Capability Guide
See: Defining Menus for SSHR, page 4-10
WorkflowThe workflow details for this module are listed below:
Workflow Process Display Name: Tenure Status
Configurable Workflow Attributes:Not applicable
Configurable Tips and InstructionsNot applicable
Configurable Flexfields
Region Attribute Name FlexField Name
Tenure Status Flex Descriptive Flexfield Extra Person Info DDF
See: Configuring Flexfields, page 6-27
Configurable Profile OptionsNot applicable
Configuring the Academic Rank ModuleThis topic provides information on configuring the Academic Rank module.
Menu and Function NamesThis module can be accessed from the following menus and functions:
User Menu Name Function Name
Employee Self Service Academic Rank
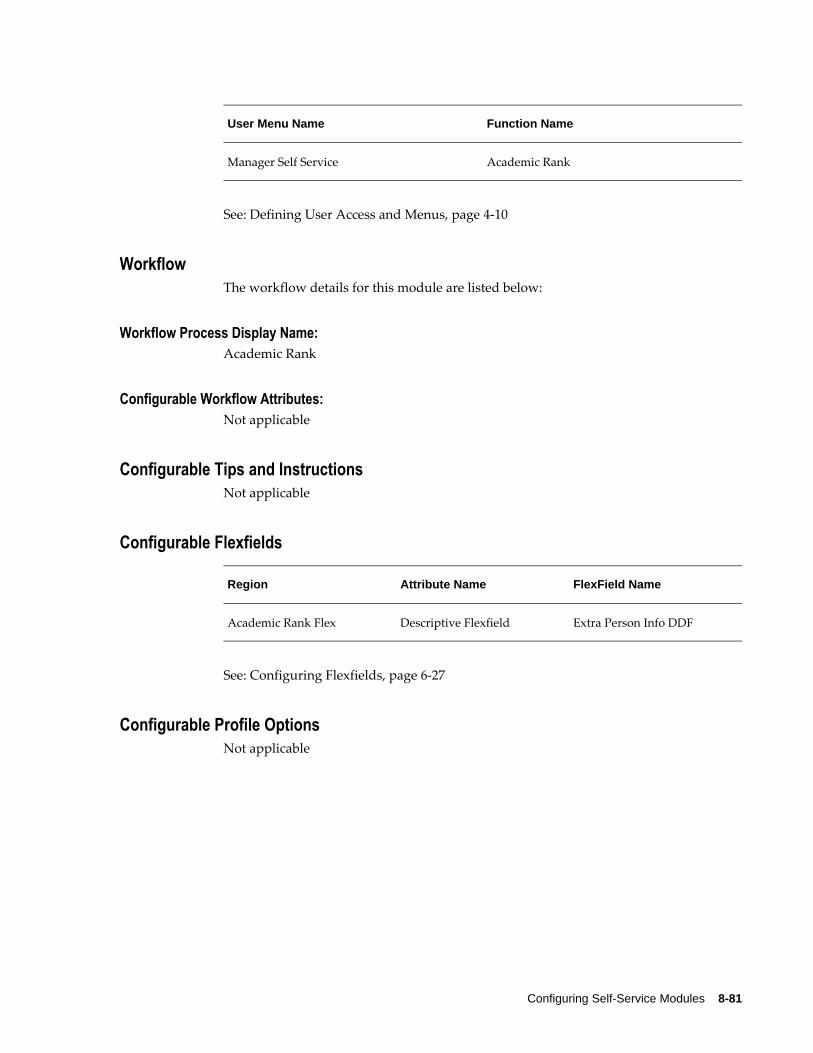
Configuring Self-Service Modules 8-81
User Menu Name Function Name
Manager Self Service Academic Rank
See: Defining User Access and Menus, page 4-10
WorkflowThe workflow details for this module are listed below:
Workflow Process Display Name: Academic Rank
Configurable Workflow Attributes:Not applicable
Configurable Tips and InstructionsNot applicable
Configurable Flexfields
Region Attribute Name FlexField Name
Academic Rank Flex Descriptive Flexfield Extra Person Info DDF
See: Configuring Flexfields, page 6-27
Configurable Profile OptionsNot applicable

8-82 Oracle Self-Service Human Resources Deploy Self-Service Capability Guide
Configuring Recruitment Modules
Configuring Applicant Hire and Rehire, Hire or Placement, Place Contingent Worker Processes
These processes provide you with the ability to hire employees or bring contingent workers into your enterprise, but if you want to configure them to fit your particular business needs, you can chain any of the following modules into the process:
• Personal Information (including basic details, address, and phone numbers)
• Assignment
• Employee or Contingent Worker Pay
• Change Manager
• SIT
• EIT
• Other Employment Information
• Work Schedule (not applicable to Place Contingent Worker)
When creating a chained process, the Hire Details, Applicant Search, or Place Contingent Worker page must be the first page, followed by the Personal Information page. Then you can add the Person EIT, Assignment EIT, or the Assignment pages. Following this, any of the remaining pages can be included.
The following table gives a list of the delivered chained processes and what modules are included in them.
Recruitment Chained Processes:
Chained Process Contains the following modules:
Hire or Placement Personal Information, Assignment, Employee or Contingent Worker Pay, Change Manager
Contingent Worker Placement Personal Information, Assignment, Employee or Contingent Worker Pay, Change Manager

Configuring Self-Service Modules 8-83
Chained Process Contains the following modules:
French Hire Personal Information, Assignment, Other Employment Information, Work Schedule, Assignment EIT, Employee or Contingent Worker Pay
Note: These processes are delivered with function level personalizations. If you make a copy either of them in order to make your own changes you will lose these delivered personalizations.
See: Function-level Personalizations, page 6-8
Menu and Function NamesThese processes can be accessed from the following menus and functions:
User Menu Name Function Name
Manager Self Service Hire
Manager Self Service Applicant Hire and Rehire
Manager Self Service Contingent Worker Placement
Manager Self Service French Hire
Manager Self Service French Applicant Hire
See: Defining User Access and Menus, page 4-10
WorkflowThe workflow details for this module are listed below:
Workflow Process Display Name: Hire or Placement
French Hire
Configurable Workflow Attributes:Refer to the individual topics on each of the modules included in your process for

8-84 Oracle Self-Service Human Resources Deploy Self-Service Capability Guide
information on what configurable workflow attributes are available.
Configurable Tips and Instructions
Search Hire Applicant Page
Region Tip Type Message Name
Applicant List Long Message HR_GENERIC_PENDING_INST_SS
Applicant Entry Instruction HR_INST_SEARCH_HIRE_APPLICANT
Applicant Entry Instruction HR_INST_SEARCH_APPLICANT
Applicant Entry Instruction HR_INST_APPLICANT_HIRE
See: Adding Instructions to Web Pages, page 6-35
Configurable FlexFields
Region Flex Name Flex Code
Basic Detail Update Name Entry
hrpersondevdfflex Person Developer DF
Basic Detail Update Other Entry
hrpersondevdfflex Person Developer DF
Basic Detail Update Other Entry
Add Per Details Flexfield PER_PEOPLE
NewHire Main Address hraddressflex Address Structure
NewHire Main Address hraddtladdressflex PER_ADDRESSES
Configurable Profile Options
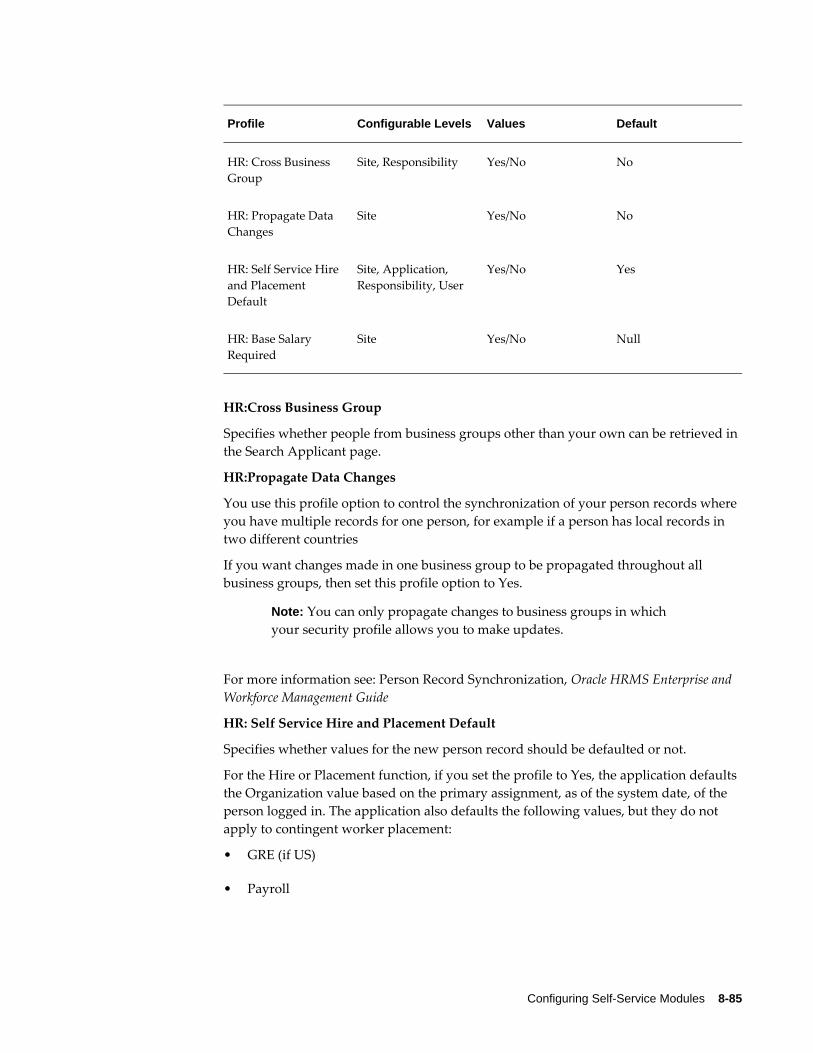
Configuring Self-Service Modules 8-85
Profile Configurable Levels Values Default
HR: Cross Business Group
Site, Responsibility Yes/No No
HR: Propagate Data Changes
Site Yes/No No
HR: Self Service Hire and Placement Default
Site, Application, Responsibility, User
Yes/No Yes
HR: Base Salary Required
Site Yes/No Null
HR:Cross Business Group
Specifies whether people from business groups other than your own can be retrieved in the Search Applicant page.
HR:Propagate Data Changes
You use this profile option to control the synchronization of your person records where you have multiple records for one person, for example if a person has local records in two different countries
If you want changes made in one business group to be propagated throughout all business groups, then set this profile option to Yes.
Note: You can only propagate changes to business groups in which your security profile allows you to make updates.
For more information see: Person Record Synchronization, Oracle HRMS Enterprise and Workforce Management Guide
HR: Self Service Hire and Placement Default
Specifies whether values for the new person record should be defaulted or not.
For the Hire or Placement function, if you set the profile to Yes, the application defaults the Organization value based on the primary assignment, as of the system date, of the person logged in. The application also defaults the following values, but they do not apply to contingent worker placement:
• GRE (if US)
• Payroll

8-86 Oracle Self-Service Human Resources Deploy Self-Service Capability Guide
• Salary Basis
The supervisor for the new person defaults to the person logged in.
For both Hire and Applicant Hire and Rehire, this profile also controls which person type is defaulted.
• If the profile is set to No and there is only one person type available, then this person type is defaulted. If there is more than one available then the field remains blank and you can select a value.
• If the profile is set to Yes and there is only one person type available, then this person type is defaulted. If there is more than one available then the field displays the person type set as the default for the system person type of Employee.
HR: Base Salary Required
See: Pay Rate, page 9-65.
For more information see: User Profiles, Oracle HRMS Configuring, Reporting, and SystemAdministration Guide
Further Configuration StepsWarning: Hire or Placement functionality uses code 'NEWH' under lookup_type 'PROPOSAL_REASON' to render the PayRate page. Do not configure this code, either by disabling the code or by disabling the localization the Hire or Placement process is running. If you do so, the Hire functionality will break.

Configuring Self-Service Modules 8-87
Configuring Absence Management
Configuring the Absence Management PagesThis topic provides information to configure the Absence Management module.
Menu and Function NamesThis module can be accessed from the following menus and functions:
User Menu Name Function Name
Leave of Absence Leave of Absence
WorkflowThis module does not use workflow to control the page flow. It uses the generic approval process to handle approvals using AME. See: Implementing Oracle ApprovalsManagement (AME), page 7-17.
ApprovalsThe HR_LOA_SS function includes two parameters to control the approval process and notifications:
• pApprovalReqd -- You can enter the following values:
• N - No approval required
• Y - Yes approval required
• YD - Yes with Dynamic approval region enabled on the page
• pNtfSubMsg -- You can enter the subject to display for absence email notifications
Configurable Tips and Instructions
Leave of Absence Summary Top Page

8-88 Oracle Self-Service Human Resources Deploy Self-Service Capability Guide
Region Tip Type Message Name
Absence Summary Instruction HR_INST_LOA_SUMMARY
Create Leave of Absence Page
Region Tip Type Message Name
Create Leave Of Absence Main
Instruction HR_INST_LOA_CREATE
Absence Details Instruction HR_INST_LOA_CREATE_DETAILS
Update Leave of Absence Page
Region Tip Type Message Name
Update Main Instruction HR_INST_LOA_UPDATE
Update Details Instruction HR_INST_LOA_UPDATE_DETAILS
Confirm Dates Top Page
Region Tip Type Message Name
Confirm Dates Main Instruction HR_INST_LOA_RETURN
Confirm Dates Details Instruction HR_INST_LOA_RETURN_DETAILS
See: Configuring Tips and Messages, page 6-35
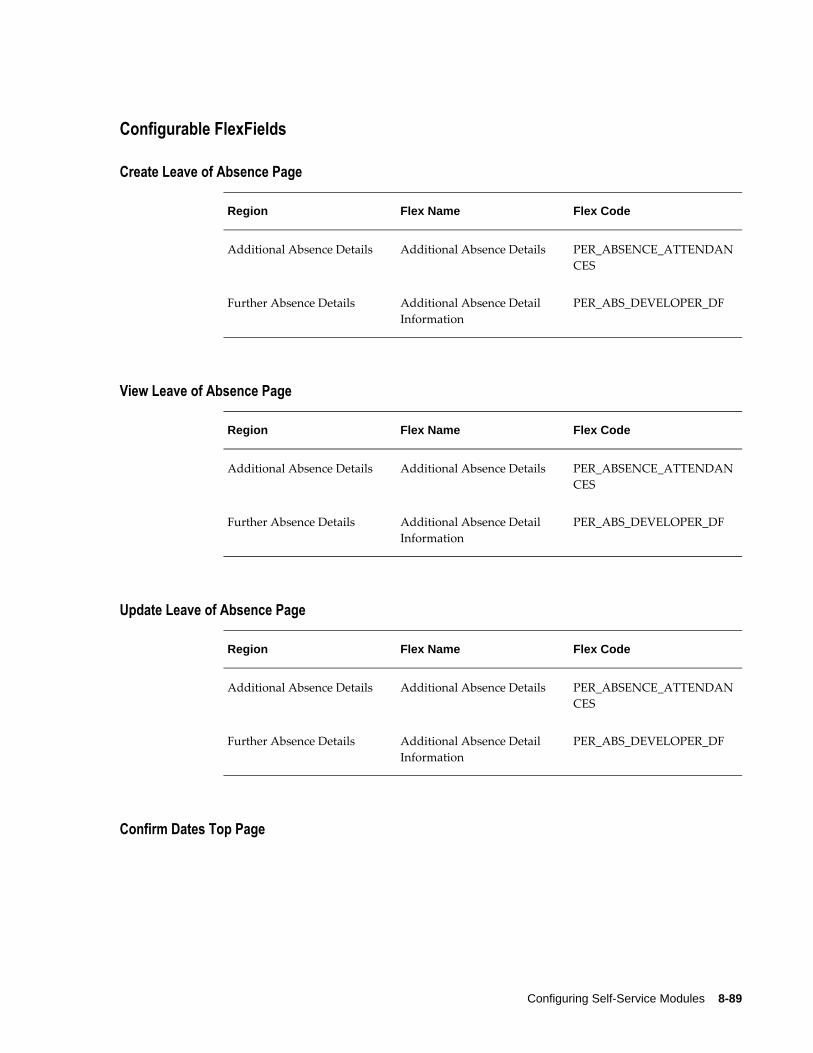
Configuring Self-Service Modules 8-89
Configurable FlexFields
Create Leave of Absence Page
Region Flex Name Flex Code
Additional Absence Details Additional Absence Details PER_ABSENCE_ATTENDANCES
Further Absence Details Additional Absence Detail Information
PER_ABS_DEVELOPER_DF
View Leave of Absence Page
Region Flex Name Flex Code
Additional Absence Details Additional Absence Details PER_ABSENCE_ATTENDANCES
Further Absence Details Additional Absence Detail Information
PER_ABS_DEVELOPER_DF
Update Leave of Absence Page
Region Flex Name Flex Code
Additional Absence Details Additional Absence Details PER_ABSENCE_ATTENDANCES
Further Absence Details Additional Absence Detail Information
PER_ABS_DEVELOPER_DF
Confirm Dates Top Page

8-90 Oracle Self-Service Human Resources Deploy Self-Service Capability Guide
Region Flex Name Flex Code
Additional Absence Details Additional Absence Details PER_ABSENCE_ATTENDANCES
Further Absence Details Additional Absence Detail Information
PER_ABS_DEVELOPER_DF
See: Configuring Flexfields, page 6-27
Info OnlineThe Info Online content container is an ancillary region that appears on self-service webpages. The Info Online content container displays hypertext links to information providers. The Absence Management page available from the Manager and Employee Self-Service responsibilities contains the Info Online content container, which is hidden by default. This content container displays the Time Off Policy link (default link) to access, for example, company's absence policies on the Enwisen web site.
To enable users to access Enwisen, complete the following steps. Using the Personalization Framework function:
• Display the Info Online content container.
• Display the default Time Off link or configure links to Enwisen according to your agreement with Enwisen.
Profile Options
The following profile options affect the Info Online functionality:
• HR: Enwisen Login URL
• HR: Class Name to Fetch KI Data
• HR: KI Providers Enabled
• HR: KI Topics Enabled
• HR: KI User Options Enabled
See: User Profiles, Oracle HRMS Configuring, Reporting, and System Administration Guide
See: Info Online Content Container, Oracle HRMS Configuring, Reporting, and System Administration Guide
See: Configuring Links between HRMS Products and Enwisen, Oracle HRMS

Configuring Self-Service Modules 8-91
Configuring, Reporting, and System Administration Guide


Workforce Sourcing and Deployment 9-1
9Workforce Sourcing and Deployment
Workforce Sourcing and Deployment OverviewSSHR provides self-service functions within the following area of Workforce Sourcing and Deployment:
• Recruiting and Hiring
• People Management
This chapter looks in detail at the self-service functions available within this area and provides information on the functionality and configuration options for each function.
Using SSHR for Workforce Sourcing and Deployment
How can I use SSHR for my workforce sourcing and deployment processes?You can use the New Hire processes to hire applicants and to bring contingent workers to your enterprise. These processes enable you to enter data in a series of web pages andto then finally hire the applicant or contingent worker.
Can I modify these processes to suit the requirements of my enterpriseYes. The sequence of web pages used in the New Hire processes is defined in the Workflow Builder. To modify this sequence, you can create your own version of the New Hire processes and chain together the required modules in a different sequence.
Does SSHR carry out any checks when I hire an applicant or contingent worker using the self-service interface?
As in the Professional Forms Interface, SSHR can check for any duplicate persons within the system if required. If you activate this functionality, SSHR displays a list of

9-2 Oracle Self-Service Human Resources Deploy Self-Service Capability Guide
any possible duplicate persons.
Can I access the iRecruitment functionality using the self-service interface?Although iRecruitment uses a self-service interface and the Oracle Applications Framework functionality, you cannot access iRecruitment directly from SSHR. To accessthe iRecruitment functionality, you must purchase the appropriate license.
What are the advantages to the HR Department of using SSHR?Potential self-service activities in an HR department range from simple data entry tasks,such as updating personal and educational details, to more complex tasks, such as informing employees of their current vacation allowance and providing policy advice. With SSHR, the person making an inquiry or wanting to change their personal details can find and manage this information themselves at little administrative cost to the HR department.
How does SSHR improve the accuracy of employee data?Employees have a vested interest in ensuring their information is accurate, for example, to ensure that their pay check is mailed to the correct address. With SSHR, employees can maintain their own data and ensure that it is correct.
How does SSHR improve a manager's access to information?Managers using SSHR can access the information for their employees using a hierarchy tree or, if enabled, the Person Search function. Security mechanisms ensure that managers can only retrieve information for those employees to whom they have access.
In addition, the Employee Directory provides contact information for employees within the enterprise. Users can search for people using different search criteria and look up contact and organizational information.
Can I use SSHR to carry out standard HR procedures?Yes. You can use the Manage Employment Events functionality to carry out such procedures as granting a salary increase, reassigning an employee to a new position, or terminating an employee. You can use the Workflow Builder functionality to chain different modules together to create enterprise-specific procedures.
Can workers use SSHR to apply for jobs online?Yes. Employees and contingent workers can use the Apply for Job module to search andapply for jobs online. Search criteria includes job location and vacancy date. They can attach a resume to their job application.
Workforce Sourcing and Deployment 9-3
Employee Demographics
Personal Information ModulesThe Personal Information function enables self-service users to enter and update their own personal records. This function is integrated within Oracle Workflow. By using Oracle Workflow and the Personalization Framework, you can design a process to control which personal details a user can change or display. You can also design an approval process for any changes made by employees, workers, or managers. You use the Personal Information function to update basic details such as Marital Status, Title, First and Last Name, Addresses, and Emergency Contacts.
US Users Only See: Entering Disability and Veteran Status Details to Comply with OFCCP, page 9-19
Personalizing the Personal Information FunctionsThere are several personalization options available to you for the Personal Information functions. Function-specific personalizations are listed in the relevant functional documentation, however, you should note the following general points:
• You can include Extra Information Types (EITs) and Special Information Types (SITs) in your Personal Information process flows.
See: Configuring Workflow Objects, page 5-8
• You can personalize the Personal Information Overview page to display the Dependents and Beneficiaries region.
• You can make the Personal Information pages read-only by hiding the Update buttons.
• You can add selected fields to the Personal Information pages. To display information on the available fields, click the "About this Page" link at the bottom of the Personal Information pages. This page displays subtabs that display information on the page including the view objects and associated entity objects and attributes.
Note: If the "About this Page" link is not displayed, check the value of the FND: Diagnostics profile option. Set this profile to Yes at the required level.
For more information on the "About this Page" feature, see: Discovering Page, Technology Stack and Session Information, in the Oracle Application Framework Documentation Resource, My Oracle Support note 391554.1.

9-4 Oracle Self-Service Human Resources Deploy Self-Service Capability Guide
• If you personalize a field in one of the Personal Information modules, for example, Phone Numbers, and want to replicate this change throughout the Personal Information function, you also need to make the change in the appropriate pages, for example, the Personal Information: Overview page.
When users click Update in the Basic Details, Main Address, Secondary Address or Tertiary Address regions in the Personal Information page, the options to correct current details or enter new information appear in the same page or a separate page, depending on the page configuration.
Future-Dated TransactionsThere are restrictions on future-dated transactions. If you submit an address change with an effective date of 6 months in the future, for example, you cannot enter another address change before the initial transaction is effective. When you display the PersonalInformation Overview page, you can view any future transactions by clicking the View Future Changes button. This button only appears if a future change exists.
Note: This does not apply to the Phone Number module which does not require an effective date.
Menu and Function NamesThis module can be accessed from the following menus and functions:
User Menu Name Function Name
Manager Self Service Personal Information
Employee Self Service Personal Information
See: Defining User Access and Menus, page 4-10
WorkflowThe workflow details for this module are listed below:
Workflow Process Display Name: Personal Information
Configurable Workflow Attributes:Not applicable

Workforce Sourcing and Deployment 9-5
Configurable Tips and InstructionsNot applicable
Configurable FlexfieldsNot applicable
Configurable Profile OptionsNot applicable
Basic DetailsThe Basic Details module records information such as a user's name and marital status.
Menu and Function NamesThis module can be accessed from the following menus and functions:
User Menu Name Function Name
Manager Self Service Personal Information
Employee Self Service Personal Information
See: Defining User Access and Menus, page 4-10
WorkflowThe workflow details for this module are listed below:
Workflow Process Display Name: Process Basic Details
Configurable Workflow Attributes:Not applicable
Configurable Tips and Instructions
Basic Details Page

9-6 Oracle Self-Service Human Resources Deploy Self-Service Capability Guide
Region Tip Type Message Name
Basic Detail Update Name Entry
Long Message HR_TIP_EFFECTIVE_DATE
Basic Detail Update Name Entry
Long Message HR_TIP_PREFIX
Basic Detail Update Name Entry
Long Message HR_TIP_SUFFIX
Basic Detail Update Name Entry
Long Message HR_TIP_PREFERRED_NAME
Basic Detail Update Name Entry
Long Message HR_TIP_PREVIOUS_LASTNAME
Basic Detail Update Name Entry
Instruction HR_INST_BASIC_DETAILS_FORM
Basic Details Update Entry Instruction HR_PERINFO_FUTURE_CHANGES
Basic Details Action Page
Region Tip Type Message Name
Basic Details Action Type Instruction HR_INST_BASIC_DETAILS_TOC
See: Adding Instructions to Web Pages, page 6-35
Configurable Flexfields
Basic Details Page
Region Flex Name Flex Code
Basic Detail Update Other Entry
Further Person Information Person Developer DF

Workforce Sourcing and Deployment 9-7
Region Flex Name Flex Code
Basic Detail Update Other Entry
Additional Personal Details PER_PEOPLE
See: Configuring Flexfields, page 6-27
Configurable Profile OptionsNot applicable
Main AddressThe Main Address module stores the worker's primary address. You cannot delete this primary addressl.
You choose how to display your address in SSHR by configuring the Personal Address Details descriptive flexfield.
US Payroll Users: If the Address Validation Using Vertex Web Services feature is enabled, then Vertex Web Services validates addresses when employees add or update their address using the Personal Information self-service page. See: Address Validation Using Vertex Web Services, Oracle HRMS Implementation Guide (US)
Address styles for new addresses
When you enter a new address in SSHR, you must select a country. The SSHR application uses the localization code for this country to select an address style from thesegment inclusion list. For example, if you select United States as the country, the application retrieves the first segment with the prefix US from the segment inclusion list. The order of the segment list determines which style is selected by the application. For example, if the segment list contains US_CUSTOM before US and US_GLB, the application chooses US_CUSTOM.
Address styles for existing addresses
If you are updating an existing address and you are not required to select a country, or if the address is read-only, the application uses the existing style. The required style must be available in the segment list.
Generic address styles
You use the GENERIC address style to provide a style for localizations without a defined style in the flex segment list. For example, if you select India (IN) as the countrywhen entering a new address, and if no IN segment is available in the flex segment inclusion list, the application uses the GENERIC style. For this reason, you must alwaysinclude a GENERIC style in the flex inclusion list.
If required, you can create your own generic style with the name GENERIC_<name>, for

9-8 Oracle Self-Service Human Resources Deploy Self-Service Capability Guide
example, GENERIC_CUSTOM. If the application finds the GENERIC_CUSTOM style before the GENERIC style in the segment list, the application uses the custom style.
Changing Address Styles
If you change from one style to another, you may see differences between the styles andthe address may not appear as expected.
For example, you enter applicant details in iRecruitment and use the US_IRC address style. This style uses the following segments:
• segment1 (Street)
• segment2 (Town or City)
• segment3 (District)
Then you hire the applicant and display address information in SSHR using the US address style. This style uses the following segments:
• segment1 (Street)
• segment2 (Town or City)
• segment4 (Country)
Both segment1 and segment2 are included in both styles and displayed on the SSHR page. However, segment3 from the US_IRC style is not displayed because it is not included in the US style. segment4 is displayed but has no value as it was not available in the original address entry page.
Note: This behavior applies whenever you switch from a XX_xxxx styleto a XX style.
For information on the Personal Address Details descriptive flexfield, see: Changing theDefault National Address Styles, Oracle HRMS Configuring, Reporting, and System Administration Guide.
Menu and Function NamesThis module can be accessed from the following menus and functions:
User Menu Name Function Name
Manager Self Service Personal Information
Employee Self Service Personal Information

Workforce Sourcing and Deployment 9-9
See: Defining User Access and Menus, page 4-10
WorkflowThe workflow details for this module are listed below:
Workflow Process Display Name: Process Main Address
Configurable Workflow Attributes:Not applicable
Configurable Tips and Instructions
Main Address Page
Region Tip Type Message Name
Main Address Update Long Message HR_TIP_MADDR_EFFECTIVE_DATE
Main Address Update Long Message HR_TIP_MADDR_ADDRESS_TYPE
Main Address Update Instruction HR_INST_MAIN_CORRECT_ADDRESS
Main Address Update Instruction HR_INST_MAIN_NEW_CHG_ADDRESS
Main Address Update Instruction HR_INST_VIEW_FUTURE_CHANGES
Main Address Action Page
Region Tip Type Message Name
Main Address Action Type Instruction HR_INST_MAIN_ADDRESS_TOC
See: Adding Instructions to Web Pages, page 6-35

9-10 Oracle Self-Service Human Resources Deploy Self-Service Capability Guide
Configurable Flexfields
Main Address Page
Region Flex Name Flex Code
Main Address Update Personal Address Details Address Structure
Main Address Update Additional Address Details PER_ADDRESSES
See: Configuring Flexfields, page 6-27
Configurable Profile OptionsNot applicable
Secondary AddressThe Secondary Address module stores additional addresses for a self-service user. Unlike the Main Address, you can delete the Secondary Address for an individual.
For information on address styles for SSHR, see: Main Address, page 9-7
Menu and Function NamesThis module can be accessed from the following menus and functions:
User Menu Name Function Name
Manager Self Service Personal Information
Employee Self Service Personal Information
See: Defining User Access and Menus, page 4-10
WorkflowThe workflow details for this module are listed below:
Workflow Process Display Name: Process Secondary Address
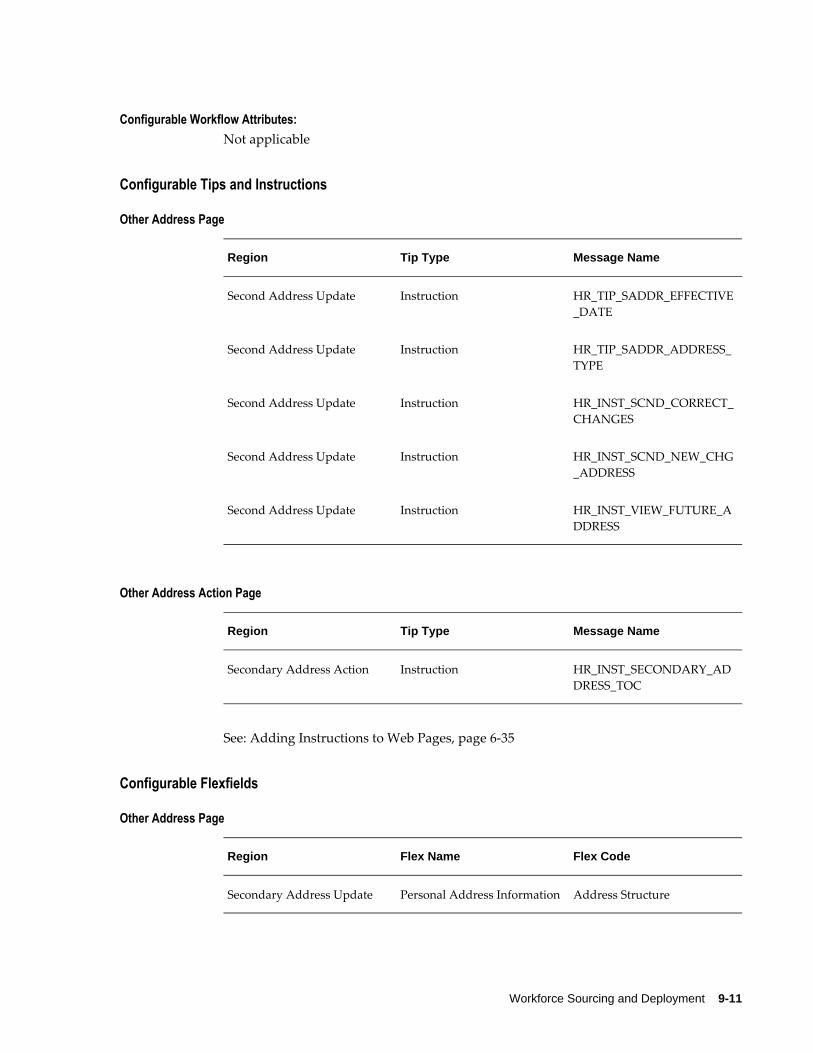
Workforce Sourcing and Deployment 9-11
Configurable Workflow Attributes:Not applicable
Configurable Tips and Instructions
Other Address Page
Region Tip Type Message Name
Second Address Update Instruction HR_TIP_SADDR_EFFECTIVE_DATE
Second Address Update Instruction HR_TIP_SADDR_ADDRESS_TYPE
Second Address Update Instruction HR_INST_SCND_CORRECT_CHANGES
Second Address Update Instruction HR_INST_SCND_NEW_CHG_ADDRESS
Second Address Update Instruction HR_INST_VIEW_FUTURE_ADDRESS
Other Address Action Page
Region Tip Type Message Name
Secondary Address Action Instruction HR_INST_SECONDARY_ADDRESS_TOC
See: Adding Instructions to Web Pages, page 6-35
Configurable Flexfields
Other Address Page
Region Flex Name Flex Code
Secondary Address Update Personal Address Information Address Structure
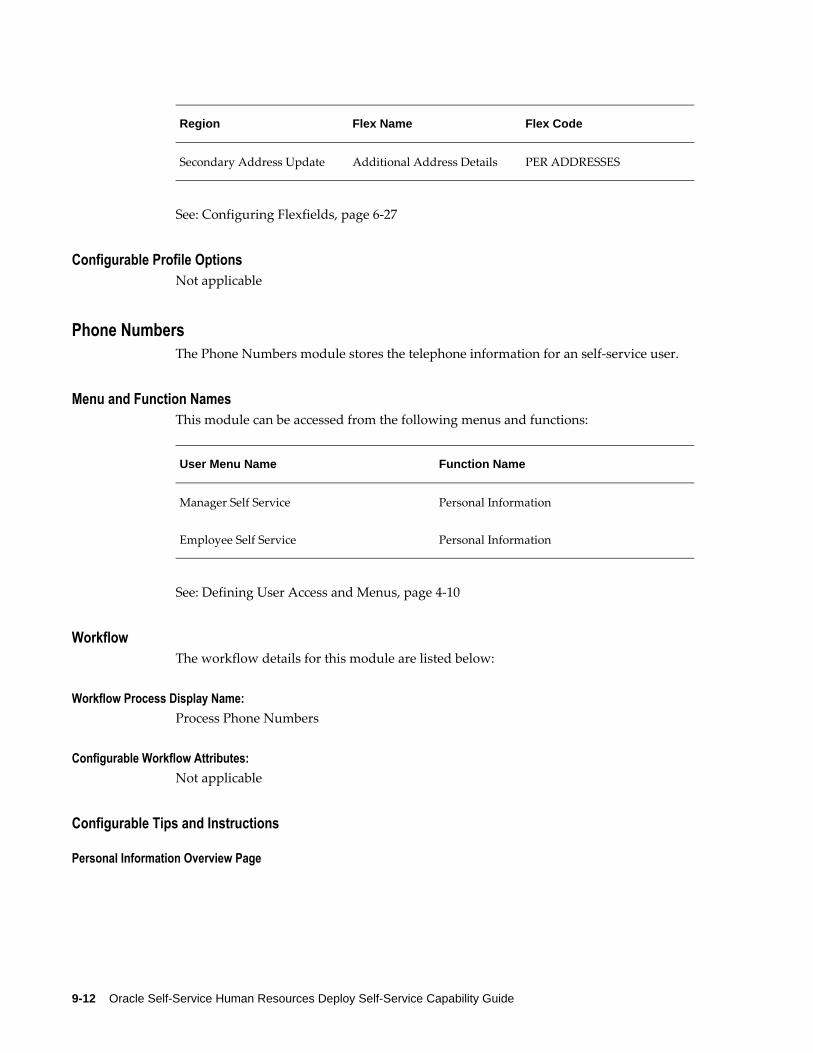
9-12 Oracle Self-Service Human Resources Deploy Self-Service Capability Guide
Region Flex Name Flex Code
Secondary Address Update Additional Address Details PER ADDRESSES
See: Configuring Flexfields, page 6-27
Configurable Profile OptionsNot applicable
Phone NumbersThe Phone Numbers module stores the telephone information for an self-service user.
Menu and Function NamesThis module can be accessed from the following menus and functions:
User Menu Name Function Name
Manager Self Service Personal Information
Employee Self Service Personal Information
See: Defining User Access and Menus, page 4-10
WorkflowThe workflow details for this module are listed below:
Workflow Process Display Name: Process Phone Numbers
Configurable Workflow Attributes:Not applicable
Configurable Tips and Instructions
Personal Information Overview Page

Workforce Sourcing and Deployment 9-13
Region Tip Type Message Name
Phone Numbers Overview Instruction HR_PERINFO_PHONES_ABOVE_LIMIT
Phone Numbers Update Instruction HR_INST_PHONES_FORM
Other Addresses Page
Region Tip Type Message Name
Second Address Update Instruction HR_INST_SCND_NEW_CHG_ADDRESS
Second Address Update Instruction HR_INST_VIEW_FUTURE_CHANGES
See: Adding Instructions to Web Pages, page 6-35
Configurable Flexfields
Phone Numbers Details Page
Region Flex Name Flex Code
Phone Number Details Additional Telephone Number Details
PER_PHONES
Phone Details Review Page
Region Flex Name Flex Code
Details Review Additional Telephone Number Details
PER_PHONES
Configurable Profile OptionsNot applicable

9-14 Oracle Self-Service Human Resources Deploy Self-Service Capability Guide
Emergency ContactsThe Emergency Contacts module stores the contact information for emergency contacts (telephone information and address). Self-service users can add and delete people from the list of emergency contacts as required. When the user has created or edited a contact, the workflow submits the transaction for approval. If the transaction is awaiting approval, the user cannot edit the contact until it has been approved or rejected by the approver.
Personalizing the Emergency Contacts Page
The standard layout for the Emergency Contacts page includes three telephone numbers. You can, however, personalize the page to display your custom phone types if required.
You can also personalize the page to create a read-only view if required.
Creating Contacts Using SSHR Only
If you choose to create an emergency contact or dependent using only SSHR (Personal Information function), instead of the forms-based interface, the following situation applies:
• The application creates two records in the per_contact_relationships table:
• one record with the value EMRG in the contact_type column
• one record with the value of the actual relationship (for example, spouse, brother) in the contact_type column
Note: Information on whether or not the contact is the Primary Contact is held only for the Emergency Contact record (record withthe EMRG value in the contact_type column). This record may havealso the primary_flag set to Y or N.
• For the actual relationship record only, the personal_flag column contains the valueY (for Yes).
Menu and Function NamesThis module can be accessed from the following menus and functions:
User Menu Name Function Name
Manager Self Service Personal Information

Workforce Sourcing and Deployment 9-15
User Menu Name Function Name
Employee Self Service Personal Information
See: Defining User Access and Menus, page 4-10
WorkflowThe workflow details for this module are listed below:
Workflow Process Display Name: Process Contacts
Configurable Workflow Attributes:Not applicable
Configurable Tips and Instructions
Contacts Page
Region Tip Type Message Name
Contacts Main Table Region Instruction HR_289383_CONT_EMRG_MAIN_MSG
Contacts Main Table Region Long Message HR_TIP_SUFFIX
Contacts Main Table Region Long Message HR_TIP_PREFIX
Contacts Main Table Region Long Message HR_289371_DEP_BNF_FLAG_TIP
Contacts Main Table Region Long Message HR_289373_PRMRY_REL_MAIN_TIP
Contact Phone Numbers Instruction HR_INT_PHONES_FORM
Contact Address Instruction HR_INST_MAIN_CORRECT_ADDRESS
See: Adding Instructions to Web Pages, page 6-35
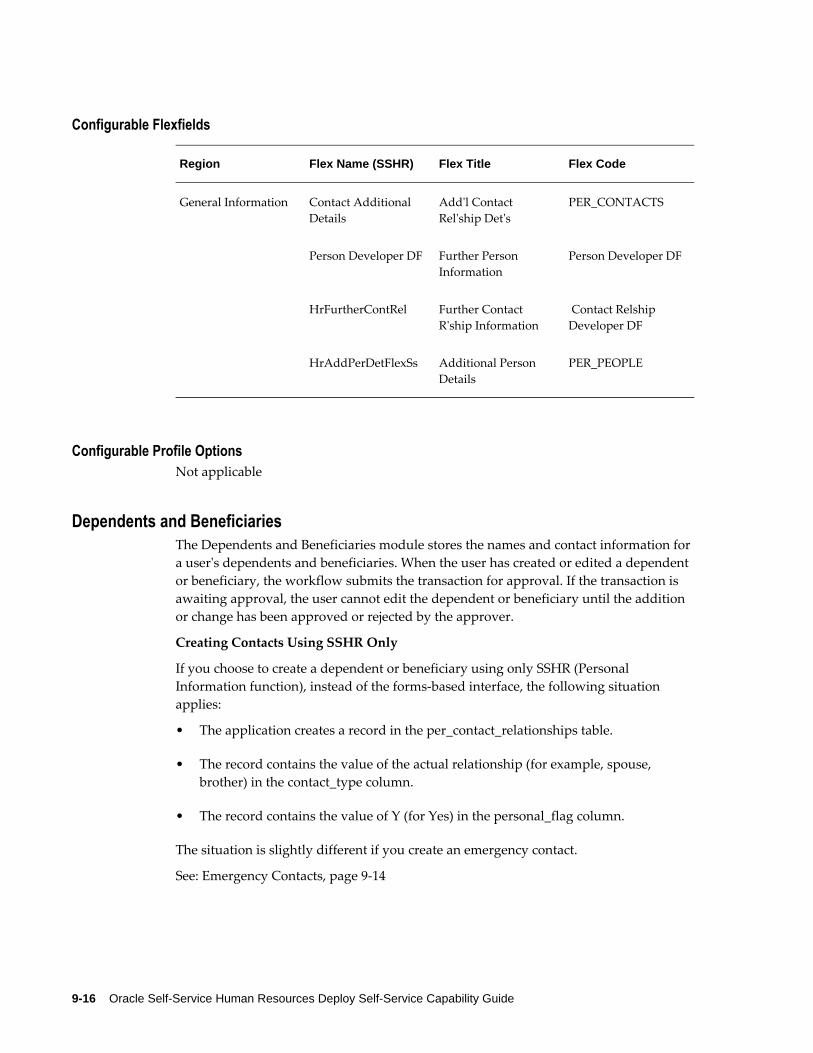
9-16 Oracle Self-Service Human Resources Deploy Self-Service Capability Guide
Configurable Flexfields
Region Flex Name (SSHR) Flex Title Flex Code
General Information Contact Additional Details
Add'l Contact Rel'ship Det's
PER_CONTACTS
Person Developer DF Further Person Information
Person Developer DF
HrFurtherContRel Further Contact R'ship Information
Contact Relship Developer DF
HrAddPerDetFlexSs Additional Person Details
PER_PEOPLE
Configurable Profile OptionsNot applicable
Dependents and BeneficiariesThe Dependents and Beneficiaries module stores the names and contact information for a user's dependents and beneficiaries. When the user has created or edited a dependent or beneficiary, the workflow submits the transaction for approval. If the transaction is awaiting approval, the user cannot edit the dependent or beneficiary until the addition or change has been approved or rejected by the approver.
Creating Contacts Using SSHR Only
If you choose to create a dependent or beneficiary using only SSHR (Personal Information function), instead of the forms-based interface, the following situation applies:
• The application creates a record in the per_contact_relationships table.
• The record contains the value of the actual relationship (for example, spouse, brother) in the contact_type column.
• The record contains the value of Y (for Yes) in the personal_flag column.
The situation is slightly different if you create an emergency contact.
See: Emergency Contacts, page 9-14

Workforce Sourcing and Deployment 9-17
Menu and Function NamesThis module can be accessed from the following menus and functions:
User Menu Name Function Name
Manager Self Service Personal Information
Employee Self Service Personal Information
See: Defining User Access and Menus, page 4-10
WorkflowNot applicable
Configurable Tips and Instructions
Contacts Page
Region Tip Type Message Name
Contacts Main Table Region Instruction HR_289383_CONT_EMRG_MAIN_MSG
Contacts Main Table Region Long Message HR_TIP_SUFFIX
Contacts Main Table Region Long Message HR_TIP_PREFIX
Contacts Main Table Region Long Message HR_289372_EMRG_CONT_FLAG_TIP
Contacts Main Table Region Long Message HR_289373_PRMRY_REL_MAIN_TIP
Contact Phone Numbers Instruction HR_INT_PHONES_FORM
Contact Address Instruction HR_INST_MAIN_CORRECT_ADDRESS
Contacts Main Table Region Instruction HR_289371_DEP_BNF_FLAG_TIP

9-18 Oracle Self-Service Human Resources Deploy Self-Service Capability Guide
See: Adding Instructions to Web Pages, page 6-35
Configurable Flexfields
Region Flex Name (SSHR) Flex Title Flex Code
General Information Contact Additional Details
Add'l Contact Rel'ship Det's
PER_CONTACTS
Person Developer DF Further Person Information
Person Developer DF
HrFurtherContRel Further Contact R'ship Information
Contact Relship Developer DF
HrAddPerDetFlexSs Additional Person Details
PER_PEOPLE
Address HrAddressFlex Personal Address Details
Address Structure
HrAdditionalAddress Additional Address Details
PER_ADDRESSES
Configurable Profile OptionsNot applicable
Info Online on the Personal Information PageThe Info Online content container is an ancillary region that appears on self-service webpages. The Info Online content container displays hypertext links to information providers. You can configure access between Oracle Self-Service HR (Oracle SSHR) and Enwisen, a third-party information provider to enable end users to access company information hosted on the Enwisen web site.
See: Configuring Links between HRMS Products and Enwisen, Oracle HRMS Configuring, Reporting, and System Administration Guide
The Info Online content container that is available on the Personal Information page, is hidden by default. This content container includes the Handbook link, which is a default link.
To enable users to access Enwisen, complete the following steps. Using the Personalization Framework function:

Workforce Sourcing and Deployment 9-19
• Display the Info Online content container.
• Display the default Handbook link or configure links to Enwisen according to your agreement with Enwisen.
Menu and Function NameYou can access the Info Online module from the Employee Self Service responsibility and Personal Information function.
Configurable Profile OptionsThe following profile options affect the Info Online functionality:
• HR: Enwisen Login URL
• HR: Class Name to Fetch KI Data
• HR: KI Providers Enabled
• HR: KI Topics Enabled
• HR: KI User Options Enabled
See: User Profiles, Oracle HRMS Configuring, Reporting, and System Administration Guide
See: Info Online Content Container, Oracle HRMS Configuring, Reporting, and System Administration Guide
Entering Disability and Veteran Status Details to Comply with OFCCP (US)Oracle SSHR for US provides the following Employee Self-Service pages to comply withthe Office of Federal Contract Compliance Programs (OFCCP).
1. The Disclose Disability Status Employee Self-Service function consists of Oracle Application Framework (OAF) self-service HTML page that reproduces Form CC 305 where a self-service user can optionally make a selection regarding their disability status.
The self-service page contains Submit and Cancel buttons. Click Submit to save theselection. Use the Cancel button to revert any selection made. Any selection made by the user will be stored in the HR database. The information that an employee provides in this page is visible in the Disability Information and Disability Entered Date fields in the Medical tab of the People window in the professional UI.
2. The Disclose Veteran Status Employee Self-Service function consists of Oracle Application Framework (OAF) self-service HTML page where a self-service user

9-20 Oracle Self-Service Human Resources Deploy Self-Service Capability Guide
can optionally make a selection regarding their veteran status. Any selection made by the user is stored in the HR database.
The self-service page contains Submit and Cancel buttons. Click Submit to save theselection. Use the Cancel button to revert any selection made.
If employees are using self-service to provide their veteran status, then they must use the Employee Self Service function "Disclose Veteran Status". The application captures the VETS-100A related information through the Disclose Veteran Status page and oncethe employee has submitted their veteran status selection, this data is stored in the HR database and is visible in the VETS-100A field in the Employment tab of the People window in the professional UI.
The employee's disability and veteran status information is retrieved when the US OFCCP Disability/VEVRAA Audit Report is run. For more information, seeRunning theUS OFCCP Disability/VEVRAA Audit Report, Oracle HRMS Enterprise and Workforce Management Guide (US).
Contact Extra Information (Japan)The Contact Extra Information function enables you to enter and maintain additional contact information in SSHR. Statutory regulations often require that employees and workers provide specific information on dependents and beneficiaries for health insurance and income tax purposes and SSHR enables you to store this information using Extra Information Types (EITs).
Both employee/workers and managers can use the Contact Extra Information function. If you are a manager, you first select the person for whom you are entering information,and then select the dependent or beneficiary from the Choose Contact page. If you are an employee, you access the Choose Contact page directly.
Note: You create the dependent and beneficiary information using the Dependents and Beneficiaries page of the Personal Information function.
See: Dependents and Beneficiaries, page 9-16
When you have selected the dependent or beneficiary, the application displays the available EITs for the dependent or beneficiary. You can create one EIT for each of the following groups:
• Health Insurance Law
Create one of the following information types:
• Health Insurance Dependent - dependent (non-spouse) information for health insurance and pension purposes. The information includes occupation, income, and qualification information.
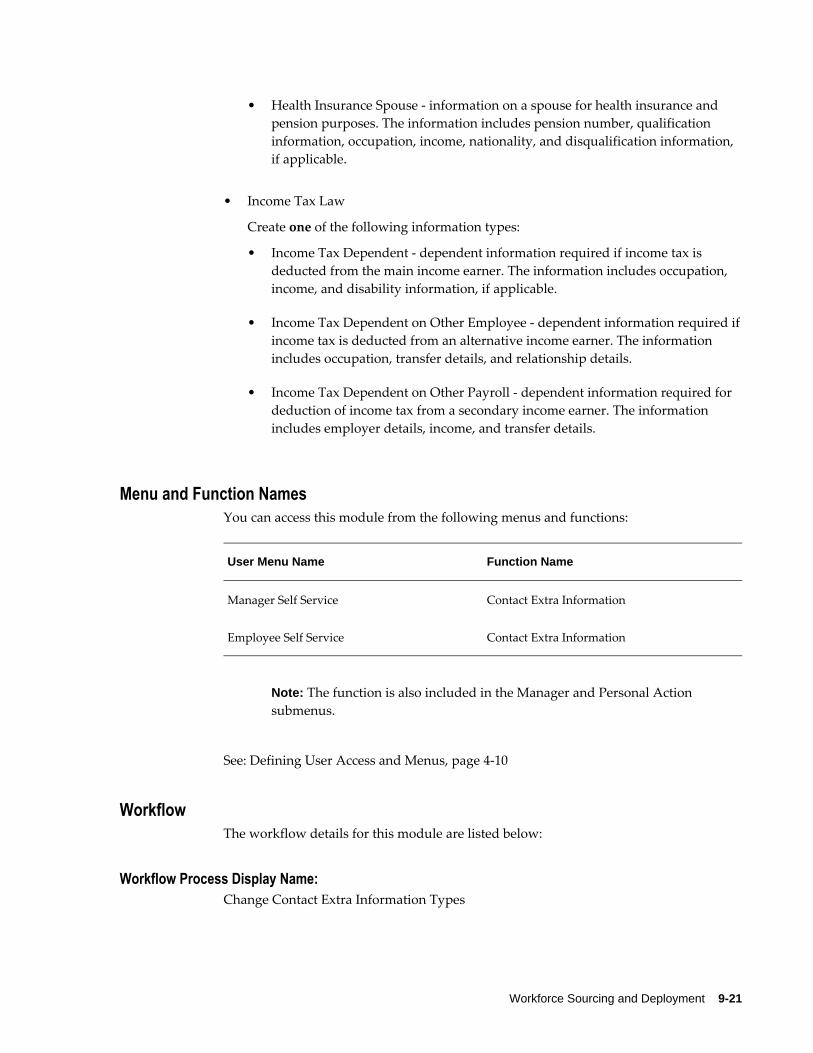
Workforce Sourcing and Deployment 9-21
• Health Insurance Spouse - information on a spouse for health insurance and pension purposes. The information includes pension number, qualification information, occupation, income, nationality, and disqualification information, if applicable.
• Income Tax Law
Create one of the following information types:
• Income Tax Dependent - dependent information required if income tax is deducted from the main income earner. The information includes occupation, income, and disability information, if applicable.
• Income Tax Dependent on Other Employee - dependent information required ifincome tax is deducted from an alternative income earner. The information includes occupation, transfer details, and relationship details.
• Income Tax Dependent on Other Payroll - dependent information required for deduction of income tax from a secondary income earner. The information includes employer details, income, and transfer details.
Menu and Function NamesYou can access this module from the following menus and functions:
User Menu Name Function Name
Manager Self Service Contact Extra Information
Employee Self Service Contact Extra Information
Note: The function is also included in the Manager and Personal Actionsubmenus.
See: Defining User Access and Menus, page 4-10
WorkflowThe workflow details for this module are listed below:
Workflow Process Display Name: Change Contact Extra Information Types

9-22 Oracle Self-Service Human Resources Deploy Self-Service Capability Guide
Configurable Workflow Attributes:Not applicable
Configurable Tips and Instructions
Region Tip Type Message Name
Dependents and Beneficiaries Instruction HR_CEI_CONTACT_NOT_SELECTED
Extra Information Types Message HR_CEI_CANNOT_UPDATE_DELETE_SS
Message HR_CEI_CANNOT_UPDATE_FT_CHG_SS
Message HR_CEI_CANNOT_UPDATE_FT_DEL_SS
Message HR_CEI_CANNOT_DELETE_FT_CHG_SS
Message HR_CEI_CANNOT_DELETE_FT_DEL_SS
Message HR_CEI_DEL_ACT_ENTER_DATE
Configurable Flexfields
Region Flex Name Flex Code
Extra Information Types Extra Contact Information Extra Contact Info DDF
Configurable Profile Options

Workforce Sourcing and Deployment 9-23
Profile Configurable Levels Values Default
HR:Display Person Name
Site, Application, Responsibility, User
Brief Name, Custom Name, Full Name
Brief
HR:Display Brief Person Name
If you set this profile option to Brief Name (default value), the application displays the person names in the brief format instead of the long name format.
Documents of RecordThe Documents of Record function enables you to store information on documents suchas work permits, visa information, and medical certificates in one place. If required, youcan also upload electronic versions of documents as attachments.
As a worker, you can create, maintain, and delete your own documents of record. If your document requires authorization, the verifier receives a notification.
If you select the country name, the document type associated with the country and global document types appear in the Document Type search. When creating a document of record, select the country name and document type based on your requirement. The valid from date value defaults to the Issued Date field. You can retain the date or change it.
Note: The person who registers the document type defines whether it requires authorization.
The default verifier is your supervisor. On verification, you also receive a notification.
Note: If the subject of the document is a contact or other person who does not exist as a user in Oracle HRMS, no notification is received.
As a manager or HR Professional, you can create, maintain, and delete documents for your direct reports and for other individuals whose records you can access.
Note: HR Professional users access the Documents of Record functionality using the forms-based interface. Self-service users (individuals and managers) access the functionality using the appropriate self-service menu.
Using the Documents of Record Function
The initial pages for the Documents of Record function differ according to the navigation path selected. If you use the Employee Self-Service responsibility, the first

9-24 Oracle Self-Service Human Resources Deploy Self-Service Capability Guide
page lists your existing documents of record. Similarly, if you use the Manager Self-Service responsibility, the first page lists any existing documents of record for the worker selected in the hierarchy. From here, you can view, create, maintain, or delete documents of record.
If you are using a HR Professional responsibility and accessing the function from the forms-based interface, you can display a search page (by navigating to People > Search Documents of Record). Alternatively, to view, create, or maintain the documents of record for a person, display the person's record in the People window and access the Documents of Record function through the task flow (Others button).
As an HR Professional, you can also access the Documents of Record pages by selecting Fastpath > Documents of Record, and then selecting a person for the transactions.
Document of Record Function with Approvals If your enterprise has setup approvals for the Documents of Record function, then when you create or update a document of record, the Next button appears on the CreateDocument of Record or the Update Document of Record page. When you click the Next button, the Documents of Record Review page appears. It shows the details that you can review. You can view the supporting documents that were attached in the Create orUpdate page. Also, Add Adhoc Approvers region is available, and you can add further approvers and notification recipients.
When you click the Submit button on the Review page, the transaction is routed for approval. The Confirm page contains a confirmation message describing the status of the transaction.
When a transaction is pending approval, the Update feature is unavailable on the Documents of Record for Person and View Document of Record pages. The Documents of Record for Person page displays the document of record details in a table. Users can click the View icon to view further details on the View Document of Record page and also can click the attachment image to view all the supporting documents.
The Notification page that an approver receives to review the document of record does not display the Return for Correction button and the Update link.
Professional Details ModulesThere are five modules within Professional Details: Competence Profiles, Education andQualifications, Other Professional Awards, Work Preferences, and Resume. In addition, there are two modules for the US localization (Tenure Tracking and Academic Rank). Employees can maintain their own details or managers can maintain the details for theirdirect reports.
Education and QualificationsThis function enables users to update a list of qualifications or create a new list of

Workforce Sourcing and Deployment 9-25
qualifications. The qualifications are academic qualifications obtained at an educational institution. The user can also add, edit, and delete the major subjects for the qualifications. School or establishment attendance information is required for an education qualification. If approvals are setup, then when the user creates or edits a qualification, the workflow submits the transaction for approval. If the transaction is awaiting approval, then the user cannot edit the qualification until it has been approvedor rejected by the approver.
The Education and Qualifications overview page shows the list of approved education qualifications for a person and also those qualifications that are pending approval.
Managers and workers can attach documents supporting their education qualifications. If the Save Attachments check box is available in the Attachments region, then they can select this option to make these attachments available in the Oracle HRMS People window.
Education and Qualifications Function for Managers
When managers access the Education and Qualifications function, they can view the listof direct reports in their hierarchy. They can view the education and qualification details of these employees or add information about their qualification.
Other Professional QualificationsThis function allows users to add other types of professional qualifications such as an award or certification to an existing list of qualifications or to create a new list of professional qualifications.
Managers and workers can attach documents supporting their other professional qualifications. If the Save Attachments check box is available in the Attachments region,then they can select this option to make these attachments available in the Oracle HRMSPeople window.
If approvals are setup, then when the user creates or edits a qualification, the workflow submits the transaction for approval. If the transaction is awaiting approval, the user cannot edit the professional qualification until it has been approved or rejected by the approver.
Note: Academic awards are entered in the Education and Qualifications page. See: Education and Qualfications, page 9-24
Other Professional Qualifications Module for Managers
When managers access the Other Professional Qualifications module, they can view the list of direct reports in their hierarchy. They can view the other professional qualifications details of these employees or add information.
Competency ProfileThe SSHR Competency Profile function enables users to view and update existing

9-26 Oracle Self-Service Human Resources Deploy Self-Service Capability Guide
competency profiles. The function is available to predefined Manager and Employee responsibilities.
Using the Competency Profile Page as ManagersWhen managers navigate to the Competency Profile page, they can view the list of employees in their direct-reports hierarchy. For each of the employees, the Competence Profile page displays the following tabbed regions.
• The Current Competencies tab shows the recorded employee's competencies and levels, except the competencies that are pending approval. You can add competencies or make changes to the competency levels. The link 'Correct' allows a correction to be made to a competence, this should not be used for actual level changes as no history is retained.
You can add competencies using the competencies defined in Oracle HRMS.
The Status Field
The Status field, which is read only, can contain the value Achieved or In Progress.
All non-unit-standard competencies have the status Achieved, by default. When you add a competency to the profile, the Status field is blank. Oracle SSHR populates the field only when you save the competency profile. When a worker achieves all outcomes for a unit standard competency, its status is Achieved. Otherwise, its status is In Progress.
• The History tab shows the history of competencies and levels for the employee.
• The Awaiting Approval tab shows changes made to the competency profile that arestill pending approval.
Managers can compare employee's competencies to those of current or potential future jobs, positions, or vacancies using Suitability Matching. See: Suitability Matching, page 12-7
Using the Competency Profile Page as WorkersUsing the Competency Profile page, workers can:
• View their current competencies and levels in the Current Competencies tabbed region.
• Add competencies to their profile using the competencies defined in Oracle HRMS.
• Make changes to their competency levels using the New Levels Attained button.
• View history of competencies and levels in the History tabbed region.
• View changes made to their competency profile that are still pending approval.
Workforce Sourcing and Deployment 9-27
Adding AttachmentsManagers and workers can attach documents supporting their competencies. If the SaveAttachments check box is available in the Attachments region, then they can select this option to make these attachments available in the Oracle HRMS People window.
Star Ratings in the Competency ProfileIf your enterprise uses the star ratings feature, then as managers and workers, you can use and view star ratings in the following pages and regions of the Competency Profile:
Note: To use the star rating component, enterprises can set the 'HR: Enable Star Rating for Performance and Proficiency Levels in Competencies' profile option. See: Profile Options in Oracle Performance Management, Oracle Performance Management Implementation and User Guide
• Current Competencies
• Correct Competencies
• Enter New Levels
• Proposed Changes table
• Competency History
• Add Competencies page
• Competency Profile: Review
• Competencies Awaiting Approval
In the All Actions Awaiting Your Attention function, the star rating component is displayed for approvers, when a Competency Profile transaction is submitted for approval.
Work PreferencesThe Work Preferences function enables users to store information about their preferred work location and their relocation and travel preferences. Employees can enter the information for themselves and managers can enter the information for their direct reports.
ResumeThe Resume module enables you to use standard attachment functionality to store and

9-28 Oracle Self-Service Human Resources Deploy Self-Service Capability Guide
update your own resume. You can upload a resume, add a link (URL) to an online resume, or edit the resume text. A manager can also store a resume for an employee or worker or update the resume with new information.
Tenure Status (US)Tenure is a unique term in the "Education Industry" that means the completion of professional criteria and an extended probationary period. This results in a person attaining permanent employment with the institution. The Tenure Status module captures the following information:
• Tenure status
• Date determined
• Projected tenure date
• Adjusted tenure date
• Reason for adjustment
• Subject to tenure quota?
Academic Rank (US)The Academic Rank module is a method for promotional progression within Higher Education. The Academic Rank module captures the following information:
• Academic rank
• Start date and end date
• Next academic rank
• Projected date
Employment VerificationThe Employment Verification function enables you (as an employee) to release employment and salary information to an external organization to complete a mortgageor loan application, for example.
To release this information, you select the required template (Employment Information or Employment with Salary Information) and provide the recipient's e-mail details. By default, the recipient's access to the released information expires after either 5 days or 5 visits, whichever occurs first.
The recipient of the information receives an e-mail notification containing an access

Workforce Sourcing and Deployment 9-29
URL, which links to an HTML page containing the released information.
Note: The external recipient sees current data, in other words, data that is valid at the time of request by the verifier. If an employee releases theinformation today and the recipient views it tomorrow, they see the current employment information about the employee. If the employee has been terminated, an error message is displayed and no information is available.
Personalizing the Employment Verification Pages
As a system administrator, you can personalize the Employment Information and Employment with Salary Information templates. You can use the Personalization Framework to display items that are hidden by default, and you can create new items todisplay, if applicable.
See: The Personalization Framework, page 6-4
Note: Any personalization changes that you make to the template pages are also apparent in the pages displayed to the external recipient.
You can also change the default values for the expiry period and maximum number of visits by changing the initial value of the Expires in or Visits item in the Recipient Information region.
Menu and Function NamesYou can access this module from the following menus and functions:
Menu Name Function Name
Employee Self-Service Employment Verification
Employment Verification Global Menu Employment Verification External
WorkflowThere are no workflow processes for this function. The following workflow item type contains the associated workflow messages:
• HRVERF (Employment Verification)

9-30 Oracle Self-Service Human Resources Deploy Self-Service Capability Guide
Configurable Flexfields
Region SSHR Flex Name Flexfield Title
Person Developer DF Further Person Information
PerPeople DDF
Salary Flex
PerAsg DFF Additional Assignment Details
Employment and Salary Person Developer DF Further Person Information
AddnPersonDetails Extra Person Information
AssignDescFlex Extra Assignment Information
Employment Person Developer DF1 Further Person Information
AddnPersonDetails1 Extra Person Details
AssignDescFlex Extra Assignment Information
Configurable Profile OptionsHR: Verification External Node
You use this profile option to set the URL for the external node, for example, http://abc1234.us.organization.com. This node redirects the access request from outside the security firewall to the HTML page containing the released information.
Additional Configuration Steps1. To enable the workflow to send notifications to the external recipients, you must
configure the Workflow Mailer.
See: Implementing Notification Mailers, Oracle Workflow Administrator's Guide
2. You can run the following purge processes with the Employment Verification

Workforce Sourcing and Deployment 9-31
functionality:
• To purge obsolete runtime data, for example, workflow role information and FYI notifications:
See: Running the Workflow Cleanup Process, page 5-12

9-32 Oracle Self-Service Human Resources Deploy Self-Service Capability Guide
Employee Directory
The Employee Directory ModuleThe Employee Directory provides an easily accessible, highly configurable lookup of people within your enterprise. Users can search for a specific person against a range of data, and navigate through the organization to view details of a person's manager or direct reports. You can set up the Employee Directory to search for people from a singlebusiness group or from multiple business groups as required.
The directory extracts information from the Employee Directory repository. The repository tables hold a snapshot of de-normalized HRMS data. In addition, users can upload their personal picture to the repository.
The Employee Directory includes the following features:
• Anonymous access to the Employee Directory repository with simple and advance search features
You can provide users with anonymous access to the read-only directory. Users canuse basic or advanced search facilities to find people and their assignment details.
• Controlled access to the HRMS data during major reorganization processes within the company
The repository data is independent of the HRMS data, and therefore remains static if your organization is undergoing internal change. The directory data will not change until you refresh the repository.
• Constant and immediate availability
The directory is available continuously, and supports concurrent users.
• Presentation of complex Oracle HRMS data
The associated HRMS data is de-normalized into the Employee Directory repositorytables, enabling users to view a range of data relating to workers and their assignments in a simple layout. In addition, the directory is not dealing with temporal data.
• Time zone support
The Employee Details page can display the local time at the worker's location.
• MLS support
If your configuration includes the MLS dictionary, you can display organization, position, and job values in the local language.
Workforce Sourcing and Deployment 9-33
• Multi-assignment support
You can view multiple assignments for each worker.
• Support for multiple data sources
You can import data from heterogeneous data sources.
Search FacilityThe simple search field enables users to enter a value to match against any of the following columns in the repository for the worker's primary assignment:
• First Name
• Last Name
• Full Name
• Preferred Name
• E-mail Address
• Work Phone Number
• Alternate First Name
• Alternate Last name
Note: To search on a telephone number enter the numbers only, without spaces or other characters. The telephone number search format can be altered using the override packages. For an example, see: Customer Override for Single Sign On, page 9-41
The Advanced Search page enables users to search on multiple values. You can configure this page to display the most appropriate search fields for your requirements.
See Configuring Web Pages, page 6-21
Deploying the Employee DirectoryYou can choose to deploy the Employee Directory in any of the following ways:
• Self Service Personal Home Page
Add the Proxy Page function (HR_EMPDIR_PROXY_SS) to a menu or responsibility using the standard AOL setup. Give the function a prompt.
See: Self-Service Menus and User Access, page 3-11

9-34 Oracle Self-Service Human Resources Deploy Self-Service Capability Guide
The Personal Home Page uses the standard Self Service Global Menu to provide global buttons. See: Configuring the Global Button Bar, page 6-38 to configure this menu.
• Portal
For information on configuring Portal, see the following notes on My Oracle Support:132035.1
Populating the Employee DirectoryBefore you can use the Employee Directory you must load data from your database intothe repository. At this time you can override any of the supplied mappings with your own data.
See: Populating the Repository, page 9-42
Editing Personal DetailsFrom the directory, users can log on to Self Service modules to update their personal information. For example, a user can log on to the employee directory to update a phone number or change name information. See: Enabling Single Sign On to Self Service, page 9-40
Personal PictureUsers can upload their personal picture into the repository using the Update Profile page if you have enabled Single Sign On. See: Enabling Single Sign On To Self Service, page 9-40.
The repository stores the images as locally.
Name FieldsThe Display Name is a format which is used in the following places:
Page Item
Employee Detail Header title (Employee Detail Region)
Name
Tree
Manager
Workforce Sourcing and Deployment 9-35
Page Item
Representative1
Representative2
Representative3
Representative4
Organization Hierarchy Employee Name
Simple Search Employee Name
Advanced Search Employee Name
Employee Profile Page title
Profile Preview Page title
You can change the format of the Display Name by using the override procedures. The change will affect the format of the name in all of the above items.
The following fields display a value depending on the legislation associated with a person:
Field name Description
First Name Displays a value for the person's first name
Last Name Displays a value for the person's last name
First Name Alternate Displays a multi-byte first name
Last Name Alternate Displays a multi-byte last name
The values held by each of the above fields can be altered by using the override procedures.
See: Setting Up Legislation and Customer Overrides, page 9-44
You can configure the pages at the required levels to display whichever name fields are appropriate for your enterprise.
9-36 Oracle Self-Service Human Resources Deploy Self-Service Capability Guide
Page Layout ConfigurationYou can configure the Employee Detail page at all personalization levels. You can configure the other pages at Function, Responsibility, User, and Site levels.
Note: Responsibility and User level personalizations are not available for Anonymous access.
On the Employee Detail page, the application automatically displays the Employee Detail region. If you enable other regions, the application will only display them if they contain data.
If you enable additional telephone number fields, map them to a lookup code of type "PHONE_TYPE".
See: Configuring Web Pages, page 6-21
Menu and Function Names
User Menu Name Function Name
Employee Directory Functions Menu Employee Directory
See: Defining User Access and Menus, page 4-10
WorkflowNot applicable
Configurable Tips and Instructions
Simple Search Page
Region Tip Type Message Name
Page Layout Region Instruction HR_EMPDIR_SIMPLE_SEARCH_INSTR
Search Results Region Instruction HR_EMPDIR_MULTI_ASG_INSTR

Workforce Sourcing and Deployment 9-37
Advanced Search Page
Region Tip Type Message Name
Search Header Region Instruction HR_EMPDIR_ADV_SEARCH_INSTR
Search Results Region Instruction HR_EMPDIR_MULTI_ASG_INSTR
Employee Detail Page
Region Tip Type Message Name
Employee Detail Cell Instruction HR_EMPDIR_EMPDETAIL_INSTR
Organization Hierarchy Page
Region Tip Type Message Name
Hierarchy Region Instruction HR_EMPDIR_HIERARCHY_INSTR
Employee Profile Page
Region Tip Type Message Name
Page Layout Region Instruction HR_EMPDIR_EDITPROFILE_INSTR
Photo Region Instruction HR_EMPDIR_PIC_INSTR
Edit Employee Information Region
Instruction HR_EMPDIR_EMPUPD_INSTR

9-38 Oracle Self-Service Human Resources Deploy Self-Service Capability Guide
Picture Preview Page
Region Tip Type Message Name
Page Layout Region Instruction HR_EMPDIR_PREVIEW_PIC_INSTR
See: Adding Instructions to Web Pages, page 6-35
Configurable FlexfieldsWith anonymous login, the application has no context of business groups, responsibilities, or personal profiles, to support flexfields. However, you can import flexfields using the override packages. If you do so, it is your responsibility to map the flexfields to MLS if you require multi-lingual support.
Configurable Profile Options
Profile Configurable Levels Values Default
HR:Employee Directory Global Menu
Site Any menu name withmenu type of Global
Employee Directory Global Menu
Server Timezone Site, User List of values based on FND_TIMEZONES_VL
None
HR:Employee Directory Global MenuThis system profile enables you to specify a menu to provide global buttons in addition to the standard Self Service Global Menu buttons when the Employee Directory is accessed anonymously.
Server TimezoneSet this profile option to the time zone corresponding to your server time zone. This option affects the date and time displayed on the Employee Details page.
Note: The Client Timezone profile option also exists within Oracle

Workforce Sourcing and Deployment 9-39
applications. If you enable this profile option at User level, there will beimplications for other windows and pages. This is because other DATETIME fields on other windows and pages are automatically converted to the time zone defined by the Client Timezone profile. Thistime zone may be inconsistent with the time zone defined by the ServerTimezone profile option. To avoid this situation, the system administrator should carry out the following steps:
• Prevent the Client Timezone profile option being set at the User level. To do this, use an Application Developer responsibility to change the delivered profile option definition. See: User Profiles, Oracle HRMS Configuring, Reporting, and System Administration Guide
• Use the Personalization Framework functionality to remove the Time Zone field from the Preferences page.
Anonymous Access to the Employee DirectoryFollow the steps below to set up anonymous access and to configure the global button bar.
To secure the Employee Directory function and to restrict access to employee data through Intranet and external servers, Oracle SSHR provides the Employee Directory responsibility that contains Employee Directory function.
The predefined GUEST user grant for the Employee Directory Functions menu no longer works. To enable GUEST user to access the Employee Directory functions, you must assign the Employee Directory responsibility to the GUEST user using the Users window.
To provide users with anonymous access to the Employee Directory:1. Log in to Oracle Applications using the System Administrator responsibility.
2. Navigate to the Users window and query the GUEST user.
3. In the responsibilities window, assign the Employee Directory responsibility and save.
4. Ensure your HTML form includes an Action referencing "/OA_HTML/EmpdirLogin.jsp". This action takes the user to the simple search field,logged in anonymously. See the example code below.
5. Ensure the HTML form has the following two elements:

9-40 Oracle Self-Service Human Resources Deploy Self-Service Capability Guide
• A Text element with the name "srchText"
This element places a text field in your form into which the user can enter search criteria in order to access people in the Employee Directory.
• A Hidden element with the name "L", and the required language code for MLS
This element provides field labels and data for the directory in the chosen language.
See the example code below.
6. Function level personalization is not automatically available for anonymous access. If you want to enable Function level personalization, add a Hidden element with the name "OAFunc" pointing to the function being personalized.
See the example code below.
Example HTML form<form NAME="people"ACTION="http://qapache.us.oracle.com:5122/OA_HTML/EmpdirLogin.jsp" METHOD="POST" target="_top"> <table WIDTH="100%" cellpadding="0" cellspacing="0"> <tr><td WIDTH="1%" valign="TOP"> <table WIDTH="130"> <tr><td valign="TOP"> <input TYPE="text" NAME="srchText" SIZE="9"> <input TYPE="hidden" NAME="L" value="US"> <input TYPE="hidden" NAME="OAFunc" value="ORACLE_PROXY_SS"> --this line is optional</form>
To configure the Global Buttons for anonymous login:1. If you require additional buttons, such as Files Online, or Calendar, make entries to
the Employee Directory Global Menu, or to any customer defined menu of menu type Global.
Note: Global buttons are defined as FND Form functions.
2. Set the system profile HR:Employee Directory Global Menu to point to the Employee Directory Global Menu (the default), or the menu you have defined in the previous Step.
Enabling Single Sign On to Self ServiceThe Employee Directory is read only. To enable users to edit their personal information,or to add or edit their image, follow the procedures below to provide them with single sign on access to Self-Service:

Workforce Sourcing and Deployment 9-41
1. Define an FND user for each person that requires access to Self-Service, if they are not defined as FND users already.
See: Defining User Access to Self-Service Functions, page 4-11
2. In the Descriptive Flexfield Segments window, configure a segment in the Additional Personal Details Descriptive flexfield to hold the FND_USER names, using any available attribute.
See: Defining Descriptive Flexfield Structures, Oracle E-Business Suite Flexfields Guide
3. Map the segment to the USER_NAME column in the PER_EMPDIR_PEOPLE repository table by editing the PER_EMPDIR_PEOPLE_OVERRIDE package body. See: Customer Override for Single Sign On, page 9-41
Enabling Customer Overrides for the Employee DirectoryYou can use overrides with the Employee Directory to customize the fields available when you synchronize the data from Oracle HRMS tables with the Employee Directory repository tables. For example, to enable single sign on to self-service applications from the Employee Directory, you can perform a customer override to add your FND_USER names to the directory. This means that the Employee Directory repository tables are modified in line with the customer or legislation override.
Note: If legislation and customer overrides exist, customer overrides take precedence over legislation overrides.
All customer override package bodies are in the peredcor.pkb file, in the $PER_TOP/patch/115/sql directory.
For more information on overrides, see: Legislation and Customer Overrides, page 4-7.
Set up Customer Override for Single Sign On:1. Open the package body PER_EMPDIR_PEOPLE_OVERRIDE in a text tool.
2. Modify the line g_override_flg BOOLEAN := FALSE;
to g_override_flg BOOLEAN := TRUE;
This change enables the override package.
3. Add the following code into the before_dml procedure:
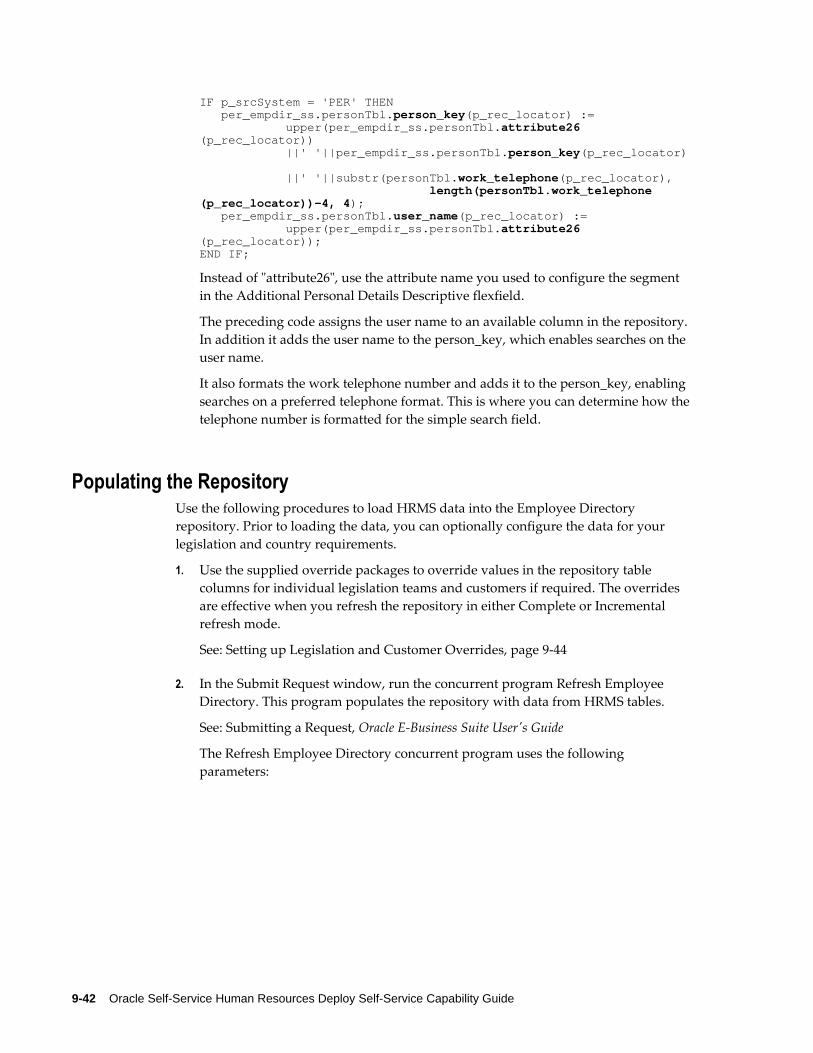
9-42 Oracle Self-Service Human Resources Deploy Self-Service Capability Guide
IF p_srcSystem = 'PER' THEN per_empdir_ss.personTbl.person_key(p_rec_locator) := upper(per_empdir_ss.personTbl.attribute26(p_rec_locator)) ||' '||per_empdir_ss.personTbl.person_key(p_rec_locator)
||' '||substr(personTbl.work_telephone(p_rec_locator), length(personTbl.work_telephone(p_rec_locator))-4, 4); per_empdir_ss.personTbl.user_name(p_rec_locator) := upper(per_empdir_ss.personTbl.attribute26(p_rec_locator)); END IF;
Instead of "attribute26", use the attribute name you used to configure the segment in the Additional Personal Details Descriptive flexfield.
The preceding code assigns the user name to an available column in the repository. In addition it adds the user name to the person_key, which enables searches on the user name.
It also formats the work telephone number and adds it to the person_key, enabling searches on a preferred telephone format. This is where you can determine how the telephone number is formatted for the simple search field.
Populating the RepositoryUse the following procedures to load HRMS data into the Employee Directory repository. Prior to loading the data, you can optionally configure the data for your legislation and country requirements.
1. Use the supplied override packages to override values in the repository table columns for individual legislation teams and customers if required. The overrides are effective when you refresh the repository in either Complete or Incremental refresh mode.
See: Setting up Legislation and Customer Overrides, page 9-44
2. In the Submit Request window, run the concurrent program Refresh Employee Directory. This program populates the repository with data from HRMS tables.
See: Submitting a Request, Oracle E-Business Suite User's Guide
The Refresh Employee Directory concurrent program uses the following parameters:

Workforce Sourcing and Deployment 9-43
Parameter Options Description
Refresh Mode Complete/Incremental Use the Complete refresh mode for the initial population of data to the Employee Directory repository tables and intermittently in the future.
A Complete refresh rebuildsall the data in the repository and clears deletes. This process requires downtime. Perform a full refresh once every six months or so to clear deletes from the repository, depending on the rate of staff turnover.
Use Incremental refresh mode at regular intervals to synchronize the data between Oracle HRMS and the Employee Directory. Thefrequency depends on how current you require the data to be.
Refresh Date Leave this blank to use the system date.
The concurrent program will collect data applicable to this date.
Warning: Oracle recommends you leave this parameter blank for scheduled refreshes. If you insert a date, every time the concurrent program runs, it will collect data for the same date - in other words, the data willnever be updated.
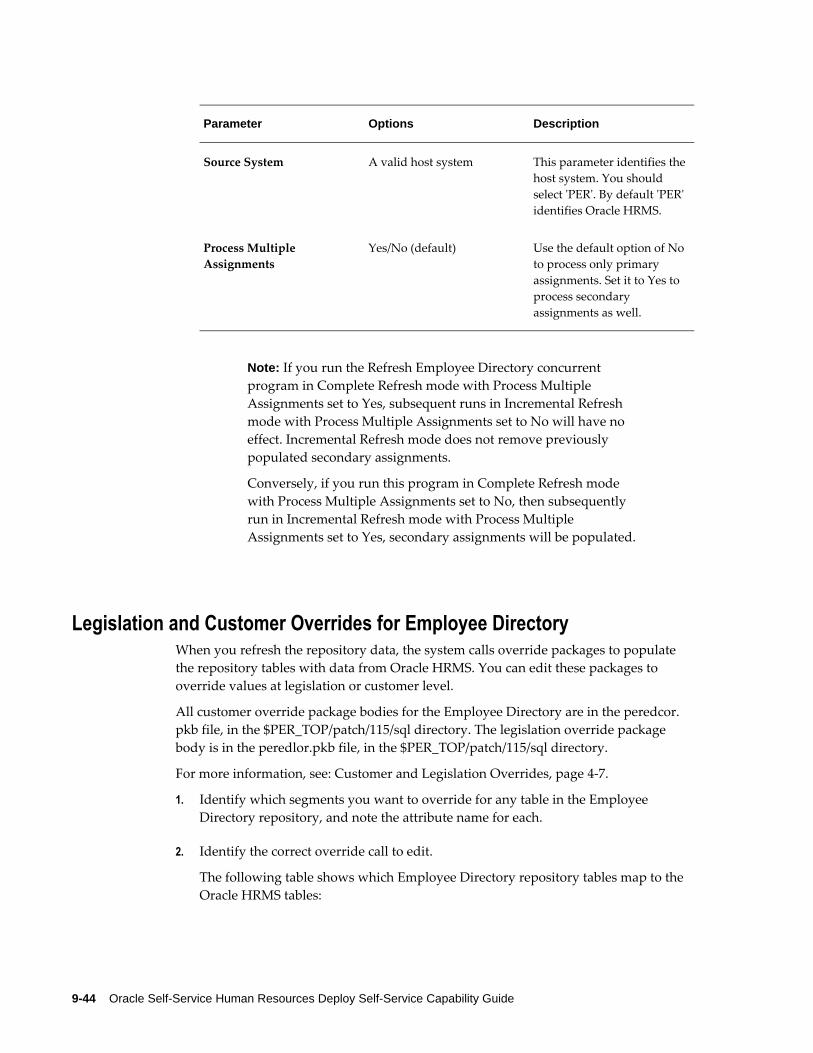
9-44 Oracle Self-Service Human Resources Deploy Self-Service Capability Guide
Parameter Options Description
Source System A valid host system This parameter identifies thehost system. You should select 'PER'. By default 'PER'identifies Oracle HRMS.
Process Multiple Assignments
Yes/No (default) Use the default option of Noto process only primary assignments. Set it to Yes to process secondary assignments as well.
Note: If you run the Refresh Employee Directory concurrent program in Complete Refresh mode with Process Multiple Assignments set to Yes, subsequent runs in Incremental Refresh mode with Process Multiple Assignments set to No will have no effect. Incremental Refresh mode does not remove previously populated secondary assignments.
Conversely, if you run this program in Complete Refresh mode with Process Multiple Assignments set to No, then subsequently run in Incremental Refresh mode with Process Multiple Assignments set to Yes, secondary assignments will be populated.
Legislation and Customer Overrides for Employee DirectoryWhen you refresh the repository data, the system calls override packages to populate the repository tables with data from Oracle HRMS. You can edit these packages to override values at legislation or customer level.
All customer override package bodies for the Employee Directory are in the peredcor.pkb file, in the $PER_TOP/patch/115/sql directory. The legislation override package body is in the peredlor.pkb file, in the $PER_TOP/patch/115/sql directory.
For more information, see: Customer and Legislation Overrides, page 4-7.
1. Identify which segments you want to override for any table in the Employee Directory repository, and note the attribute name for each.
2. Identify the correct override call to edit.
The following table shows which Employee Directory repository tables map to the Oracle HRMS tables:

Workforce Sourcing and Deployment 9-45
Entities Denormalized from Oracle HRMS
EMPDIR table name HRMS table name
PER_EMPDIR_PEOPLE PER_ALL_PEOPLE_F
PER_EMPDIR_ASSIGNMENTS PER_ALL_ASSIGNMENTS_F
PER_EMPDIR_ORGANIZATIONS HR_ALL_ORGANIZATION_UNITS, HR_ALL_ORGANIZATION_UNITS_TL
PER_EMPDIR_JOBS PER_JOBS, PER_JOBS_TL
PER_EMPDIR_POSITIONS HR_ALL_POSITIONS_F, HR_ALL_POSITIONS_TL
PER_EMPDIR_LOCATIONS HR_LOCATIONS_ALL
PER_EMPDIR_LOCATIONS_TL HR_LOCATIONS_ALL_TL
PER_EMPDIR_PHONES PER_PHONES
The following table shows which override call to use to override values in the repository tables at legislation or customer levels.
Legislation and Customer Override Calls
Table Legislation Override Call
Customer OverrideCall
Record Structure (Instance)
PER_EMPDIR_PEOPLE
PER_EMPDIR_LEG_OVERRIDE. PEOPLE
PER_EMPDIR_PEOPLE_OVERRIDE.BEFORE_DML
PER_EMPDIR_SS.PersonTblType (personTbl)
PER_EMPDIR_ASG PER_EMPDIR_LEG_OVERRIDE. ASG
PER_EMPDIR_ASG_OVERRIDE.BEFORE_DML
PER_EMPDIR_SS.AsgTblType (asgTbl)
PER_EMPDIR_ORGS
PER_EMPDIR_LEG_OVERRIDE. ORGS
PER_EMPDIR_ORGS_OVERRIDE.BEFORE_DML
PER_EMPDIR_SS.OrgTblType (orgTbl)
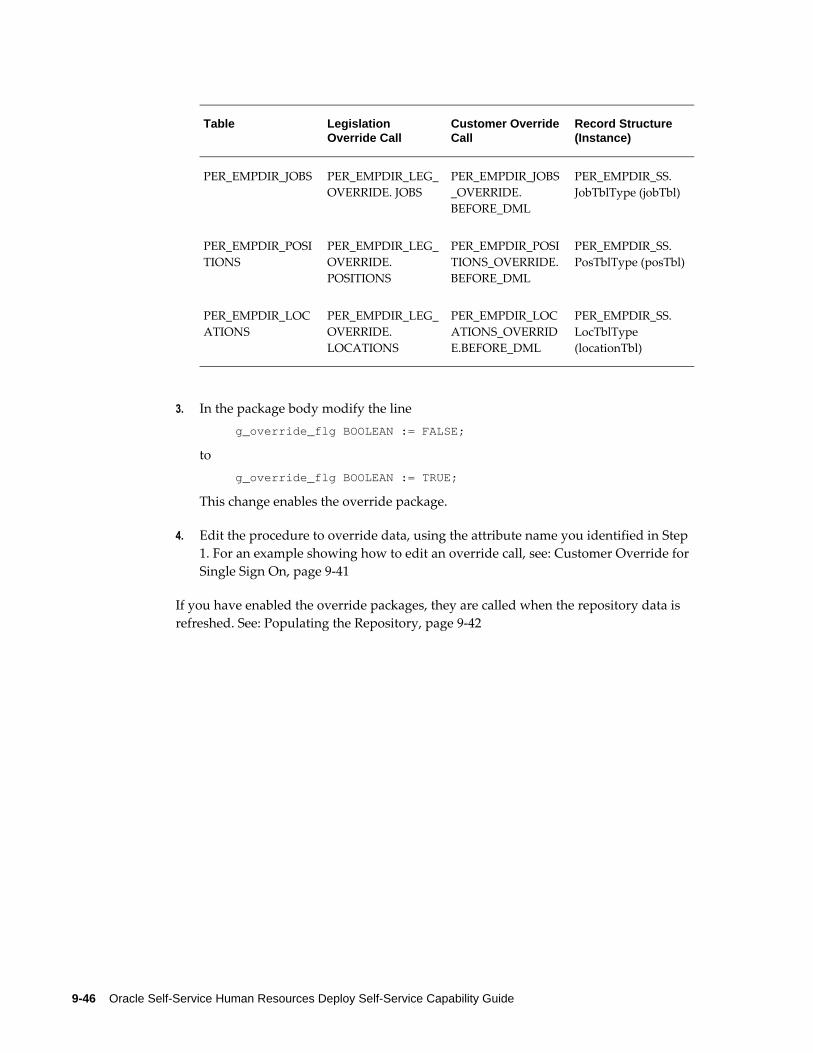
9-46 Oracle Self-Service Human Resources Deploy Self-Service Capability Guide
Table Legislation Override Call
Customer OverrideCall
Record Structure (Instance)
PER_EMPDIR_JOBS PER_EMPDIR_LEG_OVERRIDE. JOBS
PER_EMPDIR_JOBS_OVERRIDE.BEFORE_DML
PER_EMPDIR_SS.JobTblType (jobTbl)
PER_EMPDIR_POSITIONS
PER_EMPDIR_LEG_OVERRIDE. POSITIONS
PER_EMPDIR_POSITIONS_OVERRIDE.BEFORE_DML
PER_EMPDIR_SS.PosTblType (posTbl)
PER_EMPDIR_LOCATIONS
PER_EMPDIR_LEG_OVERRIDE. LOCATIONS
PER_EMPDIR_LOCATIONS_OVERRIDE.BEFORE_DML
PER_EMPDIR_SS.LocTblType(locationTbl)
3. In the package body modify the line g_override_flg BOOLEAN := FALSE;
to g_override_flg BOOLEAN := TRUE;
This change enables the override package.
4. Edit the procedure to override data, using the attribute name you identified in Step 1. For an example showing how to edit an override call, see: Customer Override for Single Sign On, page 9-41
If you have enabled the override packages, they are called when the repository data is refreshed. See: Populating the Repository, page 9-42

Workforce Sourcing and Deployment 9-47
Manage Employment Events
Manage Employment Events Modules and WorkflowThe Manage Employment Events module groups together workflow processes that relate to changes in an employee's assignment. The functions available enable you to control all actions relevant to your employees in your organization, from hiring employees through their separation from the organization.
You can build and configure these workflow processes to suit the requirements of your enterprise. The basic Manage Employment Events modules are: Assignment, Location, Work Schedule, Change Manager, Employee or Contingent Worker Termination (containing Termination and End Placement), Employee or Contingent Worker Pay (containing Pay Rate and Assignment Rate), Individual Compensation Distributions, Special Information Types, and Other Employment Information.
Chained Manage Employment Events ProcessesOracle Workflow enables you to combine different Manage Employment Events modules into one workflow process. Such processes are known as chained processes. SSHR includes a number of predefined chained processes that appear as functions on the user menus.
Note: You can also include the Individual Compensation Distributions (ICD) module in chained processes, if required.
The following table gives a list of the delivered chained processes.
Manage Employment Events Chained Processes:
Manage Employment Events Chained Process
Contains the following Manage Employment Events modules:
Change Pay Employee or Contingent Worker Pay
Change Conditions Assignment, Location, Work Schedule
Change Cost Center, Terms and Manager Assignment, Other Employment Info, Location, Change Manager
Change Cost Center, Location and Manager Assignment, Location, Change Manager
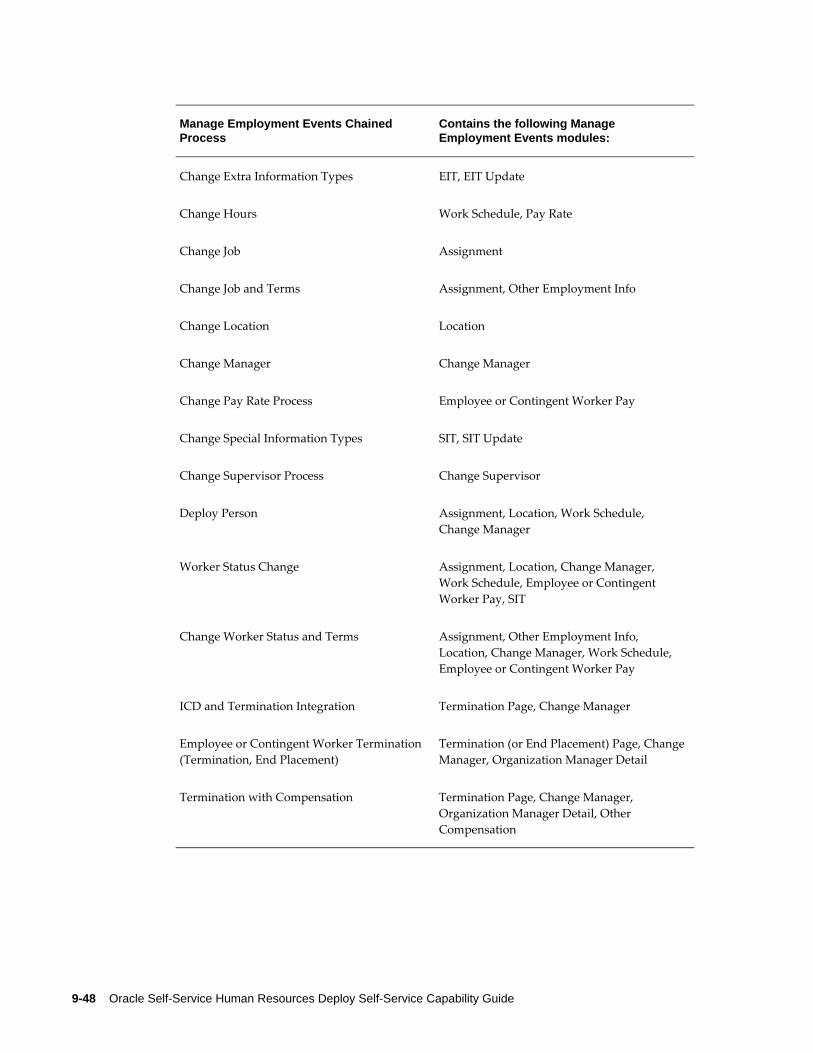
9-48 Oracle Self-Service Human Resources Deploy Self-Service Capability Guide
Manage Employment Events Chained Process
Contains the following Manage Employment Events modules:
Change Extra Information Types EIT, EIT Update
Change Hours Work Schedule, Pay Rate
Change Job Assignment
Change Job and Terms Assignment, Other Employment Info
Change Location Location
Change Manager Change Manager
Change Pay Rate Process Employee or Contingent Worker Pay
Change Special Information Types SIT, SIT Update
Change Supervisor Process Change Supervisor
Deploy Person Assignment, Location, Work Schedule, Change Manager
Worker Status Change Assignment, Location, Change Manager, Work Schedule, Employee or Contingent Worker Pay, SIT
Change Worker Status and Terms Assignment, Other Employment Info, Location, Change Manager, Work Schedule, Employee or Contingent Worker Pay
ICD and Termination Integration Termination Page, Change Manager
Employee or Contingent Worker Termination (Termination, End Placement)
Termination (or End Placement) Page, ChangeManager, Organization Manager Detail
Termination with Compensation Termination Page, Change Manager, Organization Manager Detail, Other Compensation
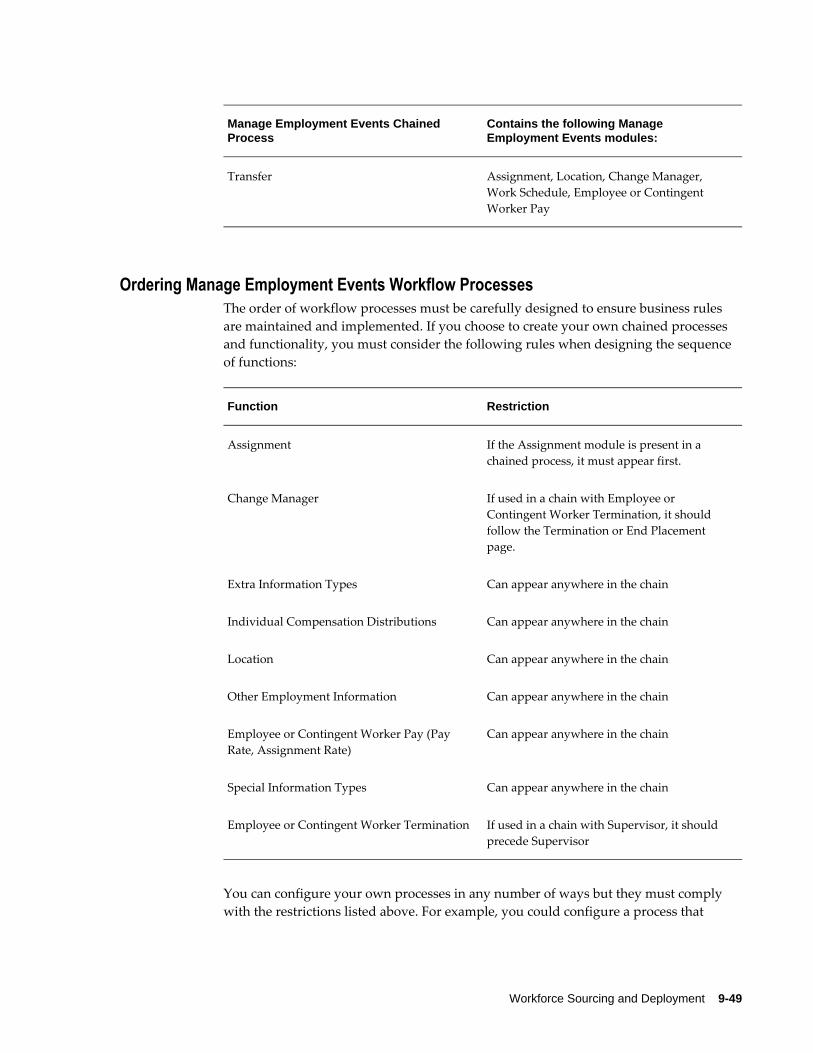
Workforce Sourcing and Deployment 9-49
Manage Employment Events Chained Process
Contains the following Manage Employment Events modules:
Transfer Assignment, Location, Change Manager, Work Schedule, Employee or Contingent Worker Pay
Ordering Manage Employment Events Workflow ProcessesThe order of workflow processes must be carefully designed to ensure business rules are maintained and implemented. If you choose to create your own chained processes and functionality, you must consider the following rules when designing the sequence of functions:
Function Restriction
Assignment If the Assignment module is present in a chained process, it must appear first.
Change Manager If used in a chain with Employee or Contingent Worker Termination, it should follow the Termination or End Placement page.
Extra Information Types Can appear anywhere in the chain
Individual Compensation Distributions Can appear anywhere in the chain
Location Can appear anywhere in the chain
Other Employment Information Can appear anywhere in the chain
Employee or Contingent Worker Pay (Pay Rate, Assignment Rate)
Can appear anywhere in the chain
Special Information Types Can appear anywhere in the chain
Employee or Contingent Worker Termination If used in a chain with Supervisor, it should precede Supervisor
You can configure your own processes in any number of ways but they must comply with the restrictions listed above. For example, you could configure a process that

9-50 Oracle Self-Service Human Resources Deploy Self-Service Capability Guide
follows this sequence:
• Step 1: Assignment
• Step 2: Location
• Step 5: Work Schedule
But, you cannot configure a process in this order, as you will break business rules:
• Step 2: Location
• Step 1: Assignment
• Step 5: Work Schedule
As long as you maintain the order of steps you can configure whichever workflow processes your enterprise needs.
AssignmentThe Assignment module is used in some delivered Manage Employment Events menu functions, for example, the Employee Status Change chained process. It can be added inany of your own business processes that you model in the Workflow Builder.
Assigning a Salary BasisYou use a salary basis in Oracle HRMS to establish the duration of a salary. For example, an hourly salary basis (for example, 1,000 yen per hour) or an annual salary basis (for example, 18,000 pounds per year).
For more information on salary bases, see Salary Basis, Oracle HRMS Compensation and Benefits Management Guide.
If you enable the Salary Information region, users can assign newly hired employees and workers to a salary basis, or change the salary basis of an existing employee or worker. If they change the salary basis mid-way through a payroll period, the application ends the existing salary element entry. This may not be desirable for payrollcalculations, therefore if a user changes the salary basis of an employee or worker assigned to a payroll on any effective date other than the first day of the payroll period, the application sends a notification to a payroll contact as part of the approval process. The payroll contact can accept or reject the change, or return it to the originator requesting a change to the effective date (normally setting it to the first day of the next payroll period).
Note: This notification is sent only for employees and workers assignedto a payroll. Also, this notification is sent to your payroll contact only if you have enabled approvals for this transaction. You must also set up

Workforce Sourcing and Deployment 9-51
the payroll contact using a workflow item attribute (Payroll Contact User Name). This notification is only sent for changes to salary basis andnot for new hires or the first assignment of a salary basis to an existing employee or worker.
If you want to enable self-service users to assign a salary basis, you must enable the Salary Information region item in the HR_ASSIGNMENT_SS and HR_ASSIGNMENT_REVIEW_SS regions.
If a salary basis is assigned without a pay proposal, the Description and Salary fields on the Pay Rate page will be mandatory if the profile option HR: Base Salary Required is set to Yes.
Multiple AssignmentsIf an employee or worker has more than one assignment, the manager must select the relevant assignment before carrying out the employee action.
Note: To enable a manager to select an assignment, the profile option HR: Enable Multiple Assignments in SSHR must be set to Yes at the required level.
Menu and Function NamesNot applicable
WorkflowThe workflow details for this module are listed below:
Workflow Process Display Name: Assignment
The Assignment module is used in several example chained processes including:
• Employee Status Change
• Change Job
• Transfer
Configurable Workflow Attributes:
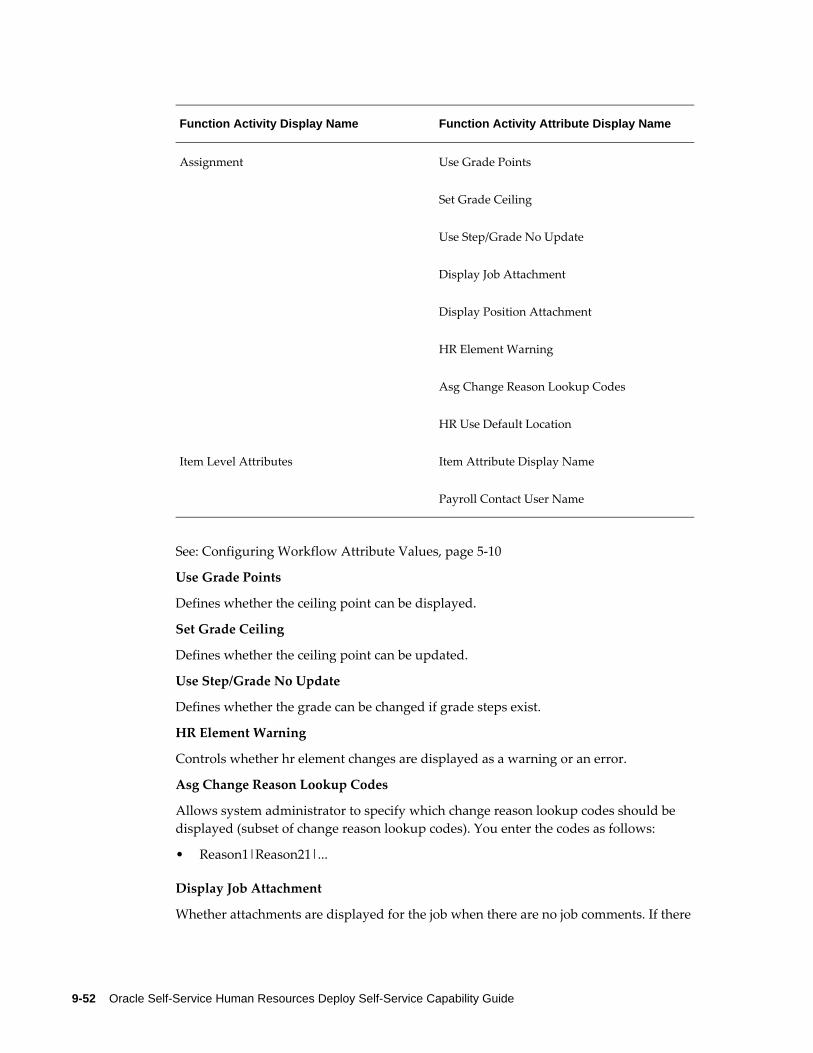
9-52 Oracle Self-Service Human Resources Deploy Self-Service Capability Guide
Function Activity Display Name Function Activity Attribute Display Name
Assignment Use Grade Points
Set Grade Ceiling
Use Step/Grade No Update
Display Job Attachment
Display Position Attachment
HR Element Warning
Asg Change Reason Lookup Codes
HR Use Default Location
Item Level Attributes Item Attribute Display Name
Payroll Contact User Name
See: Configuring Workflow Attribute Values, page 5-10
Use Grade Points
Defines whether the ceiling point can be displayed.
Set Grade Ceiling
Defines whether the ceiling point can be updated.
Use Step/Grade No Update
Defines whether the grade can be changed if grade steps exist.
HR Element Warning
Controls whether hr element changes are displayed as a warning or an error.
Asg Change Reason Lookup Codes
Allows system administrator to specify which change reason lookup codes should be displayed (subset of change reason lookup codes). You enter the codes as follows:
• Reason1|Reason21|...
Display Job Attachment
Whether attachments are displayed for the job when there are no job comments. If there

Workforce Sourcing and Deployment 9-53
are comments for the job, no attachments are displayed.
Display Position Attachment
Whether attachments are displayed for the position when there are no position comments. If there are comments for the position, no attachments are displayed.
HR Use Default Location
The location can be changed to the default organization or position locations. If the organization/position is then changed for a user, the user's location will be the default location for the organization/position.
Payroll Contact User Name
The Applications user name of the payroll representative who should be notified when a user changes a salary basis in the middle of a payroll period. This attribute is mandatory if you use the Salary Basis functionality.
Configurable Tips and Instructions
Assignment Page
Region Tip Type Message Name
Assignment Instruction HR_INST_TOP_COMMON_TEXT
Job Instruction HR_INST_ASG_JOB_SS
Position Instruction HR_INST_ASG_POSITION_SS
GRE Instruction HR_INST_ASG_GRE_SS
Payroll Instruction HR_INST_ASG_PAYROLL_SS
Location Long Message HR_INST_CHANGE_LOCATION
Location Long Message HR_INST_WORK_AT_HOME_LOC
* These instructions are delivered as hidden, although they can be displayed and personalized.

9-54 Oracle Self-Service Human Resources Deploy Self-Service Capability Guide
Configurable Flexfields
Assignment Page
Region Flex Name Flex Code
Specific Job Information HrFlex1 Job Developer DF
Extra Position Information HrFlex1 Extra Position Info DDF
Department Working Conditions
HrFlex1 Org Developer DF
People Group People Group Key Flex GRP
Other Assignment Information
Additional Assignment Details
PER_ASSIGNMENTS
Statutory Information Work Sched Key Flex GRES_AND_OTHER_DATA
See: Configuring Flexfields, page 6-27
Configurable Profile Options
Profile Configurable Levels Values Default
HR:Use Grade Defaults
Site, Application, Responsibility, User
Yes/No Yes
HR:Override Grade Defaults
Site, Application, Responsibility, User
Yes/No No
HR: Position Default Options for SSHR
Site, Application, Responsibility, User
Default with No Warning
Default with User Decision
Default with Warning
No Defaulting
Default with User Decision
The following profile options control a user's ability to use grade defaults and position

Workforce Sourcing and Deployment 9-55
defaults.
HR:Use Grade DefaultsThis profile option determines whether the user can only select a valid grade for a parent organization, job, or position. The list of values for the Grade field is determined by the entry in the Organization, Job, or Position field.
If this profile value is No, the user can select any grade for the organization, job, or position.
HR:Override Grade DefaultsThis profile option determines whether the user can select a different (non-default) grade for an organization, position, or job.
If this profile value is No, the user cannot override the default grade.
Interaction of Default Profile OptionsThe above profile options work together to control the behavior of grades in SSHR. The following situations are possible:
Profile Option HR: Use Grade Defaults
HR: Use Grade Defaults
Value Yes No
HR: Override Grade Defaults
Yes The user can select any valid grade.
The user can select any grade, either valid or invalid.
HR: Override Grade Defaults
No The user can select any valid grade or retain the current grade (even if invalid).
The user can only select valid grades.
HR: Position Defaulting Options for SSHRThese options control whether or not the application displays default information basedon the position you select for an assignment. You can set one of four values:
• Default with No Warning
• Default with User Decision

9-56 Oracle Self-Service Human Resources Deploy Self-Service Capability Guide
• Default with Warning
• No Defaulting
TerminationThe Termination page enables:
• Managers to end an employment or end a placement.
Note: A manager can only terminate an employee if the manager has access to the primary assignment for the person.
See: Terminating Employment or Ending Placement, page 9-56
• Managers to terminate secondary assignments or end secondary placements
See: Terminating Secondary Assignments or Ending Secondary Placements, page 9-57
• Employees to initiate the process of ending their employment. Contingent workers can initiate ending their placements.
See: Voluntary Termination , page 9-58 and Voluntary End Placement, page 9-59
Terminating Employment or Ending PlacementThe Termination page enables a manager to end an employment relationship. When themanager selects the Termination function from the menu, a person hierarchy is displayed to enable the manager to select an employee or contingent worker for termination. This hierarchy is usually supervisor or position-based.
For more information on the hierarchy, see Enter Process, page 11-4.
Multiple Assignments and Termination
If your organization uses multiple assignments and assignment-level security is enabled, it may be the case that an assignment-based hierarchy only displays a subset ofa person's assignments. A person may have secondary assignments that are not visible to the manager.
For more information on security, see: Assignment-Level Security, Oracle HRMS Configuring, Reporting, and System Administration Guide.
Change Manager Function
If the terminated employee or worker has direct subordinates, the system automatically displays the Change Manager page to reassign the terminated supervisor's subordinatesto another supervisor.
Workforce Sourcing and Deployment 9-57
In the event of the employee or worker also being a manager to an organization, the Update Organization Manager page may appear for you to assign a new manager. This depends on how your security profile is set up.
For more information see: Organization Manager, page 9-69
Reversing TerminationsOracle SSHR enables managers to cancel or reverse a termination. For more information, see: Reverse Termination, page 9-59
Terminating Secondary Assignments or Ending Secondary Placements Using the Termination page, managers can:
• Terminate or end secondary assignments for employees
• End secondary placements for contingent workers
Managers can perform these actions using their self-service responsibility and need not depend on their HR personnel to complete these tasks.
When you click the Termination function to initiate termination of secondary assignments, the Termination: People in Hierarchy page displays both the primary and secondary assignments of the manager's directs depending on the HR: Enable Multiple Assignments in SSHR profile option value set. This profile option controls whether a manager can view and update multiple assignments for an employee in SSHR. If the profile option is set to Yes, the Hierarchy page displays all the assignments that the manager has access to. If the profile is No, then only primary assignments are displayed.
You can use the Primary column to identify the assignment type. When you click the Action icon to terminate the secondary assignment, the Termination: Perform Action page appears. Click Yes and enter the termination effective date. The Assignment page displays the assignment details and current assignment status. In the Proposed Assignment field, select Terminate or End Assignment. The subsequent Change Manager page shows the subordinates reporting to the secondary assignment only. These subordinates have to be reassigned to proceed further. The Change Manager page appears during the Secondary assignment termination only if there are subordinates reporting to the manager's secondary assignment.
The following paragraphs explain how the setting of the HR: Manage Self Service Actions When Future-Dated Changes Exist profile impacts the termination of secondaryassignments:
• The application displays an error if future dated changes exist, and the profile valueis set to Stop with Error.
• If future dated changes (other than termination of employee or the assignment) exist and the profile value is set to Notify HR, then the application displays a

9-58 Oracle Self-Service Human Resources Deploy Self-Service Capability Guide
warning message. The transaction can be submitted which on approval notifies the HR representative. The HR representative can review the change and then apply the necessary changes to the database manually. If the future dated change is of type termination of employment or of the secondary assignment, then a manager will not be able to process the termination and an error message is displayed.
Reviewing Requests for Ending Employment or Ending PlacementUsing Oracle SSHR, employees can request for ending their employment or contingent workers can request for ending their placement.
When an employee or a contingent worker raises such a request, their managers receivethe notification. If the employee or contingent worker is a supervisor with directs, then the notification displays a message that the manager must reassign directs to another manager. If the employee is an organization manager, then the manager can select another organization manager. Based on the approvals set in the enterprise, the voluntary termination of employment or ending placement is processed.
End PlacementThe Terminate Placement page enables a manager to end a contingent worker's work relationship and specify a reason. This changes the person type to Ex-Contingent Worker and ends all assignments. If the contingent worker has direct subordinates, the system will automatically display the Change Manager page to reassign the contingent worker's subordinates to another supervisor.
If the contingent worker is also a manager of an organization, the Update Organization Manager page may appear to enable you to assign a new manager. This depends on how your security profile is set up.
See: Ending a Placement, Oracle HRMS Enterprise and Workforce Management Guide
See: Organization Manager, page 9-69
Voluntary TerminationThe Voluntary Termination feature facilitates online process for voluntary exit from the enterprise. If employees or contingent workers decide to leave the enterprise, they can use this feature to initiate the process of ending employment or placement.
Using the Voluntary Termination function:
• Employees can request for termination of their employment.
See: Requesting Termination of Employment, page 9-59
• Contingent workers can request for ending their placement.
See: Requesting End Placement, page 9-59
Workforce Sourcing and Deployment 9-59
Requesting Termination of EmploymentUsing the Voluntary Termination function of the Employee Self-Service responsibility, employees can initiate the process of ending their employment. The date that the employee enters on the Effective Date Options page is the effective date of the termination. This date defaults to the Termination Date field on the Voluntary Termination page. The notified date is for information purpose and is the date on whichthe employee informs the company about resignation. The employee can select the reason for resignation and enter comments on resignation. When the employee submits the transaction, Oracle SSHR routes the transactions for approval based on the approvals setup.
Voluntary Terminate Placement
Requesting Termination of PlacementUsing the Voluntary Termination function of the Contingent Worker Self-Service responsibility, contingent workers can initiate the process of ending their placement in the enterprise. The date that the contingent worker enters on the Effective Date Options page is the effective date of ending placement. This date defaults to the Termination Date field on the Voluntary Termination page. The contingent worker can select the reason to leave the enterprise. When the contingent worker submits the transaction, Oracle SSHR routes the transaction for approval based on the approvals setup.
Reverse TerminationThere are a number of reasons why managers may want to cancel a termination of an employee or contingent worker. For example, during the notice period a worker may decide to continue with the employer. Managers may need to revert the termination even after the last day of employment is passed. Oracle SSHR enables managers to cancel or reverse the termination of employment or placement. Managers can process reverse termination actions using Oracle SSHR.
On the actual termination date, a worker's person type will be employee or contingent worker. The day next to the actual termination date, the worker's person type changes to ex-employee or ex-contingent worker
Managers can process reverse termination provided an employee is not rehired or a contingent worker has not started a new placement.
Searching for Workers to Reverse TerminateManagers can search for workers who have an actual termination date to initiate the process of reverse termination. They can search for workers in a business group or use search criteria such as last name, job, or position.

9-60 Oracle Self-Service Human Resources Deploy Self-Service Capability Guide
In the Person search field, managers can select any one of the options:
• All
When selected, the search includes employees and contingent workers whose actualtermination date is earlier than the current date, later than the current date, or is equal to the current date
• Employee
When selected, the search includes employees whose actual termination date is earlier than the current date, later than the current date, or the current date.
• Contingent Worker
When selected, the search includes contingent workers whose actual termination date is earlier than the current date, later than the current date, or the current date.
The Actual Termination Date field criteria helps managers to perform searches using different date criteria.
For example:
• Using the Is Condition, managers can search for workers whose termination date is equal to a specific date entered in the date field. For example, managers can select the Is condition, and search for workers with termination date of 01-APR-2010.
• Managers can enter a date range to search for terminated employees or contingent workers whose termination date is set at a future date. For example, if the current date is 01-MAY-2010, they can select the 'Is Between' condition and enter dates 01-FEB-2010 and 01-JUN-2010. The search result displays workers who are terminated and whose termination date is set to a future date.
• Managers can also search for workers whose termination date is later or earlier thanthe entered date.
Note: If an ex-employee's rehire is pending approval or an ex-contingent worker's new placement is pending approval, the search results display these workers. However, managers cannot process reverse terminations for these workers.
Using the Show Future Dated Terminations Only check box, managers can filter the search results for workers (employees and contingent workers) whose actual termination date is later date than the current date.
Viewing Search ResultsThe search results table includes columns such as full name, business group, location, and actual termination date to help identify a worker to process reverse termination.
Workforce Sourcing and Deployment 9-61
In the Current Person Type column, the record indicates the person type as on the current date.
• For a worker, whose actual termination date has passed as on the current date, the search results display the worker as an ex-employee or ex-contingent worker person type.
• For a worker whose actual termination date is set at a future date, the search results display the worker as an employee or contingent worker person type.
Managers can click the Details icon to view information of the worker before reversing the termination. The search results show the leaving reason. You can review this information before processing reverse termination.
Processing Reverse TerminationOn the Reverse Termination and Review pages, the worker's assignment details are read-only. Managers can review the details and submit the transaction for approval. When managers submit the reverse termination transaction, Oracle SSHR routes the transaction for approval based on the approvals setup in the enterprise.
When an approver receives the reverse termination notification for approval, the Update and Return for Correction functions are not available on the Notification page.
Changes after Reverse Termination ActionThe following sections explain changes to the worker records after a reverse terminationaction is approved:
• When managers process reverse termination for an employee after the actual termination date, the reverse termination action clears the termination details and restores the assignment to the status prior to the termination. The person type changes from Ex-Employee to Employee
• When managers process reverse termination for a contingent worker after the actual termination date, the reverse termination action clears the termination detailsand restores the assignment to the status prior to the termination. The person type changes from Ex-Contingent Worker to Contingent Worker
• When managers process reverse termination for an employee or a contingent worker prior to the actual termination date or on the date equal to the actual termination date, the reverse termination action clears the termination details and restores the assignment of the employee or contingent worker to the status prior to the termination. The person type remains Employee or Contingent worker.
9-62 Oracle Self-Service Human Resources Deploy Self-Service Capability Guide
Work Schedule The Work Schedule workflow process enables a manager to change the work schedule and employment category for an employee or worker. A work schedule is the number of days and hours worked and the start and end times for the employee or worker. The employment category defines the type of employment, for example, full and part-time employment.
Note: Part of the Work Schedule page information is displayed from the Soft Coded Key Flexfield.
See Configuring Flexfields, page 6-27
LocationThe Location function enables a manager to change the work location for an employee or worker.
The Location function is available under the predefined Manager responsibility. If required, you can set up approvals processes for the Location function.
The Location region includes the Home Worker check box. This check box is available for all localizations, although it is delivered as hidden. US users: If you select the Home Worker check box for an employee or worker, the employee or worker is assumed, for tax purposes, to work 100% from their primary address (or tax override address if there is one) for this assignment.
For more information on the tax implications of the Home Worker check box for US users, see Entering Federal Tax Rules for an Employee, Oracle HRMS Payroll Processing Management Guide.
Special Information Types (SITs)Special Information Types (SITs) enable you to store additional information that is not currently captured by the system.
ExampleExample of a Special Information Type
To capture information on an employee's linguistic ability, you could create an SIT entitled Languages with the following segments:
• Language
• Written fluency level
• Spoken fluency level
Workforce Sourcing and Deployment 9-63
Alternatively, you could create a create an SIT to capture an employee's vehicle information and include the following segments:
• Vehicle type
• Value
• License type
• License number
See: Special Information Types, Oracle HRMS Enterprise and Workforce Management
Extra Information Types (EITs)Extra Information Types (EITs) are a type of flexfield that allows you to set up unlimited amounts of extra information. They are often used by localizations for capturing local information.
Example of an Extra Information Type:
You can capture passport information for an employee or worker by creating an EIT entitled Passport Details with the following segments:
• Country
• Passport number
• Issue date
• Expiry date
See: Extra Information Types, Oracle HRMS Configuring, Reporting, and System Administration Guide
Entering Details for EIT Segments and Additional Details for Each of one the EIT Segments
Depending on how an EIT is setup, when you enter a value for a EIT segment, you can capture additional information for that segment as the application automatically sets the context for the dependent flex. For example, you are entering Academic Rank Details EIT and you select Lecturer as the value in the Academic Rank segment. If the Lecturer value requires more information based on the setup, then the application sets the context of dependent flex and displays segments for the Lecturer value.
Other Employment InformationThe Other Employment Information module enables you to store assignment and employment information in descriptive flexfields and Developer Descriptive Flexfields

9-64 Oracle Self-Service Human Resources Deploy Self-Service Capability Guide
(DDFs).
Menu and Function NamesNot applicable
WorkflowThe workflow details for this module are listed below:
Workflow Process Display Name: Change Other Employment Info
Configurable Workflow Attributes:Not applicable
Configurable Tips and Instructions
Region Tip Type Message Name
Other Employment Info Long Message HR_INST_TOP_COMMON_TEXT
See: Adding Instructions to Web Pages, page 6-35
Configurable FlexFields
Region Flex Name Flex Code
CAGR CAGR Flexfield CAGR
Assignment Info Additional Assignment Details
PER_ASSIGNMENTS
Assignment Info Soft Coded KeyFlexField SCL
See: Configuring Flexfields, page 6-27
Workforce Sourcing and Deployment 9-65
Configurable Profile OptionsNot applicable
Change PayYou must use the Change Pay function to enable a manager to change an employee's overall salary. You can do this by attaching the salary basis to an employee and then change the pay.
Using the Change Pay function, you can do the following:
• Enter and update pay details using the Worker Status Change, Change Pay, Hire, Applicant Hire, Change Hours, and Transfer functions.
• Propose new current or future-dated pay proposals
• Propose one or multiple salary changes in a single transaction
• Update or delete any future-dated proposal that was not processed by payroll
• View Annual Equivalent, Annual Full Time Equivalent, and Annualization Multiple all in your preferred currency
• Attach the salary basis and enter pay details in the same flow
Assignment Rate If you are not using Oracle Services Procurement to provide purchase order information for contingent workers, the Assignment Rate module enables you to record contingent worker rates. You can change a contingent worker's rate for an existing assignment, or enter a rate for a new assignment. You select the assignment rate name from a list, select the currency, and enter a value. Optionally, you can specify an end date, after which the rate is no longer in effect.
Your implementation team defines one or more assignment rate names in the forms-based interface. An assignment rate name identifies a combination of rate type (such as Standard Rate or Weekend Rate) and rate basis (such as Hourly Rate or Weekly Rate).
If you are using Oracle Services Procurement, the Assignment Rate module displays information from the purchase order line for the assignment. You cannot update this information in the Assignment Rate page.
If you install and license Oracle Services Procurement at a later date, any rate information you recorded using the Assignment Rate module is no longer visible.
9-66 Oracle Self-Service Human Resources Deploy Self-Service Capability Guide
Change ManagerThe Change Manager function enables a user to perform the following operations on a selected employee or worker and assignment:
• specify which other employees or workers report to the selected manager
• reassign the selected employee or worker to report to a different manager
• reassign the subordinates of the selected employee or worker to one or more managers
Multiple Assignments and the Change Manager Function
In a manager-subordinate relationship, the manager's ID is stored against the subordinate's assignment. If the profile HR: Enable Multiple Assignments in SSHR is setto No, only primary assignments are displayed. If the profile HR: Enable Multiple Assignments in SSHR is set to Yes, other assignments will also be displayed. In situations where a subordinate employee or worker has more than one assignment, it is important to select which of the assignments is to report to the manager. In practice, thismeans that you may have to select between multiple assignments when you select the employee or worker for whom you are using the Change Manager function and when you select the direct reports for the selected employee or worker. In these cases, the listsof values will contain several fields (including Job, Department, Assignment Number, Location, Grade, Position, and Business Group) to help you select the correct assignment. If you are using an assignment-based security profile, you can also specify an assignment for a manager if you are reassigning a selected employee or worker, or the subordinates for the selected employee or worker, to a different manager.
Note: You can choose to display the additional fields mentioned above (Job, Department, Assignment Number, and so on) as fields on the Change Manager pages using the Personalization Framework. If you display these fields, they are populated when you select a manager assignment.
If you are using assignment-level security, only those assignments for which you are thenamed supervisor are displayed. This means that you can only perform the Change Manager function on those available assignments.
For more information, see: Assignment-Level Security, Oracle HRMS Configuring, Reporting, and System Administration Guide.
Menu and Function NamesNot applicable

Workforce Sourcing and Deployment 9-67
WorkflowThe workflow details for this module are listed below:
Workflow Process Display Name: Change Manager
Configurable Workflow Attributes:
Process Display Name Function Activity Display Name
Function Activity Attribute Display Name
Change Manager Change Manager HR_MANAGER_REQUIRED_INDICATOR
HR_MANAGER_REQUIRED_INDICATOR
If this attribute has a value of "Y", the employee or worker must have a manager. If no manager is entered, the application generates an error. If this attribute has a value of "N", the supervisor_id field of the per_all_assignments_f record can remain blank.
See: Configuring Workflow Attribute Values, page 5-10
Configurable Tips and Instructions
Region Tip Type Message Name
New Manager Instruction HR_INST_SUPERVISOR_MAIN
Direct Reports of Selected Employee
Instruction HR_INST_SUPERVISOR_DIRECT
New Direct Reports Instruction HR_INST_SUPERVISOR_NEW_DIRECT
Manager Update Instruction HR_INST_TOP_COMMON_TEXT
Direct Reports Long Message HR_TIP_SUPERVISOR_DR_DATE

9-68 Oracle Self-Service Human Resources Deploy Self-Service Capability Guide
Region Tip Type Message Name
New Direct Reports Long Message HR_TIP_SUPERVISOR_NDR_DATE
See: Adding Instructions to Web Pages, page 6-35
Configurable FlexFieldsNot applicable
Configurable Profile OptionsNot applicable
Workforce Sourcing and Deployment 9-69
Organization Management
Organization ManagerThe Organization Manager function enables you to maintain organization manager relationships. A manager can only be initially assigned to an organization in the professional forms interface. However, you can view and update organization managers according to your security profile in SSHR.
For more information on organization manager relationships, see Selecting and ViewingManagers for Organizations, Oracle HRMS Enterprise and Workforce Management Guide.
If you terminate an employee who is also the manager of one or many organizations, one of the following will occur:
• The Update Organization Manager page displays for you to assign new managers to the organizations for which the terminated person was the manager.
• If you have organization hierarchy security set up and the employee or worker is the manager of multiple organizations, the Update Organization Manager page displays only the records to which you have access and can update.
• If you do not have access to any records, the Update Organization Manager page does not appear.
If you have supervisor security enabled, the Organization Manager Actions Section on the Overview page will automatically display with any records that have been end dated and require you to assign a new manager.
Note: There can only be one organization manager relationship at any single point in time.
Menu and Function NamesThis Module can be accessed from the following menus and functions:
User Menu Name Function Name
Manager Self Service Organization Manager
9-70 Oracle Self-Service Human Resources Deploy Self-Service Capability Guide
WorkflowDetails of Workflow for this module are listed below:
Workflow Process Display Name: Organization Manager
Configurable Workflow Attributes:
Process Display Name Function Activity Display Name
Function Activity Attribute Display Name
Organization Manager Organization Manager Overview
Restrict Organization Classification
Description of AttributesYou can restrict the Organization Manager module to one organization classification by entering an organization classification code into the attribute. You can find the organization classification code for a classification from the ORG_CLASS Lookup Type. For example the code for HR Organization is HR_ORG.
Configurable Tips and Instructions
Manager Overview Top Page
Region Tip Type Message Name
Organization Manager Actions Section
Instruction HR_CCMGR_ACTIONS_SS
Organization Manager Overview Form
Instruction HR_CCMGR_OVERVIEW_INSTR_SS
Organization Manager SearchSection
Long Message HR_CCMGR_DIRECT_REPORTS_TIP
Organization Manager Actions Section
Long Message HR_PENDING_INSTR_SS

Workforce Sourcing and Deployment 9-71
Manager Update Top Page
Region Tip Type Message Name
Organization Manager Update Form
Instruction HR_CCMGR_UPD_PAGE_INSTR_SS
See: Adding Instructions to Web Pages, page 6-35
Configurable FlexFieldsNot applicable
Configurable Profile OptionsNot applicable
Additional Configuration StepsNot applicable

9-72 Oracle Self-Service Human Resources Deploy Self-Service Capability Guide
Views
Information OverviewThis topic and related links provide configuration details for My Information, My Employee Information, and HR Views pages.
My Information and My Employee InformationMy Information enables employees or contingent workers to view their employment and other related details. SSHR previously referred to this function as Employee Views. My Information includes past and present records, and you can also view future changes in the areas of training, absence, and job applications.
My Employee Information enables managers and HR professionals to review the same records available to users of My Information for anyone within their security access. SSHR previously referred to this function as Manager Views. In Details views, past, present, and future data is available.
You can view the details of people by the hierarchy, search results or from 'My List' functionality, giving you immediate access to records that connect people with their work context. You can use advanced search criteria to find people, and save your searches for later reuse. Lists of people display all assignments in addition to the primary, providing you with a complete picture of their duties. You can specify an effective date to review records as of a given point in time.
The application groups the information on six tabs:
• Employment
• Salary
• Performance
• Training
• Absence
• Job Applications
See: My Information and My Employee Information, page 9-73
HR ViewsThe HR Views module is aimed at HR Professionals. It offers a summarized view of employee-related information: Personal Information, Assignment Details,
Workforce Sourcing and Deployment 9-73
Compensation Activity, and Termination History.
Each area of information is displayed on separate pages or tabbed regions. From each page, the user can click a button and display different information.
See: Configuring Tabbed Regions, page 6-28
Navigate to HR Views functionality using the responsibility HR User Self Service and the function HR Views. All information is for viewing only. To modify information, users must log on with the Manager Self Service responsibility.
Note: HR Views show information that is more appropriate for HR professional users hence it is delivered under the HR Professional responsibility. Employee access using HR Views is controlled by the HRMS security access associated with the current user.
See: Employee Information View, page 9-75
See: Assignment Details View, page 9-75
See: Compensation Activity View, page 9-75
See: Termination History View, page 9-76
See: Search Functions for HR Views, page 9-76
My Information and My Employee InformationMy Information enables employees and contingent workers to view their employment, grade step and grade point of their salary and other related details.
My Employee Information enables managers to view employment, grade step and grade point of salaries and other related details of people within their security access. HR Views enables HR professionals to view details of people from hierarchy, search results, or 'My List' views.
The hierarchy display usually uses the supervisor hierarchy. However, if required, you can display a position-based hierarchy.
For more information, see: Enter Process, page 11-4.
Note: If you are using assignment-level security, you cannot access any terminated or expired assignments.
For more information, see: Assignment-Level Security, Oracle HRMS Configuring, Reporting, and System Administration Guide.
If you use user-based security profiles either based on user-based organizations, user-based positions, or user-based custom security, then you can enable HR users to access ex-employee and future-dated employee records. For more information, see the section Access to Ex-Employee and Future Dated Employee Records in Security Profiles, Oracle

9-74 Oracle Self-Service Human Resources Deploy Self-Service Capability Guide
HRMS Configuring, Reporting, and System Administration Guide
Viewing Grade Step and Grade Point Information
Employees and managers must use the following fields in the Details region of the Salary tab, on the My Employee Information page for grade step and grade point related information, using Employee Self-Service and Manager Self-Service:
• Grade Step: Displays the value of an employee's Grade Step
• Grade Point: Displays the value of an employee's Grade Point
• Grade Step Date: Displays the current effective date of the Grade Step
• Point Value: Displays the value which is associated with the Grade Point
Viewing Adjusted Service Date and Years of Service
In addition to using the latest start date to calculate years of service, Oracle SSHR uses the adjusted service date to calculate adjusted years of service. Employees, managers, and HR professionals can view the Adjusted Years of Service and the Adjusted Service Date on the following Oracle SSHR pages:
• My Information for employees
• My Employee Information for managers
• HR Views for HR professionals
In addition, the HR Views page displays the Years of Service field and the Compensation Activity tabbed region displays the Latest Hire date.
Note: To calculate adjusted years of service for employees or managers,the Adjusted Service Date must be available either in Oracle HRMS or Oracle SSHR person records.
In Oracle HRMS, you enter Adjusted Service in the Benefits tabbed region of the People window. For more information, see: Entering Additional Personal Information (People Window), Oracle HRMS Workforce Sourcing, Deployment, and Talent Management Guide
In Oracle SSHR, you enter Adjusted Service Date using the Hire or Applicant Hire function available through the Manager Self-Service responsibility.
Viewing Salary InformationThe Salary tab displays salary details of employees who are on a grade ladder, or whose salary is processed using the Salary Administration window.

Workforce Sourcing and Deployment 9-75
Employee Information ViewThe Employee Information view displays the details relevant to an employee or worker.This information need not relate to their job or employment contract.
The Employee Information page displays any specific fields which you have defined as flexfields and can also display a country-specific section which will display localization fields, for example, the national identifier or visa information.
All the information in the Employee Information view relates to the current record for the employee or worker and no history is displayed.
Assignment Details ViewThe assignment of an employee or worker identifies their role and payroll within a business group. The assignment is made up of a number of assignment components, forexample, the organization and payroll.
The Assignment Details view displays this assignment information for a particular employee or worker, and also enables you to display additional related information, forexample, the hire date or assignment number If multiple assignments are enabled, the HR Professional can select which assignment information to display. If multiple assignments are not enabled, the primary assignment information is displayed.
See: Multiple Assignments, page 9-51
Compensation Activity ViewThe Compensation activity view displays the salary and benefits information for an employee. If multiple assignments are enabled, the HR Professional can select the required assignment.
See: Multiple Assignments, page 9-51
Note: The self-service My Employee Information function also contains a Salary view, although this tab does not contain information about the employee's benefits.
The Compensation Activity view displays all the elements for a worker unless they are linked to benefit plans and, therefore, have rates defined. If this is the case, only the rates are displayed. If this is the case, only the rates are displayed. Your HR administrator can restrict the elements displayed in this view.
When HR managers or Payroll managers log in to Oracle SSHR using the HR Professional responsibility to view the compensation details for employees in the Compensation Activity tabbed region, they can view the compensation activity for all element types. Oracle SSHR displays all elements by default. Based on your enterprise

9-76 Oracle Self-Service Human Resources Deploy Self-Service Capability Guide
requirements, your HR administrator can display only specific elements using the Personalization feature.
Termination History ViewYou terminate an employee or worker when he or she leaves your organization. Information about the employee or worker remains on the system but all current assignments are ended.
The Termination History view displays any termination history for an employee or worker. If a worker's contract is terminated and the worker is subsequently rehired, the application updates the information displayed in the view so that the worker is not displayed as Terminated.
The worker's record may contain more that one termination, for example, if they have been rehired more than once.
Note: If the worker has been rehired, the SSHR application displays the last termination date.
Search Functions for HR ViewsThe first Search function for HR Views is displayed when an HR Professional selects theHR Views option from the self-service menu (when using the HR User Self Service responsibility). At this point, the user can only search for a worker.
The second Search function for HR Views is displayed when the HR Professional has searched for a worker. At this point, the user can either view data for the selected worker or search for another worker.
Workforce Sourcing and Deployment 9-77
Views - US Federal
Information Overview (US Federal)This topic and related links provide configuration details for My Information (employeeview) and My Employee Information (manager view), and Employee Information (HR professional view) pages.
My InformationEmployees can use My Information to view employment and other related details. My Information displays records as of the current date. Employees can view present and past records for all categories, but future-dated changes only for benefits, training, absence, and job applications.
See: My Information and My Employee Information, page 9-73
My Employee InformationYou can use My Employee Information to review the same records available in My Information for anyone within your security access.
The self-service application displays information according to the selected hierarchy (Supervisory or Position), in a flat list from user-defined search results, or from 'My List'functionality. You can use the advanced search criteria to find people, and save searchesfor later reuse.
Using the Details view, you can review a specific employee's past, present, and future-dated records.
Note: If you want to view the summary information as of an effective date, you can personalize the summary to enable the effective date field.
See: My Information and My Employee Information, page 9-73
Employee InformationOf the three views, Employee Information displays the most extensive summary of the employee's record. As an HR professional, you can review the same data available to managers as well as data unavailable to managers such as probation and service obligation information, and sensitive data such as the employee's date of birth and social security number. Unlike the manager's My Employee Information view, you can also view Correction and Cancellation records.

9-78 Oracle Self-Service Human Resources Deploy Self-Service Capability Guide
You navigate to Employee Information using the responsibility Federal HR Self Service.You can view details on these page, but to change this information, you must switch to a responsibility that gives you edit access to that data. You can view past, present, and future-dated records for employees within your security profile as of the current date.
See: Employee Information View, page 9-86
The Employee Information view includes the advanced search function. You can personalize the search criteria to include other criteria and to rearrange the order (for example, placing the Last Name as the first search criteria). You can further personalize Employee Information to include the My List feature, and to show or hide attributes and tabs. The self-service application displays the information according to the selected hierarchy (Supervisory or Position), from user-defined search results, or from 'My List' functionality.
See: Search Functions for HR Views, page 9-76
Employee SummariesThe view pages summarize information entered elsewhere in the application. The Employee page lists the records that match your search criteria, and displays high-level details for each employee record. For a detailed summary, you can click the employee's name. The Details page displays information in the header and the following tabbed regions:
• Employment
• Position
• Personal
• Obligation Dates (Employee Information only)
• Salary
• Benefits (on My Information, Employee Information only)
• Awards and Bonuses
• Performance
• Personnel Actions
You can view:
• Notification of Personnel Actions (NPAs) using each view
• Requests for Personnel Action (RPAs) using My Employee Information or Employee Information

Workforce Sourcing and Deployment 9-79
• Cancellation or Correction actions using Employee Information
In addition to these tabs, you can use the Personalization Framework to display the Training, Absence, and Job Application tabs.
Personalize ViewsYou can take advantage of the Oracle Framework functionality to personalize My Information, My Employee Information, and Employee Information. You can configure these views so that employees, managers, and HR professionals see only the data items that you choose. Through the use of Framework Personalization, you can rename data items, rename columns, hide unwanted items, display delivered hidden items, and reorder data items or columns. For example, you might display data fields that are normally hidden, such as step and rate.
See: Personalization Framework, page 6-4
You can also hide sub-tabs for individual responsibilities or for all responsibilities.
See: Configuring Tabbed Regions, page 6-28
My Information and My Employee Information (US Federal)My Information enables employees and contingent workers to view their employment and other related details.
My Employee Information enables managers and HR professionals to view the employment and other related details of employees and contingent workers within their security access. Managers and HR professionals can view the details of people from hierarchy, search results, or 'My List' views.
Note: If you are using assignment-level security, you cannot access any terminated or expired assignments.
See: Assignment-Level Security, Oracle HRMS Configuring, Reporting, and System Administration Guide.
The hierarchy display usually uses the supervisor hierarchy. If your organization arranges its reporting lines by position, you can display a position-based hierarchy by changing the HR:Display Position Hierarchy profile. The position hierarchy displays the position attached to the primary assignment.
See: Enter Process, page 11-4.
PersonalizationsUsing personalizations, you enable only the functionality, information, and controls you want to make available to users. For example, you can display only the column

9-80 Oracle Self-Service Human Resources Deploy Self-Service Capability Guide
headings of your choice in Summary and Details views.
Consider the following personalizations specific to My Employee Information:
• Effective Date
• My List
• Search Filter
• Name Format
See: The Personalization Framework, page 6-4
See: Configuring Web Pages, page 6-21
See: OA Framework Personalization and Extensibility Guide
Enable Effective DateThe current system date is the default date for the summary and hierarchy views for My Information (employee view), My Employee Information (manager view), and Employee Information (HR view).
For managers who want to view the summary section of My Employee Information as of an effective date, you can enable the Effective Date field. (The hierarchy view always display records as of the current date.) Click the Personalize Effective Date and View Aslink, and accept the default scope of Region: Effective Date and View As. To enable the Effective Date field and the Go button, navigate the following nodes:
• Flow Layout: Effective Date and View As
• Row Layout: Effective Date
• Message Text Input: Effective Date
• Submit Button: Go
Enable My ListEnable My List features by adding the My List entry to the context switcher. See Lookups, page 8-23, below.
The Manage My List page enables you to view or delete My List members. Enable the Manage My List link on the My Employee Information or Basic Search page using the Personalize Page link. Navigate the following nodes:
• Page: [My Employee Information|Basic Search]
• Scope: 'Shared Region: Quick Search'

Workforce Sourcing and Deployment 9-81
• Row Layout: Quick Search
• Link: Manage My List
The Add To My List button enables you to add selected people to My List. Enable the Add to My List button on the Basic Search and Advanced Search pages using the Personalize Page link. Navigate the following nodes from the Basic Search page:
• Scope: Shared Region: Basic Search
• Default Single Column: Basic Search
• Table: People
• Table Selection
• Multiple Selection
• Selection Button: Add To My List
Navigate the following nodes from the Advanced Search page:
• Scope: 'Shared Region: Advanced Search'
• Default Single Column: Basic Search
• Query: Advanced Search
• Table: People
• Table Selection
• Multiple Selection
• Selection Button: Add To My List
Enable Search FilterTo filter name searches, enable the search filter list for First Name, Last Name, or Full Name on the My Employee Information page, the Basic Search Page, or the My List page. If you do not enable the list, users see only the Name label and the Search field, and the default filter is Last Name. Navigate the following nodes:
• Page: [My Employee Information|Basic Search|My List]
• Scope: Shared Region: Quick Search
• Row Layout: Quick Search

9-82 Oracle Self-Service Human Resources Deploy Self-Service Capability Guide
• Message Choice: (SearchFilter)
Name FormatThe My Information and My Employee Information pages display names in brief format by default. If you prefer to see the full name of the employee or worker, set the profile option HR:Display Person Name to Full Name.
Personalization for End UsersPersonalization for end users is disabled by default. To enable it, set the profile "HR: Enable User Personalization" to Yes.
End user personalization is not the same as implementer personalization. The former enables users to create their own view of the data by hiding columns, and filtering the data for each tab. If you enable this feature using OA Framework technology, users can enable items that implementers have disabled.
OverridesIn the My Information and My Employee Information pages, the position and job names are displayed using a concatenated flexfield format.
For more information on overrides, see: Legislation and Customer Overrides, page 4-7.
Menu and Function NamesNavigation is available from the Employee or Manager Self Service menu, or new menus you configure. In addition to including the My Employee Information function in new menus, add the following predefined submenus as-is:
• GHR_EMP_VIEWS_FUNC_MENU (My Information Functions)
• GHR_MGR_VIEWS_FUNC_MENU (My Employee Information Functions)
Submenus provide Oracle Applications Framework page authentication only, you need not copy or recreate them.
HR professionals can enter My Employee Information using Advanced Search. Add the Advanced Search function to the HR Professional menu.
Menu Name User Menu Name Function Name Default Prompt
GHR_EMPLOYEE_DIRECT_ACCESS
Federal Employee Self Service
My Information My Information

Workforce Sourcing and Deployment 9-83
Menu Name User Menu Name Function Name Default Prompt
GHR_EMPLOYEE_DIRECT_ACCESS
Federal Employee Self Service
SS Benefits Enrollment - Federal
Benefits
GHR_LINE_MANAGER_ACCESS
Federal Manager Self Service
My Employee Information
My Employee Information
Note: You cannot change tab sequence, but you can use standard AOL menu exclusion functionality at the responsibility level to show and hide tabs. Make your changes to the My Information views sub tab menu (GHR_EMP_VIEWS_SUB_TABS) or the My Employee Information views sub tab menu (GHR_MGR_VIEWS_SUB_TABS). See: Configuring Tabbed Regions, page 6-28
See: Defining Menus for SSHR, page 4-10
LookupsTo enable My List functionality, enable My List in the following lookup.
Lookup Display Name
HR_MGRV_APPL_CONTEXT Information Views Application Context Switcher
You must also enable the navigation button Manage My List to the My Employee Information page, and the navigation button Add to My List to Simple and Advanced Search Results pages.
WorkflowNot applicable
Configurable Tips and InstructionsThe following tables describe configurable tips and instructions.
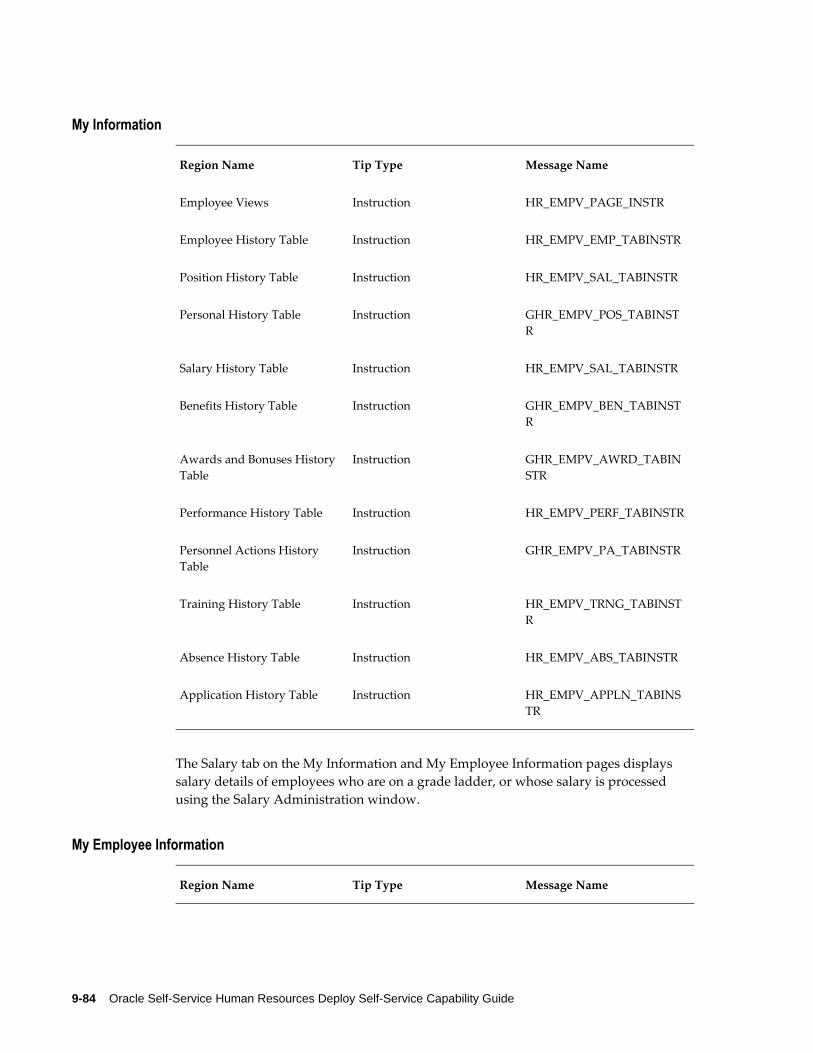
9-84 Oracle Self-Service Human Resources Deploy Self-Service Capability Guide
My Information
Region Name Tip Type Message Name
Employee Views Instruction HR_EMPV_PAGE_INSTR
Employee History Table Instruction HR_EMPV_EMP_TABINSTR
Position History Table Instruction HR_EMPV_SAL_TABINSTR
Personal History Table Instruction GHR_EMPV_POS_TABINSTR
Salary History Table Instruction HR_EMPV_SAL_TABINSTR
Benefits History Table Instruction GHR_EMPV_BEN_TABINSTR
Awards and Bonuses History Table
Instruction GHR_EMPV_AWRD_TABINSTR
Performance History Table Instruction HR_EMPV_PERF_TABINSTR
Personnel Actions History Table
Instruction GHR_EMPV_PA_TABINSTR
Training History Table Instruction HR_EMPV_TRNG_TABINSTR
Absence History Table Instruction HR_EMPV_ABS_TABINSTR
Application History Table Instruction HR_EMPV_APPLN_TABINSTR
The Salary tab on the My Information and My Employee Information pages displays salary details of employees who are on a grade ladder, or whose salary is processed using the Salary Administration window.
My Employee Information
Region Name Tip Type Message Name

Workforce Sourcing and Deployment 9-85
Manager Views Instruction HR_MGRV_PAGE_INSTR
Awards and Bonuses History Table
Instruction GHR_MGRV_AWRD_TABINST
Personnel Actions History Table
Instruction GHR_MGRV_PA_TABINST
Position History Table Instruction GHR_MGRV_POS_TABINST
Personal History Table Instruction GHR_MGRV_PRSNL_TABINSTR
Training History Table Instruction HR_MGRV_TRNG_TABINST
Configurable FlexfieldsThe following tables describe available configurable flexfields.
My Information
Region Name Flexfield Name Message Name
Absence History Table Additional Absence Details PER_ABSENCE_ATTENDANCES
Application History Table Additional Application Details
PER_APPLICATIONS
My Employee Information
Region Name Flexfield Name Message Name
Training History Table Additional Delegate Booking Information
OTA_DELEGATE_BOOKINGS
Training History Table Add'l Non OTA Training History Info.
OTA_NOTRING_HISTORIES

9-86 Oracle Self-Service Human Resources Deploy Self-Service Capability Guide
Application History Table Additional Application Details
PER_APPLICATIONS
Application History Table Additional Assignment Details
PER_ASSIGNMENTS
Configurable Profile OptionsYou can display a position hierarchy instead of a supervisory hierarchy in My Employee Information.
Profile Options
Profile Configurable Levels Values Default
HR: Display Position Hierarchy
Site Yes/No No
HR: Enable User Personalization
All Yes/No No
Employee Information View (US Federal)The Employee Information view consolidates employee and contingent worker records as of the current date. From the Employee Information self-service page, you can display a more detailed view of a worker's record, including historic and future-dated records, such as salary entitlements.
Note: You can only view details for workers within your security profile.
Menu and Function NamesYou can access worker information using the following menu and function.
User Menu Name Function Name
Federal HR Self Service Employee Information
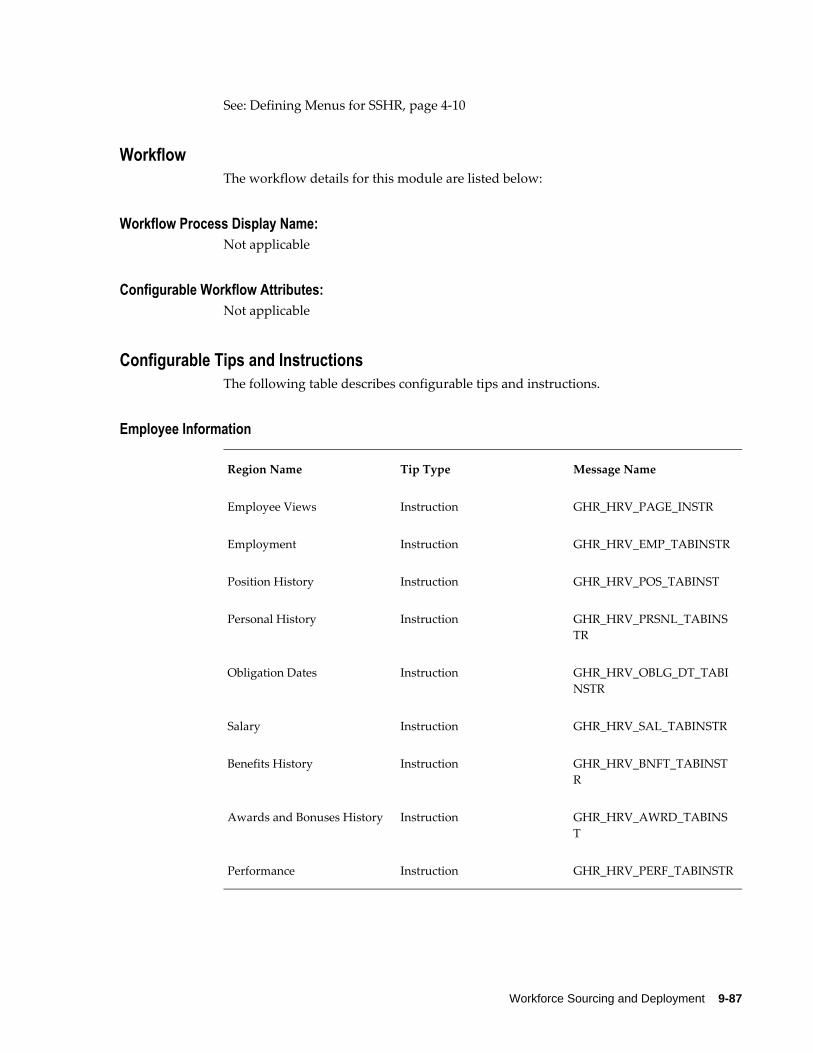
Workforce Sourcing and Deployment 9-87
See: Defining Menus for SSHR, page 4-10
WorkflowThe workflow details for this module are listed below:
Workflow Process Display Name: Not applicable
Configurable Workflow Attributes:Not applicable
Configurable Tips and InstructionsThe following table describes configurable tips and instructions.
Employee Information
Region Name Tip Type Message Name
Employee Views Instruction GHR_HRV_PAGE_INSTR
Employment Instruction GHR_HRV_EMP_TABINSTR
Position History Instruction GHR_HRV_POS_TABINST
Personal History Instruction GHR_HRV_PRSNL_TABINSTR
Obligation Dates Instruction GHR_HRV_OBLG_DT_TABINSTR
Salary Instruction GHR_HRV_SAL_TABINSTR
Benefits History Instruction GHR_HRV_BNFT_TABINSTR
Awards and Bonuses History Instruction GHR_HRV_AWRD_TABINST
Performance Instruction GHR_HRV_PERF_TABINSTR

9-88 Oracle Self-Service Human Resources Deploy Self-Service Capability Guide
Personnel Actions History Instruction GHR_HRV_PA_TABINST
Training History Instruction HR_MGRV_TRNG_TABINST
Absence Instruction HR_MGRV_ABS_TABINSTR
Job Instruction HR_MGRV_APPLN_TABINSTR
Configurable FlexFieldsNot applicable
Configurable Profile OptionsNot applicable
Workforce Sourcing and Deployment 9-89
Personnel Actions - US Federal
Processing Personnel Actions (US Federal)Oracle US Federal Human Resources enables managers and employees to initiate and process personnel action transactions using self-service for certain nature of action codes (NOACs).
Processing Personnel Actions as ManagersManagers can use the US Federal Manager Self Service responsibility to initiate personnel actions for employees in their supervisor hierarchy. They can use the following menus available with the US Federal Manager Self Service responsibility:
• Personnel Actions
Using this menu, managers can initiate the following personnel actions for the nature of action codes (NOACs):
• Return to Duty: Managers can initiate actions pertaining to 280 or 292 NOACs for their employees.
• Non Pay/Duty Status: Managers can initiate actions pertaining to 430, 460, and 473 NOACs for their employees.
• Resignation: Managers can initiate resignation actions pertaining to 312, 317, 351, and 353 NOACs for their employees.
• Retirement: Managers can initiate retirement actions pertaining to 300, 301, 302, 303, and 304 NOACs for their employees.
• Award/One-Time Payment - Managers can initiate Award actions pertaining to 840, 841, 842, 843, 844, 845, 846, 847, 848, and 849 NOACs for their employees.
• Change to Lower Grade, Level or Band: Managers can initiate action pertaining to 713 NIAC for their employees.
• Extension of NTE: Managers can initiate actions to pertaining to 769 or 773 NOACs for their employees.
• Promotion: Managers can initiate promotion actions pertaining to 702 and 703 NOACs for their employees.
• Reassignment: Managers can initiate promotion actions pertaining to 721 NOAC for their employees.

9-90 Oracle Self-Service Human Resources Deploy Self-Service Capability Guide
• RPA Actions – Status
This option displays a page with the list of all RPA actions submitted by the logged in user or employee and their status.
This page has two main sections.
• The first section displays the list of RPA actions submitted and waiting for the manager's approval.
• The second section displays the list of RPA actions that are approved by the manager and are under HR Representative.
• Phased Retirement
Using self-service, managers can initiate the following phased retirement actions onbehalf of their employees:
• Begin Phased Retirement
• End Phased Retirement
• End Phased Retirement
Managers can initiate phased retirement actions pertaining to 307, 308, 615, and 616 NOACs for their employees.
• Change Actions
Using this menu, managers can initiate the following personnel actions for the nature of action codes (NOACs):
• Name Change: Managers can initiate name change action pertaining to 780 NOAC for their employees.
• Work Schedule Change: Managers can initiate change in work schedule/Part time hours actions pertaining to 781, 782 NOACs for their employees.
• Data Element Change: Managers can initiate change in data element action pertaining to 800 NOACs for their employees.
• Duty Station Change: Managers can initiate data station action pertaining to 792NOACs for their employees.
• Non RPA Personnel Actions
Using this menu, managers can initiate the following non RPA actions.
• Personal Information: Managers can enter or modify personal details for their employees: Email Address, Telephone Information and Contact Information.

Workforce Sourcing and Deployment 9-91
• Educational/Language Information: Managers can enter or modify Educational Information (US Fed Education) and Language Information (US Fed Language) for their employees.
• Non Monetary Awards: Managers can enter or modify Non- Monetary Awards for their employees.
• Furlough Indicator: Managers can enter or modify Furlough Indicator for their employees.
Processing Personnel Actions as EmployeesEmployees can use the US Federal Employee Self Service responsibility to initiate personnel actions.
The following menus are available with the US Federal Employee Self Service responsibility:
• Personal Information
Personal Information: This is a non RPA action. Employees can enter or modify personal details: Email Address, Telephone Information and Contact Information.
• Educational/Language Information
This is a non RPA action. Employees can enter or modify Educational Information (US Fed Education) and Language Information (US Fed Language).
• Disability Designation
This is a non RPA action. Employees can enter or modify disability designation.
• Non Monetary Awards
This is a non RPA action. Employees can enter or modify non-monetary awards.
• Personnel Actions
• Return to Duty: Employees can initiate the action pertaining to 292 NOAC.
• Non Pay/Duty Status: Employees can initiate actions pertaining to 460 and 473 NOACs.
• Resignation: Employees can initiate resignation actions pertaining to 312, 317, 351, and 353 NOACs.
• Retirement: Employees can initiate retirement actions pertaining to 300, 302, 303, 304 NOACs.
9-92 Oracle Self-Service Human Resources Deploy Self-Service Capability Guide
• Extension of NTE: Employees can initiate actions pertaining to 773 NOAC.
• RPA Action – Status
This option displays a page with the list of all RPA actions submitted by the logged in user or employee and their status.
This page has 2 main sections:
• The first section displays the list of RPA actions submitted and waiting for manager's approval.
• The second section displays the list of RPA actions that are approved by the manager and are under HR Representative.
• Change Actions
• Name Change
• Work Schedule Change
• Phased Retirement
Using self-service, employees can initiate the following phased retirement actions:
• Begin Phased Retirement
• End Phased Retirement
• Request Full Retirement
Employees can initiate actions pertaining to 307, 308, 616, and 616 NOACs.
How Personnel Action Transactions are Processed?When managers or employees initiate personnel action transactions, the application displays the relevant questionnaires related to the nature of action. Employees or managers can provide their answers to process the transaction. They can review the questionnaire and approval details and click the Submit button. When the Submit button is clicked, the application routes the transaction to the approver based on the approval rules setup for such business transactions. After approvals are complete according to the approvals setup, the application initiates the RPA action and routes thetransaction to the Mass Group Box set up at the Personnel Office. The HR Administrator can open the RPA from inbox and provide the remaining details if required and perform the Update HR action. After processing Update HR, a notificationwill be sent to the initiator on the successful completion of the initiated action.

Workforce Sourcing and Deployment 9-93
Configuring Personnel Actions (US Federal)This topic provides information on the Personnel Actions menus and any configuration steps that are required to be performed.
Menu and Function NamesThis module can be accessed from the following menus and functions:
See: Defining Menus for SSHR, page 4-10
Federal Manager Self Service (GHR_LINE_MANAGER_ACCESS)The Federal Manager Self Service menu provides the following Personnel Actions menus for managers:
• RPA Actions Manager menu (Federal)
Prompt Sub Menu Sub Menu Type
Function
Return to Duty
Return To Duty Manager
Non Pay/Duty Status
Non Pay Status Manager
Resignation
Resignation Manager
Retirement Retirement Manager
Non Pay Status Employee Manager
Resignation Employee Manager
Retirement Employee Manager
Return To Duty Employee Manager
Personal Actions
Personal Actions Review

9-94 Oracle Self-Service Human Resources Deploy Self-Service Capability Guide
Prompt Sub Menu Sub Menu Type
Function
Award/One-Time Payment
Award Manager
Change to Lower Grade, Level or Band
Change to Lower Grade Manager
Extension of NTE
Extension of NTE Manager
Extension of NTE Employee Manager
Promotion Promotion Manager
Promotion Employee Manager
Reassignment
Reassignment Manager
Reassignment Employee Manager
RPA Actions - Status
Personal Actions List (Manager)
Award Employee Manager
NPDS Personal Action
NPDS Review Page
GHR NPDS Notification Standard Review Container
GHR RTD Notification Standard Review Container

Workforce Sourcing and Deployment 9-95
Prompt Sub Menu Sub Menu Type
Function
GHR Promotion Notifications Standard Review Container
GHR LowerGrade Notifications Standard Review Container
GHR Notifications Standard Review Container
Phased Retirement
RPA Phased Retirement Manager menu (Federal)
STANDARD
Recruit and Fill
Recruit and Fill Manager
Change Actions
RPA SS Change Actions Manager menu (Federal)
STANDARD
GHR Recruit Fill Notifications Standard Review Container
Change to Lower Grade Employee Manager
• Non RPA Actions Manager menu (Federal)
Prompt Sub Menu Sub Menu Type
Function
Personal Information
GHR Personal Information Mgr
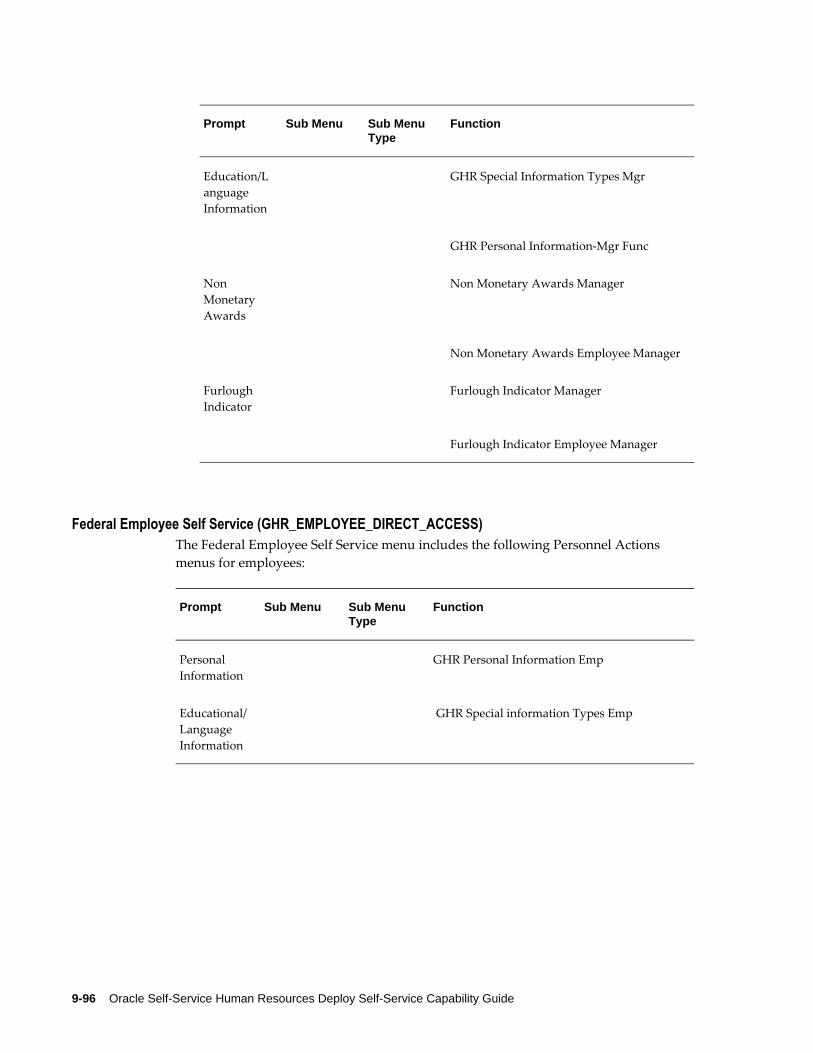
9-96 Oracle Self-Service Human Resources Deploy Self-Service Capability Guide
Prompt Sub Menu Sub Menu Type
Function
Education/Language Information
GHR Special Information Types Mgr
GHR Personal Information-Mgr Func
Non Monetary Awards
Non Monetary Awards Manager
Non Monetary Awards Employee Manager
Furlough Indicator
Furlough Indicator Manager
Furlough Indicator Employee Manager
Federal Employee Self Service (GHR_EMPLOYEE_DIRECT_ACCESS)The Federal Employee Self Service menu includes the following Personnel Actions menus for employees:
Prompt Sub Menu Sub Menu Type
Function
Personal Information
GHR Personal Information Emp
Educational/Language Information
GHR Special information Types Emp

Workforce Sourcing and Deployment 9-97
Prompt Sub Menu Sub Menu Type
Function
Personnel Actions
RPA Actions Employee menu (Federal)
Return To Duty Employee
Non Pay Status Employee
Resignation Employee
Retirement Employee
Personal Actions
Personal Actions Review
GHR Notifications Standard Review Container
Extension of NTE Employee
Personal Actions List
NPDS Personal Action
NPDS Review Page
Change Actions
RPA Change Actions Employee menu (Federal)
Employee menu (Federal)
Name Change Employee
Work Schedule Change Employee
Name Change Employee Manager
Work Schedule Change Employee Manager
GHR WS Change Notifications Standard Review Container
Phased Retirement
RPA Phased Retirement Employee menu (Federal)
STANDARD
Setting up Oracle Approvals Management (AME) for Personnel Actions ApprovalOracle US Federal Human Resources provides questionnaires to initiate and process personnel actions. When employees or managers answer the questionnaire and submit the personnel action transaction, the application routes the transaction for approval based on the AME setup defined for the business transaction approval. For information on how to setup AME rules for approvals, refer to the Oracle HRMS Approvals Management Implementation Guide.
After the final approval is in for a personnel action transaction, the application initiates

9-98 Oracle Self-Service Human Resources Deploy Self-Service Capability Guide
the RPA action and routes it to the Mass Group Box set up at the Personnel Office. The HR administrator can open the RPA from inbox and provide the remaining details if required, and perform the Update HR action. After processing the Update HR, a notification will be send to Initiator for successful completion of initiated action.
Personalization Steps to Display the Leave Without Pay Not-to-exceed (date) in the Employee and Manager Self-Service Pages
The system administrator must complete the following personalization steps to display the Leave Without Pay Not-to-exceed (date) on Header of the Return to Duty Page.
1. Select Personnel Actions.
2. Select Return to Duty Action.
3. Select Personalize Default Single Column.
4. Click the Personalize link of Message Styled Text: Leave Without Pay Start Date and set Rendered to True at Function: Return to Duty level.
5. Select Apply and Click on Personalize link of Message Styled Text: Leave Without Pay End Date and set Rendered to True at Function: Return to Duty level.
Personalization Steps to Display the Assignment NTE dates for Change to Lower Grade, Level or Band in the Manager Self-Service Pages
The system administrator must complete the following personalization steps to display the Assignment NTE dates for in the Header of the Change to Lower Grade, Level or Band page.
1. Select Personnel Actions.
2. Select the Change to Lower Grade, Level or Band Action.
3. Select the Personalize Default Single Column.
4. Click Personalize link of Message Styled Text: Assignment NTE Start Date and set Rendered to True at the Function level: Change to Lower Grade, Level or Band.
5. Select Apply and Click the Personalize link of Message Styled Text: Assignment NTE Date and set Rendered to True at Function level: Change to Lower Grade, Level or Band.
Personalization Steps to Display the Assignment NTE dates for Promotion in the Manager Self-Service pages:
The system administrator must complete the following personalization steps to display

Workforce Sourcing and Deployment 9-99
the Assignment NTE dates in the Header of the Promotion page:
1. Select Personnel Actions.
2. Select the Promotion Action.
3. Select the Personalize Default Single Column.
4. Click the Personalize link of Message Styled Text: Assignment NTE Start Date and set Rendered to True at the Function level: Promotion.
5. Select Apply and Click the Personalize link of Message Styled Text: Assignment NTE Date and set Rendered to True at Function level: Promotion.
Configurable Tips and Instructions
Region/Page Name Tip Type Message Name
Oracle Federal Human Resources Self-Service Actions page
Instruction GHRInstructionNote
See: Adding Instructions to Web Pages, page 6-35
Configurable FlexFieldsFlexfield Title: Self-Service Actions
Action Name Code Name
Return to Duty GHR_EMP_RETURN_TO_DUTY
US Federal Employee Return To Duty
GHR_MGR_RETURN_TO_DUTY
US Federal Manager Return To Duty
Non Pay/Duty Status GHR_EMP_NON_PAY_DUTY_STATUS
US Federal Employee Non Pay Status
GHR_MGR_NON_PAY_DUTY_STATUS
US Federal Manager Non Pay Status

9-100 Oracle Self-Service Human Resources Deploy Self-Service Capability Guide
Action Name Code Name
Resignation GHR_EMP_RESIGNATION US Federal Employee Resignation
GHR_MGR_RESIGNATION US Federal Manager Resignation
Retirement GHR_EMP_RETIREMENT US Federal Employee Retirement
GHR_MGR_RETIREMENT US Federal Manager Retirement
You must compile the Descriptive Flex 'Self-Service Actions' by following these steps:
1. Log in to the System Administrator or Application Developer responsibility.
2. . Navigate to Application > Flexfields >Descriptive > Segments.
3. Search for Flex-field Title 'Self-Service Actions'.
Once you set up or modify your structures and segments, you must freeze your flexfield definition and save your changes.
4. Click the Compile button to compile the flexfield.
Configurable Profile OptionsNot applicable

Workforce Sourcing and Deployment 9-101
Recruitment
Apply for JobEmployees and contingent workers can use the Apply for Job module to search and apply for jobs online.
Using this module they can:
• Search for available jobs using the location code and date posted criteria. The location code is the name of a location as entered in Oracle HRMS. This code distinguishes between different locations in the same city and identifies exactly where a job is based.
• View job details such as job title, organization name, location, and the date the vacancy is posted.
• Apply for jobs from the Job Details page using the Apply button. Applicants can click the Apply Now icon to apply for a specific job from the job search results table.They can attach a resume to their job application. If a resume exists in the database from a previous application, then the latest resume overwrites the previous one. The fields in the Basic Details region are read-only. For information on updating basic details, see: Basic Details, page 9-5
Note: Applicants can upload only one document per application. To upload more than one document, such as a resume and a covering letter, they must include both in the same document. Applicants can contact their HR representative to withdraw the job application.
View Application Information
Applicants can view and track their job applications using the My Information module. Currently they can only view applications for vacancies in their own business group.
See: My Information and My Employee Information, page 9-73
Manager Access to Applications
Managers can use the My Employee Information module to see the applications of their direct reports.
They can process the applications using the Oracle HRMS Mass Updates of Applicants window. To view applicants for vacancies, managers must have access to them through the security profile.
See: Updating Applicant Assignments by Group, Oracle HRMS Workforce Sourcing,
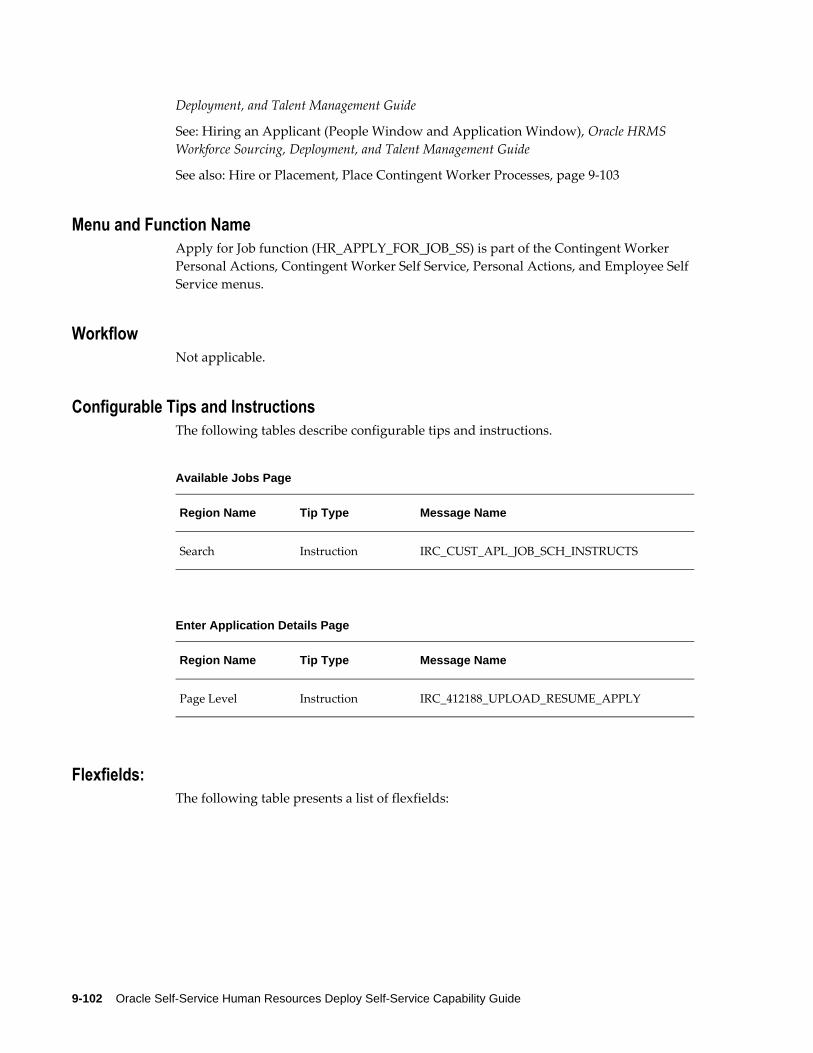
9-102 Oracle Self-Service Human Resources Deploy Self-Service Capability Guide
Deployment, and Talent Management Guide
See: Hiring an Applicant (People Window and Application Window), Oracle HRMS Workforce Sourcing, Deployment, and Talent Management Guide
See also: Hire or Placement, Place Contingent Worker Processes, page 9-103
Menu and Function NameApply for Job function (HR_APPLY_FOR_JOB_SS) is part of the Contingent Worker Personal Actions, Contingent Worker Self Service, Personal Actions, and Employee Self Service menus.
WorkflowNot applicable.
Configurable Tips and InstructionsThe following tables describe configurable tips and instructions.
Available Jobs Page
Region Name Tip Type Message Name
Search Instruction IRC_CUST_APL_JOB_SCH_INSTRUCTS
Enter Application Details Page
Region Name Tip Type Message Name
Page Level Instruction IRC_412188_UPLOAD_RESUME_APPLY
Flexfields:The following table presents a list of flexfields:

Workforce Sourcing and Deployment 9-103
Enter Application Details Page
Region Name Item Name Flexfield Name Flexfield Code
Basic Details PersDetsFlexField
Additional Personal Details
PER_PEOPLE
Basic Details PersonDeveloper
Flex
Further Person Information
Person Developer DF
Basic Details Notification PreferencesFlex
Additional Notification Preference Details
IRC_NOTIFICATION_PREFERENCES
Note: A system administrator can use Personalization Framework to display any hidden fields or flexfield segments in the Basic Details region. However, note that these are read-only. Applicants cannot update the basic information using this page.
Hire or Placement, Place Contingent Worker ProcessesSSHR's workflow processes Hire or Placement and Place Contingent Worker enable youto enter information about new employees or contingent workers.
Use the Hire page to hire new people, who are not required to have assignments with a status of Accepted. You can also use the Hire page to process the hiring of an ex-employee in a business group that is different from the business group in which the ex-employee was previously employed.
Use the Applicant Hire and Rehire page to:
• Hire external applicants who have application assignments with a status of Accepted.
• Rehire ex-employees in the same business group in which they were previously employed.
• Hire internal applicants (applicants who are employees in your organization) who have application assignments with a status of Accepted.
See: Applicant Hire and Rehire, page 9-105

9-104 Oracle Self-Service Human Resources Deploy Self-Service Capability Guide
Note: After you hire iRecruitment applicants as employees, run the iRecruitment Create Enrollment process to enroll new hires in the compensation plans included in their offer letters. For more information, see: Running the iRecruitment Create Enrollment Process, Oracle HRMS Compensation and Benefits Management Guide
Applicant SearchWhen hiring an applicant, the results displayed in the Search Applicant page are restricted according to your security profile. In addition, any applicant who is also a current or future employee in your enterprise is also excluded from the SSHR Search Applicant page.
Duplicate Person CheckingWhen entering a new person:
• If the HR: Cross Business Group and HR: Cross BG Duplicate Person Check profiles are set to Yes, then the application checks for duplicate person records in multiple business groups.
• If the HR: Cross Business Group profile option is set to Yes and the HR: Cross BG Duplicate Person Check is set to No, then the application does not search for duplicate person records either across multiple business groups or in a single business group.
For information about the searches that Oracle HRMS performs when you set up the HR: Cross BG Duplicate Person Check and HR: Cross Business Group profile options, see: User Profiles, Oracle HRMS Configuring, Reporting, and System Administration Guide
For more information about the duplicate person check, see: People in a Global Enterprise, Oracle HRMS Workforce Sourcing, Deployment, and Talent Management Guide
If an existing record is found, then a list of the possible matches is displayed in the Potential Duplicate People page. You can do one of the following:
• If a potential duplicate exists in outside of the current business group you can createa link between the two records by selecting it. This indicates that they are the same person.
• If the potential duplicate exists in the same business group, then when you click on the existing record an error is displayed as you cannot have two record for the sameperson in one business group.
• If this is a new person select No Match to indicate that the new record is not connected to any other records and continue entering information.

Workforce Sourcing and Deployment 9-105
Applicant Hire and RehireUse the Applicant Hire and Rehire page to:
• Hire external applicants who have application assignments with a status of Accepted.
• Hire internal applicants (applicants who are employees in your organization) who have application assignments with a status of Accepted.
• Rehire ex-employees in the same business group in which they were previously employed.
Applicant SearchWhen hiring an applicant, the results displayed in the Search page are restricted according to your security profile.
You can use the Person Type field to search for:
• All Applicants: This search includes internal applicants who are employees with accepted applications and external applicants with accepted applications.
• An internal applicant, who is an employee with an accepted application.
• An external applicant with an Accepted application assignment status.
• Ex-employee who is not required to have an application.
Note: You cannot view employees whose termination date is later than the system date. For example, John Smith's termination date is 10-Nov-2009. On the system date of 01-Nov-2009, you set the Effective Date to 11-Nov-2009, which is a future date and search forex-employees. The search results do not include John Smith.
Duplicate Person CheckingWhen entering a new person:
• If the HR: Cross Business Group and HR: Cross BG Duplicate Person Check profiles are set to Yes, then the application checks for duplicate person records in multiple business groups.
• If the HR: Cross Business Group profile option is set to Yes and the HR: Cross BG Duplicate Person Check is set to No, then the application does not search for duplicate person records either across multiple business groups or in a single
9-106 Oracle Self-Service Human Resources Deploy Self-Service Capability Guide
business group.
For information about the searches that Oracle HRMS performs when you set up the HR: Cross BG Duplicate Person Check and HR: Cross Business Group profile options, see: User Profiles, Oracle HRMS Configuring, Reporting, and System Administration Guide
For more information about the duplicate person check, see: People in a Global Enterprise, Oracle HRMS Workforce Sourcing, Deployment, and Talent Management Guide
If an existing record is found, then a list of the possible matches is displayed in the Potential Duplicate People page. You can do one of the following:
• If a potential duplicate exists in outside of the current business group you can createa link between the two records by selecting it. This indicates that they are the same person.
• If the potential duplicate exists in the same business group, then when you click on the existing record an error is displayed as you cannot have two record for the sameperson in one business group.
• If this is a new person select No Match to indicate that the new record is not connected to any other records and continue entering information.
Hiring an External ApplicantYou can hire external applicants who have application assignments with a status of Accepted. You can search for external applicants using search criteria such as, last name, vacancy and select the person type of All Applicants or External Applicant.
Provide basic details, phone and address information. You can enter new assignment data, propose a pay, and select a manager for the new employee assignment. You can review the new hire details and submit the transaction for approval, if approvals are setup in your enterprise.
Hiring an Internal ApplicantUsing Oracle Self-Service HR, managers can hire internal applicants (employee applicants) who apply to internal vacancies in the organization. You can search for an employee applicant who has an accepted application, view details, and hire the employee applicant into an assignment. The security profile attached to your responsibility controls the internal applicants that you can search.
The Select the assignment mode to hire internal applicant region automatically appears when the applicant search results include employee applicants.
You can select any of the assignment modes to hire the employee applicant:
• Create Secondary Assignment
This option makes the applicant assignment the employee's secondary assignment.

Workforce Sourcing and Deployment 9-107
Oracle SSHR makes no change to the existing employee primary assignment. This isthe default selection.
The Applicant Hire and Rehire: Assignment page displays the accepted applicant assignment data. Oracle SSHR creates a new secondary assignment with the defaultdata from the accepted applicant assignment. You can propose a new pay for the secondary assignment and change manager, if required. The Applicant Hire and Rehire: Review page displays the Assignment region with current and proposed data.
• Make New Assignment Primary
This option makes the new applicant assignment the employee primary assignment. The existing employee primary assignment becomes the secondary assignment.
The Applicant Hire and Rehire: Assignment page displays the accepted applicant assignment data. You can propose a pay for the new assignment and change manager, if required. The Applicant Hire and Rehire: Review page display the Assignment region with current and proposed data. The Primary Assignment field displays information about change in assignment. Current Primary Assignment region also displays the change in assignment information.
• Merge with Primary Assignment
This option copies information from the applicant assignment to the employee primary assignment, but does not copy empty fields. For example, if London is definedas the location for the employee primary assignment but a location is not available in the applicant assignment, then London remains the location for the new employee assignment.
When you select the Merge with Primary Assignment option, you can change the existing personal information and accepted applicant assignment details. Oracle SSHR displays the existing salary proposals and disables the Update and Delete buttons for the existing salary proposals that have an effective date prior to the hire date. You can propose a new salary, change the manager for the applicant, and assign new directs to the applicant. The supervisor of the primary assignment is displayed if the accepted application does not have a supervisor. You can select a new supervisor. If there are directs, then you can reassign the directs if required.
The Review page displays the current details and proposed changes. The assignment data that you view in the Proposed region is the data that will merge with the current primary assignment.
• Replace Primary Assignment
This option overwrites all fields in the existing employee primary assignment with equivalent fields from the new applicant assignment, even if those fields are empty.For example, if Employee A is a supervisor for the existing employee assignment, but the applicant assignment includes no supervisor information, then the new
9-108 Oracle Self-Service Human Resources Deploy Self-Service Capability Guide
employee assignment contains no supervisor information.
When you select this option, you can change the existing personal information and accepted applicant assignment details. Oracle SSHR displays the existing salary proposals and disables the Update and Delete buttons for the existing salary proposals that have an effective date prior to the hire date. You can propose a new salary, change the manager for the applicant, and assign new directs to the applicant. The logged in manager is displayed if the accepted application does not have a supervisor and if the 'HR: Self Service Hire and Placement Default Values' profile is set to Yes. You can select a new supervisor. If there are directs, then you can reassign the directs if required.
The Review page displays the current details and proposed changes. The assignment data that you view in the Proposed region is the data that replaces the primary assignment data.
You can review the employee applicant details and submit the transaction for approval, if approvals are setup in your enterprise.
Hiring Oracle iRecruitment ApplicantsTo hire iRecruitment applicants using the Applicant Hire and Rehire function, your enterprise must complete specific implementation steps in Oracle iRecruitment. For more information, refer to Implementation Steps for iRecruitment, Oracle iRecruitment Implementation and User Guide
As manager, when you initiate the hire process from iRecruitment, if the offer has a proposed start date, then this date appears in the Effective Date field. If there is no proposed start date for an offer, then the application displays a date one day later than the system date. You can override the date that automatically appears as the effective date to specify a new hiring date.
Hiring an External iRecruitment Applicant
To complete the hiring process, you can provide basic details such as , phone and address information. You can enter new assignment data, propose a pay, and select a manager for the new employee assignment. You can review the new hire details and submit the transaction for approval, if approvals are setup in your enterprise.
Hiring an Internal iRecruitment Applicant
If you initiate the hire process for an employee applicant, then the Select the assignmentmode to hire internal applicant region automatically appears. You must select the appropriate assignment mode to hire the employee applicant. For more information, see: Hiring an Internal Applicant, page 9-106
Rehiring an Ex-EmployeeManagers can directly rehire ex-employees into the same organization. Ex-employees are not required to have an application.
Workforce Sourcing and Deployment 9-109
Note: You cannot rehire an ex-employee if the final process date for the previous employment is not provided. The rehire date must be later than the final process date.
For an ex-employee, you can view details such as the termination date, leaving reason, and rehire recommendation. You can review these details before processing the rehire.
To rehire the ex-employee, you can update basic details that default from the previous assignment. You can also assign a new manager to the ex-employee. The Review page displays the current and proposed basic details, phone, and address. For assignment data and change manager details, the application displays only the proposed column.
You can review the rehire details and submit the transaction for approval, if approvals are setup in your enterprise.


Transaction Monitor 10-1
10Transaction Monitor

10-2 Oracle Self-Service Human Resources Deploy Self-Service Capability Guide
Transaction Monitor
Using Transaction MonitorHR professionals, managers, and workers can use the Transaction Monitor page to trackand view details of the self-service transactions. As the list of all self-service transactionsis available on a single-page, users can efficiently track the status of their transactions.
Users can track transactions using the following status values and view their details.
• Pending Approval
• Complete
• Defer
• Error
Note: In case, data is deleted from base tables, then the transaction details will not be available.
The Transaction Monitor feature helps users to view details of all pending or completedtransactions. They can navigate to the details page of the transaction to view approval history, comments, and attachments.
Oracle SSHR displays only those transactions from the date when your enterprise started using the Transaction Monitor functionality.
Using the Search Criteria to Search for TransactionsAs, HR professionals, managers, and workers, you can use following search criteria to search for self-service transactions:
• Function Name: Select the function for which you want to view self-service transactions.
• Transaction Initiator: This field represents the person who initiated the transaction.
• For workers, this field is read-only and displays the name of the person who logged in using the Employee Self-Service. By default, the Transaction Monitor functionality is not available from the Contingent Worker Self-Service responsibility.
• For managers, this field is read-only and displays the name of the person who logged in as a manager using the Manager Self-Service responsibility.

Transaction Monitor 10-3
• HR professionals, when they log in using the HR Professional responsibility, can search for workers or managers who initiated self-service transactions.
• Transaction Created for: This field represents the person for whom the self-service transaction is initiated.
• For workers, this field is read-only and displays the name of the person who logged in using the Employee Self-Service or Contingent Worker Self-Service responsibility.
• Managers, when they log in using the Manager Self-Service responsibility, can search for any of their subordinates for whom self-service transactions are initiated. Access to person records depends on the security profile.
• HR Professionals, when they log in using the HR Professional responsibility, can search for managers or workers for whom self-service transactions are initiated. Access to person records depends on the security profile.
• Specify the period start date from when you would like to view the transactions. Specify the period end date until when you could like to view the transactions.
• Select any of the following statuses to view transactions:
• Pending Approval
• Complete
• Defer
• Error
You can select only one status at a time. You cannot select multiple or all statuses. For transactions that are at the Error status, users are navigated to the Workflow Status Monitor pages.
Viewing Transactions and their DetailsDepending on the search criteria that you specify, you can view transactions and their details. To view details of a transaction, click the icon in the Transaction Details column.
Note: The following rules apply to the Transaction Monitor feature:
• Managers cannot view transactions initiated by their subordinates.
• Users cannot view draft transactions or save for later transactions.
• Approvers cannot search for transactions approved by them.

10-4 Oracle Self-Service Human Resources Deploy Self-Service Capability Guide
• The Action History Details are displayed only for those transactions, where AME is enabled.
Configuring Transaction MonitorThis topic provides details about the Transaction Monitor function.
Menu and Function NamesThis module can be accessed from the following menus and functions:
User Menu Name Function Name
Manager Self Service Transaction Monitor (HR_TRANSACTION_MGR_SS)
Employee Self Service Transaction Monitor (HR_TRANSACTION_EMP_SS)
HR Professional Transaction Monitor (HR_TRANSACTION_HR_SS)
See: Defining Menus for SSHR, page 4-10
WorkflowNot Applicable
Configurable FlexfieldsNot Applicable
Configurable Profile OptionsNot applicable
Supported FunctionsThe Transaction Monitor feature supports the following list of SSHR functions:

Transaction Monitor 10-5
Function Name User Function Name
HR_TERMINATION_SS Termination
HR_COMPETENCE_PROFILE_SS Competency Profile
HR_PERINFO_SS Personal Information
HR_QUALIFICATION_SS Qualification
HR_AWARD_SS Award
HR_CAED_SS Release Information
HR_SIT_SS Special Information Types
HR_MANAGER_SS Change Manager
HR_TERMINATION_COMP_SS Termination with Compensation V4.0
HR_CHANGE_JOB_SS Change Job
HR_CHG_COST_LOC_SUP_SS Change Cost Center, Location and Manager
PQH_TENURE_STATUS Tenure Status
PQH_ACADEMIC_RANK Academic Rank
HR_LOA_SS Absence Management
HR_CHANGE_JOB_TERMS_SS Change Job and Terms
HR_CHG_COST_TRM_LOC_SUP_SS Change Cost Center, Terms and Manager
HR_EIT_SS Extra Information Types
PQH_EMP_REVIEWS Employee Reviews V4.0
HR_EIT_A8A_SS SG IRASLINE Person EIT
HR_CEI_SS Contact Extra Information

10-6 Oracle Self-Service Human Resources Deploy Self-Service Capability Guide
Function Name User Function Name
PQPVEHINFOPROCESS_SS SS Vehicle Repository
HR_DOR_SS Documents of Record
HR_EMP_STATUS_CHANGE_SS Worker Status Change
HR_CHG_HOURS_SS Change Hours
HR_PAY_RATE_CHANGE_SS Change Pay
HR_EMP_TRANSFER_SS Transfer
HR_EMP_TERMS_CHANGE_SS Change Worker Status and Terms
HR_NEW_HIRE_SS Hire
HR_APPL_HIRE_SS Applicant Hire
BEN_SS_MGR_ADV_ICD Self Service Individual Compensation Distributions-Internal
HR_REVERSE_TERMINATION_SS Reverse Termination
HR_TERM_SS Voluntary Termination
HR_CWKPLACE_SS Contingent Worker Placement
HR_GOLD_CREATE_SS Global Deployments Create Page
HR_GOLD_UPDATE_SS Global Deployments Update Page

Common SSHR Modules 11-1
11Common SSHR Modules
Common Modules OverviewThis chapter contains information on how to configure modules that provide common, low-level functionality used in many of the higher-level functions described in later chapters.
The common modules are:
• Enter Process
• Actions Page
• Return for Correction
• Release Employee Information
• Review and Confirm
• Dates
• Save for Later
• Document Management
• New User Registration
Using Common SSHR Functions
Which common functions does SSHR provide?SSHR includes a number of common functions which are not associated with any particular area of Oracle HRMS. These functions are useful in the everyday operation of
11-2 Oracle Self-Service Human Resources Deploy Self-Service Capability Guide
SSHR and are intended to improve your self-service processes. An example of a common function is the Enter Person process which is used in the manager self-service functions to select an employee or worker for a transaction.
Is it always necessary to select the function first and then the employee?No. If you select the Manager Actions function from the self-service menu, you select your employee or worker first and can then select the required function from a list of allavailable functions for the person. The list is context-sensitive. If you are an employee or worker, you can select the Personal Actions function from the menu and you can select the required function from a list of available functions. Again, this list is context-sensitive.
Are there any review mechanisms in place?Yes. Before you submit a transaction to the database (as an employee or manager), you can check your data on the Review page. This page shows a summary of any new or changed information and enables you to make any last-minute changes before submitting the transaction to the database. You can also enter comments for approvers in this page.
Is there any way to provide approvers with additional information?If you need to provide additional information for an approver, you can add comments in the Review and Confirm page. Also, if the Attachments region is enabled in the Review and Confirm page, you can add an attachment, for example, a file, URL or pieceof text.
Can I save transactions before submitting them to the database?Yes. You can use the Save for Later button on the Review page to save a transaction to be completed at a later point. Approvers can also use this functionality to return transactions to the initiator for additional information or correction. Suspended and returned transactions are accessed from the All Actions Awaiting Your Attention table on the Actions page.
Can SSHR generate notifications and other business documents?Yes. The Document Management functionality enables you to automatically generate business documents and notifications using the data from self-service transactions. For example, you could use this functionality to create a Notification of Change or a standard letter. You define which fields are included in the documents using the PDF Forms technology.

Common SSHR Modules 11-3
Can I enable my employees and contingent workers to create their own SSHR users?Yes. You can use the New Employee and Non-employee Registration functionality to enable your users to create their own users. Employees and non-employees can register with the self-service application and create their own user names and passwords.

11-4 Oracle Self-Service Human Resources Deploy Self-Service Capability Guide
Common SSHR Modules
People in Hierarchy, My List, and Search PagesThe Hierarchy, My List, and Search pages are collectively known as the Enter Process pages.
The Hierarchy page is generally the starting point for all manager self-service functions.It enables managers to select a user record for processing in SSHR.
The navigation options from the People in Hierarchy page depend on the path that the manager has taken to navigate to the page. There are two possible paths:
• From the generic Manager Actions menu
In this case, the manager first selects a person the from People in Hierarchy page or the People in My List page. This takes the manager to the Actions page. A context-sensitive list the SSHR modules or actions available for the selected person.
• From a specific manager self-service menu item
In this case, the manager selects a specific SSHR function and then selects the person for processing in the People in Hierarchy or People in My List page. When the manager selects a person, the selected function appears.
People in HierarchyThe People in Hierarchy region displays a hierarchical view of the current manager's subordinates. Users can expand or collapse the lower levels of management as desired.
By default, the hierarchy uses a supervisor hierarchy (based either on the supervisor or the supervisor assignment).
When you move the mouse over the Details icon, you can view the photo of the worker,and details such as employment and contact in a pop-up window.
My ListThe My List functionality enables managers to store people whose records they frequently access in a list for quick record retrieval. When a manager searches for a person, they can click the Add to My List button to add that person to the list. When themanager next selects the My List option from the People in Hierarchy page, the names of these saved employees are displayed in a table. A pop-up window displays the people in My List when you place the mouse over the My List link.

Common SSHR Modules 11-5
Advanced Search PageAs an alternative to the simple search, you can select Advanced Search to specify advanced search criteria. When you select this option, the following standard search fields are available:
• First Name
• Last Name
• Assignment Number
• Job
If these fields are not sufficient, you can add additional fields from a list. You can also specify whether the search must include all criteria or whether records that meet only some of the criteria are valid. If required, you can save the search criteria to use again.
Note: When you search for employees using the Basic or Advanced Search, SSHR excludes the log-in person from the results.
Person DetailsA manager can access the personal details for any person included in the Hierarchy or My List simply by clicking the Details icon for the person. SSHR displays the Person Detail view for the person, enabling the manager to display Employment, Salary, Performance, Absence, and Application information for the person. Training information is also available although this tab is hidden as standard. When the Person Details are displayed, the views displayed are summary views. To display more detailed information, expand the view.
For more information, see: Employee Information View, page 9-75.
Multiple AssignmentsIf a person has more than one assignment for a given manager, the manager needs to select the Action icon for the relevant assignment in order to carry out the action. Managers can view multiple assignments depending on the setting of the HR:Enable Multiple Assignments in SSHR profile option.
ActionsThe Actions page displays a list of actions that can be performed for a selected person and suspended actions. Suspended actions can include actions that a user has saved for later submission or actions that have been returned to the initiator by an approver, for example, to be corrected.

11-6 Oracle Self-Service Human Resources Deploy Self-Service Capability Guide
The list is driven by the hidden submenu defined for the HR: Manager Actions Menu profile option. The default menu for this profile option is the predefined Personal Actions Menu (HR_LINE_MANAGER_PERS_FUNCTIONS).
The list of functions displayed in the Actions page is also defined by the person's legislation code.
See: Data Security Menus, page 3-11
The Actions page can be accessed in one of the following ways:
• Managers can click on the Actions icon for a specific assignment to display the actions relevant to the employee or worker
• Self-service users can select the Personal Actions menu option from their menu and display their personal actions
EligibilityThe Available Actions list is, by default, limited to those actions the user is currently eligible for.
For information on setting up eligibility see: Eligibility Processing Setup Example, page 11-34.
For further information on eligibility see: Initiating a Self Service Action, page 11-54.
Viewing and processing of ineligible actions is controlled by two profile options:
• HR:Allow Use of Eligibility for Self Service Actions
• HR:Allow Processing of Ineligible Self Service Actions
When HR:Allow Use of Eligibility for Self Service Actions system profile is set to No (the default), this page does not display the Eligibility column and only eligible actions for the selected person are listed. When this profile option is set to Yes, the page displays the Eligibility column and all actions are listed. The Eligibility column distinguishes between eligible and ineligible actions.
However, a user will not be able to process an ineligible action unless HR:Allow Processing of Ineligible Self Service Actions is also set to Yes. This will enable users to process actions for which the selected person is currently ineligible, but may be eligible by the effective date. The action will still fail if the person is not eligible for the action bythe given date.
In order to ensure that the list of eligible actions and sub-actions is up to date, you must periodically run the Participation Batch Process (Run Benefits Manage Life Events Process) for that individual. This can be set to run automatically every time a manager initiates an action by setting the profile option, HR:Run BENMNGLE When Processing a Self Service Action, to Yes.

Common SSHR Modules 11-7
Concurrent transactionsThe application supports multiple simultaneous actions on the same person. To activatethis feature you need to set the system profile option HR:Allow Concurrent Self Service Actions to Yes. When this profile option is set to No, the Pending column is displayed which indicates to the user whether pending transactions are present. The user can thenreview the pending transaction. When you set the profile option to Yes, the Pending column will not be displayed, and users will be able to perform actions against all assignments.
When concurrent transactions are activated potential data conflicts may arise. For information on how to deal with these see Managing Dates in SSHR, page 4-5.
Menu and Function NamesThis module can be accessed from the following menus and functions:
User Menu Name Function Name
Manager Self Service Manager Actions
Employee Self Service Personal Actions
Manager Self Service Suspended Actions Mgr
Employee Self Service Suspended Actions
See: Defining User Access and Menus, page 4-10
WorkflowNot applicable
Configurable Tips and Instructions
Actions Page
Region Tip Type Message Name
Actions Awaiting Your Attention
Instruction PQH_SS_PERSON_NTF_INT

11-8 Oracle Self-Service Human Resources Deploy Self-Service Capability Guide
Region Tip Type Message Name
Available Actions Instruction HR_SS_INST_ACTIONS_DUAL
Selected Action Instruction HR_SS_INST_ACTIONS_SINGLE
Selected Action Instruction HR_INST_ACTIONS_SINGLE_SUS
Effective Date Page
Region Tip Type Message Name
Effective Date Options Instruction PQH_SS_EFFECTIVE_DT_HDR
Refresh Page
Region Tip Type Message name
Intervening Actions Found Instruction PQH_SS_CONC_REFRESH_INT
Sub Actions Page
Region Tip Type Message name
Assignment Header Instruction PER_SS_ASOF_APPROVAL_DT_DESC
Sub Actions Instruction PQH_SS_SUB_ACTIONS_INT
See: Adding Instructions to Web Pages, page 6-35

Common SSHR Modules 11-9
Configurable FlexFields: Not applicable
Configurable Profile Options
Profile Configurable Levels Values Default
HR:Allow Use of Eligibility for Self Service Actions
Site Yes/No No
HR:Allow Processing of Ineligible Self Service Actions
Site Yes/No No
HR:Allow ConcurrentSelf Service Actions
Site Yes/No No
HR: Manager ActionsMenu
All All Manager Actions menus
Manager Actions Menu
HR:Personal Actions Menu
All All Personal Actions menus
Personal Actions Menu
HR:Contingent Worker Manager Actions Menu
All All Contingent Worker Manager Actions menus
Contingent Worker Manager Actions Menu
HR:Contingent Worker Personal Actions Menu
All All Contingent Worker Personal Actions menus
Contingent Worker Personal Actions Menu
HR:Actions - Validation
All All Actions Checked, Preselected Action Checked, All Validation Post Selection
All Actions Checked
See: User Profiles, Oracle HRMS Configuring, Reporting, and System Administration Guide
Return for CorrectionThe Return for Correction page is available from the Pending Approval Notification

11-10 Oracle Self-Service Human Resources Deploy Self-Service Capability Guide
page.
When a manager clicks on a Return for Correction link in a notification they navigate to the Return for Correction page. Here they can select a previous approver or the initiatorof the action and submit for correction with comments. A notification is sent to the selected user.
The receiver of the Return for Correction can then restart the approval notification from the following places:
• All Actions Awaiting Your Attention page
• Actions Awaiting Your Attention in Perform Action page
• Return for Correction notification
Menu and Function NamesThis page can be accessed from the following menus and functions:
User Menu Name Function Name
HR Self-Service Pages HR Return for Correction Page
WorkflowNot applicable.
Configurable Tips and Instructions
Return For Correction Page
Region Tip Type Message Name
Comments Region Error PQH_SS_RFC_RESPONSE_INT
Person Selection Region Error PQH_SS_RFC_SELECT_PERSON_INT
Top Content Region Error PQH_SS_RFC_CONTENT_INT

Common SSHR Modules 11-11
Configurable FlexfieldsNot applicable.
Release InformationThe Release Information function enables an employee or worker to share information about themselves with another person, often a manager, who would not usually have access to their records. Similarly, a manager can use this function to share information about one of their direct reports with a second manager.
See: Security Profiles, Oracle HRMS Configuring, Reporting, and System Administration Guide
If the employee or worker subsequently decides that the information should no longer be shared, they can use the Revoke Access functionality to block access to their information.
The Release Information function is available under predefined Manager and Employeeresponsibilities. Configuration options enable you to set up approvals processes for granting access.
Menu and Function NamesThis module can be accessed from the following menus and functions:
User Menu Name Function Name
Manager Self Service Release Information Mgr
Employee Self Service Release Information
See: Defining User Access and Menus, page 4-10
WorkflowThe workflow details for this module are listed below:
Workflow Process Display Name: Release Employee Information
Configurable Workflow Attributes:Not applicable

11-12 Oracle Self-Service Human Resources Deploy Self-Service Capability Guide
Configurable Tips and Instructions
CAED Page
Region Tip Type Message Name
CAED: Grant Access to Instruction HR_INST_CAED_GRANT_ACCESS
CAED Granted Employee Header Region
Instruction HR_INST_CAED_EXISTING_GRANTS
CAED Pending Employee Header
Instruction HR_INST_CAED_PENDING_GRANTS
CAED Control Access To Employee Data
Instruction HR_INST_CAED_TOP_TEXT
See: Adding Instructions to Web Pages, page 6-35
Configurable FlexfieldsNot applicable
Configurable Profile Options
Profile Configurable Levels Values Default
HR:CROSS_BUSINESS_GROUP
Site Yes/No No
The Cross Business Group profile option determines whether employees from other business groups are retrieved in the employee search.
See: User Profiles, Oracle HRMS Configuring, Reporting, and System Administration Guide
Additional Configuration Steps1. Configure the predefined user menus to include the Release Information function.
See: Defining User Access and Menus, page 4-10

Common SSHR Modules 11-13
2. If you want your managers to have access to employee and worker data, ensure that the Allow Granted Access check box is flagged for the security profile assigned to the manager. This enables the manager to review the user's data.
See: Security Profiles, Oracle HRMS Configuring, Reporting, and System AdministrationGuide
Review and ConfirmMost functions display at least the Review page. The Review page displays a corresponding region for each web page section that you have updated as part of the preceding transaction. Inside each region is a list of current database and proposed transaction data. Changed information is highlighted with a blue dot, enabling you to easily identify which information has changed in the transaction.
The Confirm page contains a confirmation message and appropriate navigation buttons.
ApprovalsIf your enterprise has setup approvals, then you can enter approvals comments in this page. If dynamic approvals are used, you can view approvers and pre-approval and post-approval notifiers, and add further approvers and notification recipients.
When you click the Submit button on the Review page, the transaction is committed to the Human Resources system or sent for approval. The Confirm page is then displayed. The Confirm page contains a confirmation message describing the status of the transaction.
AttachmentsIf the Attachments region is available, you can attach supporting documents to the current transaction. An attachment can be a file, a URL, or text.
When you click Add or View Attachments List, the Attachments page is displayed to edit, delete, or simply view attachments in the Attachments table. The Add displays the Add Attachment page.
Save Attachments
If the Save Attachments check box is available in the Attachments region, then you select this option to save the attachments so that the attachments are available in the relevant windows of Oracle HRMS. For example, when a manager performs the ChangeJob self-service transaction and saves an attachment, this attachment is available in the Assignment window of Oracle HRMS.
What-IfIf the What If region is available, you can assess the impact of the change on the
11-14 Oracle Self-Service Human Resources Deploy Self-Service Capability Guide
employee's eligibility for benefits before committing the change or sending it for approval.
Note: The What If feature will only function if you have Oracle Advanced Benefits (OAB) installed.
Printable PagesThe user can print a copy of the submitted transaction for their records if required. Enable the Printable Page button in the Personalization Framework to enable this feature.
When the user clicks on the Printable Page button the transaction data will be formattedfor printing. How the data is formatted depends on whether you have configured any documents in Document Management that correspond to this action. You can use Document Management to produce formatted documents containing merged data, using Acrobat Forms technology. See Document Management, page 11-16. If documentation has not been configured, users will simply see a printer-friendly versionof the Review page.
Save For LaterThe Save for Later functionality enables a user to interrupt transactions before they are complete. The user can then save them so that they can be completed at a later point. When users save a transaction for later the application sends them a notification.
In addition, approvers can return transactions to the initiator or a previous approver forcorrection. In this case, the initiator can reopen the transaction, correct the information, and resubmit it for approval. The approvers can include informational notes to clarify the reason for returning the transaction.
Both suspended transactions and returned transactions are displayed in the All Actions Awaiting Your Attention list on the Actions page.
Users can also access their saved functions using the All Actions Awaiting Your Attention menu option on the employee and manager menus.

Common SSHR Modules 11-15
Save for Later Functionality
The graphic above shows how transactions can be saved for later and returned for correction.
Route 1 (Save for Later): When a user initiates a self-service transaction, or receives a transaction for correction, they can either submit the transaction for approval immediately or save the transaction for subsequent processing. If the user submits the transaction immediately, the transaction is subject to the usual approval processes. If the user chooses to save the transaction for later, it is suspended and the user can restartit or delete it from the All Actions Awaiting Your Attention table in the Actions page.
Route 2 (Return for Correction): When a user has submitted a transaction for approval, the approver can either approve the transaction, reject the transaction, or return it for correction. If the approver returns the transaction for correction, the initiator can subsequently restart or delete it from the All Actions Awaiting Your Attention table in the Actions page of the initiator.
Note: If a transaction is interrupted due to user inactivity, or a system failure, the interrupted transaction is also stored as a suspended transaction and the user will receive a notification.
The application will notify users whenever they have saved a transaction for later.
Note: Users save a transaction for later by clicking the Save for Later button. To disable this button you need to set the profile option HR:SelfService Save for Later to No (the default is Yes). This will hide the Save

11-16 Oracle Self-Service Human Resources Deploy Self-Service Capability Guide
for Later button on all transaction pages and the Review page.
Workflow Process for Save for Later TransactionsOracle SSHR uses the HR Save for Later (hrssfl.wft) workflow item type to route the save for later transactions. The HR Save for Later Notification Process within the workflow controls the for save for later transactions. This process sends FYI notifications when save for later transactions occur and recipients can launch the transactions from notifications later.
Document ManagementDocument Management features enable you to automatically generate business documents containing data from self-service actions. Examples of business documents might include a Request for Action, Notification of Change, standard letter, or contract. You set up your documents in two stages:
• Create formatted PDF documents, using PDF or RTF form fields as place holders for transaction attribute values
• Configure document groups and attribute mappings in the HRMS Document Management function
Create Formatted Documents
PDF TemplatesCreate formatted documents in any word processing or page layout application, then generate a PDF file. In a PDF editing application, add named form fields to contain datafrom the action. The form field names are the tags you map to your action's attributes inDocument Management.
RTF TemplatesAlternatively, you can prepare your document in RTF format and add RTF form fields. When you use an RTF template, the application converts it to PDF format when you generate your document. You can also insert conditional programming statements available using RTF technology to display or hide fields based on the values of other fields. For example, you can display or hide data based on the department or e-mail address.
Configure Document Groups and Attribute MappingsUsing an HRMS Manager responsibility, run Document Management from the Main
Common SSHR Modules 11-17
Menu.
Document Management PageUse this page to search for existing document groups. Click the Create Group button to navigate to the Define Group page and create a new document group. Use document groups to define a collection of documents and associate them with their corresponding workflow process. To create the link between the document group and the workflow process, add the function parameter pGroupName=<documentgroupshortname> using a System Administrator responsibility.
From the Results list, you can add, update, or remove documents from the group. You can also delete a document from the database here.
Define Group PageFrom this page, you can create a new document group by entering a Group Name and Short Name. You can also search for existing groups. Enter a Group Name and Short Name. Once you have defined a group, you can also change the Document Type of any documents belonging to the group here.
Map Documents PageUse this page to add a document to the selected group. You can select from a list of documents in the database that are not yet part of a group, or you can add a new document. You can search by Document Name or Short Name, and Effective Date.
Define Document and Update Document PagesUse these pages to define or update a document. On the Define Document page, specifya Document Name, Short Name, and Document Category (such as Self Service Human Resources or Compensation Workbench).
Click the Update icon for an existing document to access the Update Document page. You can view Details pages displaying document and group information by clicking theView Document or View Group icons, respectively. You can also maintain versions of documents when their properties or contents change, and keep version histories showing the effective dates. You specify the document`s effective date (which automatically end dates any previous version), then upload a new file or select a file that already exists in the database.
Here you also specify any FastFormula you want to use to populate document tags withreturned values from the database, or override tag values with literals.
Define Document: Attribute MappingUse this page to merge data from transaction data attributes to form fields. The page displays a list of tags (form field names) found in the selected template, with corresponding Transaction Data Attribute fields. To merge data from attribute values to
11-18 Oracle Self-Service Human Resources Deploy Self-Service Capability Guide
each form field, search for and map available attributes in the attribute field corresponding to the tag.
You can include both current and proposed values in a document, and also Header Information attributes containing details from the selected person's record. For details, see the table Pages and Regions that Support Attribute Mapping. A Value column tells you if the chosen attribute is Current or Proposed. You can delete mappings and maintain datetracked versions within the selected document by changing the effective date of a given tag/attribute combination.
Define Documents PropertiesIf you select an existing document on the Map Document to Group page and press Continue, the Define Documents Properties page appears. You can also change the Document Type here. Available types include Pre Approval, Post Approval, and Both.
You generate pre-approval versions of documents when you press the Printable Page button on the Review page of an action, while it is still in process. You generate post-approval versions on final approval. Initiators receive a notification containing a link to the Document Information page, containing post-approval versions of available documents.
Delete Document PageUse this page to delete a document from the database. Alternatively, you can reinstate aprevious document version by clicking Delete for that version and choosing to delete allfuture changes. You can also access Document Details and Group Details from this page.
Pages and Regions that Support Attribute MappingHRMS supports the listed mapping attributes from the following pages and regions:
Assignment Header Region
Current Business Group
Current Contingent Worker Name
Current Department Name
Current Derived Locale
Current Employee Name
Current Employee Number
Current Employment Category
Current Grade
Current Job Name
Current Location

Common SSHR Modules 11-19
Current Manager Name
Current Organization Email Address
Current Payroll
Current Position
Current Salary
Current Salary Basis Name
Current Salary Frequency
Assignment Page
Additional Information
Assignment Attribute 1-30
Assignment Attribute Category
Assignment Status
Billing Title
Ceiling Step
Change Reason
Current Additional Information
Current Assignment Status
Current Ceiling Step
Current Change Reason
Current Department Name
Current Employee Category
Current Employment Category
Current Establishment Name
Current Frequency
Current Grade Ladder
Current Grade Name
Current Internal Address
Current Job Title
Current Location
Current Normal End Time
Current Normal Start Time
Current Notice Period Length

11-20 Oracle Self-Service Human Resources Deploy Self-Service Capability Guide
Current Notice Period Units
Current Payroll Name
Current People Group Key Flex
Current Performance Review Frequency
Current Performance Review Period
Current Position Name
Current Probation Period End Date
Current Probation Period Length
Current Probation Period Units
Current Project Title
Current Projected Assignment End
Current Purchase Order Line
Current Purchase Order Number
Current Salary Basis
Current Salary Review Frequency
Current Salary Review Period
Current Supervisor
Current Supplier ID for Assignment
Current Supplier ID for Worker
Assignment Page
Current Supplier Name
Current Supplier Site
Current Title
Current Work Hours
Currently a Home Worker
Department Name
Employee Category
Employee is a Manager
Employee is a Manager Currently
Employment Category
Establishment Name
Frequency
Common SSHR Modules 11-21
Grade Ladder
Grade Name
Home Worker
Internal Address
Job Title
Location
Normal End Time
Normal Start Time
Notice Period Length
Notice Period Units
Payroll Name
People Group Key Flex
Performance Review Frequency
Performance Review Period
Position Name
Probation Period End Date
Probation Period Length
Probation Period Units
Project Title
Projected Assignment End
Purchase Order Line
Purchase Order Number
Salary Basis
Salary Review Frequency
Salary Review Period
Supervisor
Supplier ID for Assignment
Supplier ID for Worker
Supplier Name
Supplier Site
Work Hours
Change Manager Page

11-22 Oracle Self-Service Human Resources Deploy Self-Service Capability Guide
Current Manager Name
Employee Name
Manager Name
Change Pay Page
Annual Change Amount
Change Amount
Change Percentage
Comments
Currency
Current Comments
Current Salary
Current Salary (Annual Equivalent)
Current Salary Effective Date
Pay Basis
Proposal Reason
Proposed Salary
Proposed Salary (Annual Equivalent)
Salary Basis Change Type
Salary Effective Date
Competency Profile Page
Current Level
Current Start Date
Name
Proposed End Date
Proposed Level
Short Name
Education and Qualifications Page
Attendance End Date
Attendance Start Date
Award On
Awarding/Examining Body
Comments
Common SSHR Modules 11-23
Completed Amount
Completed Units
Current Attendance End Date
Current Attendance Start Date
Current Award On
Current Awarding/Examining Body
Current Comments
Current Completed Amount
Current Completed Units
Current Fee
Current Fee Currency
Current Full-Time
Current Grade
Current Group Ranking
Current Projected/Actual Completion Date
Current Reimbursement Condition
Current School
Current Status
Current Study Start Date
Current Title
Current Total Amount
Current Tuition Method
Current Type
Fee
Fee Currency
Full-Time
Grade
Group Ranking
Projected/Actual Completion Date
Reimbursement Condition
School
Status
11-24 Oracle Self-Service Human Resources Deploy Self-Service Capability Guide
Study Start Date
Title
Total Amount
Tuition Method
Type
Other Employment Information Page
Bargaining Unit Code
CAGR Grade
CAGR Key Flex
Collective Agreement
Contract
Current Bargaining Unit Code
Current CAGR Grade
Current CAGR Key Flex
Current Collective Agreement
Current Contract
Current Union Member
Union Member
Other Professional Awards Page
Award On
Awarding/Examining Body
Comments
Completed Amount
Completed Units
Current Award On
Current Awarding/Examining Body
Current Comments
Current Completed Amount
Current Completed Units
Current Fee
Current Fee Currency
Current Grade

Common SSHR Modules 11-25
Current Group Ranking
Current Projected/Actual Completion Date
Current Reimbursement Condition
Current Status
Current Study Start Date
Current Title
Current Total Amount
Current Tution Method
Current Type
Fee
Fee Currency
Grade
Group Ranking
Projected/Actual Completion Date
Reimbursement Condition
Status
Study Start Date
Title
Total Amount
Tution Method
Type
Personal Information Header Region
Current Business Group
Current Contingent Worker Name
Current Employee Name
Current Employee Number
Current Organization Email Address
Personal Information Page
Current Date of Birth
Current Disability Code
Current Effective Date
Current Employee Number
11-26 Oracle Self-Service Human Resources Deploy Self-Service Capability Guide
Current First Name
Current Full Name
Current Honors
Current Last Name
Current Marital Status
Current Middle Name(s)
Current Organization Email Address
Current Preferred Name
Current Prefix
Current Previous Last Name
Current Social Security Number
Current Suffix
Current Title
Date of Birth
Disability Code
Effective Date
Employee Number
First Name
Full Name
Honors
Last Name
Marital Status
Middle Name(s)
Organization Email Address
Preferred Name
Prefix
Previous Last Name
Social Security Number
Suffix
Title
Tenure Status Page
Adjusted Tenure Date

Common SSHR Modules 11-27
Current Adjusted Tenure Date
Current Date Determined
Current Projected Tenure Date
Current Reason for Adjustment
Current Subject to Tenure Quota
Current Tenure Status
Date Determined
Projected Tenure Date
Reason for Adjustment
Subject to Tenure Quota
Tenure Status
Termination Page
Comments
Notification Date
Reason
Termination Date
Work Schedule Page
Current Employment Category
Current Frequency
Current Normal End Time
Current Normal Start Time
Current Work Hours
Current Work Schedule Key Flex
Employment Category
Frequency
Normal End Time
Normal Start Time
Work Hours
Work Schedule Key Flex
FastFormula OptionsYou can do the following using FastFormula:

11-28 Oracle Self-Service Human Resources Deploy Self-Service Capability Guide
• Set a value into the document
• Override an existing value in the document
Your formula must be of the type Document Print.
The application provides three predefined input parameters for your use:
• P_SESSION_ID
• P_TRANS_ID
• P_EFFECTIVE_DATE(TEXT)
Setting a Value into the DocumentSay you want to set the manager name in the document, but the manager name is not a data field found within the workflow process.
Using an HRMS Localization Seed Data responsibility, create three functions, described below in order of invocation.
1. A FastFormula function that passes the Transaction ID to a database function, returning the manager name
2. A database function that returns the manager name for the specified transaction
3. A second FastFormula function that sets the manager name in the tag (form field)
Function FastFormula Function1
Database Function FastFormula Function2
Name My_FF_Get_Mgr_Name MyPackage.My_DB_Mgr_Name_Function
My_FF_Put_Mgr_Name
Definition MyPackage.My_DB_Mgr_Name_Function
PQH_SS.PRINT.set_document_data
Data Type VARCHAR2 VARCHAR2 Number
Class External External
Parameters Use predefined parameter:
Use predefined parameter:
Use predefined parameters:
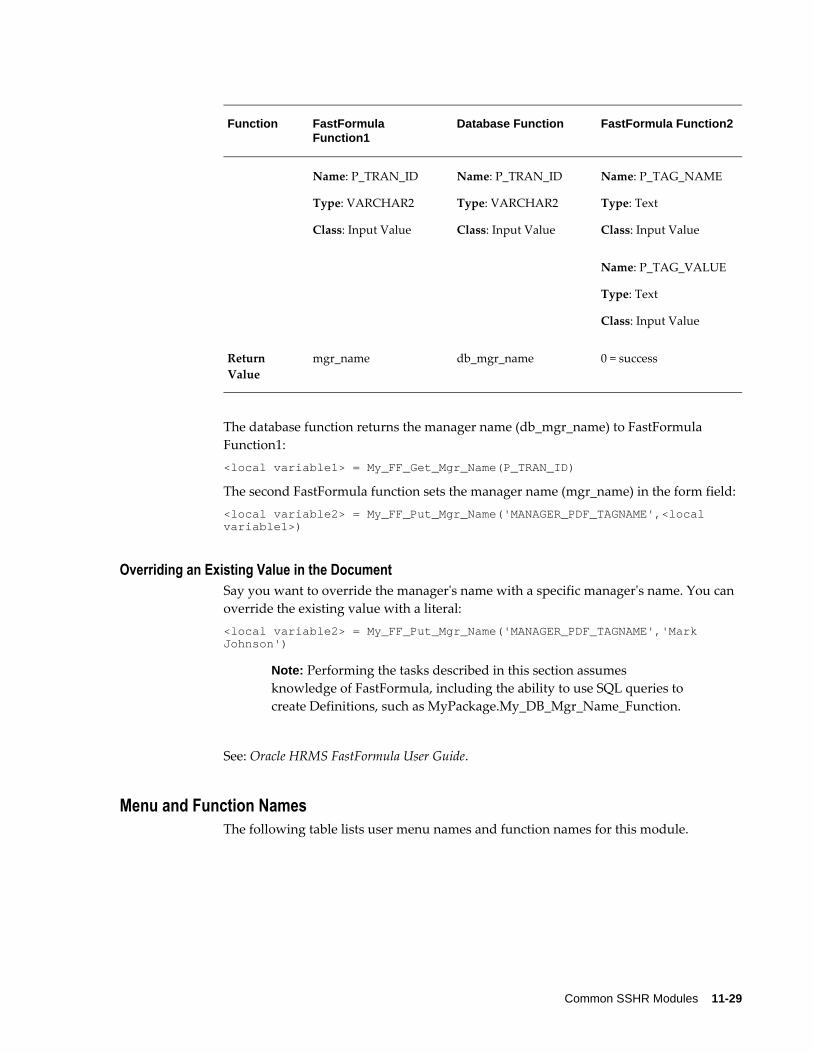
Common SSHR Modules 11-29
Function FastFormula Function1
Database Function FastFormula Function2
Name: P_TRAN_ID
Type: VARCHAR2
Class: Input Value
Name: P_TRAN_ID
Type: VARCHAR2
Class: Input Value
Name: P_TAG_NAME
Type: Text
Class: Input Value
Name: P_TAG_VALUE
Type: Text
Class: Input Value
Return Value
mgr_name db_mgr_name 0 = success
The database function returns the manager name (db_mgr_name) to FastFormula Function1:<local variable1> = My_FF_Get_Mgr_Name(P_TRAN_ID)
The second FastFormula function sets the manager name (mgr_name) in the form field:<local variable2> = My_FF_Put_Mgr_Name('MANAGER_PDF_TAGNAME',<local variable1>)
Overriding an Existing Value in the DocumentSay you want to override the manager's name with a specific manager's name. You can override the existing value with a literal:<local variable2> = My_FF_Put_Mgr_Name('MANAGER_PDF_TAGNAME','Mark Johnson')
Note: Performing the tasks described in this section assumes knowledge of FastFormula, including the ability to use SQL queries to create Definitions, such as MyPackage.My_DB_Mgr_Name_Function.
See: Oracle HRMS FastFormula User Guide.
Menu and Function NamesThe following table lists user menu names and function names for this module.
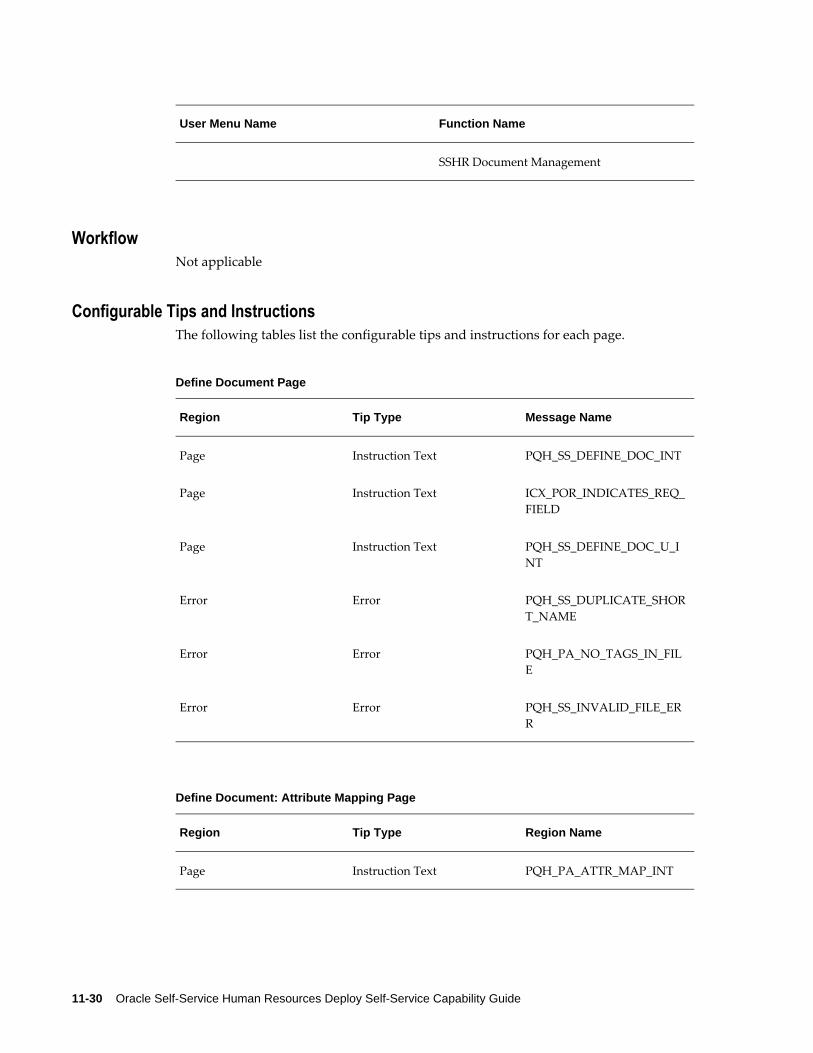
11-30 Oracle Self-Service Human Resources Deploy Self-Service Capability Guide
User Menu Name Function Name
SSHR Document Management
WorkflowNot applicable
Configurable Tips and InstructionsThe following tables list the configurable tips and instructions for each page.
Define Document Page
Region Tip Type Message Name
Page Instruction Text PQH_SS_DEFINE_DOC_INT
Page Instruction Text ICX_POR_INDICATES_REQ_FIELD
Page Instruction Text PQH_SS_DEFINE_DOC_U_INT
Error Error PQH_SS_DUPLICATE_SHORT_NAME
Error Error PQH_PA_NO_TAGS_IN_FILE
Error Error PQH_SS_INVALID_FILE_ERR
Define Document: Attribute Mapping Page
Region Tip Type Region Name
Page Instruction Text PQH_PA_ATTR_MAP_INT

Common SSHR Modules 11-31
Define Document: Attribute Mapping Delete Page
Region Tip Type Region Name
Page Instruction Text PQH_SS_DOC_DELETE_MSG_INT
Define Document Properties Page
Region Tip Type Region Name
Select Document Properties Instruction Text PQH_PA_DOC_PROP_INT
Document Mapping Page
Region Tip Type Region Name
Warning Error PQH_PA_DOC_CREATED_INT
Document Delete Page
Region Tip Type Region Name
Page Instruction Text PQH_PA_DOCUMENT_DELETE_INT
Page Instruction Text PQH_SS_DOC_DELETE_INT
Document Update Page
Region Tip Type Region Name
Page Instruction Text PQH_PA_DOCUMENT_UPDATE_INT

11-32 Oracle Self-Service Human Resources Deploy Self-Service Capability Guide
Region Tip Type Region Name
Document Information Instruction Text PQH_SS_DOC_UPDATE_ALLOWED_TIP
Document Search Page
Region Tip Type Region Name
Page Instruction Text PQH_PA_DOC_MGMT_GRP_INT
Results Instruction Text PQH_PA_DOC_MGMT_HGRID_INT
Search Group Instruction Text PQH_PA_GRP_SRCH_HRD_INT
Confirmation Information PQH_PA_RECORDS_SAVED
Document Remove Warning Page
Region Tip Type Region Name
Description Instruction Text PQH_SS_DOC_REMOVE_DESC
Instruction Instruction Text PQH_SS_DOC_REMOVE_INT
Map Documents Page
Region Tip Type Region Name
Results Instruction text PQH_PA_DOC_SRCH_RSLT_INT

Common SSHR Modules 11-33
Region Tip Type Region Name
Results Instruction text PQH_PA_DOC_SRCH_RSLT_U_INT
Search Instruction text PQH_PA_DOC_SRCH_INT
Define Group Page
Region Tip Type Region Name
Page Instruction text PQH_PA_GRP_HDR_INT
Page Instruction text PQH_MANDATORY_MESSAGE_INT
Group Details Page
Region Tip Type Region Name
Page Instruction text PQH_PA_GROUP_DETAILS_INT
Group Delete Warning Page
Region Tip Type Region Name
Description Instruction text PQH_SS_DOC_DELETE_GRP_DESC
Instruction Instruction text PQH_SS_DOC_DELETE_INSTRUCTION
See .Adding Instructions to Web Pages, page 6-35
Configurable FlexFieldsNot applicable

11-34 Oracle Self-Service Human Resources Deploy Self-Service Capability Guide
Configurable Profile OptionsNot applicable
Set Up Eligibility Processing
Eligibility Processing Setup ExampleThe following is a best practice example of how to set up automatic calculation of a person's eligibility for a self-service action, using features available in HRMS Compensation and Benefits as a processing engine. When a user initiates an action, the application runs the Compensation and Benefits BENMNGLE engine, and displays whether or not the selected person is eligible.
To enable eligibility processing, turn on the system profile HR:Allow Use of Eligibility for Self Service Actions. If you want to allow users to process actions for which a selected person is not eligible, turn on HR:Allow Processing of Ineligible Self Service Actions.
If you are confident that the BENMNGLE engine runs and updates the results tables on a regular basis, you can improve performance by disabling the profile HR:Run BENMNGLE when processing a Self Service action.
The system profiles described above are off by default.
Eligibility for Self-Service ActionsThe following figure describes how SSHR has mapped the Workflow and AOL schema onto the Compensation and Benefits schema to provide a generic eligibility processing engine. In a typical implementation, you link your copied and configured form functions to actions, such as Promotion. The actions take on a parent relationship with sub actions such as Promotion (US) or Promotion (Sales), which you define based on therequirements of, say, differing locales or departments.
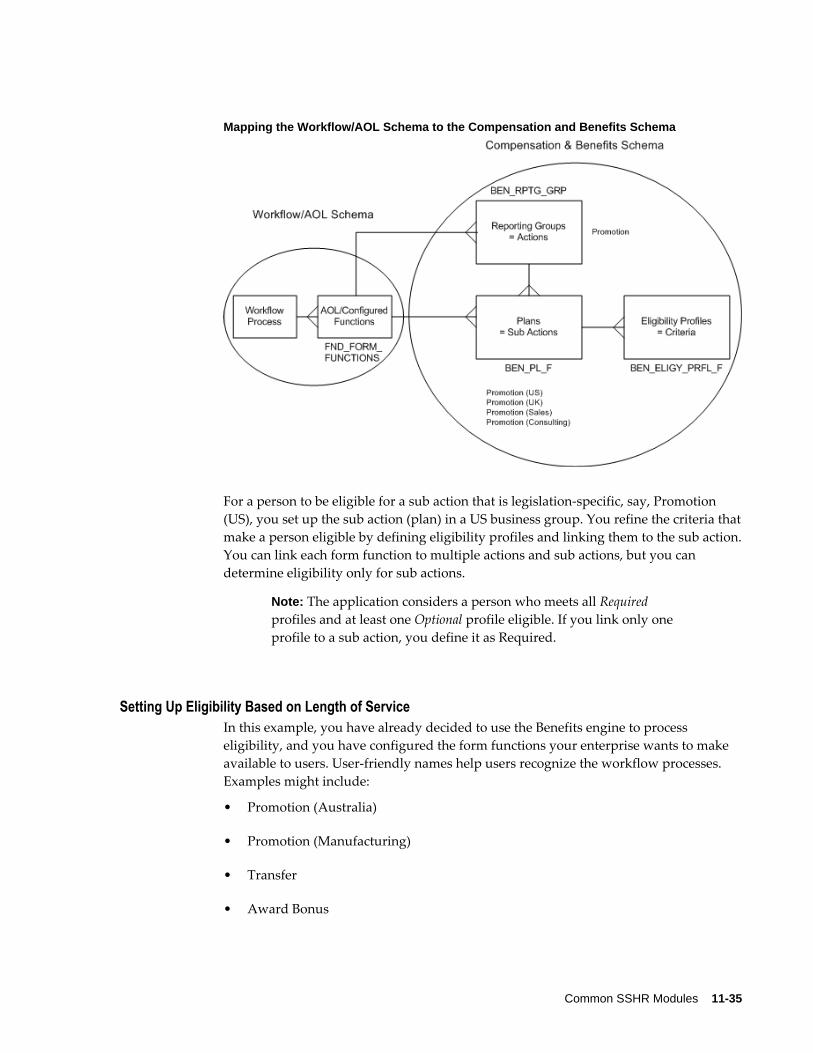
Common SSHR Modules 11-35
Mapping the Workflow/AOL Schema to the Compensation and Benefits Schema
For a person to be eligible for a sub action that is legislation-specific, say, Promotion (US), you set up the sub action (plan) in a US business group. You refine the criteria thatmake a person eligible by defining eligibility profiles and linking them to the sub action.You can link each form function to multiple actions and sub actions, but you can determine eligibility only for sub actions.
Note: The application considers a person who meets all Required profiles and at least one Optional profile eligible. If you link only one profile to a sub action, you define it as Required.
Setting Up Eligibility Based on Length of ServiceIn this example, you have already decided to use the Benefits engine to process eligibility, and you have configured the form functions your enterprise wants to make available to users. User-friendly names help users recognize the workflow processes. Examples might include:
• Promotion (Australia)
• Promotion (Manufacturing)
• Transfer
• Award Bonus

11-36 Oracle Self-Service Human Resources Deploy Self-Service Capability Guide
This example assumes that you have copied and configured two form functions based on the predefined function Change Job:
• Change Assignment
• Change Assignment with Bonus
You have identified the applicable policies and eligibility rules in effect in your organization, and reviewed the available eligibility profile criteria. You have asked and answered appropriate business questions, including:
• What are the criteria that govern eligibility for each available form function? Examples include:
• Legislation
• Organization Unit (department)
• Job
• Length of Service
• Which life events can impact eligibility for actions?
In your organization, an employee is eligible for a bonus after one year of service. You set up eligibility processing so that if a person's length of service is less than one year, the person is eligible only for Change Assignment. If length of service is one year or more, the person is eligible for Change Assignment with Bonus.
Generic Steps to Set Up EligibilityThe steps below describe the generic process of setting up eligibility for sub actions.
1. Define eligibility criteria as required
2. In the Participant Eligibility Profiles window:
• Create eligibility profiles
3. In the Plan Types window:
• Define a plan type
4. In the Plans window:
• Create plans (sub actions)
• Link each plan to a form function (Miscellaneous tab)
• Link eligibility profiles to each plan (Plan Eligibility tab)

Common SSHR Modules 11-37
5. In the Reporting Groups window:
• Create reporting groups (actions)
• Link each reporting group to a form function
• Link each reporting group to plans (Components tab)
Sample Steps for Length of ServiceUsing an HRMS Manager responsibility, follow the steps below to set up eligibility based on length of service.
Derived Factors
Specify how the application evaluates length of service criteria by defining two derived factors.
1. Define the first derived factor, in which length of service is less than one year. In the Derived Factors window (Length of Service tab):
• Name = "LOS < 1 yr"
• UOM = "Day"
• Date to Use Code = "Date of Hire"
• Values: Activate the No Min check box; Max = 364
• Determination Code = "As of Event Date"
2. Define the second derived factor, in which length of service is one year or more. In the Derived Factors window (Length of Service tab):
• Name = "LOS >= 1 yr"
• UOM = "Year"
• Values: Activate the No Max check box; Min = 1
• Date to Use Code and Determination Code are the same values as the first derived factor
Eligibility Profiles
Set up two eligibility profiles. The first makes a person eligible with less than one year of service, the other makes a person eligible with a year or more of service. You can set up as many eligibility profiles as you need to qualify a person for an action. You specifyif a profile is Required or Optional when you link the profile to a plan, below.
11-38 Oracle Self-Service Human Resources Deploy Self-Service Capability Guide
1. Define the first eligibility profile. In the Participant Eligibility Profiles window (Derived Factors tab):
• Name = "Less Than 1 yr LOS"
• Assignment Type = "Any Assignment" (Primary and Secondary)
• Status = "Active"
• Applies To = "Benefits Profile"
• Select "Length of Service" from the LOV
• Length of Service = "LOS < 1 yr"
2. Define the second eligibility profile. In the Participant Eligibility Profiles window (Derived Factors tab):
• Name = "1 yr or More LOS"
• Select the same values for Assignment Type, Status, and Applies To as the first profile
• Length of Service = "LOS >= 1 yr"
Note: If the Assignment Type is Any Assignment, eligibility processing can consider secondary assignments, enabling the application to find allactions for which the person is eligible. In a good implementation, a person is eligible for only one related sub action for each action. If BENMNGLE retrieves more than one eligible sub action, a Sub Actions page appears and displays the available choices.
Sub Actions (Plans) and Actions (Reporting Groups)
Create a plan type to relate your sub actions (plans) to self-service actions eligibility instead of benefits.
1. Define a new plan type to use for self-service actions. In the Plan Types window:
• Name = "Business Process"
• Option Type = "Personnel Action"
2. Define a sub action that includes only the assignment change. Link it to a form function and an eligibility profile. In the Plans window:
• Name = "Change Assignment"

Common SSHR Modules 11-39
• Status = "Active"
• Plan Type = "Business Process"
• Plan Usage = "May not be in program"
• On the Eligibility Rates tab, activate the "Track ineligible persons" check box
• On the Miscellaneous tab, Personnel Action Function Name = "Change Assignment" (or any form function name you have configured to change an assignment)
• Confirm that you have activated the Plan Years Not Applicable check box
• Save your work
• Press the Plan Eligibility button to open the Maintain Plan Eligibility window
• Press the Eligibility button to open the Eligibility window. Eligibility Profile Name = "Less Than 1 yr LOS"
• Activate the Required check box
• Save your work
3. Define a second sub action that additionally includes bonus. The steps are the same as in the first sub action, except for the following:
• Name = "Change Assignment with Bonus"
• On the Miscellaneous tab, Personnel Action Function Name = "Change Assignment with Bonus" (or any form function name you have configured to change an assignment and award a bonus)
• Eligibility Profile Name = "1 yr or More LOS"
4. Define an action and link it to your two sub actions to complete your setup. In the Reporting Groups window:
• Name = "Change Assignment"
• Purpose = "Personnel Action"
• Function Name = "Change Assignment"
• Save your work
• Plan = "Change Assignment"; Plan = "Change Assignment with Bonus"
11-40 Oracle Self-Service Human Resources Deploy Self-Service Capability Guide
(Components tab)
See:
Plan Design, Oracle HRMS Compensation and Benefits Management Guide
Eligibility Requirements for Total Compensation, Oracle HRMS Compensation and Benefits Management Guide
Eligibility Profile Criteria, Oracle HRMS Compensation and Benefits Management Guide
Derived Factors, Oracle HRMS Compensation and Benefits Management Guide
Defining a Reporting Group, Oracle HRMS Compensation and Benefits Management Guide
Allocated Checklists The Allocated Checklists functionality automatically generates checklists based on HR actions and eligibility profiles and assigns them to a person or assignment. A typical checklist is a New Hire checklist.
The allocated checklists contain tasks associated with a particular life event. For example, for a new employee, the New Hire checklist would contain tasks associated with the New Hire life event.
If you use the Allocated Checklists function as a Manager, you can view checklists allocated to your direct reports. As an HR Professional user, you can view checklists allocated to the workers within your security profile.
For more information on Checklists in general, see: Checklists Overview, Oracle HRMS Enterprise and Workforce Management Guide.
You create and maintain checklists and tasks using an HRMS Manager responsibility.
See: Setting Up Checklists, Oracle HRMS Workforce Sourcing, Deployment, and Talent Management Guide.
When you display an allocated checklist for a worker, you can either perform the associated task actions yourself or reassign the task. When you have processed a task, you can change the task status as appropriate (for example, Completed, Rejected, Outstanding, Suspended).
Note: If you reassign the task, the new performer receives a notificationand can update the task status by updating the notification.
From the Allocated Checklists interface, you can delete a checklist for a worker or modify the checklist by adding and deleting tasks and changing task attributes.
Note: You cannot delete a mandatory task from a checklist; however, if necessary, you can change the Mandatory attribute to No and then

Common SSHR Modules 11-41
delete the task. Checklists and tasks remain accessible from the Allocated Checklists interface until you explicitly delete them.
If required, you can also add checklists from the Allocated Checklists interface; however, by selecting a person or assignment and then creating a checklist, you have already implicitly allocated the checklist, and automatic allocation using a life event is not necessary.
Delete Transactions Pending ApprovalOracle SSHR enables managers and workers to delete any transactions that they have initiated and are in the pending approval stage. You can enable this functionality using the HR: Enable Initiator to Delete a Pending-Approval Transaction profile option.
For more information about the HR: Enable Initiator to Delete a Pending-Approval Transaction user profile, see: User Profiles, Oracle HRMS Configuring, Reporting, and System Administration Guide
When you set this profile option to Yes at any one of the levels: site, application, responsibility (Manager Self-Service and Employee Self-Service), or at the user level, theDelete icon is enabled on the following pages:
• All Actions Awaiting your Attention (Employee Self-Service responsibility)
• Personal Actions (Employee Self-Service responsibility)
• All Actions Awaiting your Attention (Manager Self-Service responsibility)
• Manager Actions (Manager Self-Service responsibility)
Initiators can view their transactions in the Pending Approval stage and delete those transactions prior to approval.
When an initiator deletes a transaction that is pending approval, Oracle SSHR performs the following actions:
• Closes all the notifications associated with the transaction from the worklist and Allactions Awaiting Your Attention region.
• Removes the transactions with the Pending-Approval stage from the initiator's list of actions.
• Deletes the transaction from the HR_API_TRANSACTIONS table.
Examples Illustrating the Delete Pending Transactions Functionality
An initiator can delete a transaction pending approval at any point in the transaction flow till the transaction is approved.

11-42 Oracle Self-Service Human Resources Deploy Self-Service Capability Guide
The following examples describe the different scenarios in a transaction flow. In these examples, John Smith is an employee in the Human Resources department in Vision Corporation and he reports to Tracy Price. Tracy Price reports to James King who is the director of the Human Resources department.
John can delete a transaction in the following scenarios:
• John submits a transaction to Tracy and the transaction is in the Pending Approval stage.
• John submits a transaction that requires approval from Tracy and James. John can delete the transaction after Tracy's approval, pending approval from James.
• James returns a transaction submitted by John, for correction to Tracy. Now, John can delete this transaction as the transaction is in the pending approval.
• Tracy corrects the transaction submitted by John, and submits it for approval from James. As the transaction is in the pending approval stage, John can delete the transaction.
• James returns the transaction to John for correction. John can delete the transaction as the transaction is yet to be approved.
Note: If you enable the HR: Defer Update After Approval profile option, then initiators can delete the deferred transactions till you run the Workflow Background Process. For more information about the HR: Defer Update After Approval user profile, see: User Profiles, OracleHRMS Configuring, Reporting, and System Administration Guide

Common SSHR Modules 11-43
Self-Service Actions
Overview of Self-Service ActionsMost enterprises adhere to rules, regulations, and reporting requirements when changing the terms of work. Oracle Self Service Human Resources (SSHR) provides a set of configuration tools and web flows for initiating, updating, and approving self-service actions according to prescribed rules.
Self-service actions represent the business processes, or actions, that change the conditions of employment in your enterprise. Public sector organizations typically refer to these processes as personnel actions, and they include business actions that manage hiring, training, promotion, transfer, compensation, and termination. Self-service actions are useful for any enterprise that wants to configure business processes using rules to determine eligibility and approval requirements, track action history as well as details, or generate standard documents for specific actions.
Self-service actions fall into three overall types, each with its own unique expectations, rules, and requirements:
• Hiring
• Deployment
• Termination
Oracle SSHR emphasizes business process over data maintenance. Though the interface provides an online form that you fill out in the course of navigating a series of web pages, your implementation team organizes the sequence and content of the data to reflect the standards and practices of your organization. With each self-service action, your implementation team defines a process consistent with the way your organization manages changes to personnel records. You design and implement your own version ofeach process, and specify the business rules that enable you to route each action for approval automatically.
SSHR provides a transition from technical orientation to functional. This approach enables you to initiate and manage self-service actions as business processes with whichyou are already familiar, rather than maintaining data in the abstract in application windows. Your focus is on the task you need to perform. Some examples of the predefined SSHR workflow modules supported by self-service actions include:
• Hiring or termination
• Recruitment
• New Hire

11-44 Oracle Self-Service Human Resources Deploy Self-Service Capability Guide
• Applicant Hire
• Termination
• Termination with compensation
• Deployment or status changes
• Employee Status Change (assignment, full/part time, grade, movement within pay scale)
• Transfer
• Leave of Absence (long term absence, sickness, sabbatical)
• Special/Extra Information Types (ending training or apprenticeship periods, disciplinary actions)
• Other Employment Information (ending training or apprenticeship periods, disciplinary actions)
• Individual Compensation Distributions (awarding bonuses or other specific pay and allowance types)
You carry out a self-service action in three overall stages that reflect standard business procedures:
• Initiate
• Approve
• Apply
For each stage, your implementation team has a range of options and features to configure unique process flows you recognize as a reflection of the way you do business. The following process flow diagram displays all the features available. What you see may differ, depending on your organization's requirements.

Common SSHR Modules 11-45
Life Cycle of a Self - Service Action
Initiate
Advanced search capability helps you confirm that you have selected the correct personbefore initiating an action. The People List and Actions page tell you whether or not a person is eligible for an action on the specified effective date. The Actions page notifies you of your own pending actions on the selected person, actions you have saved for later, and actions on the selected person awaiting approval of others. If your organization's requirements permit, you can specify that your action take effect on a date you specify, or "on approval". You enter the data that your enterprise, rules, and regulations require. What-If analysis gives you a real-time view of the impact of your proposed action on the selected person's entitlements to compensation and benefits. You can generate formatted documents, such as a pre-approval Request for Action, or a standard letter, containing merged values from your action. In addition, you can attach supporting documents, such as a resume, certificate, or Web address. Before submitting your action for approval, you can add to the list of approvers, or add people to notify.
Approve
Self-service actions use Oracle's standard workflow and approvals management tools. Oracle AME generates a list of approvers and Oracle Workflow routes your action automatically. Approvers retrieve notifications from their Worklist. Approvers with appropriate update privileges can modify the action, including its effective date. Recipients can request additional information, or return the action for correction to previous approvers. If the database encounters intervening or future-dated actions on the same person, it refreshes your action with the appropriate values, or routes your action to a Human Resources representative after approval for manual entry of the changes.
11-46 Oracle Self-Service Human Resources Deploy Self-Service Capability Guide
Apply
The application applies the action to the database after final approval.
SSHR workflow features enable you to engage in an online collaborative environment in which you can focus on the task of routing and approving actions based on their merits, with near transparency regarding selection and notification of approvers.
See: Configuring Self-Service Actions, page 11-46
See: Managing Conflicting Actions, page 11-49
See: Initiating a Self-Service Action, page 11-54
See: Approving a Self-Service Action, page 11-59
Perform Business Transactions when Person Type Changes Exist at a Future DateYou can perform the following personnel actions even if person type changes exist for a person's record at a future date:
• Hire
• Terminate
• Rehire
• Reverse Terminate
See: Performing Business Transactions when Person Type Changes Exist at a Future Date, Oracle HRMS Workforce Sourcing, Deployment, and Talent Management Guide
Configuring Self-Service ActionsThe sections below describe the process of configuring Self - Service Actions in SSHR. Some procedures are optional, for example, setting up eligibility processing or document management. Implementing the workflow processes and functions your enterprise requires is prerequisite to configuring self - service actions. When you have completed the configuration of workflow processes and functions, you must implementthe following procedures:
• Set system profile options
• Define access roles
• Personalize pages
• Add a sub menu to user menus
• Set up eligibility processing
Common SSHR Modules 11-47
• Set up document management
If previous implementations have not configured Oracle Approvals Management (AME) with the attributes, conditions, approval types, and rules your organization requires to manage routing and approving actions, you must configure these if you want to enhance the default behavior. The default is to route the action to the top of the supervisory hierarchy or 10 levels above the Initiator, whichever comes first.
Note: In order to use the new workflow features associated with self-service actions, you must upgrade to the SSHR V5 approval process.
See: Implementation Steps for Self-Service HR (SSHR), page 2-3
Set System Profile OptionsConfigure the system profiles at the Site level. The eight profiles directly relating to configuring self-service actions are as follows:
• HR:Allow Approver updates to Self Service actions
• HR:Allow concurrent Self Service actions
• HR:Manage Self Service actions when future-dated changes exist
• HR:Refresh Self Service actions with data from intervening actions
• HR:Display Position Hierarchy
• HR:Allow use of eligibility for Self Service actions
• HR:Allow processing of ineligible Self Service actions
• HR:Run BENMNGLE when processing a Self Service action
If you do not enable HR:Allow Approver updates to Self Service actions, only the Initiator is able to update or change the effective date of an action you return for correction. Approvers will be unable to use attachments.
Oracle recommends that you configure two related options in tandem:
• HR:Manage Self Service actions when future-dated changes exist
• HR:Refresh Self Service actions with data from intervening actions
Enable or disable these two options together. If you set the former to Allow approval (Notify HR Rep), enable the latter as well.
See: User Profiles, Oracle HRMS Configuring, Reporting, and System Administration Guide
11-48 Oracle Self-Service Human Resources Deploy Self-Service Capability Guide
Define Access RolesCreate and assign access roles, to grant update privileges to those who approve self-service actions, or deny them to those who do not. The Initiator of an action has privileges based on menu access, and does not need an access role.
See: Access Roles for Self Service Actions, page 3-10
Personalize PagesPersonalize self-service pages. Personalizations play a key role in configuring self-service actions, including the following:
• Personalizing workflow processes to display or hide pages or data fields (performed when you configure workflow processes)
• Personalizing the Review page to display or hide What If analysis or attachments
• Personalizing the Effective Date page to allow users to enter the effective date manually, specify that an action takes effect on approval, or both.
See: Configuring Web Pages, page 6-21
See: Self Service Workflows, page 5-3
Add a Sub Menu to User MenusAttach the sub menu HR Self-Service Pages sub menu to user menus so that users can see the following pages:
• Effective Date
• Sub Actions
• Return for Correction
• Refresh Attributes
• Document Manager pages
See: Defining Menus for SSHR, page 4-10
Set Up Eligibility ProcessingOptionally, set up automatic determination of a person's eligibility for an action, using SSHR Compensation and Benefits functionality as a generic processing engine. You do this in four stages:
• Define Eligibility Profiles

Common SSHR Modules 11-49
• Define Plans (sub actions)
• Define Reporting Groups (actions)
See: Eligibility Processing Setup Example, page 11-34
Set Up Document ManagementOptionally, configure documents and groups in Document Manager to provide formatted business documents in PDF format, containing merged data from workflow processes. Examples include Request for Change, Notification of Change, correspondence, or contracts.
See: Document Manager, page 11-16
Managing Conflicting ActionsA typical implementation for self-service actions allows you to process multiple changes to a person's record at the same time. Another common configuration allows any approver on the chain of recipients to change the effective date of an action. The ability to process concurrent actions and choose an effective date at any point in the approval process adds both flexibility and complexity. For example, what if another manager submits a status change that affects a person's grade at the same time you are processing a job change on the same person? What if you submit a change of working hours, and another manager approves a transfer while your action is in process? What ifchoosing a retroactive effective date for a bonus means that another bonus (already approved) becomes effective on a future effective date to your own?
The flexibility of processing multiple changes simultaneously requires the application to handle complex interactions among three dates associated with each action:
• Initiation date: the date you submit your action for approval (usually the system date)
• Effective date: the date your approved action takes effect (not necessarily the approval date)
• Approval date: the date you save your action to the database
The application helps you manage complex situations arising from interactions among multiple actions and dates in three ways. Consider three scenarios:
1. Concurrent Actions: The application processes multiple actions on a selected person at the same time. On final approval, each action takes effect on its own effective date, superseding any actions with a previous effective date.
2. Intervening Actions: After your action is in process, the application encounters an approved action on the same person with an effective date that falls between your

11-50 Oracle Self-Service Human Resources Deploy Self-Service Capability Guide
initiation date and effective date. Your setup can help you manage which information prevails, and (as appropriate) replace values in your action.
3. Future-Dated and Retroactive Actions: After your action is in process, the application encounters an approved action on the same person with a later effectivedate. Your setup can allow you to route your action to a Human Resources representative on final approval, for manual entry of all appropriate changes.
Concurrent Actions When you begin an action, the application checks the person/assignment combination for other actions currently in process:
• Saved for Later
• Returned for Correction
• Awaiting Approval of Others
Most implementations allow concurrent actions. Otherwise, if you try to begin an actionon a person with pending changes, you cannot proceed beyond the Actions page. But ina typical setup, existing actions on the selected person appear as actions Awaiting Your Attention or Awaiting the Approval of Others.
Intervening ActionsIntervening changes can occur for a variety of reasons, most often due to delays between request and approval. Another manager can approve a change to your selectedperson's record after your own action has entered the approval process. When the application encounters approved changes to your selected person's record, effective somewhere between your own action's initiation date and effective date, it manages them in one of two ways. Consider two scenarios:
1. After you submit your job change for approval, an HR manager approves a transferon the same person while your action is still in process. In this case, the intervening change of location prevails, because your action does not specify a location. You may still need to know about the transfer, however, in order to decide whether to approve, update, send back for correction, or cancel your job change.
2. Your action's proposed job change conflicts with an intervening change from another manager that specifies a different job. Because both your action and the intervening action specify a job, your action's proposed job prevails, because your action has the later effective date. Nevertheless, you may need to know about the intervening job change in order to make a more informed decision about your own proposed job change.
In the following illustrations, broken lines connect the initiation date and effective date of each action. Another manager approves an intervening action while yours is still in

Common SSHR Modules 11-51
the approval process.
Scenario 1: Intervening Action Specifying Different Attributes
Scenario 2: Intervening Action Specifying the Same Attributes
When intervening actions exist, and as an approver when you receive a transaction for approval, you must click Update Action for approval notifications to refresh with data from intervening actions.
Data refresh options enable you to manage potential conflicts by replacing your action'svalues with the changed information from the intervening action (scenario 1), or preserving the values from your action (scenario 2). The application displays a Refresh page with a table informing you of the original, intervening, and prevailing values.
Note: The application may also display a Refresh page if you change the effective date of your action. A new effective date can create potential conflicts with values in effect at a different point in time.
Future-Dated and Retroactive ChangesWhen the application encounters an approved change to your selected person's record, effective subsequent to your action's effective date, configuration options can help you to manage potential conflicts by routing your action on approval to a person with an HR Representative role. On review, the HR representative applies all necessary changesto the database manually.
11-52 Oracle Self-Service Human Resources Deploy Self-Service Capability Guide
You can perform an action on a person retroactively by choosing a past effective date. The application treats changes to the person's record subsequent to your effective date as future-dated actions, and routes your action on final approval to an HR representative.
Process FlowNo automated system can resolve every scenario involving conflicting data. In some cases, an HR representative applies all appropriate changes manually. On the whole, managers prefer to get their actions in process and approve them. Your configuration accommodates most scenarios automatically by setting the following options:
1. Refresh your action with valid information as of your effective date, or require that your action fail on final approval (intervening actions)
2. Allow approval of your action with subsequent routing to an HR representative, or terminate it with an error (future-dated actions)
The process flow diagram below describes in greater detail how the application manages data conflicts when intervening or future-dated actions exist. The figure assumes that concurrent transactions are allowed.
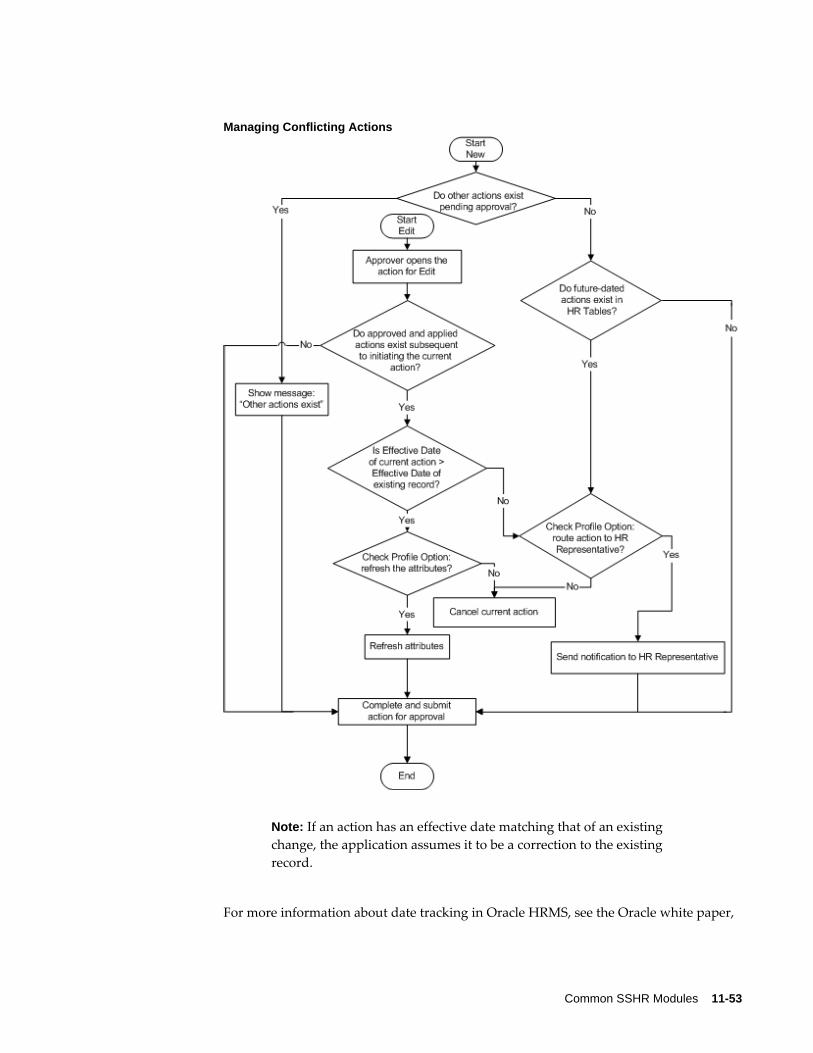
Common SSHR Modules 11-53
Managing Conflicting Actions
Note: If an action has an effective date matching that of an existing change, the application assumes it to be a correction to the existing record.
For more information about date tracking in Oracle HRMS, see the Oracle white paper,

11-54 Oracle Self-Service Human Resources Deploy Self-Service Capability Guide
How Date Track Works, available on My Oracle Support.
Initiating a Self-Service ActionOracle delivers a powerful and flexible set of tools in self-service actions. Your implementation team has many options to choose from as it decides which features are available, and how your process flow looks and feels. The following sections describe how to initiate an action, and possible exceptions resulting from implementation choices.
Enter Process PageBegin a self-service action by opening a list of persons from the Main Menu.
Your implementation team chooses to display a supervisory hierarchy of your direct reports and subordinates, or a position hierarchy. You can also select a MyList view, displaying people you choose. Your implementation team determines whether the hierarchy or MyList view is the default. View options include expanding and collapsingnodes on the tree, and focusing on one person and his or her subordinates.
Note: HR representatives typically use the MyList view to display people for whom they are responsible.
Your implementation team also determines whether multiple assignments appear in person/assignment combinations, and whether contingent workers appear.
Advanced Search criteria enable you to refine a person search by specifying criteria such as business groups, person types, department, or position.
To request a change, choose the Action icon associated with a person. The Actions page appears.
Note: From any person/assignment row, you can optionally choose a Details icon that provides information about that person and assignment.
Navigation OptionsYour implementation team may choose to display preselected actions on your Main Menu, consistent with older versions of SSHR. Oracle recommends that you open your person list by selecting Manager Actions from the Main Menu. From this single point ofentry, you can see all available actions, and the selected person's eligibility for them. With preselected actions, you restrict yourself to the single action you have selected. If your selected person is ineligible, and your setup does not allow processing ineligible actions, you may have to begin again with a new action.

Common SSHR Modules 11-55
Note: Some processes are only available via preselected actions, such asNew Hire or Organization Manager.
Selecting an ActionIf you use Manager Actions to enter the process, the Actions page lists available changes, and the selected person's eligibility for them. Pressing the Start button initiatesthe selected action, and the Effective Date page appears.
Note: If you use a preselected action from the Main Menu, and no pending actions exist for your selected person, the application skips theActions page and takes you directly to the Effective Date page.
Eligibility ProcessingYour implementation team can configure the application to determine your selected person's eligibility for a proposed action automatically. The application determines eligibility as of the effective date you specify, and displays the results in a table on the Actions page. Eligibility determination is based on personal, employment, or derived-factor criteria, such as Job, Organization, or Length of Service. The process also considers department- or locality-specific criteria to determine eligibility for actions such as Promotion (Sales), or Hire (France).
Infrequently, the selected person may be eligible for more than one version of an action,such as Promotion (Sales) and Promotion (US). In most cases, well-configured eligibilityprocessing will present only one action as a choice. If the person is eligible for more than one version of an action, you select from a list of choices on the Sub-Actions page.
Your implementation team can configure the application to process ineligible actions. For example, you can do this if approvers have the right to override eligibility criteria, or if you want to put an action in process for a person who is not eligible as of the effective date, but may become eligible later.
See: Eligibility Processing Example, page 11-34
Processing Your ActionWhen processing your action, you need to know how the application manages data conflicts. If your implementation team has configured the application to support concurrent actions, you may encounter messages and warnings about other pending actions on the selected person's record, or actions on this person you have saved for later. The Actions page displays two lists of pending actions on the selected person:
• your own actions
11-56 Oracle Self-Service Human Resources Deploy Self-Service Capability Guide
• actions awaiting the approval of others
You can also see a complete list of your own pending actions by choosing Actions Requiring Your Attention from the Main Menu. The application may also encounter intervening or future-dated changes that affect a proposed change, some of which may appear after your action is in the approval process.
See: Managing Conflicting Actions, page 11-43
Effective Date PageInitiating or approving an action typically begins on the Effective Date page, where you choose one of two options:
1. Enter an effective date manually
2. Specify that the action takes effect on approval
This page also provides information and warnings relating to your action, such as the earliest possible effective date, or other approved or pending actions on this person.
Note: If your implementation team decides to have all actions take effect on approval, the Effective Date page does not appear.
Business ProcessHere you enter data related to your action. Available actions may differ, depending on the business processes your implementation team has provided. Examples include:
• Hire a person
• Change location
• Change manager
• Change grade
• Change salary
• Change job
• Change hours
• Award bonus
• Release information for transfer
• Initiate Leave of Absence
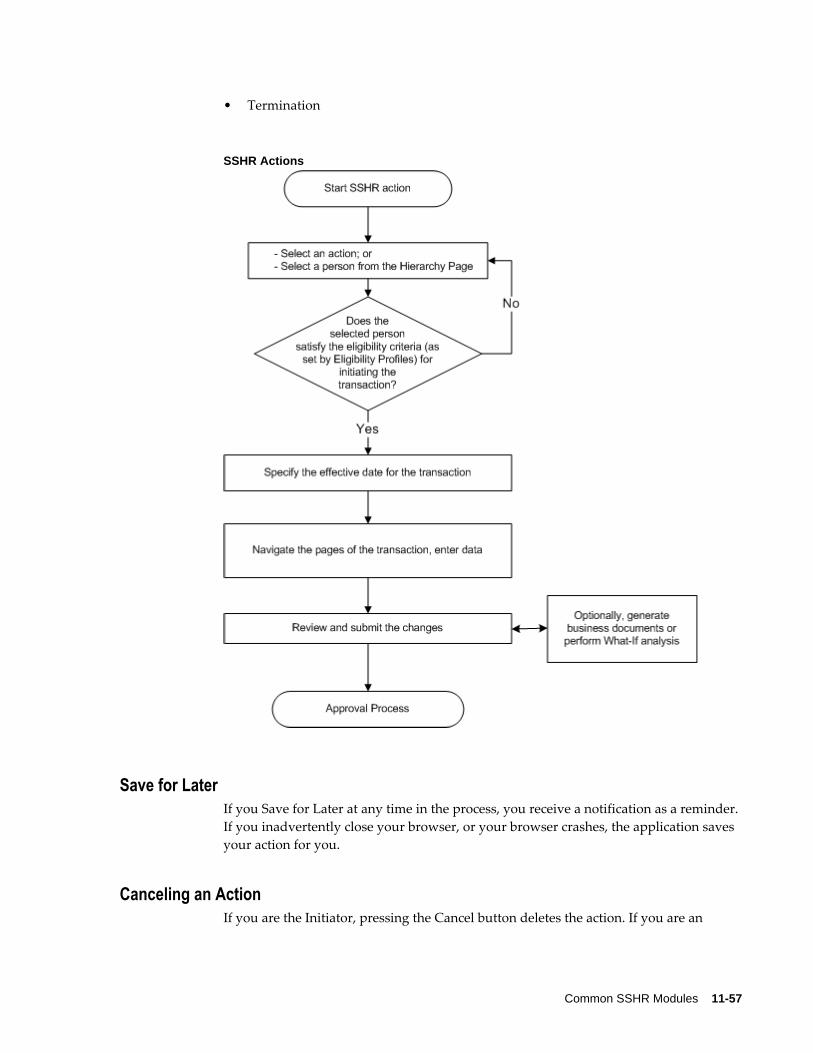
Common SSHR Modules 11-57
• Termination
SSHR Actions
Save for LaterIf you Save for Later at any time in the process, you receive a notification as a reminder. If you inadvertently close your browser, or your browser crashes, the application saves your action for you.
Canceling an ActionIf you are the Initiator, pressing the Cancel button deletes the action. If you are an

11-58 Oracle Self-Service Human Resources Deploy Self-Service Capability Guide
approver, or have Saved for Later, Cancel reverts to the previously saved data.
Review PageIn addition to displaying the proposed changes to the person's record and information about the approvers on the chain of recipients, the Review page gives you the opportunity to choose additional approvers, or add people to notify. Other available features include:
• Attachments
• What-If Analysis
• Document Management
• Approvals Management
Press the Submit button to send your action to the next approver on the chain. If you arethe final approver, you submit the changes to the database.
AttachmentsThe Review page includes an Attachments link, which enables you to attach supportingdocuments, such as a photograph, a copy of a degree or certificate, or a resume. You need update privileges to do this. Oracle does not predefine any document types, so your implementation team supplies the list of available types.
"What-If" AnalysisIf you choose the What-If Analysis link on the Review page, the application displays information about your selected person's entitlement to compensation and benefits. Choosing this link runs the BENMNGLE process, which gathers and reports information about compensation objects relating to the person's entitlements. Use this page to assess the impact of your proposed action. Here you can review the unit of currency, current amount, current period, What-If amount, and What-If period.
Note: Performing What-If analysis requires that you run Oracle Advanced Benefits.
Business DocumentsYour implementation team can create formatted business documents in Acrobat PDF format, and associate them with selected actions. The application can also include information from your action in the document automatically. For example, documents available for your use could include a Request for Change, Notification of Change, letter, or contract describing the changes to the person's status, such as a new job or

Common SSHR Modules 11-59
effective date. Your setup can provide pre-approval and post-approval versions of a document. If you press the Printable Page button on the Review page, you will see a list of pre-approval documents associated with your action that are available for printing. Ifno documents are available, pressing Printable Page displays a printer-friendly version of the Review Page.
On final approval, the Initiator receives a notification with a link to a list of available post-approval document versions.
Approving a Self-Service Action
Approvals ManagementSSHR actions use Oracle Approvals Management (AME), a rules-based expert system, to route actions via supervisory hierarchy (default), or routing list. Your implementation team can define business rules that generate a routing list automatically, ensuring that SSHR routes your action to the appropriate parties for approval. Your setup can designate approvers who record decisions by external authorities, such as unions or workers councils.
Pressing the Submit button on the Review page sends your action to an approval process that chooses the appropriate approvers automatically. Approvers receive a notification in their Worklist with a link to open the action, and (with update privileges)they can edit, change the effective date, or attach supporting documents. Approvers canreturn the action for correction to any previous approver on the chain. If you are the final approver, pressing Submit applies the action to the database.
Note: If the database encounters intervening approved actions on your selected person, workflow sends the action to a Human Resources representative on final approval for manual entry of all appropriate changes. You see a warning message if this is the case.
See: Managing Conflicting Actions, page 11-49
The Review page also provides options to add approvers and select additional notification recipients.
NotificationsWorkflow users receive notifications in their Worklist. Standard formats include:
• Approval Required
• Saved for Later
• Return for Correction
11-60 Oracle Self-Service Human Resources Deploy Self-Service Capability Guide
• FYI
• Queries from other approvers
When an approver or HR representative retrieves a notification requiring approval, the Notification Details page appears, providing notes and warnings related to the action. Notification Details provide the following options:
• Approve
• Reject
• Reassign
• Request Information
• View Action
• Update Action
• Return for Correction
Most options include an opportunity to provide comments or ask questions.
Updating an ActionUnless your implementation team has decided to have all actions take effect on approval, the Effective Date page appears when an approver opens an action. Any approver in the chain of recipients with update privileges can change the effective date here. Approvers may see messages or warnings about intervening or future-dated actions that the database has encountered. See Managing Conflicting Actions, page 11-49
Return for CorrectionAny approver can return an action for correction to any previous approver on the chain.In order to make a change, recipients must have a workflow role that grants update privileges.
Transaction Data Changes in FYI NotificationsThe FYI notifications display changes to the transactions that are either approved or rejected. The FYI notifications page displays a region with Proposed column to view transaction data changes and a Supporting Documents region to view any attachments added to the transaction. If any attachments are added to a transaction's Review page, then these attachments appear as a link on the FYI Notification page. For example, after a manager approves a leave of absence transaction, the recipient who receives the FYI notification can view the absence details that have been approved. The recipient need

Common SSHR Modules 11-61
not navigate to the relevant self-service pages in the application to understand the changes that have been approved.
Note: The FYI notification page displays transaction data changes only if the value of the pNtfFyiDetails function parameter is set to Y for formfunctions.
The FYI notifications retrieve information from the transaction table and not from the base table. Therefore if transaction data is dependent on base table and base table data is deleted then relevant data is not displayed in FYI notifications.
See: Menu Function Parameter Descriptions, page 4-34

11-62 Oracle Self-Service Human Resources Deploy Self-Service Capability Guide
New User Registration
New User RegistrationSelf-service registration for new users helps to reduce the workload and costs of HR administration. HR professionals can use this feature to add new employees to the Oracle HRMS database. The self-service approach reduces the rollout effort for large companies where the HR department is not centrally located. You can add or edit user-friendly tips and text messages in the user interface to reduce the need for end user training.
You can also use self-service registration to help shift the workload from the HR department onto the hiring line manager or even the individual employees by allowing them to register their own employee details.
Using the New Employee Registration function, employees log on with a generic company user name and supplied password or they access the function directly with a "guest login", which is invisible to users. They complete online registration, giving details such as name, address, employment details, and family members. They can create their own self-service user names and passwords (or you can choose to generate these automatically). Alternatively, HR administrators or line managers can create the employee records and self-service user names for their new hires.
Using the Non-employee Registration function, other people can log on to create non-employee records in Oracle HRMS. This is most commonly used by US third party benefits providers using Oracle Advanced Benefits. It enables benefits participants or their dependents who become COBRA qualified due to a life event (such as divorce or termination) to register so they can elect their COBRA coverage through self-service.
Using the Create User Name function, people who already have an HR record in the database can create their own self-service user names and passwords. This function provides an alternative to the existing methods of creating users, which are using the Users window or creating self-service users in a batch.
Benefits RegistrationIf you have implemented Standard Benefits or Oracle Advanced Benefits, benefits participants can register directly with you through the World Wide Web or over a corporate intranet. If you are a third party benefits administrator or provider, this means that employees' HR departments are no longer responsible for transferring HR information to your database.
Once a person completes the registration, they can navigate directly to the Self-Service Benefits functions, which process detected life events that enable benefits elections or unrestricted program elections.

Common SSHR Modules 11-63
Generic Users and ResponsibilitiesYou give a generic user name and password to people, enabling them to access self-service initially to register. You can choose how many generic user names you create. For example, a third party benefits provider is likely to create one generic user name foreach subscriber organization. Employers might create one user name for the entire business group, or different names based on the organization hierarchy structure.
Default OrganizationEach user name is associated with an organization using the profile option OAB:User toOrganization Link. This defaults the organization for a new employee assignment, but the user can select another organization from the business group during registration. You can set this profile option at the responsibility level--to link each generic user name with a separate organization--or at the site, or application levels.
Default PayrollSimilarly, for each generic user name you can select the default payroll to be assigned, by setting the profile option OAB:User to Payroll Link at the responsibility level. You can also set this profile option at the site, or application levels.
Default ResponsibilityBy default, all newly registered users are assigned the seeded Self Registered Employee Default responsibility. This responsibility gives them access to a subset of self-service functions, such as Self-Service Benefits enrollment, person name, address, and contact information. You can create your own responsibilities and assign them to responsibilities, or the whole site by setting the OAB: Self Registered User Responsibility profile option at the appropriate level.
New Employee Registration and Non-employee RegistrationThese modules are available under the predefined New User Registration Responsibility. They can be used as part of employee self-service or manager self-service. Using New Employee Registration, users log on with a generic user name to create their own employee records in Oracle HRMS, and their own self-service user name and password. Using Non-employee Registration, other people can log on to create non-employee records in your Oracle HRMS.
Menu and Function Names

11-64 Oracle Self-Service Human Resources Deploy Self-Service Capability Guide
User Menu Name Function Name
New User Registration New Employee Registration
New User Registration Non-employee Registration
WorkflowThe workflow details for this module are listed below:
Workflow Process Display Names: New Employee Registration Process and COBRA Registration Process
See: Overview of Oracle Workflow for Users, Oracle Workflow Guide
Note: Approval is not supported by these processes.
Configurable Workflow Attributes:Not applicable
Configurable Tips and Instructions
Region Tip Type Message Name
Ben Life Event Cobra Message BEN_COBRA_LIFE_EVENT_DATE
Ben Life Event Cobra Message BEN_LIFE_EVENT_COBRA
Ben Life Event Current Message BEN_LIFE_EVENT_DATE
Ben Life Event Current Message BEN_LIFE_EVENT_CURRENT
Registration user Main Content
Short Tip HR_INCORRECT_PASSWORD_LENGTH
Verification Content DATE_FORMAT
Common SSHR Modules 11-65
See: Adding Instructions to Web Pages, page 6-35
Configurable Flexfields
Region Flex Name Flex Code
Verification Content Additional Personal Details Flex
PER_PEOPLE
Extra Information Type Update
Extra Person Information Person Developer DDF
See: Configuring Flexfields, page 6-27
Configurable Profile Options
Profile Configurable Levels Values Default
OAB: User to Organization Link
All Organizations Null
OAB User to Payroll Link
All Payrolls Null
OAB: Self Registered User Responsibility
All Responsibilities Self Registered Employee Default Responsibility
HR: Business Group Set at Responsibility level
Business groups
HR: Self Service HR Licensed
Site--set to Yes Yes/No No
Create User NameThis module is available under the predefined New User Registration Responsibility. It can be used as part of employee self-service. Using Create User Name, people who already have an HR record in Oracle HRMS can create their own self-service user names and passwords.

11-66 Oracle Self-Service Human Resources Deploy Self-Service Capability Guide
Menu and Function Names
User Menu Name Function Name
New User Registration Create User Name
WorkflowThe workflow details for this module are listed below:
Workflow Process Display Names: Create User Name Process
Note: Approval is not supported by these processes.
Configurable Workflow Attributes:Not applicable
Configurable Tips and Instructions
Region Tip Type Message Name
New User Creation Verification Content
DATE_FORMAT
Registration User Main Content
Short Tip HR_INCORRECT_PASSWORD_LENGTH
See: Adding Instructions to Web Pages, page 6-35
Configurable Flexfields
Region Flex Name Flex Code
New User Creation Verification Content
Additional Personal Details PER_PEOPLE

Common SSHR Modules 11-67
See: Configuring Flexfields, page 6-27
Configurable Profile Options
Profile Configurable Levels Values Default
OAB: Self Registered User Responsibility
All Responsibilities Self Registered Employee Default Responsibility
HR: Business Group Set at Responsibility level
Business groups
HR: Self Service HR Licensed
Site--set to Yes Yes/No No
User Hooks To Generate User Names For New User RegistrationAs supplied, the New User Registration processes (Create New User, New Employee Registration, and Non-employee Registration) include a User ID page where users can enter a user name and password for logging on to self service. Alternatively, you can implement some additional code so that the user name and password are generated by the application when the user clicks a button on this page. You can implement this using user hooks.
There are two user hooks:
• BEN_PROCESS_USER_SS_BK1.CREATE_USER_DETAILS_B (which we will call the "Before user hook" because it runs before the user name is created)
• BEN_PROCESS_USER_SS_BK1.CREATE_USER_DETAILS_A (which we will call the "After user hook" because it runs after the user name is created)
They are called in the user api BEN_PROCESS_USER_SS_API. The user hooks communicate with this caller api through a set of globals. These globals are defined in the package BEN_PROCESS_USER_UTILITY. The usage notes within this package explain how to use the globals.
Using the Before User HookUse the Before user hook to set globals with user and responsibility information. To set the globals with user information, use G_FND_USER_RECORD. To associate responsibility and security group/security profile information with the user, use G_FND_RESP_RECORD. If you do not set the responsibility and security information
11-68 Oracle Self-Service Human Resources Deploy Self-Service Capability Guide
using globals, the application uses the responsibility from the OAB:Self Registered Employee Responsibility profile option.
Minimum SetupThe minimum you need to do to create a user with today's date as the start date is to put the following two lines in the Before user hook.
ben_process_user_utility.g_fnd_user_record.user_name := 'testuser'; ben_process_user_utility.g_fnd_user_record.password := 'testpassword';
You can also set up globals for start_date, end_date, last_logon_date, password_date, password_accesses_left, password_lifespan_accesses, password_lifespan_days, email_address, fax, description, customer_id, and supplier_id.
Important: Never set the employee_id global within the New User Registration processes. If you do so, the global overwrites the employeeid created during the process and so the user will not be associated with the correct employee id. If you want to use the user wrapper api outside of the page for creating user name and password, you can then pass in the global for employee id.
Using the After User HookUse the After user hook to accomplish something that needs to be done after a user is created. For example, the Before user hook enables you to pass in information about a responsibility, but it does not handle multiple responsibilities. You could pass no information about responsibility in the Before user hook and instead call the appropriate "fnd" api(s) in the After hook to take care of the responsibility, menu, or any profile value that you want to associate with the user.
Another use for the After hook might be to write code to populate some tables--such as communication or extract tables--from where you can extract the information later.
Setting Up a Generic User ID For New User RegistrationFollow these steps to create the generic user name and password that will enable new employees, managers, and other users to access self-service to register themselves in your database. These steps are required if you are using any of the following processes:
• New Employee Registration
• Non-employee Registration
• Create User Name
If you are implementing new user registration in more than one business group, see: Setting Up Generic User IDs in Multiple Business Groups, page 11-71. If you are

Common SSHR Modules 11-69
implementing new user registration within a single business group, use the following procedure.
If you are only implementing the Create User Name process (that is, you are using self-service to create new users but not to create HRMS records), you can omit steps 7, page 11-70and8, page 11-70.
To set up self-service registration in a single business group:1. If you are a third party benefits provider, create an organization to represent each
subscriber organization or company in which you are providing benefits.
If you are not a third party benefits provider, you create your HR organization hierarchy as required within your business group. Skip the next step since it appliesto third parties who administer multiple companies within a single business group.
See: Creating an Organization, Oracle HRMS Enterprise and Workforce Management Guide
See: Adapting and Creating a New Business Group, Oracle HRMS Enterprise and Workforce Management Guide
2. Third party benefits providers using Oracle Advanced Benefits only: Establish a link between your organizations and the relevant benefits program. For example, link each subscriber organization to the subscriber's benefit program. Use the Organizations tabbed region of the Programs window.
This link enables the Participation process to select the appropriate benefit programs for a particular organization when processing people within that organization. This enhances system performance by limiting the retrieval of recordsto the person's organization. The process selects the programs pertaining to that organization and then examines the person's eligibility restrictions.
Note: Set the system profile Limit By Persons Organization to Yes to enable this feature for the Benefit Service Center window. Set the Limit to Organization parameter to limit the Participation batch process.
See: Defining a Benefits Program, Oracle HRMS Compensation and Benefits Management Guide
See: Associating an Organization with a Benefits Program, Oracle HRMS Compensation and Benefits Management Guide
3. Review the predefined New User Registration responsibility and New User Registration menu, which gives access to the New Employee Registration, Non-employee Registration and Create User Name functions in self-service.
If you only need one generic user name for the business group, you can use the predefined New User Registration responsibility.
11-70 Oracle Self-Service Human Resources Deploy Self-Service Capability Guide
Otherwise, create a copy of the New User Registration responsibility for each organization for which you will create a separate generic user name. You might want more than one responsibility for each organization. For example, you might give new employees a responsibility that gives them access to the New Employee Registration function only. You could create a second responsibility for people who already exist in the database but need to create a self-service user name and password. This would reduce errors by giving each person access to one function only.
4. Create a generic user name and password for the business group or for each organization, so that new people can log on to the Registration page. If users will log in with a guest login, create the guest user instead. For further information on guest users, see: Configuring the Create User Name Process, page 11-79.
See: Users Window, Oracle E-Business Suite Security Guide
5. Add the New User Registration responsibility (or the responsibilities you created instep 3, page 11-69) to the generic user name for each organization.
6. Update the system profile HR:Business Group at the appropriate level so that the generic user name points to the business group in which the person registering belongs.
7. Update the OAB:User to Organization Link system profile at the responsibility level to link the New User Registration responsibility (or your copies) to the organizationin which the person belongs.
Important: Check to ensure that the organization you select is correct. The list of values contains all the organizations in the database. You must select an organization defined in the business group associated with the user name.
See:Setting Profile Options, Oracle E-Business Suite Setup Guide
8. Update the profile OAB User to Payroll Link at the responsibility level for the New User Registration responsibility (or your copies) to provide a default employee payroll. If this profile is blank and the employee is not assigned to a payroll, OAB processes use the benefits default payroll selected for the business group in which the person will be registered.
Important: Check to ensure that the payroll you select is correct. The list of values contains all the payrolls in the database. You mustselect a payroll defined in the business group associated with the user name.
9. Check whether the predefined Self Registered Employee Default responsibility is
Common SSHR Modules 11-71
appropriate for all your organizations. If it is not, create any new self-service responsibilities you require.
Note: The application assigns this responsibility to users when theycomplete their registration. This responsibility contains the New Employee Default Menu that the participant uses to access the self-service web pages after the initial registration.
10. If you created just one new responsibility in the previous step, change the profile OAB: Self Registered User Responsibility at the site level to point to your new responsibility. If you created a different responsibility for each organization, add it to the profile OAB: Self Registered User Responsibility at the responsibility level for the New User Registration responsibility (or your copies).
Note: Oracle delivers the system profile OAB: Self Registered User Responsibility with the seeded value of Self Registered Employee Default Responsibility predefined at the site level. The self-service menu for this seeded responsibility gives access to only a subset of employee self-service transactions.
11. Log into Self-Service with the user name and password you created.
As the system administrator, the first time you log into self-service, you gain access by using the password you created in step 4, page 11-70. After entering it, you mustchange the password to a generic password you want the new people to use when accessing self-service initially to register.
12. Use the New Employee Registration function to create a new person and a user name for that person. The application assigns the responsibility set in the OAB: Self Registered User Responsibility profile (step 10, page 11-71) to the new user name.
Setting Up Generic User IDs in Multiple Business GroupsThis procedure is appropriate for third party benefit providers who are creating a separate business group for each company or subscriber organization. It is also appropriate for employers or third party administrators who have multiple business groups on a single database.
To set up self-service registration in multiple business groups:1. Third party benefits providers: Create a business group to represent each subscriber
organization or company in which you are providing benefits. In each business group, create an HR organization for the subscriber.
Employers: Decide how many generic user names you want to create. You will need at least one generic user name for each business group. You may want to
11-72 Oracle Self-Service Human Resources Deploy Self-Service Capability Guide
create separate user names for the organizational hierarchies within each business group.
See: Creating an Organization, Oracle HRMS Enterprise and Workforce Management Guide
See: Adapting and Creating a New Business Group, Oracle HRMS Enterprise and Workforce Management Guide
2. Review the predefined New User Registration responsibility and New User Registration menu, which gives access to the New Employee Registration, Non-employee Registration and Create User Name functions in self-service.
Create a copy of the New User Registration responsibility for each business group. You might want more than one responsibility for each business group. For example,you might give new employees a responsibility that gives them access to the New Employee Registration function only. You could create a second responsibility for people who already exist in the database but need to create a self-service user name and password. This would reduce errors by giving each person access to one function only.
3. Create a generic user name and password for each organization so that new people can log on to the Registration page. If users will log in with a guest login, create the guest user instead. For further information on guest users, see: Configuring the Create User Name Process, page 11-79.
See: Users Window, Oracle E-Business Suite Security Guide
4. Add your copy of the New User Registration responsibility to the generic user name for each organization.
5. Update the system profile HR:Business Group at the appropriate level so that the generic user name points to the business group in which the person registering belongs.
6. Update the OAB:User to Organization Link system profile at the user or responsibilitylevel to link the New User Registration responsibility (or your copies) to the organization in which the person belongs.
Important: Check to ensure that the organization you select is correct. The list of values contains all the organizations in the database. You must select an organization defined in the business group associated with the user name.
See: Setting Profile Options, Oracle E-Business Suite Setup Guide
7. Update the profile OAB User to Payroll Link at the responsibility level for the New User Registration responsibility (or your copies) to provide a default employee
Common SSHR Modules 11-73
payroll. If this profile is blank and the employee is not assigned to a payroll, OAB processes use the benefits default payroll selected for the business group in which the person will be registered.
Important: Check to ensure that the payroll you select is correct. The list of values contains all the payrolls in the database. You mustselect a payroll defined in the business group associated with the user name.
8. Check whether the predefined Self Registered Employee Default responsibility is appropriate for all your organizations.
• If it is not, create any new self-service responsibilities you require.
• If it is, create a copy for each organization.
Update the system profile HR:Business Group at the responsibility level to point to the correct business group.
Note: The application assigns this responsibility to users when theycomplete their registration. This responsibility contains the New Employee Default Menu that the participant uses to access the self-service web pages after the initial registration.
9. Update the system profile OAB: Self Registered User Responsibility at the responsibility level with the name of the responsibility to use for that organization (created in step ).
Note: Oracle delivers the system profile OAB: Self Registered User Responsibility with the seeded value of Self Registered Employee Default Responsibility predefined at the site level. The self-service menu for this seeded responsibility gives access to only a subset of employee self-service transactions.
10. Log into Self-Service with the user name and password you created.
As the system administrator, the first time you log into self-service, you gain access by using the password you created in step 3, page 11-72. After entering it, you mustchange the password to the generic password you want new people to use when accessing self-service initially to register.
11. Use the New Employee Registration function to create a new person and a user name for that person. The application assigns the responsibility set in the OAB:Self Registered User Responsibility profile (step 9, page 11-73) to the new user name.
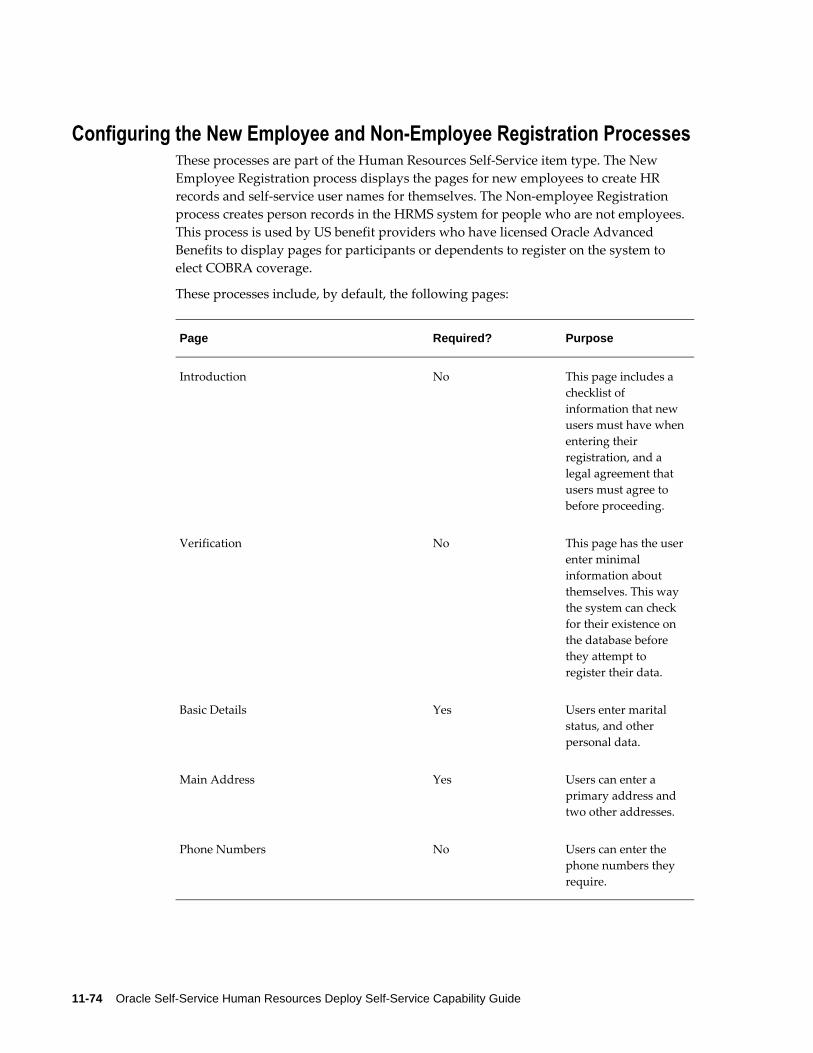
11-74 Oracle Self-Service Human Resources Deploy Self-Service Capability Guide
Configuring the New Employee and Non-Employee Registration ProcessesThese processes are part of the Human Resources Self-Service item type. The New Employee Registration process displays the pages for new employees to create HR records and self-service user names for themselves. The Non-employee Registration process creates person records in the HRMS system for people who are not employees. This process is used by US benefit providers who have licensed Oracle Advanced Benefits to display pages for participants or dependents to register on the system to elect COBRA coverage.
These processes include, by default, the following pages:
Page Required? Purpose
Introduction No This page includes a checklist of information that new users must have whenentering their registration, and a legal agreement that users must agree to before proceeding.
Verification No This page has the userenter minimal information about themselves. This way the system can check for their existence on the database before they attempt to register their data.
Basic Details Yes Users enter marital status, and other personal data.
Main Address Yes Users can enter a primary address and two other addresses.
Phone Numbers No Users can enter the phone numbers they require.

Common SSHR Modules 11-75
Page Required? Purpose
Assignment Yes, for New Employee process (notin non- employee process)
Employees can fill in information about their organization, job,position, grade, payroll, assignment status, people group, and additional employment information.
Family Member Coverage No This page simply asks users whether they wish to enter details ofother family members.If they confirm that they do, the Add Family Members pageappears.
Add Family Members No Users can enter names, addresses, phone numbers, and additional personal information for as many contacts as they require.
Life Events No Relevant to US Third Party Benefits providers only. Users can select the life event that has made them eligible for a benefits program. Thiscreates a potential life event for the person. NOTE: Employers must remove this page from the process.
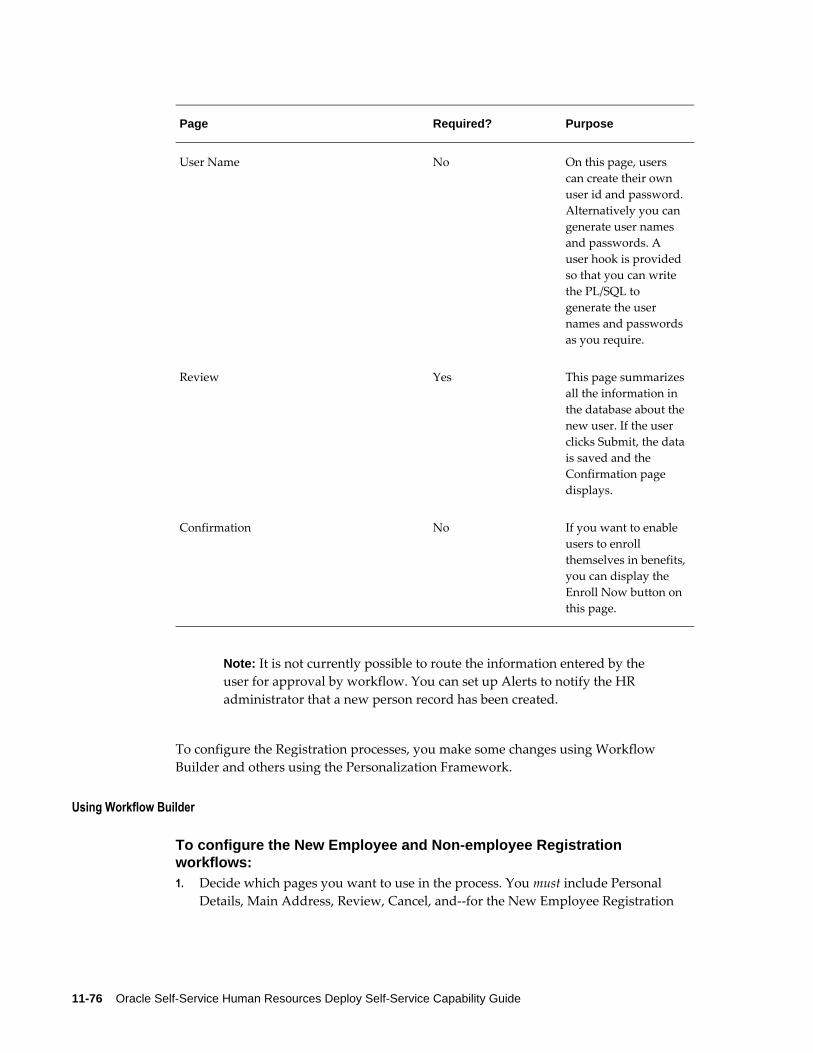
11-76 Oracle Self-Service Human Resources Deploy Self-Service Capability Guide
Page Required? Purpose
User Name No On this page, users can create their own user id and password. Alternatively you can generate user names and passwords. A user hook is provided so that you can write the PL/SQL to generate the user names and passwords as you require.
Review Yes This page summarizesall the information in the database about thenew user. If the user clicks Submit, the datais saved and the Confirmation page displays.
Confirmation No If you want to enable users to enroll themselves in benefits,you can display the Enroll Now button on this page.
Note: It is not currently possible to route the information entered by theuser for approval by workflow. You can set up Alerts to notify the HR administrator that a new person record has been created.
To configure the Registration processes, you make some changes using Workflow Builder and others using the Personalization Framework.
Using Workflow Builder
To configure the New Employee and Non-employee Registration workflows:1. Decide which pages you want to use in the process. You must include Personal
Details, Main Address, Review, Cancel, and--for the New Employee Registration

Common SSHR Modules 11-77
process only--Employment Details (to identify the correct organization).
To delete pages, delete the corresponding activities from the workflow process.
Employers must delete the Life Event page from the registration process. Oracle Advanced Benefits customers can use life event triggers in the database to determine benefit enrollment opportunities. There are no life event restriction capabilities in Standard Benefits.
2. Decide in what sequence you want pages to appear. The Introduction page normally appears first, followed by Personal Details. The only pages that can come before Personal Details are Introduction and Verification. For the Non-employee Registration workflow, the life event page must be before the Personal Details page.
To change the sequence of pages, edit the workflow process diagram.
See: Configuring Workflow Objects, page 5-8
Using the Personalization FrameworkFor each region, decide which region items you want to display. If you have implemented Standard Benefits or Oracle Advanced Benefits, ensure you are including all the fields that capture information required to assess benefits eligibility.
On the Personal Information page:
• You must display the Last Name, Gender and Hire Date fields.
• If you use rates, and therefore need a Payroll, you must require a birth date.
• In non-US countries, you should hide the field Covered Under Medicare.
• Make the Employee Number field enterable if you do not generate employee numbers in your business group.
On the Employment Information page (New Employee Registration only):
• You must display the Organization field.
• If you use rates or element entries, you must display the Payroll field.
• In localizations that use GRE, you should display the GRE field.
On the Verification page:
• You can add fields to assist the search, such as national identifier (for example, social security number), person descriptive flexfields, employee number, and email address.
• If the information entered on the Verification page matches more than one person, the application displays a tables of the duplicates so the user can choose one. Decide what information to include in this table. You can add birth date, Social
11-78 Oracle Self-Service Human Resources Deploy Self-Service Capability Guide
Security Number, employee number, person descriptive flexfields, and FND username.
For a list of configurable regions, see: New Employee Registration and Non-employee Registration, page 11-63.
See also: Configuring Web Pages, page 6-21
Setting Up Life Events (Advanced Benefits only)This section is relevant only to third party benefits providers who are including the Life Events page in the process flows. Employers who use Oracle Advanced Benefits should rely on life event triggers to determine the necessary processing instead of using this page.
You determine which life events appear on the Life Events page by the Selectable for Self-Service code you enter when you define the life event in the professional user interface. The code choices are:
• All--meaning that the life event can be selected in all self-service processes that use the Life Events page.
• Basic Registration--meaning that the life event can be selected in the New EmployeeRegistration process
• COBRA Registration--meaning that the life event can be selected in the Non-employee Registration process
• Basic and COBRA Registration--meaning that the life event can be selected in both the New Employee and the Non-employee Registration processes
Colliding Life Events:When a person selects a life event from this page, the process will insert the event as a potential life event for the person. By completing the rest of the registration process, the person may have other life events detected due to life event triggers in the business group. Ensure that your life event collapsing and collision logic leaves a user with just one "winning" potential life event during the Participation Process. You could do this byone of the following approaches:
• Ensuring that all life events that can be selected in Registration have the Override check box selected (and other life events that might be triggered do not). Then, during setup of collapsing life events, you could choose which event should win if there is more than one overriding event.
• Turning off automatic triggering of life events
• Removing Life Event page from workflow and configuring life event triggers in the business group to be detected based on data entered by the person during the registration process. This is the approach that employers should use to determine

Common SSHR Modules 11-79
data changes that may give the person an opportunity to make benefit election changes.
Configuring the Create User Name ProcessThe Create User Name Process workflow within the Human Resources Self-Service item type displays the pages for people who already have a record on the HR database to create their own self-service user names and passwords.
This process includes, by default, the following pages:
Page Required? Purpose
Verification Yes This page has the user enter minimal information about themselves. This page must find one and only one person matching the information entered so that the User is connected to the correct HR record
User Name Yes On this page, users can create their own user id and password. Alternatively you can generate user names and passwords. A user hook is provided so that you can write the PL/SQL to generate the user names and passwords as you require.
Review Yes This page summarizes all the information in the database about the new user. If the userclicks Submit, the data is saved and the Confirmation page displays.
Confirmation No If you want to enable users to enroll themselves in benefits, you can display the Enroll Now button on this page.
11-80 Oracle Self-Service Human Resources Deploy Self-Service Capability Guide
To configure the Create User Name process:1. Decide whether users should log on to use this process with a generic company ID
or with a guest ID (which would happen automatically and be invisible to the user).
2. If you decide to use a company ID for extra security:
• Decide whether to create an ID specific to this process, or shared with the new employee registration process. This determines whether the user sees a menu ofprocesses after logging on, or is taken straight to the Create User Name process.
• Decide how to communicate the company IDs to your users. One approach--if you have licensed Oracle Advanced Benefits--is to create a new communication type and use the Determine Communications batch process. This approach will only work for people currently in the database.
3. If you decide to use a guest ID, there are three approaches you can use. Do one of the following:
• In the Users window, create the guest user with the user name GUESTOAB andthe password GUESTOAB. You can grant this user the predefined New User Registration responsibility or your copy of it. Log on using this user to change the password to WELCOME.
Call the supplied pl/sql procedure ben_guest_user_api without passing a user name and password. The procedure uses user name GUESTOAB and the password WELCOME. It passes the user name and unencrypted password into the call to oraclehomepage.home().
Note: Call ben_guest_user_api from a URL in this way: [APPS_WEB_AGENT]ben_guest_user_api.login?i_1=USERNAME&i_2=PASSWORD&rmode=2
• In the Users window, create the guest user with any name and password. Log on using this user to change the password.
Call the supplied pl/sql procedure ben_guest_user_api, passing a user name and unencrypted password. (For the format of the call, see the Note above) If the user name is passed in, the password must be too, or the procedure returns an error. The procedure passes the user name and unencrypted password into the call to oraclehomepage.home().
• Call oraclehomepage.home directly passing a user name/password if desired. (For example, oraclehomepage.home?userid=<your user name>&password=<your password>).
4. On the Verification page:

Common SSHR Modules 11-81
• Decide what information a user must enter on the Verification page of the system to identify the existing HR person record. By default this information is: first name, last name, and birth date. You can add the following fields: national identifier (such as social security number), employee number, email address, supervisor, organization, location, address, and person flexfields.
• Decide what to display if the information entered on the Verification page matches more than one person. By default, the application displays an error.
For a list of configurable regions, see: Create User Name, page 11-65.
5. Decide what should happen if users try to create a user name when they do not have an existing HR record. By default the application issues an error directing the user to retry or Cancel to the menu and contact their administrator. You can configure the message text and the URL associated with the Cancel button. For example, the Cancel button could take them straight to the New Employee Registration process, rather than to the menu.
6. Determine which responsibility to assign to the new users. By default, all new usersare granted the responsibility set in the OAB:Self Registered User Responsibility profile option. You may wish to configure this to vary the responsibility by the person type (especially employee versus non-employee).
To do this, you can create different generic IDs (and responsibilities) for different groups of users and change the OAB:Self Registered User Responsibility profile option at responsibility level.
Generating Self-Service User Names and PasswordsWhen a person has registered themselves in the HR database, you can choose to generate their self-service user name and password, rather than have them create their own. You can implement this using user hooks.
To generate user names and passwords:1. Write the PL/SQL to generate the user names and passwords as you require, using
the user hooks.
See: User Hooks To Generate User Names for New User Registration (appendix), page 11-67.
2. Optionally, edit the instruction text on the User ID page, hide the user name and password fields, and change the button label from Next to Generate.
3. Consider how you will inform users of their user name. One approach--for Oracle Advanced Benefits customers--is to use a user hook to call your own code that populates the communication tables, and use this information to alert your users.

11-82 Oracle Self-Service Human Resources Deploy Self-Service Capability Guide
Another approach is to generate the user names in a standard and predictable way from users' names or national identifiers.
Talent Management 12-1
12Talent Management
Talent Management Overview (SSHR)The following topics describe the self-service functions available in the Talent Management area. They provide information about the functionality and configuration options for each function:
• Suitability Matching (Self-Service) , page 12-7
• Events and Bookings, page 12-4
• Employee Reviews, page 12-5
• Competency Profile, page 9-25
• Education and Qualifications, page 9-24
• Other Professional Qualifications, page 9-25
• Work Preferences, page 9-27
• Succession Planning, page 12-10
Note: To grant your users access to the Training, External Training, andTraining Plans functions, which were previously available from the Employee Self-Service menu, you must use the Learner Self-Service responsibility and the Learner Home and External Learning functions. For all other training functionality, see: Oracle Learning Management, Oracle Learning Management User Guide.
Oracle Performance Management is a separately licensed product. You must purchase aseparate Oracle Performance Management license in addition to an Oracle Self-Service HR license to use the Appraisals, Questionnaire Administration, and Objectives

12-2 Oracle Self-Service Human Resources Deploy Self-Service Capability Guide
Management functions.
See: Oracle Performance Management Overview, Oracle Performance Management Implementation and User Guide
The following topics describe the functions available in Oracle Performance Management. They provide information about the functionality and configuration options for each function:
• Configuring the Appraisals Function, Oracle Performance Management Implementationand User Guide
• Questionnaire Administration, Oracle Performance Management Implementation and User Guide
Using SSHR for Talent Management
Which Talent Management functions can I access from SSHR?You can access the Competency Profile, Event and Bookings, Employee Review, Suitability Matching, Work Preferences, Education and Qualifications, Succession Planning, and Other Professional Qualifications functions from SSHR.
Important: The Appraisals and Questionnaire Administration functionsare part of Oracle Performance Management. You require additional license to use these functions.
See: Oracle Performance Management Overview, Oracle Performance Management Implementation and User Guide
Are employee reviews the same as appraisals?No. The Employee Review function enables you to set up a review meeting and invite reviewers to the meeting. The Appraisals functions enable you to perform an appraisal (for example, an annual performance review) during which you can evaluate a worker'scompetencies, set or assess objectives, and complete a questionnaire.
What is the difference between the Education and Qualifications function and the Other Professional Qualifications function?
You use the Education and Qualifications function to identify the schools and colleges aperson has attended and the qualifications they earned. For example, if an employee has a Bachelor of Arts degree, you use this function to record the qualification and the college or university the employee attended.
You use the Other Professional Qualifications function to record all other recognized

Talent Management 12-3
qualifications. Such qualifications are typically gained in the work environment.
Can I create a competency profile using SSHR?No. To create a competency profile, you use the forms-based interface. However, you can use SSHR to view and update a person's competency profile.
12-4 Oracle Self-Service Human Resources Deploy Self-Service Capability Guide
Event and Attendance Administration
Events and BookingsThe Events and Bookings function enables self-service users to create their own events such as meetings, presentations, or training days or to book themselves on existing events. The Events and Bookings function is available to both managers and workers, enabling managers to book their subordinates onto events. If a manager books a subordinate onto an event, the subordinate worker receives notification of the booking.
See also: Event and Attendance Administration, Oracle HRMS Workforce Sourcing, Deployment, and Talent Management Guide
Menu and Function NamesThis module can be accessed from the following menus and functions:
User Menu Name Function Name
Employee Self Service Events and Bookings
Manager Self Service Events and Bookings
WorkflowThe workflow details for this module are listed below:
Workflow Process Display Name: Not applicable
Configurable Workflow Attributes:Not applicable
Configurable Tips and Instructions
Region Name Tip Type Message Name
Events Search Criteria Instruction PQH_EVENT_SEARCH

Talent Management 12-5
Region Name Tip Type Message Name
Events Create Button Instruction PQH_EVENT_ADDORCANCEL
Events Search And Result Header
Instruction PQH_EVENT_BOOK
Manager Events Search And Result Header
Instruction PQH_EVENT_MGR_SEARCH
Events Create Button Instruction PQH_EVENT_ADDORCANCEL
See: Adding Instructions to Web Pages, page 6-35
Configurable FlexfieldsNot applicable
Configurable Profile OptionsNot applicable
Employee ReviewsThe Employee Review function enables employees and managers to create or update reviews. Employees can create their own reviews and managers can create reviews for their employees. Both managers and employees can invite reviewers to attend the review. They can also remove these reviewers if necessary. They can also attach supporting documents. If the Save Attachments check box is available in the Attachments region, then they can select this option to make these attachments available in the Oracle HRMS People window. When reviewers are invited to a review or removed from a review, they receive a notification.
See: Event and Attendance Administration, Oracle HRMS Workforce Sourcing, Deployment, and Talent Management Guide
Menu and Function NamesThis module can be accessed from the following menus and functions:

12-6 Oracle Self-Service Human Resources Deploy Self-Service Capability Guide
User Menu Name Function Name
Employee Self Service Employee Review
Manager Self Service Employee Review
WorkflowThe workflow details for this module are listed below:
Workflow Process Display Name: Employee Review
Configurable Workflow Attributes:Not applicable
Configurable Tips and InstructionsNot applicable
Configurable FlexfieldsNot applicable
Configurable Profile OptionsNot applicable
Talent Management 12-7
Suitability Matching (Self-Service)
Suitability MatchingThe Suitability Matching function provides a range of competency-based methods for finding the right person for a work opportunity or finding the right work opportunity for a person. Managers and HR professionals can compare employees, applicants, and contingent workers by role, job, and position, and employees can find work opportunities that fit their competencies.
Depending on their responsibility, the default Suitability Matching page offers users multiple matching options.
For information on Suitability Matching in Oracle Succession Planning, see: Using Suitability Matching in Oracle Succession Planning, Oracle Succession Planning Implementation and User Guide
Suitability Matching Options Available to ManagersThe Suitability Matching page for managers displays two regions:
Note: You must select the Include Core Competencies check box to use competency requirements defined at the business group level in the Suitability Matching feature. Otherwise, the application uses the competency requirements set below the business group level.
In the Find a Person for a Work Opportunity region, the Include Core Competencies check box appears for these actions:
• Find Suitable People by Role
• Find Suitable People by Competency
In the Find a Work Opportunity for a Person region, the Include Core Competencies check box appears for the Find Work Opportunities by Competency action.
When you compare current assignments, the application uses competency requirements defined for organization, job, and position of the assignment and does not consider competency requirements defined at the business group level.
• Find a Person for a Work Opportunity
Using the options available in this region, managers can:
12-8 Oracle Self-Service Human Resources Deploy Self-Service Capability Guide
• Find employees, contingent workers, and applicants who fit the competency profile for a job, position, department, vacancy, or some combination of these criteria.
• Find employees, contingent workers, and applicants who match a list of competencies that the managers specify.
• Compare the competencies of employees and contingent workers who currently occupy a specified job or position in a department or any department within the business group.
• Compare anyone who has applied for a vacant job or position in a department or any department within the business group.
In addition to these options, HR Professionals can use the Compare Named Successors for a Position option.
• Find a Work Opportunity for a Person
Using the options available in this region, managers can:
• Find work opportunities for an individual who fits the competency profile for one or more jobs, positions, departments, vacancies, or some combination of these criteria.
• Find work opportunities for an individual employee or contingent worker who matches a list of competencies that the managers specify.
• Compare an applicant's competency profile with the competency profiles of existing vacancies.
• Compare, by competency, an employee's or contingent worker's current assignments.
In addition to these options, HR Professionals can use the Compare Succession option.
Suitability Matching Options Available to WorkersWorkers can use the Suitability Matching function to compare their competencies to those of current or potential future jobs, positions or vacancies and also search for suitable work opportunities.
Using the Suitability Matching page, workers can:
• Find work opportunities that suit their competency profile for one or more jobs, positions, departments, vacancies, or some combination of these criteria.
• Find work opportunities using person competencies.

Talent Management 12-9
• Compare their competency profiles with the competency profiles of existing vacancies.
• Compare, by competency, their succession options as defined for successors in the succession plans.
• Compare the competency profiles of their assignments with those of the other employee assignments.

12-10 Oracle Self-Service Human Resources Deploy Self-Service Capability Guide
Succession Planning
Succession PlanningSuccession planning and management is critical to the growth of an enterprise. Using the Succession Planning functionality, as an HR Professional or a manager, you can:
• Identify key positions in your organization to ensure that succession plans are in place.
• Identify employees who are likely to vacate their current positions because of promotion, retirement, or voluntary termination.
• Define additional information for succession plans to meet business needs.
• Create and update succession plans for jobs, positions, and employees.
On the Succession Planning page, you can:
• Search for plans for a job, position, or an employee.
• Create, update, and delete succession plans.
Searching for Succession PlansYou can use search criteria such as job, position, and employee to search for plans. For example, you can search for plans for the Manager job or search for plans for employee John Smith. The application provides additional search criteria, such as key role and turnover rate to search for job and position plans. You can use search criteria such as employee name, employee number, or key person, to search for an employee's succession plans.
Some employees may have multiple succession plans. To search for multiple succession plans use the Successor search criteria. The successor for a job, position, or person is always an employee.
Viewing Plan DetailsYou can view the following information for a succession plan:
• Name of the job, position, or employee.
• Whether the job or position is a key role and the employee is a key person.
• The time frame after which an employee is eligible to move to the new position.

Talent Management 12-11
• The turnover rate for the role and the risk of loss for an employee.
• Succession dates, such as the earliest date on which an employee can move to a newposition.
• Additional successions plan details.
From the search results table, you can update or delete an existing succession plan.
See: Creating and Maintaining Succession Plans, page 12-11
Creating and Maintaining Succession PlansAs an HR Professional or manager, you can create and maintain succession plans for workers.
For a general introduction to succession planning, see: Succession Planning, page 12-10
The following sections describe how to create and update succession plans.
Creating a Succession PlanUsing the Create Succession Plan page, you can create a succession plan for a job, position, or an employee, and you can add successors. You can add multiple successors to a plan.
When creating a succession plan, you can use the following features to find suitable successors:
Creating a Succession PlanComplete these steps to create a succession plan:
• Select the type of succession plan that you want to create. You can create a succession plan for a job, position, or an employee.
• Select the worker's successor. The worker's number automatically appears.
• Specify the time period after which the worker is eligible to move to a new position,for example, immediately or in one month.
• Enter the succession dates, such as the earliest date on which an employee can move to a new position.
• Select whether the worker is eligible for a promotion.
• Provide additional plan details, if required.
• Add your comments on the succession plan.
12-12 Oracle Self-Service Human Resources Deploy Self-Service Capability Guide
If your enterprise has set up information for job, position, and worker, then the following information appears automatically on the page:
• Key role and turnover rate for a role (job or position)
• Key person, advancement potential, and risk of loss for a person
Updating a Succession PlanYou update a succession plan to modify details such as succession dates or the readiness level. You can record your comments on the update.
Setting up Information for Succession PlanningTo enable managers and HR professionals use the Succession Planning functionality, you must complete the setup tasks.
To set up information for succession planning:1. Link the following succession planning information types to the responsibilities that
users access:
• Employee Career Management Information
• Job Career Management Information
• Position Career Management Information
Use the Information Type Security window to link EITs to a responsibility.
See: Setting Up Extra Information Types For a Responsibility, Oracle HRMS Configuring, Reporting, and System Administration Guide
You can link the Employee Career Management Information EIT to the Manager Self-Service responsibility to enable managers to update this extra information for employees in their hierarchy.
2. Define the following lookup types required for succession planning:
• PER_TIME_SCALES: Using this lookup, users can define values for the Readiness Level field.
• PER_SUCC_PLAN_RISK_LEVEL: Using this lookup, users can identify whether an employee is at a high risk of vacating their current position. This lookup type populates the Risk of Loss field.
• PER_SUCC_PLAN_RISK_LEVEL: Using this lookup, users can identify the turnover rate of a role (job or position).
Talent Management 12-13
The Turnover Rate and Risk of Loss fields use the same PER_SUCC_PLAN_RISK_LEVEL lookup.
• PER_SUCC_PLAN_POTENTIAL: Using this lookup, users can identify the advancement potential of an employee.
See: Adding Lookup Types and Values, Oracle HRMS Configuring, Reporting, and System Administration Guide
3. Complete the extra information required for succession planning for employees, jobs, and positions using the following windows:
• For an employee, use the Extra Person Information window in Oracle HRMS.
• For a position, use the Extra Position Information window in Oracle HRMS.
• For a job, use the Extra Job Information window in Oracle HRMS.
See: Person Extra Information Types, HRMS Workforce Sourcing, Deployment, and Talent Management Guide
See: Position Extra Information Types, Oracle HRMS Enterprise and Workforce Management Guide
See: Job Extra Information Types, Oracle HRMS Enterprise and Workforce ManagementGuide
Managers can use the Extra Information page of the Manager Self-Service responsibility to update the extra information required for succession planning for employees. You must ensure that only one extra information record exists for an employee on a specific date, irrespective of whether the extra information is enteredusing Oracle HRMS or Oracle SSHR.
4. Add segments to the Add'l Succession Planning Det descriptive flexfield to capture additional information required for succession plans in your enterprise.


Organization Chart in Oracle SSHR 13-1
13Organization Chart in Oracle SSHR
13-2 Oracle Self-Service Human Resources Deploy Self-Service Capability Guide
Using the Organization Chart
Using the Organization ChartAn Organization Chart is a visual representation of relationships between workers in anorganization. The organization chart that managers and workers view is based on supervisor hierarchy.
How to Use the Organization Chart and Control PanelThe application uses the Hierarchy Viewer component of Oracle Application Development Framework (ADF) to render the Organization Chart. The hierarchy viewer Control Panel enables a user to manipulate the position and appearance of the organization chart at runtime. The organization chart includes a control panel, a number of nodes, and links that connect the nodes. The nodes are connected to panel cards that display worker information. You can expand or collapse a hierarchy.
The following section explains how to use the Control Panel:
• Click the Hide or Show Control Panel button to hide or expand the Control Panel.
• Use the Pan Control to reposition the organization chart component within the viewport.
• Use the Zoom to Fit control to zoom a organization component so that all nodes are visible within the viewport.
• Use the different Zoom Controls to zoom the organization chart components.
• Use the Panel Selector to view information. The panel information that you can view depends on your role. For example, managers can view Contact Information, Employment Details, and Salary of workers in their hierarchy. Workers can view Contact Information and Employment Details of other workers in their organization.
• Use the Layout Selector to change the layout of the organization chart. You can select layouts such as vertical top down, horizontal left-to-right, tree, radial or circle.
Using Panel CardsPanel cards display different sets of information depending on whether the user is a manager or worker. You can click the navigation buttons at the bottom of the panel cardto navigate to the next set of information. You can isolate each of the cards and restore cards to the chart. Click the upward navigation arrow to view the hierarchy above any
Organization Chart in Oracle SSHR 13-3
specific worker.
For information on Organization Chart:
• For managers in Oracle SSHR, see: Using the Organization Chart as Managers in Oracle SSHR, page 13-3
• For workers in Oracle SSHR, see: Using the Organization Chart as Workers in Oracle SSHR, page 13-5
• In Oracle Succession Planning, see: Using the Organization Chart in Oracle Succession Planning, Oracle Succession Planning Implementation and User Guide
Using the Organization Chart as Managers in Oracle SSHRManagers can navigate to the Organization Chart using their Manager Self-Service responsibility, Talent Profile function. As a manager, when you click the Organization Chart tab, the chart displays the hierarchy of the manager who logs in. By default, the chart displays ten direct reports. If there are more than ten direct reports, then you can navigate to the next set of direct reports using the side navigator icon. For each selected node, you can view the hierarchy and then drill further down the hierarchy. If there are workers on secondary assignment reporting to a manager, then the organization chart represents this reporting structure in a dotted line format.
See: How to Use the Organization Chart and Control Panel, page 13-2
Searching for WorkersYou can perform a simple or an advanced search to search for workers in your organization. Search results of a simple search display person name and job.
Advanced search criteria includes first name, last name, manager name, job and organization. Click Add Fields to add additional search criteria. You can save your searches to use them in future.
Following your search, click the person name to view the person's details and hierarchy in the organization chart format.
Viewing Worker InformationManagers can view the following information in different panels for a worker:
• Contact Information: View email, work phone, and address of the worker. Email is a link that helps you to send mail from the organization chart. When you click the Email link, the email client on your local machine opens and the worker's email ID automatically appears in the To field.
• Employment Details: View the employee number, work location, organization, job,

13-4 Oracle Self-Service Human Resources Deploy Self-Service Capability Guide
position, and grade.
• Salary: View the worker's salary, salary currency, grade, and grade range. You can view salary details of workers in your hierarchy only. You cannot view salary details of workers above your hierarchy or workers outside of your security profile although you can view their contact and employment information.
Note: You can view information in panel fields only if data is available. For employees, you can view their Contact Information, Employment Details, and Salary. For contingent workers, you can view their Contact Information and Employment Details.
Performing Self-Service ActionsYou can perform actions for workers only if your administrator has enabled functions from the Actions list. Click the Actions link on the person details panel to perform self-service action for a worker, such as change the job, pay, or manager, and update education qualifications. When you click the Actions link and select an action, the actionis launched in a page in the Manager Actions tab. The links of all manager actions appear in the side navigation container on the left side of the page. You can complete the transaction and move on to other transactions without leaving the page. You can process multiple transactions for a worker from this page. The manager actions that youcan perform depend on the configuration choices that your enterprise makes. Manager self-service actions can be performed only for primary assignments and not secondary assignments.
You cannot launch actions related to performance management plan or appraisal functions from the Actions list for a worker. If your enterprise has licensed Oracle Succession Planning and your administrator has assigned you the Succession Planning functions, then you can launch actions to create or update succession plans for workers.
Viewing and Performing Manager Actions for Multiple AssignmentsManagers can view details and perform manager actions for multiple assignments of anemployee or worker in their hierarchy, if the subordinate has more than one assignment. If there are workers on secondary assignment reporting to a manager, then the organization chart represents this reporting structure in a dotted line format.
Note: Managers can perform these actions for multiple assignments only if the Multiple Assignments feature is enabled and the appropriatesecurity access is setup.

Organization Chart in Oracle SSHR 13-5
Identifying Key High Potential WorkersYou can identify key high potential workers for whom succession plans exist and workers who do not have at least one succession plan. Icons below the Actions link helpyou to identify such workers.
Note: You can view these icons if your enterprise has licensed Oracle Succession Planning and your administrator has assigned you the Succession Planning functions.
Using the Organization Chart as Workers in Oracle SSHRWorkers can navigate to the Organization Chart using the Employee Self-Service responsibility, Talent Profile function, My Hierarch tab. If a worker is a manager, then the Organization Chart displays that manager's hierarchy. For each selected node, you can view the hierarchy and then drill further down the hierarchy. If there are workers on secondary assignment reporting to a manager, then the organization chart representsthis reporting structure in a dotted line format.
See: How to Use the Organization Chart and Control Panel, page 13-2
The Organization Chart enables workers to:
• Search for other workers in their enterprise using the Simple or Advanced Search.
• View the following information of worker:
• Contact Information: View email, work phone and address of the worker. Emailis a link that helps you to send mail from the organization chart. When you click the Email link, your email client opens and the worker's email ID automatically appears in the To field.
• Employment Details: View the worker number, work location, organization, job, position, and grade.
You can view contact and employment details only. You cannot view salary details of other workers.
• Perform self-service personal actions: Click the Actions link in the person details panel to perform personal self-service actions. When you select an action, the action is launched in a page with a side navigation container in the Personal Actions tab. All the personal actions links appear in the side navigation container on the left side of this page. You can complete the transaction launched, and move on to other transactions without leaving the page. You can process multiple transactions for yourself. You can launch actions for your primary assignment only.

13-6 Oracle Self-Service Human Resources Deploy Self-Service Capability Guide
Implementing the Organization ChartThe Organization Chart is built on Applications Development Framework (ADF) and the component used is hierarchyViewer, which is one of the ADF Data Visualization components. This topic provides information on how to implement and configure the Organization Chart. Oracle SSHR and Oracle Succession Planning provide the Organization Chart feature.
Implementing the Organization ChartTo implement and use the Organization chart, complete the following steps:
1. Create AppsDataSource and deploy the .ear file
• Create AppsDataSource on an Oracle WebLogic Server (WLS) instance.
• Deploy your web application .ear file, which is OrgChartApplication.ear.
For information on how to create AppsDataSource and deploy the .ear file, refer to the My Oracle Support note: 1408355.1
2. Define the External ADF Application URL profile option
Set the External ADF Application URL profile option at the Site level to integrate the application with Applications Development Framework (ADF) and display the organization chart. Enter the location of the Oracle WebLogic Server instance as the profile option value.
For example:
System Profile : External ADF Application URL (code:FND_EXTERNAL_ADF_URL)
Sample value : http://domain:port/OrgChart-ViewController-context-root
Configuring the Organization Chart ComponentsTo change the organization chart components, you must modify values in the ResourceBundle.properties present in the OrgChartApplication.ear file and then redeploy the file on the Oracle WebLogic Server instance. For more information, refer tothe My Oracle Support note: 1408355.1
Configuring the Organization Chart ModuleTo configure the Organization Chart module in:
• Oracle SSHR, see: Configuring the Organization Chart Module in Oracle SSHR, page 13-7
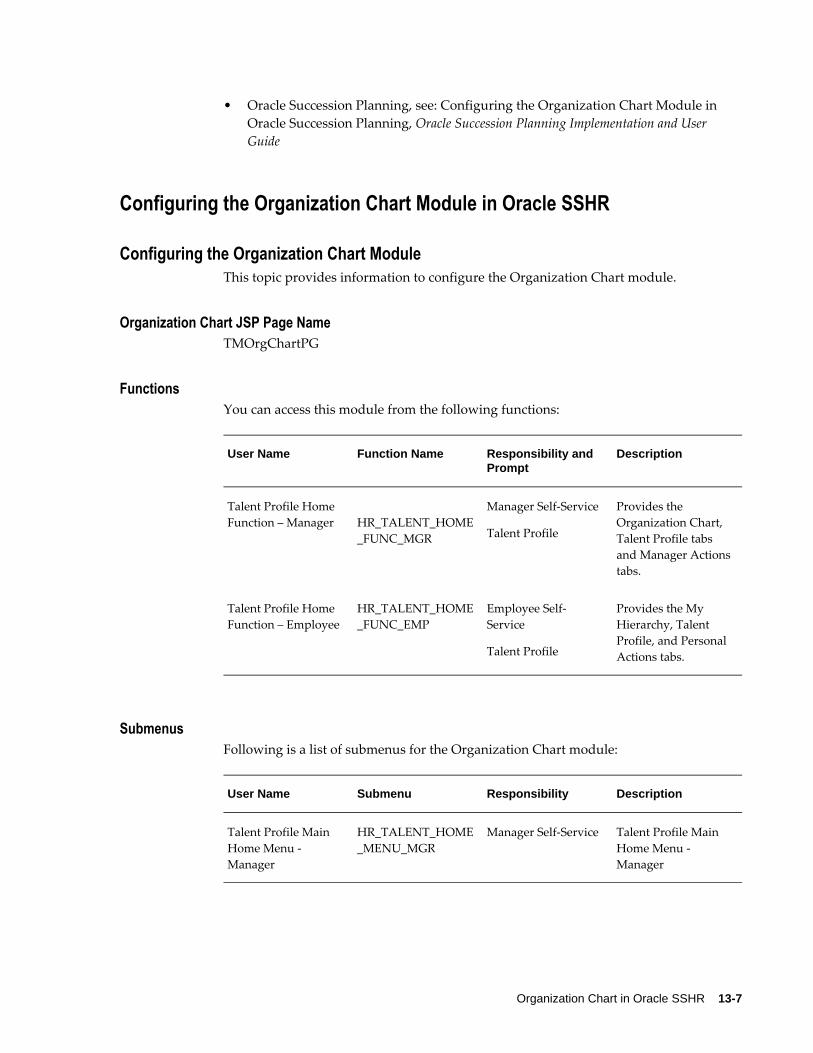
Organization Chart in Oracle SSHR 13-7
• Oracle Succession Planning, see: Configuring the Organization Chart Module in Oracle Succession Planning, Oracle Succession Planning Implementation and User Guide
Configuring the Organization Chart Module in Oracle SSHR
Configuring the Organization Chart ModuleThis topic provides information to configure the Organization Chart module.
Organization Chart JSP Page NameTMOrgChartPG
FunctionsYou can access this module from the following functions:
User Name Function Name Responsibility and Prompt
Description
Talent Profile Home Function – Manager
HR_TALENT_HOME_FUNC_MGR
Manager Self-Service
Talent Profile
Provides the Organization Chart, Talent Profile tabs and Manager Actions tabs.
Talent Profile Home Function – Employee
HR_TALENT_HOME_FUNC_EMP
Employee Self-Service
Talent Profile
Provides the My Hierarchy, Talent Profile, and Personal Actions tabs.
SubmenusFollowing is a list of submenus for the Organization Chart module:
User Name Submenu Responsibility Description
Talent Profile Main Home Menu - Manager
HR_TALENT_HOME_MENU_MGR
Manager Self-Service Talent Profile Main Home Menu - Manager

13-8 Oracle Self-Service Human Resources Deploy Self-Service Capability Guide
User Name Submenu Responsibility Description
Talent Profile Main Home Menu – Employee
HR_TALENT_HOME_MENU_EMP
Employee Self-Service
Talent Profile Main Home Menu
WorkflowNot Applicable
Configurable Tips and InstructionsNot Applicable
Configurable FlexFieldsNot Applicable
Security ProfileSet the security profiles according to your business requirements to ensure that managers cannot view salary panel of workers who are not in their reporting hierarchy.
Profile OptionsUsing the Organization Chart, managers can perform manager transactions. The application applies the following profiles when actions are launched from the Organization Chart:
• HR: Position Default Options for SSHR
• HR: Self Service Hire and Placement Default Values
• HR: Allow Concurrent Self Service Actions
• HR: Defer Update After Approval
• HR: Manage Self Service Actions When Future-Dated Changes Exist
• HR: Refresh Self Service actions with data from intervening actions
• HR: Allow processing of ineligible Self Service actions
• HR: Allow use of eligibility for Self Service actions
• HR: Enable Multiple Assignments in SSHR: If you wish to enable your managers to

Organization Chart in Oracle SSHR 13-9
view and update multiple assignments for employees and workers, you can use the HR:Enable Multiple Assignments in SSHR system profile to allow this. See the Multiple Assignments section in the User Access and Security in Oracle SSHR, page3-3 topic.
Configuring the Actions ListThe Actions list that managers and workers view is role based.
• Functions in the Available in the Predefined Personal Actions Menu
The following table provides a list of functions available in the predefined Personal Actions Menu:
Prompt Sub Menu
Sub Menu Type
Function Grant Description
Personal Information
Personal Information
Y
Payslip Payslip Y
W4 Information
Employees W4 Information
Y
Manage Payroll Payments
Manage Payroll Payments V4.0
N
Release Information
Release Information
Y
Employee Appraisals
N Obsolete - replaced with Employee: My Appraisals Page
Appraisals Employee: My Appraisals Page
Y

13-10 Oracle Self-Service Human Resources Deploy Self-Service Capability Guide
Prompt Sub Menu
Sub Menu Type
Function Grant Description
Suitability Matching
Suitability Matching
Y
Tenure Status Tenure Status Overview
Y
Academic Rank
Academic Rank
Y
Education and Qualifications
Qualification
Y
Other Professional Qualifications
Award Y
Competency Profile
Competency Profile
Y
Work Preferences
Work Preferences
Y
Resume Resume Y
Apply for Job Search and Apply for aJob Page
Y
Enroll and Cancel Training
N
External Training
N
Employee W2 Employee W2
Y

Organization Chart in Oracle SSHR 13-11
Prompt Sub Menu
Sub Menu Type
Function Grant Description
Extra Information
Extra Information Types
Y
Special Information
Special Information Types
Y
Event And Bookings
Event And Bookings
Y
Employee Review
Employee Reviews V4.0
Y
Absence Management
Absence Management
Y
Training Plan Views
N
Contact ExtraInformation
Contact Extra Information
Y
Private Vehicle Entry
SS Vehicle Repository Y
Vehicle Mileage Expenses
SS Mileage Claim
Y
CommutationInformation
JP Commutation Information Self Service
Y

13-12 Oracle Self-Service Human Resources Deploy Self-Service Capability Guide
Prompt Sub Menu
Sub Menu Type
Function Grant Description
Documents ofRecord
Documentsof Record
Y
Employment Verification
Employment Verification
Y
Voluntary Termination
Voluntary Termination
Y
Charitable Contributions
Charitable Contributions
Y
Manage Payroll Payments
Manage Payroll Payments V4.0
Y
Employee Directory
Proxy Page
N
Organization Manager V4.0
Organization Manager
Y
OTA Learner Application Menu
HOMEPAGE
Y
Defined Contribution Plan Enrollment
Defined Contribution Plan Enrollment
Y
• Functions in the Available in the Predefined Manager Actions Menu
The Organization chart uses the person-based supervisor hierarchy type to display
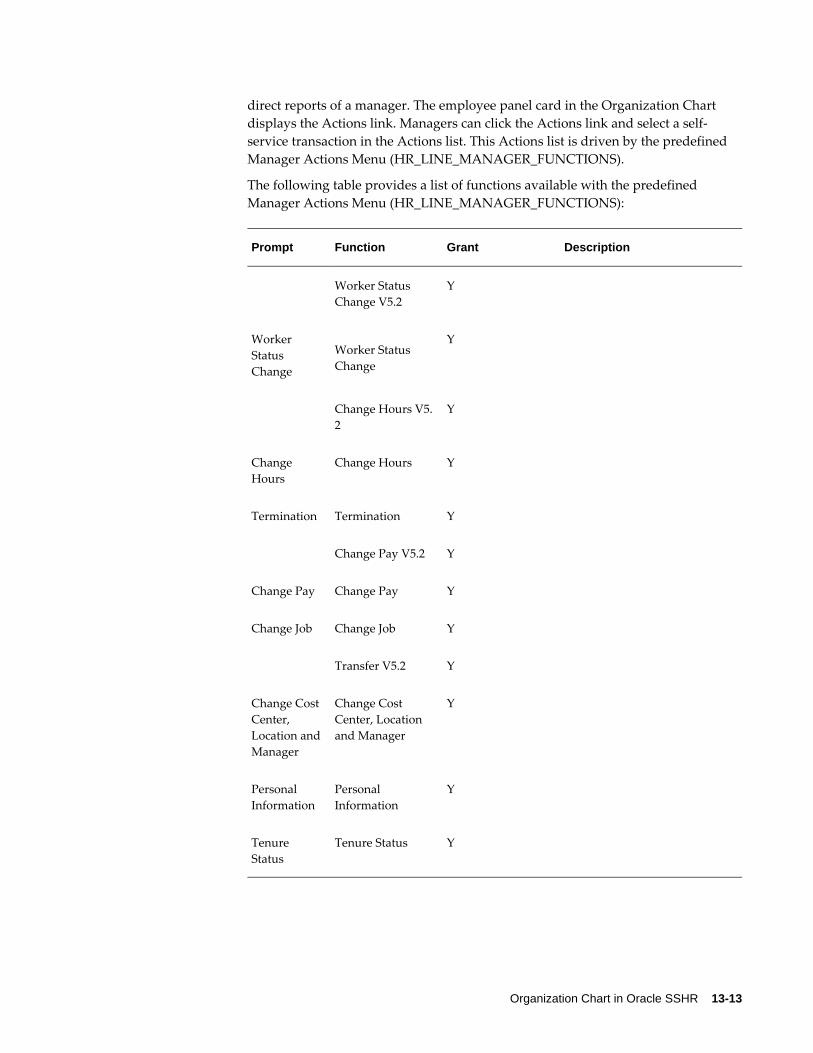
Organization Chart in Oracle SSHR 13-13
direct reports of a manager. The employee panel card in the Organization Chart displays the Actions link. Managers can click the Actions link and select a self-service transaction in the Actions list. This Actions list is driven by the predefined Manager Actions Menu (HR_LINE_MANAGER_FUNCTIONS).
The following table provides a list of functions available with the predefined Manager Actions Menu (HR_LINE_MANAGER_FUNCTIONS):
Prompt Function Grant Description
Worker Status Change V5.2
Y
Worker Status Change
Worker Status Change
Y
Change Hours V5.2
Y
Change Hours
Change Hours Y
Termination Termination Y
Change Pay V5.2 Y
Change Pay Change Pay Y
Change Job Change Job Y
Transfer V5.2 Y
Change Cost Center, Location andManager
Change Cost Center, Location and Manager
Y
Personal Information
Personal Information
Y
Tenure Status
Tenure Status Y

13-14 Oracle Self-Service Human Resources Deploy Self-Service Capability Guide
Prompt Function Grant Description
Transfer Transfer Y
Education and Qualifications
Qualification Y
Other Professional Qualifications
Award Y
Competency Profile
Competency Profile
Y
Work Preferences
Work Preferences Y
Resume Resume Y
Training Enroll and Cancel Training
N
External Training
External TrainingN
Change Job and Terms
Change Job and Terms
Y
Change Cost Center, Terms and Manager
Change Cost Center, Terms andManager
Y
Extra Information
Extra Information Types
Y
Change Worker Status and Terms V5.2
Y

Organization Chart in Oracle SSHR 13-15
Prompt Function Grant Description
Change Worker Status and Terms
Change Worker Status and Terms
Y
Employee Review Employee
Reviews V4.0Y
Individual Compensation Distribution(Original)
Self Service Individual Distributions(Original)-InternalUse
Y
Individual Compensation Distributions
Self Service Individual Compensation Distributions-Internal
Y
Organization Manager
NObsolete
Hire V5.2N Obsolete
Applicant Hire V5.2
NObsolete
French HireN Obsolete
French Applicant Hire
NObsolete
Vehicle Mileage Expenses
SS Mileage Claim Y
Commutation Information
JP Commutation Information Self Service
Y

13-16 Oracle Self-Service Human Resources Deploy Self-Service Capability Guide
Prompt Function Grant Description
Assign Schedules and Manage Exceptions
Assign Schedule Y
Documents of Record
Documents of Record
Y
Contact Extra Information
Contact Extra Information
Y
Hire Y
Applicant Hire Y
Special Information TypesV4.0- OSHA
Y
Special Information TypesV4.0- Stock Options
Y
Competence Profile
ADS Competence Profile V4.0
Y
Applicant Hire iRecruitment
Applicant Hire iRecruitment
Y
Transfer with Compensation Distribution V4.0
Transfer with Comp V4.0
Y

Organization Chart in Oracle SSHR 13-17
Prompt Function Grant Description
IRASLINE Person Extra Information Types
SG IRASLINE Person EIT
Y
Private Vehicle Entry
SS Vehicle Repository
Y
Assignment Costing
Assignment Costing
Y
Assignment Costing WorkflowNotify
Y
Reverse Termination
Y
P11D P11D Manager Action
Y
Change Manager
Change Manager Y
Termination with Compensation
Termination with Compensation V4.0
Y
Release Information
Release Information
Y
Academic Rank
Academic Rank Y
Special Information
Special Information Types
Y
Event And Bookings
Event And Bookings
Y
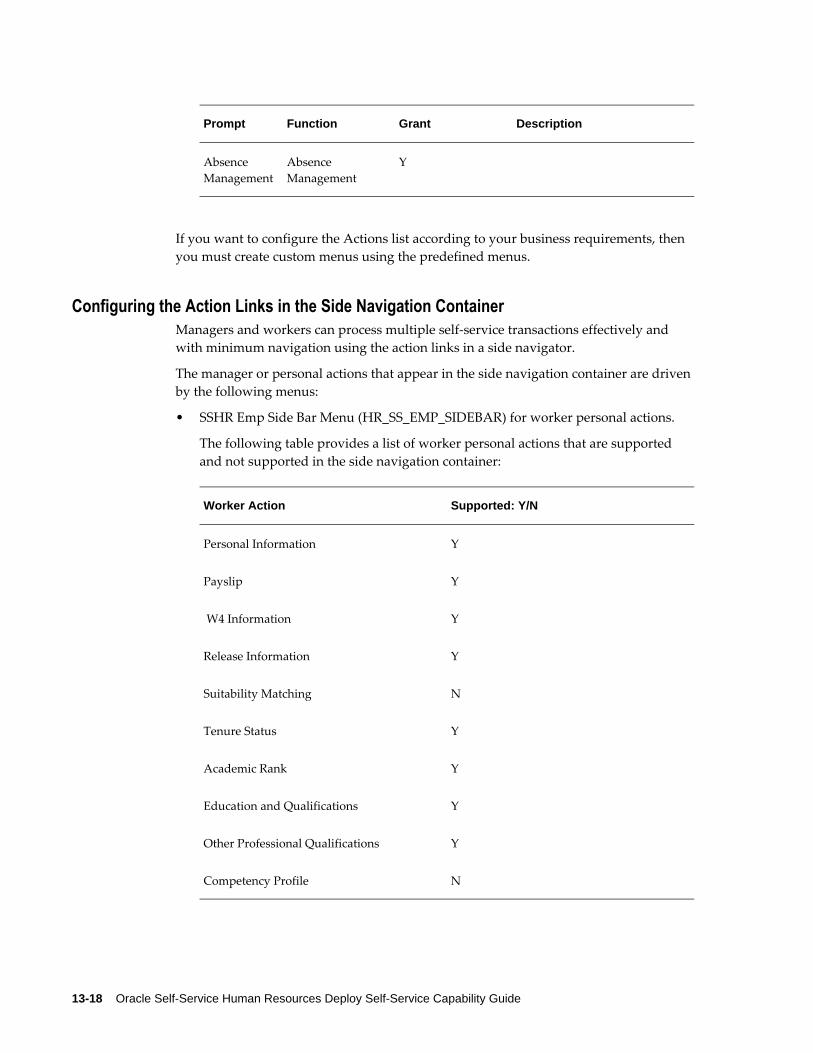
13-18 Oracle Self-Service Human Resources Deploy Self-Service Capability Guide
Prompt Function Grant Description
Absence Management
Absence Management
Y
If you want to configure the Actions list according to your business requirements, then you must create custom menus using the predefined menus.
Configuring the Action Links in the Side Navigation ContainerManagers and workers can process multiple self-service transactions effectively and with minimum navigation using the action links in a side navigator.
The manager or personal actions that appear in the side navigation container are driven by the following menus:
• SSHR Emp Side Bar Menu (HR_SS_EMP_SIDEBAR) for worker personal actions.
The following table provides a list of worker personal actions that are supported and not supported in the side navigation container:
Worker Action Supported: Y/N
Personal Information Y
Payslip Y
W4 Information Y
Release Information Y
Suitability Matching N
Tenure Status Y
Academic Rank Y
Education and Qualifications Y
Other Professional Qualifications Y
Competency Profile N

Organization Chart in Oracle SSHR 13-19
Worker Action Supported: Y/N
Work Preferences Y
Resume N
Employee W2 N
Extra Information Y
Special Information Y
Event & Bookings Y
Employee Review Y
Absence Management Y
Contact Extra Information Y
Private Vehicle Entry Y
Documents of Record Y
Voluntary Termination Y
Manage Payroll Payments Y
Organization Manager Y
Vehicle Mileage Expenses Y
Employment Verficiation Y
P60 Y
P11D Y
• SSHR Side Bar Menu (HR_SS_SIDEBAR) for manager actions.
The following table provides a list of manager actions that are supported and not supported in the side navigation container:

13-20 Oracle Self-Service Human Resources Deploy Self-Service Capability Guide
Manager Action Supported: Y/N
Work Preferences Y
Individual Compensation Distribution
Y
Private Vehicle Entry Y
P11D Y
Allocated Checklist Y
P60 Y
Documents of Record Y
Academic Rank Y
Release Information Y
Tenure Status Y
Change Cost Centre, Location and Manager
Y
Termination with Compensation
Y
Change Cost Center, Terms and Manager
Y
Change Manager Y
Contact Extra Information
Y
Other Professional Qualifications
Y
Education and Qualifications
Y

Organization Chart in Oracle SSHR 13-21
Manager Action Supported: Y/N
Events and Bookings Y
Extra Information Y
IRASLINE InformationTypes
Y
Training Plans Manager
N
Transfer Y
Worker Status Change Y
Absence Management Y
Enroll and Cancel Training
N
External Training N
Resume N
Assign Schedules and Manage Exceptions
Y
Assignment Costing Y
Commutation Information
Y
Competency Profile N
Special Information Y
Termination Y
Change Job Y
Change Pay Y

13-22 Oracle Self-Service Human Resources Deploy Self-Service Capability Guide
Manager Action Supported: Y/N
Personal Information Y
Employee Review Y
Vehicle Mileage Expenses
Y
Manage Payroll Payments
Y
Change Worker Status and Terms
Y
Important: The manager and personal actions whether launched from Self-Service Manager Actions, Personal Actions, Organization Chart or Talent Profile are the same. As some of the self-service functions are notsupported in the side navigation container, there would be a mismatch between functions in the side navigation container and the drop-down list available in Organization Chart.
Configuration Guidelines for the Side Navigator
The SSHR Side Bar Menu (HR_SS_SIDEBAR) and SSHR Emp Side Bar Menu (HR_SS_EMP_SIDEBAR) contain a list of predefined supported functions including global and localization specific. During implementation, you can remove those functions that are not applicable to your legislation using the "function exclusion" feature available in the Responsibility window of the System Administrator responsibility.
Organization Chart for Contingent WorkersBy default, the Contingent Worker Self-Service responsibility does not have the functionto launch the Organization Chart. If you want to enable contingent workers to use the Organization Chart feature, then you must create custom contingent worker menu and add the Organization Chart functions.

Talent Profile in Oracle SSHR 14-1
14Talent Profile in Oracle SSHR
14-2 Oracle Self-Service Human Resources Deploy Self-Service Capability Guide
Talent Profile Functionality in Oracle SSHR
Talent Profile in Oracle SSHRThe Talent Profile feature of Oracle SSHR helps enterprises to obtain a complete picture of the talent profile of their workforce to manage and execute their talent processes. Talent Profile captures and displays complete worker talent details on a single-interface enabling enterprises to attract, develop, and retain the best talent.
Note: Oracle Self-Service HR provides you with a minimal Talent Profile function to only view the talent profiles of your workforce. The Performance Matrix (9-box) that is available on the Oracle SSHR Talent Profile page of a worker enables manager to view the performance profile of the selected worker only.
Enterprises require Oracle Succession Planning license to:
• Compare Talent Profiles of workers. In Oracle Succession Planning,Compare Profile is a list of value in the Select an Action list of the Talent Profile page of a worker
• Use performance matrices (9-box): Performance Matrix (Potential) and Performance Matrix (Retention) to assess the performance and retention potential of workers in a manager's hierarchy. In Oracle Succession Planning, Performance Matrix (Potential) and Performance Matrix (Retention) are list of values in the Select an Action list of the Talent Profile page of a worker.
• Use Suitability Analyzer
Talent Profile FeaturesEnterprises can use the following Talent Profile features to develop and manage succession plans for their workforce:
View Complete Talent InformationTalent Profile displays worker information such as personal information, photograph, contact information, and employment details. Talent Profile obtains relevant data from talent management products and presents the information in the following regions:
• Competencies
• Qualifications

Talent Profile in Oracle SSHR 14-3
• Other Professional Qualifications
• Previous Employment
• Learning Certifications
• Training Details
• Appraisals
• Performance Objectives
• Succession Plans
• Job History
• Career Path
• Work Preferences
• Salary
• Benefits
• Monetary Compensation
• Compensation Statement
• Other Information
• Performance Ratings
View Details and Process Manager Actions for Multiple AssignmentsManagers can view details and perform manager actions for multiple assignments of anemployee or worker in their hierarchy, if the subordinate has more than one assignment. Managers can perform these actions for multiple assignments only if the Multiple Assignments feature is enabled and the appropriate security access is setup.
View 9-Box MatrixesManagers can view the performance profile of a worker in the Performance Matrix (9 - Box) that indicates performance and growth potential.
You can compare a worker's:
• Potential vs. Performance: This matrix provides information on performance and leadership potential.
14-4 Oracle Self-Service Human Resources Deploy Self-Service Capability Guide
• Retention vs. Performance: This matrix provides information on performance and risk of loss.
Enterprises can define the performance, potential, and retention rating scales according to their business requirements.
Note: Oracle Applications Development Framework (ADF)-based default templates are used to display nine box matrixes. Implementation steps must be completed to view the nine box matrixes.
Print Talent ProfilesManagers can print talent profiles of workers. The application provides a default print option with all the configured regions. Managers have the flexibility to select required talent profile regions and print a custom view of the talent profile.
Maintain NotesWorkers and managers can create and update notes to record important information about their talent profile such as notes about appraisals or learning plans.
Create and Use TagsWorkers and managers can create tags that are similar to keywords. Tags help categorize and group talent. Workers can create tags that match their individual profiles. Managers can create tags that match with the talent profiles of their workers.
Perform Self-Service ActionsManagers and workers can perform self-service actions. For example, when a manager views the talent profile of a worker, the manager can change the pay of the worker by selecting the Change Pay self-service action directly from the Talent Profile page.
Managers can use Talent Profile to launch personal actions or manager actions. These personal actions or manager actions are launched in a new page in the Personal Actions tab or the Manager Actions tab respectively. The page that is launched when a manager initiates a personal action or manager action has a side navigator that helps managers toprocess and complete multiple self-service transactions for themselves or for workers intheir hierarchy without leaving the page. Workers can use Talent Profile to launch personal actions. The personal action selected, is launched in the Personal Actions tab. The side navigator available on this page helps workers to complete multiple self-service personal actions without leaving the page.
Use Talent Profile Based on Role RequirementsAs managers and workers have different business requirements, Talent Profile delivers views based on their roles. For example, only managers can view the Succession Plan

Talent Profile in Oracle SSHR 14-5
and Performance Matrix (9-box).
Use Flexible Search Options to Search for Talent ProfilesManagers can directly search for the worker whose talent profile they want to view with out having to navigate through the entire hierarchy. The search displays the talent profile of the selected worker. Horizontal links display the complete hierarchical relationship of the worker and the manager. A saved view of recently viewed profiles helps managers to return to recent records without having to perform the search again. The application saves the recently viewed profiles only for that specific session.
Key ConceptsThe following topics provide conceptual and procedural information about using TalentProfile:
• Using Talent Profile as Managers in Oracle SSHR, page 14-5
• Using Talent Profile as Workers in Oracle SSHR, page 14-14
• Generating Printable Profiles in SSHR, page 14-20
Using Talent Profile as Managers in Oracle SSHRWhen managers navigate to the Talent Profile page, the page displays their own talent information. The Talent Profile page of a worker provides managers with information required for succession planning. To view talent profiles of workers in their hierarchy, managers can select a worker either from the hierarchy list or quick search region.
Note: Currently, Talent Profile supports only supervisor hierarchy.
As a manager, when you navigate to the Talent Profile page of a worker, you can:
• View worker details
• View talent information presented in different regions
• Print talent profiles
• Perform self-service actions
Note: Managers who are contingent workers can access Talent Profiles of employees and contingent workers reporting to them using the Manager Self-Service responsibility provided the profile option HR: Expand Role of Contingent Worker is set to Yes. For contingent

14-6 Oracle Self-Service Human Resources Deploy Self-Service Capability Guide
workers, certain regions such as Salary, Benefits, Monetary Compensation, and Compensation Statement may not be available to view.
View Worker DetailsYou can view employment details such as the organization, job, position, supervisor, and the hire date. The contact details include address, phone numbers, and e-mail address. You can also view a photograph of the worker, if available. If the worker has added tags to the profile, then you can view the tags.
View Details and Process Manager Actions for Multiple AssignmentsManagers can view details and perform manager actions for multiple assignments of anemployee or worker in their hierarchy, if the subordinate has more than one assignment. In the Assignment field, select the assignment of a worker to view details and perform the appropriate manager actions. Employment details and the talent profile information presented in the talent regions vary depending on the assignment that you select. Managers can perform these actions for multiple assignments only if theMultiple Assignments feature is enabled and the appropriate security access is setup.
View Talent Information Presented in Different RegionsThis section lists the talent regions that managers can view for their workers.
Note: Your enterprise may display all the regions or hide some of the regions according to the business needs and processes.
• Competencies
• Appraisals
• Performance Objectives
• Qualifications
• Learning Certifications
• Training
• Other Professional Qualifications
• Job History
• Career Path

Talent Profile in Oracle SSHR 14-7
• Benefits
• Work Preferences
• Previous Employment
• Monetary Compensation
• Succession Plan
• Other Information
• Salary
• Compensation Statement
• Performance Ratings
CompetenciesThe Competencies region displays the current competencies of the selected worker. You can view the level and status of the competencies.
Click the More link to navigate to the Competency Profile page of the worker to view or update the existing competency profile. When you update or add competencies for a worker, the updated information is visible on the Talent Profile page.
For information on competencies, see: Competency Profile, page 9-25
AppraisalsThe Appraisals region displays the appraisal information using a bar graph. The bar graph is a column chart where the x-axis shows the appraisal period end date and the y-axis shows the appraisal rating of the worker and the total rating value. You can easily distinguish the rating of the worker and the total rating value as the bar graph uses different color codes. Talent Profile displays information only from appraisals that are given an overall rating, regardless of whether the appraisals are created using the Appraisals function or appraisals are created as part of performance management plans. The bar graph displays information for five appraisals.
Note: Talent Profile does not display information from self appraisals.
Click the More link to navigate to the View Appraisals page for more information on the worker's appraisals. On the View Appraisals page, you can view completed and in progress appraisals.
For more information on appraisals, see: The Appraisal Process, Oracle Performance Management Implementation and User Guide

14-8 Oracle Self-Service Human Resources Deploy Self-Service Capability Guide
Performance ObjectivesYou can view worker objectives for a specific performance management plan. By default, the Plan Name field displays the latest published performance management plan. The Performance Objectives region displays the plan name, plan period, objectives, and objective start and end date. The Complete % field helps you to track the progress of the worker's objectives.
Click the More link to navigate to the Performance Management page of the worker. For each performance management plan, you can view a list of tasks. The application enables these tasks at appropriate times during the performance-management period.
View Performance Objectives of an Indirect Report
When you view the Talent Profile page of an indirect report (a worker reporting to your direct report), and click the More link, the application enables you to view and carry out the performance management tasks as the indirect report's manager. For example, Dan Bird is Sales Manager, Vision Corporation and Alice Taylor, the manager of Store A reports to Dan. When Dan views the Talent Profile of Alex Smith who reportsto Alice, Dan can perform Alice's performance-management tasks.
For more information on manager performance management tasks, see: Manager Performance-Management Tasks, Oracle Performance Management Implementation and User Guide
QualificationsThe Qualifications region displays the education qualifications information such as qualification type, title, and status.
Click the More link to navigate to the Education and Qualifications page of the workerto create or update qualifications. The Talent Profile page displays the updated qualifications information.
For more information, see: Education and Qualifications, page 9-24
Learning CertificationsYou can view the learning certification details such as the certification name, status, progress, and renew date.
Click the More link to navigate to the Learner Home page of the worker. On the Learner Home page of the worker, you can view details such as additional certification details, classes that the worker has currently enrolled in, and learning paths that the worker has subscribed to.
For more information, see: The Learner Home, Oracle Learning Management User Guide
TrainingThis region displays the training information of the selected worker. Details include the
Talent Profile in Oracle SSHR 14-9
course name, course delivery method, enrollment status, and enrollment dates. You canuse the filter values to view all, completed, or upcoming training.
Click the More link to navigate to the Learner Home page of the worker to view additional training details. You can also enroll the worker in required training. The Talent Profile displays the updated enrollment information.
For more information, see: The Learner Home, Oracle Learning Management User Guide
Other Professional QualificationsYou can view other professional qualifications of the worker such as an award. This region does not display academic qualifications, which are displayed in the Qualifications region.
Click the More link to navigate to the Other Professional Qualifications page to add new professional qualifications or update existing professional qualifications. The Talent Profile displays the updated professional qualifications information.
For more information, see: Other Professional Qualifications, page 9-25
Job HistoryThe Job History region displays the details of previous jobs of the selected worker in the same enterprise. You can use this information to analyze what the worker has gained from each role in terms of experience, skills, and professional development. When creating succession plans you can use the job history details to evaluate the work experience summary of the worker.
This is a view only region and you cannot perform any transaction as the More link is not available.
Career PathYou can view the proposed career path of the selected worker from the current job level. Managers can learn where the worker is in their career. They can analyze the worker's career path and plan for suitable training to meet the future role requirements.
This is a view only region and you cannot perform any transaction as the More link is not available.
BenefitsYou can view the benefits enrollments of the worker such as programs, plans, and options. You can also view with the benefits' coverage start date and coverage amounts.
Click the More link to launch the Self-Service Benefits Enrollments function. The subsequent benefits enrollments pages that you view depend on the configuration choices that your enterprise makes.
For more information, see:Self-Service Benefits Enrollments, Oracle HRMS Compensation and Benefits Management Guide

14-10 Oracle Self-Service Human Resources Deploy Self-Service Capability Guide
Work PreferencesYou can view the work preferences specified by the worker in two regions: Domestic Options and International Relocation Options. You can gather information such as whether the worker is willing to accept international travel or relocate domestically. You can also view preferred work hours and work schedule.
Click the More link to navigate to the Work Preferences page of the worker to add or update information. The Talent Profile page displays the updated work preferences details.
For information see: Work Preferences, page 9-27
Previous EmploymentThis region displays the work history in previous organizations. You can view previousemployment details such as the previous employer, previous employment period, and employer location. The previous employment details provide valuable inputs such as the employers that the worker has worked with. You also get an idea of the worker's experience in each industry if the worker was employed in various industries. You can evaluate how the previous roles are useful for career management and succession plans for the worker.
This is a view only region and you cannot perform any transaction as the More link is not available.
Monetary CompensationYou can view a graphical representation of the monetary compensation details of the worker. Monetary compensation can include components such as allowances, bonus, and salary. You can view a list of all compensation related sections (defined with a chartor graph) from the latest Total Compensation Statement (TCS). You can select any one of the values to view a graphical representation of the selected monetary compensation section.
Talent Profiles uses the Total Compensation Statement information to display the monetary compensation graph. If there is no Total Compensation statement available for the worker and a graph for cash compensation has not been included in the statement, then the application does not display any information in the Monetary Compensation region.
This is a view only region and you cannot perform any transaction as the More link is not available.
Succession PlanThe succession plan information that you view for a worker depends on the release level of Oracle Succession Planning that your enterprise uses:
If your enterprise uses R12.2 Oracle Succession Planning, then you can view the

Talent Profile in Oracle SSHR 14-11
following information:
• Successors Identified for
This table lists the potential successors of the worker. You can view information such as workers' performance level, succession and retention potential, and readiness percent.
• Succession Plans
This table lists the succession plans identified for the worker. Information that you can view includes whether the succession plan is for a worker or role, plan status, and the workers' performance level, succession and retention potential, and readiness percent.
Note: If your enterprise uses pre R12.2 Oracle Succession Planning thenyou can view the following information:
• Successor For:
This table lists the workers for whom the selected worker is identified as a successor. Information includes readiness level and the earliest succession date.
• As Successor:
This table lists the workers identified as the successors of the selected worker. Information includes readiness level and the earliest succession date.
This is a view only region and you cannot perform any transactionsas the More link is not available.
Other InformationFor your workers, you can make notes about their achievements and contributions. Click the More link to navigate to the Attachments page where you can add attachments. You can create attachments in different ways. You can attach a file, provide the location of the directory in which you saved the document, or provide a text description.
You can add tags for your workers. The tags that you add for a worker appear on that worker's Talent Profile page. Tags help group and categorize talent.
SalaryYou can view details of the current salary. Details include salary rate and annualized salary.
This is a view only region and you cannot perform any transactions as the More link is

14-12 Oracle Self-Service Human Resources Deploy Self-Service Capability Guide
not available.
Compensation StatementThis region displays the worker's total compensation information including compensation awards and benefits. Compensation information can include monetary awards such as salary and bonus awards as well as non-monetary awards such as stock options. Benefits information can include medical and dental benefits (optionally showing the cost to your organization).
Talent Profile uses Total Compensation Statement to display information in this region. If there is no Total Compensation statement available for the worker, then the application does not display any information in this region.
This is a view only region and you cannot perform any transactions as the More link is not available.
Performance RatingsThe application hides this region by default. Your enterprise can display this region, if you use Oracle HRMS to rate performance. HR Managers can enter performance of their workers using the Performance window in Oracle HRMS. The Performance Ratings region displays the information that HR managers enter in Oracle HRMS. You can view details such as the main appraiser and rating.
Note: If your enterprise uses Oracle Performance Management to evaluate workforce performance, then your enterprise can hide the Performance Ratings region . In this case, use Appraisals region to viewperformance ratings.
View Performance Matrix (9 - Box)On the Talent Profile page of the selected worker, you can view the performance profile using Performance Matrix (9 - Box).
You can compare a worker's:
• Potential vs. Performance: This matrix provides information on performance and leadership potential.
• Retention vs. Performance: This matrix provides information on performance and risk of loss.
Note: Oracle Applications Development Framework (ADF)-based default templates are used to display nine box matrixes. Implementation steps must be completed to view the nine box matrixes.

Talent Profile in Oracle SSHR 14-13
Talent Profile uses information from the following products to plot the rating scales on the Performance Matrix ( 9 - Box).
Performance: If your enterprises uses Oracle Performance Management, then the application derives the Performance value from the Overall Rating field on the Give Final Ratings: Main Appraiser page of the Appraisals function. Otherwise, the Performance value is derived from the Performance window in Oracle HRMS.
Potential: If your enterprise uses Oracle Performance Management, then the applicationderives the Potential value from the Readiness Level field in the Advancement Potential region on the Give Final Ratings: Main Appraiser page of the Appraisals function. Otherwise, the Potential value is derived from the Succession Potential field of the SSHR succession planning feature.
Retention: If your enterprise uses Oracle Performance Management, then the application derives the Retention value from the Retention Level field in the Advancement Potential region on the Give Final Ratings: Main Appraiser page of the Appraisals function. Otherwise, the Retention value is derived from the Risk of Loss field of the SSHR succession planning feature.
Important: The values that you view on the Performance Matrix are the values that your enterprise defines for performance, potential, and retention rating scales.
Print Talent ProfileManagers can print the worker's talent profile. Select Printable Profile in the Select an Action list and click Go. Then, click Generate Report to generate the talent report. The printable profile is a PDF document. You can view the profile of the selected worker for multiple criteria such as competency profile, appraisal ratings, and compensation. The profile report displays the workers's performance and potential matrix that helps evaluate talent. The performance and retention matrix helps to understand correlation between performance and possibility of the worker's separation from the enterprise. Managers have the flexibility to print required talent profile regions.
See: Generating Talent Profiles, page 14-20
Perform Self-Service ActionsThe Select an Action list displays the list of actions that you can perform as a manager for the selected worker. For example, you can perform self-service actions such as transfers, change manager, or change worker status
When you select an action and click Go, the action is launched in a page with a side navigation container in the Manager Actions tab. All the manager action links appear inthe side navigation container on the left side of the page. You can select any one of the action links from the side navigation container, complete a transaction, and move on to other transactions without leaving the page. You can process multiple manager actions
14-14 Oracle Self-Service Human Resources Deploy Self-Service Capability Guide
for a worker from this page.
Note: Your enterprise configures the self-service actions that a managercan perform.
Using Talent Profile as Workers in Oracle SSHRAs a worker, when you navigate to the Talent Profile page, the page displays your talent information. On this page, you can:
• View employment details
• View talent information presented in different regions
• Perform self-service actions
• Print your talent profile
Note: If the Talent Profile feature is enabled for contingent workers, then contingent workers can use this feature. However, certain regions such as Salary, Benefits, Monetary Compensation, and Compensation Statement may not be available to view. Employees or contingent workers can view talent profile of their primary assignment only.
View Employment DetailsYou can view employment details such as the organization, job, position, supervisor, and the hire date. The contact details include address, phone numbers, and e-mail address. You can also view your photograph, if available. You can also view tags that you have added to your profile.
View Talent Information Presented in Different RegionsThis section lists the talent regions that you can view on your Talent Profile page:
Note: Your enterprise may display all the regions or hide some of the regions according to the business needs and processes.
• Competencies
• Appraisals
• Performance Objectives

Talent Profile in Oracle SSHR 14-15
• Qualifications
• Learning Certifications
• Training
• Other Professional Qualifications
• Job History
• Career Path
• Benefits
• Work Preferences
• Previous Employment
• Monetary Compensation
• Other Information
• Salary
• Compensation Statement
• Performance Ratings
CompetenciesThe Competencies region displays your current competencies. You can view the level and status of the competencies.
Click the More link to navigate to the Competency Profile page to view or update the existing competency profile. When you update or add competencies, the updated information is visible on the Talent Profile page.
For more information, see: Competency Profile, page 9-25
AppraisalsThe Appraisals region displays the appraisal information using a bar graph. The bar graph is a column chart where the x-axis shows the appraisal period end date and the y-axis shows your appraisal rating and the total rating value. You can easily distinguish your appraisal and the total rating value as the bar graph uses different color codes. Talent Profile displays information only from appraisals that are given an overall rating,regardless of whether the appraisals are created using the Appraisals function or appraisals are created as part of performance management plans. The bar graph displays information for five appraisals.
14-16 Oracle Self-Service Human Resources Deploy Self-Service Capability Guide
Note: Talent Profile does not display information from self appraisals.
Click the More link to navigate to the My Appraisals page to view or update your appraisals. The Appraisal Process, Oracle Performance Management Implementation and User Guide
Performance ObjectivesYou can view objectives for a specific performance management plan. By default, the Plan Name field displays the latest published performance management plan. The Performance Objectives region displays the plan name, plan period, objectives, and objective start and end date. The Complete % field helps you to track the progress of your performance objectives.
Click the More link to navigate to the Performance Management page to view your Performance Management Task List. The tasks are those appropriate to the performancemanagement plan (PMP) and can vary from one PMP to another. The application enables these tasks at appropriate times during the performance-management period. For example, you can perform the appraisal-management task during the appraisal-taskperiod only.
For more information, see: Worker Performance-Management Tasks, Oracle Performance Management Implementation and User Guide
QualificationsThe Qualifications region displays your education qualification information such as qualification type, title and status.
Click the More link to navigate to the Education and Qualifications page to create or update qualifications. The Talent Profile page displays the updated qualifications information.
For more information, see: Education and Qualifications, page 9-24
Learning CertificationsYou can view the learning certification details such as the certification name, status, progress, and renew date.
Click the More link to navigate to the Learner Home page to view additional certification details. On the Learner Home page, you can view classes that you are currently enrolled in, view learning certifications and learning paths that you have subscribed to, track the status of pending enrollments, and communicate with instructors and other learners using forums and chats.
For more information, see: The Learner Home, Oracle Learning Management User Guide

Talent Profile in Oracle SSHR 14-17
TrainingThis region displays your training information. Details include course name, course delivery method, enrollment status and enrollment status, and enrollment dates. You can use the Filter values to see all, completed, or upcoming training.
Click the More link to navigate to the Learner Home page to view additional training details. Use the Catalog page to browse categories, search for and enroll in courses, or request enrollment from an approver.
After you enroll in training, the Talent Profile page displays the updated information.
For more information, see: The Learner Home, Oracle Learning Management User Guide
Other Professional QualificationsYou can view other professional qualifications such as an award. This region does not display academic qualifications, which are displayed in the Qualifications region.
Click the More link to navigate to the Other Professional Qualifications page to add new professional qualifications or update existing professional qualifications. The Talent Profile page displays the updated information.
For more information, see: Other Professional Qualifications, page 9-25
Job HistoryThe Job History region displays the details of your previous jobs in the same enterprise. You can use this information to review each role in terms of experience, skills, and professional development.
This is a view only region and you cannot perform any transactions as the More link is not available.
Career PathYou can view your proposed career path from the current job level. You can use this information to assess your skills and experience and create an action plan on updating your skills to meet your career goals.
This is a view only region and you cannot perform any transaction as the More link is not available.
BenefitsYou can view the benefits programs, plans, and options in which you are enrolled in along with the coverage start date and coverage amounts.
Click the More link to launch the Self-Service Benefits Enrollments function. The subsequent Benefits Enrollments pages that you view depend on the configuration choices that your enterprise makes.
14-18 Oracle Self-Service Human Resources Deploy Self-Service Capability Guide
For more information, see: Self-Service Benefits Enrollments, Oracle HRMS Compensationand Benefits Management Guide
Work PreferencesYou can view your work preferences in two regions: Domestic Options and International Relocation Options.
Click the More link to navigate to the Work Preferences page of to add or update your work preferences information. The Talent Profile page displays the updated work preferences details.
For more information, see: Work Preferences, page 9-27
Previous EmploymentThis region displays previous employment details such as the previous employer, previous employment period, and employer location.
This is a view only region and you cannot perform any transaction as the More link is not available.
Monetary CompensationYou can view a graphical representation of your monetary compensation details. Monetary compensation can include components such as allowances, bonus, and salary.You can view a list of all compensation related sections (defined with a chart or graph) from the latest Total Compensation Statement (TCS). You can select any one of the values to view a graphical representation of the selected monetary compensation section.
Click the More link to navigate to the Total Compensation Statement page and view details.
Talent Profiles uses the Total Compensation Statement information to display the monetary compensation graph. If there is no Total Compensation statement available ora graph for cash compensation has not been included in the statement, then the application does not display any information in the Monetary Compensation region.
Click the More link to navigate to the Total Compensation Statement page to view moredetails.
Other InformationUse the Notes feature to add any information about your talent profile, for example, your achievements and contributions. Click the More link to navigate to the Attachments page where you can add attachments. You can attach a file, provide the location of the directory in which you saved the document, or provide a text description.

Talent Profile in Oracle SSHR 14-19
SalaryYou can view details of your current salary. Details include salary rate and annualized salary.
Compensation StatementThis region displays your total compensation information including compensation awards and benefits. Compensation information can include monetary awards such as salary and bonus awards as well as non-monetary awards such as stock options. Benefits information can include medical and dental benefits (optionally showing the cost to your organization).
Talent Profile uses Total Compensation Statement to display information in this region. If there is no Total Compensation statement available, then the application does not display any information in this region.
Click the More link to navigate to the Total Compensation Statement page to more details.
Performance RatingsBy default, this region is hidden on the Talent Profile page. If your enterprise uses Oracle HRMS to record performance ratings, then your enterprise can display this region.
Using the Performance window in Oracle HRMS, HR managers can enter the performance ratings of their workers. The Talent Profile's Performance Ratings region displays the information that HR managers enter in Oracle HRMS. You can view detailssuch as the main appraiser and rating.
Note: If your enterprise uses Oracle Performance Management to evaluate workforce performance, then your enterprise can hide the Performance Ratings region. In this case, use Appraisals region to view performance ratings.
Perform Self-Service ActionsThe Select an Action list displays the list of actions that you can perform. For example, perform self-service actions such as manage payroll payments.
When you select an Action and click Go, the action is launched in a page with a side navigation container in the Personal Actions tab. All the personal action links appear in the side navigation container on the left side of the page. You can complete the transaction launched, and move on to other transactions without leaving the page. You can process multiple transactions for yourself.

14-20 Oracle Self-Service Human Resources Deploy Self-Service Capability Guide
Note: Your enterprise configures the self-service actions that you can perform. Note that workers can launch actions for their primary assignment only.
Print Talent ProfileYou can print your talent profile, if the Printable Profile option is available in the Select an Action list. Select the option and click Go. On the Talent Profile page, the Include in Report check box is selected by default in all the talent regions. You can choose to print selected talent regions. When you click Generate Report, the application displays a printable profile in the Adobe Acrobat PDF format.
See: Generating Printable Profiles in SSHR, page 14-20
Generating Printable Talent Profiles in Oracle SSHRManagers can print the talent profile of workers when they view the profile of workers in their hierarchy. Individual workers can also print their own talent profiles. When youselect the Printable Profile option as a worker or manager, and click Go, the printable version page appears. On this page, the Include in Report check box is automatically selected for all the talent information regions. You can select only the required regions and click Generate Report. The application generates a printable profile in the Adobe Acrobat PDF format.
Contents of the Printable ProfileThe talent profile information that managers and workers view differs. Only managers can view the following information for their workers:
• Succession Plan
• Performance Matrix (Potential)
• Performance Matrix (Retention)
The talent profile PDF displays information for multiple criteria such as competency profile, work preferences, and compensation. You can view a graphical representation of the appraisal ratings and the cash compensation. The report includes certification details, job history and salary information of your employees. You can also view the compensation statement and training details.
Note: The Printable Profile report displays only those regions that have data. For example, if no data is available for Appraisals, then this region does not appear in the report.
Talent Profile in Oracle SSHR 14-21
Viewing Performance Matrix (Potential) and Performance Matrix (Retention)Managers can view the performance profile of workers using the following matrices:
• Performance Matrix (Potential): Provides information on performance and leadership potential of a worker on a rating scale of 1 to 3.
• Performance Matrix (Retention): Provides information on a worker's performance and risk of loss on a rating scale of 1 to 3.
Talent Profile uses information from the Succession Planning feature, Oracle Performance Management or Oracle HRMS Performance window (depending on the product to assess workforce performance) to plot the rating scales on the Performance Matrix ( 9 - Box).
Important: The values that you view on the Performance Matrix are the values that your enterprise defines for performance, potential, and retention rating scales.
For example, your enterprise can define the following rating scales for performance, potential, and retention:
Performance
• 1: Needs
Indicates that the performance is significantly below the required level.
• 2: Meets
Indicates that the performance is good and in-line with job requirements.
• 3: Exceeds
Indicates that the worker has exceeded the required level of performance.
Potential
• 1: Limited
Indicates that the worker shows little or no potential to move to the next work level.
• 2: Growth
Indicates that the worker shows potential to advance to the next or higher work level.
14-22 Oracle Self-Service Human Resources Deploy Self-Service Capability Guide
• 3: High
Indicates that the worker has requisite skills and expertise and exhibits leadership qualities.
Retention
• 1: Low
Indicates that the risk of losing the worker is high.
• 2: Medium
Indicates that the risk of losing the worker is moderate.
• 3: High
Indicates that the risk of losing the worker is minimal.

Talent Profile in Oracle SSHR 14-23
Enabling Talent Profile in Oracle SSHR
Enabling Talent Profile in Oracle SSHRTalent Profile is a comprehensive and integrated talent management feature that helps enterprises to obtain a complete picture of the talent profile of their workforce. Talent Profile captures and displays complete worker talent details on a single-interface.
Oracle Self-Service HR provides you with a minimal Talent Profile function to only view the talent profiles of your workforce. You require Oracle Succession Planning license to:
• Compare Talent Profiles
• Use performance matrices (9-box): Performance Matrix (Potential) and PerformanceMatrix (Retention)
• Use Suitability Analyzer
Talent Profile Based on Role Requirements
As managers and workers have different business requirements, Talent Profile delivers views based on their roles. For example, only managers can view the Succession Plan region.
Talent Profile MenusTo meet the different talent requirements, Oracle SSHR supplies the following Talent Profile Menus:
Menu Description
SSHR Talent Profile Manager Access Menu (HR_SSHR_TP_MGR_MENU)
Enables managers to view talent profiles of workers in their supervisor hierarchy.
Talent Profile Employee Access Menu (HR_TP_EMP_MENU)
Enables workers to view their talent profiles.
SSHR Menu For All Seeded Report Template Functions (HR_SSHR_TP_TEMPLATE_MENU)
Enables managers to print the talent profiles ofworkers. Workers can print their own talent profiles.
Talent Profile Launch Menu (HR_TP_LAUNCH_MENU)
Launches the Talent Profile page.
14-24 Oracle Self-Service Human Resources Deploy Self-Service Capability Guide
Enabling Talent Profile in Oracle SSHRTo enable managers, workers, and HR Professionals to use the Talent Profile feature, complete the following steps:
1. Add the Talent Profile function
Add the function Talent Profile HR_TALENTPROFILE_SS to the appropriate menus of the self-service responsibilities. For example, you can add the function to the supplied or the configured Manager Self Service menu. Use the Menus window of the System Administrator responsibility to complete this task.
2. Assign the Talent Menus to the self-service responsibility menus
To enable managers and HR professionals to use Talent Profile, add the following menus to the manager and HR professional self-service responsibility menus:
• SSHR Talent Profile Manager Access Menu (HR_SSHR_TP_MGR_MENU)
• Talent Profile Employee Access Menu (HR_TP_EMP_MENU)
• SSHR Menu For All Seeded Report Template Functions (HR_SSHR_TP_TEMPLATE_MENU)
To enable workers to use Talent Profile, add the following menus to the appropriateworkers' responsibility menus:
• Talent Profile Employee Access Menu (HR_TP_EMP_MENU)
• SSHR Menu For All Seeded Report Template Functions (HR_SSHR_TP_TEMPLATE_MENU)
3. Complete implementation steps to view Oracle Applications Development Framework (ADF) based nine box matrixes
Oracle SSHR uses the following default templates to display talent matrixes in the nine box format:
• Default Retention vs. Impact of Loss
• Default Retention vs. Impact of Loss
• Default Performance vs. Retention
These default templates are of 3*3 matrix type and are built on Oracle Applications Development Framework (ADF).
• To view the ADF-based nine box matrixes, you must complete
Talent Profile in Oracle SSHR 14-25
deployment steps in an Oracle WebLogic Server (WLS) instance. For more information, refer to the Oracle Succession Planning Implementation and User Guide.
• To edit the default templates, you require Oracle Succession Planning license and must have enabled the Talent Matrix tool in Oracle Succession Planning.
• If you do not deploy WLS and complete the necessary implementation steps, then the application provides an option to download or save PDF reports of nine box matrixes instead of displaying them.
Display the Relevant Succession Plan Region on the Talent Profile Page of a WorkerManagers can view succession plan details of their workers when they navigate to the Talent Profile of workers. By default, the Talent Profile page of a worker displays the Succession Plan region (SuccessionPlanNewOverviewRN) that is part of the R12.2 Oracle Succession Planning model. If you are not using the Oracle Succession Planning model of R12.2, then you must hide this version of the Succession Plan region and display the pre R12.2 Succession Plan region (SuccessionPlanOverviewRN) on the Talent Profile page. See: Personalizing the Talent Profile Page, page 14-59
Setting up a Custom Version of the Talent Profile Feature If you do not want to use the supplied Talent Profile menus, you can create menus based on the predefined menus and, if necessary, add or remove functions so that the menus accurately reflect your business processes. You can base your configuration on the sample menus provided although you should not change the predefined menus directly.
For information on setting up a custom version of the Talent Profile feature, see: Setup Steps to Implement a Custom Version of the Talent Profile Feature in SSHR, page 14-26
Configuring Talent Profile for Contingent WorkersThe Talent Profile function is not supported in the predefined Contingent Worker Self Service menu, by default. If required, you can add the Talent Profile function to the predefined Contingent Worker Self Service menu (HR_CWK_DIRECT_ACCESS) or the custom Contingent Worker Self Service menu that you use.
Before, you perform the following steps, you must ensure that the HTML call for the Talent Profile Employee Home Function does not have any reference to the Organization Chart functionality.

14-26 Oracle Self-Service Human Resources Deploy Self-Service Capability Guide
To enable contingent workers in your enterprise to use the Talent Profile functionality, complete the following steps:
1. Navigate to the Functional Administrator responsibility.
2. Click the Core Services tab.
3. Click the Menus sub tab. The Navigation Menus page appears.
4. Search for the predefined or custom Contingent Worker Self Service menu.
5. Click Update.
6. Click Add Another Row.
7. Enter Talent Profile in the Prompt field.
8. Select Talent Profile Employee Home Function in the Function field.
9. Select the following functions:
Talent Profile Employee Access Menu
SSHR Menu For All Seeded Report Template Functions
10. Click Apply.
11. Click the Profiles tab. The Profiles page appears.
12. Search for the Contingent Worker Personal Actions Menu profile option. Verify thatthe profile value is set to Contingent Worker Personal Actions Menu. After completing these steps, clear the cache.
Hide Certain Regions on the Talent Profile Page for Contingent WorkersRegions such as Salary, Benefits, Monetary Compensation, and Compensation Statement that are not applicable to contingent workers must be hidden using the Personalization feature.
Setup Steps to Implement a Custom Version of the Talent Profile Feature in SSHR
This topic describes the implementation steps to set up a custom version of the Talent Profile feature:
1. Create Copies of Supplied MenusUsing the Functional Administrator responsibility, create copies of the following
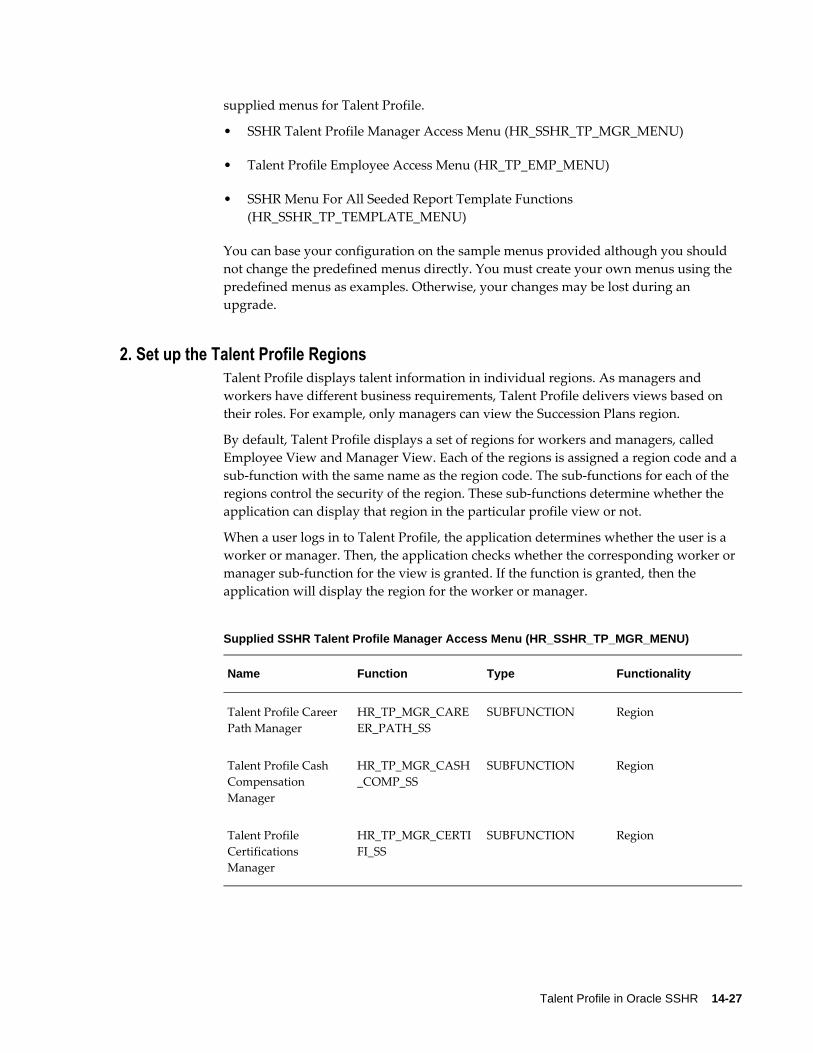
Talent Profile in Oracle SSHR 14-27
supplied menus for Talent Profile.
• SSHR Talent Profile Manager Access Menu (HR_SSHR_TP_MGR_MENU)
• Talent Profile Employee Access Menu (HR_TP_EMP_MENU)
• SSHR Menu For All Seeded Report Template Functions (HR_SSHR_TP_TEMPLATE_MENU)
You can base your configuration on the sample menus provided although you should not change the predefined menus directly. You must create your own menus using the predefined menus as examples. Otherwise, your changes may be lost during an upgrade.
2. Set up the Talent Profile RegionsTalent Profile displays talent information in individual regions. As managers and workers have different business requirements, Talent Profile delivers views based on their roles. For example, only managers can view the Succession Plans region.
By default, Talent Profile displays a set of regions for workers and managers, called Employee View and Manager View. Each of the regions is assigned a region code and a sub-function with the same name as the region code. The sub-functions for each of the regions control the security of the region. These sub-functions determine whether the application can display that region in the particular profile view or not.
When a user logs in to Talent Profile, the application determines whether the user is a worker or manager. Then, the application checks whether the corresponding worker or manager sub-function for the view is granted. If the function is granted, then the application will display the region for the worker or manager.
Supplied SSHR Talent Profile Manager Access Menu (HR_SSHR_TP_MGR_MENU)
Name Function Type Functionality
Talent Profile Career Path Manager
HR_TP_MGR_CAREER_PATH_SS
SUBFUNCTION Region
Talent Profile Cash Compensation Manager
HR_TP_MGR_CASH_COMP_SS
SUBFUNCTION Region
Talent Profile Certifications Manager
HR_TP_MGR_CERTIFI_SS
SUBFUNCTION Region

14-28 Oracle Self-Service Human Resources Deploy Self-Service Capability Guide
Name Function Type Functionality
Talent Profile Competency Manager
HR_TP_MGR_COMPETENCY_SS
SUBFUNCTION Region
Talent Profile Compensation Statement Manager
HR_TP_MGR_COMP_STAT_SS
SUBFUNCTION Region
Printable Profile HR_TP_MGR_EXPORT_CUSTOM_ACTN
SUBFUNCTION Action
Talent Profile Job History Manager
HR_TP_MGR_JOB_HIST_SS
SUBFUNCTION Region
Talent Profile Performance Matrix Manager
HR_TP_MGR_PERF_MATRIX_SS
SUBFUNCTION Action
Talent Profile Performance Objectives Manager
HR_TP_MGR_PERF_OBJ_SS
SUBFUNCTION Region
Talent Profile Previous Employment Manager
HR_TP_MGR_PREV_EMP_SS
SUBFUNCTION Region
Talent Profile Qualifications Manager
HR_TP_MGR_QUALIFI_SS
SUBFUNCTION Region
Talent Profile Salary Overview Manager
HR_TP_MGR_SALARY_SS
SUBFUNCTION Region
Talent Profile Succession Plan Manager
HR_TP_MGR_SUCCESSION_SS
SUBFUNCTION Region
Talent Profile Additional Information Manager
HR_TP_MGR_ADDITIONALINFO_SS
SUBFUNCTION Region
Talent Profile Appraisal Manager
HR_TP_MGR_APPR_SS
SUBFUNCTION Region

Talent Profile in Oracle SSHR 14-29
Name Function Type Functionality
Talent Profile AwardsManager
HR_TP_MGR_AWARDS_SS
SUBFUNCTION Region
Talent Profile Work Preferences Manager
HR_TP_MGR_WORK_PREF_SS
SUBFUNCTION Region
Talent Profile Training Manager
HR_TP_MGR_TRAINING_SS
SUBFUNCTION Region
Talent Profile Global Search Enabled
HR_TP_VIEW_GBL_SEARCH_SS
SUBFUNCTION Region
Talent Profile Show Person Hierarchy Enabled
HR_TP_VIEW_PER_HIERARCHY_SS
SUBFUNCTION Region
Download Export XML Button Security Renderer
HR_TP_DOWNLOAD_EXPORT_XML
SUBFUNCTION Reporting Action
Talent Profile More Link Manager
HR_TP_MGR_MORE_LINK
SUBFUNCTION More link configuration option for Manager
Printable Profile ( Full)
HR_TP_MGR_EXPORT_FULL_ACTN
SUBFUNCTION Action
Talent Profile BenefitsManager
HR_TP_MGR_BENFTS_SS
SUBFUNCTION Region
Talent Profile Performance Ratings Managers
HR_TP_MGR_PERFRATING_SS
SUBFUNCTION Region

14-30 Oracle Self-Service Human Resources Deploy Self-Service Capability Guide
Supplied Talent Profile Employee Access Menu - HR_TP_EMP_MENU
Name Function Type Functionality
Talent Profile Additional Information Employee
HR_TP_EMP_ADDITIONALINFO_SS
SUBFUNCTION Region
Talent Profile Appraisal Employee
HR_TP_EMP_APPR_SS
SUBFUNCTION Region
Talent Profile AwardsEmployee
HR_TP_EMP_AWARDS_SS
SUBFUNCTION Region
Talent Profile Career Path Employee
HR_TP_EMP_CAREER_PATH_SS
SUBFUNCTION Region
Talent Profile Certifications Employee
HR_TP_EMP_CERTIFI_SS
SUBFUNCTION Region
Talent Profile Competency Employee
HR_TP_EMP_COMPETENCY_SS
SUBFUNCTION Region
Talent Profile Job History Employee
HR_TP_EMP_JOB_HIST_SS
SUBFUNCTION Region
Talent Profile Performance Objectives Employee
HR_TP_EMP_PERF_OBJ_SS
SUBFUNCTION Region
Talent Profile Previous Employment Employee
HR_TP_EMP_PREV_EMP_SS
SUBFUNCTION Region
Talent Profile Qualifications Employee
HR_TP_EMP_QUALIFI_SS
SUBFUNCTION Region
Talent Profile Training Employee
HR_TP_EMP_TRAINING_SS
SUBFUNCTION Region

Talent Profile in Oracle SSHR 14-31
Name Function Type Functionality
Talent Profile Work Preferences Employee
HR_TP_EMP_WORK_PREF_SS
SUBFUNCTION Region
Talent Profile More Link Employee
HR_TP_EMP_MORE_LINK
SUBFUNCTION Region
Talent Profile Cash Compensation Employee
HR_TP_EMP_CASH_COMP_SS
SUBFUNCTION Region
Talent Profile Salary Overview Employee
HR_TP_EMP_SALARY_SS
SUBFUNCTION Region
Talent Profile Compensation Statement Employee
R_TP_EMP_COMP_STAT_SS
SUBFUNCTION Region
Printable Profile HR_TP_MGR_EXPORT_CUSTOM_ACTN
SUBFUNCTION Action
Compare Profile HR_TP_EMP_COMPARE_WITH_ACTN
SUBFUNCTION Action
Printable Profile ( Full)
HR_TP_MGR_EXPORT_FULL_ACTN
SUBFUNCTION Action
Talent Profile BenefitsEmployee
HR_TP_EMP_BENFTS_SS
SUBFUNCTION Region
Talent Profile Performance Ratings Employee
HR_TP_EMP_PERFRATING_SS
SUBFUNCTION Region
3. Configuring the More Links in the Talent Profile RegionsThe Talent Profile page regions provide a More link using which managers can navigateto the relevant self-service pages of workers. For example, when a manager clicks the More in the Qualifications region, the application displays the worker's Qualifications page. Similarly, when workers view their own Talent Profile page, they can navigate to the self-service pages using the More link. Talent Profile delivers predefined More links for manager and employee views using the following sub-functions:
14-32 Oracle Self-Service Human Resources Deploy Self-Service Capability Guide
• Manager View
Talent Profile More Link Manager (HR_TP_MGR_MORE_LINK). This sub-funciton is included in the SSHR Talent Profile Manager Access Menu (HR_SSHR_TP_MGR_MENU)
• Employee View
Talent Profile More Link Employee (HR_TP_EMP_MORE_LINK). This sub-functionis included in the Talent Profile Employee Access Menu (HR_TP_EMP_MENU).
You can configure the More links to display different application pages instead of the default configured pages. Each region has a predefined unique code defined for More links. This code is different from the region codes. The region codes are used for security of the regions. The More link code is used to specify the destination page when the More link is clicked. Note: If you do not want users to navigate to any application page from the More link, then you must leave the parameter value blank.
To map the More link code to the destination function, navigate to the Form Functions window. Query the Talent Profile form function that you have set up. Click the Form Tab region and configure the Parameter as follows:
MoreLinkMapMgr=<user defined sub-function name>&MoreLinkMapEmp=<userdefined sub-function name>, for example: MoreLinkMapMgr=HR_TP_MGR_MORE_LINK&MoreLinkMapEmp=HR_TP_EMP_MORE_LINK
The two parameters: MoreLinkMapMgr and MoreLinkMapEmp derive the destination for the More links. The value for both these parameters is a user defined sub-function. These sub-functions contain the mapping of region More link code to the destination function.
The following sections provide information about the predefined parameters supplied with the HR_TP_EMP_MORE_LINK and HR_TP_MGR_MORE_LINK sub-functions.
Talent Profile More Link Manager (HR_TP_MGR_MORE_LINK)Predefined Form Parameters
pTPMADDINFO=&pTPMBENFTS=BEN_SS_MGR_ENRT&pTPMCARERPATH=&pTPMCMPETNCY=HR_COMPETENCE_PROFILE_SS&pTPMPERFMATRIX=&pTPMJOBHIST=&pTPMSALARY=&pTPMCOMPSTMNT=&pTPMCASHCOMP=&pTPMCERT=OTA_LEARNER_HOME_SS&pTPMPERFOBJ=HR_MGR_TALMGMT_SS&pTPMAPPRAISAL=HR_VIEW_APPRAISALS_PAGE_SS&pTPMPREVEMP=&pTPMAWARDS=HR_AWARD_SS&pTPMQUALIFI=HR_QUALIFICATION_SS&pTPMSUCCPLAN=&pTPMTRAINING=OTA_LEARNER_HOME_SS&pTPMWORKPREF=HR_WORK_PREFERENCES_SS&pTPMPERFRATE=HR_MGR_VIEWS_HIST_SS
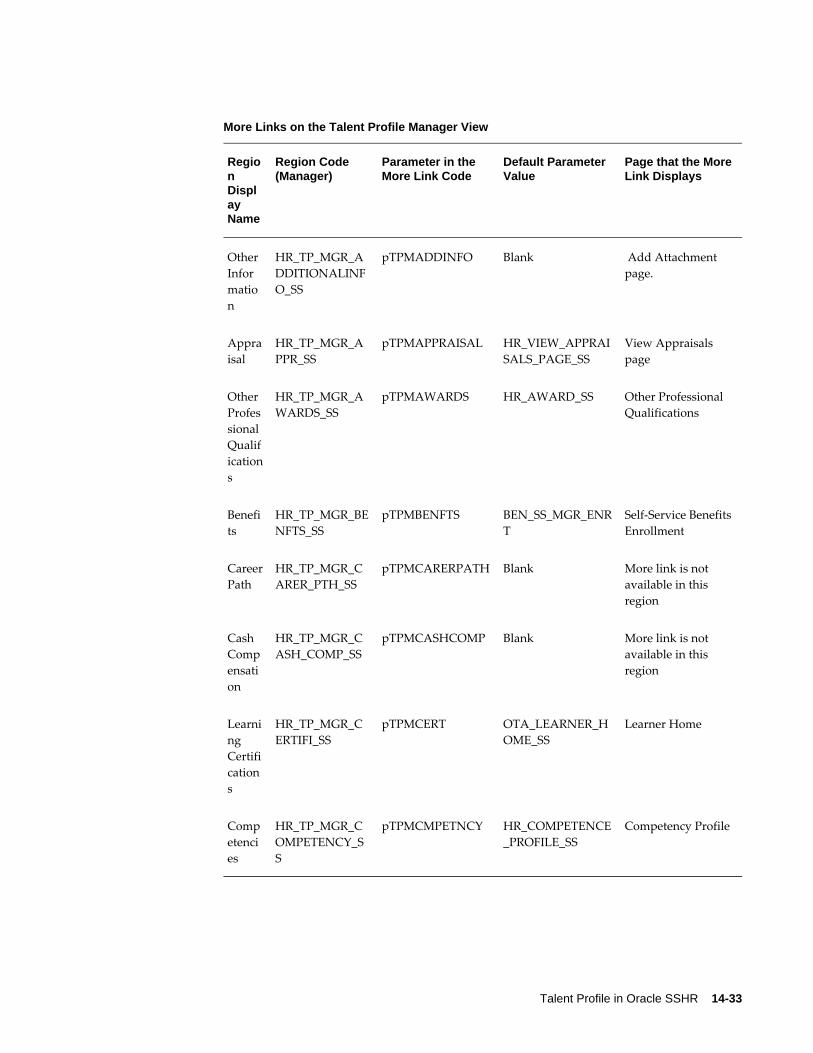
Talent Profile in Oracle SSHR 14-33
More Links on the Talent Profile Manager View
Region Display Name
Region Code (Manager)
Parameter in the More Link Code
Default Parameter Value
Page that the MoreLink Displays
Other Information
HR_TP_MGR_ADDITIONALINFO_SS
pTPMADDINFO Blank Add Attachment page.
Appraisal
HR_TP_MGR_APPR_SS
pTPMAPPRAISAL HR_VIEW_APPRAISALS_PAGE_SS
View Appraisals page
Other Professional Qualifications
HR_TP_MGR_AWARDS_SS
pTPMAWARDS HR_AWARD_SS Other Professional Qualifications
Benefits
HR_TP_MGR_BENFTS_SS
pTPMBENFTS BEN_SS_MGR_ENRT
Self-Service BenefitsEnrollment
CareerPath
HR_TP_MGR_CARER_PTH_SS
pTPMCARERPATH Blank More link is not available in this region
Cash Compensation
HR_TP_MGR_CASH_COMP_SS
pTPMCASHCOMP Blank More link is not available in this region
Learning Certifications
HR_TP_MGR_CERTIFI_SS
pTPMCERT OTA_LEARNER_HOME_SS
Learner Home
Competencies
HR_TP_MGR_COMPETENCY_SS
pTPMCMPETNCY HR_COMPETENCE_PROFILE_SS
Competency Profile

14-34 Oracle Self-Service Human Resources Deploy Self-Service Capability Guide
Region Display Name
Region Code (Manager)
Parameter in the More Link Code
Default Parameter Value
Page that the MoreLink Displays
Compensation Statement
HR_TP_MGR_COMP_STAT_SS
pTPMCOMPSTMNT
Blank More link is not available in this region
Job History
HR_TP_MGR_JOB_HIST_SS
pTPMJOBHIST Blank More link is not available in this region
PerformanceObjectives
HR_TP_MGR_PERF_OBJ_SS
pTPMPERFOBJ HR_MGR_TALMGMT_SS
Performance Management page of the worker.
Previous Employment
HR_TP_MGR_PREV_EMP_SS
pTPMPREVEMP Blank More link is not available in this region
Qualifications
HR_TP_MGR_QUALIFI_SS
pTPMQUALIFI HR_QUALIFICATION_SS
Education and Qualifications
Training
HR_TP_MGR_TRAINING_SS
pTPMTRAINING OTA_LEARNER_HOME_SS
Learner Home
Work Preferences
HR_TP_MGR_WORK_PREF_SS
pTPMWORKPREF HR_WORK_PREFERENCES_SS
Work Preferences
PerformanceRatings
HR_TP_MGR_PERFRATING_SS
&pTPMPERFRATE HR_MGR_VIEWS_HIST_SS
My Employee Information
Talent Profile More Link Employee (HR_TP_EMP_MORE_LINK)Predefined Form Parameters
pTPMADDINFO=&pTPMBENFTS=BEN_SS_BNFT_ENRT&pTPMCARERPATH=&pTP

Talent Profile in Oracle SSHR 14-35
MCMPETNCY=HR_COMPETENCE_PROFILE_SS&pTPMPERFMATRIX=&pTPMJOBHIST=&pTPMSALARY=&pTPMCOMPSTMNT=BEN_TCS_EMPSS_WELCOME_PG&pTPMCASHCOMP=BEN_TCS_EMPSS_WELCOME_PG&pTPMCERT=OTA_LEARNER_HOME_SS&pTPMPERFOBJ=HR_EMP_TALMGMT_SS&pTPMAPPRAISAL=HR_EMP_MY_APPR_SS&pTPMPREVEMP=&pTPMAWARDS=HR_AWARD_SS&pTPMQUALIFI=HR_QUALIFICATION_SS&pTPMSUCCPLAN=&pTPMTRAINING=OTA_LEARNER_HOME_SS&pTPMWORKPREF=HR_WORK_PREFERENCES_SS&pTPMPERFRATE=HR_EMP_VIEWS_SS
More Links on the Talent Profile Worker View
Region Display Name
Region Code (Employee)
Parameter in the More Link Code
Default Parameter Value
Page that the More Link Displays
Other Information
HR_TP_EMP_ADDITIONALINFO_SS
pTPMADDINFO Blank Add Attachments
Appraisal
HR_TP_EMP_APPR_SS
pTPMAPPRAISAL HR_EMP_MY_APPR_SS
My Appraisals
Other Professional Qualifications
HR_TP_EMP_AWARDS_SS
pTPMAWARDS HR_AWARD_SS Other Professional Qualifications
Benefits
HR_TP_EMP_BENFTS_SS
pTPMBENFTS BEN_SS_BNFT_ENRT
Self Service Benefits Enrollments
CareerPath
HR_TP_EMP_CARER_PTH_SS
pTPMCARERPATH Blank More link is not available in this region
Cash Compensation
HR_TP_EMP_CASH_COMP_SS
pTPMCASHCOMP BEN_TCS_EMPSS_WELCOME_PG
Total Compensation Statement
Certification
HR_TP_EMP_CERTIFI_SS
pTPMCERT OTA_LEARNER_HOME_SS
Learner Home

14-36 Oracle Self-Service Human Resources Deploy Self-Service Capability Guide
Region Display Name
Region Code (Employee)
Parameter in the More Link Code
Default Parameter Value
Page that the More Link Displays
Competencies
HR_TP_EMP_COMPETENCY_SS
pTPMCMPETNCY HR_COMPETENCE_PROFILE_SS
Competency Profile
Compensation Statement
HR_TP_EMP_COMP_STAT_SS
pTPMCOMPSTMNT
BEN_TCS_EMPSS_WELCOME_PG
Total Compensation Statement
Job History
HR_TP_EMP_JOB_HIST_SS
pTPMJOBHIST Blank More link is not available in this region
PerformanceObjectives
HR_TP_EMP_PERF_OBJ_SS
pTPMPERFOBJ HR_EMP_TALMGMT_SS
Performance Management
Previous Employment
HR_TP_EMP_PREV_EMP_SS
pTPMPREVEMP Blank More link is not available in this region
Qualifications
HR_TP_EMP_QUALIFI_SS
pTPMQUALIFI HR_QUALIFICATION_SS
Education and Qualifications
Salary HR_TP_EMP_SALARY_SS
pTPMSALARY Blank More link is not available in this region
Succession Plan
HR_TP_EMP_SUCCESSION_SS
pTPMSUCCPLAN Blank This region is not available in the Employee view
Training
HR_TP_EMP_TRAINING_SS
pTPMTRAINING OTA_LEARNER_HOME_SS
Learner Home

Talent Profile in Oracle SSHR 14-37
Region Display Name
Region Code (Employee)
Parameter in the More Link Code
Default Parameter Value
Page that the More Link Displays
Work Preferences
HR_TP_EMP_WORK_PREF_SS
pTPMWORKPREF HR_WORK_PREFERENCES_SS
Work Preferences
PerformanceMatrix(Header is not shown)
HR_TP_EMP_PERF_METRICES_SS
pTPMPERFMATRIX Blank More link is not applicable
PerformanceRatings
HR_TP_EMP_PERFRATING_SS
&pTPMPERFRATE HR_EMP_VIEWS_SS
My Information
You can display EIT, SIT, and custom content on the Talent Profile page, see:
• Person Extra Information Types (EITs)
See: Displaying Person Extra Information Types (EITs) as Talent Profile Page Regions, page 14-64
• Person Special Information Types
See: Displaying Person Special Information Types (SITs) as Talent Profile Page Regions, page 14-68
• Custom content
See: Displaying Custom Content as Talent Profile Page Regions, page 14-70
Note: The EIT, SIT, and custom content regions do not support More links.
4. Grant the Custom Menus or Add the Custom Menus to the ResponsibilityTo enable managers and workers to use the Talent Profile features, you must grant the custom Talent Profile menus to the Oracle SSHR responsibilities assigned to the users.

14-38 Oracle Self-Service Human Resources Deploy Self-Service Capability Guide
You can grant the custom menus using the Functional Administrator responsibility. Grants enable managers and workers to access the Talent Profile functions. For information on creating grants and using permission sets, see: Grants and Permissions Sets, Oracle E-Business Suite Security Guide
You can also add the custom menus to the Oracle SSHR responsibilities assigned to the users using the System Administrator responsibility
Completing the Configuration Steps for Talent Profile in SSHRAfter you set up Talent Profile, you carry out the following configuration steps:
• Define Lookups for 9-Box Matrixes, page 14-38
• Configure the Quick Search and Hierarchy Regions, page 14-43
• Configure the Region Icon in the Talent Profile Regions, page 14-44
• Personalize the Talent Profile Page, page 14-59
Define Lookups for 9-Box MatrixesUsing Talent Profile, managers can assess workers' potential, performance, and retention.
The Performance Matrix displays performance profile of the worker using the followingmatrices:
• Performance vs. Potential: Provides information on the performance and leadershippotential of a worker. The application plots the Performance rating on the horizontal x-axis on a scale of 1 to 3 and the Potential rating on the vertical y-axis ona scale of 1 to 3.
• Performance vs. Retention: Provides information on a worker's performance and risk of loss. The application plots the Performance rating on the horizontal x-axis ona scale of 1 to 3 and the Retention rating on the vertical y-axis on a scale of 1 to 3.
To assess workers' performance, potential, and retention using the 9-box matrixes, you must complete the following steps:
• Define lookup types required for Talent Profile, page 14-38
• Define lookup types for 9-box matrixes, page 14-39
• Define mapping between Talent Profile and 9-box lookups , page 14-41
1. Define Lookup Types Required for Talent Profile
Define the following lookup types to assess performance, potential, and retention:

Talent Profile in Oracle SSHR 14-39
• PERFORMANCE_RATING: Indicates the performance rating of a worker, such as, Excellent, Average, and Poor.
• PER_SUCC_PLAN_POTENTIAL: Indicates the succession potential of a workerand promotion to the next higher role, such as Emergency Stand-In and Promotion in 1 Year. The Succession Potential segment of the Employee Career Management Information person EIT uses values defined in this lookup.
• PER_SUCC_PLAN_RISK_LEVEL: Indicates the retention potential of a worker, such as High, Medium, and Low. This lookup stores the values for the Turnover Rate segment of the Job Career Management Information and Position Career Management Information EITs. The Risk of Loss segment of theEmployee Career Management Information person EIT also uses this lookup values.
If these lookups have already been defined, then you must verify that the information meets your business requirements.
For information how to add lookup values, see: Adding Lookup Types and Values, Oracle HRMS Configuring, Reporting, and System Administration Guide
2. Define Lookup Types for 9-box Matrixes
To display values in 9-box matrixes, you must add values to the following lookup types. When adding the lookup values, you must specify the code so that the application can display the relevant rating for a worker in the 9-box. If you do not enter the code, then the 9-box does not display the rating. Define a maximum of three codes on a scale of 1 to 3.
• PER_9_BOX_LEVEL
This lookup type is used to display the performance rating for a worker. The following table provides an example of how you can define lookup values for PER_9_BOX_LEVEL.
Code Meaning Description
1 Needs Performance is significantly below the required level.
2 Meets Performance is good and in-line with job requirements.
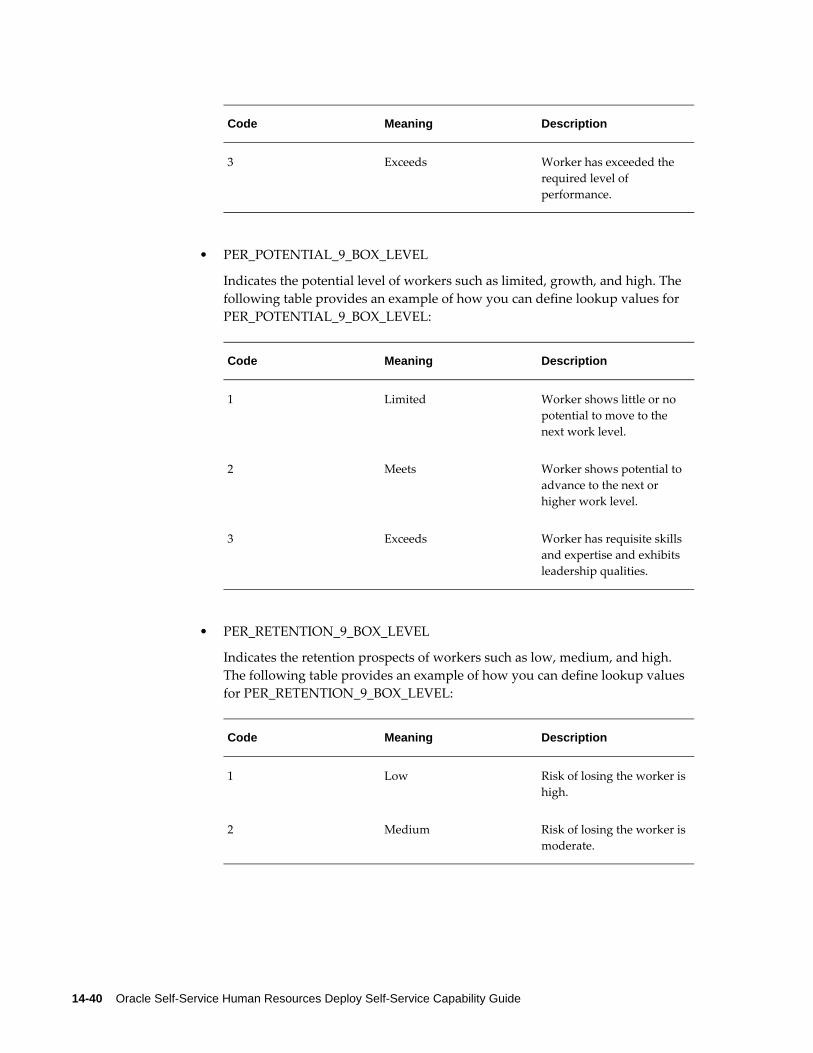
14-40 Oracle Self-Service Human Resources Deploy Self-Service Capability Guide
Code Meaning Description
3 Exceeds Worker has exceeded the required level of performance.
• PER_POTENTIAL_9_BOX_LEVEL
Indicates the potential level of workers such as limited, growth, and high. The following table provides an example of how you can define lookup values for PER_POTENTIAL_9_BOX_LEVEL:
Code Meaning Description
1 Limited Worker shows little or no potential to move to the next work level.
2 Meets Worker shows potential to advance to the next or higher work level.
3 Exceeds Worker has requisite skills and expertise and exhibits leadership qualities.
• PER_RETENTION_9_BOX_LEVEL
Indicates the retention prospects of workers such as low, medium, and high. The following table provides an example of how you can define lookup values for PER_RETENTION_9_BOX_LEVEL:
Code Meaning Description
1 Low Risk of losing the worker ishigh.
2 Medium Risk of losing the worker ismoderate.

Talent Profile in Oracle SSHR 14-41
Code Meaning Description
3 High Risk of losing the worker isminimal.
3. Define mapping between Talent Profile and 9-box lookups
The various matrixes do not directly use the lookup codes that you define in Step 1. The matrixes display ratings on a scale of 1-3 only using the 9-box lookup codes. To correctly represent workers' performance, potential, and retention dimensions, you must map the talent profile lookup codes to the 9-box look up codes.
Use the following table to identify the 9-box lookup type that is associated with a talent profile lookup type:
Talent Profile Lookup Type 9-Box Lookup Type
PERFORMANCE_RATING PER_9_BOX_LEVEL
PER_SUCC_PLAN_POTENTIAL PER_POTENTIAL_9_BOX_LEVEL
PER_SUCC_PLAN_RISK_LEVEL PER_RETENTION_9_BOX_LEVEL
The following example looks at why you must map a talent profile lookup type to a 9-box lookup type:
In your enterprise, you have defined the following values for the PERFORMANCE_RATING lookup type to assess performance of workers:
1. Below Average
2. Average
3. Sastisfactory
4. Good
5. Excellent
6. Outstanding
You have defined the following values for the PER_9_BOX_LEVEL lookup to represent performance in the 9-box matrix:
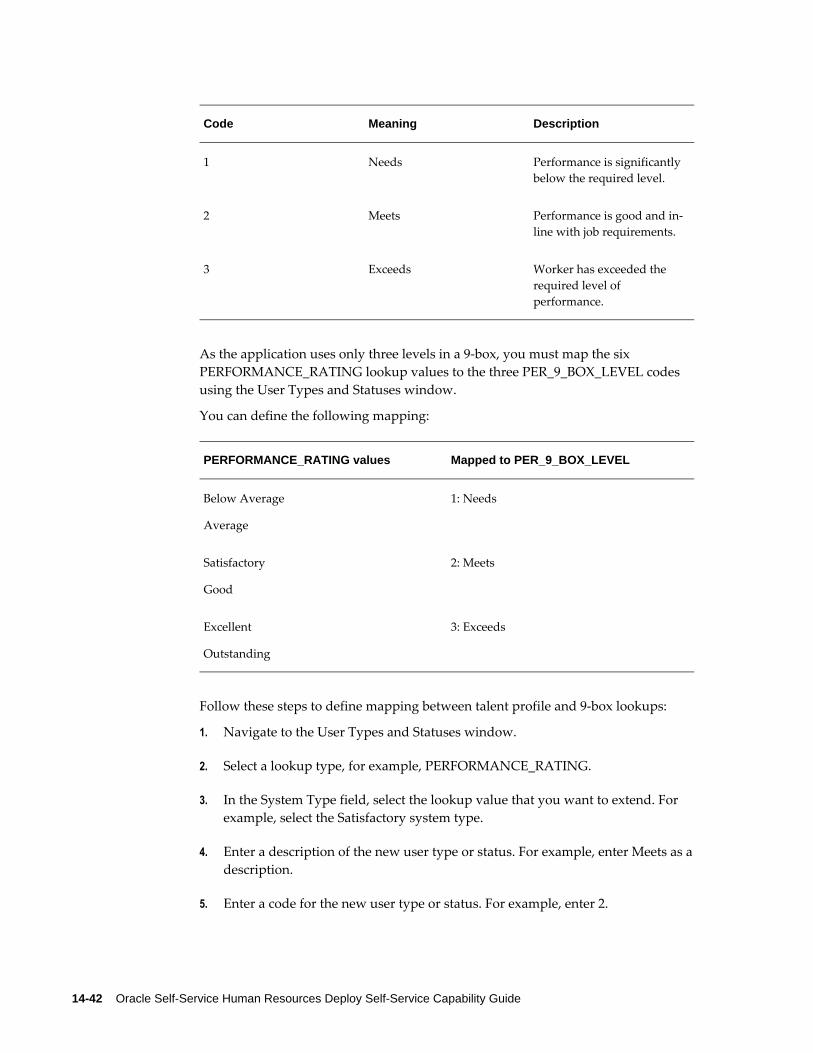
14-42 Oracle Self-Service Human Resources Deploy Self-Service Capability Guide
Code Meaning Description
1 Needs Performance is significantly below the required level.
2 Meets Performance is good and in-line with job requirements.
3 Exceeds Worker has exceeded the required level of performance.
As the application uses only three levels in a 9-box, you must map the six PERFORMANCE_RATING lookup values to the three PER_9_BOX_LEVEL codes using the User Types and Statuses window.
You can define the following mapping:
PERFORMANCE_RATING values Mapped to PER_9_BOX_LEVEL
Below Average
Average
1: Needs
Satisfactory
Good
2: Meets
Excellent
Outstanding
3: Exceeds
Follow these steps to define mapping between talent profile and 9-box lookups:
1. Navigate to the User Types and Statuses window.
2. Select a lookup type, for example, PERFORMANCE_RATING.
3. In the System Type field, select the lookup value that you want to extend. For example, select the Satisfactory system type.
4. Enter a description of the new user type or status. For example, enter Meets as adescription.
5. Enter a code for the new user type or status. For example, enter 2.

Talent Profile in Oracle SSHR 14-43
6. Click the Further Info field. The Share Type Information window appears.
7. Select the 9 Box level that the user status applies to.
8. Repeat the steps to map the PERFORMANCE_RATING 'Good' value with the PER_9_BOX_LEVEL value 'Meets'.
9. Save your work.
See: Creating User Types and Statuses, Oracle HRMS Configuring, Reporting, and System Administration Guide
Configure the Quick Search and Hierarchy RegionsBy default, the Talent Profile page displays two regions: Quick Search and Hierarchy that managers can use to navigate between talent profiles of workers. These regions are configurable and can be removed from the Talent Profile page.
The following sections explain the regions and how you can configure them.
Configuring the Quick Search RegionThe Quick Search region displays two search options:
• Search Profile
Displays profiles that logged in user can access. Users can select one of the profiles and click the Show Profile button to view the talent profile details.
• Recently Visited Profile
This option displays recently viewed profiles. Currently, the visited profiles information is stored only in the transaction and this information is lost once the transaction ends.
To display the region, you must grant the HR_TP_VIEW_GBL_SEARCH_SS function to the user.
Details of the Function
• User Function Name: Talent Profile Global Search Enabled
• Type: SUBFUNCTION
Configuring the Hierarchy BeanThe hierarchy bean appears at the top of the profile below the Quick Search region. The hierarchy bean lists the workers in the supervisor hierarchy of the logged in user.
To display the hierarchy bean, you must the grant the HR_TP_VIEW_PER_HIERARCHY_SS function to the user.

14-44 Oracle Self-Service Human Resources Deploy Self-Service Capability Guide
Details of the Function
• User Function Name: Talent Profile Show Person Hierarchy Enabled
• Type: SUBFUNCTION
Configure the Region Icon in the Talent Profile RegionsAll the Talent Profile regions display icons that indicate the regions content in a graphical representation. You can add the required icons using the Personalization function. Each region is shared region and a separate XML document. Place the icons that are going to be used in the Talent Profile Regions in the OA_Media folder.
Locate the region icon item and navigate to the PhotoCellRN page element. The Photo item of PhotoCellRN is an image type item. This item has an Image URI property, which is set to a blank image, by default. To display another image, personalize this property to point to the required image to be used on the region by starting with '/OA_Media/' followed by the icon file name of the icon being used for this region.
Display Regions on the Talent Profile pageDisplay regions on the Talent Profile page to view additional person specific details:
• Person Extra Information Types (EITs)
See: Displaying Person Extra Information Types (EITs) as Talent Profile Page Regions, page 14-64
• Person Special Information Types
See: Displaying Person Special Information Types (SITs) as Talent Profile Page Regions, page 14-68
• Custom content
See: Displaying Custom Content as Talent Profile Page Regions, page 14-70
Note: The EIT, SIT, and custom content regions do not support More links.
Configure the Print Profile Default XML Template, if RequiredOracle Succession Planning delivers the Single Person Profile Template (PEREMPTP) to print the talent profile of a worker.
The predefined Single Person Profile Template (PEREMPTP) is available to print the talent profile of a worker.
You can create custom print profile templates based on your business requirements.

Talent Profile in Oracle SSHR 14-45
Your custom print profile template must be based on the predefined Single Person Profile Template (PEREMPTP). Whenever you create a custom template to generate the Printable Profile (Full) report, you must set the custom template code as the value of the'FullProfileTemplateCode' parameter value in the relevant Talent Profile launch function so that the application uses the custom print profile template.
To create and use a custom template of the Printable Profile (Full) report, follow these steps:
1. Log in to the XML Publisher Administrator responsibility.
2. Create a XML template based on the predefined PEREMPTP template. For example,name the custom template as Custom template for Talent Profile and code as PEREMPTPCUST.
3. Navigate to the Form Functions window using the System Administrator responsibility.
4. Query the relevant Talent Profile launch function to which you want to add the custom print profile template. For example, query the Talent Profile (HR_TALENTPROFILE_SS) function.
5. Click the Form tab. You view the existing parameter definitions.
6. Add the following parameter:
FullProfileTemplateCode=PEREMPTPCUST
Important: The parameter value must be same as the code of the custom template that you created in the earlier step.
7. Save your work.
Configuring Manager and Personal Actions in Talent ProfileThis topic provides information on how to configure the manager and personal actions available from the following sections in the Talent Profile page.
• Actions list in the Talent Profile page
• Side Navigator in the Talent Profile page
Configuring the Actions ListIn Talent Profile, the standard Personal Actions or Manager Actions list is role based. The Actions list contains Personal Actions or Manager Actions depending on the profilethe person is viewing.
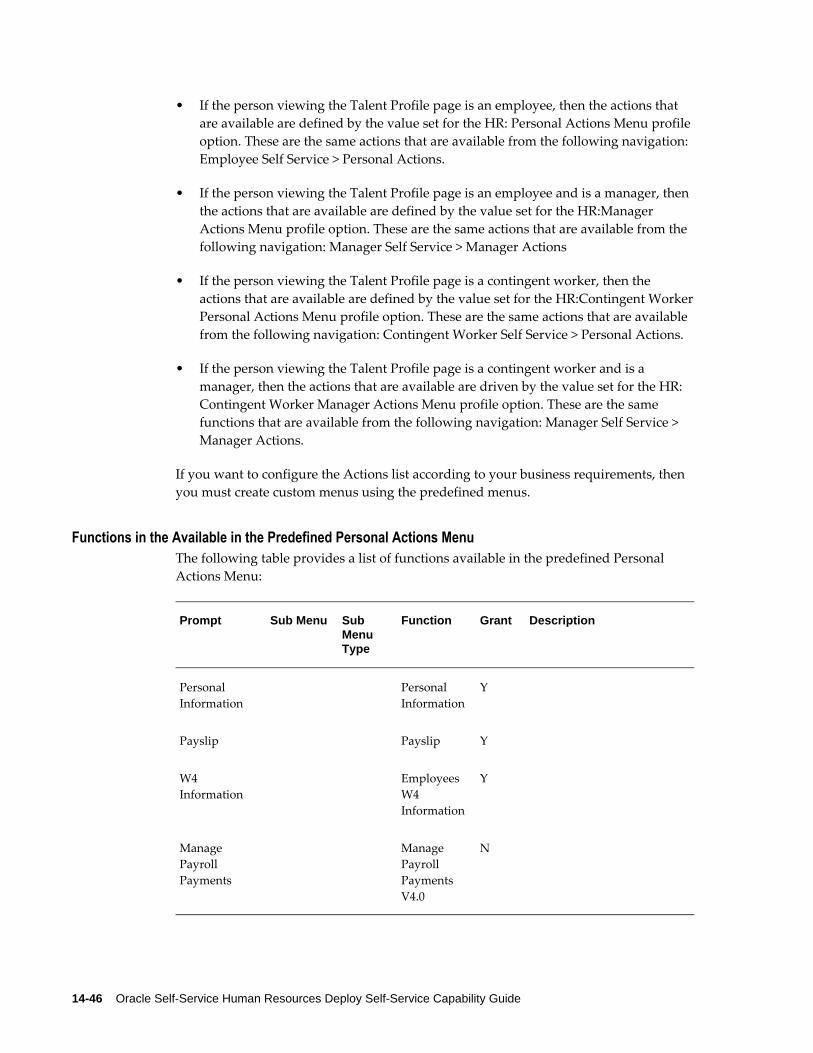
14-46 Oracle Self-Service Human Resources Deploy Self-Service Capability Guide
• If the person viewing the Talent Profile page is an employee, then the actions that are available are defined by the value set for the HR: Personal Actions Menu profile option. These are the same actions that are available from the following navigation: Employee Self Service > Personal Actions.
• If the person viewing the Talent Profile page is an employee and is a manager, then the actions that are available are defined by the value set for the HR:Manager Actions Menu profile option. These are the same actions that are available from the following navigation: Manager Self Service > Manager Actions
• If the person viewing the Talent Profile page is a contingent worker, then the actions that are available are defined by the value set for the HR:Contingent WorkerPersonal Actions Menu profile option. These are the same actions that are available from the following navigation: Contingent Worker Self Service > Personal Actions.
• If the person viewing the Talent Profile page is a contingent worker and is a manager, then the actions that are available are driven by the value set for the HR: Contingent Worker Manager Actions Menu profile option. These are the same functions that are available from the following navigation: Manager Self Service > Manager Actions.
If you want to configure the Actions list according to your business requirements, then you must create custom menus using the predefined menus.
Functions in the Available in the Predefined Personal Actions MenuThe following table provides a list of functions available in the predefined Personal Actions Menu:
Prompt Sub Menu Sub Menu Type
Function Grant Description
Personal Information
Personal Information
Y
Payslip Payslip Y
W4 Information
Employees W4 Information
Y
Manage Payroll Payments
Manage Payroll Payments V4.0
N

Talent Profile in Oracle SSHR 14-47
Prompt Sub Menu Sub Menu Type
Function Grant Description
Release Information
Release Information
Y
Employee Appraisals
N Obsolete - replaced with Employee: My Appraisals Page
Appraisals Employee: My Appraisals Page
Y
Suitability Matching
Suitability Matching
Y
Tenure Status Tenure Status Overview
Y
Academic Rank
Academic Rank
Y
Education andQualifications
Qualification
Y
Other Professional Qualifications
Award Y
Competency Profile
Competency Profile
Y
Work Preferences
Work Preferences
Y
Resume Resume Y
Apply for Job Search and Apply for a Job Page
Y

14-48 Oracle Self-Service Human Resources Deploy Self-Service Capability Guide
Prompt Sub Menu Sub Menu Type
Function Grant Description
Enroll and Cancel Training
N
External Training
N
Employee W2 Employee W2
Y
Extra Information
Extra Information Types
Y
Special Information
Special Information Types
Y
Event And Bookings
Event And Bookings
Y
Employee Review
Employee Reviews V4.0
Y
Absence Management
Absence Management
Y
Training Plan Views
N
Contact Extra Information
Contact Extra Information
Y
Private Vehicle Entry
SS Vehicle Repository Y

Talent Profile in Oracle SSHR 14-49
Prompt Sub Menu Sub Menu Type
Function Grant Description
Vehicle Mileage Expenses
SS Mileage Claim
Y
Commutation Information
JP Commutation Information Self Service
Y
Documents of Record
Documents of Record
Y
Employment Verification
Employment Verification
Y
Voluntary Termination
Voluntary Termination
Y
Charitable Contributions
Charitable Contributions
Y
Manage Payroll Payments
Manage Payroll Payments V4.0
Y
Employee Directory
Proxy Page
N
Organization Manager V4.0
Organization Manager
Y
OTA Learner Application Menu
HOMEPAGE
Y

14-50 Oracle Self-Service Human Resources Deploy Self-Service Capability Guide
Prompt Sub Menu Sub Menu Type
Function Grant Description
Defined Contribution Plan Enrollment
Defined Contribution Plan Enrollment
Y
Functions in the Available in the Predefined Manager Actions MenuThe following table provides a list of functions available in the predefined Manger Actions menu.
Prompt Function Grant Description
Worker Status Change V5.2
Y
Worker Status Change
Worker Status Change
Y
Change Hours V5.2 Y
Change Hours
Change Hours Y
Termination Termination Y
Change Pay V5.2 Y
Change Pay Change Pay Y
Change Job Change Job Y
Transfer V5.2 Y
Change Cost Center, Location and Manager
Change Cost Center, Location and Manager
Y

Talent Profile in Oracle SSHR 14-51
Prompt Function Grant Description
Personal Information
Personal Information
Y
Tenure Status Tenure Status Y
Transfer Transfer Y
Education and Qualifications
Qualification Y
Other Professional Qualifications
Award Y
Competency Profile
Competency Profile Y
Work Preferences
Work Preferences Y
Resume Resume Y
Training Enroll and Cancel Training
N
External Training
External TrainingN
Change Job and Terms
Change Job and Terms
Y
Change Cost Center, Termsand Manager
Change Cost Center, Terms and Manager
Y
Extra Information
Extra Information Types
Y
Change Worker Status and Terms V5.2
Y

14-52 Oracle Self-Service Human Resources Deploy Self-Service Capability Guide
Prompt Function Grant Description
Change Worker Status and Terms
Change Worker Status and Terms
Y
Employee Review Employee Reviews
V4.0Y
Individual Compensation Distribution(Original)
Self Service Individual Distributions(Original)-Internal Use
Y
Individual Compensation Distributions
Self Service Individual Compensation Distributions-Internal
Y
Organization Manager
NObsolete
Hire V5.2N Obsolete
Applicant Hire V5.2
NObsolete
French HireN Obsolete
French Applicant Hire
NObsolete
IRASLINE Information Types
SG IRASLINE Person EIT
Y
Private Vehicle Entry
SS Manager VehicleRepository
Y

Talent Profile in Oracle SSHR 14-53
Prompt Function Grant Description
Vehicle Mileage Expenses
SS Mileage Claim Y
CommutationInformation
JP Commutation Information Self Service
Y
Assign Schedules and Manage Exceptions
Assign Schedule Y
Documents ofRecord
Documents of Record
Y
Contact Extra Information
Contact Extra Information
Y
Hire Y
Applicant Hire Y
Special InformationTypes V4.0- OSHA
Y
Special InformationTypes V4.0- Stock Options
Y
Competence Profile
ADS Competence Profile V4.0
Y
Applicant Hire iRecruitment
Applicant Hire iRecruitment
Y
Transfer with Compensation DistributionV4.0
Transfer with Comp V4.0
Y

14-54 Oracle Self-Service Human Resources Deploy Self-Service Capability Guide
Prompt Function Grant Description
IRASLINE Person Extra Information Types
SG IRASLINE Person EIT
Y
Private Vehicle Entry
SS Vehicle Repository
Y
Assignment Costing
Assignment Costing
Y
Assignment Costing Workflow Notify
Y
Reverse Termination
Y
P11D P11D Manager Action
Y
Change Manager
Change Manager Y
Termination with Compensation
Termination with Compensation V4.0
Y
Release Information
Release Information
Y
Academic Rank
Academic Rank Y
Special Information
Special InformationTypes
Y
Event And Bookings
Event And Bookings
Y

Talent Profile in Oracle SSHR 14-55
Prompt Function Grant Description
Absence Management
Absence Management
Y
Configuring the Action Links in the Side Navigation ContainerManagers and workers can process multiple self-service transactions effectively and with minimum navigation using the action links in a side navigator. The side navigator appears in a separate page when they select an Action in the Talent Profile page.
The manager or personal actions that appear in the side navigation container are driven by the following menus:
• SSHR Emp Side Bar Menu (HR_SS_EMP_SIDEBAR) for worker personal actions.
The following table provides a list of worker personal actions that are supported and not supported in the side navigation container:
Worker Action Supported: Y/N
Personal Information Y
Payslip Y
W4 Information Y
Release Information Y
Suitability Matching N
Tenure Status Y
Academic Rank Y
Education and Qualifications Y
Other Professional Qualifications Y
Competency Profile N
Work Preferences Y

14-56 Oracle Self-Service Human Resources Deploy Self-Service Capability Guide
Worker Action Supported: Y/N
Resume N
Employee W2 N
Extra Information Y
Special Information Y
Event & Bookings Y
Employee Review Y
Absence Management Y
Contact Extra Information Y
Private Vehicle Entry Y
Documents of Record Y
Voluntary Termination Y
Manage Payroll Payments Y
Organization Manager Y
Vehicle Mileage Expenses Y
Employment Verficiation Y
P60 Y
P11D Y
• SSHR Side Bar Menu (HR_SS_SIDEBAR) for manager actions.
The following table provides a list of manager actions that are supported and not supported in the side navigation container:

Talent Profile in Oracle SSHR 14-57
Manager Action Supported: Y/N
Work Preferences Y
Individual Compensation Distribution
Y
Private Vehicle Entry Y
P11D Y
Allocated Checklist Y
P60 Y
Documents of Record Y
Academic Rank Y
Release Information Y
Tenure Status Y
Change Cost Centre, Location and Manager
Y
Termination with Compensation
Y
Change Cost Center, Terms and Manager
Y
Change Manager Y
Contact Extra Information
Y
Other Professional Qualifications
Y
Education and Qualifications
Y

14-58 Oracle Self-Service Human Resources Deploy Self-Service Capability Guide
Manager Action Supported: Y/N
Events and Bookings Y
Extra Information Y
IRASLINE InformationTypes
Y
Training Plans Manager
N
Transfer Y
Worker Status Change Y
Absence Management Y
Enroll and Cancel Training
N
External Training N
Resume N
Assign Schedules and Manage Exceptions
Y
Assignment Costing Y
Commutation Information
Y
Competency Profile N
Special Information Y
Termination Y
Change Job Y
Change Pay Y

Talent Profile in Oracle SSHR 14-59
Manager Action Supported: Y/N
Personal Information Y
Employee Review Y
Vehicle Mileage Expenses
Y
Manage Payroll Payments
Y
Change Worker Status and Terms
Y
Important: The manager and personal actions whether launched from Self-Service Manager Actions, Personal Actions, Organization Chart or Talent Profile are the same. As some of the self-service functions are notsupported in the side navigation container, there would be a mismatch between functions in the side navigation container and the drop-down list available in Talent Profile.
Configuration Guidelines for the Side Navigator
The SSHR Side Bar Menu (HR_SS_SIDEBAR) and SSHR Emp Side Bar Menu (HR_SS_EMP_SIDEBAR) contain a list of predefined supported functions including global and localization specific. During implementation, you can remove those functions that are not applicable to your legislation using the "function exclusion" feature available in the Responsibility window of the System Administrator responsibility.
Enabling Managers to View and Perform Manager Actions for Multiple AssignmentsUsing Talent Profile, managers can view and perform manager actions for multiple assignments of an employee or worker in their hierarchy, if the subordinate has more than one assignment. If you wish to enable your managers to view and update multiple assignments for employees and workers, you can use the HR: Enable Multiple Assignments in SSHR system profile to allow this. See the Multiple Assignments sectionin the User Access and Security in Oracle SSHR, page 3-3 topic.
Personalizing the Talent Profile PageThis topic provides information on personalizing Talent Profile regions and region
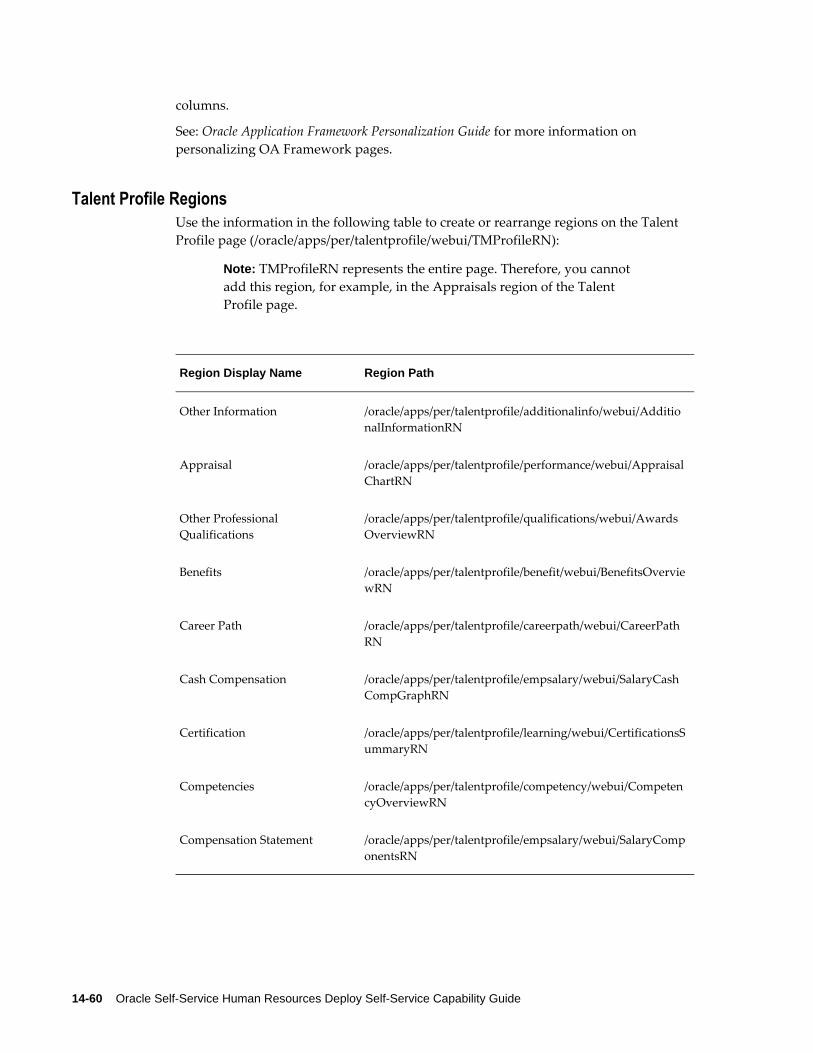
14-60 Oracle Self-Service Human Resources Deploy Self-Service Capability Guide
columns.
See: Oracle Application Framework Personalization Guide for more information on personalizing OA Framework pages.
Talent Profile RegionsUse the information in the following table to create or rearrange regions on the Talent Profile page (/oracle/apps/per/talentprofile/webui/TMProfileRN):
Note: TMProfileRN represents the entire page. Therefore, you cannot add this region, for example, in the Appraisals region of the Talent Profile page.
Region Display Name Region Path
Other Information /oracle/apps/per/talentprofile/additionalinfo/webui/AdditionalInformationRN
Appraisal /oracle/apps/per/talentprofile/performance/webui/AppraisalChartRN
Other Professional Qualifications
/oracle/apps/per/talentprofile/qualifications/webui/AwardsOverviewRN
Benefits /oracle/apps/per/talentprofile/benefit/webui/BenefitsOverviewRN
Career Path /oracle/apps/per/talentprofile/careerpath/webui/CareerPathRN
Cash Compensation /oracle/apps/per/talentprofile/empsalary/webui/SalaryCashCompGraphRN
Certification /oracle/apps/per/talentprofile/learning/webui/CertificationsSummaryRN
Competencies /oracle/apps/per/talentprofile/competency/webui/CompetencyOverviewRN
Compensation Statement /oracle/apps/per/talentprofile/empsalary/webui/SalaryComponentsRN

Talent Profile in Oracle SSHR 14-61
Region Display Name Region Path
Job History /oracle/apps/per/talentprofile/employment/webui/CareerHistoryRN
Performance Objectives /oracle/apps/per/talentprofile/perfmanagement/webui/PerformanceManagementRN
Note: Talent Profile retrieves information about objectives from Oracle Performance Management. The plan administrator must select the Include Objective Setting in Process check box for a plan to display details of objectives in the Performance Objectives region for both direct and indirect reports of a manager. For more information, refer to the Oracle Performance Management Implementation and User Guide
Previous Employment /oracle/apps/per/talentprofile/prevemp/webui/PrevEmploymentOverviewRN
Qualifications /oracle/apps/per/talentprofile/qualifications/webui/QualificationsOverviewRN
Salary /oracle/apps/per/talentprofile/empsalary/webui/SalaryOverviewRN
Succession Plan R12.2: /oracle/apps/per/talentprofile/successionplannew/webui/SuccessionPlanNewOverviewRN
Pre R12.2: /oracle/apps/per/talentprofile/successionplan/webui/SuccessionPlanOverviewRN
See this, page 14-62 section for more information.
Training /oracle/apps/per/talentprofile/training/webui/TrainingOverviewRN
Work Preferences /oracle/apps/per/talentprofile/workpreference/webui/WorkPreferenceOverviewRN
Performance Matrix (Header is not shown)
/oracle/apps/per/talentprofile/performancematrix/webui/NineBoxSwitcherRN
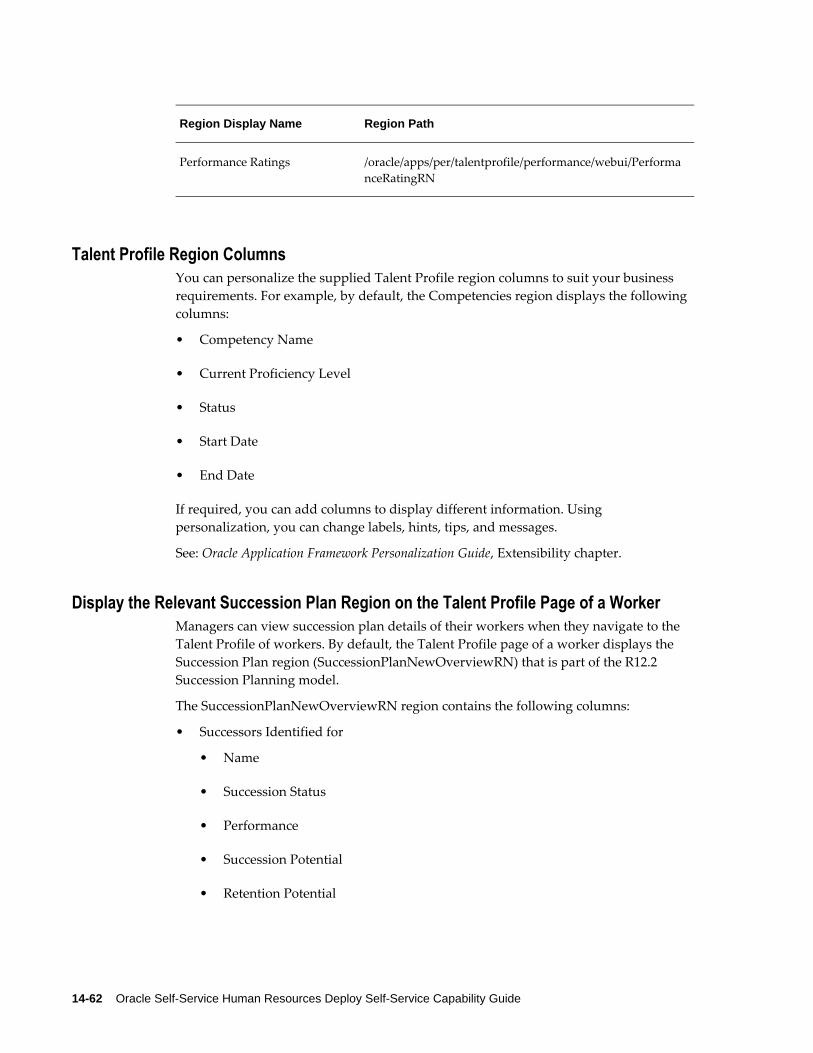
14-62 Oracle Self-Service Human Resources Deploy Self-Service Capability Guide
Region Display Name Region Path
Performance Ratings /oracle/apps/per/talentprofile/performance/webui/PerformanceRatingRN
Talent Profile Region ColumnsYou can personalize the supplied Talent Profile region columns to suit your business requirements. For example, by default, the Competencies region displays the following columns:
• Competency Name
• Current Proficiency Level
• Status
• Start Date
• End Date
If required, you can add columns to display different information. Using personalization, you can change labels, hints, tips, and messages.
See: Oracle Application Framework Personalization Guide, Extensibility chapter.
Display the Relevant Succession Plan Region on the Talent Profile Page of a WorkerManagers can view succession plan details of their workers when they navigate to the Talent Profile of workers. By default, the Talent Profile page of a worker displays the Succession Plan region (SuccessionPlanNewOverviewRN) that is part of the R12.2 Succession Planning model.
The SuccessionPlanNewOverviewRN region contains the following columns:
• Successors Identified for
• Name
• Succession Status
• Performance
• Succession Potential
• Retention Potential

Talent Profile in Oracle SSHR 14-63
• Impact of Loss
• Readiness Percent
• Succession Plans for
• Worker/Role Name
• Plan Status
• Succession Status
• Performance
• Succession Potential
• Retention Potential
• Impact of Loss
• Readiness Percent
If you are not using the Succession Planning model of R12.2, then you must hide this version of the Succession Plan region and display the pre R12.2 Succession Plan region (SuccessionPlanOverviewRN) on the Talent Profile page.
The SuccessionPlanOverviewRN region contains the following columns:
• Successor For
• Successor
• Potential Level
• Earliest Succession Date
• As Successor
• Succession Plan For
• Name
• Potential Level
• Earliest Succession Date
Complete the following steps to display the pre R12.2 Succession Plan region:
1. Navigate to the Talent Profile page of a worker.

14-64 Oracle Self-Service Human Resources Deploy Self-Service Capability Guide
2. Click the Personalize link.
3. Choose the appropriate context.
4. Click Complete View and Expand All options.
5. Navigate to the Flexible Layout row of the SuccessionPlanNewFlexRN region.
6. Click Remove Content and then select Yes. This action hides the R12.2 Succession Plan region.
7. Navigate to the Flexible Layout row that does not have content.
8. Click Add Content (green plus icon). The Add Content page appears.
9. Click Next until you view the Succession Plans option.
10. Select this option and click Apply.
11. Click Return to Application. The worker's Talent Profile page now displays the pre R12.2 Succession Plan region.
Displaying Person Extra Information Types (EITs) as Talent Profile Page Regions
To view additional details of workers, you can display the Person Extra Information Types (EITs) as regions on the Talent Profile page. You can display a maximum of 10 EIT regions. Use the Oracle Application Framework Personalization feature to display EITs as regions.
On the Talent Profile page, you can add the EIT region and then configure the Flex: Descriptive Flex (HrEitDescFlex) item in this region to display contexts and segments of your choice.
Note: The EIT region does not support More link.
To display EITs as regions, complete the steps explained in this topic.
Prerequisites1. Set up the following profile options to enable the Oracle Application Framework
Personalization feature:
• Personalize Self-service Defn
• FND: Personalization Region Link Enabled

Talent Profile in Oracle SSHR 14-65
• Self Service Accessibility Features
For information on the profile options, refer to the Oracle Application Framework Personalization Guide
2. Set up descriptive flexfield segments to record EIT data. EITs are defined using descriptive flexfields.
See: Extra Information Types, Oracle HRMS Configuring, Reporting, and System Administration Guide
Displaying EITs as RegionsExample 1
In this example, you display the Passport Details region on the Talent Profile page. To display this region, you must have defined the required flexfield segments such as Country, Passport Number, Issue Date, and Expiry Date before carrying out these steps:
1. Navigate to the Talent Profile page.
2. Click the global Personalize Page link. As you have set the Self Service Accessibility Features profile option, the Page Layout Personalization page appears.
3. Select the required Personalization level and click Go.
4. Click the Content tab and select a layout where you want to add the EIT region.
5. Click the Add Content icon to add the new region.
The Add Content page appears.
6. Select any one of the available Extra Information Types regions. 10 EIT predefined regions are available for Talent Profile. Oracle recommends that you select only oneEIT region for each flexible layout.
7. Click Apply. You can view this region on the Talent Profile page.
As a next step, configure the EIT region to enter the title.
8. Click the Personalize icon for that region.
9. Scroll to the EitFlexRN<#>.TextCellRN row and click the Personalize icon of the Static Styled Text item.
10. Change the Prompt field with the desired title such as Passport Details and click Apply.
You specify the required flexfield context to see the EIT data for that context.

14-66 Oracle Self-Service Human Resources Deploy Self-Service Capability Guide
11. Click the Personalize icon of the Flex:Descriptive Flex item.
12. Enter the EIT context and the flexfield segments that you want to display. Use the following format when specifying the context and segments:
For example:ContextName|SegmentName1|SegmentName2
Passport Details|Country|Status|Passport Number|Date of Issue|ExpiryDate
13. Click Apply to save your changes.
Example 2
In this example, you display multiple EITs: Employee Succession Planning Information and Tenure Status Details. Note that you must have defined the required segments for these flexfields before carrying out these steps:
1. Navigate to the Talent Profile page.
2. Click the global Personalize Page link. As you have set the Self Service Accessibility Features profile option, the Page Layout Personalization page appears.
3. Select the required Personalization level and click Go.
4. Click the Content tab and select a layout where you want to add the EIT region
5. Click the Add Content icon to add the new region.
The Add Content page appears.
6. Select any one of the available Extra Information Types regions. 10 EIT predefined regions are available for Talent Profile. Oracle recommends that you select only oneEIT region for each flexible layout.
7. Click Apply. You can view this region on the Talent Profile page.
As a next step, configure the EIT region to enter the title.
8. Click the Personalize icon for that region.
9. Scroll to the EitFlexRN<#>.TextCellRN row and click the Personalize icon of the Static Styled Text item.
10. Change the Prompt field with the desired title such as Passport Details and click Apply.
You specify the required flexfield context to see the EIT data for that context.
11. Click the Personalize icon for the Flex:Descriptive Flex item.
Talent Profile in Oracle SSHR 14-67
12. Enter the multiple EIT contexts and the flexfield segments that you want to display. Use double pipe || to enter two different contexts while the segments can be separated by single pipe |
For example:ContextName|SegmentName1|SegmentName2||ContextName2|SegmentName1|SegmentName2
Employee Succession Planning Information|Succession Potential|Retention Potential||Tenure Status| Tenure Status|Date Determined
13. Click Apply to save your changes.
Restricting Access to Sensitive EIT InformationWhen you display EIT regions, there may be some information that is sensitive, which requires to be hidden from users who log in to the application. For example, if you configure an EIT to display additional succession planning information, managers can view such additional succession planning information when they navigate to their Talent Profile page as workers. To restrict the display of such sensitive information, use the 'ShowLoggedInDtls' formvalue available with every EIT on the Talent Profile page. To control the display of EIT information for the logged in manager, you must specify the value using the OAF Personalization feature. If the value of this formvalue is set to 'Y', then the EIT information is visible to the logged in manager. If the value of this Form Value is set to 'N', then the EIT information is not displayed to the logged in manager.
Complete the following steps to restrict access to sensitive EIT information:
1. On the Talent Profile page, click the Personalize page link.
2. Select the 'Content' tab.
3. In the EIT region, click the Personalize properties (pencil) icon.
4. Select the Complete View radio button.
5. Click the Expand All link.
6. Click the Personalize icon for the Form Value personalization item.
7. Set the value to "Y' or 'N' as required.
8. Click Apply to save your work.
14-68 Oracle Self-Service Human Resources Deploy Self-Service Capability Guide
Displaying Person Special Information Types (SITs) as Talent Profile Page Regions
To view additional details of workers, you can display the person Special Information Types (SITs) as regions on the Talent Profile page. You can display a maximum of 10 SIT regions. Use the Oracle Application Framework Personalization feature to display SITs as regions.
On the Talent Profile page, you can add the SIT region and then configure the Flex: Key flex for Sit (HrSitKeyFlex) item to display contexts and segments of your choice.
Note: The SIT region does not support More link.
To display SITs as regions, complete the steps explained in this topic.
Prerequisites1. Set up the following profile options to enable the Oracle Application Framework
Personalization feature:
• Personalize Self-service Defn
• FND: Personalization Region Link Enabled
• Self Service Accessibility Features
For information on the profile options, refer to the Oracle Application Framework Personalization Guide
2. Set up key flexfield segments to record SIT data. SITs are stored in a key flexfield combination table where the combination of segments must be unique.
See: User Definable Key Flexfields, Oracle HRMS Configuring, Reporting, and System Administration Guide
Displaying SITs as RegionsExample 1
In this example, you display the Visa Details region on the Talent Profile page. To display this region, you must have defined the required flexfield segments such as Visa Type and Purpose of Visa.
1. Navigate to the Talent Profile page.
2. Click the global Personalize Page link. As you have set the Self Service Accessibility Features profile option, the Page Layout Personalization page appears.
Talent Profile in Oracle SSHR 14-69
3. Select the required Personalization level and click Go.
4. Click the Content tab and select a layout where you want to add the SIT region.
5. Click the Add Content icon to add the new region.
The Add Content page appears.
6. Select any one of the available Special Information Type regions. 10 SIT predefined regions are available. Oracle recommends that you select only one SIT region for each flexible layout.
7. Click Apply. You can view this region on the Talent Profile page.
As a next step, configure the SIT region to enter the title.
8. Click the Personalize icon for that region.
9. Scroll to the SitFlexRN<#>.TextCellRN row and click the Personalize icon of the Static Styled Text item.
10. Change the Prompt field with the desired title such as Visa Details and click Apply.
You specify the required flexfield context to see the EIT data for that context.
11. Click the Personalize icon of the Flex:Descriptive Flex item.
12. Enter the SIT context and the flexfield segments that you want to display. Use the following format when specifying the context and segments:
For example:ContextName|SegmentName1|SegmentName2
Visa Details|Visa Type|Purpose of Visa
13. Click Apply to save your work.
Example 2
In this example, you display multiple SITs: Vehicle Profile and Work Environment. Note that you must have defined the required segments for these flexfields.
1. Navigate to the Talent Profile page.
2. Click the global Personalize Page link. The Page Layout Personalization page appears.
3. Select the required Personalization level and click Go.
4. Click the Content tab and select a layout where you want to add the SIT region
14-70 Oracle Self-Service Human Resources Deploy Self-Service Capability Guide
5. Click the Add Content icon to add the new region.
The Add Content page appears.
6. Select any one of the available Extra Information Types regions. 10 SIT predefined regions are available for Talent Profile. Oracle recommends that you select only oneSIT region for each flexible layout.
7. Click Apply. You can view this region on the Talent Profile page.
As a next step, configure the SIT region to enter the title.
8. Click the Personalize pencil icon for that region.
9. Scroll to the EitFlexRN<#>.TextCellRN row and click the Personalize icon of the Static Styled Text item.
10. Change the Prompt field with the desired title such as Passport Details and click Apply.
You specify the required flexfield context to see the EIT data for that context.
11. Click the Personalize icon for the Flex: Key Flex for Sit item.
12. Specify the multiple SIT contexts and the flexfield segments that you want to display. Use double pipe || to enter two different contexts while the segments can be separated by single pipe |
For example:ContextName|SegmentName1|SegmentName2||ContextName2|SegmentName1|SegmentName2
Vehicle Profile|Vehicle Type|Issue Date|Plate Number|State Issued||Work Environment|Location|Plant|Field|Home
13. Click Apply to save your work.
Displaying Custom Content as Talent Profile Page RegionsOn the Talent Profile page, you can use custom regions to display business specific details. You can configure custom regions if you need to use information structures other than EITs or SITs. Use a SQL Statement to retrieve the business specific information from the database and then configure the custom regions to display the content. You can configure a maximum of 10 custom regions on the Talent Profile page.
Note: The custom region does not support More link.
To display custom content as regions, complete the steps explained in this topic.

Talent Profile in Oracle SSHR 14-71
Prerequisites1. Set up the following profile options to enable the Oracle Application Framework
Personalization feature:
• Personalize Self-service Defn
• FND: Personalization Region Link Enabled
• Self Service Accessibility Features
For information on the profile options, refer to the Oracle Application Framework Personalization Guide
2. Create a database view based on one or more tables in the database. Consider security and information requirements before creating a database view.
You can use the Additional WHERE clause to display the data of the worker whose profile is being viewed, if the database view returns data for all workers. This clause uses specific parameters that are passed dynamically. Following are the parameters:
• ##PERSON_ID## - Person ID of the currently viewed worker's profile
• ##PRIMARY_ASSIGNMENT_ID## - Assignment ID of the currently viewed worker's profile
• ##LOGIN_PERSON_ID## - Person ID of the logged in worker who is a manager
• ##BUSINESS_GROUP_ID## - Business group ID of the currently viewed worker
• ##EFFECTIVE_DATE## - Effective date in the format "YYYY-MM-DD HH24:MI:SS"
Following rules apply when you create a database view:
1. Views can be based on any database table.
2. Create an alias starting with 'D_' or 'd_' for the view columns that you want to display on the Talent Profile page.
3. Use the HR_TP_NAME_TRANSLATIONS lookup type to create a lookup for each column that is created as an alias in the previous step. The lookup code must be the same as the column alias. Provide a user friendly value in the Meaning column as this value appears as the column header in the custom region of the Talent Profile page.
Example of Lookup Codes

14-72 Oracle Self-Service Human Resources Deploy Self-Service Capability Guide
Code Meaning
D_FULL_NAME Full Name
D_PARTY_ID Party Identifier
3. Write a SQL statement to retrieve data from the database view.
Displaying Custom Content as Talent Profile RegionsExample 1
In this example, you display the Worker Information region that has two columns: Name and Party Number. The Additional Where clause in this example has a person_idIN clause where the login_person_id and the person_id of the worker whose profile is being viewed are passed.
1. Navigate to the Talent Profile page.
2. Click the global Personalize Page link. As you have set the Self Service Accessibility Features profile option, the Page Layout Personalization page appears.
3. Select the required Personalization level and click Go.
4. Click the Content tab and select a layout where you want to add the custom region
5. Click the Add Content icon to add the new region.
The Add Content page appears.
6. Select any one of the available Dynamic View regions. 10 Dynamic View predefinedregions are available. Oracle recommends that you select only one dynamic region for each flexible layout.
7. Click Apply. You can view this region on the Talent Profile page.
As a next step, configure the dynamic region to enter the title.
8. Click the Personalize icon for that region.
9. Scroll to the DyncVwFlexRN<#>.TextCellRN row and click the Personalize icon of the Static Styled Text item.
10. Change the Prompt field with the desired title such as Worker Information and click Apply.

Talent Profile in Oracle SSHR 14-73
The Dynamic View has three parameters that you must configure to display data in the region:
• Layout Style: Valid values are: TABLE - Table Layout and FORM - Message Component (Form) Style Layout
• DyViewName: The database view name that you created to show the required data in the custom region.
• DyWhereClause: Any additional where clause that is required to further filter the data retrieved from the view.
11. Click the personalize icon of the DyViewName item to specify the database view name.
12. Change the Prompt field with the desired database view name for the region and click Apply.
13. Click the personalize icon for the DyWhereClause item to specify the additional where clause.
14. Change the Prompt field with the desired additional Where Clause for the region and click Apply.

Absence Management 15-1
15Absence Management

15-2 Oracle Self-Service Human Resources Deploy Self-Service Capability Guide
Absence Management
Absence Management in SSHRThe Absences module enables employees or managers to enter absence-related information in SSHR. You can request multiple absences and view them in a summary format. You can also view a history of absences you have taken and display current leave entitlement balances. You can submit a planned absence request (before the absence is taken) or a confirmed request (either after the absence is completed or when dates have been finalized before the absence begins).
You can download absence details such as absence date to the calendar application that you use, if the Export feature is enabled. Your system administrator configures the Export feature.
You can update absence requests as a manager or employee, for example, to change the absence dates or confirm the absence. Planned, confirmed, and updated requests can be submitted for approval. You cannot update requests when they are pending approval.
Note: If your administrator has configured it, you can view and apply for only those absence types for which you are eligible.
You can view your accrual balances as an employee, or those of other employees as their manager.
See: Viewing Accrual Balances using SSHR, page 15-4.
For more information on Absence Management, see: Absence Management and PTO Accruals, Oracle HRMS Compensation and Benefits Management Guide
UK Users Only:
Entering a Sickness Absence, Oracle HRMS Compensation and Benefits Management Guide
Entering Sickness Evidence, Oracle HRMS Compensation and Benefits Management Guide
Info OnlineAccess the web site of third-party information providers, if your enterprise enables the Info Online content container. If the Handbook link is available, you can click it for information on company's absence policies.
Accrual Balances Maintained by SSHR : OverviewManagers and employees can view accrued leave details based on an effective date using Oracle SSHR.
Absence Management 15-3
Managers
Using the Manager Self-Service responsibility, you can view accrued leave details for employees in your team and allocate or plan deliverable accordingly.
You can:
• View Accrual balances in the View Entitlement Balances pop-up window from approval notifications
Note: This does not apply to email notifications.
• The notification for approval displays the accrual balance as of the system date, by default. You can enter an effective date and query for accrual balance as of that datein the View Entitlement Balances pop-up window. Additionally, you can personalize the effective date to display the accrual balance only as of the system date, or personalize to hide the View Entitlement Balance pop-up window.
• When you create, update, confirm, or submit an absence on behalf on an employee, you can view the employee's entitlement balances in the View Entitlement Balances pop-up window. You can also view the accrual balances for all assignments of an employee when you navigate to the notification from the worklist or workflow responsibilities.
Note: If a terminated employee queries for leave accrual on a future date beyond the termination date, instead of the accrual information, the application will display the following message: Contact your HR Representative for information on your accrual balance.
Employees
Using Employee Self-Service, you can view your accrued leave, allowing you with the flexibility of planning vacations well in advance.
You can:
• View accrual balance in the View Entitlement Balances pop-up window when creating, updating and submitting an absence
• View accrual balance in the View Entitlement Balances pop-up window when confirming a planned absence
• By default, you can view the accrual balances as of the system date. You can enter an effective date and query for accrual balance as of that date in the View Entitlement Balances pop-up window. Additionally, you can personalize the effective date to display the accrual balance only as of the system date, or personalize to hide the View Entitlement Balance pop-up window.
15-4 Oracle Self-Service Human Resources Deploy Self-Service Capability Guide
Managers and employees must use the Effective Date field on the tab Entitlement Balances, of the Absence Management Summary table, to query for accrued leave.
See: Leave and Absence Management Overview, Oracle HRMS Compensation and BenefitsManagement Guide
See: How do we track and analyze absences and net accrual entitlement:Leave and Absence Management, Oracle HRMS Compensation and Benefits Management Guide
See: Leave and Absence Management:Self-Service Functionality, page 1-6
Viewing Accrual Balances in SSHRUsing SSHR, employees can view their accrual balances and managers can view the accrual balances of employees in their business group and also employees belonging to other business groups. The Show Accrual Balances region in the Self-Service HR Leave of Absence page displays the accrual balances for a person as of the effective date.
Follow the steps below to enable SSHR to display the appropriate accrual balances in the Leave of Absence page.
1. Set up the accrual plans that suit the requirements of your organization.
Determine the accrual balances and their corresponding accrual plans that you would like to display in the Leave of Absences page.
See: Setting Up PTO Accrual Plans, Oracle HRMS Compensation and Benefits Management Guide.
2. Define an element set of type run set and include elements that correspond to these accrual plans.
See: Defining an Element or Distribution Set, Oracle HRMS Compensation and BenefitsManagement Guide.
3. You can now view the appropriate employee accrual balances using the SSHR Leave of Absence page.
See: Absences, page 15-2.

Vehicle and Mileage Processing 16-1
16Vehicle and Mileage Processing

16-2 Oracle Self-Service Human Resources Deploy Self-Service Capability Guide
Vehicle and Mileage Processing
Vehicle RepositoryIn the vehicle repository, you can store details of company vehicles and private vehiclesused for business purposes. This information is datetracked so that you can record changes to the vehicle - such as its status (active or inactive) - over time. Storing this data in a repository removes the need for repetitive and error-prone data entry.
Use Oracle SSHR to record vehicle repository information in the Vehicle Repository Page. The vehicle repository information includes:
• Registration number
• Make and model
• Registration date
• Engine capacity
• List price and value of optional accessories fitted initially and added later
• Fiscal rating
• Status, and reason for Inactive status
• Whether the vehicle can be allocated to multiple users
• For Russian users only:Vehicle Category, mileage/fuel limits, usage schedule, and lease details.
• For Russian users only:Extra information about vehicle insurance details
Note: You can enter multiple insurance details for the same vehicle.
• For Polish users only: Vehicle-card identification number, engine number, inspection dates, and additional, user-defined technical information about the vehicle
You can import company vehicle information from a car fleet management system, storing a fleet identifier and date transferred on each vehicle record.
Vehicle AllocationUse Oracle SSHR to allocate vehicles to your employees so they can be used in
Vehicle and Mileage Processing 16-3
employee mileage claims (UK and Poland) or Benefit in Kind processing (Ireland). You can allocate two types of vehicles : company and private.
• You can allocate one primary company vehicle to each employee, and as many additional company vehicles as your business rules allow.
• You can allocate as many private vehicles as your business rules allow. You mark one vehicle as the default.
Business rules are held in the PQP_CONFIGURATION_VALUES table. See: Configuration Settings for Vehicle Repository and Mileage Claims, page 16-4
When you allocate a vehicle, you can override some of the configuration settings for your business group.
You can record a vehicle against a single assignment, or against all of an employee's assignments.
You can allocate vehicles from the Vehicle Repository page.
When you move the mouse over the Users icon, you can view the user details in a pop-up window.
Vehicle Repository Menu and Function NamesThe Vehicle and Mileage Processing module enables managers to add vehicles to the repository in Oracle SSHR. You can add details of company and private cars, and allocate vehicles to employees.
UK users can use this module to enter their mileage claims in Oracle SSHR.
Menu and Function NamesYou can access this module from the following menus and functions:
User Menu Name Function Name
Vehicle Repository Vehicle Repository
Vehicle Mileage Claims Vehicle Mileage Claims
WorkflowThe workflow details for this module are listed below:
Workflow Process Display Name:
Private Vehicle Allocation
16-4 Oracle Self-Service Human Resources Deploy Self-Service Capability Guide
Configurable Workflow Attributes:
Not applicable
Workflow Process Display Name:
Vehicle Mileage Expense
Configurable Workflow Attributes:
Not applicable
Configuration Settings for Vehicle Repository and Mileage ClaimsGlobal and localized configuration settings provide the appropriate defaults for your business groups. You can add this information using the Configuration Values Page. Select the Vehicle Mileage module and the Configuration Type Vehicle Mileage GenericInformation to view, update or delete data for your business group.
Global and Localization SettingsThis table displays the localization settings available.
Column Segment Meaning Global UK Ireland
LEGISLATION_CODE
Legislation Code
- -- GB IE
PCV_INFORMATION_CATEGORY
Vehicle and Mileage Settings
- PQP_VEHICLE_MILEAGE
PQP_VEHICLE_MILEAGE
PQP_VEHICLE_MILEAGE
PCV_INFORMATION1
Calculation Method
Proration or Exhaustive--determines how you apply mileage bandlimits across payroll periods. You can override this default when you allocate vehicles or enter claims.
-- Exhaustive Null

Vehicle and Mileage Processing 16-5
Column Segment Meaning Global UK Ireland
PCV_INFORMATION2
Maximum Company Vehicles Allowed
Limit on the number of company vehicles that can be allocated to an assignment
-- 2 Null
PCV_INFORMATION3
Maximum Private Vehicles Allowed
Limit on the number of private vehicles that can be allocated to an assignment
-- -- Null
PCV_INFORMATION4
Share Company Vehicle
Yes means that the vehicle can beshared by several employees. No means thevehicle cannot be shared.
Y N Y
PCV_INFORMATION5
Share Private Vehicle
Yes means that the vehicle can beshared by several employees. No means thevehicle cannot be shared.
Y Y Y

16-6 Oracle Self-Service Human Resources Deploy Self-Service Capability Guide
Column Segment Meaning Global UK Ireland
PCV_INFORMATION6
Previous Tax Year Claim Valid Until
All claims for previous tax year must be submitted before the date entered. The year in the date is ignored.
-- 5 July Null
PCV_INFORMATION7
Allow Both Company and Private Vehicles Claims
No means that you cannot allocate both company andprivate vehicles to anemployee at the same time, nor submit mixedclaims.
Y N N
PCV_INFORMATION8
Search Criteria for Rates Table
The default (%) means that the RatesTable list of values displays all user defined tables. To restrict the list, use a naming convention for mileage rate tables. For example, include the word "car" in all names andenter %car% in this field.
% % %
Vehicle and Mileage Processing 16-7
Column Segment Meaning Global UK Ireland
PCV_INFORMATION9
Validate Private Vehicle Claims in Repository
Yes means that you can only enter claims against a vehicle already assigned to the employee in the repository. No means that you can enter a claim against a vehicle that isnot in the repository.
Y N N
PCV_INFORMATION10
Vehicle Claims Correction Period in Days
An input of 30 would mean that only those claims that have a claim date within the last 30 days could becorrected.
-- -- Null
PCV_INFORMATION11
Use Sliding Rates
Yes means you use the sliding rates table for additional passengers. No means you use the rates table instead of thesliding rates table.
-- PQP_VEHICLE_MILEAGE
--

16-8 Oracle Self-Service Human Resources Deploy Self-Service Capability Guide
Column Segment Meaning Global UK Ireland
PCV_INFORMATION12
Combine Taxable and NonTaxable Claims
Yes means you combine taxable and non-taxable balances to calculate rates. No means you do not combine taxable and non-taxable balances to calculate rates.
-- PQP_VEHICLE_MILEAGE
--

Payroll Process Management 17-1
17Payroll Process Management
Payroll OverviewSSHR provides self-service functions within the following areas of Payroll Process Management:
• Payroll Payment and Distributions
• Online Payslips
• Payroll Statutory Deductions and Reporting
• Tax reports
This chapter looks in detail at the self-service functions available within these areas and provides information on the functionality and configuration options for each function:
Using SSHR with Payroll Functions
Can SSHR users access payroll information online?Yes. The self-service Online Payslip function enables users to display their own payslip using the self-service interface.
Are these payslips configurable?Yes. Administrators can use the Personalization Framework functionality to configure the payslip to suit their requirements. Payslips are also available for some localizations.
Can users use the self-service functionality to specify how their salary should be paid?Yes. You can use the Payment Methods function to specify whether your salary is paid

17-2 Oracle Self-Service Human Resources Deploy Self-Service Capability Guide
using a check, or a direct deposit, for example.
Can managers see the payslips for their employees?Sometimes. The Online Payslip function is intended to be an employee-only function and is available from the Employee Self Service menu, however, the Online Payslip function is also available from the Payroll Professional menu which enables a third-party to access the payslip.
Can users view any other payroll information using SSHR?This depends on your localization. Some users, for example, users in the US, can view tax withholdings information using SSHR. This tax information can be updated and maintained as required and then submitted to the tax authority. Alternatively, the tax information form enables users to display tax statements for information purposes.

Payroll Process Management 17-3
Payroll - Global
Online Payslip
Generic and Localised Versions of Online PayslipThe Payslip module enables self-service users to view their electronic payslip for a pay period. For information on the generic payslip, see:Online Payslip, page 17-12
The generic payslip has been localized and designed to meet local requirements. For information on some localized versions, see:
• Online Payslip (UK), page 17-102
• Online Payslip (South Africa), page 17-102
• Online Payslip (US), page 17-38
• Online Payslip (Australia), page 17-106
• Online Payslip (New Zealand, page 17-106)
• Online Payslip (Hong Kong), page 17-106
• Online Payslip (India), page 17-106
• Online Payslip (Korea), page 17-106
• Online Payslip (Kuwait), page 17-106
• Online Payslip (Singapore), page 17-106
Payment MethodsThe Payroll Payments module enables self-service users to specify how they wish their salary to be paid by dividing their net pay into one or more payments. Each payment is of a particular type (cash, check, deposit) and has an associated amount and a priority. The payments are made in order of priority. SSHR always uses the lowest priority payment to pay any net pay remaining after all the other payments have been made. It is also possible that low priority payments may not receive all (or any) or their allotted funds because of the amounts used to process higher priority payments.
A typical use of this function occurs if a user wants to split their net pay so that $100 is paid into a savings account and the rest is paid into a current account. The user can subsequently change the amount paid into the savings account if required.

17-4 Oracle Self-Service Human Resources Deploy Self-Service Capability Guide
You can apply configuration options to determine:
• whether users can use the module for multiple payments
• whether payment information is for viewing only
• which types of payments the user can select (cash, check, deposit, or a combination)
• how the payment amounts are defined (percentage of net pay or a monetary amount)
• the maximum number of payments a user can set up
• which organization payment methods are used
• the bank details a user can set up for countries other than the default country
• whether users can validate their bank account number
If you configure Payment Methods so that users can edit their payments, they can carry out the following steps:
• create new payments
• update existing payments
• delete payments
• change the priorities for payments
Note: You must ensure that the required payment methods are available for the employee assignment. For information on enabling payment methods, see: Entering Payment Methods for an Employee Assignment, Oracle HRMS Workforce Sourcing, Deployment, and Talent Management Guide.
Important: You cannot delete bank details that have been used in the current month's payroll (note that the icon is greyed out). If you requireto delete your additional bank details, you will be able to do so from the 1st of the following month.
Menu and Function NamesThis module can be accessed from the following menus and functions:

Payroll Process Management 17-5
User Menu Name Function Name
Employee Self Service Manage Payroll Payments
See: Defining Menus for SSHR, page 4-10
WorkflowThe workflow details for this module are listed below:
Workflow Process Display Name: Process Payroll Payments
Note: The Process Payroll Payments module does not support approvals.
Configurable Workflow Attributes:
Process Display Name Function Activity Display Name
Function Activity Attribute Display Name
Process Payroll Payments Manage Payroll Payments View Only
Process Payroll Payments Manage Payroll Payments Permitted Payment Types
Process Payroll Payments Manage Payroll Payments Maximum Payment Methods
Process Payroll Payments Manage Payroll Payments Permitted Amount Types
Process Payroll Payments Manage Payroll Payments Deposit Payments List
Process Payroll Payments Manage Payroll Payments Cash Payments List
Process Payroll Payments Manage Payroll Payments Check Payments List
View Only
Specifies whether the user can edit the payments information. The default value enablesediting.
Permitted Payment Types

17-6 Oracle Self-Service Human Resources Deploy Self-Service Capability Guide
Specifies which types of payment methods a user can create. The available payment types are cash, check, and deposit. The default value allows the user to create any of thethree payment types.
Maximum Payment Methods
Specifies the maximum number of payments that a user can create (up to 10). The default value is 5.
Permitted Amount Types
Specifies the amount types for payments. The payment amount can be a monetary amount or a percentage of net pay. The default value enables both amount types.
Deposit Payments List
This attribute is only used if you have enabled deposit payments. This attribute stores a list of Organizational Payment Method (OPM) names that can be used to create a deposit payment. The OPM names are separated by a vertical bar (|). The module uses the first match to a deposit OPM name (for the worker's payroll) when new deposit payments are created. For example, East_Coast_NACHA|West_Coast_NACHA.
Cash Payments List
This is used in the same way as the Deposit Payments Checklist but for cash payments.
Check Payments List
This is used in the same way as the Deposit Payments Checklist but for check payments.
Note: The administrator must set at least one of Deposit Payments List, Cash Payments List, or Check Payments List.
See: Configuring Workflow Attribute Values, page 5-10
Configurable Definitions for the Personalization Framework:The following definitions can be configured in the Personalization Framework:
Regions
Summary and Edit Pages
Region Code Region Name
PAY_PAYMENTS_TOP_SS Payroll Payments Top
PAY_PAYMENTS_EDIT_SS Payroll Payments Edit
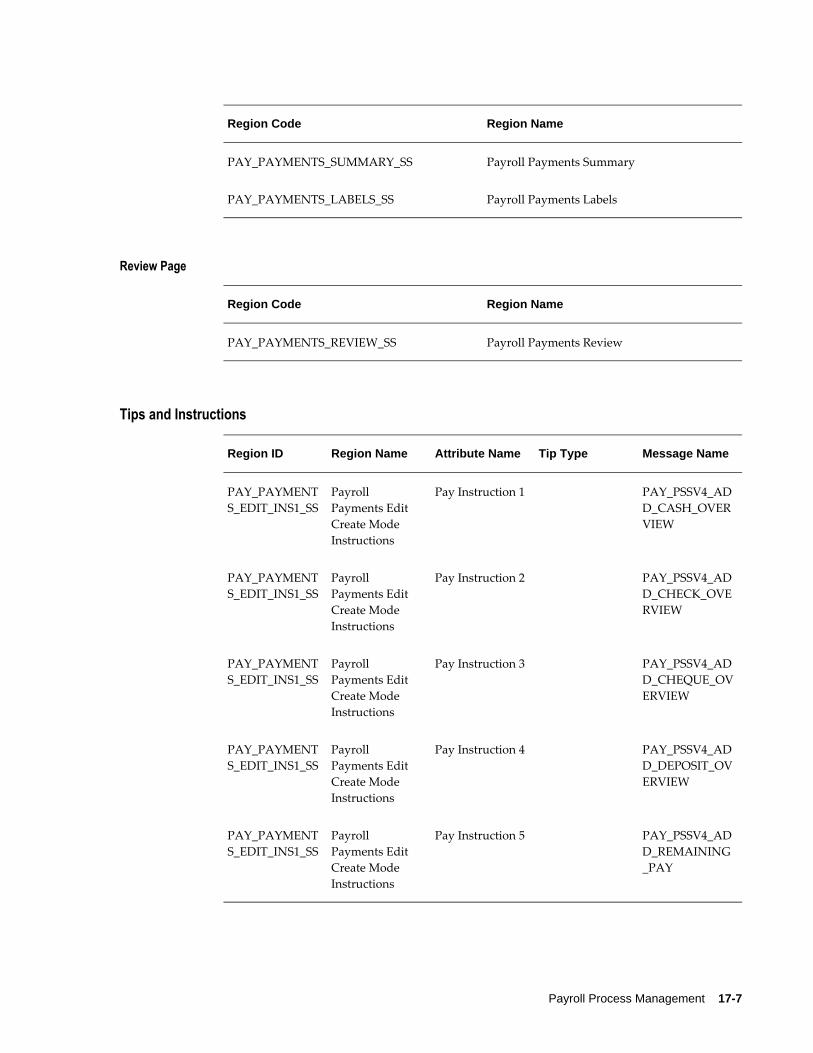
Payroll Process Management 17-7
Region Code Region Name
PAY_PAYMENTS_SUMMARY_SS Payroll Payments Summary
PAY_PAYMENTS_LABELS_SS Payroll Payments Labels
Review Page
Region Code Region Name
PAY_PAYMENTS_REVIEW_SS Payroll Payments Review
Tips and Instructions
Region ID Region Name Attribute Name Tip Type Message Name
PAY_PAYMENTS_EDIT_INS1_SS
Payroll Payments Edit Create Mode Instructions
Pay Instruction 1 PAY_PSSV4_ADD_CASH_OVERVIEW
PAY_PAYMENTS_EDIT_INS1_SS
Payroll Payments Edit Create Mode Instructions
Pay Instruction 2 PAY_PSSV4_ADD_CHECK_OVERVIEW
PAY_PAYMENTS_EDIT_INS1_SS
Payroll Payments Edit Create Mode Instructions
Pay Instruction 3 PAY_PSSV4_ADD_CHEQUE_OVERVIEW
PAY_PAYMENTS_EDIT_INS1_SS
Payroll Payments Edit Create Mode Instructions
Pay Instruction 4 PAY_PSSV4_ADD_DEPOSIT_OVERVIEW
PAY_PAYMENTS_EDIT_INS1_SS
Payroll Payments Edit Create Mode Instructions
Pay Instruction 5 PAY_PSSV4_ADD_REMAINING_PAY
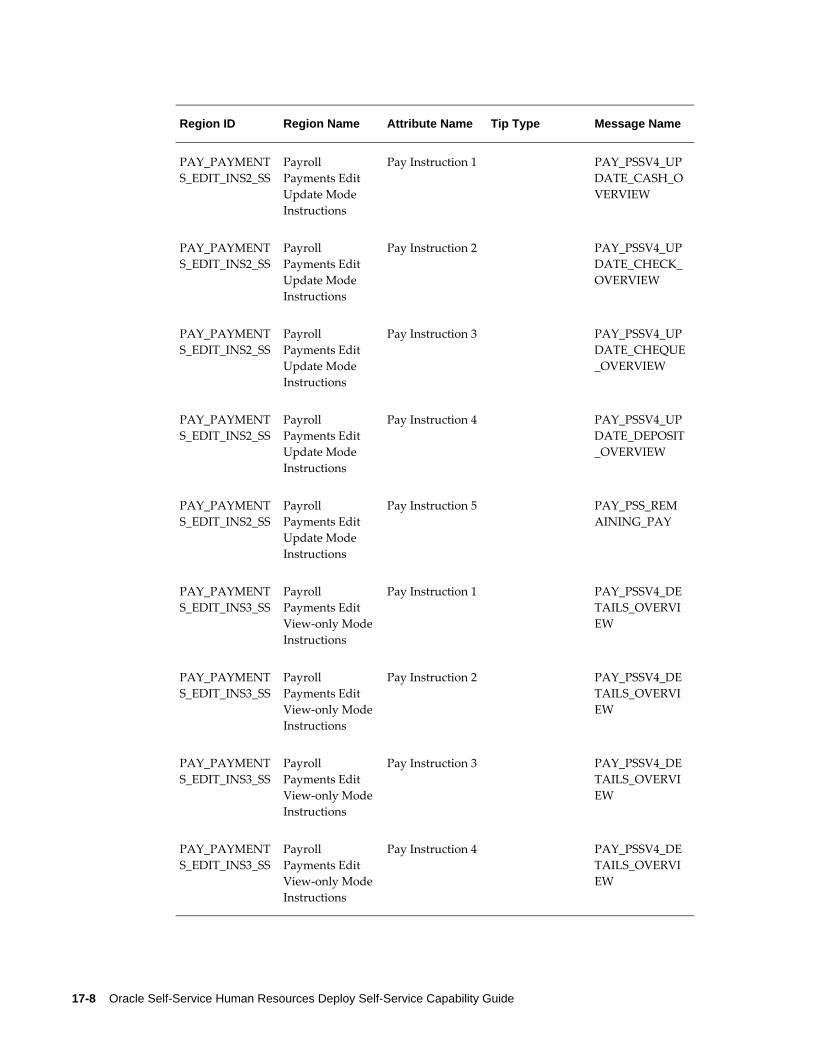
17-8 Oracle Self-Service Human Resources Deploy Self-Service Capability Guide
Region ID Region Name Attribute Name Tip Type Message Name
PAY_PAYMENTS_EDIT_INS2_SS
Payroll Payments Edit Update Mode Instructions
Pay Instruction 1 PAY_PSSV4_UPDATE_CASH_OVERVIEW
PAY_PAYMENTS_EDIT_INS2_SS
Payroll Payments Edit Update Mode Instructions
Pay Instruction 2 PAY_PSSV4_UPDATE_CHECK_OVERVIEW
PAY_PAYMENTS_EDIT_INS2_SS
Payroll Payments Edit Update Mode Instructions
Pay Instruction 3 PAY_PSSV4_UPDATE_CHEQUE_OVERVIEW
PAY_PAYMENTS_EDIT_INS2_SS
Payroll Payments Edit Update Mode Instructions
Pay Instruction 4 PAY_PSSV4_UPDATE_DEPOSIT_OVERVIEW
PAY_PAYMENTS_EDIT_INS2_SS
Payroll Payments Edit Update Mode Instructions
Pay Instruction 5 PAY_PSS_REMAINING_PAY
PAY_PAYMENTS_EDIT_INS3_SS
Payroll Payments Edit View-only ModeInstructions
Pay Instruction 1 PAY_PSSV4_DETAILS_OVERVIEW
PAY_PAYMENTS_EDIT_INS3_SS
Payroll Payments Edit View-only ModeInstructions
Pay Instruction 2 PAY_PSSV4_DETAILS_OVERVIEW
PAY_PAYMENTS_EDIT_INS3_SS
Payroll Payments Edit View-only ModeInstructions
Pay Instruction 3 PAY_PSSV4_DETAILS_OVERVIEW
PAY_PAYMENTS_EDIT_INS3_SS
Payroll Payments Edit View-only ModeInstructions
Pay Instruction 4 PAY_PSSV4_DETAILS_OVERVIEW

Payroll Process Management 17-9
Region ID Region Name Attribute Name Tip Type Message Name
PAY_PAYMENTS_EDIT_INS3_SS
Payroll Payments Edit View-only ModeInstructions
Pay Instruction 5 PAY_PSS_REMAINING_PAY
PAY_PAYMENTS_SUMMARY_INS1_SS
Payroll Payments Summary Edit Mode Instructions
Pay Instruction 1 PAY_PSSV4_SUMMARY_EDIT_OVERVIEW
PAY_PAYMENTS_SUMMARY_INS1_SS
Payroll Payments Summary Edit Mode Instructions
Pay Instruction 2 PAY_PSS_EDIT_DFLT_MANDATORY_ PAY
PAY_PAYMENTS_SUMMARY_INS1_SS
Payroll Payments Summary Edit Mode Instructions
Pay Instruction 3 PAY_PSS_EDIT_DFLT_CASH
PAY_PAYMENTS_SUMMARY_INS1_SS
Payroll Payments Summary Edit Mode Instructions
Pay Instruction 4 PAY_PSS_EDIT_DFLT_CHECK
PAY_PAYMENTS_SUMMARY_INS1_SS
Payroll Payments Summary Edit Mode Instructions
Pay Instruction 5 PAY_PSS_EDIT_DFLT_CHEQUE
PAY_PAYMENTS_SUMMARY_INS2_SS
Payroll Payments Summary View-only Mode Instructions
Pay Instruction 1 PAY_PSSV4_SUMMARY_VIEW_OVERVIEW

17-10 Oracle Self-Service Human Resources Deploy Self-Service Capability Guide
Region ID Region Name Attribute Name Tip Type Message Name
PAY_PAYMENTS_SUMMARY_INS2_SS
Payroll Payments Summary View-only Mode Instructions
Pay Instruction 2 PAY_PSS_MANDATORY_PAY
PAY_PAYMENTS_SUMMARY_INS2_SS
Payroll Payments Summary View-only Mode Instructions
Pay Instruction 3 PAY_PSS_CASH_SALARY
PAY_PAYMENTS_SUMMARY_INS2_SS
Payroll Payments Summary View-only Mode Instructions
Pay Instruction 4 PAY_PSS_CHECK_SALARY
PAY_PAYMENTS_SUMMARY_INS2_SS
Payroll Payments Summary View-only Mode Instructions
Pay Instruction 5 PAY_PSS_CHEQUE_SALARY
See: Adding Instructions to Web Pages, page 6-35
FlexFields:
Region ID Region Name Attribute Name FlexField Name
PAY_PAYMENTS_EMPLOYEE_TABLE_SS
Payroll Payments Employee Table
PAY_BANK_KEY_FLEX
BANK Bank Details Key Flexfield
PAY_PAYMENTS_EDIT_DETAILS_SS
Payroll Payments Edit Details
PAY_BANK_KEY_FLEX
BANK Bank Details Key Flexfield
PAY_PAYMENTS_REVIEW_SS
Payroll Payments Review
PAY_BANK_KEY_FLEX
BANK Bank Details Key Flexfield
See: Configuring Flexfields, page 6-27

Payroll Process Management 17-11
Configurable Profile Options
Profile Configurable Levels Values Default
HR:Payroll Payments Self-Service Enable Multiple Assignments
Site Yes/No No
HR: Payroll PaymentsSelf-Service Payment Function
Site Not NULL/ALL/NULL
NULL
PAY:Allow Paymethod Changes after Prepayments
Site Yes/No Blank. If this option isleft blank, then the profile option is considered as No.
PAY: Enable PersonalBank Account Validation
Site Yes/No This option allows users to enable/disable the validation of the bankaccount number.
HR:Payroll Payments Self-Service Enable Multiple Assignments
Specifies whether the user can use the function to define payments for multiple assignments. The default value only permits payments for the primary assignment.
HR:Payroll Payments Self-Service Payment Function
Specifies which organization payment method is the default.
• If the profile is NULL, then the application defaults to the first valid payment method for that payment category.
• If the profile is NOT NULL, then the application displays the payment category specified at the organization level.
• If the profile is ALL, then the application displays all the valid payment methods available to the payment category. You can select a payment method from the list ofvalues and create your personal payment method.
PAY:Allow Paymethod Changes after Prepayments
Enables user to update personal payment methods using forms and self service when a pre-payment process has already been run.
• If the profile option is Yes, then you can update the payment method even after a

17-12 Oracle Self-Service Human Resources Deploy Self-Service Capability Guide
pre-payment process has been run.
• If the profile option is left blank or No, then you cannot update the payment method after a pre-payment has been processed.
PAY: Enable Personal Bank Account Validation
Allows users to enable or disable the validation of bank account number.
During validation, the application checks the account number against the entered value.If the values do not match, the application prompts the user to re- enter to bank accountnumber.
Note: The bank account number verification using self-service feature isenabled by default for the US and Canada localizations only.
Online Payslip The Payslip module enables self-service users to view their electronic payslip for a pay period. Users can select what pay period to view from a list of values showing the Pay Dates, or by clicking on the Next or Back button.
Note: All columns and fields in the Online Payslip function are display only.
The Payslip is generated from the user's assignments. If there are multiple paid assignments for a user, the user can select the required assignment. Once the user has logged into the application and clicks on the View Payslip option, the user sees an electronic version of their payslip based on their selected assignment and the last pay period that has been processed.
If Multiple Assignment Payments functionality has been enabled for your localization, you have the option of combining the checks for multiple assignments into one pay check. In this case, the online payslip will show the combined totals for all assignments.
Viewing Online Payslips as a Payroll ProfessionalUsing the Payroll Professional responsibility you can select the Payslip Details link and search for a person. When you select a person from the list, their payslip will be displayed. You can also save a person in My List for future access, so you do not need to search for that person again.
In addition to displaying payslips for current employees, you can also display online payslips for ex-employees. To search for ex-employees, you use the Person Type field inthe Advanced Search page and select the person type Ex-Employee.
For more information on the function parameter used to enable the Ex-Employee

Payroll Process Management 17-13
Search, see: Menu Function Parameter Descriptions, page 4-34.
Menu and Function NamesThis module can be accessed from the following menus and functions:
User Menu Name Function Name
Employee Self Service V5.1 Payslip V5.1
Payroll Professional Employee Search (with Ex-Employee Search enabled)
See: Defining Menus for SSHR, page 4-10
WorkflowThe workflow details for this module are listed below:
Workflow Process Display Name: Not applicable
Configurable Workflow Attributes:Not applicable
Configurable Tips and InstructionsNot applicable
Configurable FlexFieldsNot applicable
Configurable Profile Options
Profile Configurable Level Values Default
HR:View Payslip From Date for WEB (MM/DD/YYY)
User specification Date 01/01/1997
17-14 Oracle Self-Service Human Resources Deploy Self-Service Capability Guide
HR:View Payslip From Date for WEB
This profile option determines how many payroll periods a user can view in the online payslip. If the profile option is not set, an error message is displayed when the user attempts to view the online payslip.
HR: Mask Characters - South Africa only
You can use this profile option to set the number of characters or digits to display in numbers such as bank account or credit card numbers.
Configuration OptionsTo set up a payslip for your employees to view online.
See: Setting Up Payslip Information and Generating Payslips, Oracle HRMS Payroll Processing Management Guide
To view an employee's statement of earnings.
See:Viewing Statement of Earnings, Oracle HRMS Payroll Processing Management Guide
Voluntary DeductionsUsing the Total Compensation data model, a compensation or benefits administrator can enable voluntary deductions for employees by setting up Individual Compensation Distribution plans, such as charitable contributions or savings bond plans.
ICD enables managers to assign one-time or recurring awards, bonuses, and allowancesto qualified employees and individuals.
You can also set up ICD for non-manager employees if your enterprise offers discretionary contribution plans, such as a charitable contribution or savings bond plan.
See: Individual Compensation Distributions (ICD), Oracle HRMS Compensation and Benefits Management Guide
Element Entries Using Self-ServiceThis function enables administrators and managers the ability to enter element entries for multiple employees at a time using a self-service interface. Users can enter, validate, and approve payroll elements prior to processing payroll. If approvals are set up, then when the user creates or updates a batch, the workflow submits the transaction for approval.
The Search/Create Batch page shows the list of submitted batches or saved batches that are yet to be submitted. The Monitor Process Status – Region displays the current status of the selected batches. If a batch status is already displayed, users can refresh for latest status.
If the HR: Auto Batch Naming in Self Service profile option has been set, then the

Payroll Process Management 17-15
application automatically populates the name when a user creates a batch. If the Profile HR: Auto Batch Naming in Self Service value is set to No, then users must enter a unique name for the batch.
Users can select employee assignment and enter payroll element input values. They canreview the assignment information to confirm the correct assignment has been chosen where multiple assignments exist. If the security profile has been set, users will be able to view the assignments of employees for whom they have access.
Users can enter element entry values for elements that are in the element set associated to them and for employees for whom they have access through their security profile.
The Element Entry page enables administrators to enter, validate, and approve payroll elements prior to processing payroll.
This feature enables managers and administrators to:
• Create batch header for employees.
• Search for employees for whom they have access based on the security profile - HR Security profile.
• Create batch lines to select employee, applicable elements, input values, and effective date.
• Save the batch header and batch lines, validate and submit the batch later.
• If approvals are setup, then managers can submit the batches for approval. Approvers can review the batches, approve them, or return for correction.
Users can create a new batch using the Create Batch field. While creating a batch, users must specify a date for the batch. The Default is system date. The Batch by Element option is selected by default. Users can create new entries, reject entries, or change existing entries.
By default, the Reject entry option is displayed in the Action if Entry Exist field. If users select the Change Existing Entry option, then the Effective Date Change field gets enabled and users can override, correct, and update the entries.
By default, the Reject if Future Changes check box is selected. The application checks whether the batch lines match the entries that start in future or if a future change is scheduled and rejects the batch. If users select the Purge After Transfer check box, then the application purges the batch from the temporary table after successful batch transfer.
When user click Next , the application ensures that the batch name is unique and the effective date is not blank. Users can navigate to Batch Lines by Assignment Page or to Batch by Element using the appropriate options.
Using the Batch By Assignment page, users can query and modify those assignments that exist for a particular batch. The Batch Details entered in Batch Creation page can be viewed on the Batch By Element/Assignment pages.

17-16 Oracle Self-Service Human Resources Deploy Self-Service Capability Guide
Users can update a batch only when the status is Valid, Transfer Incomplete, Unprocessed, Error, and Status Mismatch. Users can use the Update icon to navigate to the Update page.
When users click the Validate button, the application internally runs the Validate concurrent process. Users can query the batch name they have validated and view the output/errors in the error log. The validation process tests each batch line against certain predefined rules about element entries, and also against custom rules if users have created additional validation procedures.
If approvals are set up, then when the user submits a batch, the workflow submits the transaction for approval. If the transaction is awaiting approval, then the user cannot edit the batch until it has been approved or rejected by the approver. If rejected, the application purges the information.
Users can search according to the batch criteria provided in the Batch Name field. Userscan view the status of the submitted batches. Some the supported statuses include:
• Valid: displays this status when all the batch lines and header are valid.
• Transferred: displays this status when all of the batch lines, and header have been transferred.
• Transfer Incomplete: displays this status when header has been transferred along with some of the batch lines.
• Unprocessed: displays this status when at least one batch is unprocessed.
• Error: displays this status when the batch has not been transferred and at least one line, control total, or the header is in error.
• Status Mismatch: displays this when the combination of statuses in the header, batch lines, and batch is not consistent.
• Approved: If you have set up approvals, then this status is displayed if the approver approves the submitted batch.
• Return for Correction: If you have set up approvals, then this status is displayed if the approver returns the submitted batch for correction.
Configurable Profile Options

Payroll Process Management 17-17
Profile Configurable Level Values Default
HR: Applicable Elements for Self Service BEE
This profile is applicable at the site, responsibility and user level.
Users need to select applicable element setfrom the profile LOV
HR: Auto Batch Naming in Self Service
This profile is applicable at the site, responsibility and user level.
Yes/No No
HR: Applicable Elements for Self Service BEE
This profile is applicable at the site, responsibility and user level. The profile restricts the elements to the Self Service user. The elements are assigned to particular profile, such that only if the profile is enabled, then users can view the elements or otherwise they will not be able to view the elements from the profile LOV.
HR: Auto Batch Naming in Self Service
This profile enables generating the name automatically for a batch. The profile value is Yes or No and is set at site level. The default is No.
WorkflowThe workflow details for this module are listed below:
Workflow Process Display Name: Self-Service Batch Element Entry Process - This process governs approvals in Oracle Payroll. This process is available in the HRSSA item type (HRSSA.wft) and routes batch element entries for approval and generates notifications.
Configurable Workflow Attributes:

17-18 Oracle Self-Service Human Resources Deploy Self-Service Capability Guide
Process Display Name Function Activity Display Name
Function Activity Attribute Display Name
Self-Service Batch Element Entry Process
PAY_BATCH_JSP_PRC PAY_BATCH_SEARCH_PAGE
PAY_BATCH_CREATE_PAGE
PAY_BATCH_ASSIGNMENT_PAGE
PAY_BATCH_ELEMENT_PAGE
Using Payslip Modeler
Using Payslip ModelerThe payslip modeler enables employees and payroll administrators to model a paycheck/payslip by running a mock payroll run. Employees can use this feature to make decisions regarding various benefit options and savings using the estimates. Theycan check their estimated take-home pay based on an upcoming bonus or tax refunds.
Payroll administrators can use this feature to answer employee queries or to perform what-if analysis.
Note: The terms Payslip Modeler or Paycheck Modeler refer to the same functionality. The application displays these terms depending on your legislation.
If the profile option HR: Enable Multiple Assignments for Payroll Simulation has been set to Yes, the list of assignments is displayed from which the employee can choose the assignments to run the payroll simulation process. If this profile option has not been set,then the employee is taken to the Payslip Modeling Entry page for running the payroll simulation process.
Therefore based on the profile option set, either the page to select an assignment or the Payslip Modeling Entry page gets displayed.
Important: Ensure to select the Agree to Terms check box to proceed.
You can use the Payslip Modeler within the specified period as defined for your business group. If you try to run this process outside the dates specified, the applicationerrors.

Payroll Process Management 17-19
If this functionality is available for your localization, then depending on your legislation, the page displays varies.
• Header region - View personal, assignment, and payroll related information. This includes details such as name, job, grade, position, and payroll.
• Display region - View the details based on the configuration specified within the Extra Assignment Information types for your localization.
• Element Entries region - The Element Entries section typically contains the earningsand deductions details. The display of various details in this section varies depending on how it has been configured for your localization.
Employees and payroll administrators can select the values of the elements that are available for modeling the payslips/paychecks at the Extra Assignment Information.
Employees or payroll administrators can make the changes to the earnings or deductiondetails to model the payslip by mapping the values and generating a sample payslip.
Note: You cannot run payslip modeler process, if you have run a prepayment or costing process for the current pay period.
You can generate the model payslip using the template specified within the Self-Service Preferences window at the organization level or at business group level.
Viewing Previous PayslipsEmployees can view their previous payslips and compare the differences in pay while modeling their payslips. This enables them to plan their savings based on their take-home pay.
Localized Versions of Payslip ModelerFor Americas, see:
• Paycheck Modeling (US), page 17-42
• Payslip Modeling (Canada), page 17-59
• Payslip Modeling (Mexico), page 17-87
For the United Kingdom, see Payslip Modeling (UK), page 17-98.
Menu and FunctionsThis Module can be accessed from the following menus and functions:

17-20 Oracle Self-Service Human Resources Deploy Self-Service Capability Guide
User Menu Name Function Name
Employee Self Service Payslip Modeling
Professional Payroll User Payslip Modeling
Configurable Profile OptionsThe following table lists the configurable profile options:
Profile Configurable Levels Values Default
HR:Enable Payroll Simulation
Site, Responsibility Yes/No
HR: Enable Multiple Assignments for Payroll Simulation
Site, Application, Responsibility, User
Yes/No
Configurable Flexfields
Region Flex Name Flex Code
Element Entries Extra Assignment Information
AEI _INFORMATION_CATEGORY
For an overview of Payslip Modeler, see: Payslip Modeler, Oracle Payroll Processing Management Guide
For information on the how to set up the details for using the Payslip Modeler, see: Setting up Payslip Modeler, Oracle Payroll Processing Management Guide
Using Payroll DashboardPayroll Dashboard enables administrators to monitor different payroll-related processesin a dashboard. Payroll Dashboard uses the existing payroll functionality to collate the different process-related data. With this feature, a new capability of Payroll Readiness isincorporated. Payroll Readiness checks the prerequisite conditions required for processing payroll as configured by the administrator. From the dashboard,

Payroll Process Management 17-21
administrators can also run payroll, retry, or rollback processes.
Payroll Dashboard provides easy to read statistics for quick reference and to view the status of payrolls running and calculation-related information during a pay cycle. With this dashboard, the need to run and review numerous processes is eliminated. Users can focus on the key areas to ensure appropriate action and highlight the exceptions during payroll processing.
Payroll Dashboard displays the different components of a payroll application within a single page to ensure that a payroll manager or administrator can monitor the progress. The dashboard enables reconciling the payroll easily, efficiently, and more importantly, to the appropriate people.
Payroll Dashboard is enabled for Payroll Professional or Payroll Administrator. Payroll Professional user can :
• Access using the Payroll Dashboard and Configuration functions
• Configure processes for Payroll Dashboard
When a payroll profession user accesses the payroll dashboard, the Payroll Readiness and Process Monitor tabs are available.
Using the Payroll Readiness Viewing Current Assignment Activity
In the Payroll Readiness tab, you can view the assignment activity for all the payrolls in the current payroll period for the current business group. You can search by filter criteria such as payroll, primary assignments and then selecting the appropriate check box.
By default, the Current Assignment Activity region displays the assignment information for all the payrolls in that business group.
When you enter the Search criteria and query, the assignment activity information is displayed. The table displays all the payrolls and the count of each assignment. You canclick on each hyperlink to view the employee details such as name, date of hire, position, organization, and e-mail address. You can also view this information as a graph for a quick reference.
Viewing the Payroll Readiness
You can view the readiness status for the current payroll period by selecting a specific payroll or leaving blank for all payrolls in the current business group. The application displays the readiness information for the selected payroll with the details as indicated below:
• Payroll name – select the payroll to check the readiness.
• Last Performed - displays the date on which the last readiness check has been performed in the current payroll period.

17-22 Oracle Self-Service Human Resources Deploy Self-Service Capability Guide
• Check Readiness - select this check box if you want to perform readiness check.
• Process Payroll – select if you want to process payroll for the current period.
Clicking on the Check Readiness check box displays the readiness details for the selected payroll. You can view the process name, payroll period, status whether complete or incomplete. You can also view the message depending on the type of processes selected. Oracle supports the following processes for their readiness: - Batch Element Entry, OTL Time Entries, and Retropay. You can configure these processes against any payroll according to the business need in the Readiness Configuration page.
Running a Payroll Run
Besides running a payroll process using the forms interface, you can also process a payroll run by entering the payroll details in this region and submitting it.
Using Process MonitorWhen you click the Process Monitor tab, the Payroll Snapshot region provides a quick snapshot of the payroll processes. You can view the count of the processes that have been run for the period specified in the Readiness Configuration page.
You can select the payroll and any of the following processes such as quickpay, quickpay pre-payments, payroll run, prepayments, cheque writer, magnetic transfer and view the process count.
For the selected process that has been run, you can view period for which it has been run, and the status. The Process Info link for the selected payroll enables you to view the time taken for this process to complete such as start time, estimated completion timeand percentage of completion. You can view this information in a graphical format too.
You can also perform the retry, rollback or export actions for a selected payroll.
Note: You can retry and rollback only if there are no future processes run for that payroll.
If any errors were encountered while running the processes, then you can view this assignment with errors using the Assignment Process icon. The Messages option provides the messages generated by the run results while processing the assignment.
If any process has been configured for your localization in the extensible lookup PAY_DB_MONITOR_PROCESSES, then you can view this list of processes in the Other Process Details section.
UK users only: You can monitor the details of the predefined RTI processes from Other Payroll Related Processes section for the period specified.
Mexico users only: You can monitor the details of the Social Security Archiver, Social Security Affiliation Report, and SUA Interface Extract processes from the Other Process Details region for the period specified.

Payroll Process Management 17-23
Payment Distribution
You can view Payment Distribution information, including Prepayment, Payment Method and Third Party Payment Method details for the selected payroll and period.
Viewing the Payroll Analysis
The Payroll Analysis tabbed region is enabled by default for the US, Canada, Mexico, International Payroll localizations only.
US, Canadian, and Mexico Users: In the Payroll Analysis tabbed region, users can viewdetails of earnings and deductions, such as the current amount, previous amount, and the variance in amounts by comparing the values between a selected Current Payroll Period and a selected Previous Payroll Period. In the Analysis by field, Mexico users can select from any one of the following values: Employee State Tax, ISR, and Social Security Quota to view the balance amounts processed towards each individual employer state tax, ISR or social security quota balance in the selected payroll periods.
US and Mexico Users: In addition, users can view variances in amounts for each selected earnings or deductions category (similar to secondary classification) under a classification level. Payroll administrators can drill down into the category to view the variance in amounts at each element level in that category for the selected classification.
International Payroll Users: In the Payroll Analysis tabbed region, users can view details of earnings and deductions, such as the current amount, previous amount, and the variance in amounts by comparing the values between a selected Current Payroll Period and a selected Previous Payroll Period.
Using Readiness ConfigurationThis page enables you to configure the processes for Payroll Readiness. You can access the Readiness Configuration page using the Readiness Configuration function attached to the payroll professional responsibility.
The configuration settings specified in the Readiness Configuration page are used to display data in the Payroll Readiness and Process Monitor tabs.
Configuring Payroll Readiness Setup
You can search for the processes which are associated with a payroll and check for their readiness. You can associate the processes to a Payroll using Create available on this page. You can delete the process which is already associated to a payroll.
You can associate the selected process to All the Payrolls in the Business Group or to theselected Payrolls.
Oracle defaults the processes such as BEE, OTL Time Entry and RetroPay.
Create Readiness Configuration
When you click the Create button in the Payroll Readiness Setup region, it takes you to the Create Readiness Configuration page. You can create readiness configuration by associating readiness check with specific or with all payrolls.

17-24 Oracle Self-Service Human Resources Deploy Self-Service Capability Guide
The following types of readiness checks are currently available for you:
• Predefined Checks - seeded by Oracle. Batch Element Entry, OTL Time Entries and Retropay are the available seeded readiness checks.
• Concurrent Program - valid concurrent programs attached to the responsibility.
• Validation Check - defined by the user using Create Custom validation page.
Creating Custom ValidationsIf you want to create your own validations to meet your business requirements, you cancreate these checks for Payroll Readiness using the Create Custom Validation page.
You can access this page using the function Create Custom Validation attached to the payroll professional user responsibility.
You can search for a custom validation check to update, or create a new custom validation check. When a custom validation is created here, it will be available in the Readiness Configuration page to be associated with a specific payroll or all payrolls.
Configuring Payroll DashboardThis topic provides configuration information for payroll dashboard.
This module can be accessed from the following menus and functions:
User Menu Name Function Name
Professional Payroll User Payslip Dashboard
Readiness Configuration
Create Custom Validation

Payroll Process Management 17-25
Using SSHR for Payroll Management - US
Tax Form (W-4) (US)The Tax Form page accessed through the Employee Self-Service responsibility, Tax Form function, enables employees to update their Federal W-4 and State W-4 withholding information using self-service. When a user makes changes to the Federal information, all the states that follow the Federal information are also updated, unless the filing status, number of allowances, or exempt status are different. After you make an update to the Federal information, you see the data in PDF format when you review the changes.
The notification mechanism delivers confirmation to employees about the changes that they make. HR or payroll administrators receive notifications based on the configuration made to the W-4 notifications function. For example, if a user claims a federal tax exemption or allowances exceeding 10, then the HR/Payroll representative receives a notification and can review the data and update if necessary.
See: Handling Claims for More Than 10 Allowances, Oracle HRMS Payroll Processing Management Guide
Payroll administrators can run the following reports to track the changes made by employees in self-service to determine the tax records using:
• Tax Form Audit Report
• Tax Form Exception Report
Using the Tax Form PageThe Tax Form page enables employees to:
• Review the existing Federal W-4 and State W-4 withholding details
• Update the Federal W-4 and State W-4 withholding details
• Review the updated Federal W-4 and State W-4 withholding details
Reviewing the existing Federal W-4 and State W-4 Withholding DetailsAs an employee, when you click the Tax Form link, the Tax Form Overview page appears displaying Federal W-4 details, by default.
Tax Form Type region: In the Tax Form Type region, select the type of data that you want to view: Federal or State. The Filing Status field displays all the possible values, with the selected current value. You can view the State and Local links information

17-26 Oracle Self-Service Human Resources Deploy Self-Service Capability Guide
when you select State as the Tax Form Type.
Viewing the State W-4 InformationWhen you select a State as the Tax Form Type, the application displays the following details:
• If an employee's record is associated with only one state, then that state's W-4 withholding details are displayed. You can view that state's W-4 withholding details along with the relevant state and local withholding form links.
• If an employee's record is associated with multiple states, then the employee can select a specific state from the State List to view that particular state's W-4 details along with the relevant state and local withholding form links. For example, if you select New York, then the application displays the New York state tax withholding details along with the New York Withholding Form (PDF) and New York Local Form links.
Criteria for States to Appear in the State ListThe application uses the following rules for states to appear in the State List:
• The State List displays only the states that are effective for an employee in the current taxation year. A state is considered effective for an employee only if it is associated with the Primary Resident Address, Work Location, a non-zero Time Percentage or a Tagged Earning.
• Even if a state is effective for an employee in the taxation year, then the state will not appear in the State List if the state does not withhold tax.
Use the state withholding links to review instructions related to the State W-4 details. For states that support the Federal W-4 form, the Tip icon provides the required instructions. The Details section displays fields that are applicable to that state only. Forexample, fields such as SIT Exempt and Optional Calculation are supported only in certain states.
An Update button is available to make changes to Federal W-4 and State W-4. The Default to Federal W-4 Values button appears for states that allow the Federal W-4 formalso. For states that follow the Federal W-4 and do not have their own State W-4 form, the Update button is not displayed and instead instructions indicate that only Federal W-4 changes are applicable to those states.
Updating the Federal W-4 and State W-4 withholding detailsClick the Update button in the Overview page to navigate to the Update Tax Form page. The details that appear in this page are based on the W-4 details (federal or state) selected in the Overview page. When you navigate to the Update Tax Form page, the Tax Form Type and Select State fields become read-only in the Update Tax Form page.
Payroll Process Management 17-27
• Updating the Federal W-4 withholding details: When you select Update for Federal W-4 details, you update the applicable federal details such as the filing status, allowances, and additional amount withheld.
• Updating the State W-4 withholding details: When you select Update for State W-4 details, the Update Tax Form page that displays is based on the details applicable tothat state.
To update other state or Federal W-4 details, click Cancel to navigate backto the Overview page.
Click Continue after making necessary updates. The Tax Form: Review page appears.
Reviewing the updated Federal W-4 and State W-4 withholding detailsThe Tax Form: Review page displays information based on the type of details that you update: federal or state.
When you modify the Federal W-4 details and click Continue, you can view the Federal W-4 PDF with the latest information. Click Submit to save changes to the federal tax record of the employee.
For State W-4 changes, the Review page displays the Current and Proposed withholding values. Click Submit to save changes to the state tax record of the employee.
Functional behavior of the States List in the Tax Form pageThe following sections provide information about the State List in the Tax Form page:
• View only states with State Withholding: Alaska, Florida, Nevada, New Hampshire, South Dakota, Tennessee, Texas, Washington, and Wyoming do not have State Withholding, so these states will not appear in the State List even if an employee record is associated with any one of the states.
• States supporting both the Federal W-4 form and their own State W-4 form: Arkansas, California, Georgia, Massachusetts, Minnesota, New York, Vermont, Wisconsin support Federal W-4 form along with the State W-4 form. For these states, the Overview page displays instructions about using the Federal W-4 form. The Update page contains the Default to Federal W-4 Values button, which can be used to populate the State W-4 filing status, number of allowances and/or additional withholding amount with Federal W-4 values.
• States supporting only the Federal W-4 form: Colorado, Delaware, Idaho, Montana, Nebraska, New Mexico, North Dakota, Oklahoma, Oregon, South Carolina, and Utah support only the Federal form. For these states, updating the State W-4 details is not applicable so the Update button is not available.

17-28 Oracle Self-Service Human Resources Deploy Self-Service Capability Guide
• The SIT Exempt field is enabled only for the states that allow exemption from withholding: For these states the SIT Exempt field is displayed in the Overview, Update, and Review pages as necessary. The SIT Exempt field is disabled for the following states that do not permit exemption from SIT withholding: Alabama, Hawaii, Kentucky, Massachusetts, Indiana, California, Connecticut, Pennsylvania, Vermont, West Virginia, Mississippi, Ohio, and Puerto Rico.
• Additional filing requirement for claiming SIT Exempt: Arkansas, Louisiana, New York, North Carolina require additional filing to claim exemption from State Withholding. For these states, the details about any additional required forms appear as a tip below the Exempt check box in the Update Page.
• Optional Calculation field: The Optional Calculation field is enabled in the Overview, Update, and Review pages for Arizona, Arkansas, and New Jersey.
• Exemption Amount field: Puerto Rico supports Exemption Amount. This field is enabled in the Overview, Update, and Review pages.
• Arizona Voluntary SIT Form (AZA4V) field: Arizona Voluntary SIT Form (AZA4V) field is enabled only for Arizona in the Overview, Update and Review pages.
• Pennsylvania: Pennsylvania does not have any W-4 form. The message "No Withholding form for Pennsylvania" is displayed for this state as Pennsylvania doesnot have any W-4 form.
Configuring the Tax Form (W-4) (US)This topic provides configuration information for the Tax Form pages.
For a functional overview of the Tax Form page, see: Tax Form (W-4) (US), page 17-25
Menu and Function NamesThis module can be accessed from the following menus and functions:
User Menu Name Function Name Prompt
Employee Self Service Online Tax Forms Tax Form
See: Defining Menus for SSHR, page 4-10
WorkflowThe following workflow processes are delivered in the HRSSA Item Type (hrssa.wft):
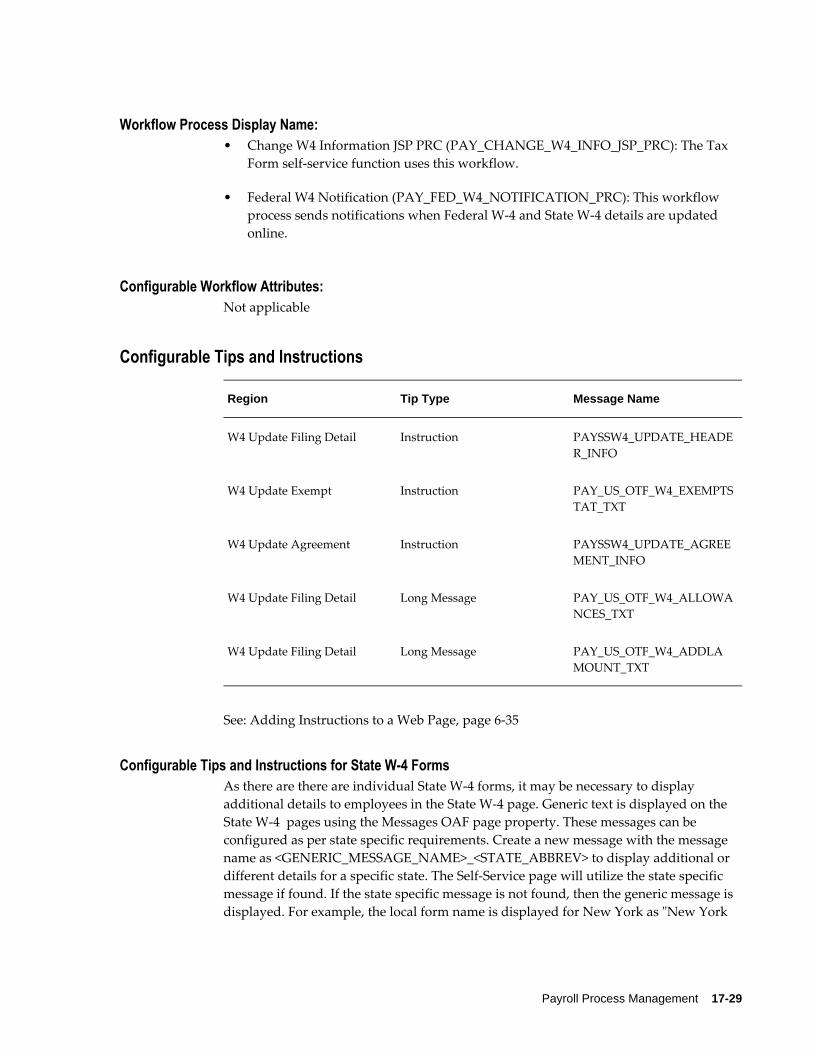
Payroll Process Management 17-29
Workflow Process Display Name: • Change W4 Information JSP PRC (PAY_CHANGE_W4_INFO_JSP_PRC): The Tax
Form self-service function uses this workflow.
• Federal W4 Notification (PAY_FED_W4_NOTIFICATION_PRC): This workflow process sends notifications when Federal W-4 and State W-4 details are updated online.
Configurable Workflow Attributes:Not applicable
Configurable Tips and Instructions
Region Tip Type Message Name
W4 Update Filing Detail Instruction PAYSSW4_UPDATE_HEADER_INFO
W4 Update Exempt Instruction PAY_US_OTF_W4_EXEMPTSTAT_TXT
W4 Update Agreement Instruction PAYSSW4_UPDATE_AGREEMENT_INFO
W4 Update Filing Detail Long Message PAY_US_OTF_W4_ALLOWANCES_TXT
W4 Update Filing Detail Long Message PAY_US_OTF_W4_ADDLAMOUNT_TXT
See: Adding Instructions to a Web Page, page 6-35
Configurable Tips and Instructions for State W-4 FormsAs there are there are individual State W-4 forms, it may be necessary to display additional details to employees in the State W-4 page. Generic text is displayed on the State W-4 pages using the Messages OAF page property. These messages can be configured as per state specific requirements. Create a new message with the message name as <GENERIC_MESSAGE_NAME>_<STATE_ABBREV> to display additional or different details for a specific state. The Self-Service page will utilize the state specific message if found. If the state specific message is not found, then the generic message is displayed. For example, the local form name is displayed for New York as "New York

17-30 Oracle Self-Service Human Resources Deploy Self-Service Capability Guide
Local Form" using the Generic message PAY_US_OSTF_LOCAL_FORM_NAME. If it is necessary to display the Local form name as, New York City Tax Form, then create a message PAY_US_OSTF_LOCAL_FORM_NAME_NY (Generic message name appended with the State abbreviation) with text as New York City Tax Form. After this message is saved, the application will start using the state specific form name instead of the generic name.
Following is a list of messages that can be configured for states by specifying state specific messages:
Message Name Description about the message usage
PAY_US_OSTF_DEF_TO_FED_MSG Instruction to use the default Federal W-4 values
PAY_US_OSTF_EXEMPTADDLFORM Tip message for the additional filing requirement to claim SIT Exemption
PAY_US_OSTF_EXEMPTSTAT_TXT Statutory text to claim SIT Exemption
PAY_US_OSTF_LOCAL_FORM_NAME Local Form Name
PAY_US_OSTF_STATE_FORM_NAME State Form Name
PAY_US_OSTF_STATE_LINK_MSG Message for the State Withholding form
PAY_US_OSTF_USE_FEDERAL_TIP Instructions about using Federal W-4
PAY_US_OSTF_W4_ADDLAMOUNT Tip message for the Additional Amount field
PAY_US_OSTF_W4_ALLOWANCES Tip message for the Allowances field
PAY_US_OSTF_W4_EXEMPTAMT Tip message for the Exemption Amount field
PAY_US_OSTF_W4_OPTCALC Tip message for the Optional Calculation field
PAY_US_OSTF_W4_SITEXEMPT Tip message for the SIT Exempt field
PAY_US_OSTF_W4_STINFO3 Tip message for the STA_INFORMATION3 field
Configurable MessagesThe following is a list of configurable messages with their description:

Payroll Process Management 17-31
Message Name Description
PAY_US_OSTF_ADD_TAX_NUMBER Validation message for Additional Amount
PAY_US_OSTF_AGREE_ERROR Error message to indicate that Agree check box must be selected
PAY_US_OSTF_EXEMPTADDLFORM_AR State specific message
PAY_US_OSTF_EXEMPTADDLFORM_LA State specific message
PAY_US_OSTF_EXEMPTADDLFORM_NC State specific message
PAY_US_OSTF_EXEMPTADDLFORM_NY State specific message
PAY_US_OSTF_EXEMPTWARN Warning that SIT Exemption has been claimed
PAY_US_OSTF_NO_W4FORM Message for states without W-4 form
PAY_US_OSTF_NO_WHSTATES Message for employee with no tax withholding States
PAY_US_OSTF_USE_FEDERAL_MSG Message about using Federal W-4, directing toTip
PAY_US_OSTF_USE_FEDERAL_TIP_AR State specific message
PAY_US_OSTF_USE_FEDERAL_TIP_CA State specific message
PAY_US_OSTF_USE_FEDERAL_TIP_GA State specific message
PAY_US_OSTF_USE_FEDERAL_TIP_MA State specific message
PAY_US_OSTF_USE_FEDERAL_TIP_MN State specific message
PAY_US_OSTF_USE_FEDERAL_TIP_NY State specific message
PAY_US_OSTF_USE_FEDERAL_TIP_VT State specific message
PAY_US_OSTF_USE_FEDERAL_TIP_WI State specific message
PAY_US_OSTF_USE_ONLY_FED Message that only Federal W-4 is supported

17-32 Oracle Self-Service Human Resources Deploy Self-Service Capability Guide
Message Name Description
PAY_US_OSTF_W4_OVERALLOW Message that allowances are above the threshold
PAY_US_OSTF_W4_STINFO3_AZ Arizona specific details for the AZ4AV field
PAY_US_OTF_W4_FITEXEMPT Tip message for the FIT Exempt field
PAYSS_STATEW4_EXEMPT_STATUS Message that Exempt selection clears Allowances and Additional Amount
PAYSS_W4_NO_CHANGES Message to indicate no changes were made forState W-4 details
PAYSSW4_STATE_EXEMPT_MSG Message that Exempt selection will be forwarded to the Tax department
Configurable FlexFieldsNot applicable
Configurable Profile Options
Profile Configurable Level Values Default
HR: Online Tax Forms Update Method
Site All, None, Primary Primary
HR: HR/Payroll Representative Source
Site Custom PL/SQL, GREContact Information, Further Payroll Information
Further Payroll Information
HR: Online Tax Forms Update Method
This profile option determines which assignments can be updated.
The possible values are as follows:
• Primary: Only the tax information for the primary assignment is updated when a user changes tax information using the Online Tax Form.
Payroll Process Management 17-33
• All (default value). The tax information for all assignments is updated when a user changes tax information.
• None. Users cannot update tax information using the Online Tax Form. The update functionality is disabled.
If this profile option is left as blank, then by default, only federal tax record corresponding to the primary assignment of employee is updated with the latest changes.
HR: HR/Payroll Representative Source
If a user makes a change to their tax information using the online tax form, a notification is sent to a designated contact person informing them of the change. This profile option defines how the contact person is determined. The possible values are as follows:
• Further Payroll Information: You must enter a payroll representative in the Further Payroll Information flexfield of the Payroll window.
• GRE Contact Information: You must enter a payroll representative in the Contact Information additional organization information window.
• Custom PL/SQL: You need to modify the Get_Next_Payroll_Notifier function in thePL/SQL package hr_approval_custom.
Configuration Steps for the Tax Form (W-4) (US)Review the following configuration steps and complete them, if required:
1. Enabling exception notifications: If the necessary configuration is made, then when employees update Federal W-4 and State W-4 details, the designated HR/Payroll Representative receives exception notifications. To enable the exception notifications, set the W4 Notifications field to Yes. W4 Notifications is available under Reporting Preferences, Additional Organization Information at the Business Group and Organization levels. The application uses the organization level preference if found. Otherwise the business group level preference will be used. If W4 Notifications is set to Yes, then exception notifications are sent. A few examples of exception scenarios are: selection of exemption or the number of allowances is greater than the threshold limit.
2. Set the HR: HR/Payroll Representative Source profile option to determine the designated contact person to whom notifications of Federal W-4 or State W-4 changes must be sent.
3. Set the HR: Online Tax Forms Update Method profile option to the required value. For employees with multiple assignments, W-4 details of only the primary assignment are shown in the Online Tax Form. When changes are submitted from

17-34 Oracle Self-Service Human Resources Deploy Self-Service Capability Guide
the Online Tax Form, by default changes are made to the tax records corresponding to the primary assignment.
4. Only State Withholding form links are Oracle delivered. You can override the Oracle-delivered State Withholding form links and/or configure Local Withholding form links, if required.
Tax Information Form W-2 and W-2c (US)The Tax Information Form enables workers to view and print their:
• Form W-2 Wage and Tax Statement on the web. Form W-2 Wage and Tax Statementfor the year 2001 and onward will be available for viewing online and printing. A consent form from the worker is not required to place this W-2 information online because the employer must still issue a paper copy of Form W-2 (see publication 15-A for further details - available at www.irs.gov).
To view or print a Form W-2 Wage and Tax Statement for your own records, use the latest version of Adobe Acrobat Reader on your local machine.
When a user selects the Employee W-2 function, the most recent Form W-2 Wage and Tax Statement displays as a PDF file in the web page. If there is no W-2 information or if you have not configured the self-service preferences to enable online access, a message appears. You can view the Form W-2 only after the Year End Pre-Process runs successfully. If the Year End Pre-Process ended with an error status, then no online Form W-2 is available for any assignment in the GRE. If the Year End Pre-Process finishes successfully but some assignments are in error, only the successfully archived assignments is available for online viewing and printing.
Workers can request a reprint of the Form W-2 Wage and Tax Statement on paper. In this case, the payroll contact receives a notification of the reprint request. You define the payroll contact using the HR: HR/Payroll Representative Source profile option.
• Form W-2c Wage and Tax Statement on the web. When a user logs into Self Service and selects the option "Employee W-2", the latest employee W-2c will be displayed if the W-2c Pre-Process and either the Employee W-2c Report request set or the Employee W-2c PDF report has been run for the employee. If multiple W-2c Pre-Processes and either the corresponding Employee W-2c report request sets or Employee W-2c PDF reports have been run, then the employee W-2cs are displayedin reverse chronological order." Employees and/or Payroll Professionals can view employee W-2cs from prior years by selecting the applicable employee W-2c from list of values.
Viewing Tax Information as a Payroll ProfessionalUsing the Payroll Professional responsibility you can select the Employee W-2 link and

Payroll Process Management 17-35
search for a person. When you select a person from the list, their tax information appears. You can also save a person in My List for future access, so you do not need to search for that person again.
In addition to displaying tax information for current employees, you can also display tax information for ex-employees. To search for ex-employees, use the Person Type fieldin the Advanced Search page and select the person type Ex-Employee.
Note: The Ex-Employee Search is enabled for the following function:
• PAY_MGR_W2_EMP_SEARCH (Employee Search for W-2)
If you choose to use this functionality, you should add this function to your responsibility.
Configuration Details for Tax Information Form W- 2 and W-2c (US)The following sections provide configuration details:
Menu and Function NamesThis module can be accessed from the following menus and functions:
User Menu Name Function Name
Employee Self Service Employee W-2
Payroll Professional Employee W-2
Payroll Professional Employee Search for W-2
WorkflowThe workflow details for this module are listed below:
Workflow Process Display Name: Pay Employee W2 Process
Configurable Workflow Attributes:Not applicable
Configurable Tips and InstructionsSee: Configuring Web Pages, page 6-21
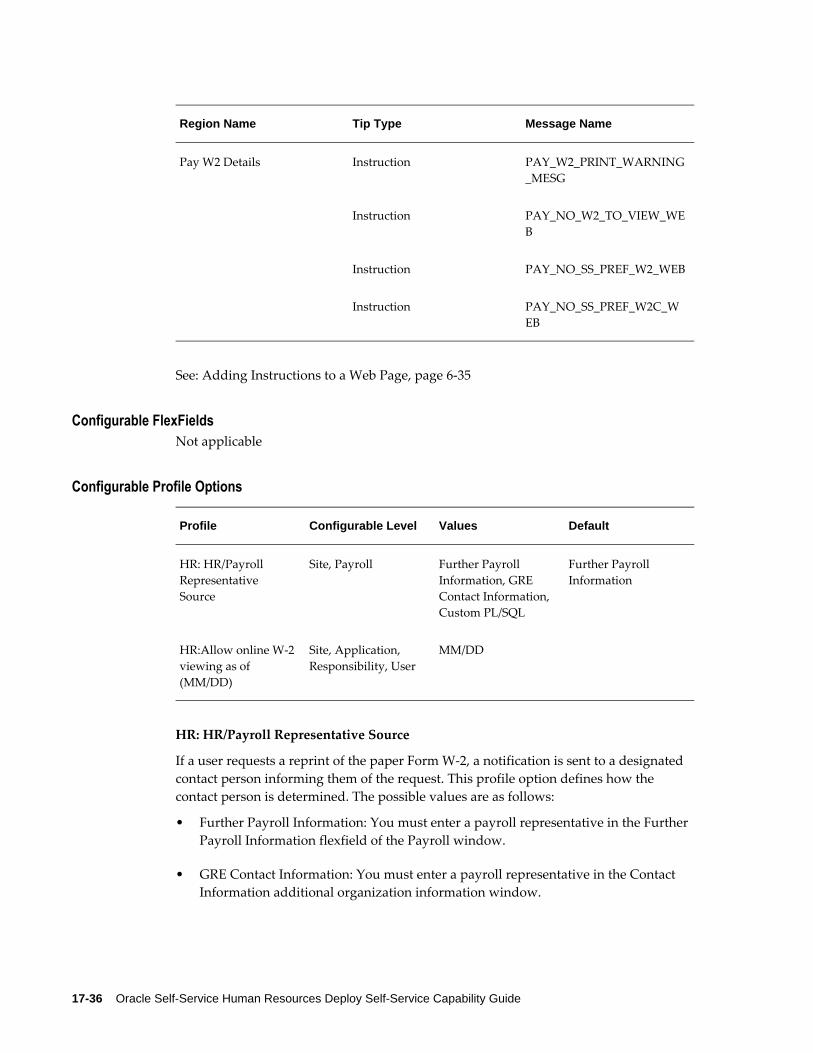
17-36 Oracle Self-Service Human Resources Deploy Self-Service Capability Guide
Region Name Tip Type Message Name
Pay W2 Details Instruction PAY_W2_PRINT_WARNING_MESG
Instruction PAY_NO_W2_TO_VIEW_WEB
Instruction PAY_NO_SS_PREF_W2_WEB
Instruction PAY_NO_SS_PREF_W2C_WEB
See: Adding Instructions to a Web Page, page 6-35
Configurable FlexFieldsNot applicable
Configurable Profile Options
Profile Configurable Level Values Default
HR: HR/Payroll Representative Source
Site, Payroll Further Payroll Information, GRE Contact Information, Custom PL/SQL
Further Payroll Information
HR:Allow online W-2viewing as of (MM/DD)
Site, Application, Responsibility, User
MM/DD
HR: HR/Payroll Representative Source
If a user requests a reprint of the paper Form W-2, a notification is sent to a designated contact person informing them of the request. This profile option defines how the contact person is determined. The possible values are as follows:
• Further Payroll Information: You must enter a payroll representative in the Further Payroll Information flexfield of the Payroll window.
• GRE Contact Information: You must enter a payroll representative in the Contact Information additional organization information window.

Payroll Process Management 17-37
• Custom PL/SQL: You need to modify the Get_Next_Payroll_Notifier function in thePL/SQL package hr_approval_custom.
HR:Allow online W-2 viewing as of (MM/DD)
Enable the profile option to allow your employees to view and download their W-2 or W-2c forms as PDF files. You can specify the month and day that the current year's W-2 or W-2c are viewable and grant these rights at the application, responsibility, user, server, organization, or site level. If employees attempt to view their W-2 or W-2c form before the specified date, they only see the previous years' W-2 or W-2c forms.
Note: Customers who have set up multiple application servers must bounce these servers after setting the profile option in order for users tobe able to view online W2s. Customers may have different configuration on the middle tier, for example, more than one application server, multiple JVMs, and load balancing. Such setup can contribute to the caching of the profile values and may not reflect the profile option setting on bouncing of Apache only, it may require bouncing of the application or middle tier to make sure the cache value is cleared.
Additional Configuration Steps:Set the document viewing and printing preferences using Self Service Preferences. You can define this information at the HR organization or business group level using additional organization information, or alternatively, at the person or location level using an extra information type.
Enter the following information:
1. Document Type – This specifies the type of document for which following segmentswill be configured. Select W-2 or W-2c depending on the document type.
2. Online – This is a Yes/No segment signifying whether to display online W-2or W2-cPDF to employees working in the current business group. If you select No, then the PDF will not be displayed.
3. Paper – This is a YES/NO segment signifying whether to print this generated W-2 orW-2c PDF or not. There is no effect on online employee's W-2 or W-2c by setting this option to YES or NO.
4. Template – Select the template to be used for displaying online W-2 or W-2c PDF. All these templates are maintained under XDO template manager and are available through the XML Publisher Responsibility. If this field is left blank, then the seeded template is used for W-2 or W-2c PDF.
5. XML Code – "Leave this field blank as it does not apply.

17-38 Oracle Self-Service Human Resources Deploy Self-Service Capability Guide
6. Effective Date – Leave this field blank or enter a date prior to or equal to the system date. Note: If you enter a date which is later than the system date, then no Online W-2or W-2c PDF will be shown.
7. Payslip Employer Address – Leave this field blank as it does not apply.
8. Display Payslip GRE Addr From – This feature is not available so the segment can be left blank.
9. Offset Criteria – This segment is only applicable to the PDF Payslip so it should be left blank.
10. Display Rate Detail Section – This segment is not available so it can be left blank. If any value entered there will be no effect on the W-2c PDF.
11. The Online W-2 or W-2c PDF self-service preferences can be overridden at organization and location levels. The order of precedence goes to Location, Organization and then Business Group. Location level templates override any templates set at any other level. Templates specified at the HR Organization level override templates specified at the Business Group level.
See: Entering Self-Service Preference Information, Oracle HRMS Enterprise and Workforce Management Guide (for HR organization or business group level)
See: Person Extra Information Types, Oracle HRMS Workforce Sourcing, Deployment, and Management Guide (Managing Your Workforce Using Oracle HRMS) (for person level)
See: Location Extra Information Types , Oracle HRMS Enterprise and Workforce Management Guide (for location level)
Configuring the Predefined XML TemplatesTo generate W2 or W-2C PDFs, you can use either the predefined templates or create your custom templates by copying the delivered rtf templates and modifying them. See:Setting Up Custom BI Publisher Templates for Payroll in the Oracle HRMS Payroll Processing Management Guide (US).
Online Payslip (US)The Online Payslip for the US is a localized version of the generic payslip and has been designed to meet local requirements.
The US Online Payslip includes regions that display information stored in the pay action information table in Action Information Categories. The Payroll Archive archivesdata for the Action Information Categories, and the application then displays the information in the payslip region. For example, the Payroll Archive archives data for Employee Third Party Payments and the application displays the data in a payslip region Third Party Pay Distribution.

Payroll Process Management 17-39
For information on the generic payslip functionality, see Online Payslip, page 17-12.
For a list of the information that appears on the payslip region, see Payslip Region Information, Oracle HRMS Payroll Processing Management Guide (US)
You can also use an RTF template to produce the online payslip using BI Publisher. Youcan use the default template or create your own.
Menu and Function NamesThis module can be accessed from the following menus and functions:
User Menu Name Function Name
Employee Self-Service Payslip
See: Defining Menus for SSHR, page 4-10
WorkflowThe workflow details for this module are listed below:
Workflow Process Display Name: Not applicable
Configurable Workflow Attributes:Not applicable
Configurable Tips and InstructionsNot applicable
Configurable FlexFieldsNot applicable
Configurable Profile Options

17-40 Oracle Self-Service Human Resources Deploy Self-Service Capability Guide
Profile Configurable Level Values Default
HR:View Payslip From Date for WEB (MM/DD/YYYY)
User specification Date 01/01/1997
HR:View Payslip From Date for WEB
This profile option determines how many payroll periods a user can view in the online payslip. If the profile option is not set, an error message is displayed when the user attempts to view the online payslip.
Additional Configuration Options1. Define Additional Information
Optionally define additional information to be displayed in the Other Information section of the payslip using the Payslip Information additional organization information. You can display elements, messages, and balances.
See: Entering Payslip Information, Oracle HRMS Payroll Processing Management Guide
2. Add Custom Code to Existing XML
If you are providing Online Payslips in PDF output, you can add custom data to thegenerated XML by defining a custom package and procedure and entering it in the XML Code field in Self Service Preference at the business group, HR organization orlocation level.
This procedure should have the following three input parameters: p_document type, p_action_context_id and p_action_information_category and will be called once for each archived action_information_category (e.g. AC_DEDUCTIONS, EMPLOYEE_DETAILS, etc as is shown in the sample below). You can add custom XML tags which will appear under that action_information_category in addition to the ones already archived (see example below).
Another call to the above procedure is invoked after all archived information has been parsed into the corresponding XML with the purpose of allowing the addition of a custom information category along with its segments (e.g. CUSTOM_CATEGORY1 and CUSTOM CATEGORY 2 in the below example). This call will pass NULL to the action_information_category parameter so as to differentiate it from the previous call(s). The value for p_document_type will always be 'PAYSLIP' and the assignment action id of the payroll archiver run will be passed for the p_action_context_id.
A sample XML generated as a combination of the generic package and the custom procedure is shown below.
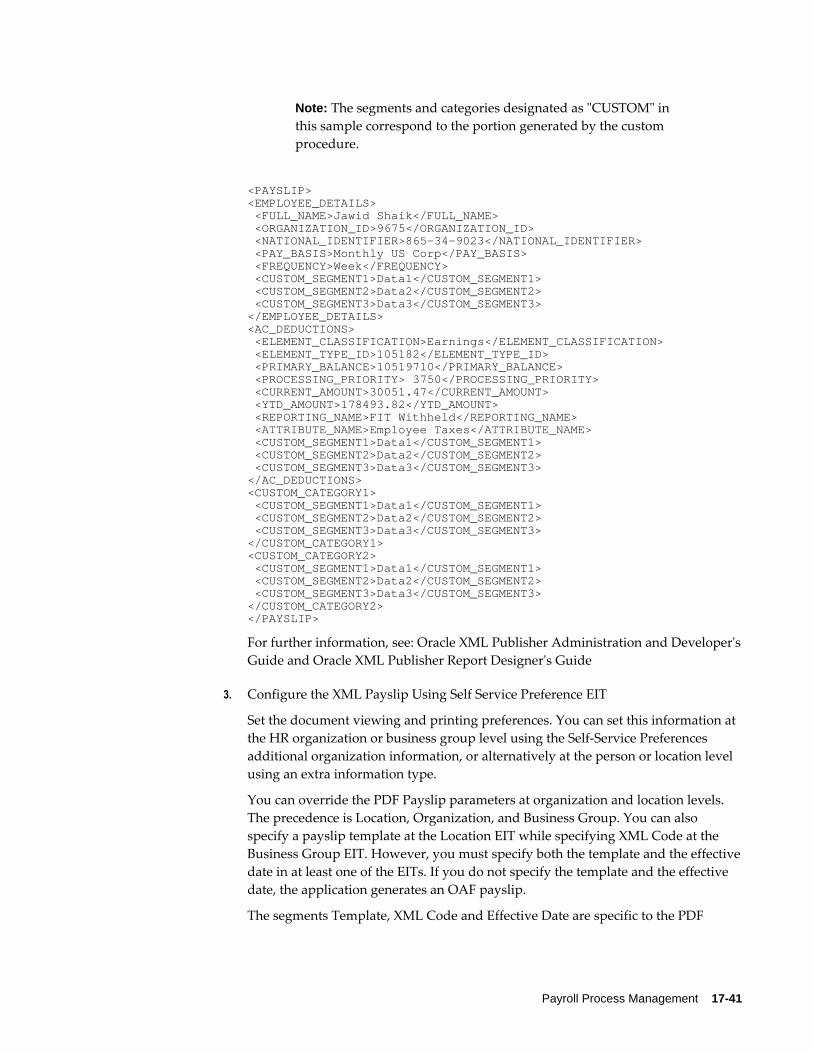
Payroll Process Management 17-41
Note: The segments and categories designated as "CUSTOM" in this sample correspond to the portion generated by the custom procedure.
<PAYSLIP><EMPLOYEE_DETAILS> <FULL_NAME>Jawid Shaik</FULL_NAME> <ORGANIZATION_ID>9675</ORGANIZATION_ID> <NATIONAL_IDENTIFIER>865-34-9023</NATIONAL_IDENTIFIER> <PAY_BASIS>Monthly US Corp</PAY_BASIS> <FREQUENCY>Week</FREQUENCY> <CUSTOM_SEGMENT1>Data1</CUSTOM_SEGMENT1> <CUSTOM_SEGMENT2>Data2</CUSTOM_SEGMENT2> <CUSTOM_SEGMENT3>Data3</CUSTOM_SEGMENT3></EMPLOYEE_DETAILS><AC_DEDUCTIONS> <ELEMENT_CLASSIFICATION>Earnings</ELEMENT_CLASSIFICATION> <ELEMENT_TYPE_ID>105182</ELEMENT_TYPE_ID> <PRIMARY_BALANCE>10519710</PRIMARY_BALANCE> <PROCESSING_PRIORITY> 3750</PROCESSING_PRIORITY> <CURRENT_AMOUNT>30051.47</CURRENT_AMOUNT> <YTD_AMOUNT>178493.82</YTD_AMOUNT> <REPORTING_NAME>FIT Withheld</REPORTING_NAME> <ATTRIBUTE_NAME>Employee Taxes</ATTRIBUTE_NAME> <CUSTOM_SEGMENT1>Data1</CUSTOM_SEGMENT1> <CUSTOM_SEGMENT2>Data2</CUSTOM_SEGMENT2> <CUSTOM_SEGMENT3>Data3</CUSTOM_SEGMENT3></AC_DEDUCTIONS><CUSTOM_CATEGORY1> <CUSTOM_SEGMENT1>Data1</CUSTOM_SEGMENT1> <CUSTOM_SEGMENT2>Data2</CUSTOM_SEGMENT2> <CUSTOM_SEGMENT3>Data3</CUSTOM_SEGMENT3></CUSTOM_CATEGORY1><CUSTOM_CATEGORY2> <CUSTOM_SEGMENT1>Data1</CUSTOM_SEGMENT1> <CUSTOM_SEGMENT2>Data2</CUSTOM_SEGMENT2> <CUSTOM_SEGMENT3>Data3</CUSTOM_SEGMENT3></CUSTOM_CATEGORY2></PAYSLIP>
For further information, see: Oracle XML Publisher Administration and Developer'sGuide and Oracle XML Publisher Report Designer's Guide
3. Configure the XML Payslip Using Self Service Preference EIT
Set the document viewing and printing preferences. You can set this information at the HR organization or business group level using the Self-Service Preferences additional organization information, or alternatively at the person or location level using an extra information type.
You can override the PDF Payslip parameters at organization and location levels. The precedence is Location, Organization, and Business Group. You can also specify a payslip template at the Location EIT while specifying XML Code at the Business Group EIT. However, you must specify both the template and the effectivedate in at least one of the EITs. If you do not specify the template and the effective date, the application generates an OAF payslip.
The segments Template, XML Code and Effective Date are specific to the PDF

17-42 Oracle Self-Service Human Resources Deploy Self-Service Capability Guide
payslip and the remaining fields are common for both OAF and PDF payslips.
See: Entering Self-Service Preference Information, Oracle HRMS Enterprise and Workforce Management Guide
See: Person Extra Information Types, Oracle HRMS Enterprise and Workforce Management Guide
See: Location Extra Information Types, Oracle HRMS Enterprise and Workforce Management Guide
4. Run the Prepayments process.
See: Running the Prepayments Process, Oracle HRMS Payroll Processing Management Guide
5. Run the payment processes (for example, the Check Writer process).
6. Run the Payroll Archive process to enable SSHR users to view their payslip.
See: Managing the Payroll Archive Process, Oracle HRMS Payroll Processing Management Guide
7. View Online Payslip Using SSHR
After completing the above configuration, you can view payslips through the Self-Service HR application using the Employee Self-Service responsibility.
Click Payslip to view the most recent pay period's payslip. You can choose other pay periods from the drop-down list available under the Choose a Payslip region. Up to ten payslips can be selected in the drop-down list of values. To see other payslips, click on 'next 10' or 'previous 10'.
Paycheck Modeling (US)The Paycheck Modeling feature for the US is a localized version of the generic Payslip Modeling functionality and is designed to meet local requirements.
For information about the generic Payslip Modeler, see: Using Payslip Modeler, page 17-18
Employees can model their paycheck using the Paycheck Modeler available online. Thisa Paycheck calculator that can be used by individuals to quickly and accurately answer paycheck related questions and address "what-if" scenarios such as how their net pay would be impacted by an increase to their 401K deduction or by a change to their federal or state filing status from single to married. Employees can elect to print a PDF copy of their model paycheck results. This feature is available to both employees and payroll professionals (administrators) via Self Service HR. Payroll administrators can use this feature to answer queries or perform what-if analysis for employees.
Payroll Process Management 17-43
Note: Users cannot run paycheck modeling process, if there is a prepayment or costing process already executed for the current pay period. The modeling process does not impact the data present in the application. The employee data remains absolutely unaffected by the simulation process. Users must first agree to the Usage Terms and Conditions in the Welcome page before they can begin modeling their paycheck. Employees can elect to print a PDF copy of their model paycheck results. The PDF output displays a watermark indicating it is a sample payslip only, plus the model result values are designated as "Estimated.
For the United States Localization, the Payroll Modeling functionality enables employees or payroll administrators to model the following information to determine the impact on payroll calculations:
• Resident Address Details
• Work Location Details
• Tax Withholding Information
• Earnings and Deductions
Using Paycheck ModelingThe Paycheck Modeling feature enables employees and payroll administrators to perform the following tasks:
• View information provided in the Welcome Page and agree to the Usage Terms andConditions.
• View certain personal and pay information such as Employee Name, Job title, Payroll, Pay Basis and Annual Salary.
• Perform paycheck modeling altering address region details such as:
• Resident State
• Resident County
• Resident City
• Work Location
• Work At Home
For example, users can change resident address details to verify corresponding tax

17-44 Oracle Self-Service Human Resources Deploy Self-Service Capability Guide
calculation changes. If taxation is present for the selected address location, you can view the change in the Simulation Output in the Tax Deductions section. For example, if users are planning on moving to a different city and/or state, they can model a resident address and/or a work location change to assess the impact on tax and other deductions in order to determine changes to net (or take-home) pay. Notethat if the user changes their resident state, they will also need to select a new resident county and city as well as state filing and exemption status. Likewise, if they change their work location, they will also need to select a new work state filingand exemption status.
• Model tax withholding information changes at Federal and State level. For example,an employee who is getting married may want to model changing their Federal Filing Status from "Single" to "Married". Likewise, they may also want to model changes to their Resident and/Work State Tax Withholding details such as changingthe state filing status and/or changing the number of state exemptions plus they canalso set up Additional Withholding amounts.
• Model changes to net or take home pay by selecting different earnings and deductions that have been made available for modeling. For example, an employee may be eligible for an upcoming bonus or overtime pay, and would like to see whattheir net or take home pay will be. Likewise, an employee may want to model a change to their 401k deferred compensation deduction to see the effect on their net or take home pay.
• View and print model paycheck results. View side by side pie charts that compare the employee's Current Pay to their Estimated (model) Pay. The Current Pay pie chart displays data from the employee's most recent payslip. The Estimated Pay pie chart displays data from the model paycheck. The Current Pay and Estimated Pay pie charts provide a breakdown of current and estimated pay by pretax deductions,taxes, other deductions and net pay.
Configuration Information for Paycheck Modeling (US)This topic provides configuration information for the Paycheck Modeling (US) function.
For information about the generic Payslip Modeler, see: Using Payslip Modeler, page 17-18Setting up Payslip Modeler, Oracle Payroll Processing Management Guide
Menu and Function NamesYou can access this module from the following menus and functions:

Payroll Process Management 17-45
User Menu Name Function Name
Manager Self Service Payslip Modeling
Payroll Professional Payslip Modeling
Note: The Oracle Payroll generic menu is Payslip Modeling. To meet the industry requirements, you can rename the menu for the United State legislation as Paycheck Modeling.
WorkflowNot Applicable
Personalization of Paycheck Modeling PagesThe Paycheck Modeling Self-Service Pages are based on Oracle Application Framework technology and you can personalize the pages to display the content as per your requirements to indicate the necessary details or instructions to employees. Following are the details which you can personalize:
Welcome Page
Welcome Message, Usage Instructions and Terms, and Conditions displayed on this page can be personalized.
Generate Model Paycheck Page
Following information can be personalized:
• Details in the "Personal Information" section.
• Details in the "Pay Information" section.
• Fields in the "Address Related Details", Tax Withholding Details", Earnings and Hours" and "Deductions" regions. Also the Information Tips for each of these Regions.
• Placeholders in the "Instructions" section.
The fields displayed in the "Pay Information", "Address Related Details", "Tax Withholding Details", "Earnings and Hours" and "Deductions" regions are configured based on Descriptive Flexfield Contexts. If any of the fields in these regions are to be hidden or made read-only, then it can be done by specifying the list of segments to be displayed and those to be displayed as Read-Only. The instructions about setting up the"Descriptive Flexfield Segment List" are specified in "Oracle Applications Framework

17-46 Oracle Self-Service Human Resources Deploy Self-Service Capability Guide
Developer Guide". For specifying the Segment List, it is necessary to know the Flexfield Context and segment names corresponding to each region. Note that the names displayed on the page for each field correspond to the Prompt information. The actual segment name will be different. The segment name should be used in the Segment List. For example, for the field "Resident State Withholding Override Rate" under "Tax Withholding Details" Region, the Segment name is "RS Override Rate".
Below are the context names for each of the regions. These flexfield contexts are available with the 'Extra Assignment Information' EIT.
Region Context Code
Pay Information US_SIMULATION_DISPLAY
Address Details US_SIMULATION_REGION1
Tax Withholding Details US_SIMULATION_REGION2
Earnings US_SIMULATION_REGION3
Deductions US_SIMULATION_REGION4
Below is the list of segment names for each of the fields in various regions.
Pay Information Region:
Field Name Segment Name
Pay Basis Pay Basis
Rate Rate
Annual Salary Annual Salary
Gross Pay YTD Gross Pay YTD
Address Details Region:
Field Name Segment Name
Resident State Resident State

Payroll Process Management 17-47
Field Name Segment Name
Resident County Resident County
Resident City Resident City
Work Location Work Location
Work At Home Work At Home
TTax Withholding Details Region:
Field Name Segment Name
Federal Filing Status Federal Filing Status
Federal Tax Exempt Federal Tax Exempt
Federal Withholding Allowances Federal Withholding Allowances
Additional Federal Withholding Addl. Federal Withholding Amt
Federal Withholding Override Rate Federal Override Rate
Federal Withholding Override Amount Federal Override Amount
Federal Supplemental WithholdingOverride Rate
Federal Override Suppl. Rate
Resident State Filing Status Resident State Filing Status
Resident State Tax Exempt Resident State Tax Exempt
Resident State Withholding Allowances Resident State Allowances
Additional Resident State Withholding Amount
Addl. RS Withholding Amount
Resident State Withholding Override Rate RS Override Rate
Resident State Withholding Override Amount RS Override Amount

17-48 Oracle Self-Service Human Resources Deploy Self-Service Capability Guide
Field Name Segment Name
Resident State Supplemental Withholding Override Rate
RS Override Suppl. Rate
Work State Filing Status Work State Filing Status
Work State Tax Exempt Work State Tax Exempt
Work State Withholding Allowances Work State Allowances
Additional Work State Withholding Amount Addl. WK Withholding Amount
Work State Withholding Override Rate WK Override Rate
Work State Withholding Override Amount WK Override Amount
Work State Supplemental Withholding Override Rate
WK Override Suppl. Rate
Earnings Region:
Field Name Segment Name
Select Earnings/Hours Type Input
Value Value
Default Value Default Value
Deductions Region:
Field Name Segment Name
Select Deductions Type Input
Value Value
Default Value Default Value

Payroll Process Management 17-49
Configurable Profile Options• HR: Enable Payroll Simulation - Users can use the Paycheck Modeling module only
if the profile option HR:Enable Payroll Simulation is set to Yes.
• HR: Enable Multiple Assignments for Payroll Simulation - If an employee has multiple active assignments, then users can choose whether they can perform paycheck modeling on just their primary assignment or select from a list of all their active assignments. Setting profile option "HR: Enable Multiple Assignments for Payroll Simulation" to Yes will allow employees to select any of their active assignments on which they wish to perform paycheck modeling. If the profile option is set to No, then paycheck modeling can only be performed on their primary assignment.
Setup StepsThe following sections provide setting up information.
Set Up the Modeling Availability RuleFurther (optional) control of when Paycheck Modeling is available to end users can be defined by setting the Modeling Availability Rule and the applicable Days After Period Start and End in Further Information for a payroll definition.
1. Navigate to the Payroll window (Payroll > Description).
2. Query the required payroll definition.
3. Click Further Information.
4. Set the following fields:
Modeling Availability Rule to either Available or Unavailable.
Set the Days After Period Start and Days Before Period End as appropriate.
For more information, see: Defining a Payroll, Oracle HRMS Oracle HRMS Payroll Processing Management Guide
Add the Simulation Details Extra Information to the Required Responsibility1. Navigate to the Information Types Security window.
2. Select the Information Type of SIMULATION_ELEMENTS (Simulation Details) andattach the type to the required Responsibility.
3. Save your work and close the Information Types Security window.
17-50 Oracle Self-Service Human Resources Deploy Self-Service Capability Guide
Configure Earnings and Deductions to be Available for ModelingThis is a mandatory setup step in order to make earning and deduction elements available to the end user when modeling their paycheck. For each earning or deduction element, the administrator needs to configure the Element Extra Information Type (EIT)'Simulation Details'. Navigate: Total Compensation > Basic > Element Description > Query the applicable element > Extra Information > Simulation Details.
Both existing elements can be configured in order to be available for paycheck modelingas well as new elements created. The following fields are available for configuration in the Element EIT 'Simulation Details':
• Enable Simulation: Set this to Yes to allow this element to be selected by the end user when performing Paycheck Modeling.
• Simulation Input 1 to Simulation Input 15: Up to 15 input values can be configured for usage with Paycheck Modeling. For example, if an hourly, non-exempt employee can model overtime earnings, then Simulation Input Values 1, 2, and 3 could be defined to enable the employee to enter a rate, number of hours as well as the applicable factor.
• Simulation Name: Enter the element name that the end user will see in the Paycheck Modeler when selecting that element, if it is to be different from the current element name.
For more information, see Defining an Element, Oracle HRMS Compensation and Benefits Management Guide
Define Element Exclusion SetBy default, an employee's existing element entries will be processed as part of the model paycheck, even if the element has not been configured to be available for Paycheck Modeling. To exclude elements from even being processed, payroll administrators can optionally define an exclusion element set to exclude these elements from being included in the model paycheck process. An example of when this feature might be useful is when a bonus is being paid out in the pay cycle that is being processed and administrators do not want the element to be seen by the employee in their model paycheck results. By defining an element exclusion set to specifically exclude that bonus element, it will neither be available for modeling by the end user norwill it be processed when the model paycheck is submitted.
For more information on how to exclude elements, see Defining an Element or Distribution Set, Oracle HRMS Compensation and Benefits Management Guide After defining an element exclusion set, you must select this set in the Modeling Exclusion Element Set field of the Self Service Preference window for your business group. For more information, see: Entering Self-Service Preference Information, Oracle HRMS Enterprise and Workforce Management Guide.
Payroll Process Management 17-51
Select the Oracle BI Publisher XML Template to Print Payslip Modeling PDFOracle Payroll for US provides a predefined XML template to print payslip modeling PDF report.
Details of the XML Template:
Name: US Payroll Simulator Template
Code: PAYUSPSSM
Application: Payroll
Data Definition: US Payroll Simulator Data Definition
Type: RTF
Default Output Type: PDF
You must select the XML template in the Payroll Simulation Template field of the Self Service Preference window for your business group.
If customers do not want to use the default template, then they can create an XML Publisher template and specify the template in the Self Service Preference window. The template must be associated with the Data Definition PAY<LEG_CODE>SIMPAYSLIP
Rules that Apply to the Paycheck Modeling (US) FunctionSingle Output for all types of Elements processed in Paycheck Modeling:
Separate Check or Process Separately options are not applicable to Paycheck Modeling. Even if the element is defined with one or both of these options selected, only one model paycheck is produced which will include all of the earnings and deductions that have been processed.
Processing of Involuntary Deductions in Paycheck Modeling:
Modeling involuntary deductions such as Garnishments is not permitted. However, anyexisting involuntary deductions that are associated with an employee's assignment will be processed during paycheck modeling unless specifically excluded by the payroll administrator." For information on how to set up an exclusion element set, refer to the Setting Run Type Exclusions and Triggers topic
Configuration Steps to Display Dates on Online Payslip (US)This topic describes the configuration steps that must be completed to display dates when employees generate the Online Payslip for US localization. Note that the configuration steps are applicable to displaying Start and End Dates for Premium and Overtime elements only.

17-52 Oracle Self-Service Human Resources Deploy Self-Service Capability Guide
Define Descriptive Flexfield SegmentsComplete this step if the following setup does not exist in your instance:
• Log in to the System Administrator responsibility.
• Navigate to the Descriptive Flexfield Segments window (Application > Flexfield > Descriptive > Segments).
• Query using the following values:
Application : Payroll
Title: "Additional Element Entry Information" (or) "Add'l Element Entry Info."
• Add the following in Context Field Values, if the value does not exist:
Code: US EARNINGS
Name: US EARNINGS
Description: Additional Element Entry Info for US
Click on Segments and enter the following values:
Click on Segments and enter the following values:
Number: 10
Name: Originating Pay Period
Window Prompt: Originating Pay Period
Column: ATTRIBUTE10
Value Set: HR_US_DATE_11
Click Open and deselect the Required check box.
• Close the Window and Save your work.
• Complete the following steps to feed the Descriptive flex field with date values. TheDescriptive Flex field defined above is linked to each of the elements that form the payroll.
• Click Additional Element Entry Information and then select the Context Value : US EARNINGS.
• Enter the Originating Pay Period, which is any date based on employee hire and element entry date.
• Freeze and compile the flexfield definition.

Payroll Process Management 17-53
Complete the Configuration Steps to Display Dates on Online Payslip1. Log in to the Oracle HRMS responsibility.
2. Go to Other Definitions.
3. Navigate to the Table Values window.
4. Query the table: ONLINE_PAYSLIP_DATE_CONTROL_TBL. By default, for the Column Name: 05, for Overtime and Premium 'Y" value is displayed.
Defining the new Column Values1. Navigate to the Table Structure window.
2. Query the table: ONLINE_PAYSLIP_DATE_CONTROL_TBL
3. Click the Columns button.
4. In the User Column Key, add the new record for the required in the form of 'State Code', for example: 35.
5. Save the changes and close the Columns window.
6. Click the Rows button.
7. Add a new record for the required element type, for example: Supplemental and save your changes.
Defining the Table Values1. Navigate to the Table Values window.
2. Query the ONLINE_PAYSLIP_DATE_CONTROL_TBL table, which handles dates. In the name field in the Column section, query the state code that you had added in the earlier step, for example 35.
3. Add record for element type in the Exact field, in this example, it is Supplemental.
4. Define value 'Y' in the corresponding value field.
5. In the values section add records for the element types and configure accordingly. For example, if you enter Overtime in the Exact field and if the corresponding Value field is left blank it assumes the default value which is 'N'.

17-54 Oracle Self-Service Human Resources Deploy Self-Service Capability Guide
Note: Instead of defining an element explicitly to N not configuringwill assume a default 'N'.
6. Save your work.

Payroll Process Management 17-55
Using Oracle SSHR for Payroll Management - Canada
Online Payslip (Canada)The Online Payslip for Canada is a localized version of the generic payslip and has beendesigned to meet local requirements.
For information on the generic payslip functionality, see Online Payslip, page 17-12.
You can also use an RTF template to produce the online payslip using XML Publisher. You can use the default template or create your own.
Menu and Function NamesThis module can be accessed from the following menus and functions:
User Menu Name Function Name
Employee Self-Service Payslip
See: Defining Menus for SSHR, page 4-10
WorkflowThe workflow details for this module are listed below:
Workflow Process Display Name: Not applicable
Configurable Workflow Attributes:Not applicable
Configurable Tips and InstructionsNot applicable
Configurable FlexFieldsNot applicable

17-56 Oracle Self-Service Human Resources Deploy Self-Service Capability Guide
Configurable Profile Options
Profile Configurable Level Values Default
HR:View Payslip From Date for WEB (MM/DD/YYYY)
User specification Date 01/01/1997
HR:View Payslip From Date for WEB
This profile option determines how many payroll periods a user can view in the online payslip. If the profile option is not set, an error message is displayed when the user attempts to view the online payslip.
Additional Configuration Options1. Define Additional Information
Optionally define additional information to be displayed in the Other Information section of the payslip using the Balances, Elements, and Message types in the Payslip Information additional organization information. If you are entering a message, you can either specify the message text or the message name. If you specify the message name, the Canadian Payroll Archiver subsequently retrieves the message from fnd_new_messages and archives it. If you enter the message text, the Canadian Payroll Archiver archives the message text entered at the organizationor business group level.
See: Entering Payslip Information, Oracle HRMS Enterprise and Workforce Management Guide
2. Append Custom Code to Existing XML
If you are providing online PDF payslips, you can append custom data to the generated XML by defining a custom procedure and entering it in the XML Code field in Self-Service Preferences at the Business Group, HR organization or Locationlevel.
This procedure should have the following three input parameters: p_document type, p_action_context_id and p_action_information_category and will be called once for each archived action_information_category (e.g. AC_DEDUCTIONS, EMPLOYEE_DETAILS, etc as is shown in the sample below). You can add custom XML tags which will appear under that action_information_category in addition to the ones already archived (see example below).
Another call to the above procedure is invoked after all archived information has been parsed into the corresponding XML with the purpose of allowing the addition of a custom information category along with its segments (e.g.

Payroll Process Management 17-57
CUSTOM_CATEGORY1 and CUSTOM CATEGORY 2 in the below example). This call will pass NULL to the action_information_category parameter so as to differentiate it from the previous call(s). The value for p_document_type will always be 'PAYSLIP' and the assignment action id of the payroll archiver run will be passed for the p_action_context_id.
A sample XML generated as a combination of the generic package and the custom procedure is shown below.
Note: The segments and categories designated as "CUSTOM" in this sample correspond to the portion generated by the custom procedure.

17-58 Oracle Self-Service Human Resources Deploy Self-Service Capability Guide
<PAYSLIP><EMPLOYEE_DETAILS> <FULL_NAME> Payslip_XML_Test, First name </FULL_NAME> <ORGANIZATION_ID>3011</ORGANIZATION_ID> <NATIONAL_IDENTIFIER>046 454 286</NATIONAL_IDENTIFIER> <PAY_BASIS>Salaried</PAY_BASIS> <FREQUENCY>Week</FREQUENCY> <CUSTOM_SEGMENT1>Data1</CUSTOM_SEGMENT1> <CUSTOM_SEGMENT2>Data2</CUSTOM_SEGMENT2></EMPLOYEE_DETAILS><AC_DEDUCTIONS> <PAY_BASIS>Salaried</PAY_BASIS> <FREQUENCY>Week</FREQUENCY> <PROCESSING_PRIORITY>2</PROCESSING_PRIORITY> <CURRENT_AMOUNT>319.48</CURRENT_AMOUNT> <YTD_AMOUNT>844.59</YTD_AMOUNT> <REPORTING_NAME>QPP</REPORTING_NAME> </ATTRIBUTE_NAME> <CUSTOM_SEGMENT1>Data1</CUSTOM_SEGMENT1> <CUSTOM_SEGMENT2>Data2</CUSTOM_SEGMENT2> <CUSTOM_SEGMENT3>Data3</CUSTOM_SEGMENT3></AC_DEDUCTIONS><AC_EARNINGS> <ELEMENT_CLASSIFICATION>Earnings</ELEMENT_CLASSIFICATION> <ELEMENT_TYPE_ID>105182</ELEMENT_TYPE_ID> <PRIMARY_BALANCE>10551965</PRIMARY_BALANCE> <PROCESSING_PRIORITY>1775</PROCESSING_PRIORITY> <CURRENT_AMOUNT>1200</CURRENT_AMOUNT> <YTD_AMOUNT>1200</YTD_AMOUNT> <REPORTING_NAME>Rate Salary</REPORTING_NAME> <CURRENT_HOURS>40</CURRENT_HOURS> <YTD_HOURS>40</YTD_HOURS> <RATE>30</RATE> <CURRENT_DAYS /> <YTD_DAYS /> <ATTRIBUTE_NAME /></AC_EARNINGS><CUSTOM_CATEGORY1> <CUSTOM_SEGMENT1>Data1</CUSTOM_SEGMENT1> <CUSTOM_SEGMENT2>Data2</CUSTOM_SEGMENT2> <CUSTOM_SEGMENT3>Data3</CUSTOM_SEGMENT3></CUSTOM_CATEGORY1><CUSTOM_CATEGORY2> <CUSTOM_SEGMENT1>Data1</CUSTOM_SEGMENT1> <CUSTOM_SEGMENT2>Data2</CUSTOM_SEGMENT2> <CUSTOM_SEGMENT3>Data3</CUSTOM_SEGMENT3></CUSTOM_CATEGORY2></PAYSLIP>
3. Configure the XML Payslip Using Self Service Preference EIT
Set the document viewing and printing preferences. You can set this information at the HR organization or business group level using the Self-Service Preferences additional organization information, or alternatively at the person or location level using an extra information type.
You can override the PDF Payslip parameters at Organization and Location levels. The precedence is Location, Organization, and Business Group. You can also specify a payslip template at the Location EIT while specifying XML Code at the Business Group EIT. However, you must specify both a template and effective date in one of the EITs. If you do not specify the template and the effective date, the

Payroll Process Management 17-59
application generates an OAF payslip.
The segments Template, XML Code and Effective Date are specific to the PDF payslip and the remaining fields are common for both OAF and PDF payslips.
See: Person Extra Information Types, Oracle HRMS Enterprise and Workforce Management Guide
See: Location Extra Information Types, Oracle HRMS Enterprise and Workforce Management Guide
See: Entering Self-Service Preference Information, Oracle HRMS Enterprise and Workforce Management Guide
4. Run the Prepayments process.
See: Running the Prepayments Process, Oracle HRMS Payroll Processing Management Guide
5. Run the payment processes (for example, the Chequewriter process).
6. Run the Canadian Payroll Archiver process to enable SSHR users to view their payslip.
See: Running the Canadian Payroll Archiver, Oracle HRMS Payroll Processing Management Guide
7. View Online Payslip Using SSHR
After completing the above configuration, you can view payslips through the self-service application using the Employee Self-Service responsibility.
Click Payslip to view the most recent pay period's payslip. You can choose other pay periods from the drop-down list available under the Choose Payslip region.
Payslip Modeling (Canada)The Payslip Modeling feature for Canada is a localized version of the generic Payslip Modeling functionality and is designed to meet local requirements.
For information about the generic Payslip Modeler, see: Using Payslip Modeler, page 17-18
Employees can model their payslip using the Payslip Modeler available online. This is apayslip calculator that can be used by individuals to quickly and accurately answer payslip related questions and address "what-if" scenarios. The calculation results of the 'what-if' scenarios are based on the employee's current pay or the most recent payslip.
This feature is available to both employees and payroll professionals (administrators) via Self Service HR. Payroll administrators can use this feature to answer queries or perform what-if analysis for employees.

17-60 Oracle Self-Service Human Resources Deploy Self-Service Capability Guide
Note: The Payslip Modeling feature is not available from Manager Self-Service and Contingent Worker Self-Service responsibilities.
The Payslip Modeling feature consists of the following processes:
• A Welcome page greeting the employee by name and where the employee must agree to certain terms and conditions.
• A Payslip Modeler page where employees can select from earnings and deductions to model as well as change tax information (if desired). Once the selections are complete, the employee can submit their model payslip to be calculated.
• Results are displayed, which the employee can optionally print out as a PDF document.
Note: Users cannot run the payslip modeling process, if there is a prepayment or costing process already executed for the current pay period. The employee data remains absolutely unaffected by the simulation process. Users must first agree to the Usage Terms and Conditions in the Welcome page before they can begin modeling their payslip. Employees can elect to print a PDF copy of their model payslipresults. The PDF output displays a watermark indicating it is a sample payslip only, plus the model result values are designated as Estimated.
For the Canada Localization, the Payslip Modeling functionality enables employees or payroll administrators to model the following information to determine the impact on payroll calculations:
• Address Details
• Tax Information Details
• Earnings and Hours
• Deductions
Using Payslip ModelingThe Payslip Modeling feature enables employees and payroll administrators to performthe following tasks:
Agree to Terms and Conditions:Employees can view information provided in the Welcome Page and agree to the UsageTerms and Conditions.

Payroll Process Management 17-61
Model Payslip:After employees agree to the usage terms and conditions, the Generate Model Payslip page appears. On this page, employees can:
• View certain personal and pay information such as Employee Name, Job Title, Payroll, Pay Basis, Annual Salary, and Gross Pay.
• Perform payslip modeling altering address related details. The work location field displays the employee's assignment work location, by default. The Employment Province and Override Province fields are read-only. If there is a change in the work location, then the read-only Employment Province field gets updated according to the new province. The Override Province, if present, is the province in which the employee is currently taxed. Employees can select a work location available to the assignment based on the business group. The federal and provincialfields that subsequently appear are related to the work location. The initial value that appears in each of the federal and provincial fields, by default, is the value set in the employee's record.
• Employees can select a work location available to the assignment based on the business group. The federal and provincial fields that subsequently appear are related to the work location. The initial value that appears in each of the federal andprovincial fields, by default, is the value set in the employee's record.
Federal Fields
Federal Tax Exempt
Federal Total Claim Amount
Additional Federal Tax
Federal Prescribed Zone Deduction
Federal Commission Remuneration
Federal Commission Expenses
Federal Annual Deduction Amount
Federal Labour Sponsored Fund Contribution
Provincial Fields
Provincial Tax Exempt: Applicable to Quebec only
Provincial Total Claim Amount: Applicable to all provinces
Additional Provincial Tax: Applicable to Quebec, Newfoundland and Labrador only.
Provincial Commission Remuneration: Applicable to Quebec only.
Provincial Commission Expenses: Applicable to Quebec only.
17-62 Oracle Self-Service Human Resources Deploy Self-Service Capability Guide
Provincial Annual Deduction Amount: Applicable to Quebec only.
Provincial Labour Sponsored Funds Contribution: Applicable to all provinces that allow this tax credit.
Number of Dependents (Ontario only)
Number of Infirm Dependents (Ontario only)
Change the work location, federal, or provincial tax details to view the impact on payroll and tax calculations. A work location change will only impact tax calculations if there is a province change. You can view the change in the Simulation Output in the Tax Deductions section. If users are planning on moving to a different province, they can model a work location change to assess the impact on tax and other deductions to determine changes to net or take-home pay.
• Model changes to net or take home pay by selecting different earnings and deductions that have been made available for modeling. For example, an employee may be eligible for an upcoming bonus or overtime pay, and would like to see whattheir net or take home pay will be. The list of Element-Input Values that appear can change, based on the work location selected.
See: Examples: Payslip Modeling Scenarios, page 17-62
View and Print Model PayslipEmployees can view and print model payslip results. They can view side by side pie charts that compare the employee's Current Pay to their Estimated (model) Pay. The Current Pay pie chart displays data from the employee's most recent payslip. The Estimated Pay pie chart displays data from the model payslip. The Current Pay and Estimated Pay pie charts provide a breakdown of current and estimated pay by pretax deductions, taxes, other deductions and net pay.
Examples of Payslip Modeling Scenarios (Canada)This topic provides examples on payslip modeling scenarios.
See: Payslip Modeling (Canada), page 17-59
Example 1Employee, who is working some overtime this week wants to estimate what their next check will be.
The employee selects the applicable earnings from the list of earnings that have been made available for payslip modeling. This selection displays their current [hourly] rate of pay and current number of hours. The employee then enters in their Estimated Hourly Rate and Estimated Number of Hours. In this case, they also select to add Overtime to the list of earnings, and are then prompted to enter the Estimated Overtime

Payroll Process Management 17-63
Rate as well as the Estimated Number of hours. Note that what the employee is able to enter or select from would be based on the element definition, namely the input values. The employee will also see a list of their current deductions (again, based on their latest actual payslip) and they can also select or de-select from the available deductions. In this case, these will be left as they are with no changes. The employee can also override their existing Federal and Provincial tax credits, etc. In this case, these values will also be left as is.
Example 2Employee, who is due a Bonus, wants to estimate their net take home pay.
The employee selects the applicable earnings from the available list of earnings. They would select the "Bonus" earning. The employee can then enter a flat dollar amount. Note that what the employee is able to enter or select from would be based on the element definition, namely the input values. The employee will also see a list of their current deductions (again, based on their latest actual payslip) and they can also select or de-select from the available deductions. In this case, these will be left as is with no changes. Employee can also override their existing Federal and Provincial tax credits, etc. In this case, these values will also be left as is.
Example 3Employee would like to increase or decrease their RRSP deduction to determine the tax effect and take home pay.
The employee selects the applicable earnings from the available list of earnings. The selection would include just their Regular earnings. This displays their current [hourly] rate of pay and current number of hours if applicable. The employee then enters in theirEstimated/Projected Hourly Rate and Estimated/Projected Number of Hours, or Estimated/Projected Amount. Note that what the employee is able to enter or select from would be based on the element definition, namely the input values.
The employee will also see a list of their current deductions (again, based on their latest actual payslip) and they can also select or de-select from the available deductions. In this case, the employee had a RRSP deduction in their most recent payslip so the last amount deducted is displayed as Current. In the Estimated/Projected Amount column, they can enter a new amount or percent, depending on how the deduction element is defined. The employee can also override their existing Federal and Provincial tax credits, etc. In this case, these values will be left as is.
Example 4Employee, who is getting married, wants to see their take home pay will be once their tax credit amount is changed.
The employee selects the applicable earnings from the available list of earnings. This would include just their Regular earnings. This selection displays their current [hourly]

17-64 Oracle Self-Service Human Resources Deploy Self-Service Capability Guide
rate of pay and current number of hours if applicable. The employee, then enters in their Estimated/Projected Hourly Rate and Estimated/Projected Number of Hours, or Estimated/Projected Amount. Note that what the employee is able to enter or select from would be based on the element definition, namely the input values. The employee can also see a list of their current deductions (again, based on their latest actual payslip) and they can also select or de-select from the available deductions. In this case, they are left intact with no changes. The employee can then change their existing Federal and Provincial tax credits.
Configuration Information for Payslip Modeling (Canada)This topic provides configuration information for the Payslip Modeling (Canada) function.
For information about the generic Payslip Modeler:
See: Using Payslip Modeler, page 17-18
Setting up Payslip Modeler, Oracle Payroll Processing Management Guide
Menu and Function NamesYou can access this module from the following menus and functions:
User Menu Name Function Name
Manager Self Service Payslip Modeling
Payroll Professional Payslip Modeling
WorkflowNot Applicable
Personalization of Paycheck Modeling PagesThe Payslip Modeling Self-Service Pages are based on Oracle Application Framework technology and you can personalize the pages to display the content as per your requirements to indicate the necessary details or instructions to employees. Following are the details which you can personalize:
Welcome Page
Welcome Message, Usage Instructions and Terms, and Conditions displayed on this page can be personalized.
Generate Model Payslip Page

Payroll Process Management 17-65
You can personalize the following information:
• Fields in these regions:
Simulation Display Region for CA
Address Related Details
Tax Information Details
Earnings and Hours
Deductions
• Information Tips for each of these Regions.
• Placeholders in the 'Instructions' section.
The fields displayed in the Generate Model Paylsip page regions are configured based on Descriptive Flexfield Contexts. If any of the fields in these regions are to be hidden or made read-only, then it can be done by specifying the list of segments to be displayed and those to be displayed as Read-Only. The instructions about setting up the"Descriptive Flexfield Segment List" are specified in the "Oracle Applications Framework Developer Guide". For specifying the Segment List, it is necessary to know the Flexfield Context and segment names corresponding to each region. Note that the names displayed on the page for each field correspond to the Prompt information. The actual segment name will be different. The segment name should be used in the Segment List.
Below are the context names for each of the regions in the Generate Model Payslip page.
These flexfield contexts are available with the 'Extra Assignment Information' EIT.
Region Context Code
Simulation Display Region for CA CA_SIMULATION_DISPLAY
Address Related Details CA_SIMULATION_REGION1
Tax Information Details CA_SIMULATION_REGION2
Earnings and Hours CA_SIMULATION_REGION3
Deductions CA_SIMULATION_REGION4
Below is the list of segment names for each of the fields in various regions.
Simulation Display Region for CA Region:

17-66 Oracle Self-Service Human Resources Deploy Self-Service Capability Guide
Field Name Segment Name
Pay Basis Pay Basis
Rate Rate
Annual Salary Annual Salary
Gross Pay YTD Gross Pay YTD
Address Related Details Region:
Field Name Segment Name
Work Location Work Location
Employment Province Employment Province
Override Province Override Province
Tax Information Region:
Field Name Segment Name
Federal Tax Exempt Federal Tax Exempt
Federal Total Claim Amount Federal Total Claim Amount
Additional Federal Tax Additional Federal Tax
Feeral Prescribed Zone Deduction Federal Prescribed Zone Dedn.
Federal Commission Remuneration Federal Comm. Remuneration
Federal Annual Deduction Amount Fed. Annual Deduction Amount
Federal Labour Sponsored Fund Contribution
Fed. Lbr Spnsrd Funds Contri
Provincial Tax Exempt Provincial Tax Exempt
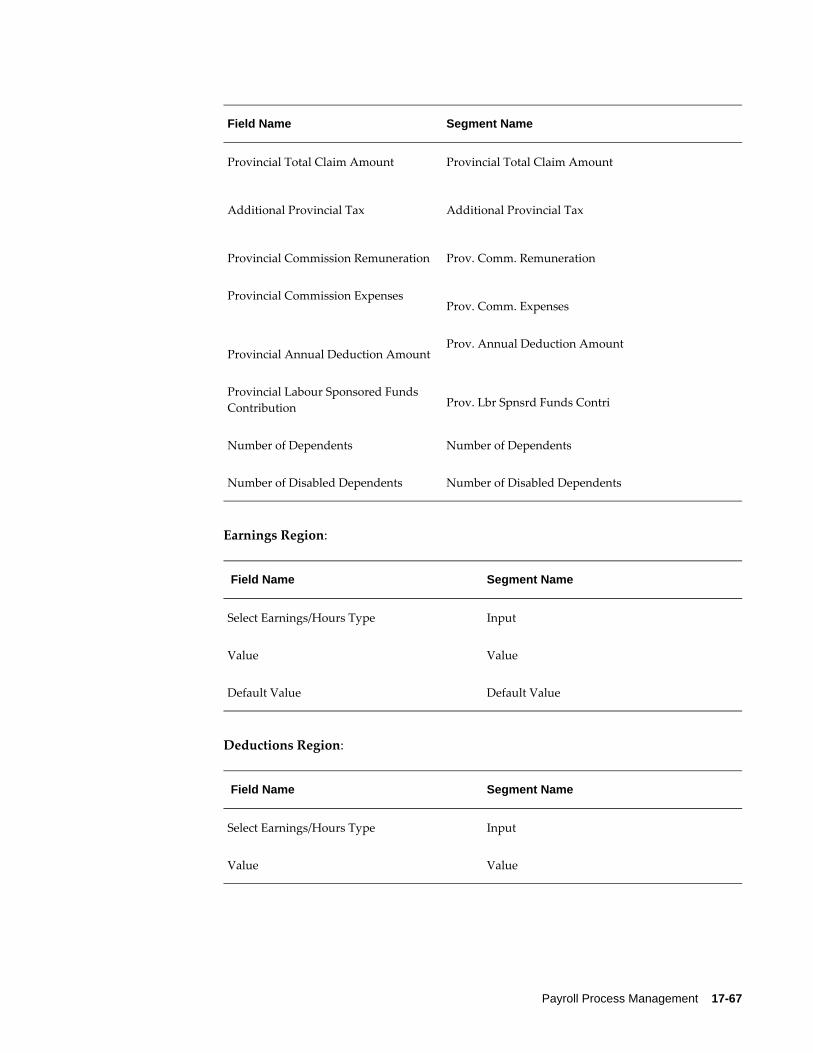
Payroll Process Management 17-67
Field Name Segment Name
Provincial Total Claim Amount Provincial Total Claim Amount
Additional Provincial Tax Additional Provincial Tax
Provincial Commission Remuneration Prov. Comm. Remuneration
Provincial Commission ExpensesProv. Comm. Expenses
Provincial Annual Deduction AmountProv. Annual Deduction Amount
Provincial Labour Sponsored Funds Contribution Prov. Lbr Spnsrd Funds Contri
Number of Dependents Number of Dependents
Number of Disabled Dependents Number of Disabled Dependents
Earnings Region:
Field Name Segment Name
Select Earnings/Hours Type Input
Value Value
Default Value Default Value
Deductions Region:
Field Name Segment Name
Select Earnings/Hours Type Input
Value Value

17-68 Oracle Self-Service Human Resources Deploy Self-Service Capability Guide
Field Name Segment Name
Default Value Default Value
Configurable Profile Options• HR: Enable Payroll Simulation - Users can use the Payslip Modeling module only if
the profile option HR:Enable Payroll Simulation is set to Yes.
• HR: Enable Multiple Assignments for Payroll Simulation - If an employee has multiple active assignments, then users can choose whether they can perform payslip modeling on just their primary assignment or select from a list of all their active assignments. Setting profile option "HR: Enable Multiple Assignments for Payroll Simulation" to Yes will allow employees to select any of their active assignments on which they wish to perform payslip modeling. If the profile option is set to No, then payslip modeling can only be performed on their primary assignment.
Setup StepsThe following sections provide information to set up the Payslip Modeling functionality:
Set Up the Modeling Availability RuleFurther (optional) control of when Payslip Modeling is available to end users can be defined by setting the Modeling Availability Rule and the applicable Days After Period Start and End in Further Information for a payroll definition.
1. Navigate to the Payroll window (Payroll > Description).
2. Query the required payroll definition.
3. Click Further Information.
4. Set the following fields:
Modeling Availability Rule to either Available or Unavailable.
Set the Days After Period Start and Days Before Period End as appropriate.
For more information, see: Defining a Payroll, Oracle HRMS Oracle HRMS Payroll Processing Management Guide
Payroll Process Management 17-69
Add the Simulation Details Extra Information to the Required Responsibility1. Navigate to the Information Types Security window.
2. Select the Information Type of SIMULATION_ELEMENTS (Simulation Details) andattach the type to the required Responsibility.
3. Save your work and close the Information Types Security window.
Configure Earnings and Deductions to be Available for ModelingThis is a mandatory setup step in order to make earning and deduction elements available to the end user when modeling their payslip. For each earning or deduction element, the administrator needs to configure the Element Extra Information Type (EIT)'Simulation Details'. Navigate: Total Compensation > Basic > Element Description > Query the applicable element > Extra Information > Simulation Details.
Note: Only those elements that are enabled and Inputs that are configured at the Element Extra Information Level will be displayed in the Generate Modeling page, Earnings and Deductions section related "Input" field.
The following fields are available for configuration in the Element EIT 'Simulation Details':
• Enable Simulation: Set this to Yes to allow this element to be selected by the end user when performing Payslip Modeling.
• Simulation Input 1 to Simulation Input 15: Up to 15 input values can be configured for usage with Payslip Modeling. For example, if an hourly, non-exempt employee can model overtime earnings, then Simulation Input Values 1, 2, and 3 could be defined to enable the employee to enter a rate, number of hours as well as the applicable factor.
• Simulation Name: Enter the element name that the end user will see in the Payslip Modeler when selecting that element, if it is to be different from the current elementname.
For more information, see Defining an Element, Oracle HRMS Compensation and Benefits Management Guide
Define Element Exclusion SetBy default, an employee's existing element entries will be processed as part of the model payslip, even if the element has not been configured to be available for Payslip Modeling. To exclude elements from even being processed, payroll administrators can optionally define an exclusion element set to exclude these elements from being included in the model payslip process. An example of when this feature might be usefulis when a bonus is being paid out in the pay cycle that is being processed and

17-70 Oracle Self-Service Human Resources Deploy Self-Service Capability Guide
administrators do not want the element to be seen by the employee in their model payslip results. By defining an element exclusion set to specifically exclude that bonus element, it will neither be available for modeling by the end user nor will it be processed when the model payslip is submitted.
For more information on how to exclude elements, see Defining an Element or Distribution Set, Oracle HRMS Compensation and Benefits Management Guide
After defining an element exclusion set, you must select this set in the Modeling Exclusion Element Set field of the Self Service Preference window for your business group. For more information, see: Entering Self-Service Preference Information, Oracle HRMS Enterprise and Workforce Management Guide.
Select the Oracle BI Publisher XML Template to Print Payslip Modeling PDFOracle Payroll for Canada provides a predefined XML template to print the payslip modeling PDF report.
Details of the XML Template:
Name: CA Payroll Simulator Template
Code: PAYCAPSSM
Application: Payroll
Data Definition: CA Payroll Simulator Data Definition (PAYCASIMPAYSLIP)
Type: RTF
Default File: PAYCAPSSM_en.rtf
Default Output Type: PDF
You must select the XML template in the Payroll Simulation Template field of the Self Service Preference window for your business group.
If customers do not want to use the default template, then they can create an XML Publisher template and specify the template in the Self Service Preference window. The template must be associated with the Data Definition PAY<LEG_CODE>SIMPAYSLIP
Changes to Self-Service Menus for CanadaInformation in this topic is applicable to new customers who have implemented Oracle HRMS R12.2.5.
If you are an existing Canadian customer, by default, the following Canadian functions are available with the Employee Self Service (HR_EMPLOYEE_DIRECT_ACCESS_V4.0)and Payroll Professional Menu (PAY_PROF_SELF_SERVICE_V4.0):
• Employee T4
• Employee T4A

Payroll Process Management 17-71
• Employee RL1
• Employee RL2
• Employee Search for T4
• Employee Search for T4A
• Employee Search for RL1
• Employee Search for RL2
If you are a new Canadian customer who has implemented Oracle HRMS R12.2.5, then these functions are not available with the predefined responsibilities. To make these self-service functions available to your employees and payroll professionals, complete the following setup steps:
1. Add Canadian functions to Canadian specific menus.
• Navigate to the Menus window.
• Create custom Self-Service and Payroll Professional menus using the following example:
• Employee Self-Service Menu
Name: CA_EMPLOYEE_SELF_SERVICE
User Menu Name: CA Employee Self Service
Add the following functions:
Seq Prompt Function
1 My T4 Employee T4
2 My T4A Employee T4A
3 My RL1 Employee RL1
4 My RL2 Employee RL2
• Payroll Professional Menu
Name: CA_PAYROLL_PROFESSIONAL
User Menu Name: CA Payroll Professional

17-72 Oracle Self-Service Human Resources Deploy Self-Service Capability Guide
Add the following functions:
Seq Prompt Submenu
Function
1 Employee Search for T4 - Employee Search for T4
2 - - Employee T4
3 Employee Search for T4A - Employee Search for T4A
4 - - Employee T4A
5 Employee Search for RL1 - Employee Search for RL1
6 - - Employee RL1
7 Employee Search for RL2 - Employee Search for RL2
8 - - Employee RL2
9 - Employees Menu
-
10 - Manager Enter ProcessMenu
-

Payroll Process Management 17-73
Seq Prompt Submenu
Function
- - SSHR hierarchy and search functions
-
2. Create two new responsibilities for the menus.
Navigate to the Responsibilities window. Create the following responsibilities and attach the menus created in step1 to the custom responsibilities:
Responsibility Name
Responsibility Key Menu
CA Employee Self Service
CA_EMP_SS CA Employee Self Service
CA Payroll Professional
CA_PAYROLL_PROF CA Payroll Professional
3. Attach the responsibilities to users.
Navigate to the Users window. Add the responsibilities created in step 2 to required users.
Employee T4The Employee T4 module enables employees to view and print the following PDFs using their self-service responsibility:
• T4 PDF
• T4 Amendment PDF
• T4 Cancellation PDF
To view or print the T4 documents, use the latest version of Adobe Acrobat Reader on your local machine. When an employee logs in and clicks the Employee T4 link in their self-service responsibility, the application displays the latest T4 PDF if the Federal Year

17-74 Oracle Self-Service Human Resources Deploy Self-Service Capability Guide
End Preprocess or Federal Year End Amendment process is run for that employee. The latest T4 PDF is displayed provided the system date must be later than the online viewing date specified in the HR: Allow Online T4/T4A viewing as of (MM/DD) profile option. Otherwise, the application displays a note that the T4 statement is not available for that specific year. If for the employee, the Payroll Archive process is run for multipleyears, then the application initially displays the latest archived T4 PDF.
To view previous years PDFs, select the appropriate value from the list of all available PDFs. When you select a particular record in the list of values and click the Go button, the PDF page will display T4 PDF in the PDF display region. If an employee's province has changed or GRE has changed within the year, then separate entries are available in the list of values for each province or GRE.
Viewing T4 as a Payroll ProfessionalUsing the Payroll Professional responsibility, you can select the Employee T4 link and search for a person. When you select a person from the list, their T4 information appears. You can also save a person in My List for future access, so you do not need to search for that person again. In addition to displaying T4 information for current employees, you can also display information for ex-employees. To search for ex-employees, use the Person Type field in the Advanced Search page and select the person type Ex-Employee.
Employee T4AThe Employee T4A module enables employees to view and print the following PDFs using their self-service responsibility:
• T4A PDF
• T4A Amendment PDF
• T4A Cancellation PDF
To view or print the T4A documents, use the latest version of Adobe Acrobat Reader onyour local machine.
When an employee logs in and clicks the Employee T4A link in their self-service responsibility, the application displays the latest T4A PDF Federal Year End Preprocess or Federal Yearned Amendment process is run for that employee. The latest T4A PDF isdisplayed provided the system date must be later than the online viewing date specifiedin the HR: Allow Online T4/T4A viewing as of (MM/DD) profile option. Otherwise, the application displays a note that the T4A PDF is not available for that specific year. If for the employee, Payroll Archive process is run for multiple years, then the application initially displays the latest archived T4A PDF.
To view previous years PDFs, select the appropriate value from the list of all available PDFs. When you select a particular record in the list of values and click the Go button,

Payroll Process Management 17-75
the PDF page will display T4A PDF in PDF display region. If an employee's province has changed or GRE has changed within the year, then separate entries are available in the list of values for each province or GRE.
Viewing T4A as a Payroll ProfessionalUsing the Payroll Professional responsibility you can select the Employee T4A link and search for a person. When you select a person from the list, their T4A information appears. You can also save a person in My List for future access, so you do not need to search for that person again. In addition to displaying T4A information for current employees, you can also display information for ex-employees. To search for ex-employees, use the Person Type field in the Advanced Search page and select the person type Ex-Employee.
Configuring Employee T4 and T4A ModulesThis topic provides configuration information for Employee T4 and T4A modules.
Important: If you are an existing Canadian customer, by default, the following Canadian functions are available with the Employee Self Service (HR_EMPLOYEE_DIRECT_ACCESS_V4.0) and Payroll Professional Menu (PAY_PROF_SELF_SERVICE_V4.0):
• Employee T4
• Employee T4A
• Employee Search for T4
• Employee Search for T4A
If you are a new Canadian customer who has implemented Oracle HRMS R12.2.5, then these functions are not available with the predefined responsibilities. To make these self-service functions available to your employees and payroll professionals, complete the setup steps listed in the topic: Changes to Self-Service Menus for Canada, page 17-70
Menu and Function NamesThe Employee T4 module can be accessed from the following menus and functions:

17-76 Oracle Self-Service Human Resources Deploy Self-Service Capability Guide
User Menu Name Prompt ( Function)
Employee Self-Service Employee T4 (PAY_T4_SS)
Payroll Professional Employee T4 Search (PAY_MGR_T4_EMP_SEARCH)
The Employee T4A module can be accessed from the following menus and functions:
User Menu Name Prompt (New Function)
Employee Self-Service Employee T4A (PAY_T4A_SS)
Payroll Professional Employee T4A Search (PAY_MGR_T4A_EMP_SEARCH)
See: Defining Menus for SSHR, page 4-10
WorkflowNot applicable
Workflow Process Display Name: Not applicable
Configurable Workflow Attributes:Not applicable
Configurable Tips and InstructionsEmployee T4
Tip Type Message Name
Error PAY_74166_NO_T4_TO_VIEW_WEB
Error PAY_74165_NO_SS_PREF_T4_WEB
Error PAY_74167_T4_INVALID_SETUP

Payroll Process Management 17-77
Employee RL2
Tip Type Message Name
Error PAY_74169_NO_SS_PREF_T4A_WEB
Error PAY_74170_NO_T4A_TO_VIEW_WEB
Error PAY_74167_T4_INVALID_SETUP
Configurable FlexFieldsNot applicable
Configurable Profile OptionsHR: Allow Online T4/T4A viewing as of (MM/DD):
Enable the HR: Allow Online T4/T4A viewing as of (MM/DD) profile option to allow your employees to view and download their T4s and T4As as PDF files. You can specifythe month and day that the current year T4s and T4As are viewable and grant these rights at the application, responsibility, user, server, organization, or site level. If employees attempt to view their T4 before the specified date, then they will have access to the previous years T4s and T4As only. If no value is provided here, then employees can view all available T4s and T4As from the prior year as soon as the Federal Year End Preprocess is run.
Additional Configuration Steps• Set the document viewing and printing preferences using Self Service Preferences at
one of the following levels:
Business Group
HR Organization
Location
Person
The precedence goes to Person, Location, Organization and then Business Group.
Define the following self-service preferences fields for online T4 and T4A:
• Document Type: This specifies the type of document for which following segments will be configured. T4 or T4A should be chosen from the list of valuesattached to this segment.

17-78 Oracle Self-Service Human Resources Deploy Self-Service Capability Guide
• Online: This is a Yes/No segment signifying whether to display the online T4/T4A PDF to employees. Select Yes to enable self- service T4/T4A PDF functionality. If you select No, then the T4/T4A will not be displayed through self-service. The default value is Yes. If Yes is chosen for a particular group, for example, location and organization, and there are employees in that group whohave not provided consent to receive their T4 or T4A online, then you must enter an override for that employee to set this option to No.
• Template: The list of seeded templates available are as follows:
If the T4 is selected under Document Type, then the following predefined templates are available:
T4 Slip
T4 Instructions
T4 Amendment PDF
T4 Amendment Instructions
T4 Cancellation PDF
T4 Cancellation Instructions
If the T4A is selected under Document Type, then the following predefined templates are available:
T4A PDF Template
T4A PDF Error Report
T4A Amendment PDF
T4A Amendment PDF Error Report
T4A Cancellation PDF
Select the template to be used for formatting the online T4/ T4A PDF. All of these templates are maintained under XDO template manager, which is available through the XML Publisher responsibility. For information on how to create custom T4 and T4A templates, see: Setting Up Custom BI Publisher Templates for Canada Payroll, Oracle HRMS Payroll Processing Management Guide (Canada)
• The following self-service preferences fields are not applicable to view T4 or T4A online using self-service:
Paper
XML Code
Effective Date
Payslip Employer Address

Payroll Process Management 17-79
Display Payslip GRE Addr
From Offset Criteria
Display Rate Detail Section
Offset Criteria
See: Person Extra Information Types, Oracle HRMS Enterprise and Workforce Management Guide
See: Location Extra Information Types, Oracle HRMS Enterprise and Workforce Management Guide
See: Entering Self-Service Preference Information, Oracle HRMS Enterprise and Workforce Management Guide
• Define the User Table columns to control the viewing of T4 and T4A PDFs online through self-service:
The CAYE_ONLINE_SLIPS_DISPLAY_CONTROL_TBL controls the viewing ofeach slip (original, amended, and cancelled) for every year. For example, if you want to restrict online viewing to only original year end slips, then enter a value of N in this table for amended and cancelled slips for each year. Rows for this table have been seeded (T4 PDF, T4 Amendment PDF, T4 Cancellation PDF, T4A PDF, T4A Amendment PDF, and T4A Cancellation PDF). Under Table Structure, you have to create columns by entering the year (YYYY) you want to control the slips. As Table Values, you can provide N or Y for a specific year (column value) and for specific report type (row value). The default is Y.
Following are the setup steps to control the viewing of the T4 and T4A statements online through self-service:
1. Navigate to the Table Structure window (Other Definitions > Table Structure).
2. Query the CAYE_ONLINE_SLIPS_DISPLAY_CONTROL_TBL table.
3. Define columns and provide year (YYYY) under Name.
4. Navigate to the Table Values window (Other Definitions > Table Values).
5. Query the form with table value as CAYE_ONLINE_SLIPS_DISPLAY_CONTROL_TBL.
6. Date track to 31-Dec of the year provided in the earlier step.
7. Select report (T4 PDF, T4 Amendment PDF, T4 Cancellation PDF, T4A PDF,T4A Amendment PDF, and T4A Cancellation PDF) in the Exact column andprovide either Y or N in the Value field.
17-80 Oracle Self-Service Human Resources Deploy Self-Service Capability Guide
Employee RL1The Employee RL1 module enables employees to view and print the following PDFs using their self-service responsibility:
• RL1 PDF
• RL1 Amendment PDF
• RL1 Cancellation PDF
To view or print the RL1 documents, use the latest version of Adobe Acrobat Reader on your local machine. The PDFs are available if the employee's payroll data is archived in either the Provincial Year End Preprocess or amendment year end preprocess or has cancelled PDFs.
When an employee logs in and clicks the Employee RL1 link in their self-service responsibility, the latest RL1 PDF will be shown if the Provincial Year End Preprocess. is run for that user. Otherwise, the application displays a note that the RL1 is not available for that specific year. If for the user Payroll Archive process is run for multipleyears, then initially the application displays the latest archive RL1 PDF.
To view previous years PDFs, select the appropriate value from the list of all available PDFs.
When you select a particular record in the list of values and click the Go button, the PDF page will display RL1 PDF in the PDF display region. If an employee's PRE has changed within the year, then separate entries are available in the list of values for each PRE.
Viewing RL1 as a Payroll ProfessionalUsing the Payroll Professional responsibility you can select the Employee RL1 link and search for a person. When you select a person from the list, their RL1 information appears. You can also save a person in My List for future access, so you do not need to search for that person again. In addition to displaying RL1 information for current employees, you can also display information for ex-employees. To search for ex-employees, use the Person Type field in the Advanced Search page and select the person type Ex-Employee.
Employee RL2The Employee RL2 module enables employees to view and print the following PDFs using their self-service responsibility:
• RL2 PDF

Payroll Process Management 17-81
• RL2 Amendment PDF
• RL1 Cancellation PDF
To view or print the RL2 documents, use the latest version of Adobe Acrobat Reader on your local machine. The PDFs are available if the employee's payroll data is archived in either the Provincial Year End Preprocess or amendment year end preprocess or has cancelled PDFs.
When an employee logs in and clicks the Employee RL2 link in their self-service responsibility, the latest RL2 PDF will be shown if the Provincial Year End Preprocess isrun for that user. Otherwise, the application displays a note that the RL2 is not availablefor that specific year. If for the user Provincial Year End Preprocess is run for multiple years, then initially the application displays the latest archive RL2 PDF.
To view previous years PDFs, select the appropriate value from the list of all available PDFs. When you select a particular record in the list of values and click the Go button, the PDF page will display RL2 PDF in the PDF display region. If an employee's PRE haschanged within the year, then separate entries are available in the list of values for each PRE
Viewing RL2 as a Payroll ProfessionalUsing the Payroll Professional responsibility you can select the Employee RL2 link and search for a person. When you select a person from the list, their RL2 information appears. You can also save a person in My List for future access, so you do not need to search for that person again. In addition to displaying RL2 information for current employees, you can also display information for ex-employees. To search for ex-employees, use the Person Type field in the Advanced Search page and select the person type Ex-Employee.
Configuring Employee RL1 and RL2 ModulesThis topic provides configuration information for Employee RL1 and RL2 modules.
Important: If you are an existing Canadian customer, by default, the following Canadian functions are available with the Employee Self Service (HR_EMPLOYEE_DIRECT_ACCESS_V4.0) and Payroll Professional Menu (PAY_PROF_SELF_SERVICE_V4.0):
• Employee RL1
• Employee RL2
• Employee Search for RL1

17-82 Oracle Self-Service Human Resources Deploy Self-Service Capability Guide
• Employee Search for RL2
If you are a new Canadian customer who has implemented Oracle HRMS R12.2.5, then these functions are not available with the predefined responsibilities. To make these self-service functions available to your employees and payroll professionals, complete the setup steps listed in the topic: Changes to Self-Service Menus for Canada, page 17-70
Menu and Function NamesThe Employee RL1 module can be accessed from the following menus and functions:
User Menu Name Prompt ( Function)
Employee Self-Service Employee RL1 (PAY_RL1_SS)
Payroll Professional Employee RL1 Search (PAY_MGR_RL1_EMP_SEARCH)
The Employee RL2 module can be accessed from the following menus and functions:
User Menu Name Prompt ( Function)
Employee Self-Service Employee RL2 (PAY_RL2_SS)
Payroll Professional Employee RL2 Search (PAY_MGR_RL2_EMP_SEARCH)
See: Defining Menus for SSHR, page 4-10
WorkflowNot applicable
Workflow Process Display Name: Not applicable
Configurable Workflow Attributes:Not applicable

Payroll Process Management 17-83
Configurable Tips and InstructionsEmployee RL1
Tip Type Message Name
Error PAY_74173_NO_RL1_TO_VIEW_WEB
Error PAY_74172_NO_SS_PREF_RL1_WEB
Error PAY_74174_RL1_INVALID_SETUP
Employee RL2
Tip Type Message Name
Error PAY_74169_NO_SS_PREF_T4A_WEB
Error PAY_74170_NO_T4A_TO_VIEW_WEB
Error PAY_74167_T4_INVALID_SETUP
Configurable FlexFieldsNot applicable
Configurable Profile OptionsHR:Allow Online RL1/RL2 viewing as of (MM/DD)
Enable the HR:Allow Online RL1/RL2 viewing as of (MM/DD) profile option to allow your employees to view and download their RL1s or RL2s as PDF files. You can specify the month and day that the current year's RL1s or RL2s are viewable and grant these rights at the application, responsibility, user, server, organization, or site level. If employees attempt to view their RL1 or RL2 before the specified date, they only see the previous years RL1s or RL2s.
Additional Configuration Steps• Set the document viewing and printing preferences using Self Service Preferences at
one of the following levels:
17-84 Oracle Self-Service Human Resources Deploy Self-Service Capability Guide
Business Group
HR Organization
Location
Person
The precedence goes to Person, Location, Organization and then Business Group.
Define the following self-service preferences fields for online T4 and T4A:
• Document Type: This specifies the type of document for which following segments will be configured. RL1 or RL2 should be chosen from the list of values attached to this segment.
• Online: This is a Yes/No segment signifying whether to display the online RL1 or RL2 PDF to employees. Select Yes to enable self -service RL1 or RL2 PDF functionality. If you select No, then RL1 or RL2 will not be displayed through self service.
• Template: The list of seeded templates available are as follows:
If the RL1 is selected under Document Type, then the following predefined templates are available:
RL1 Paper PDF
RL1 Amendment PDF
RL1 Cancelled PDF
RL1 PDF Error Report
RL1 Amendment Error Report
If the RL2 is selected under Document Type, then the following predefined templates are available:
RL2 Paper PDF
RL2 Amendment PDF
RL2 Cancel PDF
RL2 PDF Error Report
RL2 Amendment Error Report
Select the template to be used for formatting the online RL1/ RL2 PDF. All of these templates are maintained under XDO template manager, which is available through the XML Publisher responsibility. For information on how to create custom T4 and T4A templates, see: Setting Up Custom BI Publisher Templates for Canada Payroll, Oracle HRMS Payroll Processing Management Guide (Canada)

Payroll Process Management 17-85
• The following self-service preferences fields are not applicable to RL1 or RL2.
Paper
XML Code
Effective Date
Payslip Employer Address
Display Payslip GRE Addr
From Offset Criteria
Display Rate Detail Section
Offset Criteria
See: Person Extra Information Types, Oracle HRMS Enterprise and Workforce Management Guide
See: Location Extra Information Types, Oracle HRMS Enterprise and Workforce Management Guide
See: Entering Self-Service Preference Information, Oracle HRMS Enterprise and Workforce Management Guide
• Define the User Table columns to control the viewing of RL1 and RL2 Statements.
The CAYE_ONLINE_SLIPS_DISPLAY_CONTROL_TBL controls the viewing ofeach slip (original, amended and cancelled) for every year. For example, if you want to restrict online viewing to only original year end slips, then enter a value of N in this table for amended and cancelled slips for each year. Rows for this table have been seeded (RL1 PDF, RL1 Amendment PDF, RL1 Cancellation PDF, RL2 PDF, RL2 Amendment PDF, and RL2 Cancellation PDF). Under TableStructure, you have to create columns by entering the year (YYYY) you want to control the slips. As Table Values, you can provide N or Y for a specific year (column value) and for specific report type (row value). The default is Y.
Following are the setup steps to control the viewing of T4 and T4A statements through self-service:
1. Navigate to the Table Structure window (Other Definitions > Table Structure).
2. Query the CAYE_ONLINE_SLIPS_DISPLAY_CONTROL_TBL table.
3. Define columns and provide year (YYYY) under Name.
4. Navigate to the Table Values window (Other Definitions > Table Values).
5. Query the form with table value as
17-86 Oracle Self-Service Human Resources Deploy Self-Service Capability Guide
CAYE_ONLINE_SLIPS_DISPLAY_CONTROL_TBL.
6. Date track to 31-Dec of the year provided in the earlier step.
7. Select the report (RL1 PDF, RL1 Amendment PDF, RL1 Cancellation PDF, RL2 PDF, RL2 Amendment PDF, and RL2 Cancellation PDF) in the Exact column and provide either Y or N in the Value field.
Payroll Process Management 17-87
Using Oracle SSHR for Payroll Management - Mexico
Payslip Modeling (Mexico)The Payslip Modeling feature for Mexico is a localized version of the generic Payslip Modeling functionality and is designed to meet local requirements.
For information about the generic Payslip Modeler, see: Using Payslip Modeler, page 17-18
Payroll professionals (administrators) can model payslips using the Payslip Modeler available online. This is a payslip calculator that can be used to quickly and accurately answer payslip related questions and address "what-if" scenarios. The calculation results of the 'what-if' scenarios are based on the employee's current pay or the most recent payslip. The simulation output displays some additional components like Employer Taxes, IDW components, and ISR Run results in addition to the employee components which are displayed in the Employee Online Payslip. These additional components are useful for Payroll Managers to simulate employee payroll calculations.
The Payslip Modeling feature is available to payroll professionals (administrators) via Self Service HR. Payroll administrators can use this feature to answer queries or perform what-if analysis for employees.
Note: The Payslip Modeling feature is not available from Employee Self-Service, Manager Self-Service and Contingent Worker Self-Service responsibilities.
The Payslip Modeling feature consists of the following processes:
• A Welcome page greeting the user by name and where the user must agree to certain terms and conditions.
• A Payslip Modeler page where users can select from earnings and deductions to model as well as change tax information, if desired. Once the selections are complete, the user can submit the model payslip to be calculated.
• Results are displayed, which the user can optionally print out as a PDF document.
Note: Users cannot run the payslip modeling process, if there is a prepayment or costing process already executed for the current pay period. The employee data remains absolutely unaffected by the simulation process. Users must first agree to the Usage Terms and Conditions in the Welcome page before they can begin modeling their payslip.
17-88 Oracle Self-Service Human Resources Deploy Self-Service Capability Guide
For the Mexico localization, the Payslip Modeling functionality enables payroll administrators to model the following information to determine the impact on payroll calculations:
• Location Details
• Mexico Tax Witholding Details
• Earnings and Hours
• Deductions
Using Payslip ModelingThe Payslip Modeling feature enables payroll administrators to perform the following tasks:
Agree to Terms and Conditions:Payroll administrators can view information provided in the Welcome Page and agree to the Usage Terms and Conditions.
Model Payslip:After payroll administrators agree to the usage terms and conditions, the Generate Model Payslip page appears.
This page enables payroll administrators to alter work location, GRE and ISR Tax Rates user tables in addition to the earnings and deductions values to determine their impact on payroll calculations.
• View certain personal and pay information such as Employee Name, Job Title, Payroll, Pay Basis, Annual Salary, and Gross Pay.
• Perform payslip modeling altering location details. The work location field displaysthe employee's assignment work location, by default. The government reporting entity field displays the assignment's GRE, by default. The list of GREs available to the assignment are based on the business group.
• Payroll administrators can select a work location available to the assignment based on the business group. The tax withholding details fields that subsequently appear are related to the work location. The following is a list of fields that appear in the Mexico Tax Witholding Details region:
• Pay Run Type: Employees can select the required run type to submit the simulation payroll run. The default run type is Regular.
• ISR Tax Rate

Payroll Process Management 17-89
• ISR Monthly Tax Rate
• ISR Tax Annual Rate
• ISR Subsidy for Empl
The initial values that appear in the Mexico Tax Witholding Details region are the default values set for the assignment's payroll.
Payroll administrators can change the work location and tax witholding details to view the impact on payroll and tax calculations. For example, users can change the work location to verify corresponding tax calculation changes. If taxation is present for the selected work location, then you can view the change in the Simulation Output under Estimated Taxes and Estimated Employer Taxes section.
• Model changes to net or take home pay by selecting different earnings and deductions that have been made available for modeling. The list of Element-Input Values that appear can change, based on the work location selected.
View and Print Model PayslipPayroll administrators can view and print model payslip results. They can view side by side pie charts that compare the employee's Current Pay to their Estimated (model) Pay.The Current Pay pie chart displays data from the employee's most recent payslip. The Estimated Pay pie chart displays data from the model payslip. The Current Pay and Estimated Pay pie charts provide a breakdown of current and estimated pay by pretax deductions, taxes, other deductions and net pay.
Configuration Information for Payslip Modeling (Mexico)This topic provides configuration information for the Payslip Modeling (Mexico) function.
For information about the generic Payslip Modeler:
See: Using Payslip Modeler, page 17-18
See: Setting up Payslip Modeler, Oracle Payroll Processing Management Guide
Menu and Function NamesYou can access this module from the following menus and functions:
User Menu Name Function Name
Payroll Professional Payslip Modeling

17-90 Oracle Self-Service Human Resources Deploy Self-Service Capability Guide
WorkflowNot Applicable
Personalization of Paycheck Modeling PagesThe Payslip Modeling Self-Service Pages are based on Oracle Application Framework technology and you can personalize the pages to display the content as per your requirements to indicate the necessary details or instructions to employees. Following are the details which you can personalize:
Welcome Page
Welcome Message, Usage Instructions and Terms, and Conditions displayed on this page can be personalized.
Generate Model Payslip Page
You can personalize the following information:
• Fields in these regions:
Simulation Display Region for MX
Location Details
Mexico Tax Withholding Details
Earnings and Hours
Deductions
• Information Tips for each of these Regions.
• Placeholders in the 'Instructions' section.
The fields displayed in the Generate Model Paylsip page regions are configured based on Descriptive Flexfield Contexts. If any of the fields in these regions are to be hidden or made read-only, then it can be done by specifying the list of segments to be displayed and those to be displayed as Read-Only. The instructions about setting up the"Descriptive Flexfield Segment List" are specified in the "Oracle Applications Framework Developer Guide". For specifying the Segment List, it is necessary to know the Flexfield Context and segment names corresponding to each region. Note that the names displayed on the page for each field correspond to the Prompt information. The actual segment name will be different. The segment name should be used in the Segment List.
Below are the context names for each of the regions in the Generate Model Payslip page.
These flexfield contexts are available with the 'Extra Assignment Information' EIT.

Payroll Process Management 17-91
Region Context Code
Simulation Display Region for MX MX_SIMULATION_DISPLAY
Location Details MX_SIMULATION_REGION1
Mexico Tax Withholding Details MX_SIMULATION_REGION2
Earnings and Hours MX_SIMULATION_REGION3
Deductions MX_SIMULATION_REGION4
Below is the list of segment names for each of the fields in various regions.
Simulation Display Region for MX:
Field Name Segment Name
Pay Basis Pay Basis
Rate Rate
Annual Salary Annual Salary
Gross Pay YTD Gross Pay YTD
Location Details Region:
Field Name Segment Name
Work Location Work Location
Government Reporting Entity Government Reporting Entity
Mexico Tax Withholding Details:
Field Name Segment Name
Pay Run Type Pay Run Type

17-92 Oracle Self-Service Human Resources Deploy Self-Service Capability Guide
Field Name Segment Name
ISR Tax Rate ISR Tax Rate
ISR Monthly Tax Rate ISR Monthly Tax Rate
ISR Tax Annual Rate ISR Tax Annual Rate
ISR Tax Annual Rate ISR Tax Annual Rate
ISR Subsidy for Empl ISR Subsidy for Empl
Earnings Region:
Field Name Segment Name
Select Earnings/Hours Type Input
Value Value
Default Value Default Value
Deductions Region:
Field Name Segment Name
Select Earnings/Hours Type Input
Value Value
Default Value Default Value
Configurable Profile Options• HR: Enable Payroll Simulation - Users can use the Payslip Modeling module only if
the profile option HR:Enable Payroll Simulation is set to Yes.
• HR: Enable Multiple Assignments for Payroll Simulation - If an employee has multiple active assignments, then users can choose whether they can perform

Payroll Process Management 17-93
payslip modeling on just their primary assignment or select from a list of all their active assignments. Setting profile option "HR: Enable Multiple Assignments for Payroll Simulation" to Yes will allow employees to select any of their active assignments on which they wish to perform payslip modeling. If the profile option is set to No, then payslip modeling can only be performed on their primary assignment.
Setup StepsThe following sections provide information to set up the Payslip Modeling functionality:
Set Up the Modeling Availability RuleFurther (optional) control of when Payslip Modeling is available to end users can be defined by setting the Modeling Availability Rule and the applicable Days After Period Start and End in Further Information for a payroll definition.
1. Navigate to the Payroll window (Payroll > Description).
2. Query the required payroll definition.
3. Click Further Information.
4. Set the following fields:
Modeling Availability Rule to either Available or Unavailable.
Set the Days After Period Start and Days Before Period End as appropriate.
For more information, see: Defining a Payroll, Oracle HRMS Oracle HRMS Payroll Processing Management Guide
Add the Simulation Details Extra Information to the Required Responsibility1. Navigate to the Information Types Security window.
2. Select the Information Type of SIMULATION_ELEMENTS (Simulation Details) andattach the type to the required Responsibility.
3. Save your work and close the Information Types Security window.
Configure Earnings and Deductions to be Available for ModelingThis is a mandatory setup step in order to make earning and deduction elements available to the end user when modeling their payslip. For each earning or deduction element, the administrator needs to configure the Element Extra Information Type (EIT)'Simulation Details'. Navigate: Total Compensation > Basic > Element Description > Query the applicable element > Extra Information > Simulation Details.

17-94 Oracle Self-Service Human Resources Deploy Self-Service Capability Guide
Note: Only those elements that are enabled and Inputs that are configured at the Element Extra Information Level will be displayed in the Generate Modeling page, Earnings and Deductions section related "Input" field.
The following fields are available for configuration in the Element EIT 'Simulation Details':
• Enable Simulation: Set this to Yes to allow this element to be selected by the end user when performing Payslip Modeling.
• Simulation Input 1 to Simulation Input 15: Up to 15 input values can be configured for usage with Payslip Modeling. For example, if an hourly, non-exempt employee can model overtime earnings, then Simulation Input Values 1, 2, and 3 could be defined to enable the employee to enter a rate, number of hours as well as the applicable factor.
• Simulation Name: Enter the element name that the end user will see in the Payslip Modeler when selecting that element, if it is to be different from the current elementname.
For more information, see Defining an Element, Oracle HRMS Compensation and Benefits Management Guide
Define Element Exclusion SetBy default, an employee's existing element entries will be processed as part of the model payslip, even if the element has not been configured to be available for Payslip Modeling. To exclude elements from even being processed, payroll administrators can optionally define an exclusion element set to exclude these elements from being included in the model payslip process. An example of when this feature might be usefulis when a bonus is being paid out in the pay cycle that is being processed and administrators do not want the element to be seen by the employee in their model payslip results. By defining an element exclusion set to specifically exclude that bonus element, it will neither be available for modeling by the end user nor will it be processed when the model payslip is submitted.
For more information on how to exclude elements, see Defining an Element or Distribution Set, Oracle HRMS Compensation and Benefits Management Guide
After defining an element exclusion set, you must select this set in the Modeling Exclusion Element Set field of the Self Service Preference window for your business group. For more information, see: Entering Self-Service Preference Information, Oracle HRMS Enterprise and Workforce Management Guide.
Select the Oracle BI Publisher XML Template to Print Payslip Modeling PDFOracle Payroll for Mexico provides a predefined XML template to print the payslip modeling PDF report.
Details of the XML Template:
Payroll Process Management 17-95
Name: MX Payroll Simulator Template
Code: PAYMXPSSM
Application: Payroll
Data Definition: MX Payroll Simulator Data Definition
Type: RTF
Default Output Type: PDF
You must select the XML template in the Payroll Simulation Template field of the Self Service Preference window for your business group.
If customers do not want to use the default template, then they can create an XML Publisher template and specify the template in the Self Service Preference window. The template must be associated with the Data Definition PAY<LEG_CODE>SIMPAYSLIP
Recommended Step for the Government Reporting Field in the Location Details RegionThe Government Reporting Entity field in the Location Details region, by default, displays the assignment's GRE recorded in the Statutory Info tab of the Assignment window.
If the GRE is not entered, then the application determines the GRE of an assignment based on the hierarchy the location is associated with. Therefore, it is recommended that all locations be associated with the appropriate GREs using the Mexico HRMS Statutory Reporting Hierarchy.

17-96 Oracle Self-Service Human Resources Deploy Self-Service Capability Guide
Payroll Management - EMEA
Online Payslip (South Africa) The Payslip module enables self-service users to view an electronic payslip for a pay period. Users can select what pay period to view from a list of values showing the Pay Dates, or by clicking on the Next or Back button.
Note: All columns and fields in the Online Payslip function are display only.
The Payslip is generated from the user's assignments. If there are multiple paid assignments for a user, the user can select the required assignment. Once the user has logged into the application and clicks on the View Payslip option, the user will see an electronic version of their payslip based on their selected assignment and the last pay period that has been processed.
If Multiple Assignment Payments functionality has been enabled for your localization, you have the option of combining the checks for multiple assignments into one pay check. In this case, the online payslip will show the combined totals for all assignments.
Menu and Function NamesThis module can be accessed from the following menus and functions:
User Menu Name Function Name
Employee Self-Service Payslip
See: Defining Menus for SSHR, page 4-10
WorkflowThe workflow details for this module are listed below:
Workflow Process Display Name: Not applicable
Configurable Workflow Attributes:Not applicable

Payroll Process Management 17-97
Configurable Tips and InstructionsNot applicable
Configurable FlexFieldsNot applicable
Configurable Profile Options
Profile Configurable Level Values Default
HR:View Payslip From Date for WEB (MM/DD/YYYY)
User specification Date 01/01/1997
HR:View Payslip From Date for WEB
This profile option determines how many payroll periods a user can view in the online payslip. If the profile option is not set, an error message is displayed when the user attempts to view the online payslip.
HR:Mask Characters
You can use this profile option to set the number of characters or digits to display in numbers such as bank account or credit card numbers.
Additional Configuration Options1. Optionally define additional information to be displayed in the Other Information
section of the payslip using the ZA Payslip Balances and ZA Payslip Elements additional organization information types.
• ZA Payslip Balances
See: Business Groups: Entering ZA Payslip Balances, Oracle HRMS Enterprise and Workforce Management Guide
• ZA Payslip Elements
See: Business Groups: Entering ZA Payslip Elements, Oracle HRMS Enterprise and Workforce Management Guide
2. Set the document viewing and printing preferences using the Self Service Preferences additional organization information.
See: Entering Self-Service Preference Information, Oracle HRMS Enterprise and

17-98 Oracle Self-Service Human Resources Deploy Self-Service Capability Guide
Workforce Management Guide
3. Run the Prepayments process.
See: Running the Prepayments Process, Oracle HRMS Payroll Processing Management Guide
4. Run the payment processes (for example, the Chequewriter process).
5. Run the Pay Advice Generation - Self Service (South Africa) process to enable SSHRusers to view their payslip.
See: Running the Pay Advice Generation - Self Service (South Africa), Oracle HRMS Payroll Processing Management Guide
Payslip Modeling (UK)The payslip modeling feature for the United Kingdom (UK) is a localized version of the generic payslip modeling functionality and is designed to meet local requirements.
Note: For information about the generic Payslip Modeler, see: Using Payslip Modeler, page 17-18.
Employees can model their payslip using the payslip modeler available online. You can use the payslip calculator to quickly and accurately answer payslip related questions and address "what-if" scenarios such as how their net pay would be impacted. Employees can print a PDF copy of their model payslip results. This feature is available to both employees and payroll professionals (administrators) from the Self Service HR.
Additional Information: You cannot run the payslip modeling process ifa prepayment or costing process has already been run for the current pay period. The modeling process does not impact the data present in the application. Users must first agree to the Usage Terms and Conditions in the Welcome page before they can begin modeling their payslip. Employees can elect to print a PDF copy of their sample payslip.
For UK, the payslip modeling feature enables employees or payroll administrators to model the following information to determine the impact on payroll calculations: all types of elements like Tax Related Details, Earnings Details and Deduction details can be simulated.
Using Payslip ModelingPayslip modeling allows you to simulate the results of a payroll run and display those results as a payslip. You can view certain personal and pay information such as

Payroll Process Management 17-99
employee name, job title, payroll, pay basis, and annual salary. Use the upper part of the Payslip Modeler window to change tax details and enter termination information. You can add extra Earnings, Pre Tax deductions, and Termination Payment elements if required in the lower part of the Payslip Modeler window.
As this is a simulation, the actual data is changed data within the application when running the simulation and rolled back at the end of simulation. Users can simulate custom Earnings, Pre Tax Deductions elements with Multiple Entries Allowed Flag as No. You can only simulate in current open period in which the system date falls and cannot simulate in any other past periods or future payroll periods.
Configuration Information for Payslip Modeling (UK)This topic provides configuration information for the Paycheck Modeling (UK) function.
For information about the generic Payslip Modeler, see: Using Payslip Modeler, page 17-18 and Setting up Payslip Modeler., Oracle Payroll Processing Management Guide
Menu and Function NamesYou can access this module from the following menus and functions:
User Menu Name Function Name
Manager Self Service Payslip Modeling
Payroll Professional Payslip Modeling
Note: The Oracle Payroll generic menu is Payslip Modeling. To meet the industry requirements, you can rename the menu for the United State legislation as Paycheck Modeling.
Set Up the REGISTER EIT PROGRAMComplete the following post-installation steps:
1. Navigate to the UK Super HRMS Manager > Processes and Reports > Submit Processes and Reports.
2. Click Single Request.
3. Select Register Extra Information Types (EITs) with the following parameters:
17-100 Oracle Self-Service Human Resources Deploy Self-Service Capability Guide
• Table Name = PER_ASSIGNMENT_INFO_TYPES
• Information Type = DEFAULT_GB_SIMULATION_REGION1
• Multiple Rows = No
• Legislation Code = United Kingdom
4. Submit the concurrent program.
5. Submit the program for the information type DEFAULT_GB_SIMULATION_REGION2.
View and Print Model PayslipPayroll administrators can view and print sample payslip results. You can access this module from the following menus and functions:
(N) Self Service for UK Employees > Payslip Modeling > Configurable Profile Options HR: Enable Payroll Simulation
To use the payslip modeling module, the profile option HR: Enable Payroll Simulation must be set to to Yes.
For more information, see: Defining a Payroll, Oracle HRMS Oracle HRMS Payroll Processing Management Guide
Setup StepsThe following steps describe how to set up the payslip modeling feature.
Note: Additional (optional) control of when payslip modeling is available to end users can be defined by setting the Modeling Availability Rule and the applicable Days After Period Start and End inFurther Information for a payroll definition
1. Navigate to the Payroll window (Payroll > Description).
2. Query the required payroll definition.
3. Click Further Information.
4. Set the following fields: Modeling Availability Rule to either Available or Unavailable.
5. Set the Days After Period Start and Days Before Period End as appropriate.
Payroll Process Management 17-101
Payslip Modeling Scenario1. Create an employee.
2. Attach payroll and earnings for which simulation is enabled with some value.
3. On the Tax Information tab, enter the Tax Code, Tax Basis, and NI Category.
4. Run quick pay for any previous month
5. Navigate to the Self Service responsibility.
6. Navigate to Payslip Modeling.
7. Select Yes, I have read and I agree to the above Usage Terms and Conditions. in the Welcome to Payslip Modelling window and click Next.
8. On the Generate Model Payslip page, enter all details and click Next.
9. In Sample Payslip, the payslip is generated successfully with complete details.
P11D Reports (UK)The P11D report for the UK provides information on expenses and benefits paid by an employer to an employee or worker. UK employers must submit P11D information for employees on paper, or using Electronic Data Interchange (EDI) or magnetic tape.
See: P11D: Flat File Contents and Required Input Values, Oracle HRMS Payroll Processing Management Guide
The online P11D functionality in SSHR enables employees, workers, and Payroll Professional users to view their P11D information using a self-service interface. The user can select components to include in the report and select whether to display the P11D Expenses and Benefits report or the P11D Summary report.
If required, the user can print out the information.
Menu and Function NamesThe P11D report is not attached to any self-service menu when delivered. However, youcan add the function to self-service menus if required.
See: Viewing P11Ds Online, Oracle HRMS Payroll Processing Management Guide
WorkflowNot applicable

17-102 Oracle Self-Service Human Resources Deploy Self-Service Capability Guide
Configurable Tips and InstructionsNot applicable
Configurable FlexfieldsNot applicable
Configurable Profile OptionsNot applicable
Additional Configuration StepsIf you are a Payroll Professional and choose to view the P11D reports for leavers, you must create an assignment set and run the P11D Reports process for that assignment set.
See: Viewing P11Ds Online, Oracle HRMS Payroll Processing Management Guide
Online Payslip (UK)The Online Payslip for the UK is a localized version of the generic payslip and has been designed to meet local requirements.
For information on the generic payslip functionality, see Online Payslip, page 17-12.
Menu and Function NamesThis module can be accessed from the following menus and functions:
User Menu Name Function Name
Employee Self-Service Payslip V4.0
See: Defining Menus for SSHR, page 4-10
WorkflowThe workflow details for this module are listed below:
Workflow Process Display Name: Not applicable

Payroll Process Management 17-103
Configurable Workflow Attributes:Not applicable
Configurable Tips and InstructionsNot applicable
Configurable FlexFieldsNot applicable
Configurable Profile Options
Profile Configurable Level Values Default
HR:View Payslip From Date for WEB (MM/DD/YYYY)
User specification Date 01/01/1997
HR:View Payslip From Date for WEB
This profile option determines how many payroll periods a user can view in the online payslip. If the profile option is not set, an error message is displayed when the user attempts to view the online payslip.
Additional Configuration Options1. Optionally define additional information to be displayed in the Other Information
section of the payslip using the Payslip Balances and Payslip Elements additional organization information.
• Payslip Balances
See: Entering Payroll Balances, Oracle HRMS Payroll Processing Management Guide
• Payslip Elements
See: Entering Payroll Elements, Oracle HRMS Payroll Processing Management Guide
2. Set the document viewing and printing preferences using the Self Service Preferences additional organization information.
See: Entering Self-Service Preference Information, Oracle HRMS Enterprise and

17-104 Oracle Self-Service Human Resources Deploy Self-Service Capability Guide
Workforce Management Guide
3. Run the Prepayments process.
See: Running the Prepayments Process, Oracle HRMS Payroll Processing Management Guide
4. Run the payment processes (for example, the Chequewriter process).
5. Run the Payslip Generation Self-Service process to enable SSHR users to view their payslip.
See: Generating the Payslip, Oracle HRMS Payroll Processing Management Guide
Employee Claims
Creating Employee ClaimsThis functionality is currently enabled for the UK localization only.
The Employee Claims form enables the employees to enter their claims using the self-service interface.
Before users can use the Employee Claims functionality, users must configure the element set at the HR Organization level.
See: HR Organizations: Entering Claims Element Set Information, Oracle HRMS Enterprise and Workforce Management Guide (UK)
Users can navigate to the Employee Claims page and search for existing claims or createnew claims. They can select the elements, add input values, or attach supporting documents for the elements to create their claim. Users must ensure that the standard approval workflow has been set up.
Viewing Employee Claims as a Payroll ProfessionalUsing the Payroll Professional responsibility, users can select the Employee Claims link and search for an employee. When users select an employee from the list, the employee details are displayed.
Menu and Function NamesThis module can be accessed from the following menus and functions:

Payroll Process Management 17-105
User Menu Name Function Name
Employee Self-Service Employee Claims
Payroll Professional Employee Claims
See: Defining Menus for SSHR, page 4-10
WorkflowThe workflow details for this module are listed below:
Workflow Process Display Name:
Workflow Name Function Name
Employee Claims PAY_EMP_CLAIMS_JSP_PRC
Configurable Workflow Attributes:Not applicable
Configurable Tips and InstructionsNot applicable
Configurable FlexFieldsNot applicable
Configurable Profile OptionsNot applicable
Additional Configuration OptionsTo use the Employee Claims functionality, you must associate the element set at the HR organization level using Additional Organization Information.
See: Entering Claims Element Set Information, Oracle HRMS Enterprise and Workforce Management Guide

17-106 Oracle Self-Service Human Resources Deploy Self-Service Capability Guide
Payroll Management - APAC
Online Payslip (Australia, Hong Kong, Korea, Singapore, New Zealand, India, Kuwait)
The Online Payslips for the above localizations are localized versions of the generic payslip and have been designed to meet local requirements. For example, the Australian online payslip displays hourly rate information for the number of hours worked and the exact rate paid for those hours.
For information on the generic payslip functionality, see Online Payslip, page 17-12.
Menu and Function NamesThis module can be accessed from the following menus and functions:
User Menu Name Function Name
Employee Self-Service Payslip
See: Defining Menus for SSHR, page 4-10
WorkflowThe workflow details for this module are listed below:
Workflow Process Display Name: Not applicable
Configurable Workflow Attributes:Not applicable
Configurable Tips and InstructionsNot applicable
Configurable FlexFieldsNot applicable
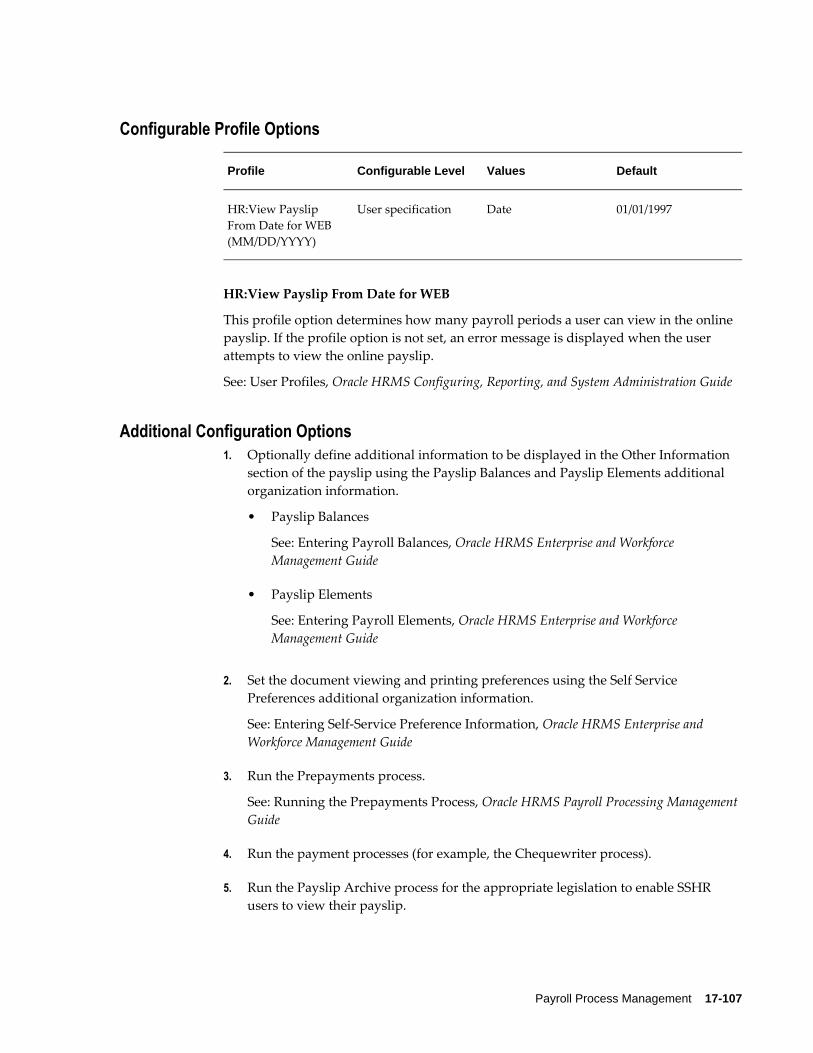
Payroll Process Management 17-107
Configurable Profile Options
Profile Configurable Level Values Default
HR:View Payslip From Date for WEB (MM/DD/YYYY)
User specification Date 01/01/1997
HR:View Payslip From Date for WEB
This profile option determines how many payroll periods a user can view in the online payslip. If the profile option is not set, an error message is displayed when the user attempts to view the online payslip.
See: User Profiles, Oracle HRMS Configuring, Reporting, and System Administration Guide
Additional Configuration Options1. Optionally define additional information to be displayed in the Other Information
section of the payslip using the Payslip Balances and Payslip Elements additional organization information.
• Payslip Balances
See: Entering Payroll Balances, Oracle HRMS Enterprise and Workforce Management Guide
• Payslip Elements
See: Entering Payroll Elements, Oracle HRMS Enterprise and Workforce Management Guide
2. Set the document viewing and printing preferences using the Self Service Preferences additional organization information.
See: Entering Self-Service Preference Information, Oracle HRMS Enterprise and Workforce Management Guide
3. Run the Prepayments process.
See: Running the Prepayments Process, Oracle HRMS Payroll Processing Management Guide
4. Run the payment processes (for example, the Chequewriter process).
5. Run the Payslip Archive process for the appropriate legislation to enable SSHR users to view their payslip.

17-108 Oracle Self-Service Human Resources Deploy Self-Service Capability Guide
Self Printed Payment Summary Report (AU)Employers who submit their Payment Summary data to the ATO electronically can print these reports on paper. The online Payment Summary Report functionality in SSHR enables employees to view the payment summary information using a self-service interface.
Managers can search and view the payment summaries for their employees using the following criteria:
• financial year
• employee full name
• employee number
• start year
Based on the above criteria, managers can view and print the payment summary for an employee. For example, if you specify the financial year, then the application displays all the employees within all legal employers within the financial year. You can view a normal Payment Summary for existing employees and view the normal and employment termination payment details for terminated employees.
Note: You cannot, however, print a payment summary report submitted before the financial year 2005-2006.
When a start year has been enabled, then you cannot view or search for the payment summary created earlier than the start year and later than the financial year.
For information on the generic payment summary functionality, see Self Printed Payment Summary Archive.
Menu and Function NamesYou can access the Payment Summary Report using the self-service menu AU Self Printed Report.
User Menu Name Function Name
AU Self Printed Report AU View Payment Summary
AU Manager Payment Summary Manager Self Service Self Printed Report
See: Defining Menus for SSHR, page 4-10
Payroll Process Management 17-109
WorkflowThe workflow details for this module are listed below:
Workflow Process Display Name:
Not Applicable
Configurable Workflow Attributes:
Not Applicable
Configurable Tips and Instructions
Not Applicable
Configurable Flexfields
Not Applicable
Configurable Profile Options
Not Applicable
Additional Configuration Steps
To view Payment Summary report using Self Service interface, you must complete the process Self Printed Payment Summary Archive for the employee.
You can enable the Self Service interface for an employee by setting the Self Service Preferences at Business group, Organization, Location or Person Level.
The Self Service Preference is defined at four levels:
• Person
• Location
• HR Organization
• Business Group
For Person and Location level, the statutory document printing option is delivered as anExtra Information Type (EIT) called 'Self Service Preference for Person' and 'Self Service Preference for Location' respectively. This EIT must be added to your user-defined responsibility to access the statutory document printing option.
For Organization and Business Group, the self-service preference for statutory document printing is delivered through an Org Developer DF. A segment called 'Self Service Preference' is added to the Descriptive Flexfield for HR Organization and Business Group.
Navigation: Work Structures > Organization > Description > Find the applicable Business Group or HR Organization > click Others and select Self Service Preference.
For more information, see : Entering Self-Service Preference Information, Oracle HRMS
17-110 Oracle Self-Service Human Resources Deploy Self-Service Capability Guide
Enterprise and Workforce Management Guide
Payslip Modeler (AU)The Payslip Modeling feature for the Australia is a localized version of the generic Payslip Modeling functionality and is designed to meet local requirements.
Employees can model their payslip using the Payslip Modeler available online. This a payslip calculator that can be used by individuals to quickly and accurately answer payslip related questions and address "what-if" scenarios such as how their net pay would be impacted . Employees can elect to print a PDF copy of their model payslip results. This feature is available to both employees and payroll professionals (administrators) via Self Service HR.
Note: Users cannot run Payslip modeling process, if there is a prepayment or costing process already executed for the current pay period. The modeling process does not impact the data present in the application.
Users must first agree to the Usage Terms and Conditions in the Welcome page before they can begin modeling their Payslip. Employees can elect to print a PDF copy of their sample payslip.
For Australia, the Payslip Modeling functionality enables employees or payroll administrators to model the following information to determine the impact on payroll calculations:
• All types of Custom Earnings elements of the type Standard, Allowances, Additional, Nontaxable, Progressive, Leave Loading and the Bonus Earnings elements (Fixed/Spread) can be simulated.
Note: These custom elements must have the Multiple Entries Allowed Flag set to No, otherwise the simulation is not possible if the Multiple Entries Allowed flag is set to Yes.
• Predefined Termination payment elements - Annual Leave on Termination and Long Service Leave on Termination
Using Payslip ModellingPayslip Modelling allows you to simulate the results of a payroll run and display those results as a payslip. You can view certain personal and pay information such as employee name, job title, payroll, pay basis, and annual salary.
Use the upper part of the Payslip Modeller window to change tax details and enter termination information. You can add extra Earnings, Pre Tax deductions, and

Payroll Process Management 17-111
Termination Payment elements if required in the lower part of the Payslip Modeler window.
As this is a simulation the actual data is changed data within the application when running the simulation and rolled back at the end of simulation. Users can simulate custom Earnings, Pre Tax Deductions elements with Multiple Entries Allowed Flag as No.
You can only simulate in current open period in which the system date falls and cannot simulate in any other past periods or future payroll periods.
View and Print Model PayslipPayroll administrators can view and print sample payslip results.
Configuration Information for Payslip Modeling (Australia)This topic provides configuration information for the Payslip Modeling (Australia)function.
For information about the generic Payslip Modeler:
See: Using Payslip Modeler, page 17-18
Setting up Payslip Modeler, Oracle Payroll Processing Management Guide
Menu and Function NamesYou can access this module from the following menus and functions:
User Menu Name Function Name
Employee Self-Service Payslip Modeling
WorkflowNot Applicable
Configurable Profile Options• HR: Enable Payroll Simulation - Users can use the Payslip Modeling module only if
the profile option HR:Enable Payroll Simulation is set to Yes.
• HR: Enable Multiple Assignments for Payroll Simulation - If an employee has multiple active assignments, then users can choose whether they can perform payslip modeling on just their primary assignment or select from a list of all their

17-112 Oracle Self-Service Human Resources Deploy Self-Service Capability Guide
active assignments. Setting profile option "HR: Enable Multiple Assignments for Payroll Simulation" to Yes will allow employees to select any of their active assignments on which they wish to perform payslip modeling. If the profile option is set to No, then payslip modeling can only be performed on their primary assignment.
Setup StepsThe following sections provide information to set up the Payslip Modeling functionality:
Set Up the Modeling Availability RuleFurther (optional) control of when Payslip Modeling is available to end users can be defined by setting the Modeling Availability Rule and the applicable Days After Period Start and End in Further Information for a payroll definition.
1. Navigate to the Payroll window (Payroll > Description).
2. Query the required payroll definition.
3. Click Further Information.
4. Set the following fields:
Modeling Availability Rule to either Available or Unavailable.
Set the Days After Period Start and Days Before Period End as appropriate.
For more information, see: Defining a Payroll, Oracle HRMS Oracle HRMS Payroll Processing Management Guide
Add the Simulation Details Extra Information to the Required Responsibility1. Navigate to the Information Types Security window.
2. Select the Information Type of SIMULATION_ELEMENTS (Simulation Details) andattach the type to the required Responsibility.
3. Save your work and close the Information Types Security window.
Define Element Exclusion SetBy default, an employee's existing element entries will be processed as part of the model payslip, even if the element has not been configured to be available for Payslip Modeling. To exclude elements from even being processed, payroll administrators can optionally define an exclusion element set to exclude these elements from being included in the model payslip process. An example of when this feature might be usefulis when a bonus is being paid out in the pay cycle that is being processed and
Payroll Process Management 17-113
administrators do not want the element to be seen by the employee in their model payslip results. By defining an element exclusion set to specifically exclude that bonus element, it will neither be available for modeling by the end user nor will it be processed when the model payslip is submitted.
For more information on how to exclude elements, see Defining an Element or Distribution Set, Oracle HRMS Compensation and Benefits Management Guide
After defining an element exclusion set, you must select this set in the Modeling Exclusion Element Set field of the Self Service Preference window for your business group. For more information, see: Entering Self-Service Preference Information, Oracle HRMS Enterprise and Workforce Management Guide.
Configuring the Readiness Check for TFNUsing the payroll dashboard, payroll users can now perform the readiness check for employees for Tax File Number (TFN). Using this check, they can identify the number of employees who do not have TFN or who have the default TFN of 111 111 111 for more than 28 days from the date of hire. Run the following steps for performing the readiness check for TFN of employees.
1. Use the Payroll Professional responsibility.
2. Navigate to System Administrator > Security > Responsibility. Query for Payroll Professional responsibility. Attach request group as AU HRMS Reports and Processes to this responsibility.
3. Using the AU HRMS responsibility, run concurrent program Employees with TFN 111111111 in Business Group (Australia).
4. Associate the readiness check with all payroll or selected payrolls.
5. Navigate to Payroll Professional > Payroll Dashboard > Payroll Dashboard. In the Payroll Readiness Details section, query for the payroll and perform the readiness check.
6. Check the output. You can sort by payroll, employee number, or employee name.
Menu and Function NamesYou can access this module from the following menus and functions:
User Menu Name Function Name
Payroll Professional Payroll Dashboard

17-114 Oracle Self-Service Human Resources Deploy Self-Service Capability Guide
Tax Declaration (India)Employees in India must declare their income and investments at the beginning of the financial year. The Tax Declaration module enables self-service users to make their tax declarations. Employees can update their declaration at any time, other than the freeze period.
During the freeze period, employees submit physical proofs of their earnings and investments to the employer. The reviewer checks the proofs and updates the tax declaration of the employee. Reviewers can check and update tax declaration from the self-service module. Reviewers can also download multiple tax declarations as an Microsoft Excel file, and later upload it after reviewing.
Note: New employees can create a new tax declaration using SSHR during the window period, within a few days of joining the enterprise. This window can occur even during the freeze periods.
You can configure freeze period details and new employee's window period in the Tax Declaration Information window.
See: Entering Tax Declaration Information, Oracle HRMS Enterprise and Workforce Management Guide
House Loan Details
Employees can record their house loan details during their tax declaration using the TaxDeclaration self service interface. Employees can record the house loan details for self occupied property and let out property.
For a self occupied property, employees can add the following information - address of the property, date of occupation, the date and amount of the loan sanctioned and the interest amount.
For let out property, employees can enter the address of the property, the date when thehome was let out for rent, rental income received for the financial year, amount of municipal tax paid, interest paid on borrowed capital, amount of loan sanctioned and interest amount.
Based on whether the property or let out, the application calculates the taxes on property for the employee to be eligible for tax exemptions. If the employee is eligible for deduction under Section 80EE, select the check box. If the employee and the spouse have availed a joint loan, then select the Joint Loan checkbox. Employees can avail tax exemption by submitting a declaration stating the percentage of co-payment for the house loan.
The predefined element House Loan Information holds the details regarding the home loan. Payroll user must ensure that this element is linked to the payroll. A Payroll professional can view and approve the details submitted or request for changes.
Deductions under Chapter VI A

Payroll Process Management 17-115
The self service interface enables employees to record the following investments :
• Higher Education Loan Interest Repayment
• Donation for Research
• Claim Exemption under Sec 80GG - Select Yes only if you have expenses towards house rent and if there is no House Rent Allowance or accommodation provided bycompany.
• Life Insurance Premium. You can record the policy number, premium paid, and thesum assured for the insurance policy you have take,
• Medical Insurance Premium - You can record the insurance amount for medical premiums and expenses towards preventive health check paid for self and dependents. You can also record if these are paid for parents who are senior citizens.
• Medical Treatment for Disabled Dependants (80DD)
• Donations under Section 80G
• Investments under Section 80CCG
• Investments under Section 80EE
Other Income
You can record the amounts for Profit and Gain from Business, Long Term Capital Gain, Short Term Capital Gain, Income from Any Other Source, TDS Paid on Other Income, Interest On Deposits.
Upload ProofsEmployees can submit their tax declarations and upload their proofs using the Upload Proofs option. They can upload multiple documents for each tax element while making tax declarations. For example, if there are two house loans declared then the employee can verify the loan against which the document is being uploaded by clicking on Show details option.
A payroll professional configures the documents required for each element which have to be submitted as a proof of investment by the employee. A payroll professional can search for employees verify the proofs submitted by the employee. They can modify thedeclared amount if there are any discrepancies between the declared amount and the submitted amount would be updated in the element entries and further used in the tax calculations .

17-116 Oracle Self-Service Human Resources Deploy Self-Service Capability Guide
Menu and Function NamesAccess this module from the following menus and functions:
User Menu Name Function Name
India Employee Self Service Tax Declaration
India Professional User Self Service Search Tax Declarations
See: Defining Menus for SSHR, page 4-10
WorkflowThe workflow details for this module are listed below:
Workflow Process Display Name: Not Applicable
Configurable Workflow Attributes:Not applicable
Configurable Definitions for the Personalization Framework
Regions
Page Name Region Code Region Name
Tax Declaration InformationDetails Information Details
Deductions under Chapter VI A
Chapter6aLimits Chapter VI A Maximum Exemption
Rebates under Section 88 RebateLimits Rebates Maximum Exemption
Tax Declaration Review ReviewProofs Proof required

Payroll Process Management 17-117
Configurable Tips and Instructions
Region Tip Type Message Name
RentDetails Long Message PER_IN_CITY_TYPE
Chapter6aDetails Long Message PER_IN_SECTION_8GG
Chapter6aDetails Long Message PER_IN_MEDICAL_INSURANCE
Chapter6aDetails Long Message PER_IN_SPECIFIED_DISEASES
MedicalDetailsTable Long Message PER_IN_DISABILITY_CATEGORY
PremiumTable Long Message PER_IN_PREMIUM_PAID
OtherIncome Instruction PER_IN_HOUSE_PROPERTY
See: Adding Instructions to a Web Page, page 6-35
Configurable FlexFieldsNot applicable
Configurable Profile OptionsNot Applicable
Medical Expenses (India)Employees submit and reimburse their medical expenses for self or their dependents at any time during the financial year to be eligible for a tax exemption. The Medical Expenses self-service module enables employees to record and submit their medical expenses and enables employers to validate and approve these expenses.
Employees must also submit physical proofs of their medical expenses to the employer. Employers validate the physical proofs and the details submitted. If there are any changes, then employers modify the amount and approve the benefit amount payable to employees.
The Professional User uses the self-service module to:

17-118 Oracle Self-Service Human Resources Deploy Self-Service Capability Guide
• view the medical expense details
• validate the details submitted and the physical proofs
• approve the exempted amount for employees
• update the actual benefit amount to pay employees
Users can search for bills submitted within the specified date range and approve. Additionally, users can download and upload medical expenses for multiple employeesas a Microsoft Excel file.
Users can use the Element Design Wizard to create elements to record the medical expense information. You can use the following elements:
• Medical Fringe Benefit Element – this element holds information such as benefit amount, maximum annual limit, and if part of net pay. This is a non-recurring element.
• Bills Element – this element holds information such as exempted value of the bill amount. This is a non - recurring element.
See:Setting up Medical Expenses, Oracle HRMS Payroll Processing Management Guide (India)
When employees submit their medical expenses, Oracle HRMS stores the exempted amount of each bill in the PER Extra Information - Medical Details (PER_IN_MEDICAL_BILLS).
Users can validate the details submitted and the physical proofs and modify the benefit amount if there are any changes to the benefit amount. Use the Change Payment function on the self-service module to modify the benefit amount.
On validation, users can approve and submit the medical expenses. Employees cannot update the expenses once the professional user approves and submits the medical expenses. The application automatically creates the element entries for the month selected. To process medical expenses during a payroll run, users must attach the Medical Fringe Benefit element during a payroll run. The application then adjusts the taxable/non-taxable value of the medical benefit.
Menu and Function NamesAccess this module from the following menus and functions:
User Menu Name Function Name
India Employee Self Service Medical Expenses
Payroll Process Management 17-119
User Menu Name Function Name
India Professional User Self Service Approve/Update Medical Expenses
See: Defining Menus for SSHR, page 4-10
Workflow:The workflow details for this module are listed below
Workflow Process Display Name:Not Applicable
Configurable Workflow Attributes:Not Applicable
Configurable Definitions for the Personalization FrameworkRegion
Page Name Region Code Region Name
Medical Bill Entry InstructionList Instructions
Configurable Tips and InstructionsNot Applicable
Configurable FlexFieldsNot Applicable
Configurable Profile OptionsNot Applicable
Leave Travel Concession Expenses (India)Employees can submit and reimburse their leave travel expenses for self or their dependents at any time during the financial year. Employees are eligible for a tax
17-120 Oracle Self-Service Human Resources Deploy Self-Service Capability Guide
exemption on their leave expenses. The approved bill amount for LTC is non-taxable. Only the employer contribution that exceeds the exempted bill amount is taxable.
The Leave Travel Concession (LTC) expenses module enables employees to submit theirleave expenses. It enables professional users to view, validate, and approve the leave travel expenses. For taxation purposes, Oracle HRMS enables you to setup and process Leave Travel Concession under the classification Regular Earnings. Use the Element Design Wizard to create the elements for processing LTC.
See: Setting up Regular Earnings, Oracle HRMS Payroll Processing Management Guide (India) and Setting up LTC Expenses, Oracle HRMS Payroll Processing Management Guide (India)
Employees submit the travel expense details such as the mode of travel, source and destination of travel, and the ticket as the physical proof of their travel expenses to the employer for self and their dependents.
When employees submit their leave expenses using self-service, the application stores the exempted amount of each bill in the Assignment Extra Information - LTC Bill Details (PER_IN_LTC_BILLS). You record information such as the ticket fare, employer contribution, and if carried over from previous block. The application holds the bills and the benefit amount in a single element.
The professional user uses the self-service module to:
• view the leave expense details
• update the actual benefit amount to pay employees
• validate and approve the exempted amount for employees
Users can search for bills submitted within the specified date range and approve them. Additionally, they can download and upload LTC expenses for multiple employees as aMicrosoft Excel file.
The LTC self-service module enables users to specify the date to create the element entries. Oracle HRMS creates element entries only when the professional user enters exempted value of bill amount and uses the exempted amount during payroll calculations.
Users can use the Validate LTC Bills option to verify and approve the bills and physical proofs the employee submits. If there are any changes to expenses, users can use the Change LTC Payment option to update the benefit amount and pay employees.
Employees can also avail advance payment prior to an LTC journey. The advance is not taxed at the time of payment but is later adjusted with the benefit amount.
Menu and Function NamesAccess this module from the following menus and functions:

Payroll Process Management 17-121
User Menu Name Function Name
India Employee Self Service LTC Expenses
India Professional User Self Service Approve/Update LTC Expense
See: Defining Menus for SSHR, page 4-10
WorkflowNot Applicable
Workflow Process Display NameNot Applicable
Configurable Workflow AttributesNot Applicable
Configurable Definitions for the Personalization FrameworkRegions
Page Name Region Code Region Name
LTC Bill Entry InstructionList Instructions
Configurable Tips and InstructionsNot Applicable
Configurable FlexFieldsNot Applicable
Configurable Profile OptionsNot Applicable
17-122 Oracle Self-Service Human Resources Deploy Self-Service Capability Guide
Payslip Modeler (India)The Payslip Modeling feature for India is a localized version of the generic Payslip Modeling functionality and is designed to meet local requirements.
Employees can model their payslip using the Payslip Modeler available online. This a payslip calculator that can be used by individuals to quickly and accurately answer payslip related questions and address "what-if" scenarios such as how their net pay would be impacted. Employees can elect to print a PDF copy of their model payslip results. This feature is available to both employees and payroll professionals (administrators) via Self Service HR.
Note: Users cannot run Payslip modeling process, if there is a prepayment or costing process already executed for the current pay period. The modeling process does not impact the data present in the application.
Users must first agree to the Usage Terms and Conditions in the Welcome page before they can begin modeling their Payslip. Employees can choose to print a PDF copy of their sample payslip.
Using employee self-service, users can select the desired tax declaration components forwhat-if-analysis and generate a sample payslip.
The application enables simulation of the following elements for multiple entries.
• Deduction under Section 80CCE (Investment Under Section 80CCE)
• Life Insurance Premium
• Deduction under Section 80DD (Medical Treatment for Disabled Dependents)
• Deduction under Section 80G (Donations Under Section 80G)
The elements can be attached to the employee "n" number of times based on the input values/component types.
By default the application uses the standard information that normally appears on the payslip.
Users can simulate using either existing investment type or enter new values for Investments under Section 80CCE. If you select the existing investment type, the existing amounts for the selected investment type get automatically displayed.
You can simulate a maximum of 10 investments. If you want to simulate more that 10 investment, then you must add the new investment amounts into any of the existing investment amounts and then simulate a model payslip.
Users can also enter the amount spent on treatment of disabled dependent depending on the severity of disability. When you enter the treatment amount for a dependent
Payroll Process Management 17-123
with 40%-79% disability or with 80%-100% disability, then all the element entries with this percentage will be deleted and new element entry will be created with the simulated value.
Users can also simulate a model payslip by specifying a donation amount that is eligiblefor 50% or 100% deduction on the donation. When you simulate the donation amount with 100% exemption, then all the element entries for donation types which come under100% exemption will be deleted and new element entry will be created with default donation type - PM National Relief Fund and for 50% exemption, the elements are created with PM Drought Relief Fund.
For the premiums on Life Insurance Policies, when you enter the policy number, if the policy number already exists, then all the remaining policy details such as start date, sum assured, premium amount get displayed automatically. You can change and simulate the existing policy details. If you want to enter a new policy, then you must enter the number and the remaining details for simulation. Values of policy start date, premium paid and sum assured will be displayed based on policy number entered. If there are more than 10 premiums, you can enter the sum of the premium amounts and the amount sum assured of the policies and then simulate.
You can also simulate the following remaining tax declaration elements:
• House Rent Information
• Deduction under Section 80E
• Deduction under Section 80GGA
• Deduction under Section 80GG
• Deduction under Section 80D
• Deduction under Section 80DDB
• Deduction under Section 80CCG
View and Print Model PayslipPayroll administrators can view and print sample payslip results.
Configuration Information for Payslip Modeling (India)This topic provides configuration information for the Payslip Modeling (India) function.
For information about the generic Payslip Modeler:
See: Using Payslip Modeler, page 17-18
Setting up Payslip Modeler, Oracle Payroll Processing Management Guide

17-124 Oracle Self-Service Human Resources Deploy Self-Service Capability Guide
Menu and Function NamesYou can access this module from the following menus and functions:
User Menu Name Function Name
Employee Self-Service Payslip Modeling
Payroll Professional User Payslip Modeling
WorkflowNot Applicable
Configurable Profile Options• HR: Enable Payroll Simulation - Users can use the Payslip Modeling module only if
the profile option HR:Enable Payroll Simulation is set to Yes.
• HR: Enable Multiple Assignments for Payroll Simulation - If an employee has multiple active assignments, then users can choose whether they can perform payslip modeling on just their primary assignment or select from a list of all their active assignments. Setting profile option "HR: Enable Multiple Assignments for Payroll Simulation" to Yes will allow employees to select any of their active assignments on which they wish to perform payslip modeling. If the profile option is set to No, then payslip modeling can only be performed on their primary assignment.
Setup StepsThe following sections provide information to set up the Payslip Modeling functionality:
Set Up the Modeling Availability RuleFurther (optional) control of when Payslip Modeling is available to end users can be defined by setting the Modeling Availability Rule and the applicable Days After Period Start and End in Further Information for a payroll definition.
1. Navigate to the Payroll window (Payroll > Description).
2. Query the required payroll definition.

Payroll Process Management 17-125
3. Click Further Information.
4. Set the following fields:
Modeling Availability Rule to either Available or Unavailable.
Set the Days After Period Start and Days Before Period End as appropriate.
For more information, see: Defining a Payroll, Oracle HRMS Oracle HRMS Payroll Processing Management Guide
Add the Simulation Details Extra Information to the Required Responsibility1. Navigate to the Information Types Security window.
2. Select the Information Type of SIMULATION_ELEMENTS (Simulation Details) andattach the type to the required Responsibility.
3. Save your work and close the Information Types Security window.
Define Element Exclusion SetBy default, an employee's existing element entries will be processed as part of the model payslip, even if the element has not been configured to be available for Payslip Modeling. To exclude elements from even being processed, payroll administrators can optionally define an exclusion element set to exclude these elements from being included in the model payslip process. An example of when this feature might be usefulis when a bonus is being paid out in the pay cycle that is being processed and administrators do not want the element to be seen by the employee in their model payslip results. By defining an element exclusion set to specifically exclude that bonus element, it will neither be available for modeling by the end user nor will it be processed when the model payslip is submitted.
For more information on how to exclude elements, see Defining an Element or Distribution Set, Oracle HRMS Compensation and Benefits Management Guide
After defining an element exclusion set, you must select this set in the Modeling Exclusion Element Set field of the Self Service Preference window for your business group. For more information, see: Entering Self-Service Preference Information, Oracle HRMS Enterprise and Workforce Management Guide.
Select the Oracle BI Publisher XML Template to Print Payslip Modeling PDFOracle Payroll for India provides a predefined XML template to print payslip modeling PDF report.
You must select the XML template in the Payroll Simulation Template field of the Self Service Preference window for your business group.
Details of the XML Template:

17-126 Oracle Self-Service Human Resources Deploy Self-Service Capability Guide
Name: IN Payroll Simulator Template
Code: PAYINPSSM
Application: Payroll
Data Definition: IN Payroll Simulator Data Definition
Type: RTF
Default Output Type: PDF
If users do not want to use the default template, then they can create an XML Publisher template and specify the template in the Self Service Preference window. The template must be associated with the Data Definition PAY<LEG_CODE>SIMPAYSLIP.
Income Tax Register Report (India)The Income Tax Register Report displays the detailed breakup of the salary componentswith the actual salary paid till current pay period and the projected salary for the remaining pay periods. The report displays all the allowances exempted under section 10, exemptions under Section 16, and other income details declared by the employee which contribute to the total annual income of the employee.
The Income Tax Register Report function must be attached to the Employee Self- Service responsibility or the Professional User responsibility.
Using the self-service, employees can choose the financial year for which they want to view the details.
Professional users can search for the employee for whom they want to display the report.
The Income Tax Register Archival (India) process archives the data to include in the report. Users must run this archival process to view the details on the Income Tax Register Report. For more information, see: Running the Income Tax Register Archival (India) Process, Oracle HRMS Payroll Processing and Management Guide
Menu and Function NamesAccess this module from the following menus and functions:
User Menu Name Function Name
India Employee Self Service Income Tax Register Report
India Professional User Self Service Income Tax Register Report - Professional User
See: Defining Menus for SSHR, page 4-10

Payroll Process Management 17-127
Commutation Allowance (Japan)The Commutation Allowance form enables you to enter, view and print information about a worker's commutation allowance information.
Employees in Japan are entitled to allowances for transportation or commuting methods to and from work. The Commutation Allowance form provides allowance information about public transportation, and traffic tools - which encompass other methods of traveling to and from work.
From this form, users can add, update, delete and view future actions for each allowance.
Withholding ITAX (Japan)The Withholding ITAX Report for Employee form enables you to receive and view withholding ITAX report.
Employees in Japan are required to submit their Certificate of Withholding Income Tax to the National Tax Agency (NTA) at the end of the calendar year. From this form, userscan view and print the withholding ITAX report.
The Withholding ITAX Report for Payroll Manager form enables payroll managers to view and update the comment column of withholding ITAX report. From this form, the payroll manager can define the open and close dates for which changes can be made, view results, and update the comments column.
Function NamesThis module can be accessed from the following function:
• JP Tax Withheld Report: Payroll Manager
See: Defining Menus for SSHR, page 4-10
WorkflowThe workflow details for this module are listed below:
Workflow Process Display Name:Not applicable
Configurable Workflow Attributes:Not applicable

17-128 Oracle Self-Service Human Resources Deploy Self-Service Capability Guide
Configurable Tips and InstructionsNot applicable
Configurable FlexfieldsNot applicable
Configurable Profile OptionsNot applicable
Life Insurance Notification (Japan)The Life Insurance Notification module enables employees to submit the life insurance notification to the employer.
From this form, users can add, update and view a worker's life insurance information tobe used in the tax calculation.
Menu and Function NamesThis module can be accessed from the following functions:
• JP Ins and SP Deduct Form for Sal Earner - Assignment Processes
• JP Ins and Sp Deduct Form for Sal Earner - Self Service
• JP Ins and SP Deduct Form for Sal Earner - Payroll Processes
See: Defining Menus for SSHR, page 4-10
WorkflowThe workflow details for this module are listed below:
Workflow Process Display Name:Not applicable
Configurable Workflow Attributes:Not applicable
Configurable Tips and InstructionsNot applicable
Payroll Process Management 17-129
Configurable FlexfieldsNot applicable
Configurable Profile OptionsNot applicable
Dependent Exemption Notification (Japan)The Dependent Exemption Notification module enables employees to submit the dependent exemption notification to the employer.
From this form, users can add, update and view a worker's dependent and special spouse information related to the tax calculation.
Menu and Function NamesThis module can be accessed from the following functions:
• JP Dependent Exemption Form for Sal Earner - Assignment Process
• JP Dependent Exemption Form for Sal Earner - Self Service
• JP Dependent Exemption Form for Sal Earner - Payroll Processes
See: Defining Menus for SSHR, page 4-10
WorkflowThe workflow details for this module are listed below:
Workflow Process Display Name:Not applicable
Configurable Workflow Attributes:Not applicable
Configurable Tips and InstructionsNot applicable
Configurable FlexfieldsNot applicable

17-130 Oracle Self-Service Human Resources Deploy Self-Service Capability Guide
Configurable Profile OptionsNot applicable
Personal Number (Japan)The Personal Number module enables employees to enter and view their personal number and for their dependents using their self-service responsibility. An employee can enter/update Personal Number details and dependents within the entry period startand end dates. When employee leave the organization, the Personal Number details of self and dependents must be updated as 999999999999 and card expiry details with blank. For dependent, HR users update the Personal Number of dependent with 999999999999 after the retention period of records is completed. After the entry period end/closing date, employees can no longer enter/update the Personal Number details. Once entered, they can view only the number with first 8 digits are masked (XXXX-XXXX-1234 format)
HR and Payroll representatives can search, view, and update the Personal Number details of employees and dependents.
They can search, view and update the list of dependents whose Personal Number is missing.
Menu and Function NamesThis module can be accessed from the following functions:
• JP Personal Number : Employee
• JP Personal Number : Payroll Representative - JP Personal Number : Search Employee and JP Personal Number : Search Dependent
• JP Personal Number: Human Resources Representative - JP Personal Number : Search Employee and JP Personal Number : Search Dependent
See: Defining Menus for SSHR, page 4-10
Human Resource RepresentativeAn HR representative can enter the entry period dates at business group, HR organization or assignment levels to enable users to enter the Personal Number. HR representative can enter or update the Personal Number details of all self service and non self service employees within the start date and end dates of entry periods. After the entry period end or closing date, they can no longer enter or update the Personal Number details.
HR representative can also update the start and end dates of entry period for any

Payroll Process Management 17-131
assignment whenever required. This will give access to the employee to update the Personal Number details even after end or closing dates at business group or organization levels.
Besides entering the details, an HR representative can access Employee Search page to search and enter or update the Personal Number details. Additionally, they can access Dependent Search page to find dependents whose Personal Number is missing and can enter the Personal Number details of dependents.
HR representative can view both the masked and full personal number to check whether the number is correct or not. The option Display Personal Number has the values:
• Based on Entry Periods
• Always Display Full Personal Number
• Always Display Masked Personal Number
Payroll RepresentativePayroll representative can view the masked Personal Number details of employee and their dependents. Payroll representative can only check if number is entered or not which is required for processing the payroll. The payroll professional can notify the employee to update the information if it is not entered. Payroll representative can accessthe Dependent Search page and view the list of dependents whose personal number is not entered.
WorkflowThe workflow details for this module are listed below:
Workflow Process Display Name:Not applicable
Configurable Workflow Attributes:Not applicable
Configurable Tips and InstructionsNot applicable
Configurable FlexfieldsNot applicable

17-132 Oracle Self-Service Human Resources Deploy Self-Service Capability Guide
Configurable Profile OptionsNot applicable

Self-Service Benefits Enrollments -US Federal 18-1
18Self-Service Benefits Enrollments -US
Federal

18-2 Oracle Self-Service Human Resources Deploy Self-Service Capability Guide
Self-Service Benefits Enrollments - US Federal
US Federal Self-Service BenefitsUS Federal employees can use self-service to enroll and manage their Federal EmployeeHealth Benefits and Thrift Savings Plans elections. Employees can review their current elections using self-service benefits. They can also review their current, past, and future benefit elections from their My Information self-service page, as well as other employment-related information.
See: Information Overview , page 9-77
Federal Employee Health BenefitsFederal government employees can elect, change, or cancel Federal Employee Health Benefits (FEHB). You can enroll employees when you process an Appointment, Conversion to Appointment, or Extension RPA. Employees enroll and manage their FEHB benefits using self-service. As an HR specialist, you can also enroll and administer benefits for employees using the professional user interface.
See: Federal Employee Health Benefits Overview, Oracle HRMS Compensation and Benefits Management Guide
Thrift Savings PlansFederal government employees covered by the Federal Employee's Retirement System (FERS) and the Civil Service Retirement System (CSRS) can participate in Thrift SavingsPlans (TSP) and, where eligible, contribute to Thrift Savings Catch-up plans.
You can enroll employees when you process an Appointment, conversion to Appointment, or Extension RPA. Employees enroll and manage their TSP benefits usingOracle Self-Service Human Resources (SSHR). As an HR specialist, you can also enroll and administer benefits for employees using the professional user interface.
See: Thrift Savings Plan Overview, Oracle HRMS Compensation and Benefits Management Guide
See: Managing the Thrift Savings Plans (TSP) Information Using Self-Service, page 18-3
Appointment, Conversion, and Extension EnrolmentsWhen you process an Appointment or Conversion to Appointment RPA action, you canenter employee benefits, and upon update to HR, the application establishes the Health Benefits elements, Federal Employee Group Life Insurance, and Thrift Savings Plan (TSP) elements. Similarly, for Extension actions, you can enter new employee benefits

Self-Service Benefits Enrollments -US Federal 18-3
and change existing health benefits. (OPM does not authorize changes to these benefits for Extension actions.)
When you update the RPA action, the application initiates appropriate potential life events, such as an Initial Opportunity. The employee can then modify the choices during the life event period using self-service, or you can enter the elections for the employee using the professional user interface.
Appointment, Conversion, and Extension Enrolments, Oracle HRMS Compensation and Benefits Management Guide
Managing the Thrift Savings Plans (TSP) Information Using Self-ServiceEmployees covered by the Federal Employee Retirement System (FERS), Civil Service Retirement System (CSRS), or Foreign Service Retirement and Disability System (FSRDS) can participate in Thrift Savings Plans (TSP). Oracle US Federal Human Resources (HR) enables employees and HR professionals acting on behalf of employees to manage their TSP contributions and changes using self-service. Employees and HR professionals can view and update information about their TSPs using the TSP For Employees self-service page.
To update the TSP information:
• As an employee acting on your own behalf, click the TSP link in your Employee Self-Service responsibility page to navigate to the TSP For Employees page.
• As an HR Professional acting on behalf of an employee, click the TSP link in your HR Professional Self-Service responsibility to navigate to the TSP: People page. In the TSP: People page, search for the employee whose TSP details that you want to update. Click the Action icon to navigate to the TSP For Employees page.
The TSPs that appear in the TSP for Employees page are accessible to employees and HR professionals regardless of open life events for health benefits or life insurance actions. If an employee's current TSP status is Ineligible (I), then the employee cannot access the TSP For Employees self-service page.
Using the TSP For Employees PageUse the TSP For Employees page to:
• View your current TSP enrollment information such as the TSP name, the contribution percent or amount, and the plan enrollment start date.
• View the details of your TSP enrollments that will become active at a future date. You can change the following information for a TSP that is pending enrollment:
• Effective date

18-4 Oracle Self-Service Human Resources Deploy Self-Service Capability Guide
• Percent
• Amount
• End date
You can also cancel a pending enrollment.
• Perform the following actions:
• Change a pending enrollment: Use this action to enter the percent or the amount that you want to contribute to a TSP enrollment that will become activeat a future date. If you want to change the effective date, then you must first cancel the enrollment that is pending and then change the effective date of the pending enrollment.
• Cancel a pending enrollment: Use this action to unenroll from a future enrollment in a TSP.
• Change the contribution of a current enrollment. Use this action to change the following details of your current TSP enrollment:
Effective date
Percent or an amount for each TSP contribution
• Stop the contribution to a current enrollment: Use this action to stop your contribution to all TSPs or a specific TSP. When you perform this action, the application automatically updates the contributed value (the percent or the amount)to zero.
• Print a Form TSP-1 for the latest election: Use this action to view the TSP-1 form and print. You can save the form to your local directory.
Understanding the TSP Status and the TSP Status Date FieldsWhen an employee or an HR professional changes the TSP enrollment details using self-service, Oracle US Federal HR uses rules to default the correct TSP status code in the TSP Status field. For more information, see Default Rules for the TSP Status and the TSP Status Date Fields, page 18-5 table. Employees cannot change the default TSP status. However, HR professionals can edit the default TSP status using the HR Professional self-service responsibility.
The TSP status codes and their descriptions are:
• A: Automatically Enrolled Participant (A)
• N: Elected Not To Contribute (N)

Self-Service Benefits Enrollments -US Federal 18-5
• Y: Elected To Contribute (Y)
• E: Eligible To Contribute (E)
• I: Ineligible to Participate (I)
• S: Stop Employee Contrib Before Eligible for Agency Contrib (S)
• T: Terminated Contributions (T)
• W: Waiting to Receive Agency Contributions (W)
The following table explains how the default rules work for the TSP Status and TSP Status Date fields when an employee or an HR professional changes the enrollment details of a TSP.
Default Rules for the TSP Status and the TSP Status Date Fields
Current TSP Status Is:
Employee or HR Professional Enters:
Employee or HR Professional Stops:
New TSP StatusWill Be:
New TSP StatusDate Will Be:
A Any contributionvalue other than zero
----- Y Effective date of the change
E Any contributionvalue other than zero
----- Y Effective date of the change
Y Any contributionvalue other than zero
----- Y Unchanged
A or E or Y All contributions T Effective date of the change
A Any of the contributions,
but not all
Y Effective date of the change
Y Any of the contributions,
but not all
Y Unchanged

18-6 Oracle Self-Service Human Resources Deploy Self-Service Capability Guide
Current TSP Status Is:
Employee or HR Professional Enters:
Employee or HR Professional Stops:
New TSP StatusWill Be:
New TSP StatusDate Will Be:
Current TSP Status Is:
HR ProfessionalSelects:
HR ProfessionalStops:
New TSP Status Will Be:
New TSP Status Date Will Be:
A or E or Y The Hardship check box*
All contributions T Effective date of the change
* When an employee or an HR Professional acting on behalf of an employee elects to terminate all TSP contributions, the employee continues to be eligible to reelect participation at any time. In a termination instance, the TSP Status is set to T and the TSP Employee Contribution Eligibility Date remains unchanged.
The TSP status changes occur only when an employee or an HR professional updates the TSP and the TSP Catch-Up fields. If an employee or an HR Professional updates the TSP Roth fields, the Roth Catch-Up fields, or both, then the TSP status code and the TSPstatus date remain the same. When an HR professional terminates all of any employee's contributions due to a hardship withdrawal, the employee will be ineligible to reelect for a period of 6 months. In such a case, the HR professional must select the Hardship check box, and then the application defaults the TSP Status to T.
Submitting TSP ChangesWhen you submit TSP changes, the application updates the relevant TSP element entries based on the effective date. The application uses pay period pay dates, the dates on which the agency issues employee pay checks, as a basis for validating an employee's TSP enrollment eligibility. See Pay Period Pay Dates, Oracle US Federal Human Resources Compensation and Benefits Management Guide for more information.
Configuring Thrift Savings Plan (TSP) Self-Service PagesThis topic provides technical information about the Thrift Savings Plan (TSP) self-service pages.
For an overview, see Managing the Thrift Savings Plans (TSP) Information Using Self-Service, page 18-3.
The TSP pages can be accessed from the following predefined responsibilities, menus, and functions:

Self-Service Benefits Enrollments -US Federal 18-7
Responsibility, Menu, and Function Names
Responsibility: US Federal Employee Self Service (FED_EMPLOYEE_DIRECT_ACCESS)Menu: Federal Employee Self Service (GHR_EMPLOYEE_DIRECT_ACCESS)
The Federal Employee Self Service menu provides the following function to manage the TSP information:
Prompt Submenu Submenu Type Function
TSP TSP Employee (GHR_SS_ACTION_TSP_EMP)
Responsibility: US Federal HR Self Service (FED_HR_PROFESSIONAL_ACCESS)Menu: Federal HR Self Service (GHR_HR_MANAGER_ACCESS)
The Federal HR Self Service menu provides the following function to manage the TSP information:
Prompt Submenu Submenu Type Function
TSP GHR TSP Action HR Self Service (GHR_SS_ACTION_TSP_HR_SS)
FunctionsThe following table provides information about TSP functions.

18-8 Oracle Self-Service Human Resources Deploy Self-Service Capability Guide
User Function Name(Function)
Type Parameters Web HTML
TSP Employee (GHR_SS_ACTION_TSP_EMP)
JSP pActionType=GHR_EMP_TSP
OA.jsp?page=/oracle/apps/ghr/selfservice/ben/tsp/webui/EmpTSPPG&akRegionApplicationId=800
GHR TSP HR (GHR_SS_ACTION_TSP_HR)
JSP pActionType=GHR_HR_TSP
OA.jsp?page=/oracle/apps/ghr/selfservice/ben/tsp/webui/EmpTSPPG&akRegionApplicationId=800pCalledFrom=GHR_SS_ACTION_TSP_HR&pPersonID=&OAFunc=GHR_SS_ACTION_TSP_HR
GHR TSP Action HR Self Service (GHR_SS_ACTION_TSP_HR_SS)
JSP pPersonID=&pFromMenu=Y&pManagerEnabled=N&pCalledFrom=GHR_SS_ACTION_TSP_HR&pIsHRProf=Y&pActionType=GHR_HR_TSP
OA.jsp?akRegionCode=HR_PERSON_SEARCH_TOP_SS&akRegionApplicationId=800
Cancel Pending Enrollment Employee(GHR_TSP_CAN_PEND_ENROLL_EMP)
JSP pAMETranType=SSHRMS&pAMEAppId=800&pActionType=GHR_EMP_CAN_TSPPEND_ENR&pProcessName=GHR_ACTIONS_PRC&pItemType=HRSSA&pCalledFrom=GHR_TSP_CAN_PEND_ENROLL_EMP&pAplReq=N&pNtfFyiDetails=Y
OA.jsp?akRegionCode=HR_CREATE_PROCESS_TOP_SS&akRegionApplicationId=800&OAFunc=GHR_TSP_CAN_PEND_ENROLL_EMP

Self-Service Benefits Enrollments -US Federal 18-9
User Function Name(Function)
Type Parameters Web HTML
Change Current Enrollment Employee(GHR_TSP_CHG_CURR_ENROLL_EMP)
JSP pAMETranType=SSHRMS&pAMEAppId=800&pActionType=GHR_EMP_CHG_TSPCURR_ENR&pProcessName=GHR_ACTIONS_PRC&pItemType=HRSSA&pCalledFrom=GHR_TSP_CHG_CURR_ENROLL_EMP&pAplReq=N&pNtfFyiDetails=Y
OA.jsp?akRegionCode=HR_CREATE_PROCESS_TOP_SS&akRegionApplicationId=800&OAFunc=GHR_TSP_CHG_CURR_ENROLL_EMP
Change Pending Enrollment Employee(GHR_TSP_CHG_PEND_ENROLL_EMP)
JSP pAMETranType=SSHRMS&pAMEAppId=800&pActionType=GHR_EMP_CHG_TSPPEND_ENR&pProcessName=GHR_ACTIONS_PRC&pItemType=HRSSA&pCalledFrom=GHR_TSP_CHG_PEND_ENROLL_EMP&pAplReq=N&pNtfFyiDetails=Y
OA.jsp?akRegionCode=HR_CREATE_PROCESS_TOP_SS&akRegionApplicationId=800&OAFunc=GHR_TSP_CHG_PEND_ENROLL_EMP
Stop Current Enrollment Employee(GHR_TSP_STP_CURR_ENROLL_EMP)
JSP pAMETranType=SSHRMS&pAMEAppId=800&pActionType=GHR_EMP_STP_TSPCURR_ENR&pProcessName=GHR_ACTIONS_PRC&pItemType=HRSSA&pCalledFrom=GHR_TSP_STP_CURR_ENROLL_EMP&pAplReq=N&pNtfFyiDetails=Y
OA.jsp?akRegionCode=HR_CREATE_PROCESS_TOP_SS&akRegionApplicationId=800&OAFunc=GHR_TSP_STP_CURR_ENROLL_EMP
Configurable FlexfieldsNot applicable

18-10 Oracle Self-Service Human Resources Deploy Self-Service Capability Guide
Configurable Profile OptionsNot applicable
Setting Up User Access to Self-Service BenefitsSelf-Service Benefits functions are attached to the Benefits Self-Service menu. You can change menu names and function names, or remove menus and functions if required.
As a standard practice, you should copy and edit all delivered menus you want to update. Otherwise, your changes will be overwritten the next time you apply a patch to the application.
See: Configuring Tabbed Regions, page 6-28
See: User's Menu (Oracle E-Business Suite System Administrator's Guide - Security) for more information on configuring menus.
To set up user access to self-service benefits:1. Log on to Oracle HRMS with the System Administrator responsibility.
2. Open the Menus window.
3. Query the Self-Service Menu in the Menu field: GHR_EMPLOYEE_DIRECT_ACCESS. The following Self-Service User Menu Namedisplays to users:
• Federal Employee Self-Service
You can change the menu name if required.
4. Query the global Benefits Submenu in the Menu field: BEN_SELF_SERVICE_BENEFITS. The following Benefits Submenu User Name displays:
• Benefits Self Service
Because the Benefits Self Service submenu is not linked to a top level menu (it has no prompt) the submenu is hidden. The Benefits Self Service submenu has the following prompts.
• Benefits Enrollment
• Current Benefits
These prompts function as the labels on the tabs of the self-service web page.
5. Save your work.

Self-Service Benefits Enrollments -US Federal 18-11
6. Add a new row for the US Federal benefits function.
7. Enter a sequence number.
8. Enter a prompt, such as US Federal HR Benefits.
9. Choose the Self-Service Benefits Enrollment - Federal function, (GHR_SS_BNFT_ENRT).
10. Save your work and close the Menus window.
11. You can use the Form Functions window to customize the predefined functions--GHR_SS_BNFT_ENRT.
12. Use the Form Functions window to create your own Self-Service Benefit functions from the sample functions supplied. The sample User Function Names are:
• Self Service View Current Benefits
• Self Service Benefits Enrollment
The Function Names are:
• BEN_SS_CURR_BNFT
• GHR_SS_BNFT_ENRT
If you update the predefined functions, you must update your custom function to use the predefined parameters and HTML Calls.
Note: It is a good practice to check the Readme for each Self-ServiceBenefits patch you apply to see if the parameters and HTML Calls for the predefined functions have changed.
See: Form Functions Window (Oracle E-Business Suite System Administrator's Guide - Security)
13. Set Security Profiles. Use the System Profile Values window to link the responsibility you have created to a Security Profile and your Business Group. The Security Profile is:
• HR: Security Profile
Note: If you fail to link your Responsibility to your Business group with the HR: Security Profile, any benefits participants who attempt to enroll will receive an error message indicating they cannot enroll.

18-12 Oracle Self-Service Human Resources Deploy Self-Service Capability Guide
See: User Profiles (Oracle E-Business Suite User's Guide and Oracle E-Business Suite System Administrator's Guide - Security)
14. Set the HR: Business Group Profile. Use the System Profile Values window to link the responsibility you have created to your Business Group. The Business Group Profile is:
• HR: Business Group
15. Define the people you would like to access Self-Service Benefits.
There are two ways to do this. You can follow the typical steps for defining a new user and assign each user a responsibility that enables access to Self-Service Benefits, one at a time.
See: Users Window (Oracle E-Business Suite System Administrator's Guide - Security).
Or, you can set up concurrent programs to automate this manual process.
Enabling US Federal Benefits NotificationsAs a general practice, most federal personnel offices approve a participant's benefits elections, such as health benefit and TSP selections. If your agency's policies include thisreview or approval process, you can have Oracle workflow send a notification to the POI groupbox when employees enroll or update their benefit elections. The notification contains a link to the employee's confirmation page. After reviewing the elections, you can contact the participant to correct and resubmit the elections or manually override the changes in the professional user interface.
When you want to change the predefined function, you copy and rename the original process. By leaving the original process intact, you can refer to it and also use it as a basis for future upgrade. After you copy the process, use the Function window and the system administrator responsibility to change the notification setting and attach the function to your menu Federal Employee Self Service Benefits.
See: Defining SSHR Functions, Oracle HRMS Configuring, Reporting, and System Administration Guide
To have Oracle Workflow send the POI groupbox a benefit notification:1. Click the Forms tab.
2. Query the function GHR_SS_BNFT_ENRT
3. Navigate to the Parameters field and change the send Notification parameter from N to Y. The entire parameter should read:
displayDate=N&allowEnrt=Y&ssProcessUnrestricted=Y&sessionDate=&sendFYINotification=Y&wfProcessName=GHR_FYI_NOTIFICATION_PRC&displayAgreemen

Self-Service Benefits Enrollments -US Federal 18-13
t=N
4. Save the form function.

Glossary-1
Glossary
360-Degree Appraisal
Part of the Performance Management Appraisal function and also known as a Group Appraisal. This is an employee appraisal undertaken by managers with participation byreviewers.
Absence
A period of time in which an employee performs no work for the assigned organization.
Absence Case
Two or more absences for the same person that you associate manually because they share a common factor, such as the same underlying cause.
Absence Type
Category of absence, such as medical leave or vacation leave, that you define for use in absence windows.
Accrual
The recognized amount of leave credited to an employee which is accumulated for a particular period.
Accrual Band
A range of values that determines how much paid time off an employee accrues. The values may be years of service, grades, hours worked, or any other factor.
Accrual Period
The unit of time, within an accrual term, in which PTO is accrued. In many plans, the same amount of time is accrued in each accrual period, such as two days per month. In other plans, the amount accrued varies from period to period, or the entitlement for the full accrual term is given as an up front amount at the beginning of the accrual term.
Accrual Plan
See: PTO Accrual Plan, page Glossary-31

Glossary-2
Accrual Term
The period, such as one year, for which accruals are calculated. In most accrual plans, unused PTO accruals must be carried over or lost at the end of the accrual term. Other plans have a rolling accrual term which is of a certain duration but has no fixed start and end dates.
Action
In AME, an Action is the Then part of an Approval Rule that specifies how the application must progress a transaction's approval process in a particular way depending on the conditions met.
Action Type
In AME, an action type is the generic container for specific actions. It enables you to specify the action to take if a transaction meets the condition of an approval rule. The action type, thus, generates the appropriate approvers for a transaction. As an AME administrator you can make particular action types available for specified transaction types.
Activity Rate
The monetary amount or percentage associated with an activity, such as $12.35 per pay period as an employee payroll contribution for medical coverage. Activity rates can apply to participation, eligibility, coverages, contributions, and distributions.
Actual Premium
The per-participant premium an insurance carrier charges the plan sponsor for a given benefit.
Administrative Enrollment
A type of scheduled enrollment caused by a change in plan terms or conditions and resulting in a re-enrollment.
AdvancePay
A process that recalculates the amount to pay an employee in the current period, to make an authorized early payment of amounts that would normally be paid in future payroll periods.
Agency
An external organization that assists an enterprise in their recruitment process. Agencies act on behalf of the candidates to help them search and apply for jobs. They provide candidates to the fill up job openings in an enterprise or sometimes handle the complete placement process for a vacancy.

Glossary-3
Agency Candidate
An agency candidate is a person whose profile is created in iRecruitment by a recruitingagency. This profile includes personal and professional information.
Agency User
An external person who belongs to a recruiting agency and accesses iRecruitment to conduct recruiting activities such as creating candidates and applying on behalf of the candidates.
Alert
An email notification that you can set up and define to send a recipient or group of recipients a reminder or warning to perform a certain task or simply a notification to inform the recipient of any important information.
Align
To define a relationship between objectives. Workers can align their own objectives with objectives that other workers have shared with them. Aligned objectives are also known as supporting objectives.
AME
Oracle Approvals Management Engine. A highly extensible approvals rules engine that enables organizations implementing Oracle Applications to simply and effectively define business rules that determine who must approve a transaction originating withinan application. You can devise simple or complex rules, as your organization requires, which then form part of your overall business flow. A central repository holds all the rules to facilitate management and sharing between business processes.
API
Application Programmatic Interfaces, used to upload data to the Oracle Applications database. APIs handle error checking and ensure that invalid data is not uploaded to the database.
Applicant
An applicant is a person who submits an application for employment to an organization.
Applicability
In HRMS budgeting, a term describing whether a budget reallocation rule pertains to donors or receivers.
Applicant/Candidate Matching Criteria
Matching functionality in the iRecruitment system that systematically identifies which

Glossary-4
candidates and applicants possess the skills, knowledge and abilities to be considered for a specific vacancy. The following columns are used for matching:
• Skills
• FT/PT
• Contractor/Employee
• Work at Home
• Job Category
• Distance to Location
• Key Words
• Salary
Apply for a Job
An SSHR function that enables an employee to, apply, search and prepare applications for an internally advertised vacancy.
Appraisal
An appraisal is a process where an employee's work performance is rated and future objectives set.
See also: Assessment, page Glossary-5.
Appraisee
The person who is the subject of an appraisal.
Appraiser
A person, usually a manager, who appraises an employee.
Appraising Manager
The person who initiates and performs an Employee-Manager or 360 Degree Appraisal.An appraising manager can create appraisal objectives.
Approval Rule
In AME, a business rule that determines a transaction's approval process. You construct rules using conditions and actions. For example, you can write a business rule with the conditions that if the total cost of a transaction is less than 1000 USD, and the transaction is for travel expenses, then the action must be to obtain approval from the immediate supervisor of the person triggering the transaction.

Glossary-5
Approver Groups
In AME, an approver group is a collection of approvers you define, which you can include as part of actions when you set up your approval rules.
Arrestment
Scottish court order made out for unpaid debts or maintenance payments.
See also: Court Order , page Glossary-12
Assessment
An information gathering exercise, from one or many sources, to evaluate a person's ability to do a job.
See also: Appraisal, page Glossary-4.
Assignment
A worker's assignment identifies their role within a business group. The assignment is made up of a number of assignment components. Of these, organization is mandatory, and payroll is required (for employees only) for payment purposes.
Assignment Number
A number that uniquely identifies a worker's assignment. A worker with multiple assignments has multiple assignment numbers.
Assignment Rate
A monetary value paid to a contingent worker for a specified period of time. For example, an assignment rate could be an hourly overtime rate of $10.50.
Assignment Set
A grouping of employees and applicants that you define for running QuickPaint reports and processing payrolls.
See also: QuickPaint Report, page Glossary-32
Assignment Status
For workers, used to track their permanent or temporary departures from your enterprise and, for employees only, to control the remuneration they receive. For applicants, used to track the progress of their applications.
Attribute
In AME, attributes are the business facts of a transaction, such as the total amount of a transaction, percentage of a discount, an item's category, or a person's salary and so on. These business variables form part of the conditions of an approval rule, and determine how the transaction must progress for approvals.

Glossary-6
Authoria
A provider of health insurance and compensation information, that provides additional information about benefits choices.
BACS
Banks Automated Clearing System. This is the UK system for making direct deposit payments to employees.
Balance Adjustment
A correction you make to a balance. You can adjust user balances and assignment level predefined balances only.
Balance Dimension
The period for which a balance sums its balance feeds, or the set of assignments/transactions for which it sums them. There are five time dimensions: Run, Period, Quarter, Year and User. You can choose any reset point for user balances.
Balance Feeds
These are the input values of matching units of measure of any elements defined to feed the balance.
Balances
Positive or negative accumulations of values over periods of time normally generated by payroll runs. A balance can sum pay values, time periods or numbers.
See also: Predefined Components , page Glossary-30
Bargaining Unit
A bargaining unit is a legally organized group of people which have the right to negotiate on all aspects of terms and conditions with employers or employer federations. A bargaining unit is generally a trade union or a branch of a trade union.
Base Summary
A database table that holds the lowest level of summary. Summary tables are populatedand maintained by user-written concurrent programs.
Beneficiary
A person or organization designated to receive the benefits from a benefit plan upon thedeath of the insured.
Benefit
Any part of an employee's remuneration package that is not pay. Vacation time,

Glossary-7
employer-paid medical insurance and stock options are all examples of benefits.
See also: Elements, page Glossary-16
Block
The largest subordinate unit of a window, containing information for a specific business function or entity. Every window consists of at least one block. Blocks contain fields and, optionally, regions. They are delineated by a bevelled edge. You must save your entries in one block before navigating to the next.
See also: Region, page Glossary-33, Field, page Glossary-18
Budget Measurement Type (BMT)
A subset of Workforce Measurement Type. It consists of a number of different units used to measure the workforce. The most common units are headcount and full time equivalent.
Budget Value
In Oracle Human Resources you can enter staffing budget values and actual values for each assignment to measure variances between actual and planned staffing levels in an organization or hierarchy.
Business Group
The business group represents a country in which your enterprise operates. It enables you to group and manage data in accordance with the rules and reporting requirementsof each country, and to control access to data.
Business Group Currency
The currency in which Oracle Payroll performs all payroll calculations for your Business Group. If you pay employees in different currencies to this, Oracle Payroll calculates the amounts based on exchange rates defined in the system.
Business Number (BN)
In Canada, this is the employer's account number with Revenue Canada. Consisting of 15 digits, the first 9 identify the employer, the next 2 identify the type of tax account involved (payroll vs. corporate tax), and the last 4 identify the particular account for that tax.
Business Rule
See Configurable Business Rules, page Glossary-10
Cafeteria Benefits Plan
See: Flexible Benefits Program, page Glossary-18

Glossary-8
Calendar Exceptions
If you are using the Statutory Absence Payments (UK) feature, you define calendar exceptions for an SSP qualifying pattern, to override the pattern on given days. Each calendar exception is another pattern which overrides the usual pattern.
Calendars
In Oracle Human Resources you define calendars that determine the start and end dates for budgetary years, quarters and periods. For each calendar you select a basic period type. If you are using the Statutory Absence Payments (UK) feature, you define calendars to determine the start date and time for SSP qualifying patterns.
Canada/Quebec Pension Plan (CPP/QPP) Contributions
Contributions paid by employers and employees to each of these plans provide incomebenefits upon retirement.
Candidate
(iRecruitment) A candidate is a person who has either directly provided their personal and professional information to a company's job site or provided their resume and details to a manager or recruiter for entering in the iRecruitment system.
Candidate Offers
An SSHR function used by a line manager to offer a job to a candidate. This function is supplied with its own responsibility.
Career Path
This shows a possible progression from one job or position from any number of other jobs or positions within the Business Group. A career path must be based on either job progression or position progression; you cannot mix the two.
Carry Over
The amount of unused paid time off entitlement an employee brings forward from one accrual term to the next. It may be subject to an expiry date i.e. a date by which it must be used or lost.
See also: Residual, page Glossary-34
Cascade
A process managers at each level in a hierarchy use to allocate their own objectives to workers who report directly to them. This technique enables the allocation of enterprise objectives in some form to all workers.
Cash Analysis
A specification of the different currency denominations required for paying your

Glossary-9
employees in cash. Union contracts may require you to follow certain cash analysis rules.
Ceiling
The maximum amount of unused paid time off an employee can have in an accrual plan. When an employee reaches this maximum, he or she must use some accrued time before any more time will accrue.
Certification
Documentation required to enroll or change elections in a benefits plan as the result of a life event, to waive participation in a plan, to designate dependents for coverage, or toreceive reimbursement for goods or services under an FSA.
Child/Family Support Payments
In Canada, these are payments withheld from an employee's compensation to satisfy a child or family support order from a Provincial Court. The employer is responsible for withholding and remitting the payments to the court named in the order.
Collective Agreement
A collective agreement is a form of contract between an employer or employer representative, for example, an employer federation, and a bargaining unit for example,a union or a union branch.
Collective Agreement Grade
Combination of information that allows you to determine how an employee is ranked or graded in a collective agreement.
Communications
Benefits plan information that is presented in some form to participants. Examples include a pre-enrollment package, an enrollment confirmation statement, or a notice of default enrollment.
Compensation
The pay you give to employees, including wages or salary, and bonuses.
See also: Elements, page Glossary-16
Compensation Category
A group of compensation items. Compensation Categories determine the type of compensation that you award under a plan.
Compensation Object
For Standard and Advanced Benefits, compensation objects define, categorize, and help

Glossary-10
to manage the benefit plans that are offered to eligible participants. Compensation objects include programs, plan types, plans, options, and combinations of these entities.
Competency
Any measurable behavior required by an organization, job or position that a person may demonstrate in the work context. A competency can be a piece of knowledge, a skill, an attitude, or an attribute.
See also: Unit Standard Competency, page Glossary-40
Competency Assessment Template
The entity that configures the Competencies section of an appraisal.
See also: Objective Assessment Template, page Glossary-25
Competency Evaluation
A method used to measure an employees ability to do a defined job.
Competency Profile
Where you record applicant and employee accomplishments, for example, proficiency in a competency.
Competency Requirements
Competencies required by an organization, job or position.
See also: Competency, page Glossary-10, Core Competencies, page Glossary-11
Competency Type
A group of related competencies.
Condition
In AME, a Condition is the If part of an Approval Rule that specifies the conditions a transaction must meet to trigger an approval action. A condition consists of an attribute,which is a business variable, and a set of attribute values that you can define. When a transaction meets the specified attribute values, then the application triggers the appropriate action.
Configurable Business Rule
In HRMS position control and budgeting, predefined routines (also called process rules)that run when you apply an online transaction, and validate proposed changes to positions, budgets, or assignments. You set their default status level (typically Warning)to Warning, Ignore, or Error.
Configurable Forms
Forms that your system administrator can modify for ease of use or security purposes

Glossary-11
by means of Custom Form restrictions. The Form Customization window lists the formsand their methods of configuration.
Consideration
(iRecruitment) Consideration means that a decision is registered about a person in relation to a vacancy so that the person can be contacted.
Consolidation Set
A grouping of payroll runs within the same time period for which you can schedule reporting, costing, and post-run processing.
Contact
A person who has a relationship to an employee that you want to record. Contacts can be dependents, relatives, partners or persons to contact in an emergency.
Content
When you create a spreadsheet or word processing document using Web ADI, the content identifies the data in the document. Content is usually downloaded from the Oracle application database.
Contingent Worker
A worker who does not have a direct employment relationship with an enterprise and is typically a self-employed individual or an agency-supplied worker. The contingent worker is not paid via Oracle Payroll.
Contract
A contract of employment is an agreement between an employer and employee or potential employee that defines the fundamental legal relationship between an employing organization and a person who offers his or her services for hire. The employment contract defines the terms and conditions to which both parties agree and those that are covered by local laws.
Contribution
An employer's or employee's monetary or other contribution to a benefits plan.
Core Competencies
Also known as Leadership Competencies or Management Competencies. The competencies required by every person to enable the enterprise to meet its goals.
See also: Competency, page Glossary-10
Costable Type
A feature that determines the processing an element receives for accounting and

Glossary-12
costing purposes. There are four costable types in Oracle HRMS: costed, distributed costing, fixed costing, and not costed.
Costing
Recording the costs of an assignment for accounting or reporting purposes. Using Oracle Payroll, you can calculate and transfer costing information to your general ledger and into systems for project management or labor distribution.
Court Order
A ruling from a court that requires an employer to make deductions from an employee's salary for maintenance payments or debts, and to pay the sums deducted to a court or local authority.
See also: Arrestment, page Glossary-5
Credit
A part of the Qualifications Framework. The value a national qualifications authority assigns to a unit standard competence or a qualification. For example, one credit may represent 10 hours of study, a unit standard competence may equate to 5 credits, and a qualification may equate to 30 credits.
Criteria Salary Rate
Variable rate of pay for a grade, or grade step. Used by Grade/Step Progression.
Current Period of Service
An employee's period of service is current if their most recent hire date is on or before the effective date, and either the employee does not have a termination date for their latest employment, or their termination date is later than the effective date.
The table below provides an example using an effective date of 12 October 2004:
Effective Date Hire Date Termination Date Current Period of Service?
12 Oct 2004 23 Jan 1994 16 Aug 2003 No
12 Oct 2004 14 Oct 2004 ANY No
12 Oct 2004 14 Mar 2000 NONE Yes
12 Oct 2004 11 Sep 2001 15 Oct 2004 Yes

Glossary-13
Additional Information: In Oracle HRMS an employee cannot transfer from one business group to another. To move from one business group to another, the business group they are leaving must terminate the employee, and the business group they are joining must re-hire the employee. Therefore the definition of period of service, above, does not take account of any service prior to the most recent business group transfer.
Current Period of Placement
A contingent worker's period of placement, page Glossary-29 is current if their most recent placement start date is on or before the effective date, and either the contingent worker does not have a placement end date for their latest placement or their placementend date is later than the effective date.
Effective Date Place Date End Placement Date Current Period of Placement?
12 Oct 2004 23 Jan 1994 16 Aug 2003 No
12 Oct 2004 14 Oct 2004 ANY No
12 Oct 2004 14 Mar 2000 NONE Yes
12 Oct 2004 11 Sep 2001 15 Oct 2004 Yes
Database Item
An item of information in Oracle HRMS that has special programming attached, enabling Oracle FastFormula to locate and retrieve it for use in formulas.
Date Earned
The date the payroll run uses to determine which element entries to process. In North America (and typically elsewhere too) it is the last day of the payroll period being processed.
Date Paid
The effective date of a payroll run. Date paid dictates which tax rules apply and which tax period or tax year deductions are reported.
Date To and Date From
These fields are used in windows not subject to DateTrack. The period you enter in

Glossary-14
these fields remains fixed until you change the values in either field.
See also: DateTrack, page Glossary-14, Effective Date, page Glossary-15
DateTrack
When you change your effective date (either to past or future), DateTrack enables you to enter information that takes effect on your new effective date, and to review information as of the new date.
See also: Effective Date, page Glossary-15
Default Postings
(iRecruitment) Default text stored against business groups, organizations, jobs, and/or positions. The default postings are used to create job postings for a vacancy.
Dependent
In a benefit plan, a person with a proven relationship to the primary participant whom the participant designates to receive coverage based on the terms of the plan.
Deployment
The temporary or permanent employment of an employee in a business group.
See also: Secondment, page Glossary-36
Deployment Factors
See: Work Choices, page Glossary-42
Deployment Proposal
The entity that controls the permanent transfer or temporary secondment of an employee from a source business group to a destination business group. The HR Professional in the destination business group creates the deployment proposal using the Global Deployments function.
Derived Factor
A factor (such as age, percent of fulltime employment, length of service, compensation level, or the number of hours worked per period) that is used in calculations to determine Participation Eligibility or Activity Rates for one or more benefits.
Descriptive Flexfield
A field that your organization can configure to capture additional information requiredby your business but not otherwise tracked by Oracle Applications.
See also: Key Flexfield , page Glossary-22
Deviation
A change to the standard approver list is a deviation.

Glossary-15
Developer Descriptive Flexfield
A flexfield defined by your localization team to meet the specific legislative and reporting needs of your country.
See also: Extra Information Types, page Glossary-18
Direct Deposit
The electronic transfer of an employee's net pay directly into the account(s) designated by the employee.
Discoverer Workbook
A grouping of worksheets. Each worksheet is one report.
Additional Information: See also My Oracle Support Knowledge Document 2277369.1, Oracle E-Business Suite Support Implications for Discoverer 11gR1.
Discoverer Worksheet
A single report within a workbook. A report displays the values of predefined criteria for analysis.
Distribution
Monetary payments made from, or hours off from work as allowed by, a compensationor benefits plan.
Download
The process of transferring data from the Oracle HRMS application to your desktop (the original data remains in the application database).
Effective Date
The date for which you are entering and viewing information. You set your effective date in the Alter Effective Date window.
See also: DateTrack, page Glossary-14
EIT
See: Extra Information Type, page Glossary-18
Electability
The process which determines whether a potential benefits participant, who has satisfied the eligibility rules governing a program, plan, or option in a plan, is able to elect benefits. Participants who are eligible for benefits do not always have electable benefit choices based on the rules established in a benefit plan design.

Glossary-16
Element Classifications
These control the order in which elements are processed and the balances they feed. Primary element classifications and some secondary classifications are predefined by Oracle Payroll. Other secondary classifications can be created by users.
Element Entry
The record controlling an employee's receipt of an element, including the period of time for which the employee receives the element and its value.
See also: Recurring Elements, page Glossary-33, Nonrecurring Elements, page Glossary-25
Element Link
The association of an element to one or more components of an employee assignment. The link establishes employee eligibility for that element. Employees whose assignmentcomponents match the components of the link are eligible for the element.
See also: Standard Link, page Glossary-38
Elements
Components in the calculation of employee pay. Each element represents a compensation or benefit type, such as salary, wages, stock purchase plans, and pension contributions.
Element Set
A group of elements that you define to process in a payroll run, or to control access to compensation information from a configured form, or for distributing costs.
Eligibility
The process by which a potential benefits participant satisfies the rules governing whether a person can ever enroll in a program, plan, or option in a plan. A participant who is eligible for benefits must also satisfy electability requirements.
Eligibility Profile
A set of eligibility criteria grouped together. Eligibility profiles help determine eligibility for compensation and benefits and are re-usable. Eligibility profiles can be linked to a compensation object (such as a program, plan, or option), a collective agreement, a grade ladder, or a work schedule to restrict eligibility for these.
Employee
A worker who has a direct employment relationship with the employer. Employees aretypically paid compensation and benefits via the employer's payroll application.
Employees have a system person type of Employee and one or more assignments with an assignment type of Employee.

Glossary-17
Employee Histories
An SSHR function for an employee to view their Learning History, Job Application History, Employment History, Absence History, or Salary History. A manager can also use this function to view information on their direct reports.
Employment Category
A component of the employee assignment. Four categories are defined: Full Time - Regular, Full Time - Temporary, Part Time - Regular, and Part Time - Temporary.
Employment Equity Occupational Groups (EEOG)
In Canada, the Employment Equity Occupational Groups (EEOG) consist of 14 classifications of work used in the Employment Equity Report. The EEOGs were derived from the National Occupational Classification system.
Employment Insurance (EI)
Benefit plan run by the federal government to which the majority of Canadian employers and employees must contribute.
Employment Insurance Rate
In Canada, this is the rate at which the employer contributes to the EI fund. The rate is expressed as a percentage of the employee's contribution. If the employer maintains an approved wage loss replacement program, they can reduce their share of EI premiums by obtaining a reduced contribution rate. Employers would remit payroll deductions under a different employer account number for employees covered by the plan.
Enrollment Action Type
Any action required to complete enrollment or de-enrollment in a benefit.
Entitlement
In Australia, this is all unused leave from the previous year that remains to the credit ofthe employee.
ESS
Employee Self Service. A predefined SSHR responsibility.
Event
An activity such as a training day, review, or meeting, for employees or applicants. Known as class in OLM.
Ex-Applicant
Someone who has previously applied for a vacancy or multiple vacancies, but all applications have ended, either because the applicant has withdrawn interest or they
Glossary-18
have been rejected. Ex-Applicants can still be registered users.
Expected Week of Childbirth (EWC)
In the UK, this is the week in which an employee's baby is due. The Sunday of the expected week of childbirth is used in the calculations for Statutory Maternity Pay (SMP).
Extra Information Type (EIT)
A type of developer descriptive flexfield that enables you to create an unlimited number of information types for six key areas in Oracle HRMS. Localization teams may also predefine some EITs to meet the specific legislative requirements of your country.
See also: Developer Descriptive Flexfield, page Glossary-14
Field
A view or entry area in a window where you enter, view, update, or delete information.
See also: Block, page Glossary-7, Region, page Glossary-33
Flex Credit
A unit of "purchasing power" in a flexible benefits program. An employee uses flex credits, typically expressed in monetary terms, to "purchase" benefits plans and/or levels of coverage within these plans.
Flexible Benefits Program
A benefits program that offers employees choices among benefits plans and/or levels ofcoverage. Typically, employees are given a certain amount of flex credits or moneys with which to "purchase" these benefits plans and/or coverage levels.
Flexible Spending Account
(FSA) Under US Internal Revenue Code Section 125, employees can set aside money ona pretax basis to pay for eligible unreimbursed health and dependent care expenses. Annual monetary limits and use-it-or-lose it provisions exist. Accounts are subject to annual maximums and forfeiture rules.
Form
A predefined grouping of functions, called from a menu and displayed, if necessary, onseveral windows. Forms have blocks, regions and fields as their components.
See also: Block, page Glossary-7, Region, page Glossary-33, Field, page Glossary-18
Format Mask
A definition of a person-name format. The format mask comprises standard name components, such as title, first name, and last name, in an order appropriate to its

Glossary-19
purpose and legislation.
Format Type
A format-mask classification that identifies the mask's purpose. Oracle HRMS defines the Full Name, Display Name, List Name, and Order Name format types. You can also define your own format types for use in custom code.
Full Time Equivalent (FTE)
A Workforce Measurement Type (WMT) that measures full time equivalent. Although the actual value and calculation may vary, this value is taken from the Assignment Budget Value (ABV) in Oracle HRMS. If the Assignment Budget Value in Oracle HRMS is not set up then a FastFormula is used to determine the value to be calculated.
Global Value
A value you define for any formula to use. Global values can be dates, numbers or text.
Goods or Service Type
A list of goods or services a benefit plan sponsor has approved for reimbursement.
Grade
A component of an employee's assignment that defines their level and can be used to control the value of their salary and other compensation elements.
Grade Comparatio
A comparison of the amount of compensation an employee receives with the mid-pointof the valid values defined for his or her grade.
Grade Ladder
The key component of Grade/Step Progression. You use a grade ladder to categorize grades, to determine the rules for how an employee progresses from one grade (or step)to the next, and to record the salary rates associated with each grade or step on the ladder.
Grade Rate
A value or range of values defined as valid for a given grade. Used for validating employee compensation entries.
Grade Scale
A sequence of steps valid for a grade, where each step corresponds to one point on a pay scale. You can place each employee on a point of their grade scale and automatically increment all placements each year, or as required.
See also: Pay Scale, page Glossary-27

Glossary-20
Grade Step
An increment on a grade scale. Each grade step corresponds to one point on a pay scale.
See also: Grade Scale, page Glossary-19
Grandfathered
A term used in Benefits Administration. A person's benefits are said to be grandfathered when a plan changes but they retain the benefits accrued.
Group
A component that you define, using the People Group key flexfield, to assign employees to special groups such as pension plans or unions. You can use groups to determine employees' eligibility for certain elements, and to regulate access to payrolls.
Group Certificate
In Australia, this is a statement from a legal employer showing employment income of an employee for the financial year..
Headcount(HEAD)
A Workforce Measurement Type (WMT) that measures headcount. Although the actual value and calculation may vary, this value is taken from the Assignment Budget Value (ABV) in Oracle HRMS. If the Assignment Budget Value in Oracle HRMS is not set up then a FastFormula is used to determine the value to be calculated.
Hierarchy
An organization or position structure showing reporting lines or other relationships. You can use hierarchies for reporting and for controlling access to Oracle HRMS information.
High Availability
iRecruitment functionality that enables enterprises to switch between two instances to continuously support the candidate job site.
Imputed Income
Certain forms of indirect compensation that US Internal Revenue Service Section 79 defines as fringe benefits and taxes the recipient accordingly. Examples include employer payment of group term life insurance premiums over a certain monetary amount, personal use of a company car, and other non-cash awards.
Incumbent
In Oracle HRMS, the term Incumbent refers to an active worker (employee or
Glossary-21
contingent worker).
Individual Compensation Distribution
A tool that enables managers assign one-time or recurring awards, bonuses, and allowances to qualified employees such as housing allowances, spot bonuses, and company cars. Also enables employees to enter voluntary contributions, such as savingsplans, charitable organizations, and company perquisites.
Info Online
A generic framework to integrate Oracle applications with partner applications, enabling users to access information from third-party providers, My Oracle Support (formerly MetaLink) and Learning Management.
Initiator
A person who starts a 360 Degree appraisal (Employee or Self) on an individual. An initiator and the appraisee are the only people who can see all appraisal information.
Input Values
Values you define to hold information about elements. In Oracle Payroll, input values are processed by formulas to calculate the element's run result. You can define up to fifteen input values for an element.
Instructions
An SSHR user assistance component displayed on a web page to describe page functionality.
Integrating Application
In AME, an application that uses Oracle Approvals Management Engine to manage the approval processes of its transactions.
Integrator
Defines all the information that you need to download or upload from a particular window or database view using Web ADI.
Interface
A Web ADI term for the item that specifies the columns to be transferred from the Oracle applications database to your desktop or vice versa.
Involuntary
Used in turnover to describe employees who have ceased employment with the enterprise not of their own accord, for example, through redundancy.

Glossary-22
Job
A job is a generic role within a business group, which is independent of any single organization. For example, the jobs "Manager" and "Consultant" can occur in many organizations.
Job Posting
An advertisement for a specific vacancy. This is the public side of the vacancy for which a candidate would apply.
Key Flexfield
A flexible data field made up of segments. Each segment has a name you define and a set of valid values you specify. Used as the key to uniquely identify an entity, such as jobs, positions, grades, cost codes, and employee groups.
See also: Descriptive Flexfield, page Glossary-14
Layout
Indicates the columns to be displayed in a spreadsheet or Word document created using Web ADI.
Learning Management
Oracle's enterprise learning management system that administers online and offline educational content.
Leave Loading
In Australia, an additional percentage amount of the annual leave paid that is paid to the employee.
Leaver's Statement
In the UK, this Records details of Statutory Sick Pay (SSP) paid during a previous employment (issued as form SSP1L) which is used to calculate a new employee's entitlement to SSP. If a new employee falls sick, and the last date that SSP was paid for under the previous employment is less than eight calendar weeks before the first day of the PIW for the current sickness, the maximum liability for SSP is reduced by the number of weeks of SSP shown on the statement.
Legal Employer
A business in Australia that employs people and has registered with the Australian TaxOffice as a Group Employer.
Legal Entity
A legal entity represents the designated legal employer for all employment-related

Glossary-23
activities. The legal authorities in a country recognize this organization as a separate employer.
Life Event
A significant change in a person's life that results in a change in eligibility or ineligibility for a benefit.
Life Event Collision
A situation in which the impacts from multiple life events on participation eligibility, enrollability, level of coverage or activity rates conflict with each other.
Life Event Enrollment
A benefits plan enrollment that is prompted by a life event occurring at any time during the plan year.
Linked PIWs
In the UK, these are linked periods of incapacity for work that are treated as one to calculate an employee's entitlement to Statutory Sick Pay (SSP). A period of incapacity for work (PIW) links to an earlier PIW if it is separated by less than the linking interval. A linked PIW can be up to three years long.
Linking Interval
In the UK, this is the number of days that separate two periods of incapacity for work. If a period of incapacity for work (PIW) is separated from a previous PIW by less than the linking interval, they are treated as one PIW according to the legislation for entitlement to Statutory Sick Pay (SSP). An employee can only receive SSP for the maximum number of weeks defined in the legislation for one PIW.
LMSS
Line Manager Self Service. A predefined SSHR responsibility.
Long Service Leave
Leave with pay granted to employees of a particular employer after a prescribed periodof service or employment with that employer.
Lookup Types
Categories of information, such as nationality, address type and tax type, that have a limited list of valid values. You can define your own Lookup Types, and you can add values to some predefined Lookup Types.
Lower Earnings Limit (LEL)
In the UK, this is the minimum average weekly amount an employee must earn to pay
Glossary-24
National Insurance contributions. Employees who do not earn enough to pay National Insurance cannot receive Statutory Sick Pay (SSP) or Statutory Maternity Pay (SMP).
Manager
(iRecruitment) A manager accesses the iRecruitment system to document their hiring needs and conduct their recruiting activities online. Specifically, these activities include vacancy definition, searching for candidates, and processing applicants through the vacancy process.
Manager-Employee Appraisal
Part of the Appraisal function. A manager appraisal of an employee. However, an appraising manager does not have to be a manager.
Mapping
If you are bringing in data from a text file to Oracle HRMS using a spreadsheet created in Web ADI, you need to map the columns in the text file to the application's tables and columns.
Maternity Pay Period
In the UK, this is the period for which Statutory Maternity Pay (SMP) is paid. It may start at any time from the start of the 11th week before the expected week of confinement and can continue for up to 18 weeks. The start date is usually agreed with the employee, but can start at any time up to the birth. An employee is not eligible to SMP for any week in which she works or for any other reason for ineligibility, defined by the legislation for SMP.
Medicare Levy
An amount payable by most taxpayers in Australia to cover some of the cost of the public health system.
Menus
You set up your own navigation menus, to suit the needs of different users.
My Account
(iRecruitment) My Account is the total of either a candidate or applicant's personal and vacancy-specific information including the information needed to manage their progress through the recruitment process.
NACHA
National Automated Clearing House Association. This is the US system for making direct deposit payments to employees.

Glossary-25
National Identifier
This is the alphanumeric code that is used to uniquely identify a person within their country. It is often used for taxation purposes. For example, in the US it is the Social Security Number, in Italy it is the Fiscal Code, and in New Zealand it is the IRD Number.
National Occupational Classification (NOC) code
In Canada, the National Occupational Classification (NOC) System was developed to best reflect the type of work performed by employees. Occupations are grouped in terms of particular tasks, duties and responsibilities. The use of this standardized system ensures consistency of data from year to year within the same company as well as between companies. These codes are used in the Employment Equity Report.
Net Accrual Calculation
The rule that defines which element entries add to or subtract from a plan's accrual amount to give net entitlement.
Net Entitlement
The amount of unused paid time off an employee has available in an accrual plan at any given point in time.
Nonrecurring Elements
Elements that process for one payroll period only unless you make a new entry for an employee.
See also: Recurring Elements, page Glossary-33
North American Industrial Classification (NAIC) code
The North American Industrial Classification system (NAICs) was developed jointly bythe US, Canada and Mexico to provide comparability in statistics regarding business activity across North America. The NAIC replaces the US Standard Industrial Classification (SIC) system, and is used in the Employment Equity Report.
Not in Program Plan
A benefit plan that you define outside of a program.
Objective Assessment Template
The entity that configures the Objectives section of the appraisal.
See also: Competency Assessment Template, page Glossary-10
Objectives Library
A collection of reusable objectives. HR Professionals can either create individual
Glossary-26
objectives in the Objectives Library or import them from an external source.
Off-Boarding
Descriptive term covering all HR processes and procedures involved in removing a worker from your organization, including termination, relocation, and long-term sickness.
OLM
Oracle Learning Management.
On-Boarding
Descriptive term covering all HR processes and procedures involved in hiring and integrating a worker in your organization, including recruitment, hiring, and orientation.
Online Analytical Processing (OLAP)
Analysis of data that reveals business trends and statistics that are not immediately visible in operational data.
Online Transactional Processing (OLTP)
The storage of data from day-to-day business transactions into the database that contains operational data.
Open Enrollment
A type of scheduled enrollment in which participants can enroll in or alter elections in one or more benefits plans.
Options
A level of coverage for a participant's election, such as Employee Only for a medical plan, or 2x Salary for a life insurance plan.
Oracle FastFormula
Formulas are generic expressions of calculations or comparisons you want to repeat with different input values. With Oracle FastFormula you can write formulas using English words and basic mathematical functions. The output of FastFormulas is fed back into reports.
Organization
A required component of employee assignments. You can define as many organizationsas you want within your Business Group. Organizations can be internal, such as departments, or external, such as recruitment agencies. You can structure your organizations into organizational hierarchies for reporting purposes and for system

Glossary-27
access control.
Organization Manager Hierarchy
An HRMS structure that contains supervisors and subordinates on a reporting chain who also own organizations. HRMS uses this hierarchy to filter the information you display in report modules.
OSSWA
Oracle Self Service Web Applications.
Outcome
For a unit standard competence, a behavior or performance standard associated with one or more assessment criteria. A worker achieves a unit standard competence when they achieve all outcomes for that competence.
Overrides
You can enter overrides for an element's pay or input values for a single payroll period.This is useful, for example, when you want to correct errors in data entry for a nonrecurring element before a payroll run.
Parameter Portlet
A portlet in which you select a number of parameters that may affect all your portlets on your page. These may include an effective date, the reporting period, the comparisontype, the reporting manager, and the output currency for your reports. The parameter portlet is usually available at the top of the portal page.
Pattern
A pattern comprises a sequence of time units that are repeated at a specified frequency. The Statutory Absence Payments (UK) feature, uses SSP qualifying patterns to determine employees entitlement to Statutory Sick Pay (SSP).
Pattern Time Units
A sequence of time units specifies a repeating pattern. Each time unit specifies a time period of hours, days or weeks.
Pay Scale
A set of progression points that can be related to one or more rates of pay. Employee's are placed on a particular point on the scale according to their grade and, usually, work experience.
See also: Grade Scale, page Glossary-19
Glossary-28
Pay Value
An amount you enter for an element that becomes its run item without formula calculations.
See also: Input Values, page Glossary-21
Payment Type
There are three standard payment types for paying employees: check, cash and direct deposit. You can define your own payment methods corresponding to these types.
Payroll
A group of employees that Oracle Payroll processes together with the same processing frequency, for example, weekly, monthly or bimonthly. Within a Business Group, you can set up as many payrolls as you need.
Payroll Reversal
A payroll reversal occurs when you reverse a payroll run for a single employee, in effectcancelling the run for this employee.
Payroll Rollback
You can schedule a payroll rollback when you want to reverse an entire payroll run, cancelling out all information processed in that run. To preserve data integrity, you can roll back only one payroll at a time, starting with the one most recently run.
Payroll Run
The process that performs all the payroll calculations. You can set payrolls to run at anyinterval you want.
People List
An SSHR line manager utility used to locate an employee.
Performance Management Plan
The entity that defines the performance-management process for a specified period. A component of the Workforce Performance Management function.
Performance Management Viewer (PMV)
A reporting tool that displays the report that corresponds to one or more PMF targets.
Period of Incapacity for Work (PIW)
In the UK, this is a period of sickness that lasts four or more days in a row, and is the minimum amount of sickness for which Statutory Sick Pay can be paid. If a PIW is separated by less then the linking interval, a linked PIW is formed and the two PIWs aretreated as one.

Glossary-29
Period of Placement
The period of time a contingent worker spends working for an enterprise. A contingentworker can have only one period of placement at a time; however, a contingent worker can have multiple assignments during a single period of placement.
Period Type
A time division in a budgetary calendar, such as week, month, or quarter.
Personal Public Service Number (PPS)
The Irish equivalent to National Insurance number in the UK, or the Social Security number in the US.
Personal Tax Credits Return (TD1)
A Revenue Canada form which each employee must complete. Used by the employee to reduce his or her taxable income at source by claiming eligible credits and also provides payroll with such important information as current address, birth date, and SIN. These credits determine the amount to withhold from the employee's wages for federal/provincial taxes.
Person Search
An SSHR function which enables a manager to search for a person. There are two typesof search, Simple and Advanced.
Person Type
There are eight system person types in Oracle HRMS. Seven of these are combinations of employees, ex-employees, applicants, and ex-applicants. The eighth category is 'External'. You can create your own user person types based on the eight system types.
Personal Scorecard
A collection of objectives for a single worker arising from a single Performance Management Plan.
Personnel Actions
Personnel actions is a public sector term describing business processes that define and document the status and conditions of employment. Examples include hiring, training, placement, discipline, promotion, transfer, compensation, or termination. Oracle HRMSuses the term self-service actions synonymously with this public sector term. Oracle Self Service Human Resources (SSHR) provides a configurable set of tools and web flows forinitiating, updating, and approving self-service actions.
Plan Design
The functional area that allows you to set up your benefits programs and plans. This

Glossary-30
process involves defining the rules which govern eligibility, available options, pricing, plan years, third party administrators, tax impacts, plan assets, distribution options, required reporting, and communications.
Plan Sponsor
The legal entity or business responsible for funding and administering a benefits plan. Generally synonymous with employer.
Position
A specific role within the Business Group derived from an organization and a job. For example, you may have a position of Shipping Clerk associated with the organization Shipping and the job Clerk.
Predefined Components
Some elements and balances, all primary element classifications and some secondary classifications are defined by Oracle Payroll to meet legislative requirements, and are supplied to users with the product. You cannot delete these predefined components.
Process Rule
See Configurable Business Rules, page Glossary-10
Professional Information
An SSHR function which allows an employee to maintain their own professional details or a line manager to maintain their direct reports professional details.
Proficiency
A worker's perceived level of expertise in a competency, in the opinion of an assessor, over a given period. For example, a worker may demonstrate the communication competency at Novice or Expert level.
Progression Point
A pay scale is calibrated in progression points, which form a sequence for the progression of employees up the pay scale.
See also: Pay Scale, page Glossary-27
Prospect Pool
(iRecruitment) The prospect pool contains all registered users who have given permission for their information to be published.
Provincial/Territorial Employment Standards Acts
In Canada, these are laws covering minimum wages, hours of work, overtime, child labour, maternity, vacation, public/general holidays, parental and adoption leave, etc.,
Glossary-31
for employees regulated by provincial/territorial legislation.
Provincial Health Number
In Canada, this is the account number of the provincially administered health care planthat the employer would use to make remittances. There would be a unique number foreach of the provincially controlled plans i.e. EHT, Quebec HSF, etc.
PTO Accrual Plan
A benefit in which employees enroll to entitle them to accrue and take paid time off (PTO). The purpose of absences allowed under the plan, who can enroll, how much time accrues, when the time must be used, and other rules are defined for the plan.
QPP
(See Canada/Quebec Pension Plan)
QA Organization
Quality Assurance Organization. Providers of training that leads to Qualifications Framework qualifications register with a QA Organization. The QA Organization is responsible for monitoring training standards.
Qualification Type
An identified qualification method of achieving proficiency in a competence, such as anaward, educational qualification, a license or a test.
See also: Competence, page Glossary-10
Qualifications Framework
A national structure for the registration and definition of formal qualifications. It identifies the unit standard competencies that lead to a particular qualification, the awarding body, and the field of learning to which the qualification belongs, for example.
Qualifying Days
In the UK, these are days on which Statutory Sick Pay (SSP) can be paid, and the only days that count as waiting days. Qualifying days are normally work days, but other days may be agreed.
Qualifying Pattern
See: SSP Qualifying Pattern, page Glossary-37
Qualifying Week
In the UK, this is the week during pregnancy that is used as the basis for the qualifying rules for Statutory Maternity Pay (SMP). The date of the qualifying week is fifteen

Glossary-32
weeks before the expected week of confinement and an employee must have been continuously employed for at least 26 weeks continuing into the qualifying week to be entitled to SMP.
Quebec Business Number
In Canada, this is the employer's account number with the Ministere du Revenu du Quebec, also known as the Quebec Identification number. It consists of 15 digits, the first 9 identify the employer, the next 2 identify the type of tax account involved (payroll vs. corporate tax), and the last 4 identify the particular account for that tax.
Questionnaire
A function which records the results of an appraisal.
QuickPaint Report
A method of reporting on employee and applicant assignment information. You can select items of information, paint them on a report layout, add explanatory text, and save the report definition to run whenever you want.
See also: Assignment Set, page Glossary-5
QuickPay
QuickPay allows you to run payroll processing for one employee in a few minutes' time. It is useful for calculating pay while someone waits, or for testing payroll formulas.
Ranking
(iRecruitment) A manually entered value to indicate the quality of the applicant against other applicants for a specific vacancy.
Rates
A set of values for employee grades or progression points. For example, you can define salary rates and overtime rates.
Rate By Criteria
A function that enables the calculation of pay from different rates for each role a workerperforms in a time period.
Rating Scale
Used to describe an enterprise's competencies in a general way. You do not hold the proficiency level at the competence level.
Record of Employment (ROE)
A Service Canada form that must be completed by an employer whenever an

Glossary-33
interruption of earnings occurs for any employee. This form is necessary to claim Employment Insurance benefits.
Recruitment Activity
An event or program to attract applications for employment. Newspaper advertisements, career fairs and recruitment evenings are all examples of recruitment activities. You can group several recruitment activities together within an overall activity.
Recurring Elements
Elements that process regularly at a predefined frequency. Recurring element entries exist from the time you create them until you delete them, or the employee ceases to be eligible for the element. Recurring elements can have standard links.
See also: Nonrecurring Elements, page Glossary-25, Standard Link, page Glossary-38
Recruiting Area
A recruiting area consists of a set of countries, business groups, and locations. Define recruiting areas using the Generic Hierarchy function of Oracle HRMS. In iRecruitment,when managers create vacancies, they can select multiple locations as vacancy locations using recruiting areas.
Referenced Rule
In HRMS budgeting, any predefined configurable business rule in the Assignment Modification, Position Modification, or Budget Preparation Categories you use as the basis for defining a new rule.
See Configurable Business Rules, page Glossary-10
Region
A collection of logically related fields in a window, set apart from other fields by a rectangular box or a horizontal line across the window.
See also: Block, page Glossary-7, Field, page Glossary-18
Registered Pension Plan (RPP)
This is a pension plan that has been registered with Revenue Canada. It is a plan wherefunds are set aside by an employer, an employee, or both to provide a pension to employees when they retire. Employee contributions are generally exempt from tax.
Registered Retirement Savings Plan (RRSP)
This is an individual retirement savings plan that has been registered with Revenue Canada. Usually, contributions to the RRSP, and any income earned within the RRSP, isexempt from tax.
Glossary-34
Registered User
(iRecruitment) A person who has registered with the iRecruitment site by entering an e-mail address and password. A registered user does not necessarily have to apply for jobs.
Reporting Group
A collection of programs and plans that you group together for reporting purposes, such as for administrative use or to meet regulatory requirements.
Report Parameters
Inputs you make when submitting a report to control the sorting, formatting, selection, and summarizing of information in the report.
Report Set
A group of reports and concurrent processes that you specify to run together.
Requisition
The statement of a requirement for a vacancy or group of vacancies.
Request Groups
A list of reports and processes that can be submitted by holders of a particular responsibility.
See also: Responsibility, page Glossary-34
Residual
The amount of unused paid time off entitlement an employee loses at the end of an accrual term. Typically employees can carry over unused time, up to a maximum, but they lose any residual time that exceeds this limit.
See also: Carry Over, page Glossary-8
Responsibility
A level of authority in an application. Each responsibility lets you access a specific set of Oracle Applications forms, menus, reports, and data to fulfill your business role. Several users can share a responsibility, and a single user can have multiple responsibilities.
See also: Security Profile, page Glossary-36, User Profile Options, page Glossary-41, Request Groups, page Glossary-34, Security Groups, page Glossary-34
Resume
A document that describes the experience and qualifications of a candidate.
Glossary-35
RetroPay
A process that recalculates the amount to pay an employee in the current period to account for retrospective changes that occurred in previous payroll periods.
Retry
Method of correcting a payroll run or other process before any post-run processing takesplace. The original run results are deleted and the process is run again.
Revenue Canada
Department of the Government of Canada which, amongst other responsibilities, administers, adjudicates, and receives remittances for all taxation in Canada including income tax, Employment Insurance premiums, Canada Pension Plan contributions, and the Goods and Services Tax (legislation is currently proposed to revise the name to the Canada Customs and Revenue Agency). In the province of Quebec the equivalent is the Ministere du Revenu du Quebec.
Reversal
Method of correcting payroll runs or QuickPay runs after post-run processing has takenplace. The system replaces positive run result values with negative ones, and negative run result values with positive ones. Both old and new values remain on the database.
Reviewer (SSHR)
A person invited by an appraising manager to add review comments to an appraisal.
RIA
Research Institute of America (RIA), a provider of tax research, practice materials, and compliance tools for professionals, that provides U.S. users with tax information.
Rollback
Method of removing a payroll run or other process before any post-run processing takesplace. All assignments and run results are deleted.
Rollup
An aggregate of data that includes subsidiary totals.
Run Item
The amount an element contributes to pay or to a balance resulting from its processing during the payroll run. The Run Item is also known as calculated pay.
Salary Basis
The period of time for which an employee's salary is quoted, such as hourly or
Glossary-36
annually. Defines a group of employees assigned to the same salary basis and receiving the same salary element.
Salary Rate
The rate of pay associated with a grade or step. Used by Grade/Step Progression.
Scheduled Enrollment
A benefits plan enrollment that takes place during a predefined enrollment period. Scheduled enrollments can be administrative, or open.
Search by Date
An SSHR sub-function used to search for a Person by Hire date, Application date, Job posting date or search by a Training event date.
Secondment
The temporary transfer of an employee to a different business group.
Security Group
Security groupsenable HRMS users to partition data by Business Group. Only used for Security Groups Enabled security.
See also: Responsibility, page Glossary-34, Security Profile, page Glossary-36, User Profile Options, page Glossary-41
Security Groups Enabled
Formerly known as Cross Business Group Responsibility security. This security model uses security groups and enables you to link one responsibility to many Business Groups.
Security Profile
Security profiles control access to organizations, positions and employee and applicant records within the Business Group. System administrators use them in defining users' responsibilities.
See also: Responsibility, page Glossary-34
Self Appraisal
Part of the Appraisal function. This is an appraisal undertaken by an employee to rate their own performance and competencies.
Separation Category
Separation category groups the leaving reasons. HRMSi refers to Termination Category as Separation Category.
See also: termination category, page Glossary-39

Glossary-37
Site Visitor
(iRecruitment) A person who navigates to the iRecruitment web site and may view job postings. This person has not yet registered or logged in to the iRecruitment system. This individual may search for postings on the web site and also has the ability to log inor register with the iRecruitment site.
SMP
See: Statutory Maternity Pay, page Glossary-38
Social Insurance Number (SIN)
A unique number provided by Human Resources Development Canada (HRDC) to each person commencing employment in Canada. The number consists of 9 digits in thefollowing format (###-###-###).
Source Deductions Return (TP 1015.3)
A Ministere du Revenu du Quebec form which each employee must complete. This form is used by the employee to reduce his or her taxable income at source by claiming eligible credits and also provides payroll with such important information as current address, birth date, and SIN. These credits determine the amount of provincial tax to withhold from the employee's wages.
Special Information Types
Categories of personal information, such as skills, that you define in the Personal Analysis key flexfield.
Special Run
The first run of a recurring element in a payroll period is its normal run. Subsequent runs in the same period are called special runs. When you define recurring elements you specify Yes or No for special run processing.
SSHR
Oracle Self-Service Human Resources. An HR management system using an intranet and web browser to deliver functionality to employees and their managers.
SSP
See: Statutory Sick Pay, page Glossary-38
SSP Qualifying Pattern
In the UK, an SSP qualifying pattern is a series of qualifying days that may be repeated weekly, monthly or some other frequency. Each week in a pattern must include at least one qualifying day. Qualifying days are the only days for which Statutory Sick Pay (SSP) can be paid, and you define SSP qualifying patterns for all the employees in your organization so that their entitlement to SSP can be calculated.

Glossary-38
Standard HRMS Security
The standard security model. Using this security model you must log on as a different user to see a different Business Group.
Standard Link
Recurring elements with standard links have their element entries automatically created for all employees whose assignment components match the link.
See also: Element Link, page Glossary-16, Recurring Elements, page Glossary-33
Statement of Commissions and Expenses for Source Deduction Purposes (TP 1015.R.13.1)
A Ministere du Revenu du Quebec form which allows an employee who is paid partly or entirely by commissions to pay a constant percentage of income tax based on his or her estimated commissions for the year, less allowable business expenses.
Statement of Earnings (SOE)
A summary of the calculated earnings and deductions for an assignment in a payroll period.
Statement of Remuneration and Expenses (TD1X)
In Canada, the Statement of Remuneration and Expenses allows an employee who is paid partly or entirely by commission to pay a constant percentage of income tax, basedon his or her estimated income for the year, less business-related expenses.
Statutory Adoption Pay
In the UK, Statutory Adoption Pay (SAP) is payable to a person of either sex with whoma child is, or is expected to be, placed for adoption under UK law.
Statutory Maternity Pay
In the UK, you pay Statutory Maternity Pay (SMP) to female employees who take time off work to have a baby, providing they meet the statutory requirements set out in the legislation for SMP.
Statutory Sick Pay
In the UK, you pay Statutory Sick Pay (SSP) to employees who are off work for four or more days because they are sick, providing they meet the statutory requirements set outin the legislation for SSP.
Statutory Paternity Pay
In the UK, Statutory Paternity Pay Birth (SPPB) is payable to a person supporting the mother at the time of birth. In cases of adoption, the primary carer receives Statutory Adoption Pay, while the secondary carer receives Statutory Paternity Pay Adoption

Glossary-39
(SPPA).
Suitability Matching
An SSHR function which enables a manager to compare and rank a persons competencies.
Superannuation Guarantee
An Australian system whereby employers are required to contribute a percentage of aneligible employee's earnings to a superannuation fund to provide for their retirement.
Supplier
An internal or external organization providing contingent workers for an organization. Typically suppliers are employment or recruitment agencies.
Supporting Objective
An objective aligned with another objective. Supporting objectives contribute to the achievement of the objectives they support.
Tabbed Regions
Parts of a window that appear in a stack so that only one is visible at any time. You click on the tab of the required region to bring it to the top of the stack.
Task Flows
A sequence of windows linked by buttons to take you through the steps required to complete a task, such as hiring a new recruit. System administrators can create task flows to meet the needs of groups of users.
Tax Point
The date from which tax becomes payable.
Template Letter
Form letter or skeleton letter that acts as the basis for creating mail merge letters. The template letter contains the standard text, and also contains field codes, which are replaced by data from the application during the mail merge process.
Terminating Employees
You terminate an employee when he or she leaves your organization. Information about the employee remains on the system but all current assignments are ended.
Termination Category
When employees leave an enterprise, the decision is either made by the employee or by the enterprise. When the decision is made by the employee the termination is

Glossary-40
Voluntary. When the decision is made by the enterprise, the termination is Involuntary.
HRMSi elsewhere refers to Termination Category as Separation Category.
Termination Rule
Specifies when entries of an element should close down for an employee who leaves your enterprise. You can define that entries end on the employee's actual termination date or remain open until a final processing date.
Tips
An SSHR user assistance component that provides information about a field.
Total Compensation Statement
A module to communicate compensations, rewards, and benefits to employees and contingent workers.
Transaction Type
In AME, an integrating application may divide its transactions into several categories, where each category requires a distinct set of approval rules. Each set of rules is a transaction type. Different transaction types can use the same attribute name to represent values that the application fetches from different places. This enables several transaction types to share approval rules, thus facilitating a uniform approval policy across multiple transaction types.
Transcentive
A third-party compensation management solutions provider, that provides additional information about benefits choices.
Unit Standard
A nationally registered document that describes a standard of performance. The standard is typically defined and maintained by industry representatives.
Unit Standard Competency
A competency that is defined in a Unit Standard and linked to a Qualifications Framework qualification.
Upload
The process of transferring the data from a spreadsheet on your desktop, created using Web ADI, back to the Oracle HRMS application.
User Assistance Components
SSHR online help comprising tips and instructions.

Glossary-41
User Balances
Users can create, update and delete their own balances, including dimensions and balance feeds.
See also: Balances, page Glossary-6
User Profile Options
Features that allow system administrators and users to tailor Oracle HRMS to their exact requirements.
See also: Responsibility, page Glossary-34, Security Profile, page Glossary-36
User-based Security
With this type of security, the application generates the security permissions for a current user when that user logs on to a system. The system uses the security profile (can be position, supervisor, or organization-based, for example) to generate security permissions for the current user, for example, based on the user's position. An alternative to user-based security is a security profile with defined security rules, for example, to specify that the top-level position for a position-based security profile is Position A, irrespective of the current user's position.
View
An example of an interface that you can use to download data from the Oracle HRMS application to a spreadsheet using Web ADI.
Viewer (SSHR)
A person with view only access to an appraisal. An appraising manager or an employee in a 360 Degree Self appraisal can appoint view only access to an appraisal.
Viewer (Web ADI)
A desktop application, such as a spreadsheet or word processing tool, that you use to view the data downloaded from Oracle HRMS via Web ADI.
Voluntary
Term used in turnover to describe employees who have ceased employment with the enterprise of their own accord, for example, by resigning.
Waiting Days
In the UK, statutory Sick Pay is not payable for the first three qualifying days in period of incapacity for work (PIW), which are called waiting days. They are not necessarily the same as the first three days of sickness, as waiting days can be carried forward from a previous PIW if the linking interval between the two PIWs is less than 56 days.
Glossary-42
WCB Account Number
In Canada, this is the account number of the provincially administered Workers' Compensation Board that the employer would use to make remittances. There would be a unique number for each of the provincially controlled boards i.e. Workplace Safety & Insurance Board of Ontario, CSST, etc.
Work Choices
Also known as Work Preferences, Deployment Factors, or Work Factors. These can affect a person's capacity to be deployed within an enterprise, such willingness to travelor relocate. You can hold work choices at both job and position level, or at person level.
Worker
An employee, page Glossary-16 or a contingent worker, page Glossary-11
Workers' Compensation Board
In Canada, this is a provincially governed legislative body which provides benefits to employees upon injury, disability, or death while performing the duties of the employer. Workers' Compensation Board premiums are paid entirely by the employer.
Workflow
An Oracle application which uses charts to manage approval processes and in addition is used in SSHR to configure display values of sections within a web page and instructions.
Workforce Measurement Type (WMT)
Groups of different units combined to measure the workforce. The most common units are headcount and full time equivalent.
Workforce Measurement Value (WMV)
A WMT value, for example, headcount or FTE.
Workforce Performance Management
The Oracle HRMS functions that support enterprise-directed objective setting, management, and assessment.
Work Structures
The fundamental definitions of organizations, jobs, positions, grades, payrolls and other employee groups within your enterprise that provide the framework for defining the work assignments of your employees.

Glossary-43

Index-1
Index
AAbsences, 1-21, 15-2Academic Rank, 1-16, 9-28access levels
See workflow access levelsaccess roles, 5-3Actions
available functions, 4-14Save for Later, 11-14
Actions menus, 3-13, 4-10Actions page, 3-7, 11-14Advanced Search, 11-4Allocated Checklists, 1-9, 11-40AME, 7-4, 7-5
approval levels, 7-8attributes, 7-6components, 7-5configuring functions, 7-17default configuration, 7-6integration, 1-8parameters, 4-13
AOL functions, 1-5Applicant Hire and Rehire, 9-105Application Object Library functions
See AOL functionsApply for a Job, 1-17Appraisals, 1-20approval levels, 7-8approvals, 5-3, 7-9, 11-13
access roles, 5-3AME, 7-4, 7-5
and Workflow Builder, 5-3approval levels, 7-8configuring, 4-3configuring in Workflow Builder, 7-21customizing using PL/SQL, 7-15deferring update, 7-10dynamic approvals, 7-4interfaces, 7-4overview, 7-1, 7-3pending transactions, 7-9Return for Correction, 1-8Review and Confirm, 11-13routing transactions, 7-10standard, 7-5
Approvalsself-service actions, 11-59
Assignment, 1-11, 9-50multiple assignments, 9-51salary basis, 9-50
Assignment Details view, 9-75Assignment Rate, 1-12, 9-65attachments, 11-13Attachments
self-service actions, 11-58attributes
AME, 7-6
BBasic Details, 9-5batch user accounts, 3-63
and user hooks, 3-68concurrent processes, 3-63

Index-2
concurrent programs, 3-64Benefits Enrollment, 1-22Business documents
self-service actions, 11-58business events
subscribing, 3-19business processes, 1-5Business processes
self-service actions, 11-56button bar, 6-38
CCandidate Offers, 1-17Career and Performance Management functions, 1-20Change Location, 1-11, 9-62Change Manager, 1-11, 9-66Change Pay, 9-65checklists
See Allocated ChecklistsCommutation Allowance, 1-25Compensation Activity view, 9-75Compensation and Benefits Management functions, 1-21Compensation functions, 1-23Compensation Workbench, 1-23Competency Profile, 1-16, 9-25Complete Defunct HR Workflow Processes program, 5-12concurrent programs, 3-63
for batch creation of user accounts, 3-63, 3-64user hooks, 3-64
Configuration FrameworkSee Personalization Framework
ConfiguringAssignment Details View, 8-28Compensation Activity View, 8-30Employee Information View, 8-27My Information and My Employee Information Views, 8-18Search Functions for HR Views, 8-33Termination History View, 8-31
Configuring Employee RL1 and RL2 Modules, 17-81Configuring Employee T4 and T4A Modules, 17-75
Conflicting actionsmanaging, 11-49
Contact Extra Information, 1-14, 9-20contacts
extra information, 9-20Contingent Worker Placement, 1-18contingent workers
Assignment Rate, 9-65End Placement function, 9-58functions, 3-10
Contingent Worker Self Service menu, 4-32Create Batch Users process, 3-63Create Custom Validations, 17-20
Ddata grants
for Responsibility Ownership, 3-23Data Mining, 4-3Data Pump Engine, 3-64data security menus, 3-13dates
concurrent transactions, 4-6effective date prompts, 6-41effective dates, 4-5future-dated changes, 4-7intervening actions, 4-6
Delete Transactions Pending Approval, 11-41Dependents and Beneficiaries, 9-16Disability and Veteran Status Details to Comply with OFCCP, 9-19Disable Self-Service Personal profile option, 6-7document categories, 8-60
creating, 8-60Document Management, 1-9, 11-16
printable pages, 11-14self-service actions, 11-58
documentscategories, 8-60Documents of Record, 9-23printable pages, 11-14subcategories, 8-60types, 8-60
Documentsbusiness, 11-58
Documents of Record, 1-14, 9-23document subcategories, 8-60
Index-3
creating, 8-60document types, 8-60
creating, 8-60duplicate person checking, 9-104
EEducation and Qualifications, 1-15, 9-24Effective dates
self-service actions, 11-56Element Entries, 17-14eligibility
and length of service, 11-35setting up, 11-36setup example, 11-34
Eligibilityself-service actions, 11-55
eligibility profiles, 11-37e-mail addresses, 5-11Emergency Contacts, 9-14Employee Claims, 17-104Employee Directory, 1-10, 9-32
Anonymous Access, 9-39overriders, 9-41Overrides, 9-44Repository, 9-42single sign on, 9-40, 9-41
Employee Information, 9-75, 9-86, 9-86employee menus, 3-13Employee Reviews, 1-21, 12-5Employee RL2, 17-80employees
functions, 3-10Employee Self Service Foundation menu, 4-18Employee Self Service menu, 4-26Employee T4, 17-73Employee T4A, 17-74Employment Verification, 1-15, 9-28End Placement, 1-12
and Organization Manager, 9-58contingent workers, 9-58
Enter Process, 1-7, 3-3See People in Hierarchy Person Search, 3-4self-service actions, 11-54
error processesSee workflow error processes
Events and Bookings, 1-21, 12-4Extra Information Types (EITs), 1-11, 9-20, 9-63
FFEHB
notifications, 18-12flexfields
configuring, 6-27in page headers, 6-26
FND: Personalization Region Link Enabled profile option, 6-7Form Functions window, 7-17function-level personalizations, 6-6functions
Absences, 1-21Academic Rank (US), 1-16Actions pages, 4-14and AME, 7-17and user access, 3-7Apply for a Job, 1-17Apply for Job, 9-101Appraisals, 1-20Benefits Enrollment, 1-22Candidate Offers, 1-17Career and Performance Management, 1-20Commutation Allowance, 1-25Compensation, 1-23Compensation and Benefits Management, 1-21Compensation Workbench, 1-23Competency Profile, 1-16configuring, 4-2Contact Extra Information, 1-14Contingent Worker Placement, 1-18contingent workers, 3-10defining, 4-12definition, 1-6Documents of Record, 1-14, 9-23Education and Qualifications, 1-15Employee Directory, 1-10Employee Review, 1-21employees, 3-10Employment Verification, 1-15, 9-28Events and Bookings, 1-21 for managers, 4-15global, 4-14Hire, 1-17

Index-4
HR Views, 1-17Individual Compensation Distributions (ICD),1-23in menus, 4-14legislative, 3-8, 4-14managers, 3-10Medical Expenses (India), 17-117My Employee Information, 1-16My Information, 1-16navigation options, 3-17New User Registration, 1-8, 3-9, 11-65Organization Manager, 1-13Other Professional Qualifications, 1-15parameters, 4-13, 4-16
descriptions, 4-34Payment Methods, 1-25Payroll, 1-24Payslip, 1-24Personal Information, 1-14, 1-31Release Information, 3-6, 11-11Responsibility Ownership, 3-17, 3-19Resume, 1-16sample function, 1-26Special Information Types (SITs), 9-62Succession Planning, 1-20Suitability Matching, 1-21Tax Declaration (India), 17-114Tax Form (W-2), 1-24Tax Form (W-4), 1-24Tenure Status (US), 1-16Travel Expenses (India), 17-user access, 4-11Voluntary Deductions, 1-25What-If analysis, 11-13workflow, 1-6Work Preferences, 1-16
Ggeneric users
New User Registration, 11-68
HHire, 1-17Hire or Placement, 9-103Hiring, 9-103HR: Allow Approver Updates to Self Service
Actions profile option, 7-9HR:Allow Concurrent Self Service Actions profile option, 4-6HR: Cross Business Group profile option, 11-4, 11-11HR:Defer Update After Approval profile options,7-10HR: Display Position Hierarchy profile option, 9-73, 9-79HR:Enable Multiple Assignments in SSHR profile option, 3-6HR:HR/Payroll Representative Source profile option, 17-25HR: HR/Payroll Representative Source profile option, 17-34HR: Include Terminated People in Search profile option, 11-4HR: Manager Actions Menu profile option, 11-5HR:Manage Self Service Actions When Future-Dated Changes Exist profile option, 4-6HR: Online Tax Forms Update Method profile option, 17-25HR:Override Grade Defaults profile option, 9-50HR:Payroll Payments Self-Service Enable Multiple Assignments profile option, 17-3HR: Personal Actions Menu profile option, 11-5HR:Refresh Self Service Actions With Data From Intervening Actions profile option, 4-6HR: Self Service HR Licensed profile option, 11-65HR:Use Grade Defaults profile option, 9-50HR:View Payslip From Date for WEB (MM/DD/YYYY) profile option, 17-12, 17-55, 17-106HR Professional menu, 4-17HR Views, 1-17, 9-72
Iimages
personalizing, 6-39implementation steps, 2-1, 2-3Income Tax Register Report, 17-126India
Medical Expenses, 17-117Tax Declaration, 17-114Travel Expenses, 17-

Index-5
Individual Compensation Distributions (ICD), 1-23instructions
See messagesitem types, 5-3
See workflow item types
LLeave Travel Expenses (India), 17-legislative functions, 3-8legislative menus, 3-17license information, 1-4logos
See images
MMain Address, 9-7Manage Employment Events
See MEEManager Actions, 1-8, 11-5manager menus, 3-14managers
functions, 3-10, 4-15Manager Self Service Foundation menu, 4-17Manager Self Service menu, 4-18MDS Repository, 1-5
See Meta Data Services RepositoryMedical Expenses (India), 17-117MEE, 1-10
chained processes, 9-47sequence, 9-49
menu function parametersSee parameters
menusContingent Worker Self Service, 4-32data security, 3-13defining, 4-10delivered functions, 4-16Employee Self Service, 4-26Employee Self Service Foundation, 4-18for managers, 3-14for non-managers, 3-13functions, 4-14HR Professional, 4-17legislative, 3-17Manager Actions, 3-14
Manager Self Service, 4-18Manager Self Service Foundation, 4-17Payroll Professional, 4-16Personal Actions, 3-13types, 3-11user, 3-15user access, 3-11
Menus window, 4-10, 4-14configuring button bar, 6-38
messages, 6-35effective date prompts, 6-41
Messages window, 6-41Meta Data Services Repository, 6-1
See MDS Repositorymigration
from previous SSHR versions, 1-26mileage claims
configuration settings, 16-4storing vehicle data, 16-2
modulesAllocated Checklists, 1-9, 11-40Assignment, 1-11Assignment Rate, 1-12Change Location, 1-11definition, 1-6delivered, 1-6End Placement, 1-12Enter Process, 1-7Extra Information Types, 1-11Other Employment Information , 1-12Pay Rate, 1-12People Management, 1-10Special Information Types, 1-12Termination, 1-12Workforce Sourcing and Deployment, 1-10Work Schedule, 1-13
multiple assignments, 3-6, 9-51My Employee Information, 1-16, 9-72, 9-73, 9-77, 9-79My Information, 1-16, 9-72, 9-73, 9-77My List, 11-4
Nname formats, 6-26New User Registration, 1-8, 3-9, 11-62
configuring, 11-74

Index-6
Create User Name process, 11-65, 11-79generic users, 11-68Life events, 11-78user hook, 11-67user names and passwords, 11-81
notification messages, 5-6notifications
See workflow notifications
OOAB
license information, 1-4OAB: Self Registered User Responsibility , 11-65OA Framework, 1-5, 6-1Oracle Advanced Benefits
See OABOracle Applications Framework
See OA FrameworkOracle Approvals Management
See AMEOracle Compensation Workbench
license information, 1-4Oracle Payroll
license information, 1-4Oracle Performance Management
license information, 1-5Oracle Self-Service Applications
See OSSWAOracle Total Compensation Statement
license information, 1-5Oracle Training Administration
OTA, 1-4Organization chart
implementing and configuring, 13-6Organization Chart, 1-18
managers, 13-3using, 13-2workers, 13-5
Organization Manager, 1-13, 1-13, 9-69and End Placement, 9-58and Termination, 9-57
OSSWA, 1-5OTA
license information, 1-4Other Employment Information, 1-12, 9-63Other Professional Qualifications, 1-15, 9-25
overridescustomer, 4-7enabling, 4-8examples, 4-9for Employee Directory, 4-7, 9-41for job and position fields, 4-8legislation, 4-7
PP11D Reports, 17-101page headers
configuring, 6-26page layouts
configuring, 4-3parameters, 4-13, 4-16
AME, 4-13descriptions, 4-34
Participant Eligibility Profiles window, 11-36passwords
New User Registration, 11-81Paycheck Modeling, 17-18Paycheck Modeling (US), 17-42Payment Methods, 1-25, 17-3Pay Rate, 1-12Payroll, 17-1
SSHR functions, 1-24Payroll: Leave Travel Expenses for India, 17-Payroll: Leave Travel Expenses for IndiaLeave Travel Expenses (India)IndiaTravel ExpensesfunctionsTravel Expenses (India), 17-119Payroll: Medical Expenses for India, 17-117Payroll: Tax Declaration for India, 17-114Payroll Dashboard, 17-20
configuring, 17-24Payroll Professional menu, 4-16Payroll Readiness, 17-20Payroll Simulation, 17-18Payslip, 1-24
Australia, 17-106Canada, 17-55generic, 17-12Hong Kong, 17-106Korea, 17-106New Zealand, 17-106Singapore, 17-106

Index-7
South Africa, 17-96UK, 17-102US, 17-38viewing, 17-12
Payslip Modeling, 17-110Payslip Modeling (Australia), 17-111Payslip Modeling (India), 17-123Payslip Modeling (Mexico), 17-87, 17-89Payslip Modeling (UK), 17-98Payslip Simulation, 17-110People in Hierarchy, 11-4People Management modules, 1-10Performance, Potential, and Retention
define lookups, 14-38Personal Actions, 1-9, 11-5Personal Information, 1-14, 1-31Personal Information modules, 9-3Personalization Framework, 1-5, 1-31, 4-1, 6-1, 6-4, 6-21, 6-35
Add Content page, 6-25configuring page headers, 6-26Create Item page, 6-25effective date prompts, 6-41flexfields, 6-27function-level personalizations, 6-6, 6-8hierarchy, 6-4images, 6-39messages, 6-35overview, 6-1, 6-1personalization levels, 6-4Personalization Properties page, 6-23personalizing notifications, 5-6regions, 1-6Reorder Contents page, 6-25
personalization levels, 6-4Personalize Self-Service Defn profile option, 6-7Personal Number, 17-130Personnel Actions (US Federal)
processing, 9-89Person Search, 3-4, 4-15
ex-employees, 3-4Phone Number, 9-12Place Contingent Worker, 9-103Plans window, 11-36Plan Types window, 11-36printable pages
Document Management, 11-14
processesconfiguring, 4-2Create Batch Users, 3-63User Account Employee Extract, 3-64workflow, 1-6
Professional Details modules, 9-24profile options, 4-12
Disable Self-Service Personal, 6-7FND: Personalization Region Link Enabled, 6-7HR: Allow Approver Updates to Self Service Actions, 7-9HR:Allow Concurrent Self Service Actions, 4-6HR:Business Group, 11-63, 11-65HR:Cross Business Group, 8-4HR: Cross Business Group, 9-103, 11-4, 11-11HR:Defer Update After Approval, 7-10HR: Display Position Hierarchy, 9-73, 9-79HR:Enable Multiple Assignments in SSHR, 3-6HR:HR/Payroll Representative Source, 17-25HR:HR/Payroll Representative Source, 17-114HR: HR/Payroll Representative Source, 17-34HR: Include Terminated People in Search, 11-4HR: Manager Actions Menu, 11-5HR:Manage Self Service Actions When Future-Dated Changes Exist, 4-6HR: Online Tax Forms Update Method, 17-25HR:Override Grade Defaults, 9-50HR:Payroll Payments Self-Service Enable Multiple Assignments, 17-3HR: Personal Actions Menu, 11-5HR: Propagate Data Changes, 9-103HR:Restrict Transactions Across Business Groups in SSHR, 8-4HR:Self Service Hire or Placement Default Values, 9-103HR: Self Service HR Licensed, 11-63, 11-65HR:Use Grade Defaults, 9-50HR:View Payslip From Date for WEB (MM/DD/YYYY), 17-12, 17-38, 17-55, 17-102, 17-106OAB: Self Registered User Responsibility, 11-63, 11-65OAB: User to Organization Link, 11-63OAB: User to Payroll Link, 11-63Personalize Self-Service Defn, 6-7Self Printed Payment Summary, 17-108
Index-8
Profile Options, 17-14profile options
HR:Refresh Self Service Actions With Data From Intervening Actions, 4-6
programsComplete Defunct HR Workflow Processes, 5-12Purge Obsolete Workflow Runtime Data, 5-12
Purge Obsolete Workflow Runtime Data program, 5-12
RReadiness Configuration, 17-23regions, 1-6Release Information, 3-6, 11-11Reporting Groups window, 11-37responsibilities, 3-3, 3-9
defining, 4-11delivered, 3-14
Responsibility Ownership, 3-17, 3-19data grants, 3-23sample code, 3-19
Resume, 1-16, 9-27Return for Correction, 1-8, 11-9Reverse termination, 9-59Review
self-service actions, 11-58Review and Confirm, 1-8, 11-13roles
access for self-service actions, 3-10types, 3-10
SSalary basis, 9-50Save for Later, 1-9, 11-14
self-service actions, 11-57searches, 11-4Secondary Address, 9-10security, 3-3
data grants, 3-23profile options, 4-12security profiles, 4-11user access, 3-1, 3-1user profiles, 3-9
security groups, 4-11security profiles, 3-5, 4-11
self-service actionsaccess roles, 3-10eligibility processing setup, 11-34
Self-service actionsapproving, 11-59attachments, 11-58business documents, 11-58business processes, 11-56configuring, 11-46effective date, 11-56eligibility processing, 11-55Enter Process, 11-54initiating, 11-54overview, 11-43Review, 11-58Save for Later, 11-57selecting an action, 11-54What-If analysis, 11-58
Self-Service Benefitsuser access to, 18-10
short tipsSee messages
Simplified User Interface (UI) MenusAmericas Localizations, 3-50APAC Localizations, 3-58EMEA Localizations, 3-55General Self-Service, 3-29
Simplified User Interface (UI) Menus for Oracle SSHR , 3-28Special Information Types (SITs), 1-12, 9-62SSHR
accrual balances, 15-2concepts, 1-5definitions, 1-5features, 1-1
Document Management, 1-9integration with AME, 1-8Manager Actions, 1-8Personal Actions, 1-9Return for Correction, 1-8Review and Confirm, 1-8Save for Later, 1-9
getting started, 1-26, 1-32license information, 1-4overview, 1-1, 1-2previous versions
migrating from, 1-26

Index-9
scope, 1-2Succession plan
creating, 12-11updating, 12-12view details, 12-10
succession planningsetting up information, 12-12
Succession Planning, 1-20, 12-10Succession plans
creating and maintaining, 12-11search for, 12-10
Suitability Matching, 1-21function, 12-7
system profilesSee security profiles
System Profile Values window, 4-11system requirements, 1-32
Ttabbed regions
configuring, 6-28Talent Profile, 1-19
completing configuration steps, 14-38enabling in Oracle SSHR, 14-23menus, 14-23setting up a custom version, 14-25setting up a custom version of the Talent Profile feature in SSHR, 14-26
Talent Profile 9-Box Performance Matrices, 14-3Appraisals region, 14-7Benefits region, 14-9Career Path region, 14-9Compensation Statement region, 14-12Competencies region, 14-7Job History region, 14-9Learning Certifications region, 14-8managers, 14-5Monetary Compensation region, 14-10notes, 14-4Other Information region, 14-11Other Professional Qualifications region, 14-9Performance Matrix (9-box), 14-12Performance Objectives region, 14-8Performance Ratings region, 14-12Previous Employment region, 14-10
print, 14-4, 14-13Qualifications region, 14-8regions, 14-2self-service actions, 14-4, 14-13Succession Plan region, 14-10tags, 14-4Training region, 14-8view, 14-2view worker details, 14-6Work Preferences region, 14-10
Talent Profile in Oracle SSHR, 14-2Talent Profiles
printing, 14-20Tax Declaration (India), 17-114Tax Form (W-4), 17-25
configuring, 17-28Tax Information Form (W-2), 1-24Tax Information Form W-2 and W-2c (US), 17-34Tax Withholdings Form (W-4), 1-24Tenure Status (US), 1-16, 9-28Termination, 1-12, 9-56
and Organization Manager, 9-57Termination History view, 9-76Thrift Savings Plan (TSP) Self-Service Pages
configuring, 18-6Thrift Savings Plans (TSP)
using Self-Service, 18-3tips
See messagesTransaction Monitor, 10-2Transaction pending approval
approval, 1-9transactions, 1-6
access roles, 5-3concurrent, 4-6Data Mining, 4-3deferring update, 7-10history, 4-3intervening actions, 4-6pending, 7-9routing, 7-10
UUK reports
P11D, 17-101user access, 3-1

Index-10
configuring, 4-2defining, 4-11menus, 3-11responsibilities, 3-3security, 3-1security profiles, 3-5to functions, 3-7to people, 3-3
User Account Employee Extract process, 3-64user accounts
batch creation, 3-63user hooks, 3-64
for batch creation of user accounts, 3-68for new user registration, 11-67
user menus, 3-15delivered, 3-14
user profiles, 3-9users, 3-9
defining, 4-12New User Registration, 11-81
US Federal Self-Service Benefits, 18-2
Vvehicle repository, 16-2
configuration settings, 16-4menu and function names, 16-3
viewsAssignment Details, 9-75Compensation Activity, 9-75Employee Information, 9-75, 9-86, 9-86My Employee Information, 9-73, 9-79My Information, 9-73, 9-79search function, 9-76Termination History, 9-76
Voluntary deductions, 17-14Voluntary Deductions, 1-25Voluntary Termination, 9-58
Wweb pages
configuring, 1-31, 6-21instructions, 6-35messages, 6-35sample, 1-31
What-If analysis, 11-13self-service actions, 11-58
windowsForm Functions, 7-17Menus, 4-10, 4-14Messages, 6-41Participant Eligibility Profiles, 11-36Plans, 11-36Plan Types, 11-36Reporting Groups, 11-37System Profile Values, 4-11
workflowaccess levels, 5-4attribute values, 5-10cleanup processes, 5-12configuring objects, 5-8error processes, 5-11functions, 1-6item types, 5-3objects, 5-3overview, 5-1, 5-1processes, 1-6
Workflow, 17-14workflow access levels, 5-4workflow attribute values, 5-10Workflow Builder, 1-6
approvals, 5-3, 7-21e-mail addresses, 5-11
workflow error processes, 5-11workflow item types, 5-3workflow notifications, 5-5
messages, 5-6personalizing, 5-6
workflow objectsconfiguring, 5-8copying, 5-3
workflow processes, 1-6Workflow transactions
access, 3-8Restricting access, 3-25
Workforce Sourcing and Deployment modules, 1-10Work Preferences, 1-16, 9-27Work Schedule, 1-13, 9-62