Embed Size (px)
Citation preview

Open Path Eddy Covariance System With IRGASON or EC150/CSAT3A Quick Deploy Guide
March 2014

1. Setup tripod and mount enclosures.
Datalogger Enclosure
EC100 Electronics

2. Ground tripod and enclosures.
Ground Lug
Grounding Rod

3. Setup tripod or mast with CM20X Crossarm.
Crossarm‐To‐Pole
Bracket
CM20X Crossarm

4. Mount the IRGASON or EC150/CSAT3A and point into the prevailing wind.
IRGASON
CM20X Crossarm
IRGASON Boom
Adapter
IRGASON
Mounting Bracket Leveling
Bubble
EC150
CSAT3A
CSAT3A Boom
Adapter
CSAT3A Mounting
Bracket
OR
Leveling
Bubble

5. Mount the radiation shield and IRGASON or EC150/CSAT3A Temperature Probe.
CM20X Crossarm
Radiation Shield
IRGASON or EC150/CSAT3A
Temperature Probe
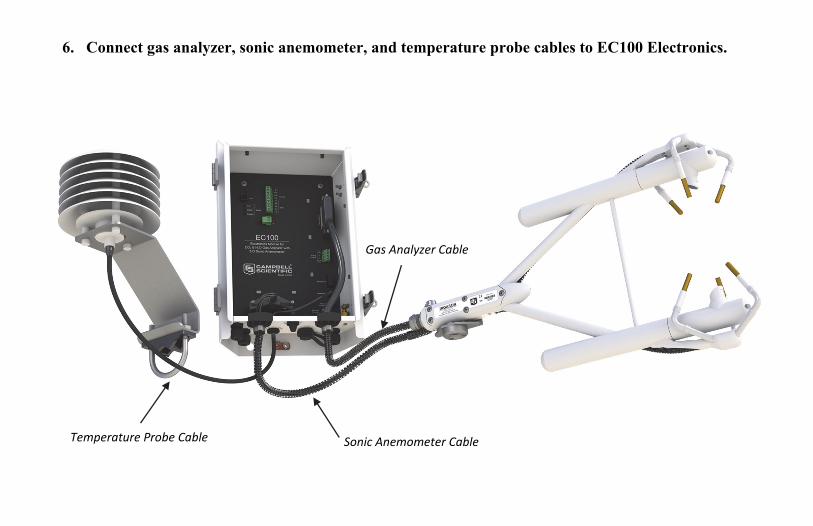
6. Connect gas analyzer, sonic anemometer, and temperature probe cables to EC100 Electronics.
Temperature Probe Cable
Gas Analyzer Cable
Sonic Anemometer Cable

7. Connect system wiring and insert CompactFlash (CF) card.
Datalogger
Enclosure
EC100 Power and SDM Cables
Insert CF card

SDM Cable
Otherwise connect
cable from +12 Vdc
power supply here
Power Cable
Power Cable (can connect here or
directly to +12 Vdc power supply)
SDM Cable
If datalogger has
rechargeable base,
connect cable from
+17‐28 Vdc or +18 Vac
power supply here

8. Turn on the power supply and use the datalogger keyboard display to set settings. (Follow the stepsfrom left to right, top to bottom).
System ControlSonic Azmth :0.00000Change Press Source > On Site Zero & Span > System Menu
Select “Sonic Azmth”.
Press <Esc> to activate the display. Press <Enter> to display the System Control Menu.
CampbellScientific
CR3000 Datalogger 01/01/2012, 14:00:08.4 CPU: OPEC_basic_vx_x.cr3 Running.

Modify Value NUM Sonic Azmth
Current Value: 0.00000 New Value: 150
Enter in the azimuth (the angle in degrees between true north and the direction the IRGASON or EC150/CSAT3A points), and press <ENTER>.
Press <Esc> to exit.
Campbell Scientific
CR3000 Datalogger 01/01/2012, 14:00:08.4 CPU: OPEC_basic_vx_x.cr3 Running.

Please visit www.campbellsci.com to obtain contact information for your local US or International representative.