Embed Size (px)
Citation preview

Office of Planning and Budgets
Unit Budget Planning-General Fund
for Fiscal Year 2017-18
Resource Guide
This application is used by units to create general fund budgets
that will be loaded into financial system (KFS); populated by
salary distribution data for each unit.
Denice Beckwith
353-0864
and
Brent Johnston
353-5519
and
Val Thebeau
432-0219

Table of Contents
Chapter 1: Reminders ............................................................................................................ 1
Chapter 2: Business Intelligence Reports ...................................................................... 2
Chapter 3: Introduction ........................................................................................................ 3
Chapter 4: Installation Instructions .................................................................................. 6
Chapter 5: Security Rights ................................................................................................... 7
Chapter 6: Steps to Open Application ............................................................................. 8
Chapter 7: Workflow .............................................................................................................. 9
Chapter 8: General Fund Unit Budget Planning Applications ............................ 11
MSU Budget Control Allocation Application ..................................... 12
MSU General Fund Unit Budget Planning Application .................. 14
Chapter 9: View Data .......................................................................................................... 16
Chapter 10: Enter Data .......................................................................................................... 23
Chapter 11: System Link and Administrative Link ................................................... 33
Chapter 12: Validate Data .................................................................................................... 34
Chapter 13: Submit and Reject Data ................................................................................ 36
Chapter 14: Print Data ........................................................................................................... 39
Chapter 15: General Fund Unit Budget Process ......................................................... 43
Chapter 16: Employee Groups and Object Codes ....................................................... 45
Glossary ......................................................................................................................................... 47
Contacts ......................................................................................................................................... 48


General Fund Unit Budget Planning Resource Guide Last edited: 6/13/2017 4:07 PM Page 1
Chapter 1: Reminders Users can select and open more than one organization at a time (see page 14 for details).
Users can highlight over a row or column of numbers and a sum will appear in lower right corner of the
screen.
There are two position adjustment tabs: OPEN Position Adj and COMMITTED Position Adj.
Any adjustments to salaries shown on the Salary Distribution tab are entered within the COMMITTED
Position Adjustment tab.
Raise data is not being calculated within the application. Users will need to budget for this increase on
the OPEN Position Adjustment tab.
Grad health and tuition allocations are not being calculated within the application. Users will need to
budget for these fees on the OPEN Position Adjustment tab by selecting either Grad SI Health or Grad SI
Tuition Fees within the Employee Group column. The budget for these fees will be either loaded in
object codes 7230-OPEN-GRD TF or 7516-OPEN-GRD HL.
Student labor allocations are to be entered within the OPEN Position Adjustment tab. This budget will
be loaded in object code 7591-OPEN-STUDENT.
The Consolidation tab displays dollars and cents. There is a validation at the MAU level which requires
the control and budget amounts to equal before the budget plan can be submitted. There is a $.49
tolerance.
Anytime Sub Account, Sub Object Code and Project Code are entered within the budget application they
need to be typed exactly as shown in KFS (upper case sensitive) or the budget load will fail.
Anytime Org Ref ID code is entered within the budget application it can only include 8 characters.
General Fund Unit Budget Planning Resource Guide Last edited: 6/13/2017 4:07 PM Page 2
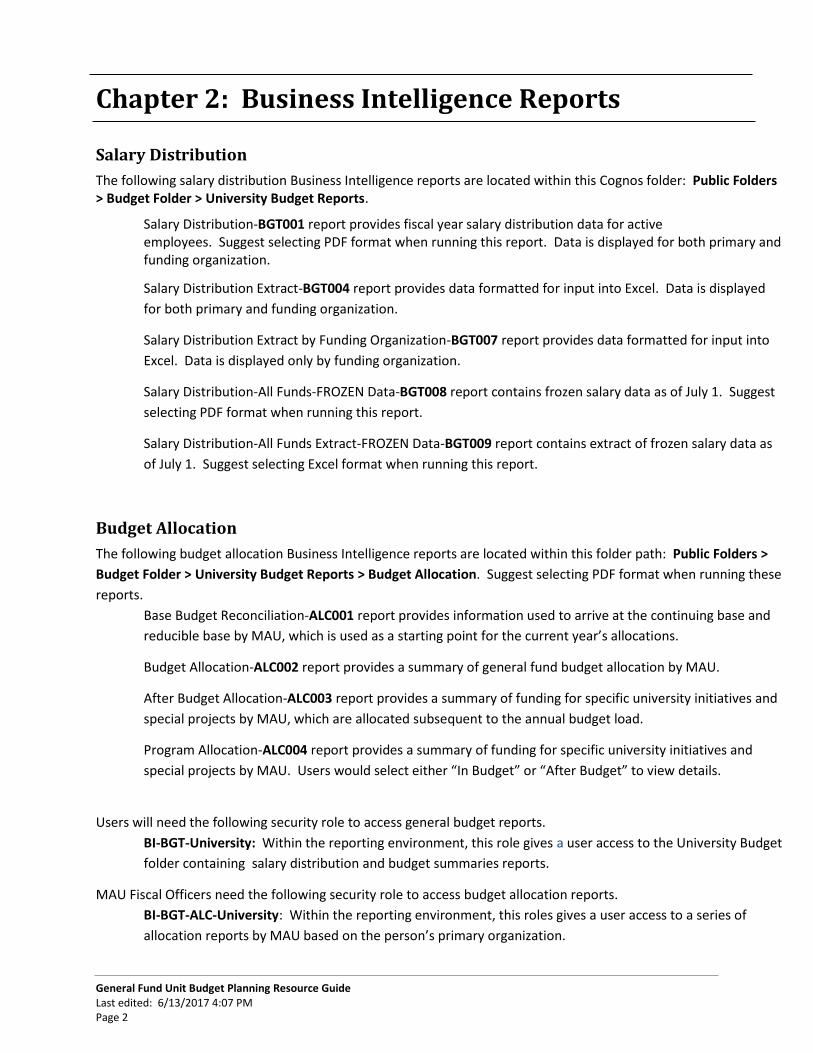
Chapter 2: Business Intelligence Reports
Salary Distribution
The following salary distribution Business Intelligence reports are located within this Cognos folder: Public Folders > Budget Folder > University Budget Reports.
Salary Distribution-BGT001 report provides fiscal year salary distribution data for active employees. Suggest selecting PDF format when running this report. Data is displayed for both primary and funding organization.
Salary Distribution Extract-BGT004 report provides data formatted for input into Excel. Data is displayed
for both primary and funding organization.
Salary Distribution Extract by Funding Organization-BGT007 report provides data formatted for input into
Excel. Data is displayed only by funding organization.
Salary Distribution-All Funds-FROZEN Data-BGT008 report contains frozen salary data as of July 1. Suggest
selecting PDF format when running this report.
Salary Distribution-All Funds Extract-FROZEN Data-BGT009 report contains extract of frozen salary data as
of July 1. Suggest selecting Excel format when running this report.
Budget Allocation
The following budget allocation Business Intelligence reports are located within this folder path: Public Folders >
Budget Folder > University Budget Reports > Budget Allocation. Suggest selecting PDF format when running these
reports.
Base Budget Reconciliation-ALC001 report provides information used to arrive at the continuing base and
reducible base by MAU, which is used as a starting point for the current year’s allocations.
Budget Allocation-ALC002 report provides a summary of general fund budget allocation by MAU.
After Budget Allocation-ALC003 report provides a summary of funding for specific university initiatives and
special projects by MAU, which are allocated subsequent to the annual budget load.
Program Allocation-ALC004 report provides a summary of funding for specific university initiatives and
special projects by MAU. Users would select either “In Budget” or “After Budget” to view details.
Users will need the following security role to access general budget reports.
BI-BGT-University: Within the reporting environment, this role gives a user access to the University Budget
folder containing salary distribution and budget summaries reports.
MAU Fiscal Officers need the following security role to access budget allocation reports.
BI-BGT-ALC-University: Within the reporting environment, this roles gives a user access to a series of
allocation reports by MAU based on the person’s primary organization.
General Fund Unit Budget Planning Resource Guide Last edited: 6/13/2017 4:07 PM Page 3
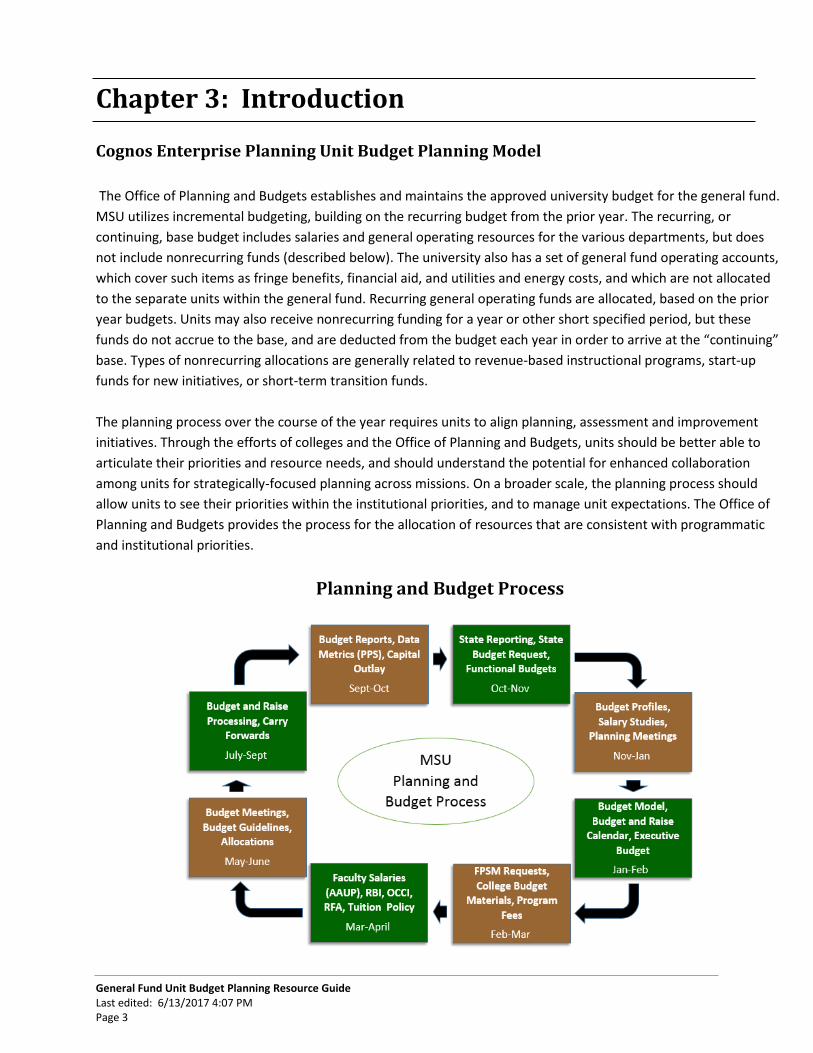
Chapter 3: Introduction
Cognos Enterprise Planning Unit Budget Planning Model
The Office of Planning and Budgets establishes and maintains the approved university budget for the general fund.
MSU utilizes incremental budgeting, building on the recurring budget from the prior year. The recurring, or
continuing, base budget includes salaries and general operating resources for the various departments, but does
not include nonrecurring funds (described below). The university also has a set of general fund operating accounts,
which cover such items as fringe benefits, financial aid, and utilities and energy costs, and which are not allocated
to the separate units within the general fund. Recurring general operating funds are allocated, based on the prior
year budgets. Units may also receive nonrecurring funding for a year or other short specified period, but these
funds do not accrue to the base, and are deducted from the budget each year in order to arrive at the “continuing”
base. Types of nonrecurring allocations are generally related to revenue-based instructional programs, start-up
funds for new initiatives, or short-term transition funds.
The planning process over the course of the year requires units to align planning, assessment and improvement
initiatives. Through the efforts of colleges and the Office of Planning and Budgets, units should be better able to
articulate their priorities and resource needs, and should understand the potential for enhanced collaboration
among units for strategically-focused planning across missions. On a broader scale, the planning process should
allow units to see their priorities within the institutional priorities, and to manage unit expectations. The Office of
Planning and Budgets provides the process for the allocation of resources that are consistent with programmatic
and institutional priorities.
Planning and Budget Process
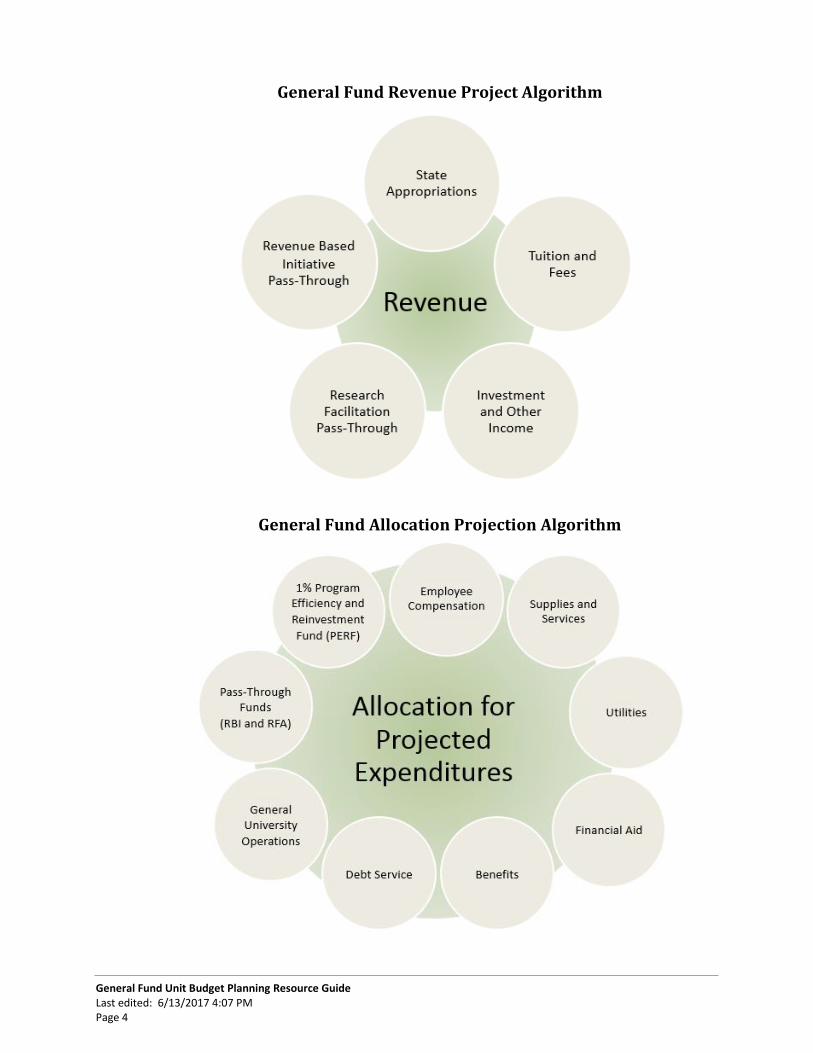
General Fund Unit Budget Planning Resource Guide Last edited: 6/13/2017 4:07 PM Page 4
General Fund Revenue Project Algorithm
General Fund Allocation Projection Algorithm
General Fund Unit Budget Planning Resource Guide Last edited: 6/13/2017 4:07 PM Page 5
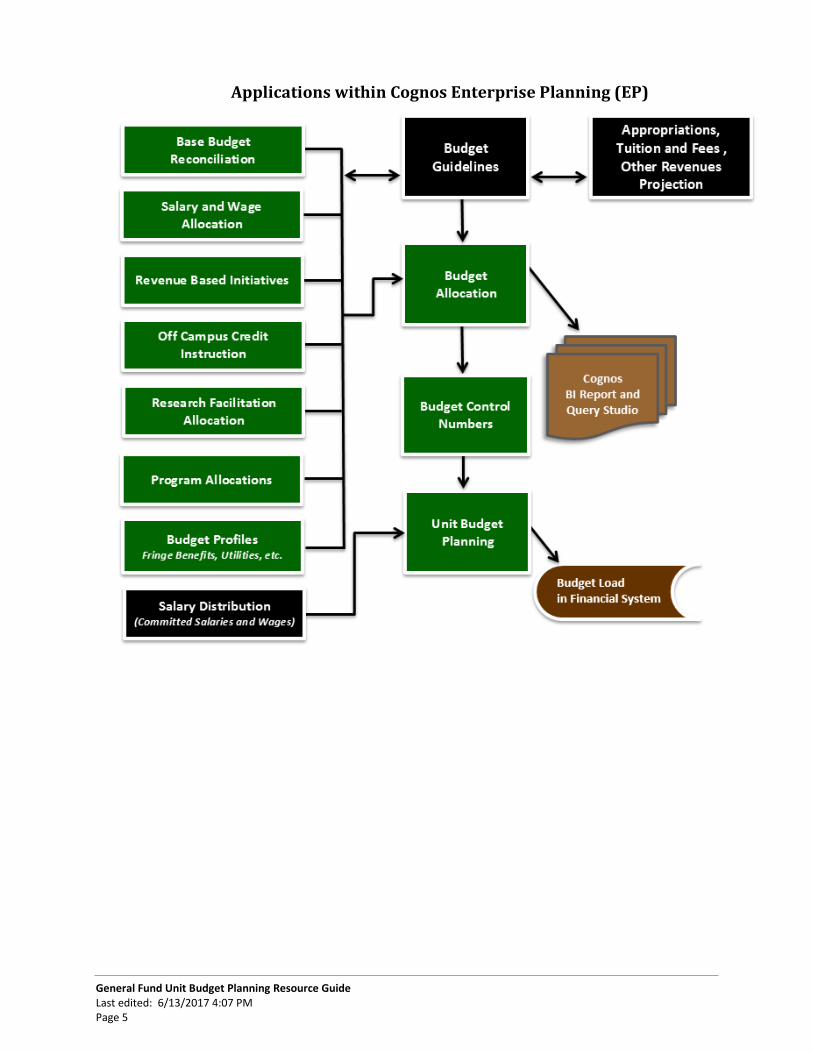
Applications within Cognos Enterprise Planning (EP)

General Fund Unit Budget Planning Resource Guide Last edited: 6/13/2017 4:07 PM Page 6
Chapter 4: Installation Instructions
Cognos Contributor Client Installation Instructions – New Users
Users will need to install the Cognos Contributor Client before they can open applications. To install the Contributor Client, follow instructions within the following document filed on the Office of Planning and Budgets portal under “Required Software”. URL Link: https://opb.msu.edu/functions/budget/cognos.html.
Cognos Contributor Client Installation Instructions – Current Users
Starting January 12, 2016 on Windows machines, both IE9 and 10 will no longer receive security updates which
requires users to download IE11. If you use Internet Explorer, please update to IE11 which Cognos EP now
supports.
Steps to Download IE11: 1. Use the following URL to load IE11: https://www.microsoft.com/en-us/download/internet-
explorer-11-for-windows-7-details.aspx. 2. Click the Download button on this page to start the download.
3. Do one of the following:
a. To start the installation immediately, click Open or Run this program from its current location.
b. To copy the download to your computer for installation at a later time, click Save or Save this program to disk.
4. Follow Microsoft IE11 loading steps.
General Information about IE11 Set-Up:
Within the IE11 Compatibility View Settings, be sure to include msu.edu.
You may have to completely shut down your computer for the updated settings to load.
If you encounter issues with the EBS portal opening, you may have to add https://ebs.msu.edu to
your Trusted Sites.
If you are having difficulty opening Cognos EP applications on the web, please follow the steps in
this document: Troubleshooting Cognos EP Web Client.
If you still encounter an issue with Cognos EP opening, then follow the directions to uninstall and
reinstall the Contributor Web Client. The URL for the installation procedure is:
https://opb.msu.edu/functions/budget/documents/cognos-planning/contributor_install.pdf.
General Fund Unit Budget Planning Resource Guide Last edited: 6/13/2017 4:07 PM Page 7
Chapter 5: Security Rights
Security Rights
Access to this application is determined through security roles granted by Security Contacts within D6501 or
through an ARM form. Workflow screens will be different depending on the security role entered for each
application.
Cognos EP Viewer – users get “view only” rights in system.
Cognos EP Submitter – users may view, edit and save changes, as well as submit data for their
organization(s) for central approval. This role is appropriate for MAU fiscal officers, deans or
administrators, as identified by MAU.
Cognos EP Reviewer – users may view and reject submission of data. This role will be a small group of
central users, primarily in OPB.
Security Groups in D6501
The Cognos EP security groups are decentralized to be managed directly within D6501.
To add or remove users from a role, follow the procedures at https://aissecuritycontact.ais.msu.edu/SecurityAdmin/D6501.html.
- Drop down to the middle of the page and locate the section beginning “To sign on.” - Choose the first option, https://security.ais.msu.edu. - Select an option from the menu.
The following is the path to the ARM form for requesting access to the application in Cognos EP:
http://aissecuritycontact.ais.msu.edu/arms/index-ebs.html. - At the bottom of this screen you will find Cognos Enterprise Planning section. - Select the PDF link in the last column: EBSUnitCognosEPRoles.pdf.
Contact the Help Desk ([email protected]) with questions about completing ARM forms. Contact Denice Beckwith ([email protected] or call 353-0864) or Val Thebeau
([email protected] or call 432-0219) with questions on security roles. The following is the format for security groups in D6501: Cognos EP <MAU>-<Application>-SUBMIT or VIEW.
Example of security groups for general fund unit budget planning application:
/group/EBSP/EP/10002000-BP-GF-SUBMIT /group/EBSP/EP/10002000-BP-GF-VIEW /group/EBSP/EP/10002030-BP-GF-SUBMIT /group/EBSP/EP/10002030-BP-GF-VIEW
There are a number of security groups in D6501 for Cognos EP. Using a filter within the “Title” field will help to show a listing of Cognos EP groups for your MAU. Example of filter: %10002%
General Fund Unit Budget Planning Resource Guide Last edited: 6/13/2017 4:07 PM Page 8
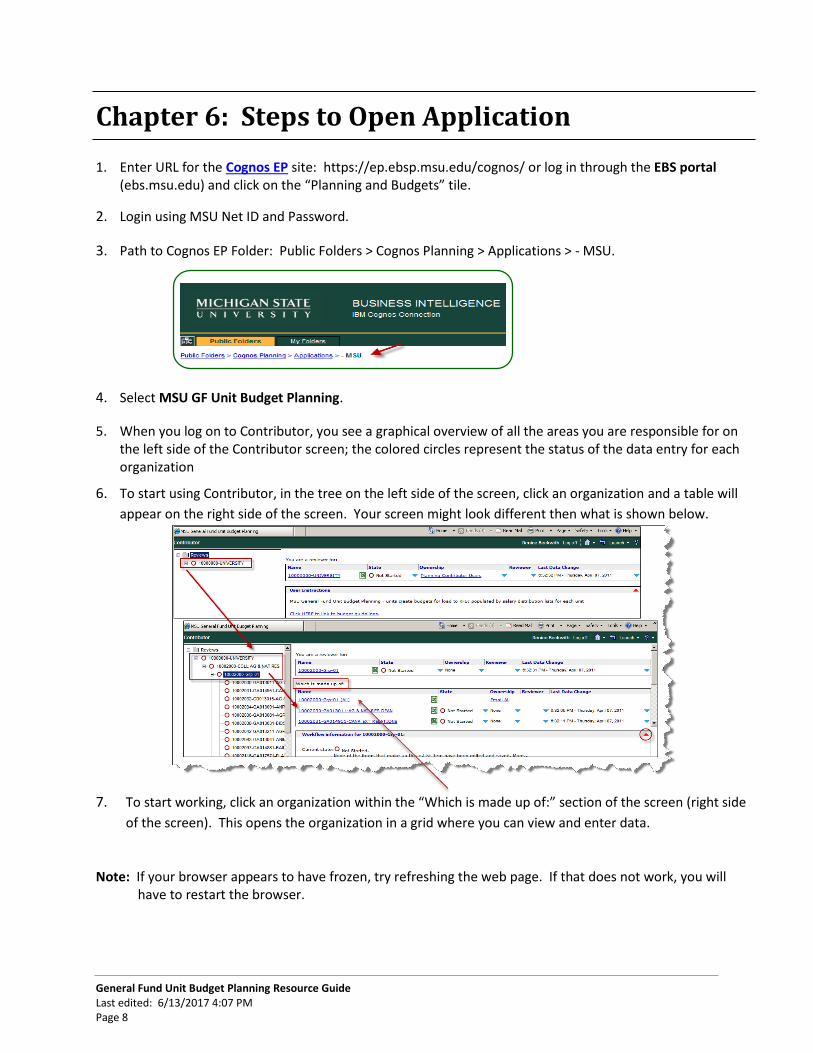
Chapter 6: Steps to Open Application
1. Enter URL for the Cognos EP site: https://ep.ebsp.msu.edu/cognos/ or log in through the EBS portal (ebs.msu.edu) and click on the “Planning and Budgets” tile.
2. Login using MSU Net ID and Password.
3. Path to Cognos EP Folder: Public Folders > Cognos Planning > Applications > - MSU.
4. Select MSU GF Unit Budget Planning.
5. When you log on to Contributor, you see a graphical overview of all the areas you are responsible for on the left side of the Contributor screen; the colored circles represent the status of the data entry for each organization
6. To start using Contributor, in the tree on the left side of the screen, click an organization and a table will
appear on the right side of the screen. Your screen might look different then what is shown below.
7. To start working, click an organization within the “Which is made up of:” section of the screen (right side
of the screen). This opens the organization in a grid where you can view and enter data.
Note: If your browser appears to have frozen, try refreshing the web page. If that does not work, you will have to restart the browser.
General Fund Unit Budget Planning Resource Guide Last edited: 6/13/2017 4:07 PM Page 9
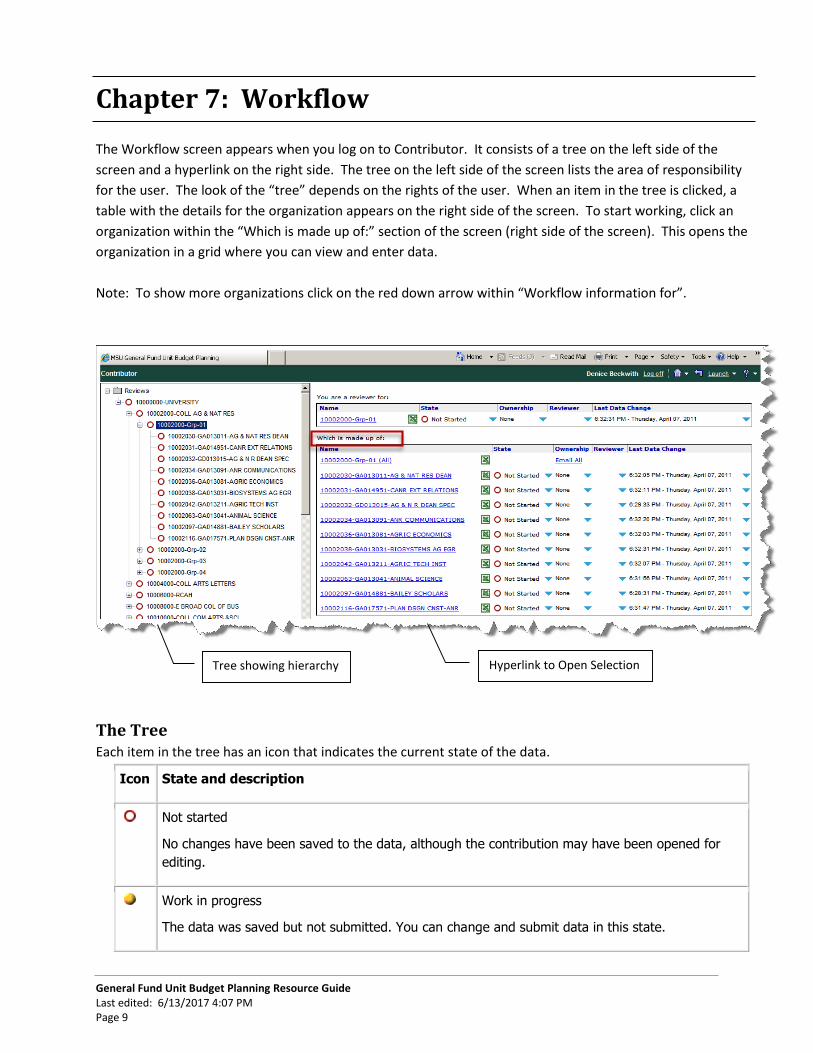
Chapter 7: Workflow The Workflow screen appears when you log on to Contributor. It consists of a tree on the left side of the
screen and a hyperlink on the right side. The tree on the left side of the screen lists the area of responsibility
for the user. The look of the “tree” depends on the rights of the user. When an item in the tree is clicked, a
table with the details for the organization appears on the right side of the screen. To start working, click an
organization within the “Which is made up of:” section of the screen (right side of the screen). This opens the
organization in a grid where you can view and enter data.
Note: To show more organizations click on the red down arrow within “Workflow information for”.
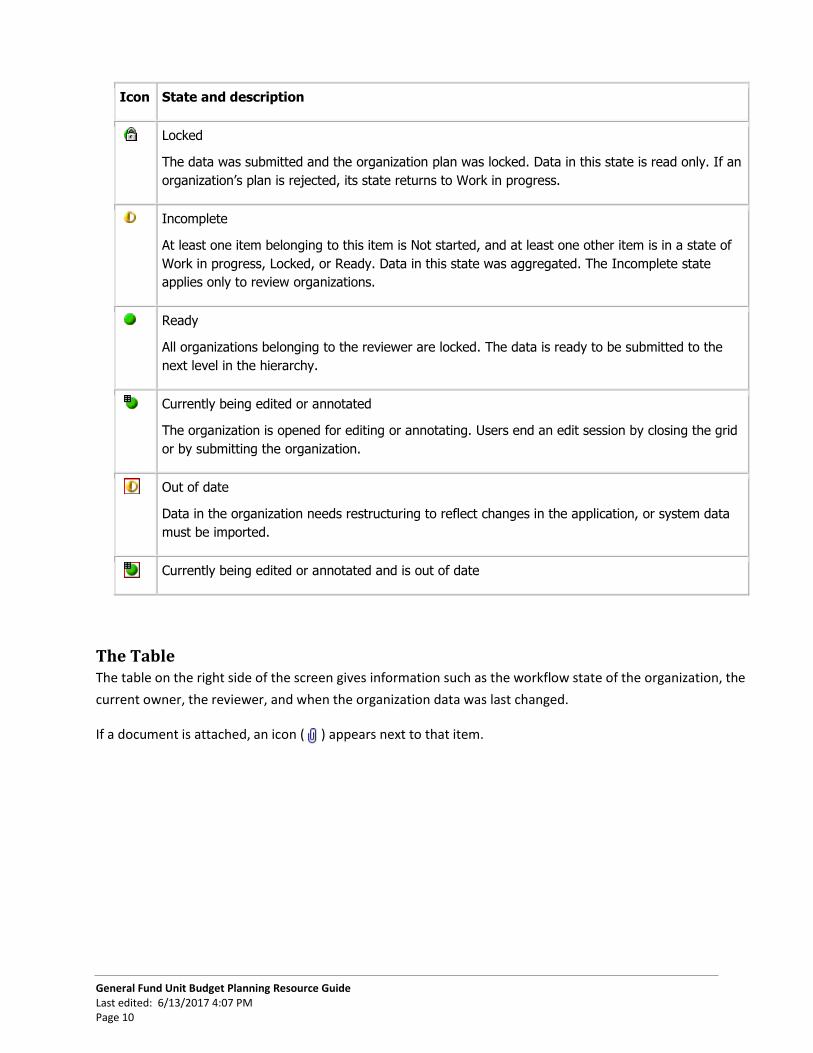
The Tree Each item in the tree has an icon that indicates the current state of the data.
Icon State and description
Not started
No changes have been saved to the data, although the contribution may have been opened for
editing.
Work in progress
The data was saved but not submitted. You can change and submit data in this state.
Tree showing hierarchy Hyperlink to Open Selection
General Fund Unit Budget Planning Resource Guide Last edited: 6/13/2017 4:07 PM Page 10
Icon State and description
Locked
The data was submitted and the organization plan was locked. Data in this state is read only. If an
organization’s plan is rejected, its state returns to Work in progress.
Incomplete
At least one item belonging to this item is Not started, and at least one other item is in a state of
Work in progress, Locked, or Ready. Data in this state was aggregated. The Incomplete state
applies only to review organizations.
Ready
All organizations belonging to the reviewer are locked. The data is ready to be submitted to the
next level in the hierarchy.
Currently being edited or annotated
The organization is opened for editing or annotating. Users end an edit session by closing the grid
or by submitting the organization.
Out of date
Data in the organization needs restructuring to reflect changes in the application, or system data
must be imported.
Currently being edited or annotated and is out of date
The Table The table on the right side of the screen gives information such as the workflow state of the organization, the
current owner, the reviewer, and when the organization data was last changed.
If a document is attached, an icon ( ) appears next to that item.

General Fund Unit Budget Planning Resource Guide Last edited: 6/13/2017 4:07 PM Page 11
Chapter 8: General Fund Unit Budget Planning Applications
The following is a view of how the tabs within the budget planning applications are connected. Two applications are used by units to create budgets for loading into the financial system (KFS); includes MAU’s budget control figures to units and budget plans. Prior Year is shown as PY; Current Year is shown as CY within this application. Within the application, small light bulbs ( ) next to the field name contain descriptive information about the fields; be sure to check the light bulbs. If the field is calculated, then the calculation is shown by hovering over the cell. The following is a view of how the tabs within Unit Control Number Allocation and General Fund Unit Budget Planning applications link:
Unit Control Number and General Fund Unit Budget Planning Data Flow
budgets are planned and
loaded by object code
data from SAP
for revising Salary
Distribution allocations
for entering Open Dollars

General Fund Unit Budget Planning Resource Guide Last edited: 6/13/2017 4:07 PM Page 12
MSU Budget Control Allocation Application
Using the MSU Budget Control Allocation application, MAUs communicate budget control figures to units.
Amounts entered within the ORG Control Number column are linked to the budget planning application (see
image below).
Within the Unit Control Number Allocation application, the MAU level cannot be submitted if the total difference is less/greater than $.49. Adjust allocations if the following error message appears “The CUC Control Number total does not equal the MAU Control Number. Therefore you cannot submit the budget allocation.” Also a validation rule requires the justification field be filled in if the allocation to an organization/account is
less than the committed salaries.
Image of Unit Control Number Allocation Application
“STEPS” – Opening Budget Control Allocation Application
Open the MSU Budget Control Allocation Application
Select the MSU Budget Control Allocation application.
Open an organization.
Note: - If a message appears asking about taking ownership from another person, know the
set-up allows you to bounce another user out of the application.
Click on Take Ownership icon ( ).
Click on “ + “ by MAU to expand listing of organizations.

General Fund Unit Budget Planning Resource Guide Last edited: 6/13/2017 4:07 PM Page 13
Within the ORG Control Number column, budget amounts for each unit have been loaded within this
application. During the budget planning process, MAU fiscal officers enter their control amounts for
units which will be linked to the MSU General Fund Budget Planning application (see image below)
Note: Data that you can edit has a white background. Read-only data has a gray background.
A validation rule requires the justification field be filled in if the allocation to an organization/account
is less than the committed salaries.
A validation rule requires the MAU Control Number and ORG Control Number to equal. Do not have
units submit their budgets until allocations have been completed and the link run.
Note: If you enter a value outside the bounds of the rule, a warning message is shown when you
attempt to submit or save the plan. You must correct the data before you can submit.
Chapter 11, System Link and Administrative Link, will show you how the linkage is done.
General Fund Unit Budget Planning Resource Guide Last edited: 6/13/2017 4:07 PM Page 14
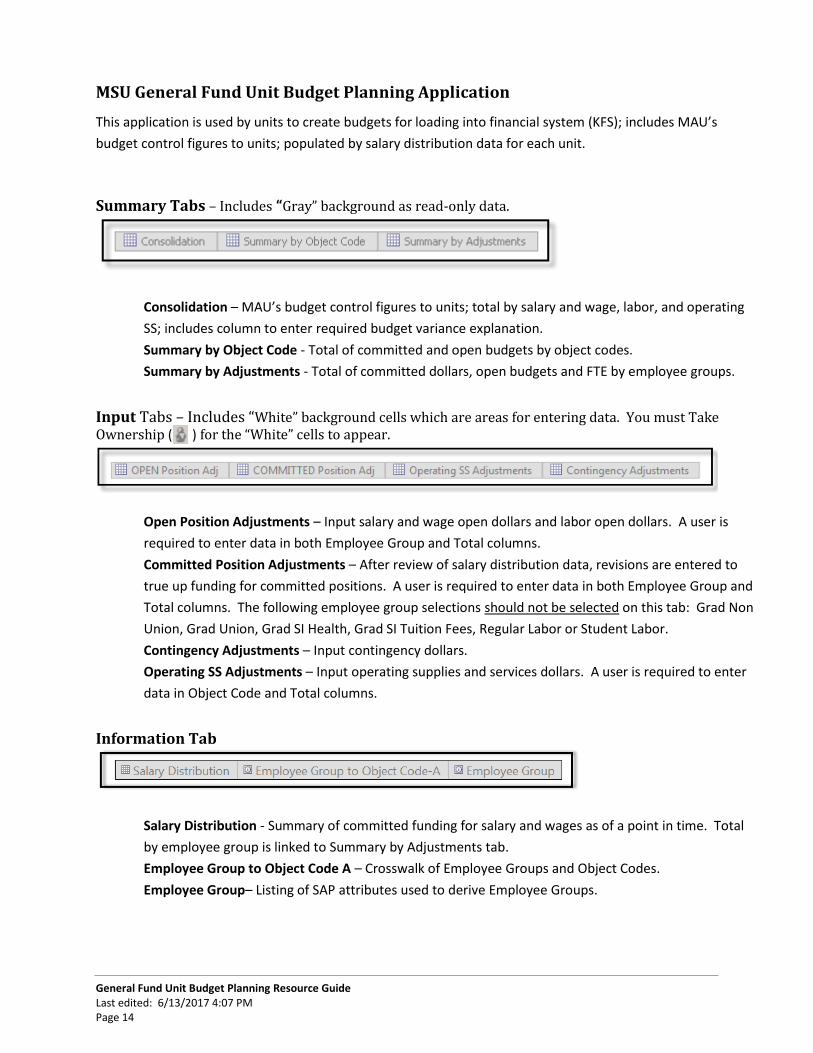
MSU General Fund Unit Budget Planning Application
This application is used by units to create budgets for loading into financial system (KFS); includes MAU’s
budget control figures to units; populated by salary distribution data for each unit.
Summary Tabs – Includes “Gray” background as read-only data.
Consolidation – MAU’s budget control figures to units; total by salary and wage, labor, and operating
SS; includes column to enter required budget variance explanation.
Summary by Object Code - Total of committed and open budgets by object codes.
Summary by Adjustments - Total of committed dollars, open budgets and FTE by employee groups.
Input Tabs – Includes “White” background cells which are areas for entering data. You must Take Ownership ( ) for the “White” cells to appear.
Open Position Adjustments – Input salary and wage open dollars and labor open dollars. A user is
required to enter data in both Employee Group and Total columns.
Committed Position Adjustments – After review of salary distribution data, revisions are entered to
true up funding for committed positions. A user is required to enter data in both Employee Group and
Total columns. The following employee group selections should not be selected on this tab: Grad Non
Union, Grad Union, Grad SI Health, Grad SI Tuition Fees, Regular Labor or Student Labor.
Contingency Adjustments – Input contingency dollars.
Operating SS Adjustments – Input operating supplies and services dollars. A user is required to enter
data in Object Code and Total columns.
Information Tab
Salary Distribution - Summary of committed funding for salary and wages as of a point in time. Total
by employee group is linked to Summary by Adjustments tab.
Employee Group to Object Code A – Crosswalk of Employee Groups and Object Codes.
Employee Group– Listing of SAP attributes used to derive Employee Groups.

General Fund Unit Budget Planning Resource Guide Last edited: 6/13/2017 4:07 PM Page 15
“STEPS” – Opening and Closing Budget Applications
Close the MSU Budget Control Allocation Application (if open)
Close MSU Budget Control, if it is open; select File, Close.
Click on the back arrow to return to the listing of applications ( ).
Open One Organization within MSU General Fund Unit Budget Planning Application
Select the MSU General Fund Unit Budget application.
Open one organization or the group.
Note: You can open multiple organizations at the same time. It is indicated by (All) in the first row of the table. Because more data is downloaded to your computer in a multi-organization view, it can take longer than opening one organization.
Select Take Ownership ( ).
Close MSU General Fund Unit Budget application, select File, Close.
Open Two or More Organizations within MSU General Fund Unit Budget Planning
Application
Open two or more organizations (see image below).
Place curser in margin beside organizations you wish to open.
Hit Enter key.
Select Open when dialog box appears.
Note: If you select hyperlink rather than margin, select Cancel when dialog box appears.

General Fund Unit Budget Planning Resource Guide Last edited: 6/13/2017 4:07 PM Page 16
Chapter 9: View Data When you open Cognos EP, you can begin to view or enter data depending on your rights.
Parts of the Contributor Workspace The Contributor workspace contains the following parts:
All dimensions within a tab determine the information shown in the grid. While dimensions in rows or columns display all of the items in their lists, context dimension filters the grid to display only information for the active item.
Dimension Bar
Tabs – a separate tab represents each cube in the application
Dimension Bar – shows the dimensions that are in the rows, columns, and context
Dimensions – groups of related data, such as organizations, semesters, fiscal year, etc.
Grid – where you add or edit data
Grid Handles – where a dimension or tab can be “grabbed” to move it within the grid
Tab
Dimension
Grid
Grid Handles
General Fund Unit Budget Planning Resource Guide Last edited: 6/13/2017 4:07 PM Page 17
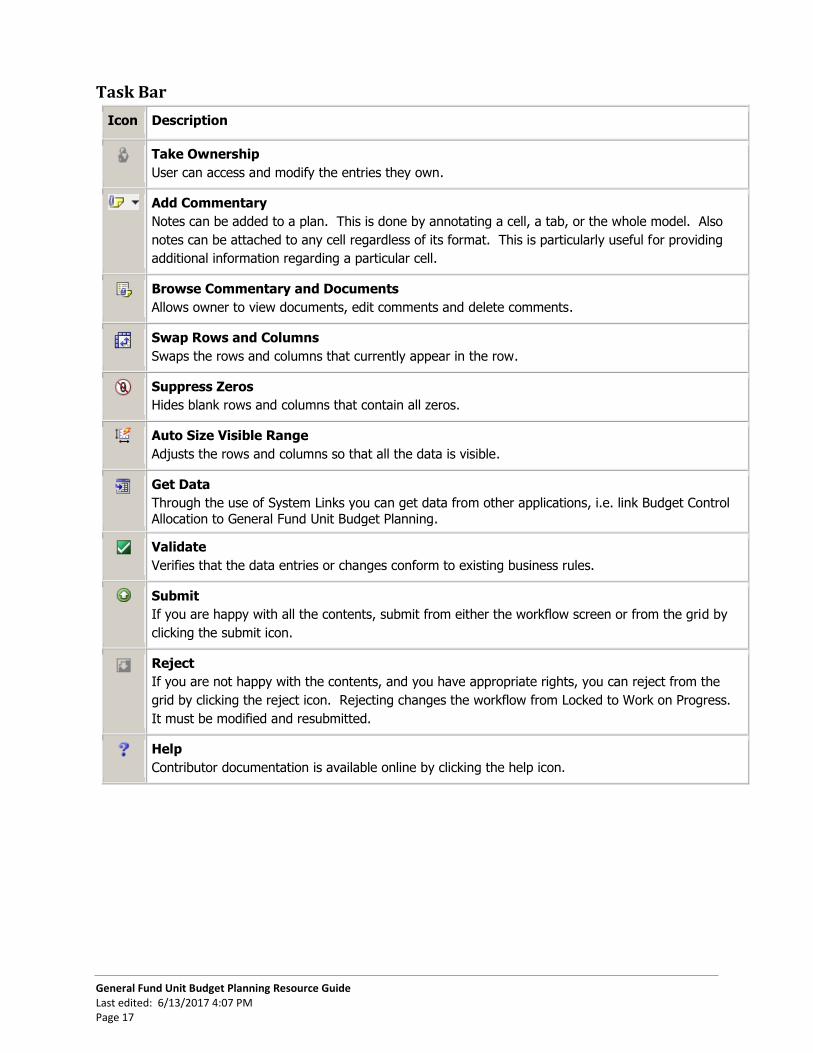
Task Bar
Icon Description
Take Ownership
User can access and modify the entries they own.
Add Commentary
Notes can be added to a plan. This is done by annotating a cell, a tab, or the whole model. Also
notes can be attached to any cell regardless of its format. This is particularly useful for providing
additional information regarding a particular cell.
Browse Commentary and Documents
Allows owner to view documents, edit comments and delete comments.
Swap Rows and Columns
Swaps the rows and columns that currently appear in the row.
Suppress Zeros
Hides blank rows and columns that contain all zeros.
Auto Size Visible Range
Adjusts the rows and columns so that all the data is visible.
Get Data
Through the use of System Links you can get data from other applications, i.e. link Budget Control
Allocation to General Fund Unit Budget Planning.
Validate
Verifies that the data entries or changes conform to existing business rules.
Submit
If you are happy with all the contents, submit from either the workflow screen or from the grid by
clicking the submit icon.
Reject
If you are not happy with the contents, and you have appropriate rights, you can reject from the
grid by clicking the reject icon. Rejecting changes the workflow from Locked to Work on Progress.
It must be modified and resubmitted.
Help
Contributor documentation is available online by clicking the help icon.
General Fund Unit Budget Planning Resource Guide Last edited: 6/13/2017 4:07 PM Page 18
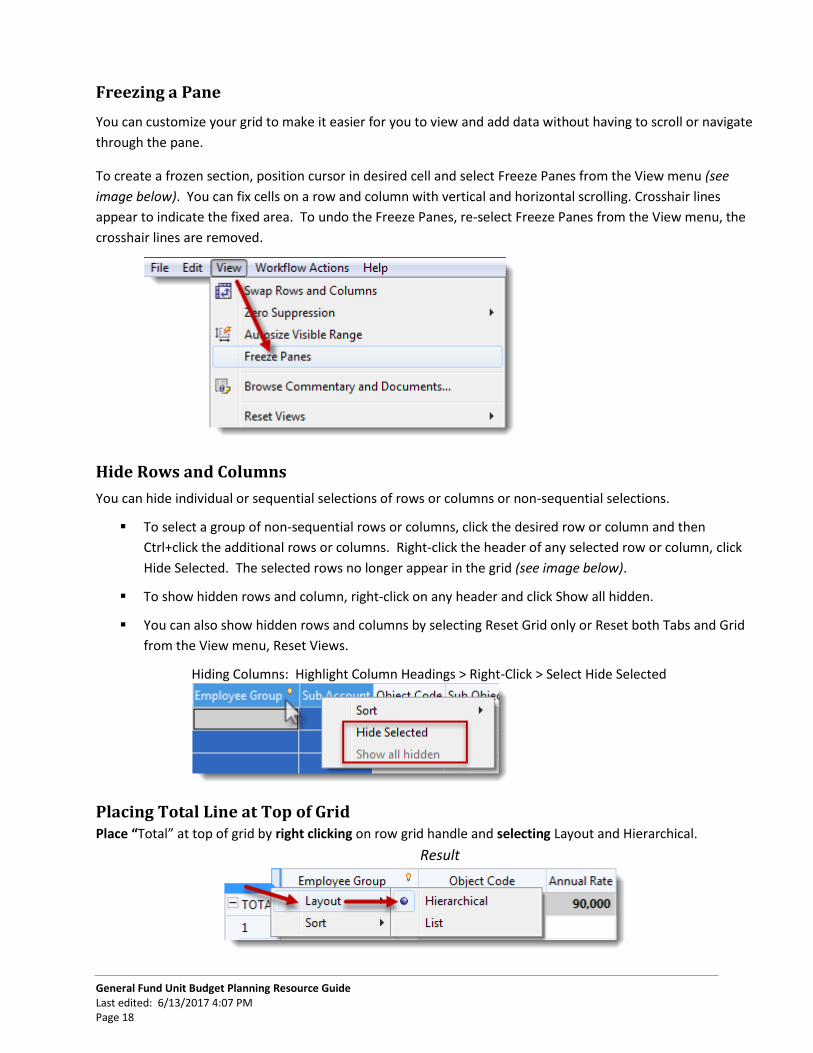
Freezing a Pane
You can customize your grid to make it easier for you to view and add data without having to scroll or navigate
through the pane.
To create a frozen section, position cursor in desired cell and select Freeze Panes from the View menu (see
image below). You can fix cells on a row and column with vertical and horizontal scrolling. Crosshair lines
appear to indicate the fixed area. To undo the Freeze Panes, re-select Freeze Panes from the View menu, the
crosshair lines are removed.
Hide Rows and Columns
You can hide individual or sequential selections of rows or columns or non-sequential selections.
To select a group of non-sequential rows or columns, click the desired row or column and then
Ctrl+click the additional rows or columns. Right-click the header of any selected row or column, click
Hide Selected. The selected rows no longer appear in the grid (see image below).
To show hidden rows and column, right-click on any header and click Show all hidden.
You can also show hidden rows and columns by selecting Reset Grid only or Reset both Tabs and Grid
from the View menu, Reset Views.
Hiding Columns: Highlight Column Headings > Right-Click > Select Hide Selected
Placing Total Line at Top of Grid Place “Total” at top of grid by right clicking on row grid handle and selecting Layout and Hierarchical.
Result

General Fund Unit Budget Planning Resource Guide Last edited: 6/13/2017 4:07 PM Page 19
Row and Column Dimensions
The row and column dimensions are shown on the Dimension Bar. Placing a dimension into a row or column
displays each of its list items as a heading, and a cell is created for every intersecting row and column. To have
any cells in the grid you must have at least one row and one column dimension.
Basic Layout
The basic layout has one row and one column dimension on the dimension bar.
Nested Layout
Nesting dimensions on the rows or columns increases the amount of data visible on the grid and allows you to
view information that is more specific. For example, the following grid has two dimensions nested on the
column.
Dimension Bar
Dimension Bar
General Fund Unit Budget Planning Resource Guide Last edited: 6/13/2017 4:07 PM Page 20
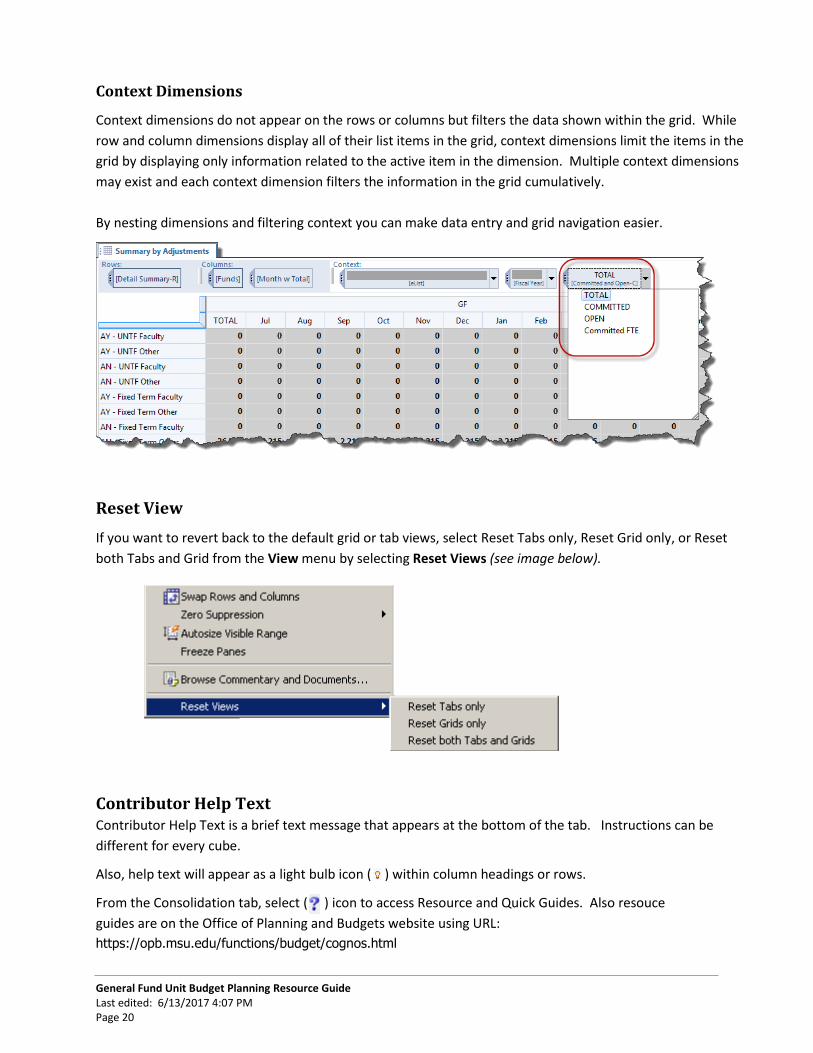
Context Dimensions
Context dimensions do not appear on the rows or columns but filters the data shown within the grid. While
row and column dimensions display all of their list items in the grid, context dimensions limit the items in the
grid by displaying only information related to the active item in the dimension. Multiple context dimensions
may exist and each context dimension filters the information in the grid cumulatively.
By nesting dimensions and filtering context you can make data entry and grid navigation easier.
Reset View
If you want to revert back to the default grid or tab views, select Reset Tabs only, Reset Grid only, or Reset
both Tabs and Grid from the View menu by selecting Reset Views (see image below).
Contributor Help Text Contributor Help Text is a brief text message that appears at the bottom of the tab. Instructions can be
different for every cube.
Also, help text will appear as a light bulb icon ( ) within column headings or rows.
From the Consolidation tab, select ( ) icon to access Resource and Quick Guides. Also resouce
guides are on the Office of Planning and Budgets website using URL:
https://opb.msu.edu/functions/budget/cognos.html
General Fund Unit Budget Planning Resource Guide Last edited: 6/13/2017 4:07 PM Page 21
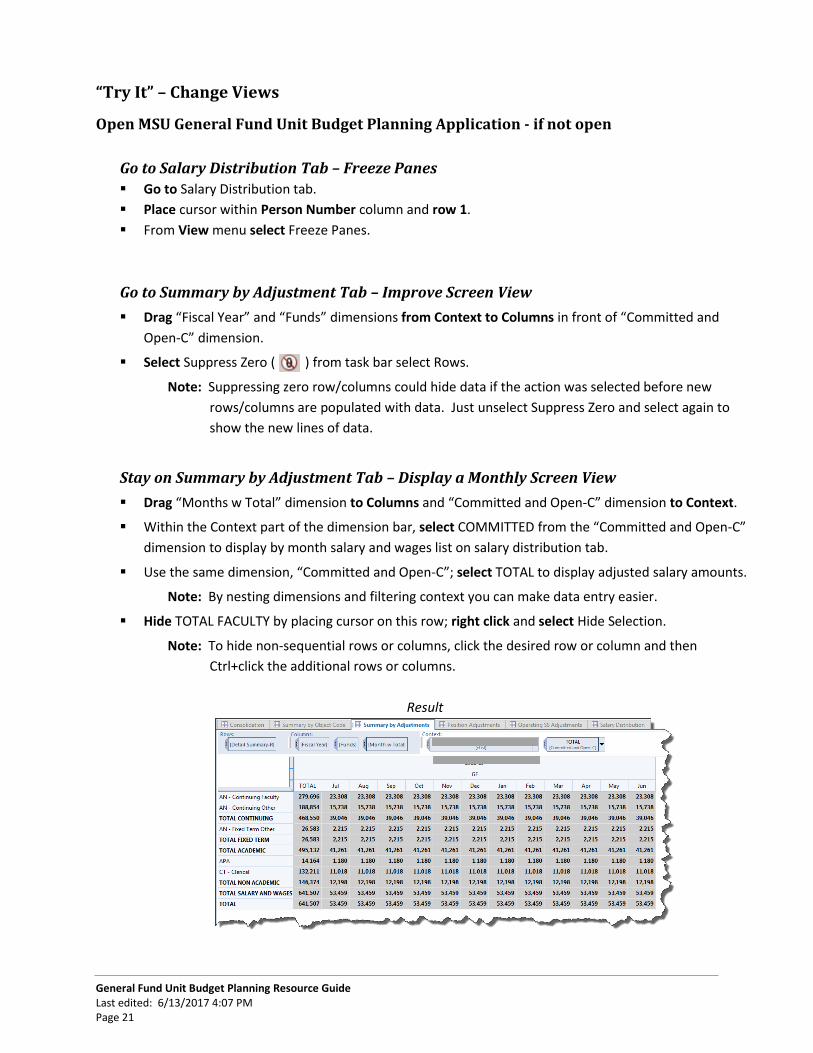
“Try It” – Change Views
Open MSU General Fund Unit Budget Planning Application - if not open
Go to Salary Distribution Tab – Freeze Panes
Go to Salary Distribution tab.
Place cursor within Person Number column and row 1.
From View menu select Freeze Panes.
Go to Summary by Adjustment Tab – Improve Screen View
Drag “Fiscal Year” and “Funds” dimensions from Context to Columns in front of “Committed and
Open-C” dimension.
Select Suppress Zero ( ) from task bar select Rows.
Note: Suppressing zero row/columns could hide data if the action was selected before new
rows/columns are populated with data. Just unselect Suppress Zero and select again to
show the new lines of data.
Stay on Summary by Adjustment Tab – Display a Monthly Screen View
Drag “Months w Total” dimension to Columns and “Committed and Open-C” dimension to Context.
Within the Context part of the dimension bar, select COMMITTED from the “Committed and Open-C”
dimension to display by month salary and wages list on salary distribution tab.
Use the same dimension, “Committed and Open-C”; select TOTAL to display adjusted salary amounts.
Note: By nesting dimensions and filtering context you can make data entry easier.
Hide TOTAL FACULTY by placing cursor on this row; right click and select Hide Selection.
Note: To hide non-sequential rows or columns, click the desired row or column and then
Ctrl+click the additional rows or columns.
Result
General Fund Unit Budget Planning Resource Guide Last edited: 6/13/2017 4:07 PM Page 22
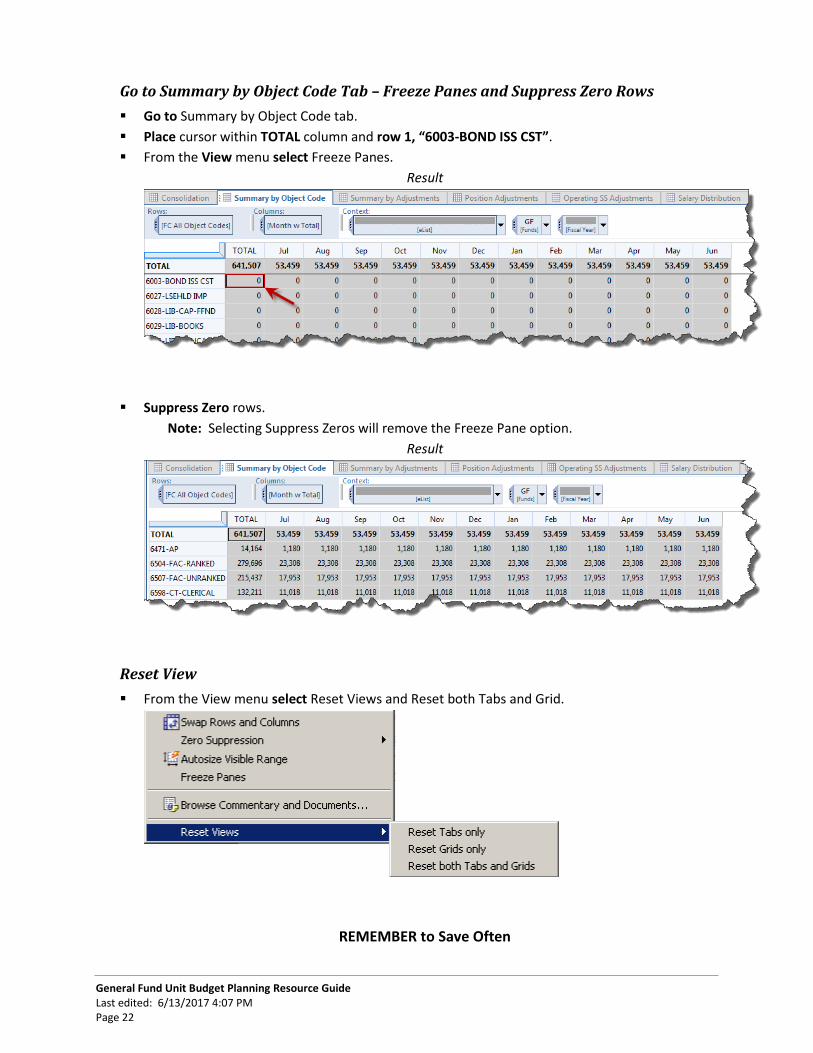
Go to Summary by Object Code Tab – Freeze Panes and Suppress Zero Rows
Go to Summary by Object Code tab.
Place cursor within TOTAL column and row 1, “6003-BOND ISS CST”.
From the View menu select Freeze Panes.
Result
Suppress Zero rows.
Note: Selecting Suppress Zeros will remove the Freeze Pane option.
Result
Reset View
From the View menu select Reset Views and Reset both Tabs and Grid.
REMEMBER to Save Often
General Fund Unit Budget Planning Resource Guide Last edited: 6/13/2017 4:07 PM Page 23
Chapter 10: Enter Data When you open Cognos EP, you can begin to view or enter data depending on your rights.
Enter Data Data that you can edit has a white background. Read-only data has a gray background.
If you are not the current owner, the data opens in a read-only view.
You can edit data only if it has a workflow state of Not started ( ) or Work in progress ( ). Other
workflow icons are shown on pages 9 and 10.
To start adding or editing data, click Take Ownership icon ( ).
Entering large amounts of text can expand the column width so that the Contributor grid is difficult to
use. You may not be able to see the full text within the grid. This is because text formatted cells do
not wrap text. Keep text in cells short to avoid this problem.
You can use Contributor’s cell-based Quick Commands (see pages 25-26).
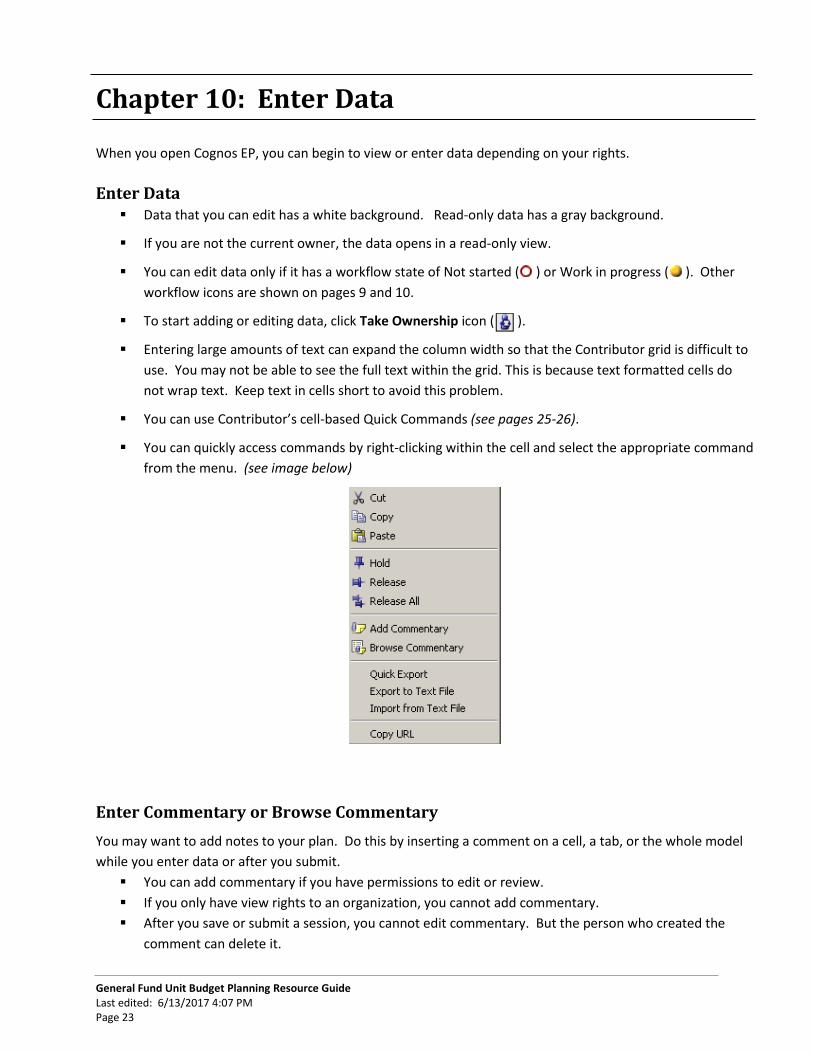
You can quickly access commands by right-clicking within the cell and select the appropriate command
from the menu. (see image below)
Enter Commentary or Browse Commentary
You may want to add notes to your plan. Do this by inserting a comment on a cell, a tab, or the whole model
while you enter data or after you submit.
You can add commentary if you have permissions to edit or review.
If you only have view rights to an organization, you cannot add commentary.
After you save or submit a session, you cannot edit commentary. But the person who created the
comment can delete it.
General Fund Unit Budget Planning Resource Guide Last edited: 6/13/2017 4:07 PM Page 24
Steps to Add Commentary/Attachment
1. Select the cell you want to annotate and right-click.
2. Click Add Commentary and type your note.
Note: Also you can click the Add Commentary icon ( ) to add a note or attachment.
3. If you want to attach a document, click the Source file browse button.
4. Browse to the folder location of the document.
5. To see your document, select the file type from the listing in the lower right side of the screen.
6. Select the document; Hit Open; Hit OK; Select Save.
Steps to View Commentary
1. To view commentary, move your pointer over the red triangle in the top right corner of the cell.
2. Select the cell and right-click.
3. Select Browse Commentary. Note: Also you can click on Browse Commentary icon ( ) to open a note or attachment.
4. Select View Document.
Steps to Delete Commentary
1. To delete commentary, you need to be the owner of the attachment.
2. Move your pointer over the red triangle in the top right corner of the cell.
3. Select the cell and right-click.
4. Select Browse Commentary.
5. Select Delete Document; Hit Yes; Hit Close; Select Save.
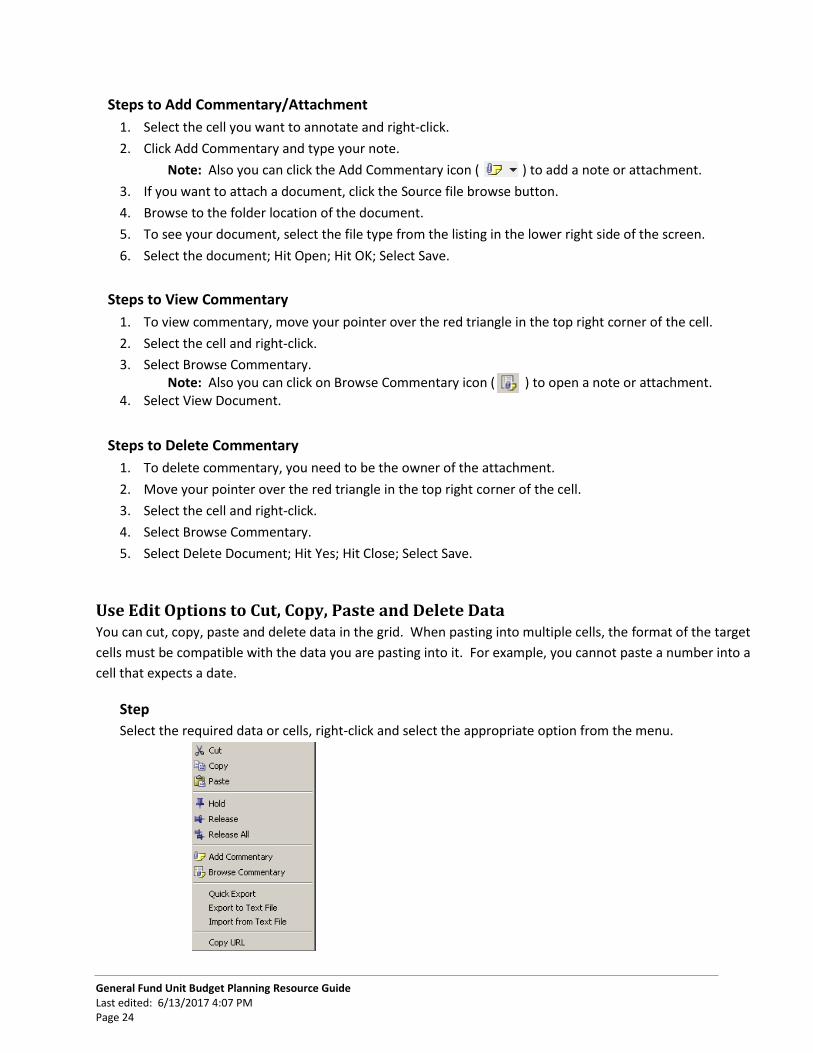
Use Edit Options to Cut, Copy, Paste and Delete Data You can cut, copy, paste and delete data in the grid. When pasting into multiple cells, the format of the target
cells must be compatible with the data you are pasting into it. For example, you cannot paste a number into a
cell that expects a date.
Step
Select the required data or cells, right-click and select the appropriate option from the menu.

General Fund Unit Budget Planning Resource Guide Last edited: 6/13/2017 4:07 PM Page 25
Apply or Release a Hold You can apply a hold to a cell which means that if breakback is used, the held cell is protected from it. A held
cell is turquoise in color.
Step to Apply a Hold
To apply a hold, right-click the cell, and select Hold.
Step to Release a Hold
To release a held cell, right-click the cell, and select Release.
Reset Data You can reset all data in all of the tabs to the last saved version. This also resets commentary.
Step From the File menu select Reset Data.
Quick Copy Commands The commands below copy a value or operation to the left, right, above, or below rows and columns on a
single tab. Copy commands perform an action on cells of the same type as the one they were entered in and
only apply to the current grid. You can combine copy and data entry commands.
The following table lists the quick copy commands.
Command Description Action
> Copies Right Example: 5>
Copies the number 5 to the right
Example: inc6>
Increases the row by 6% for each value to the right
< Copies Left Example: add15<
Adds 15 to each value in the row to the left
| Copies Down Example: 3|
Copies 3 down the column
Example: reset|
Resets the cells down the column to the last saved value.
^ Copies Up Example: Hold ^
Holds the cell values up the column
Example: 2>^
Copies 2 to the right and up the column
: Copy Stopper Used in conjunction with a copy command to stop copying beyond
the cell

General Fund Unit Budget Planning Resource Guide Last edited: 6/13/2017 4:07 PM Page 26
Quick Data Entry Commands Typing a data entry command in a cell performs an action on the cell value. Data entry commands are
processed when you press Enter and only apply to the current grid. These commands are not case sensitive.
You can use commands across two dimensions, but not across pages.
The following table lists the quick data entry commands.
Command Description Action
K Enters the value in thousands Example: 5K
Gives a value of 5,000
M Enters the value in millions Example: 10M
Gives a value of 10,000,000
Add, + Adds a number to the cell value Example: add8
Adds 8 to the cell value
Subtract, Sub Subtracts a number from the cell value Example: sub8
Subtracts 8 from the cell value
Multiply, Mul, * Multiplies the cell value by a number Example: mul3
Multiples the cell value by 3
Percent, per,
%
Multiples the cell value by a number added as a
percentage
Example: per5
Gives 5% of the original cell value
Increase, Inc Increase the cell value by a number Example: inc6
Increase the cell value by 6%
Decrease, Dec Decreases the cell value by a number added as a
percentage
Example: dec6
Decrease the cell value by 6%
Power, Pow Takes the cell value to the number added as an
exponent
Example: Pow10
Raise the value to the power of 10
Divide, Div, / Divides the cell value Example: Div1.1
Divides cell value by 1.1
Reset, Res Resets selected cell values to the last saved version
Zero, Zer Makes the cell value a zero
Round, Rou Rounds cells to the appropriate level based on
input
Example: Round100
Rounds all cells to the nearest
100, where 5,475 becomes 5,500
Hold, Hol Holds the cell value from breakback calculations
Release, Rel Releases held cells
General Fund Unit Budget Planning Resource Guide Last edited: 6/13/2017 4:07 PM Page 27
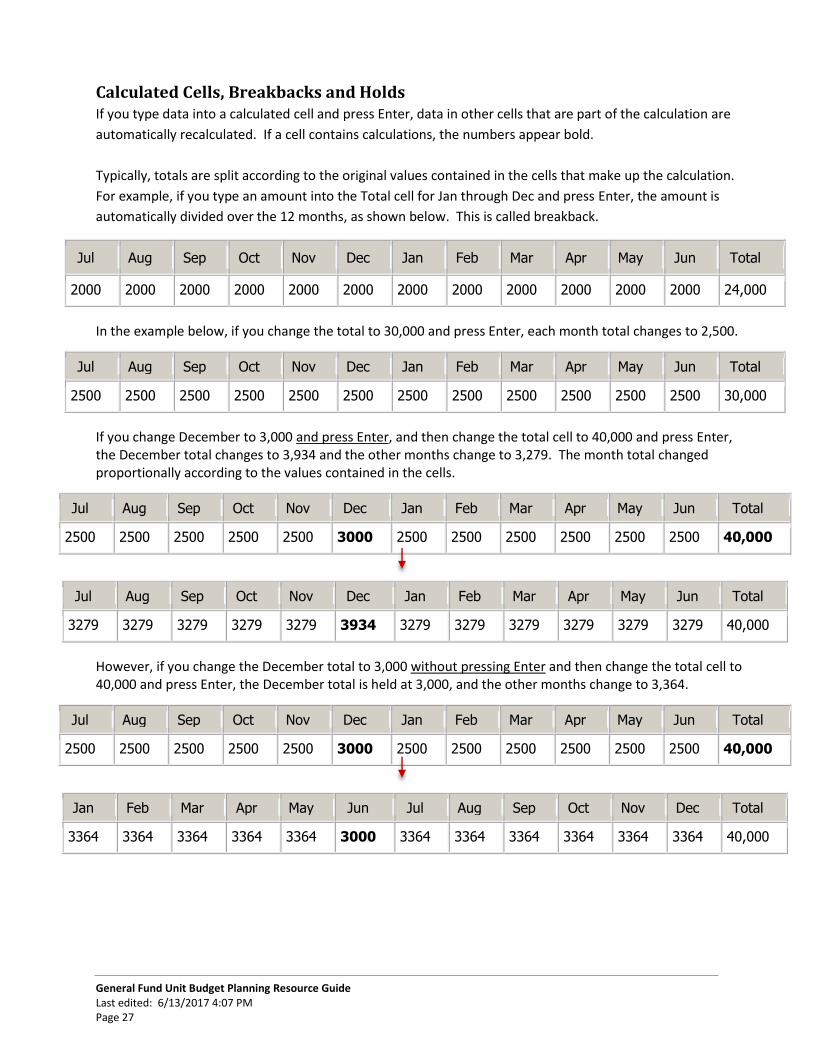
Calculated Cells, Breakbacks and Holds If you type data into a calculated cell and press Enter, data in other cells that are part of the calculation are
automatically recalculated. If a cell contains calculations, the numbers appear bold.
Typically, totals are split according to the original values contained in the cells that make up the calculation.
For example, if you type an amount into the Total cell for Jan through Dec and press Enter, the amount is
automatically divided over the 12 months, as shown below. This is called breakback.
In the example below, if you change the total to 30,000 and press Enter, each month total changes to 2,500.
If you change December to 3,000 and press Enter, and then change the total cell to 40,000 and press Enter, the December total changes to 3,934 and the other months change to 3,279. The month total changed proportionally according to the values contained in the cells.
However, if you change the December total to 3,000 without pressing Enter and then change the total cell to 40,000 and press Enter, the December total is held at 3,000, and the other months change to 3,364.
Jul Aug Sep Oct Nov Dec Jan Feb Mar Apr May Jun Total
2000 2000 2000 2000 2000 2000 2000 2000 2000 2000 2000 2000 24,000
Jul Aug Sep Oct Nov Dec Jan Feb Mar Apr May Jun Total
2500 2500 2500 2500 2500 2500 2500 2500 2500 2500 2500 2500 30,000
Jul Aug Sep Oct Nov Dec Jan Feb Mar Apr May Jun Total
2500 2500 2500 2500 2500 3000 2500 2500 2500 2500 2500 2500 40,000
Jul Aug Sep Oct Nov Dec Jan Feb Mar Apr May Jun Total
3279 3279 3279 3279 3279 3934 3279 3279 3279 3279 3279 3279 40,000
Jul Aug Sep Oct Nov Dec Jan Feb Mar Apr May Jun Total
2500 2500 2500 2500 2500 3000 2500 2500 2500 2500 2500 2500 40,000
Jan Feb Mar Apr May Jun Jul Aug Sep Oct Nov Dec Total
3364 3364 3364 3364 3364 3000 3364 3364 3364 3364 3364 3364 40,000
General Fund Unit Budget Planning Resource Guide Last edited: 6/13/2017 4:07 PM Page 28
“Try It” -- REMEMBER to Save Often
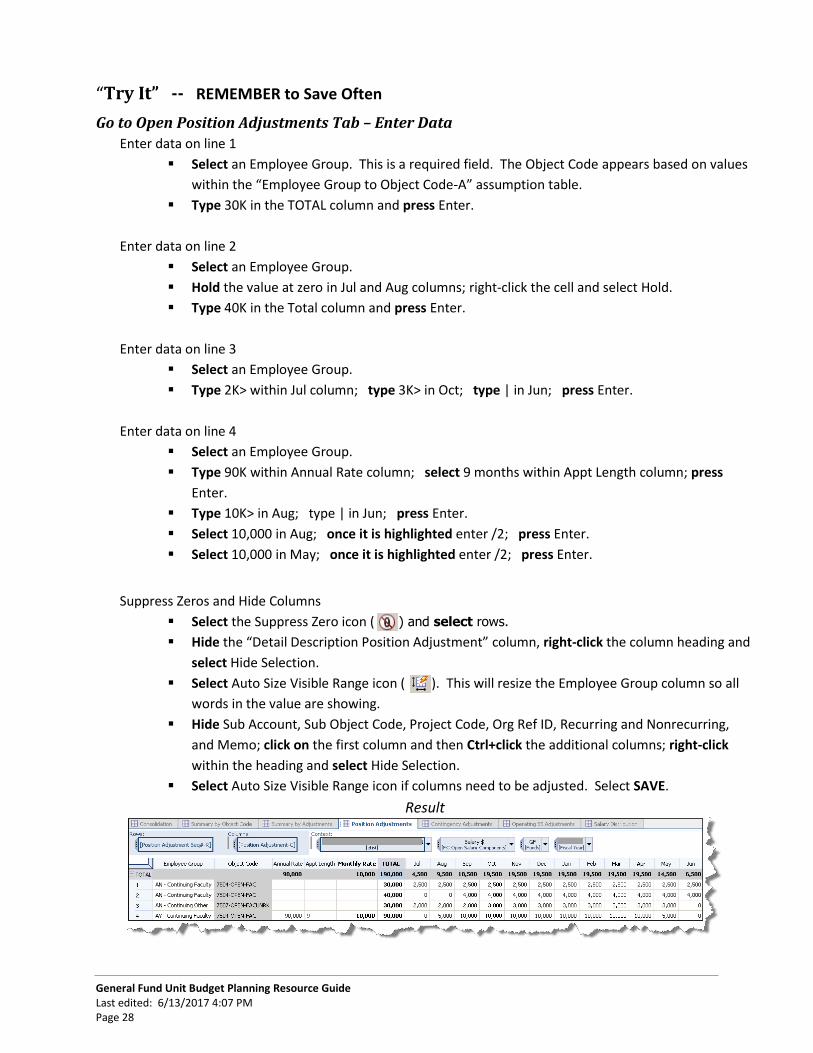
Go to Open Position Adjustments Tab – Enter Data
Enter data on line 1
Select an Employee Group. This is a required field. The Object Code appears based on values
within the “Employee Group to Object Code-A” assumption table.
Type 30K in the TOTAL column and press Enter.
Enter data on line 2
Select an Employee Group.
Hold the value at zero in Jul and Aug columns; right-click the cell and select Hold.
Type 40K in the Total column and press Enter.
Enter data on line 3
Select an Employee Group.
Type 2K> within Jul column; type 3K> in Oct; type | in Jun; press Enter.
Enter data on line 4
Select an Employee Group.
Type 90K within Annual Rate column; select 9 months within Appt Length column; press
Enter.
Type 10K> in Aug; type | in Jun; press Enter.
Select 10,000 in Aug; once it is highlighted enter /2; press Enter.
Select 10,000 in May; once it is highlighted enter /2; press Enter.
Suppress Zeros and Hide Columns
Select the Suppress Zero icon ( ) and select rows.
Hide the “Detail Description Position Adjustment” column, right-click the column heading and
select Hide Selection.
Select Auto Size Visible Range icon ( ). This will resize the Employee Group column so all
words in the value are showing.
Hide Sub Account, Sub Object Code, Project Code, Org Ref ID, Recurring and Nonrecurring,
and Memo; click on the first column and then Ctrl+click the additional columns; right-click
within the heading and select Hide Selection.
Select Auto Size Visible Range icon if columns need to be adjusted. Select SAVE.
Result
General Fund Unit Budget Planning Resource Guide Last edited: 6/13/2017 4:07 PM Page 29
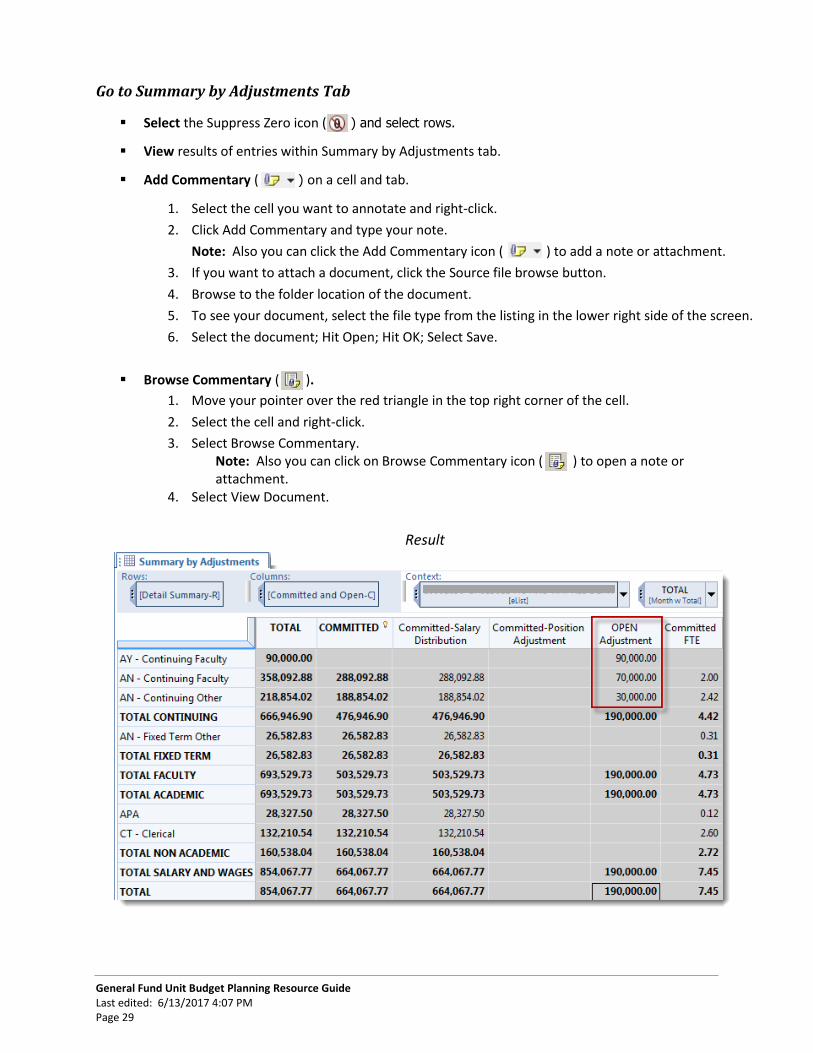
Go to Summary by Adjustments Tab
Select the Suppress Zero icon ( ) and select rows.
View results of entries within Summary by Adjustments tab.
Add Commentary ( ) on a cell and tab.
1. Select the cell you want to annotate and right-click.
2. Click Add Commentary and type your note.
Note: Also you can click the Add Commentary icon ( ) to add a note or attachment.
3. If you want to attach a document, click the Source file browse button.
4. Browse to the folder location of the document.
5. To see your document, select the file type from the listing in the lower right side of the screen.
6. Select the document; Hit Open; Hit OK; Select Save.
Browse Commentary ( ).
1. Move your pointer over the red triangle in the top right corner of the cell.
2. Select the cell and right-click.
3. Select Browse Commentary. Note: Also you can click on Browse Commentary icon ( ) to open a note or attachment.
4. Select View Document.
Result

General Fund Unit Budget Planning Resource Guide Last edited: 6/13/2017 4:07 PM Page 30
Go to Operating SS Adjustments Tab
Enter data on line 1
Enter description within Detail Description Operating SS
Select Auto Size Visible Range icon ( ), if needed.
Type 6611 within the Object Code column and select 6611-TVL-OUTSTATE.
Enter 0 in Jul, Aug and Sep; 4 in Oct and Nov; 2 in Dec and Jan; 4 in Feb, Mar, Apr; 0 in
May and Jun; press Enter.
Highlight 24 in TOTAL column, once it is highlighted enter 48K in the TOTAL column and press
Enter.
Enter data on line 2
Enter description within Detail Description Operating SS
Select Auto Size Visible Range icon, if needed.
Type 6611 within the Object Code column and select 6611-TVL-OUTSTATE.
Type 2K> within Oct column; type | in Dec; press Enter.
Select 2,000 in Oct; once it is highlighted enter *4; press Enter.
Select 2,000 in Nov; once it is highlighted enter *8; press Enter.
Suppress Zeros and Hide Columns
Hide Sub Account, Sub Object Code, Project Code, Org Ref ID, Recurring and Nonrecurring,
MEMO; click on the first column and then Ctrl+click the additional columns; right-click within
the heading and select Hide Selection.
Select the Suppress Zero icon ( ) and select rows.
Position Total Row at Top of Grid
Place Total at top of grid by right clicking on row grid handle and selecting Layout and
Hierarchical (see image below).
Result

General Fund Unit Budget Planning Resource Guide Last edited: 6/13/2017 4:07 PM Page 31
Example of Open Position Adjustment
Includes funding needed for raise; annualized; reductions; new staff, sabbatical, etc.
Example of Operation SS Adjustment
Includes funding needed supplies, travel, technology, special projects, etc.
NOTE
Sub Account, Sub Object Code and Project Code has to be entered exactly
as shown in KFS (upper case only) or budget load will fail.
Anytime Org Ref ID code is entered within the budget application
it can only be 8 characters.
General Fund Unit Budget Planning Resource Guide Last edited: 6/13/2017 4:07 PM Page 32
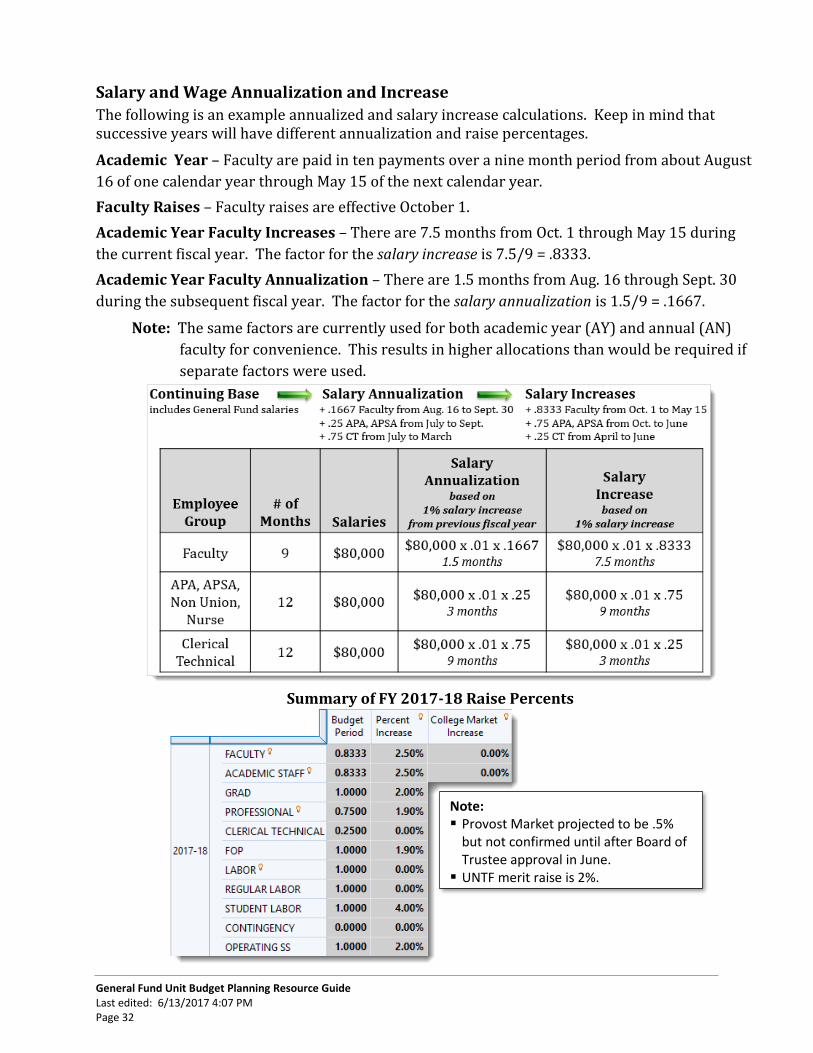
Salary and Wage Annualization and Increase
The following is an example annualized and salary increase calculations. Keep in mind that successive years will have different annualization and raise percentages.
Academic Year – Faculty are paid in ten payments over a nine month period from about August
16 of one calendar year through May 15 of the next calendar year.
Faculty Raises – Faculty raises are effective October 1.
Academic Year Faculty Increases – There are 7.5 months from Oct. 1 through May 15 during
the current fiscal year. The factor for the salary increase is 7.5/9 = .8333.
Academic Year Faculty Annualization – There are 1.5 months from Aug. 16 through Sept. 30
during the subsequent fiscal year. The factor for the salary annualization is 1.5/9 = .1667.
Note: The same factors are currently used for both academic year (AY) and annual (AN)
faculty for convenience. This results in higher allocations than would be required if
separate factors were used.
Summary of FY 2017-18 Raise Percents
Note: Provost Market projected to be .5%
but not confirmed until after Board of Trustee approval in June.
UNTF merit raise is 2%.
General Fund Unit Budget Planning Resource Guide Last edited: 6/13/2017 4:07 PM Page 33
Chapter 11: System Link and Administrative Link
Linking Budget Control Numbers to General Fund Unit Budget Planning A system link has been entered to import control numbers assigned by MAU fiscal officers within the Budget
Control Number application into the General Fund Unit Budget Planning application. This system link is
defined within the application set-up settings.
Steps 1. Take Ownership of organization to be included in System Link.
Note: Be sure only one organization/account is open.
2. From the task menu, select Get Data icon ( ).
3. Select System Links tab.
4. Select System Link to run. Link name: BP GF Unit Budget Planning<BC Control Allocation.
5. Click Run. Click OK. Click Close. If you cannot see the “Run” button, expand the window.
Administrative Link An administrative link will be scheduled to run automatically each evening beginning Monday, July 31 through
Friday, August 11.
“Try It”
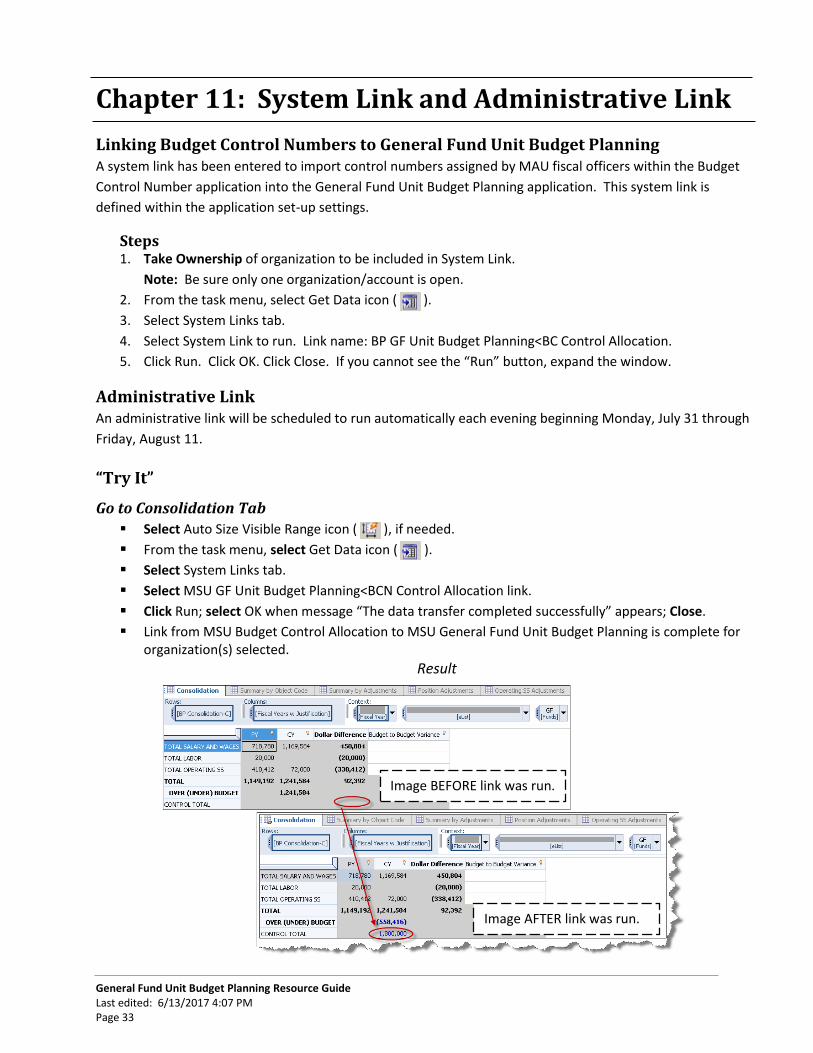
Go to Consolidation Tab
Select Auto Size Visible Range icon ( ), if needed.
From the task menu, select Get Data icon ( ).
Select System Links tab.
Select MSU GF Unit Budget Planning<BCN Control Allocation link.
Click Run; select OK when message “The data transfer completed successfully” appears; Close.
Link from MSU Budget Control Allocation to MSU General Fund Unit Budget Planning is complete for organization(s) selected.
Result
Image BEFORE link was run.
Image AFTER link was run.
General Fund Unit Budget Planning Resource Guide Last edited: 6/13/2017 4:07 PM Page 34
Chapter 12: Validate Data
Validation Some cells contain validation rules. If you enter a value in a cell that is outside the bounds of the rule, a
warning message is shown when you attempt to submit or save the plan. You must correct the data before
you can submit.
If errors are detected, in the Validation Error dialog box, click the error to view its location in the grid. The cursor goes to the first offending cell of the first failed rule. You can check data entry for your plan at any time by using the Validate Data command from the File menu or
the Validate Data icon ( ) from the toolbar.
The following are validations in the CUC Control Number and Unit Budget Planning applications.
Unit Control Number Allocation Tab:
- The CUC Control Number total does not equal the MAU Control Number. Therefore you cannot submit the budget.
- Please enter Justification if ORG Control Number is less than Committed Salaries.
Consolidation Tab:
- The BUDGET TOTAL does not equal the CONTROL TOTAL. Therefore you cannot submit the
budget plan.
Open Position Adj and Committed Position Adj Tabs:
- EMPLOYEE GROUP needs to be selected for each TOTAL entered. Therefore you cannot submit
the budget plan.
Committed Position Adj Tab: - Employee Groups GRAD NON UNION, GRAD UNION, GRAD SI HEALTH, GRAD SI TUITION FEES,
REGULAR LABOR, STUDENT LABOR or FRINGE BENEFITS cannot be selected within the
COMMITTED Position Adjustments tab.
Operating SS Adjustments Tab: - OBJECT CODE needs to be selected for each TOTAL entered. Therefore you cannot submit the
budget plan.

General Fund Unit Budget Planning Resource Guide Last edited: 6/13/2017 4:07 PM Page 35
“Try It”
Go to Operating SS Adjustments Tab
Show all rows; select Suppress Zero icon ( ) and uncheck rows. Enter data on line 3.
On line 3, type 60K within the Total column and press Enter.
Go to Open Position Adjustments Tab
Enter data on line 7. On line 7, type 60K within the Total column and press Enter.
Validate Data Entered Correctly
Select Validate ( ), Save or Submit. An error message will appear, “Submit is not allowed due to one or more blocking validations”. Click OK. Select the link within the Location column of the Validation Error table to move the cursor to the cell
where the correction needs to be made.
Results
Select hyperlink to move
cursor to the cell where the
correction needs to be made.
General Fund Unit Budget Planning Resource Guide Last edited: 6/13/2017 4:07 PM Page 36
Chapter 13: Submit or Reject Data
Submit Budget Plan You submit the budget plan to the next reviewer in the application hierarchy when you are happy with the
data it contains. After you submit, the item is locked and you can make no further changes to the data,
although you can annotate. The reviewer can either accept or reject the changes.
If you entered a value into a cell that has a validation rule defined, and that value is outside the bounds of the
specified validation rule, a warning message is shown when you attempt to submit the plan. You must correct
the data before you can submit to the next reviewer.
When all organizational plans within an MAU have been submitted, the Ready workflow icon appears ( ). When the MAU budget plan is submitted to the Office of Planning and Budget, a Locked workflow icon appears ( ). When organizations within a MAU requests a lock be removed, a MAU fiscal officer can unlock the workflow by selecting the reject icon.
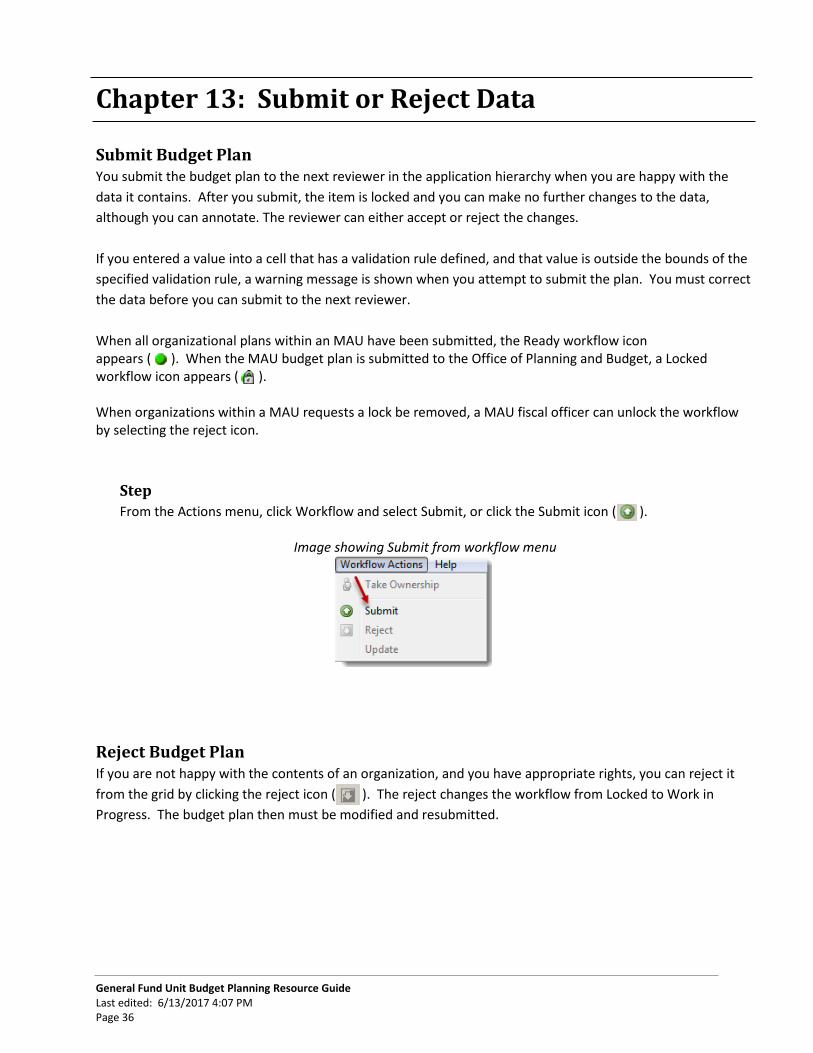
Step
From the Actions menu, click Workflow and select Submit, or click the Submit icon ( ).
Image showing Submit from workflow menu
Reject Budget Plan If you are not happy with the contents of an organization, and you have appropriate rights, you can reject it
from the grid by clicking the reject icon ( ). The reject changes the workflow from Locked to Work in
Progress. The budget plan then must be modified and resubmitted.

General Fund Unit Budget Planning Resource Guide Last edited: 6/13/2017 4:07 PM Page 37
Submit Budgets to the Office of Planning and Budgets
Submit MSU Budget Control Allocation Application within Cognos EP
Steps
1. Open MAU organization within MSU Budget Control Allocation application 2. Verify all of the MAU budget allocation has been spread to organizations 3. Select Submit icon ( ) -- if an error message appears than funding has not been completely
allocated
Note: Administration link will be run by Office of Planning and Budgets each evening from August 1 to
August 12.
Submit MSU General Fund Unit Budget Planning Application within Cognos EP
Steps
1. Submitting Organization(s) within an MAU.
Select one of your group lines to open all organizations within a group in the “Which is made up
of:” section of the screen.
Open all organizations in a group and “Take Ownership” if not already the owner.
Select Submit for each organization.
Repeat the above steps for all groups within a MAU.
2. Submitting Group(s) within an MAU.
Select MAU (All) to open all groups in the “Which is made up of:” section of the screen.
Open all groups.
Select Submit for each group -- if an error message appears than funding has not been completely
allocated.
General Fund Unit Budget Planning Resource Guide Last edited: 6/13/2017 4:07 PM Page 38
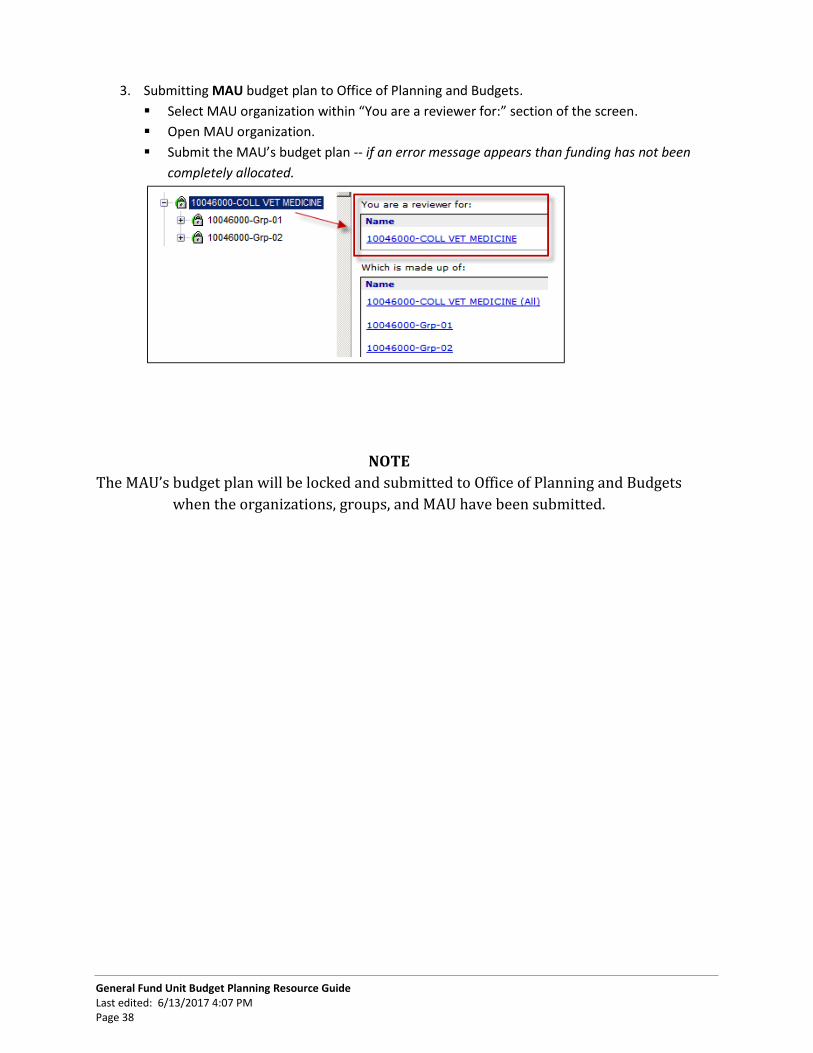
3. Submitting MAU budget plan to Office of Planning and Budgets.
Select MAU organization within “You are a reviewer for:” section of the screen.
Open MAU organization.
Submit the MAU’s budget plan -- if an error message appears than funding has not been
completely allocated.
NOTE
The MAU’s budget plan will be locked and submitted to Office of Planning and Budgets
when the organizations, groups, and MAU have been submitted.
General Fund Unit Budget Planning Resource Guide Last edited: 6/13/2017 4:07 PM Page 39
Chapter 14: Print Data
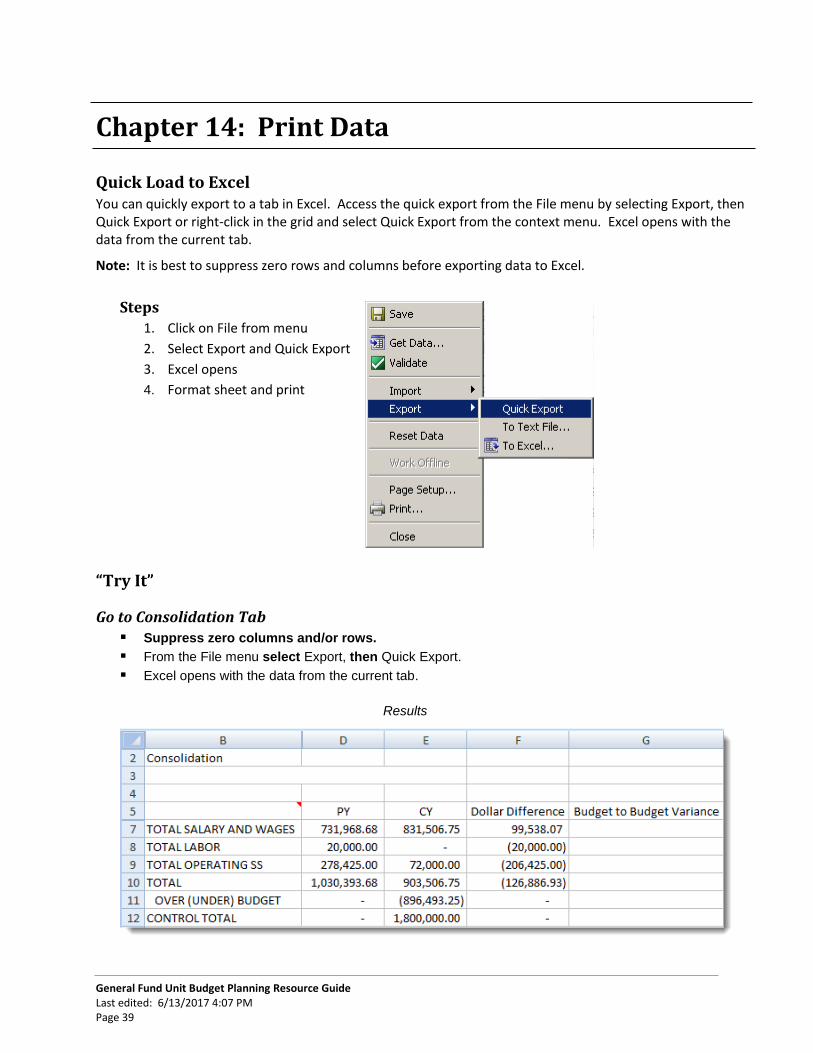
Quick Load to Excel You can quickly export to a tab in Excel. Access the quick export from the File menu by selecting Export, then Quick Export or right-click in the grid and select Quick Export from the context menu. Excel opens with the data from the current tab.
Note: It is best to suppress zero rows and columns before exporting data to Excel.
Steps
1. Click on File from menu
2. Select Export and Quick Export
3. Excel opens
4. Format sheet and print
“Try It” Go to Consolidation Tab
Suppress zero columns and/or rows.
From the File menu select Export, then Quick Export.
Excel opens with the data from the current tab.
Results
General Fund Unit Budget Planning Resource Guide Last edited: 6/13/2017 4:07 PM Page 40
Print ( ) You can print the current view of Contributor data by specifying certain items. You can also choose to include
commentary. If you want to print just the active grid, click the print button on the toolbar.
Steps
1. Suppress zero columns and/or rows.
2. From the File menu, click Print.
3. The first screen of the wizard displays the pages that you have selected to print. Click the items you
want to include. Use Ctrl+click to select more than one item.
4. If you want to include commentary, select the include commentaries check box.
5. Click Next to view a list of pages you have selected to print. You can select or remove pages included
in the printout.
6. Click Finish.
7. Select the printer you want to use and click Print.
8. If you want to preview before printing, click Yes.
9. If you want to change margins, scaling, and alignment, click Page Setup.
10. Click Print.
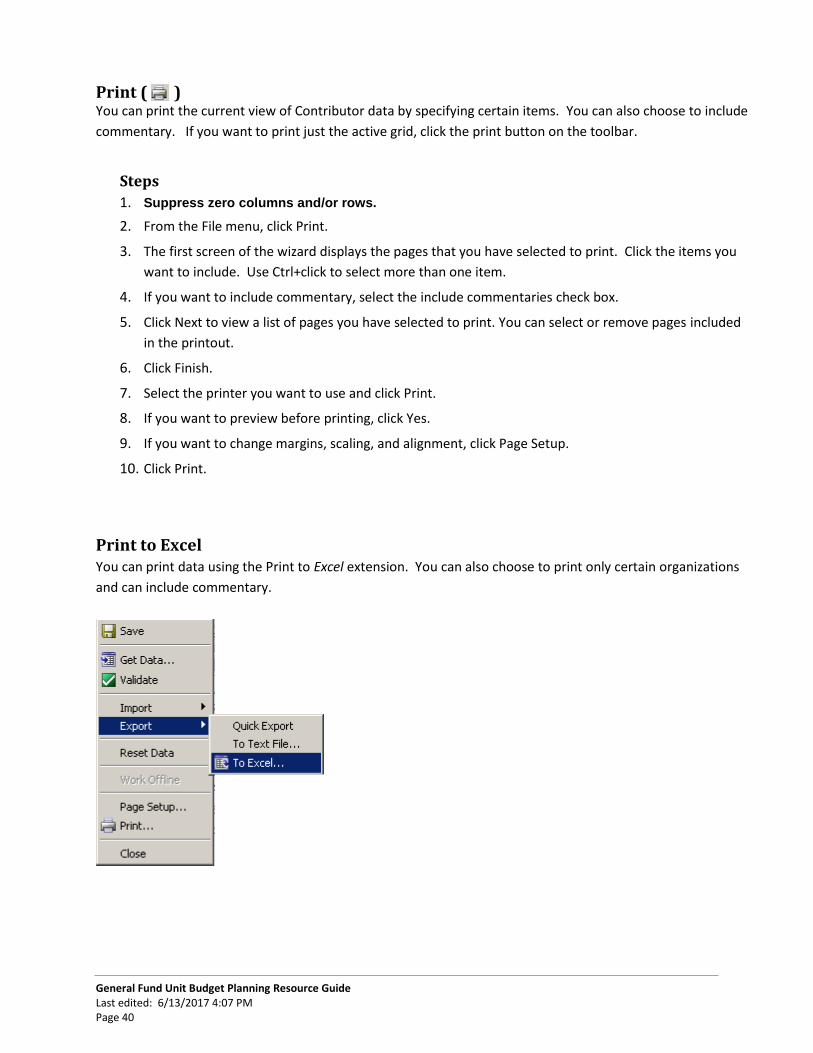
Print to Excel You can print data using the Print to Excel extension. You can also choose to print only certain organizations
and can include commentary.
General Fund Unit Budget Planning Resource Guide Last edited: 6/13/2017 4:07 PM Page 41
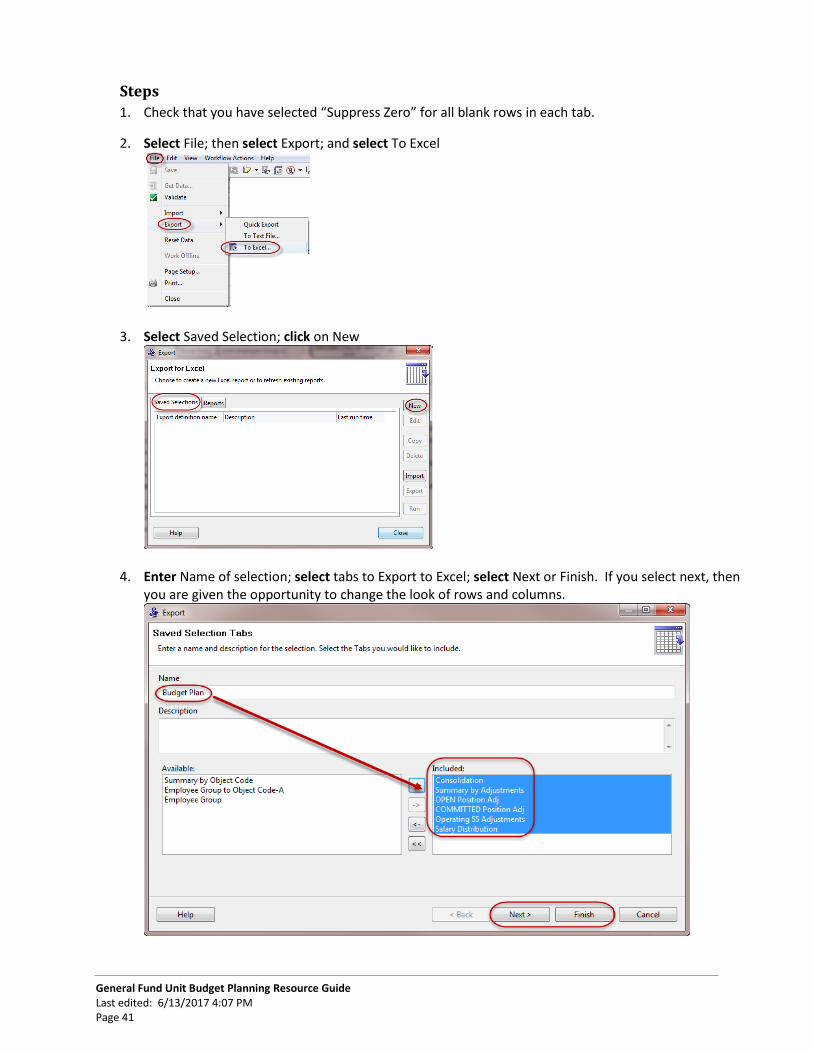
Steps
1. Check that you have selected “Suppress Zero” for all blank rows in each tab.
2. Select File; then select Export; and select To Excel
3. Select Saved Selection; click on New
4. Enter Name of selection; select tabs to Export to Excel; select Next or Finish. If you select next, then you are given the opportunity to change the look of rows and columns.
General Fund Unit Budget Planning Resource Guide Last edited: 6/13/2017 4:07 PM Page 42
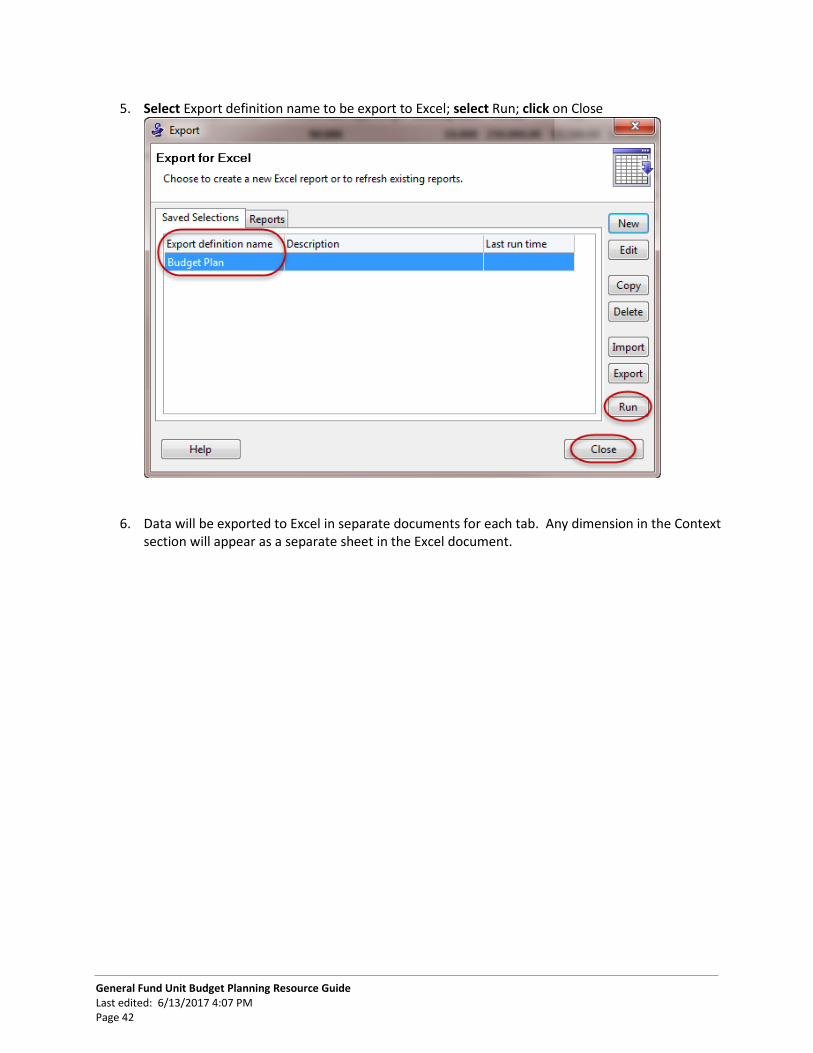
5. Select Export definition name to be export to Excel; select Run; click on Close
6. Data will be exported to Excel in separate documents for each tab. Any dimension in the Context
section will appear as a separate sheet in the Excel document.
General Fund Unit Budget Planning Resource Guide Last edited: 6/13/2017 4:07 PM Page 43
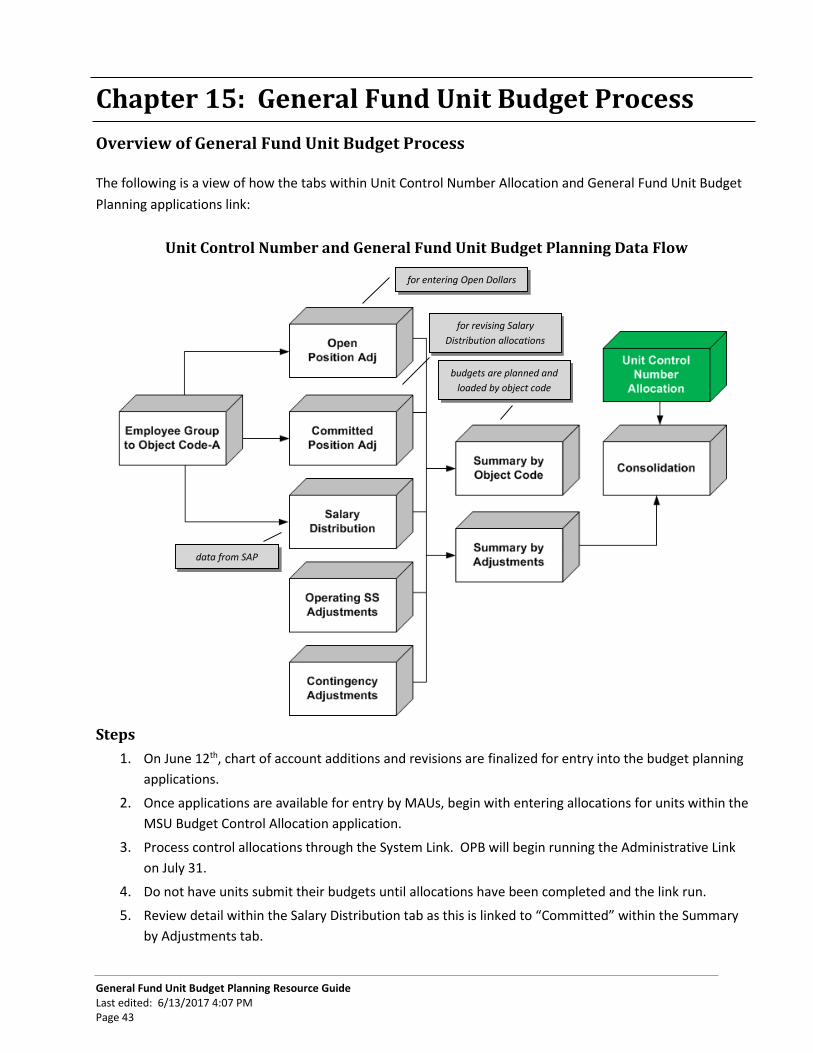
Chapter 15: General Fund Unit Budget Process
Overview of General Fund Unit Budget Process The following is a view of how the tabs within Unit Control Number Allocation and General Fund Unit Budget
Planning applications link:
Unit Control Number and General Fund Unit Budget Planning Data Flow
Steps
1. On June 12th, chart of account additions and revisions are finalized for entry into the budget planning
applications.
2. Once applications are available for entry by MAUs, begin with entering allocations for units within the
MSU Budget Control Allocation application.
3. Process control allocations through the System Link. OPB will begin running the Administrative Link
on July 31.
4. Do not have units submit their budgets until allocations have been completed and the link run.
5. Review detail within the Salary Distribution tab as this is linked to “Committed” within the Summary
by Adjustments tab.
budgets are planned and
loaded by object code
data from SAP
for revising Salary
Distribution allocations
for entering Open Dollars
General Fund Unit Budget Planning Resource Guide Last edited: 6/13/2017 4:07 PM Page 44
6. Enter budget amounts within the Open Position Adjustments, Committed Position Adjustments,
Contingency Adjustments and Operating SS Adjustments tabs. Be sure cells with validation rules are
completed correctly (see list below). Be sure to include raise, annualization, grad, and labor funding.
7. Enter justification within the Consolidation tab.
8. Check to be sure correct values have been entered for sub accounts, sub object code, project. These
fields are case sensitive (all upper case).
9. Org Ref ID code can only contain 8 characters.
10. Both MAU fiscal officers and OPB will validate chart of account fields within MSU General Fund Unit
Budget Planning application against the Kuali financial system.
11. Select Submit when complete to lock the submission. Budget plans are due to OPB by August 11.
12. After review and approvals are completed by OPB, budget is loaded in the Kuali financial system on
August 17.
13. KFS and OOI will be open for changes on August 18.
Validations within Application
Unit Control Number Allocation Tab:
- The CUC Control Number total does not equal the MAU Control Number. Therefore you cannot submit the budget.
- Please enter Justification if ORG Control Number is less than Committed Salaries.
Consolidation Tab:
- The BUDGET TOTAL does not equal the CONTROL TOTAL. Therefore you cannot submit the
budget plan.
Open Position Adj and Committed Position Adj Tabs:
- EMPLOYEE GROUP needs to be selected for each TOTAL entered. Therefore you cannot submit
the budget plan.
Committed Position Adj Tab: - Employee Groups GRAD NON UNION, GRAD UNION, GRAD SI HEALTH, GRAD SI TUITION FEES,
REGULAR LABOR, STUDENT LABOR or FRINGE BENEFITS cannot be selected within the
COMMITTED Position Adjustments tab.
Operating SS Adjustments Tab: - OBJECT CODE needs to be selected for each TOTAL entered. Therefore you cannot submit the
budget plan.
REMEMBER
Save Often Take Ownership to Enter Data
Verify All Chart of Account Fields are Correct
General Fund Unit Budget Planning Resource Guide Last edited: 6/13/2017 4:07 PM Page 45
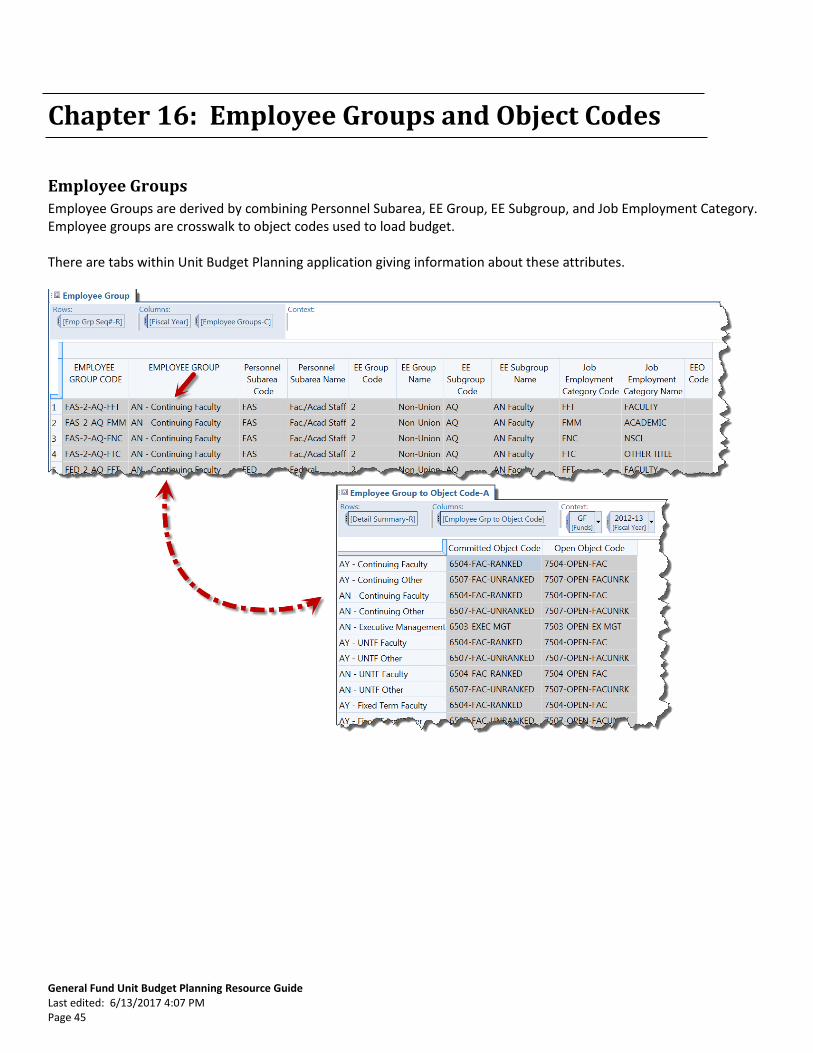
Chapter 16: Employee Groups and Object Codes
Employee Groups
Employee Groups are derived by combining Personnel Subarea, EE Group, EE Subgroup, and Job Employment Category. Employee groups are crosswalk to object codes used to load budget. There are tabs within Unit Budget Planning application giving information about these attributes.
General Fund Unit Budget Planning Resource Guide Last edited: 6/13/2017 4:07 PM Page 46
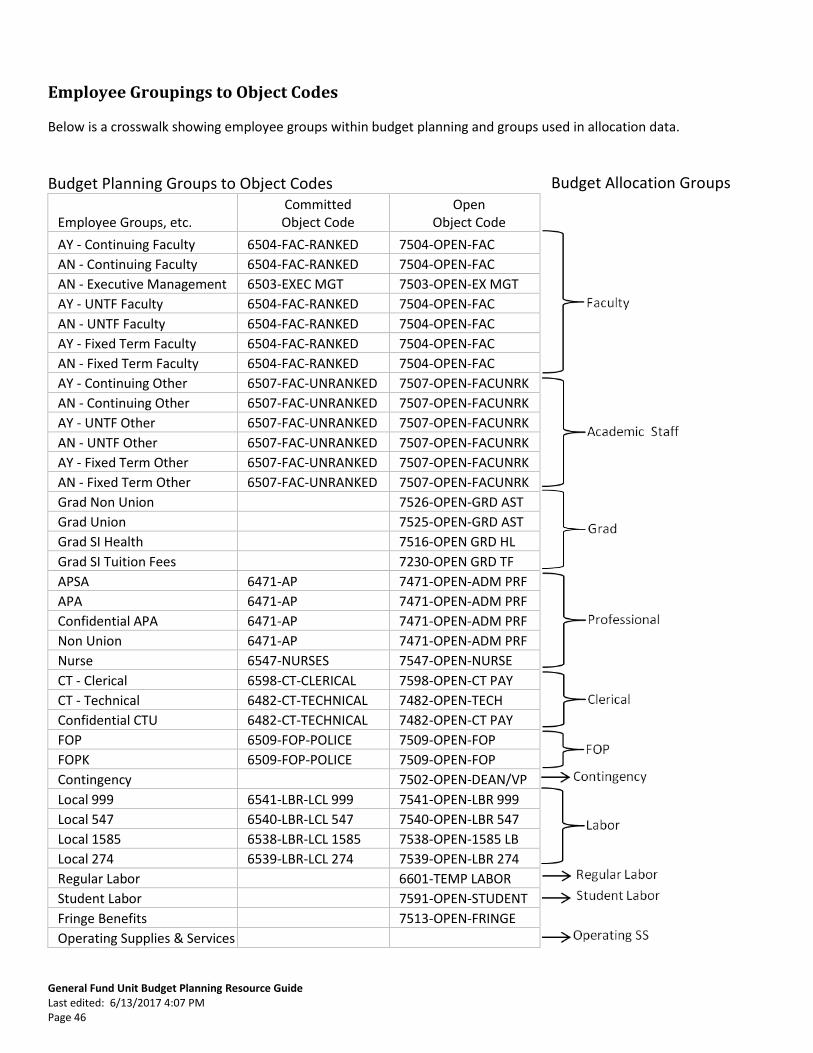
Employee Groupings to Object Codes
Below is a crosswalk showing employee groups within budget planning and groups used in allocation data.
Budget Planning Groups to Object Codes
Employee Groups, etc. Committed Object Code
Open Object Code
AY - Continuing Faculty 6504-FAC-RANKED 7504-OPEN-FAC
AN - Continuing Faculty 6504-FAC-RANKED 7504-OPEN-FAC
AN - Executive Management 6503-EXEC MGT 7503-OPEN-EX MGT
AY - UNTF Faculty 6504-FAC-RANKED 7504-OPEN-FAC
AN - UNTF Faculty 6504-FAC-RANKED 7504-OPEN-FAC
AY - Fixed Term Faculty 6504-FAC-RANKED 7504-OPEN-FAC
AN - Fixed Term Faculty 6504-FAC-RANKED 7504-OPEN-FAC
AY - Continuing Other 6507-FAC-UNRANKED 7507-OPEN-FACUNRK
AN - Continuing Other 6507-FAC-UNRANKED 7507-OPEN-FACUNRK
AY - UNTF Other 6507-FAC-UNRANKED 7507-OPEN-FACUNRK
AN - UNTF Other 6507-FAC-UNRANKED 7507-OPEN-FACUNRK
AY - Fixed Term Other 6507-FAC-UNRANKED 7507-OPEN-FACUNRK
AN - Fixed Term Other 6507-FAC-UNRANKED 7507-OPEN-FACUNRK
Grad Non Union 7526-OPEN-GRD AST
Grad Union 7525-OPEN-GRD AST
Grad SI Health 7516-OPEN GRD HL
Grad SI Tuition Fees 7230-OPEN GRD TF
APSA 6471-AP 7471-OPEN-ADM PRF
APA 6471-AP 7471-OPEN-ADM PRF
Confidential APA 6471-AP 7471-OPEN-ADM PRF
Non Union 6471-AP 7471-OPEN-ADM PRF
Nurse 6547-NURSES 7547-OPEN-NURSE
CT - Clerical 6598-CT-CLERICAL 7598-OPEN-CT PAY
CT - Technical 6482-CT-TECHNICAL 7482-OPEN-TECH
Confidential CTU 6482-CT-TECHNICAL 7482-OPEN-CT PAY
FOP 6509-FOP-POLICE 7509-OPEN-FOP
FOPK 6509-FOP-POLICE 7509-OPEN-FOP
Contingency 7502-OPEN-DEAN/VP
Local 999 6541-LBR-LCL 999 7541-OPEN-LBR 999
Local 547 6540-LBR-LCL 547 7540-OPEN-LBR 547
Local 1585 6538-LBR-LCL 1585 7538-OPEN-1585 LB
Local 274 6539-LBR-LCL 274 7539-OPEN-LBR 274
Regular Labor 6601-TEMP LABOR
Student Labor 7591-OPEN-STUDENT
Fringe Benefits 7513-OPEN-FRINGE
Operating Supplies & Services
Budget Allocation Groups

General Fund Unit Budget Planning Resource Guide Last edited: 6/13/2017 4:07 PM Page 47
Glossary
Application An application is a planning model such as base budget reconciliation, salary and wage allocation, general fund unit budget planning and many others. One application can be used by many users in different locations at the same time.
Break back Break back is a function that changes the value of variables to make a formula equal to a specified value. If you type an amount into the Total cell for Jan through Dec and press Enter, the amount is automatically divided over the 12 months.
Commentary Commentary represents any additional information attached to Contributor cells, tabs, or e.List items, including both user annotations and attached files.
Cubes A cube is similar to a spreadsheet. A cube always contains rows and columns and usually at least one other page, making it multidimensional. It is used to collect data. Cells in cubes can contain entered data or calculations.
Dimensions The rows, columns, and pages of a cube are created from dimensions. Dimensions are lists of related items, such as employee groups, fiscal year, organization, object codes, semesters and months.
Dimension Bar Shows the dimensions that are in the rows, columns, and context.
D-Links Cubes are linked by a series of D-Links in Analyst. A D-Link copies information in and out of cubes, and sometimes to and from ASCII or text files.
e.Lists The structure of an application is based on an e.List. An e.List is a kind of dimension that contains a hierarchical structure that reflects the structure of the university. For example, it may include MAU and department organizations. There is one e.List per application, and the e.List item is assigned to a group/role.
Grid Where you add or edit data.
Grid Handles Where a dimension or tab can be “grabbed” to move it within the grid.
Help Icon ( ) Clicking on the help icon will bring up the Contributor Web Client User Guide. This is a handy guide when working with
Contributor, including explanations of to work with screens.
Tabs A separate tab represents each cube in the application.
General Fund Unit Budget Planning Resource Guide Last edited: 6/13/2017 4:07 PM Page 48
For Questions, Contact
For Cognos EP Questions, Contact
Denice Beckwith
353-0864
or
Val Thebeau
432-0219
For Funding and Allocation Questions, Contact
Brent Johnston
353-5519