Embed Size (px)
Citation preview

8/3/2019 Network Adapter Manual
http://slidepdf.com/reader/full/network-adapter-manual 1/36
Wireless N Mini USB Adapter
Model # AWLL6075
User’s Manual
Rev. 2.0

8/3/2019 Network Adapter Manual
http://slidepdf.com/reader/full/network-adapter-manual 2/36
1
Table of Contents
1. Introduction ..............................................................................................................................2
1.1 Package Contents................................................................................................................21.2 Features...............................................................................................................................2
2. Install the Wireless Adapter .....................................................................................................33. Connect to the Wireless Network.............................................................................................84. Configure Wireless Monitor...................................................................................................15
4.1 General..............................................................................................................................15
4.2 Profile Settings .................................................................................................................164.3 Available Network............................................................................................................18
4.4 Status ................................................................................................................................19
4.5 Statistics............................................................................................................................20
4.6 Wi-Fi Protected Setup (WPS)...........................................................................................214.7 Configuring Wireless Security .........................................................................................26
4.8 Ad-hoc and Peer-to-Peer Wireless Networks...................................................................31
4.9 About ................................................................................................................................33Appendix A - Specification ........................................................................................................34
Technical Support.......................................................................................................................35

8/3/2019 Network Adapter Manual
http://slidepdf.com/reader/full/network-adapter-manual 3/36
2
1. Introduction
Congratulations on your purchase of the Wireless N Mini USB Adapter. The supercompact mini design gives you more flexibility and its high bandwidth combined with
extended wireless coverage delivers fast and reliable connection for all of yournetworking applications. The adapter will yield a higher throughput is it is used withother Airlink101® Wireless N products.
A full range of security features such as WEP, WPA-PSK, and WPA2-PSK will provideyou the highest level of wireless network security. The bundled wireless utility allowsyou to set up the adapter with an easy-to-use user interface. The Wireless N Mini USBAdapter works with 802.11g and 802.11b network devices ensuring compatibility withyour existing wireless products.
1.1 Package Contents
Before you begin the installation, please check the items of your package. Thepackage should include the following items:
• Wireless N Mini USB Adapter
• Quick Installation Guide
• Installation CD (Driver/Utility/Manual)
1.2 Features
• Higher data rate and broader coverage with Wireless N technology • Built-in Easy Setup Button for easy connection to the existing wireless network • WPA2, WPA, and WEP enhanced security to provide a full protection for your
wireless connection
• Great for environments that need higher wireless data traffic• Fully backward compatible with 802.11b/g
• Light-weight, super compact mini design• RoHS compliant

8/3/2019 Network Adapter Manual
http://slidepdf.com/reader/full/network-adapter-manual 4/36
3
2. Install the Wireless Adapter
This section provides instructions on how to install the Wireless N Mini USB Adapter.The driver is installed along with the utility. For Windows 7, only driver will be installed.
For Macintosh users, you can find the software and installation instructions for MACunder the MAC folder on the provided CD.
Step 2.1 Insert the USB adapter into an available USB port of the computer.
Step 2.2 Click Cancel to quit the wizard.
Windows 2000/XP Users:
Windows Vista/7 Users:
8/3/2019 Network Adapter Manual
http://slidepdf.com/reader/full/network-adapter-manual 5/36
4
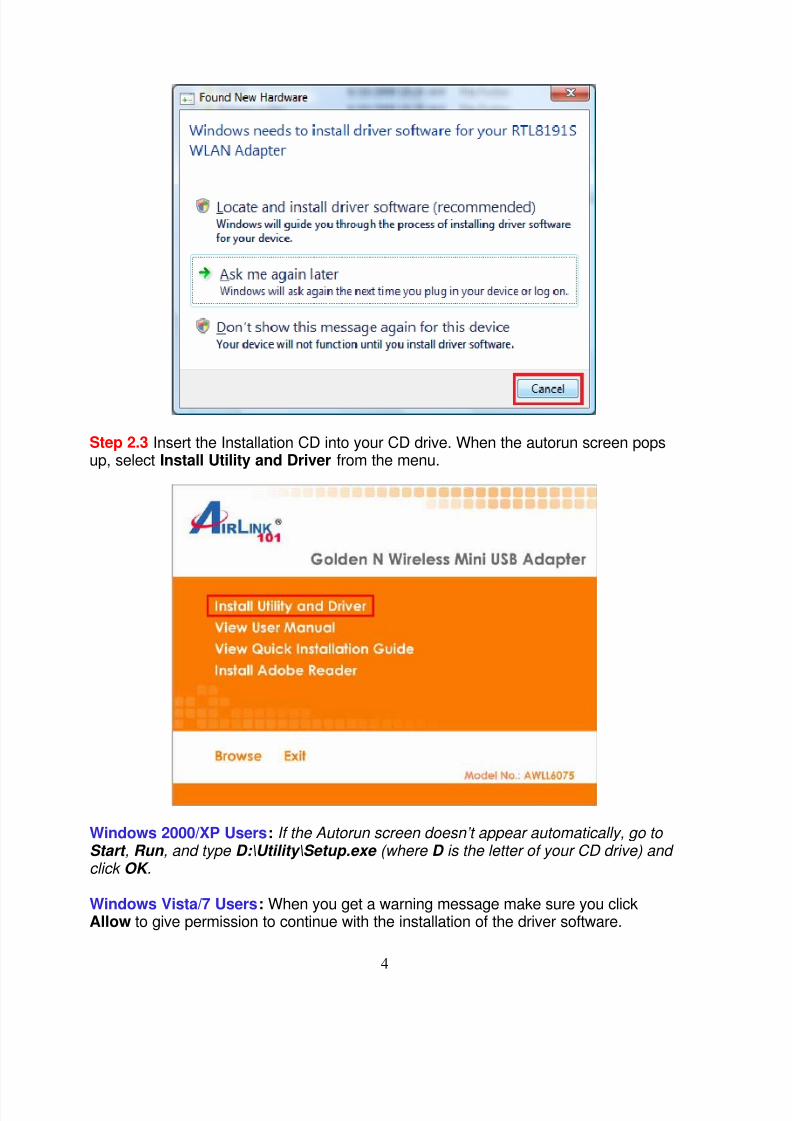
Step 2.3 Insert the Installation CD into your CD drive. When the autorun screen popsup, select Install Utility and Driver from the menu.
Windows 2000/XP Users: If the Autorun screen doesn’t appear automatically, go to Start , Run , and type D:\Utility\Setup.exe (where D is the letter of your CD drive) and click OK .
Windows Vista/7 Users: When you get a warning message make sure you clickAllow to give permission to continue with the installation of the driver software.
8/3/2019 Network Adapter Manual
http://slidepdf.com/reader/full/network-adapter-manual 6/36
5
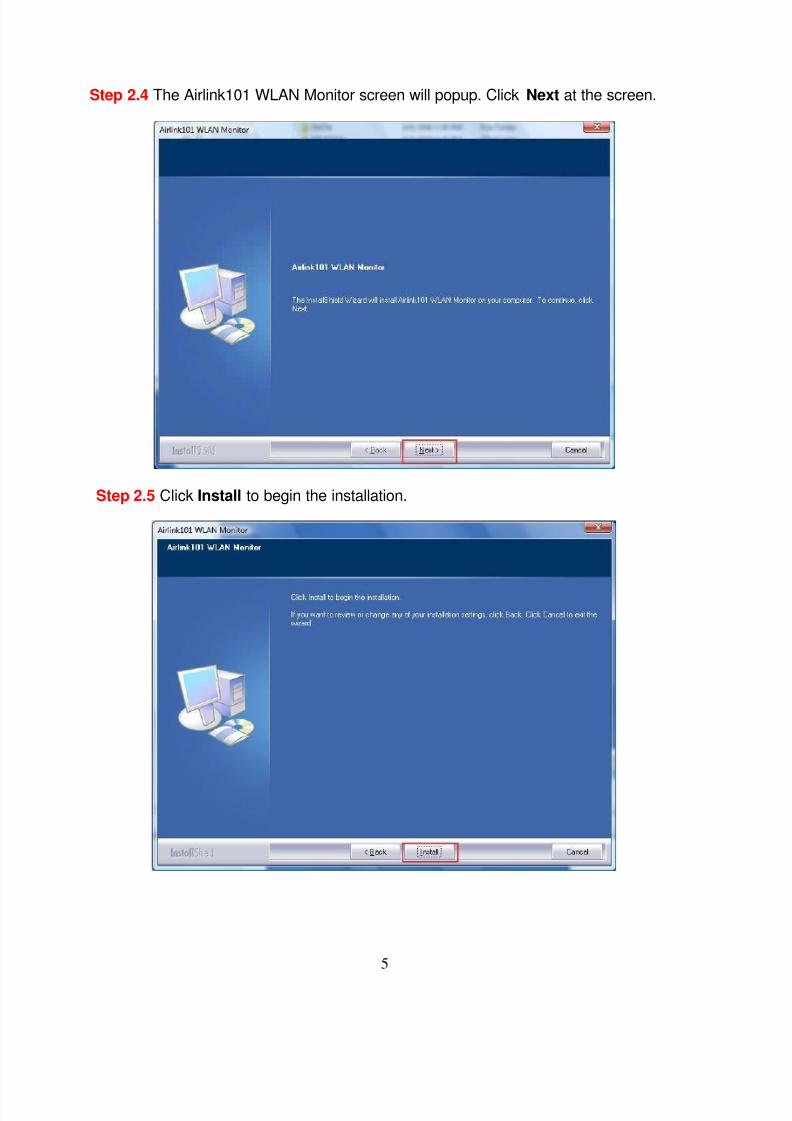
Step 2.4 The Airlink101 WLAN Monitor screen will popup. Click Next at the screen.
Step 2.5 Click Install to begin the installation.
8/3/2019 Network Adapter Manual
http://slidepdf.com/reader/full/network-adapter-manual 7/36
6
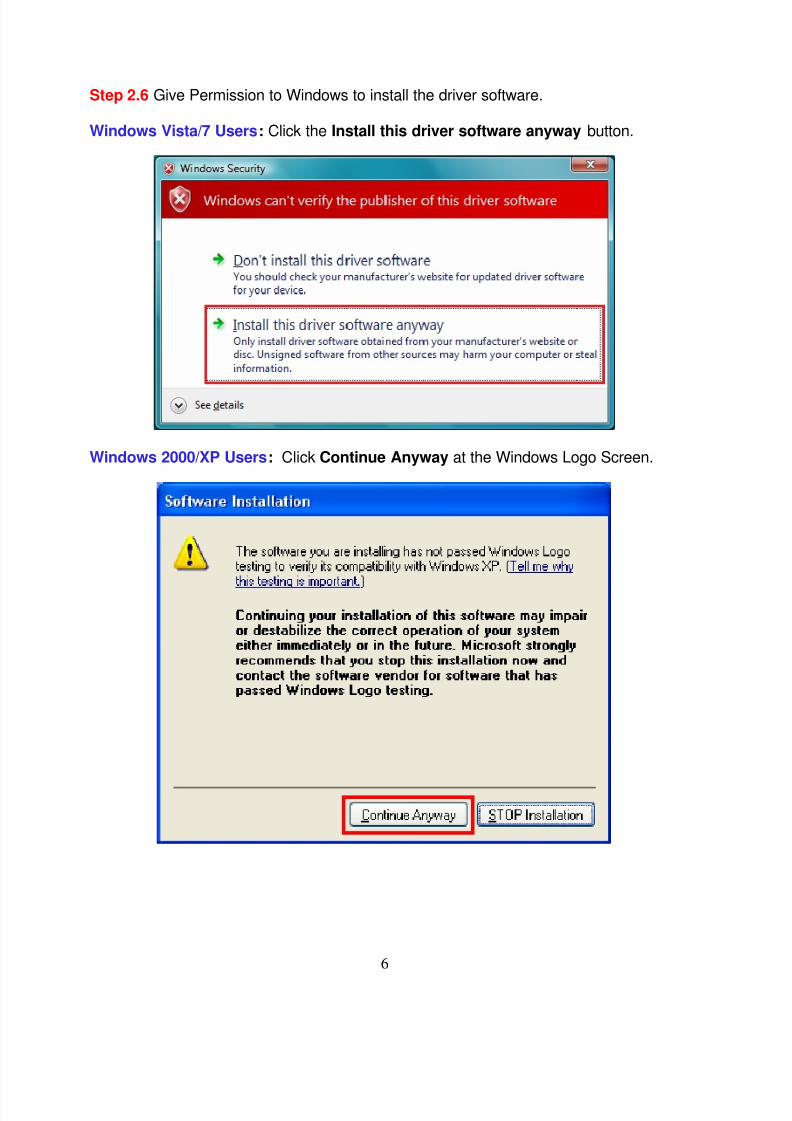
Step 2.6 Give Permission to Windows to install the driver software.
Windows Vista/7 Users: Click the Install this driver software anyway button.
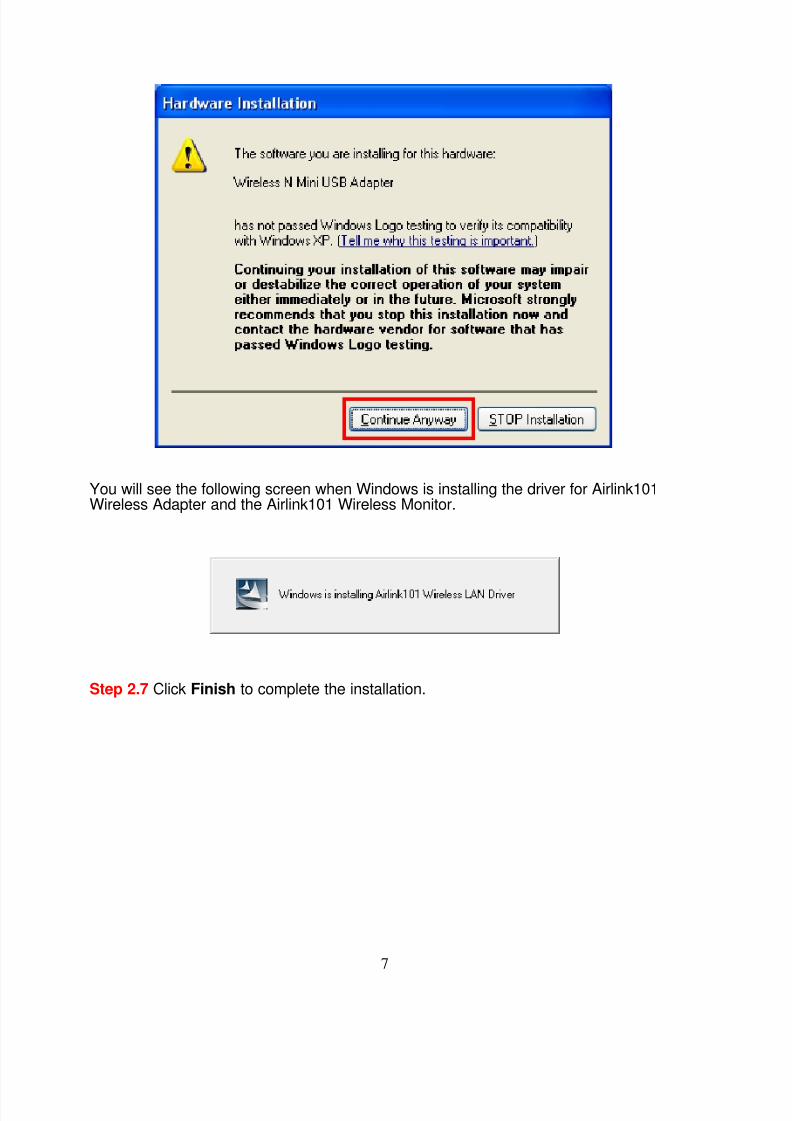
Windows 2000/XP Users: Click Continue Anyway at the Windows Logo Screen.
8/3/2019 Network Adapter Manual
http://slidepdf.com/reader/full/network-adapter-manual 8/36
7
You will see the following screen when Windows is installing the driver for Airlink101Wireless Adapter and the Airlink101 Wireless Monitor.
Step 2.7 Click Finish to complete the installation.
8/3/2019 Network Adapter Manual
http://slidepdf.com/reader/full/network-adapter-manual 9/36
8
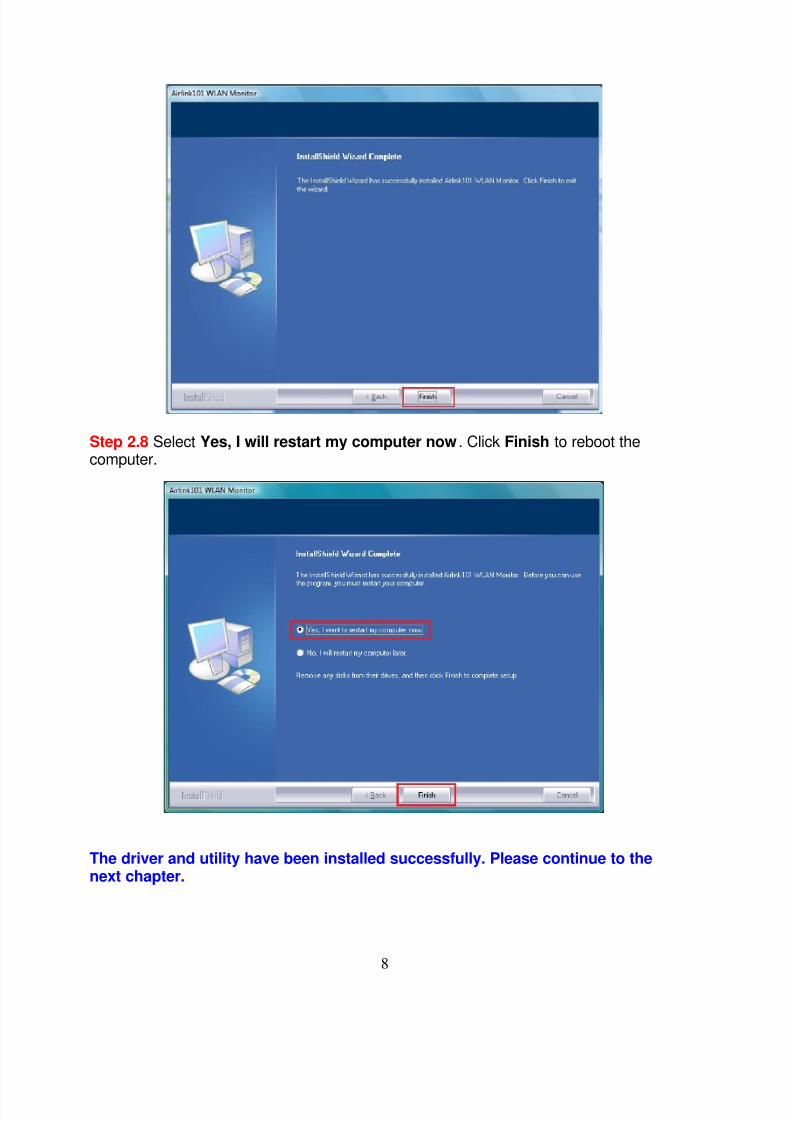
Step 2.8 Select Yes, I will restart my computer now. Click Finish to reboot thecomputer.
The driver and utility have been installed successfully. Please continue to thenext chapter.

8/3/2019 Network Adapter Manual
http://slidepdf.com/reader/full/network-adapter-manual 10/36
9
3. Connect to the Wireless Network
This section describes how to connect your wireless adapter to a wireless network.
For Windows 7 Users:
You will need to use the utility built in Windows 7 to manage this wireless USB adapter.Currently, Airlink101 Wireless Monitor does not support on Windows 7.
Step 3.1 Click on the wireless icon in the system tray at the bottom right-hand cornerof your screen. A list of available network will pop up. Select the one you want toconnect to and click Connect.
Step 3.2 Enter the network security key if the wireless network you are attempting toconnect to has wireless encryption enabled. Click OK. The connection should be nowestablished.

8/3/2019 Network Adapter Manual
http://slidepdf.com/reader/full/network-adapter-manual 11/36
10
For Windows Vista/XP/2000 Users:
Step 3.1 Open the Airlink101 Wireless Monitor utility by double clicking on the icon inthe system tray at the bottom right-hand corner of your screen.
8/3/2019 Network Adapter Manual
http://slidepdf.com/reader/full/network-adapter-manual 12/36
11
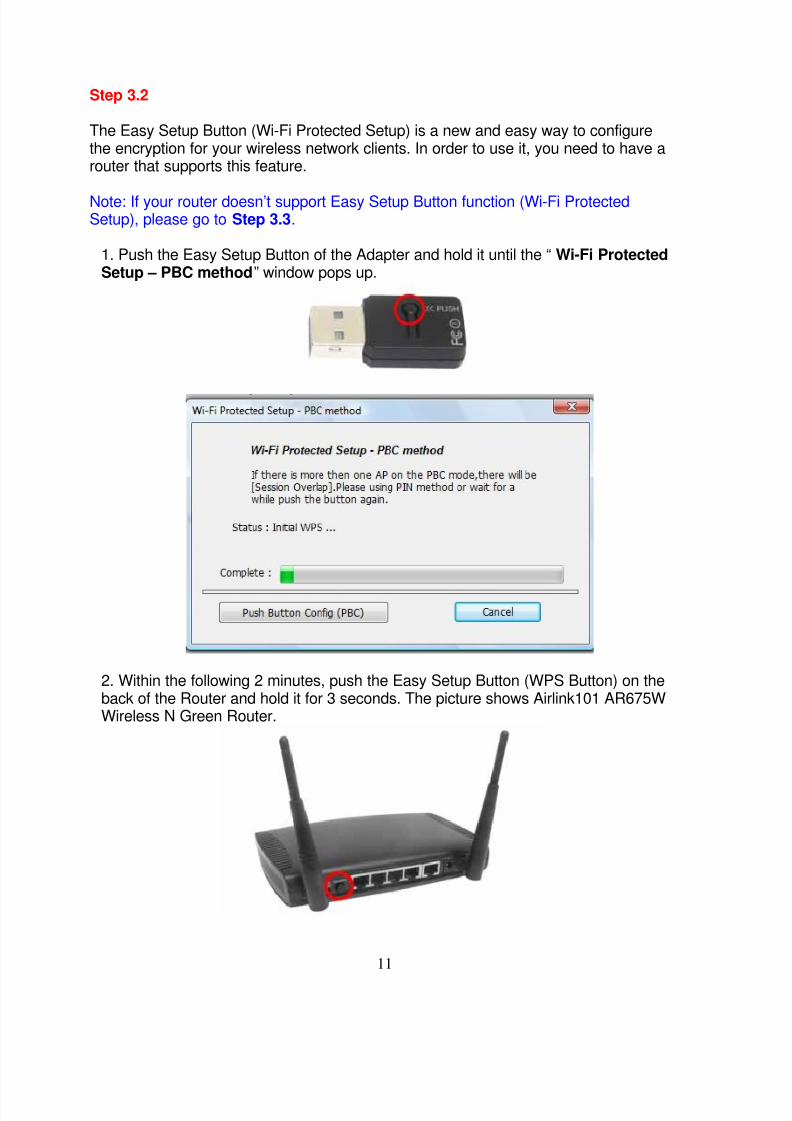
Step 3.2
The Easy Setup Button (Wi-Fi Protected Setup) is a new and easy way to configurethe encryption for your wireless network clients. In order to use it, you need to have arouter that supports this feature.
Note: If your router doesn’t support Easy Setup Button function (Wi-Fi ProtectedSetup), please go to Step 3.3.
1. Push the Easy Setup Button of the Adapter and hold it until the “Wi-Fi ProtectedSetup – PBC method” window pops up.
2. Within the following 2 minutes, push the Easy Setup Button (WPS Button) on theback of the Router and hold it for 3 seconds. The picture shows Airlink101 AR675WWireless N Green Router.

8/3/2019 Network Adapter Manual
http://slidepdf.com/reader/full/network-adapter-manual 13/36
12
3. The router will now start to synchronize the encryption settings with the wirelessadapter. The connection will be established in few seconds. Continue to Step 3.5.
If the connection is not able to establish, continue to Step 3.3.
Step 3.3 Click the Available Network tab of the Wireless Monitor, select the wireless
network that you wish to connect to, and click Add to Profile.
If the network that you are attempting to connect does not have encryption enabled,you will receive a warning about connecting to an unsecured network. Click OK tocomplete the connection. Go to Step 3.5.
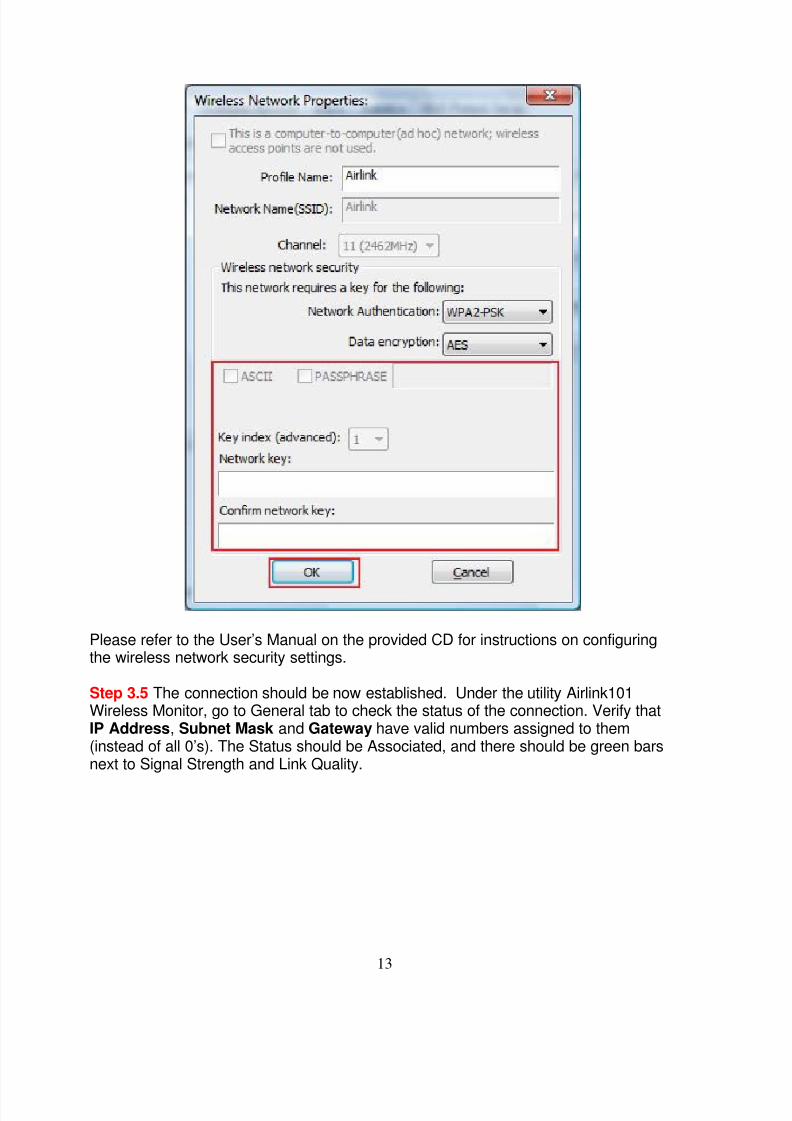
Step 3.4 Enter the wireless security key into the Network Key and Confirm NetworkKey boxes. The wireless adapter will automatically detect the type of NetworkAuthentication and the Data encryption, so it is recommended to keep these settingsas they are. Click OK after you finished.
8/3/2019 Network Adapter Manual
http://slidepdf.com/reader/full/network-adapter-manual 14/36
13
Please refer to the User’s Manual on the provided CD for instructions on configuringthe wireless network security settings.
Step 3.5 The connection should be now established. Under the utility Airlink101Wireless Monitor, go to General tab to check the status of the connection. Verify thatIP Address, Subnet Mask and Gateway have valid numbers assigned to them(instead of all 0’s). The Status should be Associated, and there should be green barsnext to Signal Strength and Link Quality.

8/3/2019 Network Adapter Manual
http://slidepdf.com/reader/full/network-adapter-manual 15/36
14
Congratulations! You have now connected to the wireless network successfully.
Troubleshooting
1. If you cannot open the wireless monitor utility, make sure that the USB adapter isinserted firmly into the USB port.
2. If you cannot connect to the wireless router, you may want to double check thewireless security settings on the router. The network key you entered in Step 3.4 mustmatch with the settings on the wireless router.
3. If you are experiencing problems with the connection such as low signal strength,slow connection speed, or unstable wireless connection, you can try to tune yourrouter’s signal by changing the channels on the router and/or by adjusting the directionof the antenna(s). You do not need to change the channel on the Adapter; it willautomatically pick up the new channel after you reboot the router. Your router has 11different channels to choose from. Keep going through the channels until you find onethat gives you a stable connection. For instructions on changing channels, refer to thedocumentation that comes with the router.

8/3/2019 Network Adapter Manual
http://slidepdf.com/reader/full/network-adapter-manual 16/36
15
4. Configure Wireless Monitor
This section describes the various functions of the Airlink101 Wireless Monitor thatyou can configure, including the settings of wireless encryption.
4.1 General
The General tab provides you with the status of the current connection, includingsignal, network name (SSID) and IP Address.
At the bottom you have options for controlling the utility and adapter.
Show Tray Icon allows you to show or hide the tray icon for the utility.
Radio Off disables the wireless function of the adapter.
Disable Adapter will completely disable the wireless adapter.

8/3/2019 Network Adapter Manual
http://slidepdf.com/reader/full/network-adapter-manual 17/36
16
4.2 Profile Settings
The Profile tab lists the current profiles and allows you to create new profiles.
The Available Profile(s) box lists all the profiles that you’ve created for your network.Profiles are automatically created and added to this list when you connect to newnetworks. You can also manually add the profiles.
To modify an existing profile, select the profile from the Available Profile(s) boxand click on Edit.
To create a new profile, click on Add.
The Profile box will appear allowing you to specify the settings for your new profile orto change settings for your existing profile.

8/3/2019 Network Adapter Manual
http://slidepdf.com/reader/full/network-adapter-manual 18/36
17
Enter a Profile Name and SSID. Enter the encryption settings for the profile. Click
OK to save the changes.
The Configuring Encryption section (section 4.7) will give you the information of how toset the different options of the wireless network encryption settings.

8/3/2019 Network Adapter Manual
http://slidepdf.com/reader/full/network-adapter-manual 19/36
18
4.3 Available Network
The Available network tab lists all of the networks that the adapter detects in your area.
Clicking Refresh will refresh the list. To connect to a network, select a network fromthe list and click Add to Profile.

8/3/2019 Network Adapter Manual
http://slidepdf.com/reader/full/network-adapter-manual 20/36
19
4.4 Status
The status section provides you with a list of information about the current status ofthe adapter.
8/3/2019 Network Adapter Manual
http://slidepdf.com/reader/full/network-adapter-manual 21/36
20
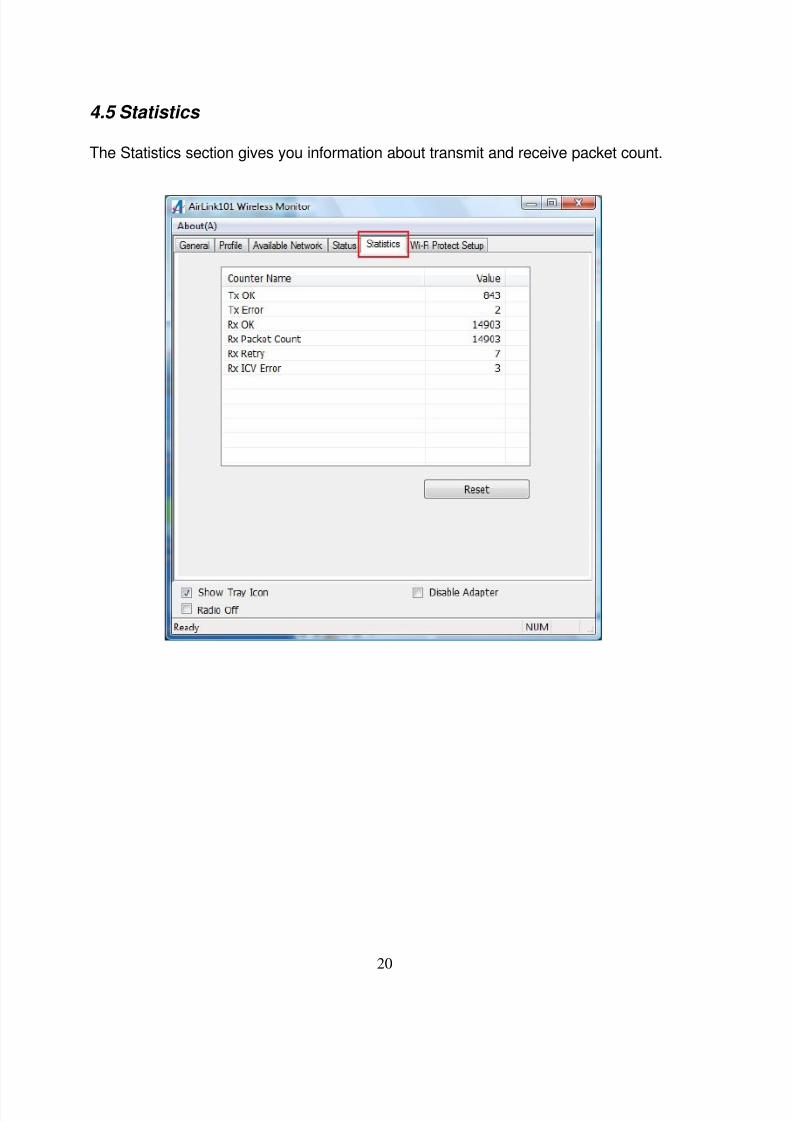
4.5 Statistics
The Statistics section gives you information about transmit and receive packet count.

8/3/2019 Network Adapter Manual
http://slidepdf.com/reader/full/network-adapter-manual 22/36
21
4.6 Wi-Fi Protected Setup (WPS)
The Wi-Fi Protected Setup™ (WPS) is a new and easy way to configure theencryption for your wireless network clients. In order to use it, you need to have a
router that supports this feature, like the AR670W or AR675W Airlink101 Wireless NRouter. You also need to configure the wireless encryption on the router; you shouldfind the instructions for configuring it in the router User Manual. If your wireless routerdoes not support WPS, you will need to set up the wireless security manually and youcan skip this section.
We are using the AWLL6075 Wireless N Mini USB Adapter and the AR675WAirlink101 Wireless N Green Router to illustrate the following setup instructions.
Step 4.6.1 Open the Airlink101 Wireless Monitor. Click the Wi-Fi Protect Setup tab.
Choose your configuration method:
- For Push Button method, click Push Button Config (PBC) tab, continue toStep 4.6.2a
- For Pin Input Config method, click Pin Input Config (PIN) tab., continue toStep 4.6.3a
8/3/2019 Network Adapter Manual
http://slidepdf.com/reader/full/network-adapter-manual 23/36
22
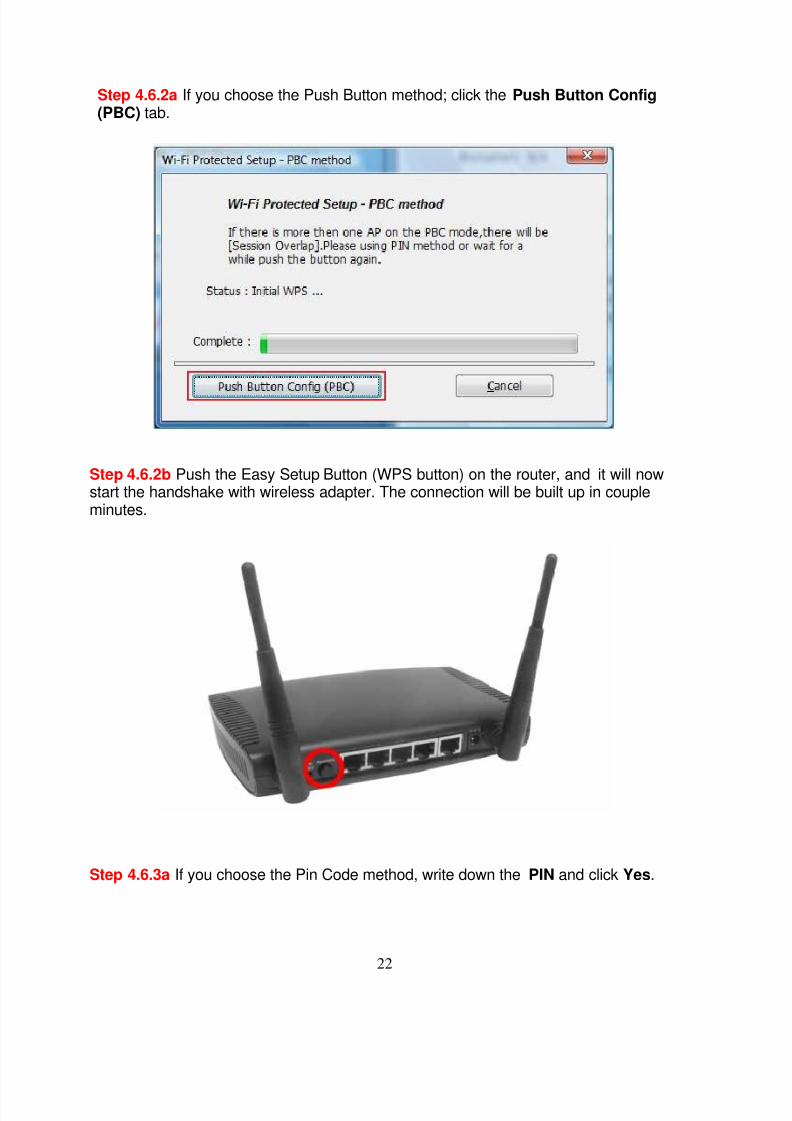
Step 4.6.2a If you choose the Push Button method; click the Push Button Config(PBC) tab.
Step 4.6.2b Push the Easy Setup Button (WPS button) on the router, and it will nowstart the handshake with wireless adapter. The connection will be built up in coupleminutes.
Step 4.6.3a If you choose the Pin Code method, write down the PIN and click Yes.

8/3/2019 Network Adapter Manual
http://slidepdf.com/reader/full/network-adapter-manual 24/36
23
Select the Access Point that you want to connect, and then click Select.

8/3/2019 Network Adapter Manual
http://slidepdf.com/reader/full/network-adapter-manual 25/36
24
Step 4.6.3b Log on to your router’s configuration page from the web browser andclick on Wireless. Then click WPS.
Step 4.6.3c Make sure that the Disable WPS is not checked. Enter the Pin Code inthe Client Pin Number box and click Start PIN.

8/3/2019 Network Adapter Manual
http://slidepdf.com/reader/full/network-adapter-manual 26/36
25
After a few moments both the router configuration screen and the adapterconfiguration screen should show a message telling you that a connection isestablished.
Note: If you cannot connect successfully with WPS, you need to log in to your router’sconfiguration and click on Wireless. Then click Wireless security. Make sure that the
Disable WPS box is NOT checked, refer to Step 4.6.3b.
8/3/2019 Network Adapter Manual
http://slidepdf.com/reader/full/network-adapter-manual 27/36
26
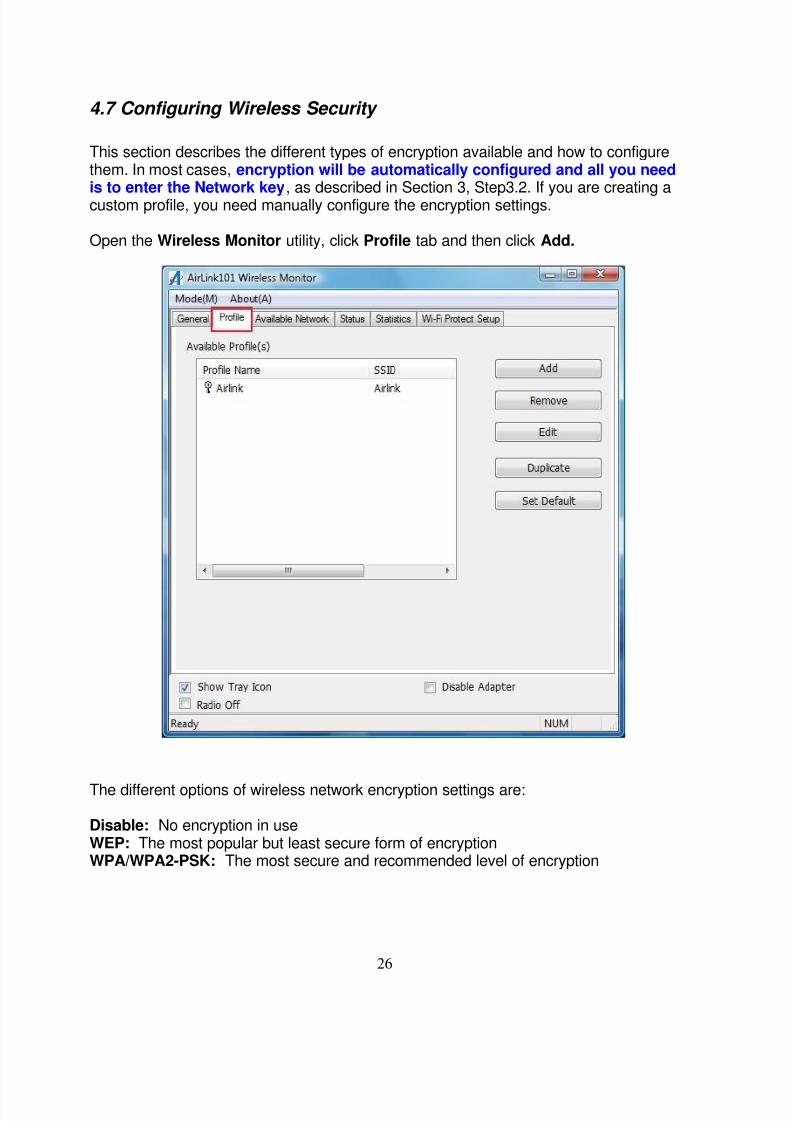
4.7 Configuring Wireless Security
This section describes the different types of encryption available and how to configurethem. In most cases, encryption will be automatically configured and all you needis to enter the Network key, as described in Section 3, Step3.2. If you are creating acustom profile, you need manually configure the encryption settings.
Open the Wireless Monitor utility, click Profile tab and then click Add.
The different options of wireless network encryption settings are:
Disable: No encryption in useWEP: The most popular but least secure form of encryptionWPA/WPA2-PSK: The most secure and recommended level of encryption

8/3/2019 Network Adapter Manual
http://slidepdf.com/reader/full/network-adapter-manual 28/36
27

8/3/2019 Network Adapter Manual
http://slidepdf.com/reader/full/network-adapter-manual 29/36
28
4.7.1 Configuring WEP encryption
Select WEP from the Data encryption box.
Under Network Authentication, you will want to select Shared key or OpenSystem, depending on the router settings.
Select the encryption setting according to the setting of the router.
• ASCII or PASSPHRASE will also be predetermined by the router. Refer to
your routers settings to find out what you should select here.or• Key Index is the key on the router that is currently in use. Input the Network
key that matches the Network key of the router.
Click OK to save your settings.

8/3/2019 Network Adapter Manual
http://slidepdf.com/reader/full/network-adapter-manual 30/36
29
4.7.2 Configuring WPA/WPA2-PSK Encryption (for home users)
Select WPA-PSK/WPA2-PSK from the Network Authentication box.
Under Data encryption select either AES or TKIP depending on the settings for yourrouter.
Enter the encryption key that the router is using into the Network Key box.
Click OK to save your settings.

8/3/2019 Network Adapter Manual
http://slidepdf.com/reader/full/network-adapter-manual 31/36
30
4.7.3 Configuring WPA/WPA2 Encryption (for corporate networks)
Select WPA 802.1x / WPA2 802.1x from the Network Authentication box.
Under Data encryption select either TKIP or AES depending on the settings for therouter.

8/3/2019 Network Adapter Manual
http://slidepdf.com/reader/full/network-adapter-manual 32/36
31
4.8 Ad-hoc and Peer-to-Peer Wireless Networks
Ad-hoc networking is used when you want to connect two or more computerstogether but you don’t have a router.
In ad-hoc mode, you lose many features that come with a router. The maximumconnection speed drops to 11Mbps. In addition, WEP encryption is the onlysecurity available in ad-hoc mode.
To set up ad-hoc mode, you will need to create a new profile.
Open the Wireless Monitor.Click on Profile and click on Add. The profile settings box will appear.
First change the network type to Adhoc, by checking the computer-to-computer(ad-hoc) network.Enter a network name (SSID) into the SSID box. Select your desired Channel.

8/3/2019 Network Adapter Manual
http://slidepdf.com/reader/full/network-adapter-manual 33/36
32
You can also choose between no security or WEP security. If you choose WEPsecurity, you can follow the instructions in the Configuring Encryption section of themanual.
Click OK to save the profile.
Select your new profile from the Available Profile(s) box, and double click to enable it.
You need to configure all other computers that you are planning on connecting to your
ad-hoc network with the same settings that you input on this screen. Everycomputer has to be set up exactly the same. If any of the settings are different,the network will not function.
Troubleshooting: If you are having trouble connecting, slow connection, orconnection is unstable, you will want to try changing channels. Start with channel 1and work your way up until you find a channel that gives you the best connection.Each time you change the channel, save the settings then reboot the computer. Also,

8/3/2019 Network Adapter Manual
http://slidepdf.com/reader/full/network-adapter-manual 34/36
33
make sure that you do this on every ad-hoc machine so that they will all be set to thesame channel.
4.9 About
The About window provides the information about the Wireless Monitor Utility versionand the current driver version.

8/3/2019 Network Adapter Manual
http://slidepdf.com/reader/full/network-adapter-manual 35/36
34
Appendix A - Specification
Frequency Band
• 2.4Ghz
Standards• IEEE 802.11b / g / n
Interface• USB 2.0 / 1.1
Data Rate*
• Receiving: 300Mbps• Transmitting: 150Mbps
Antenna Type
• Built-in 2 print antennas
Security• WPA2/WPA-PSK (TKIP & AES)
• WEP 64/128-bit• 802.1x
LED• Link/Power
System Requirements
• Windows 7, Vista, XP and 2000• MAC 10.4 and above
• Available USB slot
Weight
• 1g
Dimensions
• 35.5 x 16 x 8mm (L x W x H)
Temperature
• Operating: 0ºC to 55ºC• Storage: -20ºC to 60ºC
Humidity• Operating: 10% to 90% Non-
Condensing
• Storage: Max. 95% Non-Condensing
Warranty• Limited 1-year warranty
Safety Approvals
• FCC, CE, IC

8/3/2019 Network Adapter Manual
http://slidepdf.com/reader/full/network-adapter-manual 36/36
Technical Support
E-mail: [email protected]
Toll Free: 1-888-746-3238
Web Site: www.airlink101.com
*Theoretical maximum wireless signal rate derived from IEEE standard 802.11 specifications. Actual data throughputwill vary. Network conditions and environmental factors, including volume of network traffic, building materials andconstruction, mix of wireless products used, radio frequency interference (e.g., cordless telephones and microwaves)as well as network overhead lower actual data throughput rate. This product is based on IEEE draft 802.11nspecification and is not guaranteed to be compatible with future versions of IEEE 802.11n specification. Compatibilitywith draft 802.11n devices from other manufactures is not guaranteed. Specifications are subject to change withoutnotice. Photo of product may not reflect actual content. All products and trademarks are the property of theirrespective owners. Copyright ©2010 Airlink101®