Embed Size (px)
Citation preview

Odem Evaporator Standard Operating Procedure
Nano Fabrication Center

Standard Operation
1 Log in to system by pressing the logged user on the upper left corner.
2 On the upper right side at Main screen set tab to chamber controls.
3 Press the start Loadlock vent button (red) wait till pressure in it reaches 7.5 e2.
4 Open the loadlock chamber door.
5 Take sample holder out from the Load lock using the special tool.
6 Attach your samples to the sample holder.

7 Place sample holder in the load lock and make sure it seats tight in its place by trying to move it in its place by your hand.
8 Close the load lock door.
9 If you need plasma of O2 or Ar go to step 31
10 Press the Auto Loading button
11 If you wish to stop any action of the instrument press the STOP ALL button.
12 Wait till the transfer procedure has finished and the sample was placed in the main chamber.
13 Go to process section By pressing the Process button on the left side of the main screen.

14 Choose the recipe you desire at the recipe list.
15 Choose the film you want to edit and then press edit Layer (the deposition parameters will appear on the right side of the screen).
16 Set the rate and thickness you desire and press OK.
17 If you wish to edit another layer go to step 15
18 When all parameters are set to your satisfaction press the RUN RECIPE at the bottom of the screen The screen will transfer to main screen and will start the process.
19 Press the status tab on the upper right and view that the process is functioning properly.
20 If you wish to change the process parameters press the deposition control button and then the edit deposition controller parameters
21 Change the parameters you desire
22 Press set parameters if you wish parameters to set. Press the close button if you finished editing the layer at run
23 When process complete a message will appear Process complete.

24 In order to take out the sample holder press the chamber control tab
25 Press auto unloading button Activate the make vent after unloading if you wish the instrument to vent the load lock automatically
26 When chamber reached atmosphere (7.5 e-2) Open the load lock door
27 Take out the sample holder using the special tool.
28 Remove the samples from the sample holder
29 Place the sample holder back in the load lock and pump the chamber by pressing the start loadlock vacuum.
30 Log out
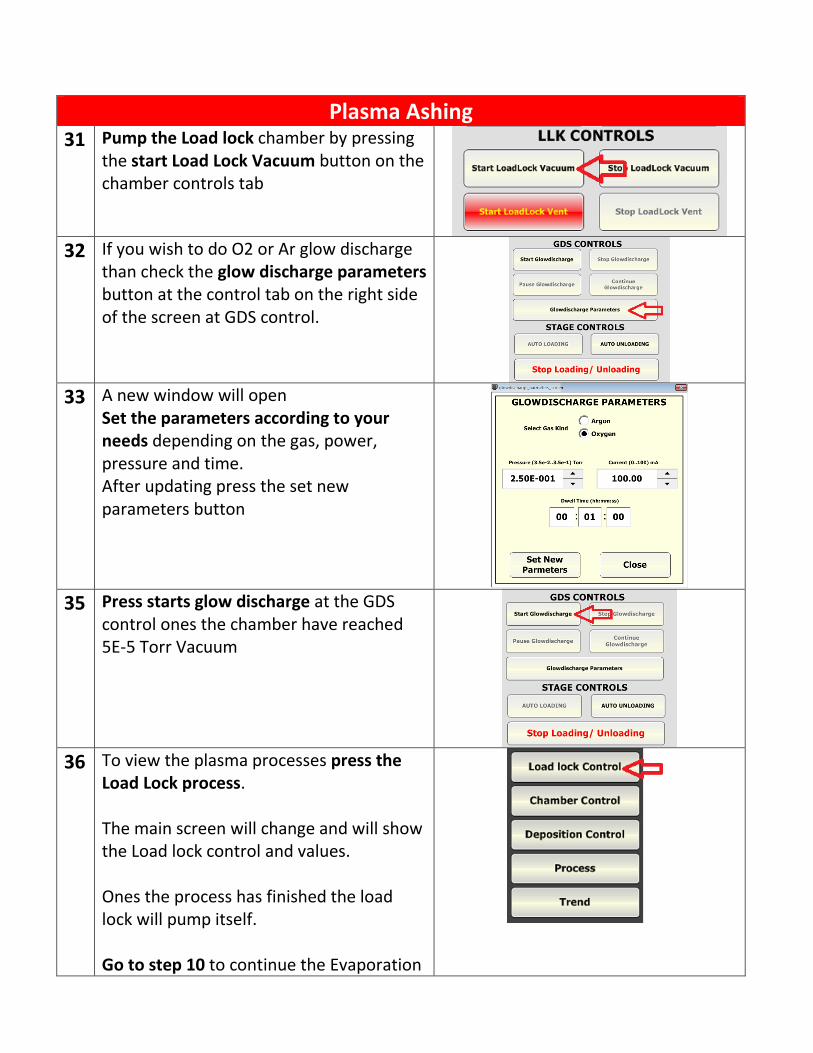
Plasma Ashing 31 Pump the Load lock chamber by pressing
the start Load Lock Vacuum button on the chamber controls tab
32 If you wish to do O2 or Ar glow discharge than check the glow discharge parameters button at the control tab on the right side of the screen at GDS control.
33 A new window will open Set the parameters according to your needs depending on the gas, power, pressure and time. After updating press the set new parameters button
35 Press starts glow discharge at the GDS control ones the chamber have reached 5E-5 Torr Vacuum
36 To view the plasma processes press the Load Lock process. The main screen will change and will show the Load lock control and values. Ones the process has finished the load lock will pump itself. Go to step 10 to continue the Evaporation

process.