Embed Size (px)
Citation preview

Dayforce Location Administrator GuideHR and Payroll Administration Overview

My HR Overview

HR Administration - My HR
From the main menu, choose My HR.
Here you will see a list of employees. You can:
• Choose an employee from the list currently displayed
• Use the Filter function to search for specific employees
• Use the Forms menu to add a new employee
3

HR Administration - My HR – Status
and Work Assignment
The 2 main sections of an employee’s HR record are: Status and Work Assignment
Status contains their core
employment data such as:
Pay Class and Pay Type
Annual Salary/Base Rate
Punch Policy
Entitlement Policy
Normal Weekly Hours
This data controls the way
the system treats things like
Clocking in/Out, Time Off
and Benefits.
4

HR Administration - My HR – Status
and Work Assignment (continued)Work Assignment records the position(s) in which an employee is currently assigned or has
been assigned in the past. Employees can have multiple work assignments effective at the
same time – but must have at least one “Primary” assignment. The Primary Assignment is
displayed on the Status tab.
The Primary assignment is has
a check in the “Primary” box
Note: Some locations may have
employees with different
pay rates for each assignment.
The total pay rate must be
manually updated on the
status screen.
5

HR Administration - My HR – Employee
Forms and Changes
During the “normal” cycle of an employee, you will use following forms:
New Hire form
Use this form to hire a new employee. Don’t forget to enter the additional data
once the employee is in they system.
Position and Compensation Change form – Changes the STATUS tab
This form is best for a job change which INCLUDES a change in their PAY RATE
Termination form
Should someone’s employment end, use this form to terminate their HR record.
Employees can still log in to retrieve earning statements and W2s
In addition, you may need to make changes directly on the employee record for new
or additional work assignments
6

After you have submitted the new hire form,
you must click Refresh for the employee to be
listed in the MyHR section.
It may take a few minutes for the new employee to appear.
HR Administration - My HR – New Hires
Open the employee’s HR record and add additional required data to complete the new
hire process:
Direct Deposit
Tax Definitions
Payroll Elections
Garnishments
Additional Work Assignments
Also, if the employee needs the Manager user role, you must go to System Admin – User
to assign the role and location access.
You should be very familiar with the New Hire form by now…
But don’t forget to add the additional data once the new employee is in the database.
7

To access the form, you must have the employee’s HR record open in MyHR.
Click on an employee’s name to open their HR record.
Then click on the Forms menu and choose Professional then Position and Compensation Change.
HR Administration - My HR – Position and
Compensation Change Form
8
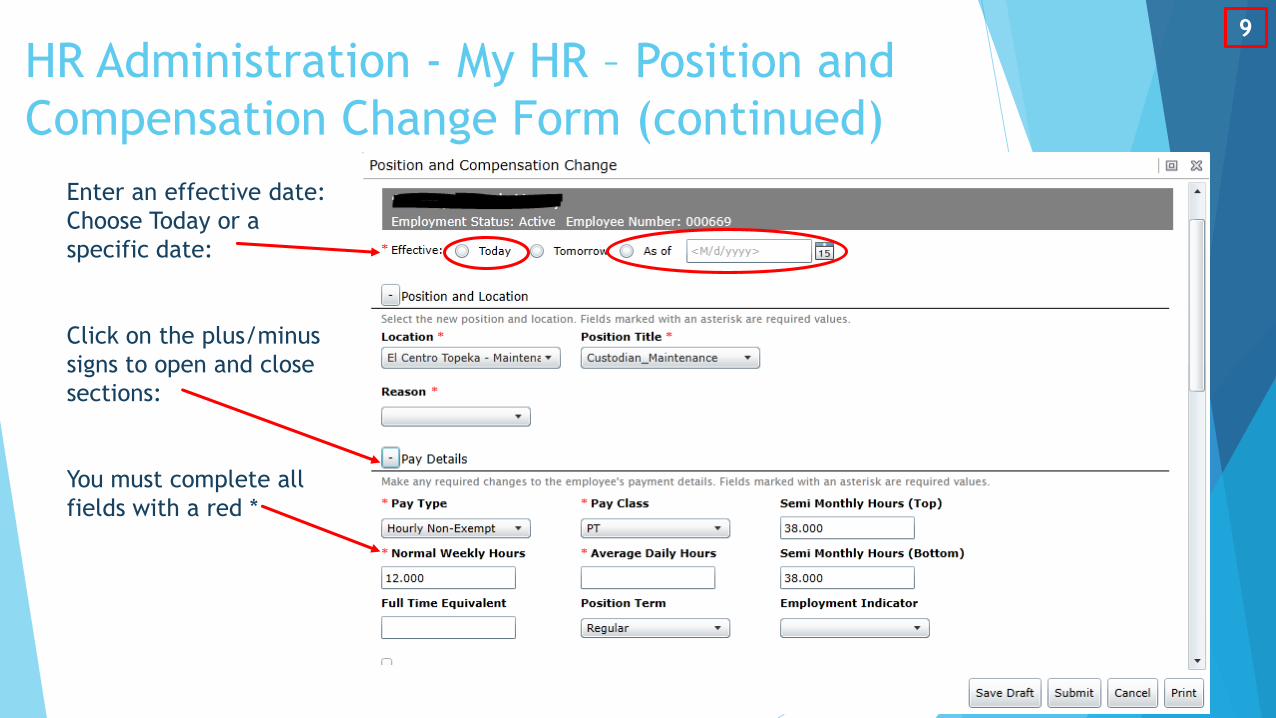
Enter an effective date:
Choose Today or a
specific date:
Click on the plus/minus
signs to open and close
sections:
You must complete all
fields with a red *
HR Administration - My HR – Position and
Compensation Change Form (continued)
9

The bar graph shows the history
of an employee’s pay rates.
Click the NEW button to enter a
new rate
IMPORTANT !!!!
Be careful when choosing the
Change Type!
New Hourly Rate – enter the new
rate. ($16.00)
$ or % Amount – enter the
amount of the increase. ($0.25)
TIP: Always click REFRESH before you
Submit and check the new total
HR Administration - My HR – Position and
Compensation Change Form (continued)
10
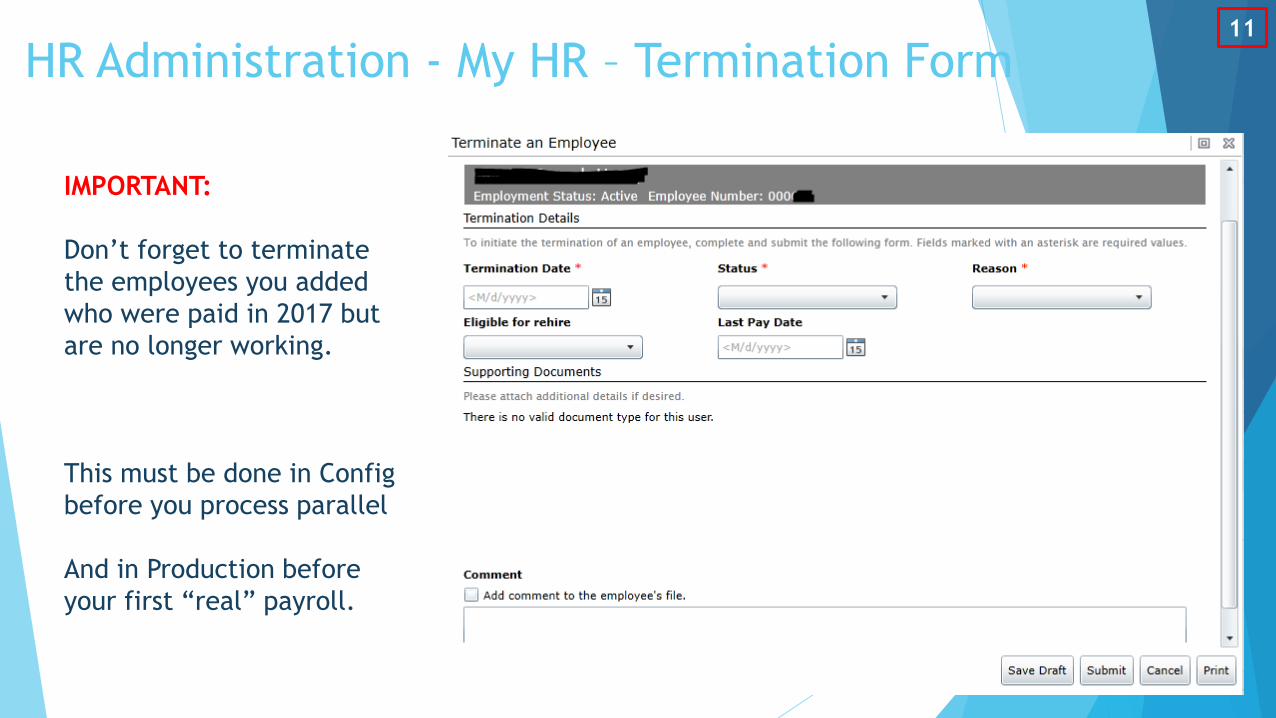
IMPORTANT:
Don’t forget to terminate
the employees you added
who were paid in 2017 but
are no longer working.
This must be done in Config
before you process parallel
And in Production before
your first “real” payroll.
HR Administration - My HR – Termination Form11

To enter a new or additional
assignment
1. Click New
2. Choose the Location first then a
Position - this makes it easier to
choose the correct Position
3. Check the Primary box if this will
be the Primary assignment
4. Enter the starting effective date
in the “Effective From” box
5. Choose a Reason from the list
HR Administration - My HR – Work Assignments
1
2
3
4
5
Note: If the employee has different pay rates for each of their work assignments, enter the rate
on each of the assignment rows. Then complete a PCC form to update the total rate.
12

Payroll Administration
Payroll Administration –
Payroll Processing Steps
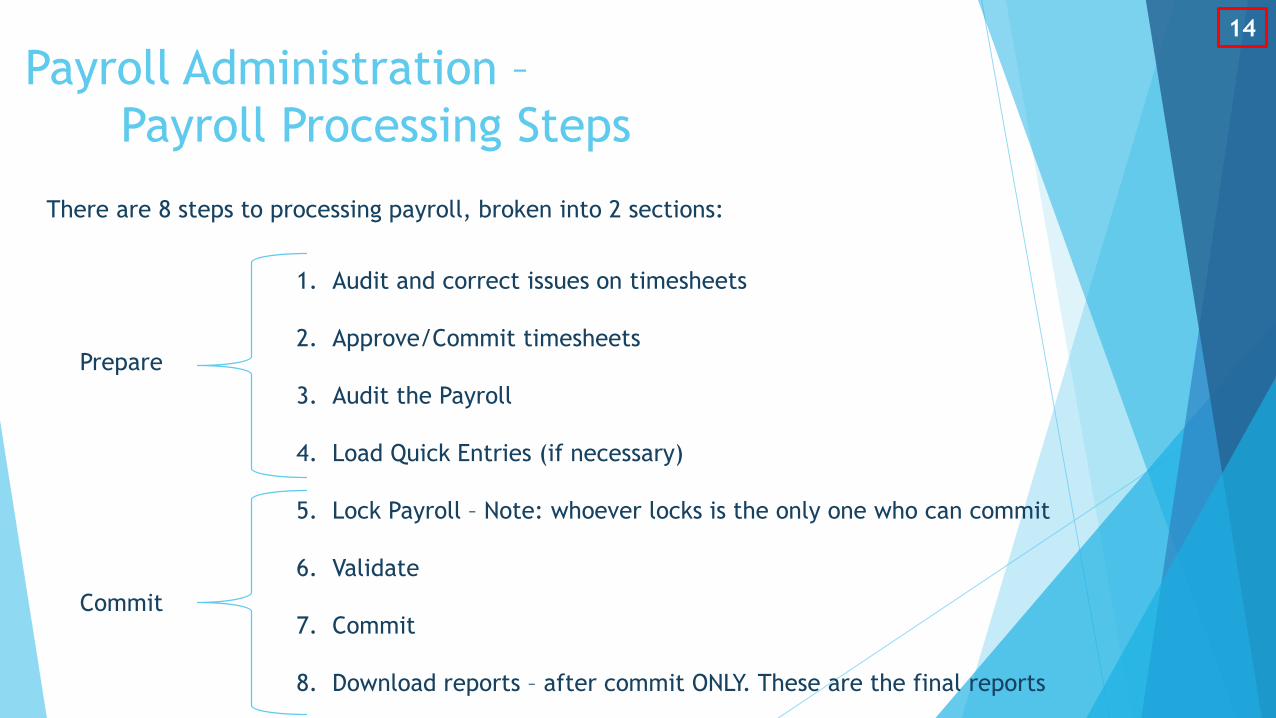
1. Audit and correct issues on timesheets
2. Approve/Commit timesheets
3. Audit the Payroll
4. Load Quick Entries (if necessary)
5. Lock Payroll – Note: whoever locks is the only one who can commit
6. Validate
7. Commit
8. Download reports – after commit ONLY. These are the final reports
Prepare
Commit
There are 8 steps to processing payroll, broken into 2 sections:
14

Payroll Administration
To perform these steps you will access two sections of Dayforce:
My Day – this is the section which manages the time sheets and time off requests.
My Pay – payroll is actually processed in this section. In My Pay you will review
various audit reports, add quick entries (if needed) and perform the steps
required to commit payroll.
15

Payroll Administration – Prepare Your Payroll
Following these preparation steps will help to ensure your payroll is accurate:
1. Audit and correct issues on timesheets (My Day)
2. Approve/Commit timesheets (My Day)
3. Audit the Payroll (My Pay)
4. Load Quick Entries (My Pay)
16

Payroll Administration – Prepare –
Step 1- Timesheets/My Day
In MyDay, you can expand a section by clicking on the black box
Click it again to shrink the section
To begin, expand the PAY ADMIN CHECKLIST:
17

Payroll Administration – Prepare –
Step 1 - Timesheets/My DayStep 1 – Select the pay period you need to process.
Step 2 - Check for issues- If there are issues which will prevent you from processing payroll… there
will be a number in the “Problem Punches” column
Step 3 – Make any corrections needed and finalize timesheets. You can access the timesheet by
clicking on the yellow pencil. Don’t forget to SAVE your changes in the timesheet!!!
23
1
18

Payroll Administration – Prepare –
Step 1 - Timesheet Audits
Tips for Timesheet Review:
Task: When making changes/updates, SAVE often!!! Path:
Check guarantee hours entered/approved Timesheets
Review: Run Pay Summary and Unathorized Time in Timesheets Report: Pay Summary
Review: Unauthorized Time (& notify Managers of Unauth Time) Report: Unathorized Time
Review: Unauthorized TAFW (Time Off Reqest Manager) for this period MyDay: Time Off Request Mgr
Review: EE time for reasonableness (Employee Names/Depts)
Review: Holiday, Gift, etc time for accuracy Internal: Location EE's List
Review: Multi Work Assignment Clock-In's Internal: Location EE's Notes
Make changes (pay/time adjustments) per Manager/email
Authorize "unauthorized time" per Manager/HR Admin, etc Timesheets>EE>day>edit
Check problems pane to make sure no time punches are missed Timesheets>Problems
19
Payroll Administration – Prepare –
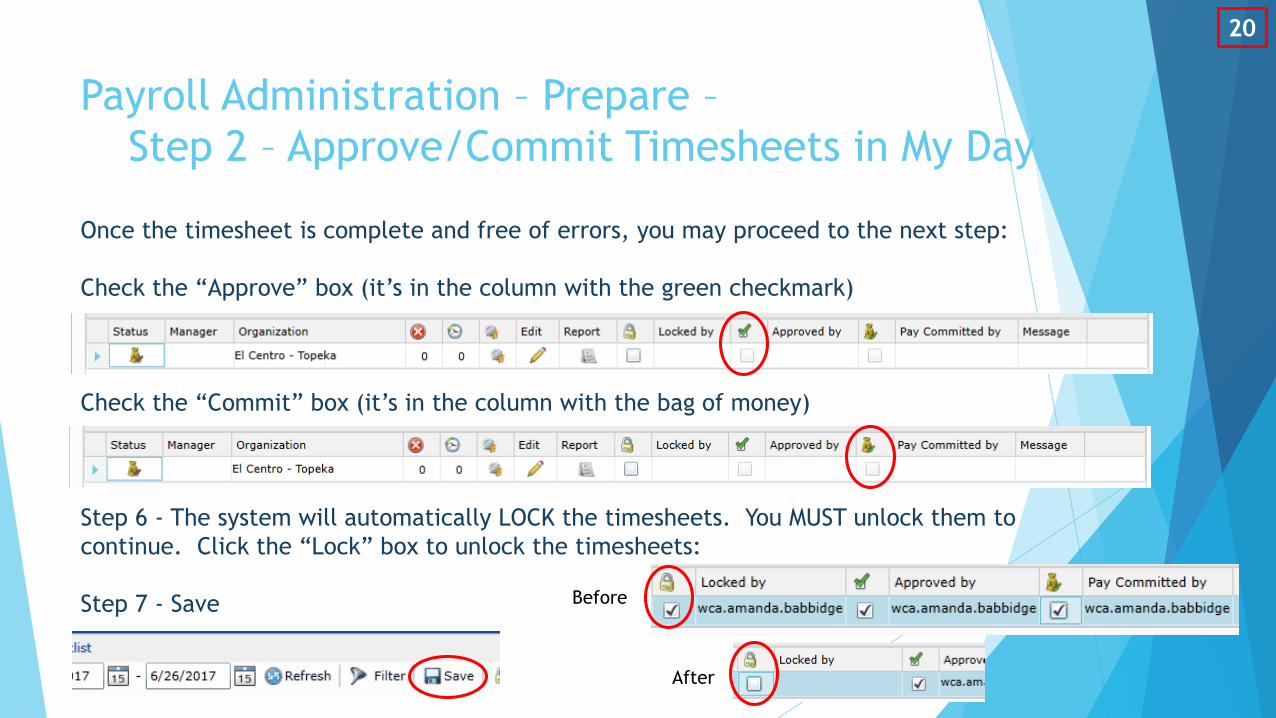
Step 2 – Approve/Commit Timesheets in My Day
Once the timesheet is complete and free of errors, you may proceed to the next step:
Check the “Approve” box (it’s in the column with the green checkmark)
Check the “Commit” box (it’s in the column with the bag of money)
Step 6 - The system will automatically LOCK the timesheets. You MUST unlock them to
continue. Click the “Lock” box to unlock the timesheets:
Step 7 - Save Before
After
20

Payroll Administration – Prepare –
Step 3 – Audit the payroll in My PayNow go to My Pay.
Start by choosing the pay period you need to process – just click somewhere on that
row so it’s highlighted blue. Then click OPEN.
TIP: Once the pay period is open…
Click on the blue X to close the Load option so
you can see more information on your screen.
21

Payroll Preview provides details about the pay period. You can verify amounts and see
differences from prior periods to help identify any potential issues.
Look at the group as a whole, or individual employees.
Payroll Administration – Prepare –
Step 3 – Audit the payroll in My Pay
22

To preview an employee’s earning statement
Click on the arrow next to the employee’s name
to see details
Then click on the Earning Statement icon (on the
far right section of the screen) to preview their
earning statement
Payroll Administration – Prepare –
Step 3 – Audit the payroll in My Pay
23

You can easily see differences from the prior
pay period on the preview screen:
Payroll Administration – Prepare –
Step 3 – Audit the payroll in My Pay
There are also a large number of reports available for you to run and preview as you audit.
Just click on Reports:
Examples: Preview Payroll Register,
Check/Direct Deposit Register, etc.
24

Payroll Administration – Prepare –
Step 3 – Audit the payroll
Task: Save – Recalc – Refresh often!!! Path:
Make entries from payroll notes for period My Pay>Report: Pay Delta
Enter Quick Entries, if Any MyPay>Quick Entry (one time)
Enter Adjustments, if Any MyPay>Adjustment (one time)
Enter Manual Checks, if Any MyPay>Checks (one time)
After all entries and adjustments are made, compare to prior period MyPay>Payroll Preview (or Report)
Review/Correct Warning messages at top; Must resolve Red X issues My Pay
Double-Check for accuracy; compare $/diff's to prior payroll My Pay>Changes in EE's pay
Review Analytics/Audit Reports My Pay> Time Data
Add message(s) to timesheets for pay collection period. My Pay>Statement Messages Button
* See the next page for more
details on the Time Data tab
25

Time Data Preview:
Click on the Time Data tab.
Click on the Source menu and choose Internal WFM
Move the scroll bar to the right and click Apply Filter
Payroll Administration – Prepare –
Step 3 – Audit the payroll in My Pay
Now you can see the
Date, Pay Code and
Amount which makes
up their total pay.
26

Payroll Administration – Prepare –
Step 4 – Load Quick Entries (if necessary)
A Quick Entry is a change in normal pay or deductions which only applies to one paycheck.
Example – Christmas Bonus or a deductions for a Donation.
To load Quick Entries,
go to My Pay
Click on the
Quick Entry tab
Then click the
NEW button
Click in the Employee Name field and start typing for a list of employees… or
Click in the Number field to search by Employee Number
27

Once you have selected your employee…
To REPLACE their NORMAL pay period earnings – click the “Replace” box
The Rate will automatically populate but you must enter the number of hours.
Click in the Code field to choose the necessary Pay Code or Deduction Code
Click in the Amount column to enter the dollar amount.
TIP – hit TAB to move to the next field.
Payroll Administration – Prepare –
Step 4 – Load Quick Entries
28

Once you have added all of your entries:
Click Save
Then Refresh
Then Recalc
This will recalculate ONLY the employees who have a Quick Entry
TIP: Anytime you are having issues in Payroll Preview or feel like your amounts are off…
Refresh then Reclac
Payroll Administration – Prepare –
Step 4 – Load Quick Entries
2 31
29

Payroll Administration - Commit
Now that your timesheets are correct and your audits are done…
the finish steps to commit payroll:
5. Lock Payroll – Note: whoever locks is the only one who can commit
6. Validate
7. Commit
8. Download reports – after commit ONLY. These are the final reports
30

Payroll Administration – Commit –
Step 5 - 7 – Lock, Commit, Validate in My Pay
Step 5 – Lock Payroll
IMPORTANT – the person who locks the payroll is the only person who can commit!
Step 6 – Validate
Step 7 – Commit
5 6 7
31

As you move through the commit process the status bar will show you which step you
are on and what to do next:
Hint - you cannot click on the status image…it’s just a visual aid to help you through the commit process
This is a completely committed payroll:
Notice the last step of “Publishing Complete”. This occurs automatically after commit
but may take a few minutes depending on the size of your location.
Payroll Administration – Commit –
Step 5 - 7 – Lock, Commit, Validate in My Pay
32

Step 8 - Download reports and save to your server or hard drive
(where you would keep other permanent records)
From the main menu, click Reporting the Archived Reports
Choose the Year, Pay Group, and Pay Period:
Then download the necessary reports
Payroll Administration – Commit –
Step 8 – Download Reports in Reporting
33

Congratulations – you are done!
Questions?