Embed Size (px)
Citation preview

Cordless Impact WrenchDestornillador de impacto inalámbrico
Operating InstructionsManual de instrucciones
Model No : HTP-IPW
IMPORTANTBefore operating this unit, please read these instructions completely and save this manual for future use.
IMPORTANTEAntes de usar este aparato por primera vez, lea todas las instrucciones de este manual y guarde el manual para poderlo consultar en el futuro.

FUNCTIONAL DESCRIPTIONDESCRIPCIÓN FUNCIONAL
10.8 V ─ 28.8 V
(L)
(D)
(J)(I)
(A)
(B)
(C)
(E)
(K)(G)
(H)
(M)
(F)
Index/Index/IndiceEnglish: Page 3 Español: Página 17
(A) Square drive (retainer ring and pin) Adaptador para puntas (anillo de retención y pasador)
(B) Nose protector Protector del morro
(C) Forward/Reverse lever Palanca de avance/marcha atrás
(D) Alignment marks Marcas de alineación
(E) Battery pack release button Botón de liberación de batería
(F) Battery pack Batería
(G) Indication panel Panel de indicación
(H) Battery level button Botón de nivel de batería
(I) Battery level indicator Indicador de nivel de batería
(J) Overheat warning lamp (motor/battery)
Luz de advertencia de sobrecalentamiento (motor/batería)
(K) Variable speed control trigger Disparador del control de velocidad variable
(L) Battery charger Cargador de batería
(M) Pack cover Cubierta de batería

This tool, as a complete unit with a battery pack, satisfies appropriate IP Degrees of Protection based on the IEC regulations.
Definition of IP code IP5X: Ingress of dust is not totally
prevented, but dust shall not penetrate in a quantity to interfere with satisfactory operation of the tool or to impair safety (In case that the talcum powder under 75 μm intrudes inside the tool).
IPX6: Water projected in powerful jets against the tool from any direction shall have no harmful effects (In case that, with a nozzle of 12.5 mm inner diameter, approximately 100 L/min of normal temperature water is injected to the tool for 3 minutes from 3 meter distance).
LIMITED WARRANTY The rating of IP56 qualifies this tool for
the minimum impact of water or dust, but not for the assurance of performance in such conditions. See Safety and Operating Instructions for further details for proper operation.
I. GENERAL SAFETY RULES WARNING! Read all instructions
Failure to follow all instructions listed below may result in electric shock, fire and/or serious injury. The term “power tool” in all of the warnings listed below refers to your mains operated (corded) power tool and battery operated (cordless) power tool.
SAVE THESE INSTRUCTIONSWork Area Safety1) Keep work area clean and well lit. Cluttered or dark areas invite accidents.2) Do not operate power tools in explosive
atmospheres, such as in the presence of flammable liquids, gases or dust.
Power tools create sparks which may ignite the dust or fumes.
3) Keep children and bystanders away while operating a power tool.
Distractions can cause you to lose control.
Electrical Safety1) Power tool plugs must match the outlet.
Never modify the plug in any way. Do not use any adapter plugs with earthed (grounded) power tools.
Unmodified plugs and matching outlets will reduce risk of electric shock.
2) Avoid body contact with earthed or grounded surfaces such as pipes, radiators, ranges and refrigerators.
There is an increased risk of electric shock if your body is earthed or grounded.
3) Do not expose power tools to rain or wet conditions.
Water entering a power tool will increase the risk of electric shock.
4) Do not abuse the cord. Never use the cord for carrying, pulling or unplugging the power tool. Keep cord away from heat, oil, sharp edges or moving parts.
Damaged or entangled cords increase the risk of electric shock.
5) When operating a power tool outdoors, use an extension cord suitable for outdoor use.
Use of a cord suitable for outdoor use reduces the risk of electric shock.
6) If operating a power tool in a damp location is unavoidable, use a residual current device (RC D) protected supply.
Use of RCD reduces the risk of electrical shock.
Personal Safety1) Stay alert, watch what you are doing and
use common sense when operating a power tool. Do not use a power tool while you are tired or under the influence of drugs, alcohol or medication.
A moment of inattention while operating power tools may result in personal injury.
2) Use safety equipment. Always wear eye protection.
Safety equipment such as dust mask, non-skid safety shoes, hard hat, or hearing protection used for appropriate conditions will reduce personal injuries.
3) Avoid accidental starting. Ensure the switch is in the off position before plugging in.
Carrying power tools with your finger on the switch or plugging in the power tools that have the switch on invites accidents.
4) Do not overreach. Keep proper footing and balance at all times.
This enables better control of the power tool in unexpected situations.
5) Dress properly. Do not wear loose clothing or jewellery. Keep your hair, clothing and gloves away from moving parts.
Loose clothes, jewellery or long hair can be caught in moving parts.
6) If devices are provided for the connection of dust extraction and collection facilities, ensure these are connected and properly used.
Use of these devices can reduce dust related hazards.
Power Tool Use and Care1) Do not force the power tool. Use the
correct power tool for your application. The correct power tool will do the job
better and safer at the rate for which it was designed.
2) Do not use the power tool if the switch does not turn it on and off.
Any power tool that cannot be controlled with the switch is dangerous and must be repaired.
3) Disconnect the plug from the power source and/or the battery pack from the power tool before making any adjustments, changing accessories, or storing power tools.
Such preventive safety measures reduce the risk of starting the power tool accidentally.
4) Store idle power tools out of the reach of children and do not allow persons unfamiliar with the power tool or these instructions to operate the power tool.
Power tools are dangerous in the hands of untrained users.
5) Maintain power tools. Check for misalignment or binding of moving parts, breakage of parts and any other condition that may affect the power tools operation. If damaged, have the power tool repaired before use.
Many accidents are caused by poorly maintained power tools.
6) Keep cutting tools sharp and clean. Properly maintained cutting tools with sharp
cutting edges are less likely to bind and are easier to control.
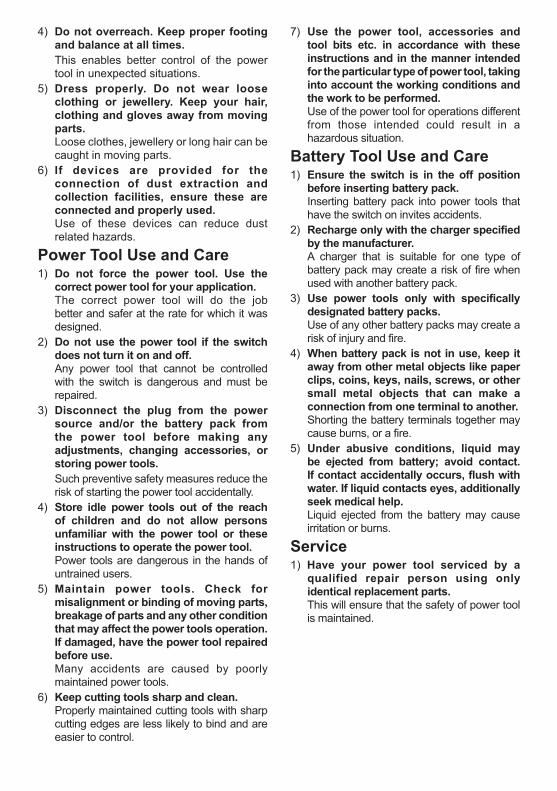
7) Use the power tool, accessories and tool bits etc. in accordance with these instructions and in the manner intended for the particular type of power tool, taking into account the working conditions and the work to be performed.
Use of the power tool for operations different from those intended could result in a hazardous situation.
Battery Tool Use and Care1) Ensure the switch is in the off position
before inserting battery pack. Inserting battery pack into power tools that
have the switch on invites accidents.2) Recharge only with the charger specified
by the manufacturer. A charger that is suitable for one type of
battery pack may create a risk of fire when used with another battery pack.
3) Use power tools only with specifically designated battery packs.
Use of any other battery packs may create a risk of injury and fire.
4) When battery pack is not in use, keep it away from other metal objects like paper clips, coins, keys, nails, screws, or other small metal objects that can make a connection from one terminal to another.
Shorting the battery terminals together may cause burns, or a fire.
5) Under abusive conditions, liquid may be ejected from battery; avoid contact. If contact accidentally occurs, flush with water. If liquid contacts eyes, additionally seek medical help.
Liquid ejected from the battery may cause irritation or burns.
Service1) Have your power tool serviced by a
qualified repair person using only identical replacement parts.
This will ensure that the safety of power tool is maintained.

II. SPECIFIC SAFETY RULES
1) Wear ear protection. Exposure to noise can cause hearing loss.
2) Be aware that this tool is always in an operating condition, since it does not have to be plugged into an electrical outlet.
3) Hold power tools by insulated gripping surfaces when performing an operation where the cutting tool may contact hid den wiring.
Contact with a “live” wire will make exposed metal parts of the tool “live” and shock the operator.
4) If the socket becomes jammed, immediately turn the trigger switch off to prevent an overload which can damage the battery pack or motor. Use reverse motion to loosen jammed sockets.
5) Do NOT operate the Forward/Reverse lever when the trigger switch is on. The battery will discharge rapidly and damage to the unit may occur.
6) When storing or carrying the tool, set the Forward/Reverse lever to the center position (switch lock).
7) Do not strain the tool by holding the speed control trigger halfway (speed control mode) so that the motor stops. The protection circuit will activate and may prevent speed control operation. If this happens, release the speed control trigger and squeeze again for normal operation.
8) Be careful not to get dust inside the chuck.9) Do not touch the rotating parts to avoid injury.10) Do not use the tool continuously for a long
period of time. Stop using the tool from time to time to avoid temperature rise and heat overload of the motor.
11) Do not drop the tool.
Symbol Meaning
V Volts
Direct current
n0 No load speed
… min-1 Revolutions or reciprocations per minutes
Ah Electrical capacity of battery pack
To reduce the risk of injury user must read and
understand instruction manual.
WARNING!
Some dust created by power sanding, sawing, grinding, drilling, and other construction activities contains chemicals known to the State of California to cause cancer, birth defects or other reproductive harm. Some examples of these chemicals are:• Lead from lead-based paints• Crystalline silica from bricks and cement
and other masonry products• Arsenic and chromium from chemically-
treated lumber.To reduce your exposure to these chemicals: work in a well ventilated area, and work with approved safety equipment, such as dust masks that are specially designed to filter out microscopic particles.
III. FOR BATTERY CHARGER & BATTERY PACK
Important Safety Instructions1) SAVE THESE INSTRUCTIONS -This
manual contains important safety and operating instructions for battery charger.
2) Before using battery charger, read all instructions and cautionary markings on battery charger, battery pack, and product using battery pack.
3) CAUTION -To reduce the risk of injury, charge only Huskie Tools Battery Pack as shown in last page.
Other types of batteries may burst causing personal injury and damage.
4) Do not expose charger and battery pack to rain or snow.
5) To reduce risk of damaging the electric plug and cord, pull by plug rather than cord when disconnecting charger.
6) Make sure cord is located so that it will not be stepped on, tripped over, or otherwise subjected to damage or stress.

7) An extension cord should not be used unless absolutely necessary.
Use of improper extension cord could result in a risk of fire and electric shock. If extension cord must be used, make sure that:
a. pins on plug of extension cord are the same number, size and shape as those of plug on charger.
b. extension cord is properly wired and in good electrical condition.
c. wire size is large enough for ampere rating of charger as specified below.
RECOMMENDED MINIMUM AWG SIZE OF EXTENSION CORDS FOR BATTERY
CHARGERSAC Input Rating. Amperes AWG Size of CordEqual to or greater than
But less than
Length of Cord, Feet25 50 100 150
0 2 18 18 18 16
8) Do not operate charger with damaged cord or plug-replace them immediately.
9) Do not operate charger if it has received a sharp blow, been dropped, or otherwise damaged in any way; take it to a qualified service personnel.
10) Do not disassemble charger; take it to a qualified service personnel when service or repair is required. Incorrect reassembly may result in a risk of electric shock or fire.
11) To reduce the risk of electric shock, unplug charger from outlet before attempting any maintenance or cleaning.
12) The charger and battery pack are specifically designed to work together. Do not attempt to charge any other cordless tool or battery pack with this charger.
13) Do not attempt to charge the battery pack with any other charger.
14) Do not attempt to disassemble the battery pack housing.
15) Do not store the tool and battery pack in locations where the temperature may reach or exceed 50°C (122°F) (such as a metal tool shed, or a car in the summer), which can lead to deterioration of the storage battery.
16) Do not charge battery pack when the temperature is BELOW 0°C (32°F) or ABOVE 40°C (104°F). This is very important in order to maintain optimal condition of the battery pack.
17) Do not incinerate the battery pack. It can explode in a fire.
18) Avoid dangerous environment. Do not use charger in damp or wet locations.
19) The charger is designed to operate on standard household electrical power only. Do not attempt to use it on any other voltage!
20) Do not abuse cord. Never carry charger by cord or yank it to disconnect from outlet. Keep cord away from heat, oil and sharp edges.
21) Charge the battery pack in a well ventilated place, do not cover the charger and battery pack with a cloth, etc., while charging.
22) Use of an attachment not recommended may result in a risk of fire, electric shock, or personal injury.
23) Do not short the battery pack. A battery short can cause a large current flow, over heating and create the risk of fire or personal injury.
24) NOTE: If the supply cord of this appliance is damaged, it must only be replaced by a repair shop authorized by the manufacturer, because special purpose tools are required.
25) TO REDUCE THE RISK OF ELECTRIC SHOCK, THIS APPLIANCE HAS A POLARIZED PLUG (ONE BLADE IS WIDER THAN THE OTHER).
This plug will fit in a polarized outlet only one way. If the plug does not fit fully in the outlet, reverse the plug. If it still does not fit, contact a qualified electrician to install the proper outlet. Do not change the plug in any way.

WARNING!
• Do not use other than the Huskie Tools battery packs that are designed for use with this rechargeable tool.
• Huskie Tools is not responsible for any damage or accident caused by the use of the recycled battery pack and the counterfeit battery pack.
• Do not dispose of the battery pack in a fire, or expose it to excessive heat.
• Do not drive the likes of nails into the battery pack, subject it to shocks, dismantle it, or attempt to modify it.
• Do not allow metal objects to touch the battery pack terminals.
• Do not carry or store the battery pack in the same container as nails or similar metal objects.
• Do not charge the battery pack in a high-temperature location, such as next to a fire or in direct sunlight. Otherwise, the battery may overheat, catch fire, or explode.
• Never use other than the dedicated charger to charge the battery pack. Otherwise, the battery may leak, overheat, or explode.
• After removing the battery pack from the tool or the charger, always reattach the pack cover. Otherwise, the battery contacts could be shorted, leading to a risk of fire.
• When the Battery Pack Has Deteriorated, Replace It with a New One.
Continued use of a damaged battery pack may result in heat generation, ignition or battery rupture.
IV. ASSEMBLY
Attaching or Removing Sock et1. Attaching Socket 1) Remove the rubber ring and pin.
rubber ringpin
groove
2) Attach the socket putting each holes.
3) Attach the rubber ring and pin in reverse order of 1).
NOTE:Attach socket firmly by using pin and rubber ring.Retainer ring is only for temporary fixing.
2. Removing Socket 1) Remove the rubber ring and pin.
rubber ring pin
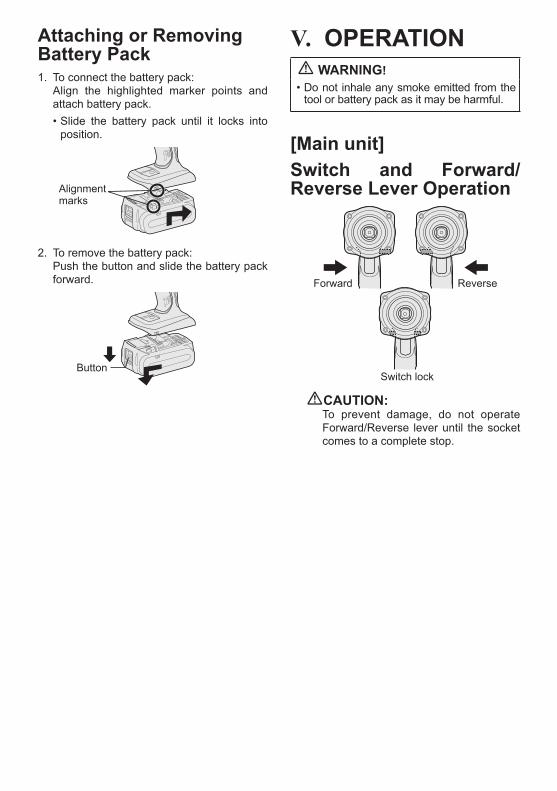
Attaching or Removing Bat tery Pack1. To connect the battery pack: Align the highlighted marker points and
attach battery pack.• Slide the battery pack until it locks into
position.
Alignment marks
2. To remove the battery pack: Push the button and slide the battery pack
forward.
Button
V. OPERATION WARNING!
• Do not inhale any smoke emitted from the tool or battery pack as it may be harmful.
[Main unit]Switch and Forward/Reverse Lever Operation
Forward Reverse
Switch lock
CAUTION:To prevent damage, do not operate Forward/Reverse lever until the socket comes to a complete stop.

Forward Rotation Switch Operation1. Push the lever for forward rotation.2. Depress the trigger switch slightly to start
the tool slowly.3. The speed increases with the amount
of depression of the trigger for efficient tightening of bolts. The brake operates and the socket stops immediately when the trigger is released.
4. After use, set the lever to its center position (switch lock).
Reverse Rotation Switch Operation1. Push the lever for reverse rotation. Check
the direction of rotation before use.2. Depress the trigger switch slightly to start the
tool slowly.3. After use, set the lever to its center position
(switch lock).
CAUTION:• To eliminate excessive temperature
increase of the tool surface, do not operate the tool continuously using two or more battery packs. Tool needs cool off time before switching to another pack.
Variable Speed Control Trigger
To set the center of a hole, pull the trigger slightly to start the socket rotation slowly.The more the speed control trigger is pulled, the higher the speed becomes.
CAUTION:When operating the tool by depressing the trigger, there may be a momentary lag before rotation starts. This does not signal a malfunction.• This lag occurs as the tool’s circuitry
starts up when the trigger is pulled for the first time after installing a new battery pack or after the tool has not been used for at least 1 minute. Rotation will start without any lag during second and subsequent operations.
Indication panel
(1)(2)
(1) Battery level indicator and button• Press the battery level button. Battery level indicator shows battery level
for approx. 10 seconds.
NOTE:The indicator will not show the battery level even the button is pushed in the following cases.
• The main unit is powered off.• Just after attaching the battery pack• The main unit or battery level button is
not operated for approx. one minute. Push the battery level button again after
depressing the trigger switch.• The battery temperature is high. Stop the operation and wait until the
battery temperature is low.Indicator Battery status
3 lamps illuminated
Charged enough
2 lamps illuminated
Approx. 50% remaining
One lamp illuminated
Battery level is low.Need to be charged soon
One lamp flashing
EmptyNeed to be charged immediately
Battery level indication is just guide.The indication may change due to the condition of battery or ambient temperature.

(2) Overheat warning lamp
Off(normaloperation)
Illuminated:Overheat(motor)
Flashing:Overheat(battery)
Indicates operation has been halted due to motor or battery overheating.
To protect the motor or battery, be sure to note the following when carrying out this operation. • If the motor or battery becomes hot, the
protection function will be activated and the motor or battery will stop operating. The overheat warning lamp on the indication panel illuminates or flashes when this feature is active.
• If the overheating protection feature activates, allow the tool to cool thoroughly (at least 30 minutes). The tool is ready for use when the overheat warning lamp goes out.
• Avoid using the tool in a way that causes the overheating protection feature to activate repeatedly.
• If the tool is operated continuously under high-load conditions or if it is used in hot-temperature conditions (such as during summer), the overheating protection feature may activate frequently.
• If the tool is used in cold-temperature conditions (such as during winter) or if it is frequently stopped during use, the overheating protection feature may not activate.
Recommended GripUse the grip to hold and operate the driver with one hand. If the job requires additional force, you can push against the rear end of the driver with your other hand.
[Battery Pack]For Appropriate Use of Bat tery PackLi-ion Battery Pack
• For optimum battery life, store the Li-ion battery pack following use without charging it.
• When charging the battery pack, confirm that the terminals on the battery charger are free of foreign substances such as dust and water etc. Clean the terminals before charging the battery pack if any foreign substances are found on the terminals.
The life of the battery pack terminals may be affected by foreign substances such as dust and water etc. during operation.
• When battery pack is not in use, keep it away from other metal objects like: paper clips, coins, keys, nails, screws, or other small metal objects that can make a connection from one terminal to another.
Shorting the battery terminals together may cause sparks, burns or a fire.
• When operating the battery pack, make sure the work place is well ventilated.
• When the battery pack is removed from the main unit of the tool, replace the battery pack cover immediately in order to prevent dust or dirt from contaminating the battery terminals and causing a short circuit.
Battery Pack LifeThe rechargeable batteries have a limited life. If the operation time becomes extremely short after recharging, replace the battery pack with a new one.
Battery RecyclingATTENTION:
FOR Li-ion Battery PackA Li-ion battery that is recyclable powers the product you have purchased. Please call 1-800-8-BATTERY for information on how to recycle this battery.
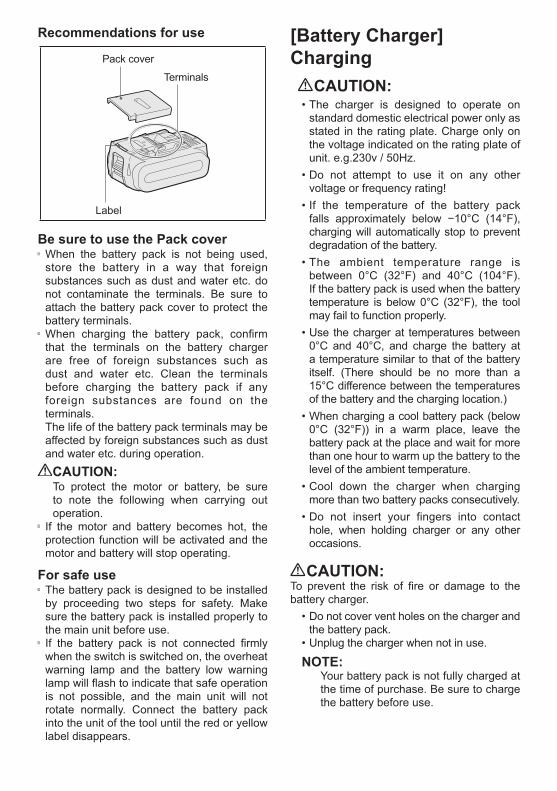
Recommendations for use
Terminals
Pack cover
Label
Be sure to use the Pack cover ● When the battery pack is not being used, store the battery in a way that foreign substances such as dust and water etc. do not contaminate the terminals. Be sure to attach the battery pack cover to protect the battery terminals.
● When charging the battery pack, confirm that the terminals on the battery charger are free of foreign substances such as dust and water etc. Clean the terminals before charging the battery pack if any foreign substances are found on the terminals. The life of the battery pack terminals may be affected by foreign substances such as dust and water etc. during operation.CAUTION:
To protect the motor or battery, be sure to note the following when carrying out operation.
● If the motor and battery becomes hot, the protection function will be activated and the motor and battery will stop operating.
For safe use ● The battery pack is designed to be installed by proceeding two steps for safety. Make sure the battery pack is installed properly to the main unit before use.
● If the battery pack is not connected firmly when the switch is switched on, the overheat warning lamp and the battery low warning lamp will flash to indicate that safe operation is not possible, and the main unit will not rotate normally. Connect the battery pack into the unit of the tool until the red or yellow label disappears.
[Battery Charger]Charging
CAUTION:• The charger is designed to operate on
standard domestic electrical power only as stated in the rating plate. Charge only on the voltage indicated on the rating plate of unit. e.g.230v / 50Hz.
• Do not attempt to use it on any other voltage or frequency rating!
• If the temperature of the battery pack falls approximately below −10°C (14°F), charging will automatically stop to prevent degradation of the battery.
• The ambient temperature range is between 0°C (32°F) and 40°C (104°F). If the battery pack is used when the battery temperature is below 0°C (32°F), the tool may fail to function properly.
• Use the charger at temperatures between 0°C and 40°C, and charge the battery at a temperature similar to that of the battery itself. (There should be no more than a 15°C difference between the temperatures of the battery and the charging location.)
• When charging a cool battery pack (below 0°C (32°F)) in a warm place, leave the battery pack at the place and wait for more than one hour to warm up the battery to the level of the ambient temperature.
• Cool down the charger when charging more than two battery packs consecutively.
• Do not insert your fingers into contact hole, when holding charger or any other occasions.
CAUTION:To prevent the risk of fire or damage to the battery charger.
• Do not cover vent holes on the charger and the battery pack.
• Unplug the charger when not in use.
NOTE:Your battery pack is not fully charged at the time of purchase. Be sure to charge the battery before use.

How to charge1. Plug the charger into the AC outlet.
NOTE:Sparks may be produced when the plug is inserted into the AC power supply, but this is not a problem in terms of safety.
2. Connect the battery pack firmly into the charger.1 Line up the alignment marks and place
the battery onto the dock on the charger.2 Slide forward in the direction of the arrow.
Alignment marks
3. During charging, the charging lamp will be Illuminated.When charging is completed, an internal electronic switch will automatically be triggered to prevent overcharging.• Charging will not start if the battery pack
is warm (for example, immediately after heavy-duty operation).
The orange standby lamp will be flashing until the battery cools down.
Charging will then begin automatically.
4. The charge lamp (green) will flash slowly once the battery is approximately 80% charged.
5. When charging is completed, the charging lamp in green color will turn off.
6. If the temperature of the batter pack is 0°C or less, charging takes longer to fully charge the battery pack than the standard charging time.
Even when the battery is fully charged, it will have approximately 50% of the power of a fully charged battery at normal operating temperature.
7. Consult an authorized dealer if the charging lamp (green) does not turn off.
8. If a fully charged battery pack is inserted into the charger again, the charging lamp lights up. After several minutes, the charging lamp in green color will turn off.
9. Remove the battery pack while the battery pack release button is held up.
Battery pack release button
LAMP INDICATIONSCharging is completed. (Full charge.)
Battery is approximately 80% charged.
Now charging.
Charger is plugged into the AC outlet. Ready to charge.
(Green) (Orange) Charging Status Lamp.Left: green Right: orange will be displayed.
Battery pack is cool.The battery pack is being charged slowly to reduce the load on the battery.
Battery pack is warm. Charging will begin when temperature of battery pack drops. If the temperature of the battery pack is -10° or less, the charging status lamp (orange) will also start flashing .Charging will begin when the temperature of the battery pack goes up"Charging is not possible. Clogged with dust or malfunction of the bat-tery pack.
Turn off Illuminated Flashing

Tigh
teni
ng to
rque
Tightening time (Sec.)
M16, M20, M24 x 45 mmHigh tensile bolt
Bolt
Nut
Washer
Steel platethickness 10 mm (3/8”)
WasherSpring washer
Tightening conditions• The following bolts are used. Standard bolts: Strength type 4.8 High tensile type 12.9
4.8
Explanation of the strength type
Bolt yield point(80% of tensile strength)32 kgf/mm2 (45000 psi)Bolt tensile strength 40 kgf/mm2 (56000 psi)
2) Tightening timeLonger tightening time results in increased tightening torque. Excessive tightening, how ever, adds no value and reduces the life of the tool.
3) Different bolt diametersThe size of the bolt diameter affects the tight ening torque.Generally, as the bolt diameter increases, tightening torque rises.
4) Tightening conditions• Tightening torque will vary, even with the same bolt, according to grade, length, and torque coefficient (the fixed coefficient indi-cated by the manufacturer upon produc-tion).
VI. MAINTENANCE• Use only a dry, soft cloth for wiping the unit.
Do not use a damp cloth, thinner, benzine, or other volatile solvents for cleaning.
• In the event that the inside of the tool or battery pack is exposed to water, drain and allow to dry as soon as possible. Carefully remove any dust or iron filings that collect inside the tool. If you experience any problems operating the tool, consult with a repair shop.
VII. TIGHTENING TORQUE
The power required for tightening a bolt will vary, according to bolt material and size, as well as the material being bolted. Choose the length of tightening time accordingly.Reference values are provided below.(They may vary according to tightening conditions.)
Factors Affecting Tighten-ing Torque
The tightening torque is affected by a wide variety of factors including the followings. After tightening, always check the torque with a torque wrench.
1) VoltageWhen the battery pack becomes nearly discharged, the voltage decreases and the tightening torque drops.
M16, M20, M24 x 45 mmStandard bolt
Tigh
teni
ng to
rque
Tightening time (Sec.)

• Tightening torque will vary, even with the same bolting material (e.g. steel), accord ing to the surface finish.
• Torque is greatly reduced when the bolt and nut start turning together.
5) Socket playTorque is lowered as the six-sided configu-ration of the socket of the wrong size is used to tighten a bolt.
6) Switch (Variable speed control trigger) Torque is lowered if the unit is used with
the switch not fully depressed.7) Effect of Connecting Adaptor The tightening torque will be lowered
through the use of a universal joint or a connecting adaptor.
VIII. ACCESSORIESUse only suitable size of socket.
IX. APPENDIXMAXIMUM RECOMMENDED CAPACITIESModel HTP-IPW
Bolt fastening Standard bolt : M12 - M20High tensile bolt : M12 - M18
WARRANTY SUPPLEMENTThe breakdown and damage caused by usage consistent for a long time (e.g.: factory work on the assembly line, etc.) is out of warranty.
X. SPECIFICATIONSMAIN UNITModel HTP-IPW
Motor voltage 18 V DC
No load speed 0 - 1550 min-1
Maximum torque 470 N·m (4160 in-lbs)
Impact per minute 0 - 2400 min-1
Overall length 214 mm (8-7/16”)
Weight (with battery pack: EY9L50)
2.6 kg (5.73 lbs)Weight (with battery pack: EY9L51)
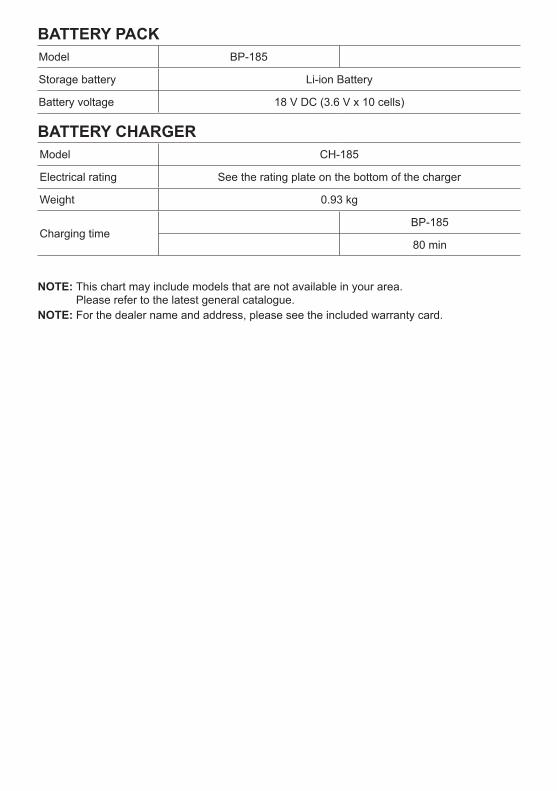
BATTERY PACKModel BP-185
Storage battery Li-ion Battery
Battery voltage 18 V DC (3.6 V x 10 cells)
BATTERY CHARGERModel CH-185
Electrical rating See the rating plate on the bottom of the charger
Weight 0.93 kg
Charging timeBP-185
80 min
NOTE: This chart may include models that are not available in your area. Please refer to the latest general catalogue.
NOTE: For the dealer name and address, please see the included warranty card.

Federal Communication Commission Interference StatementThis equipment has been tested and found to comply with the limits for a Class B digital device, pursuant to Part 15 of the FCC Rules. These limits are designed to provide reasonable protection against harmful interference in a residential installation. This equipment generates, uses and can radiate radio frequency energy and, if not installed and used in accordance with the instructions, may cause harmful interference to radio communications. However, there is no guarantee that interference will not occur in a particular installation. If this equipment does cause harmful interference to radio or television reception, which can be determined by turning the equipment off and on, the user is encouraged to try to correct the interference by one of the following measures:• Reorient or relocate the receiving antenna.• Increase the separation between the equipment and receiver.• Connect the equipment into an outlet on a circuit different from that to which the receiver is
connected.• Consult the dealer or an experienced radio/TV technician for help.
FCC Caution: To assure continued compliance, install and use in accordance with provided instructions. Use only the battery pack specified in the instructions. Any changes or modifications not expressly approved by the party responsible for compliance could void the user’s authority to operate this equipment.
This device complies with part 15 of the FCC Rules. Operation is subject to the following two conditions: (1) This device may not cause harmful interference, and (2) this device must accept any interference received, including interference that may cause undesired operation.
This Class B digital apparatus complies with Canadian ICES-003.
X. HARMONIZED STANDARDS
BATTERY CHARGER
Conforms to UL Std.1310
Certified to CSA Std.C22.2 No. 223-M91

Esta herramienta, como una unidad completa con un paquete de pilas, satisface los grados de protección IP basados en las normas IEC.
Definición del código IP IP5X: El ingreso de polvo no está totalmente
sellado, pero el polvo no penetrará en cantidades que interfieran con el buen funcionamiento de la herramienta o afecten la seguridad. (Para el caso en que entre talco de polvo en la herrameinta, de menos de 75 μm).
IPX6: El agua dispersada en chorros potentes hacia la herramienta desde diferentes direcciones no la dañará. (En caso de usar un aspersor de 12,5 mm de diámetro interior, aproximadamente 100 lts./min. agua a temperatura normal es inyectada hacia la herramienta durante 3 minutos desde 3 metros de distancia).
GARANTÍA LIMITADA La clasificación IP56 califica esta
herramienta para un mínimo impacto del agua o polvo, pero no asegura el rendimiento en dichas condiciones. Vea el Manual de Seguridad e Instrucciones para una mayor información para un funcionamiento apropiado.
I. REGLAS DE SEGURIDAD GENERALES
¡ADVERTENCIA! Lea todas las instrucciones.Si no cumple con todas las siguientes instrucciones puede recibir una descarga eléctrica, incendio y/o heridas graves. El término “herramienta eléctrica” en todas las advertencias a continuación se refiere a su herramienta eléctrica conectada al tomacorriente (cableado) y a la herramienta eléctrica que funciona con batería (sin cable).
GUARDE ESTAS INSTRUCCIONESSeguridad del lugar de trabajo1) Mantenga el lugar de trabajo limpio y bien
iluminado. Un área desprolija u oscura es una causa de
accidentes.
2) No haga funcionar herramientas eléctricas en un ambiente explosivo como en lugares donde hay líquidos inflamables cajas o polvo.
Las herramientas eléctricas producen chispas que pueden encender el polvo o el vapor.
3) Mantenga a los niños y personal no relacionado lejos mientras haga funcionar la herramienta eléctrica.
Una distracción puede hacer que pierda el control.
Seguridad eléctrica1) Los enchufes de herramientas elé ctricas
deben coincidir con el tomacorriente. Nunca modifique el enchufe. No utilice ningún adaptador de enchufe con herramientas eléctricas con tierra (conexión a tierra).
Un enchufe no modificado y tomacorrientes que coincidan reducirán el riesgo de descarga eléctrica.
2) Evite el contacto de su cuerpo con una superficie de tierra o conectado a una tierra tales como tubos, radiadores, microondas y refrigeradores.
Existe un mayor riesgo de descarga eléctrica si su cuerpo queda conectado a una tierra.
3) No exponga herramientas eléctricas a la lluvia o condiciones de hume dad.
El agua que entra en una herramienta eléctrica aumentará el riesgo de descarga eléctrica.
4) No abuse del cable. Nunca utilice el cable para transportar, tirar de o desenchufar la herramienta eléctrica. Mantenga el cable lejos de fuentes de calor, aceite, bordes afilados o piezas móviles.
Un cable dañado o enredado puede aumentar el riesgo de descarga eléctrica.
5) Cuando haga funcionar una herramienta eléctrica en exteriores, utilice un cable de extensión adecuado para uso en exteriores.
El uso de un cable adecuado para uso en exteriores reduce el riesgo de descarga eléctrica.
6) Si la operación de una herramienta de poder en una localización húmeda es inevitable, use una alimentación eléctrica protegida por un dispositivo de corriente residual (RCD).
El uso del RCD reduce el riesgo de choques eléctricos.

Seguridad personal1) Manténgase alerta, vigile lo que haga
y utilice sentido común cuando haga funcionar la herramienta eléctrica. No utilice una herramienta eléctrica mientras está cansado o bajo la influencia de drogas, alcohol o medicamentos.
Un descuido instantáneo mientras hace funcionar las herramientas eléctricas puede provocar una herida personal de gravedad.
2) Utilice equipo de seguridad. Utilice siempre gafas protectoras.
Un equipo de seguridad como máscara antipolvo, zapatos antideslizamiento, casco duro o protección contra los oídos utilizado en condiciones adecuadas reducirá heridas personales.
3) Evite un arranque por accidente. Asegúrese que el interruptor está en la posición de desconexión antes de desenchufar.
El transporte de las herramientas eléctricas con su dedo en el interruptor o el desenchufado de las herramientas eléctricas que tengan el interruptor conectado puede provocar un accidente.
4) No fuerce su cuerpo. Mantenga sus pies bien apoyados en el piso y su equilibrio en todo momento.
Esto permite un mejor control de la herramienta eléctrica en situaciones inespe radas.
5) Vístase correctamente. No utilice ropa floja o joyas. Mantenga su cabello, ropa y guantes lejos de piezas móviles.
Una ropa floja, joyas o cabello largo puede quedar atrapado en piezas móviles.
6) Si se entregan dispositivos para recolección y extracción de polvo, asegúrese que estén conectados y se utilicen bien.
El uso de estos dispositivos puede reducir los peligros relacionados con el polvo.
Uso y cuidados de herramientas eléctricas1) No fuerce la herramienta eléctrica. Utilice
la herramienta eléctrica correcta según su aplicación.
Una herramienta eléctrica correcta hará el trabajo mejor y más seguro a la velocidad para la que fue diseñada.
2) No utilice la herramienta eléctrica si el interruptor no se conecta y desconecta.
Cualquier herramienta eléctrica que no pueda controlarse con el interruptor es peligroso y debe repararse.
3) Desconecte el enchufe del tomacorriente y/o paquete de bate ría de la herramienta eléctrica antes de hacer un ajuste, cambio de acce sorios o guardado de herramien tas eléctricas.
Estas medidas de seguridad preventiva reducen el riesgo de que la herramienta eléctrica arranque por accidente.
4) Guarde las herramientas eléctricas apagadas en un lugar fuera del alcance de los niños y no permita que personas que no saben el uso de la herramienta eléctrica o estas instrucciones hagan funcionar la herramienta eléctrica.
Las herramientas eléctricas son peligrosas en manos de usuarios no entrena dos.
5) Mantenga las herramientas eléctricas. Verifique por mala alineación o atascado de piezas móviles, rotura de piezas y otras condiciones que puedan afectar el funcionamiento de las herramientas eléctricas. Si está dañada, haga reparar la herramienta eléc trica antes de utilizar.
Muchos accidentes se deben a her ramientas eléctricas mal mantenidas.
6) Mantenga las herramientas de corte afiladas y limpias.
Las herramientas de corte bien mantenidas con bordes de corte afilados tienen menos posibilidades de atascarse y son más fáciles de controlar.
7) Utilice la herramienta eléctrica, accesorios y brocas de herramienta, etc. de acuerdo con estas instrucciones y la forma especificada para el tipo particular de herramienta eléctrica, teniendo en cuenta las condiciones de trabajo y el trabajo a hacer.
El uso de la herramienta eléctrica para un funcionamiento diferente del especificado puede traducirse en una situación peligrosa.
Uso y cuidado de la herramienta a batería1) Asegúrese que el interruptor está
desconectado antes de insertar el paquete de batería.
La colocación del paquete de batería en las herramientas eléctricas que tienen el interruptor activado es causa de accidentes.
2) Recargue sólo con el cargador especificado por el fabricante.
Un cargador que es adecuado para un tipo de paquete de batería puede provocar el riesgo de incendio cuando se utiliza con otro paquete de batería.
3) Utilice herramientas eléctricas sólo con los paquetes de batería especificados.
El uso de otros paquetes de batería puede provocar el riesgo de heridas e incendio.
4) Cuando no se utilice el paquete de batería, mantenga alejado de otros objetos metálicos como ganchos de papel, monedas, llaves, clavos, tornillos u otros objetos pequeños que puedan crear una conexión de un termi nal a otro.
El cortocircuito de terminales de batería puede provocar quemaduras o un incendio.
5) En condiciones de uso abusivo, el líquido puede salir de la batería; evite el contacto. Si se produce un contacto por accidente, lave con agua. Si el líquido entra en contacto con los ojos, solicite además ayuda médica.
El líquido que sale de la batería puede provocar irritación o quemaduras.
Servicio1) Solicite el servicio de la herramienta
eléctrica a un técnico cualificado utilizando sólo repuestos idénticos.
Esto mantendrá la seguridad de la herramienta eléctrica.
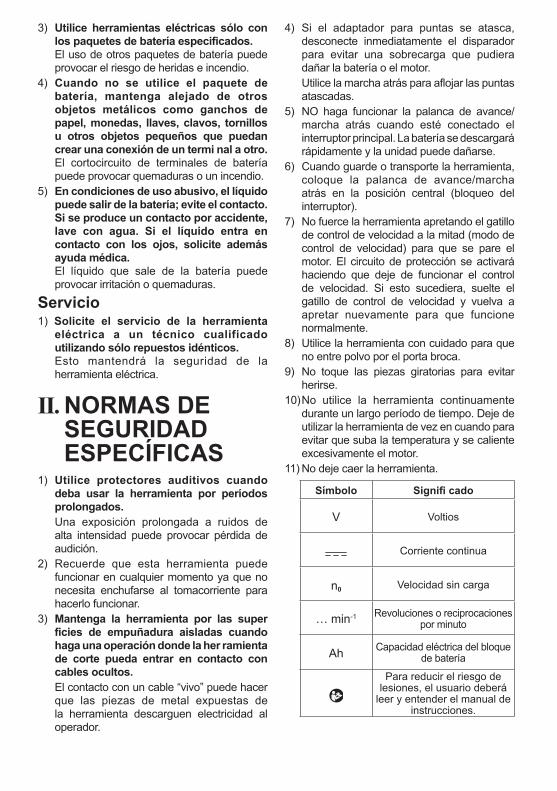
II. NORMAS DE SEGURIDAD ESPECÍFICAS
1) Utilice protectores auditivos cuando deba usar la herramienta por períodos prolongados.
Una exposición prolongada a ruidos de alta intensidad puede provocar pérdida de audición.
2) Recuerde que esta herramienta puede funcionar en cualquier momento ya que no necesita enchufarse al tomacorriente para hacerlo funcionar.
3) Mantenga la herramienta por las super ficies de empuñadura aisladas cuando haga una operación donde la her ramienta de corte pueda entrar en contacto con cables ocultos.
El contacto con un cable “vivo” puede hacer que las piezas de metal expuestas de la herramienta descarguen electricidad al operador.
4) Si el adaptador para puntas se atasca, desconecte inmediatamente el disparador para evitar una sobrecarga que pudiera dañar la batería o el motor.
Utilice la marcha atrás para aflojar las puntas atascadas.
5) NO haga funcionar la palanca de avance/marcha atrás cuando esté conectado el interruptor principal. La batería se descargará rápidamente y la unidad puede dañarse.
6) Cuando guarde o transporte la herramienta, coloque la palanca de avance/marcha atrás en la posición central (bloqueo del interruptor).
7) No fuerce la herramienta apretando el gatillo de control de velocidad a la mitad (modo de control de velocidad) para que se pare el motor. El circuito de protección se activará haciendo que deje de funcionar el control de velocidad. Si esto sucediera, suelte el gatillo de control de velocidad y vuelva a apretar nuevamente para que funcione normalmente.
8) Utilice la herramienta con cuidado para que no entre polvo por el porta broca.
9) No toque las piezas giratorias para evitar herirse.
10) No utilice la herramienta continuamente durante un largo período de tiempo. Deje de utilizar la herramienta de vez en cuando para evitar que suba la temperatura y se caliente excesivamente el motor.
11) No deje caer la herramienta.
Símbolo Signifi cado
V Voltios
Corriente continua
n0 Velocidad sin carga
… min-1 Revoluciones o reciprocaciones por minuto
Ah Capacidad eléctrica del bloque de batería
Para reducir el riesgo de lesiones, el usuario deberá
leer y entender el manual de instrucciones.

¡ADVERTENCIA!
Algunos tipos de polvo creados al lijar, serrar, pulir, taladrar y al hacer otras actividades de construcción contienen productos químicos que el Estado de Cali fornia sabe que producen cáncer, defectos de nacimiento y otros daños en la reproducción. Entre estos productos químicos se encuentran:• El plomo de pinturas con base de plomo.• El sílice cristalino de ladrillos, cemento y
otros productos de albañilería.• El arsénico y el cromo de la madera tratada
químicamente.Para reducir la exposición a estos productos químicos: Trabaje en un lugar bien ventilado y con el equipo de seguridad aprobado como, por ejemplo, máscaras contra el polvo que han sido diseñadas especialmente para no dejar pasar las partículas microscópicas.
III. PARA EL CARGADOR DE BATERIA Y LA BATERIA
Instrucciones de seguridad importantes1) GUARDE ESTAS INSTRUCCIONES
-Este manual contiene instrucciones de seguridad importantes y de funcionamiento para el cargador de batería.
2) Antes de utilizar el cargador de batería, lea tods las instrucciones y marcas de precaución en el cargador de batería, la batería y el producto que utilice la batería.
3) PRECAUCIÓN -Para reducir el riesgo de heridas, cargue sólo la batería de Huskie Tools indicada en la última página. Los otros tipos de baterías pueden explotar provocando heridas personales y daños.
4) No exponga el cargador a la lluvia o nieve.5) Para reducir el riesgo de dañar el enchufe
y cable eléctrico, tire del enchufe y no del cable cuando desconecte el cargador.
6) Cerciórese que el cable está instalado de tal forma que nadie lo pise o enriede en los pies
o esté expuesto a otros daños o tensión.7) No debe utilizar un cable de extensión a
menos que sea absolutamente necesario. El uso de un cable de extensión incorrecto
puede provocar un riesgo de fuego o descarga eléctrica. Si debe utilizar un cable de extensión, cerciórese de que:
a. las patas en el enchufe del cable de extensión son del mismo número, tamaño y forma que los del enchufe en el cargador.
b. el cable de extensión está bien enchufado y en buenas condiciones eléctricas.
c. el tamaño del cable es lo suficientemente grande para las especificaciones de amperios del cargador, tal como se especifica a continuación.
TAMAÑO PROMEDIO MINIMO RECOMENDADO PARA LOS CABLES DE EXTENSION DE LOS
CARGADORES DE BATERIAEspec. entrada de CA
Amperios Tamaño promedio de cable
Igual o mayor que
Pero menosde
Longitud de cable Pies25 50 100 150
0 2 18 18 18 16
8) No haga funcionar el cargador con un cable o enchufe dañado – cámbielos inmediatamente.
9) No haga funcionar el cargador si recibió un golpe fuerte, se cayó o está dañado de alguna otra forma; lleve al personal de servicio calificado.
10) No desarme el cargador, llévelo al personal de servicio calificado cuando sea necesario un servicio o reparación. Un rearmado incorrecto puede traducirse en un riesgo de descarga eléctrica o fuego.
11) Para reducir el riesgo de descarga eléctrica, desenchufe el cargador del tomacorriente antes de proceder a un mantenimiento o limpieza.
12) El cargador de batería y la batería fueron diseñados específicamente para funcionar uno con el otro.
No trate de cargar cualquier otra herramienta inalámbrica o la batería con este cargador.
13) No trate de cargar la batería con ningún otro cargador.
14) No trate de desarmar la caja de la batería.

15) No guarde la herramienta y la ba tería en ambientes donde la temperatura pueda alcanzar o superar los 50ºC (122ºF) (tales como galpón de herramientas para metal o un coche en verano), ya que puede deteriorar la batería guardada.
16) No cargue la batería cuando la temperatura está por DEBAJO de 0ºC (32ºF) o por ENCIMA de 40ºC (104ºF). Esto es muy importante para mantener en condiciones óptimas la batería.
17) No incinere la batería. Puede explotar en el fuego.
18) Evite ambientes peligrosos. No utilice el cargador en lugares húmedos o mojados.
19) El cargador fue diseñado para funcionar sólo con la corriente eléctrica normal del hogar. ¡No trate de utilizar con otro voltaje!
20) No abuse del cable. Nunca transporte el cargador por el cable o tire del cable para desconectarlo del tomacorriente. Mantenga el cable lejos del calor, aceite y bordes agudos.
21) Cargue la batería en un lugar con buena circulación de aire, no cubra el cargador de batería y la batería con un paño, etc. durante la carga.
22) No se recomienda el uso de un enchufe triple ya que puede provocar el riesgo de fuego, descarga eléctrica o heridas personales.
23) No cortocircuite la batería. Una batería cortocircuitada puede provocar un gran flujo de corriente, calentamiento excesivo y el riesgo de fuego o heridas personales.
24) NOTA: Si el cable de alimentación de este aparato está dañado debe cambiarlo en un taller de reparaciones autorizado por el fabricante porque son necesarias herramientas de uso especial.
25) PARA REDUCIR EL RIESGO DE DESCARGA ELECTRICA, ESTE APARATO TIENE UN ENCHUFE POLARIZADO (UNA PATA ES MAS ANCHA QUE LA OTRA).
Este enchufe entrará en el tomacorriente polarizado sólo de una forma. Si el enchufe no entra completamente en el tomacorriente, invierta el en chufe. Si no entra incluso de esta forma, hable con un electricista calificado para que le instale un toma corriente adecuado.
No cambie el enchufe de ninguna forma.
ADVERTENCIA:
• Solamente use paquetes de baterías Huskie Tools que están diseñados para uso con esta herramienta recargable.
• Huskie Tools no asume ninguna responsabilidad por daños o accidentes provocados por el uso de un paquete de baterías recicladas y un paquete de baterías no originales.
• No elimine el paquete de baterías en el fuego,ni lo exponga al calor excesivo.
• No permita que los objetos metálicos toquen los terminales del paquete de baterías.
• No permita que los objetos metálicos toquen los terminales del paquete de baterías.
• No transporte ni almacene el paquete de baterías en el mismo contenedor que clavos u otros objetos metálicos similares.
• No entierre clavos ni similares en el paquete de baterías, no lo someta a golpes, no lo desarme, ni intente modificarlo.
• No cargue el paquete de baterías en un lugar a alta temperatura, como por ejemplo cerca de una fuente de fuego o bajo la luz solar directa. De otra manera, la batería podría sobrecalentarse, encenderse o explotar.
• Solamente use el cargador dedicado para cargar el paquete de baterías. De otra manera, la batería podría filtrarse, sobrecalentarse o explotar.
• Después de extraer el paquete de baterías de la herramienta o el cargador, siempre reinstale la cubierta del paquete. De otra manera, los contactos de la batería podrían ser cortados, causando el riesgo de fuego.
• Cuando el paquete de pilas se deteriora, reemplácelo con uno nuevo. El uso continuo de un paquete de pilas dañado puede ser causa de la generación de calor, ignición o rotura de batería.

IV. MONTAJEInstalación o desmontaje del cubo1. Instalación del cubo
1) Retire el anillo de caucho y el pasador.
anillo de
2) Acople el cubo colocando los elementos en cada orificio.
3) Acople el anillo de caucho y el pasador siguiendo el orden expuesto en 1) de forma inversa.
NOTA:Acople el cubo con firmeza utilizando el pasador y el anillo de caucho.El anillo de retención está destinado únicamente a fijación temporal.
2. Desmontaje del cubo 1) Retire el anillo de caucho y el pasador.
anillo de pasador
Colocación y extracción de la batería1. Para conectar la batería: Alinee las marcas de alineación resaltadas
y acople el paquete de baterías.
• Deslice la batería hasta que se blo quee en su posición.
Marcas de alineación
2. Para extraer la batería:Presione el botón y deslice el paquete de baterías hacia delante.
Botón
V. FUNCIONAMIENTO ¡ADVERTENCIA!
• No respire el humo emitido por la herramienta o el paquete de baterías, ya que podría ser nocivo.
[Unidad principal]Funcionamiento del inter-ruptor y de la palanca de avance/marcha atrás
Avance Marcha atrás
Bloqueo del interruptor

PRECAUCIÓN:Para impedir que se produzcan daños,no utilice la palanca de avance/marcha atrás hasta que la punta esté totalmente parada.
Funcionamiento del inter-ruptor de rotación de avance1. Empuje la palanca para que se produzca
una rotación de avance.2. Apriete ligeramente el gatillo del dis-
parador para iniciar la herramienta con lentitud.
3. La velocidad aumenta con la presión del disparador para un apriete eficiente de tornillos. El freno funciona y la punta se detiene inmediatamente cuando suelta el disparador.
4. Tras utilizarlo, coloque la palanca en su posición central (bloqueo del interruptor).
Funcionamiento del inter-ruptor de rotación inversa1. Empuje la palanca para que se pro duzca
una rotación inversa. Compruebe la direc-ción de la rotación antes de utilizarlo.
2. Apriete ligeramente el gatillo del dis parador para iniciar la herramienta con lentitud.
3. Tras utilizarlo, coloque la palanca en su posi ción central (bloqueo del inter ruptor).
PRECAUCIÓN:• Para evitar un aumento excesivo de
tem pe ratura en la superficie de la herramienta, no haga funcionar continua-mente la herramienta utili zando dos o más baterías. La her ramienta debe enfriarse antes de cambiar por otra bate ría.
Disparador del control de velocidad variable
Para determinar el centro de un orificio, apriete ligeramente el gatillo para que empiece la rotación lenta de la punta.Cuanto más se tira del gatillo, mayor es la velocidad.
PRECAUCIÓN:Al accionar la herramienta pulsando el gatillo puede que la rotación tarde unos instantes en comenzar. Esto no es señal de un malfuncionamiento.• Este intervalo ocurre cuando se inicia el
sistema de circuitos de la herramienta cuando se tira del disparador por primera vez después de instalar un nuevo paquete de batería o después de que la herramienta no ha sido usada por al menos 1 minuto. La rotación se iniciará sin ningún intervalo durante segundas y subsiguientes operaciones.
Panel de indicación
(1)(2)
(1) Indicador y botón de nivel de batería• Pulse el botón de nivel de batería. El indicador de nivel de batería mostrará el
nivel de batería durante aproximadamente 10 segundos.
NOTA:El indicador no mostrará el nivel de batería en los siguientes casos, ni siquiera aunque se pulse el botón.
• La unidad principal se encuentra apagada.• Justo después de acoplar el paquete de
batería.• La unidad principal o el botón de nivel
de batería no se acciona durante aproximadamente un minuto.
Pulse de nuevo el botón de nivel de batería tras pulsar el gatillo del disparador.
• La temperatura de la batería es elevada. Detenga el funcionamiento y espere
hasta que disminuya la temperatura de la batería.

Indicador Estado de la batería
3 lámparas iluminadas
Carga suficiente
2 lámparas iluminadas
Queda aprox. el 50%
Una lámpara iluminada
El nivel de carga de la batería es bajo.Debe cargarse en breve.
Una lámpara parpadeando
AgotadaDebe cargarse inmediatamente
La indicación del nivel de batería es meramente una guía.La indicación podría cambiar debido al estado de la batería o la temperatura ambiente.
(3) Luz de advertencia de sobrecalentamiento
Off(normaloperation)
Illuminated:Overheat(motor)
Flashing:Overheat(battery)
Indicates operation has been halted due to motor or battery overheating.
Apagado(funcionamientonormal)
Iluminado:Sobrecalentamiento(motor)
Destella:Sobrecalentamiento(batería)
Indica que se detuvo elfuncionamiento por unsobrecalentamiento de labatería o el motor.
Para proteger el motor o la batería, asegúrese de observar lo siguiente cuando efectúe esta operación.• Si el motor o la batería se calienta,
se activará la función de protección y el motor o la batería dejará de funcionar. La luz de advertencia de sobrecalentamiento del panel de indicación se ilumina o parpadea cuando esta función está activa.
• Si se activa la función de protección de sobrecalentamiento, espere hasta que la herramienta se haya enfriado completamente (por lo menos 30 minutos). La herramienta está lista para usar cuando se apaga la luz de advertencia de sobrecalentamiento.
• Evite utilizar la herramienta de tal forma que la función de protección de sobrecalentamiento se active repetidamente.
• Si la herramienta funciona continuamente bajo condiciones de carga pesada o si se usa en condiciones de alta temperatura (tal como durante el verano), la protección contra sobrecalentamiento puede activarse frecuentemente.
• Si la herramienta se usa en condiciones de temperatura fría (tal como durante el invierno) o si se detiene con frecuencia durante el uso, la protección contra sobrecalentamiento quizás no se active.
Agarre recomendadoUtilice la empuñadura para sostener y accionar la herramienta con una sola mano. Si el trabajo requiere fuerza adicional, podrá empujar la parte trasera de la herramienta con la otra mano.
[Bloque de pilas]Para un uso adecuado de la bateríaBatería de Li-ión
• Para una vida óptima de la batería, guarde la batería de Li-ión siguiendo el uso sin carga.
• Cuando cargue la caja de batería, confirme que los terminales en el cargador de batería estén libres de materias extrañas tales como polvo y agua, etc. Limpie los terminales antes de cargar la caja de batería si hay materias extrañas en los terminales.
La vida de los terminales de la caja de batería puede verse afectada por materias extrañas tales como polo y agua, etc. durante su funcionamiento.
• Cuando no se utiliza la batería, man-téngala separada de otros objetos metá-licos, como: clips de papel, monedas, llaves, clavos, tornillos u otros objetos metálicos pequeños que pueden actuar de conexión entre un terminal y el otro.
Un cortocircuito entre los terminales de la batería pueden ocasionar chispas, quemaduras o incendios.
• Cuando haga funcionar con la batería, asegúrese que el lugar de trabajo está bien ventilado.

• Cuando saque la batería de la unidad principal de la herramienta, vuelva a cerrar inmediatamente la cubierta de batería, para evitar que el polvo o la suciedad puedan ensuciar los terminales de batería y provocar un cortocircuito.
Vida útil de la bateríaLas baterías recargables tienen una vida útil limitada. Si el tiempo de funciona-miento se acorta mucho tras la recarga, sustituya la batería por una nueva.
Reciclado de la bateríaATENCIÓN:
PARA batería Li-iónLa batería de Li-ión que compró es reciclable. Llame a 1-800-8-BATTERY para información sobre el reciclado de esta batería.
Recomendaciones de uso
Asegúrese de utilizar la cubierta de la caja de batería
● Cuando no utilice la caja de batería, guarde la batería de tal forma que las materias extrañas tales como polvo y agua, etc. ensucien los terminales. Asegúrese de colocar la cubierta de la caja de batería de tal forma de proteger los terminales de la batería.
● Cuando cargue la caja de batería, confirme que los terminales en el cargador de batería estén libres de
materias extrañas tales como polvo y agua, etc. Limpie los terminales antes de cargar la caja de batería si hay materias extrañas en los terminales. La vida de los terminales de la caja de batería puede verse afectada por materias extrañas tales como polo y agua, etc. durante su funcionamiento.
PRECAUCIÓN: Para proteger el motor o la batería, asegúrese de observar lo siguiente cuando efectúe esta operación.
● Si el motor o la batería se calienta, se activará la función de protección y la batería dejará de funcionar.
Para un uso más seguro ● La batería está diseñada para conectarse siguiendo dos pasos por motivos de seguridad. Compruebe que la batería está conectada correctamente en la unidad principal antes de utilizar la herramienta.
● Si la batería no ha quedado bien conectada, al activar el interruptor parpadearán la lámpara de aviso de sobrecalentamiento y la lámpara de aviso de bajo nivel de carga de batería, para indicar que no es posible un funcionamiento seguro, y la unidad principal no girará con normalidad. Conecte la batería a la unidad de la herramienta hasta que el indicador rojo o amarillo desaparezca.
[Cargador de la batería]Carga
PRECAUCIÓN:• El cargador está diseñado para funcionar
con alimentación eléctrica doméstica estándar únicamente tal y como se indica en la placa de características. Realice la carga únicamente con la tensión indicada en la placa de características de la unidad. P. ej. 230 V/50 Hz.
• No intente utilizarlo con ninguna otra tensión o frecuencia nominal.
• Si la temperatura del paquete de baterías cae aproximadamente bajo −10°C (14°F), la carga se detendrá automáticamente para evitar la degradación de la batería.
• La variación de temperatura ambiente es de entre 0°C (32°F) y 40°C (104°F). Si la batería se utiliza cuando la temperatura de la batería es inferior a 0°C (32°F), la herramienta puede no funcionar correctamente.

• Utilice siempre el cargador a una temperatura entre 0°C y 40°C y cargue la batería a una temperatura similar a la de la propia batería. (Procure que no haya una diferencia superior a 15°C entre la temperatura de la batería y la del lugar donde se realiza la carga.)
• Cuando se vaya a cargar una batería fría (unos 0°C (32°F) o menos) en un cuarto cálido, deje la batería en la habitación durante al menos una hora y cárguela cuando se haya calentado a la temperatura de la habitación.
• Deje que se enfríe el cargador al cargar más de dos baterías de forma consecutiva.
• No introduzca sus dedos dentro del hueco del contacto, cuando esté sujetando el cambiador o en ninguna otra ocasión.
PRECAUCIÓN: Para impedir el riesgo de incendio o daños del cargador de batería.
• No tapone los orificios de ventilación del cargador y la bate ría.
• Desenchufe el cargador cuando no lo utilice.
NOTA:Su batería no está totalmente cargada al momento de comprarla. Asegúrese de cargar la batería antes de utilizarla.
Cómo cargar el dispositivo1. Enchufe el cargador en la fuente de
alimentación de CA.
NOTA:Se pueden producir chispas cuando seinserta el enchufe en la alimentación eléctrica de CA pero este no es un problema en términos de seguridad.
2. Conecte el paquete de batería con firmeza al cargador.1 Alinee las marcas de alineación y
coloque la batería en el enchufe del cargador.
2 Deslice hacia adelante en el sen tido de la flecha.
Marcas de alineación
3. Durante el proceso de carga la lámpara de carga permanecerá iluminada.Cuando haya terminado la carga, se ac cio-nará automáticamente un conmutador electrónico interno para impedir cualquier sobrecarga.• No podrá cargar la batería si ésta está
todavía caliente (por ejemplo, inmediata-mente después de haber trabajado mucho).
La luz de espera naranja seguirá deste-llando hasta que se enfríe la batería.
La carga comenzará automáticamente.4. La luz de carga (verde) destellará lentamente
cuando la batería se haya cargado a un 80%.
5. Cuando se completa la carga, la luz de carga empezará a destellar rápidamente en color verde.
6. Si la temperatura de la batería es de 0°C o menos, la batería demora más en cargarse completamente que el tiempo de carga normal.
Incluso cuando la batería esté completamente cargada, tendrá aproximadamente 50% de la carga de una batería totalmente cargada a la temperatura de funcionamiento normal.
7. Si la luz de carga no se enciende inmediatamente después de enchufar el cargador o si la luz de carga no empieza a destellar rápidamente en verde después del tiempo de carga normal, consulte con un concesionario autorizado.
8. Si se vuelve a colocar una batería totalmente cargada en el cargador, se encen derá la luz de carga. Luego de algunos minutos, la lámpara de carga destellará rápidamente para indicar que la carga se ha completado.
9. Extraiga la batería mientras mantiene levantado el botón de desbloqueo de la batería.
Botón de desbloqueo de la batería

INDICACIÓN DE LA LÁMPARALa carga ha sido completada. (Carga completa.)
La batería se cargó en aproximadamente 80%.
Ahora cargando.
(Verde)
Apagada Encendida Parpadeando
(Naranja)
Se ha enchufado el cargador en la fuente de alimentación de CA. Está preparado para cargar.
Luz de estado de cargaAparecerá Izquierda: verde Derecha: naranja
La batería está fría.La batería se esta cargando lentamente para reducir la carga de la batería.
La batería está caliente.La carga comenzará cuando baje la temperatura de la batería. Si la temperatura de la batería es de –10°C o menos, la luz de carga (naranja) también empezará a destellar. La carga empezará cuando sube la temperatura de la batería.
No es posible realizar la carga. Existe un bloqueo de polvo o una falla de la batería.
1) TensiónCuando la batería se ha prácticamente descargado, la tensión decrece y el par de apriete baja.
M16, M20, M24 x 45 mm
Par
de
aprie
te
VI. MANTENIMIENTOUtilice sólo un paño suave y seco para limpiar la herramienta. No utilice paños húmedos, bencina, diluyentes u otros disolventes volátiles de limpieza.
VII. PAR DE APRIETELa potencia necesaria para apretar un perno variará en función del material y el tamaño del perno, así como del material que se está acoplando. Elija la duración del tiempo de apriete en consecuencia.Se facilitan a continuación los valores de referencia.(Pueden variar según las condiciones de apriete.)
Factores que afectan al par de apriete
El par de apriete resulta afectado por una amplia variedad de factores, incluidos los siguien tes. Tras el apriete, compruebe siempre el par con una llave de tuercas de par.

M16, M20, M24 x 45 mmP
ar d
e ap
riete
Perno Arandela
Placa de acerogrosor 10 mm (3/8”)
ArandelaArandela de resorte
Condiciones de apriete• Se utilizan los siguientes pernos. Perno estándar: Tipo de resistencia 4,8 Tipo de alta ductilidad 12,9
4.8
Explicación del tipo de resistencia
Límite de elasticidad del perno(80% de resistencia de ductilidad)
32 kgf/mm2 (45000 psi)Resistencia dúctil del perno
40 kgf/mm2 (56000 psi)
2) Tiempo de aprieteUn tiempo de apriete mayor da como resultado un par de apriete incrementado. Un apriete excesivo, no obstante, no añade valor y reduce la vida útil de la herramienta.
3) Diámetros diferentes de pernoEl tamaño del diámetro de perno afecta al par de apriete.En general, al aumentar el diámetro de perno, asciende el par de apriete.
4) Condiciones de apriete• El par de apriete variará, incluso con el mismo perno, según el coeficiente del tipo, longitud y par (el coeficiente fijo indicado por el fabricante en el proceso de producción).
• El par de apriete variará, incluso con el mismo material del perno (ej. acero), en función del acabado de la superficie.
• El par se reduce mucho cuando el perno y la tuerca empiezan a girar juntos.
5) Juego del enchufeEl par disminuye en la medida en que se utiliza para apretar un perno la configuración de seis caras del enchufe de tamaño incorrecto.
6) Interruptor (disparador de control de velocidad variable)
La torsión baja cuando se utiliza la unidad con un interruptor no presionado completamente.
7) Efecto del adaptador de conexión El par de apriete disminuirá a través del
uso de una junta universal o un adaptador de conexión.
VIII. ACCESORIOSUtilice sólo puntas de tamaño adecuado.
IX. ANEXOMÁXIMAS CAPACIDADES RECOMENDADASModelo HTP-IPW
Apriete de perno Perno normal: M12 – M20Perno de gran tracción: M12 – M18
INFORMACIÓN ADICIONAL SOBRE LA GARANTÍALa rotura y los daños provocados por un uso continuado durante un periodo de tiempo prolongado (por ejemplo trabajos en líneas de montaje de fábricas, etc.) no están cubiertos por la garantía.

X. ESPECIFICACIONESUNIDAD PRINCIPALModelo HTP-IPW
Motor 18 V DC
Sin velocidad de carga 0 - 1550 min-1
Torsión máxima 470 N·m (4160 in-lbs)
Impactos por minuto 0 - 2400 min-1
Longitud total 214 mm (8-7/16”)
Peso (con batería: EY9L50)2.6 kg (5.73 lbs)
Peso (con batería: EY9L51)
BATERÍAModelo Bp-185
Batería de almacenaje Batería Li-ión
Tensión de batería 18 V CC (3,6 V x 10 celdas)
CARGADOR DE BATERÍAModelo CH-185
Régimen Vea la placa de especificaciones en la parte inferior del cargador
Peso 0,93 kg
Tiempo de cargaBP-185
80 min
NOTA: Este cuadro puede contener modelos no disponibles en su país. Consulte el más reciente catálogo general.
NOTA: Puede consultar el nombre y la dirección del concesionario en la tarjeta de garantía que se incluye.

Declaración de interferencias con radiofrecuencias de la Comisión Federal de Comunicaciones
Este equipo ha sido probado y se ha determinado que cumple con las limitaciones de un dispositivo digital de Clase B, de conformidad con el Apartado 15 de las regulaciones de FCC. Estas limitaciones están diseñadas para brindar protección razonable contra las interferencias perjudiciales en un entorno residencial. Este equipo genera, utiliza y puede irradiar energía de radiofrecuencia y, si no se instala y utiliza de acuerdo a las instrucciones, puede provocar interferencias perjudiciales en las comunicaciones de radio. Sin embargo, no existe ninguna garantía de que no se produzcan interferencias en una instalación concreta. Si este equipo provoca interferencias perjudiciales en la recepción de radio o televisión, lo que se puede determinar apagando y encendiendo el equipo, se recomienda al usuario intentar corregir la interferencia adoptando una de las siguientes medidas:• Cambie la orientación o posición de la antena receptora.• Aumente la separación entre el equipo y el receptor.• Conecte el equipo en una toma de corriente de un circuito que no sea el mismo en el que
está conectado el receptor.• Consulte por ayuda a un proveedor o un técnico de radio/televisión con experiencia.
Precaución de FCC: Para asegurar un cumplimiento continuo, instale y use el equipo según las instrucciones provistas. Utilice solamente el paquete de pilas especificado en el manual de instrucciones. Cualquier cambio o modificación no aprobada expresamente por el grupo responsable de su certificación puede anular el derecho del usuario sobre el uso del equipo.
Este dispositivo cumple con el Apartado 15 de las regulaciones de FCC. La operación está sujeta a las siguientes dos condiciones (1) Este dispositivo no puede ocasionar interferencias que ocasionen daños y (2) este dispositivo debe aceptar cualquier interferencia, incluida una interferencia que pueda ocasionar una operación no deseada.
Este aparato digital de Clase B cumple con la norma canadiense ICES-003.
Normas armonizadas CARGADOR Cumple con UL Std.1310
Certificado de CSA Std.C22.2 N ° 223-M91


195 Internationale BlvdGlendale Heights, IL 60139
Phone 800-860-6170 Fax 800-345-3767
www.huskietools.com