Embed Size (px)
Citation preview

Minimising damage

W W W . P O T A T O . O R G . U K / M I N I M I S I N G - D A M A G E2
Section 1
2
Section 6
W W WW W WW W WW W WW WW W WW W WW W WW W WW W WW WW W WW W WW W WW W WW W WW WW W WW WWWW W WW W WW W WW W WW WWW W WW W WW W WWWWWWWWW W WWWWW W WW W WW WWW W WWWWWWWWW W WWWWW WW WW WWWWW W WW WWW WWW WWWWWW WWWWW WWWWW WWW WWWWWWW WW WWWWWWWWW WW WWWW WWWWWWWWWW WWWWWWWWWWWWW WWWWWWWWWWWWWWWWWWW P O. P OP O. P OP. P O. P OP O. P OOP OOOP OOOP OP O. P O. P OOOOP OP OOO. P OP. P OO. P OP. P OP OP OOOOOOOOOOOOOOOOOOOOOOOOOOOOOOOOOOOO T A TT A TT A TT A TT A TT AT AT A TT A TT A TT A TAT A TT A TT A TT A TT A TT AAAAAT AT AAA TA TAA TA TT A TA TT A TA TA TT A TT A TA TA TT A TTT A TT A TT A TAAAT AT AAAA TT A TT A TT A TT A TT A TT A TT A TAT AT AAA TA TT A TAT AAT AT A TAAAT A TT A TAA TAT AT A TA TT A TT A TT AAAT AT AAAAA TT A TT ATTT AT AAAAA TAT AAT AAT AT A TT AT AAAT AT AT AT AAAAAAA TTT AAAAAAA TAAAAAAT AT A TTT AT AAAAAAAT AAAAAT AAT AAAT AAAT AT AT AT AT AT AT AAAATTTTT AT AT AAT ATTTTTTT AT ATTTTTTT AATTTTTTTT AT ATTTTT AT AATTTTTTTTTTTTTTTTTT ATTTTTTTTTTTTTTTTTTTTTT ATTTT AA O . OO . OO . OO . OO . OO . OO . OO . OO . OO . OOO .O . OO . OO .O .O . O. O. O. OO. OOO .OO OO .O .O . O. O. OOOO . OO .O . OO . O. OO . O. O. O. OO O. OO .. O. O. O. OO. O. OO . O. O.. OOOO. OOO. O. OO. OO. OOOO. O.O ... R GR G .R G .R G .R GR GR G .R GR GR GR GR G .R GR G .R G .R G .R GGR GR GR GR GGGGGGGGR GR G .GGGGGR GR GR GR G .R GR G .R G .RRR GR G .RR GR GR G .R GR GGR GR GGGR GGGR GGR G .R GR G .R G .R G .R G .R G .R G .R GR GRR GR GGGR GR GR GGGGGGR GR G .GR GR G .R G .R GRRR GRRR GGR GGGR GR GR G .RR GRRRR GR GGGR G .R G .R GRRRRR GGR GRR G .RRR G .RRR GR GGR GR GRR GR GGR GGR GR GRRRRRR GR GRRRRRR GRRRRRRRRRRRRRRR GRRRRRRRRRRRRR GRRRRRRRRRRRRRRRRRR .RRRRR UUUUU KUUU KU KUUUUU KKU K /U K /K /U KU KU KK /K /UUUUUUU K /U K /K /U K /U KU K /UUU KKU KU KU KU K /U K /U K /U /UU KU KU KUU KU K /U KU KU KUU K /UUUUU KUUUU KKUUUUU KKUUUU KUUUU KUU KKUUUU KU KUUUUUUUUU M I NM I NM I NM I NM I NNMMM I NM I NMMM I NM NNNNNM I MI M II M II MI M IM IMM IMMM IM IMMMMM IMMMMMM IIMMM IMM I S I NS I NS I NS I NS I NS I NS ISS IS I NS I NS I NS I NS I NI NS I NI NS I NS I NS I NS I NS I NIS I NNNS I NNNNNNNNNS I NNNNNNNNNNS I NNNNNNNNNNNNS I NNNNNNNNNNNNNNNNNNNNNNNNNNNNNNNNNNNNNNNNNNNNNNNNNNNNNNNNNNNNS NNNNNNNNNN GGGGGGGGGGGGGGGGGGGGGGGGGGGGGGGGGGGGGGGGGGGGGGGGGGGGGGGGGGGGGGGGGGGGGGGGGGGGGGGGGGGGGGGGGGGGGGGGGGGGGGGGGGGGGGGGGGGGGGGGGGGGGGGGGGGGGGGGGGGGGGGGGGGGGGGG -------------------- DD A MD A MDD A MD AD A MD AD A MD A MD A MD A MD AD A MD AD A MD A MD A MD A MD AD A MD A MD A MD A MD A MD A MD A MD A MD A MD A MD AD A MAD A MD A MD A MA MMD A MD A MD A MD A MD A MD A MD A MD A MD A MMMMDD A MD AADDD AD A MD A MD A MD A MD A MMD A MD A MD A MD A MMD A MDD AD AD AD AA MD A MD A MMD A MA MMMMMD A MD A MD A MD A MD A MD A MD A MMMMMD A MD A MD A MA MA MDDDDD AD A MD A MD A MA MA MMA MA MMMD MMMMDD A MMMMMD AD A MD AD AD A MDDDDDDDD ADDD AD ADDD AD A MMMMD MD ADD AA MDD A GA GA GA GA GA G EA G EA GA GA GA GA G EG EG EGA G EA G EA G EG EG EG EG EG EGGGGGGG EGG EGG EG EG EEG EEGG EA GG EEEEG EEEEEEEA G EA G EA G EA G EG EA G EG EG EG EGGG EGG EEEEEA GA GA GG EG EGGG EGGG EGGA G EEA GAA GA GGGG EG EG EEEEA G EGG EA G EEEEEA EA G EEA G EEEEEEEEEEEEEGA G EEEEEEEEEEEEEEEEEEEEEA EEEEEEEEEEEEEEEEEEA GA G EEEA G EG EEE22222222222222222222222222222222222222222222222222222222222222
Section 6
• Make sure the harvester is well maintained and fi t for work. Worn parts or a wrongly set up machine can cause major problems.
• Elevator to trailer/box transfers. Try and maintain a low drop height on a soft surface, not steel.
• Haulm removal rollers and guide fi ngers. Correct setting depends on crop condition.
• Cleaning units, star wheels, spiral and axial rollers. Good maintenance and calibration required.
• Clod breakers and haulm rakes. These, especially the clod breakers, can do serious damage.
• Web speeds and agitation. Only use as much agitation as required. Try to keep soil on the primary web and have around 85% fi ll of the secondary web.
• Badly aligned shares, diablo rollers applying too much downward pressure, gaps around crop retainers and discs can cause tubers to be crushed and sliced.
• Web and elevator gaps. These cause tubers to be pinched and damaged.
• Crop susceptibility depends on variety, dry matter content, agronomy, weather and haulm destruction method. Variety can have a large effect. The crops should be regularly inspected for damage particularly when changing crops and fi eld.
• Monitoring of damage levels is essential. If a problem is found, be prepared to spend time reducing the damage. Sample at several locations on the harvester and spend time making adjustments to reduce the level of damage.
The priorities

3
Section 1
W W W . P O T A T O . O R G . U K / M I N I M I S I N G - D A M A G E 3
Section 6
Contents
Section 6 Health & Safety – training ...................... 30
Section 1 Planning stages ............................................. 5 1. Variety ...............................................................................................5
2. Site selection ..................................................................................6
3. Soil type ...........................................................................................6
4. Field layout ......................................................................................7
5. Soil preparation ...........................................................................8
6. Planting ............................................................................................8
7. Crop nutrition ..............................................................9
Nitrogen (N) 9
Potash (K) 9
8. Irrigation ..........................................................................................9
9. Crop maturity and dry matter (DM) ................................. 10
10. Haulm destruction ................................................................ 10
11. Soil moisture ...........................................................11
Soil moisture at defoliation 11
12. Temperature ............................................................................. 11
13. Storage and store unloading .......................................... 12
9. Cart elevator .............................................................. 19
10. Elevator transfer ..................................................... 19
1. Average soil conditions.............................................21
2. Dry soil conditions .....................................................22
3. Wet soil conditions ....................................................23
4. Stones .........................................................................24
Potential damage points ...............................................25
1. Bulker/trailer to hopper 25
2. Tipping box into hopper 25
3. Transfer from hopper to cleaner 26
4. Crop cleaner 26
5. Sizing 26
6. Inspection 26
7. Transfer to boxes 27
8. Transfer to bulk storage or bulker/trailer 27
Introduction 4
Basic set-up 13
Stop-check of crop in the machine 14
1. Haulm destruction ..................................................... 14
2. Diablo rollers .............................................................. 14
3. Share ........................................................................... 15
4. Discs .......................................................................... 15
5. Sieving web ................................................................ 16
6. Agitation .................................................................... 16
7. Haulm separation ..................................................... 17
Oscillating fi ngers 17
Haulm rollers 17
8. Cleaning unit ............................................................. 18
Section 3 Soil conditions ............................................ 21
How to complete a damage and bruising assessment......................................................................................... 28
Sampling 28
Damage assessment 28
Bruising assessment 29
In-fi eld damage assessment checks .......................... 29
Temperature checks 29
Electronic potato 29
Section 4 Grader settings ........................................... 25
Section 2 Harvester settings..................................... 13
Section 5 Assessing damage .................................... 28

W W W . P O T A T O . O R G . U K / M I N I M I S I N G - D A M A G E4
Section 1
4
Section 6
Damaged crops cost the UK potato industry over £200/ha and care needs to be taken at every stage of the production system to minimise this cost. Planning ahead, routine maintenance and adapting machinery settings to the conditions are key areas to reducing the risk of damaging crops.
There are many damage points through the harvesting and grading process where tuber damage could occur. Some components, when badly set or operated, will only result in small changes in damage, while others could show a massive reduction in damage if carefully set and operated.
This document aims to highlight settings and operations for minimising damage without compromising fi eld or crop conditions. When damage is referred to, it includes both bruising and shatter cracking, both of which are caused by impacts.
Check with the manufacturer’s handbook for recommended settings.
Claire Hodge
Technical Executive, Potato Council
Email: [email protected]
Introduction
Training fi lmsTraining fi lms can be found on the Potato Council website: www.potato.org.uk/minimising-damage
These short fi lms complement this guide covering key aspects to reducing damage.
Sou
rce:
Gar
y N
aylo
r P
hoto
grap
hyS
ourc
e: G
ary
Nay
lor
Pho
togr
aphy
Sou
rce:
Em
ber
TV

5
Section 1
W W W . P O T A T O . O R G . U K / M I N I M I S I N G - D A M A G E
Local variation in ranking does occur, for example Cara has been reported as bruising on silt soils and Maris Piper having a higher bruising sensitivity than Marfona in Potato Council trials in Lothian. Where known, local variety information should be used.
It should be noted that variety is only one of many factors infl uencing bruising susceptibility and even varieties with a high score may bruise under the infl uence of other factors. Scores are useful when comparing one variety with another as a guide to bruise potential. Varietal characteristics such as tuber size, shape and dry matter (DM) may also infl uence a tuber’s susceptibility to bruising. The intended market often limits the variety choice and specifi es a larger tuber size that may be more prone to bruising.
Action:
When the variety being grown is known to be vulnerable to bruising, aim to eliminate all other factors that can increase a tuber’s susceptibility. This also applies to markets that require large tubers as they are more prone to bruising, and tubers that are oval or long oval, as these are particularly susceptible to bruising at the rose and heel end.
1. Variety
Varieties differ in their susceptibility to damage. Potato Council Independent Variety Trials score varieties for their susceptibility to bruising and shatter damage on a 1-9 scale (1 = susceptible, 9 = resistant). The table gives some examples, for other varieties see the Potato Council seed variety database on http://varieties.potato.org.uk
Planning stages
Section 1
Variety Bruise score Shatter score
Markies 8 7
Cara 8 7
Fianna 7 7
Nadine 7 6
Sante 7 6
Saxon 7 7
Estima 6 6
Lady Claire 6 6
Hermes 6 7
King Edwards 6 5
Lady Rosetta 6 7
Maris Piper 6 7
Maris Peer 6 7
Nicola 6 6
Pentland Dell 6 6
Shepody 6 6
Charlotte 5 6
Desiree 5 5
Marfona 5 7
Russet Burbank 4 2

W W W . P O T A T O . O R G . U K / M I N I M I S I N G - D A M A G E6
Section 1
2. Site selection
Site selection can infl uence tuber damage at harvest. Potatoes should only be grown on suitable land. When selecting fi elds for potato production, consider the following points:
• Field shape and size – irregular fi elds will require more harvester turning which can result in more damage
• Slopes – in a fi eld will make lifting diffi cult. Harvesting is made much worse with multiple irregular side slopes (sidings)
• Field history – previous crop to help identify problem areas in the fi eld. In particular, soil depth, soil type, soil compaction, known nutrient defi ciencies, weed problems and burial of high organic matter. If potatoes have been grown previously on the site, fi nd out if bruising occurred
• Stone content of soil – size and sharpness
• Soil type
• Availability of irrigation
• Access routes on and off the fi eld for transporting potatoes, a rough ride can increase bruising risk
• Under single farm payment, soil must be kept in good agricultural and environmental condition(GAEC), soil management is a key compliance standard for GAEC. When selecting fi elds for potato production,
consider the specifi c factors, including soil type and fi eld gradients, which may have implications on cross compliance, eg sloping sandy fi eld = high risk of erosion and run-off.
Action:
Where potatoes have been grown previously on the site, investigate if bruising did occur, consider previous fi eld layout and crop history data to help identify factors that may have contributed to the crop’s bruising susceptibility.
Potatoes are more likely to damage:
• In a fi eld with shorter runs where more turning takes place
• Where organic manures have been applied but their nutrient content has not been accounted for, which can delay maturity and hence affect harvest date
• Where manures haven’t rotted down and can affect destoning
• Where the stone content of the soil is high due to small stones/fl ints which cannot be removed by destoning
• When soil types vary within a fi eld.
3. Soil type
Soil type is a major factor infl uencing tuber susceptibility to damage. Agronomic infl uences relate to nutrient availability, soil moisture or different husbandry.
When assessing soil type consider:
• How many operations it will take to prepare the soil for planting
• Variations in soil type, as this will affect planting depth and drill profi le
• The moisture holding capacity of the soil.
Action:
Where possible consider avoiding sandy soils when planting highly susceptible varieties.
Potatoes are more likely to damage:
• Where soil operations have caused compaction or smearing and clods may be present
• Where planting depth and drill profi le vary, harvester operations cannot be consistent
Sou
rce:
Gar
y N
aylo
r P
hoto
grap
hy

7
Section 1
W W W . P O T A T O . O R G . U K / M I N I M I S I N G - D A M A G E
• When grown on land where potatoes may suffer stress, eg wet soils
• Where soil cannot be kept on the harvester such as with sandy soils, especially when dry or soils with a high gravel content.
4. Field layout
The shape, size and slopes of a fi eld will infl uence layout. Careful planning of fi eld layout can help minimise bruising levels.
Actions:
• Headlands – consider not planting headlands. These can account for up to 10% of the planted area but frequently the crop is more damaged due to inaccurate turnings, heavy traffi c, clods and diffi cult lifting conditions. If planted, consider segregating the crop.
• Rows and beds – aim for straight uniform rows and beds. Where rows curve tubers are more likely to be cut by the shares or bruised by diablo rollers. Damage can also occur during fi eld operations, such as spraying or fl ailing.
• Opening up the crop – think about how you will open up the crop. Plan the layout so it will not be necessary to run on other rows.
• Slopes – try to plant the crop up and down slopes, avoid planting across slopes. Consider the other implications of planting direction such as diffuse pollution.
• Spray lines/irrigation runs – crops are more prone to bruising in spray lines and irrigation runs, due to the clods from wheelings. Question if you should plant spray lines/irrigation runs or segregate harvested crop. Consider reducing wheelings by maximising spray boom width and justifying all passes.
Sou
rce:
Gar
y N
aylo
r P
hoto
grap
hyS
ourc
e: G
ary
Nay
lor
Pho
togr
aphy

W W W . P O T A T O . O R G . U K / M I N I M I S I N G - D A M A G E8
Section 1
Potatoes are more likely to damage where:
• Headlands are planted and lifting requires running on other drills
• Rows curve
• It is necessary to run over other rows to open up the crop for harvesting
• Spray lines are planted.
5. Soil preparation
Soil preparation should produce a seedbed free of large clods and stone, without creating too fi ne a tilth and avoiding compaction or smearing. An ideal seedbed has at least 20cm fi ne tilth free from large clods and stones.
When soils are too wet, serious compaction and clods can be created on all soil types. Delaying soil preparation by a day or two can reduce the risks.
Actions:
• Pay attention to creating the correct bed width. A narrow width will lead to the harvester share picking up stones and clods from the wheelings, increasing potato damage
• If using wide tyres with bed tillers or separators, check the degree of compaction to the edge of the bed. Sometimes wide tyres only make contact at the edges and not the furrow bottom, so any benefi t of wide tyres is lost
• Try to avoid undulating beds after the separator. This makes accurate planting depth diffi cult
• Make sure the separator discharge is to the furrow bottom and not the drill side.
Potatoes are more likely to damage:
• When soils are cloddy or high in stone content and following poor destoning
• Where soils are compacted or smeared
• Where poor soil preparation has taken place.
6. Planting
Season, site location, soil type and soil preparation will infl uence planting conditions, crop development and maturity. Time operations to reduce the incidence of a cold, wet and cloddy seedbed.
The main factors at planting that can infl uence damage at harvest are the position within the ridge (side to side) and the consistency of planting depth. These factors affect the harvester’s ability to lift the crop with minimal damage.
Actions:
• Check planter set-up to ensure seed is planted in the centre of the ridge and that it remains there
• Ensure the covering units do not bring up stones and clods from the wheelings
• Ensure seed is planted at an even depth with a good cover of soil and at least 7.5cm (depending on variety) of free soil below the seed
• Monitor planting operations for even depth and uniform spacing between plants
• Watch out for creating clods and compaction with ridging bodies and hoods.
Potatoes are more likely to damage when:
• Planted off centre and at variable depths
• Crop is uneven.
Sou
rce:
Gar
y N
aylo
r P
hoto
grap
hy
Sou
rce:
Gar
y N
aylo
r P
hoto
grap
hy

9
Section 1
W W W . P O T A T O . O R G . U K / M I N I M I S I N G - D A M A G E
7. Crop nutrition
Nitrogen (N)Can affect maturity and dry matter (DM) content. N applications should be tailored to variety and length of growing season. Potato Council-funded research shows bruising can be signifi cantly lowered in crops receiving 240kg/ha N application. However, N application at this level is excessive for most crops and other factors for managing bruising should be used.
Note: excessive N will delay maturity, resulting in later harvest, possibly when soil temperatures are lower.
Potash (K)Some trials have shown a reduction in bruising with increased rates of K, however, this has not been consistent in all trials. The best recommendation is to follow the guidelines in the Potato Council’s manual ‘Crop Nutrition for Potatoes’ (www.potato.org.uk/publications/crop-nutrition-potatoes) or RB209 and to test the soil for K every 3 to 5 years and aim for the target index 2. Any additional K needed to build soil reserves can be included. Bear in mind K above the amount applied for an index 2 soil is not guaranteed to reduce bruising. High K applications can reduce the DM content of tubers. Applying K in the autumn, or using potassium chloride (muriate of potash), could result in a higher DM content.
8. Irrigation
Crops suffering from water-stress are more likely to be susceptible to bruising; therefore, availability of irrigation can help minimise bruising.
The level of soil moisture can infl uence nutrient uptake by a crop, with crops in dry soils often having poor nutrient uptake. Levels of N&K can affect bruising susceptibility.
Dry soil conditions, both at defoliation and harvest, are associated with bruising. The availability of irrigation will allow the soil moisture to be managed at these critical times. Soil moisture should be monitored carefully. Saturated soils through either over irrigation or rainfall before harvest can lead to delayed skin set and tubers being more susceptible to shatter cracking. Saturated soils during harvest can lead to soft rots and disease development.
Actions:
• Where irrigation is not available, consider site selection carefully and choose moisture retentive soils
• Think carefully about positioning of irrigation runs
• Crops are more prone to damage in irrigation runs so consider segregating the harvested crop from these areas.
Potatoes are more likely to damage:
• When grown under dry conditions.
Sou
rce:
Gar
y N
aylo
r P
hoto
grap
hy
Sou
rce:
Gar
y N
aylo
r P
hoto
grap
hy

W W W . P O T A T O . O R G . U K / M I N I M I S I N G - D A M A G E10
Section 1
9. Crop maturity and dry matter (DM)
Bruising has been reported to increase with crop maturity, some trials have supported this but not for all varieties. However, there is no clear defi nition or measure of crop maturity. When comparing two crops of the same variety, there is a reasonable chance that the crop with the higher dry matter will be more prone to bruising. This does not hold in every case, therefore caution must be used in making decisions of bruising susceptibility based only on DM %. When comparing dry matter of different potato varieties there is no correlation between dry matter and bruising.
High DM content can arise from an increase in starch content and/or tuber dehydration and this may account for the inconsistencies from some varieties and in some seasons. Other research has indicated that tuber water status may play a key role in determining bruising susceptibility and the potential for shatter cracking, as evidence suggests that this is infl uenced when tubers are hydrated.
Actions:
• Crops should be managed to reach the desired maturity before harvest by:
– Timely planting
– An even plant stand
– Correct nutrition
• Assess a crop’s dry matter prior to harvesting
• Treat all high dry matter crops with caution.
Potatoes are more likely to damage when:
• Tubers are old
• They have a higher dry matter.
10. Haulm destruction
In the majority of harvest operations the less haulm that needs to be removed by the harvester the lower the tuber damage. Damage can often occur when haulm is separated from the crop by the haulm rollers/separators, especially if the tubers are fi rmly attached to the stolons.
Haulm should be managed so that it is fully desiccated at the time of harvest and the stolons can be easily detached from tubers.
Flailing as part of the desiccation process or prior to harvest will reduce the amount of haulm having to be separated from the crop. Care should be taken to match the ridge profi le to that of the fl ail, with fl ail tines in good condition. Aim for approximately 6 inches of stem left behind for the haulm rollers. Anything less and the risk of impact of the tines on the soil surface causing damage will be increased.
Actions:
• Ensure effective haulm desiccation to achieve easy separation of tubers from stolons and good skin set
• Keep the volume of haulm that enters the harvester to a minimum.
Potatoes are more likely to damage when:
• An excessive amount of haulm has to be removed by haulm rollers/separators
• There is poor desiccation and stolons are still attached to the tubers.
Sou
rce:
Gar
y N
aylo
r P
hoto
grap
hy
Sou
rce:
Gar
y N
aylo
r P
hoto
grap
hy

11
Section 1
W W W . P O T A T O . O R G . U K / M I N I M I S I N G - D A M A G E
11. Soil moisture
Soil moisture at defoliation Soil moisture at harvest is a well-known key factor in relation to the levels of bruising. Extreme soil moisture, such as very wet or very dry, will challenge the harvester operator. In very dry conditions there is diffi culty in achieving adequate soil cushioning for tubers on the webs or at transfer points. In wet conditions extra cleaning is required to remove clods without causing damage to tubers.
Action:
• When soils are dry consider whether additional irrigation will ease the harvesting process. Take account of weather forecasts so that irrigation is not scheduled ahead of a forecasted rainfall
• Where irrigation is not available, and if the risk of bruising susceptibility is high, consider delaying harvest until after rainfall
• Check harvester settings are appropriate to soil conditions.
Potatoes are more likely to damage when:
• Harvested in dry conditions with little soil cushioning on the primary web
• Harvested in wet conditions where increased agitation and separation is needed.
12. Temperature
Lower tuber and soil temperatures experienced when harvesting early in the morning or late in the season increases damage susceptibility. Ideally tubers should be over 10°C before harvesting begins. In many regions where minimum daily temperatures are lower, harvesting when tubers are above the recommended temperature is often limited to early season only. Later in the season, consider delaying harvesting until temperatures have risen.
Research has shown that temperatures affect the physical properties of the tuber. Results from the United States show tubers will bruise more easily with impact at lower temperatures due to ‘failure’ of tuber tissue.
Soil temperatures in individual fi elds may vary and can be infl uenced by soil type, soil moisture, aspect and localised environmental factors. Soil temperatures in specifi c fi elds are important considerations in prioritising fi elds for harvest.
It is important that soil or tuber temperature is used as a guide and not ambient air temperature.
Sou
rce:
Gar
y N
aylo
r P
hoto
grap
hy
Sou
rce:
Gar
y N
aylo
r P
hoto
grap
hy
W W W . P O T A T O . O R G . U K / M I N I M I S I N G - D A M A G E12
Section 1
Actions:
• Preferably, harvest crops when soil and tuber temperatures are above 10°C
• Later in the season when night time temperature begins to fall, delay harvesting until later in the day when temperatures have risen.
Potatoes are more likely to damage when:
• Harvested at low temperatures during early morning or harvesting later in the season
• Harvested at lower temperatures, less than 10°C.
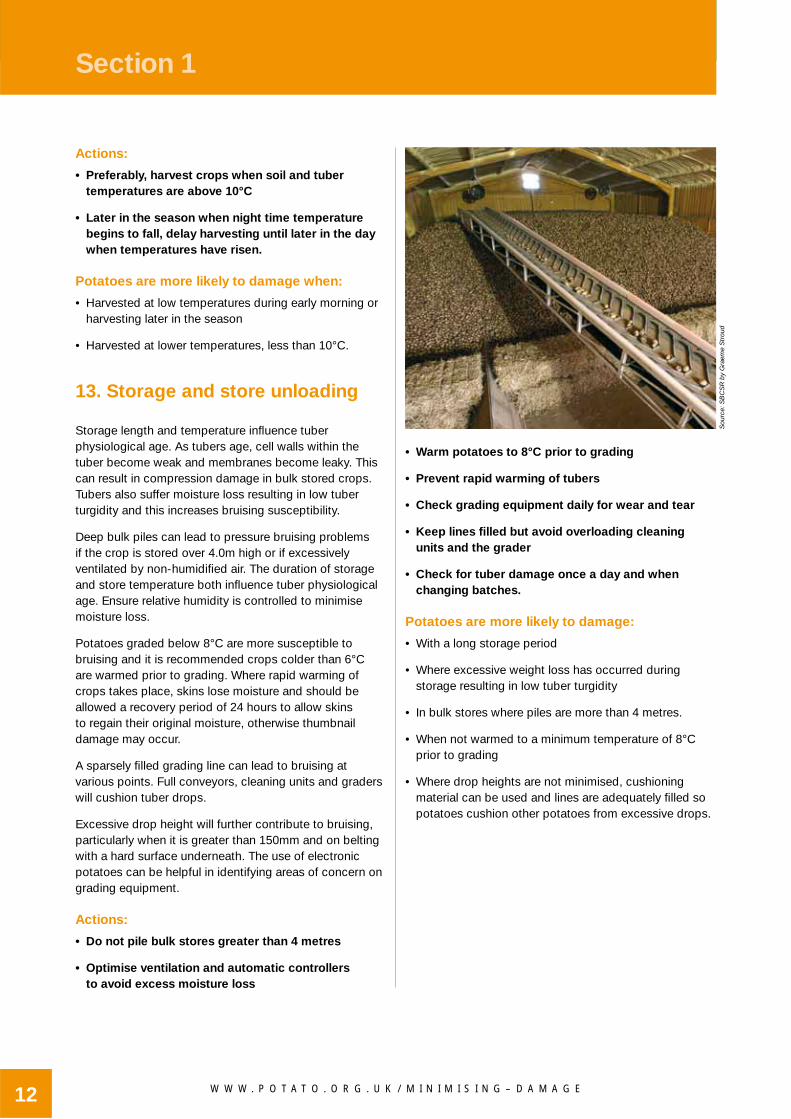
13. Storage and store unloading
Storage length and temperature infl uence tuber physiological age. As tubers age, cell walls within the tuber become weak and membranes become leaky. This can result in compression damage in bulk stored crops. Tubers also suffer moisture loss resulting in low tuber turgidity and this increases bruising susceptibility.
Deep bulk piles can lead to pressure bruising problems if the crop is stored over 4.0m high or if excessively ventilated by non-humidifi ed air. The duration of storage and store temperature both infl uence tuber physiological age. Ensure relative humidity is controlled to minimise moisture loss.
Potatoes graded below 8°C are more susceptible to bruising and it is recommended crops colder than 6°C are warmed prior to grading. Where rapid warming of crops takes place, skins lose moisture and should be allowed a recovery period of 24 hours to allow skins to regain their original moisture, otherwise thumbnail damage may occur.
A sparsely fi lled grading line can lead to bruising at various points. Full conveyors, cleaning units and graders will cushion tuber drops.
Excessive drop height will further contribute to bruising, particularly when it is greater than 150mm and on belting with a hard surface underneath. The use of electronic potatoes can be helpful in identifying areas of concern on grading equipment.
Actions:
• Do not pile bulk stores greater than 4 metres
• Optimise ventilation and automatic controllers to avoid excess moisture loss
• Warm potatoes to 8°C prior to grading
• Prevent rapid warming of tubers
• Check grading equipment daily for wear and tear
• Keep lines fi lled but avoid overloading cleaning units and the grader
• Check for tuber damage once a day and when changing batches.
Potatoes are more likely to damage:
• With a long storage period
• Where excessive weight loss has occurred during storage resulting in low tuber turgidity
• In bulk stores where piles are more than 4 metres.
• When not warmed to a minimum temperature of 8°C prior to grading
• Where drop heights are not minimised, cushioning material can be used and lines are adequately fi lled so potatoes cushion other potatoes from excessive drops.
Sou
rce:
SB
CS
R b
y G
raem
e S
trou
d

13
Section 1
W W W . P O T A T O . O R G . U K / M I N I M I S I N G - D A M A G E 13
Section 2
Harvester settings
Section 3
This section progresses through the harvester from front to rear as the crop fl ows. The 10 major points on the harvester where tuber damage occurs are covered here.
The loss of tubers from various parts of the harvester should be investigated. While some are lost which can reduce marketable yield, others can be pinched or trapped, increasing the number of damaged tubers.
Harvester main functions:
• Lift the crop
• Separate soil from potatoes
• Separate clods from potatoes
• Separate haulm from potatoes
• Deliver tubers to transport
• To achieve the above in a timely and economic manner.
Before the season starts, it’s essential to maintain your equipment. Equally important is checking for damage areas caused by the harvester as the crop is lifted. Remember, conditions change and your harvester needs to set up for the current fi eld conditions.
Basic set-up • The harvester must be hitched with the correct height of
drawbar and extension length to allow turning. Follow the recommendations in the manufacturer’s handbook for the correct hitch geometry to your tractor
• The machine should have a width share compatible with the drill profi le and the bed widths being lifted
• The harvester should sit level and the wheels, particularly on the left side should be aligned correctly. Normally, the left side wheel is offset 50-100mm towards the centre of the machine to avoid touching the next drill
• Tractor wheel settings – it is important that the wheel width settings are checked on the towing vehicle. If they are set too wide or too narrow this can squeeze the sides of the ridges and cause damage to the potatoes in the ridges. Also, if the tyre widths are too great then this can also cause damage at this point.
Sou
rce:
Sta
nden
, Ale
x M
athi
as
10 Transfer out of harvester
1 Haulm destruction before harvester
8 Cleaning unit9 Elevator transfer
6 Agitation
5 Sieving web
2 Diablo rollers
7 Haulm separation
4 Disks
3 Share

W W W . P O T A T O . O R G . U K / M I N I M I S I N G - D A M A G E14
Section 1
14
Section 2
Stop-check of crop in the machineOnce the topper and the tractor have been checked, it is advisable to do a stop-check of the harvester in the fi eld in harvesting conditions. To do this, stop the harvester while it is still full of crop and take samples of potatoes from key areas through the machine, ie main web, second main web, separator, picking table (if fi tted), cart elevator and in the trailer.
1. Haulm destruction
While this is often regarded as ‘mainly’ for getting the skin to set and disease control, it is of vital importance to harvesting. Try to reduce the volume of haulm entering the harvester; this will help reduce the damage in the majority of cases.
Flailing, as part of the desiccation process or prior to harvest, will reduce the amount of haulm having to be separated from the crop. Be careful that the settings on the fl ail do not go too low and damage the tubers in the ridge. Also, make sure the fl ail matches the shape of the ridge, particularly if you use a hood cover on the planter.
Leave the haulm in a state for easy lifting, not tangled or too short, as this will cause major problems at the front end of the harvester. Haulm that is cut too short increases the risk of fl ail damage to tubers in the drill. Short haulm will also fall through the webs and wrap on the drive rollers and won’t be caught in the haulm extractors.
• Avoid fl ailing in wet weather, as the tractor will produce clods, which are diffi cult to remove
• If set correctly, the haulm will be smoothly separated from the tubers and they will fl ow evenly into the harvester.
2. Diablo rollers
Their main function is to hold the drill together as the share enters underneath the crop and to regulate the depth of the share.
Ensure correct alignment with the drills. High downward pressure will damage tubers close to the surface and with some soil types will also cause tubers to spill out the side and be sliced by the discs. Releasing the pressure will lift the crop through undamaged. If the pressure is too low, soil will bulldoze up the front of the machine. Set the pressure point just before this occurs.
Sou
rce:
Em
ber
TV
Sou
rce:
Em
ber
TV

15
Section 1
W W W . P O T A T O . O R G . U K / M I N I M I S I N G - D A M A G E 15
Section 2
The Diablo shoulder needs to just touch the rows to help an even feed into the machine. Adjust the pressure of the Diablo on the ridge to allow an even shape and density to be presented into the machine.
3. Share
The depth of the share should allow all the tubers to be lifted without being sliced. Excessive depth results in too much soil being brought into the harvester which results in a requirement for extra cleaning. Stones will also be picked up.
Watch out for wear on stone fl aps, they may drop and tubers will be lost or hit the primary web.
Check the share height and pitch adjustment to ensure a clean feed onto the web. Digging depth is adjustable to lift the whole crop without cutting any potatoes while avoiding lifting unnecessary amounts of soil.
If the share is set too low, bruising can occur when the potatoes are fed directly into the web. This is diffi cult for operators to see, as crop will be covered by soil at this point.
A well-set share will cause a clean lift with an even fl ow of crop onto the web.
4. Discs
Check discs are set at the correct width and alignment, if set too wide, the machine will take in excessive amounts of soil and stones from the windrow, set too narrow and it will cut into the ridge and slice tubers.
Check the depth and width of discs to ensure no potatoes are cut and to stop the intake section being carried by the discs.
Haulm intake wheels can be set to avoid blockages. These prevent ‘spill’ of tubers from around the sides of the discs. Haulm intake wheels prevent haulm catching at the front support. Watch for the effectiveness of the clearance and any gaps, as tubers falling out will become stuck and damaged and then return into the crop fl ow. Adjust to suit row widths. Monitor wear regularly.
Sou
rce:
Grim
me
UK
Sou
rce:
Sta
nden
, Ale
x M
athi
as
Sou
rce:
Em
ber
TV
Sou
rce:
Sta
nden
, Ale
x M
athi
as

W W W . P O T A T O . O R G . U K / M I N I M I S I N G - D A M A G E16
Section 1
16
Section 2
5. Sieving web
Speed depends on crop yield and soil type. Optimum is to run the web around 85% fi led with tubers. Too slow and tubers will be several deep and will be caught by the haulm roller and forced against the sides. Too fast and tubers will have too much room to move and hit hard surfaces. Ideally, the web should be run so that there is as little rollback of tubers as possible, by keeping soil on the web right to the top or crowd the web with tubers.
• Keep agitation off whenever possible
• The webs are designed to effectively sieve the soil. All rivets should be covered; anything that protrudes will damage your crop
• Tubers will be damaged when they rollback on the web
• The web speed should be set so that the soil goes up to the top of the main web. If too slow, damage could be caused when the crop is fed directly onto the haulm separation unit.
Watch out for damaged rods, bad joining links and web attachment plates. Often, there is too large a gap at the sides and, with a meandering web, tubers can get damaged. Keep guide rollers tight onto the web to prevent it moving from side to side. Web covers can be used to reduce damage, however, make sure they are checked for wear, as they can cause damage if not in good condition.
6. Agitation
An aggressive agitation will damage the crop. Therefore, choose agitation to increase the sieving capacity when necessary but avoid causing the tubers to bounce over the web.
The crop should fl ow evenly, looking like a stream of water.
Action
Keep agitation set as low as possible.
Sou
rce:
Sta
nden
, Ale
x M
athi
asS
ourc
e: G
ary
Nay
lor
Pho
togr
aphy
Sou
rce:
Em
ber
TV

17
Section 1
W W W . P O T A T O . O R G . U K / M I N I M I S I N G - D A M A G E 17
Section 2
7. Haulm separation HIGH RISK AREA
Oscillating fi ngers Designed to spread and align haulm for easier removal by haulm rollers and to separate tubers and haulm. If they are positioned too far down, tubers will be damaged Avoid using if possible.
Ensure they are well lined with rubber (check wear). Back-off pre-loading in light haulm crops. Check spacing to web.
Increase web clearance when excessive haulm is present, to allow greater capacity for haulm removal.
Haulm rollers Try to keep volume of haulm entering the harvester to a low level. Setting is a compromise, depending on crop and haulm. Where the haulm is too short, removal is diffi cult.
The haulm extractors should be set to take out just enough haulm and no more. The aim is to remove 60-70% of the haulm at this point. If all the haulm is removed, the chances are it will be doing more damage than necessary.
If more there is more than one set of extractors divide the task between them. Watch for haulm moving to one
side on the slopes and choking the rollers. Reposition the haulm fi ngers to help guide it out.
Watch spring tensions, especially side to side balance.
The further forward the roller is underneath the primary web head roller, the less haulm is taken out and the less tuber damage.
The further out the roller, the more haulm is caught and the more tubers are caught.
Web drive/roller gap: Too far away from the web and the haulm will not be caught properly but tubers will be. Too close and excessive wear occurs if it touches the web.
Haulm separation should be effi cient but gentle. The confi gurations should be adjusted to suit the varying crop conditions.
Sou
rce:
Sta
nden
, Ale
x M
athi
as
Sou
rce:
Em
ber
TV

W W W . P O T A T O . O R G . U K / M I N I M I S I N G - D A M A G E18
Section 1
18
Section 2
8. Cleaning unit
HIGH RISK AREA
The cleaning unit should suit the different conditions and crops. All systems are adjustable for speed and aggression. Unnecessary damage can be avoided by making sure the separator is set to suit lifting conditions. Keep the crop on the cleaning unit for as little time as possible.
Cameras in/on the harvester can be used to monitor crop fl ow and detect blockages quickly.
It is designed to get rid of those annoying little clods and stones and other bits of weed and haulm. Correct setting is a compromise between the crop and conditions. Check with the manufacturer’s handbook.
The main adjustments are:• Roller speed
• Angle
• Covering material
• Spiral pitch
• Diameter
• Assistor pintel belts
• Area of rollers used
In general, keep the speed around mid position, too fast and tubers are damaged by being thrown up, too slow and they are ‘grabbed’ by the rollers. The tubers must be kept moving. Use angle as the main adjustment.
Use large diameter rollers for small tubers, less cleaning, less damage and in dry conditions. For increased cleaning, use smaller diameter rollers; this can, however, result in more tuber damage. Most manufacturers have three to four different sizes available.
Correct presentation of the crop is essential; crop on-fl ow and off-fl ow must be smooth to keep damage down. Avoid large vertical drops and tubers moving fast.
Spools • Watch for wear and stuck stones
Spirals • Distorted spirals edge gaps and damaged curtains,
stuck stones
• Spacing is usually adjustable
Finer rollers – types • Roller-star, galaxy cleaner
Adjustments • Speed: crop should move as a continuous ‘stream’,
not too fast, not too slow
Cleaning unit options
Omega
RS + twinsep + multisep
Multisep
Dahlmen
Source: Standen, Alex Mathias
Source: Standen, Alex Mathias
Source: Grimme UK
Source: Grimme UK

19
Section 1
W W W . P O T A T O . O R G . U K / M I N I M I S I N G - D A M A G E 19
Section 2
• Spacing: the greater the space the more cleaning and the more tubers lost
• Height of plain roller: too high = more cleaning, crop is held back and can be damaged
• Angle of unit: the steeper the angle, the less cleaning
• Watch for haulm loading, wear and gaps.
Picking tables• Watch drops and tuber direction changes. Use web
covers and foam padding, keep an eye on wear of padding material and side curtains. Be aware of side gaps where tubers can get damaged. Keep conveyor speeds low to keep tuber speeds down.
9. Cart elevator
Most cart elevators have sort pockets and active side panels, which ensure that the crop is not moving within the elevator. Each pocket is like an individual basket of crop. This type of elevator avoids scuffi ng.
On-feed drop heights should be kept as low as possible. Keep speeds down so that fl ights are 75% full and not running with only half a dozen tubers per fl ight. Elevator speed affects tuber damage at both the on-feed and the discharge point.
All ‘rods’ should be rubber covered.
Excessive side gaps can cause a lot of skinning and gouging of the tubers. Keep side shield close to fl ights and check to make sure the guide rollers are holding the web tight and not allowing it to meander from side to side.
10. Elevator transfer
The major problem area for damage.
Trailer drivers and the harvester operator must work as a team to deliver the crop safely into the trailer or boxes, this is a key component to minimising damage in the crop.
Sou
rce:
Sta
nden
, Ale
x M
athi
asS
ourc
e: S
tand
en, A
lex
Mat
hias

W W W . P O T A T O . O R G . U K / M I N I M I S I N G - D A M A G E20
Section 1
20
Section 2
a) Trailer transfer – modern harvester cart elevators are designed to place the crop into the trailer without the use of fall breakers. It is important to layer the crop across the trailer to minimise drops.
b) Box fi lling shoot – can reduce the drop into the boxes, minimising possible bruising. It improves the accuracy of delivery when loading directly into boxes.
Typical drop heights are 1-2m onto hard surfaces such as trailer or box fl oors. There is also a high chance of collision between the elevator and trailer/boxes.
Low damage is very dependent on operator skill and teamwork with the trailer driver. Most operators know that the elevator should be kept at a low drop height for low damage. There are so many other parts of the harvester to watch that usually the elevator is kept at a higher than ideal height.
Increase the visibility wherever possible and use aids, such as trailer mats and fall breakers.
Essential to low damage is a good operator.
Sou
rce:
Gar
y N
aylo
r P
hoto
grap
hyS
ourc
e: G
ary
Nay
lor
Pho
togr
aphy
21
Section 1
W W W . P O T A T O . O R G . U K / M I N I M I S I N G - D A M A G E 21
Section 3
Soil conditions
Harvester settings/operator guide for reduced tuber damage (for harvesters fi tted with axial rollers) is dependent upon soil conditions.
The information on the harvester settings, dependent upon the soil conditions covered in this section, is intended to be additional to and not a replacement for the previous pages.
1. Average soil conditions
Soil that can be separated, if required, or kept on the harvester easily; eg wet to damp light soils or damp heavy soil.
GeneralSet axial cleaning systems to maximise angle (minimum cleaning), adjust axial roller speed to suit crop size and shape and adjust forward speed and primary web agitation to achieve a small amount of soil or crumbly clods to be carried over to the fi rst part of the axial rollers. Use the angle of roller table to adjust for differences along the drill. Use forward speed and primary web agitation for larger shifts in soil condition. Use roller speed to ‘tweak’ cleaning.
Several attempts at adjustments of forward speed and agitation settings are usually required to get good output and optimum cleaning.
Share Set share depth just below the deepest tuber but take care not to dig into unseparated ground.
Some varieties do produce tubers excessively deep, particularly if subsoiled before planting and it may be impossible to lift the crop without slicing tubers. If in doubt, check the depth with fork/spade to justify depth settings.
Webs Always observe crop fl ow on the primary web and look for excessive rollback of tubers. Tubers moving gently are not likely to receive too much damage. However, a problem occurs when tubers start rolling back continuously or roll for more than 500mm on the web, or even worse, are seen to leave the web and bounce. Action should be taken to reduce this form of rollback immediately.
Suffi cient soil should be kept with the crop to protect and reduce impact damage at transfer points.
Haulm rollers The tubers should just ‘kiss’ the edge of the haulm extraction roller with just a slight defl ection of the crop.
Tubers observed hitting the haulm rollers and bouncing off or defl ected back onto the web are likely to be damaged. Adjusting the crop fl ow over the haulm extraction roller is a combination of web speed and haulm roller position. Too slow a web speed with the haulm roller high up or rearward will cause damage. If running the web slower than normal, ensure the haulm roller is tucked well underneath.
Set the haulm extraction system at the minimum setting to take out the haulm with the particular crop that you are lifting. Remember, most machines have at least two, if not three, areas where haulm could be removed, do not try and take all the haulm at one point. Try to keep the volume of haulm entering the harvester low as this signifi cantly reduces the amount of tuber damage.
Cleaning systems Study the harvester manual and the manufacturer’s recommendations.
Check that the axial roller diameter is appropriate for the crop.
Large diameter rollers = less cleaning and less damage to smaller tubers.
Section 3

W W W . P O T A T O . O R G . U K / M I N I M I S I N G - D A M A G E22
Section 1
22
Section 3
Use just enough cleaning to remove clods. Running the cleaning units at full speed when no clods are present will cause extra damage.
2. Dry soil conditions
General The main areas for tuber damage in dry soil conditions are rollback on webs, web-to-web or web to cleaning system transfers, haulm extraction and cleaning units.
Try to run the harvester full of crop so that at transfers the ‘new’ crop falls onto the previous crop. This avoids the crop hitting hard material and works as long as the base material is harder than tubers. If your harvester has soft landings then it is better that the crop falls onto these soft surfaces rather than tuber to tuber contact.
Shares Increase/adjust share depth to take in as much soil as possible without digging into unseparated ground. Use full-width share in preference to two single drills.
Web To reduce rollback try to keep webs full of crop by increasing forward speed and reducing web speed. Check if your machine has the option of a sprocket change to reduce web speeds.
Use no agitation on the primary web. You may need to disconnect the drive on some machines to prevent agitation.
If the harvester has an adjustment for web angle at various positions (by changing support roller position), set for as gentle an incline as possible with no major changes in angle.
Consider changing web pitch to narrower spacing to try and hold more soil on the harvester. Be careful not to use a size smaller than the separator gap or you will pick up stones. With some crops it is better to stick with the wider web as this ‘holds’ the crop better, reducing rollback.
Haulm extractionConsider reversing haulm rollers or changing to softer material (eg Grimme use profi le unit). Check if rotational speed can also be slowed down.
Sou
rce:
Gar
y N
aylo
r P
hoto
grap
hy

23
Section 1
W W W . P O T A T O . O R G . U K / M I N I M I S I N G - D A M A G E 23
Section 3
Second web Use covers on the second web, either split basic, rubber-covered webs or use an agri-web cover.
Cleaning moduleKeep the angle at maximum and speed slightly faster than normal. Try to get the crop off rollers as quickly as possible. Lift up or remove any devices used to hold the crop onto rollers, eg rubber fl aps.
Use watering kit at fi rst point onto axial rollers.
Consider changing module to a gentler unit, eg transverse rollers instead of in line or stars/multi-sep type units.
On machines with the ability to vary the area of axial rollers exposed, you need to determine optimum setting for lowest damage. This may not necessarily be the smallest area of axial exposed.
3. Wet soil conditions
General Tuber damage on harvesters in wet conditions is mainly caused by the need for increased separation of soil and clods especially on the web and cleaning systems.
Remember, the main area for soil extraction on a harvester is the primary web and web-to-web transfers. Use agitation to help sieve soil but watch for tubers being thrown airborne, they can bruise when they land.
Share Keep share as shallow as possible (be prepared to accept some sliced tubers, they are easier to grade-out than bruised tubers from aggressive cleaning modules) use two single shares in preference to full share to reduce soil volume. Some soils will, however, be better with full share to avoid choking.
If the harvester is fi tted with a full width share, fi t a worn share to the middle share and/or adjust digging depths so that it is as shallow as possible, without disrupting soil fl ow.
Check digging width of share blades; keep as short as possible to avoid picking up clods from tractor wheels.
If the incline of the primary web is adjustable, adjust to the steepest angle.
Use as wide as appropriate web pitch to increase sieving. Be aware of possible ground keeper problems.
Keep forward speed slow and web speeds fast to achieve a thin depth of soil on the webs. Soil of more than 100mm depth will ‘lock’ and be very diffi cult to separate.
Adjust forward speed and agitation levels to achieve soil loading that the cleaning unit can cope with. Avoid excessive cleaning to get rid of every last drop of clod, especially if grading into store as it can be taken out at the second attempt.
If the crop is not to receive a second cleaning operation (grading into store) then use a manned harvester with full complement of pickers to help clean the crop up.
Sou
rce:
Gar
y N
aylo
r P
hoto
grap
hy
W W W . P O T A T O . O R G . U K / M I N I M I S I N G - D A M A G E24
Section 1
24
Section 3
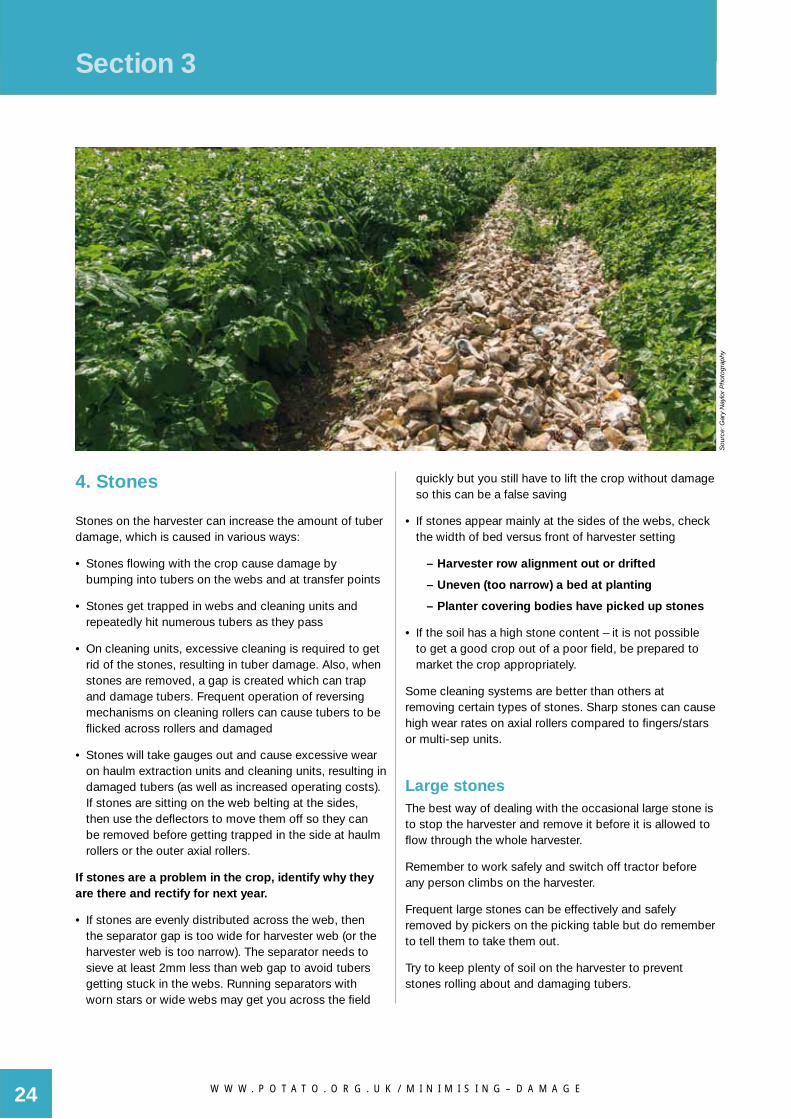
4. Stones
Stones on the harvester can increase the amount of tuber damage, which is caused in various ways:
• Stones fl owing with the crop cause damage by bumping into tubers on the webs and at transfer points
• Stones get trapped in webs and cleaning units and repeatedly hit numerous tubers as they pass
• On cleaning units, excessive cleaning is required to get rid of the stones, resulting in tuber damage. Also, when stones are removed, a gap is created which can trap and damage tubers. Frequent operation of reversing mechanisms on cleaning rollers can cause tubers to be fl icked across rollers and damaged
• Stones will take gauges out and cause excessive wear on haulm extraction units and cleaning units, resulting in damaged tubers (as well as increased operating costs). If stones are sitting on the web belting at the sides, then use the defl ectors to move them off so they can be removed before getting trapped in the side at haulm rollers or the outer axial rollers.
If stones are a problem in the crop, identify why they are there and rectify for next year.
• If stones are evenly distributed across the web, then the separator gap is too wide for harvester web (or the harvester web is too narrow). The separator needs to sieve at least 2mm less than web gap to avoid tubers getting stuck in the webs. Running separators with worn stars or wide webs may get you across the fi eld
quickly but you still have to lift the crop without damage so this can be a false saving
• If stones appear mainly at the sides of the webs, check the width of bed versus front of harvester setting
– Harvester row alignment out or drifted
– Uneven (too narrow) a bed at planting
– Planter covering bodies have picked up stones
• If the soil has a high stone content – it is not possible to get a good crop out of a poor fi eld, be prepared to market the crop appropriately.
Some cleaning systems are better than others at removing certain types of stones. Sharp stones can cause high wear rates on axial rollers compared to fi ngers/stars or multi-sep units.
Large stones The best way of dealing with the occasional large stone is to stop the harvester and remove it before it is allowed to fl ow through the whole harvester.
Remember to work safely and switch off tractor before any person climbs on the harvester.
Frequent large stones can be effectively and safely removed by pickers on the picking table but do remember to tell them to take them out.
Try to keep plenty of soil on the harvester to prevent stones rolling about and damaging tubers.
Sou
rce:
Gar
y N
aylo
r P
hoto
grap
hy
25
Section 1
W W W . P O T A T O . O R G . U K / M I N I M I S I N G - D A M A G E 25
Section 4
Grader settings
Section 4
Potato grading can be done straight from the fi eld or out of store and, if not managed carefully, will damage the crop.
Grader main functions:
• Separate soil, clod and stones from potatoes
• Remove reject crop
• Size grade.
Before grading starts, it’s essential to maintain your equipment; worn parts and abrasive edges need to be restored. Remember, crops differ from variety and fi eld and your grader needs to be set up for the current crop type. Equally important is checking for key damage areas caused by the grader, the top eight areas to check are detailed here.
Potential damage points
1. Bulker/trailer to hopper
Ensure that the hopper rubber back traps and soft-landing rubber hopper lining are kept in good condition to ensure cushioned landing of crop when transferred to the hopper and to prevent damage and/or wastage by crop falling onto the fl oor.
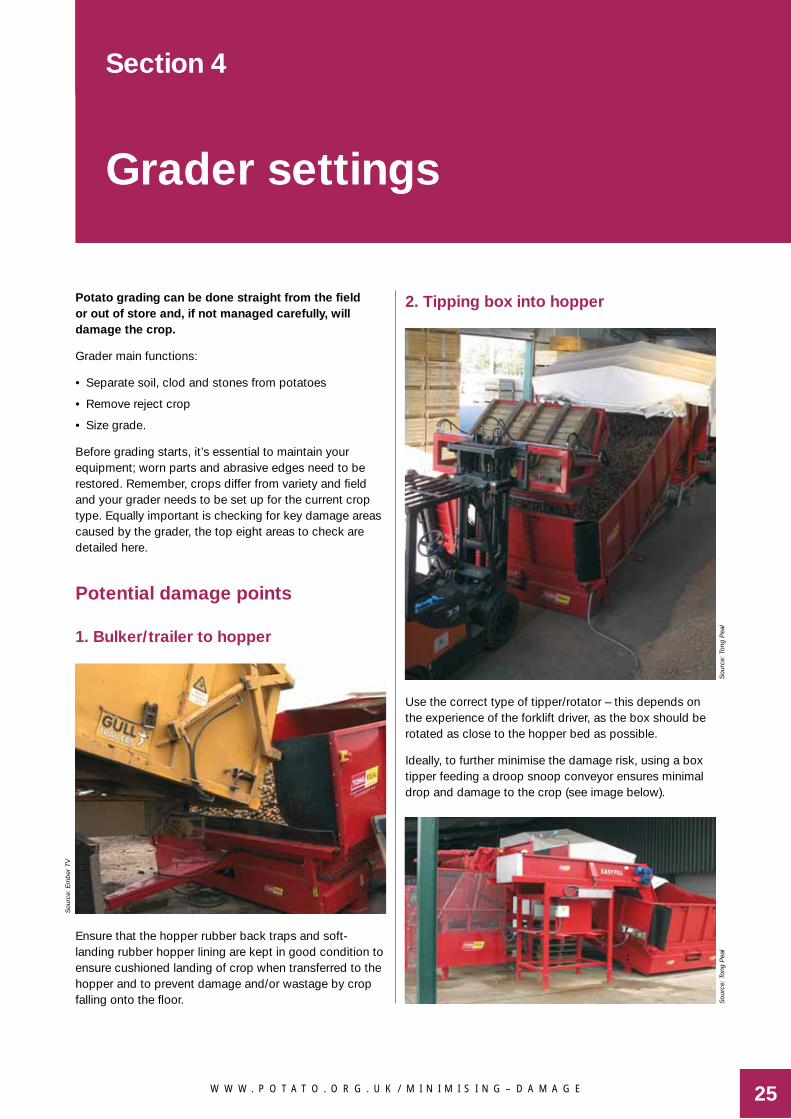
2. Tipping box into hopper
Use the correct type of tipper/rotator – this depends on the experience of the forklift driver, as the box should be rotated as close to the hopper bed as possible.
Ideally, to further minimise the damage risk, using a box tipper feeding a droop snoop conveyor ensures minimal drop and damage to the crop (see image below).
Sou
rce:
Em
ber
TV
Sou
rce:
Ton
g P
eal
Sou
rce:
Ton
g P
eal

W W W . P O T A T O . O R G . U K / M I N I M I S I N G - D A M A G E26
Section 1
26
Section 4
3. Transfer from hopper to cleaner
Maintain an even fl ow of crop to the cleaner to ensure it is carefully spread out from debris ensuring maximum effect of the cleaner in removal of soil and potentially damaging stones.
4. Crop cleaner
To ensure effective yet gentle cleaning of the crop, it is vital that the cleaning unit, whether spiral rollers, stars or coils, is set up to suit the crop conditions of any given load. Be aware of the right settings for the conditions you’re dealing with. This will ensure the cleaner cleans the crop effectively without damaging it.
5. Sizing
Check that pintle drive rollers are in good order so that the screen doesn’t slip. Ensure the screen is kept in good condition, as any damage to the steel could damage the crop. Do not run agitators too fast, ensure agitator rollers are maintained in good order.
6. Inspection
Check the drop from the screen to the inspection area and ensure this is kept to a minimum. Keep crop feed constant and steady, running too fast could cause
Sou
rce:
Em
ber
TV
Sou
rce:
Ton
g P
eal
Sou
rce:
Em
ber
TV
Sou
rce:
Em
ber
TV
Sou
rce:
Ton
g P
eal

27
Section 1
W W W . P O T A T O . O R G . U K / M I N I M I S I N G - D A M A G E 27
Section 4
8. Transfer to bulk storage or bulker/trailer
Ensure heights are matched between elevators and conveyors at any transfer points, to minimise drop. Keep rubber soft landing at contact points, including elevator hopper, in good condition to minimise damage. Ensure elevator head is controlled carefully so that it is placed as close to stored crop as possible for minimum drop. Match the speed of the grader conveyors and elevator to help keep the fl ow of crop evenly spread, minimising damage.
damage to the crop and cause it to be missed by those inspecting. Use turn rollers on inspection belts so both sides of crop are inspected as it travels along the conveyors.
7. Transfer to boxes
Ensure the box fi lling machine keeps the crop drop to a minimum. Ensure the machine belt has deep fl ight or doorstop fi ngers to gently hold the crop until it reaches the bottom of the box. This stops it falling quickly into the box. Ensure the sensors are clean, maintained and set correctly to suit your box size to ensure minimal crop damage at all times.
Do not over fi ll boxes, forklift tines and the bottom of the box above can cause damage when stacking.
Sou
rce:
Em
ber
TV
Sou
rce:
Em
ber
TV
Sou
rce:
Em
ber
TV
Sou
rce:
Ton
g P
eal
Sou
rce:
Ton
g P
eal

W W W . P O T A T O . O R G . U K / M I N I M I S I N G - D A M A G E28
Section 1
28
Section 5Section 5
Assessing damage
How to complete a damage and bruising assessment
Excessive levels of damage and bruising can make your product unacceptable to your customers and can lead to it rotting in store and assisting in the spread of fungal diseases.
It is relatively straightforward to carry out your own assessment of any damage and bruising, which may occur during crop harvesting and handling operations. For peace of mind and self-assurance, it is good practice to police your own work.
As a fi rst step, make sure that you know the preferred sampling, assessment and quality requirements of your buyer. If these are not available, then the following guidelines are provided so that you can develop your own assessment plans.
SamplingDamage and bruising levels will increase throughout harvesting and handling operations. You may wish to sample at more than one point in the harvesting process to identify causes of damage and bruising. In each case,
ensure machinery is safe to approach before collecting a sample. Depending on how much damage is being encountered you may need to repeat sampling at various times throughout the day, especially if you have changed variety and soil type or adjusted machinery settings. A sample will need to comprise 15-20kg of tubers.
Damage assessmentCarefully wash all traces of soil from the sample. This is best done by hand using copious amounts of water and a sponge (mechanical washers tend to cause some damage which may interfere with your assessment). Tubers should then be inspected and divided into categories – Undamaged, Scuffed, Slight or Severe.
‘Scuffed’ – defi ned as broken skin only, with no fl esh damage.
‘Slight’ – defi ned as fl esh damage removable by two strokes of a peeler.
‘Severe’ – defi ned as damage not removed by two strokes of a peeler.
Once assessed, the weight of tubers (a) in each category should be recorded. From this, an index can be calculated using the following table:
Damage type Weight of tubers Total weight % Factor Damage index
Undamaged (a) (c) = (a/b*100) 0 = (c) x factor
Scuffed 1
Slight 3
Severe 7
Total (b) (d)*
Example of 20kg sample assessment* Index (d) should be as low as possible (<100) but you or more importantly your customers, will set their own standards – the lower the index the less damage is being caused. If you get a score over 100 stop and recheck operations and settings.
45153
3551
20 85
551
07515

29
Section 1
W W W . P O T A T O . O R G . U K / M I N I M I S I N G - D A M A G E 29
Section 5
Bruising assessmentA bruise on a potato will normally take 3 or 4 days to develop but this process can be accelerated by storing a sample in warm humid conditions overnight. A hot box is ideal for this. These can be bought from various suppliers or you can make your own. The hot box needs to be able to maintain 34-36°C, 95-98% relative humidity and must not be completely sealed.
Once the sample has been ‘hot-boxed’ overnight, the assessment can be completed. Carefully peel around the tuber to look for black/grey discolouration of the fl esh below the skin. Categorise as Nil, Slight or Severe. Slight bruises being removed by 2 peels, severe bruises not being removed by 2 peels. Assessing samples in batches of 25 tubers, makes it easy to calculate % bruising in each category. Check with your buyer since some companies use ‘minutes in the rumbler’ rather than number of peels.
In-fi eld damage assessment checks
Temperature checksIt is important that before harvesting commences the temperature is checked. When tuber temperature is below 10°C there is a high risk of the tubers thumbnail cracking.
Electronic potatoThis device will record impacts as the crop is moving through a piece of machinery. It is a good on-site tool to see where potential sources of damage could be. Comparing this information with hot box results allows the harvester and grader teams to isolate any problems relatively quickly. It is a good interactive tool when changing settings and assessing the effect on the crop.

W W W . P O T A T O . O R G . U K / M I N I M I S I N G - D A M A G E30
Section 1
30
Section 6Section 6
Health & Safety – training
Safe working is critical when utilising with all potato handling machinery. It is important to remember to switch off machine engines and moving parts when making any adjustments or clearing blockages. All staff in the area should be trained in the use of this type of machinery, aware of the risks and equipped with the appropriate Personal Protection Equipment (PPE). Machinery Damage checks and maintenance to machinery must be completed with care and in accordance with the manufacturer’s guidelines.
Potato Council has developed an online modular training programme for the Industry to train staff in procedures to ensure a safe working environment, while emphasising product quality and the correct use of machinery within operations that are regarded as high risk.
See more at: www.potato.org.uk/growing/health-safety
Sou
rce:
Gar
y N
aylo
r P
hoto
grap
hy

31W W W . P O T A T O . O R G . U K / M I N I M I S I N G – D A M A G E

© Agriculture and Horticulture Development Board 2013. All rights reserved. Potato Council is a division of AHDB. Registered Offi ce: Agriculture and Horticulture Development Board, Stoneleigh Park, Kenilworth, Warwickshire CV8 2TL.
Potato CouncilAgriculture and Horticulture Development Board
Stoneleigh ParkKenilworth
WarwickshireCV8 2TL
Tel: 0247 669 2051Web: www.potato.org.ukTwitter: @PotatoCouncil
2013 revision by:Claire Hodge
Potato Council would like to acknowledgeGrimme UK, Martin Lishman, SBCSR, Standen and Tong Peal
for their contribution to this guide.Content sourced from 2006 minimising bruising
publications written by Fraser Milne.
While the Agriculture and Horticulture Development Board, operating through its Potato Council division, seeks to ensure that the information contained within this document is accurate at the time of printing, no warranty is given in respect thereof and, to the
maximum extent permitted by law, the Agriculture and Horticulture Development Board accepts no liability for loss, damage or injury howsoever caused (including that caused by negligence) or suffered directly or indirectly in relation to information and opinions
contained in or omitted from this document.
£80.00where sold