Embed Size (px)
Citation preview
M.D.G., EMI Division © 1995 Yamaha Corporation
VT49660 509POCP1.3-01A0 Printed in Japan

1
Congratulations!You are the proud owner of a fine electronic keyboard. The Yamaha PSR-A3 PortaTone
combines the most advanced AWM tone generation technology with state-of-the-art digitalelectronics and features to give you stunning sound quality with maximum musical enjoyment.A new large graphic display and easy-to-use interface also greatly enhance the operability ofthis advanced instrument.
In order to make the most of your PortaTone’s features and extensive performancepotential, we urge you to read the manual thoroughly while trying out the various featuresdescribed. Keep the manual in a safe place for later reference.
Important Features 160 outstanding voices with nine percussion kits.
A Voice Set function automatically selects appropriate voice parameters whenever a voiceis selected.
140 accompaniment styles, each with independent intro, main A and B, 4 fill-ins, and endingsections.
Advanced auto-accompaniment technology gives you fully-orchestrated accompanimentto back up what you play on the keyboard.
Large multi-function LCD display panel makes it easy to select and edit parameters.
One Touch Setting feature instantly provides you with four types of registration settings, allof which match to the selected accompaniment style.
Digital Effects — Reverb, Chorus and DSP, let you freely create a variety of different sonicenvironments.
Minus One, and Repeat functions are ideal for learning new songs and polishing yourkeyboard technique.
Song recording feature lets you record two melody tracks with an accompaniment track.
With the Multi Pads, you can play and record a number of short rhythmic and melodicsequences, to add a spice to your performance.
Registration Memory saves 128 your favorite panel settings for instant recall when needed.
Arabic Scale instantly allows you to play arabic music.
Optional Yamaha Music Cartridges can be plugged in for enjoyable automated perform-ance, keyboard practice, and extra accompaniment styles.
MIDI compatibility and a range of MIDI functions make the PSR-A3 useful in a range ofadvanced MIDI music systems.
Built-in amplifier and speaker system delivers top-quality sound without the need forexternal equipment.

2
Contents
Taking Care of Your PortaTone ................................................. 3
Panel Controls 4
The Music Stand ......................................................................... 5
Setting Up 6
Power Supply .............................................................................. 6 Using An Optional AC Power Adaptor .................................. 6 Using Batteries ..................................................................... 6
Connections ................................................................................ 7 The PHONES Jack ............................................................... 7 SUSTAIN Jack ...................................................................... 7 AUX OUT R and L+R/L Jack ................................................ 7 MIDI IN and OUT Connectors .............................................. 7
The Demonstration 8
Basic Display Operation 10
Playing the PSR-A3 12
Selecting & Playing Voices ...................................................... 12 Keyboard Percussion ......................................................... 14
The Split Mode .......................................................................... 15Changing the Split Voice & Related Parameters ................... 15
Touch Response ....................................................................... 17Dual Voice .................................................................................. 17
Changing the Dual Voice & Related Parameters ................... 18Harmony/Echo ........................................................................... 20
Selecting a Harmony/Echo Type ........................................... 20Sustain ....................................................................................... 22Transposition ............................................................................ 23Pitch Bend ................................................................................. 23
Digital Effects 24
Using the Digital Effects ........................................................... 24Changing the Reverb Effect ..................................................... 24
Selecting the Reverb Effect Type .......................................... 24Setting the Reverb Return Level ............................................ 25
Changing the Chorus Effect .................................................... 26Selecting the Chorus Effect Type .......................................... 26Setting the Chorus Return Level ............................................ 27
Changing the DSP Effect .......................................................... 28Selecting the DSP Effect Type .............................................. 28Setting the DSP Return Level ................................................ 29
Using Auto Accompaniment 30
The Stop Accompaniment Function ................................... 37Accompaniment Track Control ................................................ 38
Large/Small Accompaniment .............................................. 39 Muting Individual Tracks ..................................................... 39 Changing Accompaniment Track Voices ............................ 40 Adjusting Accompaniment Track Volume ........................... 40
Changing the Accompaniment Split Point ............................. 41One Touch Setting .................................................................... 42
Using Arabic Scales 43
Setting an Arabic Scale ............................................................ 43Adjusting the Scale Tuning .................................................... 43
Registering the Scale Settings ................................................ 45Recall the Scale Settings ......................................................... 45Accompaniment Scale Tuning ................................................. 46
Registration Memory 47
Registering the Panel Settings ................................................ 47Recall the Registered Panel Settings ...................................... 49The Accomp Freeze Function .................................................. 49
Song Recording 50
Recording a Melody Track ....................................................... 50Recording Accompaniment With or Without a Melody .............. 53Accompaniment and Melody Playback ................................... 56
Play from a Specified Measure .............................................. 57 Voice & Volume Rewrite ..................................................... 58 Clearing the SONG TRACKS ............................................. 58
The Multi Pads 59
Playing the MULTI PADS .......................................................... 59Recording the MULTI PADS ..................................................... 61
Using Music Cartridges 64
Inserting a Music Cartridge ................................................. 64 Music Cartridge Handling Precautions ............................... 64
Cartridge Accompaniment Styles ........................................... 65Selecting Cartridge Styles ..................................................... 65
Cartridge Songs ........................................................................ 66Cartridge Song Playback ....................................................... 66
Cartridge Registration Presets ................................................ 67Selecting Cartridge Registration ............................................ 67
Practice Features 68
The Minus One Mode ................................................................ 68 Specifying the Parts To Be Turned On or Off ..................... 68
Repeat Play ................................................................................ 69
Overall Functions 70
General Functions .................................................................... 71 Keyboard Volume ............................................................... 71 Octave ................................................................................ 71 Reverb Level ...................................................................... 72 Chorus Level ...................................................................... 72 DSP Level ........................................................................... 72 Pan ..................................................................................... 72 Voice Set ............................................................................ 73 Accompaniment Volume ..................................................... 73 Touch Sensitivity ................................................................ 73 Minus-one Right/Left-hand Channel ................................... 74 Pitch Bend Range ............................................................... 74 Metronome ......................................................................... 74 Tuning ................................................................................. 74
MIDI Functions .......................................................................... 75 Remote Channel ................................................................. 76 Keyboard Out ..................................................................... 77 Song Out ............................................................................ 77 Accompaniment Out ........................................................... 77 Local Control ...................................................................... 78 External Clock .................................................................... 78 Initial Data Send ................................................................. 78 Bulk Data Send ................................................................... 79 Receiving Bulk Data ........................................................... 79
AppendixPSR-A3 Function Tree ........................................................... 80About Digital Effect ................................................................ 82Troubleshooting ..................................................................... 84Data Backup & Initialization ................................................... 85 Data Initialization ................................................................ 85
Index ........................................................................................... 86
Specifications ......................................................................... 87Voice List ............................................................................... 88Percussion Kit List ................................................................. 92MIDI Implementation Chart .................................................... 94MIDI Data Format .................................................................. 97 GM System Level 1 .......................................................... 101

3
YAMAHA is not responsible for damage caused by improper handling or operation.
LocationDo not expose the instrument to the following
conditions to avoid deformation, discoloration, ormore serious damage.
Direct sunlight (e.g. near a window). High temperatures (e.g. near a heat source, out-
side, or in a car during the daytime). Excessive humidity. Excessive dust. Strong vibration.
Power Supply Turn the power switch OFF when the instrument
is not in use. An AC adaptor, if used (the PSR-A3 runs from
either batteries or an optional AC adaptor),should be unplugged from the AC outlet if theinstrument is not to be used for an extended pe-riod of time.
Unplug the AC adaptor during electric storms. Avoid plugging the AC adaptor into the same AC
outlet as appliances with high power consump-tion, such as electric heaters or ovens. Also avoidusing multi-plug adaptors since these can resultin reduced sound quality, operation errors, andpossibly damage.
Turn Power OFF When MakingConnections To avoid damage to the instrument and other
devices to which it is connected, turn the powerswitches of all related devices OFF prior to con-necting or disconnecting MIDI cables.
Handling and Transport Never apply excessive force to the controls, con-
nectors or other parts of the instrument. Always unplug cables by gripping the plug
firmly, not by pulling on the cable.
Disconnect all cables before moving the instru-ment.
Physical shocks caused by dropping, bumping,or placing heavy objects on the instrument canresult in scratches and more serious damage.
Cleaning Clean the cabinet and panel with a dry soft cloth. A slightly damp cloth may be used to remove
stubborn grime and dirt. Never use cleaners such as alcohol or thinner. Avoid placing vinyl objects on top of the instru-
ment (vinyl can stick to and discolor the sur-face).
Electrical Interference This instrument contains digital circuitry and
may cause interference if placed too close toradio or television receivers. If this occurs, movethe instrument further away from the affectedequipment.
Data Backup Internal data (registration memory, user song,
user pad and scale memory data) will be retainedin memory even if the power switch is turnedOFF as long as an AC power adaptor is con-nected or batteries are installed.
Service and Modification The PSR-A3 contains no user serviceable parts.
Opening it or tampering with it in anyway canlead to irreparable damage and possibly electricshock. Refer all servicing to qualified YAMAHApersonnel.
Taking Care of Your PortaTone
Your PortaTone will give you years of playing pleasure if you follow the simple rules given below:

4
Panel Controls
1 POWER Switch ............................................. page 8
2 MASTER VOLUME Control ........................... page 8
3 DEMO Button ................................................ page 9
4 SCALE SETTING Buttons .......................... page 43
5 SCALE MEMORY Section• MEMORIZE Button .................................. page 45• 1~6 Buttons .............................................. page 45
6 DIGITAL EFFECT Section• REVERB Button ....................................... page 24• CHORUS Button....................................... page 24• DSP Button ............................................... page 24• DSP VARIATION Button ........................... page 24
7 LCD Panel ................................................... page 10
8 Data Dial .................................................. page 9, 14
9 Number [0]~[9] and[+/YES], [–/NO] Buttons .......................... page 9, 13
0 SONG Section• REC Button......................................... page 51, 54• PLAY/STOP Button ...................... page 52, 55, 56• REPEAT PLAY Button .............................. page 69• MINUS ONE Button ................................. page 68
! AUTO ACCOMPANIMENT Section• SYNC-START/STOP Button .................... page 35• START/STOP Button .......................... page 35, 37• INTRO Button ........................................... page 35• MAIN A/B Button ................................ page 35, 37• ENDING Button ........................................ page 37• ACCOMP LARGE/SMALL Button ............ page 39• TRACK ON/OFF Button ........................... page 39
@ CURSOR s, t, <, > Buttons ................... page 10
# TEMPO s, t Buttons ................................. page 34
$ FUNCTION s, t Buttons ........................... page 10
% REGISTRATION MEMORY Section• MEMORIZE Button .................................. page 48• 1~4 Buttons ........................................ page 48, 49• ACCOMP FREEZE Button ....................... page 49
^ MODE Button .......................................... page 11
& STYLE Button .............................................. page 33
Top Panel Controls .................................................................
* VOICE Button .............................................. page 12
( ONE TOUCH SETTING Button ................... page 42
) Music CARTRIDGE Slot ............................. page 64
q KEYBOARD Section• TOUCH RESPONSE Button .................... page 17• DUAL VOICE Button ................................ page 17• HARMONY/ECHO Button ........................ page 20• SUSTAIN Button ....................................... page 22
w MULTI PADS Section• MULTI PADS 1~4 ............................... page 60, 62• REC/END, TERMINATE Button ......... page 60, 62
e PITCH BEND Wheel ................................... page 23
r PHONES Jack ............................................... page 7
/
INTROSTART/STOP
SYNC-START/STOP
REC PLAY/STOP REPEATPLAY
MINUSONE
SONG
AAUTOACCOMPANIMENT
REVERB
CHORUS
DSP
DSPVARIATION
DIGITAL EFFECT
MIN MAX
MASTERVOLUME
POWER
PITCH BEND
PHONES
ON / OFF
DEMO1
2
3 6
4
5
0
!
e
r
POP01 8BEAT02 8 UPBT03 LIGHT 04 16BT P05 FOLKR06 POP R07 DETRO08 UP PO09 POP S10 POP R11 POP R POP BAL12 8BT LI13 SLOW 14 EPIC B15 16BT B16 16BT B17 PNO B
STYLE
PSR-A3
SCALESETTING
SCALEMEMORY
MEMORIZE 1 2 3 4 5 6

5
Panel Controls
The PSR-A3 is supplied with a music standthat can be attached to the instrument by insertingit into the slot at the rear of the control panel.
Rear Panel Controls...............................................................
t MIDI OUT and IN Connectors .................... page 7, 75
y SUSTAIN Jack ............................................... page 7
u AUX OUT R, L+R/L Jacks ................................. page 7
i DC IN 10-12V Jack ........................................ page 6
The Music Stand
–/NO +/YES
1 2 3
654
7 8 9
0
STYLE VOICE
MODE
ONE TOUCHSETTING
REC/END1 2 3 4
MULTI PADS
KEYBOARD
TOUCH RESPONSE
DUAL VOICE
HARMONY/ECHO
SUSTAIN
ACCOMP TRACK SONG TRACK
FUNCTION
CURSOR
TEMPO
RESET
ENDINGMAINAUTO FILL
A B
N
ACCOMPFREEZE
REGISTRATIONMEMORY
ACCOMP LARGE/SMALL TRACK ON/OFF
MEMORIZE 1 2 3 4
GrandPnoTEMPO TRANSPOSE MEASURE REPEAT CHORD
BEAT
TOUCHMINUS ONE
REVERB DUAL
CHORUS HARMONY
DSP SUSTAIN
RHYTHM BASS CHORD PAD PHRASE ACCOMP MELODY2
MELODY11 1 1
ON /OFF
VOICE
VOL
REGIST
dimmM
67
119513
augsus4( )
REC REC REC
OTS801
135102117130 1011011
118 10 a01
VOICE
STYLE
SONG
REGIST MEMORY
MULTI PAD
DUAL VOICE
SPLIT VOICE
HARM/ECHO
OVERALL
DIGITAL EFFECT
NORMAL
SPLIT
SINGLE
1
TERMINATE
FINGERED
* *
* PRESS AND HOLD FOR A WHILE.
7
8
9
@$
#
%
^
(
)
q
w
T POPT POPPOP
POPROCKROCKOIT POP
OP SHFLSHUFFLERHMBA 1RHMBA 2LLADGHTBALLAD
BALLADBLD 1BLD 2BALLAD
18 6/8 BLD 119 6/8 BLD 2 ROCK20 ROCK POP21 ROCK BALLAD22 LITE RK BLD23 HARD ROCK24 ROCK SHUFFL25 6/8HVY ROCK26 SLOW ROCK DANCE27 TECHNO 128 TECHNO 229 POP RAP30 EUROBEAT31 DANCE POP DISCO32 DISCO POP33 70S DISCO34 DISCO SOUL35 DISCO PARTY36 DISCO TROP
37 POLKA POP RHYTHM & BLUES38 R&B39 SOUL40 FUNK41 6/8 BLUES42 6/8 GOSPEL43 GOSPEL WLTZ ROCK & ROLL44 ROCK&ROLL 145 ROCK&ROLL 246 BOOGIE47 TWIST TRAD JAZZ48 DIXIELAND49 BIG BAND50 B B BALLAD51 SWING52 CHARLESTON CONTEMP JAZZ53 COOL JAZZ54 JAZZ BALLAD
55 JAZZ WALTZ56 FUSION LATIN57 FAST BOSSA58 SLOW BOSSA59 POP BOSSA60 SALSA61 SAMBA 162 MAMBO63 SON64 MERENGUE65 BOLERO LNTO CARIBBEAN66 POP REGGAE67 REGGAE 1668 REGGAE 12 C & W69 BLUEGRASS
70 C ROCK 171 C ROCK 272 COWBOY BOOG73 C BALLAD74 C SHUFFLE75 TWO STEP76 C WALTZ 177 C WALTZ 2 WORLD MUSIC78 POLKA179 POLKA280 ESPAGNOLE81 TARANTELLA82 MUSETTE83 TRD WALTZ 184 TRD WALTZ 2 MARCH85 MARCH 186 MARCH 2
87 6/8 MARCH 1 88 6/8 MARCH 2 BALLROOM STD 89 TANGO ARGN 90 FOXTROT 91 JIVE 92 QUICKSTEP 93 SLOWFOX 94 SLOW WALTZ 95 VIEN WALTZ BALLROOM LATIN 96 CHA CHA 97 RHUMBA 98 SAMBA 2 99 CONGA100 PASODOBLE ORIENTAL101 MAKSOUM102 MAKSOUM S
103 SAIDI 1104 SAIDI 2105 SAIDI 3106 BALADI107 MALFOUF108 OMAR'K109 IBRAHIMI110 MASMOUDI111 WEHDA112 10/8 SAMAAI113 3/4 DAREJ114 SOUDASSI115 KATAKOUFTI116 AYOUB117 ZAFFA118 A'DANI119 KHALIGI 1120 KHALIGI 2121 BAMBI
122 FALLAHI123 MAGHRIBI124 HAJAA125 VALS126 FOX127 ZAKY'N128 SAMBA MASRI129 RHUMBA130 GUARACHA131 JERK132 SHABABY 1133 SHABABY 2134 TSIFTETELI135 ZEIMBEKIKOS136 KALAMATA137 SIRTOS138 TSAMIKOS139 KARSILAMAS140 5/8
PIANO01 GRAND PIANO02 BRIGHT PNO03 HONKY-TONK04 FUNKY E PNO05 DX E PIANO06 MIDI GRAND07 HYPER E PNO08 DREAM E PNO09 BELL E PNO10 ICE E PIANO11 TREM E PNO12 HARPSICHORD13 HARPSI CPL14 CLAVI15 WAH CLAVI16 CELESTA
MALLETS17 VIBRAPHONE18 MARIMBA19 GLOCKEN20 XYLOPHONE21 TUBE BELLS22 TIMPANI23 STEEL DRUMS24 DULCIMER25 MUSIC BOX26 KALIMBA ORGAN27 JAZZ ORGAN 128 JAZZ ORGAN 229 DRAWBAR ORG30 FULL ORGAN31 CLICK ORGAN32 ROCK ORGAN 133 ROCK ORGAN 2
34 16+2 ORGAN35 16+4 ORGAN36 CHURCH ORG37 REED ORGAN38 MUSETTE39 TRAD ACCORD40 SOFT ACCORD41 TANGO ACCRD42 BANDONEON GUITAR43 CLASSIC GTR44 FOLK GUITAR45 12ST GUITAR46 JAZZ GUITAR47 OCTAVE GTR48 HAWAII GTR49 CLEAN GTR50 TREMOLO GTR
51 MUTE GUITAR52 HARMONICS53 OVRDRV GTR54 DIST GUITAR BASS55 ACC BASS56 FINGER BASS57 PICK BASS58 FRETLESS 59 SLAP BASS60 SY BASS 161 SY BASS 262 TECHNO BASS STRINGS63 VIOLIN64 VIOLA65 CELLO66 CONTRABASS67 BANJO
68 SHAMISEN69 KOTO70 HARP71 SITAR ENSEMBLE72 STRINGS 173 STRINGS 274 CHAMBER STR75 SYNTH STRS76 SLOW STRS77 TREMOLO STR78 VIOLIN+STRS79 PIZZ STR80 CHOIR81 CHOIR AAHS82 CHOIR OOHS83 SYNTH CHOIR84 VOYAGER85 ORCH HIT
BRASS 86 TRUMPET 87 FLUGEL HORN 88 MUTE TRP 89 TROMBONE 90 TRB SECTION 91 FRENCH HORN 92 TUBA 93 BRASS SECT 94 BRASS+SAX 95 BRASS+TRB 96 BRASS+TRP 97 SY BRASS 1 98 SY BRASS 2 REED 99 SOPRANO SAX100 ALTO SAX101 ALTO SAX BR102 TENOR SAX
103 TEN SAX BR104 BARI SAX105 SAX+CLARNET106 SAX+TRB107 OBOE108 ENG HORN109 BASSOON110 CLARINET111 HARMONICA112 SHANAI113 BAGPIPE PIPE114 PICCOLO115 FLUTE116 PAN FLUTE117 RECORDER118 BOTTLE119 SHAKUHACHI
120 WHISTLE121 OCARINA SYNTH LEAD122 SQUARE LEAD123 SAWTOOTH LD124 VOICE LEAD125 CRYSTAL126 BRIGHTNESS127 SUB AQUA128 ANALOG LEAD129 RAIN HOLD130 70'S LEAD131 SYNTH CLAVI SYNTH PAD132 FANTASIA133 BELL PAD134 XENON PAD135 ANGELS
136 TRANSFORM137 ATMOSPHERE138 SHINING139 DARK MOON140 CYBER PAD141 SCI-FI ORIENTAL142 KANOUN143 OCTAVE KNUN144 OUD145 TREMOLO OUD146 RABABA147 KAMAN148 WATARYAT149 BOUZOUKI150 BAGLAMAS151 SANTURI152 BOUZOUK
153 MIZMAR154 MIJWEZ155 NAY156 KAWALA157 ARGOUL158 ARABIC BRAS159 ARABIC ORG160 ARABIC ACD DRUM KITS161 STANDARD162 ROOM163 ROCK164 ELECTRONIC165 ANALOG166 JAZZ167 BRUSH168 CLASSIC169 ARABIC
EVOICE
& *
DC IN 10-12V SUSTAINOUT IN
MIDIR L+R/L
AUX OUT
t y u i

6
Power Supply
Your PSR-A3 will run either from batteries or an optional power adaptor.Follow the instructions below according to the power source you intend to use. • Never interrupt the power
supply (e.g. remove the batter-ies or unplug the AC adaptor)during any PSR-A3 recordoperation! Doing so can resultin a loss of data.
Using Batteries...............................................................................................................................................
For battery operation the PSR-A3 requires six 1.5V SUM-1, “D” size, R-20 or equivalent batteries.
When the batteries need to be replaced “Btry Low” will appear on thedisplay. Also the volume may be reduced, the sound may be distorted, andother problems may occur. When this happens, turn the power OFF and ei-ther replace the batteries or connect an AC adaptor.
Replace the batteries as follows:
ZOpen the battery compartment cover located on the instrument’s bottompanel.
XInsert the six new batteries, being careful to follow the polarity markingson the inside of the compartment.
CReplace the compartment cover, making sure that it locks firmly in place.
• When the batteries run down,replace them with a completeset of six new batteries.NEVER mix old and new batter-ies.
• Do not use different kinds ofbatteries (e.g. alkaline andmanganese) at the same time.
• To prevent possible damagedue to battery leakage, removethe batteries from the instru-ment if it is not to be used foran extended period of time.
Setting UpThis section contains information about setting up your PSR-A3and preparing to play. Be sure to go through this section carefullybefore using your PSR-A3.
• Use ONLY a Yamaha PA-5, PA-5B, or PA-5C AC Power Adap-tor to power your instrumentfrom the AC mains. The use ofother adaptors may result inirreparable damage to both theadaptor and the PSR-A3.
Using An Optional AC Power Adaptor .............................................................
Plug the DC output cable from an optional Yamaha PA-5, PA-5B, or PA-5C AC Power Adaptor into the DC IN jack on the rear panel of the PSR-A3,then plug the Power Adaptor (or the AC cable of the Power Adaptor) into aconvenient wall AC power socket. The internal batteries are automaticallydisconnected when an AC Power Adaptor is used.
DC IN 10-12V
PA-5,PA-5B,
orPA-5C
AC power socket

7
Connections
The PHONES Jack ...................................................................................................................................
Setting Up
SUSTAIN Jack ...................................................................................................................................................
• Be sure that you do not press thepedal while turning the powerON. If you do, the ON/OFF statusof the footswitch will be reversed.
AUX OUT R and L+R/L Jack ..................................................................................................
MIDI IN and OUT Connectors .............................................................................................
A standard pair of stereo headphonescan be plugged in here for private prac-tice or late-night playing. The internalstereo speaker system is automaticallyshut off when a pair of headphones isplugged into the PHONES jack.
An optional Yamaha FC4 or FC5footswitch can be plugged into the rear-panel SUSTAIN jack for sustain control.The footswitch functions like the damperpedal on a piano — press for sustain,release for normal sound.
The AUX OUT R and L+R/L jacksdeliver the output of the PSR-A3 forconnection to an external amplifier, mix-ing console, PA system, or recordingequipment. If you will be connecting thePSR-A3 to a monophonic sound system,use only the L+R/L jack. When a plug isinserted into the L+R/L jack only, theleft- and right-channel signals are com-bined and delivered via the L+R/L jackso you don’t lose any of the instrument’ssound.
SUSTAIN
PHONES
R L+R/LAUX OUT
The MIDI IN connector receivesMIDI data from an external MIDI device(such as a MIDI sequencer) which canbe used to control the PSR-A3. TheMIDI OUT connector transmits MIDIdata generated by the PSR-A3 (e.g. noteand velocity data produced by playingthe keyboard). More details on MIDI areprovided on page 75.
OUT INMIDI
StereoSystem

8
POWER ON / OFF
MIN MAX
MASTERVOLUME
The DemonstrationOnce you’ve set up your PSR-A3, try listening to the pre-programmeddemonstration songs — they’ll give you a good idea of what the PSR-A3can do! A total of 29 demo songs are provided — songs 01 through 04play arabic demonstration songs, songs 05 through 21 demonstrateseveral of the instrument’s voices and songs 22 through 29 demonstratea range of accompaniment styles.
ACCOMP TRACK SONG TRACK
ArabSng1TEMPO TRANSPOSE MEASURE REPEAT CHORD
BEAT
TOUCHMINUS ONE
REVERB DUAL
CHORUS HARMONY
DSP SUSTAIN
RHYTHM BASS CHORD PAD PHRASE ACCOMP MELODY2
MELODY11 1 1
ON /OFF
VOICE
VOL
REGIST
REC REC REC
OTS801
135102117130 1011011
118 10 a01
VOICE
STYLE
SONG
REGIST MEMORY
MULTI PAD
DUAL VOICE
SPLIT VOICE
HARM/ECHO
OVERALL
DIGITAL EFFECT
NORMAL
SPLIT
SINGLE
FINGERED
1 Switch ON .................................................................................................................................................................
Turn the power ON by pressing the [POWER] switch.
2 Set an Initial Volume Level .......................................................................................................
Turn the [MASTER VOLUME] control up (clockwise) about a quarter-turn from its minimum position. You can re-adjust the [MASTER VOL-UME] control for the most comfortable overall volume level after playbackbegins.

9
ArabSng1801
DEMO
3 Press the [DEMO] Button...........................................................................................................
Press the [DEMO] button to start demo playback. The PSR-A3 SONGfunction will automatically be selected and the number and name of the firstdemo song will appear on the top line of the display and the SONG [PLAY/STOP] indicator will light. The demo will begin playing automatically. Thedemo songs will play in sequence, and the sequence will repeat untilstopped.
• You can play along on the PSR-A3 keyboard while the demon-stration is playing.
• The volume bars of the songtracks at the bottom of the dis-play will move in response to thedata in each track while thedemo plays.
• About the demo songs createdby the PSR-A3 internal accompa-niment styles:
* Chord names will appear onthe display and the volumebars of the accomp tracks willmove in response to the datain each track, while the demoplays.
* Harmony effect (see page 20)can be applied when playingalong with the chord progres-sion of the song.
5 Exit When Done .............................................................................................................................................
Press the [DEMO] button, the SONG [PLAY/STOP] button, or theAUTO ACCOMPANIMENT [START/STOP] button to stop demo play-back, then press the [VOICE] button to exit from the SONG function andreturn to the normal play-mode display when you’ve finished playing thedemo songs.
DEMO
• When you stop the demo songsplayed in sequence and startagain by pressing the [PLAY/STOP] button, the selected songwill play and stop automaticallywhen the selected song playbackhas ended.
4 Skip to the Beginning Of a Different Demo Song.......................
While the demonstration is playing you can select any of the 29 demosongs by using the [–/NO] and [+/YES] buttons, the number buttons or thedata dial. Playback will skip to the beginning of the selected song.
–/NO +/YES
654
0
7 8 9
1 2 3
1– –* *
FUNCTION ArabSng1801VOICE
STYLE
SONG
REGIST MEMORY
MULTI PAD
DUAL VOICE
SPLIT VOICE
HARM/ECHO
OVERALL
DIGITAL EFFECT
The Demonstration
10
CURSOR
FUNCTION
ACCOMP TRACK SONG TRACK
GrandPnoTEMPO TRANSPOSE MEASURE
RHYTHM BASS CHORD PAD PHRASE ACCOMP MELODY2
MELODY11 1 1
ON /OFF
VOICE
VOL
REGIST
REC REC REC
801
135102117130 1011011
118 10 a01
VOICE
STYLE
SONG
REGIST MEMORY
MULTI PAD
DUAL VOICE
SPLIT VOICE
HARM/ECHO
OVERALL
DIGITAL EFFECT
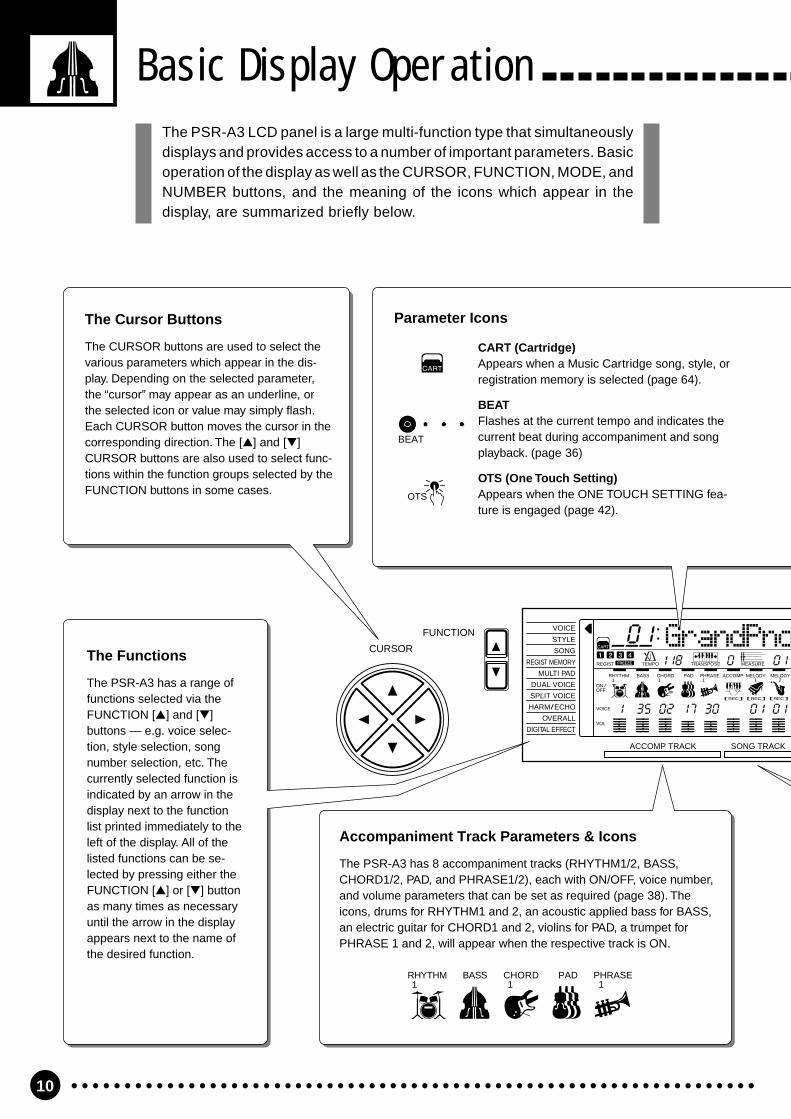
Basic Display OperationThe PSR-A3 LCD panel is a large multi-function type that simultaneouslydisplays and provides access to a number of important parameters. Basicoperation of the display as well as the CURSOR, FUNCTION, MODE, andNUMBER buttons, and the meaning of the icons which appear in thedisplay, are summarized briefly below.
The Cursor Buttons
The CURSOR buttons are used to select thevarious parameters which appear in the dis-play. Depending on the selected parameter,the “cursor” may appear as an underline, orthe selected icon or value may simply flash.Each CURSOR button moves the cursor in thecorresponding direction. The [] and []CURSOR buttons are also used to select func-tions within the function groups selected by theFUNCTION buttons in some cases.
Parameter Icons
CART (Cartridge)Appears when a Music Cartridge song, style, orregistration memory is selected (page 64).
BEATFlashes at the current tempo and indicates thecurrent beat during accompaniment and songplayback. (page 36)
OTS (One Touch Setting)Appears when the ONE TOUCH SETTING fea-ture is engaged (page 42).
BEAT
OTS
The Functions
The PSR-A3 has a range offunctions selected via theFUNCTION [] and []buttons — e.g. voice selec-tion, style selection, songnumber selection, etc. Thecurrently selected function isindicated by an arrow in thedisplay next to the functionlist printed immediately to theleft of the display. All of thelisted functions can be se-lected by pressing either theFUNCTION [] or [] buttonas many times as necessaryuntil the arrow in the displayappears next to the name ofthe desired function.
Accompaniment Track Parameters & Icons
The PSR-A3 has 8 accompaniment tracks (RHYTHM1/2, BASS,CHORD1/2, PAD, and PHRASE1/2), each with ON/OFF, voice number,and volume parameters that can be set as required (page 38). Theicons, drums for RHYTHM1 and 2, an acoustic applied bass for BASS,an electric guitar for CHORD1 and 2, violins for PAD, a trumpet forPHRASE 1 and 2, will appear when the respective track is ON.
RHYTHM BASS CHORD PAD PHRASE1 1 1
11
MODE
oREPEAT CHORD
BEAT
TOUCHMINUS ONE
REVERB DUAL
CHORUS HARMONY
DSP SUSTAIN
m
OTS
NORMAL
SPLIT
SINGLE
FINGERED
Basic Display Operation
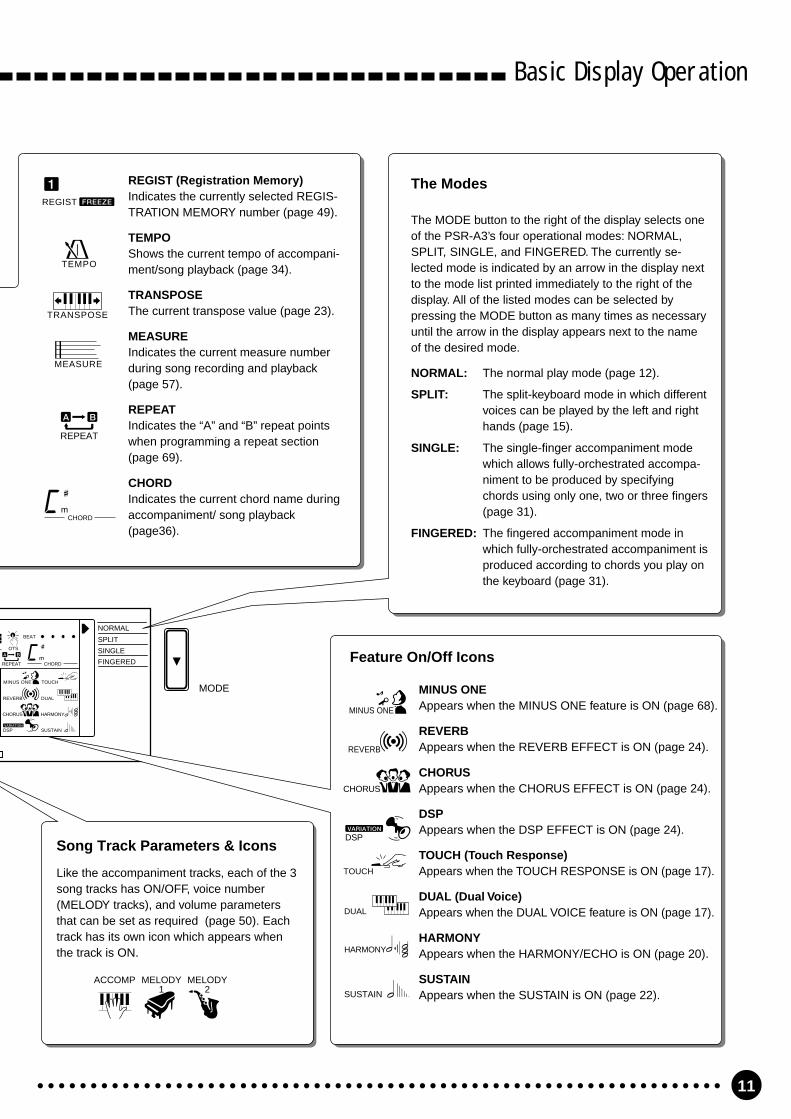
The Modes
The MODE button to the right of the display selects oneof the PSR-A3’s four operational modes: NORMAL,SPLIT, SINGLE, and FINGERED. The currently se-lected mode is indicated by an arrow in the display nextto the mode list printed immediately to the right of thedisplay. All of the listed modes can be selected bypressing the MODE button as many times as necessaryuntil the arrow in the display appears next to the nameof the desired mode.
NORMAL: The normal play mode (page 12).
SPLIT: The split-keyboard mode in which differentvoices can be played by the left and righthands (page 15).
SINGLE: The single-finger accompaniment modewhich allows fully-orchestrated accompa-niment to be produced by specifyingchords using only one, two or three fingers(page 31).
FINGERED: The fingered accompaniment mode inwhich fully-orchestrated accompaniment isproduced according to chords you play onthe keyboard (page 31).
Song Track Parameters & Icons
Like the accompaniment tracks, each of the 3song tracks has ON/OFF, voice number(MELODY tracks), and volume parametersthat can be set as required (page 50). Eachtrack has its own icon which appears whenthe track is ON.
REGIST (Registration Memory)Indicates the currently selected REGIS-TRATION MEMORY number (page 49).
TEMPOShows the current tempo of accompani-ment/song playback (page 34).
TRANSPOSEThe current transpose value (page 23).
MEASUREIndicates the current measure numberduring song recording and playback(page 57).
REPEATIndicates the “A” and “B” repeat pointswhen programming a repeat section(page 69).
CHORDIndicates the current chord name duringaccompaniment/ song playback(page36).
REGIST
TEMPO
TRANSPOSE
MEASURE
REPEAT
CHORDm
ACCOMP MELODY1
MELODY2
Feature On/Off Icons
MINUS ONEAppears when the MINUS ONE feature is ON (page 68).
REVERBAppears when the REVERB EFFECT is ON (page 24).
CHORUSAppears when the CHORUS EFFECT is ON (page 24).
DSPAppears when the DSP EFFECT is ON (page 24).
TOUCH (Touch Response)Appears when the TOUCH RESPONSE is ON (page 17).
DUAL (Dual Voice)Appears when the DUAL VOICE feature is ON (page 17).
HARMONYAppears when the HARMONY/ECHO is ON (page 20).
SUSTAINAppears when the SUSTAIN is ON (page 22).
MINUS ONE
REVERB
CHORUS
DSP
TOUCH
DUAL
HARMONY
SUSTAIN
12
NORMAL
SPLIT
SINGLE
FINGERED
MODE
Playing the PSR-A3
Selecting & Playing VoicesThe PSR-A3 has 160 outstanding “pitched” voices (voice numbers 01 through 160) and 9 percussion kits
(numbers 161 through 169) that you can select and play on the keyboard. It includes 19 oriental voices and 1arabic percussion kit.
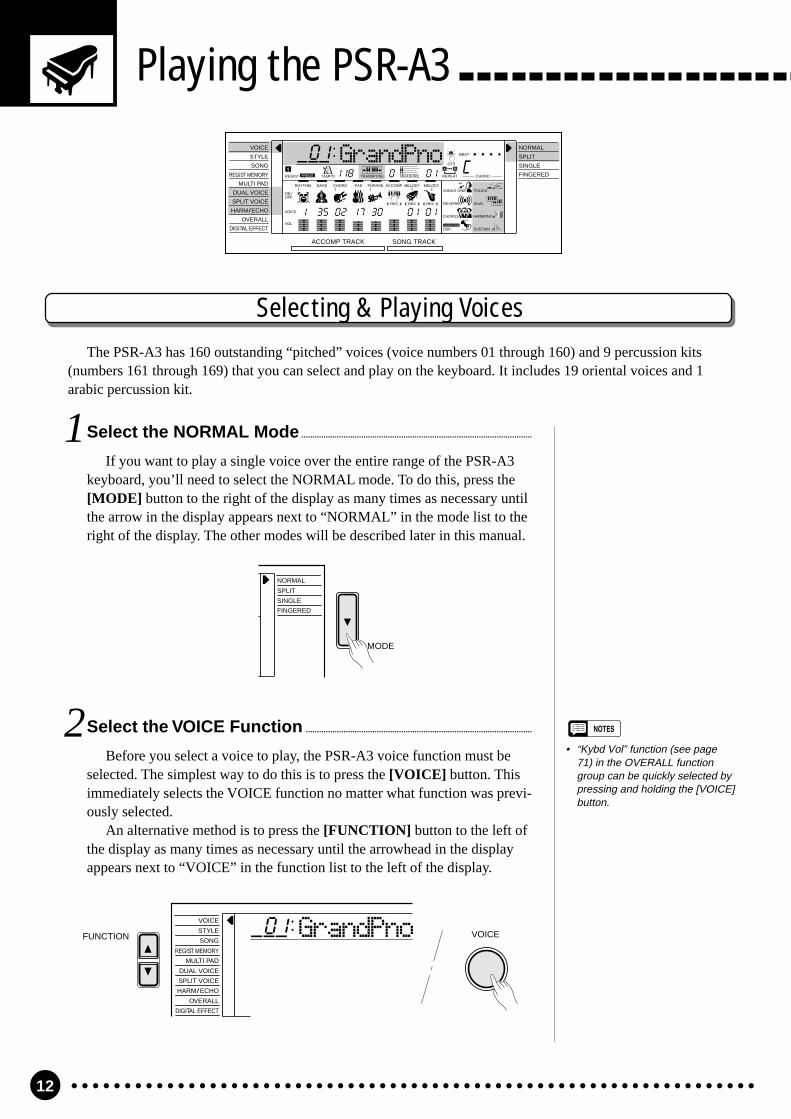
2 Select the VOICE Function ......................................................................................................
Before you select a voice to play, the PSR-A3 voice function must beselected. The simplest way to do this is to press the [VOICE] button. Thisimmediately selects the VOICE function no matter what function was previ-ously selected.
An alternative method is to press the [FUNCTION] button to the left ofthe display as many times as necessary until the arrowhead in the displayappears next to “VOICE” in the function list to the left of the display.
• “Kybd Vol” function (see page71) in the OVERALL functiongroup can be quickly selected bypressing and holding the [VOICE]button.
ACCOMP TRACK SONG TRACK
GrandPnoTEMPO TRANSPOSE MEASURE REPEAT CHORD
BEAT
TOUCHMINUS ONE
REVERB DUAL
CHORUS HARMONY
DSP SUSTAIN
RHYTHM BASS CHORD PAD PHRASE ACCOMP MELODY2
MELODY11 1 1
ON /OFF
VOICE
VOL
REGIST
REC REC REC
OTS801
135102117130 1011011
118 10 a01
VOICE
STYLE
SONG
REGIST MEMORY
MULTI PAD
DUAL VOICE
SPLIT VOICE
HARM/ECHO
OVERALL
DIGITAL EFFECT
NORMAL
SPLIT
SINGLE
FINGERED
FUNCTION GrandPno801VOICE
STYLE
SONG
REGIST MEMORY
MULTI PAD
DUAL VOICE
SPLIT VOICE
HARM/ECHO
OVERALL
DIGITAL EFFECT
VOICE
1 Select the NORMAL Mode ........................................................................................................
If you want to play a single voice over the entire range of the PSR-A3keyboard, you’ll need to select the NORMAL mode. To do this, press the[MODE] button to the right of the display as many times as necessary untilthe arrow in the display appears next to “NORMAL” in the mode list to theright of the display. The other modes will be described later in this manual.

13
Playing the PSR-A3
3 Select a Voice.....................................................................................................................................................
The PSR-A3 has 169 voices that can be selected by using either the [–/NO] and [+/YES] buttons, the number buttons or the data dial. The voicesare listed in the VOICE list printed at the top of the instrument’s controlpanel. The number and name of the currently selected voice appears on thetop line of the display panel while the VOICE function is selected.
The [–/NO] and [+/YES] ButtonsWhen the VOICE function is selected these buttons step up or downthrough the PSR-A3’s voices. Press either button briefly to step to thenext voice in the corresponding direction, or hold the button to scrollrapidly through the voices in the corresponding direction.
–/NO +/YES0
7 8 9
–/NO +/YES
654
0
7 8 9
1 2 3
1– –* *
The Number ButtonsThe number buttons can be used to directly enter the number of the de-sired voice, thereby immediately selecting that voice without having tostep through a number of other voices.
Two-digit voice numbers (i.e. “01” through “99”) are selected simply byentering the two digits in sequence — e.g. to select voice number “57”,briefly press the [5] buttons and then the [7] button.
• Whenever you select a newvoice, the appropriate voice-related parameters for that voicewill be set automatically. This isthe PSR-A3 Voice Set function.The Voice Set function can beturned OFF if not required —page 73.
• The stereo pan position of thevoice can be set via the “Pan”function in the OVERALL func-tion group — see page 72.
Three-digit voice numbers (i.e. “100” through “169”) are entered by firstpressing and holding the [1] button until “1” appears in the hundredsposition on the display, then press the remaining two digits in sequence.
–/NO +/YES
654
0
7 8 9
1 2 3
1– –* *
GrandPno102VOICE
STYLE
SONG
• Voice numbers 170~171 exclu-sively can be used as the dualvoice — see page 19.
14
Playing the PSR-A3
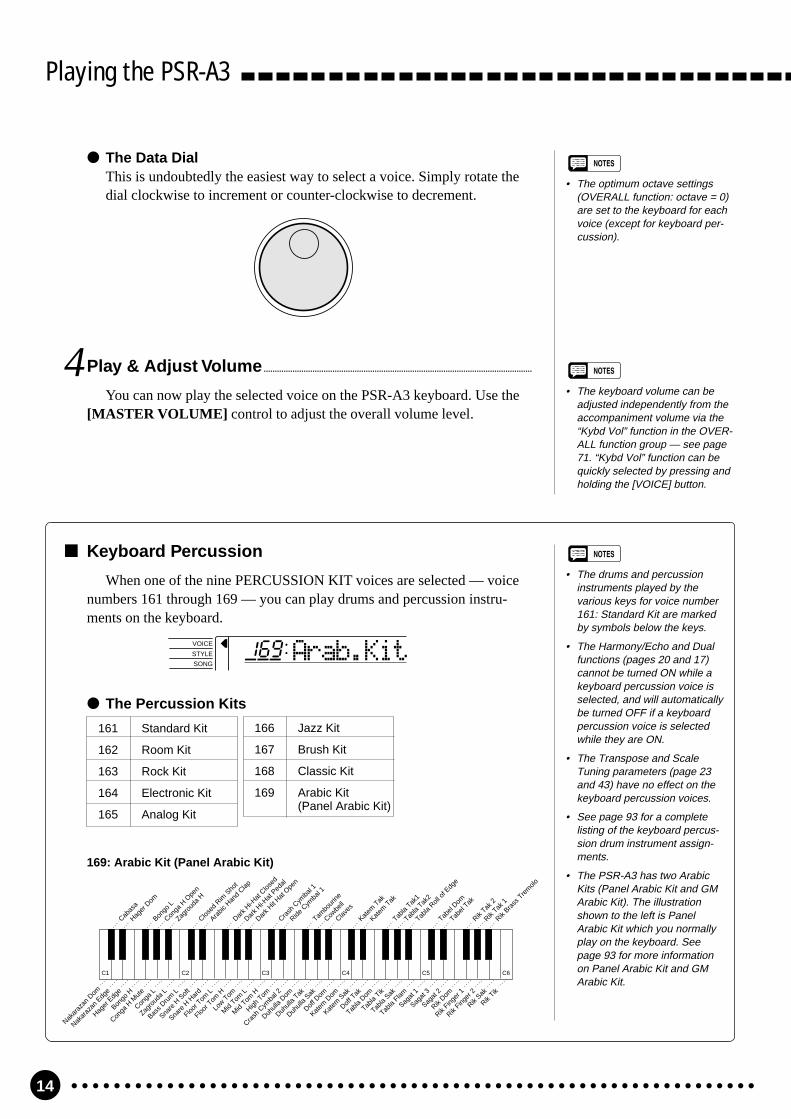
The Data DialThis is undoubtedly the easiest way to select a voice. Simply rotate thedial clockwise to increment or counter-clockwise to decrement.
4 Play & Adjust Volume.........................................................................................................................
You can now play the selected voice on the PSR-A3 keyboard. Use the[MASTER VOLUME] control to adjust the overall volume level.
• The keyboard volume can beadjusted independently from theaccompaniment volume via the“Kybd Vol” function in the OVER-ALL function group — see page71. “Kybd Vol” function can bequickly selected by pressing andholding the [VOICE] button.
• The optimum octave settings(OVERALL function: octave = 0)are set to the keyboard for eachvoice (except for keyboard per-cussion).
Keyboard Percussion
When one of the nine PERCUSSION KIT voices are selected — voicenumbers 161 through 169 — you can play drums and percussion instru-ments on the keyboard.
Nakar
azan
Dom
Rik Tik
Rik Sak
Rik Fing
er 2
Rik Fing
er 1
Rik Dom
Sagat
2
Sagat
3
Sagat
1
Tabla
Flam
Tabla
Sak
Tabla
Tik
Tabla
Dom
Doff T
ak
Katem
Sak
Katem
Dom
Doff D
om
Duhull
a Sak
Duhull
a Tak
Duhull
a Dom
Crash
Cym
bal 2
High T
om
Mid
Tom H
Mid
Tom L
Low T
om
Floor T
om H
Floor T
om L
Snare
H H
ard
Snare
H S
oft
Bass D
rum
L
Zagro
uda
L
Conga
L
Conga
H M
ute
Bongo
H
Hager
Edg
e
Nakar
azan
Edg
e
Cabas
a
Rik Bra
ss T
rem
olo
Rik Tak
1
Rik Tak
2
Tabel
Tak
Tabel
Dom
Tabla
Roll o
f Edg
e
Tabla
Tak2
Tabla
Tak1
Katem
Tak
Katem
Tak
Claves
Cowbe
ll
Tambo
urine
Ride C
ymba
l 1
Crash
Cym
bal 1
Dark H
it Hat
Ope
n
Dark H
i-Hat
Ped
al
Dark H
i-Hat
Clos
ed
Arabic
Han
d Clap
Closed
Rim
Sho
t
Zagro
uda
H
Conga
H O
pen
Bongo
L
Hager
Dom
C1 C2 C3 C4 C5 C6
169: Arabic Kit (Panel Arabic Kit)
The Percussion Kits
161 Standard Kit
162 Room Kit
163 Rock Kit
164 Electronic Kit
165 Analog Kit
166 Jazz Kit
167 Brush Kit
168 Classic Kit
169 Arabic Kit(Panel Arabic Kit)
• The drums and percussioninstruments played by thevarious keys for voice number161: Standard Kit are markedby symbols below the keys.
• The Harmony/Echo and Dualfunctions (pages 20 and 17)cannot be turned ON while akeyboard percussion voice isselected, and will automaticallybe turned OFF if a keyboardpercussion voice is selectedwhile they are ON.
• The Transpose and ScaleTuning parameters (page 23and 43) have no effect on thekeyboard percussion voices.
• See page 93 for a completelisting of the keyboard percus-sion drum instrument assign-ments.
• The PSR-A3 has two ArabicKits (Panel Arabic Kit and GMArabic Kit). The illustrationshown to the left is PanelArabic Kit which you normallyplay on the keyboard. Seepage 93 for more informationon Panel Arabic Kit and GMArabic Kit.
Arab.Kit169VOICE
STYLE
SONG

15
Playing the PSR-A3
The Split Mode
The SPLIT mode lets you play different voices with the left and right hands.You could, for example, play bass with the left hand while playing piano withthe right. The right-hand voice is the keyboard voice you select in the normalway (page 12), and the left hand voice is selected via the SPLIT VOICE func-tion, described below. The “split point” is initially set at B2 (note number 59),but it can be set at any key on the keyboard.
The SPLIT mode is engaged by pressing the [MODE] button so that thearrow in the display appears next to “SPLIT” in the mode list to the right of thedisplay.
• The SPLIT mode and DUALVOICE feature (page 17) can beused together. In this case thedual voice plays simultaneouslywith the right-hand voice only.
Changing the Split Voice & Related Parameters
1 Select the SPLIT VOICE Function ..............................................................................
Press the [FUNCTION] button to the left of the display as many timesas necessary until the arrowhead in the display appears next to “SPLITVOICE” in the function list to the left of the display.
Split Point
Split Voice
2 Select the Function and Set As Required .................................................
Use the cursor [] and [] buttons to select the desired function, andthen the [–/NO] and [+/YES] buttons, the number buttons or the data dial toset as required (the name of the selected function and its current setting ap-pear on the top line of the display).
Voice selected viathe VOICE function
NORMAL
SPLIT
SINGLE
FINGERED
FUNCTION Aco.Bass855VOICE
STYLE
SONG
REGIST MEMORY
MULTI PAD
DUAL VOICE
SPLIT VOICE
HARM/ECHO
OVERALL
DIGITAL EFFECT

16
Function Description
Split Voice The split voice can be changed as required while the numberand name of the current split voice appear on the top line ofthe display.
S.Volume Sets the volume of the split voice so you can create the opti-mum blend with the right-hand voice. The volume range isfrom “00” (no sound) to “127” (maximum split voice volume).
S.Octave Shifts the pitch of the split voice up or down one or two oc-taves. “–1” is down one octave, “–2” is down two octaves; “+1”and “+2” are up one and two octaves, respectively.
S.RevLvl Sets the reverb send level for the split voice. The reverb sendlevel determines the amount of signals input to the reverbeffect. The level range is from “00” (no effect) to “127” (maxi-mum effect).
S.ChoLvl Sets the chorus send level for the split voice. The chorus sendlevel determines the amount of signals input to the choruseffect. The level range is from “00” (no effect) to “127” (maxi-mum effect).
S.Pan Positions the split voice in the stereo sound field. The panrange is from “–7” to “+7”. “–7” is full left and “+7” is full right.
S.Split Sets the keyboard split point — i.e. the key that separates theleft- and right-hand voices (the split-point key is included in theleft-hand section of the keyboard). Simply press the key youwant to assign as the split point. The key number of the keyyou press will appear to the left of “S.Split” on the top line ofthe display. You can also use the [–/NO] and [+/YES] buttons,the number buttons or the data dial to enter the split point keynumber. The lowest key on the keyboard (C1) is key number“36”, middle C (C3) is “60”, and the highest key (C6) is 96. Thesplit point can be set at any key number from 00 through 127,allowing the split point to be set outside the range of the PSR-A3 keyboard for MIDI applications. The default split point is 59(B2).
CURSOR
–/NO +/YES
654
0
7 8 9
1 2 3
1– –* *
• If the Voice Set function is ON(page 73), the Split Voice param-eters will change automaticallywhenever a different keyboardvoice is selected.
• The selected Split Voice param-eter can be reset to its defaultvalue by simultaneously pressingthe [–/NO] and [+/YES] buttons.
• Negative values with “S.Octave”and “S.Pan” parameters can beentered by pressing the numberbuttons while holding the [–/NO]button.
• Reverb return level and chorusreturn level can be changed viathe “RevRtnLv” and “ChoRtnLv”function in the DIGITAL EFFECTfunction — see pages 25 and 27.
3 Exit .........................................................................................................................................................................................
Press the [VOICE] button or select a different function to exit from theSPLIT VOICE function.
Playing the PSR-A3
17
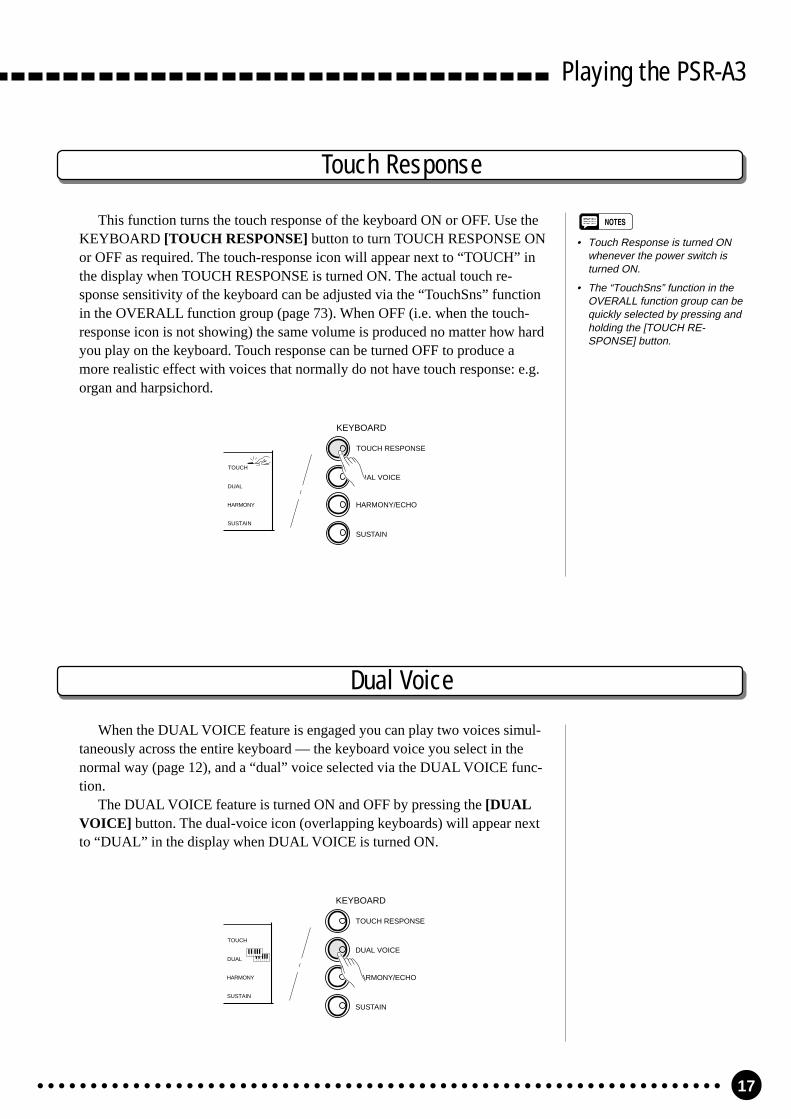
Touch Response
This function turns the touch response of the keyboard ON or OFF. Use theKEYBOARD [TOUCH RESPONSE] button to turn TOUCH RESPONSE ONor OFF as required. The touch-response icon will appear next to “TOUCH” inthe display when TOUCH RESPONSE is turned ON. The actual touch re-sponse sensitivity of the keyboard can be adjusted via the “TouchSns” functionin the OVERALL function group (page 73). When OFF (i.e. when the touch-response icon is not showing) the same volume is produced no matter how hardyou play on the keyboard. Touch response can be turned OFF to produce amore realistic effect with voices that normally do not have touch response: e.g.organ and harpsichord.
Dual Voice
When the DUAL VOICE feature is engaged you can play two voices simul-taneously across the entire keyboard — the keyboard voice you select in thenormal way (page 12), and a “dual” voice selected via the DUAL VOICE func-tion.
The DUAL VOICE feature is turned ON and OFF by pressing the [DUALVOICE] button. The dual-voice icon (overlapping keyboards) will appear nextto “DUAL” in the display when DUAL VOICE is turned ON.
• Touch Response is turned ONwhenever the power switch isturned ON.
• The “TouchSns” function in theOVERALL function group can bequickly selected by pressing andholding the [TOUCH RE-SPONSE] button.
KEYBOARD
TOUCH RESPONSE
DUAL VOICE
HARMONY/ECHO
SUSTAIN
TOUCH
DUAL
HARMONY
SUSTAIN
KEYBOARD
TOUCH RESPONSE
DUAL VOICE
HARMONY/ECHO
SUSTAIN
TOUCH
DUAL
HARMONY
SUSTAIN
Playing the PSR-A3

18
Changing the Dual Voice & Related Parameters
1 Select the DUAL VOICE Function ...............................................................................
Press the [FUNCTION] button to the left of the display as many timesas necessary until the arrowhead in the display appears next to “DUALVOICE” in the function list to the left of the display.
• “DUAL VOICE” function can bequickly selected by pressing andholding the [DUAL VOICE] but-ton.
FUNCTION Strings2873VOICE
STYLE
SONG
REGIST MEMORY
MULTI PAD
DUAL VOICE
SPLIT VOICE
HARM/ECHO
OVERALL
DIGITAL EFFECT
2 Select the Function and Set As Required .................................................
Use the cursor [] and [] buttons to select the desired function, andthen the [–/NO] and [+/YES] buttons, the number buttons or the data dial toset as required (the name of the selected function and its current setting ap-pear on the top line of the display).
FUNCTION D.Volume100VOICE
STYLE
SONG
REGIST MEMORY
MULTI PAD
DUAL VOICE
SPLIT VOICE
HARM/ECHO
OVERALL
DIGITAL EFFECT
CURSOR
Playing the PSR-A3

19
Function Description
Dual Voice The dual voice can be changed as required while thenumber and name of the current dual voice appear on thetop line of the display.The PSR-A3 has 162 (voice number 01~160 and170~171) dual voices. Voice numbers 170~171 exclu-sively can be used as the dual voice.
D.Volume Sets the volume of the dual voice so you can create theoptimum blend with the main keyboard voice. The volumerange is from “00” (no sound) to “127” (maximum dualvoice volume).
D.Octave Shifts the pitch of the dual voice up or down one or twooctaves. “–1” is down one octave, “–2” is down two oc-taves; “+1” and “+2” are up one and two octaves, respec-tively. The original octave of the dual voice is determinedby the “Octave” function in the OVERALL function group— page 71.
D.RevLvl Sets the reverb send level for the dual voice. The reverbsend level determines the amount of signals input to thereverb effect. The level range is “00” (no effect) to “127”(maximum effect).
D.ChoLvl Sets the chorus send level for the dual voice. The chorussend level determines the amount of signals input to thechorus effect. The level range is “00” (no effect) to “127”(maximum effect).
D.Pan Positions the dual voice in the stereo sound field. The panrange is from “–7” to +”7". “–7” is full left and “+7” is fullright.
• If the Voice Set function is ON(page 73), the Dual Voice param-eters will change automaticallywhenever a different voice isselected via the VOICE function.
• Keyboard percussion voicescannot be used as the dualvoice.
• The selected Dual Voice param-eter can be reset to its defaultvalue by simultaneously pressingthe [–/NO] and [+/YES] buttons.
• The octave of the main and dualvoices can be changed via the“Octave” function in the OVER-ALL function group — page 71.
• Negative values with “D.Octave”and “D.Pan” parameters can beentered by pressing the numberbuttons while holding the [–/NO]button.
• Reverb return level and chorusreturn level can be changed viathe “RevRtnLv” and “ChoRtnLv”functions, respectively, in theDIGITAL EFFECT function —see pages 25 and 27.
3 Exit .........................................................................................................................................................................................
Press the [VOICE] button or select a different function to exit from theDUAL VOICE function.
Playing the PSR-A3

20
Harmony/Echo
The harmony effect (01~10) automatically adds appropriate harmony notesto the melody line you play on the keyboard. The harmony effect is derivedfrom the chords you play on the left hand parts.
The echo effect (11~22) adds delay-based effects to the right hand melodyparts.
Press the [HARMONY/ECHO] button to turn the HARMONY/ECHOeffect ON or OFF. When HARMONY/ECHO is turned ON, the harmony iconwill appear next to “HARMONY” in the display.
KEYBOARD
TOUCH RESPONSE
DUAL VOICE
HARMONY/ECHO
SUSTAIN
TOUCH
DUAL
HARMONY
SUSTAIN
Selecting a Harmony/Echo Type
1 Select the Harmony/Echo Function.......................................................................
Press the [FUNCTION] button to the left of the display as many timesas necessary until the arrowhead in the display appears next to “HARM/ECHO” in the function list to the left of the display.
You can also enter the HARM/ECHO function by pressing and holdingthe [HARMONY/ECHO] button until the arrow jumps to the “HARM/ECHO” position and the current harmony/echo name appears in the display.
FUNCTION Block805VOICE
STYLE
SONG
REGIST MEMORY
MULTI PAD
DUAL VOICE
SPLIT VOICE
HARM/ECHO
OVERALL
DIGITAL EFFECT
• Harmony/Echo effect can not beturned ON when a keyboardpercussion kit is selected for theVoice.
• Harmony can not be used whenthe Auto Accompaniment ChordCancel function (page 32) is inuse.
• Harmony does not apply in theNORMAL mode.
• Harmony can be used in theSPLIT mode as well as in theSINGLE and FINGERED modes.
• The Harmony/Echo effect cannot be turned ON when the FIN-GERED FULL mode (page 33) isin use and will automatically beturned OFF when the FINGEREDFULL mode is selected.
Playing the PSR-A3

21
2 Select a Harmony/Echo Type .............................................................................................
Use the [–/NO] and [+/YES] buttons, the number buttons or the data dialto select one of the available harmony/echo types (listed below).
The Harmony (01~10) / Echo (11~22) Types
Type Description
01: Duet This harmony type produces a duophonic melody with thesecond voice below the melody line.
02: 1+5 A parallel voice is produced a fifth above the melody voice.
03: Country Similar to Duet, but the second voice is above the melodyline.
04: Trio This harmony type generates two voices in addition to themelody voice.
05: Block Three or four notes are added to the melody to producefour or five-note chords.
06: 4WayClose1 Three harmony notes are generated to produce a four-notechord.
07: 4WayClose2 Similar to the preceding type, but depending on the chordsplayed this type will sometimes produce a more colorfulsound.
08: 4WayOpen Four-note chords with open voice (large intervals betweenthe notes). The result is a very “open” sound. Since theharmony notes can be as much as two octaves below themelody, avoid playing in the lower registers.
09: Octave One note is added an octave below the melody.
10: Strum The notes and assignments are the same as in the Blocktype, but the notes are arpeggiated.
11: Echo1/4 This type creates quarter-note delayed repeats.
12: Echo1/6 This type creates quarter-note triplet delayedrepeats.
13: Echo1/8 This type creates 8th-note delayed repeats.
14: Echo1/12 This type creates 8th-note triplet delayedrepeats.
• If the VOICE SET function is ON(page 73), the harmony/echotype will change automaticallywhenever a different voice isselected via the VOICE function.
• The harmony/echo type can bereset to its default by simultane-ously pressing the [–/NO] and [+/YES] buttons.
3
3
Playing the PSR-A3

22
Sustain
When the Sustain feature is ON (the sustain icon will appear next to “SUS-TAIN” in the display), all notes played on the keyboard have a longer sustain. Press the [SUSTAIN] button to turn the SUSTAIN effect ON or OFF.
• Sustain does not apply to somevoices.
KEYBOARD
TOUCH RESPONSE
DUAL VOICE
HARMONY/ECHO
SUSTAIN
TOUCH
DUAL
HARMONY
SUSTAIN
Type Description
15: Tremolo1/8 This type creates 8th-note tremolos.
16: Tremolo1/12 This type creates 8th-note triplet tremolos.
17: Tremolo1/16 This type creates 16th-note tremolos.
18: Tremolo1/32 This type creates 32nd-note tremolos.
19: Trill1/12 This type creates 8th-note triplet trilled repeats.
20: Trill1/16 This type creates 16th-note trilled repeats.
21: Trill1/24 This type creates 16th-note triplet trilled repeats.
22: Trill1/32 This type creates 32nd-note trilled repeats.
3
3
3
3 Exit .........................................................................................................................................................................................
Press the [VOICE] button or select a different function to exit from theHARM/ECHO function.
Playing the PSR-A3

23
Transposition
This functions allow the overall pitch of the PSR-A3 to be transposed up or down by a maximum of oneoctave in semitone increments.
1 Move the Cursor to the Transpose Value ...................................................
Use the CURSOR buttons to select the number to the right of the key-board icon labelled “TRANSPOSE” on the display (the number will flashwhen selected).
• Press the [–/NO] and [+/YES]buttons simultaneously to in-stantly reset the transpose valueto “0”.
• The new transpose value willapply from the next note played.
TRANSPOSE 0
2 Set the Transposition As Required.........................................................................
Use the [–/NO] and [+/YES] buttons, the number buttons or the data dialto set the desired degree of transposition. The transpose range is from –12 to+12, allowing a maximum upward or downward transposition of 1-octave.A setting of “0” produces the normal pitch.
• Negative values can be enteredby pressing the number buttonswhile holding the [–/NO] button.
–/NO +/YES0
7 8 9
PITCH BEND
Pitch Bend
The PITCH BEND wheel to the left of the keyboard allows the pitch ofnotes played on the keyboard to be bend up or down - roll the wheel away fromyou to bend up, and toward you to bend down.
The actual pitch bend range can be adjusted via the “PBRange” function inthe OVERALL function group (page 74).
Playing the PSR-A3

24
Digital Effects
1 Select the Reverb Type Function ...................................................................
Press the [FUNCTION] button to the left of the display as manytimes as necessary until the arrowhead in the display appears next to“DIGITAL EFFECT” in the function list to the left of the display, anduse the cursor [] and [] buttons to select the Reverb Type function,“Reverb m”.
FUNCTION Reverb ≥VOICE
STYLE
SONG
REGIST MEMORY
MULTI PAD
DUAL VOICE
SPLIT VOICE
HARM/ECHO
OVERALL
DIGITAL EFFECT
CURSOR
The PSR-A3 provides a variety of Digital Effects-12 Reverb Effects, 9Chorus Effects and 45 DSP Effects- which are specially tailored and makeyour performance perfect.
ACCOMP TRACK SONG TRACK
≤Hall1TEMPO TRANSPOSE MEASURE REPEAT CHORD
BEAT
TOUCHMINUS ONE
REVERB DUAL
CHORUS HARMONY
DSP SUSTAIN
RHYTHM BASS CHORD PAD PHRASE ACCOMP MELODY2
MELODY11 1 1
ON /OFF
VOICE
VOL
REGIST
REC REC REC
OTS801
135102117130 1011011
118 10 a01
VOICE
STYLE
SONG
REGIST MEMORY
MULTI PAD
DUAL VOICE
SPLIT VOICE
HARM/ECHO
OVERALL
DIGITAL EFFECT
NORMAL
SPLIT
SINGLE
FINGERED
Selecting the Reverb Effect Type
Changing the Reverb Effect
The PSR-A3 has three types of digital effects — Reverb, Chorusand DSP— that can be turned ON or OFF by pressing the [REVERB]button, [CHORUS] button and [DSP] button respectively. DSP effecthas a set of variations which can be accessed by using the [DSP VARI-ATION] button (ON/OFF). Each icon will appear in the display whenthe effects are turned ON.
• Pressing the [REVERB], [CHORUS] or[DSP] button turns ON/OFF the respec-tive effect for the VOICE function voice.
• If the Voice Set function (page 73) isON, the Reverb/Chorus/DSP VARIA-TION ON/OFF status will automaticallybe determined, while DSP will beturned ON whenever a different voice isselected via the VOICE function.
Using the Digital Effects
REVERB
CHORUS
DSP
DSPVARIATION
DIGITAL EFFECT

25
2 Select the Reverb Type ...................................................................................................................
Use the cursor [>] button to enter the Reverb Type function and thenselect one of the 13 reverb types using the [–/NO] and [+/YES] buttons, thenumber buttons or the data dial. The name of the selected reverb type ap-pears on the top line of the display.
Digital Effects
FUNCTION ≤Hall1101VOICE
STYLE
SONG
REGIST MEMORY
MULTI PAD
DUAL VOICE
SPLIT VOICE
HARM/ECHO
OVERALL
DIGITAL EFFECT
CURSOR
You can also enter the Reverb Type function by pressing and holding the[REVERB] button until the arrow jumps to the “DIGITAL EFFECT” posi-tion and the current reverb type name appears in the display.
Setting the Reverb Return Level
3 Exit .........................................................................................................................................................................................
Press the [VOICE] button or select a different function to exit from theDIGITAL EFFECT function.
The reverb return level determines the amount of “wet” (affected) signals output to the amplifier.
1 Select the Reverb Return Level Function ..................................................
Press the [FUNCTION] button to the left of the display as many timesas necessary until the arrowhead in the display appears next to “DIGITALEFFECT” in the function list to the left of the display, and use the cursor[] and [] buttons to select the Reverb Return Level function.
• See page 82 for more details onthe Digital Effects.
• The reverb return level desig-nated here affects the entiresetting, while the reverb sendlevel can be applied to the voiceselected via the VOICE function,the split voice and the dual voiceseparately via the “RevLevel” inthe OVERALL function group, the“S.RevLvl” in the SPLIT VOICEfunction and the “D.RevLvl” in theDUAL VOICE function (seepages 72, 16 and 19).
• The default reverb return level =64 can be recalled instantly bypressing both the [–/NO] and [+/YES] buttons simultaneously.
RevRtnLv164
2 Set the Reverb Return Level ................................................................................................
Use the [–/NO] and [+/YES] buttons, the number buttons or the data dialto set the desired reverb return level. The range is from “00” to “127”.
3 Exit .........................................................................................................................................................................................
Press the [VOICE] button or select a different function to exit from theDIGITAL EFFECT function.
• See page 83 for a completelisting of the reverb types.
• The reverb type can be reset toits default by simultaneouslypressing the [–/NO] and [+/YES]buttons.
• You can return to the previousdisplay, “Reverbm”, by pressingthe cursor [<] button, andchoose the CHORUS or DSPeffect.
• The Reverb type will changeautomatically whenever a differ-ent style is selected.
• If you want to disable the reverbeffect for all the data exceptingVOICE function voice, selectOFF in the Type selection.
The Reverb Types
01~04 Hall 1~405~08 Room 1~409, 10 Stage 1, 211, 12 Plate 1, 213 OFF

26
Digital Effects
Changing the Chorus Effect
1 Select the Chorus Type Function...............................................................................
Press the [FUNCTION] button to the left of the display as many timesas necessary until the arrowhead in the display appears next to “DIGITALEFFECT” in the function list to the left of the display, and use the cursor[] and [] buttons to select the Chorus Type function, “Chorus m”.
Selecting the Chorus Effect Type
2 Select the Chorus Type ..................................................................................................................
Use the cursor [>] button to enter the Chorus Type function and thenselect one of the 10 chorus types using the [–/NO] and [+/YES] buttons, thenumber buttons or the data dial. The name of the selected chorus type ap-pears on the top line of the display.
FUNCTION Chorus ≥VOICE
STYLE
SONG
REGIST MEMORY
MULTI PAD
DUAL VOICE
SPLIT VOICE
HARM/ECHO
OVERALL
DIGITAL EFFECT
CURSOR
FUNCTION ≤Chorus1101VOICE
STYLE
SONG
REGIST MEMORY
MULTI PAD
DUAL VOICE
SPLIT VOICE
HARM/ECHO
OVERALL
DIGITAL EFFECT
CURSOR
You can also enter the Chorus Type function by pressing and holding the[CHORUS] button until the arrow jumps to the “DIGITAL EFFECT” posi-tion and the current chorus type name appears in the display.
• See page 83 for a completelisting of the chorus types.
• The chorus type will changeautomatically whenever a differ-ent style is selected.
• You can return to the previousdisplay, “Chorusm”, by pressingthe cursor [<] button, andchoose the REVERB or DSPeffect.
• The chorus type can be reset toits default by simultaneouslypressing the [–/NO] and [+/YES]buttons.
• If you want to disable the choruseffect for all the data exceptingVOICE function voice, selectOFF in the Type selection.
The Chorus Types
01~05 Chorus 1~506~09 Flanger 1~410 OFF
27
Digital Effects
3 Exit .........................................................................................................................................................................................
Press the [VOICE] button or select a different function to exit from theDIGITAL EFFECT function.
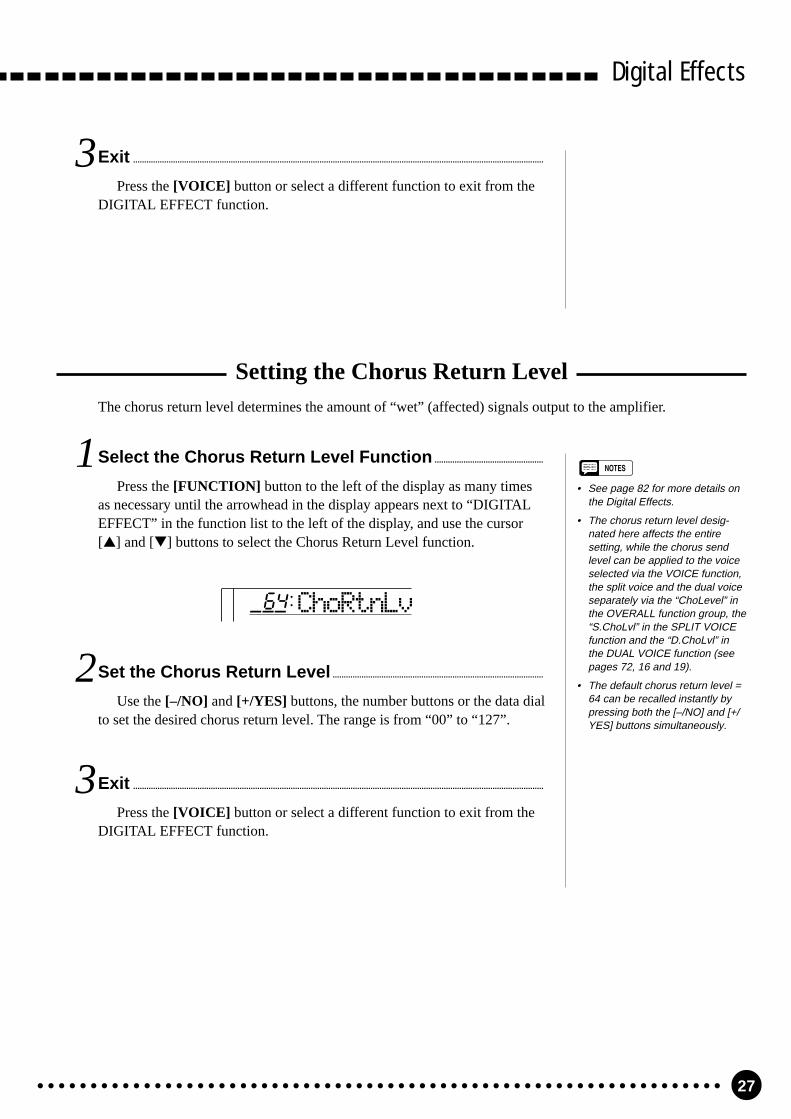
1 Select the Chorus Return Level Function .................................................
Press the [FUNCTION] button to the left of the display as many timesas necessary until the arrowhead in the display appears next to “DIGITALEFFECT” in the function list to the left of the display, and use the cursor[] and [] buttons to select the Chorus Return Level function.
• See page 82 for more details onthe Digital Effects.
• The chorus return level desig-nated here affects the entiresetting, while the chorus sendlevel can be applied to the voiceselected via the VOICE function,the split voice and the dual voiceseparately via the “ChoLevel” inthe OVERALL function group, the“S.ChoLvl” in the SPLIT VOICEfunction and the “D.ChoLvl” inthe DUAL VOICE function (seepages 72, 16 and 19).
• The default chorus return level =64 can be recalled instantly bypressing both the [–/NO] and [+/YES] buttons simultaneously.
2 Set the Chorus Return Level ...............................................................................................
Use the [–/NO] and [+/YES] buttons, the number buttons or the data dialto set the desired chorus return level. The range is from “00” to “127”.
3 Exit .........................................................................................................................................................................................
Press the [VOICE] button or select a different function to exit from theDIGITAL EFFECT function.
ChoRtnLv164
Setting the Chorus Return LevelThe chorus return level determines the amount of “wet” (affected) signals output to the amplifier.

28
Digital Effects
Changing the DSP Effect
Selecting the DSP Effect Type
2 Select the DSP Type..............................................................................................................................
Use the cursor [>] button to enter theDSP Type function and then selectone of the 46 DSP types using the [–/NO] and [+/YES] buttons, the numberbuttons or the data dial. The name of the selected DSP type appears on thetop line of the display.
FUNCTION ≤Stage2110VOICE
STYLE
SONG
REGIST MEMORY
MULTI PAD
DUAL VOICE
SPLIT VOICE
HARM/ECHO
OVERALL
DIGITAL EFFECT
CURSOR
1 Select the DSP Type Function ..........................................................................................
Press the [FUNCTION] button to the left of the display as many timesas necessary until the arrowhead in the display appears next to “DIGITALEFFECT” in the function list to the left of the display, and use the cursor[] and [] buttons to select the DSP Type function, “Dsp m”.
FUNCTION Dsp ≥VOICE
STYLE
SONG
REGIST MEMORY
MULTI PAD
DUAL VOICE
SPLIT VOICE
HARM/ECHO
OVERALL
DIGITAL EFFECT
CURSOR
The DSP Types
01~04 Hall 1~405~08 Room 1~409, 10 Stage 1, 211, 12 Plate 1, 213, 14 Early Reflection 1, 215 Gate Reverb16 Reverse Gate17~21 Chorus 1~522~25 Flanger 1~426 Symphonic27 Phaser28~32 Rotary Speaker 1~533, 34 Tremolo 1, 235 Guitar Tremolo36 Auto Pan37 Auto Wah38 Delay L, C, R39 Delay L, R40 Echo41 Cross Delay42 Distortion Hard43 Distortion Soft44 EQ Disco45 EQ Telephone46 OFF
• See page 83 for a completelisting of the DSP types.
• The DSP type can be reset to itsdefault by simultaneously press-ing the [–/NO] and [+/YES] but-tons.
• If the Voice Set function is ON(page 73) the DSP type willchange automatically whenever adifferent voice is selected via theVOICE function.
• When the Rotary Speaker 1~5 isselected, the [DSP VARIATION]button (ON/OFF) will switch thespeed of the rotating speakerbetween fast (ON) and slow(OFF).
• You can return to the previousdisplay, “Dspm”, by pressing thecursor [<] button, and choosethe REVERB or CHORUS effect.
• If you want to disable the DSPeffect for all the data exceptingVOICE function voice, selectOFF in the Type selection.
29
Digital Effects
3 Exit .........................................................................................................................................................................................
Press the [VOICE] button or select a different function to exit from theDIGITAL EFFECT function.
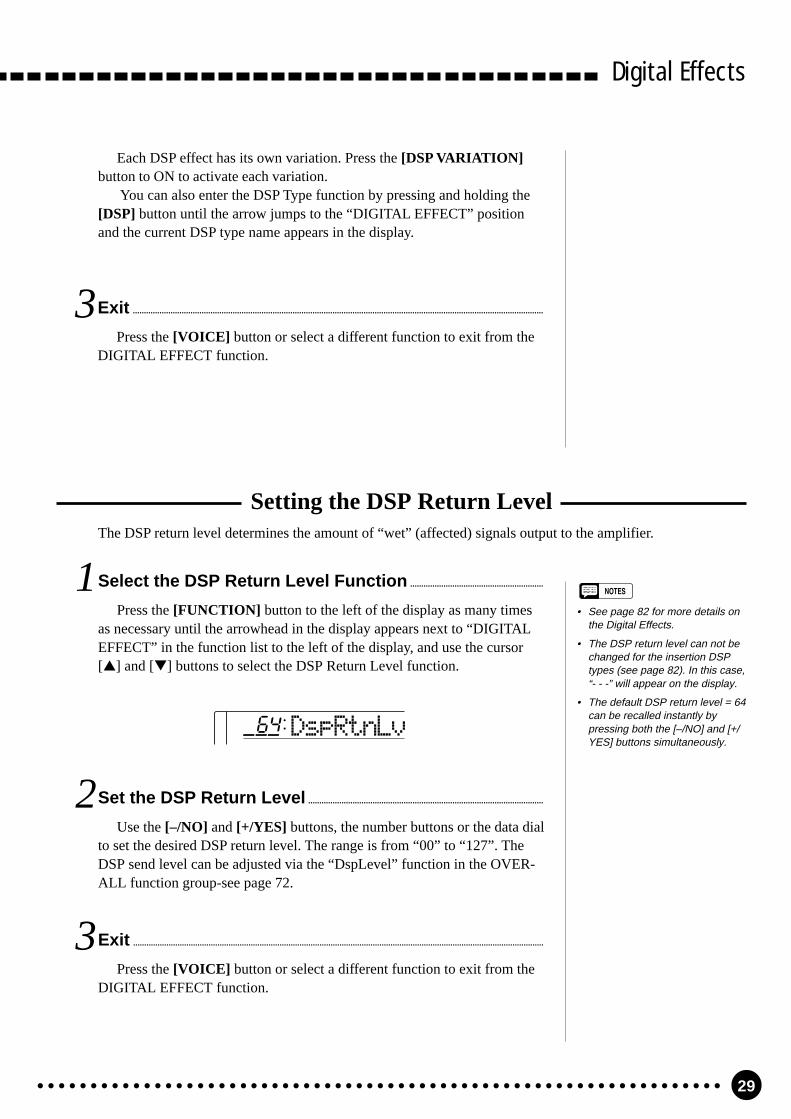
2 Set the DSP Return Level ..........................................................................................................
Use the [–/NO] and [+/YES] buttons, the number buttons or the data dialto set the desired DSP return level. The range is from “00” to “127”. TheDSP send level can be adjusted via the “DspLevel” function in the OVER-ALL function group-see page 72.
1 Select the DSP Return Level Function ............................................................
Press the [FUNCTION] button to the left of the display as many timesas necessary until the arrowhead in the display appears next to “DIGITALEFFECT” in the function list to the left of the display, and use the cursor[] and [] buttons to select the DSP Return Level function.
• See page 82 for more details onthe Digital Effects.
• The DSP return level can not bechanged for the insertion DSPtypes (see page 82). In this case,“- - -” will appear on the display.
• The default DSP return level = 64can be recalled instantly bypressing both the [–/NO] and [+/YES] buttons simultaneously.
3 Exit .........................................................................................................................................................................................
Press the [VOICE] button or select a different function to exit from theDIGITAL EFFECT function.
DspRtnLv164
Each DSP effect has its own variation. Press the [DSP VARIATION]button to ON to activate each variation.
You can also enter the DSP Type function by pressing and holding the[DSP] button until the arrow jumps to the “DIGITAL EFFECT” positionand the current DSP type name appears in the display.
The DSP return level determines the amount of “wet” (affected) signals output to the amplifier.
Setting the DSP Return Level

30
NORMAL
SPLIT
SINGLE
FINGERED
MODE
Using Auto AccompanimentThe PSR-A3 has 140 (including 40 oriental styles) different accompani-ment “styles” that can be used to provide fully-orchestrated or rhythm-only accompaniment. The PSR-A3’s sophisticated Auto Accompanimentsystem can provide automated bass and chord backing that is perfectlymatched to the selected accompaniment style.
• The maximum number of notes that can be played simultaneously on the PSR-A3 keyboard isreduced when the Accompaniment is used.
1 Select the SINGLE or FINGEREDAccompaniment Mode.....................................................................................................................
Press the [MODE] button to the right of the display as many times asnecessary until the arrow in the display appears next to “SINGLE” or “FIN-GERED” in the mode list to the right of the display. If you select the “SIN-GLE” mode, accompaniment chords are played as follows:
ACCOMP TRACK SONG TRACK
8BeatPopTEMPO TRANSPOSE MEASURE REPEAT CHORD
BEAT
TOUCHMINUS ONE
REVERB DUAL
CHORUS HARMONY
DSP SUSTAIN
RHYTHM BASS CHORD PAD PHRASE ACCOMP MELODY2
MELODY11 1 1
ON /OFF
VOICE
VOL
REGIST
REC REC REC
OTS801
134126152105 1011011
118 10 a01
VOICE
STYLE
SONG
REGIST MEMORY
MULTI PAD
DUAL VOICE
SPLIT VOICE
HARM/ECHO
OVERALL
DIGITAL EFFECT
NORMAL
SPLIT
SINGLE
FINGERED
About the PSR-A3 StylesThe styles are created with the “Style File Format”, Yamaha’s original auto-accom-paniment format which has evolved through years of development and refinement.Style File Format allows you to use exceptionally high quality accompaniments witha variety of chord types through its unique conversion system. Style File Formatstyles, based on GM system level 1, can be played with the GM compatible tonegenerator. In addition to the internal styles, the optional music cartridges let you usedifferent high quality styles created with the Style File Format.

31
Using Auto Accompaniment
SINGLE FINGER ACCOMPANIMENT
Single-finger accompaniment makes it simple to produce beautifullyorchestrated accompaniment using major, seventh, minor and minor-seventh chords by pressing a minimum number of keys on the left-handsection of the keyboard. The abbreviated chord fingerings described be-low are used:
Cm
C7
Cm7
C
For a major chord, press the root key only.
For a minor chord, simultaneously press the root keyand a black key to its left.
For a seventh chord, simultaneously press the rootkey and a white key to its left.
For a minor-seventh chord, simultaneously press theroot key and both a white and black key to its left.
FUNCTION FngrngMdnorVOICE
STYLE
SONG
REGIST MEMORY
MULTI PAD
DUAL VOICE
SPLIT VOICE
HARM/ECHO
OVERALL
DIGITAL EFFECT
CURSOR
2 If the FINGERED Mode is Selected, Select theDesired Fingering Mode ...............................................................................................................
The PSR-A3 has three fingering modes for fingered accompaniment —Normal, Bass and Full. The NORMAL mode is automatically selectedwhenever the power is initially turned ON. To select a different fingeringmode first select the OVERALL functions by pressing the [FUNCTION]button to the left of the display as many times as necessary until the arrow-head in the display appears next to “OVERALL” in the function list to theleft of the display. “FngrngMd” should appear on the top line of the display(if a different OVERALL function is selected, press the cursor [] or []button as many times as necessary until “FngrngMd” appears). Then use the[–/NO] and [+/YES] buttons and the data dial to select the desired fingeringmode (the mode abbreviation appears to the left of “FngrngMd” on the dis-play).
The Normal (“nor”), Bass (“bAS”) and Full (“Full”) fingering modesfunction as follows:

32
Using Auto Accompaniment
NORMAL
This is the default FINGERED accompaniment mode. The NORMALmode lets you finger your own chords on the left-hand section of thekeyboard (i.e. all keys to the left of and including the split-point key —normally 59 while the PSR-A3 supplies appropriately orchestratedrhythm, bass, and chord accompaniment in the selected style.The FINGERED mode will accept the chord types listed below (notes inparentheses may be omitted).
Csus
Cmadd9
CMC6 Cm7C CMadd C CaugCM9
Cm11
Cm
Cm
(
)
(
)
(
)(
)
CmM9CmM 7
C
CCdim7 C sus4Cdim
C
(
)
(
)
7 7CM #11
(
)
9
(
)
96 Cm6
Cm b57 9 7
(
)
(
)
7
97
(
)
C #117 C 137
(
)
Cb97
(
)
C b137 C #97
(
)
CM aug7 C aug7 4 1+2+5
C b57
(
)
(
)(
)
(
)
(
)
(
)
Example for “C” chords
Chord (C) DisplayC CC6 C6CM7 CM7CM7#11 CM7(#11)CMadd9 CM(9)CM9 CM7(9)C6 9 C6(9)Caug CaugCm CmCm6 Cm6Cm7 Cm7Cm7b5 Cm7b5Cmadd9 Cm(9)Cm9 Cm7(9)Cm11 Cm7(11)CmM7 CmM7CmM9 CmM7(9)Cdim CdimCdim7 Cdim7C7 C7C7sus4 C7sus4C7b5 C7b5C7 9 C7(9)C7#11 C7(#11)
C7 13 C7(13)
C7b9 C7(b9)C7b13 C7(b13)C7#9 C7(#9)CM7aug CM7augC7aug C7augCsus4 Csus4C1+2+5 C
• If you play any three adjacentkeys (including black keys), thechord sound will be cancelledand only the rhythm instrumentswill continue playing (CHORDCANCEL function).
• An octave (1+8) produces ac-companiment based only on theroot.
• A perfect fifth (1+5) producesaccompaniment based only onthe root and fifth which can beused with many major and minorchords.
• The chord fingerings listed are allin “root” position, but other inver-sions can be used — with thefollowing exceptions:
* 6 chords are only recognizedin root position. All other inver-sions are interpreted as m7.
* 6 9 chords are only recognizedin root position. All other inver-sions are interpreted as m11.
* m6 chords are only recognizedin root position. All other inver-sions are interpreted as m7b5.
* 1+2+5 chords are only recog-nized in root position. All otherinversions are interpreted assus4.
* With aug and dim7 chords thelowest note played is assumedto be the root.
* With 7#11 and 7b5 chords thelowest note played is assumedto be the root or b7.
Chord Name/[Abbreviation] Normal VoicingMajor [M] 1-3-5Major sixth [6] 1-(3)-5-6Major seventh [M7] 1-3-(5)-7Major seventh sharp eleventh [M7#11] 1-(2)-3-#4-(5)-7Major add ninth [Madd9] 1-2-3-5Major ninth [M9] 1-2-3-(5)-7Major sixth add ninth [6 9] 1-2-3-(5)-6Augmented [aug] 1-3-#5Minor [m] 1-b3-5Minor sixth [m6] 1-b3-5-6Minor seventh [m7] 1-b3-(5)-b7Minor seventh flatted fifth [m7b5] 1-b3-b5-b7Minor add ninth [madd9] 1-2-b3-5Minor ninth [m9] 1-2-b3-(5)-b7Minor eleventh [m11] 1-(2)-b3-4-5-(b7)Minor major seventh [mM7] 1-b3-(5)-7Minor major ninth [mM9] 1-2-b3-(5)-7Diminished [dim] 1-b3-b5Diminished seventh [dim7] 1-b3-b5-6Seventh [7] 1-3-(5)-b7Seventh suspended fourth [7sus4] 1-4-5-b7Seventh flatted fifth [7b5] 1-3-b5-b7Seventh ninth [7 9] 1-2-3-(5)-b7Seventh sharp eleventh [7#11] 1-2-3-#4-(5)-b7 or
1-(2)-3-#4-5-b7Seventh thirteenth [7 13] 1-3-(5)-6-b7 or
2-3-5-6-b7Seventh flatted ninth [7b9] 1-b2-3-(5)-b7Seventh flatted thirteenth [7b13] 1-3-5-b6-b7Seventh sharp ninth [7#9] (1)-#2-3-(5)-b7Major seventh augmented [M7aug] 1-3-#5-7Seventh augmented [7aug] (1)-3-#5-b7Suspended fourth [sus4] 1-4-5One plus two plus five [1+2+5] 1-2-5

33
Using Auto Accompaniment
BASS
This is essentially the same as the NORMAL mode, above, except thatthe lowest note played in the auto accompaniment section of the key-board will be played by the bass part rather than the chord root.
FULL
In this mode the PSR-A3 automatically differentiates between left-handchords and right-hand melody, no matter where they are played on thekeyboard. Right-hand chords with a left-hand bass line — single or oc-tave — are also recognized. In the former case left-hand chords are rec-ognized and accompaniment is produced in the same way as in the NOR-MAL mode, in the latter case the right-hand chords are recognized in thesame way but the accompaniment bass line will be based on the left-handbass line you play. This means you can play in just about any style any-where on the keyboard, and the PSR-A3 will automatically produce ap-propriate accompaniment.
• A single note one octave lowerthan the lowest note of the chordis recognized as a bass note,and a single note eleven noteshigher is recognized as a melodynote.
• The Harmony/Echo feature (page20) has no effect in the FULLmode.
C on E C on GC
3 Select the Style Function ...........................................................................................................
Press the [STYLE] button to directly select the STYLE function.Another way to do this is to press the [FUNCTION] button to the left of
the display as many times as necessary until the arrowhead in the displayappears next to “STYLE” in the function list to the left of the display.
• The “AcompVol” function in theOVERALL function group can bequickly selected by pressing andholding the [STYLE] button.
FUNCTION 8BeatPop801VOICE
STYLE
SONG
REGIST MEMORY
MULTI PAD
DUAL VOICE
SPLIT VOICE
HARM/ECHO
OVERALL
DIGITAL EFFECT
STYLE
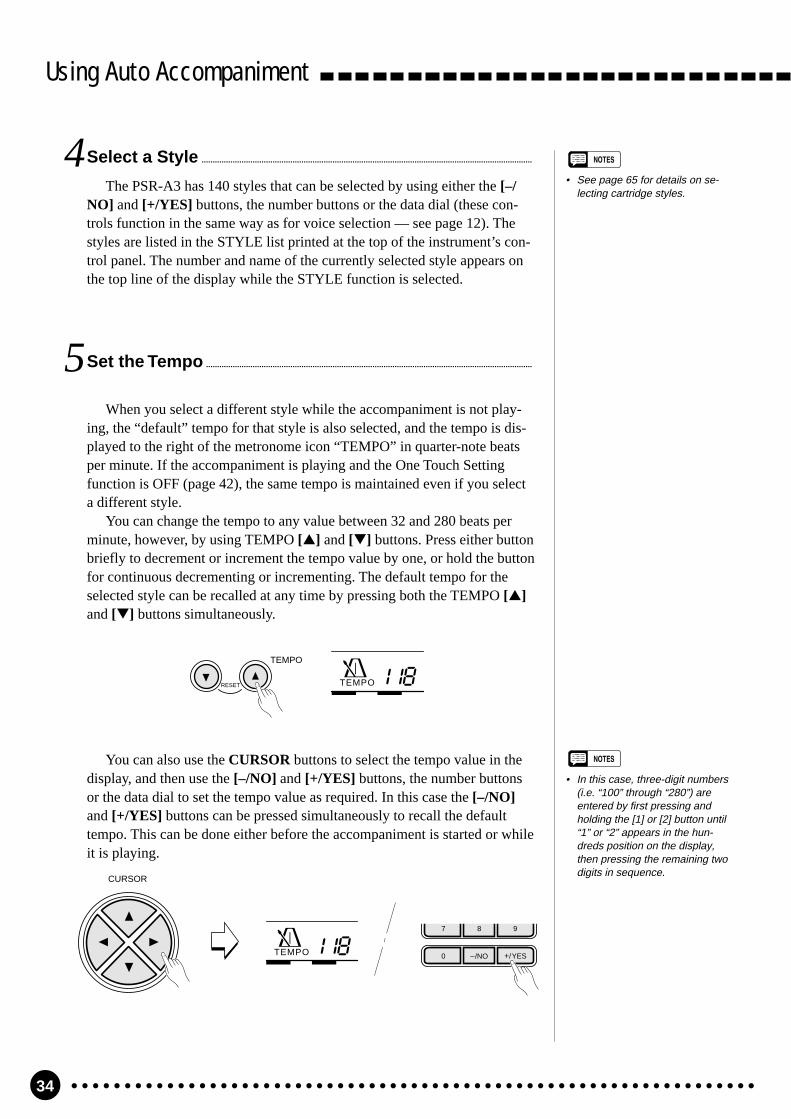
34
TEMPO 118TEMPO
RESET
Using Auto Accompaniment
5 Set the Tempo ...................................................................................................................................................
When you select a different style while the accompaniment is not play-ing, the “default” tempo for that style is also selected, and the tempo is dis-played to the right of the metronome icon “TEMPO” in quarter-note beatsper minute. If the accompaniment is playing and the One Touch Settingfunction is OFF (page 42), the same tempo is maintained even if you selecta different style.
You can change the tempo to any value between 32 and 280 beats perminute, however, by using TEMPO [] and [] buttons. Press either buttonbriefly to decrement or increment the tempo value by one, or hold the buttonfor continuous decrementing or incrementing. The default tempo for theselected style can be recalled at any time by pressing both the TEMPO []and [] buttons simultaneously.
4 Select a Style .....................................................................................................................................................
The PSR-A3 has 140 styles that can be selected by using either the [–/NO] and [+/YES] buttons, the number buttons or the data dial (these con-trols function in the same way as for voice selection — see page 12). Thestyles are listed in the STYLE list printed at the top of the instrument’s con-trol panel. The number and name of the currently selected style appears onthe top line of the display while the STYLE function is selected.
• See page 65 for details on se-lecting cartridge styles.
You can also use the CURSOR buttons to select the tempo value in thedisplay, and then use the [–/NO] and [+/YES] buttons, the number buttonsor the data dial to set the tempo value as required. In this case the [–/NO]and [+/YES] buttons can be pressed simultaneously to recall the defaulttempo. This can be done either before the accompaniment is started or whileit is playing.
• In this case, three-digit numbers(i.e. “100” through “280”) areentered by first pressing andholding the [1] or [2] button until“1” or “2” appears in the hun-dreds position on the display,then pressing the remaining twodigits in sequence.
TEMPO 118
CURSOR
–/NO +/YES0
7 8 9
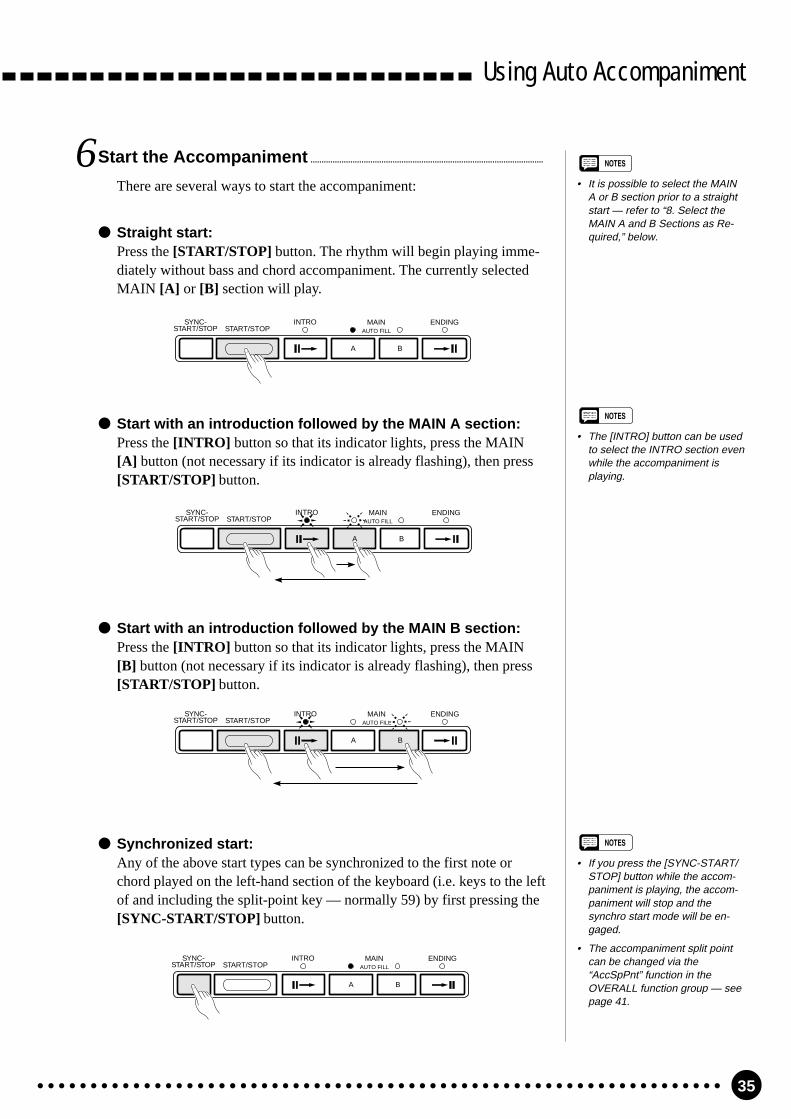
35
Using Auto Accompaniment
6 Start the Accompaniment .........................................................................................................
There are several ways to start the accompaniment:
Straight start:Press the [START/STOP] button. The rhythm will begin playing imme-diately without bass and chord accompaniment. The currently selectedMAIN [A] or [B] section will play.
• It is possible to select the MAINA or B section prior to a straightstart — refer to “8. Select theMAIN A and B Sections as Re-quired,” below.
INTRO ENDINGMAINAUTO FILLSTART/STOP
SYNC-START/STOP
A B
Start with an introduction followed by the MAIN A section:Press the [INTRO] button so that its indicator lights, press the MAIN[A] button (not necessary if its indicator is already flashing), then press[START/STOP] button.
INTRO ENDINGMAINAUTO FILLSTART/STOP
SYNC-START/STOP
A B
Start with an introduction followed by the MAIN B section:Press the [INTRO] button so that its indicator lights, press the MAIN[B] button (not necessary if its indicator is already flashing), then press[START/STOP] button.
INTRO ENDINGMAINAUTO FILLSTART/STOP
SYNC-START/STOP
A B
• The [INTRO] button can be usedto select the INTRO section evenwhile the accompaniment isplaying.
INTRO ENDINGMAINAUTO FILLSTART/STOP
SYNC-START/STOP
A B
• If you press the [SYNC-START/STOP] button while the accom-paniment is playing, the accom-paniment will stop and thesynchro start mode will be en-gaged.
• The accompaniment split pointcan be changed via the“AccSpPnt” function in theOVERALL function group — seepage 41.
Synchronized start:Any of the above start types can be synchronized to the first note orchord played on the left-hand section of the keyboard (i.e. keys to the leftof and including the split-point key — normally 59) by first pressing the[SYNC-START/STOP] button.

36
Using Auto Accompaniment
• If you press and hold the [SYNC-START/STOP] button the“InitSnd?” function will be se-lected — see page 78.
Pressing the [SYNC-START/STOP] button alone causes a straight startto occur when the first note or chord is played. Press the [SYNC-START/STOP] button and then the appropriate [INTRO] and [MAIN]buttons for a synchronized introduction start. The BEAT display willflash at the current tempo when a synchronized start mode has been se-lected.The synchro start mode can be disengaged prior to actually starting theaccompaniment by pressing the [SYNC-START/STOP] button a secondtime.
7 Play On the Auto-accompaniment SectionOf the Keyboard ...........................................................................................................................................
As soon as you play any fingering that the PSR-A3 can “recognize” onthe left-hand section of the keyboard (or anywhere on the keyboard if theFULL fingering mode is selected), the PSR-A3 will automatically begin toplay the appropriate bass line and chord parts along with the selected style.The accompaniment will continue playing even if you release the keys.
The chord name recognized will be shown above “CHORD” in the dis-play.
CHORDm 7
The Beat IndicatorThe four dots of the BEAT display provide a visual indication of the se-lected tempo and beat as shown below.
BEAT
BEAT
4/4 time 3/4 time1st beat
2nd beat
3rd beat
4th beat

37
Using Auto Accompaniment
The Stop Accompaniment Function
While the SINGLE or FINGERED mode is selected chords played in theAuto Accompaniment section of the keyboard are also detected and playedby the PSR-A3 Auto Accompaniment system when the accompaniment isstopped (except when the FULL FINGERED mode is engaged). In this casethe bass note and chord voices are selected automatically.
8 Select the MAIN A and B Sections as Required ............................
The MAIN A and MAIN B sections can be selected at any time duringplayback by pressing the corresponding button. Whenever you press theMAIN [A] or [B] button during playback, the PSR-A3 will generate an ap-propriate “fill-in” (one of four types) which will smoothly connect the cur-rent section to the selected section — even if it is the same section. For ex-ample, if you press the MAIN [A] button while the MAIN A section is play-ing, a fill-in will be produced, then the MAIN A section will continue play-ing. When you select a different section, the fill-in will begin immediatelyand the new section will actually begin playing from the top of the nextmeasure unless the MAIN [A] or [B] button is pressed during the last beatof the measure, in which case the fill-in will begin from the first beat of thenext measure.
9 Stop the Accompaniment ..........................................................................................................
The accompaniment can be stopped at any time by pressing the [START/STOP] button. Press the [ENDING] button if you want to go to the endingsection and then stop. The ending section will begin from the top of the nextmeasure.
• Some INTRO and ENDINGsections have their own chordprogressions which play in thecurrent accompaniment key.
• If the MAIN [A] or [B] button ispressed while the ENDING sec-tion is playing, an appropriate fill-in will be played, followed by areturn to the MAIN A or B sec-tion.
• The accompaniment volume canbe adjusted independently of themain keyboard volume via the“AcompVol” function in theOVERALL function group — seepage 73.
INTRO ENDINGMAINAUTO FILLSTART/STOP
SYNC-START/STOP
A B
INTRO ENDINGMAINAUTO FILLSTART/STOP
SYNC-START/STOP
A B
INTRO ENDINGMAINAUTO FILLSTART/STOP
SYNC-START/STOP
A B

38
Using Auto Accompaniment
Accompaniment Track ControlThe PSR-A3 has eight accompaniment tracks — RHYTHM 1/2, BASS,
CHORD 1/2, PAD, and PHRASE 1/2 — that you can control to modify the“orchestration” and therefore the overall sound of the accompaniment. Whenthe power switch is turned ON or an accompaniment style is selected,RHYTHM 1, CHORD 1 and PHRASE 1 tracks appear on the display.RHYTHM 2, CHORD 2 and PHRASE 2 tracks can be selected by moving thecursor [<<<<<] or [>>>>>] button from track to track when the cursor is located at oneof the track icons. If the RHYTHM 1 track is selected and the cursor is movedonce to the right, for example, the cursor will not actually move but“RHYTHM 2” will appear in place of “RHYTHM 1” and the parameters forthe RHYTHM 2 track can be changed as required. The same applies to theCHORD 1 and 2, and PHRASE 1 and 2 tracks.
• The icons for all tracks that con-tain data in any section will ap-pear whenever an accompani-ment style is selected.
What’s in the Tracks
ACCOMP TRACK
RHYTHM BASS CHORD PAD PHRASE1 1 1
ON /OFF
VOICE
VOL
1351021171301
RHYTHM 1&2 Both these tracks provide the drum and/or percussion sounds.
BASS The BASS track always plays a bass line, but the voice willchange to fit the selected style … acoustic bass, synth bass,tuba, etc.
CHORD 1&2 Both these tracks provide the rhythmic chordal accompanimentrequired by each style. You’ll find guitar, piano, and otherchordal instruments here.
PAD This track plays long chords where necessary, using sustainedinstruments such as strings, organ, choir.
PHRASE 1&2 This is where the musical embellishments reside. ThePHRASE tracks are used for punchy brass stabs, arpeggiatedchords, and other extras that make the accompaniment moreinteresting.

39
Using Auto Accompaniment
Large/Small Accompaniment .............................................................................................
The simplest form of accompaniment track control is provided by the[ACCOMP LARGE/SMALL] button. This button alternately turns theappropriate track (s) ON and OFF, thereby changing the number of parts inthe accompaniment. When the LARGE accompaniment is selected and ac-companiment tracks are ON, their respective icons will appear in the appro-priate positions in the display. When the SMALL accompaniment is se-lected, some tracks for that style will be turned OFF and their respectiveicons will disappear.
Muting Individual Tracks ..............................................................................................................
The PSR-A3 Auto Accompaniment system includes five Track buttonswhich allow you to control the accompaniment arrangement in real time.The accompaniment tracks can be turned OFF (muted) or ON by pressingthe corresponding TRACK buttons. The track icon will disappear when atrack is muted.
For example, PHRASE 1 and 2 tracks are turned ON or OFF at the sametime by pressing the PHRASE track button. The same applies to theRHYTHM 1 and 2, and CHORD 1 and 2 tracks.
RHYTHM BASS CHORD PAD PHRASE
ON /OFF
1 1 1
ACCOMP LARGE/SMALL
ACCOMP TRACK
RHYTHM BASS CHORD PAD PHRASE1 1 1
ON /OFF
VOICE
VOL
1351021171301
TRACK ON/OFF
Individual accompaniment tracks can also be turned OFF (muted) or ONby using the cursor buttons to select the icon of the target track (the icon andtrack name will flash), and then using the [–/NO] and [+/YES] buttons orthe data dial to turn the track OFF or ON, respectively. In this way,RHYTHM 1 and RHYTHM 2 tracks can be independently turned OFF orON. The same applies to the CHORD 1 and 2, and PHRASE 1 and 2 tracks.
• The LARGE accompaniment isalways selected whenever a newstyle is selected.
• Please note that the tracks useddepend on the selected style andall the tracks are not alwaysactive even when the LARGEaccompaniment is selected.

40
Using Auto Accompaniment
Changing Accompaniment Track Voices......................................................
You can change the voice used for each track by moving the cursor but-tons to select the voice number of the target track (the voice number willflash), and then using the [–/NO] and [+/YES] buttons, the number buttonsor the data dial to select the desired voice number. Please note that the GMvoices are used for the accompaniment instead of the panel voices. There-fore, voice numbers of the accompaniment tracks are different from the onesfor the PSR-A3 panel voices. Refer to the GM Voice List (see page 91) forthe GM voice numbers and names. Only the numbers from 1 through 9 canbe selected for the RHYTHM tracks. In this case, the numbers from 1through 9 correspond to the PERCUSSION KIT numbers 129 through 137.Voice numbers 01 through 137 can be selected for all other tracks.
Voice Number
PAD
17
ON /OFF
VOICE
VOL
Adjusting Accompaniment Track Volume...................................................
The volume of each accompaniment track can be adjusted to produce theideal “mix” between tracks. Use the cursor buttons to select the volume barof the target track (the volume bar will flash), and then use the [–/NO] and[+/YES] buttons and the data dial to set the maximum volume of the trackas required. The shorter the bar, the lower the volume. During playback thetop segment of each volume bar will remain at the maximum volume level,while the lower bars will move according to the amount of activity in eachtrack.
• When a different style number isselected, all accompanimenttrack parameters will be reset totheir initial values. Use the REG-ISTRATION MEMORY — page47 — if you want to store a par-ticular set of settings for instantrecall when needed.
• After changing the voice or vol-ume, the [–/NO] and [+/YES]buttons can be pressed simulta-neously to reset the initial values.
• The track data changed appliesto all sections.
• Muting individual tracks, chang-ing accompaniment track voicesand adjusting accompanimenttrack volume cannot be executedduring song recording.
PAD
17
ON /OFF
VOICE
VOLVolume

41
Using Auto Accompaniment
Changing the Accompaniment Split Point
1 Select the Accompaniment Split Point Function.........................
Press the [FUNCTION] button to the left of the display as many timesas necessary until the arrowhead in the display appears next to “OVERALL”in the function list to the left of the display. Then use the cursor [] and []buttons to select the “AccSpPnt” function from within the OVERALL func-tion list.
FUNCTION AccSpPnt059VOICE
STYLE
SONG
REGIST MEMORY
MULTI PAD
DUAL VOICE
SPLIT VOICE
HARM/ECHO
OVERALL
DIGITAL EFFECT
CURSOR
2 Set As Required ...........................................................................................................................................
Simply press the key you want to assign as the split point. The keynumber of the key you press will appear to the left of “AccSpPnt” on the topline of the display. You can also use the [–/NO] and [+/YES] buttons, thenumber buttons or the data dial to enter the split point key number. The low-est key on the keyboard (C1) is key number “36”, middle C (C3) is “60”,and the highest key (C6) is “96”. The split point can be set at any keynumber from 00 through 127, allowing the split point to be set outside therange of the PSR-A3 keyboard for MIDI applications.
• The split point key becomes thehighest key in the Auto Accom-paniment section of the key-board.
• The default split point (59) can beinstantly recalled by pressing the[–/NO] and [+/YES] buttons at thesame time.
–/NO +/YES
654
0
7 8 9
1 2 3
1– –* *
3 Exit .........................................................................................................................................................................................
Press the [VOICE] button or select a different function to exit from theOVERALL functions.

42
Using Auto Accompaniment
One Touch Setting
One Touch Setting lets you instantly select the appropriate panel settingssuitable for the current style. Each style (140 styles) contains four variations.This means that you can freely use 560 different panel settings. The One TouchSetting feature automatically sets the following parameters:
1 Turn On the One Touch Setting ......................................................................................
Press the [ONE TOUCH SETTING] button so that the “OTS” icon appearsnext to the BEAT display and number “1 “ (type1) appears above “REGIST” onthe display. The panel settings, with the type1 selected, suitable for the cur-rently selected style are automatically set up for you to play.
The BEAT indicator dots flash at the tempo and synchro start mode is en-gaged.
• If the One Touch Setting isturned ON when the NORMAL orSPLIT mode is selected, theFINGERED mode is automati-cally selected.
• You can create your originalsetting by editing the One TouchSetting data and store it into theRegistration Memory — see page47.
• “No OTS” will appear on thedisplay if the optional cartridgestyles have no one touch settingdata.
One Touch Setting Parameter List• Voice number• Octave• Pan• Dual Voice (Voice number, volume,
octave, reverb level, chorus level,pan)
• Dual ON/OFF• Split Voice (Voice number, volume,
octave, reverb level, chorus level,pan, split point=59)
• DSP variation ON/OFF• Multi Pad Kit number• Style parameters=default• Synchro start=ON• Accomp volume=100• Accomp split point=59• Accomp large/small=large• Tempo=Default (for the currently
selected style)• Main A/B section
• Keyboard volume• Reverb level• Chorus level• DSP level• Harmony/Echo ON/OFF, type• DSP type• Sustain (Panel) ON/OFF• Reverb ON/OFF• Chorus ON/OFF• DSP ON/OFF
2 Select another Type ...............................................................................................................................
Press one of the REGISTRATION MEMORY buttons [2]~[4] to select an-other type. The corresponding One Touch Setting number appears above“REGIST” in the display, and the display changes to the one for the selectedtype.
ONE TOUCHSETTING
REPEAT CHORD
BEAT
OTSREGIST
ACCOMPFREEZEMEMORIZE 1 2 3 4
REGIST
One Touch Setting can be turned OFF by pressing the [ONE TOUCH SET-TING] button a second time so that the “OTS” icon disappears from the dis-play.

43
The PSR-A3’s Arabic Scale feature lets you simply and easily raise orlower the pitch of the specific note(s) and create your own scale (arabicscale). You can change the scale settings at any time- even when you areplaying. The PSR-A3 is capable of registering 6 scale settings so that youcan memorize your own setting and recall it whenever you want to use.
Using Arabic Scales
FUNCTION SclTune≥800VOICE
STYLE
SONG
REGIST MEMORY
MULTI PAD
DUAL VOICE
SPLIT VOICE
HARM/ECHO
OVERALL
DIGITAL EFFECT
Adjusting the Scale Tuning
1 Select the Scale Tuning Function.........................................................................
Press the [FUNCTION] button to the left of the display as many timesas necessary until the arrowhead in the display appears next to “OVER-ALL” in the function list to the left of the display and use the cursor []and [] buttons to select “SclTunem”, the Scale Tuning function.
ACCOMP TRACK SONG TRACK
SclTune≥TEMPO TRANSPOSE MEASURE REPEAT CHORD
BEAT
TOUCHMINUS ONE
REVERB DUAL
CHORUS HARMONY
DSP SUSTAIN
RHYTHM BASS CHORD PAD PHRASE ACCOMP MELODY2
MELODY11 1 1
ON /OFF
VOICE
VOL
REGIST
REC REC REC
OTS-50
134126152105 1011011
118 10 a01
VOICE
STYLE
SONG
REGIST MEMORY
MULTI PAD
DUAL VOICE
SPLIT VOICE
HARM/ECHO
OVERALL
DIGITAL EFFECT
NORMAL
SPLIT
SINGLE
FINGERED
Setting an Arabic Scale
SCALESETTING
The [SCALE SETTING] buttons, located at the top left side of thepanel, simulate an one-octave keyboard (C through B). Pressing each buttonturns ON and OFF the “Scale Setting” feature of the specific note. The “ScaleSetting” feature affects all the notes having the same note name in all theregister. When set to ON (the indicator above the selected button is lit), youcan play on the keyboard in the arabic scale. The default scale setting (tuning)for each note is –50 cents. You can also adjust the scale tuning by 1 cent asfollows.
• The Scale Setting function is al-ways turned OFF, whenever thepower switch is turned ON.
• Pressing one of the [SCALE SET-TING] buttons to ON always setsthe tuning to –50 cents (defaultvalue).
• The song and multi pad playbackare tuned by pressing the [SCALESETTING] button to ON.
• The [SCALE SETTING] indicatorwill light or go out according to thesong playback data.
• Any scale setting changes includingthe ones in the song playback datawill take effect at the appropriatetimes.
• The Scale Setting function has noeffect on the keyboard percussionvoices (see page 14).
• It may take some time to processthe scale setting change whenrecording/playing a song or playingan accompaniment.

44
2 Select a Note to Set the Tuning ......................................................................................
Use the cursor [>] button to enter the Scale Tuning function and thenselect one of the notes using the cursor [] and [] buttons (the selectednote name appears on the top line of the display).
FUNCTION ≤Tune C-50VOICE
STYLE
SONG
REGIST MEMORY
MULTI PAD
DUAL VOICE
SPLIT VOICE
HARM/ECHO
OVERALL
DIGITAL EFFECT
CURSOR
You can also enter the Scale Tuning function by pressing and holdingone of the [SCALE SETTING] button until the arrowhead jumps to theOVERALL position and the current scale tuning of the specific note appearson the display.
3 Adjust the Scale Tuning ................................................................................................................
Use the [–/NO] and [+/YES] buttons, the number buttons or the data dialto adjust the desired tuning. The tuning range is from “–64” to “63” cents(one cent is one hundredth of a semitone).
–/NO +/YES
654
0
7 8 9
1 2 3
1– –* *
Using Arabic Scales
• You can return to the previousdisplay “SclTunem” by pressingthe cursor [<] button.
• Press the [–/NO] and [+/YES]buttons simultaneously to in-stantly reset the scale tuning to“00”.
• If the scale is tuned to the valueother than 00 (not regular scale),the indicator of the [SCALESETTING] button correspondingto the note will be lit.
If you want to keep the adjusted scale tunings, be sure to store it into theScale Memory (see page 45) before turning the [SCALE SETTING] buttonto OFF.
4 Exit .........................................................................................................................................................................................
Press the [VOICE] button or select a different function to exit from theOVERALL function.

45
Using Arabic Scales
Registering the Scale Settings
• Scale Tuning• Scale Setting ON/OFF
1 Set Up the Scale Settings as Required ...........................................................
Make the desired scale settings. The following settings are memorized bythe Scale Memory function:
2 Register the Settings ..........................................................................................................................
While holding the [MEMORIZE] button, press one of the SCALEMEMORY buttons. Any data that was previously in the selected location iserased and replaced by the new settings. The indicator of the selected buttonwill light to indicate that the data has been stored.
• The Scale Memory data is re-tained in memory even when thepower switch is turned OFF, aslong as the batteries are installedor the AC adaptor is connected.
• All OFF scale settings (regularscale) can also be memorized.
The scale settings stored to a SCALE MEMORY button can be recalled atany time simply by pressing the appropriate button.
The indicator of the selected button will flash as soon as any change is madeto the scale settings. A flashing SCALE MEMORY indicator therefore indi-cates that the current scale settings do not correspond to those stored in theSCALE MEMORY.
The scale memory function can be turned OFF by pressing the [SCALEMEMORY] button which indicator is lit, so that the indicator goes out andPSR-A3 returns to the regular scale setting.
Recall the Scale Settings
SCALEMEMORY
MEMORIZE 1 2 3 4 5 6
SCALEMEMORY
MEMORIZE 1 2 3 4 5 6
• The stored scale settings can berecalled again by pressing the[SCALE MEMORY] button whichindicator is flashing.

46
Accompaniment Scale Tuning
The Scale Setting feature of the specific note for the accompaniment can also be turned ON by press-ing the [SCALE SETTING] button. If you want to change the tuning of the accompaniment with playingthe tuned melody, turn the Accompaniment Scale Tuning to ON in the OVERALL function group.
1 Select the Accompaniment Scale Tuning Function ................
Press the [FUNCTION] button to the left of the display as many timesas necessary until the arrowhead in the display appears next to “OVERALL”in the function list to the left of the display and use the cursor [] and []buttons to select “TuneAcc”, the Accompaniment Scale Tuning function.
FUNCTION TuneAccoFFVOICE
STYLE
SONG
REGIST MEMORY
MULTI PAD
DUAL VOICE
SPLIT VOICE
HARM/ECHO
OVERALL
DIGITAL EFFECT
2 Turn the Accompaniment Scale Tuning ON/OFF..........................
Use the [–/NO] and [+/YES] buttons or the data dial to turn the Accom-paniment Scale Tuning OFF or ON. The tuned accompaniment will beplayed when turned ON.
• The Accompaniment Scale Tun-ing function is always turnedOFF, whenever the power switchis turned ON.
• When the Accompaniment ScaleTuning is turned ON, the basenote and chord voices for theStop Accompaniment function(see page 37) are also tuned.
3 Exit .........................................................................................................................................................................................
Press the [VOICE] button or select a different function to exit from theOVERALL function.
–/NO +/YES
654
0
7 8 9
1 2 3
1– –* *
Using Arabic Scales

47
2 Select a Registration Bank (if necessary) .................................................
Any of the 32 Registration Memory banks can be selected via theREGIST MEMORY function. Use the [FUNCTION] buttons to move thearrowhead next to “REGIST MEMORY” in the function list to the left ofthe display, then use the [–/NO] and [+/YES] buttons, the number buttons orthe data dial to select the desired Registration Memory bank (01 through32).
• The REGIST MEMORY functioncan be quickly selected by press-ing and holding the [MEMORIZE]button.
FUNCTION Bank1101VOICE
STYLE
SONG
REGIST MEMORY
MULTI PAD
DUAL VOICE
SPLIT VOICE
HARM/ECHO
OVERALL
DIGITAL EFFECT
Data Stored By the Registration Memory
VOICE PARAMETERS• Voice number• Keyboard volume• Octave• Pan• Split voice (Voice number,
volume, octave, reverb level,chorus level, pan, split point)
• Dual voice (Voice number,volume, octave, reverb level,chorus level, pan)
• Dual voice ON/OFF• Touch response ON/OFF,
sensitivity
• Harmony/Echo ON/OFF,type
• DSP ON/OFF, DSP (type,return level)
• DSP variation ON/OFF• Reverb ON/OFF• Chorus ON/OFF• Sustain (Panel) ON/OFF• Reverb Level• Chorus Level• DSP Level• Pitch Bend Range
ACCOMPANIMENT PARAMETERS• Mode (NORMAL/SPLIT/SINGLE/FINGERED)• Style number (includes cartridge styles)• Tempo• Split point (Accomp)• Fingering mode• Accompaniment volume• Track data (Track ON/OFF, voice, volume)• Main A/B section• Transpose• Multi Pad Kit number• Reverb (type, return level)• Chorus (type, return level)
1 Set Up the Controls as Required ................................................................................
Make the desired control settings. The following settings are memorizedby the Registration Memory function:
Registering the Panel Settings
Registration MemoryThe PSR-A3 Registration Memory feature can be used to memorize 128complete control-panel setups (32 banks, 4 setups each) that you canrecall whenever needed.
ACCOMP TRACK SONG TRACK
Bank1TEMPO TRANSPOSE MEASURE REPEAT CHORD
BEAT
TOUCHMINUS ONE
REVERB DUAL
CHORUS HARMONY
DSP SUSTAIN
RHYTHM BASS CHORD PAD PHRASE ACCOMP MELODY2
MELODY11 1 1
ON /OFF
VOICE
VOL
REGIST
REC REC REC
OTS801
135102117130 1011011
118 10 a01
VOICE
STYLE
SONG
REGIST MEMORY
MULTI PAD
DUAL VOICE
SPLIT VOICE
HARM/ECHO
OVERALL
DIGITAL EFFECT
NORMAL
SPLIT
SINGLE
FINGERED

48
Registration Memory
3 Register the Settings..........................................................................................................................
While holding the [MEMORIZE] button, press one of the REGISTRA-TION MEMORY buttons. Any data that was previously in the selected loca-tion is erased and replaced by the new settings. The corresponding Registra-tion Memory number will appear above “REGIST” in the display.
ACCOMPFREEZE
REGISTRATIONMEMORY
MEMORIZE 1 2 3 4
• Please note that anytime youstore to a REGISTRATIONMEMORY button, all settingspreviously stored in that buttonwill be erased and replaced bythe new settings.
Enter a New Name for the Registration Bank
If you want to enter a descriptive name for easier identification, enteryour original Registration Bank name, this is recommended.
Use the cursor [>] button to move the cursor to the first (left most)character of the Registration Bank name in the display. A RegistrationBank name can consist of up to 8 characters. The position of the charac-ter you want to enter or change can be selected by moving the cursor.
Using the [–/NO] and [+/YES] buttons or the data dial, enter the de-sired character listed below. The number buttons can also be used to en-ter the number. If you want to insert an underline character at the cursorposition, press the cursor [] button. If you want to delete a character atthe cursor position, press the cursor [] button. When you’ve finishedentering the Registration Bank name, move the cursor to the positionother than the Registration Bank name so that the newly entered Regis-tration Bank name will be memorized.
• The Registration Memory dataincluding it’s name is retained inmemory even when the powerswitch is turned OFF, as long asthe batteries are installed or theAC adaptor is connected.
Character ListABCDEFGHIJKLMNOPQRSTUVWXYZabcdefghijklmnopqrstuvwxyz0123456789–
Yamaha101

49
Registration Memory
Recall the Registered Panel Settings
• Music Cartridge registrationsettings can be recalled in thesame way — see page 67.
• If the Accomp Freeze function isON when a REGISTRATIONMEMORY is recalled, the regis-tration number will flash.
• Registration bank 01 can beinstantly recalled by simultane-ously pressing the [–/NO] and [+/YES] buttons.
• When the One Touch Setting isON, registration memory datacan not be recalled.
Simply select the appropriate bank as described above, then press the de-sired REGISTRATION MEMORY button at any time to recall the memorizedsettings. The corresponding Registration Memory number will appear above“REGIST” in the display, and the appropriate setting changes will appear in thedisplay.
The indicator of the selected REGISTRATION MEMORY will flash assoon as any change is made to the panel settings. In other words, if the REGIS-TRATION MEMORY indicator is flashing, the current panel settings are differ-ent from those stored in the memory.
No REGISTRATION MEMORY indicator will be showing when the PSR-A3 is turned ON or a bank is selected.
FUNCTION Bank1101VOICE
STYLE
SONG
REGIST MEMORY
MULTI PAD
DUAL VOICE
SPLIT VOICE
HARM/ECHO
OVERALL
DIGITAL EFFECT
ACCOMPFREEZEMEMORIZE 1 2 3 4
REGIST
The Accomp Freeze Function
When the ACCOMP FREEZE function is engaged, the accompaniment pa-rameters listed above will not be changed when a REGISTRATION MEMORYis recalled. This allows you to recall different REGISTRATION MEMORYsettings while using Auto Accompaniment, without suddenly disturbing theflow of the accompaniment. The ACCOMP FREEZE function is turned ONand OFF by pressing the [ACCOMP FREEZE] button. The “FREEZE” indi-cator appears in the “REGIST” area in the display when it is turned ON.
• Accomp Freeze remains ONeven if a different registrationbank is selected.
• When you recall the REGISTRA-TION MEMORY settings whilesong recording or playback, onlythe voice parameter settings canbe recalled even if the ACCOMPFREEZE function is turned OFF.
ACCOMPFREEZEMEMORIZE 1 2 3 4
REGIST

50
Song RecordingThe PSR-A3 SONG TRACKS allows you to record and play back com-plete songs including chord sequences created using the Auto Accompa-niment feature and a melody line you play on the keyboard. The SONGTRACKS include one ACCOMP track and two MELODY tracks.The PSR-A3 can retain up to 8 complete songs in internal memory, andthese can be selected and played back simply by selecting the appropri-ate SONG. The song numbers 30 through 37 are the area for your owncreation (user songs).
• Material recorded on the SONG TRACKs is retained in memory even when the POWER switch isturned OFF if batteries are present or an AC adaptor is connected.
• The recorded data will be lost if the power is turned OFF, the AC adaptor is unplugged, or thebatteries fail during recording.
• For 8 songs, up to approximately 4200 notes in the MELODY tracks, or 2100 chords in theACCOMP tracks can be recorded.
The SONG MELODY tracks record the following operations and data:
Recording a Melody Track
• Note ON/OFF• Velocity• Voice number• Octave• Pan• Dual voice ON/OFF• Dual Voice (voice
number, volume, octave,reverb level, choruslevel, pan)
• Keyboard volume*• Pitch Bend• Pitch Bend Range*• Reverb Level• Chorus Level
• DSP Level (MELODY 1 track only)• Harmony/Echo ON/OFF, type• Reverb ON/OFF• Chorus ON/OFF• DSP ON/OFF, DSP type (MELODY 1 track only)• DSP variation ON/OFF (MELODY 1 track only)• Sustain (Panel) ON/OFF (Sustain pedal ON/OFF)• Scale Setting ON/OFF• Scale Tuning• (Tempo signature common to melody & accomp
tracks)*
* Recorded only at the beginning of a song; changescannot be made during recording.
ACCOMP TRACK SONG TRACK
UserSng1TEMPO TRANSPOSE MEASURE REPEAT CHORD
BEAT
TOUCHMINUS ONE
REVERB DUAL
CHORUS HARMONY
DSP SUSTAIN
RHYTHM BASS CHORD PAD PHRASE ACCOMP MELODY2
MELODY11 1 1
ON /OFF
VOICE
VOL
REGIST
REC REC REC
OTS830
135102117130 1011011
118 10 a01
VOICE
STYLE
SONG
REGIST MEMORY
MULTI PAD
DUAL VOICE
SPLIT VOICE
HARM/ECHO
OVERALL
DIGITAL EFFECT
NORMAL
SPLIT
SINGLE
FINGERED
• The Scale Setting ON/OFF statusand Scale Tuning data in thelatest recorded melody track willtake effect in the song.

51
FUNCTION UserSng1830VOICE
STYLE
SONG
REGIST MEMORY
MULTI PAD
DUAL VOICE
SPLIT VOICE
HARM/ECHO
OVERALL
DIGITAL EFFECT
Song Recording
1 Select a SONG Number .................................................................................................................
If necessary, use the [FUNCTION] buttons to select the SONG function,and then the [–/NO] and [+/YES] buttons, the number buttons or the datadial to select the SONG number (user song numbers “30”~“37”) to whichyou want to record.
2 Select a Voice and Set the Voice Parameters ......................................
Select the voice you want to record with, and set the digital effects andother parameters as required.
• You cannot record in the SPLITmode — the NORMAL mode willautomatically be selected whenthe SONG record ready mode isengaged.
3 Engage the MELODY Track Record Ready Mode ........................
Press the SONG [REC] button. The [REC] indicator will flash, and“REC” will appear in the MELODY 1 track position on the display indicat-ing that the PSR-A3 is ready to record. Flashing square brackets in both theMELODY 1 and MELODY 2 track positions indicate that either track canbe selected for recording at this point — use the [–/NO] and [+/YES] but-tons or the data dial to select the MELODY track to be recorded (“REC”appears in the selected track position).
/
REC PLAY/STOP
SONG
–/NO +/YES0
7 8 9ACCOMP MELODY2
MELODY1
REC
The BEAT indicator dots flash at the current tempo. If the “Metronom”function in the OVERALL function group is turned ON, the metronomewill also begin to sound at the currently selected tempo (page 74).
• If a previously-recorded SONGACCOMP. track is ON (theSONG ACCOMP track icon isshowing), it can be monitoredwhile recording a MELODY track.If you don’t want to hear theACCOMP track while recording,move the cursor to the ACCOMPtrack icon and press the [–/NO]button to turn it OFF.
• If a non-user song number isselected when the record readymode is engaged, user songnumber 30 will automatically beselected.
• The melody track volume is thecurrent Keyboard Volume setting— see page 71.
• Only one melody track can berecorded at a time.
• The record-ready mode of theMELODY track can be disen-gaged by pressing the [REC]button.
• When the record-ready mode isengaged, the measure numberwill compulsorily be reset to “01”.

52
Song Recording
4 Record .............................................................................................................................................................................
Recording will begin as soon as you play a note on the keyboard orpress the SONG [PLAY/STOP] button, and the BEAT indicator dots willbegin to indicate the current beat as in the Auto Accompaniment mode. TheMEASURE parameter will also show the current measure number. The[REC] indicator lights continuously once recording has started.
/
REC PLAY/STOP REPEATPLAY
MINUSONE
SONG
• Whenever you record using theSONG MEMORY, any previouslyrecorded material in the sametrack will be erased.
• If you start recording by pressingthe [PLAY/STOP] button, nothingwill be recorded until you beginplaying on the keyboard.
• Melody Track data can becleared by pressing the [PLAY/STOP] button to start recordingand stop it without playing thekeyboard (Melody Track DataClear).
• Recording is carried out in 1-measure increments. If you stoprecording in the middle of ameasure, rests will automaticallybe recorded until the end of thatmeasure.
• If the SONG MEMORY becomesfull while recording, “Full” willappear on the display and re-cording will stop.
• If you want to re-record theMelody track which “Full” wasshown on the display duringrecording, execute “Melody TrackData Clear” operation (seeabove) before recording.
• Only VOICE function voice num-bers are shown in the melodytrack displays (dual voice num-bers are not shown).
5 Stop Recording ..............................................................................................................................................
Stop recording by pressing the SONG [PLAY/STOP] button. The[REC] indicator will go out and the MEASURE number on the display willreturn to “01”.
The melody track voice number and volume settings will appear on thedisplay.
/
REC PLAY/STOP REPEATPLAY
MINUSONE
SONG
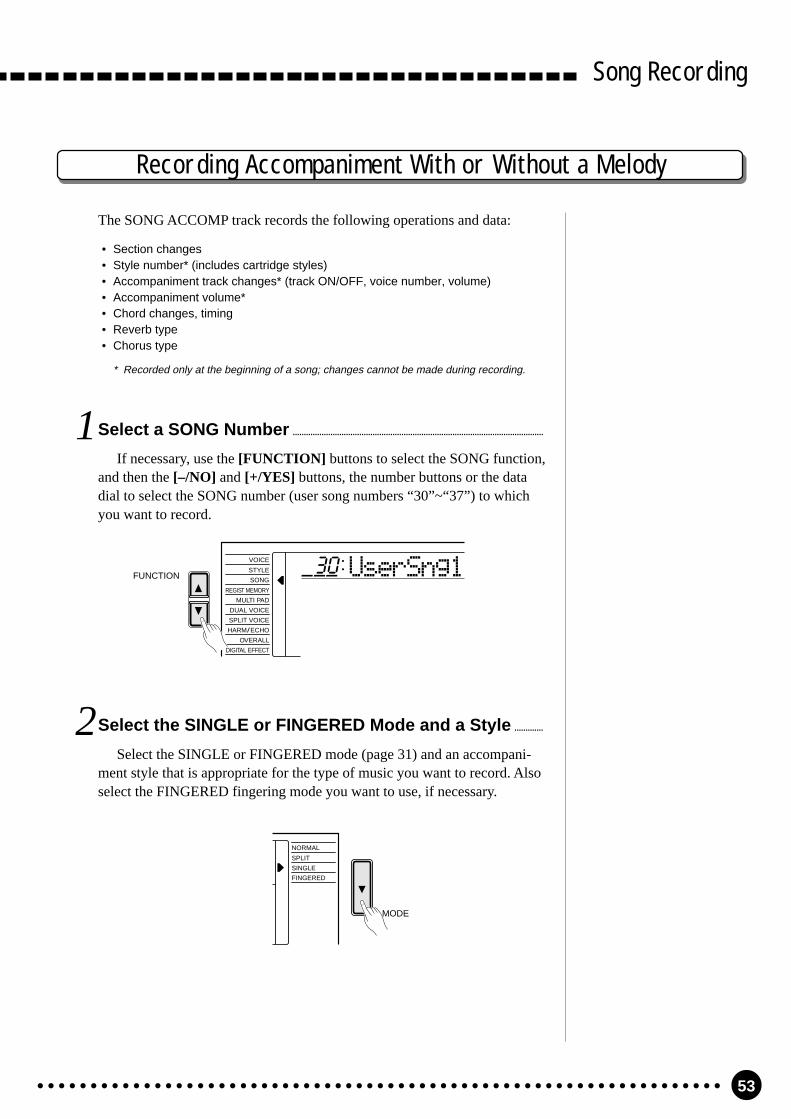
53
NORMAL
SPLIT
SINGLE
FINGERED
MODE
Song Recording
The SONG ACCOMP track records the following operations and data:
Recording Accompaniment With or Without a Melody
• Section changes• Style number* (includes cartridge styles)• Accompaniment track changes* (track ON/OFF, voice number, volume)• Accompaniment volume*• Chord changes, timing• Reverb type• Chorus type
* Recorded only at the beginning of a song; changes cannot be made during recording.
1 Select a SONG Number .................................................................................................................
If necessary, use the [FUNCTION] buttons to select the SONG function,and then the [–/NO] and [+/YES] buttons, the number buttons or the datadial to select the SONG number (user song numbers “30”~“37”) to whichyou want to record.
2 Select the SINGLE or FINGERED Mode and a Style .............
Select the SINGLE or FINGERED mode (page 31) and an accompani-ment style that is appropriate for the type of music you want to record. Alsoselect the FINGERED fingering mode you want to use, if necessary.
FUNCTION UserSng1830VOICE
STYLE
SONG
REGIST MEMORY
MULTI PAD
DUAL VOICE
SPLIT VOICE
HARM/ECHO
OVERALL
DIGITAL EFFECT

54
Song Recording
3 Engage the ACCOMP/MELODY TrackRecord Ready Mode .............................................................................................................................
Press the SONG [REC] button. The [REC] indicator will flash, and“REC” will appear in the ACCOMP and MELODY 1 track positions on thedisplay indicating that the PSR-A3 is ready to record. Flashing squarebrackets in both the MELODY 1 and MELODY 2 track positions indicatethat either track can be selected for recording at this point — use the [–/NO]and [+/YES] buttons or the data dial to select the MELODY track to be re-corded, or none if you only want to record the ACCOMP track (“REC” ap-pears in the selected track position).
The BEAT indicator dots flash at the current tempo. If the “Metronom”function in the OVERALL function group is turned ON, the metronome willalso begin to sound at the currently selected tempo (page 74).
/
REC PLAY/STOP
SONG
–/NO +/YES0
7 8 9ACCOMP MELODY2
MELODY1
REC REC
4 Record .............................................................................................................................................................................
Recording will begin as soon as you play a chord on the Auto Accompa-niment section of the keyboard. If you’ve selected the MELODY track torecord with the ACCOMP track, a right-hand note will also start the record-ing process. The [REC] indicator lights continuously once recording hasstarted.
• Whenever you record using theSONG MEMORY, any previouslyrecorded material in the sametrack will be erased.
• If the SONG MEMORY becomesfull while recording, “Full” willappear on the display and re-cording will stop.
• Recording is carried out in 1-measure increments. If you stoprecording in the middle of ameasure, rests will automaticallybe recorded until the end of thatmeasure.
• If you start the ACCOMP trackrecording by pressing the [PLAY/STOP] button, no chord data willbe recorded until you beginplaying on the keyboard.
/
REC PLAY/STOP REPEATPLAY
MINUSONE
SONG
Recording can also be started by pressing the ACCOMPANIMENTCONTROL [START/STOP] button. In this case only the rhythm will beginwithout bass and chord accompaniment until you play the first chord on theAuto Accompaniment section of the keyboard.
INTRO ENDINGMAINAUTO FILLSTART/STOP
SYNC-START/STOP
A B
• If a previously-recordedMELODY track is turned ON (itsicon is showing), it can be moni-tored while recording. If you don’twant to hear the previous trackwhile recording, move the cursorto the corresponding track iconand press the [–/NO] button toturn it OFF.
• The accompaniment track vol-ume is the current Accompani-ment Volume setting — see page73.
• When the record-ready mode isengaged, the measure numberwill compulsorily be reset to “01”.
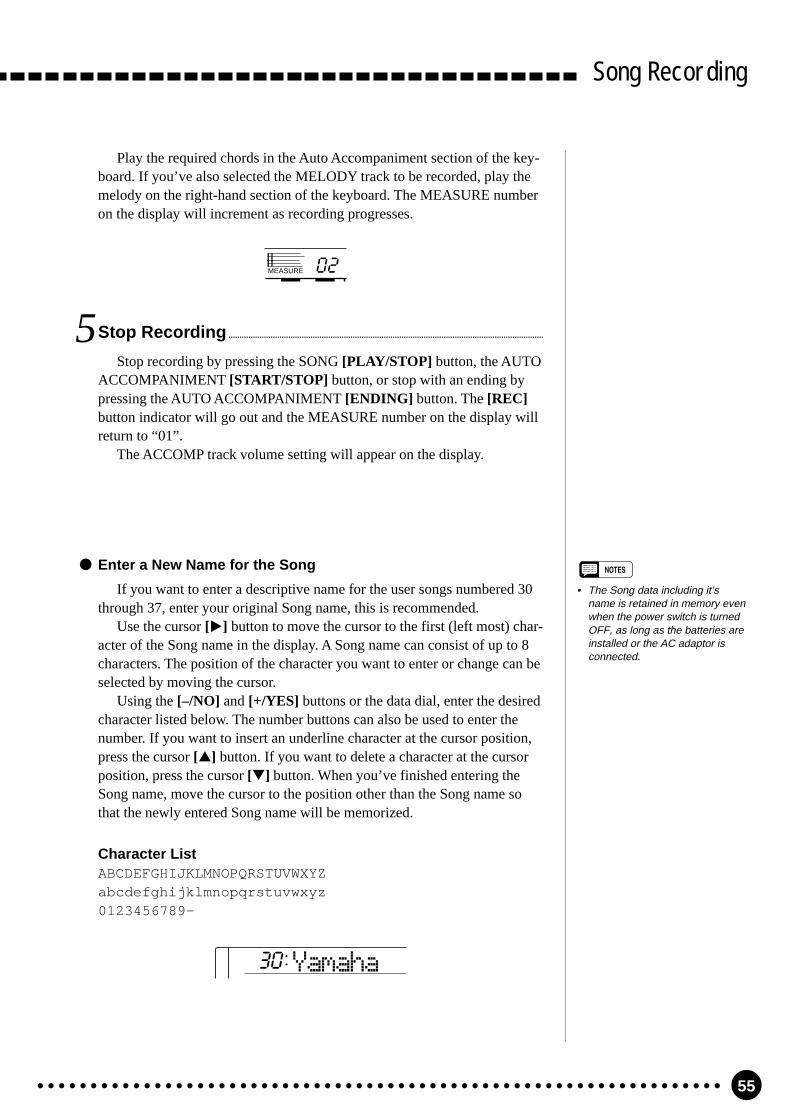
55
Song Recording
Enter a New Name for the Song
If you want to enter a descriptive name for the user songs numbered 30through 37, enter your original Song name, this is recommended.
Use the cursor [>] button to move the cursor to the first (left most) char-acter of the Song name in the display. A Song name can consist of up to 8characters. The position of the character you want to enter or change can beselected by moving the cursor.
Using the [–/NO] and [+/YES] buttons or the data dial, enter the desiredcharacter listed below. The number buttons can also be used to enter thenumber. If you want to insert an underline character at the cursor position,press the cursor [] button. If you want to delete a character at the cursorposition, press the cursor [] button. When you’ve finished entering theSong name, move the cursor to the position other than the Song name sothat the newly entered Song name will be memorized.
Character ListABCDEFGHIJKLMNOPQRSTUVWXYZabcdefghijklmnopqrstuvwxyz0123456789–
Yamaha130
• The Song data including it’sname is retained in memory evenwhen the power switch is turnedOFF, as long as the batteries areinstalled or the AC adaptor isconnected.
Play the required chords in the Auto Accompaniment section of the key-board. If you’ve also selected the MELODY track to be recorded, play themelody on the right-hand section of the keyboard. The MEASURE numberon the display will increment as recording progresses.
MEASUREa02
5 Stop Recording ..............................................................................................................................................
Stop recording by pressing the SONG [PLAY/STOP] button, the AUTOACCOMPANIMENT [START/STOP] button, or stop with an ending bypressing the AUTO ACCOMPANIMENT [ENDING] button. The [REC]button indicator will go out and the MEASURE number on the display willreturn to “01”.
The ACCOMP track volume setting will appear on the display.

56
Song Recording
Accompaniment and Melody Playback
1 Select a SONG Number .................................................................................................................
If necessary, use the [FUNCTION] buttons to select the SONG function,and then the [–/NO] and [+/YES] buttons, the number buttons or the datadial to select the SONG number (user song numbers “30”~“37”) containingthe song you want to play.
2 Start Playback ..................................................................................................................................................
Playback will begin as soon as the SONG [PLAY/STOP] button ispressed. You can turn the ACCOMP and MELODY tracks ON and OFFduring playback as required.
3 Play Along If You Like ........................................................................................................................
Play along on the keyboard if you like. You can also change the tempoduring playback.
4 Stop Playback ...................................................................................................................................................
Accompaniment and melody playback will stop automatically when allrecorded data has been played back. You can also stop playback at any timeby pressing the SONG [PLAY/STOP] button.
• You can also start playback fromany specified measure (see page57).
• Individual tracks can be turnedOFF (muted) or ON by using thecursor buttons to select the iconof the target track (the icon andtrack name will flash), and thenusing the [–/NO] and [+/YES]buttons or the data dial to turnthe track OFF or ON, respec-tively. The track icon will disap-pear when a track is muted.
• The NORMAL mode is automati-cally selected when SONG play-back is started.
• Voice and volume data can berewritten during playback — see“Voice & Volume Rewrite”, below.
• When the song playback isstopped, the DSP type will com-pulsorily be changed accordingto the currently selected voiceand the reverb and chorus typeswill be changed according to thecurrently selected style.
/
REC PLAY/STOP REPEATPLAY
MINUSONE
SONG
FUNCTION UserSng1830VOICE
STYLE
SONG
REGIST MEMORY
MULTI PAD
DUAL VOICE
SPLIT VOICE
HARM/ECHO
OVERALL
DIGITAL EFFECT

57
Song Recording
Play from a Specified MeasureYou can start SONG playback from any specified measure, as long as the
specified measure is within the range of measures that has already been re-corded:
1 Select the MEASURE Parameter ..................................................................................
While no recording or playback is in progress, use the CURSOR buttonsto select the MEASURE parameter in the display.
2 Enter the Desired Measure Number ......................................................................
Use the [–/NO] and [+/YES] buttons, the number buttons or the data dialto enter the desired measure number.
• Three-digit numbers are enteredby first pressing and holding the[1] or [2] button until “1” or “2”appears in the hundreds positionon the display, then pressing theremaining two digits in sequence.
MEASUREa01
CURSOR
3 Start Playback ..................................................................................................................................................
You can now start playback from the specified measure number.
–/NO +/YES
654
0
7 8 9
1 2 3
1– –* *

58
Song Recording
Voice & Volume Rewrite
You can rewrite the last recorded voice change in any individual trackduring playback by using the cursor buttons to select the voice number ofthe target track (the voice number will flash), and then using the numberbuttons, the [–/NO] and [+/YES] buttons or the data dial to select the de-sired voice number. The data will actually be rewritten when the [PLAY/STOP] button is pressed or the end of the song is reached or the next voicechange is encountered in the recorded data. The original voice number canbe recalled before it is actually rewritten by simultaneously pressing the[–/NO] and [+/YES] buttons. Any other voice changes included in the re-corded track data will take effect at the appropriate times.
Clearing the SONG TRACKS
All data in the ACCOMP, MELODY 1 and MELODY 2 tracks of thecurrently selected song can be completely erased by first pressing the [MI-NUS ONE] button while holding the [REC] button, and then press the[+/YES] button in response to the “Clear?” confirmation prompt on the dis-play (press [–/NO] if you decide not to erase the data).
The volume of each track can be rewritten during playback in the sameway. Use the cursor buttons to select the volume bar of the target track (thevolume bar will flash), and then use the [–/NO] and [+/YES] buttons or thedata dial to set the maximum volume of the track as required. The shorterthe bar, the lower the volume. The data will actually be rewritten when the[PLAY/STOP] button is pressed or the end of the song is reached. Theoriginal volume can be recalled before it is actually rewritten by simultane-ously pressing the [–/NO] and [+/YES] buttons. The new volume data iswritten only at the beginning of the track and affects the entire track.
• The dual voice will changeautomatically when a melodytrack voice is changed.
• Voice and volume data canonly be rewritten in songs youhave recorded yourself.
• Only songs you have recordedyourself can be cleared.
• If a non-user song number isselected when the song-clearmode is engaged, user songnumber 30 will automaticallybe selected.
–/NO +/YES
654
0
7 8 9
1 2 3
1– –* *CURSOR
ACCOMP MELODY2
MELODY1
REC REC REC
101103
/
REC PLAY/STOP REPEATPLAY
MINUSONE
SONG
Clear ?130

59
The Multi PadsThe PSR-A3 MULTI PADS can be used to play 144 short pre-recordedrhythmic and melodic sequences, that can be used to add impact andvariety to your keyboard performances. Some of the pad phrases simplyplay back as programmed, while others are “chord match” types which areautomatically transposed to match chords played using the PSR-A3 AutoAccompaniment feature.
The PSR-A3 MULTI PADS can also be used to record 16 short rhythmicor melodic sequences, percussion fill-ins, or single percussion soundsthat can be played at any time simply by pressing the appropriate pad. Themulti pad kit numbers 37 through 40 are the area for your own creation(user pad kits).
• See page 60 for a completelisting of the Multi Padassingnments.
• The MULTI PAD function can bequickly selected by pressing andholding the [REC/END] button.
FUNCTION Arpeggio101VOICE
STYLE
SONG
REGIST MEMORY
MULTI PAD
DUAL VOICE
SPLIT VOICE
HARM/ECHO
OVERALL
DIGITAL EFFECT
1 Select the MULTI PAD Function.....................................................................................
To select a multi pad kit, first select the MULTI PAD function by press-ing one of the [FUNCTION] buttons until the arrowhead in the display ap-pears next to “MULTI PAD” in the function list to the left of the display.
The PSR-A3 has 36 multi pad kits, each containing a complete set of 4 MULTI PAD phrases — 144phrases in all. Before using the MULTI PADS, select the MULTI PAD kit containing the phrases you want touse as follows:
Playing the MULTI PADS
ACCOMP TRACK SONG TRACK
ArpeggioTEMPO TRANSPOSE MEASURE REPEAT CHORD
BEAT
TOUCHMINUS ONE
REVERB DUAL
CHORUS HARMONY
DSP SUSTAIN
RHYTHM BASS CHORD PAD PHRASE ACCOMP MELODY2
MELODY11 1 1
ON /OFF
VOICE
VOL
REGIST
REC REC REC
OTS801
135102117130 1011011
118 10 a01
VOICE
STYLE
SONG
REGIST MEMORY
MULTI PAD
DUAL VOICE
SPLIT VOICE
HARM/ECHO
OVERALL
DIGITAL EFFECT
NORMAL
SPLIT
SINGLE
FINGERED

60
The Multi Pads
2 Select a Multi Pad Kit Number .........................................................................................
Use the [–/NO] and [+/YES] buttons, the number buttons or the data dialto select one of the 36 available multi pad kits.
Chord MatchKit Pad 1 Pad 2 Pad 3 Pad 401 Arpeggio O O O O02 Brass Hit O O O O03 Synth Arpeggio O O O O04 Pianist O O O O05 Fanfare – – – O06 Synth SFX O O O O07 Wet Synth O O O O08 Synth Sound O O O O09 Human Vox O O O O10 Twinkle O O O O11 Open Air – – – –12 Guitar Play O O O O13 Drum Flam1 – – – –14 Drum Flam2 – – – –15 Drum Kit – – – –16 Conga & Vibraslap – – – –17 Timbales – – – –18 Latin Percussion1 – – – –
The Multi Pad Kits
Chord MatchKit Pad 1 Pad 2 Pad 3 Pad 419 Rock Drum – – – –20 Latin Percussion2 – – – –21 Drum Fill – – – –22 Arabic Percussion – – – –23 Ashgan1 O O O O24 Ashgan1 O O O O25 Blow it O O O O26 Chords O O O O27 Duhulla – – – –28 Finale O O O –29 Guitar Chords O O O O30 Mazamir O – O O31 Belly Dance – – – –32 Rik – – – –33 Stage & Handclap – – – –34 Rakassni – – – –35 Tabel – – – –36 Tabla – – – –
–/NO +/YES0
7 8 9
3 Play the Multi Pad .....................................................................................................................................
Simply tap any of the MULTI PADS at any time to play back the corre-sponding phrase. MULTI PAD playback begins as soon as the button is pressed.You can even play two, three, or four MULTI PADS at the same time. Also, youcan create “retriggered sample” effects by repeatedly pressing a pad before itscontents are completely played back.
The MULTI PAD voices are independent from the voices you have currentlyselected for keyboard performance. You could, for example, play piano on thekeyboard while a MULTI PAD plays a brass chord stab.
When a “chord match” type MULTI PAD phrase is played, the phrase willbe automatically transposed to match chords played using the PSR-A3 Auto-accompaniment feature.
MULTI PAD playback can be terminated by pressing the MULTI PADS[TERMINATE] button.
• MULTI PAD playback speed isdetermined by the currentTEMPO setting.
REC/END1 2 3 4
MULTI PADS
TERMINATE
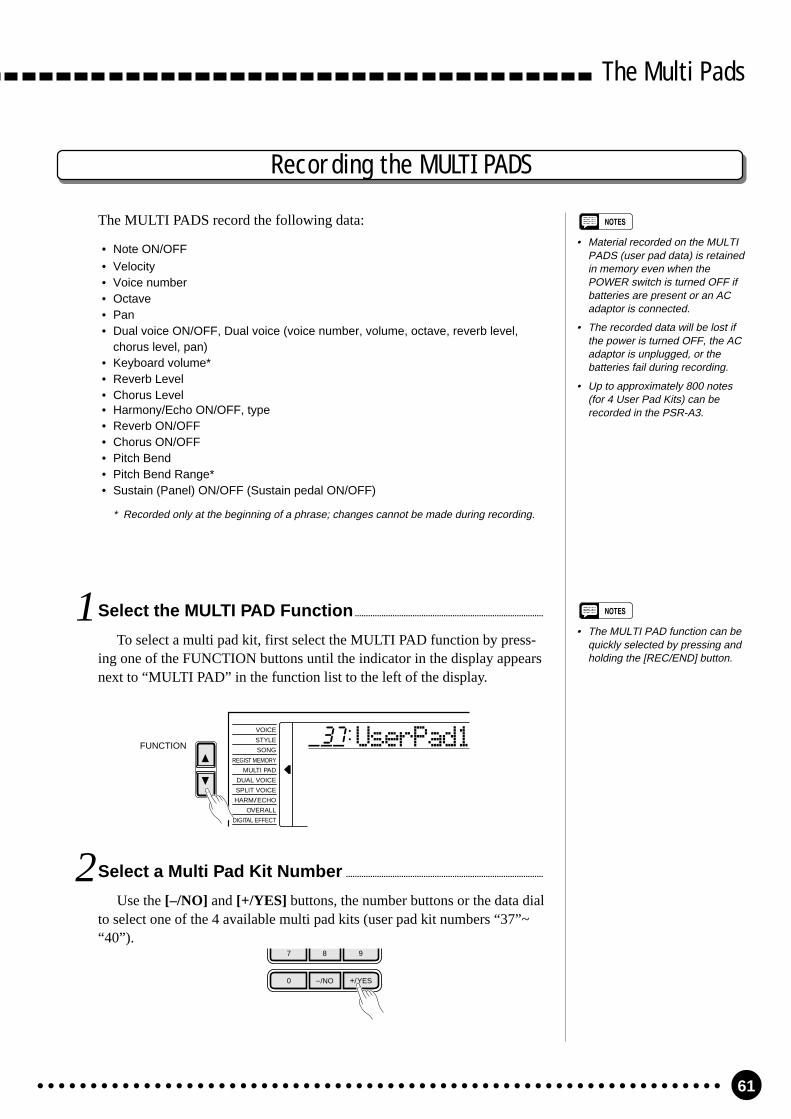
61
The Multi Pads
The MULTI PADS record the following data:
Recording the MULTI PADS
• Note ON/OFF
• Velocity• Voice number• Octave• Pan• Dual voice ON/OFF, Dual voice (voice number, volume, octave, reverb level,
chorus level, pan)• Keyboard volume*• Reverb Level• Chorus Level• Harmony/Echo ON/OFF, type• Reverb ON/OFF• Chorus ON/OFF• Pitch Bend• Pitch Bend Range*• Sustain (Panel) ON/OFF (Sustain pedal ON/OFF)
* Recorded only at the beginning of a phrase; changes cannot be made during recording.
• Material recorded on the MULTIPADS (user pad data) is retainedin memory even when thePOWER switch is turned OFF ifbatteries are present or an ACadaptor is connected.
• The recorded data will be lost ifthe power is turned OFF, the ACadaptor is unplugged, or thebatteries fail during recording.
• Up to approximately 800 notes(for 4 User Pad Kits) can berecorded in the PSR-A3.
2 Select a Multi Pad Kit Number .........................................................................................
Use the [–/NO] and [+/YES] buttons, the number buttons or the data dialto select one of the 4 available multi pad kits (user pad kit numbers “37”~“40”).
–/NO +/YES0
7 8 9
1 Select the MULTI PAD Function.....................................................................................
To select a multi pad kit, first select the MULTI PAD function by press-ing one of the FUNCTION buttons until the indicator in the display appearsnext to “MULTI PAD” in the function list to the left of the display.
FUNCTION UserPad1137VOICE
STYLE
SONG
REGIST MEMORY
MULTI PAD
DUAL VOICE
SPLIT VOICE
HARM/ECHO
OVERALL
DIGITAL EFFECT
• The MULTI PAD function can bequickly selected by pressing andholding the [REC/END] button.

62
The Multi Pads
3 Select a Voice and Other Parameters .................................................................
Select a voice and related parameters you want to record on the MULTIPADS. You might also want to set a tempo that will be easy to record at.
If you select a pitched voice to record, the data will automatically betransposed to match the chords played by the Auto Accompaniment feature(“chord match”).
6 Stop Recording ..............................................................................................................................................
Stop recording by pressing the [REC/END] button. The [REC/END]button indicator will go out.
REC/END1 2 3 4
MULTI PADS
TERMINATE
4 Engage the MULTI PAD Record Ready Mode......................................
Press one of the MULTI PAD buttons - [1] through [4] - while holdingthe [REC/END] button. The [REC/END] indicator will flash to indicatethat the record ready mode is engaged.
The four dots of the BEAT display flash at the current tempo. If the“Metronom” function in the OVERALL function group is turned ON, themetronome will begin to sound at the currently selected tempo.
• You cannot record in the SPLIT/SINGLE/FINGERED mode - theNORMAL mode will automaticallybe selected when the MULTIPAD record ready mode is en-gaged.
• If a non-user multi pad kit numberis selected when the recordready mode is engaged, usermulti pad kit number 37 willautomatically be selected.
• The recorded multi pad volumedepends on the current KeyboardVolume setting — see page 71.
• [DSP] button is disabled whenthe MULTI PAD is in recordready mode and record mode.Also, DSP will automatically beturned OFF when the MULTIPAD record ready mode is en-gaged.
REC/END1 2 3 4
MULTI PADS
TERMINATE
5 Record .............................................................................................................................................................................
Play a short sequence. The [REC/END] indicator will light during re-cording, and the BEAT indicator dots will indicate the current beat.
If you want to play back the recorded data as the “chord match” type,record all the phrases on CM7. The sound will be properly transposed whenused with the Auto Accompaniment feature.
• Whenever you record to a MULTIPAD, all previous data in thesame pad will be completelyerased and replaced by the newmaterial.
• If the MULTI PAD memory be-comes full while recording, “Full”will appear on the display andrecording will stop.

63
The Multi Pads
7 Play the Multi Pads .................................................................................................................................
Tap any of the MULTI PADS. Your recorded data will be played in ex-actly the same way as the preset data.
Enter a New Name for the Multi Pad Kit
If you want to enter a descriptive name for the user pad kit numbered 37through 40, enter your original Multi Pad Kit name, this is recommended.
Use the cursor [>] button to move the cursor to the first (left most) char-acter of the Multi Pad Kit name in the display. A Multi Pad Kit name canconsist of up to 8 characters. The position of the character you want to enteror change can be selected by moving the cursor.
Using the [–/NO] and [+/YES] buttons or the data dial, enter the desiredcharacter listed below. The number buttons can also be used to enter thenumber. If you want to insert an underline character at the cursor position,press the cursor [] button. If you want to delete a character at the cursorposition, press the cursor [] button. When you’ve finished entering theMulti Pad Kit name, move the cursor to the position other than the MultiPad Kit name so that the newly entered Multi Pad Kit name will be memo-rized.
Character ListABCDEFGHIJKLMNOPQRSTUVWXYZabcdefghijklmnopqrstuvwxyz0123456789–
Yamaha137
• The user pad kit data includingit’s name is retained in memoryeven when the power switch isturned OFF, as long as the bat-teries are installed or the ACadaptor is connected..
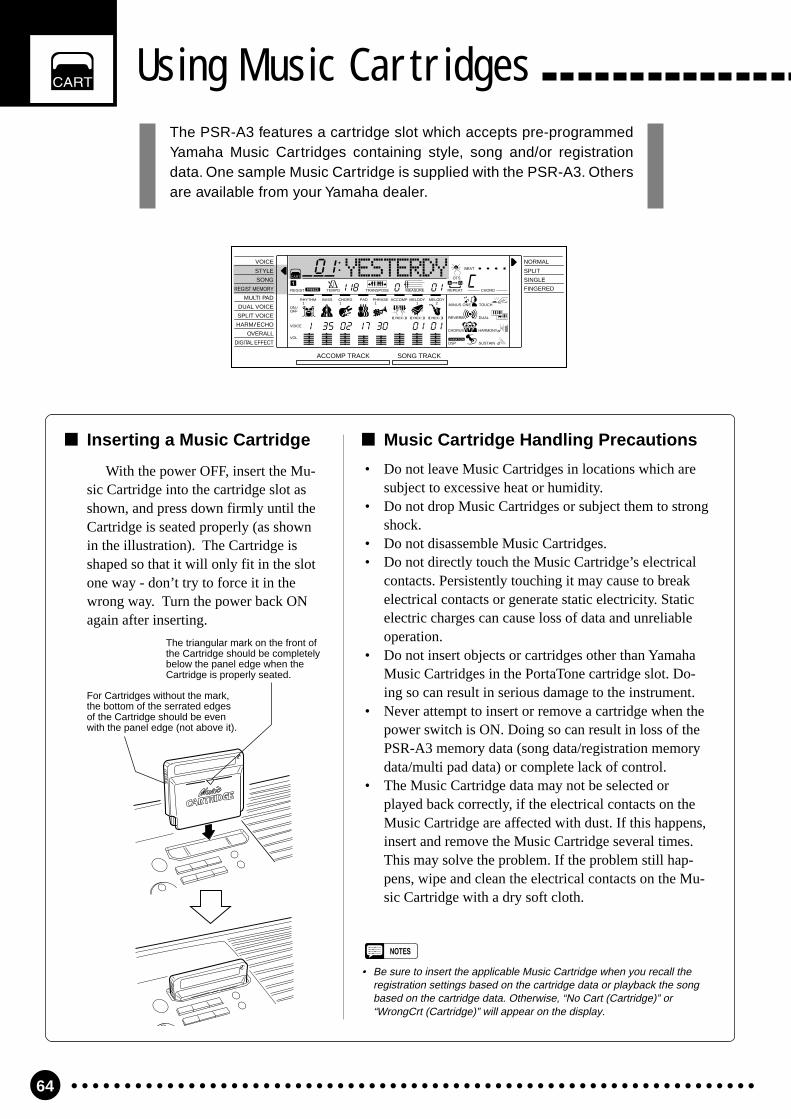
64
Using Music CartridgesThe PSR-A3 features a cartridge slot which accepts pre-programmedYamaha Music Cartridges containing style, song and/or registrationdata. One sample Music Cartridge is supplied with the PSR-A3. Othersare available from your Yamaha dealer.
ACCOMP TRACK SONG TRACK
YESTERDYTEMPO TRANSPOSE MEASURE REPEAT CHORD
BEAT
TOUCHMINUS ONE
REVERB DUAL
CHORUS HARMONY
DSP SUSTAIN
RHYTHM BASS CHORD PAD PHRASE ACCOMP MELODY2
MELODY11 1 1
ON /OFF
VOICE
VOL
REGIST
REC REC REC
OTS801
135102117130 1011011
118 10 a01
VOICE
STYLE
SONG
REGIST MEMORY
MULTI PAD
DUAL VOICE
SPLIT VOICE
HARM/ECHO
OVERALL
DIGITAL EFFECT
NORMAL
SPLIT
SINGLE
FINGERED
Music Cartridge Handling Precautions
• Do not leave Music Cartridges in locations which aresubject to excessive heat or humidity.
• Do not drop Music Cartridges or subject them to strongshock.
• Do not disassemble Music Cartridges.• Do not directly touch the Music Cartridge’s electrical
contacts. Persistently touching it may cause to breakelectrical contacts or generate static electricity. Staticelectric charges can cause loss of data and unreliableoperation.
• Do not insert objects or cartridges other than YamahaMusic Cartridges in the PortaTone cartridge slot. Do-ing so can result in serious damage to the instrument.
• Never attempt to insert or remove a cartridge when thepower switch is ON. Doing so can result in loss of thePSR-A3 memory data (song data/registration memorydata/multi pad data) or complete lack of control.
• The Music Cartridge data may not be selected orplayed back correctly, if the electrical contacts on theMusic Cartridge are affected with dust. If this happens,insert and remove the Music Cartridge several times.This may solve the problem. If the problem still hap-pens, wipe and clean the electrical contacts on the Mu-sic Cartridge with a dry soft cloth.
• Be sure to insert the applicable Music Cartridge when you recall theregistration settings based on the cartridge data or playback the songbased on the cartridge data. Otherwise, “No Cart (Cartridge)” or“WrongCrt (Cartridge)” will appear on the display.
With the power OFF, insert the Mu-sic Cartridge into the cartridge slot asshown, and press down firmly until theCartridge is seated properly (as shownin the illustration). The Cartridge isshaped so that it will only fit in the slotone way - don’t try to force it in thewrong way. Turn the power back ONagain after inserting.
For Cartridges without the mark,the bottom of the serrated edgesof the Cartridge should be evenwith the panel edge (not above it).
The triangular mark on the front ofthe Cartridge should be completelybelow the panel edge when theCartridge is properly seated.
Inserting a Music Cartridge

65
Using Music Cartridges
Cartridge Accompaniment Styles
Different Number of SectionsSome cartridge styles, for example, have A and B intro and ending sectionsas well as A and B main sections. In such a case, if the [INTRO] and MAIN[A] buttons are pressed in order to start the accompaniment with an intro-duction and then go to the main A section, the intro A section will play. Ifthe [INTRO] and MAIN [B] buttons are pressed, the intro B section willplay. A similar situation applies to endings: if the main A or B section isplaying and the [ENDING] button is pressed, the ending A or B section willplay accordingly.
The Music Cartridge supplied with the PSR-A3 provides an extra 8 accompaniment styles that can be usedin the same way as the internal accompaniment styles.
1 Select the Style Function ...........................................................................................................
Press the [STYLE] button to directly select the STYLE function, orpress the [FUNCTION] button to the left of the display as many times asnecessary until the arrowhead in the display appears next to “STYLE” in thefunction list to the left of the display.
Selecting Cartridge Styles
2 Select and Use a Cartridge Style ................................................................................
To select a cartridge style, first press and hold the number [3] button(below the cartridge icon on the panel) until the cartridge icon appears to theleft of the style name in the display, then enter the number of the cartridgestyle you want to select via the number buttons in the normal way (2 digits).The cartridge styles can also be selected by using the [–/NO] and [+/YES]buttons or the data dial to go beyond the highest or lowest internal stylenumbers — e.g. pressing the [+/YES] button while internal style number140 is selected will select cartridge style number 01 (the cartridge icon willappear).
The cartridge styles are used in exactly the same way as the internal ac-companiment styles (page 34).
• “No OTS” will appear on thedisplay if the optional cartridgestyles have no one touch settingdata.
–/NO +/YES
654
0
7 8 9
1 2 3
1– –* *
ORGRKBLD801VOICE
STYLE
SONG
REGIST MEMORY
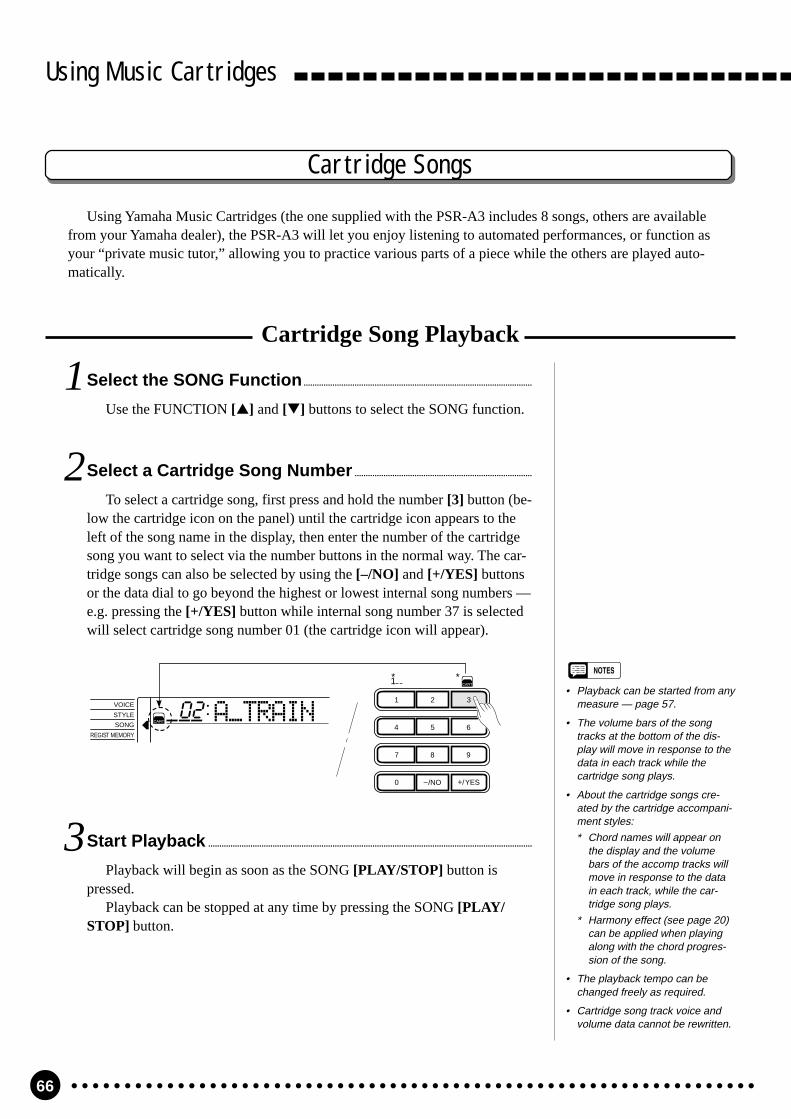
66
Using Music Cartridges
Cartridge Songs
1 Select the SONG Function.......................................................................................................
Use the FUNCTION [] and [] buttons to select the SONG function.
2 Select a Cartridge Song Number ................................................................................
To select a cartridge song, first press and hold the number [3] button (be-low the cartridge icon on the panel) until the cartridge icon appears to theleft of the song name in the display, then enter the number of the cartridgesong you want to select via the number buttons in the normal way. The car-tridge songs can also be selected by using the [–/NO] and [+/YES] buttonsor the data dial to go beyond the highest or lowest internal song numbers —e.g. pressing the [+/YES] button while internal song number 37 is selectedwill select cartridge song number 01 (the cartridge icon will appear).
Cartridge Song Playback
3 Start Playback ..................................................................................................................................................
Playback will begin as soon as the SONG [PLAY/STOP] button ispressed.
Playback can be stopped at any time by pressing the SONG [PLAY/STOP] button.
–/NO +/YES
654
0
7 8 9
1 2 3
1– –* *
AåTRAIN802VOICE
STYLE
SONG
REGIST MEMORY
• Playback can be started from anymeasure — page 57.
• The volume bars of the songtracks at the bottom of the dis-play will move in response to thedata in each track while thecartridge song plays.
• About the cartridge songs cre-ated by the cartridge accompani-ment styles:
* Chord names will appear onthe display and the volumebars of the accomp tracks willmove in response to the datain each track, while the car-tridge song plays.
* Harmony effect (see page 20)can be applied when playingalong with the chord progres-sion of the song.
• The playback tempo can bechanged freely as required.
• Cartridge song track voice andvolume data cannot be rewritten.
Using Yamaha Music Cartridges (the one supplied with the PSR-A3 includes 8 songs, others are availablefrom your Yamaha dealer), the PSR-A3 will let you enjoy listening to automated performances, or function asyour “private music tutor,” allowing you to practice various parts of a piece while the others are played auto-matically.

67
Using Music Cartridges
Cartridge Registration Presets
The Music Cartridge supplied with the PSR-A3 provides 8 banks of preset registration settings (8 banks x4 registration memories = 32 total) that provide a number of useful registration setups (refer to page 47 fordetails on the registration memory).
1 Select the Regist Memory Function......................................................................
Press either of the [FUNCTION] buttons to the left of the display asmany times as necessary until the arrowhead in the display appears next to“REGIST MEMORY” in the function list to the left of the display.
2 Select and Use a Cartridge Registration .....................................................
To select a cartridge registration memory, first press and hold the number[3] button (below the cartridge icon on the panel) until the cartridge iconappears to the left of the registration bank number in the display, then enterthe number of the bank you want to select via the number buttons in thenormal way (page 47). The cartridge registration memories can also be se-lected by using the [–/NO] and [+/YES] buttons or the data dial to go be-yond the highest or lowest internal bank numbers — e.g. pressing the [+/YES] button while internal bank number 32 is selected will select cartridgeregistration bank number 01 (the cartridge icon will appear).
The individual cartridge registration memories are recalled via the REG-ISTRATION MEMORY buttons and used in exactly the same way as theinternal registration memories (page 49).
Selecting Cartridge Registration
• Original data cannot be stored inthe cartridge registrationmemory.
• The voices recalled by a car-tridge registration are not thePSR-A3 panel voices but the GMvoices. When you select a car-tridge registration, GM voices willbe used. As a result, the voicenumber “- - -” and GM voicename will appear on the display.The GM voices can also beplayed on the keyboard and canbe recorded to the SONGMEMORY or the MULTI PADS.
–/NO +/YES
654
0
7 8 9
1 2 3
1– –* *
ORGRKBLD801VOICE
STYLE
SONG
REGIST MEMORY

68
Practice FeaturesThe PSR-A3 includes two features that can be a great aid in learning toplay and practicing on the keyboard.
Specifying the Parts To Be Turned On or Off .......................................
To specify the right-hand, left-hand, or both parts to be turned OFF whenthe Minus One mode is engaged, first select the OVERALL functions bypressing either of the [FUNCTION] buttons to the left of the display asmany times as necessary until the arrowhead in the display appears next to“OVERALL” in the function list to the left of the display. Then use the cur-sor [] and [] buttons to locate the “MinusMod” function. Finally use the[–/NO] and [+/YES] buttons or the data dial to select the desired Minus Onemode.
The Minus One Mode
When the Minus One mode is engaged, the left-hand, right-hand, or bothkeyboard parts of a song — internal demo or Music Cartridge — are turnedOFF so you can practice them on the PSR-A3 keyboard. The “MinusMod”function in the OVERALL function group determines which part or parts areturned OFF when the Minus One mode is engaged.
To turn the Minus One function ON, thus cancelling the specified parts,press the [MINUS ONE] button. The MINUS ONE icon will appear in thedisplay when the Minus One function is engaged.
• See page 74 for information onusing the Minus One mode withthe specified channel.
• With songs you record yourself,the MELODY 1 track corre-sponds to the right-hand part andthe MELODY 2 track is the left-hand part.
• “MinusMod” function in theOVERALL function group can bequickly selected by pressing andholding the [MINUS ONE] button.
• “_ _ r” (Right hand) is selectedwhenever the power switch isturned ON.
ACCOMP TRACK SONG TRACK
MinusModTEMPO TRANSPOSE MEASURE REPEAT CHORD
BEAT
TOUCHMINUS ONE
REVERB DUAL
CHORUS HARMONY
DSP SUSTAIN
RHYTHM BASS CHORD PAD PHRASE ACCOMP MELODY2
MELODY11 1 1
ON /OFF
VOICE
VOL
REGIST
REC REC REC
OTS__r
135102117130 1011011
118 10 a01
VOICE
STYLE
SONG
REGIST MEMORY
MULTI PAD
DUAL VOICE
SPLIT VOICE
HARM/ECHO
OVERALL
DIGITAL EFFECT
NORMAL
SPLIT
SINGLE
FINGERED
/
REC PLAY/STOP REPEATPLAY
MINUSONE
SONG
MINUS ONE
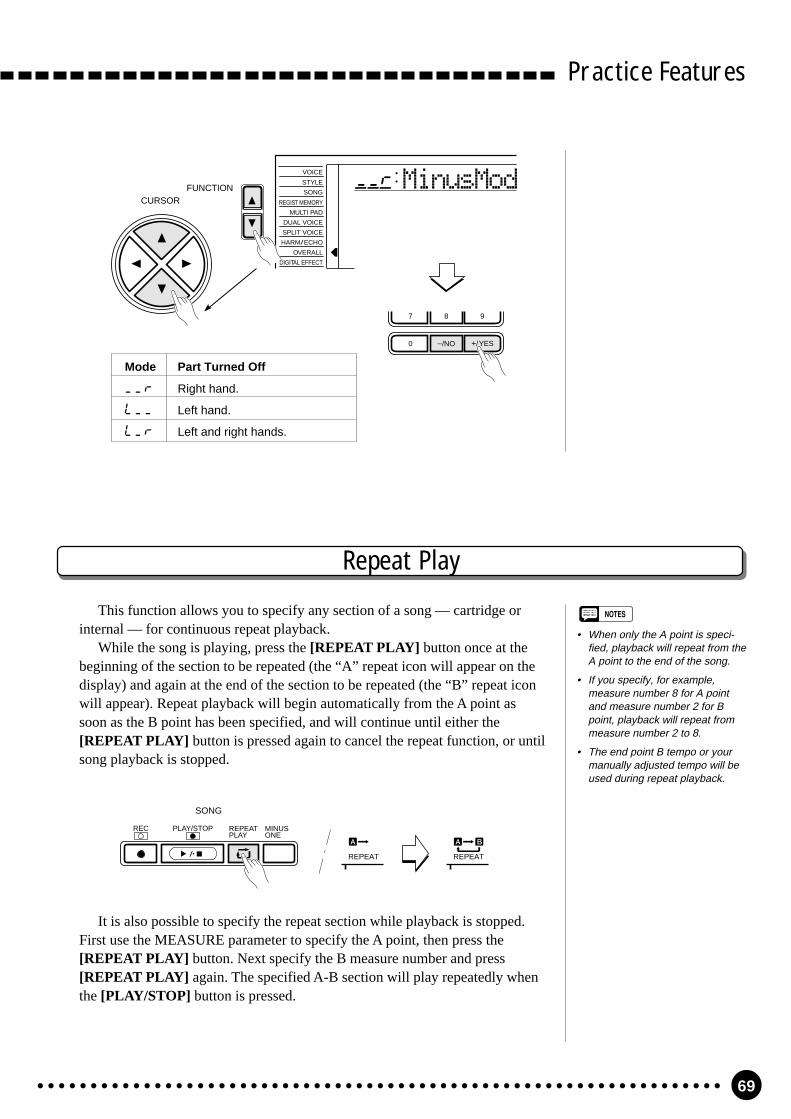
69
Practice Features
FUNCTION MinusMod__rVOICE
STYLE
SONG
REGIST MEMORY
MULTI PAD
DUAL VOICE
SPLIT VOICE
HARM/ECHO
OVERALL
DIGITAL EFFECT
CURSOR
–/NO +/YES0
7 8 9
Mode Part Turned Off
__r Right hand.
L__ Left hand.
L_r Left and right hands.
It is also possible to specify the repeat section while playback is stopped.First use the MEASURE parameter to specify the A point, then press the[REPEAT PLAY] button. Next specify the B measure number and press[REPEAT PLAY] again. The specified A-B section will play repeatedly whenthe [PLAY/STOP] button is pressed.
/
REC PLAY/STOP REPEATPLAY
MINUSONE
SONG
REPEAT REPEAT
This function allows you to specify any section of a song — cartridge orinternal — for continuous repeat playback.
While the song is playing, press the [REPEAT PLAY] button once at thebeginning of the section to be repeated (the “A” repeat icon will appear on thedisplay) and again at the end of the section to be repeated (the “B” repeat iconwill appear). Repeat playback will begin automatically from the A point assoon as the B point has been specified, and will continue until either the[REPEAT PLAY] button is pressed again to cancel the repeat function, or untilsong playback is stopped.
Repeat Play
• When only the A point is speci-fied, playback will repeat from theA point to the end of the song.
• If you specify, for example,measure number 8 for A pointand measure number 2 for Bpoint, playback will repeat frommeasure number 2 to 8.
• The end point B tempo or yourmanually adjusted tempo will beused during repeat playback.
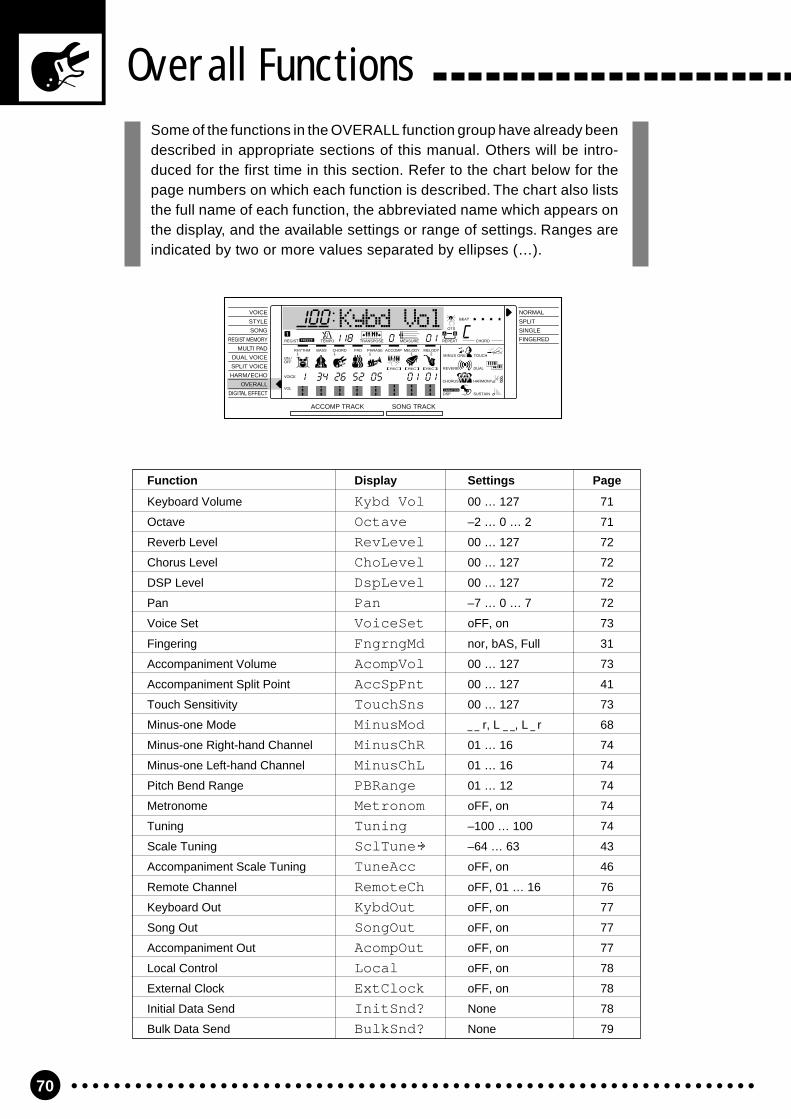
70
Some of the functions in the OVERALL function group have already beendescribed in appropriate sections of this manual. Others will be intro-duced for the first time in this section. Refer to the chart below for thepage numbers on which each function is described. The chart also liststhe full name of each function, the abbreviated name which appears onthe display, and the available settings or range of settings. Ranges areindicated by two or more values separated by ellipses (…).
Overall Functions
ACCOMP TRACK SONG TRACK
Kybd VolTEMPO TRANSPOSE MEASURE REPEAT CHORD
BEAT
TOUCHMINUS ONE
REVERB DUAL
CHORUS HARMONY
DSP SUSTAIN
RHYTHM BASS CHORD PAD PHRASE ACCOMP MELODY2
MELODY11 1 1
ON /OFF
VOICE
VOL
REGIST
REC REC REC
OTS100
134126152105 1011011
118 10 a01
VOICE
STYLE
SONG
REGIST MEMORY
MULTI PAD
DUAL VOICE
SPLIT VOICE
HARM/ECHO
OVERALL
DIGITAL EFFECT
NORMAL
SPLIT
SINGLE
FINGERED
Function Display Settings Page
Keyboard Volume Kybd Vol 00 … 127 71
Octave Octave –2 … 0 … 2 71
Reverb Level RevLevel 00 … 127 72
Chorus Level ChoLevel 00 … 127 72
DSP Level DspLevel 00 … 127 72
Pan Pan –7 … 0 … 7 72
Voice Set VoiceSet oFF, on 73
Fingering FngrngMd nor, bAS, Full 31
Accompaniment Volume AcompVol 00 … 127 73
Accompaniment Split Point AccSpPnt 00 … 127 41
Touch Sensitivity TouchSns 00 … 127 73
Minus-one Mode MinusMod _ _ r, L _ _, L _ r 68
Minus-one Right-hand Channel MinusChR 01 … 16 74
Minus-one Left-hand Channel MinusChL 01 … 16 74
Pitch Bend Range PBRange 01 … 12 74
Metronome Metronom oFF, on 74
Tuning Tuning –100 … 100 74
Scale Tuning SclTune –64 … 63 43
Accompaniment Scale Tuning TuneAcc oFF, on 46
Remote Channel RemoteCh oFF, 01 … 16 76
Keyboard Out KybdOut oFF, on 77
Song Out SongOut oFF, on 77
Accompaniment Out AcompOut oFF, on 77
Local Control Local oFF, on 78
External Clock ExtClock oFF, on 78
Initial Data Send InitSnd? None 78
Bulk Data Send BulkSnd? None 79

71
Octave100
To access an OVERALL function press either of the [FUNCTION] buttons to the left of the display asmany times as necessary until the arrowhead in the display appears next to “OVERALL” in the functionlist to the left of the display. Then use the cursor [] and [] buttons to select the desired function fromwithin the OVERALL function list. Once the function has been selected, use the [–/NO] and [+/YES] but-tons or the data dial (or number buttons, where applicable) to set the function as required.
General Functions
Octave ..............................................................................................................................................................................
Shifts the right-hand keyboard voice (including the dual voice) up ordown by one or two octaves. “–1” is down one octave, “–2” is down twooctaves; “+1” and “+2” are up one and two octaves, respectively.
• Negative values can be enteredby pressing the number buttonswhile holding the [–/NO] button.
• The default setting=0 can berecalled by pressing the [-/NO]and [+/YES] buttons simultane-ously.
• “Kybd Vol” function can bequickly selected by pressing andholding the [VOICE] button.
• The default setting=100 can berecalled by pressing the [-/NO]and [+/YES] buttons simultane-ously.
Keyboard Volume .......................................................................................................................................
Sets the volume of the keyboard sound (including dual and split voices)in relation to the accompaniment and song playback sound. The range isfrom “00” to “127”. A setting of “00” produces no sound. “127” producesmaximum volume.
FUNCTION Kybd Vol100VOICE
STYLE
SONG
REGIST MEMORY
MULTI PAD
DUAL VOICE
SPLIT VOICE
HARM/ECHO
OVERALL
DIGITAL EFFECT
CURSOR
–/NO +/YES
654
0
7 8 9
1 2 3
1– –* *
Overall Functions
KybdbVol100
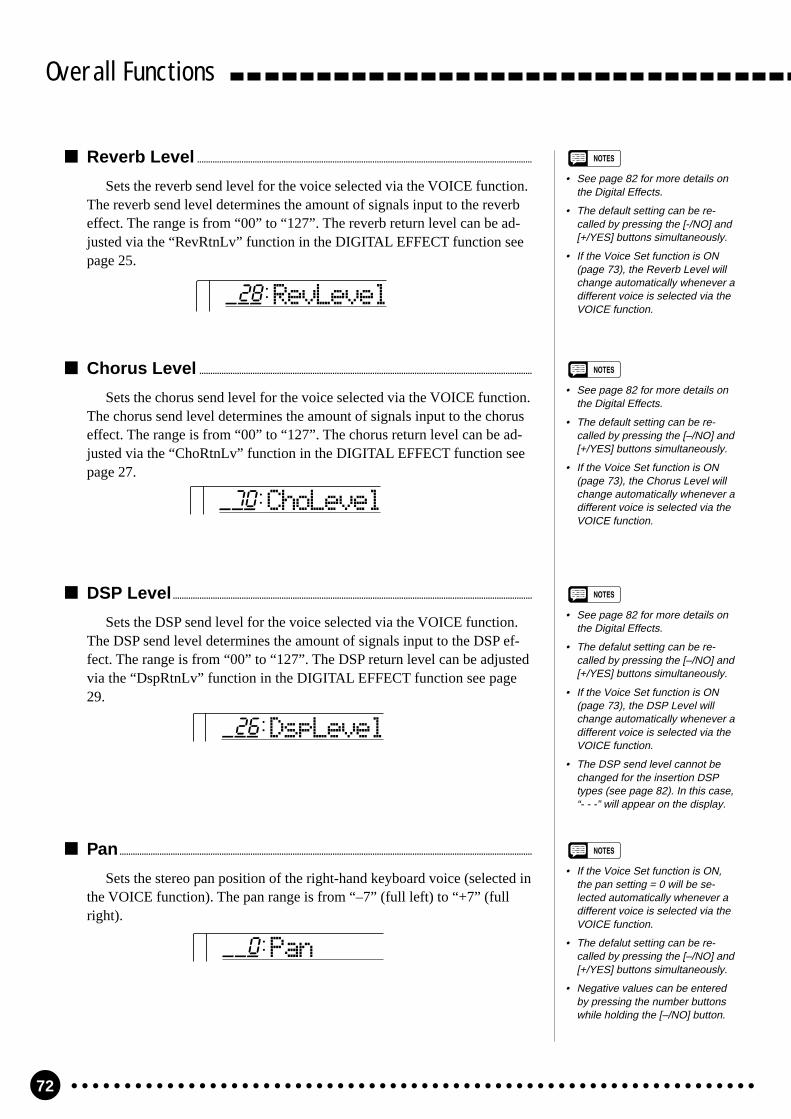
72
ChoLevel170
DspLevel126
Overall Functions
Reverb Level .......................................................................................................................................................
Sets the reverb send level for the voice selected via the VOICE function.The reverb send level determines the amount of signals input to the reverbeffect. The range is from “00” to “127”. The reverb return level can be ad-justed via the “RevRtnLv” function in the DIGITAL EFFECT function seepage 25.
• See page 82 for more details onthe Digital Effects.
• The default setting can be re-called by pressing the [-/NO] and[+/YES] buttons simultaneously.
• If the Voice Set function is ON(page 73), the Reverb Level willchange automatically whenever adifferent voice is selected via theVOICE function.
Chorus Level ......................................................................................................................................................
Sets the chorus send level for the voice selected via the VOICE function.The chorus send level determines the amount of signals input to the choruseffect. The range is from “00” to “127”. The chorus return level can be ad-justed via the “ChoRtnLv” function in the DIGITAL EFFECT function seepage 27.
• See page 82 for more details onthe Digital Effects.
• The default setting can be re-called by pressing the [–/NO] and[+/YES] buttons simultaneously.
• If the Voice Set function is ON(page 73), the Chorus Level willchange automatically whenever adifferent voice is selected via theVOICE function.
DSP Level ..................................................................................................................................................................
Sets the DSP send level for the voice selected via the VOICE function.The DSP send level determines the amount of signals input to the DSP ef-fect. The range is from “00” to “127”. The DSP return level can be adjustedvia the “DspRtnLv” function in the DIGITAL EFFECT function see page29.
• See page 82 for more details onthe Digital Effects.
• The defalut setting can be re-called by pressing the [–/NO] and[+/YES] buttons simultaneously.
• If the Voice Set function is ON(page 73), the DSP Level willchange automatically whenever adifferent voice is selected via theVOICE function.
• The DSP send level cannot bechanged for the insertion DSPtypes (see page 82). In this case,“- - -” will appear on the display.
Pan..........................................................................................................................................................................................
Sets the stereo pan position of the right-hand keyboard voice (selected inthe VOICE function). The pan range is from “–7” (full left) to “+7” (fullright).
• If the Voice Set function is ON,the pan setting = 0 will be se-lected automatically whenever adifferent voice is selected via theVOICE function.
• The defalut setting can be re-called by pressing the [–/NO] and[+/YES] buttons simultaneously.
• Negative values can be enteredby pressing the number buttonswhile holding the [–/NO] button.
Pan100
RevLevel128

73
Overall Functions
Voice Set .....................................................................................................................................................................
The VOICE SET feature brings out the best in each individual voice byautomatically setting a range of important voice-related parameters when-ever a voice is selected. The parameters that may be set by the VOICE SETfeature are listed below. This function lets you turn VOICE SET ON or OFF,as required. The Voice Set function is turned ON whenever the power switchis turned ON.
Accompaniment Volume ..............................................................................................................
Sets the volume of the accompaniment sound in relation to the keyboardand song melody track sound. The range is from “00” to “127”. A setting of“00” produces no sound. “127” produces maximum volume.
• The “AccompVol” function can bequickly selected by pressing andholding the [STYLE] button.
• The default setting=100 can berecalled by pressing the [–/NO]and [+/YES] buttons simultane-ously.
AcompVol100
Touch Sensitivity ........................................................................................................................................
This function sets the keyboard touch sensitivity when the TOUCH RE-SPONSE function (page 17) is ON. The range is from “00” to “127”. Thehigher the value the higher the sensitivity.
• The default setting=100 can berecalled by pressing the [–/NO]and [+/YES] button simultane-ously.
• The “TouchSns” function can bequickly selected by pressing andholding the [TOUCH RE-SPONSE] button.
VoiceSetoon
• Pan=0• Reverb Level• Chorus Level• DSP Level• Dual voice (voice number, volume, octave, reverb level, chorus level, pan=0)• Split voice (voice number, volume, octave, reverb level, chorus level, pan)• Harmony/Echo type• DSP type• Reverb ON/OFF• Chorus ON/OFF• DSP=ON• DSP variation ON/OFF
TouchSns100

74
Minus-one Right/Left-hand Channel ....................................................................
You can practice the specific part (in the Minus One mode) by selectingthe demo/cartridge song you want to practice and by assigning the appropri-ate channel to the desired part.
Any channel —1 through 16 — can be selected. The default setting “01”for the right-hand channel, “02” for the left-hand channel recalled by press-ing the [–/NO] and [+/YES] buttons simultaneously.
• The channel for the specific partwill automatically be selected ifthe selected song contains theMinus-one(Right-/Left-hand)channel settings. In this case,“- - -” will appear on the displayand you can not change it.
• Regardless of the Minus-onechannel settings, with songs yourecord yourself, the MELODY 1track corresponds to the right-hand part and the MELODY 2track is the left-hand part. Whileplaying songs you record your-self, “- - -” will appear on thedisplay and you cannot changethe Minus-One channel settings.
Overall Functions
Tuning ..............................................................................................................................................................................
Sets the pitch of the PSR-A3 to match other instruments. Tuning can beaccomplished over a ±100 cent range (that’s 200 cents total, or a tone). Thetuning range is from “–100” to “+100”. “00” is the “normal” tuning value.
• The normal tuning value=00 canbe recalled instantly by pressingboth the [–/NO] and [+/YES]buttons simultaneously.
Tuning100
Metronome ..............................................................................................................................................................
Turns the metronome function ON or OFF. The metronome will soundduring accompaniment/song playback and song/multi pad recording whenturned ON.
• The metronome function isturned OFF whenever the powerswitch is turned ON.
• While playing demo songs insequence, the metronome func-tion cannot be used.
MetronomoFF
Pitch Bend Range .....................................................................................................................................
Sets the pitch bend range. The pitch bend range value is displayed insemitone ( “01” through “12” i.e. one octave).
• The default pitch bend range=02can be instantly recalled bypressing the [–/NO] and [+/YES]buttons simultaneously.
PBRange102
MinusChR801
MinusChL802

75
MIDI Functions
MIDI, the Musical Instrument Digital Interface, is a world-standard communication interface that allowsMIDI-compatible musical instruments and equipment to share musical information and control one another.This makes it possible to create “systems” of MIDI instruments and equipment that offer far greater versatil-ity and control than is available with isolated instruments.
The MIDI Connectors
The MIDI IN connector receives MIDI data from an external MIDI de-vice which can be used to control the PSR-A3. The MIDI OUT connec-tor transmits MIDI data generated by the PSR-A3 (e.g. note and velocitydata produced by playing the keyboard).
OUT INMIDI
Simple MIDI Control
Most MIDI keyboards (including the PSR-A3, of course) transmit noteand velocity (touch response) information via the MIDI OUT connectorwhenever a note is played on the keyboard. If the MIDI OUT connectoris connected to the MIDI IN connector of a second keyboard (synthe-sizer, etc.) or a tone generator (essentially a synthesizer with no key-board), the second keyboard or tone generator will respond precisely tonotes played on the original transmitting keyboard. The result is that youcan effectively play two instruments at once, providing thick multi-in-strument sounds. The PSR-A3 also transmits “program change” datawhen one of its voices is selected. Depending on how the receiving de-vice is set up, the corresponding voice will be automatically selected onthe receiving keyboard or tone generator whenever a voice is selected onthe PSR-A3.
Tone GeneratorMIDI INMIDI OUTPSR-A3
Overall Functions

76
Remote Channel ..........................................................................................................................................
Sets the MIDI channel on which data from a remote keyboard will bereceived. Any of the standard MIDI channels — 1 through 16 — can bespecified. The remote keyboard must be set up to transmit on the specifiedremote channel, and the keyboard’s MIDI OUT connector must be con-nected to the PSR-A3 MIDI IN connector via a standard MIDI cable. Referto the “MIDI Implementation Chart” section (page 94) for technical details.When set to OFF data is received on all 16 MIDI channels. The default set-ting — OFF — can be recalled by pressing the [–/NO] and [+/YES] but-tons simultaneously.
• Remote Channel is automaticallyturned OFF when a MIDI “GMON” message is received.
• The Remote channel setting isretained in memory even whenthe power switch is turned OFF,as long as batteries are installedor an AC adaptor is connected.
The PSR-A3 is capable of receiving the same MIDI data, so a secondMIDI keyboard connected to the PSR-A3 MIDI IN connector can beused to remotely play the PSR-A3 and select voices as required.
RemoteChoFF
Overall Functions
MIDI KeyboardMIDI OUTMIDI INPSR-A3
MIDI Sequence Recording
Although the PSR-A3 features a built-in “sequencer” (the SONG re-corder is a type of sequencer), the same type of musical informationtransfer described above can be used for more sophisticated MIDI se-quence recording using an external sequencer or music computer. AMIDI sequence recorder or music computer can be used to “record”MIDI data received from a PSR-A3, for example. When the recordeddata is played back, the PSR-A3 automatically “plays” the recorded per-formance in precise detail.
• Never use MIDI cables longerthan about 15 meters. Cableslonger than this can pick up noisewhich can cause data errors.
MusicComputer
MIDI INMIDI OUT
MIDI OUTMIDI IN
PSR-A3

77
Keyboard Out.....................................................................................................................................................
Determines whether keyboard data will or will not be transmitted via theMIDI OUT connector. Keyboard data is transmitted when this function isturned ON (default). When set to ON the keyboard data is transmitted on thefollowing MIDI channels:
Accompaniment Out ...........................................................................................................................
Determines whether auto-accompaniment data will or will not be trans-mitted via the MIDI OUT connector. Accompaniment data is transmittedwhen this function is turned ON. The default setting is OFF. When set toON the accompaniment data is transmitted on the following MIDI channels:
• Accompaniment Out setting isretained in memory even whenthe power switch is turned OFF,as long as batteries are installedor an AC adaptor is connected.
Song Out .....................................................................................................................................................................
Determines whether song data (Melody track/s only) will or will not betransmitted via the MIDI OUT connector. Song data is transmitted whenthis function is turned ON. The default setting is OFF. When set to ON thesong data is transmitted on the following MIDI channels:
Voice Channel
Right-hand main voice 1
Dual voice 11
Left-hand voice (Split voice) 2
Track/voice Channel
Melody 1/main voice 13
Melody 1/dual voice 14
Melody 2/main voice 15
Melody 2/dual voice 16
KybdOutoon
SongOutoFF
• Keyboard Out setting is retainedin memory even when the powerswitch is turned OFF, as long asbatteries are installed or an ACadaptor is connected.
• Song Out setting is retained inmemory even when the powerswitch is turned OFF, as long asbatteries are installed or an ACadaptor is connected.
• Only the user song you recordedcan be transmitted.
• If you want to transmit all thesong data (including Accomptrack), set “Song Out” and “Ac-companiment Out” to ON.
Track Channel
Rhythm 1 9
Rhythm 2 10
Bass 3
Chord 1 4
Chord 2 5
Pad 6
Phrase 1 7
Phrase 2 8
AcompOutoFF
Overall Functions
78
Local Control ......................................................................................................................................................
“Local Control” refers to the fact that, normally, the PSR-A3 keyboardcontrols the internal tone generator, allowing the internal voices to be playeddirectly from the keyboard. This situation is “Local Control ON” since theinternal tone generator is controlled locally by its own keyboard. Local con-trol can be turned OFF, however, so that the keyboard does not play the in-ternal voices, but the appropriate MIDI information is still transmitted viathe MIDI OUT connector when notes are played on the keyboard. At thesame time, the internal tone generator can respond to MIDI informationreceived via the MIDI IN connector. This means that while an externalMIDI sequencer, for example, plays the PSR-A3 internal voices, an externaltone generator can be played from the PSR-A3 keyboard. The default LocalControl setting is ON.
ExtClockoFF
InitSnd?YES
Localoon
Initial Data Send ...........................................................................................................................................
Transmits all current panel settings to a MIDI data storage device beforeactually recording your performance. With the “InitSnd?” function selected,press the [+/YES] button to start transmission. When the data has beentransmitted, “End” will appear momentarily on the display and return to the“InitSnd?”.
• The song data will not be playedback correctly, if the panel set-tings for the song has not beenrecorded in advance. To recordthe panel settings to an externaldevice, engage the externaldevice in the record mode andexecute the Initial Data Sendoperation.
• The “InitSnd?” function can bequickly selected by pressing andholding the [SYNC-START/STOP] button.
External Clock..................................................................................................................................................
Reception of an external MIDI clock signal can be enabled or disabled asrequired. When disabled (OFF), all of the time-based functions (Auto Ac-companiment, SONG recording and playback, etc.) are controlled by itsown internal clock. When MIDI clock reception is enabled (ON), however,all timing is controlled by an external MIDI clock signal received via theMIDI IN terminal. The default setting is OFF.
Overall Functions
• If the External Clock function isturned ON but the external clocksignal is interrupted for more than400 milliseconds, the internalclock is re-selected automatically.
• External Clock setting is retainedin memory even when the powerswitch is turned OFF, as long asbatteries are installed or an ACadaptor is connected.
• When the External Clock isturned ON, the song recording/playback will be controlled by theexternal device.
79
Bulk Data Send...............................................................................................................................................
This function causes the contents of the registration, song, multi pad andscale data to be transmitted via the MIDI OUT connector. This data can besaved to memory or disk via a MIDI sequence recorder or MIDI data re-corder, and then reloaded when required. The bulk data can also be sentdirectly to a second PSR-A3.
To send the bulk data select the “BulkSnd?” function, then press the [+/YES] button. “Sure?” will appear on the display. Press the [+/YES] again tobegin transmission of the bulk data. “BkSnd:Sg” (song data), “BkSnd:Pd”(multi pad data), “BkSnd:Rg” (registration data) and then “BkSnd:Sl” (scaledata) will appear on the display during transmission. When the data hasbeen transmitted, “End” will appear momentarily on the display and returnto the “BulkSnd?”
Receiving Bulk Data
The PSR-A3 will automatically receive compatible bulk data from anexternal MIDI device as long as no style playback or song recording/play-back operation is in progress. “BkRcv:Sg” (song data), “BkRcv:Pd” (multipad data), “BkRcv:Rg” (registration data), and then “BkRcv:Sl” (scaledata) will appear on the display during reception. When the data has beenreceived, “End” will appear momentarily on the display and return to thepreviously selected display.
• No other operations can beperformed during bulk dumpreception.
• If an error occurs during bulkdata reception, “BkRcvErr” andthen “MemClrSg”, “MemClrPd”,“MemClrRg”, or “MemClrSl” willappear on the display indicatingthat any of the song, multi pad,registration memory, and scalememory data has been cleared.
• When a bulk dump is received,the received data replaces anydata that was previously in thePSR-A3 memory.
Overall Functions
• A bulk dump transmission can bestopped at any time by pressingthe [–/NO] button.
• No other operations can beperformed during bulk dumptransmission.
BulkSnd?YES
BkRcv:Sg001

80
Appendix: PSR-A3 Function Tree
VOICE GrandPno Selecting Voices ....................................................................... page 12(Voice Name)
STYLE 8BeatPop Selecting Accompaniment Styles ............................................. page 33(Style Name)
SONG ArabSng1 Selecting Songs ........................................................................ page 51(Song Name)
REGIST MEMORY Bank1 Selecting Registration Banks .................................................... page 47
MULTI PAD Arpeggio Selecting Multi Pad Kits ............................................................ page 59(Multi Pad Kit Name)
DUAL VOICE Strings2 Selecting Dual Voices ............................................................... page 18(Dual Voice Name)
D.Volume Changing Dual Voice Volume ................................................... page 18
D.Octave Changing Dual Voice Octave.................................................... page 18
D.RevLvl Changing Dual Voice Reverb Send Level ................................ page 18
D.ChoLvl Changing Dual Voice Chorus Send Level ................................ page 18
D.Pan Changing Dual Voice Panning .................................................. page 18
SPLIT VOICE Aco.Bass Selecting Split Voices ............................................................... page 15(Split Voice Name)
S.Volume Changing Split Voice Volume ................................................... page 15
S.Octave Changing Split Voice Octave .................................................... page 15
S.RevLvl Changing Split Voice Reverb Send Level ................................. page 15
S.ChoLvl Changing Split Voice Chorus Send Level ................................. page 15
S.Pan Changing Split Voice Panning .................................................. page 15
S.Split Changing Split Point (Split mode) ............................................. page 15
HARMONY/ECHO Block Selecting Harmony/Echo types ................................................. page 20(Harmony/Echo Type Name)
OVERALL
DIGITAL EFFECT
FUNCTIONDisplay Description

81
Appendix: PSR-A3 Function Tree
Kybd Vol Changing Keyboard volume ................................................................... page 71
Octave Changing Octave (VOICE function voice and dual voice) ...................... page 71
RevLevel Changing Reverb Send Level (VOICE function voice) ........................... page 72
ChoLevel Changing Chorus Send Level (VOICE function voice) ........................... page 72
DspLevel Changing DSP Send Level (VOICE function voice) .............................. page 72
Pan Stereo Panning (VOICE function voice) ................................................. page 72
VoiceSet Turning Voice Set ON/OFF..................................................................... page 73
FngrngMd Selecting Fingering mode (Fingered mode) ........................................... page 31
AcompVol Setting Accompaniment Volume............................................................. page 73
AccSpPnt Changing Accompaniment Split Point (Accomp mode) .......................... page 41
TouchSns Setting Touch Sensitivity ........................................................................ page 73
MinusMod Selecting Minus One Mode..................................................................... page 68
MinusChR Selecting Minus One Right-hand Channel .............................................. page 74
MinusChL Selecting Minus One Left-hand Channel ................................................ page 74
PBRange Setting Pitch Bend Range....................................................................... page 74
Metronom Metronome ON/OFF ............................................................................... page 74
Tuning Fine Tuning ............................................................................................. page 74
SclTune Changing the Scale Tuning .................................................................... page 43
TuneAcc Accompaniment Scale Tuning ON/OFF ................................................. page 46
RemoteCh Setting Remote Keyboard Channel ........................................................ page 76
KybdOut Transmitting Keyboard Data ................................................................... page 77
SongOut Transmitting Song data (Melody track/s) ................................................ page 77
AcompOut Transmitting Auto-accompaniment data ................................................. page 77
Local Local Control ON/OFF ............................................................................ page 78
ExtClock External Clock ON/OFF .......................................................................... page 78
InitSnd? Sending Initial Data ................................................................................. page 78
BulkSnd? Sending Bulk Data .................................................................................. page 79
Reverb Hall1 Selecting Reverb Types ............ page 24(Reverb Type Name)
RevRtnLv Setting Reverb Return Level ................................................................... page 25
Chorus Chorus1 Selecting Chorus Types ............ page 26(Chorus Type Name)
ChoRtnLv Setting Chorus Return Level ................................................................... page 27
Dsp Stage2 Selecting DSP Types ................. page 28(DSP Type Name)
DspRtnLv Setting DSP Return Level ....................................................................... page 29
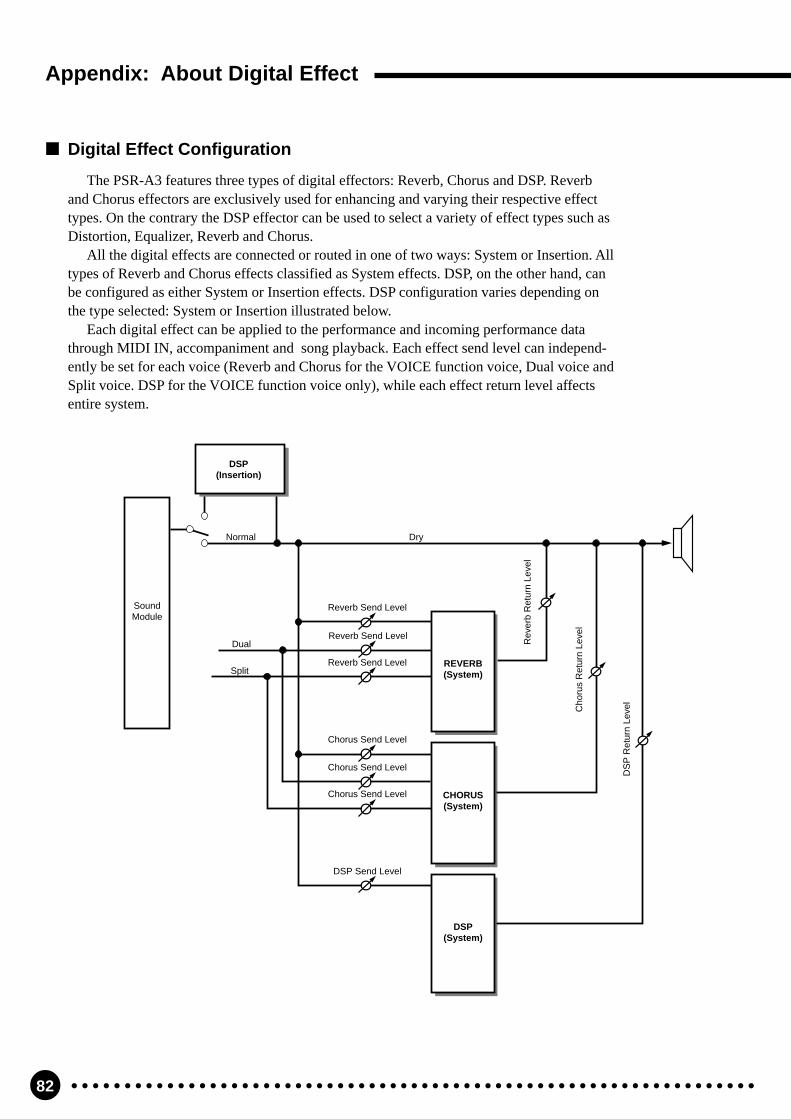
82
Appendix: About Digital Effect
SoundModule
CHORUS(System)
DSP(System)
DSP(Insertion)
Reverb Send Level
Reverb Send LevelDual
Normal Dry
Reverb Send LevelSplit
Rev
erb
Ret
urn
Leve
l
DS
P R
etur
n Le
vel
Cho
rus
Ret
urn
Leve
l
DSP Send Level
Chorus Send Level
Chorus Send Level
Chorus Send Level
REVERB(System)
Digital Effect Configuration
The PSR-A3 features three types of digital effectors: Reverb, Chorus and DSP. Reverband Chorus effectors are exclusively used for enhancing and varying their respective effecttypes. On the contrary the DSP effector can be used to select a variety of effect types such asDistortion, Equalizer, Reverb and Chorus.
All the digital effects are connected or routed in one of two ways: System or Insertion. Alltypes of Reverb and Chorus effects classified as System effects. DSP, on the other hand, canbe configured as either System or Insertion effects. DSP configuration varies depending onthe type selected: System or Insertion illustrated below.
Each digital effect can be applied to the performance and incoming performance datathrough MIDI IN, accompaniment and song playback. Each effect send level can independ-ently be set for each voice (Reverb and Chorus for the VOICE function voice, Dual voice andSplit voice. DSP for the VOICE function voice only), while each effect return level affectsentire system.

83
Appendix: About Digital Effect
No. Effect Type Features
REVERB
01~04 Hall1~4 System Concert hall reverb.
05~08 Room1~4 System Small room reverb.
09, 10 Stage1, 2 System Reverb for solo instruments.
11, 12 Plate1, 2 System Simulated steel plate reverb.
13 OFF — No effect.
CHORUS
01~05 Chorus1~5 System Conventional chorus program with rich, warm chorusing.
06~09 Flanger1~4 System Pronounced three-phase modulation with a slight metallic sound.
10 OFF — No effect.
DSP
01~04 Hall1~4 System Concert hall reverb.
05~08 Room1~4 System Small room reverb.
09, 10 Stage1, 2 System Reverb for solo instruments.
11, 12 Plate1, 2 System Simulated steel plate reverb.
13, 14 Early Reflection1, 2 System Early reflections only.
15 Gate Reverb System Gated reverb effect, in which the reverberation is quickly cut off for special ef-fects.
16 Reverse Gate System Similar to Gate Reverb, but with a reverse increase in reverb.
17~21 Chorus1~5 System Conventional chorus program with rich, warm chorusing.
22~25 Flanger1~4 System Pronounced three-phase modulation with slight metallic sound.
26 Symphonic System Exceptionally rich & deep chorusing.
27 Phaser System Pronounced, metallic modulation with periodic phase change.
28~32 Rotary Speaker 1~5 Insertion Rotary speaker simulation.
33, 34 Tremolo 1, 2 Insertion Rich Tremolo effect with both volume and pitch modulation.
35 Guitar Tremolo Insertion Simulated electric guitar tremolo.
36 Auto Pan Insertion Several panning effects that automatically shift the sound position (left, right,front, back).
37 Auto Wah Insertion Repeating filter sweep “wah” effect.
38 Delay L, C, R System Three independent delays, for the left, right and center stereo positions.
39 Delay L, R System Initial delay for each stereo channel, and two separate feedback delays.
40 Echo System Stereo delay, with independent Feedback Level controls for each channel.
41 Cross Delay System Complex effect that sends the delayed repeats “bouncing” between the left andright channels.
42 Distortion Hard Insertion Hard-edge distortion.
43 Distortion Soft Insertion This type is not so hard compared with Distortion Hard.
44 EQ Disco Insertion Discotype equalizer program to boost high and low frequencies.
45 EQ Telephone Insertion Equalizer program which eliminates higher and lower frequencies to simulatethe sounds through telephone.
46 OFF — No effect.
The Digital Effect List

84
Appendix: Troubleshooting
POSSIBLE CAUSE/SOLUTIONPROBLEM
The speakers produce a “pop” soundwhenever the power is turned ON orOFF.
This is normal and is no cause for alarm.
Turn the power OFF and turn the power ON again. The default setting “Local ON”is automatically selected.
You are probably exceeding the maximum polyphony of the PSR-A3. The PSR-A3can play up to 32 notes at the same time — including split, dual, auto-accompani-ment, song memory, and multi pad notes. Notes exceeding this limit will notsound.
Not all simultaneously-played notessound.
Auto accompaniment won’t sound right if you’re using SINGLE FINGER typefingering when the SINGLE FINGER mode is not selected (page 31).
Are you sure you’re playing in the Auto-Accompaniment section of the keyboard?Auto accompaniment won’t functionproperly. No lower keyboard sound.
Are you playing chords that the PSR-A3 can recognize (see chord types on page32)?
The Local Control function could be turned OFF. Make sure Local Control isturned ON (page 78).
No sound when the keyboard is played.
Something not working as it should? In many cases what appears to be a malfunc-tion can be traced to a simple error that can be remedied immediately. Before assum-ing that your PSR-A3 is faulty, please check the following points.
Make sure that the Keyboard Volume, Split Voice Volume, and/or Dual Voice Vol-ume parameters are set at an appropriate level (pages 71, 15, and 18).
Turn the power OFF and turn the power ON again. The appropriate default vol-ume setting for the voice is automatically selected.
The selected voice does not soundwhen the keyboard is played.
Some sections of some styles do not use the accompaniment rhythm track.Rhythm doesn’t sound when started.
Sustain pedal operation will be reversed if you turn ON the power or plug in thepedal while pressing the pedal. For normal operation turn OFF the power thenturn it back ON while the pedal is not pressed.
Operation of the sustain pedal is re-versed.
The cursor is not located at the parameter to be edited. Make sure that the cursoris located at the parameter to be edited (the parameter should be flashing).
The desired parameter cannot be ed-ited.
Make sure that the accompaniment tracks you want to hear are not muted (page39), and that the Accomp Volume parameter is turned up to a reasonable level(page 73).
Turn the power OFF and turn the power ON again. The appropriate default tracksetting for the style and the default accompaniment volume is automatically se-lected.
Accompaniment does not play properly.
Neither of these functions can be turned ON if a percussion kit voice is selected.Make sure a voice between number 01 and 160 is selected.
The Harmony/Echo effect cannot be turned ON when the FINGERED FULL modeis in use.
The Harmony/Echo and/or Dual Voicefunction will not turn ON.
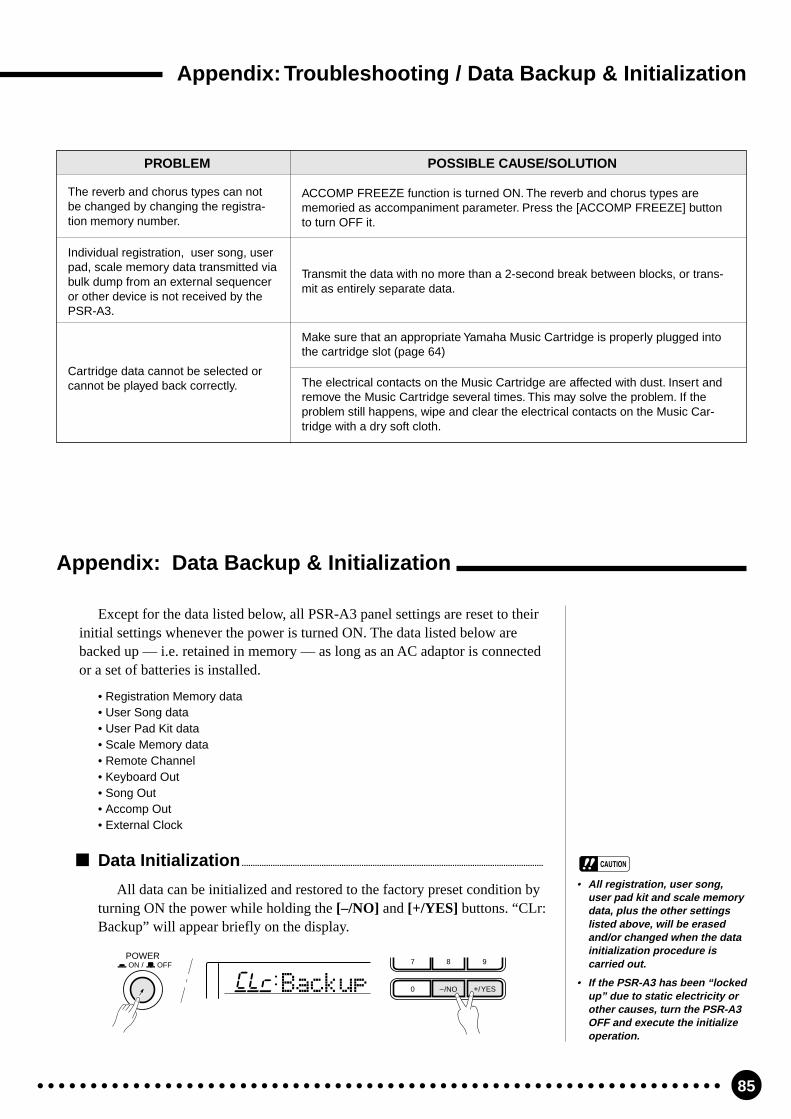
85
Appendix: Troubleshooting / Data Backup & Initialization
POSSIBLE CAUSE/SOLUTIONPROBLEM
ACCOMP FREEZE function is turned ON. The reverb and chorus types arememoried as accompaniment parameter. Press the [ACCOMP FREEZE] buttonto turn OFF it.
The reverb and chorus types can notbe changed by changing the registra-tion memory number.
Data Initialization........................................................................................................................................
All data can be initialized and restored to the factory preset condition byturning ON the power while holding the [–/NO] and [+/YES] buttons. “CLr:Backup” will appear briefly on the display.
• All registration, user song,user pad kit and scale memorydata, plus the other settingslisted above, will be erasedand/or changed when the datainitialization procedure iscarried out.
• If the PSR-A3 has been “lockedup” due to static electricity orother causes, turn the PSR-A3OFF and execute the initializeoperation.
BackupCLr –/NO +/YES0
7 8 9POWERON / OFF
Individual registration, user song, userpad, scale memory data transmitted viabulk dump from an external sequenceror other device is not received by thePSR-A3.
Transmit the data with no more than a 2-second break between blocks, or trans-mit as entirely separate data.
Make sure that an appropriate Yamaha Music Cartridge is properly plugged intothe cartridge slot (page 64)
The electrical contacts on the Music Cartridge are affected with dust. Insert andremove the Music Cartridge several times. This may solve the problem. If theproblem still happens, wipe and clear the electrical contacts on the Music Car-tridge with a dry soft cloth.
Cartridge data cannot be selected orcannot be played back correctly.
Except for the data listed below, all PSR-A3 panel settings are reset to theirinitial settings whenever the power is turned ON. The data listed below arebacked up — i.e. retained in memory — as long as an AC adaptor is connectedor a set of batteries is installed.
Appendix: Data Backup & Initialization
• Registration Memory data• User Song data• User Pad Kit data• Scale Memory data• Remote Channel• Keyboard Out• Song Out• Accomp Out• External Clock
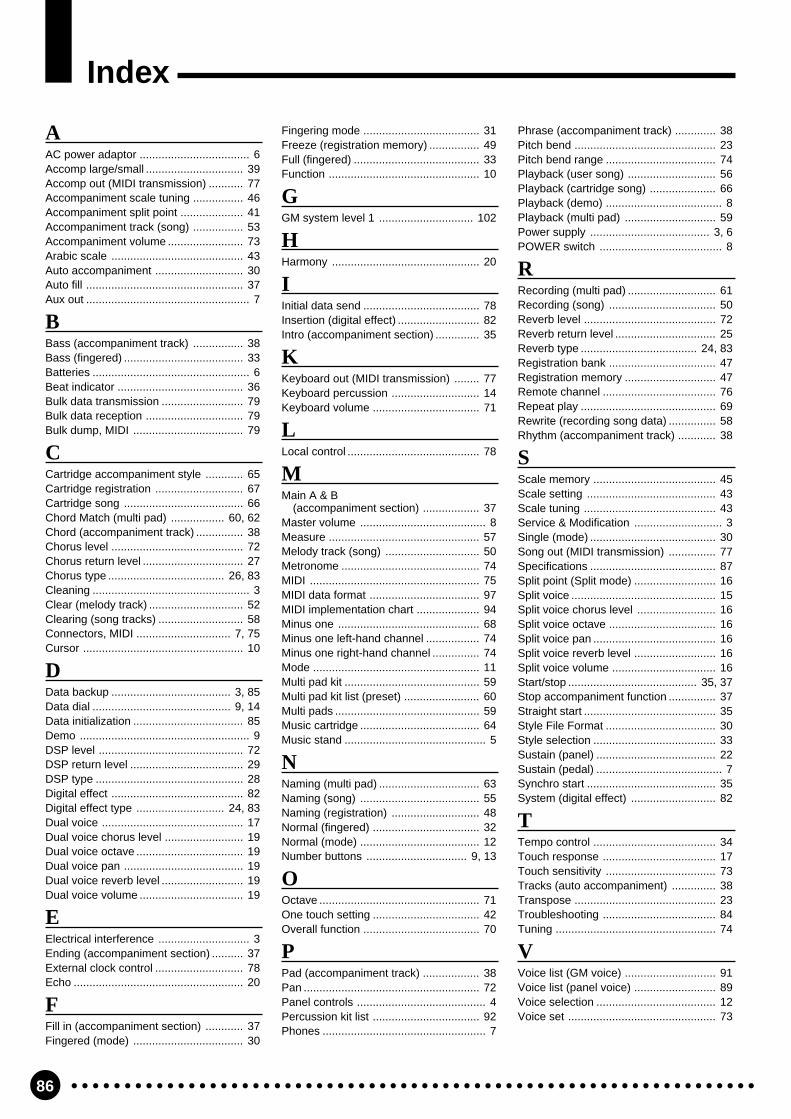
86
Index
AAC power adaptor ................................... 6Accomp large/small ............................... 39Accomp out (MIDI transmission) ........... 77Accompaniment scale tuning ................ 46Accompaniment split point .................... 41Accompaniment track (song) ................ 53Accompaniment volume ........................ 73Arabic scale .......................................... 43Auto accompaniment ............................ 30Auto fill .................................................. 37Aux out .................................................... 7
BBass (accompaniment track) ................ 38Bass (fingered) ...................................... 33Batteries .................................................. 6Beat indicator ........................................ 36Bulk data transmission .......................... 79Bulk data reception ............................... 79Bulk dump, MIDI ................................... 79
CCartridge accompaniment style ............ 65Cartridge registration ............................ 67Cartridge song ...................................... 66Chord Match (multi pad) ................. 60, 62Chord (accompaniment track) ............... 38Chorus level .......................................... 72Chorus return level ................................ 27Chorus type ..................................... 26, 83Cleaning .................................................. 3Clear (melody track) .............................. 52Clearing (song tracks) ........................... 58Connectors, MIDI .............................. 7, 75Cursor ................................................... 10
DData backup ...................................... 3, 85Data dial ............................................ 9, 14Data initialization ................................... 85Demo ...................................................... 9DSP level .............................................. 72DSP return level .................................... 29DSP type ............................................... 28Digital effect .......................................... 82Digital effect type ............................ 24, 83Dual voice ............................................. 17Dual voice chorus level ......................... 19Dual voice octave .................................. 19Dual voice pan ...................................... 19Dual voice reverb level .......................... 19Dual voice volume ................................. 19
EElectrical interference ............................. 3Ending (accompaniment section) .......... 37External clock control ............................ 78Echo ...................................................... 20
FFill in (accompaniment section) ............ 37Fingered (mode) ................................... 30
Fingering mode ..................................... 31Freeze (registration memory) ................ 49Full (fingered) ........................................ 33Function ................................................ 10
GGM system level 1 .............................. 102
HHarmony ............................................... 20
IInitial data send ..................................... 78Insertion (digital effect) .......................... 82Intro (accompaniment section) .............. 35
KKeyboard out (MIDI transmission) ........ 77Keyboard percussion ............................ 14Keyboard volume .................................. 71
LLocal control .......................................... 78
MMain A & B
(accompaniment section) .................. 37Master volume ........................................ 8Measure ................................................ 57Melody track (song) .............................. 50Metronome ............................................ 74MIDI ...................................................... 75MIDI data format ................................... 97MIDI implementation chart .................... 94Minus one ............................................. 68Minus one left-hand channel ................. 74Minus one right-hand channel ............... 74Mode ..................................................... 11Multi pad kit ........................................... 59Multi pad kit list (preset) ........................ 60Multi pads .............................................. 59Music cartridge ...................................... 64Music stand ............................................. 5
NNaming (multi pad) ................................ 63Naming (song) ...................................... 55Naming (registration) ............................ 48Normal (fingered) .................................. 32Normal (mode) ...................................... 12Number buttons ................................ 9, 13
OOctave ................................................... 71One touch setting .................................. 42Overall function ..................................... 70
PPad (accompaniment track) .................. 38Pan ........................................................ 72Panel controls ......................................... 4Percussion kit list .................................. 92Phones .................................................... 7
Phrase (accompaniment track) ............. 38Pitch bend ............................................. 23Pitch bend range ................................... 74Playback (user song) ............................ 56Playback (cartridge song) ..................... 66Playback (demo) ..................................... 8Playback (multi pad) ............................. 59Power supply ...................................... 3, 6POWER switch ....................................... 8
RRecording (multi pad) ............................ 61Recording (song) .................................. 50Reverb level .......................................... 72Reverb return level ................................ 25Reverb type ..................................... 24, 83Registration bank .................................. 47Registration memory ............................. 47Remote channel .................................... 76Repeat play ........................................... 69Rewrite (recording song data) ............... 58Rhythm (accompaniment track) ............ 38
SScale memory ....................................... 45Scale setting ......................................... 43Scale tuning .......................................... 43Service & Modification ............................ 3Single (mode) ........................................ 30Song out (MIDI transmission) ............... 77Specifications ........................................ 87Split point (Split mode) .......................... 16Split voice .............................................. 15Split voice chorus level ......................... 16Split voice octave .................................. 16Split voice pan ....................................... 16Split voice reverb level .......................... 16Split voice volume ................................. 16Start/stop ......................................... 35, 37Stop accompaniment function ............... 37Straight start .......................................... 35Style File Format ................................... 30Style selection ....................................... 33Sustain (panel) ...................................... 22Sustain (pedal) ........................................ 7Synchro start ......................................... 35System (digital effect) ........................... 82
TTempo control ....................................... 34Touch response .................................... 17Touch sensitivity ................................... 73Tracks (auto accompaniment) .............. 38Transpose ............................................. 23Troubleshooting .................................... 84Tuning ................................................... 74
VVoice list (GM voice) ............................. 91Voice list (panel voice) .......................... 89Voice selection ...................................... 12Voice set ............................................... 73

87
Keyboards:61 standard-size keys (C1~C6) with touch response.
Display:Large multi-function LCD display
Setup:Power: ON/OFFMaster Volume: MIN-MAX
Control & Ten Keys:CURSOR< >, FUNCTION, MODE, [0]~[9], [+/YES],[–/NO], Data dial
Cartridge Slot
Demo:Voice Demo:21 songsStyle Demo:8 songs
Mode:NORMAL, SPLIT,SINGLE,FINGERED
Voice:AWM 160 voices+9 Keyboard Percussion KitsPolyphony: 32Split Voice: Volume, Octave, Reverb Level, Chorus Level, Pan,
Split PointDual Voice: Volume, Octave, Reverb Level, Chorus Level, PanTouch Response:Touch SensitivityHarmony/Echo: 22 typesSustainOthers: Keyboard Volume, Octave, Reverb Level, Chorus Level,
DSP Level, Pan
Auto Accompaniment:140 stylesAccomp Track: RHYTHM1/2, BASS, CHORD1/2, PAD,
PHRASE1/2ACCOMP LARGE/SMALLAccomp Track Settings: ON/OFF, Voice, VolumeAccompaniment Control: SYNC-START/STOP, START/STOP,
INTRO, MAIN A/B (AUTO FILL), ENDINGTempoFingering (FINGERED Mode): Normal, Bass, FullAccompaniment VolumeAccompaniment Split Point
One Touch Setting:560 One Touch Settings
Overall Controls:Transpose, Metronome, Tuning
Pitch Bend Wheel:Pitch Bend Range
Digital Effect:Reverb:12 types, Reverb Return LevelChorus: 9 types, Chorus Return LevelDSP: 45 types, DSP Return LevelDSP Variation
Scale Setting:One-octave keyboard buttons, Scale TuningAccompaniment Scale Tuning
Scale Memory:1~6
Registration Memory:32 Registration Bank, 1~4, Accomp Freeze
Multi Pads:36 Preset Multi Pad Kits+4 User Multi Pad Kits4 Pads+Terminate
Song:Song: 8 User SongsRecording Tracks: ACCOMP, MELODY 1,2Edit: Volume, Voice (MELODY TRACK), Song ClearMinus One: 3 Modes
Minus One Right-hand Channel,Minus One Left-hand Channel
Repeat
MIDI:Remote Channel, Keyboard Out, Song Out, Accompaniment Out,External Clock, Local Control, Initial Data Send, Bulk Data Send
Auxiliary Jacks:DC IN 10-12V, PHONES, SUSTAIN, AUX OUT R and L+R/L,MIDI IN/OUT
Amplifiers:6.0 W + 6.0 W (when using PA-5B AC Power adaptor)4.5 W + 4.5 W (when using batteries)Phones output: 75Ω ±5% Impedance
Speakers:12cm (4-3/4") x 2
Power Consumption:22 W (when using PA-5B AC power adaptor)
Batteries:Six SUM-1, “D” size, R-20 or equivalent batteries
Rated Voltage:DC 10-12V
Dimensions (WxDxH):973 x 397 x 146 mm (38-1/4" x 15-5/8" x 5-3/4")
Weight:7.4 kg (16.2 lbs.) excluding batteries
Supplied Accessories:• Music Cartridge• Music Stand• Owner’s Manual
Optional Accessories:• Headphones HPE-3, HPE-150• AC Power Adaptor PA-5, PA-5B, PA-5C• Footswitch FC4, FC5• Music Cartridge
Specifications /
* Specifications subject to change without notice.

88
Voice List /
The PSR-A3 is provided with the Panel Voices (voice numbers01~171) and GM Voices (voice numbers 01~137). GM Voices are usedfor the accompaniment. Refer to the GM Voice List on page 91 for theaccompaniment track voice editing.
PolyphonyThe PSR-A3 can play up to 32 individual notes at the same time (i.e. it
has a maximum “polyphony” of 32). This number includes all voicesused: dual, split, auto accompaniment, song, and multi pads. If the maxi-mum polyphony of the PSR-A3 is exceeded, the excess notes will betruncated (they will not sound).
Another feature affecting polyphony is the fact that some PSR-A3voices actually use two voices at once, as shown in the voice list below.The effective maximum polyphony of the PSR-A3 is correspondinglyreduced when these voices are used.
• The voice list includes the MIDI programnumbers and MIDI bank select numbers(Panel Voice List only) that control eachvoice when the PSR-A3 is played froman external MIDI device.
• Panel voice number 113/GM voicenumber 110 (Bagpipe) uses only onevoice above A#2.
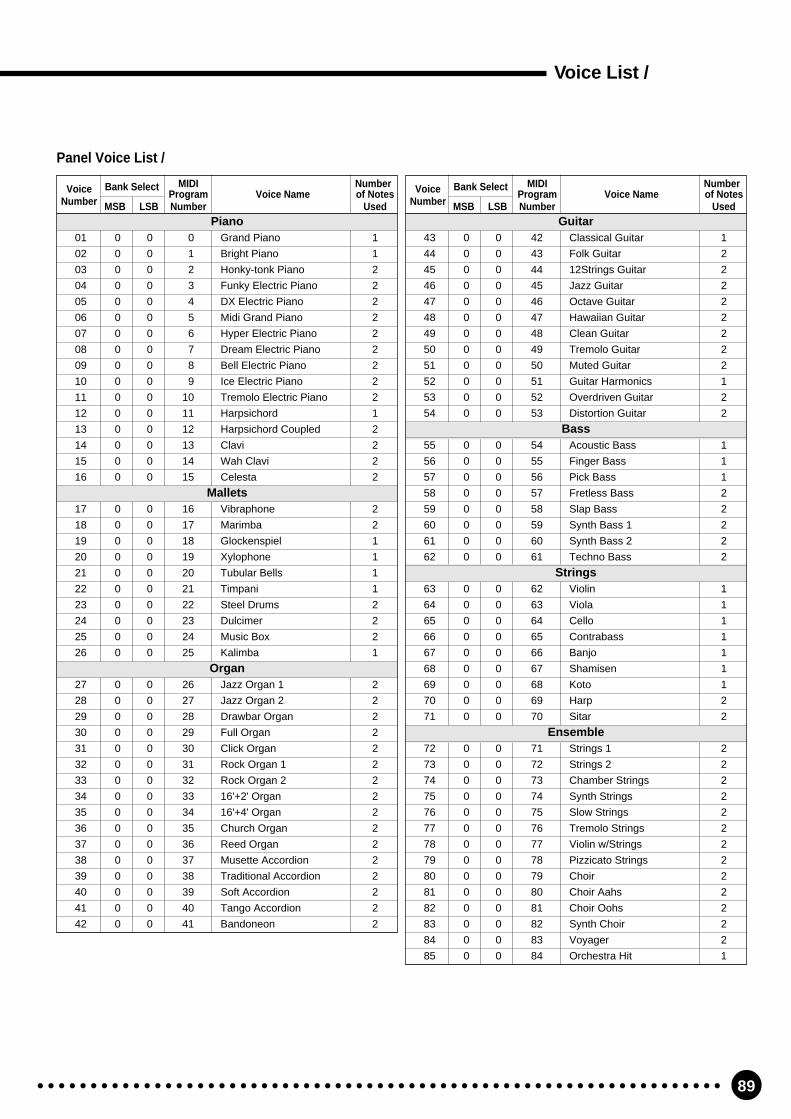
89
Panel Voice List /
Bank Select MIDI NumberVoice Program Voice Name of NotesNumber MSB LSB Number Used
Piano01 0 0 0 Grand Piano 1
02 0 0 1 Bright Piano 1
03 0 0 2 Honky-tonk Piano 2
04 0 0 3 Funky Electric Piano 2
05 0 0 4 DX Electric Piano 2
06 0 0 5 Midi Grand Piano 2
07 0 0 6 Hyper Electric Piano 2
08 0 0 7 Dream Electric Piano 2
09 0 0 8 Bell Electric Piano 2
10 0 0 9 Ice Electric Piano 2
11 0 0 10 Tremolo Electric Piano 2
12 0 0 11 Harpsichord 1
13 0 0 12 Harpsichord Coupled 2
14 0 0 13 Clavi 2
15 0 0 14 Wah Clavi 2
16 0 0 15 Celesta 2
Mallets17 0 0 16 Vibraphone 2
18 0 0 17 Marimba 2
19 0 0 18 Glockenspiel 1
20 0 0 19 Xylophone 1
21 0 0 20 Tubular Bells 1
22 0 0 21 Timpani 1
23 0 0 22 Steel Drums 2
24 0 0 23 Dulcimer 2
25 0 0 24 Music Box 2
26 0 0 25 Kalimba 1
Organ27 0 0 26 Jazz Organ 1 2
28 0 0 27 Jazz Organ 2 2
29 0 0 28 Drawbar Organ 2
30 0 0 29 Full Organ 2
31 0 0 30 Click Organ 2
32 0 0 31 Rock Organ 1 2
33 0 0 32 Rock Organ 2 2
34 0 0 33 16'+2' Organ 2
35 0 0 34 16'+4' Organ 2
36 0 0 35 Church Organ 2
37 0 0 36 Reed Organ 2
38 0 0 37 Musette Accordion 2
39 0 0 38 Traditional Accordion 2
40 0 0 39 Soft Accordion 2
41 0 0 40 Tango Accordion 2
42 0 0 41 Bandoneon 2
Bank Select MIDI NumberVoice Program Voice Name of NotesNumber MSB LSB Number Used
Guitar43 0 0 42 Classical Guitar 1
44 0 0 43 Folk Guitar 2
45 0 0 44 12Strings Guitar 2
46 0 0 45 Jazz Guitar 2
47 0 0 46 Octave Guitar 2
48 0 0 47 Hawaiian Guitar 2
49 0 0 48 Clean Guitar 2
50 0 0 49 Tremolo Guitar 2
51 0 0 50 Muted Guitar 2
52 0 0 51 Guitar Harmonics 1
53 0 0 52 Overdriven Guitar 2
54 0 0 53 Distortion Guitar 2
Bass55 0 0 54 Acoustic Bass 1
56 0 0 55 Finger Bass 1
57 0 0 56 Pick Bass 1
58 0 0 57 Fretless Bass 2
59 0 0 58 Slap Bass 2
60 0 0 59 Synth Bass 1 2
61 0 0 60 Synth Bass 2 2
62 0 0 61 Techno Bass 2
Strings63 0 0 62 Violin 1
64 0 0 63 Viola 1
65 0 0 64 Cello 1
66 0 0 65 Contrabass 1
67 0 0 66 Banjo 1
68 0 0 67 Shamisen 1
69 0 0 68 Koto 1
70 0 0 69 Harp 2
71 0 0 70 Sitar 2
Ensemble72 0 0 71 Strings 1 2
73 0 0 72 Strings 2 2
74 0 0 73 Chamber Strings 2
75 0 0 74 Synth Strings 2
76 0 0 75 Slow Strings 2
77 0 0 76 Tremolo Strings 2
78 0 0 77 Violin w/Strings 2
79 0 0 78 Pizzicato Strings 2
80 0 0 79 Choir 2
81 0 0 80 Choir Aahs 2
82 0 0 81 Choir Oohs 2
83 0 0 82 Synth Choir 2
84 0 0 83 Voyager 2
85 0 0 84 Orchestra Hit 1
Voice List /
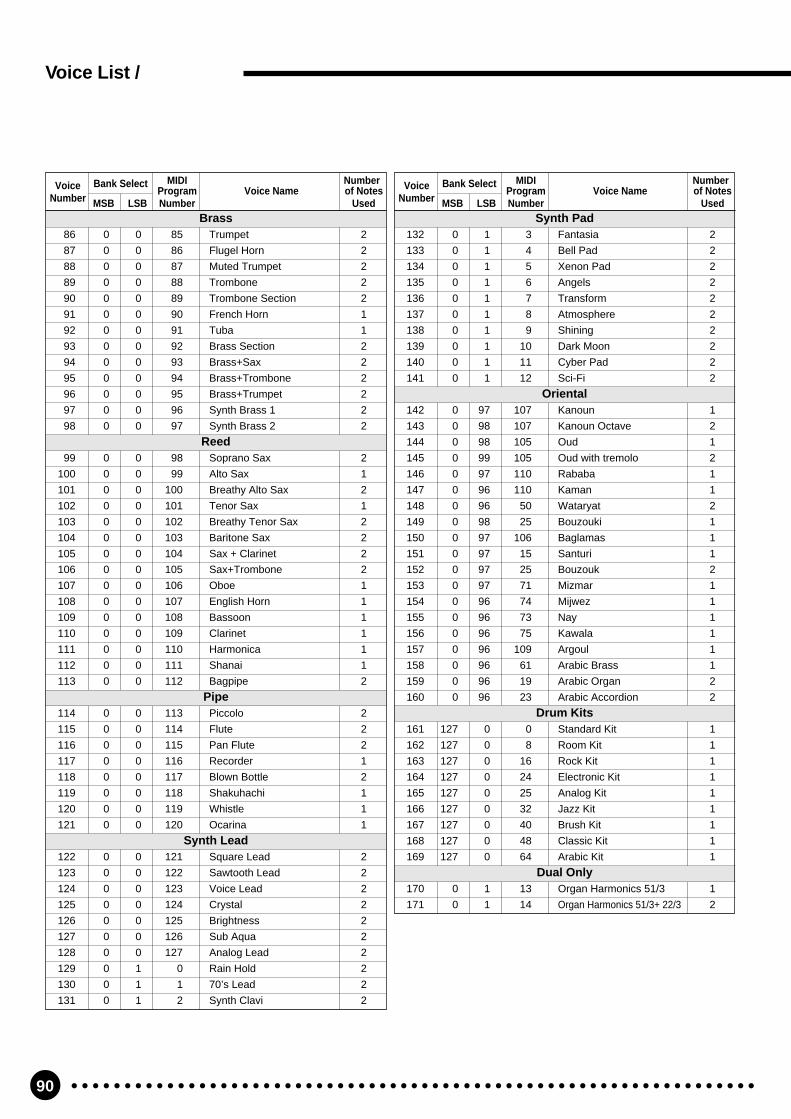
90
Voice List /
Bank Select MIDI NumberVoice Program Voice Name of NotesNumber MSB LSB Number Used
Brass86 0 0 85 Trumpet 2
87 0 0 86 Flugel Horn 2
88 0 0 87 Muted Trumpet 2
89 0 0 88 Trombone 2
90 0 0 89 Trombone Section 2
91 0 0 90 French Horn 1
92 0 0 91 Tuba 1
93 0 0 92 Brass Section 2
94 0 0 93 Brass+Sax 2
95 0 0 94 Brass+Trombone 2
96 0 0 95 Brass+Trumpet 2
97 0 0 96 Synth Brass 1 2
98 0 0 97 Synth Brass 2 2
Reed99 0 0 98 Soprano Sax 2
100 0 0 99 Alto Sax 1
101 0 0 100 Breathy Alto Sax 2
102 0 0 101 Tenor Sax 1
103 0 0 102 Breathy Tenor Sax 2
104 0 0 103 Baritone Sax 2
105 0 0 104 Sax + Clarinet 2
106 0 0 105 Sax+Trombone 2
107 0 0 106 Oboe 1
108 0 0 107 English Horn 1
109 0 0 108 Bassoon 1
110 0 0 109 Clarinet 1
111 0 0 110 Harmonica 1
112 0 0 111 Shanai 1
113 0 0 112 Bagpipe 2
Pipe114 0 0 113 Piccolo 2
115 0 0 114 Flute 2
116 0 0 115 Pan Flute 2
117 0 0 116 Recorder 1
118 0 0 117 Blown Bottle 2
119 0 0 118 Shakuhachi 1
120 0 0 119 Whistle 1
121 0 0 120 Ocarina 1
Synth Lead122 0 0 121 Square Lead 2
123 0 0 122 Sawtooth Lead 2
124 0 0 123 Voice Lead 2
125 0 0 124 Crystal 2
126 0 0 125 Brightness 2
127 0 0 126 Sub Aqua 2
128 0 0 127 Analog Lead 2
129 0 1 0 Rain Hold 2
130 0 1 1 70’s Lead 2
131 0 1 2 Synth Clavi 2
Bank Select MIDI NumberVoice Program Voice Name of NotesNumber MSB LSB Number Used
Synth Pad132 0 1 3 Fantasia 2
133 0 1 4 Bell Pad 2
134 0 1 5 Xenon Pad 2
135 0 1 6 Angels 2
136 0 1 7 Transform 2
137 0 1 8 Atmosphere 2
138 0 1 9 Shining 2
139 0 1 10 Dark Moon 2
140 0 1 11 Cyber Pad 2
141 0 1 12 Sci-Fi 2
Oriental142 0 97 107 Kanoun 1
143 0 98 107 Kanoun Octave 2
144 0 98 105 Oud 1
145 0 99 105 Oud with tremolo 2
146 0 97 110 Rababa 1
147 0 96 110 Kaman 1
148 0 96 50 Wataryat 2
149 0 98 25 Bouzouki 1
150 0 97 106 Baglamas 1
151 0 97 15 Santuri 1
152 0 97 25 Bouzouk 2
153 0 97 71 Mizmar 1
154 0 96 74 Mijwez 1
155 0 96 73 Nay 1
156 0 96 75 Kawala 1
157 0 96 109 Argoul 1
158 0 96 61 Arabic Brass 1
159 0 96 19 Arabic Organ 2
160 0 96 23 Arabic Accordion 2
Drum Kits161 127 0 0 Standard Kit 1
162 127 0 8 Room Kit 1
163 127 0 16 Rock Kit 1
164 127 0 24 Electronic Kit 1
165 127 0 25 Analog Kit 1
166 127 0 32 Jazz Kit 1
167 127 0 40 Brush Kit 1
168 127 0 48 Classic Kit 1
169 127 0 64 Arabic Kit 1
Dual Only170 0 1 13 Organ Harmonics 51/3 1
171 0 1 14 Organ Harmonics 51/3+ 22/3 2

91
GM Voice List /MIDI NumberVoice Program Voice Name of Notes
Number Number UsedPiano
01 0 Acoustic Grand Piano 1
02 1 Bright Acoustic Piano 1
03 2 Electric Grand Piano 2
04 3 Honky-tonk Piano 2
05 4 Electric Piano 1 2
06 5 Electric Piano 2 2
07 6 Harpsichord 1
08 7 Clavi 1
Chromatic Percussion 09 8 Celesta 1
10 9 Glockenspiel 1
11 10 Music Box 2
12 11 Vibraphone 1
13 12 Marimba 1
14 13 Xylophone 1
15 14 Tubular Bells 1
16 15 Dulcimer 2
Organ 17 16 Drawbar Organ 1
18 17 Percussive Organ 1
19 18 Rock Organ 2
20 19 Church Organ 2
21 20 Reed Organ 1
22 21 Accordion 2
23 22 Harmonica 1
24 23 Bandoneon 2
Guitar 25 24 Acoustic Guitar (nylon) 1
26 25 Acoustic Guitar (steel) 1
27 26 Electric Guitar (jazz) 1
28 27 Electric Guitar (clean) 2
29 28 Electric Guitar (muted) 1
30 29 Overdriven Guitar 1
31 30 Distortion Guitar 1
32 31 Guitar Harmonics 1
Bass 33 32 Acoustic Bass 1
34 33 Electric Bass (finger) 1
35 34 Electric Bass (pick) 1
36 35 Fretless Bass 1
37 36 Slap Bass 1 1
38 37 Slap Bass 2 1
39 38 Synth Bass 1 1
40 39 Synth Bass 2 1
Strings 41 40 Violin 1
42 41 Viola 1
43 42 Cello 1
44 43 Contrabass 1
MIDI NumberVoice Program Voice Name of NotesNumber Number Used 45 44 Tremolo Strings 2
46 45 Pizzicato Strings 2
47 46 Orchestral Harp 1
48 47 Timpani 1
Ensemble 49 48 Strings Ensemble 1 1
50 49 Strings Ensemble 2 1
51 50 Synth Strings 1 2
52 51 Synth Strings 2 2
53 52 Choir Aahs 2
54 53 Voice Oohs 1
55 54 Synth Voice 1
56 55 Orchestra Hit 1
Brass 57 56 Trumpet 1
58 57 Trombone 1
59 58 Tuba 1
60 59 Muted Trumpet 1
61 60 French Horn 1
62 61 Brass Section 1
63 62 Synth Brass 1 2
64 63 Synth Brass 2 2
Reed 65 64 Soprano Sax 1
66 65 Alto Sax 1
67 66 Tenor Sax 1
68 67 Baritone Sax 1
69 68 Oboe 1
70 69 English Horn 1
71 70 Bassoon 1
72 71 Clarinet 1
Pipe 73 72 Piccolo 1
74 73 Flute 1
75 74 Recorder 1
76 75 Pan Flute 1
77 76 Blown Bottle 2
78 77 Shakuhachi 1
79 78 Whistle 1
80 79 Ocarina 1
Synth Lead 81 80 Lead 1 (square) 2
82 81 Lead 2 (sawtooth) 2
83 82 Lead 3 (calliope) 2
84 83 Lead 4 (chiff) 2
85 84 Lead 5 (charang) 2
86 85 Lead 6 (voice) 2
87 86 Lead 7 (fifth) 2
88 87 Lead 8 (bass+Lead ) 2
Synth Pad 89 88 Pad 1 (new age) 2
90 89 Pad 2 (warm) 2
MIDI NumberVoice Program Voice Name of NotesNumber Number Used 91 90 Pad 3 (polysynth) 2
92 91 Pad 4 (choir) 2
93 92 Pad 5 (bowed) 2
94 93 Pad 6 (metallic) 2
95 94 Pad 7 (halo) 2
96 95 Pad 8 (sweep) 2
Synth Effects 97 96 FX 1 (rain) 2
98 97 FX 2 (soundtrack) 2
99 98 FX 3 (crystal) 2
100 99 FX 4 (atmosphere) 2
101 100 FX 5 (brightness) 2
102 101 FX 6 (goblins) 2
103 102 FX 7 (echoes) 2
104 103 FX 8 (sci-fi) 2
Ethnic105 104 Sitar 1
106 105 Banjo 1
107 106 Shamisen 1
108 107 Koto 1
109 108 Kalimba 1
110 109 Bagpipe 2
111 110 Fiddle 1
112 111 Shanai 1
Percussive113 112 Tinkle Bell 2
114 113 Agogo 1
115 114 Steel Drums 2
116 115 Woodblock 1
117 116 Taiko Drum 1
118 117 Melodic Tom 1
119 118 Synth Drum 1
120 119 Reverse Cymbal 1
Sound Effects121 120 Guitar Fret Noise 1
122 121 Breath Noise 1
123 122 Seashore 2
124 123 Bird Tweet 2
125 124 Telephone Ring 1
126 125 Helicopter 2
127 126 Applause 2
128 127 Gunshot 1
Drum Kits129 0 Standard Kit 1
130 8 Room Kit 1
131 16 Rock Kit 1
132 24 Electronic Kit 1
133 25 Analog Kit 1
134 32 Jazz Kit 1
135 40 Brush Kit 1
136 48 Classic Kit 1
137 64 Arabic Kit 1
Voice List /
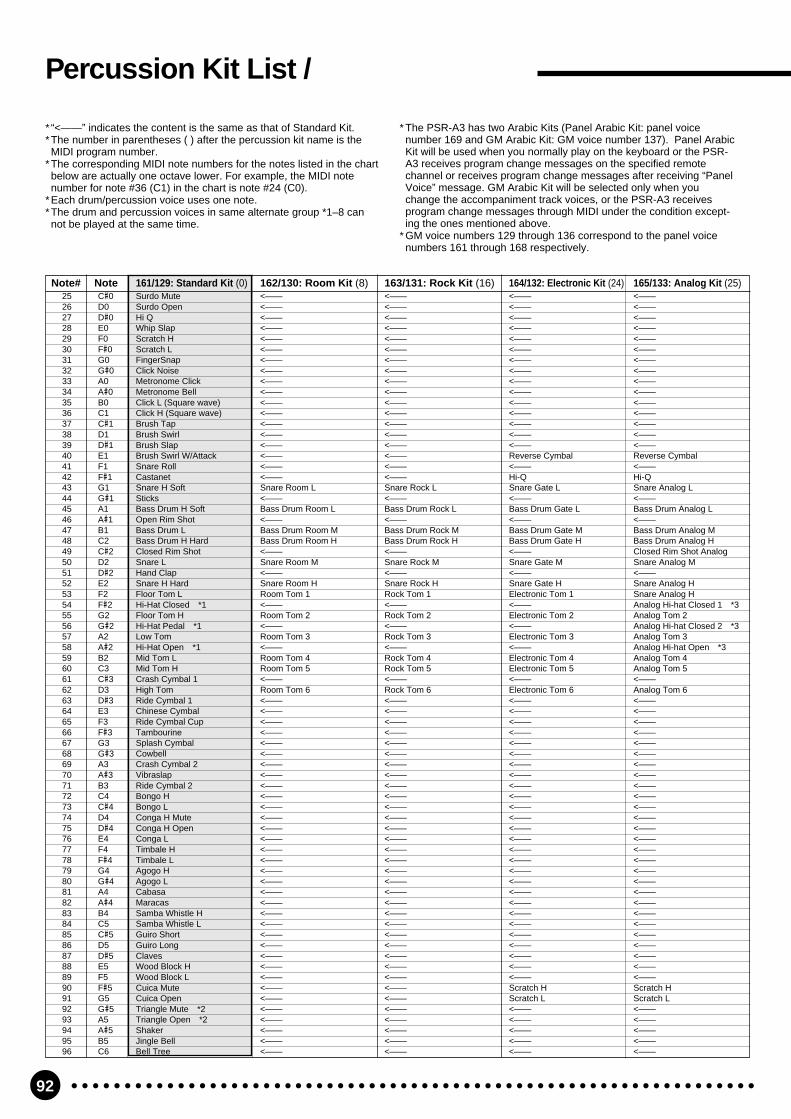
92
Note# Note 161/129: Standard Kit (0) 162/130: Room Kit (8) 163/131: Rock Kit (16) 164/132: Electronic Kit (24) 165/133: Analog Kit (25)25 C#0 Surdo Mute <—— <—— <—— <——26 D0 Surdo Open <—— <—— <—— <——27 D#0 Hi Q <—— <—— <—— <——28 E0 Whip Slap <—— <—— <—— <——29 F0 Scratch H <—— <—— <—— <——30 F#0 Scratch L <—— <—— <—— <——31 G0 FingerSnap <—— <—— <—— <——32 G#0 Click Noise <—— <—— <—— <——33 A0 Metronome Click <—— <—— <—— <——34 A#0 Metronome Bell <—— <—— <—— <——35 B0 Click L (Square wave) <—— <—— <—— <——36 C1 Click H (Square wave) <—— <—— <—— <——37 C#1 Brush Tap <—— <—— <—— <——38 D1 Brush Swirl <—— <—— <—— <——39 D#1 Brush Slap <—— <—— <—— <——40 E1 Brush Swirl W/Attack <—— <—— Reverse Cymbal Reverse Cymbal41 F1 Snare Roll <—— <—— <—— <——42 F#1 Castanet <—— <—— Hi-Q Hi-Q43 G1 Snare H Soft Snare Room L Snare Rock L Snare Gate L Snare Analog L44 G#1 Sticks <—— <—— <—— <——45 A1 Bass Drum H Soft Bass Drum Room L Bass Drum Rock L Bass Drum Gate L Bass Drum Analog L46 A#1 Open Rim Shot <—— <—— <—— <——47 B1 Bass Drum L Bass Drum Room M Bass Drum Rock M Bass Drum Gate M Bass Drum Analog M48 C2 Bass Drum H Hard Bass Drum Room H Bass Drum Rock H Bass Drum Gate H Bass Drum Analog H49 C#2 Closed Rim Shot <—— <—— <—— Closed Rim Shot Analog50 D2 Snare L Snare Room M Snare Rock M Snare Gate M Snare Analog M51 D#2 Hand Clap <—— <—— <—— <——52 E2 Snare H Hard Snare Room H Snare Rock H Snare Gate H Snare Analog H53 F2 Floor Tom L Room Tom 1 Rock Tom 1 Electronic Tom 1 Snare Analog H54 F#2 Hi-Hat Closed *1 <—— <—— <—— Analog Hi-hat Closed 1 *355 G2 Floor Tom H Room Tom 2 Rock Tom 2 Electronic Tom 2 Analog Tom 256 G#2 Hi-Hat Pedal *1 <—— <—— <—— Analog Hi-hat Closed 2 *357 A2 Low Tom Room Tom 3 Rock Tom 3 Electronic Tom 3 Analog Tom 358 A#2 Hi-Hat Open *1 <—— <—— <—— Analog Hi-hat Open *359 B2 Mid Tom L Room Tom 4 Rock Tom 4 Electronic Tom 4 Analog Tom 460 C3 Mid Tom H Room Tom 5 Rock Tom 5 Electronic Tom 5 Analog Tom 561 C#3 Crash Cymbal 1 <—— <—— <—— <——62 D3 High Tom Room Tom 6 Rock Tom 6 Electronic Tom 6 Analog Tom 663 D#3 Ride Cymbal 1 <—— <—— <—— <——64 E3 Chinese Cymbal <—— <—— <—— <——65 F3 Ride Cymbal Cup <—— <—— <—— <——66 F#3 Tambourine <—— <—— <—— <——67 G3 Splash Cymbal <—— <—— <—— <——68 G#3 Cowbell <—— <—— <—— <——69 A3 Crash Cymbal 2 <—— <—— <—— <——70 A#3 Vibraslap <—— <—— <—— <——71 B3 Ride Cymbal 2 <—— <—— <—— <——72 C4 Bongo H <—— <—— <—— <——73 C#4 Bongo L <—— <—— <—— <——74 D4 Conga H Mute <—— <—— <—— <——75 D#4 Conga H Open <—— <—— <—— <——76 E4 Conga L <—— <—— <—— <——77 F4 Timbale H <—— <—— <—— <——78 F#4 Timbale L <—— <—— <—— <——79 G4 Agogo H <—— <—— <—— <——80 G#4 Agogo L <—— <—— <—— <——81 A4 Cabasa <—— <—— <—— <——82 A#4 Maracas <—— <—— <—— <——83 B4 Samba Whistle H <—— <—— <—— <——84 C5 Samba Whistle L <—— <—— <—— <——85 C#5 Guiro Short <—— <—— <—— <——86 D5 Guiro Long <—— <—— <—— <——87 D#5 Claves <—— <—— <—— <——88 E5 Wood Block H <—— <—— <—— <——89 F5 Wood Block L <—— <—— <—— <——90 F#5 Cuica Mute <—— <—— Scratch H Scratch H91 G5 Cuica Open <—— <—— Scratch L Scratch L92 G#5 Triangle Mute *2 <—— <—— <—— <——93 A5 Triangle Open *2 <—— <—— <—— <——94 A#5 Shaker <—— <—— <—— <——95 B5 Jingle Bell <—— <—— <—— <——96 C6 Bell Tree <—— <—— <—— <——
Percussion Kit List /
* “<——” indicates the content is the same as that of Standard Kit.*The number in parentheses ( ) after the percussion kit name is theMIDI program number.
*The corresponding MIDI note numbers for the notes listed in the chartbelow are actually one octave lower. For example, the MIDI notenumber for note #36 (C1) in the chart is note #24 (C0).
*Each drum/percussion voice uses one note.*The drum and percussion voices in same alternate group *1–8 cannot be played at the same time.
* The PSR-A3 has two Arabic Kits (Panel Arabic Kit: panel voicenumber 169 and GM Arabic Kit: GM voice number 137). Panel ArabicKit will be used when you normally play on the keyboard or the PSR-A3 receives program change messages on the specified remotechannel or receives program change messages after receiving “PanelVoice” message. GM Arabic Kit will be selected only when youchange the accompaniment track voices, or the PSR-A3 receivesprogram change messages through MIDI under the condition except-ing the ones mentioned above.
* GM voice numbers 129 through 136 correspond to the panel voicenumbers 161 through 168 respectively.

93
Note# Note 166/134: Jazz Kit (32) 167/135: Brush Kit (40) 168/136: Classic Kit (48) 169: Panel Arabic Kit (64) 137: GM Arabic Kit (64)25 C#0 <—— <—— <—— —26 D0 <—— <—— <—— —27 D#0 <—— <—— <—— —28 E0 <—— <—— <—— —29 F0 <—— <—— <—— —30 F#0 <—— <—— <—— —31 G0 <—— <—— <—— —32 G#0 <—— <—— <—— —33 A0 <—— <—— <—— —34 A#0 <—— <—— <—— —35 B0 <—— <—— <—— —36 C1 <—— <—— <—— Nakarazan Dom37 C#1 <—— <—— <—— Cabasa38 D1 <—— <—— <—— Nakarazan Edge39 D#1 <—— <—— <—— Hager Dom40 E1 <—— <—— <—— Hager Edge41 F1 <—— <—— <—— Bongo H42 F#1 <—— <—— <—— Bongo L43 G1 <—— Brush Slap L Snare Classic L Conga H Mute44 G#1 <—— <—— <—— Conga H Open45 A1 <—— <—— Gran Casa L Conga L46 A#1 <—— <—— <—— Zagrouda H47 B1 <—— <—— Gran Casa M Zagrouda L48 C2 <—— <—— Gran Casa H Bass Drum L49 C#2 <—— <—— <—— Closed Rim Shot50 D2 <—— Brush Slap H Snare Classic M Snare H Soft51 D#2 <—— <—— <—— Arabic Hand Clap52 E2 <—— Brush Tap Snare Classic H Snare H Hard53 F2 Natural Tom 1 Brush Tom 1 Natural Tom 1 Floor Tom L54 F#2 Dark Hi-Hat Closed *4 Dark Hi-Hat Closed *5 Dark Hi-Hat Closed *6 Dark Hi-Hat Closed *755 G2 Natural Tom 2 Brush Tom 2 Natural Tom 2 Floor Tom H56 G#2 Dark Hi-Hat Pedal *4 Dark Hi-Hat Pedal *5 Dark Hi-Hat Pedal *6 Dark Hi-Hat Pedal *757 A2 Natural Tom 3 Brush Tom 3 Natural Tom 3 Low Tom58 A#2 Dark Hit Hat Open *4 Dark Hit Hat Open *5 Dark Hit Hat Open *6 Dark Hit Hat Open *759 B2 Natural Tom 4 Brush Tom 4 Natural Tom 4 Mid Tom L60 C3 Natural Tom 5 Brush Tom 5 Natural Tom 5 Mid Tom H61 C#3 <—— <—— Hand Cymbal Long L Crash Cymbal 162 D3 Natural Tom 6 Brush Tom 6 Natural Tom 6 High Tom63 D#3 <—— <—— Hand Cymbal Short L Ride Cymbal 164 E3 <—— <—— <—— Crash Cymbal 265 F3 <—— <—— <—— Duhulla Dom66 F#3 <—— <—— <—— Tambourine67 G3 <—— <—— <—— Duhulla Tak68 G#3 <—— <—— <—— Cowbell69 A3 <—— <—— Hand Cymbal Long H Duhulla Sak70 A#3 <—— <—— <—— Claves71 B3 <—— <—— Hand Cymbal Short H Doff Dom72 C4 <—— <—— <—— Katem Dom73 C#4 <—— <—— <—— Katem Tak74 D4 <—— <—— <—— Katem Sak75 D#4 <—— <—— <—— Katem Tak76 E4 <—— <—— <—— Doff Tak77 F4 <—— <—— <—— Tabla Dom78 F#4 <—— <—— <—— Tabla Tak179 G4 <—— <—— <—— Tabla Tik80 G#4 <—— <—— <—— Tabla Tak281 A4 <—— <—— <—— Tabla Sak82 A#4 <—— <—— <—— Tabla Roll of Edge83 B4 <—— <—— <—— Tabla Flam84 C5 <—— <—— <—— Sagat 185 C#5 <—— <—— <—— Tabel Dom86 D5 <—— <—— <—— Sagat 387 D#5 <—— <—— <—— Tabel Tak88 E5 <—— <—— <—— Sagat 289 F5 <—— <—— <—— Rik Dom90 F#5 <—— <—— <—— Rik Tak 291 G5 <—— <—— <—— Rik Finger 192 G#5 <—— <—— <—— Rik Tak 193 A5 <—— <—— <—— Rik Finger 294 A#5 <—— <—— <—— Rik Brass Tremolo95 B5 <—— <—— <—— Rik Sak96 C6 <—— <—— <—— Rik Tik
Tabel TakTabel DomNakarazan EdgeWhip SlapScratch HScratch LNakarazan DomKatem TakKatem SakKatem DomRik Tak 2Rik Tak 1Rik Finger 2Brush SwirlRik Finger 1Rik Brass TremoloTabla Roll of EdgeRik DomDuhulla SakRik SakTabla DomTabla SakDuhulla DomBass Drum LClosed Rim ShotSnare H SoftArabic Hand ClapSnare H HardFloor Tom LDark Hi-Hat Closed *8Floor Tom HDark Hi-Hat Pedal *8Low TomDark Hit Hat Open *8Mid Tom LMid Tom HCrash Cymbal 1High TomRide Cymbal 1Chinese CymbalRide Cymbal CupTambourineSplash CymbalCowbellCrash Cymbal 2Tabla FlamRik TikBongo HBongo LConga H MuteConga H OpenConga LDoff TakDoff DomAgogo HAgogo LCabasaTabla TikZagrouda HZagrouda LGuiro ShortGuiro LongClavesTabla Tak2Tabla Tak1Hager EdgeHager DomSagat 2Sagat 3Duhulla TakSagat 1Bell Tree
Percussion Kit List /

94
MIDI Implementation Chart /
[Portable Keyboard] Date: 1995. 5. 18
Model: PSR-A3 MIDI Implementation Chart Version: 1.00
Function Transmitted Recognized Remarks
Basic Default 1~16 CH 1~16 CH (*1)Channel Changed 1~16 CH 1~16 CH (*1)
Default Mode 3 (*1)Mode Messages X X
Altered ***************** X
Note 0~127 0~127Number : True voice ***************** 0~127
Velocity Note on O 9nH, v=1~127 O 9nH, v=1~127Note off X 9nH, v=0 X 9nH, v=0 or 8nH
After key’s X XTouch Ch’s X X
Pitch Bender O OControl Change 0, 32 O O Bank select MSB, LSB (*2)
1 X (*3) O Modulation6, 38 O O Data entry MSB, LSB
7 O O Volume10 O O Pan11 X (*3) O Expression64 O O Sustain66 X (*3) O Sostenuto67 X (*3) O Soft pedal71 X (*3) O Harmonic content72 X (*3) O Release time73 X (*3) O Attack time74 X (*3) O Brightness84 X (*3) O Portamento control91 O O Reverb send level93 O O Chorus send level94 O O DSP send level
96, 97 X (*3) O Data increment, decrement98, 99 X (*3) O NRPN LSB, MSB (*4)
100, 101 O O RPN LSB, MSB (*5)120 O (*6) O All sound off121 X O Reset all controllers (*7)
Program O 0~127 O 0~127Change : True # ***************** 0~127 (*8)
System Exclusive O O (*10)
System : Song Position X X: Song Select X X
Common : Tune X X
System : Clock O O (*9)Real Time : Commands O O (*9) Start, stop
Aux : Local ON/OFF X X: All Notes Off X O
Messages : Active Sense O O: Reset X X
Mode 1: OMNI ON, POLY Mode 2: OMNI ON, MONO O: YesMode 3: OMNI OFF, POLY Mode 4: OMNI OFF, MONO X: No

95
*1 PSR-A3 ordinarily functions as 16 MIDI channel multi-timbral tonegenerator controlled by MIDI reception data. Panel voices and theother panel settings are not affected by the MIDI message, except-ing the followings:
MIDI Master TuningSystem Exclusive Message for controlling Reverb, Chorus andDsp
The Remote Channel can be designated by the panel settings. Thedesignated channel on the PSR-A3 can be controlled by an exter-nal device and receive all the data excepting the following controlchange data:
Data entry, MSB, LSBPortamento controlData incrementData decrementNRPN LSB, MSBRPN LSB, MSB
*2 Bank Select MSBThe bank select MSB is used for melody voice and rhythm voiceswitching.
MSB 00H: Melody voice.MSB 7FH: Rhythm voice.
Transmission: Transmitted when changing the voice, style andsong.Reception: All channels except10 channel receive this message.( 10 channel is fixed at rhythm voice.). But when 10 channel is setfor the remote channel or receives XG System On message, 10channel receives this message and the rhythm voice can changeto the melody voice.
Bank Select LSBThis message is used to correspond to the panel voice numbershigher than 128.
Bank Select LSB=00H: program change numbers 0~127 corre-spond to the panel voice numbers 1~128.Bank Select LSB=01H: program change numbers 0~12 corre-spond to the panel voice numbers 129~141.Bank Select LSB=96H~99H: Oriental voices (refer to the PanelVoice List on page 90).
Transmission: Transmitted when changing the voice, style andsong.Reception: This message can be received only at the channeldesignated as the remote channel or the panel voice.
No voice change will occur when only a bank select is received.When a program change is received the latest bank select value isused.
*3 These Control Change messages are not transmitted by the PSR-A3 panel operation, but may be transmitted by the accompanimentstyle playing.
*4 NRPN transmission/receptionThe following parameters are supported.
NRPN Data entryMSB LSB MSB LSB Parameter Name/Range Default01H 08H mmH - - Vibrato Rate 40H
mm : 00H - 40H - 7FH (-64 - 0 - +63)01H 09H mmH - - Vibrato Depth 40H
mm : 00H - 40H - 7FH (-64 - 0 - +63)01H 0AH mmH - - Vibrato Delay 40H
mm : 00H - 40H - 7FH (-64 - 0 - +63)01H 20H mmH - - Filter Cutoff Freq. 40H
mm : 00H - 40H - 7FH (-64 - 0 - +63)01H 21H mmH - - Filter Resonance 40H
mm : 00H - 40H - 7FH (-64 - 0 - +63)01H 63H mmH - - EG Attack Time 40H
mm : 00H - 40H - 7FH (-64 - 0 - +63)01H 64H mmH - - EG Decay Time 40H
mm : 00H - 40H - 7FH (-64 - 0 - +63)01H 66H mmH - - EG Release TIme 40H
mm: 00H - 40H - 7FH (-64 - 0 - +63)14H rrH mmH - - Drum Filter Cutoff Freq. 40Hrr: drum instrument note number mm: 00H - 40H - 7FH (-64 - 0 - +63)15H rrH mmH - - Drum Filter Resonance 40Hrr: drum instrument note number mm: 00H - 40H - 7FH (-64 - 0 - +63)16H rrH mmH - - Drum EG Attack Rate 40Hrr: drum instrument note number mm: 00H - 40H - 7FH (-64 - 0 - +63)17H rrH mmH - - Drum EG Decay Rate 40Hrr: drum instrument note number mm: 00H - 40H - 7FH (-64 - 0 - +63)18H rrH mmH - - Drum Instrument Pitch Course 40Hrr: drum instrument note number mm: 00H - 40H - 7FH (-64 - 0 - +63)19H rrH mmH - - Drum Instrument Pitch Fine 40Hrr: drum instrument note number mm: 00H - 40H - 7FH (-64 - 0 - +63)1AH rrH mmH - - Drum Instrument Level Depends on noterr: drum instrument note number mm: 00H - 7FH (0 - 127)1CH rrH mmH - - Drum Instrument Panpot Depends on noterr: drum instrument note number mm: 00H - 40H - 7FH (L - Center - R)1DH rrH mmH - - Drum Instrument Reverb Send Level Depends on noterr: drum instrument note number mm: 00H - 7FH (0 - 127)1EH rrH mmH - - Drum Instrument Chorus Send Level Depends on noterr: drum instrument note number mm: 00H - 7FH (0 - 127)1FH rrH mmH - - Drum Instrument DSP Send Level 7FHrr: drum instrument note number mm : 00H - 7FH (0 - 127)
Data entry LSB is ignored.
*5 RPN transmission/receptionThe following parameters are supported.
RPN Data entryMSB LSB MSB LSB Parameter Name/Range Default00H 00H mmH - - Pitch bend Sensitivity 02H
mm: 00H - 02H - 0CH (0 - 2 - 12)00H 01H mmH - - Fine Tuning 40H
mm: 00H - 40H - 7FH (-64 - 0 - +63)00H 02H mmH - - Course Tuning 40H
mm: 00H - 40H - 7FH (-64 - 0 - +63)7FH 7FH - - - - RPN Null - -
Clears current RPN and NRPN number settings.
Data entry LSB is ignored.
*6 Not transmitted when Song and Accompaniment is playing.
*7 Pitch Bend, modulation, expression, sustain, sostenuto andsoftpedal are returned to their defult values.Clears current RPN and NRPN number settings.Resets portament source note number.
*8 129~160 voice numbers are selectable through an appropriateBank Select setting (Refer to *2).
*9 When the External Clock is turned ON by PSR-A3 panel setting,Clock, Start/Stop message will be received.The start/stop of the song recording and playback will be controlledby the external device. The initial set up data is transmitted beforethe song playback, so that the start may be delayed.
MIDI Implementation Chart /
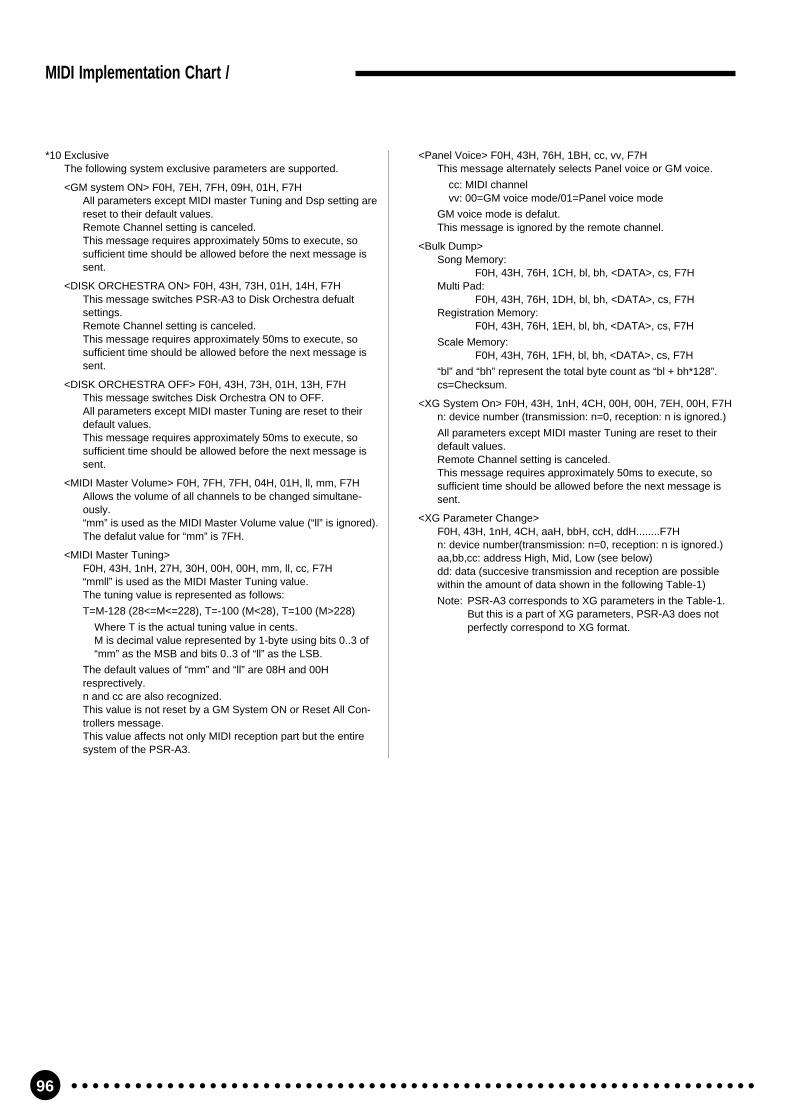
96
*10 ExclusiveThe following system exclusive parameters are supported.
<GM system ON> F0H, 7EH, 7FH, 09H, 01H, F7HAll parameters except MIDI master Tuning and Dsp setting arereset to their default values.Remote Channel setting is canceled.This message requires approximately 50ms to execute, sosufficient time should be allowed before the next message issent.
<DISK ORCHESTRA ON> F0H, 43H, 73H, 01H, 14H, F7HThis message switches PSR-A3 to Disk Orchestra defualtsettings.Remote Channel setting is canceled.This message requires approximately 50ms to execute, sosufficient time should be allowed before the next message issent.
<DISK ORCHESTRA OFF> F0H, 43H, 73H, 01H, 13H, F7HThis message switches Disk Orchestra ON to OFF.All parameters except MIDI master Tuning are reset to theirdefault values.This message requires approximately 50ms to execute, sosufficient time should be allowed before the next message issent.
<MIDI Master Volume> F0H, 7FH, 7FH, 04H, 01H, ll, mm, F7HAllows the volume of all channels to be changed simultane-ously.“mm” is used as the MIDI Master Volume value (“ll” is ignored).The defalut value for “mm” is 7FH.
<MIDI Master Tuning>F0H, 43H, 1nH, 27H, 30H, 00H, 00H, mm, ll, cc, F7H“mmll” is used as the MIDI Master Tuning value.The tuning value is represented as follows:
T=M-128 (28<=M<=228), T=-100 (M<28), T=100 (M>228)
Where T is the actual tuning value in cents.M is decimal value represented by 1-byte using bits 0..3 of“mm” as the MSB and bits 0..3 of “ll” as the LSB.
The default values of “mm” and “ll” are 08H and 00Hresprectively.n and cc are also recognized.This value is not reset by a GM System ON or Reset All Con-trollers message.This value affects not only MIDI reception part but the entiresystem of the PSR-A3.
<Panel Voice> F0H, 43H, 76H, 1BH, cc, vv, F7HThis message alternately selects Panel voice or GM voice.
cc: MIDI channelvv: 00=GM voice mode/01=Panel voice mode
GM voice mode is defalut.This message is ignored by the remote channel.
<Bulk Dump>Song Memory:
F0H, 43H, 76H, 1CH, bl, bh, <DATA>, cs, F7HMulti Pad:
F0H, 43H, 76H, 1DH, bl, bh, <DATA>, cs, F7HRegistration Memory:
F0H, 43H, 76H, 1EH, bl, bh, <DATA>, cs, F7H
Scale Memory:F0H, 43H, 76H, 1FH, bl, bh, <DATA>, cs, F7H
“bl” and “bh” represent the total byte count as “bl + bh*128”.cs=Checksum.
<XG System On> F0H, 43H, 1nH, 4CH, 00H, 00H, 7EH, 00H, F7Hn: device number (transmission: n=0, reception: n is ignored.)
All parameters except MIDI master Tuning are reset to theirdefault values.Remote Channel setting is canceled.This message requires approximately 50ms to execute, sosufficient time should be allowed before the next message issent.
<XG Parameter Change>F0H, 43H, 1nH, 4CH, aaH, bbH, ccH, ddH........F7Hn: device number(transmission: n=0, reception: n is ignored.)aa,bb,cc: address High, Mid, Low (see below)dd: data (succesive transmission and reception are possiblewithin the amount of data shown in the following Table-1)
Note: PSR-A3 corresponds to XG parameters in the Table-1.But this is a part of XG parameters, PSR-A3 does notperfectly correspond to XG format.
MIDI Implementation Chart /

97
<Table-1> Parameter Change
SYSTEMAddress Size Data Parameter Description Default(H) (H) (H) value(H)00 00 00 4 0000 - 07FF MASTER TUNE -102.4 - +102.3[cent] 00 04 00 00
01 1st bit3-0 m bit15-1202 2nd bit3-0 m bit11-803 3rd bit3-0 m bit7-4
4th bit3-0 m bit3-004 1 00 - 7F MASTER VOLUME 0 - 127 7F
06 1 28 - 58 TRANSPOSE -24 - +24[semitone] 407D 1 00 - 01 DRUM SETUP RESET 00: Drum setup 1 —
01: Drum setup 27E 1 00 XG SYSTEM ON —7F 1 00 ALL PARAMETER RESET —
EFFECTAddress Size Data Parameter Description Default(H) (H) (H) value(H)02 01 00 2 00-7F REVERB TYPE MSB Refer to Table-2 01(=HALL1)
00-7F REVERB TYPE LSB Refer to Table-2 0002 1 00-7F REVERB PARAMETER 1 Refer to Table-3 Depends on reverb type03 1 00-7F REVERB PARAMETER 2 Refer to Table-3 Depends on reverb type04 1 00-7F REVERB PARAMETER 3 Refer to Table-3 Depends on reverb type05 1 00-7F REVERB PARAMETER 4 Refer to Table-3 Depends on reverb type06 1 00-7F REVERB PARAMETER 5 Refer to Table-3 Depends on reverb type07 1 00-7F REVERB PARAMETER 6 Refer to Table-3 Depends on reverb type08 1 00-7F REVERB PARAMETER 7 Refer to Table-3 Depends on reverb type09 1 00-7F REVERB PARAMETER 8 Refer to Table-3 Depends on reverb type0A 1 00-7F REVERB PARAMETER 9 Refer to Table-3 Depends on reverb type0B 1 00-7F REVERB PARAMETER 10 Refer to Table-3 Depends on reverb type0C 1 00-7F REVERB RETURN -∞dB...0dB...+6dB(0...64...127) 400D 1 01-7F REVERB PAN L63...C...R63(1...64...127) 40
02 01 10 1 00-7F REVERB PARAMETER 11 Refer to Table-3 Depends on reverb type11 1 00-7F REVERB PARAMETER 12 Refer to Table-3 Depends on reverb type12 1 00-7F REVERB PARAMETER 13 Refer to Table-3 Depends on reverb type13 1 00-7F REVERB PARAMETER 14 Refer to Table-3 Depends on reverb type14 1 00-7F REVERB PARAMETER 15 Refer to Table-3 Depends on reverb type15 1 00-7F REVERB PARAMETER 16 Refer to Table-3 Depends on reverb type
02 01 20 2 00-7F CHORUS TYPE MSB Refer to Table-2 41(=CHORUS1)00-7F CHORUS TYPE LSB Refer to Table-2 00
22 1 00-7F CHORUS PARAMETER 1 Refer to Table-3 Depends on chorus type23 1 00-7F CHORUS PARAMETER 2 Refer to Table-3 Depends on chorus type24 1 00-7F CHORUS PARAMETER 3 Refer to Table-3 Depends on chorus type25 1 00-7F CHORUS PARAMETER 4 Refer to Table-3 Depends on chorus type26 1 00-7F CHORUS PARAMETER 5 Refer to Table-3 Depends on chorus type27 1 00-7F CHORUS PARAMETER 6 Refer to Table-3 Depends on chorus type28 1 00-7F CHORUS PARAMETER 7 Refer to Table-3 Depends on chorus type29 1 00-7F CHORUS PARAMETER 8 Refer to Table-3 Depends on chorus type2A 1 00-7F CHORUS PARAMETER 9 Refer to Table-3 Depends on chorus type2B 1 00-7F CHORUS PARAMETER 10 Refer to Table-3 Depends on chorus type2C 1 00-7F CHORUS RETURN -∞dB...0dB...+6dB(0...64...127) 402D 1 01-7F CHORUS PAN L63...C...R63(1...64...127) 402E 1 00-7F SEND CHORUS TO REVERB -∞dB...0dB...+6dB(0...64...127) 00
02 01 30 1 00-7F CHORUS PARAMETER 11 Refer to Table-3 Depends on chorus type31 1 00-7F CHORUS PARAMETER 12 Refer to Table-3 Depends on chorus type32 1 00-7F CHORUS PARAMETER 13 Refer to Table-3 Depends on chorus type33 1 00-7F CHORUS PARAMETER 14 Refer to Table-3 Depends on chorus type34 1 00-7F CHORUS PARAMETER 15 Refer to Table-3 Depends on chorus type35 1 00-7F CHORUS PARAMETER 16 Refer to Table-3 Depends on chorus type
02 01 40 2 00-7F VARIATION TYPE MSB Refer to Table-2 05(=DELAY L,C,R)00-7F VARIATION TYPE LSB Refer to Table-2 00
42 2 00-7F VARIATION PARAMETER 1 MSB Refer to Table-3 Depends on variation type00-7F VARIATION PARAMETER 1 LSB Refer to Table-3 Depends on variation type
44 2 00-7F VARIATION PARAMETER 2 MSB Refer to Table-3 Depends on variation type00-7F VARIATION PARAMETER 2 LSB Refer to Table-3 Depends on variation type
46 2 00-7F VARIATION PARAMETER 3 MSB Refer to Table-3 Depends on variation type00-7F VARIATION PARAMETER 3 LSB Refer to Table-3 Depends on variation type
48 2 00-7F VARIATION PARAMETER 4 MSB Refer to Table-3 Depends on variation type00-7F VARIATION PARAMETER 4 LSB Refer to Table-3 Depends on variation type
MIDI Data Format /

98
Address Size Data Parameter Description Default(H) (H) (H) value(H)
4A 2 00-7F VARIATION PARAMETER 5 MSB Refer to Table-3 Depends on variation type00-7F VARIATION PARAMETER 5 LSB Refer to Table-3 Depends on variation type
4C 2 00-7F VARIATION PARAMETER 5 MSB Refer to Table-3 Depends on variation type00-7F VARIATION PARAMETER 6 LSB Refer to Table-3 Depends on variation type
4E 2 00-7F VARIATION PARAMETER 7 MSB Refer to Table-3 Depends on variation type00-7F VARIATION PARAMETER 7 LSB Refer to Table-3 Depends on variation type
50 2 00-7F VARIATION PARAMETER 8 MSB Refer to Table-3 Depends on variation type00-7F VARIATION PARAMETER 8 LSB Refer to Table-3 Depends on variation type
52 2 00-7F VARIATION PARAMETER 9 MSB Refer to Table-3 Depends on variation type00-7F VARIATION PARAMETER 9 LSB Refer to Table-3 Depends on variation type
54 2 00-7F VARIATION PARAMETER 10 MSB Refer to Table-3 Depends on variation type00-7F VARIATION PARAMETER 10 LSB Refer to Table-3 Depends on variation type
56 1 00-7F VARIATION RETURN -∞dB...0dB...+6dB(0...64...127) 4057 1 01-7F VARIATION PAN L63...C...R63(1...64...127) 4058 1 00-7F SEND VARIATION TO REVERB -∞dB...0dB...+6dB(0...64...127) 0059 1 00-7F SEND VARIATION TO CHORUS -∞dB...0dB...+6dB(0...64...127) 005A 1 00-01 VARIATION CONNECTION “0:INSERTION,1:SYSTEM” 005B 1 00-01 VARIATION PART 00H~0FH: Ch1~16 7F: Off 7F
02 01 70 1 00-7F VARIATION PARAMETER 11 Refer to Table-3 Depends on variation type71 1 00-7F VARIATION PARAMETER 12 Refer to Table-3 Depends on variation type72 1 00-7F VARIATION PARAMETER 13 Refer to Table-3 Depends on variation type73 1 00-7F VARIATION PARAMETER 14 Refer to Table-3 Depends on variation type74 1 00-7F VARIATION PARAMETER 15 Refer to Table-3 Depends on variation type75 1 00-7F VARIATION PARAMETER 16 Refer to Table-3 Depends on variation type
* VARIATION means PSR-A3 Dsp effect.
MULTI PARTAddress Size Data Parameter Description Default(H) (H) (H) value(H)08 nn 07 1 00 - 05 PART MODE 00: NORMAL 00 (except 10Ch)/02 (10Ch)
01: Preset Drum Setup02: Drum Setup 103: Drum Setup 2
nn 11 1 00 - 7F DRY LEVEL 0 - 127 7F
nn 41 1 00 - 7F SCALE TUNING C -64 - +63[cent] 40nn 42 1 00 - 7F SCALE TUNING C# -64 - +63[cent] 40nn 43 1 00 - 7F SCALE TUNING D -64 - +63[cent] 40nn 44 1 00 - 7F SCALE TUNING D# -64 - +63[cent] 40nn 45 1 00 - 7F SCALE TUNING E -64 - +63[cent] 40nn 46 1 00 - 7F SCALE TUNING F -64 - +63[cent] 40nn 47 1 00 - 7F SCALE TUNING F# -64 - +63[cent] 40nn 48 1 00 - 7F SCALE TUNING G -64 - +63[cent] 40nn 49 1 00 - 7F SCALE TUNING G# -64 - +63[cent] 40nn 4A 1 00 - 7F SCALE TUNING A -64 - +63[cent] 40nn 4B 1 00 - 7F SCALE TUNING A# -64 - +63[cent] 40nn 4C 1 00 - 7F SCALE TUNING B -64 - +63[cent] 40
* nn: MIDI Channel(00-0F)
DRUM SETUPAddress Size Data Parameter Description Default(H) (H) (H) value(H)3n rr 00 1 00 - 7F PITCH COARSE -64 - +63[semitone] 403n rr 01 1 00 - 7F PITCH FINE -64 - +63[cent] 403n rr 02 1 00 - 7F LEVEL 0 - 127 Depends on note3n rr 04 1 00 - 7F PAN 1(Left)-64(Center)-127(Right) Depends on note3n rr 05 1 00 - 7F REVERB SEND 0 - 127 Depends on note3n rr 06 1 00 - 7F CHORUS SEND 0 - 127 7F3n rr 07 1 00 - 7F VARIATION SEND 0 - 127 7F
3n rr 0B 1 00 - 7F FILTER CUTOFF FREQUENCY -64 - 63 403n rr 0C 1 00 - 7F FILTER RESONANCE -64 - 63 403n rr 0D 1 00 - 7F EG ATTACK -64 - 63 403n rr 0E 1 00 - 7F EG DECAY1 -64 - 63 40
* n:Drum setup number (0H or 1H)rr:note number(18H to 54H)
MIDI Data Format /

99
<Table-2> Effect map
The following types in the boxes can be controlled by the PSR-A3 settings. The numbers in the brackets are PSR-A3 panel effect numbers.The blank indicates the content is the same as that of 00H.
REVERB TYPE LSB
00H 01H 02H 08H 09H 0AH 0BH 0CHMSB
00H NO EFFECT01H [1]HALL1 HALL5 [2]HALL2 [3]HALL3 [4]HALL402H ROOM5 ROOM6 ROOM7 [5]ROOM1 [6]ROOM2 [7]ROOM3 [8]ROOM403H STAGE3 STAGE4 [9]STAGE1 [10]STAGE204H PLATE3 [11]PLATE1 [12]PLATE205H NO EFFECT: :7FH NO EFFECT
CHORUS TYPE LSB
00H 01H 02H 08H 09H 0AH 0BH 0CHMSB
00H NO EFFECT01H NO EFFECT: :40H NO EFFECT41H CHORUS6 CHORUS7 [5]CHORUS542H CELESTE1 [4]CHORUS4 CELESTE2 [2]CHORUS2 [3]CHORUS3 [1]CHORUS143H FLANGER 5 [9]FLANGER4 [6]FLANGER1 [7]FLANGER2 [8]FLANGER344H NO EFFECT: :7FH NO EFFECT
VARIATION TYPE LSB
00H 01H 02H 08H 09H 0AH 0BH 0CHMSB
00H NO EFFECT01H [1]HALL1 HALL2 [2]HALL2 [3]HALL3 [4]HALL402H ROOM5 ROOM6 ROOM7 [5]ROOM1 [6]ROOM2 [7]ROOM3 [8]ROOM403H STAGE3 STAGE4 [9]STAGE1 [10]STAGE204H PLATE3 [11]PLATE1 [12]PLATE205H DELAY L,C,R2 [38]DELAY LCR06H [39]DELAY L,R07H [40]ECHO08H [41]CROSS DELAY09H [13]EARLY REF1 [14]EARLY REF20AH [15]GATE REVERB0BH [16]REVERSE GATE0CH NO EFFECT or THRU*: :3FH NO EFFECT or THRU*40 THRU41 CHORUS6 CHORUS7 [21]CHORUS542 CELESTE1 [20]CHORUS4 CELESTE2 [18]CHORUS2 [19]CHORUS3 [17]CHORUS1 [32]ROTARY SP543 FLANGER 5 [25]FLANGER4 [22]FLANGER1 [23]FLANGER2 [24]FLANGER344 SYMPHONIC2 [26]SYMPHONIC45 ROTARY SP6 [28]ROTARY SP146 TREMOLO3 [33]TREMOLO1 [31]ROTARY SP447 AUTO PAN2 [36]AUTO PAN [29]ROTARY SP2 [30]ROTARY SP3 [34]TREMOLO2 [35]GTR TREMOLO48 [27]PHASER49 DISTORTION4A OVER DRIVE4B AMP SIMULATOR [42]DIST.HARD [43]DIST.SOFT4C 3-BAND EQ [44]EQ DISCO [45]EQ TEL4D 2-BAND EQ4E AUTO WAH2 [37]AUTO WAH4F THRU: :7F THRU
*No effect or Thru is determined by either Variation connection is system or insertion.
MIDI Data Format /

100
<Table-3> Effect Parameter List
Only the following parameter numbers are effective.Parameter values consists of 2-bytes. Enter 00H for MSB and appropriate value for LSB.* Parameter number 10 Dry/Wet is effective only when Variation connection is insertion.
TYPE Type Parameter Parameter Value Description
MSB(H) Number
01 HALL 1 Reverb Time 0-69 0.3~30.0s
02 ROOM 2 Diffusion 0-10
03 STAGE 3 Initial Delay 0-63 0.0~99.3ms
04 PLATE 4 HPF Cutoff 0-52 Thru~8.0kHz
5 LPF Cutoff 34-60 1.0k~Thru
10* Dry/Wet 1-127 D63>W ~ D=W ~ D<W63
11 Rev Delay 0-63 0.0~100.0ms
12 Density 0-4
13 Rev/Er Balance 1-127 R<E63 ~ R=E ~ R63>E
15 Feedback Level 1-127 -63~+63
05 DELAY L,C,R 1 Lch Delay 1-7200 0.1~720.0ms
2 Rch Delay 1-7200 0.1~720.0ms
3 Cch Delay 1-7200 0.1~720.0ms
4 Feedback Delay 1-7200 0.1~720.0ms
5 Feedback Level 1-127 -63~+63
6 Cch Level 0-127
7 High Damp 1-10 0.1~1.0
10* Dry/Wet 1-127 D63>W ~ D=W ~ D<W63
13 EQ Low Frequency 8-40 50Hz~2.0kHz
14 EQ Low Gain 52-76 -12~+12dB
15 EQ High Frequency 28-58 500Hz~16.0kHz
16 EQ High Gain 52-76 -12~+12dB
06 DELAY L,R 1 Lch Delay 1-7200 0.1~720.0ms
2 Rch Delay 1-7200 0.1~720.0ms
3 Feedback Delay 1 1-7200 0.1~720.0ms
4 Feedback Delay 2 1-7200 0.1~720.0ms
5 Feedback Level 1-127 -63~+63
6 High Damp 1-10 0.1~1.0
10* Dry/Wet 1-127 D63>W ~ D=W ~ D<W63
13 EQ Low Frequency 8-40 50Hz~2.0kHz
14 EQ Low Gain 52-76 -12~+12dB
15 EQ High Frequency 28-58 500Hz~16.0kHz
16 EQ High Gain 52-76 -12~+12dB
07 ECHO 1 Lch Delay1 1-3600 0.1~360.0ms
2 Lch Feedback Level 1-127 -63~+63
3 Rch Delay1 1-3600 0.1~360.0ms
4 Rch Feedback Level 1-127 -63~+63
5 High Damp 1-10 0.1~1.0
6 Lch Delay2 1-3600 0.1~360.0ms
7 Rch Delay2 1-3600 0.1~360.0ms
8 Delay2 Level 0-127
10* Dry/Wet 1-127 D63>W ~ D=W ~ D<W63
13 EQ Low Frequency 8-40 50Hz~2.0kHz
14 EQ Low Gain 52-76 -12~+12dB
15 EQ High Frequency 28-58 500Hz~16.0kHz
16 EQ High Gain 52-76 -12~+12dB
08 CROSS DELAY 1 L->R Delay 1-3600 0.1~360.0ms
2 R->L Delay 1-3600 0.1~360.0ms
3 Feedback Level 1-127 -63~+63
4 Input Select 0-2 L,R,L&R(L,R is mono mix)
5 High Damp 1-10 0.1~1.0
10* Dry/Wet 1-127 D63>W ~ D=W ~ D<W63
13 EQ Low Frequency 8-40 50Hz~2.0kHz
14 EQ Low Gain 52-76 -12~+12dB
15 EQ High Frequency 28-58 500Hz~16.0kHz
16 EQ High Gain 52-76 -12~+12dB
TYPE Type Parameter Parameter Value Description
MSB(H) Number
09 EARLY REF 1 Type 0-5 S-H, L-H, Rdm, Rvs, Plt, Spr
2 Room Size 0-127
3 Diffusion 0-10 0~10
4 Initial Delay 0-127 0.0~200.0ms
5 Feedback Level 1-127 -63~+63
6 HPF Cutoff 0-52 Thru~8.0kHz
7 LPF Cutoff 34-60 1.0k~Thru
10* Dry/Wet 1-127 D63>W ~ D=W ~ D<W63
11 Liveness 0-10
12 Density 0-3
13 High Damp 1-10 0.1~1.0
0A GATE REVERB 1 Type 0-1 TypeA, TypeB
0B REVERSE GATE 2 Room Size 0-127
3 Diffusion 0-10
4 Initial Delay 0-127 0.0~200.0ms
5 Feedback Level 1-127 -63~+63
6 HPF Cutoff 0-52 Thru~8.0kHz
7 LPF Cutoff 34-60 1.0k~Thru
10* Dry/Wet 1-127 D63>W ~ D=W ~ D<W63
11 Liveness 0-10
12 Density 0-3
13 High Damp 1-10 0.1~1.0
41 CHORUS 1 LFO Frequency 0-127 0.00~39.7Hz
42 CELESTE 2 LFO PM Depth 0-127
3 Feedback Level 1-127 -63~+63
4 Delay Offset 0-127 0.0~50.0ms
6 EQ Low Frequency 8-40 50Hz~2.0kHz
7 EQ Low Gain 52-76 -12~+12dB
8 EQ High Frequency 28-58 500Hz~16.0kHz
9 EQ High Gain 52-76 -12~+12dB
10* Dry/Wet 1-127 D63>W ~ D=W ~ D<W63
15 Input Mode 0-1 mono/stereo
43 FLANGER 1 LFO Frequency 0-127 0.00~39.7Hz
2 LFO Depth 0-127
3 Feedback Level 1-127 -63~+63
4 Delay Offset 0-127 0.0~50.0ms
6 EQ Low Frequency 8-40 50Hz~2.0kHz
7 EQ Low Gain 52-76 -12~+12dB
8 EQ High Frequency 28-58 500Hz~16.0kHz
9 EQ High Gain 52-76 -12~+12dB
10* Dry/Wet 1-127 D63>W ~ D=W ~ D<W63
14 LFO Phase Difference 4-124 -180°~+180° (resolution 3°)15 Input Mode 0-1 mono/stereo
44 SYMPHONIC 1 LFO Frequency 0-127 0.00~39.7Hz
2 LFO Depth 0-127
3 Delay Offset 0-127 0.0~50.0ms
6 EQ Low Frequency 8-40 50Hz~2.0kHz
7 EQ Low Gain 52-76 -12~+12dB
8 EQ High Frequency 28-58 500Hz~16.0kHz
9 EQ High Gain 52-76 -12~+12dB
10* Dry/Wet 1-127 D63>W ~ D=W ~ D<W63
45 ROTARY 1 LFO Frequency 0-127 0.00~39.7Hz
SPEAKER 2 LFO Depth 0-127
6 EQ Low Frequency 8-40 50Hz~2.0kHz
7 EQ Low Gain 52-76 -12~+12dB
8 EQ High Frequency 28-58 500Hz~16.0kHz
9 EQ High Gain 52-76 -12~+12dB
10* Dry/Wet 1-127 D63>W ~ D=W ~ D<W63
MIDI Data Format /

101
TYPE Type Parameter Parameter Value Description
MSB(H) Number
46 TREMOLO 1 LFO Frequency 0-127 0.00~39.7Hz
2 AM Depth 0-127
3 PM Depth 0-127
6 EQ Low Frequency 8-40 50Hz~2.0kHz
7 EQ Low Gain 52-76 -12~+12dB
8 EQ High Frequency 28-58 500Hz~16.0kHz
9 EQ High Gain 52-76 -12~+12dB
14 LFO Phase Difference 4-124 -180°~+180° (resolution 3°)15 Input Mode 0-1 mono/stereo
47 AUTO PAN 1 LFO Frequency 0-127 0.00~39.7Hz
2 L/R Depth 0-127
3 F/R Depth 0-127
4 PAN Direction 0-5 L<->R, L->R, L<-R,
Lturn, Rturn, L/R
6 EQ Low Frequency 8-40 50Hz~2.0kHz
7 EQ Low Gain 52-76 -12~+12dB
8 EQ High Frequency 28-58 500Hz~16.0kHz
9 EQ High Gain 52-76 -12~+12dB
48 PHASER 1 LFO Frequency 0-127 0.00~39.7Hz
2 LFO Depth 0-127
3 Phase Shift Offset 0-127
4 Feedback Level 1-127 -63~+63
6 EQ Low Frequency 8-40 50Hz~2.0kHz
7 EQ Low Gain 52-76 -12~+12dB
8 EQ High Frequency 28-58 500Hz~16.0kHz
9 EQ High Gain 52-76 -12~+12dB
10* Dry/Wet 1-127 D63>W ~ D=W ~ D<W63
11 Stage 6-10
49 DISTORTION 1 Drive 0-127
4A OVERDRIVE 2 EQ Low Frequency 8-40 50Hz~2.0kHz
3 EQ Low Gain 52-76 -12~+12dB
4 LPF Cutoff 34-60 1.0k~Thru
5 Output Level 0-127
7 EQ Mid Frequency 28-54 500Hz~10.0kHz
8 EQ Mid Gain 52-76 -12~+12dB
9 EQ Mid Width 10-120 1.0~12.0
10* Dry/Wet 1-127 D63>W ~ D=W ~ D<W63
11 Edge(Clip Curve) 0-127 0:Mild ~ 127:Sharp
4B AMP 1 Drive 0-127
SIMULATOR 2 AMP Type 0-3 Off,Stack,Combo,Tube
3 LPF Cutoff 34-60 1.0k~Thru
4 Output Level 0-127
10* Dry/Wet 1-127 D63>W ~ D=W ~ D<W63
11 Edge(Clip Curve) 0-127 0:Mild ~ 127:Sharp
4C 3-BAND EQ 1 EQ Low Gain 52-76 -12~+12dB
2 EQ Mid Frequency 28-54 500Hz~10.0kHz
3 EQ Mid Gain 52-76 -12~+12dB
4 EQ Mid Width 10-120 1.0~12.0
5 EQ High Gain 52-76 -12~+12dB
6 EQ Low Frequency 8-40 50Hz~2.0kHz
7 EQ High Frequency 28-58 500Hz~16.0kHz
4D 2-BAND EQ 1 EQ Low Frequency 8-40 50Hz~2.0kHz
2 EQ Low Gain 52-76 -12~+12dB
3 EQ High Frequency 28-58 500Hz~16.0kHz
4 EQ High Gain 52-76 -12~+12dB
4E AUTO WAH 1 LFO Frequency 0-127 0.00~39.7Hz
2 LFO Depth 0-127
3 Cutoff Frequency Offset 0-127 50Hz~14.0kHz
4 Resonance 10-120 1.0~12.0
6 EQ Low Frequency 8-40 50Hz~2.0kHz
7 EQ Low Gain 52-76 -12~+12dB
8 EQ High Frequency 28-58 500Hz~16.0kHz
9 EQ High Gain 52-76 -12~+12dB
10* Dry/Wet 1-127 D63>W ~ D=W ~ D<W63
GM System Level 1
The existing MIDI protocol allows performance andother data to be transferred between different instru-ments, even if they are from different manufacturers.This means, for example, that sequence data that wasoriginally created to control a tone generator frommanufacturer A can also be used to control a differenttone generator from manufacturer B. Since the voiceallocation in different devices from different manufactur-ers is usually different, however, appropriate programchange data must be transmitted to select the rightvoices.
The General MIDI protocol was developed to mini-mize confusion and the need for re-programming whenplaying software created by one MIDI device on an-other. This has been achieved by defining a standardvoice allocation in which the same or similar voices areaccessed by the same program change numbers orMIDI channels. The current standard recognized by theInternational MIDI Association is known as “GM SystemLevel 1.” The PSR-A3 voice allocation complies withthe GM System Level 1 standard.
MIDI Data Format /

103
FCC INFORMATION (U.S.A.)1. IMPORTANT NOTICE: DO NOT MODIFY THIS UNIT!
This product, when installed as indicated in the instructions con-tained in this manual, meets FCC requirements. Modifications notexpressly approved by Yamaha may void your authority, grantedby the FCC, to use the product.
2. IMPORTANT: When connecting this product to accessories and/or another product use only high quality shielded cables. Cable/ssupplied with this product MUST be used. Follow all installationinstructions. Failure to follow instructions could void your FCCauthorization to use this product in the USA.
3. NOTE: This product has been tested and found to comply withthe requirements listed in FCC Regulations, Part 15 for Class “B”digital devices. Compliance with these requirements provides areasonable level of assurance that your use of this product in aresidential environment will not result in harmful interference withother electronic devices. This equipment generates/uses radiofrequencies and, if not installed and used according to the instruc-tions found in the users manual, may cause interference harmfulto the operation of other electronic devices. Compliance with FCC
regulations does not guarantee that interference will not occur inall installations. If this product is found to be the source of inter-ference, which can be determined by turning the unit “OFF” and“ON”, please try to eliminate the problem by using one of thefollowing measures:Relocate either this product or the device that is being affected bythe interference.Utilize power outlets that are on different branch (circuit breakeror fuse) circuits or install AC line filter/s.In the case of radio or TV interference, relocate/reorient the an-tenna. If the antenna lead-in is 300 ohm ribbon lead, change thelead-in to co-axial type cable.If these corrective measures do not produce satisfactory results,please contact the local retailer authorized to distribute this typeof product. If you can not locate the appropriate retailer, pleasecontact Yamaha Corporation of America, Electronic Service Divi-sion, 6600 Orangethorpe Ave, Buena Park, CA90620The above statements apply ONLY to those products distributedby Yamaha Corporation of America or its subsidiaries.
* This applies only to products distributed by YAMAHA CORPORATION OF AMERICA.
This product utilizes batteries or an external power supply (adapter).DO NOT connect this product to any power supply or adapter otherthan one described in the manual, on the name plate, or specificallyrecommended by Yamaha.
This product should be used only with the components supplied or; acart, rack, or stand that is recommended by Yamaha. If a cart, etc., isused, please observe all safety markings and instructions that accom-pany the accessory product.
SPECIFICATIONS SUBJECT TO CHANGE:The information contained in this manual is believed to be correct at thetime of printing. However, Yamaha reserves the right to change ormodify any of the specifications without notice or obligation to updateexisting units.
This product, either alone or in combination with an amplifier and head-phones or speaker/s, may be capable of producing sound levels thatcould cause permanent hearing loss. DO NOT operate for long periodsof time at a high volume level or at a level that is uncomfortable. If youexperience any hearing loss or ringing in the ears, you should consultan audiologist.IMPORTANT: The louder the sound, the shorter the time period beforedamage occurs.
NOTICE:Service charges incurred due to a lack of knowledge relating to how afunction or effect works (when the unit is operating as designed) are notcovered by the manufacturer’s warranty, and are therefore the ownersresponsibility. Please study this manual carefully and consult yourdealer before requesting service.
ENVIRONMENTAL ISSUES:Yamaha strives to produce products that are both user safe and envi-ronmentally friendly. We sincerely believe that our products and theproduction methods used to produce them, meet these goals. In keep-ing with both the letter and the spirit of the law, we want you to beaware of the following:
Battery Notice:This product MAY contain a small non-rechargeable battery which (ifapplicable) is soldered in place. The average life span of this type of
battery is approximately five years. When replacement becomesnecessary, contact a qualified service representative to perform thereplacement.
This product may also use “household” type batteries. Some of thesemay be rechargeable. Make sure that the battery being charged is arechargeable type and that the charger is intended for the batterybeing charged.
When installing batteries, do not mix batteries with new, or with batter-ies of a different type. Batteries MUST be installed correctly. Mis-matches or incorrect installation may result in overheating and batterycase rupture.
Warning:Do not attempt to disassemble, or incinerate any battery. Keep allbatteries away from children. Dispose of used batteries promptly andas regulated by the laws in your area. Note: Check with any retailer ofhousehold type batteries in your area for battery disposal information.
Disposal Notice:Should this product become damaged beyond repair, or for somereason its useful life is considered to be at an end, please observe alllocal, state, and federal regulations that relate to the disposal of prod-ucts that contain lead, batteries, plastics, etc. If your dealer is unableto assist you, please contact Yamaha directly.
NAME PLATE LOCATION:The name plate is located on the bottom of the product. The modelnumber, serial number, power requirements, etc., are located on thisplate. You should record the model number, serial number, and thedate of purchase in the spaces provided below and retain this manualas a permanent record of your purchase.
Model
Serial No.
Purchase Date
SPECIAL MESSAGE SECTION
PLEASE KEEP THIS MANUAL92-BP