Embed Size (px)
Citation preview

Abstract
MageNative Mobile App Magento® 2 extension provides a flexibility and an easiest way to
build the mobile app. MageNative is the Application Development Platform that enables to
present the website in the Mobile Application Environment. .
MageNative Apps
Admin Guide Version 1.0

Admin Guide
1 | P a g e © CedCommerce. All Rights Reserved
Table of Contents Overview................................................................................................................... 2
Mobiconnect Menu ...................................................................................................... 4
Mobiconnect Configuration ........................................................................................ 5
Manage Banner ..................................................................................................... 17
Import or Export EAN ............................................................................................. 22
Manage Home Page Banner Widget.......................................................................... 24
Deals ................................................................................................................... 30
Deal Groups .......................................................................................................... 34
Notifications.......................................................................................................... 38
Delete Device ID From the Device Listing Page .......................................................... 43
Enable or Disable .................................................................................................. 44

Admin Guide
© CedCommerce. All Rights Reserved. 2 | P a g e
Overview MageNative Mobile App Magento® 2 extension provides a flexibility and an easiest way to
build the mobile app. With the help of the MageNative app, the admin can convert the
Magento® 2 website into a featured mobile app consisting of all the website functionalities.
MageNative is the Application Development Platform that enables to present the website in
the Mobile Application Environment. The admin can customize the app to match the brand
image and publish it to meet the requirements of the front-end users.
The app displays the product information in an interactive way and uses the less data to
show the product related information.
This application is compatible with the following operating systems:
Windows
Android
ios
Note : It is available with the free trial version for the Ninety days.
The key features of the MageNative Mobile App extension are as follows:
Attractive and User-Friendly Layout: Provides an attractive and user-friendly layout
that makes the users to instinctively experience, how to use the interface.
Multi Lingual and RTL Support: It supports multiple languages and the right to left
theme. In the right to left theme, writing starts from the right of the page and continues
to the left.
Native App: An application program, developed for the use on a specific platform or
device.
Synchronization: The app is synchronized with the website.
Supports all product type: It supports all type of the products available in the
Magento 2 store.
Search: Enhanced search feature available to search the required product in the app
based Name, description, Category of the product.
Barcode And QR Code Reader and Scanner: QR Code Reader is used for Product
sharing and easy product search. Barcode Scanner is used for the Real world product
search.
Push Notification: Using Push Notification the MageNative App sends the user a
notification message regarding any new offer or any other app related messages without
the user actually opening the app. The notification is pushed to the mobile to draw the
user’s attention towards the latest happening in the app, even when the screen of the
tab or mobile is locked, and the app that is pushing the notification is closed.
Social Login: A single sign-on technology is used that allows users to authenticate
themselves on MageNative App by connecting through a social media such as Facebook
and Google. Thus, offering an option to register, log in with their regular social login ID
and password rather than going through the regular process of registration for using the
App.

Admin Guide
3 | P a g e © CedCommerce. All Rights Reserved
Native Payment Gateway: Will provide the NATIVE PAYMENT GATEWAYS that will
make the application run smoothly and even faster on the transactions performed by the
users.
Voice Search: You can search the product with your own voice.
Other Efficient Features are as follows:
Support all the payment method available on the Magento 2 store.
Homepage Promotional Banner
Promotional Deals
Product Social Sharing
Google Maps
Google Analytics
Customize App Design
Filters
Sort

Admin Guide
© CedCommerce. All Rights Reserved. 4 | P a g e
Mobiconnect Menu After the successful app building and the connector installation, the Admin can view the
MOBICONNECT menu on the left navigation bar of the Admin panel.
Figure 1
Admin Guide
5 | P a g e © CedCommerce. All Rights Reserved
Mobiconnect Configuration
After App building and connector installation, the admin has to configure the various
features of the app through the Admin panel. The Admin has rights to enable or disable the
features of the extension.
To set up the configuration settings
1) Go to the Admin panel.
2) On the left navigation bar, click the MOBICONNECT menu, and then click Mobiconnect
Configuration.
Figure 2

Admin Guide
© CedCommerce. All Rights Reserved. 6 | P a g e
The Configuration page appears as shown in the Figure 3.
Figure 3
Admin Guide
7 | P a g e © CedCommerce. All Rights Reserved
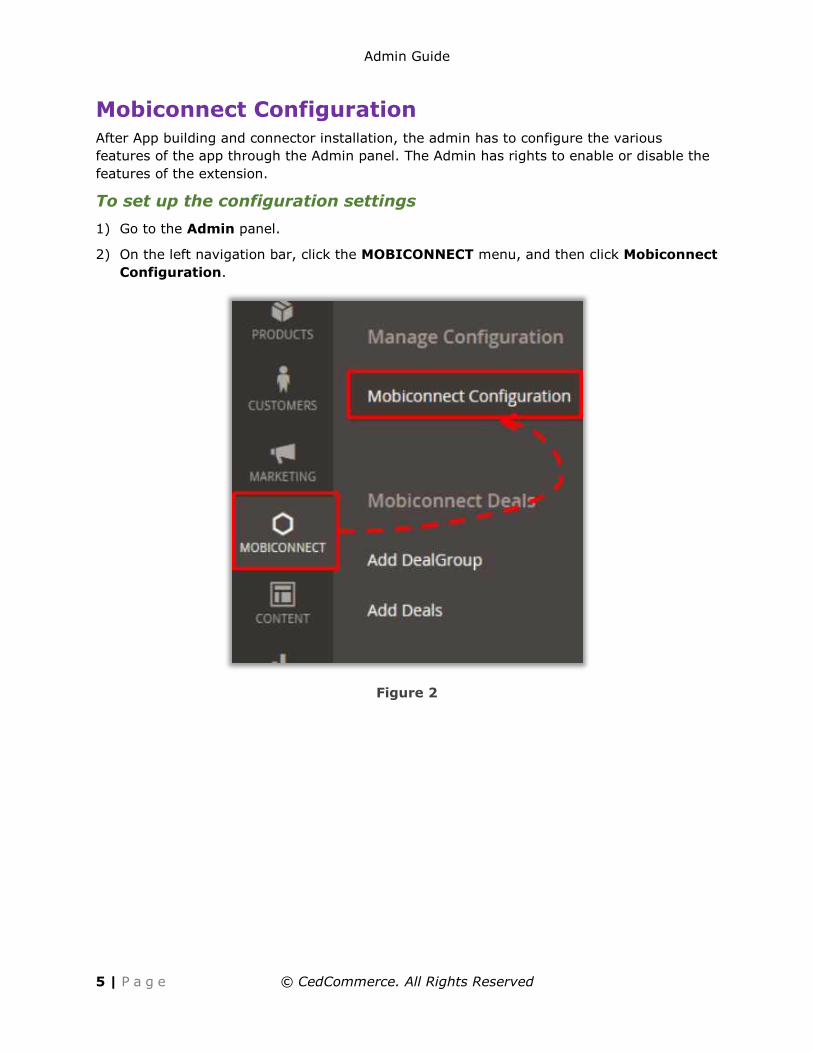
The MAGENATIVE menu in the left navigation panel appears as shown in the Figure 4.
Figure 4
Note : While setting the configuration, admin can click the Save Config button, to
save the settings at any point.
3) In the right panel, click the General tab.

Admin Guide
© CedCommerce. All Rights Reserved. 8 | P a g e
The General tab is expanded and the relevant fields appear as shown in the Figure 5.
Figure 5
4) Under General, do the following steps:
a) In the Enable list, do one of the following:
Select the corresponding Use System Value check box, to use the default value.
OR
Clear the Use System Value check box, and then enter the required value in the
Enable list.
Note : If the admin selects the No option, then the Mobiconnect module is
disabled.
b) In the Force Customer To Install Update list, do one of the following:
Select the corresponding Use System Value check box, to use the default value.
OR
Clear the Use System Value check box, and then enter the required value in the
Enable list.
Note : To make it mandatory for the front-end users to install the update, select
the Yes option.
c) In the Header Hash Key box, enter the secret key provided while app building
process.

Admin Guide
9 | P a g e © CedCommerce. All Rights Reserved
Note :Select the corresponding Use System Value check box, to use the default
value.
d) In the Current APP Version On Store box, enter a value.
Enter the app version on Play store or app store.
5) In the right panel, click the Banner Settings tab.
The Banner Settings tab is expanded and the relevant field appears as shown in the
Figure 6.
Figure 6
6) Under Banner Settings, in the Show Banner On Home Page list, do one of the
following:
Select the corresponding Use System Value check box, to use the default value.
OR
Clear the Use System Value check box, and then enter the required value in the
Enable list.
Note : If the admin selects the No option, then the Banner Settings feature is
disabled.
7) In the right panel, click the Homepage Products tab.
The Homepage Products tab is expanded and the relevant fields appear as shown in
the Figure 7.
Figure 7
8) Under Homepage Products, do the following steps:

Admin Guide
© CedCommerce. All Rights Reserved. 10 | P a g e
a) In the Enabled list, do one of the following:
Select the corresponding Use System Value check box, to use the default value.
OR
Clear the Use System Value check box, and then enter the required value in the
Enable list.
Note : If the admin selects the No option, then the Homepage Products
feature is disabled.
b) In the Select Category list, select the required option.
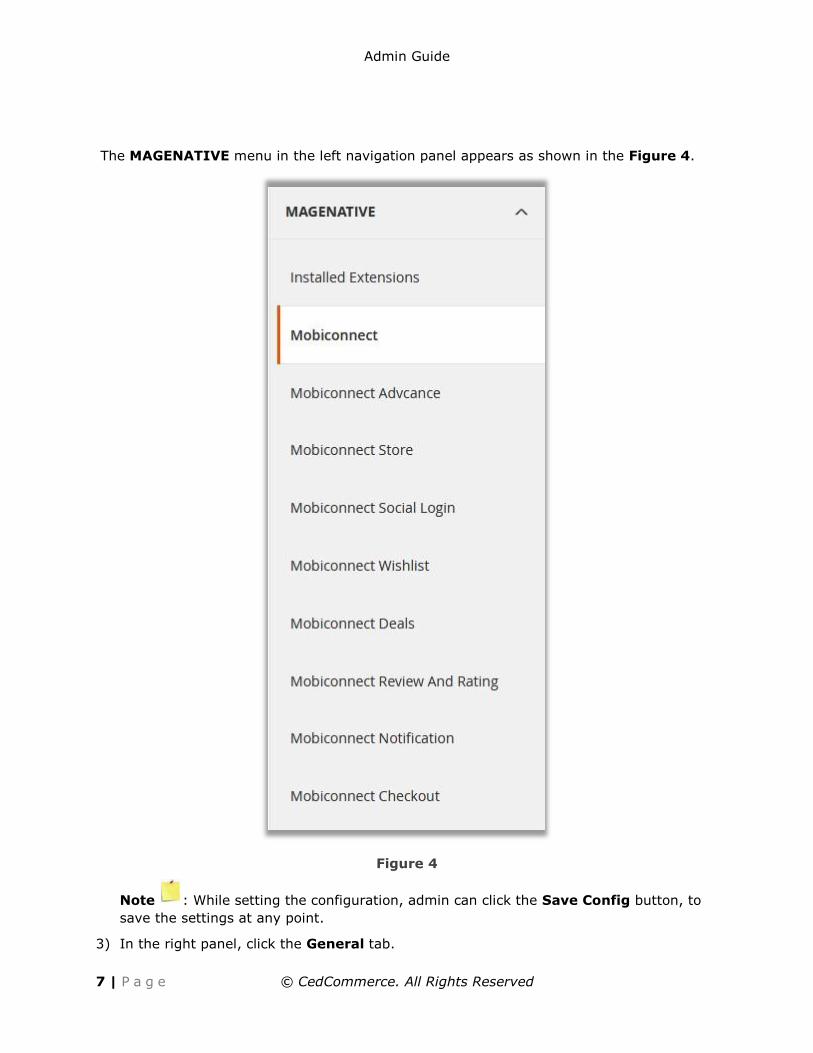
9) On the MAGENATIVE menu, click Installed Extensions.
In the right panel, under Installed Extensions, the corresponding fields appear as
shown in the Figure 8.
Admin Guide
11 | P a g e © CedCommerce. All Rights Reserved
Figure 8

Admin Guide
© CedCommerce. All Rights Reserved. 12 | P a g e
10) Enter the valid license numbers in the respective fields.
Note : The license numbers that have been automatically generated while
downloading the purchased extensions or package. If the license numbers are not
available, then get them from the Magenative.com website.
11) In the right panel, click the Notifications tab.
The tab is expanded and the corresponding field appears as shown in the Figure 9.
Figure 9
12) In the Select Notifications box, select the required notifications.
Tip :To select more than one notifications, select a single notification, then hold
down the CTRL key, and then click other required notifications.
13) On the MAGENATIVE menu, click Mobiconnect Advance.
In the right panel, the corresponding fields under the General tab appear as shown in
the Figure 10.

Admin Guide
13 | P a g e © CedCommerce. All Rights Reserved
Figure 10
14) Under General, do the following steps:
a) In the Enable Auto Complete Search list, select Yes.
Enables or disables the Auto Complete Search feature for the app.
b) In the Limit Auto Complete Suggestion Result box, enter the required value.
To mention the number of products that are allowed to display in the search result.
15) On the MAGENATIVE menu, click Mobiconnect Store.
In the right panel, the corresponding fields under the General tab appear as shown in the
Figure 11.
Figure 11
16) Under General, do the following steps:
a) In the Enable list, do one of the following:
Select the corresponding Use System Value check box, to use the default value.

Admin Guide
© CedCommerce. All Rights Reserved. 14 | P a g e
OR
Clear the Use System Value check box, and then enter the required value in the
Enable list.
Note : If the admin selects the No option, then the Mobiconnect Store feature
is disabled.
b) In the Select Store for App list, select the required value.
All Stores: The default value is All Stores. It means, all the stores are available
in the app.
Specific Stores: If the admin selects Specific Stores, then the Specific Stores
field is activated.
c) In the Specific Stores list, select the required stores.
Note : The default value is Default Store View.
17) On the MAGENATIVE menu, click Mobiconnect Social Login.
In the right panel, the corresponding field under the General tab appears as shown in
the Figure 12.
Figure 12
18) Under General, in the Enable list, do one of the following:
Select the corresponding Use System Value check box, to use the default value.
OR
Clear the Use System Value check box, and then enter the required value in the
Enable list.
Note : If the admin selects the No option, then the Mobiconnect Social Login
feature is disabled.
19) On the MAGENATIVE menu, click Mobiconnect Wishlist.
In the right panel, the corresponding field under the General tab appears as shown in
the Figure 13.

Admin Guide
15 | P a g e © CedCommerce. All Rights Reserved
Figure 13
20) Under General, in the Enable Mobiconnect Wishlist list, do one of the following:
Select the corresponding Use System Value check box, to use the default value.
OR
Clear the Use System Value check box, and then enter the required value in the
Enable Mobiconnect Wishlist list.
Note : If the admin selects the No option, then the Mobiconnect Wishlist
feature is disabled.
21) On the MAGENATIVE menu, click Mobiconnect Deals.
In the right panel, the corresponding field under the General tab appears as shown in
the Figure 14.
Figure 14
22) Under General, in the Enable list, do one of the following:
Select the corresponding Use System Value check box, to use the default value.
OR
Clear the Use System Value check box, and then enter the required value in the
Enable list.
Note : If the admin selects the No option, then the Mobiconnect Deals feature
is disabled.
23) On the MAGENATIVE menu, click Mobiconnect Review and Rating.
In the right panel, the corresponding field under the General tab appears as shown in
the Figure 15.

Admin Guide
© CedCommerce. All Rights Reserved. 16 | P a g e
Figure 15
24) Under General, in the Enable Review And Rating System list, do one of the following
steps:
Select the corresponding Use System Value check box, to use the default value.
OR
Clear the Use System Value check box, and then enter the required value in the
Enable Review And Rating System list.
Note : If the admin selects the No option, then the Mobiconnect Review And
Rating System feature is disabled.
25) On the MAGENATIVE menu, click Mobiconnect Notifications.
In the right panel, the corresponding field under the General tab appears as shown in the
Figure 16.
Figure 16
26) Under General, do the following steps:
a) In the Enable list, do one of the following steps:
Select the corresponding Use System Value check box, to use the default value.
OR
Clear the Use System Value check box, and then enter the required value in the
Enable list.
Note : If the admin selects the No option, then the Mobiconnect Notifications
feature is disabled.

Admin Guide
17 | P a g e © CedCommerce. All Rights Reserved
b) In the Google API Key box, enter a value.
Enter the registration key obtained from Google.
27) On the MAGENATIVE menu, click Mobiconnect Checkout.
In the right panel, the corresponding field under the General tab appears as shown in
the Figure 17.
Figure 17
28) Under General, in the Enable list, do one of the following steps:
Select the corresponding Use System Value check box, to use the default value.
OR
Clear the Use System Value check box, and then enter the required value in the
Enable list.
Note : If the admin selects the No option, then the Mobiconnect checkout
feature is disabled.
29) Click the Save Config button.
Manage Banner
Admin can upload the promotional banner for the app home page. Admin can perform the
following tasks:
Add Banner Image
Edit Banner Image
Delete Banner Image
To add banner image
1) Go to the Admin panel.
2) On the left navigation bar, click the Mobiconnect menu, and then click Manage
Banner.
The Manage Banner page appears as shown in the Figure 18.

Admin Guide
© CedCommerce. All Rights Reserved. 18 | P a g e
Figure 18
3) Click the Add Banner Image button.
The Upload New Banner page appears as shown in the Figure 19.
Figure 19

Admin Guide
19 | P a g e © CedCommerce. All Rights Reserved
4) In the Title box, enter the title for the banner.
5) In the Description box, enter the description of the banner.
6) Click the Enable icon to switch to the enable or disable mode.
Tips :
o : Resembles the Enable mode.
o : Resembles the Disable mode.
7) Click the Upload button, next to the Image field, to upload the banner image.
8) In the Choose Link Type list, select one of the following options:
Product in app: To redirect the user to the Products page available on the Front-
end view of the app.
Note : When the admin selects the Product in app option, then the Choose
Product field appears below the field.
o In the Choose Product list, select the product to redirect the user to the
selected product page.
Category in app: To redirect the user to the Category page available on the Front-
end view of the app.
Note : When the admin selects the Category in app option, then the Choose
Category field appears below the field.
o In the Choose Category list, select the category to redirect the user to the
selected category page.
Website Page: To redirect the user to the specific link provided.
Note : When the admin selects the Website Page option, then the Static Link
field appears below the field.
o In the Static Link box, enter the required link to redirect the user to that
particular page.
9) Click the Save button.
The new banner is added and the page view is moved to the Manage Banner page.
To edit the existing banner image
1) Go to the Admin panel.
2) On the left navigation bar, click the Mobiconnect menu, and then click Manage
Banner.
The Manage Banner page appears as shown in the Figure 20.

Admin Guide
© CedCommerce. All Rights Reserved. 20 | P a g e
Figure 20
3) In the Action column, click the Edit link associated with the banner image that the
admin wants to edit.
The banner page appears as shown in the Figure 21.
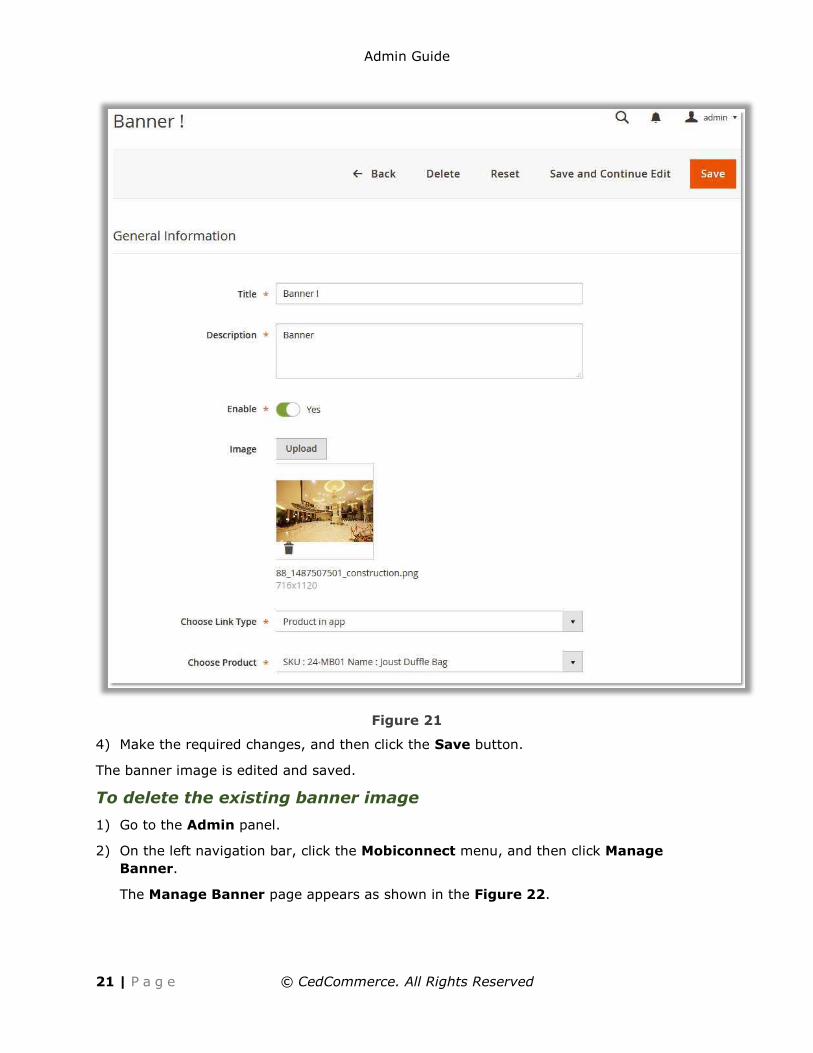
Admin Guide
21 | P a g e © CedCommerce. All Rights Reserved
Figure 21
4) Make the required changes, and then click the Save button.
The banner image is edited and saved.
To delete the existing banner image
1) Go to the Admin panel.
2) On the left navigation bar, click the Mobiconnect menu, and then click Manage
Banner.
The Manage Banner page appears as shown in the Figure 22.

Admin Guide
© CedCommerce. All Rights Reserved. 22 | P a g e
Figure 22
3) In the Action column, click the Edit link associated with the banner image that the
admin wants to delete.
The banner page appears.
4) Click the Delete button.
A confirmation dialog box appears as shown in the Figure 23.
Figure 23
5) Click the OK button.
The banner image is deleted.
Import or Export EAN
EAN (European Article Number) is a numeric only barcode system used in global trade. It is
used to identify a specific retail product type, in a specific packaging configuration, from a
specific manufacturer. EAN barcodes can also be used as numbers for wholesale order or
account maintenance.
With the Barcode Scanner the front-end user can capture image of a barcode of the
required product. The Barcode reader then uses the advanced digital image processing
techniques to decode the EAN barcode, which is then converted into the matching numbers.
Admin Guide
23 | P a g e © CedCommerce. All Rights Reserved
The admin can maintain the records of EAN barcodes provided with the corresponding
product, to facilitate the users to search their product by using the required barcodes.
The Admin can perform the following tasks:
Import EAN
Export EAN
To Import or Export EAN
1) Go to the Admin panel.
2) On the left navigation bar, click the Mobiconnect menu, and then click Import/Export
EAN.
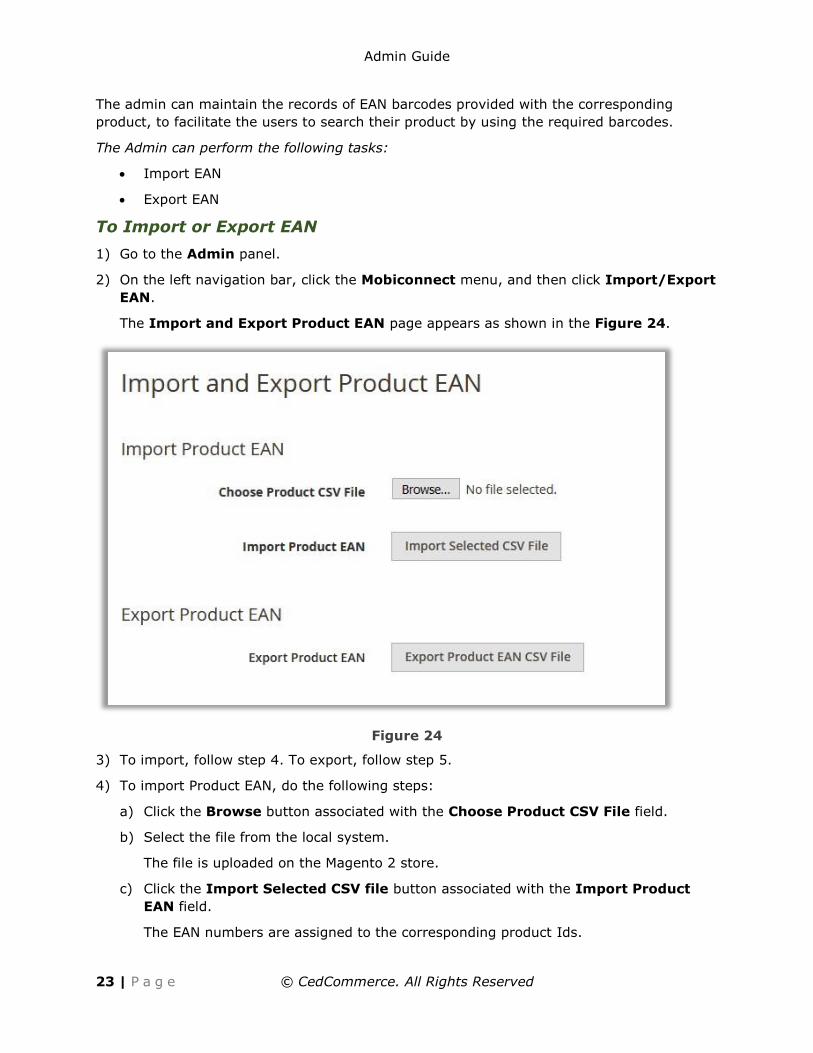
The Import and Export Product EAN page appears as shown in the Figure 24.
Figure 24
3) To import, follow step 4. To export, follow step 5.
4) To import Product EAN, do the following steps:
a) Click the Browse button associated with the Choose Product CSV File field.
b) Select the file from the local system.
The file is uploaded on the Magento 2 store.
c) Click the Import Selected CSV file button associated with the Import Product
EAN field.
The EAN numbers are assigned to the corresponding product Ids.

Admin Guide
© CedCommerce. All Rights Reserved. 24 | P a g e
Figure 25
5) To export Product EAN, do the following steps:
a) Click the Export Product EAN CSV file button associated with the Export Product
EAN field.
A dialog box appears as shown in the Figure 26.
Figure 26
b) Click Save File, and then click the OK button.
The CSV file is save on the local system.
Manage Home Page Banner Widget
The admin can assign the available banner images to the Banner widget while creation of
the widget. Only the assigned banner images are displayed on the app home page. If the
admin creates the multiple widgets, then the widget with highest priority is displayed on the
Admin Guide
25 | P a g e © CedCommerce. All Rights Reserved
home page. If two or more widgets have the same priority, then all of them are displayed
on the home page.
Admin can perform the following tasks:
Add Banner Widget
Edit Banner Widget
Delete Banner Widget
To add a banner widget
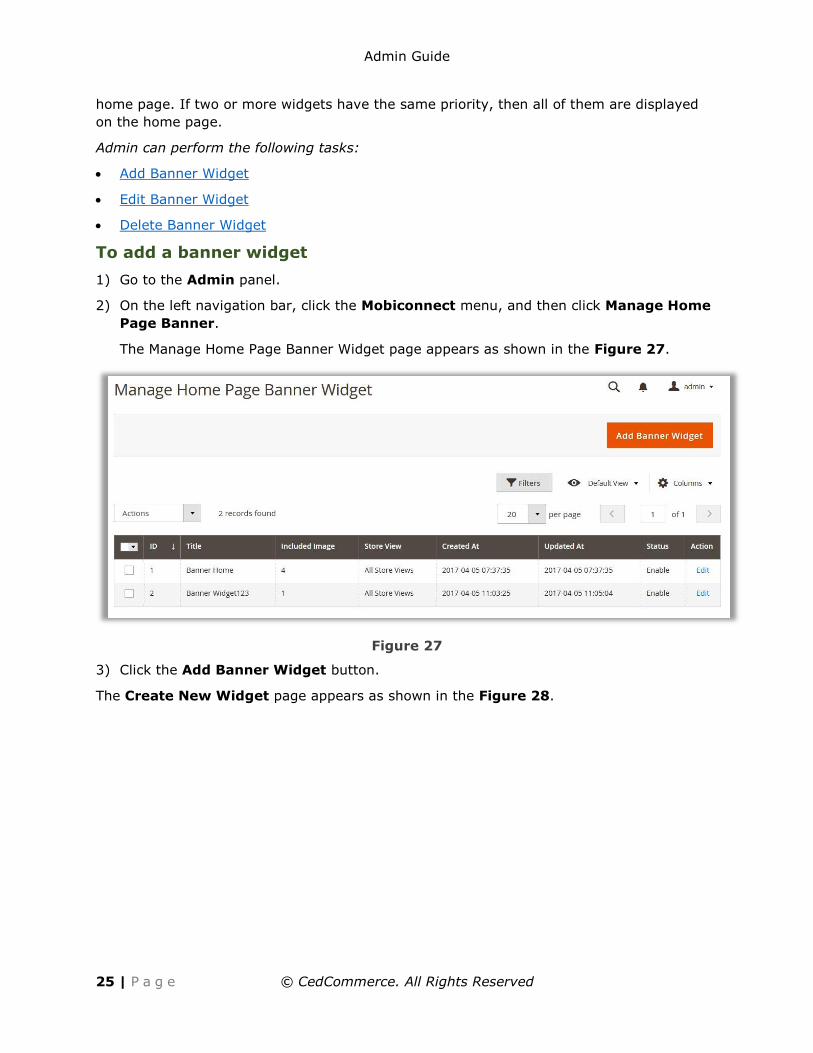
1) Go to the Admin panel.
2) On the left navigation bar, click the Mobiconnect menu, and then click Manage Home
Page Banner.
The Manage Home Page Banner Widget page appears as shown in the Figure 27.
Figure 27
3) Click the Add Banner Widget button.
The Create New Widget page appears as shown in the Figure 28.

Admin Guide
© CedCommerce. All Rights Reserved. 26 | P a g e
Figure 28
4) Under General Information, do the following steps:
a) In the Widget Title box, enter the title of the widget.
b) In the Store View list, select the required website.
c) In the Priority box, enter a numeric value.
Note : A higher number has a higher priority.
d) Click the Enable icon to switch to the enable or disable mode.
Tips :
o : Resembles the Enable mode.
o : Resembles the Disable mode.
5) Click the Assign Banner Images tab.
The tab is expanded and appears as shown in the Figure 29.

Admin Guide
27 | P a g e © CedCommerce. All Rights Reserved
Figure 29
6) Select the check boxes associated with the required banners.
7) Click the Save button.
To edit the existing banner widget
1) Go to the Admin panel.
2) On the left navigation bar, click the Mobiconnect menu, and then click Manage Home
Page Banner.
The Manage Home Page Banner Widget page appears as shown in the Figure 30.
Figure 30
Admin Guide
© CedCommerce. All Rights Reserved. 28 | P a g e
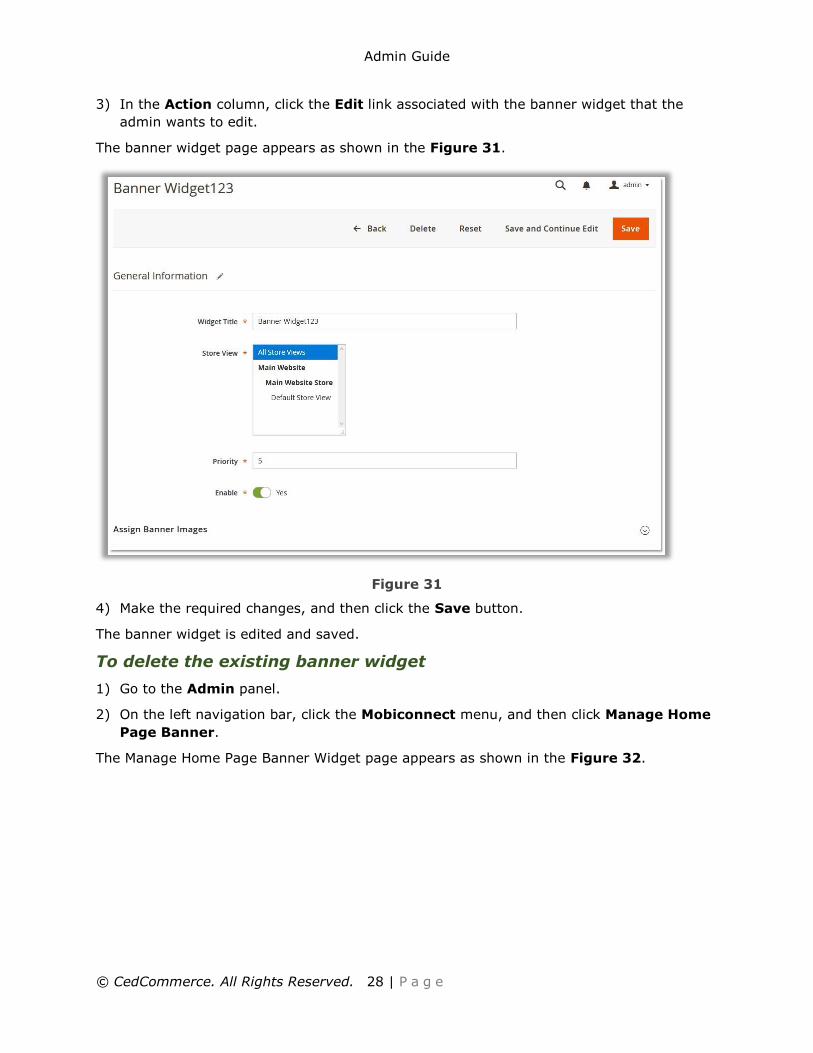
3) In the Action column, click the Edit link associated with the banner widget that the
admin wants to edit.
The banner widget page appears as shown in the Figure 31.
Figure 31
4) Make the required changes, and then click the Save button.
The banner widget is edited and saved.
To delete the existing banner widget
1) Go to the Admin panel.
2) On the left navigation bar, click the Mobiconnect menu, and then click Manage Home
Page Banner.
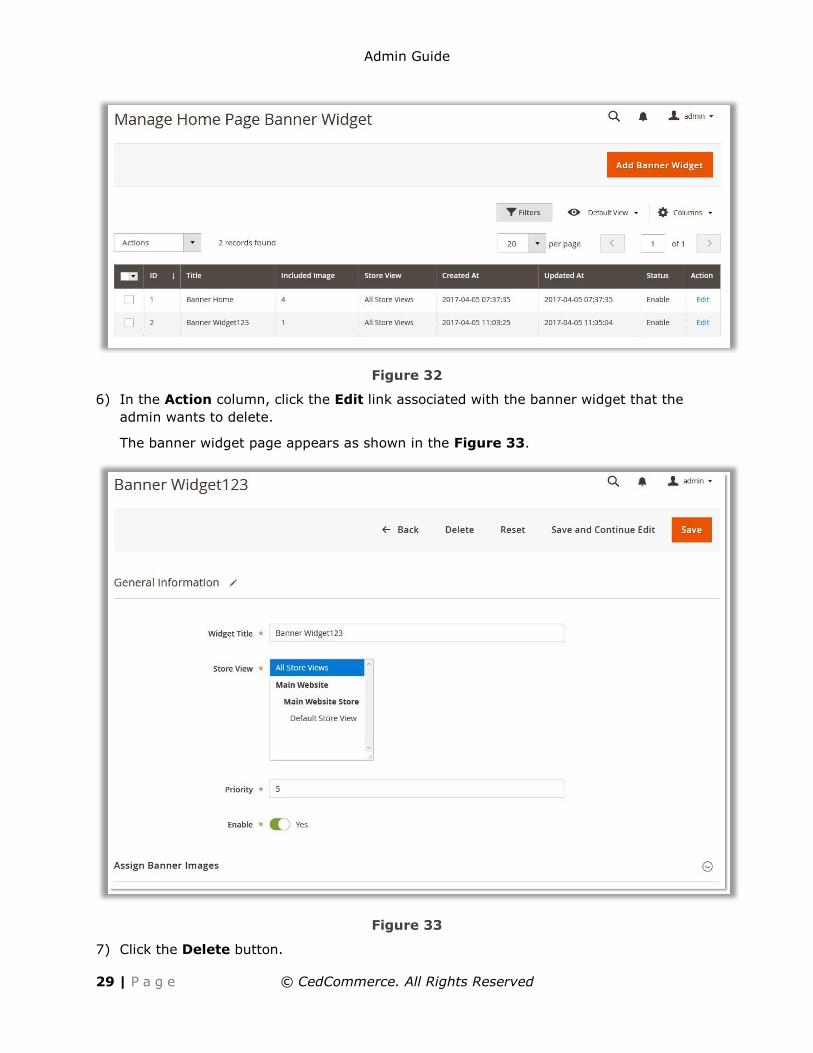
The Manage Home Page Banner Widget page appears as shown in the Figure 32.
Admin Guide
29 | P a g e © CedCommerce. All Rights Reserved
Figure 32
6) In the Action column, click the Edit link associated with the banner widget that the
admin wants to delete.
The banner widget page appears as shown in the Figure 33.
Figure 33
7) Click the Delete button.
Admin Guide
© CedCommerce. All Rights Reserved. 30 | P a g e
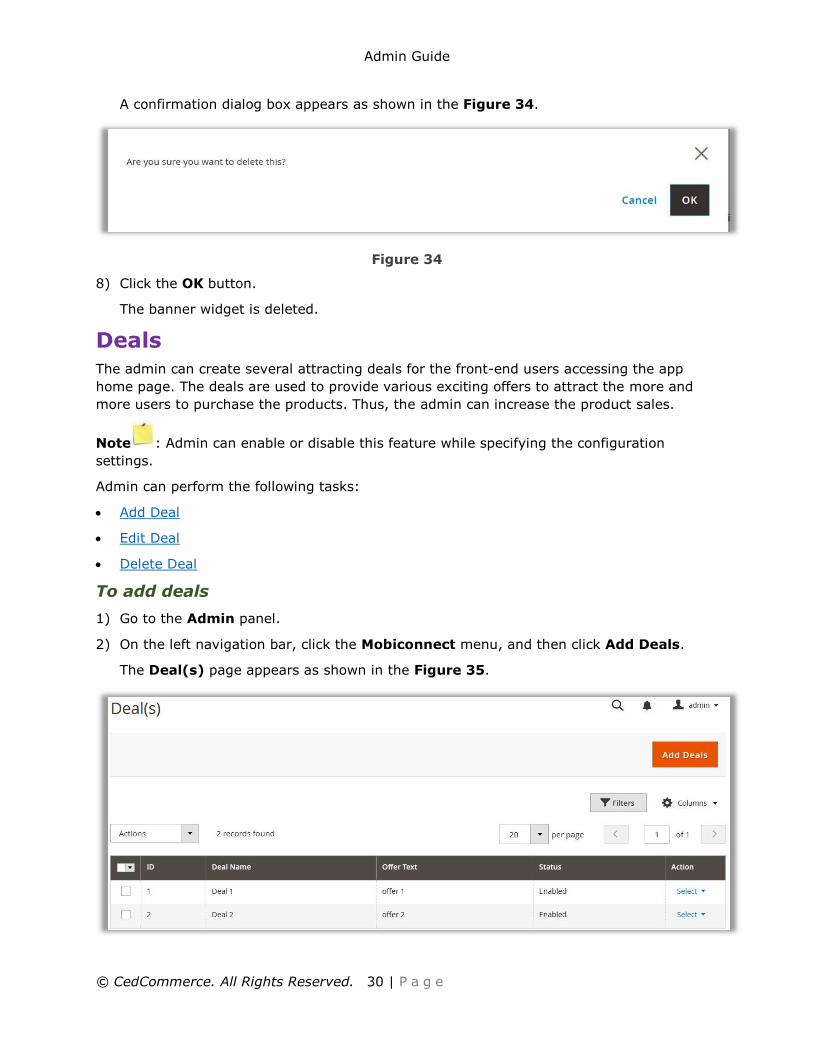
A confirmation dialog box appears as shown in the Figure 34.
Figure 34
8) Click the OK button.
The banner widget is deleted.
Deals
The admin can create several attracting deals for the front-end users accessing the app
home page. The deals are used to provide various exciting offers to attract the more and
more users to purchase the products. Thus, the admin can increase the product sales.
Note : Admin can enable or disable this feature while specifying the configuration
settings.
Admin can perform the following tasks:
Add Deal
Edit Deal
Delete Deal
To add deals
1) Go to the Admin panel.
2) On the left navigation bar, click the Mobiconnect menu, and then click Add Deals.
The Deal(s) page appears as shown in the Figure 35.
Admin Guide
31 | P a g e © CedCommerce. All Rights Reserved
Figure 35
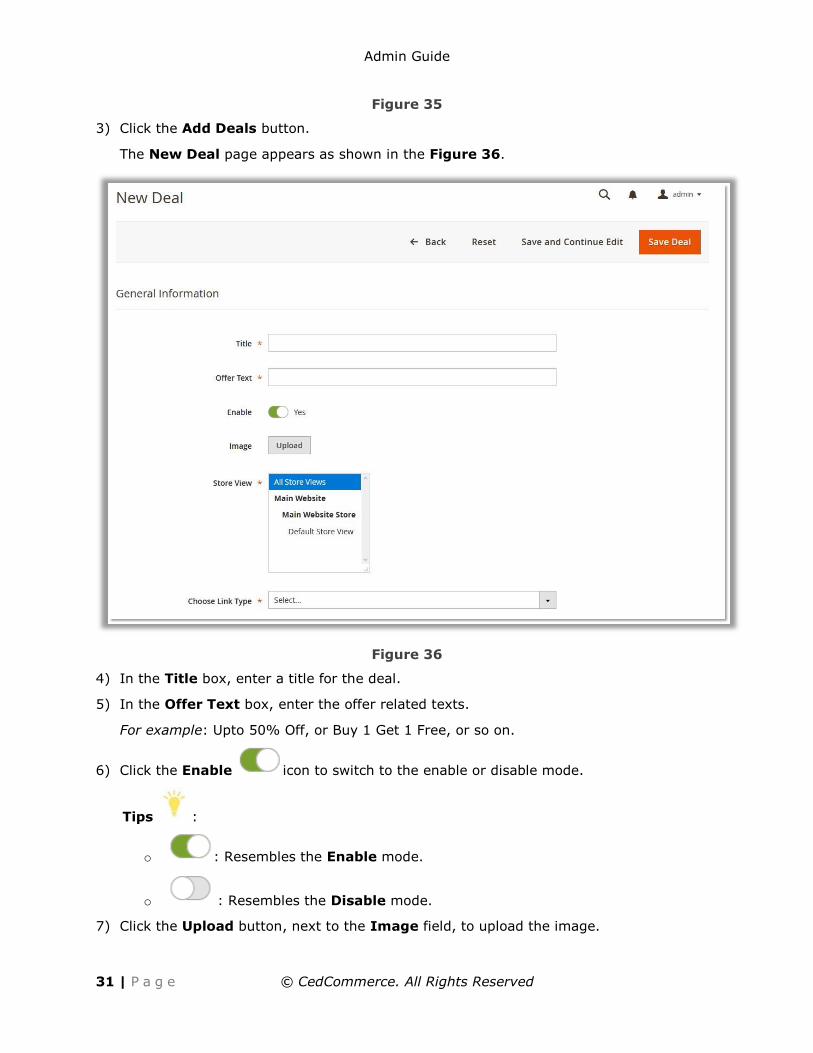
3) Click the Add Deals button.
The New Deal page appears as shown in the Figure 36.
Figure 36
4) In the Title box, enter a title for the deal.
5) In the Offer Text box, enter the offer related texts.
For example: Upto 50% Off, or Buy 1 Get 1 Free, or so on.
6) Click the Enable icon to switch to the enable or disable mode.
Tips :
o : Resembles the Enable mode.
o : Resembles the Disable mode.
7) Click the Upload button, next to the Image field, to upload the image.

Admin Guide
© CedCommerce. All Rights Reserved. 32 | P a g e
The image relevant to the deal.
8) In the Store View list, select the required website.
10) In the Choose Link Type list, select one of the following options:
Product in app: To redirect the user to the Products page available on the Front-
end view of the app.
Note : When the admin selects the Product in app option, then the Choose
Product field appears below the field.
o In the Choose Product list, select the specific product to redirect the user to
the selected product page.
Category in app: To redirect the user to the Category page available on the Front-
end view of the app.
Note : When the admin selects the Category in app option, then the Choose
Category field appears below the field.
o In the Choose Category list, select the category to redirect the user to the
selected category page.
Static Link: To redirect the user to the specific link provided.
Note : When the admin selects the Static Link option, then the Static Link field
appears below the field.
o In the Static Link box, enter the required link to redirect the user to that
particular page.
9) Click the Save Deal button.
The new deal is saved and the New Deal page is closed.
To edit the existing deal
1) Go to the Admin panel.
2) On the left navigation bar, click the Mobiconnect menu, and then click Add Deals.
The Deal(s) page appears as shown in the Figure 37.

Admin Guide
33 | P a g e © CedCommerce. All Rights Reserved
Figure 37
3) In the Actions column, click the arrow next to the Select link associated with the
required deal, and then click Edit.
The selected deal page appears for editing.
4) Make the required changes, and then click the Save Deal button.
The changes made in the selected deal are saved and the page is closed.
To delete the existing deal
1) Go to the Admin panel.
2) On the left navigation bar, click the Mobiconnect menu, and then click Add Deals.
The Deal(s) page appears as shown in the Figure 38.
Figure 38
3) In the Actions column, click the arrow next to the Select link associated with the
required deal, and then click Delete.

Admin Guide
© CedCommerce. All Rights Reserved. 34 | P a g e
A confirmation dialog box appears.
4) Click the OK Deal button.
The selected deal is deleted and a success message appears.
Note : Admin can also delete the selected deal from the editing page.
Deal Groups
After creating the various deals, the admin can assign all the deals to the different deal
groups.
Note : Until and unless the deal is assigned to any deal group, it is not available on the
app home page.
Admin can perform the following tasks:
Add Deal Groups
Edit Deal Groups
Delete Deal Groups
To add deal groups
1) Go to the Admin panel.
2) On the left navigation bar, click the Mobiconnect menu, and then click Add
DealGroup.
The Deal Group(s)page appears as shown in the Figure 39.
Figure 39
3) Click the Add Group button.
The New Group page appears as shown in the Figure 40.

Admin Guide
35 | P a g e © CedCommerce. All Rights Reserved
Figure 40
4) In the Title box, enter the title for the deal group.
5) Click the Enable icon to switch to the enable or disable mode.
Tips :
o : Resembles the Enable mode.
o : Resembles the Disable mode.
6) Click the Show Timer icon to switch to the enable or disable mode.
7) Click the Is Static icon to switch to the enable or disable mode.
Admin Guide
© CedCommerce. All Rights Reserved. 36 | P a g e
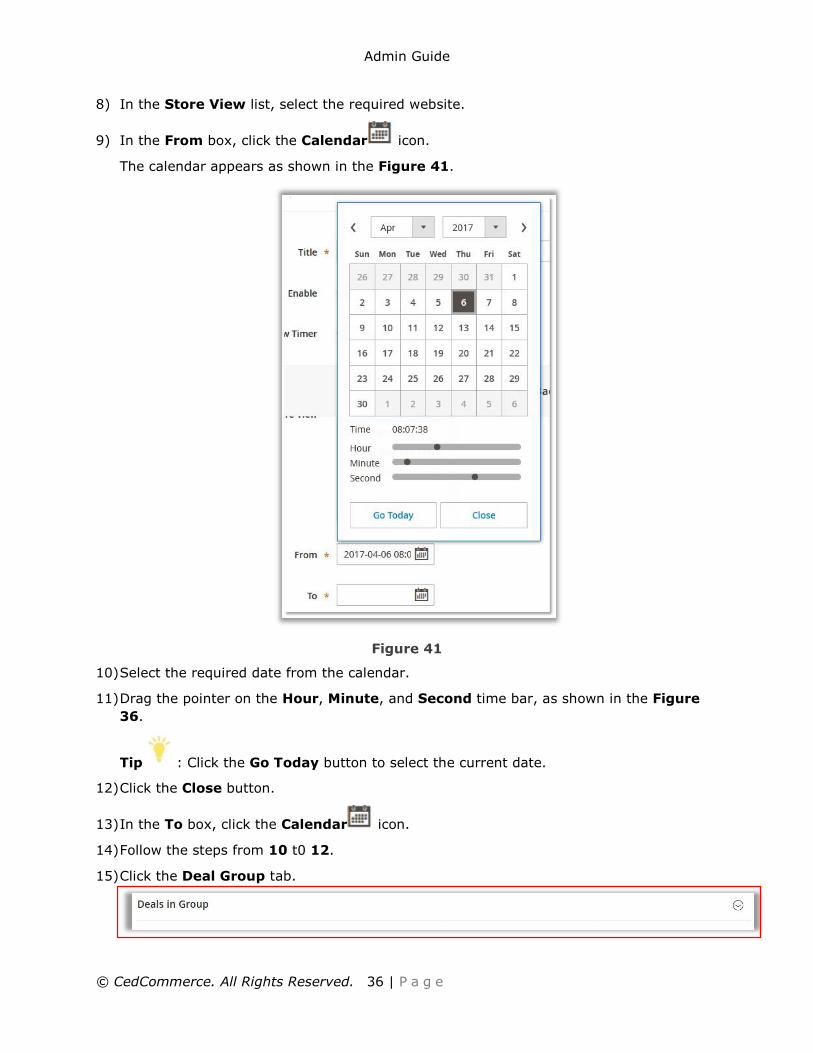
8) In the Store View list, select the required website.
9) In the From box, click the Calendar icon.
The calendar appears as shown in the Figure 41.
Figure 41
10) Select the required date from the calendar.
11) Drag the pointer on the Hour, Minute, and Second time bar, as shown in the Figure
36.
Tip : Click the Go Today button to select the current date.
12) Click the Close button.
13) In the To box, click the Calendar icon.
14) Follow the steps from 10 t0 12.
15) Click the Deal Group tab.

Admin Guide
37 | P a g e © CedCommerce. All Rights Reserved
The tab is expanded, and the available Deals are listed in the tabular format as shown in
the Figure 42.
Figure 42
16) Select the Check Box associated with the deal that the admin wants to assign to the
Deal Group.
17) Click the Save Group button.
To edit the existing deal group
1) Go to the Admin panel.
2) On the left navigation bar, click the Mobiconnect menu, and then click Add
DealGroup.
The Deal Group(s)page appears as shown in the Figure 43.
Figure 43
3) In the Actions column, click the arrow next to the Select link associated with the
required deal group, and then click Edit.

Admin Guide
© CedCommerce. All Rights Reserved. 38 | P a g e
The selected deal group page appears for editing.
4) Make the required changes, and then click the Save Group button.
The changes made in the selected deal group are saved and the view moves to the Deal
Group(s) page.
To delete the existing deal group
1) Go to the Admin panel.
2) On the left navigation bar, click the Mobiconnect menu, and then click Add
DealGroup.
The Deal Group(s)page appears as shown in the Figure 44.
Figure 44
3) In the Actions column, click the arrow next to the Select link associated with the
required deal group, and then click Delete.
A Confirmation dialog box appears.
4) Click the OK button.
The deal group is deleted and a success message appears.
Note : Admin can also delete the selected deal group from the editing page.
Notifications
The admin can do the following tasks:
Add New Notifications
Edit Existing Notifications
Send Selected Notifications
Delete Selected Notifications

Admin Guide
39 | P a g e © CedCommerce. All Rights Reserved
To add a new notification
1) Go to the Admin panel.
2) On the left navigation bar, click the Mobiconnect menu, and then click Add
Notifications.
The Notifications Listing page appears as shown in the following figure:
Figure 45
3) In the right-upper corner, click the Add Notification button.
The New Notification page appears as shown in the Figure 46.
Figure 46

Admin Guide
© CedCommerce. All Rights Reserved. 40 | P a g e
4) In the Title box, enter a title for the notification.
5) In the Store View list, select the required website.
6) In the Message box, enter the notification message.
7) Click the Enable icon to switch to the enable or disable mode.
Tips :
o : Resembles the Enable mode.
o : Resembles the Disable mode.
8) Click the Upload button, next to the Image field, to upload the relevant image.
9) In the Choose Link Type list, select one of the following options:
Product in app: To redirect the user to the Products page available on the Front-
end view of the app.
Note : When the admin selects the Product in app option, then the Choose
Product field appears below the field.
o In the Choose Product list, select the specific product to redirect the user to
the selected product page.
Category in app: To redirect the user to the Category page available on the Front-
end view of the app.
Note : When the admin selects the Category in app option, then the Choose
Category field appears below the field.
o In the Choose Category list, select the category to redirect the user to the
selected category page.
Static Link: To redirect the user to the specific link provided.
Note : When the admin selects the Static Link option, then the Static Link field
appears below the field.
o In the Static Link box, enter the required link to redirect the user to that
particular page.
10) Click the Save Notification button.
The new notification is saved and appears on the Notification Listing page.
To edit the existing notification
1) Go to the Admin panel.
2) On the left navigation bar, click the Mobiconnect menu, and then click Add
Notifications.
Admin Guide
41 | P a g e © CedCommerce. All Rights Reserved
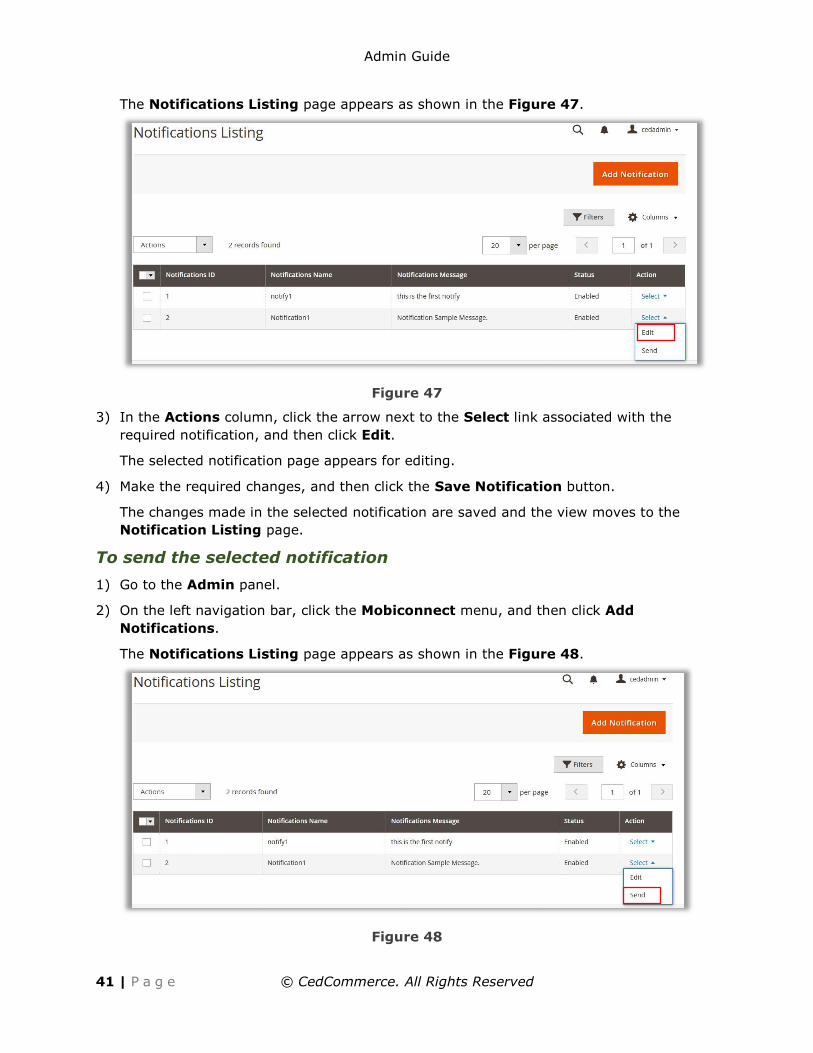
The Notifications Listing page appears as shown in the Figure 47.
Figure 47
3) In the Actions column, click the arrow next to the Select link associated with the
required notification, and then click Edit.
The selected notification page appears for editing.
4) Make the required changes, and then click the Save Notification button.
The changes made in the selected notification are saved and the view moves to the
Notification Listing page.
To send the selected notification
1) Go to the Admin panel.
2) On the left navigation bar, click the Mobiconnect menu, and then click Add
Notifications.
The Notifications Listing page appears as shown in the Figure 48.
Figure 48

Admin Guide
© CedCommerce. All Rights Reserved. 42 | P a g e
3) In the Actions column, click the arrow next to the Select link associated with the
required notification, and then click Send.
Or
On the selected notification editing page, click the Send button.
The Device Listing page appears as shown in the Figure 49.
Figure 49
4) In the Actions column, click the arrow next to the Select link associated with the
required deal, and then click Send.
The selected notification is sent to the selected device, and a success message appears
on the Device Listing page.
To delete the selected notification
1) Go to the Admin panel.
2) On the left navigation bar, click the Mobiconnect menu, and then click Add
Notifications.
The Notifications Listing page appears as shown in the Figure 50.

Admin Guide
43 | P a g e © CedCommerce. All Rights Reserved
Figure 50
3) Click to select the required check box associated with the corresponding notification.
4) In the Actions list, select Delete.
A Confirmation dialog box appears.
5) Click the OK button.
The notification is deleted and a success message appears.
Note : Admin can also delete the selected deal group from the editing page.
Delete Device ID From the Device Listing Page
Admin can delete the device Id, which is not required, from the Device Listing Page.
To delete the device Id
1) Go to the Admin panel.
2) On the left navigation bar, click the Mobiconnect menu, and then click Send
Notifications.
The Device Listing page appears.
3) Follow one of the following steps:
In the Action column, click the arrow next to the Select link associated with the
required deal, and then click Delete.
OR
Click to select the required check box associated with the corresponding device Id,
and then in the Actions list, select Delete.
A Confirmation dialog box appears.
Admin Guide
© CedCommerce. All Rights Reserved. 44 | P a g e
4) Click the OK button.
The notification is deleted and a success message appears.
Enable or Disable
Admin can enable or disable the following options from the respective pages:
Banners
Home Page Banners
Deal Groups
Deals
Notifications
Note : This Guide covers the procedure of enabling or disabling the selected notification.
Similarly, the admin can enable or disable the other listed options from the respective
pages.
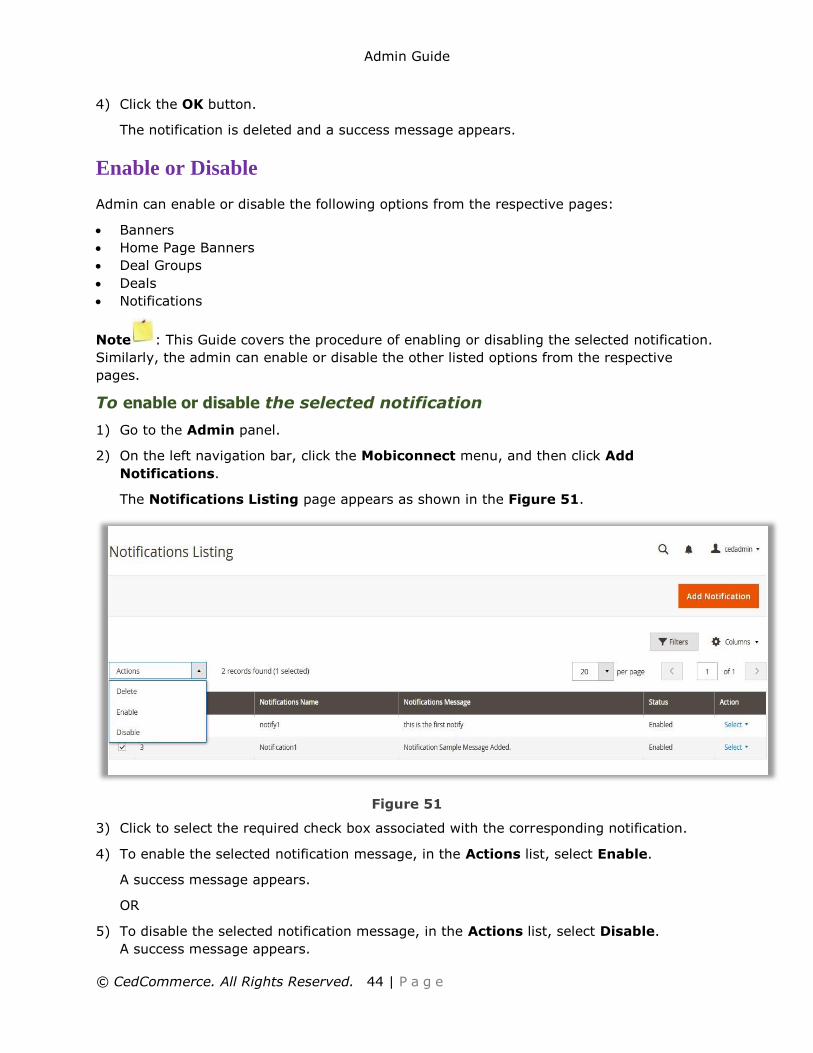
To enable or disable the selected notification
1) Go to the Admin panel.
2) On the left navigation bar, click the Mobiconnect menu, and then click Add
Notifications.
The Notifications Listing page appears as shown in the Figure 51.
Figure 51
3) Click to select the required check box associated with the corresponding notification.
4) To enable the selected notification message, in the Actions list, select Enable.
A success message appears.
OR
5) To disable the selected notification message, in the Actions list, select Disable.
A success message appears.