Embed Size (px)
Citation preview

8/13/2019 Lashings Skills
http://slidepdf.com/reader/full/lashings-skills 1/11
Lashing
Square | Diagonal | Tripod | Japanese Square | Filipino Diagonal | Round | Shear | Ladder
Square Lashing - Step by Step
• Used to fasten two spars or poles together.
• Start by rossing the two sti!s or dowels at perpendiular or "# degree angles.
• $a!e a %lo&e 'ith on the &ertial sti! or dowel near the point where the twosti!s ross. This fastens the rope to the sti!.
• (ea&e the rope under and o&er the rossed sti!s alternately.• To do this) run the rope o&er the hori*ontal bar) around behind the &ertial bar)
then ba! o&er the fae of the hori*ontal bar on the left.
Basics Info Advancement Badges Methods Knots Skills History Media Games Search

8/13/2019 Lashings Skills
http://slidepdf.com/reader/full/lashings-skills 2/11
• Tighten snugly) then bring the rope behind the &ertial bar and up the right frontside of the hori*ontal bar.
• Repeat this three or four ti+es) !eeping the rope tight.
• (hen you ha&e finished wea&ing the lashing) then ,FR, it by wrapping therope between the poles /in front of the ba! sti! and in ba! of the front sti!0)
pulling tightly. This tightens the onneted poles.• Finish your lashing with another %lo&e 'ith.
- Top -
Diagonal Lashing - Step 1y Step
Step 2 Step 3 Step 4
Step 5 Step 6 Step 7
Step 8 Step 9 Step "

8/13/2019 Lashings Skills
http://slidepdf.com/reader/full/lashings-skills 3/11
Step 2#
Use
Diagonal lashing is used to bind poles together that ross eah other but do not touhwhen their ends are lashed in plae in a struture.
%o++ents
The diagonal lashing gets its na+e fro+ the fat that the wrapping turns ross the polesdiagonally. The diagonal lashing an be used to bind poles that ross eah other fro+ "#:to 56:. ;f the angle between the poles is less than 56: a shear lashing should be used. Thediagonal lashing +a!es use of the ti+ber hith to pull poles together that are not touhingeah other. The ti+ber hith allows the poles to be drawn together without hanging therelati&e positions of the poles. <=>T?@ ;f a square lashing were used to bind poles that donot touh) the beginning lo&e hith would pull the ross pole toward the lo&e hithausing unneessary bowing of the ross pole and ould also produe a fore that wouldat along the length of the pole to whih the lo&e hith is tied. These additional fores) if strong enough) an plae unneessary strain on other lashing within the struture ausingthe struture to twist and fail.
=arration
2. Tie a ti+ber hith diagonally around both poles.3. Start the wrapping turns on the opposite diagonal to the ti+ber hith) by pulling
the rope tight so that the poles ontat eah other.4. Ta!e 4 to 5 wrapping turnsA !eep the wrapping turns parallelA pull eah wrapping
turn tight. <=>T?@ ;f the wrapping turns are allowed to ross) the inreasedfrition between the strands of the rope will +a!e it diffiult to tighten thewrapping turns.
5. Start the seond set of wrapping turns by going past and around the &ertial pole.=>T?@ Boing around the pole the rope allows the diretion of the rope to be
hanged without rossing the first set of wrapping diagonally.6. Ta!e 4 to 5 wrapping turnsA be sure to !eep the wrapping turns parallelA pull eahwrapping turn tight.
7. Start the frapping turns by going past and around one of the poles. <=>T?@ Boingaround the pole with the rope allows the diretion of the rope to be hangedwithout rossing the wrapping turns diagonally.
8. Ta!e 3 to 4 frapping turnsA !eep the frapping turns parallel. 1e sure to pull eahturn tight.

8/13/2019 Lashings Skills
http://slidepdf.com/reader/full/lashings-skills 4/11
9. ?nd the lashing with a lo&e hith. Ta!e the first half hith of the lo&e hith bygoing past and then around one of the poles. Lo! the half hith tight against thelashing by wor!ing it tight.
". Ta!e a seond half hith around the pole.2#.(or! the seond half hith tight against the first half hith so that the lo&e hith
is lo!ed against the lashing.;f &ery s+ooth rope is used) the lashing an be +ade +ore seure by adding a third or forth half hith to the lo&e hith.
- Top -
Tripod Lashing - Step 1y Step
Step 2 Step 3 Step 4
Step 5 Step 6 Step 7
Step 8 Step 9 Step "
Step 2# Step 22 Step 23
Desription
shear lashing around 4 poles.
Use
To bind three poles together) for the onstrution of a tripod. To bind three poles together that ontat at the sa+e point in a struture.

8/13/2019 Lashings Skills
http://slidepdf.com/reader/full/lashings-skills 5/11
%o++ents
The tripod lashing is a shear lashing that binds three poles together at the sa+e point. Thetripod lashing gets it na+e fro+ the fat that its +ost o++on use is the onstrution of atripod. The tripod lashing an be used Cust about any where in a struture that three polesross eah other at the sa+e point and the sa+e ti+e in the sequene of onstrution.
Tripod lashing ta!es two +ain for+sA with ra!ed wrapping turns /the rope is wo&en between the poles0 and with plain wrapping turns /the rope is wrapped around the poleswithout wea&ing the rope between the poles0. (hen the lashing is +ade with ra!ingturns the rope ontats eah pole around its entire iru+ferene A this ontat +a!es thetripod lashing with ra!ing turns the +ost seure for+ of tripod lashing therefore tripodlashing with ra!ing turns should be used when safety is i+portant. 'owe&er) for lightstrutures where there would be no danger if the lashing slipped) the faster to tie tripodlashing with plain wrapping turns +ay be used
Laying >ut The oles
For +ost tripod lashings) laythe pole side by side with the butt ends aligned. The align+ent of the butts of the poleinsures that the tripod legs are the desired length
=oteThe pratie of laying the enter pole in the opposite diretion to the outside poles reatesse&eral proble+s. (hen the poles are laid in opposite diretions the wrappings +ust be put on loosely so that when the enter pole is rotated to its proper position the lashing istightened around the poles. ;f the wrappings are put on too tight) the rope is strethedausing da+age to the rope fibers) therefore wea!ening the lashing. >n the other hand) if the rope is wrapped two loosely) the lashing will not tighten enough when the enter poleis rotated and the lashing will be able to slip along the length of the pole. ?ither way) therope to loose or the rope too tight) a dangerous situation is reated.
8/13/2019 Lashings Skills
http://slidepdf.com/reader/full/lashings-skills 6/11
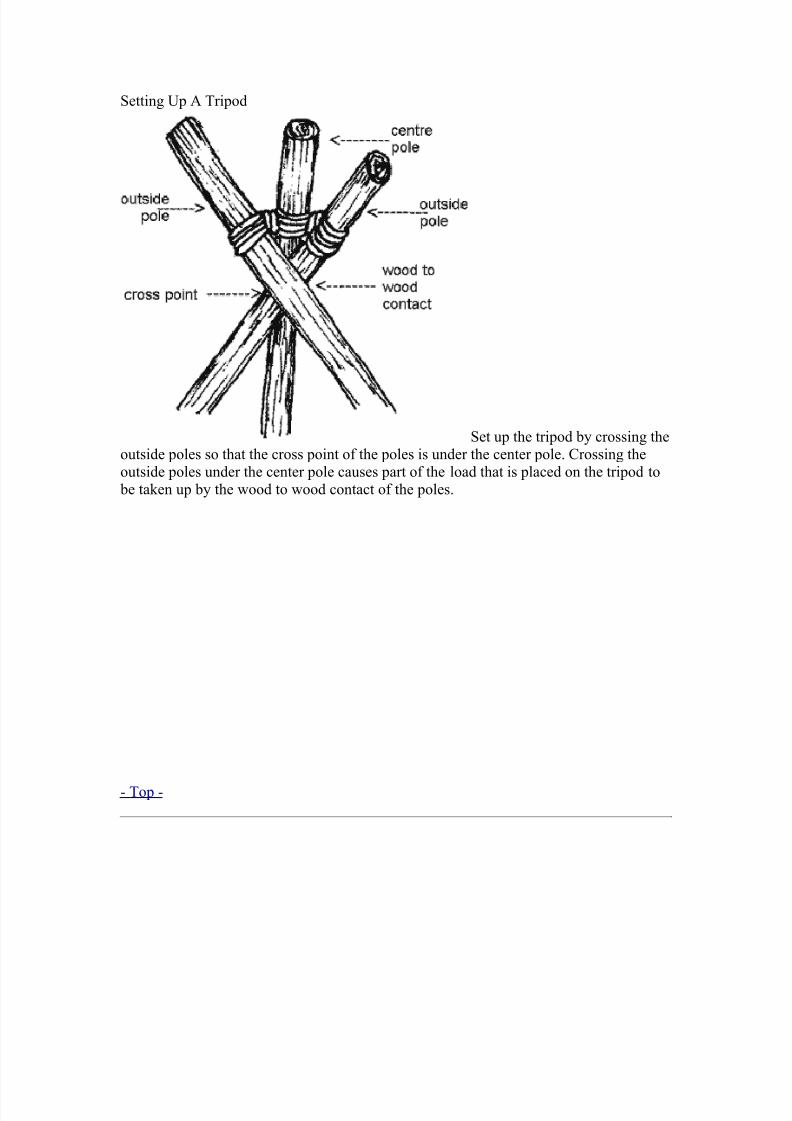
Setting Up Tripod
Set up the tripod by rossing theoutside poles so that the ross point of the poles is under the enter pole. %rossing theoutside poles under the enter pole auses part of the load that is plaed on the tripod to be ta!en up by the wood to wood ontat of the poles.
- Top -
8/13/2019 Lashings Skills
http://slidepdf.com/reader/full/lashings-skills 7/11
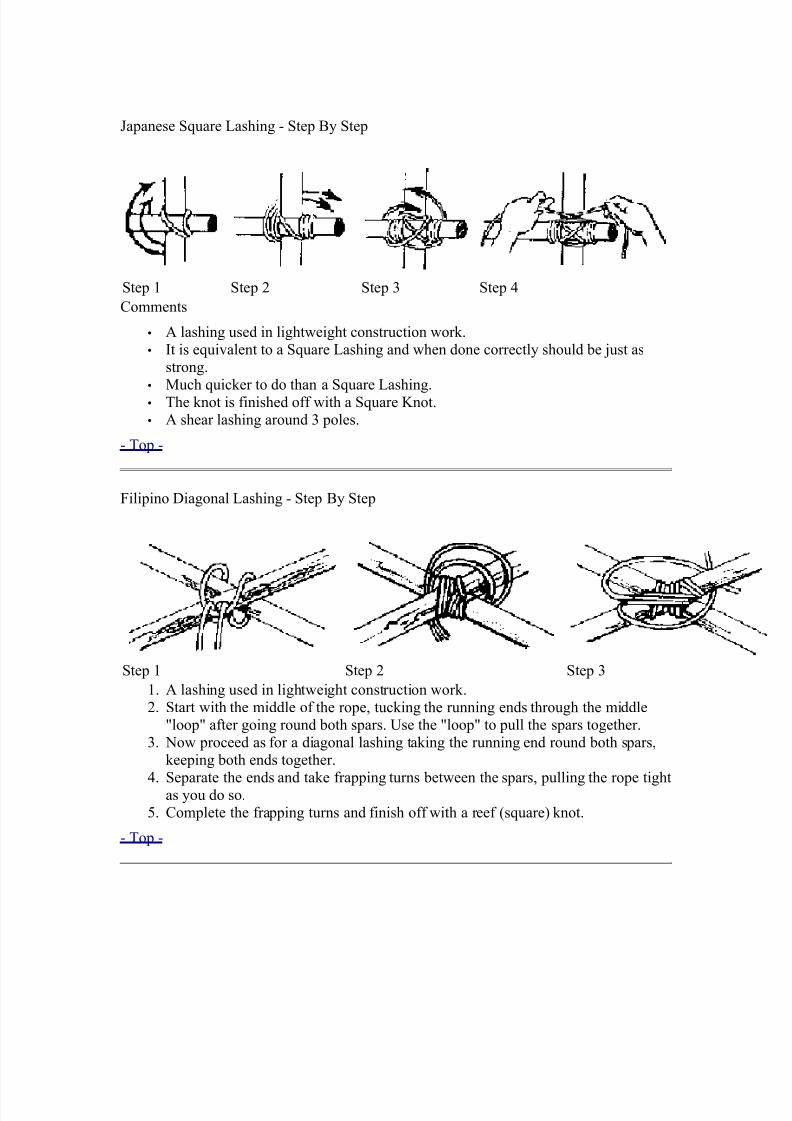
Japanese Square Lashing - Step 1y Step
Step 2 Step 3 Step 4 Step 5
%o++ents
• lashing used in lightweight onstrution wor!.• ;t is equi&alent to a Square Lashing and when done orretly should be Cust as
strong.•
$uh qui!er to do than a Square Lashing.• The !not is finished off with a Square Enot.• shear lashing around 4 poles.
- Top -
Filipino Diagonal Lashing - Step 1y Step
Step 2 Step 3 Step 4
2. lashing used in lightweight onstrution wor!.3. Start with the +iddle of the rope) tu!ing the running ends through the +iddle
,loop, after going round both spars. Use the ,loop, to pull the spars together.4. =ow proeed as for a diagonal lashing ta!ing the running end round both spars)
!eeping both ends together.
5. Separate the ends and ta!e frapping turns between the spars) pulling the rope tightas you do so.
6. %o+plete the frapping turns and finish off with a reef /square0 !not.
- Top -

8/13/2019 Lashings Skills
http://slidepdf.com/reader/full/lashings-skills 8/11
Round Lashing - Step 1y Step
%o++ents2. Used to lash two poles together /onstruting a flagpole0.3. Tie a lo&e hith round the botto+ pole.4. (ind the rope around both si or se&en ti+es.5. Finish with two half hithes round both poles.6. The lashing an be tightened by dri&ing a s+all wooden peg between the poles.7. ;f possible fore a wedge under the lashings to +a!e the+ really tight. ;f the spars
are &ertial) bang the wedge in downwards.
- Top -
Shear Lashing

8/13/2019 Lashings Skills
http://slidepdf.com/reader/full/lashings-skills 9/11
%o++ents
sheer lashing is often used to bind adCaent poles together. ;t is also a good way toreinfore a bro!en or wea! pole. The frapping turns used to tighten the lashing +ay beo+itted and replaed with wedges inserted between the poles.
loose Sheer Lashing +ade around the ends of two poles will allow the poles to beopened out and used as an -fra+e. ;t an also be used to for+ a tripod Cust li!e theFigure-of-eight lashing.
2. Lay out the poles. For +ost lashings you will want to lay the poles side by sidewith the butt ends aligned /thi!er ends0.
3. Tie a lo&e hith around one of the outside poles and seure the standing part bywrapping it around the running part /or trap it under the first turns0. =ote ;f youonly lashing two poles together it +ay be better to si+ply tie the lo&e hitharound both poles and pull tight.
4. ass the rope around the poles to for+ a first turn.5. ulling eah turn tight +ade a series of turns until the lashing is at least as long as
the o+bined dia+eters of the two poles /usually a set of 5 to 7 turns will besuffiient0.
6. Tighten the lashing with a frapping turn by ta!ing the rope down between two poles at one end of the turns. This should be diffiult to do if the turns ha&e been pulled tightly /as they should be0. 1ring the rope ba! up between the poles at the
other end of the lashing and pull tight. Repeat 3 or 4 ti+es.7. Start the seond set of frapping turns by ta!ing the rope around the enter pole andfrapping. Ta!e the seond set of frapping turns in the opposite diretion to the firstset.
8. Repeat for any additional poles.9. ass the rope one +ore between the poles then around one pole and tu! it under
itself to for+ a half hith. ull this tight and +a!e a seond half hith for+ing alo&e hith by ta!ing the rope around the sa+e pole and tu!ing it under itself.
=otes on -Fra+e Lashing
n -fra+e lashing or Sheer Legs is +ade in the sa+e way as a Sheer Lashing with thelashing and frapping turns +ade slightly loose so that the poles an be opened out. ;t is
often used to raise a boat +ast or to for+ the legs of a rope bridge. Gou +ust ta!e are toensure that the legs of the fra+e do not slip.
=otes on Tripods
Ta!e a tripod by using a Figure-of-eight lashing on three poles. Set up the tripod byrossing the outside poles so that the ross point of the poles is under the enter pole.This +a!es sure that part of the load is ta!en by the wood in ontat.

8/13/2019 Lashings Skills
http://slidepdf.com/reader/full/lashings-skills 10/11
;f a sy++etrial arrange+ent of the poles is needed within a struture the tripod an beset up by rotating the poles around the lashing. This +eans that the load is supported only by the ropes and the Coint beo+es fleible and so the tripod +ay beo+e unstable.
- Top -
Ladder Lashing
%o++ent
Ladder lashing allows for a qui! and seure +ethod for onstruting a ladder or for onstruting a de!ing with e&enly spae de!ing piees.
This for+ of lashing has se&eral ad&antages o&er the traditional floor lashing. Less+aterial is required beause unli!e floor lashing a spae an be left between eah piee of the de!ing. lso) eah rung is seurely lashed in plae by se&eral loops of rope in +uhthe sa+e way as a square lashingA with the traditional floor lashing only a single loop of the rope holds eah end of the de!ing in plae) therefore if one piee loosens) the entirede! loosens.
The ladder lashing has two for+sA left and right) eah is a +irror i+age of the other.
Step 2 The ladder lashing is started byusing a lo&e hith stopped with two half hithes to seure a rope to the top end of eah rail.
Step 3 Lay an o&erhand loop o&er eahside rail so that the running end of eahloop is to the outside.
Step 4 lae a ruthat the standing ploop is o&er the erunning part of eaunder the rung.

8/13/2019 Lashings Skills
http://slidepdf.com/reader/full/lashings-skills 11/11
Step 5 ull the running part side of eaho&erhand loop behind and to the outsideof eah rail.
Step 6 Then pull the loop o&er the endof the rung.
Step 7 (or! eatightened around is in its desired po
Step 8 For+ an o&erhand loop in eahrunning part.
Step 9 lae an o&erhand loop o&er eah end of the rung to for+ a half hith around eah end of the rung.
Step " (or! the
. Step 2# Repeat steps 2 through 9 for eah additional rung.
.
?=D Finish the lashing by tying a lo&e hith around eah rail so that the lo&e hith is diretly und
- Top -


