Embed Size (px)
Citation preview

Lashings
Potowatomi Area Council 1
Basic lashings
Square Lashing
Square lashings are used to bind together two spars that are at right angles with one
another.
i) Place the poles on the ground in the shape of a cross. Tie a clove hitch around the bottom pole near the crosspiece. Twist the free end of the rope around its standing part and tuck it out of the way. ii) Make three or four wraps around the spars, keeping the rope very tight. As you form the wraps, lay the rope on the outside of each previous turn around the crosspiece, and on the inside of each previous turn around the bottom pole. iii) Then wind three or four frapping turns around the wrapping to tighten the lashing as much as you can. iv) Finish it off with another clove hitch.
Japanese Square Lashing
Japanese Square Lashing

Lashings
Potowatomi Area Council 2
This is used as an alternative to the square lashing for light spars and staves. Fig. 1. Take the middle of the lashing rope round a spar; Fig.2. Using both ends together (rope doubled) lay 3 turns as in ordinary square lashing; Fig.3. Take one end across the diagonal and behind the crossed spar; Fig.4. The other rope now doubles back in front of the vertical spar; Fig.5. The ends are now going in opposite directions to make frapping turns; Fig.6. Finish the lashing with a reef knot across a spar.
Diagonal Lashing
Diagonal lashings are used to lash to spars together other than at a right angle.
i) Start by tying a timber hitch around both poles and pulling it snug. ii) Make four tight wraps around the spars, laying each wrap neatly alongside the timber hitch. iii) Make four more tight wraps across the first three. iv) Frap it three or four times and finish it off with a clove hitch.
Filipino Diagonal Lashing
Filipino Diagonal Lashing
This is used as an alternative to the usual diagonal lashing for light spars and staves. Fig. 1: Start with the middle of the rope and pass the ends through the loop; Fig. 2: Lay three turns around both spars and then three more turns at right angles; Fig. 3: Split the two ends of the rope and make flapping turns between the spars; Fig. 4: The two ends, now going in opposite directions, are pulled tight; Fig.5. Finish off the lashing with a reef knot across one of the spars.

Lashings
Potowatomi Area Council 3
Tripod Lashing
A Tripod lashing is made by laying three spars alongside each other, with the center
spare pointing in the opposite direction to that of the outside spars.
i) Tie a clove hitch around one outside pole. ii) Loosely wrap the spars five or six times, then make the frapping on either side of the center spar. iii) Finish the lashing with a clove hitch around the outside spar.
Sheer (or Shear) Lashing
Sheer lashing is used two lash two spars together.
i) Lay two spars side by side. ii) Tie a clove hitch to one spar. iii) Make four loose wraps around the spars and four frapping turns between them. iv) Finish with a clove hitch.
Sheer Legs
This is one method of lashing three poles together to form a tripod. Three spars are laid side by side and loosely lashed with a figure of eight lashing (not a true description). The lashing is started with a clove hitch around one of the outside spars

Lashings
Potowatomi Area Council 4
followed by six or eight loose turns over and under the other spars. The lashing is finished with frapping turns between each pair of spars and a final clove hitch. The three legs are then opened out to form an equilateral triangle at the base. To complete the tripod, three extra spars should be square lashed across the butts a foot or so above the base.
Sheer Legs
This is the other method of making sheer legs (favored by most pioneers). Lay out the spars with the tip of one pointing in one direction, and with the other two, one at either side, pointing the opposite way. Continue as for the previous example.
Round Lashing
Step by step:
Comments:
• Used to lash two poles together (constructing a flagpole).
• Tie a clove hitch round the bottom pole. • Wind the rope around both six or seven times. • Finish with two half hitches round both poles. • The lashing can be tightened by driving a small
wooden peg between the poles. • If possible force a wedge under the lashings to make
them really tight. If the spars are vertical, bang the wedge in downwards.

Lashings
Potowatomi Area Council 5
Lashing Activities and Games
Alligator Pit Crossing Activity This Activity is meant for Boy Scouts. Decide for yourself if it is appropriate for your younger scouts or not.
Required: Per team: 4 15foot ropes, 3 10foot ropes, 3 6-8foot poles
Notes: A member from each team needs to get across a foul pit teaming with starved alligators.
Each team assembles by their equipment. On 'GO' signal, the team lashes an A-frame stilt walker using square lashings. They then attach the 4 guide ropes to the top of it. One member boards the walker and tries to 'walk' it across the alligator pit while 4 other members steady it with the guide ropes. When the team crosses the pit, they disassemble the walker, stack the equipment, line up, and give their yell. Score for speed, teamwork, quality of walker, neatness of equipment.
Lashing Grab Bag Activity This Activity is meant for Boy Scouts. Decide for yourself if it is appropriate for your younger scouts or not.
Required: lots of ropes and poles
Combine knot tieing, lashing, and public speaking into a competition between patrols to create camp gadgets. Print the list of items and cut them into individual slips of paper. Have the leader pull out one slip and read it. Each team goes off and creates the described item as best they can in a set amount of time, like 20 minutes. At the end of the time limit, everyone gathers and each team has 90 seconds to explain what knots and lashings were used why their design

Lashings
Potowatomi Area Council 6
is superior. An alternate activity would be to have each team pull out a slip and build that item. Then, when teams gather, they describe their creation and explain what knots were used and why it is a good design. Judges can choose the best designs.
• a free-standing Flag Pole • a stand for a 3-gallon water bucket that makes pouring water
easier. • a garbage bag holder • a Fire Building bench - where scouts can practice flint-n-steel
fire starting. • a Chair for the Scoutmaster • a Clothesline for rainy weekends • a Fence around the campsite - just a section or two • a Swing - for one person at a time • a Crane - to lift a 25lb. log and swing it to a different location • a Ladder • a Ballista or Catapult for water balloons • a Sleeping Platform - to keep you out of the mud
Lashing Travois Races Activity This Activity is meant for Boy Scouts. Decide for yourself if it is appropriate for your younger scouts or not.
Location: This Activity should be done Outside.
Required: Per patrol: 4 15foot ropes, 3 10foot ropes, 3 6-8foot poles
Each patrol assembles by their equipment. On 'GO' signal, the patrol lashes an A-frame travois using square lashings. They then attach the 4 harness ropes to it. One scout rides the travois while the rest pull him around the course and back. When the patrol reaches the finish, they disassemble the travois, stack the equipment, line up, and give patrol yell. Score for speed, teamwork, quality of travois, neatness of

Lashings
Potowatomi Area Council 7
equipment.
Lava Walkers Activity This Activity is meant for Boy Scouts. Decide for yourself if it is appropriate for your younger scouts or not.
Required: three 8 foot poles per patrol three 8 foot ropes per patrol four 40 foot ropes per patrol bag of treats per patrol
Preparation:
Draw a lava field on the ground, about 15-20 feet across.
Goal: Cross the lava field to retrieve the reward. Each patrol needs to get one scout across the lava field to get the reward and bring it back. The ends of each pole are coated in a heat-resistant chemical so they are lava-proof. If anything else comes in contact with the lava, it is disintegrated.
Lotsa Knots Activity This Activity is meant for Boy Scouts. Decide for yourself if it is appropriate for your younger scouts or not.
Required: 4 foot rope for every scout. 15 foot rope for each patrol. 2 poles for each patrol.
Notes: Need a score keeper. The judges yell out the score for each knot to the scorekeeper.
Patrols group up into a circle with each patrol at least 15 feet away from those next to it. Patrol leaders retrieve gear for their patrol (two poles, long rope, and rope for each scout) and distribute it to their patrols. The patrol leaders will be the judges in this activity/game. Have each patrol leader choose someone else in the patrol to be in charge while he is gone - probably the assistant patrol leader. Then, have each patrol leader stand in front of a different patrol. Patrol leaders will rotate around the circle,

Lashings
Potowatomi Area Council 8
judging a different patrol for each task. A patrol leader can use an adult as a technical aid in determining the 'correctness' of a knot if he is not sure. The leader calls out the name of one knot and everyone in each patrol ties the knot, shows it to the judge, and is awarded points. Knots:
• Square Knot • Clove Hitch • Sheet Bend • Taut Line Hitch • Two Half-Hitches • Bowline
For the lashings (Square Lashing, Diagonal Lashing, Shear Lashing), each patrol ties it with two different scouts working together each time it is tied. The rest of the patrol can watch and coach, but not touch the rope. Sample Patrol Scoring:
• 5 points for the first correct knot in the patrol. • 3 points for the next. • 1 point for each additional correct knot. • 4 bonus points if every scout in the patrol ties the knot.
Rules:
• 5 minute time limit per knot. • Can use scout handbook. • Can teach other scouts. • A scout can only touch his own rope.
Reflect:
• What skills were developed? • How did you help someone else? • Was it important to be the first one to tie a knot? • What was most important to score points?

Lashings
Potowatomi Area Council 9
• Was this a fair contest? • Were the judges fair?
Pretzel Lashing Activity This Activity is meant for Boy Scouts, Webelos scouts. Decide for yourself if it is appropriate for your younger scouts or not.
Required: long stick pretzels (7 inches long) long shoestring licorice
Each patrol gets 8-10 pretzels and 20 pieces of licorice. Give the assignment to use lashings to:
• Build a teepee in less than 3 minutes. • Build the tallest free-standing structure in less than 3 minutes.Build ...
whatever else you want.
It's actually quite difficult to successfully lash with the licorice, so this is mostly for fun.
Reactor Transporter Activity This Activity is meant for Boy Scouts. Decide for yourself if it is appropriate for your younger scouts or not.
Required: Per patrol: 6 staffs or poles, 6 feet long 4 pieces of rope or cord, 6 feet long 20 feet of twine 1 #10 size can 1 1/2inch metal nut
Preparation: Create a 'Reactor Bell' for each patrol: Punch a hole in the bottom of the can. Run the twine through the hole and tie a knot, leaving about 1 foot of twine in the can. To the end of this twine, tie the nut so it swings inside the can like the clapper

Lashings
Potowatomi Area Council 10
Notes: Good for lashings, leadership, teamwork. Can be done as a single patrol activity or a troop competition.
Goal: Transport a radioactive reactor core to a safe disposal site using your self-made transporter. Each patrol uses their materials to construct a tripod pyramid by lashing the poles together. The reactor is hung by the twine from the top of the pyramid so it hangs freely. The transporter is moved to the 'safe zone' - the finish line about 100 feet away.If the reactor bell sounds, there was too much jarring and the patrol must return to the starting line to begin the transport again.
A Few Pioneering Projects Clothes Line Darren Dowling
Clothes Line
A line for drying those tea towels and sundry clothing items will be essential for any camp kitchen. This is very simple to construct, as you can see from the picture. Simply drive two uprights into the ground and lash a cross piece to join them across the top. To ensure the structure is sturdy you could add two further poles lashed at an angle to form a simple 'A' frame at either end. Attach guy ropes to the two ends and peg out to keep the clothes rack on the ground in those high winds. You can add several lines by lashing ropes across the uprights (or even saplings), on which you can hang your towels to dry.

Lashings
Potowatomi Area Council 11
Building a Catapult
The catapult that is described here will throw a water balloon several hundred feet. Obviously if you reduce the dimensions of the components the distances you can throw will change accordingly.
Equipment List
Quantity Item Comments
3 2.4m (8ft) spars (front face) All spars must be good quality. DO NOT use dowelling.
3 4.5m (15ft) spars (back brace)
1 4.5m (15ft) spar (throwing arm)
Best results will come from a good but relatively thin spar.
1 1m (3.5ft) spar (throwing arm cross piece) Must be strong
15m (50ft) .6cm (1/4in) or thicker rope Launching rope 7 X 3.5m
(12ft) .6cm (1/4in) rope These are for lashing. I prefer braided nylon or better still, braided polyester.
1 double pulley or 2 single pulleys Must fit the launching rope above.
1 throwing tin (see diagram below) 2 X 1/2m
(20in) .6cm (1/4in) rope to attach pulley(s) and throwing tin
1 supply water balloons
Step 1 - Build front face triangle
Lay out the 2.4m spars as shown in the diagram and lash the spars together with a square lashing where they cross.
Step 2 - Attach the back supports

Lashings
Potowatomi Area Council 12
Lash the back brace spars to the front face triangle as shown in the diagram. Note: The two side spars should be lashed to the inside of the triangle about 2/3 of the way up from the bottom. The bottom spar should be attached on the outside.
Step 3 - Build the throwing arm
• Lash the throwing arm cross piece to the bottom side of the throwing arm about 1m (3.5Ft) back from the thickest end. If the throwing arm has a curve in it make sure the apex of the curve is up (see diagram).
• Attach the throwing tin to the tip of the throwing arm.
Step 4 - Assemble the catapult
1. Set the completed throwing arm into the catapult as shown.
2. Attach the pulley(s) to the end of the lower back support.
3. Attach the middle of the launching rope with a clove hitch to the large end of the throwing arm.
4. Run the two ends of the launching rope through the pulley(s) and lay them back beside the two back supports.
Step 5 - Safety considerations
The excitement of watching the water balloon sail out and hit its mark is the fun of building a catapult. However, what goes up will also come down and the throwing arm is no exception. Once the balloon is launched all eyes will follow the balloon and unfortunately not the decent of the arm. One person MUST act as safety control and control the decent of the arm. (see the diagram). This means that they must stand just in

Lashings
Potowatomi Area Council 13
front of the catapult and keep their hand on the short end of the throwing arm. The same person can check the path of the throwing arm before they call "fire" to ensure everyone is clear.
Step 6 - Operation
Assign youth to pull the launching ropes. Depending on their strength and size, you can assign several on each rope. When the water balloon is in the tin and everyone is clear of the arm, the safety control person should yell "fire" and both ropes pulled. If the throwing arm is heavy then the safety control person may want to assist the throw by pushing down on the throwing arm extension. (Remember to control the descent of the arm after the water balloon has been thrown.)
Step 7 - Have fun!
As with all games a set of rules will help keep the excitement under control. If you are building several catapults to throw balloons at each other, then here are some simple rules that have work for me.
1. No balloons will be thrown until all the catapults are built and operational. (This keeps the focus of the teams on the building process.)
2. No balloons will be thrown by hand. 3. Only water balloons can be thrown.
Throwing Tin
The throwing tin is made from a large coffee tin. The side is cut down to a 8cm (3in) height and the edge is turned over. Two slots 1.25cm (.5in)wide X 10cm (4in)long, about 2.5cm (1in) apart. (see diagram). Tape the edges with duct tape. (Note: If the tin is to be used on several occasions then add a stiffener that fits inside the tin between the two slots and extends out to the sides. Hold it in place with more tape!)

Lashings
Potowatomi Area Council 14
Special Note: The distance that this catapult can throw a water balloon is a related to the square of the length of the throwing arm i.e. an arm ½ the length will only through a water balloon ½ X ½ or ¼ of the distance. In addition the weight of catapult itself is too light.
Build a Rope Bridge
By Glenn Cockwell glenn.cockwell.com/scouting
A rope bridge is a great way to learn a few knots and have fun while you do it. The project that is described here can be put together in 30-45 minutes.
If you have to learn the knots as you go then allow a bit more time.
Where To Build
The best place to build the bridge is on flat ground between 2 anchors (trees) about 20 metres (60 feet) apart. I have used a telephone pole as an anchor and in a pinch you can create a holdfast (described later).
DO NOT succumb to the temptation to build the bridge over a gully or stream. Unless the bridge will be used to actual cross these areas on an ongoing basis there is no point in adding the additional effort.
Equipment List
Quantity Item Comments
4 2.4-3m (8-10ft) spars Ideally the 3m length. All spars must be good quality. DO NOT use dowelling.
2 1m (3ft) spars 2 1.5m (4.5ft) spars 2 2m (6ft) spars
30m (100ft) 3cm (1in) natural fiber rope This is the footrope and I prefer the natural fiber. It gives a good grip to the soles of the shoes and it is not elastic like nylon.
2 X 45m 1.5cm (.5in) rope These are the handrails

Lashings
Potowatomi Area Council 15
(150ft) 10 X 2m
(6ft) .6cm (1/4in) rope These are the stringers
14 X 3.5m (12ft) .6cm (1/4in) rope These are for lashing. I prefer braided
nylon or better still, braided polyester.
1 3 X block and tackle expandable to about 3m (10ft)
A 2X can be used but you will have to tension it more often if natural fiber rope is used.
2 pcs burlap or heavy cloth This material will protect the lashing where the footrope crosses the trestle.
1 short heavy rope Depending on the type of anchor you use you need a method to attach the block of the block and tackle.
Step 1 - Build the 2 trestles
Lay out 2 sets of spars as shown in the diagram and lash the spars together with a square lashing where they cross. (Note: Ensure the lashing at the crossing point of the longest spars is done well.)
Step 2 - Lay out the long ropes
• Attach the footrope and the 2 handrail ropes to one of the anchors with "round turn two half hitches". (note: If your handrail rope is a single length then loop the rope around the anchor twice to prevent slipping)
• String the ropes out on the ground to the next anchor. • Attach the block and tackle to the second anchor and stretch it out towards the
first anchor. • At the point that the end of the block and tackle meets the footrope, tie a loop in
the footrope using a bowline (if the end is handy) or a figure 8 1/2. DO NOT use

Lashings
Potowatomi Area Council 16
an over hand knot to create a loop. You will have a great deal of trouble releasing the knot afterwards.
• Attach the block and tackle to the footrope
Step 3 - Attach the first trestles
• Lay 1 trestle under the long ropes so that the top of the trestle is about 3m (10ft) from the 1st anchor and the bottom of the trestle is pointing at the anchor.
• Attach the handrails to the tops of the long spars with clove hitches. • Lift the top of the trestle and position the bottom such that the trestle is leaning
away from the anchor at about 45 degrees. • If the two handrails are not taking up equal tension adjust the length by slipping
the clove hitch.
Step 4 - Attaching the second trestle
• Slip the second trestle under the 3 long ropes so that the top of the trestle is about 10m from the 1st trestle, and the base is pointing at the 1st trestle. (Note: The top of the second trestle should not be within 1.5m (5ft) of the point the block and tackle and the footrope are attached. Shorten the distance between the two trestles if necessary)
• Tie the handrails to the top of the 2nd trestle with clove hitches. • Lift the top of the trestle and swing the bottom in until the trestle leans against the
handrails at a 45-degree angle. • The two handrails should be parallel with the same amount of sag. If not then
adjust them by slipping the clove hitch at the second trestle.

Lashings
Potowatomi Area Council 17
• Take the ends of the handrails and pass them around the anchor and back and tie a "trucker's hitch" (see diagram).
• Tension the handrails enough to take out the slack between the anchor and the 2nd trestle.
Step 5 - Attach the stringers
• Tilt the 2nd trestle so that it is leaning away from the anchor and towards the other trestle.
• Adjust the tension in the handrails so that they are reachable from the ground the entire length between the trestles but clear the ground by about 1.5m (5ft) half way between.
• Tension the footrope with the block and tackle so that it runs parallel to the handrails
• Equally space the stringer ropes (~1 metre - 3ft apart) the entire length between the trestles and attach them by tying a "round turn two half hitches" to the handrail and a "clove hitch" to the footrope. (Note: Ensure that the "round turn two half hitches" are tied at the very end of the rope and that the "clove hitch" is tied at the centre.)

Lashings
Potowatomi Area Council 18
Step 6 - Tensioning
• Swing the bottoms of the 2 trestles in so that they are completely upright. • Apply tension to the handrails with the trucker's hitch. • Reposition the trestles so that they have a slight tilt (5 degrees) away from their
respective anchors (this makes climbing onto the bridge easier) • Insert the burlap between the footrope and the "V" of the trestle • Tension the footrope.
Step 7 - Safety inspection
• Check all knots (do this on a regular basis) • Reposition any stringers that do not go vertically from the footrope to the
handrail.
Step 8 - Have fun!
Lashings
Potowatomi Area Council 19
• As each person crosses the bridge, 2 spotters should walk along, one on either side.
• The best way to cross is to walk with your toes pointed out and your knees bent slightly.
Special Notes:
1. The "special effort" mentioned in Step 1 that is required if you put the bridge over a gully or steam is a fourth line strung high over the bridge that can take the weight of anyone that falls off the bridge. Each person crossing the bridge must wear a harness and be fastened from the harness to the safety line by a traveler.
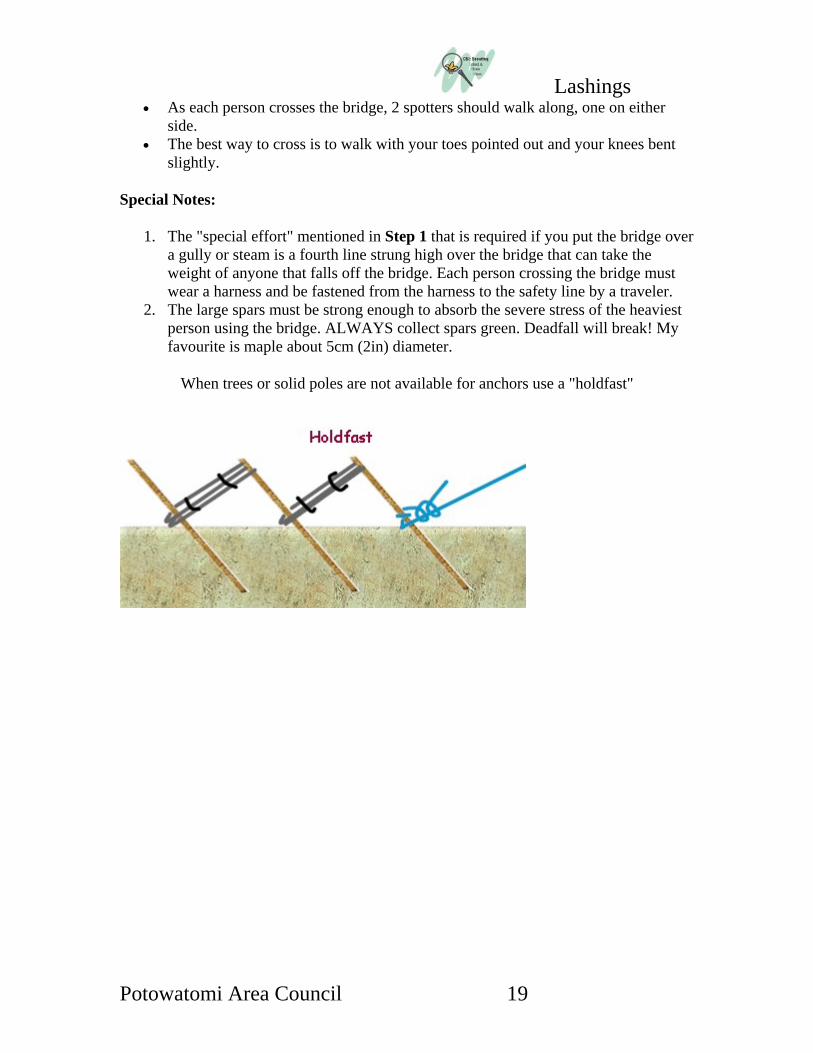
2. The large spars must be strong enough to absorb the severe stress of the heaviest person using the bridge. ALWAYS collect spars green. Deadfall will break! My favourite is maple about 5cm (2in) diameter.
When trees or solid poles are not available for anchors use a "holdfast"