Embed Size (px)
Citation preview

LANDSCAPE PHOTOGRAPHY WITH YOUR SMARTPHONE // © PHOTZY.COM 1
LANDSCAPE PHOTOGRAPHY WITH YOUR SMARTPHONEQuick Guide
Written by Kent DuFault
Photzy

LANDSCAPE PHOTOGRAPHY WITH YOUR SMARTPHONE // © PHOTZY.COM 2
I’m going to just flat-out say it, “I love taking photographs with my iPhone 6+.” In fact, on a recent trip to Italy, I experimented with taking ALL of my travel photographs on the iPhone 6+.
I can hear some of you gasping out there!
It’s true; this iPhone produces better quality pictures than my DSLR cameras from just a few years back — cameras that I used professionally.
Sure, a smartphone camera has limitations, but so does a DSLR, in my opinion.
For me, the main advantage to the iPhone camera is that it’s always with me and ready to go. I see something, I can slip the iPhone out of my pocket, and take a photograph.
I will admit that a Nikon DSLR camera did come along on our trip to Italy; my wife brought it, and of course she got great pictures…
But so did I.

LANDSCAPE PHOTOGRAPHY WITH YOUR SMARTPHONE // © PHOTZY.COM 3
I recently heard some debate about the use of a smartphone camera. The opinion was made that it took no skill. That you simply snap a picture, run it through some app, and voilà: a wondrous photograph is made!
That statement couldn’t be any further from the truth.
Sure, you can make a picture like that, just like you could with a DSLR, or a mirror-less camera, or a $50,000 dollar medium format camera, or ANY camera for that matter.
When folks get all caught up on equipment, I always like to bring up this quote from world-renowned National Geographic, and Life Magazine Photographer, Gordon Parks. He said, “I believe that I created some of my very best photographs with my simple Brownie Camera.” A simple Brownie Camera was basically a smartphone camera that shot on film. It had a fixed lens, fixed shutter speed, and a fixed aperture. It was a box with film in it.
It’s not the camera! It’s the thought process of the photographer.
I would counter those previously mentioned debaters with the following: “It’s harder to take a great photograph with a smartphone camera, because you have less tools to work with.” You are limited to a single lens and a fixed aperture (just like the Brownie Camera).
Okay, there are Apps that can be purchased that will allow you to make some adjustments manually as far as shutter speed and ISO. And you can buy clip-on lenses to change the focal length of your smartphone lens, but why would you want to do that? Doesn’t that defeat the purpose? At that point, you might as well be carrying your other camera around! And, it is easy to go “too far” with the processing apps and create something that looks like cheap art. (By the way, you can also accomplish that same cheap art look with a DSLR raw file and Photoshop or Lightroom!)
It’s harder to take a great photograph with a smartphone camera, because you have less
tools to work with.

LANDSCAPE PHOTOGRAPHY WITH YOUR SMARTPHONE // © PHOTZY.COM 4
Don’t fool yourself into believing that great photography cannot be accomplished with a simple, straightforward smartphone camera. An intelligent photographer/artist, applying APP processing with a trained eye, can create amazing smartphone photographs. There is evidence of this all over the Internet.
And so can you!
When you’re finished with this guide, you should begin to have a basic understanding of how to better pre-visualize your landscape photograph when you’re creating it with your smartphone camera. You should also have an understanding of the relationship between taking the picture and post-processing the picture when using a smartphone camera for landscape photography. Finally, you’ll gain knowledge on post-processing tricks for landscape photography!
I have found for myself that I have to push my thought processes further, and search deeper into my skillset, to create excellent photography when using my iPhone 6+ camera.
Today, we are going to focus on how to create a great landscape photograph with a smartphone camera.
So, are there limitations to the smartphone camera? Sure!
The biggest obstacles to overcome with a smartphone camera are limited focal length, focus placement, focus speed, shutter lag, uncontrolled shutter speed, and uncontrolled depth of field. Each generation of smartphone technology is getting better and better at some of these functions.
But, currently, they are still some things that have to be dealt with, which is a big part of the fun.
Fortunately, for the landscape photography genre, some of these obstacles aren’t so much of an issue as they would be in, say, street photography.
Don’t fool yourself into believing that great photography cannot be
accomplished with a simple, straightforward smartphone camera.
LANDSCAPE PHOTOGRAPHY WITH YOUR SMARTPHONE // © PHOTZY.COM 5
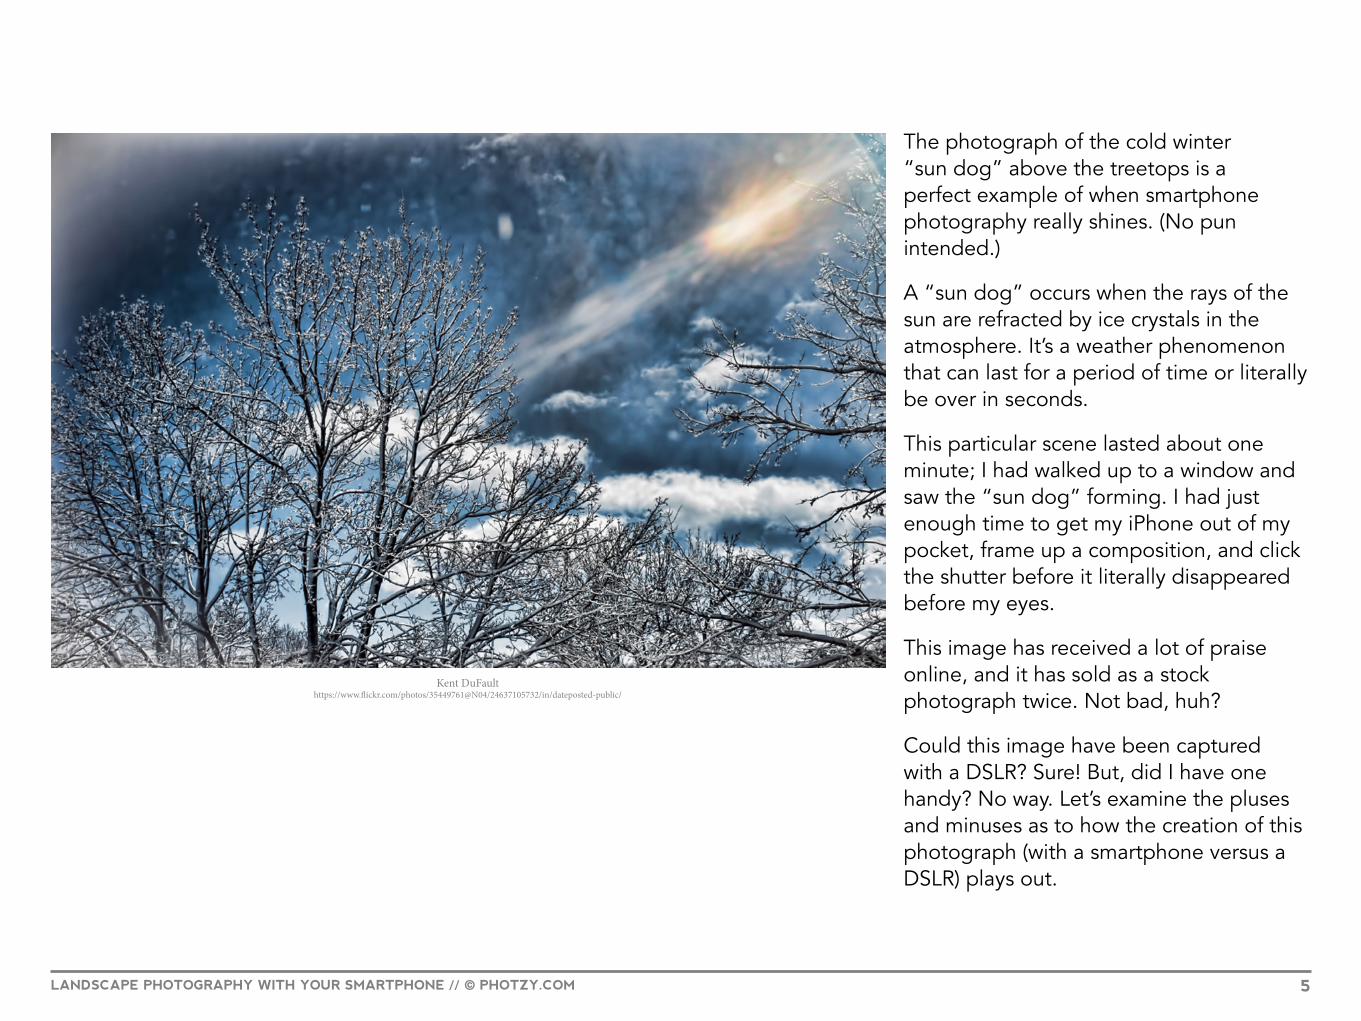
Kent DuFaulthttps://www.flickr.com/photos/35449761@N04/24637105732/in/dateposted-public/
The photograph of the cold winter “sun dog” above the treetops is a perfect example of when smartphone photography really shines. (No pun intended.)
A “sun dog” occurs when the rays of the sun are refracted by ice crystals in the atmosphere. It’s a weather phenomenon that can last for a period of time or literally be over in seconds.
This particular scene lasted about one minute; I had walked up to a window and saw the “sun dog” forming. I had just enough time to get my iPhone out of my pocket, frame up a composition, and click the shutter before it literally disappeared before my eyes.
This image has received a lot of praise online, and it has sold as a stock photograph twice. Not bad, huh?
Could this image have been captured with a DSLR? Sure! But, did I have one handy? No way. Let’s examine the pluses and minuses as to how the creation of this photograph (with a smartphone versus a DSLR) plays out.

LANDSCAPE PHOTOGRAPHY WITH YOUR SMARTPHONE // © PHOTZY.COM 6
Pluses
· The moment happened in the middle of an average day. I had my smartphone with me in my pocket and my DSLR was in the camera bag (where it would normally be unless I was “out shooting”).
· I was able to use APP software (Snapseed) to process the image to my liking and post it to several online resources in a matter of minutes. (The first sale of this image actually occurred that very same day. It wasn’t big bucks. But it was something!)
Minuses
· The resolution is lower than with a DSLR (for most smartphones, although I believe there is a 50 megapixel smartphone camera out there somewhere). You can’t print a poster with most smartphone photos.
· Depth of field (DOF) has limited control. At the time that I took this photograph, I had no ability to adjust DOF. I now have several apps that
electronically allow me to create an effect that looks like minimal depth of field. There is currently no way, that I’m aware of, that allows you to manually increase DOF. Again, smartphone photography is about adjusting your thinking.
Part of the success of using a smartphone camera is reading a situation and producing a successful photograph that works for you.
Let me address the negatives.
· I’m not worried about the resolution. Most of the photography world (today) exists online. Sure, it’s great to have huge files for your originals. But, is it necessary? Not really, unless you plan on creating huge wall prints or selling to advertising agencies. Even when I shoot the large file sizes with my Nikon DSLR camera, I almost always end up reducing the file size for use on the Internet. Mostly all of my stock photo sales (at this point in time) are for Internet use! A number of my smartphone photographs are
I’m not worried about the resolution. Most of the photography world (today)
exists online.
LANDSCAPE PHOTOGRAPHY WITH YOUR SMARTPHONE // © PHOTZY.COM 7
placed in the Getty Images Stock Photography Library. If it’s good enough for them, it’s good enough for me!
· Depth of field is an issue with smartphone photography. You must learn to work with it rather than against it. If you want less depth of field, or what can be referred to as “selective focus,” that can be done. I achieve that through several apps that I own including Snapseed and (to some extent) Camera+. The key to successfully “creating” minimal DOF (using an app) is having a light touch. I try not to take the effect so far that it overwhelms the photograph.
When we get to the end of the guide, I’m going to walk you through some processing tips using app software. For the purposes of demonstration, I’ll be using Snapseed.
Now, let’s take a look at a landscape photograph that was created with my iPhone that wasn’t very successful in the beginning. Let’s analyze why…
Depth of field is an issue with smartphone
photography. You must learn to work with it rather
than against it.

LANDSCAPE PHOTOGRAPHY WITH YOUR SMARTPHONE // © PHOTZY.COM 8
Kent DuFault/ Baptism River in Northern Minnesotahttps://www.flickr.com/photos/35449761@N04/24386639519/in/dateposted-public/
The image of the Baptism River running peacefully among the trees of Northern Minnesota suffers from a number of problems that keep it from being a great photograph.
You might ask yourself, “Why is it so, blah? It’s a gorgeous place!”
Let’s make a bullet point list of what’s wrong with it.
· The contrast range was too great for the camera. (Just for the record, it would have been too much for most DSLR cameras as well.) This was taken late in the day, when you would think that the light would have been perfect for landscape photography. However, because the river sits down low in the trees, in a gorge, the late-in-the-day sunlight didn’t work out so well. Would it be better to have taken this image at midday? Not really, as the lighting would not have been very complementary. So, what are you supposed to do? We’ll talk about that in a minute.
· What’s really wrong with this image is a lack of purpose, or what I like to call “story.” What that means is the image is lacking two things: a complete purposeful

LANDSCAPE PHOTOGRAPHY WITH YOUR SMARTPHONE // © PHOTZY.COM 9
composition and a meaningful story as the viewer’s eyes walk through the picture. (That same problem could also have resulted from an image created with a DSLR camera.) The difference is with a DSLR (or any interchangeable lens system), you have the option of changing the composition/POV/story by changing lenses. That’s a luxury you don’t have with a smartphone. You’ll notice that the word “complete” (above) is in Bold Type. I want to point that out because the basis for the composition was laid out when the photograph was created with the smartphone camera. However, it needed help, which we will talk about in a minute.
If you don’t have a firm grasp of composition technique, you may want to check out the Understanding Composition Premium Guide, or the Advanced Composition Premium Guide, which are for sale on the Photzy website.
So, if you’re using your smartphone camera, what do you do?
Well, you could change your camera POV by physically moving your body. In this case, I did not have that option because I was on a bridge. The other thing you can do is plan the image in your mind (pre-visualize) and then take the correct photograph as best you can (which is what I did at the Baptism River). Then you could finalize your image (composition/story) using the APP software of your choice.
That’s exactly what I did with this photograph. Let me show you the end result…
The other thing you can do is plan the image in your
mind (pre-visualize)

LANDSCAPE PHOTOGRAPHY WITH YOUR SMARTPHONE // © PHOTZY.COM 10
My plan, upon taking this photograph, was to focus on the rocks and waterfall directly below me. With my understanding of composition, I realized that I had the bones for a good shot. I had to work with the limitations of my smartphone camera and the lighting to achieve my goal.
Here is how I accomplished that.
1. By touching the screen, I placed the focus, where I wanted the viewer’s eyes to lock and stop. That was the group of rocks, in the sunshine, directly below me. Remember, a viewer’s eyes will tend to gravitate to, and stop at, any spot in the photograph that is in critical focus, and a bright spot will almost always receive attention first over a dark spot.
2. I composed the image as a vertical, letting the river run into the rear of the frame to add depth to the landscape.
3. The limitation of the lens focal length included things I didn’t want, like the blown-out sky. I pre-visualized that I would remove it with cropping.
Kent DuFaulthttps://www.flickr.com/photos/35449761@N04/24716300622/in/dateposted-public/

LANDSCAPE PHOTOGRAPHY WITH YOUR SMARTPHONE // © PHOTZY.COM 11
4. There was still an imbalance in the shadows to highlights that gave the image a washed out appearance. In Snapseed, I evened out the exposure using the HDR Filter. I then lightened shadow areas, and darkened highlight areas, using the Selective Tool.
5. I then brought much of the color saturation back into the image using the Glamour Glow Filter. I reduced the glow to about 1/4 of the default setting so that it didn’t overwhelm the image.
6. I was now at a place where the trees were effectively framing the river, thus keeping the viewer’s eyes where I wanted them. I reinforced that by using the Selective Focus Filter and putting a blur on the very outside edge of the frame.
7. I then used the Details Tool to bring texture and liveliness back to the rocks and spraying water.
8. I then did a dual vignette. This is a cool aspect of the Snapseed Vignette Tool. Not only can you darken or lighten the outside edge, but you can also change the exposure value of the inside area. This allowed me to really focus the viewer’s attention on the river through “light to dark” contrast.
9. Finally, I used the Healing Tool to remove some unwanted details (eye snags) near the edges of the frame.
When working with a smartphone camera,
you must plan your shot while keeping your post-processing in the back of
your mind.

LANDSCAPE PHOTOGRAPHY WITH YOUR SMARTPHONE // © PHOTZY.COM 12
Kent DuFaulthttps://www.flickr.com/photos/35449761@N04/24129545684/in/dateposted-public/
Here’s a before and after view.
Important Lesson: When working with a smartphone camera, you must plan your shot while keeping your post-processing in the back of your mind. This is something that most photographers don’t typically do in DSLR photography, so it requires a change in mindset. With DSLR camera equipment, we utilize our camera and lenses to formulate our image. With smartphone photography, the post-processing becomes an essential tool right from the beginning of the process. Sometimes, a smartphone photographer will have to change the camera point of view (by physically moving) to achieve his or her goal, while a traditional photographer will simply change their lens focal length. Now, here’s a beautiful thing for the smartphone photographer. If you want to, you can edit your image right there at that moment. Editing the Baptism River photograph took me less than four minutes. I don’t always edit immediately. In fact, I would say that it’s more the norm that I don’t, but sometimes I do, especially if it is a really spectacular shot and I want to make sure that I got it.

LANDSCAPE PHOTOGRAPHY WITH YOUR SMARTPHONE // © PHOTZY.COM 13
Sub-note: I recommend finding one or two editing apps that you really like and stick with them. It’s easy to get caught up in the trap of trying more and more apps because there are so many of them out there. I have seven photo-related apps on my iPhone 6+: Snapseed, NoiseReducer for IOS, Photoblend, Camera+, Pro HDR X, Slow Shutter, and Mextures. My total investment is less than $20.00 USD. Snapseed is my go-to editing app. I use it 90% of the time. I can make just about any photograph that I can pre-visualize with it. If there is something that I want to do in editing a photograph that can’t be done in my app programs, I’ll email the original file to myself and work on it in Photoshop. However, that is the exception rather than the rule. I use NoiseReducer when the noise is evident, but low. If the noise is average or above, I’ll transfer the image to Photoshop on my computer, and use the Macphun app Noiseless CK to remove the noise. Photoblend is for making double exposures and creating a blended layer look that is popular in Photoshop. I use Camera+ primarily for focus control, or shutter speed control when taking a picture. Pro HDR X is for the HDR technique. Slow shutter allows you to create REALLY slow shutter effects that are so popular right now. Mextures is a layering texture app.
Let me visually walk you through my post-processing of this landscape smartphone photograph. All the post-production work was done in the Snapseed app.
It’s easy to get caught up in the trap of trying more and
more apps...

LANDSCAPE PHOTOGRAPHY WITH YOUR SMARTPHONE // © PHOTZY.COM 14
While it is possible to crop your photograph in Apple Photos IOS, you don’t really want to do that because you can’t undo it. The one time it’s really useful is if you need to straighten a horizon line. The angular crop tool is easier, and more accurate, to use than the one in Snapseed.
Kent DuFaulthttps://www.flickr.com/photos/35449761@N04/24792460996/in/album-72157664040273021/

LANDSCAPE PHOTOGRAPHY WITH YOUR SMARTPHONE // © PHOTZY.COM 15
Kent DuFaulthttps://www.flickr.com/photos/35449761@N04/24191878573/in/album-72157664040273021/
This is the Tool Kit in Snapseed. For now, we will just address the tools that we use in this demonstration.

LANDSCAPE PHOTOGRAPHY WITH YOUR SMARTPHONE // © PHOTZY.COM 16
Kent DuFaulthttps://www.flickr.com/photos/35449761@N04/24725241901/in/album-72157664040273021/
Below the Tool Kit are the Filters. The Filters are preset for certain effects. However, they all have levels of adjustment and change, so you can let your creative self fly!
LANDSCAPE PHOTOGRAPHY WITH YOUR SMARTPHONE // © PHOTZY.COM 17
Kent DuFaulthttps://www.flickr.com/photos/35449761@N04/24191878453/in/album-72157664040273021/
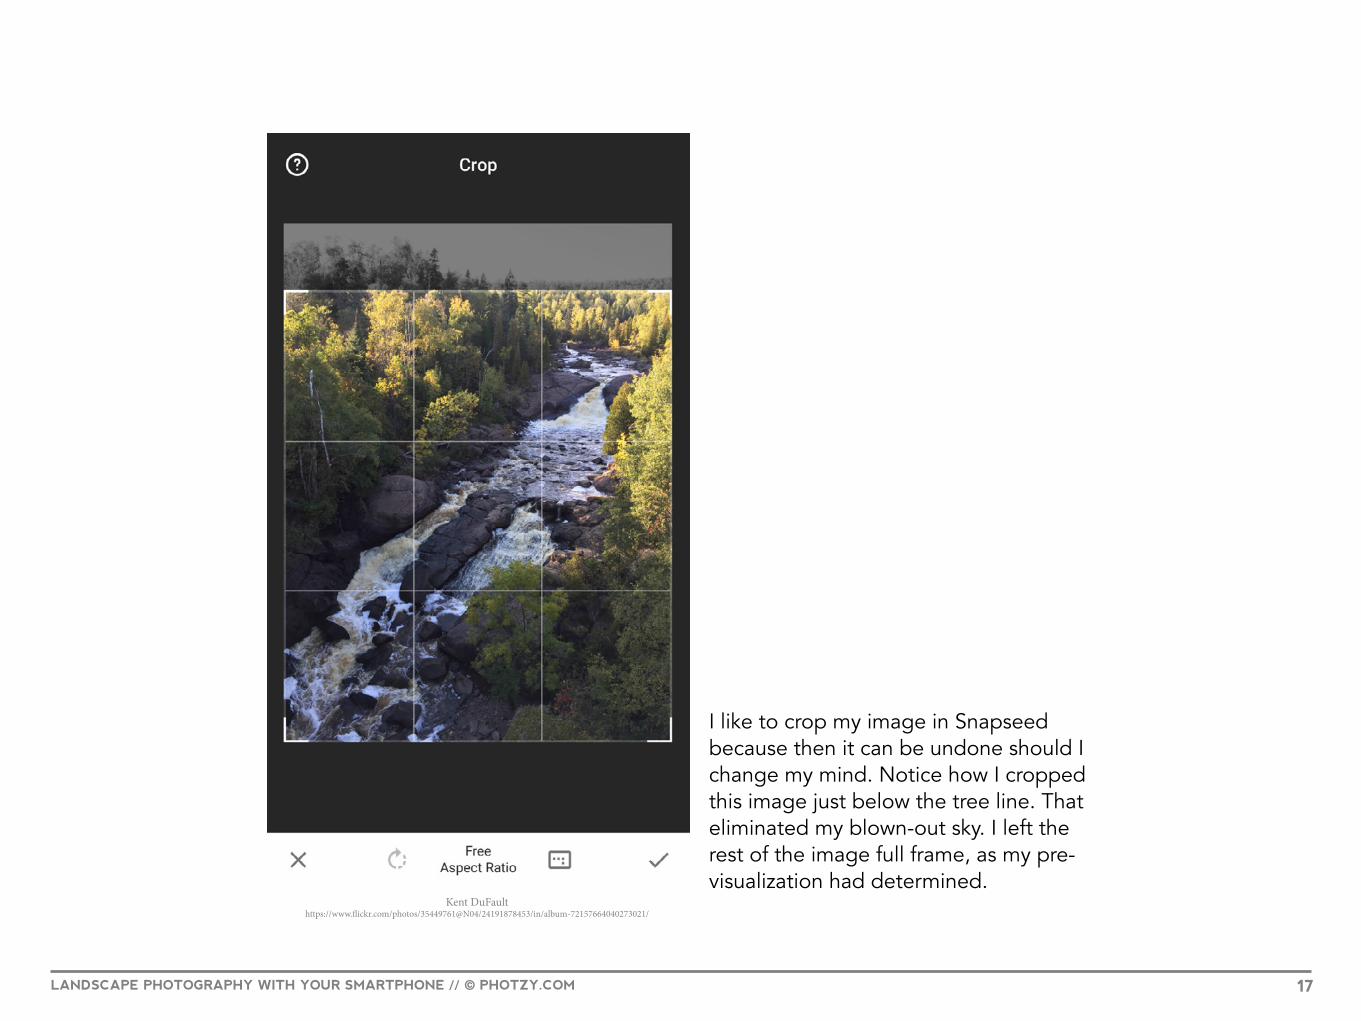
I like to crop my image in Snapseed because then it can be undone should I change my mind. Notice how I cropped this image just below the tree line. That eliminated my blown-out sky. I left the rest of the image full frame, as my pre-visualization had determined.

LANDSCAPE PHOTOGRAPHY WITH YOUR SMARTPHONE // © PHOTZY.COM 18
Kent DuFaulthttps://www.flickr.com/photos/35449761@N04/24451073399/in/album-72157664040273021/
Next, I wanted to adjust the Dmax, which was out of range for the camera to capture. I accomplished that with the HDR Filter. As you can see at the bottom, there are four settings: Nature, People, Fine, and Strong. Ninety-nine percent of the time I use the Nature or People settings. I’m not a big fan of when HDR becomes overdone and turns the photograph into fantasy art. The Nature and People settings are subtler. You can adjust the filter strength by dragging your fingertip horizontally across the screen.

LANDSCAPE PHOTOGRAPHY WITH YOUR SMARTPHONE // © PHOTZY.COM 19
Kent DuFaulthttps://www.flickr.com/photos/35449761@N04/24725241651/in/album-72157664040273021/
With the Selective Tool, you can fine-tune areas of your photograph. The Selective Tool allows adjusting the Brightness, Contrast, and Saturation. You can change the function by dragging your finger up or down vertically on the screen. You select new “places” to adjust by pressing the + icon.

LANDSCAPE PHOTOGRAPHY WITH YOUR SMARTPHONE // © PHOTZY.COM 20
Kent DuFaulthttps://www.flickr.com/photos/35449761@N04/24190539794/in/album-72157664040273021/
The Glamour Glow Filter can perform a number of functions. There are five presets and you can adjust the level of the glow. I used #5 and reduced the glow from the default setting by about 1/3. The result of using this filter was this: the highlight-to-shadow tones were evened out, the saturation in the warm tones was boosted, and the image overall was shifted toward the warm spectrum. Bottom line; it made the image much prettier to look at!
LANDSCAPE PHOTOGRAPHY WITH YOUR SMARTPHONE // © PHOTZY.COM 21
Kent DuFaulthttps://www.flickr.com/photos/35449761@N04/24191878053/in/album-72157664040273021/
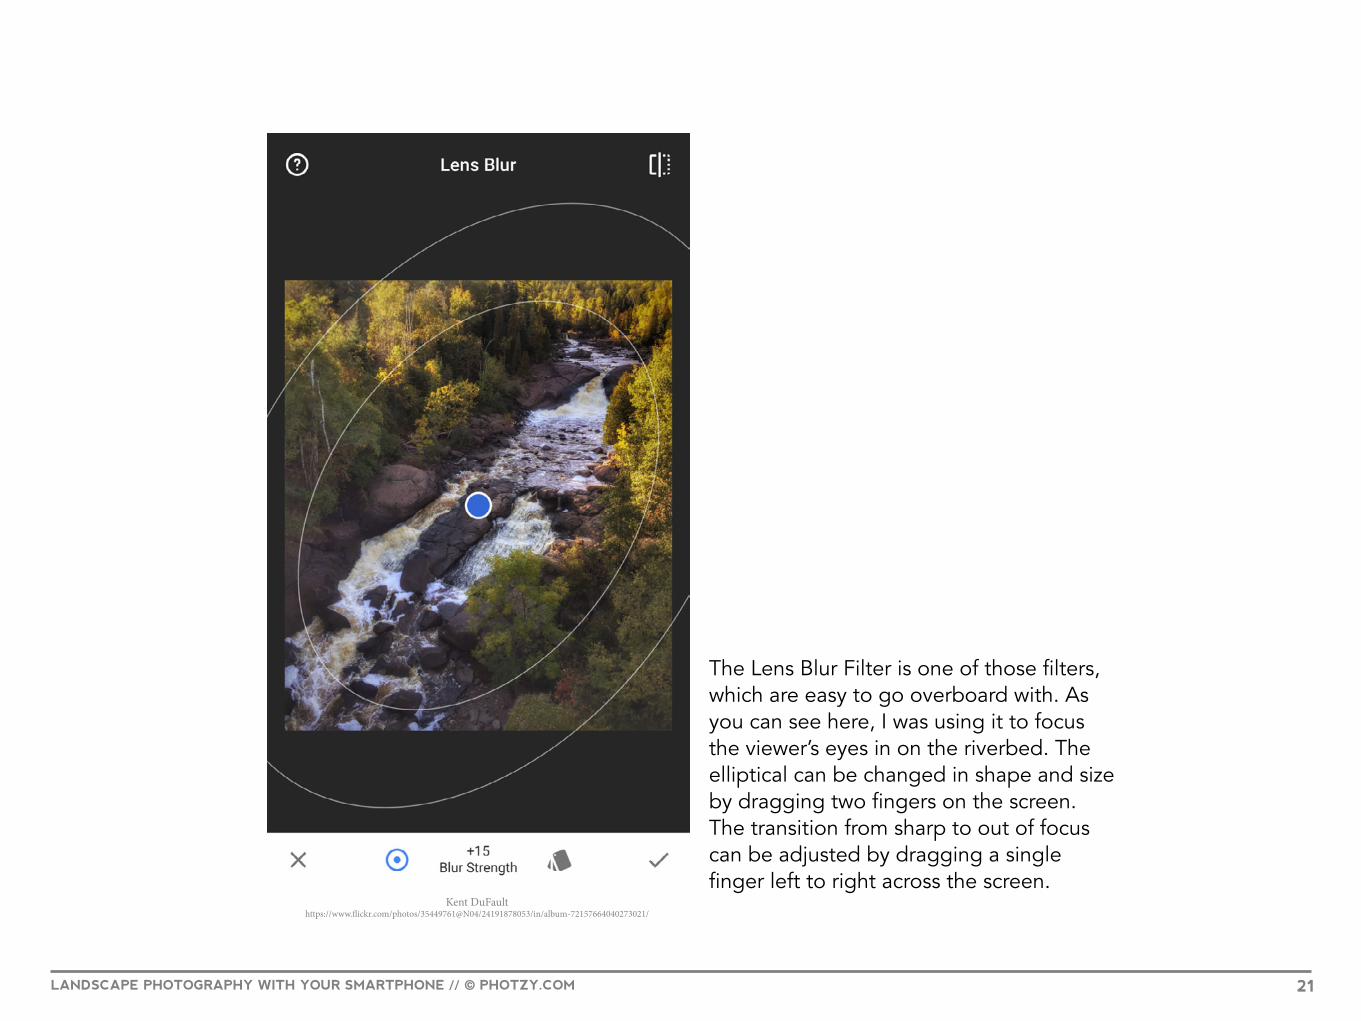
The Lens Blur Filter is one of those filters, which are easy to go overboard with. As you can see here, I was using it to focus the viewer’s eyes in on the riverbed. The elliptical can be changed in shape and size by dragging two fingers on the screen. The transition from sharp to out of focus can be adjusted by dragging a single finger left to right across the screen.

LANDSCAPE PHOTOGRAPHY WITH YOUR SMARTPHONE // © PHOTZY.COM 22
Kent DuFaulthttps://www.flickr.com/photos/35449761@N04/24700861942/in/album-72157664040273021/
The Details Tool is similar to some adjustments that you might be familiar with, like Clarity or Sharpening in Photoshop and Lightroom. It brings out the lines and structure that can be lost in a digital image. It makes the image sharper to the eye. This is a global adjustment to the entire image.

LANDSCAPE PHOTOGRAPHY WITH YOUR SMARTPHONE // © PHOTZY.COM 23
Kent DuFaulthttps://www.flickr.com/photos/35449761@N04/24451072839/in/album-72157664040273021/
Eye snags are unwanted attention-gathering elements within a photograph. They are discussed at length in the premium composition guides that I mentioned earlier. In our example, there were two that I felt gathered unwanted attention: a stand of tree trunks to the left, and a group of bright red leaves in the lower right.
LANDSCAPE PHOTOGRAPHY WITH YOUR SMARTPHONE // © PHOTZY.COM 24
Kent DuFaulthttps://www.flickr.com/photos/35449761@N04/24190539554/in/album-72157664040273021/
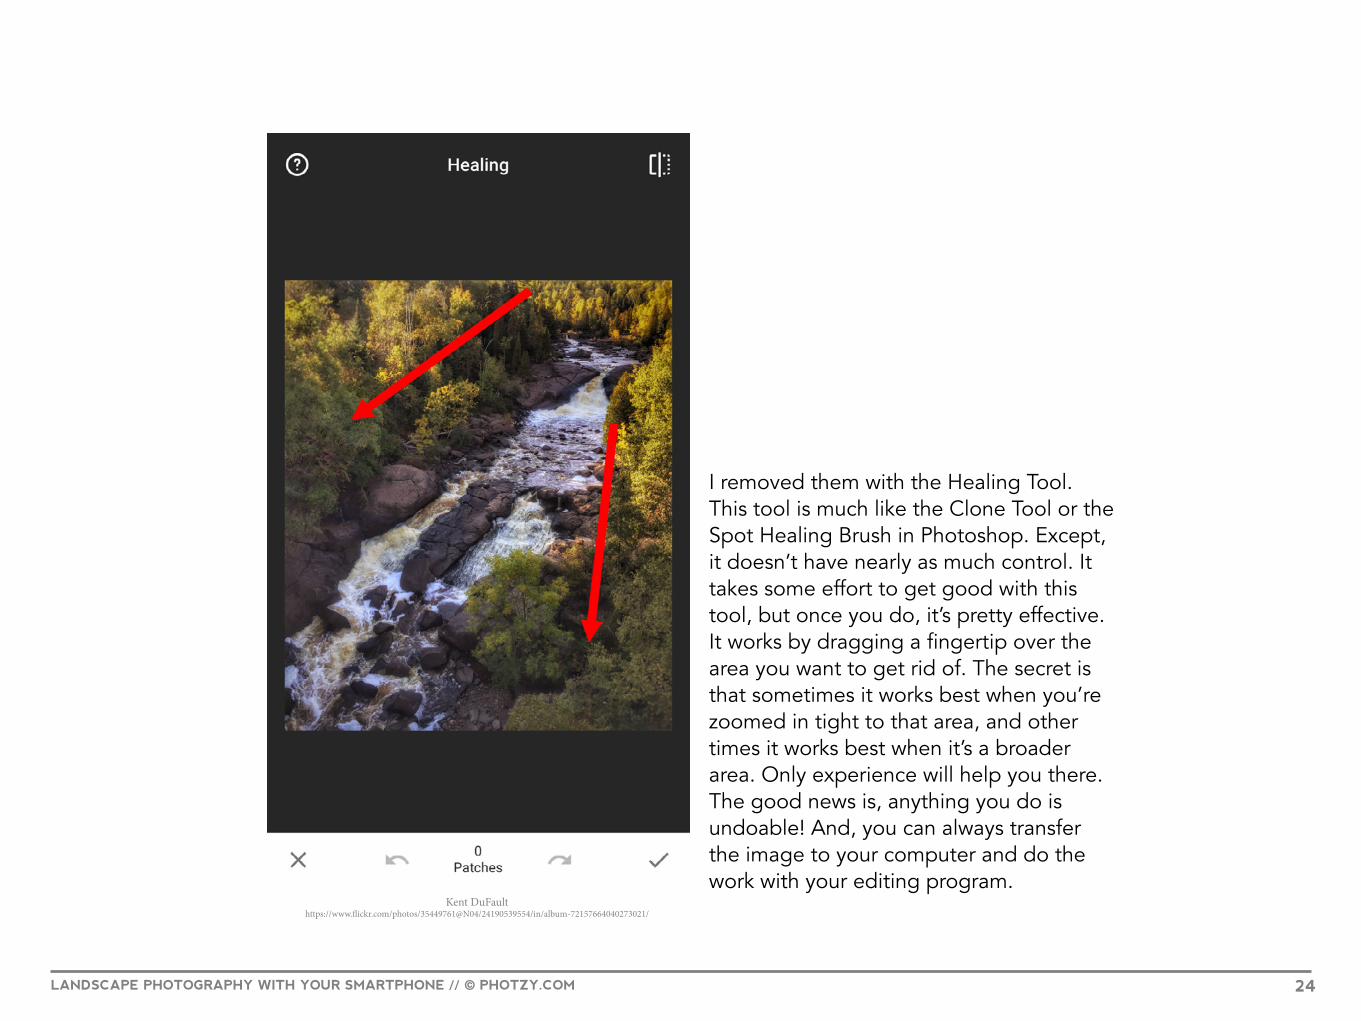
I removed them with the Healing Tool. This tool is much like the Clone Tool or the Spot Healing Brush in Photoshop. Except, it doesn’t have nearly as much control. It takes some effort to get good with this tool, but once you do, it’s pretty effective. It works by dragging a fingertip over the area you want to get rid of. The secret is that sometimes it works best when you’re zoomed in tight to that area, and other times it works best when it’s a broader area. Only experience will help you there. The good news is, anything you do is undoable! And, you can always transfer the image to your computer and do the work with your editing program.

LANDSCAPE PHOTOGRAPHY WITH YOUR SMARTPHONE // © PHOTZY.COM 25
Kent DuFaulthttps://www.flickr.com/photos/35449761@N04/24725241061/in/album-72157664040273021/
Some people like vignettes and others don’t. I like them when they direct the viewer’s eyes toward an area that I want them to go. Remember earlier, I told you that a viewer’s eyes will tend to go to a focused area and a bright area, over an unfocused area or a dark area. By putting a darker vignette around the outer rim of this image, it reinforced my desire to force the viewer’s eyes toward the river.

LANDSCAPE PHOTOGRAPHY WITH YOUR SMARTPHONE // © PHOTZY.COM 26
Kent DuFaulthttps://www.flickr.com/photos/35449761@N04/24725241151/in/album-72157664040273021/
One of the beautiful aspects of the Snapseed Vignette Tool is that you cannot only adjust the outside of the frame, but you can also adjust the reverse inner area. I utilized that to further brighten the area where I wanted the eyes to go (right where that blue dot is!).

LANDSCAPE PHOTOGRAPHY WITH YOUR SMARTPHONE // © PHOTZY.COM 27
Kent DuFaulthttps://www.flickr.com/photos/35449761@N04/24523189630/in/album-72157664040273021/
These were my final touches on the image. I want you to note the red area by the “Blue B.” With many of the tools and filters, you can adjust the area that they will affect. You do that by placing your thumb and forefinger on the screen and squeezing them in and out. The red area is the spot that will be affected by your adjustment. In my final adjustments, I either brightened or darkened all of the locations where the arrows point.

LANDSCAPE PHOTOGRAPHY WITH YOUR SMARTPHONE // © PHOTZY.COM 28
Kent DuFaulthttps://www.flickr.com/photos/35449761@N04/24716300622/in/dateposted-public/
Here is the large version of the final image.

LANDSCAPE PHOTOGRAPHY WITH YOUR SMARTPHONE // © PHOTZY.COM 29
Let’s take a self-test and see what you’ve learned.
1. Please name three limitations of a smartphone camera.
2. Please tell me which camera system (DSLR or smartphone) has an advantage when the photographer is stuck to a particular point of view.
3. Can you name for me two advantages to creating your landscape photography with a smartphone?
4. Tell me two characteristics in a photograph that attract a viewer’s attention.
5. Name three smartphone apps discussed in this guide.
6. Name two techniques that are easily “overdone” resulting in images that look fake or with a fantasy element.
7. When creating a landscape photograph with your smartphone, what should always be in the back of your mind?
8. Is Snapseed a shooting app, an editing app, or both?
If you have an outstanding smartphone landscape photograph, we would like to see it. If you created it after reading this guide, then we also want to hear the story behind your shot and how the guide helped you. Post your image on the Photzy Facebook page along with your story and the hashtag #smartphonelandscapephoto.
If you have an outstanding smartphone
landscape photograph, we would like to see it.
xxxxxx
30
DO YOU WANT TO TAKE AMAZING LANDSCAPE PHOTOGRAPHS?
CLICK HERE TO TAKE A LOOK AT OUR
COMPLETE GUIDE »
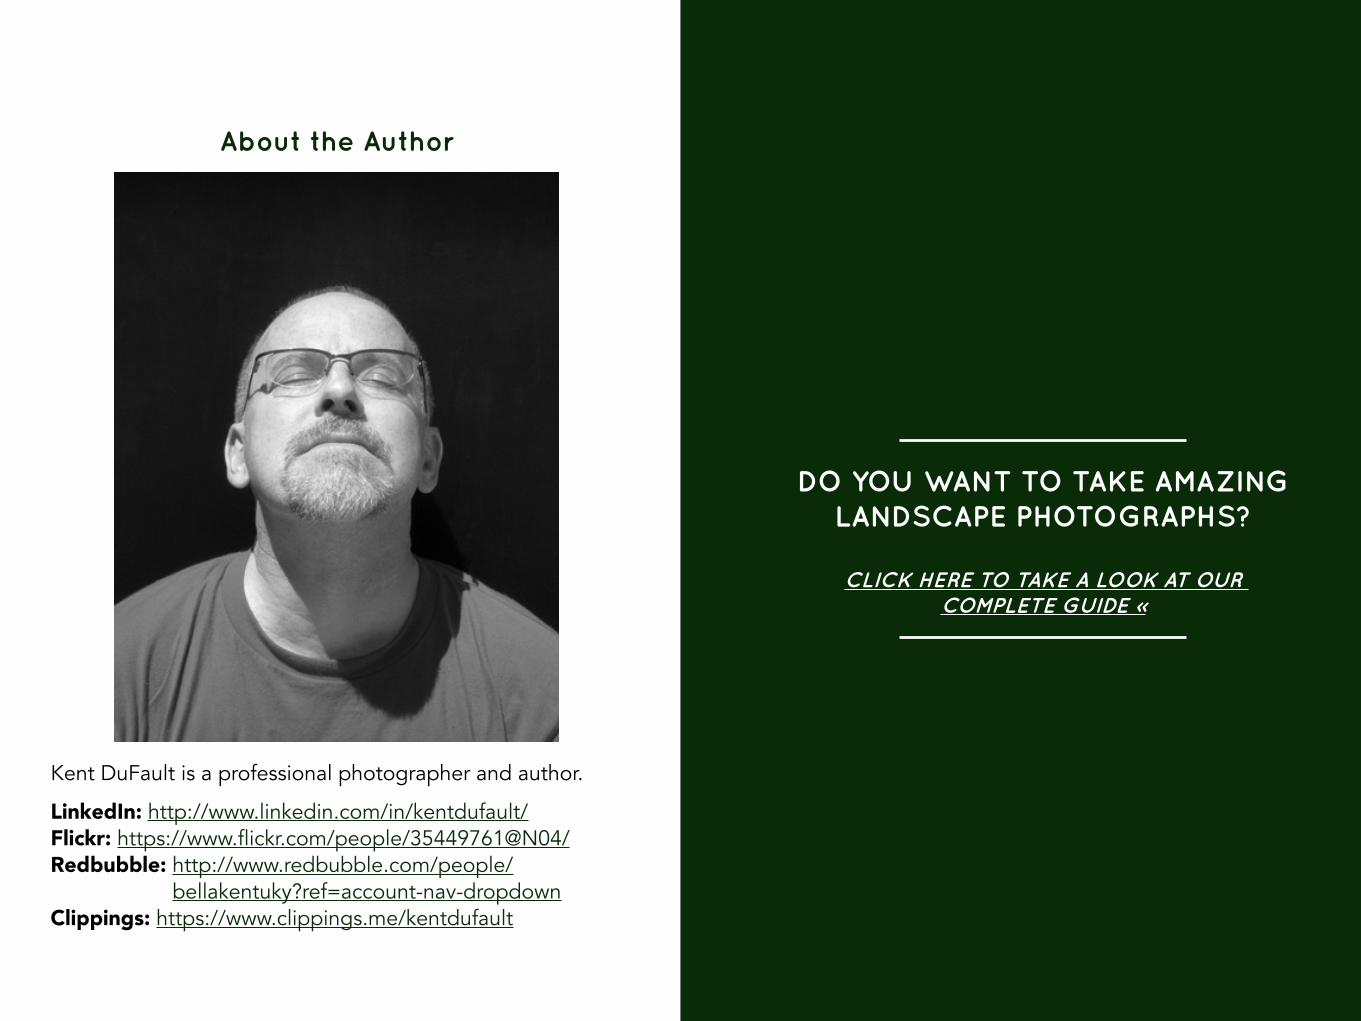
About the Author
Kent DuFault is a professional photographer and author.
LinkedIn: http://www.linkedin.com/in/kentdufault/Flickr: https://www.flickr.com/people/35449761@N04/Redbubble: http://www.redbubble.com/people/
bellakentuky?ref=account-nav-dropdownClippings: https://www.clippings.me/kentdufault