Embed Size (px)
Citation preview
Ken Goldberg Database Lab Notes
1
Lab 2: MS ACCESS Tables Summary
• Introduction to Tables and How to Build a New Database • Creating Tables in Datasheet View and Design View • Working with Data on Sorting and Filtering
1. Introduction
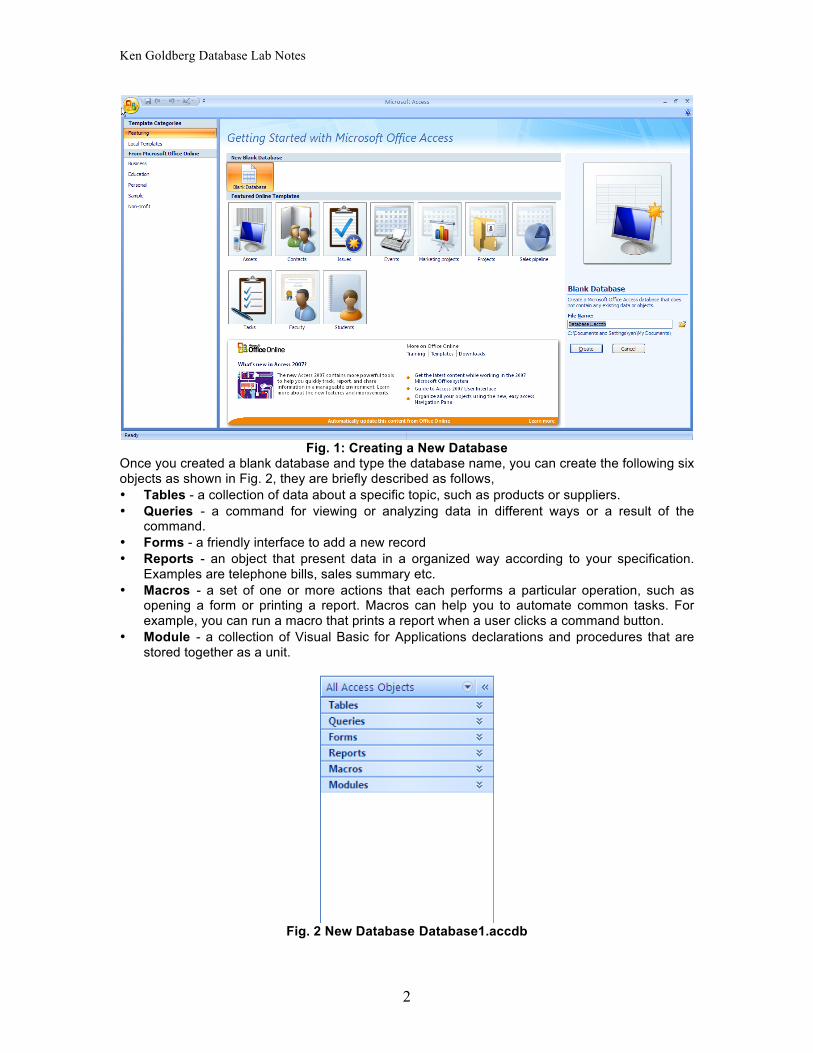
Creating a New Database First, open MS Access 2007. To build a new database, choose New Blank Database. By selecting New Blank Database, a panel will show up on the right, which allows us to create a blank database by entering the database name and choosing the location where on the computer we want to create the new database. We can also create a new database from other database template. For this session, we will focus on creating a database from a blank one, so click New Blank Database à Blank Database.
Ken Goldberg Database Lab Notes
2
Fig. 1: Creating a New Database
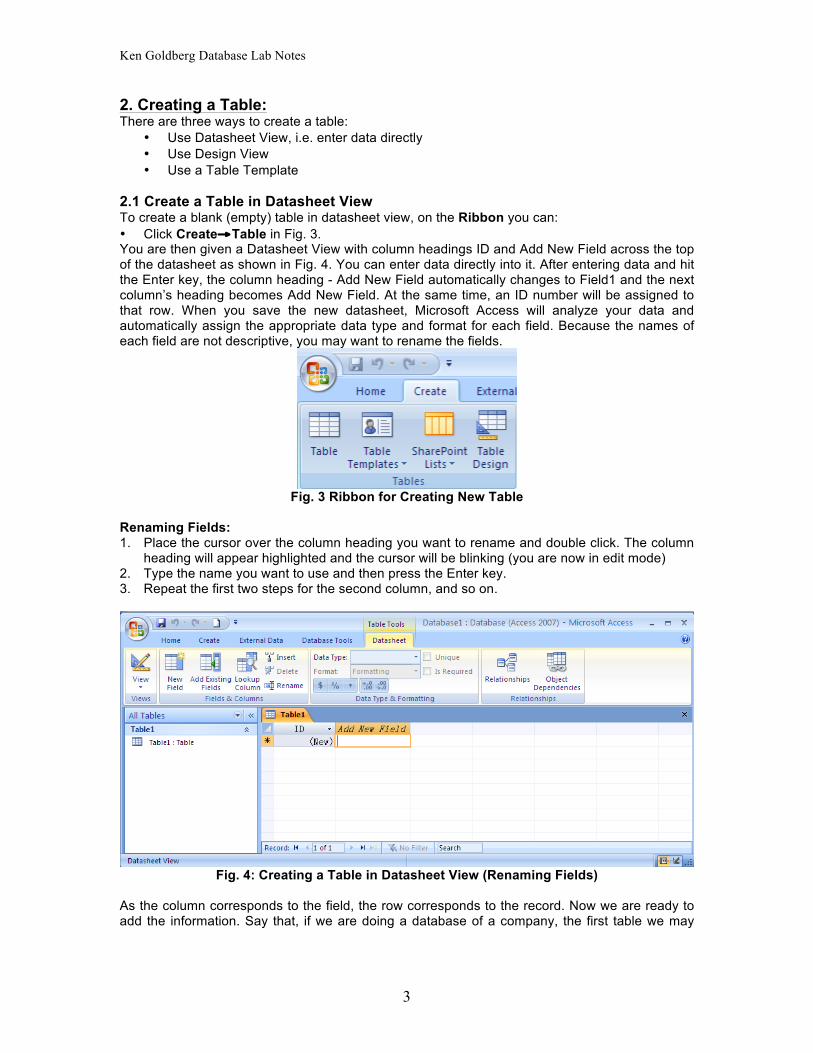
Once you created a blank database and type the database name, you can create the following six objects as shown in Fig. 2, they are briefly described as follows, • Tables - a collection of data about a specific topic, such as products or suppliers. • Queries - a command for viewing or analyzing data in different ways or a result of the
command. • Forms - a friendly interface to add a new record • Reports - an object that present data in a organized way according to your specification.
Examples are telephone bills, sales summary etc. • Macros - a set of one or more actions that each performs a particular operation, such as
opening a form or printing a report. Macros can help you to automate common tasks. For example, you can run a macro that prints a report when a user clicks a command button.
• Module - a collection of Visual Basic for Applications declarations and procedures that are stored together as a unit.
Fig. 2 New Database Database1.accdb
Ken Goldberg Database Lab Notes
3
2. Creating a Table: There are three ways to create a table:
• Use Datasheet View, i.e. enter data directly • Use Design View • Use a Table Template
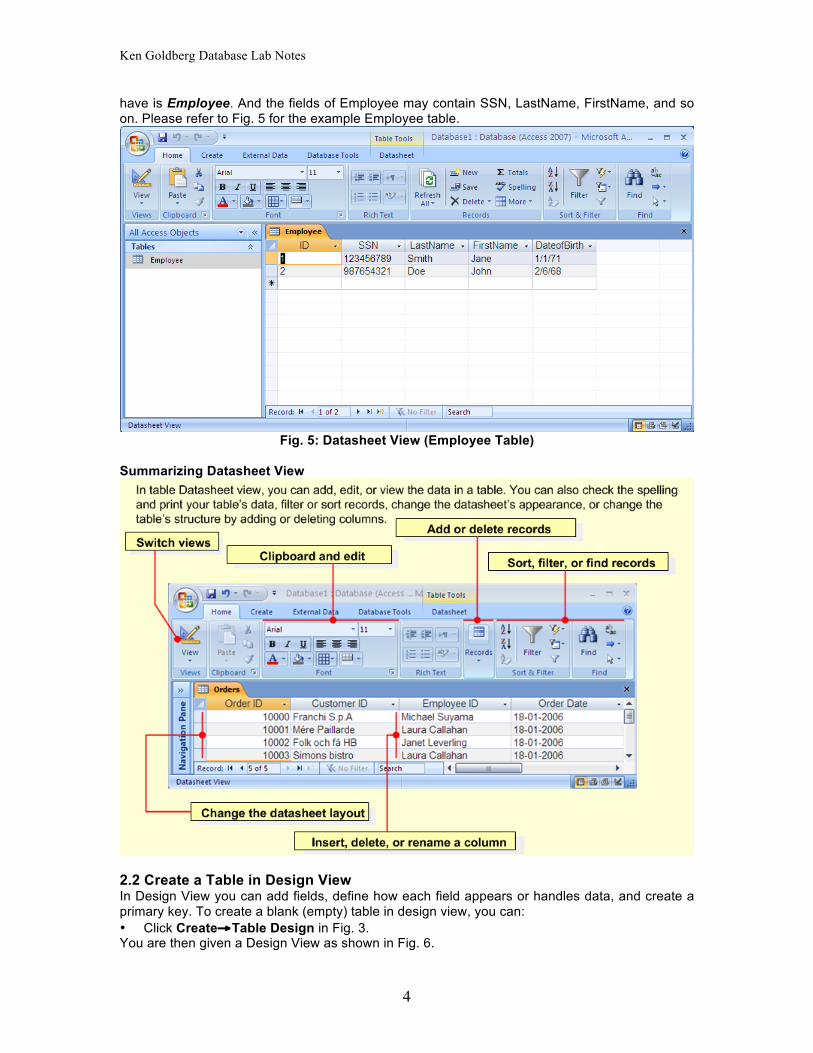
2.1 Create a Table in Datasheet View To create a blank (empty) table in datasheet view, on the Ribbon you can: • Click Create→Table in Fig. 3. You are then given a Datasheet View with column headings ID and Add New Field across the top of the datasheet as shown in Fig. 4. You can enter data directly into it. After entering data and hit the Enter key, the column heading - Add New Field automatically changes to Field1 and the next column’s heading becomes Add New Field. At the same time, an ID number will be assigned to that row. When you save the new datasheet, Microsoft Access will analyze your data and automatically assign the appropriate data type and format for each field. Because the names of each field are not descriptive, you may want to rename the fields.
Fig. 3 Ribbon for Creating New Table
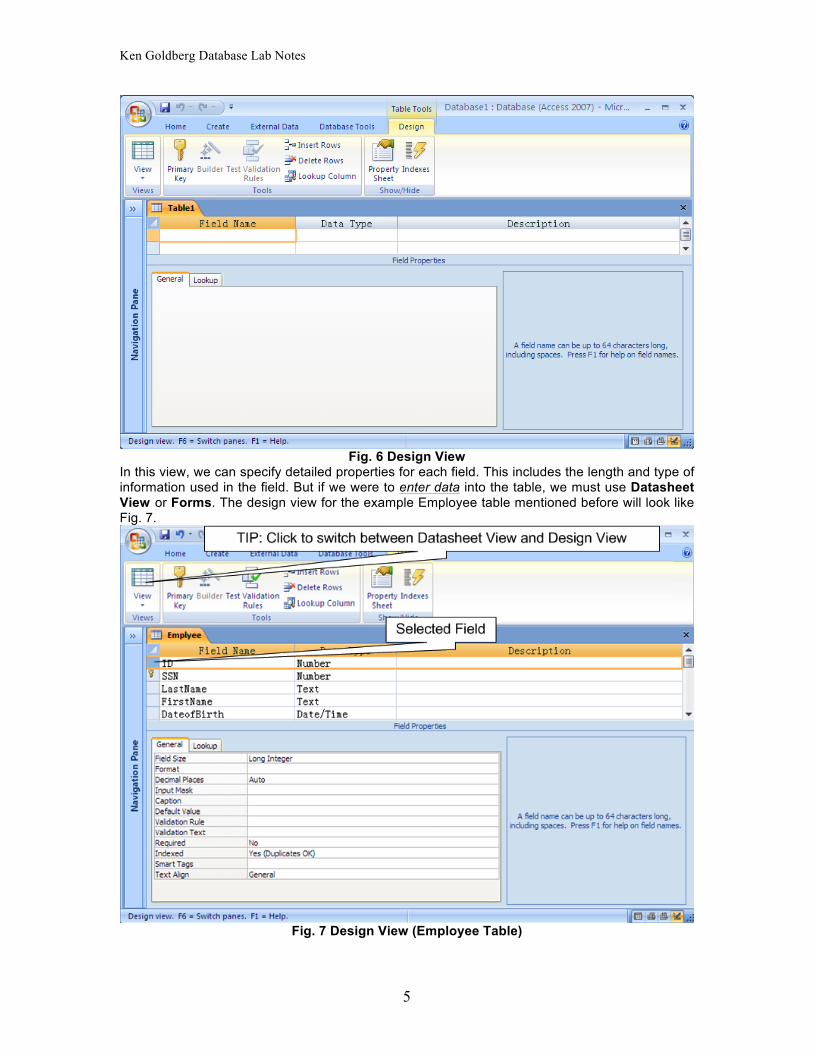
Renaming Fields: 1. Place the cursor over the column heading you want to rename and double click. The column
heading will appear highlighted and the cursor will be blinking (you are now in edit mode) 2. Type the name you want to use and then press the Enter key. 3. Repeat the first two steps for the second column, and so on.
Fig. 4: Creating a Table in Datasheet View (Renaming Fields)
As the column corresponds to the field, the row corresponds to the record. Now we are ready to add the information. Say that, if we are doing a database of a company, the first table we may
Ken Goldberg Database Lab Notes
4
have is Employee. And the fields of Employee may contain SSN, LastName, FirstName, and so on. Please refer to Fig. 5 for the example Employee table.
Fig. 5: Datasheet View (Employee Table)
Summarizing Datasheet View
2.2 Create a Table in Design View In Design View you can add fields, define how each field appears or handles data, and create a primary key. To create a blank (empty) table in design view, you can: • Click Create→Table Design in Fig. 3. You are then given a Design View as shown in Fig. 6.
Ken Goldberg Database Lab Notes
5
Fig. 6 Design View
In this view, we can specify detailed properties for each field. This includes the length and type of information used in the field. But if we were to enter data into the table, we must use Datasheet View or Forms. The design view for the example Employee table mentioned before will look like Fig. 7.
Fig. 7 Design View (Employee Table)
Ken Goldberg Database Lab Notes
6
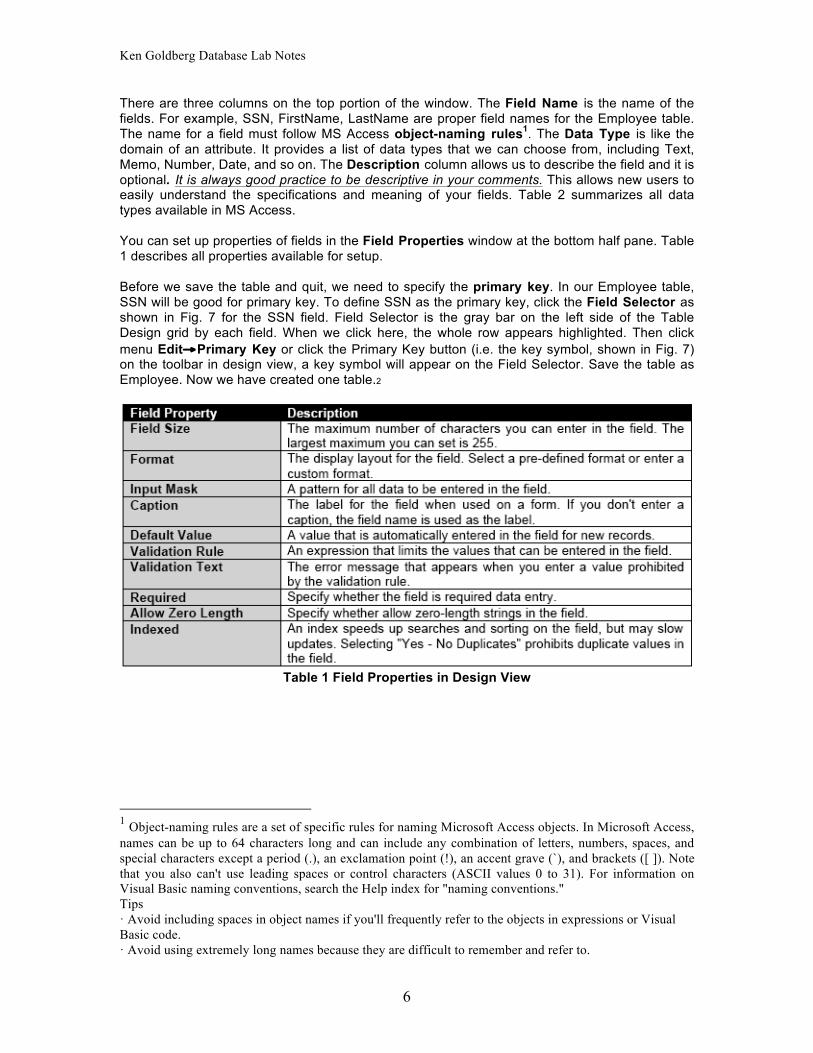
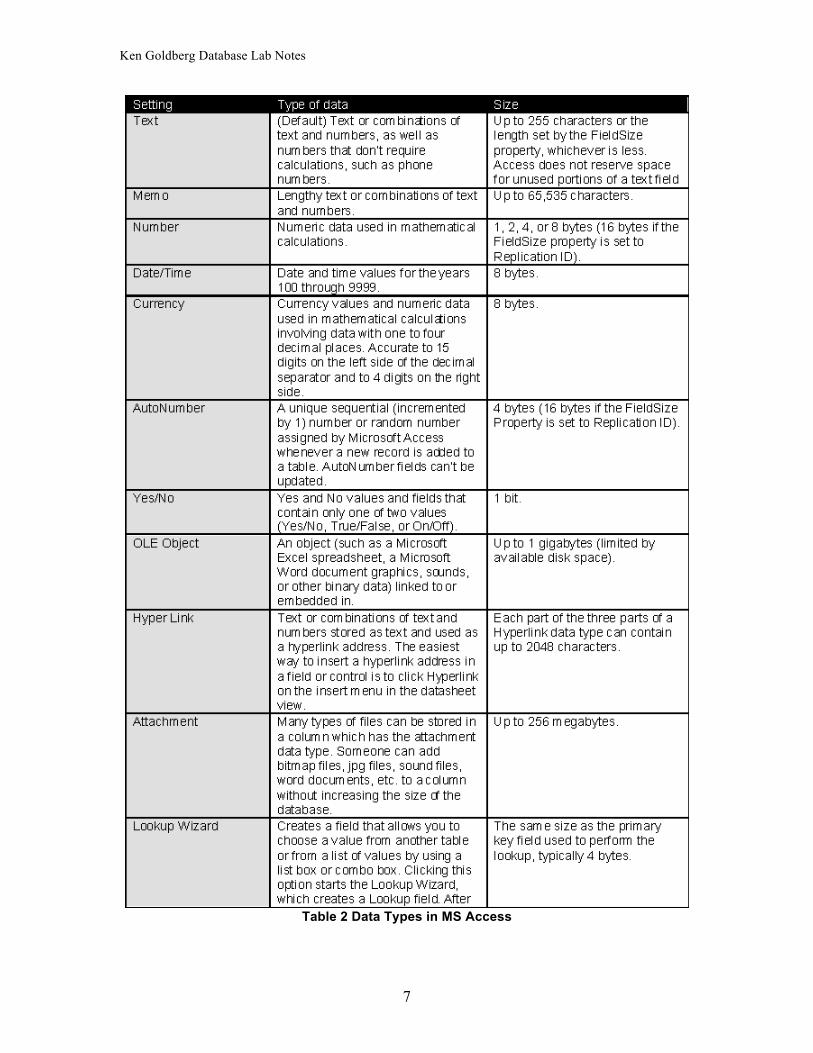
There are three columns on the top portion of the window. The Field Name is the name of the fields. For example, SSN, FirstName, LastName are proper field names for the Employee table. The name for a field must follow MS Access object-naming rules1. The Data Type is like the domain of an attribute. It provides a list of data types that we can choose from, including Text, Memo, Number, Date, and so on. The Description column allows us to describe the field and it is optional. It is always good practice to be descriptive in your comments. This allows new users to easily understand the specifications and meaning of your fields. Table 2 summarizes all data types available in MS Access. You can set up properties of fields in the Field Properties window at the bottom half pane. Table 1 describes all properties available for setup. Before we save the table and quit, we need to specify the primary key. In our Employee table, SSN will be good for primary key. To define SSN as the primary key, click the Field Selector as shown in Fig. 7 for the SSN field. Field Selector is the gray bar on the left side of the Table Design grid by each field. When we click here, the whole row appears highlighted. Then click menu Edit→Primary Key or click the Primary Key button (i.e. the key symbol, shown in Fig. 7) on the toolbar in design view, a key symbol will appear on the Field Selector. Save the table as Employee. Now we have created one table.2
Table 1 Field Properties in Design View
1 Object-naming rules are a set of specific rules for naming Microsoft Access objects. In Microsoft Access, names can be up to 64 characters long and can include any combination of letters, numbers, spaces, and special characters except a period (.), an exclamation point (!), an accent grave (`), and brackets ([ ]). Note that you also can't use leading spaces or control characters (ASCII values 0 to 31). For information on Visual Basic naming conventions, search the Help index for "naming conventions." Tips · Avoid including spaces in object names if you'll frequently refer to the objects in expressions or Visual Basic code. · Avoid using extremely long names because they are difficult to remember and refer to.
Ken Goldberg Database Lab Notes
7
Table 2 Data Types in MS Access
T

Ken Goldberg Database Lab Notes
8
Summarizing Design View2
2.3 Create a Table Based on a Table Template To create a Contacts, Tasks, Issues, Events or Assets table, you might want to start with the table templates for these subjects that come with Office Access 2007. To choose a template for your table from the above predefined templates you can: • Click Create→Table Templates in Fig. 3, • Select one of the available templates from the dropdown list. 3. Working with Data In this section, we will learn how to work with existing data. The sample database file used here is "Northwind 2007.accdb". It is a sample database comes with Microsoft Access. You can find it in by:
• Open MS Access; click Sample under the category listed in the left task pane on the Getting Started with Office Access page; then click on the Northwind 2007 icon, enter the name and location on the right task pane and click the Download button.
or • Go to directory C:\Program Files\Microsoft Office\Templates\1033\Access\ and
double click Northwind.accdb. Choose Object Type on the Navigation Pane after Northwind 2007.accdb is launched, Open "Orders" under "Tables". 3.1 Sorting In the Datasheet View, we can sort the records in ascending or descending orders. To sort a single column, click anywhere in the column desired. Simply click either the Sort Ascending
button or Sort Descending button on the Ribbon. We can also click the arrow on the right of the desired column heading and choose Sort Ascending or Sort Descending from the popup window.
2 You can set combination of more than two attributes as a primary key. To do so, first highlight attributes you wish to set as primary key, and click Primary Key button in design view.
Ken Goldberg Database Lab Notes
9
If we want to sort multiple columns, we need to do a little more work. The two columns we want to sort by must be adjacent to each other; the one that we want to sort by first must be to the left of the other. Let's work with "Orders" table in Northwind Database. Now we will try sorting by ' Shipped Date' then by 'Order Date', we must first move 'Shipped Date' column to the left of 'Order Date' column. Here are the steps,
1. Highlight the 'Shipped Date' column by clicking the 'Shipped Date' column heading. 2. Let go of the mouse button and then press it again, holding it this time. 3. Now drag the 'Shipped Date' column over the 'Required Date' column. When we get
just to the left of the 'Order Date', let go of the mouse button. Then 'Shipped Date' and 'Order Date' should sit side by side now.
4. Click the mouse button on the 'Shipped Date' header, highlighting the column. Holding the mouse button down, drag it over the 'Order Date' column so that both the 'Shipped Date' and 'Order Date' columns appear highlighted.
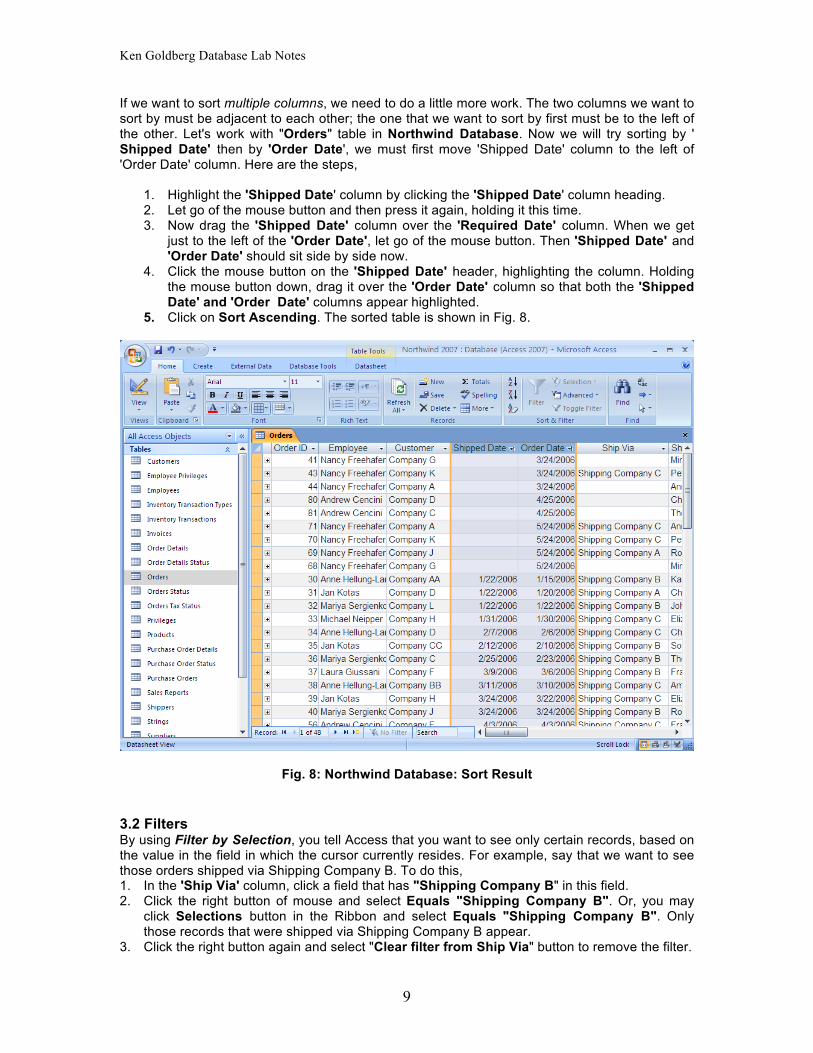
5. Click on Sort Ascending. The sorted table is shown in Fig. 8.
Fig. 8: Northwind Database: Sort Result 3.2 Filters By using Filter by Selection, you tell Access that you want to see only certain records, based on the value in the field in which the cursor currently resides. For example, say that we want to see those orders shipped via Shipping Company B. To do this, 1. In the 'Ship Via' column, click a field that has "Shipping Company B" in this field. 2. Click the right button of mouse and select Equals "Shipping Company B". Or, you may
click Selections button in the Ribbon and select Equals "Shipping Company B". Only those records that were shipped via Shipping Company B appear.
3. Click the right button again and select "Clear filter from Ship Via" button to remove the filter.
Ken Goldberg Database Lab Notes
10
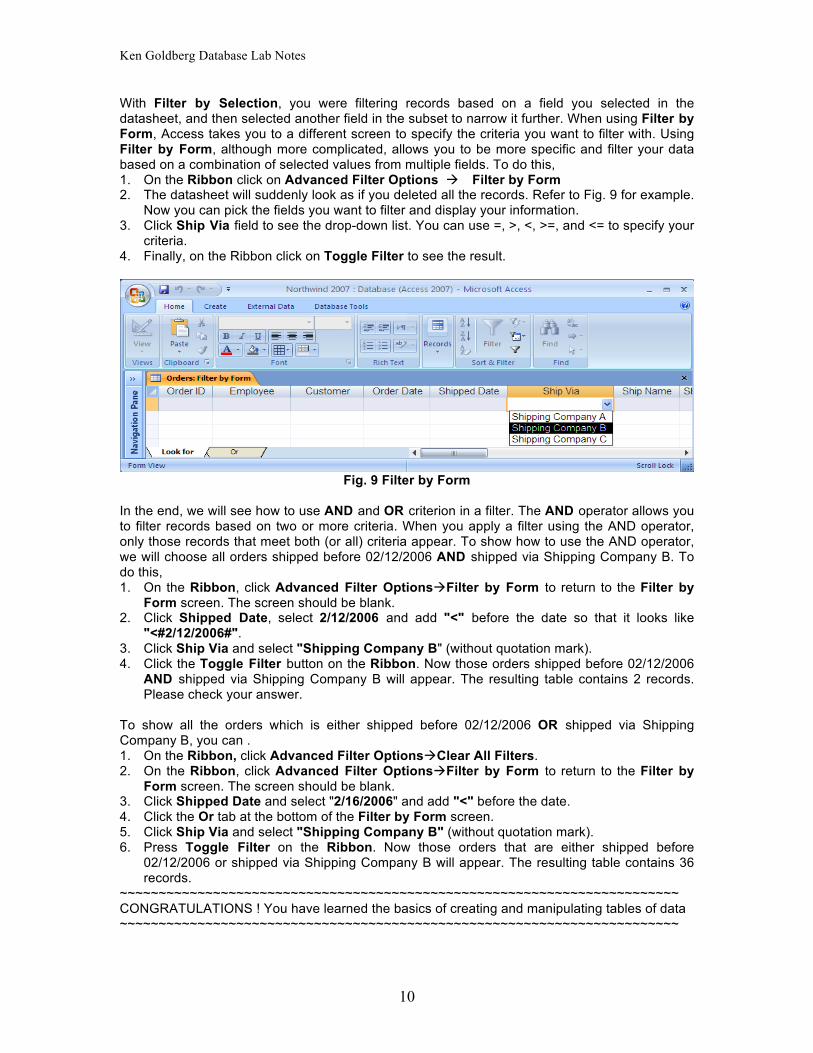
With Filter by Selection, you were filtering records based on a field you selected in the datasheet, and then selected another field in the subset to narrow it further. When using Filter by Form, Access takes you to a different screen to specify the criteria you want to filter with. Using Filter by Form, although more complicated, allows you to be more specific and filter your data based on a combination of selected values from multiple fields. To do this, 1. On the Ribbon click on Advanced Filter Options à Filter by Form 2. The datasheet will suddenly look as if you deleted all the records. Refer to Fig. 9 for example.
Now you can pick the fields you want to filter and display your information. 3. Click Ship Via field to see the drop-down list. You can use =, >, <, >=, and <= to specify your
criteria. 4. Finally, on the Ribbon click on Toggle Filter to see the result.
Fig. 9 Filter by Form
In the end, we will see how to use AND and OR criterion in a filter. The AND operator allows you to filter records based on two or more criteria. When you apply a filter using the AND operator, only those records that meet both (or all) criteria appear. To show how to use the AND operator, we will choose all orders shipped before 02/12/2006 AND shipped via Shipping Company B. To do this, 1. On the Ribbon, click Advanced Filter OptionsàFilter by Form to return to the Filter by
Form screen. The screen should be blank. 2. Click Shipped Date, select 2/12/2006 and add "<" before the date so that it looks like
"<#2/12/2006#". 3. Click Ship Via and select "Shipping Company B" (without quotation mark). 4. Click the Toggle Filter button on the Ribbon. Now those orders shipped before 02/12/2006
AND shipped via Shipping Company B will appear. The resulting table contains 2 records. Please check your answer.
To show all the orders which is either shipped before 02/12/2006 OR shipped via Shipping Company B, you can . 1. On the Ribbon, click Advanced Filter OptionsàClear All Filters. 2. On the Ribbon, click Advanced Filter OptionsàFilter by Form to return to the Filter by
Form screen. The screen should be blank. 3. Click Shipped Date and select "2/16/2006" and add "<" before the date. 4. Click the Or tab at the bottom of the Filter by Form screen. 5. Click Ship Via and select "Shipping Company B" (without quotation mark). 6. Press Toggle Filter on the Ribbon. Now those orders that are either shipped before
02/12/2006 or shipped via Shipping Company B will appear. The resulting table contains 36 records.
~~~~~~~~~~~~~~~~~~~~~~~~~~~~~~~~~~~~~~~~~~~~~~~~~~~~~~~~~~~~~~~~~~~~~~~~ CONGRATULATIONS ! You have learned the basics of creating and manipulating tables of data ~~~~~~~~~~~~~~~~~~~~~~~~~~~~~~~~~~~~~~~~~~~~~~~~~~~~~~~~~~~~~~~~~~~~~~~~