Embed Size (px)
Citation preview

Italian Clock (Orologio) ©Class 1, Session A: Thursday 8:30 AM - 12:00 PM Part 1Class 4, Session B: Thursday 1:30 - 5:00 PM Part 2
Instructor / Designer: Giotto Faugno
Designation for Project Use: Giotto Faugno retains full rights for use of this project.
Instructor’s Comments: Giotto designed this clock for us. He made all the plaits for this project, however to save time for the participant, he has some prepared plaits which will be provided in the kit. The participant will need to prepare the spiral plait and the straws for marquetry so that there will be enough time to complete the project. The prepared plaits used for the clock are also used in hat making so they are available where hat makers’ supplies are sold. He has given us the measurements in cm and I have them in inches in parentheses as they are not exactly the same but it will help you get an idea of sizes.
Size of Project: 42 cm (16 ½”) x 33 cm (13”)
Skill Level: Intermediate
Pre-requisites: Know how to prepare straw for marquetry and five straw spiral
What will be taught in class: Basket weave marquetry and assembly of the clock
What needs to be done before coming to class: Prepare straws for basket weave marquetry. 56” of 5 straw spiral weave 1998 PD pg. 37 (diameter is 1/2 inch, use fine/med straws)
Suggested Wheat: see straws needed

Straws needed: Also needed are the straws for the 5 straw spiral, which will be made before the class.
35 split straws 16 1/2” in length x 3/8” width as uniform as possible and 45 split straws 13” by 3/8” to create a panel that measures 161/2 “ by 13” when finished. If you do not have straw this size, you can purchase them from The Straw Shop https://thestrawshop.com/rye-straw/ The packages come with mixed lengths of straw. If you do not get enough long ones for the project, please contact Joan Dulcey [email protected] for help. The verticals straws for the clock can be pieced while weaving to get the length.
Rye or wheat works for this project, but you may have to use rye in order to get the length and uniform width in a second joint straw. To prepare rye straw for marquetry the following method works pretty well.
Method 1: Run hot water from your sink through the straws. Open the straw with a Hindenburg or other tool you use to split straws. Gently open and pull straw through a hair straightening iron several times to get a nice flat straw. Once you open the straws you will need to adjust width of straws to be the same. Pulling a pin through the length at the correct width works pretty well.
Method 2: Boil water in a tea kettle that whistles. Stick the rye straw in the whistle hole so that it forces the steam through the straw for a count of 20 or so. Quickly split the rye straw open with a Hindenburg or other tool and flatten the straw. You may want to iron it, and you may need to adjust the width.
Other supplies by instructor: *wooden base, *clockworks, *prepared plaits in the following sizes:7 straw flat plait, 1.3cm x 2 meters and 80 cm 11 straw flat plait, 2.5cm x 3 meters and 40 cm
Supplies to bring:Masking tape, scissors, x-acto knife, hot glue gun, hot glue sticks. Felt for the back of the clock, extension cord.
Materials Kit: Cost: $35 However, at the time of this posting, he was still working on them, so the cost of postage will be added to this. If you can afford to pay more it would be greatly appreciated.
Extra kits – Not available
Kits are required if offered. Includes * items above.

Lithuanian Cross © 2018
Class 2, Session A: Thursday 8:30 AM - 12:00 PM
Instructor / Designer: Marion Vavra
Designation for Project Use: Artist grants full use of the project for NAWW members.
Instructor’s Comments: This Lithuanian Cross was designed as a master class project for the 9th International Straw Art Festival, Magic of Straw, held in Vilnius, Lithuania in July, 2019. I wanted to share my American cultural style of cross making and show the beauty of our Kansas wheat straw. The cross has a brilliant red linen fringed center that highlights the circle of plaited straw. The linen was purchased in Sanok, Poland where I was attending the 8th International Straw Art Festival in 2016. I want to share these experiences with our NAWW artists as we make this multi-cultural cross.
Size of Project: 5” wide, 8” long, ¾” deep (12.7cm, 20.3cm, 1.9cm)
Skill Level: Intermediate
Pre-requisites: None
What will be taught in class: • Modified basket weave cathedral step - Marian’s instructions• Cat foot plait (NAWW Plait 1998 – Three-straw cat foot (a.k.a. Ring, Cat’s Paw))
What needs to be done before coming to class: Soak all the straws for plaiting

Suggested Wheat: Good plaiting straw. Marian uses the variety Larned a Kansas hard red winter wheat.
Straws needed: *28 matched straws without heads, 12”-14” (30.9cm - 35.5cm) long for cross arms *3 matched straws without heads, 14” (35.6cm) long for center boss
Other supplies by instructor: • *Red linen fabric, 2 ½” (6.3 cm) square • *Red seed beads, *Small sequins pins 4-5• *26 gauge beading wire for hanger• *Snap clothespins -2 small
Supplies to bring:• Thread and tacky glue• Masking tape and cardboard or pins and pin board for center boss
Materials Kit: Cost: $20 email: [email protected]• Extra kits – Available
Kits are required if offered. Includes * items above.

Embroidered Mallow Flower ©
Class 3, Session A: Thursday 8:30 AM - 12:00 PM Part 1Class 6, Session B: Thursday 1:30 - 5:00 PM Part 2
Instructor / Designer: Illia Lashko
Assistant: Lana Lashko
Designation for Project Use: Illia Lashko retains full rights for use of this project.
Instructor’s Comments: Illia learned straw embroidery from his mother as a young boy. Now a college professor, Illia’s work has gotten its own recognition. He has developed his own very unique straw embroidery techniques. He often embroiders on pattern fabric which contrasts with his beautiful straw work. He will be assisted by his new bride Yana.
Size of Project: 8” x 8”
Skill Level: Open Pre-requisites: None
What will be taught in class: Straw embroidery
What needs to be done before coming to class: n/a
Suggested Wheat: Soft straws
Straws needed: *in kit
Other supplies by instructor: *fabric, *straw, *needles, *glue
Supplies to bring: Scissor snips, small ruler, 9” embroidery hoop
Materials Kit: Cost: $10 Extra kits – Not available
Kits are required if offered. Includes * items above.

Bent Oak Leaf Medallion - Framed Class 5, Session B: Thursday 1:30 - 5:00 PM
Instructor / Designer: Richard Kulbacki
Designation for Project Use: The plaits and techniques are in public domain. Richard Kulbacki gives NAWW members full use of the project.
Instructor’s Comments: The mighty oak is a prominent symbol in Slavic/ Scandinavian folk lore and in Viking religion. In Manitoba, Canada one of my favorite leaves to gather and press in the fall is the Manitoba Oak because of its distinctive shape and symbolism.
Size of Project: 7” x 2” x ⅛”
Skill Level: Open
Pre-requisites: N/A , Advanced students may want to make 20” or longer plait of single batwing plait. 1998 PD pg.119
What will be taught in class: Marquetry and a choice of Hair braid 1998 PD pg 73, Four Straw Rustic 1998 PD pg 153 or Compass Plait 1998 PD pg 3, and how to add straws to make the plaits longer. Advanced weavers may make a single Batwing frame but this will not be taught in class. 1998 PD pg 119.
What needs to be done before coming to class: n/a
Suggested Wheat: Any long, pliable variety of wheat is good for the plaited frame. Second joint barley or wild oats is good for marquetry. In Canada Sinton, Old Russian, or 1812 Red Fife from Scotland.

Straws needed: * Frame- 20 long pliable straws soaked,* Marquetry – 10 + pieces, second straw 10” long , split and flattened .
Other supplies by instructor: * real pressed leaf, * cardstock
Supplies to bring:Tacky Glue, small curved scissors for delicate cuts, thread, a few groceries ties, pencil, ruler, flattening tool such as a Hindenburg, basic straw art kit as listed in registration packet.
Materials Kit: Cost: $10
Extra kits – Available if artist contacted in timely manner prior to convention. email: [email protected]
Kits are required if offered. Includes * items above.

Italian Heart Box (Scatola Cuore) ©Class 7, Session C: Friday 8:30 AM - 12:00 PM Part 1Class 10, Session D: Friday 1:30 - 5:00 PM Part 2
Instructor / Designer: Giotto Faugno
Designation for Project Use: Giotto Faugno retains full rights for use of this project.
Instructor’s Comments: This box has a lot of texture and interest. Giotto originally made all the plaits for this project. However, for the sake of time, many prepared plaits will be provided in the kit. The participant will need to prepare the straws for marquetry as well as a few other basic plaits, so that there will be enough time to complete the project. The prepared plaits used for the heart are also used in hat making so they are available where hat makers’ supplies are sold. Size of Project: 8” x 8”
Skill Level: Open
Pre-requisites: Know how to prepare straw for marquetry, two straw plait 1998 PD pg 1, catsfoot 1998 PD pg 15, 5- straw spiral 1998 PD pg 37, hairbraid 1998 PD pg 73.
What will be taught in class: Basket weave marquetry and applying different textures to box.
What needs to be done before coming to class: Prepare straw marquetry. Make the following plaits: 26” of 5-straw spiral (diameter is 1/2 inch, use fine/med straws).14 ½” of 2 straw plait 14 ½” of Catsfoot 14 ½” of hairbraid

Suggested Wheat: see straws needed
Straws needed: 55 split straws 9-10” in length x 3/8” width as uniform as possible for the basket weave marquetry. Whole straws uniform in thickness to fill center of heart about 5” x 5”. Prepare enough straws for marquetry 3 ½” x 22” to cover sides of box. Straws for above plaits.
If you do not have straws for the basketweave marquetry, you can purchase them from The Straw Shop https://thestrawshop.com/rye-straw/
Rye or wheat works for this project, but you may have to use rye in order to get the length and uniform width in a second joint straw. To prepare rye straw for marquetry the following method works pretty well.
Method 1: Run hot water from your sink through the straws. Open the straw with a Hindenburg or other tool you use to split straws. Gently open and pull straw through a hair straightening iron several times to get a nice flat straw. Once you open the straws you will need to adjust width of straws to be the same. Pulling a pin through the length at the correct width works pretty well.
Method 2: Boil water in a tea kettle that whistles. Stick the rye straw in the whistle hole so that it forces the steam through the straw for a count of 20 or so. Quickly split the rye straw open with a Hindenburg or other tool and flatten the straw. You may want to iron it, and you may need to adjust the width.
Other supplies by instructor: *paper mache’ boxes about 8” x 8”, *Prepared plaits in the following sizes, 7 straw flat plait, 1cm x 65 cm 5 straw flat plait, 1cm x 65 cm5 straw flat plait, 1cm x 2 meters 70 cm rolled up on stick will make 1 meter 36 cm
Supplies to bring:Masking tape, scissors, x-acto knife, hot glue gun, hot glue sticks. extension cord.
Materials Kit: Cost: $20 Extra kits – Not available
Kits are required if offered. Includes * items above.
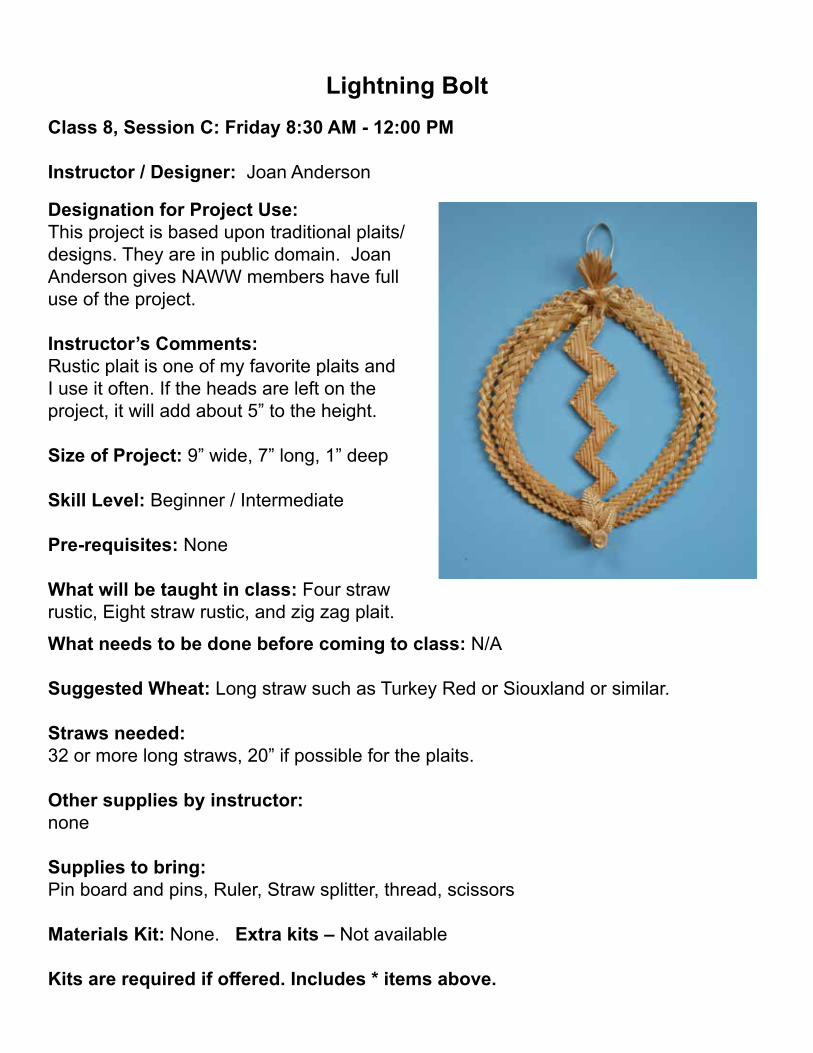
Lightning BoltClass 8, Session C: Friday 8:30 AM - 12:00 PM
Instructor / Designer: Joan Anderson
Designation for Project Use: This project is based upon traditional plaits/designs. They are in public domain. Joan Anderson gives NAWW members have full use of the project.
Instructor’s Comments: Rustic plait is one of my favorite plaits and I use it often. If the heads are left on the project, it will add about 5” to the height.
Size of Project: 9” wide, 7” long, 1” deep
Skill Level: Beginner / Intermediate
Pre-requisites: None
What will be taught in class: Four straw rustic, Eight straw rustic, and zig zag plait.
What needs to be done before coming to class: N/A
Suggested Wheat: Long straw such as Turkey Red or Siouxland or similar.
Straws needed: 32 or more long straws, 20” if possible for the plaits.
Other supplies by instructor: none
Supplies to bring:Pin board and pins, Ruler, Straw splitter, thread, scissors
Materials Kit: None. Extra kits – Not available
Kits are required if offered. Includes * items above.

Embroidered Rose ©Class 9, Session C: Friday 8:30 AM - 12:00 PM Part 1Class 12, Session D: Friday 1:30 - 5:00 PM Part 2
Instructor / Designer: Natalya Lashko
Assistant: Illia Lashko
Designation for Project Use: Natalya Lashko retains full rights for use of this project.
Instructor’s Comments: Natalya has developed a very unique straw embroidery technique after seeing an example of a table cloth made with embroidered straw in a book over 40 years ago. The straw looks like gold on fabric. Although we would have liked for her to teach us how to make human figures, like her Madonnas, it takes more time then is available, so Natalya kindly came up with this stunning rose that uses the same techniques, but can be just a bud or a few petals or the complete rose.
Size of Project: 5” x 8” Skill Level: Open Pre-requisites: None
What will be taught in class: Straw embroidery
What needs to be done before coming to class: n/a
Suggested Wheat: Soft straws (in kit) Straws needed: *in kit
Other supplies by instructor: * fabric, *foam core, *straw, *needles, and *glue
Supplies to bring: Scissor snips, small ruler, 9” embroidery hoop, x-acto knife
Materials Kit: Cost: $10 Extra kits – Not available
Kits are required if offered. Includes * items above.

Spring Wreath Class 11, Session D: Friday 1:30 - 5:00 PM
Instructor / Designer: Rita Peterman
Designation for Project Use: This project is based upon traditional plaits/designs. They are in public domain. Rita Peterman gives NAWW members full use of the project.
Instructor’s Comments: This project was developed with Doris Johnson and Donna Morgenstern. Donna shared this project with KASA and I have expanded with the decorations and instructions.I know you will have new and different ideas to finish your project
Size of Project: 4 ½” X 4 ½” X 2”
Skill Level: Intermediate
Pre-requisites: None
What will be taught in class: • 8-straw Whip Plait
What needs to be done before coming to class: -n/a
Suggested Wheat: n/a
Straws needed: *Scandi ⅜” width 5 yards *10-12 second joint straws glued on light cardstock with a space between the straws, natural or colored
Other supplies by instructor: *Dowel rod ⅜”diameter 15” long*Floral wire 18 gauge 12½” long*Floral wire 22 gauge 5” long for hanger*Cardstock for flowers
Supplies to bring:Tape measure Scissors, thread, masking tapeGlass or jar with 12” circumference 1” daisy punch, small leaf punch, or other floral punchesInstructor will have punches for use in class
Materials Kit: Cost: $10
Extra kits – Not available
Kits are required if offered. Includes * items above.

Italian Frame (Cornice San Pio ) ©Class 13, Session E: Saturday 8:30 AM - 12:00 PM Part 1Class 16, Session F: Saturday 1:30 - 5:00 PM Part 2
Instructor / Designer: Giotto Faugno
Designation for Project Use: Giotto Faugno retains full rights for use of this project.
Instructor’s Comments: This framed Saint shows some of Giotto’s intricate work. He made all of the plaits in this project, however for the sake of time, many prepared plaits will be provided in the kit. The participant will need to prepare the straws for marquetry as well as a few other basic plaits, so that there will be enough time to complete the project. You can bring your own picture to put in the frame or choose one from Giotto.
Size of Project: 19” x 12.25”
Skill Level: Intermediate
Pre-requisites: Know how to prepare straw for marquetry, two straw plait 1998 PD pg 1, five straw spiral 1998 PD pg 37.
What will be taught in class: Basket weave marquetry and applying straw to create frame
What needs to be done before coming to class: Prepare straws: 35 -10” and 30- 12” in length for basket weave marquetry. They should be about 3/8” and as uniform as possible. Make the following plaits: 16” of 5-straw spiral (diameter is 1/2 inch, use fine/med straws). 16” of 2 straw plait
Suggested Wheat: see straws needed

Straws needed: 35-10” and 30-12” by 3/8” width as uniform as possible. If you do not have straws for the basketweave marquetry, you can purchase them from The Straw Shophttps://thestrawshop.com/rye-straw/ The packages come with mixed lengths of straw. If you do not get enough long ones for the project, please contact Joan Dulcey [email protected] for help. The verticals straws for the clock can be pieced while weaving to get the length.
Rye or wheat works for this project, but you may have to use rye in order to get the length and uniform width in a second joint straw. To prepare rye straw for marquetry the following method works pretty well.
Method 1: Run hot water from your sink through the straws. Open the straw with a Hindenburg or other tool you use to split straws. Gently open and pull straw through a hair straightening iron several times to get a nice flat straw. Once you open the straws you will need to adjust width of straws to be the same. Pulling a pin through the length at the correct width works pretty well.
Method 2: Boil water in a tea kettle that whistles. Stick the rye straw in the whistle hole so that it forces the steam through the straw for a count of 20 or so. Quickly split the rye straw open with a Hindenburg or other tool and flatten the straw. You may want to iron it, and you may need to adjust the width.
Other supplies by instructor: *wood frame parts*7 straw flat plait, 1.3cm x 5 meters and 80 cm*11 straw flat plait, 2 cm x 1 meter and 20 cm *5 straw flat plait, 1cm x I meter and 20 cm *5 straw flat plait, 1cm x 1 meter and 20 cm rolled up on stick will make 90 cm
Supplies to bring:Masking tape, scissors, x-acto knife, hot glue gun, hot glue sticks, picture 33.5cm (13.25) x 24 cm (9.44”) to insert in the frame, (Giotto did change order of assembly so you will be able to insert picture later as needed), extension cord.
Materials Kit: Cost: $38 However, at the time of this posting, he was still working on them so they have not been shipped. The cost of shipping will be added to this price. If you are able to pay more, it will be appreciated.
Extra kits – Not available
Kits are required if offered. Includes * items above.

Straw Frames Class 14, Session E: Saturday 8:30 AM - 12:00 PM
Instructor: Dianne Gardner
Designation for Project Use: Artist grants full use of the project for NAWW members.
Instructor’s Comments: The pieces of marquetry are not overlapped, they are cut to fit. We always have scrap straw and damaged straw that can be shaded by using a wood burning tool or soldering iron. Dianne is teaching the technique Raisa Ramanenia used for frames.
Size of Project: Size will vary
Skill Level: Beginner or Intermediate
Pre-requisites: How to use a wood burner or soldering iron
What will be taught in class: How to apply marquetry to the frame and how to blend damaged straw using a wood burning tool.
What needs to be done before coming to class: n/a
Suggested Wheat: Any variety of wheat or rye for marquetry.
Straws needed: *A quantity of good or damaged straw, flattened for marquetry.
Other supplies by instructor: *Thick and regular card stock to make frame.
Supplies to bring: Any wood burning tool or soldering iron with the widest tip you have. Regular Aleene’s glue.
Materials Kit: Cost: $5 Extra kits – Not available
Kits are required if offered. Includes * items above.

Popotillo Box Class 15, Session E: Saturday 8:30 AM - 12:00 PM
Instructor / Designer: Cesar Carbajal
Designation for Project Use: The designs and techniques are traditional designs and are in public domain.
Instructor’s Comments: The wooden box base in this picture is no longer available. The one that will be used in this project, is slightly different. It is square with a hinged lid and stays closed with a magnetic latch. Several designs will be available for this project.
Size of Project: 3½” x 3½” x 2”
Skill Level: Open
Pre-requisites: None
What will be taught in class: • Popotillo straw painting
What needs to be done before coming to class: n/aSuggested Wheat: n/aStraws needed: * Popotillo straw
Other supplies by instructor: * Kit: contains wooden box, bees wax, Popotillo straws in a variety of colors, several patterns to choose from.
Supplies to bring: Basic tools
Materials Kit: Cost: $25 Extra kits – Not Available
Kits are required if offered. Includes * items above.

Popotillo PictureClass 17, Session F: Saturday 1:30 - 5:00 PM
Instructor / Designer: Cesar Carbajal
Designation for Project Use: The designs and techniques are traditional designs and are in public domain
Instructor’s Comments: Special Class opened to non-members. Class fee and kit is paid directly to instructor. Cost is $40. Members are also welcome to take this class. Please make separate check payable to Cesar Carbajal. Several designs will be available to choose from for all skill levels. No experience is necessary to take this class.
Size of Project: 5” x 7” Skill Level: Beginner
Pre-requisites: None
What will be taught in class: Popotillo straw painting
What needs to be done before coming to class: n/aSuggested Wheat: n/a
Straws needed: *Popotillo straw
Other supplies by instructor: * Kit contains: Preprinted designs to choose from, bees wax, Popotillo straws in a variety of colors
Supplies to bring: Basic tools
Materials Kit: Cost: $ included in class fee
Kits are required if offered. Includes * items above.
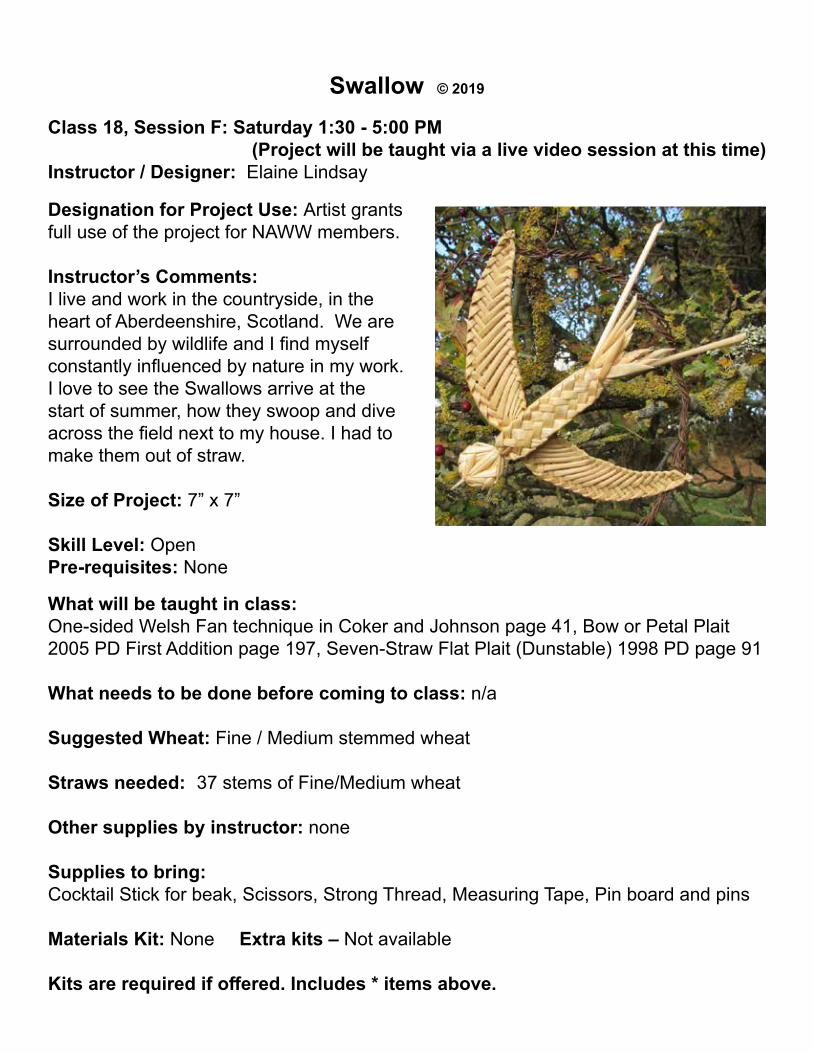
Swallow © 2019
Class 18, Session F: Saturday 1:30 - 5:00 PM (Project will be taught via a live video session at this time)
Instructor / Designer: Elaine Lindsay
Designation for Project Use: Artist grants full use of the project for NAWW members.
Instructor’s Comments: I live and work in the countryside, in the heart of Aberdeenshire, Scotland. We are surrounded by wildlife and I find myself constantly influenced by nature in my work. I love to see the Swallows arrive at the start of summer, how they swoop and dive across the field next to my house. I had to make them out of straw.
Size of Project: 7” x 7”
Skill Level: Open Pre-requisites: None
What will be taught in class: One-sided Welsh Fan technique in Coker and Johnson page 41, Bow or Petal Plait 2005 PD First Addition page 197, Seven-Straw Flat Plait (Dunstable) 1998 PD page 91
What needs to be done before coming to class: n/a
Suggested Wheat: Fine / Medium stemmed wheat
Straws needed: 37 stems of Fine/Medium wheat
Other supplies by instructor: none
Supplies to bring:Cocktail Stick for beak, Scissors, Strong Thread, Measuring Tape, Pin board and pins
Materials Kit: None Extra kits – Not available
Kits are required if offered. Includes * items above.

Quilled Teardrop Necklace and Earrings © 2017
Class 19, Session G: Sunday 8:30 AM - 12:00 PM
Instructor / Designer: Kathy Dailey
Designation for Project Use: Kathy Dailey grants full use of the project by NAWW members
Instructor’s Comments: Wheat quilling was adapted from the ancient art form known as paper scrolling or filigree. If you look on the internet you will see many beautiful modern quilling items. There are many different quilling elements available. Some are not easily made in wheat quilling because of the length and texture of the wheat. However, with patience and practice you will find many elements can be made in wheat quilling to create beautiful projects.
Size of Project: 2” x 1¼” x ⅛”
Skill Level: Open
Pre-requisites: None
What will be taught in class: We will learn how to form the frame of the necklace and earrings and decorate them using tight circles of various sizes and open tight circles- teardrops.
What needs to be done before coming to class: n/a
Suggested Wheat: thin walled second straws such as Turkey Red Wheat

Straws needed: *10 main choice of color (blue, orange, green) ⅛” strips 8 “– 10” long for the frame of the necklace and earrings*5 light brown ⅛” strips 8” long for the teardrops*12 natural straw ⅛” strips 8” – 10” long for various tight circles
Other supplies by instructor:
* 1- 9mm jump ring* Earring findings, 2 - 6mm jump ring, 2 pierced earring wiresI will bring Polyurethane spray, Press n’ Seal, pattern, and forms to share. I will have a few cutting tools and a few quilling tools available for sale.
Supplies to bring:I will have some forms to share. If possible, please bring a small Elmers glue stick 0.21oz, approx 3/4” diameter - 2.5 inch circumference to form the earring shape. We will only be using the outside. Wrap a layer of clear packing tape around the label so the wheat will not stick to it and to make it exactly 2.5 inch circumference. To check the circumference, wrap a piece of paper around the stick and mark where the paper meets. Measure this distance and add layers of tape to make it measure exactly 2.5 inches.
4.5 mm knitting needleslotted quilling tool (available in craft stores like Hobby Lobby)Aleene’s Tacky Glue, glue brushHindenburg tool or flattening tool Cutting tool to make 1/8” quilling strips (for future projects)needle nose pliers or jewelry pliers, ruler, dish for small parts, tooth picks, damp cloth rag/dish, dry rag, tweezers, pinning board and pins, used emery boards and rubber band, scissors
Bring a necklace chain or cord or use one you already have
Materials Kit: Cost: $15
Extra kits – Not available
Kits are required if offered. Includes * items above.

Popotillo Cross Class 20, Session G: Sunday 8:30 AM - 12:00 PM
Instructor / Designer: Cesar Carbajal
Designation for Project Use: The designs and techniques are traditional designs and are in public domain
Instructor’s Comments: Cesar is a third generation Popotillo straw artist from Mexico. His work is beautiful and intricate. There will be several patterns to choose from to create the painting on your cross.
Size of Project: 6” wide, 8” high
Skill Level: Beginner
Pre-requisites: None
What will be taught in class: • Popotillo straw painting
What needs to be done before coming to class: n/aSuggested Wheat: n/a
Straws needed: *Popotillo straw
Other supplies by instructor: *Kit: contains wooden cross base, bees wax, Popotillo straws in a variety of colors, several patterns to choose from.
Supplies to bring: Basic tools
Materials Kit: Cost: $25 Extra kits – Not Available
Kits are required if offered. Includes * items above.

Rose and Butterfly Bouquet © 2019
Class 21, Session G: Sunday 8:30 AM - 12:00 PM
Instructor / Designer: Morgyn Owens-Celli
Designation for Project Use: Morgyn Owens-Celli retains full rights of his copyrighted project. NAWW members must obtain written permission from the artist to use the project other than for personal use.
Instructor’s Comments: I have been using the paper crafting industry’s steel dyes with straw for a number of years. I want to teach this because you can enhance your straw work with such detailed straw work with very little trouble. These steel dyes allow you to create some really intricate work that looks great with little effort.
Size of Project: 5” high, 3” wide
Skill Level: Intermediate
Pre-requisites: You will need to know how to create straw marquetry work on your own . Red and green sections of straw marquetry approx. 4-6” will be needed for the rose and leaves. Two contrasting colors of straw 8 x 10” inches will be necessary to bring to class
What will be taught in class: Learning how to create work with steel dyes and embossers. Dyes and embossing machine will be provided at class. You will learn how to put flowers together.
What needs to be done before coming to class: One each red and green sections of straw marquetry approx. 4-6” will be needed for the rose and leaves. Two contrasting colors of straw 8 x 10”

Suggested Wheat: Whatever you are comfortable for straw marquetry. DO NOT GLUE STRAW ON THICK PAPER Regular paper is fine. If you can find paper the same color as the straw that is a great advantage
Straws needed: Red and green sections of straw marquetry approx. 4-6” will be needed for the rose and leaves. Two contrasting colors of straw 8 x 10” inches for the butterflies will be necessary to bring to class
Other supplies by instructor: N/A
Supplies to bring: Basic tools
Materials Kit: None
Extra kits – Not available
Kits are required if offered. Includes * items above.