Embed Size (px)
Citation preview

IP Phone Applications: Core Development Concepts Cisco Unified Application Environment 2.3

i Cisco Unified Application Environment

Contents
⎯⎯⎯⎯⎯⎯⎯ CONTENTS
About This Guide....................................................................................................................3
Intended Audience........................................................................................................ 3
Notational Conventions................................................................................................ 3
Typographical Conventions.......................................................................................... 4
Making an IP Phone Services Application.............................................................................5
Example 1: Displaying Content on IP Phones.......................................................................6
Create a Project and Script .......................................................................................... 6
Navigating a Project and Script................................................................................... 7
Script Configuration ..................................................................................................... 8
Example 2: Sending Content in HTTP Requests.................................................................15
Creating Options......................................................................................................... 15
Example 3: Using Content from HTTP Requests................................................................19
Additional Event Handlers ........................................................................................ 19
Retrieve Query Parameters ....................................................................................... 20
IP Phone Menu System .............................................................................................. 21
Extending the Example........................................................................................................28
Cisco Unified Application Environment ii
About This Guide
About This Guide The Error! Reference source not found. describes the steps and concepts involved in creating an IP phone application.
Intended Audience
The Error! Reference source not found. is intended for use by programmers wishing to learn how to develop IP phone applications for the Cisco Unified Communications Environment. You should be familiar with the basics of the Cisco Unified Application Designer as a prerequisite to this document.
Notational Conventions
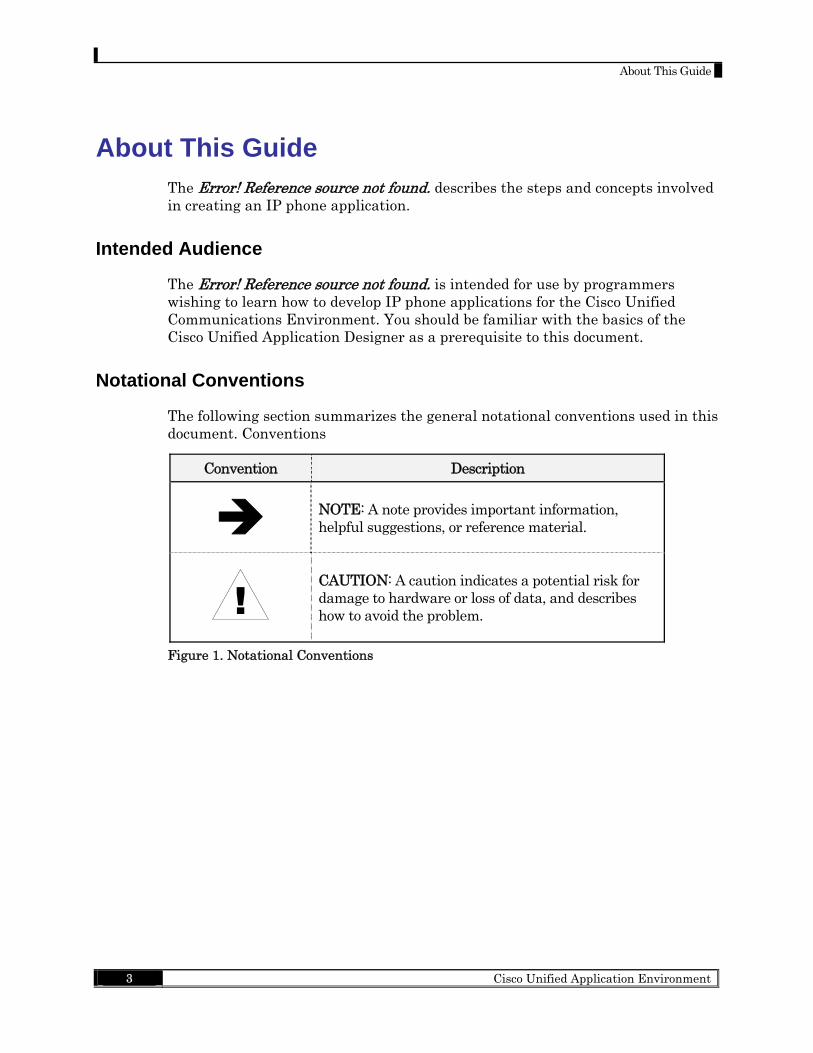
The following section summarizes the general notational conventions used in this document. Conventions
Convention Description
NOTE: A note provides important information, helpful suggestions, or reference material.
CAUTION: A caution indicates a potential risk for damage to hardware or loss of data, and describes how to avoid the problem.
Figure 1. Notational Conventions
3 Cisco Unified Application Environment

About This Guide
Typographical Conventions
The following typographical components are used for defining special terms and command syntax:
Convention Description Bold typeface Represents literal information such as
• Information and controls displayed on screen, including menu options, windows dialogs and field names
• Commands, file names, and directories Italic typeface Italics typeface is used to denote
• A new concept • A reference to a chapter or section heading
<input> Text contained in angle brackets is used to denote user supplied input.
Courier typeface Denotes text to be entered on a command line or the output of a command line program.
UPPERCASE Denotes keys and keystroke combinations such as CTRL+ALT+DEL.
Figure 2. Typographical Conventions
Cisco Unified Application Environment 4

Making an IP Phone Services Application
Making an IP Phone Services Application Developing an IP phone application for the Cisco Unified Application Server does not require an intimate understanding of the XSI syntax and protocol. This is possible because the Cisco Unified Application Designer provides easy-to-use actions, which make leveraging the use of XSI commands straightforward and simple.
NOTE: The Cisco IP Phone API abstracts IP telephony protocols into a simple, unified interface.
5 Cisco Unified Application Environment

Example 1: Basic IP Phone Service
Example 1: Displaying Content on IP Phones Cisco IP Phone models that support ‘services’ use HTTP to request data from a web server, such as the Cisco Unified Application Server. The response data from the web server is in XML, formed to the Cisco IP Phone services schema.
So how can a developer cause the phone to make such a request? There are multiple ways--most common is when a user presses the ‘services’ key on the IP phone. At that time, an HTTP request is sent from the IP phone to the CallManager cluster publisher (typically), which responds with a list of services configured for that phone. Choosing any item from this list of configured services causes a subsequent HTTP request to be sent, this time wherever the service URL was configured on the CallManager. This configurable listing of services is a perfectly suitable means to cause the IP phone to make an HTTP request to the Cisco Unified Application Server. Whenever an HTTP request is routed to the Cisco Unified Application Server, the event is presented to the application layer as a triggering event. A triggering event causes the Cisco Application Runtime to launch an instance of an application script matched to that event.
NOTE: In this and the other examples contained in this guide, the reader can either open the accompanying complete sample project in the Application Designer, or can create the sample application from scratch by following along with the tutorial. The completed application for this current example can be found in the displayText script of IPPhoneServicesTutorial.max.
Create a Project and Script
To create a new sample project, open the Application Designer and select New Project from the File menu. Name the project IPPhoneServicesTutorial as shown below.
Figure 3. Create a new project
Once your new application has been created, you will add a script to the project to handle an HTTP GotRequest event. Select Add Script from the File menu, the Project menu, or from the Project Explorer. The New Application Script dialog
Cisco Unified Application Environment 6

Example 1: Basic IP Phone Service
appears as shown below. Here you will select the triggering event for your script, which will be Metreos.Providers.Http.GotRequest.
Figure 4. New application script
Navigating a Project and Script
Now that the project has been initially created and a script was added, this guide will touch on how to navigate inside the project and scripts.
The Project Explorer can be found on the left side of the Application Designer window. This explorer displays a tree with the project name as well as any scripts that make up the project. Additionally, you can access the properties of the project by right-clicking on the project name to set basic properties like author, company, version, and so on. These project properties are always optional so we will skip them for the purposes of this tutorial.
Below the project name in the explorer window, you will see the script we added earlier. This script and any other scripts that make up the project will be visible in this tree. If you expand any script contained in the project, you should see the name of the script shown again under the script node, symbolized with the node
. By double-clicking on this node, the middle area of the Application Designer, or ‘canvas’, will focus on the Global Canvas. If one double-clicks any of the nodes found below the Global Canvas node , or the Function Canvas nodes, then the canvas will focus on that function. Please take a second to familiarize yourself with this behavior.
7 Cisco Unified Application Environment

Example 1: Basic IP Phone Service
At this point, you should see two tabs that correspond to the script that we have created so far. One is named displayText and the other tab is OnGotRequest. The displayText tab is the Global Canvas for this script, and contains the global configurations for the script. The OnGotRequest tab is a Function Canvas, created automatically to provide the developer a design area for defining the application logic that begins execution on, or handles, the HTTP request that triggers this script.
Script Configuration
With the needed steps taken to prepare a script for development, we can focus on making it display text on the phone.
Click on the global canvas tab (displayText) at the top of the window. Under the Events and Functions branch, you will need to set a property for the Http.GotRequest (trigger) node. Right click on this item and choose Properties to make the properties appear in the window on the right. There are several configurable settings here, but the only one we need at this moment is URL. This field will be the URL that the client should access to trigger the application. For the purposes of this tutorial, type /lunchOrder in this field as shown below. By setting URL to this value, this script can be initiated by having the phone access the URL http://<AppServerIP>:8000/lunchOrder.
Figure 5. Add a URL for the triggering event
After the trigger has been set, click on the OnGotRequest tab at the top of the screen. This will bring up the function canvas where actions can be placed—in other words, where one defines the flow of the script.
Cisco Unified Application Environment 8
Example 1: Basic IP Phone Service
CreateText Action To start, this IP phone service will display some text to the user. To do so, one must drag a CreateText action from the Cisco IP Phone API in the Toolbox to the canvas. This will provide the ability to display text on the phone.
In the properties for the CreateText action, several properties control where text is located on the phone’s display (Action Parameters), one property is for logging (Logging), and one property controls the result data (Result Data).
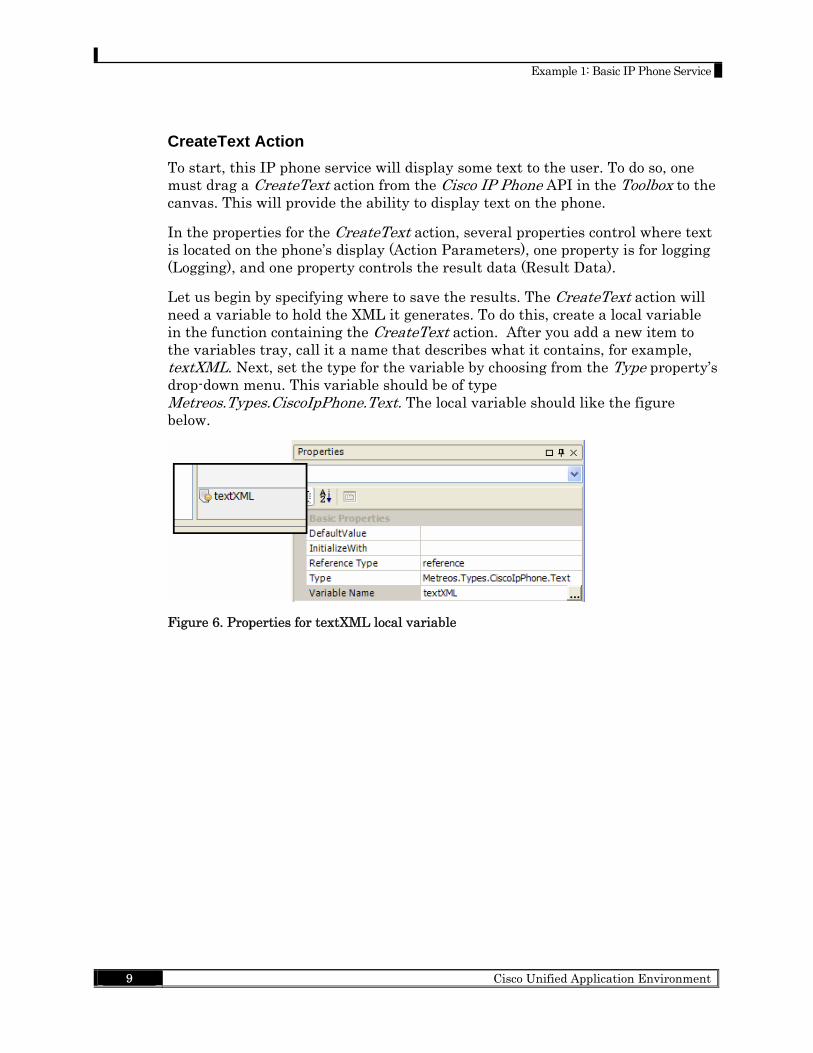
Let us begin by specifying where to save the results. The CreateText action will need a variable to hold the XML it generates. To do this, create a local variable in the function containing the CreateText action. After you add a new item to the variables tray, call it a name that describes what it contains, for example, textXML. Next, set the type for the variable by choosing from the Type property’s drop-down menu. This variable should be of type Metreos.Types.CiscoIpPhone.Text. The local variable should like the figure below.
Figure 6. Properties for textXML local variable
9 Cisco Unified Application Environment
Example 1: Basic IP Phone Service
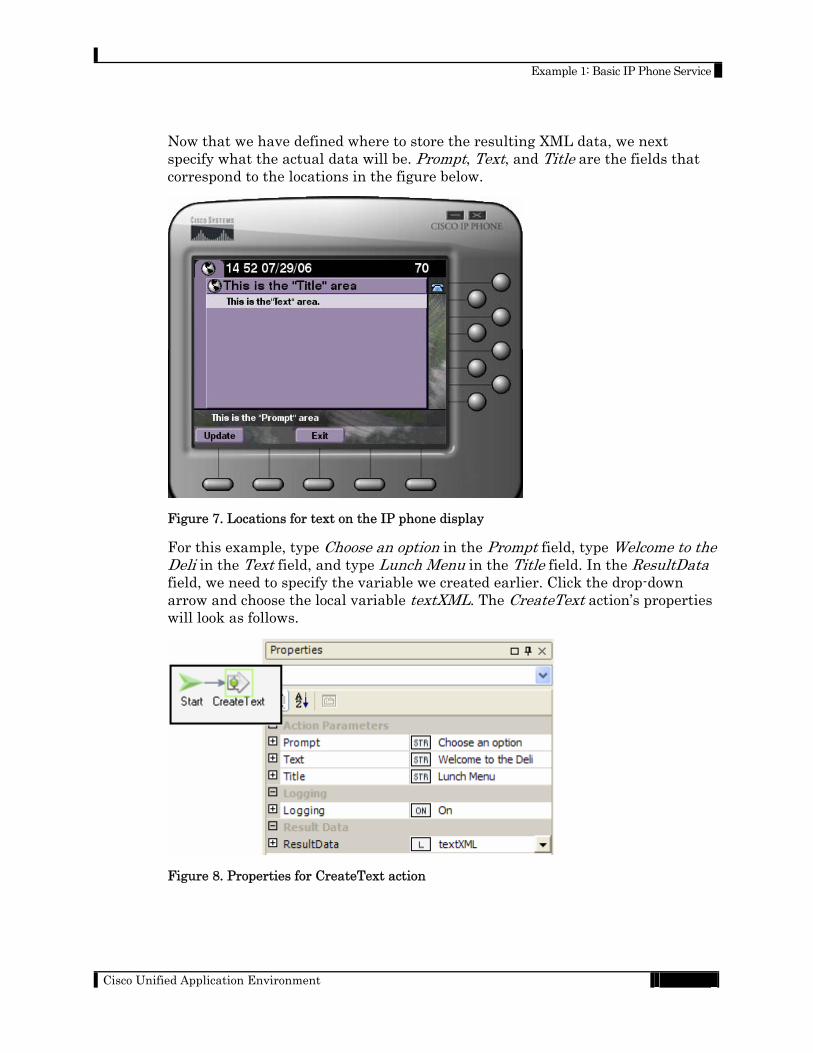
Now that we have defined where to store the resulting XML data, we next specify what the actual data will be. Prompt, Text, and Title are the fields that correspond to the locations in the figure below.
Figure 7. Locations for text on the IP phone display
For this example, type Choose an option in the Prompt field, type Welcome to the Deli in the Text field, and type Lunch Menu in the Title field. In the ResultData field, we need to specify the variable we created earlier. Click the drop-down arrow and choose the local variable textXML. The CreateText action’s properties will look as follows.
Figure 8. Properties for CreateText action
Cisco Unified Application Environment 10

Example 1: Basic IP Phone Service
SendResponse Action Once the text command has been defined, we must send the response back to the remote host who requested it. With each HTTP request received by the Application Server, the server captures several pieces of information about the sender. One of them is the remote host’s IP address and port. We will need this information when sending the response, which can be accomplished by creating a local variable named remoteHost and initializing it with the remoteHost option from the drop down menu.
Figure 9. Properties for remoteHost local variable
Now that we have the IP address and port of the remote host who sent the HTTP request, we can send a response back to it. From the HTTP API in the Toolbox, drag SendResponse on to the OnGotRequest canvas and add a connecting arrow from CreateText to SendResponse.
Once the action is on the canvas, we can configure its properties. The Body property contains the body of the response. Simply put, we want the XML text command to be sent back to the client in the Body parameter.
The textXML variable has this XML content embedded within it—the task before us is to extract that XML data and pass it into the Body parameter.
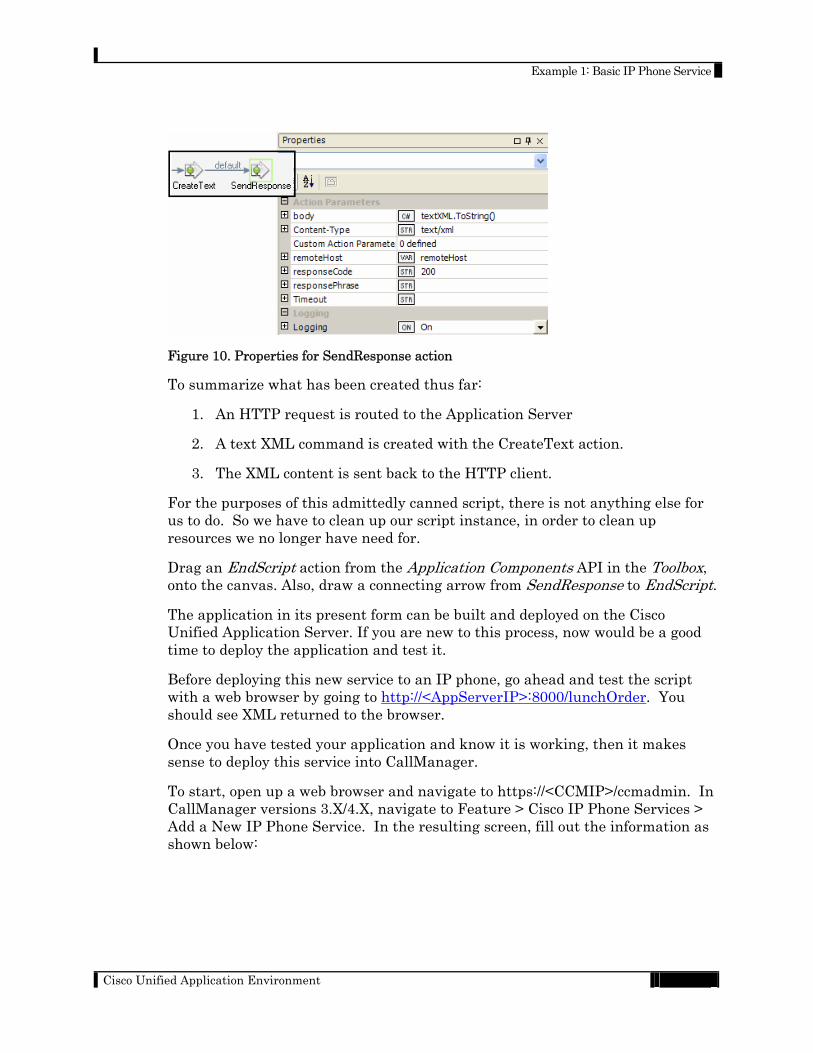
Change the User Type of the Body property to C# by expanding the field and using the drop-down or right clicking on the property and choosing csharp. Then type textXML.ToString() to serialize the XML contained within the textXML varibale to a string. For the Content-Type property we should enter the string text/xml to declare its content—the IP phones require this. We also have to specify the remoteHost, so we can use the variable we initialized earlier to provide this information. Finally, put 200 in the responseCode property to signal that the response has succeeded. At this point, the properties window for SendResponse action should have the following settings.
11 Cisco Unified Application Environment
Example 1: Basic IP Phone Service
Figure 10. Properties for SendResponse action
To summarize what has been created thus far:
1. An HTTP request is routed to the Application Server
2. A text XML command is created with the CreateText action.
3. The XML content is sent back to the HTTP client.
For the purposes of this admittedly canned script, there is not anything else for us to do. So we have to clean up our script instance, in order to clean up resources we no longer have need for.
Drag an EndScript action from the Application Components API in the Toolbox, onto the canvas. Also, draw a connecting arrow from SendResponse to EndScript.
The application in its present form can be built and deployed on the Cisco Unified Application Server. If you are new to this process, now would be a good time to deploy the application and test it.
Before deploying this new service to an IP phone, go ahead and test the script with a web browser by going to http://<AppServerIP>:8000/lunchOrder. You should see XML returned to the browser.
Once you have tested your application and know it is working, then it makes sense to deploy this service into CallManager.
To start, open up a web browser and navigate to https://<CCMIP>/ccmadmin. In CallManager versions 3.X/4.X, navigate to Feature > Cisco IP Phone Services > Add a New IP Phone Service. In the resulting screen, fill out the information as shown below:
Cisco Unified Application Environment 12

Example 2: IP Phone Service with SoftKeys
Figure 11: Creating a new IP Phone Service
Once the service is created, one can then associate this service to the IP phone that they have to test with.
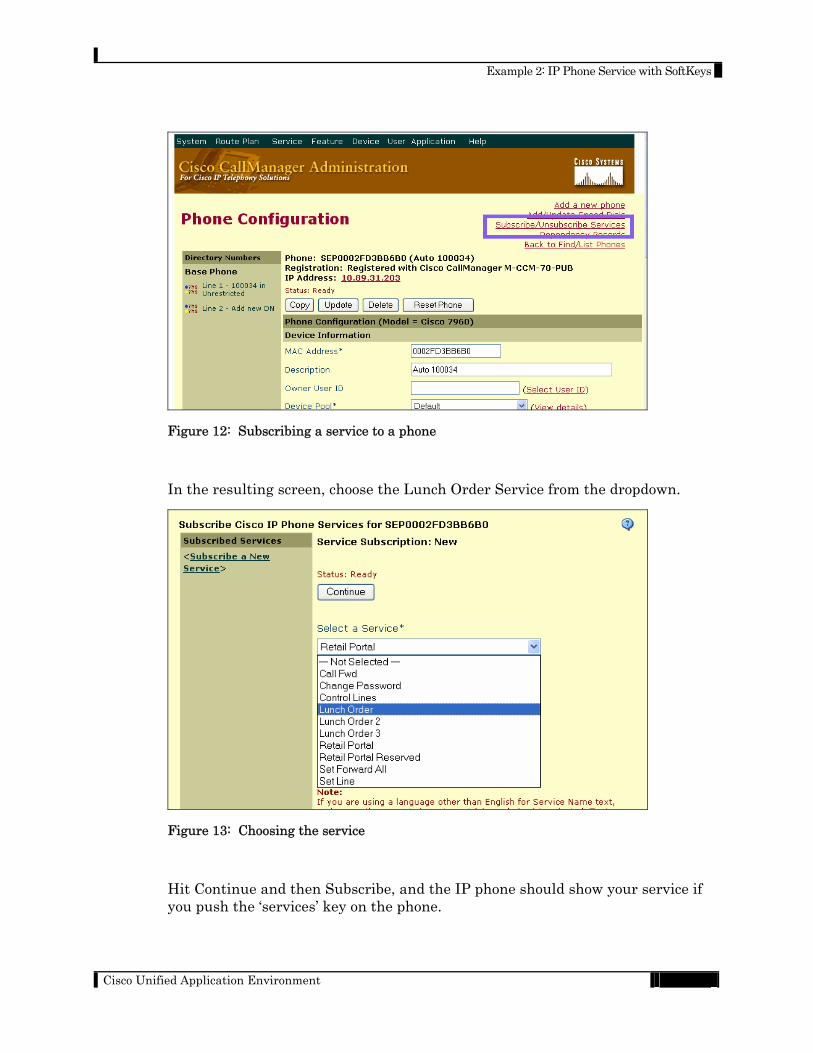
To accomplish this, first find your IP phone in CallManager, by navigating to Device > Phone. Enter the directory number or device name into the field (and match the ‘Find phones where’ dropdown to your query). Once you have located and selected your phone, click the Subscribe/Unsubscribe Services link in the upper-right hand page of the device:
13 Cisco Unified Application Environment
Example 2: IP Phone Service with SoftKeys
Figure 12: Subscribing a service to a phone
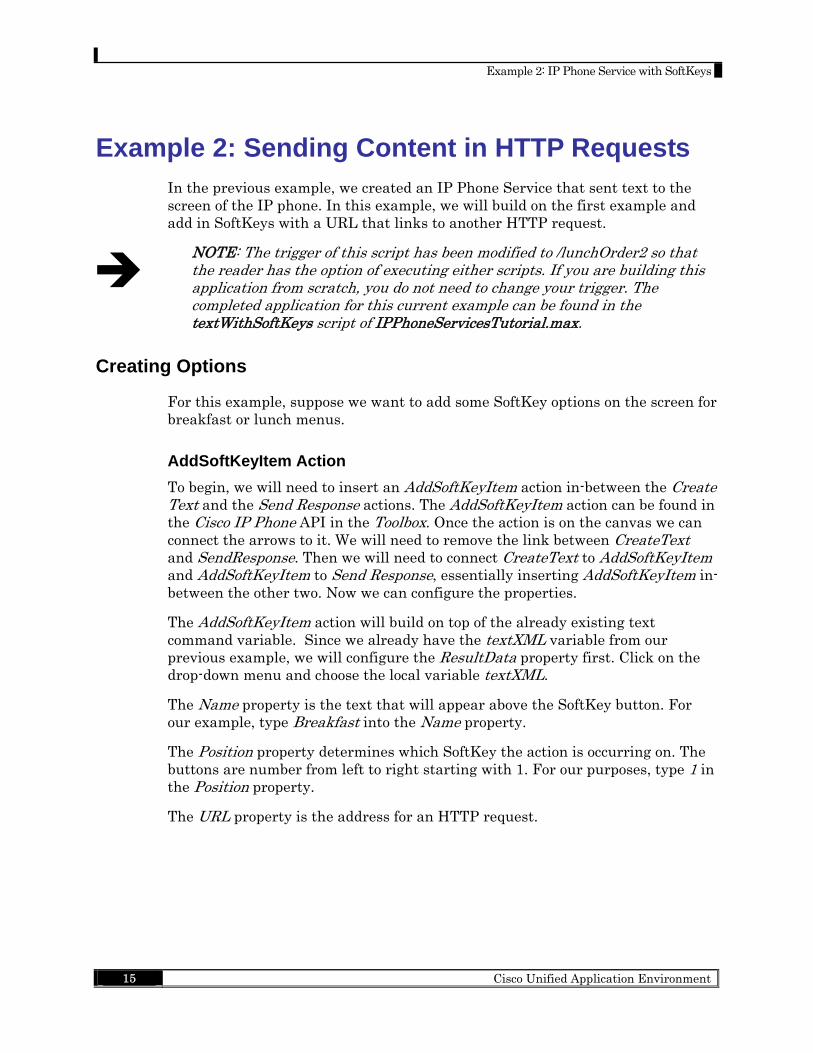
In the resulting screen, choose the Lunch Order Service from the dropdown.
Figure 13: Choosing the service
Hit Continue and then Subscribe, and the IP phone should show your service if you push the ‘services’ key on the phone.
Cisco Unified Application Environment 14
Example 2: IP Phone Service with SoftKeys
Example 2: Sending Content in HTTP Requests In the previous example, we created an IP Phone Service that sent text to the screen of the IP phone. In this example, we will build on the first example and add in SoftKeys with a URL that links to another HTTP request.
NOTE: The trigger of this script has been modified to /lunchOrder2 so that the reader has the option of executing either scripts. If you are building this application from scratch, you do not need to change your trigger. The completed application for this current example can be found in the textWithSoftKeys script of IPPhoneServicesTutorial.max.
Creating Options
For this example, suppose we want to add some SoftKey options on the screen for breakfast or lunch menus.
AddSoftKeyItem Action To begin, we will need to insert an AddSoftKeyItem action in-between the Create Text and the Send Response actions. The AddSoftKeyItem action can be found in the Cisco IP Phone API in the Toolbox. Once the action is on the canvas we can connect the arrows to it. We will need to remove the link between CreateText and SendResponse. Then we will need to connect CreateText to AddSoftKeyItem and AddSoftKeyItem to Send Response, essentially inserting AddSoftKeyItem in-between the other two. Now we can configure the properties.
The AddSoftKeyItem action will build on top of the already existing text command variable. Since we already have the textXML variable from our previous example, we will configure the ResultData property first. Click on the drop-down menu and choose the local variable textXML.
The Name property is the text that will appear above the SoftKey button. For our example, type Breakfast into the Name property.
The Position property determines which SoftKey the action is occurring on. The buttons are number from left to right starting with 1. For our purposes, type 1 in the Position property.
The URL property is the address for an HTTP request.
15 Cisco Unified Application Environment

Example 2: IP Phone Service with SoftKeys
Building URLs Since we want to send the request back to ourselves, we can use a variable to hold the hostname and port of our current session so we can use it later. Create a local variable named host and initialize it with host from the drop-down menu.
Figure 14. Properties for host local variable
We will also need a RoutingGuid to refer to the instance of the application that is currently running. This is necessary because multiple devices could be using this service at once, so each session must be uniquely identifiable. Create a new local variable named routingGuid and initialize it with RoutingGuid from the drop-down menu.
Figure 15. Properties for routingGuid local variable
Cisco Unified Application Environment 16

Example 2: IP Phone Service with SoftKeys
Now we have all the pieces we need to build the URL. Set the User Type of the URL property to csharp and type "http://" + host + "/showMenu?metreosSessionId=" + routingGuid + "&value=Breakfast" into the field This will use the host variable we initialized earlier as well as the routingGuid variable. The properties for this AddSoftKeyItem action should be as follows.
Figure 16. Properties for AddSoftKeyItem action
Now that we have one SoftKey item displayed on the screen, adding another one will be easy. Insert another AddSoftKeyItem action in-between the previous AddSoftKeyItem and the Send Response action. Next, connect the arrows similar to earlier, at the beginning of this example. When configuring this action, enter Lunch in the Name property, enter 3 in the Position property, and the URL property should read "http://" + host + "/showMenu?metreosSessionId=" + routingGuid + "&value=Lunch” The properties for this AddSoftKeyItem action should be as follows.
Figure 17. Properties for AddSoftKeyItem action
17 Cisco Unified Application Environment

Example 2: IP Phone Service with SoftKeys
At this point, we can build the project and deploy it to the Application Server. If everything went correctly, you will see the welcoming text we wrote in the first example as well as two SoftKey options at the bottom of the display for Breakfast and for Lunch.
Figure 18. IP phone display
If you press one of the SoftKeys, it will send a request to the URL we specified, but in its current state, it will not receive a response. That is because we have not specified any event handlers to listen for a request to that address. We will cover how to do this in the next example, and we will also cover how to retrieve the value that was passed in the URL. Finally, we will show how to add a series of menus to the display of the IP phone.
Cisco Unified Application Environment 18

Example 3:
Example 3: Using Content from HTTP Requests In the previous examples, we created an IP phone service that sent text to the screen of the IP phone and presented two SoftKey options at the bottom of the display. In this example, we will build on the previous two examples by adding an event handler to listen for requests, retrieving query parameter values that were passed through a URL, and finally, adding in another menu with multiple options.
NOTE: The trigger of this script has been modified to /lunchOrder3 so that the reader has the option of executing any of scripts. If you are building this application from scratch, you do not need to change your trigger. The completed application for this current example can be found in the displayMenu script of IPPhoneServicesTutorial.max.
Since we would like to add additional events occurring after the response is sent, we should not end the entire script at this point. Replace the EndScript action with an EndFunction action and we can continue to add more complexity to the application. At this point, your OnGotRequest function canvas should look like the figure below.
Figure 19. Replacing EndScript with EndFunction
Additional Event Handlers
If you look at the previous URLs we created, you will notice a reference to /showMenu in part of the URL. We will need to create another request handler to listen for requests to this address. Click on the Global Canvas tab at the top of the screen and expand the Events and Functions option. Drag a GotRequest event handler onto the canvas to create an OnGotRequest1 function canvas. The GotRequest event handler can be found in the HTTP API in the Toolbox.
19 Cisco Unified Application Environment

Example 3:
To configure this item, we will need to specify a URL for the handler similar to how we did at the beginning of the first example. In the URL property, type /showMenu.
Figure 20. Properties for GotRequest event handler
After the trigger has been set, click on the OnGotRequest1 tab at the top of the screen. This will bring up the new function canvas so we can extend the application.
Retrieve Query Parameters
If we recall the previous URL we constructed, we passed the value of the selected option as a query parameter in the URL. We will need access to this value to determine which set of options to display on the phone menu. To do this a local variable must be created. Name this variable query and initialize it with the query option from the drop-down menu. Next, we will need to set the type of this variable to Metreos.Types.Http.QueryParamCollention. This variable will now hold any query parameters that were passed in the HTTP request, which are accessible as key-value pairs. When you are finished, your query variable should have the following properties.
Figure 21. Properties for query local variable
Cisco Unified Application Environment 20

Example 3:
Now that we have a variable holding the information, we will need a way to get at the information contained in the value query parameter at a later time. To do this, we would use a piece of C# code, namely query[“value”]. The word “value” is used in this case, because that is the name of the query parameter that has been passed.
IP Phone Menu System
In this example, we want to add a menu that presents some breakfast or lunch options based upon which SoftKey option was pressed.
CreateMenu Action As before, we will need container for the XML menu we are generating. Create a local variable named menuXML and set the type to be Metreos.Types.CiscoIpPhone.Menu.
Figure 22. Properties for menuXML local variable
We can begin to create a menu for the Cisco IP phone by dragging a CreateMenu action from the Toolbox onto the canvas. The CreateMenu action can be found in the Cisco IP Phone API. Again, we will have some properties to configure.
The ResultData property should be set to the menuXML variable we just created in the step above. This will allow us to build up the menu with subsequent AddMenuItem actions.
The Prompt property is a text line that directs the user what to do. Type Please make a selection in this field because we will be providing the user a menu of choices to select from.
The Title property will be at the top of the menu so we should choose something appropriate. We already know whether the user wanted to see the breakfast menu or the lunch menu, so we can display that information in the title. With a little snippit of C# we can use the information passed in the value query parameter.
21 Cisco Unified Application Environment

Example 3:
We can also do some string manipulation to concatenate the word “Menu” onto the end of this value to produce “Breakfast Menu” or “Lunch Menu.” Change the User Type of the Title property to csharp and type query[“value”] + “ Menu” into the field to achieve the desired results. When you are done, the properties for the CreateMenu action should look like this.
Figure 23. Properties for CreateMenu action
After the menu is initially created, we can begin to add items to the menu to provide choices for the user. At this point, the user has indicated a desire for either the breakfast menu or the lunch menu. Based on this information, we want to give the user a choice between pancakes or eggs if they selected breakfast, and a choice between pizza or burgers if they selected lunch.
We will need the use of an action from the Application Component API of the Toolbox. The Switch action evaluates the given expression and returns a result, which will be used to determine which branch of the path to take. For our purposes, we want to switch on the data held in the value query parameter.
Drag a Switch action from the toolbox onto the canvas. Next, configure the SwitchOn property to be a csharp snippit and type query[“value”] in the field. This provides the expression to evaluate and decide with. Your Switch action should look like this so far.
Figure 24. Properties for Switch action
We are not completely done with switching concept yet. We will still need to assign values to the different branches so the script can take the intended path. However, before we can add connection arrows to create the paths, we must add the next actions on the path.
Cisco Unified Application Environment 22
Example 3:
AddMenuItem At this point, we should add more items to the menu, so let us begin with the breakfast menu. As it was mentioned earlier, the choices for breakfast were pancakes or eggs. To add these new items to the menu, we will need actions from the Cisco IP Phone API in the Toolbox. Drag AddMenuItem from the Toolbox to the canvas so we can configure a few of the basic properties.
By now, some of the properties should be sounding familiar. The Name property will be the text displayed for the menu choice, so type Pancakes in this field. Also, as we have done several times before, we should set the ResultData property to be the local variable menuXML we previously defined.
The URL property is the last property we will have to set on the AddMenuItem action. In the last example, we constructed the URL using C# to concatenate several variables and strings to achieve the desired results. We will need some local variables to capture information about the HTTP request like in the previous example.
Create a local variable named host and initialize it with the host option from the drop-down menu. Next, create a local variable named routingGuid and initialize it with the RoutingGuid option from the drop-down menu.
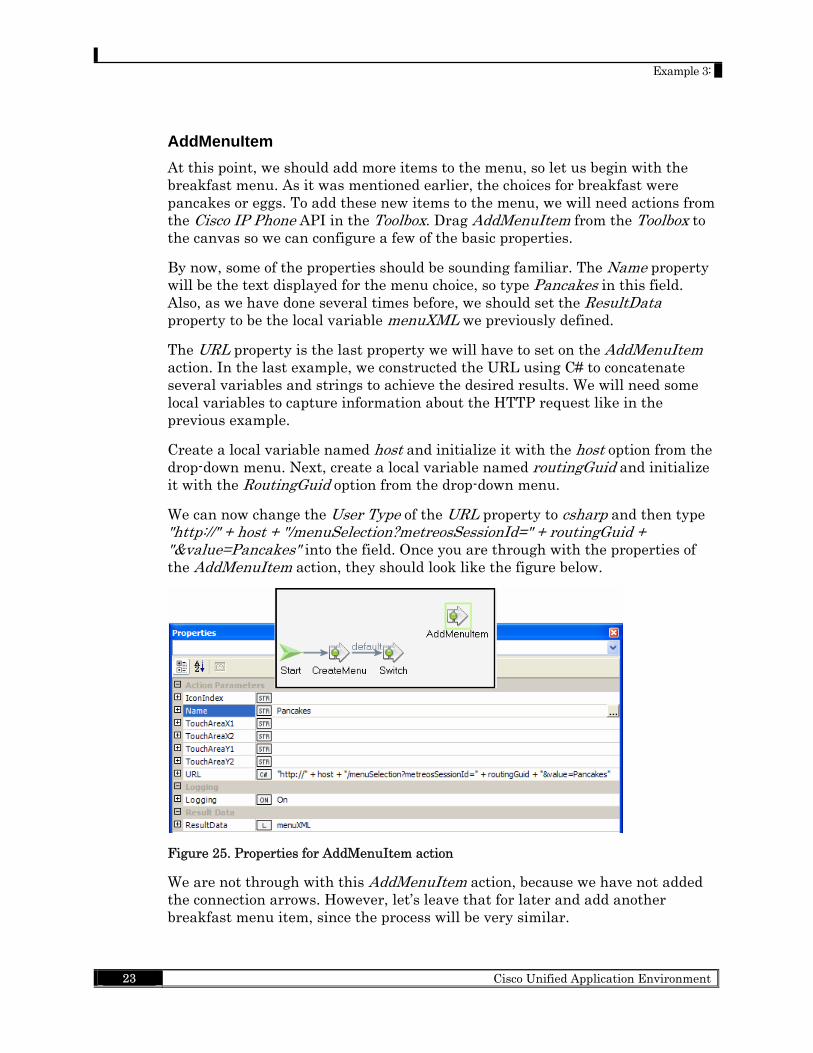
We can now change the User Type of the URL property to csharp and then type "http://" + host + "/menuSelection?metreosSessionId=" + routingGuid + "&value=Pancakes" into the field. Once you are through with the properties of the AddMenuItem action, they should look like the figure below.
Figure 25. Properties for AddMenuItem action
We are not through with this AddMenuItem action, because we have not added the connection arrows. However, let’s leave that for later and add another breakfast menu item, since the process will be very similar.
23 Cisco Unified Application Environment

Example 3:
In fact, the actions are so similar, we can make a copy of the AddMenuItem action we just made, and use it with only slight modifications. Configure this second AddMenuItem action to have the Name, Eggs and to have the URL, "http://" + host + "/menuSelection?metreosSessionId=" + routingGuid + "&value=Eggs”. The ResultData should be set to the local variable menuXML.
Figure 26. Properties for AddMenuItem action
Now, we should also make some lunch menu options. This can be done by copying one of the AddMenuItem actions again or dragging a new one to the canvas from the Cisco IP Phone API. In either method, configure the AddMenuItem to have the Name, Pizza and the URL, "http://" + host + "/menuSelection?metreosSessionId=" + routingGuid + "&value=Pizza". The ResultData property should be set to the local variable menuXML.
Figure 27. Properties for AddMenuItem action
Cisco Unified Application Environment 24

Example 3:
The last menu item we will make is for the burger option. Configure another AddMenuItem action with the Name property to be Burger, and the URL property to be “http://" + host + "/menuSelection?metreosSessionId=" + routingGuid + "&value=Burger". The ResultData should be set to the local variable menuXML.
Figure 28. Properties for AddMenuItem action
As mentioned earlier, there is one thing left to do with the AddMenuItem actions. We need to add the connection arrows, but this time, we must specify the condition in which each branch should be taken.
Connect the Switch action to the first AddMenuItem action we created for a breakfast item. Change the label on the connection arrow to read “Breakfast.” This is done by clicking on the default label, then erasing it, and finally typing in Breakfast. After this, you can connect the first breakfast AddMenuItem action to the second breakfast AddMenuItem action. The finished product will look like the figure below.
Figure 29. Branching paths after a Switch action
25 Cisco Unified Application Environment

Example 3:
Next, connect a second arrow branching from the Switch action to the first AddMenuItem action we created for a lunch item. This branch should be labeled Lunch in the manner we did for the breakfast branch.
Figure 30. Branching paths after a Switch action
Once the menu has been created, we must send the response back to the host who requested it. We will need some information about the remote host again, so create a local variable named remoteHost and initialize it with the remoteHost option from the drop-down menu.
Figure 31. Properties for remoteHost local variable
Now that we have the address of the remote host who sent the HTTP request, we can send a response back. Drag the SendResponse action on to the canvas and connect it with arrows from both branches of the menu so that all the paths converge at the SendResponse action.
Cisco Unified Application Environment 26

Example 3:
Once the action is on the canvas, we can configure its properties. First, change the User Type of the Body property to csharp, and then type menuXML.ToString() in the field to serialize the XML to a string. For the Content-Type property, we should enter the string text/xml to declare its content. We also need to specify the remoteHost with the local variable we initialized earlier. Finally, put 200 in the responseCode property to signal that the response has succeeded. At this point, the properties window for SendResponse should have the following settings.
Figure 32. Properties for SendResponse action
Once the response has been sent, there is nothing left for this script to do. Drag an EndScript action from the Application Components API onto the canvas. Also, draw a connecting arrow from SendResponse to EndScript.
Figure 33. EndScript action
At this point, we can build the project and deploy it to the Application Server. If everything went correctly, you will see the welcoming text and SoftKeys we added the previous example as well as menu with breakfast or lunch options.
27 Cisco Unified Application Environment

Example 3:
Extending the Example If you build and deploy the example in its current state, you will see the text, SoftKeys, and menu examples. Similar to after the first example, the final buttons on the menu selection screen do not return a response from the host. This is because we have not created an event handler to listen on the /menuSelection URL.
To take the example a step further, we could add another event handler to listen for a request on the /menuSelection URL. Then, we would extract the value query parameter, which holds the menu selection, to display a confirmation screen.
This all can be accomplished with the concepts described in this guide. To practice using these concepts, these last features will be left for the reader to try on their own; however, the completed example can be found in the displayMenu script of IPPhoneServicesTutorial.max.
Cisco Unified Application Environment 28

Index
29 Cisco Unified Application Environment