Embed Size (px)
Citation preview

Intralinks Connectorfor SharePoint®Version 4.3.1
Installation and Configuration Guide
Intralinks 24x7x365 support US: + (1) 212 543 7800 UK: +44 (0)20 7623 8500. See Intralinks login page for other national numbers
Copyright © 2018 Intralinks, Inc. Version 4.3.1 May 2018

Table of Contents
Chapter 1: Introduction.....................................................................................4Overview.............................................................................................................................4
Chapter 2: Prerequisites...................................................................................5Microsoft SharePoint ..........................................................................................................5Hardware requirements ......................................................................................................5Active Directory ..................................................................................................................6
Domain accounts .........................................................................................................6Active Directory group..................................................................................................7
Log network path and access.............................................................................................7Proxy requirements ............................................................................................................7WCF service requirement...................................................................................................7
IIS server level requirement .........................................................................................8Certificate requirements .....................................................................................................9
Digital certificate for high trust app...............................................................................9SharePoint Provider hosted app requirements...................................................................9
SharePoint services requirement .................................................................................9SharePoint service application requirements...............................................................9User profile requirements.............................................................................................9
Registering the App in the SharePoint Farm ......................................................................9Setting permissions for executing installation scripts .......................................................10Setting the time zone of the SharePoint servers, Intralinks Connector servers and the SharePoint site(s) ................................................................................................11 Upgrading the Intralinks Connector for SharePoint .........................................................12 Installing the Intralinks Connector for multiple web applications .....................................13
Chapter 3: Preparing for installation ..............................................................14Before executing the installation scripts ...........................................................................14
Chapter 4: Installing the Intralinks Connector for SharePoint ........................15Executing the installation scripts ......................................................................................15
Chapter 5: Post-installation configuration of the Intralinks Connector ...........17Updating the certificate store............................................................................................17Updating the server ID......................................................................................................17Updating the Intralinks Connector web service configuration...........................................17SMTP settings ..................................................................................................................17Updating the Farm Identifier .............................................................................................18Restarting syncing ............................................................................................................18Proxy server settings ........................................................................................................18
Chapter 6: Verifying the Connector Installation ..............................................20
Intralinks Connector for SharePoint Installation and Configuration Guide page 2

Chapter 7: Migrating the Intralinks Connector from SharePoint 2013 to SharePoint 2016.........................................................................................21
Before you migrate content ..............................................................................................21Migration best practices....................................................................................................21Post Migration...................................................................................................................22Troubleshooting steps during Migration process..............................................................23
An error occurs when a user tries to add the app, or the app is not visible to the user ..................................................................................................................23Application error when access /_layouts/15/appredirect.aspx, Error=The app <app-realm>" does not exist. .....................................................................................23A 403 or 401 error occurs while redirecting from the app ..........................................23A SQL error occurs while restoring a database: "Exclusive access could not be obtained because the database is in use" .............................................24
Appendix A: Understanding the input.xml file.................................................25
Appendix B: Bill of Materials and installation components .............................28Overview...........................................................................................................................28Bill of Materials .................................................................................................................28What components are installed by the script?..................................................................29
Appendix C: List of components and their installation location ......................32
Appendix D: IntralinksConnector.config configuration settings ......................33
Intralinks Connector for SharePoint Installation and Configuration Guide page 3
Intralinks Connector for SharePoint Installation and Configuration Guide page 4
Chapter 1: IntroductionOverview
This guide provides an overview of Intralinks Connector for SharePoint®, along with instructions for installing it on your SharePoint server, configuring it for use, and testing it.
This guide is intended for the Intralinks Connector administrator or server administrator who is responsible for the hardware and software platform for the Intralinks Connector, and for the SharePoint site administrator who is responsible for configuring the SharePoint site and mapping the Intralinks Connector to the associated Intralinks exchange and resources.
This guide assumes a basic familiarity with standard SharePoint procedures such as adding folders, deleting documents, and adding groups.
For information about using the Intralinks Connector once it is installed and configured, see the Intralinks Connector for SharePoint User Guide.

Chapter 2: Prerequisites
Read this chapter for detailed information about the prerequisites required for installation and configuration of the Intralinks Connector for SharePoint version 4.2.
Microsoft SharePoint
The Intralinks Connector for SharePoint version 4.2 is compatible with SharePoint 2013 and SharePoint 2016. It cannot be used with SharePoint 2010 or earlier versions.
Hardware requirements
This section describes the hardware requirements for setting up the Intralinks Connector for SharePoint 4.2.
Prerequisites > Preparing for Installation
> Installation > Post Installation
Server type Minimum configuration requirements
Comments
Web servers • 8GB RAM
• 64-bit, 4 processor cores
• Two disks: C: 100GB, D: 100GB
• Windows Server 2012 R2
• Microsoft IIS 8.5
• Microsoft .Net Framework 4.6.1 or higher
App servers • 8GB RAM
• 64-bit, 4 processor cores
• Two disks: C: 100GB, D: 100GB
• Windows Server 2012 R2
• Microsoft .Net Framework 4.6.1 or higher
More app servers can be added to scale out the servers.
Intralinks Connector for SharePoint Installation and Configuration Guide page 5
Note:
• These specifications reflect the minimum requirement. They can be scaled up based on your organization’s requirements.
• App, web and database server components can be hosted on a single server, but it is recommended that they be on separate servers.
• Virtual machines can be used for environment setup.
Active Directory
Domain accounts
Intralinks Connector installation requires four domain (service) accounts: one for the sync service (Windows service) and three for the app pool identity for each IIS website. You can use same account in all four cases, or you can use a different service account in each case. You can specify another name during configuration. When you create the accounts, be sure that their passwords are set to never expire. Alos be sure that the account user for the sync service is assigned the Log in as a service right.
Review the table below for an explanation of the permissions required for each account.
*These accounts do not require full access if the Connector Admin and Connector Service websites are not secured. (That is, they use the HTTP protocol.)
Database servers • 20GB RAM
• 64-bit, 4 processor cores
• Two disks: C: 100GB, D: 100GB
• Windows Server 2012 R2
• Microsoft SQL Server 2012 Standard
• Highly available cluster environment.
• An existing database server can be leveraged.
Permissions Required
Service accounts for
Database Proxy SharePoint Certificate Store
Logs Directory
Sync Service Db_Owner Connect to Intralinks
Site Owner Full Access Full Control
Sync Admin Db_Owner Connect to Intralinks
None Full Access Full Control
Connector Admin
Db_Owner None None Full Access* Full Control
Connector Service
Db_datareader
None None Full Access* Full Control
Server type Minimum configuration requirements
Comments
Intralinks Connector for SharePoint Installation and Configuration Guide page 6
Active Directory group
An Active Directory group needs to be created to ensure that Intralinks Connector administrators accessing the administrator portal are authorized. All users who will act as Intralinks Connector administrators must be part of this group in order to access the administrator portal.
Note: An existing Active Directory group can be used for the Intralinks Connector administrator group. If you want to use an existing Active Directory group, select the group name in the Intralinks Connector configuration screen during installation and configuration.
The group type must be Security groups.
Log network path and access
Sync logs for the Intralinks Connector will be stored under a network path. Please ensure that this network path is always available for the Connector to access and log information.
You can specify the path for the logs during installation and configuration.
Note: This network path should be shared with read/write permission and full control of the folder should be given to all of the service accounts and the Active Directory group created above.
Proxy requirements
If the Intralinks Connector is located behind the corporate firewall, it will need to be provided access to https://services.intralinks.com. The service account is used for this. The required access should be provided to this service account through your network’s proxy/firewall settings.
WCF service requirement
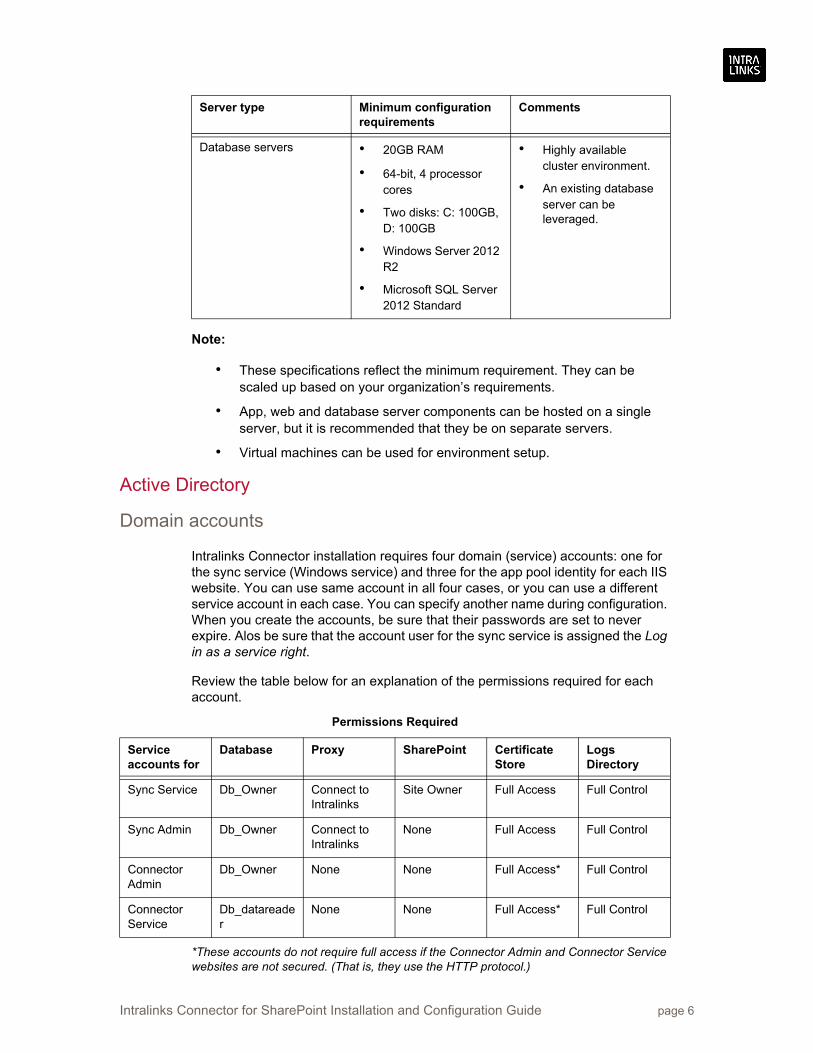
In Server Manager, the HTTP Activation feature in .Net Framework 4.5 must be enabled.
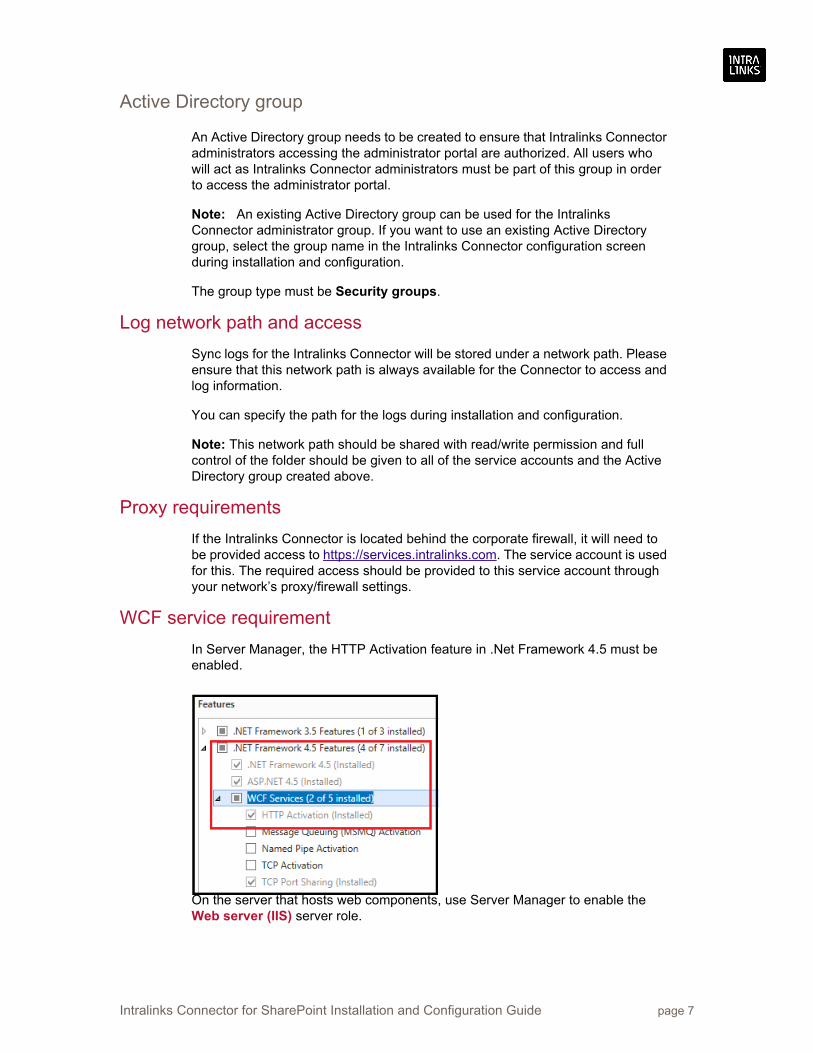
On the server that hosts web components, use Server Manager to enable the Web server (IIS) server role.
Intralinks Connector for SharePoint Installation and Configuration Guide page 7
On the server that hosts web components, use Server Manager to enable the Windows authentication server role.
Note: On the Server Roles page, expand Web Server (IIS), expand Web Server, expand Security, and then select Windows Authentication.
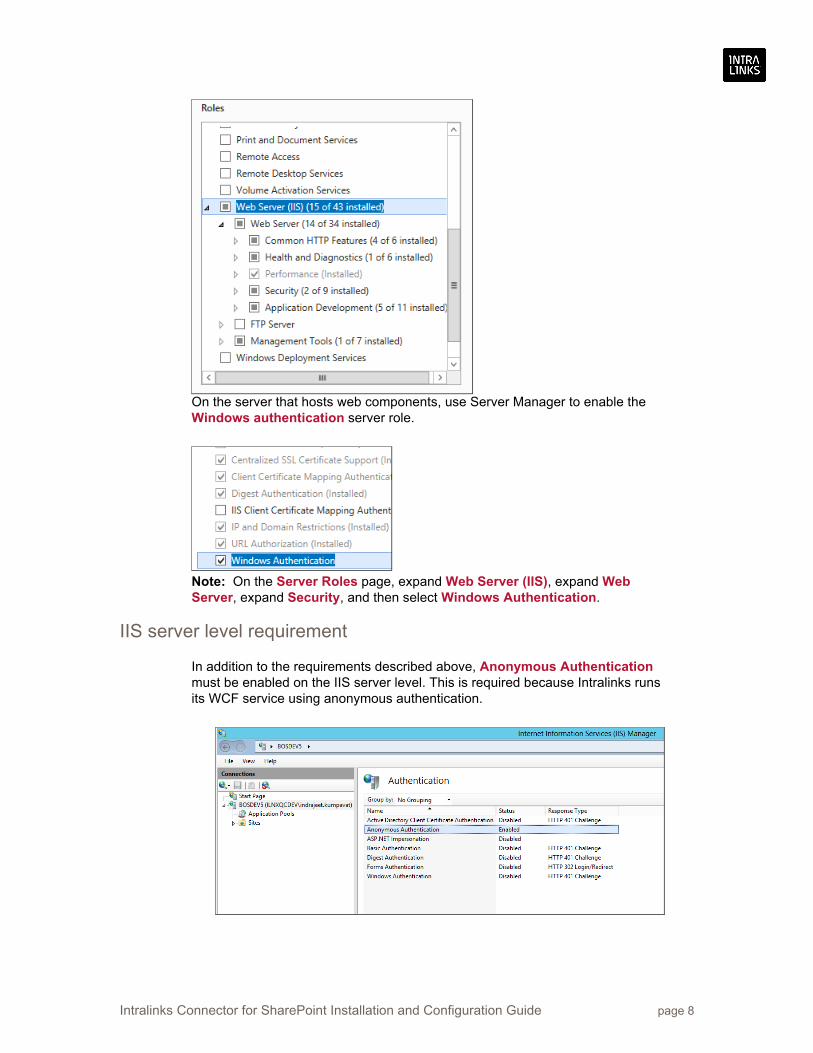
IIS server level requirement
In addition to the requirements described above, Anonymous Authentication must be enabled on the IIS server level. This is required because Intralinks runs its WCF service using anonymous authentication.
Intralinks Connector for SharePoint Installation and Configuration Guide page 8
Certificate requirements
Digital certificate for high trust app
A high-trust app uses digital certificates to establish trust between the remote web application and SharePoint 2013.
The certificate needs to be signed. Certificates that can be used for Internet-facing web servers can also be used for intranet web servers. The certificate should be in two formats, Personal Information Exchange (pfx) and Security Certificate (cer).
Installing the certificate to the Certificate StoreEnsure that the certificate is installed in the certificate store on all servers in the Connector server farm.
SharePoint Provider hosted app requirements
SharePoint services requirement
In order to run apps on the SharePoint farm, the following services must be running on the server:
• App Management Service
• Claims to Windows Token Service
• User Profile Service
• User Profile Synchronization Service
• Microsoft SharePoint Foundation Subscription Settings Service /Subscription Settings Service
SharePoint service application requirements
Ensure the following service applications are provisioned and started. This is required for any provider-hosted app on SharePoint 2013.
• App Management Service
Note: Be sure the App catalog and app URL are configured.
• Secure Token Service
• User Profile Service application
• Subscription Settings Service Application
User profile requirements
Ensure that the SharePoint user profile service and user profile synchronization service are provisioned to the organization’s Active Directory.
Registering the App in the SharePoint Farm
1. Access any site and append /_layouts/15/appregnew.aspx
Intralinks Connector for SharePoint Installation and Configuration Guide page 9

2. Click the Generate buttons for both App Id and App Secret fields.
3. The App Domain is the domain name set on the remote web application server’s IIS Site that will be hosting this app.
4. Be sure the Redirect URI field displays the URL for the SyncAdmin portal, including the port number where the app will be redirected.
Very Important: Copy the output. It will be needed during the packaging phase. Also be sure to save following values: AppId and AppSecret, Update these values in the CLIENT_ID and CLIENT_SECRET fields in input.xml before installation.
Setting permissions for executing installation scripts
Ensure that the accounts used for installation have the appropriate level of access:
• The user account used for installing SharePoint components must have Farm Administrator access
• The user account used for installing SharePoint components must have full control permission for the User Profile Service Application, as shown below. To display this screen, select Central Administration > Manage service applications > User Profile Service Application > Permissions
Intralinks Connector for SharePoint Installation and Configuration Guide page 10

• The user account used for installing connector components must have Local administrator access and database creator access on the SQL server
Setting the time zone of the SharePoint servers, Intralinks Connector servers and the SharePoint site(s)
For the Intralinks Connector to work correctly, be sure that the time zone settings on the servers and SharePoint site(s) are the same.
1. First, check the time zone of the servers on which SharePoint and Intralinks Connector are installed. Click on the time and then click Change date and time settings.
The Windows calendar widget.
2. When the Date and Time screen opens, check the time zone setting.
Intralinks Connector for SharePoint Installation and Configuration Guide page 11
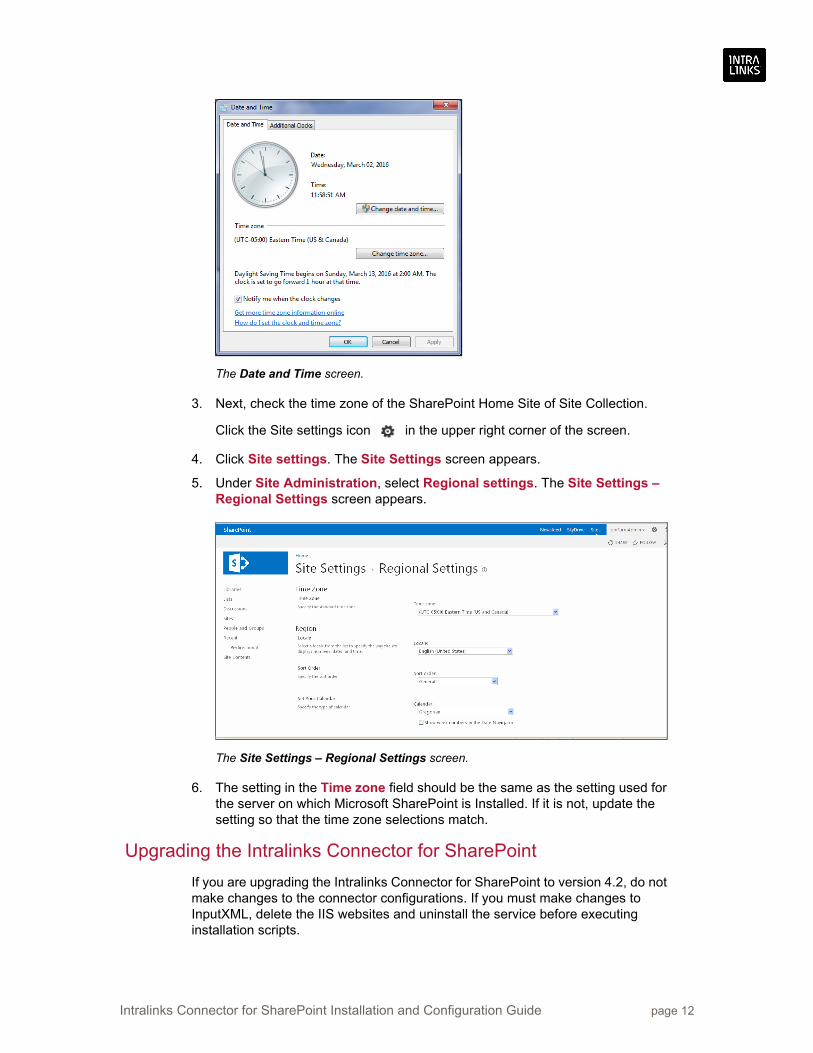
The Date and Time screen.
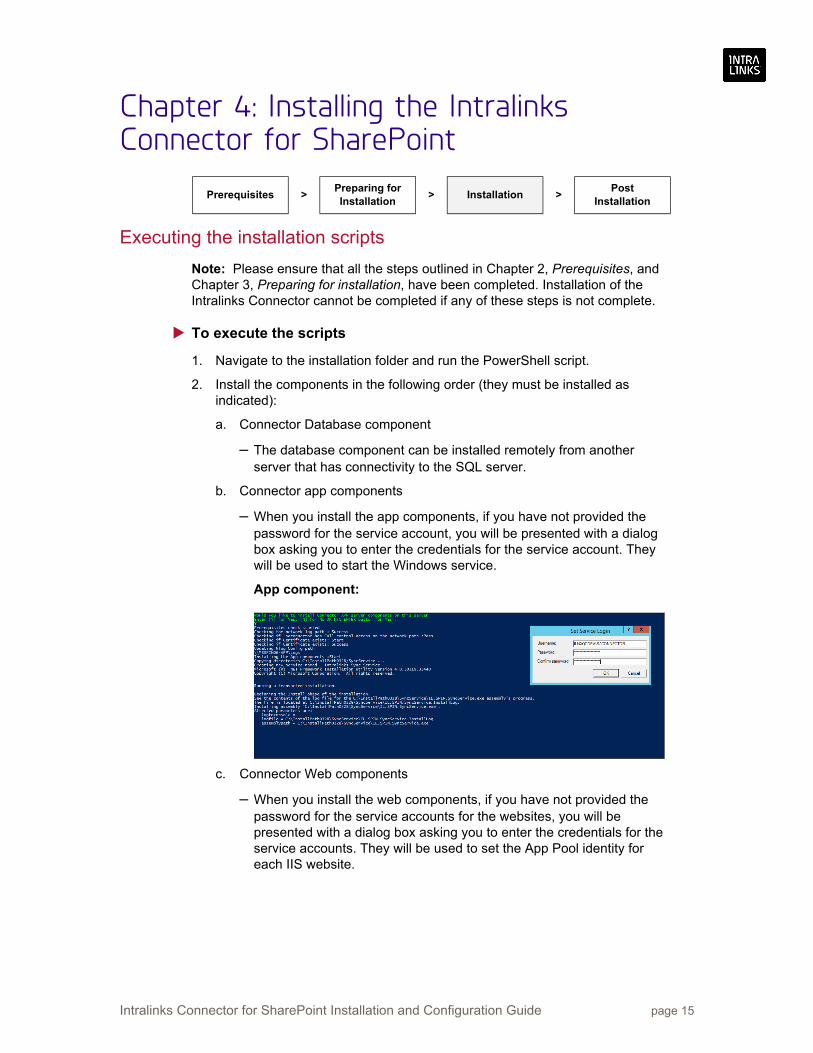
3. Next, check the time zone of the SharePoint Home Site of Site Collection.
Click the Site settings icon in the upper right corner of the screen.
4. Click Site settings. The Site Settings screen appears.
5. Under Site Administration, select Regional settings. The Site Settings – Regional Settings screen appears.
The Site Settings – Regional Settings screen.
6. The setting in the Time zone field should be the same as the setting used for the server on which Microsoft SharePoint is Installed. If it is not, update the setting so that the time zone selections match.
Upgrading the Intralinks Connector for SharePoint
If you are upgrading the Intralinks Connector for SharePoint to version 4.2, do not make changes to the connector configurations. If you must make changes to InputXML, delete the IIS websites and uninstall the service before executing installation scripts.
Intralinks Connector for SharePoint Installation and Configuration Guide page 12

Before starting the upgrade process, use the Halt Syncing screen to stop syncing for all sites.
Installing the Intralinks Connector for multiple web applications
If you are installing the Intralinks Connector app for multiple web applications, be sure to complete the following steps:
1. Register the app for another web application, as described in “Registering the App in the SharePoint Farm” on page 9. Be sure to use the same App ID, App Secret, Title, App Domain and Redirect URI that you used when registering the first web app for each additional app.
2. Repeat the SharePoint app installation process (describe in step number 2 and substep D of “To execute the scripts” on page 15) for each web application; change the App_Catalog_URL parameter in the input.xml file, which is described in Appendix A, Understanding the input.xml file, on page 25.
Intralinks Connector for SharePoint Installation and Configuration Guide page 13

Intralinks Connector for SharePoint Installation and Configuration Guide page 14
Chapter 3: Preparing for installation
Before executing the installation scripts
Complete the following steps before you begin the installation process.
To prepare for installation
1. Begin by downloading the installation folder from the location provided by Intralinks and copy the folder to a local drive.
2. Ensure that the installation folder has been copied to all server(s) that requires installation on a separate folder. Also copy the .pfx and .cer versions of the certificates into the installation folder before installation.
3. Ensure that Windows PowerShell is installed on the servers where the script will be executed. Open a PowerShell prompt in administrator mode. Run the following command to make the downloaded package ready for installation:
Get-Childitem <path for sync service folder> | Unblock-file
4. Ensure that input xml has been updated. For details on populating the input.xml file, please see Appendix A, Understanding the input.xml file, on page 25.
5. Navigate to the location where DeploySPIN4O.ps1 is present.
6. From this point forward, the script expects only a single input to understand which component should be installed on a server. The script presents the following questions. Enter Y to install each component that you want installed on each server. Enter N to skip a component.
Would you like to install DB components?Enter [Y] for Yes; [N] for No OR Hit ENTER button for Yes:
Would you like to install Connector APP server components on this server?Enter [Y] for Yes; [N] for No OR Hit ENTER button for Yes:
Would you like to install Connector Web server components on this server?Enter [Y] for Yes; [N] for No OR Hit ENTER button for Yes:
Would you like to install SharePoint APP components on this server? Enter [Y] for Yes; [N] for No OR Hit ENTER button for Yes:
Refer to Appendix C, List of components and their installation location, on page 32 for a list of components that will be installed on the selected servers.
Prerequisites >Preparing for Installation
> Installation >Post
Installation
Chapter 4: Installing the Intralinks Connector for SharePoint
Executing the installation scripts
Note: Please ensure that all the steps outlined in Chapter 2, Prerequisites, and Chapter 3, Preparing for installation, have been completed. Installation of the Intralinks Connector cannot be completed if any of these steps is not complete.
To execute the scripts
1. Navigate to the installation folder and run the PowerShell script.
2. Install the components in the following order (they must be installed as indicated):
a. Connector Database component
– The database component can be installed remotely from another server that has connectivity to the SQL server.
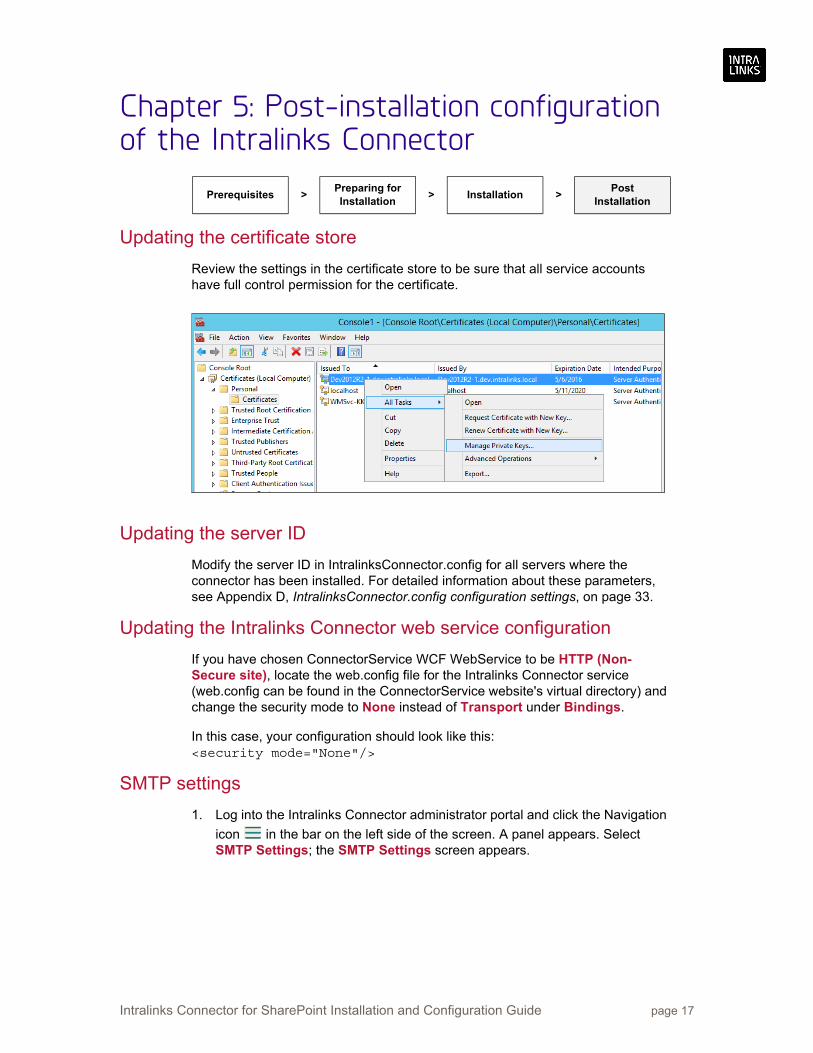
b. Connector app components
– When you install the app components, if you have not provided the password for the service account, you will be presented with a dialog box asking you to enter the credentials for the service account. They will be used to start the Windows service.
App component:
c. Connector Web components
– When you install the web components, if you have not provided the password for the service accounts for the websites, you will be presented with a dialog box asking you to enter the credentials for the service accounts. They will be used to set the App Pool identity for each IIS website.
Prerequisites >Preparing for Installation
> Installation >Post
Installation
Intralinks Connector for SharePoint Installation and Configuration Guide page 15

Web component:
If you press Cancel or ESCAPE, or click the x button to close the window, the following message will appear:
d. SharePoint app component
Intralinks Connector for SharePoint Installation and Configuration Guide page 16
Chapter 5: Post-installation configuration of the Intralinks Connector
Updating the certificate store
Review the settings in the certificate store to be sure that all service accounts have full control permission for the certificate.
Updating the server ID
Modify the server ID in IntralinksConnector.config for all servers where the connector has been installed. For detailed information about these parameters, see Appendix D, IntralinksConnector.config configuration settings, on page 33.
Updating the Intralinks Connector web service configuration
If you have chosen ConnectorService WCF WebService to be HTTP (Non-Secure site), locate the web.config file for the Intralinks Connector service (web.config can be found in the ConnectorService website's virtual directory) and change the security mode to None instead of Transport under Bindings.
In this case, your configuration should look like this: <security mode="None"/>
SMTP settings
1. Log into the Intralinks Connector administrator portal and click the Navigation
icon in the bar on the left side of the screen. A panel appears. Select SMTP Settings; the SMTP Settings screen appears.
Prerequisites >Preparing for Installation
> Installation >Post
Installation
Intralinks Connector for SharePoint Installation and Configuration Guide page 17

Figure 2: The SMTP Settings screen.
3. Enter your organization’s SMTP settings. Required fields are indicated by a red asterisk.
• Server Name — Enter the name of your SMTP server in the format x.x.com.
• User Name — If your SMTP server requires authentication, enter the user name.
• Password — If your SMTP server requires authentication, enter the password.
• Days to Intralinks Password Reset — Indicate the frequency, in days, with which your Intralinks password should be reset. The default frequency is 60 days.
4. Click Save to save your changes and close the SMTP Settings screen.
Updating the Farm Identifier
If you are upgrading the Intralinks Connector database from version 4.1 to version 4.2, you must update the default GUID value on the Instance Catalog screen to show the correct farm ID for the SharePoint server, as shown below.
Restarting syncing
After upgrading, use the Halt Syncing screen to restart syncing for all sites.
Proxy server settings
If your company uses a proxy server, enter the settings in SharePoint.
Intralinks Connector for SharePoint Installation and Configuration Guide page 18

1. Log into the Intralinks Connector administrator portal and click the Navigation
icon in the bar on the left side of the screen. A panel appears. Select Proxy Settings; the Proxy Settings screen appears.
Figure 2: The Proxy Settings screen.
3. Enter the information required for your configuration.
• Use system settings (recommended) — Select this option if you want the Intralinks application to detect and use the proxy settings used by your computer system. No additional entries are required.
• Automatic proxy configuration URL — Select this option if proxy settings will be provided in a Proxy Automatic Configuration (PAC) file. If you select this option, you must provide users with the address for the PAC file (for example, http://proxy.Intralinks.com/pacfile.pac). No additional entries are required.
When users log in, they will select the automatic proxy configuration URL option and enter the address for the PAC file in the field that appears below the option.
• Manual Proxy Settings — Select this option if users will enter proxy settings manually. If you select this option, you must provide users with the following information:
– Authentication type — BASIC or NTLM
– The IP address or URL for the proxy, (for example, 192.192.192.192)
– The port used for the proxy (for example, 8080)
– The proxy user ID and password, if the proxy server requires login credentials
Users will have to enter these values in the appropriate fields in the Manual Proxy settings section of the login screen.
4. Click Save to save your changes and close the Proxy Settings screen.
For more information, see Appendix B, Bill of Materials and installation components, on page 28.
Intralinks Connector for SharePoint Installation and Configuration Guide page 19

Intralinks Connector for SharePoint Installation and Configuration Guide page 20
Chapter 6: Verifying the Connector Installation
First, valid that SharePoint can connect to the Intralinks Platform:
• Log into the SharePoint server using your username and password.
• Using Internet Explorer, navigate to https://services.Intralinks.com and https://webservices.Intralinks.com.
– Verify that the pages load immediately and that no warning messages appear.
– If you encounter certificate warnings, fix them by manually installing the Intralinks certificates. You may need assistance from your organization’s server administrators.
Next, validate that the Intralinks Connector is installed correctly:
• If you have access to an Intralinks exchange and own a SharePoint site, create a test connection between the SharePoint site and the Intralinks exchange and verify that all components sync as expected.
• Additionally, log into the Connector administrator portal and verify that all the settings provided in the input.xml file have been set correctly. To learn more about the parameters in input.xml, see Appendix A, Understanding the input.xml file, on page 25. Once you have launched the portal, select Site Configuration Settings from the navigation panel on the left side of the screen.
For more information about establishing a connection and logging into the administrator portal, see the Intralinks Connector for SharePoint User Guide.

Chapter 7: Migrating the Intralinks Connector from SharePoint 2013 to SharePoint 2016
Intralinks strongly recommends that you use Microsoft’s recommended procedure to migrate your organization’s content from SharePoint 2013 to SharePoint 2016. While other third-part tools may work, Intralinks does not recommend their use.
Before you migrate content
Complete the following steps before migrating your organization’s content.
1. Halt syncing in SharePoint 2013 and wait for all the sites to reach a stable state.
2. If you currently are using the Intralinks Connector Site Template in version 3.5 of the Intralinks Connector, you must use the following procedure to install the compatibility connector template within the SharePoint 2016 environment.
Migration best practices
Use the following best practices for migration.
• Complete the steps for migrating from SharePoint 2013 to SharePoint 2016 outlined in the following Microsoft webpage:
https://technet.microsoft.com/en-us/library/cc263026(v=office.16).aspx
• Back up the app management service and subscription settings service databases and restore them to the SharePoint 2016 database server.
Note: To avoid errors after migration, restore the content database first, then restore the subscription settings database, followed by the app management database. See “Troubleshooting steps during Migration process” on page 23 for more information.
• Create new App Management Service and Subscription Settings Service applications using the copied database.
Note: If you did not rename the database after pasting it, it will use the existing database for newly created service applications.
• After migrating both of the service and web applications above, set the app catalog site collection
– Go to Central Administration —> Apps —> Manage App Catalog.
– Select Enter existing App catalog site, as shown below.
Intralinks Connector for SharePoint Installation and Configuration Guide page 21

• Configure app URLs in Central Administration in SharePoint 2016.
Post Migration
After migration is complete, use the following steps to set the app up on SharePoint 2016.
1. Do App registration in SharePoint 2016
– Access any site and append /_layouts/15/appregnew.aspx.
– Copy the entries in the App ID and App Secret fields.
Note: Be sure you use the client ID and client secret that was entered on the Site Configuration screen. To copy the client ID and secret follow the below instructions
a. Open the Intralinks Connector administrator portal
b. Click on the left navigation menu.
c. Click on the Site Configuration Settings menu.
d. Click the edit icon next to the Client_ID setting and copy its value. Click Cancel after copying.
e. Click on the edit icon next to the Client_Secret setting and copy its value. Click Cancel after copying.
– The App Domain is the domain name set on the remote web application server’s IIS site that will host this application.
– Be sure the Redirect URI field displays the URL for the SyncAdmin portal, including the port number where the app will be redirected.
2. Install the SharePoint app components on SharePoint 2016, using the same input.xml file used in installation on SharePoint 2013.
3. After installation, use the following steps to update the new Issuer ID on the Configuration Settings screen in the Intralinks Connector administrator portal.
– Log into the Intralinks Connector administrator portal and click the Navigation icon in the bar on the left side of the screen. A panel appears. Select Site Configuration Settings; the Site Configuration Settings screen appears.
– Locate the Issuer_ID setting and click the edit icon next to it. The setting becomes editable.
Intralinks Connector for SharePoint Installation and Configuration Guide page 22

– Enter the Issuer ID that was displayed in the final step of the installation process. (If you did not copy the ID during the installation process, you can find the ID in the log file stored in the installation folder.)
– Click Save.
4. Restart the sync process using the Connector administrator portal:
– Open the Connector administrator portal.
– Click on the left navigation menu.
– Click on the Halt Syncing menu item.
– Click on the Restart Syncing button.
Troubleshooting steps during Migration process
This section highlights issues that you may encounter during migration and provides resolutions for these issues.
An error occurs when a user tries to add the app, or the app is not visible to the user
• Be sure the user is part of the site collection admin group
• Be sure the App Prefix and Domain are entered correctly.
– Go to Central Administration –> Apps –> App Configuration
Application error when access /_layouts/15/appredirect.aspx, Error=The app <app-realm>" does not exist.
This can happen if the App Management database was pasted before the content database was, This causes the correlation between the Content database and the App Management database to break. Please be sure the Content database is copied and pasted first.
A 403 or 401 error occurs while redirecting from the app
This can occur if the app is not registered. Use the following URLs by entering the Client ID:
<siteURL>/_layouts/15/appinv.aspx
If no app found while looking up by app ID, you will be required to register the app with the same client ID by using <siteURL>/_layouts/15/appregnew.aspx
You can also check app principals for the site using the following URL:
<siteURL>/_layouts/15/appprincipals.aspx
Intralinks Connector for SharePoint Installation and Configuration Guide page 23
A SQL error occurs while restoring a database: "Exclusive access could not be obtained because the database is in use"
Ensure that only one user is logged into the SharePoint database server and only one instance of the SQLServer Management Studio is open.
Set the Restrict Access setting to SINGLE_USER in the database properties on the Options screen. This setting will be set to MULTI_USER automatically when the restore operation is complete.
Intralinks Connector for SharePoint Installation and Configuration Guide page 24
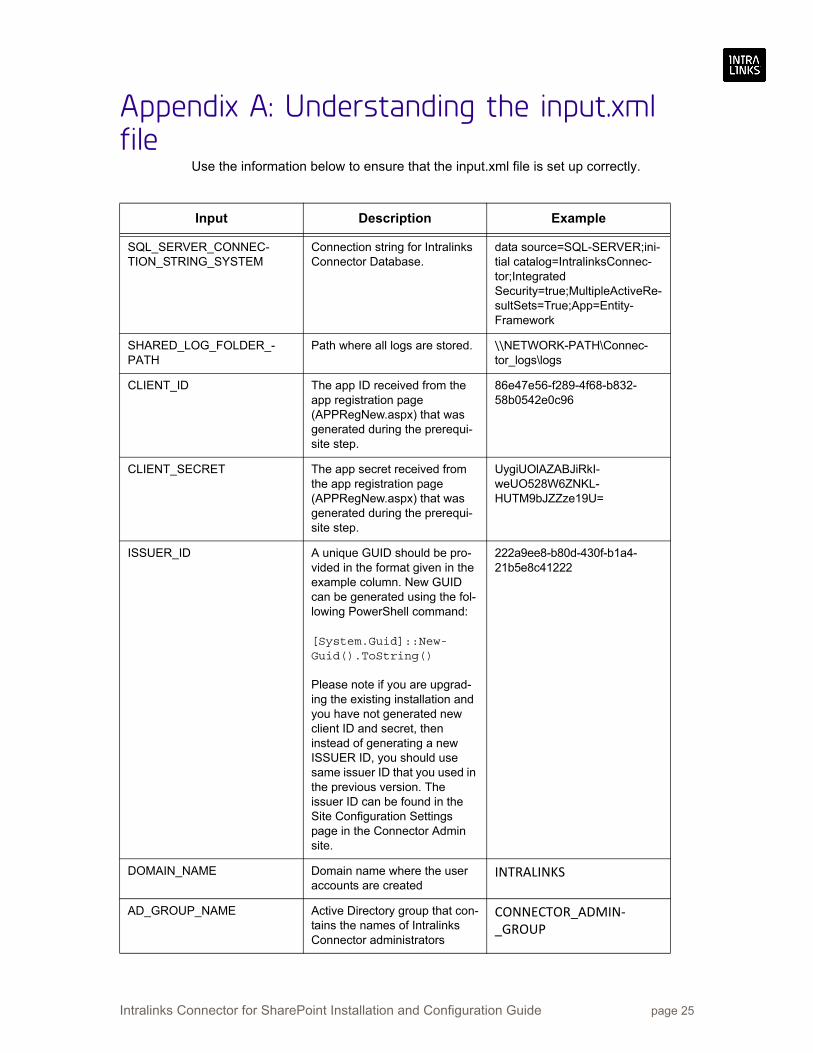
Appendix A: Understanding the input.xml file
Use the information below to ensure that the input.xml file is set up correctly.
Input Description Example
SQL_SERVER_CONNEC-TION_STRING_SYSTEM
Connection string for Intralinks Connector Database.
data source=SQL-SERVER;ini-tial catalog=IntralinksConnec-tor;Integrated Security=true;MultipleActiveRe-sultSets=True;App=Entity-Framework
SHARED_LOG_FOLDER_-PATH
Path where all logs are stored. \\NETWORK-PATH\Connec-tor_logs\logs
CLIENT_ID The app ID received from the app registration page (APPRegNew.aspx) that was generated during the prerequi-site step.
86e47e56-f289-4f68-b832-58b0542e0c96
CLIENT_SECRET The app secret received from the app registration page (APPRegNew.aspx) that was generated during the prerequi-site step.
UygiUOlAZABJiRkI-weUO528W6ZNKL-HUTM9bJZZze19U=
ISSUER_ID A unique GUID should be pro-vided in the format given in the example column. New GUID can be generated using the fol-lowing PowerShell command:
[System.Guid]::New-Guid().ToString()
Please note if you are upgrad-ing the existing installation and you have not generated new client ID and secret, then instead of generating a new ISSUER ID, you should use same issuer ID that you used in the previous version. The issuer ID can be found in the Site Configuration Settings page in the Connector Admin site.
222a9ee8-b80d-430f-b1a4-21b5e8c41222
DOMAIN_NAME Domain name where the user accounts are created
INTRALINKS
AD_GROUP_NAME Active Directory group that con-tains the names of Intralinks Connector administrators
CONNECTOR_ADMIN‐_GROUP
Intralinks Connector for SharePoint Installation and Configuration Guide page 25
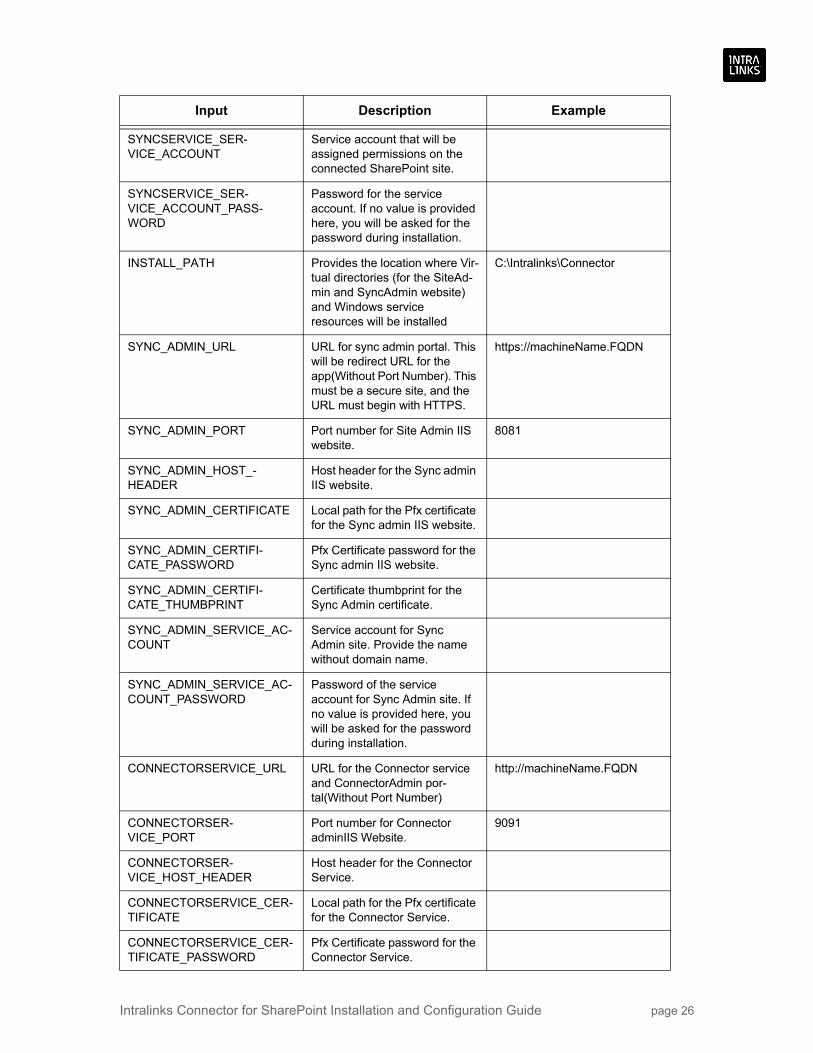
SYNCSERVICE_SER-VICE_ACCOUNT
Service account that will be assigned permissions on the connected SharePoint site.
SYNCSERVICE_SER-VICE_ACCOUNT_PASS-WORD
Password for the service account. If no value is provided here, you will be asked for the password during installation.
INSTALL_PATH Provides the location where Vir-tual directories (for the SiteAd-min and SyncAdmin website) and Windows service resources will be installed
C:\Intralinks\Connector
SYNC_ADMIN_URL URL for sync admin portal. This will be redirect URL for the app(Without Port Number). This must be a secure site, and the URL must begin with HTTPS.
https://machineName.FQDN
SYNC_ADMIN_PORT Port number for Site Admin IIS website.
8081
SYNC_ADMIN_HOST_-HEADER
Host header for the Sync admin IIS website.
SYNC_ADMIN_CERTIFICATE Local path for the Pfx certificate for the Sync admin IIS website.
SYNC_ADMIN_CERTIFI-CATE_PASSWORD
Pfx Certificate password for the Sync admin IIS website.
SYNC_ADMIN_CERTIFI-CATE_THUMBPRINT
Certificate thumbprint for the Sync Admin certificate.
SYNC_ADMIN_SERVICE_AC-COUNT
Service account for Sync Admin site. Provide the name without domain name.
SYNC_ADMIN_SERVICE_AC-COUNT_PASSWORD
Password of the service account for Sync Admin site. If no value is provided here, you will be asked for the password during installation.
CONNECTORSERVICE_URL URL for the Connector service and ConnectorAdmin por-tal(Without Port Number)
http://machineName.FQDN
CONNECTORSER-VICE_PORT
Port number for Connector adminIIS Website.
9091
CONNECTORSER-VICE_HOST_HEADER
Host header for the Connector Service.
CONNECTORSERVICE_CER-TIFICATE
Local path for the Pfx certificate for the Connector Service.
CONNECTORSERVICE_CER-TIFICATE_PASSWORD
Pfx Certificate password for the Connector Service.
Input Description Example
Intralinks Connector for SharePoint Installation and Configuration Guide page 26

CONNECTORSERVICE_CER-TIFICATE_THUMBPRINT
Certificate thumbprint for the Connector Service.
CONNECTOR_SERVICE_AC-COUNT
Service account for the Con-nector Service site. Provide the name without the domain name.
CONNECTOR_SERVICE_AC-COUNT_PASSWORD
Password for the service account for the Connector Ser-vice site. If no value is provided here, you will be asked for the password during installation.
CONNECTOR_ADMIN_PORT Port number for Connector adminIIS Website.
8082
CONNECTOR_ADMIN_URL Provide the site URL for Con-nectorAdmin portal(without port number)
CONNECTOR_ADMIN-_HOST_HEADER
Host header for the Connector admin portal..
CONNECTOR_ADMIN_CER-TIFICATE
Local path for the Pfx certificate for the Connector admin IIS website..
CONNECTOR_ADMIN_CER-TIFICATE_PASSWORD
Pfx Certificate password for the Connector admin IIS website.
CONNECTOR_ADMIN_CER-TIFICATE_THUMBPRINT
Certificate thumbprint for the Connector admin certificate.
CONNECTOR_ADMIN_SER-VICE_ACCOUNT
Service account for the Con-nector Admin site. Provide the name without the domain name.
CONNECTOR_ADMIN_SER-VICE_ACCOUNT_PASS-WORD
Password for the service account for the Connector Admin site. If no value is pro-vided here, you will be asked for the password during instal-lation.
PUBLICCERTPATH Local path for the public certifi-cate (.cer) version of the Sync Admin certificate. This is the public certificate (.cer) version of the .pfx certificate used for the Sync Admin.
C:\InstallationFolder\Connec-torCertifcate.cer
APP_CATALOG_URL URL of the SharePoint APP Catalog where app will be uploaded.
http://machineName.FQDN/sites/appcatalog
APPIMAGESLIBRARY Library name for app-related images e.g. “Site Assets.”
AppImagesLibrary
Input Description Example
Intralinks Connector for SharePoint Installation and Configuration Guide page 27

Appendix B: Bill of Materials and installation components
This section describes the components received from Intralinks prior to installation and the components that will be created during installation of the Intralinks Connector for SharePoint.
Overview
Intralinks Connector for SharePoint requires that a number of components be installed on the SharePoint environment and Intralinks Connector environment server(s). Intralinks provides PowerShell scripts to install all the components required for a successful setup.
The Intralinks Connector installation consists of four components:
1. A SharePoint component
2. A Connector DB component
3. A Connector Web component
4. A Connector App component
Note: The scripts provide options to install components 2, 3 and 4 on the same server or on different servers. Component 1 should be run on any of the SharePoint servers.
Bill of Materials
The Intralinks Connector for SharePoint 4.2 package consists of the following resources.
DeploySPIN4O.ps1This is a PowerShell script that will be used to install SharePoint and connector components on respective environments.
Input.xmlThis is an XML-based input file that must be updated by the administrator before the scripts are executed. The scripts refer to each and every input at various stages of the installation.
Config folderThis folder contains configuration files that are used to ensure that all configuration that are required by the application and that can be configured are present on the connector server(s).
IntralinksConnector.config This file contains the configuration information specific to each server, including the number of processors that each server can handle, the nickname for the server that is displayed in the Administrator dashboard, and the number of threads that each process can handle.
WSB.config This file contains information about the Intralinks URL service.intralinks.com.
Intralinks Connector for SharePoint Installation and Configuration Guide page 28
Nlog.config All application logs are stored in a network path using NLog library. NLog is a free logging platform for .NET with rich log routing and management capabilities. This configuration file contains the network location where the logs will be stored. All logs are in CSV format.
SPINApp folderThis folder contains the App package (.app file).
App images folderThis folder contains all the images used by the Intralinks Connector for SharePoint add-in.
SPINDb folderThis folder contains all the resources required to set up the SQL Database.
SPINWeb folderThis folder contains all the resources required for the Connector web components.
• The SyncAdmin subfolder contains the core of the product, which hosts the resources required for the app to function.
• The SPINAdmin subfolder contains the resources required for the Connector administrator portal.
• The SPINService subfolder contains the resources required for hosting the Windows communication foundation service, which exposes the custom field definition that is stored in the Connector SQL Server.
SyncService folderThis folder consists of all the resources needed to install and start the Intralinks sync service. These resources are Windows services that enable you to create long-running executable applications that run in their own Windows sessions and that are required for Sync operations. They include:
• WindowsBase.dll
• WindowsBase.xml
Note: These resources are used internally to repackage the app.
What components are installed by the script?
For each component described above, the script checks to be sure required prerequisites are met and also installs or sets up the required resources. Details of the prerequisite check and setup for each component can be seen below
1. SharePoint component
Prerequisites checks:
• Ensures that SharePoint services and service applications for add-in are provisioned.
• Ensures that a user profile has been created for the service account for Sync Service.
Intralinks Connector for SharePoint Installation and Configuration Guide page 29
Setup:
• Registers the certificate to the root authority and as an official token issuer.
• Registers the app in the SharePoint farm.
• Prepares the .app file with the appropriate redirect URL and issuer ID.
• Uploads the app file to the app catalog.
2. Connector DB component
Prerequisites check:
• Ensures that the service accounts have the appropriate rights to the SQL database.
Setup:
• Creates the database on the SQL server identified in the SQL_SERVER_Connection_String_System key in input.xml.
• Creates the SQL Schema and provisions the configuration data that is required for the Intralinks Connector version 4.2.
3. Connector Web component
Prerequisites check:
• Ensures all the service accounts are set up as the identity for application pool
• Ensures required authentications are in place for each IIS website
Setup:
• Imports the provided certificate to the IIS.
• Sets up three IIS websites and the application pool required for the Connector.
4. Connector App component
Prerequisites check:
• Ensures that the service account (provided under the SyncService_SERVICE_ACCOUNT key in input.xml) has been created in the Active Directory.
• Ensures that the AD Group (provided under the AD_GROUP_NAME key in input.xml) exists.
• Ensures that the network log path (provided under the Shared_Log_Folder_Path key in input.xml) exists.
• Ensures that the network path is shared with read/write permission and has full control for all the service accounts.
• Ensures that all the certificate paths provided exist.
Setup:
• Installs the Intralinks Sync service (windows service).
• Starts the service with provided service account.
Intralinks Connector for SharePoint Installation and Configuration Guide page 30

Intralinks Connector for SharePoint Installation and Configuration Guide page 31

Intralinks Connector for SharePoint Installation and Configuration Guide page 32
Appendix C: List of components and their installation location
Use the information below to ensure that the input.xml file is set up correctly.
ComponentServer on which the script
needs to be run*Key actions performed by
the script
SharePoint Component One of the servers in the SharePoint farm.
• Registers the certificate to the root authority and as an official token issuer.
• Registers the app in the SharePoint farm.
• Prepares the .app file with the appropriate redirect URL and issuer ID.
• Uploads the app file to the app catalog.
Intralinks web server component
Intralinks Connector Web server (Server on which IIS is installed)
• Imports the provided certificate to the IIS.
• Sets up three IIS websites and the application pool required for the Connector.
Intralinks app server component
Intralinks Connector App server.
• Installs the Intralinks Sync service (Windows service).
• Starts the service with the provided service account.
Intralinks database component Any server from where SQL server can be accessed.
• Creates the database on the SQL server identified in the SQL_SERVER_Connection_String_System key in input.xml.
• Creates the SQL Schema and provisions the configuration data that is required for the Intralinks Connector version 4.2.
Intralinks Connector for SharePoint Installation and Configuration Guide page 33
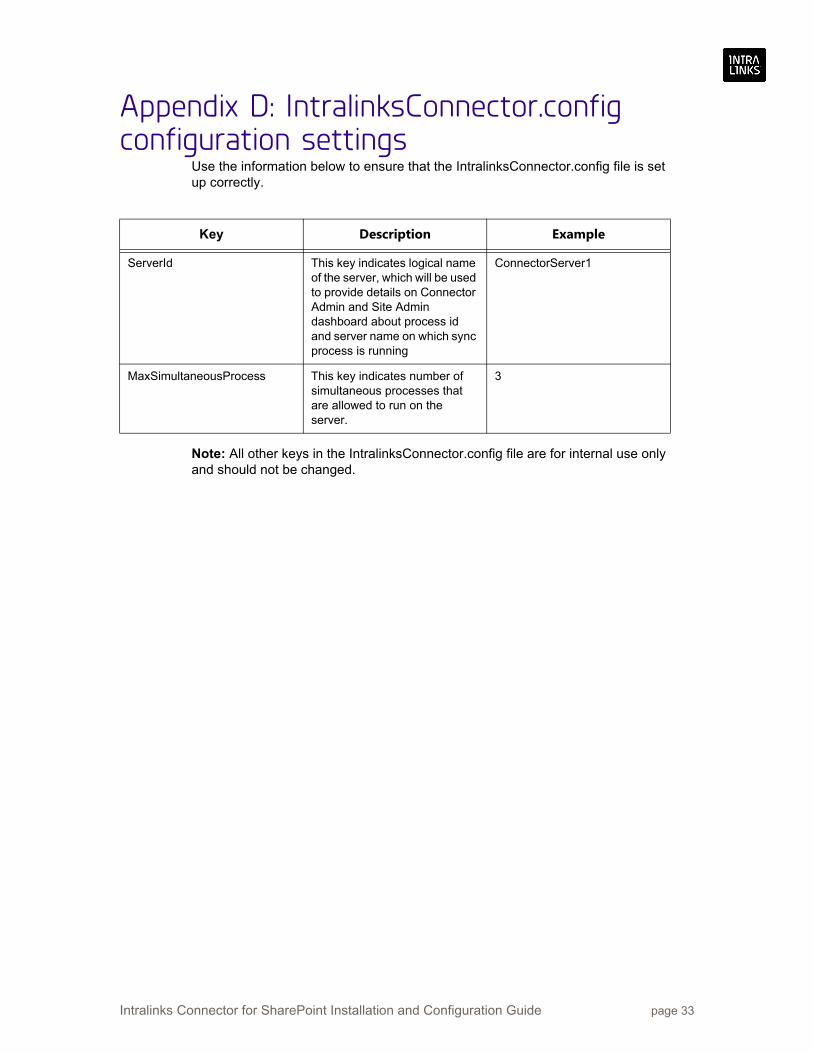
Appendix D: IntralinksConnector.config configuration settings
Use the information below to ensure that the IntralinksConnector.config file is set up correctly.
Note: All other keys in the IntralinksConnector.config file are for internal use only and should not be changed.
Key Description Example
ServerId This key indicates logical name of the server, which will be used to provide details on Connector Admin and Site Admin dashboard about process id and server name on which sync process is running
ConnectorServer1
MaxSimultaneousProcess This key indicates number of simultaneous processes that are allowed to run on the server.
3