Embed Size (px)
Citation preview

Foryoursafety,read
carefully
andkeep
inthisvehicle.
In Touch Navigation

Foreword
Thank you for purchasing an INFINITI vehicle.
This user’s manual is for Infiniti InTouch and thesystems linked to Infiniti InTouch offered in yourINFINITI vehicle.
Please read this manual carefully to ensure safeoperation of Infiniti InTouch.
• Because of possible specification changes and op-tional equipment, some sections of this manualmay not apply to your vehicle.
• All information, specifications and illustrations inthis manual are those in effect at the time of print-ing. INFINITI reserves the right to change specifi-cations or design at any time without notice.
• Do not remove this manual from the vehicle whenselling thisvehicle. Thenextuser of Infiniti InTouchmay need the manual.
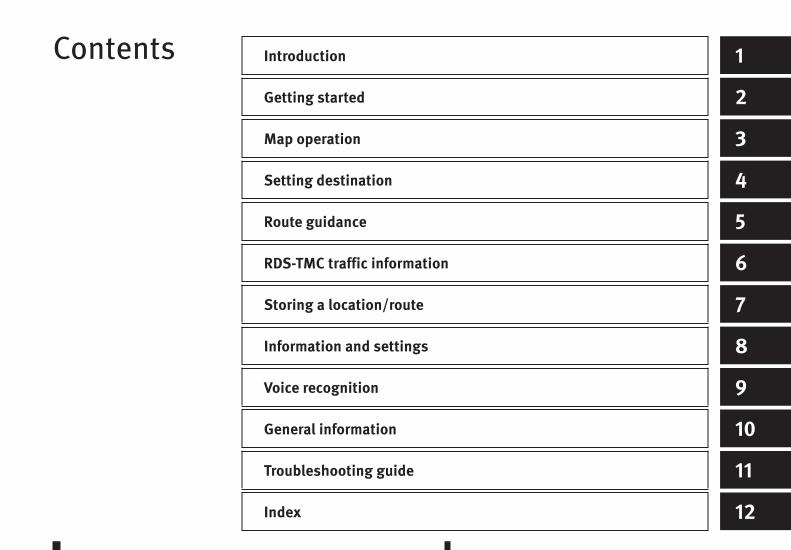
Contents Introduction 1
Getting started 2
Map operation 3
Setting destination 4
Route guidance 5
RDS-TMC traffic information 6
Storing a location/route 7
Information and settings 8
Voice recognition 9
General information 10
Troubleshooting guide 11
Index 12

1 IntroductionIntroduction
How to use this manual ..................................... 1-2For safe operation ........................................ 1-2Reference symbols ....................................... 1-2Screen illustrations ...................................... 1-2
Safety information ............................................ 1-3Laser product ................................................... 1-3Customer assistance ......................................... 1-4
This manual uses special words, symbols, iconsand illustrations organised by function.
Please refer to the following items and familiar-ise yourself with them.
FOR SAFE OPERATION
WARNING:
This is used to indicate the presence of a hazard thatcould cause death or serious personal injury. To avoidor reduce this risk, the procedures must be followedprecisely.
CAUTION:
This is used to indicate the presence of a hazard thatcould cause minor or moderate personal injury or dam-age to your vehicle. To avoid or reduce this risk, theprocedures must be followed carefully.
NOTE:
This indicates items that help you understand andmaximise the performance of your vehicle. Ignoringthem may lead to a malfunction or poor performance.
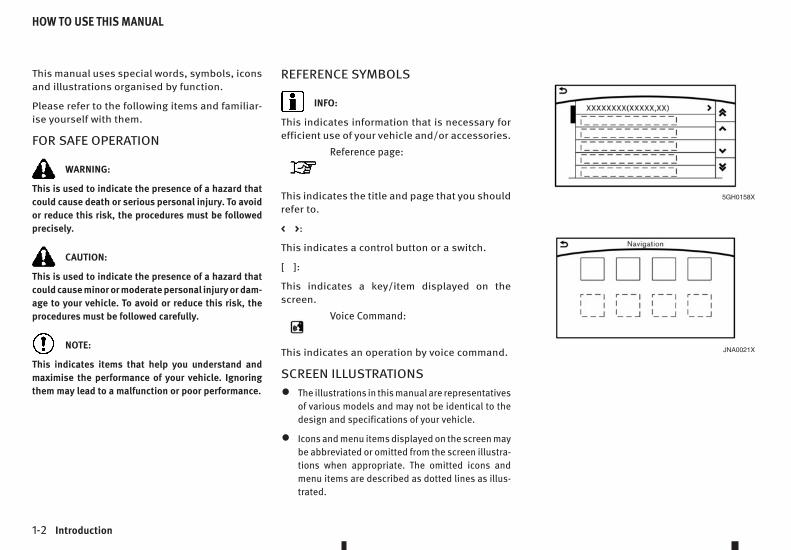
REFERENCE SYMBOLS
INFO:
This indicates information that is necessary forefficient use of your vehicle and/or accessories.
mReference page:
This indicates the title and page that you shouldrefer to.
< >:
This indicates a control button or a switch.
[ ]:
This indicates a key/item displayed on thescreen.
mVoice Command:
This indicates an operation by voice command.
SCREEN ILLUSTRATIONS
• The illustrations in this manual are representativesof various models and may not be identical to thedesign and specifications of your vehicle.
• Icons and menu items displayed on the screen maybe abbreviated or omitted from the screen illustra-tions when appropriate. The omitted icons andmenu items are described as dotted lines as illus-trated.
5GH0158X
JNA0021X
HOW TO USE THIS MANUAL
1-2 Introduction
The navigation system is primarily designed toguide you and help you to reach your destina-tion. However, you, the driver, must use the sys-tem safely and properly. Information concern-ing road conditions, traffic signs and the avail-ability of services may not always be up to date.The system is not a substitute for safe, properand legal driving.
Before using the system, please read the follow-ing safety information. Always use the systemas specified in this manual.
WARNING:
• Do not rely on route guidance alone. Always besure that all driving manoeuvres are legal and safein order to avoid accidents.
• To operate Infiniti InTouch or to use the INFINITIcontroller, first park the vehicle in a safe locationand set the parking brake. Operating the systemwhile driving can distract the driver and may re-sult in a serious accident.
• Exercise extreme caution at all times so full atten-tion may be given to vehicle operation. If the sys-tem does not respond immediately, please be pa-tient and keep your eyes on the road. Inattentivedriving may lead to a crash resulting in seriousinjuries or death.
• Do not disassemble or modify this system. Doingso may result in an accident, fire or electricalshock.
• If you notice any foreign objects in the systemhardware, spill liquid on the system or noticesmoke or a smell coming from it, stop using thesystem immediately and contact an INFINITICentre or qualified workshop. Ignoring such con-ditions may lead to an accident, fire or electricalshock.
CAUTION:
• Some jurisdictions may have laws limiting the useof video screens while driving. Use this systemonly where it is legal to do so.
• Extreme temperatures [below −20°C (−4°F) andabove 70°C (158°F)] could affect the performanceof the system.
• The display screen may break if it is hit with a hardor sharp object. If the glass screen breaks, do nottouch it. Doing so could result in an injury.
NOTE:
Do not keep the system running with the enginestopped. Doing so may discharge the vehicle battery.When using the system, always keep the engine run-ning.
This Infiniti InTouch is certified as a Class 1 laserproduct.
WARNING:
• Do not disassemble or modify this system. Thereare no user serviceable parts in Infiniti InTouch.
• If maintenance, adjustments and operations otherthan those specified in this manual are attempted,injury due to laser radiation and exposure couldoccur.
SAFETY INFORMATION LASER PRODUCT
Introduction 1-3

For assistance or inquiries about InfinitiInTouch, or to order updated map data for thenavigation system, contact an INFINITI Centre orqualified workshop.
CUSTOMER ASSISTANCE
1-4 Introduction
2 Getting startedGetting started
Control buttons and functions............................ 2-2How to handle display .................................. 2-2INFINITI controller......................................... 2-2Steering wheel switch .................................. 2-4
Starting system ................................................ 2-4Map data authentication............................... 2-4
Touch panel operation....................................... 2-4Operating menu screen ................................ 2-5Scrolling list or message............................... 2-5Selecting item.............................................. 2-6Adjusting settings ........................................ 2-6
Navigation system status screen........................ 2-6Shortcut menu.................................................. 2-7
Edit shortcut menu ....................................... 2-7Map menu ........................................................ 2-7Display view bar ............................................... 2-8
Customising the display view bar .................. 2-9How to input letters and numbers ...................... 2-10
Alphanumeric character (letters andnumbers) input screen.................................. 2-10Chinese Character (Handwriting) inputscreen ......................................................... 2-10Chinese Character (Pinyin) input screen......... 2-10
Functions disabled while driving (where fitted) ... 2-11Additional system information........................... 2-11
Designs and button layout may vary dependingon the model and specifications.
HOW TO HANDLE DISPLAYThe display is a liquid crystal display and shouldbe handled with care.
WARNING:
Never disassemble the display. Some parts utilise ex-tremely high voltage. Touching them may result in se-rious personal injury.
Characteristics of liquid crystaldisplay
• If the temperature inside the vehicle is especiallylow, the display will stay relatively dim or the move-ment of the images may be slow. These conditionsare normal. The display will function normallywhen the interior of the vehicle has warmed up.
• Some pixels in the display are darker or brighterthan others. This condition is an inherent charac-teristic of liquid crystal display, and it is not a mal-function.
• A remnant of the previous display image may re-main on the screen. This screen burn is inherent inthis type of display, and it is not a malfunction.
Maintenance of display
CAUTION:
• To clean the display, stop the vehicle in a safelocation.
• Clean the display with the ignition switch in theOFF position. If the display is cleaned while theignition switch is in the ON position, unintentionaloperation may occur.
• When cleaning the display, never use a roughcloth, alcohol, benzine, thinner or any kind of sol-vent or paper towel with a chemical cleaningagent. Doing so will cause scratches or deteriora-tion of the panel.
• Do not splash any liquid such as water or car fra-grance on the display. Contact with liquid willcause the system to malfunction.
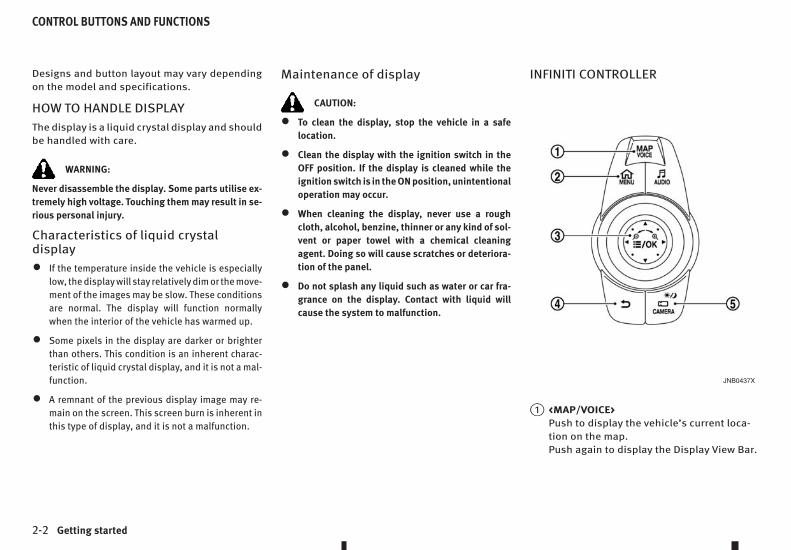
INFINITI CONTROLLER
j1 <MAP/VOICE>Push to display the vehicle’s current loca-tion on the map.Push again to display the Display View Bar.
JNB0437X
CONTROL BUTTONS AND FUNCTIONS
2-2 Getting started
“Display view bar” (page 2-8)Push and hold to hear the current guidancefor a programmed route.
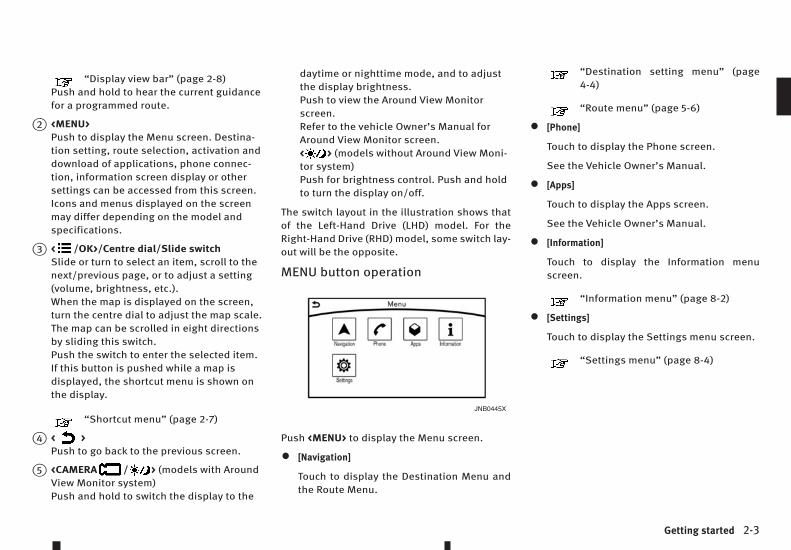
j2 <MENU>Push to display the Menu screen. Destina-tion setting, route selection, activation anddownload of applications, phone connec-tion, information screen display or othersettings can be accessed from this screen.Icons and menus displayed on the screenmay differ depending on the model andspecifications.
j3 <m /OK>/Centre dial/Slide switchSlide or turn to select an item, scroll to thenext/previous page, or to adjust a setting(volume, brightness, etc.).When the map is displayed on the screen,turn the centre dial to adjust the map scale.The map can be scrolled in eight directionsby sliding this switch.Push the switch to enter the selected item.If this button is pushed while a map isdisplayed, the shortcut menu is shown onthe display.
“Shortcut menu” (page 2-7)
j4 <m >Push to go back to the previous screen.
j5 <CAMERAm /m > (models with AroundView Monitor system)Push and hold to switch the display to the
daytime or nighttime mode, and to adjustthe display brightness.Push to view the Around View Monitorscreen.Refer to the vehicle Owner’s Manual forAround View Monitor screen.<m > (models without Around View Moni-tor system)Push for brightness control. Push and holdto turn the display on/off.
The switch layout in the illustration shows thatof the Left-Hand Drive (LHD) model. For theRight-Hand Drive (RHD) model, some switch lay-out will be the opposite.
MENU button operation
Push <MENU> to display the Menu screen.
• [Navigation]
Touch to display the Destination Menu andthe Route Menu.
“Destination setting menu” (page4-4)
“Route menu” (page 5-6)
• [Phone]
Touch to display the Phone screen.
See the Vehicle Owner’s Manual.
• [Apps]
Touch to display the Apps screen.
See the Vehicle Owner’s Manual.
• [Information]
Touch to display the Information menuscreen.
“Information menu” (page 8-2)
• [Settings]
Touch to display the Settings menu screen.
“Settings menu” (page 8-4)
JNB0445X
Getting started 2-3
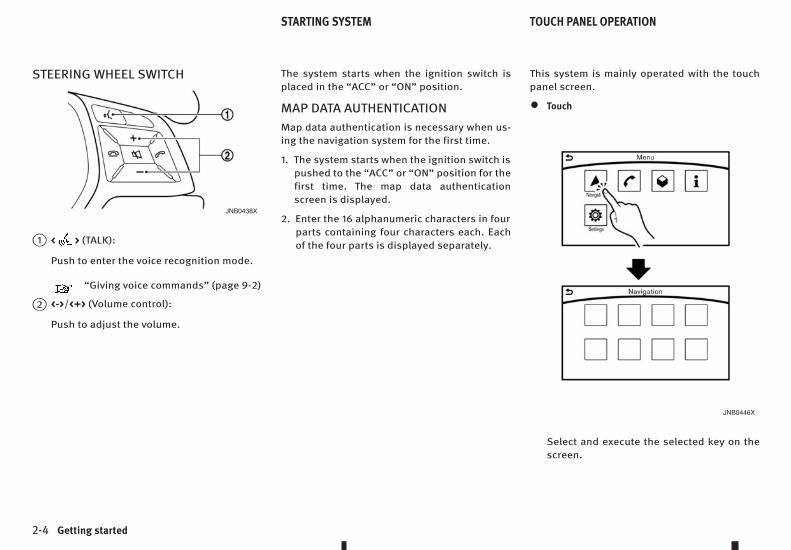
STEERING WHEEL SWITCH
j1 <m > (TALK):
Push to enter the voice recognition mode.
“Giving voice commands” (page 9-2)
j2 <->/<+> (Volume control):
Push to adjust the volume.
The system starts when the ignition switch isplaced in the “ACC” or “ON” position.
MAP DATA AUTHENTICATIONMap data authentication is necessary when us-ing the navigation system for the first time.
1. The system starts when the ignition switch ispushed to the “ACC” or “ON” position for thefirst time. The map data authenticationscreen is displayed.
2. Enter the 16 alphanumeric characters in fourparts containing four characters each. Eachof the four parts is displayed separately.
This system is mainly operated with the touchpanel screen.
• Touch
Select and execute the selected key on thescreen.
JNB0438X
JNB0446X
STARTING SYSTEM TOUCH PANEL OPERATION
2-4 Getting started
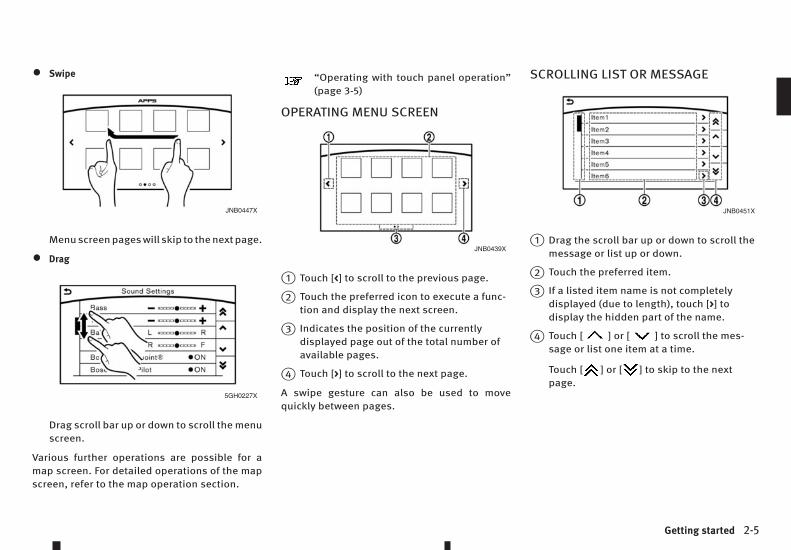
• Swipe
Menu screen pages will skip to the next page.
• Drag
Drag scroll bar up or down to scroll the menuscreen.
Various further operations are possible for amap screen. For detailed operations of the mapscreen, refer to the map operation section.
“Operating with touch panel operation”(page 3-5)
OPERATING MENU SCREEN
j1 Touch [<] to scroll to the previous page.
j2 Touch the preferred icon to execute a func-tion and display the next screen.
j3 Indicates the position of the currentlydisplayed page out of the total number ofavailable pages.
j4 Touch [>] to scroll to the next page.
A swipe gesture can also be used to movequickly between pages.
SCROLLING LIST OR MESSAGE
j1 Drag the scroll bar up or down to scroll themessage or list up or down.
j2 Touch the preferred item.
j3 If a listed item name is not completelydisplayed (due to length), touch [>] todisplay the hidden part of the name.
j4 Touch [m ] or [m ] to scroll the mes-sage or list one item at a time.
Touch [m ] or [m ] to skip to the nextpage.
JNB0447X
5GH0227X
JNB0439X
JNB0451X
Getting started 2-5
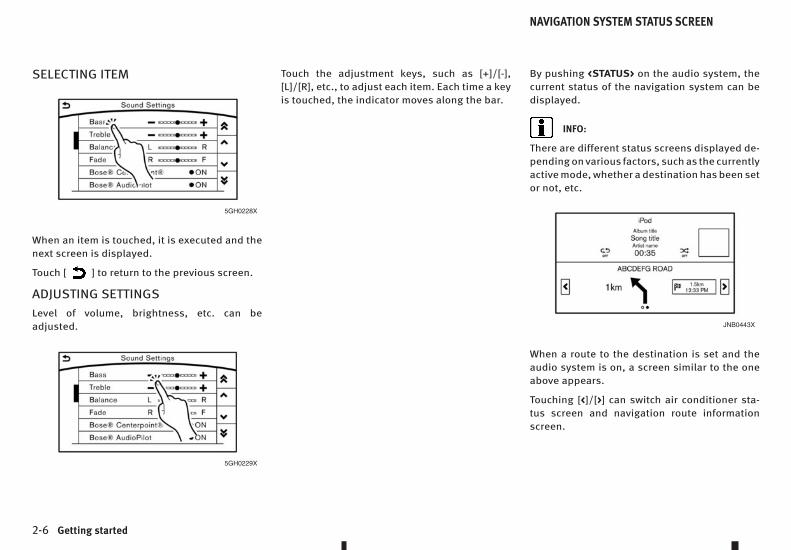
SELECTING ITEM
When an item is touched, it is executed and thenext screen is displayed.
Touch [m ] to return to the previous screen.
ADJUSTING SETTINGSLevel of volume, brightness, etc. can beadjusted.
Touch the adjustment keys, such as [+]/[-],[L]/[R], etc., to adjust each item. Each time a keyis touched, the indicator moves along the bar.
By pushing <STATUS> on the audio system, thecurrent status of the navigation system can bedisplayed.
INFO:
There are different status screens displayed de-pending on various factors, such as the currentlyactive mode, whether a destination has been setor not, etc.
When a route to the destination is set and theaudio system is on, a screen similar to the oneabove appears.
Touching [<]/[>] can switch air conditioner sta-tus screen and navigation route informationscreen.
5GH0228X
5GH0229X
JNB0443X
NAVIGATION SYSTEM STATUS SCREEN
2-6 Getting started

Push <m /OK> or touch [m ] while the currentlocation map screen is displayed to display theshortcut menu screen.
The items on the shortcut menu can be custom-ised to your preference.
Available items:
• Audio Source
• Audio List
• Call History
• Phonebook
• Cancel Route
• Nearby Places
• Store Location
• Select Add/Edit
EDIT SHORTCUT MENUThe following procedure can be used to edit orsort the shortcut menu.
1. Select [Select Add/Edit] to register a new itemto the menu, or to change an existing menuitem.
2. Select the preferred setting.
• [Change Order]
Change the order in which shortcut menuitems are shown. Touch and hold the[m ] displayed next to the item you wishto relocate. Drag the icon to the positionin the list where you wish to insert theitem.
• [Edit Shortcut Items]
Select items to be displayed in the short-cut menu.
While scrolling the map screen, push <m /OK>or touch [m ] to display the Map Menu.
• New Destination
• Show Current Location
• Store Location
• Nearby Places
• Delete Stored Locations
INFO:
[Delete Stored Locations] is available only whenaligned the cross pointer over the stored loca-tion.
JNB0442X
JNB0448X
SHORTCUT MENU MAP MENU
Getting started 2-7
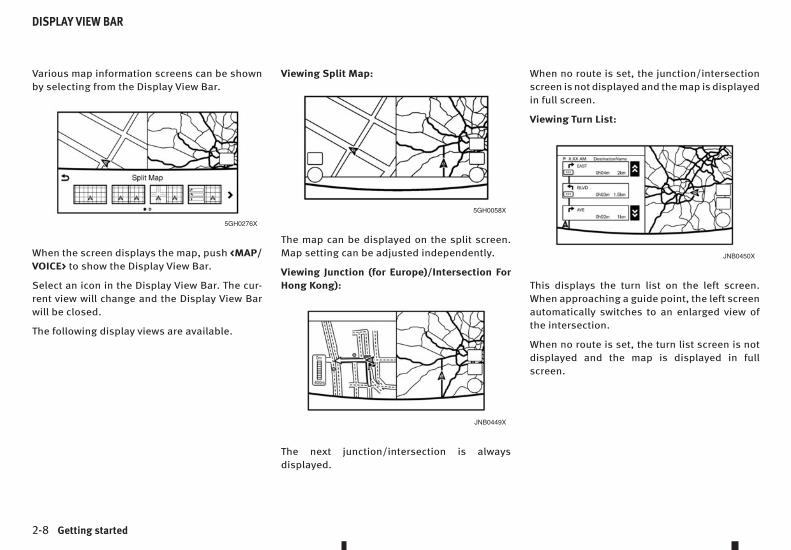
Various map information screens can be shownby selecting from the Display View Bar.
When the screen displays the map, push <MAP/VOICE> to show the Display View Bar.
Select an icon in the Display View Bar. The cur-rent view will change and the Display View Barwill be closed.
The following display views are available.
Viewing Split Map:
The map can be displayed on the split screen.Map setting can be adjusted independently.
Viewing Junction (for Europe)/Intersection ForHong Kong):
The next junction/intersection is alwaysdisplayed.
When no route is set, the junction/intersectionscreen is not displayed and the map is displayedin full screen.
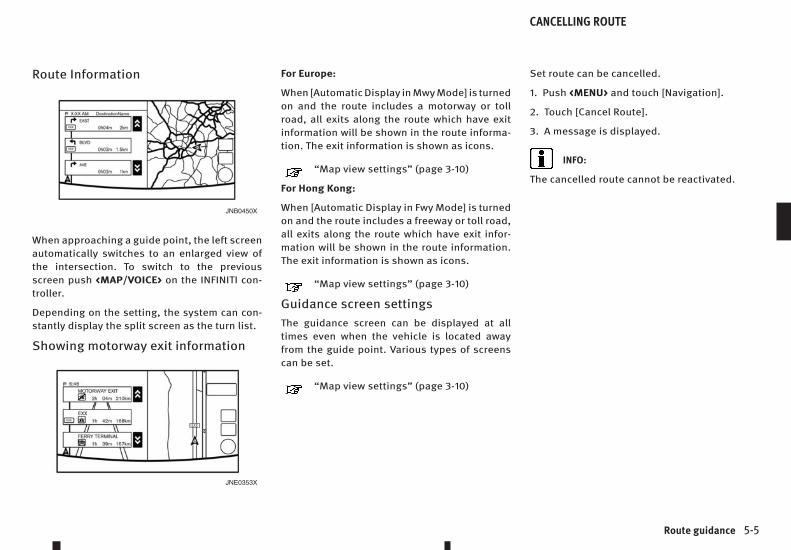
Viewing Turn List:
This displays the turn list on the left screen.When approaching a guide point, the left screenautomatically switches to an enlarged view ofthe intersection.
When no route is set, the turn list screen is notdisplayed and the map is displayed in fullscreen.
5GH0276X
5GH0058X
JNB0449X
JNB0450X
DISPLAY VIEW BAR
2-8 Getting started
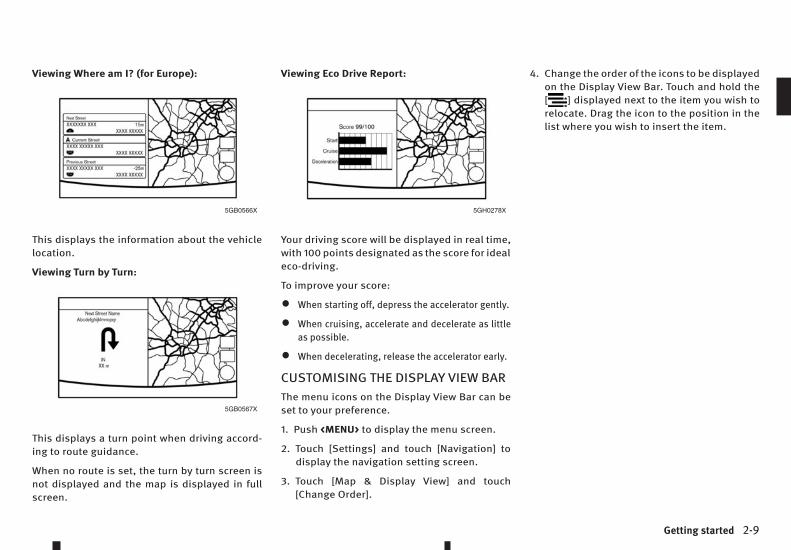
Viewing Where am I? (for Europe):
This displays the information about the vehiclelocation.
Viewing Turn by Turn:
This displays a turn point when driving accord-ing to route guidance.
When no route is set, the turn by turn screen isnot displayed and the map is displayed in fullscreen.
Viewing Eco Drive Report:
Your driving score will be displayed in real time,with 100 points designated as the score for idealeco-driving.
To improve your score:
• When starting off, depress the accelerator gently.
• When cruising, accelerate and decelerate as littleas possible.
• When decelerating, release the accelerator early.
CUSTOMISING THE DISPLAY VIEW BARThe menu icons on the Display View Bar can beset to your preference.
1. Push <MENU> to display the menu screen.
2. Touch [Settings] and touch [Navigation] todisplay the navigation setting screen.
3. Touch [Map & Display View] and touch[Change Order].
4. Change the order of the icons to be displayedon the Display View Bar. Touch and hold the[m ] displayed next to the item you wish torelocate. Drag the icon to the position in thelist where you wish to insert the item.
5GB0566X
5GB0567X
5GH0278X
Getting started 2-9
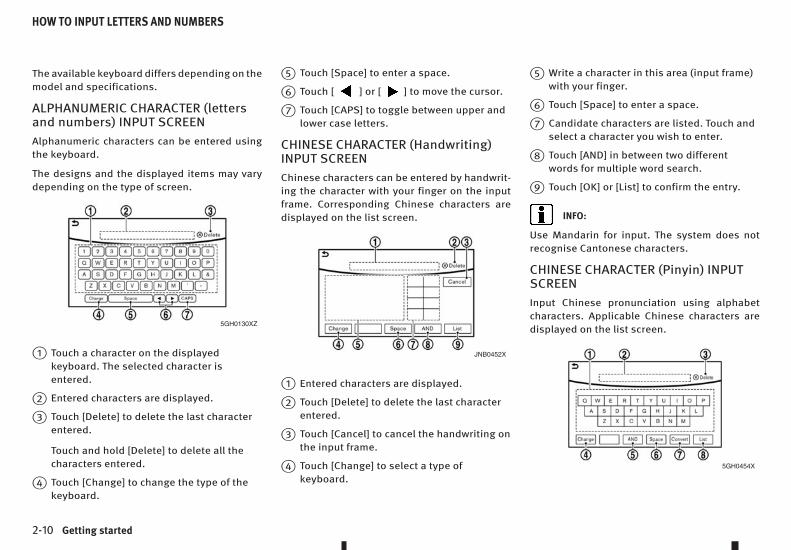
The available keyboard differs depending on themodel and specifications.
ALPHANUMERIC CHARACTER (lettersand numbers) INPUT SCREENAlphanumeric characters can be entered usingthe keyboard.
The designs and the displayed items may varydepending on the type of screen.
j1 Touch a character on the displayedkeyboard. The selected character isentered.
j2 Entered characters are displayed.
j3 Touch [Delete] to delete the last characterentered.
Touch and hold [Delete] to delete all thecharacters entered.
j4 Touch [Change] to change the type of thekeyboard.
j5 Touch [Space] to enter a space.
j6 Touch [m ] or [m ] to move the cursor.
j7 Touch [CAPS] to toggle between upper andlower case letters.
CHINESE CHARACTER (Handwriting)INPUT SCREENChinese characters can be entered by handwrit-ing the character with your finger on the inputframe. Corresponding Chinese characters aredisplayed on the list screen.
j1 Entered characters are displayed.
j2 Touch [Delete] to delete the last characterentered.
j3 Touch [Cancel] to cancel the handwriting onthe input frame.
j4 Touch [Change] to select a type ofkeyboard.
j5 Write a character in this area (input frame)with your finger.
j6 Touch [Space] to enter a space.
j7 Candidate characters are listed. Touch andselect a character you wish to enter.
j8 Touch [AND] in between two differentwords for multiple word search.
j9 Touch [OK] or [List] to confirm the entry.
INFO:
Use Mandarin for input. The system does notrecognise Cantonese characters.
CHINESE CHARACTER (Pinyin) INPUTSCREENInput Chinese pronunciation using alphabetcharacters. Applicable Chinese characters aredisplayed on the list screen.
5GH0130XZ
JNB0452X
5GH0454X
HOW TO INPUT LETTERS AND NUMBERS
2-10 Getting started

j1 Touch a character on the displayedkeyboard. The selected character isentered.
j2 Entered characters are displayed.
j3 Touch [Delete] to delete the last characterentered.
Touch and hold [Delete] to delete all thecharacters entered.
j4 Touch [Change] to select a type ofkeyboard.
j5 Touch [AND] in between two differentwords for multiple word search.
j6 Touch [Space] to enter a space.
j7 Touch [Convert] to convert the enteredcharacters to Chinese characters.
j8 Touch [OK] or [List] to confirm the entry.
INFO:
When searching for a destination using [ByName Pinyin], initial letters of the words in thesearch field can be entered to display a list ofcandidate names of places. (For example, enter“BJ” for Beijing.)
Use Mandarin spelling for Pinyin input. The sys-tem does not recognise Cantonese spelling.
To ensure safe driving, some functions cannotbe operated while driving.
The on-screen functions that are not availablewhile driving will be “greyed-out” or muted. Insome cases, certain text will not be displayed onthe screen.
To use these functions, first park the vehicle in asafe location and then operate the system.
In regions where image viewing in the vehicle isrestricted, still pictures and movies may not bedisplayed on the display while the vehicle is inmotion.
For Hong Kong:
Due to local regulations, images on some of thescreens may not be displayed even when thevehicle is parked.
Infiniti InTouch uses an operating system likethose found on many computers, tablets and cellphones. Like these devices, processing speedmay vary, and system response delays or resetsmay occur intermittently. This does not indicatea malfunction. Further information on systemoperation can be found below.
System Start-Up
Due to the large number of features and capa-bilities that Infiniti InTouch system needs to loadon start-up, it may take up to a minute for allfunctions (such as Apps) to be available. Thesystem will display a message indicating thatthe application is loading during this time.
System Response Delay
Infiniti InTouch uses an operating system likethose found on many computers, tablets and cellphones. As with these devices, sometimes pro-grammes do not respond immediately and thismay temporarily delay system use.
In most situations, simply waiting a few mo-ments longer should be sufficient for the pend-ing operations to complete.
If the system temporarily does not respond tocommands, the system can be easily reset. Sim-ply push down the Audio Power knob for at least5 seconds. The system will turn off and restart.
After restart, all functions should be available.
FUNCTIONS DISABLED WHILE DRIVING(where fitted)
ADDITIONAL SYSTEM INFORMATION
Getting started 2-11
If a navigation route was set, the route shouldresume automatically.
System Reset
As noted above, intermittent system resets mayoccur during normal operation. You may alsowish to reset the system if you find that a par-ticular feature is not loading or responding. Of-ten, a quick system reset will resolve any issueyou may be experiencing. After restart, all func-tions will be available as described above.
System Updates
Like many digital devices, Infiniti InTouch sys-tem is designed to allow for software updates asenhancements are developed and additionalfeatures added. If you have questions about sys-tem performance, contact your INFINITI Centreor qualified workshop to ensure that your ve-hicle has the latest available software installed.
Operating Tips
Infiniti InTouch provides several methods of op-eration to suit your preferences. The followingare suggested operating tips.
• Operating the Infiniti Controller, Steering WheelControls, or other controls too quickly can cause alag between the control and the display. Operatethe controls carefully and allow the system to re-spond to your request.
• INFINITI recommends using Voice Recognitionwhenever possible to select options while driving.
Some touch screen functionality is intentionallyunavailable during driving. Please view the avail-able voice commands by pushing <m > on thesteering wheel and then selecting a category onthe display.
• In some situations, the system may not be able torecognise a voice command even if you say theexact command. This can be due to noise condi-tions or an accent.
2-12 Getting started

3 Map operationMap operation
Map types ........................................................ 3-22D map........................................................ 3-2Birdview™ (3D) map..................................... 3-4Building graphics......................................... 3-4
Displaying current vehicle location..................... 3-5Operating with INFINITI controller.................. 3-5Operating with touch panel operation............ 3-5
Moving map ..................................................... 3-52D map........................................................ 3-5Birdview™ (3D) map..................................... 3-6
Changing scale of map ...................................... 3-6
Touch panel operation .................................. 3-6INFINITI controller operation ......................... 3-7Map scale .................................................... 3-7
Changing map orientation ................................. 3-8Setting split screen........................................... 3-9Map view settings............................................. 3-10Displaying information on map .......................... 3-12
Displaying facility icons ................................ 3-12Displaying map scrolling information............. 3-12Road colour ................................................. 3-13
Traffic information on map (where fitted) ............ 3-13

Two types of map views are available: 2D mapand Birdview™ (3D) map.
2D MAPThe 2D map displays the map in a two-dimen-sional environment similar to a road map.
Screen informationj1 m Arrow:
Indicates the distance to the next guidepoint and the turning direction at thatguide point.
j2 Traffic information indicator (for Europe):
Displays the name of the provider and thereception condition of traffic informationtransmitted from the provider.
5GB0259X
MAP TYPES
3-2 Map operation

When the reception condition of trafficinformation transmitted from the provideris not detected, the traffic informationindicator will not be displayed.
j3 m Waypoint:
Displays the set locations between thestarting point and the destination. Amaximum of five waypoints can be set.
j4 m Guide point:
Indicates a guide point on the route.
j5 m Vehicle icon:
Indicates the current vehicle location andthe direction of travel.
j6 m Starting point:
Shows the vehicle location, with which theroute is set, as the starting point.
j7 Speed limit icon (for Europe):
Indicates the speed limit of the road youare currently driving on. The icon designvaries depending on the country.
j8 m Passing protection area guidance icon(for Europe):
Indicates the distance to the next passingprotection area.
j9 m Remaining time and distance tothe destination:
Indicates the approximate remaining timeand the distance to the destination orwaypoint. This indicator will appear when adestination or waypoint is set and routeguidance is started.
j10 m Speed Limit Warning icon (for Europe):
Indicates the distance to a safety camera.
j11 m Map menu icon:
Touch the icon to display menus on thedisplay.
“Shortcut menu” (page 2-7)
“Map menu” (page 2-7)
j12 m Scale indicator:
Indicates the scale of the map.
Touch the icon to display the scale bar. Themap scale can be adjusted using the scalebar.
“Changing scale of map” (page 3-6)
j13 m /m Direction indicator:
Indicates the directional setting of themap.
m : North always pointing up.
m : The direction of the vehicle is alwayspointing up.
Touch the icon to change the setting fromamong North Up, Heading Up, and 3D map.
j14 m Avoid Area (green/blue):
Displays the areas to avoid that are storedin the Stored Locations. During the routesearch, route guidance is performed bysearching for a route that avoids thoseareas.
“Storing Avoid Area” (page 7-4)
j15 Street name:
Displays the name of the street that you arecurrently driving on.
j16 Suggested route:
Appears in bold blue during route guid-ance. (for Europe)
Appears in bold yellow during route guid-ance. (for Hong Kong)
j17 m Stored location (yellow):
Displays the locations that are stored inthe Stored Location. The icons can bechanged according to your preferences.
j18 m Destination:
Indicates the destination location of routeguidance.
Map operation 3-3
INFO:
Designs and locations of the icons displayed onthe map screen may change depending on con-ditions.
BIRDVIEW™ (3D) MAPBirdview™ displays the map from an elevatedperspective. In Birdview™, it is easy to recogn-ise an image of the route because it provides apanoramic view over a long distance.
INFO:
Note the following items about the Birdview™display.
• “Birdview™” is a registered trademark of ClarionCo., Ltd.
• The map in Birdview™ always appears with thecurrent forward direction facing up.
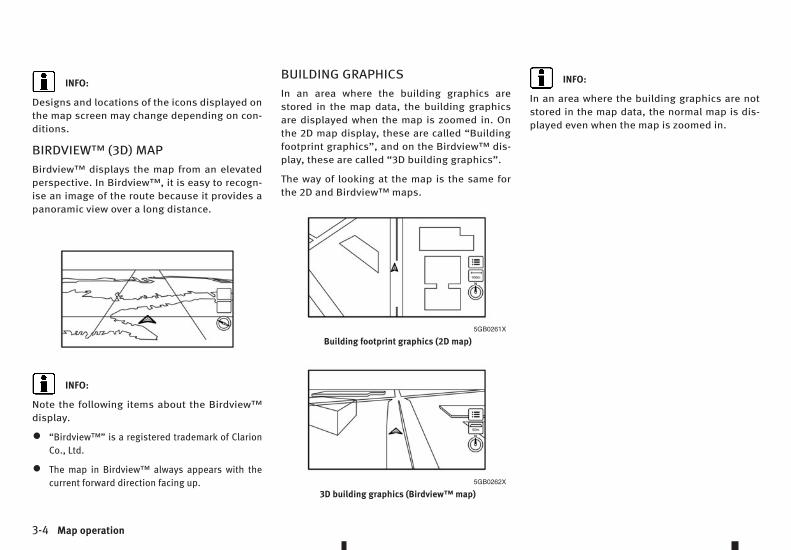
BUILDING GRAPHICSIn an area where the building graphics arestored in the map data, the building graphicsare displayed when the map is zoomed in. Onthe 2D map display, these are called “Buildingfootprint graphics”, and on the Birdview™ dis-play, these are called “3D building graphics”.
The way of looking at the map is the same forthe 2D and Birdview™ maps.
INFO:
In an area where the building graphics are notstored in the map data, the normal map is dis-played even when the map is zoomed in.
5GB0261X
Building footprint graphics (2D map)
5GB0262X
3D building graphics (Birdview™ map)
3-4 Map operation
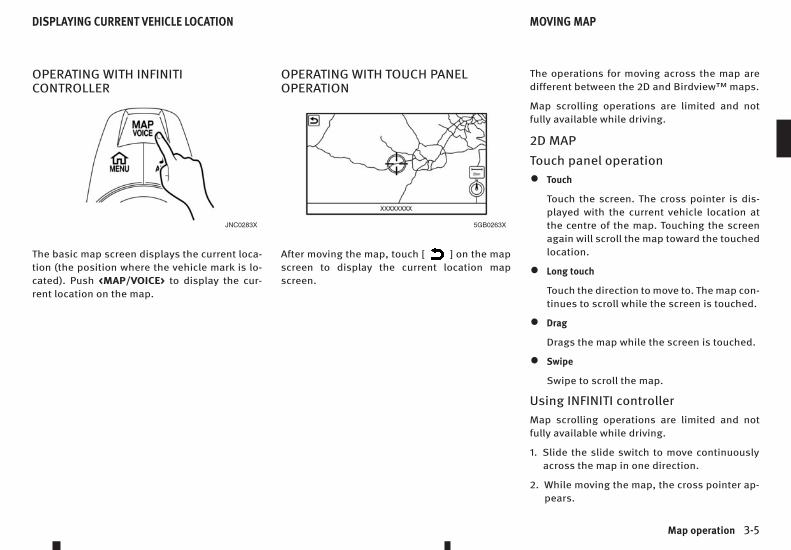
OPERATING WITH INFINITICONTROLLER
The basic map screen displays the current loca-tion (the position where the vehicle mark is lo-cated). Push <MAP/VOICE> to display the cur-rent location on the map.
OPERATING WITH TOUCH PANELOPERATION
After moving the map, touch [m ] on the mapscreen to display the current location mapscreen.
The operations for moving across the map aredifferent between the 2D and Birdview™ maps.
Map scrolling operations are limited and notfully available while driving.
2D MAP
Touch panel operation
• Touch
Touch the screen. The cross pointer is dis-played with the current vehicle location atthe centre of the map. Touching the screenagain will scroll the map toward the touchedlocation.
• Long touch
Touch the direction to move to. The map con-tinues to scroll while the screen is touched.
• Drag
Drags the map while the screen is touched.
• Swipe
Swipe to scroll the map.
Using INFINITI controllerMap scrolling operations are limited and notfully available while driving.
1. Slide the slide switch to move continuouslyacross the map in one direction.
2. While moving the map, the cross pointer ap-pears.
JNC0283X 5GB0263X
DISPLAYING CURRENT VEHICLE LOCATION MOVING MAP
Map operation 3-5

INFO:
While driving, one-touch continuous scrolling isdisabled. Touch the screen again to scroll fur-ther.
If the map screen is set to display the buildingfootprint graphics, the map cannot be scrolledwhile driving.
BIRDVIEW™ (3D) MAP
Touch panel operationTouch
Touch the screen. The cross pointer is displayedat the centre of the map. Touching the screenagain will scroll the map toward the touched lo-cation.
Touch [m ] or [m ] to change the direction ofthe map.
Long touch
Touch the direction to move to. The map contin-ues to scroll while the screen is touched.
Swipe
Swipe the touch panel to scroll the map screenquickly.
Using INFINITI controller1. Slide the slide switch except left or right to
move continuously across the map in one di-rection.
2. While moving on the map, the cross pointerappears.
INFO:
While driving, one-touch continuous scrolling isdisabled.
If the map screen is set to display the buildingfootprint graphics, the map cannot be scrolledwhile driving.
There are several methods for changing the mapscale.
INFO:
While driving, operation for changing map scaleis limited.
TOUCH PANEL OPERATIONTouching scale bar:
1. Touch [m ].
The scale bar is displayed.
2. Touch [Zoom In] or [Zoom Out] to change thescale.
5GB0264XZ
CHANGING SCALE OF MAP
3-6 Map operation
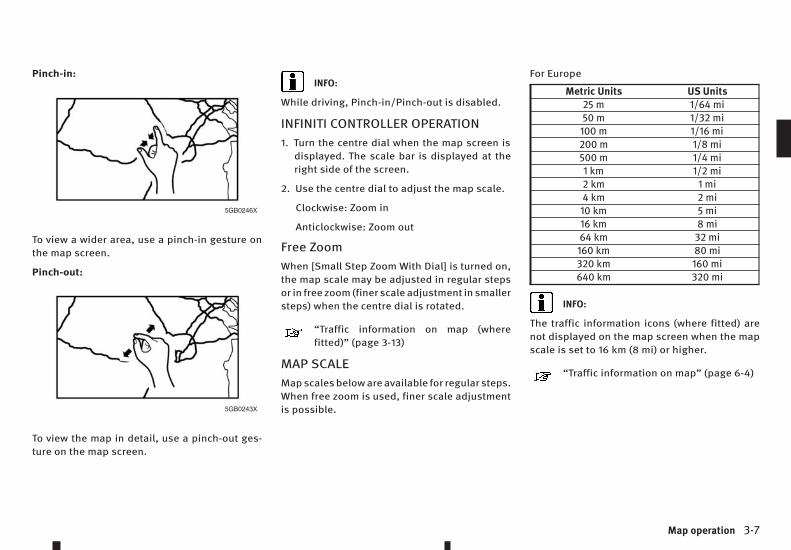
Pinch-in:
To view a wider area, use a pinch-in gesture onthe map screen.
Pinch-out:
To view the map in detail, use a pinch-out ges-ture on the map screen.
INFO:
While driving, Pinch-in/Pinch-out is disabled.
INFINITI CONTROLLER OPERATION1. Turn the centre dial when the map screen is
displayed. The scale bar is displayed at theright side of the screen.
2. Use the centre dial to adjust the map scale.
Clockwise: Zoom in
Anticlockwise: Zoom out
Free ZoomWhen [Small Step Zoom With Dial] is turned on,the map scale may be adjusted in regular stepsor in free zoom (finer scale adjustment in smallersteps) when the centre dial is rotated.
“Traffic information on map (wherefitted)” (page 3-13)
MAP SCALEMap scales below are available for regular steps.When free zoom is used, finer scale adjustmentis possible.
For Europe
Metric Units US Units25 m 1/64 mi50 m 1/32 mi
100 m 1/16 mi200 m 1/8 mi500 m 1/4 mi1 km 1/2 mi2 km 1 mi4 km 2 mi10 km 5 mi16 km 8 mi64 km 32 mi
160 km 80 mi320 km 160 mi640 km 320 mi
INFO:
The traffic information icons (where fitted) arenot displayed on the map screen when the mapscale is set to 16 km (8 mi) or higher.
“Traffic information on map” (page 6-4)
5GB0246X
5GB0243X
Map operation 3-7

For Hong Kong
Metric Units25 m50 m
100 m200 m500 m1 km2 km4 km12 km16 km64 km160 km320 km640 km
The map orientation and map view can bechanged by touching [m ]/[m ] on the mapscreen.
The screen will change to North Up, Heading Up,and BirdviewTM each time [m /m ] is touched.
You can also set the map view by pushing<MENU> and touching [Settings] and then [Navi-gation] and [Map Preferences].
“Map view settings” (page 3-10)5GB0044X
North Up
5GB0005X
Heading Up
5GB0352X
Birdview™
CHANGING MAP ORIENTATION
3-8 Map operation

The split screen allows you to display two differ-ent maps on the left and right side of the screenat the same time. Alternatively, you can displaya map on the right side of the screen and otherinformation (such as junction information) onthe left side of the screen.
1. Push <MAP/VOICE> while the current locationmap screen is displayed, the Display View Baris displayed.
2. Select a screen type.
“Display view bar” (page 2-8)
• [Split Map]
• [Junction/Intersection]
• [Turn List]
• [Where am I?] (for Europe)
• [Turn by Turn]
• [Eco Drive Report]
5GH0276X
SETTING SPLIT SCREEN
Map operation 3-9
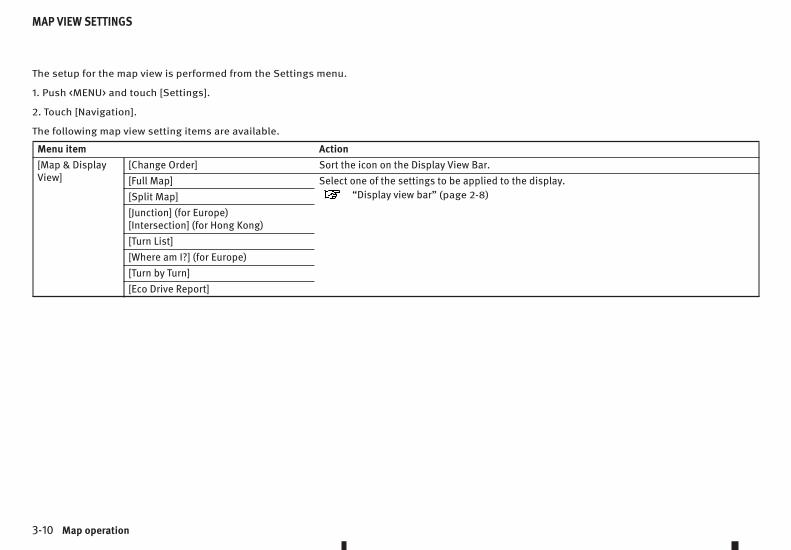
The setup for the map view is performed from the Settings menu.
1. Push <MENU> and touch [Settings].
2. Touch [Navigation].
The following map view setting items are available.
Menu item Action[Map & DisplayView]
[Change Order] Sort the icon on the Display View Bar.[Full Map] Select one of the settings to be applied to the display.
“Display view bar” (page 2-8)[Split Map][Junction] (for Europe)[Intersection] (for Hong Kong)[Turn List][Where am I?] (for Europe)[Turn by Turn][Eco Drive Report]
MAP VIEW SETTINGS
3-10 Map operation

Menu item Action[Map Prefer-ences]
[Map View] [North Up] Select one of the map views to be applied to the map screen.[Heading Up][Birdview (3D)]
[Long Range Heading Up] The position of the vehicle icon can be changed to view a wider area in the travelling direction.The vehicle icon is located slightly lower than the centre of the screen.Long Range map view is available only when the map view is “Heading Up”.
[Map Colour] (for Europe)[Map Color] (for Hong Kong)
Select a preferred map colour.
[Map Text Size] [Large] Set the font size.[Medium][Small]
[Birdview Angle] Adjust the BirdviewTM angle.[Auto North Up] Set the top of the map to remain oriented to the north.[Automatic Display in Mwy Mode] (forEurope)[Automatic Display in Fwy Mode] (forHong Kong)
The route information can be set to on or off to be displayed automatically while driving on amotorway or freeway.
[Names Displayedon Map]
[Place Names] Allows place names to be displayed on the map screen.[POI Names] Allows facility names to be displayed on the map screen.[Road Names] Allows road names to be displayed on the map screen.
[Left Split MapSettings]
[Left Side MapOrientation]
The map view for the left side of split screen can be selected from North Up or Heading Up.
[Long Range Head-ing Up] (for Europe)[Long Range Driv-ing Direction] (forHong Kong)
Allows the map view for the left side of the split screen to change the position of the vehicleicon so that a wider area in the travelling direction can be viewed. The vehicle icon is locatedslightly lower than the centre of the screen.
Map operation 3-11
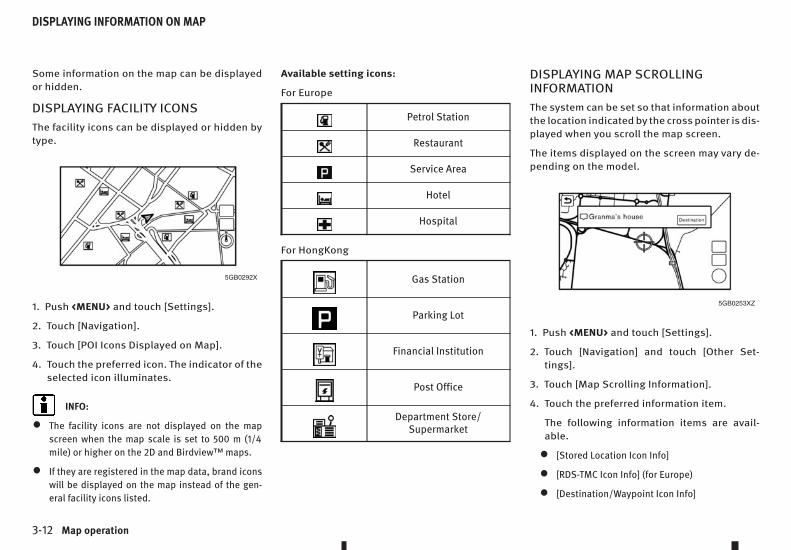
Some information on the map can be displayedor hidden.
DISPLAYING FACILITY ICONSThe facility icons can be displayed or hidden bytype.
1. Push <MENU> and touch [Settings].
2. Touch [Navigation].
3. Touch [POI Icons Displayed on Map].
4. Touch the preferred icon. The indicator of theselected icon illuminates.
INFO:
• The facility icons are not displayed on the mapscreen when the map scale is set to 500 m (1/4mile) or higher on the 2D and Birdview™ maps.
• If they are registered in the map data, brand iconswill be displayed on the map instead of the gen-eral facility icons listed.
Available setting icons:
For Europe
m Petrol Station
m Restaurant
m Service Area
m Hotel
m Hospital
For HongKong
m Gas Station
m Parking Lot
m Financial Institution
m Post Office
mDepartment Store/
Supermarket
DISPLAYING MAP SCROLLINGINFORMATIONThe system can be set so that information aboutthe location indicated by the cross pointer is dis-played when you scroll the map screen.
The items displayed on the screen may vary de-pending on the model.
1. Push <MENU> and touch [Settings].
2. Touch [Navigation] and touch [Other Set-tings].
3. Touch [Map Scrolling Information].
4. Touch the preferred information item.
The following information items are avail-able.
• [Stored Location Icon Info]
• [RDS-TMC Icon Info] (for Europe)
• [Destination/Waypoint Icon Info]
5GB0292X
5GB0253XZ
DISPLAYING INFORMATION ON MAP
3-12 Map operation

• [Latitude/Longitude Info]
ROAD COLOURRoad types are differentiated by colour. Themain road colours are listed below.
For Europe
Road type ColourMotorway Yellow, red lineMain road Red, orange or yellowNarrow street GreyRoad withincomplete mapdata
Dark
For Hong Kong
Road type ColourFreeway BlueNational road PurpleProvincial/Countyroad
Green
Local road Light brownOther road Grey
Traffic information can be displayed in areaswhere it is broadcast.
Traffic congestion indicator:
Lines displayed along the roads indicate loca-tions of traffic congestion. The lines are colourcoded as shown below.
Free Flow: Green arrow
Moderate traffic: Yellow arrow
Heavy traffic: Red
Section affected by serious traffic event: Purple
Icons:
The following traffic information icons may bedisplayed on the map at locations where inci-dents are detected.
m : Information
m : Accident
m : Broken vehicle
m : Closed road
m : Contraflow
m : Danger
m : Delay
m : Fog reduced visibility
m : Lane restrictions
m : Major events
m : Rain
m : Road surface in poor condition
m : Roadwork
m : Slippery road
m : Snow
m : Stationary or Queuing Traffic
m : Vehicle on wrong carriage way
m : Weather
m : Wind
m : Slow and Heavy traffic
If the route has not been set, all of the trafficinformation icons on the map screen are dis-played in red. When the route is set, the iconson the route are displayed in red, and the iconsoutside the route are displayed in grey. Informa-tion icons and forecast information icons aredisplayed in blue.
TRAFFIC INFORMATION ON MAP (where fitted)
Map operation 3-13

MEMO
3-14 Map operation

4 Setting destinationSetting destination
Changing region ............................................... 4-2Specifying country (for Europe) ..................... 4-2Specifying region (for Hong Kong) ................. 4-2Specifying city (for Europe) ........................... 4-2
Destination setting menu .................................. 4-4Finding address (for Europe).............................. 4-6Finding Points of Interest (POI) (for Europe) ........ 4-7
Searching by a landmark name...................... 4-7Searching from the landmark category........... 4-7
Finding Points of Interest (POI) (for HongKong) ............................................................... 4-8
Searching by a landmark name...................... 4-8Setting home as destination.............................. 4-9
Finding nearby place ......................................... 4-9Searching from stored locations ........................ 4-10Searching from previous destinations ................ 4-10Setting junction as destination (for Europe) ........ 4-11Setting motorway entrance/exit as destination(for Europe) ...................................................... 4-11Setting city centre as destination (for Europe)..... 4-12Setting destination by phone number (forHong Kong) ...................................................... 4-12Setting from stored routes................................. 4-12Setting point on map......................................... 4-13Procedures after setting route ........................... 4-13
Moving location of destination ...................... 4-14

When setting a destination, the location can benarrowed down by specifying the region or city.
SPECIFYING COUNTRY (for Europe)When setting a destination, the location can benarrowed down by specifying the country.
1. Push <MENU> and touch [Navigation].
2. Touch [Destination Menu] and touch the iconfor the preferred search method.
3. Touch [Country].
4. Touch the preferred country from the list.
SPECIFYING REGION (for Hong Kong)
1. Push <MENU> and touch [Navigation].
2. Touch [Points of Interest].
3. Touch [Change Region].
4. Touch the preferred region from the list.
SPECIFYING CITY (for Europe)Depending on the destination search method(such as Street Address, Junctions, etc.), thecandidates of locations can be narrowed downby specifying the city.
Enter the name of the city you wish to set as adestination.
INFO:
• Touch [List] to display a list of items that matchesthe entered characters.
• Touch [Change] to switch the type of keyboard.
• For an area where postal code information is avail-able, [Postcode] will appear. Touch [Postcode] tosearch for a location by postal code.
5GB0266XZ
5GB0305X
5GB0328XZ
CHANGING REGION
4-2 Setting destination

Setting destination 4-3
There are several methods that can be used to set a destination. Understand the advantages of each method and select the best method for finding andsetting the preferred destination.
The items displayed on the screen may vary depending on the model.
1. Push <MENU>.
2. Touch [Navigation] and touch [Destination Menu].
For Europe
Setting item Action[Street Address] Search for a destination by address.
“Finding address (for Europe)” (page 4-6)
[Points of Interest] Search for a destination from various categories of businesses or locations.“Finding Points of Interest (POI) (for Europe)” (page 4-7)
[Home] Search for a route from the current location to the previously stored home destination.“Setting home as destination” (page 4-9)
[Nearby Places] Search for points of interest near the current vehicle location, such as restaurants, etc.“Finding nearby place” (page 4-9)
[Stored Locations] Search for a destination from the list of stored locations.“Searching from stored locations” (page 4-10)
[Previous Destinations] Set the previous starting point as the destination. Search for the destination from previous destinations.“Searching from previous destinations” (page 4-10)
[M-way Entrance/Exit ] Search for a destination from a motorway entrance/exit.“Setting motorway entrance/exit as destination (for Europe)” (page 4-11)
[Stored Routes] Select a stored route.“Setting from stored routes” (page 4-12)
[Junction] Set a junction as the destination.“Setting junction as destination (for Europe)” (page 4-11)
DESTINATION SETTING MENU
4-4 Setting destination

[City Centre] Set the centre of a city as the destination.“Setting city centre as destination (for Europe)” (page 4-12)
[Stored Routes] Select a stored route. “Setting from stored routes” (page 4-12)
For Hong Kong
Setting item Action[Points of Interest] Search for a destination from various categories of businesses or locations.
“Finding Points of Interest (POI) (for Hong Kong)” (page 4-8)
[Home] Search for a route from the current location to the previously stored home destination.“Setting home as destination” (page 4-9)
[Nearby Places] Search for points of interest near the current vehicle location, such as restaurants, etc.“Finding nearby place” (page 4-9)
[Stored Locations] Search for a destination from the list of stored locations.“Searching from stored locations” (page 4-10)
[Previous Destinations] Set the previous starting point as the destination. Search for the destination from previous destina-tions.
“Searching from previous destinations” (page 4-10)
[Phone Number] Search for a point of interest by a telephone number.“Setting destination by phone number (for Hong Kong)” (page 4-12)
[Stored Routes] Select a stored route.“Setting from stored routes” (page 4-12)
INFO:
• The order of items displayed on the screen mayvary depending on the model.
• If the route is already set, the selected locationbecomes a waypoint.
• After setting a destination, the location of the des-tination can be adjusted and the location can bestored in the Stored Locations, etc.
“Procedures after setting route”(page 4-13)
• The destination can be deleted.
“Cancelling route” (page 5-5)
Setting destination 4-5
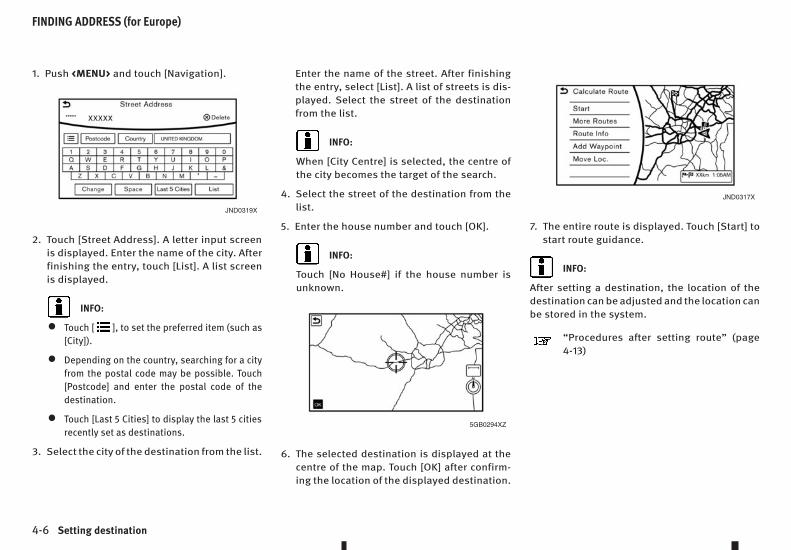
1. Push <MENU> and touch [Navigation].
2. Touch [Street Address]. A letter input screenis displayed. Enter the name of the city. Afterfinishing the entry, touch [List]. A list screenis displayed.
INFO:
• Touch [m ], to set the preferred item (such as[City]).
• Depending on the country, searching for a cityfrom the postal code may be possible. Touch[Postcode] and enter the postal code of thedestination.
• Touch [Last 5 Cities] to display the last 5 citiesrecently set as destinations.
3. Select the city of the destination from the list.
Enter the name of the street. After finishingthe entry, select [List]. A list of streets is dis-played. Select the street of the destinationfrom the list.
INFO:
When [City Centre] is selected, the centre ofthe city becomes the target of the search.
4. Select the street of the destination from thelist.
5. Enter the house number and touch [OK].
INFO:
Touch [No House#] if the house number isunknown.
6. The selected destination is displayed at thecentre of the map. Touch [OK] after confirm-ing the location of the displayed destination.
7. The entire route is displayed. Touch [Start] tostart route guidance.
INFO:
After setting a destination, the location of thedestination can be adjusted and the location canbe stored in the system.
“Procedures after setting route” (page4-13)
JND0319X
5GB0294XZ
JND0317X
FINDING ADDRESS (for Europe)
4-6 Setting destination
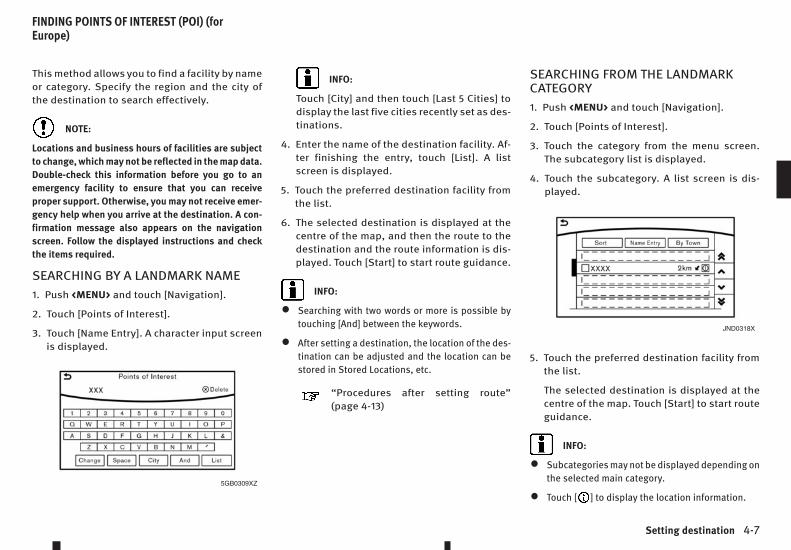
This method allows you to find a facility by nameor category. Specify the region and the city ofthe destination to search effectively.
NOTE:
Locations and business hours of facilities are subjectto change, which may not be reflected in the map data.Double-check this information before you go to anemergency facility to ensure that you can receiveproper support. Otherwise, you may not receive emer-gency help when you arrive at the destination. A con-firmation message also appears on the navigationscreen. Follow the displayed instructions and checkthe items required.
SEARCHING BY A LANDMARK NAME1. Push <MENU> and touch [Navigation].
2. Touch [Points of Interest].
3. Touch [Name Entry]. A character input screenis displayed.
INFO:
Touch [City] and then touch [Last 5 Cities] todisplay the last five cities recently set as des-tinations.
4. Enter the name of the destination facility. Af-ter finishing the entry, touch [List]. A listscreen is displayed.
5. Touch the preferred destination facility fromthe list.
6. The selected destination is displayed at thecentre of the map, and then the route to thedestination and the route information is dis-played. Touch [Start] to start route guidance.
INFO:
• Searching with two words or more is possible bytouching [And] between the keywords.
• After setting a destination, the location of the des-tination can be adjusted and the location can bestored in Stored Locations, etc.
“Procedures after setting route”(page 4-13)
SEARCHING FROM THE LANDMARKCATEGORY1. Push <MENU> and touch [Navigation].
2. Touch [Points of Interest].
3. Touch the category from the menu screen.The subcategory list is displayed.
4. Touch the subcategory. A list screen is dis-played.
5. Touch the preferred destination facility fromthe list.
The selected destination is displayed at thecentre of the map. Touch [Start] to start routeguidance.
INFO:
• Subcategories may not be displayed depending onthe selected main category.
• Touch [m ] to display the location information.5GB0309XZ
JND0318X
FINDING POINTS OF INTEREST (POI) (forEurope)
Setting destination 4-7

• After setting a destination, the location of the des-tination can be adjusted and the location can bestored in Stored Locations, etc.
“Procedures after setting route”(page 4-13)
• If the nearest POI cannot be searched, a messageasking whether to search from an extended areawill be displayed. When [Yes] is selected, the sys-tem starts to search for POI in a wider area.
This method allows you to find a facility by nameor by category. To increase the effectiveness ofyour search, specify the region and the city ofthe destination.
NOTE:
Locations and business hours of the facilities are sub-ject to change, which may not be reflected in the mapdata. Double-check this information before you go toan emergency facility to ensure that you can receiveproper support. Otherwise, you may not receive emer-gency help when you arrive at the destination. A con-firmation message also appears on the navigationscreen. Follow the displayed instructions and checkthe items required.
SEARCHING BY A LANDMARK NAME1. Push <MENU> and touch [Navigation].
2. Touch [Points of Interest].
3. Touch [By Chinese Characters] or [By NamePinyin]. A character input screen is displayed.
4. Enter the name of the destination facility. Af-ter finishing the entry, touch [List]. A listscreen is displayed.
INFO:
Touch [m ] to display the location informa-tion. If [Call] is activated on the location in-formation screen, it is possible to call the lo-cation indicated.
5. Touch the preferred destination facility fromthe list.Touch [Start] to start route guidance.
INFO:
After setting a destination, the location of thedestination can be adjusted and the locationcan be stored in Store Locations, etc.
“Procedures after setting route” (page4-13)
JND0320X
FINDING POINTS OF INTEREST (POI) (for HongKong)
4-8 Setting destination
The home location can be set as the destinationif the home location is stored in advance. Thisfunction is especially useful when searching fora route to return to the home location.
1. Push <MENU>, touch [Navigation] and thentouch [Home].
2. The system sets the home location as thedestination.
INFO:
If the home location is not stored, the systemwill display a screen with a message asking ifyou wish to store a home location.
“Storing home location” (page 7-2)
3. Touch [Start] to start route guidance.
m Setting by voice command
1. Push <m > located on the steering wheel.
2. After the tone sounds, speak a command.
To set the home location as the destination:
“Go Home”
A facility located near the current vehicle loca-tion or another location that you scroll to on themap can be set as the destination. This allowsyou to set the destination to a facility locatednear the current vehicle location or another lo-cation that you scroll to on the map.
1. Push <MENU> and touch [Navigation].
2. Touch [Destination Menu] and touch [NearbyPlaces]. The category list is displayed.
3. Select [RESTAURANT] for example.
4. Touch the preferred destination from the list.The route to the destination is displayed inthe preview.
INFO:
• Touch [m ] to display the location information.If [Call] is activated on the location informationscreen, it is possible to call the location indi-cated.
• For Europe:
If the suggested route is already set, bytouching [Along Route], the system dis-plays only the facilities located along theroute.
For Hong Kong:
If the suggested route is already set, bytouching [Show Along Route], the systemdisplays only the facilities located alongthe route.
• A maximum of 100 facilities can be displayedon the list screen.
5. Touch [Start] to start route guidance.
INFO:
A nearby place can also be set as a destinationby touching [m ] while scrolling the map on thecurrent location map screen and selecting[Nearby Places] on the map menu screen.
SETTING HOME AS DESTINATION FINDING NEARBY PLACE
Setting destination 4-9

Storing frequently used destinations in StoredLocations makes it easy to set a destination. Lo-cations should be stored in Stored Locations be-fore using this function.
“Storing location” (page 7-2)
1. Push <MENU> and touch [Navigation].
2. Touch [Destination Menu] and touch [StoredLocations].
3. Touch the preferred location from the list.
INFO:
Selecting [Sort] displays a list of various sortfunctions.
• [Sort by Entry No.] (for Europe)/[By Number] (forHong Kong):
The Address Book entries are displayed inascending numerical order.
• [Sort by Name] (for Europe)/[By Name] (for HongKong):
The Address Book entries are displayed inalphabetic order.
• [Sort by Icon] (for Europe)/[By Icon] (for HongKong):
By selecting a particular icon, a list that con-tains only the Address Book entries associ-ated with that icon is displayed.
• [Sort by Group] (for Europe)/[By Group] (for HongKong):
By selecting a particular group (family,friends, leisure, etc.), the selected group isdisplayed at the top of the list.
4. The selected destination is displayed. Touch[Start] to start route guidance.
m Setting by voice command
1. Push <m > located on the steering wheel.
2. After the tone sounds, speak a command.
To set the destination from the Stored Locations:
“Address Book”
A previous destination can be set as the desti-nation.
Up to 100 previous destinations will be auto-matically stored. If the number of previous des-tinations exceeds 100, the oldest entry will bereplaced with the newest one.
1. Push <MENU> and touch [Navigation].
2. Touch [Destination Menu] and [Previous Des-tinations]. A list screen is displayed.
3. Touch the previous start point or the previ-ous destination from the list.
4. Touch [Start] to start route guidance.
INFO:
Touch [m ] to display the location information. If[Call] is activated on the location informationscreen, it is possible to call the location indi-cated.
m Setting by voice command
1. Push <m > located on the steering wheel.
2. After the tone sounds, speak a command.
To display the previous destinations list:
“Previous Destinations”
5GB0396X
SEARCHING FROM STORED LOCATIONS SEARCHING FROM PREVIOUS DESTINATIONS
4-10 Setting destination
It is possible to set a junction of any two streetsas the destination and have the system calcu-late a route.
1. Push <MENU> and touch [Navigation].
2. Touch [Destination Menu] and touch [Junc-tion].
3. The first street input screen is displayed.
INFO:
Touch [Country] or [City] to narrow down thespecified country and city.
4. Enter the name of the first street. After finish-ing the entry, touch [List]. A list screen is dis-played.
5. Touch a street as the first street from the list.
6. The second street input screen is displayed.
7. Enter the name of the second street. After fin-ishing the entry, touch [List]. A list screen isdisplayed.
8. Touch a street as the second street from thelist.
9. The selected destination is displayed at thecentre of the map. Touch [Start] to start routeguidance.
It is possible to set a motorway entrance or exitas the destination.
1. Push <MENU> and touch [Navigation].
2. Touch [Destination Menu] and [M-wayEntrance/Exit]. A character input screen isdisplayed.
3. Enter the name of the motorway. After finish-ing entry, touch [List].
4. Touch the preferred motorway.
5. Touch [Entrance] or [Exit]. A list screen is dis-played.
6. Touch the preferred destination from the list.The selected location is displayed in the pre-view on the display.
INFO:
Touch [Sort] and then select [By Road No.] or[Sort By Distance] to sort the items in the se-lected order.
7. Touch [Start] to start route guidance.
5GB0369X
SETTING JUNCTION AS DESTINATION (forEurope)
SETTING MOTORWAY ENTRANCE/EXIT ASDESTINATION (for Europe)
Setting destination 4-11
It is possible to set the centre of a specified cityas a destination.
1. Push <MENU> and touch [Navigation].
2. Touch [Destination Menu] and [City Centre]. Acharacter input screen is displayed.
3. Enter the name of the city and touch [List]. Alist screen is displayed.
INFO:
Touch [Last 5 Cities] to display the last fivecities recently set as destinations.
4. Touch the preferred destination from the list.
INFO:
Touch [Map] on the list to preview on the dis-play.
5. Touch [Start] after confirming the location ofthe displayed destination.
If the phone number of a facility is known, it ispossible to search for a facility by entering thephone number.
INFO:
• If the area code of the specified telephone numberdoes not exist in the map data, the system cannotsearch for the location.
• Only the locations included in the database in themap data can be searched for by phone number.Residential phone numbers cannot be used tosearch for a location.
1. Push <MENU> and touch [Navigation].
2. Touch [Destination Menu] and [Phone Num-bers]. The telephone number input screen isdisplayed.
3. Enter the telephone number including thearea code. After finishing entry, touch [OK].
INFO:
A list screen is displayed if there are two ormore search results. Touch the preferred des-tination from the list.
4. The selected destination is displayed. Touch[Start] after confirming the location of thedisplayed destination.
It is possible to select a preferred route from thestored routes. This search method is available
only if previous routes have been stored.“Storing route” (page 7-3)
1. Push <MENU> and touch [Navigation].
2. Touch [Destination Menu] and [StoredRoutes]. A list screen is displayed.
3. Touch the preferred route from the list.
4. When the stored route is displayed, touch[New Dest.].
5. Touch [Start] to start route guidance.
INFO:
The stored route only includes locations (desti-nation and waypoints) and route calculationconditions, not the route itself. Therefore, whenthe destination is set using a stored route, a dif-ferent route may be suggested if the current ve-hicle location is different from the one when theroute was stored.
SETTING CITY CENTRE AS DESTINATION (forEurope)
SETTING DESTINATION BY PHONE NUMBER (forHong Kong)
SETTING FROM STORED ROUTES
4-12 Setting destination
A destination can be set by scrolling to andtouching a location on the map.
1. Scroll the map, place the cross pointer overthe preferred location, and touch [m ] orpush <m /OK>.
INFO:
• Adjust the map scale for effective locationsearch.
• A road on the map will blink when it is alignedwith the cross pointer indicating that the roadcan be set as a destination.
2. Touch [New Destination].
3. The entire route is shown on the display.Touch [Start] to start route guidance.
The system sets the destination to the selectedlocation and starts calculating a route. After per-forming a route search, route guidance can bestarted. Also, it is possible to confirm or changea route.
Available items
• [Start]:
Start route guidance to the selected destina-tion.
If no operations have been performed on thesystem for several seconds, [Start] is auto-matically selected, and the system startsroute guidance. When the vehicle is beingdriven, [Start] is automatically selected andthe system will start the route guidance func-tion.
• [More Routes]:
Route conditions for route calculation can bechanged.
5GB0322XZ
JND0317X
SETTING POINT ON MAP PROCEDURES AFTER SETTING ROUTE
Setting destination 4-13
The routes may not always be different.
• [Route Info]:
Route Information can be displayed.
• [Add Waypoint]:
Allows you to edit the route by adding a des-tination or waypoint.
If a destination is added, the prior destina-tion becomes a waypoint.
• [Move Loc.]:
The location can be adjusted.
• [Information]:
If there is information about the destination(street address and phone number) storedin the map data, it can be displayed.
INFO:
• Estimated Time of Arrival (ETA) can be checked onthe lower right of the display.
• It is possible to edit or add a destination or way-points to the route that is already set.
“Editing route” (page 5-6)
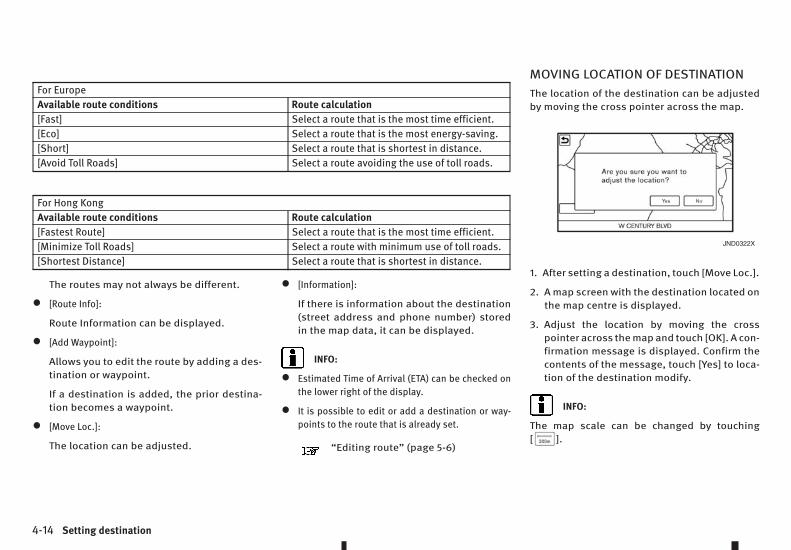
MOVING LOCATION OF DESTINATIONThe location of the destination can be adjustedby moving the cross pointer across the map.
1. After setting a destination, touch [Move Loc.].
2. A map screen with the destination located onthe map centre is displayed.
3. Adjust the location by moving the crosspointer across the map and touch [OK]. A con-firmation message is displayed. Confirm thecontents of the message, touch [Yes] to loca-tion of the destination modify.
INFO:
The map scale can be changed by touching[m ].
For EuropeAvailable route conditions Route calculation[Fast] Select a route that is the most time efficient.[Eco] Select a route that is the most energy-saving.[Short] Select a route that is shortest in distance.[Avoid Toll Roads] Select a route avoiding the use of toll roads.
For Hong KongAvailable route conditions Route calculation[Fastest Route] Select a route that is the most time efficient.[Minimize Toll Roads] Select a route with minimum use of toll roads.[Shortest Distance] Select a route that is shortest in distance.
JND0322X
4-14 Setting destination
5 Route guidanceRoute guidance
About route guidance........................................ 5-2Voice guidance............................................. 5-2Route guidance screens................................ 5-4
Cancelling route ............................................... 5-5Route menu...................................................... 5-6Editing route..................................................... 5-6
Adding destination or waypoint..................... 5-7Editing/deleting destination or waypoint ....... 5-7Changing route calculation conditions........... 5-8Changing order of destination andwaypoints.................................................... 5-8
Recalculating route ........................................... 5-9Searching for detour route (for Europe) .............. 5-9
Traffic information based detour ................... 5-9Specified distance based detour ................... 5-9Automatic detour guidance ........................... 5-10
Searching for a detour route (for Hong Kong) ...... 5-10Route guidance settings.................................... 5-11
Guidance settings ........................................ 5-11Route Settings ............................................. 5-16
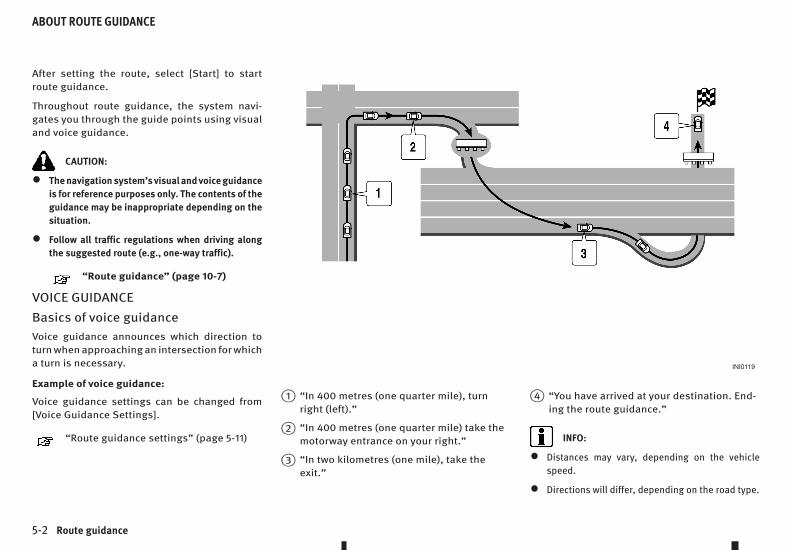
After setting the route, select [Start] to startroute guidance.
Throughout route guidance, the system navi-gates you through the guide points using visualand voice guidance.
CAUTION:
• The navigation system’s visual and voice guidanceis for reference purposes only. The contents of theguidance may be inappropriate depending on thesituation.
• Follow all traffic regulations when driving alongthe suggested route (e.g., one-way traffic).
“Route guidance” (page 10-7)
VOICE GUIDANCE
Basics of voice guidanceVoice guidance announces which direction toturn when approaching an intersection for whicha turn is necessary.
Example of voice guidance:
Voice guidance settings can be changed from[Voice Guidance Settings].
“Route guidance settings” (page 5-11)
j1 “In 400 metres (one quarter mile), turnright (left).”
j2 “In 400 metres (one quarter mile) take themotorway entrance on your right.”
j3 “In two kilometres (one mile), take theexit.”
j4 “You have arrived at your destination. End-ing the route guidance.”
INFO:
• Distances may vary, depending on the vehiclespeed.
• Directions will differ, depending on the road type.
INI0119
ABOUT ROUTE GUIDANCE
5-2 Route guidance
• There may be some cases in which voice guidanceand the actual road conditions do not correspond.This may occur because of discrepancies betweenthe actual road and the information in the mapdata, or may also be due to the vehicle’s speed.
• In case voice guidance does not correspond to theactual road conditions, follow the information ob-tained from traffic signs or notices on the road.
• When approaching a guide point (intersection orcorner) or destination, etc. during route guidance,voice guidance announces the remaining distanceand/or turning direction. Push and hold <MAP/VOICE> to repeat voice guidance.
Repeating voice guidanceThis function is available throughout route guid-ance, from the time after the route calculation iscompleted until the vehicle arrives at the desti-nation. Push and hold <MAP/VOICE>. Voice guid-ance will be repeated.
INFO:
• If <MAP/VOICE> is pushed and held when the ve-hicle has deviated from the suggested route andwhen the automatic reroute function is off, voiceguidance will announce, “Proceed to thehighlighted route.”
• If <MAP/VOICE> is pushed and held when the ve-hicle is going in the wrong direction, voice guid-ance will announce: “If possible make a U-turn”.
Notification when approachingdestinationWhen approaching the destination, voice guid-ance will announce, “You have arrived at yourdestination. Ending route guidance.” To reachyour final destination, refer to the map screen.
Notes on voice guidance
• Voice guidance in this system should be regardedas a supplementary function. When driving the ve-hicle, check the route on the map and follow theactual roads and traffic regulations.
• Voice guidance only activates for intersections un-der certain conditions. There may be cases wherethe vehicle has to turn, but voice guidance is notprovided.
• Voice guidance contents may vary, depending onthe direction of the turn and the type of intersec-tion.
• The voice guidance timing will vary depending onthe situation.
• When the vehicle has deviated from the suggestedroute, voice guidance will not be available. Thesystem will not announce this. Refer to the mapand recalculate the route.
“Recalculating route” (page 5-9)
• Voice guidance may not accurately correspondwith road numbers and directions at motorwayjunctions.
• Voice guidance may not accurately correspond tostreet names at motorway exits.
• The displayed street names may sometimes differfrom the actual names.
• Voice guidance is not available when [GuidanceVoice] is turned off.
“Volume settings” (page 8-8)
• Voice guidance will start when the vehicle entersthe suggested route. Refer to the map for direc-tions to the starting point of the route.
• When approaching a waypoint, voice guidance willannounce, “You have arrived at waypoint 1 (2, 3,4,...).” Voice guidance will switch to the next sec-tion of the route. When voice guidance is not avail-able, refer to the map for directions.
• In some cases, voice guidance ends before arrivalat the destination. Refer to the destination icon onthe map to reach the destination.
• If the system recognises on which side the desti-nation (waypoint) is located, voice guidance willannounce “on the right/left” after announcing thearrival at the destination.
• Voice guidance may be partially operational or in-operative due to the angle of roads at an intersec-tion.
• Motorway lane information is available only for thelimited major motorways, and guidance is notavailable for all junctions and exits.
Route guidance 5-3

• Motorway exit information may differ from the in-formation on the actual exit signs.
• Because it is not possible to use data for roadswhose accessibility changes depending on theseason, a route may be displayed that does notmatch the actual traffic restrictions. Be sure to fol-low the actual traffic restrictions while driving.
ROUTE GUIDANCE SCREENSRoute guidance displays map screens and vari-ous information according to the situation.
Route guidance on map screen
When route guidance starts, a small turn arrowis displayed in the upper left corner of the mapscreen. This arrow indicates the turning direc-tion at the next guide point (corner or intersec-tion). The distance is also displayed. At the topof the screen, the distance to the next guidepoint and the name of the next street to turn on
to are displayed. Also, there may be cases wherethe next street names are announced.
Enlarged intersection view
When approaching a guide point, the system au-tomatically changes to the split screen andshows an enlarged view of the intersection onthe left screen. To switch to the previous screenwhile the enlarged intersection view isdisplayed, push <MAP/VOICE> on the INFINITIcontroller.
Junction guidance
While driving on a motorway, when the vehicleis approximately two km (approximately onemile) from a junction, the system automaticallyswitches to the split screen and displays an en-larged view of the junction on the left screen.After passing the junction, the system automati-cally returns to the full screen mode. To switchto the previous screen while the enlarged junc-tion view is displayed, push <MAP/VOICE> on theINFINITI controller.
5GB0277X
JNE0356X
5GB0400X
5-4 Route guidance
Route Information
When approaching a guide point, the left screenautomatically switches to an enlarged view ofthe intersection. To switch to the previousscreen push <MAP/VOICE> on the INFINITI con-troller.
Depending on the setting, the system can con-stantly display the split screen as the turn list.
Showing motorway exit information
For Europe:
When [Automatic Display in Mwy Mode] is turnedon and the route includes a motorway or tollroad, all exits along the route which have exitinformation will be shown in the route informa-tion. The exit information is shown as icons.
“Map view settings” (page 3-10)
For Hong Kong:
When [Automatic Display in Fwy Mode] is turnedon and the route includes a freeway or toll road,all exits along the route which have exit infor-mation will be shown in the route information.The exit information is shown as icons.
“Map view settings” (page 3-10)
Guidance screen settingsThe guidance screen can be displayed at alltimes even when the vehicle is located awayfrom the guide point. Various types of screenscan be set.
“Map view settings” (page 3-10)
Set route can be cancelled.
1. Push <MENU> and touch [Navigation].
2. Touch [Cancel Route].
3. A message is displayed.
INFO:
The cancelled route cannot be reactivated.
JNB0450X
JNE0353X
CANCELLING ROUTE
Route guidance 5-5

WARNING:
Always stop the vehicle in a safe location before modi-fying the route conditions. Modifying the route condi-tions while driving may cause an accident.
During route guidance, the route conditions canbe modified and the route information can beconfirmed. Set route conditions according toyour personal preference.
The route menu screen is available only when adestination is set.
1. Push <MENU> and touch [Navigation].
2. Touch [Route Menu]. The following items areavailable.
Available settings
• [Edit Route]:
Edit or add a destination or waypoint to theroute that is already set.
“Editing route” (page 5-6)
• [Search Criteria Settings]:
Change the route calculation conditions any-where along the route.
“Route Settings” (page 5-16)
• [Recalculate]:
Manually search for the route again afterchanging the search conditions and have thesystem calculate a route.
“Recalculating route” (page 5-9)
• [Show Destination]:
The destination is displayed on the mapscreen.
• [Detour]:
– A detour of a specified distance can becalculated.
“Searching for detour route (forEurope)” (page 5-9)
“Searching for a detour route (forHong Kong)” (page 5-10)
– [Traffic Detour]:
Sets the route search condition to detourtraffic jam and traffic accident.
• [Cancel Route]:
The destination and the waypoints on theroute are deleted.
• [Route Info]:
Route Information can be displayed.
1. Push <MENU> and touch [Navigation].
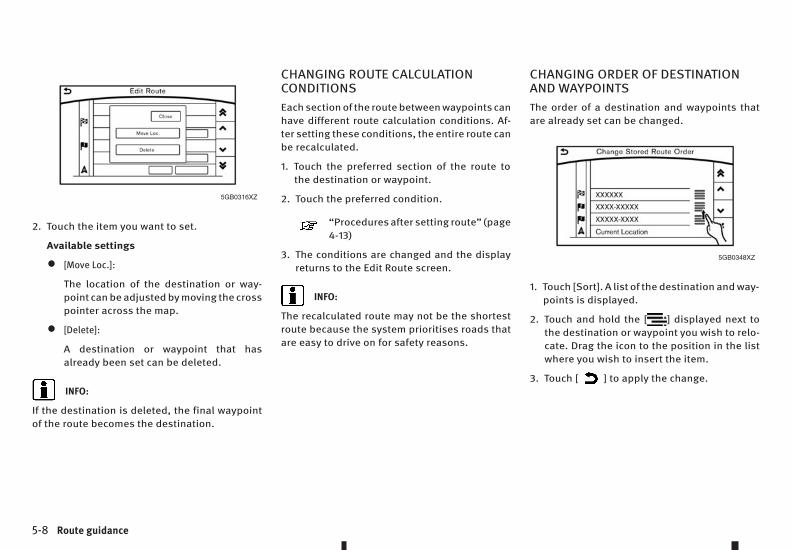
2. Touch [Edit Route].
3. Touch the item you wish to edit.
Available settings
j1 [Add Destination]:
Touch to add a destination.
“Adding destination or waypoint”(page 5-7)
j2 Current destination:
Change or delete the destination.
“Editing/deleting destination orwaypoint” (page 5-7)
5GB0373X
ROUTE MENU EDITING ROUTE
5-6 Route guidance

j3 Condition for calculating a route to thedestination:
Change the conditions for calculating aroute to the destination.
“Changing route calculationconditions” (page 5-8)
j4 [Add Waypoint]:
“Adding destination or waypoint”(page 5-7)
j5 Current waypoint:
Change or delete the waypoint.
“Changing order of destination andwaypoints” (page 5-8)
j6 Condition for calculating a route to awaypoint:
Change the conditions for calculating aroute to a waypoint.
“Changing route calculationconditions” (page 5-8)
j7 [Sort]:
The waypoint and the destination can besorted.
j8 [Store Route]:
Store a route including a destination androute conditions. A maximum of five routescan be stored. Stored routes can be easilyretrieved and set as the suggested route.
ADDING DESTINATION OR WAYPOINTA destination or waypoint can be added to aroute that has already been set. A total of sixdestinations or waypoints can be set.
1. Push <MENU> and touch [Navigation].
2. Touch [Edit Route].
3. Touch [Add Destination] or [Add Waypoint].
INFO:
If [Add Destination] is selected, the currentdestination changes to a waypoint.
4. Set a destination or waypoint. The method ofsearching for a destination or waypoint is thesame as the one for a destination.
“Destination setting menu” (page 4-4)
5. The system will recalculate the routes. Afterthe route search is completed, the display willautomatically return to the Edit Route screen.Set the route conditions as necessary.
“Editing/deleting destination orwaypoint” (page 5-7)
INFO:
The prior route is automatically deleted.
EDITING/DELETING DESTINATION ORWAYPOINTA destination or waypoint that has already beenset can be modified or deleted. If a location ismodified or deleted when a suggested route isalready set, the prior suggested route will berecalculated accordingly.
1. Touch a destination or waypoint that is al-ready set.
5GB0347XZ
Route guidance 5-7
2. Touch the item you want to set.
Available settings
• [Move Loc.]:
The location of the destination or way-point can be adjusted by moving the crosspointer across the map.
• [Delete]:
A destination or waypoint that hasalready been set can be deleted.
INFO:
If the destination is deleted, the final waypointof the route becomes the destination.
CHANGING ROUTE CALCULATIONCONDITIONSEach section of the route between waypoints canhave different route calculation conditions. Af-ter setting these conditions, the entire route canbe recalculated.
1. Touch the preferred section of the route tothe destination or waypoint.
2. Touch the preferred condition.
“Procedures after setting route” (page4-13)
3. The conditions are changed and the displayreturns to the Edit Route screen.
INFO:
The recalculated route may not be the shortestroute because the system prioritises roads thatare easy to drive on for safety reasons.
CHANGING ORDER OF DESTINATIONAND WAYPOINTSThe order of a destination and waypoints thatare already set can be changed.
1. Touch [Sort]. A list of the destination and way-points is displayed.
2. Touch and hold the [m ] displayed next tothe destination or waypoint you wish to relo-cate. Drag the icon to the position in the listwhere you wish to insert the item.
3. Touch [m ] to apply the change.
5GB0316XZ
5GB0348XZ
5-8 Route guidance

A route can be manually searched for again afterchanging the search conditions.
1. Push <MENU> and touch [Navigation].
2. Touch [Route Menu] and touch [Recalculate].
3. A message is displayed and the route is re-calculated.
INFO:
• When a waypoint has been set on the route, thesystem will search for only one route, even if routerecalculation is performed.
• When the vehicle deviates from the suggestedroute, the route from the current location to thedestination is automatically searched for again bythe Auto Reroute function.
“Route Settings” (page 5-16)
There are two methods for setting a detourroute: A detour route setting taking traffic infor-mation into consideration and a detour routesetting specifying the distance
TRAFFIC INFORMATION BASED DETOURWhen a serious traffic event occurs on the route,or if the system finds a faster route, a detouralert will display automatically. If you do not no-tice the automatic alert, a detour can also besearched for manually.
1. Push <MENU> and touch [Navigation].
2. Touch [Route Menu] and touch [Detour]
3. Touch [Traffic Detour].
4. When the detour search is successful, de-tailed information about the detour route andthe comparison screen of the two routes) aredisplayed.
j1 : Current Route (blue)
j2 : New Route (purple)
j3 : Estimated change time and distance
5. To accept the suggested detour route, touch[Yes].
INFO:
• Traffic Information is available only in areas whereRDS-TMC is broadcast. RDS-TMC information is notavailable in some regions.
• If no route is set, or [Use Real Time Traffic Informa-tion] is turned off, this function cannot be oper-ated.
“Route Settings” (page 5-16)
• If a detour route is not selected and no further ac-tion is performed, the detour route will be auto-matically cancelled.
• The detour suggestion can be retrieved even afterthe message disappears by manually selecting[Traffic Detour]. The system will then search for thedetour again and will suggest a detour if one isavailable at that time.
SPECIFIED DISTANCE BASED DETOURTo detour from the suggested route, a route de-touring for a specified distance can be calcu-lated.
1. Push <MENU> and touch [Navigation].
2. Touch [Route Menu] and [Detour].
JNE0354X
RECALCULATING ROUTE SEARCHING FOR DETOUR ROUTE (for Europe)
Route guidance 5-9
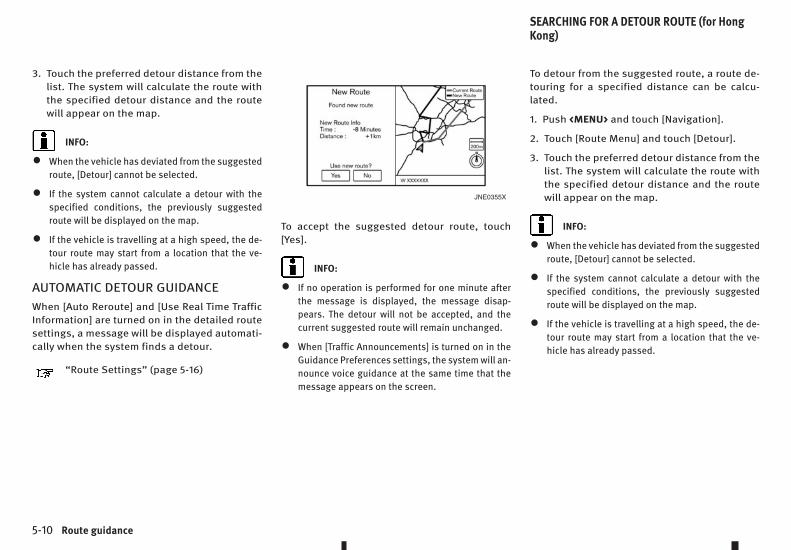
3. Touch the preferred detour distance from thelist. The system will calculate the route withthe specified detour distance and the routewill appear on the map.
INFO:
• When the vehicle has deviated from the suggestedroute, [Detour] cannot be selected.
• If the system cannot calculate a detour with thespecified conditions, the previously suggestedroute will be displayed on the map.
• If the vehicle is travelling at a high speed, the de-tour route may start from a location that the ve-hicle has already passed.
AUTOMATIC DETOUR GUIDANCEWhen [Auto Reroute] and [Use Real Time TrafficInformation] are turned on in the detailed routesettings, a message will be displayed automati-cally when the system finds a detour.
“Route Settings” (page 5-16)
To accept the suggested detour route, touch[Yes].
INFO:
• If no operation is performed for one minute afterthe message is displayed, the message disap-pears. The detour will not be accepted, and thecurrent suggested route will remain unchanged.
• When [Traffic Announcements] is turned on in theGuidance Preferences settings, the system will an-nounce voice guidance at the same time that themessage appears on the screen.
To detour from the suggested route, a route de-touring for a specified distance can be calcu-lated.
1. Push <MENU> and touch [Navigation].
2. Touch [Route Menu] and touch [Detour].
3. Touch the preferred detour distance from thelist. The system will calculate the route withthe specified detour distance and the routewill appear on the map.
INFO:
• When the vehicle has deviated from the suggestedroute, [Detour] cannot be selected.
• If the system cannot calculate a detour with thespecified conditions, the previously suggestedroute will be displayed on the map.
• If the vehicle is travelling at a high speed, the de-tour route may start from a location that the ve-hicle has already passed.
JNE0355X
SEARCHING FOR A DETOUR ROUTE (for HongKong)
5-10 Route guidance

The route search conditions and route guidancecan be set.
GUIDANCE SETTINGSVarious guidance information can be set to beplayed during route guidance and the route and/or voice guidance can be activated or deacti-vated.
1. Push <MENU> and touch [Settings].
2. Touch [Navigation].
3. Touch [Guidance Preferences].
The displayed items vary depending on the ve-hicle model and equipped options.
ROUTE GUIDANCE SETTINGS
Route guidance 5-11
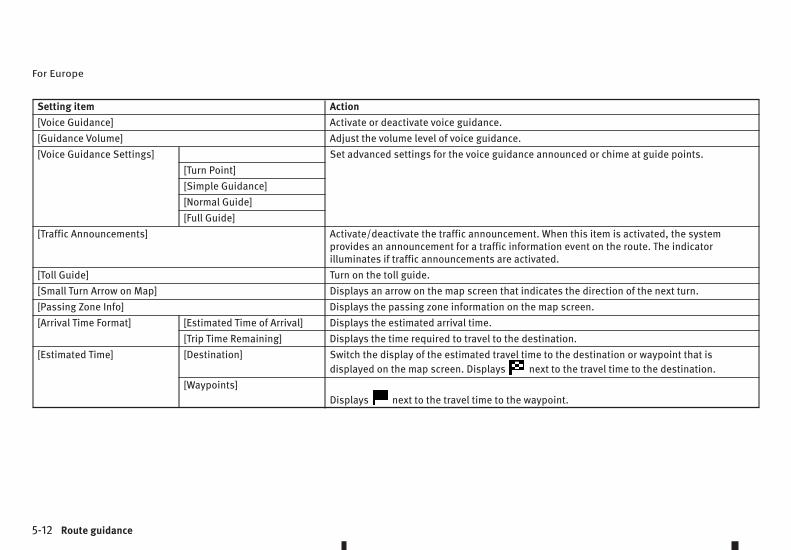
For Europe
Setting item Action[Voice Guidance] Activate or deactivate voice guidance.[Guidance Volume] Adjust the volume level of voice guidance.[Voice Guidance Settings] Set advanced settings for the voice guidance announced or chime at guide points.
[Turn Point][Simple Guidance][Normal Guide][Full Guide]
[Traffic Announcements] Activate/deactivate the traffic announcement. When this item is activated, the systemprovides an announcement for a traffic information event on the route. The indicatorilluminates if traffic announcements are activated.
[Toll Guide] Turn on the toll guide.[Small Turn Arrow on Map] Displays an arrow on the map screen that indicates the direction of the next turn.[Passing Zone Info] Displays the passing zone information on the map screen.[Arrival Time Format] [Estimated Time of Arrival] Displays the estimated arrival time.
[Trip Time Remaining] Displays the time required to travel to the destination.[Estimated Time] [Destination] Switch the display of the estimated travel time to the destination or waypoint that is
displayed on the map screen. Displays m next to the travel time to the destination.[Waypoints]
Displays m next to the travel time to the waypoint.
5-12 Route guidance
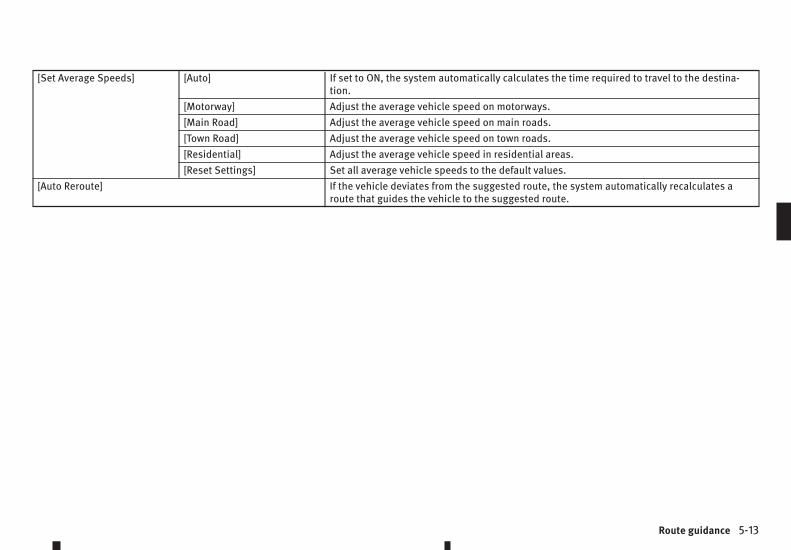
[Set Average Speeds] [Auto] If set to ON, the system automatically calculates the time required to travel to the destina-tion.
[Motorway] Adjust the average vehicle speed on motorways.[Main Road] Adjust the average vehicle speed on main roads.[Town Road] Adjust the average vehicle speed on town roads.[Residential] Adjust the average vehicle speed in residential areas.[Reset Settings] Set all average vehicle speeds to the default values.
[Auto Reroute] If the vehicle deviates from the suggested route, the system automatically recalculates aroute that guides the vehicle to the suggested route.
Route guidance 5-13
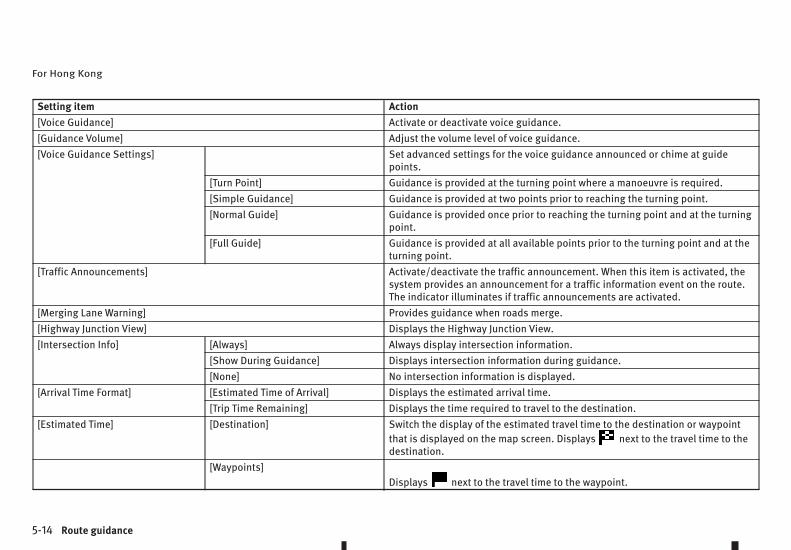
For Hong Kong
Setting item Action[Voice Guidance] Activate or deactivate voice guidance.[Guidance Volume] Adjust the volume level of voice guidance.[Voice Guidance Settings] Set advanced settings for the voice guidance announced or chime at guide
points.[Turn Point] Guidance is provided at the turning point where a manoeuvre is required.[Simple Guidance] Guidance is provided at two points prior to reaching the turning point.[Normal Guide] Guidance is provided once prior to reaching the turning point and at the turning
point.[Full Guide] Guidance is provided at all available points prior to the turning point and at the
turning point.[Traffic Announcements] Activate/deactivate the traffic announcement. When this item is activated, the
system provides an announcement for a traffic information event on the route.The indicator illuminates if traffic announcements are activated.
[Merging Lane Warning] Provides guidance when roads merge.[Highway Junction View] Displays the Highway Junction View.[Intersection Info] [Always] Always display intersection information.
[Show During Guidance] Displays intersection information during guidance.[None] No intersection information is displayed.
[Arrival Time Format] [Estimated Time of Arrival] Displays the estimated arrival time.[Trip Time Remaining] Displays the time required to travel to the destination.
[Estimated Time] [Destination] Switch the display of the estimated travel time to the destination or waypointthat is displayed on the map screen. Displays m next to the travel time to thedestination.
[Waypoints]Displays m next to the travel time to the waypoint.
5-14 Route guidance
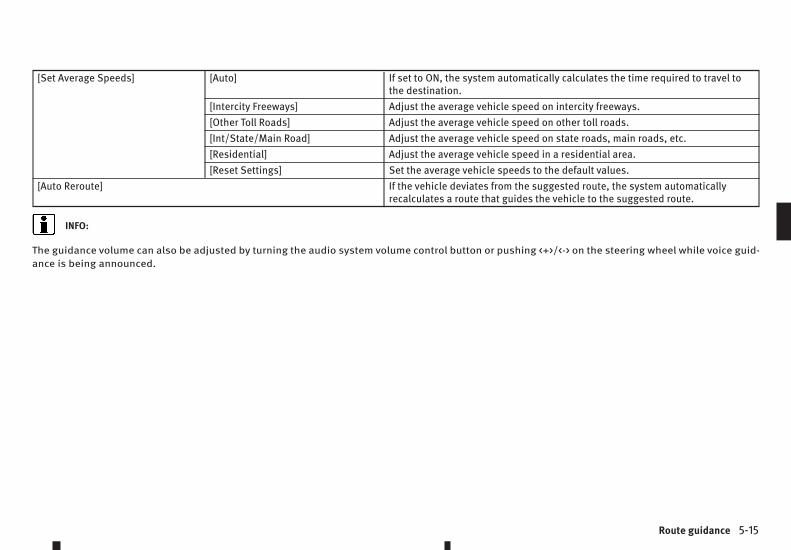
[Set Average Speeds] [Auto] If set to ON, the system automatically calculates the time required to travel tothe destination.
[Intercity Freeways] Adjust the average vehicle speed on intercity freeways.[Other Toll Roads] Adjust the average vehicle speed on other toll roads.[Int/State/Main Road] Adjust the average vehicle speed on state roads, main roads, etc.[Residential] Adjust the average vehicle speed in a residential area.[Reset Settings] Set the average vehicle speeds to the default values.
[Auto Reroute] If the vehicle deviates from the suggested route, the system automaticallyrecalculates a route that guides the vehicle to the suggested route.
INFO:
The guidance volume can also be adjusted by turning the audio system volume control button or pushing <+>/<-> on the steering wheel while voice guid-ance is being announced.
Route guidance 5-15

ROUTE SETTINGSRoute search condition for route calculation can be changed.
1. Push <MENU> and touch [Settings].
2. Touch [Navigation].
3. Touch [Route Search Criteria].
For Europe
Setting item Action[Search Criteria] Route search conditions can be selected.
“Procedures after setting route” (page 4-13)
[Route Preference] [Avoid Toll Roads] (where fitted) Minimises the use of toll roads.[Use Time Restricted Roads] Use any roads subject to time restrictions.[Use Real Time Traffic Information] Uses the latest traffic information received via the RDS-TMC broadcast.[Use Avoid Area Setting] Enable the Avoid Area setting.
“Storing Avoid Area” (page 7-4)
[Use Ferries] Include the use of ferries.[Use Learned Routes] Use the roads that are most frequently travelled on with the help of self-learning
technology.[Auto Reroute] If the vehicle deviates from the suggested route, the system automatically
recalculates a route that leads the vehicle to the suggested route.
5-16 Route guidance
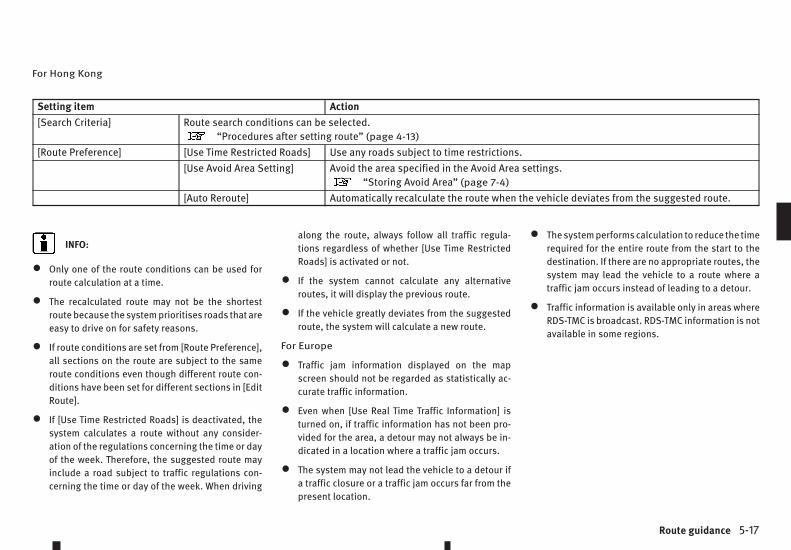
For Hong Kong
Setting item Action[Search Criteria] Route search conditions can be selected.
“Procedures after setting route” (page 4-13)
[Route Preference] [Use Time Restricted Roads] Use any roads subject to time restrictions.[Use Avoid Area Setting] Avoid the area specified in the Avoid Area settings.
“Storing Avoid Area” (page 7-4)
[Auto Reroute] Automatically recalculate the route when the vehicle deviates from the suggested route.
INFO:
• Only one of the route conditions can be used forroute calculation at a time.
• The recalculated route may not be the shortestroute because the system prioritises roads that areeasy to drive on for safety reasons.
• If route conditions are set from [Route Preference],all sections on the route are subject to the sameroute conditions even though different route con-ditions have been set for different sections in [EditRoute].
• If [Use Time Restricted Roads] is deactivated, thesystem calculates a route without any consider-ation of the regulations concerning the time or dayof the week. Therefore, the suggested route mayinclude a road subject to traffic regulations con-cerning the time or day of the week. When driving
along the route, always follow all traffic regula-tions regardless of whether [Use Time RestrictedRoads] is activated or not.
• If the system cannot calculate any alternativeroutes, it will display the previous route.
• If the vehicle greatly deviates from the suggestedroute, the system will calculate a new route.
For Europe
• Traffic jam information displayed on the mapscreen should not be regarded as statistically ac-curate traffic information.
• Even when [Use Real Time Traffic Information] isturned on, if traffic information has not been pro-vided for the area, a detour may not always be in-dicated in a location where a traffic jam occurs.
• The system may not lead the vehicle to a detour ifa traffic closure or a traffic jam occurs far from thepresent location.
• The system performs calculation to reduce the timerequired for the entire route from the start to thedestination. If there are no appropriate routes, thesystem may lead the vehicle to a route where atraffic jam occurs instead of leading to a detour.
• Traffic information is available only in areas whereRDS-TMC is broadcast. RDS-TMC information is notavailable in some regions.
Route guidance 5-17

MEMO
5-18 Route guidance
6 RDS-TMC traffic information (where fitted)RDS-TMC traffic information (where fitted)
RDS-TMC feature ............................................... 6-2Viewing available traffic information .................. 6-2Viewing traffic information list........................... 6-3
Urgent traffic information .................................. 6-3Traffic information settings................................ 6-4Traffic information on map................................. 6-4
The navigation system receives traffic informa-tion from the best available sources and enablesthe RDS-TMC (Radio Data System - Traffic Mes-sage Channel) to broadcast this information forthe best possible guidance. The RDS-TMC broad-cast is fed by a dedicated FM tuner so that youcan still listen to the radio while Traffic Informa-tion is being broadcast. Traffic information canbe displayed only in areas where RDS-TMC isbroadcast. Traffic information is not available insome areas.
1. Push <MENU> and touch [Information].
2. Touch [Traffic Information].
3. Touch the preferred information.
Available item Action[Nearby Traffic Info] The list of available traffic information around the current vehicle
location is displayed.[Info. on Route] This is only available when a route is set. A list of traffic informa-
tion found on the recommended route from the current vehiclelocation to the destination is displayed. Detailed informationabout displayed events can also be checked.
RDS-TMC FEATURE VIEWING AVAILABLE TRAFFIC INFORMATION
6-2 RDS-TMC traffic information (where fitted)

A list of traffic information found on the recom-mended route from the current vehicle locationto the destination is displayed. Detailed infor-mation about displayed events can also bechecked.
1. Touch the event to check the detailed infor-mation. Touch [Map] to display the traffic in-formation location.
2. The map screen centred around the selectedevent is displayed. On the display, detailedinformation about the event is displayed.
The message can be scrolled.
3. Touch [m ] to return to the previous screen.
When an urgent event is found around the cur-rent vehicle location, a message pops up auto-matically on the display with a voice announce-ment.
The message includes the icon, event type,event information and the direct distance fromthe current location to the event.
INFO:
• Urgent traffic information is displayed regardlessof whether the traffic information system is on oroff.
• When there are multiple urgent events, the eventwith the shortest direct distance from the currentlocation is displayed.
• If the urgent event is on the recommended route,and if a detour is found, the detour route notifica-tion screen is displayed when the vehicleapproaches the detour point.
JNG0280X
JNG0279X
VIEWING TRAFFIC INFORMATION LIST URGENT TRAFFIC INFORMATION
RDS-TMC traffic information (where fitted) 6-3

This displays or changes the settings for the traf-fic information related functions.
1. Push <MENU>.
2. Touch [Settings] and touch [Navigation].
3. Touch [Traffic Info Settings].
4. Touch the preferred setting. The indicator forthe selected setting illuminates.
Available setting items
• [Show Traffic Info on Map]:
Display all RDS-TMC information on the mapwhile driving.
• [TMC Service]:
Define the RDS-TMC broadcasting tuning.
• [RDS-TMC On Map]:
Select and display the relevant RDS-TMCicons on the map.
• [Traffic Announcement]:
Announces the traffic information event onthe route.
INFO:
• The RDS-TMC system automatically updates andoverwrites old information. Traffic information isnot available in some areas.
• The colour of the RDS-TMC icon displayed on thescreen indicates the traffic information receptioncondition. The icon turns green while in an areawhere traffic information is being broadcast andthe RDS-TMC system receives broadcast informa-tion.
m Setting by voice command
1. Push <m > located on the steering wheel.
2. After the tone sounds, speak a command.
To turn the traffic information system on/off:
“Traffic Information”
Traffic information is displayed on both the 2Dand Birdview™ map screens.
“Viewing available traffic information”(page 6-2)
j1 Traffic indicator
Displays the reception condition of trafficinformation transmitted from the provider.
When the reception condition of trafficinformation transmitted from the provideris not detected, traffic indicators will not bedisplayed.
j2 Estimated travel time to destinationcalculated taking traffic information on theroute into consideration.
j3 Road conditions
Free Flow: Green arrow
Moderate traffic: Yellow arrow
5GB0288XZ
TRAFFIC INFORMATION SETTINGS TRAFFIC INFORMATION ON MAP
6-4 RDS-TMC traffic information (where fitted)
Heavy traffic: Red arrow
Section affected by serious traffic event:Purple arrow
j4 Traffic information icon
“Traffic information on map (wherefitted)” (page 3-13)
If a route is not set, all of the trafficinformation icons on the map screen aredisplayed in colour. When a route isalready set, the icons on the route aredisplayed in colour, and the icons outsidethe route are displayed in grey.
INFO:
Traffic information icons can be displayed onlywhen the scale level of the map is between 25 m(100 ft) and 16 km (8 mi).
“Map scale” (page 3-7)
RDS-TMC traffic information (where fitted) 6-5

MEMO
6-6 RDS-TMC traffic information (where fitted)
7 Storing a location/routeStoring a location/route
Storing location................................................ 7-2Storing home location .................................. 7-2Storing location by searching........................ 7-2Storing location by moving map .................... 7-2
Storing route .................................................... 7-3Storing Avoid Area ............................................ 7-4Editing stored information................................. 7-6
Editing stored home and location .................. 7-6
Editing Avoid Area ........................................ 7-10Editing stored route...................................... 7-11
Deleting stored item ......................................... 7-12Deleting stored item individually................... 7-12Deleting individual item on map.................... 7-13
Transferring information to/from AddressBook (for Europe) .............................................. 7-13
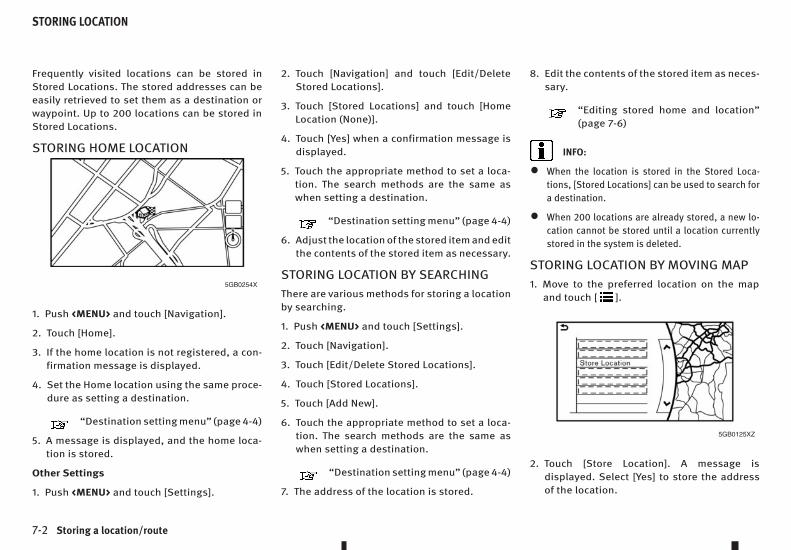
Frequently visited locations can be stored inStored Locations. The stored addresses can beeasily retrieved to set them as a destination orwaypoint. Up to 200 locations can be stored inStored Locations.
STORING HOME LOCATION
1. Push <MENU> and touch [Navigation].
2. Touch [Home].
3. If the home location is not registered, a con-firmation message is displayed.
4. Set the Home location using the same proce-dure as setting a destination.
“Destination setting menu” (page 4-4)
5. A message is displayed, and the home loca-tion is stored.
Other Settings
1. Push <MENU> and touch [Settings].
2. Touch [Navigation] and touch [Edit/DeleteStored Locations].
3. Touch [Stored Locations] and touch [HomeLocation (None)].
4. Touch [Yes] when a confirmation message isdisplayed.
5. Touch the appropriate method to set a loca-tion. The search methods are the same aswhen setting a destination.
“Destination setting menu” (page 4-4)
6. Adjust the location of the stored item and editthe contents of the stored item as necessary.
STORING LOCATION BY SEARCHINGThere are various methods for storing a locationby searching.
1. Push <MENU> and touch [Settings].
2. Touch [Navigation].
3. Touch [Edit/Delete Stored Locations].
4. Touch [Stored Locations].
5. Touch [Add New].
6. Touch the appropriate method to set a loca-tion. The search methods are the same aswhen setting a destination.
“Destination setting menu” (page 4-4)
7. The address of the location is stored.
8. Edit the contents of the stored item as neces-sary.
“Editing stored home and location”(page 7-6)
INFO:
• When the location is stored in the Stored Loca-tions, [Stored Locations] can be used to search fora destination.
• When 200 locations are already stored, a new lo-cation cannot be stored until a location currentlystored in the system is deleted.
STORING LOCATION BY MOVING MAP1. Move to the preferred location on the map
and touch [m ].
2. Touch [Store Location]. A message isdisplayed. Select [Yes] to store the addressof the location.
5GB0254X
5GB0125XZ
STORING LOCATION
7-2 Storing a location/route
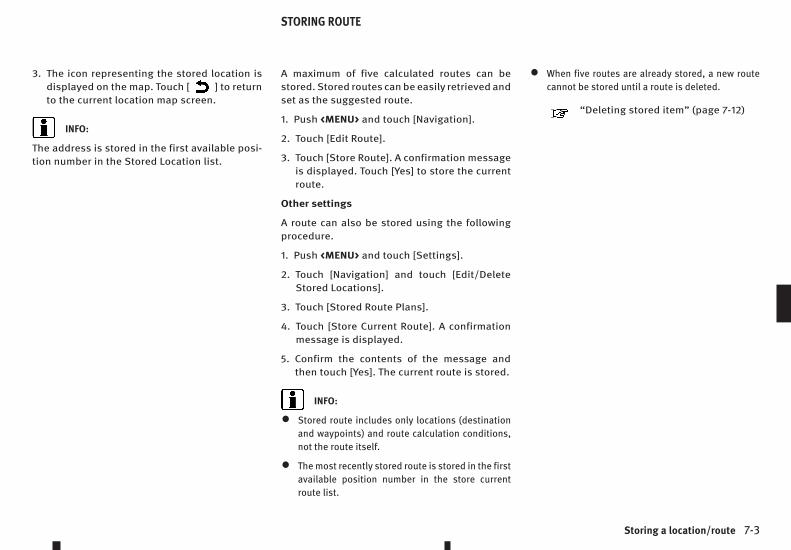
3. The icon representing the stored location isdisplayed on the map. Touch [m ] to returnto the current location map screen.
INFO:
The address is stored in the first available posi-tion number in the Stored Location list.
A maximum of five calculated routes can bestored. Stored routes can be easily retrieved andset as the suggested route.
1. Push <MENU> and touch [Navigation].
2. Touch [Edit Route].
3. Touch [Store Route]. A confirmation messageis displayed. Touch [Yes] to store the currentroute.
Other settings
A route can also be stored using the followingprocedure.
1. Push <MENU> and touch [Settings].
2. Touch [Navigation] and touch [Edit/DeleteStored Locations].
3. Touch [Stored Route Plans].
4. Touch [Store Current Route]. A confirmationmessage is displayed.
5. Confirm the contents of the message andthen touch [Yes]. The current route is stored.
INFO:
• Stored route includes only locations (destinationand waypoints) and route calculation conditions,not the route itself.
• The most recently stored route is stored in the firstavailable position number in the store currentroute list.
• When five routes are already stored, a new routecannot be stored until a route is deleted.
“Deleting stored item” (page 7-12)
STORING ROUTE
Storing a location/route 7-3
An Avoid Area can be stored. The Avoid Area isan area that can be excluded from a route, suchas a road that is always congested. Once AvoidAreas are stored, the system avoids those areaswhen calculating a route. Up to 10 Avoid Areascan be stored.
1. Push <MENU> and touch [Settings].
2. Touch [Navigation] and touch [Edit/DeleteStored Locations].
3. Touch [Avoid Areas].
4. Touch [Add New].
Touch the appropriate method to search for alocation.
“Destination setting menu” (page 4-4)
5. Adjust the location of the Avoid Area and editthe contents of the Avoid Area as necessary.
“Editing Avoid Area” (page 7-10)
INFO:
A maximum of 10 Avoid Areas can be stored.When 10 Avoid Areas are already stored, a newAvoid Area cannot be stored until a currentlystored Avoid Area is deleted.
“Deleting stored item” (page 7-12)
STORING AVOID AREA
7-4 Storing a location/route

Storing a location/route 7-5
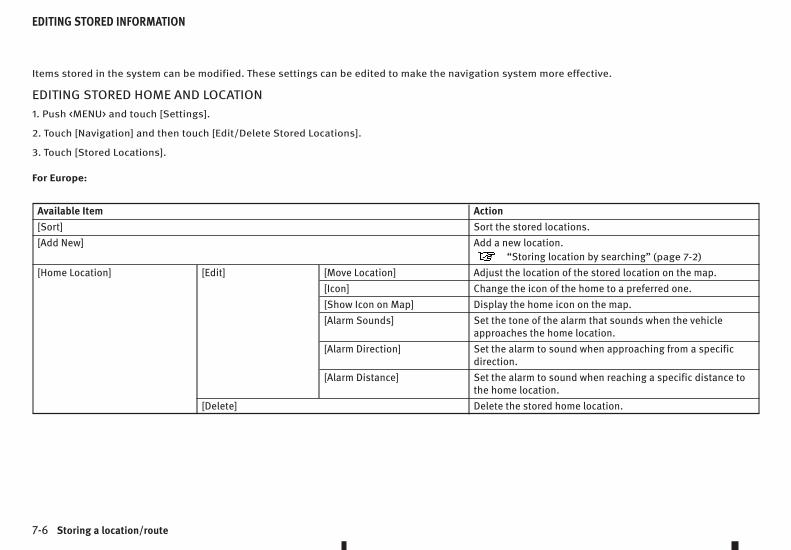
Items stored in the system can be modified. These settings can be edited to make the navigation system more effective.
EDITING STORED HOME AND LOCATION1. Push <MENU> and touch [Settings].
2. Touch [Navigation] and then touch [Edit/Delete Stored Locations].
3. Touch [Stored Locations].
For Europe:
Available Item Action[Sort] Sort the stored locations.[Add New] Add a new location.
“Storing location by searching” (page 7-2)
[Home Location] [Edit] [Move Location] Adjust the location of the stored location on the map.[Icon] Change the icon of the home to a preferred one.[Show Icon on Map] Display the home icon on the map.[Alarm Sounds] Set the tone of the alarm that sounds when the vehicle
approaches the home location.[Alarm Direction] Set the alarm to sound when approaching from a specific
direction.[Alarm Distance] Set the alarm to sound when reaching a specific distance to
the home location.[Delete] Delete the stored home location.
EDITING STORED INFORMATION
7-6 Storing a location/route
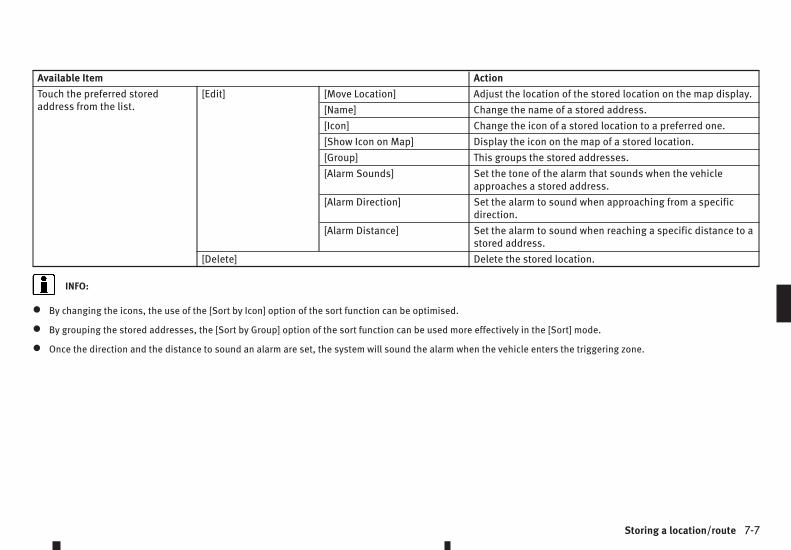
Available Item ActionTouch the preferred storedaddress from the list.
[Edit] [Move Location] Adjust the location of the stored location on the map display.[Name] Change the name of a stored address.[Icon] Change the icon of a stored location to a preferred one.[Show Icon on Map] Display the icon on the map of a stored location.[Group] This groups the stored addresses.[Alarm Sounds] Set the tone of the alarm that sounds when the vehicle
approaches a stored address.[Alarm Direction] Set the alarm to sound when approaching from a specific
direction.[Alarm Distance] Set the alarm to sound when reaching a specific distance to a
stored address.[Delete] Delete the stored location.
INFO:
• By changing the icons, the use of the [Sort by Icon] option of the sort function can be optimised.
• By grouping the stored addresses, the [Sort by Group] option of the sort function can be used more effectively in the [Sort] mode.
• Once the direction and the distance to sound an alarm are set, the system will sound the alarm when the vehicle enters the triggering zone.
Storing a location/route 7-7
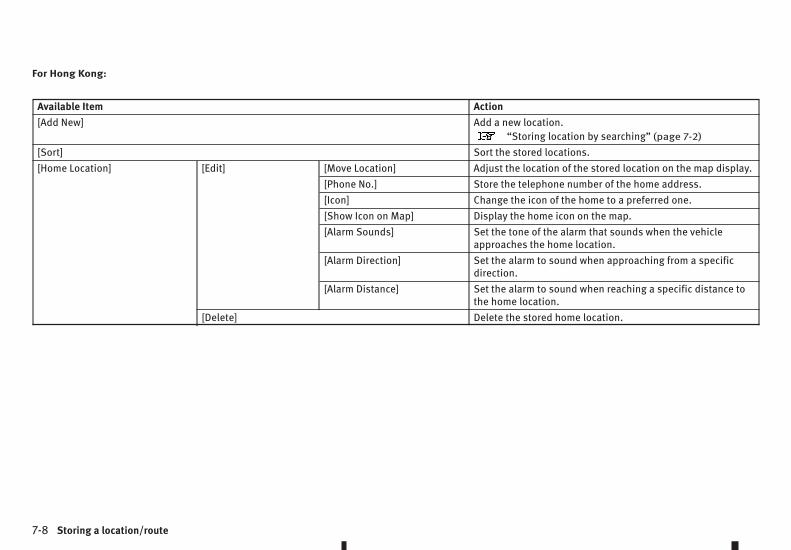
For Hong Kong:
Available Item Action[Add New] Add a new location.
“Storing location by searching” (page 7-2)
[Sort] Sort the stored locations.[Home Location] [Edit] [Move Location] Adjust the location of the stored location on the map display.
[Phone No.] Store the telephone number of the home address.[Icon] Change the icon of the home to a preferred one.[Show Icon on Map] Display the home icon on the map.[Alarm Sounds] Set the tone of the alarm that sounds when the vehicle
approaches the home location.[Alarm Direction] Set the alarm to sound when approaching from a specific
direction.[Alarm Distance] Set the alarm to sound when reaching a specific distance to
the home location.[Delete] Delete the stored home location.
7-8 Storing a location/route

Available Item ActionTouch the preferred storedaddress from the list.
[Edit] [Move Location] Adjust the location of the stored location on the map display.[Name] Change the name of a stored address.[Phone No.] Store the telephone number of a stored address.[Icon] Change the icon of a stored location to a preferred one.[Show Icon on Map] Display the icon on the map of a stored location.[Group] This groups the stored addresses.[Alarm Sounds] Set the tone of the alarm that sounds when the vehicle
approaches a stored address.[Alarm Direction] Set the alarm to sound when approaching from a specific
direction.[Alarm Distance] Set the alarm to sound when reaching a specific distance to a
stored address.[Delete] Delete the stored location.
INFO:
• By changing the icons, the use of the [By Icon] option of the sort function can be optimised.
• By grouping the stored addresses, the [By Group] option of the sort function can be used more effectively in the [Sort] mode.
• Once the direction and the distance to sound an alarm are set, the system will sound the alarm when the vehicle enters the triggering zone.
Storing a location/route 7-9
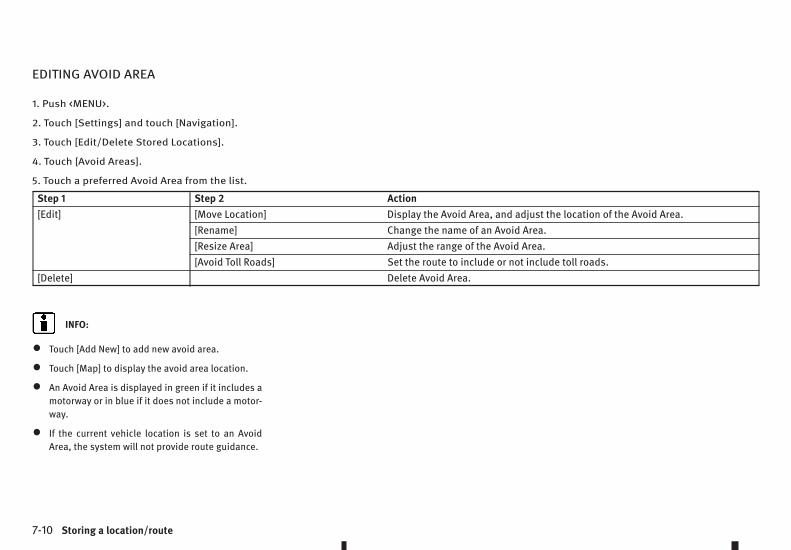
EDITING AVOID AREA
1. Push <MENU>.
2. Touch [Settings] and touch [Navigation].
3. Touch [Edit/Delete Stored Locations].
4. Touch [Avoid Areas].
5. Touch a preferred Avoid Area from the list.
Step 1 Step 2 Action[Edit] [Move Location] Display the Avoid Area, and adjust the location of the Avoid Area.
[Rename] Change the name of an Avoid Area.[Resize Area] Adjust the range of the Avoid Area.[Avoid Toll Roads] Set the route to include or not include toll roads.
[Delete] Delete Avoid Area.
INFO:
• Touch [Add New] to add new avoid area.
• Touch [Map] to display the avoid area location.
• An Avoid Area is displayed in green if it includes amotorway or in blue if it does not include a motor-way.
• If the current vehicle location is set to an AvoidArea, the system will not provide route guidance.
7-10 Storing a location/route
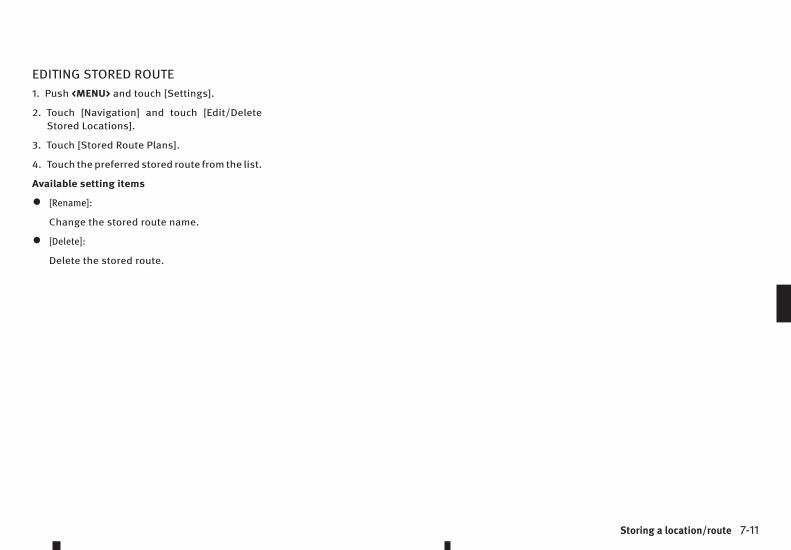
EDITING STORED ROUTE1. Push <MENU> and touch [Settings].
2. Touch [Navigation] and touch [Edit/DeleteStored Locations].
3. Touch [Stored Route Plans].
4. Touch the preferred stored route from the list.
Available setting items
• [Rename]:
Change the stored route name.
• [Delete]:
Delete the stored route.
Storing a location/route 7-11

The locations and routes in the Stored Locations can be deleted. Two deletion methods are available: deleting an individual item and deleting all storeditems.
INFO:
Deleted items cannot be restored. Before deleting an item, always make sure that the item is no longer needed.
DELETING STORED ITEM INDIVIDUALLY1. Push <MENU> and touch [Settings].
2. Touch [Navigation] and touch [Edit/Delete Stored Locations].
3. Touch [Delete Stored Items].
Step 1 Step 2 Action[Delete Stored Locations] [Sort] Sort stored locations.
[Delete All] Delete all stored locations.[Multi Select] Delete the selected stored locations. To select all the stored items, touch [Select All].[Home Location] Delete Home Location.[Stored Locations] Delete the selected stored location individually.
[Delete Stored Route Plans] [Delete All] Delete all stored routes.[Stored Route Plans] Delete the selected stored routes.
[Delete Avoid Areas] [Delete All] Delete all Avoid Areas.[Avoid Areas] Delete the selected Avoid Area.
[Reset Learned Routes] (for Europe) Delete learned route.
DELETING STORED ITEM
7-12 Storing a location/route
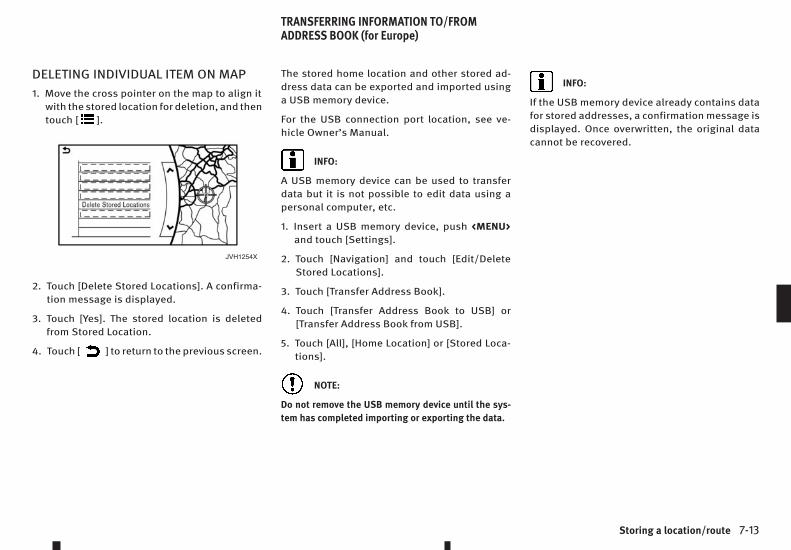
DELETING INDIVIDUAL ITEM ON MAP1. Move the cross pointer on the map to align it
with the stored location for deletion, and thentouch [m ].
2. Touch [Delete Stored Locations]. A confirma-tion message is displayed.
3. Touch [Yes]. The stored location is deletedfrom Stored Location.
4. Touch [m ] to return to the previous screen.
The stored home location and other stored ad-dress data can be exported and imported usinga USB memory device.
For the USB connection port location, see ve-hicle Owner’s Manual.
INFO:
A USB memory device can be used to transferdata but it is not possible to edit data using apersonal computer, etc.
1. Insert a USB memory device, push <MENU>and touch [Settings].
2. Touch [Navigation] and touch [Edit/DeleteStored Locations].
3. Touch [Transfer Address Book].
4. Touch [Transfer Address Book to USB] or[Transfer Address Book from USB].
5. Touch [All], [Home Location] or [Stored Loca-tions].
NOTE:
Do not remove the USB memory device until the sys-tem has completed importing or exporting the data.
INFO:
If the USB memory device already contains datafor stored addresses, a confirmation message isdisplayed. Once overwritten, the original datacannot be recovered.
JVH1254X
TRANSFERRING INFORMATION TO/FROMADDRESS BOOK (for Europe)
Storing a location/route 7-13

MEMO
7-14 Storing a location/route
8 Information and settingsInformation and settings
Information menu ............................................. 8-2Settings menu .................................................. 8-4
Clock settings .............................................. 8-6Language settings........................................ 8-7
Volume settings ........................................... 8-8Screen settings ............................................ 8-9
Navigation settings........................................... 8-10

Various information that is helpful for using the vehicle can be set in the information screen. Available items include vehicle information, traffic informa-tion, current location information and navigation software version.
The displayed items vary depending on the vehicle model and equipped options.
1. Push <MENU>.
2. Touch [Information].
Menu item Result[Eco Drive Report] Display the Eco Drive Report.
[History] The Eco Drive Report History screen can be scrolled.Touching [ < ]/[ > ] while the Eco Drive Report History screen is displayed willdisplay a previous or a more updated history.
[Reset] Reset the Eco Drive Report screen.The average for the Reset-to-Reset period is stored as an Eco Drive Reporthistory.
[Traffic Information] [Nearby Traffic Info] Displays traffic information detected nearby.[Info. on Route] Displays traffic information detected along the route.
[Map Information] Display the navigation system unit identification number, the current mapversion and the software version.
INFO:
For Europe:
[Traffic Information] is available only in areas where RDS-TMC is broadcast. RDS-TMC information is not available in some regions.
INFORMATION MENU
8-2 Information and settings

Information and settings 8-3
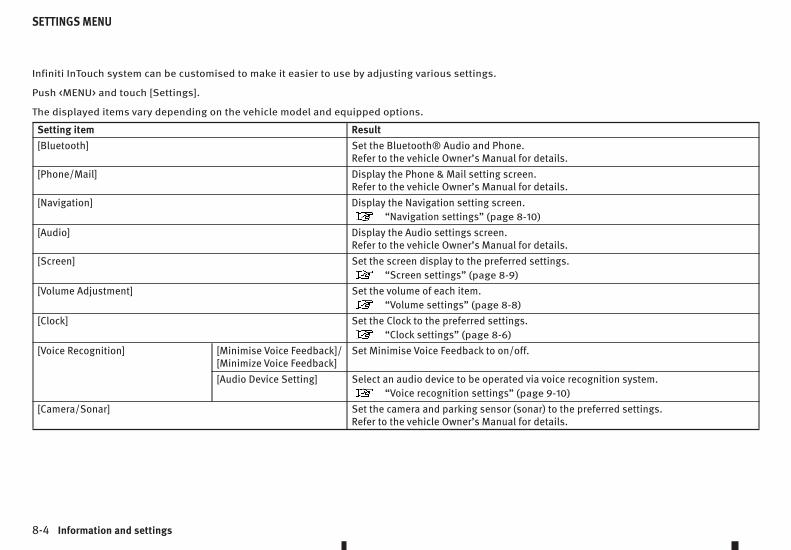
Infiniti InTouch system can be customised to make it easier to use by adjusting various settings.
Push <MENU> and touch [Settings].
The displayed items vary depending on the vehicle model and equipped options.
Setting item Result[Bluetooth] Set the Bluetooth® Audio and Phone.
Refer to the vehicle Owner’s Manual for details.[Phone/Mail] Display the Phone & Mail setting screen.
Refer to the vehicle Owner’s Manual for details.[Navigation] Display the Navigation setting screen.
“Navigation settings” (page 8-10)
[Audio] Display the Audio settings screen.Refer to the vehicle Owner’s Manual for details.
[Screen] Set the screen display to the preferred settings.“Screen settings” (page 8-9)
[Volume Adjustment] Set the volume of each item.“Volume settings” (page 8-8)
[Clock] Set the Clock to the preferred settings.“Clock settings” (page 8-6)
[Voice Recognition] [Minimise Voice Feedback]/[Minimize Voice Feedback]
Set Minimise Voice Feedback to on/off.
[Audio Device Setting] Select an audio device to be operated via voice recognition system.“Voice recognition settings” (page 9-10)
[Camera/Sonar] Set the camera and parking sensor (sonar) to the preferred settings.Refer to the vehicle Owner’s Manual for details.
SETTINGS MENU
8-4 Information and settings

Setting item Result[Other] [Language] Set the language to the preferred settings.
“Language settings” (page 8-7)
[Keyboard Type] Set the keyboard type to [QWERTY] or [ABC].[Low on Fuel Alert] Set the fuel low notification to on/off.[Software Information] Display the software information.
Information and settings 8-5
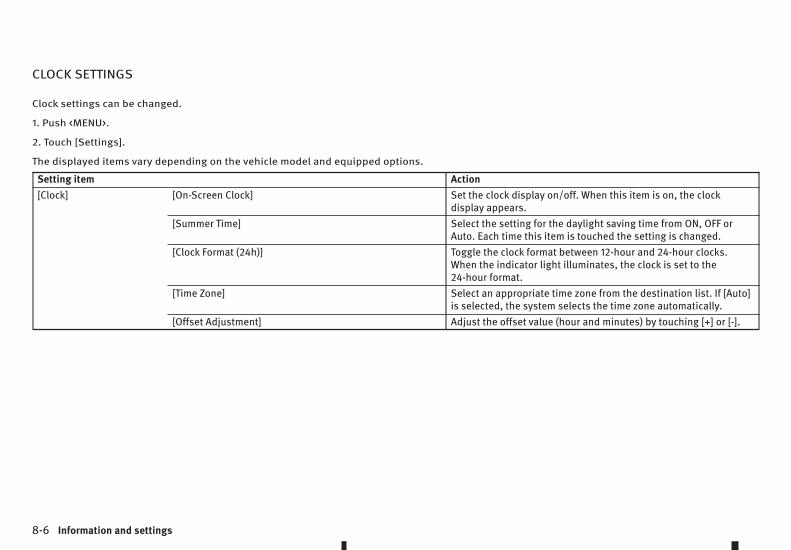
CLOCK SETTINGS
Clock settings can be changed.
1. Push <MENU>.
2. Touch [Settings].
The displayed items vary depending on the vehicle model and equipped options.
Setting item Action[Clock] [On-Screen Clock] Set the clock display on/off. When this item is on, the clock
display appears.[Summer Time] Select the setting for the daylight saving time from ON, OFF or
Auto. Each time this item is touched the setting is changed.[Clock Format (24h)] Toggle the clock format between 12-hour and 24-hour clocks.
When the indicator light illuminates, the clock is set to the24-hour format.
[Time Zone] Select an appropriate time zone from the destination list. If [Auto]is selected, the system selects the time zone automatically.
[Offset Adjustment] Adjust the offset value (hour and minutes) by touching [+] or [-].
8-6 Information and settings

LANGUAGE SETTINGS
You can change the language used by the system.
1. Push <MENU> and touch [Settings].
2. Touch [Other].
Setting item Action[Language] [System Language] Select the language of the display.
INFO:
• Do not push the ignition switch while changing thelanguage.
• The language setting is also applied to the voicerecognition system. The voice recognition systemcan be used only if the language is supported bythe voice recognition system.
• The unit that is set by the vehicle information dis-play is applied to the navigation system. Refer tothe vehicle Owner’s Manual for the vehicle infor-mation display.
• If the selected language is also supported by thevehicle information display, a confirmation mes-sage asking if you also wish to change the vehicleinformation display language is displayed.
• Depending on the language selected, availablevoice commands for the voice recognition systemmay differ.
Information and settings 8-7
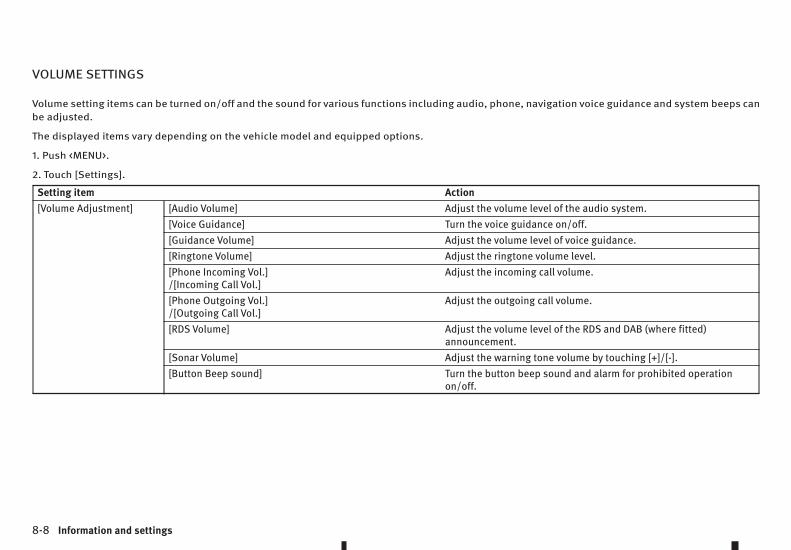
VOLUME SETTINGS
Volume setting items can be turned on/off and the sound for various functions including audio, phone, navigation voice guidance and system beeps canbe adjusted.
The displayed items vary depending on the vehicle model and equipped options.
1. Push <MENU>.
2. Touch [Settings].
Setting item Action[Volume Adjustment] [Audio Volume] Adjust the volume level of the audio system.
[Voice Guidance] Turn the voice guidance on/off.[Guidance Volume] Adjust the volume level of voice guidance.[Ringtone Volume] Adjust the ringtone volume level.[Phone Incoming Vol.]/[Incoming Call Vol.]
Adjust the incoming call volume.
[Phone Outgoing Vol.]/[Outgoing Call Vol.]
Adjust the outgoing call volume.
[RDS Volume] Adjust the volume level of the RDS and DAB (where fitted)announcement.
[Sonar Volume] Adjust the warning tone volume by touching [+]/[-].[Button Beep sound] Turn the button beep sound and alarm for prohibited operation
on/off.
8-8 Information and settings

SCREEN SETTINGS
The display can be turned on/off and the image quality of the display can be adjusted in this menu.
1. Push <MENU> and touch [Settings].
2. Touch [Screen].
3. Touch the item to be adjusted.
Available items[Display Settings] [Brightness] Adjust the brightness.
[Contrast] Adjust the contrast.[Black Level] Adjust the black level.
[Display OFF] Turns the display off.To turn the display back on, push and hold <CAMERAm m > (models with AroundView Monitor) or <m > (models without Around View Monitor) for more than 2seconds.
[Day/Night] Adjust the screen brightness.Map colour can also be changed between the daytime mode and the night time mode.
[Change Map Colour]/[Change Map Color]
Toggles the map colour between the daytime mode and the night time mode.
[Reset Settings] Return the display settings to default.
Information and settings 8-9

The navigation system can be customised ac-cording to the user’s preference.
1. Push <MENU> and touch [Settings].
2. Touch [Navigation].
3. Touch the item you want to set.
The displayed items vary depending on the ve-hicle model and equipped options.
[Map & Display View]
Touch to change the map and display the viewsettings.
“Map view settings” (page 3-10)
[Map Preferences]
Touch to set the map view, orientation, font sizeor map colour etc.
“Map view settings” (page 3-10)
[POI Icons Displayed on Map]
The facility icons can be displayed or hidden bytype.
“Displaying facility icons” (page 3-12)
[Guidance Preferences]
Various guidance information can be set to beplayed during route guidance and the route and/or voice guidance can be activated or deacti-vated.
“Guidance settings” (page 5-11)
[Route Search Criteria]
Set conditions for the route search.
“Route Settings” (page 5-16)
[Traffic Info Settings]
Displays or changes the settings for the trafficinformation related functions.
“Traffic information settings” (page 6-4)
NAVIGATION SETTINGS
8-10 Information and settings
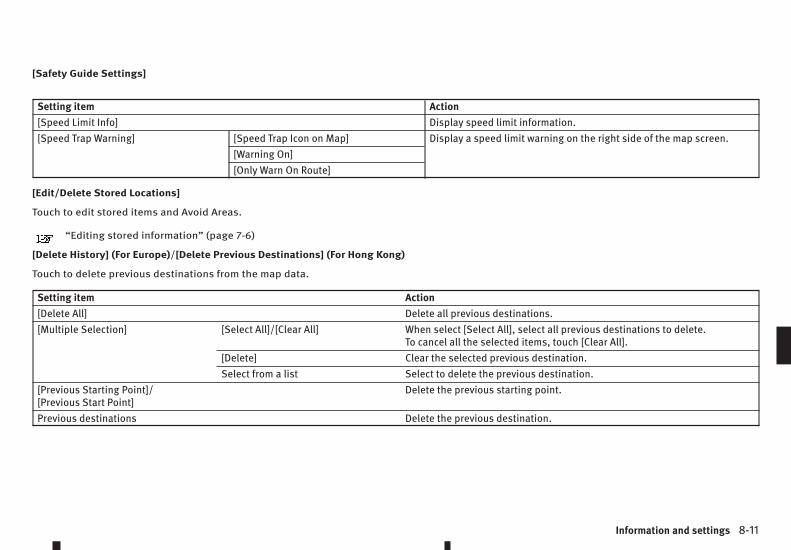
[Safety Guide Settings]
Setting item Action[Speed Limit Info] Display speed limit information.[Speed Trap Warning] [Speed Trap Icon on Map] Display a speed limit warning on the right side of the map screen.
[Warning On][Only Warn On Route]
[Edit/Delete Stored Locations]
Touch to edit stored items and Avoid Areas.
“Editing stored information” (page 7-6)
[Delete History] (For Europe)/[Delete Previous Destinations] (For Hong Kong)
Touch to delete previous destinations from the map data.
Setting item Action[Delete All] Delete all previous destinations.[Multiple Selection] [Select All]/[Clear All] When select [Select All], select all previous destinations to delete.
To cancel all the selected items, touch [Clear All].[Delete] Clear the selected previous destination.Select from a list Select to delete the previous destination.
[Previous Starting Point]/[Previous Start Point]
Delete the previous starting point.
Previous destinations Delete the previous destination.
Information and settings 8-11

[Other Settings]
Setting item Action[Small Step Zoom With Dial] Touch to turn the free zoom function on/off. With the free zoom turned on, the scale levels
can be adjusted in smaller steps than with the normal scale adjustment.[Map Scrolling Information] The system can be set so that information about the location indicated by the cross pointer
is displayed when you scroll the map screen.“Displaying map scrolling information” (page 3-12)
[Customise Nearby Places]/[Customize Nearby Places]
Nearby Places List Customise nearby categories to show the categories that you frequently use.[Restore Default Settings] Reset the settings of all five items in the nearby place list.
[Tracking Dots Displayed onMap]
[Show Tracking Dots on Map] Display a stored tracked route on the map.[Dist. Between Tracking Dots] Select the tracking dot interval.[Delete Current Tracking] Delete the stored tracked route.
[Adjust Current Location] If the vehicle icon indicating the current vehicle location is not in the correct position, thelocation of the vehicle icon on the map screen can be adjusted.
[Reset Settings]
Reset various settings (display, volume level,etc.) to the default settings.
8-12 Information and settings

9 Voice recognitionVoice recognition
INFINITI Voice Recognition system...................... 9-2Using Voice Recognition system .................... 9-2Before starting............................................. 9-2
Giving voice commands ................................ 9-2Voice recognition settings............................. 9-10
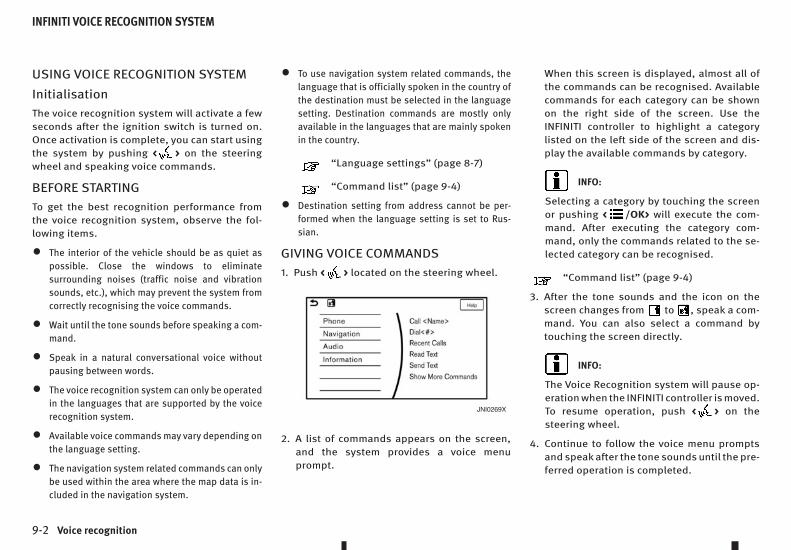
USING VOICE RECOGNITION SYSTEM
InitialisationThe voice recognition system will activate a fewseconds after the ignition switch is turned on.Once activation is complete, you can start usingthe system by pushing <m > on the steeringwheel and speaking voice commands.
BEFORE STARTINGTo get the best recognition performance fromthe voice recognition system, observe the fol-lowing items.
• The interior of the vehicle should be as quiet aspossible. Close the windows to eliminatesurrounding noises (traffic noise and vibrationsounds, etc.), which may prevent the system fromcorrectly recognising the voice commands.
• Wait until the tone sounds before speaking a com-mand.
• Speak in a natural conversational voice withoutpausing between words.
• The voice recognition system can only be operatedin the languages that are supported by the voicerecognition system.
• Available voice commands may vary depending onthe language setting.
• The navigation system related commands can onlybe used within the area where the map data is in-cluded in the navigation system.
• To use navigation system related commands, thelanguage that is officially spoken in the country ofthe destination must be selected in the languagesetting. Destination commands are mostly onlyavailable in the languages that are mainly spokenin the country.
“Language settings” (page 8-7)
“Command list” (page 9-4)
• Destination setting from address cannot be per-formed when the language setting is set to Rus-sian.
GIVING VOICE COMMANDS1. Push <m > located on the steering wheel.
2. A list of commands appears on the screen,and the system provides a voice menuprompt.
When this screen is displayed, almost all ofthe commands can be recognised. Availablecommands for each category can be shownon the right side of the screen. Use theINFINITI controller to highlight a categorylisted on the left side of the screen and dis-play the available commands by category.
INFO:
Selecting a category by touching the screenor pushing <m /OK> will execute the com-mand. After executing the category com-mand, only the commands related to the se-lected category can be recognised.
“Command list” (page 9-4)
3. After the tone sounds and the icon on thescreen changes from m to m , speak a com-mand. You can also select a command bytouching the screen directly.
INFO:
The Voice Recognition system will pause op-eration when the INFINITI controller is moved.To resume operation, push <m > on thesteering wheel.
4. Continue to follow the voice menu promptsand speak after the tone sounds until the pre-ferred operation is completed.
JNI0269X
INFINITI VOICE RECOGNITION SYSTEM
9-2 Voice recognition
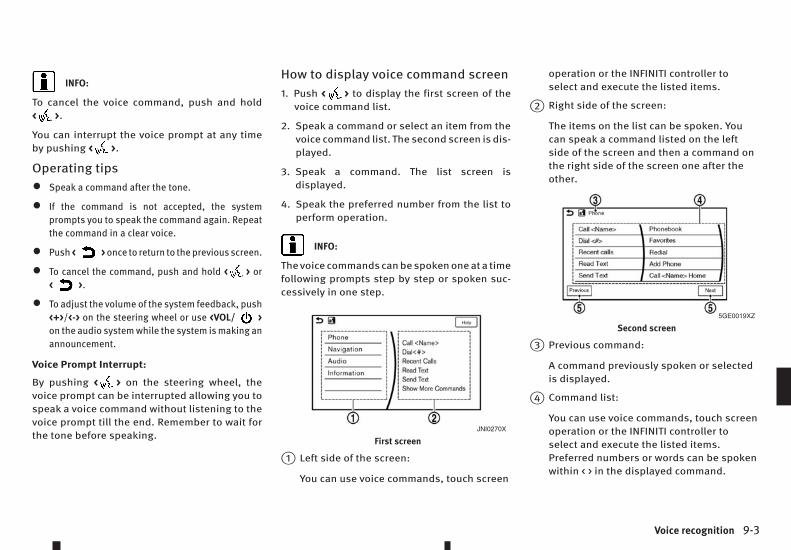
INFO:
To cancel the voice command, push and hold<m >.
You can interrupt the voice prompt at any timeby pushing <m >.
Operating tips
• Speak a command after the tone.
• If the command is not accepted, the systemprompts you to speak the command again. Repeatthe command in a clear voice.
• Push <m > once to return to the previous screen.
• To cancel the command, push and hold <m > or<m >.
• To adjust the volume of the system feedback, push<+>/<-> on the steering wheel or use <VOL/m >on the audio system while the system is making anannouncement.
Voice Prompt Interrupt:
By pushing <m > on the steering wheel, thevoice prompt can be interrupted allowing you tospeak a voice command without listening to thevoice prompt till the end. Remember to wait forthe tone before speaking.
How to display voice command screen1. Push <m > to display the first screen of the
voice command list.
2. Speak a command or select an item from thevoice command list. The second screen is dis-played.
3. Speak a command. The list screen isdisplayed.
4. Speak the preferred number from the list toperform operation.
INFO:
The voice commands can be spoken one at a timefollowing prompts step by step or spoken suc-cessively in one step.
j1 Left side of the screen:
You can use voice commands, touch screen
operation or the INFINITI controller toselect and execute the listed items.
j2 Right side of the screen:
The items on the list can be spoken. Youcan speak a command listed on the leftside of the screen and then a command onthe right side of the screen one after theother.
j3 Previous command:
A command previously spoken or selectedis displayed.
j4 Command list:
You can use voice commands, touch screenoperation or the INFINITI controller toselect and execute the listed items.Preferred numbers or words can be spokenwithin < > in the displayed command.
JNI0270X
First screen
5GE0019XZ
Second screen
Voice recognition 9-3
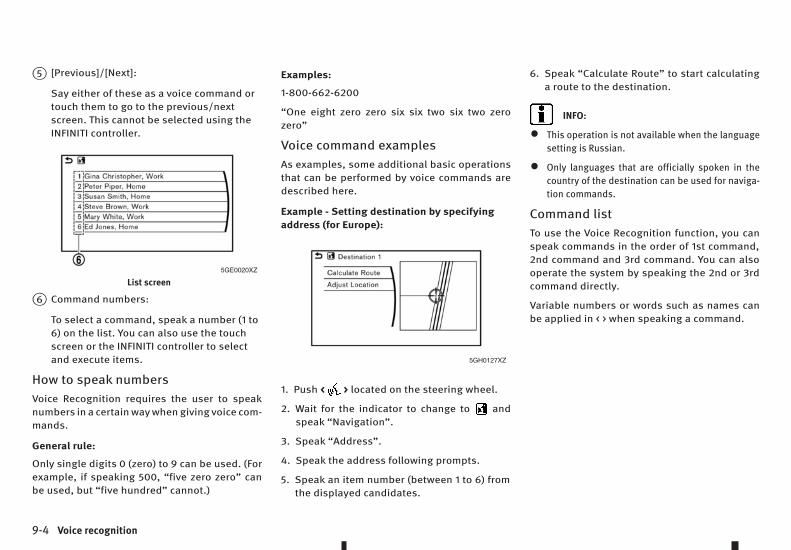
j5 [Previous]/[Next]:
Say either of these as a voice command ortouch them to go to the previous/nextscreen. This cannot be selected using theINFINITI controller.
j6 Command numbers:
To select a command, speak a number (1 to6) on the list. You can also use the touchscreen or the INFINITI controller to selectand execute items.
How to speak numbersVoice Recognition requires the user to speaknumbers in a certain way when giving voice com-mands.
General rule:
Only single digits 0 (zero) to 9 can be used. (Forexample, if speaking 500, “five zero zero” canbe used, but “five hundred” cannot.)
Examples:
1-800-662-6200
“One eight zero zero six six two six two zerozero”
Voice command examplesAs examples, some additional basic operationsthat can be performed by voice commands aredescribed here.
Example - Setting destination by specifyingaddress (for Europe):
1. Push <m > located on the steering wheel.
2. Wait for the indicator to change to m andspeak “Navigation”.
3. Speak “Address”.
4. Speak the address following prompts.
5. Speak an item number (between 1 to 6) fromthe displayed candidates.
6. Speak “Calculate Route” to start calculatinga route to the destination.
INFO:
• This operation is not available when the languagesetting is Russian.
• Only languages that are officially spoken in thecountry of the destination can be used for naviga-tion commands.
Command listTo use the Voice Recognition function, you canspeak commands in the order of 1st command,2nd command and 3rd command. You can alsooperate the system by speaking the 2nd or 3rdcommand directly.
Variable numbers or words such as names canbe applied in < > when speaking a command.
5GE0020XZ
List screen
5GH0127XZ
9-4 Voice recognition

General command
Command ActionShow More Commands Display other commands of the same category.Go back Correct the last recognition result to return to the previous screen.Exit Cancel Voice Recognition.Next Skip to next page.Previous Skip to previous page.
General phone command
Please refer to the vehicle Owner’s Manual
Phone command
Please refer to the vehicle Owner’s Manual
General navigation command (for Europe)
The following commands can be used during the Navigation voice recognition session.
Command ActionCalculate Route Calculate a route.Adjust Location Fine-tune the destination.
Voice recognition 9-5
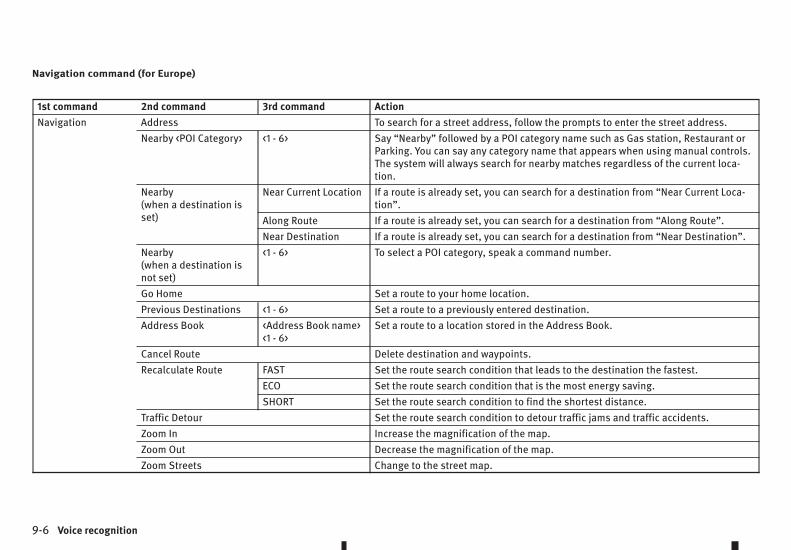
Navigation command (for Europe)
1st command 2nd command 3rd command ActionNavigation Address To search for a street address, follow the prompts to enter the street address.
Nearby <POI Category> <1 - 6> Say “Nearby” followed by a POI category name such as Gas station, Restaurant orParking. You can say any category name that appears when using manual controls.The system will always search for nearby matches regardless of the current loca-tion.
Nearby(when a destination isset)
Near Current Location If a route is already set, you can search for a destination from “Near Current Loca-tion”.
Along Route If a route is already set, you can search for a destination from “Along Route”.Near Destination If a route is already set, you can search for a destination from “Near Destination”.
Nearby(when a destination isnot set)
<1 - 6> To select a POI category, speak a command number.
Go Home Set a route to your home location.Previous Destinations <1 - 6> Set a route to a previously entered destination.Address Book <Address Book name>
<1 - 6>Set a route to a location stored in the Address Book.
Cancel Route Delete destination and waypoints.Recalculate Route FAST Set the route search condition that leads to the destination the fastest.
ECO Set the route search condition that is the most energy saving.SHORT Set the route search condition to find the shortest distance.
Traffic Detour Set the route search condition to detour traffic jams and traffic accidents.Zoom In Increase the magnification of the map.Zoom Out Decrease the magnification of the map.Zoom Streets Change to the street map.
9-6 Voice recognition

1st command 2nd command 3rd command ActionNorth Up Lock the map to make North always point up.Heading Up Lock the vehicle indicator to make it always point up.2D Map Change the current map to 2D map.3D Map Change the current map to 3D map.Show POI Icons Display POI icons on the map.Remove POI Icons Remove POI icons from the map.Repeat Instruction Replay the current navigation guidance.Voice Guidance OFF/Voice Guidance ON Turn the navigation guidance on/off.
INFO:
• Some of the navigation commands are not available depending on the language setting.
• The command “Address” can be used only in the following languages:
Country of Destination Language SettingUnited Kingdom UK EnglishFrance FrenchGermany GermanItaly ItalianSpain SpanishPortugal PortugueseHolland DutchSwitzerland French, Italian, GermanBelgium German, Dutch, French
Voice recognition 9-7

Navigation command (for Hong Kong)
1st command 2nd command 3rd command ActionNavigation Nearby <POI Category> <1 - 6> Say “Nearby” followed by a POI category name such as Gas station, Restaurant or
Parking. You can say any category name that appears when using manual controls.The system will always search for nearby matches regardless of the current loca-tion.
Nearby(when a destination isset)
Near Current Location If a route is already set, you can search for a destination from “Near Current Loca-tion”.
Along Route If a route is already set, you can search for a destination from “Along Route”.Near Destination If a route is already set, you can search for a destination from “Near Destination”.
Nearby(when a destination isnot set)
<1 - 6> To select a POI category, speak a command number.
Go Home Set a route to your home location.Previous Destinations <1 - 6> Set a route to a previously entered destination.Address Book <Address Book name>
<1 - 6>Set a route to a location stored in the Address Book.
Cancel Route Delete the destination and waypoints.Recalculate Route Freeway Preferred Set the route search condition to find the fastest time.
Shortest Distance Set the route search condition to find the shortest distance.Minimize Toll Roads Set the route search condition to find a route with the use of toll roads minimized.
Zoom In Increase the magnification of the map by the number of steps specified.Zoom Out Decrease the magnification of the map by the number of steps specified.Zoom Streets Change to the street map.North Up Lock the map to make North always point up.Heading Up Lock the vehicle indicator to make it always point up.2D Map Change the current map to 2D map.
9-8 Voice recognition
1st command 2nd command 3rd command Action3D Map Change the current map to 3D map.Show POI Icons Display POI icons on the map.Remove POI Icons Remove POI icons from the map.Repeat Instruction Speaks the current navigation guidance.Voice Guidance OFF/Voice Guidance ON Turn the navigation guidance on/off.
Audio command (for Europe)
Please refer to the vehicle Owner’s Manual
Notes on operating audio by voice recognition:
• An audio device connected via Bluetooth® cannotbe operated using the Voice Recognition system.Source change is only available for Bluetooth® Au-dio.
• Song title and Artist name information will be over-written when another iPod/iPhone is connectedafter song titles and artist names in the previouslyconnected iPod/iPhone have been installed.
• If two USB devices are connected at the same time,voice operation will only be available for use withone registered and selected device. When select-ing “YES” in the pop-up screen that displays aftera new USB audio device is connected, the USB au-dio device is registered in the voice recognitionsystem and is selected automatically. One iPodand one USB device can be registered in the sys-tem. If a USB audio device is newly registered, old
data is overwritten. It may take a few moments toregister an audio device. If you want to enable voiceoperation for music stored on a previously regis-tered audio device, select the device you want touse in advance.
“Voice recognition settings” (page9-10)
Even when a device has been previously reg-istered, simply connecting the device will notresult in it being selected automatically.
• The Voice Recognition system may not functionwhen the song information is too long (artistnames, album titles, song titles and playlists, etc.).
Voice recognition 9-9
Information command (for Europe)
1st command 2nd command ActionInformation Where am I? Display information regarding the current location.
Traffic Information Turn the traffic information system on/off.Route Information Display route information.
Information command (for Europe)
1st command 2nd command ActionInformation Route Information Display route information.
VOICE RECOGNITION SETTINGSVoice recognition functions can be set.
1. Push <MENU> and touch [Settings].
2. Touch [Voice Recognition].
3. Touch the item you want to set.
Available settings
• [Minimise Voice Feedback] (for Europe)/[MinimizeVoice Feedback] (for Hong Kong):
Set the Minimise Voice Feedbackfunction ON(short feedback) or OFF (long feedback).
• [Audio Device Setting]:
Select an audio device to be operated viavoice recognition system from the list of de-vices registered to the in-vehicle audio sys-tem. The device with an indicator light illu-minated can be operated with the voice rec-ognition system.
9-10 Voice recognition
10 General informationGeneral information
Current vehicle location..................................... 10-2Display of current vehicle location ................. 10-2What is GPS (Global Positioning System)? ...... 10-2Incorrect display of vehicle position............... 10-3Detailed Map Coverage Areas (MCA) fornavigation system ........................................ 10-5
Route calculation .............................................. 10-5Route guidance................................................. 10-7
Notification of intersection on ordinaryroad ............................................................ 10-7Notification of consecutive intersections onordinary roads ............................................. 10-7
Notification of motorway entrance (wherefitted) .......................................................... 10-7Notification of motorway junction (wherefitted) .......................................................... 10-8Notification of motorway exit (where fitted).... 10-8
Map data.......................................................... 10-9How to handle the map SD card..................... 10-9How to order map data updates..................... 10-9About map data............................................ 10-9End-user terms (for Europe) .......................... 10-11End User Licence Agreement (for HongKong) .......................................................... 10-13
DISPLAY OF CURRENT VEHICLELOCATIONThis navigation system combines the data ob-tained from the vehicle (by gyro sensor) andfrom GPS (Global Positioning System) satellitesto calculate the current location of the vehicle.This position is then displayed throughout routeguidance to a destination.
WHAT IS GPS (GLOBAL POSITIONINGSYSTEM)?GPS is a position detecting system that uses sat-ellites deployed by the U.S. government. Thisnavigation system receives radio signals fromthree or more different satellites that orbit21,000 km (13,049 miles) above the earth inspace, and detects the position of the vehicle byutilising the principle of triangulation.
Positioning adjustmentWhen the system judges that the vehicle posi-tion is not accurate based on the vehicle speedand gyro sensor data calculations, the systemwill automatically adjust the position of the ve-hicle icon using GPS signals.
Receiving signals from GPS satellitesThe reception of GPS signals can be weak, de-pending on the environment. Vehicles in the fol-lowing areas/environments may not receive GPSsignals.
• Inside tunnels or parking garages.
• In areas with numerous tall buildings.
• Under multi-layered highways.
• In areas with numerous tall trees.
NAI0422
NAI0423
NAI0424
NAI0425
CURRENT VEHICLE LOCATION
10-2 General information
• In a canyon.
INFO:
The GPS antenna is located on the instrumentpanel inside the vehicle. Do not place any ob-jects, especially mobile phones or transceivers,on the instrument panel. Because the strengthof the GPS signal is approximately one billionthof that of TV waves, phones and transceivers willaffect or may totally disrupt the signal.
INCORRECT DISPLAY OF VEHICLEPOSITIONThe following cases may affect the display accu-racy of the vehicle’s position or travelling direc-tion. The accuracy will return to normal if thedriving conditions return to normal.
• When there is a similar road nearby.
• When the vehicle is travelling in an areawith a grid pattern road system.
• When the vehicle is passing through alarge Y-shaped intersection/junction.
• When the vehicle is travelling on a continu-ous, slowly curving road.
NAI0713 NAI0426
NAI0427
NAI0428
NAI0429
General information 10-3

• When the vehicle is travelling on a roadwith repeating S-shaped curves.
• When the vehicle is on a loop bridge.
• When the vehicle is on a snow-covered orunpaved road.
• When repeatedly turning left or right, ordriving in zigzags.
• When the vehicle is rotated on a parking lotturntable while the ignition switch is off.
• When driving on a road not displayed onthe map screen or a road that has beenchanged due to additional construction orother reasons.
NAI0430
NAI0431
NAI0432
NAI0433
NAI0434
NAI0435
10-4 General information
• When the GPS positioning accuracy is low.
INFO:
• The vehicle icon may be misaligned when startingthe vehicle just after the READY to drive indicatorlight turns ON.
• The vehicle icon may also be misaligned if differ-ent sized tyres or tyre chains are installed.
• The system has a function that automatically cor-rects the vehicle icon position when it ismisaligned from the actual position.
• Vehicle position correction by GPS or GLONASSmay not function when the vehicle is stopped.
• If the vehicle icon position does not return to nor-mal even after driving for a while, correct the ve-hicle icon position manually.
DETAILED MAP COVERAGE AREAS(MCA) FOR NAVIGATION SYSTEMThis system is designed to assist guidance tothe destination, and it also performs other func-tions as outlined in this manual. However, thesystem must be used safely and properly. Infor-mation concerning road conditions, traffic signsand the availability of services may not alwaysbe up-to-date. The system is not a substitute forsafe, proper and legal driving.
Map data covers select metropolitan areas.
Map data includes two types of areas: “Detailedcoverage areas” providing all detailed road dataand other areas showing “Main roads only”.
INFO:
Detailed map data is not available in many areasand is generally limited to select major metro-politan areas.
• The navigation system does not provide routeguidance for roads displayed in dark green.
• If the destination is set on a dark green road, theenlarged map display will switch to the ordinarymap screen at some point and suggest a route thatis near the destination. The distance and directionto the endpoint of the suggested route will be dis-played in the lower right corner of the screen. Also,at this time, voice guidance will announce, “Theroute to the destination includes roads through in-complete map areas. Voice guidance will not beprovided in these areas.”
When approaching the endpoint of the sug-gested route, voice guidance will announce,“Entering the road with incomplete mapdata. Use the direction arrow and distanceinformation to proceed to your destination.”
To reach the destination, refer to the mapscreen. Always follow actual roads and regu-lations and drive safely.
• The suggested route may not be the shortest, norare other circumstances such as traffic jams con-sidered.
• Because of the inevitable difference in road condi-tions and circumstances between the time you usethis system and the time the information was pro-duced for the map data, there may be discrepan-cies in roads and regulations. In such cases, ac-tual road conditions and regulations take prece-dence over map data information.
NAI0436
ROUTE CALCULATION
General information 10-5

• During route calculation, the map will not scroll,however the vehicle icon will move according tothe actual vehicle’s movement.
• During route calculation, buttons such as <MAP/VOICE> and <MENU> will be disabled.
• In some cases, after the calculation is complete,the calculated route may not be displayed immedi-ately.
• Waypoints that have been passed will be disre-garded by rerouting calculation.
• If you scroll the map while the suggested route isbeing drawn, it may take more time to finish draw-ing.
• If waypoints are set, the system calculates routesbetween waypoints simultaneously, and the fol-lowing may result.
– If one section between waypoints cannotbe calculated, none of the route will bedisplayed.
– The route may require a U-turn close tosome waypoints.
• Route calculation may not be completed in the fol-lowing cases.
– If there is no main road within a range of2.5 km (1.5 miles) from the vehicle, a mes-sage saying so will appear on the screen.Try recalculating when the vehicle iscloser to a main road.
– If there is no main road within a range of2.5 km (1.5 miles) from the destination orwaypoint, a message saying so will ap-pear on the screen. Try setting the loca-tion closer to a main road.
– If the vehicle is too close to the destina-tion or if there are no roads to the desti-nation, a message saying so will appearon the screen.
– If it is impossible to reach the destina-tion or waypoints because of traffic regu-lations, etc.
– If the only route to reach the destinationor waypoints is extremely complicated.
• The following may occur when the route is dis-played.
– If you calculate a route on a main road,the starting point of the route may notexactly match the current vehicle loca-tion.
– The endpoint of the route may not exactlymatch the destination.
– If you calculate a route on a main road,the system may display a route from an-other main road. This may be because theposition of the vehicle icon is not accu-rate. In this case, park the vehicle in asafe location and reset the vehicle icon,or continue driving to see if the position
of the vehicle icon is automatically ad-justed before recalculating the route.
– There are cases in which the systemshows an indirect route to reach the des-tination or waypoints if you set them fromstored or facility information. In order tocorrect this, you must pay attention to thetraffic direction, especially when laneswith different travel directions are shownseparately, such as interchanges andservice areas.
– This system makes no distinctionbetween limited traffic control and totalcontrol (blockage). It may show an indi-rect route even if the road is usable.
– Even if the motorway preference is set toOFF, a route that uses a motorway may besuggested.
– Even if the ferry preference is set to OFF,a route that uses a ferry line may be sug-gested.
10-6 General information
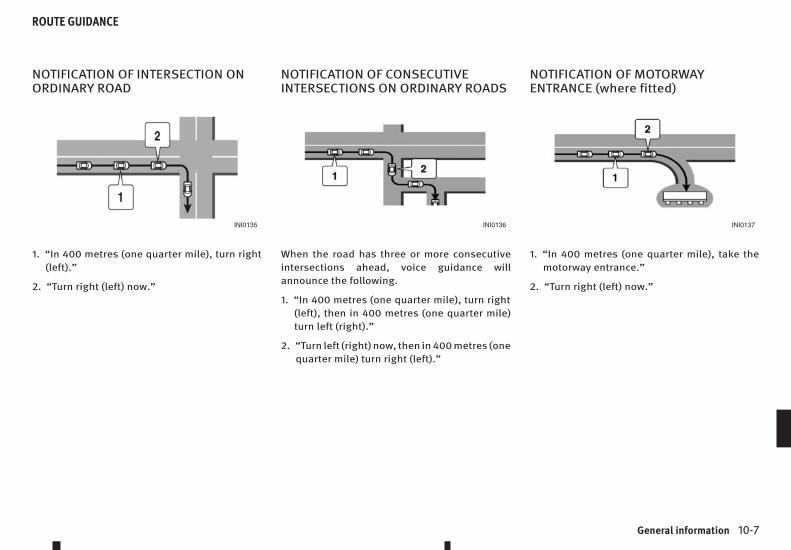
NOTIFICATION OF INTERSECTION ONORDINARY ROAD
1. “In 400 metres (one quarter mile), turn right(left).”
2. “Turn right (left) now.”
NOTIFICATION OF CONSECUTIVEINTERSECTIONS ON ORDINARY ROADS
When the road has three or more consecutiveintersections ahead, voice guidance willannounce the following.
1. “In 400 metres (one quarter mile), turn right(left), then in 400 metres (one quarter mile)turn left (right).”
2. “Turn left (right) now, then in 400 metres (onequarter mile) turn right (left).”
NOTIFICATION OF MOTORWAYENTRANCE (where fitted)
1. “In 400 metres (one quarter mile), take themotorway entrance.”
2. “Turn right (left) now.”
INI0135 INI0136 INI0137
ROUTE GUIDANCE
General information 10-7
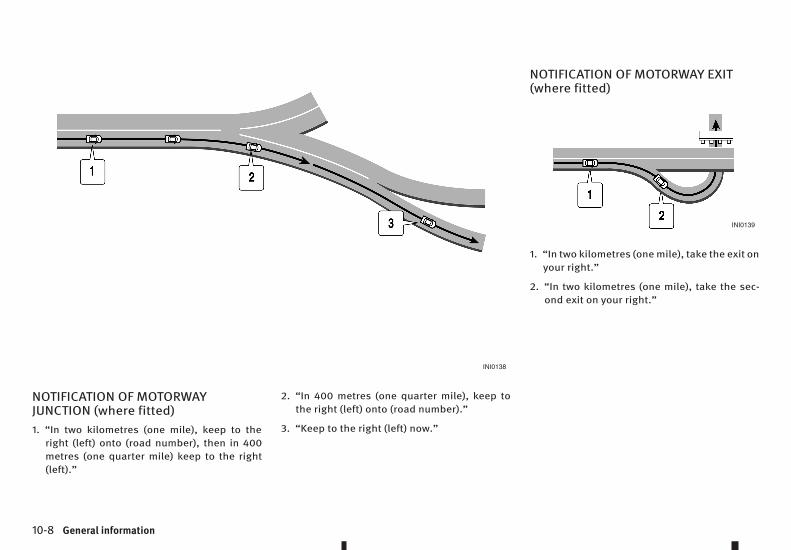
NOTIFICATION OF MOTORWAYJUNCTION (where fitted)1. “In two kilometres (one mile), keep to the
right (left) onto (road number), then in 400metres (one quarter mile) keep to the right(left).”
2. “In 400 metres (one quarter mile), keep tothe right (left) onto (road number).”
3. “Keep to the right (left) now.”
NOTIFICATION OF MOTORWAY EXIT(where fitted)
1. “In two kilometres (one mile), take the exit onyour right.”
2. “In two kilometres (one mile), take the sec-ond exit on your right.”
INI0138
INI0139
10-8 General information
HOW TO HANDLE THE MAP SD CARDAn SD card that includes the map data is in-serted. When handling the map SD card, pleasebe careful and adhere to the following instruc-tions:
• An SD card is inserted in the slot. This is an SDHCcard that is exclusively used for this device. Thiscard includes the map data. The SDHC card is nec-essary to operate the device. Do not remove thiscard except when the map data requires updating.
• Never analyse, modify, delete or format the mapdata. Doing so may cause improper operation ofthe device.
• The SDHC card that is exclusively used for this de-vice will not work properly if it is inserted in an-other device.
• The map data cannot be used even if it is copied toanother SDHC card.
• Do not remove the SDHC card containing map datafrom the system. Using the system with the SDHCcard containing map data removed will preventsome functions from operating.
NOTE:
The SD card slot is located in the console box.
Do not remove the SD card containing map data that isinserted in the slot. When this SD card containing mapdata is removed the navigation system will not oper-ate. If the SD card containing map data is accidentally
removed, after reinserting the SD card containing mapdata into the slot, place the ignition switch in the OFFposition and then place it back in the ON positionagain.
HOW TO ORDER MAP DATA UPDATESTo order updated map data, contact an INFINITICentre or qualified workshop.
ABOUT MAP DATA
For Europe1. This map data has been prepared by CLARION
CO., LTD. (CLARION), under licence from HERE.has added, processed and digitised databased on the digital road map data of HERE..Due to the production timing of the map data,some new roads may not be included in thismap data or some of the names or roads maybe different from those at the time you usethis map data.
2. Traffic control and regulation data used inthis map data may be different from those atthe time you use this map data due to thedata production timing. When driving yourvehicle, follow the actual traffic control signsand notices on the roads.
3. Reproducing or copying this map software isstrictly prohibited by law.
Published by Clarion Co., Ltd. Manufactured byZENRIN CO., LTD.
© 1987- 2015 HERE. All Rights Reserved.
© ZENRIN CO., LTD. 2015. All rights reserved.
WARNING:
• This navigation system should not be used as asubstitute for your own judgment. Any route sug-gestions made by this navigation system maynever override any local traffic regulations, yourown judgment, and/or knowledge of safe drivingpractices.
Disregard route suggestions by the naviga-tion system if such suggestions would:cause you to perform a hazardous or illegalmanoeuvre, place you in a hazardous situa-tion, or route you into an area you considerunsafe.
• The advice provided by the navigation system isto be regarded only as a suggestion(s). There maybe situations where the navigation system dis-plays the vehicle’s location incorrectly, fails tosuggest the shortest course, and/or fails to directyou to your desired destination. In such situa-tions, rely on your own driving judgment, takinginto account the current driving conditions.
• Do not use the navigation system to route you toemergency services. The database does not con-tain a complete listing of the locations of emer-gency service providers such as police, fire sta-
MAP DATA
General information 10-9

tions, hospitals and clinics. Please use your judg-ment and your ability to ask for directions in thesesituations.
• As the driver you solely are responsible for yourdriving safety.
– In order to avoid traffic accidents, do notoperate the system while driving.
– In order to avoid traffic accidents, oper-ate the system only when the vehicle isstopped at a safe place and the parkingbrake is set.
– In order to avoid traffic accidents or traf-fic offences, remember that the actualroad conditions and traffic regulationstake precedence over the informationcontained on the navigation system.
– Accordingly, the Software may containinaccurate or incomplete informationdue the passage of time, changing cir-cumstances, and the nature of thesources used. Please observe the actualtraffic circumstances and regulations atall times while driving.
– In a situation when the actual road con-ditions and traffic regulations differ fromthe information contained on the navi-gation system, abide by the traffic rules.
– The navigation system does not provide,or account for in any way, information re-
garding traffic and road laws; speed re-strictions; road conditions includingroad slope, grade, and/or surface condi-tions; obstruction information includingbridge and tunnel height and width,and/or other prevailing driving and/orroad conditions. Always rely on your owndriving judgment, taking into accountthe current driving conditions.
– Minimise the amount of time spent view-ing the screen while driving.
For Hong Kong1. This map data has been prepared by CLARION
CO., LTD. (CLARION), under licence fromNAVINFO. has added, processed and digitizeddata based on the digital road map data ofNAVINFO. Due to the production timing of themap data, some new roads may not be in-cluded in this map data or some of the namesor roads may be different from those at thetime you use this map data.
2. Traffic control and regulation data used inthis map data may be different from those atthe time you use this map data due to thedata production timing. When driving yourvehicle, follow the actual traffic control signsand notices on the roads.
3. Reproducing or copying this map software isstrictly prohibited by law.
Published by Clarion Co., Ltd. Manufactured byWuhan KOTEI Informatics Co., LTD.
© 2015 NAVINFO CO., LTD. All Rights Reserved.
© Wuhan KOTEI Informatics Co., LTD. 2015. Allrights reserved.
WARNING:
• This navigation system should not be used as asubstitute for your own judgment. Any route sug-gestions made by this navigation system maynever override any local traffic regulations, yourown judgment and/or knowledge of safe drivingpractices.
Disregard route suggestions by the naviga-tion system if such suggestions would:cause you to perform a hazardous or illegalmanoeuvre, place you in a hazardous situa-tion, or route you into an area you considerunsafe.
• The advice provided by the navigation system isto be regarded only as a suggestion(s). There maybe situations where the navigation system dis-plays the vehicle’s location incorrectly, fails tosuggest the shortest course, and/or fails to directyou to your desired destination. In such situa-tions, rely on your own driving judgment, takinginto account the current driving conditions.
• Do not use the navigation system to route you toemergency services. The database does not con-tain a complete listing of the locations of emer-
10-10 General information
gency service providers such as police, fire sta-tions, hospitals and clinics. Please use your judg-ment and your ability to ask for directions in thesesituations.
• As the driver you solely are responsible for yourdriving safety.
– In order to avoid traffic accidents, do notoperate the system while driving.
– In order to avoid traffic accidents, oper-ate the system only when the vehicle isstopped at a safe place and the parkingbrake is set.
– In order to avoid traffic accidents or traf-fic offences, remember that the actualroad conditions and traffic regulationstake precedence over the informationcontained on the navigation system.
– Accordingly, the Software may containinaccurate or incomplete informationdue the passage of time, changing cir-cumstances, and the nature of thesources used. Please observe the actualtraffic circumstances and regulations atall times while driving.
– In a situation when the actual road con-ditions and traffic regulations differ fromthe information contained on the navi-gation system, abide by the traffic rules.
– The navigation system does not provide,or account for in any way, information re-garding traffic and road laws; speed re-strictions; road conditions includingroad slope, grade, and/or surface condi-tions; obstruction information includingbridge and tunnel height and width,and/or other prevailing driving and/orroad conditions. Always rely on your owndriving judgment, taking into accountthe current driving conditions.
– Minimise the amount of time spent view-ing the screen while driving.
Company trademarksThe company trademarks used in this product toidentify locations and business offices are thetrademarks of their respective owners. Their usedoes not represent sponsorship, approval orrecommendation of this product by these com-panies.
END-USER TERMS (for Europe)The data (“Data”) is provided for your personal,internal use only and not for resale. It is pro-tected by copyright, and is subject to the follow-ing terms and conditions which are agreed to byyou, on the one hand, and CLARION CO., LTD.(“CLARION”) and its licensors (including their li-censors and suppliers) on the other hand.
©1987- 2015 HERE. All rights reserved.
© Bundesamt für Eich- und Vermessungswesen
© EuroGeographics
Traffic codes for Belgium are provided by theMinisterie van de Vlaamse Gemeenschap andthe Ministèrie de l’Equipement et desTransports.
source: © IGN 2009 – BD TOPO ®
“Die Grundlagendaten wurden mit Genehmi-gung der zuständigen Behörden entnommen” or“Die Grundlagendaten wurden mit Genehmi-gung der zustaendigen Behoerden entnom-men.”
Contains Ordinance Survey data © Crown copy-right and database right 2010 Contains RoyalMail data © Royal Mail copyright and databaseright 2010 This map data contain public sectorinformation licensed under the Open Govern-ment Licence v1.0.
Copyright Geomatics Ltd.
Copyright © 2003; Top-Map Ltd.
La Banca Dati Italiana è stata prodotta usandoquale riferimento anche cartografia numerica edal tratto prodotta e fornita dalla RegioneToscana.
Copyright © 2000; Norwegian Mapping Author-ity
General information 10-11

Source: IgeoE – Portugal
Información geográfica propiedad del CNIG
Based upon electronic data © National LandSurvey Sweden.
Topografische Grundlage: © Bundesamt fürLandestopographie
Terms and conditionsPersonal Use Only. You agree to use this Datatogether with Nissan Automotive Products forthe solely personal, noncommercial purposesfor which you were licensed, and not for servicebureau, timesharing or other similar purposes.Accordingly, but subject to the restrictions setforth in the following paragraphs, you agree notto otherwise reproduce, copy, modify, decom-pile, disassemble or reverse engineer any por-tion of this Data, and may not transfer or distrib-ute it in any form, for any purpose, except to theextent permitted by mandatory laws. Multi-discsets may only be transferred or sold as a com-plete set as provided by CLARION and not as asubset thereof.
Restrictions. Except where you have been spe-cifically licensed to do so by CLARION, and with-out limiting the preceding paragraph, you maynot (a) use this Data with any products, systems,or applications installed or otherwise connectedto or in communication with vehicles, capable ofvehicle navigation, positioning, dispatch, realtime route guidance, fleet management or simi-
lar applications; or (b) with or in communicationwith any positioning devices or any mobile orwireless-connected electronic or computer de-vices, including without limitation mobilephones, palmtop and handheld computers, pag-ers, and personal digital assistants or PDAs.
Warning. The Data may contain inaccurate or in-complete information due to the passage oftime, changing circumstances, sources usedand the nature of collecting comprehensive geo-graphic data, any of which may lead to incorrectresults.
No Warranty. This Data is provided to you “asis,” and you agree to use it at your own risk.CLARION and its licensors (and their licensorsand suppliers) make no guarantees, represen-tations or warranties of any kind, express or im-plied, arising by law or otherwise, including butnot limited to, content, quality, accuracy, com-pleteness, effectiveness, reliability, fitness fora particular purpose, usefulness, use or resultsto be obtained from this Data, or that the Data orserver will be uninterrupted or error-free.
Disclaimer of Warranty: CLARION AND ITS LICEN-SORS (INCLUDING THEIR LICENSORS AND SUP-PLIERS) DISCLAIM ANY WARRANTIES, EXPRESSOR IMPLIED, OF QUALITY, PERFORMANCE, MER-CHANTABILITY, FITNESS FOR A PARTICULAR PUR-POSE OR NON-INFRINGEMENT. Some States, Ter-
ritories and Countries do not allow certain war-ranty exclusions, so to that extent the aboveexclusion may not apply to you.
Disclaimer of Liability: CLARION AND ITS LICEN-SORS (INCLUDING THEIR LICENSORS AND SUP-PLIERS) SHALL NOT BE LIABLE TO YOU: IN RE-SPECT OF ANY CLAIM, DEMAND OR ACTION, IRRE-SPECTIVE OF THE NATURE OF THE CAUSE OF THECLAIM, DEMAND OR ACTION ALLEGING ANYLOSS, INJURY OR DAMAGES, DIRECT OR INDI-RECT, WHICH MAY RESULT FROM THE USE ORPOSSESSION OF THE INFORMATION; OR FOR ANYLOSS OF PROFIT, REVENUE, CONTRACTS OR SAV-INGS, OR ANY OTHER DIRECT, INDIRECT, INCIDEN-TAL, SPECIAL OR CONSEQUENTIAL DAMAGESARISING OUT OF YOUR USE OF OR INABILITY TOUSE THIS INFORMATION, ANY DEFECT IN THE IN-FORMATION, OR THE BREACH OF THESE TERMSOR CONDITIONS, WHETHER IN AN ACTION INCONTRACT OR TORT OR BASED ON A WARRANTY,EVEN IF CLARION OR ITS LICENSORS HAVE BEENADVISED OF THE POSSIBILITY OF SUCHDAMAGES. Some States, Territories and Coun-tries do not allow certain liability exclusions ordamages limitations, so to that extent the abovemay not apply to you.
Export Control. CLARION shall not export fromanywhere any part of the Data or any direct prod-uct thereof except in compliance with, and withall licenses and approvals required under, ap-plicable export laws, rules and regulations, in-cluding but not limited to the laws, rules and
10-12 General information

regulations administered by the Office of For-eign Assets Control of the U.S. Department ofCommerce and the Bureau of Industry and Secu-rity of the U.S. Department of Commerce. To theextent that any such export laws, rules or regu-lations prohibit NT from complying with any ofits obligations hereunder to deliver or distributeData, such failure shall be excused and shall notconstitute a breach of this Agreement.
Entire Agreement. These terms and conditionsconstitute the entire agreement betweenCLARION (and its licensors, including their licen-sors and suppliers) and you pertaining to thesubject matter hereof, and supersedes in theirentirety any and all written or oral agreementspreviously existing between us with respect tosuch subject matter.
Governing Law. The above terms and conditionsshall be governed by the laws of the State of Illi-nois, without giving effect to (i) its conflict oflaws provisions, or (ii) the United Nations Con-vention for Contracts for the International Saleof Goods, which is explicitly excluded. You agreeto submit to the jurisdiction of The Netherlandsfor any and all disputes, claims and actions aris-ing from or in connection with the Data providedto you hereunder.
Government End Users. If the Data is being ac-quired by or on behalf of the United States gov-ernment or any other entity seeking or applyingrights similar to those customarily claimed by
the United States government, the Data is a“commercial item” as that term is defined at 48C.F.R. (“FAR”) 2.101, is licensed in accordancewith the End-User Terms under which this Datawas provided, and each copy of the Data deliv-ered or otherwise furnished shall be marked andembedded as appropriate with the following“Notice of Use,” and shall be treated in accor-dance with such Notice:
NOTICE OF USE
CONTRACTOR (MANUFACTURER/SUPPLIER)NAME: HERE
CONTRACTOR (MANUFACTURER/SUPPLIER) AD-DRESS: c/o Nokia 425 West Randolph Street,Chicago, Illinois 60606
This Data is a commercial item as defined in FAR2.101 and is subject to the End-User Terms un-der which this Data was provided.
© 1987-2015 HERE – All rights reserved.
If the Contracting Officer, federal governmentagency, or any federal official refuses to use thelegend provided herein, the Contracting Officer,federal government agency, or any federal offi-cial must notify HERE prior to seeking additionalor alternative rights in the Data
END USER LICENCE AGREEMENT (forHong Kong)PLEASE READ THIS END USER LICENCE AGREE-MENT CAREFUL BEFORE USING THE NAVINFO DA-TABASE
NOTICE TO THE USER
THIS IS A LICENCE AGREEMENT - AND NOT ANAGREEMENT FOR SALE - BETWEEN YOU ANDNAVINFO (NAVINFO CO., LTD (HEREINAFTER RE-FERRED TO AS NAVINFO) FOR YOUR COPY OF THENAVINFO NAVIGABLE MAP DATABASE, INCLUD-ING ASSOCIATED COMPUTER SOFTWARE, MEDIAAND EXPLANATORY PRINTED DOCUMENTATIONPUBLISHED BY NAVIFO (JOINTLY “THE DATA-BASE”). BY USING THE DATABASE, YOU ACCEPTAND AGREE TO ALL TERMS AND CONDITIONS OFTHIS END USER LICENCE AGREEMENT (“AGREE-MENT”). IF YOU DO NOT AGREE TO THE TERMSOF THIS AGREEMENT, YOU SHALL PROMPTLY RE-TURN THE DATABASE, ALONG WITH ALL OTHERACCOMPANYING ITEMS, TO YOUR SUPPLIER FORA REFUND.
OWNERSHIP
The Database and the copyrights and intellec-tual property or neighboring rights therein areowned by NAVINFO or its licensors. Ownershipof the media on which the Database is containedis retained by NAVINFO and/or your supplier un-til after you have paid in full any amounts due to
General information 10-13
NAVINFO and/or your supplier pursuant to theagreement under which goods are provided toyou.
LICENCE GRANT
NAVINFO grants you a non-exclusive licence touse the Database for your personal use or, if ap-plicable, for use in your business’s internal op-erations. This licence does not include the rightto grant sub-licenses.
LIMITATIONS ON USE
The Database is restricted for use in the specificsystem for which it was created. You may notextract or reutilize substantial parts of the con-tents of the Database nor reproduce, copy,modify, adapt, translate, disassemble, decom-pile, reverse engineer any portion of the Data-base.
TRANSFER OF LICENCE
You may not transfer the Database to third par-ties, except when installed in the system forwhich it was created or when you do not retainany copy of the Database, and provided that thetransferee agrees to all terms and conditions ofthis Agreement and confirms this in writing toNAVINFO. Multi-disc sets may only betransferred or sold as a complete set as providedby NAVINFO and not as subset thereof.
LIMITED WARRANTY
NAVINFO warrants that, subject to the warningsset out below, for a period of 12 months afteracquisition of your copy of the Database, it willperform substantially in accordance with NAVIN-FO’s Criteria for Accuracy and Completeness ex-isting on the date you acquired the Database;these criteria are available from NAVINFO at yourrequest. If the Database does not perform in ac-cordance with this limited warranty, NAVINFOwill use reasonable efforts to repair or replaceyour non-conforming copy of the Database. Ifthese efforts do not lead to performance of theDatabase in accordance with the warranties setout herein, you will have the option to eitherreceive a reasonable refund of the price you paidfor the Database or to rescind this Agreement.This shall be NAVINFO’s entire liability and yoursole remedy against NAVINFO. Except asexpressly provided in this section, NAVINFOdoes not warrant nor make any representationsregarding the use of results of the use of theDatabase in terms of its correctness, accuracy,reliability, or otherwise. NAVINFO does not war-rant that the Database is or will be error free. Nooral or written information or advice provided byNAVINFO, your supplier or any other person shallcreate a warranty or in any way increase thescope of the limited warranty described above.The limited warranty set forth in this Agreement
does not affect or prejudice any statutory legalrights that you may have under the legal war-ranty against hidden defects.
If you did not acquire the Database fromNAVINFO directly, you may have statutory rightsagainst the person from whom you haveacquired the Database in addition to the rightsgranted by NAVINFO hereunder according to thelaw of your jurisdiction. The above warranty ofNAVINFO shall not affect such statutory rightsand you may assert such rights in addition tothe warranty rights granted herein.
LIMITATION OF LIABILITY
The price of the Database does not include anyconsideration for assumption of risk of conse-quential, indirect or unlimited direct damageswhich may arise in connection with your use ofthe Database. Accordingly, in no event shallNAVINFO be liable for any consequential or indi-rect damages, including without limitation, lossof revenue, data, or use, incurred by you or anythird party arising out of your use of the Data-base, whether in an action in contract or tort orbased on a warranty, even if NAVINFO has beenadvised of the possibility of such damages. Inany event NAVINFO’s liability for direct damagesis limited to the price of your copy of the Data-base.
10-14 General information
THE LIMITED WARRANTY AND LIMITATION OF LI-ABILITY, SET FORTH IN THIS AGREEMENT, DONOT AFFECT OR PREJUDICE YOUR STATUTORYRIGHTS WHERE YOU HAVE ACQUIRED THE DATA-BASE OTHERWISE THAN IN THE COURSE OF ABUSINESS.
WARNINGS
The Database may contain inaccurate or incom-plete information due to the passage of time,changing circumstances, sources used and thenature of collecting comprehensive geographicdata, any of which may lead to incorrect results.The Database does not include or reflect infor-mation on - inter alia - neighborhood safety; lawenforcement; emergency assistance; construc-tion work; road or lane closures; vehicle orspeed restrictions; road slope or grade; bridgeheight, weight or other limits; road or trafficconditions; special events; traffic congestion; ortravel time.
GOVERNING LAW
This Agreement shall be governed by the laws ofthe People’s Republic of China, without givingeffect to (i) its conflict of laws provisions, or (ii)the United Nations Convention for Contracts forthe International Sale of Goods, which is explic-itly excluded. You agree to submit to the juris-diction of China for any and all disputes, claimsand actions arising from or in connection withthe Data provided to you hereunder.
General information 10-15

MEMO
10-16 General information
11 Troubleshooting guideTroubleshooting guide
System unit ...................................................... 11-2Liquid crystal display.................................... 11-2
Navigation........................................................ 11-3Basic operations .......................................... 11-3Navigation display ....................................... 11-4
Route calculation and visual guidance ........... 11-6Voice guidance............................................. 11-8Traffic information (for Europe)...................... 11-9
Voice recognition .............................................. 11-10
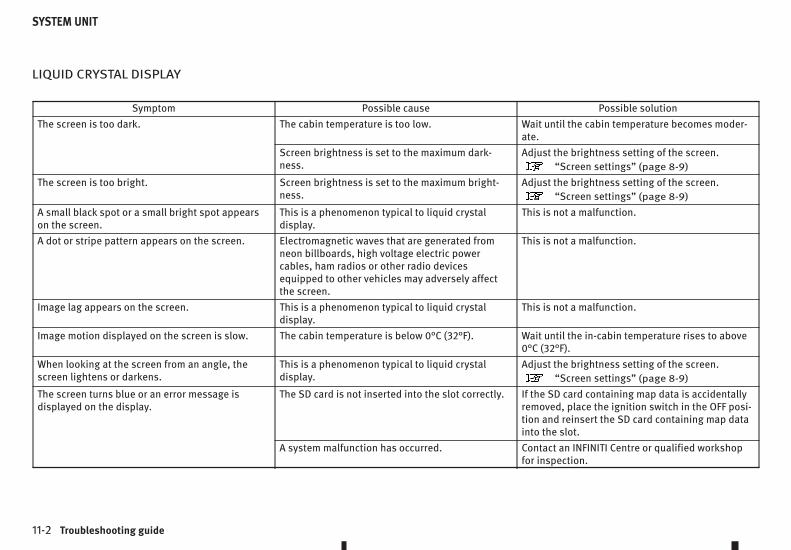
LIQUID CRYSTAL DISPLAY
Symptom Possible cause Possible solutionThe screen is too dark. The cabin temperature is too low. Wait until the cabin temperature becomes moder-
ate.Screen brightness is set to the maximum dark-ness.
Adjust the brightness setting of the screen.“Screen settings” (page 8-9)
The screen is too bright. Screen brightness is set to the maximum bright-ness.
Adjust the brightness setting of the screen.“Screen settings” (page 8-9)
A small black spot or a small bright spot appearson the screen.
This is a phenomenon typical to liquid crystaldisplay.
This is not a malfunction.
A dot or stripe pattern appears on the screen. Electromagnetic waves that are generated fromneon billboards, high voltage electric powercables, ham radios or other radio devicesequipped to other vehicles may adversely affectthe screen.
This is not a malfunction.
Image lag appears on the screen. This is a phenomenon typical to liquid crystaldisplay.
This is not a malfunction.
Image motion displayed on the screen is slow. The cabin temperature is below 0°C (32°F). Wait until the in-cabin temperature rises to above0°C (32°F).
When looking at the screen from an angle, thescreen lightens or darkens.
This is a phenomenon typical to liquid crystaldisplay.
Adjust the brightness setting of the screen.“Screen settings” (page 8-9)
The screen turns blue or an error message isdisplayed on the display.
The SD card is not inserted into the slot correctly. If the SD card containing map data is accidentallyremoved, place the ignition switch in the OFF posi-tion and reinsert the SD card containing map datainto the slot.
A system malfunction has occurred. Contact an INFINITI Centre or qualified workshopfor inspection.
SYSTEM UNIT
11-2 Troubleshooting guide

BASIC OPERATIONS
Symptom Possible cause Possible solutionNo image is displayed. The brightness is at the lowest setting. Adjust the brightness of the display.
“Screen settings” (page 8-9)
The display is turned off. Push and hold <CAMERAm /m > or <m > toturn on the display.
No voice guidance is available.The volume is too high or too low.
The volume is not correctly set or the sound isturned off.
Adjust the volume of voice guidance.
Voice guidance is not provided for certain streets(roads displayed in grey).
This is not a malfunction.
The map does not appear on the screen. A screen other than the map screen is displayed. Push <MAP/VOICE>.The screen is too dim. The movement is slow. The temperature in the interior of the vehicle is
low.Wait until the interior of the vehicle warms up.
Some pixels in the display are darker or brighterthan others.
This condition is an inherent characteristic ofliquid crystal display.
This is not a malfunction.
Some menu items cannot be selected. Some menu items become unavailable while driv-ing.
Park the vehicle in a safe location, and then oper-ate the navigation system.
NAVIGATION
Troubleshooting guide 11-3

NAVIGATION DISPLAY
Symptom Possible cause Possible solutionNames of roads and locations in Plan Viewand Birdview™ do not match.
The quantity of the displayed information is reduced so thatthe screen does not become too cluttered. There is also achance that the names of the roads or locations may bedisplayed multiple times, and the names appearing on thescreen may be different because of a processing procedure.
This is not a malfunction.
The vehicle icon is not displayed in thecorrect position.
The vehicle was transported, for example by a ferry or vehicletransporter, after the power switch was turned off.
Drive the vehicle for a period of time on a roadwhere GPS signals can be received.
The position and direction of the vehicle icon may be incor-rect depending on the driving environment and the level ofpositioning accuracy of the navigation system.
This is not a malfunction. Drive the vehicle for aperiod of time to automatically correct the posi-tion and direction of the vehicle icon.
“Current vehicle location” (page 10-2)
When the vehicle is travelling on a newroad, the vehicle icon is located onanother road nearby.
Because the new road is not stored in the map data, thesystem automatically places the vehicle icon on the nearestroad available.
Update the navigation system with new mapdata.
The screen does not switch to the nightscreen even after the headlights areturned on.
The daytime screen was set the last time the headlights wereturned on.
Set the screen to the night screen mode using
<CAMERAm /m > or <m > when theheadlights are turned on.
“Screen settings” (page 8-9)
The map does not scroll even when thevehicle is moving.
The current location map screen is not displayed. Push <MAP/VOICE>.
The vehicle icon is not displayed. The current location map screen is not displayed. Push <MAP/VOICE>.
11-4 Troubleshooting guide

Symptom Possible cause Possible solutionThe location of the vehicle icon ismisaligned from the actual position.
The speed sensor may not be able to calculate correct vehiclelocation when tyre chains are used or the tyres have beenreplaced.
Drive the vehicle (at approximately 30 km/h (19MPH) for about 30 minutes) without tyre chainsto automatically correct the vehicle icon posi-tion.If this does not correct the vehicle icon position,contact your INFINITI Centre or qualifiedworkshop.
The map data is out of date. Update the navigation system with new mapdata.
Troubleshooting guide 11-5
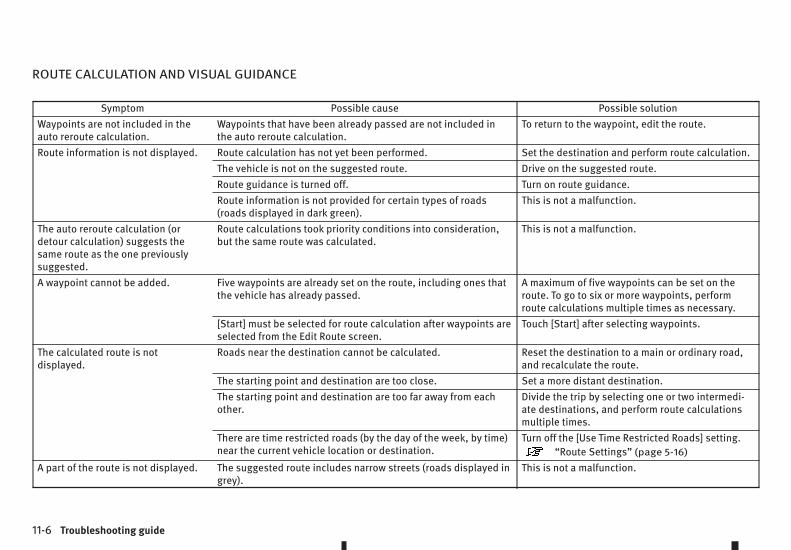
ROUTE CALCULATION AND VISUAL GUIDANCE
Symptom Possible cause Possible solutionWaypoints are not included in theauto reroute calculation.
Waypoints that have been already passed are not included inthe auto reroute calculation.
To return to the waypoint, edit the route.
Route information is not displayed. Route calculation has not yet been performed. Set the destination and perform route calculation.The vehicle is not on the suggested route. Drive on the suggested route.Route guidance is turned off. Turn on route guidance.Route information is not provided for certain types of roads(roads displayed in dark green).
This is not a malfunction.
The auto reroute calculation (ordetour calculation) suggests thesame route as the one previouslysuggested.
Route calculations took priority conditions into consideration,but the same route was calculated.
This is not a malfunction.
A waypoint cannot be added. Five waypoints are already set on the route, including ones thatthe vehicle has already passed.
A maximum of five waypoints can be set on theroute. To go to six or more waypoints, performroute calculations multiple times as necessary.
[Start] must be selected for route calculation after waypoints areselected from the Edit Route screen.
Touch [Start] after selecting waypoints.
The calculated route is notdisplayed.
Roads near the destination cannot be calculated. Reset the destination to a main or ordinary road,and recalculate the route.
The starting point and destination are too close. Set a more distant destination.The starting point and destination are too far away from eachother.
Divide the trip by selecting one or two intermedi-ate destinations, and perform route calculationsmultiple times.
There are time restricted roads (by the day of the week, by time)near the current vehicle location or destination.
Turn off the [Use Time Restricted Roads] setting.“Route Settings” (page 5-16)
A part of the route is not displayed. The suggested route includes narrow streets (roads displayed ingrey).
This is not a malfunction.
11-6 Troubleshooting guide
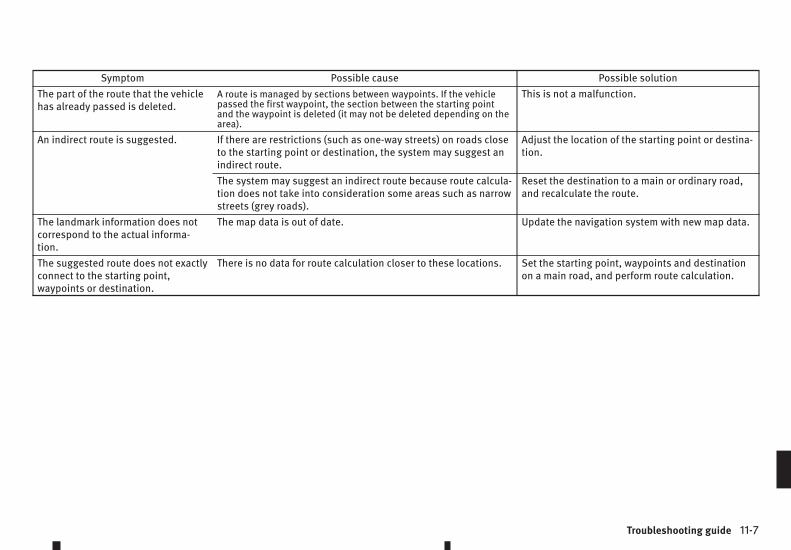
Symptom Possible cause Possible solutionThe part of the route that the vehiclehas already passed is deleted.
A route is managed by sections between waypoints. If the vehiclepassed the first waypoint, the section between the starting pointand the waypoint is deleted (it may not be deleted depending on thearea).
This is not a malfunction.
An indirect route is suggested. If there are restrictions (such as one-way streets) on roads closeto the starting point or destination, the system may suggest anindirect route.
Adjust the location of the starting point or destina-tion.
The system may suggest an indirect route because route calcula-tion does not take into consideration some areas such as narrowstreets (grey roads).
Reset the destination to a main or ordinary road,and recalculate the route.
The landmark information does notcorrespond to the actual informa-tion.
The map data is out of date. Update the navigation system with new map data.
The suggested route does not exactlyconnect to the starting point,waypoints or destination.
There is no data for route calculation closer to these locations. Set the starting point, waypoints and destinationon a main road, and perform route calculation.
Troubleshooting guide 11-7

VOICE GUIDANCE
Symptom Possible cause Possible solutionVoice guidance is not available. Voice guidance is only available at certain intersections marked with
m . In some cases, voice guidance is not available even when thevehicle makes a turn.
This is not a malfunction.
The vehicle has deviated from the suggested route. Go back to the suggested route or recalculatethe route.
Voice guidance is turned off. Turn on voice guidance.Route guidance is turned off. Turn on route guidance.
The guidance content does notcorrespond to the actual roadconditions.
The content of voice guidance may vary, depending on the types ofintersections at which turns are made.
Follow all traffic rules and regulations.
11-8 Troubleshooting guide
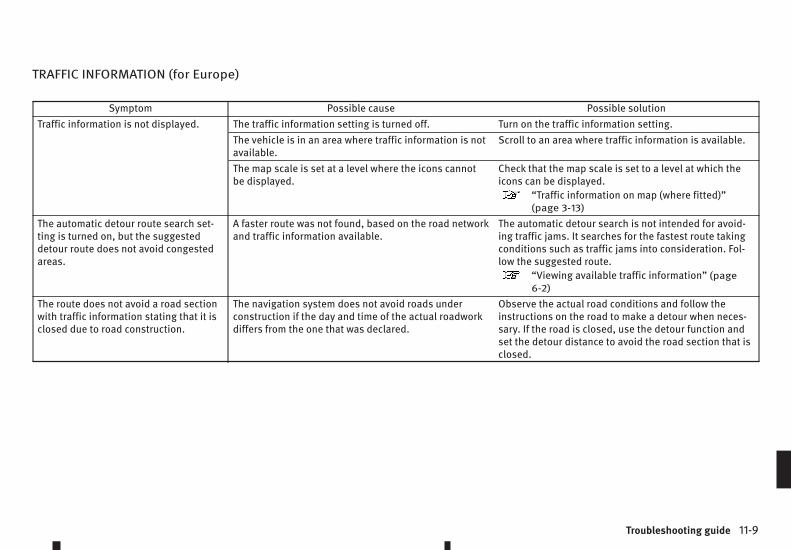
TRAFFIC INFORMATION (for Europe)
Symptom Possible cause Possible solutionTraffic information is not displayed. The traffic information setting is turned off. Turn on the traffic information setting.
The vehicle is in an area where traffic information is notavailable.
Scroll to an area where traffic information is available.
The map scale is set at a level where the icons cannotbe displayed.
Check that the map scale is set to a level at which theicons can be displayed.
“Traffic information on map (where fitted)”(page 3-13)
The automatic detour route search set-ting is turned on, but the suggesteddetour route does not avoid congestedareas.
A faster route was not found, based on the road networkand traffic information available.
The automatic detour search is not intended for avoid-ing traffic jams. It searches for the fastest route takingconditions such as traffic jams into consideration. Fol-low the suggested route.
“Viewing available traffic information” (page6-2)
The route does not avoid a road sectionwith traffic information stating that it isclosed due to road construction.
The navigation system does not avoid roads underconstruction if the day and time of the actual roadworkdiffers from the one that was declared.
Observe the actual road conditions and follow theinstructions on the road to make a detour when neces-sary. If the road is closed, use the detour function andset the detour distance to avoid the road section that isclosed.
Troubleshooting guide 11-9
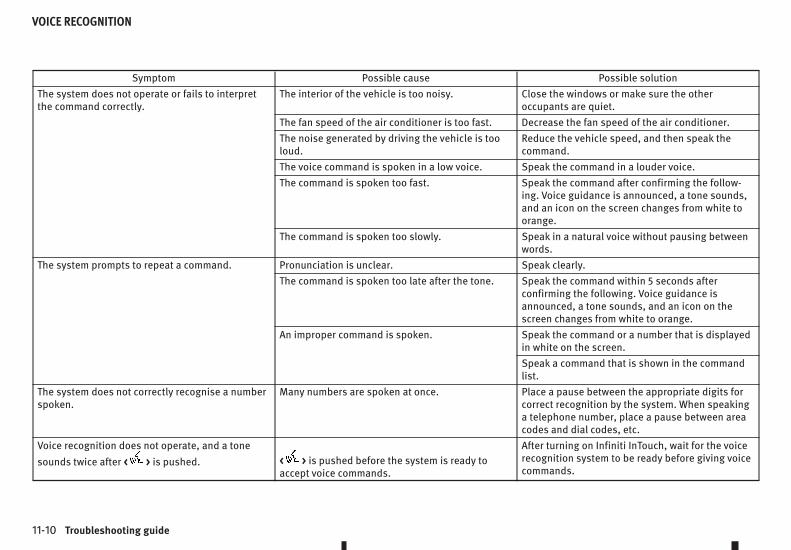
Symptom Possible cause Possible solutionThe system does not operate or fails to interpretthe command correctly.
The interior of the vehicle is too noisy. Close the windows or make sure the otheroccupants are quiet.
The fan speed of the air conditioner is too fast. Decrease the fan speed of the air conditioner.The noise generated by driving the vehicle is tooloud.
Reduce the vehicle speed, and then speak thecommand.
The voice command is spoken in a low voice. Speak the command in a louder voice.The command is spoken too fast. Speak the command after confirming the follow-
ing. Voice guidance is announced, a tone sounds,and an icon on the screen changes from white toorange.
The command is spoken too slowly. Speak in a natural voice without pausing betweenwords.
The system prompts to repeat a command. Pronunciation is unclear. Speak clearly.The command is spoken too late after the tone. Speak the command within 5 seconds after
confirming the following. Voice guidance isannounced, a tone sounds, and an icon on thescreen changes from white to orange.
An improper command is spoken. Speak the command or a number that is displayedin white on the screen.Speak a command that is shown in the commandlist.
The system does not correctly recognise a numberspoken.
Many numbers are spoken at once. Place a pause between the appropriate digits forcorrect recognition by the system. When speakinga telephone number, place a pause between areacodes and dial codes, etc.
Voice recognition does not operate, and a tonesounds twice after <m > is pushed. <m > is pushed before the system is ready to
accept voice commands.
After turning on Infiniti InTouch, wait for the voicerecognition system to be ready before giving voicecommands.
VOICE RECOGNITION
11-10 Troubleshooting guide

MEMO
Troubleshooting guide 11-11
12 IndexIndexB
Basic operations– Troubleshooting ............................................. 11-3Birdview– 3D .................................................................. 3-4Building graphics ................................................. 3-4
C
Cancelling route .................................................... 5-5Changing– Region ............................................................ 4-2Characters– Chinese ........................................................ 2-10– Input ............................................................. 2-10Chinese .............................................................. 2-10City centre .......................................................... 4-12Clock– Settings ......................................................... 8-6Command list ....................................................... 9-4Control buttons and functions ................................ 2-2Controller operation .............................................. 3-7Current vehicle location ....................................... 10-2Customer assistance ............................................. 1-4
D
Deleting stored item ............................................ 7-12Destination– Setting menu .................................................. 4-4
Detour route– Traffic information based ................................. 5-9Display– Current vehicle location ................................... 3-5– Information on map ....................................... 3-12– View bar ......................................................... 2-8
E
Editing– Route ............................................................. 5-6– Stored information .......................................... 7-6
F
Finding– Address .......................................................... 4-6– Nearby place ................................................... 4-9
G
Giving voice commands ......................................... 9-2GPS (Global Positioning System) .......................... 10-2Guidance– Route .............................................................. 5-2– Screen settings ............................................... 5-4– Settings ......................................................... 5-11
H
Home as destination ............................................. 4-9How to handle– Display ........................................................... 2-2– The map SD card ............................................ 10-9
I
INFINITI– Controller ....................................................... 2-2– Voice Recognition system ................................ 9-2Information– System .......................................................... 2-11Information menu ................................................. 8-2
J
Junction .............................................................. 4-11
L
Language settings ................................................ 8-7Laser product ........................................................ 1-3Letters– Input ............................................................. 2-10
M
Map– data .............................................................. 10-9– Operation ....................................................... 3-2
– Orientation ..................................................... 3-8– Traffic information .......................................... 3-13– Types .............................................................. 3-2– View - Settings .............................................. 3-10– View (2D) ........................................................ 3-2– View (3D) ................................................. 3-4, 3-6Motorway entrance/exit ....................................... 4-11Moving map .......................................................... 3-5
N
Navigation ........................................................... 11-3– Settings ........................................................ 8-10– Troubleshooting ............................................. 11-4Navigation system status screen ............................ 2-6Numbers– Input ............................................................. 2-10
O
Orientation (Map) ................................................. 3-8
P
Pinyin ................................................................. 2-10Point on map ....................................................... 4-13Procedures after setting route .............................. 4-13
R
RDS-TMC feature ................................................... 6-2Recalculating route ............................................... 5-9Region– Changing ........................................................ 4-2
Route– Calculation .................................................... 10-5– Guidance ................................................ 10-7, 5-2– Guidance -Settings ......................................... 5-11– Menu .............................................................. 5-6– Troubleshooting ............................................. 11-6
S
Safety– Information ..................................................... 1-3Scale (Map) .......................................................... 3-6Screen– Settings ......................................................... 8-9Searching– Detour route ........................................... 5-10, 5-9– Previous destinations .................................... 4-10– Stored locations ............................................ 4-10Setting– City centre ..................................................... 4-12– Home as destination ....................................... 4-9– Junction ......................................................... 4-11– Motorway entrance/exit ................................. 4-11– Point on map ................................................. 4-13– Stored routes ................................................ 4-12Settings– Language ........................................................ 8-7– Navigation .................................................... 8-10– Screen ............................................................ 8-9– Volume ........................................................... 8-8Shortcut menu ...................................................... 2-7Split screen ................................................... 2-8, 3-9
Steering wheel– Switches ......................................................... 2-4Stored routes ...................................................... 4-12Storing– Avoid area ....................................................... 7-4– Location .......................................................... 7-2– Route .............................................................. 7-3System– Information ................................................... 2-11System unit ......................................................... 11-2
T
Touch panel .......................................................... 2-4– Operation ....................................................... 3-6Traffic information .......................................... 6-2, 6-3– Map ............................................................... 6-4– Settings ......................................................... 6-4– Troubleshooting ............................................. 11-9Transferring information– Address Book ................................................ 7-13Troubleshooting– Navigation ..................................................... 11-3– System unit ................................................... 11-2– Voice recognition .......................................... 11-10
V
Voice guidance– Troubleshooting ............................................. 11-8Voice recognition ............................................... 11-10– Settings ........................................................ 9-10Volume– Settings ......................................................... 8-8
12-2 Index


Printing
:Octob
er2015/Pu
blicationNum
ber:N
M15E-ITSDE0
E/Printedin
Fran
ce
NM15E-ITSDE0E