Embed Size (px)
Citation preview

InterstageBusiness Process ManagerV11.0
Server and ConsoleInstallation Guide(BEA WebLogic Server)
J2U3-0060-02ENZ0(00)March 2010

March 2010Publication Date
3Revision
Interstage is a trademark of Fujitsu Limited.ARIS is a registered trademark of IDS Scheer AG,Saarbruecken.Microsoft, Windows, Windows NT, and Windows Server areregistered trademarks of Microsoft Corporation in the UnitedStates and other countries.UNIX is a registered trademark of the Open Group in theUnited States and in other countries.Java, all Java-based trademarks and Solaris are trademarksof Sun Microsystems, Inc. in the U.S. or other countries.AIX is a trademark of IBM Corp.Linux is a registered trademark of Linus Torvalds in the USAand other countries.Red Hat, the Red Hat "Shadow Man" logo, RPM, MaximumRPM, the RPM logo, Linux Library, PowerTools, LinuxUndercover, RHmember, RHmember More, Rough Cuts,Rawhide and all Red Hat-based trademarks and logos aretrademarks or registered trademarks of Red Hat, Inc. in theUnited States and other countries.All other trademarks and trade names mentioned have beenregistered by their respective manufacturer.
Trademarks
All rights reserved, including those of translation into otherlanguages. No part of this manual may be reproduced inany form whatsoever by means of photocopying, microfilmingor any other process without the written permission of FujitsuLimited.
All Rights Reserved,Copyright © FUJITSULIMITED 2005-2010
High Risk Activity
The Customer acknowledges and agrees that the Product is designed, developed andmanufactured as contemplated for general use, including without limitation, general officeuse, personal use, household use, and ordinary industrial use, but is not designed,developed and manufactured as contemplated for use accompanying fatal risks or dangersthat, unless extremely high safety is secured, could lead directly to death, personal injury,severe physical damage or other loss (hereinafter "High Safety Required Use"), includingwithout limitation, nuclear reaction control in nuclear facility, aircraft flight control, air trafficcontrol, mass transport control, medical life support system, missile launch control inweapon system. The Customer shall not use the Product without securing the sufficientsafety required for the High Safety Required Use. In addition, Fujitsu (or other affiliate'sname) shall not be liable against the Customer and/or any third party for any claims ordamages arising in connection with the High Safety Required Use of the Product.

Table of ContentsAbout this Manual............................................................................8
1 System Configurations for Interstage BPM Server.....................12
1.1 Minimum Configuration: All Systems on the same Computer........................12
1.2 Database on Remote Computer..........................................................................13
2 System Configurations for Interstage BPM Console..................14
2.1 Minimum Configuration: All Systems on the same Computer........................14
3 System Requirements for Interstage BPM Server and Console.15
3.1 Hardware Requirements for Interstage BPM Server and Console..................15
3.2 Minimum Software Requirements for Server and Console..............................16
3.3 Hardware Requirements for Browser.................................................................16
3.4 Minimum Software Requirements for Web Browser Clients...........................16
4 Overview of Integrated Deployment of Interstage BPMServer andConsole...........................................................................................17
5 Preparing for Installation and Deployment of Interstage BPMServer and Console........................................................................18
5.1 Database Server Preparation..............................................................................185.1.1 Configuring Microsoft® SQL Server.......................................................................185.1.2 Configuring Oracle.................................................................................................195.1.3 Starting the Database Server.................................................................................20
5.2 Configuring WebLogic 9.2...................................................................................21
5.3 Starting WebLogic Administration Server.........................................................22
6 Installing and Deploying Interstage BPMServer with Console, ORonly the Interstage BPM Server....................................................23
6.1 Installation and Deployment Worksheet............................................................23
6.2 Permissions Required for Installation and Deployment..................................29
6.3 Overview of the Installation and Deployment Procedure.................................29
6.4 Installing Interstage BPM....................................................................................31
Interstage BPM Server and Console Installation Guide (BEA WebLogic Server) 3
Table of Contents

6.5 Starting the Deployment Tool.............................................................................38
6.6 Configuring the Remote Database.....................................................................39
6.7 Deploying Server Instances with Console, OR only Server Instances...........406.7.1 Operation Mode and Application Server Selection................................................416.7.2 WebLogic Application Server Settings...................................................................426.7.3 Interstage BPM Console Settings..........................................................................446.7.4 Database Selection................................................................................................456.7.5 Microsoft SQL Server Settings...............................................................................456.7.6 Oracle Settings.......................................................................................................476.7.7 Super User and Multitenancy Settings...................................................................506.7.8 User and Group Management................................................................................516.7.9 Sun Java System Directory Settings......................................................................526.7.10 Active Directory Settings........................................................................................536.7.11 Other Settings........................................................................................................546.7.12 Starting the Deployment.........................................................................................56
6.8 Password Protection............................................................................................56
6.9 User Accounts and Groups.................................................................................56
6.10 Configuring WebLogic's Embedded LDAP Server...........................................57
6.11 Switching on Java Security.................................................................................58
6.12 Starting Interstage BPM Server..........................................................................59
6.13 Starting Interstage BPM Console and Tenant Management Console.............60
7 Deploying only the Interstage BPM Console...............................62
7.1 Preparing for Console Deployment....................................................................627.1.1 Creating a WebLogic Domain for Interstage BPM Console...................................627.1.2 Starting WebLogic Administration Server..............................................................62
7.2 Permissions Required for Deployment..............................................................62
7.3 Overview of Installation and Deployment of Interstage BPM Console...........62
7.4 Deploying Interstage BPM Console Using the Deployment Tool....................63
7.5 Starting Interstage BPM Console.......................................................................65
7.6 Interstage BPM Console - Other Configurations..............................................657.6.1 Configuring Interstage BPM Console to work with Interstage Analytics................657.6.2 UTF-8 Character Support.......................................................................................667.6.3 Using Wf-XML-Based Functions............................................................................66
Interstage BPM Server and Console Installation Guide (BEA WebLogic Server) 4
Table of Contents

7.6.4 Special WebLogic Server Configurations to Enable Web Service Operations......667.6.5 Configuring WebLogic's Embedded LDAP Server.................................................677.6.6 Configuring the SOAP Listener..............................................................................67
8 Undeploying and Uninstalling Interstage BPM Server andConsole...........................................................................................69
8.1 Undeploying Interstage BPM Server and Console from the ApplicationServer....................................................................................................................69
8.2 Uninstalling Interstage BPM...............................................................................72
9 Upgrading Interstage BPM from Previous Versions...................75
9.1 Upgrading from Previous Versions of Interstage BPM....................................75
9.2 Migrating Application Resources from Previous Versions to Interstage BPMv11.0.......................................................................................................................76
9.3 Migrating Application Owners from Previous Versions to Interstage BPMv11.0.......................................................................................................................78
9.4 Migrating WebDAV Repository and UDDI Registry from Previous Versions toInterstage BPM v11.0 ..........................................................................................78
9.5 Additional Steps for Handling Pre-11.0 Console URLs....................................789.5.1 Steps to Overcome the URL-incompatibility Problem............................................79
10 Setting Up a Directory Service......................................................82
10.1 Setting Up Microsoft® Active Directory.............................................................8210.1.1 Importing the IBPMADAdd.ldif File.........................................................................8210.1.2 Using Existing Active Directory Users and Groups................................................8310.1.3 Adding New Users with an LDIF File.....................................................................8310.1.4 Adding New Users Using the GUI..........................................................................8410.1.5 Adding New Groups with an LDIF File...................................................................8710.1.6 Adding New Groups Using the GUI.......................................................................8810.1.7 Adding Members to a Group Using LDIF...............................................................8910.1.8 Adding Members to a Group Using the GUI..........................................................89
10.2 Setting Up Sun Java System Directory Server .................................................9210.2.1 Starting the Sun Java System Directory Server.....................................................9310.2.2 Importing the IBPMLDAPAdd.ldif File.....................................................................9310.2.3 Using Existing Sun Java System Directory Server Users and Groups..................9310.2.4 Adding New Sun Java System Directory Server Users.........................................9410.2.5 Adding New Groups...............................................................................................94
10.3 Group Caching.....................................................................................................95
Interstage BPM Server and Console Installation Guide (BEA WebLogic Server) 5
Table of Contents

10.4 User Attribute Caching........................................................................................95
10.5 Changing Username and Password of Tenant Owner .....................................96
AppendixA Security...........................................................................................97
A.1 Interstage BPM Operation Model........................................................................97
A.2 Password Encryption...........................................................................................98
A.3 Using Demo Mode and Security Mode.............................................................100
A.4 Configuring SMTP Authentication for Use with Interstage BPM...................101
A.5 Using the Configuration Export and Import Scripts.......................................101
AppendixB Silent Mode Installation...............................................................105
B.1 Setting Up a Silent Mode Installation of Interstage BPM...............................105
B.2 Installing Interstage BPM in Silent Mode.........................................................106
B.3 Silent Mode Installation Options......................................................................107
AppendixC Silent Mode Deployment..............................................................109
C.1 Setting Up Silent Mode Operation....................................................................109
C.2 Running Silent Mode Operations.....................................................................109
C.3 Silent Mode Deployment Options.....................................................................110
AppendixD Running Interstage Business Process Manager in SolarisContainers.....................................................................................117
Appendix E Clustering, Load Balancing, and Failover.................................120
E.1 Setting Up an Interstage BPM Cluster on WebLogic Application Server 9.2.120E.1.1 Preparing the Cluster...........................................................................................121E.1.2 Configuring Environment Variables......................................................................122E.1.3 Configuring the Cluster........................................................................................123E.1.4 Configuring the Shared Resource Root...............................................................125E.1.5 Updating the Interstage BPM Server Configuration Files....................................127E.1.6 Updating the Interstage BPM Client Configuration..............................................129E.1.7 Updating Environment Variables and Server Startup Scripts...............................129E.1.8 Importing the Interstage BPM Server Configuration Files....................................131E.1.9 Starting the Cluster...............................................................................................131E.1.10 Implementing Failover..........................................................................................132E.1.11 Running Two Cluster Servers on the Same Computer (Optional).......................134
Interstage BPM Server and Console Installation Guide (BEA WebLogic Server) 6
Table of Contents

E.1.12 Removing an Interstage BPM Cluster..................................................................136
Appendix F Troubleshooting...........................................................................137
F.1 Log File Information...........................................................................................137
F.2 Resolving Specific Error Situations.................................................................137F.2.1 Interstage BPM Server Fails to Start....................................................................137F.2.2 Error in IBPMServer.log.......................................................................................138F.2.3 Timeout During JavaScript Execution..................................................................138F.2.4 Failure in Writing to an Oracle Database.............................................................139
F.3 Errors During Installation, Deployment and Configuration...........................139
F.4 Errors during Starting the Interstage BPM Server .........................................142
F.5 Contacting Your Local Fujitsu Support Organization.....................................143
Index .......................................................................................................145
Interstage BPM Server and Console Installation Guide (BEA WebLogic Server) 7
Table of Contents

About this ManualThis manual describes how to configure the system environment and install the Interstage BusinessProcess Manager (Interstage BPM) Server and Console.Note that the Interstage BPM Tenant Management Console is automatically deployed when youdeploy Interstage BPM Console.
Intended AudienceThis manual is intended for Interstage BPM Super Users, who are administrators managing InterstageBPM Server. It assumes that the reader has a working knowledge of• Operating system administration• Application server administration• Database administration• Directory Service administration
This Manual ContainsHere is a list of what is in this manual:
DescriptionTitleChapter
Description of the typical systemconfigurations for the installationof Interstage BPM Server.
System Configurations for InterstageBPM Server
1
Description of the typical systemconfigurations for the installationof Interstage BPM Console.
System Configurations for InterstageBPM Console
2
Description of the minimumsystem requirements byplatform.
System Requirements for InterstageBPM Server and Console
3
An overview of using the newintegrated Deployment Tool
Overview of Integrated Deployment ofInterstage BPM Server and Console
4
Instructions for preparingexternal systems like thedatabase or the applicationserver.
Preparing for Installation andDeployment of Interstage BPM Serverand Console
5
Instructions for performinginstallation of Interstage BPMServer with Console, or onlyInterstage BPM Server.
Installing and Deploying Interstage BPMServer with Console, OR only theInterstage BPM Server
6
Instructions for performingdeployment of only InterstageBPM Console
Deploying only the Interstage BPMConsole
7
Interstage BPM Server and Console Installation Guide (BEA WebLogic Server) 8
About this Manual

DescriptionTitleChapter
Instructions for removing aninstance of Interstage BPMServer and Console from theapplication server and foruninstalling Interstage BPM
Undeploying and Uninstalling InterstageBPM Server and Console
8
Instructions for performing anupgrade.
Upgrading Interstage BPM Server fromPrevious Versions
9
Instructions for setting up yourDirectory Service.
Setting Up a Directory Service10
Instructions for securityimplementation on InterstageBPM.
SecurityAppendix A
Instructions for using the SilentMode installation feature ofInterstage BPM.
Silent Mode InstallationAppendix B
Instructions for running theInterstage BPM DeploymentTool in Silent Mode.
Silent Mode DeploymentAppendix C
Information about CommandInterface Web Services
Web Services InterfacesAppendix D
Instructions for installingInterstage BPM Server in Solariscontainers that run on the samephysical computer.
Running Interstage Business ProcessManager in Solaris Containers
Appendix E
Instructions for setting up acluster of Interstage BPMServers.
Clustering, Load Balancing, andFailover
Appendix F
Information to help youtroubleshoot problemsassociated with using InterstageBPM.
TroubleshootingAppendix G
Screenshots of the products that appear in this manual are approximations only. What you see whenusing the product may differ in appearance due to platform or product version differences.
Typographical ConventionsThe following conventions are used throughout this manual:
MeaningExample
Text, which you are required to type at acommand line, is identified by Courier font.
command
Text, which is visible in the user interface, is bold.screen text
Interstage BPM Server and Console Installation Guide (BEA WebLogic Server) 9
About this Manual

MeaningExample
Reference material is in italics.Reference
A command parameter is identified by Courierfont.
Parameter
Other ReferencesThe following references for Interstage Business Process Manager are also available:• Release Notes
Contains an overview of Interstage Business Process Manager, installation tips, and late-breakinginformation that could not make it into the manuals.
• Interstage Business Process Manager Server and Console Installation GuideDescribes software and hardware requirements, installation procedure for Interstage BusinessProcess Manager Server and Console
• Interstage Business Process Manager Server Administration GuideExplains how to configure and administrate Interstage Business Process Manager Server. Thisguide also describes the configuration parameters of the Interstage BPM Server.
• Interstage Business Process Manager Developer's GuideDescribes how to use the Interstage Business Process Manager API to customize and extendInterstage BPM to fit the unique needs of your organization.
• Interstage Business Process Manager Studio User's GuideExplains how to model processes using the Interstage Business Process Manager Studio.
• Interstage Business Process Manager Tenant Management Console Online HelpExplains how to use the Interstage Business Process Manager Tenant Management Consoleuser interface.
• Interstage Business Process Manager Console Online HelpExplains how to use the Interstage Business Process Manager Console user interface.
• Interstage Business Process Manager ARIS Process Performance Manager Integration GuideDescribes how to install and configure the PPM adapter and the PPM autoConfig tool. With bothprograms, process data can be transferred from Interstage Business Process Manager to ARISProcess Performance Manager.
• API Javadoc DocumentationThis HTML documentation provides the API and syntax of the packages, interfaces and classesfor developing custom applications or embedding Interstage Business Process Manager intoother products.
AbbreviationsThe products described in this manual are abbreviated as follows:• "ARIS Process Performance Manager" is abbreviated as "ARIS PPM".• "BEA WebLogic Server" is referred to as "WebLogic Application Server" and abbreviated as
"WebLogic".• "Interstage Business Process Manager" is abbreviated as "Interstage BPM".
Interstage BPM Server and Console Installation Guide (BEA WebLogic Server) 10
About this Manual

• "Microsoft® Windows Server® 2003" is abbreviated as "Windows Server® 2003".• "Solaris ™ Operating System" is abbreviated as "Solaris".• "Microsoft® SQL Server 2005 Standard Edition", and "Microsoft® SQL Server 2005 Enterprise
Edition", "Microsoft® SQL Server 2008 Standard Edition", and "Microsoft® SQL Server 2008Enterprise Edition" are abbreviated as "Microsoft® SQL Server","Microsoft SQL Server", or "SQLServer".
• "Oracle 10g R2 Standard Edition", "Oracle 10g R2 Standard Edition One", "Oracle 10g R2Enterprise Edition", "Oracle 11g Standard Edition", "Oracle 11g Standard Edition One", "Oracle11g Enterprise Edition" are abbreviated as "Oracle".
Interstage BPM Server and Console Installation Guide (BEA WebLogic Server) 11
About this Manual

1 System Configurations for Interstage BPM ServerInterstage Business Process Manager (Interstage BPM) is a server-based workflow engine with APIs(Application Programming Interfaces) for workflow application development.The Interstage BPM Server runs on an application server providing load balancing and failovercapabilities, and it operates with a database, which persistently stores and maintains all processinformation.A user and group store is required to manage Interstage BPM user accounts and to expand a groupinto a list of users. Depending on your choices when deploying the server, users are managed eitherin Interstage BPM's local user store or in a Directory Service. Groups can be managed in InterstageBPM's local group store, in a Directory Service or in both systems.The Interstage BPM Server is shipped with a Deployment Tool, which is used to• Configure the database, the application server and the Interstage BPM Server• Deploy the Interstage BPM Server to the application server• Deploy the Interstage BPM Console to the application serverThe system configurations described in the next sections are typically used. The decision of theconfiguration to be used depends on the desired performance of the employed systems.
1.1 Minimum Configuration: All Systems on the sameComputerYou can install the Interstage BPM Deployment Tool, the Interstage BPM Server, the database, and,if you plan to use a remote user store, the Directory Service on the same computer.
Figure 1: All systems on the same computer
For details about the architecture of Interstage BPM, refer to the Interstage Business ProcessManagerServer Administration Guide.
Interstage BPM Server and Console Installation Guide (BEA WebLogic Server) 12
1: System Configurations for Interstage BPM Server

1.2 Database on Remote ComputerThe following figure shows a configuration where the Interstage BPM Server and the database areinstalled on separate computers.
Figure 2: Database on Remote Computer
To set up this configuration, you install the Interstage BPM Server software on the computer hostingthe database and use the Deployment Tool to configure the database.Next, you install the Interstage BPM Server software on the computer hosting the application server.The Interstage BPM Deployment Tool can then be run from that computer to configure the applicationserver and deploying the Interstage BPM Server to the application server.In the configuration shown above, the Directory Service is also installed on a remote computer.However, this has no impact on the Interstage BPM installation procedure.
Interstage BPM Server and Console Installation Guide (BEA WebLogic Server) 13
1: System Configurations for Interstage BPM Server
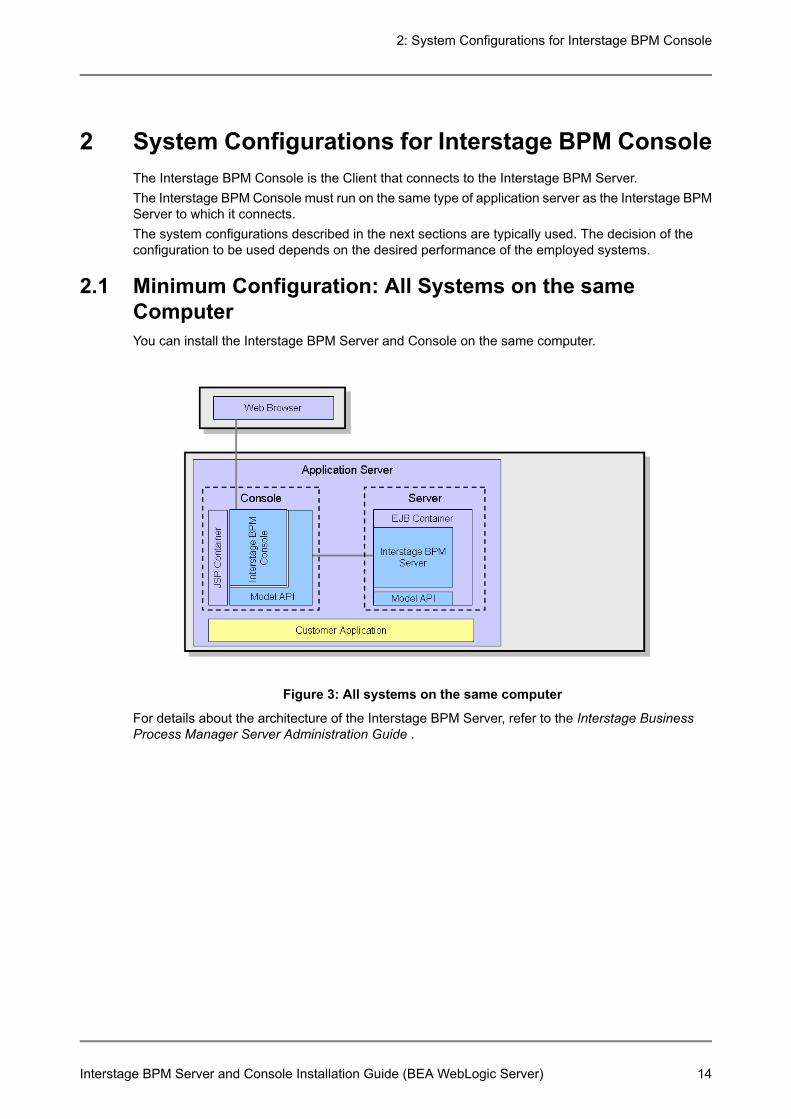
2 System Configurations for Interstage BPM ConsoleThe Interstage BPM Console is the Client that connects to the Interstage BPM Server.The Interstage BPM Console must run on the same type of application server as the Interstage BPMServer to which it connects.The system configurations described in the next sections are typically used. The decision of theconfiguration to be used depends on the desired performance of the employed systems.
2.1 Minimum Configuration: All Systems on the sameComputerYou can install the Interstage BPM Server and Console on the same computer.
Figure 3: All systems on the same computer
For details about the architecture of the Interstage BPM Server, refer to the Interstage BusinessProcess Manager Server Administration Guide .
Interstage BPM Server and Console Installation Guide (BEA WebLogic Server) 14
2: System Configurations for Interstage BPM Console

3 System Requirements for Interstage BPM Serverand Console
3.1 Hardware Requirements for Interstage BPM Server andConsole
Machine and Processor
ProcessorMachineOperatingSystem
Minimum: Intel® Pentium III processor,1 GHz, 1 CPU or greaterRecommended: Intel® Pentium IIIprocessor, 2 GHz, 2 CPU or greater
Fujitsu PRIMERGY or other IntelArchitecture servers
Windows
Minimum: Ultra SPARC or SPARC64 V(kernel arch: sun4u/sun4us/sun4d) 1GHz, 1 CPU or greaterRecommended: SPARC 1.2GHz, 2CPUor greater
Fujitsu PRIMEPOWER or other Solarisservers
Solaris
Minimum: Intel® Pentium III processor,1 GHz, 1 CPU or greaterRecommended: Intel® Pentium IIIprocessor, 2 GHz, 2 CPU or greater
Fujitsu PRIMERGY or other IntelArchitecture server
Linux
MemoryMinimum: 1 GBRecommended for Server: 2 GB or moreRecommended for Console: 4 GB or more
Hard DriveRecommended for Server: 8 GB of free space during runtime (at least 1 GB must be available in the/tmp directory)(Please refer the calculation method below)Interstage BPM installation: 200 MBLog file space: Depends on the number of active users. As a rule of thumb, with the default log level,calculate 5 KB for each user logging in. For example, if 1000 users log in per day, the log file increasesby 5 MB per day.Database server installation: Please refer to the product documentation.Database space:As a rule of thumb, 1000 instances of a process definition with 10 nodes require about 5 MB. DuringInterstage BPM runtime, the processing of work items, history entries in the database, etc., requireadditional space besides the initial database size. This additional space depends on 1) the number
Interstage BPM Server and Console Installation Guide (BEA WebLogic Server) 15
3: System Requirements for Interstage BPM Server and Console

of process instances 2) the number of active nodes 3) the number of users who are assigned to workitems.For example, if you have 1000 instances of a process with 10 nodes, 50% of the nodes requireparallel processing (e.g. OR nodes), 10 users are accessing the process instances, you need thefollowing disk space at runtime:1500 active nodes multiplied with 10 users: 15,000 KB or 15 MB
3.2 Minimum Software Requirements for Server and ConsoleFor software requirements for the server, refer to the Interstage BPM Server Release Notes.For software requirements for the Console, refer to the Interstage BPM Console Release Notes.
3.3 Hardware Requirements for Browser
MachineFujitsu DESKPOWER, ESPRIMO, SCENIC, SCALEO, CELCIUS, Lifebook, AMILO, PRIMERGY orother Windows PC / Intel Architecture servers
ProcessorPentium III 500 MHz or greater
MemoryMinimum: 512 MB, Recommended: 2 GB or more
3.4 MinimumSoftware Requirements forWebBrowser ClientsFor software requirements for the client machines connecting to the Console remotely, refer to theRelease Notes.
Interstage BPM Server and Console Installation Guide (BEA WebLogic Server) 16
3: System Requirements for Interstage BPM Server and Console

4 Overview of Integrated Deployment of InterstageBPM Server and ConsoleYou can deploy Interstage BPM Server and Console together using the integrated Deploment Tool.The Deployment Tool offers the following possible combinations of deploying Server and Console.
Possible Combinations of Deploying Interstage BPM Server and Console1. Deploying Server and Console together
Refer sections Preparing for Installation and Deployment of Interstage BPM Server and Consoleon page 18 and Installing and Deploying Interstage BPM Server with Console, OR only theInterstage BPM Server on page 23
2. Deploying only the ServerRefer sections Preparing for Installation and Deployment of Interstage BPM Server and Consoleon page 18 and Installing and Deploying Interstage BPM Server with Console, OR only theInterstage BPM Server on page 23
3. Deploying only the Console, after having deployed the ServerRefer section Deploying only the Interstage BPM Console on page 62
If you plan to deploy Server and Console on the same machine, but different WebLogicdomains, you need to run the Deployment Tool twice; once for deploying Server, and oncefor deploying Console.
Note:
When you deploy Interstage BPM Console, Interstage BPM Tenant Management Consoleis automatically deployed as well.
Note:
If you are upgrading from a previous version of Interstage BPM, refer Upgrading InterstageBPM from Previous Versions on page 75.
Note:
Interstage BPM Server and Console Installation Guide (BEA WebLogic Server) 17
4: Overview of Integrated Deployment of Interstage BPM Server and Console

5 Preparing for Installation and Deployment ofInterstage BPM Server and ConsoleThis chapter explains how to set up your environment before installation and deployment of InterstageBPM.
Use this chapter if you plan to install and deploy Interstage BPM Server together withConsole, OR, only the Server.If you have already completed deployment of Interstage BPM Server, and plan to deployonly Interstage BPM Console, refer section Preparing for Console Deployment on page 62If you have already completed deployment of Interstage BPM Server, and plan to deployConsole on a different WebLogic domain than the server, refer section Preparing for ConsoleDeployment on page 62
Note:
5.1 Database Server PreparationThis section provides instructions in configuring your database software for use by Interstage BPM.You must create a new database instance for Interstage BPM. When deploying the Interstage BPMServer, you will specify this instance. These instructions use the default database instance for thepurpose of providing an example.
5.1.1 Configuring Microsoft® SQL ServerMicrosoft® SQL Server 2005 or Microsoft® SQL Server 2008 can be used as the database withInterstage BPM.To configure Microsoft SQL Server:1. Make sure that you install Microsoft® SQL Server in Mixed Mode.
Microsoft® SQL Server in Mixed Mode allows Windows Authentication, i.e. a Windows user canlog in to the database, and Microsoft® SQL Server Authentication, i.e. a user needs a user nameand a password for the database.
If Microsoft® SQL Server is already installed, you may have to run the setup program againif the default selection from the prior installation enabled Named Pipes. Run the Microsoft®SQL Server setup again and add TCP/IP. However, do not disable Named Pipes. Both mustbe selected.
Note:
2. Confirm that TCP/IP is selected under Network Operations.3. Determine the port number of the Microsoft® SQL Server instance that Interstage BPM will connect
to. To do so:a) Select Start > Programs > Microsoft SQL Server 2005/2008 > Configuration Tools > SQL
Server Configuration Manager.b) Navigate to SQL Server Network Configuration > Protocols for <MSSQLInstance>.
For the default instance, the value of <MSSQLInstance> is MSSQLSERVER.
c) Confirm that TCP/IP is enabled. Then, go to the TCP/IP properties and click the IP Addressestab.The IPAll section displays the TCP port and TCP Dynamic Ports parameters.
Interstage BPM Server and Console Installation Guide (BEA WebLogic Server) 18
5: Preparing for Installation and Deployment of Interstage BPM Server and Console

d) If you are using the default Microsoft® SQL Server instance, note down the value of TCP Port.If you are using a named instance, note down the value of the TCP Dynamic Ports. You willneed to specify the port number later when deploying the Interstage BPM Server.
4. Install the SQL Server Driver for JDBC.Microsoft does not provide a JDBC driver with Microsoft SQL Server, so you must obtain thelatest service pack of the SQL Server Driver for JDBC from the Microsoft Web Site and install itusing the instructions provided on the download page. For information about supported versionsof the driver, refer to the Release Notes.The sqljdbc.jar file is the actual driver.You will need to specify the driver location later when deploying the Interstage BPM Server.
5. If you are running your database on a remote computer, copy the JDBC driver sqljdbc.jar intoa new directory on the application server computer.Create a directory with an identifiable name because you must specify it as the driver locationduring the deployment of the Interstage BPM Server.
6. On the computer where Microsoft® SQL Server is installed, make sure that a J2SE DevelopmentKit (JDK) or Java Runtime Environment (JRE) is installed.For information about supported versions, refer to the Release Notes.
Microsoft® SQL Server is now configured.
If you change the default datapath for the Microsoft® SQL Server instance, make sure thatyou specify a directory on a local disk. The default datapath is the location where newdatabases will be stored.
Note:
5.1.2 Configuring OraclePrerequisite: Oracle is installed.
To configure Oracle for Interstage BPM:1. On the computer where Oracle is installed, make sure that a J2SE Development Kit (JDK) or
Java Runtime Environment (JRE) is installed.For information about supported versions, refer to the Release Notes.
Ensure that the value of the environment variable ORACLE_HOME is set to the path of theOracle installation directory for UNIX environment.
Note:
2. Create a new database instance for Interstage BPM.When deploying the Interstage BPM Server, you will specify this instance. The default databaseinstance for Oracle is orcl.
Make sure that the database instance is created with the following character sets:Note:• AL32UTF8 as the database character set• AL16UTF16 as the national character setThese settings are required to support Unicode UTF-16 characters.
Refer to the Oracle documentation for instructions on how to install Oracle and a databaseinstance.
Interstage BPM Server and Console Installation Guide (BEA WebLogic Server) 19
5: Preparing for Installation and Deployment of Interstage BPM Server and Console

3. For performance reasons, the following settings are required:• The database instance must be configured with at least 1 GB System Global Area (SGA) size.• The database statistics must be up-to-date. Depending on the number of changes, it might
be appropriate to collect the statistics explicitly although the database server is doing thisautomatically every 24 hours per default.
4. Make sure that a TCP/IP version of Oracle's SQL*Net is installed.The Oracle JDBC driver requires a TCP/IP version of Oracle's SQL*Net. This is the default for astandard installation.
If you need to uninstall Oracle or require recovery from a failed installation, contact OracleTechnical Support for instructions before reinstalling.
Note:
5. Make sure that you know the TCP/IP port number of the database.The port number is typically set to 1521.
6. On the database server computer, create a directory in which the Interstage BPM database willreside.Later, when running the Interstage BPM Deployment Tool, you will specify this directory as thelocation of the data files.
The user who will perform the database setup using the Deployment Tool must have writepermissions for this directory.
Note:
7. If you are running your database on a remote computer, you are recommended to make Oracle'sJDBC driver (ojdbc14.jar for Oracle 10g, ojdbc5.jar for Oracle 11g) available on the applicationserver computer. To do so:Copy the JDBC driver file, typically located in the <ORACLE_HOME>/jdbc/lib directory, into a newdirectory on the application server computer.Create a directory with an identifiable name because you must specify it as the driver locationduring the deployment of the Interstage BPM Server.Example on Windows: C:\myOracleJDBCJar.Example on Solaris: /usr/lib/myOracleJDBCJar.Example on Linux: /usr/lib/myOracleJDBCJar.
In the directory into which you copied the driver file, change the file permission of the driverfile to 666 (ugo=rw) if you are installing on the following operating system:
Note:
• Solaris• Linux
If you intend to use Oracle 11g, make sure that Oracle's JDBC driver version is V11.1.0.7or higher. If not, get the JDBC driver having version V11.1.0.7 or higher, and use it.
Note:
Oracle is now configured.
5.1.3 Starting the Database ServerSince configuration information must be written to the database during deployment, ensure that thedatabase server is running prior to deploying Interstage BPM Server. Start the database serveraccording to the documentation provided with your database server.
Interstage BPM Server and Console Installation Guide (BEA WebLogic Server) 20
5: Preparing for Installation and Deployment of Interstage BPM Server and Console

5.2 Configuring WebLogic 9.2Prerequisite: You have installed the WebLogic Application Server Version 9.2.
You must have a WebLogic domain to which Interstage BPM Server and Console can be deployed.A WebLogic domain is a collection of resources, such as servers, clusters, database connections,security services, and J2EE applications that you manage as a unit.You can create and configure a special WebLogic Server domain for Interstage BPM by running theWebLogic Configuration Wizard. You can create and configure your domain at any time after installingthe WebLogic Application Server but before deploying Interstage BPM Server and Console.For detailed instructions on creating and configuring WebLogic domains, refer to your WebLogicServer documentation.
If you want to use a pre-existing WebLogic domain for Interstage BPM, there is no need tocreate a WebLogic domain using these instructions.If this existing WebLogic domain is from a WebLogic version previous to 9.x, you mustupgrade it to WebLogic 9.2; make sure that the Run Quickstart checkbox is checked onthe final WebLogic Application Server installation screen. Then, select the option forupgrading your domains to the current WebLogic version.
Note:
To create a WebLogic domain for Interstage BPM:1. Start the WebLogic Configuration Wizard as follows:
• On Windows, select Start > Programs > BEA Products > Tools > Configuration Wizard.• On Windows, run the configuration script config.cmd.• On Solaris, run the configuration script config.sh.• On Linux, run the configuration script config.sh.The configuration script is located in the <WL_HOME>/common/bin directory.The Welcome page appears.
2. Make sure that the Create a new WebLogic domain option is selected. Then, click Next.The Select Domain Source page appears.
3. Make sure that the Generate a domain configured automatically to support the followingBEA products option and the WebLogic Server (Required) checkbox are selected. Then, clickNext.The Configure Administrator Username and Password page appears.
4. Enter a user name and password. This user becomes the initial administrative user for the domain.Then, click Next.You will be asked for this user name and password when deploying the Interstage BPM Server.This user is also known as your WebLogic AdminUser.The Configure Server Start Mode and JDK page appears.
5. Select the appropriate Java SDK and click Next:• On Windows, select the SUN SDK.• On Solaris, select the SUN SDK.• On Linux, select the SUN SDK.The Customize Environment and Services Settings page appears.
6. Select No and click Next.
Interstage BPM Server and Console Installation Guide (BEA WebLogic Server) 21
5: Preparing for Installation and Deployment of Interstage BPM Server and Console

The Create WebLogic Domain page appears.
7. In the Domain name field, specify a name for your domain. By default, base_domain is used. Inthe Domain location field, specify a configuration location. By default,<BEA_HOME>/user_projects/domains/ is used. Then, click Create.
You do not have to accept the default domain name or domain location. You can chooseany name or location for your new domain.
Note:
5.3 Starting WebLogic Administration ServerBefore deploying Interstage BPM Server or Console, make sure that the WebLogic AdministrationServer is running.To start the WebLogic Administration Server:• Run the startup script located in <BEA Home>/user_projects/domains/<Domain Name>/bin:
ScriptOperating System
startWebLogic.cmdWindows
startWebLogic.shSolarisLinux
• On Windows, you can start the server by selecting Start > Programs > BEA Products > UserProjects > <Domain Name> > Start Admin Server for WebLogic Server Domain.
Upon successful initialization of the WebLogic Administration Server, the following message appearsnear the end of the WebLogic Console Window:<Server started in RUNNING mode>
If you run the WebLogic Administration Server as a Windows service, wait awhile after theWindows service says that the service is running, because it takes longer for WebLogicAdministration Server to start.
Note:
Interstage BPM Server and Console Installation Guide (BEA WebLogic Server) 22
5: Preparing for Installation and Deployment of Interstage BPM Server and Console

6 Installing and Deploying Interstage BPMServer withConsole, OR only the Interstage BPM ServerUse the information in this chapter if:• You plan to install and deploy Interstage BPM Server and Console together• You plan to install and deploy only the Interstage BPM Server
When you deploy Interstage BPM Console, Interstage BPM Tenant Management Consoleis also automatically deployed.
Note:
For other combinations, refer Overview of Integrated Deployment of Interstage BPM Server andConsole on page 17Interstage BPM comes with an installation program and a Deployment Tool. The installation programinstalls the product documentation, the Deployment Tool and all files required for subsequentdeployment of the Interstage BPM Server and Console to an application server of your choice. TheDeployment Tool walks you through the required configuration steps and performs the actualdeployment to an application server.This chapter explains how to perform server and console installation using the installation programand the Deployment Tool in graphical mode.Installation and deployment is a short, smooth process if you know the overall procedure and all ofthe values for the parameters that you need to supply. It is recommended that you take the time tofill out the installation and deployment worksheet before and read the overview of the installationand deployment procedure before starting the installation.Refer to System Requirements for Interstage BPM Server and Console on page 15 and to theRelease Notes for details on the required components mentioned in the procedures described inthis chapter.
If you install Interstage BPM Server on a computer that is periodically disconnected fromthe network, your computer’s DHCP lease may expire while you are off line. If this happens,TCP/IP (and therefore Interstage BPM Server) will cease functioning. Therefore, you shoulduse a static IP address for the computer.
Note:
If you want to change the Interstage BPM configuration after deployment, you can do so by followingthe instructions in the Interstage Business Process Manager Server Administration Guide.
6.1 Installation and Deployment WorksheetDuring the course of the installation and the deployment you will be asked to enter values for anumber of parameters. To ensure a smooth and easy setup, it is recommended that you fill out thefollowing worksheet before beginning the installation.
Interstage BPM Server and Console Installation Guide (BEA WebLogic Server) 23
6: Installing and Deploying Interstage BPM Server with Console, OR only the Interstage BPM Server

Interstage BPM Server Settings
Your ValueInterstage BPM Installation Setting
Installation directory of Interstage BPMDefault on Windows:C:\Fujitsu\InterstageBPM
Default on Solaris: /opt/FJSVibpmDefault on Linux: /opt/FJSVibpm
Location of the J2SE Development Kit (JDK) orJava Runtime Environment (JRE) (top-leveldirectory)
WebLogic Application Server 9.2 Settings
Your ValueWebLogic Application Server Setting
Administration Server addressExample: <WebLogic Server Host Name>:7001
User name of the application server administratorExample: weblogic
Password of the application server administrator
Location of weblogic.jarExample: <WebLogic Server InstallationDirectory>/server/lib
Interstage BPM Server nameExample: InterstageBPMServer
Interstage BPM Server portExample: 49950
Location of the JDK shipped with WebLogicExample: <BEA Home>/jdk150_10
Interstage BPM Console Settings
Your ValueInterstage BPM Console Setting
ServerBaseURL, in the formathttp://<ConsoleHost>:<ConsolePort>/console/
Example: http://docone:49950/console/
Interstage BPM Server and Console Installation Guide (BEA WebLogic Server) 24
6: Installing and Deploying Interstage BPM Server with Console, OR only the Interstage BPM Server

Your ValueInterstage BPM Console Setting
ServerEmailBaseURL, in the formathttp://<ConsoleHost>:<ConsolePort>/console/
Example: http://docone:49950/console/
Database Settings - Microsoft SQL Server
Your ValueDatabase Setting - Microsoft SQL Server
User name of a non-administrative database useraccountExample: ibpmuser
Password of the non-administrative databaseuser account
Database instance name
Database server host name or IP address of theserver that hosts the database instance
Database port numberDefault: 1433
Database administrator password
Package name of the JDBC driver class, typicallycom.microsoft.sqlserver.jdbc.SQLServerDriver
Database connection URL, typicallyjdbc:sqlserver://<Hostname>:<DatabasePort>;databaseName=teamflowdb
Location of the database JDBC driversqljdbc.jar
Example: C:\MicrosoftSQLServer2005JDBCDriver\sqljdbc_1.2\enu
Database top-level directory, typicallyC:\Program Files\Microsoft SQL Server
Database directory, typicallyC:\Program Files\Microsoft SQLServer\MSSQL.1\MSSQL\Data
Location of a JDK or JRE installation on thedatabase server computer
Interstage BPM Server and Console Installation Guide (BEA WebLogic Server) 25
6: Installing and Deploying Interstage BPM Server with Console, OR only the Interstage BPM Server

Database Settings - Oracle
Your ValueDatabase Setting - Oracle
User name of a non-administrative database useraccountExample: ibpmuser
Password of the non-administrative databaseuser account
Host name or IP address of the computer thathosts the database instance
Connection identifier of the database, typicallythe database name
Database port number
Password of the SYSTEM user
Package name of the JDBC driver classExample: oracle.jdbc.driver.OracleDriver
Database connection URLExample:jdbc:oracle:thin:@localhost:1521:ORCL
Location of the database JDBC driver(ojdbc14.jar for Oracle 10g, ojdbc5.jar forOracle 11g)Example:<ORACLE_BASE>/product/10.1.0/db_1/jdbc/lib
Database top-level directoryExample:<ORACLE_BASE>/product/10.1.0/db_1
This directory is also referred to as<ORACLE_HOME>.
Database directoryExample on Windows:C:\Oracle\Product\10.2.0\oradata\<DatabaseName>
Example on Solaris: /u01/oradata/<DatabaseName>
Example on Linux: /u01/oradata/<DatabaseName>
Location of a JDK or JRE installation on thedatabase server computer
Interstage BPM Server and Console Installation Guide (BEA WebLogic Server) 26
6: Installing and Deploying Interstage BPM Server with Console, OR only the Interstage BPM Server

Interstage BPM Super User Account
Your ValueInterstage BPM Server Setting
User nameExample: ibpm_server1
Password
Interstage BPM Tenant Owner AccountThe following information is not needed if you choose the SaaS mode but choose not to set up adefault tenant.
Your ValueInterstage BPM Server Setting
Tenant Owner nameExample: default_tenant
Password
Directory Service Settings - Microsoft Active DirectoryThe following configuration information is only needed if using Microsoft Active Directory.
Your ValueDirectory Service Setting
Directory Service host name or IP address (localor remote)
Directory search stringExample: dc=fujitsu, dc=com
Organizational unitExample: ou=Groups
Directory Service port number (not the admin portnumber)Example: 389
Directory Server Settings - Sun Java System Directory ServerThe following configuration information is only needed if using Sun Java System Directory Server.
Your ValueDirectory Server Setting
Directory Server host name or IP address (localor remote)
Directory search stringExample: dc=fujitsu, dc=com
Interstage BPM Server and Console Installation Guide (BEA WebLogic Server) 27
6: Installing and Deploying Interstage BPM Server with Console, OR only the Interstage BPM Server

Your ValueDirectory Server Setting
Organizational unitExample: ou=Groups
Directory Server port number (not the admin portnumber)Example: 389
Mail Server Settings
Your ValueMail Server Setting
SMTP server host nameNote: If you do not enter a SMTP server hostname, Interstage BPM’s email notification featurewill be disabled. Consult your systemadministrator and your email Administrator forthe correct host names, since the Interstage BPMServer will not start if the SMTP server host nameis incorrect. If you are in doubt, leave this fieldblank and change the configuration of theInterstage BPM Server later. Refer to theInterstage Business Process Manager ServerAdministration Guide for details.
Interstage BPM Tenant Owner’s email address(can be any active email address )
WebDAV and UDDI Server Settings
Your ValueWebDAV and UDDI Server Setting
URL for WebDAV Repository
Name of a user that has administrative rights topublish to the WebDAV
Password of that user
UDDI Business Name
URL to which UDDI Registry information will bepublished
Name of a user that has administrative rights topublish UDDI Registry information to theorganization specified as UDDI Business Name
Password of that user
URL that allows to search the UDDI Registry
Interstage BPM Server and Console Installation Guide (BEA WebLogic Server) 28
6: Installing and Deploying Interstage BPM Server with Console, OR only the Interstage BPM Server

6.2 Permissions Required for Installation and Deployment
Permissions Required for InstallationYou must have read, write and execute permissions on the installation directory of the InterstageBPM Server and Console.
On Solaris, if you are installing as a non-root user, Interstage BPM Server will not be installedas a package.
Note:
Permissions Required for Deployment When Using Oracle• You must have execute permissions for the sqlplus file located in the <ORACLE_HOME>/bin
directory.• You must have write permissions for the directory in which the Interstage BPM database will
reside.• The ORACLE_HOME environment variable must be set to the installation directory of the database
server if you are deploying on• Solaris• LinuxExample: ORACLE_HOME=/opt/oracle/app/oracle/product/10.2.0/db_1You can either set the environment variable in your ~/.profile file or in the shell before startingthe Deployment Tool.
If you set the environment variable in the shell, run the set -a command so that theenvironment variable is set for all subshells created from the parent shell.
Note:
6.3 Overview of the Installation and Deployment ProcedureThis section summarizes the steps required to install and deploy the Interstage BPM Server with theConsole, or just the Server. The installation and deployment procedure depends on whether thedatabase and the application server are installed on the same or on different computers.To connect to a Directory Service and log into Interstage BPM (except for the default Interstage BPMuser created during deployment), you must configure and start the Directory Service before startingthe Interstage BPM Server. The best time for configuration is after deploying and before you startthe Interstage BPM Server, because the Deployment Tool creates an Interstage BPM LDIF file thatyou need to import into the Directory Service.
If you are upgrading from a previous version of Interstage BPM, refer Upgrading InterstageBPM from Previous Versions on page 75.
Note:
Running the Database and Interstage BPM Server on the Same Computer1. Prepare the database and make sure that the database server is running.
Refer to section Database Server Preparation on page 18.
2. Prepare the application server.Refer to section Configuring WebLogic 9.2 on page 21.
Interstage BPM Server and Console Installation Guide (BEA WebLogic Server) 29
6: Installing and Deploying Interstage BPM Server with Console, OR only the Interstage BPM Server

3. Make sure that the application server is running.Refer to section Starting WebLogic Administration Server on page 22
4. Install Interstage BPMRefer to section Installing Interstage BPM on page 31.
5. Configure the Interstage BPM Server and Console (or only the Server) and deploy to the applicationserver.Refer to section Deploying Server Instances with Console, OR only Server Instances on page40.
6. If you want to connect to a Directory Service, you must configure it before starting the InterstageBPM Server.Refer to chapter Setting Up a Directory Service on page 82.
7. Configure WebLogic's Embedded LDAP Server.Refer to section Configuring WebLogic's Embedded LDAP Server on page 57.
8. If you opted for SaaS mode during Server deployment, switch on Java security.Refer to section Switching on Java Security on page 58.
9. Start the Interstage BPM Server.Refer to section Starting Interstage BPM Server on page 59.
10. If you have also deployed the Console, start Interstage BPM ConsoleRefer to section Starting Interstage BPM Console and Tenant Management Console on page 60
11. If required, perform further configurations for Interstage BPM ConsoleRefer section Interstage BPM Console - Other Configurations on page 65
Running the Database and Interstage BPM Server on Different Computers1. Prepare the database and make sure that the database server is running.
Refer to section Database Server Preparation on page 18.
2. Prepare the application server.Refer to section Configuring WebLogic 9.2 on page 21.
3. Make sure that the application server is running.Refer to section Starting WebLogic Administration Server on page 22
4. Install Interstage BPM on the database server computer.Refer to section Installing Interstage BPM on page 31.
5. On the database server computer, run the Deployment Tool to configure the database.Refer to section Configuring the Remote Database on page 39.
6. Install Interstage BPM on the application server computer.Refer to section Installing Interstage BPM on page 31.
7. On the application server computer, run the Deployment Tool to deploy the Interstage BPMServer with Console (or only Server).Refer to section Deploying Server Instances with Console, OR only Server Instances on page40.
Interstage BPM Server and Console Installation Guide (BEA WebLogic Server) 30
6: Installing and Deploying Interstage BPM Server with Console, OR only the Interstage BPM Server

8. If you want to connect to a Directory Service, you must configure it before starting the InterstageBPM Server.Refer to chapter Setting Up a Directory Service on page 82.
9. Configure WebLogic's Embedded LDAP Server.Refer to section Configuring WebLogic's Embedded LDAP Server on page 57.
10. If you opted for SaaS mode during Server deployment, switch on Java security.Refer to section Switching on Java Security on page 58.
11. Start the Interstage BPM Server.Refer to section Starting Interstage BPM Server on page 59.
12. If you have also deployed the Console, start Interstage BPM ConsoleRefer to section Starting Interstage BPM Console and Tenant Management Console on page 60
13. If required, perform further configurations for Interstage BPM ConsoleRefer section Interstage BPM Console - Other Configurations on page 65
6.4 Installing Interstage BPMUse the instructions in this section to perform a new installation of Interstage BPM.
If you have a previous version of Interstage BPM Server on your computer, refer to chapterUpgrading Interstage BPM from Previous Versions on page 75.
Note:
To install Interstage BPM:1. Read the Release Notes located in the top-level directory of the CD-ROM.2. Start the installation program located in the engine directory on the CD-ROM.
Installation ProgramOperating System
setupwin32.exeWindows
setupSolaris.binSolaris
setupLinux.bin
Note: If you receive an error while launchingthe installation program on Linux, download thelibXp-1.0.0-8.i386.rpm package from yourRed Hat Enterprise Linux CD or the Red HatNetwork website and install the package usingthe rpm -i libXp-1.0.0-8.i386.rpmcommand. Then, retry starting the InterstageBPM installation program for Linux.
Linux
3. Read the Welcome screen and click Next.4. On the Interstage Business ProcessManager Installation Directory screen, specify a directory
where the Interstage BPM software is to be installed. Accept the default or click Browse andnavigate to a directory of your choice.Default on Windows: C:\Fujitsu\InterstageBPMDefault on Solaris: /opt/FJSVibpm
Interstage BPM Server and Console Installation Guide (BEA WebLogic Server) 31
6: Installing and Deploying Interstage BPM Server with Console, OR only the Interstage BPM Server

Default on Linux: /opt/FJSVibpm
Interstage BPM Server and Console Installation Guide (BEA WebLogic Server) 32
6: Installing and Deploying Interstage BPM Server with Console, OR only the Interstage BPM Server

The installation directory path must not contain blanks. Do not specify an installation directorypath that is longer than 255 characters.
Note:
Figure 4: Server Installation Directory (for Windows)
Interstage BPM Server and Console Installation Guide (BEA WebLogic Server) 33
6: Installing and Deploying Interstage BPM Server with Console, OR only the Interstage BPM Server

Figure 5: Server Installation Directory (for Solaris, Linux)
5. Click Next.6. On the Java Development Kit (JDK) Location screen, specify the top-level directory of your
J2SE Development Kit (JDK) or Java Runtime Environment (JRE) installation. If the defaultdirectory is not the top-level directory of your JDK or JRE installation, click Browse and navigateto it.For information on the supported JDK and JRE version, refer to the Release Notes.
Interstage BPM Server and Console Installation Guide (BEA WebLogic Server) 34
6: Installing and Deploying Interstage BPM Server with Console, OR only the Interstage BPM Server

The JDK or JRE installation path must not contain blanks.Note:
Figure 6: JDK/JRE Directory (for Windows)
Interstage BPM Server and Console Installation Guide (BEA WebLogic Server) 35
6: Installing and Deploying Interstage BPM Server with Console, OR only the Interstage BPM Server

Figure 7: JDK/JRE Directory (for Solaris, Linux)
7. Click Next.8. Make sure that the information displayed on the Pre-Installation Summary screen is correct.9. Click Next to start the installation.
The installation program starts copying files to your computer. Once the files have been copied,the Start Deployment Tool screen is displayed.
10. To launch the Deployment Tool, do one of the following:• For Windows: On the Deployment Tool Option Screen screen, if you want to proceed with
the initial configuration, select Launch Deployment Tool check-box.A 64 bit-JVM-specific Deployment Tool and a 32 bit-JVM-specific Deployment Tool are providedfor Windows Server 2003 and Windows Server 2008.1. Select the appropriate radio button to launch the 32 bit-specific or 64bit-specific Deployment
Tool.
Interstage BPM Server and Console Installation Guide (BEA WebLogic Server) 36
6: Installing and Deploying Interstage BPM Server with Console, OR only the Interstage BPM Server

2. Click Next.
Figure 8: Start Deplyment Tool - For Windows
Interstage BPM Server and Console Installation Guide (BEA WebLogic Server) 37
6: Installing and Deploying Interstage BPM Server with Console, OR only the Interstage BPM Server

• For Solaris or Linux:On the Start Deployment Tool screen, select the Launch DeploymentTool check box and click Next.
Figure 9: Start Deployment Tool - For Solaris, Linux
If you want to configure and deploy Interstage BPM Server or Console at a later time, make surethat you select the Do not launch Deployment Tool radio button. Click Next and then Finish.Refer Starting the Deployment Tool on page 38 for more information about launching theDeployment Tool at a later time.
If you intend to deploy Interstage BPM Console on a different WebLogic domain thanInterstage BPM Server, you cannot use the Deployment Tool to deploy Console. In thiscase, ensure you do not check the Launch Deployment Tool checkbox.
Note:
The installation program exits. If you selected to launch the Deployment Tool, the DeploymentTool is started.
6.5 Starting the Deployment ToolPrerequisites:• You have prepared the database server and the application server as explained in chapter
Preparing for Installation and Deployment of Interstage BPM Server and Console on page 18.• You have installed Interstage BPM.• You have set the resolution of your screen and the font size as follows:
On Solaris: 1024x768, Sans 9 pt font or 1280x1024, Sans 10 pt fontOn Linux: 1024x768, Sans 9 pt font or 1280x1024, Sans 10 pt font
Interstage BPM Server and Console Installation Guide (BEA WebLogic Server) 38
6: Installing and Deploying Interstage BPM Server with Console, OR only the Interstage BPM Server

On Windows: 1024x768, system default font
• You have the required permissions for deployment. For details, refer to section PermissionsRequired for Installation and Deployment on page 29.
If you did not select the Launch Deployment Tool check box at the end of the installation process,you can start the Deployment Tool manually.To start the Deployment Tool (for 32bit JVM):• Run the startup script located in <Interstage BPM Installation
Directory>/server/deployment/tool:
Startup ScriptOperating System
run_windows.batWindows
run_solaris.shSolaris
run_linux.shLinux
On Windows, you can also start the Deployment Tool using Start > Programs > InterstageBusiness Process Manager > Launch Deployment Tool.
Do not use the 32bit-JVM-specific Deployment Tool if your Operating System is 64bitWindows and your Java Environment (JVM) is 64bit. Doing so will fail to launch theDeployment Tool. Instead, use the 64bit-JVM-specific Deployment Tool as detailed below.
Note:
64bit Deployment Tool for WindowsA new 64bit-JVM-specific Deployment Tool is provided for Windows Server 2003 and WindowsServer 2008.• Use the 64bit Deployment Tool only if both your Operating System as well as Java Environment
(JVM) is 64bit. If used otherwise, the Deployment Tool will fail to start.• When both Operating System and JVM is 64bit, do not launch the Deployment Tool through the
final screen of the Installation Wizard (using the 'Launch Deployment Tool' checkbox). Doing solaunches the 32bit Deployment Tool, causing a failure in the launch of the Deployment Tool.
• Irrespective of your Operating System, if your JVM is 32bit, use the 32bit Deployment Tool.• 32bit Operating Systems and 64bit JVM are incompatible and using this combination will cause
launch of Deployment Tool to fail irrespective of the version of Deployment Tool.To start the 64bit-JVM-specific Deployment Tool do one of the following:• Run the run_windows_x64.bat startup script located in <Interstage BPM Installation
Directory>/server/deployment/tool
• On the WindowsStartmenu, navigate toAll Programs > InterstageBusiness ProcessManager,and click Launch Deployment Tool (64 bit)
6.6 Configuring the Remote DatabasePrerequisite: You have prepared the database server as instructed in section Database ServerPreparation on page 18.
This section describes how to run the Deployment Tool on the database server computer to configurethe database. You will typically perform the instructions in this section only if your database is installedon a remote computer.
Interstage BPM Server and Console Installation Guide (BEA WebLogic Server) 39
6: Installing and Deploying Interstage BPM Server with Console, OR only the Interstage BPM Server

To configure the database:1. If the Deployment Tool is not running, start it.
For details, refer to section Starting the Deployment Tool on page 38.
2. On the Welcome screen of the Deployment Tool, select Database Setup.3. Click Next.4. On the Database Selection screen, select the database system you wish to use.5. Click Next.6. On the Database Configuration screen, enter the settings for your database.
If you are using Oracle, refer to section Oracle Settings on page 47 for a detailed explanation.If you are using Microsoft SQL Server, refer to section Microsoft SQL Server Settings on page45 for a detailed explanation.
7. Click Next.8. Make sure that all the information displayed on the Review Information screen is correct.9. Click Finish to start configuring the database.
At the end of the process, a message is displayed notifying you that the database has beenconfigured.
10. Click OK to exit the Deployment Tool.
6.7 Deploying Server Instances with Console, OR only ServerInstancesPrerequisite: If you are using a remote database, you must have configured it as explained in sectionConfiguring the Remote Database on page 39.After you have started the Deployment Tool, you perform initial configuration steps before actuallydeploying the Interstage BPM Server with Console, or only the Server to an application server.
Interstage BPM Server and Console Installation Guide (BEA WebLogic Server) 40
6: Installing and Deploying Interstage BPM Server with Console, OR only the Interstage BPM Server

6.7.1 Operation Mode and Application Server Selection1. On the Welcome screen of the Deployment Tool, select Server/ Console Instance Setup and
click Next.
Figure 10: Welcome
2. On the Application Server Selection screen:a) Select the type of application server on which you intend to deploy.
In this case, select BEA WebLogic.
b) Depending on your requirement, select the appropriate checkboxes (either, or both of InterstageBPM Server, Interstage BPM Console) for the Interstage BPM component you want todeploy.
If you plan to deploy Server and Console on the same machine, but different WebLogicdomains, you need to run the Deployment Tool twice; once for deploying Server, and oncefor deploying Console.
Note:
Interstage BPM Server and Console Installation Guide (BEA WebLogic Server) 41
6: Installing and Deploying Interstage BPM Server with Console, OR only the Interstage BPM Server

If you choose to deploy Interstage BPM Console, Interstage BPM Tenant ManagementConsole is also automatically deployed.
Note:
Figure 11: Application Server and Component selection sample screen
3. Click Next.
6.7.2 WebLogic Application Server SettingsPrerequisites:• The application server is running.• A WebLogic domain is available for use by Interstage BPM.
Refer to section ConfiguringWebLogic 9.2 on page 21 for more information on creating WebLogicdomains.
• A J2SE Development Kit (JDK) or Java Runtime Environment (JRE) is installed on the localcomputer, preferably the same version that is shipped with the application server. For exactversion information, refer to the Release Notes.
Interstage BPM Server and Console Installation Guide (BEA WebLogic Server) 42
6: Installing and Deploying Interstage BPM Server with Console, OR only the Interstage BPM Server

On the WebLogic 9.2 Configuration screen, you provide the settings for your application server.
Figure 12: WebLogic Settings
1. In the WebLogic Domain for Interstage Business Process Manager area, enter the followinginformation about the WebLogic domain you will be using for Interstage BPM Server and/orConsole:• Administration Server (Server:Port): Enter the address of your WebLogic domain's
Administration Server.Example: localhost:7001
• Administrator Username: Enter the user name of the administrator for your WebLogicAdministration Server.If you created a WebLogic domain using the default values, the user name is weblogic.
• Administrator Password: Enter the password of the administrator for your WebLogicAdministration Server.
• Path of WebLogic JAR File: Specify the path of the WebLogic JAR file weblogic.jar onyour local computer.weblogic.jar is located in the directory <WebLogic Server InstallationDirectory>/server/lib.
2. In the Interstage Business Process Manager Server area, provide the following information:• Interstage Business ProcessManager Server Name: Define a name for the Interstage BPM
Server to be deployed, for example IBPMServer.
Interstage BPM Server and Console Installation Guide (BEA WebLogic Server) 43
6: Installing and Deploying Interstage BPM Server with Console, OR only the Interstage BPM Server
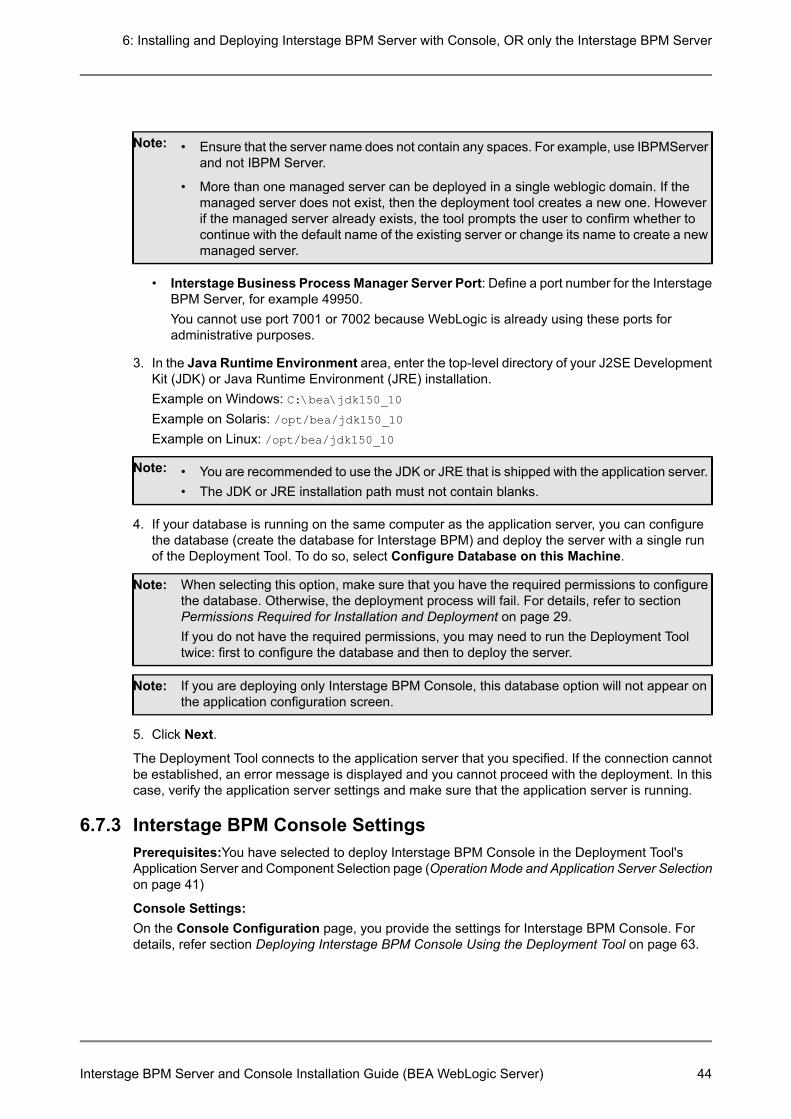
Note: • Ensure that the server name does not contain any spaces. For example, use IBPMServerand not IBPM Server.
• More than one managed server can be deployed in a single weblogic domain. If themanaged server does not exist, then the deployment tool creates a new one. Howeverif the managed server already exists, the tool prompts the user to confirm whether tocontinue with the default name of the existing server or change its name to create a newmanaged server.
• Interstage Business Process Manager Server Port: Define a port number for the InterstageBPM Server, for example 49950.You cannot use port 7001 or 7002 because WebLogic is already using these ports foradministrative purposes.
3. In the Java Runtime Environment area, enter the top-level directory of your J2SE DevelopmentKit (JDK) or Java Runtime Environment (JRE) installation.Example on Windows: C:\bea\jdk150_10Example on Solaris: /opt/bea/jdk150_10Example on Linux: /opt/bea/jdk150_10
Note: • You are recommended to use the JDK or JRE that is shipped with the application server.• The JDK or JRE installation path must not contain blanks.
4. If your database is running on the same computer as the application server, you can configurethe database (create the database for Interstage BPM) and deploy the server with a single runof the Deployment Tool. To do so, select Configure Database on this Machine.
When selecting this option, make sure that you have the required permissions to configurethe database. Otherwise, the deployment process will fail. For details, refer to sectionPermissions Required for Installation and Deployment on page 29.If you do not have the required permissions, you may need to run the Deployment Tooltwice: first to configure the database and then to deploy the server.
Note:
If you are deploying only Interstage BPM Console, this database option will not appear onthe application configuration screen.
Note:
5. Click Next.
The Deployment Tool connects to the application server that you specified. If the connection cannotbe established, an error message is displayed and you cannot proceed with the deployment. In thiscase, verify the application server settings and make sure that the application server is running.
6.7.3 Interstage BPM Console SettingsPrerequisites:You have selected to deploy Interstage BPM Console in the Deployment Tool'sApplication Server and Component Selection page (Operation Mode and Application Server Selectionon page 41)
Console Settings:On the Console Configuration page, you provide the settings for Interstage BPM Console. Fordetails, refer section Deploying Interstage BPM Console Using the Deployment Tool on page 63.
Interstage BPM Server and Console Installation Guide (BEA WebLogic Server) 44
6: Installing and Deploying Interstage BPM Server with Console, OR only the Interstage BPM Server

6.7.4 Database Selection1. On the Database Selection screen, select the database system you wish to use.
Refer to the Release Notes for the exact versions and editions of the supported databasesystems.
Note:
2. Click Next.The next appearing screen depends on the database system that you selected.
6.7.5 Microsoft SQL Server SettingsPrerequisite: You have prepared the database server as instructed in section Database ServerPreparation on page 18.
On the Database Configuration screen, you provide the settings for the database you will be usingwith Interstage BPM. The items displayed on this screen depend on your selections regarding thedatabase on previous screens.
Figure 13: Database Configuration
1. In the Interstage Business Process Manager Database User area, define the user name andpassword for a non-administrative database user account.An example of the user name is ibpmuser.Interstage BPM will use this account to log into the database.
Interstage BPM Server and Console Installation Guide (BEA WebLogic Server) 45
6: Installing and Deploying Interstage BPM Server with Console, OR only the Interstage BPM Server

As a default, Microsoft SQL Server enforces a password policy that prevents users fromusing simple passwords. Make sure that you enter a password that meets the passwordpolicy requirements. Otherwise, the deployment will fail. For details on the password policy,refer to the Microsoft SQL Server documentation.
Note:
2. Select the version of your SQL Server database.3. In the SQL Server Settings area, enter the following information:
• DB Driver: This field is set by the Deployment tool. It is the full package name of the JDBCdriver class used to create the database connection.If you are using the JDBC driver provided by Microsoft, the package name is:com.microsoft.sqlserver.jdbc.SQLServerDriver
If you are using another JDBC driver than the one provided by Microsoft, refer to the driverdocumentation for information about the name of the driver class.
• DBConnection URL: This field is set by the Deployment tool. This is the URL of the databaseto connect to. If you are using the JDBC driver provided by Microsoft, the database connectionURL has the following format:jdbc:sqlserver://<Hostname>:<Database Port>;databaseName=teamflowdb
Here <Hostname> is the name of the computer on which Microsoft SQL Server is installed. Ifthis computer does not have a name use its IP address. If the database and the applicationserver are running on different computers, make sure that you specify the actual hostnameinstead of localhost.<Database Port> is the port number of the database server instance, typically 1433. Forinstructions on verifying the port number, refer to section Configuring Microsoft® SQL Serveron page 18.Example: jdbc:sqlserver://localhost:1433;databaseName=teamflowdb
Do not change the name of the database.Note:
If you are using another JDBC driver than the one provided by Microsoft, refer to the driverdocumentation for information about the database connection URL that you need to specifyfor that driver.
• Path of the JDBC Driver JAR File (sqljdbc.jar): Specify the path of the JDBC driversqljdbc.jar on the local computer.The Interstage BPM Server needs access to this driver to set up a connection to the database.For information about supported versions of the JDBC driver, refer to the Release Notes. Formore information about the JDBC driver, refer to section Configuring Microsoft® SQL Serveron page 18.Example: C:\MicrosoftSQLServer2005JDBCDriver\sqljdbc_1.2\enu\sqljdbc.jar
4. If you are configuring a database on the local computer, provide the following information:• SQLServer Database Instance: The default instance of Microsoft SQL Server is represented
by a <blank>. If you are using a named instance of Microsoft SQL Server, enter the instancename.
• Database Host: This field is set by the Deployment tool. It is the host name or IP address ofthe computer that hosts the Microsoft SQL Server instance you are using.
Interstage BPM Server and Console Installation Guide (BEA WebLogic Server) 46
6: Installing and Deploying Interstage BPM Server with Console, OR only the Interstage BPM Server

• Database Port: This field is set by the Deployment tool. It is the port number of the MicrosoftSQL Server instance you are using. If you are using the default instance, the port number is1433.
• Database Administrator Password: Enter the password for the Microsoft SQL ServerAdministrator user account.
• SQL Server Home Directory: Specify the top-level directory of your Microsoft SQL Serverinstallation, typically C:\Program Files\Microsoft SQL Server.
• Path to store Data files: Specify a directory on a local disk in which the Interstage BPMdatabase will reside, typically C:\Program Files\Microsoft SQLServer\MSSQL.1\MSSQL\Data.The specified directory must already exist.
• JRE Home Directory: Specify the top-level directory of your J2SE Development Kit (JDK) orJava Runtime Environment (JRE) installation.Example: C:\Java\jdk5For exact version information, refer to the Release Notes.
The JDK or JRE installation path must not contain blanks.Note:
5. Click Next.
6.7.6 Oracle SettingsPrerequisite: You have prepared the database server as instructed in section Database ServerPreparation on page 18.
Interstage BPM Server and Console Installation Guide (BEA WebLogic Server) 47
6: Installing and Deploying Interstage BPM Server with Console, OR only the Interstage BPM Server

On the Database Configuration screen, you provide the settings for the database you will be usingwith Interstage BPM. The items displayed on this screen depend on your selections regarding thedatabase on previous screens.
Figure 14: Database Configuration
1. In the Interstage Business Process Manager Database User area, define the user name andpassword for a non-administrative database user account.An example of the user name is ibpmuser.Interstage BPM will use this account to log into the database.
2. In the Oracle Settings area, enter the following information:• DB Host: This field is set by the Deployment tool. It is the name of the computer on which
Oracle is installed.• Connect Identifier: This field is set by the Deployment tool. It is the connection identifier for
the Oracle database that you are using. The connection identifier usually corresponds to thedatabase name unless the database name is longer than eight characters. In this case, atrunkated version of the database name is used. You can verify the actual connection identifierin the tnsnames.ora file located in the <ORACLE_HOME>/network/admin directory.
• Port: This field is set by the Deployment tool. It is the Oracle port number, typically 1521. Youcan check the actual port number in the targets.xml file located in the<ORACLE_HOME>/<hostname>_<SID>/sysman/emd directory.
• DB Driver: This field is set by the Deployment tool. It is the full package name of the JDBCdriver class used to create the database connection.If you are using the JDBC driver provided by Oracle, the package name is:oracle.jdbc.driver.OracleDriver
Interstage BPM Server and Console Installation Guide (BEA WebLogic Server) 48
6: Installing and Deploying Interstage BPM Server with Console, OR only the Interstage BPM Server

If you are using another JDBC driver than the one provided by Oracle, refer to the driverdocumentation for information about the name of the driver class.
• DB Connection URL: This field is set by the Deployment tool. It is the URL of the databaseto connect to. If you are using the JDBC driver provided by Oracle, the database connectionURL has the following format:jdbc:oracle:thin:@<Hostname>:<Database Port>:<Database Name>
Here <Hostname> is the name of the computer on which Oracle is installed. If the databaseand the application server are running on different computers, make sure that you specify theactual hostname instead of localhost.<Database Port> is the Oracle port number, typically 1521.<Database Name> is exactly the same Oracle database name as specified when you createdit.Example: jdbc:oracle:thin:@localhost:1521:ORCL
You must specify thin as the protocol in the database connection URL.Note:
If you are using another JDBC driver than the one provided by Oracle, refer to the driverdocumentation for information about the database connection URL that you need to specifyfor that driver.
• Path of the JDBC Driver JAR File: Specify the path of the Oracle JDBC driver (ojdbc14.jarfor Oracle 10g,ojdbc5.jar for Oracle 11g) on the local computer.Example on Windows: C:\Oracle\Product\10.2.0\db_1\jdbc\lib\ojdbc14.jarExample on Solaris: /opt/oracle/product/10.2.0/db_1/jdbc/lib/ojdbc14.jarExample on Linux: /opt/oracle/product/10.2.0/db_1/jdbc/lib/ojdbc14.jarThe Interstage BPM Server needs access to this driver to set up a connection to the database.
3. If you are configuring a database on the local computer, provide the following information:• SYSTEM User's Password: Enter the password of the SYSTEM user.
The SYSTEM user is one of the administrative user accounts maintained by Oracle.
• Oracle Home Directory: Specify the top-level directory of your Oracle installation.Example on Windows: C:\Oracle\Product\10.2.0\db_1Example on Solaris: /opt/oracle/product/10.2.0/db_1Example on Linux: /opt/oracle/product/10.2.0/db_1
• Path to Store Data Files: Specify a directory in which you want the Interstage BPM databaseto reside.Example on Windows: C:\Oracle\Product\10.2.0\oradata\<Database Name>
Example on Solaris: /u01/oradata/<Database Name>
Example on Linux: /u01/oradata/<Database Name>
You must specify an existing directory and have write permissions for the specified directory.Note:
• JRE Home Directory: Specify the top-level directory of your J2SE Development Kit (JDK) orJava Runtime Environment (JRE) installation.For exact version information, refer to the Release Notes.Example on Windows: C:\j2sdk1.5
Interstage BPM Server and Console Installation Guide (BEA WebLogic Server) 49
6: Installing and Deploying Interstage BPM Server with Console, OR only the Interstage BPM Server

Example on Solaris: /usr/java/j2sdk1.5Example on Linux: /usr/java/j2sdk1.5
The JDK or JRE installation path must not contain blanks.Note:
4. Click Next.
6.7.7 Super User and Multitenancy SettingsOn the InterstageBPM Super User Page, you set your Super User name and password, as wellas multitenancy settings.
Figure 15: Super User and Mulititenancy Settings
1. Set the username and password for the Super User. Also confirm the password.2. In the General Settings section, optionally update the Mail Server that will be used to send email
notifications.3. In the Multitenancy Settings section, choose from the following options:
a) Select SAAS Mode if you intend to use Interstage BPM in the SaaS (Software as a Service)mode, and also choose whether you want to create a default tenant or not.If you select the SaaS mode, you will be set up as a Super User, and be allowed to createmultiple tenant users to whom you can provide the Interstage BPM as a software service overa network. However, your functionality will be limited to only managing tenants and theInterstage BPM Server; if you also need to use Interstage BPM just as a tenant would, andalso work with the default System application, you can choose to set up a default tenant.
b) Select Non-SAAS Mode if you intend to use Interstage BPM in the non-SAAS mode.
Ensure you selectNon-SAASMode if you are upgrading from previous versions of InterstageBPM.
Note:
Interstage BPM Server and Console Installation Guide (BEA WebLogic Server) 50
6: Installing and Deploying Interstage BPM Server with Console, OR only the Interstage BPM Server

In the non-SaaS mode, the default tenant, tenant owner, with the default System applicationwill be set up; you will not be allowed to create any further tenants nor provide Interstage BPMas a software service. All Interstage BPM functionality will be accessible only through thisdefault tenant.For more information about Interstage BPM's SaaS feature, refer the Interstage BusinessProcess Manager Developer's Guide.
The default tenant that is set up is named Default.Note:
4. Click Next.
6.7.8 User and Group ManagementThe Directory Server Selection screen appears only if you have selected the SaaS mode with theoption to create a default tenant, or the non-SaaS mode. In this screen you select the system to beused for managing users and groups and you define the Interstage BPM default tenant account.
Figure 16: Directory Service Selection and Authentication
1. In theDirectory Servers and Local User Management area, select one of the following options:• LDAP Directory Service Adapter• Microsoft Active Directory Adapter• Use Local User Management
If you use Sun Java System Directory Server as your Directory Service, select LDAPDirectory Service Adapter.
Note:
Interstage BPM Server and Console Installation Guide (BEA WebLogic Server) 51
6: Installing and Deploying Interstage BPM Server with Console, OR only the Interstage BPM Server

2. In the Interstage Business Process Manager Tenant Owner Account area, enter a user nameand password for the tenant owner. The tenant owner role is the administrator for the defaulttenant account.If you selected a Directory Service, by default, the user account defined on this screen is alsoused to log into the Directory Service. You can also use a different user. To do so, you mustchange the LDAPAccessUserID and LDAPAccessUserPassword configuration parameters of theInterstage BPM Server. Refer to the Interstage Business Process Manager Server AdministrationGuide for more information.
3. Click Next.The screen appearing next depends on the type of Directory Service you selected.
6.7.9 Sun Java System Directory SettingsOn the LDAP Configuration screen, you provide the settings for Sun Java System Directory.
Figure 17: LDAP Settings
1. Enter the following information:• LDAP Host: Enter the name of the computer on which your LDAP server is running.• LDAP Key: Enter the directory sub-tree where groups and users to be used with Interstage
BPM are stored.• LDAP Organizational Unit (OU): Enter the organizational unit where groups to be used with
Interstage BPM are stored.
Interstage BPM Server and Console Installation Guide (BEA WebLogic Server) 52
6: Installing and Deploying Interstage BPM Server with Console, OR only the Interstage BPM Server

Example: ou=Groups.
• LDAP Port: Enter the port number of your LDAP server. The port number is typically 389.After deployment, you need to configure your Directory Service for Interstage BPM. Refer tosection Setting Up Sun Java System Directory Server on page 92 for more information.
2. Click Next.
6.7.10 Active Directory SettingsOn theActive Directory Configuration screen, you provide the settings for Microsoft Active Directory.
Figure 18: Active Directory Settings
1. Enter the following information:• Active Directory Host: Enter the name of the computer on which your Active Directory server
is running.• Active Directory Key: Enter the directory sub-tree where groups and users to be used with
Interstage BPM are stored.• Active Directory Organizational Unit (OU): Enter the organizational unit where groups to
be used with Interstage BPM are stored.• Active Directory Port: Enter the port number of your Active Directory server.After deployment, you need to configure your Directory Service for Interstage BPM. Refer tosection Setting Up Microsoft® Active Directory on page 82 for more information.
2. Click Next.
Interstage BPM Server and Console Installation Guide (BEA WebLogic Server) 53
6: Installing and Deploying Interstage BPM Server with Console, OR only the Interstage BPM Server

6.7.11 Other SettingsOn the Other Settings for Default Tenant screen, you specify settings for the following externalsystems. Specifying these settings is optional.• Interstage BPM Analytics
Interstage BPM Analytics can be used for analyzing and evaluating the process data from theInterstage BPM Server.
• WebDAV RepositoryInterstage BPM can be integrated with any WebDAV-compliant repository in order to publishmetadata for process definitions to that repository. The examples used below are for CentraSite.If you do not know the settings for your particular WebDAV repository, refer to the instructionsfor using your WebDAV repository software.
• UDDI RegistryInterstage BPM can be integrated with any UDDI-compliant registry in order to publish processdefinition information and search for Web Services. The examples used below are for CentraSite.If you do not know the settings for your particular UDDI registry, refer to the instructions for usingyour UDDI registry software.
Figure 19: Other Settings
1. In the General Settings area, enter the following information:• Email Address of the Interstage Business Process Manager Administrator: Specify the
email address (or alias email address) of the Interstage BPM Tenant Owner.This address will appear in the From: field on all email messages sent from the InterstageBPM Server. This includes all email notifications, work item escalations, timer resolutionmessages, etc.
Interstage BPM Server and Console Installation Guide (BEA WebLogic Server) 54
6: Installing and Deploying Interstage BPM Server with Console, OR only the Interstage BPM Server

• Enable Interstage Business Process Manager Analytics monitoring: Select this option ifyou want to use Interstage BPM Analytics for analyzing and evaluating process data.Additional configuration steps must be performed to set up the Interstage BPM AnalyticsSensor. Refer to the Interstage BPM Analytics documentation for more information.
2. If you want to publish metadata for process definitions to a metadata repository, in the WebDAVRepository Settings area, select Publish Metadata to WebDAV Repository and enter thefollowing information:• Metadata URL (WebDAV): Enter the URL to which metadata will be published when an
Interstage BPM process definition is published. For CentraSite use the following URL:http://<hostname>:53305/CentraSite/CentraSite/ino:dav/ino:dav/projects
• Metadata Username: Enter the name of the user used for publishing metadata. This usermust be a CentraSite Administrator.On Windows: Specify a fully-qualified user name, i.e. user name including the domain name:<DOMAIN NAME>\\<user name>. Specify the domain name in capital letters. If you specify alocal user, use the hostname as a domain name, e.g. MYLOCALHOST\\myusername.
• Metadata Password: Enter the password of the user used for publishing metadata.
3. If you want to publish process definitions to a UDDI registry, select Enable Publishing to UDDIRegistry and enter the following information:• UDDI Business Name: Name of the organization that is publishing process definition
information to the UDDI registry. It is an identifier that helps you to categorize the processdefinition information added to the UDDI registry and makes it easier to search and retrievethe process definition Web Services.For CentraSite, use your company name. Make sure that the company name specified isregistered as an organization in CentraSite.
• UDDI Publish URL: URL to which UDDI registry information will be published when anInterstage BPM process definition is published. For CentraSite use the following URL:http://<hostname>:53307/UddiRegistry/publish
• UDDI Publish Username: Name of the user used for publishing UDDI registry information.This user must be a CentraSite Administrator. Also, the user must have rights to publish datato the organization specified in UDDI Business Name. For CentraSite, specify the name ofthe user who registered the UDDI Business Name as an organization in CentraSite.On Windows: Specify a fully-qualified user name, i.e. user name including the domain name:<DOMAIN NAME>\\<user name>. Specify the domain name in capital letters. If you specify alocal user, use the hostname as a domain name, e.g. MYLOCALHOST\\myusername.
• UDDI Publish Password: Password of the user used for publishing UDDI registry information.
4. If you want to search a UDDI registry, select Enable search in UDDI Registry and enter theUDDI search location.This option allows you to search the UDDI registry using a dialog that is part of the ProcessDesigner tool in the Interstage BPM Console. For CentraSite, use the following URL:http://<hostname>:53307/UddiRegistry/inquiry
5. Click Next.
Interstage BPM Server and Console Installation Guide (BEA WebLogic Server) 55
6: Installing and Deploying Interstage BPM Server with Console, OR only the Interstage BPM Server

6.7.12 Starting the DeploymentThe Review Information screen summarizes the selected operations.1. Make sure that all the information displayed on the Review Information screen is correct.
2. If you want to generate a script that can be used for silent deployment of the Interstage BPMServer, select Generate properties file for silent operation mode.A silent mode deployment is a non-interactive type of deployment, which may save a significantamount of time. You may want to consider using the silent mode deployment if you have to performmultiple deployments of the Interstage BPM Server and the configurations are essentially thesame. For further information, refer to appendix Silent Mode Deployment on page 109.
Plain text passwords will be written to the properties file. As this may pose a security problem,make sure that you protect the properties file from being accessed by unauthorized users.
Note:
3. Click Finish to start deploying the Interstage BPM Server to the application server.At the end of the deployment process, a message is displayed notifying you that the server hasbeen deployed.
4. Click OK to exit the Deployment Tool.
The Deployment Tool created a configuration file named ibpm.properties in <Interstage BPMServer Installation Directory>/server/instance/default. This file reflects the serverconfiguration parameters that have been written to the database during deployment. You can usethe ibpm.properties file as a reference of your initial configuration settings. If you need to changethe configuration, you can use the Configuration Tool or the configuration scripts provided by InterstageBPM. For details, refer to the Interstage Business Process Manager Server Administration Guide.
6.8 Password ProtectionPasswords set during deployment are written to several files. Exposing these passwords may posea security problem. Fujitsu recommends that you implement suitable security measures over thesefiles to ensure that the passwords are inaccessible to those users who should not have access tothem.• From <Interstage BPM Server Installation Directory>/server/deployment/sql, secure
the database scripts.• From <Interstage BPM Server Installation Directory>/server/deployment/WLS-Cluster,
secure the ibpmWLInstallScripts.properties file.• From <Interstage BPM Server Installation Directory>/client/samples/configuration,
secure• createADUser.bat
• IBPMLDAPAdd.ldif
• importAD.bat
6.9 User Accounts and GroupsEvery user that is to work with Interstage BPM needs a user account and must be assigned to oneor more groups.
Interstage BPM Server and Console Installation Guide (BEA WebLogic Server) 56
6: Installing and Deploying Interstage BPM Server with Console, OR only the Interstage BPM Server

A group is a collection of users who share a function within an organization. For example, a Managergroup might contain the first-line managers in an organization. Any Interstage BPM user may bemade a member of any group.In Interstage BPM, groups are used to determine who is responsible for carrying out a task in aprocess. Activities in process definitions are assigned to so-called Roles, which are equivalent togroups. The advantage of assigning activities to Roles (rather than individuals) is that if personnelchanges occur, only the Role definition needs to be updated, and not all the processes that use theRole.To set up an Interstage BPM user account, you create an account with appropriate user rights. Youmust make sure that the user names for the Interstage BPM users and the group members areidentical.
To create user accounts and groups that are valid for Interstage BPM, use only alphanumericcharacters, hyphens, and underscore characters ("_"). User names and group names mustnot begin with an at character ("@") as this is used to identify Agents in Interstage BPM.
Note:
The default group used by Interstage BPM is Role. Interstage BPM administrator accounts must bemembers of a special group named by default AdminRole.If you have configured the Interstage BPM Server to use a Directory Service, you need to configurethe Directory Service before starting the Interstage BPM Server. The Interstage BPM DeploymentTool has created an Interstage BPM LDIF file, which contains default users, default groups and thedefault Interstage BPM object class for the Directory Service. You can import the LDIF file into yourDirectory Service in order to configure it. For details, refer to chapter Setting Up a Directory Serviceon page 82.If you have configured the Interstage BPM Server to use its local user store, the Interstage BPMSuper User account has already been created in the user store. There is no need to perform furtherconfiguration steps before starting the Interstage BPM Server. For details on creating additional useraccounts and groups, refer to the Interstage Business Process Manager User's Guide.
6.10 Configuring WebLogic's Embedded LDAP ServerIn case you are using the Interstage BPM Console, please read Special WebLogic ServerConfigurations to Enable Web Service Operations on page 66 and ignore the informationgiven here.If you are not using the Interstage BPM Console, follow the steps described in this section.
Note:
WebLogic Application Server comes with an embedded LDAP Server. You need to configureWebLogic's embedded LDAP Server if any of the following applies:• You are using Interstage BPM Studio.• You want to run remote subprocesses using SWAP (Simple Workflow Access Protocol) or ASAP
(Asynchronous Service Access Protocol).• You want to call Web Services from process definitions without specifying an endpoint URL.To configure the embedded LDAP Server, do one of the following:• Configure the Directory Service that you are using as an authentication provider for the embedded
LDAP Server.• Add the required users manually to the embedded LDAP Server.
If you want to run remote subprocesses, you need to add the owner of the parent process definition.
Interstage BPM Server and Console Installation Guide (BEA WebLogic Server) 57
6: Installing and Deploying Interstage BPM Server with Console, OR only the Interstage BPM Server

If you want to call Interstage BPM Web Services from process definitions without specifying anendpoint URL, you need to add the Interstage BPM Administrator account. This is the accountthat you defined during the deployment of Interstage BPM Server.
For detailed instructions on how to configure the embedded LDAP Server, refer to the WebLogicApplication Server documentation.
6.11 Switching on Java SecurityThis section is applicable for SaaS mode only.In the SaaS mode, it is critical that each tenant has access to only their own resources, and no othertenant's resources. To achieve this security, you need to manually switch on Java security as follows:
For WebLogic:1. At a location of your choice on the Server machine, create a policy.txt file, with the following
content:
grant {permission java.security.AllPermission;
};
2. To the startWebLogic.cmd / startWebLogic.sh file located in <BEAHome>/user_projects/domains/<Domain Name>/bin/, for the JAVA_OPTIONS variable, add thefollowing command level arguments:
-Djava.security.manager -Djava.security.policy=<Location of policy.txt>
For example:
...%JAVA_HOME%\bin\java %JAVA_VM% %MEM_ARGS% %JAVA_OPTIONS%-Dweblogic.Name=%SERVER_NAME%-Djava.security.manager -Djava.security.policy=C:\policy.txt%PROXY_SETTINGS% %SERVER_CLASS%...
3. If you intend to invoke any custom JavaActions, JavaScripts, or Agents, the following permissionneeds to be added to the policy.xml file. Refer the Interstage BPM Administration Guide fordetails about its location and how to edit this file.
...<permissionclassName="java.io.FilePermission"target="<WebLogic Domain
dir>\\<server>\\<ServerName>\\cache\\EJBCompilerCache\\-"action="read,write,execute,delete"/><permissionclassName="java.io.FilePermission"target="<WebLogic Domain dir>\\<server>\\<ServerName>\\tmp\\-"action="read,write,execute,delete"/><permissionclassName="java.io.FilePermission"target="<WebLogic Domain dir>\\<server>\\<ServerName>\\-"
Interstage BPM Server and Console Installation Guide (BEA WebLogic Server) 58
6: Installing and Deploying Interstage BPM Server with Console, OR only the Interstage BPM Server

action="read,write,execute,delete"/>...
For example:
...<permissionclassName="java.io.FilePermission"
target="D:\\bea\\user_projects\\domains\\base_domain\\servers\\AdminServer\\cache\\EJBCompilerCache\\-"
action="read,write,execute,delete"/><permissionclassName="java.io.FilePermission"
target="D:\\bea\\user_projects\\domains\\base_domain\\servers\\AdminServer\\tmp\\-"
action="read,write,execute,delete"/><permissionclassName="java.io.FilePermission"
target="D:\\bea\\user_projects\\domains\\base_domain\\servers\\AdminServer\\-"
action="read,write,execute,delete"/>...
Additional Settings for Custom AdaptorsIn case you intend to use Custom Directory Adapters to connect to remote server, you need to addthe following permission in the policy.xml file. Refer the Interstage BPM Administration Guide fordetails about its location and how to edit this file.
...<permissionclassName="java.net.SocketPermission"target="*"action="connect,resolve"/>...
6.12 Starting Interstage BPM ServerPrerequisites:• If you are using a Directory Service, you must have configured that Directory Service for Interstage
BPM. For details, refer to chapter Setting Up a Directory Service on page 82.• The WebLogic Administration Server is running.• If you opted for SaaS mode during Server deployment, you have switched on Java security. For
details, refer Switching on Java Security on page 58.
To start Interstage BPM Server:1. Run the startup script located in <BEA Home>/user_projects/domains/<Domain Name>/bin:
Interstage BPM Server and Console Installation Guide (BEA WebLogic Server) 59
6: Installing and Deploying Interstage BPM Server with Console, OR only the Interstage BPM Server

ScriptOperating System
startManagedWebLogic.cmd <Server Name>
Example:startManagedWebLogic.cmd IBPMServer
Windows
startManagedWebLogic.sh <Server Name>
Example:startManagedWebLogic.sh IBPMServer
SolarisLinux
For <Server Name>, specify the name that you defined when deploying the Interstage BPMServer.
2. When asked by the startup script, enter the name and password of the administrator for theWebLogic Administration Server.Upon successful initialization of the Interstage BPM Server, the following message appears nearthe end of the Console Window:<Server started in RUNNING mode>
Interstage BPM Server for WebLogic is now ready to use.
6.13 Starting Interstage BPM Console and Tenant ManagementConsolePrerequisites:The WebLogic Administration Server where you have deployed Console is running.
When Interstage BPM Console is deployed on WebLogic, starting the Interstage BPM Server alsostarts Interstage BPM Console and Tenant Management Console. For details of starting InterstageBPM Server, refer section Starting Interstage BPM Server on page 59To access Interstage BPM Console or Tenant Management Console:1. In a Web browser
• To access the Interstage BPM Tenant Management Console, enter the URLhttp://<hostname>:<port>/console/TenantManager.page
• To access the Interstage BPM Console, enter the URLhttp://<hostname>:<port>/console/<TenantName>/
Here:• <hostname> is the machine name of the computer upon which you have deployed the Interstage
BPM Console.• The default port is 49950.• <TenantName> is the name of the tenant; if you are in non-SaaS mode, this is default.• It is recommended to use the tenant name in the URL with the same case as it has been
created with during deployment. Tenant name in the URL is case sensitive for accessingcertain features.
The Login page appears.
2. Log on to Interstage BPM Console or Tenant Management Console.
Interstage BPM Server and Console Installation Guide (BEA WebLogic Server) 60
6: Installing and Deploying Interstage BPM Server with Console, OR only the Interstage BPM Server

You can now begin using Interstage BPM Console and Tenant Management Console. Refer theInterstage BPMConsole Online Help and Interstage BPM Tenant Management Console Online Helpfor details.
For information about further configuration of Interstage BPM Console, refer Interstage BPMConsole - Other Configurations on page 65
Note:
Interstage BPM Server and Console Installation Guide (BEA WebLogic Server) 61
6: Installing and Deploying Interstage BPM Server with Console, OR only the Interstage BPM Server

7 Deploying only the Interstage BPM ConsoleUse the information in this chapter if, having already installed and deployed Interstage BPM Serverseparately, you plan to deploy only Interstage BPM Console.
You need to deploy Interstage BPM Console separately from Interstage BPM Server if youplan to deploy Server and Console on the same machine, but different WebLogic domains.
Note:
It is recommended that you read the overview of the deployment procedure before starting thedeployment.Refer to System Requirements for Interstage BPM Server and Console on page 15 and to theRelease Notes for details on the required components.
When you deploy Interstage BPM Console, you also automatically deploy Interstage BPMTenant Management Console.
Note:
7.1 Preparing for Console DeploymentThis chapter explains how to set up your environment before you deploy Interstage BPM Console.
7.1.1 Creating a WebLogic Domain for Interstage BPM ConsoleUse the information in this section only if you plan to deploy Interstage BPM Console on aWebLogic domain different from the one on which you deployed Interstage BPM Server.
Note:
To create a WebLogic domain for Console, refer section Configuring WebLogic 9.2 on page 21.
7.1.2 Starting WebLogic Administration ServerBefore deploying Interstage BPM Console, ensure you start the WebLogic Administration Server.For information on starting the server, refer section StartingWebLogic Administration Server on page22.
7.2 Permissions Required for DeploymentYou must have read, write, and execute permissions on the installation directory of Interstage BPMConsole.
7.3 Overview of Installation and Deployment of Interstage BPMConsoleThis section summarizes the steps required for installing and deploying only Interstage BPM Console.
Installing and Deploying only Console on WebLogic1. Make sure Interstage BPM Server is already installed and deployed
Refer chapter Installing and Deploying Interstage BPMServer with Console, OR only the InterstageBPM Server on page 23
2. Make sure the application server is running
Interstage BPM Server and Console Installation Guide (BEA WebLogic Server) 62
7: Deploying only the Interstage BPM Console

Refer section Starting WebLogic Administration Server on page 62
3. Deploy Interstage BPM Console to the application server using the Deployment ToolRefer section Deploying Interstage BPM Console Using the Deployment Tool on page 63
4. Make sure Interstage BPM Server is runningRefer section Starting Interstage BPM Server on page 59
5. Start Interstage BPM ConsoleRefer section Starting Interstage BPM Console on page 65
6. If required, perform further configurations for Interstage BPM ConsoleRefer section Interstage BPM Console - Other Configurations on page 65
7.4 Deploying Interstage BPM Console Using the DeploymentToolPrerequisites:• You have already installed and deployed Interstage BPM Server, OR are in the process of
deploying Server and Console together.• The application server is running.
If you are deploying only Interstage BPM Console, start from step 1.If you are in the process of deploying Interstage BPM Server and Console together, start from step4.To deploy Interstage BPM Console using the Deployment Tool:1. Start the Deployment Tool. Refer section Starting the Deployment Tool on page 38.2. On the Welcome page, select the mode of operation. On the Application Server Selection
screen select the application server, and components to be deployed (that is, Console). Fordetails, refer section Operation Mode and Application Server Selection on page 41.
3. On the application server configuration page, provide settings for your application server.Refer section WebLogic Application Server Settings on page 42
Interstage BPM Server and Console Installation Guide (BEA WebLogic Server) 63
7: Deploying only the Interstage BPM Console

4. On the Console Configuration page, provide your settings for Interstage BPM Console.
Figure 20: Console Configuration page
a) In the Console Configuration Parameters area, depending on your application server, thevalues for the following fields are auto-populated:NamingProvider,UserAgentServiceName,NamingProviderURL, (and ServerBaseURL, ServerEmailBaseURL, if deploying InterstageBPM Server and Console together).
b) In the Properties Configuration Parameters area, the value for ServerBaseURL isauto-populated in the format http://<ConsoleHost>:<ConsolePort>/console/Example: http://docone:49950/console/This is the base URL to access Interstage BPM Console. Console-related functions areaccessed by appending appropriate values to this base URL.
This parameter does not appear in the Console Configuration page when deploying onlyInterstage BPM Console.
Note:
c) In the Properties Configuration Parameters area, the value for ServerEmailBaseURL isauto-populated in the format http://<ConsoleHost>:<ConsolePort>/console/Example: http://docone:49950/console/Console Web Services are accessesed by appending appropriate values to this base URL.
This parameter does not appear in the Console Configuration page when deploying onlyInterstage BPM Console.
Note:
d) If you are deploying only Console:1. Click Finish.
Interstage BPM Server and Console Installation Guide (BEA WebLogic Server) 64
7: Deploying only the Interstage BPM Console

2. For further steps refer Overview of Installation and Deployment of Interstage BPMConsoleon page 62.
e) If you are deploying Console together with Interstage BPM Server, click Next. For further stepsrefer Database Selection on page 45.
7.5 Starting Interstage BPM ConsolePrerequisites:You have finished deploying Console on your application server.
To start Interstage BPM Console, refer section Starting Interstage BPM Console and TenantManagement Console on page 60.
7.6 Interstage BPM Console - Other ConfigurationsThis section describes other configurations for Interstage BPM Console after you have deployed iton an application server.
7.6.1 Configuring Interstage BPM Console to work with InterstageAnalyticsPre-requisitesMake sure that you have installed Interstage Analytics and Interstage BPM including Interstage BPMConsole on the same machine.
To configure Interstage BPM console to display Analytics information:1. Update the following parameters in console.conf file
• InterstageAnalyticsHostName
• InterstageAnalyticsPort
2. Delete the ibpmaApiIF.jar from /WEBINF/lib directory of the Console deployment directory.
The location of this file can be different for different application servers.Note:• For Weblogic: <Interstage BPM Deployment
Directory>/client/console/WEB-INF/lib
3. Copy the following JAR files from WEB-INF/lib of the Analytics installation directory to WEBINF/libof the Console deployment directory.• ibpmm.jar
• json-lib-2.1-jdk13_fj.jar
• jakarta-oro.jar
• ezmorph-1.0.4.jar
• commons-beanutils.jar
• commons-collections-3.1.jar
• commons-lang-2.1.jar
• commons-logging.jar
4. Restart the Application Server or the Console Web Application.
Interstage BPM Server and Console Installation Guide (BEA WebLogic Server) 65
7: Deploying only the Interstage BPM Console

Only the user registered in Interstage Analytics can access analytics information fromConsole. Ensure that your Interstage BPM Console username is also a registered InterstageAnalytics username.
Note:
7.6.2 UTF-8 Character SupportThe Servlet engine on which you run the Interstage BPM Console must be configured correctly tosend and receive UTF-8 characters in URL query parameters. This would be the standard way tosend and receive the Java character set. Many, but not all, Servlet engines may be configured thatway by default. For instance, if you are using TomCat 5.0, then you need to make sure that thecontainer setting in <Tomcat_Home>/conf/server.xml has the following attribute:URIEncoding="UTF-8". Please refer to your Servlet container documentation to assure that passedURI parameters are propertly interpreted as being UTF-8 encoded.The following is an example of adding the UTF-8 Attribute to server.xml:
<!-- Define a non-SSL Coyote HTTP/1.1 Connector on port 8080 --><Connector URIEncoding="UTF-8" port="49950"
maxPostSize="0"...
If the Servlet engine in improperly configured, the you will get an error message displayed when youtry to use the Console.
7.6.3 Using Wf-XML-Based FunctionsIf you will be using any of the Wf-XML 2.0-Based Functions listed in this section, you must performa special WebLogic Configuration. For instructions in performing this configuration, see SpecialWebLogic Server Configurations to Enable Web Service Operations on page 66Wf-XML-Based Functions• Download process definitions.• Upload process definitions.• Make Wf-XML 2.0 requests from external Wf-XML 2.0 Clients to the Interstage BPM Server.• Use Remote Subprocess whether Interstage BPM is the Server or the Client.Wf-XML-Based Functions on the Studio: Since the Studio uses the Interstage BPM Console forWf-XML Functions, the following Wf-XML Functions performed on the Studio are listed because theyalso depend on this configuration (for instructions performing any of these functions, see the InterstageBPM Studio Users Guide):• List process definitions stored in an Interstage BPM Server.• Retrieve a process definition from an Interstage BPM Server and display it in the Studio Target
Area.• Save a process definition newly created or updated in the Studio to the Interstage BPM Server.
7.6.4 Special WebLogic Server Configurations to Enable Web ServiceOperationsDeploy the Interstage BPM Console on the WebLogic Server before using the instructions in thistopic.
Interstage BPM Server and Console Installation Guide (BEA WebLogic Server) 66
7: Deploying only the Interstage BPM Console

The instructions in this topic are needed only if you have deployed the Interstage BPMConsole on the WebLogic Server.
Note:
The instructions in this topic are needed if you want to perform the following operations:• Download or upload process definitions from remote Interstage BPM Servers.• Run remote subprocesses using SWAP (Simple Workflow Access Protocol) or ASAP
(Asynchronous Service Access Protocol).• Call Web Services from process definitions without specifying an endpoint URL.
You also need to perform the instructions in this topic each time you install a new Webapplication or EJB to the same WebLogic domain of the Interstage BPM Console.
Note:
As an option to performing the instructions in this topic, you can enable the Web Service Operationslisted above by performing the instructions in the topic following this one Configuring WebLogic'sEmbedded LDAP Server on page 67.To enable the listed Web Services Operations :1. Stop the WebLogic Administration Server and Interstage BPM Server in which the Console is
running.2. Add the following tag block as the last block in the <security-configuration> tag block to the
<BEA_HOME>/user_projects/domains/base_domain/config/config.xml file for the WebLogicServer Domain in which the Interstage BPM Console is deployed:<enforce-valid-basic-auth-credentials>false</enforce-valid-basic-auth-credentials>
For example:
...<enforce-valid-basic-auth-credentials>false</enforce-valid-basic-auth-credentials>
</security-configuration>
3. Save the changes you have made to this file.4. Start the WebLogic Administration Server and Interstage BPM Server in which the Console is
configured.
The WebLogic configuration change described in these instructions effectively "turns off" WebLogicauthentication. For Interstage BPM purposes, WebLogic authentication is unnecessary because theConsole authenticates its users.
7.6.5 Configuring WebLogic's Embedded LDAP ServerIf you have performed the instructions in the previous topic Special WebLogic ServerConfigurations to Enable Web Service Operations on page 66, the instructions in this topicare unnecessary.
Note:
To configure the embedded LDAP Server, refer section Configuring WebLogic's Embedded LDAPServer on page 57.
7.6.6 Configuring the SOAP ListenerBefore you can configure the SOAP Listener, you must make sure that your Interstage BPM Serverand Console are running properly and that you are logged in to the Console.
Interstage BPM Server and Console Installation Guide (BEA WebLogic Server) 67
7: Deploying only the Interstage BPM Console

For instructions, refer Starting Interstage BPM Server on page 59, and Starting Interstage BPMConsole and Tenant Management Console on page 60.
To configure the SOAP Listener:1. Check to make sure that the services required for SOAP Messaging are available with the following
instructions:a) Enter the following URL in the Location field of your browser:
http://<host>:<port>/<context-root>/<tenant-name>/soap/soapindex.jsp
Example:http://ConsoleHost:9001/console/default/soap/soapindex.jsp
b) If no page is displayed, the SOAP Services are not available, so you must start them by runningthe following batch file:<Interstage BPM Console>/web/soap/soaplisteners_start.bat on Windows or<Interstage BPM Console>/web/soap/soaplisteners_start.sh on UNIX.
In case you need to stop the SOAP services, run the following batch file:<Interstage BPM Console>/web/soap/soaplisteners_stop.bat on Windows or<Interstage BPM Console>/web/soap/soaplisteners_stop.sh on UNIX.
Note:
You may need to update the following in the startup and stop scripts before running themNote:• JAVA_HOME and INSTALL_DIR properties• MACHINE_NAME and port numbers in all URLs
c) Click Run.The Apache SOAP Admin page appears.
d) Click List.If the required services are available, a page appears that lists the following services:• urn.POClientListener• urn.HRClientListener
2. Update your Client authentication by making the following changes in the file <Interstage BPMConsole>/web/soap/clientlisteners.xml:• <servertype> “EE” for Enterprise Edition• <servername> <Server-Host>Flow• <userid> userid to be used to log in to the Server• <password> password to be used to log in to the Server.
3. Update the log file location by replacing <Interstage BPM Console InstallationDirectory>/web/soap/ with path to the SOAP directory in the log4j.properties file.
4. Make sure that the following files are in the CLASSPATH of the Web Container in which theConsole is deployed:
If you are installing the Console on the Interstage Application Server, this step is unnecessary.Note:
• iFlow.jar
5. Restart the Web Container.
Interstage BPM Server and Console Installation Guide (BEA WebLogic Server) 68
7: Deploying only the Interstage BPM Console

8 Undeploying andUninstalling InterstageBPMServerand ConsoleThis chapter explains how to undeploy Interstage BPM Server and Console from an applicationserver and how to uninstall Interstage BPM.
8.1 Undeploying Interstage BPM Server and Console from theApplication ServerPrerequisite: The WebLogic Administration Server is running.
You can undeploy an instance of the Interstage BPM Server and/or Interstage BPM Console fromthe application server using the Interstage BPM Deployment Tool.
When you remove a server or console instance, the Interstage BPM database will not beremoved.
Note:
To undeploy an Interstage BPM Server or Console instance:1. Log out of all Interstage BPM Clients and close all Browser windows.2. Stop the Interstage BPM Server by running the shutdown script located in <BEA
Home>/user_projects/domains/<Domain Name>/bin:
ScriptOperating System
stopManagedWebLogic.cmd <Server Name>
Example:stopManagedWebLogic.cmd IBPMServer
Windows
stopManagedWebLogic.sh <Server Name>
Example:stopManagedWebLogic.sh IBPMServer
SolarisLinux
For <Server Name>, specify the name that you defined when deploying the Interstage BPMServer.
3. When asked by the script, enter the name and password of the administrator for the WebLogicAdministration Server.
4. Start the Interstage BPM Deployment Tool.For details, refer to section Starting the Deployment Tool on page 38.
5. For Windows: Select the appropriate radio button on the Deployment Tool Option Screen andclick Next.
Interstage BPM Server and Console Installation Guide (BEA WebLogic Server) 69
8: Undeploying and Uninstalling Interstage BPM Server and Console

If you have already removed the Interstage BPM Server and Console from the applicationserver, make sure that you select the Do not launch Deployment Tool radio button.
Note:
Figure 21: Starting Deployment Tool - For Windows
6. On the Welcome screen, click Server/Console Instance Removal.7. On the Application Server Selection screen:
a) Select the type of application server from which you want to undeploy.In this case, select BEA WebLogic.
Interstage BPM Server and Console Installation Guide (BEA WebLogic Server) 70
8: Undeploying and Uninstalling Interstage BPM Server and Console

b) Select the checkbox(es) for the Interstage BPM component (Server and/or Console) you wantto undeploy.
Figure 22: Application Server and Component selection sample screen
8. Click Next.9. On theWebLogic 9.2 Configuration screen, specify the server instance that you want to remove.
Interstage BPM Server and Console Installation Guide (BEA WebLogic Server) 71
8: Undeploying and Uninstalling Interstage BPM Server and Console

Provide the information that you entered when creating the server instance. For more information,refer to section WebLogic Application Server Settings on page 42.
Figure 23: WebLogic Settings
10. Click Next.11. Make sure that all the information displayed on the Review Information screen is correct.12. Click Finish to start the removal.
At the end of the process, a message is displayed notifying you that the server/console has beenremoved from the application server.
13. Click OK to exit the Deployment Tool.
8.2 Uninstalling Interstage BPMWhen you uninstall Interstage BPM using its uninstallation program, everything except the followingis removed:• The Interstage BPM database• Log files and configuration files located in <Interstage BPM Server Installation Directory>
or in one of the subdirectoriesDuring uninstallation, the Deployment Tool is started so that you can remove Interstage BPM Serverfrom the application server if you have not done so yet.
Interstage BPM Server and Console Installation Guide (BEA WebLogic Server) 72
8: Undeploying and Uninstalling Interstage BPM Server and Console

To uninstall Interstage BPM:1. If you have not yet removed the Interstage BPM Server/Console from the application server:
a) Log out of all Interstage BPM Clients and close all Browser windows.b) Make sure that the WebLogic Administration Server is running.c) Stop the Interstage BPM Server by running the shutdown script located in <BEA
Home>/user_projects/domains/<Domain Name>/bin:
ScriptOperating System
stopManagedWebLogic.cmd <Server Name>
Example:stopManagedWebLogic.cmd IBPMServer
Windows
stopManagedWebLogic.sh <Server Name>
Example:stopManagedWebLogic.sh IBPMServer
SolarisLinux
d) When asked by the script, enter the name and password of the administrator for the WebLogicAdministration Server.
2. Start the Interstage BPM uninstallation program:• On Windows, select Start > Programs > Interstage Business ProcessManager >Uninstall.
Alternatively, you can use the Windows Control Panel (Start > Settings > Control Panel >Add or Remove Programs > Interstage Business Process Manager)
• On Solaris, run <Interstage BPM Server InstallationDirectory>/_uninst/uninstall.sh.
• On Linux, run <Interstage BPM Server Installation Directory>/_uninst/uninstall.sh.
3. For platforms other than Windows, the Welcome screen will appear. On this screen, click Nextto launch the Deployment Tool.
4. On Windows: Select the appropriate radio button on the Deployment Tool Option Screen andclick Next.
Interstage BPM Server and Console Installation Guide (BEA WebLogic Server) 73
8: Undeploying and Uninstalling Interstage BPM Server and Console

If you have already removed the Interstage BPM Server and Console from the applicationserver, make sure that you select the Do not launch Deployment Tool radio button.
Note:
Figure 24: Start Deployment Tool - For Windows
5. In the Deployment Tool, do one of the following:• If you have already removed the Interstage BPM Server and Console from the application
server, click Cancel to exit the Deployment Tool.• If you have not yet removed the Interstage BPM Server and Console from the application
server, click Server/Console instance removal to start the removal process.For further instructions, refer to sectionUndeploying Interstage BPMServer and Console fromthe Application Server on page 69.
In either case, after exiting the Deployment Tool, you will return to the uninstallation program.
6. On Windows, when asked if you want to completely remove the selected application and all ofits features, click Yes /Next.
7. During uninstallation, the uninstallation program may ask you to confirm the deletion of somefiles. Decide whether you want to keep or remove the files.
8. When the uninstallation is complete, click Finish.
Interstage BPM Server and Console Installation Guide (BEA WebLogic Server) 74
8: Undeploying and Uninstalling Interstage BPM Server and Console

9 Upgrading Interstage BPM from Previous Versions9.1 Upgrading from Previous Versions of Interstage BPM
To upgrade from previous versions of Interstage BPM:1. Before uninstalling the previous version of Interstage BPM, back up the following:
• The Interstage BPM database - This is the only way to ensure the retention of your currentInterstage BPM data. The upgrade process automatically migrates (and therefore overwrites)process definitions to the current release's formats. Use the default functionalities of yourdatabase software for backing up your database.
• The ibpm.properties file, if upgrading from Interstage BPM v10.x - This preserves yourprevious server configurations. (If upgrading from Interstage BPM v7.x or v8.x, the uninstallationprogram automatically saves your configuration files with the suffix previous appended totheir file names. For example, the ibpm.properties file is saved asibpmprevious.properties. ) After installing the new version of Interstage BPM, you can usethe saved properties file to manually configure your new server installation. For informationon how to change the server configuration, refer to the Interstage Business Process ManagerServer Administration Guide.
• All files from the previous agents/ folder• All files from the previous calendar/ folder• The resources/DataSourceDefinition.xml file• The resources/fileListenerConf.xml file• The DmsCollections.xml file and the directories specified in it - these directories contain
data that users have previously uploaded.
2. Uninstall the previous version of Interstage BPM according to the instructions for that version.
3. Make sure that you have the required permissions for installation and deployment.For details, refer to section Permissions Required for Installation and Deployment on page 29.
4. Install Interstage BPM Server according to the instructions in section Installing Interstage BPMon page 31.
5. Upgrade your database as follows:a) If the Deployment Tool is not running, start it using the instructions in section Starting the
Deployment Tool on page 38.b) On the Welcome screen of the Deployment Tool, select Database Upgrade.c) Click Next.d) On the Database Selection screen, select the database system you are using.e) Click Next.f) On the Database Configuration screen, specify the settings for your database.
If you are using Oracle, refer to section Oracle Settings on page 47 for a detailed explanation.If you are using Microsoft SQL Server, refer to section Microsoft SQL Server Settings on page45 for a detailed explanation.If you are migrating from an Interstage BPM Advanced Edition, select the Upgrade fromAE to EE Version check box.
If you are upgrading from an Interstage BPM Enterprise Edition, do not select theUpgradefrom AE to EE Version check box. Otherwise, your database may get incorrectly updated.
Note:
Interstage BPM Server and Console Installation Guide (BEA WebLogic Server) 75
9: Upgrading Interstage BPM from Previous Versions

g) Click Next.h) Make sure that all the information displayed on the Review Information screen is correct.i) Click Finish to start upgrading the database.
At the end of the process, a message is displayed notifying you that the database has beenupgraded.
j) Click OK to exit the Deployment Tool.
6. Deploy the Interstage BPM Server and/or Console according to the instructions in sectionDeployingServer Instances with Console, OR only Server Instances on page 40.
On the <Application Server> Configuration screen, do not select theConfigure Databaseon this Machine option. Otherwise, the old database will be overwritten and you will loseall of the previous work that is stored in the database.
Note:
On the Interstage BPM Super User screen, ensure you select the Non-SAAS mode.Note:
7. Migrate application resources as described in Migrating Application Resources from PreviousVersions to Interstage BPM v11.0 on page 76.
8. Start the Interstage BPM Server and Console. Refer the following topics:• Starting Interstage BPM Server on page 59• Starting Interstage BPM Console and Tenant Management Console on page 60
9. If needed, migrate application owners as described in Migrating Application Owners from PreviousVersions to Interstage BPM v11.0 on page 78.
Interstage BPM is now upgraded to the latest version.
9.2 Migrating Application Resources from Previous Versionsto Interstage BPM v11.0Pre-requisites: You have completed the following steps as described in Upgrading from PreviousVersions of Interstage BPM on page 75:• You have uninstalled the previous version of Interstage BPM• You have installed the new version of Interstage BPM• You have upgraded the database• You have deployed an instance of Interstage BPM Server (and, if required, Console) in non-SaaS
mode.
To migrate application resources from previous versions to Interstage BPM v11.0:1. Copy the DmsCollections.xml file of the previous version to the <Interstage BPM Installation
Directory>/server/instance/default/tenants/Default/resources/ folder.2. Copy the apps folder from <Interstage BPM Installation
Directory>/server/instance/default/tenants/Default/ to the DMSRoot <Path> youchoose to specify in DmsCollections.xml.
For Solaris and Linux environments, while specifying the DMSRoot, ensure you use thecorrect case in the file path.
Note:
Interstage BPM Server and Console Installation Guide (BEA WebLogic Server) 76
9: Upgrading Interstage BPM from Previous Versions

3. For each application, do one of the following:a) If an application already contains the agentsConfig.xml file (located in
<DMSRoot>/apps/<application id>/), add the following code to that file:
<ActionAgent><Name>@FTP</Name><Description>FTP Agent</Description><RetryInterval>20</RetryInterval><EscalationInterval>1</EscalationInterval>
<ClassName>com.fujitsu.iflow.serveree.impl.actionagent.ServiceAgent</ClassName>
<ConfigFile>ftp.xml</ConfigFile></ActionAgent><ActionAgent>
<Name>@HTTPAgent</Name><Description>HTTP Agent</Description><RetryInterval>20</RetryInterval><EscalationInterval>1</EscalationInterval>
<ClassName>com.fujitsu.iflow.serveree.impl.actionagent.httpservice.HTTPServiceAgent</ClassName>
<ConfigFile>HTTPAgent.xml</ConfigFile></ActionAgent>
b) If an application does not contain the agentsConfig.xml file (located in<DMSRoot>/apps/<application id>/)• Copy the agentsConfig.xml file of the previous version to the <DMSRoot>/apps/System
folder.• Edit the copied agentsConfig.xml to remove 'agents/' from the text within the
<ConfigFile> tag.
4. Copy the fileListenerConf.xml file of the previous version to the <DMSRoot>/apps/Systemdirectory.
5. Copy the previous versions of each of the following to each application folder in the<DMSRoot>/apps/<application id>/ directory.• HTTPAgent.xml file• ftp.xml file• Business Calendar (.cal) files• DataSourceDefinition.xml file
Do not migrate Decision Table Management (DTM) configuration files from previous versionsof Interstage BPM; Interstage BPM v11.0 does not support DTM configuration files ofprevious versions.
Note:
Interstage BPM Server and Console Installation Guide (BEA WebLogic Server) 77
9: Upgrading Interstage BPM from Previous Versions

From version 11.0 of Interstage BPM:Note:• Parent process definitions can only call sub process definitions if they exist in the same
application. To continue using parent process definition from previous versions inInterstage BPM v11.0, enusre their sub process definitions exist in the same applicationas the parent process definition.
• You cannot migrate process instances from one application to another.• You cannot copy process definitions from one application to another.
9.3 Migrating Application Owners from Previous Versions toInterstage BPM v11.0When you migrate pre-v11.0 applications to Interstage BPM v11.0, the user group having the roleof AdminRole is automatically set as the owner of the application. After application migration, if youwant to assign application ownership to a group other than the AdminRole, you can do so by usingInterstage BPM Console. For information about changing application owners in Interstage BPMConsole, refer the Managing Applications section of the Interstage BPM Console Online Help.
9.4 Migrating WebDAV Repository and UDDI Registry fromPrevious Versions to Interstage BPM v11.0If you had configured pre-v11.0 Interstage BPM to use WebDAV repository and UDDI registry (suchas Centrasite), you need to synchronize the Interstage BPM Server with your WebDAV and UDDIrepositories before you can use already published information or publish new process definitions.Use the following steps to achieve this:1. After upgrade and configuration of Interstage BPM Server and Console, start the Interstage BPM
Server and Console.• Starting Interstage BPM Server on page 59• Starting Interstage BPM Console and Tenant Management Console on page 60
2. Login to Interstage BPM Console as an administrator.3. After choosing an application, in the System Administration tab, click Application Settings.4. In the Application Settings page, click Synchronize with Repository, and then click
Synchronize in the pop-up that appears.Once synchronization is successful, an appropriate message is displayed.
Now Interstage BPM v11.0 is ready to be used with WebDAV and UDDI repositories
9.5 Additional Steps for Handling Pre-11.0 Console URLsIn version 11.0 of Interstage BPM Console, the Interstage BPM Console URL has been changed,making older versions of URLs such as those of Remote SubProcesses, Service Registry, and soon incompatible when called from previous versions of Interstage BPM.To overcome this problem, deploy the Compatibility Proxy WAR provided in this release using thesteps listed in this section.
Interstage BPM Server and Console Installation Guide (BEA WebLogic Server) 78
9: Upgrading Interstage BPM from Previous Versions

Note: 1. For a remote subprocess, perform the steps listed here only in the following cases:• When both the Parent and child process instances are running, and you upgrade
Interstage BPM on the parent server to v11.0• When the parent process is running but the child process instance has not yet started,
and you upgrade Interstage BPM on the child server to v11.0
2. Support for HTTPS is not available in this release.
In order to use the Compatibility Proxy for supporting pre-V11.0 URLs, the following requirementsmust be met:• When a pre-V11.0 server is upgraded to V11.0, the Non-SaaS mode should be selected during
upgrade.• The Compatibility Proxy should be deployed at the original pre-V11 context root, and the V11
Console should be deployed at a different context root. For example, if the pre-v11.0 Consolewas deployed at the context root ibpmconsole, then you should install the compatibility proxy atibpmconsole and the V11 Console at any other context root, for example, console. The defaultcontext root for V11 Console is console, which is different from the default context root for anyprevious version. So if you have followed the defaults, this requirement rule will be automaticallysatisfied.
• V10.x had the restriction that two applications cannot have process definitions with the samename. This restriction has been removed in V11.0. But to use the Compatibility Proxy, the samerestriction needs to be followed, that is, two applications should not have process definitions withthe same name.
9.5.1 Steps to Overcome the URL-incompatibility ProblemPre-requisites: You have completed the following steps as described in Upgrading from PreviousVersions of Interstage BPM on page 75:• You have uninstalled the previous version of Interstage BPM• You have installed the new version of Interstage BPM• You have upgraded the database• You have deployed an instance of Interstage BPM Server and Console in non-SaaS mode.• Make sure that the BEA WebLogic Server is running.
To overcome the URL-incompatibility problem caused by pre-11.0 URLs:1. Create a folder whose name corresponds to your pre-v11.0 context root (for example ibpmconsole)
on your machine. For example purposes, the following directory will be used:On UNIX or Linux:/opt/FJSVibpm/ibpmconsole
On Windows:c:\fujitsu\InterstageBPM\ibpmconsole
2. Copy webserviceproxy.war from the console directory of your Interstage BPM Console InstallationCD or CD Image to the directory that you just created on your machine.
3. Extract the files from webserviceproxy.war into the ibpmconsole directory. Use the followingJava command:jar -xvf webserviceproxy.war
Interstage BPM Server and Console Installation Guide (BEA WebLogic Server) 79
9: Upgrading Interstage BPM from Previous Versions

4. After extracting the jar, edit the proxy.conf file under <Extraction Directory>\WEB-INF\configand update the ServerBaseURL to the V11 port number and context root.
5. Start the WebLogic Server Default Server with the following command:
cd /usr/local/bea/user_projects/domains/base_domain/bin./startWebLogic.sh
The WebLogic Administration Server will start in a Console Window.
6. Start the Interstage BPM Server to which you want to connect in WebLogic with the followingcommand:
cd /usr/local/bea/user_projects/domains/base_domain/bin./startManagedWebLogic.sh <Server Name>
If the default Server is used, the Interstage BPM Server would be started as follows:
cd /usr/local/bea/user_projects/domains/base_domain/bin./startManagedWebLogic.sh IBPMServer
The Interstage BPM Server will start in a Console Window.
7. Open the WebLogic Admin Console by entering the following URL in you Web Browser:http://<HOSTNAME>:7001/console
The WebLogic Administration Console will open in your Web Browser.
8. Login to the WebLogic Administration Console.9. Deploy the webserviceproxy.war on the WebLogic Application Server. See the Deploy Web
Application topic in the WebLogic Server Administration Console Help for instructions specific tothe particular version of WebLogic that you are using.
10. Deploying the webserviceproxy using the WebLogic Administration Console:
These instructions are for deploying the webserviceproxy on the WebLogic ApplicationServer Version 9.2. Two different scenarios are presented in these instructions. In Case 1,the webserviceproxy is deployed in the same WebLogic Server Domain as the InterstageBPM Server. In Case 2, the webserviceproxy is deployed in a WebLogic Server Domainother than the one used by the Interstage BPM Server.
Note:
a) In the left pane of the Administration Console, click Lock & Edit, so you can deploy thewebserviceproxy.war. This action greys out the Lock & Edit button and makes the ReleaseConfiguration button available. The WebLogic Administration Console is now in edit mode.The WebLogic configuration cannot be changed unless you are in edit mode.
b) In the left pane of the Administration Console, click Deployments in the Domain Structurelist. The Summary of Deployments page appears.
c) In the right pane, click Install. The Install Application Assistant page appears.d) Click the link for Location and navigate to the ibpmconsole (where we have extracted the
webserviceproxy.war in Step 3) directory.e) Check the ibpmconsole checkbox. Then, click Next. The Choose Targeting Style step of the
Install Application Assistant is displayed.f) Make sure that the Install this deployment as an application checkbox is checked. Then,
click Next.
Interstage BPM Server and Console Installation Guide (BEA WebLogic Server) 80
9: Upgrading Interstage BPM from Previous Versions

g) For Case 1, check the InterstageBPMServer checkbox in the Servers list. For Case 2, youonly only have the option of using the Admin Server, so no action is needed on this screen.
h) For Case 1, click Next. For Case 2, click Finish. In Case 1, the Optional Settings step of theInstall Application Assistant is displayed. In Case 2, you can skip the next step.
i) You do not need to make any optional settings, so click Next.j) Activate your deployment by clicking Activate Changes. A message appears informing you
that your changes have been activated.k) Click Deployments in the Domain Structure list. Your newly deployed Web Application
appears in the Deployments list.l) For Case 1, make sure that your Interstage BPM Server is running because you will not be
able to start ibpmconsole (webserviceproxy) if it is not running.m) Check the Selection box of ibpmconsole (webserviceproxy), then select Servicing all
requests from the Start drop-down list to the Web application.n) Click Yes to confirm that you want to start the selected Web applications. A page indicating
that the deployment has started will appear.
11. Start the Interstage BPM Server and Console. Refer the following topics:• Starting Interstage BPM Server on page 59• Starting Interstage BPM Console and Tenant Management Console on page 60
Interstage BPM Server and Console Installation Guide (BEA WebLogic Server) 81
9: Upgrading Interstage BPM from Previous Versions

10 Setting Up a Directory ServiceThis chapter provides instructions for setting up your Directory Service.Interstage BPM comes with configuration files that you use to configure the Directory Service. Theseconfiguration files are located in the <Interstage BPM Server InstallationDirectory>/client/samples/configuration directory. During deployment, configuration files forthe Directory Service that you selected in the Deployment Tool were updated with the settings thatyou specified.The <Interstage BPM Server Installation Directory>/client/samples/configurationdirectory contains configuration files for all of the supported Directory Services. However, theDeployment Tool only updated the configuration files for the selected Directory Service. Configurationfiles for other Directory Services contain placeholders and cannot be used without modifications. Ifyou selected Interstage BPM's local user store during deployment, no configuration files were updated.
Do not edit the configuration files in the <Interstage BPM Server InstallationDirectory>/client/samples/configuration directory because these files will beoverwritten if you re-execute a server instance setup. Before making any changes, copythe configuration files to another directory and edit the copy.
Note:
10.1 Setting Up Microsoft® Active DirectoryThis section provides instructions for setting up Microsoft® Active Directory. Active Directory uses aform of the Lightweight Directory Access Protocol (LDAP). Like all LDAP-type Directory Services,Active Directory organizes people into Groups, and maintains a user profile with the appropriatepermissions for each user.The Active Directory setup procedure must be performed on the domain controller for your networkby an Administrator.To customize your Active Directory Server installation:1. Import the IBPMADAdd.ldif file into your Directory Server. The IBPMADAdd.ldif file contains
the default Interstage BPM users and Groups.2. Add users and Groups to the Directory Service.
10.1.1 Importing the IBPMADAdd.ldif FileTo effectively import the IBPMADAdd.ldif file, you must have permission to import the file on themachine containing the Active Directory domain controller. The batch file importAD.bat imports theIBPMADAdd.ldif file, but it must be moved to the domain controller machine with the IBPMADAdd.ldiffile.Importing the LDIF file generated by the Interstage BPM installation program results in the following:• The IflowGroups and IflowUsers Groups are added to the Organizational Unit (ou) specified
during the installation of Interstage BPM.• The Organizational Units people and groups are added to Active Directory.• The default Interstage BPM Roles Role and AdminRole are added to the Organizational Unit
groups.• The default user (typically ibpm_server1) is added to the Organizational Unit people.• The default Groups Role and AdminRole are added to the members of IflowGroups.• The default user (typically ibpm_server1) is added to the members of IflowUsers.
Interstage BPM Server and Console Installation Guide (BEA WebLogic Server) 82
10: Setting Up a Directory Service

To import the IBPMADAdd.ldif file:1. Log on as an Administrator to the computer containing the Active Directory domain controller.2. Ensure that the Password Policies of the Domain Security Policy are set as follows:
• Minimum password length: 0 characters• Password must meet complexity requirements: DisabledIf you changed these settings remember the current settings, so you can restore them later.
3. If the Active Directory server is installed on a computer different from the Interstage BPM Server,copy the IBPMADAdd.ldif file and the importAD.bat file located in <Interstage BPM ServerInstallation Directory>/client/samples/configuration to the Active Directory Server.
4. Ensure that the IBPMADAdd.ldif file is in your current directory.5. Execute importAD.bat.6. Restore the Password Policies to their original settings if you changed them in a previous step.
10.1.2 Using Existing Active Directory Users and GroupsIf you are new to Interstage BPM and are already using Active Directory as the Directory Service tomaintain your organization's Users and Groups, you can use your existing directory structure withInterstage BPM. You can do this by designating your LDAP Users as Interstage BPM users and yourLDAP Groups as Interstage BPM Roles. This involves the modification of two special LDAP Groups,IflowUsers and IflowGroups.When you imported the IBPMADAdd.ldif file (refer to section Importing the IBPMADAdd.ldif File onpage 82), you created two LDAP Groups under your main Organizational Unit (ou) called IflowUsersand IflowGroups. Of course, this assumes that you specified your main organizational unit whenyou deployed Interstage BPM. These two special LDAP Groups can be used to allow your LDAPUsers and Groups access to Interstage BPM.To give your LDAP Users access to Interstage BPM as Interstage BPM users, add them as membersof the IflowUsers group. You can add each user individually or add a group that contains the users.Users in the Group sub-levels are also given access. To give your LDAP Groups access to InterstageBPM as Interstage BPM Roles, add them as members of the IflowGroups Group.
10.1.3 Adding New Users with an LDIF FileYou can add new users to Active Directory by manually editing the LDIF file, then importing it.To add new users with an LDIF File:1. Log on as an Administrator to the computer where the Active Directory domain controller is located.2. The Domain Security Policy is an administrative tool provided by Microsoft®. Access the Domain
Security Policy for that computer.• To display the Domain Security Policy on Windows Server 2003, navigate to Start >
Administrative Tools.• To display the Domain Security Policy on Windows Server 2008, navigate to Start >
Administrative Tools > Group Policy Management. In the Group Policy ManagementConsole, navigate to Forest > Domains > <DomainName> > Group Policy Objects. Thenright-click Default Domain Policy and click Edit.
3. In the Domain Security Policy, Password Policy is an option in the respective tree view (WindowsSettings > Security Settings > Account Policies). Ensure that the Password Policies of theDomain Security Policy are set using the following instructions:
Interstage BPM Server and Console Installation Guide (BEA WebLogic Server) 83
10: Setting Up a Directory Service

Make sure to remember the current settings to restore them in a later step.• Minimum password length: 0 characters• Password must meet complexity requirements : Disabled
4. Copy the createADUser.ldif and createADUser.bat files located in <Interstage BPM ServerInstallation Directory>/client/samples/configuration to another directory.If the Active Directory Server is different from the Interstage BPM Server, copy the files to theActive Directory Server.
5. To create a new user, update the copies of the createADUser.ldif and createADUser.batfiles. Refer to the instructions in the files for details.
6. Ensure that the createADUser.ldif file is located in your current directory.7. Execute the createADUser.bat batch file.8. Restore the Password Policies if you changed them in a previous step.
10.1.4 Adding New Users Using the GUITo create users that are valid for Interstage BPM, use only alphanumeric characters,hyphens, and underscore characters ("_"). User names must not begin with an at character("@") as this is used to identify Agents in Interstage BPM.
Note:
To add new users using the ActiveDirectory GUI:1. Launch the Active Directory Console if you haven't already done so by selecting Start > Settings
> Control Panel > Administrative Tools > Active Directory Users and Computers. Expandthe host name and the domain name to find the people Organizational Unit.
2. Right click people.
Interstage BPM Server and Console Installation Guide (BEA WebLogic Server) 84
10: Setting Up a Directory Service

3. From the popup menu, select New, and then select User to open the New Object - User dialog.
Figure 25: Adding a New User
4. Enter the new user's information and click Next.For each user, Active Directory requires you to provide a first name, last name, full name, anduser login name.Interstage BPM requires both a user login name and password to log in.
Interstage BPM Server and Console Installation Guide (BEA WebLogic Server) 85
10: Setting Up a Directory Service

5. Enter the user's password, and then click Next.
Figure 26: Adding a New User
Interstage BPM Server and Console Installation Guide (BEA WebLogic Server) 86
10: Setting Up a Directory Service

6. Confirm the adding of the new user by clicking Finish in the confirmation dialog.
Figure 27: Adding a New User
Use the New Object - User dialog to create as many new user profiles as you want.
7. Add the new user to IflowUsers so that the new user is recognized by Interstage BPM. To doso:a) In theActive Directory Users and Computerswindow, expand the host name and the domain
name to find the main Organizational Unit that you specified during Interstage BPM installation.b) Right click the IflowUsers Group and select Properties from the popup menu.c) Select the Members tab and click Add.
The Select Users, Contacts, Computers, or Groups dialog appears.
d) Enter the name of the new user that is to be added to IflowUsers. Click Check Names toverify the user name.
e) Click OK.
10.1.5 Adding New Groups with an LDIF FileYou can add new Groups to Active Directory by manually editing the LDIF file, then importing it.To add new Groups with an LDIF File:1. Log on as an Administrator to the computer where the Active Directory master schema is located.2. Copy the createADGroup.ldif and createADGroup.bat files located in <Interstage BPM
Server Installation Directory>/client/samples/configuration to another directory.
Interstage BPM Server and Console Installation Guide (BEA WebLogic Server) 87
10: Setting Up a Directory Service

If the Active Directory Server is different from the Interstage BPM Server, copy the files to theActive Directory Server.
3. To create a new Group, update the copy of the createADGroup.ldif file. Refer to the instructionsin this file for details.
4. Ensure that the createADGroup.ldif file is located in your current directory.5. Execute the createADGroup.bat batch file.
10.1.6 Adding New Groups Using the GUITo create Groups that are valid for Interstage BPM, use only alphanumeric characters,hyphens, and underscore characters ("_"). Group names must not begin with an at character("@") as this is used to identify Agents in Interstage BPM.
Note:
To add a new Group using the GUI:1. Launch the Active Directory Console if you haven't already done so by selecting Start > Settings
> Control Panel > Administrative Tools > Active Directory Users and Computers. Expandthe host name and the domain name to find the groups Organizational Unit.
2. Right click groups.3. From the popup menu, select New, and then select Groups to open the New Object - Groups
dialog.4. Add the new Group's information, and then click OK to add your new Group.
In the example below, the Group Role is added.
Figure 28: Adding New Groups
Interstage BPM Server and Console Installation Guide (BEA WebLogic Server) 88
10: Setting Up a Directory Service

5. Confirm the adding of the new Group by clicking Finish in the confirmation dialog box.Use the New Object - Groups dialog to create as many new user profiles as you want.For each Group, Active Directory requires you to provide a unique name for your Group.
6. Add the new Group to IflowGroups so that the new Group is recognized by Interstage BPM. Todo so:a) In theActive Directory Users and Computerswindow, expand the host name and the domain
name to find the main Organizational Unit that you specified during Interstage BPM installation.b) Right click the IflowGroups Group and select Properties from the popup menu.c) Select the Members tab and click Add.
The Select Users, Contacts, Computers, or Groups dialog appears.
d) Enter the name of the new Group that is to be added to IflowGroups. Click Check Namesto verify the Group name.
e) Click OK.
10.1.7 Adding Members to a Group Using LDIFThe batch file addADGrMember.bat imports the addADGrMember.ldif file. The file must be availableon the Active Directory master schema machine.To add Members to a Group Using LDIF:1. Log on as an Administrator to the computer where the Active Directory master schema is located.2. Copy the addADGrMember.ldif and addADGrMember.bat files located in <Interstage BPM
Server Installation Directory>/client/samples/configuration to another directory.If the Active Directory Server is different from the Interstage BPM Server, copy the files to theActive Directory Server.
3. To add a member to a Group, update the copy of the addADGrMember.ldif file. Refer to theinstructions in this file for details.
4. Ensure that the addADGrMember.ldif file is located in your current directory.5. Execute the addADGrMember.bat batch file.
10.1.8 Adding Members to a Group Using the GUIAfter normal installation using Active Directory, the default Administrator Role is a Groupcalled AdminRole. You can change this default name by modifying the AdminRole parameterof the Interstage BPM Server.
Note:
To add members to a Group using the GUI:1. Launch the Active Directory Console if you haven't already done so by selecting Start > Settings
> Control Panel > Administrative Tools > Active Directory Users and Computers. Expandthe hostname and the domain name to find the groups Organizational Unit.
2. Right click the group to which you want to add members.3. From the popup menu that appears select Properties, and then select theMembers tab to display
the Group's properties dialog.
Interstage BPM Server and Console Installation Guide (BEA WebLogic Server) 89
10: Setting Up a Directory Service

The Properties dialog for the Role Group is used in the following example. ibpm_example isalready a member of the Role Group.
Figure 29: Adding Members
The default Group named Role is installed when you import the IBPMADAdd.ldif file. You canmaintain all of your users if you like.
4. In the Role Properties dialog, click Add.The Select Users, Contacts, Computers, or Groups dialog appears.
5. In Windows® 2003 Server, search a user or Group that you want to add as a member of theGroup.
Interstage BPM Server and Console Installation Guide (BEA WebLogic Server) 90
10: Setting Up a Directory Service

The user or Group appears in the bottom text area of the dialog.
Figure 30: Selecting a User
6. Click OK.
Interstage BPM Server and Console Installation Guide (BEA WebLogic Server) 91
10: Setting Up a Directory Service

The user appears with the existing users in the Properties dialog.
Figure 31: New Member Added
7. To theAdminRoleGroup, add the IDs of all Interstage BPM users who will create WFAdminSessionobjects through Java. This Group should at least include the Interstage BPM Administrator accountthat you defined during deployment.
10.2 Setting Up Sun Java System Directory ServerSun Java System Directory Server (formerly known as iPlanet Server) uses a form of the LightweightDirectory Access Protocol (LDAP). Like all LDAP-type Directory Services, it organizes people intoGroups, and maintains a user profile with the appropriate permissions for each user.To use Interstage BPM with Sun Java System Directory Server, you must customize your Sun JavaSystem Directory Server installation as follows:• Start the Sun Java System Directory Server.• Import the IBPMLDAPAdd.ldif file into your Sun Java System Directory Server. The
IBPMLDAPAdd.ldif file contains the default Interstage BPM users and Groups. TheIBPMLDAPAdd.ldif file also contains information about access permissions required to runInterstage BPM.
• Add users and Groups to the Directory Service.
Interstage BPM Server and Console Installation Guide (BEA WebLogic Server) 92
10: Setting Up a Directory Service

10.2.1 Starting the Sun Java System Directory ServerPrerequisite:• Install the Sun Java System Directory Server.• Create a Directory Server Instance.
You can start the directory server using Directory Service Control Center through JavaWeb Console.By default, the URL to access Java Web Console is:
https://hostname:6789
For details, refer Sun Java SystemDirectory Server Enterprise Edition 6.3 Installation Guide.
10.2.2 Importing the IBPMLDAPAdd.ldif FilePrerequisites:Create a suffix for the Directory Server Instance.
The IBPMLDAPAdd.ldif file contains the default Interstage BPM users and Groups. TheIBPMLDAPAdd.ldif file also contains information about access permissions required to run InterstageBPM.To import the IBPMLDAPAdd.ldif file:1. Make sure that you have the IBPMLDAPAdd.ldif file in the <Interstage BPM Server
Installation Directory>/client/samples/configuration directory.2. Copy the IBPMLDAPAdd.ldif file to a computer in which the Directory Server is running.3. Run the ldapmodify command on the computer in which the Directory Server is running.
The ldapmodify command is typically located at: /opt/SUNWdsee/dsee6/bin/ directory.
ldapmodify -c -h (hostname) -p (port number of the Directory Server)-D (DN of an user who connect to the Directory Server) -w (password ofthe user specified with -D option) -f (location of IBPMLDAPAdd.ldif)
For example,
ldapmodify -c -h machineName -p 389 -Dcn=admin,cn=Administrators,cn=config -w adminpassword -f IBPMLDAPAdd.ldif
The import function, ldapmodify command will not overwrite existing settings. If you haveimported an IBPMLDAPAdd.ldif file previously, duplicate settings will be detected andrejected. An appropriate message will appear.
Note:
10.2.3 Using Existing Sun Java SystemDirectory Server Users andGroupsIf you are new to Interstage BPM and are already using Sun Java System Directory Server as theDirectory Service to maintain your organization's users and Groups, you can use your existingdirectory structure with Interstage BPM. You can do this by designating your LDAP Users as InterstageBPM users and your LDAP Groups as Interstage BPM Roles. This involves the modification of twospecial LDAP Groups, IflowUsers and IflowGroups.When you imported the IBPMLDAPAdd.ldif file, you created two LDAP Groups under your mainOrganizational Unit (ou) called IflowUsers and IflowGroups. Of course, this assumes that you
Interstage BPM Server and Console Installation Guide (BEA WebLogic Server) 93
10: Setting Up a Directory Service

specified your main organizational unit when you installed Interstage BPM. These two special LDAPGroups can be used to allow your LDAP Users and Groups access to Interstage BPM.To give your LDAP Users access to Interstage BPM as Interstage BPM users, add them as membersof the IflowUsers Group. You can add each user individually or add a Group that contains the users.Users in the Group sub-levels are also given access. To give your LDAP Groups access to InterstageBPM as Interstage BPM Roles, add them as members of the IflowGroups Group.
10.2.4 Adding New Sun Java System Directory Server UsersYou can add new users by manually editing a copy of the IBPMLDAPAdd.ldif file or by using theDirectory Service Control Center through JavaWeb Console.
Do not edit the IBPMLDAPAdd.ldif file in the <Interstage BPM Server InstallationDirectory>/client/samples/configuration directory because it will be overwritten ifyou re-execute a server instance setup. Copy the file to another directory and edit the copy.
Note:
When you create new users, note the following:1. To create users that are valid for Interstage BPM, use only alphanumeric characters, hyphens,
and underscore characters ("_"). User IDs must not begin with an at character ("@") as this isused to identify Agents in Interstage BPM.
2. For each user, Sun Java System Directory Server requires you to provide a last name and commonname(s). In addition, Interstage BPM requires a User ID.
3. Although entering a password and confirming it are optional for Sun Java System Directory Server,Interstage BPM requires a password to log in.
4. The other fields such as E-Mail, Phone, and Fax are not used by Interstage BPM.
10.2.5 Adding New GroupsYou can add new Groups by manually editing a copy of the IBPMLDAPAdd.ldif file or by using theDirectory Service Control Center through JavaWeb Console.
Do not edit the IBPMLDAPAdd.ldif file in the <Interstage BPM Server InstallationDirectory>/client/samples/configuration directory because it will be overwritten ifyou re-execute a server instance setup. Copy the file to another directory and edit the copy.
Note:
When you create new groups, note the following:1. To create Groups that are valid for Interstage BPM, use only alphanumeric characters, hyphens,
and underscore characters ("_"). Group names must not begin with an at character ("@") as thisis used to identify Agents in Interstage BPM.
2. Groups are known as Roles in Interstage BPM. There is a default Group named Role installedby Interstage BPM when you import the IBPMLDAPAdd.ldif file.
3. After a normal installation using the Sun Java System Directory Server, the default AdministratorGroup is called AdminRole. You can change this default name by modifying the AdminRoleparameter of the Interstage BPM Server. For a parameter description, refer to the InterstageBusiness Process Manager Server Administration Guide. To this Group, add the IDs of allInterstage BPM users who will access administration functions in the Interstage BPM Console orcreate WFAdminSession objects through Java. This Group should at least include the InterstageBPM Administrator account that you defined during deployment (typically ibpm_server1).
Interstage BPM Server and Console Installation Guide (BEA WebLogic Server) 94
10: Setting Up a Directory Service

10.3 Group CachingWhen the Interstage BPM Server starts up, Interstage BPM connects to the Directory Service andcopies all of the user and Group information defined in LDAPUsersDN and LDAPGroupsDN to a cacheon the Interstage BPM Server. This increases Interstage BPM performance because user and Groupinformation no longer has to be retrieved from the Directory Service, which might be running on aseparate network computer. It retrieves it from the LDAP Cache that is on the local computer inmemory.If the cache is not updated, users added since the start of the Interstage BPM Server would not beable to login to or use Interstage BPM. To avoid this, the cache has to be updated periodically.The LDAPGroupCacheAgeSec parameter of the Interstage BPM Server specifies how often the LDAPCache is updated. Groups that have been in service for longer than the period of time specified inthe LDAPGroupCacheAgeSec parameter are checked, and new user and Group information is retrievedfrom the Directory Service. The default value for this parameter is 3600 seconds; that is, the LDAPCache will be checked every hour. If this parameter is set to -1, new user and Group information isretrieved from the Directory Service every time it is needed. Refer to the Interstage Business ProcessManger Server Administration Guide for more information about the configuration parameters of theInterstage BPM Server.Each entry in the cache has a timestamp that is set to the last time that group was read from theDirectory Service. Whenever someone calls the Directory Adapter to fetch a Group, the DirectoryAdapter checks if that Group is in the cache:• If the Group requested is not in the cache, it is read in and timestamped with the current time.• If the Group requested is already in the cache, the timestamp is checked. If the Group was
timestamped before the previous cache check (it is at a time before LDAPGroupCacheAgeSecseconds ago), then just that Group is deleted from the LDAP Cache and read back in from theDirectory Service. All other Groups in the cache are unaffected.
10.4 User Attribute CachingThe generic structure of an Interstage BPM user's profile is stored using multiple user attributes.These attribute values include the user's ID, email, manager or subordinate's ID, and so on. Inclusionof manager or subordinate information in the Interstage BPM user profile allows mapping of yourcompany’s organization and people structure so that Interstage BPM can further use this information.The RequiredUserAttribute property of Interstage BPM stores names of user attributes that arenecessary to be defined for a user profile.All attributes specified for RequiredUserAttribute are not cached. Only attributes for which thecache option is specified are cached. Storing attributes in the local database cache allows InterstageBPM to quickly search and retrieve these attribute values for any user, from the cache. Retrievedattribute values can further be used for different purposes (for example, directly allocating a task toa particular user's manager or subordinate, or viewing what tasks a user’s subordinates are allocatedto).Interstage BPM server refreshes the user attribute values in the cache in the following scenarios:• When you modify the value of the RequiredUserAttribute Interstage BPM property• When you call the Model API WFAdminSession.refreshAllUserProfileCache() method
Interstage BPM Server and Console Installation Guide (BEA WebLogic Server) 95
10: Setting Up a Directory Service

10.5 Changing Username and Password of Tenant OwnerWhen a tenant is created, the Tenant Owner name and password specified while creation of thetenant are stored in Interstage BPM Server tenant properties of ServerUserName, ServerPasswordand in LDAPAccessUserID, LDAPAccessUserPassword for LDAP-related directory services.If you change Tenant Owner name or password then please do not forget to change these InterstageBPM Server tenant properties as well and also re-activate the tenant.But, if you use Local User Management (LUM) as a directory service and change the Tenant Ownerpassword then ServerPassword will be changed automatically at the same time. In this scenario,you need not re-activate the tenant.
Interstage BPM Server and Console Installation Guide (BEA WebLogic Server) 96
10: Setting Up a Directory Service

Appendix A: SecurityInterstage BPM can be set to two security levels: Demo Mode and Security Mode. Demo Mode isuseful while key members of your work team learn the features of the software. Later, Security Modeprovides a stable and controlled environment for implementing Interstage BPM across your company.
A.1 Interstage BPM Operation ModelIt is assumed that Interstage BPM is used in an organizational Intranet. In most situations, end-userswill work with Interstage BPM applications via a firewall, administrators, however, will be using theserver segment.End-users do not need to run applets or other clients requiring the Interstage BPM model. This meansthat the only port that needs to be opened in the firewall is the standard HTTPS port (443) and theWeb Server in the server segment.The following diagram depicts a deployment situation where Interstage BPM applications are usedvia a firewall. It also shows possible security threats – these are described in more detail in thesubsequent table.
Figure 32: Interstage BPM Operation Model
The following table lists the possible security threats as well as possible solutions:
Interstage BPM Server and Console Installation Guide (BEA WebLogic Server) 97
Appendix A: Security

SolutionThreat#
Use SSL.Message interception(1)
Make sure that your administrators are properly trained andcertified, and that the firewall, the Web Server, the InterstageBPM Server, the Database Server and the Directory Server areconfigured correctly.
Wrong configuration(2)
Use firewall configuration to block illegitimate requests.Denial of service(3)
Use secure cookies if you are using cookies for sessionmanagement.
Cookie wiretap(4)
Keep the Web Server, Interstage BPM Server, the DirectoryServer and the Database Server machines in a secure location.
Internal messageinterception
(5)
Keep the Web Server, Interstage BPM Server, Directory Serverand Database Server machines in a secure location. Set theoperating system/database permissions such that file/databaseaccess is possible only by authorized people. Take special carefor the directories/database of Interstage BPM, InterstageApplication Server, Active Directory and Oracle.
Alternation of config file ordatabase
(6)
All guessed passwords should be changed to something thatis less vulnerable. Passwords should not be proper nouns (e.g.,a person's name), a word found in a dictionary or the samestring as the user name.Ideally, a password should contain a minumum of 6 charactersin a mixture of upper case, lower case, numeric digits and othercharacters. In addition, it should not contain more than twoidentical consecutive characters and more than two ascendingor descending consecutive characters.
Password suspectible tobrute force attack
(7)
Install under the condition that no one is around you.Password peep during theinstallation
(8)
Secure the files created by the Deployment Tool instantly afterthe deployment. For a list of files, refer to section PasswordProtection on page 56.
Remaining passwords couldbe leaked
(9)
As a rule, always use anti-virus software.Virus or worm injection(10)
A.2 Password EncryptionThe Interstage BPM Deployment Tool encrypts the passwords entered during deployment and writesthe encrypted passwords into the database. The ibpm.properties file, which is generated by theDeployment Tool as a backup copy of the initial configuration, also contains encrypted passwordsonly.The Interstage BPM Server decrypts all passwords at startup. If decryption fails, a warning messageis printed in the IBPMServer.log file.If you need to change the user/passwords after deployment, an Encryption Utility is provided so thatyou can encrypt the passwords and overwrite them in the server's configuration. The EncryptionUtility does not provide for decryption of passwords. It can only be used for encryption.
Interstage BPM Server and Console Installation Guide (BEA WebLogic Server) 98
Appendix A: Security

Initially, a default key is used to encrypt and decrypt the passwords. If you want to use a differentkey for security reasons, you must add this key to the server's configuration. The default key is notpublished; it is hardcoded in the server code.The Encryption Utility provided is:com.fujitsu.iflow.utilities.TextEncrypter.class
To call the Encryption Utility, use the encryption script located in <Interstage BPM ServerInstallation Directory>/client/samples/configuration:• On Windows: EncryptPassword.bat• On Solaris: EncryptPassword.sh• On Linux: EncryptPassword.sh
Encrypting a Password With the Default KeyTo encrypt a password with the default key, run the script with the following option:On Windows: EncryptPassword.bat -e "<TextPassword>"
On Solaris: EncryptPassword.sh -e "<TextPassword>"
On Linux: EncryptPassword.sh -e "<TextPassword>"
Make sure to enclose the password and the encryption key in double quotes. Otherwise,the encryption process might fail. As double quotes are delimiters, do not use double quotesin the encryption key.
Note:
Encrypting Passwords With a New KeyYou are recommended to encrypt your passwords with your own key.To encrypt a single password with a new key, run the script with the following options:On Windows: EncryptPassword.bat -e "<TextPassword>" "<Key>"
On Solaris: EncryptPassword.sh -e "<TextPassword>" "<Key>"
On Linux: EncryptPassword.sh -e "<TextPassword>" "<Key>"
If a key other than the default key is used, it should contain more than 24 characters.Make sure to enclose the password and the encryption key in double quotes. Otherwise,the encryption process might fail. As double quotes are delimiters, do not use double quotesin the encryption key.
Note:
During startup of the Interstage BPM Server, the key needs to be present in the server's configuration.Therefore, before starting the server, use the configuration export and import scripts to add thefollowing parameter to the server's configuration:EncryptionKey=<Key>
For details on the procedure, refer to section Using the Configuration Export and Import Scripts onpage 101. For security reasons, the key can be removed again from the configuration file that youimported into the database.Alternatively, you can encrypt all passwords in the configuration file at the same time before importingit into the database. To do this, substitute all passwords in the configuration file with actual textpasswords and encrypt the configuration file by running the script with the following options:On Windows: EncryptPassword.bat -f "<Path of Configuration File>" "<Key>"
On Solaris: EncryptPassword.sh -f "<Path of Configuration File>" "<Key>"
Interstage BPM Server and Console Installation Guide (BEA WebLogic Server) 99
Appendix A: Security

On Linux: EncryptPassword.sh -f "<Path of Configuration File>" "<Key>"
Make sure to enclose the file path and the encryption key in double quotes. Otherwise, theencryption process might fail. As double quotes are delimiters, do not use double quotesin the encryption key.
Note:
The following parameters in the configuration file are encrypted using this method:• DBALoginpassword
• LDAPAccessUserPassword
• MetadataRepositoryPassword
• ServerPassword
• SMTPPassword
• SWAPLinkagePassword
• UDDIPublisherPassword
ExampleUse the following command to encrypt all passwords in the configuration file at the same time.On Windows: EncryptPassword.bat -f"C:\SomeDirectory\MyServerConfiguration.properties" "EWAERJQ23FIQ0J22"
On Solaris: EncryptPassword.sh -f "/SomeDirectory/MyServerConfiguration.properties""EWAERJQ23FIQ0J22"
On Linux: EncryptPassword.sh -f "/SomeDirectory/MyServerConfiguration.properties""EWAERJQ23FIQ0J22"
A.3 Using Demo Mode and Security ModeInterstage BPM can be set to two security levels: Demo Mode and Security Mode. Demo Mode isuseful while key members of your work team learn the features of the software. Later, Security Modeprovides a stable and controlled environment for implementing Interstage BPM across your company.Demo Mode restricts access to Interstage BPM in two ways:• Only the person who is assigned a work item may make choices about it, thus advancing the
process to the next work item - or completing it.• Only members of the AdminRole can access administration functions in the Interstage BPM
Console.All Interstage BPM users can experiment with all of Interstage BPM functions, including creating andediting process definitions and process instances.In Security Mode, access to process definitions, process instances, and work items are restrictedto the specific people who need to use them. The following are examples of people who need to usethem:• Only members of the Role specified in the TemplatePublishers parameter of the Interstage
BPM Server can create new process definitions.• Only the process instance owners, current assignees, and Interstage BPM Administrators can
view any specific process instances. (Current assignees are those who have active taskassignments. This does not include people who will have task assignments later in the process.)
Interstage BPM Server and Console Installation Guide (BEA WebLogic Server) 100
Appendix A: Security

• Only the process instance owners, current assignees, and Interstage BPM Administrative Userscan edit their specific process instances. This means they can change User Defined Attributesand add or delete attachments. However, they are not allowed to edit the process structure.
To set up Security Mode:• Add the following parameters to the server configuration:
SecuritySwitch=true
This setting enables Security Mode.TemplatePublishers =<Registered Role>
This Role must be registered in Interstage BPM's local group store or in your Directory Service.For example, if you have defined a Role of pubRole, you would typeTemplatePublishers=pubRole. Be aware that this key takes effect only if the Security Mode isswitched on.For information on how to add parameters, refer to section Using the Configuration Export andImport Scripts on page 101.
A.4 Configuring SMTP Authentication for Use with InterstageBPM
Only a System Administrator should perform these instructions.Note:
If you required SMTP Authentication for logging in to Interstage BPM, use the following instructions:1. Set up an email server and enable SMTP Authentication.2. Add the following parameters to the server configuration:
SMTPServerHost=<Email Server Host Name>
SMTPUserName=<User Name for SMTP Authentication>
SMTPPassword=<Password for SMTP authentication>
For details on the procedure, refer to section Using the Configuration Export and Import Scriptson page 101.
3. Design a process definition to test the email feature.Refer to the Interstage Business Process Manager Studio User's Guide for information on howto design process definitions.
If the SMTPUserName or SMTPPassword are set correctly, the email will be accepted by the emailserver. If neither the SMTPUserName nor SMTPPassword values are blank, Interstage BPM will usethe SMTP authentication feature.
A.5 Using the Configuration Export and Import ScriptsPrerequisite: The database server is running.
Interstage BPM comes with configuration export and import scripts that allow you to change theserver configuration. You can use these scripts to add parameters that are not present in theconfiguration or remove parameters from the configuration. If the server fails to start or denies logindue to configuration errors, you can use the scripts to import a working configuration into the database.You can add or edit both System as well as Tenant properties using the export and import scripts.For more information about System and Tenant properties, refer the Interstage BPM ServerAdministration Guide.
Interstage BPM Server and Console Installation Guide (BEA WebLogic Server) 101
Appendix A: Security

The Interstage BPM Server is not required to be running for the configuration export and importscripts to be used.To use the configuration export and import scripts:1. Export the server configuration by running the export script located in <Interstage BPM Server
Installation Directory>/server/deployment/bin:
Configuration Export ScriptOperating System
• For System Properties:exportProperties.bat <File Name> <Database User Name><Password>
Example:exportProperties.bat MyServerConfiguration.propertiesSomeUserName SomePassword
• For Tenant Properties:exportProperties.bat <File Name> <Database User Name><Password> <TenantName>
Note that <TenantName> is case-sensitive.Example:exportProperties.bat MyServerConfiguration.propertiesSomeUserName SomePassword Default
Windows
• For System Properties:exportProperties.sh <File Name> <Database User Name><Password>
Example:exportProperties.sh MyServerConfiguration.propertiesSomeUserName SomePassword
• For Tenant Properties:exportProperties.sh <File Name> <Database User Name><Password> <TenantName>
Note that <TenantName> is case-sensitive.Example:exportProperties.sh MyServerConfiguration.propertiesSomeUserName SomePassword Default
SolarisLinux
For <File Name>, specify the file name and, optionally, the path of the configuration file to begenerated. If you do not specify a path, the configuration file is written to the current directory.For <Database User Name> and <Password>, specify the database user account that you definedduring deployment of the Interstage BPM Server.
Before you make any changes to the configuration file, create a copy of the configurationfile you exported as a back-up. In case you make errors while editing parameters and importthe file, Interstage BPM Server may not be able to start or errors may occur at runtime. Insuch a case you can use the back-up file which contains a working configuration.
Note:
Interstage BPM Server and Console Installation Guide (BEA WebLogic Server) 102
Appendix A: Security

2. Make the required changes in the generated configuration file.If you want to add parameters, use the following syntax:<Parameter Name>=<Parameter Value>
Note: • Parameter names and values are case sensitive.• Any backslashes "\" or colons ":" used in parameter values must be escaped by
backslashes. For example, a server address is specified like this:ibpmhost\:49950
• Some configuration parameters have a <Hostname> or <Hostname>.<Servername> suffixappended to their names. These suffixes are automatically removed during the exportand are automatically appended during the import. Do not add these suffixes to theparameter names.
Passwords in the generated configuration file are encrypted for security reasons. If you changea password, you are recommended to encrypt it before importing the configuration file. Passwordsare not automatically encrypted during the import. For details on how to encrypt passwords, referto section Password Encryption on page 98.
3. Import the updated configuration file into the database by running the import script located in<Interstage BPM Server Installation Directory>/server/deployment/bin:
Interstage BPM Server and Console Installation Guide (BEA WebLogic Server) 103
Appendix A: Security

Configuration Import ScriptOperating System
• For System Properties:importProperties.bat <File Name> <Database User Name><Password>
Example:importProperties.bat MyServerConfiguration.propertiesSomeUserName SomePassword
• For Tenant Properties:importProperties.bat <File Name> <Database User Name><Password> <TenantName>
Note that <TenantName> is case-sensitive.Example:importProperties.bat MyServerConfiguration.propertiesSomeUserName SomePassword Default
Windows
• For System Properties:importProperties.sh <File Name> <Database User Name><Password>
Example:importProperties.sh MyServerConfiguration.propertiesSomeUserName SomePassword
• For Tenant Properties:importProperties.sh <File Name> <Database User Name><Password> <TenantName>
Note that <TenantName> is case-sensitive.Example:importProperties.sh MyServerConfiguration.propertiesSomeUserName SomePassword Default
SolarisLinux
For <File Name>, specify the file name and, if required, the path of the updated configurationfile. You need to specify the path if the configuration file is not located in the current directory.For <Database User Name> and <Password>, specify the database user account that you definedduring deployment of the Interstage BPM Server.
4. In a cluster installation, each server node must be configured individually. Therefore, repeat steps1-3 for the other server nodes.
5. Restart the Interstage BPM Server for the changes to take effect.
Interstage BPM Server and Console Installation Guide (BEA WebLogic Server) 104
Appendix A: Security

Appendix B: Silent Mode InstallationA Silent Mode installation is a non-interactive type of installation, i.e. you start the installation programand Interstage BPM is installed. If you have to perform multiple installations of Interstage BPM, andthe installations are essentially the same, you might want to consider installing Interstage BPM inSilent Mode as you can save a significant amount of time.
How It WorksSilent Mode installations involve the use of an installation script. You perform the first installationinteractively using a special installation option that records the installation into an installation scriptin ASCII (text) format. You then run subsequent installations in silent mode using this script. Minorinstallation variations can be handled by editing the script.
B.1 Setting Up a Silent Mode Installation of Interstage BPMTo set up a Silent Mode Installation:1. Create a new directory on your computer.2. Copy the following files from the engine directory on your CD-ROM to the directory that you
created on your computer:• setup.jar
• setupwin32.exe on Windows• setupSolaris.bin on Solaris• setupLinux.bin on Linux
3. Open a Command Prompt window and navigate to the directory on your computer containing thecopied files.
4. Start the installation program for Interstage BPM by entering the following command:On Windows:setupwin32.exe /r /f1"<Absolute Installation Script Path>\<Installation ScriptName>"
In the following example, RMI is the directory containing the copied files and record-install.issis the name of the installation script to be recorded:C:\RMI> setupwin32.exe /r /f1"C:\RMI\record-install.iss"
The installation script for Windows is created in a .iss (and not .txt) file.Note:
On Solaris:./setupSolaris.bin -options-record <Installation Script>
In the following example, RMI is the directory containing the copied files and record-install.txtis the name of the installation script to be recorded:/RMI> ./setupSolaris.bin -options-record record-install.txt
On Linux:/RMI> ./setupLinux.bin -options-record record-install.txt
Interstage BPM Server and Console Installation Guide (BEA WebLogic Server) 105
Appendix B: Silent Mode Installation

If you receive an error while launching the installation program on Linux, download thelibXp-1.0.0-8.i386.rpm package from your Red Hat Enterprise Linux CD or the Red HatNetwork website and install the package using the rpm -i libXp-1.0.0-8.i386.rpmcommand. Then, retry starting the Interstage BPM installation program for Linux.
Note:
This command starts a normal mode installation of Interstage BPM and records the installationchoices that you make. As the installation program runs, use the instructions in chapter Installingand Deploying Interstage BPM Server with Console, OR only the Interstage BPM Server on page23.At the end of installation, the installation choices are written to the installation script. In the example,the installation script record-install.txt (record-install.iss for Windows) is created inthe RMI directory. You can now use the installation script to install Interstage BPM on othercomputers in Silent Mode.
B.2 Installing Interstage BPM in Silent ModePrerequisite: You have set up your Silent Mode installation as instructed in section Setting Up aSilent Mode Installation of Interstage BPM on page 105.
To install Interstage BPM using Silent Mode:1. Create a directory on the computer where you want to install Interstage BPM in Silent Mode. In
the example below, RMI is used as the directory's name.2. Copy the following files from the computer where you recorded the installation script to the directory
that you created in the previous step:• the installation script that you recorded, e.g. record-install.txt• setup.jar
• setupwin32.exe on Windows• setupSolaris.bin on Solaris• setupLinux.bin on Linux
3. Make a note of the drive and directory to which you copied the files.4. Open the installation script in a text editor and make any changes necessary to make it run
properly in the different environment. Refer to section Silent Mode Installation Options on page107 for allowed changes.For example, you might have your J2SE Development Kit (JDK) installed on a different drive andin a different directory than on the computer where you recorded the installation script. You mustsearch for that path and change it to the path used by the computer on which you are runningthe silent mode installation.
5. Save the changes made to your installation script.6. Open a Command Prompt window and navigate to the directory that contains the installation
script.7. Install Interstage BPM in Silent Mode with the following command:
On Windows:C:\RMI> <Absolute Path>\setupwin32.exe /s /f1"<Absolute Installation ScriptPath>\<Installation Script Name>" /f2"<Absolute Installation Log FilePath>\<Installation Log File Name>"
On Solaris:
Interstage BPM Server and Console Installation Guide (BEA WebLogic Server) 106
Appendix B: Silent Mode Installation

/RMI> ./setupSolaris.bin -options "<Absolute Path>/record-install.txt" -silent
On Linux:/RMI> ./setupLinux.bin -options "<Absolute Path>/record-install.txt" -silent
This procedure can be repeated for all of your Interstage BPM installations.
B.3 Silent Mode Installation OptionsThe Silent Mode installation script is a text file that you record while performing the first installation.
Only use the installation script for the type of installation that you recorded. Do not add ordelete parameters. Otherwise, your installation script might not work properly.
Note:
You can customize the installation script to make it run properly in a different environment. Forexample, you might have your J2SE Development Kit (JDK) installed on a different drive and in adifferent directory than on the computer where you recorded the installation script.
Parameter DescriptionThe following table lists the parameters that occur in the installation script. All parameter values haveto be enclosed in double quotes. A short description of the parameters is also provided. For detailedinformation about the parameters, refer to section Installing Interstage BPM on page 31.
DescriptionSample ValueParameter Name
Absolute path to the installationdirectory of the Interstage BPM.
On Windows:"C:\Fujitsu\InterstageBPM"
On Solaris: "/opt/FJSVibpm"On Linux: "/opt/FJSVibpm"
On Windows: szDir (locatedbelow SdAskDestPath2)On Solaris: -Wbean1.destinationPath
On Linux: -Wbean1.destinationPath
Absolute path to the top-leveldirectory of the J2SEDevelopment Kit (JDK)installation. Alternatively, thepath to a Java RuntimeEnvironment (JRE) installationcan be provided.
On Windows: "C:\j2sdk"On Solaris: "/usr/java"On Linux: "/usr/java"
On Windows: szDir (locatedbelow SelectDir)On Solaris: -W bean11.jdkHome
On Linux: -W bean11.jdkHome
Interstage BPM Server and Console Installation Guide (BEA WebLogic Server) 107
Appendix B: Silent Mode Installation

DescriptionSample ValueParameter Name
Specifies whether the installationprogram launches theDeployment Tool in graphicalmode at the end of installation."A": The installation programlaunches the Deployment Toolin graphical mode. This optiondoes not make sense whenrunning a silent mode installationbecause it requires some userinteraction after installation."": The installation programdoes not launch the DeploymentTool.Like the installation program, theDeployment Tool can be run inSilent Mode. For details, refer toappendix Silent ModeDeployment on page 109.
""On Windows: this parameterdoes not exist for this platformOn Solaris: -Wbean2223.deploymenttool
On Linux: -Wbean2223.deploymenttool
ExampleThe following sample script performs a new installation of the Interstage BPM without launching theDeployment Tool at the end of installation.Sample script for• Solaris• Linux
-W bean1.destinationPath="opt/FJSVibpm"-W bean11.jdkHome="/usr/java"-W bean2223.deploymenttool=""
Interstage BPM Server and Console Installation Guide (BEA WebLogic Server) 108
Appendix B: Silent Mode Installation

Appendix C: Silent Mode DeploymentLike the installation program, the Deployment Tool can be run in Silent Mode. Silent Mode deploymentallows you to configure the database and deploy or undeploy Interstage BPM Server without userinteraction. This is an efficient way to perform multiple deployments if the deployments are essentiallythe same.Silent Mode deployments require the use of a Silent Mode script. You perform an interactivedeployment using a special option that records your choices into a Silent Mode script. You then runsubsequent deployments in Silent Mode using this script. Minor deployment variations can be handledby editing the script.
C.1 Setting Up Silent Mode OperationTo set up a Silent Mode operation:1. Start the Deployment Tool.
2. Walk through the configuration steps until you reach the Review Information screen. On thatscreen, select Generate properties file for silent operation mode.
3. Click Finish to start the selected operation.Your configuration choices are written to a Silent Mode script named silent_<Date>. The scriptis located in <Interstage BPM Server InstallationDirectory>/server/deployment/resources.
It is recommended you rename the Silent Mode script because it will be overwritten if youregenerate it.
Note:
You can now use the script to perform the recorded operations on other computers in Silent Mode.
C.2 Running Silent Mode OperationsPrerequisite: You have created a Silent Mode script as instructed in section Setting Up Silent ModeOperation on page 109.
To run the Deployment Tool in Silent Mode:1. Install Interstage BPM on the computer where you want to run the Deployment Tool in Silent
Mode.2. Copy the Silent Mode script that you recorded to the computer where you want to run the
Deployment Tool in Silent Mode.You can copy the script to a directory of your choice.
3. Open the Silent Mode script in a text editor and make any changes necessary to make it runproperly in the different environment. Refer to section Silent Mode Deployment Options on page110 for allowed changes.For example, you might have your database installed on a different drive and in a different directorythan on the computer where you recorded the script. You must search for that path and changeit to the path used by the computer on which you are running the silent mode deployment.
4. Open a Command Prompt window and navigate to the directory <Interstage BPM ServerInstallation Directory>/server/deployment/tool.
5. Execute the following command:
Interstage BPM Server and Console Installation Guide (BEA WebLogic Server) 109
Appendix C: Silent Mode Deployment

On Windows:run_Windows.bat -silentmode <Silent Mode Script>
On Solaris:./run_solaris.sh -silentmode <Silent Mode Script>
On Linux:./run_linux.sh -silentmode <Silent Mode Script>
For <Silent Mode Script>, specify the absolute path of your script.
C.3 Silent Mode Deployment OptionsThe Silent Mode script is a text file that you record while running the Deployment Tool in interactivemode. The contents of the Silent Mode script depends on the type of operation that you record. Thereare different types of operations; each type has its own set of parameters:• Server/Console instance setup without configuring the database• Server/Console instance setup including database configuration• Database setup• Server instance removalFor each type of operation, there are additional variations depending on the application server,database and Directory Service you are using.
Only use the Silent Mode script for the type of operation that you recorded.Note:
You can customize the script to make it run properly in a different environment. For example, youmight have your database installed on a different drive and in a different directory than on the computerwhere you recorded the script.The following tables list the parameters that you may change in the script. A short description of theparameters is also provided. For detailed information about the parameters, refer to chapter Installingand Deploying Interstage BPM Server with Console, OR only the Interstage BPM Server on page23.
Note: • Only change parameters that are described below. Do not change any other parameters.Do not not add or delete parameters. Otherwise, your script might not work properly.
• Any backslashes "\", colons ":" or equal signs "=" used in parameter values must beescaped by backslashes. For example, a server address is specified like this:ibpmhost\:49950
WebLogic Application Server Parameters
DescriptionSample Value (withoutspaces)
Parameter
Address of your WebLogicdomain's Administration Server.
localhost\:7001as_weblogicurl
User name of the administratorfor your WebLogicAdministration Server.
weblogicweblogic_adminusername
Interstage BPM Server and Console Installation Guide (BEA WebLogic Server) 110
Appendix C: Silent Mode Deployment

DescriptionSample Value (withoutspaces)
Parameter
Password of the user specifiedin weblogic_adminusername.
passwordweblogicwizard_adminpassword
Absolute path of the WebLogicJAR file weblogic.jar.
On Windows: C\:\\bea\\weblogic92\\server\\lib\\weblogic.jar
On Solaris:/opt/bea/weblogic92/server/lib/weblogic.jar
On Linux:/opt/bea/weblogic92/server/lib/weblogic.jar
weblogicwizard_weblogicjars
Name of the Interstage BPMServer.
InterstageBPMServerweblogicwizard_ibpmservername
Port number used by theInterstage BPM Server.
49950as_ibpmserverport
Absolute path to the top-leveldirectory of the J2SEDevelopment Kit (JDK) or JavaRuntime Environment (JRE)installation.
On Windows:C\:\\bea\\jdk150_10
On Solaris:/opt/bea/jdk150_10
On Linux: /opt/bea/jdk150_10
as_javahome
The path to the consoleapplication folder.
On Windows:C\:\\Fujitsu\InterstageBPM\\client\\console.war
On Linux:/opt/FJSVibpm/client/console.war
ConsoleWARPath
Interstage BPM Console Parameters
DescriptionSample Value (withoutspaces)
Parameter
Naming Providerweblogic.jndi.WLInitialContextFactory
consoleconfignamingprovider
User Agent Service Nameiflow. UserAgentServiceconsoleconfiguseragentservicename
Host Name of the machine onwhich you deploy Console
itl-hw-132024consoleconfighostname
Naming provider URL for theapplication
t3://itl-hw-132024:49950consoleconfignamingproviderurl
Interstage BPM Server and Console Installation Guide (BEA WebLogic Server) 111
Appendix C: Silent Mode Deployment

DescriptionSample Value (withoutspaces)
Parameter
Server Email Base URL;changing this value will make allof your Client-related URLscorrect with regard to theConsole
http://docone:49950/console/
ServerEmailBaseURL
Server Base URL; changing thisvalue will make all of yourClient-related URLs correct withregard to the Console WebServices
http://docone:49950/console/
ServerBaseURL
Database Parameters – Microsoft SQL Server
DescriptionSample Value (withoutspaces)
Parameter
User name for anon-administrative databaseuser account.
ibpmuserdb_ibpmusername
Password for thenon-administrative databaseuser account.
ibpmuserpassworddb_ibpmpassword
Parameter to choose version ofMicrosoft SQL Server.• Set this to true for Microsoft
SQL Server 2005• Set this to false for
Microsoft SQL Server 2008
falsesqlDB_dbVersion
Database instance of MicrosoftSQL Server to be used. Thedefault instance is representedby a blank value.
sql_dbinstance
Port on which Microsoft SQLServer is running.
1433db_port
Password for the administrativedatabase user account.
adminpasswordsql_dbadminpassword
Full package name of the JDBCdriver class used to create thedatabase connection.
com.microsoft. sqlserver.jdbc.SQLServerDriver
db_driverclassname
URL of the database to connectto.
jdbc\:sqlserver\://localhost\:1433;databaseName\=teamflowdb
db_connectionurl
Interstage BPM Server and Console Installation Guide (BEA WebLogic Server) 112
Appendix C: Silent Mode Deployment

DescriptionSample Value (withoutspaces)
Parameter
Absolute path of the JDBC driversqljdbc.jar.
C\:\\ MicrosoftSQLServer2005JDBCDriver\\sqljdbc_1.2\\enu\sqljdbc.jar
db_jdbclibrarypath
Absolute path to the top-leveldirectory of your Microsoft SQLServer installation.
C\:\\Program Files\\Microsoft SQL Server
db_databasehome
Absolute path to the directorywhere the Interstage BPMdatabase resides.
C\:\\Program Files\\Microsoft SQL Server\\MSSQL.1\\MSSQL\\Data
sql_dbdatafilesdir
Absolute path to the top-leveldirectory of your JDK or JREinstallation.
C\:\\Java\\jdk5db_javahome
Database Parameters – Oracle
DescriptionSample Value (withoutspaces)
Parameter
User name for anon-administrative databaseuser account.
ibpmuserdb_ibpmusername
Password for thenon-administrative databaseuser account.
ibpmuserpassworddb_ibpmpassword
Name of the computer on whichOracle is installed.
localhostdb_host
Connection identifier for theOracle database.
orcloracle_sid
Port number of the database1521db_port
Password of the SYSTEM user.oracleadminpasswordoracle_dbadminpassword
Full package name of the JDBCdriver class used to create thedatabase connection.
oracle.jdbc.driver.OracleDriver
db_driverclassname
URL of the Oracle database toconnect to.
jdbc\:oracle\:thin\:@localhost\: 1521\:ORCL
db_connectionurl
Interstage BPM Server and Console Installation Guide (BEA WebLogic Server) 113
Appendix C: Silent Mode Deployment

DescriptionSample Value (withoutspaces)
Parameter
Absolute path of the OracleJDBC driver (ojdbc14.jar forOracle 10g, ojdbc5.jar forOracle 11g)
On Windows: C\:/oracle/product/10.2.0/db_1/jdbc/lib/ojdbc14.jar
On Solaris: /opt/oracle/product/10.2.0/db_1/jdbc/lib/ojdbc14.jar
On Linux: /opt/oracle/product/10.2.0/db_1/jdbc/lib/ojdbc14.jar
db_jdbclibrarypath
Absolute path to the top-leveldirectory of your Oracleinstallation.
On Windows: C\:/oracle/product/10.2.0/db_1
On Solaris: /opt/oracle/product/10.2.0/db_1
On Linux: opt/oracle/product/10.2.0/db_1
db_databasehome
Absolute path to the directorywhere the Interstage BPMdatabase resides.
On Windows: C\:/oracle/product/10.2.0/db_1/database
On Solaris: /opt/oracle/product/10.2.0/db_1/database
On Linux:/opt/oracle/product/10.2.0/db_1/database
oracle_dbdatafilelocation
Absolute path to the top-leveldirectory of your JDK or JREinstallation.
On Windows: C\:/ j2sdk
On Solaris: /usr/ java
On Linux: /usr/ java
db_javahome
Interstage BPM System Administrator (Super User)
DescriptionSample Value (withoutspaces)
Parameter
User name of the InterstageBPM System Administrator(Super User)
ibpm_adminsystemadminuser
Interstage BPM Server and Console Installation Guide (BEA WebLogic Server) 114
Appendix C: Silent Mode Deployment

DescriptionSample Value (withoutspaces)
Parameter
Password of the Interstage BPMSystem Administrator (SuperUser)
ibpm_adminpasswordsystemadminpassword
Interstage BPM SaaS Mode Selection
DescriptionSample Value (withoutspaces)
Parameter
Boolean string value (true orfalse) to select or de-select theSaaS mode.Ensure this value is alwaysopposite that of theMultiTenancyMode_Non-SAASparameter.
trueMultiTenancyMode_SAAS
Boolean string value (true orfalse) to select or de-selectcreation of the default tenant.
trueCreateDefaultTenant_SAAS
Boolean string value (true orfalse) to select or de-select thenon-SaaS mode.Ensure this value is alwaysopposite that of theMultiTenancyMode_SAASparameter.
falseMultiTenancyMode_Non-SAAS
Directory Service Parameters
DescriptionSample ValueParameter
Host name or IP address of thecomputer hosting the DirectoryService.
myhostLDAPServer
Directory Service Key.dc\=fujitsu, dc\=comLDAPDBSuffix
Directory Service OrganizationalUnit.
ou\=GroupsLDAPGroups
Directory Service port.389LDAPPort
Interstage BPM Server and Console Installation Guide (BEA WebLogic Server) 115
Appendix C: Silent Mode Deployment

Interstage BPM Tenant Owner
DescriptionSample Value (withoutspaces)
Parameter
User name of Tenant Owner ofthe default tenant.
ibpm_server1LDAPAccessUserID
Password of Tenant Owner ofthe default tenant.
ibpm_server1passwordLDAPAccessUserPassword
Other Settings
DescriptionSample ValueParameter
Host name of SMTP server (mailserver).
mailhostSMTPUserName
URL of the repository to whichmetadata will be published.
http\://localhost\:53305/CentraSite/CentraSite/ino\:dav/ino\:dav/projects
MetadataRepositoryURL
Name of the user used forpublishing metadata.
RepositoryAdministratorMetadataRepositoryUserName
Password of the user specifiedinMetadataRepositoryUserName.
RepositoryAdminPasswordMetadataRepositoryPassword
Name of the organization that ispublishing process definitioninformation to the UDDI registry.
MyCompanyUDDIBusinessName
URL of the UDDI registry towhich process definitioninformation will be published.
http\://localhost\:53307/UddiRegistry/publish
UDDIPublishURL
Name of the user used forpublishing UDDI registryinformation.
RegistryAdministratorUDDIPublisherUserName
Password of the user specifiedin UDDIPublisherUserName.
RegistryAdminPasswordUDDIPublisherPassword
URL of the UDDI registry usedfor searching.
http\://localhost\:53307/UddiRegistry/inquiry
UDDIInquiryURL
Interstage BPM Server and Console Installation Guide (BEA WebLogic Server) 116
Appendix C: Silent Mode Deployment

Appendix D: Running Interstage Business ProcessManager in Solaris Containers
The Solaris "container" feature enables you to run several Solaris servers with the same version ofthe Solaris operating system on the same physical machine. Each of the Solaris servers configuredin this way is called a "container" with the following properties:• individual, separate IP address• individual server name• individual file system• individual or shared resource poolFor instructions on setting up Solaris containers, refer to the Solaris product documentation. Below,you find a sample setup.
SampleThis section lists all commands that need to be called on a Solaris 10 machine in order to set up acontainer with the following settings:• Container name (host name): IBPM_Test• IP address: 11.1.111.111• File system: default• Additional devices: none• Project: myIBPMProject• Resource pool: minimum 2 and maximum 4 CPUsThe basic Solaris installation consists of exactly one container (or zone): the global zone. Everyadditionally installed zone is called local zone or container. Proceed as follows:Step 1: Configuring the container1. Create a root directory for the IBPM_Test container:
mkdir -p /export/zones/IBPM_Test
2. Set the user permissions:
chmod 700 /export/zones/IBPM_Test
3. Create and configure the container:
zonecfg -z IBPM_Testcreateset zonepath=/export/zones/IBPM_Testset autoboot=trueadd net
set address=11.1.111.111set physical=hme0
endverifycommitexit
Interstage BPM Server and Console Installation Guide (BEA WebLogic Server) 117
Appendix D: Running Interstage Business Process Manager in Solaris Containers

4. Install the container:
zoneadm -z IBPM_Test install
5. Boot the container:
zoneadm -z IBPM_Test boot
6. Login to the container:
zlogin -C IBPM_Test
7. Proceed with answering the default questions for the container settings when you log in for thefirst time.
Step 2: Setting up ssh connectivity for the container1. Edit the /etc/ssh/sshd_config file:
vi /etc/ssh/sshd_config
and set the PermitRootLogin to yes.
2. Restart the container:
init 1init 3
After having finished the initial setup, leave the current prompt by typing ~. (currently you are loggedin as the root of the global container). All subsequent actions can be performed if you log in as rootuser via ssh.Step 3: Setting up a resource pool and binding it to the container1. Create a processor set:
poolcfg -c 'create pset ibpm (uint pset.min=2; uint pset.max=4)'
2. Create the resource pool:
poolcfg -c 'create pset ibpmpool (string pool.scheduler="FSS")'
3. Associate the processor set to the pool:
poolcfg -c 'associate pool ibpmpool (pset ibpm)'
4. Enable the settings:
pooladm -c
5. Verify the settings:
poolcfg -dc info
Interstage BPM Server and Console Installation Guide (BEA WebLogic Server) 118
Appendix D: Running Interstage Business Process Manager in Solaris Containers

Step 4: Binding the pool to the container1. Set the pool for the container:
zonecfg -z IBPM_Test set pool=ibpmpool
2. Bind the pool to the container:
poolbind -p ibpmpool -i zoneid IBPM_Test
3. Exit the prompt.Step 5: Setting up the project for the container1. Log on to the local container IBPM_Test as user root.2. Create a project myIBPMProject for user root:
projadd -c "IBPM default project" -U root myIBPMProject
3. Set the maximum shared memory for the project:
projmod -sK "project.max-shm-memory=(priviliged,521M,deny)" myIBPMProject
4. Set the CPU shares for the project:
projmod -sK "project.cpu-shares=(privileged,100,none)" myIBPMProject
Step 7: Starting Interstage Business Project Manager1. To start Interstage Business Process Manager and apply the restrictions set in the previous steps:
newtask -p myIBPMProject
All activities that will be started subsequent to the above command will be subject to the set resourcerestrictions and be started for / in the myIBPMProject of the IBPM_Test container.
Interstage BPM Server and Console Installation Guide (BEA WebLogic Server) 119
Appendix D: Running Interstage Business Process Manager in Solaris Containers

Appendix E: Clustering, Load Balancing, and FailoverThis appendix provides you with an effective means of increasing the scalability and reliability ofyour Interstage Business Process Manager system. Configuring your system for load balancing canincrease scalability. Configuring your system for failover can increase reliability.This appendix provides guidelines for setting up a cluster of Interstage BPM Servers. It also providesguidelines for configuring that cluster for load balancing and failover.In an Interstage BPM Cluster, multiple Interstage BPM Servers are deployed to work in concert witheach other. In other words, they work together as a unit. The default Interstage BPM Cluster isconfigured for load balancing in a round-robin configuration and for failover. For Interstage BPMClusters in a round-robin configuration, requests sent to the cluster are distributed evenly amongthe servers in the cluster. If the cluster is configured for failover, a working server in the clusterautomatically "takes over for" a server in the cluster that has just failed for some reason.
E.1 Setting Up an Interstage BPM Cluster on WebLogicApplication Server 9.2To set up an Interstage BPM Cluster, you must first configure a cluster of Interstage BPM Servers,and then connect that cluster to all of the Interstage BPM components in the same manner that theywere connected to a single Interstage BPM Server. Setting up the cluster consists of the followingmajor steps:1. Preparing the cluster setup. This involves preparing the database, the application server and
Interstage BPM Server.2. Configuring environment variables3. Configuring Interstage BPM for the cluster by running a script4. Configuring the Shared Resource Root5. Updating the Interstage BPM Server configuration files6. Updating the Interstage BPM Client configuration7. Updating environment variables and server startup scripts8. Importing the Interstage BPM Server configuration files9. Starting the cluster10. Implementing failover if you require this featureThe sample cluster used to illustrate the instructions in this section is deployed on two computers.The computer with hostname svmd2 is the computer on which the WebLogic Administration Serveris running. svmdapp5 is the other computer in the sample cluster. The cluster is configured to run astandard load-balancing algorithm known as round-robin. A file server is used for storing documents
Interstage BPM Server and Console Installation Guide (BEA WebLogic Server) 120
Appendix E: Clustering, Load Balancing, and Failover

that need to be accessed by all cluster nodes, for example attachments to process instances. Thefollowing figure shows the sample system.
Figure 33: Sample Cluster
The next sections provide step-by-step instructions on how to set up the cluster.
E.1.1 Preparing the ClusterPrerequisite: All cluster nodes can reach each other via IP multicast. For you to check whethermulticasts are available in the target environment, perform the following steps:1. Run the following script on each node of the cluster:
Multicast Receiver ScriptOperating System
startMulticastReceiver.batWindows
startMulticastReceiver.shSolarisLinux
This script file is located in <Interstage BPM Server InstallationDirectory>/server/deployment/bin.
2. Run the following script on one node of the cluster and check whether all nodes in the cluster arereceiving the multicasts:
Multicast Sender ScriptOperating System
startMulticastSender.batWindows
startMulticastSender.shSolarisLinux
Interstage BPM Server and Console Installation Guide (BEA WebLogic Server) 121
Appendix E: Clustering, Load Balancing, and Failover

This script file is also located in <Interstage BPM Server InstallationDirectory>/server/deployment/bin.
3. Stop the execution of the multicast sender script. If there are any remaining nodes that were nottested, repeat step 2 for them.
In case of any problems, contact your network administrator to make sure that the network is IPmulticast enabled.
To prepare the cluster:1. Prepare the database system as explained in section Database Server Preparation on page 182. Install WebLogic Application Server 9.2 on all computers that you want to include in your cluster.
Use the installation instructions provided by BEA Systems and the special instructions forconfiguring WebLogic in section Configuring WebLogic 9.2 on page 21.
3. On the computer you have selected for your WebLogic Administration Server, perform the followingsubsteps:a) Start the WebLogic Administration Server as instructed in section Starting WebLogic
Administration Server on page 22.b) Install and deploy Interstage BPM Server. Use the instructions in chapter Installing and
Deploying Interstage BPM Server with Console, OR only the Interstage BPM Server on page23.
Ensure you select to create the default tenant during deployment.Note:
Ensure you do not use 'localhost' but the machine name or IP address in all screensduring deployment.
Note:
This deployment is only a dummy deployment, that is done for generating all the necessaryfiles to be used for the cluster set-up.
Note:
During deployment, a properties file is generated that contains the server configurationparameters. You will need to update and import the generated file in a later configuration step.
c) Make sure that Interstage BPM is operating correctly in a simple configuration i.e. running asingle Interstage BPM Server.
d) Stop the Interstage BPM Server.e) Back up the config.xml file that contains the configuration for your installed Interstage BPM
Server by copying it to a directory where it remains unmodified during an installation.The config.xml file that contains the configuration for your installed Interstage BPM Serveris located in the following directory:<BEA Home>/user_projects/domains/<Domain Name>/config
f) Undeploy the dummy Interstage BPM Server deployment. Refer Undeploying and UninstallingInterstage BPM Server and Console on page 69.
You are now ready to configure a WebLogic 9.2 cluster.
E.1.2 Configuring Environment VariablesTo configure the required environment variables:1. Edit the environment variable script located in <Interstage BPM Server Installation
Directory>/server/deployment/WLS-Cluster:
Interstage BPM Server and Console Installation Guide (BEA WebLogic Server) 122
Appendix E: Clustering, Load Balancing, and Failover
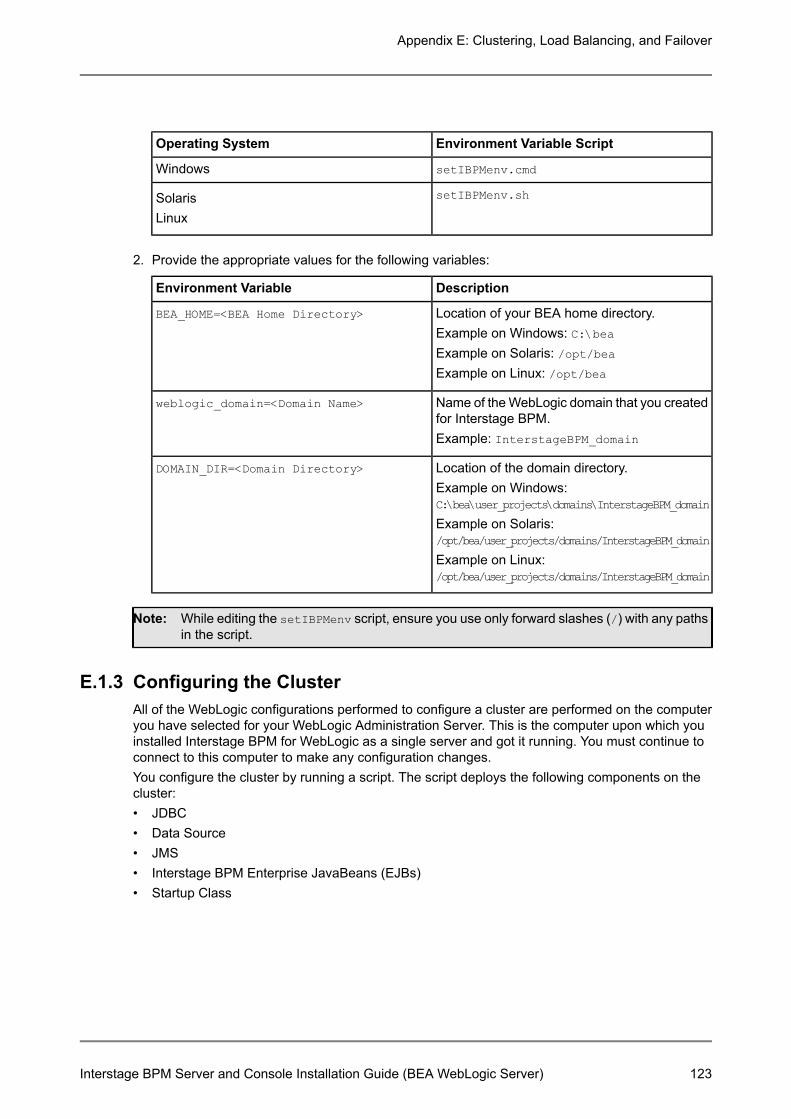
Environment Variable ScriptOperating System
setIBPMenv.cmdWindows
setIBPMenv.shSolarisLinux
2. Provide the appropriate values for the following variables:
DescriptionEnvironment Variable
Location of your BEA home directory.Example on Windows: C:\beaExample on Solaris: /opt/beaExample on Linux: /opt/bea
BEA_HOME=<BEA Home Directory>
Name of the WebLogic domain that you createdfor Interstage BPM.Example: InterstageBPM_domain
weblogic_domain=<Domain Name>
Location of the domain directory.Example on Windows:C:\bea\user_projects\domains\InterstageBPM_domain
Example on Solaris:/opt/bea/user_projects/domains/InterstageBPM_domain
Example on Linux:/opt/bea/user_projects/domains/InterstageBPM_domain
DOMAIN_DIR=<Domain Directory>
While editing the setIBPMenv script, ensure you use only forward slashes (/) with any pathsin the script.
Note:
E.1.3 Configuring the ClusterAll of the WebLogic configurations performed to configure a cluster are performed on the computeryou have selected for your WebLogic Administration Server. This is the computer upon which youinstalled Interstage BPM for WebLogic as a single server and got it running. You must continue toconnect to this computer to make any configuration changes.You configure the cluster by running a script. The script deploys the following components on thecluster:• JDBC• Data Source• JMS• Interstage BPM Enterprise JavaBeans (EJBs)• Startup Class
Interstage BPM Server and Console Installation Guide (BEA WebLogic Server) 123
Appendix E: Clustering, Load Balancing, and Failover

To configure an Interstage BPM Cluster on the WebLogic Administration Server computer:1. Locate the following files in <Interstage BPM Server Installation
Directory>/server/deployment/WLS-Cluster:• ibpmWLInstallScripts.properties
• ibpmWLInstallScripts.py
• On Windows: runWLScript.bat• On Solaris: runWLScript.sh• On Linux: runWLScript.sh
2. If you want more than two servers in your Interstage BPM Cluster or want to change the namesof your servers or port numbers:• Change the clusterServers parameter in the ibpmWLInstallScripts.py script.• Change the NoOfServerInCluster parameter in the ibpmWLInstallScripts.properties
properties file as appropriate.Make sure that the server names and port numbers are unique.Example:To add a server called InterstageBPMCS3 with port 49959 to the cluster configuration, changethe clusterServers parameter in the ibpmWLInstallScripts.py properties file to the following:clusterServers={'InterstageBPMCS1':49952,'InterstageBPMCS2':49956,'InterstageBPMCS3':49959}
Also, change the NoOfServerInCluster parameter in the ibpmWLInstallScripts.propertiesproperties file to the following:NoOfServerInCluster=3
3. Run the cluster configuration script:
Cluster Configuration ScriptOperating System
runWLScript.bat <WebLogic Administrator Name> <WebLogicAdministrator Password> <Database User Name> <DatabaseUser Password>
Windows
runWLScript.sh <WebLogic Administrator Name> <WebLogicAdministrator Password> <Database User Name> <DatabaseUser Password>
SolarisLinux
For <WebLogic Administrator Name> <WebLogic Administrator Password>, specify theuser account of the administrator for the WebLogic Administration Server.For <Database User Name> <Database User Password>, specify the database user accountthat you defined during deployment of the Interstage BPM Server.Running this script configures the cluster. It modifies the EJBs, JMS, database connections, etc.to a cluster configuration.If you did not modify the cluster setup files according to step 2 of this procedure, you now havea cluster called InterstageBPMCluster and two WebLogic Managed Servers. The primary serveris named InterstageBPMCS1. Its port is 49952. The secondary server is namedInterstageBPMCS2. Its port is 49956.
4. Verify that the application server has been configured correctly. To do so:a) Log in to the WebLogic Administration Console using the following URL:
http://<hostname>:7001/console
Interstage BPM Server and Console Installation Guide (BEA WebLogic Server) 124
Appendix E: Clustering, Load Balancing, and Failover

b) Go to <Domain> > Environment > Servers and verify that the servers have been created.If you did not modify the cluster setup files, the primary server is named InterstageBPMCS1and uses port 49952. The secondary server is named InterstageBPMCS2. Its port is 49956.
c) Go to <Domain> > Deployments and verify that an application calledInterstageBPMCServerApplication has been installed.
E.1.4 Configuring the Shared Resource RootThe ResourceRoot is a directory on a central server containing resources (such as workflowapplications, file listeners, shared classes, and so on).In a load-balancing system, the ResourceRoot directory must be located on a central server that canbe accessed by all server nodes; all server nodes must use the same ResourceRoot directory.Each server node must be configured to access the ResourceRoot directory on that central server.The server nodes are allowed to map those directories to different physical paths as long as theyuse the same symbolic name for the directory.To configure your ResourceRoot:1. On a central server, create a ResourceRoot directory. Make sure that all server nodes have read
and write access to this directory.Example: In the sample system, a file server is used to host the ResourceRoot directory. Youcould create a directory named InterstageBPMShared.
2. Create the tenants/Default/ folders under the ResourceRoot directory.For example, //MyFileServer/InterstageBPMShared/tenants/Default/
3. Do the following:a) From the Weblogic Administration Server computer's <Interstage BPM Installation
Directory>/server/instance/default/tenants/Default/ directory, move the followingfolders to the tenants/Default/ folder under the ResourceRoot directory.• apps
• attachments
• classes
• dmsroot
• lib
b) Copy the entire Interstage BPM structure from the Weblogic Administration Server computerto the other computers in your cluster.Example on Windows: If you accepted the default Interstage BPM locationC:\Fujitsu\InterstageBPM during installation, you would copy the Fujitsu directory andall of its subdirectories from the WebLogic Administration Server computer svmd2 to the C:drive of svmdapp5.Example on Solaris: If you accepted the default Interstage BPM location /opt/FJSVibpmduring installation, you would copy the FJSVibpm directory and all of its subdirectories fromthe WebLogic Administration Server computer svmd2 to the /opt directory of svmdapp5.Example on Linux: If you accepted the default Interstage BPM location /opt/FJSVibpmduring installation, you would copy the FJSVibpm directory and all of its subdirectories fromthe WebLogic Administration Server computer svmd2 to the /opt directory of svmdapp5.
Interstage BPM Server and Console Installation Guide (BEA WebLogic Server) 125
Appendix E: Clustering, Load Balancing, and Failover

The path of the Interstage BPM Server installation directory must be the same on allcomputers in your cluster.
Note:
4. On Windows, on each server node, update the <Path> tag of DmsCollections.xml file locatedin <Interstage BPM Server InstallationDirectory>/server/instance/default/tenants/Default/resources to specify theattachments directory on the file server.Use one of the following formats to specify the directory's path://<Remote Computer Name>/<Directory Name>/
\\<Remote Computer Name>\<Directory Name>\
Example:
<DmsCollections><Dms>
<Path>//MyFileServer/InterstageBPMShared/tenants/Default/attachments</Path>
<ImplementationClass>com.fujitsu.iflow.dmsadapter.impl.FileSystemDmsSessionImpl
</ImplementationClass><Name>Attachments</Name></Dms></DmsCollections>
Note: • Do not use a network drive in the path specification. (For example, like in<Path>P:\InterstageBPMShared\tenants\Default\attachments</Path>). Networkdrives cannot be accessed by the Interstage BPM Server.
• In the path specification, if using the machine name does not work use the machine IP,and vice-versa.
5. Perform the subsequent steps if you are installing on the following operating system:• Solaris• Linuxa) On each server node, mount the attachments directory that you copied on the file server.b) On each server node, update the DmsCollections.xml file located in <Interstage BPM
Server InstallationDirectory>/server/instance/default/tenants/Default/resources to specify theattachments directory on the file server.
Example: If you mount the shared directory at mp1, you would update the DmsCollections.xmlfile to look like the following:
<DmsCollections><Dms><Path>/mp1/attachments</Path>
<ImplementationClass>com.fujitsu.iflow.dmsadapter.impl.FileSystemDmsSessionImpl
</ImplementationClass><Name>Attachments</Name>
Interstage BPM Server and Console Installation Guide (BEA WebLogic Server) 126
Appendix E: Clustering, Load Balancing, and Failover

</Dms></DmsCollections>
The DMS root directory's mount point may be different on the individual server nodes. However,the directory's symbolic name, which is specified in the <Name> element, must be the same onall server nodes. The following figure shows this configuration:
Figure 34: Sample DMS Configuration
E.1.5 Updating the Interstage BPM Server Configuration FilesWhen you are running Interstage BPM Servers in a cluster, you must change some serverconfiguration settings to complete the cluster's server configuration.To update the Interstage BPM Server configuration files:1. On each of the cluster nodes, from the database, export system level server configuration
parameters into a configuration file (<filename>.properties).
Configuration Import ScriptOperating System
exportProperties.bat <filePath> <Database User Name><Password>
Windows
exportProperties.sh <filePath> <Database User Name><Password>
SolarisLinux
Before you make any changes to the configuration file, create a copy of the configurationfile you exported as a back-up. In case you make errors while editing parameters and importthe file, Interstage BPM Server may not be able to start or errors may occur at runtime. Insuch a case you can use the back-up file which contains a working configuration.
Note:
Interstage BPM Server and Console Installation Guide (BEA WebLogic Server) 127
Appendix E: Clustering, Load Balancing, and Failover

2. Add the following entries to the configuration file:
ServerName=<Name of the Cluster Server>ServerSharedRoot=<Path of shared ResourceRoot in file server>
Example:These are the entries on svmd2:
ServerName=InterstageBPMCS1ServerSharedRoot=//MyFileServer/InterstageBPMShared/
Make sure that you specify the server names defined in the WLInstallScripts.py scriptlocated in <Interstage BPM Server InstallationDirectory>/server/deployment/WLS-Cluster.
Note:
3. On any one of the cluster nodes, add the following to the configuration file:
ServerInCluster=true
4. Check the default settings for the multicast group.A multicast group is used to distribute information among the Interstage BPM Servers in a cluster.These are the default settings used by the Interstage BPM Servers:• Multicast port number: 5000• Multicast group address: 225.4.5.6
A multicast group address is an IP address in the range 224.0.0.0 to 239.255.255.255, inclusive.It is used to identify the members of a multicast group. Each member of the group uses thesame multicast group address. The address 224.0.0.0 is reserved and must not be used.
If you want to change the default settings, add the relevant parameters to the configuration file
ClusterMulticastPort=<Multicast Port Number>ClusterMulticastTopic=<Multicast Group Address>
If already present in the configuration file, ensure these parameters are not empty.Note:
As the multicast parameters are identical for all cluster servers, you only need to add themto the configuration file on one of the cluster nodes.
Note:
5. On each cluster node, ensure the values of the following node-specific properties are correct:• JMSNamingProviderURL
• KPIListenerConfigFile
• ServerBaseURL
• ServerEmailBaseURL
• ServerHost
• ServerName
• ServerRoot
6. Before importing the configuration file to the database, delete the older system properties fromthe database (from the IBPMProperties table) using the following SQL command:
DELETE FROM IBPMProperties WHERE tenantId = -1
Interstage BPM Server and Console Installation Guide (BEA WebLogic Server) 128
Appendix E: Clustering, Load Balancing, and Failover

In order for your changes to take effect, you will later import the updated configuration files into thedatabase.
E.1.6 Updating the Interstage BPM Client ConfigurationInterstage BPM Server comes with a client configuration file, which is used by Interstage BPM Clientsto connect to the server. You need to update the client configuration file so that the client connectsto one of the cluster servers.To update the client configuration:• On all computers in your cluster, update the following properties in the configuration file
iFlowClient.properties located in <Interstage BPM Server InstallationDirectory>/client:• JmsNamingProviderUrl
• NamingProviderUrl
Example:These are the entries on svmd2:
JmsNamingProviderUrl=t3://svmd2:49952NamingProviderUrl=t3://svmd2:49952
These are the entries on svmdapp5:
JmsNamingProviderUrl=t3://svmdapp5:49956NamingProviderUrl=t3://svmdapp5:49956
E.1.7 Updating Environment Variables and Server Startup ScriptsScripts that start Interstage BPM Servers in single-server mode are currently on all of your clustercomputers. You must modify some environment variables to start the cluster servers instead of thedefault Interstage BPM Server. Also, you must check whether the server startup scripts match thehost's environment.To update environment variables and server startup scripts:1. On the WebLogic Administration Server, change the SERVERNAME parameter to the name of the
primary server in the environment variable script.
Environment Variable ScriptOperating System
setIBPMenv.cmdWindows
setIBPMenv.shSolarisLinux
The script is located in <Interstage BPM Server InstallationDirectory>/server/deployment/WLS-Cluster.Example:This is the entry before the change: SERVERNAME=<Server Name Provided During Deployment>
This is the entry after the change: SERVERNAME=InterstageBPMCS1
Interstage BPM Server and Console Installation Guide (BEA WebLogic Server) 129
Appendix E: Clustering, Load Balancing, and Failover

The server names to be used in a cluster are defined in the ibpmWLInstallScripts.pyscript located in <Interstage BPM Server InstallationDirectory>/server/deployment/WLS-Cluster.
Note:
2. On all other computers in the cluster, perform these steps:a) Update the SERVERNAME and SERVER_HOST_NAME entries in the environment variable script.
Environment Variable ScriptOperating System
setIBPMenv.cmdWindows
setIBPMenv.shSolarisLinux
Example:These are the entries on svmdapp5 before the change:SERVERNAME=InterstageBPMServer
SERVER_HOST_NAME= svmd2
These are the entries after the change:SERVERNAME=InterstageBPMCS2
SERVER_HOST_NAME=svmdapp5
b) Make sure that the JDBCPATH entry in the environment variable script is correct.JDBCPATH specifies the path to the JDBC driver of the database you are using. The JDBCdriver must be copied from your database installation to a local directory on your computer.For more information on the names of the JDBC driver files, refer to section Database ServerPreparation on page 18.
While editing the setIBPMenv script, ensure you use only forward slashes (/) with any pathsin the script.
Note:
3. On the WebLogic Administration Server and on all other computers in the cluster, make sure thatthe paths specified in the server startup script and in the server shutdown scripts are correct.
Server Startup/Shutdown ScriptsOperating System
iFlowServer_Managed.bat
StopiFlowServer_Managed.bat
Windows
iFlowServer_Managed.sh
StopiFlowServer_Managed.sh
Solaris
iFlowServer_Managed.sh
StopiFlowServer_Managed.sh
Linux
The scripts are located in <Interstage BPM Server InstallationDirectory>/server/deployment/WLS-Cluster.Especially, verify the path to weblogic.jar and weblogic_sp.jar and the path to WebLogic'sserver/bin directory.
Interstage BPM Server and Console Installation Guide (BEA WebLogic Server) 130
Appendix E: Clustering, Load Balancing, and Failover

E.1.8 Importing the Interstage BPM Server Configuration FilesPrerequisites:• On one of the cluster nodes, you have updated the server configuration file as instructed in section
Updating the Interstage BPM Server Configuration Files on page 127.• On each cluster node, you have updated the environment variables as explained in section
Updating Environment Variables and Server Startup Scripts on page 129.• The database server is running.
To import the system configuration files into the database:• On the node on which you updated the configuration file in section Updating the Interstage BPM
Server Configuration Files on page 127, run the configuration import script located in <InterstageBPM Server Installation Directory>/server/deployment/WLS-Cluster:
Configuration Import ScriptOperating System
importProperties.bat <filePath> <Database User Name><Password>
Windows
importProperties.sh <filePath> <Database User Name><Password>
SolarisLinux
For <Database User Name> and <Password>, specify the database user account that you definedduring deployment of the Interstage BPM Server. <filePath> is the fully qualified file path of theconfiguration file you updated.
The script imports the configuration file you updated in section Updating the Interstage BPM ServerConfiguration Files on page 127 into the database.
E.1.9 Starting the ClusterPrerequisite: The Interstage BPM Cluster must be completely configured by following the clusteringappendix instructions through section Updating the Interstage BPM Client Configuration on page129.
To start the Interstage BPM cluster:1. Make sure that the WebLogic Administration Server is started by checking to see that its Console
Window is open and that the output <Server started in RUNNING mode> is displayed.If it is not started, you can start it in either of the following ways:• Run the startup script provided by Interstage BPM in the <Interstage BPM Server
Installation Directory>/server/deployment/WLS-Cluster directory:
Startup ScriptOperating System
startWebLogic.batWindows
startWebLogic.shSolarisLinux
• Run the startup script provided by Weblogic. For details, refer to section Starting WebLogicAdministration Server on page 22.
Interstage BPM Server and Console Installation Guide (BEA WebLogic Server) 131
Appendix E: Clustering, Load Balancing, and Failover

2. On all cluster computers, start the Interstage BPM Server using the startup script provided byInterstage BPM.This ensures that required environment variables are set before actually starting the server.The startup script is located in <Interstage BPM Server InstallationDirectory>/server/deployment/WLS-Cluster.
Server Startup ScriptOperating System
iFlowServer_Managed.bat <WebLogic Administrator Name><WebLogic Administrator Password>
Windows
iFlowServer_Managed.sh <WebLogic Administrator Name><WebLogic Administrator Password>
SolarisLinux
You can start the cluster servers in any order.If you are following the example, run the server startup script on svmd2 and svmdapp5.Upon successfull initialization of the server, the following output is displayed:
...<Joining cluster InterstageBPMCluster on ...>...<Server started in RUNNING mode>
E.1.10 Implementing FailoverDuring operation, events are created and written to the database by each server node. Events aretied to the server node that created them and will be processed by this server node. If a server nodegoes down, remaining events tied to this node will not be processed. The processing of such eventsis resumed only when the server node is available again.You can implement a failover mechanism such that events that cannot be processed are transferredto other server nodes in the load-balancing system. To do so, you create a custom Java applicationthat performs the following operations:• Create an administration session, that is a WFAdminSession object.• Call recoverEvents(serverName) to transfer events from the server node that is passed as an
argument to the other server nodes.For general information on how to create a Model API application, refer to the Interstage BusinessProcess Manager Developer's Guide. Details on WFAdminSession and recoverEvents() can befound in the API Javadoc documentation.
ExampleThis example demonstrates the processing of events in case one of two server nodes fails.
Interstage BPM Server and Console Installation Guide (BEA WebLogic Server) 132
Appendix E: Clustering, Load Balancing, and Failover

A sample load-balancing system with two server nodes has been set up. While all of the server nodesare up and running, events are created and written to the database by each server node.
Figure 35: All Server Nodes are Up and Running
If Node A goes down, events remain assigned to that node and are waiting to be processed.
Figure 36: Server Node Goes Down
Interstage BPM Server and Console Installation Guide (BEA WebLogic Server) 133
Appendix E: Clustering, Load Balancing, and Failover

After executing recoverEvents("Node A"), all remaining events of Node A are transferred to andprocessed by Node B.
Figure 37: Events are Transferred to Another Node
E.1.11 Running Two Cluster Servers on the Same Computer (Optional)Prerequisite: The database server is running.
To configure two cluster servers running on the same computer:1. Prepare and configure the cluster as instructed in sections Preparing the Cluster on page 121 and
Configuring the Cluster on page 123.2. Make a copy of the directory <Interstage BPM Server Installation
Directory>/server/deployment/WLS-Cluster and place the copy under <Interstage BPMServer Installation Directory>/server/deployment.For the directory name, you are recommended to append the name of the cluster server that youwant to run from this computer, for example WLS-ClusterInterstageBPMCS1.However, you can choose any other name.
3. Copy ibpm.properties from <Interstage BPM Server InstallationDirectory>/server/instance/default to the subdirectory that you just created, for exampleto <Interstage BPM Server InstallationDirectory>/server/deployment/WLS-ClusterInterstageBPMCS1.
4. In the subdirectory that you created, update ibpm.properties according to the instructions insection Updating the Interstage BPM Server Configuration Files on page 127.
5. Change the value of the ServerLogFile parameter in ibpm.properties by changing the nameof the log file to the server's name in the cluster.Example: ServerLogFile=<Interstage BPM Server InstallationDirectory>/server/instance/default/logs/InterstageBPMCS1.log
Interstage BPM Server and Console Installation Guide (BEA WebLogic Server) 134
Appendix E: Clustering, Load Balancing, and Failover

6. In the environment variable script, change the SERVERNAME parameter to the server's name in thecluster.The script is located in the subdirectory that you created, for example in <Interstage BPMServer Installation Directory>/server/deployment/WLS-ClusterInterstageBPMCS1:
Environment Variable ScriptOperating System
setIBPMenv.cmdWindows
setIBPMenv.shSolarisLinux
Example:This is the entry before the change: set SERVERNAME=<Server Name Provided DuringDeployment>
This is the entry after the change: set SERVERNAME=InterstageBPMCS1
The server names to be used in a cluster are defined in the ibpmWLInstallScripts.pyscript located in <Interstage BPM Server InstallationDirectory>/server/deployment/WLS-Cluster.
Note:
While editing the setIBPMenv script, ensure you use only forward slashes (/) with any pathsin the script.
Note:
7. Update the configuration import script. To do so:a) Open the script from the subdirectory that you created, for example from <Interstage BPM
Server Installation Directory>/server/deployment/WLS-ClusterInterstageBPMCS1:
Configuration Import ScriptOperating System
importProperties.bat <FileName><UserName> <Password>
Windows
importProperties.sh <FileName><UserName> <Password>
SolarisLinux
b) Replace ../../instance/default/ibpm.properties with ./ibpm.properties.The script now references the ibpm.properties file that you copied to the subdirectory.
8. Run the configuration import script.9. Start the Interstage BPM Server by running the startup script from the subdirectory that you
created, for example from <Interstage BPM Server InstallationDirectory>/server/deployment/WLS-ClusterInterstageBPMCS1:
Server Startup ScriptOperating System
iFlowServer_Managed.bat <WebLogic Administrator Name><WebLogic Administrator Password>
Windows
Interstage BPM Server and Console Installation Guide (BEA WebLogic Server) 135
Appendix E: Clustering, Load Balancing, and Failover
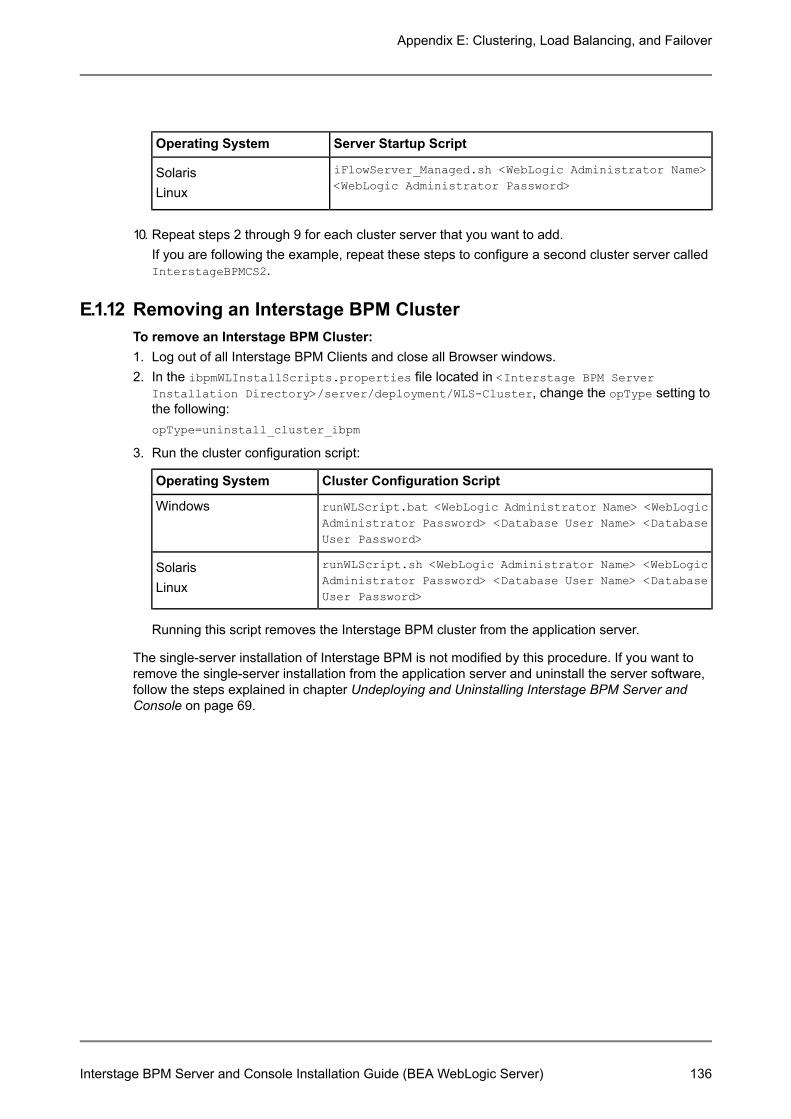
Server Startup ScriptOperating System
iFlowServer_Managed.sh <WebLogic Administrator Name><WebLogic Administrator Password>
SolarisLinux
10. Repeat steps 2 through 9 for each cluster server that you want to add.If you are following the example, repeat these steps to configure a second cluster server calledInterstageBPMCS2.
E.1.12 Removing an Interstage BPM ClusterTo remove an Interstage BPM Cluster:1. Log out of all Interstage BPM Clients and close all Browser windows.2. In the ibpmWLInstallScripts.properties file located in <Interstage BPM Server
Installation Directory>/server/deployment/WLS-Cluster, change the opType setting tothe following:opType=uninstall_cluster_ibpm
3. Run the cluster configuration script:
Cluster Configuration ScriptOperating System
runWLScript.bat <WebLogic Administrator Name> <WebLogicAdministrator Password> <Database User Name> <DatabaseUser Password>
Windows
runWLScript.sh <WebLogic Administrator Name> <WebLogicAdministrator Password> <Database User Name> <DatabaseUser Password>
SolarisLinux
Running this script removes the Interstage BPM cluster from the application server.
The single-server installation of Interstage BPM is not modified by this procedure. If you want toremove the single-server installation from the application server and uninstall the server software,follow the steps explained in chapter Undeploying and Uninstalling Interstage BPM Server andConsole on page 69.
Interstage BPM Server and Console Installation Guide (BEA WebLogic Server) 136
Appendix E: Clustering, Load Balancing, and Failover

Appendix F: TroubleshootingF.1 Log File Information
If Interstage BPM does not seem to be working properly, check the following log files:• IBPMServer.log - all errors from the server and the Interstage BPM adapters are logged in this
file. This log file is often very helpful in troubleshooting. For example, it may indicate that thedatabase server is down.
• AnalyticsError.log - all analytics errors are logged in this file.These files are located at the following location on the Interstage BPM Server computer: <InterstageBPM Server Installation Directory>/ server/instance/default/logs
F.2 Resolving Specific Error Situations
F.2.1 Interstage BPM Server Fails to StartCheck the IBPMServer.log in the <Interstage BPM Server InstallationDirectory>/server/instance/default/logs directory.
What to doLook for
Check if the database is running. Also check thatyou can access the database from the machinewhere the Interstage BPM Server is installed incase the database is running on a differentmachine. You can use telnet <DatabaseServer Hostname> <Port> from the server hostmachine to check that the connection to thedatabase host/port can be established.
DbService : setConnection: Connection todatabase server failed. Is the databaseserver running and reachable through thenetwork? {ORA-01089: immediate shutdownin progress - no operations arepermitted.
Ensure that the user name/password as specifiedin the LDAPAccessUserID /LDAPAccessUserPassword parameters of theInterstage BPM Server are correct and you canlogin to your Directory Server using the aboveuser name/password.
LdapBroker : getContext: Could not createthe directory services. {[LDAP: errorcode 49 - Invalid Credentials]}
LdapBroker : getGroupMembersByDN: Couldnot retrieve the user groups. {Could notcreate the directory services. {[LDAP:error code 49 - Invalid Credentials]}}
LdapBroker : Could not retrieve the usergroups. {Could not create the directoryservices. {[LDAP: error code 49 - InvalidCredentials]}}
Interstage BPM Server and Console Installation Guide (BEA WebLogic Server) 137
Appendix F: Troubleshooting

What to doLook for
Ensure that the LDAP Server is running on theport as specified in the LDAPServer parameterof the Interstage BPM Server. You can usetelnet ldapServerHostName port from theserver host machine to check that the connectionto the host/port can be established.
getContext: Could not create thedirectory services.
LdapBroker : getGroupMembersByDN: Couldnot retrieve the user groups. {Could notcreate the directory services.
LdapBroker : Could not retrieve the usergroups. {Could not create the directoryservices.
This is because you installed WebSphereApplication Server in a Cell (deployment managerand a managed node) environment, causing theBOOTSTRAP_ADDRESS port to be incorrect in someconfiguration files.1. Get the correct value of the
BOOTSTRAP_ADDRESS port from the WebSphereApplication Server Console (from Servers >Application Servers > <ServerName> >Ports).
2. Update the value of the BOOTSTRAP_ADDRESSport for the following entries in theiflowClient.properties, ibpm.propertiesfiles, as well as Interstage BPM properties inthe database:
• JMSNamingProviderURL (in the formatiiop://<Host Name>:<BOOSTRAP_ADDRESS>)
• NamingProviderURL (in the formatiiop://<Host Name>:<BOOSTRAP_ADDRESS>)
IflowStartup : @(Failed to execute theIBPM startup routine task)Unable todeliver the message for the requestedeventClass.{javax.naming.ServiceUnavailableException:A communication failure occurred whileattempting to obtain an initial contextwith the provider URL:"iiop://<ServerName>:<Ports>". Make surethat any bootstrap address informationin the URL is correct and that the targetname server is running. A bootstrapaddress with no port specificationdefaults to port 2809. Possible causesother than an incorrect bootstrap addressor unavailable name server include thenetwork environment and workstationnetwork configuration.}
F.2.2 Error in IBPMServer.logCheck the IBPMServer.log in the <Interstage BPM Server InstallationDirectory>/server/instance/default/logs directory.
What to doLook for
Possible cause of this error: A user has beendeleted from the Directory Server (LDAP Server)but the reference of it is still there in one of thegroups.
getGroupMembersByDN: Could not retrievethe user groups. {[LDAP: error code 32- No Such Object]}
F.2.3 Timeout During JavaScript ExecutionWhen executing large JavaScripts, the transaction timeout currently set for WebLogic and WebSphereapplication servers (120 seonds) is insufficient. Due to this setting, script execution may fail with a"transaction timeout".
Interstage BPM Server and Console Installation Guide (BEA WebLogic Server) 138
Appendix F: Troubleshooting

Your application server administrator can increase the transaction timeout depending on your usagerequirements, for example, to 200 seconds. This setting can be changed in the following location:• WebLogic application server:
<WebLogic install dir>/../config/config.xml/<jta>/<timeout-seconds>
• WebSphere application server:In the WebSphere Console: Servers -> ApplicationServers -> server1 (default name) ->Container Services -> Transaction Services -> Total Transaction lifetime timeout.
F.2.4 Failure in Writing to an Oracle DatabaseWhen the updting of an Oracle database table fails, for example, when you try to archive a processinstance, check the Oracle alert log file located in the <Oracle Installation Dir>/admin/<DBinstance name>/bdump directory, for example:C:\ProgramFiles\Oracle\admin\orcl\bdump\alert_orcl.log
The following error may be observed:{Database add/create request failed. {ORA-08103: object no longer exists}}
This failure may be due to the fact that the Datafile size reached the file size limit on the hard diskof the database server.The system administrator of the database server needs to increase the file size on the databaseserver hard disk.
F.3 Errors During Installation, Deployment and ConfigurationThis section lists several errors that could occur during the installation, deployment and configurationof Interstage BPM and describes the required action(s) to take:
Installation of IBPM fails when trying to install a new build
The build directory of the exisitng installed build was deleted, without un-installingthe build or un-installation failed.
CauseI
Interstage BPM Server and Console Installation Guide (BEA WebLogic Server) 139
Appendix F: Troubleshooting

For WindowsManually delete the earlier build's registry-entry, as follows:1. Go to Start > Run, type regedit, click OK.2. In the Registry Editor screen, go to HKEY_LOCAL_MACHINE > SOFTWARE
> Fujitsu > Install > Interstage BPM Server .
3. Delete the Interstage BPM Server registry entry under Install key.4. Go to HKEY_LOCAL_MACHINE > SOFTWARE > Microsoft > Windows >
CurrentVersion > Uninstall >Interstage Business Process Manager xx.x.
5. Delete the Interstage Business Process Manager xx.x registry entry underUninstall key. This will ensure complete deletion of the registry entry for Windowsplatform.
For SolarisManually delete the Solaris package information, as follows:1. Open the Command Prompt window and run the command pkginfo -l FJSVibpm
from any location of the Solaris machine, to check if the Solaris packageinformation still exists.
2. If the Solaris package information is displayed, then delete the package informationusing the following steps:a. Create a file named ibpm.uninst under the /tmp location.b. Run the command pkgrm FJSVibpm to delete the Solaris package.c. Run the command pkginfo -l FJSVibpm once more, to ensure that the
Solaris package has been deleted successfully. If no information is displayed,then it confirms that the Solaris package has been completely deleted fromthe Solaris platform.
For LinuxManually delete the RPM package information, as follows:1. Open the Command Prompt window and run the command rpm -qi FJSVibpm
from any location of the Linux machine, to check if the RPM package still exists.2. If the RPM package information is displayed, then delete the package information
using the command rpm -e FJSVibpm.3. Run the command rpm -qi FJSVibpm once more to ensure that the RPM package
has been deleted successfully. If no information is displayed, then it confirms thatthe RPM package has been completely deleted from the Linux platform.
Action
The Interstage BPM installation program was unable to launch on Linux
The libXp-1.0.0-8.i386.rpm package is not installed on the Linux machine.CauseI
Interstage BPM Server and Console Installation Guide (BEA WebLogic Server) 140
Appendix F: Troubleshooting

On the Linux machine, do the following:1. Download the libXp-1.0.0-8.i386.rpm package from your Red Hat Enterprise
Linux CD or the Red Hat Network website.2. Install the package using the rpm -i libXp-1.0.0-8.i386.rpm command.3. Retry launching the Interstage BPM installation program for Linux.
Action
An error occurred during Interstage BPM database creation/update
One of the following values provided during deployment were wrong:• Database Administrator user name• Database Administrator password
CauseI
Restore the database from the backup of the database made before deployingInterstage BPM.Run the Deployment Tool again and selectDatabase Configuration on theWelcomescreen. In this way, the database is configured without deploying Interstage BPMagain.
Action
One of the following values provided during deployment were wrong:• Host name of the database server• Database SID (database instance name)• Database port
CauseII
Restore the database from the backup of the database made before deployingInterstage BPM.Remove Interstage BPM from the application server and deploy it again using theDeployment Tool.
Action
Database server is not running.CauseIII
Start the database server.Run the Deployment Tool again and selectDatabase Configuration on theWelcomescreen. In this way, the database is configured without deploying Interstage BPMagain.
Action
An error occurred during the execution of importLDAP.bat
One of the following values provided during deployment were wrong:• LDAP Key• LDAP Organizational Unit
CauseI
Remove Interstage BPM from the application server and deploy it again using theDeployment Tool.
Action
Interstage BPM Server and Console Installation Guide (BEA WebLogic Server) 141
Appendix F: Troubleshooting

An error occurred during the execution of importAD.bat
One of the following values provided during deployment were wrong:• Active Directory Key• Active Directory Organizational Unit
CauseI
Remove Interstage BPM from the application server and deploy it again using theDeployment Tool.
Action
F.4 Errors during Starting the Interstage BPM ServerThe following tables explain the possible causes of errors during server startup and the appropriateaction(s) to take:
Errors Pertaining to Active Directory
The Active Directory Server is remote and Active Directory is not running.CauseI
Start the Active Directory Server, and then start the Interstage BPM Server.Action
One of the following values provided during deployment was wrong:• User name for the Directory Service Login account• Password for the Directory Service Login accountThese values are used in the importAD.bat file as arguments of the net usercommand.
CauseII
Remove Interstage BPM from the application server and deploy it again using theDeployment Tool.
Action
Interstage BPM cannot connect to the Active Directory Server because one of thefollowing values provided during deployment was wrong:• Active Directory Key• Active Directory Organizational Unit
CauseIII
Remove Interstage BPM from the application server and deploy it again using theDeployment Tool.
Action
Errors Pertaining to Sun Java System Directory Server
Interstage BPM cannot connect to the LDAP Server because one of the followingvalues provided during deployment was wrong:• LDAP Key• LDAP Organizational Unit
CauseI
Remove Interstage BPM from the application server and deploy it again using theDeployment Tool.
Action
Interstage BPM Server and Console Installation Guide (BEA WebLogic Server) 142
Appendix F: Troubleshooting

Errors Pertaining to the Database
The Database Server is not running.CauseI
Start the Database Server, and then start the Interstage BPM Server.Action
Errors Pertaining to a Hostname Change
You changed the hostname of the computer where Interstage BPM Server has beeninstalled. As the hostname occurs in the names and values of various configurationparameters of the Interstage BPM Server, the server cannot access its configurationsettings.
CauseI
In the IBPMProperties table of the Interstage BPM database, make the followingchanges:• In the PROPERTYKEY column, update any parameter names that have the hostname
in the suffix.These parameters have the format <PARAMETER_NAME>.<HOSTNAME> or<PARAMETER_NAME>.<HOSTNAME>.<SERVERNAME>.
• In the PROPERTYVALUE column, update any parameter values containing thehostname.
To update the IBPMProperties table, use the appropriate database commands ora database client software.
Action
F.5 Contacting Your Local Fujitsu Support OrganizationIf you are unable to troubleshoot your problem:1. Set the DebugLevel parameter of the Interstage BPM Server to 2 using these steps:
a) Start the Interstage BPM Server Configuration Tool using the following URL:http://<Hostname>:<Port>/fujitsu-ibpm-config-webapp/IBPMConfigServlet
b) Log in as an Interstage BPM Super User.c) Set the DebugLevel parameter to 2.d) Click Save and Reload properties.
2. Replicate the actions that caused the error.3. Contact your local Fujitsu Support organization and provide the following information:
General Information• Operating System• Directory Service (type and version)• Database server (type and version)• JDK or JRE version• Application server (type and version)• Interstage BPM edition, version and build number• Major problem area• Priority of the issue• Environment in which the problem occurs
Interstage BPM Server and Console Installation Guide (BEA WebLogic Server) 143
Appendix F: Troubleshooting

Configuration Information• The configuration file that you exported from the Interstage BPM ServerLog Files• All log files from <Interstage BPM Server Installation
Directory>/server/instance/default/logs
• When using WebLogic: All log files from <WebLogic InstallationDirectory>/user_projects/domain/<Your Domain>/servers/AdminServer/logs
OS System Logs• The Windows event log that you obtain using the Windows Event Viewer• UNIX system logs stored in /var/adm/messages
• Linux system logs stored in /var/log/messages
Problem Description• Description of the steps you performed before the problem occurred• Frequency with which the problem occurrsProblem Details• The application program and its source code that caused the error• The XPDL file of the process definition that caused the error• Information about Java Actions, Timers and Agents defined in the process definition• Screenshot of the process instance history if the process instance goes into error state• Stack trace if any exception is displayed
You can obtain the strack trace by clicking Details on the error page displayed in the InterstageBPM Console.
• Screenshot of the exception wherever it is displayed• Screenshot of the process instance (graphical view) if the process instance goes into error
state or into an unexpected state• Calendar files (*.cal) if timers are used• The agentsConfig.xml file if agents are used
Interstage BPM Server and Console Installation Guide (BEA WebLogic Server) 144
Appendix F: Troubleshooting

Index
A
About this manual, 8Active Directory settings, 53
C
Cluster, 120on WebLogic Application Server 9.2, 120removing, 136
Configuration export script, 101Configuration import script, 101
D
Databaseconfiguring, 39preparation, 18Server, 18settings, 45, 48
Database server, 45Demo Mode, 100Deployment
only Console, 62Server, 23Server with Console, 23Silent Mode, 109
Deployment Tool32bit, 3964bit, 39
Directory ServiceAdd members to Groups, 89Add new Groups, 87Add new users, 83IBPMADAdd.ldif, 82Setup, 82, 92Users and Groups, 83
E
EmailServer administrator, 54
F
Failover, 120, 132
G
GroupAdd, 87Add member, 89
Group Caching, 95Groups, 56
H
Hardware requirements, 15
I
ibpm.properties, 56Installation procedure overview, 29
only Console, 62Interstage Analytics, 55Interstage BPM
deploying, 40documentation list, 10installation on a laptop, 23installing, 31removing, 69starting, 59uninstalling, 72upgrading from a previous version, 75
Interstage BPM Consoleother configurations, 65Overview, 14starting, 60
Interstage BPM ServerDeployment Tool, 12overview, 12
L
LDAPAdd members to Groups, 89Add new Groups, 87Add new users, 83IBPMADAdd.ldif, 82Setup, 82Users and Groups, 83
LDAP settings, 52Load balancing, 120
Interstage BPM Server and Console Installation Guide (BEA WebLogic Server) 145
Index

M
Microsoft SQL Serversettings, 45
Microsoft® Active Directory, 82Minimum configuration
Server, 12
O
Oraclepreparing, 19settings, 48
P
Passwordsencryption, 98protection, 56
R
Remote database, 13Removing
Interstage BPM, 69Roles, 56
S
Security features, 97Security Mode, 100Server System configuration
Minimum configuration, 12Remote database, 13
Server System configurations, 12Silent Mode deployment, 109Silent Mode installation, 105Starting
Interstage BPM Console, 60Interstage BPM Server, 59
Starting (continued)WebLogic Administration Server, 22
Sun Java System Directory Server, 92Add new users, 94Import IBPMLDAPAdd.ldif, 93Start, 93
Sun Java System Directory settings, 52System requirements, 15
T
TCP/IP, 18Troubleshooting, 139
Interstage BPM Server startup, 142
U
UDDI registry, 55Undeploying Interstage BPM, 69Uninstalling, 72Upgrade, 75Upgrade from a previous version, 75User
Add, 83Assign to LDAP Group, 83
User accounts, 56User groups, 56
W
WebDAV Repository, 55WebLogic
configuring, 21Embedded LDAP Server, 57, 67preparing cluster, 122settings, 43starting Administration Server, 22Starting Interstage BPM, 59Starting Interstage BPM Console, 60
Interstage BPM Server and Console Installation Guide (BEA WebLogic Server) 146
Index


![Interstage Coolers a Hot Item[1]](https://img.dokumen.tips/doc/110x75/5452d2d3af795904308b50ec/interstage-coolers-a-hot-item1.jpg)