Embed Size (px)
Citation preview

MIMIC®
Virtual Lab
Installation Guide
Version: 4.30
Gambit Communications
76 Northeastern Blvd, Suite 30B
Nashua, NH 03062
www.SNMPSimulation.com
Support: (603) 881-3500

Page 2 MIMIC Virtual Lab Installation GUIDE
Installation
Gambit Communications, Inc.
76 Northeastern Blvd., Suite 30B
Nashua, NH 03062
www.SNMPSimulation.com
Sales: (603) 889-5100 ([email protected])
Support: (603) 881-3500 ([email protected])
Fax: (603) 889-5005
MIMIC®
Installation Guide
Version 4.30
Copyright © 1996-2009 Gambit Communications, Inc.
Gambit Communications and MIMIC are registered trademarks of Gambit Communications, Inc.
All other product and brand names are trademarks or registered trademarks of their respective holders.
ALL RIGHTS RESERVED.
Gambit Communications reserves the right to modify the design and specifications contained herein
without prior notice. Please contact your Gambit Sales Representative for the most current information.

MIMIC Virtual Lab Installation GUIDE Page 3
Installation
Overview
MIMIC is distributed as a compressed file for each of the platforms referred to in this manual.
MIMIC is available on a CD-ROM or by a download from the Web. In either case, it is
necessary to uncompress the file and extract its contents onto your system.
You only need to download MIMIC when a new release is issued; the retail version of MIMIC is
identical to the evaluation version except for the license keys. Permanent license keys are
included with your purchase.
If MIMIC is already installed, determine the version you are running by looking at the
Help>About menu or at the contents of the config/version file. Download MIMIC again only
if a newer version is available. If you are upgrading from an older release, terminate from
MIMIC before running the install program. Uninstalling the older release is not necessary, since
this will provide a backup in case of problems with the newer release.
To terminate from MIMIC:
1. Click on File.
2. Click on Terminate.
Please review the MIMIC Frequently Asked Questions page after having installed MIMIC.

Page 4 MIMIC Virtual Lab Installation GUIDE
Installation
Preparing for Installation
Windows Platforms
MIMIC Virtual Lab supports the following Windows platforms:
• Windows XP
• Windows 2000
• Windows NT 4.0 Service Pack 4 or newer
• Windows Server 2003
Windows Vista Business Edition
With Java Runtime Environment (JRE) 1.6.
This section describes requirements for the Windows platforms. Later in this section, common
problems encountered while running MIMIC on Windows are discussed, along with their related
fixes.
Administrator Privileges
You must have Administrator privileges to install and to run MIMIC. The install script requires
write access to restricted parts of the Registry. Therefore:
• Install MIMIC from a user account with Administrator privileges; and
• Run MIMIC from a user account with Administrator privileges.
By establishing a separate user account with Administrator privileges, you can control access to
this functionality.
Firewalls
Due to pervasive security attacks against Windows systems connected to the Internet, it has be-
come common to run a software firewall on recent versions of Windows.
MIMIC will coexist with a software firewall, provided that the firewall is configured to recog-
nize MIMIC as a program allowed to access the network. MIMIC will, due to its very nature of
simulating networked components, open network sockets and communicate with external appli-
cations (eg. network management applications, telnet clients, etc).
There are certain components of MIMIC that will access the Internet (eg. specific web sites to
determine software updates, etc).

MIMIC Virtual Lab Installation GUIDE Page 5
Installation
File Systems and Windows Disk Space
MIMIC creates many small files for its simulations. Other file systems, such as NTFS or Unix,
efficiently handle these small files. However, the FAT (or FAT16) file system, which operates
on some Windows NT operating systems, requires 10 to 100 times more disk space than other
file systems. To display the file system installed on your system, select the Properties dialog on
your partition from the Windows Explorer.
Assigning IP Addresses
MIMIC requires at least one operational network interface card (NIC). On Windows NT, 2000,
XP or Server 2003, as on the Unix platforms, MIMIC dynamically assigns IP addresses when
starting each agent instance.
Duplicate IP Addresses
You must not have duplicate IP addresses on a connected network. If Windows detects that an IP
address on one of its NICs conflicts with another system (resulting in a duplicate IP address), it
tries to resolve this problem by shutting down the NIC and displays a message such as the
following:
The System has detected an IP address conflict with another system on the network. The local
interface has been disabled. More details are available in the system event log. Consult your
network administrator to resolve the conflict.
NOTE: on Windows 2000, XP or Server 2003, the agent will not start and will print an error
message in the Log.

Page 6 MIMIC Virtual Lab Installation GUIDE
Installation
Media Sense on Windows 2000 or newer
Newer versions of Windows (Windows 2000 onwards) have a TCP/IP feature whereby it can
sense if a NIC is actually connected to the network. By default, a NIC is disabled if it is not
found to be on the network, which prevents agents from starting in MIMIC. There is a way to
disable this behavior so that you can work on standalone Windows 2000/XP machines. Attached
is the Microsoft KB article on this topic. Please remember to make a copy of your registry before
making any changes just to be on the safe side.
How to Disable Media Sense for TCP/IP in Windows 2000
-----------------------------------------------------------------------------
The information in this article applies to:
a.. Microsoft Windows 2000 Advanced Server
b.. Microsoft Windows 2000 Datacenter Server
c.. Microsoft Windows 2000 Professional
d.. Microsoft Windows 2000 Server
----------------------------------------------------------------------------
SUMMARY
Windows 2000 contains the "Media Sensing" feature. You may use this feature on
a Windows 2000-based computer using Transmission Control Protocol/Internet
Protocol (TCP/IP) to detect whether or not your network media is in a "link
state". A "link state" is defined as the physical media connecting or
inserting itself on the network. For example, assuming a 10bt or 100bt
physical media, Ethernet network adapters and hubs typically have a "link"
light to indicate the current connection status. This is the same condition in
which Windows 2000 can detect a link. Whenever Windows 2000 detects a "down"
state on the media, it removes the bound protocols from that adapter until it
is detected as "up" again. There may be situations where you may not want your
network adapter to detect this state, and you can configure this by editing
the registry.
NOTE: 10b2 or coaxial (RG-58) Ethernet cable is not a connection-based media.
Because of this, Windows 2000 does not attempt to detect a "connect" state if
this type of cabling is used.
MORE INFORMATION
WARNING: Using Registry Editor incorrectly can cause serious problems that may
require you to reinstall your operating system. Microsoft cannot guarantee
that problems resulting from the incorrect use of Registry Editor can be
solved. Use Registry Editor at your own risk. For information about how to
edit the registry, view the "Changing Keys and Values" Help topic in Registry
Editor (Regedit.exe) or the "Add and Delete Information in the Registry" and
"Edit Registry Data" Help topics in Regedt32.exe. Note that you should back up

MIMIC Virtual Lab Installation GUIDE Page 7
Installation
the registry before you edit it. If you are running Windows NT or Windows
2000, you should also update your Emergency Repair Disk (ERD).
To prevent your network adapter from detecting the link state:
NOTE: NetBEUI and IPX do not recognize Media Sense.
1. Use Registry Editor (Regedt32.exe) to view the following key in the
registry:
HKEY_LOCAL_MACHINE\System\CurrentControlSet\Services\Tcpip\Parameters
Add the following registry value:
Value Name: DisableDHCPMediaSense
Data Type: REG_DWORD -Boolean
Value Data Range: 0, 1 (False, True) Default: 0 (False)
Description: This parameter controls DHCP Media Sense behavior. If you set
this value data to 1, DHCP, and even non-DHCP, clients ignore Media Sense
events from the interface. By default, Media Sense events trigger the DHCP
client to take an action, such as attempting to obtain a lease (when a connect
event occurs), or invalidating the interface and routes (when a disconnect
event occurs).
2. Restart your computer.
NOTE: There are some side effects of disabling the "Media Sensing" feature.
For example, if you have a machine with two network adapters, and you have the
"Media Sensing" feature enabled, if one network adapter does not work, it is
unbound, and associated routes are removed so that all traffic goes through
the other network adapter (assuming a default gateway is there). Also, if you
are a roaming (portable) user, the "Media Sensing" feature is what provides
the ability to connect to any network and have everything work, without
restarting, release and renewing, and so on. After disabling Media Sense and
restarting, Windows 2000 still shows the "Network Disconnected" icon on the
TaskBar and the 'ipconfig' command still shows a "Media State .....: Cable
Disconnected" message when the cable is disconnected. However, the Network
Interface is bound to TCP/IP and you can verify this by looking at the route
table—you can use the "route print" command—which shows the interface IP
address (you are also able to ping the IP address assigned to the NIC).
*END*

Page 8 MIMIC Virtual Lab Installation GUIDE
Installation
Windows Vista
1. User Account Control
Windows Vista has the new User Account Control feature, which impacts the running of
MIMIC. For details, consult this Analysis of the Windows Vista Security Model from
Symantec. In order to enable to run MIMIC on Vista, you have 2 options:
� Disable User Account Control
This turns UAC off globally. NOTE: do this only if you are aware of the implications of
this action.
� Open User Accounts via Start->Control Panel->User Accounts->User Ac-
counts.
� Click on Turn User Account Control on or off
� Clear the checkbox for Use User Account Control (UAC) to help protect
your computer.
� Click Ok
� A dialog will popup prompting you to Restart Now or Restart Later. Choose appro-
priately. User Account Control will be disabled once the system reboots.
� Run MIMIC with User Account Control enabled
This involves changing the access control level of the MIMIC programs.
� Change the privilege level of MIMIC Virtual Lab application in the MIMIC Start
Program group using the following steps:
� Click Start->All Programs->MIMIC Virtual Lab ... x.xx
� Move the cursor to the MIMIC Virtual Lab ... entry
� Right click and select Properties.
� In the Compatibility tab, check Run this program as an administrator
� Once this is done, MIMIC Virtual Lab can be started as above or by running the
VLABx.bat script in the bin folder of the MIMIC installation.
� If MimicD.exe will be run directly, set the privilege level of it using the following steps:
� In Windows Explorer, select it.
� Right click and select Properties.
� In the Compatibility tab, check Run this program as an administrator
2. Duplicate Address Detection

MIMIC Virtual Lab Installation GUIDE Page 9
Installation
On Windows Vista, the new TCP/IP stack tries to do "duplicate address detection" by de-
fault. This prevents MIMIC from starting agents, because IP aliasing is delayed, and even
with a workaround in our software would unacceptably slow down the starting of agents. To
correctly workaround the problem, you need to disable "duplicate address detection" for the
network interface using the Windows netsh utility:
netsh interface ipv4 set interface "name or index" dadtransmits=0
The interface name and index info can be obtained by
netsh interface ipv4 show interfaces
For example:
H:\>netsh interface ipv4 show interfaces
Idx Met MTU State Name
--- --- ----- ----------- -------------------
1 50 4294967295 connected Loopback Pseudo-Interface 1
7 20 1500 connected Local Area Connection
H:\>netsh interface ipv4 set interface "7" dadtransmits=0
3. Vista Power Management
The default power options will put the Windows Vista system to sleep after 1 hour of I activ-
ity. To disable this, perform the following:
Open Power Options using Control Panel->System and Maintenance->Power Op-
tions.
Change Preferred Plan from Balanced to High Performance.
Verify by clicking on Change Plan Settings for High Performance. Ensure that Put the
computer to sleep setting is Never.
4. Program Compatibility Assistant
After the install is completed or aborted, the Program Compatibility Assistant may prompt
with the message
This program might not have installed correctly.

Page 10 MIMIC Virtual Lab Installation GUIDE
Installation
Please select This program installed correctly if the install completed. Else, select
Cancel.
Debugging
Crashes can be analyzed post-mortem using the Dr. Watson's crash dumps. This requires that Dr.
Watson be enabled to handle any application exceptions on the system.
To install Dr. Watson as the default exception handler:
Click Start->Run.
Type drwtsn32 -i
Click Ok.
A subsequent crash should popup the Dr. Watson dialog. Search for the following files in the
Windows directory (this location can be changed using the Dr. Watson GUI) : drwtsn32.log
and user.dmp . Send these to Gambit Technical Support ([email protected]).
Known Problems
Gambit is constantly improving MIMIC’s performance. The following problems while running
MIMIC on a Windows platform have been identified:
• Windows NT/2000/XP/Server 2003 — If the host is using DHCP to obtain its address, no
agent instance can use that same address to export a MIB. The problem is that stopping the
agent results in the deletion of this address and shuts off TCP/IP services (ftp/telnet/internet).
To restore operation:
• REBOOT, or
• Start the agent on the DHCP assigned address again (i.e., keep it running).
• On Windows, certain network interface cards have limitations supporting multiple IP ad-
dresses. In particular, some adapters and/or drivers from 3com have been giving us trouble
(e.g. 3C905-TX or 3Com 3C90x Ethernet Adapter). The symptom is that a small number of
agent instances can be started and polled correctly, but connectivity is lost to the box when
starting more.

MIMIC Virtual Lab Installation GUIDE Page 11
Installation
Installation
Step 1: Get the MIMIC distribution
If you have a CD-ROM, copy the distribution file for your platform from the CD-ROM to a
temporary directory. Go to Step 2.
If you do not have a CD-ROM, you can request a download of MIMIC from Gambit
Communications’ website at www.gambitcomm.com/support. The download URL will then be
e-mailed to you.
Step 2: Uncompress, extract and install the distribution
1. Run the self-extracting mimic_vlab.exe from a system with an Administrator account. The
Welcome screen appears:

Page 12 MIMIC Virtual Lab Installation GUIDE
Installation
2. Click on Next. The following screen appears:
Continued next page…

MIMIC Virtual Lab Installation GUIDE Page 13
Installation
3. Read the License Agreement, and click I Agree. The next screen will not appear unless you
accept the License Agreement. Click Next to continue.
Continued next page…

Page 14 MIMIC Virtual Lab Installation GUIDE
Installation
4. Then following screen appears:
Continued next page…

MIMIC Virtual Lab Installation GUIDE Page 15
Installation
5. Click on No if you do not have the necessary license keys, then click Next to continue. The
following dialog pop-up will provide you with the instructions and information required to
obtain one. If you have received a licensing ticket, you can redeem it for a license key
yourself by providing the HOSTID displayed in this dialog. Otherwise, copy/paste the in-
formation into an e-mail request to us.
Continued next page…

Page 16 MIMIC Virtual Lab Installation GUIDE
Installation
Click on Yes if you have the necessary licenses for MIMIC Virtual Lab. The MIMIC Virtual
Lab License keys screen appears:
6. Enter the License Keys. This is best done by using the Windows copy/paste feature. Then
click Next.
Continued next page…
MIMIC Virtual Lab Installation GUIDE Page 17
Installation
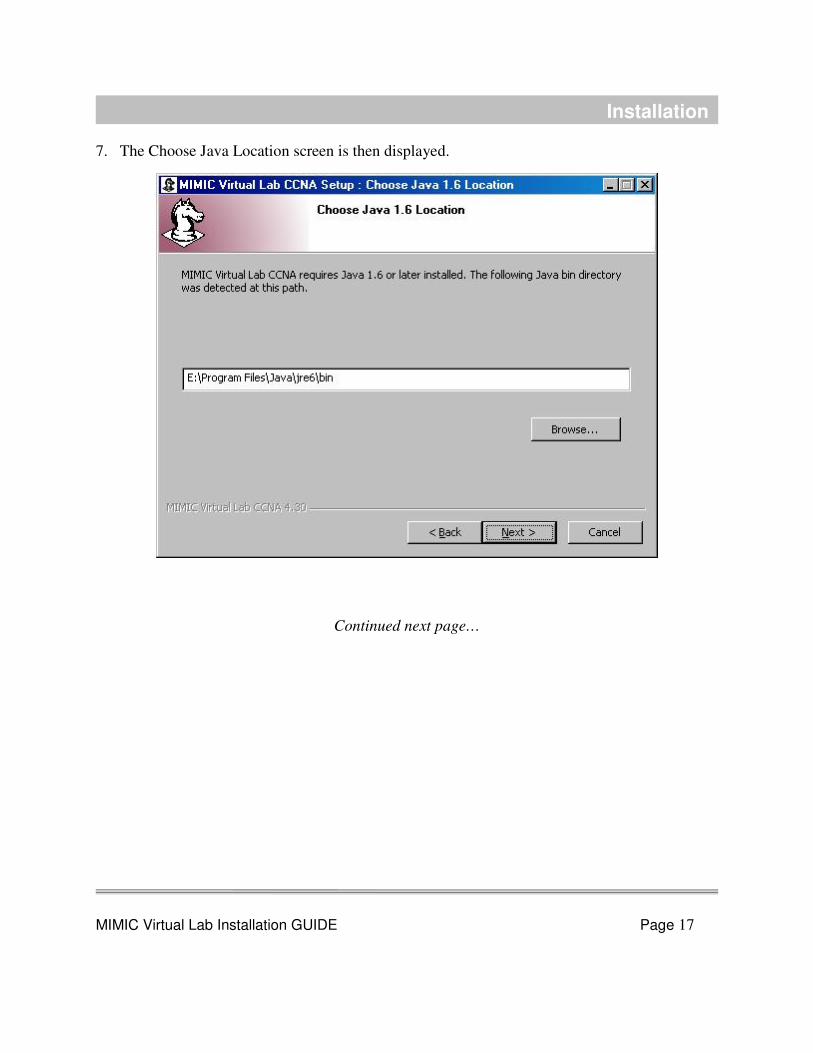
7. The Choose Java Location screen is then displayed.
Continued next page…

Page 18 MIMIC Virtual Lab Installation GUIDE
Installation
8. MIMIC Virtual Lab requires the use of the Java(TM) 2 Runtime Environment 1.6.0 or later.
The setup program automatically detects the Java 1.6. If it is not detected then following
screens appear with instructions to install Java 1.6 otherwise go to Step 8.
Continued next page…

MIMIC Virtual Lab Installation GUIDE Page 19
Installation
Continued next page…

Page 20 MIMIC Virtual Lab Installation GUIDE
Installation
9. Then following screen appears if Java 1.6 is installed properly otherwise Step 8 above is re-
peated.
Continued next page…

MIMIC Virtual Lab Installation GUIDE Page 21
Installation
10. Click Next to continue
Select a destination folder for your MIMIC Virtual Lab installation:
• Click on Next to install MIMIC Virtual Lab in the default folder shown next to the
Browse button; or,
• Click on Browse and follow the instructions on screen to select a different folder for
MIMIC Virtual Lab. The following screen appears:
Continued next page…

Page 22 MIMIC Virtual Lab Installation GUIDE
Installation
Click OK after slecting the desired folder to install. Then following screen appears:
Continued next page…

MIMIC Virtual Lab Installation GUIDE Page 23
Installation
Click on Next to install MIMIC Virtual Lab. Then following screen appears:

Page 24 MIMIC Virtual Lab Installation GUIDE
Installation
11. You may type a new folder name, or select one from the existing Folders list, or use default
Folder e.g., MIMIC Vlab 4.30. Click on Next to continue.
12. MIMIC will be installed in the directory selected in Step 10. After copying installation files,
following screen pops up:
Continued next page…

MIMIC Virtual Lab Installation GUIDE Page 25
Installation

Page 26 MIMIC Virtual Lab Installation GUIDE
Installation
Select “View the MIMIC Virtual Lab Online Documentation” to view MIMIC Virtual Lab
online documentation after finishing the installation. Then MIMIC Virtual Lab Installation
will complete with following windows:
Continued next page…

MIMIC Virtual Lab Installation GUIDE Page 27
Installation

Page 28 MIMIC Virtual Lab Installation GUIDE
Installation
Index
F
FAT file systems 5
I
IP addresses
Windows 5
S
Service packs (Windows NT) 5
Solaris
Swap space 11
U
Uninstall MIMIC 3
W
Windows
FAT file systems 5
IP addresses 5
Required privileges 4
Service pack 3 5


![[F6]sooin lang vlab](https://img.dokumen.tips/doc/110x75/559d218c1a28aba57a8b45d9/f6sooin-lang-vlab.jpg)