Embed Size (px)
Citation preview
InsightUnlimited Version: 2014.1 and above
Document Version: 6.4 | Last Updated: July 29, 2014
InsightUnlimited
Reporting™ Supplemental
User Guide June 2014

InsightUnlimited Supplemental Reporting Guide
Page 2 of 58
©2011-2014 InsightSoftware.com International. All Rights Reserved.
Introduction ............................................................................................................................ 6
Displaying Data: Additional Aggregations – 201 ................................................................. 7
Overview .......................................................................................................................................................................... 7
Aggregation Functions .................................................................................................................................................. 7
Create an Aggregation .................................................................................................................................................. 8
Displaying Data: UOM Conversion Solution – 202 (JDE) ..................................................... 9
Overview .......................................................................................................................................................................... 9
UOM Conversion Templates ....................................................................................................................................... 9
Branch Plant Profile Setting ........................................................................................................................................ 9
Features ......................................................................................................................................................................... 10
Formatting: Conditional Formatting – 203.0 ..................................................................... 12
Overview ........................................................................................................................................................................ 12
Conditional Format Styles .......................................................................................................................................... 12
Stop Lighting ................................................................................................................................................................. 13
Report Management: Best Practices - 204 ......................................................................... 14
Overview ........................................................................................................................................................................ 14
Recommended Folder Structure ............................................................................................................................. 14
Recommended File Naming Conventions ............................................................................................................. 16
Recommended Backups ............................................................................................................................................ 16
Report Management: Import and Export Reports - 205 .................................................. 17
Overview ........................................................................................................................................................................ 17
Export a Report ............................................................................................................................................................ 17
Import a Report ............................................................................................................................................................ 18
Output: Exporting to an Existing Workbook - 206 ............................................................ 19
Overview ........................................................................................................................................................................ 19
Set Capability ................................................................................................................................................................ 19
Set User Preferences .................................................................................................................................................. 19
Export to Existing Workbook: Add/Replace Worksheet ...................................................................................... 20
InsightUnlimited Supplemental Reporting Guide
Page 3 of 58
©2011-2014 InsightSoftware.com International. All Rights Reserved.
Aging: As Of Functionality - 207 .......................................................................................... 21
Overview ........................................................................................................................................................................ 21
As-of Dates .................................................................................................................................................................... 21
As-Of Optimization Level ........................................................................................................................................... 22
Other As-Of Options ................................................................................................................................................... 23
Linking: Repair Broken Links - 208 ..................................................................................... 23
Overview ........................................................................................................................................................................ 23
Repair Broken Links .................................................................................................................................................... 24
Linking: Create Hyperlink - 209 ........................................................................................... 25
Overview ........................................................................................................................................................................ 25
Link the Hyperlink ........................................................................................................................................................ 26
Calculations: Blank Columns and Rows - 210 .................................................................... 27
Overview ........................................................................................................................................................................ 27
Blank Columns ............................................................................................................................................................. 27
Blank Rows in a Hierarchy ......................................................................................................................................... 28
Blank Rows in a Report ............................................................................................................................................... 29
Calculations: Concatenate Columns - 211 ......................................................................... 30
Overview ........................................................................................................................................................................ 30
Concatenate Columns ................................................................................................................................................ 30
Calculations: Substring - 212 ............................................................................................... 33
Overview ........................................................................................................................................................................ 33
Create Custom Column Using Substring Function .............................................................................................. 33
Use Substring Function to Format Subledgers (JDE only) .................................................................................. 35
Calculations: Multiple Fiscal Date Pattern Setup - 213 .................................................... 36
Overview ........................................................................................................................................................................ 36
Begin Setup with Balance Template ........................................................................................................................ 36
Create and Activate Conditional Calculations ....................................................................................................... 37
Selectors: Quarter to Date (QTD) - 214 ............................................................................... 40

InsightUnlimited Supplemental Reporting Guide
Page 4 of 58
©2011-2014 InsightSoftware.com International. All Rights Reserved.
Overview ........................................................................................................................................................................ 40
Quarter to Date Definitions ....................................................................................................................................... 40
Include QTD Selectors in a Report .......................................................................................................................... 40
Include QTD Selectors in Reports Prior to 2012.2 ............................................................................................... 41
Configurator: Alternate Joins(JDE) - 215 ............................................................................. 42
Overview ........................................................................................................................................................................ 42
Activate Alternate Joins ............................................................................................................................................... 42
Advanced Functions: Business Unit Snapshot - 216 ......................................................... 43
Overview ........................................................................................................................................................................ 43
Enable Business Unit Snapshot ............................................................................................................................... 43
Activate Business Unit Snapshot ............................................................................................................................. 44
Advanced Functions: Percent Split - 217 ............................................................................ 46
Overview ........................................................................................................................................................................ 46
Basic Steps .................................................................................................................................................................... 46
Enable Percent Split Functionality ........................................................................................................................... 46
Percent Split Tables ..................................................................................................................................................... 47
Create a Percent Split ................................................................................................................................................. 48
Advanced Functions: Currency Restatement - 218 .......................................................... 49
Overview ........................................................................................................................................................................ 49
Working with Restatement Periods ......................................................................................................................... 49
Accessing Underlying Exchange Rate ..................................................................................................................... 51
Change Restatement Currency ................................................................................................................................ 52
Advanced Functions: Additional Inquiry Options - 219 ................................................... 53
Overview ........................................................................................................................................................................ 53
Inquiry Options General Tab ..................................................................................................................................... 53
Reusable Inquiry Objects (RIO): Best Practices - 220 ....................................................... 57
Overview ........................................................................................................................................................................ 57
Connections .................................................................................................................................................................. 57

InsightUnlimited Supplemental Reporting Guide
Page 5 of 58
©2011-2014 InsightSoftware.com International. All Rights Reserved.
Recommended File Structure for Reusable Inquiry Objects ............................................................................. 57
Further Information ............................................................................................................. 58
Contacts ......................................................................................................................................................................... 58
Customer Support ....................................................................................................................................................... 58
Notices and Disclaimer............................................................................................................................................... 58
InsightUnlimited Supplemental Reporting Guide
Page 6 of 58
©2011-2014 InsightSoftware.com International. All Rights Reserved.
InsightSoftware.com is an enterprise information company, providing software for Reporting,
Planning and Business Performance Management. Our solutions cover:
Enterprise Reporting/Inquiry, Analytics (Understand the Business)
Financial Consolidation, Management Reporting, Dashboards, KPIs (Manage the Business)
Forecasting, Planning, Budgeting, Strategy Management (Predict the Business)
The InsightUnlimited™ modules offer the following benefits:
An easy-to-navigate look and feel.
A common interface which works with various ERP systems such as JD Edwards, Oracle
E-Business Suite (EBS), and PeopleSoft.
InsightUnlimited templates operate directly over your ERP tables without duplicating the
data in order to deliver a real-time solution.
Full drilldown to transactions.
Data aggregation across all aspects of your enterprise data.
Ability to enter, save and share comments with a report.
For JD Edwards ERP system users: leveraging of all key JDE category codes, such as
Business Unit, Object, Sub Ledger, Fixed Asset, Address Book, Customer and Supplier
category codes.
Reports can be loaded, saved, published, printed and exported to Microsoft Excel® at
the touch of a button.
Scroll bars are provided instead of having to page down the inquiry result set.
Sophisticated grouping and sub-totaling of data.
Reports can be stylized and formatted, including the use of User-Defined Captions and
positioning techniques.
Multiple selections on any data item, including Period, Year, Ledger and Balance Type.
Predefined and user defined real-time calculations.
True, real-time exception reporting.
Both summary and transaction inquiries with multiple-selection capability.
Hierarchy builder which provides management information using user-defined or
predefined hierarchies and row-based calculations.
For Oracle E-Business Suite ERP system users: import structures already defined in the
EBS segments or FSG row sets.
Introduction
InsightUnlimited Supplemental Reporting Guide
Page 7 of 58
©2011-2014 InsightSoftware.com International. All Rights Reserved.
Overview
The Aggregation functionality works with any column within a report. It allows you to combine data
in the following ways and insert a row at any sort level to show:
Sum
Average
Count
Maximum/Minimum
Unique Count
Aggregation Functions
Header- Used primarily for display of text associated with a header.
Sum- Provides a sum for each selected aggregation level.
Average- This function returns the average value of the selected aggregation level.
The amounts will be displayed at the bottom of each level in every one of the selected value
and/or custom columns.
Count- Counts the number of values of a certain field included in the selected label or
custom column. Counts can be applied to label columns other than the selected aggregation
level.
Example: If the aggregation level is Customer, you can count the number of Sales Orders
associated with each Customer.
Maximum- Displays the highest value from those that are displayed in the respective value
column.
Minimum- Displays the lowest value from those that are displayed in the respective value
column.
Unique Count- Counts the number of unique values of a certain field included in the selected
label or custom column; this operation can be applied to label columns other than the
selected aggregation level.
Displaying Data: Additional Aggregations – 201

InsightUnlimited Supplemental Reporting Guide
Page 8 of 58
©2011-2014 InsightSoftware.com International. All Rights Reserved.
Create an Aggregation
Create an Aggregation by completing the following steps:
Ribbon: Design > Layout
1. Click the Column, Sorting & Grouping menu.
2. Click the Sorting & Grouping menu.
3. Click the Advanced button to open the More Totals dialog.
Note: There are two Advanced buttons on the tab: the first opens the More Totals dialog and the
level highlights and the one on the bottom opens the dialog with the grand total level as the
default. Click either button.
4 Click the Aggregation Level drop-down and choose at which Aggregation level you want the
aggregation to occur.
5 Click the Operation checkbox for the appropriate Aggregation.
6 Click the Column checkbox for the column(s) you want the aggregation to include.
7 Accept or modify the column to Display Text from the “in column” drop-down.
8 Click OK.
Example of an Aggregation occurring at the Business Unit level to count the number of Object
Accounts:
Display Text - Allows you to edit the description of the caption that is displayed in the report
result set.
Formatting - Aggregation rows can be separately formatted in terms of background color, font
type, number of decimal places, etc. Click on formatting to access options for the specific
aggregation.
Positioning - By default, the heading/sum description displays in the column where the
aggregation is performed. To display the description in a different column, click the drop-down
and choose the appropriate column.

InsightUnlimited Supplemental Reporting Guide
Page 9 of 58
©2011-2014 InsightSoftware.com International. All Rights Reserved.
Overview
A Unit of Measure Conversion defines the conversion factor from one unit to another unit. JD
Edwards provides the ability to process inventory-related transactions in multiple Units of Measure
(UOM). The UOM Conversion Solution for JDE allows transactions in different UOM to be converted
to a common UOM.
UOM Conversion Templates
The following Unit of Measure Conversion templates are available in the following modules with
UOM Conversion as part of the title:
Inventory
Purchasing
Sales
Master Data
Note: It is possible to add the UOM conversion filter to any JDE template that uses items with UOM.
Branch Plant Profile Setting
Set the ‘UOM by Branch Plant’ profile option via InsightUnlimited Administrator™ to match your JDE
Constant. This option determines if Item UOM Conversions are defined at the:
Item level OR
Item/branch plant level.
Confirm in InsightUnlimited Administrator that the correct setting in your profile is shown within
Options> Options tab. When the setting is disabled, the UOM Conversion Factor will look for an Item
UOM Conversion at the item level.
Displaying Data: UOM Conversion Solution – 202
(JDE)

InsightUnlimited Supplemental Reporting Guide
Page 10 of 58
©2011-2014 InsightSoftware.com International. All Rights Reserved.
When the setting is enabled, the UOM Conversion Factor will look for an Item UOM Conversion at
the item/branch plant level.
Features
The following features are available for the UOM Conversion functionality:
UOM Conversion Filter:
Available in Configurator>Filter Layout>Controls.
Available with UOM Conversion templates.
Provides drop-down list for single selection:

InsightUnlimited Supplemental Reporting Guide
Page 11 of 58
©2011-2014 InsightSoftware.com International. All Rights Reserved.
UOM Conversion Filter when selection is None:
When None is selected, the UOM Conversion functionality will not be executed and:
UOM Conversion Factor equals 1.0000000.
Converted UOM is the same as the transaction UOM or primary UOM.
Converted UOM Quantities are the same as the transaction or balances quantity.
Converted UOM Unit Cost and Unit Price are the same as the transaction Unit Cost and Unit
Price.
UOM Conversion Factor:
The UOM conversion factor is calculated by reading the Item UOM Conversion table (F41002) and
the Standard UOM Conversion table (F41003), based on the Transaction UOM or the Primary UOM
and the UOM Conversion selected in the header filter.
The ‘UOM Conversion Factor’ is an internal report column and
is not associated with the table in the database.
The grid column is available in More Columns and is
associated with the fact table for the template as xxVALN. The
‘UOM Conversion Factor’ is created within InsightUnlimited
and is not associated with the table in the database.
Converted UOM:
The ‘Converted UOM’ dynamically displays the same UOM selected in the ‘UOM
Conversion’ header filter for exports to Excel and pdf. The grid column is
available in More Columns and is associated with the fact table for the template
as xxBSTT. The ‘Converted UOM’ is an InsightUnlimited-created report column
and is not associated with the table in the database.

InsightUnlimited Supplemental Reporting Guide
Page 12 of 58
©2011-2014 InsightSoftware.com International. All Rights Reserved.
Overview
Conditional formatting allows you to apply formatting styles to values, labels, calculations and/or
custom columns based on user-defined conditions.
One type of conditional format is the Stoplight, which is used to highlight numbers that fall in or out
of a designated range. For example, if the calculated column is Budget Variance %, and the
threshold ranges from –10 to +10, then amounts that exceed the upper threshold are displayed in
green, amounts within the range are displayed in yellow and amounts below the lower threshold
are displayed in red.
Conditional Format Styles
Create conditional format styles by completing the following steps:
Ribbon: Formatting> Format Types
1. Click Conditional.
2. Click New to create a new definition (style).
3. Create the format:
Name - enter a meaningful name that best reflects the content and scope of the format.
Conditions - displays conditions as they are created.
Item - shows the title of the label, value or calculated field on which the condition is
based.
Condition - displays defined conditions.
Item - use the drop-down list to choose label columns, value fields or calculations on
which to apply the formatting rules.
Buttons – click New to create an additional rule; click remove to remove the highlighted
item from the condition listing.
Selected Item (e.g. Account, Calculation, Label Column) - changes according to your
selected item.
Value – select individual associated values.
Item/Text Only - available when the selected item is a label, these options enable you to
base your condition either to the item code or to description (text).
And/Or – specifies how the conditions relate. For example, you might want a condition to
apply when the department is A OR the region is X.
Apply To – specifies whether to apply the format to value columns, only label columns or
Formatting: Conditional Formatting – 203.0

InsightUnlimited Supplemental Reporting Guide
Page 13 of 58
©2011-2014 InsightSoftware.com International. All Rights Reserved.
to the entire row.
Set Format - click to open the standard formatting window.
Preview Style - displays a sample of your formatting choices.
Formatting - click Edit to launch the Define Formatting Style Dialog where you can set the
format style.
4. Click OK.
5. Refer to QRA 107.1 for more information about format options.
Stop Lighting
Create Stop Lighting format styles by completing the following steps:
Ribbon: Formatting> Format Types
1. Click Conditional.
2. Click New Stoplight to create new definition:
Name - enter a meaningful name.
Item - use the drop-down menu to choose one of the across-pivoted fields to apply the
formatting rules.
Selection (e.g. ledger) – this item updates according to your selected item. Use the Visual
Assist to select the specific items.
Thresholds - type the lower threshold value on the top box and the upper threshold
value on the bottom box.
Stoplight Color Boxes - click on the colored boxes to change to a different color such as
white.
Expense Reporting (JDE only) - check this option to recognize a change in accounting
behavior when used with specified accounts.
3. Click OK.

InsightUnlimited Supplemental Reporting Guide
Page 14 of 58
©2011-2014 InsightSoftware.com International. All Rights Reserved.
Overview
Establish best practices for naming and organizing your folders and reports.
Recommended Folder Structure
Following is the recommended Public Folder Structure:
01 Production
01 GL
02 AP
03 AR
02 Test
01 GL
02 AP
03 AR
98 Promote to Production
99 Demote to In-Process
03 In-Process
01 GL
02 AP
03 AR
98 Promote to Test
99 Delete
04 Shared Folder
Report Management: Best Practices - 204

InsightUnlimited Supplemental Reporting Guide
Page 15 of 58
©2011-2014 InsightSoftware.com International. All Rights Reserved.
Folder Notes Permissions
01
Production
Authorized administrator:
Moves tested report from
the Test to the Production
folder.
Edits the report name using
recommended file naming
conventions.
Read Permission is
granted for general
users.
Administrator and/or
very limited number of
super users have full
access.
02 Test Users who are authorized
to test reports have access
to move and edit reports.
Read Permission is
granted to general
users.
Full access is granted
to the administrator
and designated
testers.
03 In-Process All end users who are
authorized to write public
reports should be able to
save and edit reports in all
subfolders below this
folder.
Read, write, and move
Permission is granted
to any users with
authorization to create
public reports.

InsightUnlimited Supplemental Reporting Guide
Page 16 of 58
©2011-2014 InsightSoftware.com International. All Rights Reserved.
Recommended File Naming Conventions
As the number of saved inquiries and reports grows, a standardized naming convention makes a big
difference in manageability. Following is the recommended naming convention:
GLB0001 - Description
GL – Source Module = GL
B – Source Template = Balances
0001 – Unique ID
Description – Meaningful description of purpose of report such as “Consolidated Balance Sheet” or
“Branch Income Statement”
Examples:
1. Report Details: Income Statement, created from the Balances (B) template, in the GL (GL)
module.
Recommended File Name: GLB0001 – Corporate Income Statement
2. Report Details: Detailed AP report, created from the Integrated Detail (I) template, in the AP
(AP) module.
Recommended File Name: API0001 – AP Details by Vendor
3. Report Details: Fixed Asset Schedule, created from the Balances (B) template, in the Fixed
Asset (FA) Module.
Recommended File Name: FAB0001 – Fixed Asset Schedule by Location
4. Report Details: Received not Vouchered, created from Received not Vouchered template
(RN), in the Purchasing (POP) module.
Recommended File name: POPRN0001 – Received Not Vouchered
Recommended Backups
Backups are performed manually via InsightUnlimited Administrator. It is recommended to back up
the repository daily or as needed.
Refer to QRA 901.5 (InsightUnlimited Administrator) for instructions on how to perform these
backups.
Note: Access to InsightUnlimited Administrator can be assigned to business users with controls to
limited capabilities such as managing documents, users and/or backups.

InsightUnlimited Supplemental Reporting Guide
Page 17 of 58
©2011-2014 InsightSoftware.com International. All Rights Reserved.
Overview
The Import/Export functionality allows you to share reports. Additionally, it can act as an alternative
to using backup.
Importing and exporting can be done for a single report in the application or for multiple
reports using InsightUnlimited Administrator.
The file format for reports is .rdf.
When you import a report, you must grant Permissions as you would any other report.
Export a Report
Export a report by completing the following steps:
1. Open the folder that you want to export.
2. Go to the Backstage View.
3. Click Export.
4. In the export dialog, choose the location to where you want to export.
Note: if you plan to email the report, save the report to a location where you can easily find
it.
5. Click Save.
Report Management: Import and Export Reports -
205
InsightUnlimited Supplemental Reporting Guide
Page 18 of 58
©2011-2014 InsightSoftware.com International. All Rights Reserved.
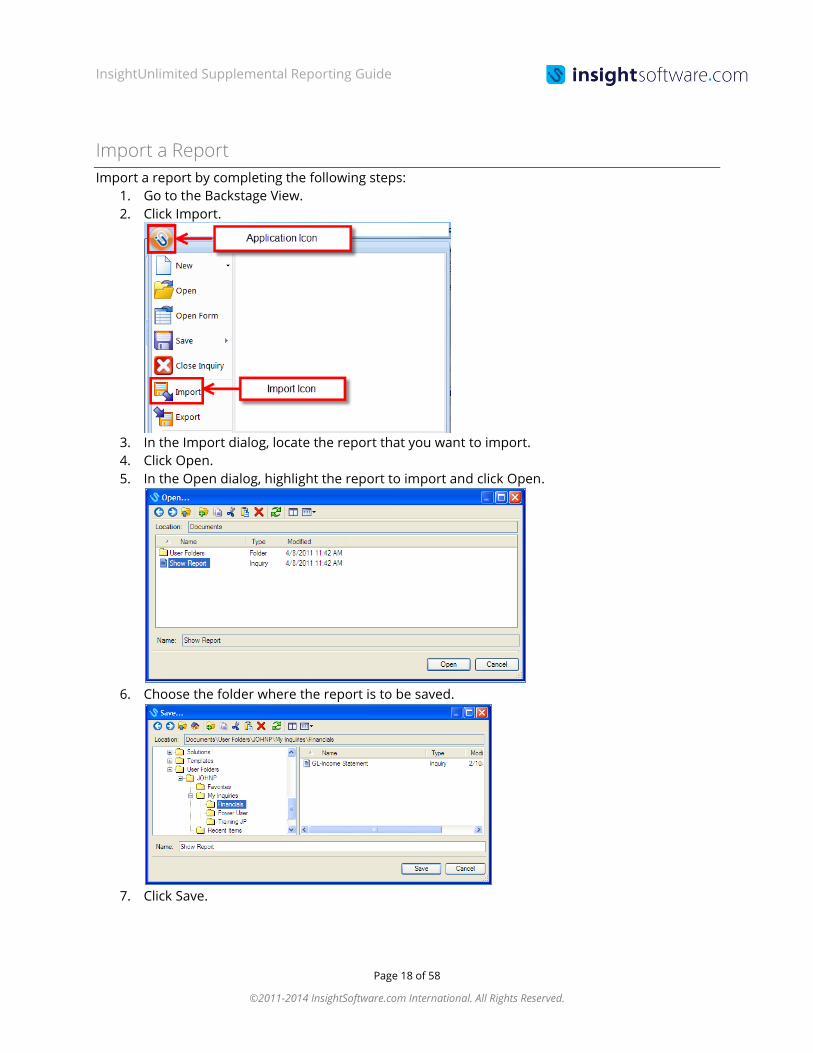
Import a Report
Import a report by completing the following steps:
1. Go to the Backstage View.
2. Click Import.
3. In the Import dialog, locate the report that you want to import.
4. Click Open.
5. In the Open dialog, highlight the report to import and click Open.
6. Choose the folder where the report is to be saved.
7. Click Save.

InsightUnlimited Supplemental Reporting Guide
Page 19 of 58
©2011-2014 InsightSoftware.com International. All Rights Reserved.
Overview
You can export a report to a new Excel workbook or export to an existing workbook.
Set Capability
The capability in InsightUnlimited Administrator must be set to prompt the user for file location to
be able to access the option to export to an existing Excel workbook.
Right-click Users and Groups (select everyone, a group, or individual user) >Capabilities >Advanced
1. Click Export to file.
2. Click Prompt for File Location.
3. Highlight users (based on where you
initially right-clicked).
4. Change setting to Yes.
5. Check Prompt user for name and
location of the export document.
6. Click Close.
7. Click OK.
Set User Preferences
Set User Preference by completing the following steps (this only needs to be done once):
1. Go to the Backstage View.
2. Click User Preferences.
3. Uncheck (or verify already
unchecked). Create Unique File
Name.
4. Click OK.
Output: Exporting to an Existing Workbook - 206
InsightUnlimited Supplemental Reporting Guide
Page 20 of 58
©2011-2014 InsightSoftware.com International. All Rights Reserved.
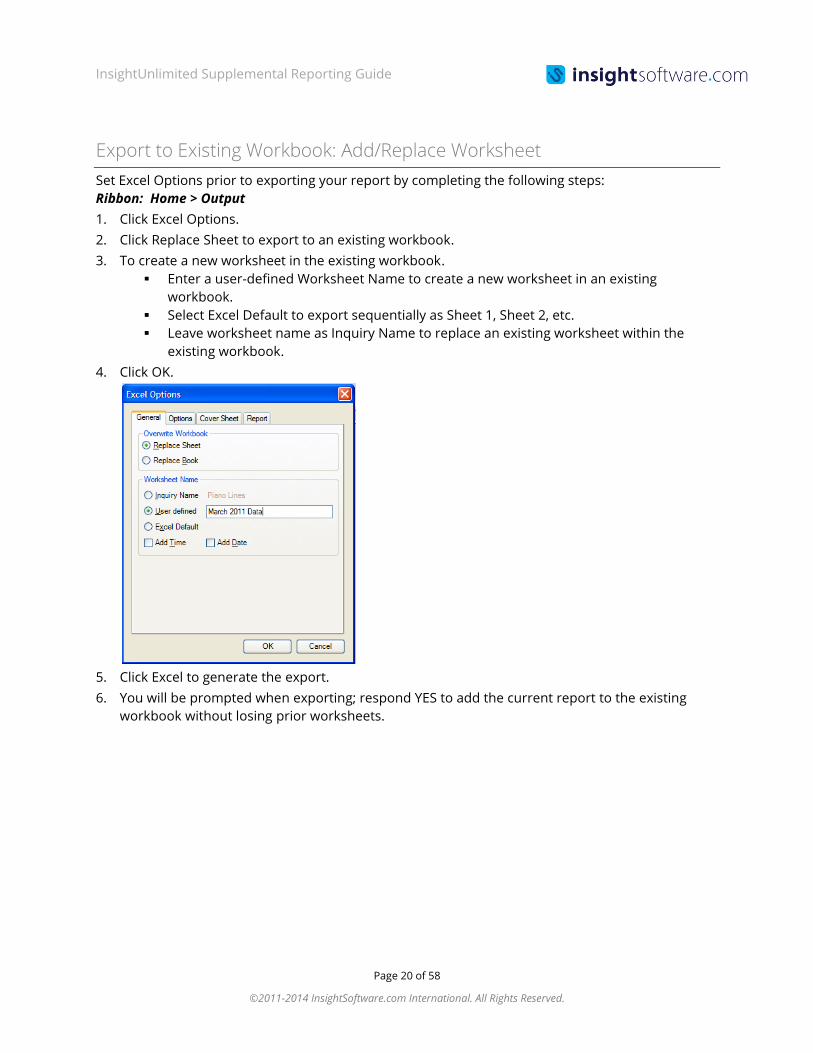
Export to Existing Workbook: Add/Replace Worksheet
Set Excel Options prior to exporting your report by completing the following steps:
Ribbon: Home > Output
1. Click Excel Options.
2. Click Replace Sheet to export to an existing workbook.
3. To create a new worksheet in the existing workbook.
Enter a user-defined Worksheet Name to create a new worksheet in an existing
workbook.
Select Excel Default to export sequentially as Sheet 1, Sheet 2, etc.
Leave worksheet name as Inquiry Name to replace an existing worksheet within the
existing workbook.
4. Click OK.
5. Click Excel to generate the export.
6. You will be prompted when exporting; respond YES to add the current report to the existing
workbook without losing prior worksheets.

InsightUnlimited Supplemental Reporting Guide
Page 21 of 58
©2011-2014 InsightSoftware.com International. All Rights Reserved.
Overview
The As-Of functionality is available in the Accounts Receivable (JDE and EBS) and Accounts Payable
(JDE only) modules. Templates that contain this functionality have a prefix of As Of in the name.
As-Of functionality allows you to see what the records would have looked like for a specific date in
time in both domestic and foreign currency. These records are analyzed in real time from the
respective data tables. The As-Of Date can be specified and modified when running the report
without running a batch process in the ERP system (JDE only).
As-of Dates
Include As of functionality by completing the following steps:
Open an As-Of template
1. Click in the As-Of Date filter.
2. Change the date to restrict transactions (AP payments or AR receipts) to a specific date in
time.
Note: The term “payment” is used to describe all transactions that cause the current open
amount to be adjusted up or down. This could include cash receipts, spread adjustments or
voiding entries. Generally you will see all adjustment types unless they are specifically
excluded.
3. Optionally uncheck “Only include invoices open on As-Of Date”’.
4. Define amounts to be displayed by keying in the amounts filter or by selecting from the list
available by using the Visual Assist.
Aging: As Of Functionality - 207

InsightUnlimited Supplemental Reporting Guide
Page 22 of 58
©2011-2014 InsightSoftware.com International. All Rights Reserved.
Example (available options differ for each template):
5. Optionally, use any As-Of amount to create aging definitions. These values do not have to be
included as value columns in your report to make them available for aging category
definitions.
For Example:
As-Of Optimization Level
For As-Of templates, in both the AR and AP modules, the As-Of Optimization Level option can be
used under certain circumstances to assist performance of As-Of reports. Select the As-Of
Optimization Level by completing the following steps:
Ribbon: Home>Options
1. Click the Inquiry Options menu.
2. Click the Advanced tab.
3. Click to display the drop-down list.
4. Make your selection:
Auto (Recommended) - selects the best method from the next two options based on the
filters set in the report.
Optimize for shortest SQL - the underlying SQL for the As-Of functionality is reduced
where possible (useful for older databases that have limited SQL length processing).
Optimize to allow best use of indexes - switches to a longer SQL setting.

InsightUnlimited Supplemental Reporting Guide
Page 23 of 58
©2011-2014 InsightSoftware.com International. All Rights Reserved.
Other As-Of Options
There are two other options available for As-Of processing which are shown on the same dialog as
the As-Of Optimization Level. Click the drop-down list to respond YES or NO to:
1. Include Currency Gains and Losses In As-Of Values.
2. Include Draft Invoice Payments.
Overview
Linking, also known as drilldown or drilling is a way to connect one or more reports together to
provide a more detailed view of a record, a summary view of a record, or an alternate view of the
same information.
With linking, you can cross modules (e.g. Accounts Payable to Purchasing) or stay within the same
module. Links can connect to existing reports or they can connect to standard or custom templates.
The report you link from is the source report; the report you link to is the destination or target
report. Some templates have pre-set default links or you can create your own custom links.
When an inquiry contains links to other inquiries, these links correspond to absolute paths in the
object repository. When a target inquiry is moved, then the links in any source inquiries must be
updated.
Linking: Repair Broken Links - 208

InsightUnlimited Supplemental Reporting Guide
Page 24 of 58
©2011-2014 InsightSoftware.com International. All Rights Reserved.
Repair Broken Links
Repair broken links by completing the following steps:
Ribbon: Home>Documents
1. Click the Manage Folders menu.
2. Right-click on the desired folder.
3. Select Update Links from the drop-down list.
4. Click Analyze.
5. Double-click each broken link and repair the issue.

InsightUnlimited Supplemental Reporting Guide
Page 25 of 58
©2011-2014 InsightSoftware.com International. All Rights Reserved.
Overview
Create a link to an external document or a webpage through a hyperlink. A hyperlink can be linked
to a report similarly to a Custom Link. When executed, it will display the linked document, picture or
webpage.
Create a hyperlink to an external object by completing the following steps:
Ribbon: Home > Documents
1. Click the Manage Folders button.
2. Right-click on the appropriate folder.
3. Click New, Hyperlink.
4. Fill in the Name field with a descriptive name.
5. Fill in the Description field if applicable.
6. Type or paste the URL for the hyperlink in the URL field.
Note: The external document should be located in a place that is accessible to report users.
7. Type the known Variable at the end of the file structure in the URL in addition to the file
extension (.pdf, .xls, .jpg, etc.).
In the above example, the variable is <DocNumber> and is dynamic. Typing <DocNumber> will
associate the link with the correspondingly labeled .pdf in the folder.
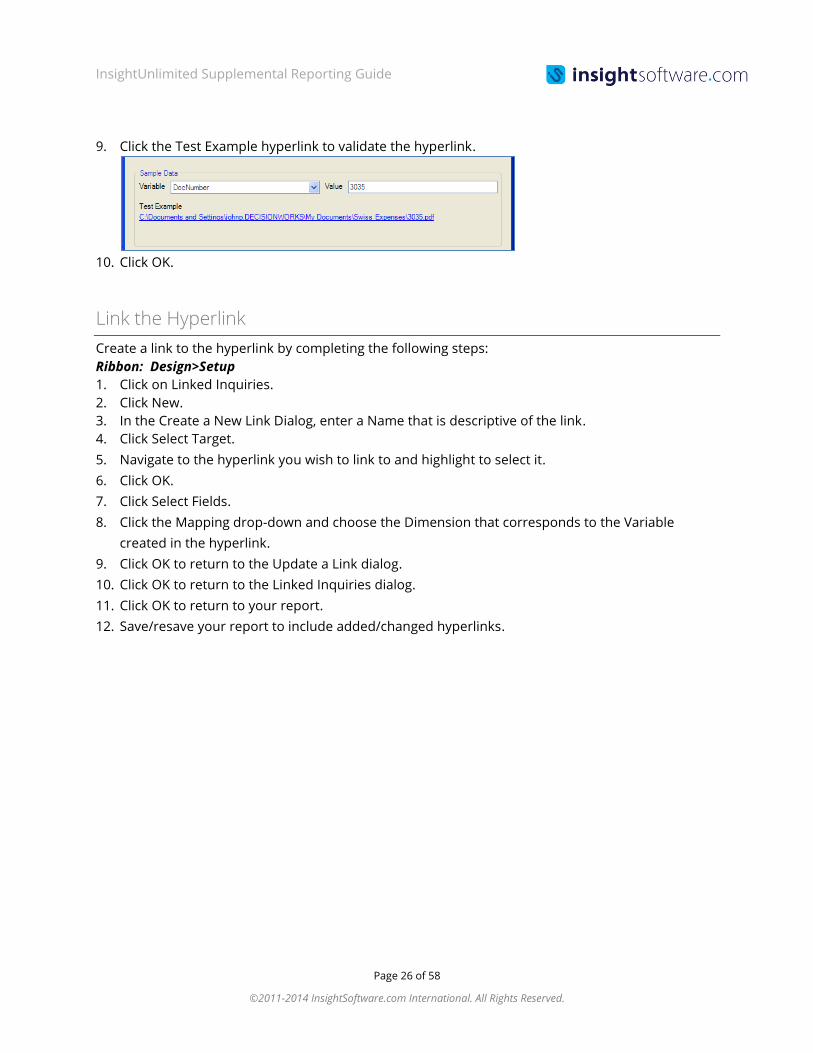
8. To test the hyperlink, select the dynamic variable from the Variable drop-down and type the
known Value.
Linking: Create Hyperlink - 209
InsightUnlimited Supplemental Reporting Guide
Page 26 of 58
©2011-2014 InsightSoftware.com International. All Rights Reserved.
9. Click the Test Example hyperlink to validate the hyperlink.
10. Click OK.
Link the Hyperlink
Create a link to the hyperlink by completing the following steps:
Ribbon: Design>Setup
1. Click on Linked Inquiries.
2. Click New.
3. In the Create a New Link Dialog, enter a Name that is descriptive of the link.
4. Click Select Target.
5. Navigate to the hyperlink you wish to link to and highlight to select it.
6. Click OK.
7. Click Select Fields.
8. Click the Mapping drop-down and choose the Dimension that corresponds to the Variable
created in the hyperlink.
9. Click OK to return to the Update a Link dialog.
10. Click OK to return to the Linked Inquiries dialog.
11. Click OK to return to your report.
12. Save/resave your report to include added/changed hyperlinks.

InsightUnlimited Supplemental Reporting Guide
Page 27 of 58
©2011-2014 InsightSoftware.com International. All Rights Reserved.
Overview
Review the section below to learn how to insert blank rows or blank columns in your report.
Blank Columns
Choose an option below in order to create a blank column in your report:
Option 1: Create a blank column using the calculations function: Ribbon: Inquiry Objects > Calculations
1. Click Calculations.
2. Click New to create a calculation/custom column.
3. Name: ‘Blank’ Caption: ‘Blank’. Click Define.
4. Click on the right side of the screen: functions (fn(x), more functions.
5. Select String from the drop-down.
6. Press the space bar a few times. Click OK.
7. Click OK.
8. Click OK.
9. Click the checkbox to activate the ‘Blank’ calculation.
10. Click OK.
11. Position the blank column as desired in the report.
12. Set the column heading to spaces to create a blank column heading.
Calculations: Blank Columns and Rows - 210

InsightUnlimited Supplemental Reporting Guide
Page 28 of 58
©2011-2014 InsightSoftware.com International. All Rights Reserved.
Option 2: Create a blank column using the add Comment Column feature:
Ribbon: Design> Comments
1. Click Add Comment Column.
Note: if you don’t see this option, contact your Insight Administrator to assign this capability.
2. Optionally right-click in the report grid and select Add Column from the drop-down menu.
3. Position the column as preferred.
4. Set column heading and format as preferred.
Blank Rows in a Hierarchy
Choose an option below in order to create a blank row in a hierarchy.
Option 1: Format Hierarchy:
Ribbon: Formatting > Hierarchies
1. Use Ctrl, click to select rows where you want additional spacing.
2. Click New to create a new format definition.
3. Click Borders and select row spacing.
Option 2: Create label entry in the hierarchy:
1. Position Label Entries into the hierarchy wherever you want a blank row to appear:
Type: Label Entry
Name: Blank 1 (subsequent blank rows: Blank2, Blank3, etc.)
Display: Always
Reverse signs: Unchecked
Roll values up into this one: Unchecked
2. Create Conditional Format:
Condition: Select label column that contains text ‘Blank’.
Text is case sensitive.
Do not enter quotes.
Do not key wildcards (system takes care of this).
Apply to: Entire Row
Set Format: Check Suppress Data box on Appearance Tab.

InsightUnlimited Supplemental Reporting Guide
Page 29 of 58
©2011-2014 InsightSoftware.com International. All Rights Reserved.
Blank Rows in a Report
Choose from the following options in order to create a blank row in a report:
Option 1: Format from ribbon:
Ribbon: Formatting > Headers or Totals
1. Highlight the header or total to format.
2. Click edit to change the format definition.
3. Click Borders and select row spacing.
4. Select Before or After and size.
5. Click OK.
Option 2: Create and suppress aggregation:
Ribbon: Design > Columns Sorting & Grouping
1. Click the Sorting & Grouping tab.
2. Click the Advanced button.
3. Select an aggregation at the level you want a blank row (one that you don’t want displayed in
your report).
4. Click format for this aggregation.
5. Check Suppress Data box on Appearance tab.
6. Click OK.

InsightUnlimited Supplemental Reporting Guide
Page 30 of 58
©2011-2014 InsightSoftware.com International. All Rights Reserved.
Overview
Combine two or more columns (fields) into a single column by using the Calculations feature.
Optionally, you can include separators between the fields such as periods, commas, spaces, and
dashes by using the String function. The new column can also be used in titles, subtitles, or
subtotals.
Concatenate Columns
Concatenated columns by completing the following steps:
Option 1:
Ribbon: Inquiry Objects
1. Click Calculations.
2. Click New.
3. Fill in Name and Caption.
Note: Caption will be the new Column Header that appears in the report.
4. Click Define.
5. Click Functions > More Functions.
6. Select Concatenate String from the drop-down menu.
7. Click OK.
Calculations: Concatenate Columns - 211

InsightUnlimited Supplemental Reporting Guide
Page 31 of 58
©2011-2014 InsightSoftware.com International. All Rights Reserved.
8. Select the first column and second column to combine from the drop-down lists (this example
combines Object Account and Subsidiary).
Note: This method does not include a separator such as a period or dash.
9. Click OK.
10. Click OK.
11. Activate the calculation by ticking the box in front of the calculation name.
Note: You can concatenate 3 columns by combining the calculation (the concatenated column)
with an additional column.
Examples from JDE
Order Number. Line
Number
25651000
25652000
GL Balances Template
Object.Subsidiary
1110BEAR
1110FIB
DE

InsightUnlimited Supplemental Reporting Guide
Page 32 of 58
©2011-2014 InsightSoftware.com International. All Rights Reserved.
Option 2:
1. Type Catstr( in the Add Default Calculation dialog.
2. Click All Columns in the middle drop-down.
3. Double-click the first column to be concatenated.
4. Add a separator.
Place the cursor where the separator is to be positioned.
Click the Function fn(x) button.
Click More Functions . . .
Click String (Single) from the Type drop-down.
Type the appropriate separator ( . , - ) in the Please enter contents field.
5. Repeat steps 5-7 for additional columns.
6. Click OK.
7. Click OK.
Examples from JDE
Sales Order
Processing Detail
Template
Order Number. Line
Number
2565.1000
2565.2000
Catstr(Column(ID__COL__F0018_TDDOCO),Catstr(String(.),Co
lumn(ID_LINENUMBER_CODE)))
GL Balances Template
Object.Subsidiary
1110.BEAR
1110.FIB
Catstr(Catstr(Column(ID_OBJECT),String(.)),Column(ID_SUB))
GL Balances Template
Business Unit.
Object.Subsidiary
63.1110.BEAR
63.1110.FIB
Catstr(Catstr(Catstr(Catstr(Column(ID_BU),String(.)),Colum
n(ID_OBJECT)),String(.)),Column(ID_SUB))

InsightUnlimited Supplemental Reporting Guide
Page 33 of 58
©2011-2014 InsightSoftware.com International. All Rights Reserved.
Overview
Use the substring function within calculations to create a new custom column that contains a
portion of another column (field). You will specify the starting character and length of the substring.
Note: The column you are using to substring must be included in the inquiry.
Create Custom Column Using Substring Function
Example: Breaking down the Object Account and displaying the first 2 characters as a separate
column.
Ribbon: Inquiry Objects> Inquiry Objects
1. Click Calculations.
2. Click New.
3. Enter a Name – use a unique name to identify the substring.
4. Enter a Caption – this is the column heading.
5. Category - the tab under which the calculation will be stored; by default, calculations are in the
category ‘User Defined’.
6. Click Define.
7. Click fn(x), MoreFunctions.
Calculations: Substring - 212

InsightUnlimited Supplemental Reporting Guide
Page 34 of 58
©2011-2014 InsightSoftware.com International. All Rights Reserved.
8. Select Substring function from the drop-down.
9. Select the column (field) from the drop-down that you want to use.
10. Select Start Index: enter the position of the character where you want to start parsing the field.
11. Select Length: enter the number of characters to include.
12. Click OK.
13. Click OK.
14. Click OK.
15. Activate the custom column (substring) by ticking the checkbox.
16. Click OK.
17. Result:

InsightUnlimited Supplemental Reporting Guide
Page 35 of 58
©2011-2014 InsightSoftware.com International. All Rights Reserved.
Use Substring Function to Format Subledgers (JDE only)
When a subledger is added as a column in JDE, the format is, for example using the Address Book as
a subledger, A.0000037. Use the substring function to display only the numbers (changing to only
code or only description doesn’t accomplish this).
Note: Even though the first zero is in the 3rd
position, still begin with position 1 as the starting point;
otherwise, the first two zeros would not be included.
Complete the New Custom Column dialog to look like the following:

InsightUnlimited Supplemental Reporting Guide
Page 36 of 58
©2011-2014 InsightSoftware.com International. All Rights Reserved.
Overview
Use these steps to create a single report when you have two different fiscal date patterns and want
to combine or consolidate data. This example uses:
Company 80: Fiscal Date Pattern = R (January 1 – December 31)
Company 50: Fiscal Date Pattern = F (June 1 – May 31)
To accomplish this, create calculated columns to display balances for both companies and sync the
data for a specific month (e.g. June).
Begin Setup with Balance Template
Create a single report using the GL Balances template to include a single column with the total for
JUNE (Period 1 for Company 50; Period 6 for Company 80) by completing the following steps:
Ribbon: Design > Layout
1. Click Columns Sorting & Grouping.
2. Add columns available from More Columns:
Fiscal Date Pattern
Date End of Period 1
Fiscal Year Begins
3. Filter on two Periods that represent a single month (e.g. June = 1,6).
4. Filter on two companies that use differing date patterns (e.g. 50, 80).
5. Use filters to limit the data for ease of validation (e.g., one object account, one subsidiary).
Calculations: Multiple Fiscal Date Pattern Setup -
213

InsightUnlimited Supplemental Reporting Guide
Page 37 of 58
©2011-2014 InsightSoftware.com International. All Rights Reserved.
Create and Activate Conditional Calculations
Create conditional calculations to define the monthly periods. Base the condition on the fiscal date
pattern with the correct period/year combination by completing the following steps:
Ribbon: Inquiry Objects> Inquiry Objects
1. Click Calculations.
2. Click New.
3. Enter a Name – name with the Month/Year you are defining e.g. JUN05.
4. Enter a Caption – Use the Month/Year e.g. Jun 2005.
5. Enter the year for which you are creating these calculations as the Category to organize the
completed calculations.
6. Uncheck the Default Calculation option.
7. Check Conditional Override option.
8. Click New to define the condition.
9. Select Fiscal Date Pattern from the drop-down.
10. Enter the value Equal To F (the first date pattern).
11. Click OK.
InsightUnlimited Supplemental Reporting Guide
Page 38 of 58
©2011-2014 InsightSoftware.com International. All Rights Reserved.
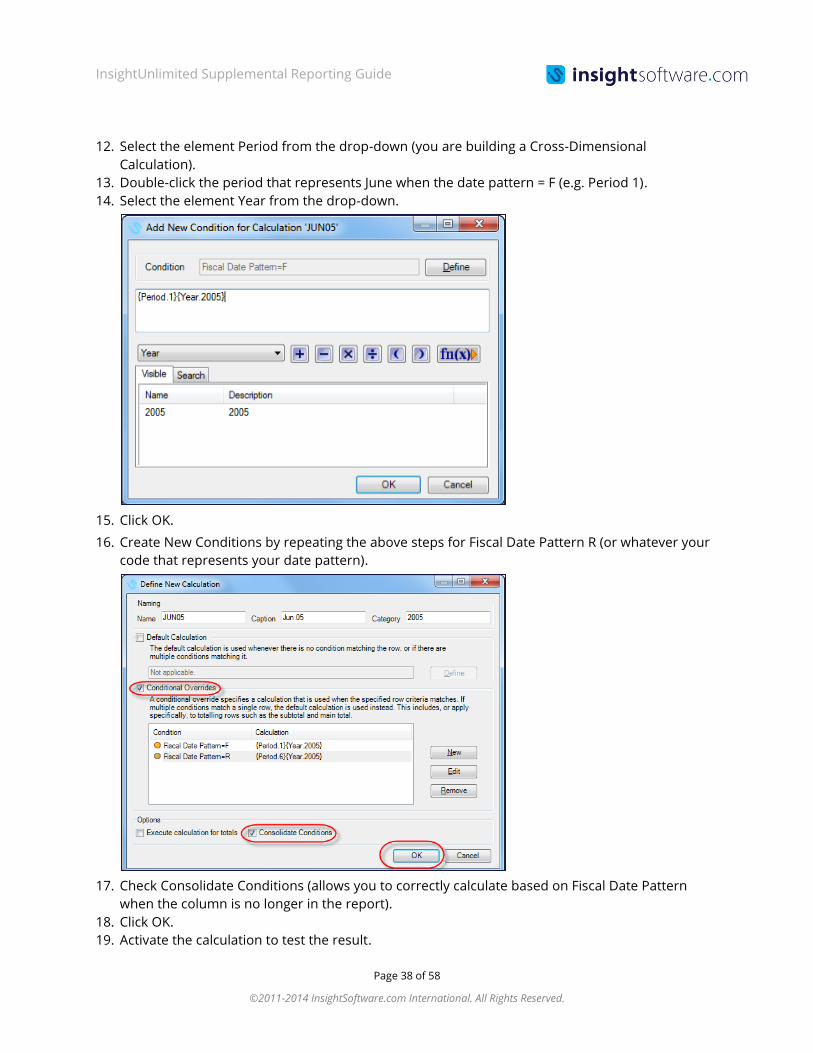
12. Select the element Period from the drop-down (you are building a Cross-Dimensional
Calculation).
13. Double-click the period that represents June when the date pattern = F (e.g. Period 1).
14. Select the element Year from the drop-down.
15. Click OK.
16. Create New Conditions by repeating the above steps for Fiscal Date Pattern R (or whatever your
code that represents your date pattern).
17. Check Consolidate Conditions (allows you to correctly calculate based on Fiscal Date Pattern
when the column is no longer in the report).
18. Click OK.
19. Activate the calculation to test the result.

InsightUnlimited Supplemental Reporting Guide
Page 39 of 58
©2011-2014 InsightSoftware.com International. All Rights Reserved.
20. Your report will now look like this:
21. Repeat for each month.
22. Remove unnecessary filter selections for Period and Year.
Leave only the condit,6)
Leave only the conditional calculation in the year filter and remove the original year
(e.g.2005)
23. Leave only label columns that are meaningful to your report; remove any that you were using to
validate your calculations.
24. Your report will now look similar to this depending on which columns you remove:
Notes:
If you get no data for the calculated column, go back and verify that you checked the
Consolidate Conditions in your calculation.
These Calculations can be saved as Reusable Inquiry Object (RIO).

InsightUnlimited Supplemental Reporting Guide
Page 40 of 58
©2011-2014 InsightSoftware.com International. All Rights Reserved.
Overview
The Quarter to Date feature provides the ability to display amount data up to your CURRENT period
defined in JD Edwards for the current quarter in the Balances templates for:
General Ledger (GL)
Job Cost (JC)
Fixed Assets (FA)
Advanced Cost Accounting (ACA)
Quarter to Date Definitions
The QTD Period Selectors are based on the CURRENT Period value. Identify which period is defined
for CURRENT to determine the appropriate QTD Selector.
Examples:
For QTD1 (Quarter 1 to Date):
if the current period is 1, QTD1 = P1
if the current period is 2, QTD1 = P1+P2
if the current period is 3 or more, QTD1 = P1+P2+P3
For QTD2 (Quarter 2 to Date):
if the current period is less than 4, QTD2 = <BLANK>
if the current period is 4, QTD2 = P4
if the current period is 5, QTD2 = P4+P5
if the current period is 6 or more, QTD2 = P4+P5+P6
Include QTD Selectors in a Report
Include QTD selector(s) in a report created via a Balances template by completing the following
steps:
With a Balances Template/Report on screen
1. Click the Period filter.
2. Click the Visual Assist (flashlight).
3. Click the Selectors tab.
4. Click find (magnifying glass).
5. Move the QTD selector(s) from the left to the right panel.
6. Click OK.
Note: Optionally key the QTD selectors directly into the Period filter (QTD1, QTD1, etc.).
Selectors: Quarter to Date (QTD) - 214

InsightUnlimited Supplemental Reporting Guide
Page 41 of 58
©2011-2014 InsightSoftware.com International. All Rights Reserved.
Include QTD Selectors in Reports Prior to 2012.2
QTD selectors were not available for reports created using templates prior to version 2012.2. Use
one of the two options to include them:
Option 1: Add via Reusable Inquiry Objects.
Add to Reusable Inquiry Objects (RIO) from a 2012.2 Balances template. Once available in RIO,
access the report you wish to include the selectors in and subscribe to them from RIO. Refer to QRA
202.5 for more information.
Option 2: Manually add QTD Period Selectors to existing reports.
Create a new fixed selector by completing the following steps:
Ribbon: Inquiry Objects> Inquiry Objects
1. Click the drop-down arrow on Selectors.
2. Click Setup Selectors.
3. Click New.
4. Enter information into the New Selector dialog:
Field – Period
Name – QTD1
Caption – Quarter 1 to Period
5. Click ADD.
6. Select Relative Value.
7. Relation = Quarter 1 to Period.
8. Selector = CURRENT.
9. Click OK.
10. Click OK.
11. Repeat for other QTD selectors.
12. Follow steps to Include QTD Selectors in a Report as outlined in the beginning of this QRA.

InsightUnlimited Supplemental Reporting Guide
Page 42 of 58
©2011-2014 InsightSoftware.com International. All Rights Reserved.
Overview
Columns from associated tables are joined together and impact the data that is returned. Some
templates have alternate joins available. You must have Configurator licensing and capabilities to
access this functionality.
Only the options displayed in the dialog for Alternate Joins are available for most users. In the
Designer Express Designer module, functionality is available to define JDE table custom joins.
Activate Alternate Joins
You can alternate joins for the on-screen inquiry by completing the following steps:
Ribbon: Configurator > Configurator
1. Click Alternate Joins.
2. Highlight the table you wish to impact.
3. Select the new link from the drop-down list.
4. Click OK.
5. Run the inquiry and validate that the change returns the correct values.
Configurator: Alternate Joins(JDE) - 215

InsightUnlimited Supplemental Reporting Guide
Page 43 of 58
©2011-2014 InsightSoftware.com International. All Rights Reserved.
Overview
The Business Unit Snapshot functionality allows users to create reports that derive the correct
Business Unit attribute/category codes using the JDE Snapshot effective dates.
The F0006 data can be used for summary reports (such as GL Balances) or transactional reports
(such as GL Transactions), accurately grouping amounts and journal entries according to structures
recorded in the F0006S.
Users will have full drill-down capability to the original GL transactions based on time-phased
organizational changes.
Enable Business Unit Snapshot
If Snapshot functionality is enabled in JDE, then as business units are moved into different groupings
using category codes, the date history of the structure change is stored in the F0006S table.
You can then go back in time and run financial reporting based on the business unit structures As-Of
specified dates.
Additionally, cumulative period reports can be written to take into account the organizational
structure changes, placing dollar amounts into the correct organizational buckets based on timing of
the organizational changes.
To enable Business Unit Snapshot functionality, the associated Data Source must map to the Date
Effective Business Unit Master (F0006S) table.
Advanced Functions: Business Unit Snapshot - 216

InsightUnlimited Supplemental Reporting Guide
Page 44 of 58
©2011-2014 InsightSoftware.com International. All Rights Reserved.
Activate Business Unit Snapshot
Activate Business Unit Snapshot functionality by completing the following steps:
Ribbon: Home > Options
1. Click on Inquiry Options.
2. Click on Advanced.
3. Choose the appropriate drop-down for Use Business Unit.
No, don’t use snapshots.
Include period if snapshot date falls inside it.
Exclude period if snapshot date falls inside it.
Include when snapshot falls in first half; otherwise exclude.
4. Click OK.
5. In your report, sort & group your data using the BU Cat Codes defined in the Date Effective
Business Unit Master (F0006S) table
Note: Refer to QRA 104.1 Displaying Data – Sorting and Grouping on Labels for additional
information on sorting & grouping.
Example:
The data included in the report changes according to the option selected in Inquiry Options.
Data can be included or excluded by the circumstances described in each option.
Sample results in a GL Balances report when Snapshot is not enabled:

InsightUnlimited Supplemental Reporting Guide
Page 45 of 58
©2011-2014 InsightSoftware.com International. All Rights Reserved.
The same report, with Business Unit Snapshot enabled (with a setting of Include period if
snapshot date falls inside it), has different results due to the values in the Date Effective
Business Master (F0006S) Table:
Note: In order to see the Business Unit Snapshot option in your Balances or Transactions report,
you must have the F0006S Table mapped in your data source.

InsightUnlimited Supplemental Reporting Guide
Page 46 of 58
©2011-2014 InsightSoftware.com International. All Rights Reserved.
Overview
The Percent Split feature takes values from the data source and splits them into multiple values
depending on a percentage.
You can do this to allow part-ownership of entities, i.e. for joint venture purposes.
Example: You could split all values for Company 1 regardless of which business unit they belonged
to originally into:
30% for Business Unit 1
30% for Business Unit 2
40% for Business Unit 3
The values you create are uploaded to a database that your Administrator has specified in the data
source.
Basic Steps
1. Set up a percent split definition based on a specific table and the fields that can be split.
2. Enter in the percentage values.
3. Choose the split percentage to add to your report in order to apply it and update the
database.
Enable Percent Split Functionality
Your Administrator must setup the following in order to use Percent Split functionality:
The data entry information must be entered in the data source being used so that data can
be uploaded to the specified database.
The appropriate Advanced Capabilities must be granted.
o Choose Percent Splits – allow the user to choose which percent splits to add to the
report.
o Contribute to Percent Splits – allow the user to contribute to percent splits.
o Create & Edit Percent Splits – allow the user to create and edit percent splits.
o Percent Split Table Management – allows access to the Clean Up Tables Dialog
where percent split database tables can be removed.
Advanced Functions: Percent Split - 217
InsightUnlimited Supplemental Reporting Guide
Page 47 of 58
©2011-2014 InsightSoftware.com International. All Rights Reserved.
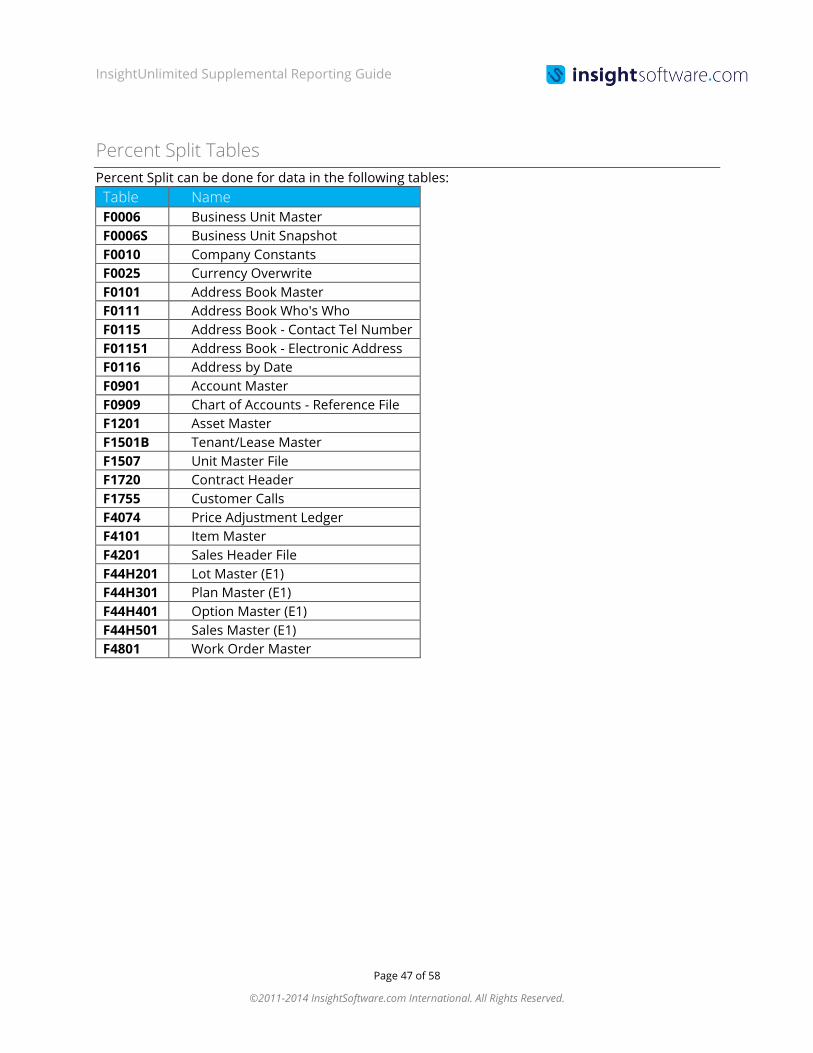
Percent Split Tables
Percent Split can be done for data in the following tables:
Table Name
F0006 Business Unit Master
F0006S Business Unit Snapshot
F0010 Company Constants
F0025 Currency Overwrite
F0101 Address Book Master
F0111 Address Book Who's Who
F0115 Address Book - Contact Tel Number
F01151 Address Book - Electronic Address
F0116 Address by Date
F0901 Account Master
F0909 Chart of Accounts - Reference File
F1201 Asset Master
F1501B Tenant/Lease Master
F1507 Unit Master File
F1720 Contract Header
F1755 Customer Calls
F4074 Price Adjustment Ledger
F4101 Item Master
F4201 Sales Header File
F44H201 Lot Master (E1)
F44H301 Plan Master (E1)
F44H401 Option Master (E1)
F44H501 Sales Master (E1)
F4801 Work Order Master

InsightUnlimited Supplemental Reporting Guide
Page 48 of 58
©2011-2014 InsightSoftware.com International. All Rights Reserved.
Create a Percent Split
Create a Percent Split by completing the following steps:
Ribbon: Inquiry Objects > Chart Options
1. Click drop-down arrow to the right of % Percent Split.
2. Click Setup Percent Split.
The following functions can be completed in the Percent Split dialog window:
New - Define a new percent split based on a specific table.
Edit - Edit existing percent splits.
Import - Import a percent split definition that is already defined on another report.
Remove - Remove existing percent splits.
Properties - View properties of the percent split, such as its definition, usage and
statistics about the data.
Clean Up Tables - Delete the database tables created by the percent split.
3. Click New.
4. Click Next.
5. Fill in Name and Table on which the split is to be based.
6. Click Next.
7. Click Analyze Table.
Note: All columns found in the designated table are listed as “Do Not Use” until you specify how
they should be used.
8. Highlight the column(s) you wish to split or mark as a key column and then use the appropriate
radio button to mark it as such.
Key Columns – Key columns in the table.
Splitable Columns – Columns that can be split into multiple values based on
percentages.
Note: You can use the CTRL and SHIFT keys to do multiple selections.
9. Click Next.
10. Click Finish.
11. To save the percent split definition, save the report after creating the definition.

InsightUnlimited Supplemental Reporting Guide
Page 49 of 58
©2011-2014 InsightSoftware.com International. All Rights Reserved.
Overview
Currency Restatement is a separate module that:
Provides real-time currency conversion of period amounts.
Allows multiple companies with different base currencies to be reconciled into one
Restatement Exchange Rate.
Is available for the following templates:
o GL – Balances
o JC – Balances
o ACA – Balances
Working with Restatement Periods
The Restatement functionality takes into account the Currency Restatement Rates and associated
periods in order to derive the correct exchange rate.
The Currency Restatement Rates are imported from the Currency Restatement Rates File (F1113).
They take the currency of the company and convert the associated amounts into the Restatement
Currency (which initially is defaulted to the Domestic Currency of Company 00000).
When using the Period filter, you have the option to select not only the JDE defined period values,
but also InsightUnlimited’s calculated values for Currency Restatement purposes.
To select a Restatement Period for your report, complete the following steps:
1. Click in the Period filter of your report.
2. Click the Visual Assist for Period.
3. Click the Restatement tab.
4. Click Find.
5. Choose the applicable Restatement Period.
Advanced Functions: Currency Restatement - 218

InsightUnlimited Supplemental Reporting Guide
Page 50 of 58
©2011-2014 InsightSoftware.com International. All Rights Reserved.
6. Click OK.
Within the Currency Restatement Rates File (F1113), there are several exchange rate conversions.
The Currency Restatement functionality analyzes the individual object accounts in order to select the
correct exchange rate that has an applicable Rate Type for the associated period.
These rate types can be similar to a Month End rate, which is applied to Balance Sheet accounts, or a
Monthly Average, which is applied to Profit and Loss Accounts.

InsightUnlimited Supplemental Reporting Guide
Page 51 of 58
©2011-2014 InsightSoftware.com International. All Rights Reserved.
These exchange rates are then applied to the Restatement Period column:
Accessing Underlying Exchange Rate
Reconciliation of the derived amounts can be done through the Exchange Rate dialog. The two
currencies being used for restatement of the object accounts are displayed as well as the associated
date and the two exchange rates.
To access the Exchange Rate dialog, complete the following steps:
Ribbon: Restatement > Options
1. Click on Exchange Rate.
2. Verify the exchange rate for the current filter settings.
3. Click Close.
Note: If Conflicting exchange rate data occurs, InsightUnlimited Reporting will use the most
recent value to make the calculations.

InsightUnlimited Supplemental Reporting Guide
Page 52 of 58
©2011-2014 InsightSoftware.com International. All Rights Reserved.
Change Restatement Currency
Restatement Currency defaults from Company 00000. You can convert object account period
balances into any currency, as long as there is associated Currency Restatement Rates File (F1113)
data.
To change the restatement currency, complete the following steps:
Ribbon: Restatement > Options
1. Click on Settings.
2. Click the Restatement Currency drop-down.
3. Click the applicable currency.
4. Click OK.

InsightUnlimited Supplemental Reporting Guide
Page 53 of 58
©2011-2014 InsightSoftware.com International. All Rights Reserved.
Overview
Options are available on some templates to personalize your inquiry, making it more relevant to
your business reporting needs. Options may vary by template.
Inquiry Options General Tab
Customize your report using Inquiry Options by completing the following steps:
Ribbon: Home > Options
1. Click the Inquiry Options menu.
2. Click the General Tab.
Presentation Options
Missing Text – enter text to be used to replace null values.
Blank Text – used to select blank values.
Null Value Text – used to select null values.
Console Options
Don’t warn or deny – inquiry will load without any warning. Filter values that conflict with
ERP security will be removed.
Warn users when any filter selections have been changed – user is prompted: Some
filters have been changed due to security requirements. The report may look different as
a result.
Deny loading when any filter selections have been changed to a * - The user is unable to
load the inquiry.
Deny loading on any changed filter selection – The user will not be able to load the
inquiry if any filter values conflict with ERP security.
Advanced Functions: Additional Inquiry Options -
219

InsightUnlimited Supplemental Reporting Guide
Page 54 of 58
©2011-2014 InsightSoftware.com International. All Rights Reserved.
Localization Option (JDE)
Select options to enable localization for specific modules/language if used in JD Edwards.
3. Click the Advanced Tab (JDE)
Note: Options are specific to the report you are running.
Who’s Who Phone Number Type
Make selection(s).
Click OK to continue.
Who’s Who Address Book
Make selection(s).
Click OK to continue.

InsightUnlimited Supplemental Reporting Guide
Page 55 of 58
©2011-2014 InsightSoftware.com International. All Rights Reserved.
Business Unit Snapshot & Restatement Currency
Business Unit Snapshot - refer to QRA 117.1
Restatement Currency – refer to QRA 117.3
Object Account and Subsidiary Descriptions (General Ledger Module)
Make selection(s).
Click OK to continue.
Cost Code and Cost Type Descriptions (Job Cost Module)
Make selection(s).
Click OK to continue.
Use Account Ledger and/or Purge Tables (General Ledger Transactions)
Make selection(s).
Click OK to continue.

InsightUnlimited Supplemental Reporting Guide
Page 56 of 58
©2011-2014 InsightSoftware.com International. All Rights Reserved.
Item Cross Reference Type (Templates with Items)
Make selection(s).
Click OK to continue.
Sales Order Details and Header (Sales Order Processing Module)
Make selection(s).
Click OK to continue.
As-Of Options (AR and AP Modules)
Refer to QRA 110.2 for more information.
Make selection(s).
Click OK to continue.

InsightUnlimited Supplemental Reporting Guide
Page 57 of 58
©2011-2014 InsightSoftware.com International. All Rights Reserved.
Overview
Maintaining the objects in RIO in an organized manner ensures that users will be able to easily
locate the object for subscription.
Connections
When objects are stored in RIO, they can be entered in any of the available connections.
Recommended File Structure for Reusable Inquiry Objects
Following is the recommendation for organizing objects RIO:
Calculations (per module)
GL
AP
AR
Formats (by type of format)
Conditional
Subtitles
Subtotals
Columns
Hierarchies (per unique hierarchy)
Income Statement
Balance Sheet
Expenses
Tax Reporting
User Defined Captions (by type of caption)
Periods
Years
Ledgers
Category Codes
Note: Once the RIO folder structure is set, the ability for users to change the structure should be
disabled. Future changes to the hierarchy folder structure should be made by a system
administrator, not end users. This will keep the RIO folder structure clean and manageable over
time.
Reusable Inquiry Objects (RIO): Best Practices -
220
InsightUnlimited Supplemental Reporting Guide
Page 58 of 58
©2011-2014 InsightSoftware.com International. All Rights Reserved.
Contacts
For more information regarding our products, please contact us at:
Email [email protected]
Web www.insightsoftware.com
Customer Support
For product support, please create a case with our Customer Support Department.
Support Portal http://supportportal.insightsoftware.com/
Notices and Disclaimer
InsightUnlimited Reporting, InsightUnlimited Reconciler, InsightUnlimited Scheduler,
InsightUnlimited Budgeting, InsightUnlimited Budgeting Lite, InsightUnlimited Designer,
InsightUnlimited Console, InsightUnlimited Administrator and InsightUnlimited Personal Edition, are
brand names of the InsightSoftware.com Group. InsightSoftware.com is a registered trademark of
InsightSoftware.com Limited.
Other product and company names mentioned herein may be the trademarks of their respective
owners. The InsightSoftware.com Group is the owner or licensee of all intellectual property rights in
this document, which are protected by copyright laws around the world. All such rights are
reserved.
The information contained in this document represents the current view of InsightSoftware.com on
the issues discussed as of the date of publication. This document is for informational purposes only.
InsightSoftware.com makes no representation, guarantee or warranty, expressed or implied, that
the content of this document is accurate, complete or up to date.
Further Information