Embed Size (px)
Citation preview

InsightSoftware.com
_____________________________________________________________________________________________
____________________________________________________________________________________
Insight Version: 2012.1 and above
Document Version: 4.0 | Last Updated: September 13, 2012
Administration & Configuration Guide

InsightSoftware.com Administration & Configuration Guide
__________________________________________________________________________________
Page 2 of 106
1. Architecture ____________________________________________________________ 4
Overview _________________________________________________________________________ 4
Deployment ______________________________________________________________________ 4
2. Installation _____________________________________________________________ 6
Overview _________________________________________________________________________ 6
Detailed Install Steps _______________________________________________________________ 7
Parallel Installations _______________________________________________________________ 14
Information Specific to Insight Upgrades ______________________________________________ 16
3. Administration Setup ____________________________________________________ 18
Overview ________________________________________________________________________ 18
Functional Icons __________________________________________________________________ 19
Initial Setup Wizard _______________________________________________________________ 22
4. Repository Management _________________________________________________ 24
Saving the Repository Selection File __________________________________________________ 24
Delete a Repository _______________________________________________________________ 24
Exporting Lists to Excel _____________________________________________________________ 24
ERP Data Sources _________________________________________________________________ 25
ERP Database Connections __________________________________________________________ 25
ERP Connection Profiles ____________________________________________________________ 27
Manually Create a Repository Database Connection _____________________________________ 35
Log into a Repository ______________________________________________________________ 35
Integrity Checker__________________________________________________________________ 35
Data Dictionary Overrides __________________________________________________________ 39
Back Up & Restore Repository _______________________________________________________ 40
Documents ______________________________________________________________________ 41
Import & Export __________________________________________________________________ 45
Logging _________________________________________________________________________ 50
Reusable Inquiry Objects ___________________________________________________________ 54
License Keys _____________________________________________________________________ 54
Capabilities ______________________________________________________________________ 57
Password Policy __________________________________________________________________ 60

InsightSoftware.com Administration & Configuration Guide
__________________________________________________________________________________
Page 3 of 106
Users and Groups _________________________________________________________________ 60
Permissions ______________________________________________________________________ 69
5. Module Security ________________________________________________________ 71
Overview ________________________________________________________________________ 71
Set up Module Security ____________________________________________________________ 71
Module Security Examples __________________________________________________________ 72
Advanced Security Inheritance and Priority ____________________________________________ 83
6. Repository Database Management ________________________________________ 85
Create the Object Repository ________________________________________________________ 85
Create a New Database in Microsoft® SQL Server™ ______________________________________ 85
Create a New Database User in Microsoft® SQL Server™ __________________________________ 86
SQL Server Authentication Mode _____________________________________________________ 86
New Oracle Schema _______________________________________________________________ 87
New Library/Schema in IBM DB2 for i _________________________________________________ 87
7. Creating Data Sources ___________________________________________________ 88
Overview ________________________________________________________________________ 88
ODBC Data Source ________________________________________________________________ 88
8. Other _________________________________________________________________ 89
Increase Performance on the DB2 for i ________________________________________________ 89
Journals & Journal Receivers ________________________________________________________ 93
Double-Byte & Unicode Support _____________________________________________________ 93
SQL Script for Oracle EBS Installation _________________________________________________ 94
Oracle EBS Table Information _______________________________________________________ 98
Asian Character Display ___________________________________________________________ 102
9. Troubleshooting _______________________________________________________ 103
Logging In ______________________________________________________________________ 103
Errors with User Accounts _________________________________________________________ 103
10. Further Information ____________________________________________________ 106
Contacts _______________________________________________________________________ 106
Customer Support ________________________________________________________________ 106
Notices and Disclaimer ____________________________________________________________ 106

InsightSoftware.com Administration & Configuration Guide
__________________________________________________________________________________
Page 4 of 106
Overview
Can you explain Insight’s architecture?
Insight is a Microsoft .NET Windows application that runs under a 2-tier architecture. The application has its own built-in database connectivity layer which is responsible for submitting the queries to the ERP database directly and independently from the ERP application. Insight’s configuration and inquiry parameters are stored in a centralized database (an Object Repository) created during the initial installation. This repository can be created on one of four different database servers: Oracle, SQL Server, DB2, and DB2 UDB. The architecture is shown below:
**NOTE: InsightSoftware.com highly recommends that the Object Repository is added to your daily database backup routines.
Deployment
How is Insight deployed?
Insight offers multiple deployment options:
1) Manual desktop deployment When initially installing and configuring the software, the manual desktop deployment option is used. This same installation process can be used if a small number of additional desktops need to be installed.
2) Terminal server deployment For larger desktop installations, a terminal server deployment utilizing Windows Terminal Services or Citrix is available. This option is best for those users who will be accessing the Object Repository and ERP databases from a Wide Area Network (WAN) connection. Terminal server deployment is shown below:

InsightSoftware.com Administration & Configuration Guide
__________________________________________________________________________________
Page 5 of 106
3) Smart Client deployment that utilizes Microsoft’s ClickOnce Technology The Smart Client deployment method is possible due to the built-in database connectivity layer delivered with Insight. All database connectivity is handled within the application, thus eliminating the need for desktop-specific connectivity setup. The software deployment files are stored on a web or network file server. The users access the link and the software automatically downloads to the individual workstation. Software updates are delivered automatically without user interaction and roll-back options are also available. The major benefit of the Smart Client Deployment is that Insight, a feature-rich desktop application, can be delivered and managed centrally like a web application. This option requires minimal IT involvement and potentially eliminates the need for costly servers. Smart Client Deployment is shown below:
The Smart Client Deployment method requires custom configuration of the standard software installation; InsightSoftware’s Customer Support needs the customer-specific installation information (the repository and deployment locations) in order to build the application and deployment files for them. These files will then be then sent back to the customer for deployment.
4) All of the above options can be used in combination to meet the needs of the users and the IT Department.

InsightSoftware.com Administration & Configuration Guide
__________________________________________________________________________________
Page 6 of 106
Overview
Can you provide an overview of the installation process for Insight?
The installation process involves the creation of the Object Repository, installation of the software, configuration of the application and deployment. The database connectivity layer is built into the application and is set up during the configuration stage of the process. Object Repository The Object Repository contains the application’s configuration information, objects such as hierarchies, Reusable Inquiry Objects and user-specific information. Report parameters are stored in the repository, but not the report results themselves. The repository needs to be created on a relational database server that is available whenever the user logs on to the Insight application. The application uses the Repository to perform critical processes such as user verification and validation of permissions. The application has a built-in database layer that will allow access from the application to the database. The repository contains a number of tables that are created during the initial application configuration. These tables can be created in an existing database/schema/library but it is preferable for disaster recovery purposes to create a separate database/schema/library to hold the new repository tables. All users need to have read/write permissions to the Repository which is typically handled using a system user profile. The size of the repository differs from site to site depending on the number of users and reports created and saved. The majority of customers have repository databases under 1GB in size and they should not require any special configuration with regards to portioning, etc. Installation and Configuration The software is installed via a Windows Installer Component (msi file). Once the software is installed, the application needs to be configured and users set up via Insight Administrator.

InsightSoftware.com Administration & Configuration Guide
__________________________________________________________________________________
Page 7 of 106
Detailed Install Steps
Can you walk me through the Insight installation steps?
Note that while the below screenshots were taken from an installation of Insight for JD Edwards, the same information applies to installations of Insight for Oracle E-Business Suite.
Step 1 – Run the installation program
Depending on your version of Windows, the exact steps vary slightly. The general steps are listed below. If you’re installing on a server, you must put the server in install mode by either installing it through Control Panel > Add Program or by using a command prompt. If installing on a PC, click on the executable installation file once you have run it.
Step 2 – Setup Language Selection
Once the installation program is started, a short pause will ensue, and the screen below will appear. The Setup Language Selection screen will automatically default to the language selected as the default in the workstation’s Regional Settings.
Click OK to continue the installation process.
InsightSoftware.com Administration & Configuration Guide
__________________________________________________________________________________
Page 8 of 106
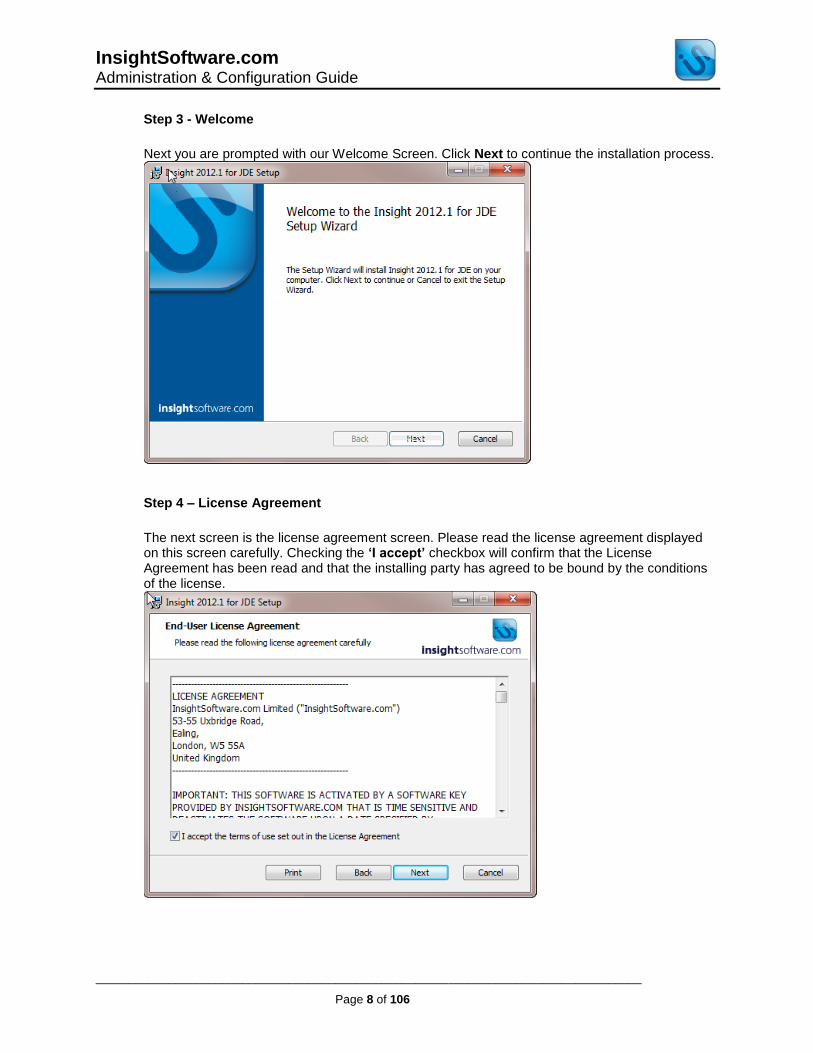
Step 3 - Welcome
Next you are prompted with our Welcome Screen. Click Next to continue the installation process.
Step 4 – License Agreement
The next screen is the license agreement screen. Please read the license agreement displayed on this screen carefully. Checking the ‘I accept’ checkbox will confirm that the License Agreement has been read and that the installing party has agreed to be bound by the conditions of the license.

InsightSoftware.com Administration & Configuration Guide
__________________________________________________________________________________
Page 9 of 106
Step 5 – Installation Scope
The next step is to select whether installing for just one user or multiple users. If you need to designate where the software is to be installed we recommend selecting the 2
nd option, “Install
for all users of this machine”.
Click Next after selecting the appropriate option.
Step 6 – Destination Folder
In the next step, specify the folder location where the software is to be installed. To select a different install path other than the default path, click Change:

InsightSoftware.com Administration & Configuration Guide
__________________________________________________________________________________
Page 10 of 106
Browse to the appropriate location where Insight will be installed. If needed, click on the ‘create new folder’ icon to create a new folder for this specific installation. In the below example, there is a folder for each software version that is installed:
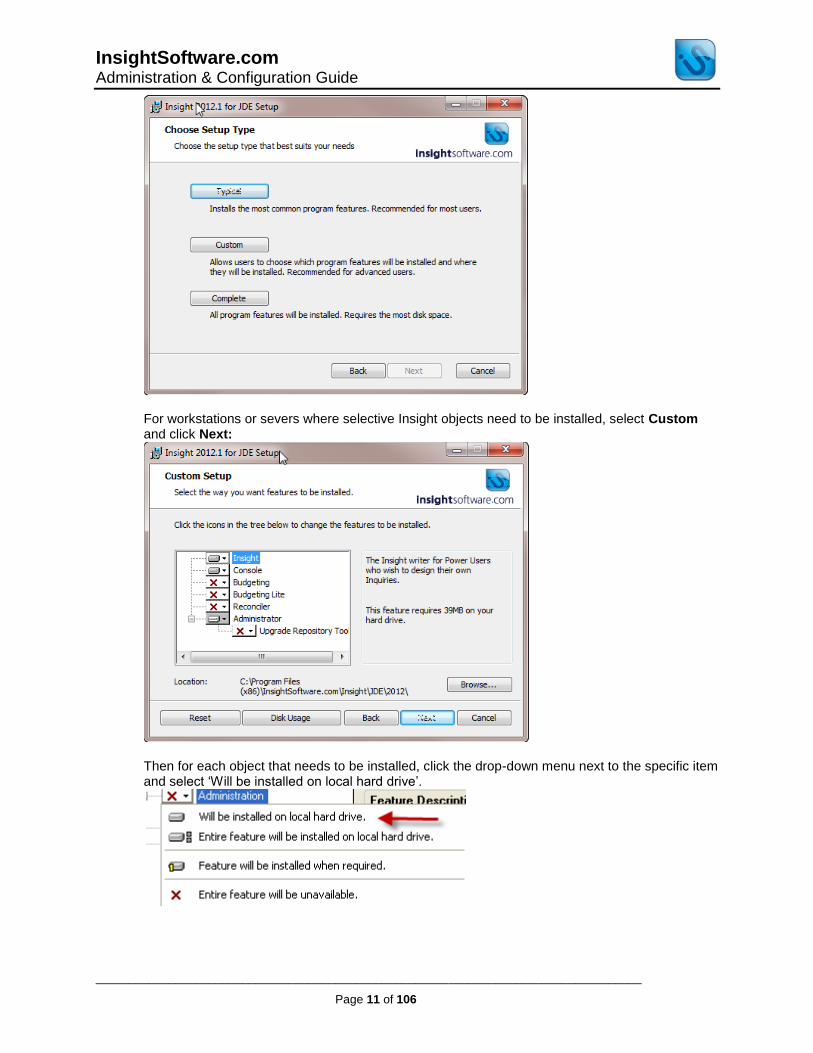
Step 7 – Installation Type
There are three types of installations to choose from:
Typical - installs Insight Reporting only
Custom – allows you to choose which features are installed
Complete - installs all features o for Insight for JDE: Insight, Console, Budgeting, Budgeting Lite,
Reconciler, Administrator, Upgrade Repository Tool o for Insight for Oracle E-Business Suite: Insight, Console,
Administrator, Upgrade Repository Tool
InsightSoftware.com Administration & Configuration Guide
__________________________________________________________________________________
Page 11 of 106
For workstations or severs where selective Insight objects need to be installed, select Custom and click Next:
Then for each object that needs to be installed, click the drop-down menu next to the specific item and select ‘Will be installed on local hard drive’.

InsightSoftware.com Administration & Configuration Guide
__________________________________________________________________________________
Page 12 of 106
Once back in the Setup screen, clicking Disk Usage shows the current selection’s disk space requirements. Any highlighted volumes signify that there is not have enough disk space for the selected features.
Step 8 – Ready to Install the Application
Click Install to install the application:

InsightSoftware.com Administration & Configuration Guide
__________________________________________________________________________________
Page 13 of 106
Step 9 - Finish
Once the installation procedure has been completed, this final screen appears:
Finally, click Finish to exit the installation program and complete setup process.

InsightSoftware.com Administration & Configuration Guide
__________________________________________________________________________________
Page 14 of 106
Parallel Installations
How do I do parallel installations of Insight?
When upgrading to a newer Insight version, it is recommended that you run the new version and current version in parallel. This enables you to complete a testing and user acceptance phase.
1. In the Installation Wizard, you must first accept the End User License Agreement. In the
next screen, choose the scope of the installation:
2. Click Next 3. In the Destination Folder screen, click Change to change the location of the installation.
You want to be sure you are not overwriting the existing Insight version, so you will define a different location for the new version to be installed.
4. Click Next 5. In the next screen, choose the type of setup required:

InsightSoftware.com Administration & Configuration Guide
__________________________________________________________________________________
Page 15 of 106
6. Click Next 7. Click Install to compete the installation:
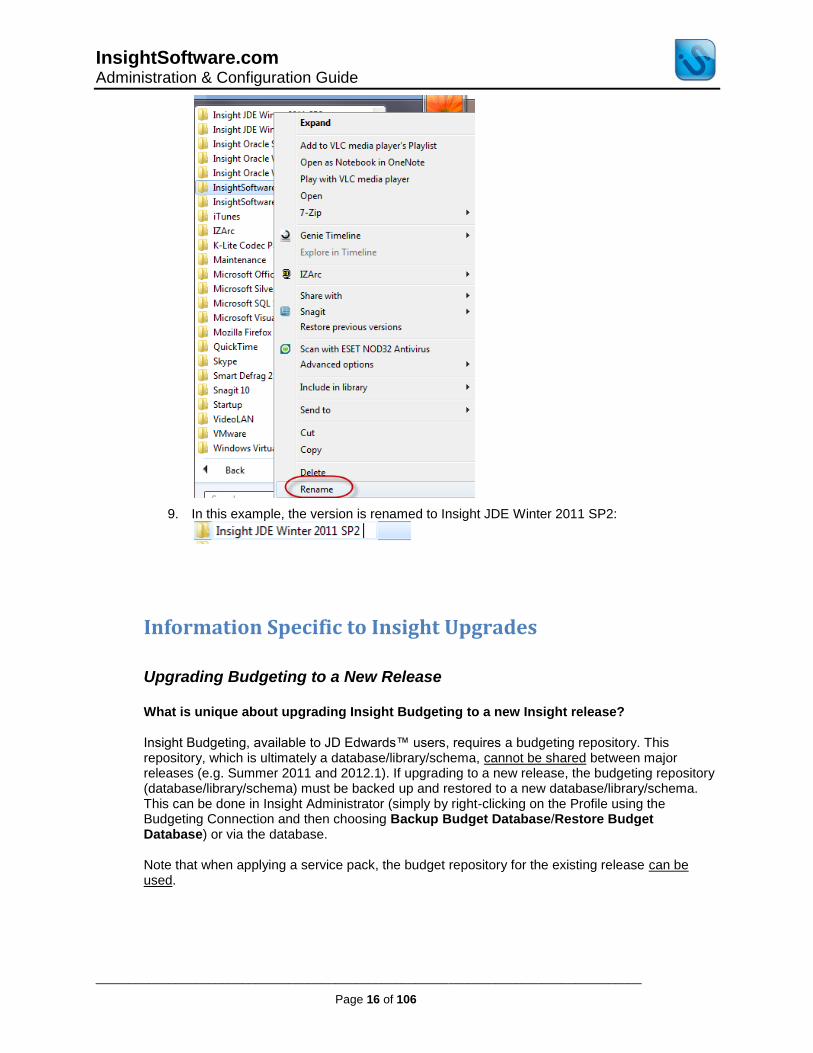
8. Once the installation is done, you can rename the Program Menu Name from
InsightSoftware.com to the specific version name in order to distinguish one version from the other:
InsightSoftware.com Administration & Configuration Guide
__________________________________________________________________________________
Page 16 of 106
9. In this example, the version is renamed to Insight JDE Winter 2011 SP2:
Information Specific to Insight Upgrades
Upgrading Budgeting to a New Release
What is unique about upgrading Insight Budgeting to a new Insight release? Insight Budgeting, available to JD Edwards™ users, requires a budgeting repository. This repository, which is ultimately a database/library/schema, cannot be shared between major releases (e.g. Summer 2011 and 2012.1). If upgrading to a new release, the budgeting repository (database/library/schema) must be backed up and restored to a new database/library/schema. This can be done in Insight Administrator (simply by right-clicking on the Profile using the Budgeting Connection and then choosing Backup Budget Database/Restore Budget Database) or via the database. Note that when applying a service pack, the budget repository for the existing release can be used.

InsightSoftware.com Administration & Configuration Guide
__________________________________________________________________________________
Page 17 of 106
What are the requirements for creating a new database/library/schema for budgeting when upgrading to a new major Insight release?
The new database/library/schema must be created on the same database server that hosts your JDE Production Data or Business Data.
o On an AS/400/DB2 Database, be sure to create the library from a green screen via STRSQL and then use the command CREATE COLLECTION BUDLIBNAME. (BUDLIBNAME is the name of the library that follows your company standards.)
o There are no special instructions for SQL and Oracle.
Name the database and schema by following your company standards.
Establish a database user with read/write permissions to the new Budgeting database/library/schema. Additionally, this database user has to have read permission to JDE production data and read/write permission to the JDE F0902Z1 table. (This can be the database user used in the Production Profile/Connection or it can be a new user.)
Updated License Key
A new license is required for each new major release, such as Summer 2011 and 2012.1. Please contact Customer Support for an updated license key and include in the case the following:
Repository ID/Name - for example V2012_1SP2 Server ID, which is dependent on the database platform hosting the repository:
SQL Server – Database ID, e.g. InsightDatabase DB2 – Schema/Database ID, e.g. SERVER\InsightDatabase Oracle – Schema Owner User ID, e.g. INSIGHT

InsightSoftware.com Administration & Configuration Guide
__________________________________________________________________________________
Page 18 of 106
Overview
What is Insight Administrator?
Insight Administrator is used for working with the administration elements of Insight. This includes the creation and management of database repositories, setting up and managing user profiles and permissions, and implementing individual business preferences. Insight Administrator’s installation wizards and intuitive interfaces provide a user-friendly tool for managing the product. Insight uses the Ribbon user interface with buttons/commands on the Ribbon that are organized in groups by common functionality. The contents of the ribbon are contextual; they change according to the item you in which you are focused. The Ribbon buttons are active when they are in color and grayed out when inactive. Beneath the ribbon are a left and a right panel. The right-hand panel of Insight Administrator displays the contents of the selected item from the left-hand panel. The display and tree structure have the same ‘look and feel’ of the Windows Explorer™ file management tool.
Some buttons on the Ribbon have a drop-down menu to the right of them, such as the View button in the List group on the Home menu. There are 4 options available from View: Details, List, Small Icons and Large Icons. In this case it means that the information in the right panel can be viewed with details, as a list, or as small or large icons.
InsightSoftware.com Administration & Configuration Guide
__________________________________________________________________________________
Page 19 of 106
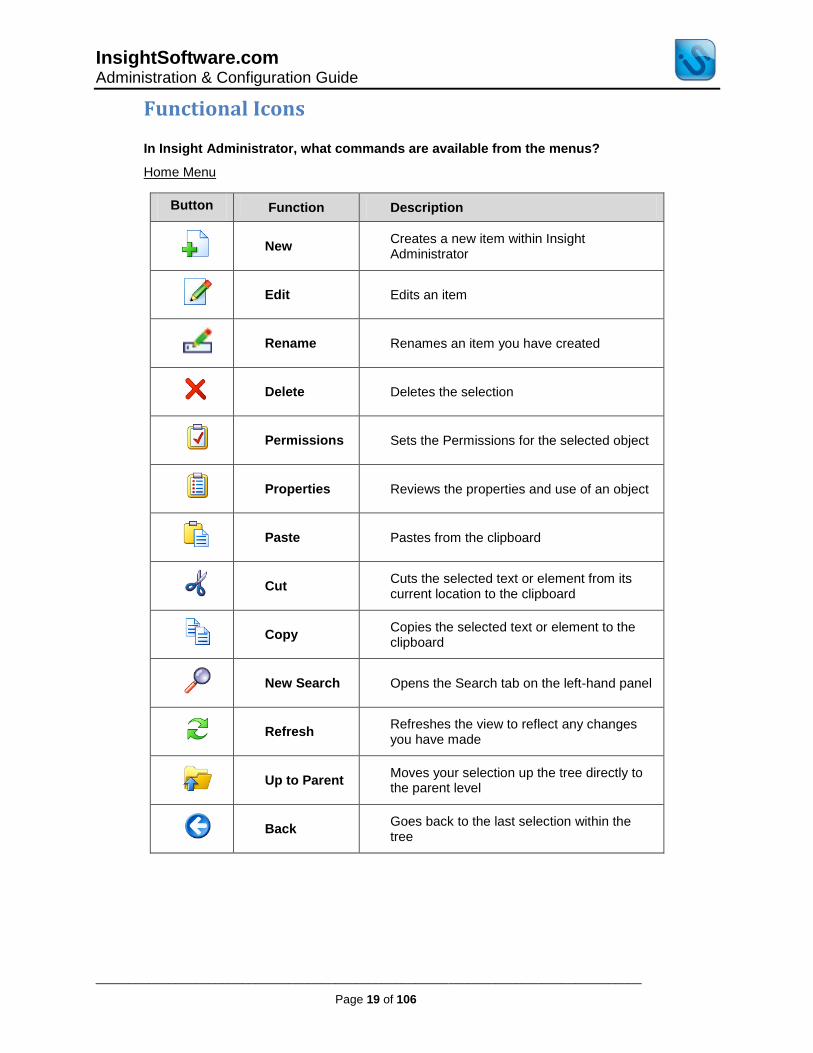
Functional Icons
In Insight Administrator, what commands are available from the menus?
Home Menu
Button Function Description
New
Creates a new item within Insight Administrator
Edit Edits an item
Rename Renames an item you have created
Delete Deletes the selection
Permissions Sets the Permissions for the selected object
Properties Reviews the properties and use of an object
Paste Pastes from the clipboard
Cut
Cuts the selected text or element from its current location to the clipboard
Copy
Copies the selected text or element to the clipboard
New Search Opens the Search tab on the left-hand panel
Refresh
Refreshes the view to reflect any changes you have made
Up to Parent
Moves your selection up the tree directly to the parent level
Back
Goes back to the last selection within the tree

InsightSoftware.com Administration & Configuration Guide
__________________________________________________________________________________
Page 20 of 106
Forward
Goes to your most recent selections after using Back
Save
Saves the list you have in the right-hand panel to a .csv spreadsheet compatible (comma separated) file
View
Arranges the right-hand panel by List, Details, Small Icons, Large Icons
Sort List
Sorts the elements of the right-hand panel by Name, Type or Modified
Select All
Selects all of the elements within the right-hand panel
Invert Selection
Selects the un-highlighted elements
Initial Setup
Opens the wizard that creates a Repository Database Connection and Repository
Upload
Uploads a Microsoft Excel® spreadsheet into the Insight Repository for use in Insight Budgeting
Download
Downloads a Microsoft Excel® spreadsheet from the Insight Repository to your local drive
Repository Menu
Button Function Description
Login/ Logout
Login/logout of the currently selected repository
Backup Backs up the Repository Database
Validate
Validates the Repository connections and settings
Save Selection
Saves the repository selection that Insight will use upon launching the product. Saves the configuration and allows users to select and switch between repositories that are active.
InsightSoftware.com Administration & Configuration Guide
__________________________________________________________________________________
Page 21 of 106
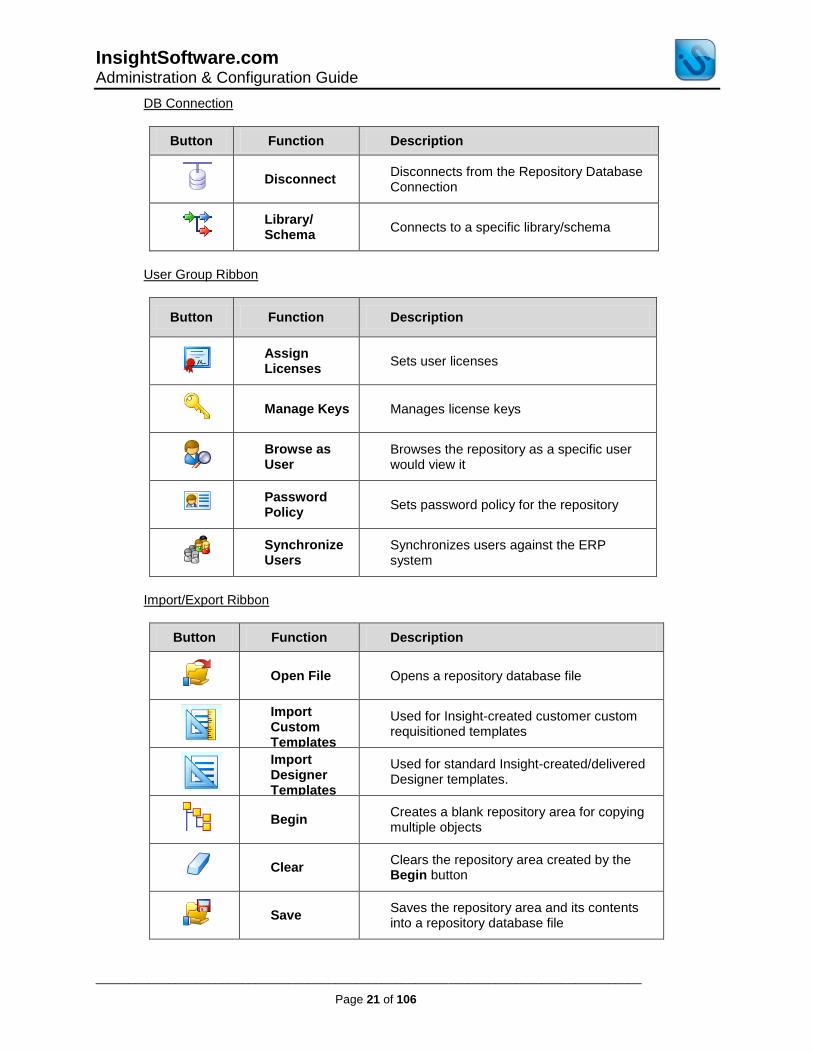
DB Connection
Button Function Description
Disconnect
Disconnects from the Repository Database Connection
Library/ Schema
Connects to a specific library/schema
User Group Ribbon
Button Function Description
Assign Licenses
Sets user licenses
Manage Keys Manages license keys
Browse as User
Browses the repository as a specific user would view it
Password Policy
Sets password policy for the repository
Synchronize Users
Synchronizes users against the ERP system
Import/Export Ribbon
Button Function Description
Open File Opens a repository database file
Import Custom Templates
Used for Insight-created customer custom requisitioned templates
Import Designer Templates
Used for standard Insight-created/delivered Designer templates.
Begin
Creates a blank repository area for copying multiple objects
Clear
Clears the repository area created by the Begin button
Save
Saves the repository area and its contents into a repository database file
InsightSoftware.com Administration & Configuration Guide
__________________________________________________________________________________
Page 22 of 106
Initial Setup Wizard
What is the Initial Setup Wizard in Insight Administrator?
The first time you open Insight Administrator after installing it, the Initial Setup Wizard dialog will automatically open. The Initial Setup wizard is a tool for administrators to quickly get their installation of Insight up and running. It takes you through the necessary steps to both create a new instance of Insight and/or to upgrade from a previous version. You can cancel the wizard by clicking Cancel or by clicking the Close Window (X) on the top right corner of the wizard dialog. If you accidentally cancelled the wizard and need to open it again, click the Initial Setup button on the Ribbon. You can create multiple repositories for Insight by setting up different repositories and Repository Database Connections (e.g. setting up a connection to a separate test environment). The configuration done within the Initial Setup Wizard is as follows:
1. When the welcome page of the wizard comes up, click Next 2. In the Choose Configuration Method step, choose between one of the two options:
a. Provide the information now, using this wizard – the subsequent sections of the wizard will configure a new Repository Connection
b. Read it from an existing Repository Selection file - allows the selection of an existing Repository Connection by using the Repository Selection File. Navigate to the saved .xml file by selecting the radio button and clicking the “…” button. (The .xml file is commonly found within the Insight program directory.) When this option is chosen and the existing .xml file is selected, that is the only step needed to configure the Repository Connection.
3. In order to create a workspace/Object Repository for Insight via the option to Provide the information now, using this wizard, we must first set up a Repository Database Connection. This will define where the Insight Repository will be stored and how the software will connect to it.
a. Identification - specify a unique name for this Repository Database Connection and, optionally, provide a different description than that which defaults in
b. Data Source Type - specify the Type of database in which your Insight Repository will be stored:
i. Microsoft SQL Server ii. Oracle iii. IBM DB2 iv. UDB v. Local Database file
c. Data Source Provider – specify the Provider or ‘driver’ you are using to connect to the Repository from your client machines. The options for creating connections are appropriate to the data source type already selected:
i. SqlClient Data Provider ii. Built-in Data Provider iii. OracleClient Data Provider iv. ODBC Data Provider v. Remote Data Provider (used internally by InsightSoftware.com for
access to demo databases) 4. Click Next when you have selected your Data Sources. You are now ready to configure
the Connection 5. In the Repository Database Connection Configuration screen, specify the specific
information needed to connect to the Repository. This information is then used by the

InsightSoftware.com Administration & Configuration Guide
__________________________________________________________________________________
Page 23 of 106
driver or data provider whenever you connect to the Repository. Depending on the type of database the Repository is located in, the settings vary.
a. If using .NET Framework Data Provider for SqlServer: i. Server – select the server your Repository Database is stored on, or
type in the location manually ii. Login - specify the login details needed to access the server on which
the Repository will be located. If you have no password, click the Blank checkbox.
iii. Database - select the database in which you are storing the Insight Repository
iv. Test Connection – mark this option if you want Insight Administrator to verify that all of the connection details are working as expected when you click Next. If there are any errors, a message box will appear and identify them so they can be addressed. When the configuration is working, the Test Connection message confirms that it is successful.
b. If using ODBC for IBM or Oracle: i. ODBC Data Source Name - select the specific ODBC you will be using
to connect to the Repository. If the default is not your choice, complete the Connection String field with the location for the ODBC. Use the Build function to navigate to the File Data Source or an alternative Machine Source File where you are sharing the ODBC.
ii. Login - specify the login details needed to access the server on which the Repository will be located
iii. Test Connection – mark this option if you want Insight Administrator to verify that all of the connection details are working as expected when you click Next. If there are any errors, a message box will appear and identify them so they can be addressed. When the configuration is working, the Test Connection message confirms that it is successful.
iv. The library for the repository will be chosen based on the user name. c. If using Oracle Built-in Data Provider:
i. Server - specify the Host (Server) Name of your server, the Oracle SID (Service Name) of the instance you wish to connect to and its Port number
ii. Login - specify the login details needed to access the server on which the Schema and Repository will be located
iii. Test Connection button, mark this option if you want Insight Administrator to verify that all of the connection details are working as expected when you click Next. If there are any errors, a message box will appear and identify them so they can be addressed. When the configuration is working, the Test Connection message confirms that it is successful.
iv. The library for the repository will be chosen based on the user name. 6. After you have configured the Repository Database information, click Next 7. The Select Repository screen displays, showing a list of any existing repositories on the
specified database. Here you can select an existing repository or create a new one. 8. To create a new repository, click the radio button next to Create a new Repository and
then enter the following: a. A unique Repository Name (up to 16 letters and digits) b. A Description of the repository (optional field) c. The Initial Administrator is the username to access the repository. It initially
defaults to ‘Administrator’, however this can be overtyped d. Administrator Password is set here and then confirmed in the later Confirm
Password field e. License Key or Code (optional field)
9. Click both Next and Finish on the Wizard completion page to save and complete the creation of your new repository

InsightSoftware.com Administration & Configuration Guide
__________________________________________________________________________________
Page 24 of 106
Saving the Repository Selection File
How do I save the Repository Selection File in Insight Administrator?
The Repository Selection File (or RepositorySelection.xml file) defines where the Insight Repository is stored and how the software connects to it. Once a new repository has been created or an existing one selected, the Repository Selection File should be saved in the Insight directory for subsequent use for all users on that machine.
1. In the left panel under Repository Database Connection, right-click on the repository for which you wish to save the Repository Selection File
2. Select Save Repository Selection 3. A Save As dialog will be displayed, allowing you to specify the Insight directory 4. The file can be copied by to other machines in order to use the same Repository
selection
Note: If the RepositorySelection.xml file does not exist in the Insight directory, the Login dialog will display the Initial Setup wizard, which will be used to select or create a repository.
Delete a Repository
How do I delete a repository in Insight Administrator?
Assuming the repository is no longer in use, you can delete the repository within Insight Administrator. 1. Launch the version of Insight Administrator that has the old repository. 2. Log in if you are not logged in automatically. 3. Click on the Application Menu in the upper left corner (the Insight logo with a hammer
symbol) and select About to note the version and build. 4. Back up the repository. Include the date and the repository name or version in the title of the
backup file created. 5. Right-click on the repository and select delete. A prompt will appear to confirm the deletion.
Exporting Lists to Excel
How do I export a list from Insight Administrator to Microsoft Excel®?
You can export any results within the right-hand panel to a .csv spreadsheet compatible file from within Insight Administrator, allowing you enhanced management and maintenance of the repository.
1. Log into the repository if you are not logged in already 2. Expand the nodes in the tree structure in the left panel as needed in order to view the
desired results in the right panel 3. Once you can view the results you wish to export, right-click within the right-hand panel

InsightSoftware.com Administration & Configuration Guide
__________________________________________________________________________________
Page 25 of 106
4. Select Save List. You can then name, save and open the results within any spreadsheet application.
ERP Data Sources
In Insight Administrator, what are Data Sources?
When you are logged into your repository in Insight Administrator, you will see the Data Sources node in the tree structure in the left panel. When you expand this, you see 2 items:
Connections - store the information (database type, user name and password) required to connect to your ERP Database(s)
Profiles - designate the Data Source connection(s) to be used in Insight as well as define the parameters for Insight to derive correct information from your ERP System
ERP Database Connections
Create a Database Connection
In Insight Administrator, how do I create a new Connection?
1. Log into your repository if you are not logged in already 2. Expand the Data Sources node in the left panel 3. Use 1 of these 2 options:
a. Right-click on Connections, select New, then Database Connection b. Highlight Connections, click the New button on the Ribbon and select Database
Connection 4. Configure the connection in the Database Connection dialog:
a. Identification - set a unique name for this connection (e.g. ‘JDE90 Production’) and, optionally, set a description
b. Data Source Type - specify the Type of database in which your ERP Data is located i. Microsoft SQL Server ii. Oracle iii. IBM DB2 iv. UDB v. Attunity (driver used to access IBM Optim archived files) vi. Local Database file
c. Data Source Provider - specify the Provider or ‘driver’ you are using to connect to your ERP data. The options for creating connections are appropriate to the data source type already selected:
i. SqlClient Data Provider ii. Built-in Data Provider iii. OracleClient Data Provider iv. ODBC Data Provider
5. Click Configure 6. Depending on the type of database the connection is located in, the settings vary in the
Database Provider Configuration dialog. a. If using SqlServer:
i. Server - select the server on which your database is located or manually type in the location
ii. Login – specify the details needed to access the server. If you have no password, click the Blank checkbox

InsightSoftware.com Administration & Configuration Guide
__________________________________________________________________________________
Page 26 of 106
iii. Database - select the database on which your ERP data, security, Data Dictionary or UDC tables are stored (whichever this connection is being used for)
iv. Test Connection – mark this option if you want Insight Administrator to verify that all of the connection details are working as expected when you click OK in the next step. If there are any errors, a message box will appear and identify them so they can be addressed. When the configuration is working, the Test Connection message confirms that it is successful.
b. If using IBM DB2: i. Server – specify the Host Name for the database and mark the checkbox if
your database version is pre-V5R3 ii. Login - specify the login details needed to access the server on which the
ERP tables are located. If you prefer to enter the password each time, choose the second option.
iii. Settings - specify the Default Library and the names of the Data, Control and Security Libraries
iv. Test Connection – mark this option if you want Insight Administrator to verify that all of the connection details are working as expected when you click OK in the next step. If there are any errors, a message box will appear and identify them so they can be addressed. When the configuration is working, the Test Connection message confirms that it is successful.
c. If using Oracle: i. Server - specify the Host (Server) Name of your server, the Service Name
(SID) of the instance you wish to connect to and its Port number ii. Login - specify the login details needed to access the server. If you prefer to
enter the password each time, choose the second option iii. Test Connection – mark this option if you want Insight Administrator to
verify that all of the connection details are working as expected when you click OK in the next step. If there are any errors, a message box will appear and identify them so they can be addressed. When the configuration is working, the Test Connection message confirms that it is successful.
7. Click OK
If you require more than one connection to your ERP tables, you will repeat this process for each connection
InsightSoftware.com Administration & Configuration Guide
__________________________________________________________________________________
Page 27 of 106
ERP Connection Profiles
In Insight Administrator, how do I create a new Profile using JD Edwards Data?
Once Data Source Connections have been created in Insight Administrator, you can create a Profile that uses these Connections. A Profile can be made up of multiple Connections. This is why the ERP Wizard allows you to create a new Connection or make use of an already existing one. Additionally, for ease of use, a Connection can also be reused by multiple Profiles. 1. Log into your repository if you are not logged in already 2. Expand the Data Sources node in the left panel 3. Use 1 of these 2 options:
a. Right-click on Profiles, select New, then JDE Profile b. Highlight Profiles, click the New button on the Ribbon and select JDE Profile
4. The New ERP Profile dialog opens. Enter a unique name that identifies this Profile 5. Click OK 6. In the Create/Edit ERP Profile Wizard, click Next 7. For clients using JD Edwards™, you will next designate the Connections that link Insight with
the JD Edwards™ database tables. Choose the relevant connection from the previously defined list of available Connections. If a Connection has not been defined, click the New button and you will be presented with the Database Connection dialog and from here, a new Connection can be created. If the JDE Security, Data Dictionary or UDC tables reside in the same database on the same machine as the Data tables, it is possible to use the same Connection for all of these tables. In such instances, the Same as Data Connection checkbox should be enabled for the relevant connection and no further connection details need to be provided
a. Data Connection – the Connection that links to the main JDE Data tables, such as F0902 and F0911
b. Security Connection – the Connection that links to the JDE Security tables, such as F0092 and F0093
c. Data Dictionary Connection – the Connection that links to the JDE Data Dictionary table F9201(World) or F9210 (E1)
d. UDC Connection – the Connection that links to the JDE UDC Data table, such as F0005
8. Click Next 9. Platform - select the JDE edition and version to which you will be connecting 10. Click Next 11. For DB2 for i, there are specific database settings due to restrictions on what can be done
with regards to SQL commands and query sizes: a. DB2 / AS/400 Options - select any of the applicable options. If you use a V5
release of OS400 you do not need to select any of these. b. When enabling the SQL setting Column Limit, you will specify a maximum limit
on the number of columns allowed in a SQL Query. You can allow the configuration tool to attempt discovery of this value by using the Detect option when enabled. Depending on your database and version, the number of columns will differ. It is recommend that you use the Detect functionality and enable the Column Limit.
12. Click Next 13. In the Module Selection screen, activate the modules and options you wish to use in this
Profile. (Note that when applicable, only the modules or features your organization is licensed for are available to select.)
a. Modules b. Features:
i. Localized Captions - gives the ability to derive different language captions from the underlying JD Edwards™ system

InsightSoftware.com Administration & Configuration Guide
__________________________________________________________________________________
Page 28 of 106
ii. Currency Restatement – if you have a license for this feature, you can activate it for this Profile
iii. Budgeting - if you have a license for this feature, you can activate it for this Profile
iv. Designer Express - if you have a license for this feature, you can activate it for this Profile
c. GL & JC Settings - Weekly reporting - available if you use this option in JD Edwards™, this option is directly related to the Date Fiscal Patterns – 52 Period Accounting Table (F0008B)
d. AR & SOP Settings - Line of Business Support and Use Date Effective Categories - settings available if you use these Accounts Receivable/Sales Order Processing options in JD Edwards™
i. Line of Business Support – when enabled, Insight will use the Customer Master by Line of Business Table (F03012). When disabled, Insight will use the Customer Master Table (F0301)
ii. Date Effective Categories – when enabled, Insight will be able to derive data from the Customer Date Effective Category Codes Table (F03012A)
14. Click Next. (There will be a pause while the data source is analyzed for relevant control and data tables. The amount of time this process takes will vary depending on the size of the JD Edwards™ implementation.)
15. If you have a license for Designer Express and have activated it in this Profile, you will be presented with the Designer Express screen:
a. Connection - set how to connect to the Object Librarian Master Table (F9860 in E1 and F9801 World), whether it is the same Insight Connection as that being used to connect to your JDE Data, or whether it is a different Connection
b. Object Library - define the library where the F9860/F9801 table resides (allows you to map to tables not configured in the profile)
c. Choose Tables – define the tables which will be used in new templates if they are not already mapped
16. Click Next 17. In the Table Locations screen, define all of the tables needed for Insight with the appropriate
Owner, Library or Schema name. If there is uncertainty over any of the table selections explained below, please consult your JD Edwards™ Administrator. The tables available are split between mandatory and optional, both of which can be defined on this screen. The default setting for the table definition is to only show those tables that have multiple selectable prefixes. Click Show All Tables to see all database tables. If all tables have the same prefix, this screen will be blank until you check Show All Tables.
a. Table Owners/Library Names - In the IBM DB2/400 database, this grouping is called a library. For Oracle and SQL Server databases, the equivalent of a library is the Table Owner (SQL Server) or schema (Oracle). A table owner/schema is associated with the database user who owns, and most likely created, the database table. In this Profile Wizard we use the term Owners/library names to cover all possibilities.
b. If the correct default libraries have been supplied in the ODBC connection for DB2/400, Oracle or SQL Server, the library prefixes should automatically be completed. Please ensure that all of the tables in the list either have a valid prefix or are set to ‘Do not use’ where appropriate. If this is not the case, valid prefixes can be manually entered by double-clicking on the appropriate prefix field and entering the name manually.
c. To select multiple rows, use either the Shift or Ctrl keys to select the fields with a common owner/table. Highlight the rows and right-click. This will provide you with a selection of Library Prefix names that are common to all highlighted table:

InsightSoftware.com Administration & Configuration Guide
__________________________________________________________________________________
Page 29 of 106
After selecting the common owner/table for the selected fields, you see that the table prefix has changed to the value you selected.
18. When all of these prefixes have been applied, click Next to continue 19. If you are using Budgeting and/or the Percent Split functionality, complete the information in
the Budgeting Connection screen. This is where you define the connection and the database or library where uploaded data will be stored.
a. Data Entry section: i. Connection – identify the connection being used to connect to the
Budgeting Repository ii. Database / Library – identify the database/library being used for the
Budgeting Repository. If it has already been initialized, it will be listed in the drop-down box; otherwise, the location must be typed in. For SQL Server, enter the name of the database in SQL Server, followed by a period, followed by the database owner username (typically ‘dbo’). For DB2 and Oracle, you only need name of the database/library.
iii. New Connection - if you wish to have a separate Budgeting Connection but have not yet created it, create it by clicking on the New Connection button
b. Budgeting Upload Table section - You can upload the F0902Z1 using a different connection than the Data Connection (the F0902Z1 can be located on a different server than the Budgeting Repository and JDE.) Therefore within this section you define which connection is being used to connect to the F0902Z1. Note: if using JDE World, you need a 3
rd party program to upload the data.
i. Connection - identify the connection being used to connect to the F0902Z1 table
ii. Upload - define the name of the database and owner or library name where the F0902Z1 Table is located. (This will be listed automatically if it is visible via the JD Edwards™ Data Connection; otherwise, enter the database name, followed by a period, followed by the database owner or library name.) If it has already been initialized, it will be listed in the drop-down box; otherwise, the location must be typed in. For SQL Server, enter the name of the database in SQL Server, followed by a period, followed by the database owner username (typically ‘dbo’). For DB2 and Oracle, you only need name of the database/library.
iii. New Connection - if you wish to have a separate Connection to the location of the F0902Z1 table but have not yet created it, create it by clicking on the New Connection button
20. Click Next 21. Define the location of the Data Dictionary table and choose whether you want to use any
Data Dictionary overrides. The Data Dictionary library is an information library that contains data definitions to access when using Insight. If using EnterpriseOne™ or World™ version A81 or higher, the table is F9210. When using World™ versions lower than A81, the table is F9201. Therefore the syntax will either be <LIBRARY>.F9210 or <LIBRARY>.F9201. In some environments, the database name is needed. In such cases, the syntax will be <DATABASE>.<LIBRARY>.<TABLE>.
22. Click Next 23. In the Test the Configuration screen, the application tests what has been entered so far in
the Profile Wizard. If you wish to see the number of rows returned in each test, mark the checkbox to Include Row Count Information.
24. Click Run Test. If a warning message is received at this point, click the Back button to return to the screen that is relevant to the issue highlighted in the message. Examine and alter those settings that are at fault before returning to test the configuration.
25. Click Next 26. In the Environment and Model Business Unit screen:
InsightSoftware.com Administration & Configuration Guide
__________________________________________________________________________________
Page 30 of 106
a. Environment – when users sign in to Insight, the application validates that they have access to the JD Edwards Environment defined here. This can be selected from the drop-down list of options or it can be entered manually.
b. Enter in a JD Edwards Model Business Unit to validate object accounts selected by the user. (In JD Edwards™, Model Business Units (BU) are identified as such within the Business Unit Master table – F0006. Typically a Model BU will be kept up to date and will contain a complete account structure. A Model BU typically does not have any transactional data.) If there is no single model Chart of Accounts but there are separate model balance sheets and model profit and loss accounts, multiple Business Units can be entered. Initially the dialog allows for one General Model Business Unit option, which is then applied to all modules.
c. Enable the Override for specific Modules option if you wish to use a different Model Business Unit for the General Ledger, Job Cost and/or Fixed Asset modules.
d. Either manually enter the Model Business Unit(s) (comma separated for multiple Models) in the field provided or press the Search button to the right of the field to search for and select a Model Business Unit. If you do not have a complete Model BU available, you may opt to enter an alternative BU (one that is not defined as a Model BU in JD Edwards™). If you choose to enter a ‘live’ Business Unit in this dialog, all users will be able to see the transactional data for that Business Unit.
27. Click Next 28. There are several tabs in the Options screen:
a. Subledger Locations – using the drop-down list, choose to include or exclude each Subledger type from the Subledger filter. (Optionally, you can use the Select All button to select all at once.)
i. Optionally, mark the option to Use temporary table in Subledger joins. (Some clients have experienced reduced performance when joining to JD Edwards™ Subledger tables in Insight. This is because the key fields are stored in a different format in the main and Subledger tables. This option can assist with these performance concerns.)
ii. For the A, C and W Subledger types, you can further narrow them down by clicking on the button next to the Sub Type column. When presented with the list to choose from, you can use the Shift and Ctrl keys to multi-select.
iii. If the Address Book Subledger type has been selected, only include the sub types that are needed as this can dramatically speed up the processing of the Subledger visual assist
iv. Within the Subledger type `A` – Address Book, it is also possible to select which Address Book record description should be used within the Insight by clicking the Advanced button next to the Description column. The choices include:
1. Mail Name (WWMLNM from F0111) 2. Alpha Name (WWALPH from F0111) 3. Alpha Name (ABALPH from F0101)
v. In Insight, for Subledger Type `S` only, we will suppress all the * selections when retrieving the Structured Subledger type `S` items. The * selection is wildcard searching functionality that can be achieved in the Query by Example (QBE) filters of the Query Assist dialog.
b. Balance Sheet Overrides - define which Automatic Accounting Instructions values from the AAI table, F0012, define the start and end items for your balance sheet and profit & loss range of accounts. By default this is GLG2 and GLG5. You can change the start and end of the AAI value range that Insight uses by selecting No Override and using the corresponding dropdown menus. Alternatively, you can select an override. Note that override settings do NOT get
InsightSoftware.com Administration & Configuration Guide
__________________________________________________________________________________
Page 31 of 106
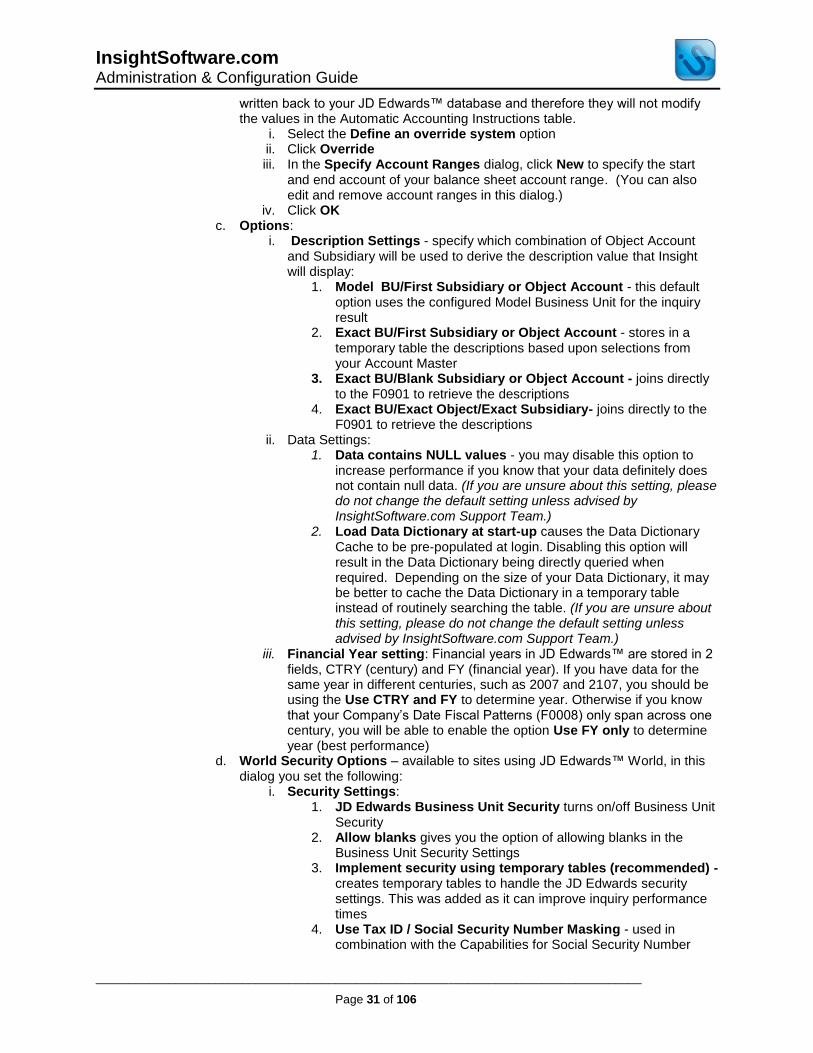
written back to your JD Edwards™ database and therefore they will not modify the values in the Automatic Accounting Instructions table.
i. Select the Define an override system option ii. Click Override iii. In the Specify Account Ranges dialog, click New to specify the start
and end account of your balance sheet account range. (You can also edit and remove account ranges in this dialog.)
iv. Click OK c. Options:
i. Description Settings - specify which combination of Object Account and Subsidiary will be used to derive the description value that Insight will display:
1. Model BU/First Subsidiary or Object Account - this default option uses the configured Model Business Unit for the inquiry result
2. Exact BU/First Subsidiary or Object Account - stores in a temporary table the descriptions based upon selections from your Account Master
3. Exact BU/Blank Subsidiary or Object Account - joins directly to the F0901 to retrieve the descriptions
4. Exact BU/Exact Object/Exact Subsidiary- joins directly to the F0901 to retrieve the descriptions
ii. Data Settings: 1. Data contains NULL values - you may disable this option to
increase performance if you know that your data definitely does not contain null data. (If you are unsure about this setting, please do not change the default setting unless advised by InsightSoftware.com Support Team.)
2. Load Data Dictionary at start-up causes the Data Dictionary Cache to be pre-populated at login. Disabling this option will result in the Data Dictionary being directly queried when required. Depending on the size of your Data Dictionary, it may be better to cache the Data Dictionary in a temporary table instead of routinely searching the table. (If you are unsure about this setting, please do not change the default setting unless advised by InsightSoftware.com Support Team.)
iii. Financial Year setting: Financial years in JD Edwards™ are stored in 2 fields, CTRY (century) and FY (financial year). If you have data for the same year in different centuries, such as 2007 and 2107, you should be using the Use CTRY and FY to determine year. Otherwise if you know that your Company’s Date Fiscal Patterns (F0008) only span across one century, you will be able to enable the option Use FY only to determine year (best performance)
d. World Security Options – available to sites using JD Edwards™ World, in this dialog you set the following:
i. Security Settings: 1. JD Edwards Business Unit Security turns on/off Business Unit
Security 2. Allow blanks gives you the option of allowing blanks in the
Business Unit Security Settings 3. Implement security using temporary tables (recommended) -
creates temporary tables to handle the JD Edwards security settings. This was added as it can improve inquiry performance times
4. Use Tax ID / Social Security Number Masking - used in combination with the Capabilities for Social Security Number

InsightSoftware.com Administration & Configuration Guide
__________________________________________________________________________________
Page 32 of 106
Options, Insight can mask the display of Tax IDs / Social Security numbers
ii. Connection Settings allow you to select which security authentication mode you want your users to use as part of the logon process:
1. Option 1 – connect to the AS/400 using the user’s entered username and password
2. Option 2 – connect using the username and password entered in the configuration wizard (Step 2) but validate the entered username and password against the AS/400
3. Option 3 – connect using option 1; upon failure, connect using option 2
4. Option 4 - connect using the username and password entered in the configuration wizard (Step 2) but validate the entered username and password using the Insight Object Repository password management
e. Security Options – available to sites using JD Edwards™ E1, in this dialog you set the following:
i. Use JD Edwards Security - select the security you wish to use: Company, Business Unit and Object Account. You are able to allow blanks when choosing your security settings.
ii. Implement security using temporary tables (recommended) – when selected, Insight will create temporary tables to handle the JD Edwards™ security settings. This was added as it can improve inquiry performance times.
iii. Use Tax ID / Social Security Number masking - used in combination with the Capabilities for Social Security Number options, Insight can mask the display of Tax IDs / Social Security Numbers
f. DB2 Indices – available if your JDE system is using a DB2 database, this option can improve the performance for Object Account/Subsidiary validation by relying on your indices on the F0901 table. Click the Test button to verify that Insight can use your indices and then check the box as appropriate.
g. Joins - Within the Insight General Ledger and Job Cost modules, we are using tables F0901 and F0902. This tab allows us to define how we want to join the two files:
i. Full Join - joins on all aspects of an account, i.e. Account I.D, Company, Business Unit, Object Account and Subsidiary. By joining on all of these fields, you are sacrificing speed for integrity due to the additional checks Insight will need to perform
ii. Account ID Only Join - only joins on Account ID (which is the same way that JD Edwards™ joins these tables). This type of join sacrifices integrity for speed. You can check the integrity of your system by running the Account ID Integrity Test under Extended Tests in the Integrity Checker; this will allow you to see if it is safe to use this faster option.
29. Click Next. (Pressing Cancel on this screen will result in your profile not being saved.) 30. Click Finish. You will see the Updating ERP Profile screen, which runs through two
connections: Setup Standard Templates and Setup Budgeting Repository. This process will load all of the information and templates that will be used by the configured ERP Profile. Once completed, the status bar columns will show as OK.
31. Click Close to exit the screen if it doesn’t exit automatically. 32. If the process has not updated correctly, the status column will show as Error. This will mean
that your profile will not be completed. You will need to fix the error before re-running the process. Double-click on the line to receive further information.
33. On completion, your ERP Profile will appear as an item within Profiles.

InsightSoftware.com Administration & Configuration Guide
__________________________________________________________________________________
Page 33 of 106
In Insight Administrator, how do I create a new Profile using Oracle EBS Data?
1. Log into your repository if you are not logged in already. 2. Expand the Data Sources node in the left panel. 3. Use 1 of these 2 options:
a. Right-click on Profiles, select New, then Oracle Profile. b. Highlight Profiles, click the New button on the Ribbon and select Oracle Profile.
4. The New ERP Profile dialog opens. Enter a unique name that identifies this Profile. 5. Click OK. 6. In the Create/Edit ERP Profile Wizard, click Next. 7. Designate the Connection that links Insight with your Oracle database tables. Choose the
relevant connection from the previously defined list of available Connections. If a Connection has not been defined, click the New button and you will be presented with the Database Connection dialog and from here, a new Connection can be created. NOTE: for Oracle ERP data, only one connection is needed to connect to all data. Therefore, only the Data Connection needs to be identified. Mark the Same as Data Connection checkbox for the Security, Data Dictionary and UDC Connections.
8. Click Next. 9. Platform - select the Oracle version to which you will be connecting. 10. Click Next. 11. In the Module Selection screen, activate the modules and options you wish to use in this
Profile. (Note that only the modules available to select are those for which your organization is licensed.) a. Modules b. Features:
i. FSG Row Set Importer - enables the option to import FSG Row Sets ii. Parent Code Filter Support –enables users to filter on parent codes. (For
example, Account 1000 (Cash) is the parent code and has no postings directly against it. If this option is enabled, users can filter on Account 1000 and see the sum of all its descendants.)
12. Click Next. 13. In the Table Locations screen, define all of the tables needed for Insight with the appropriate
Schema name. If there is uncertainty over any of the table selections explained below, please consult your Oracle EBS Administrator. The tables available are split between mandatory and optional, both of which can be defined on this screen. The default setting for the table definition is to only show those tables that have multiple selectable prefixes. Click Show All Tables to see all database tables. If all tables have the same prefix, this screen will be until you check Show All Tables. a. Table Owners/Library Names - For an Oracle database, this is the schema. A table
owner/schema is associated with the database user who owns, and most likely created, the database table.
b. If the correct default libraries have been supplied in the Data Source Connections, the prefixes should automatically be completed. Please ensure that all of the tables in the list either have a valid prefix or are set to ‘Do not use’ where appropriate. If this is not the case, valid prefixes can be manually entered by double-clicking on the appropriate prefix field and entering the name manually.
c. To select multiple rows, use either the Shift or Ctrl keys to select the fields with a common owner/table. Highlight the rows and right-click. This will provide you with a selection of Library Prefix names that are common to all highlighted table. After selecting the common owner/table for the selected fields, you see the table prefix has changed to the value you selected.
14. When all of these prefixes have been applied, click Next to continue. Now all the mandatory views required by Insight are created.
15. Click Next. 16. In this screen, Insight tests what has been entered so far in the Profile Wizard. If you want to
see the number of rows returned for each table, click Include Row Count Information prior to running the test.
InsightSoftware.com Administration & Configuration Guide
__________________________________________________________________________________
Page 34 of 106
17. Click Run Test. If a warning message is received at this point, click the Back button to return to the screen that is relevant to the issue highlighted in the message. Examine and alter those settings that are at fault before returning to test the configuration.
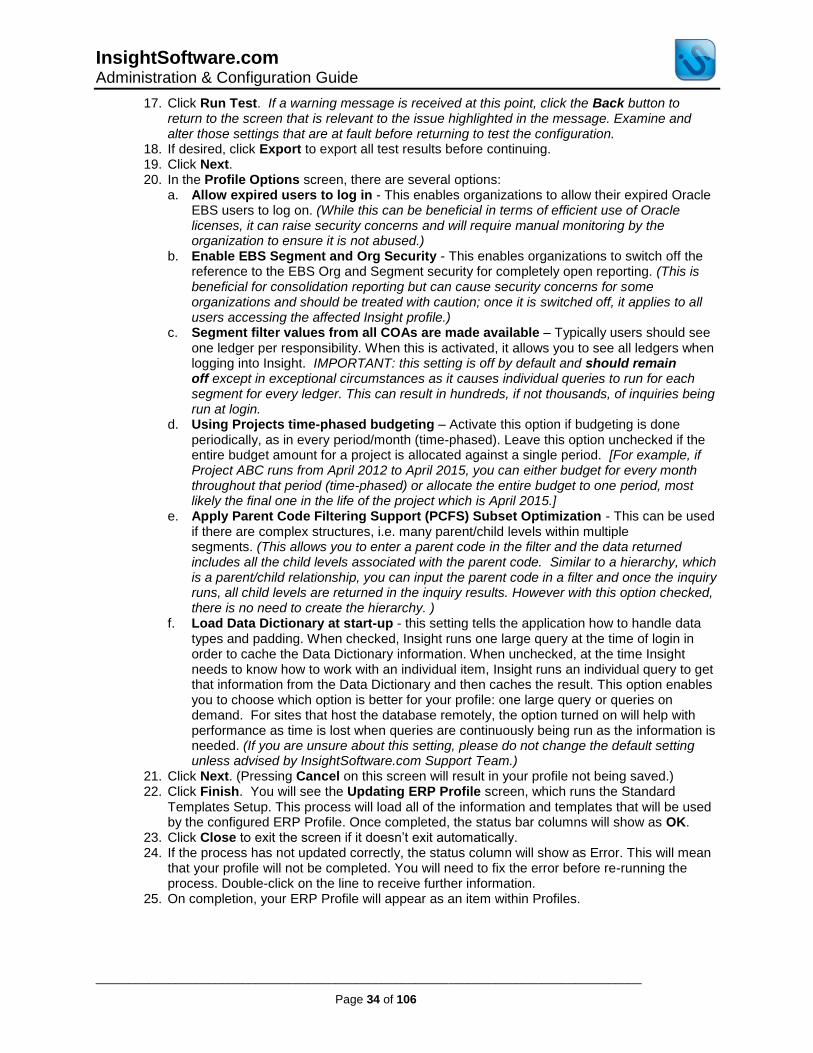
18. If desired, click Export to export all test results before continuing. 19. Click Next. 20. In the Profile Options screen, there are several options:
a. Allow expired users to log in - This enables organizations to allow their expired Oracle EBS users to log on. (While this can be beneficial in terms of efficient use of Oracle licenses, it can raise security concerns and will require manual monitoring by the organization to ensure it is not abused.)
b. Enable EBS Segment and Org Security - This enables organizations to switch off the reference to the EBS Org and Segment security for completely open reporting. (This is beneficial for consolidation reporting but can cause security concerns for some organizations and should be treated with caution; once it is switched off, it applies to all users accessing the affected Insight profile.)
c. Segment filter values from all COAs are made available – Typically users should see one ledger per responsibility. When this is activated, it allows you to see all ledgers when logging into Insight. IMPORTANT: this setting is off by default and should remain off except in exceptional circumstances as it causes individual queries to run for each segment for every ledger. This can result in hundreds, if not thousands, of inquiries being run at login.
d. Using Projects time-phased budgeting – Activate this option if budgeting is done periodically, as in every period/month (time-phased). Leave this option unchecked if the entire budget amount for a project is allocated against a single period. [For example, if Project ABC runs from April 2012 to April 2015, you can either budget for every month throughout that period (time-phased) or allocate the entire budget to one period, most likely the final one in the life of the project which is April 2015.]
e. Apply Parent Code Filtering Support (PCFS) Subset Optimization - This can be used if there are complex structures, i.e. many parent/child levels within multiple segments. (This allows you to enter a parent code in the filter and the data returned includes all the child levels associated with the parent code. Similar to a hierarchy, which is a parent/child relationship, you can input the parent code in a filter and once the inquiry runs, all child levels are returned in the inquiry results. However with this option checked, there is no need to create the hierarchy. )
f. Load Data Dictionary at start-up - this setting tells the application how to handle data types and padding. When checked, Insight runs one large query at the time of login in order to cache the Data Dictionary information. When unchecked, at the time Insight needs to know how to work with an individual item, Insight runs an individual query to get that information from the Data Dictionary and then caches the result. This option enables you to choose which option is better for your profile: one large query or queries on demand. For sites that host the database remotely, the option turned on will help with performance as time is lost when queries are continuously being run as the information is needed. (If you are unsure about this setting, please do not change the default setting unless advised by InsightSoftware.com Support Team.)
21. Click Next. (Pressing Cancel on this screen will result in your profile not being saved.) 22. Click Finish. You will see the Updating ERP Profile screen, which runs the Standard
Templates Setup. This process will load all of the information and templates that will be used by the configured ERP Profile. Once completed, the status bar columns will show as OK.
23. Click Close to exit the screen if it doesn’t exit automatically. 24. If the process has not updated correctly, the status column will show as Error. This will mean
that your profile will not be completed. You will need to fix the error before re-running the process. Double-click on the line to receive further information.
25. On completion, your ERP Profile will appear as an item within Profiles.

InsightSoftware.com Administration & Configuration Guide
__________________________________________________________________________________
Page 35 of 106
Manually Create a Repository Database Connection
In Insight Administrator, can I manually create a new repository database connection without using the Initial Setup Wizard?
You can create a new Repository Database Connection without using the Initial Setup Wizard.
1. From Repository Database Connection (highest level in the tree structure in the left panel), click New on the ribbon or right-click on Repository Database Connection and click New
2. Select Repository Database Connection
Log into a Repository
After creating a new repository in Insight Administrator, how do I log into it?
1. After completing the Initial Setup Wizard or manually creating a repository, you will see the Repository Database Connection you have just created appear in the left panel of Insight Administrator
2. Open the Repository Login dialog by doing either of the following: a. Click on the underlying repository so the Ribbon automatically displays the
Repository tab. Then click Login to open the Repository Login dialog b. Double-click on the repository name to open the Repository Login dialog
3. In the Repository Login dialog, enter the login name and password that you specified in the Initial Setup for the Repository (e.g. ‘Administrator’)
4. Optionally, mark the option to Automatically login in the future to be logged in upon launching Insight Administrator
5. Click Login. The Repository Icon will change from Grey to Yellow if you have correctly entered in your login credentials.
To select a subfolder, you can navigate using the + icons in the left-hand panel or click on the folder in the right-hand panel of Insight Administrator
Integrity Checker
In Insight Administrator, how do I use the Integrity Checker?
The integrity checker is designed to detect any problems or inconsistencies within the database that might interfere with the operation of Insight. To run an Integrity Check:
1. Right-click on a specific profile from the right-hand panel of Insight Administrator 2. Select Integrity Checker 3. Under Available Tests, use the checkboxes to select which tests or groups of tests you
want to run. Expand Common and Extended Tests as needed to see the detailed list of tests:
a. Common Tests - recommended tests, which detect common inconsistent settings. These run quickly and can be run as part of the configuration of the database connection.
b. Extended Tests - additional tests, which may take considerably longer to run, are designed to tackle more complex data issues. We would typically recommend that you run these tests overnight.
4. Click Run. The results of the test appear in the bottom panel of the dialog.

InsightSoftware.com Administration & Configuration Guide
__________________________________________________________________________________
Page 36 of 106
5. When the results appear in the bottom-half of the dialog, you can export them to a CSV file by right-clicking on the results panel. If you have Microsoft Excel® installed, the results will launch in Microsoft Excel®.
6. The feedback from the data integrity tool is divided into two categories: a. Warnings - these suggest that current database settings may result in
unexpected behavior b. Errors - these indicate settings that are not compatible with Insight and need to
change in order to ensure a complete and proper configuration 7. If there are any errors or warnings, please seek advice from your Systems Administrator
Tests Descriptions Tables Columns
Data Dictionary
Checks the existence of the Data Dictionary (F9210 for EnterpriseOne™ sites or F9201 for World sites). Also checks to see if the Data Dictionary is populated.
F9210/ F9201
Date – Default Year and Date Pattern
This is split into two tests. One test checks that there is a date pattern and a default year set for the model company 00000 in the F0010. The second test checks that the default year and date pattern for the model company 00000 exists in the F0008.
F0010 F0008
CCDTPN (Pattern) CCDFYJ (Year)
Date – Week Data
Checks the existence of data in the F0008B. F0008B
Ledger Checks the existence of ledger data in the relevant table (F0025 for EnterpriseOne™ sites or F0005 for World sites).
F0005 F0025
DRKY (F0005) LHLT (F0025)
Level Of Detail Checks that we can create a temporary table. This is used in hierarchy queries, including LOD queries.
Account ID Checks that the combination of Company, Business Unit, Object Account and Subsidiary are unique to an account ID across the fact tables and then checks to see if an individual account ID is unique to the combination of Company, Business Unit, Object Account and Subsidiary.
F0901 F0902 F0902B F0911 F1202 – FA F1602 - ACA
CO MCU OBJ SUB OBJ AID
Business Unit Category
Checks that the category codes defined in the F0006 exist in the F0005.
F0006 F0005
MCRP01 – MCRP30 DRKY
Currency Information
a. Checks for currencies in the F0013. b. Checks that currencies used in the F0902 exist in the F0013. c. Checks in the F0010 that company 00000 has a default currency set.
F0013 F0902 F0010
CCRCD GBCRCD CCCRCD
Model Business
Returns a list of Object Accounts from the F0901 that are not included in the Model Business.
F0901 GOBJ GMMCU
F03012 Table Integrity Test
Runs a test against the F03012 and F03B11 tables to see if a table join between the tables on columns CO and AN8 can be used.
F03012 F03B11
RPCO RPAN8 AICO AIAN8
AS/400 Accounts Master Index Test
Tests the master index in the F0901 table. F0901

InsightSoftware.com Administration & Configuration Guide
__________________________________________________________________________________
Page 37 of 106
Tests Descriptions Tables Columns
Object Category
Checks that all the category codes in the F0901 exist in the F0005.
F0005 F0901
DRKY GMR0xx (xx = Category Number)
Account ID Integrity Test
In Insight Administrator, when would I run the Account ID integrity test?
The Account ID test is typically the most commonly used extended integrity test. The Account ID test is particularly helpful in a couple scenarios:
Trial balances in Insight are different from the balances in JD Edwards™
Transactions displayed in the Insight Transactions template are not visible in the Insight Balances template even though they are posted transactions
In JD Edwards™, for a unique Account ID in the Accounts Masters table (F0901), there is only one unique combination of Company, Business Unit, Object Account and Subsidiary. In Insight, you can set whether the application joins the Balances and Transactions tables the same way or by a full join (this is set in Profile Options in Insight Administrator). When the profile is set to join by Account ID, the join is the same as what is used in JD Edwards™ and therefore inquiry results will be the same as what is seen in JD Edwards™. When the profile is set to a full join between the F0901 and F0902, the join is on Account ID, Company, Business Unit, Object Account and Subsidiary. In this case there can be a discrepancy in data between Insight inquiries and JDE data. It is slower to perform queries on this join option; however it will point out discrepancies that can then be fixed in your JDE data. This test is performed across the JDE Balances tables; the inconsistency could be in a single table or multiple tables. Any integrity issues found by running this test need to be fixed in your JDE data. So for example, you have the following account in the Account Master:
AccountID (AID)
Co (CO) BU (MCU) Obj (OBJ) Sub (SUB)
00000100 00001 1 1110 BEAR
In the Balances or Transactions table you would have postings against the same structure and the transactions balance:
AccountID (AID)
Co (CO) BU (MCU) Obj (OBJ) Sub (SUB) Value
00000100 00001 1 1110 BEAR 100
00000100 00001 1 1110 BEAR -100
If you sum the values by Company (Co), this would balance to 0:
Company (CO) Value
00001 100
00001 -100
Total for Company 00001 0
And again by Business Unit (MCU), this would also balance to 0:
InsightSoftware.com Administration & Configuration Guide
__________________________________________________________________________________
Page 38 of 106
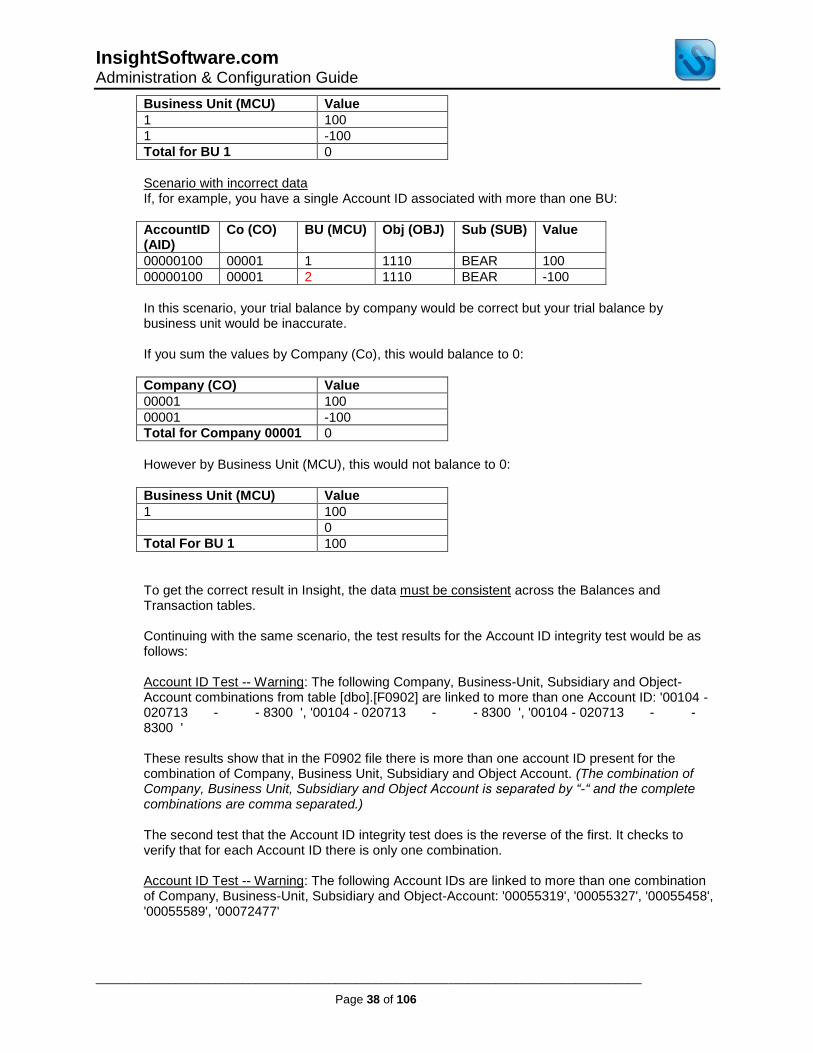
Business Unit (MCU) Value
1 100
1 -100
Total for BU 1 0
Scenario with incorrect data If, for example, you have a single Account ID associated with more than one BU:
AccountID (AID)
Co (CO) BU (MCU) Obj (OBJ) Sub (SUB) Value
00000100 00001 1 1110 BEAR 100
00000100 00001 2 1110 BEAR -100
In this scenario, your trial balance by company would be correct but your trial balance by business unit would be inaccurate. If you sum the values by Company (Co), this would balance to 0:
Company (CO) Value
00001 100
00001 -100
Total for Company 00001 0
However by Business Unit (MCU), this would not balance to 0:
Business Unit (MCU) Value
1 100
0
Total For BU 1 100
To get the correct result in Insight, the data must be consistent across the Balances and Transaction tables. Continuing with the same scenario, the test results for the Account ID integrity test would be as follows: Account ID Test -- Warning: The following Company, Business-Unit, Subsidiary and Object-Account combinations from table [dbo].[F0902] are linked to more than one Account ID: '00104 - 020713 - - 8300 ', '00104 - 020713 - - 8300 ', '00104 - 020713 - - 8300 ' These results show that in the F0902 file there is more than one account ID present for the combination of Company, Business Unit, Subsidiary and Object Account. (The combination of Company, Business Unit, Subsidiary and Object Account is separated by “-“ and the complete combinations are comma separated.) The second test that the Account ID integrity test does is the reverse of the first. It checks to verify that for each Account ID there is only one combination. Account ID Test -- Warning: The following Account IDs are linked to more than one combination of Company, Business-Unit, Subsidiary and Object-Account: '00055319', '00055327', '00055458', '00055589', '00072477'

InsightSoftware.com Administration & Configuration Guide
__________________________________________________________________________________
Page 39 of 106
Data Dictionary Overrides
In Insight Administrator, how do I create Data Dictionary Overrides for a Profile?
The Data Dictionary Override is designed to override settings held within the JD Edwards™ Data Dictionary in order to negate any inconsistencies within the database that might interfere with the operation of Insight. Note that any override set for the profile does not modify the Data Dictionary in your JD Edwards™ database. The override information is stored within the Insight Object Repository. To set up overrides to the Data Dictionary:
1. Log into your repository if you are not logged in already 2. Expand the Data Sources node in the left panel 3. Click on Profiles 4. In the right panel, right-click on the profile that you wish to amend 5. Select Assign Data Dictionary Override 6. Using the drop-down menu next to Use override, select the override you wish to use 7. If you need to create a new override, click Manage 8. In the Data Dictionary Overrides dialog, click New 9. Enter a name for the new Data Dictionary Override 10. Click OK 11. Enter the Name of the item as entered on the Data Dictionary table, and click Retrieve to
import the attributes to the override table. The naming convention for Data Dictionary Overrides ONLY allows for letters, numbers and underscores. Space characters are not valid.
12. You can now modify the settings for that particular data item. These new settings will be the values used within Insight once it is restarted.
Can you provide an example of when I would need to create a Data Dictionary Override in Insight Administrator?
Scenario: the description for a JDE column is not visible on the Insight report even though the column allows descriptions and descriptions are visible in the Visual Assist Likely cause for this error: the JDE Data Dictionary definition for this column While correcting the faulty data dictionary definition in JDE itself is the preferred solution, making system changes to JDE may not always be practical. Insight provides an alternative solution that allows the error to be corrected without making any system changes to JDE. In Insight Administrator, create a Data Dictionary Override for the profile being used. In this example, a field ending “PEC” has 3 character values. In the F0005, the values are stored with padding to the left. (so “ PEC”). In the JDE Data Dictionary definition, it is stored as a 4 character field, though it actually only uses 3 characters (in this example “PEC “ with no spaces to the left and one space to the right of the value). In this case, this means that Insight is not able find the description in the F0005 corresponding to the “PEC” code. The Data Dictionary Overrides dialog would need to be set as shown below:
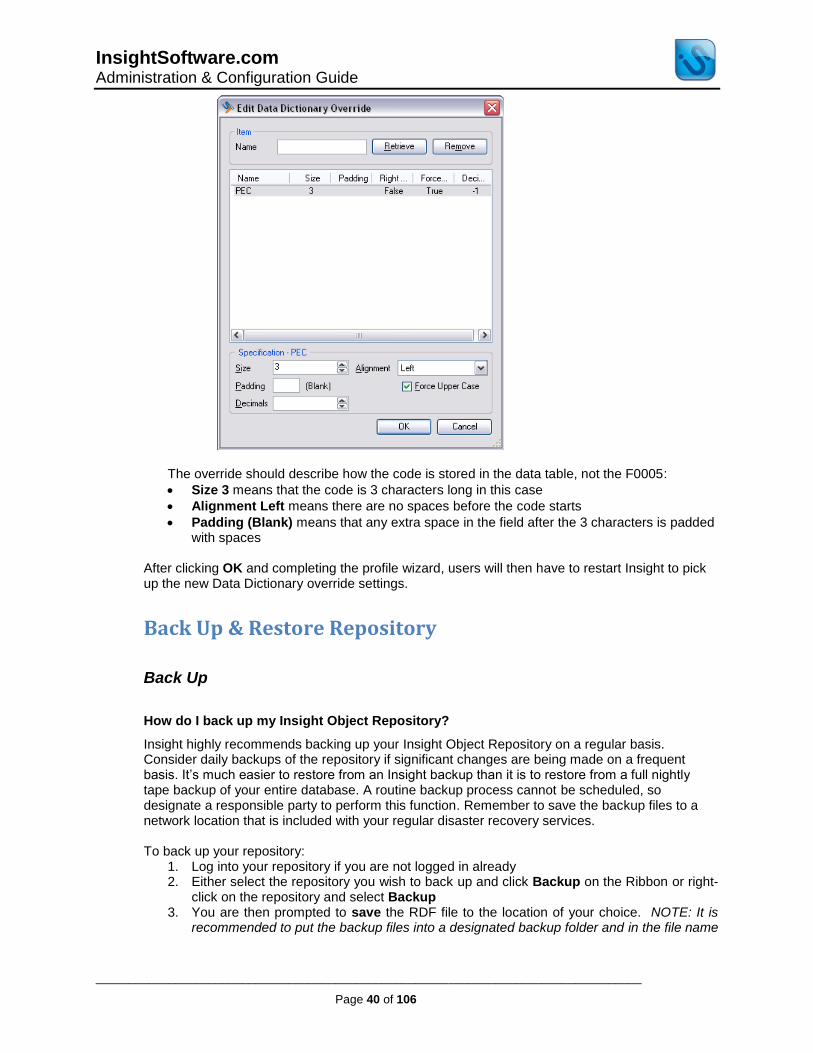
InsightSoftware.com Administration & Configuration Guide
__________________________________________________________________________________
Page 40 of 106
The override should describe how the code is stored in the data table, not the F0005:
Size 3 means that the code is 3 characters long in this case
Alignment Left means there are no spaces before the code starts
Padding (Blank) means that any extra space in the field after the 3 characters is padded with spaces
After clicking OK and completing the profile wizard, users will then have to restart Insight to pick up the new Data Dictionary override settings.
Back Up & Restore Repository
Back Up
How do I back up my Insight Object Repository?
Insight highly recommends backing up your Insight Object Repository on a regular basis. Consider daily backups of the repository if significant changes are being made on a frequent basis. It’s much easier to restore from an Insight backup than it is to restore from a full nightly tape backup of your entire database. A routine backup process cannot be scheduled, so designate a responsible party to perform this function. Remember to save the backup files to a network location that is included with your regular disaster recovery services. To back up your repository:
1. Log into your repository if you are not logged in already 2. Either select the repository you wish to back up and click Backup on the Ribbon or right-
click on the repository and select Backup 3. You are then prompted to save the RDF file to the location of your choice. NOTE: It is
recommended to put the backup files into a designated backup folder and in the file name

InsightSoftware.com Administration & Configuration Guide
__________________________________________________________________________________
Page 41 of 106
include the specific repository information (such as the repository name) so that you can easily identify the backup files.
Once a repository is backed up, you can either use the Import function to bring in specific items from the backup, or the Restore function to bring in all items from the backup.
Restore
How do I restore from an Insight Object Repository backup?
You can use the Restore function to add a new repository to an existing one or create a new one.
1. Log into your repository if you are not logged in already 2. Right-click on the repository you wish to restore into and select Restore 3. When the Open File dialog opens, navigate to and select the Repository Data File (RDF)
you want to restore 4. Click OK 5. When the restore has completed, save the repository selection file to the appropriate
Insight installation path The repository being restored will then be appended to the open repository. Any incompatible files will be reported through a message dialog. When you restore into a repository that has existing data, it adds any new reports that are not currently there. If the same report already lives in the repository and it is in the restore, the restore will overwrite the existing report. If a report lives in the repository currently and the restore does not have the report, you will still have the report. If a profile was renamed, a restore will bring it in again with the original name; otherwise it will overwrite the profile/connections if they are the same name.
Documents
Update Links
In Insight Administrator, what is the Update Links functionality?
The Update Links functionality allows a user to quickly analyze multiple inquiries and view links between inquiries. You can view all links, only valid links or only broken links. When viewing broken links, you can uncover instances where links to other inquiries/templates are not functional. To use the Update Links functionality:
1. Right-click on a specific document or folder (even the entire ‘Documents’ Folder) and select Update Links
2. This brings up the Update Links dialog:

InsightSoftware.com Administration & Configuration Guide
__________________________________________________________________________________
Page 42 of 106
3. Use the drop-down next to Show Links to filter on Broken/Valid/All Links 4. Click Analyze 5. The information returned includes the following:
a. Status – link status (broken or valid) b. Link Name – name of the link used within Insight c. Source Report – the report you are linking from d. Source Report Location – saved location of the source report e. Type – type of document (e.g. template or inquiry) f. Source Module – module the source report belongs to g. Links To – the report you are linking to h. Target Location – location of the target/destination report i. Target Module – module the target report belongs to
6. To change a link, click Change Link 7. Navigate to the new inquiry you wish to link to 8. Click Open 9. Back in the Update Links dialog, if you click Analyze again you will see the link status
has changed 10. To save the results list in the Update Links dialog, click Save List to save it as a .csv
spreadsheet compatible file. 11. Click Close to exit the dialog
Search
In Insight Administrator, how does the Search functionality work?
In Insight Administrator, you can search for folders, templates and inquiries. This is particularly useful when items have been misplaced or incorrectly saved. You can also use the Search functionality to perform functions such as save, rename, delete, and export items, as well as create a spreadsheet with all results returned from the search. To use the search functionality:
1. At the level you wish to search (such as everything under the ‘Documents’ folder), highlight that folder
2. Either right-click and select Search or click the New Search button in the Ribbon
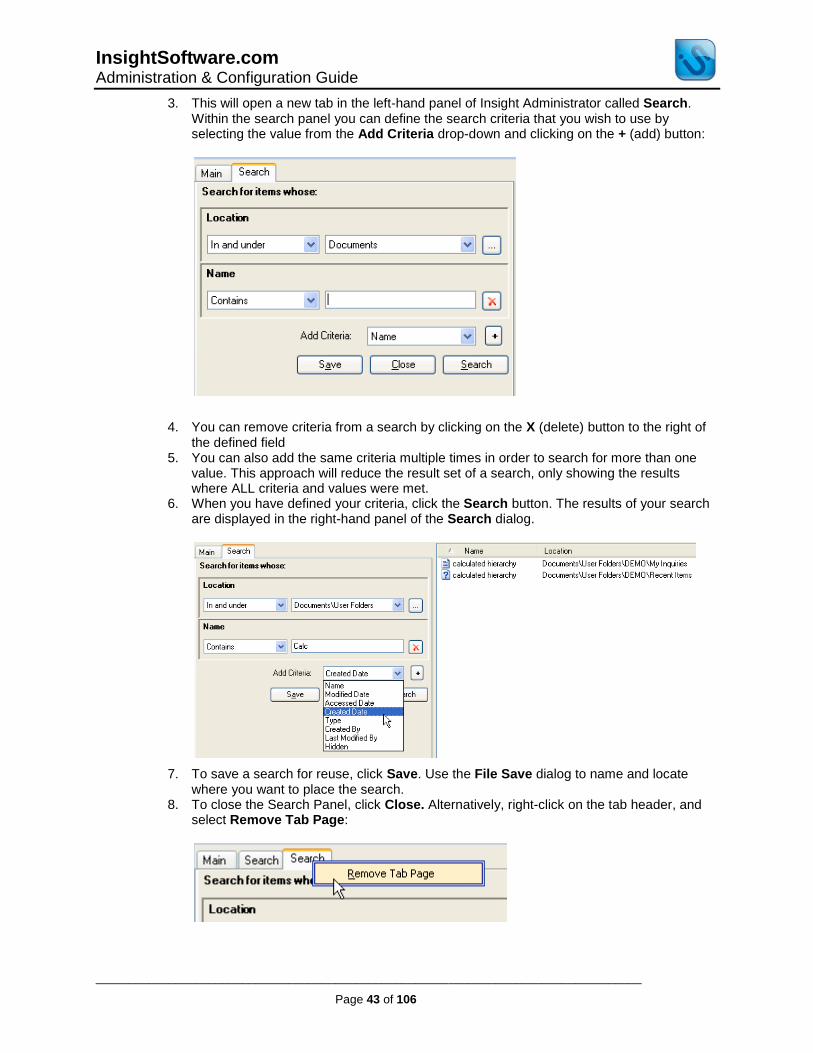
InsightSoftware.com Administration & Configuration Guide
__________________________________________________________________________________
Page 43 of 106
3. This will open a new tab in the left-hand panel of Insight Administrator called Search. Within the search panel you can define the search criteria that you wish to use by selecting the value from the Add Criteria drop-down and clicking on the + (add) button:
4. You can remove criteria from a search by clicking on the X (delete) button to the right of
the defined field 5. You can also add the same criteria multiple times in order to search for more than one
value. This approach will reduce the result set of a search, only showing the results where ALL criteria and values were met.
6. When you have defined your criteria, click the Search button. The results of your search are displayed in the right-hand panel of the Search dialog.
7. To save a search for reuse, click Save. Use the File Save dialog to name and locate where you want to place the search.
8. To close the Search Panel, click Close. Alternatively, right-click on the tab header, and select Remove Tab Page:
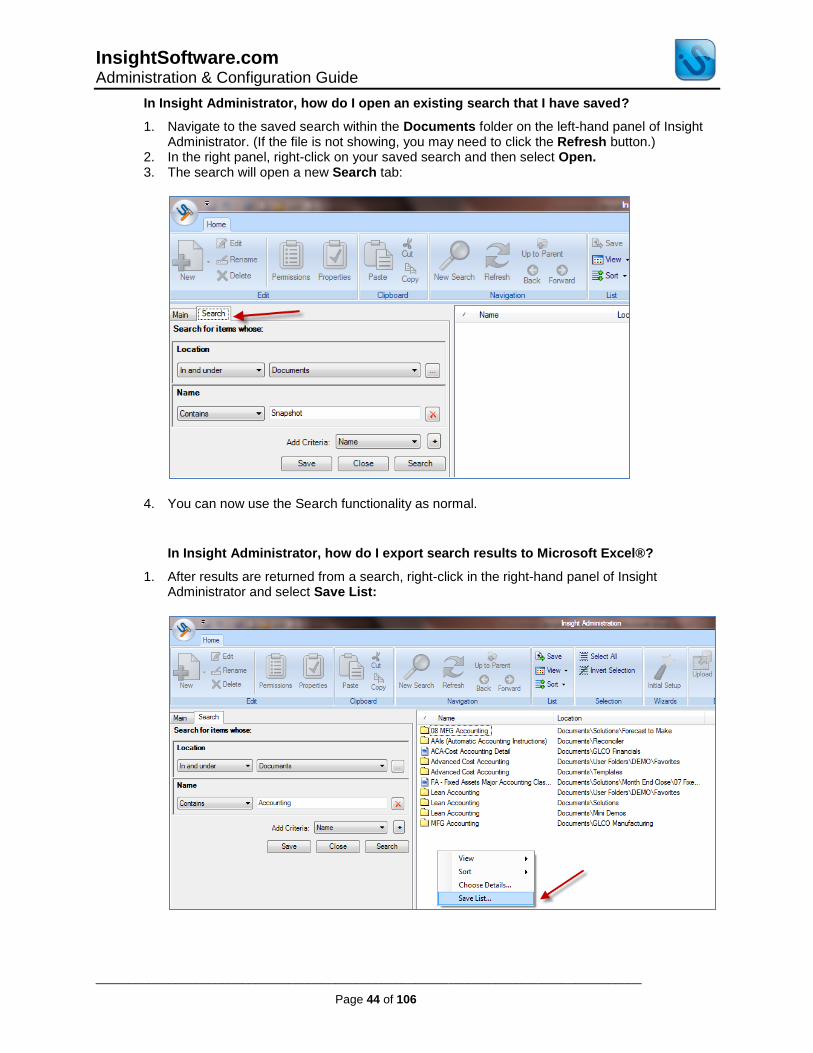
InsightSoftware.com Administration & Configuration Guide
__________________________________________________________________________________
Page 44 of 106
In Insight Administrator, how do I open an existing search that I have saved?
1. Navigate to the saved search within the Documents folder on the left-hand panel of Insight Administrator. (If the file is not showing, you may need to click the Refresh button.)
2. In the right panel, right-click on your saved search and then select Open. 3. The search will open a new Search tab:
4. You can now use the Search functionality as normal.
In Insight Administrator, how do I export search results to Microsoft Excel®?
1. After results are returned from a search, right-click in the right-hand panel of Insight Administrator and select Save List:

InsightSoftware.com Administration & Configuration Guide
__________________________________________________________________________________
Page 45 of 106
2. The File Save dialog allows you to name and locate where you want to save the results. Upon clicking Save, the file will automatically launch within Microsoft Excel® (if installed).
Import & Export
How does the import/export function work within Insight Administrator?
Insight uses repository data files (RDFs) to store repository information. The import/export function allows you to share items between your Insight Repository and your computer via an RDF file. Import/export functions as a temporary workspace or staging area, so once you have completed the import or export, be sure to clear this workspace. Examples of when you may use the import function include the following:
when upgrading or running parallel to an existing Object Repository
when you need to restore your Object Repository from a backup
when you wish to import the Standard Templates back into Insight Administrator (for example when templates have been overwritten or have not been upgraded)
Examples of when you may use the export function include the following:
when running parallel installs of Insight
when you need to send a particular inquiry to Insight Customer Services for further assistance
In Insight Administrator, how do I import an item into the Insight Repository?
1. Log into your repository if you are not logged in already 2. Highlight the Import/Export node in the left panel and then either right-click and select Open
File or click Open File on the Ribbon 3. From the Open File dialog, navigate to and select the RDF file and click Open 4. The data from the RDF is now in a staging area under Import/Export. Everything included is
displayed in the right panel:

InsightSoftware.com Administration & Configuration Guide
__________________________________________________________________________________
Page 46 of 106
5. You now have the option to either drag and drop or copy each imported object from the holding area to the corresponding object within the Object Repository. This can be done at the highest level of the object tree, such as Data Sources, or lower down the tree, such as under Profiles. (The objects can also be copied to multiple repositories if desired.) If you wish to add all items of one Repository Data File to another, use the Restore function instead of the Import function.
6. If any profiles have been imported, we recommend going through the profile wizard again, making sure all tests are completed successfully. The profile wizard can be access by right-clicking the individual profile, in this example JDE8.12, and then selecting Edit.
7. Assign permissions as needed for this object that was just moved into the repository 8. When finished, be sure to clear the temporary workspace area by highlighting the
Import/Export node in the left panel and then either right-clicking and selecting Clear or clicking Clear on the Ribbon

InsightSoftware.com Administration & Configuration Guide
__________________________________________________________________________________
Page 47 of 106
In Insight Administrator, how do I import the Standard Templates?
1. Log into your repository if you are not logged in already 2. Highlight the Import/Export node in the left panel and then either and then right-click on
Import/Export and select Open File or click Open file on the Ribbon 3. From within the Insight installation folder, highlight StandardTemplates.rdf and select Open:
4. On the left panel, expand Import/Export > Documents > Templates 5. In this example, the GL Balances and Weekly Balances templates will be copied. Using the
Ctrl key, select both templates and either right-click and select Copy or click Copy in the Ribbon:
6. Collapse the Import/Export Folder, expand Documents > Templates in the designated repository and highlight the folder into which you wish to put the templates (in this case the General Ledger folder).

InsightSoftware.com Administration & Configuration Guide
__________________________________________________________________________________
Page 48 of 106
7. Either right-click and select Paste or click Paste in the Ribbon 8. When prompted, select Replace All to overwrite the old templates 9. When finished, clear the staging area by selecting the Import/Export folder and either right-
clicking on Import/Export and selecting Clear or by clicking Clear on the Ribbon

InsightSoftware.com Administration & Configuration Guide
__________________________________________________________________________________
Page 49 of 106
In Insight Administrator, how do I export an item from the Insight Repository?
The Export function is used to select and save single and multiple Repository elements to a repository data file (RDF). (To export the entire repository, use the Backup function instead of the Export function.)
1. Log into your repository if you are not logged in already 2. Highlight the Import/Export node in the left panel and then either right-click and select
Begin Export or click Begin on the Ribbon 3. A blank repository then opens within the Import/Export tree. Use this to paste or drag
and drop the repository items that you want to export. In this example, the ‘Solutions’ Folder was moved into the staging area.
4. Once all the items you wish to export are in the Import/Export node, highlight this node and either right-click and select Save to File or click Save on the Ribbon
5. When the Save file dialog opens, name and select a location to store the Repository data.
6. When finished, be sure to clear the temporary workspace area by highlighting the Import/Export node in the left panel and then either right-clicking and selecting Clear or clicking Clear on the Ribbon
There is one other way to export single items from the Repository: 1. Highlight the item you wish to export 2. Right-click and select Export 3. When the Save file dialog opens, name and select a location to store the data

InsightSoftware.com Administration & Configuration Guide
__________________________________________________________________________________
Page 50 of 106
Logging
What is the logging functionality in Insight Administrator?
The logging functionality records events including who did what, when and to whom. Basic logging is enabled automatically in all new repositories within the repository itself and is stored in a table created automatically. The log will record when an inquiry object has been edited, but cannot record the details of what changed (for example formats or calculations). Any new repository will have a new directory called Logging. This directory contains one Log Stream called Default, shown below:
The Logging directory can contain multiple log streams which can be enabled or disabled for different logging scenarios. Log Streams can be treated like any other object within the repository in that they can be created, renamed, deleted, copied, etc.
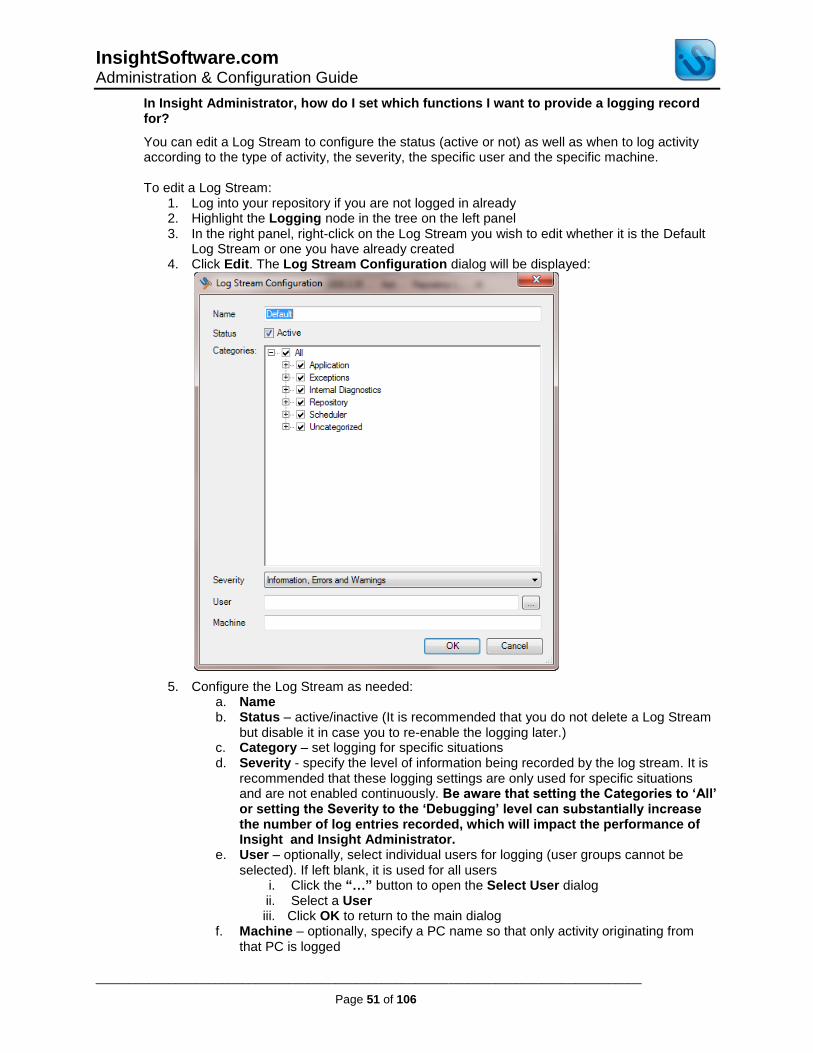
InsightSoftware.com Administration & Configuration Guide
__________________________________________________________________________________
Page 51 of 106
In Insight Administrator, how do I set which functions I want to provide a logging record for?
You can edit a Log Stream to configure the status (active or not) as well as when to log activity according to the type of activity, the severity, the specific user and the specific machine. To edit a Log Stream:
1. Log into your repository if you are not logged in already 2. Highlight the Logging node in the tree on the left panel 3. In the right panel, right-click on the Log Stream you wish to edit whether it is the Default
Log Stream or one you have already created 4. Click Edit. The Log Stream Configuration dialog will be displayed:
5. Configure the Log Stream as needed: a. Name b. Status – active/inactive (It is recommended that you do not delete a Log Stream
but disable it in case you to re-enable the logging later.) c. Category – set logging for specific situations d. Severity - specify the level of information being recorded by the log stream. It is
recommended that these logging settings are only used for specific situations and are not enabled continuously. Be aware that setting the Categories to ‘All’ or setting the Severity to the ‘Debugging’ level can substantially increase the number of log entries recorded, which will impact the performance of Insight and Insight Administrator.
e. User – optionally, select individual users for logging (user groups cannot be selected). If left blank, it is used for all users
i. Click the “…” button to open the Select User dialog ii. Select a User iii. Click OK to return to the main dialog
f. Machine – optionally, specify a PC name so that only activity originating from that PC is logged
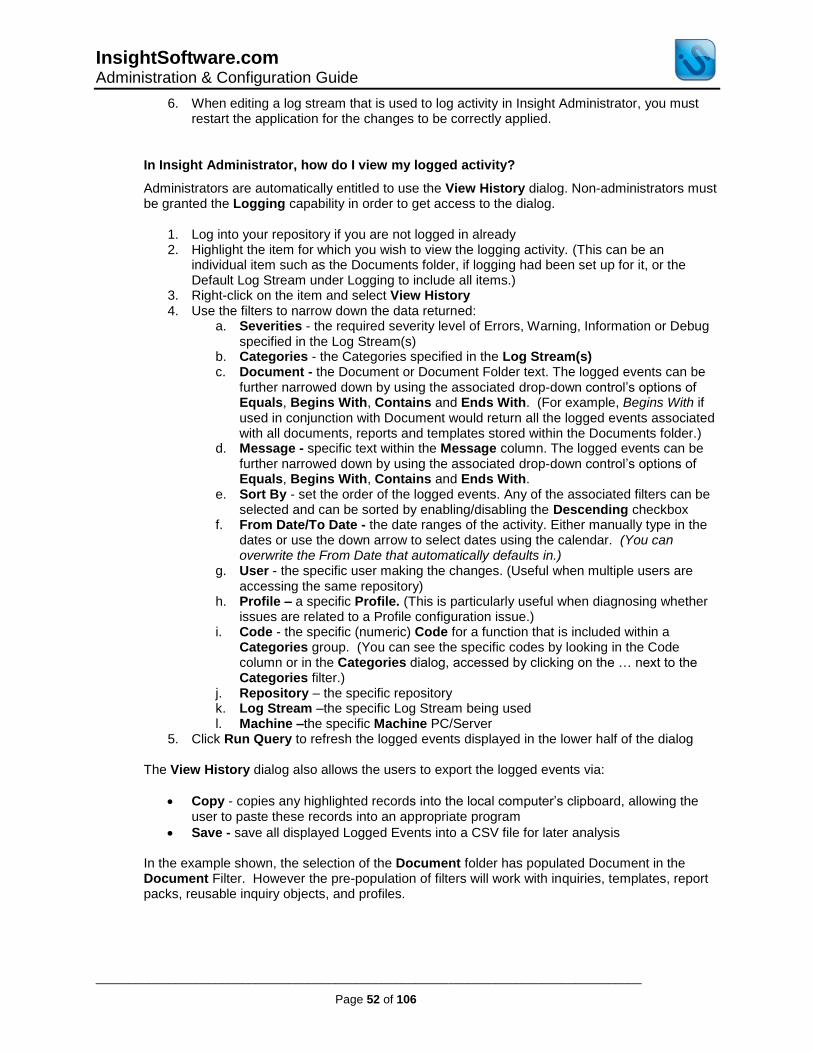
InsightSoftware.com Administration & Configuration Guide
__________________________________________________________________________________
Page 52 of 106
6. When editing a log stream that is used to log activity in Insight Administrator, you must restart the application for the changes to be correctly applied.
In Insight Administrator, how do I view my logged activity?
Administrators are automatically entitled to use the View History dialog. Non-administrators must be granted the Logging capability in order to get access to the dialog.
1. Log into your repository if you are not logged in already 2. Highlight the item for which you wish to view the logging activity. (This can be an
individual item such as the Documents folder, if logging had been set up for it, or the Default Log Stream under Logging to include all items.)
3. Right-click on the item and select View History 4. Use the filters to narrow down the data returned:
a. Severities - the required severity level of Errors, Warning, Information or Debug specified in the Log Stream(s)
b. Categories - the Categories specified in the Log Stream(s) c. Document - the Document or Document Folder text. The logged events can be
further narrowed down by using the associated drop-down control’s options of Equals, Begins With, Contains and Ends With. (For example, Begins With if used in conjunction with Document would return all the logged events associated with all documents, reports and templates stored within the Documents folder.)
d. Message - specific text within the Message column. The logged events can be further narrowed down by using the associated drop-down control’s options of Equals, Begins With, Contains and Ends With.
e. Sort By - set the order of the logged events. Any of the associated filters can be selected and can be sorted by enabling/disabling the Descending checkbox
f. From Date/To Date - the date ranges of the activity. Either manually type in the dates or use the down arrow to select dates using the calendar. (You can overwrite the From Date that automatically defaults in.)
g. User - the specific user making the changes. (Useful when multiple users are accessing the same repository)
h. Profile – a specific Profile. (This is particularly useful when diagnosing whether issues are related to a Profile configuration issue.)
i. Code - the specific (numeric) Code for a function that is included within a Categories group. (You can see the specific codes by looking in the Code column or in the Categories dialog, accessed by clicking on the … next to the Categories filter.)
j. Repository – the specific repository k. Log Stream –the specific Log Stream being used l. Machine –the specific Machine PC/Server
5. Click Run Query to refresh the logged events displayed in the lower half of the dialog
The View History dialog also allows the users to export the logged events via:
Copy - copies any highlighted records into the local computer’s clipboard, allowing the user to paste these records into an appropriate program
Save - save all displayed Logged Events into a CSV file for later analysis
In the example shown, the selection of the Document folder has populated Document in the Document Filter. However the pre-population of filters will work with inquiries, templates, report packs, reusable inquiry objects, and profiles.

InsightSoftware.com Administration & Configuration Guide
__________________________________________________________________________________
Page 53 of 106
In Insight Administrator, how do I delete my logged activity?
Logged data can be purged via the Delete History functionality. Individual objects within the repository can have their logged events purged or, alternatively, this can be done by individual Log Streams as shown below.
1. Log into your repository if you are not logged in already 2. In the left panel, highlight Logging 3. In the right panel, highlight the specific Log Stream for which you wish to delete the
logging activity and select Delete History 4. In the Delete History dialog, specify:
a. Log Stream – either the selected stream or all streams b. Older than – log streams older than the date specified will be deleted. (If left
blank, all entries will be deleted.) The default date can be overridden.
c. Click Delete. The Insight Information dialog that appears tells you how many log entries were deleted.

InsightSoftware.com Administration & Configuration Guide
__________________________________________________________________________________
Page 54 of 106
Reusable Inquiry Objects
Can I manage Reusable Inquiry Objects from Insight Administrator?
From Insight Administrator, you can manage Reusable Inquiry Objects (RIO) by creating new folders and defining Permissions to users/groups for the folders and/or the individual RIO items within the folders. (From Insight Reporting, new folders can be created but permissions can only be set for them through Insight Administrator.) To create a Reusable Inquiry Objects (RIO) folder:
1. Log into your repository if you are not logged in already 2. In the left panel, expand the RIO node in the tree structure. You will then see a folder for
Global as well as folders for any individual profile that has been set up. The Global folder holds RIO items that can be used in all profiles.
3. Right-click on the level you wish to create a folder, whether it is Global or a specific profile, and select New > Folder
4. Provide a name for the folder 5. Assign permissions by right-clicking on a specific folder or an item within a folder and
selecting Permissions
License Keys
How do I manage license keys in Insight Administrator?
There are several ways to access the License Keys dialog: 1. Within a repository, select the Users and Groups node in the left panel and click the
Manage Keys button on the Ribbon 2. Within a repository, select the Users and Groups node. 3. Select Everyone (or the level at which you wish to view the license keys), right-click on
this group or user and select License Keys 4. From within the License Assignments dialog, click the Manage button
** NOTE: Be aware that for backward compatibility with previous versions, the key name of ‘Key1’ needs to be retained for your primary key.
Within the License Keys dialog, you can:
Add new license keys. (Use Add to add a brand new license key that is not replacing an existing one, e.g. when adding a license key for the first time or adding a trial license key that is separate from your main license key.)
Remove old license keys
Replace a license key with another one. (Use Replace to replace a license key, e.g. an expired one or one from a previous version, with a new one. When you use this, your existing license assignments are retained and the new key validates that it can accommodate all of your current license assignments.)
Details – view details of the selected key
To replace a license key
1. In the License Keys dialog, select the key that you wish to replace 2. Click Replace 3. When the Enter Replacement Key dialog opens, copy and paste in the new license key
(clicking Paste will paste in whatever was most recently copied) 4. Click OK

InsightSoftware.com Administration & Configuration Guide
__________________________________________________________________________________
Page 55 of 106
5. A replaced license key cannot revoke any existing licenses or license assignments. Therefore, if an incompatible license key is used (one that has less licenses than those that have already been assigned), a message dialog opens to show you which modules are not accommodated such as the one below:
6. Click OK to close the message 7. Change the license assignments as needed in License Assignments 8. You can now replace the license key
To add a new license key
1. In the License Keys dialog, click Add 2. When the Add Replacement Key dialog opens, copy and paste in the new license key
(clicking Paste will paste in whatever was most recently copied) 3. Click OK
How do I set user licenses in Insight Administrator?
Once you have applied a valid license key and have users set up in Insight Administrator, you can assign licenses to individual users.
1. Log into your repository if you are not logged in already 2. Select Users & Groups from the left-hand panel of Insight Administrator 3. Select Everyone (or the level at which you wish to view the license keys), right-click on
this group or user and either click the Assign Licenses button on the Ribbon or right-click and select License Assignments
4. Note the Selected License Key as displayed in the top middle of the dialog. You can change this as needed to select the license key for which you want to apply licenses.
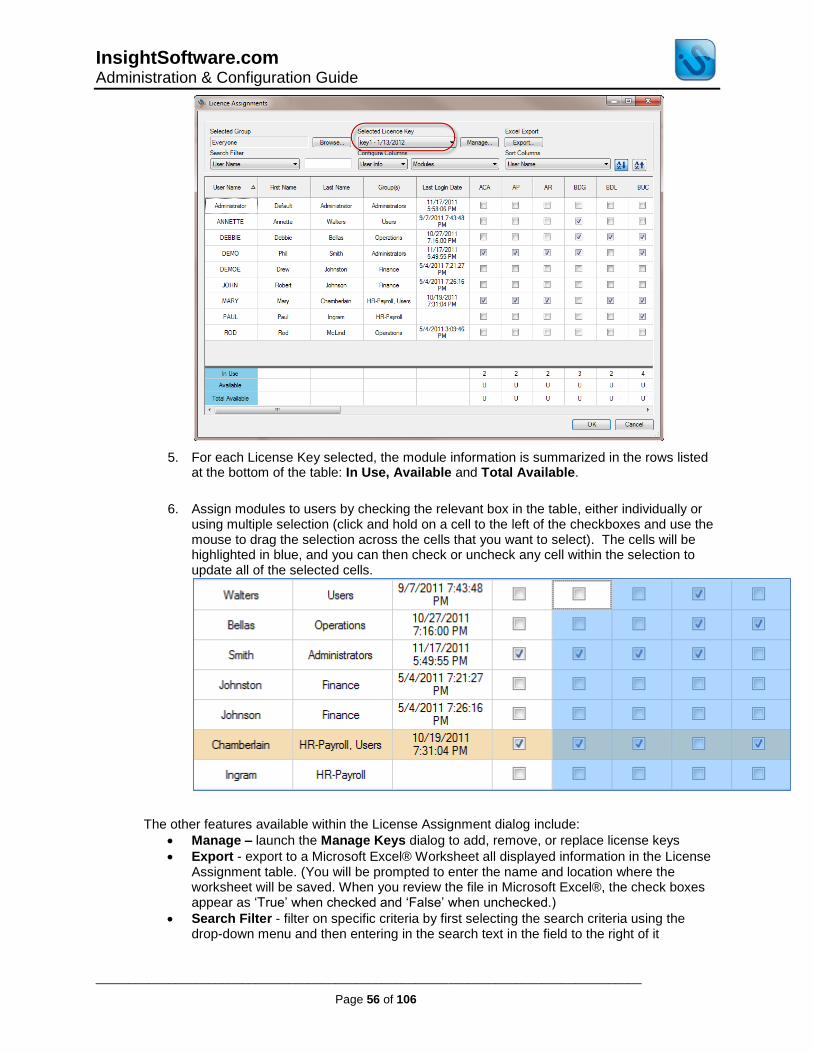
InsightSoftware.com Administration & Configuration Guide
__________________________________________________________________________________
Page 56 of 106
5. For each License Key selected, the module information is summarized in the rows listed at the bottom of the table: In Use, Available and Total Available.
6. Assign modules to users by checking the relevant box in the table, either individually or using multiple selection (click and hold on a cell to the left of the checkboxes and use the mouse to drag the selection across the cells that you want to select). The cells will be highlighted in blue, and you can then check or uncheck any cell within the selection to update all of the selected cells.
The other features available within the License Assignment dialog include:
Manage – launch the Manage Keys dialog to add, remove, or replace license keys
Export - export to a Microsoft Excel® Worksheet all displayed information in the License Assignment table. (You will be prompted to enter the name and location where the worksheet will be saved. When you review the file in Microsoft Excel®, the check boxes appear as ‘True’ when checked and ‘False’ when unchecked.)
Search Filter - filter on specific criteria by first selecting the search criteria using the drop-down menu and then entering in the search text in the field to the right of it

InsightSoftware.com Administration & Configuration Guide
__________________________________________________________________________________
Page 57 of 106
Configure columns – select/de-select the user information to display as well as the modules to display in the table
Sort Columns – select the column to sort by and then whether to sort in ascending or descending order
Capabilities
What are Capabilities in Insight Administrator?
Capabilities are used to manage users’ access to functionality within Insight such as being able to export data, build Hierarchies and Time Series, and other functional elements where you may wish to restrict capabilities to trained or authorized users. Capabilities are also used to assign limited functional rights within Insight Administrator to non-administrators. They can be set at the individual user level or at the group level, whether it be Everyone or other groups. To access and set Capabilities:
1. Log into your repository if you are not logged in already 2. Select Users & Groups from the left-hand panel of Insight Administrator and either click
the Assign Licenses button on the Ribbon or right-click and select License Assignments
3. Right-click on the specific level (group or individual user) you wish to set Capabilities for and select Capabilities
4. The Capabilities dialog opens with default settings, allowing users to manage the different features within Insight features:
a. Basic Capabilities are all those set within the main Capabilities dialog b. Advanced Capabilities are accessed by clicking on the Advanced Button in the
lower left corner of the Capabilities dialog i. Using the tree structure in the left panel of the Advanced Capabilities
dialog, navigate to and select the specific capability you wish to view/edit ii. In the upper right corner of the dialog, select the owner or level at which
you wish to set the capability iii. The settings in the lower right corner of the dialog vary depending on the
capability; set these accordingly. Inherit means that the settings are l inherited from the group above. The Everyone level inherits the setting from Defaults.
iv. Click Close once the settings have been made For example, navigate to Feature Control > Advanced Tuning Capability, which is used for viewing the SQL statement within Insight. In the Owner section, we are setting it at the Everyone level. Select Editable = Yes and activate the option to Show the Advanced Tuning Feature:

InsightSoftware.com Administration & Configuration Guide
__________________________________________________________________________________
Page 58 of 106
5. Click OK to save the settings 6. Insight must be restarted in order for changes to be made
What are the Basic Capabilities in Insight Administrator?
Basic Capabilities are all those set within the main Capabilities dialog: 1. Feature Control tab – activate/de-activate any of the listed features for the selected
user(s): a. Calculations b. Create Links c. Export to Excel d. Hierarchy e. Manage Folders f. Permissions g. Time Series
2. Print/Export tab – these are the default settings for all inquiries, however can be overridden within individual inquiries
a. Print Output Location – the default location for printing and exporting, initially this is the installed directory of Insight. Users may want this to be in a different location on their own machines. For clients who have Insight installed on a terminal server, it can be changed to be a generic mapped drive that users can change in order to save on their own workstation
b. Reports – Logo Image Location – the default location for logo images that can be included in PDF outputs, initially this is the installed directory of Insight
c. Reports – Display Confidential Footnote – set whether the confidential footnote displays on PDF outputs as well as the text of this footnote
d. Display Repository Location - set whether the confidential footnote displays on PDF outputs
e. Display Profile – set whether to display the data profile being used on PDF outputs
3. Budgeting tab – set whether to grant specific Budgeting permissions

InsightSoftware.com Administration & Configuration Guide
__________________________________________________________________________________
Page 59 of 106
a. Administration tab - grant specific capabilities within Insight Administrator to specific users/groups
i. Features: 1. Data Sources – Allows access to view the connections and
profiles (requires additional permissions to edit) 2. Reusable Inquiry Objects – Allows access to RIO 3. Documents – This should be granted by default for a user’s own
folder (requires additional permissions if more folders should be included)
4. Users and Groups – Allows access to view Users and Groups (requires additional permissions to update or create users/groups)
5. Import/Export – Allows access to Export to file but used in conjunction with the Repository Import and Export options, the user will be able to use all functionality
6. Logging – Allows access to the Logging folder (requires additional permissions to the specific log stream to use the Logging Functionality)
7. Module Security – Allows access to set Module Security (requires read and update permission to the individual profile as well)
8. Application Objects – Allows access to the Designer Objects Folder
ii. Repository: 1. Backup – Allows access to back up the Object Repository 2. Restore – Allows access to restore the Object Repository 3. Validate – Allows access to validate the Object Repository (this
function checks the repository for errors and attempts to fix them)
4. Edit – Allows access to edit the Object Repository 5. Delete – Allows access to delete the Object Repository 6. Import – Allows access to import in Import/Export 7. Export – Allows access to export in Import/Export
iii. Users and Groups: 1. User Licenses – Grants access to User Licenses. Needs to be
used to conjunction with Users and Groups (Features) 2. Manage License Keys – Grants access to Manage Licenses
Keys. Needs to be used to conjunction with Users and Groups (Features)
3. Synchronize – Grants access to Synchronize Users. Needs to be used to conjunction with Users and Groups (Features)
4. Basic Capabilities – Allows access to Basic Capabilities 5. Advanced Capabilities - Allows access to Advanced
Capabilities
InsightSoftware.com Administration & Configuration Guide
__________________________________________________________________________________
Page 60 of 106
Password Policy
In Insight Administrator, what is the Password Policy?
The Password Policy is used to define and manage password protection for Insight users. A Password Policy can be set for any individual or group. When set at the group level, whether it is Everyone or another group, it will then apply to all users and sub-groups within that group. A password policy defined at a group level can be overridden by a policy set at a lower level. So if settings for an individual user are different than those in the group the user belongs to, the individual user’s settings will take precedence. The Password Policy options, such as minimum length, are enforced only when a password is being changed – they are not retroactive. The default settings in the Password Policy are minimal. To access view and potentially change settings in the Password Policy:
1. Log into your repository if you are not logged in already 2. Expand the Users & Groups node in the left panel of Insight Administrator 3. At the level you want to view/edit the Password Policy, such as Everyone, right-click and
select Password Policy 4. Use the checkboxes to set and define any additional password criteria:
a. Inherit Policy b. Disable user after failed login attempts c. Restrict password re-use d. Restrict number of times a password can be changed e. Set minimum password length f. Enforce password strength g. Password should expire after x number of days h. Password can be the same as user name i. Password can be a dictionary word j. Password is case-sensitive k. Password must contain numerics
5. Click OK to make the changes
How is the Insight password strength determined?
The password strength rating is based on a points system:
the longer the password, the higher the rating
repeated characters at the beginning or end of the password slightly reduces the rating
having the password be a dictionary word (currently English only) significantly reduces the rating (best practice is to disallow this in the password policy)
having a mix of lower case and upper case letters slightly increases the rating
including digits, punctuation, or other non-alphanumeric characters slightly increases the rating
*note: InsightSoftware.com reserves the right to update the algorithm at any time.
Users and Groups
In Insight Administrator, how do I manually create a user group?
In Insight Administrator, you can create groups in which to organize users; this can particularly be useful not just for organizational purposes but also when performing tasks at the group level such as when setting permissions or capabilities.

InsightSoftware.com Administration & Configuration Guide
__________________________________________________________________________________
Page 61 of 106
1. Log into your repository if you are not logged in already 2. Expand the Users and Groups node in the left panel 3. Highlight the level above which you want to create the new group, whether it be
Everyone or another level that already exists 4. Right-click on this level and New > Group 5. In the Group Definition dialog, create a name for the group and, optionally, a
description. (Leave the Members section in this dialog blank for now; it will show the users included in this group after you have added them in at a later step.)
6. Click OK 7. You will now see this group listed in the tree structure under Users and Groups
In Insight Administrator, how do I edit a user group definition?
Once created, a user group can be edited. The email address and description of the group are changed in the Group Definition dialog.
1. Log into your repository if you are not logged in already 2. Expand the Users and Groups node in the left panel 3. Right-click on the group you wish to edit and select Edit 4. Click OK to accept the changes
In Insight Administrator, how do I delete a user group?
Once created, a user group can be deleted. It is important to know that when a group is deleted, all users and groups within it will be deleted as well. The exception to this is for users who also belong to other groups; in that case the user will not be deleted. Additionally, you cannot delete the ‘Administrator’ or ‘Everyone’ Groups.
1. Log into your repository if you are not logged in already 2. Expand the Users and Groups node in the left panel 3. Right-click on the group you wish to delete and select Delete 4. You will be prompted to confirm this action
In Insight Administration, how do I add Insight users?
Under the Users and Groups node within your repository in Insight Administration, users can be added in either of 2 ways:
1. Manually 2. Imported and synchronized from your ERP system
NOTE: For Oracle EBS customers, once a valid username is added in Insight Administration, the application also picks up the responsibilities assigned to the user. Upon logging in to Insight, the user will select one of these responsibilities.
In Insight Administrator, how do I manually add in a new Insight user?
You can manually add Insight users within Insight Administrator. If you manually create a user, you must manually assign permissions for the profiles. (This is different than synchronizing a user when the system automatically assigns permissions for that user to the associated profile.)
1. Log into your repository if you are not logged in already 2. Expand the Users and Groups node in the left panel 3. Highlight the level above which you want to add the user, whether it be Everyone or
another level that already exists

InsightSoftware.com Administration & Configuration Guide
__________________________________________________________________________________
Page 62 of 106
4. Right-click on this level and New > User 5. In the User Definition dialog, enter in the requested information and activate the options
as desired: a. Name [Insight username] b. First Name c. Surname d. Email e. Password f. Confirm password g. Enforce password policy h. Enforce password expiration i. User must change password at next login j. Enforce account expiration k. Account is disabled
6. Click OK 7. You will now see this user listed in the tree structure under whichever group you placed
them in.
In Insight Administrator, how do I edit or delete a user?
A user’s profile can be edited after it is created. The only setting that cannot be changed is the user’s Insight username. You can only delete the Administrator User when there is at least one other Administrative Account available (other than System). The System User cannot be used as a login and cannot be deleted, renamed or moved even by Administrators as it is used for internal operations. Before deleting a user, you may want to review what is contained within their profile by using the Browse as User functionality.
1. Log into your repository if you are not logged in already 2. Expand the Users and Groups node in the left panel 3. Right-click on the specific user and select Edit or Delete, depending on which action you
wish to do
In Insight Administrator, can I move a user to a different user group?
In Insight Administrator you can move users to different user groups
1. Log into your repository if you are not logged in already 2. Expand Users and Groups in the left panel 3. Select Everyone (or whichever group the users are currently included in). 4. Highlight the users in the right panel and drag them over to the desired group. In the example below, we will move 2 users from the Everyone level to the Finance Group. This is done by focusing on the Everyone level, highlighting the 2 users, and then dragging and dropping them from the right panel to the correct group in the left panel:

InsightSoftware.com Administration & Configuration Guide
__________________________________________________________________________________
Page 63 of 106
The users now are listed under the Finance Group:
In Insight Administrator, how do I import and synchronize users against a Profile?
After creating Connections and Profiles, you can then import and synchronize user names and information from your Enterprise Resource Planning (ERP) system with Insight. Synchronizing allows you to check for users not currently stored in the Repository and also to cross-reference user data such as Group or Role information. Any subsequent amendments to Group/Role structures in the ERP system can then be mirrored by running the Synchronize tool. 1. Log into your repository if you are not logged in already 2. Expand the Users and Groups node in the left panel 3. Highlight Everyone 4. Either right-click and select Synchronize or click Synchronize Users on the Ribbon 5. In the upper left-hand corner of the ERP User Synchronization dialog, choose the ERP
profile from which you wish to synchronize users

InsightSoftware.com Administration & Configuration Guide
__________________________________________________________________________________
Page 64 of 106
6. In the bottom left-hand corner of the dialog, click Settings to set all synchronization settings prior to bringing in the users
7. Set the options within Synchronization Settings as needed, and then click OK when finished:
a. Repository Users – select to select from all users or just those from the profile previously defined in the main ERP User Synchronization screen
b. Profiles – select to group users under their ERP Role, ERP Group or a specific group within Insight
c. Password – select the default password for each user being synchronized in d. Hide password in Details form – hides the password in the Details dialog,
accessed from the ERP User Synchronization screen (after selecting a specific user)
e. Expire passwords for new users – automatically expire the original passwords for new users so they are forced to create new passwords when logging into Insight for the first time
f. Disable new users – automatically set new users’ status to disabled until you enable them individually
8. Back in the ERP User Synchronization Dialog, click Analyze to list all users from the defined profile in the upper left corner:
9. Adjust Display to Show Updates. Uncheck all users; otherwise synchronizing them again changes their existing grouping in Insight:
10. Change the Display again, this time to either Change Additions (if you just want to show new users added in your ERP system since you last synchronized) or Show All to see all users:

InsightSoftware.com Administration & Configuration Guide
__________________________________________________________________________________
Page 65 of 106
11. Use the Shift/Ctrl keys to select users. Check the boxes next to the users you are synchronizing. You can use the Filter in the upper right corner to search for specific users.
12. If you wish to set the group where these users will be placed within the Users and Groups Folder, select all the appropriate users, right-click, and select Set Group:
13. Mark the group you wish to place them under and select OK:

InsightSoftware.com Administration & Configuration Guide
__________________________________________________________________________________
Page 66 of 106
14. You see their group has changed appropriately:
15. To see details about any one user, highlight the user’s name and select Details to bring up the Details dialog. You can change settings in here as needed. Click OK when finished.

InsightSoftware.com Administration & Configuration Guide
__________________________________________________________________________________
Page 67 of 106
16. Prior to synchronizing, change Display to Show Selected to confirm which users you are updating. (This way you know only the selected users are being added and users that had already been synchronized will not be synchronized again as they will lose all previously set groupings and permissions.) The users who will be synchronized have checkmarks next to their names. To prevent any users from being synchronized, uncheck the box next to their names.
17. Click Synchronize to synchronize users:
18. Assign licenses as needed. 19. The action status has changed to ‘Added’. 20. Click Close to complete the process.
** NOTE: If you change a user name in your ERP system or in Insight, the synchronization will be lost and the user is treated as a new addition.

InsightSoftware.com Administration & Configuration Guide
__________________________________________________________________________________
Page 68 of 106
What is the ‘Browse as User’ functionality in Insight Administrator?
If you want to review what functions and visibility a user has within Insight Administrator, you can use the Browse as User functionality to open a new tab in the left-hand panel of Insight Administrator. To browse the repository as a specific user:
1. Log into your repository if you are not logged in already 2. Expand the Users & Groups node in the left panel of Insight Administrator 3. Select the user and either click the Browse as User button on the Ribbon or right-click
and select Browse as User 4. A new tab, named after the user, will open in the left-hand panel of Insight Administrator.
Within this tab, you can see what access this user has. In the example below, user Mary only has access to the Documents folder:
5. To close this tab, right-click and select Remove Tab Page:
Changes to the functionality or items that a user has access to in Insight Administrator are done via Capabilities and Permissions.

InsightSoftware.com Administration & Configuration Guide
__________________________________________________________________________________
Page 69 of 106
How do I disassociate a Windows user from an Insight user?
There may be circumstances where you which to remove the linking of the Windows user account with the Insight user account. To disassociate them, follow the below steps:
1. Log into your repository if you are not logged in already 2. Expand Users and Groups in the navigation tree on the left panel and select Everyone 3. Expand the group that contains the user, highlight the specific user and then right-click
and select Disassociate Windows User:
4. This user can now log into the Insight application
Permissions
How are permissions used in Insight Administrator?
While permissions are used in Insight Reporting to manage which users can do what with inquiries and folders, in Insight Administrator they are also used for any saved objects such as Connections, Profiles, documents, folders and Reusable Inquiry Objects. You can assign permissions at the individual or group level. When new Data Sources (Connections and Profiles) are created in Insight Administrator, the Administrator must be sure to grant Read permissions to the users who need to use those Connections and Profiles when using Insight. By default, all users other than those in the Administrators Group under Users and Groups are denied all permissions to the Data Sources. When a new folder or document is created, the user who created it is automatically granted all permissions for that folder or document. Permissions are retained by objects that are renamed or moved, and are deleted when the object is deleted. Any changes to permissions made within Insight Administrator will take effect immediately. To view and potentially edit the permissions on an object in Insight Administrator:
1. Log into your repository if you are not logged in already 2. Navigate to the object you wish to view/edit permissions on 3. Either right-click on the object and select Permissions or highlight the object and select
Permissions on the Ribbon 4. This launches the Permissions dialog, where you can set permissions as desired for a
user or group of users
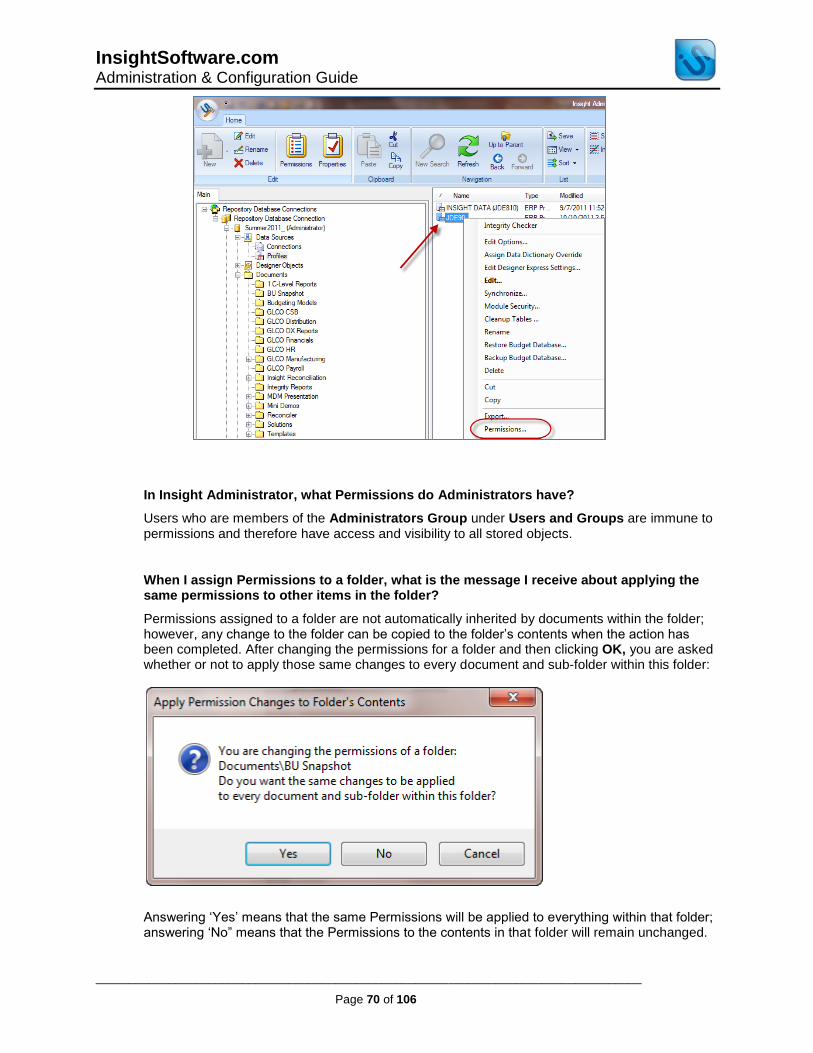
InsightSoftware.com Administration & Configuration Guide
__________________________________________________________________________________
Page 70 of 106
In Insight Administrator, what Permissions do Administrators have?
Users who are members of the Administrators Group under Users and Groups are immune to permissions and therefore have access and visibility to all stored objects.
When I assign Permissions to a folder, what is the message I receive about applying the same permissions to other items in the folder?
Permissions assigned to a folder are not automatically inherited by documents within the folder; however, any change to the folder can be copied to the folder’s contents when the action has been completed. After changing the permissions for a folder and then clicking OK, you are asked whether or not to apply those same changes to every document and sub-folder within this folder:
Answering ‘Yes’ means that the same Permissions will be applied to everything within that folder; answering ‘No” means that the Permissions to the contents in that folder will remain unchanged.

InsightSoftware.com Administration & Configuration Guide
__________________________________________________________________________________
Page 71 of 106
Overview
What is Module Security?
Module Security was created to allow greater control of what a user can see when using the Payroll, Timesheet and Human Resources modules. This feature works in conjunction with the standard security settings provided with JD Edwards™ products, e.g. Business Unit Security. The feature is available within Insight Administrator and is attached directly to a profile. By defining security conditions based on fields and values, you can choose what a user can view and ultimately report on. These security conditions can be made against a specific User ID, against a specified group or even a combination of the two. Brief examples of how the feature can be used include allowing administrative staff to see the contact details of staff while hiding their salary, or allowing the head of a department to only see the employees for whom he is responsible. It is important to remember that users and groups will inherit permissions from their respective parent groups. In the situation of large numbers of users or groups, we recommend grouping users together with security levels in mind in order to reduce the overall maintenance. When similar level users are in the same group, you can apply the same security settings for the entire group instead of assigning them to individual users. The fields which are available within Module Security are controlled using an xml table. The software is shipped with a default selection of commonly restricted payroll fields; however this table can be configured by a member of the InsightSoftware.com’s Development Team to contain any file/field combinations which you might require. This allows security to be applied to any file/field which isn’t already covered by standard JD Edwards™ security. The application of Module Security only comes into effect when creating/opening a new inquiry. If the user whose security settings you are changing is already in an inquiry which you would like to restrict, the security will not be enforced. The user would need to close out of the inquiry and then reopen it in order for the security to take effect.
Set up Module Security
How do I set up Module Security in Insight Administrator?
In order to be able to set up Module Security, you must have the following set in Insight Administrator:
1. You must have Read and Update Permissions for the profile on which you will be setting Module Security
2. You must have the Module Security Capability (accessed in Basic Capabilities > Administration tab > Module Security feature
To set up Module Security for a Profile:
1. Log into your repository if you are not logged in already 2. Expand Data Sources in the navigation tree on the left panel and select Profiles 3. In the right panel, right-click on the required Profile and select Module Security

InsightSoftware.com Administration & Configuration Guide
__________________________________________________________________________________
Page 72 of 106
4. Within the Module Security dialog, set Grant or Deny Permissions to specific users on specific modules:
a. Select the specific module using the drop-down menu b. At the level you wish to set security, highlight that user or group in the left panel c. Click New d. From the drop-down list, select the field to be restricted e. Specify the specific field values to either grant or deny to the selected user(s).
(Multiple selections are separated with a comma and ranges are supported using the colon character. Only a single definition can be made per user for any one field.)
f. Using the radio button, select either Granted or Denied g. Click OK h. Click OK again in the main Module Security dialog
Module Security Examples
Can you provide examples of Module Security?
While the below examples are very specific in how Module Security can be configured to restrict or allow access to certain values, the logic can be applied to any allowable field. Example 1: Denying specific values
In the first example, we are going to restrict a user from seeing specific employees’ payroll details using the Denied mode. The result of using Module Security will be shown by comparing the results before and after changing the security. Below is a basic Payroll History inquiry prior to setting security. The filter selections, hidden to maximize the display result set, are left blank to return all results. Additionally all non-essential columns were removed.

InsightSoftware.com Administration & Configuration Guide
__________________________________________________________________________________
Page 73 of 106
In Insight Administrator, we will apply security to the Accounting Group as shown below. This will affect all users within this group. We selected the Payroll Module at the top of the dialog, then selected the Accounting group. In the new security entry, we denied access to the AN8 field for values 6002, 6078 and 6001:

InsightSoftware.com Administration & Configuration Guide
__________________________________________________________________________________
Page 74 of 106
After clicking OK, you see the security entry for the Accounting group:
After closing and re-opening the inquiry, you see that the inquiry results no longer contain the Employee Numbers 6002, 6078 and 6001. This is because we denied the user visibility to these employees by using the Deny option to those specific field values:

InsightSoftware.com Administration & Configuration Guide
__________________________________________________________________________________
Page 75 of 106
Example 2: Granting specific values
In the next example we can see the result of using the Granted mode against specific criteria. In Insight Administrator, change your previously entered security condition and click Edit. Change the security entry to Granted, as shown below:
Click OK to see the changes referenced in the dialog:

InsightSoftware.com Administration & Configuration Guide
__________________________________________________________________________________
Page 76 of 106
After closing and re-opening the inquiry, you see that the results have now been amended so we can see only the field values that were specified using the Granted option:

InsightSoftware.com Administration & Configuration Guide
__________________________________________________________________________________
Page 77 of 106
Example 3: Suppress label columns
Some fields can be set to suppress the display of sensitive information from a user. In this example we will suppress the display of Hourly Rate, a label column found with the Payroll History Template. Before any security is applied, the inquiry looks like this:
In Insight Administrator, add a new security entry on the Payroll – PHRT field. The PHRT field cannot be specified as in the previous examples, so the Values field is grayed out to prevent data entry. Instead, the Values section of the dialog is populated with a ‘*’ (a select all) to indicate that all data returned will be affected. For this example we will apply a Denied mode, as shown below:

InsightSoftware.com Administration & Configuration Guide
__________________________________________________________________________________
Page 78 of 106
Once the Module Security is set, the associated user will see that the Hourly Rate (PHRT) is now suppressed as shown below:
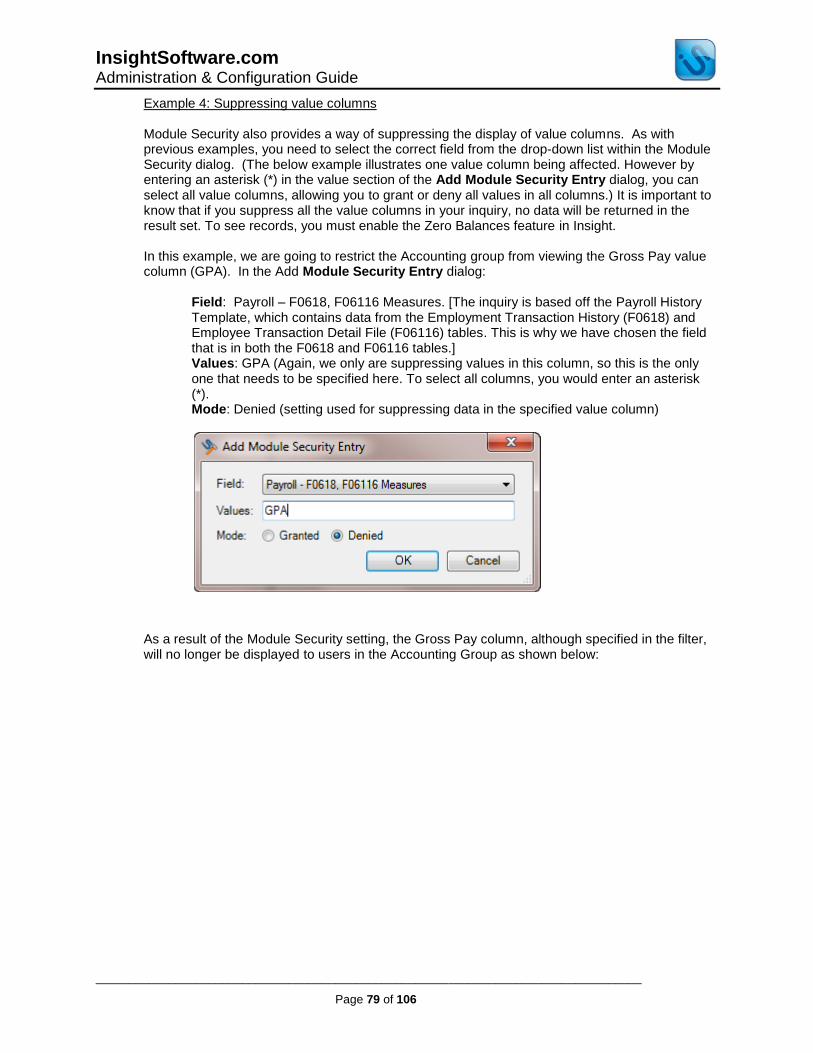
InsightSoftware.com Administration & Configuration Guide
__________________________________________________________________________________
Page 79 of 106
Example 4: Suppressing value columns Module Security also provides a way of suppressing the display of value columns. As with previous examples, you need to select the correct field from the drop-down list within the Module Security dialog. (The below example illustrates one value column being affected. However by entering an asterisk (*) in the value section of the Add Module Security Entry dialog, you can select all value columns, allowing you to grant or deny all values in all columns.) It is important to know that if you suppress all the value columns in your inquiry, no data will be returned in the result set. To see records, you must enable the Zero Balances feature in Insight. In this example, we are going to restrict the Accounting group from viewing the Gross Pay value column (GPA). In the Add Module Security Entry dialog:
Field: Payroll – F0618, F06116 Measures. [The inquiry is based off the Payroll History Template, which contains data from the Employment Transaction History (F0618) and Employee Transaction Detail File (F06116) tables. This is why we have chosen the field that is in both the F0618 and F06116 tables.] Values: GPA (Again, we only are suppressing values in this column, so this is the only one that needs to be specified here. To select all columns, you would enter an asterisk (*). Mode: Denied (setting used for suppressing data in the specified value column)
As a result of the Module Security setting, the Gross Pay column, although specified in the filter, will no longer be displayed to users in the Accounting Group as shown below:
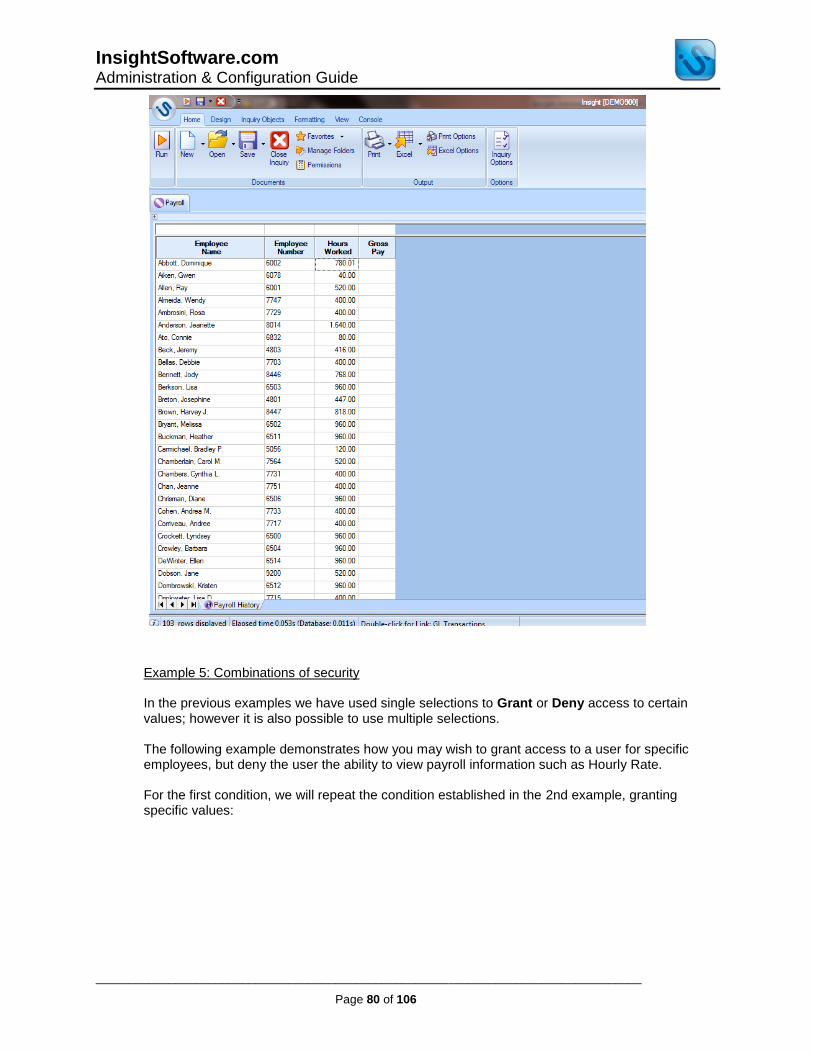
InsightSoftware.com Administration & Configuration Guide
__________________________________________________________________________________
Page 80 of 106
Example 5: Combinations of security In the previous examples we have used single selections to Grant or Deny access to certain values; however it is also possible to use multiple selections. The following example demonstrates how you may wish to grant access to a user for specific employees, but deny the user the ability to view payroll information such as Hourly Rate. For the first condition, we will repeat the condition established in the 2nd example, granting specific values:

InsightSoftware.com Administration & Configuration Guide
__________________________________________________________________________________
Page 81 of 106
For the second condition, we will repeat the condition established in the 3rd example, suppressing label columns:

InsightSoftware.com Administration & Configuration Guide
__________________________________________________________________________________
Page 82 of 106
The Module Security dialog will then display both conditions:
As shown below, the user has been limited to the three employee’s records via Granted Mode and the hourly rate has been affected by the Denied Mode. The combination of security conditions allows for detailed and complicated authorities to be handled in a reasonably straightforward manner.

InsightSoftware.com Administration & Configuration Guide
__________________________________________________________________________________
Page 83 of 106
Advanced Security Inheritance and Priority
With Module Security, how does inheritance and priority work?
Module Security is designed to work with large hierarchical organizational structures by allowing users and groups to inherit security conditions from their respective parent groups. The underlying security engine will combine all the levels for one particular Field. However a condition established with a Deny mode will take precedence over a Granted mode.
Security Inheritance on a two-level system
The table below shows how security condition priorities would be applied when security is set at the Group and User levels.
Group Level Security
User Level Security Result
Grant 1000 Grant 2000 User can see 1000 and 2000 only
Deny 1000 Deny 2000 User can see everything except 1000 and 2000
Deny 1000 Grant 1000 Denies everything; denying a specific field and setting takes precedence
Grant 1000:2000
Deny 1500 User can see 1000:1499 and 1501:2000
Grant 1000 Deny * Will deny all
Deny 1000 Grant * Will allow all
Security Inheritance on a three-level system
The table below shows examples of how priorities would be applied when security is set on a three level system. Everyone Level
+ Group Level + User Level
Everyone Level Security
Group Level Security
User Level Security
Result
Deny * Grant 1000:5000
Grant 7000 User can view records for employees 1000:5000 and 7000
Deny * Grant 1000:5000
Deny 3000 User can view records for employees 1000:5000 but not 3000
Deny * Deny 1000:5000
Grant 7000 User can view records for employee 7000 only
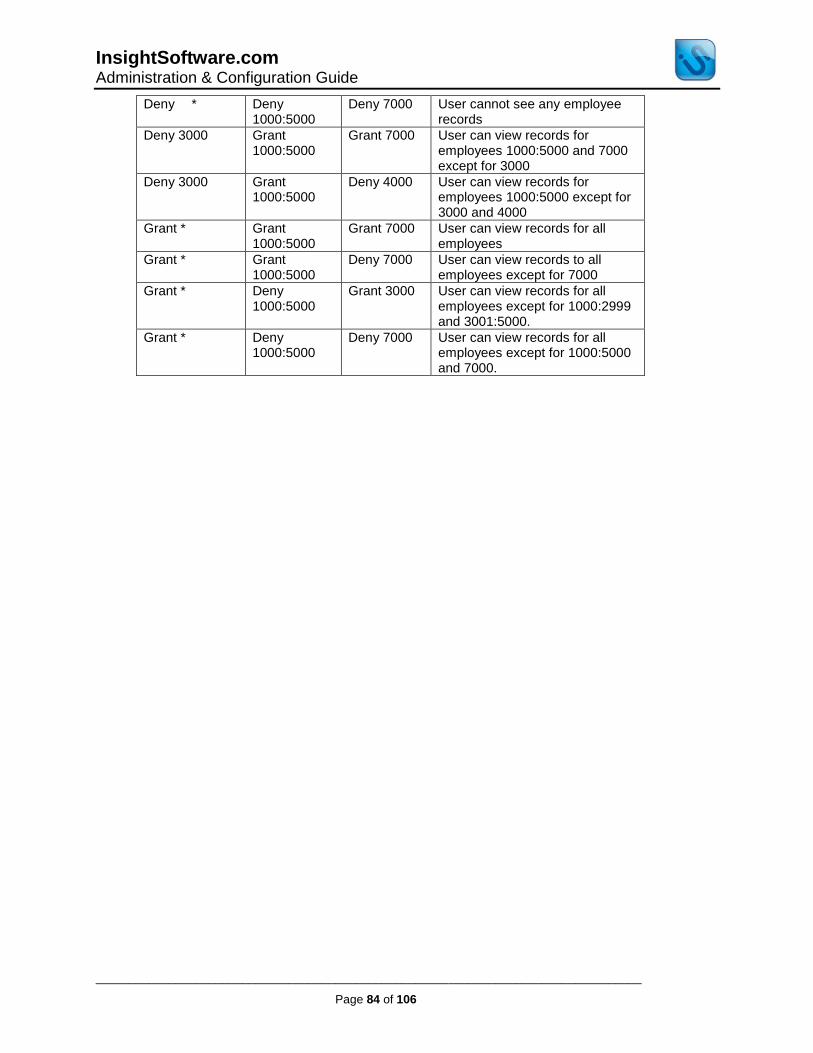
InsightSoftware.com Administration & Configuration Guide
__________________________________________________________________________________
Page 84 of 106
Deny * Deny 1000:5000
Deny 7000 User cannot see any employee records
Deny 3000 Grant 1000:5000
Grant 7000 User can view records for employees 1000:5000 and 7000 except for 3000
Deny 3000 Grant 1000:5000
Deny 4000 User can view records for employees 1000:5000 except for 3000 and 4000
Grant * Grant 1000:5000
Grant 7000 User can view records for all employees
Grant * Grant 1000:5000
Deny 7000 User can view records to all employees except for 7000
Grant * Deny 1000:5000
Grant 3000 User can view records for all employees except for 1000:2999 and 3001:5000.
Grant * Deny 1000:5000
Deny 7000 User can view records for all employees except for 1000:5000 and 7000.

InsightSoftware.com Administration & Configuration Guide
__________________________________________________________________________________
Page 85 of 106
Create the Object Repository
How do I create the Object Repository for Insight?
Prior to installing and configuring the Insight application, you will need to create an empty database, library or schema for hosting the Object Repository component of Insight. This can be created in any of the following:
1) Microsoft® SQL Server™ 2) Oracle 3) DB2 for i (formerly AS/400) 4) DB2 for Linux, UNIX and Windows
** Supported database versions:
1) Microsoft® SQL Server™ 2000 and above 2) Oracle 9i and above 3) DB2 for i version V5R3 above
Create a New Database in Microsoft® SQL Server™
How do I create a new database in Microsoft® SQL Server™ that will hold the Insight Object Repository?
The steps for creating a new database are listed below; however be aware that these can vary depending on your version of Microsoft® SQL Server™. The links to documentation based on specific version numbers are listed below. If you still have further questions, please consult your Systems Administrator to complete this task. From SQL Server Enterprise Manager:
1. Connect to the database server where the database is to be created 2. Right-click on the Databases node in the tree structure in the left panel 3. Select New Database 4. Provide a database name 5. Click OK
For detailed steps on creating a database in SQL Server 2005, refer to these instructions: http://msdn.microsoft.com/en-us/library/ms186312%28v=SQL.90%29.aspx For detailed steps on creating a database in SQL Server 2008, refer to these instructions: http://msdn.microsoft.com/en-us/library/ms186312%28v=SQL.100%29.aspx

InsightSoftware.com Administration & Configuration Guide
__________________________________________________________________________________
Page 86 of 106
Create a New Database User in Microsoft® SQL Server™
How do I create a new database user in Microsoft® SQL Server™ for the database that will hold the Insight Object Repository?
The steps for creating a new database user are listed below; however be aware that these can vary depending on your version of Microsoft® SQL Server™. The links to documentation based on specific version numbers are listed below. If you still have further questions, please consult your Systems Administrator to complete this task. From SQL Server Enterprise Manager:
1. Connect to the database server where the database has been created 2. In the left panel, expand Microsoft SQL Servers 3. Expand the SQL Server Group to be presented with a list of available servers 4. Select the server for which you wish to create a user 5. Expand the server selection 6. Expand the Security folder 7. Underneath the Security folder, right-click on Login 8. Select New Login 9. On the General tab of the SQL Server Login Properties - New Login dialog:
a. Provide a name for the new user b. Select the SQL Server Authentication option c. Enter the password of your choice d. For the default database, select the database created for the Insight Object
Repository 10. On the Server Roles tab of the SQL Server Login Properties - New Login dialog,
leave the default selection 11. On the Database Access tab of the SQL Server Login Properties - New Login dialog:
a. Highlight the database created for the Insight Object Repository b. Check the Permit item from the list of databases c. Select the database roles of public and db_owner
12. When you click OK, you will be asked to re-enter the new user’s password
For detailed steps on creating a database user in SQL Server 2005, refer to these instructions: http://msdn.microsoft.com/en-us/library/aa337545%28v=SQL.90%29.aspx\ For detailed steps on creating a database in SQL Server 2008, refer to these instructions: http://msdn.microsoft.com/en-us/library/aa337545%28v=SQL.100%29.aspx
SQL Server Authentication Mode
How does the SQL Server Authentication mode need to be set for the Microsoft SQL Server where the database holding the Insight Object Repository is located?
The Microsoft SQL Server Authentication mode must be set to SQL Server and Windows Authentication. (If the authentication mode is set to Windows Authentication only, you will not be allowed to log onto the SQL Server database with the designated database user.) To change the Server Authentication mode in SQL Server 2005, follow these steps: http://msdn.microsoft.com/en-us/library/ms188670%28v=SQL.90%29.aspx To change the Server Authentication mode in SQL Server 2008, follow these steps: http://msdn.microsoft.com/en-us/library/ms188670%28v=SQL.100%29.aspx
InsightSoftware.com Administration & Configuration Guide
__________________________________________________________________________________
Page 87 of 106
New Oracle Schema
How do I create a new schema in Oracle to hold the Insight Object Repository?
Since the process of creating new databases can be done in a variety of ways within Oracle, a step-by-step guide is not provided here. Rather, the steps are described at an abstract level and you may need to consult your DBA to complete this task. Prior to installing Insight, you need to either create a new, empty Oracle database or a new schema within an existing Oracle database. No tables need to be created at this time; the Repository will be populated during the software configuration process.
New Library/Schema in IBM DB2 for i
How do I create a new library/schema in IBM DB2 for i to host the Insight Object Repository and/or Insight Budgeting Repository?
Depending on the version of DB2 for i (formerly AS/400) you are in, the terminology will be different; what was called ‘library’ in older versions is now called ‘schema’ in newer versions. There are two ways to create the library/schema with a SQL collection: via SQL or the iSeries Navigator. Note that the Insight Repository requires that Journaling must be enabled for the library/schema as the database must allow support for database transactions. Option 1: Create the library/schema using a SQL command 1. On the AS/400, use the CREATE COLLECTION function. (Do not use the CRTLIB command.) Example: Create a library/schema called REPOSITORY: CREATE COLLECTION REPOSITORY Option 2: Create the library/schema using the iSeries Navigator 1. Right-click on the library/schema selection 2. Select New Library/New Schema 3. In the New Library/New Schema dialog, add a name for the new library/schema 4. In the list of options:
b) For older iSeries versions, be sure to activate the option to Create as a SQL collection c) For newer iSeries versions, be sure to uncheck the option to Create as a standard
library 5. Click OK and the library/schema will be created

InsightSoftware.com Administration & Configuration Guide
__________________________________________________________________________________
Page 88 of 106
Overview
How does the Insight Application access the Object Repository?
The Insight Application uses a ‘driver’ or Data Provider to access the Object Repository. The Data Provider is the messenger that passes and translates information between your data source (in this case the Insight Object Repository) and the Insight application. Depending on the type of database being used to hold the Object Repository, there are different types of Data Providers that can be used; options include a Built-in Data Provider, SQL Server Data Provider, Oracle Server Data Provider and ODBC Data Provider.
o Built-in Data Provider: created by Insight, this can be used no matter which server your data is located on.
o SQL Server Data Provider: (used with SQL Server only) o Oracle Server Data Provider: (used with Oracle Server only) o ODBC Data Provider: uses a defined ODBC data source
In Insight Administrator, what is the advantage of using one data provider over another one to connect to either the ERP database or the Insight Object Repository? The built-in data provider has 2 advantages: simplicity and security. It is very simple to set up in Insight Administrator and only the Insight application would be able to use to connect to the data source (whether you are using it to connect to your ERP data or your Insight Object Repository). The SQL Server and Oracle Server Data Providers can be used if using those servers. The ODBC Data Provider requires more maintenance; with this option, you must set up an ODBC data source on each Insight installation instance (server and individual PCs). The ODBCs must be set up exactly the same (name, description, and all settings) on each installation. Additionally, you must consider that ODBCs can access data not just within Insight but other applications such as Microsoft® Excel™.
ODBC Data Source
How do I create an ODBC Data Source?
An ODBC (Open Database Connectivity) Data Provider can be used to connect to your ERP system and/or your Insight Object Repository. The general steps for creating an ODBC are listed below; however be aware that these can vary depending on your version of Windows as well as the database provider. If you still have further questions, please consult your Systems Administrator to complete this task. For an ODBC being used to connect to your ERP data, you will need to set up an additional ODBC Data Source if your security, Data Dictionary or UDC tables are physically located on a different machine or within a different database from the data tables.
1. Access the ODBC Data Source Administrator using your System Control Panel >
Administrative Tools > Data Sources

InsightSoftware.com Administration & Configuration Guide
__________________________________________________________________________________
Page 89 of 106
2. Click on the System DSN tab (if you create the ODBC Data Source in the User DSN section, only the current user will be able to access the ODBC connection)
3. Click Add 4. Within the New Data Source dialog, choose the appropriate ODBC driver for the
database being accessed 5. Click Finish 6. Within the dialog to create the new Data Source,
a. For Microsoft SQL Server: i. Enter a Name for the new data source, a Description (optional) and the
Server name to which the Data Source is connecting ii. Click Next iii. For the Login ID and Password, provide a user name and password
with sufficient privileges to read and write to the newly created database iv. Click Next v. Set the default database as needed to the one the ODBC is pointing to
whether it is the Object Repository or ERP database vi. Click Next vii. If needed, make any necessary amendments to the Login criteria for the
Server and default languages viii. Test the connection on the final page of the wizard (see your Systems
Administrator for further assistance if any errors are received) b. For Oracle:
i. Enter the Data Source Name, Description, valid User Name for the server you are using, and Server hosting the database
ii. Click OK c. For DB2:
i. In the General tab, provide a Data Source Name, description and server hosting the database
ii. In the Server tab, set the naming convention to SQL naming convention. Set the Connection Type is set to Read/Write. If connecting to your JDE data, the SQL Default Library is QGBL and the Library List consists of your data, control and security libraries. If connecting to your Object Repository, specify the newly created library name in both the SQL Default Library and Library List fields.
iii. In the Translation tab, check the Convert binary data to text option 7. Once all the settings have been made, click OK to return to the ODBC Administrator 8. Click OK again to return to the configuration wizard from which the new connection can
be selected
Increase Performance on the DB2 for i
How can I increase performance on the DB2 for i when running Insight inquiries?
As of release V5R2, there are two query engines that can be used to process queries generated by Insight. Some of the queries are handled by the old engine (CQE) and some by the new engine (SQE). The number of queries handled by the old engine has increased with the OS release levels. There is a particular instance, when a table is queried which has a logical file with an OMIT clause, which always results in the old (CQE) engine being used. In order to force the new engine to be used, the QAQQINI file can be altered to ensure the new (SQE) engine is used

InsightSoftware.com Administration & Configuration Guide
__________________________________________________________________________________
Page 90 of 106
in these instances. Note that on newer DB2 for i systems, the new query engine is used by default.
The following explains how to create a copy of the QAQQINI file into a new library.
1. Create a copy of the QAQQINI file on the AS/400. Using the CRTDUPOBJ command,
create a new QAQQINI from the standard file that most often resides in QSYS. Enter a specific library in the To library field.
2. Edit the new QAQQINI file. The setting that needs to be modified in the QAQQINI file is IGNORE_DERIVED_INDEX and the value needs to be set to *YES.
3. Update the driver used by Insight to access the JDE: a. ODBC Drivers
The specific ODBC data sources used by Insight to access the JDE database need to be changed to read the new QAQQINI in the specific library it was created in (Step 1).
1. On the Diagnostic tab, enter the library where the new QAQQINI file is saved in the Query options file library field:
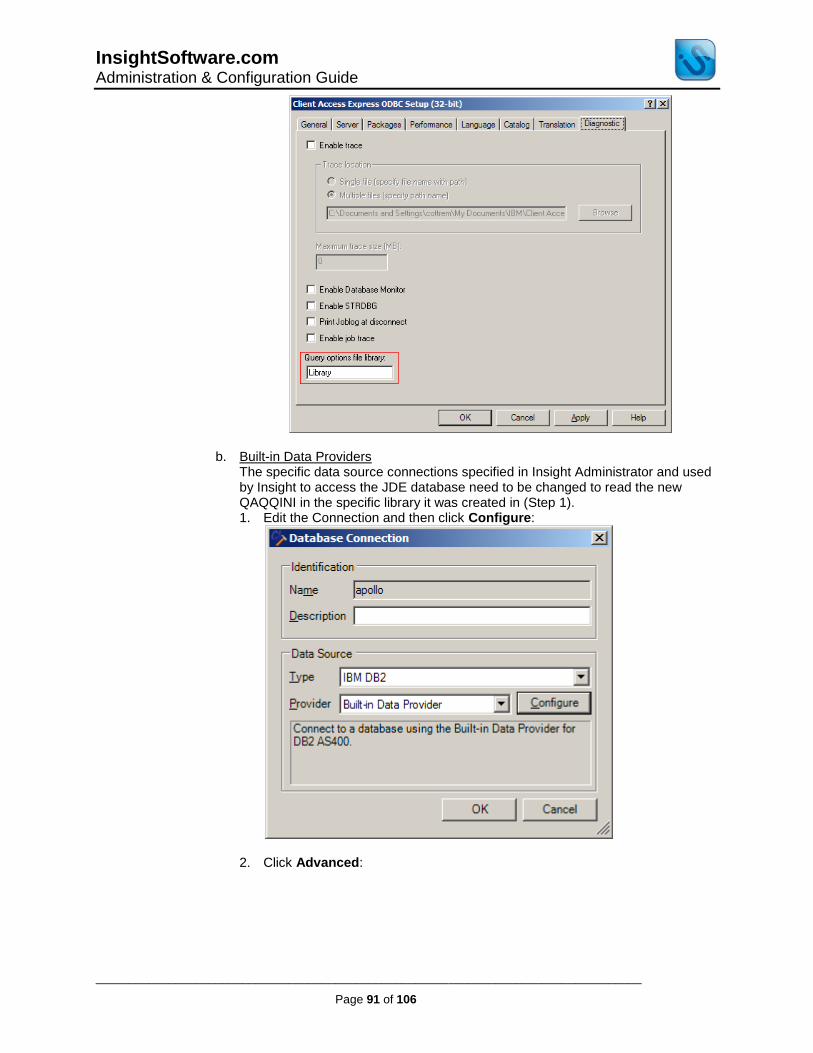
InsightSoftware.com Administration & Configuration Guide
__________________________________________________________________________________
Page 91 of 106
b. Built-in Data Providers The specific data source connections specified in Insight Administrator and used by Insight to access the JDE database need to be changed to read the new QAQQINI in the specific library it was created in (Step 1). 1. Edit the Connection and then click Configure:
2. Click Advanced:

InsightSoftware.com Administration & Configuration Guide
__________________________________________________________________________________
Page 92 of 106
3. On the Query Options Library line, enter the library where the new
QAQQINI file is saved:

InsightSoftware.com Administration & Configuration Guide
__________________________________________________________________________________
Page 93 of 106
Journals & Journal Receivers
For clients with an Object Repository on DB2 for i, how are journals and journal receivers used within Insight?
Insight uses journals and their associated journal receivers for transaction support when updating the Object Repository tables. Once a journal or journal receiver is out of use, it can be deleted immediately either manually or automatically by the system. To set up the system to automatically delete the receivers, set the 'Delete Receivers' attribute of the journal to *Yes using the CHGJRN command with option DLTRCV(*YES). Then whenever the system creates a new receiver, the old receiver is deleted automatically. Journal and journal receiver creation happens automatically when creating a SQL collection. When executing 'CREATE COLLECTION' via STRSQL, among other objects the system creates QSQJRN (the journal) and QSQJRN0001 (the journal receiver). To turn on automatic receiver deletion, run the following command (assuming that the collection is called OSTORE): CHGJRN JRN(OSTORE/QSQJRN) DLTRCV(*YES)
Double-Byte & Unicode Support
How does Insight support double-byte in JD Edwards World and Unicode in JD Edwards EnterpriseOne?
JD Edwards™ World uses double-byte, which is IBM's proprietary way of encoding some sets of national characters on DB2 for i (previously AS/400) only, which predates Unicode. JD Edwards™ EnterpriseOne uses Unicode, which is a modern, international, universal standard for representing all characters of all languages in any computer system or network. Unicode can be stored in a single-byte format (UTF-8), a two byte format (UTF-16) and a four byte format (UTF-32), which is why calling it double-byte is not accurate. Within Insight Administrator, you can convert double-byte text to Unicode for a specific profile by doing the following:
1. Log into the repository if you are not logged in already 2. Expand Data Sources 3. Select Profiles and in the right panel, right-click on the specific profile you wish to edit 4. Select Edit Options 5. In to the DB2 Options tab, check the box to Convert double byte text to Unicode box 6. Select in the drop-down list the Coded Character Set Identifier which was used when the
Asian text was entered into the database (the conversion will be applied to JDE descriptive columns only (e.g. DL01, EXA)

InsightSoftware.com Administration & Configuration Guide
__________________________________________________________________________________
Page 94 of 106
SQL Script for Oracle EBS Installation
How do I apply the SQL script for an Insight Oracle EBS installation?
1. Open an SQL tool such as Oracle SQL Developer. For SQL*Plus, open a command window
and type sqlpus.
2. Browse to the script using the Open dialog. Go to step 3 for SQL*Plus.
3. Hit F5 or choose Run Script. You may be prompted to select an Oracle connection. In
SQL*Plus, run the script using @Script.sql from command line.
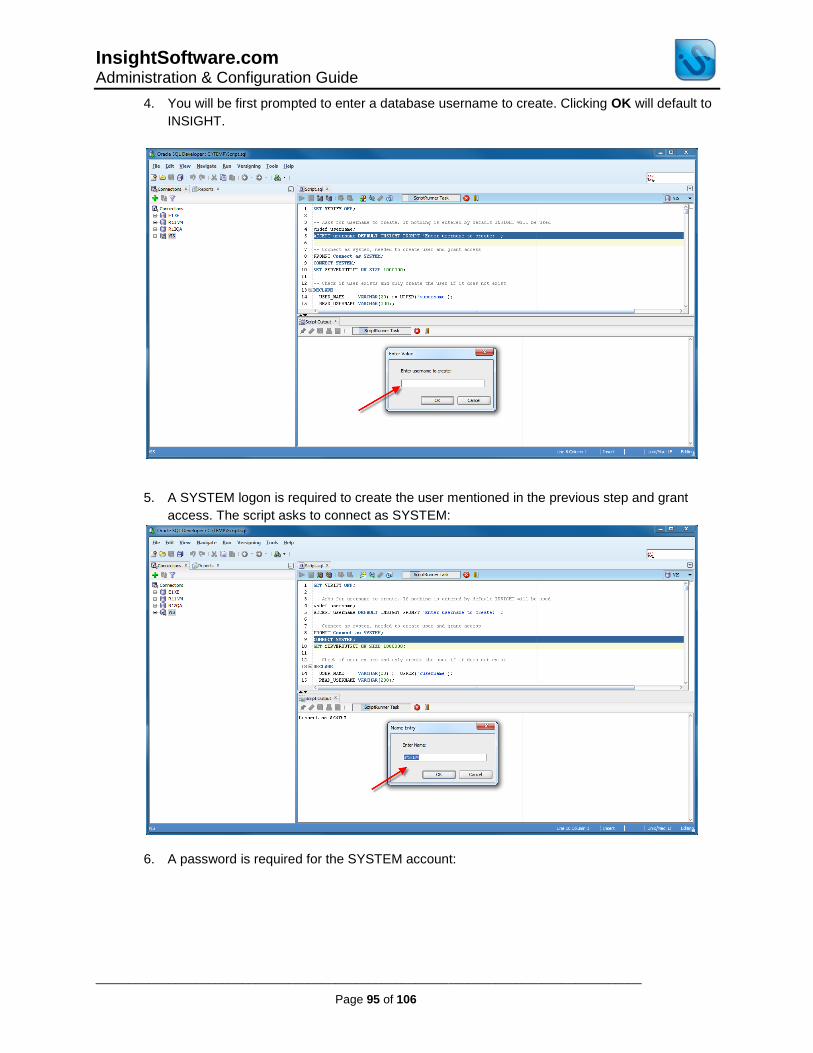
InsightSoftware.com Administration & Configuration Guide
__________________________________________________________________________________
Page 95 of 106
4. You will be first prompted to enter a database username to create. Clicking OK will default to
INSIGHT.
5. A SYSTEM logon is required to create the user mentioned in the previous step and grant
access. The script asks to connect as SYSTEM:
6. A password is required for the SYSTEM account:

InsightSoftware.com Administration & Configuration Guide
__________________________________________________________________________________
Page 96 of 106
7. To continue on the current connection, leave this field blank:
8. The script begins to create the user and grant functions:

InsightSoftware.com Administration & Configuration Guide
__________________________________________________________________________________
Page 97 of 106
9. After a short time the script will complete:
In the event of any issues with this script, please contact InsightSoftware.com’s Customer
Services. The log output from the script is useful in the troubleshooting process.
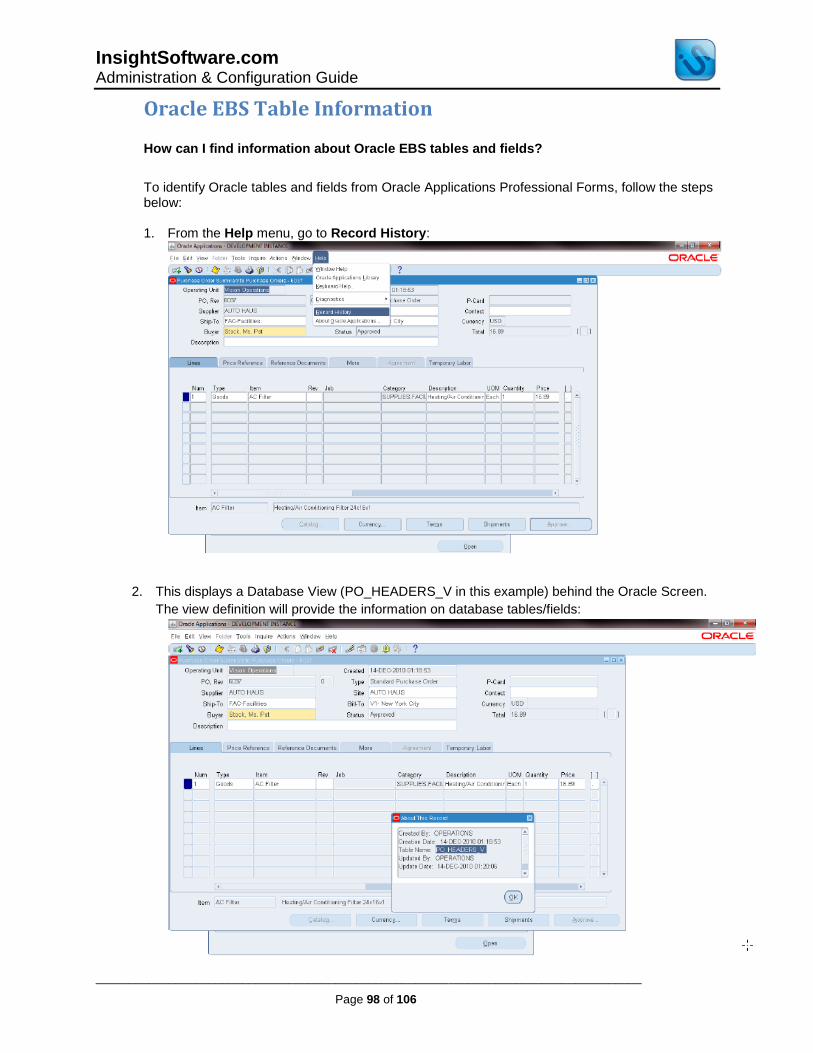
InsightSoftware.com Administration & Configuration Guide
__________________________________________________________________________________
Page 98 of 106
Oracle EBS Table Information
How can I find information about Oracle EBS tables and fields?
To identify Oracle tables and fields from Oracle Applications Professional Forms, follow the steps below:
1. From the Help menu, go to Record History:
2. This displays a Database View (PO_HEADERS_V in this example) behind the Oracle Screen.
The view definition will provide the information on database tables/fields:

InsightSoftware.com Administration & Configuration Guide
__________________________________________________________________________________
Page 99 of 106
This is not always straight forward, especially in the case of DFF fields. In that case, the Oracle Technical Reference Manual would help to understand the physical model behind the screens. To identify Oracle table/fields from Oracle Applications Web screens: 1. Click on “About this Page” from the required web screen:
2. The “About This Page” screen displays the Page Definition Technical Information. Click
Expand All. The views related to the database views/tables are stored on 5th column as

InsightSoftware.com Administration & Configuration Guide
__________________________________________________________________________________
Page 100 of 106
View Object:
3. Click on View Object (in this example Supplier VO). The View Definition provides the
database fields/tables:

InsightSoftware.com Administration & Configuration Guide
__________________________________________________________________________________
Page 101 of 106

InsightSoftware.com Administration & Configuration Guide
__________________________________________________________________________________
Page 102 of 106
Asian Character Display
How can I change my machine settings so that Asian characters are displayed within column headers, filter labels, query assist dialog etc.?
Depending on the version of Windows you are using, the steps to do this vary slightly. For Windows XP: 1. Install the appropriate language pack on your machine if you have not done so already 2. In the Control Panel on your workstation, go to Regional and Language Options 3. In the Advanced tab, set the language 4. In the Languages tab, put a checkmark next to the two Supplemental language support
boxes:
5. Click Apply. At this point you may be asked to insert a Windows CD or restart your machine
For Windows Vista and Windows 7, you do not need to enable East Asian languages as a separate step after installation of the appropriate language. The new Windows can display Chinese characters as soon as you start up the first time.

InsightSoftware.com Administration & Configuration Guide
__________________________________________________________________________________
Page 103 of 106
Logging In
Why can I not log in to Insight?
There are a number of possible reasons as to why you may not be able to log in to the application. The most common courses to resolve this problem include the following:
Ensure that the username and password are entered correctly. o If the connection is to a JD Edwards™ World configuration, the username and
password will be the user’s normal JD Edwards™ username and password. o If the connection is to a JD Edwards™ EnterpriseOne configuration, the
username will be their normal JD Edwards™ username and their password is that which is set in Insight Administrator in the user’s profile.
o If the connection is to Oracle EBS, the username is their normal Oracle EBS username and their password is that which is set in Insight Administrator in the user’s profile.
Check that the username exists in the Insight Object Repository and that the user has Read permissions to the Data Source Connection and Profile being used
If using an ODBC Data Connection, be sure it has been created with the name entered during installation (e.g. JDE810) and that this connection points to the correct database
Errors with User Accounts
When I log into Insight, why am I getting an error stating, “This user is associated with a different windows user account”?
By default, Insight users are linked to their Windows account. This error is saying that the Insight username being used to login is associated with a different user account than that which was used to log into Windows. This error specifically states the current user (current Windows user) and the expected user (expected Windows user), based on the Insight username being used to login. Please see your Insight Administrator about whether there is a need to disassociate the Windows user from the Insight username. This is done from within Insight Administrator.
When logging into Insight, why am I getting an error that my user is not defined in the F0093 library?
This error occurs when the user or the user’s group/role does not exist in the JDE F0093 table with access to the environment defined in the profile being used. The error is: User '<username>' is not defined in the [<database>].[<table_prefix>].[F0093] library. In Insight Administrator, view the profile being used to log into Insight to verify which JDE environment your user ID is being validated against. To do this, follow these steps:
1. Log into the repository if you are not logged in already 2. Expand the Data Sources node in the left panel 3. Select Profiles and in the right panel 4. Right-click on the specific profile being used to log into Insight

InsightSoftware.com Administration & Configuration Guide
__________________________________________________________________________________
Page 104 of 106
5. Select Edit 6. Click Next in the Profile Wizard until you get to the Environment and Model Business
Unit screen 7. The environment defined here is that which is being used in JDE to validate the user
signing into Insight:
8. The error this user is receiving when signing into Insight is saying that this user’s group or role is not associated with this environment in the F0093 table in JD Edwards™.
To confirm this, you can use the following SQL to see if the user exists:
SELECT LLUSER,LLLL
FROM <TABLE_PREFIX>.F0093
WHERE LLLL = '<ENVIRONMENT>'
AND LLUSER IN ('<USERNAME>','<USERSGROUPOR_ROLE>')
Where:
<TABLE_PREFIX> is the table prefix
<ENVIRONMENT> is the environment
<USERNAME> is the JDE username
<USERSGROUPOR_ROLE> is the user’s group or role
If the user has access to that environment, at least one row will be returned. If the user does not have access to that environment, no results will be returned.
For this example we will be using database OPENWORLD2007, table prefix DBO, environment DEMO900, user JASON and groups/roles SUPPORT and SUPPORT1.
USE OPENWORLD2007
SELECT LLUSER,LLLL
FROM DBO.F0093
WHERE LLLL = 'DEMO900'
AND LLUSER IN ('JASON','SUPPORT','SUPPORT1')
Running the SQL against the database returns zero rows.

InsightSoftware.com Administration & Configuration Guide
__________________________________________________________________________________
Page 105 of 106
Selecting all columns and returning all results reveals that groups/roles SUPPORT and SUPPORT1 only have access to environment DEMO810NT.
To resolve this issue, the user or user’s group/role will need to be granted access to the environment from within JD Edwards™.

InsightSoftware.com Administration & Configuration Guide
__________________________________________________________________________________
Page 106 of 106
Contacts
For more information regarding our products, please contact us at:
Email [email protected]
Web www.insightsoftware.com
Customer Support
For product support, please create a case with our Customer Support Department: Support Portal
http://supportportal.insightsoftware.com/
Notices and Disclaimer
Insight Reporting, Insight Reconciler, Insight Scheduler, Insight Budgeting, Insight Designer, Insight Console, Insight Administrator and GL Inquiry are trademarks of InsightSoftware.com Limited. InsightSoftware.com is a registered trademark of InsightSoftware.com Limited. Oracle, JD Edwards, JD Edwards EnterpriseOne, JD Edwards World and Oracle E-Business are registered trademarks of Oracle Corporation. Other product and company names mentioned herein may be the trademarks of their respective owners. The information contained in this document represents the current view of InsightSoftware.com on the issues discussed as of the date of publication. InsightSoftware.com cannot guarantee the accuracy of any information presented after the date of publication. This document is for informational purposes only. InsightSoftware.com makes no warranties, expressed or implied, in this document. © 2000-2012 InsightSoftware.com Limited. All rights reserved.