Embed Size (px)
Citation preview

1
Information Technology
NVEQ Level 1 ‒ Class IX
IT106-NQ2012-Digital Presentation
Student╆s Handbook

2
© PSS Central Institute of Vocational Education, 2012
Copyright protects this publication. Except for purposes permitted by the
Copyright Act, reproduction, adaptation, electronic storage and communication
to the public are prohibited without prior written permission.

3
Student Details
Student Name:___________________________
Student Roll Number:______________________
Batch Start Date:________________________

4
Acknowledgements
The following partners were instrumental in providing the content:
1. Central Board of Secondary Education (CBSE) in conjunction with Pandit
Sunderlal Sharma Central Institute of Vocational Education (PSSCIVE) for
providing text and exercises in Computer and IT Basics. The team involved
included Dr. Om Vikas (Convener), Dr. Vinay Swarup Mehrotra (Co-
Convener), Ms Gurpreet Kaur, Mr. Mukesh Kumar, Ms Nancy Sehgal and Mr.
Yogesh Kumar and Mr. Rituraj Tamrakar.
2. Accenture India’s Corporate Citizenship Program (Skills 4 Life). Accenture
has provided the content material they have commissioned and developed
as well as access to their implementing partners (Dr. Reddy’s Foundation and QUEST Alliance) for this material.
3. Microsoft Free Digital Literacy Program eLearning package has been used to
supplement CBSE/ PSSCIVE’s content.
4. The Wadhwani Foundation team involved in designing and building this
curriculum and content include Ms. Darshika Sanghani, Ms. Sonia Kakkar, Mr.
Toral Veecumsee, Ms. Rekha Menon, Mr. Ajay Goel and Mr. Austin Thomas.
5. In addition, various public domain sources have been leveraged to create
material across modules. The contributions of all these sources is gratefully
acknowledged and recognized.

5
TABLE OF CONTENTS
Acknowledgements ................................................................................................. 4
Preface ……………………………………………………………………………………………………………………………5
About Your Workbook ……………………………………………………………………………………………………7
Session 1: Introduction to Digital Presentation .......................................................................9
Session 2: Create, Save and Close Presentation ....................................................................15
Session 3: Create a Simple Presentation .................................................................................17
Session 4: View a Presentation – Slide Show View ................................................................20
Session 5: Edit Text - Font Size, Style and Colour ................................................................22
Session 6: Edit Text in a Presentation .....................................................................................23
Session 7: Insert Image in a Presentation ................................................................................25
Session 8: Add Shapes in a Presentation .................................................................................27
Session 9: Presentation Themes ................................................................................................30
Session 10: Change Sesign of a Presentation ..........................................................................32
Session 11: Arrange, Delete and Add slides ............................................................................34
Session 12: Print a Presentation ................................................................................................36

6
Preface
The National Curriculum Framework, 2005, recommends that children’s life at school must be linked to their life outside the school. This principle makes a
departure from the legacy of bookish learning which continues to shape our
system and causes a gap between the school, home, community and the
workplace.
The student workbook on “Digital Presentation (Basic)” is a part of the qualification package developed for the implementation of National Vocational
Education Qualification Framework (NVEQF), an initiative of Ministry of Human
Resource Development (MHRD), Government of India to set common principles
and guidelines for a nationally recognized qualification system covering
Schools, Vocational Education and Training Institutions, Technical Education
Institutions, Colleges and Universities. It is envisaged that the NVEQF will
promote transparency of qualifications, cross-sectoral learning, student-
centred learning and facilitate learner’s mobility between different qualifications, thus encouraging lifelong learning.
This student workbook, which forms a part of vocational qualification package
for student’s who have passed Class VIII or equivalent examination, was created by a group of experts. The IT-ITeS Skill Development Council approved by the
National Skill Development Corporation (NSDC) for the IT/ITeS Industry
developed the National Occupation Standards (NOS). The National Occupation
Standards are a set of competency standards and guidelines endorsed by the
representatives of IT Industry for recognizing and assessing skills and knowledge
needed to perform effectively in the workplace.
The Pandit Sunderlal Sharma Central Institute of Vocational Education
(PSSCIVE), a constituent of National Council of Educational Research and
Training (NCERT) in association with Wadhwani Foundation has developed
modular curricula and learning materials (Units) for the vocational qualification
package in IT/ITes sector for NVEQ levels 1 to 4; level 1 is equivalent to Class
IX. Based on NOS, occupation related core competencies (knowledge, skills, and
abilities) were identified for development of curricula and learning modules
(Units).
This student workbook attempts to discourage rote learning and to bring about
necessary flexibility in offering of courses, necessary for breaking the sharp
boundaries between different subject areas. The workbook attempts to
enhance these endeavour by giving higher priority and space to opportunities
for contemplation and wondering, discussion in small groups and activities
requiring hands-on-experience. We hope these measures will take us

7
significantly further in the direction of a child-centred system of education
outlined in the National Policy of Education (1986). The success of this effort
depends on the steps that school Principals and Teachers will take to encourage
children to reflect their own learning and to pursue imaginative and on-the-job
activities and questions. Participation of learners in skill development exercises
and inculcation of values and creativity is possible if we involve children as
participants in learning, and not as receiver of information. These aims imply
considerable change in school routines and mode of functioning. Flexibility in
the daily time-table would be a necessity to maintain the rigour in
implementing the activities and the required number of teaching days will have
to be increased for teaching and training.
8
About Your Workbook
This workbook is to assist you with completing the Unit of Competency IT106-NQ2012: Digital Presentation (Basic). You should work through the workbook in the classroom, at the workplace or in your own time under the guidance and supervision of your teacher or trainer.
This workbook contains sessions which will help you to acquire relevant knowledge and skills (soft and hard) on various aspects of the unit of competency. Each session is small enough to be easily tackled and digested by you before you move on to the next session. Animated pictures and photographs have been included to bring about visual appeal and to make the text lively and interactive for you. You can also try to create your own illustrations using your imagination or taking the help of your teacher. Let us now see what the sections in the sessions have for you.
Section1: Introduction
This section introduces you to the topic of the Unit. It also tells you what you will learn through the various sessions covered in the Unit.
Section 2: Relevant Knowledge
This section provides you with the relevant information on the topic (s) covered in the session. The knowledge developed through this section will enable you to perform certain activities. You should read through the information to develop an understanding on the various aspects of the topic before you complete the exercise (s).
Section 3: Exercise
Each session has exercises, which you should complete on time. You will perform the activities in the classroom, at home or at the workplace. The activities included in this section will help you to develop necessary knowledge, skills and attitude that you need for becoming competent in performing the tasks at workplace. The activities should be done under the supervision of your teacher or trainer who will guide you in completing the tasks and also provide feedback to you for improving your performance. To achieve this, prepare a timetable in consultation with your teacher or trainer and strictly adhere to the stipulated norms or standards. Do not hesitate to ask your teacher or trainer to explain anything that you do not understand.
Section 4: Assessment
The review questions included in this section will help you to check your progress. You must be able to answer all the questions before you proceed to the next session.
At the end of the Unit, there is a list of learning resources which include books, journals, newsletters, websites, etc. to support your further learning.

9
SESSION 1: INTRODUCTION TO DIGITAL PRESENTATION
Imagine a scenario - you want to make a presentation on a particular topic to
your class along with text, images, figures, drawings, etc., - how would you go
about doing it? You could have a choice of using a blackboard, posters,
whiteboard, pamphlets, chart-paper, hand-outs or overhead transparencies.
Presentations made using presentation software provides an alternative to the
older kind of visual aids. Presentation software can be used to present a formal
display of information organised onto slides.
By now you would have observed that word processor, spreadsheet and
presentation software, have a simple interface using menus on the Ribbon.
Most of the commonly used functions have a graphical symbol or icon in the
Ribbon. This kind of user interface is called Graphical User Interface. This
section will familiarize you with the elements of the user interface.
A digital presentation is a useful method to show or explain a concept to an
audience. A presentation program (also called a presentation graphics program)
is actually a computer software package used to display information; normally
in the form of a slide show. It typically includes three major functions:
1. An editor that allows text to be inserted and formatted
2. A method for inserting and manipulating graphic images
3. A slide-show system to display the content.
Presentations can be used for a variety of tasks. For example:
Creating slides to display information. Slides may contain text, pictures,
shapes, sound and video. A collection of slides is called a presentation.
Present the information in an attractive manner.
Show the presentation using a computer, or display it using a data
projector or take paper printouts.
Why would you create a presentation vs. using a word processed document? It
depends, but typically you would use a presentation under the following
circumstances:
When you want a large group of people to view what you are talking
about on a projected screen you would use presentation software. But
when you want to share information with a couple of people, you might
use a document. In other words, if the material is to be viewed by others
in a meeting, you may use presentation software. If it is to be viewed by
the other readers on a screen or through print, use documents.

10
When you want to make the material more interesting with graphics,
tables, pictures and other media, you may use presentation software.
Word processors have limited multi-media capabilities.
When you have a lot of information that needs to be written down, use
word processor documents. When shorter point-wise information (like a
summary) would be sufficient, you may use presentation software.
RELEVANT KNOWLEDGE
After having learnt the basics of a word processor and spreadsheet software,
you are now familiar with selecting the tabs on the Ribbon and also choosing
different options by clicking on the appropriate icon. In this exercise, you will
take a short tour of the different tabs and some of the options under the tabs,
in presentation software.
The Tabs (Home, Insert etc.) on the Ribbon contain the buttons needed to
edit characters, text, and layout, as well as additional tools that you may
need (Design, Animation etc).
Each Tab consists of different groups, for example the Home tab has six
groups namely, Clipboard, Slides, Font, Paragraph, Drawing and Editing.
Each group has Icons for different functions. To know the function of an icon
or button (or command), keep the pointer on it for a few seconds and, the
function of that button will appear in a small box below the pointer. For
example, leaving the icon on displays “Bold (Ctrl+B). It makes the
selected text bold.”.
Home Tab:
Let’s understand the Home tab in more detail. The Home Tab has commands
for formatting of text, selecting a new slide and for drawing of objects. The
Tabs
Icons Groups
Figure 1: Graphical User Interface

11
Home Tab is also used for editing the content of a presentation with functions
such as find and replace, cut, copy and paste etc.
The Clipboard group has options to cut, copy and paste text. The Format
Painter is also present here.
Slides group enables you to select a theme and layout for a slide, reset a
slide or delete a slide.
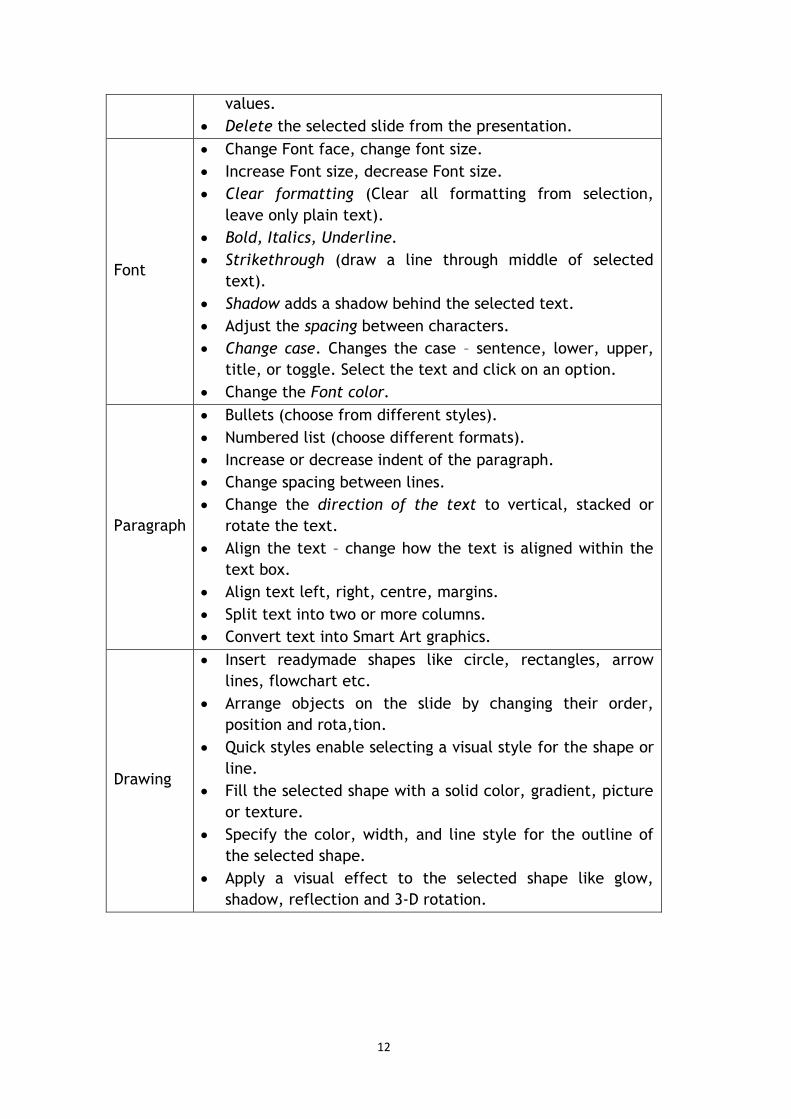
Font group has options that enable you to change of the Font – font face,
style, size, effects (Strikethrough, Shadow etc.), color and character
spacing. These options can be changed, before or after typing the text. If
case of making changes after entering text, you need to select the text first.
Paragraph group is used to change paragraph settings – alignment, indents,
spacing, and pagination like Spacing 1.5, Double Spacing, Indentation,
Spacing Before and After a Heading. Move the cursor to the line which needs
to be changed.
The Drawing group enables a quick selection from in-built shapes; arranging
the order and grouping objects; filling, outlining and adding effects to a
selected shape.
Editing group has options to select, find and replace text.
A detailed description of the different options available under each of the
groups is given in the table below.
Group Description
Clipboard
Paste the cut or copied information in Clipboard at the
location where cursor is positioned.
o Paste Special - To paste in a particular format.
o Paste as Hyperlink - Used with copy to paste the copied
information as a hyperlink.
o Duplicate – To duplicate a slide).
Cut removes the selected text from the presentation and
puts into Clipboard for later retrieval.
Copy copies the selected item or text and puts it on the
Clipboard.
Format painter copies formatting from a selected position
and applies it to another (Note: To apply same formatting
to many places, double-click the format painter button).
Slides
Add a new slide to the Presentation.
Change the layout of the selected slide.
Reset the position, size and setting of the slide to default
12
values.
Delete the selected slide from the presentation.
Font
Change Font face, change font size.
Increase Font size, decrease Font size.
Clear formatting (Clear all formatting from selection,
leave only plain text).
Bold, Italics, Underline.
Strikethrough (draw a line through middle of selected
text).
Shadow adds a shadow behind the selected text.
Adjust the spacing between characters.
Change case. Changes the case – sentence, lower, upper,
title, or toggle. Select the text and click on an option.
Change the Font color.
Paragraph
Bullets (choose from different styles).
Numbered list (choose different formats).
Increase or decrease indent of the paragraph.
Change spacing between lines.
Change the direction of the text to vertical, stacked or
rotate the text.
Align the text – change how the text is aligned within the
text box.
Align text left, right, centre, margins.
Split text into two or more columns.
Convert text into Smart Art graphics.
Drawing
Insert readymade shapes like circle, rectangles, arrow
lines, flowchart etc.
Arrange objects on the slide by changing their order,
position and rota,tion.
Quick styles enable selecting a visual style for the shape or
line.
Fill the selected shape with a solid color, gradient, picture
or texture.
Specify the color, width, and line style for the outline of
the selected shape.
Apply a visual effect to the selected shape like glow,
shadow, reflection and 3-D rotation.

13
Some of the most popular presentation software are:
MS-PowerPoint
Open Office – Impress
Google Documents
Getting started with Presentation software:
To start you can choose any of the above software to start creating
presentations. We would encourage you to start learning presentations by using
either the OpenOffice – Impress or MS-PowerPoint. Make sure that this software
is already installed in your computer.
You can start using MS-PowerPoint software, by performing any one of the
following steps:
a) Double Click on a shortcut key of the MS-PowerPoint icon, if available,
on the desktop; or
b) Click [1] Start [2] All Programs [3] Microsoft office [4] Microsoft
Office PowerPoint
If you are using any other presentation software, the steps to start it would be
almost identical to what is given above.
After you start the MS-PowerPoint, the following screen (Figure 2) would be
displayed. Some of the components of the screen displayed are given below.
Slides / Outline tab Slide Pane
Notes Pane View Buttons
Figure 2: Components of MS-PowerPoint
14
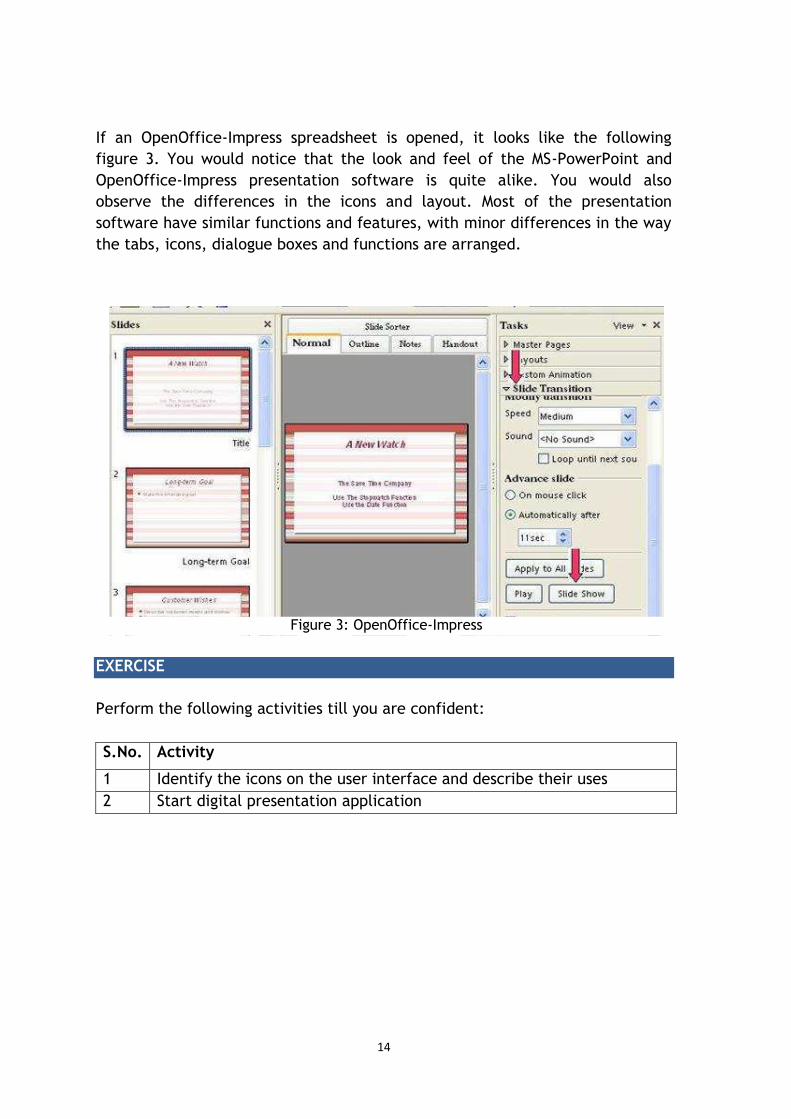
If an OpenOffice-Impress spreadsheet is opened, it looks like the following
figure 3. You would notice that the look and feel of the MS-PowerPoint and
OpenOffice-Impress presentation software is quite alike. You would also
observe the differences in the icons and layout. Most of the presentation
software have similar functions and features, with minor differences in the way
the tabs, icons, dialogue boxes and functions are arranged.
EXERCISE
Perform the following activities till you are confident:
S.No. Activity
1 Identify the icons on the user interface and describe their uses
2 Start digital presentation application
Figure 3: OpenOffice-Impress

15
SESSION 2: CREATE, SAVE AND CLOSE PRESENTATION
This exercise begins with creating a new file in the presentation software and
then saving it. To begin with, let us create a simple presentation. Before
creating the presentation, create a folder “D:\IT Class IX\PPT_Practice” where you shall store all the files that you create.
RELEVANT KNOWLEDGE
a) Open: Start the presentation. When you start a file with a default name is
given by the presentation software. MS-PowerPoint names it Presentation1,
whereas OpenOffice names it as Untitled1.
a. After starting PowerPoint, you will see a screen with two text boxes.
b. Enter the text in each of the text boxes, as shown in Figure1 & 2. This
first slide of a presentation referred to as Title Slide.
c. Click on the New Slide icon under the Home tab, in the Slides group.
A new slide is added. Enter the text.
Figure 1: Title Slide
Figure 2: New Slide with Text
Added

16
Hint: Bullets are available by default. You have learnt to use them while
creating documents. Use your knowledge to work with them here. Observe the
Ribbon in MS-PowerPoint. Do you see any similarities?
b) Save this file and give it the name First. Follow the same steps as you used
for saving a file in word processor or spreadsheet.
a. Now this file will be saved in MS-PowerPoint with the name
First.pptx. The first part is the name of the file and .pptx is the
extension name.
b. Similarly if you are using OpenOffice, the file is saved with the name
First.odp. OpenOffice gives an extension name of .odp to a
presentation file.
c) Close: Now close this file by one of the following sets of commands:
a. Click on the cross symbol “X”, that you see on the top right hand corner of the screen.
OR
b. Click [1] File [2] Close.
d) Open: Now re-open the above file. Add one more slide to it and also add
some text in the new slide. Save it with a different name – e.g. Second.
EXERCISE
e)
Perform the following activities till you are confident:
S.No. Activity
1. Open a template to create a new presentation
2. Select the design layout and style
3. Change the background of the slides
4. Enter the text in the title slide
5. Add a new slide
6. Type the text in the new slide
7. Save the presentation

17
SESSION 3: CREATE A SIMPLE PRESENTATION
RELEVANT KNOWLEDGE
In this exercise you will create a simple presentation, using the default slide
design provided by the presentation software.
To make creating slides a simple task, each new slide comes with a pre-
formatted template for you to enter your information. You can change this
format to suit the type of information you want to display. In the earlier
exercises, when you added a new slide in a presentation, it had two boxes, as
shown in Figure 1. The box on the top is where you write the title of the slide.
In the bigger box, you enter the main content. It is also possible to create a
slide, as shown in FigureFigure 2. This has two boxes for writing the content.
The steps to add one more text box in the slide are as follows:
Click anywhere inside the text box. Eight small rectangles will appear
along the edges of the box.
Figure 1: Default Text Boxes
Figure 2: Two Text Boxes

18
Click on the rectangular box, (refer place pointed by the arrow in
Figure3), and drag the side of the box to the left, to reduce the width of
the box to approximately half. The slide will look like as shown in
Figure3.
Enter one or two words in this text box.
Select this box. Under the Home tab, in the Clipboard group, select Copy
and then Paste. You will see that a duplicate copy of the text box has
been created.
Now select this second (copied) text box, drag it and position it at the
appropriate place. Now you can text in each of these two boxes.
In fact, you can create three of even four text boxes in a slide (Refer
Figure 4).
Figure 3: Text Box with reduced width
Figure 4: Slide with three Text Boxes

19
Open a new file using presentation software. Create the following presentation.
Save the presentation with the name Manners.
Close the presentation software
EXERCISE
1.
Perform the following activities till you are confident:
S.No. Activity
1 Create a simple presentation
2 Create a presentation with text box
20
SESSION 4: VIEW A PRESENTATION – SLIDE SHOW VIEW
After you have created all the required slides in the presentation, you need to
view the slides. You can project the presentation on the full screen of the
computer. Your presentation can be also be viewed a projection device or an
LCD screen if your computer is connected to it.
RELEVANT KNOWLEDGE
There are there primary ways in which you can view the presentation on your
computer. The selection of a particular view is based on the purpose for which
you want to view the presentation. The three primary views are:
a) Normal: You are already familiar with this view. You used this view while
creating the slides in the previous exercises. In this view, you can see
the Slide pane, notes pane and a left pane having slides / outline tab
(refer Figure 1).
b) Slide Sorter: This view enables you to easily arrange, move, delete, and
reorder slides.
c) Slide Show: This view is used to show the presentation to other people,
either directly on your computer / computing device or by connecting it
with a projector.
In addition to these views, there are some more views, such as Notes Page,
Slide Master, Handout Master, Notes Master, Print Preview etc. You will learn
about some of these in subsequent exercises.
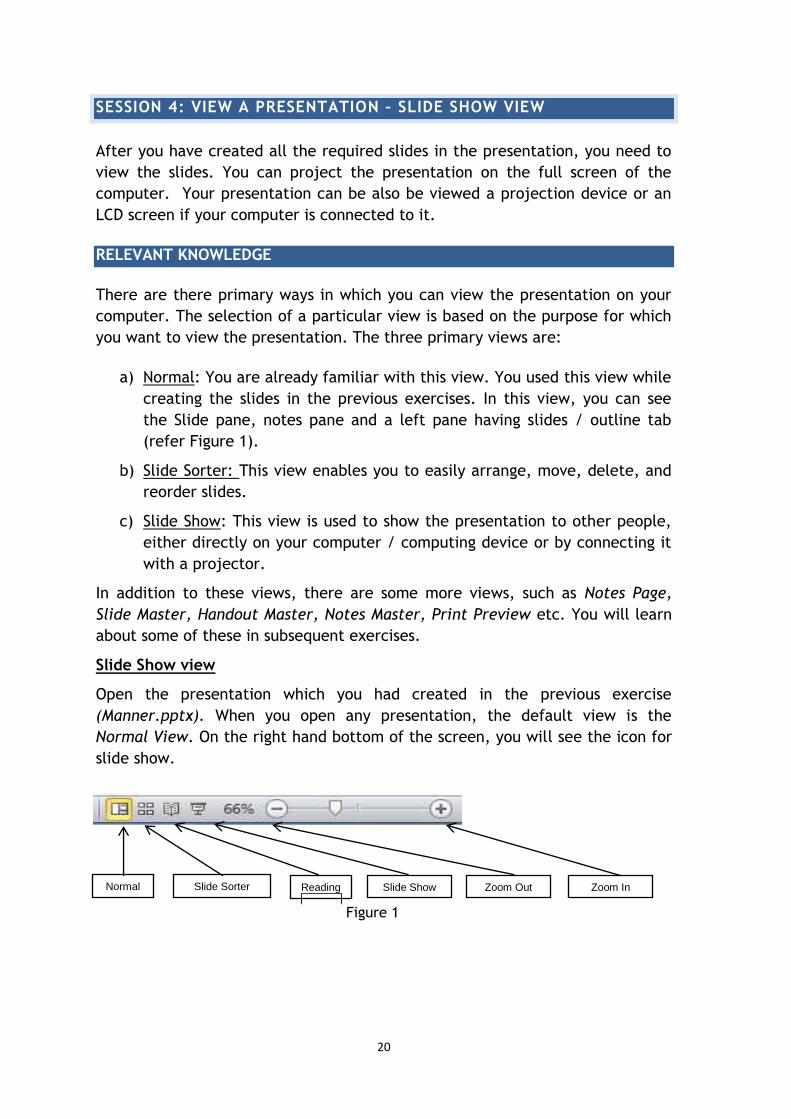
Slide Show view
Open the presentation which you had created in the previous exercise
(Manner.pptx). When you open any presentation, the default view is the
Normal View. On the right hand bottom of the screen, you will see the icon for
slide show.
Normal Slide Sorter Reading Slide Show Zoom Out Zoom In
Figure 1
21
To show the presentation in a slide show view, follow the steps given below:
1. Open the presentation.
2. Click on the Slide Show icon, positioned in the right hand bottom side of
the screen.
3. The current slide is shown the entire screen. You can move to the next
slide by clicking your mouse or using the Enter key.
a. You can also move across slides by using the keys :
1. Pgup and Pgdn.
2. Up Arrow and Down Arrow.
3. Right-click the mouse. A short-cut menu appears which
provides further options. Use these options and see what
happens.
4. To exit the Slide Show view:
a. Use the Esc key.
b. Right-click the mouse. A short-cut menu and select the End Show… option.
The view automatically moves to Normal mode, once you click on the last slide.
EXERCISE
Perform the following activities till you are confident:
S.No. Activity
1 View a presentation using slide show view
2 Close the presentation
22
SESSION 5: EDIT TEXT - FONT SIZE, STYLE AND COLOUR
In this exercise you will learn to change and customise the font sizes, style and
colour, to make the presentation clear, eye-catching and meaningful.
RELEVANT KNOWLEDGE
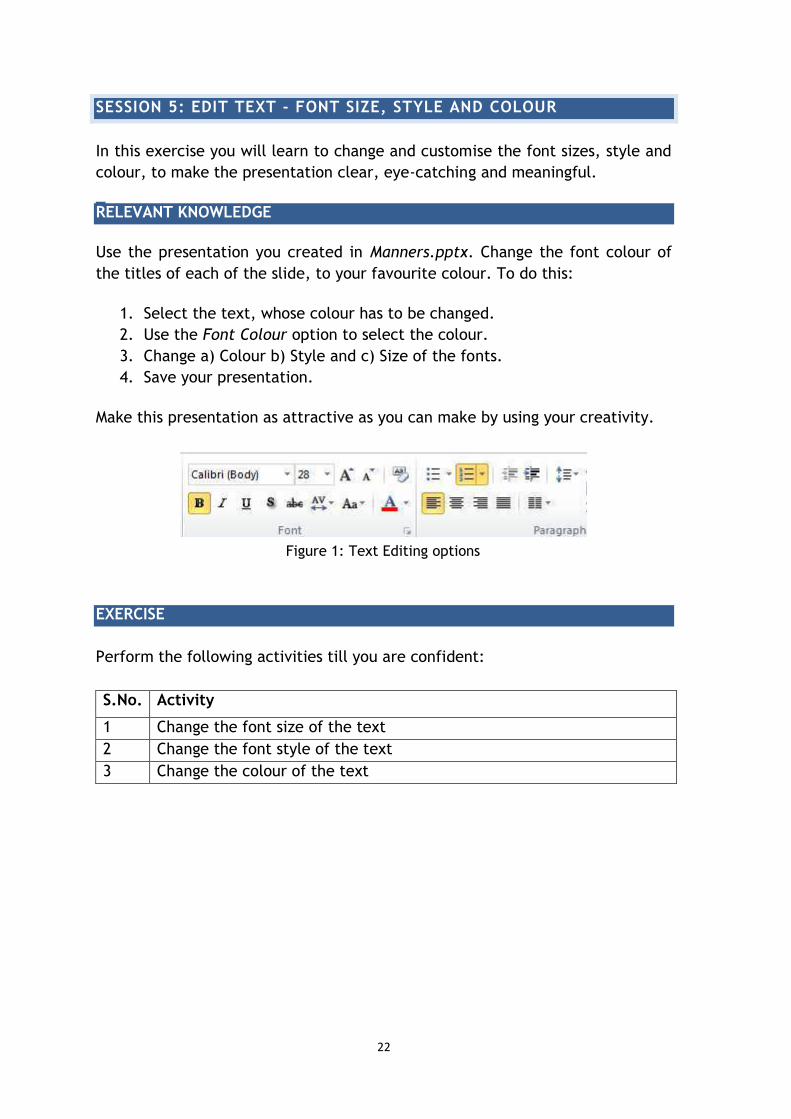
Use the presentation you created in Manners.pptx. Change the font colour of
the titles of each of the slide, to your favourite colour. To do this:
1. Select the text, whose colour has to be changed.
2. Use the Font Colour option to select the colour.
3. Change a) Colour b) Style and c) Size of the fonts.
4. Save your presentation.
Make this presentation as attractive as you can make by using your creativity.
EXERCISE
Perform the following activities till you are confident:
S.No. Activity
1 Change the font size of the text
2 Change the font style of the text
3 Change the colour of the text
Figure 1: Text Editing options

23
SESSION 6: EDIT TEXT IN A PRESENTATION
RELEVANT KNOWLEDGE
In this exercise you will apply some of the options available under the Home
tab to edit the slides. You need to edit this presentation and make it look like
as shown in Figure 1.
Figure 1
24
You would have used many options from the Font and the Group options under the Home tab.
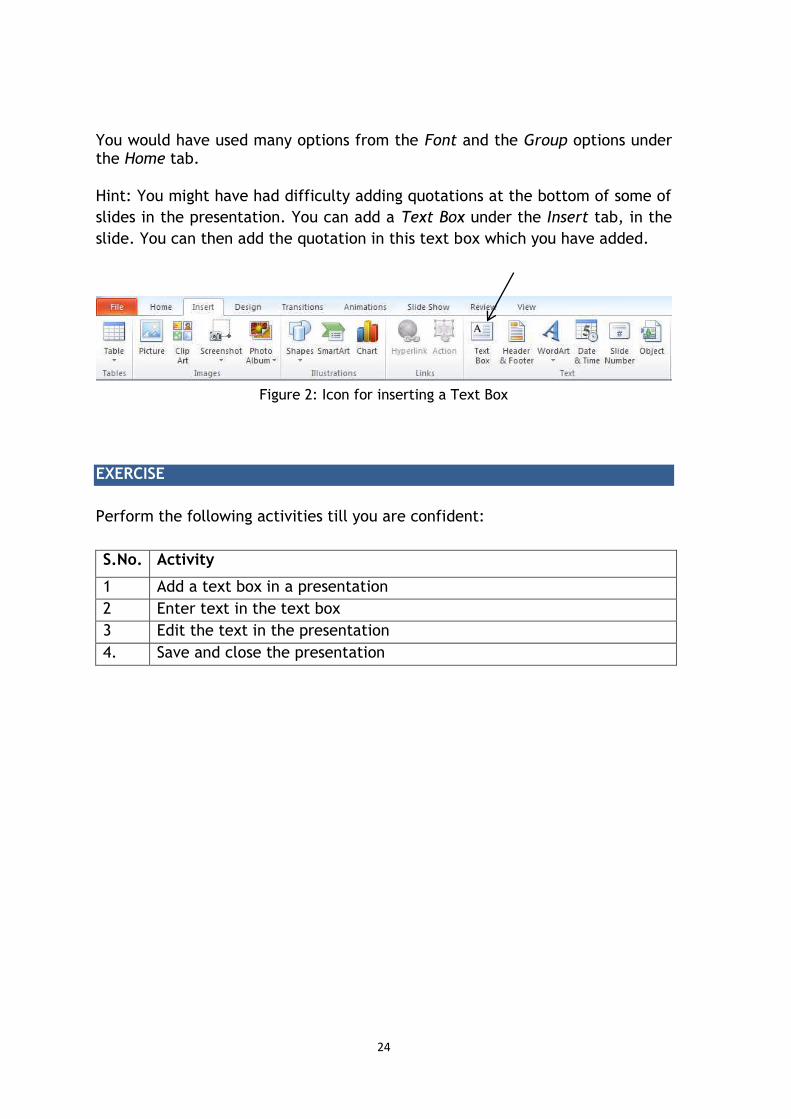
Hint: You might have had difficulty adding quotations at the bottom of some of
slides in the presentation. You can add a Text Box under the Insert tab, in the
slide. You can then add the quotation in this text box which you have added.
EXERCISE
Perform the following activities till you are confident:
S.No. Activity
1 Add a text box in a presentation
2 Enter text in the text box
3 Edit the text in the presentation
4. Save and close the presentation
Figure 2: Icon for inserting a Text Box

25
SESSION 7: INSERT IMAGE IN A PRESENTATION
RELEVANT KNOWLEDGE
It is said that “A Picture speaks louder than a thousand words”. Presentations can be enhanced substantially by adding images and pictures in it. In this
exercise you will learn to add a picture in a slide. You will search for the
picture from the internet and
insert it in a slide.
Open a new presentation file.
Create the 2 slides as shown in
Figure 11 & 2 and enter the
text.
Open any Web Browser. Search
for an image of “Stephen Covey”. (He is the author of
the book “Seven habits of highly effective people”)
Copy any of the images of
Stephen Covey. (Hint: This you
can do by right clicking on the
image and selecting the option
Copy Image in the short-cut
menu that appears.)
Go to Slide-2 in the file where
you had entered the text.
In the Home tab, under the
Clipboard group, select the
option Paste.
The picture will get pasted on
to the slide.
Re-size the picture. (Hint: Click on the
picture. You will see small rectangular
boxes on the edges of the picture. Click on
any one of these boxes. Cursor shape
changes to that of an arrow. Drag that box
by left-clicking the mouse and keeping it
pressed).
Re-size and position the picture properly
on the slide.
Figure 2
Figure 1

26
For moving the image on your slide, keep the cursor in the middle of the
image. The cursor shape turns into a plus symbol with four arrow head
Drag the image by keeping the left button of the mouse pressed.
Save the presentation file.
Create the slides shown in Figure 3. Insert at least two relevant pictures in each
of the above slides. Re-size and position them appropriately to get the best
output.
1. You may also like to use your creativity to make the slides look
attractive, by changing the font size, font colours, or any other feature
of the presentation software.
2. Save the file.
There is one more way to insert an image into a slide. Using this method you
can insert and image or a photo stored in your computer. So go ahead, open a
new file, locate some photos stored in your computer and insert it in a slide
using the following steps:
In the Insert tab, choose the option Picture.
A dialogue box will appear. Select the
folder in which this picture file is stored,
select the file and click on it to insert it.
Now you can re-size and position it
appropriately.
EXERCISE
Perform the following activities till you are confident:
S.No. Activity
1 Insert image in a presentation
2 Resize and rotate the image
Figure 3
Figure 4

27
SESSION 8: ADD SHAPES IN A PRESENTATION
RELEVANT KNOWLEDGE
Slides in a presentation can be enhanced by adding Shapes. There are many
shapes available as a part of the presentation software. In this exercise, you
will add a shape as shown in the slide in Figure 1.
o Open a new presentation file. Add
a slide. Enter the text shown in
the slide above.
o Under the Insert tab, in the
Illustrations group, select the
option for Shapes. (Refer Figure 2).
o A drop down list appears, as shown in Figure 3.
Choose the appropriate shape (a cloud callout
was selected in the figure above). In case the
shape shown the slide is not available in the
software you are using, select any other similar
shape.
o The cursor changes to a + symbol when you
move it on the slide. Left-click and drag the
cursor and then, when you have the desired
size, release the mouse button. The shape
selected shape is created.
o Adjust the size of the shape added.
o You can enter the text “Do you know the origin
Figure 1
Figure 2
Figure 3

28
of the term “Computer Bug”?” in this shape. To add the text:
- Keep the cursor on the created shape. The shape of the cursor
changes to a four headed arrow.
- Right-click and choose the option Edit Text.
- You can now write the above text.
o To format this shape, i.e. changing its colour, outlines etc., do the
following:
o Select the shape.
o A Format tab will appear in the Ribbon. Some of the options in the
format tab are as shown in Figure4. Use these options to change
the colour of the shape, its outline etc.
o Shapes can be used to create diagrams in a presentation. In this exercise
you will create a simple flow diagram using different kinds of shapes as
shown in Figure 5 5.
Figure 4: Format Tab options
Figure 5 : Input Process Output

29
EXERCISE
Perform the following activities till you are confident:
S.No. Activity
1 Create 6-7 slide presentation in any one of the following areas.
A tourist place
Your family
Your favourite teacher
Your favourite leader
Your favourite actor / actress
A country
While making this presentation use the following features.
Text Font, Style (Bold, Italic), Size, Color
Alignment of text – left, right, center, justify
Bullets, Numbering
Background effects – Fill gradient, texture, pattern, picture in
the background of the slides, or color of the background
Insert a Picture
3. Create a presentation showing Input-Process-Output concept

30
SESSION 9: PRESENTATION THEMES
Presentation software helps in preparing attractive colourful presentations.
When you open a new file in presentation software, the default design is simple
black and white. It is possible to have different designs in a presentation. Most
of the presentation software offer, pre-defined designs called Presentation
Themes. You can use these to enhance presentations. They have different
backgrounds, colours, designs and font types. Using a different “theme” can significantly change the way the presentation looks. Some examples of such
Themes available in presentation software are shown in Figure 1.
You can select an existing theme, by:
The options: File, New. A box with various existing designs appears as shown
in Figure 2.
Select the option Themes. Another box opens, which has the existing
themes. Select one of them.
The blank file with the selected theme will open.
You can use this file to create the presentation.
Figure 1: Different Themes
Figure 2

31
Use this file with the Theme selected by you and create a presentation with a
title slide and four more slides, using the text given below.
Insert some appropriate pictures and / or shapes in the above presentation.
Open an existing presentation, which you made in one of the earlier exercises.
Change the Theme of this presentation. You need to select the Design tab. You
will see different themes available, as shown in Figure 3. You can select any
one of them. Try applying different themes to the same presentation. Save the
presentation.
EXERCISE
Perform the following activities till you are confident:
S.No. Activity
1 Select theme and prepare a presentation
GREETINGS Every interaction starts with some form of greeting. Given below are some statements we generally make whenever we greet someone. Greeting a friend:
Hi! How are you doing? Hey! It has been a long time since we last met! Hi! What are you doing now? Hey! How’s life?
Greeting an acquaintance:
Hello! How are you? Hello! How have you been? Good morning/afternoon/evening! All’s well?
Greeting a stranger:
Hello!
Figure 3
32
SESSION 10: CHANGE DESIGN OF A PRESENTATION
Themes are an inbuilt part of the presentation software. You can also make
changes in the design of the presentation by using other features available in
the presentation software. In this exercise, you will learn to make basic design
and visual changes to the presentation that you made earlier. In fact you can
pick up any of the presentations which you have in the earlier exercises for
doing this exercise.
RELEVANT KNOWLEDGE
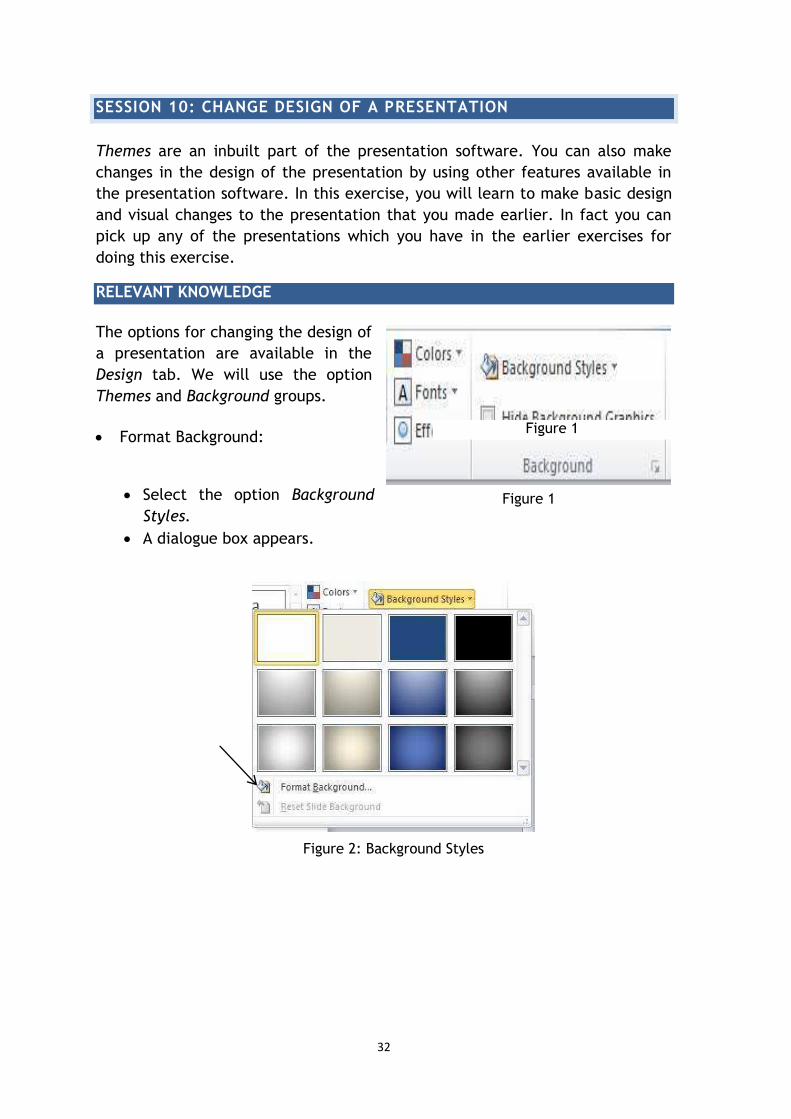
The options for changing the design of
a presentation are available in the
Design tab. We will use the option
Themes and Background groups.
Format Background:
Select the option Background
Styles.
A dialogue box appears.
Figure 1
Figure 2: Background Styles
Figure 1

33
Click the option Format Background. A dialogue box as appears.
Select the options Fill Solid fill Colour (Click the down arrow and a color box appears.).
Select the desired colour and select the option Apply All.
All the slides in this presentation will get the selected background colour.
Try changing the colour of the background to another colour.
Also try out the option Transparency and observe what happens.
Now try out the other options of Solid Fill, Gradient Fill, Picture Fill, and Pattern Fill. Observe what changes occur in the presentation.
Click on Close to close this dialog box, or click on the “X” symbol.
EXERCISE
Perform the following activities till you are confident:
S.No. Activity
1 Open a presentation and change the design of preseantation
Figure 3: Dialogue Box

34
SESSION 11: ARRANGE, DELETE AND ADD SLIDES
RELEVANT KNOWLEDGE
So far you have learnt to view a presentation using the Slide Show view.
Another view that is frequently used in presentations is the Slide Sorter view.
Slide sorter view in MS-PowerPoint or OpenOffice-Impress is a window that
displays thumbnail versions (small size) of all your slides, arranged in horizontal
rows. This view is helpful when you want to:
Make global changes to several slides at one time.
Rearranging or deleting slides.
Move, copy, or delete a lot of slides
However, there is a limitation that you cannot edit the contents of a slide in
this view. To edit the contents of a slide you can use the Normal view. In Slide
Sorter view, a presentation looks like the one in Figure 1.
To see the slides in a Slide sorter view, under the View tab in the ribbon,
select the option Slide Sorter.
Figure 1: Slide Sorter View
Figure 2: Slide Sorter Icon

35
To add a slide in Slide Sorter view:
Position the cursor between the two slides, where you want to add the
blank slide
Under Home tab, in the Slides group, select the New Slide option.
Note: If you position the cursor between slide 3 and 4 in the above
presentation, a blank slide will be inserted after slide 3.
To delete a slide in Slide Sorter view:
Select the slide to be deleted.
Press the Delete key on your keyboard or select the option under
the Home tab, Clipboard group.
The selected slide will be deleted.
To move a slide in this view:
Select the slide to be moved, and drag it with the left button of the
mouse pressed, to the place, where you want to move the slide.
You can also select multiple slides by using the combination of Shift key (for
slides adjacent to one another) or Ctrl key (for slides at different positions
in the presentations) and the left button of mouse.
Try selecting multiple slides and deleting them together.
Try selecting three slides and then moving them together into another
place.
EXERCISE
Perform the following activities till you are confident:
S.No. Activity
1 Rearrange the slides using slide sorter
2 Add slides in between the slides
3 Delete the unwanted slides
4. Move a slide

36
SESSION 12: PRINT A PRESENTATION
RELEVANT KNOWLEDGE
Normally a presentation is made for showing it on a computer or data projector
to a big audience. Many presenters also provide a print copy of the
presentation. In this exercise you will learn to print a presentation. The basic
steps to print a presentation are quite similar to what you followed for printing
text documents and Spreadsheets. These are:
Click [1] File [2] Print. A Print dialog box appears as shown in Figu 1.
In the Copies box, enter the number of copies you want to print.
In the Name box, select the printer that you want to use.
To print all slides, select All in the Print Range.
To print one or more slides that you selected, select Selection
To print only the slide that is currently displayed, select Current Slide.
To print specific slides by number, click Slides, and then enter a list of
individual slides, a range, or both. Use commas to separate the numbers and
no spaces, for example, 1,3,5-12.
If you select Handouts in the Print what box, you can choose, how many
slides you want to print on a page and click OK.
Figure 1: Print dialogue box

37
EXERCISE
Perform the following activities till you are confident:
S.No. Activity
1. Create a “Birthday” card for your friend or brother or sister or teacher 2. Design a poster on any one of the following topics:
Invite all students of your school to the Computer Festival.
Invite all students of class 11-12 for a blood donation camp.
Inviting all students of your class to a picnic.
Inviting all students for the Annual Sports day of your school.
4. Print a handout of the presentation with 2, 4, 6 slides on a page