Embed Size (px)
Citation preview

Outlook 2003 Setup Instructions Page 1 of 13
How to Configure Outlook 2003 to connect to Exchange 2010
Outlook 2003 will install and work correctly on any version of Windows XP, Vista, Windows 7 or Windows 8.
These instructions describe how to setup Outlook 2003 on a Windows XP Professional PC but the process is
virtually identical for all the other version of Windows.
Outlook 2003 was available as a separate program but usually came as part of the Office 2003 program suite.
These versions of Outlook and Office are no longer available to buy.
Outlook 2003 with Exchange 2010 still gives an excellent email experience and the improvements made in
Outlook 2007, Outlook 2010 and Outlook 2013 are relatively minor.
Outlook 2003 was the first version of Outlook capable of connecting to an Exchange server over the Internet,
as opposed to an Exchange server located on the same LAN.
This type of connection is called an Outlook Anywhere connection.
Step-by-Step Instructions for creating an Outlook Anywhere profile
Make sure that Outlook isn’t running and then:-
Click: Start – Control Panel – Mail
(If there’s no Mail icon in Control Panel it could be that you’ve just installed Outlook 2003 and haven’t run it yet.
Start Outlook for the first time, cancel the setup wizard and the Control Panel Mail icon should then appear.)
Click: Show Profiles… - Add…
and for Profile Name let’s choose:-
pushex
(The profile name is only for your reference so it could be anything you want.)
The New Email Account wizard will then start so chose: Add a new email account
Click: Next >
Select the top option: Microsoft Exchange Server
Click: Next>

Outlook 2003 Setup Instructions Page 2 of 13
In the next window, shown below, enter the exchange server name which will always be: mail.pushex.com
Select: Use Cached Exchange Mode
Enter your username which is usually in the format: firstname.lastname (all lower-case). (Actually, case doesn’t matter with usernames but, for consistency, we recommend using all lower-case.)
Click: More Settings…
There is now a short delay as Outlook tries, and
fails, to locate the Exchange server on the local
LAN.
Click: OK to dismiss the error message that will
appear about Exchange server not being available.
Also click Cancel on this window, which then
appears:

Outlook 2003 Setup Instructions Page 3 of 13
The More Settings… windows, with 5 tabs, will then appear:- (If it doesn’t, click More Settings.. again)
On the General tab we recommend changing the
box that says Microsoft Exchange Server to your
main email address.
(This will help identify this address if you are going to send
emails from other email addresses assigned to your account.)
On the Advanced tab there’s usually nothing to do.
If you have been given access to another person’s
mailbox in your group then this is where you add
their mailbox, so that their folders will show up in
Outlook. (If you have any mailboxes to add you’ll have to return to this
screen later, after successfully connecting to the Exchange
server, as you haven’t entered enough information yet for any
additional mailboxes to be found.)
Also, if you use Public Folders ,you can select the
box called Download Public Folder Favorites so
your favorite Public Folders will be available
off-line.

Outlook 2003 Setup Instructions Page 4 of 13
On the Security tab there’s only one job to do:-
Select the box labelled:-
Encrypt data between Microsoft Office Outlook
and Microsoft Exchange Server
(In Outlook 2003 the default is for this box not to be selected
but, to connect to our servers, it needs to be selected –
simple as that!)
The Connection tab is where you tell Outlook you will be connecting over the Internet:-
Select the box labelled:-
Connect to my Exchange mailbox using HTTP
Then click: Exchange Proxy Settings…

Outlook 2003 Setup Instructions Page 5 of 13
The Exchange Proxy Settings windows is where it’s easy to make a mistake so, take your time over this one.
If Outlook can’t connect, come back and check the settings here:-
We’ve shown
Basic Authentication selected
here because it will always
work. It will, however, require
you to enter your password
everytime you start Outlook,
which can be annoying.
Our servers will also accept NTLM authentication, which is the other choice in this window, and this will
allow Outlook to save your password.
Although NTLM was designed to be a more secure form of authentication than Basic, as all communications
take place over a strongly-encrypted SSL link, both forms of authentication are equally secure.
Windows XP Home cannot do NTLM authentication so, with that, the only choice is Basic.
Our advice is:-
1 – If you have Windows XP Home then use Basic Authentication.
2 – With any other version of Windows, try NTLM Authentication and if it won’t work change it to Basic.
There’s nothing to do on the Remote Mail tab so:-
Click: OK – OK – Next> - Finish
which takes you back to the Show Profiles window.

Outlook 2003 Setup Instructions Page 6 of 13
The Show Profiles window:-
The new pushex profile you’ve just created will
be visible in the top part of the window, along
with any other pre-existing profiles.
Select Always use this profile and then select
the pushex profile from the drop-down list so
that Outlook will use it the next time it starts.
Click: OK and close the Control Panel window if it’s open.
Outlook 2003 is now configured to access our Exchange servers.
Outlook 2003 Setup Instructions Page 7 of 13
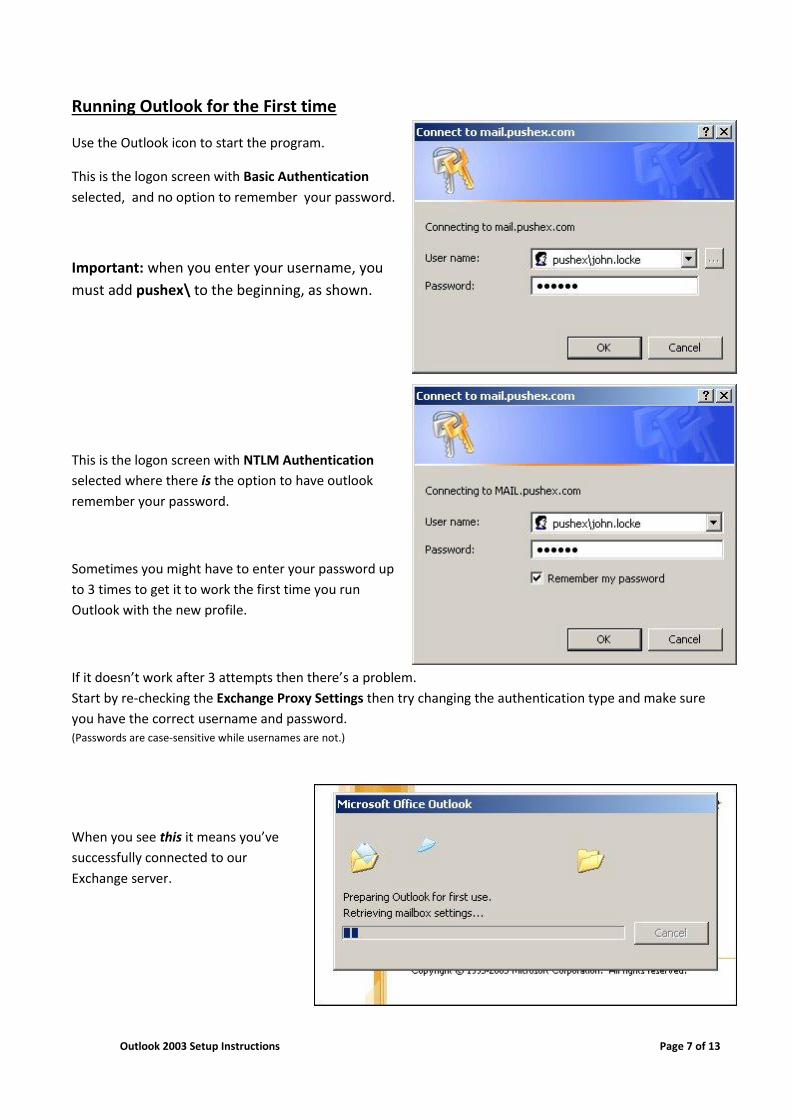
Running Outlook for the First time
Use the Outlook icon to start the program.
This is the logon screen with Basic Authentication
selected, and no option to remember your password.
Important: when you enter your username, you
must add pushex\ to the beginning, as shown.
This is the logon screen with NTLM Authentication
selected where there is the option to have outlook
remember your password.
Sometimes you might have to enter your password up
to 3 times to get it to work the first time you run
Outlook with the new profile.
If it doesn’t work after 3 attempts then there’s a problem.
Start by re-checking the Exchange Proxy Settings then try changing the authentication type and make sure
you have the correct username and password. (Passwords are case-sensitive while usernames are not.)
When you see this it means you’ve
successfully connected to our
Exchange server.

Outlook 2003 Setup Instructions Page 8 of 13
Optional Extra Setup Tasks
Here is a list of things we do after creating an new Outlook profile to streamline the way Outlook works with
our servers. Feel free to skip any steps you don’t agree with or that don’t fit the way you like to work.
1 - Change Outlook to always download headers first before it downloads the full items
This means that you will be alerted to new emails more quickly as they will show up in your Inbox before any
attachments have finished downloading.
Right-click on the word Connected in the bottom right
corner and select only:-
Download Headers and then Full Items and
On Slow Connections Only Download Headers
2 - Stop Outlook performing its own spam filtering
Our Internet-facing servers perform spam filtering on all incoming emails before they arrive in Exchange.
With spam filtering you only want one system to be in charge of determining if an email is spam, otherwise
you don’t know which system to
blame when an email is
miss-classified.
We recommend that you turn off
Outlook’s built-in Junk E-Mail
filtering feature.
In Outlook go to:-
Tools – Options… - Preferences -
Junk E-Mail… - Options
And select:-
No Automatic Filtering…
You should also check the
anti-virus program on your PC and,
if necessary, disable it’s anti-spam
features.

Outlook 2003 Setup Instructions Page 9 of 13
3 - Stop Outlook automatically removing older emails from your mailbox and storing
them in a local archive file
There’s no easy answer to which
method of email archiving is best.
Outlook 2003’s default method of
removing emails from your highly-
resilient Exchange mailbox which is
accessible from everywhere and storing
them in a file on a single PC is probably
not what you want.
We, therefore, recommend that you
disable AutoArchiving.
In Outlook go to:-
Tools – Options – Other – AutoArchive
And deselect:-
Run AutoArchive every
The best answer we have to the email
archiving problem is don’t do it;
leave everything, readily available in your main mailbox. Your 6gb of storage should be ample for this as long
as you delete emails that are unlikely to be needed for future reference and, if you send a lot of
attachements, delete older items in the Sent Items folder.
4 - Remove any Outlook Buttons you don’t use
There may be some of Outlook’s features that you don’t use, such as Tasks. If so, you can give more space in
the left-hand column to show emails folders by hiding the unused buttons.
Click on the double-chevrons (circled in red)
to reveal the menu.
Click: Show Fewer Buttons to remove the
lowest Outlook button.
Click: Navigation Pane Options… to change
the order in which the buttons are displayed,

Outlook 2003 Setup Instructions Page 10 of 13
5 - Make the Address Book show your contacts instead of the Global Address List
By default, the Address Book in Outlook displays the
Global Address List which is just a list of everyone in your
email group, and this might just be you.
It’s more useful if the Address Book displays your Outlook
contacts.
In Outlook, click on the Address Book icon to open the
Address Book and then click Tools – Options…
Select Contacts in the top 2 boxes.
Remove all other address books from this
section except Contacts.
Click: OK and then File – Close to close the
Address Book.
6 - Remove the Default Favorite Folders
In our opinion, none of the Favorite Folders you are given by
default in Outlook 2003 (ringed in red) are useful and can be
removed to give more space, in the left-hand column, to show
email folders .
Unread Mail might just be worth keeping.
Right-click on each Favorite folder, in turn and select:-
Remove from Favorite Folders

Outlook 2003 Setup Instructions Page 11 of 13
7 - Add the Public Folders you access often to your Favorite Folders
If you’re part of a group that uses Public Folders, it’s useful to place the ones you access frequently in
Favorite Folders to make them easy to access and to alert you to new items in them when they turn bold.
In Outlook, click on the Folder List icon to change the display in the
left-hand column to showing all folders.
Next, it’s a 2 stage process.
Stage 1
Find each Public Folder you want to add,
right-click on it and choose:-
Add to Favorites…
Then click: Add

Outlook 2003 Setup Instructions Page 12 of 13
Stage 2
Find each folder again in Favorites, right-click and
choose Add to Favorite Folders
The above process is for Public Folders that contain mail items. Public Folders that contain calendars or
contacts can’t appear in Favorite Folders but, completing the steps in Stage 1 and then selecting the folder
under Favorites, is enough to make these types of Public Folders available on the Outlook Contacts or
Calendar page.
Now click the Mail button to return the left-hand column to its normal appearance and the Public Folders
you added will now be in Favorite Folders:-
Occasionally, for some unknown reason,
a Public Folder may disappear from Favorite Folders,
but repeating Stage 2 above usually bings it back.

Outlook 2003 Setup Instructions Page 13 of 13
8 - Make the Junk E-Mail folder go bold only when there are unread emails in it
With our email system, “probable spam” is automatically routed to your Junk E-mail folder which
you may want to review occasionally in case genuine emails have been put there by mistake.
By default, the Junk E-mail folder in
Outlook 2003 shows as bold when it
contains any emails, but you may find it
more useful if it behaves like all the other
folders, and only shows as bold when
there are unread emails in it.
In Outlook:-
Right-click on the Junk Email folder and
select Properties
Change the selected option from:-
Show total number of items
to
Show number of unread items
9 - Other Tasks
Create an Email Signature
In Outlook go to:-
Tools – Options… - Mail Format – Signatures…
Select Spell-Checker Options
In Outlook go to:
Tools – Options… Spelling
Maybe you want to select: Always check spelling before sending