Embed Size (px)
Citation preview

Happy Tails I-frame Setup Guide
PetPoint | v.20101227

How to Setup PetPoint’s Happy Tails Search I-frame v. 20101227 Page 2 of 13
INTRODUCTION
PetPoint’s Happy Tails I-frame provides adopted pet data to your website on a daily basis, giving the world information about pets that have found happy homes!
This document describes in detail the steps for adding PetPoint’s Happy Tails I-frame to your website, including customization options. It additionally describes how to setup and update records in PetPoint so they are displayed in the Happy Tails I-frame.
For your convenience we have also created a Happy Tails Quick Setup Guide for easy installation.
You will need to be able to edit the actual HTML code of pages on your website – either via your website provider’s Administrative utilities (ex. Convio’s PageBuilder) or by editing the files locally in a software application such as Dreamweaver and posting them to your site.
Adding the Happy Tails I-frame should only take a matter of minutes to complete – the process is very similar to adding the Adoptable Search I-frame to your organization’s website.
Should you have any questions on deploying PetPoint’s Happy Tails I-frame after reviewing this document, please contact us at 866-630-7387 x400 or [email protected].
How to Setup PetPoint’s Happy Tails Search I-frame v. 20101227 Page 3 of 13
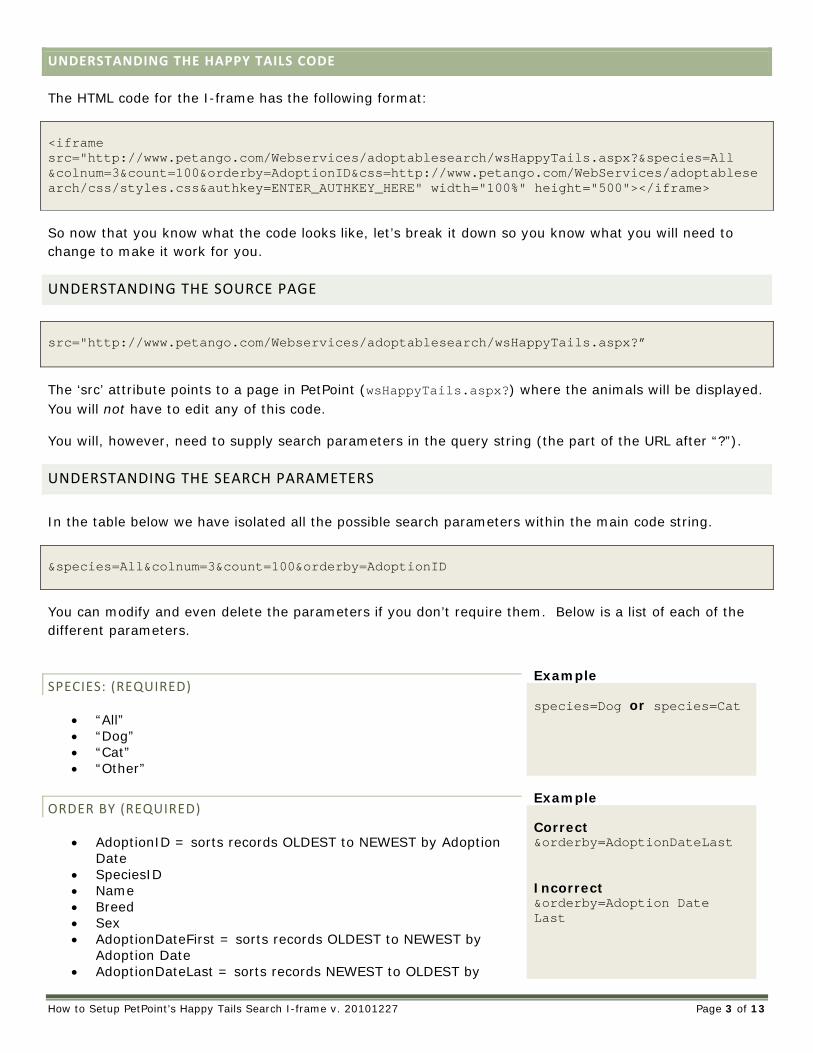
UNDERSTANDING THE HAPPY TAILS CODE
The HTML code for the I-frame has the following format:
<iframe src="http://www.petango.com/Webservices/adoptablesearch/wsHappyTails.aspx?&species=All &colnum=3&count=100&orderby=AdoptionID&css=http://www.petango.com/WebServices/adoptablesearch/css/styles.css&authkey=ENTER_AUTHKEY_HERE" width="100%" height="500"></iframe>
So now that you know what the code looks like, let’s break it down so you know what you will need to change to make it work for you.
UNDERSTANDING THE SOURCE PAGE
src="http://www.petango.com/Webservices/adoptablesearch/wsHappyTails.aspx?”
The ‘src’ attribute points to a page in PetPoint (wsHappyTails.aspx?) where the animals will be displayed. You will not have to edit any of this code.
You will, however, need to supply search parameters in the query string (the part of the URL after “?”).
UNDERSTANDING THE SEARCH PARAMETERS
In the table below we have isolated all the possible search parameters within the main code string.
&species=All&colnum=3&count=100&orderby=AdoptionID
You can modify and even delete the parameters if you don’t require them. Below is a list of each of the different parameters.
SPECIES: (REQUIRED)
• “All” • “Dog” • “Cat” • “Other”
Example
species=Dog or species=Cat
ORDER BY (REQUIRED)
• AdoptionID = sorts records OLDEST to NEWEST by Adoption Date
• SpeciesID • Name • Breed • Sex • AdoptionDateFirst = sorts records OLDEST to NEWEST by
Adoption Date • AdoptionDateLast = sorts records NEWEST to OLDEST by
Example
Correct &orderby=AdoptionDateLast
Incorrect &orderby=Adoption Date Last

Adoption Date • ExpiryDate = sorts records OLDEST to NEWEST by Happy Tails
Expiry Date • AnimalID • SiteID • DateOfBirth = sorts records OLDEST to YOUNGEST • AgeGroup • Random
You must enter in the Orderby selections as written above exactly. You can only choose one.
COUNT: (OPTIONAL)
Controls how many animal records will appear in the I-frame up to a maximum of 500.
Tip: This limit on records, along with the “random” orderby, can be useful if you wish to create a Happy Tails I-frame that randomly displays just a few records for your website’s home page.
Example
count=4 or count=100
COLUMNS (OPTIONAL) Number of columns in the list of Happy Tails pets
Example
&colnum=3 or &colnum=2
SITE: (OPTIONAL)
Do not include this parameter at all if you wish to display animals from all sites within PetPoint or if you do not have sites setup in your database. If you wish to filter your listing by animals adopted from a specific site, include one of your Site IDs from the Add/Edit Site screen in Admin Options as shown in the example above.
Note: Within PetPoint, Site IDs are in the format S00000123, however; only use the actual number in the parameter, such as “123”.
Example
&site=ENTER_SITEID_HERE
&site=123 or &site=456
You can change the search parameters at anytime and use as many I-frames as you want. For example, you can have one page pointing to Happy Tails for cats, another for dogs, and another for other animals.
UNDERSTANDING THE AUTHKEY
Your group will be issued a unique authentication key provided by PetPoint. Simply copy and paste the key it’s in entirety, replacing the “ENTER_AUTHKEY_HERE” text.
&AuthKey=ENTER_AUTHKEY_HERE > &AuthKey=hecwiewf23bnf98h23idf98yh2inf92nf922
Your AuthKey can be found anytime in PetPoint under Admin – Admin Options – Setup – Adoptable, Lost/Found, and Happy Tails Search Options.

How to Setup PetPoint’s Happy Tails Search I-frame v. 20101227 Page 5 of 13
UNDERSTANDING THE CSS PARAMETER
The next section of the code looks at the defined CSS for the information displayed in the I-frame. We have a CSS file available as a default shown here:
&css=http://www.petango.com/WebServices/adoptablesearch/css/styles.css
If your group wishes to change the look of the information displayed to best match your site’s color scheme, then simply add the URL to the CSS file you defined. If you are happy with the way the I-frame looks, you will not need to touch this part of the code.
UNDERSTANDING WIDTH AND HEIGHT TAGS
After the CSS code, we included two tags that will control the size of your I-frame and how it is displayed on your website.
Examples width="700" height="700" or width="90%" height="800"
To change the size of the I-frame, simply change the numerical values within the quotations. You may use either exact numbers or use percentages.

How to Setup PetPoint’s Happy Tails Search I-frame v. 20101227 Page 6 of 13
INSTALLING THE HAPPY TAILS I‐FRAME
Now that we have gone through the code in great detail, this section will explain how to install the I-frame on your website. Installing the Happy Tails I-frame is simply a matter of copying and pasting the supplied code, modifying the search string parameters to suit your needs then uploading your completed website files.
STEP 1
Highlight and copy a relevant code sample as your starting point: Code Sample #1 – Adopted Dogs
<iframe src="http://www.petango.com/Webservices/adoptablesearch/wsHappyTails.aspx?&species=Dog&colnum=3&count=100&orderby=AdoptionID&css=http://www.petango.com/WebServices/adoptablesearch/css/styles.css&authkey=ENTER_AUTHKEY_HERE" width="700" height="700"></iframe>
Code Sample #2 – Adopted Cats
<iframe src="http://www.petango.com/Webservices/adoptablesearch/wsHappyTails.aspx?&species=Cat&colnum=3&count=100&orderby=AdoptionID&css=http://www.petango.com/WebServices/adoptablesearch/css/styles.css&authkey=ENTER_AUTHKEY_HERE" width="700" height="700"></iframe>
Code Sample #3 – All Adopted Animals
<iframe src="http://www.petango.com/Webservices/adoptablesearch/wsHappyTails.aspx?&species=All&colnum=3&count=100&orderby=AdoptionID&css=http://www.petango.com/WebServices/adoptablesearch/css/styles.css&authkey=ENTER_AUTHKEY_HERE" width="700" height="700"></iframe>
STEP 2
As previously indicated, you will need to be able to edit the actual HTML code of pages on your website. There are several ways to display the Happy Tails I-frame on your web pages. You could create a single page for all your adopted animals (e.g. /HappyTails.html) and placing a single I-frame set to ‘species=All’. Another more popular option is to create separate pages for each species type (e.g. HappyTailsDogs.html, HappyTailCats.html etc. You can then change the species tag for each page ‘species=Dog’/’species=Cat’.

EXAMPLE
This example illustrates the Happy Tails I-frame code for a simple webpage called HappyTails.html.
Note: Your code will most likely look more complex, the important aspect of this is to decide where you want the I-frame to appear.
Next you must replace the ENTER_AUTHKEY_HERE text with the AuthKey supplied to your group.
Make sure there are no spaces before or after the AuthKey – spaces will result in an error.
STEP 3
The third step of this process is to save your website file, upload it to your server and confirm that it works. If the I-frame is too large you can change the size by adjusting the width and height tags at the end of the code string. If you are receiving errors after you upload the website files please contact [email protected]

How to Setup PetPoint’s Happy Tails Search I-frame v. 20101227 Page 8 of 13
CONFIGURING ANIMAL LISTING AND ANIMAL DETAIL PAGES
You can choose which fields and how long adopted animal listings are displayed on your Happy Tails animal listing and detail pages.
By default, the following fields display on the animal listing pages: • Animal Name • PetPoint Animal ID # • Species, Primary Breed & Secondary Breed
• Sex & Altered Status • Age (in years/months/days based Date of Birth)
By default, the following fields will display on the animal detail pages:
• Animal Name • PetPoint Animal ID # • Species, Primary Breed & Secondary Breed • Age (in years/months/days based Date of Birth) • Sex & Altered Status
• Size • Declawed • Primary Color & Secondary Color • Adoption Date • Happy Tails Memo
If you wish, you can choose to hide many of the above fields by applying a filter. These filters are global, meaning they will apply to all listings and animal detail pages you setup. To apply a filter, login into your PetPoint Database as an Administrator and go to Admin - Admin Options - Setup - Adoptable, Lost/Found and Happy Tails Options – then select the Happy Tails tab:
Select or deselect the different fields as you would like them to appear on your website & click Submit to save the changes. Please note that changes you make here will not be immediate – it will take 24 hours for the changes to take effect on your website.
Full documentation for configuring Happy Tails Search Options in PetPoint can be found in Online Help.

How to Setup PetPoint’s Happy Tails Search I-frame v. 20101227 Page 9 of 13
TESTING YOUR CSS AND CHECKING SOURCE CODE
Web designers can check the source code of the test page as an example of how to setup the I-frame for the group’s website at:
http://www.petango.com/webservices/testHappyTails.htm This page is a good way to experiment with parameters and test your CSS files.

How to Setup PetPoint’s Happy Tails Search I-frame v. 20101227 Page 10 of 13
RULES FOR THE HAPPY TAILS IFRAME LISTINGS
Now that we’ve shown you how to install the I-frame onto your website, it’s important to understand which animals will be displayed as well as how to control and update their information in PetPoint.
Only animals that have been processed through Outcome Adoption in PetPoint will appear in the Happy Tails I-frame. They will be published to the Happy Tails I-frame the day after the adoption is processed (regardless of Immediate or Deferred Release) and will stay posted until their Happy Tales Expiry Date or until the animal is processed through a subsequent Intake Return or Surrender.
Administrators have the ability to set a default time animals should appear on the Happy Tails I-frame, which is used to populate a Happy Tails Expiry Date on the Outcome Details page of the Adoption. They can do this in the Admin Options - Adoptable, Lost/Found, and Happy Tails Search Options page.
Users can fill in or change the default Happy Tails Expiry Date on the Outcome Details when processing the adoption, setting it to a future date or a date in the past (for example, if they do not wish to have the animal displayed in the Happy Tails I-frame). Animals without a Happy Tails Expiry Date will be posted to the I-frame indefinitely.
Finally, Administrators can update the Happy Tails Expiry Dates as-needed in Admin Options - Utilities - Edit Intake/Outcome. This can be useful for manually expiring an animal’s existing listing, adding a

previously expired animal to the listing, or extending a particular animal’s listing in the I-frame.
HOW TO A ADD HAPPY TAILS MEMO TO ANIMAL RECORDS
In addition, you can write a ‘Happy Tail’ to add to each animal’s record. To add a memo during the outcome adoption you may click the Animal Memo button at the bottom of the Outcome Details screen.
You may also add a memo anytime after the adoption has been completed by going to Edit - Animal and searching for the animal’s record. Here you can click on the Memo button and add in the story.
Either way, the animal memo pop up will open, where you can add the story under the “Happy Tails” memo type. Don’t forget to Submit when done.
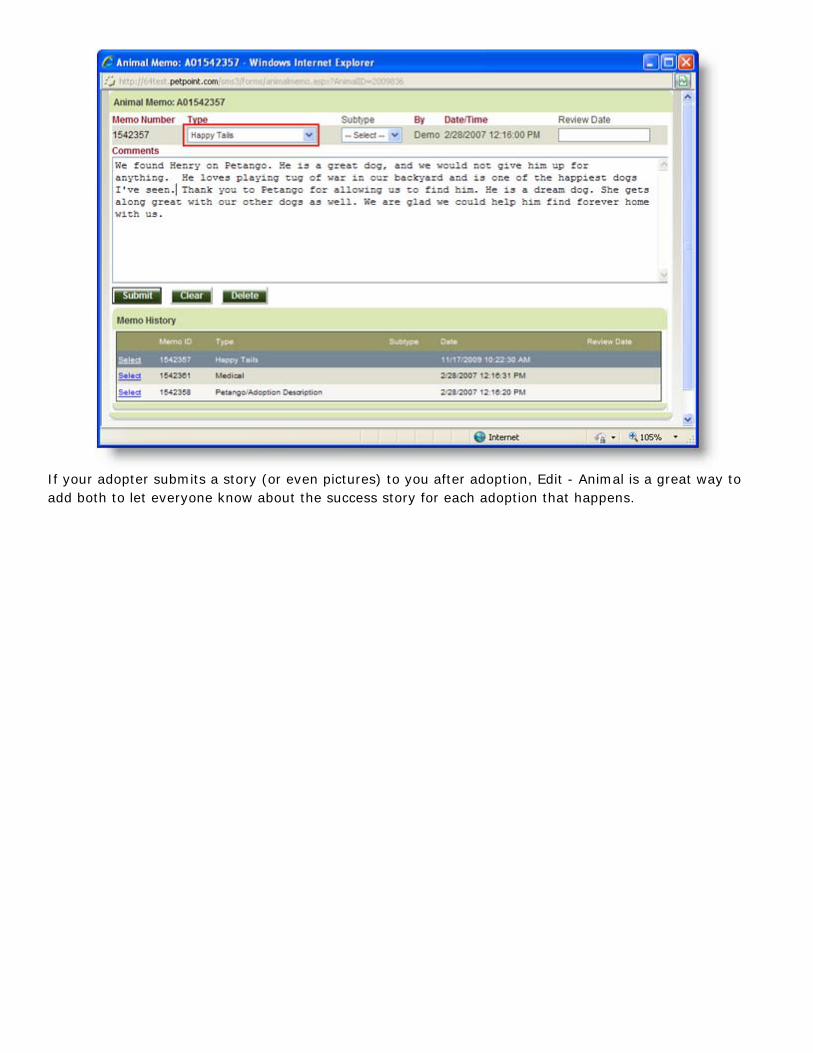
If your adopter submits a story (or even pictures) to you after adoption, Edit - Animal is a great way to add both to let everyone know about the success story for each adoption that happens.

How to Setup PetPoint’s Happy Tails Search I-frame v. 20101227 Page 13 of 13
HOW TO DISPLAY YOUR ‘OTHER’ ANIMALS
Animal Type / Species / Breed: PetPoint’s Cat & Dog breeds automatically map over to the I-frame, meaning no additional setup is required for dogs & cats to appear in the I-frame. However, if you have setup other Animal Types / Species / Breeds within PetPoint (such as Rabbits, Ferrets, Birds, etc.), an Administrator will need to map each of the Species and Breeds to a corresponding Petango Animal Type and Breed.
Species: In Admin Options – Add/Edit Field Values – Species, each Species has a “Petango Associated Value” drop-down containing all of the choices we provide in the Petango “Animal Type” list (Cat, Dog, BarnYard, Bird, Horse, Pig, Rabbit, Reptile, and Small&Furry). Make sure each Species you have created is mapped to a corresponding choice from this Petango Associated Value list:
Breeds: In Admin Options – Add/Edit Field Values – Breeds, each Breed has a “Petango Associated Value” drop-down containing all of the breed choices we provide in the Petango “Breed” list (i.e. – Dwarf, Lop Eared, etc. for Rabbits; etc). Make sure each Breed you have created is mapped to a corresponding choice from this Petango Associated Value list: