Embed Size (px)
Citation preview
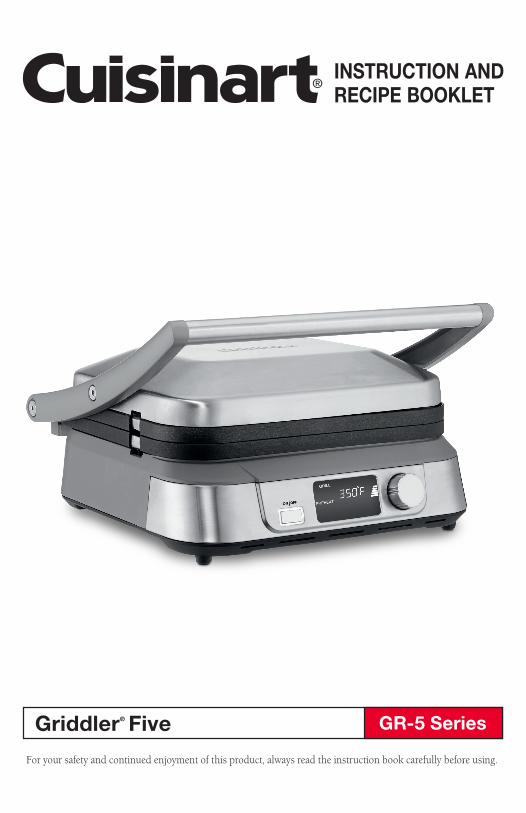
Griddler® Five GR-5 Series
INSTRUCTION AND RECIPE BOOKLET

3
IMPORTANT SAFEGUARDS 1. READ ALL INSTRUCTIONS.
2. Do not touch hot surfaces; use handles or knobs.
3. To protect against fire, electric shock, and injury to persons, DO NOT IMMERSE CORD OR PLUG in water or other liquids.
4. Close supervision is necessary when any appliance is used by or near children or individuals with certain disabilities.
5. Unplug from outlet when not in use and before cleaning. Allow to cool before putting on or taking off parts, and before cleaning appliance.
6. Do not operate any appliance with a damaged cord or plug, or after the appliance has malfunctioned or has been damaged in any manner. Return the appliance to the nearest Cuisinart® Consumer Service Center for examination, repair or adjustment.
7. The use of accessory attachments not recommended by Cuisinart may result in fire, electric shock, or risk of injury to persons.
8. Do not use outdoors.
9. Do not let power cord hang over edge of table or counter, or touch hot surfaces.
10. Do not place on or near hot gas or electric burner, or in a heated oven.
11. Unplug the unit when finished using.
12. Do not use appliance for other than its intended use.
13. Extreme caution must be exercised when moving an appliance containing hot oil or other hot liquids.
14. To disconnect, press the ON/OFF button to turn the unit off.
15. WARNING: TO REDUCE THE RISK OF FIRE OR ELECTRIC SHOCK, ONLY AUTHORIZED PERSONNEL SHOULD DO REPAIRS.
16. Do not operate your appliance in an appliance garage or under a wall
cabinet. When storing in an appliance garage, always unplug the unit from the electrical outlet. Not doing so could create a risk of fire, especially if the appliance touches the walls of the garage or the door touches the unit as it closes.
SAVE THESE INSTRUCTIONSFOR HOUSEHOLD USE ONLYSPECIAL CORD SET INSTRUCTIONSA short power-supply cord is provided to reduce the risks resulting from becoming entangled in or tripping over a longer cord. Longer extension cords are available and may be used if care is exercised in their use.
If a long extension cord is used, the marked electrical rating of the extension cord should be at least as great as the electrical rating of the appliance, and the longer cord should be arranged so that it will not drape over the countertop or tabletop where it can be pulled on by children or animals, or tripped over.
NOTICEThis appliance has a polarized plug (one blade is wider than the other). As a safety feature, this plug will fit in a polarized outlet only one way. If the plug does not fit in the outlet, reverse the plug. If it still does not fit, contact a qualified electrician. Do not modify the plug in any way.
CONTENTSImportant Safeguards ............................ 3 Parts and Features ................................ 4 Before the First Use ............................... 4 Getting to Know Your Control Panel ...... 5 The Griddler® Five Does It All ................ 6 Assembly Instructions ........................... 7 Operating Instructions ........................... 9 Tips & Hints .......................................... 10 Cleaning and Maintenance .................. 11 Storage ................................................. 11 Warranty ............................................... 11 Recipes ................................................. 13

57
4
8
6
9
1 2
3b
3a
4
PARTS AND FEATURES1. Top Cover
Solid construction with stainless steel, self-adjusting cover
2. Stainless Steel Handle Sturdy stainless steel handle adjusts cover to accommodate thickness of food
3. Removable and Reversible Cooking Plates Nonstick and dishwasher safe for easy cleanup
a. Grill Side: Perfect for grilling steak, burgers, chicken and vegetables
b. Griddle Side: Prepare flawless pancakes, eggs, bacon and seared foods
4. Control Panel and Display (see page 5)
5. Drip Tray Collects grease and removes from base for easy cleanup (top rack dishwasher safe)
6. Drip Spout Allows grease to drip into the drip tray
7. Cleaning/Scraping Tool Helps clean grill and griddle plates after cooking (top rack dishwasher safe)
8. Plate Release Buttons Push in to release and remove cooking plates
9. Hinge Release Lever Allows the cover to extend back for cooking in the flat position
10. BPA Free All parts that come in contact with food are BPA free
BEFORE THE FIRST USERemove all packing materials and any promotional labels or stickers from your grill. Be sure all parts (listed under Parts and Features) of your new appliance have been included before discarding any packing materials. You may want to keep the box and packing materials for use at a later date.
ATTENTION: Be sure to unpack your new Cuisinart® Griddler® Five carefully. It comes with two accessories: an integrated drip tray inserted at the base of the unit, and a scraping tool. The Griddler® Five base and cover will become hot during cooking. If you need to adjust the cover or to lay the product in the flat position, be sure to use an oven mitt to protect your hand. The reversible grill and griddle plates are interchange- able.
Before using your Cuisinart® Griddler®
Five for the first time, remove any dust from shipping by wiping the base, cover and controls with a damp cloth. Thoroughly clean cooking plates, drip tray and scraping tool. Refer to Assembly Instructions for plate removal.

1 32
A
F
D
B
E
C
5
GETTING TO KNOW YOUR CONTROL PANEL
1. ON/OFF Button Press to turn unit on and off.
2. Large LCD The backlit LCD screen is easy to read; it displays the cooking function (Grill or Griddle), Temperature,Timer, Sear, Preheat and the Preheat Bars.
3. Select and Confirm Dial Use to select cooking function (Grill or Griddle). Set the temperature and the count-up or countdown timer. Use dial to increase temperature and time if desired.
A. Cooking Function Grill or Griddle
B. Temperature 175˚F – 450˚F in 25˚ increments
C. Timer Set to count up or count down. See operating instructions.
D. Preheat Appears in LCD when Griddler® Five is heating.
E. Preheat Bars Appear when Griddler® Five is heating, to show heat-up progress.
F. Sear Appears when Griddler® Five is in Sear Mode – 450˚F. Searing will last for 2 minutes, then temperature will change to 425˚F.
START-UP SCREEN
6
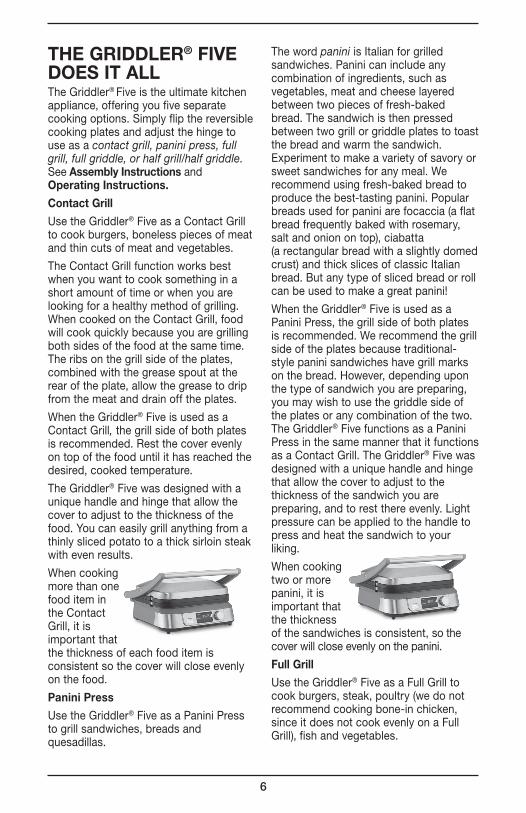
THE GRIDDLER® FIVE DOES IT ALLThe Griddler® Five is the ultimate kitchen appliance, offering you five separate cooking options. Simply flip the reversible cooking plates and adjust the hinge to use as a contact grill, panini press, full grill, full griddle, or half grill/half griddle. See Assembly Instructions and Operating Instructions.
Contact Grill
Use the Griddler® Five as a Contact Grill to cook burgers, boneless pieces of meat and thin cuts of meat and vegetables.
The Contact Grill function works best when you want to cook something in a short amount of time or when you are looking for a healthy method of grilling. When cooked on the Contact Grill, food will cook quickly because you are grilling both sides of the food at the same time. The ribs on the grill side of the plates, combined with the grease spout at the rear of the plate, allow the grease to drip from the meat and drain off the plates.
When the Griddler® Five is used as a Contact Grill, the grill side of both plates is recommended. Rest the cover evenly on top of the food until it has reached the desired, cooked temperature.
The Griddler® Five was designed with a unique handle and hinge that allow the cover to adjust to the thickness of the food. You can easily grill anything from a thinly sliced potato to a thick sirloin steak with even results.
When cooking more than one food item in the Contact Grill, it is important that the thickness of each food item is consistent so the cover will close evenly on the food.
Panini Press
Use the Griddler® Five as a Panini Press to grill sandwiches, breads and quesadillas.
The word panini is Italian for grilled sandwiches. Panini can include any combination of ingredients, such as vegetables, meat and cheese layered between two pieces of fresh-baked bread. The sandwich is then pressed between two grill or griddle plates to toast the bread and warm the sandwich. Experiment to make a variety of savory or sweet sandwiches for any meal. We recommend using fresh-baked bread to produce the best-tasting panini. Popular breads used for panini are focaccia (a flat bread frequently baked with rosemary, salt and onion on top), ciabatta (a rectangular bread with a slightly domed crust) and thick slices of classic Italian bread. But any type of sliced bread or roll can be used to make a great panini!
When the Griddler® Five is used as a Panini Press, the grill side of both plates is recommended. We recommend the grill side of the plates because traditional-style panini sandwiches have grill marks on the bread. However, depending upon the type of sandwich you are preparing, you may wish to use the griddle side of the plates or any combination of the two. The Griddler® Five functions as a Panini Press in the same manner that it functions as a Contact Grill. The Griddler® Five was designed with a unique handle and hinge that allow the cover to adjust to the thickness of the sandwich you are preparing, and to rest there evenly. Light pressure can be applied to the handle to press and heat the sandwich to your liking.
When cooking two or more panini, it is important that the thickness of the sandwiches is consistent, so the cover will close evenly on the panini.
Full Grill
Use the Griddler® Five as a Full Grill to cook burgers, steak, poultry (we do not recommend cooking bone-in chicken, since it does not cook evenly on a Full Grill), fish and vegetables.

7
Full Grill refers to using the Griddler® Five with the cover lying flat, creating a double flat cooking surface. In this position, the foods you are grilling will have to be turned over for cooking. When the Griddler® Five is used as a Full Grill, the grill side of both plates should be used.
Cooking on the Full Grill is the most versatile method of using the Griddler® Five.
With the Full Grill, you have double the surface area (200 sq. inches) for grilling. You have the option of cooking different types of foods on separate plates without combining their flavors, or cooking large amounts of the same type of food.
The Full Grill also accommodates different cuts of meat with varying thicknesses, allowing you to cook each piece to your liking.
Full Griddle
Use the Griddler® Five as a Full Griddle to cook pancakes, eggs, French toast, hash browns and breakfast meats.
When you use the Griddler® Five as a Full Griddle, open the cover so it lies flat, creating a double, flat cooking surface. In this position, the foods you are preparing will have to be turned over for cooking. When using this cooking function, the griddle side of both plates should be used.
Cooking on the Full Griddle is a wonderful way to prepare breakfast for two or for a large family. The large surface area allows you to cook a variety of different foods at the same time, or large amounts of your favorite food.
Half Grill/Half Griddle
Use the Griddler® Five as a Half Grill/Half Griddle in order to create full meals like bacon and eggs or steak and potatoes at the same time.
When using the Griddler® Five® as a Half Grill/Half Griddle, simply place the unit in the flat position and insert the griddle plate on the lower portion of the Griddler® Five and the grill plate on the upper portion.
ASSEMBLY INSTRUCTIONSPlace Griddler® Five on a clean, flat surface where you intend to cook. The Griddler® can be positioned in three ways:
Closed Position – Upper plate/cover rests flat on lower plate/base. This is your starting and heating position when using the Contact Grill or Panini Press functions.
Open Position – Upper plate/cover is open slightly beyond a 90˚ angle. Open the cover to this position before using the Griddler® Five as a Contact Grill or Panini Press.
To adjust the Griddler® Five to this position, simply lift the handle until you feel it come to a resting position. The unit will stay in this position until you close the cover or continue to open it to the flat position.
The cover will stay in the upright position until you lower the handle for cooking. When this is done, the cover will release itself so that it lies flat on the top of the food you are preparing. This allows you to cook your food evenly from both top and

Hinge release lever
Lower plate
release button
Upper plate
release button
8
bottom. When you lift the handle to open the Griddler® Five after cooking, the cover will remain floating. In order to lock the cover back into the upright position, you must close the Griddler® Five, without any food in place, and open it again.
Flat Position – Upper plate/cover is level with lower plate/base. The upper and lower plates line up to create one large cooking surface. The Griddler® Five is in this position when it is used as a Full Grill, Full Griddle, or Half Grill/Half Griddle.
To adjust the Griddler® Five to this position, locate the hinge release lever on the right arm.
With your left hand on the handle, use your right hand to slide the lever toward you. Push the handle back until the cover rests flat on the counter. To change position, lift the handle and cover to return it to the closed position.
If the Griddler® Five is already in the open position and you wish to adjust it to the flat position, pull the handle slightly toward you and then lift the hinge release lever. Push the handle back until the cover rests in the flat position. Pulling the handle forward slightly before lifting the hinge release lever will take some of the pressure off of the hinge and you will be able to adjust the Griddler® Five more easily.
To insert cooking plates
Adjust the Griddler® Five to the flat position with the control panel directly in front of you. Insert one plate at a time. Each plate is designed to fit in either the upper housing or the lower housing of the Griddler® Five.
If you are facing the Griddler® Five, the drip spout should be at the rear of the plate. Locate the metal brackets at the center of the housing. Tilt the back end of
the plate and line up the cutouts at the back of the plate with the metal brackets. Slide the plate underneath the brackets and push down the front end of the plate. It will snap into place. Turn the Griddler® Five around and insert the second plate on either its grill or griddle side into the upper housing as you did with the first plate.
To remove cooking plates
Once the Griddler® Five is cooled, adjust to flat position. Locate the plate release button on one side of the unit. Press firmly on button and the plate will pop up slightly from the base. Grasp the plate with two hands, slide it out from under the metal brackets, and lift it out of the base. Press on the other plate release button to remove the other cooking plate in the same manner.
To position drip tray
One side of the base has a slot provided for the drip tray. Slide the drip tray into the base according to the instruction on the tray.
Grease from the food will run off the plates through the drip spout and into the drip tray. Slowly remove the drip tray. Grease should be safely disposed of after the Griddler® Five has cooled down completely. The drip tray can be cleaned in the dishwasher.
9
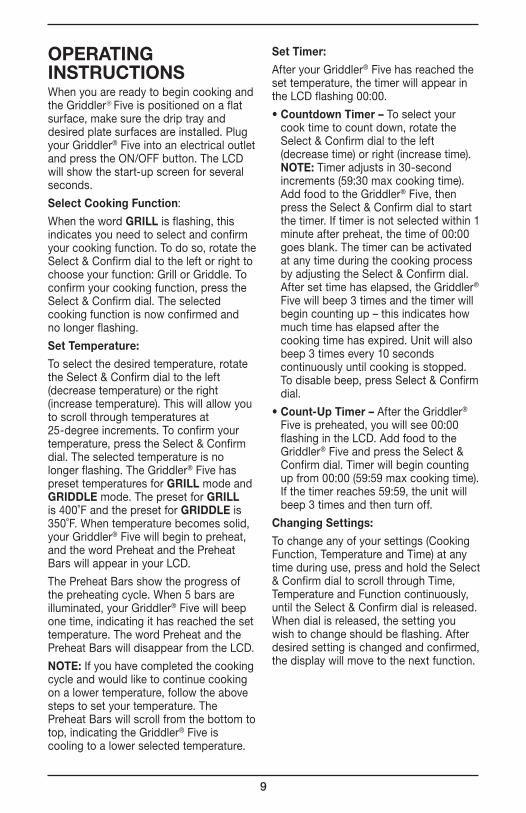
OPERATING INSTRUCTIONSWhen you are ready to begin cooking and the Griddler®Five is positioned on a flat surface, make sure the drip tray and desired plate surfaces are installed. Plug your Griddler® Five into an electrical outlet and press the ON/OFF button. The LCD will show the start-up screen for several seconds.
Select Cooking Function:
When the word GRILL is flashing, this indicates you need to select and confirm your cooking function. To do so, rotate the Select & Confirm dial to the left or right to choose your function: Grill or Griddle. To confirm your cooking function, press the Select & Confirm dial. The selected cooking function is now confirmed and no longer flashing.
Set Temperature:
To select the desired temperature, rotate the Select & Confirm dial to the left (decrease temperature) or the right (increase temperature). This will allow you to scroll through temperatures at 25-degree increments. To confirm your temperature, press the Select & Confirm dial. The selected temperature is no longer flashing. The Griddler® Five has preset temperatures for GRILL mode and GRIDDLE mode. The preset for GRILL is 400˚F and the preset for GRIDDLE is 350˚F. When temperature becomes solid, your Griddler® Five will begin to preheat, and the word Preheat and the Preheat Bars will appear in your LCD.
The Preheat Bars show the progress of the preheating cycle. When 5 bars are illuminated, your Griddler® Five will beep one time, indicating it has reached the set temperature. The word Preheat and the Preheat Bars will disappear from the LCD.
NOTE: If you have completed the cooking cycle and would like to continue cooking on a lower temperature, follow the above steps to set your temperature. The Preheat Bars will scroll from the bottom to top, indicating the Griddler® Five is cooling to a lower selected temperature.
Set Timer:
After your Griddler® Five has reached the set temperature, the timer will appear in the LCD flashing 00:00.
• Countdown Timer – To select your cook time to count down, rotate the Select & Confirm dial to the left (decrease time) or right (increase time). NOTE: Timer adjusts in 30-second increments (59:30 max cooking time). Add food to the Griddler® Five, then press the Select & Confirm dial to start the timer. If timer is not selected within 1 minute after preheat, the time of 00:00 goes blank. The timer can be activated at any time during the cooking process by adjusting the Select & Confirm dial. After set time has elapsed, the Griddler® Five will beep 3 times and the timer will begin counting up – this indicates how much time has elapsed after the cooking time has expired. Unit will also beep 3 times every 10 seconds continuously until cooking is stopped. To disable beep, press Select & Confirm dial.
• Count-Up Timer – After the Griddler® Five is preheated, you will see 00:00 flashing in the LCD. Add food to the Griddler® Five and press the Select & Confirm dial. Timer will begin counting up from 00:00 (59:59 max cooking time). If the timer reaches 59:59, the unit will beep 3 times and then turn off.
Changing Settings:
To change any of your settings (Cooking Function, Temperature and Time) at any time during use, press and hold the Select & Confirm dial to scroll through Time, Temperature and Function continuously, until the Select & Confirm dial is released. When dial is released, the setting you wish to change should be flashing. After desired setting is changed and confirmed, the display will move to the next function.

10
TIPS & HINTS• It may take up to 10 minutes to reach
operating temperature, depending on the temperature level that was set.
• For cooking recommendations, refer to the Cooking Guide and Food Temperature Chart on pages 26–27 of the Recipe Book.
• Always exercise caution when handling the Griddler® Five during cooking, as the Griddler® Five housing will become hot during use. To open the Griddler® Five, grasp the handle. The arms are made of die-cast aluminum and will become hot during use. Do not touch them during or immediately following cooking.
• The cover is made of stainless steel and will become very hot and should not be touched during or immediately following cooking. If you need to adjust the cover, be sure to use an oven mitt to prevent burns.
• The lower housing is made of plastic and can become very warm. If you need to move the Griddler® Five during cooking, be sure to handle it from the base only while wearing an oven mitt. Do not touch the cover.
• Allow the Griddler® Five to cool down before handling (at least 30 minutes).
• The first time you use the Griddler® Five, it may have a slight odor and may smoke a bit. This is normal and common to appliances with nonstick surfaces.
• The Griddler® Five comes with a black cleaning/scraping tool. This can be used for cleaning both the grill and griddle sides of the plates after you have finished cooking and the unit has cooled down completely (at least 30 minutes). Using the cleaning tool on a hot surface for too long will cause the plastic to melt.
• Never use metal utensils, as they will scratch the nonstick plates.
• Never leave plastic utensils in contact with the hot grill plates. This includes the provided cleaning tool.
• In between recipes, use a wooden or heatproof plastic utensil to scrape excess food buildup through grease channels and into drip tray. Then, carefully wipe off any residue with a paper towel before proceeding with next recipe.

11
CLEANING AND MAINTENANCE Allow the unit to cool down for at least 30 minutes before handling.
• Once you have finished cooking, press the ON/OFF button to power off and unplug the power cord from the wall outlet.
• Use the cleaning/scraping tool to remove any leftover food from the cooking plates. The scraping tool can be washed by hand or in the top rack of the dishwasher.
• Dispose of grease from the drip tray once cooled. The drip tray can be cleaned by hand or in the top rack of the dishwasher.
• Press the plate release buttons to remove plates from the housing. Be sure that the plates have cooled completely before handling (at least 30 minutes). The cooking plates can be washed in the dishwasher. Do not use metallic objects such as knives or forks for cleaning. Do not use a scouring pad for cleaning; the nonstick coating can be damaged.
• If you have been cooking seafood, wipe the cooking plates with lemon juice to prevent seafood flavor transferring to the next recipe.
• The housing base, cover and control panel can be wiped clean with a soft, dry cloth. For tough stains, dampen cloth. Never use an abrasive cleaner or harsh pad.
Any other servicing should be performed by an authorized service representative.
STORAGEAlways make sure the Griddler® Five is cool and dry before storing.
The power cord can be wrapped around the back of the base for storing.
The cooking plates and drip tray should be stored in the Griddler® Five when not in use. The scraping tool can be stored in a drawer or cabinet.
LIMITED THREE-YEAR WARRANTY (U.S. and Canada only)This warranty is available to consumers only. You are a consumer if you own a Cuisinart® Griddler® Five that was purchased at retail for personal, family or household use. Except as otherwise required under applicable law, this warranty is not available to retailers or other commercial purchasers or owners.
We warrant that your Cuisinart® Griddler® Five will be free of defects in materials and workmanship under normal home use for 3 years from the date of original purchase.
We recommend that you visit our website, www.cuisinart.com for a fast, efficient way to complete your product registration. However, product registration does not eliminate the need for the consumer to maintain the original proof of purchase in order to obtain the warranty benefits. In the event that you do not have proof of purchase date, the purchase date for purposes of this warranty will be the date of manufacture.
If your Cuisinart® Griddler® Five should prove to be defective within the warranty period, we will repair it, or if we think necessary, replace it. To obtain warranty service, simply call our toll-free number 1-800-726-0190 for additional information from our Consumer Service Representatives or send the defective product to Consumer Service at Cuisinart, 7475 North Glen Harbor Blvd., Glendale, AZ 85307.
To facilitate the speed and accuracy of your return, please enclose $10.00 for shipping and handling of the product.
Please pay by check or money order made payable to Cuisinart (California residents need only supply proof of purchase and should call 1-800-726-0190 for shipping instructions).
NOTE: For added protection and secure handling of any Cuisinart® product that is being returned, we recommend you use a traceable, insured delivery service. Cuisinart cannot be held responsible for in-transit damage or for packages that are not delivered to us. Lost and/or damaged products are not covered under warranty.
Please be sure to include your return address, daytime phone number, description of the product defect, product model # (located on bottom of product), original date of purchase, and any other information pertinent to the product’s return.

12
CALIFORNIA RESIDENTS ONLY
California law provides that for In-Warranty Service, California residents have the option of returning a nonconforming product (A) to the store where it was purchased or (B) to another retail store which sells Cuisinart products of the same type.
The retail store shall then, at its discretion, either repair the product, refer the consumer to an independent repair facility, replace the product, or refund the purchase price less the amount directly attributable to the consumer’s prior usage of the product. If the above two options do not result in the appropriate relief to the consumer, the consumer may then take the product to an independent repair facility if service or repair can be economically accomplished. Cuisinart and not the consumer will be responsible for the reasonable cost of such service, repair, replacement, or refund for nonconforming products under warranty.
California residents may also, according to their preference, return nonconforming products directly to Cuisinart for repair, or if necessary, replacement, by calling our Consumer Service Center toll-free at 1-800-726-0190.
Cuisinart will be responsible for the cost of the repair, replacement, and shipping and handling for such products under warranty.
BEFORE RETURNING YOUR CUISINART® PRODUCTYour Cuisinart® Griddler® Five has been manufactured to the strictest specifications and has been designed for use only in 120 volt outlets and only with authorized accessories and replacement parts. This warranty expressly excludes any defects or damages caused by attempted use of this unit with a converter, as well as use with accessories, replacement parts or repair service other than those authorized
by Cuisinart. This warranty does not cover any damage caused by accident, misuse, shipment or other than ordinary household use. This war-ranty excludes all incidental or consequential damages. Some states do not allow the exclusion or limitation of these damages, so these exclusions may not apply to you.
This Warranty gives you specific legal rights, and you may also have other rights, which vary from state to state.
Important: If the nonconforming product is to be serviced by someone other than Cuisinart’s Authorized Service Center, please remind the servicer to call our Consumer Service Center at 1-800-726-0190 to ensure that the problem is properly diagnosed, the product is serviced with the correct parts, and to ensure that the product is still under warranty.
©2017 Cuisinart150 Milford Road
East Windsor, NJ 08520Printed in China
17CE028511
Trademarks or service marks referred to herein are the trademarks or service marks of their respective owners.
IB-15045-ESP

13
RECIPESBlueberry Buttermilk Pancakes ........................................................................ 14
Breakfast Tortas ............................................................................................... 14
Challah French Toast ........................................................................................ 15
Mini Hash Browns ........................................................................................... 15
Grilled Green Beans with Walnut-Mint Pesto ................................................... 16
Grilled Peach Salad .......................................................................................... 16
Grilled Vegetable Salad .................................................................................... 17
Black Bean Veggie Burger ................................................................................ 17
Buffalo Chicken Quesadillas ............................................................................ 18
Chermoula Salmon with Grilled Potatoes......................................................... 19
Cuban Sandwich .............................................................................................. 19
Greek-Style Kebabs ......................................................................................... 20
Grilled Pizza with Bacon and Olives ................................................................. 20
Hamburgers with Caramelized Onions and Gruyère ........................................ 21
Italian Panini with Grilled Chicken .................................................................... 21
Latin Pork Chops .............................................................................................. 22
Shrimp Fajitas ................................................................................................... 22
Skirt Steak with Chimichurri Sauce .................................................................. 23
Toasted Avocado, Cheese and Tomato Panini ................................................. 24
Chocolate Hazelnut Panini with Strawberries .................................................. 24
Grilled Pineapple .............................................................................................. 25
S’more Panini ................................................................................................... 25
14
Blueberry Buttermilk Pancakes
These pancakes are light and fluffy with a nice tang thanks to the buttermilk and lemon.
Plate Side: GriddleGriddler® Cooking Position: Open and flat
Makes about twelve, 4-inch pancakes
1½ cups unbleached, all-purpose flour
1½ teaspoons baking powder½ teaspoon baking soda¼ teaspoon kosher salt¼ teaspoon ground cinnamon1½ cups buttermilk 2 large eggs1 tablespoon pure maple syrup½ teaspoon pure vanilla extract1 cup fresh blueberries½ teaspoon grated lemon zest1 teaspoon unsalted butter,
optional
1. Put the dry ingredients, through the cinnamon, in a large mixing bowl. Whisk to combine; reserve.
2. Combine the buttermilk, eggs, maple syrup, and vanilla extract and whisk well. Add to the reserved dry ingredients and whisk until just combined (dry sections are OK). Add the blueberries and lemon zest and fold to incorporate, but do not overmix or the pancakes will be tough.
3. Turn on the Cuisinart® Griddler®. Select Griddle and set to 350°F.
4. Once preheated, use a ¼-cup measure, drop batter onto preheated griddle (if you like extra-buttery pancakes, put 1 teaspoon of butter on each plate and melt before dropping batter on plates), and set the count-up timer. Cook pancakes until bubbles form, about 4 to 5 minutes; flip and cook until done, about 3 minutes longer.
5. Transfer to warm plates to serve. As you finish each batch of pancakes, you can keep them warm on a wire rack placed on a baking sheet in a low oven (200°F). Repeat until all the batter is used.
Nutritional information per serving (2 pancakes): Calories 189 (32% from fat) • carb. 24g • pro. 7g fat 7g • sat. fat 2g • chol. 171mg • sod. 203mg
calc. 102mg • fiber 1g
Breakfast Tortas
If you like spicy, add extra heat to this sandwich by using hot, smoked Spanish chorizo.
Plate Side: Bottom Griddle, Top Grill Griddler® Cooking Position: Open and flat, and then closed
Makes 2 tortas
1 tablespoon vegetable oil, divided
4 eggs2 Kaiser rolls, cut in half length-
wise½ avocado 2 ounces Spanish chorizo, thinly
sliced on the bias2 tablespoons store-bought green
salsa, plus more for serving2 slices Monterey Jack cheese
1. Turn on the Cuisinart® Griddler®. Select Griddle and set to 350°F.
2. Once preheated, drizzle 2 teaspoons of the vegetable oil onto the bottom plate. Crack the eggs onto the bottom plate. Set the count-up timer to 5 minutes. At the 3-minute mark (when the egg whites are set and opaque), flip the eggs. When time expires, transfer 2 of the eggs to the bottom of each roll. Reserve.
3. While the eggs are cooking, divide the avocado evenly between the inside surfaces of the 2 tops of bread. Use a fork to smash into an even layer. Reserve.
4. When the eggs finish cooking, put the chorizo on the bottom plate and close the grill. Set the temperature to 425°F. Once preheated, transfer the chorizo to the top of the eggs in an even layer.
5. Drizzle each sandwich with 1 tablespoon of the salsa. Top with one slice of cheese and the top of the bun with the smashed avocado.

15
6. Brush the tops of each sandwich with the remaining oil. Transfer the two sandwiches to the Griddler®. Close the Griddler® and set the count-up timer. Lightly press down on the sandwiches for about 20 seconds. Cook for about 4 minutes total, until the cheese is melted and the tops are lightly golden and grill marks are visible.
7. Remove from Griddler® and let cool slightly. Cut in half on the bias. Serve with more salsa on the side.
Nutritional information per serving (one torta): Calories 789 (59% from fat) carb. 42g • pro. 39g
fat 52g • sat. fat 18g • chol. 435mg • sod. 1229mg calc. 482mg • fiber 4g
Challah French Toast
We love using eggy challah bread for French toast. Thanks to its soft yet sturdy structure, it soaks up the custard better than any other bread, making for the most decadent breakfast.
Plate Side: GriddleGriddler® Cooking Position: Open and flat
Makes 8 servings
8 large eggs2 cups milk (we used reduced fat,
but any variety will do)1 tablespoon pure vanilla extract2 tablespoons pure maple syrup1 teaspoon ground cinnamon Pinch ground nutmeg1 to 2 pinches kosher salt8 slices challah bread, ¾ inch
thick Unsalted butter or coconut oil,
for griddle Confectioners’ sugar for
serving Fresh fruit for serving
1. Put the eggs, milk, vanilla extract, maple syrup, cinnamon, nutmeg and salt into a medium bowl. Whisk to fully combine and pour into a 13 x 9-inch baking dish.
2. Soak half of the bread in the milk mixture, turning so both sides are saturated.
3. While the bread is soaking, turn on the Cuisinart® Griddler®. Select Griddle and set to 350°F.
4. Once preheated, put the soaked bread on the hot griddle and select the count-up timer. Cook 3½ to 4 minutes per side. Soak remaining bread while first batch of French toast is cooking.
5. Remove and reserve the cooked French toast in a warm oven and then repeat with remaining soaked bread.
6. To serve, dust with confectioners’ sugar and top with fresh fruit and maple syrup, if desired.
Nutritional information per slice: Calories 195 (32% from fat) • carb. 25g • pro. 7g • fat 7g
sat. fat 3g • chol. 172mg • sod. 208mg calc. 116mg • fiber 1g
Mini Hash Browns
Quickly stirring the shredded potatoes in salted water and then squeezing out all liquid prevents them from oxidizing.
Plate Side: GriddleGriddler® Cooking Position: Open and flat
Makes 8 servings
2 cups water2 teaspoons plus 1 pinch kosher
salt, divided1 pound Yukon gold potatoes Pinch freshly ground black
pepper3 tablespoons vegetable oil, plus
more to brush plates
1. Put the water and 2 teaspoons of salt into a medium mixing bowl. Whisk until salt is fully dissolved; reserve.
2. Shred the potatoes to a medium thickness, using either a medium shredding disc of a Cuisinart® Food Processor or a box grater. Immediately transfer to the salted water and stir a few times. Drain and then put into a tea towel or dish towel and squeeze out all water.
3. Put the squeezed potatoes into a mixing bowl and toss with the

16
remaining pinch of salt, pepper and 3 tablespoons of the oil.
4. Turn on the Cuisinart® Griddler®. Select Griddle and set to 425°F.
5 Once preheated, brush the plates with additional oil and then, using a ¼-cup scoop or measuring cup, dollop the seasoned potatoes onto the hot, oiled griddle, 4 scoops per side, and select the count-up timer. Flatten slightly with a heatproof spatula. Brush the tops with additional oil and allow to cook until bottoms are browned and crispy, about 6 to 8 minutes. Carefully flip each hash brown and cook on the opposite side until very crispy, an additional 8 minutes.
6. Remove and transfer to a wire rack to maintain crispiness while cooking next batch of potatoes.
Nutritional information per hash brown: Calories 89 (51% from fat) • carb. 10g • pro. 1g • fat 5g
sat. fat 1g • chol. 0mg • sod. 146mg • calc. 7mg fiber 1g
Grilled Green Beans with Walnut-Mint Pesto
As these green beans with the pesto cool, the flavors will stand out even more, making them perfect for a party.
Plate Side: GrillGriddler® Cooking Position: Closed
Makes 2/3 cup pesto and 2½ cups green beans
1 small garlic clove1 ounce fresh mint leaves1 1-inch piece lemon peel ¼ cup toasted walnuts1 tablespoon shredded Parmesan2 teaspoons lemon juice½ teaspoon salt¼ teaspoon freshly ground black
pepper½ cup extra virgin olive oil 16 ounces green beans, washed
and trimmed1 tablespoon olive oil ½ teaspoon salt¼ teaspoon freshly ground black
pepper¼ teaspoon grated lemon zest
1. Make the walnut-mint pesto: Put the garlic in a mini chopper. Process until finely chopped. Scrape down the sides and add the mint leaves and lemon peel. Pulse to roughly chop. Add the remaining ingredients, except for the olive oil. Pulse to combine. With the food processor running, add the olive oil through the drip hole and process until mostly smooth. Reserve.
2. Turn on the Cuisinart® Griddler®. Select Grill and set the temperature to 425°F.
3. Toss the green beans with olive oil, salt and pepper. Once preheated, put half of the green beans on the bottom plate in a single layer. Close the Griddler® and set the count-up timer. Cook for about 8 minutes, until soft and grill marks are visible.Transfer grilled beans to a large bowl and repeat with remaining green beans.
4. When all the green beans are grilled, toss with 2 tablespoons of the walnut mint pesto* and the lemon zest.
* Remaining pesto maybe be stored in the refrigerator for up to 2 weeks and stirred into soups or pastas.
Nutritional information per serving (about 1 cup): Calories 199 (72% from fat) • carb. 12g • pro. 3g
fat 16g / sat. fat 2g • chol. 0mg • sod. 565mg calc. 100mg • fiber 5g
Grilled Peach Salad
Light summer lunch served in minutes.
Plate side: GrillGriddler® Cooking Position: Closed
Makes 2 servings
3 medium peaches, cut in half, pits removed
2 cups baby arugula4 ounces fresh mozzarella*2 ounces prosciutto1 teaspoon balsamic glaze1 tablespoon extra virgin olive oil Kosher salt Freshly ground black pepper
1. Turn on the Cuisinart® Griddler®. Select Grill and set to 400°F.
17
2. Once preheated, put peaches onto the grill, cut side down, and set the count-up timer. Close and grill for about 8 minutes, so that the peaches are soft and grill marks are visible.
3. While the peaches are grilling, put the arugula and cheese in a large mixing bowl. Toss with the olive oil, salt and pepper. Transfer to the center of a large, round platter. Arrange the peaches with prosciutto on top. Drizzle with balsamic glaze.
* If available, burrata makes a great substitute. Instead of tossing it with arugula, oil, salt and pepper, arrange it on top with the peaches and prosciutto.
Nutritional information per serving (based on 2 servings): Calories 389 (52% from fat) • carb. 24g •
pro. 22g • fat 22g • sat. fat 8g • chol. 435mg sod. 861mg calc. 158mg • fiber 4g
Grilled Vegetable Salad
This grilled salad makes a beautiful presentation, perfect for entertaining.
Plate Side: GrillGriddler® Cooking Position: Closed
Makes about 8 cups
1 medium red pepper (about 6 ounces), cut into strips 1 to 1½ inches wide
1 medium yellow pepper (about 6 ounces), cut into strips 1 to 1½ inches wide
1 medium zucchini (about 6.5 ounces), sliced horizontally into ¼-inch thick slices
1 small eggplant (about 10 ounces), sliced horizontally into ¼-inch thick slices
1 medium red onion (about 10 ounces), cut into wedges, keeping root intact
1 bunch asparagus (about 8 ounces), hard ends trimmed and discarded
1 tablespoon fresh lemon juice¼ cup extra virgin olive oil2 to 3 ounces ricotta salata, crumbled½ cup pitted Kalamata olives,
roughly chopped½ cup fresh basil leaves
1. Turn on Cuisinart® Griddler®. Select Grill and set to 425˚F.
2. Grill all veggies in batches in the closed position. They are done once charred with grill marks and soft. The peppers take about 8 minutes, zucchini 5 minutes, eggplant 6 to 8 minutes, red onion 5 minutes and asparagus 3 to 4 minutes. Once grilled, toss all the vegetables together with the lemon juice, olive oil, cheese, olives and basil leaves.
3. Serve immediately.
Nutritional information per serving (based on 8 servings): Calories 147 (65% from fat) • carb. 11g
pro. 3g • fat 11g • sat. fat 2g • chol. 6mg sod. 312mg • calc. 60mg • fiber 3g
Black Bean Veggie Burger
Packed with protein and studded with colorful, vitamin-rich veggies, this burger will be a hit among meat and non-meat eaters alike. A Cuisinart® Food Processor will make the prep quick, but it can easily be prepared by hand.
Plate Side: GriddleGriddler® Cooking Position: Open and flat
Makes 6 burgers
1 tablespoon olive oil, plus more to brush plates
2 garlic cloves, finely chopped¼ medium to large onion, finely
chopped½ teaspoon kosher salt, divided Pinch freshly ground black
pepper1 can (15 ounces) black beans,
drained and rinsed½ chipotle pepper in adobo,
chopped, plus 1 teaspoon adobo sauce
½ cup water, divided (this is approximate, you may not need the entire amount)
1 cup cooked quinoa½ cup diced carrot½ cup diced zucchini¼ cup chopped fresh cilantro6 hamburger buns1 avocado, sliced

18
1. Put the oil in a medium sauté pan set over medium heat. Once hot, add the garlic, onion and ¼ teaspoon of salt and pepper. Sauté until softened and fragrant, about 5 minutes. Add the black beans, chipotle and sauce, and enough water to keep the pan from being dry. Cook until beans are soft enough where they can be easily mashed, about 10 minutes, adding additional water as needed to prevent the pan from going dry.
2. Once beans are soft, add the remaining salt, quinoa, carrot and zucchini. Add additional water, about 2 to 3 tablespoons, stir, partially cover and reduce heat to medium-low and cook until vegetables are just slightly cooked, about 5 minutes.
3. Transfer mixture to a Cuisinart® Food Processor fitted with the chopping blade. Add the cilantro and pulse 4 to 5 times to slightly mash the mixture.
4. Turn on the Cuisinart® Griddler®. Select Griddle and set to 375ºF.
5. While Griddler® is heating, form burger mixture into 1/3-cup patties (the mixture may be too warm to handle. If that is the case, then allow to rest until slightly cooled).
6. Once preheated, brush the plates with additional oil and put the prepared patties onto the hot, oiled griddle. Select the count-up timer and cook 3 minutes per side. Brush the tops with additional oil and allow to cook until bottoms are golden brown and the burger is just getting firm, about 3 to 4 minutes. Carefully flip and cook on the other side for another 3 to 4 minutes.
7. To serve, put on a bun and top with sliced avocado. Serve immediately.
Nutritional information per burger: Calories 236 (25% from fat) • carb. 36g • pro. 8g • fat 7g
sat. fat 1g • chol. 0mg • sod. 410mg • calc. 87mg fiber 5g
Buffalo Chicken Quesadillas
You won’t be able to stop eating these quesadillas—they’re great for a large get-together and can be kept warm in the oven at a low temperature once they’re cut.
Plate Side: GriddleGriddler® Cooking Position: Closed
Makes 6 quesadillas
2 pounds boneless, skinless chicken thighs
2 cups Buffalo sauce, divided 4 cups shredded Mexican-blend
cheese 12 tablespoons cream cheese 1½ tablespoons vegetable oil 12 7- to 8-inch flour tortillas Blue cheese dressing,
for serving Celery sticks, for serving
1. Turn on the Cuisinart® Griddler®. Select Griddle and set to 425°F.
2. Once preheated, put the chicken on the Griddler®. Close the Griddler® and set the timer for 8 minutes, until chicken is fully cooked through. Remove from Griddler® and let cool slightly. When cool enough to handle, thinly slice the chicken and toss with 1½ cups of the Buffalo sauce. Reserve.
3. While the chicken is cooking, combine the cream cheese with the remaining (½ cup) Buffalo sauce. Spread about 1 tablespoon of the cream cheese mixture onto the center of one of the tortillas, leaving about a 1-inch border all around. Sprinkle with 1/3 cup of the shredded cheese. Top with ½ scoop of the cooked chicken mixture and an additional 1/3 cup shredded cheese. Spread 1 more tablespoon of the cream cheese mixture onto another tortilla, also leaving about a 1-inch border. Put the tortilla, cream-cheese side down, onto the bottom tortilla. Brush the top with vegetable oil.
4. When the chicken is done cooking, decrease the temperature to 375°F. Once heated, put the quesadilla on the bottom plate and close the Griddler®. Set the count-up timer and cook for about 3 to 3½ minutes, until cheese is melted and the top of the quesadilla is a little brown and crispy. Remove from Griddler®, let cool slightly and cut
19
into 8 pieces. Repeat with remaining ingredients.
Nutritional information per serving (1 quesadilla): Calories 821 (54% from fat) • carb. 41g • pro. 53g fat 48g sat. / fat 25g • chol. 224mg • sod. 3414mg
calc. 656mg • fiber 2g
Chermoula Salmon with Grilled Potatoes
This zesty Moroccan marinade is a great match for grilled fish and seafood.
Plate Side: Bottom Grill, Top Griddle Griddler® Cooking Position: Closed, then open and flat
Makes 1¾ cups chermoula and 3 to 4 servings of salmon and potatoes
Chermoula marinade:6 small garlic cloves1 teaspoon paprika¾ teaspoon kosher salt, divided½ teaspoon freshly ground black
pepper1 teaspoon ground coriander½ teaspoon ground cumin1 teaspoon red pepper flakes4 2 x ½-inch strips lemon peel,
white pith removed¾ cup fresh cilantro, roughly
chopped¼ cup fresh parsley, roughly
chopped1/3 cup fresh lemon juice2 tablespoons white wine vinegar1 cup olive oil, reserving 1 table-
spoon1/3 cup pitted, whole Kalamata
olives, finely chopped1 pound salmon, about 1½ inches
thick 2 large (about 1 pound total)
russet potatoes, scrubbed
1. Make the chermoula: Put the garlic into a mini chopper. Pulse to finely chop. Add the paprika, ½ teaspoon of the salt, pepper, coriander, cumin, red pepper flakes and lemon peel. Pulse until a paste forms. Transfer mixture to a small bowl. Add the cilantro, parsley, lemon juice and vinegar. Slowly whisk
in the olive oil. Add the olives. Put the salmon in a 9 x 13-inch baking dish; add ½ cup of the marinade to cover the fish. Cover with plastic wrap; marinate 1 to 2 hours. Bring to room temperature before grilling.
2. Twenty minutes before cooking the salmon, slice the potatoes into ¼-inch slices. Put the potato slices in a large bowl with the reserved tablespoon of olive oil and remaining salt. Toss to evenly coat.
3. Turn on the Cuisinart® Griddler®. Select Grill and set temperature to 425°F.
4. Once preheated, put the potatoes onto the bottom plate of Griddler® in an even layer. Close the Griddler® and set the timer for 16 minutes, until potatoes are browned and crispy and fully cooked through. Transfer the cooked potatoes to a large serving plate and loosely cover with foil.
5. Put the salmon on the bottom plate of the Griddler®. Set the count-up timer and cook for about 8 to 9 minutes on the first side. Flip salmon, reduce temperature to 400°F and cook the second side of the salmon for about 6 minutes, until desired doneness.
6. When salmon is cooked, transfer to a serving plate and drizzle with 2 to 3 tablespoons of the remaining chermoula. Serve salmon with the reserved potatoes.
Nutritional information per serving (based on 4 servings): Calories 856 (75% from fat) • carb. 29g
pro. 27g • fat 73g • sat. fat 10g • chol. 69mg sod. 819mg • calc. 91mg • fiber 4g
Cuban Sandwich
Ham and cheese magically come together in this take on the traditional Cuban toasted sandwich. A great way to use up any leftover Latin Pork Chops (page 22).
Plate Side: GrillGriddler® Cooking Position: Closed
Makes 2 large sandwiches, about 6 servings
20
2 large Cuban or Portuguese-style soft rolls, about 10 inches long
1 tablespoon plus 1 teaspoon Dijon or deli mustard
4 to 6 ounces sliced Swiss cheese, divided
4 to 6 ounces sliced roasted pork4 to 6 ounces sliced ham4 ounces dill pickles, thinly sliced
horizontally1 teaspoon olive oil
1. Assemble sandwiches by slicing rolls and placing on a work surface. Spread the mustard on each side of both rolls. Put a slice of cheese on the bottom of each roll. Add the pork, ham and the pickle slices. Finish with the remaining cheese and the top of the roll. Brush the top with the olive oil.
2. Fit the Cuisinart® Griddler® with the grill plates. Turn unit on. Select Grill and set to 375°F.
3. Once preheated, place the sandwiches on the grill and free the floating hinge. Press the sandwiches firmly when closing the grill and set the count-up timer. Keep it pressed for about one minute. Continue cooking for about 6 minutes total, until bread is crisp and cheese is melted.
4. Slice sandwich in pieces to serve.
Nutritional information per serving (based on 6 servings): Calories 215 (45% from fat) • carb. 13g
pro. 16g • fat 10g • sat. fat 5g • chol. 38mg sod. 700mg • calc. 191mg • fiber 0g
Greek-Style Kebabs
Chicken or a hearty fish can be substituted for the pork in this recipe. Simply adjust the time accordingly and make sure both are fully cooked through before serving.
Plate Side: GrillGriddler® Cooking Position: Open and flat
Makes 10 kebabs
2 pounds trimmed pork shoulder¼ cup olive oil2 tablespoons fresh lemon juice
1 teaspoon kosher salt1 teaspoon dried oregano ½ teaspoon pepper1 small red onion, cut into 1-inch
chunks1 pint cherry tomatoes Pita bread, for serving, optional Tzatziki*, for serving, optional 10 wooden skewers
1. Cut the pork into 1-inch pieces. Season with the olive oil, lemon juice, salt, oregano and pepper. Put 1 piece of pork onto 1 of the skewers. Then add a piece of the onion (about 2 or 3 layers thick), followed by another piece of pork, a tomato, another piece of pork, onion and pork. Repeat with the remaining skewers and ingredients.
2. Turn on the Cuisinart® Griddler®. Select Grill. Set to 425°F.
3. Once preheated, put the kebabs on the Griddler® and set the count-up timer. Cook skewers, rotating until each side is browned, for about 25 to 30 minutes, until fully cooked through. Alternately, skewers may be cooked in the closed position for about 5 to 6 minutes.
4. If desired, serve with pita bread and tzatziki.
* Tzatziki is a traditional Greek yogurt-based dip served with kebabs. It may be bought pre-made or can be made from scratch. Search Cuisinart.com for recipes.
Nutritional information per serving (1 kebab): Calories 272 (73% from fat) • carb. 2g • pro. 16g fat 22g / sat. fat 6g • chol. 64mg • sod. 274mg
calc. 19mg • fiber 1g
Grilled Pizza with Bacon and Olives
Use our method for grilling pizza and add any toppings you’d like.
Plate Side: GriddleGriddler® Cooking Position: Open, closed
and flat
Makes 4 to 6 servings
6 slices bacon

21
12 ounces fresh pizza dough1/3 cup pizza sauce 2 tablespoons sliced black olives2 teaspoons olive oil
1. Put the bacon on the bottom plate of the griddle. Turn the Cuisinart® Griddler® on and select Griddle. Set to 425°F. When the bacon is brown and crispy, transfer to a plate. Once cool, crumble and reserve.
2. Shape the dough into a rectangle that fits the size of the griddle. Put the pizza dough onto the griddle and close the Griddler®. Set the count-up timer and cook for about 4 minutes, until lightly golden on both sides. Open the grill and flip the pizza. Reduce heat to 400°F.
3. Top the partially cooked pizza dough with the sauce, olives and crumbled bacon. Brush the edges of the pizza with the olive oil.
4. Set the count-up timer again and continue cooking for about 6 to 8 minutes in the open position until the bottom of the pizza is crispy and dough is fully cooked through.
Nutritional information per serving (based on 6 servings): Calories 211 (39% from fat) • carb. 25g
pro. 8g • fat 9g / sat. fat 2g • chol. 15mg sod. 571mg • calc. 0mg • fiber 1g
Hamburgers with Caramelized Onions and Gruyère
This French-style burger is rich and delicious.
Plate Side: Bottom Grill, Top Griddle Griddler® Cooking Position: Open and flat
Makes 4 burgers
1 yellow onion, thinly sliced2 tablespoons olive oil, divided 1¼ teaspoon salt, divided¼ cup water4 brioche rolls24 ounces ground beef½ teaspoon freshly ground black
pepper4 slices Gruyère cheese
1. Combine the onion slices, 2 teaspoons of the oil and ¼ teaspoon of the salt in a bowl. Turn on the Cuisinart® Griddler®. Select Grill and set to 425°F.
2. Once preheated, put the onions on the top plate of the Griddler®. Set the count-up timer and cook for about 20 minutes, until onions are soft. Once the onions are soft, add 1 teaspoon of the water to the onions and stir until water evaporates. Repeat until onions are very soft and caramelized, about 10 more minutes, until all water is used.
3. While the onions are cooking, put the buns on the grill plate face-down. Cook until lightly crisped, about 2 to 3 minutes. Set aside.
4. When the buns are toasted, form the ground beef into 4 even-sized patties, 6 ounces each. Sprinkle both sides evenly with the salt and pepper. Brush with the olive oil.
5. Add the burgers to the bottom plate, and cook until desired doneness. Top with cheese and transfer to the grilled bottom buns. Top the burgers with the onions, buns and serve.
Nutritional information per serving (1 burger): Calories 638 (60% from fat) • carb. 25g • pro. 39g fat 43g / sat. fat 16g • chol. 133mg • sod. 1064mg
calc. 182mg • fiber 1g
Italian Panini with Grilled Chicken
Looking for a quick, all-purpose grilled chicken recipe? The grilled chicken in this recipe may be enjoyed on its own.
Plate Side: GrillGriddler® Cooking Position: Closed
Makes 4 panini
3 large (about 1½ pounds total) boneless, skinless chicken breasts, cut in half lengthwise
¼ cup, plus 2 teaspoons olive oil, divided
1½ teaspoons Italian seasoning1 teaspoon kosher salt4 ciabatta rolls, cut in half length-
wise4 slices jarred, roasted red bell
peppers

22
1 cup arugula½ pound fresh mozzarella, thinly
sliced1. Turn on the Cuisinart® Griddler®.
Select Grill and set to 425°F. While the Griddler® is preheating, season the chicken breasts with 2 teaspoons of the olive oil and Italian seasoning.
2. Once preheated, put the chicken breasts on the bottom plate and set the count-up timer. Close Griddler® and cook for about 6 minutes, until the chicken is fully cooked through and grill marks are visible. Remove chicken from Griddler® and divide among the bottoms of the 4 rolls.
3. Top each chicken piece with 1 slice of the jarred bell peppers and ¼ cup of the arugula. Drizzle the arugula with 2 teaspoons of the olive oil and a small pinch of salt. Top with the cheese and the top of the ciabatta roll. Brush the top of the roll with oil.
4. Transfer 2 of the sandwiches to the back of the hot grill. Close the Griddler® and set the count-up timer. Press down on Griddler handle and hold for 1 minute, then cook for an additional 5 minutes until roll is crusty and cheese is melted. Repeat with remaining paninis. Cut in half before serving.
Nutritional information per serving: Calories 234 (47% from fat)
carb. 37g • pro. 57g • fat 37g / sat. fat 10g chol. 142mg • sod. 1273mg • calc. 234mg
fiber 1g
Latin Pork Chops
Jazz up weeknight pork chops with this Latin-inspired marinade. Sliced leftovers are perfect in a Cuban sandwich.
Plate Side: GrillGriddler® Cooking Position: Closed
Makes 4 servings
1 small onion, sliced4 garlic cloves, sliced½ cup orange juice2 tablespoons fresh lime juice½ cup cilantro, roughly chopped4 1-inch thick, boneless pork
chops½ teaspoon kosher salt¼ teaspoon freshly ground black
pepper1. Stir together the onion and garlic with
the juices and cilantro.
2. Add the pork chops so they are covered with the marinade. Cover and place in the refrigerator for about 3 hours.
3. When ready to grill, remove chops from the marinade, pat dry, and sprinkle evenly on both sides with the salt and pepper.
4. Fit the Cuisinart® Griddler® with the grill plates. Turn unit on. Select Grill and set to 450°F.
5. Once the grill comes to temperature, place the chops on the grill in the closed position and set the count-up timer. Pork chops are done when an instant-read thermometer reads 145°F in the thickest part, about 5 minutes.
6. Allow the chops to rest about 5 minutes before serving.
Nutritional information per serving (based on 4 servings): Calories 278 (40% from fat) • carb. 3g
pro. 37g • fat 12g • sat. fat 4g • chol. 114mg sod. 350mg • calc. 24mg • fiber 0g
Shrimp Fajitas
This recipe is great for a festive dinner that guests can assemble themselves at the table.
Plate Side: Bottom Grill, Top GriddleGriddler® Cooking Position: Open and flat
Makes about 8 fajitas (3 shrimp per fajita)
1 pound frozen large shrimp, thawed and fully peeled
3 tablespoons olive oil, divided 1 large garlic clove, finely
chopped¾ teaspoon chili powder Pinch ground cumin 2 small bell peppers (any color),
sliced into ¼-inch strips 1 small red onion, sliced into
¼-inch strips ½ teaspoon kosher salt, divided Pinch pepper

23
Pinch garlic powder1 tablespoon cilantro, roughly
chopped 1 tablespoon fresh lime juice 4 wooden skewers, cut in half,
optional Small flour tortillas Small lime wedges, for serving Guacamole, for serving,
optional Salsa, for serving, optional Sour cream, for serving,
optional
1. Use paper towels to fully dry the peeled shrimp. Put the dried shrimp in a small bowl or plastic bag with 2 tablespoons of the olive oil, garlic, chili powder and cumin. Stir to evenly coat with all of the ingredients. Refrigerate for 20 minutes to marinate.
2. While the shrimp is marinating, toss the peppers and onions in the remaining oil. Sprinkle with ¼ teaspoon of the salt and the pinch of pepper and garlic powder. Turn on the Cuisinart® Griddler®. Select Griddle and set to 425°F.
3. Once preheated, put the peppers and onions on the Griddler®. Set the timer for 15 minutes and cook, stirring occasionally with silicone-tipped tongs until peppers and onions are browned and melted.
4. Once time expires, transfer all of the peppers and onions to the top half of the griddle while the shrimp cook. Transfer to a serving bowl when shrimp are done and toss with the chopped cilantro.
5. Once shrimp have marinated, remove from the refrigerator. Combine with the lime juice and remaining salt. If using wooden skewers, put 3 shrimp on each skewer. Set the count-up timer and cook the skewers on the bottom half of the grill for about 5 minutes on the first side and 3 minutes on the other side until fully opaque. Alternately, shrimp may be cooked directly on the bottom plate of the grill without the skewers for the same amount of time. Transfer shrimp to a serving plate.
6. To assemble fajitas, put 3 shrimp on a tortilla and top with a spoonful of the peppers and onions. Serve with
a small lime wedge and, if desired, guacamole, salsa and sour cream.
Nutritional information per serving (1 fajita): Calories 196 (40% from fat) • carb. 16g • pro. 13g • fat 9g
sat. fat 1g • chol. 85mg • sod. 418mg • calc. 76mg fiber 1g
Skirt Steak with Chimichurri Sauce
If you have any ripe fruit on hand, like ripe pineapple or mango, chop it finely and add about 1 tablespoon to the sauce for added sweetness and a pop of color.
Plate Side: GrillGriddler® Cooking Position: Open and flat
Makes about 1 cup sauce, 3 to 4 servings
Sauce:4 garlic cloves, finely chopped ½ teaspoon salt Pinch cumin Pinch red pepper flakes1 tablespoon plus 2 teaspoons
red wine vinegar2/3 cup extra virgin olive oil ¼ cup parsley leaves, roughly
chopped2 tablespoons fresh oregano
leaves, roughly choppedSteak:1 pound skirt steak, about 1 inch
thick2 teaspoons olive oil ½ teaspoon salt¼ teaspoon pepper
1. Make the Chimichurri Sauce: Combine the first 5 ingredients in a small bowl. While whisking, add the extra virgin olive oil, and then fold in the chopped parsley and oregano. Cover and allow to sit so the flavors can meld.
2. Turn on the Cuisinart® Griddler®. Select Grill and set to 450°F.
3. While the Griddler® is preheating, season the steak on both sides with the olive oil, salt and pepper.
4. Once preheated, put the steak on the bottom plate. Set the count-up timer and cook for about 6 minutes on the first side and 4 to 5 minutes on the second side, until desired doneness.

24
5. Transfer the steak to a cutting board and allow to rest for 5 minutes. Slice, against the grain. Serve with a spoonful of the sauce drizzled on top.
Nutritional information per serving (based on 4 servings): Calories 789 (59% from fat) • carb. 42g
pro. 39g • fat 52g / sat. fat 18g • chol. 435mg sod. 1229mg • calc. 482mg • fiber 4g
Toasted Avocado, Cheese and Tomato Panini
Simple ingredients with maximum taste.
Plate Side: GrillGriddler® Cooking Position: Closed
Makes 2 sandwiches
2 ciabatta or French rolls½ ripe avocado1/8–¼ teaspoon kosher salt, divided1/8 teaspoon freshly ground black
pepper1 small/medium tomato
(about 4 ounces), thinly sliced3 ounces sliced Havarti cheese
(about 4 thin slices)¼ teaspoon extra virgin olive oil
1. Slice the rolls and lay flat. Spread half of the avocado on the bottom half of each roll. Sprinkle with ½ of the salt and pepper. Divide the tomato slices evenly and place on the avocado. Sprinkle evenly with remaining salt and pepper.
2. Add the cheese evenly, place tops on both rolls, and then brush the top of each roll with the olive oil.
3. Fit the Cuisinart® Griddler® with the grill plates. Turn unit on. Select Grill and set to 375°F.
4. Once preheated, place the sandwiches in the middle of the grill. Loosen the floating hinge and press the top plate down on the sandwiches in the closed position. Set the count-up timer.
5. Grill until bread is crisp and cheese is melted, about 7 minutes.
Nutritional information per 1/2 sandwich (based on 4 servings): Calories 172 (55% from fat) • carb. 12g
pro. 8g • fat 11g • sat. fat 5g • chol. 19mg sod. 361mg • calc. 174mg • fiber 2g
Chocolate Hazelnut Panini with Strawberries
Why should panini only be savory? Here we take two favorite flavors, chocolate hazelnut and strawberry, and put them together in this delicious, sweet treat.
Plate Side: GrillGriddler® Cooking Position: Closed
Makes 2 panini
2 brioche rolls or croissants Olive oil or softened butter,
for brushing¼ cup chocolate hazelnut spread Pinch kosher salt2 to 3 large strawberries, hulled and
sliced (you need enough to cover the entire surface of the bottom of the roll/croissant)
1. Turn on the Cuisinart® Griddler®. Select Grill and set to 400°F.
2. While the Griddler® is heating, assemble the panini. Halve the rolls or croissants horizontally. Brush the outer parts with oil or butter. Evenly spread the chocolate hazelnut spread on the inside tops and bottoms. Sprinkle with salt and lay the strawberry slices across the bottom surface.
3. Put the two pieces together for each panini.
4. Once preheated, put the panini on the hot grill and select the count-up timer. Using medium pressure, press on the handle for 20 seconds and then allow to cook for 3 minutes, or until outside has visible grill marks and filling is warmed through.
5. Remove and allow to cool for 1 minute. Cut each panini in half and serve warm.
Nutritional information per serving (1/2 panini on croissant): Calories 230 (50% from fat) • carb. 25g
pro. 4g • fat 13g • sat. fat 5g • chol. 19mg sod. 142mg • calc. 33mg • fiber 2g

25
Grilled Pineapple
The heat of the grill caramelizes the pineapple, making it super sweet. Perfect with vanilla ice cream!
Plate Side: GrillGriddler® Cooking Position: Closed
Makes 8 servings
1 medium fresh pineapple, peeled, cored and cut into 8 slices
5 to 8 teaspoons granulated sugar¼ teaspoon ground cinnamon
1. Turn on the Cuisinart® Griddler®. Select Grill and set to 375°F.
2. Stir together the sugar and cinnamon and sprinkle the pineapple slices evenly on both sides with the mixture.
3. Once preheated, put half of the pineapple slices onto the grill and set the count-up timer. Close and grill for about 8 minutes, so that the pineapple is slightly soft and grill marks are visible. Repeat with remaining slices.
4. Serve immediately.
Nutritional information per serving (one slice): Calories 189 (32% from fat) • carb. 24g • pro. 7g fat 7g • sat. fat 2g • chol. 171mg • sod. 203mg
calc. 102mg • fiber 1g
S’more Panini
A nod to the campfire fare, you can use your favorite chocolate bar in this panini, be it milk, semisweet or dark.
Plate Side: GrillGriddler® Cooking Position: Closed
Makes 2 panini
2 brioche rolls or croissants Olive oil or softened butter,
for brushing1 ounce chocolate (milk, semi-
sweet or dark), broken into pieces
4 standard-size marshmallows, halved
1. Turn on the Cuisinart® Griddler®. Select Grill and set to 400°F.
2. While the Griddler® is heating, assemble the panini. Halve the rolls or croissants horizontally. Brush the outer parts with oil or softened butter. Divide the chocolate between the two bottom halves of the rolls/croissants. Top with the halved marshmallows. Place the top half of the rolls/croissants on top of the fillings.
3. Once preheated, put the panini on the hot grill and select the count-up timer. Using medium pressure, press on the handle for 20 seconds and then allow to cook for 3 minutes, or until the outside has visible grill marks and marshmallows have melted.
4. Remove and allow to cool for 1 minute. Cut each panini in half and serve warm.
Nutritional information per serving (1/2 panini on croissant): Calories 183 (45% from fat) • carb. 23g
pro. 3g • fat 9g • sat. fat 5g • chol. 20mg sod. 105mg • calc. 11mg • fiber 1g
26
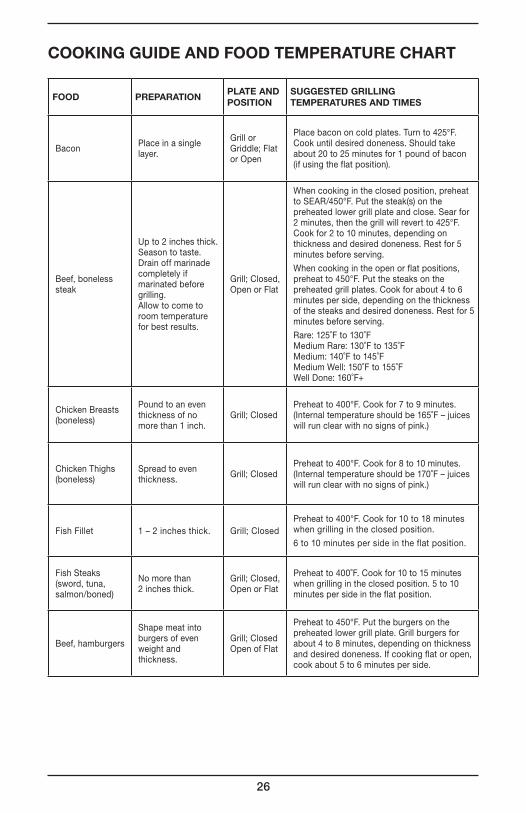
COOKING GUIDE AND FOOD TEMPERATURE CHART
FOOD PREPARATIONPLATE AND POSITION
SUGGESTED GRILLING TEMPERATURES AND TIMES
Bacon Place in a single layer.
Grill or Griddle; Flat or Open
Place bacon on cold plates. Turn to 425°F. Cook until desired doneness. Should take about 20 to 25 minutes for 1 pound of bacon (if using the flat position).
Beef, boneless steak
Up to 2 inches thick. Season to taste. Drain off marinade completely if marinated before grilling. Allow to come to room temperature for best results.
Grill; Closed, Open or Flat
When cooking in the closed position, preheat to SEAR/450°F. Put the steak(s) on the preheated lower grill plate and close. Sear for 2 minutes, then the grill will revert to 425°F. Cook for 2 to 10 minutes, depending on thickness and desired doneness. Rest for 5 minutes before serving.
When cooking in the open or flat positions, preheat to 450°F. Put the steaks on the preheated grill plates. Cook for about 4 to 6 minutes per side, depending on the thickness of the steaks and desired doneness. Rest for 5 minutes before serving.
Rare: 125˚F to 130˚F Medium Rare: 130˚F to 135˚F Medium: 140˚F to 145˚F Medium Well: 150˚F to 155˚F Well Done: 160˚F+
Chicken Breasts (boneless)
Pound to an even thickness of no more than 1 inch.
Grill; Closed Preheat to 400°F. Cook for 7 to 9 minutes. (Internal temperature should be 165˚F – juices will run clear with no signs of pink.)
Chicken Thighs (boneless)
Spread to even thickness. Grill; Closed
Preheat to 400°F. Cook for 8 to 10 minutes. (Internal temperature should be 170˚F – juices will run clear with no signs of pink.)
Fish Fillet 1 – 2 inches thick. Grill; ClosedPreheat to 400°F. Cook for 10 to 18 minutes when grilling in the closed position.
6 to 10 minutes per side in the flat position.
Fish Steaks (sword, tuna, salmon/boned)
No more than 2 inches thick.
Grill; Closed, Open or Flat
Preheat to 400˚F. Cook for 10 to 15 minutes when grilling in the closed position. 5 to 10 minutes per side in the flat position.
Beef, hamburgers
Shape meat into burgers of even weight and thickness.
Grill; Closed Open of Flat
Preheat to 450°F. Put the burgers on the preheated lower grill plate. Grill burgers for about 4 to 8 minutes, depending on thickness and desired doneness. If cooking flat or open, cook about 5 to 6 minutes per side.

27
Sausages, uncooked
Prick links with tines of fork or tip of paring knife.
Grill or Griddle; Closed
Preheat to 400°F. Put the links on the preheated grill/griddle plates – the grill ribs are perfect for holding the links in place, and allow easy turning for even cooking. Close the top. Grill about 10 – 15 minutes, depending on the thickness of the sausages.
Panini
Brush tops and bottoms of bread with oil or softened butter before grilling.
Grill or Griddle; Closed
Preheat to 400°F. Put the prepared sandwiches on the preheated lower grill/griddle plate. Close the top. Allow sandwiches to cook for about 4 to 6 minutes, depending on thickness of sandwiches.
QuesadillasPrepare quesadillas according to your favorite recipe.
Grill or Griddle; Closed (with cover height adjuster)
Preheat to 400°F. Put the prepared quesadilla on the preheated lower plate and close. Grill for about 2 to 3 minutes, depending on thickness and filling of the quesadillas.
EggsFried or over-easy. Up to 4 eggs per plate.
Griddle; Open or Flat
Preheat to 350°F. Break the eggs onto the hot griddle plates. Flip once whites are set, about 3 to 3½ minutes, and then remove when cooked to desired doneness.
French Toast Prepare French toast as desired.
Griddle; Open
Preheat to 350°F. Flip after 3 to 5 minutes, depending on thickness. Cook for an additional 2 to 3 minutes.
Vegetables
Have vegetables evenly cut. Season or marinate if desired.
Grill; Open, Flat or Closed (if closed, be sure that the vegetables are all the exact same thickness, or results will be uneven)
Preheat to 400°F. Grill until tender. This will vary depending on the types of vegetables used, but should take between 10 and 30 minutes.
Pork Chop ½ – 1 inch thick. Grill; Closed or Open Flat
400˚F for 10 minutes, closed.
5 to 6 minutes per side; internal temperature should be 145˚F.

28
NOTES: