Embed Size (px)
Citation preview

for precious little ones
11knit & crochet ideas
new

Page 2
DIRECTORY
DirectoryAbout Baby Hugs .........................................................3
Colors .........................................................................................4
Projects .....................................................................................5
PatternsBaby’s First Poncho ..............................................................11
Toddler’s Perfect Poncho .................................................13
Colorful Striped Pullover ..................................................15
Toddler Joyful Jumper ........................................................17
Cute & Classic Baby Cardigan ........................................20
Too Cool Boy’s Cardigan ...................................................23
Cable Sweater Dress ...........................................................26
Little Man Cable Cardigan ..............................................30
Cutie Pointed Hat .................................................................34
Makin’ Squares Blanket .....................................................36
Nite-Nite Security Blankie ..............................................38
ABOUT BABY HUGS
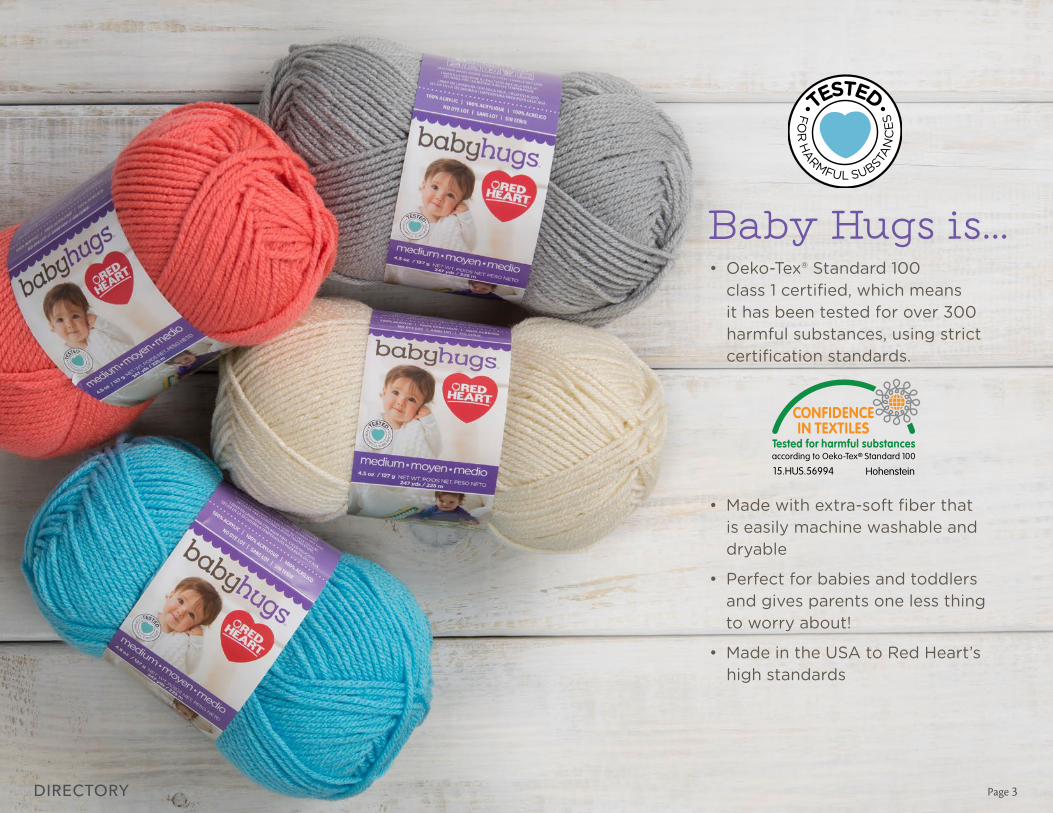
• Oeko-Tex® Standard 100 class 1 certified, which means it has been tested for over 300 harmful substances, using strict certification standards.
• Made with extra-soft fiber that is easily machine washable and dryable
• Perfect for babies and toddlers and gives parents one less thing to worry about!
• Made in the USA to Red Heart’s high standards
Baby Hugs is…
Page 3 DIRECTORY

COLORS
Frosting
Orangie Peachie Pinkie
Happy Aloe Sprout Pool
Sky Bluie Lilac Blueberry
Ink Dolphin
Shell Teddy Sunny
Ladybug
Page 4 DIRECTORY

Poncho Pleasure for Baby and Child Crocheted in the round in stripes and embellished with sweet flowers, this shoulder-warming poncho is the perfect accessory for a stylish little girl. Using new Baby Hugs yarn means that you have the assurance that your handmades are tested for harmful substances.
DIRECTORY Page 5
PROJECTS

Page 6
Toddler Joyful Jumper Choose from the selection of brights and traditional pastels for a jumper that shows your loving care. Crochet it with new Baby Hugs yarn that is soft and can be machine washed and dried
DIRECTORY
Colorful Stripes Sweater Babies are stimulated by bright colors, so crochet this sweater in vibrant stripes and have a happy baby! Parents will be happy too, knowing that the yarn has been tested.

Page 7
Too Cool Kid’s & Toddler's CardigansWhatever your little guy’s age (from baby to 6 year size) he’ll enjoy the comfort of this soft stylish cardigan. We’ve included instructions for for it to button on either side, so you can change it up for your little girls too.
DIRECTORY

Page 8 DIRECTORY
Cable Sweater Dress and Cable CardiganSend your love with cabled knitwear made with comfy-to-wear extra-soft yarn. Look for the blue heart mark on the ball band and be confident in your yarn choice.

Page 9
Makin’ Squares Blanket Start at the center as if you were crocheting a simple granny square and then just keep going until you have a soft, wonderfully cuddly blanket. Choose from the complete range of bright and pastel hues in this tested yarn.
DIRECTORY
Cutie Hat Get right to the point and make this darling hat for a sweet baby or child! It only takes one ball of this highest quality colorfast yarn.

Page 10 DIRECTORY
Nite-Nite Security BlankieHere's the perfect blankie to take along on all of baby's travels. Parents will appreciate that it is crocheted with yarn that has been tested.

Page 11 DIRECTORY
Continued...
Red HEART® Baby Hugs™ Medium: 1 ball each 4830 Pool A, 4001 Frosting B, and 4410 Dolphin C
Susan Bates® Crochet Hook:5.5mm [US I-9]
Susan Bates® Split lock stitch markers
Yarn needle
GAUGE: 12 dc = 4” (10 cm); 8½ dc rows = 4” (10 cm) when worked in Camel stitch (see Notes). CHECK YOUR GAUGE. Use any size hook to obtain the gauge.
RED HEART® Baby Hugs™ Medium, Art E404 Oeko-Tex
Certified 100% Acrylic baby yarn available in 4.5 oz (127 g) 247 yds (225 m) balls
LW5250
crochet
Designed by Marly Bird
What you will need:
Buy Yarn
Embellished with sweet flowers, this shoulder-warming poncho is the perfect accessory for a stylish baby. Using new Baby Hugs yarn
means that you have the assurance that your handmades are made with quality yarn.
Directions are for size 6-12 months; changes for size 18-24 months are in parentheses.
Circumference at top: 20” (51 cm)Circumference at bottom: 24 (26)” (61 (66) cm)Length: 7 (10)” (18 (25.5) cm)
NOTESPoncho is worked from the top down in joined rounds with the right side always facing.All stitches are worked through the back loop and the third loop (the strand below the back loop, also known as Camel stitch). To change color, work last stitch of old color to last yarn over. Yarn over with new color and draw through all loops on hook to complete stitch. Proceed with new color.
Color Sequence3 (4) rounds with A2 (3) rounds with B1 round with C2 (3) rounds with B1 round with A2 (3) rounds with B3 (5) rounds with C1 round (edging) with A
Baby’s First Poncho
PATTERNS
Page 12 DIRECTORY
LW5250 Baby’s First Poncho
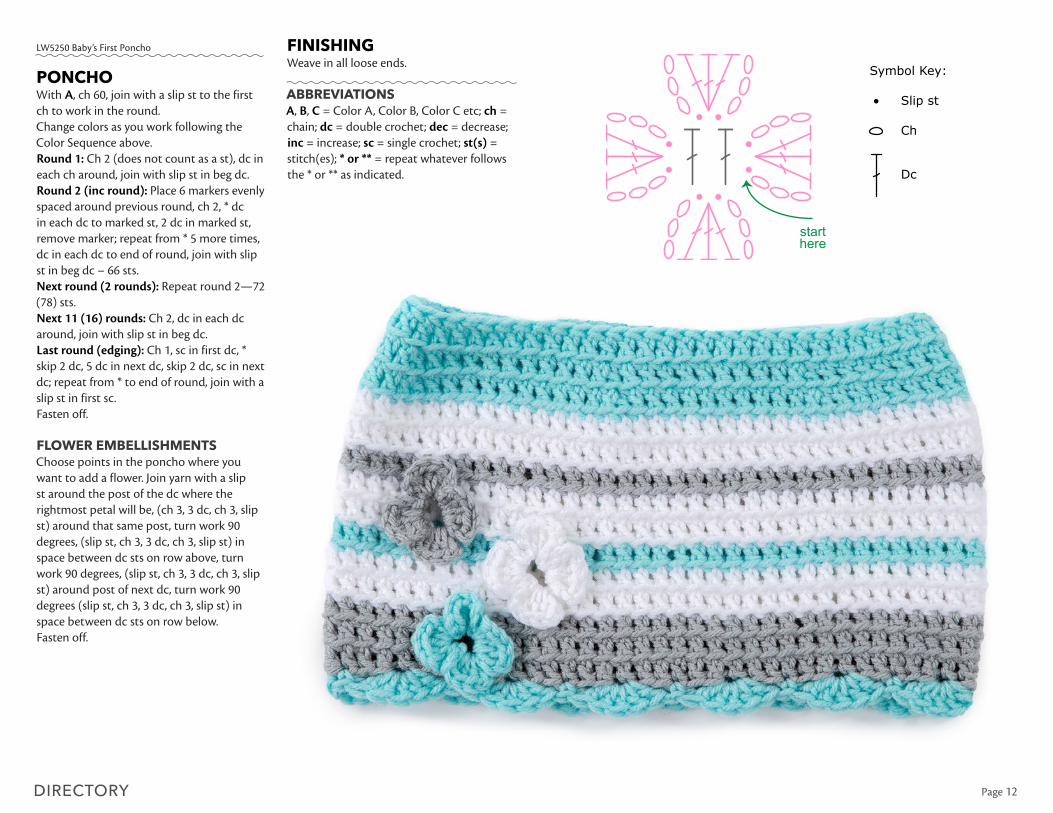
PONCHOWith A, ch 60, join with a slip st to the first ch to work in the round.Change colors as you work following the Color Sequence above.Round 1: Ch 2 (does not count as a st), dc in each ch around, join with slip st in beg dc.Round 2 (inc round): Place 6 markers evenly spaced around previous round, ch 2, * dc in each dc to marked st, 2 dc in marked st, remove marker; repeat from * 5 more times, dc in each dc to end of round, join with slip st in beg dc – 66 sts.Next round (2 rounds): Repeat round 2—72 (78) sts. Next 11 (16) rounds: Ch 2, dc in each dc around, join with slip st in beg dc. Last round (edging): Ch 1, sc in first dc, * skip 2 dc, 5 dc in next dc, skip 2 dc, sc in next dc; repeat from * to end of round, join with a slip st in first sc.Fasten off.
FLOWER EMBELLISHMENTSChoose points in the poncho where you want to add a flower. Join yarn with a slip st around the post of the dc where the rightmost petal will be, (ch 3, 3 dc, ch 3, slip st) around that same post, turn work 90 degrees, (slip st, ch 3, 3 dc, ch 3, slip st) in space between dc sts on row above, turn work 90 degrees, (slip st, ch 3, 3 dc, ch 3, slip st) around post of next dc, turn work 90 degrees (slip st, ch 3, 3 dc, ch 3, slip st) in space between dc sts on row below.Fasten off.
FINISHINGWeave in all loose ends.
ABBREVIATIONSA, B, C = Color A, Color B, Color C etc; ch = chain; dc = double crochet; dec = decrease; inc = increase; sc = single crochet; st(s) = stitch(es); * or ** = repeat whatever follows the * or ** as indicated.
starthere
Dc
Ch
Slip st
Symbol Key:

Page 13 DIRECTORY
Directions are for size 2T; changes for sizes 3T, 4T, and 5T are in parentheses.
Circumference at top: 20” (51 cm)Circumference at bottom: 40 (42, 44, 46)” (101.5 (106.5, 112, 117) cm)Length: 12 (13½, 15, 16½)” (30.5 (34, 38, 42) cm)
NOTESPoncho is worked from the bottom up in joined rounds with the right side always facing.All stitches are worked through the back loop and the third loop (the strand below the back loop, also known as Camel stitch). To change color, work last stitch of old color to last yarn over. Yarn over with new color and draw through all loops on hook to complete stitch. Proceed with new color.
SPECIAL STITCHESdc2tog = [Yarn over, insert hook in next stitch, yarn over and pull up loop, yarn over, draw through 2 loops] twice, yarn over, draw through all loops on hook
Continued...
RED HEART® Baby Hugs™ Medium: 1 ball each 4830 Pool A, 4001 Frosting B, and 4410 Dolphin C
Susan Bates® Crochet Hook:5.5mm [US I-9]
Susan Bates® split lock stitch markers
Yarn needle
GAUGE: 12 dc = 4” (10 cm); 8½ dc rows = 4” (10 cm) when worked in Camel stitch (see Notes). CHECK YOUR GAUGE. Use any size hook to obtain the gauge.
RED HEART® Baby Hugs™ Medium, Art E404 Oeko-Tex
Certified 100% Acrylic baby yarn available in 4.5 oz (127 g) 247 yds (225 m) balls
LW5251
crochet
Designed by Marly Bird
What you will need:
Buy Yarn
Children who want to look as fashionable as their parents will love wearing this sweet poncho.
Parents will love that it is crocheted with yarn that has been tested for harmful substances.
Toddler’s Perfect Poncho

Page 14 DIRECTORY
LW5250 Toddler's Perfect Poncho
COLOR SEQUENCE4 rounds with C2 rounds with B[1 round with A (C, A, C)2 rounds with B1 round with C (A, C, A)2 rounds with B ] 3 (3, 4, 4) times0 (1, 0, 1) round with A (C, A, C)0 (2, 0, 2) rounds with B1 round with A1 round with B1 round (edging) with C- 26 (29, 32, 35) rounds total
PONCHOWith A, ch 120 (126, 132, 138), join with a slip st to the first ch to work in the round.Change colors as you work following the Color Sequence above.Round 1: Ch 2 (does not count as a st), dc in each ch around, join with slip st in beg dc.Next 5 (8, 11, 14) rounds: Ch 2, dc in each dc around, join with slip st in beg dc.Next round (dec round): Ch 2, dc in each of first 28 (30, 31, 33) dc), [dc2tog over next 2 dc] twice and mark the 2 dc2tog just made, dc in each of next 56 (58, 62, 64) dc, [dc2tog over next 2 dc] twice and mark the 2 dc2tog just made, dc in each dc to end of round – 116 (122, 128, 134) sts.
** Work 2 rounds evenly.Next round (dec round): * Ch 2, dc in each dc to 1 st before marked st, [dc2tog over next 2 dc] twice and mark the 2 dc2tog just made; rep from * once more, dc in each dc to end of round – 108 (114, 120, 128) sts.Rep from ** twice more – 92 (98, 104, 110) sts.Remove all markers.Work 3 (3, 3, 1) rounds evenly.
** Next round (dec round): Place 8 (10, 11, 10) markers evenly spaced around previous round, ch 2, * dc in each dc to marked st, dc2tog over next 2 sts, remove marker; rep
from * 7 (9, 10, 9) more times, dc in each dc to end of round, join with slip st in beg dc – 84 (88, 93, 100) sts.Work 1 round evenly.Rep from ** 2 (2, 2, 3) more times – 68 (68, 71, 70) sts.Next round (dec round): Place 8 (8, 11, 10) markers evenly spaced around previous round, ch 2, * dc in each dc to marked st, dc2tog over next 2 sts, remove marker; rep from * 7 (7, 10, 9) more times, dc in each dc to end of round, join with slip st in beg dc – 60 sts.Last round (edging): Ch 1, sc in each st around, join with a slip st in first sc.Fasten off.
FLOWER EMBELLISHMENTSChoose points in the poncho where you want to add a flower. Join yarn with a slip st around the post of the dc where the rightmost petal will be, (ch 3, 3 dc, ch 3, slip st) around that same post, turn work 90 degrees, (slip st, ch 3, 3 dc, ch 3, slip st) in space between dc sts on row above, turn work 90 degrees, (slip st, ch 3, 3 dc, ch 3, slip st) around post of next dc, turn work 90 degrees (slip st, ch 3, 3 dc, ch 3, slip st) in space between dc sts on row below.Fasten off.
FINISHINGWeave in all loose ends.
ABBREVIATIONSA, B, C = Color A, Color B, Color C etc; ch = chain; dc = double crochet; dec = decrease; sc = single crochet; st(s) = stitch(es); [ ] = work directions in brackets the number of times specified; * or ** = repeat whatever follows the * or ** as indicated.
starthere
Dc
Ch
Slip st
Symbol Key:

Page 15 DIRECTORY
Directions are for size 6 months. Changes for sizes 12 months, 18 months, and 24 months are in parentheses.
To Fit Chest: 17 (18, 19, 20)” [43 (45.5, 48.5, 51) cm]Finished Chest: 20 (21¼, 22½, 23¾)” [51 (54, 57, 60.5) cm]Finished Length: 9 (9, 11, 11)” [23 (23, 28, 28) cm]
Notes1. Collar is worked back and forth in rows. Body and sleeves
are worked in joined rounds from the top down. 2. Sleeve bands are worked in continuous rounds, do not
join until instructed.3. To change color, work last stitch of old color to last yarn
over. Yarn over with new color and draw through all loops on hook to complete stitch. Proceed with new color. Cut old color.
Special Stitchreverse sc (reverse single crochet) = Work single crochet in opposite direction from which you would usually work (left to right if you are right-handed and right to left if you are left-handed). This stitch is also known as crab stitch. It creates a rope-like twisted single crochet edging.
Continued...
RED HEART® Baby Hugs™ Medium: 1 ball each 4562 Aloe A, 4704 Happy B, 4909 Ladybug C, 4001 Frosting D, and 4201 Sunny E
Susan Bates® Crochet Hook: 4.5mm [US 7] Yarn needle, ¼” (6mm) button
GAUGE: 9 slip sts = 2” (5 cm); 6 rows = ¾” (2 cm) in slip stitch; 16 tr = 5” (12.5 cm); 5 rows = 4½” (25.5 cm) in treble crochet. CHECK YOUR GAUGE. Use any size hook to obtain the gauge.
RED HEART® Baby Hugs™ Medium, Art E404 Oeko-Tex
Certified 100% Acrylic baby yarn available in 4.5 oz (127 g) 247 yds (225 m) balls
LW5200
crochet
Designed by Cristina Mershon
What you will need:
Buy Yarn
This comfortable sweater is striped in bright colors that babies love. Rows of triple crochet make this quick to crochet. Choose your yarn
with confidence. Look for the blue heart on the ball band.
Colorful Striped Pullover

DIRECTORY
LW5200 Colorful Striped Pullover
SWEATERNeckbandWith A, ch 62 (70, 78, 86).Row 1 (right side): Slip st in 2nd ch from hook and in each ch across, turn—61 (69, 77, 85) slip sts.Rows 2–6: Ch 1, slip st in each slip st across, turn. Fasten off.
BodyRound 1 (right side): With right side of Row 1 facing and working in back loops only, join B with slip st in first st, ch 4 (counts as first tr here and throughout), 2 tr in same st, *tr in next 10 (12, 14, 16) slip sts, 3 tr in next slip st, tr in next 16 (18, 20, 22) slip sts*, 3 tr in next slip st; repeat from * to * once; leave last 5 sts unworked (for button flap); join with slip st in top of beginning ch—64 (72, 80, 88) tr. Fasten off.Round 2: With right side facing and working in back loops only, join C with slip st in first tr, ch 4, 2 tr in same st as join, *tr in next 12 (14, 16, 18) tr, 5 tr in next tr, tr in next 18 (20, 22, 24) tr*, 5 tr in next tr; repeat from * to * once, 2 tr in top of beginning ch-4 of previous round; join with slip st in top of beginning ch; change to B—80 (88, 96, 104) tr. Round 3: Ch 4, working in back loops only, 2 tr in same st as join, *tr in next 16 (18, 20, 22) tr, 5 tr in next tr, tr in next 22 (24, 26, 28) tr*, 5 tr in next tr; repeat from * to * once, 2 tr in top of beginning ch of previous round; join with slip st in top of beginning ch; change to C—96 (104, 112, 120) tr. Round 4: Ch 4, working in back loops only, 2 tr in same st as join, *tr in next 20 (22, 24, 26) tr, 5 tr in next tr, tr in next 26 (28, 30, 32) tr*, 5 tr in next tr; repeat from * to * once, 2 tr in top of beginning ch of previous round; join with slip st in top of beginning ch; change to D—112 (120, 128, 136) tr.
Round 5: Ch 4, skip next 24 (26, 28, 30) tr (first armhole opening), working in back loops only, tr in next 32 (34, 36, 38) tr, skip next 24 (26, 28, 30) tr (2nd armhole opening), tr in each remaining tr around; join with slip st in top of beginning ch; change to E—64 (68, 72, 76) tr and 2 armholes. Round 6: Ch 4, working in back loops only, tr in each tr around; join with slip st in top of beginning ch; change to D—64 (68, 72, 76) tr. Round 7: Repeat Round 6; change to E.
Sizes 18 months and 24 months only:Round 8: Repeat Round 6; change to D.Round 9: Repeat Round 6; change to E.
All sizes:Round 8 (8, 10, 10): Repeat Round 6. Do not change color. Round 9 (9, 11, 11): Ch 1, reverse sc in each tr around; join with slip st in first sc. Fasten off.
Sleeve (work twice)Round 1: With right side of armhole facing and working in back loops only, join D in first skipped tr, ch 4, tr in each skipped tr around; join with slip st in top of beginning ch; change to E—24 (26, 28, 30) tr. Round 2: Ch 4, working in back loops only, tr in each tr around; join with slip st in top of beginning ch; change to D.
Sizes 6 months and 12 months only: Round 3: Repeat Round 2; change to A.
Sizes 18 months and 24 months only: Round 3: Repeat Round 2; change to E.Round 4: Repeat Round 2; change to A.
Sleeve BandRounds 4 (4, 5, 5): Ch 1, working in back loops only, slip st in each tr around.
Rounds 5–7 (5–7, 6–8, 6–8): Working in back loops only, slip st in each slip st around; at end of last round, join with slip st in first slip st. Fasten off.
FINISHINGWith beginning or end tails, close opening between first and last sts at armhole opening. Weave in ends.Sew button on button flap. Use any space between stitches on front of collar as a buttonhole.
ABBREVIATIONS A, B, C = Color A, Color B, Color C, etc.; ch = chain(s); sc = single crochet; st(s) = stitch(es); tr = treble (triple) crochet;
* = repeat whatever follows the * as indicated.
Page 16

Page 17 DIRECTORY
Directions are for size 2 years. Changes for sizes 4 years, and 6 years are in parentheses.
Finished Chest: 23 (25, 28)” [58.5 (63.5, 71) cm]Finished Length (from back neck): 18¼ (18¼, 18½)” [46.5 (46.5, 47) cm]
Notes1. Jumper is made in 3 pieces: Front collar, back collar,
and skirt. 2. The front collar is worked back and forth in rows.
Increases are worked in two locations to form corners. Stitches before the first corner and following the 2nd corner form the straps. Stitches between the corners form the upper front of the Jumper. The back collar is worked the same as the front collar, except with longer straps.
3. The skirt is worked in joined rounds, beginning by working across the lower edges (between corners) of the front and back collar.
Special Stitchreverse sc (reverse single crochet) = Work single crochet in opposite direction from which you would usually work (left to right if you are right-handed, and right to left if you are left-handed). This stitch is also known as crab stitch. It creates a rope-like twisted single crochet edging.
Continued...
RED HEART® Baby Hugs™ Medium: 1 (1, 1) ball 4303 Shell A, 1 (1, 1) ball 4704 Happy B, 1 (1, 1) ball 4562 Aloe C, and 1 (1, 1) ball 4801 Blueberry D
Susan Bates® Crochet Hook: 4 mm [US G-6]
Stitch markers, two ¼ or ½” [6 or 13 mm] pearl-style buttons, yarn needle.
GAUGE: 16 sts = 4” [10 cm]; 16 rows = 4” [10 cm], in single crochet. CHECK YOUR GAUGE. Use any size hook to obtain the gauge.
RED HEART® Baby Hugs™ Medium, Art E404 Oeko-Tex
Certified 100% Acrylic baby yarn available in 4.5 oz (127 g) 247 yds (225 m) balls
LW5190
crochet
Designed by Cristina Mershon
What you will need:
Buy Yarn
Toddler Joyful Jumper
This comfortable crochet jumper is striped in bright colors that are fun to wear and can be accessorized according to the season. Choose
tested yarn with confidence. Look for the tested mark with the blue heart on the ball band.

DIRECTORY
LW5190 Toddler Joyful Jumper
FRONT COLLARWith B, ch 49.Row 1 (right side): Sc in 2nd ch from hook and in next 13 ch for first strap, 3 sc in next ch (corner made), place a marker in the middle sc of 3-sc corner just made, sc in next 18 ch for front, 3 sc in next ch, place a marker in the middle sc of 3-sc corner just made, sc in last 14 ch for 2nd strap—52 sc.Row 2: Ch 1, turn, [sc in each st to next marked st, 3 sc in marked st and move marker to middle sc of 3-sc just made] twice, sc in each st to end of row—56 sc.Rows 3–9 (9, 10): Repeat Row 2 for 7 (7, 8) more times —84 (84, 88) sc.Fasten off. Do not remove markers.
BACK COLLARWith C, ch 69.Row 1 (right side): Sc in 2nd ch from hook and in next 23 ch for first strap, 3 sc in next ch (corner made), place a marker in the middle sc of 3-sc corner just made, sc in next 18 ch for back, 3 sc in next ch, place a marker in the middle sc of 3-sc corner just made, sc in last 24 ch for 2nd strap—72 sc.Row 2: Ch 1, turn, [sc in each st to next marked st, 3 sc in marked st and move marker to middle sc of 3-sc just made] twice, sc in each st to end of row—76 sc.Rows 3–9 (9, 10): Repeat Row 2 for 7 (7, 8) more times —104 (104, 108) sc.Fasten off. Do not remove markers.
SKIRTHold front and back collar pieces with wrong sides together, right sides facing out, and corner markers matching.Join A with slip st in st following first marked stitch of back collar so that you are ready to work across the long edge towards the 2nd marked stitch.
Round 1 (right side): Ch 1, sc in same st as joining, sc in each st to 2nd marked stitch of back collar, do not work in the marked st, ch 10 (14, 18) for underarm, sc in st following first marked st of front collar, sc in each st to 2nd marked st of front collar, do not work in the marked st, ch 10 (14, 18) for underarm; join with slip st in first sc of this round—72 (72, 76) sc and 2 ch-10 (14, 18) underarm chains. Remove the markers.Round 2: Ch 1, sc in same st as joining, *ch 1, skip next st, sc in next st; repeat from * around to last st, ch 1, skip last st; join with slip st in first sc—46 (50, 56) sc and 46 (50, 56) ch-1 spaces. Fasten off A. Round 3: With right side facing, draw up a loop of D in first ch-space, ch 1, 2 sc in same ch-space, 2 sc in each ch-space around; join with slip st in first sc—92 (100, 112) sc. Fasten off D. Round 4: With right side facing, draw up a loop of A in first space between 2-sc groups, ch 1, sc in same space, *ch 1, sc in next space between 2-sc groups; repeat from * around, ch 1; join with slip st in first sc—46 (50, 56) sc and 46 (50, 56) ch-1 spaces. Fasten off A.Round 5: With B, repeat Round 3. Fasten off B.Round 6: With A, repeat Round 4. Fasten off A.Round 7: With C, repeat Round 3. Fasten off C.Round 8: With right side facing, draw up a loop of A in first space between 2-st groups, ch 1, sc in same space, *ch 2, sc in next space between 2-st groups; repeat from * around, ch 2; join with slip st in first sc—46 (50, 56) sc and 46 (50, 56) ch-2 spaces. Fasten off A.Round 9: With D, repeat Round 3. Fasten off D.Round 10: With A, repeat Round 8. Fasten off A.
Continued...
Page 18
Page 19 DIRECTORY
LW5190 Toddler Joyful Jumper
Round 11: With B, repeat Round 3. Fasten off B.Round 12: With A, repeat Round 8. Fasten off A.Round 13: With C, repeat Round 3. Fasten off C.Round 14: With A, repeat Round 8. Fasten off A.Round 15: With right side facing, draw up a loop of D in first ch-space, ch 1, 2 hdc in same ch-space, 2 hdc in each ch-space around; join with slip st in first st—92 (100, 112) hdc. Fasten off D. Round 16: With A, repeat Round 8. Fasten off A.Round 17: With B, repeat Round 15. Fasten off B.Round 18: With A, repeat Round 8. Fasten off A.Round 19: With C, repeat Round 15. Fasten off C.Rounds 20–25: Repeat Rounds 14–19.Round 26: With A, repeat Round 8. Fasten off A.Round 27: With right side facing, draw up a loop of D in first ch-space, ch 1, 3 hdc in same ch-space, 3 hdc in each ch-space around; join with slip st in first st—138 (150, 168) hdc. Fasten off D.Round 28: With right side facing, draw up a loop of A in first space between 3-st groups, ch 1, sc in same space, *ch 2, sc in next space between 3-st groups; repeat from * around, ch 2; join with slip st in first sc. Fasten off A.Round 29: With B, repeat Round 27. Fasten off B.Round 30: With A, repeat Round 28. Fasten off A.Round 31: With C, repeat Round 27. Fasten off C.Rounds 32–37: Repeat Rounds 26–31.
Round 38: With A, repeat Round 28. Fasten off A.Round 39: With right side facing, draw up a loop of D in first ch-space, ch 3 (counts as dc), 2 dc in same ch-space, 3 dc in each ch-space around; join with slip st in top of beg ch—138 (150, 168) dc. Fasten off D. Round 40: With A, repeat Round 28. Fasten off A.Round 41: With B, repeat Round 39. Fasten off B.Round 42: With A, repeat Round 28. Fasten off A.Round 43: With C, repeat Round 39. Fasten off C.Round 44: With right side facing, draw up a loop of A in first space between 3-st groups, ch 1, (sc , ch 3, sc) in same space, *ch 2, (sc, ch 3, sc) in next space between 3-st groups; repeat from * around, ch 2; join with slip st in first sc. Fasten off A.
FINISHINGFront Collar TrimWith right side facing, join B with slip st in one lower corner of the front collar so that you are ready to work reverse sc all along the edges of the front collar. Row 1: Ch 1, work reverse sc evenly spaced up side edge of strap, across top of strap, down other side of strap, across front neck edge, up side of 2nd strap, across top of strap, and down last side of 2nd strap. Fasten off.
Back Collar TrimWith C, working along edges of back collar, work same as front collar trim.Fold top of back straps over front straps and sew a pearl button through each overlap to seam straps.Weave in ends.
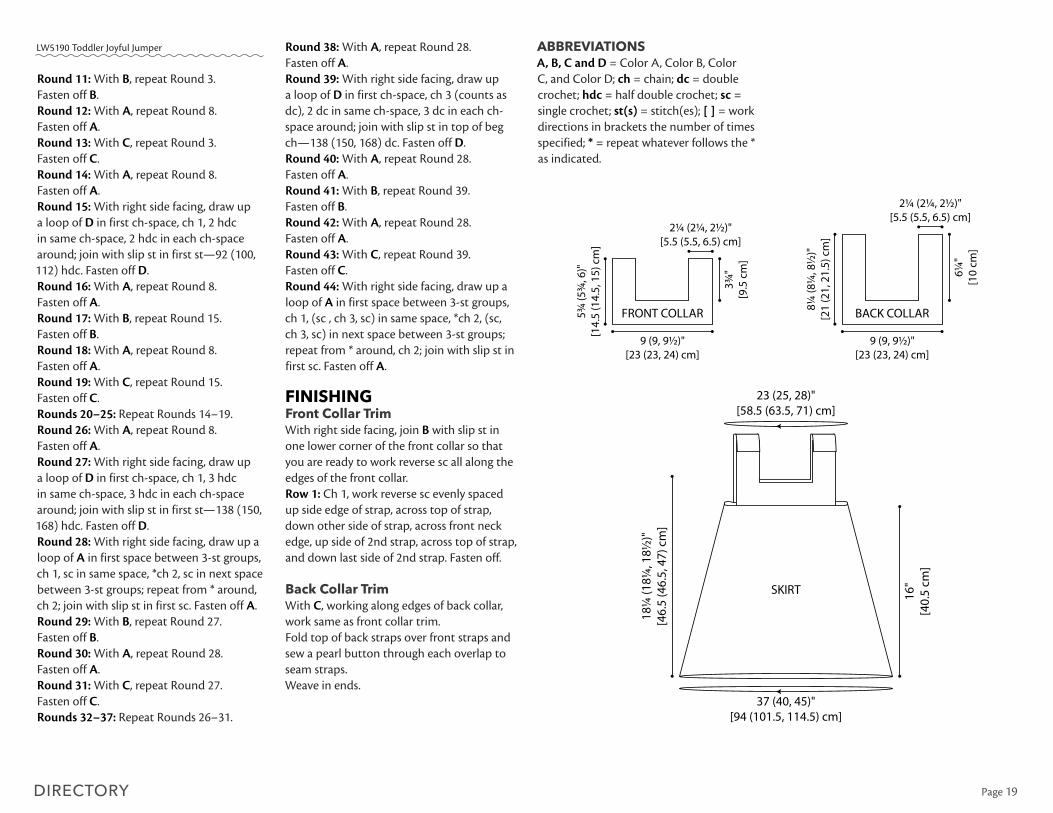
ABBREVIATIONS A, B, C and D = Color A, Color B, Color C, and Color D; ch = chain; dc = double crochet; hdc = half double crochet; sc = single crochet; st(s) = stitch(es); [ ] = work directions in brackets the number of times specified; * = repeat whatever follows the * as indicated.
FRONT COLLAR
9 (9, 9½)"[23 (23, 24) cm]
5¾ (5
¾, 6
)"[1
4.5
(14.
5, 1
5) c
m]
3¾"
[9.5
cm
]
2¼ (2¼, 2½)"[5.5 (5.5, 6.5) cm]
BACK COLLAR
9 (9, 9½)"[23 (23, 24) cm]
8¼ (8
¼, 8
½)"
[21
(21,
21.
5) c
m]
6¼"
[10
cm]
2¼ (2¼, 2½)"[5.5 (5.5, 6.5) cm]
SKIRT 16"
[40.
5 cm
]
18¼
(18¼
, 18½
)"[4
6.5
(46.
5, 4
7) c
m]
23 (25, 28)"[58.5 (63.5, 71) cm]
37 (40, 45)"[94 (101.5, 114.5) cm]

Page 20 DIRECTORY
Directions are for size 6 months. Changes for sizes 12 months, 18 months and 24 months are in parentheses.
Finished Chest: 20 (22, 24, 26)” [51 (56, 61, 66) cm]Finished Length: 10 (11½, 14, 16½)” [25.5 (29, 35.5, 42) cm]
Special Stitchkfb (Knit into front and back) = Knit next stitch but do not remove from needle, knit into back loop of same stitch and remove from needle.
Pattern Stitch1x1 Rib (over odd number of sts)Row 1 (right side): K1, *p1, k1; repeat from * to end of row.Row 2: Knit the knit sts and purl the purl sts to end of row.Repeat Row 2 for 1x1 Rib.
Notes1. Body is worked in one piece from lower edge to
underarms. Piece is then divided and fronts and back worked separately to shoulders.
2. Stitches for sleeves are picked up along armhole edges of upper body then sleeves are knit down to cuffs.
3. If preferred, use a circular needle. Work back and forth on circular needle as if working with straight needles. A circular needle may be particularly helpful when knitting the sleeves.
4. Pockets are worked separately and sewn to Cardigan.
BODYWith A, cast on 79 (87, 95, 103) sts.Work in 1x1 Rib until piece measures about ½” [1.5 cm] from beginning.
Continued...
RED HEART® Baby Hugs™ Medium: 2 (2, 2, 3) balls 4012 Ink A, 1 (1, 1, 1) ball 4825 Blue B
Susan Bates® Knitting Needles: 5 mm [US 8]
Two stitch holders, five stitch markers, five ¾” [19 mm] buttons, yarn needle
GAUGE: 16 sts = 4” [10 cm]; 32 rows = 4” [10 cm], in Garter stitch (knit every row). CHECK YOUR GAUGE. Use any size needles to obtain the gauge.
RED HEART® Baby Hugs™ Medium, Art E404 Oeko-Tex
Certified 100% Acrylic baby yarn available in 4.5 oz (127 g) 247 yds (225 m) balls
LW5175
knitting
Designed by Lorna Miser
What you will need:
Buy Yarn
Cute & Classic Baby Cardigan
Your little guy will enjoy being able to move freely in a soft, comfy sweater. Knitting it with
this tested yarn helps ensure his comfort.

Page 21 DIRECTORY
LW5175 Cute & Classic Baby Cardigan
Next Row (increase): K39 (43, 47, 51), kfb, knit to end of row—80 (88, 96, 104) sts.Work in Garter st (knit every row) until piece measures about 6 (7, 9, 11)” [15 (18, 23, 28) cm] from beginning.
Dividing Row (right side): K16 (18, 20, 22) and place these sts on a holder for right front, bind off 8 sts for underarm, knit until you have 32 (36, 40, 44) sts on right needle then place these sts on a holder for back, bind off 8 sts for underarm, knit to end of row for left front—16 (18, 20, 22) sts remain on needle for left front.
Left FrontWork over 16 (18, 20, 22) left front sts only.Work in Garter st until left front measures about 2 (2½, 3, 3½)” [5 (6.5, 7.5, 9) cm] from dividing row, end with a right side row.
Shape Left NeckRow 1 (wrong side): Bind off 4 sts, knit to end of row—12 (14, 16, 18) sts.Row 2: Knit.Row 3: Bind off 2 sts, knit to end of row—10 (12, 14, 16) sts.Rows 4 and 5: Repeat Rows 2 and 3—8 (10, 12, 14) sts in Row 5.Work even in Garter st until left front measures about 4 (4½. 5, 5½)” [10 (11.5, 12.5, 14) cm] from dividing row. Bind off.
BackReturn the 32 (36, 40, 44) back sts to needles and join A, ready to work a wrong side row.Work even in Garter st until back measures same as left front. Bind off.
Right FrontReturn 16 (18, 20, 22) right front sts to needles and join A, ready to work a wrong side row.
Work in Garter st until right front measures same as left front to neck, end with a wrong side row.
Shape Right NeckRow 1 (right side): Bind off 4 sts, knit to end of row—12 (14, 16, 18) sts.Row 2: Knit.Row 3: Bind off 2 sts, knit to end of row—10 (12, 14, 16) sts.Rows 4 and 5: Repeat Rows 2 and 3—8 (10, 12, 14) sts in Row 5.Work even in Garter st until right front measures same as back. Bind off.
Sew shoulder seams.
SLEEVES (work 2)Note: Pick up stitches along armhole edges of front and back only. Leave the bound-off underarm sts unworked.Row 1 (right side): With right side facing and A, pick up and k33 (37, 41, 45) sts evenly spaced along armhole edges between lower back and lower front corners of armhole, leaving bound-off underarm sts unworked.Work in Garter st for 7 rows.Decrease Row: K1, k2tog, k to last 3 sts, k2tog, k1—31 (35, 39, 43) sts.Repeat last 8 rows 3 (5, 7, 9) more times—25 sts.Work even in Garter st until piece measures about 5½ (7, 8½, 10)” [14 (18, 21.5, 25.5) cm].Work in 1x1 Rib for about ½” [1.5 cm]. Bind off.Repeat along other armhole edges for 2nd sleeve.
POCKETS (make 2)With B, cast on 12 (12, 14, 14) sts.Work in Garter st for 24 rows.Bind off.
Continued...

Page 22
LW5175 Cute & Classic Baby Cardigan
FINISHINGNeck EdgingWith right side facing and A, pick up and k49 sts evenly spaced around neck edge.Work in 1x1 Rib for about ¾” [2 cm]. Bind off.Place five stitch markers along right front edge if you are making the cardigan for a boy and along left front edge if you are making the cardigan for a girl. Place first marker about ½” [13 mm] below neck edge. Place fifth marker about ½” [13 mm] above lower edge. Space remaining 3 stitch markers evenly between the first and fifth.
Front BandWith right side facing and A, pick up and k37 (45, 53, 61) sts evenly spaced along unmarked front edge.Work in 1x1 Rib for about ¾” [2 cm]. Bind off.
Button BandWith right side facing and A, pick up and k37 (45, 53, 61) sts evenly spaced along marked front edge.Work in 1x1 Rib for 2 rows.Buttonhole Row: [Work in 1x1 Rib to marker, yo, k2tog (buttonhole made)] 5 times, work in 1x1 Rib to end of row.Work in 1x1 Rib until ribbing measures about ¾” [2 cm]. Bind off.Sew buttons to front band, opposite buttonholes.Sew side edges of top of sleeves to bound-off underarm sts then sew sleeve seams.Sew pockets to fronts, about 2 or 3 rows above lower ribbing and 2 or 3 sts from front ribbing.Weave in ends.
ABBREVIATIONSA and B = Color A and Color B; k = knit; k2tog = knit next 2 sts together; st(s) = stitch(es); yo = yarn over; * = repeat whatever follows the * as indicated.
BODY
RightFront
LeftFront
Back
2 (2½, 3, 3½)"[5 (6.5, 7.5, 9) cm]
2"[5
cm
]
4 (4
½, 5
, 5½
)"[1
0 (1
1.5,
12.
5, 1
4) c
m]8 (9, 10, 11)"
[20.5 (23, 25.5, 28) cm]
6 (7
, 9, 1
1)"
[15
(18,
23,
28)
cm
]
20 (22, 24, 26)"[51 (56, 61, 66) cm]
10 (1
1½, 1
4, 1
6½)"
[25.
5 (2
9, 3
5.5,
42)
cm
]
SLEEVE
8¼ (9¼, 10¼, 11¼)"[21 (23.5, 26, 28.5) cm]
6 (7
½, 9
, 10½
)"[1
5 (1
9, 2
3, 2
6.5)
cm
]
6¼"[16 cm]
DIRECTORY

Page 23 DIRECTORY
Directions are for size 2 years. Changes for sizes 4 years and 6 years are in parentheses.
Finished Chest: 26 (28, 30)” [66 (71, 76) cm]Finished Length: 16½ (18, 19½)” [42 (45.5, 49.5) cm]
Notes1. Body is worked in one piece from lower edge to
underarms. Piece is then divided and fronts and back worked separately to shoulders.
2. Stitches for sleeves are picked up along armhole edges of upper body then sleeves are knit down to cuffs.
3. If preferred, use a circular needle. Work back and forth on circular needle as if working with straight needles. A circular needle may be particularly helpful when knitting the sleeves.
4. Pockets are worked separately and sewn to Cardigan.
Special Stitchkfb (Knit into front and back) = Knit next stitch but do not remove from needle, knit into back loop of same stitch and remove from needle.
Pattern Stitch1x1 Rib (over odd number of sts)Row 1 (right side): K1, *p1, k1; repeat from * to end of row.Row 2: Knit the knit sts and purl the purl sts to end of row.Repeat Row 2 for 1x1 Rib.
Continued...
RED HEART® Baby Hugs™ Medium: 3 (3, 4) balls 4801 Blueberry A, 1 (1, 1) ball 4909 Ladybug B
Susan Bates® Knitting Needles: 5 mm [US 8]
Two stitch holders, five stitch markers, five ¾” [19 mm] buttons, yarn needle
GAUGE: 16 sts = 4” [10 cm]; 32 rows = 4” [10 cm], in Garter stitch (knit every row). CHECK YOUR GAUGE. Use any size needles to obtain the gauge.
RED HEART® Baby Hugs™ Medium, Art E404 Oeko-Tex
Certified 100% Acrylic baby yarn available in 4.5 oz (127 g) 247 yds (225 m) balls
LW5189
knitting
Designed by Lorna Miser
What you will need:
Buy Yarn
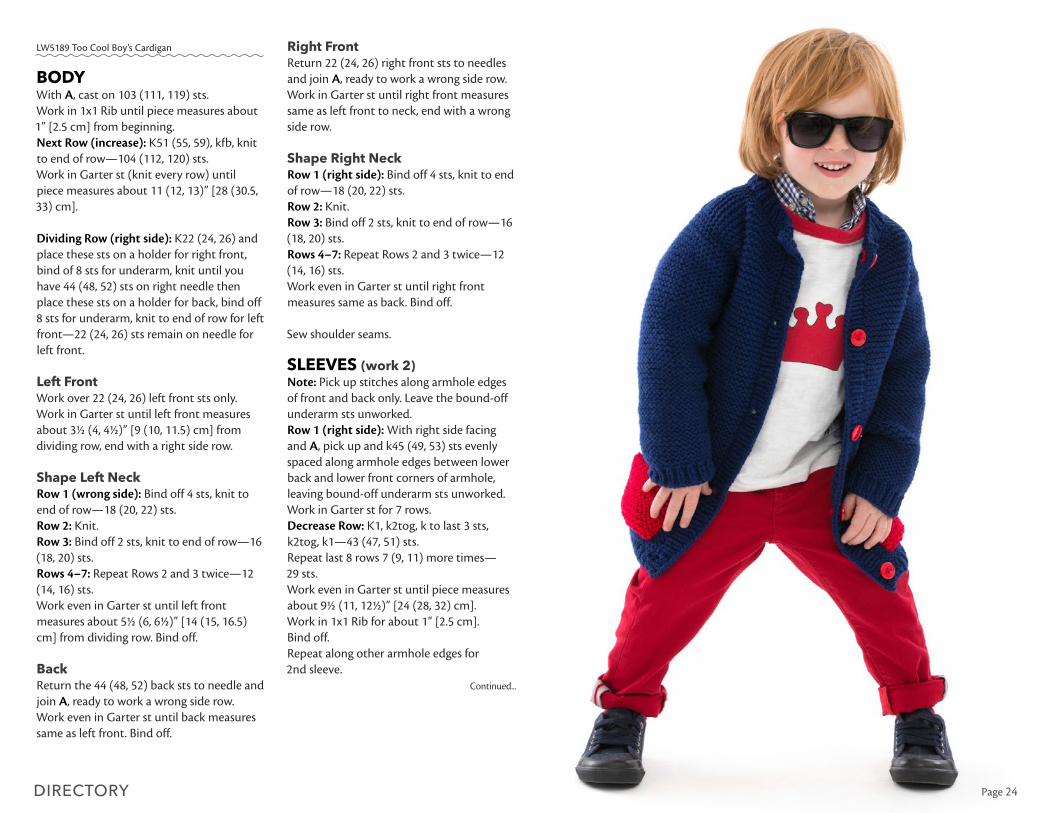
Too Cool Boy’s Cardigan
Active little guys will enjoy the comfortable warmth of this soft stylish knit cardigan. And
since it is made with certified yarn, you’ll enjoy knowing that you are using quality materials.
We’ve included instructions for buttons on either side so you can knit it for your little girls too.
DIRECTORY
LW5189 Too Cool Boy’s Cardigan
BODYWith A, cast on 103 (111, 119) sts.Work in 1x1 Rib until piece measures about 1” [2.5 cm] from beginning.Next Row (increase): K51 (55, 59), kfb, knit to end of row—104 (112, 120) sts.Work in Garter st (knit every row) until piece measures about 11 (12, 13)” [28 (30.5, 33) cm].
Dividing Row (right side): K22 (24, 26) and place these sts on a holder for right front, bind of 8 sts for underarm, knit until you have 44 (48, 52) sts on right needle then place these sts on a holder for back, bind off 8 sts for underarm, knit to end of row for left front—22 (24, 26) sts remain on needle for left front.
Left FrontWork over 22 (24, 26) left front sts only.Work in Garter st until left front measures about 3½ (4, 4½)” [9 (10, 11.5) cm] from dividing row, end with a right side row.
Shape Left NeckRow 1 (wrong side): Bind off 4 sts, knit to end of row—18 (20, 22) sts.Row 2: Knit.Row 3: Bind off 2 sts, knit to end of row—16 (18, 20) sts.Rows 4–7: Repeat Rows 2 and 3 twice—12 (14, 16) sts.Work even in Garter st until left front measures about 5½ (6, 6½)” [14 (15, 16.5) cm] from dividing row. Bind off.
BackReturn the 44 (48, 52) back sts to needle and join A, ready to work a wrong side row.Work even in Garter st until back measures same as left front. Bind off.
Right FrontReturn 22 (24, 26) right front sts to needles and join A, ready to work a wrong side row.Work in Garter st until right front measures same as left front to neck, end with a wrong side row.
Shape Right NeckRow 1 (right side): Bind off 4 sts, knit to end of row—18 (20, 22) sts.Row 2: Knit.Row 3: Bind off 2 sts, knit to end of row—16 (18, 20) sts.Rows 4–7: Repeat Rows 2 and 3 twice—12 (14, 16) sts.Work even in Garter st until right front measures same as back. Bind off.
Sew shoulder seams.
SLEEVES (work 2)Note: Pick up stitches along armhole edges of front and back only. Leave the bound-off underarm sts unworked.Row 1 (right side): With right side facing and A, pick up and k45 (49, 53) sts evenly spaced along armhole edges between lower back and lower front corners of armhole, leaving bound-off underarm sts unworked.Work in Garter st for 7 rows.Decrease Row: K1, k2tog, k to last 3 sts, k2tog, k1—43 (47, 51) sts.Repeat last 8 rows 7 (9, 11) more times—29 sts.Work even in Garter st until piece measures about 9½ (11, 12½)” [24 (28, 32) cm].Work in 1x1 Rib for about 1” [2.5 cm]. Bind off.Repeat along other armhole edges for 2nd sleeve.
Continued...
Page 24

DIRECTORY
LW5189 Too Cool Boy’s Cardigan
POCKETS (make 2)With B, cast on 14 (16, 18) sts.Work in Garter st for 24 rows.Bind off.
FINISHINGNeck EdgingWith right side facing and A, pick up and k55 sts evenly spaced around neck edge.Work in 1x1 Rib for about 1” [2.5 cm]. Bind off.Place five stitch markers along right front edge if you are making the cardigan for a boy and along left front edge if you are making the cardigan for a girl. Place first marker about ¾ (¾, 1)” [2 (2, 2.5) cm] below neck edge. Place fifth marker about ¾ (¾, 1)” [2 (2, 2.5) cm] above lower edge. Space remaining 3 stitch markers evenly between the first and fifth.
Front BandWith right side facing and A, pick up and k65 (71, 81) sts evenly spaced along unmarked front edge.Work in 1x1 Rib for about 1” [2.5 cm]. Bind off.
Button BandWith right side facing and A, pick up and k65 (71, 81) sts evenly spaced along marked front edge.Work in 1x1 Rib for 2 rows.Buttonhole Row: [Work in 1x1 Rib to marker, yo, k2tog (buttonhole made)] 5 times, work in 1x1 Rib to end of row.Work in 1x1 Rib until ribbing measures about 1” [2.5 cm].Bind off.Sew buttons to front band, opposite buttonholes.
Sew side edges of top of sleeves to bound-off underarm sts then sew sleeve seams.Sew pockets to fronts placed 2 or 3 rows above lower ribbing and 2 or 3 sts from front ribbing.Weave in ends.
ABBREVIATIONS A and B, C = Color A and Color B; k = knit; k2tog = knit next 2 sts together; st(s) = stitch(es); yo = yarn over; * = repeat whatever follows the * as indicated.
BODY
RightFront
LeftFront
Back
3 (3½, 4)"[7.5 (9, 10) cm]
2"[5
cm
]
5½ (6
, 6½
)"[1
4 (1
5, 1
6.5)
cm
]
11 (12, 13)"[28 (30.5, 33) cm]
11 (1
2, 1
3)"
[28
(30.
5, 3
3) c
m]
26 (28, 30)"[66 (71, 76) cm]
16½
(18,
19½
)"[4
2 (4
5.5,
49.
5) c
m]
SLEEVE
11¼ (12¼, 13¼)"[28.5 (31, 33.5) cm]
10½
(12,
13½
)"[2
6.5
(30.
5, 3
4.5)
cm
]
7¼"[18.5 cm]
Page 25
Page 26 DIRECTORY
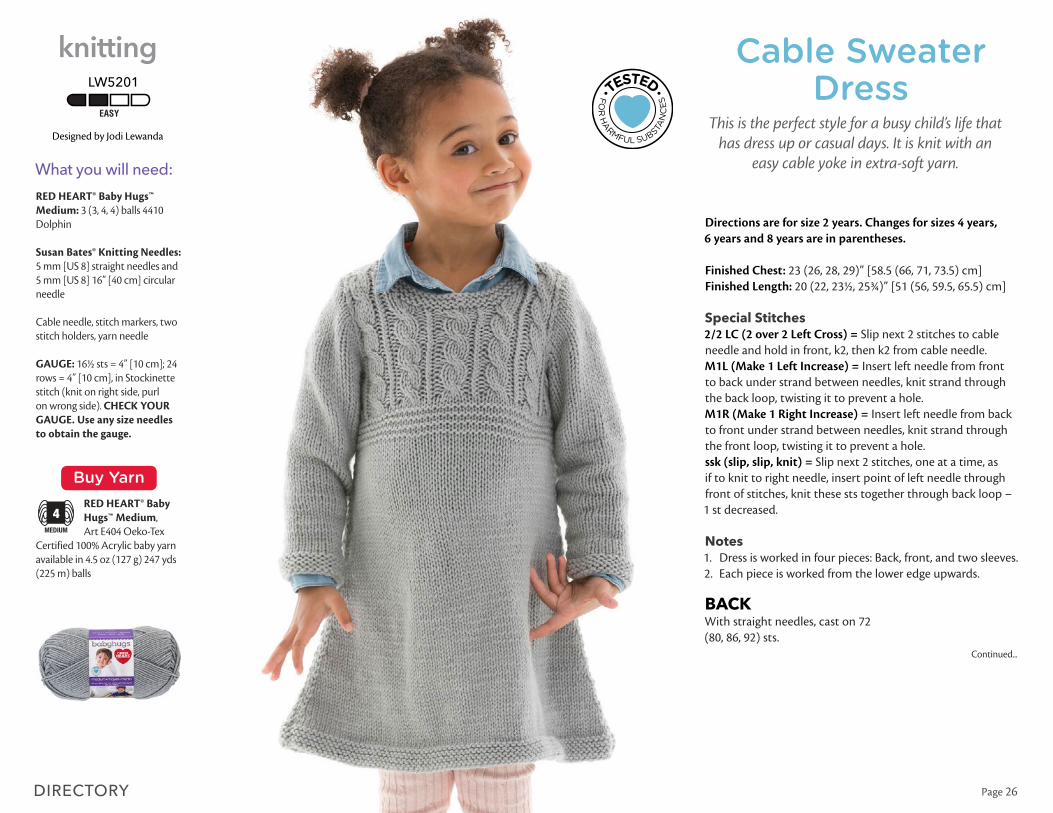
Directions are for size 2 years. Changes for sizes 4 years, 6 years and 8 years are in parentheses.
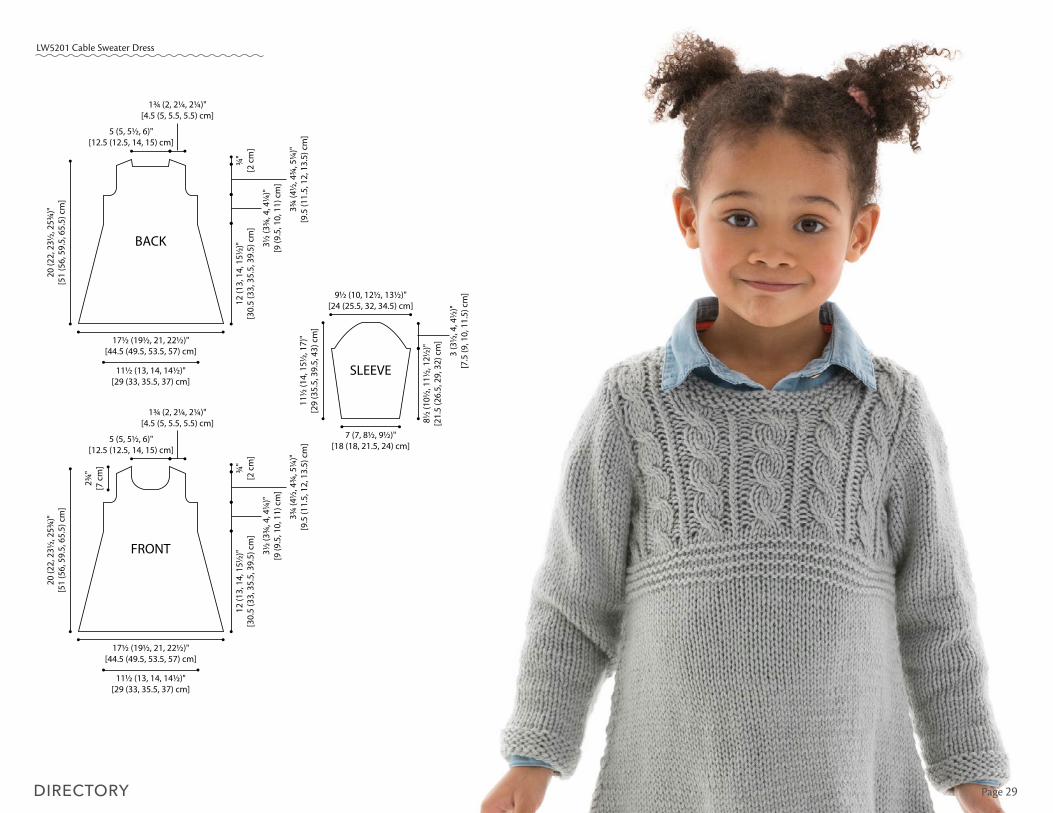
Finished Chest: 23 (26, 28, 29)” [58.5 (66, 71, 73.5) cm]Finished Length: 20 (22, 23½, 25¾)” [51 (56, 59.5, 65.5) cm]
Special Stitches2/2 LC (2 over 2 Left Cross) = Slip next 2 stitches to cable needle and hold in front, k2, then k2 from cable needle.M1L (Make 1 Left Increase) = Insert left needle from front to back under strand between needles, knit strand through the back loop, twisting it to prevent a hole.M1R (Make 1 Right Increase) = Insert left needle from back to front under strand between needles, knit strand through the front loop, twisting it to prevent a hole.ssk (slip, slip, knit) = Slip next 2 stitches, one at a time, as if to knit to right needle, insert point of left needle through front of stitches, knit these sts together through back loop – 1 st decreased.
Notes1. Dress is worked in four pieces: Back, front, and two sleeves.2. Each piece is worked from the lower edge upwards.
BACKWith straight needles, cast on 72 (80, 86, 92) sts.
Continued...
RED HEART® Baby Hugs™ Medium: 3 (3, 4, 4) balls 4410 Dolphin
Susan Bates® Knitting Needles: 5 mm [US 8] straight needles and 5 mm [US 8] 16” [40 cm] circular needle
Cable needle, stitch markers, two stitch holders, yarn needle
GAUGE: 16½ sts = 4” [10 cm]; 24 rows = 4” [10 cm], in Stockinette stitch (knit on right side, purl on wrong side). CHECK YOUR GAUGE. Use any size needles to obtain the gauge.
RED HEART® Baby Hugs™ Medium, Art E404 Oeko-Tex
Certified 100% Acrylic baby yarn available in 4.5 oz (127 g) 247 yds (225 m) balls
LW5201
knitting
Designed by Jodi Lewanda
What you will need:
Buy Yarn
Cable Sweater Dress
This is the perfect style for a busy child’s life that has dress up or casual days. It is knit with an
easy cable yoke in extra-soft yarn.

DIRECTORY
LW5201 Cable Sweater Dress
SkirtWork in Garter st (knit every row) for 7 rows.Beginning with a right side (knit) row, work in Stockinette st (knit on right side, purl on wrong side) for 2 (4, 4, 4) rows.Decrease Row (right side): K1, ssk, knit to last 3 sts, k2tog, k1—70 (78, 84, 90) sts.Work even in Stockinette st for 5 rows.Repeat Decrease Row—68 (76, 82, 88) sts.Repeat last 6 rows 7 (8, 8, 9) more times— 54 (60, 66, 70) sts.Work even in Stockinette st for 3 rows.Repeat Decrease Row—52 (58, 64, 68) sts.Repeat last 4 rows 2 (2, 3, 4) more times— 48 (54, 58, 60) sts.Work even in Stockinette st until piece measures about 12 (13, 14, 15½)” [30.5 (33, 35.5, 39.5) cm] from beginning, end with a right side row as the last row you work.
BodiceWork in Garter st for 8 rows.Next Row (wrong side): Purl.
Begin Cable PatternRow 1 (right side): K5 (1, 3, 4), *p1, k1 through back loop, p1, k4; repeat from * to last 8 (4, 6, 7) sts, p1, k1 through back loop, p1, k5 (1, 3, 4).Row 2: P5 (1, 3, 4), *k1, p1 through back loop, k1, p4; repeat from * to last 8 (4, 6, 7) sts, k1, p1 through back loop, k1, p5 (1, 3, 4).Row 3: K5 (1, 3, 4), *p1, k1 through back loop, p1, 2/2 LC; repeat from * to last 8 (4, 6, 7) sts, p1, k1 through back loop, p1, k5 (1, 3, 4).Row 4: Repeat Row 2.Rows 5 and 6: Repeat Rows 1 and 2.Repeat Rows 1–6 until bodice measures about 3½ (3¾, 4, 4¼)” [9 (9.5, 10, 11) cm], end with a wrong side row as the last row you work.
Continue to work Cable pattern as established in Rows 1–6 throughout remainder of piece, lining up the stitches and cables as in previous rows.
Shape ArmholesRow 1 (right side): Bind off 3 (4, 4, 4) sts, work in established pattern to end of row—45 (50, 54, 56) sts.Row 2: Bind off 3 (4, 4, 4) sts, work in established pattern to end of row—42 (46, 50, 52) sts.Row 3 (decrease row): K1, ssk, work in established pattern to last 3 sts, k2tog, k1—40 (44, 48, 50) sts.Row 4: Work even in established pattern.Repeat last 2 rows 2 (3, 3, 3) more times— 36 (38, 42, 44) sts.Work even in established pattern until armholes measure about 3¾ (4½, 4¾, 5¼)” [9.5 (11.5, 12, 13.5) cm], end with a wrong side row as the last row you work.
Shape Back Neck and ShouldersPlace a marker on each side of center 20 (20, 22, 24) sts.Row 1 (right side): Bind off 4 sts, work in established pattern to first marker for right shoulder, drop yarn and place center 20 (20, 22, 24) sts on a holder for back neck, removing markers; join a 2nd ball of yarn and work in established pattern to end of row for left shoulder—4 (5, 6, 6) sts right shoulder sts and 8 (9, 10, 10) sts left shoulder sts.Both shoulders are now worked AT THE SAME TIME using separate balls of yarn.Row 2: Bind off 4 sts, work in established pattern to end of left shoulder; bind off first right shoulder st then work in established pattern to end of right shoulder—4 (5, 6, 6) left shoulder sts and 3 (4, 5, 5) right shoulder sts.
Continued...
Page 27

Page 28 DIRECTORY
LW5201 Cable Sweater Dress
Row 3: Bind off rem 3 (4, 5, 5) right shoulder sts; bind off first left shoulder st then work in established pattern to end of left shoulder—3 (4, 5, 5) left shoulder sts.Row 4: Bind off rem 3 (4, 5, 5) left shoulder sts.
FRONTWork same as back until armholes measure about 1¾ (2½, 2¾, 3¼)” [4.5 (6.5, 7, 8.5) cm] and armhole shaping is complete, end with a wrong side row as the last row you work— 36 (38, 42, 44) sts.
Shape Front NeckPlace a marker on each side of center 10 (10, 12, 14) sts.Row 1 (right side): Work in established pattern to first marker for left shoulder, drop yarn and place next 10 (10, 12, 14) sts on holder for front neck, removing markers; join a 2nd ball of yarn and work in established pattern to end of row for right shoulder—13 (14, 15, 15) sts for each shoulder.Row 2: Work in established pattern over right shoulder sts, then work in established pattern over left shoulder sts.Row 3 (decrease row): Work in established pattern to last 3 sts of left shoulder, k2tog, k1; working over right shoulder sts, k1, ssk, work in established pattern to end of right shoulder—12 (13, 14, 14) sts for each shoulder.Repeat last 2 rows 4 more times—8 (9, 10, 10) sts for each shoulder.Next Row (wrong side): Work in established pattern over right shoulder sts, then work in established pattern over left shoulder sts.
Shape ShouldersNext Row (right side): Bind off 4 sts, work in established pattern to last 3 sts of left shoulder, k2tog, k1; working over right shoulder sts, k1, ssk, work in established pattern to end of right shoulder—3 (4, 5, 5) left shoulder sts and 7 (8, 9, 9) right shoulder sts.Next Row: Bind off 4 sts, work in established pattern to end of right shoulder; work in established pattern to end of left shoulder—3 (4, 5, 5) sts for each shoulder.Next Row: Bind off rem 3 (4, 5, 5) left shoulder sts; work in established pattern to end of right shoulder.Next Row: Bind off rem 3 (4, 5, 5) right shoulder sts.
SLEEVES (make 2)With straight needles, cast on 28 (28, 36, 40) sts.Work in Garter st for 7 rows.Beginning with a right side (knit) row, work in Stockinette st for 2 rows.Increase Row (right side): K1, M1L, knit to last st, M1R, k1—30 (30, 38, 42) sts.Work even in Stockinette st for 5 rows.Repeat Increase Row—32 (32, 40, 44) sts.Repeat last 6 rows 0 (2, 1, 0) more times—32 (36, 42, 44) sts.Work even in Stockinette st for 7 rows.Repeat Increase Row—34 (38, 44, 46) sts.Repeat last 8 rows 3 (2, 4, 5) more times—40 (42, 52, 56) sts.Work even in Stockinette st until piece measures about 8½ (10½, 11½, 12½)” [21.5 (26.5, 29, 32) cm] from beginning, end with a wrong side row as the last row you work.
Shape CapRow 1 (right side): Bind off 3 (4, 4, 4) sts, knit to end of row—37 (38, 48, 52) sts.Row 2: Bind off 3 (4, 4, 4) sts, purl to end of row—34 (34, 44, 48) sts.Row 3 (decrease row): K1, ssk, knit to last 3 sts, k2tog, k1—32 (32, 42, 46) sts.Row 4: Purl.Repeat last 2 rows 1 (3, 5, 5) more times— 30 (26, 32, 36) sts.Next Row (decrease row – right side): K1, ssk, knit to last 3 sts, k2tog, k1—28 (24, 30, 34) sts.Next Row (decrease row – wrong side): P1, p2tog, purl to last 3 sts, p2tog through back loops, p1—26 (22, 28, 32) sts.Repeat last 2 rows 3 (2, 3, 2) more times— 14 (14, 16, 24) sts.Next Row (decrease row – right side): K1, ssk, knit to last 3 sts, k2tog, k1—12 (12, 14, 22) sts.Next Row: Purl.Repeat last 2 rows 1 (1, 0, 3) more time(s)—10 (10, 14, 16) sts.Bind off.
FINISHINGWet block bodices to open up cables.Sew shoulder seams.
Neck EdgingWith right side facing and circular needle, beginning at right shoulder seam, pick up and k2 sts along right back neck edge, knit the 20 (20, 22, 24) back neck sts from holder, pick up and k2 sts along left back neck edge, pick up and k11 (12, 13, 14) sts along left front neck edge, knit the 10 (10, 12, 14) front neck sts from holder, pick up and k11 (12, 13, 14) sts along right front neck edge—56 (58, 64, 70) sts. Place marker for beginning of round and prepare to work in rounds.Beginning with a purl round, work in Garter st worked in rnds (purl 1 round, knit 1 round) for 6 rounds.Bind off loosely as if to purl.Sew in sleeves. Sew sleeve and side seams.Weave in ends.
ABBREVIATIONSk = knit; k2tog = knit next 2 sts together; p = purl; p2tog = purl next 2 sts together; st(s) = stitch(es); * = repeat whatever follows the * as indicated.
See next page for schematic and alternate photo
DIRECTORY
LW5201 Cable Sweater Dress
Page 29
BACK
17½ (19½, 21, 22½)"[44.5 (49.5, 53.5, 57) cm]
11½ (13, 14, 14½)"[29 (33, 35.5, 37) cm]
12 (1
3, 1
4, 1
5½)"
[30.
5 (3
3, 3
5.5,
39.
5) c
m]
3½ (3
¾, 4
, 4¼
)"[9
(9.5
, 10,
11)
cm
]
¾"
[2 c
m]
3¾ (4
½, 4
¾, 5
¼)"
[9.5
(11.
5, 1
2, 1
3.5)
cm
]
1¾ (2, 2¼, 2¼)"[4.5 (5, 5.5, 5.5) cm]
5 (5, 5½, 6)"[12.5 (12.5, 14, 15) cm]
20 (2
2, 2
3½, 2
5¾)"
[51
(56,
59.
5, 6
5.5)
cm
]
FRONT
17½ (19½, 21, 22½)"[44.5 (49.5, 53.5, 57) cm]
11½ (13, 14, 14½)"[29 (33, 35.5, 37) cm]
12 (1
3, 1
4, 1
5½)"
[30.
5 (3
3, 3
5.5,
39.
5) c
m]
3½ (3
¾, 4
, 4¼
)"[9
(9.5
, 10,
11)
cm
]
¾"
[2 c
m]
3¾ (4
½, 4
¾, 5
¼)"
[9.5
(11.
5, 1
2, 1
3.5)
cm
]
1¾ (2, 2¼, 2¼)"[4.5 (5, 5.5, 5.5) cm]
5 (5, 5½, 6)"[12.5 (12.5, 14, 15) cm]
20 (2
2, 2
3½, 2
5¾)"
[51
(56,
59.
5, 6
5.5)
cm
]
2¾"
[7 c
m]
SLEEVE
7 (7, 8½, 9½)"[18 (18, 21.5, 24) cm]
8½ (1
0½, 1
1½, 1
2½)"
[21.
5 (2
6.5,
29,
32)
cm
]
3 (3
½, 4
, 4½
)"[7
.5 (9
, 10,
11.
5) c
m]9½ (10, 12½, 13½)"
[24 (25.5, 32, 34.5) cm]11
½ (1
4, 1
5½, 1
7)"
[29
(35.
5, 3
9.5,
43)
cm
]

Page 30 DIRECTORY
Directions are for size 2 years. Changes for sizes 4 years, 6 years, and 8 years are in parentheses.
Finished Chest: 24½ (26½, 28½, 30½)” (62 (67.5, 72.5, 77.5) cm, buttonedFinished Length: 14½ (16, 18, 20)” (37 (40.5, 45.5, 51) cm
Notes1. Body of cardigan is worked in one piece beginning at
lower edge. Piece is divided at underarms and back and fronts worked separately to shoulders. Front bands are also worked separately to center back neck.
2. Sleeves are worked separately and sewn into armholes.
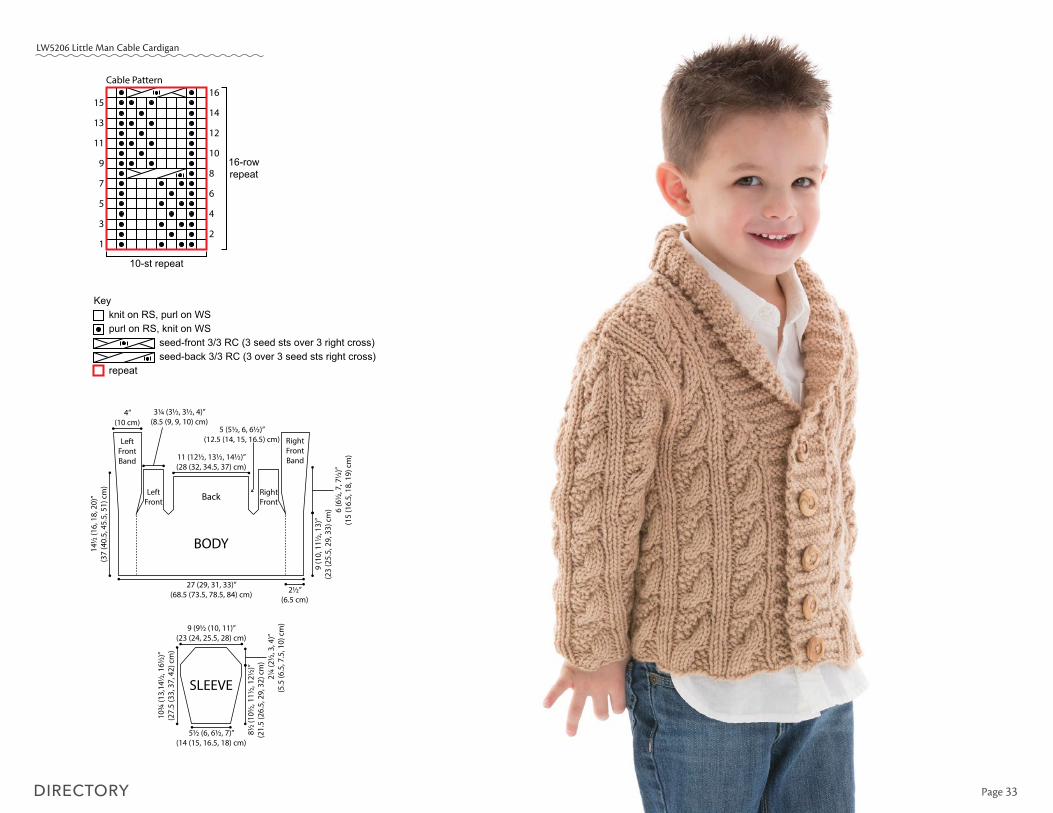
Special Stitchesseed-back 3/3 RC (3 over 3 seed sts right cross) = Slip next 3 stitches to cable needle and hold in back, k3, then k1, p1, k1 from cable needle.seed-front 3/3 RC (3 seed sts over 3 right cross) = Slip next 3 stitches to cable needle and hold in back, k1, p1, k1, then k3 from cable needle.M1 = Make 1 (Increase) – Lift strand between needles to left-hand needle and work strand through the back loop, twisting it to prevent a hole, [knit or purl as indicated by pattern st].
RED HEART® Baby Hugs™ Medium: 3 (3, 3, 3, 5) balls 4315 Teddy
Susan Bates® Knitting Needles: 5.5 mm [US 9]
4 (5, 5, 5) buttons 1” (2.5 cm) diameter, cable needle, 2 stitch holders, yarn needle
GAUGE: 14 sts = 4” (10 cm); 27 rows = 4” (10 cm) in Garter Ridge pattern. 20 sts = 4” (10 cm); 21 rows = 4” (10 cm) in Cable pattern. CHECK YOUR GAUGE. Use any size needles to obtain the gauge.
RED HEART® Baby Hugs™ Medium, Art E404 Oeko-Tex
Certified 100% Acrylic baby yarn available in 4.5 oz (127 g) 247 yds (225 m)
LW5206
knitting
Designed by Alice Tang
What you will need:
Buy Yarn
Little Man Cable Cardigan
Classic cables and an on-trend shawl collar are combined for a sweater that keeps a kid warm
and totally comfortable. It’s knit in washable yarn and includes how to place buttonholes on either side. Plus this yarn has been tested and certified free from harmful levels of over 300 substances.
Continued...

DIRECTORY
LW5206 Little Man Cable Cardigan
Pattern StitchesButtonhole (over 9 sts)Row 1: Work in Garter Ridge pattern as established over next 3 sts, work next 2 sts tog (k2tog or p2tog to match pattern), yo, work in Garter Ridge pattern as established over next 4 sts..
Cable Pattern (over 10 sts)Row 1 (wrong side): *P1, k1, p3, k1, p1, k2, p1; repeat from * across.Row 2: *[K1, p1] twice, k4, p1, k1; repeat from * across.Rows 3–6: Repeat Rows 1 and 2 twice.Row 7: Repeat Row 1.Row 8: *K1, p1, seed-back 3/3 RC, p1, k1; repeat from * across.Row 9: *P1, k2, p1, k1, p3, k1, p1; repeat from
* across.Row 10: *K1, p1, k4, [p1, k1] twice; repeat from * across.Rows 11–14: Repeat Rows 9 and 10 twice.Row 15: Repeat Row 9.Row 16: *K1, p1, seed-front 3/3 RC, p1, k1; repeat from * across.Repeat Rows 1–16 for Cable pattern.
Garter Ridge PatternRow 1 (wrong side): Knit.Row 2: Knit.Rows 3 and 4: Purl.Repeat Rows 1–4 for Garter Ridge pattern.
BODYCast on 128 (138, 148, 158) sts.Row 1 (wrong side): Work Row 1 of Garter Ridge pattern over first 9 sts, place marker, work Row 1 of Cable pattern to last 9 sts, place marker, work Row 1 of Garter Ridge pattern to end of row.
Rows 2–4: Work in Garter Ridge pattern to first marker, slip marker, work in Cable pattern to next marker, slip marker, work in Garter Ridge pattern to end of row.Row 5 (buttonhole row): If making girl’s cardigan work in Garter Ridge pattern to first marker, if making boy’s cardigan work Buttonhole over first 9 sts, slip marker, work in Cable pattern to next marker, slip marker, if making boy’s cardigan work in Garter Ridge pattern to end of row, if making girl’s cardigan work Buttonhole over last 9 sts.Work even in pattern as established for 13 (11, 13, 15) rows.Repeat Row 5 (buttonhole row).Repeat last 14 (12, 14, 16) rows 1 (2, 2, 2) more times (for a total of 3 (4, 4, 4) buttonholes).Work even in pattern as established for 13 (11, 13, 15) rows.
Left FrontNotes: 1. When instructed to “decrease 1 st” work
k2tog or p2tog, whichever you prefer, to match the current pattern.
2. The fronts are longer than the back. The shoulder seam will lie at the back of the shoulder, slightly below the natural shoulder line.
Row 1 (wrong side): If making girl’s cardigan work in Garter Ridge pattern to first marker, if making boy’s cardigan work Buttonhole over first 9 sts, remove marker and place these 9 sts on a holder (for left front band), work in Cable pattern over next 22 (24, 26, 29) sts, decrease 1 st; place remaining sts on another holder for back and right front—23 (25, 27, 30) sts.Row 2: Decrease 1 st (armhole edge decrease), work in Cable pattern as established to last 2 sts, decrease 1 st (neck edge decrease)—21 (23, 25, 28) sts.
Continued...
Page 31

Page 32 DIRECTORY
Row 3: Work in Cable pattern as established to last 2 sts, decrease 1 st (armhole edge decrease)—20 (22, 24, 27) sts.Row 4: Work in Cable pattern as established to last 2 sts, decrease 1 st (neck edge decrease)—19 (21, 23, 26) sts.Row 5: Work even in Cable pattern as established.Rows 6–11 (13, 15, 17): Repeat last 2 rows 3 (4, 5, 6) more times—16 (17, 18, 20) sts remain.Work even in patterns as established until armhole measures about 6 (6½, 7, 7½)” (15 (16.5, 18, 19) cm).Bind off.
BackRow 1 (WS): With wrong side facing, join yarn at beginning of stitches on holder, decrease 1 st, work in Cable pattern as established over next 58 (64, 70, 74) sts, decrease 1 st; leave remaining sts on holder for right front—60 (66, 72, 76) sts.Rows 2 and 3 (decrease rows): Decrease 1 st, work in Cable pattern as established to last 2 sts, decrease 1 st—56 (62, 68, 72) sts.Work even in Cable pattern as established for 24 (26, 28, 30) more rows.Bind off.
Right FrontRow 1 (WS): With wrong side facing, join yarn at beginning of stitches on holder, decrease 1 st, work in Cable pattern as established to marker, slip marker, if making boy’s cardigan work in Garter Ridge pattern to end of row, if making girl’s cardigan work Buttonhole over last 9 sts.
Row 2: Work in Garter Ridge pattern to marker, remove marker and place these 9 sts on a holder (for right front band), decrease 1 st (neck edge decrease), work in Cable pattern as established to last 2 sts, decrease 1 st (armhole edge decrease) —21 (23, 25, 28) sts.Row 3: Decrease 1 st (armhole edge decrease), work in Cable pattern as established to end of row—20 (22, 24, 27) sts.Row 4: Decrease 1 st (neck edge decrease), work in Cable pattern as established to end of row—19 (21, 23, 26) sts.Row 5: Work even in patterns as established.Rows 6–11 (13, 15, 17): Repeat last 2 rows 3 (4, 5, 6) more times—16 (17, 18, 20) sts remain.Work even in patterns as established until right front measures same as left front.Bind off.
If desired, block piece by misting and let dry. Do not use heat, because the cables and ridges will flatten. Sew shoulder seams.
Left Front BandReturn left front band sts from holder to needle, ready to work a right side row.Work even in Garter Ridge pattern as established for 4 rows.Increase Row (right side): Work first st, M1, continue in Garter Ridge pattern to end of row—10 sts.Work even in Garter Ridge pattern for 3 rows.Repeat Increase Row—11 sts.Repeat last 4 rows 3 more times—14 sts.Work even in Garter Ridge pattern until band comfortably reaches slightly past center back neck; end with a Row 1 or Row 3 of pattern. Place sts on a holder. Cut yarn.
LW5206 Little Man Cable Cardigan Right Front BandReturn right front band sts from holder to needle, ready to work a wrong side row.Work even in Garter Ridge pattern as established for 3 rows.Increase Row (right side): Work in Garter Ridge pattern to last st, M1, work last st—10 sts.Repeat last 4 rows 4 more times—14 sts.Work even in Garter Ridge pattern until band comfortably reaches slightly past center back neck; end with same row of pattern as left front band. Graft ends of front bands together. Sew long inner edge of front bands to neck edge of cardigan, easing in fullness of band at back of neck.
SLEEVES (make 2)Cast on 28 (30, 32, 34) sts.
Size 2 years Only:Row 1 (wrong side): P1, k2, p1, work in Cable pattern to last 4 sts, p1, k1, p2.Row 2: K2, p1, k1, work in Cable pattern to last 4 sts, [k1, p1] twice.
Size 4 years Only:Row 1 (wrong side): Work in Cable pattern to end of row.Row 2: Work in Cable pattern to end of row.
Size 6 years Only:Row 1 (wrong side): P1, work in Cable pattern to last st, p1.Row 2: K1, work in Cable pattern to last st, k1.
Size 8 years Only:Row 1 (wrong side): K1, p1, work in Cable pattern to last 2 sts, p1, k1.Row 2: P1, k1, work in Cable pattern to last 2 sts, k1, p1.
All Sizes:Notes: You will now continue in pattern as established. As stitches are increased, incorporate the new stitches into the Cable pattern. Do not work any crosses in the new stitches until a sufficient number of stitches have been increased.Work even in Cable pattern as established for 1 (1, 3, 3) rows.Increase Row (right side): Work in Cable pattern as established and increase 1 st at beginning and end of row—30 (32, 34, 36) sts.Work even in Cable pattern as established for 3 (3, 5, 5) rows.Repeat Increase Row—32 (34, 36, 38) sts.Repeat last 4 (4, 6, 6) rows 7 (7, 7, 8) more times—46 (48, 50, 54) sts.Work even in Cable pattern as established until piece measures about 8½ (10½, 11½, 12½)” (21.5 (26.5, 29, 32) cm) from beginning.
Shape CapNext 12 (14, 16, 20) Rows: Work in Cable pattern as established and decrease 1 st at beginning and end of each row—22 (20, 18, 14) sts.Bind off.
FINISHINGIf desired, block sleeves but only lightly. Sew sleeve seams and sew sleeves into armholes. Sew buttons opposite buttonholes. Weave in any remaining ends.
ABBREVIATIONS k = knit; k2tog = knit next 2 sts together; p = purl; p2tog = purl next 2 sts together; st(s) = stitch(es); yo = yarn over; [ ] = work directions in brackets the number of times specified; * = repeat whatever follows the * as indicated.
See schematics and alternate photo on next page
DIRECTORY
LW5206 Little Man Cable Cardigan
knit on RS, purl on WSpurl on RS, knit on WS
Key
seed-back 3/3 RC (3 over 3 seed sts right cross)seed-front 3/3 RC (3 seed sts over 3 right cross)
repeat
12
34
56
78
910
1112
1314
1516
10-st repeat
16-rowrepeat
Cable Pattern
BODY
Back RightFront
LeftFront
RightFrontBand
LeftFrontBand
27 (29, 31, 33)”(68.5 (73.5, 78.5, 84) cm) 2½”
(6.5 cm)
9 (1
0, 1
1½, 1
3)”
(23
(25.
5, 2
9, 3
3) c
m)
4”(10 cm)
6 (6
½, 7
, 7½
)”(1
5 (1
6.5,
18,
19)
cm
)
3¼ (3½, 3½, 4)”(8.5 (9, 9, 10) cm)
11 (12½, 13½, 14½)”(28 (32, 34.5, 37) cm)
14½
(16,
18,
20)
”(3
7 (4
0.5,
45.
5, 5
1) c
m)
5 (5½, 6, 6½)”(12.5 (14, 15, 16.5) cm)
SLEEVE
5½ (6, 6½, 7)”(14 (15, 16.5, 18) cm)
8½ (1
0½, 1
1½, 1
2½)”
(21.
5 (2
6.5,
29,
32)
cm
)2¼
(2½
, 3, 4
)”(5
.5 (6
.5, 7
.5, 1
0) c
m)
10¾
(13,
14½
, 16½
)”(2
7.5
(33,
37,
42)
cm
)
9 (9½ (10, 11)”(23 (24, 25.5, 28) cm)
Page 33
Page 34 DIRECTORY
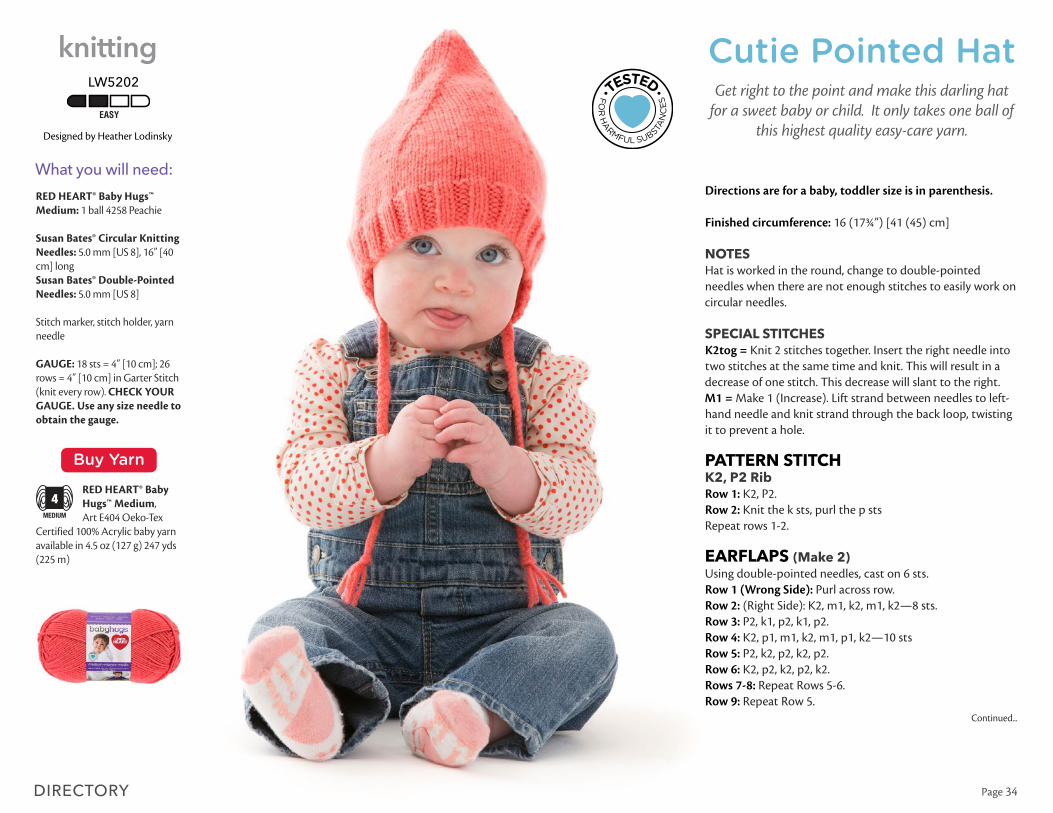
Directions are for a baby, toddler size is in parenthesis. Finished circumference: 16 (17¾”) [41 (45) cm]
NOTESHat is worked in the round, change to double-pointed needles when there are not enough stitches to easily work on circular needles.
SPECIAL STITCHESK2tog = Knit 2 stitches together. Insert the right needle into two stitches at the same time and knit. This will result in a decrease of one stitch. This decrease will slant to the right.M1 = Make 1 (Increase). Lift strand between needles to left-hand needle and knit strand through the back loop, twisting it to prevent a hole.
PATTERN STITCHK2, P2 RibRow 1: K2, P2.Row 2: Knit the k sts, purl the p stsRepeat rows 1-2.
EARFLAPS (Make 2)Using double-pointed needles, cast on 6 sts. Row 1 (Wrong Side): Purl across row.Row 2: (Right Side): K2, m1, k2, m1, k2—8 sts.Row 3: P2, k1, p2, k1, p2.Row 4: K2, p1, m1, k2, m1, p1, k2—10 stsRow 5: P2, k2, p2, k2, p2.Row 6: K2, p2, k2, p2, k2.Rows 7-8: Repeat Rows 5-6.Row 9: Repeat Row 5.
Continued...
RED HEART® Baby Hugs™ Medium: 1 ball 4258 Peachie
Susan Bates® Circular Knitting Needles: 5.0 mm [US 8], 16” [40 cm] longSusan Bates® Double-Pointed Needles: 5.0 mm [US 8]
Stitch marker, stitch holder, yarn needle
GAUGE: 18 sts = 4” [10 cm]; 26 rows = 4” [10 cm] in Garter Stitch (knit every row). CHECK YOUR GAUGE. Use any size needle to obtain the gauge.
RED HEART® Baby Hugs™ Medium, Art E404 Oeko-Tex
Certified 100% Acrylic baby yarn available in 4.5 oz (127 g) 247 yds (225 m)
LW5202
knitting
Designed by Heather Lodinsky
What you will need:
Buy Yarn
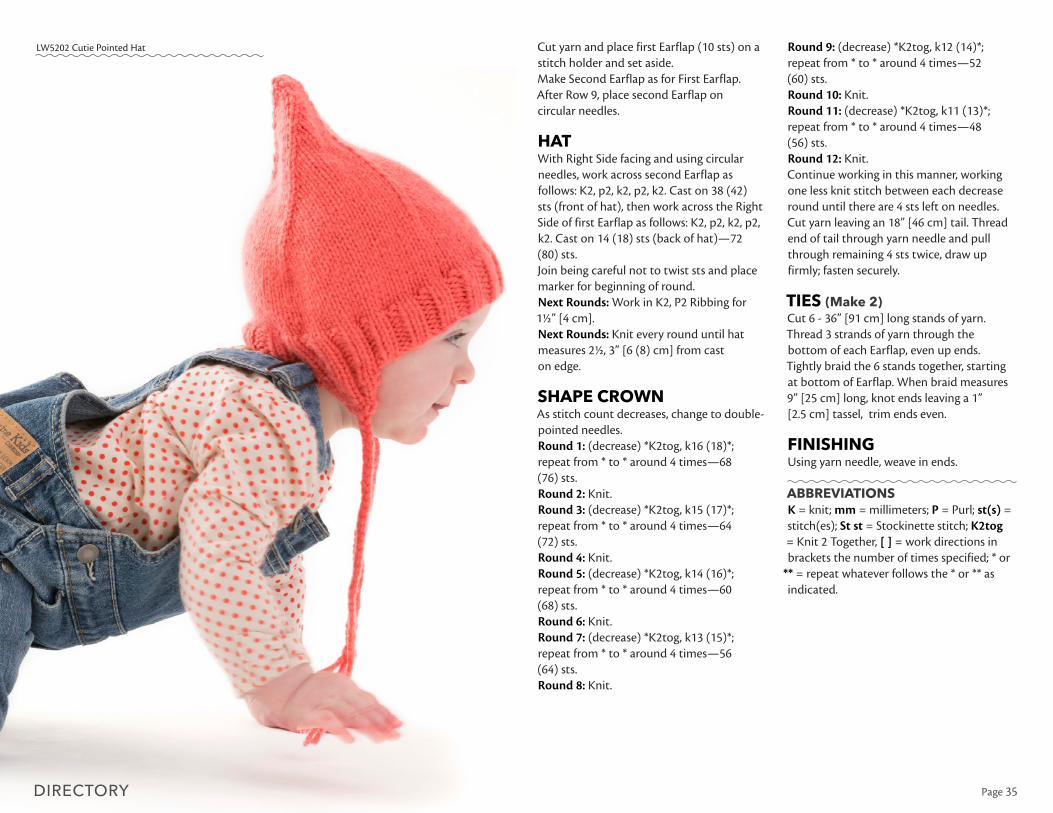
Cutie Pointed HatGet right to the point and make this darling hat
for a sweet baby or child. It only takes one ball of this highest quality easy-care yarn.
Page 35
LW5202 Cutie Pointed Hat Cut yarn and place first Earflap (10 sts) on a stitch holder and set aside.Make Second Earflap as for First Earflap. After Row 9, place second Earflap on circular needles.
HATWith Right Side facing and using circular needles, work across second Earflap as follows: K2, p2, k2, p2, k2. Cast on 38 (42) sts (front of hat), then work across the Right Side of first Earflap as follows: K2, p2, k2, p2, k2. Cast on 14 (18) sts (back of hat)—72 (80) sts. Join being careful not to twist sts and place marker for beginning of round. Next Rounds: Work in K2, P2 Ribbing for 1½” [4 cm]. Next Rounds: Knit every round until hat measures 2½, 3” [6 (8) cm] from cast on edge.
SHAPE CROWNAs stitch count decreases, change to double-pointed needles.Round 1: (decrease) *K2tog, k16 (18)*; repeat from * to * around 4 times—68 (76) sts.Round 2: Knit.Round 3: (decrease) *K2tog, k15 (17)*; repeat from * to * around 4 times—64 (72) sts.Round 4: Knit.Round 5: (decrease) *K2tog, k14 (16)*; repeat from * to * around 4 times—60 (68) sts.Round 6: Knit.Round 7: (decrease) *K2tog, k13 (15)*; repeat from * to * around 4 times—56 (64) sts.Round 8: Knit.
Round 9: (decrease) *K2tog, k12 (14)*; repeat from * to * around 4 times—52 (60) sts.Round 10: Knit.Round 11: (decrease) *K2tog, k11 (13)*; repeat from * to * around 4 times—48 (56) sts.Round 12: Knit. Continue working in this manner, working one less knit stitch between each decrease round until there are 4 sts left on needles. Cut yarn leaving an 18” [46 cm] tail. Thread end of tail through yarn needle and pull through remaining 4 sts twice, draw up firmly; fasten securely.
TIES (Make 2)Cut 6 - 36” [91 cm] long stands of yarn.Thread 3 strands of yarn through the bottom of each Earflap, even up ends. Tightly braid the 6 stands together, starting at bottom of Earflap. When braid measures 9” [25 cm] long, knot ends leaving a 1” [2.5 cm] tassel, trim ends even.
FINISHINGUsing yarn needle, weave in ends.
ABBREVIATIONS K = knit; mm = millimeters; P = Purl; st(s) = stitch(es); St st = Stockinette stitch; K2tog = Knit 2 Together, [ ] = work directions in brackets the number of times specified; * or
** = repeat whatever follows the * or ** as indicated.
DIRECTORY

Page 36 DIRECTORY
Blanket measures 39” x 39” (99 cm x 99 cm).
Special Stitchreverse sc (reverse single crochet) = Work single crochet in opposite direction from which you would usually work (left to right if you are right-handed and right to left if you are left-handed). This stitch is also known as crab stitch. It creates a rope-like twisted single crochet edging.
Special TechniqueJoin with sc = Place a slip knot on hook, insert hook in indicated stitch, yarn over and draw up a loop, yarn over and draw through both loops on hook.
BLANKETWith A, ch 4; join with slip st to first ch to form a ring.Round 1 (right side): Ch 2 (counts as first dc here and throughout), 2 dc in ring, *ch 3, 3 dc; repeat from * twice, 3 times in ring, ch 3; join with slip st in top of beginning ch—12 dc and 4 ch-3 spaces.Round 2: Slip st in next 2 dc, slip st in first ch-3 space, (ch 2, 2 dc, ch 3, 3 dc) in same space, *ch 1, (3 dc, ch 3, 3 dc) in next ch-3 space; repeat from * twice, ch 1; join with slip st in top of beginning ch—24 dc, 4 ch-1 spaces, and 4 ch-3 spaces.Round 3: Slip st in next 2 dc, slip st in first ch-3 space, (ch 2, 2 dc, ch 3, 3 dc) in same space, *ch 1, 3 dc in next ch-1 space, ch 1, (3 dc, ch 3, 3 dc) in next ch-3 space; repeat from * twice, ch 1, 3 dc in last ch-1 space, ch 1; join with slip st in top of beginning ch—36 dc, 8 ch-1 spaces, and 4 ch-3 spaces.
Continued...
RED HEART® Baby Hugs™ Medium: 2 balls each 4201 Sunny A and 4001 Frosting C, 1 ball 4562 Aloe B
Susan Bates® Crochet Hook:5.5mm [US I-9] Yarn needle
GAUGE: Rounds 1–3 = 4” (10 cm); 3 pattern repeats and 1 dc = 4” (10 cm) (one pattern repeat consists of 3 double crochet and one chain-1 space; 6 rows = 4” (10 cm). CHECK YOUR GAUGE. Use any size hook to obtain the gauge.
RED HEART® Baby Hugs™ Medium, Art E404 Oeko-Tex
Certified 100% Acrylic baby yarn available in 4.5 oz (127 g) 247 yds (225 m)
LW4950
crochet
Designed by Salena Baca
What you will need:
Buy Yarn
Makin’ Squares Blanket
This soft, cuddly blanket is crocheted starting at the center and is really just a great big granny
square. Choose from a complete range of bright and pastel hues in this certified, quality yarn.

Page 37 DIRECTORY
LW4950 Makin’ Squares Blanket
Round 4: Slip st in next 2 dc, slip st in first ch-3 space, (ch 2, 2 dc, ch 3, 3 dc) in same space, *(ch 1, 3 dc) in each ch-1 space across to next ch-3 space, ch 1, (3 dc, ch 3, 3 dc) in next ch-3 space; repeat from * twice, (ch 1, 3 dc) in each ch-1 space to beginning ch, ch 1; join with slip st in top of beginning ch—48 dc, 12 ch-1 spaces, and 4 ch-3 spaces. Fasten off.Round 5: With right side facing, join B with slip st in any ch-3 space, (ch 2, 2 dc, ch 3, 3 dc) in same space, *(ch 1, 3 dc) in each ch-1 space across to next corner ch-3 space, ch 1, (3 dc, ch 3, 3 dc) in next ch-3 space; repeat from * twice, (ch 1, 3 dc) in each ch-1 space to beginning ch, ch 1; join with slip st in top of beginning ch—60 dc, 16 ch-1 spaces, and 4 ch-3 spaces. Fasten off B.Round 6: With C, repeat Round 5. Do not fasten off.Rounds 7–9: Repeat Round 4. Fasten off at end of Round 9.Round 10: Repeat Round 5.Rounds 11–14: With A, repeat Rounds 6–9. Round 15: Repeat Round 5.Rounds 16–25: Repeat Rounds 6–15.Rounds 26–30: Repeat Rounds 6–10.Round 31: With right side facing, join C with sc in first dc after any ch-3 space, sc in each st and ch around working 3 sc in center ch of each ch-3; join with slip st in first sc—3-sc group at each corner. Rounds 32–34: Ch 1, sc in each sc around working 3 sc in center st of each 3-sc group; join with slip st in first sc. Fasten off.Round 35: With right side facing, join B with sc in 3rd sc of any 3-sc group, *ch 1, skip next sc, reverse sc in next sc; repeat from * around; ch 1, skip last sc; join with slip st in first sc. Fasten off.
FINISHINGWeave in ends.
ABBREVIATIONSA, B, C = Color A, Color B, Color C, etc.; ch = chain(s); dc = double crochet; sc = single crochet; st(s) = stitch(es); ( ) = work directions in parentheses into same st; * = repeat whatever follows the * as indicated.

Page 38 DIRECTORY
Blanket measures about 15 x 16” [38 x 40.5 cm], not including edging
Note: Blanket is worked back and forth in rows then edging is worked around the entire outer edge.
BLANKETCh 54.Sedge Stitch PatternRow 1: Work 2 dc in 3rd ch from hook (first pattern repeat made), *skip next 2 ch, (sc, 2 dc) in next ch; repeat from * to last 3 ch, skip next 2 ch, sc in last ch—17 pattern repeats.Row 2: Ch 2, turn, 2 dc in first sc, *skip next 2 dc, (sc, 2 dc) in next sc; repeat from * to last 2-dc group, skip last 2-dc group, sc in top of beginning ch-2.Repeat Row 2 until piece measures about 16” [40.5 cm] from beginning.Do not fasten off.Edging: Ch 2, turn, 2 dc in first sc, *skip next 2 dc, (sc, 2 dc) in next sc; repeat from * across, (sc, 2 dc) in top of beginning ch-2 (corner made), do not turn, work (sc, 2 dc) evenly spaced down side edge, (sc, 2 dc) in corner; working across opposite side of foundation ch, work (sc, 2 dc) in ch at base of each (sc, 2 dc) of Row 1, (sc, 2 dc) in corner; work (sc, dc) evenly spaced up other side edge (work same number of (sc, dc) groups as were worked across first side edge); join with slip st top of beginning ch-2. Fasten off.
Continued...
RED HEART® Baby Hugs™ Medium: 1 ball 4001 Frosting
Susan Bates® Crochet Hook: 6.5mm [US K-10½]
Yarn needle
GAUGE: 4 pattern repeats = 3½” [9 cm] in Sedge Stitch pattern. Note: Each pattern repeat consists of (sc, 2 dc) or a beginning ch-2 and the first 2 dc. CHECK YOUR GAUGE. Use any size hook to obtain the gauge.
RED HEART® Baby Hugs™ Medium, Art E404 Oeko-Tex
Certified 100% Acrylic baby yarn available in 4.5 oz (127 g) 247 yds (225 m) balls
LW4944
crochet
Designed by Heather Lodinsky
What you will need:
Buy Yarn
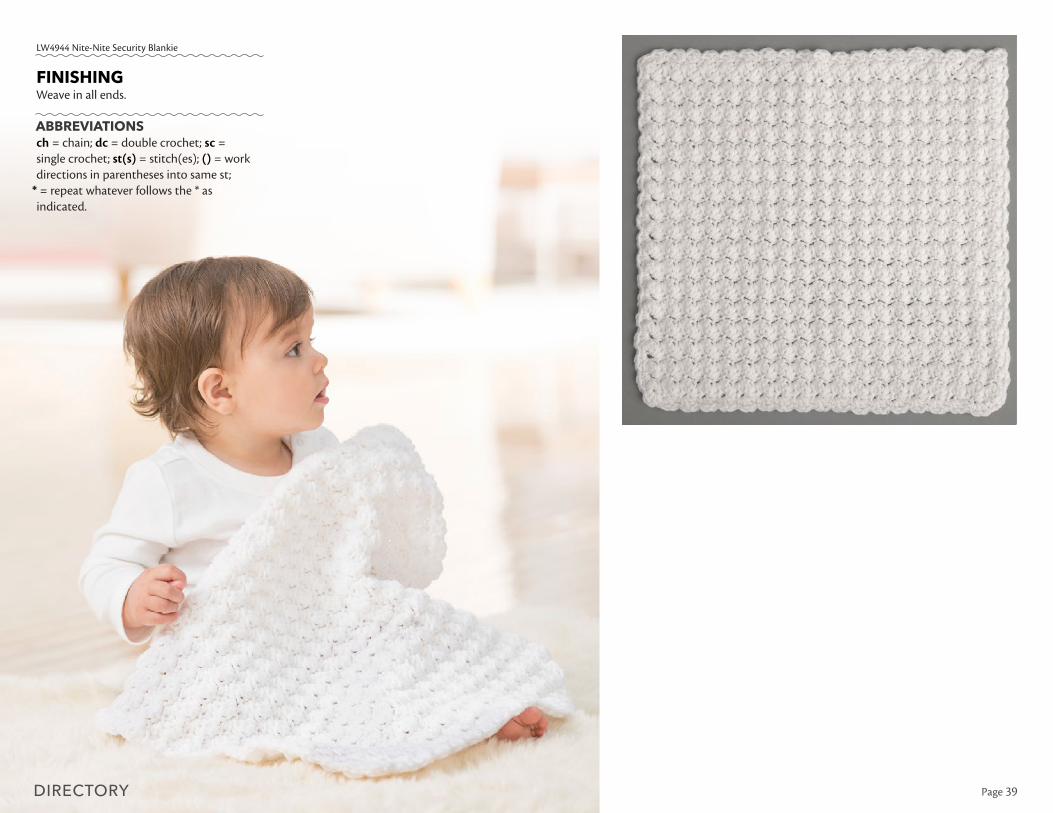
Nite-Nite Security Blankie
Crochet baby a blankie that is small enough to easily go wherever baby goes. Look for the blue
heart on the ball band and know that it has been tested for harmful substances.
Page 39
FINISHINGWeave in all ends.
ABBREVIATIONS ch = chain; dc = double crochet; sc = single crochet; st(s) = stitch(es); () = work directions in parentheses into same st;
* = repeat whatever follows the * as indicated.
LW4944 Nite-Nite Security Blankie
DIRECTORY
©2016 Coats & Clark
For these and over 3,000 other free patterns visit redheart.com