Embed Size (px)
Citation preview
155
5Finishing Drywall Systems

Levels of Gypsum FinishingThe finished appearance of a drywall wall or ceiling is largely depen-dent upon the quality of the framing job and the care exercised inapplying the drywall panels. The better the framing and cladding, theeasier it is to have a near-perfect wall. Once that is accomplished, thelast remaining challenge is to finish the joints to meet your appearanceexpectations. This chapter helps you determine the level of quality youneed in your finish and shows you how to obtain it.
Note that various organizations provide information about recommendedstandards or tolerances for finishing of drywall joints. See pages 435 and442 in the Appendix for information about standards and tolerances.
For instructions on the safe use of joint compounds, texturing materialsand related products, see Chapter 13, Safety Considerations, MaterialHandling.
Contract documents traditionally have used nonspecific terms such as‘industry standards’ or ‘workmanlike finish’ to describe how finishedgypsum board walls and ceilings should look. This practice often haslead to misunderstanding about the degree of finishing sophisticationrequired for any particular job.
A collective effort of four industry trade associations—Association ofthe Wall and Ceiling Industries-International (AWCI), Ceilings andInterior Systems Construction Association (CISCA), Gypsum Association(GA) and Painting and Decorating Contractors of America (PDCA)—hasresulted in the adoption of industry-wide recommended specificationson levels of gypsum board finish. The work identifies five specific lev-els of finishing, enabling architects to more closely identify the sophis-tication required and allowing for better competitive bidding amongcontractors. ASTM recognized this specification by including the levelsof gypsum board finishing in ASTM C840.
Key factors used in determining the sophistication level requiredinclude the location of the work to be done, type and angle of surfaceillumination (both natural and artificial lighting), orientation of the pan-els during installation (see page 96), type of paint or wall covering tobe used and method of application. Critical lighting conditions, glosspaints and thin wall coverings require a high level of finish, while heav-ily textured surfaces or surfaces that will be decorated with heavy-gauge wall coverings require less sophistication.
Definitions of the five levels of finishing are provided below, togetherwith a matrix that helps detail how each level of finishing is achieved,using SHEETROCK Brand joint treatment and finishing products, and theappearance of the finished wall that may be anticipated for each level.
Applications of SHEETROCK Brand joint treatment products to joints,beads, trims and corners is described on pages 161-167. The numberof layers of compound and the degree of finishing advances to meetthe requirements of each level.
156
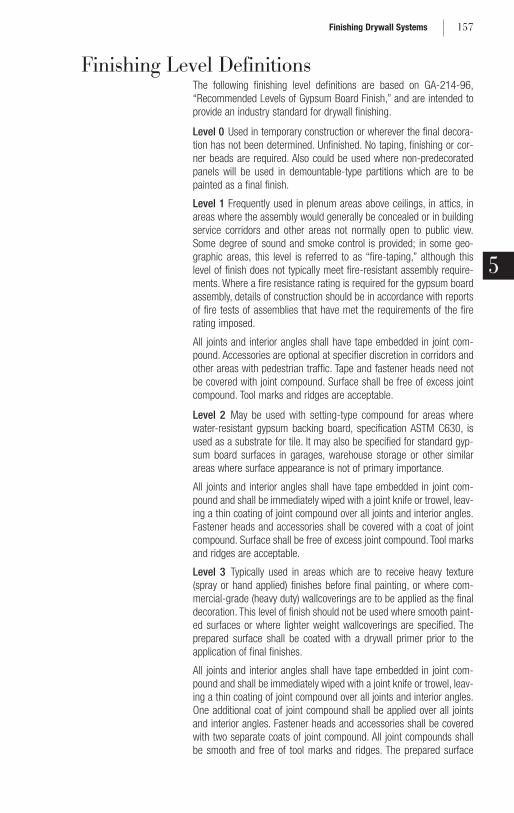
Finishing Level DefinitionsThe following finishing level definitions are based on GA-214-96,“Recommended Levels of Gypsum Board Finish,” and are intended toprovide an industry standard for drywall finishing.
Level 0 Used in temporary construction or wherever the final decora-tion has not been determined. Unfinished. No taping, finishing or cor-ner beads are required. Also could be used where non-predecoratedpanels will be used in demountable-type partitions which are to bepainted as a final finish.
Level 1 Frequently used in plenum areas above ceilings, in attics, inareas where the assembly would generally be concealed or in buildingservice corridors and other areas not normally open to public view.Some degree of sound and smoke control is provided; in some geo-graphic areas, this level is referred to as “fire-taping,” although thislevel of finish does not typically meet fire-resistant assembly require-ments. Where a fire resistance rating is required for the gypsum boardassembly, details of construction should be in accordance with reportsof fire tests of assemblies that have met the requirements of the firerating imposed.
All joints and interior angles shall have tape embedded in joint com-pound. Accessories are optional at specifier discretion in corridors andother areas with pedestrian traffic. Tape and fastener heads need notbe covered with joint compound. Surface shall be free of excess jointcompound. Tool marks and ridges are acceptable.
Level 2 May be used with setting-type compound for areas wherewater-resistant gypsum backing board, specification ASTM C630, isused as a substrate for tile. It may also be specified for standard gyp-sum board surfaces in garages, warehouse storage or other similarareas where surface appearance is not of primary importance.
All joints and interior angles shall have tape embedded in joint com-pound and shall be immediately wiped with a joint knife or trowel, leav-ing a thin coating of joint compound over all joints and interior angles.Fastener heads and accessories shall be covered with a coat of jointcompound. Surface shall be free of excess joint compound. Tool marksand ridges are acceptable.
Level 3 Typically used in areas which are to receive heavy texture(spray or hand applied) finishes before final painting, or where com-mercial-grade (heavy duty) wallcoverings are to be applied as the finaldecoration. This level of finish should not be used where smooth paint-ed surfaces or where lighter weight wallcoverings are specified. Theprepared surface shall be coated with a drywall primer prior to theapplication of final finishes.
All joints and interior angles shall have tape embedded in joint com-pound and shall be immediately wiped with a joint knife or trowel, leav-ing a thin coating of joint compound over all joints and interior angles.One additional coat of joint compound shall be applied over all jointsand interior angles. Fastener heads and accessories shall be coveredwith two separate coats of joint compound. All joint compounds shallbe smooth and free of tool marks and ridges. The prepared surface
5
157Finishing Drywall Systems

shall be covered with a drywall primer prior to the application of thefinal decoration.
Level 4 This level should be used where residential grade (light duty)wall coverings, flat paints or light textures are to be applied. The pre-pared surface shall be coated with a drywall primer prior to the appli-cation of final finishes. Release agents for wall coverings are specifi-cally formulated to minimize damage if coverings are subsequentlyremoved. The weight, texture and sheen level of the wallcovering mate-rial selected should be taken into consideration when specifying wall-coverings over this level of drywall treatment. Joints and fastenersmust be sufficiently concealed if the wallcovering material is light-weight, contains limited pattern, has a glossy finish or has any combi-nation of these features. In critical lighting areas, flat paints appliedover light textures tend to reduce joint photographing. Gloss, semiglossand enamel paints are not recommended over this level of finish.
All joints and interior angles shall have tape embedded in joint com-pound and shall be immediately wiped with a joint knife or trowel, leav-ing a thin coating of joint compound over all joints and interior angles.In addition, two separate coats of joint compound shall be applied overall flat joints and one separate coat of joint compound applied overinterior angles. Fastener heads and accessories shall be covered withthree separate coats of joint compound. All joint compounds shall besmooth and free of tool marks and ridges. The prepared surface shallbe covered with a drywall primer prior to the application of the finaldecoration.
Level 5 The highest quality finish is the most effective method to pro-vide a uniform surface and minimize the possibility of joint pho-tographing and of fasteners showing through the final decoration. Thislevel of finish is required where gloss, semigloss or enamel are speci-fied. or when flat joints are specified over an untextured surface, orwhere critical lighting conditions occur. The prepared surface shall becoated with a drywall primer prior to the application of final decoration.
All joints and interior angles shall have tape embedded in joint com-pound and immediately wiped with a joint knife or trowel, leaving a thincoating of joint compound over all joints and interior angles. Two sep-arate coats of joint compound shall be applied over all flat joints andone separate coat of joint compound applied over interior angles.Fastener heads and accessories shall be covered with three separatecoats of joint compound. A thin skim coat of joint compound shall betrowel applied to the entire surface. Excess compound is immediatelysheared off, leaving a film or skim coating of compound completelycovering the paper. As an alternative to a skim coat, a material manu-factured especially for this purpose may be applied. The surface mustbe smooth and free of tool marks and ridges. The prepared surfaceshall be covered with a drywall primer prior to the application of thefinal decoration.
The following matrix helps define the expected appearance of eachlevel and basic requirements for achieving that level. Additional guide-lines are offered for meeting the specified finish level using SHEETROCK
Brand products and application techniques.
158
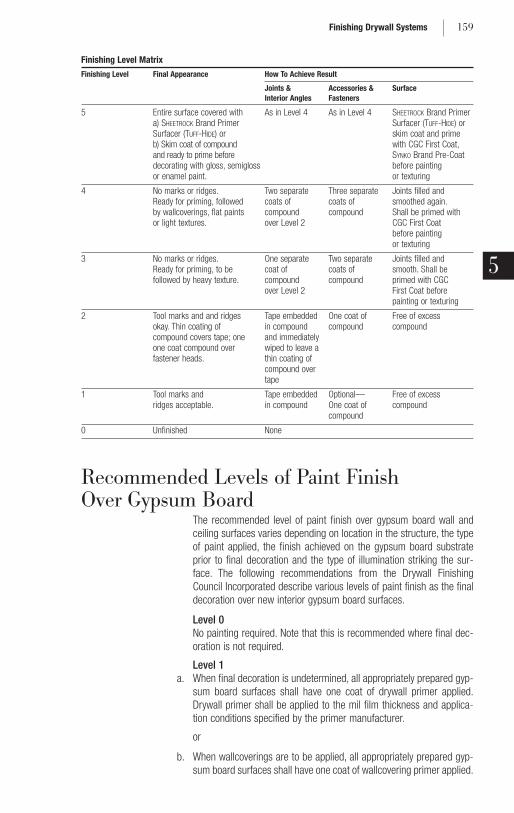
Finishing Level Matrix
Finishing Level Final Appearance How To Achieve Result
Joints & Accessories & SurfaceInterior Angles Fasteners
5 Entire surface covered with As in Level 4 As in Level 4 SHEETROCK Brand Primera) SHEETROCK Brand Primer Surfacer (TUFF-HIDE) orSurfacer (TUFF-HIDE) or skim coat and primeb) Skim coat of compound with CGC First Coat,and ready to prime before SYNKO Brand Pre-Coat decorating with gloss, semigloss before painting or enamel paint. or texturing
4 No marks or ridges. Two separate Three separate Joints filled and Ready for priming, followed coats of coats of smoothed again.by wallcoverings, flat paints compound compound Shall be primed withor light textures. over Level 2 CGC First Coat
before paintingor texturing
3 No marks or ridges. One separate Two separate Joints filled andReady for priming, to be coat of coats of smooth. Shall be followed by heavy texture. compound compound primed with CGC
over Level 2 First Coat beforepainting or texturing
2 Tool marks and and ridges Tape embedded One coat of Free of excess okay. Thin coating of in compound compound compoundcompound covers tape; one and immediatelyone coat compound over wiped to leave a fastener heads. thin coating of
compound over tape
1 Tool marks and Tape embedded Optional— Free of excessridges acceptable. in compound One coat of compound
compound
0 Unfinished None
Recommended Levels of Paint Finish Over Gypsum Board
The recommended level of paint finish over gypsum board wall andceiling surfaces varies depending on location in the structure, the typeof paint applied, the finish achieved on the gypsum board substrateprior to final decoration and the type of illumination striking the sur-face. The following recommendations from the Drywall FinishingCouncil Incorporated describe various levels of paint finish as the finaldecoration over new interior gypsum board surfaces.
Level 0No painting required. Note that this is recommended where final dec-oration is not required.
Level 1a. When final decoration is undetermined, all appropriately prepared gyp-
sum board surfaces shall have one coat of drywall primer applied.Drywall primer shall be applied to the mil film thickness and applica-tion conditions specified by the primer manufacturer.
or
b. When wallcoverings are to be applied, all appropriately prepared gyp-sum board surfaces shall have one coat of wallcovering primer applied.
5
159Finishing Drywall Systems
Wallcovering primer shall be applied to the mil film thickness andapplication conditions specified by the primer manufacturer.
Level 2All appropriately prepared gypsum board surfaces shall have one coatof topcoat material applied to yield a uniform surface. Paint shall beapplied to the mil film thickness and application conditions specified bythe paint manufacturer. Note that the painted surface may not achieveuniform appearance, color or sheen, but shall be absent of defectscaused by the painting contractor’s workforce. This level is recom-mended where economy is of primary concern.
Level 3All appropriately prepared gypsum board surfaces shall have two sep-arate coats of topcoat material applied to yield a properly painted sur-face. Paint shall be applied to the mil film thickness and applicationconditions specified by the paint manufacturer. Note that this is typi-cally recommended for areas having textures (spray or hand applied)over a primed gypsum board surface and the area is not subject to crit-ical lighting. Refer to Drywall Finishing Council document titled,“Recommended Specification For Preparation of Gypsum BoardSurfaces Prior To Texture Application.” When subjected to critical light-ing, a Level 5 gypsum board finish as defined in GA-214-96(“Recommended Levels of Gypsum Board Finish”) is recommended.
Level 4All appropriately prepared gypsum board surfaces shall have one coatof drywall primer applied to yield a properly painted surface and oneseparate coat of topcoat material applied to a properly painted surfaceover the drywall primer. Paint shall be applied to the mil film thicknessand application conditions specified by the paint manufacturer. Notethat this is typically recommended for smooth surfaces not subject tocritical lighting and areas having light to medium texture finishes (sprayor hand applied over a primed gypsum board surface). Refer to DrywallFinishing Council document titled, “Recommended Specification ForPreparation of Gypsum Board Surfaces Prior To Texture Application.”When subjected to critical lighting, a Level 5 gypsum board finish asdefined in GA-214-96 is recommended.
Level 5All appropriately prepared gypsum board surfaces shall have one coatof drywall primer applied to yield a properly painted surface. Two sep-arate coats of topcoat material shall be applied over the drywall primerto yield a properly painted surface. Paint shall be applied to the mil filmthickness and application conditions specified by the paint manufacturer.Note that this level is recommended where the best paint finish isrequired, such as under critical lighting conditions or when paints thathave a glossy surface are used. Recommended with a Level 5 gypsumboard finish as described in the “Recommended Levels of GypsumBoard Finish” (GA-214-96). This system, when combined with theLevel 5 gypsum board finish is the most effective method to minimizejoint and fastener photographing and provides the most uniform finalfinish.
160
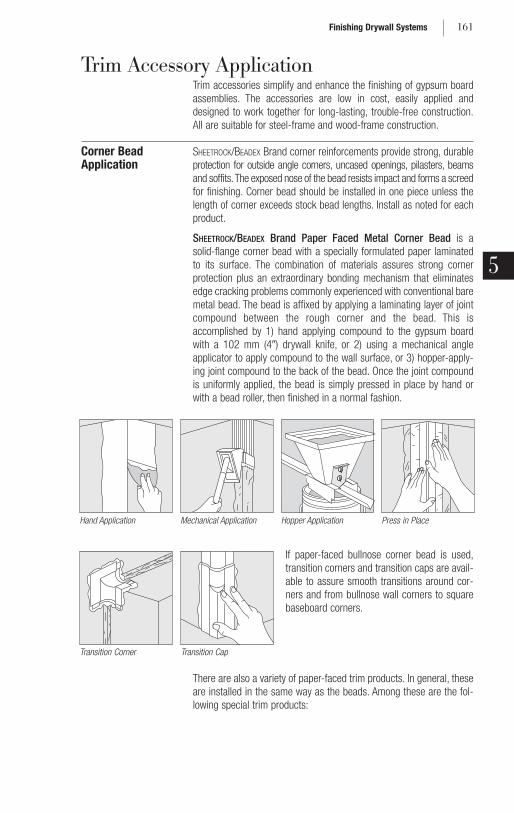
Trim Accessory ApplicationTrim accessories simplify and enhance the finishing of gypsum boardassemblies. The accessories are low in cost, easily applied anddesigned to work together for long-lasting, trouble-free construction.All are suitable for steel-frame and wood-frame construction.
Corner Bead SHEETROCK/BEADEX Brand corner reinforcements provide strong, durable Application protection for outside angle corners, uncased openings, pilasters, beams
and soffits.The exposed nose of the bead resists impact and forms a screed for finishing. Corner bead should be installed in one piece unless thelength of corner exceeds stock bead lengths. Install as noted for eachproduct.
SHEETROCK/BEADEX Brand Paper Faced Metal Corner Bead is asolid-flange corner bead with a specially formulated paper laminatedto its surface. The combination of materials assures strong cornerprotection plus an extraordinary bonding mechanism that eliminatesedge cracking problems commonly experienced with conventional baremetal bead. The bead is affixed by applying a laminating layer of jointcompound between the rough corner and the bead. This isaccomplished by 1) hand applying compound to the gypsum boardwith a 102 mm (4�) drywall knife, or 2) using a mechanical angleapplicator to apply compound to the wall surface, or 3) hopper-apply-ing joint compound to the back of the bead. Once the joint compoundis uniformly applied, the bead is simply pressed in place by hand orwith a bead roller, then finished in a normal fashion.
If paper-faced bullnose corner bead is used,transition corners and transition caps are avail-able to assure smooth transitions around cor-ners and from bullnose wall corners to squarebaseboard corners.
There are also a variety of paper-faced trim products. In general, theseare installed in the same way as the beads. Among these are the fol-lowing special trim products:
5
161Finishing Drywall Systems
Hand Application Mechanical Application Hopper Application Press in Place
Transition Corner Transition Cap

– SHEETROCK/BEADEX Brand Paper Faced Metal Inside Corner, Tape On Trim(B2), forms true inner 90-degree corner angles.
– SHEETROCK/BEADEX Brand Paper Faced Metal Offset Inside Corner, TapeOn Trim (B2 OS), is designed for 135-degree inside corner offsetangles.
– SHEETROCK/BEADEX Brand Paper Faced Metal Inner Cove, Tape On Trim(SLIC), creates smooth, rounded inside corners.
– SHEETROCK/BEADEX Brand Paper Faced Metal Offset Inner Cove, Tape OnTrim (SLIC OS), is a softline (bullnose) inside corner for 135-degreeoffset angles.
– SHEETROCK/BEADEX Brand Paper Faced Metal “L” Shaped, Tape On Trim(B4 Series), is a trim used where wallboard abuts suspended ceilings,beams, plaster and concrete walls; also used at untrimmed door andwindow jambs; available with and without bead.
– SHEETROCK/BEADEX Brand Paper Faced Metal Reveal, Tape On Trim(Reveal NB), is a modified tape-on “L” trim which can be used to createreveals on soffits, walls and ceilings, around light boxes and otherarchitectural components.
– SHEETROCK/BEADEX Brand Paper Faced Metal “J” Shaped, Tape On Trim(B9), is a J-trim that completely surrounds the rough edge ofwallboard, providing a strong, clean corner.
– SHEETROCK/BEADEX Brand Paper Faced Metal Premasked L-Shaped,Tape On Trim (Premasked L), provides a serrated paper strip thatprotects the adjacent surfaces of ceiling or wall intersections. Simplytear away the protective strip after the job is completed, leavingvirtually no clean up of the adjacent surface.
SHEETROCK/BEADEX Brand Flexible Metal Corner Tape is a flexiblereinforcement that ensures straight, sharp corners on any angle. Itprovides durable corner protection on cathedral and drop ceilings,arches and around bay windows. The tape is available in two widths:52 mm (2-1/16�) and 102 mm (4�). The 52 mm (2-1/16�) width has a1.6 mm (1/16�) gap between two 11 mm (7/16�)-wide galvanized,rust-resistant steel strips and the 102 mm (4�) width has two 22 mm(7/8�)-wide galvanized, rust-resistant steel strips. When folded, thetape forms a strong corner bead. It is applied with standard jointcompound, feathered at the edges for a smooth wall surface. It is alsouseful for joining drywall partitions to plastered walls in remodeling andfor repairing chipped and cracked corners. Available in convenient 30 m (100�) rolls in dispenser box.
To install: Cut tape to length desired with snips or score with knife andbend. Notch or angle cut for arches and window returns. Do not over-lap at intersections or corners. Apply joint compound to both sides ofcorner angle, fold tape at its center to form a bead and press the metalstrip side into joint compound. Follow immediately with a thin coat ofcompound over the tape and let dry. Finish the corner in the conven-tional manner with additional coats of joint compound.
162
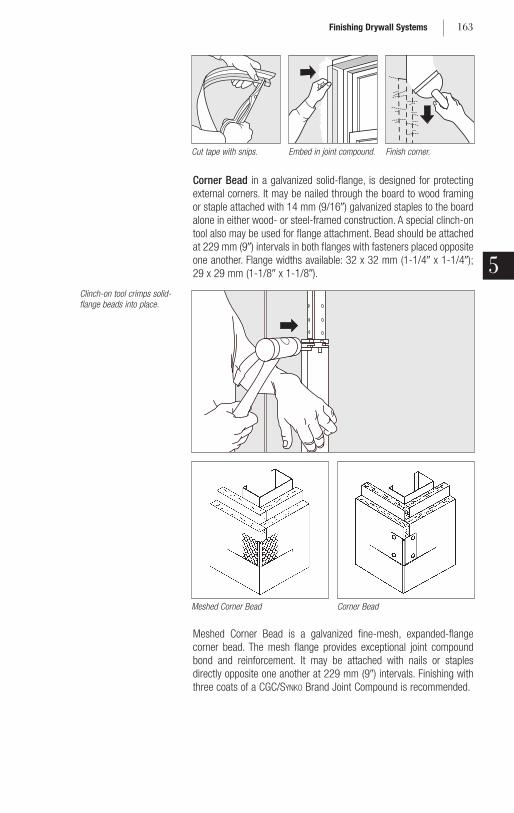
Corner Bead in a galvanized solid-flange, is designed for protectingexternal corners. It may be nailed through the board to wood framingor staple attached with 14 mm (9/16�) galvanized staples to the boardalone in either wood- or steel-framed construction. A special clinch-ontool also may be used for flange attachment. Bead should be attachedat 229 mm (9�) intervals in both flanges with fasteners placed oppositeone another. Flange widths available: 32 x 32 mm (1-1/4� x 1-1/4�);29 x 29 mm (1-1/8� x 1-1/8�).
Meshed Corner Bead is a galvanized fine-mesh, expanded-flangecorner bead. The mesh flange provides exceptional joint compoundbond and reinforcement. It may be attached with nails or staplesdirectly opposite one another at 229 mm (9�) intervals. Finishing withthree coats of a CGC/SYNKO Brand Joint Compound is recommended.
5
163Finishing Drywall Systems
Cut tape with snips.
Meshed Corner Bead Corner Bead
Clinch-on tool crimps solid-flange beads into place.
Embed in joint compound. Finish corner.
Metal Trim Metal Trim serves to protect and finish gypsum panels at window Application framing and door jambs; they are also used at ceiling-wall intersections
and partition perimeters to form a recess for acoustical sealant. Alsoserve as a relief joint at the intersection of dissimilar constructions,such as gypsum board to concrete.
Metal trims provide maximum protection and neat finished edges togypsum panels at window and door jambs, at internal angles and atintersections where panels abut other materials. The trim pieces areeasily installed by nailing or screwing through the proper leg of trim.Various configurations are available depending on the requiredapplication.
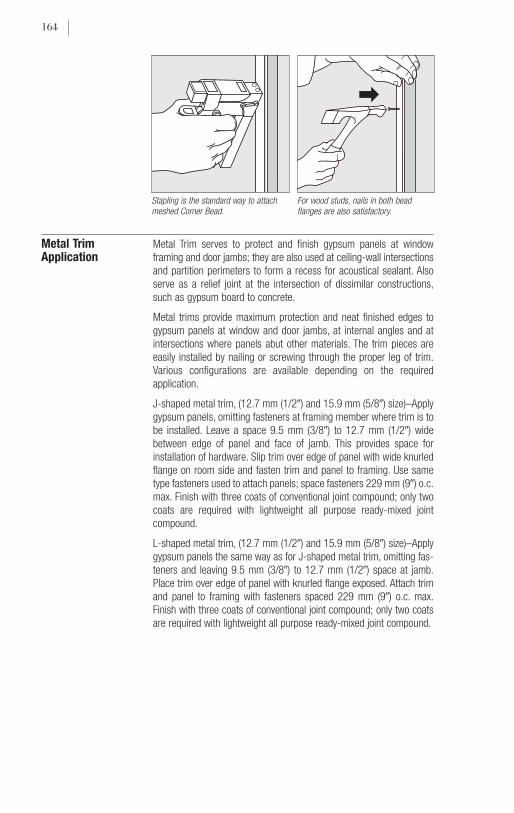
J-shaped metal trim, (12.7 mm (1/2�) and 15.9 mm (5/8�) size)–Applygypsum panels, omitting fasteners at framing member where trim is tobe installed. Leave a space 9.5 mm (3/8�) to 12.7 mm (1/2�) widebetween edge of panel and face of jamb. This provides space forinstallation of hardware. Slip trim over edge of panel with wide knurledflange on room side and fasten trim and panel to framing. Use sametype fasteners used to attach panels; space fasteners 229 mm (9�) o.c.max. Finish with three coats of conventional joint compound; only twocoats are required with lightweight all purpose ready-mixed jointcompound.
L-shaped metal trim, (12.7 mm (1/2�) and 15.9 mm (5/8�) size)–Applygypsum panels the same way as for J-shaped metal trim, omitting fas-teners and leaving 9.5 mm (3/8�) to 12.7 mm (1/2�) space at jamb.Place trim over edge of panel with knurled flange exposed. Attach trimand panel to framing with fasteners spaced 229 mm (9�) o.c. max.Finish with three coats of conventional joint compound; only two coatsare required with lightweight all purpose ready-mixed joint compound.
164
Stapling is the standard way to attachmeshed Corner Bead.
For wood studs, nails in both beadflanges are also satisfactory.
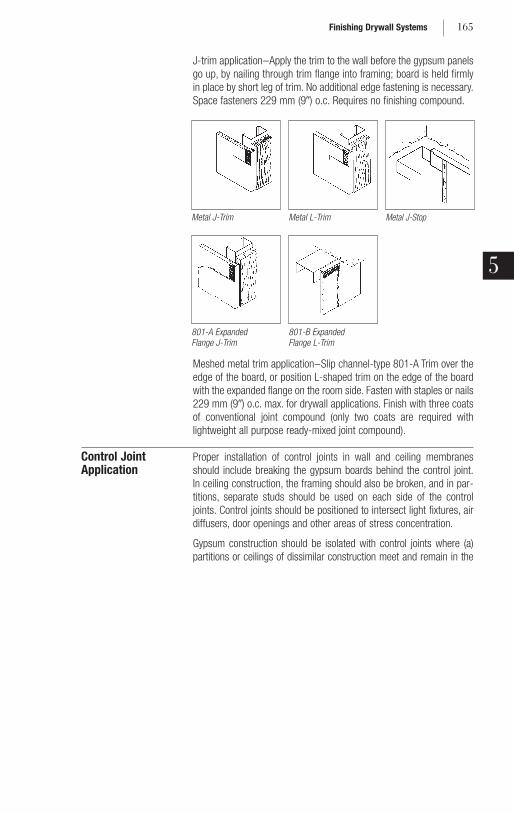
J-trim application–Apply the trim to the wall before the gypsum panelsgo up, by nailing through trim flange into framing; board is held firmlyin place by short leg of trim. No additional edge fastening is necessary.Space fasteners 229 mm (9�) o.c. Requires no finishing compound.
Meshed metal trim application–Slip channel-type 801-A Trim over theedge of the board, or position L-shaped trim on the edge of the boardwith the expanded flange on the room side. Fasten with staples or nails229 mm (9�) o.c. max. for drywall applications. Finish with three coatsof conventional joint compound (only two coats are required withlightweight all purpose ready-mixed joint compound).
Control Joint Proper installation of control joints in wall and ceiling membranesApplication should include breaking the gypsum boards behind the control joint.
In ceiling construction, the framing should also be broken, and in par-titions, separate studs should be used on each side of the controljoints. Control joints should be positioned to intersect light fixtures, airdiffusers, door openings and other areas of stress concentration.
Gypsum construction should be isolated with control joints where (a)partitions or ceilings of dissimilar construction meet and remain in the
5
165Finishing Drywall Systems
Metal J-Trim Metal L-Trim Metal J-Stop
801-A Expanded Flange J-Trim
801-B Expanded Flange L-Trim
same plane; (b) wings of “L”, “U” and “T” shaped ceiling areas arejoined; and (c) expansion or control joints occur in the base wallconstruction and/or building structure. Just as important, control jointsshould be used in the face of gypsum partitions and ceilings when thesize of the surface exceeds the following control-joint spacings;Partitions, 9 m (30 ft.) maximum in either direction; Interior Ceilings(with perimeter relief), 15 m (50 ft.) maximum in either direction; InteriorCeilings (without perimeter relief), 9 m (30 ft.) maximum in either direc-tion; and Exterior Ceilings, 9 m (30 ft.) maximum in either direction.
Ceiling-height door frames may be used as vertical control joints forpartitions; however, door frames of lesser height may only be used ascontrol joints if standard control joints extend to the ceiling from bothcorners of the top of the door frame. When planning locations for con-trol joints in the ceiling, it is recommended that they be located to inter-sect column penetrations, since movement of columns can imposestresses on the ceiling membrane.
Control Joints, when properly insulated and backed by gypsum panels,have been fire-endurance tested and are certified for use in one- andtwo-hour-rated walls.
Installation At control joint locations:
1. Leave a 12.7 mm (1/2�) continuous opening between gypsum boardsfor insertion of surface-mounted joint.
2. Interrupt wood floor and ceiling plates with a 12.7 mm (1/2�) gap,wherever there is a control joint in the structure.
3. Provide separate supports for each control joint flange.
4. Provide an adequate seal or safing insulation behind control jointswhere sound and/or fire ratings are prime considerations.
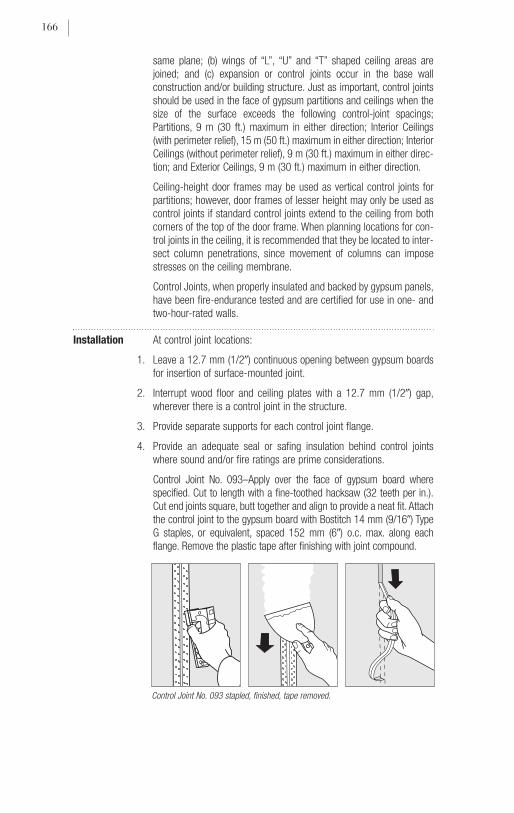
Control Joint No. 093–Apply over the face of gypsum board wherespecified. Cut to length with a fine-toothed hacksaw (32 teeth per in.).Cut end joints square, butt together and align to provide a neat fit. Attachthe control joint to the gypsum board with Bostitch 14 mm (9/16�) TypeG staples, or equivalent, spaced 152 mm (6�) o.c. max. along eachflange. Remove the plastic tape after finishing with joint compound.
166
Control Joint No. 093 stapled, finished, tape removed.

Fire-Rated Control Joints
Maximum Spacing–Control Joints
Max. SingleDimension
Construction & Location m ft.
Partition-interior 9 30
Ceiling-interior
with perimeter relief 15 50
without perimeter relief 9 30
Ceiling-exterior gypsum 9 30
13 mm (1/2") max. control joint(both sides)
15.9 mm (5/8")
48 mm(17/8")79 mm (31/8")
15.9 mm (5/8") SHEETROCK Brand gypsum panel,FIRECODE core
13 mm (1/2") max.
15.9 mm (5/8")15.9 mm (5/8") SHEETROCK Brand gypsum panel,FIRECODE core
control joint(both sides)
48 mm(17/8")79 mm (31/8")
5
167Finishing Drywall Systems
������������ ����
13mm (1/2") gap
zinc control joint no. 093 (both sides)
15.9mm (5/8") SHEETROCKbrand gypsum panel,FIRECODE core
����
15.9mm (5/8") SHEETROCKbrand gypsum panel,FIRECODE core
wood stud
16mm (5/8") gap
Fire resistive control joints
���������������� ��������
zinc control joint no. 093 (both sides)
15.9mm (5/8") SHEETROCKbrand gypsum panel,FIRECODE core
���� wood
stud
16mm (5/8")gap
13mm (1/2") gap
15.9mm (5/8") SHEETROCKbrand gypsum panel,FIRECODE core
1 Hr. fire resistance–estimated based on WH-651-0318.1
(wood stud partitions)
2 Hr. fire resistance–estimated based on WH-651-0318.1
(wood stud partitions)
47 STC (SA-860302);2-hr. Fire Rating
(steel stud partitions)
1-hr. Fire Rating(steel stud partitions)

Joint Treatment for Drywall Construction Application In cold weather during joint finishing, temperatures within the building Conditions should be maintained within the range of 13° (55°) to 21°C (70°F)
and adequate ventilation should be provided. Also see “Good Weatheror Foul Weather Drywall finishing,” CGC folder EJC-1518.
Check Working Gypsum panels must be tightly fastened to framing members withoutSurfaces breaking the surface paper or fracturing the core. Make certain panel
joints are aligned. When one panel is higher than another it becomes dif-ficult to leave sufficient compound under the tape covering the high panel.Blisters, bond failure and cracks can easily develop in these areas.
Open spaces between panels of 6.4 mm (1/4�) or more should be filledwith compound at least 24 hours prior to embedding or first-coat work.Setting-type joint compounds, which are hardening types, arerecommended for these large fills. With these setting-type compoundsas a fill, joint treatment may begin as soon as the compound hashardened, eliminating the typical 24-hr. drying period. Good planningprior to hanging panels eliminates unnecessary joints.
Care of Applicators must keep tools and equipment clean and in good repair to Equipment secure satisfactory results. With mechanical tools, parts must be
replaced when they show signs of wear.
Mixing joint compounds in dirty buckets or failure to wash down theexposed container sides as material is used causes lumps, scratchesand usually creates hard working material. With setting-type materialsa residue of dry compounds will shorten setting time of the new batch.
The hardening action of setting-type joint compounds requires that alltools, mixing containers, mud pans, etc., used for application bethoroughly cleaned. Flush and clean these compounds from equipmentand brush before the setting action takes place. Immersion ofequipment in water will not prevent hardening of the compound.
Mechanical tool application is not recommended with fast-setting jointcompounds.
Mixing Joint 1. Mix powder joint compounds in a clean 19-L (5-gal.) container—Compounds (preferably plastic) for setting-type joint compounds. A hand mixer
resembling a commercial potato masher makes a convenient mixingtool. Power mixing saves considerable time, particularly where mixing ina central location is convenient. Power mixing is highly recommended.
168
Control Joint No. 093

Power may be supplied by a 12.7 mm (1/2�) heavy-duty electric drilloperating at 450 to 650 rpm. Drills operating at high speeds whip airinto the compound, and also accelerate setting of setting-typecompounds. (See page 400 for information about mixing paddles.)Small amounts of powder joint compounds may be mixed in a smallbowl or mud pan. Keep mixing buckets and tools clean at all times.Containers having any residue of joint compounds in them may causepremature hardening, scratching and incompatibility problems.
2. Pour proper amount of clean drinkable water into a container. Useroom-temperature water, as very cold or hot water will affect the settime. The amounts for type of application and product used are shownin the directions on the package. Dirty water (such as that used toclean tools) will contaminate compound and cause erratic setting ofsetting-type compounds.
3. Sift powder joint compound into water, allowing complete wetting ofthe powder.
4. Mix as shown below:
a. For powder joint compounds, follow mixing directions on the bag. Donot overmix; this may speed up hardening time. Note: Keep compoundfrom being contaminated by any other materials such as other typejoint compounds, dirty water or previously mixed joint compound.Contamination will affect the hardening time and properties of thecompound. Do not remix if product has started to set. Overmixing orretempering of setting-type joint compounds will affect the set timeand reduce strength development.
Mix only as much joint compound as can be used within time periodshown on bag (usually about 30 minutes for DURABOND 45, 1 hour forDURABOND 90, for example).
The compound will harden chemically after this time period, evenunder water. Do not attempt to hold wet mix or immerse jointcompound-coated tools in water to hold back hardening. Retemperingthe compound is not recommended.
An accelerator may be used to alter the set time of the compound. CGCGypsum Accelerator-High Strength is an accelerator that wasdeveloped for use in conventional basecoat plaster products, but canbe used to reduce the setting time of joint compounds.
b. For ready-mixed compounds (drying type), mix contents and use atpackage consistency for fasteners and corner beads. Should bethinned for taping and finishing and for use with mechanical tools. Addwater in half-pint increments to avoid overthinning. Remix and testapply after each water addition. Either hand mixer or drill mixer can beused to mix compounds.
Use cool to lukewarm (not hot) water. If compound should accidentallybe overthinned, simply add more Ready-Mixed Compound to thicken,then remix.
To hold the wet mix in a container for prolonged periods, wash downthe exposed container sides, cover the material with a wet cloth or athin layer of water and put the lid back on the pail. When needed, pouroff water and adjust to a working viscosity.
5
169Finishing Drywall Systems
Ready-mixed compound is sensitive to cold weather and must be pro-tected from freezing. If material freezes in container, allow it to thaw atroom temperature (do not force the thawing process). Do not pour offany liquid that has separated from the compound. Remix using a powerdrill mixer until smooth and creamy. Usually it will again be usable,unless it has been subjected to several freeze-thaw cycles.
Ready-mixed compound can be used in tools and containers previouslyused for powder compound after normal cleaning.
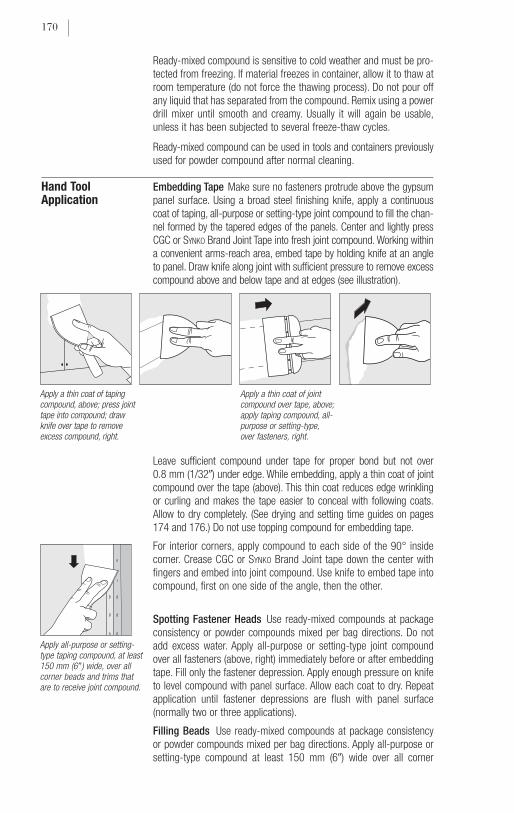
Hand Tool Embedding Tape Make sure no fasteners protrude above the gypsum Application panel surface. Using a broad steel finishing knife, apply a continuous
coat of taping, all-purpose or setting-type joint compound to fill the chan-nel formed by the tapered edges of the panels. Center and lightly pressCGC or SYNKO Brand Joint Tape into fresh joint compound. Working withina convenient arms-reach area, embed tape by holding knife at an angleto panel. Draw knife along joint with sufficient pressure to remove excesscompound above and below tape and at edges (see illustration).
Leave sufficient compound under tape for proper bond but not over 0.8 mm (1/32�) under edge. While embedding, apply a thin coat of jointcompound over the tape (above). This thin coat reduces edge wrinklingor curling and makes the tape easier to conceal with following coats.Allow to dry completely. (See drying and setting time guides on pages174 and 176.) Do not use topping compound for embedding tape.
For interior corners, apply compound to each side of the 90° insidecorner. Crease CGC or SYNKO Brand Joint tape down the center withfingers and embed into joint compound. Use knife to embed tape intocompound, first on one side of the angle, then the other.
Spotting Fastener Heads Use ready-mixed compounds at packageconsistency or powder compounds mixed per bag directions. Do notadd excess water. Apply all-purpose or setting-type joint compoundover all fasteners (above, right) immediately before or after embeddingtape. Fill only the fastener depression. Apply enough pressure on knifeto level compound with panel surface. Allow each coat to dry. Repeatapplication until fastener depressions are flush with panel surface(normally two or three applications).
Filling Beads Use ready-mixed compounds at package consistencyor powder compounds mixed per bag directions. Apply all-purpose orsetting-type compound at least 150 mm (6�) wide over all corner
170
Apply a thin coat of tapingcompound, above; press jointtape into compound; drawknife over tape to removeexcess compound, right.
Apply a thin coat of jointcompound over tape, above;apply taping compound, all-purpose or setting-type,over fasteners, right.
Apply all-purpose or setting-type taping compound, at least150 mm (6�) wide, over allcorner beads and trims thatare to receive joint compound.

beads (below) and to trims that are to receive compound. Allow eachcoat to dry. Apply following coats approximately 50 mm (2�) wider thanpreceding coats. For smoother finishing, the final coat of jointcompound may be thinned slightly.
Paper-Faced Metal Beads and Trims Paper-faced metal beads andtrims perform the same function as bare metal or vinyl beads andtrims, but are applied at the taping stage rather than at the claddingstage of the drywall job. SHEETROCK/BEADEX Brand Paper-Faced MetalBead and Trim are preferred because the paper bonds with the jointcompound and drywall surface to provide superior resistance to edgecracking and chipping despite the stresses of normal buildingmovement and everyday wear and tear.
Unlike conventional metal or vinyl, which are mechanically attached tothe board surface, paper-faced metal beads and trims are adhesivelyapplied using CGC/SYNKO Brand Setting-Type, or CGC/SYNKO BrandReady-Mixed (Taping or All Purpose) Joint Compounds. Toppingcompounds are not recommended for embedding bead. The paperfacing assures excellent adhesion of joint compounds, textures andpaints for a strong, smooth finish.
Apply the joint compound by hand or mechanically to the wallboardand then press the bead in place, or apply joint compound by hopperto the inside of the bead (see illustrations above), then mount in posi-tion on board corners. The bead is then finished in the same manneras other beads.
Fill Coat Application After the tape embedding coat is dry, apply atopping or all-purpose compound fill (second) coat approx. 180 mm(7�) to 250 mm (10�) wide over taped joints (shown below), beads andtrim. Feather edge of second coat approx. 50 mm (2�) beyond edge offirst coat. Spot fasteners with second coat. Allow to dry.
5
171Finishing Drywall Systems
Paper-faced metal drywallbead is applied quickly byapplying joint compound to the bead with an installationhopper. Bead is then pressedonto corner.
After tape embedding coat isdry, apply topping coat 180 mm (7�) to 250 mm(10�) wide over joints, beadsand trim.

Finish Coat Application After second coat is dry, smooth tool marksand other protrusions with a finishing knife. Apply a thin finish (third)coat of ready-mixed, topping or all-purpose compound over joints, fas-teners, beads and trim. Finish compound should be applied at a slight-ly thinner consistency. Feather edges of third coats at least 50 mm (2�)wider than second coats (left). Joints, fasteners, beads and trim shouldbe finished as smooth as possible to minimize sanding. Go over thewhole job to smooth and touch up with joint compound all scratches,craters, nicks and other imperfections in the dried finish coat.
End Joints Because ends of gypsum panels are flat and have no taperlike panel edges, end joints are difficult to conceal. Also, exposed paperon ends may cause visible ridging or beading. The following steps arerecommended for joint treatment to minimize crowning and/or ridgingof end joints:
1. Before attachment, bevel panel ends approx. 3 mm (1/8�) at a 45°angle using a sharp utility knife. This keeps the paper ends apart andreduces expansion problems caused by the raw paper edge. Also, peelback and remove any loose paper from the end.
2. Gypsum panel ends should be loosely butted together. Ends should beseparated slightly and not touching.
3. Prefill the recess with compound and allow to set or dry.
4. Apply compound and paper reinforcing tape over the joint in the samemanner as for tapered joints. Embed tape tightly to minimize jointthickness but leave sufficient compound under tape for continuousbond and blister prevention.
5. Finish the end joint to a width at least twice the finish width of arecessed edge joint. This will make the joint less apparent after deco-ration as the crown will be more gradual.
Finishing Inside Corners Fold tape along center crease. Apply jointcompound to both sides of corner and press folded tape into angle.Tightly embed tape into both sides of angle with finishing knife and letdry. Next, apply a thin coat to one side of angle only. Allow to dry beforeapplying finish coat to other side of angle.
Dry Sanding Sand joint compounds to prepare gypsum drywall sur-faces for decoration. Sand as necessary to remove excess joint com-pound from tool marks, lap marks and high crowned joints. Scratches,craters and nicks should be filled with joint compound, then sanded.Do not try to remove these depressions by sanding only.
Select sandpaper or abrasive-mesh cloth with grit as fine as possible.Excessively coarse sandpapers leave scratches that are visible afterdecoration. For conventional-weight all-purpose compounds, use #120grit or finer sandpaper (#200 grit or finer mesh cloth or 100 micron orless polyester film-back abrasive sheets). For lightweight, midweightand topping compounds, use #150 grit or finer sandpaper (#220 gritor finer mesh cloth or 80 micron or less polyester film-back abrasivesheets). Only sand surfaces coated with joint compound to avoid scuff-ing gypsum panel paper. Remove sanding dust before decorating.
172
Bevel edges of butt endsof drywall panels beforeapplying joint compound.
Apply topping compound overjoints, fasteners, beads andtrim with edges 50 mm (2�)wider than previous coat.
Ventilate or use a dust collector to reduce dust in work areas. Use aNIOSH-approved respirator specified for mica and talc when air isdusty. Use of safety glasses is recommended.
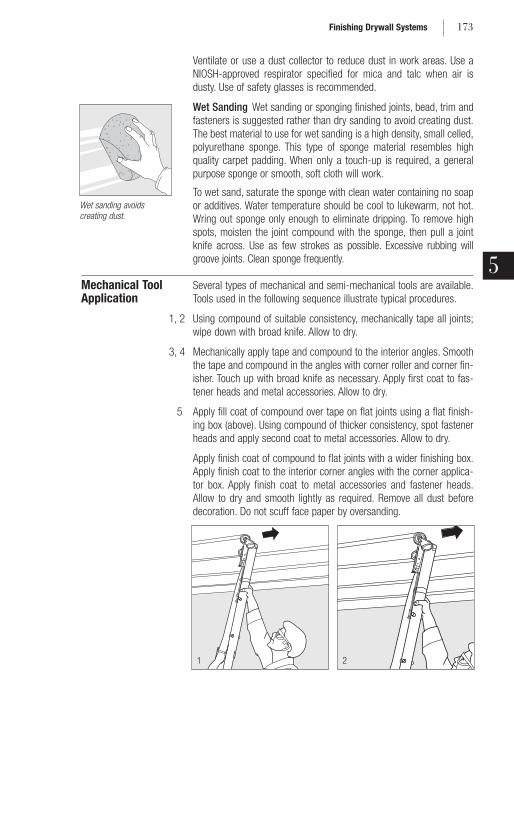
Wet Sanding Wet sanding or sponging finished joints, bead, trim andfasteners is suggested rather than dry sanding to avoid creating dust.The best material to use for wet sanding is a high density, small celled,polyurethane sponge. This type of sponge material resembles highquality carpet padding. When only a touch-up is required, a generalpurpose sponge or smooth, soft cloth will work.
To wet sand, saturate the sponge with clean water containing no soapor additives. Water temperature should be cool to lukewarm, not hot.Wring out sponge only enough to eliminate dripping. To remove highspots, moisten the joint compound with the sponge, then pull a jointknife across. Use as few strokes as possible. Excessive rubbing willgroove joints. Clean sponge frequently.
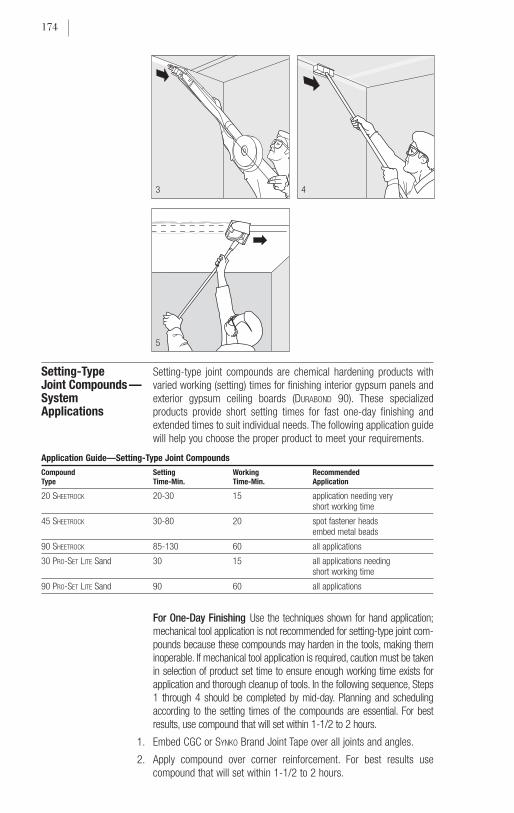
Mechanical Tool Several types of mechanical and semi-mechanical tools are available.Application Tools used in the following sequence illustrate typical procedures.
1, 2 Using compound of suitable consistency, mechanically tape all joints;wipe down with broad knife. Allow to dry.
3, 4 Mechanically apply tape and compound to the interior angles. Smooththe tape and compound in the angles with corner roller and corner fin-isher. Touch up with broad knife as necessary. Apply first coat to fas-tener heads and metal accessories. Allow to dry.
5 Apply fill coat of compound over tape on flat joints using a flat finish-ing box (above). Using compound of thicker consistency, spot fastenerheads and apply second coat to metal accessories. Allow to dry.
Apply finish coat of compound to flat joints with a wider finishing box.Apply finish coat to the interior corner angles with the corner applica-tor box. Apply finish coat to metal accessories and fastener heads.Allow to dry and smooth lightly as required. Remove all dust beforedecoration. Do not scuff face paper by oversanding.
5
173Finishing Drywall Systems
Wet sanding avoidscreating dust.
1 2
Setting-Type Setting-type joint compounds are chemical hardening products with Joint Compounds — varied working (setting) times for finishing interior gypsum panels and System exterior gypsum ceiling boards (DURABOND 90). These specialized Applications products provide short setting times for fast one-day finishing and
extended times to suit individual needs. The following application guidewill help you choose the proper product to meet your requirements.
Application Guide—Setting-Type Joint Compounds
Compound Setting Working Recommended Type Time-Min. Time-Min. Application
20 SHEETROCK 20-30 15 application needing very short working time
45 SHEETROCK 30-80 20 spot fastener heads embed metal beads
90 SHEETROCK 85-130 60 all applications
30 PRO-SET LITE Sand 30 15 all applications needing short working time
90 PRO-SET LITE Sand 90 60 all applications
For One-Day Finishing Use the techniques shown for hand application;mechanical tool application is not recommended for setting-type joint com-pounds because these compounds may harden in the tools, making theminoperable. If mechanical tool application is required, caution must be takenin selection of product set time to ensure enough working time exists forapplication and thorough cleanup of tools. In the following sequence, Steps1 through 4 should be completed by mid-day. Planning and schedulingaccording to the setting times of the compounds are essential. For bestresults, use compound that will set within 1-1/2 to 2 hours.
1. Embed CGC or SYNKO Brand Joint Tape over all joints and angles.
2. Apply compound over corner reinforcement. For best results usecompound that will set within 1-1/2 to 2 hours.
174
3 4
5
3. Spot fastener heads.
4. As soon as taping coat has set (hardened even though not dry), applysecond (fill) coat over all joints and angles.
5. After the second (fill) coat application has hardened, apply finishingcoat of selected finishing compound to completely cover all joints,angles, corner bead and fasteners.
For SHEETROCK Brand Exterior Ceiling Board Surfaces Use handapplication techniques and a setting-type joint compound to treat jointsand fasteners in CGC Exterior Ceiling Board applications. Duringperiods of near-freezing temperatures, check weather forecast beforebeginning work. Minimum air, water, mix and surface temperatures of7°C (45°F) must be assured until compound is completely dry.
1. Prefill joints of SHEETROCK Brand Exterior Gypsum Ceiling Board withcompound. After prefill has set, tape all joints and angles in the ceilingwith compound and CGC or SYNKO Brand Joint Tape. When compoundsets (hardens), immediately apply a fill coat of compound; allow toharden before finishing.
2. Apply Compound over flanges of control joints, metal beads and trim.Spot all fastener heads.
3. After fill coat has set, apply Compound finishing coat. Completely coverall joints, angles, beads, control joints and fasteners.
4. After the joint compound has dried, apply one coat of a good-qualitylatex flat exterior primer to equalize the joint and wallboard surfaces.Then follow with at least one coat of a balanced, good-quality alkyd orlatex exterior finishing system as specified by the paint manufacturer.
For Use with SHEETROCK Brand Gypsum Panels, W/R In areas to betiled, for tapered edge joints, embed CGC or SYNKO Brand Joint Tape withsetting-type joint compound. When set, apply a fill coat of the same jointcompound. Take care not to crown the joint. Wipe excess joint compoundfrom the water resistant panel surface before it sets. For end joints andinterior angles, embed CGC or SYNKO Brand Joint Tape with setting-typejoint compound. A fill coat is not necessary. Again, take care not to crownthe joint. For fasteners, spot fastener heads at least once with setting-type joint compound. Chapter 4 provides instructions for tile work andsubstrates for areas subjected to constant moisture.
Fill and seal all openings around pipes, fittings and fixtures with athinned down coat of a good quality tile adhesive. For best results, usetile adhesive both as a sealer and to set the tile. Thin to a paint-like vis-cosity and apply the thinned compound with a small brush onto the rawgypsum panel core at the cutouts and allow areas to dry thoroughlyprior to application of tile. Before adhesive dries, wipe excess materialfrom the surface of gypsum panels.
For areas not to be tiled, embed tape with setting-type joint compoundin the conventional manner. Finish with at least two coats of a jointcompound to provide joint finishing for painting and wallpapering.
Note: SHEETROCK Brand Gypsum Panels, WR are not intended for use inshower areas or in areas subject to constant moisture, such as interiorswimming pools, gang showers and commercial food processing areas.DUROCK Cement Boards are recommended for these uses.
5
175Finishing Drywall Systems
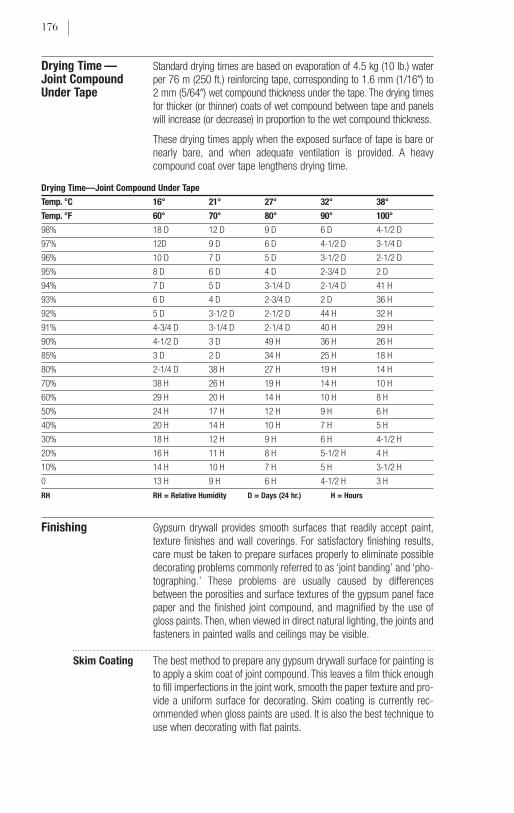
Drying Time — Standard drying times are based on evaporation of 4.5 kg (10 lb.) water Joint Compound per 76 m (250 ft.) reinforcing tape, corresponding to 1.6 mm (1/16�) to Under Tape 2 mm (5/64�) wet compound thickness under the tape. The drying times
for thicker (or thinner) coats of wet compound between tape and panelswill increase (or decrease) in proportion to the wet compound thickness.
These drying times apply when the exposed surface of tape is bare ornearly bare, and when adequate ventilation is provided. A heavycompound coat over tape lengthens drying time.
Drying Time—Joint Compound Under Tape
Temp. °C 16° 21° 27° 32° 38°
Temp. °F 60° 70° 80° 90° 100°
98% 18 D 12 D 9 D 6 D 4-1/2 D
97% 12D 9 D 6 D 4-1/2 D 3-1/4 D
96% 10 D 7 D 5 D 3-1/2 D 2-1/2 D
95% 8 D 6 D 4 D 2-3/4 D 2 D
94% 7 D 5 D 3-1/4 D 2-1/4 D 41 H
93% 6 D 4 D 2-3/4 D 2 D 36 H
92% 5 D 3-1/2 D 2-1/2 D 44 H 32 H
91% 4-3/4 D 3-1/4 D 2-1/4 D 40 H 29 H
90% 4-1/2 D 3 D 49 H 36 H 26 H
85% 3 D 2 D 34 H 25 H 18 H
80% 2-1/4 D 38 H 27 H 19 H 14 H
70% 38 H 26 H 19 H 14 H 10 H
60% 29 H 20 H 14 H 10 H 8 H
50% 24 H 17 H 12 H 9 H 6 H
40% 20 H 14 H 10 H 7 H 5 H
30% 18 H 12 H 9 H 6 H 4-1/2 H
20% 16 H 11 H 8 H 5-1/2 H 4 H
10% 14 H 10 H 7 H 5 H 3-1/2 H
0 13 H 9 H 6 H 4-1/2 H 3 H
RH RH = Relative Humidity D = Days (24 hr.) H = Hours
Finishing Gypsum drywall provides smooth surfaces that readily accept paint,texture finishes and wall coverings. For satisfactory finishing results,care must be taken to prepare surfaces properly to eliminate possibledecorating problems commonly referred to as ‘joint banding’ and ‘pho-tographing.’ These problems are usually caused by differencesbetween the porosities and surface textures of the gypsum panel facepaper and the finished joint compound, and magnified by the use ofgloss paints. Then, when viewed in direct natural lighting, the joints andfasteners in painted walls and ceilings may be visible.
Skim Coating The best method to prepare any gypsum drywall surface for painting is to apply a skim coat of joint compound. This leaves a film thick enoughto fill imperfections in the joint work, smooth the paper texture and pro-vide a uniform surface for decorating. Skim coating is currently rec-ommended when gloss paints are used. It is also the best technique touse when decorating with flat paints.
176

Skim Coat Finish joints and fasteners in the conventional three-coat manner.Application After joints are dry, mix joint compound to a consistency approximating
that used for hand taping. Using a trowel, broad knife, or long-naptexture roller, apply only sufficient amounts of joint compound to coverthe drywall surface. Then immediately wipe the compound as tightly aspossible over the panel surface using a trowel or broad knife. Note: Donot use setting-type joint compound for thin skim coats. If setting-typecompound dries before it sets, bond failure may result.
Finishing and 1. When sanding joint compound applied over joints, fasteners, trim and Decorating Tips corner bead, take care to avoid roughening the panel face paper. Any
paper roughened during sanding has raised fibers which are conspic-uous after painting.
2. All surfaces (including applied joint compound) must be thoroughly dryand dust free before decorating.
3. After conventional finishing of gypsum panel joints and fasteners, applya skim coat of joint compound over the entire surface. This is the besttechnique for minimizing surface defects that will show through afterpainting if critical lighting conditions exist and/or glossy paints areused. Skim coating fills imperfections in joint work, smooths the papertexture and provides a uniform surface for decorating. After skim coathas dried, apply a prime coat of CGC First Coat, SYNKO Pre-Coat forbest results.
4. If skim coating is not done, the next best technique for minimizing dec-orating problems is to apply a prime coat of CGC First Coat, SYNKO
Pre-Coat. This paint-like product equalizes joint and wallboard surfacesto help avoid texture or suction variations when the finished paint coatsare applied. This procedure minimizes problems with concealment ofjoints and fasteners.
5. A ceiling or wall texture finish is an excellent method for maskingimperfections and diffusing light across wall and ceiling surfaces.
6. Frequent job inspections forestall potential problems and help insureproject specifications are being met. Wall and ceiling surfaces shouldbe inspected after the gypsum panels are installed, when the joints arebeing treated and after the joints are finished before the surface is dec-orated. These checks will reveal starved and crowned joints whichalways show up under critical lighting.
5
177Finishing Drywall Systems
Priming Surface Preparation Proper preparation is essential for producing thebest possible painted finish. Surfaces must be dry, clean, sound andfree of oil, grease and efflorescence. Glossy surfaces must be dulled.Metal: Exposed metal should be primed with a good rust-inhibitiveprimer. Concrete: New concrete should age 60 days or more beforecovering. Fill cracks and level any offsets and voids to the same levelas adjacent surfaces with setting-type joint compound. Apply as manycoats as are needed to provide a crack-free fill without edge joiningsthat show through decoration. Exercise special care to provide asmooth surface free of irregularities in areas exposed to sharply angledlighting. Drywall: Treat drywall joints and nailheads with a CGC/SYNKO
Brand Joint Treatment System.
Also important for a superior paint job is the equalization of both theporosity and texture of the surface to be painted. The best way toachieve this is to apply SHEETROCK Brand Primer-Surfacer (TUFF-HIDE) orto skim coat the entire surface with CGC/SYNKO Brand All PurposeReady to use Joint Compound as described above, followed by a primecoat of CGC First Coat, SYNKO Pre-Coat.
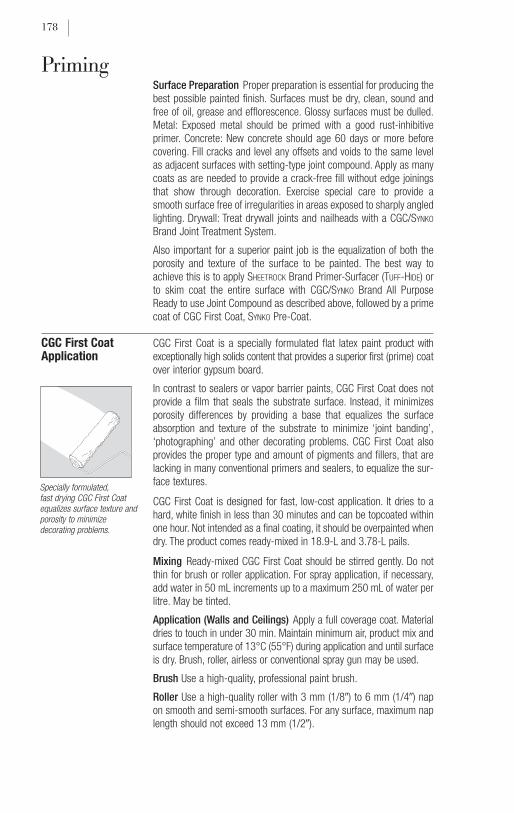
CGC First Coat CGC First Coat is a specially formulated flat latex paint product with Application exceptionally high solids content that provides a superior first (prime) coat
over interior gypsum board.
In contrast to sealers or vapor barrier paints, CGC First Coat does notprovide a film that seals the substrate surface. Instead, it minimizesporosity differences by providing a base that equalizes the surfaceabsorption and texture of the substrate to minimize ‘joint banding’,‘photographing’ and other decorating problems. CGC First Coat alsoprovides the proper type and amount of pigments and fillers, that arelacking in many conventional primers and sealers, to equalize the sur-face textures.
CGC First Coat is designed for fast, low-cost application. It dries to ahard, white finish in less than 30 minutes and can be topcoated withinone hour. Not intended as a final coating, it should be overpainted whendry. The product comes ready-mixed in 18.9-L and 3.78-L pails.
Mixing Ready-mixed CGC First Coat should be stirred gently. Do notthin for brush or roller application. For spray application, if necessary,add water in 50 mL increments up to a maximum 250 mL of water perlitre. May be tinted.
Application (Walls and Ceilings) Apply a full coverage coat. Materialdries to touch in under 30 min. Maintain minimum air, product mix andsurface temperature of 13°C (55°F) during application and until surfaceis dry. Brush, roller, airless or conventional spray gun may be used.
Brush Use a high-quality, professional paint brush.
Roller Use a high-quality roller with 3 mm (1/8�) to 6 mm (1/4�) napon smooth and semi-smooth surfaces. For any surface, maximum naplength should not exceed 13 mm (1/2�).
178
Specially formulated,fast drying CGC First Coatequalizes surface texture andporosity to minimize decorating problems.

Conventional Spray Gun Use Binks Model 2001 gun, pressurizedexternal, with #565 fluid needle, #66 fluid nozzle and #65 PR air nozzle;or Binks Model 18, pressurized external, with #65 fluid needle, #66 fluidnozzle and #65 PR air nozzle; or Binks model 18, pressurized internal,with #68 fluid needle, #68 fluid nozzle and #206 air nozzle; or BinksModel 18D gun, pressurized internal with #54-1209 fluid needle, #57fluid nozzle and R-27 air nozzle; or similar equipment. Air hose is typi-cally 9.5 mm (3/8�) i.d. with 12.7 mm (1/2�) fluid hose i.d.
Airless Spray Gun Use professional equipment that meets or exceedsthe following when spraying through 15 m (50�) of 6.4 mm (1/4�) i.d.airless spray hose: output at least 2.8 L per minute; pressure at least(2700 psi); and accommodates a spray tip of 0.5 mm (0.021�) at(2000 psi). Recommended equipment includes Graco Ultra 1500,1000 or 750 models with a suitable spray gun that will accommodatea RAC IV 519 (0.019�) or RAC IV 521 (0.021�) tip, a RAC IV DriplessGuard, and a 30-mesh filter.
Note: Adjust atomizing air pressure and fluid flow rate so that full cov-erage rate can be achieved by overlapping preceding application withone-quarter to one-half the fan width at a distance of 457 mm (18�)from the surface. Air pressures and flow rates will vary with hose sizeand length and paint consistency.
CGC First Coat contains a high level of select pigments and fillers likeconventional latex flat paints. When these paints are used in sprayequipment previously used to spray PVA sealers which contain highlevels of resin, clogging at the spray gun tip may result. The use ofclean or new hoses is recommended to avoid this problem whenspraying CGC First Coat.
Coverage Approx. 7-12 m2 per litre of wet-mixed material dependingupon factors such as application equipment and technique, conditionof the substrate, amount of dilution and thickness and uniformity ofcoating.
Adding to Wall and Ceiling Textures If slightly better spray properties,wet hide, improved bond, whiteness and surface hardness of texture aredesired, CGC First Coat may be added to wet-mixed SHEETROCK Brand Walland Ceiling Textures at a rate of up to 3.78 L CGC First Coat per 20 kgbag of texture. Reduce water quantity to account for addition of CGC FirstCoat based on 1:1 replacement basis. Surface priming recommendationson texture bag still apply.
SHEETROCK Brand SHEETROCK Brand Primer-Surfacer, TUFF-HIDE is a dual-purpose vinyl acrylic Primer-Surfacer latex-based coating designed especially for interior application over new (TUFF-HIDE) drywall. In a single spray application it provides the same results achieved
using a typical two-step process of skim coating surfaces with jointcompound followed by a coat of primer. In a GA-214/ASTM C-840Level 5 gypsum board finish, SHEETROCK Brand Primer-Surfacer,TUFF-HIDE is used in lieu of a skim coat of joint compound and paintprimer coat to provide the highest quality drywall finish.
In ceiling applications where a flat white finish is desired, SHEETROCK
Brand Primer-Surfacer, TUFF-HIDE can be left unpainted providing anideal final finish.
5
179Finishing Drywall Systems
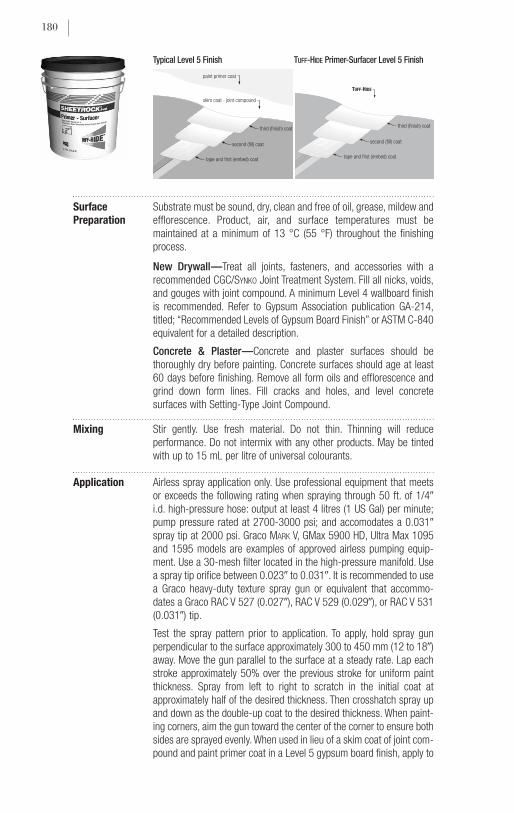
Typical Level 5 Finish TUFF-HIDE Primer-Surfacer Level 5 Finish
Surface Substrate must be sound, dry, clean and free of oil, grease, mildew and Preparation efflorescence. Product, air, and surface temperatures must be
maintained at a minimum of 13 °C (55 °F) throughout the finishingprocess.
New Drywall—Treat all joints, fasteners, and accessories with arecommended CGC/SYNKO Joint Treatment System. Fill all nicks, voids,and gouges with joint compound. A minimum Level 4 wallboard finishis recommended. Refer to Gypsum Association publication GA-214,titled; “Recommended Levels of Gypsum Board Finish” or ASTM C-840equivalent for a detailed description.
Concrete & Plaster—Concrete and plaster surfaces should bethoroughly dry before painting. Concrete surfaces should age at least60 days before finishing. Remove all form oils and efflorescence andgrind down form lines. Fill cracks and holes, and level concretesurfaces with Setting-Type Joint Compound.
Mixing Stir gently. Use fresh material. Do not thin. Thinning will reduce performance. Do not intermix with any other products. May be tintedwith up to 15 mL per litre of universal colourants.
Application Airless spray application only. Use professional equipment that meets or exceeds the following rating when spraying through 50 ft. of 1/4�i.d. high-pressure hose: output at least 4 litres (1 US Gal) per minute;pump pressure rated at 2700-3000 psi; and accomodates a 0.031�spray tip at 2000 psi. Graco MARK V, GMax 5900 HD, Ultra Max 1095and 1595 models are examples of approved airless pumping equip-ment. Use a 30-mesh filter located in the high-pressure manifold. Usea spray tip orifice between 0.023� to 0.031�. It is recommended to usea Graco heavy-duty texture spray gun or equivalent that accommo-dates a Graco RAC V 527 (0.027�), RAC V 529 (0.029�), or RAC V 531(0.031�) tip.
Test the spray pattern prior to application. To apply, hold spray gunperpendicular to the surface approximately 300 to 450 mm (12 to 18�)away. Move the gun parallel to the surface at a steady rate. Lap eachstroke approximately 50% over the previous stroke for uniform paintthickness. Spray from left to right to scratch in the initial coat atapproximately half of the desired thickness. Then crosshatch spray upand down as the double-up coat to the desired thickness. When paint-ing corners, aim the gun toward the center of the corner to ensure bothsides are sprayed evenly. When used in lieu of a skim coat of joint com-pound and paint primer coat in a Level 5 gypsum board finish, apply to
180
third (finish) coat
second (fill) coat
tape and first (embed) coat
paint primer coat
skim coat - joint compound
TUFF-HIDE
third (finish) coat
second (fill) coat
tape and first (embed) coat

a minimum Wet Film Thickness (WFT) of 15 mils (0.38 mm). In allapplications a wet film thickness in excess of 20 mils (0.51 mm) is notrecommended. During and after application, avoid drafts and maintain13 °C (55 °F) minimum product, air and surface temperatures untilsurface is dry.
Drying Time Dries to touch in approximately 60-90 minutes when applied at 15-20 mils WFT (0.38 to 0.51 mm) (9-12 mils DFT) under normal drying condi-tions (77 °F/50% RH). Let dry before re-coating. High humidity and/orcold temperature will slow drying.
Coverage Approximately 100-125 sq. ft. per US gallon (2.5-3 m2 per litre) whenapplied at 15-20 mils WFT (9-12 mils DFT). Actual coverage can varydepending on factors such as substrate surface condition, spray tech-niques, procedures, coating uniformity, and thickness.
Cleanup Wipe up drips and spills immediately with damp cloth. Clean tools withwarm soapy water. Close container after each use.
Decorating May be painted after overnight drying. Follow paint manufacturer’s instructions. May be left unpainted.
Testing: Tested for abrasion resistance, passing 1000 cycles, inaccordance with ASTM D4977 (modified). For additional information onabrasion resistance testing methods and comparative results, refer toAbuse Resistant Systems (SA929). Tested in accordance with ASTMD3450 (washability), and ASTM D2486 (scrubability).
Material: Vinyl acrylic latex-based.
Types: Spray application only.
Temperature Sensitivity: Store in a dry location. Protect from freez-ing, exposure to extreme heat and direct sunlight.
Coverage: Approximately 100-125 ft. per US gallon (2.5-3 m2 perlitre) when applied at 15-20 mils WFT (0.38 to 0.51 mm) (9-12 milsDFT).
Drying Time: Approximately 60-90 minutes when applied at 15-20mils WFT (0.38 to 0.51 mm) (9-12 mils DFT) under normal drying con-ditions (77 °F/50% RH).
Storage: Store at room temperature in a dry location.
Packaging: 5 US gallon pail (18.9 L).
Concrete Coating Application COVER COAT Levelling CGC COVER COAT is a premium grade, aggregated powder formulation Compound for filling and smoothing monolithic interior concrete ceilings and columns
located above grade. It is easily applied directly over concrete andmasonry surfaces—no bonding agent is required. Features minimumdrying shrinkage and excellent bond and crack resistance.
SYNKO CONCRETE SEAL Designed to be trowelled over sound and dry interior concrete withoutthe need for bonding agents. CONCRETE SEAL levels and seals concreteprior to the application of SYNKO texture spray.
5
181Finishing Drywall Systems
Surface Preparation: All surfaces must be clean, dry, and sound.Remove all loose dirt, dust, grease, form-oil, parting compounds, crackedand scaling paint, and other contaminants. Grind down fins and otherprojections, remove lumps and ridges, and dust surface clean. Patch anylarge holes with DURABOND 90 or CONCRETE FILL or by spot application ofCOVER COAT prior to finish coat application. Coat metal surfaces with rustpreventative paint and allow to dry thoroughly.
Mixing: Use drinkable water and clean mixing equipment. Sift 15 kg (1bag) of powder into 12 litres of water for trowel application, or 23 litresof water for spray application. Let soak for 15 minutes, remix tocreamy consistency and use. Consistency may be adjusted by addingsmall amounts of water. Do not overthin.
Application: May be hand troweled or spray applied. Maintain 12 °Ctemperature during and after application until building is occupied.Provide adequate ventilation for proper drying. Do not use unventedgas or oil heaters. If more than one coat applied, allow each coat to drythoroughly before applying subsequent coats. For spray applicationuse spray-gun with large surface nozzle set at low atomizing pressure.
Coverage: Trowel: 8 m2 (86 ft2)/15 kg at 3 mm (1/8�) thickness. Spray:14 m2 (150 ft2)/15 kg at 3 mm (1/8�) thickness. Coverage may vary depend-ing on surface characteristics, depth of fill, and method of application.
Care of Equipment and Storage: Clean all equipment after use.Remove residues and partially dry material from tools. Store in a dryplace. Close open bags as airtight as possible.
Painting and Decorating: May be left as a texture finish or over-sprayed with standard spray textures. Follow painting and decorationinstructions of appropriate manufacturers for overpainting.
Basic Cautions: Do not apply drywall tape to levelling compounds atceiling-partition interface. Taping must be to the concrete surfaceotherwise bond failure may occur.
• Excessive water usage causes check cracking, poor bond, lack of hide.• Do not intermix with other compounds in wet or dry form.• Do not apply over moist surfaces (or surfaces likely to become moist
by condensation or otherwise), on ceiling areas below grade, onexterior surfaces or other areas subject to moisture, freezing,effervescence, pitting or popping, or other abnormal conditions.
• Maintain minimum air, water, mix, and surface temperatures of 12 °C (55 °F) within working areas during application.
• Do not exceed recommended coverage.
SYNKO CONCRETE FILL SYNKO CONCRETE FILL is a quick setting fiberglass setting-type jointcompound. Designed to fill deep voids or cracks in interior masonrywalls and ceilings.
CGC Setting-Type CGC DURABOND or CGC SHEETROCK setting-type compounds are equally Joint Compounds suitable for filling form offsets and voids left in interior concrete. These
Joint Compounds should not be applied over moist surfaces or surfacessubject to moisture, or any abnormal condition.
Application Grind off high plane differences in concrete level with adjacent area; remove any form oil, efflorescence or greasy deposits.
182
Prime exposed metal with a good rust-inhibitive primer.
Mix CONCRETE FILL or CGC setting-type compounds according to bagdirections.
Use compound to fill cracks and holes and level any offsets and voids tothe same level as adjacent surfaces. Apply as many coats as are neededto provide a crack-free fill without edge joinings that show throughdecoration. Exercise special care to provide a smooth surface, free ofirregularities in areas that will be exposed to sharply angled lighting.
Apply additional coats as required after each coat has set, but notnecessarily dried.
Apply a thick skim coat of CGC DURABOND or SHEETROCK setting-type jointcompound over entire surface. Skim coat must be thick enough to pre-vent dryout before setting, or bond failure may result. If an easier-sandingsurface is desired, apply final skim coat of CGC/SYNKO Ready-Mixed JointCompound instead of CGC DURABOND setting-type compound.
Before decorating with paint or texture, apply coat of CGC First Coat ora good quality, undiluted interior latex flat wall paint over entire surfaceand allow to dry.
For textured ceiling, apply CGC/SYNKO Texture Spray in uniform coat.
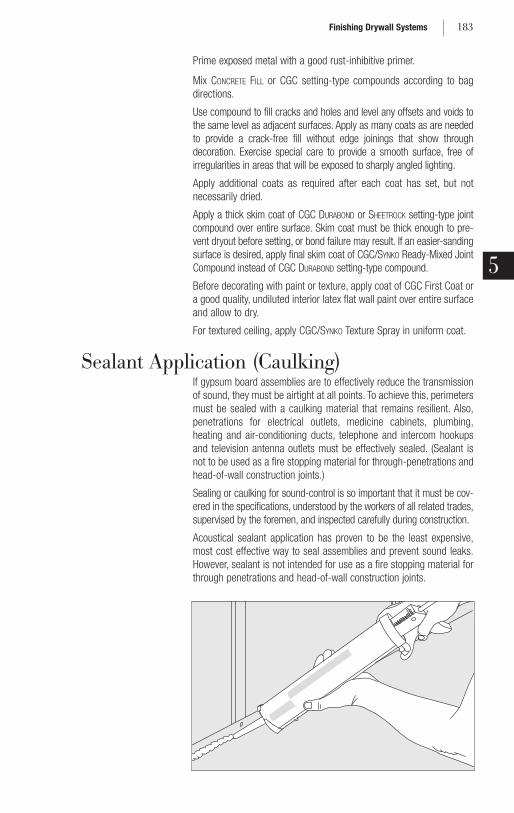
Sealant Application (Caulking) If gypsum board assemblies are to effectively reduce the transmissionof sound, they must be airtight at all points. To achieve this, perimetersmust be sealed with a caulking material that remains resilient. Also,penetrations for electrical outlets, medicine cabinets, plumbing,heating and air-conditioning ducts, telephone and intercom hookupsand television antenna outlets must be effectively sealed. (Sealant isnot to be used as a fire stopping material for through-penetrations andhead-of-wall construction joints.)
Sealing or caulking for sound-control is so important that it must be cov-ered in the specifications, understood by the workers of all related trades,supervised by the foremen, and inspected carefully during construction.
Acoustical sealant application has proven to be the least expensive,most cost effective way to seal assemblies and prevent sound leaks.However, sealant is not intended for use as a fire stopping material forthrough penetrations and head-of-wall construction joints.
5
183Finishing Drywall Systems

Tests conducted at the USG Research Center demonstrate thatreliability of the perimeter seal is increased if perimeter relief does notexceed 3 mm (1/8�). When such a gap, around the base-layerperimeter, is caulked with a 6 mm (1/4�) bead of sealant, installationof face panels compresses the sealant into firm contact with alladjacent surfaces to form a permanent airtight seal.
To be effective, sealant must be properly placed. Placement is asimportant as the amount used. The technical drawings below indicatecorrect and incorrect applications of acoustical sealant.
184
Proper caulking of outlet box (left), and double-layerpartition (right).
Sealant applied around pipesand ducts effectively sealsthe wall to reduce soundtransmission. Note: Sealantis not to be used as a firestopping material for throughpenetrations and head-of-wall construction joints.
acoustical sealant acoustical sealant
sound path
steel runner
wall panels
Do Don’t
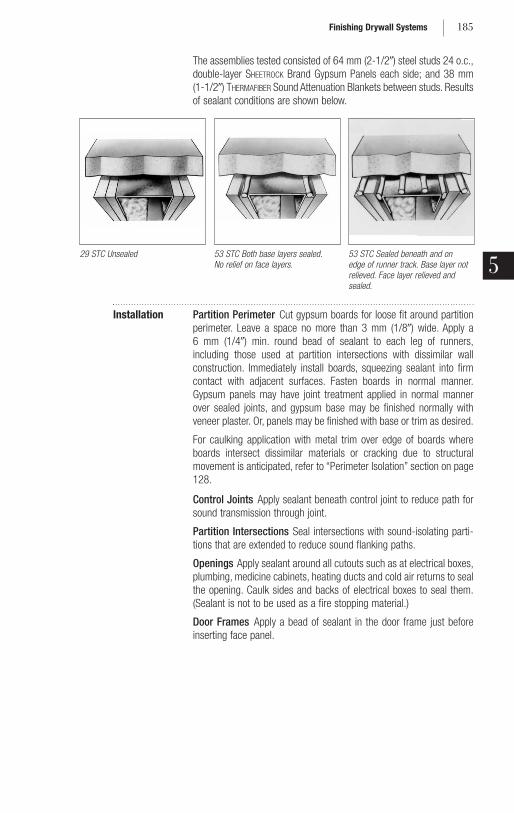
The assemblies tested consisted of 64 mm (2-1/2�) steel studs 24 o.c.,double-layer SHEETROCK Brand Gypsum Panels each side; and 38 mm(1-1/2�) THERMAFIBER Sound Attenuation Blankets between studs. Resultsof sealant conditions are shown below.
Installation Partition Perimeter Cut gypsum boards for loose fit around partition perimeter. Leave a space no more than 3 mm (1/8�) wide. Apply a 6 mm (1/4�) min. round bead of sealant to each leg of runners,including those used at partition intersections with dissimilar wallconstruction. Immediately install boards, squeezing sealant into firmcontact with adjacent surfaces. Fasten boards in normal manner.Gypsum panels may have joint treatment applied in normal mannerover sealed joints, and gypsum base may be finished normally withveneer plaster. Or, panels may be finished with base or trim as desired.
For caulking application with metal trim over edge of boards whereboards intersect dissimilar materials or cracking due to structuralmovement is anticipated, refer to “Perimeter Isolation” section on page128.
Control Joints Apply sealant beneath control joint to reduce path forsound transmission through joint.
Partition Intersections Seal intersections with sound-isolating parti-tions that are extended to reduce sound flanking paths.
Openings Apply sealant around all cutouts such as at electrical boxes,plumbing, medicine cabinets, heating ducts and cold air returns to sealthe opening. Caulk sides and backs of electrical boxes to seal them.(Sealant is not to be used as a fire stopping material.)
Door Frames Apply a bead of sealant in the door frame just beforeinserting face panel.
5
185Finishing Drywall Systems
29 STC Unsealed 53 STC Both base layers sealed.No relief on face layers.
53 STC Sealed beneath and onedge of runner track. Base layer notrelieved. Face layer relieved andsealed.
186
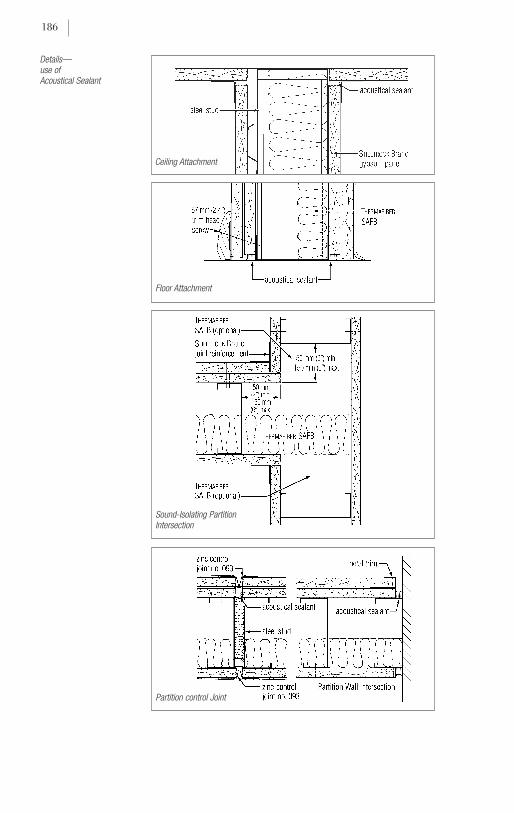
Details—use of Acoustical Sealant
Ceiling Attachment
Floor Attachment
Sound-Isolating PartitionIntersection
Partition control Joint
Texture Finish ApplicationTextured finishes for gypsum board surfaces are desired for their deco-rative beauty and ability to obscure minor surface imperfections witheconomical spray application. CGC offers a full line of products to createmedium and coarse simulated acoustic texture finishes, as well as sandfinishes. Interesting wall patterns can be created by using texture finishproducts with stipple brushes, pattern devices, rollers, floats, trowels andfinishing knives.
Note: Textured surfaces also can be created with veneer plaster fin-ishes. See veneer application section in Chapter 6.
General 1. Not recommended below grade or in high-humidity areas.Limitations 2. Heavy, water-based texturing materials may cause sag in gypsum
panel ceilings under the following adverse conditions: high humidity,improper ventilation, panels applied parallel to framing and panels hav-ing insufficient thickness to span the distance between framing. Thefollowing table gives max. framing spacing for panels that are to becovered with water-based texturing materials.
Frame Spacing—Textured Gypsum Panel Ceilings
Board Thickness Application Method Max. Framing Spacing o.c.mm in. (long edge relative to frame) mm in.
9.5 3/8 not recommended — —
12.7 1/2 perpendicular only 400 16
12.7* 1/2* perpendicular or parallel* 600* 24*
15.9 5/8 perpendicular only 600 24
* 12.7 mm (1/2�) SHEETROCK Brand Interior Gypsum Ceiling Board provides the strength and sag resistance of 15.9 mm (5/8�) standard boardwithout the added thickness. Note: For adhesively laminated double-layer applications with 19 mm (3/4�) or more total thickness, 24 o.c. max.
3. The following surface preparation directions apply to new drywall andconcrete surfaces. When redecorating an old, existing surface with awater-based texture, migrating stains or contaminants from the sub-strate may leach to the finished surface, resulting in discoloration andstaining. See preparation directions for ‘Redecorating Ceilings’ onpages 193-195 for more information on the proper surface preparationof existing surfaces prior to redecorating with a water-based texture.
See “Ceiling Sag Precautions” on page 321 for more information onthe application of water-based textures and interior finishing materials.
5
187Finishing Drywall Systems
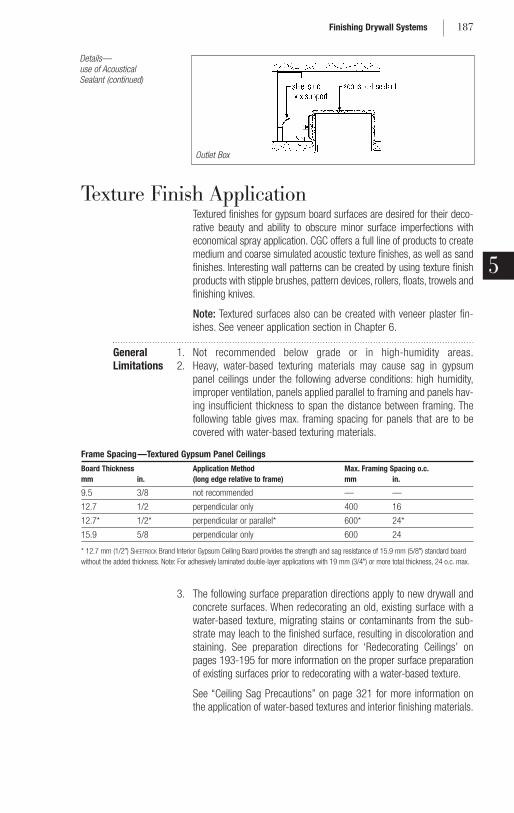
Details—use of Acoustical Sealant (continued)
Outlet Box
Preparation All surfaces must be dry, clean and sound. Dull glossy surfaces. Metal:Prime metal with a good rust inhibitive primer. Wood: Fill and sealsurfaces. New concrete: Age 60 days or more before covering; removeform oils, grease, efflorescence; grind down plane differences andremove grinding dust and sludge; fill cracks and holes and level any off-sets and voids to the same level as adjacent surfaces with CGC COVER
COAT, CGC DURABOND, SHEETROCK setting-type compound or SYNKO CONCRETE
FILL or CONCRETE SEAL. Apply as many coats as are needed to provide acrack-free fill without edge joinings that show through decoration.Exercise special care to provide a smooth surface free of irregularities inareas that will be exposed to sharply angled light. New drywall: reinforceand conceal drywall joints using CGC or SYNKO Brand Joint Tape and aCGC/SYNKO Brand joint compound; fill all fastener depressions with jointcompound; smooth surface scratches and scuffs. Correct plane irregular-ities, as these are accentuated by sharp, angular lighting.
When prepared surfaces are dry and free of dust, apply a prime coatof CGC FIRST COAT, SYNKO PRE-COAT. This product equalizes porosityvariations between the gypsum board face paper and the finishedjoints, minimizing decorating problems such as “joint banding.” As aless effective substitute, a good quality, white, interior latex flat wallpaint with high solids content may be used. Apply undiluted and allowto dry before decorating.
Note: Application of a prime coat is to equalize the surface porosityand to provide a uniform color. Primers are not intended to reduce sagpotential or to prevent migrating stains or contaminants from leachingto the finished surface.
Note: For redecorating old ceilings, see pages 193-195 for propersurface preparation and application of decorating materials.
Powder Texture FinishesCGC SHEETROCK Mixing Use clean vessel equipped with variable-speed power agitator.medium or coarse Sift texture finish into the recommended amount of water, agitating finish, SYNKO RUFF-TEX water during powder addition. Allow to soak for at least 15 min.—or SYNKO SNOW-TEX longer in cold water. Remix until a creamy (but aggregated) lump-free (aggregated) mix is obtained. Adjust spray consistency by adding small amounts of
powder or water. Do not overthin, as poor adhesion, lack of hide andtexture variation may result.
Equipment Use professional spray equipment such as a 10-to-1 ratio,double-action piston pump with 191 mm (7-1/2-in.) stroke, equipped with1220 mm (4-ft.) pole gun having 9.5- to 12.7-mm (3/8- to 1/2-in.) roundorifice, or Binks 7E2 or equivalent hand gun with 9.5 mm (3/8-in.) roundopening. Use 19 mm (3/4-in.) to 25 mm (1-in.) material hose, 9.5 mm(3/8-in.) atomizing hose and 12.7 mm (1/2-in.) air line from compressor topump; or rotor-stator pump (L3 or L4) with 8 mm (5/16�) to 9.5 mm (3/8�)round orifice. Compressor must be adequate for length and size of hose.Keep pressure as low as possible. Plaster mixers or hopper-typeapplicators also may be used.
188

Application Apply at rate up to 1 to 1.6 m2 per kg. Do not exceedrecommended coverage, as subsurface defects, variations in base suctionor color differences may show through, or lighter texture may result.
Surfaces with uneven suction may require two coats. Let first coat drybefore applying second. Remove splatters immediately from woodworkand trim. Maintain 13°C (55°F) minimum air, water, product mix andsurface temperature of the substrate during application and untilsurface is dry. Not washable, but can be painted (spray application isrecommended) when redecoration is needed.
SYNKO SPAN-TEXTURE Application Apply by machine or hand to create the desired effect.Non-Aggregated Application rates will vary depending on the texture pattern of choice.Walls and Ceilings Generally, apply at 2 m2 (22 ft.2) per kg for crowsfoot, swirl and stipple Texture patterns; (20-40 ft2/lb.) for orange peel pattern; and 2-5 m2 (22-55 ft.2)
per kg for spatter and knockdown patterns. Maintain 13°C (55°F) mini-mum air, water, product mix and surface temperature during applicationand until surface is dry. Avoid drafts while applying product but provideventilation after application to aid drying. Do not use unvented gas or oilheaters. May be painted after overnight drying. Not washable unpainted.
5
189Finishing Drywall Systems
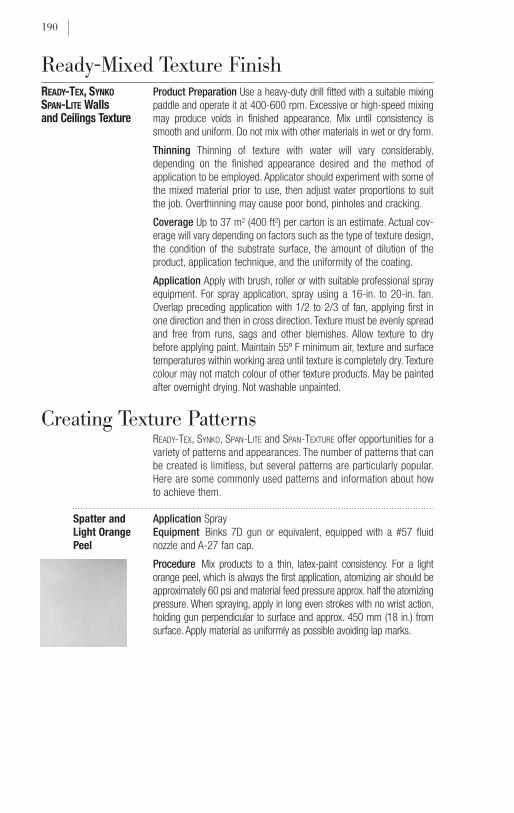
Ready-Mixed Texture FinishREADY-TEX, SYNKO Product Preparation Use a heavy-duty drill fitted with a suitable mixing SPAN-LITE Walls paddle and operate it at 400-600 rpm. Excessive or high-speed mixing and Ceilings Texture may produce voids in finished appearance. Mix until consistency is
smooth and uniform. Do not mix with other materials in wet or dry form.
Thinning Thinning of texture with water will vary considerably,depending on the finished appearance desired and the method ofapplication to be employed. Applicator should experiment with some ofthe mixed material prior to use, then adjust water proportions to suitthe job. Overthinning may cause poor bond, pinholes and cracking.
Coverage Up to 37 m2 (400 ft2) per carton is an estimate. Actual cov-erage will vary depending on factors such as the type of texture design,the condition of the substrate surface, the amount of dilution of theproduct, application technique, and the uniformity of the coating.
Application Apply with brush, roller or with suitable professional sprayequipment. For spray application, spray using a 16-in. to 20-in. fan.Overlap preceding application with 1/2 to 2/3 of fan, applying first inone direction and then in cross direction. Texture must be evenly spreadand free from runs, sags and other blemishes. Allow texture to drybefore applying paint. Maintain 55º F minimum air, texture and surfacetemperatures within working area until texture is completely dry. Texturecolour may not match colour of other texture products. May be paintedafter overnight drying. Not washable unpainted.
Creating Texture PatternsREADY-TEX, SYNKO, SPAN-LITE and SPAN-TEXTURE offer opportunities for avariety of patterns and appearances. The number of patterns that canbe created is limitless, but several patterns are particularly popular.Here are some commonly used patterns and information about howto achieve them.
Spatter and Application SprayLight Orange Equipment Binks 7D gun or equivalent, equipped with a #57 fluid Peel nozzle and A-27 fan cap.
Procedure Mix products to a thin, latex-paint consistency. For a lightorange peel, which is always the first application, atomizing air should beapproximately 60 psi and material feed pressure approx. half the atomizingpressure. When spraying, apply in long even strokes with no wrist action,holding gun perpendicular to surface and approx. 450 mm (18 in.) fromsurface. Apply material as uniformly as possible avoiding lap marks.
190

Spatter Coat After fog coat has been applied, allow about 10-15 min.for surface to partially dry, then apply spattering by removing the A-27fan cap and reducing atomizing air to approx. 15 psi and material feedto approx. 10 psi. While applying spatter coat, move spray gun in a rapidrandom fashion standing about 1800 mm (6 ft.) from surface. Size ofspatters depends on pressures used. Amount (or density) of spatters onsurface depends on personal preference.
Orange Peel Application Spray
Equipment Same as for light orange peel except atomizing airpressure should be approximately 40 psi and material feed pressureapprox. 20 psi. Degree of orange peel pattern depends on amount ofmaterial applied to surface.
Knock-Down Application Sprayand Skip-Trowel Equipment Pole gun, hopper, or Binks 7D or Binks 7E2 gun
Knock-Down Procedure Apply as spatter as described except usematerial at heavy latex-paint consistency. After spattering surface, waitabout 10-15 min., then very lightly flatten only tops of spatters with flatblade or flat hand trowel. Again, size of spatters depends on pressuresused.
Skip-Trowel Procedure Mix in #30 mesh silica sand (125 mL silicasand/litre of texture). Apply as spatter coat but at very low pressures toallow for large spatters on surface. Wait approx. 10 to 15 min., then useblade as in the knock-down procedure, but applying more pressure.
Stipple Application HandTexture Equipment Paint pan or large pail, paint roller 6 to 25 mm (1/4-in. to
1-in.) nap. Short nap produces lower stipple—fine pattern. Long napproduces higher stipple—coarse pattern.
Procedure for Hand Texturing Mix product to a consistency similar tospatter/knockdown. Completely wet out roller with material, then applyto surface as evenly as possible, covering entire surface. Let partiallydry to a “dull wet” appearance, then roll again for desired texture effect.
5
191Finishing Drywall Systems
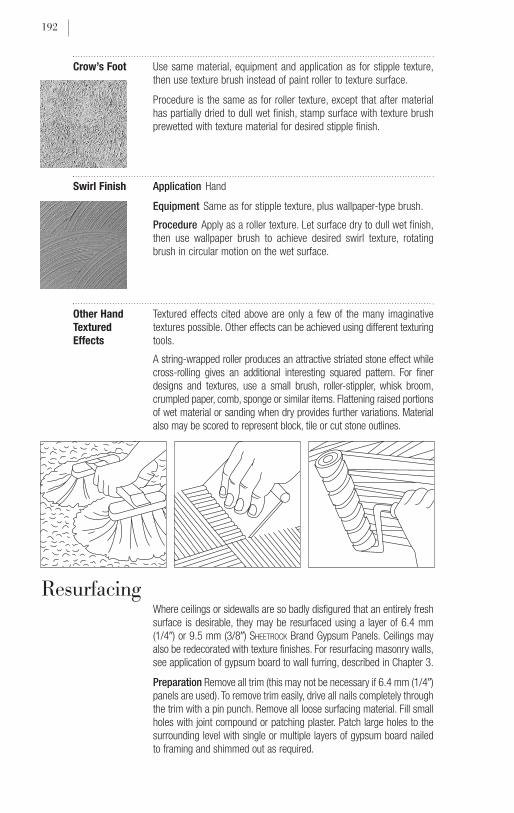
Crow’s Foot Use same material, equipment and application as for stipple texture,then use texture brush instead of paint roller to texture surface.
Procedure is the same as for roller texture, except that after materialhas partially dried to dull wet finish, stamp surface with texture brushprewetted with texture material for desired stipple finish.
Swirl Finish Application Hand
Equipment Same as for stipple texture, plus wallpaper-type brush.
Procedure Apply as a roller texture. Let surface dry to dull wet finish,then use wallpaper brush to achieve desired swirl texture, rotatingbrush in circular motion on the wet surface.
Other Hand Textured effects cited above are only a few of the many imaginative Textured textures possible. Other effects can be achieved using different texturingEffects tools.
A string-wrapped roller produces an attractive striated stone effect whilecross-rolling gives an additional interesting squared pattern. For finerdesigns and textures, use a small brush, roller-stippler, whisk broom,crumpled paper, comb, sponge or similar items. Flattening raised portionsof wet material or sanding when dry provides further variations. Materialalso may be scored to represent block, tile or cut stone outlines.
ResurfacingWhere ceilings or sidewalls are so badly disfigured that an entirely freshsurface is desirable, they may be resurfaced using a layer of 6.4 mm(1/4�) or 9.5 mm (3/8�) SHEETROCK Brand Gypsum Panels. Ceilings mayalso be redecorated with texture finishes. For resurfacing masonry walls,see application of gypsum board to wall furring, described in Chapter 3.
Preparation Remove all trim (this may not be necessary if 6.4 mm (1/4�)panels are used). To remove trim easily, drive all nails completely throughthe trim with a pin punch. Remove all loose surfacing material. Fill smallholes with joint compound or patching plaster. Patch large holes to thesurrounding level with single or multiple layers of gypsum board nailedto framing and shimmed out as required.
192
Electrical outlet boxes for switches, wall receptacles and fixtures should beextended outward to compensate for the added gypsum panel thickness.
Locate joists and studs by probing or with a magnetic “stud finder.”Snap a chalk line to mark their full length and mark their location onthe adjacent wall or ceiling. Where great irregularities of surface exist,apply furring strips not over 406 mm (16�) o.c., using wood shinglesto shim out to a true, even plane.
Installation Apply SHEETROCK Brand Gypsum Panels with long dimen-sion placed horizontally or vertically. Fasten with gypsum board nails ordrywall screws, spaced 178 mm (7�) o.c. on ceilings, 203 mm (8�) o.c.on walls. Nails or screws must be long enough to penetrate intoframing members at least 15.9 mm (5/8�).
Gypsum panels may be adhesively applied over sound, existing wallswith Setting-Type Lightweight Setting-Type Joint Compound.
Finish SHEETROCK Brand Panels with metal corner reinforcement andjoint treatment as necessary, and replace all trim.
Redecorating CeilingsRedecorating cracked, discolored or damaged ceilings with texture canmake old ceilings look like new. Spray-applied texture finishes coverminor surface cracks and imperfections and provide beautiful surfaces.Redecorating surfaces previously decorated with a large-aggregatetexture is especially effective since these surfaces normally are noteasily cleaned, rolled or brush-painted. Yet they are easily spray-painted with texture. These modernized ceilings add value and beauty.Best of all, most jobs can be done in one day without removing rugs,furniture or light fixtures.
Preparation Surface cracks larger than hairline size should be treatedwith a drywall joint compound and tape, and thoroughly dried, prior toredecorating. Tobacco smoke stains require predecorating attentionand treatment with a special stain-blocking sealer. Remove greasestains using mild detergent. Seal water-stained surfaces with primerspecifically recommended by the manufacturer. Remove soot or dirt by“air dusting” surfaces.
5
193Finishing Drywall Systems

Redecorating Painted Surfaces Ceilings that have been painted with pastel flat with Texture alkyd or latex flat paints can be sprayed with no special pretreatment
if free of grease, dirt, smoke stains or other contaminants. Glossy surfaces must be dulled by lightly sanding to develop “tooth” for goodbond. Wash surface with a strong solution of TSP (tri-sodium phos-phate). Stained surfaces require application of a stain-blocking sealer.Spot prime bare metal with a good rust-inhibitive primer. After pre-pared surfaces have thoroughly dried, apply SHEETROCK First Coat.
Previously Textured Surfaces Priming a ceiling previously decoratedwith a large-aggregate texture with a paint primer is not necessary if thesurface is not stained and is free of grease, dirt, smoke stains or othercontaminants. Use only CGC/SYNKO (coarse aggregate) to redecorate anaggregated texture surface.
Wallpaper or Vinyl Wall Covering Remove material and prime ceilingsurface with appropriate primer prior to texturing.
Plaster Ceilings Surface must be in paintable condition. Prior totexturing, cover with primer-sealer specifically recommended by paintmanufacturer.
Mask surfaces by covering floors and walls with 0.85 to 1-mil-thickpolyethylene sheeting, available in 2440 to 3660 mm (8 to 12-ft.)widths, folded and rolled in half for easier handling. Spread polyethylenesheeting on floor, making sure that all areas are completely covered.Next, apply wide masking tape to wall-ceiling intersection, fasteningonly top of tape to wall and leaving bottom hanging free. Fasten oneedge of folded poly sheeting to loose edge of tape, then unfold film tofull width. Press tape into firm contact with both wall and sheeting.
Cover Furniture, Cabinets, Light Fixtures Anything that will remainin the room during spraying operation. Lower ceiling light fixtures sothey can be quickly and completely covered.
For information on mixing, equipment and application, see pages 188-189.
Equipment Use professional spray equipment such as a hand-heldhopper or 10:1 ratio, double-action piston pump with 7-1/2-in. stroke,equipped with 1220 mm (4-ft.) pole gun having 9.5 to 12.7 mm (3/8 to1/2-in.) round orifice, or Binks 7E2 hand gun or equivalent with 9.5 mm (3/8-in.) round opening. Use 19 to 25 mm (3/4 to 1-in.) materialhose, 9.5 mm (3/8-in.) atomizing hose and 12.7 mm (1/2-in.) air line fromcompressor to pump. Compressor must be adequate (85 cfm) for lengthand size of hose. Keep pressure as low as possible. Plaster mixers orhopper-type applicators also may be used.
Application Apply CGC/SYNKO Ceiling Spray at a rate of up to 2 m2 (22 ft2)per kg. Do not exceed recommended coverage, as subsurface defects,variations in base suction or color differences may show through, or lightertexture may result. Maintain 13°C (55°F) minimum air and surfacetemperature during application and until surface is dry.
194
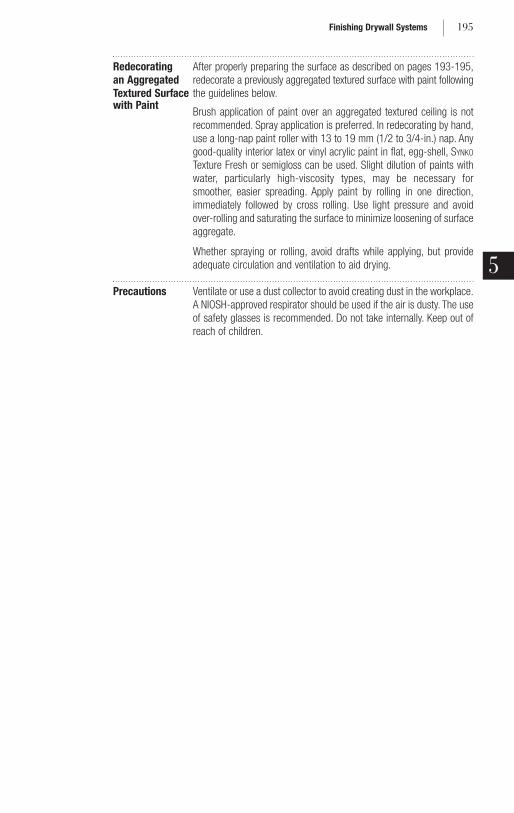
Redecorating After properly preparing the surface as described on pages 193-195,an Aggregated redecorate a previously aggregated textured surface with paint following Textured Surface the guidelines below.with Paint
Brush application of paint over an aggregated textured ceiling is notrecommended. Spray application is preferred. In redecorating by hand,use a long-nap paint roller with 13 to 19 mm (1/2 to 3/4-in.) nap. Anygood-quality interior latex or vinyl acrylic paint in flat, egg-shell, SYNKO
Texture Fresh or semigloss can be used. Slight dilution of paints withwater, particularly high-viscosity types, may be necessary forsmoother, easier spreading. Apply paint by rolling in one direction,immediately followed by cross rolling. Use light pressure and avoidover-rolling and saturating the surface to minimize loosening of surfaceaggregate.
Whether spraying or rolling, avoid drafts while applying, but provideadequate circulation and ventilation to aid drying.
Precautions Ventilate or use a dust collector to avoid creating dust in the workplace.A NIOSH-approved respirator should be used if the air is dusty. The useof safety glasses is recommended. Do not take internally. Keep out ofreach of children.
5
195Finishing Drywall Systems

196