Embed Size (px)
Citation preview

Exploring the next generation of
Big Data solutions with Hadoop 2 Deploying Hortonworks Data Platform 2.0 on Red Hat Enterprise Linux 6 with OpenJDK 7
Version 1.2
April 2014

[email protected] ii www.redhat.com
100 East Davie Street Raleigh NC 27601 USA Phone: +1 919 754 3700 Phone: 888 733 4281 Fax: +1 919 754 3701 PO Box 13588 Research Triangle Park NC 27709 USA Linux is a registered trademark of Linus Torvalds. Red Hat, Red Hat Enterprise Linux and the Red Hat "Shadowman" logo are registered trademarks of Red Hat, Inc. in the United States and other countries.
Hortonworks is a trademark of Hortonworks Inc. Hadoop and the Hadoop elephant logo are trademarks of the Apache Software Foundation.
UNIX is a registered trademark of The Open Group.
Intel, the Intel logo and Xeon are registered trademarks of Intel Corporation or its subsidiaries in the United States and other countries.
All other trademarks referenced herein are the property of their respective owners.
© 2014 by Red Hat, Inc. This material may be distributed only subject to the terms and conditions set forth in the Open Publication License, V1.0 or later (the latest version is presently available at http://www.opencontent.org/openpub/). The information contained herein is subject to change without notice. Red Hat, Inc. shall not be liable for technical or editorial errors or omissions contained herein. Distribution of modified versions of this document is prohibited without the explicit permission of Red Hat Inc. Distribution of this work or derivative of this work in any standard (paper) book form for commercial purposes is prohibited unless prior permission is obtained from Red Hat Inc. The GPG fingerprint of the [email protected] key is: CA 20 86 86 2B D6 9D FC 65 F6 EC C4 21 91 80 CD DB 42 A6 0E
Send feedback to [email protected].

[email protected] iii www.redhat.com
Comments and Feedback
In the spirit of open source, we invite anyone to provide feedback and comments on any reference architectures. Although we review our papers internally, sometimes issues or typographical errors are encountered. Feedback allows us to not only improve the quality of the papers we produce, but allows the reader to provide their thoughts on potential improvements and topic expansion to the papers.
Feedback on the papers can be provided by emailing [email protected]. Please refer to the title within the email.
Staying In Touch
Join us on some of the popular social media sites where we keep our audience informed on new reference architectures as well as offer related information on things we find interesting.
Like us on Facebook:
https://www.facebook.com/rhrefarch
Follow us on Twitter:
https://twitter.com/RedHatRefArch
Plus us on Google+:
https://plus.google.com/u/0/b/114152126783830728030/

www.redhat.com iv [email protected]
Table of Contents 1 Executive Summary ........................................................................................................... 6
2 Brief Introduction to Hadoop 2.x ........................................................................................ 6
2.1 Essential Hadoop Components ................................................................................... 6
2.2 Use Cases for a Hadoop Cluster ................................................................................. 6
2.3 Security ........................................................................................................................ 7
3 Reference Architecture for a Six-Node Hadoop Cluster on Red Hat Enterprise Linux 6 .... 7
3.1 Design Choices ........................................................................................................... 7
3.2 Hardware ..................................................................................................................... 9
3.2.1 Servers .................................................................................................................. 9
3.2.2 Networking .......................................................................................................... 10
3.3 Installing Red Hat Enterprise Linux 6 ......................................................................... 10
3.3.1 Installation ........................................................................................................... 10
3.3.2 Post-Installation Configuration ............................................................................ 10
3.4 Installing Hortonworks Data Platform 2.0 on the Cluster ........................................... 13
3.4.1 Installing Hadoop Software ................................................................................. 13
3.4.2 Configuring HDFS ............................................................................................... 14
3.4.3 Configuring YARN ............................................................................................... 16
3.4.4 Installation Clean-Up ........................................................................................... 17
3.5 Starting Hadoop for the First Time ............................................................................. 18
3.5.1 Initializing HDFS .................................................................................................. 18
3.5.2 Initializing YARN .................................................................................................. 18
3.6 Managing HDP .......................................................................................................... 19
3.6.1 Starting Hadoop .................................................................................................. 19
3.6.2 Stopping Hadoop................................................................................................. 19
3.6.3 Assessing the Health of HDFS ............................................................................ 20
3.6.4 Viewing Cluster and Job Status from the Command Line or Web Browser ......... 21
4 Virtualizing the Hadoop Cluster on Red Hat Enterprise Linux 6 with KVM ...................... 22
4.1 Design Choices ......................................................................................................... 22
4.2 Hardware for the Virtualized Hadoop Clusters ........................................................... 24
4.2.1 Physical Servers ................................................................................................. 24
4.2.2 Networking .......................................................................................................... 25
4.2.3 Storage ................................................................................................................ 25
4.3 Virtualized Configuration ............................................................................................ 25

[email protected] v www.redhat.com
4.3.1 Scale-out Virtualization configuration .................................................................. 25
4.3.2 Consolidation Virtualization configuration ........................................................... 31
5 Validating the Reference Architecture .............................................................................. 34
5.1 HiBench, a Hadoop Benchmarking Suite ................................................................... 34
5.2 Installing and Running HiBench to Validate the Reference Architecture .................... 34
5.2.1 Installing HiBench ............................................................................................... 34
5.2.2 Running HiBench Sort, Bayes, K-Means, and TeraSort Tests ............................. 35
5.3 HiBench Results ........................................................................................................ 37
5.3.1 Bare-Metal Use Case .......................................................................................... 37
5.3.2 Scale-Out Virtualization Use Case ...................................................................... 37
5.3.3 Consolidated Virtualization Use Case ................................................................. 37
6 Conclusion ....................................................................................................................... 38
7 References ...................................................................................................................... 38

www.redhat.com 6 [email protected]
1 Executive Summary Corporate and government entities have become increasingly dependent on processing vast amounts of data that they are collecting from various sources. Managing, sorting, and acting upon that data requires capable and scalable software solutions that provide valuable business insights and create competitive advantage. Apache™ Hadoop® data platform provides a comprehensive and efficient way to process large datasets on industry-standard x86 server clusters to solve big data problems.
The combination of Red Hat Enterprise Linux, which includes OpenJDK, the open source Java development and run-time environment, and Hortonworks Data Platform (HDP), an open source platform based on Apache Hadoop, provides a reliable, high-performance data solution for both physical and virtualized deployments.
This reference architecture offers a brief introduction to the essential components of Apache Hadoop 2.0; highlights the advantages of Hortonworks Data Platform 2.0, including several reasons for an organization to choose it; and details how to set up an HDP 2.0 cluster using Red Hat Enterprise Linux 6.5 and OpenJDK 7. Finally, we discuss installing Hortonworks Data Platform 2 in two virtual environments using Kernel-based Virtual Machines (KVM).
2 Brief Introduction to Hadoop 2.x Hadoop harnesses resources from a cluster of simple servers, which can be either physical or virtual, to provide small- to large-scale computing and data-storage services. The hallmark of the first version of Hadoop was its use of programs implemented in the MapReduce framework.
Hadoop 2.x extends the computing framework of Hadoop 1.x to allow programs of any type, not just MapReduce ones, to run in the Hadoop environment. It is backward compatible, in general, with the first generation of the Hadoop platform.
Many complete application environments can be used atop the Hadoop cluster: HBase (NoSQL database), Hive (SQL database), Pig (MapReduce scripting), Flume (Streaming Data integration), Mahout (Machine Learning analysis), and more.
2.1 Essential Hadoop Components This reference architecture concentrates on the essential components of a generic Hadoop 2 cluster: Hadoop Distributed File System (HDFS), YARN, and OpenJDK. HDFS distributes files among slave nodes to provide fault tolerance and to allow the Hadoop job scheduler to place jobs on or close to nodes that have the job's data. YARN is a new component of the Hadoop 2.0 architecture, whose function is to monitor and assign cluster resources (e.g., node RAM). OpenJDK is an open source implementation of Java SE. Red Hat is a leading contributor to the project. OpenJDK is an essential component of Hadoop in that both HDFS and YARN are Java programs.
2.2 Use Cases for a Hadoop Cluster For many, Hadoop and big data are synonymous. Certainly, the hallmark of Hadoop is its ability to process huge data sets that are too large to fit on a single, even very large server.

[email protected] 7 www.redhat.com
While it can be deployed across hundreds and thousands of systems processing petabytes of data, Hadoop can also be used with a smaller numbers of servers working on moderately sized datasets. Furthermore, Hadoop provides tools and the environment to organize and analyze these datasets, enabling you to explore the data and begin to gain business insights from it.
2.3 Security In a sense, security policies for the Hadoop cluster should not be much different from those of any other cluster in an organization’s critical infrastructure. It is often best to use network controls to isolate the cluster and thereby restrict access to the servers and to its Hadoop services. One possibility is to introduce a gateway system, such as the Apache Knox Gateway software, which provides user authentication and role-based access to the Hadoop cluster.
In the absence of a gateway, authentication and access to content in HDFS and to YARN jobs are controlled by one of three methods: user-id, service-level authorization, or Kerberos. This document uses user-id authentication. Access to HDFS requires membership in the HDFS group. Once inside HDFS, users can control access to their files just as in Linux, through file permissions and file ownership. By default, YARN allows anyone to access the MapReduce queues.
3 Reference Architecture for a Six-Node Hadoop Cluster on Red Hat Enterprise Linux 6
3.1 Design Choices This reference architecture captures the installation and configuration of a six-node Hadoop cluster that has two master nodes and four data nodes (sometimes called slave nodes).
One master node (named “name01”) runs the HDFS NameNode service. The second master node (named “name02”) is a back-up NameNode and runs the YARN resource manager and MapReduce Job History manager.
The four data nodes (named “data01”, “data02”, “data03”, and “data04”) run the HDFS DataNode service and the YARN distributed NodeManager.

www.redhat.com 8 [email protected]
Figure 3.1.1: Schematic of the six-node Hadoop cluster used in the reference architecture. The
red lines denote the network connections for the Hadoop-cluster network. Similarly, the grey
lines denote the server-management network.

[email protected] 9 www.redhat.com
3.2 Hardware
Figure 3.2.1: The physical hardware used for the six-node Hadoop cluster in the reference
architecture.
3.2.1 Servers The setup in this reference architecture features six Dell PowerEdge R710 servers – two master nodes and four data nodes. Each server had 300GB SAS disks, a PowerEdge Raid Controller (PERC), two Intel® Xeon® X5670 processors, and one four-port GbE NIC.
The resources required by the two master nodes differ from those required by the data nodes, so they are discussed separately.
3.2.1.1 Master Nodes
Each master node has 96GB RAM and six disks. The operating system is installed on a mirrored pair of disks (RAID 1). The remaining four disks are also configured as two mirrored pairs because the Hadoop metadata stored therein must be protected from loss.
3.2.1.2 Data Nodes
Each data node has 48GB RAM and eight disks. The operating system is installed on a mirrored pair of disks (RAID 1 in hardware). The remaining six disks are presented to the system as is (single-disk RAID 1 volume) to increase I/O by providing the maximum number of spindles for the configuration.

www.redhat.com 10 [email protected]
3.2.2 Networking The cluster in this reference architecture uses two subnets: one for cluster traffic, and one for access to the servers. Consequently, two network ports are used on each server. In this paper, the cluster subnet is 192.168.100.0/24 and the data subnet is 192.168.200.0/24.
3.3 Installing Red Hat Enterprise Linux 6 The first step in setting up the six-node Hortonworks Data Platform 2 cluster is to install the Red Hat Enterprise Linux 6.5 operating system on the servers.
3.3.1 Installation For each server, master and data, install the Red Hat Enterprise Linux 6.5 operating system, which is the latest available update for Red Hat Enterprise Linux 6. For complete details on the installation of Red Hat Enterprise Linux 6.5, see the Red Hat Enterprise Linux 6 Installation Guide at https://access.redhat.com/site/documentation/en-US/Red_Hat_Enterprise_Linux/6/html/Installation_Guide.
Note: Prior to starting the installation, you should have a designated list of host names and IP addresses.
Install Red Hat Enterprise Linux 6.5 either from the full installation DVD, kickstart file, satellite server, or via PXE. Generally, defaults are acceptable on the installation, with the following exceptions made in this reference architecture:
Networking – configure the applicable interfaces with static IP addresses, subnet masks, gateways, and DNS servers manually by editing the Network Connections screen during the installation or adjusting the kickstart files accordingly.
Partitioning – configure the server’s OS disk by deleting the /home logical volume and assign the resulting free space to the root partition.
The Reference Architecture uses and benefits from the security policy maintained by SELinux in enforcing mode, the default with Red Hat Enterprise Linux 6.5. Note that during installation of Hadoop, the SELinux mode is temporarily set to permissive per the HDP 2.0 installation guide.
3.3.2 Post-Installation Configuration This section shows how to perform post-installation configuration steps for all hosts at once by running a sequence of bash commands from one of the servers, rather than configuring them one at a time. The post-installation configurations include:
Copying SSH keys
Configuring NTP
Configuring the file systems
Disabling unnecessary services
3.3.2.1 Copying SSH keys
Configure password-less access to the servers via SSH by generating a key pair. You can remove this access for root after Hadoop is configured (see section 3.4.4).

[email protected] 11 www.redhat.com
1. Ensure the servers in the cluster are powered on.
2. Log on to one of the cluster servers (e.g., name01) as root.
3. Generate a password-less SSH RSA key pair.
ssh-keygen -P ""
4. Add the public key to the authorized keys.
cat /root/.ssh/id_rsa.pub > /root/.ssh/authorized_keys
5. Add the IP addresses and host names of every server in the cluster to /etc/hosts. For example:
127.0.0.1 localhost localhost.localdomain localhost4 localhost4.localdomain4 ::1 localhost localhost.localdomain localhost6 localhost6.localdomain6 # 192.168.100.221 name01 192.168.100.222 name02 192.168.100.231 data01 192.168.100.232 data02 192.168.100.233 data03 192.168.100.234 data04
6. Copy the key pairs and authorized key file to the remaining servers. Enter the root
password for each server when prompted.
for host in data0{1,2,3,4} name0{1,2} ; do echo $host ssh-copy-id -i /root/.ssh/id_rsa.pub $host done
3.3.2.2 Configuring NTP
1. The servers’ clocks must be synchronized to a common time source for Hadoop to function properly. Modify /etc/ntp.conf to add the IP address of your local NTP server as in the following line:
server 10.10.10.10 iburst
2. Start the NTP daemon on each server.
for host in data0{1,2,3,4} name0{1,2} ; do scp /etc/ntp.conf $host:/etc ssh $host service ntpdate start ssh $host service ntpd start \; chkconfig ntpd on done
3.3.2.3 Configuring the file system
Partition, format, and mount the data disks on each server. The OS disk is mapped to device /dev/sda so the two data disks on the master nodes are mapped to /dev/sdb and /dev/sdc. The six data disks on the data nodes are mapped to the sdb through sdg devices.

www.redhat.com 12 [email protected]
for host in name0{1,2} ; do for dev in b c ; do ssh $host parted -s /dev/sd$dev mklabel gpt ssh $host parted /dev/sd$dev mkpart primary '"1 -1"' ssh $host mkfs.ext4 /dev/sd${dev}1 done ssh $host mkdir /grid0{1,2,3,4,5,6} ssh $host "cat - >> /etc/fstab" <<EOF /dev/sdb1 /grid01 ext4 defaults 0 0 /dev/sdc1 /grid02 ext4 defaults 0 0 EOF ssh $host mount -a done for host in data0{1,2,3,4} ; do for dev in b c d e f g ; do ssh $host parted -s /dev/sd$dev mklabel gpt ssh $host parted /dev/sd$dev mkpart primary '"1 -1"' ssh $host mkfs.ext4 /dev/sd${dev}1 done ssh $host mkdir /grid0{1,2} ssh $host "cat - >> /etc/fstab" <<EOF /dev/sdb1 /grid01 ext4 defaults 0 0 /dev/sdc1 /grid02 ext4 defaults 0 0 /dev/sdd1 /grid03 ext4 defaults 0 0 /dev/sde1 /grid04 ext4 defaults 0 0 /dev/sdf1 /grid05 ext4 defaults 0 0 /dev/sdg1 /grid06 ext4 defaults 0 0 EOF ssh $host mount -a done
3.3.2.4 Disable unnecessary services
Disable unneeded services. If the iptables firewall is needed, please see chapter 2 in the Hortonworks Data Platform Reference for a list of network TCP and UDP ports used by Hadoop.1
for host in data0{1,2,3,4} name0{1,2} ; do for service in autofs cups nfslock portreserve postfix rpcbind\ rpcgssd iptables ip6tables; do ssh $host chkconfig $service off \; service $service stop done done
3.3.2.5 Install OpenJDK
Install the latest version of the OpenJDK development package and link it to directory /usr/java/default, which is the location Hortonworks Data Platform prefers.
Note: If OpenJDK is updated, then the symbolic link to /usr/java/default must be redone.
1 http://docs.hortonworks.com/HDPDocuments/HDP2/HDP-2.0.8.0/bk_reference/content/reference_chap2.html

[email protected] 13 www.redhat.com
for host in data0{1,2,3,4} name0{1,2} ; do ssh $host yum -y install java-1.7.0-openjdk-devel ssh $host mkdir /usr/java ssh $host ln -s /usr/lib/jvm/java-1.7.0-openjdk-1.7.0.\*.x86_64\ /usr/java/default done
3.3.2.6 Configure tuned
Install and configure the tuned package to use the enterprise-storage profile.
for host in data0{1,2,3,4} name0{1,2} ; do ssh $host yum -y install tuned ssh $host tuned-adm profile enterprise-storage done
3.4 Installing Hortonworks Data Platform 2.0 on the Cluster The instructions for installing and configuring Hortonworks Data Platform closely follow those found in the document titled "Installing HDP Manually" (chapters 2-4).2 Hortonworks Data Platform can be installed in other ways (with the Ambari framework or from tar archive files). However, the method detailed here has the advantage that the RPM installation creates the Hadoop user accounts and groups along with system configuration files controlling system resources (e.g., per-account maximum number of open files and maximum number of processes).
Because this procedure installs the Hadoop software from repositories hosted by Hortonworks, each server needs Internet access. If your cluster cannot access the Internet directly, Hortonworks provides alternate installation methods. See chapter 4 in the HDP Reference document.3
If the number of servers in your cluster is large, you may wish to host the Hadoop RPMs locally to speed installation and reduce the amount of Internet traffic.
Hortonworks Data Platform will find and use the version of Java linked to directory /usr/java/default (see section 3.3.2.5). You may wish to explicitly fix the Java version by setting the following shell variables for all accounts on all nodes that will use Java. For example:
export JAVA_HOME=/usr/java/default export PATH=$JAVA_HOME/bin:$PATH
3.4.1 Installing Hadoop Software 1. Temporarily disable SELinux during installation and configuration.
for host in data0{1,2,3,4} name0{1,2} ; do ssh $host setenforce 0 done
2 http://docs.hortonworks.com/HDPDocuments/HDP2/HDP-2.0.9.0/bk_installing_manually_book/content/index.html 3 http://docs.hortonworks.com/HDPDocuments/HDP2/HDP-2.0.8.0/bk_reference/content/reference_chap4.html

www.redhat.com 14 [email protected]
2. Get the HDP yum repo file from Hortonworks and copy it to each of the nodes.
wget http://public-repo-1.hortonworks.com/HDP/centos6/2.x/updates/\ 2.0.6.0/hdp.repo for host in data0{1,2,3,4} name0{1,2} ; do scp hdp.repo $host:/etc/yum.repos.d/hdp.repo done
3. Install the Hadoop software (HDFS, YARN, compression and SSL libraries) on each node.
for host in data0{1,2,3,4} name0{1,2} ; do ssh $host yum -y install hadoop hadoop-hdfs hadoop-libhdfs hadoop-yarn\ hadoop-mapreduce hadoop-client openssl snappy snappy-devel lzo \ lzo-devel hadoop-lzo hadoop-lzo-native ssh $host ln -sf /usr/lib64/libsnappy.so /usr/lib/hadoop/lib/native/. done
3.4.2 Configuring HDFS Hadoop stores its data as regular Linux files on the ext4 filesystem. The HDFS data is organized in a directory hierarchy.
1. Use the following bash script to create the HDFS-specific directories on the master and data nodes.
# both master nodes are namenodes for host in name0{1,2} ; do ssh $host mkdir -p /grid{01,02}/hadoop/hdfs/{nn,snn} ssh $host chown -R hdfs:hadoop /grid{01,02}/hadoop/hdfs/{nn,snn} ssh $host chmod -R 755 /grid{01,02}/hadoop/hdfs/{nn,snn} done # data nodes will access data stored in HDFS for host in data0{1,2,3,4} ; do ssh $host mkdir -p /grid{01,02,03,04,05,06}/hadoop/hdfs/dn ssh $host chown -R hdfs:hadoop /grid{01,02,03,04,05,06}/hadoop/hdfs/dn ssh $host chmod -R 750 /grid{01,02,03,04,05,06}/hadoop/hdfs/dn done
2. Create directories on the nodes for logs and run-time data (process id, etc.).
for host in data0{1,2,3,4} name0{1,2} ; do ssh $host mkdir -p /var/{log,run}/hadoop/hdfs ssh $host chown -R hdfs:hadoop /var/{log,run}/hadoop/hdfs ssh $host chmod -R 755 /var/{log,run}/hadoop/hdfs done
The Hadoop components require configuration to specify the nodes and their roles as well as the location of each node's HDFS files. Hortonworks provides a sample set of configuration files that you can readily modify for your cluster. The up-to-date Internet location of the tar archive for these helper files can always be found in Hortonworks HDP documentation; see Hortonworks Data Platform: Installing HDP Manually, section 1.8, Download Companion Files.4
4 http://docs.hortonworks.com/HDPDocuments/HDP2/HDP-2.0.9.0/bk_installing_manually_book/content/rpm-chap1-9.html
[email protected] 15 www.redhat.com
This set of instructions uses version 2.0.6.101 of the helper files.
1. Download the helper files: http://public-repo-1.hortonworks.com/HDP/tools/2.0.6.0/.
wget http://public-repo-1.hortonworks.com/HDP/tools/2.0.6.0/\ hdp_manual_install_rpm_helper_files-2.0.6.101.tar.gz
2. Extract the files.
tar zxf hdp_manual_install_rpm_helper_files-2.0.6.101.tar.gz
3. Find the core Hadoop configuration files.
cd hdp_manual_install_rpm_helper_files-2.0.6.101/\ configuration_files/core_hadoop
4. On each node, save the original Hadoop configuration values. For example:
mv /etc/hadoop/conf /etc/hadoop/conf-orig mkdir /etc/hadoop/conf chmod 755 /etc/hadoop/conf
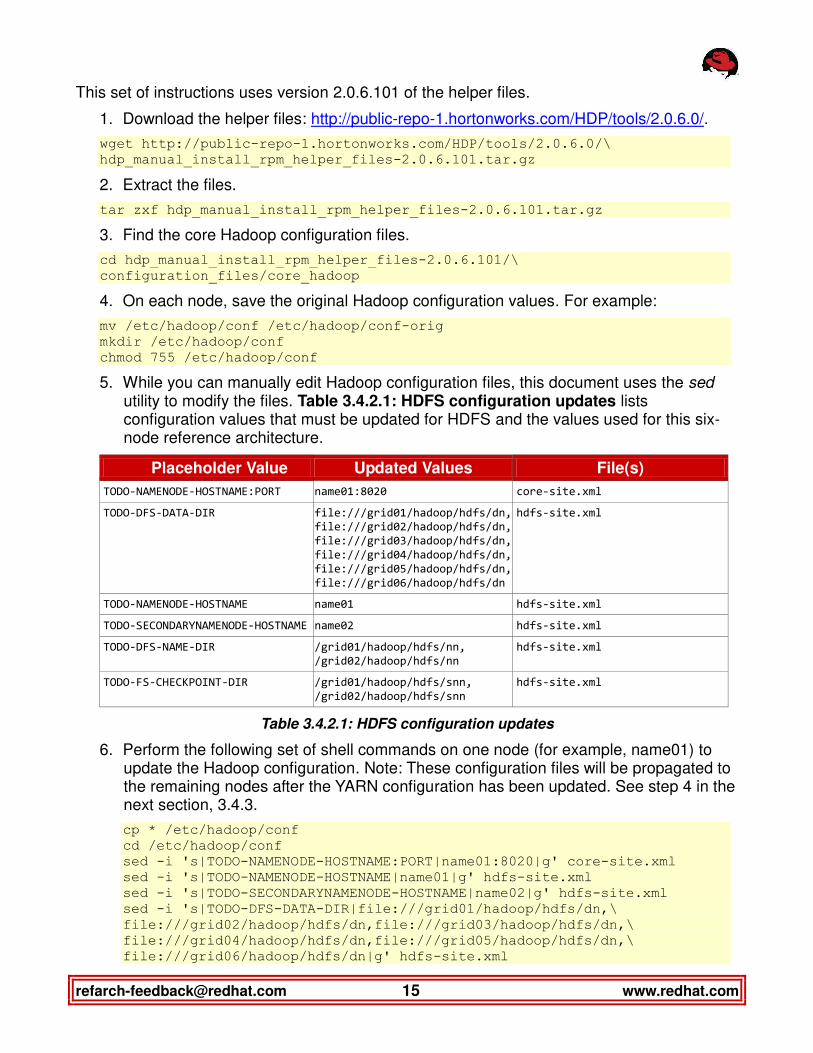
5. While you can manually edit Hadoop configuration files, this document uses the sed utility to modify the files. Table 3.4.2.1: HDFS configuration updates lists configuration values that must be updated for HDFS and the values used for this six-node reference architecture.
Placeholder Value Updated Values File(s)
TODO-NAMENODE-HOSTNAME:PORT name01:8020 core-site.xml
TODO-DFS-DATA-DIR file:///grid01/hadoop/hdfs/dn,
file:///grid02/hadoop/hdfs/dn,
file:///grid03/hadoop/hdfs/dn,
file:///grid04/hadoop/hdfs/dn,
file:///grid05/hadoop/hdfs/dn,
file:///grid06/hadoop/hdfs/dn
hdfs-site.xml
TODO-NAMENODE-HOSTNAME name01 hdfs-site.xml
TODO-SECONDARYNAMENODE-HOSTNAME name02 hdfs-site.xml
TODO-DFS-NAME-DIR /grid01/hadoop/hdfs/nn,
/grid02/hadoop/hdfs/nn hdfs-site.xml
TODO-FS-CHECKPOINT-DIR /grid01/hadoop/hdfs/snn,
/grid02/hadoop/hdfs/snn hdfs-site.xml
Table 3.4.2.1: HDFS configuration updates
6. Perform the following set of shell commands on one node (for example, name01) to update the Hadoop configuration. Note: These configuration files will be propagated to the remaining nodes after the YARN configuration has been updated. See step 4 in the next section, 3.4.3.
cp * /etc/hadoop/conf cd /etc/hadoop/conf sed -i 's|TODO-NAMENODE-HOSTNAME:PORT|name01:8020|g' core-site.xml sed -i 's|TODO-NAMENODE-HOSTNAME|name01|g' hdfs-site.xml sed -i 's|TODO-SECONDARYNAMENODE-HOSTNAME|name02|g' hdfs-site.xml sed -i 's|TODO-DFS-DATA-DIR|file:///grid01/hadoop/hdfs/dn,\ file:///grid02/hadoop/hdfs/dn,file:///grid03/hadoop/hdfs/dn,\ file:///grid04/hadoop/hdfs/dn,file:///grid05/hadoop/hdfs/dn,\ file:///grid06/hadoop/hdfs/dn|g' hdfs-site.xml

www.redhat.com 16 [email protected]
sed -i 's|TODO-DFS-NAME-DIR|/grid01/hadoop/hdfs/nn,\ /grid02/hadoop/hdfs/nn|g' hdfs-site.xml sed -i 's|TODO-FS-CHECKPOINT-DIR|/grid01/hadoop/hdfs/snn, /grid02/hadoop/hdfs/snn |g' hdfs-site.xml
3.4.3 Configuring YARN Hadoop YARN also stores its data as regular Linux files, organized in a directory hierarchy.
1. Use the following bash script to create the YARN-specific directories on the YARN-master and data nodes.
for host in data0{1,2,3,4} ; do ssh $host mkdir -p /grid{01,02,03,04,05,06}/hadoop/yarn/{local,logs} ssh $host chown -R yarn:hadoop \ /grid{01,02,03,04,05,06}/hadoop/yarn/{local,logs} ssh $host chmod -R 750 /grid{01,02,03,04,05,06}/hadoop/yarn/{local,logs} done ssh name02 mkdir -p /grid{01,02}/hadoop/yarn/{local,logs} ssh name02 chown -R yarn:hadoop /grid{01,02}/hadoop/yarn/{local,logs} ssh name02 chmod -R 750 /grid{01,02}/hadoop/yarn/{local,logs}
2. Create directories on the nodes for logs and run-time data (process id, etc.).
for host in data0{1,2,3,4} name0{1,2} ; do ssh $host mkdir -p /var/{log,run}/hadoop/{yarn,mapred} ssh $host chown -R yarn:hadoop /var/{log,run}/hadoop/yarn ssh $host chown -R mapred:hadoop /var/{log,run}/hadoop/mapred ssh $host chmod -R 755 /var/{log,run}/hadoop/{yarn,mapred} done
As for the HDFS configuration, the YARN and MapReduce configuration files will be updated from the Hortonworks helper files that have already been copied onto /etc/hadoop/conf/.
Table 3.4.3.1: YARN and MapReduce configuration updates lists configuration values that must be updated for YARN and MapReduce and the values used for this six-node reference architecture.
Placeholder Value Updated Values File(s)
TODO-YARN-LOCAL-DIR /grid01/hadoop/yarn/local,
/grid02/hadoop/yarn/local container-executor.cfg
yarn-site.xml
TODO-YARN-LOG-DIR /grid01/hadoop/yarn/logs,
/grid02/hadoop/yarn/logs container-executor.cfg
TODO-YARN-LOCAL-LOG-DIR grid01/hadoop/yarn/logs,
/grid02/hadoop/yarn/logs
Yarn-site.xml
TODO-RMNODE-HOSTNAME name02 yarn-site.xml
TODO-JOBHISTORYNODE-HOSTNAME name02 mapred-site.xml
Table 3.4.3.1: YARN and MapReduce configuration updates
3. Perform the following set of shell commands on one node (for example, name01) to update the Hadoop configuration.

[email protected] 17 www.redhat.com
cd /etc/hadoop/conf sed -i 's|TODO-RMNODE-HOSTNAME|name02|g' yarn-site.xml sed -i 's|TODO-JOBHISTORYNODE-HOSTNAME|name02|g' mapred-site.xml for file in container-executor.cfg yarn-site.xml ; do sed -i 's|TODO-YARN-LOCAL-DIR|/grid01/hadoop/yarn/local, /grid02/hadoop/yarn/local|g' $file done sed -i 's|TODO-YARN-LOG-DIR|/grid01/hadoop/yarn/logs,\ /grid02/hadoop/yarn/logs|g' container-executor.cfg sed -i 's|TODO-YARN-LOCAL-LOG-DIR|/grid01/hadoop/yarn/logs,\ /grid02/hadoop/yarn/logs|g' yarn-site.xml
4. Copy the Hadoop configuration (HDFS, YARN, and MapReduce) from this node (for example, name01) to the remaining nodes.
for host in name02 data0{1,2,3,4} ; do scp /etc/hadoop/conf/* $host:/etc/hadoop/conf/ done
5. Add the yarn and mapred users to the hdfs group on all nodes so that the history tracker can manipulate job data.
usermod -G hdfs yarn usermod -G hdfs mapred
3.4.4 Installation Clean-Up At this point, you can re-enable SELinux and remove the password-less key pairs for root, if desired. Subsequent remote commands with SSH will prompt for a password.
for host in data0{1,2,3,4} name0{1,2} ; do ssh $host setenforce 1 ssh $host rm -f .ssh/authorized_keys done

www.redhat.com 18 [email protected]
3.5 Starting Hadoop for the First Time
3.5.1 Initializing HDFS 1. On the namenode, format HDFS.
ssh name01 'su - hdfs -c "hdfs namenode -format"'
2. Start HDFS by running the commands in step 1 of section 3.6.1.
3. Optional: To test HDFS, create a directory and one file on the Hadoop filesystem.
su - hdfs -c "hdfs dfs -mkdir -p /user/hdfs" su - hdfs -c "hdfs dfs -touchz /user/hdfs/temp-file" su - hdfs -c "hdfs dfs -ls /user/hdfs" su - hdfs -c "hdfs dfsadmin –report"
3.5.2 Initializing YARN 1. With HDFS running, create and configure directories for the job-history service.
ssh name02 'su - hdfs -c "hdfs dfs -mkdir -p /mr-history/tmp"' ssh name02 'su - hdfs -c "hdfs dfs -mkdir -p /mr-history/done"' ssh name02 'su - hdfs -c "hdfs dfs -mkdir -p /app-logs"' ssh name02 'su - hdfs -c "hdfs dfs -chmod -R 1777 /mr-history/tmp"' ssh name02 'su - hdfs -c "hdfs dfs -chmod -R 1777 /mr-history/done"' ssh name02 'su - hdfs -c "hdfs dfs -chmod -R 1777 /app-logs"' ssh name02 'su - hdfs -c "hdfs dfs -chown -R mapred:hdfs /mr-history"' ssh name02 'su - hdfs -c "hdfs dfs -chown yarn /app-logs"'
2. Change the permissions on the YARN container-executer program.
for host in data0{1,2,3,4} name0{1,2} ; do ssh $host chown -R root:hadoop \ /usr/lib/hadoop-yarn/bin/container-executor ssh $host chmod -R 6050 /usr/lib/hadoop-yarn/bin/container-executor done
3. Start YARN by running the commands in step 2 of section 3.6.1.
4. Optional: To test YARN, run one of the example MapReduce programs, e.g., the program to compute an estimate of the mathematical constant pi, and examine the progress messages as the job goes through the map and reduce phases.
su - hdfs -c "hadoop jar \ /usr/lib/hadoop-mapreduce/hadoop-mapreduce-examples-2*.jar pi 10 1000000"

[email protected] 19 www.redhat.com
3.6 Managing HDP Each component of Hadoop has a command-line program to check the status of the component and to modify Hadoop resources (e.g., HDFS files, YARN resources, MapReduce jobs, nodes, etc.).
3.6.1 Starting Hadoop 1. First, start HDFS by running the following commands.
ssh name01 'su - hdfs -c \ "/usr/lib/hadoop/sbin/hadoop-daemon.sh start namenode"' ssh name02 'su - hdfs -c \ "/usr/lib/hadoop/sbin/hadoop-daemon.sh start secondarynamenode"' for host in data0{1,2,3,4} ; do echo $host ssh $host 'su - hdfs -c \ "/usr/lib/hadoop/sbin/hadoop-daemon.sh start datanode"' done # Check that HDFS is available by printing the (initial) disk usage. su - hdfs -c "hdfs –du /"
2. Next, start YARN by running the following commands.
ssh name02 'su - yarn -c "HADOOP_LIBEXEC_DIR=/usr/lib/hadoop/libexec \ /usr/lib/hadoop-yarn/sbin/yarn-daemon.sh start resourcemanager"' ssh name02 'su - mapred -c "HADOOP_LIBEXEC_DIR=/usr/lib/hadoop/libexec \ /usr/lib/hadoop-mapreduce/sbin/mr-jobhistory-daemon.sh start \ historyserver"' for host in data0{1,2,3,4} ; do echo $host ssh $host 'su - yarn -c "HADOOP_LIBEXEC_DIR=/usr/lib/hadoop/libexec \ /usr/lib/hadoop-yarn/sbin/yarn-daemon.sh start nodemanager"' done
3. Optional: Check that YARN is running by querying the MapReduce job manager.
su – hdfs –c "mapred job –list all"
3.6.2 Stopping Hadoop 1. First, stop YARN by running the following commands.
for host in data0{1,2,3,4} ; do echo $host ssh $host 'su - yarn -c "HADOOP_LIBEXEC_DIR=/usr/lib/hadoop/libexec \ /usr/lib/hadoop-yarn/sbin/yarn-daemon.sh stop nodemanager"' done ssh name02 'su - mapred -c "HADOOP_LIBEXEC_DIR=/usr/lib/hadoop/libexec \ /usr/lib/hadoop-mapreduce/sbin/mr-jobhistory-daemon.sh stop \ historyserver"' ssh name02 'su - yarn -c "HADOOP_LIBEXEC_DIR=/usr/lib/hadoop/libexec \ /usr/lib/hadoop-yarn/sbin/yarn-daemon.sh stop resourcemanager"'

www.redhat.com 20 [email protected]
2. Next, stop HDFS by running the following commands.
for host in data0{1,2,3,4} ; do echo $host ssh $host 'su - hdfs -c \ "/usr/lib/hadoop/sbin/hadoop-daemon.sh stop datanode"' done ssh name02 'su - hdfs -c \ "/usr/lib/hadoop/sbin/hadoop-daemon.sh stop secondarynamenode"' ssh name01 'su - hdfs -c \ "/usr/lib/hadoop/sbin/hadoop-daemon.sh stop namenode"'
3.6.3 Assessing the Health of HDFS The status and health of HDFS can be queried from the command line.
su - hdfs -c "hdfs dfsadmin -report" Configured Capacity: 7073745272808 (6.43 TB) Present Capacity: 6704157089792 (6.10 TB) DFS Remaining: 6701894090752 (6.10 TB) DFS Used: 2262999040 (2.11 GB) DFS Used%: 0.03% Under replicated blocks: 2 Blocks with corrupt replicas: 0 Missing blocks: 0 ------------------------------------------------- Datanodes available: 4 (4 total, 0 dead) Live datanodes: Name: 192.168.100.233:50010 (data03) Hostname: data03 Decommission Status : Normal Configured Capacity: 1768436318202 (1.61 TB) DFS Used: 532844544 (508.16 MB) Non DFS Used: 92374077434 (86.03 GB) DFS Remaining: 1675529396224 (1.52 TB) DFS Used%: 0.03% DFS Remaining%: 94.75% Last contact: Fri Jan 31 14:48:51 EST 2014 .. (data for the other data nodes has been truncated)
HDFS has an fsck command to check the consistency of filesystem metadata.
su - hdfs -c "hdfs fsck /" Connecting to namenode via http://name01:50070 FSCK started by hdfs (auth:SIMPLE) from /192.168.100.221 for path / at Fri Jan 31 14:50:35 EST 2014 ............. (many intermediate lines of dots removed for clarity) .......... ....Status: HEALTHY Total size: 433034003 B Total dirs: 251 Total files: 44615 Total symlinks: 0
[email protected] 21 www.redhat.com
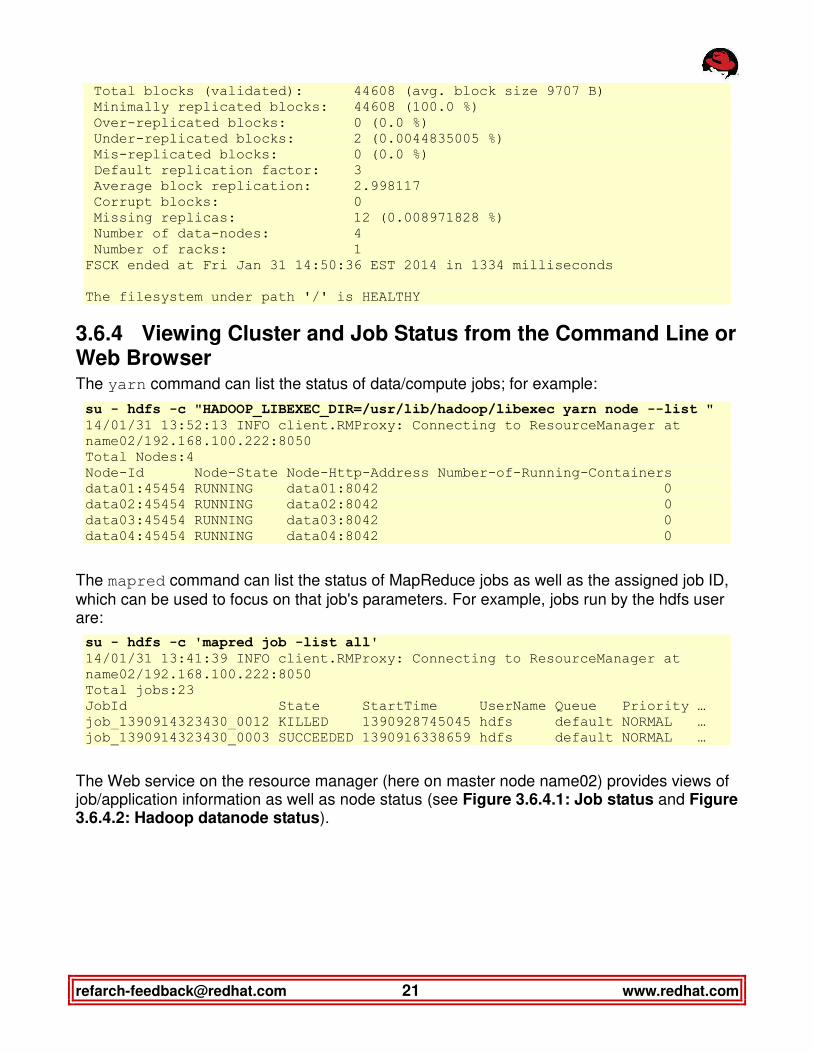
Total blocks (validated): 44608 (avg. block size 9707 B) Minimally replicated blocks: 44608 (100.0 %) Over-replicated blocks: 0 (0.0 %) Under-replicated blocks: 2 (0.0044835005 %) Mis-replicated blocks: 0 (0.0 %) Default replication factor: 3 Average block replication: 2.998117 Corrupt blocks: 0 Missing replicas: 12 (0.008971828 %) Number of data-nodes: 4 Number of racks: 1 FSCK ended at Fri Jan 31 14:50:36 EST 2014 in 1334 milliseconds The filesystem under path '/' is HEALTHY
3.6.4 Viewing Cluster and Job Status from the Command Line or Web Browser The yarn command can list the status of data/compute jobs; for example:
su - hdfs -c "HADOOP_LIBEXEC_DIR=/usr/lib/hadoop/libexec yarn node --list " 14/01/31 13:52:13 INFO client.RMProxy: Connecting to ResourceManager at name02/192.168.100.222:8050 Total Nodes:4 Node-Id Node-State Node-Http-Address Number-of-Running-Containers data01:45454 RUNNING data01:8042 0 data02:45454 RUNNING data02:8042 0 data03:45454 RUNNING data03:8042 0 data04:45454 RUNNING data04:8042 0
The mapred command can list the status of MapReduce jobs as well as the assigned job ID, which can be used to focus on that job's parameters. For example, jobs run by the hdfs user are:
su - hdfs -c 'mapred job -list all' 14/01/31 13:41:39 INFO client.RMProxy: Connecting to ResourceManager at name02/192.168.100.222:8050 Total jobs:23 JobId State StartTime UserName Queue Priority … job_1390914323430_0012 KILLED 1390928745045 hdfs default NORMAL … job_1390914323430_0003 SUCCEEDED 1390916338659 hdfs default NORMAL …
The Web service on the resource manager (here on master node name02) provides views of job/application information as well as node status (see Figure 3.6.4.1: Job status and Figure 3.6.4.2: Hadoop datanode status).

www.redhat.com 22 [email protected]
Figure 3.6.4.1: Job status: http://name02:8088/cluster/apps
Figure 3.6.4.2: Hadoop datanode status: http://name02:8088/cluster/nodes
4 Virtualizing the Hadoop Cluster on Red Hat Enterprise Linux 6 with KVM
4.1 Design Choices While consolidation of Hadoop servers appears to go against the philosophy of Hadoop—distributed computing on servers with just enough resources (namely, CPU, RAM, and local storage)—running Hadoop clusters in virtualized environments is being actively investigated because virtual machines can be provisioned and destroyed readily.
Other benefits of consolidating servers and their applications onto virtualized guests are the usual ones: power savings, higher utilization of server resources, simplified datacenter management, and possible lower aggregate RAM-utilization by merging identical memory pages.
[email protected] 23 www.redhat.com
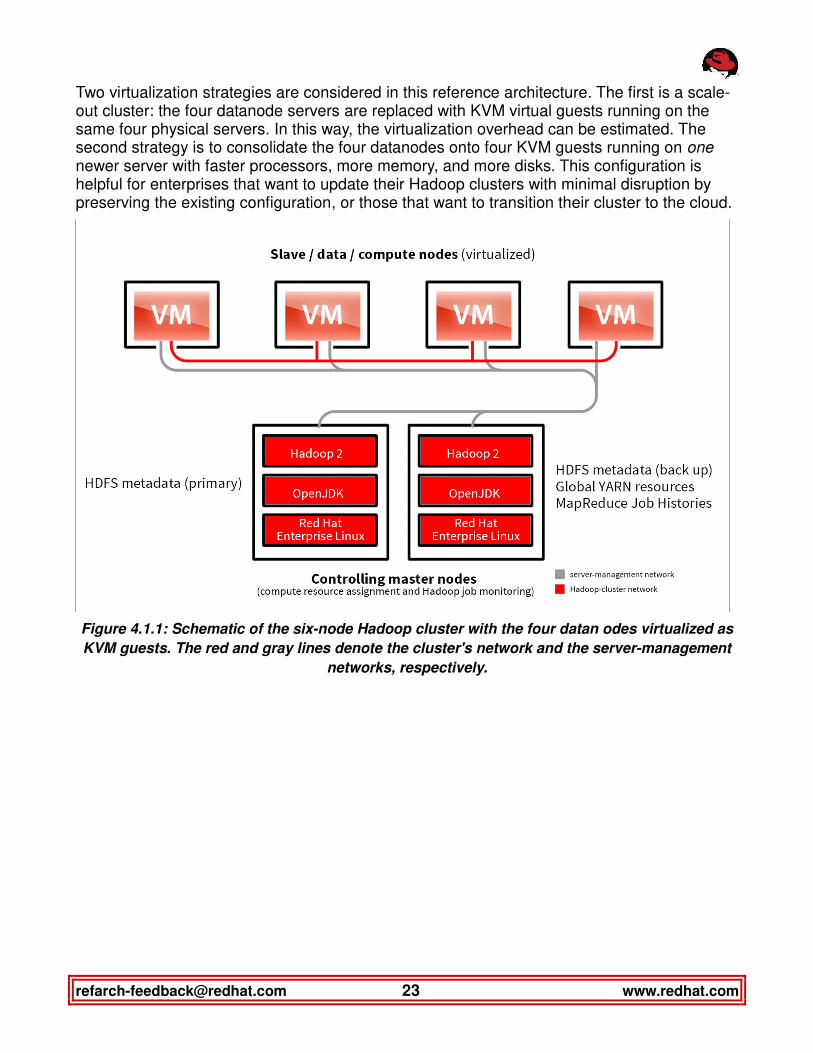
Two virtualization strategies are considered in this reference architecture. The first is a scale-out cluster: the four datanode servers are replaced with KVM virtual guests running on the same four physical servers. In this way, the virtualization overhead can be estimated. The second strategy is to consolidate the four datanodes onto four KVM guests running on one newer server with faster processors, more memory, and more disks. This configuration is helpful for enterprises that want to update their Hadoop clusters with minimal disruption by preserving the existing configuration, or those that want to transition their cluster to the cloud.
Figure 4.1.1: Schematic of the six-node Hadoop cluster with the four datan odes virtualized as
KVM guests. The red and gray lines denote the cluster's network and the server-management
networks, respectively.

www.redhat.com 24 [email protected]
4.2 Hardware for the Virtualized Hadoop Clusters
Figure 4.2.1: The physical hardware used for the scale-out virtualized Hadoop cluster used in
the reference architecture.
4.2.1 Physical Servers
4.2.1.1 Scale-out Virtualization Use Case
The servers used in this reference architecture for scale-out virtualization were the same six Dell PowerEdge R710 servers used in the bare-metal use case. The four bare-metal servers were converted to KVM hypervisors for the Hadoop data nodes, and the two Hadoop master nodes remained on the same bare-metal servers because they managed a light load of just four data nodes.
4.2.1.2 Consolidated Virtualization Use Case
The consolidated setup in this reference architecture features one Dell PowerEdge R720xd server as the KVM hypervisor for the Hadoop data nodes and, as before, two PowerEdge R710 servers as Hadoop master nodes. The master nodes are not virtualized or consolidated because they are redundant at the physical level and can control a large number of data nodes. The master nodes provide room for potential expansion of the data side of the cluster.
The server used for consolidation has two 146GB and 24 300GB SAS disks, one PowerEdge Raid Controller (PERC), two Intel Xeon processors E5-2697 v2, one four-port GbE NIC, and 384GB RAM. The server does not run any Hadoop components outside of respective KVM instances.

[email protected] 25 www.redhat.com
4.2.2 Networking The virtualized Hadoop cluster in this reference architecture uses two subnets: one for cluster traffic and one for access to the servers. Consequently, two network ports on the server connect the virtual machines to the physical networks.
For efficiency, this setup does not use the KVM's default network, and disables NATing and the iptables firewall. Network bridging connects the virtual machines to the physical networks via the network ports mentioned in the previous paragraph.
4.2.3 Storage On each server, two 146GB disks are used to boot the Red Hat Enterprise Linux 6.5 operating system as a hypervisor as well as to store the system image for the guest. As before, the server's disk-controller is used to mirror the disks in a RAID 1 configuration.
The remaining six disks are Hadoop data disks. For efficiency, these instructions do not create image files on these disks and present them to the guests; rather, the main partition on each of the six physical disks will be presented to the guests as a raw device.
4.3 Virtualized Configuration The configurations of the KVM hypervisors and guests differ slightly between the two use cases. Consequently, the scale-out virtualization configuration steps will be presented in detail, but for the consolidation use case, only the differences between the two sets of configuration steps will be mentioned. See section 4.3.1 for the scale-out case and section 4.3.2 for the consolidation case.
4.3.1 Scale-out Virtualization configuration
4.3.1.1 Configuring the KVM Hypervisors
Install the Red Hat Enterprise Linux 6.5 operating system on the servers as outlined in section 3.3.1. The post-installation configuration differs, however. Complete the following steps on each hypervisor for configuration.
1. Log onto the KVM server as root.
2. Install the KVM virtualization and auxiliary RPMs.
yum groupinstall Virtualization yum groupinstall "Virtualization Platform" yum groupinstall "Virtualization Client"
3. Add the IP addresses and host names of every server in the cluster to /etc/hosts. For
example:

www.redhat.com 26 [email protected]
192.168.100.221 name01 # master node 192.168.100.222 name02 # second master node 192.168.100.231 data01 # hypervisor for 1st data node 192.168.100.232 data02 # hypervisor for 2nd data node 192.168.100.233 data03 # hypervisor for 3rd data node 192.168.100.234 data04 # hypervisor for 4th data node 192.168.100.241 data01v # virtualized data nodes 192.168.100.242 data02v 192.168.100.243 data03v 192.168.100.244 data04v
4. Disable unneeded services.
for service in autofs cups nfslock portreserve postfix rpcbind rpcgssd \ iptables ip6tables; do chkconfig $service off service $service stop done
5. The servers’ clocks must be synchronized to a common time source for the virtualized
machines (as well as Hadoop) to function properly. Modify /etc/ntp.conf to add the IP address of your local NTP server as in the following line.
server 10.10.10.10 iburst
6. Start the NTP daemon on the KVM server.
service ntpdate start service ntpd start chkconfig ntpd on
7. Install and configure tuned to use the virtual-host profile.
yum install tuned tuned-adm profile virtual-host
8. Partition and format the 6 data disks that the virtualized guest will use. The KVM's
operating system disks use device /dev/sda so that the data disks are mapped to the sdb through sdg devices. These data disks need not be mounted on the KVM server.
for dev in b c d e f g; do parted -s /dev/sd$dev mklabel gpt parted /dev/sd$dev mkpart primary '"1 -1"' mkfs.ext4 /dev/sd${dev}1 done
9. Reboot the server.
4.3.1.2 Configuring Virtual Networking
1. First, remove the default virtual network profile.
virsh net-destroy default virsh net-undefine default service libvirtd restart

[email protected] 27 www.redhat.com
2. Create two bridges (br0 and br1), one for each of the two physical interfaces em1 and em2 (corresponding to the aforementioned cluster management and Hadoop networks).
virsh iface-bridge em1 br0 virsh iface-bridge em2 br1
4.3.1.3 Configuring Virtual Machines
To save time and reduce the chance of potential for errors, follow the practice of creating and fully configuring one virtual machine, and then cloning it as many times as needed. After the creation of the first image, this approach was used to create the remaining three guests. After cloning, start each cloned guest in turn and adjust its configuration.
Please note that the guests must be cloned before attaching the physical disks, or copies of these disks will be made as image files, which is a lengthy and unnecessary process.
In addition, install Hadoop after cloning so that the instructions in sections 3.4, 3.5, and 3.6 can be followed with only a few minor modifications.
In this example each guest will have 24 virtualized CPUs, 44GB RAM (similar to the RAM on a physical server), one 20GB system disk, and six data disks. The KVM images will be named data01, data02, data03 and data04 (identical to the hostnames used for the physical servers), but the hostnames of the guests will be data01v, data02v, data03v and data04v.
4.3.1.3.1 Creating the First Virtual Machine and Installing Red Hat Enterprise Linux 6.5
The operating system can be installed in several ways. This section uses the Red Hat Enterprise Linux 6.5 installation DVD via a copy on an NFS file system (/mnt/Linux/RHEL/6.5/rhel-server-6.5-x86_64-dvd.iso).
While the operating system installation on the guest follows the steps in section 3.3.1, the post-installation configuration is slightly different as this setup uses a single server rather than the entire cluster.
1. The following command will allocate the resources for the first VM (named data01) and then open a console window from which the operating system can be installed following the instructions in section 3.3.1. The symbolic name for the attached disk will be "vda" and not "sda" as for the physical servers.
virt-install --connect qemu:///system -n data01 -r 45056 --vcpus=24 \ --disk /var/lib/libvirt/images/data01.img,size=20 -w bridge=br0\ -w bridge=br1 --graphics vnc -arch=x86_64 --os-type=linux \ --os-variant=rhel6 -c /mnt/Linux/RHEL/6.5/rhel-server-6.5-x86_64-dvd.iso
2. After the guest reboots, log in as root via ssh, and close the virt-viewer console window.
3. Add the IP addresses and host names of every server in the cluster to /etc/hosts. For example:

www.redhat.com 28 [email protected]
192.168.100.221 name01 # master node 192.168.100.222 name02 # second master node 192.168.100.231 data01 # hypervisor for 1st data node 192.168.100.232 data02 # hypervisor for 2nd data node 192.168.100.233 data03 # hypervisor for 3rd data node 192.168.100.234 data04 # hypervisor for 4th data node 192.168.100.241 data01v # virtualized data nodes 192.168.100.242 data02v 192.168.100.243 data03v 192.168.100.244 data04v
4. Disable unneeded services.
for service in autofs cups nfslock portreserve postfix rpcbind rpcgssd \ iptables ip6tables kdump mdmonitor ; do chkconfig $service off service $service stop done
5. The guests’ clocks must be synchronized to a common time source for the virtualized machines (as well as Hadoop) to function properly. Modify /etc/ntp.conf to add the IP address of your local NTP server as in the following line.
server 10.10.10.10 iburst
6. Start the NTP daemon on the guest.
service ntpdate start service ntpd start chkconfig ntpd on
7. Install and configure the tuned package to use the virtual-guest profile.
yum install tuned tuned-adm profile virtual-guest
8. Install the latest version of the OpenJDK development package and link it to directory /usr/java/default.
yum -y install java-1.7.0-openjdk-devel mkdir /usr/java ln -s /usr/lib/jvm/java-1.7.0-openjdk-1.7.0.\*.x86_64 /usr/java/default
9. Create the directories where the Hadoop data disk will be mounted.
mkdir /grid0{1,2,3,4,5,6}
10. Copy the key pairs and authorized key file from one of the master servers (assuming that it has not been deleted per the optional direction in section 3.4.4) to this guest.
scp -r name01:/root/.ssh /root/ restorecon -vr /root/.ssh
11. Shut down the guest.
shutdown -h now
4.3.1.3.2 Cloning the First Guest to create the Remaining Guests
Next create the virtual machines for the three remaining data nodes by cloning the first virtual machine.
[email protected] 29 www.redhat.com
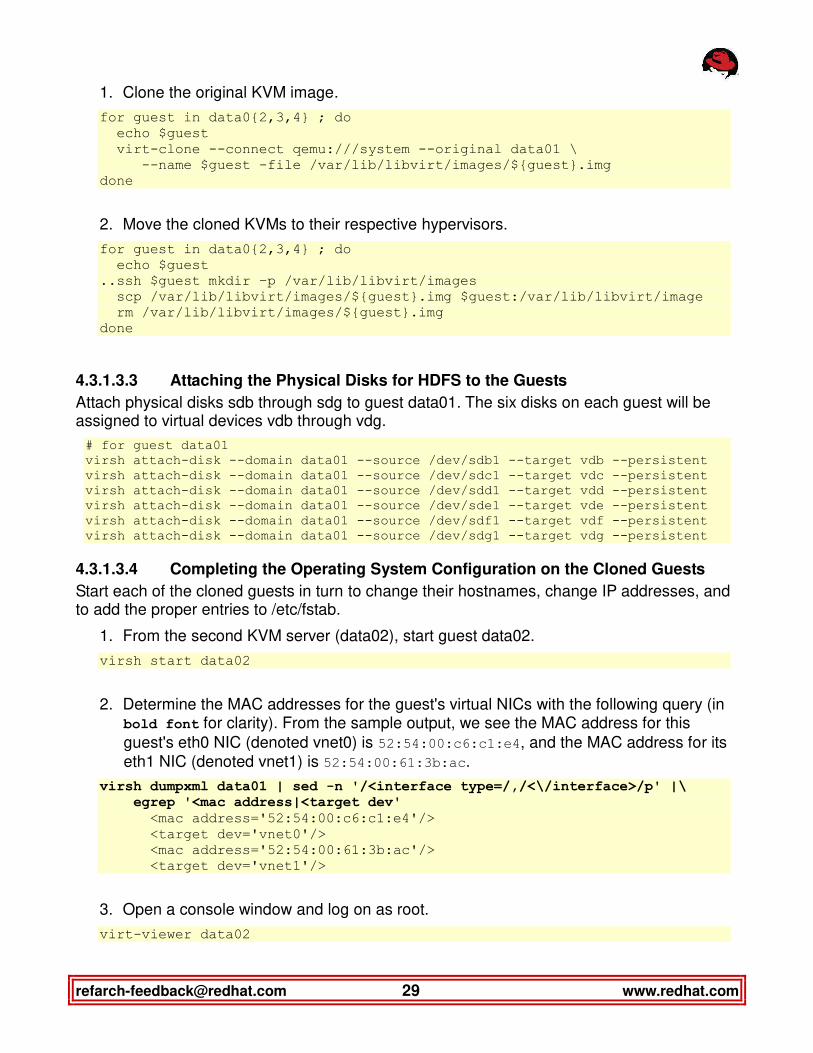
1. Clone the original KVM image.
for guest in data0{2,3,4} ; do echo $guest virt-clone --connect qemu:///system --original data01 \ --name $guest -file /var/lib/libvirt/images/${guest}.img done
2. Move the cloned KVMs to their respective hypervisors.
for guest in data0{2,3,4} ; do echo $guest ..ssh $guest mkdir –p /var/lib/libvirt/images scp /var/lib/libvirt/images/${guest}.img $guest:/var/lib/libvirt/image rm /var/lib/libvirt/images/${guest}.img done
4.3.1.3.3 Attaching the Physical Disks for HDFS to the Guests
Attach physical disks sdb through sdg to guest data01. The six disks on each guest will be assigned to virtual devices vdb through vdg.
# for guest data01 virsh attach-disk --domain data01 --source /dev/sdb1 --target vdb --persistent virsh attach-disk --domain data01 --source /dev/sdc1 --target vdc --persistent virsh attach-disk --domain data01 --source /dev/sdd1 --target vdd --persistent virsh attach-disk --domain data01 --source /dev/sde1 --target vde --persistent virsh attach-disk --domain data01 --source /dev/sdf1 --target vdf --persistent virsh attach-disk --domain data01 --source /dev/sdg1 --target vdg --persistent
4.3.1.3.4 Completing the Operating System Configuration on the Cloned Guests
Start each of the cloned guests in turn to change their hostnames, change IP addresses, and to add the proper entries to /etc/fstab.
1. From the second KVM server (data02), start guest data02.
virsh start data02
2. Determine the MAC addresses for the guest's virtual NICs with the following query (in bold font for clarity). From the sample output, we see the MAC address for this
guest's eth0 NIC (denoted vnet0) is 52:54:00:c6:c1:e4, and the MAC address for its eth1 NIC (denoted vnet1) is 52:54:00:61:3b:ac.
virsh dumpxml data01 | sed -n '/<interface type=/,/<\/interface>/p' |\ egrep '<mac address|<target dev' <mac address='52:54:00:c6:c1:e4'/> <target dev='vnet0'/> <mac address='52:54:00:61:3b:ac'/> <target dev='vnet1'/>
3. Open a console window and log on as root.
virt-viewer data02

www.redhat.com 30 [email protected]
4. Change the hostname from data01 to data02 by editing the file etc/sysconfig/network.
5. Clear the udev entries for the network interfaces by deleting the contents of /etc/udev/rules.d/70-persistent-net.rules.
rm /etc/udev/rules.d/70-persistent-net.rules touch /etc/udev/rules.d/70-persistent-net.rules
6. Replace the guest's network-interface configuration files for eth0 and eth1 with the following template.
rm /etc/sysconfig/network-scripts/ifcfg-eth{0,1} for nic in eth0 eth1 ; do cat - /etc/sysconfig/network-scripts/ifcfg-$nic <<EOF DEVICE=$nic HWADDR=CHANGE_MAC TYPE=Ethernet ONBOOT=yes BOOTPROTO=none NM_CONTROLLED=no IPV6INIT=no IPADDR=CHANGE_IPADDR PREFIX=24 EOF
7. Modify each NIC's configuration file and replace the placeholder tag CHANGE_MAC with the MAC address found in step 2, and replace the placeholder tag CHANGE_IPADDR with that NIC's IP address. For example, if this guest's IP addresses for NICs eth0 and eth1 are 192.168.100.112 and 192.168.200.112, respectively, the following sed commands will effect the updates:
sed -i -e 's/CHANGE_MAC/52:54:00:c6:c1:e4/' \ -e 's/CHANGE_IPADDR/192.168.100.112/' \ /etc/sysconfig/network-scripts/ifcfg-eth0 sed -i -e 's/CHANGE_MAC/52:54:00:61:3b:ac/' \ -e 's/CHANGE_IPADDR/192.168.200.112/' \ /etc/sysconfig/network-scripts/ifcfg-eth1
8. Add the data disks to /etc/fstab.
cat - >> /etc/fstab <<EOF /dev/vdb /grid01 ext4 defaults 0 0 /dev/vdc /grid02 ext4 defaults 0 0 /dev/vdd /grid03 ext4 defaults 0 0 /dev/vde /grid04 ext4 defaults 0 0 /dev/vdf /grid05 ext4 defaults 0 0 /dev/vdg /grid06 ext4 defaults 0 0 EOF
9. Reboot the guest.
shutdown -r now
[email protected] 31 www.redhat.com
10. After the guest reboots, log on via ssh and close the virt-viewer console window.
11. Repeat steps 1 through 10 for guests data03 and data04.
12. Start guest data01.
virsh start data01
4.3.1.3.5 Installing and Configuring Hadoop on the Guests
Hadoop installation procedures on the guests are similar to those of the bare-metal configuration, but with minor modifications. Make sure the four guests are running and perform the steps in sections 3.4, 3.5, and 3.6 to install, configure, and run Hadoop. In particular, perform the steps in these three sections with the exception that master nodes name01 and name02 need not be configured and can be omitted from all loops. Also, the Hadoop configuration files need not be recreated, and can be copied from one of the master nodes to the virtualized data nodes.
4.3.1.4 Running the Virtualized Hadoop Cluster
Start the virtualized guest from the KVM server with the following commands.
Note: We take advantage of the fact that the hypervisor's host name is identical to the name of its KVM guest image.
for guest in data0{1,2,3,4} ; do ssh $guest virsh start $guest done
Once the data and master nodes are running, you can manage and use Hadoop as section 3.6 describes.
4.3.2 Consolidation Virtualization configuration The configuration of the consolidated Hadoop cluster onto a single server closely follows the configuration for the scale-out KVM cluster of section 4.3.1. The biggest differences are the single hypervisor, the 24 local disks assigned to the guests, and that the guests have one-half the vCPUs. For simplicity, only differences to the scale-out configuration will be highlighted.
4.3.2.1 Configuring the KVM Hypervisor
1. On the sole hypervisor, perform steps 1 through 7 from section 4.3.1.1.
2. Partition and format the 24 data disks that the virtualized guest will use. The operating system disks of the KVM use the root device /dev/sda so that the 24 data disks will be the devices labelled sdb through sdy devices. These data disks need not be mounted on the KVM hypervisor.
for dev in b c d e f g h I j k l m n o p q r s t u v w x y; do parted -s /dev/sd$dev mklabel gpt parted /dev/sd$dev mkpart primary '"1 -1"' mkfs.ext4 /dev/sd${dev}1 done
3. Reboot the server.

www.redhat.com 32 [email protected]
4.3.2.2 Configuring Virtual Networking
Perform all the steps in section 4.3.1.2 on the hypervisor to set up networking.
4.3.2.3 Configuring Virtual Machines
As in section 4.3.1, the first guest will be created and then cloned three times. Each guest will have 12 vCPUs for a total of 48, which matches the number of threads available on the physical server.
4.3.2.3.1 Creating the First Virtual Machine and Installing Red Hat Enterprise Linux 6.5
1. Create the first guest as done in step 1 of section 4.3.1.3.1, except with 12 vCPUs.
virt-install --connect qemu:///system -n data01 -r 45056 --vcpus=12 \ --disk /var/lib/libvirt/images/data01.img,size=20 -w bridge=br0\ -w bridge=br1 --graphics vnc -arch=x86_64 --os-type=linux \ --os-variant=rhel6 -c /mnt/Linux/RHEL/6.5/rhel-server-6.5-x86_64-dvd.iso
2. Perform the remaining steps (2 through 11) from section 4.3.1.3.1.
4.3.2.3.2 Cloning the First Guest to create the Remaining Guests
1. On the hypervisor, perform the clonings from step 1 of section 4.3.1.3.2.
for guest in data0{2,3,4} ; do echo $guest virt-clone --connect qemu:///system --original data01 \ --name $guest -file /var/lib/libvirt/images/${guest}.img done
4.3.2.3.3 Attaching the Physical Disks for HDFS to the Guests
Attach physical disks sdb through sdg to guest data01, disks sdh through sdm to disk02, disks sdn through sds to disk03, and disks sdt through sdy to data04. The six disks on each guest will be assigned to virtual devices vdb through vdg.
1. Attach the disks to the guests.

[email protected] 33 www.redhat.com
# for guest data01 virsh attach-disk --domain data01 --source /dev/sdb1 --target vdb --persistent virsh attach-disk --domain data01 --source /dev/sdc1 --target vdc --persistent virsh attach-disk --domain data01 --source /dev/sdd1 --target vdd --persistent virsh attach-disk --domain data01 --source /dev/sde1 --target vde --persistent virsh attach-disk --domain data01 --source /dev/sdf1 --target vdf --persistent virsh attach-disk --domain data01 --source /dev/sdg1 --target vdg --persistent # for guest data02 virsh attach-disk --domain data02 --source /dev/sdh1 --target vdb --persistent virsh attach-disk --domain data02 --source /dev/sdi1 --target vdc --persistent virsh attach-disk -domain data02 --source /dev/sdj1 --target vdd --persistent virsh attach-disk --domain data02 --source /dev/sdk1 --target vde --persistent virsh attach-disk --domain data02 --source /dev/sdl1 --target vdf --persistent virsh attach-disk --domain data02 --source /dev/sdm1 --target vdg --persistent # for guest data03 virsh attach-disk --domain data03 --source /dev/sdn1 --target vdb --persistent virsh attach-disk --domain data03 --source /dev/sdo1 --target vdc --persistent virsh attach-disk --domain data03 --source /dev/sdp1 --target vdd --persistent virsh attach-disk --domain data03 --source /dev/sdq1 --target vde --persistent virsh attach-disk --domain data03 --source /dev/sdr1 --target vdf --persistent virsh attach-disk --domain data03 --source /dev/sds1 --target vdg --persistent
# for guest data04 virsh attach-disk --domain data04 --source /dev/sdt1 --target vdb --persistent virsh attach-disk --domain data04 --source /dev/sdu1 --target vdc --persistent virsh attach-disk --domain data04 --source /dev/sdv1 --target vdd --persistent virsh attach-disk --domain data04 --source /dev/sdw1 --target vde --persistent virsh attach-disk --domain data04 --source /dev/sdx1 --target vdf --persistent virsh attach-disk --domain data04 --source /dev/sdy1 --target vdg --persistent
4.3.2.3.4 Completing the Operating System Configuration on the Cloned Guests
Start each of the cloned guests in turn to change their hostnames, change IP addresses, and to add the proper entries to /etc/fstab.
1. From the KVM server, start guest data02.
virsh start data02
2. Perform steps 2 through 12 from section 4.3.1.3.4.
4.3.2.3.5 Installing and Configuring Hadoop on the Guests
Hadoop installation procedures on the guests are similar to those of the bare-metal configuration, but with minor modifications. Make sure the four guests are running and perform the steps from sections 3.4, 3.5, and 3.6 to install, configure, and run Hadoop. In particular, perform the steps from these three sections with the exception that master nodes name01 and name02 do not need to be configured and can be omitted from all loops. Also, the Hadoop configuration files do not need to be recreated, and can be copied from one of the master nodes to the virtualized data nodes.
4.3.2.4 Running the Virtualized Hadoop Cluster
Start the virtualized guest from the KVM server with the following commands.

www.redhat.com 34 [email protected]
Note: We take advantage of the fact that the hypervisor's host name is identical to the name of its KVM guest image.
for guest in data0{1,2,3,4} ; do virsh start $guest done
Once the data and master nodes are running, you can manage and use Hadoop as section 3.6 describes.
5 Validating the Reference Architecture This section describes in detail how to test implementations of the reference architecture by providing configurations and results for Hadoop on bare-metal and virtualized infrastructures. It focuses on showing how to validate configurations based on this architecture, rather than obtaining performance data for them.
5.1 HiBench, a Hadoop Benchmarking Suite These tests used the Hadoop 2 (or YARN) version of the HiBench 2.2 suite, available from Intel's GitHub source code repository at https://github.com/intel-hadoop/HiBench/tree/yarn. At present, only six of the nine tests have been updated to Hadoop 2.0. The six are the Sort, TeraSort, WordCount, enhanced DFSIO, Bayes, and K-Means tests. This reference architecture uses four tests for validation: the Sort, Bayes, K-Means, and TeraSort tests.
The HiBench Sort test simply sorts randomly generated textual data. One parameter, the total number of characters, controls the dataset size. The HiBench Bayes test implements the Naïve Bayes Classifier algorithm using the Apache Mahout framework, part of the greater Hadoop ecosystem. Mahout implements several machine-learning algorithms using Hadoop MapReduce. The dataset comprises a set of documents generated from a fixed list of words (the Linux dictionary), sampled randomly using Zipf's Law. One parameter, the total number of pages, controls the dataset size. The HiBench TeraSort test implements a standard sorting benchmark and the HiBench K-Means test uses Mahout to group data into clusters.
5.2 Installing and Running HiBench to Validate the Reference Architecture
5.2.1 Installing HiBench 1. Download the HiBench Suite from the GitHub URL https://github.com/intel-
hadoop/HiBench/tree/yarn.
2. Copy the HiBench ZIP archive to the /tmp directory on the namenode.
3. Log on to the namenode as root.
4. Unzip the HiBench archive under /opt.
cd /opt unzip /tmp/HiBench-yarn.zip
5. Install Mahout 0.8.0 from the HDP 2.0 repository on the namenode.
yum -y install mahout

[email protected] 35 www.redhat.com
6. Modify the default HiBench configuration for HDP 2 in the file /opt/HiBench-yarn/bin/hibench-config.sh by adding the locations of the Hadoop configuration files and the location of an HDP mapreduce library.
cp /opt/HiBench-yarn/bin/hibench-config.sh \ /opt/HiBench-yarn/bin/hibench-config.sh-orig sed -i -e 's|^HADOOP_CONF_DIR=|HADOOP_CONF_DIR=/etc/hadoop/conf|' \ 's|^HADOOP_EXAMPLES_JAR=|HADOOP_EXAMPLES_JAR=/usr/lib/hadoop-mapreduce/hadoop-mapreduce-examples-2.2.0.2.0.6.0-101.jar|' \ /opt/HiBench-yarn/bin/hibench-config.sh
7. Change the ownership of the HiBench files to user hdfs.
The HiBench code will be in directory /opt/HiBench-yarn, with the Sort and Naïve Bayes Classifier tests in sub-directories sort and bayes, respectively.
5.2.2 Running HiBench Sort, Bayes, K-Means, and TeraSort Tests The HiBench tests are performed as user hdfs from the namenode. The default dataset sizes were modified to use more of the cluster's resources.
The changes to the configurations are as follows:
1. For the Sort test, the dataset size is increased by a factor of 10 to 24,000,000,000 bytes.
cp /opt/HiBench-yarn/sort/conf/configure.sh \ /opt/HiBench-yarn/sort/conf/configure.sh- sed -i 's|^DATASIZE=2400000000$|DATASIZE=24000000000|' \ /opt/HiBench-yarn/sort/conf/configure.sh
2. For the Bayes test, the number of document pages in the dataset is increased by a factor of 2.5 to 100,000.
cp /opt/HiBench-yarn/bayes/conf/configure.sh \ /opt/HiBench-yarn/bayes/conf/configure.sh- sed -i 's|^PAGES=40000$|PAGES=100000|' \ /opt/HiBench-yarn/ bayes/conf/configure.sh
3. For the TeraSort test, the number of document pages in the dataset is increased by a factor of 2.5 to 2,000,000,000, and the number of MapReduce maps is increased from 96 to 180.
cp /opt/HiBench-yarn/terasort/conf/configure.sh \ /opt/HiBench-yarn/terasort/conf/configure.sh- sed -i -e 's|^DATASIZE=100000000$|DATASIZE=2000000000|' \ -e ^NUM_MAPS=96$|NUM_MAPS=180|' \ /opt/HiBench-yarn/terasort/conf/configure.sh
4. For the K-Means test, the dataset size and dimensionality are increased.
cp /opt/HiBench-yarn/kmeans/conf/configure.sh \ /opt/HiBench-yarn/kmeans/conf/configure.sh- sed -i -e 's|^NUM_OF_CLUSTERS=5$|NUM_OF_CLUSTERS=32|' \ -e ^NUM_OF_SAMPLES=3000000$|NUM_OF_SAMPLES=200000000|' \ -e ^SAMPLES_PER_INPUTFILE=600000$|SAMPLES_PER_INPUTFILE=40000000|' \ -e ^DIMENSIONS=20$|DIMENSIONS=4|' \ /opt/HiBench-yarn/kmeans/conf/configure.sh

www.redhat.com 36 [email protected]
The following bash script was used to perform complete runs for each HiBench test. In each case, the script performs the following steps:
1. Before the HiBench data is created, the page cache is cleared on the six nodes by running an auxiliary script included at the end of this section. This script must be run as root. The sudo command was used to effect this.
2. The HiBench data is prepared.
3. The page cache is cleared again before the HiBench algorithm is started.
4. Pause for 120 seconds.
5. Run the HiBench algorithm.
6. Print the HiBench statistics.
The bash script run-hibench.sh for running the full test follows.
#!/bin/bash # run-hibench.sh ## run the HiBench Sort test, specified by the argument if [ "$#" -ne 1 ]; then echo "Usage: $0 <name of test>" exit 1 fi TEST=$1 HIBENCH_DIR=/opt/HiBench-yarn echo "Run of HiBench test $TEST"; date; echo " clearing the cache" sudo sh /root/scripts/clear-cache.sh echo; echo "Pausing for 50 seconds"; sleep 50 echo; echo Starting data preparation...; date; echo $HIBENCH_DIR/$TEST/prepare.sh; echo; date; echo echo Data prep completed echo " clearing the cache before the main run" sudo sh /root/scripts/clear-cache.sh echo; echo "Pausing for 120 seconds"; sleep 120 ; echo; echo Starting data-transformation...; date; echo MAHOUT_HOME=/usr/lib/mahout \ $HIBENCH_DIR/$TEST/bin/run.sh; echo; date; echo echo Run completed; echo echo HiBench statistics head -n 1 $HIBENCH_DIR/hibench.report tail -n 1 $HIBENCH_DIR/hibench.report echo Done
The bash script clear-cache.sh, used by sort-run.sh and bayes-run.sh, follows.
#!/bin/bash # clear-cache.sh ## clear the page cache on the Hadoop nodes for host in name0{1,2} data0{1,2,3,4} ; do echo $host ssh $host 'sync; echo 3 > /proc/sys/vm/drop_caches ; sync' done
The test results were sometimes sensitive to the contents of the server's page cache. To

[email protected] 37 www.redhat.com
obtain consistent results, the page cache was cleared at the start of the data-preparation stage and at the start of the data-manipulation stage. For the tests with the KVM guests, the KSM daemon was disabled on the hypervisor because hypervisor memory was undersubscribed.
5.3 HiBench Results Differences in page caching can explain the minor improvements in the Sort and Bayes tests for the scale-out virtualized Hadoop cluster over the bare-metal cluster. The K-Means and TeraSort tests use more CPU, network, and disk, so the results for the virtualized guests reflect this overhead.
In fact, when testing the consolidation use-case, the K-Means and TeraSort tests were too CPU intensive for these KVM data nodes because each had one-half the number of CPU threads of the bare-metal and scale-out nodes.
While virtualization brings some overhead, it is consistent across both virtualization and consolidation deployment scenarios. The results show that the amount of overhead is workload-specific and could be relatively small or even nonexistent. Therefore, it is important for Big Data architects and users to pick the best deployment scenario for their workload.
5.3.1 Bare-Metal Use Case Low-level Data
Manipulation: Sort Data Classification:
Naïve Bayes Data Manipulation:
TeraSort Data Clustering:
K-Means 936.2 1,046.3 2,284.7 2,364.2
Table 5.3.1.1: HiBench statistics for data nodes hosted on the bare-metal servers
5.3.2 Scale-Out Virtualization Use Case For the less CPU- and I/O-intensive tests, the Hadoop cluster of the scale-out virtualization case performed at the same level as the bare-metal cluster on the same servers.
Low-level Data Manipulation: Sort
Data Classification: Naïve Bayes
Data Manipulation: TeraSort
Data Clustering: K-Means
933.2 1,019.2 2,768.9 2,459.7
Table 5.3.2.1: HiBench statistics for data nodes virtualized on KVM guests running on original
servers
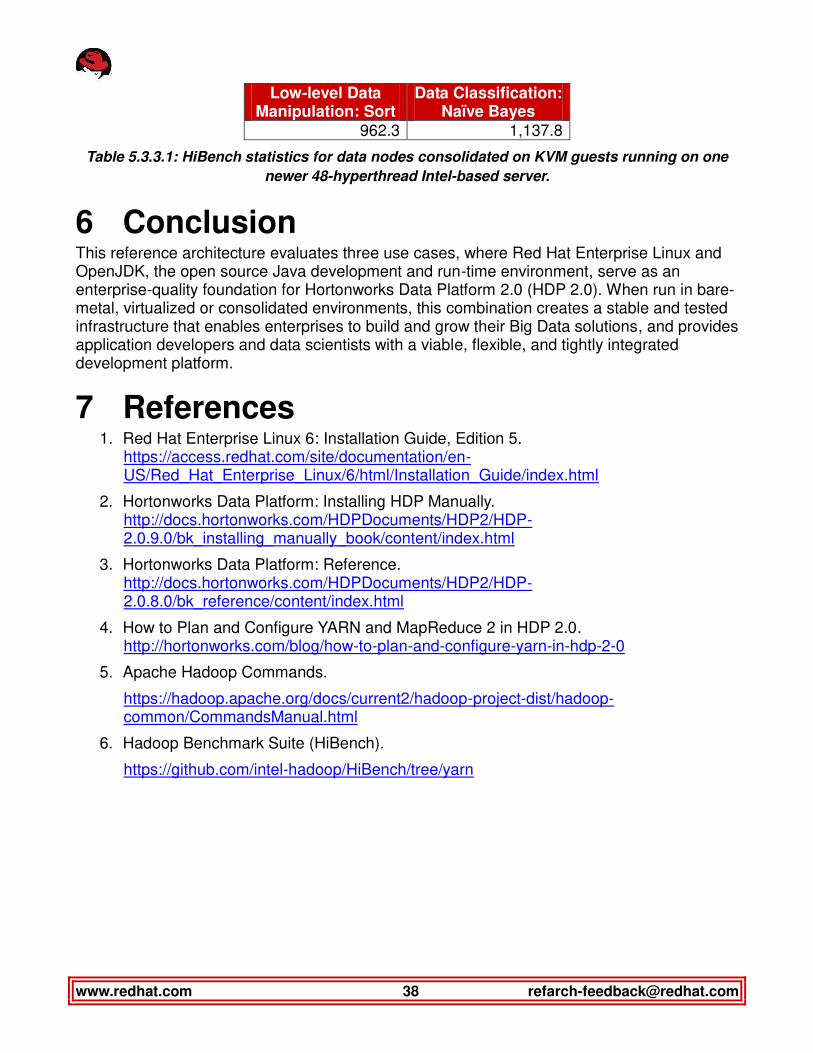
5.3.3 Consolidated Virtualization Use Case TeraSort and K-means are CPU-intensive workloads that often require a dedicated CPU thread to deliver the best performance. In the consolidation scenario, we lowered the total number of CPU threads (by limiting the number of vCPUs per guest) and saw an impact on these workloads. The best practice should be to carefully examine the behavior of your workload prior to virtualizing and take into consideration the resource consolidation ration and other limiting factors, such as the number of disks and the number of network interfaces per consolidation target. Observations obtained during the validation phase of the bare-metal use case demonstrated that neither TeraSort nor K-means workloads would be good candidates for consolidation.
www.redhat.com 38 [email protected]
Low-level Data Manipulation: Sort
Data Classification: Naïve Bayes
962.3 1,137.8
Table 5.3.3.1: HiBench statistics for data nodes consolidated on KVM guests running on one
newer 48-hyperthread Intel-based server.
6 Conclusion This reference architecture evaluates three use cases, where Red Hat Enterprise Linux and OpenJDK, the open source Java development and run-time environment, serve as an enterprise-quality foundation for Hortonworks Data Platform 2.0 (HDP 2.0). When run in bare-metal, virtualized or consolidated environments, this combination creates a stable and tested infrastructure that enables enterprises to build and grow their Big Data solutions, and provides application developers and data scientists with a viable, flexible, and tightly integrated development platform.
7 References 1. Red Hat Enterprise Linux 6: Installation Guide, Edition 5.
https://access.redhat.com/site/documentation/en-US/Red_Hat_Enterprise_Linux/6/html/Installation_Guide/index.html
2. Hortonworks Data Platform: Installing HDP Manually. http://docs.hortonworks.com/HDPDocuments/HDP2/HDP-2.0.9.0/bk_installing_manually_book/content/index.html
3. Hortonworks Data Platform: Reference. http://docs.hortonworks.com/HDPDocuments/HDP2/HDP-2.0.8.0/bk_reference/content/index.html
4. How to Plan and Configure YARN and MapReduce 2 in HDP 2.0. http://hortonworks.com/blog/how-to-plan-and-configure-yarn-in-hdp-2-0
5. Apache Hadoop Commands.
https://hadoop.apache.org/docs/current2/hadoop-project-dist/hadoop-common/CommandsManual.html
6. Hadoop Benchmark Suite (HiBench).
https://github.com/intel-hadoop/HiBench/tree/yarn

[email protected] 39 www.redhat.com
Appendix A: Revision History
Revision 1.2 Thursday, April 10, 2014
Added third use case: scale-out virtualization.
Revision 1.0-1 Monday, March 17, 2014
Added section on validation of the reference architecture, and corrected steps to configure HDFS and YARN.
Revision 1.0 Friday, February 6, 2014
Updated Red Hat, Inc. 2014

www.redhat.com 40 [email protected]
Appendix B: Details of the validation results HiBench calculates several statistics for the data-manipulation stage (and not the data-preparation stage): dataset size in megabytes, duration of the run in seconds, and throughput in megabytes/second. Each test ran on each platform three times, and the median run-duration was selected as the representative run.
B.1 Low-Level Data Manipulation Test: Sort
Datanode Platform
Dataset Size (MBytes)
Duration (seconds)
Throughput (MBps)
Bare-metal 93,983.45 936.2 100.39 Scale-out KVM 93,983.54 933.2 100.72
Consolidated KVM 93,983.52 962.3 97.66
Table B.1.1: HiBench statistics for the Sort test
B.2 Data Classification Test: Naïve Bayes Classifier with Mahout
Datanode Platform
Dataset Size (MBytes)
Duration (seconds)
Throughput (MBps)
Bare-metal 426.83 1,046.3 0.42
Scale-out KVM 426.83 1,019.2 0.41
Consolidated KVM 426.83 1,137.8 0.38
Table B.2.1: HiBench statistics for the Naïve Bayes Classifier test
B.3 Data Manipulation Test: TeraSort Datanode Platform
Dataset Size (MBytes)
Duration (seconds)
Throughput (MBps)
Bare-metal 190,734.86 2,284.7 83.48
Scale-out KVM 190,734.86 2,768.9 68.88
Table B.3.1: HiBench statistics for the TeraSort test
B.4 Data Clustering Test: K-Means with Mahout
Datanode Platform
Dataset Size (MBytes)
Duration (seconds)
Throughput (MBps)
Bare-metal 48,828.13 2,364.2 20.65
Scale-out KVM 48,828.13 2,459.7 19.85
Table B.4.1: HiBench statistics for the K-Means test