Embed Size (px)
Citation preview

PURPOSE Students will experiment with the different aspects of boat design, including buoyancy, weight capacity, load line, water displacement and hydrodynamics. Through extended activities, students will test specifi cations and record data for various model boats of their creation. The lessons focus especially on integrating design principles with inquiry-based experimental skills.
BACKGROUNDWhile visiting the exhibition From Here to There by Land, Sea and Air, students were able to experience different ways in which people and things can be moved across land, over water, and through the air. In each case, many factors need to be tested when engineers build a vehicle. Some of these factors include weight capacity, resistance to friction (including drag), stability, and buoyancy.
ACTIVITIESActivities have been grouped according to grade level, but you can combine or change the activities to fi t the ability and interest level of your class.
Weight – A measure of the gravitational force exerted on a mass.
Mass – A measure of the amount of matter that an object contains.
Matter – Anything that has mass and occupies space.
Force – A push or a pull.
Gravity – The force of attraction between two masses. The force that attracts objects toward the center of the Earth.
Pressure – The force applied to a unit area of surface.
Drag – The combination of all the forces that slow something down as it moves through a liquid or a gas.
Hull – The frame or body of a ship.
Keel - A rigid, fl at piece of material anchored below the hull, running from front to back. It adds strength to the hull, protects it from damage, and helps the boat maintain straight movement.
Volume – The amount of 3-dimensional space occupied by an object.
Density – The amount of mass per unit of volume.
Buoyancy – The upward force exerted when an object is immersed in a fl uid. This force is equal to the weight of fl uid displaced by the object.
Archimedes principle - A body immersed in a fl uid is buoyed up by a force equal to the weight of the displaced fl uid.
Displacement – The movement of something away from its starting location.
Image Here
VOCABULARY
From Here to There | Sea Explorations 1
Sea Explorations

- 1Will it Float? -
Materials:• Sink or tub of water
• Bowls or small buckets
• Wood blocks
• Modeling clay
• Aluminum foil
• Plastic bottles
• Sponges
• Cardboard
Teacher Preparation:Teacher Preparation:
Have students gather around the sink or tub of water. Before placing any objects in the water, examine one of the objects closely, asking students to note some of the things they observe about the object. Then ask students to predict whether they think it will sink or fl oat. Place the object in the water and ask the students to describe what happens. Next, divide the class into groups of four or fi ve. Give each group a bucket or bowl of water and an assortment of items to test and share (include duplicate objects). Give each student a Sink or Float Activity Sheet.
Activity:Activity:• Choose one of the materials to test in the water.
• Before placing it in the water, make a prediction of whether it will sink or fl oat.
• Place the object into the sink or tub fi lled with water, then record your results and observations in the data table.
• Try a different material, or try a new experiment with the same material – like changing the mass of material used.
• Try reshaping each of the sinking materials to form fl at "rafts” and try the experiment again, being sure to make predictions and record everything in the data table. (see above picture)
• Reshape the materials into rectangular "ships" with sides and test them again. (see above picture)
Questions:
Why do you think some of the materials you tested fl oated while others sank? Was it simply that the sinking objects weighed more? What happened when you made rafts and boats? Which was better? Why do you think there might be a difference? What other factors do you think determine whether something sinks or fl oats?
Grades K – 2 Grades K – 2
When engineers build a car, airplane, or boat they do many experiments fi rst, so that they can understand what will make it work the best. By understanding the principles of fl oating (and sinking) engineers can build bigger, faster, stronger boats. The following activities guide students through the iterative process of designing a boat that can carry a large amount of cargo, or weight.
fl at raftfl at raft
rectangular shiprectangular ship
From Here to There | Sea Explorations 2
Sea Explorations

Grades K–2 continued...
- 1So Much to Pack -
Materials:• Sink or tub of water (optional substitute – large bowls)
• Modeling clay
• Aluminum foil
• Pennies or marbles
• Ruler
• Cardboard
• Plastic bottles
• Rectangular ships from last step of “Will it Float”
Teacher Preparation:Teacher Preparation:
Begin this activity using the rectangular ships built during the “Will it Float?” activity. Have additional supplies on hand so that students can build new boats of different shapes, using the same material (clay works best because it is most easily changed). Plan for enough time, as students will often be willing to spend a signifi cant amount of time making changes and counting the cargo.
Activity:Activity:• Measure ship dimensions (length, width, and depth). Record in data table.
• Place pennies or marbles ("cargo") in ship one at a time until boat sinks. Record total cargo before sinking. Repeat for a total of three trials (Be sure to dry the boat between trials.)
• Try changing the dimensions: Make the boat longer, deeper, wider...repeating Steps 1 and 2 for each change.
• Make as many changes as necessary (including boats that are not rectangles) to draw some conclusions about how a boat’s shape affects the load it can carry.
Questions:
What factors helped the boat hold more weight? What factors made the boat sink (or start to sink)? Why do you think these variables help a boat carry more weight?
1These projects adapted from:
Karen Mcnulty, “Will It Float,” Science World, 1992, http://teacher.scholastic.com/lessonrepro/lessonplans/scifl oat.htmhttp://teacher.scholastic.com/lessonrepro/lessonplans/scifl oat.htm.
From Here to There | Sea Explorations 3
Sea Explorations

Materials:• A bucket, pan, or tub for holding water at least twice as deep and twice as long as the maximum size of the boat. • 2-4 cup liquid measure with milliliter markings • Aluminum foil (2-3 large sheets of 3-4 feet) • Craft or roll paper (3-foot-long sheet); waxed “butcher paper” works well. • Wooden craft sticks and/or pipe cleaners (10-30 per group) • Craft glue and/or hot glue gun and glue sticks • Metal nuts, bolts, or screws, heavy plastic beads or buttons, dried beans, or other weights (10-30 pieces per group;
it is preferable to use objects all of the same size and weight for consistency) • Waterproof markers or wax pencils for marking load lines • Plastic shoebox • Cardboard shoeboxes for mounting and displaying boats• Ship Specifi cations student sheet (see attached)• Salt• Dry rice• Ruler• Dishpan with a lip that is larger than the shoebox (a baking tray will also work)• Plastic lids or plates
Teacher Preparation:Teacher Preparation:
Have students work in teams of 3-4 (or whatever works for your particular class size). Prepare two testing bowls or tubs for each group: one containing fresh water, and a second containing 3.5% salt water (3.5 g of salt per 100 mL of water). The amount of materials needed by each group depends on the maximum allowed size of the boat; the materials listed above are for a boat that is 12 inches or less in length.
It is important to allow teams enough time so that if their initial designs are not successful in fl oating and carrying a load, they have time to adjust their design and repair their boats.
Activity:Activity:
•Tell students that each team will be in charge of designing, building, and testing a boat. Each boat should:
a. include a hull and keel.
b. be less than or equal to the maximum specifi ed length (you specify the length).
c. be capable of carrying a load at least as heavy as the boat itself.
d. be “seaworthy” in both calm and rough waters; and be constructed from the materials provided.
Grades 3 – 5/6 – 8Grades 3 – 5/6 – 8
When any object is put into water, it starts to sink, pushing water out of the way. It takes up the space where the water was, and the level of the water rises. The weight of the object and the weight of the water the object displaces are equal. A boat stops sinking when the weight of the water it pushes out of the way is equal to the weight of the boat and everything on it. This is called Archimedes Principle, and the force that the water pushes back against the boat with is called upthrust.
- 2What Floats Your Boat? -
Hull
From Here to There | Sea Explorations 4
Sea Explorations

• After the boats are built, have students determine the volume of their boat hull, using one of these two methods:
• Use a ruler to measure the length, width, and height of your boat hull. Volume in cm3 equals length × width × height (each measured in cm).
• Carefully fi ll the boat hull with dry rice until the rice is level with the top of the hull. Being careful not to damage the hull, pour the dry rice into the measuring cup. Gently shake the cup to level the rice and read the volume of the dry rice, in mL. This is the volume of your boat hull.
• Challenge students to develop a procedure for determining their boats' load lines in fresh and salt water. Allow students to develop their detailed procedures (e.g., where the load will be distributed on the boat) and present it to you for approval.
• In general, each group should fl oat its boat in a tub or container of calm, room temperature, water and add weight to the boat until it sinks. This weight represents an “overload” for the group’s boat. Note that some boat shapes will be “tippier” than others. Students with these boats will have to pay careful attention to balancing the load (left to right, front and back—or port to starboard, fore and aft, if you’re feeling nautical) as you add weight.
• Then students should repeat the procedure, adding weight only until they feel the boat has reached a safe load. Using a permanent marker, they should mark the fresh water load line.
• They can then repeat the procedure using salt water.
• Next, students can determine their boats' water displacement by using the same procedure as Archimedes.
• Set the dishpan on a fl at surface and set the plastic shoebox in the middle of the dishpan.
• Completely fi ll the shoebox to the very rim with fresh water, making sure not to spill water over into the dishpan.
• Students should then fl oat their unloaded boat on the water in the shoebox and begin loading it carefully and evenly with weights (nuts, bolts, etc.) until they reach the load line they had drawn. Water will spill over the side into the dishpan.
• When their load line is reached, they should carefully lift out the boat, then the shoebox.
• Pour the water in the dishpan into the liquid measuring cup. This is the volume of water the boat displaces when fully loaded.
• Finally, each team can test its boat in “rough” water:
• Teams should load their boats with a full cargo (at the load line) and test them in a tank where another team is creating waves with plastic lids or plates. The water should be rough enough to create a turbulent “ocean” but not so rough as to destroy the boats.
• Using an upside down shoebox, teams can mount their boats on top, and write the boats’ specifi cations on the side. Each team can describe to the class how they built their boat, how they determined its load line, what load it will carry in fresh and salt water, and what the water displacement is.
Questions:
What modifi cations could they make so that their boats can carry more weight? What could make them more “seaworthy” in rough weather? What additional materials do they think would help them make a better boat (this could mean many things, including: stronger, larger, lighter, more stable, etc…).
2This project adapted from:
“What fl oats Your Boat,” Science NetLinks, 2002, http://www.sciencenetlinks.com/lessons.cfm?DocID=302http://www.sciencenetlinks.com/lessons.cfm?DocID=302.
From Here to There | Sea Explorations 5
Sea Explorations

Grade 6 – 8/ 9 - 12Grade 6 – 8/ 9 - 12
There are many different hull designs used for small boats. The best design for a particular boat depends on the purpose for the boat, for example fi shing, sailing, water skiing, transportation, or recreation.
Sailboat hulls tend to be long and narrow, with a deep keel to keep the boat from tipping when sailing in a strong wind. They are designed to cut easily through the water. Their shape helps to reduce drag, or fl uid friction, on the boat as it moves through the water. Dinghies and row boats have fl at bottoms for stability in the water. When powered with a motor, the ride can be rough if there are waves, since the fl at bottom tends to slap on top of the waves rather than cut through them.
- 3Hull Design –
Materials:• Soft wood (e.g., pine or balsa) for making boat hulls (2 × 4 lumber is a good starting material), or pre-made boat
hulls• Small nails, brads, or cup hooks for fastening string to boat hulls• Wood carving tools for cutting and shaping the wood (hobby knife, rotary tool, chisel)• 1–2 meter length of 4” plastic gutter• Plastic gutter endpieces• Garden hose• Water source• String
• Spring scale (250 g range)
Teacher Preparation:Teacher Preparation:
Begin the project with a group discussion to familiarize the class with the terms and concepts surrounding boat design and construction. Ask students about different types of boats they have seen, and how they look different. Discuss how these differences might be chosen for certain functions such as speed and stability.
For younger groups or shorter class times, hull types can be prepared ahead for the students. The hulls should be cut from sections of soft wood using chisels, a utility knife and rotary shaping tools such as a dremelTM, or they can be purchased from a hobby store.
To set up the fl ow tank:
• Close off both ends of the rain gutter, but leave a small gap at one end for water outfl ow. Make sure the outfl ow point is connected to a drain.
• Place the garden hose at the other end, and start water fl owing.
• Adjust the fl ow rate of the hose so that the rain gutter is nearly full, with a steady fl ow of water.
Safety Guidelines: Safety Guidelines:
Students must be supervised when working with wood carving tools.
From Here to There | Sea Explorations 6
Sea Explorations
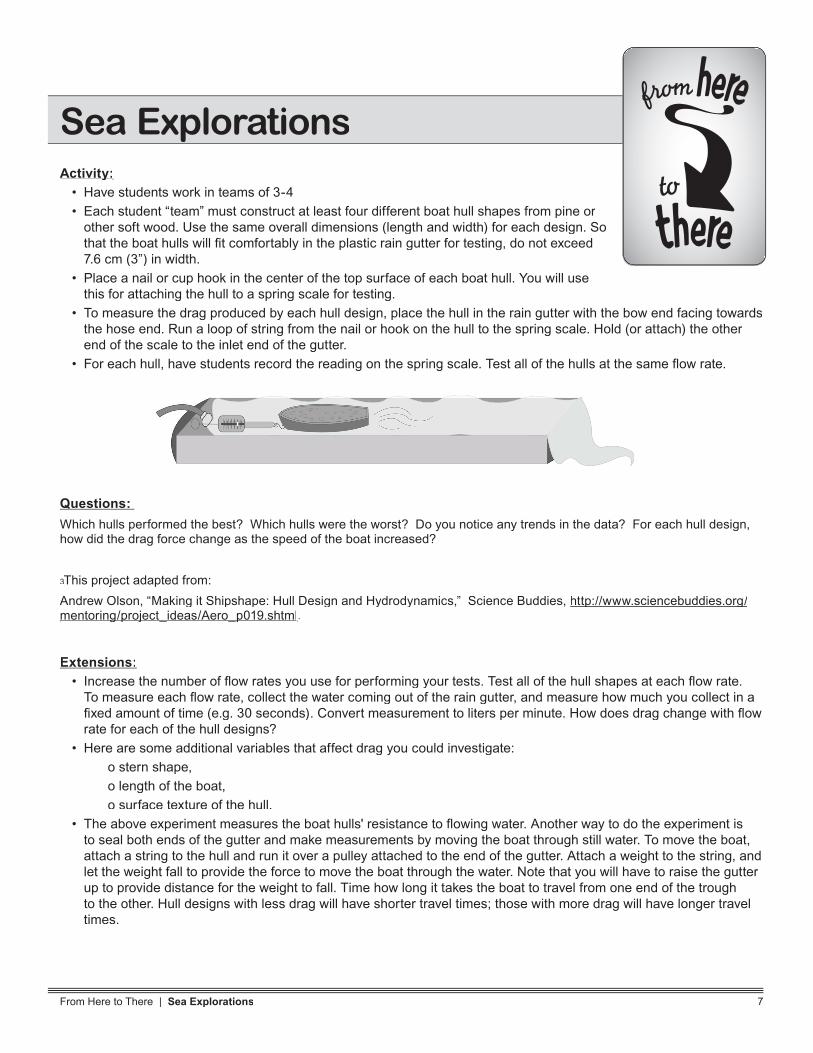
Activity:Activity:• Have students work in teams of 3-4
• Each student “team” must construct at least four different boat hull shapes from pine or other soft wood. Use the same overall dimensions (length and width) for each design. So that the boat hulls will fi t comfortably in the plastic rain gutter for testing, do not exceed 7.6 cm (3”) in width.
• Place a nail or cup hook in the center of the top surface of each boat hull. You will use this for attaching the hull to a spring scale for testing.
• To measure the drag produced by each hull design, place the hull in the rain gutter with the bow end facing towards the hose end. Run a loop of string from the nail or hook on the hull to the spring scale. Hold (or attach) the other end of the scale to the inlet end of the gutter.
• For each hull, have students record the reading on the spring scale. Test all of the hulls at the same fl ow rate.
Questions:
Which hulls performed the best? Which hulls were the worst? Do you notice any trends in the data? For each hull design, how did the drag force change as the speed of the boat increased?
3This project adapted from: 3This project adapted from: 3
Andrew Olson, “Making it Shipshape: Hull Design and Hydrodynamics,” Science Buddies, http://www.sciencebuddies.org/http://www.sciencebuddies.org/mentoring/project_ideas/Aero_p019.shtmlmentoring/project_ideas/Aero_p019.shtml.
Extensions:• Increase the number of fl ow rates you use for performing your tests. Test all of the hull shapes at each fl ow rate.
To measure each fl ow rate, collect the water coming out of the rain gutter, and measure how much you collect in a fi xed amount of time (e.g. 30 seconds). Convert measurement to liters per minute. How does drag change with fl ow rate for each of the hull designs?
• Here are some additional variables that affect drag you could investigate:
o stern shape,
o length of the boat,
o surface texture of the hull.
• The above experiment measures the boat hulls' resistance to fl owing water. Another way to do the experiment is to seal both ends of the gutter and make measurements by moving the boat through still water. To move the boat, attach a string to the hull and run it over a pulley attached to the end of the gutter. Attach a weight to the string, and let the weight fall to provide the force to move the boat through the water. Note that you will have to raise the gutter up to provide distance for the weight to fall. Time how long it takes the boat to travel from one end of the trough to the other. Hull designs with less drag will have shorter travel times; those with more drag will have longer travel times.
From Here to There | Sea Explorations 7
Sea Explorations


![HNgoztechnika.hu/keszletlista/pdf/572.pdf · 0puphfvwvh nnfrv]dniwovdr +dwwipnun,p2h6 u '1 )7 )7 )7 )7 )7 edu edu edu edu edu edu edu edu edu](https://img.dokumen.tips/doc/110x75/5fc6730ab5393d30f166460f/0puphfvwvh-nnfrvdniwovdr-dwwipnunp2h6-u-1-7-7-7-7-7-edu-edu-edu-edu-edu.jpg)